lipgloss
v1.0.0

Stildefinitionen für schöne Terminal-Layouts. Gebaut mit Blick auf TUIs.

Lip Gloss verfolgt einen ausdrucksstarken, deklarativen Ansatz zur abschließenden Darstellung. Benutzer, die mit CSS vertraut sind, werden sich mit Lip Gloss zu Hause fühlen.
 import "github.com/charmbracelet/lipgloss"

var style = lipgloss . NewStyle ().
    Bold ( true ).
    Foreground ( lipgloss . Color ( "#FAFAFA" )).
    Background ( lipgloss . Color ( "#7D56F4" )).
    PaddingTop ( 2 ).
    PaddingLeft ( 4 ).
    Width ( 22 )

fmt . Println ( style . Render ( "Hello, kitty" ))Lip Gloss unterstützt die folgenden Farbprofile:
 lipgloss . Color ( "5" )  // magenta
lipgloss . Color ( "9" )  // red
lipgloss . Color ( "12" ) // light blue lipgloss . Color ( "86" ) // aqua
lipgloss . Color ( "201" ) // hot pink
lipgloss . Color ( "202" ) // orange lipgloss . Color ( "#0000FF" ) // good ol' 100% blue
lipgloss . Color ( "#04B575" ) // a green
lipgloss . Color ( "#3C3C3C" ) // a dark gray...sowie ein 1-Bit-ASCII-Profil, das nur Schwarzweiß ist.
Das Farbprofil des Terminals wird automatisch erkannt und Farben außerhalb des Farbumfangs der aktuellen Palette werden automatisch auf den nächstgelegenen verfügbaren Wert gesetzt.
Sie können auch Farboptionen für helle und dunkle Hintergründe festlegen:
lipgloss. AdaptiveColor { Light : "236" , Dark : "248" }Die Hintergrundfarbe des Terminals wird automatisch erkannt und zur Laufzeit wird die entsprechende Farbe ausgewählt.
CompleteColor gibt genaue Werte für True Color-, ANSI256- und ANSI-Farbprofile an.
lipgloss. CompleteColor { TrueColor : "#0000FF" , ANSI256 : "86" , ANSI : "5" }Eine automatische Farbverschlechterung wird in diesem Fall nicht durchgeführt und basiert auf der angegebenen Farbe.
Sie können CompleteColor mit AdaptiveColor verwenden, um die genauen Werte für helle und dunkle Hintergründe ohne automatische Farbverschlechterung anzugeben.
lipgloss. CompleteAdaptiveColor {
    Light : CompleteColor { TrueColor : "#d7ffae" , ANSI256 : "193" , ANSI : "11" },
    Dark :  CompleteColor { TrueColor : "#d75fee" , ANSI256 : "163" , ANSI : "5" },
}Lip Gloss unterstützt die üblichen ANSI-Textformatierungsoptionen:
 var style = lipgloss . NewStyle ().
    Bold ( true ).
    Italic ( true ).
    Faint ( true ).
    Blink ( true ).
    Strikethrough ( true ).
    Underline ( true ).
Reverse ( true )Lip Gloss unterstützt auch Regeln für die Formatierung auf Blockebene:
 // Padding
var style = lipgloss . NewStyle ().
    PaddingTop ( 2 ).
    PaddingRight ( 4 ).
    PaddingBottom ( 2 ).
    PaddingLeft ( 4 )

// Margins
var style = lipgloss . NewStyle ().
    MarginTop ( 2 ).
    MarginRight ( 4 ).
    MarginBottom ( 2 ).
    MarginLeft ( 4 )
Es gibt auch eine Kurzsyntax für Ränder und Auffüllung, die dem gleichen Format wie CSS folgt:
 // 2 cells on all sides
lipgloss . NewStyle (). Padding ( 2 )

// 2 cells on the top and bottom, 4 cells on the left and right
lipgloss . NewStyle (). Margin ( 2 , 4 )

// 1 cell on the top, 4 cells on the sides, 2 cells on the bottom
lipgloss . NewStyle (). Padding ( 1 , 4 , 2 )

// Clockwise, starting from the top: 2 cells on the top, 4 on the right, 3 on
// the bottom, and 1 on the left
lipgloss . NewStyle (). Margin ( 2 , 4 , 3 , 1 )Sie können Textabsätze links, rechts oder in der Mitte ausrichten.
 var style = lipgloss . NewStyle ().
    Width ( 24 ).
    Align ( lipgloss . Left ).  // align it left
    Align ( lipgloss . Right ). // no wait, align it right
Align ( lipgloss . Center ) // just kidding, align it in the center Das Festlegen einer Mindestbreite und -höhe ist einfach und unkompliziert.
 var style = lipgloss . NewStyle ().
    SetString ( "What’s for lunch?" ).
    Width ( 24 ).
    Height ( 32 ).
Foreground ( lipgloss . Color ( "63" ))Das Hinzufügen von Rändern ist einfach:
 // Add a purple, rectangular border
var style = lipgloss . NewStyle ().
    BorderStyle ( lipgloss . NormalBorder ()).
    BorderForeground ( lipgloss . Color ( "63" ))

// Set a rounded, yellow-on-purple border to the top and left
var anotherStyle = lipgloss . NewStyle ().
    BorderStyle ( lipgloss . RoundedBorder ()).
    BorderForeground ( lipgloss . Color ( "228" )).
    BorderBackground ( lipgloss . Color ( "63" )).
    BorderTop ( true ).
    BorderLeft ( true )

// Make your own border
var myCuteBorder = lipgloss. Border {
    Top :         "._.:*:" ,
    Bottom :      "._.:*:" ,
    Left :        "|*" ,
    Right :       "|*" ,
    TopLeft :     "*" ,
    TopRight :    "*" ,
    BottomLeft :  "*" ,
    BottomRight : "*" ,
}
Es gibt auch Kurzfunktionen zum Definieren von Rändern, die einem ähnlichen Muster wie die Kurzfunktionen „margin“ und „padding“ folgen.
 // Add a thick border to the top and bottom
lipgloss . NewStyle ().
    Border ( lipgloss . ThickBorder (), true , false )

// Add a double border to the top and left sides. Rules are set clockwise
// from top.
lipgloss . NewStyle ().
    Border ( lipgloss . DoubleBorder (), true , false , false , true )
Weitere Informationen zu Rändern finden Sie in den Dokumenten.
Verwenden Sie einfach die Zuweisung:
 style := lipgloss . NewStyle (). Foreground ( lipgloss . Color ( "219" ))

copiedStyle := style // this is a true copy

wildStyle := style . Blink ( true ) // this is also true copy, with blink added
Da Style -Datenstrukturen nur primitive Typen enthalten, wird durch die Zuweisung eines Stils zu einem anderen effektiv eine neue Kopie des Stils erstellt, ohne das Original zu verändern.
Stile können Regeln von anderen Stilen erben. Bei der Vererbung werden nur nicht gesetzte Regeln auf dem Empfänger vererbt.
 var styleA = lipgloss . NewStyle ().
    Foreground ( lipgloss . Color ( "229" )).
    Background ( lipgloss . Color ( "63" ))

// Only the background color will be inherited here, because the foreground
// color will have been already set:
var styleB = lipgloss . NewStyle ().
    Foreground ( lipgloss . Color ( "201" )).
Inherit ( styleA )Alle Regeln können deaktiviert werden:
 var style = lipgloss . NewStyle ().
    Bold ( true ).                        // make it bold
    UnsetBold ().                       // jk don't make it bold
    Background ( lipgloss . Color ( "227" )). // yellow background
    UnsetBackground ()                  // never mind
Wenn eine Regel nicht festgelegt ist, wird sie nicht vererbt oder kopiert.
Manchmal, beispielsweise bei der Entwicklung einer Komponente, möchten Sie sicherstellen, dass Stildefinitionen ihren beabsichtigten Zweck in der Benutzeroberfläche berücksichtigen. Hier kommen Inline und MaxWidth und MaxHeight ins Spiel:
 // Force rendering onto a single line, ignoring margins, padding, and borders.
someStyle . Inline ( true ). Render ( "yadda yadda" )

// Also limit rendering to five cells
someStyle . Inline ( true ). MaxWidth ( 5 ). Render ( "yadda yadda" )

// Limit rendering to a 5x5 cell block
someStyle . MaxWidth ( 5 ). MaxHeight ( 5 ). Render ( "yadda yadda" ) Das Tabulatorzeichen ( t ) wird in verschiedenen Terminals unterschiedlich dargestellt (oft als 8 Leerzeichen, manchmal als 4). Aufgrund dieser Inkonsistenz wandelt Lip Gloss beim Rendern Tabulatoren in 4 Leerzeichen um. Dieses Verhalten kann jedoch pro Stil geändert werden:
 style := lipgloss . NewStyle () // tabs will render as 4 spaces, the default
style = style . TabWidth ( 2 )    // render tabs as 2 spaces
style = style . TabWidth ( 0 )    // remove tabs entirely
style = style . TabWidth ( lipgloss . NoTabConversion ) // leave tabs intact Im Allgemeinen rufen Sie einfach die Render(string...) -Methode für einen lipgloss.Style auf:
 style := lipgloss . NewStyle (). Bold ( true ). SetString ( "Hello," )
fmt . Println ( style . Render ( "kitty." )) // Hello, kitty.
fmt . Println ( style . Render ( "puppy." )) // Hello, puppy.
Sie können aber auch die Stringer-Schnittstelle verwenden:
 var style = lipgloss . NewStyle (). SetString ( "你好,猫咪。" ). Bold ( true )
fmt . Println ( style ) // 你好,猫咪。Mit benutzerdefinierten Renderern können Sie bestimmte Ausgaben rendern. Dies ist besonders wichtig, wenn Sie auf verschiedenen Ausgaben rendern und das Farbprofil und den Status des dunklen Hintergrunds für jede Ausgabe korrekt erkennen möchten, beispielsweise in einer Server-Client-Situation.
 func myLittleHandler ( sess ssh. Session ) {
    // Create a renderer for the client.
    renderer := lipgloss . NewRenderer ( sess )

    // Create a new style on the renderer.
    style := renderer . NewStyle (). Background (lipgloss. AdaptiveColor { Light : "63" , Dark : "228" })

    // Render. The color profile and dark background state will be correctly detected.
    io . WriteString ( sess , style . Render ( "Heyyyyyyy" ))
}
Ein Beispiel für die Verwendung eines benutzerdefinierten Renderers über SSH mit Wish finden Sie im SSH-Beispiel.
Zusätzlich zum reinen Styling enthält Lip Gloss auch einige Hilfsprogramme, die Ihnen bei der Zusammenstellung Ihrer Layouts helfen.
Das horizontale und vertikale Zusammenfügen von Absätzen ist ein Kinderspiel.
 // Horizontally join three paragraphs along their bottom edges
lipgloss . JoinHorizontal ( lipgloss . Bottom , paragraphA , paragraphB , paragraphC )

// Vertically join two paragraphs along their center axes
lipgloss . JoinVertical ( lipgloss . Center , paragraphA , paragraphB )

// Horizontally join three paragraphs, with the shorter ones aligning 20%
// from the top of the tallest
lipgloss . JoinHorizontal ( 0.2 , paragraphA , paragraphB , paragraphC )Manchmal möchten Sie beim Erstellen Ihrer Layouts die Breite und Höhe von Textblöcken wissen.
 // Render a block of text.
var style = lipgloss . NewStyle ().
    Width ( 40 ).
    Padding ( 2 )
var block string = style . Render ( someLongString )

// Get the actual, physical dimensions of the text block.
width := lipgloss . Width ( block )
height := lipgloss . Height ( block )

// Here's a shorthand function.
w , h := lipgloss . Size ( block )Manchmal möchten Sie einfach einen Textblock in Leerzeichen platzieren.
 // Center a paragraph horizontally in a space 80 cells wide. The height of
// the block returned will be as tall as the input paragraph.
block := lipgloss . PlaceHorizontal ( 80 , lipgloss . Center , fancyStyledParagraph )

// Place a paragraph at the bottom of a space 30 cells tall. The width of
// the text block returned will be as wide as the input paragraph.
block := lipgloss . PlaceVertical ( 30 , lipgloss . Bottom , fancyStyledParagraph )

// Place a paragraph in the bottom right corner of a 30x80 cell space.
block := lipgloss . Place ( 30 , 80 , lipgloss . Right , lipgloss . Bottom , fancyStyledParagraph )
Sie können den Leerraum auch formatieren. Einzelheiten finden Sie in den Dokumenten.
Lip Gloss wird mit einem Unterpaket für die Tabellenwiedergabe geliefert.
import "github.com/charmbracelet/lipgloss/table"Definieren Sie einige Datenzeilen.
 rows := [][] string {
    { "Chinese" , "您好" , "你好" },
    { "Japanese" , "こんにちは" , "やあ" },
    { "Arabic" , "أهلين" , "أهلا" },
    { "Russian" , "Здравствуйте" , "Привет" },
    { "Spanish" , "Hola" , "¿Qué tal?" },
}
Verwenden Sie das Tabellenpaket, um die Tabelle zu formatieren und zu rendern.
 t := table . New ().
    Border ( lipgloss . NormalBorder ()).
    BorderStyle ( lipgloss . NewStyle (). Foreground ( lipgloss . Color ( "99" ))).
    StyleFunc ( func ( row , col int ) lipgloss. Style {
        switch {
        case row == 0 :
            return HeaderStyle
        case row % 2 == 0 :
            return EvenRowStyle
        default :
            return OddRowStyle
        }
    }).
    Headers ( "LANGUAGE" , "FORMAL" , "INFORMAL" ).
    Rows ( rows ... )

// You can also add tables row-by-row
t . Row ( "English" , "You look absolutely fabulous." , "How's it going?" )
Drucken Sie die Tabelle aus.
fmt . Println ( t )
Warnung
Rows müssen vor Offset deklariert werden, sonst passiert nichts.
Weitere Informationen zu Tabellen finden Sie in den Dokumenten und Beispielen.
Lip Gloss wird mit einem Unterpaket zur Listenwiedergabe geliefert.
import "github.com/charmbracelet/lipgloss/list"Definieren Sie eine neue Liste.
l := list . New ( "A" , "B" , "C" )Drucken Sie die Liste aus.
 fmt . Println ( l )

// • A
// • B
// • C
Listen können verschachtelt werden.
 l := list . New (
    "A" , list . New ( "Artichoke" ),
    "B" , list . New ( "Baking Flour" , "Bananas" , "Barley" , "Bean Sprouts" ),
    "C" , list . New ( "Cashew Apple" , "Cashews" , "Coconut Milk" , "Curry Paste" , "Currywurst" ),
    "D" , list . New ( "Dill" , "Dragonfruit" , "Dried Shrimp" ),
    "E" , list . New ( "Eggs" ),
    "F" , list . New ( "Fish Cake" , "Furikake" ),
    "J" , list . New ( "Jicama" ),
    "K" , list . New ( "Kohlrabi" ),
    "L" , list . New ( "Leeks" , "Lentils" , "Licorice Root" ),
)
Drucken Sie die Liste aus.
fmt . Println ( l )
Listen können sowohl über ihre Aufzählungsfunktion als auch über lipgloss.Style s angepasst werden.
 enumeratorStyle := lipgloss . NewStyle (). Foreground ( lipgloss . Color ( "99" )). MarginRight ( 1 )
itemStyle := lipgloss . NewStyle (). Foreground ( lipgloss . Color ( "212" )). MarginRight ( 1 )

l := list . New (
    "Glossier" ,
    "Claire’s Boutique" ,
    "Nyx" ,
    "Mac" ,
    "Milk" ,
    ).
    Enumerator ( list . Roman ).
    EnumeratorStyle ( enumeratorStyle ).
    ItemStyle ( itemStyle )
Drucken Sie die Liste aus.

Zusätzlich zu den vordefinierten Enumeratoren ( Arabic , Alphabet , Roman , Bullet , Tree ) können Sie auch Ihren eigenen benutzerdefinierten Enumerator definieren:
 l := list . New ( "Duck" , "Duck" , "Duck" , "Duck" , "Goose" , "Duck" , "Duck" )

func DuckDuckGooseEnumerator ( l list. Items , i int ) string {
    if l . At ( i ). Value () == "Goose" {
        return "Honk →"
    }
    return ""
}

l = l . Enumerator ( DuckDuckGooseEnumerator )
Drucken Sie die Liste aus:

Bei Bedarf können Sie Listen auch inkrementell erstellen:
 l := list . New ()

for i := 0 ; i < repeat ; i ++ {
    l . Item ( "Lip Gloss" )
}Lip Gloss wird mit einem Baum-Rendering-Unterpaket geliefert.
import "github.com/charmbracelet/lipgloss/tree"Definieren Sie einen neuen Baum.
 t := tree . Root ( "." ).
    Child ( "A" , "B" , "C" )
Drucken Sie den Baum aus.
 fmt . Println ( t )

// .
// ├── A
// ├── B
// └── C
Bäume haben die Fähigkeit zu nisten.
 t := tree . Root ( "." ).
    Child ( "macOS" ).
    Child (
        tree . New ().
            Root ( "Linux" ).
            Child ( "NixOS" ).
            Child ( "Arch Linux (btw)" ).
            Child ( "Void Linux" ),
        ).
    Child (
        tree . New ().
            Root ( "BSD" ).
            Child ( "FreeBSD" ).
            Child ( "OpenBSD" ),
    )
Drucken Sie den Baum aus.
fmt . Println ( t )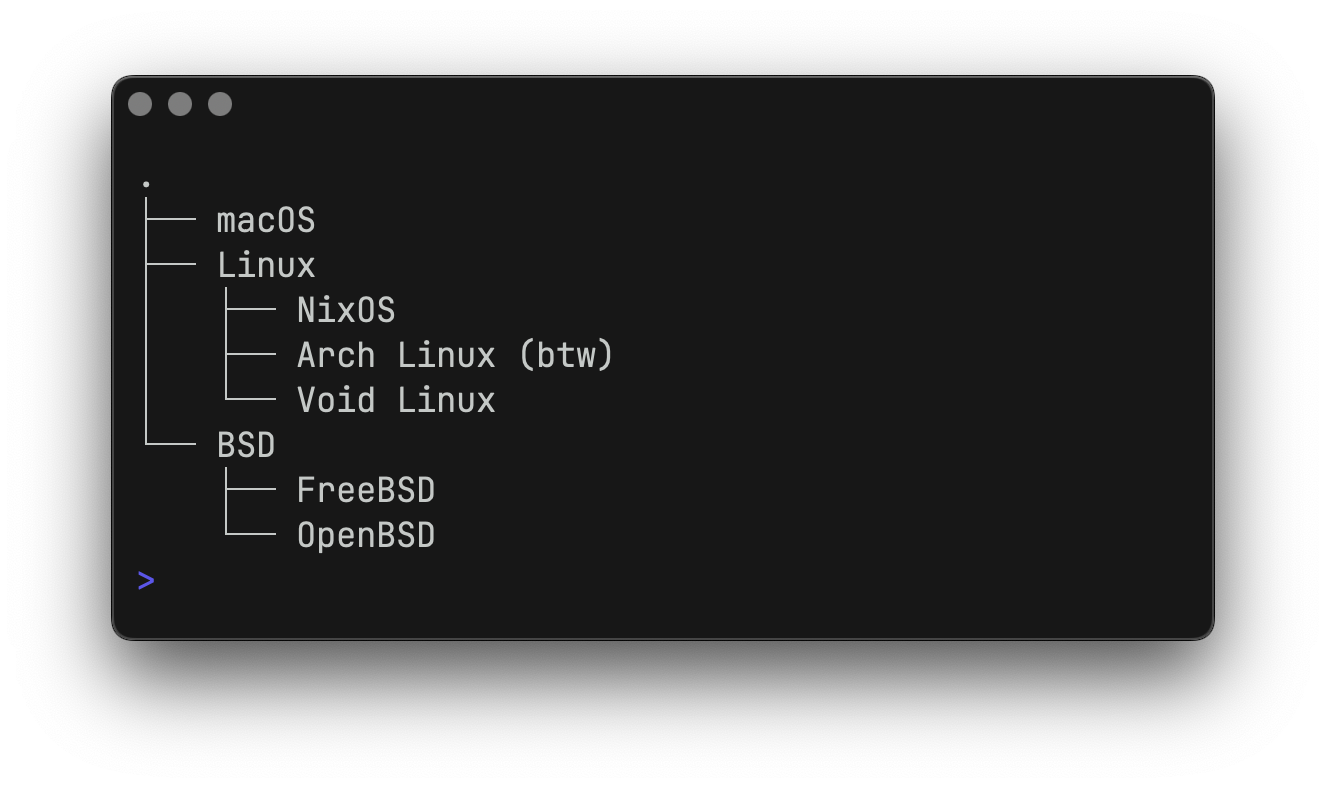
Bäume können über ihre Aufzählungsfunktion sowie mithilfe von lipgloss.Style s angepasst werden.
 enumeratorStyle := lipgloss . NewStyle (). Foreground ( lipgloss . Color ( "63" )). MarginRight ( 1 )
rootStyle := lipgloss . NewStyle (). Foreground ( lipgloss . Color ( "35" ))
itemStyle := lipgloss . NewStyle (). Foreground ( lipgloss . Color ( "212" ))

t := tree .
    Root ( "⁜ Makeup" ).
    Child (
        "Glossier" ,
        "Fenty Beauty" ,
        tree . New (). Child (
            "Gloss Bomb Universal Lip Luminizer" ,
            "Hot Cheeks Velour Blushlighter" ,
        ),
        "Nyx" ,
        "Mac" ,
        "Milk" ,
    ).
    Enumerator ( tree . RoundedEnumerator ).
    EnumeratorStyle ( enumeratorStyle ).
    RootStyle ( rootStyle ).
    ItemStyle ( itemStyle )
Drucken Sie den Baum aus.

Die vordefinierten Enumeratoren für Bäume sind DefaultEnumerator und RoundedEnumerator .
Bei Bedarf können Sie Bäume auch schrittweise erstellen:
 t := tree . New ()

for i := 0 ; i < repeat ; i ++ {
    t . Child ( "Lip Gloss" )
} Dies liegt höchstwahrscheinlich an Ihrem Gebietsschema und Ihrer Kodierung, insbesondere im Hinblick auf Chinesisch, Japanisch und Koreanisch (z. B. zh_CN.UTF-8 oder ja_JP.UTF-8 ). Der direkteste Weg, dies zu beheben, besteht darin, RUNEWIDTH_EASTASIAN=0 in Ihrer Umgebung festzulegen.
Einzelheiten finden Sie unter https://github.com/charmbracelet/lipgloss/issues/40.
Lip Gloss stuft die Farben automatisch auf die beste verfügbare Option im jeweiligen Terminal herab, und wenn die Ausgabe kein TTY ist, wird die Farbausgabe vollständig entfernt. Dies ist häufig der Fall, wenn Tests oder CI ausgeführt werden oder wenn die Ausgabe an eine andere Stelle weitergeleitet wird.
Bei Bedarf können Sie mit SetColorProfile ein Farbprofil in Ihren Tests erzwingen.
 import (
    "github.com/charmbracelet/lipgloss"
    "github.com/muesli/termenv"
)

lipgloss . SetColorProfile ( termenv . TrueColor )
Hinweis: Diese Option schränkt die Flexibilität Ihrer Anwendung ein und kann dazu führen, dass ANSI-Escape-Codes ausgegeben werden, wenn dies möglicherweise nicht erwünscht ist. Beachten Sie sorgfältig Ihren Anwendungsfall und Ihre Umgebung, bevor Sie sich dafür entscheiden, ein Farbprofil zu erzwingen.
Lipgloss ersetzt keinen Bubble Tea. Vielmehr ist es ein hervorragender Bubble Tea-Begleiter. Es wurde entwickelt, um das Zusammenstellen von Terminal-Benutzeroberflächenansichten so einfach und unterhaltsam wie möglich zu gestalten, sodass Sie sich auf die Erstellung Ihrer Anwendung konzentrieren können, anstatt sich mit Layoutdetails auf niedriger Ebene zu beschäftigen.
Einfach ausgedrückt: Sie können Lipgloss verwenden, um Ihre Bubble Tea-Ansichten zu verbessern.
Lip Gloss basiert auf den hervorragenden Termenv- und Reflow-Bibliotheken, die sich mit Farb- bzw. ANSI-fähigen Textoperationen befassen. Für viele Anwendungsfälle reichen Termenv und Reflow für Ihre Anforderungen aus.
Für eine dokumentzentriertere Rendering-Lösung mit Unterstützung für Dinge wie Listen, Tabellen und syntaxhervorgehobenen Code werfen Sie einen Blick auf Glamour, den Stylesheet-basierten Markdown-Renderer.
Siehe Mitwirken.
Wir würden gerne Ihre Meinung zu diesem Projekt hören. Schreiben Sie uns gerne eine Nachricht!
MIT
Ein Teil von Charme.
Charm-Inhalte • Charm liebt Open Source


