The STM32MP157A-DK1 discovery kit for the STM32MP157 SoC contains two Bosch M_CAN IP cores (one M_CAN and one MTT_CAN) that support CAN FD.
In opposite to the STM32MP157C-DK2 discovery kit the STM32MP157A-DK1 does not provide a connector (including CAN Transceiver and SUB-D9 connector) to access the M_CAN CAN controllers. Btw. the STM32MP157C-DK2 provides only the access to one of the two available CAN IP cores.
To access the two CAN controllers on the STM32MP157A-DK1 we need to ...
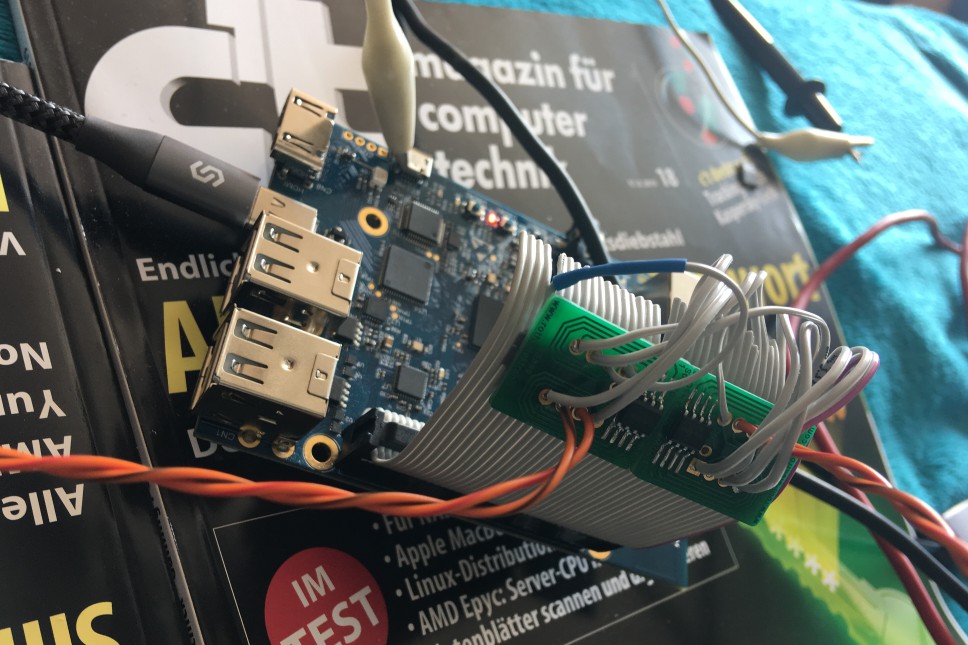
The final setup could probably look like this:

Two CAN FD transceivers sticked on an old IDE cable
In fact the STM wiki is very good and up-to-date, so it can be followed to set up your system to build your own Linux kernel: Installing the Linux kernel
The key points:
Before compiling the kernel with the cross compiler from the SDK the following 3 patches need to be copied to the existing 30 patches in the linux-stm32mp-4.19-r0 directory:
These 3 patches can be found in the patches directory.
After copying the 3 patches to the linux-stm32mp-4.19-r0 directory just follow the steps in the README.HOW_TO.txt which can also be found in that directory to build and finally install the new kernel on the target.
The STM wiki states: The README.HOW_TO.txt helper file is THE reference for the Linux kernel build - and they are right.
The hardware consists of two CAN FD transceivers (that also support Classic CAN 2.0) and some cabling:
I soldered the two PCBs head-to-head on the back to handle only one PCB and finally fixed the PCB with some double-sided adhesive tape on the IDE cable after soldering the pins.
The pins to connect for FD_CAN1:
| TRX Function | TRX Pin | CN2 Pin | CN2 Function |
|---|---|---|---|
| TXD | 1 | 03 | FDCAN1_TX |
| VSS | 2 | 06 | GND |
| VDD | 3 | 02 | +5V |
| RXD | 4 | 05 | FDCAN1_RX |
| VIO | 5 | 01 | +3V3 |
| CAN_L | 6 | - | (CAN_L to SUB-D9 pin 2) |
| CAN_H | 7 | - | (CAN_H to SUB-D9 pin 7) |
| STBY | 8 | 09 | GND |
The pins to connect for FD_CAN2:
| TRX Function | TRX Pin | CN2 Pin | CN2 Function |
|---|---|---|---|
| TXD | 1 | 36 | FDCAN2_TX |
| VSS | 2 | 20 | GND |
| VDD | 3 | 04 | +5V |
| RXD | 4 | 10 | FDCAN2_RX |
| VIO | 5 | 17 | +3V3 |
| CAN_L | 6 | - | (CAN_L to SUB-D9 pin 2) |
| CAN_H | 7 | - | (CAN_H to SUB-D9 pin 7) |
| STBY | 8 | 14 | GND |
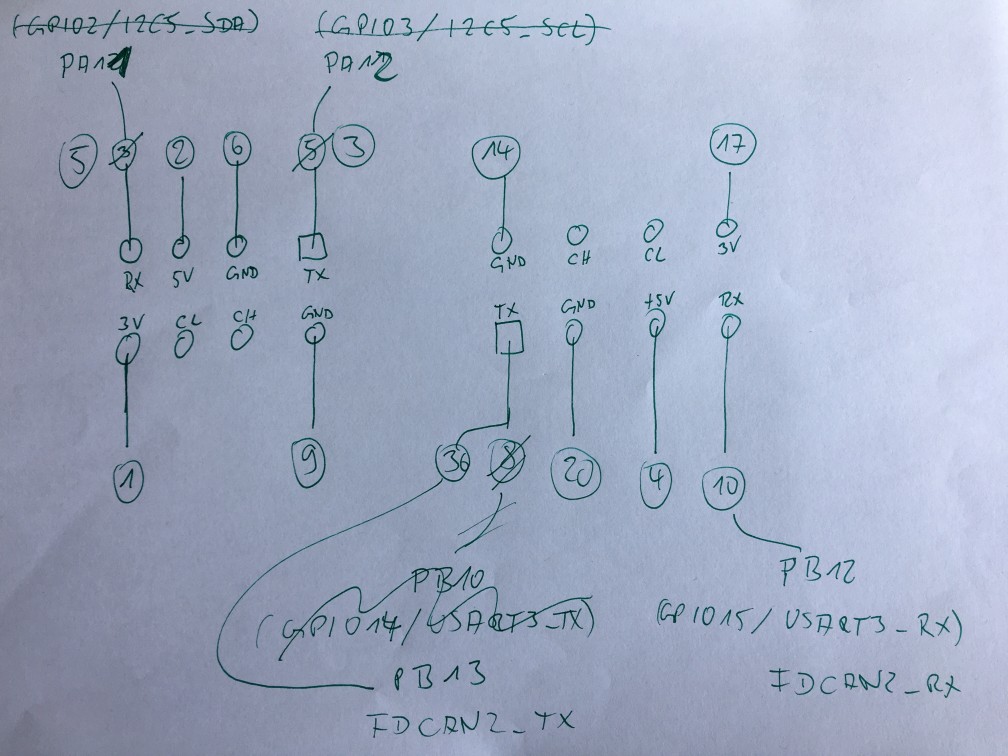
I made an ugly sketch before soldering my head-to-head PCBs which also depicts a change as I didn't get the DTS right at the first time. Only specific pins can be used to route the CAN IP connections. See details in "Discovery kits with STM32MP157 MPUs - User manual" (DevKit-en.DM00591354.pdf page 31 & 32).
| Function | BGA pin | CN2 pin |
|---|---|---|
| FDCAN1_RX (also I2C5_SCL) | PA11 | 05 |
| FDCAN1_TX (also I2C5_SDA) | PA12 | 03 |
| FDCAN2_RX (also USART3_RX) | PB12 | 10 |
| FDCAN2_TX (also USART3_CTS) | PB13 | 36 |
I2C5 and USART3 were already both set to "disabled" in the STM32MP157A-DK1 DTS file before. So we won't have any interference on these pins.
Many thanks to Alexandre Torgue from STM for the M_CAN device tree snippet! I learned much from this little hack to use the M_CAN IP cores on the STM32MP157A-DK1.
Please let me know if you find any mismatch between the description above and the photo below. It should tell the same. This description has been summarized to my best knowledge. If you are unsure please double check with the STM documentation. If you can't solder things ask someone else. You can use this description as-is at your own risk!
Oliver Hartkoppp 2020-01-28
