Aarlo is a custom component for Home Assistant, that provides access to the Arlo system.
Aarlo provides, amongst other things:
Aarlo is a custom component for Home Assistant, that provides access to the Arlo system.
The integration uses the APIs provided by the Arlo Camera Website and there are several limitations to this. See the Known Limitations section for further details.
If you encounter an issue then look at the FAQ section to see if it has a known problem and has a workaround or fix. If not, look at the Bug Report section for information on how to generate debug logs and create a debug report.
The advanced README is here
The old README is still available here.
This document assumes you are familiar with Home Assistant setup and configuration.
Wherever you see /config in this document it refers to your Home Assistant configuration directory. For example, for my installation it's /home/steve/ha which is mapped to /config by my docker container.
Wherever you see Arlo it refers to any piece of the Arlo system.
Wherever you see Aarlo I'm referring to this component.
Many thanks to:
Aarlo also provides a custom Lovelace Card, which overlays a camera's last snapshot with its current status and allows access to the cameras recording library and live-streaming.
If you aren't familiar with Home Assistant I recommend visiting the Community Website. It's full of helpful people and there is always someone who's encountered the problem you are trying to fix.
Aarlo needs a dedicated Arlo account. If you try to reuse an existing account, for example, the one you use on the Arlo app on your phone, the app and this integration will constantly fight to log in. This is an Arlo limitation.
The dedicated Aarlo account needs Allow Access Rights to be enabled to set the alarm levels and read certain status values.
See the Arlo documentation for further instructions.
You need to enable two factor authentication. Set up an email address to receive the verification code. Aarlo supports other TFA mechanisms but email is the easiest to use. See the Two Factor Authentication section later for more details.
You only need to use one of these installation mechanisms. I recommend HACS.
Aarlo is part of the default HACS store. If you're not interested in using development branches this is the easiest way to install.
Copy the aarlo directory into your /config/custom_components directory.
Run the installation script. Run it once to make sure the operations look sane and run it a second time with the go parameter to do the actual work. If you update just rerun the script, it will overwrite all installed files.
install /config # check output looks good
install go /configHowever you install the source code you know need to add the integration into Home Assistant. From the home page select Settings -> Devices & Services, from here click ADD INTEGRATION and search for Aarlo. On the first screen enter your account details.
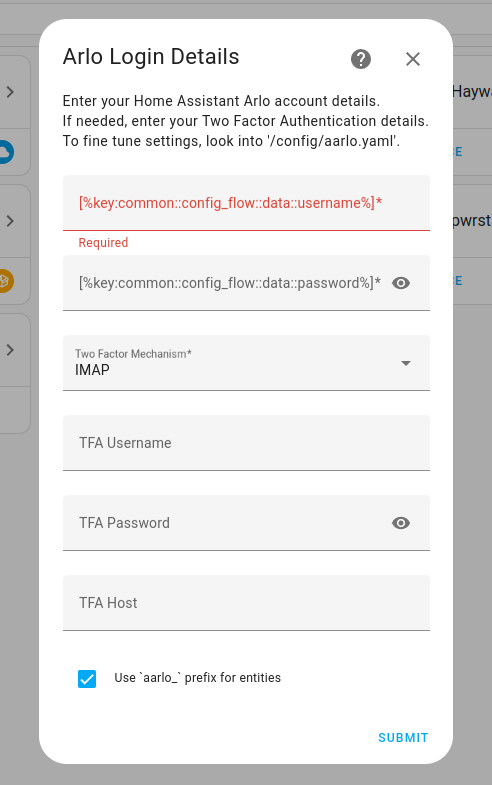
| Field | Value |
|---|---|
| Username | Your Arlo account username |
| Password | Your Arlo account password |
| Two Factor Mechanism | Select IMAP |
| TFA Username | The email account you registered for TFA |
| TFA Password | The email account password |
| TFA Host | The IMAP server to look for the email on |
If you leave Use aarlo prefix checked all your devices will be of the format type.aarlo_*.
Click SUBMIT. The integration will log into Arlo and retrieve the list of devices associated with it. If it all works you will be able to assign the devices to rooms on the the next screen.
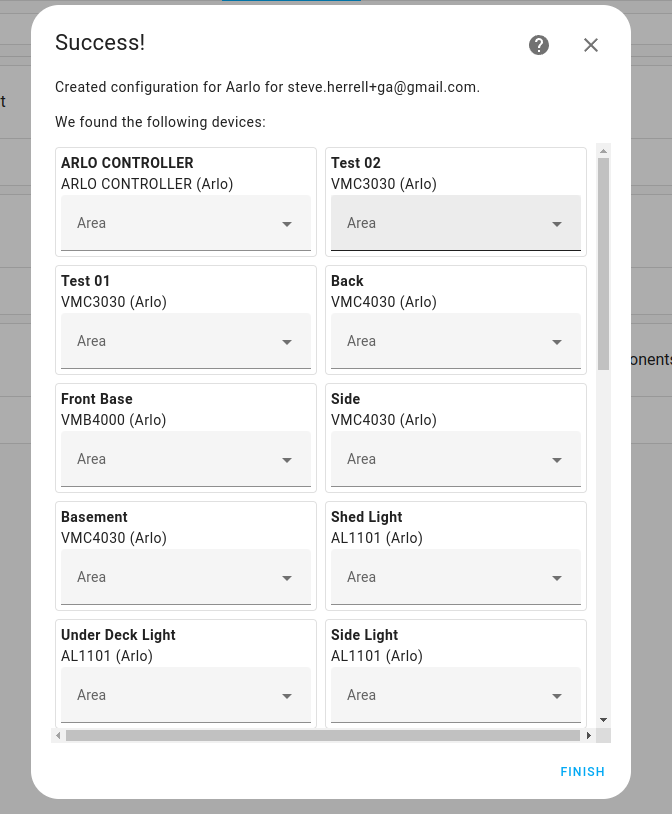
You can fine tune the settings further. From the Integration page click CONFIGURE.
Fine tune the alarm settings:
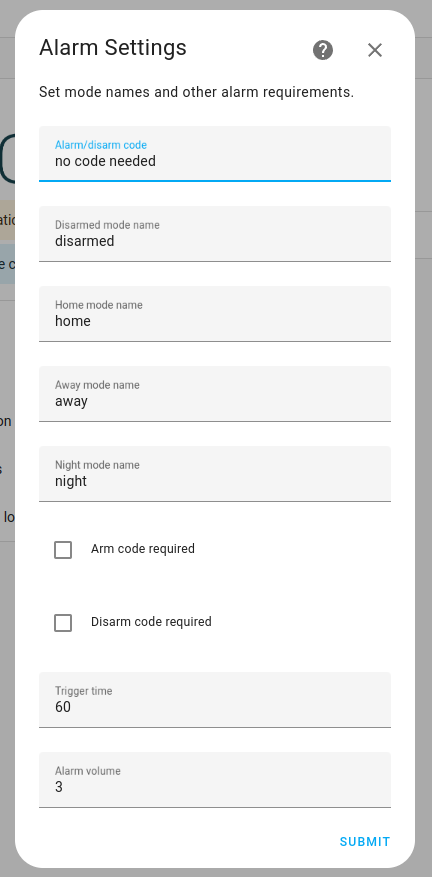
| Field | Value |
|---|---|
| Alarm/disarm Code | Enter a code if needed, otherwise leave as default |
| Disarmed mode name | Change if your Arlo account has a custom disarmed name |
| Home mode name | Change if your Arlo account has a custom home mode name |
| Away mode name | Change if your Arlo account has a custom away mode name |
| Night mode name | Change if your Arlo account has a custom night mode name |
| Arm code required | Select if Alarm/disarm code is needed to arm |
| Disarm code required | Select if Alarm/disarm code is needed to disarm |
| Trigger time | How long to wait when arming |
| Alarm volume | Default volume for the alarm sirens |
Night Mode; Arlo will not have one of these unless you create it
If you need to clear the alarm code enter no code needed. I will look to make this accept a blank entry...
Determine which binary sensors are available:
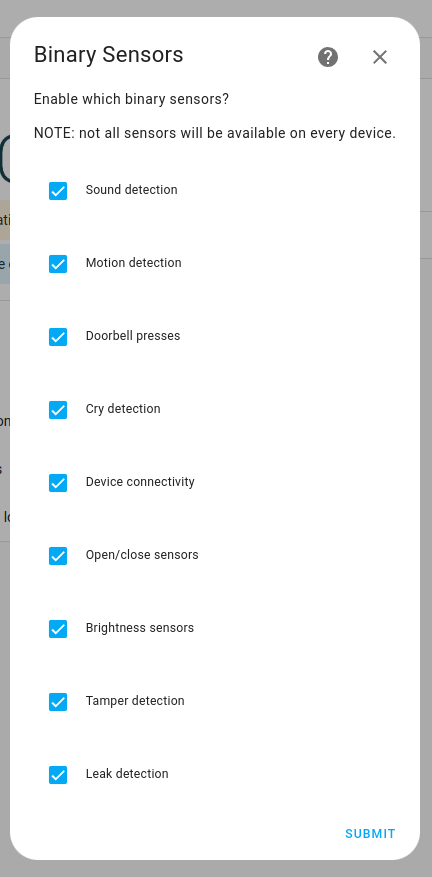
| Field | Value |
|---|---|
| Sound detection | Enable microphones on cameras |
| Motion detection | Enable motion detection on cameras |
| Doorbell presses | Enable doorbell buttons |
| Cry detection | For Arlo baby, enable cry detection |
| Device connectivity | Be notified when a device disconnects |
| Open/Close sensors | Enable door and window sensors |
| Brightness sensors | Enable light detection |
| Tamper detection | Enable notification if device is opened |
| Leak detection | Enable leak monitoring devices |
Not all sensors are available on all devices.
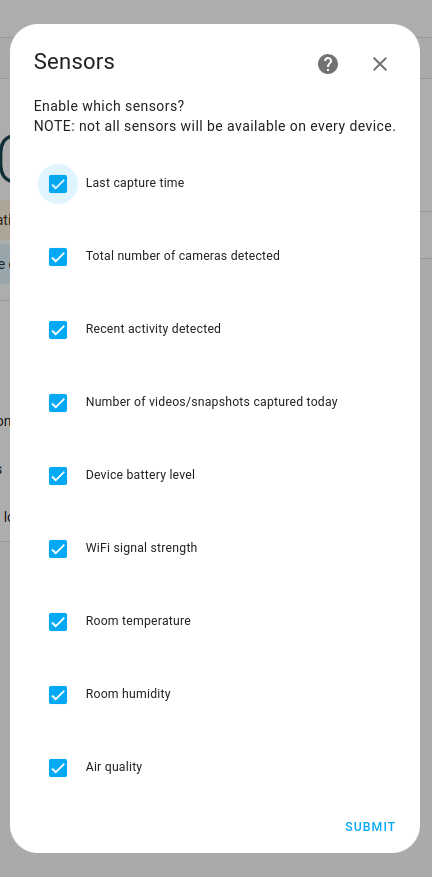
Determine which sensors are available:
| Field | Value |
|---|---|
| Last capture time | A per camera sensor indicating when the last recording was made |
| Total number of cameras detected | Integer value of camera count |
| Recent activity detected | Was the camera recently active |
| Number of videos/snapshots captured today | Integer value of recording made today |
| Device battery level | Percentage of battery left |
| WiFi signal strength | WiFi strength, has a range of 1 to 5 |
| Room temperature | Room conditions |
| Room humidity | Room conditions |
| Air quality | Room conditions |
Not all sensors are available on all devices. And recent activity should probably be a binary_sensor.
Enable miscellaneous switches:
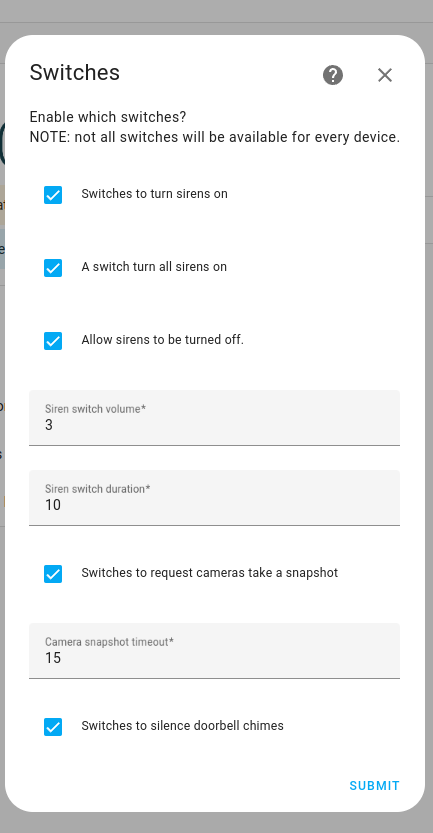
| Field | Value |
|---|---|
| Switches to turn sirens on | Provide a switch to turn individual sirens on |
| A switch turn all sirens on | Provide a switch to turn all sirens on |
| Allow sirens to be turned off | Allow sirens to be turned off by switch |
| Siren switch volume | Default volume level, from 1 to 10 |
| Siren Switch duration | Default time to run the alarm |
| Switches to request cameras take a snapshot | Provide a switch to take a camera snapshot |
| Camera snapshot timeout | How long to wait for badly behaved cameras to finish |
| Switches to silence doorbell chimes | Provide a switch to silence doorbells. |
If you are coming from an early there are several things to note:
config flow mechanism. All your devices will appear on the integration page.yaml entries.prefix with _aarlo to keep the naming identical.aarlo domain.pyaarlo component is now installed via pip and not included with the Integration..aarlo/session.pickle.I wasn't willing to move some of the more esoteric configuration items into the config flow mechanisms, if you had any configured they will appear in the /config/aarlo.yaml file. See here for more on these options.
Arlo will use either SSE or MQTT to signal events to Aarlo. I'm not fully sure of the mechanism which determines which gets chosen but I know adding or removing a user_agent will switch between the two.
Arlo recently updated the response they send to the session/v3 API requests to indicate which back end to choose. Aarlo will parse that out when using auto.
# This is the MQTT backend. We use the host and port.
'mqttUrl': 'ssl://mqtt-cluster-z1.arloxcld.com:8883'

# This is the SSE backend. We use a fixed host and port.
'mqttUrl': 'wss://mqtt-cluster-z1.arloxcld.com:8084'
If you enable verbose debugging your should be able to find this value in the Home Assistant logs.
Starting with the 0.8 release Aarlo should be smart enough to work out which back end to use. But if you find yourself running into problems, like missing motion detection events or missing sensor value updates you can manually override the setting. Change this setting in /config/aarlo.yaml.
aarlo:
  # This forces the SSE backend
backend: sseaarlo:
# This forces the MQTT backend
backend: mqtt
# These might also be needed
mqtt_hostname_check: false
mqtt_host: mqtt-cluster-z1.arloxcld.comaarlo:
# This forces Aarlo to choose
backend: autoNote, removing the setting is equivalent to auto.
Arlo uses Cloud Flare anti-bot protection to the Arlo website login. This service doesn't work well with the Python Requests package (or how Aarlo uses those requests, I'm not too sure).
If you see the following errors you are running into Cloud Flare issues.
2021-06-03 13:28:32 WARNING (SyncWorker_4) [pyaarlo] request-error=CloudflareChallengeError
This problem affects me, and I'm constantly trying to refine the code.
Aarlo does several things to work around this:
Header level.But, if you are still seeing login issues there are several configuration items you can try.
You can try a different user agent. This is configured in /config/aarlo.yaml:
aarlo:
  # Change the user agent. It can be either arlo, iphone, ipad, mac, firefox or linux
  #  or random. random will change it each time it tries to login
  user_agent: linux

  # Or use a custom user agent, everything after the ! will be used
  user_agent: !this-is-a-custom-user-agent
You can add a Source header along with the login request. I have one site that needs this and one that doesn't. I think it might be user agent related.
aarlo:
  # This adds the following header "Source: arloCamWeb"
  send_source: true
You can disable session caching with the following:
aarlo:
  # This will force a full login on every restart
  save_session: false
You can select different ecdh curves to use. This topic is out of the scope of this document, see here for an explanation.
aarlo:
  # Make this curve the first choice. You can only enter 1 choice.
  ecdh_curve: secp384r1
You can modify /etc/hosts to point to a specific Arlo web server
# Remove the # to force the request to go to a particular cloudflare server
#104.18.30.98 ocapi-app.arlo.com
#104.18.31.98 ocapi-app.arlo.com
Arlo calls this Two-step Verification. You are going to need to enable this for your Home Assistant specific account. Aarlo support IMAP and PUSH mechanisms but I recommend using IMAP, with PUSH you need to manually respond to the login request.
You will find instructions for setting up two factor authentication here Arlo provide here
You enter two factor authentication when you add the integration.
Follow the two factor authentication instructions and add and set up an Email verification method. You can test this by logging into the main Arlo web page and making sure it sends you an email.
For Gmail and Yahoo (and other web based email client) you can't log in with your usual password, you will have to create an application specific password. Explaining why this is necessary is out of the scope of this document so see the following pages.
If you find you can't log in to your IMAP account check the application password requirement.
The following servers are known to work:
| Service | Host Name |
|---|---|
| Gmail | imap.gmail.com |
| Yahoo! | imap.mail.yahoo.com |
Follow the two factor authentication instructions and add and set up a PUSH verification method.
If you need to change the cipher list passed to the IMAP client you specify it with the following option. You shouldn't need to do this. see the openssl man page for more information.
aarlo:
  # specify cipher list to use
  cipher_list: "HIGH:!DH:!aNULL"

  # Use DEFAULT for the cipher list
default_ciphers: TrueIf you run into problems please create a bug report, include the following information in the bug report to help debugging. If you don't I'll just pester you until you do.
You turn on basic Aarlo debugging by changing the logging setting in configuration.yaml.
logger:
  default: info
  logs:
    pyaarlo: debug
    custom_components.aarlo: debug
You can turn on verbose debugging by enabling logging and adding the following to /config/aarlo.yaml as well. Verbose debug will generate a lot of logs so it's best to enable only while needed.
aarlo:
  verbose_debug: true
Aarlo will write the debug logs to the standard Home Assistant log file /config/home-assistant.log.
Before you send me the debug you should encrypt it. You can encrypt your output on this web page. You can upload the file or copy and paste it into the buffer then press Submit.
This page doesn't forward automatically the output to me, so you will have to copy and paste it into a file and attach it to the bug report.
This page will obscure the logs so only I can read them, I'm the sole possessor of the private key to decrypt it, but be wary, along with serial number it might include your account and password information. You can obscure those before encrypting, I never need them.
I don't own every piece Arlo of equipment so sometimes, when things go wrong or new equipment is released, I need to see what Arlo actually expects this code to send and what this code can expect back from Arlo. Aarlo simulates a web browser connection so you can find out what is expected by using the browser Developer Tools.
This instructions are for Chrome but most browsers (I hope!) have similar functionality.
More Tools and finally select Developer Tools. You can also use the shortcut CTRL+SHIFT+I.Network tab in the newly opened window.When you log in the data passed between the browser and Arlo website will start to appear, and keep appearing, in this tab. If you click on an entry under Name you can examine the packets in more detail.
Headers tab shows you what was sent in the headers of the request.Payload tabs shows you what was sent in the body of the requestPreview tab shows the reply sent back from Arlo.
If you hover over the field under name a pop up will display the full URL the request was sent to.
I need to document this.
Look for a URL containing the word subscribe, this will be the even stream Arlo sends back to the web page. As you click buttons on the web page more items will appear in this list. I can use this information to determine how to parse response packets for cases I don't yet handle.
For example, Arlo creates a new device with a WOOHOO button, I don't posses such a device but you'd like the WOOHOO functionality implementing in Aarlo. What I need is the sequence of packets and their replies when you press the button. The only real way to do this is to press the button and see what new packets appear in the Name tab.
You will then need to copy and paste them into a bug report on GitHub. See the previous section on how to hide sensitive data.
No. They spend all their timing arguing about who has control. This is an Arlo limitation.
Are you sure you've shared the device? Log in to the Arlo Web Page and make sure it appears there. If it does then turn on debug logs and raise a bug report with them.
Make sure you have given the account you share the devices with Admin Access, it is needed for things like battery or signal strength updates.
Make sure you have given the account you share the devices with Admin Access, it is needed to share the base stations.
Are you using the new Arlo location based interface, in this case you can only arm or disarm locations and not individual devices.
No subscription is needed to see the feeds, but you will need one to see recording.
At the time of writing (May 2024), there is no option to read local recordings. All others features works well.
They sure do. Arlo doesn't work like IP cameras and only records when motion is detected so asking it to start a stream involves talking to the Arlo servers that talk to the camera at your house... it can take a few seconds to get things running. Streaming works something like this:
Camera ---> Arlo Cloud Servers --> Home Assistant --> Your Home Assistant Client
The video traffic has to travel out of your house and then back into it...
This is a list of devices that are known to work. Most Arlo devices will work even if not explicitly mentioned in this list although they might have limited functionality.
| Model | Name | Features |
|---|---|---|
| ABC1000 | Baby | motion, audio, environment, cry |
| AVD1001 | Wired Video Doorbell | motion |
| AVD2001 | Essential Video Doorbell | motion, siren |
| AVD3001 | Wired Video Doorbell HD | motion, siren |
| AVD4001 | Wired Video Doorbell 2K | motion, siren |
| FB1001 | Pro 3 Floodlight | floodlight |
| MS1001 | All in 1 Sensor | motion, open, wet, tamper, temperature |
| VMB3010 | Base Station | |
| VMB4000 | Base Station 2 | siren |
| VMB4500 | Pro Base Station | siren |
| VMC2030 | Essential Camera | motion, audio, siren, spotlight |
| VMC2040 | Essential Indoor Camera | motion, audio, siren no battery |
| VMC3030 | HD Camera | motion, audio |
| VMC3040 | Q Camera | motion, audio |
| VMC3060 | Essential Indoor Camera 2 | motion, needs looking at |
| VMC3052 | Essential XL Camera | motion, audio, spotlight |
| VMC4030 | Pro 2 Camera | motion, audio |
| VMC4040 | Pro 3 Camera | motion, audio, siren, spotlight |
| VMC4041 | Pro 4 Camera | motion, audio, siren, spotlight |
| VMC4060 | Pro 5 Camera | motion, audio, siren, spotlight |
| VMC5040 | Ultra Camera | motion, audio, siren, spotlight |
| VML2030 | Go 2 Camera | motion, audio |
| VML4030 | Go Camera | motion |
This component was written by reverse engineering the APIs used on the Arlo Camera web page.
These are general limitations:
These are limitations verses the website:
These are limitations versus the mobile application:
The last two can be summed up as if the WEB API doesn't support it, neither can the component. Bear that in mine when asking for new feature requests.