A suite of custom nodes for ComfyUI that includes Integer, string and float variable nodes, GPT nodes and video nodes.
Important
These nodes were tested primarily in Windows in the default environment provided by ComfyUI and in the environment created by the notebook for paperspace specifically with the cyberes/gradient-base-py3.10:latest docker image. Any other environment has not been tested.
Clone the repository:
git clone https://github.com/Nuked88/ComfyUI-N-Nodes.git
to your ComfyUI custom_nodes directory
IMPORTANT: If you want the GPT nodes on GPU you'll need to run install_dependency bat files.
There are 2 versions: install_dependency_ggml_models.bat for the old ggmlv3 models and install_dependency_gguf_models.bat for all the new models (GGUF).
YOU CAN ONLY USE ONE OF THEM AT A TIME!
Since llama-cpp-python needs to be compiled from source code to enable it to use the GPU, you will first need to have CUDA and visual studio 2019 or 2022 (in the case of my bat) installed to compile it. For details and the full guide you can go HERE.
If you intend to use GPTLoaderSimple with the Moondream model, you'll need to execute the 'install_extra.bat' script, which will install transformers version 4.36.2.
Reboot ComfyUI
In case you need to revert these changes (due to incompatibility with other nodes), you can utilize the 'remove_extra.bat' script.
ComfyUI will automatically load all custom scripts and nodes at startup.
Note
The llama-cpp-python installation will be done automatically by the script. If you have an NVIDIA GPU NO MORE CUDA BUILD IS NECESSARY thanks to jllllll repo. I've also dropped the support to GGMLv3 models since all notable models should have switched to the latest version of GGUF by now.
Note
Since 14/02/2024, the node has undergone a massive rewrite, which also led to the change of all node names in order to avoid any conflicts with other extensions in the future (or at least I hope so). Consequently, the old workflows are no longer compatible and will require manual replacement of each node. To avoid this, I have created a tool that allows for automatic replacement. On Windows, simply drag any *.json workflow onto the migrate.bat file located in (custom_nodes/ComfyUI-N-Nodes), and another workflow with the suffix _migrated will be created in the same folder as the current workflow. On Linux, you can use the script in the following way: python libs/migrate.py path/to/original/workflow/. For security reasons, the original workflow will not be deleted." For install the last version of this repository before this changes from the Comfyui-N-Suite execute git checkout 29b2e43baba81ee556b2930b0ca0a9c978c47083
ComfyUI-N-Nodes folder in custom_nodescomfyui-n-nodes folder in ComfyUIwebextensionsn-styles.csv and n-styles.csv.backup file in ComfyUIstylesGPTcheckpoints folder in ComfyUImodelscustom_nodes/ComfyUI-N-Nodesgit pull
The LoadVideoAdvanced node allows loading a video file and extracting frames from it.
The name has been changed from LoadVideo to LoadVideoAdvanced in order to avoid conflicts with the LoadVideo animatediff node.
video: Select the video file to load.framerate: Choose whether to keep the original framerate or reduce to half or quarter speed.resize_by: Select how to resize frames - 'none', 'height', or 'width'.size: Target size if resizing by height or width.images_limit: Limit number of frames to extract.batch_size: Batch size for encoding frames.starting_frame: Select which frame to start from.autoplay: Select whether to autoplay the video.use_ram: Use RAM instead of disk for decompressing video frames.IMAGES: Extracted frame images as PyTorch tensors.LATENT: Empty latent vectors.METADATA: Video metadata - FPS and number of frames.WIDTH: Frame width.HEIGHT: Frame height.META_FPS: Frame rate.META_N_FRAMES: Number of frames.The node extracts frames from the input video at the specified framerate. It resizes frames if chosen and returns them as batches of PyTorch image tensors along with latent vectors, metadata, and frame dimensions.
The SaveVideo node takes in extracted frames and saves them back as a video file.
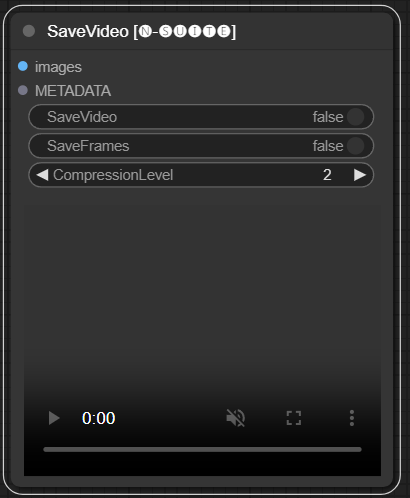
images: Frame images as tensors.METADATA: Metadata from LoadVideo node.SaveVideo: Toggle saving output video file.SaveFrames: Toggle saving frames to a folder.CompressionLevel: PNG compression level for saving frames.Saves output video file and/or extracted frames.
The node takes extracted frames and metadata and can save them as a new video file and/or individual frame images. Video compression and frame PNG compression can be configured. NOTE: If you are using LoadVideo as source of the frames, the audio of the original file will be maintained but only in case images_limit and starting_frame are equal to Zero.
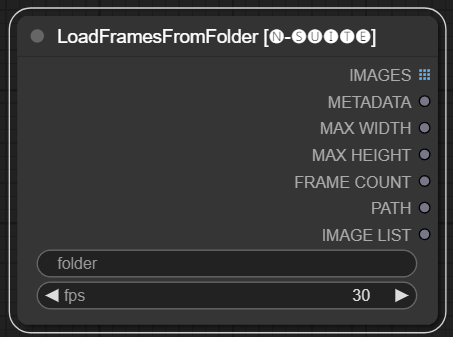
The LoadFramesFromFolder node allows loading image frames from a folder and returning them as a batch.
folder: Path to the folder containing the frame images.Must be png format, named with a number (eg. 1.png or even 0001.png).The images will be loaded sequentially.fps: Frames per second to assign to the loaded frames.IMAGES: Batch of loaded frame images as PyTorch tensors.METADATA: Metadata containing the set FPS value.MAX_WIDTH: Maximum frame width.MAX_HEIGHT: Maximum frame height.FRAME COUNT: Number of frames in the folder.PATH: Path to the folder containing the frame images.IMAGE LIST: List of frame images in the folder (not a real list just a string divided by n).The node loads all image files from the specified folder, converts them to PyTorch tensors, and returns them as a batched tensor along with simple metadata containing the set FPS value.
This allows easily loading a set of frames that were extracted and saved previously, for example, to reload and process them again. By setting the FPS value, the frames can be properly interpreted as a video sequence.
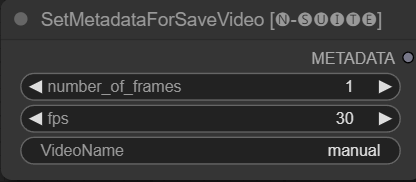
The SetMetadataForSaveVideo node allows setting metadata for the SaveVideo node.
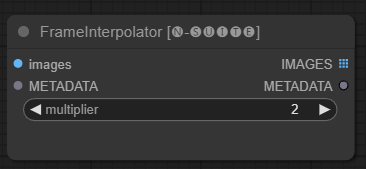
The FrameInterpolator node allows interpolating between extracted video frames to increase the frame rate and smooth motion.
images: Extracted frame images as tensors.METADATA: Metadata from video - FPS and number of frames.multiplier: Factor by which to increase frame rate.IMAGES: Interpolated frames as image tensors.METADATA: Updated metadata with new frame rate.The node takes extracted frames and metadata as input. It uses an interpolation model (RIFE) to generate additional in-between frames at a higher frame rate.
The original frame rate in the metadata is multiplied by the multiplier value to get the new interpolated frame rate.
The interpolated frames are returned as a batch of image tensors, along with updated metadata containing the new frame rate.
This allows increasing the frame rate of an existing video to achieve smoother motion and slower playback. The interpolation model creates new realistic frames to fill in the gaps rather than just duplicating existing frames.
The original code has been taken from HERE
Since the primitive node has limitations in links (for example at the time i'm writing you cannot link "start_at_step" and "steps" of another ksampler toghether), I decided to create these simple node-variables to bypass this limitation The node-variables are:
These custom nodes are designed to enhance the capabilities of the ConfyUI framework by enabling text generation using GGUF GPT models. This README provides an overview of the two custom nodes and their usage within ConfyUI.
You can add in the extra_model_paths.yaml the path where your model GGUF are in this way (example):
other_ui: base_path: I:\text-generation-webui GPTcheckpoints: models/
Otherwise it will create a GPTcheckpoints folder in the model folder of ComfyUI where you can place your .gguf models.
Two folders have also been created within the 'Llava' directory in the 'GPTcheckpoints' folder for the LLava model:
clips: This folder is designated for storing the clips for your LLava models (usually, files that start with mm in the repository).
models: This folder is designated for storing the LLava models.
This nodes actually supports 4 different models:
The GGUF models can be downloaded from the Huggingface Hub
HERE a video of an example of how to use the GGUF models by boricuapab
Here a small list of the models supported by this nodes:
LlaVa 1.5 7B LlaVa 1.5 13B LlaVa 1.6 Mistral 7B BakLLaVa Nous Hermes 2 Vision
####Example with Llava model:
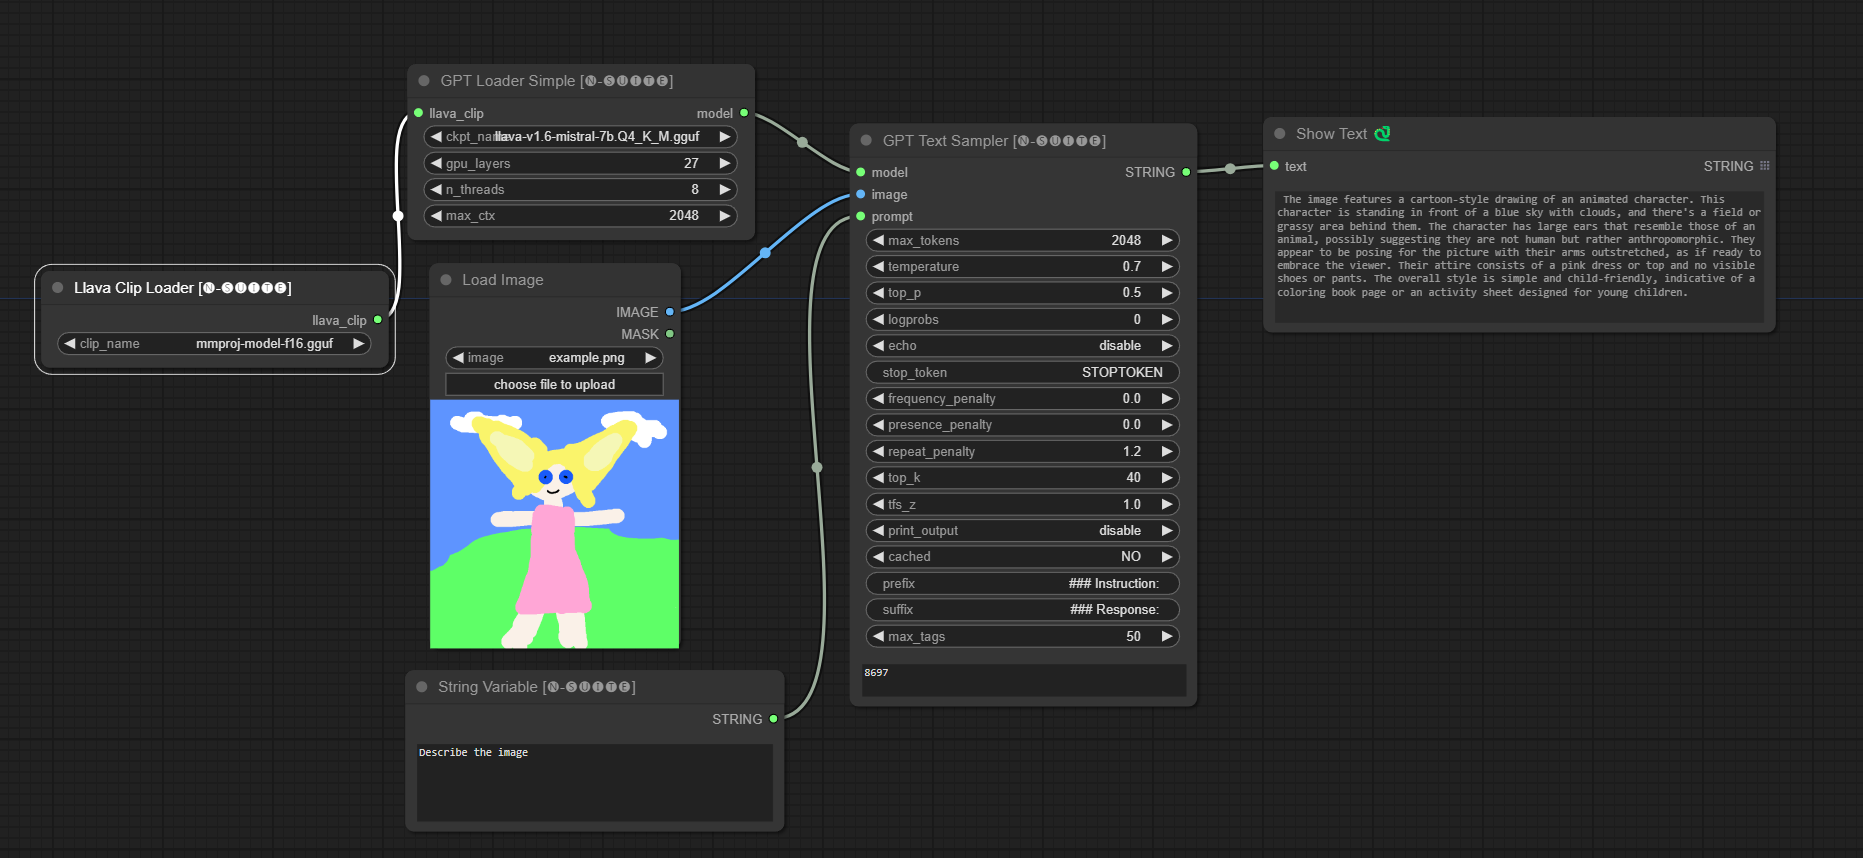
The model will be automatically downloaded when you run the first time. Anyway, it is available HERE The code taken from this repository
####Example with Moondream model:
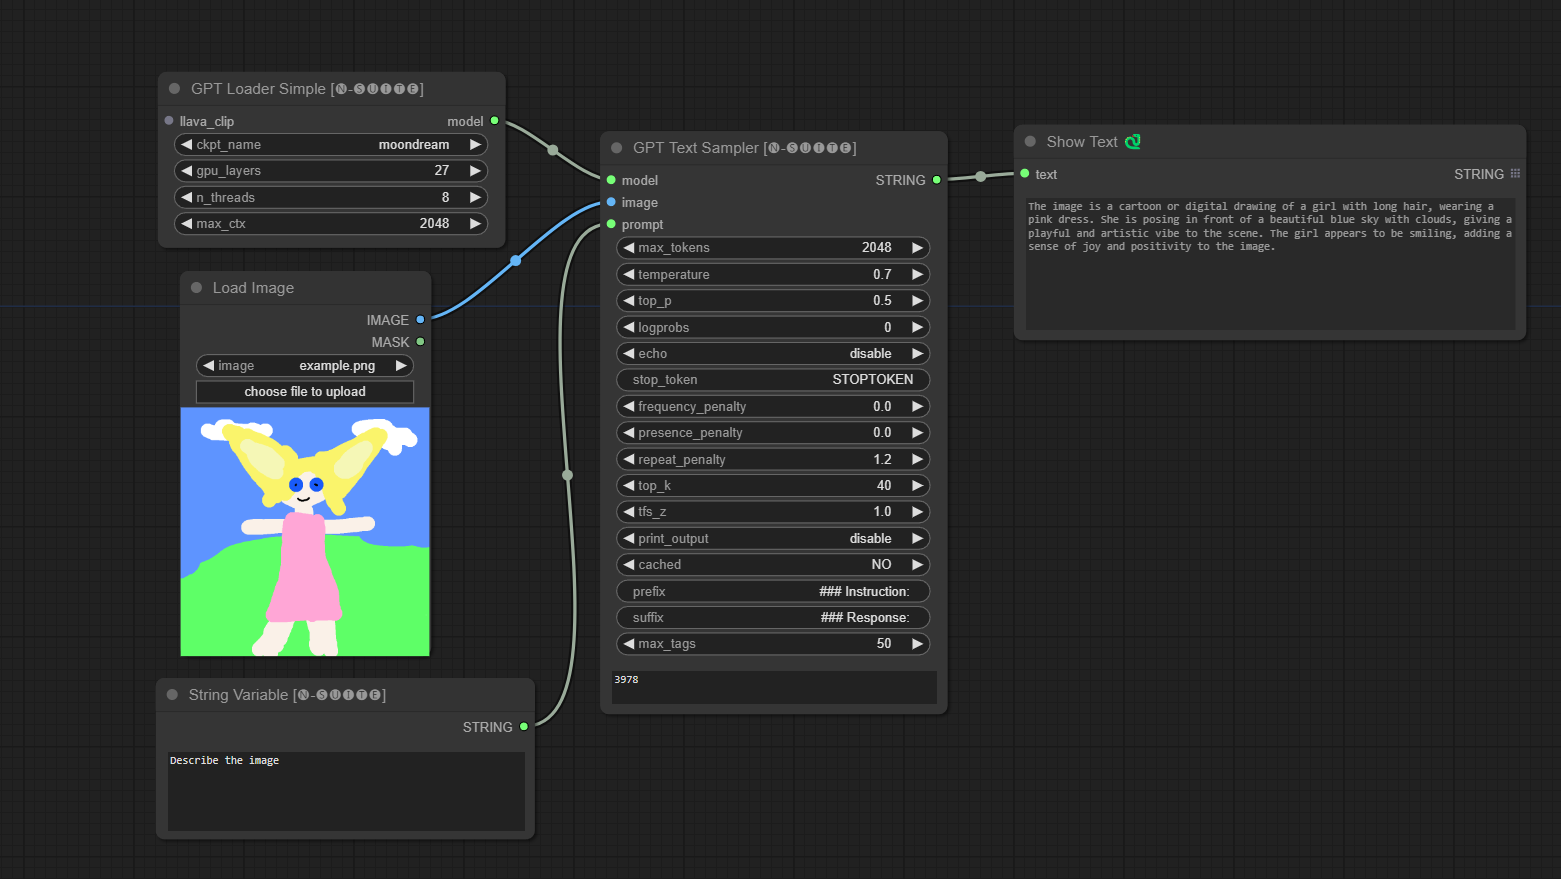
The model will be automatically downloaded when you run the first time. Anyway, it is available HERE The code taken from this repository
####Example with Joytag model:
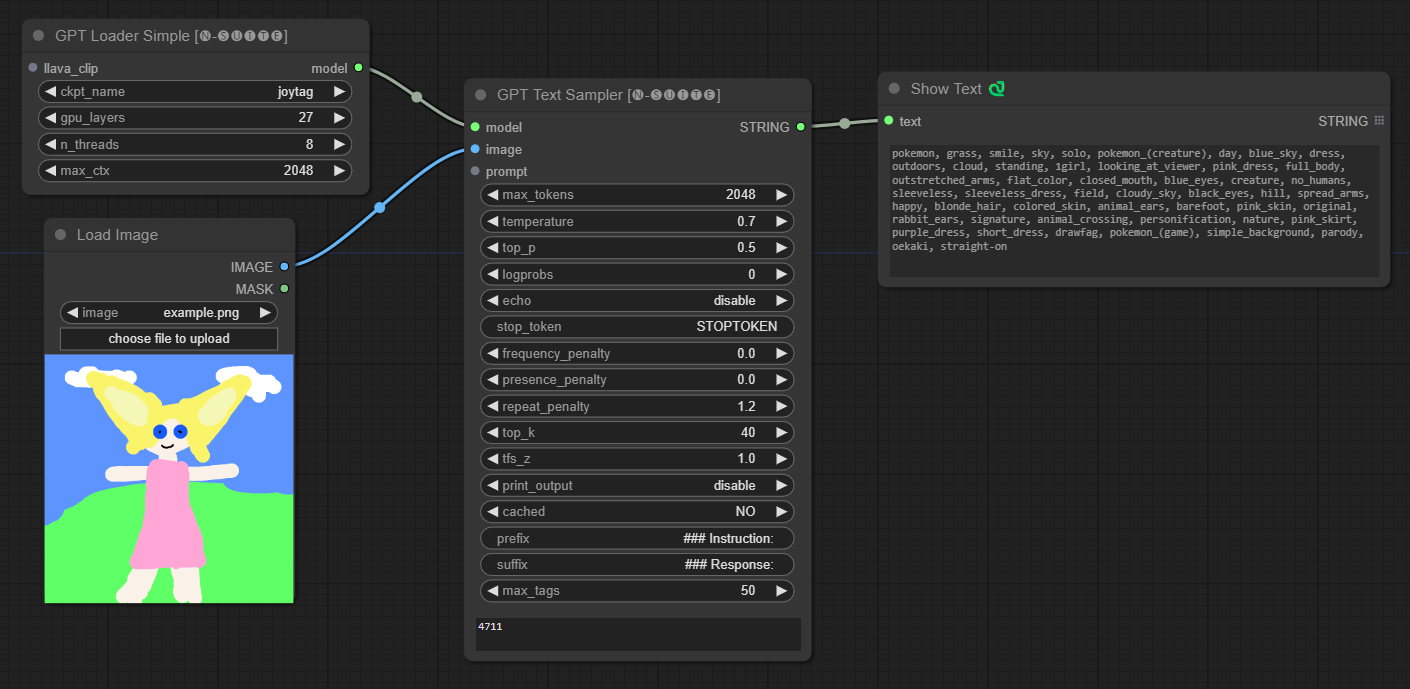
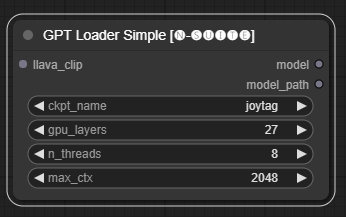
The GPTLoaderSimple node is responsible for loading GPT model checkpoints and creating an instance of the Llama library for text generation. It provides an interface to configure GPU layers, the number of threads, and maximum context for text generation.
ckpt_name: Select the GPT checkpoint name from the available options (joytag and moondream will be automatically downloaded used the first time).gpu_layers: Specify the number of GPU layers to use (default: 27).n_threads: Specify the number of threads for text generation (default: 8).max_ctx: Specify the maximum context length for text generation (default: 2048).The node returns an instance of the Llama library (MODEL) and the path to the loaded checkpoint (STRING).
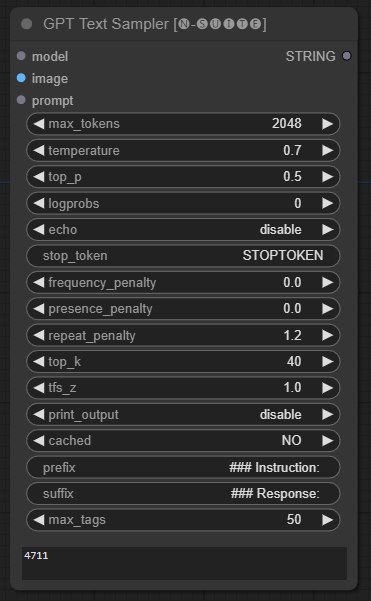
The GPTSampler node facilitates text generation using GPT models based on the input prompt and various generation parameters. It allows you to control aspects like temperature, top-p sampling, penalties, and more.
prompt: Enter the input prompt for text generation.image: Image input for Joytag, moondream and llava models.model: Choose the GPT model to use for text generation.max_tokens: Set the maximum number of tokens in the generated text (default: 128).temperature: Set the temperature parameter for randomness (default: 0.7).top_p: Set the top-p probability for nucleus sampling (default: 0.5).logprobs: Specify the number of log probabilities to output (default: 0).echo: Enable or disable printing the input prompt alongside the generated text.stop_token: Specify the token at which text generation stops.frequency_penalty, presence_penalty, repeat_penalty: Control word generation penalties.top_k: Set the top-k tokens to consider during generation (default: 40).tfs_z: Set the temperature scaling factor for top frequent samples (default: 1.0).print_output: Enable or disable printing the generated text to the console.cached: Choose whether to use cached generation (default: NO).prefix, suffix: Specify text to prepend and append to the prompt.max_tags: This only affect the max number of tags generated by joydag.The node returns the generated text along with a UI-friendly representation.
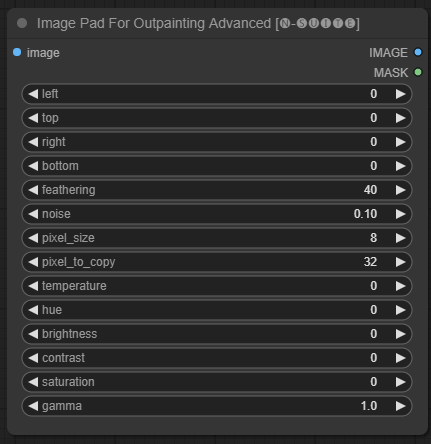
The ImagePadForOutpaintingAdvanced node is an alternative to the ImagePadForOutpainting node that applies the technique seen in this video under the outpainting mask.
The color correction part was taken from this custom node from Sipherxyz
image: Image input.left: pixel to extend from left,top: pixel to extend from top,right: pixel to extend from right,bottom: pixel to extend from bottom.feathering: feathering strengthnoise: blend strenght from noise and the copied borderpixel_size: how big will be the pixel in the pixellated effectpixel_to_copy: how many pixels to copy (from each side)temperature: color correction setting that is only applied to the mask part.hue: color correction setting that is only applied to the mask part.brightness: color correction setting that is only applied to the mask part.contrast: color correction setting that is only applied to the mask part.saturation: color correction setting that is only applied to the mask part.gamma: color correction setting that is only applied to the mask part.The node returns the processed image and the mask.

The DynamicPrompt node generates prompts by combining a fixed prompt with a random selection of tags from a variable prompt. This enables flexible and dynamic prompt generation for various use cases.
variable_prompt: Enter the variable prompt for tag selection.cached: Choose whether to cache the generated prompt (default: NO).number_of_random_tag: Choose between "Fixed" and "Random" for the number of random tags to include.fixed_number_of_random_tag: If number_of_random_tag if "Fixed" Specify the number of random tags to include (default: 1).fixed_prompt (Optional): Enter the fixed prompt for generating the final prompt.The node returns the generated prompt, which is a combination of the fixed prompt and selected random tags.
variable_prompt field with tag comma separated, the fixed_prompt is optional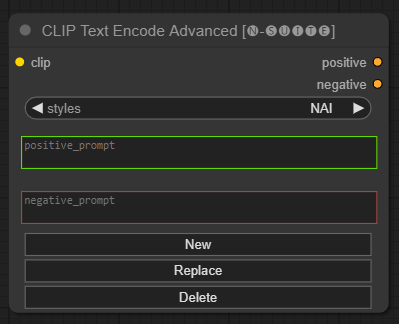
The CLIP Text Encode Advanced node is an alternative to the standard CLIP Text Encode node. It offers support for Add/Replace/Delete styles, allowing for the inclusion of both positive and negative prompts within a single node.
The base style file is called n-styles.csv and is located in the ComfyUIstyles folder.
The styles file follows the same format as the current styles.csv file utilized in A1111 (at the time of writing).
NOTE: this note is experimental and still have alot of bugs
clip: clip inputstyle: it will automatically fill the positive and negative prompts based on the choosen stylepositive: positive conditionsnegative: negative conditionsFeel free to contribute to this project by reporting issues or suggesting improvements. Open an issue or submit a pull request on the GitHub repository.
This project is licensed under the MIT License. See the LICENSE file for details.