| Generative AI Application Builder on AWS | ? Feature request | ? Bug Report | Implementation Guide |
NOTE:
The Generative AI Application Builder on AWS solution (GAAB) provides a web-based management dashboard to deploy customizable Generative AI (Gen AI) use cases. This Deployment dashboard allows customers to deploy, experiment with, and compare different combinations of Large Language Model (LLM) use cases. Once customers have successfully configured and optimized their use case, they can take their deployment into production and integrate it within their applications.
The Generative AI Application Builder is published under an Apache 2.0 license and is targeted for novice to experienced users who want to experiment and productionize different Gen AI use cases. The solution uses LangChain open-source software (OSS) to configure connections to your choice of Large Language Models (LLMs) for different use cases. The first release of GAAB allows users to deploy chat use cases which allow the ability to query over users' enterprise data in a chatbot-style User Interface (UI), along with an API to support custom end-user implementations.
Some of the features of GAAB are:
For a detailed solution implementation guide, refer to The Generative AI Application Builder on AWS
There are 3 unique user personas that are referred to in the solution walkthrough below:
NOTE:
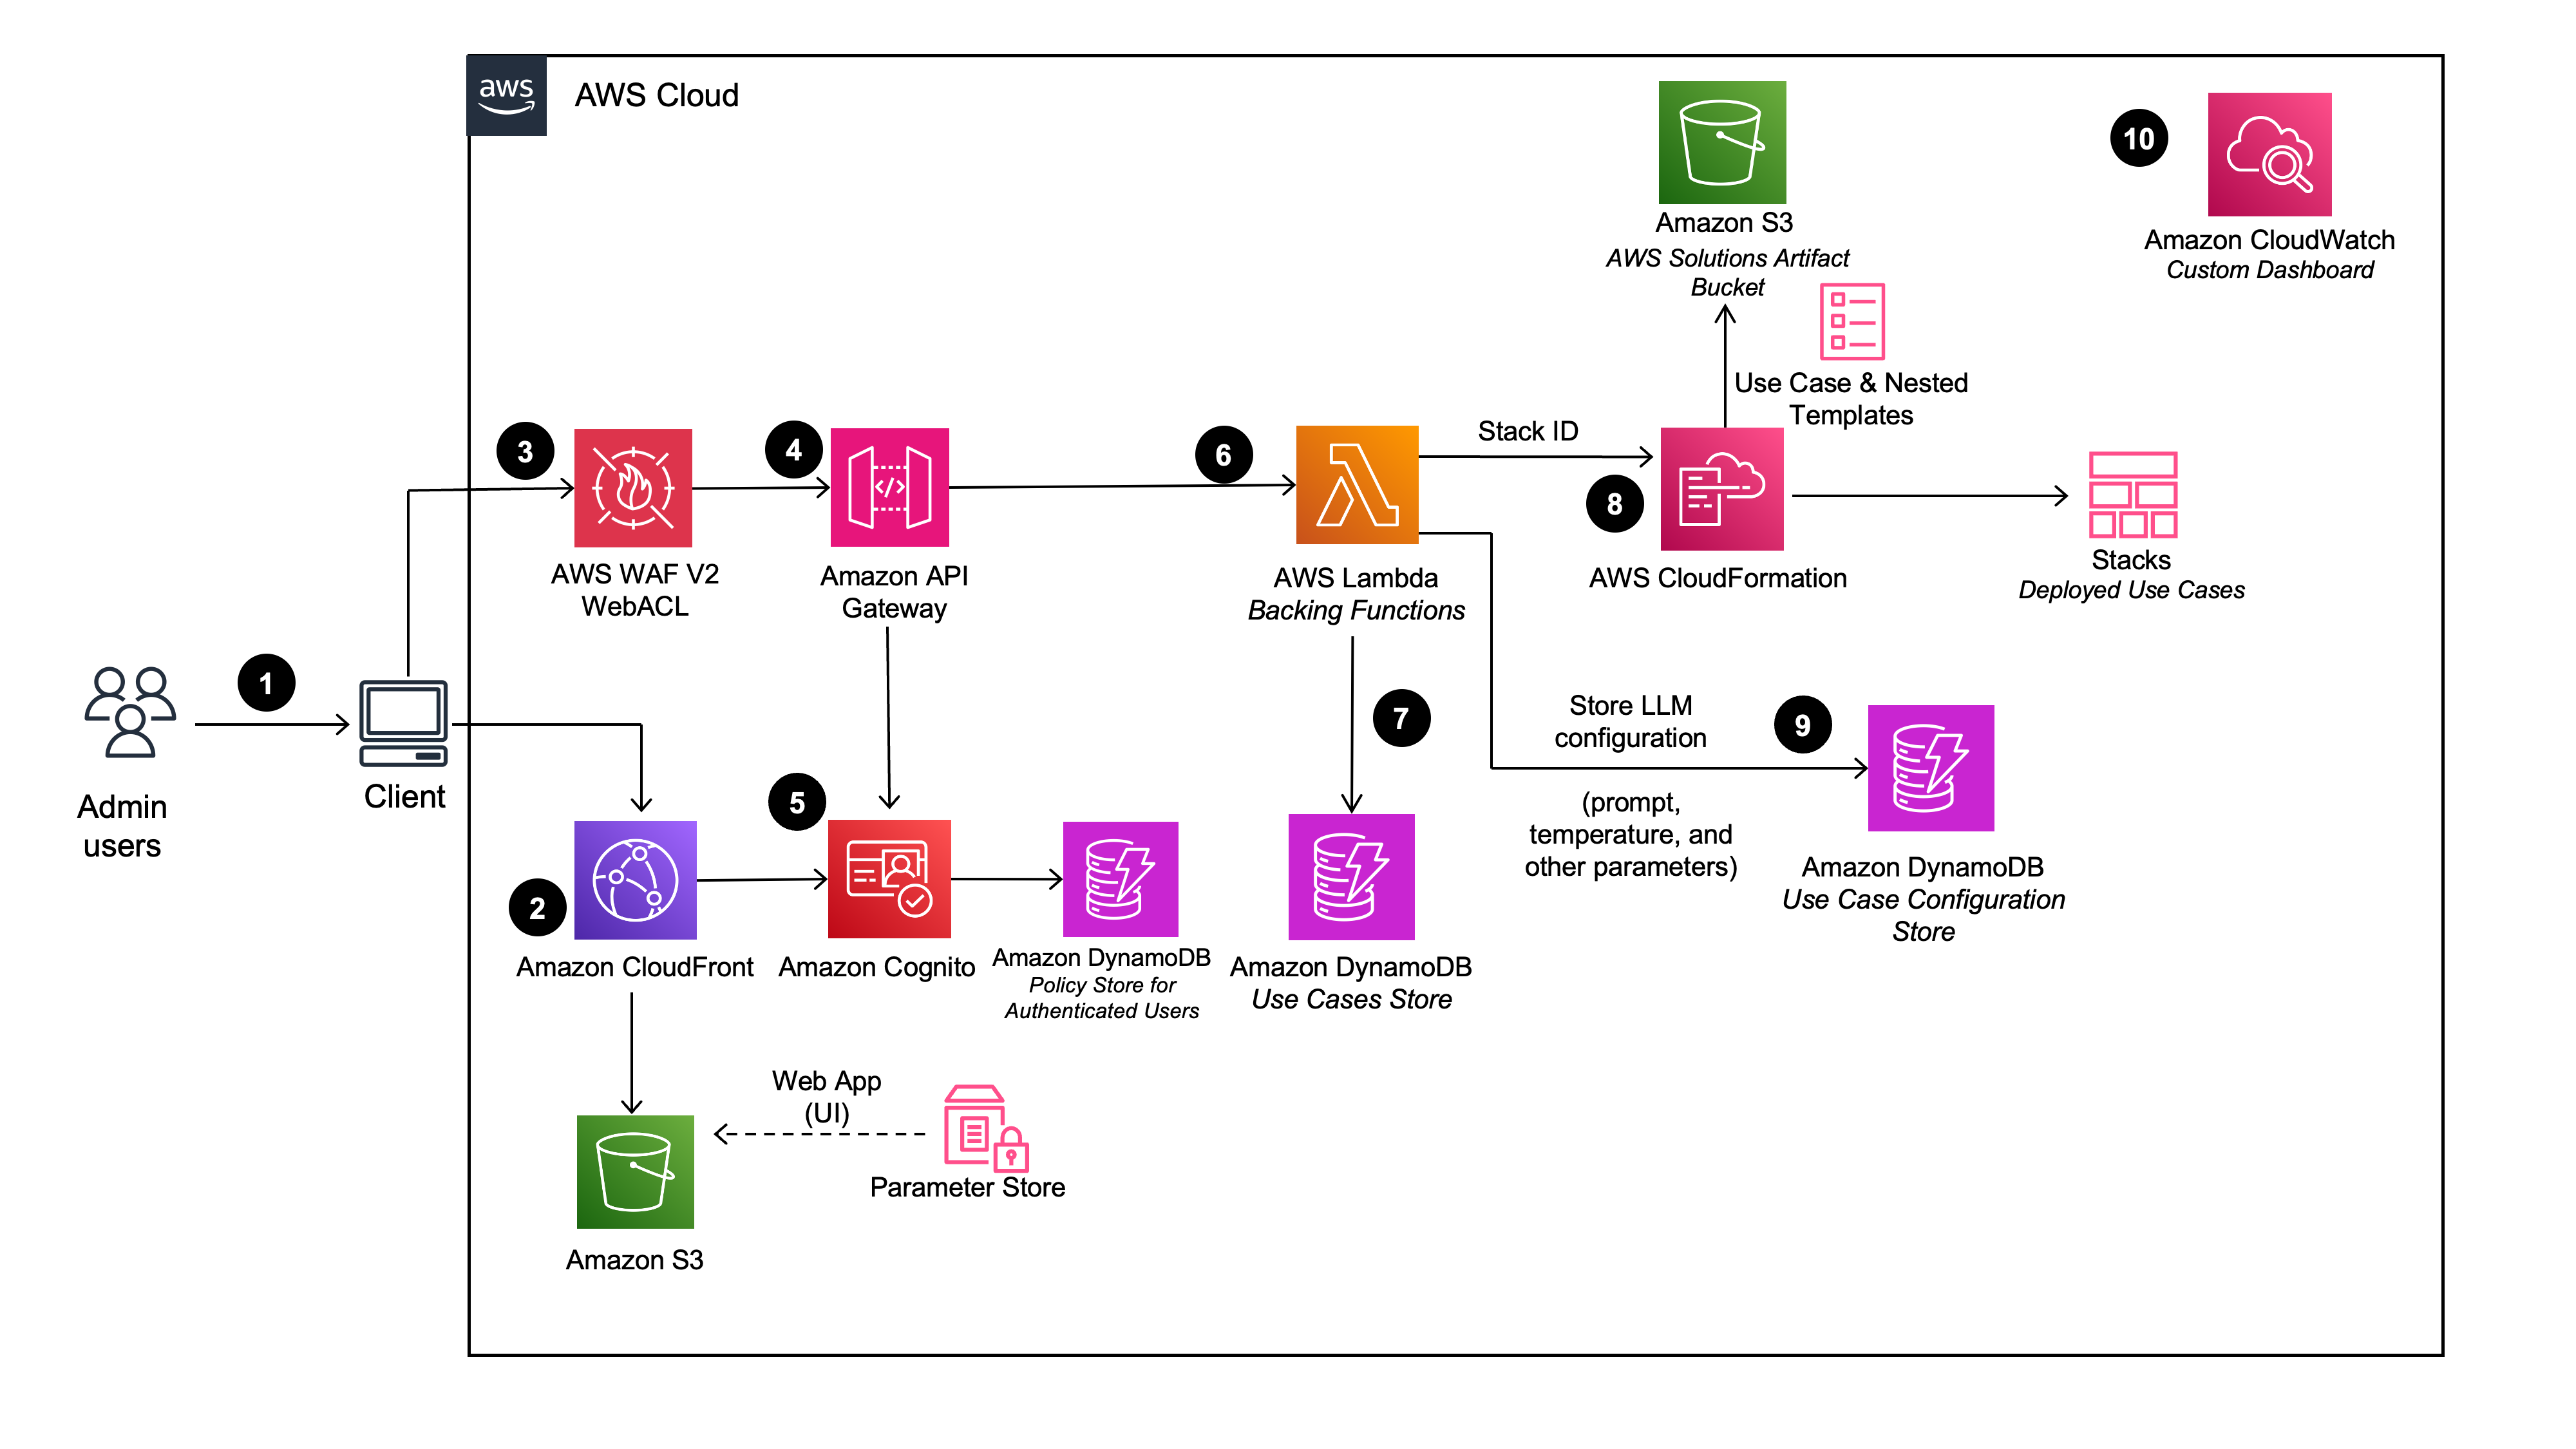
When the DevOps user deploys the Deployment Dashboard, the following components are deployed in the AWS account:

Note: Although the Deployment dashboard can be launched in most AWS regions, the deployed use cases have some restrictions based on service availability. See Supported AWS Regions in the Implementation Guide for more details.
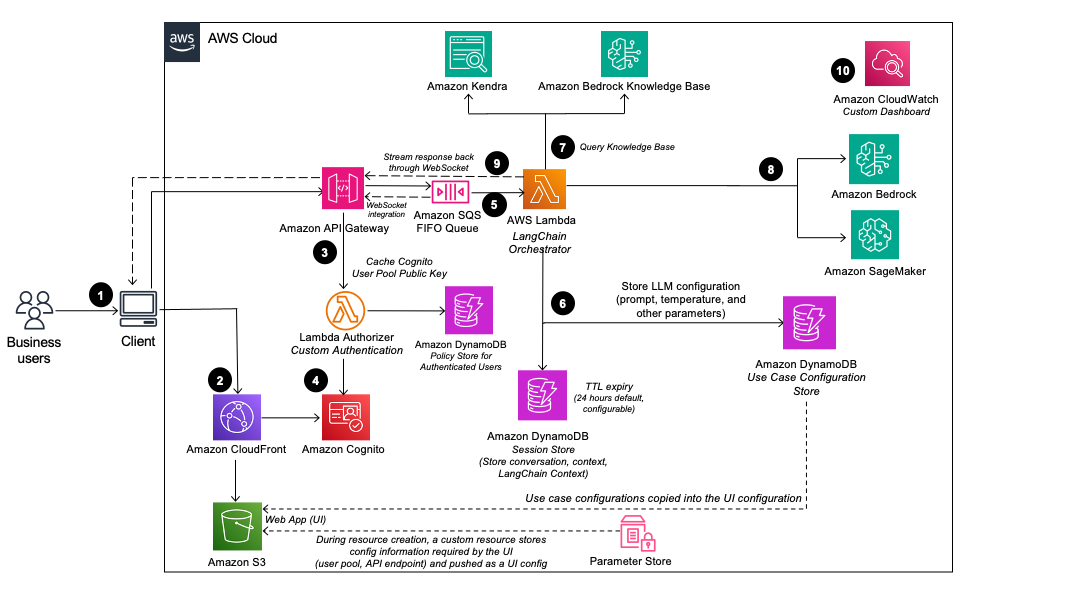
Once the Deployment Dashboard is deployed, the admin user can then deploy multiple use case stacks. When a use case stack is deployed by the admin user, the following components are deployed in the AWS account:

NOTE:
There are two options for deployment into your AWS account:
cdk deploy
Following are pre-requisites to build and deploy locally:
ensurepip and pip; however, if running in an environment without these packages you will need to manually install them (e.g. a minimal docker image). See pip's installation guide for details.Note: Configure the AWS CLI with your AWS credentials or have them exported in the CLI terminal environment. In case the credentials are invalid or expired, running cdk deploy produces an error.
Also, if you have not run cdk bootstrap in this account and region, please follow the instructions here to execute cdk bootstrap as a one time process before proceeding with the below steps.
After cloning the repo from GitHub, complete the following steps:
NOTE:
cdk-asset-bucket property in source/infrastructure/cdk.json. The value of this property should be the bucket name that cdk bootstrap process created. Unless a bucket name is configured, the cdk bootstrap process creates a bucket in the following
format: cdk-hnb659fds-assets-<aws-account-number>-<region> (where is the AWS Account ID where the solution is being deployed in the specific ). The repo currently has the value set as the following:
"cdk-asset-bucket": "cdk-hnb659fds-assets-123456789012-us-east-1"
  cd <project-directory>/source/infrastructure
  npm install
  npm run build
  cdk synth
  cdk deploy DeploymentPlatformStack --parameters AdminUserEmail=<replace with admin user's email>
Note: Because cdk deploy is executed with a stack name, it does not synthesize the other CloudFormation stacks in the infrastructure folder. To ensure all stacks are synthesized based on the infrastructure code changes, please ensure to cdk synth. For a complete list of cdk commands that can be run, see Toolkit commands
For the deployment dashboard to deploy LLM chat use cases, you would additionally need to stage synthesized CDK assets (such as lambdas, synthesized CloudFormation templates, etc.) from the source/infrastructure/cdk.out directory to a configured S3 bucket in your account from where these resources will be pulled from at the time of deployment. To make it easy to stage these assets, you can use the source/stage-assets.sh script. This script should be run from the source directory.
cd <project-directory>/source
./stage-assets.sh
When run, the script looks like this:
>>> ./stage-assets.sh
This script should be run from the 'source' folder
The region to upload CDK artifacts to (default:us-east-1)?
>>> us-west-2
>>> All assets will be uploaded to cdk-hnb659fds-assets-123456789-us-west-2
>>> Do you want to proceed? (y/n) y
You must provide the full region name as the first input to the script as shown in the above example.
Note: Assets must be staged every time there is a change in the codebase to have the most up-to-date staged assets. It is also recommend to run cdk synth before staging.
Refer section Creating a custom build
├── CHANGELOG.md
├── CODE_OF_CONDUCT.md
├── CONTRIBUTING.md
├── Config
├── LICENSE.txt
├── NOTICE.txt
├── README.md
├── buildspec.yml
├── deployment
│   ├── build-open-source-dist.sh
│   ├── build-s3-dist.sh
│   ├── cdk-solution-helper
│   ├── clean-for-scan.sh
│   ├── get-cdk-version.js
│   └── manifest.yaml
|   ├── run-unit-tests.sh                     [shell script that can run unit tests for the entire project]
├── pyproject.toml
├── pytest.ini
├── sonar-project.properties
└── source
    ├── images
    ├── infrastructure                       [CDK infrastructure]
    ├── lambda                               [Lambda functions for the application]
    ├── pre-build-lambda-layers.sh           [pre-builds lambda layers for the project]
    ├── scripts                              [standalone utility scripts]
    ├── stage-assets.sh
    ├── test
    ├── ui-chat                              [Web App project for chat UI]
    └── ui-deployment                        [Web App project for deployment dashboard UI]
└── docs
The project provides a docs folder which gives you access to sample SageMaker inputs. As SageMaker models can take in and output a variety of input and output schemas, respectively, the solution requests these values from the users to allow correct model invocation. This allows the solution to support a wide set of SageMaker models.
The input schemas are essentially your model's payload, with placeholders for the actual values. The placeholders enable replacing the actual model values at run-time and are represented by a keyword enclosed in angle brackets like: <<prompt>>. Note that <<prompt>> and <<temperature>> are reserved placeholders for the model prompt and temperatures respectively.
The model's output JSONPath provides the solution a path to retrieve the LLM's textual response from the model response.
Please always refer to model documentation and SageMaker JumpStart jupyter notebook samples to see the most up-to-date model payloads and supported parameters.
Run the following command:
git clone https://github.com/aws-solutions/<repository_name>
cd <rootDir>/source/infrastructure
npm install
Note: To run the unit tests, docker must be installed and running, and valid AWS credentials must be configured.
cd <rootDir>/deployment
chmod +x ./run-unit-tests.sh
./run-unit-tests.sh
export DIST_OUTPUT_BUCKET=my-bucket-name
export VERSION=my-version
cd <rootDir>/deployment
chmod +x ./build-s3-dist.sh
./build-s3-dist.sh $DIST_OUTPUT_BUCKET $SOLUTION_NAME $VERSION $CF_TEMPLATE_BUCKET_NAME
Parameter details:
$DIST_OUTPUT_BUCKET - This is the global name of the distribution. For the bucket name, the AWS Region is added to the global name (example: 'my-bucket-name-us-east-1') to create a regional bucket. The lambda
artifacts should be uploaded to the regional buckets for the CloudFormation template to pick it up for deployment.

$SOLUTION_NAME - The name of This solution (example: generative-ai-application-builder-on-aws)
$VERSION - The version number of the change
$CF_TEMPLATE_BUCKET_NAME - The name of the S3 bucket where the CloudFormation templates should be uploaded
When you create and use buckets, we recommended that you:
Note: You must have the AWS CLI installed.
aws s3 cp ./global-s3-assets/ s3://my-bucket-name-<aws_region>/generative-ai-application-builder-on-aws/<my-version>/ --recursive --acl bucket-owner-full-control --profile aws-cred-profile-name
aws s3 cp ./regional-s3-assets/ s3://my-bucket-name-<aws_region>/generative-ai-application-builder-on-aws/<my-version>/ --recursive --acl bucket-owner-full-control --profile aws-cred-profile-name
The solution includes two separate React-based web applications: the Deployment Dashboard UI and the Chat UI. Both user interfaces are built using Vite, a modern and fast build tool for modern web projects.
Open a Terminal
Navigate to the Source Directory
source directory within the project root:
cd <project-directory>/source
Fetch and Update Runtime Config
Run the provided setup_local_dev_server.py script with the appropriate arguments:
python setup_local_dev_server.py --ui-project-type <ui_project_name> --website <website_url>
<ui_project_name> with either ui-chat or ui-deployment depending on which UI project you want to set up.<website_url> with the URL of the website where the solution is deployed (e.g., https://example.com).The script will fetch the runtime configuration used to configure AWS Amplify, which the project uses. It will also update the Cognito app client by adding the localhost address to the callbackurls and logouturls list, so it works with the Cognito hosted domain.
For example, to update the UI Chat project:
python setup_local_dev_server.py --ui-project-type ui-chat --website https://example.com
or
python setup_local_dev_server.py -t ui-chat -w https://example.com
To update the UI Deployment project:
python setup_local_dev_server.py --ui-project-type ui-deployment --website https://example.com
or
python setup_local_dev_server.py -t ui-deployment -w https://example.com
Navigate to the UI Project Directory
Change to the directory of the UI project you want to work with:
cd ui-chat
or
cd ui-deployment
Install Dependencies
Install the required Node.js dependencies by running the following command in the project directory:
npm install
Start the Local Development Server
In the project directory, run the following command to start the local Vite development server:
npm start
The Deployment Dashboard UI development server will start at http://localhost:5177, and the Chat UI development server will start at http://localhost:5178.
If these ports are already in use on your machine, you can customize the setup_local_dev_server.py script to use different ports.
With the local development environment set up, you can now customize the React components and functionality of the UI projects according to your requirements. The source code for the Deployment Dashboard UI is located in the source/ui-deployment directory, and the source code for the Chat UI is located in the source/ui-chat directory.
Follow the standard React development workflow to make changes to the code, and use the local Vite development server to preview your changes in real-time.
When you're ready to deploy your customized UI projects, follow the instructions in the main README file for building and deploying the solution using the AWS CDK.
This solution collects anonymized operational metrics to help AWS improve the quality and features of the solution. For more information, including how to disable this capability, please see the implementation guide.
Copyright Amazon.com, Inc. or its affiliates. All Rights Reserved.
Licensed under the Apache License, Version 2.0 (the "License"); you may not use this file except in compliance with the License. You may obtain a copy of the License at
http://www.apache.org/licenses/LICENSE-2.0
Unless required by applicable law or agreed to in writing, software distributed under the License is distributed on an "AS IS" BASIS, WITHOUT WARRANTIES OR CONDITIONS OF ANY KIND, either express or implied. See the License for the specific language governing permissions and limitations under the License.
A script is included to migrate use cases created by v1.X to an upgraded v2.X deployment. See the documentation