CrawlerTutorial
1.0.0
When we browse the Internet, we often see a variety of interesting content, such as news, products, videos, pictures, etc. But if you want to collect a large amount of specific information from these web pages, manual operations will be time-consuming and laborious.
At this time, the web crawler (Web Crawler) comes in handy! Simply put, a web crawler is a program that can imitate the behavior of a human browser and automatically crawl web information. Using the automation capabilities of this program, we can easily "crawl" the data we are interested in from the website, and then store this data for future analysis.
The way a web crawler usually works is to first send an HTTP request to the target website, then obtain the HTML response from the website, parse the content of the page, and then extract useful data. For example, if we want to collect the title, author, time and other information of articles on the PTT gossip board, we can use web crawler technology to automatically capture this information and store it. This way you can get the information you need without manually browsing the website.
Web crawlers have many practical applications, such as:
Of course, when using web crawlers, we need to abide by the website's terms of use and privacy policy, and cannot crawl information in violation of the website's regulations. At the same time, in order to ensure the normal operation of the website, we also need to design appropriate crawling strategies to avoid excessive load on the website.
This tutorial uses Python3 and will use pip to install the required packages. The following packages need to be installed:
requests : used to send and receive HTTP requests and responses.requests_html : used to analyze and crawl elements in HTML.rich : Let the information be output to the console beautifully, such as displaying a beautiful table.lxml or PyQuery : used to parse elements in HTML.Use the following instructions to install these packages:
pip install requests requests_html rich lxml PyQueryIn the basic chapter, we will briefly introduce how to collect information from the PTT web page, such as article title, author and time.
Let’s use PTT’s version-reading articles as our crawler targets!
When crawling a web page, we use the requests.get() function to simulate the browser sending an HTTP GET request to "browse" the web page. This function will return a requests.Response object, which contains the response content of the web page. However, it should be noted that this content is presented in the form of pure text source code and is not rendered by the browser. We can get it through the response.text property.
 import requests

# 發送 HTTP GET 請求並獲取網頁內容
url = 'https://www.ptt.cc/bbs/Gossiping/index.html'
response = requests . get ( url )
print ( response . text )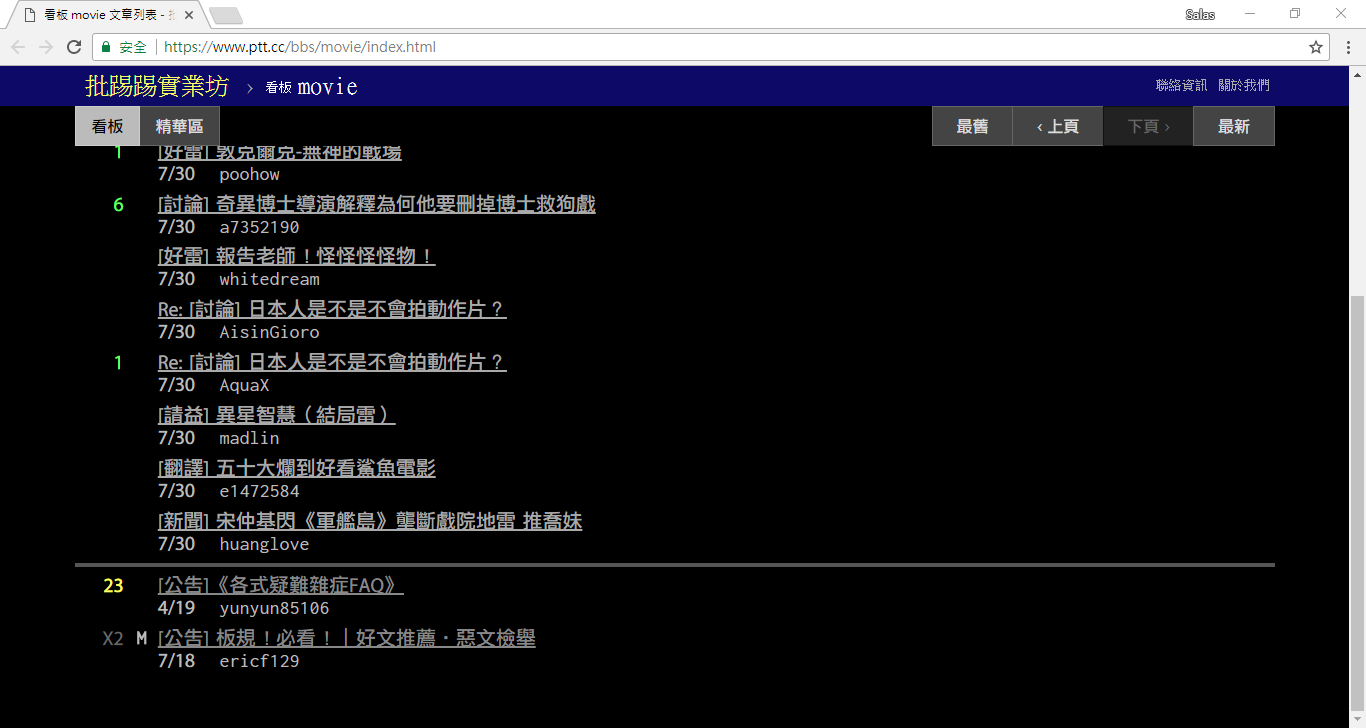
In subsequent uses, we will need to use requests_html to expand requests In addition to browsing like a browser, we also need to parse HTML web pages. requests_html will package the plain text response.text source code into requests_html.HTML for later use. Rewriting is also very simple. Use session.get() to replace the above requests.get() .
 from requests_html import HTMLSession

# 建立 HTML 會話
session = HTMLSession ()
# 發送 HTTP GET 請求並獲取網頁內容
response = session . get ( url )
print ( response . text )
However, when we try to apply this method to Gossiping, we may encounter errors. This is because when we browse the gossip board for the first time, the website will confirm whether we are over 18 years old; when we click to confirm, the browser will record the corresponding cookies so that we will not ask again the next time we enter again (you You can try to use incognito mode to open the test and take a look at the Bagua board homepage). However, for web crawlers, we need to record this special cookie so that we can pretend to have passed the eighteen-year-old test while browsing.
import requests
url = 'https://www.ptt.cc/bbs/Gossiping/index.html'
session = HTMLSession ()
session . cookies . set ( 'over18' , '1' ) # 向網站回答滿 18 歲了 !
# 發送 HTTP GET 請求並獲取網頁內容
response = session . get ( url )
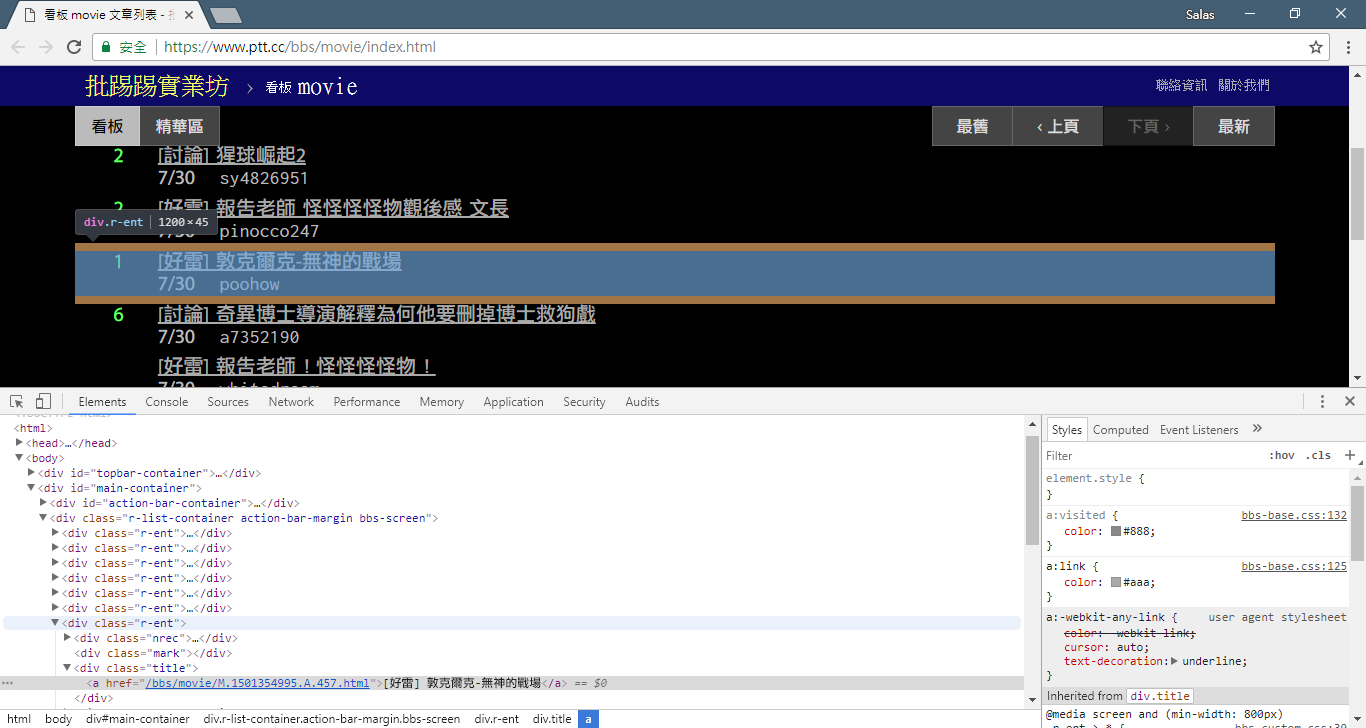
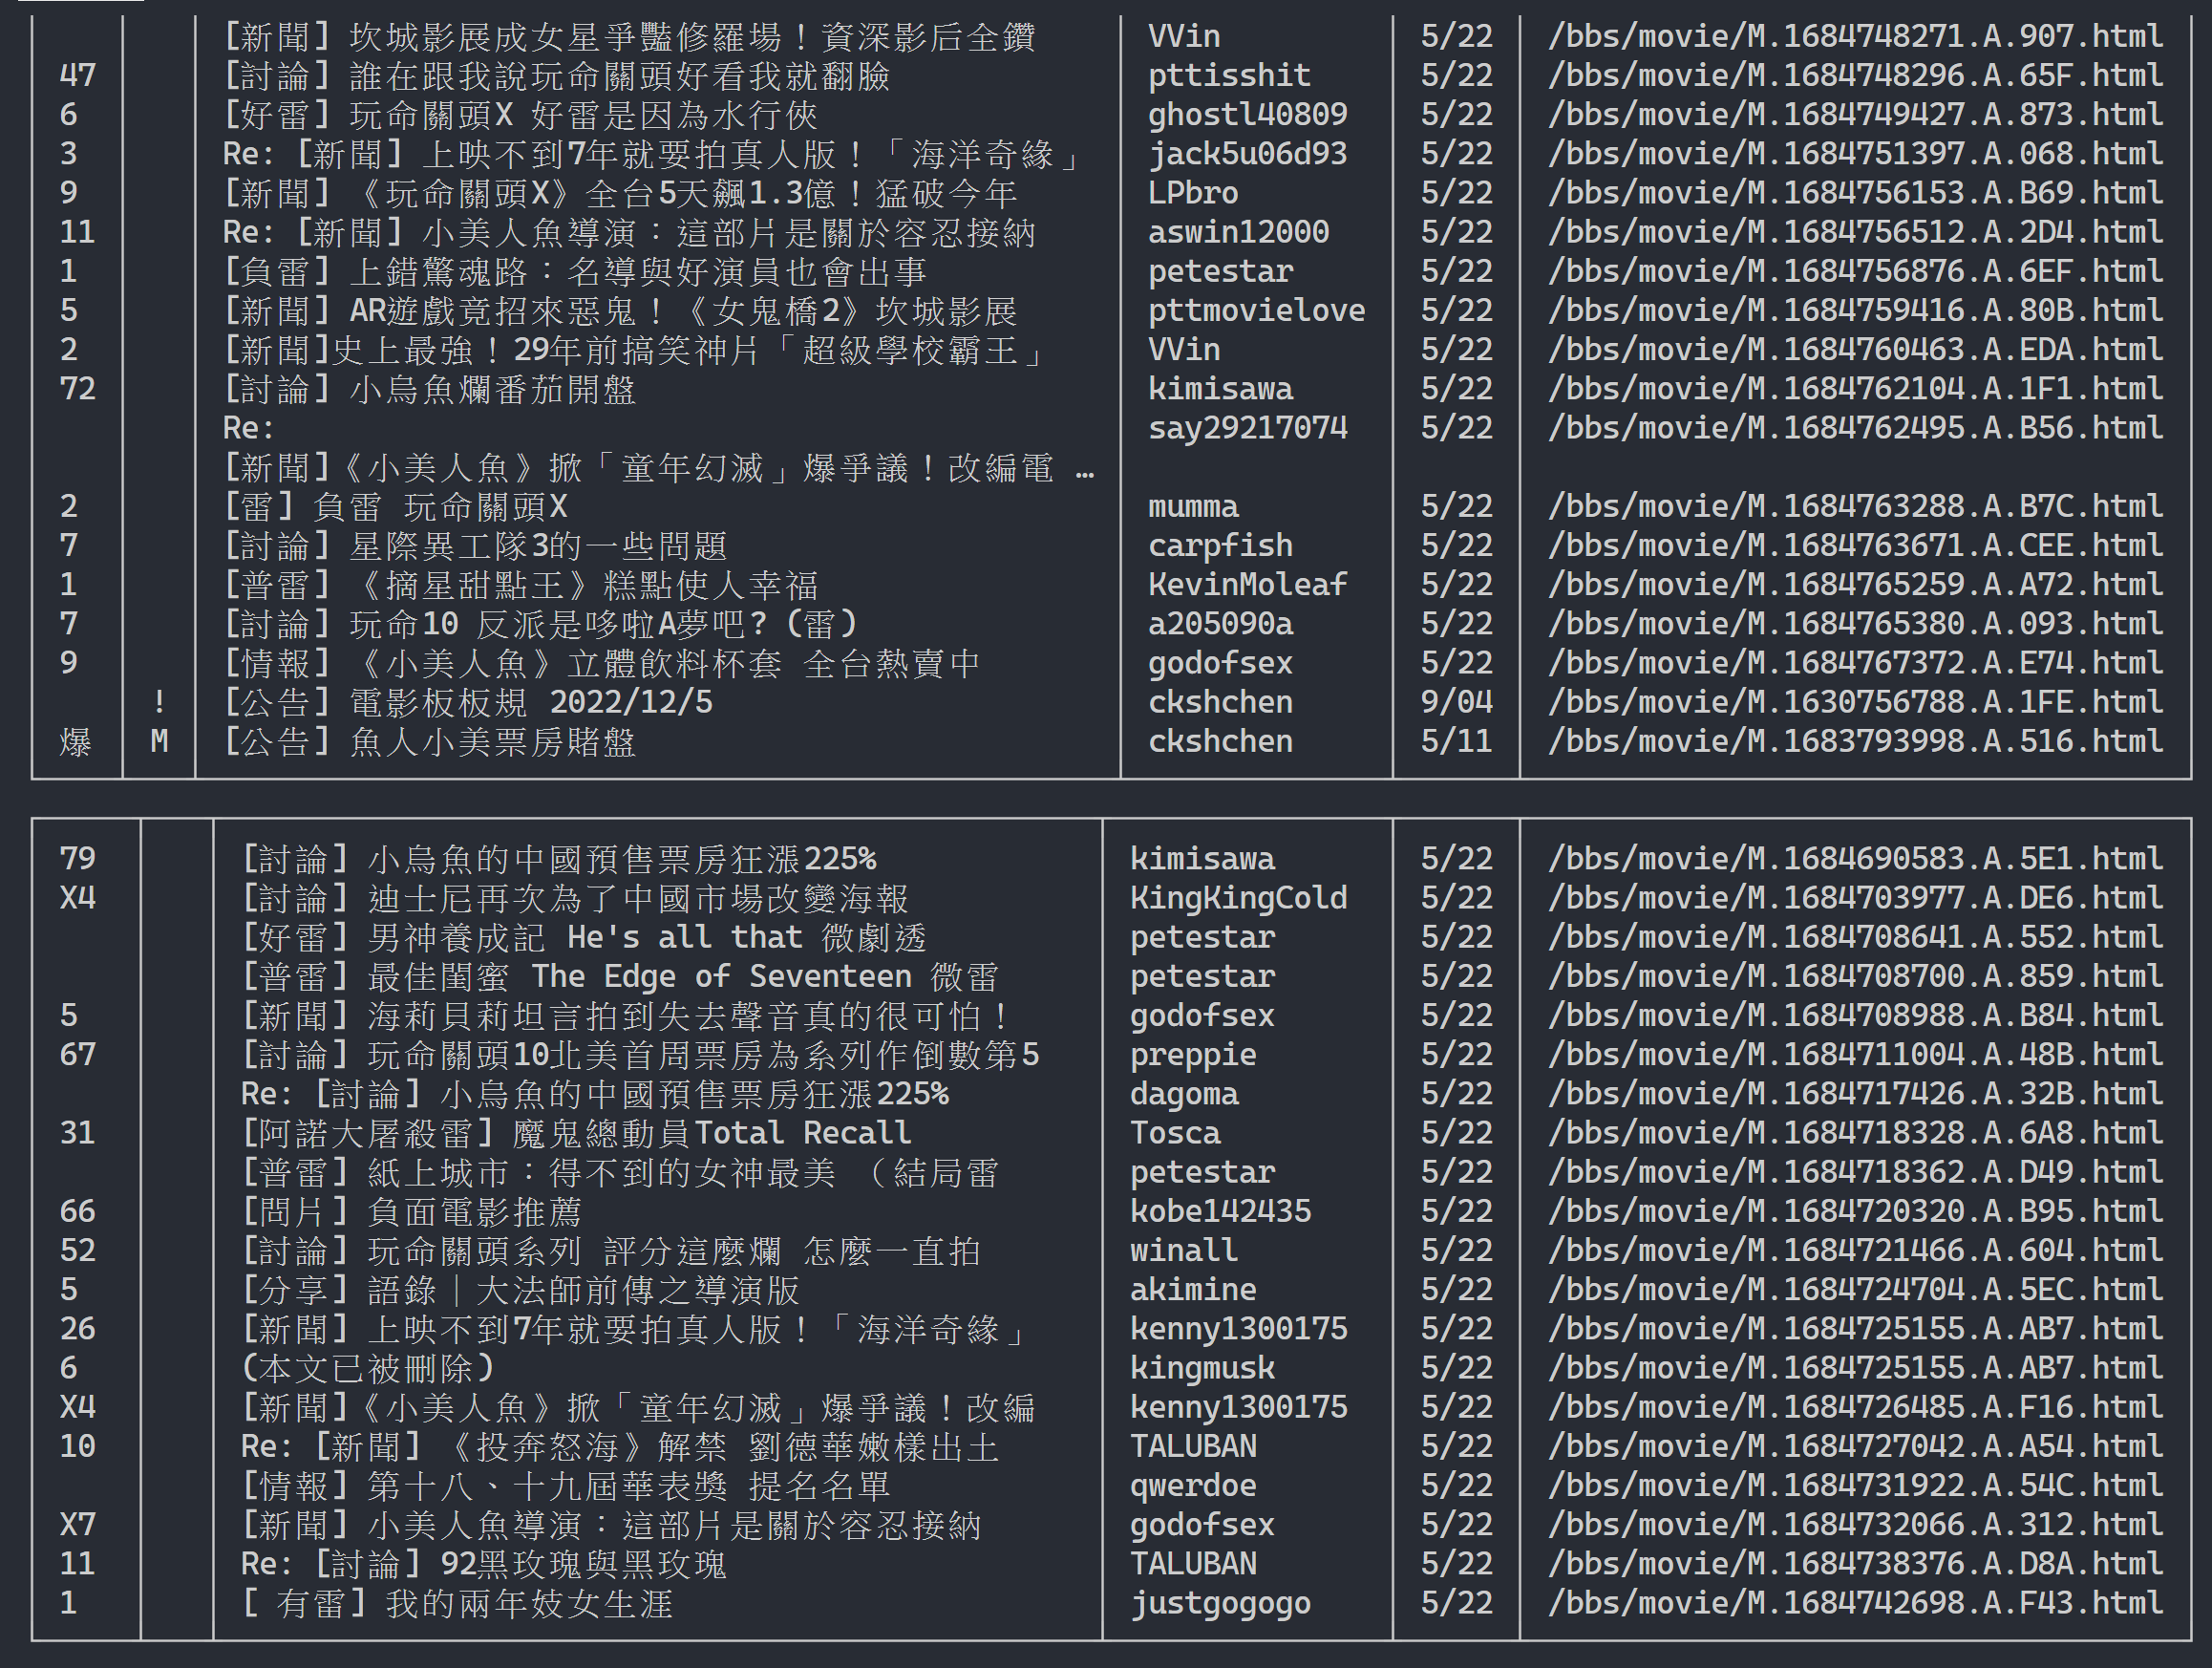
print ( response . text ) Next, we can use the response.html.find() method to locate the element and use the CSS selector to specify the target element. In this step, we can observe that in the PTT web version, the title information of each article is located in a div tag with an r-ent category. Therefore, we can use the CSS selector div.r-ent to target these elements.
Using the response.html.find() method will return a list of elements that meet the conditions, so we can use for loop to process these elements one by one. Inside each element, we can use element.find() method to further parse the element and use CSS selectors to specify the information to extract. In this example, we can use the CSS selector div.title to target the title element. Likewise, we can use the element.text property to get the text content of an element.
Here is sample code using requests_html :
 from requests_html import HTMLSession

# 建立 HTML 會話
session = HTMLSession ()
session . cookies . set ( 'over18' , '1' )  # 向網站回答滿 18 歲了 !
# 發送 HTTP GET 請求並獲取網頁內容
response = session . get ( url )

# 使用 CSS 選擇器定位目標元素
elements = response . html . find ( 'div.r-ent' )
for element in elements :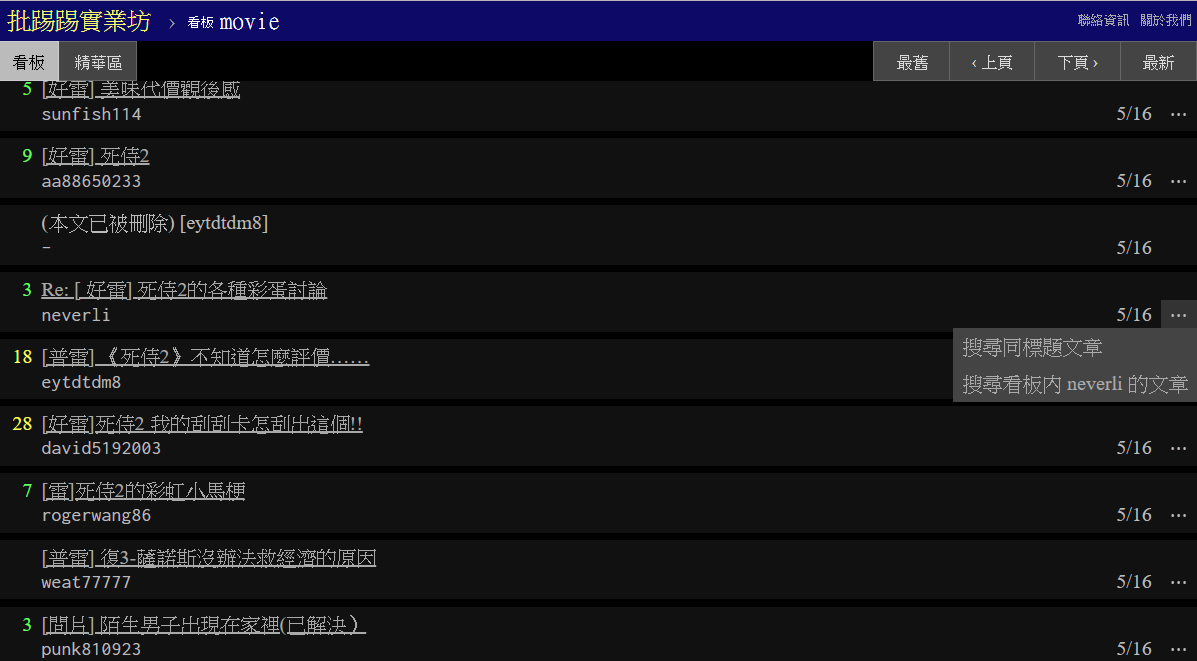
# 提取資訊... In the previous step, we used the response.html.find() method to locate the elements of each article. These elements are targeted using the div.r-ent CSS selector. You can use the Developer Tools feature to observe the element structure of a web page. After opening the web page and pressing the F12 key, a developer tools panel will be displayed, which contains the HTML structure of the web page and other information.

Using the developer tools, you can use the mouse pointer to select a specific element on the webpage, and then view the element's HTML structure, CSS attributes, and other details in the developer tools panel. This helps you determine which element to target and the corresponding CSS selector. In addition, you may find out why the program sometimes goes wrong? ! Looking at the web version, I found that when an article on the page was deleted, the source code結構of the <本文已被刪除> element on the web page was different from the original one! So we can further strengthen it to handle the situation where articles are deleted.
Now, let's return to the sample code for information extraction using requests_html :
 import re

# 使用 CSS 選擇器定位目標元素
elements = response . html . find ( 'div.r-ent' )

# 逐個處理每個元素
for element in elements :
    # 可能會遇上文章已刪除的狀況,所以用例外處理 try-catch 包起來
    try :
        push = element . find ( '.nrec' , first = True ). text  # 推文數
        mark = element . find ( '.mark' , first = True ). text  # 標記
        title = element . find ( '.title' , first = True ). text  # 標題
        author = element . find ( '.meta > .author' , first = True ). text  # 作者
        date = element . find ( '.meta > .date' , first = True ). text  # 發文日期
        link = element . find ( '.title > a' , first = True ). attrs [ 'href' ]  # 文章網址
    except AttributeError :
        # 處理已經刪除的文章資訊
        if '(本文已被刪除)' in title :
            # e.g., "(本文已被刪除) [haudai]"
            match_author = re . search ( '[(w*)]' , title )
            if match_author :
                author = match_author . group ( 1 )
        elif re . search ( '已被w*刪除' , title ):
            # e.g., "(已被cappa刪除) <edisonchu> op"
            match_author = re . search ( '<(w*)>' , title )
            if match_author :
                author = match_author . group ( 1 )

    print ( '推文數:' , push )
    print ( '標記:' , mark )
    print ( '標題:' , title )
    print ( '作者:' , author )
    print ( '發文日期:' , date )
    print ( '文章網址:' , link )
    print ( '---' )
Output word processing:
Here we can use rich to display beautiful output. First create a rich table object, and then replace print in the loop of the above example code with add_row to the table. Finally, we use rich 's print function to correctly output the table to the terminal.
Execution result
 import rich
import rich . table

# 建立 `rich` 表格物件,設定不顯示表頭
table = rich . table . Table ( show_header = False )

# 逐個處理每個元素
for element in elements :
    ...
    # 將每個結果新增到表格中
    table . add_row ( push , title , date , author )

# 使用 rich 套件的 print 函式輸出表格
rich . print ( table )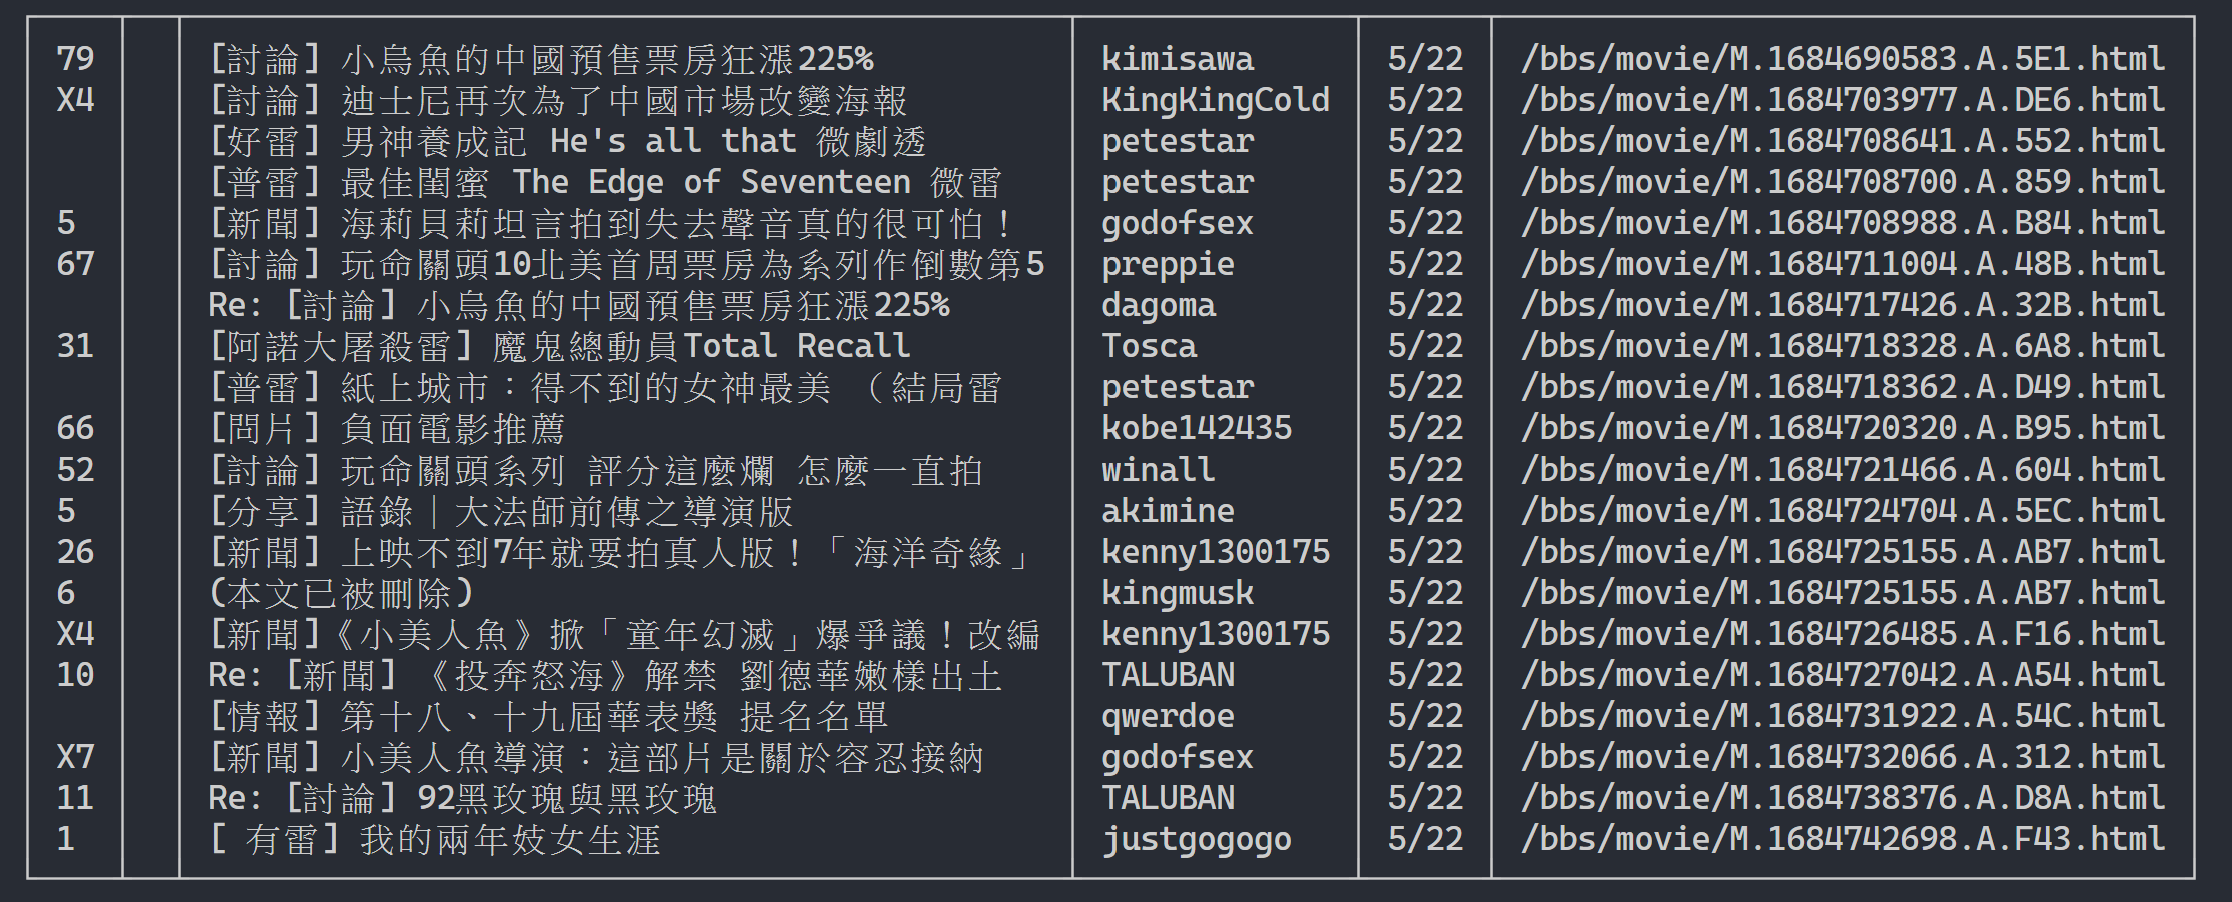
Now, we will use the "observation method" to find the link to the previous page. No, I'm not asking you where the button is on your browser, but the "source tree" in the developer tools. I believe you have discovered that the hyperlink for page jump is located in the <a class="btn wide"> element of <div class="action-bar"> . Therefore, we can extract them like this:
 # 控制頁面選項: 最舊/上頁/下頁/最新
controls = response . html . find ( '.action-bar a.btn.wide' )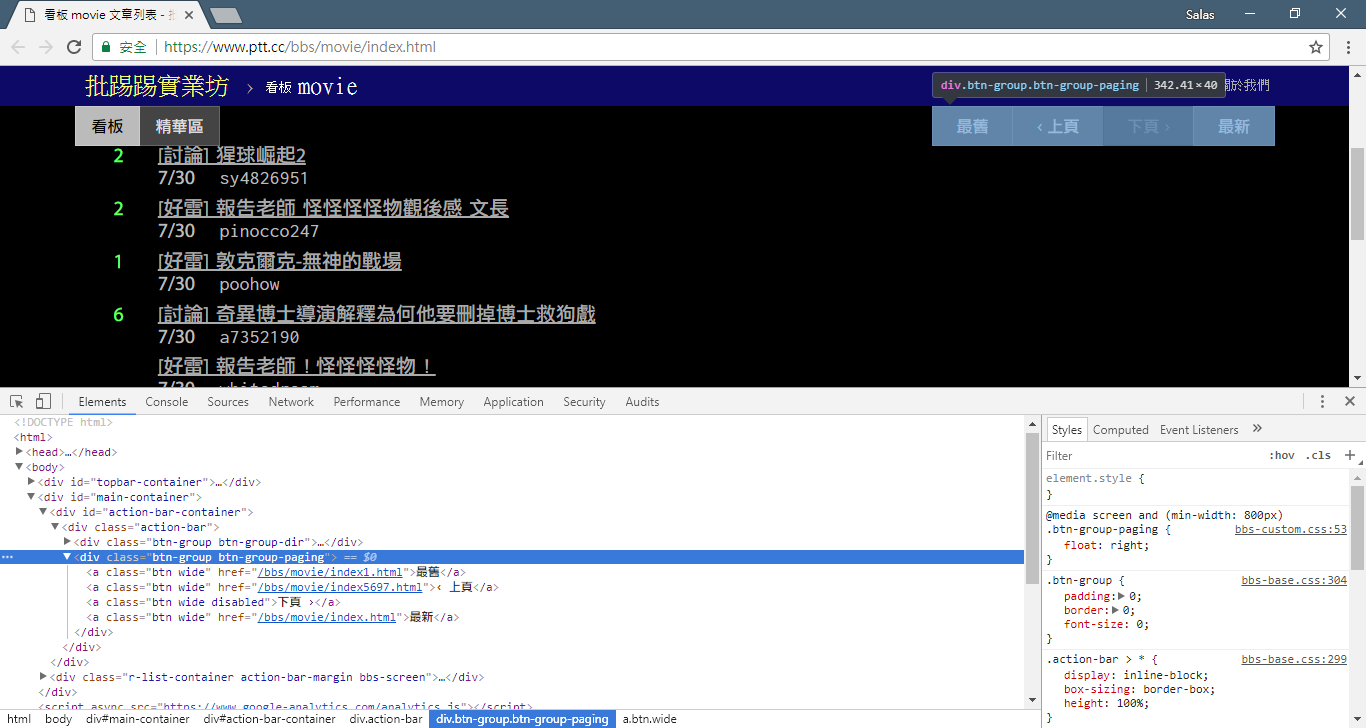
What we need is the "previous page" function. Why? Because PTT displays the latest articles at the front, you must scroll forward if you want to dig up information.
So how to use it? First grab the second href in control (index is 1), then it may look like this /bbs/movie/index3237.html ; and the complete website address (URL) must be https://www.ptt.cc/ (domain url), so use urljoin() (or direct string connection) to compare and merge the Movie homepage link with the new link into a complete URL!
 import urllib . parse

def parse_next_link ( controls ):
    link = controls [ 1 ]. attrs [ 'href' ]
    next_page_url = urllib . parse . urljoin ( 'https://www.ptt.cc/' , link )
    return next_page_url
Now let's rearrange the function to facilitate subsequent explanation. Let's change the example of processing each article element in Step 3: Let's take a look at these title messages into an independent function parse_article_entries(elements)
 # 解析該頁文章列表中的元素
def parse_article_entries ( elements ):
    results = []
    for element in elements :
        try :
            push = element . find ( '.nrec' , first = True ). text
            mark = element . find ( '.mark' , first = True ). text
            title = element . find ( '.title' , first = True ). text
            author = element . find ( '.meta > .author' , first = True ). text
            date = element . find ( '.meta > .date' , first = True ). text
            link = element . find ( '.title > a' , first = True ). attrs [ 'href' ]
        except AttributeError :
            # 處理文章被刪除的情況
            if '(本文已被刪除)' in title :
                match_author = re . search ( '[(w*)]' , title )
                if match_author :
                    author = match_author . group ( 1 )
            elif re . search ( '已被w*刪除' , title ):
                match_author = re . search ( '<(w*)>' , title )
                if match_author :
                    author = match_author . group ( 1 )
        # 將解析結果加到回傳的列表中
        results . append ({ 'push' : push , 'mark' : mark , 'title' : title ,
                        'author' : author , 'date' : date , 'link' : link })
    return results
Next, we can handle multi-page content
 # 起始首頁
url = 'https://www.ptt.cc/bbs/movie/index.html'
# 想要收集的頁數
num_page = 10

for page in range ( num_page ):
    # 發送 GET 請求並獲取網頁內容
    response = session . get ( url )
    # 解析文章列表的元素
    results = parse_article_entries ( elements = response . html . find ( 'div.r-ent' ))
    # 解析下一個連結
    next_page_url = parse_next_link ( controls = response . html . find ( '.action-bar a.btn.wide' ))

    # 建立表格物件
    table = rich . table . Table ( show_header = False , width = 120 )
    for result in results :
        table . add_row ( * list ( result . values ()))
    # 輸出表格
    rich . print ( table )

    # 更新下面一位 URL~
    url = next_page_url
Output result:
After obtaining the article list information, the next step is to obtain the article (PO article) content (post content)! link in metadata is the link of each article. We also use urllib.parse.urljoin to concatenate the complete URL and then issue HTTP GET to obtain the content of the article. We can observe that the task of capturing the content of each article is highly repetitive and is very suitable for processing using a parallelization method.
In Python, you can use multiprocessing.Pool to do high-level multiprocessing programming ~ This is the easiest way to use multi-process in Python! It is very suitable for this SIMD (Single Instruction Multiple Data) application scenario. Use the with statement syntax to automatically release process resources after use. The usage of ProcessPool is also very simple, pool.map(function, items) , which is a bit like the concept of functional programming. Apply function to each item, and finally get the same number of result lists as items.
Used in the task of crawling article content introduced earlier:
 from multiprocessing import Pool

def get_posts ( post_links ):
    with Pool ( processes = 8 ) as pool :
        # 建立 processes pool 並指定 processes 數量為 8
        # pool 中的 processes 將用於同時發送多個 HTTP GET 請求,以獲取文章內容

        responses = pool . map ( session . get , post_links )
        # 使用 pool.map() 方法在每個 process 上都使用 session.get(),並傳入文章連結列表 post_links 作為參數
        # 每個 process 將獨立地發送一個 HTTP GET 請求取得相應的文章內容

        return responses

response = session . get ( url )
# 解析文章列表的元素
metadata = parse_article_entries ( elements = response . html . find ( 'div.r-ent' ))
# 解析下一頁的連結
next_page_url = parse_next_link ( controls = response . html . find ( '.action-bar a.btn.wide' ))
# 一串文章的 URL
post_links = [ urllib . parse . urljoin ( url , meta [ 'link' ]) for meta in metadata ]

results = get_posts ( post_links )  # list(requests_html.HTML)
rich . print ( results )
import time
if __name__ == '__main__' :
post_links = [...]
...
start_time = time . time ()
results = get_posts ( post_links )
print ( f'花費: { time . time () - start_time :.6f }秒,共 { len ( results ) } 篇文章' )Attached are the experimental results:
 # with 1-process
花費: 15.686177秒,共 202 篇文章

# with 8-process
花費: 3.401658秒,共 202 篇文章
It can be seen that the overall execution speed has been accelerated by nearly five times, but the more Process the better. In addition to the hardware specifications such as the CPU, it mainly depends on the limitations of external devices such as network cards and network speeds.
The above code can be found in ( src/basic_crawler.py )!
New feature in PTT Web: Search! Finally available on the web version
Let’s also use the movie version of PTT as our crawler target! Content searchable in the new feature includes:
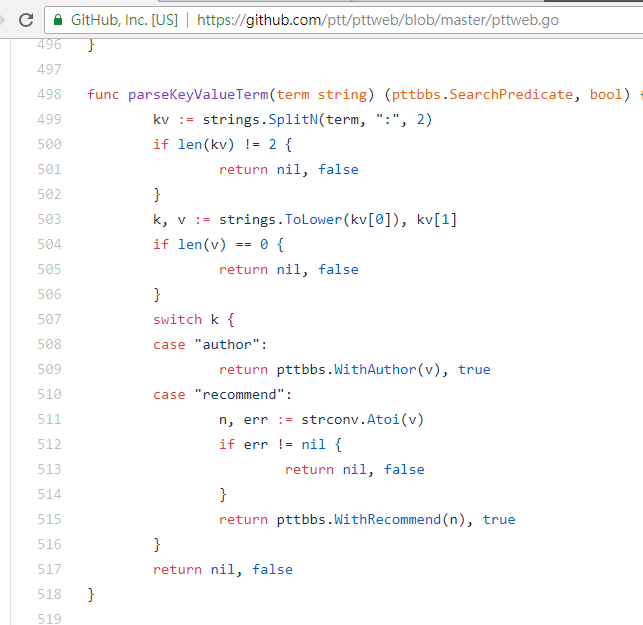
The first three can all find rules from the new version of the page source code and send requests, but the tweet count search does not seem to have appeared in the web version UI interface; so here are the parameters mined by the author from PTT 網站原始碼. The PTT we usually browse actually includes the BBS server (that is, BBS) and the front-end Web server (web version). The front-end Web server is written in Go language (Golang) and can directly access the back-end BBS data, and use The general website interaction mode renders the content into a web page for browsing.
In fact, it is very simple to use these new functions. You only need to obtain this information through an HTTP GET request and the standard query string method. The endpoint URL that provides the search function is /bbs/{看板名稱}/search . Just use the corresponding query to get the search results from here. First, take the title keyword as an example,
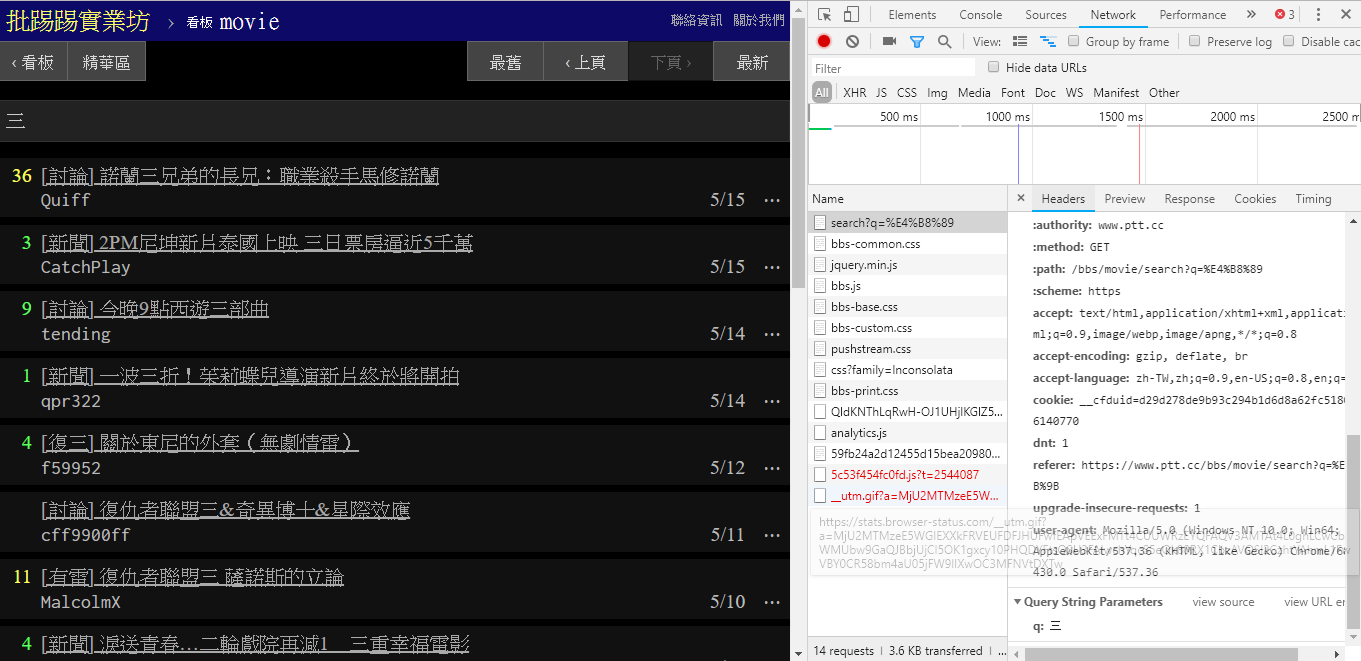
As can be seen from the lower right corner of the picture, when searching, a GET request with q=三is actually sent to endpoint , so the entire complete URL should be like https://www.ptt.cc/bbs/movie/search?q=三, the URL copied from the address bar may be in the form https://www.ptt.cc/bbs/movie/search?q=%E4%B8%89 because the Chinese has been HTML encoded but Represents the same meaning. In requests , if you want to add additional query parameters, you don’t need to manually construct the string form yourself. You only need to put them into the function parameters through dict() of param= , like this:
 search_endpoint_url = 'https://www.ptt.cc/bbs/movie/search'

resp = requests . get ( search_endpoint_url , params = { 'q' : '三' })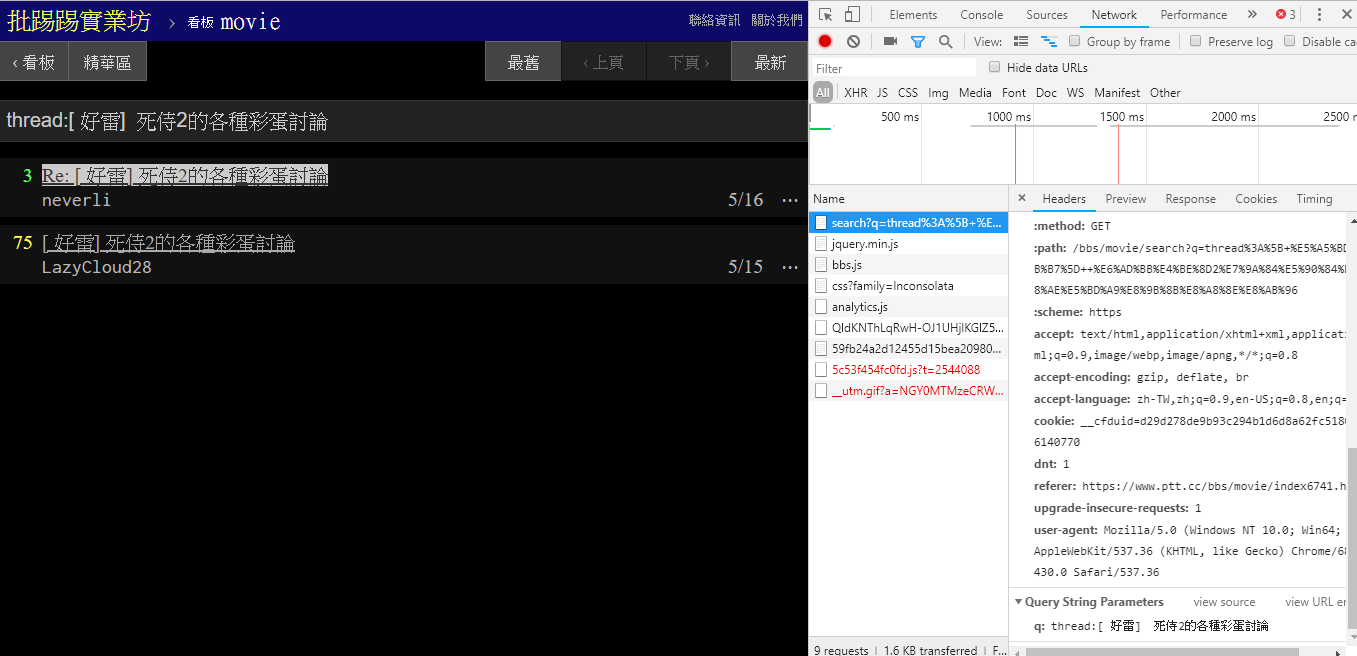
When searching for the same article (thread), you can see from the information in the lower right corner that you actually string the string thread: in front of the title and send the query.
resp = requests . get ( search_endpoint_url , params = { 'q' : 'thread:[ 好雷] 死侍2的各種彩蛋討論' })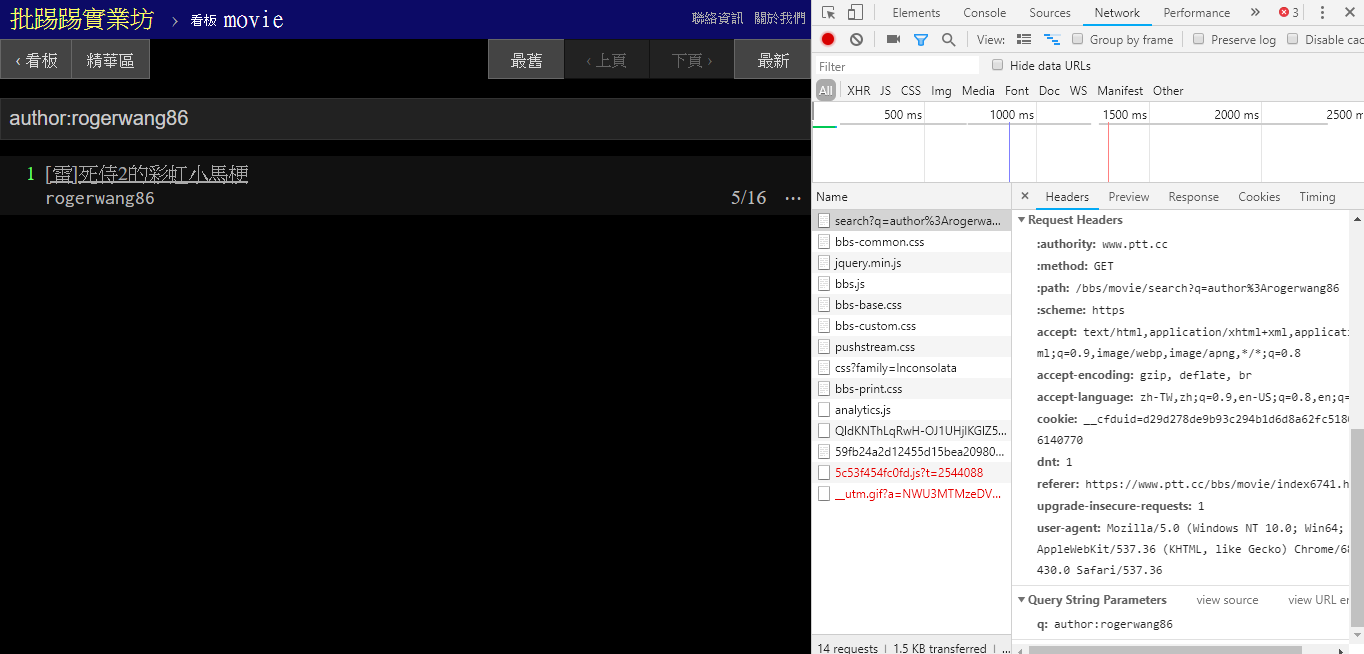
When searching for articles with the same author (author), it can also be seen from the information in the lower right corner that author: string is concatenated with the author's name and then the query is sent.
resp = requests . get ( search_endpoint_url , params = { 'q' : 'author:rogerwang86' })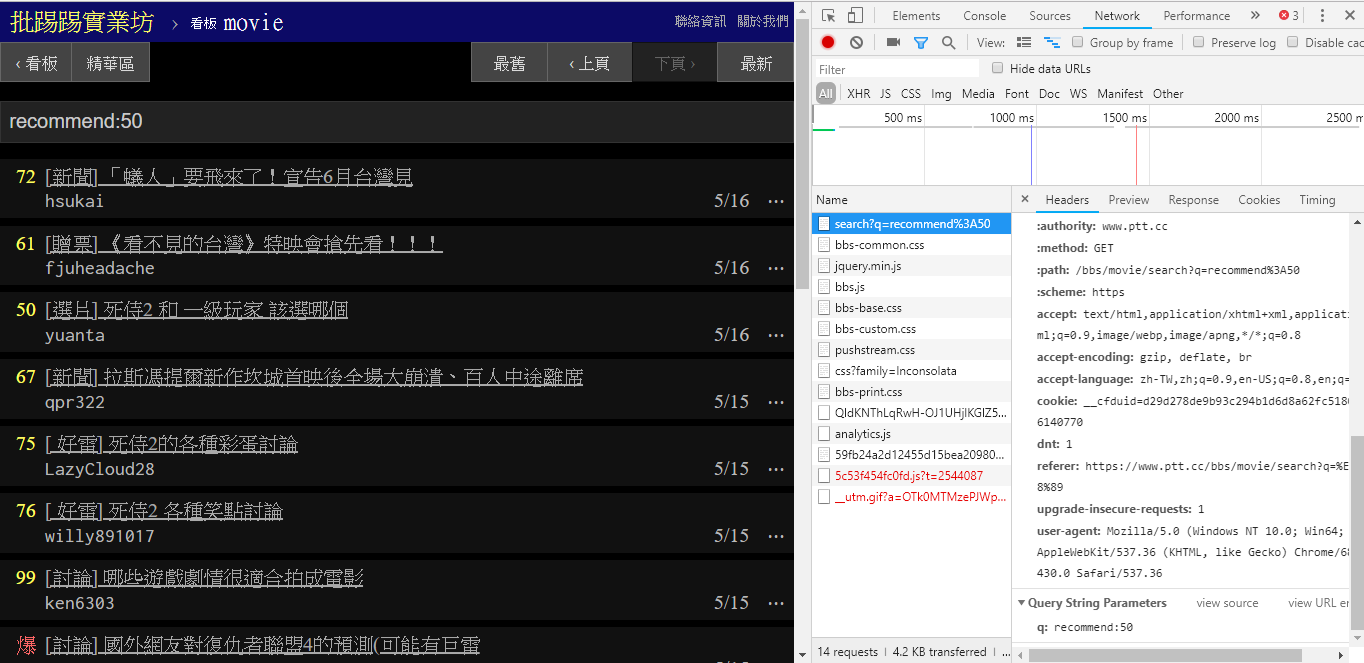
When searching for articles with a number of tweets greater than (recommend), string the string recommend: with the minimum number of tweets you want to search and then send the query. In addition, it can be found from the PTT Web server source code that the number of tweets can only be set within ±100.
resp = requests . get ( search_endpoint_url , params = { 'q' : 'recommend:50' })PTT Web parsing function source code of these parameters
It is also worth mentioning that the final presentation of the search results is the same as the general layout mentioned in the basics, so you can directly reuse the previous functions. Don't do it again!
 resp = requests . get ( search_endpoint_url , params = { 'q' : 'recommend:50' })

post_entries = parse_article_entries ( resp . text )  # [沿用]
metadata = [ parse_article_meta ( entry ) for entry in post_entries ]  # [沿用]
There is another parameter in the search. The number of page is just like Google search. The searched thing may have many pages, so you can use this additional parameter to control which page of results you want to get without having to parse. link on the page.
resp = requests . get ( search_endpoint_url , params = { 'q' : 'recommend:50' , 'page' : 2 }) Integrating all the previous functions into ptt-parser can provide command-line functions and爬蟲in the form of APIs that can be called programmatically.
scrapy to stably crawl PTT data.
This work was produced by leVirve and is released under a Creative Commons Attribution 4.0 International License.


