axios tutorial
1.0.0
axios is an http request library based on Promise, which can be used in browsers and node.js. It currently has 42K stars on github.
├── /dist/                     # 项目输出目录
├── /lib/                      # 项目源码目录
│ ├── /cancel/                 # 定义取消功能
│ ├── /core/                   # 一些核心功能
│ │ ├── Axios.js               # axios的核心主类
│ │ ├── dispatchRequest.js     # 用来调用http请求适配器方法发送请求
│ │ ├── InterceptorManager.js  # 拦截器构造函数
│ │ └── settle.js              # 根据http响应状态,改变Promise的状态
│ ├── /helpers/                # 一些辅助方法
│ ├── /adapters/               # 定义请求的适配器 xhr、http
│ │ ├── http.js                # 实现http适配器
│ │ └── xhr.js                 # 实现xhr适配器
│ ├── axios.js                 # 对外暴露接口
│ ├── defaults.js              # 默认配置
│ └── utils.js                 # 公用工具
├── package.json               # 项目信息
├── index.d.ts                 # 配置TypeScript的声明文件
└── index.js                   # 入口文件
Note: Because the codes we need to look at are all files in the /lib/ directory, we will search under /lib/ for all the following file paths.
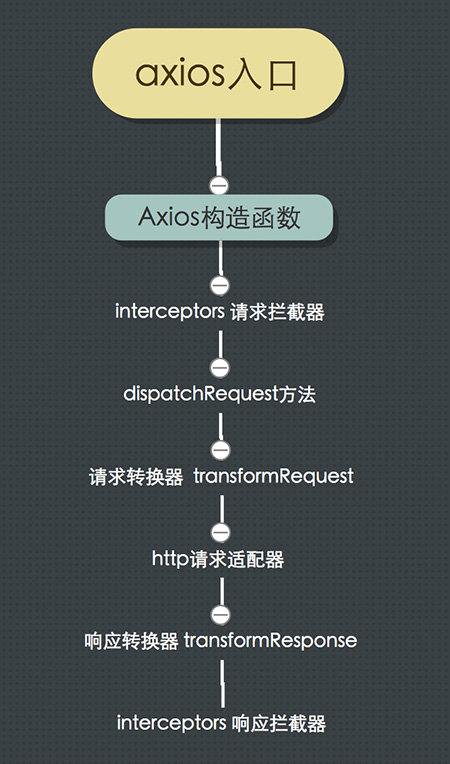
interceptorsinterceptors
(If you are familiar with middleware, it will be easy to understand, because it plays the role of promise-based middleware)
Interceptors are divided into request interceptors and response interceptors. As the name implies: Request interceptors ( interceptors.request ) can intercept each or specified http request, and can modify the configuration item. Response interceptors ( interceptors.response ) can be used every time. After several http requests, intercept each or specified http request, and the returned result items can be modified.
Here is a brief explanation first, and later we will give a detailed introduction on how to intercept the request response and modify the request parameters and response data.
Data converter (actually converts data, such as converting objects into JSON strings)
Data converters are divided into request converters and response converters. As the name implies: the request converter ( transformRequest ) refers to converting data before the request, and the response converter ( transformResponse ) mainly performs data conversion on the response body after the request response.
http request adapter (actually a method)
In the axios project, http request adapter mainly refers to two types: XHR and http. The core of XHR is the XMLHttpRequest object on the browser side, and the core of http is the http[s].request method of node.
Of course, axios also leaves it to the user to configure the adapter interface through config. However, under normal circumstances, these two adapters can satisfy the request from the browser to the server or from the node's http client to the server. Requested requirements.
This sharing mainly focuses on XHR.
config configuration item (actually an object)
The config we are talking about here is not really called the variable name config in the project. This name is a name I gave based on its purpose to facilitate everyone's understanding.
In the axios project, when settingreading config, some places call it defaults ( /lib/defaults.js ), here is the default configuration item, and some places call it config , such as the parameters of Axios.prototype.request , Another example is the parameters of xhrAdapter http request adapter method.
config is a very important link in the axios project, and is the main bridge for "communication" between users and the axios project.
(Note: You can skip this section first and come back to check it out later if you need it)
There are some methods that are used in many places in the project. Let’s briefly introduce these methods.
bind ( fn , context ) ; The implementation effect is the same as Function.prototype.bind method: fn.bind(context)
 var utils = require ( './utils' ) ;
var forEach = utils . forEach ;

// 数组
utils . forEach ( [ ] , ( value , index , array ) => { } )

// 对象
utils . forEach ( { } , ( value , key , object ) => { } ) var utils = require ( './utils' ) ;
var merge = utils . merge ;
var obj1 = {
a : 1 ,
b : {
bb : 11 ,
bbb : 111 ,
}
} ;
var obj2 = {
a : 2 ,
b : {
bb : 22 ,
}
} ;
var mergedObj = merge ( obj1 , obj2 ) ; The mergedObj object is:
 {
  a : 2 ,
  b : {
    bb : 22 ,
    bbb : 111
  }
} var utils = require ( './utils' ) ;
var extend = utils . extend ;
var context = {
a : 4 ,
} ;
var target = {
k : 'k1' ,
fn ( ) {
console . log ( this . a + 1 )
}
} ;
var source = {
k : 'k2' ,
fn ( ) {
console . log ( this . a - 1 )
}
} ;
let extendObj = extend ( target , source , context ) ;The extendObj object is:
 {
  k : 'k2' ,
  fn : source . fn . bind ( context ) ,
}
Execute extendObj.fn(); print 3
 // 首先将axios包引进来
import axios from 'axios'
The first way to use: axios(option)
 axios ( {
  url ,
  method ,
  headers ,
} )
The second way to use: axios(url[, option])
 axios ( url , {
  method ,
  headers ,
} )
The third usage method (for get、delete etc. methods): axios[method](url[, option])
 axios . get ( url , {
  headers ,
} )
The fourth usage method (for post、put etc. methods): axios[method](url[, data[, option]])
 axios . post ( url , data , {
  headers ,
} )
The fifth way to use: axios.request(option)
 axios . request ( {
  url ,
  method ,
  headers ,
} ) As the entry file of the axios project, let's first take a look at the source code of axios.js The core that can realize the various ways of using axios is createInstance method:
 // /lib/axios.js
function createInstance ( defaultConfig ) {
  // 创建一个Axios实例
  var context = new Axios ( defaultConfig ) ;

  // 以下代码也可以这样实现:var instance = Axios.prototype.request.bind(context);
  // 这样instance就指向了request方法,且上下文指向context,所以可以直接以 instance(option) 方式调用
  // Axios.prototype.request 内对第一个参数的数据类型判断,使我们能够以 instance(url, option) 方式调用
  var instance = bind ( Axios . prototype . request , context ) ;

  // 把Axios.prototype上的方法扩展到instance对象上,
  // 这样 instance 就有了 get、post、put等方法
  // 并指定上下文为context,这样执行Axios原型链上的方法时,this会指向context
  utils . extend ( instance , Axios . prototype , context ) ;

  // 把context对象上的自身属性和方法扩展到instance上
  // 注:因为extend内部使用的forEach方法对对象做for in 遍历时,只遍历对象本身的属性,而不会遍历原型链上的属性
  // 这样,instance 就有了  defaults、interceptors 属性。(这两个属性后面我们会介绍)
  utils . extend ( instance , context ) ;

  return instance ;
}

// 接收默认配置项作为参数(后面会介绍配置项),创建一个Axios实例,最终会被作为对象导出
var axios = createInstance ( defaults ) ;
The above code seems convoluted. In fact, createInstance ultimately hopes to get a Function. This Function points to Axios.prototype.request . This Function will also have every method on Axios.prototype as a static method, and the context of these methods is point to the same object.
So let’s take a look at the source code of Axios、Axios.prototype.request ?
Axios is the core of the axios package. An Axios instance is an axios application. Other methods are extensions of Axios content. The core method of Axios constructor is request method. Various axios calling methods ultimately send requests through request method.
 // /lib/core/Axios.js
function Axios ( instanceConfig ) {
  this . defaults = instanceConfig ;
  this . interceptors = {
    request : new InterceptorManager ( ) ,
    response : new InterceptorManager ( )
  } ;
}

Axios . prototype . request = function request ( config ) {
  // ...省略代码
} ;

// 为支持的请求方法提供别名
utils . forEach ( [ 'delete' , 'get' , 'head' , 'options' ] , function forEachMethodNoData ( method ) {
  Axios . prototype [ method ] = function ( url , config ) {
    return this . request ( utils . merge ( config || { } , {
      method : method ,
      url : url
    } ) ) ;
  } ;
} ) ;
utils . forEach ( [ 'post' , 'put' , 'patch' ] , function forEachMethodWithData ( method ) {
  Axios . prototype [ method ] = function ( url , data , config ) {
    return this . request ( utils . merge ( config || { } , {
      method : method ,
      url : url ,
      data : data
    } ) ) ;
  } ;
} ) ;
Through the above code, we can initiate http requests in a variety of ways: axios()、axios.get()、axios.post()
In general, the project can meet the demand by using the default exported axios instance. If the demand is not met, a new axios instance needs to be created. The axios package also reserves interfaces. See the following code:
 // /lib/axios.js  -  31行
axios . Axios = Axios ;
axios . create = function create ( instanceConfig ) {
  return createInstance ( utils . merge ( defaults , instanceConfig ) ) ;
} ;
After talking about why there are so many ways to use axios, you may have a question in your mind: When using axios, no matter the get method or the post method, Axios.prototype.request method is ultimately called. So how does this method depend on our What about the config configuration that sends the request?
Before we start talking about Axios.prototype.request , let's first take a look at how the user-configured config works in the axios project?
config mentioned here refers to the configuration item object throughout the entire project. Through this object, you can set:
http请求适配器、请求地址、请求方法、请求头header、 请求数据、请求或响应数据的转换、请求进度、http状态码验证规则、超时、取消请求等
It can be found that almost all functions of axios are configured and delivered through this object, which is not only the communication bridge within the axios project, but also the communication bridge between users and axios .
First, let’s take a look at how users can define configuration items:
 import axios from 'axios'

// 第1种:直接修改Axios实例上defaults属性,主要用来设置通用配置
axios . defaults [ configName ] = value ;

// 第2种:发起请求时最终会调用Axios.prototype.request方法,然后传入配置项,主要用来设置“个例”配置
axios ( {
  url ,
  method ,
  headers ,
} )

// 第3种:新建一个Axios实例,传入配置项,此处设置的是通用配置
let newAxiosInstance = axios . create ( {
  [ configName ] : value ,
} )
Take a look at the line of code in Axios.prototype.request method: ( /lib/core/Axios.js - line 35)
config = utils . merge ( defaults , { method : 'get' } , this . defaults , config ) ; It can be found that the default configuration object defaults ( /lib/defaults.js ), Axios instance attribute this.defaults , and request parameter config are merged here.
From this, the priority of multiple configurations from low to high is: —> Default configuration object defaults ( /lib/defaults.js )
—> { method: 'get' }
—> Axios instance property this.defaults
—> request parameter config
I leave you with a question: When are the configurations of defaults and this.defaults the same, and when are they different?
So far, we have obtained the config object after merge multiple places, so how is this object transferred in the project?
 Axios . prototype . request = function request ( config ) {
  // ...
  config = utils . merge ( defaults , { method : 'get' } , this . defaults , config ) ;

  var chain = [ dispatchRequest , undefined ] ;
  // 将config对象当作参数传给Primise.resolve方法
  var promise = Promise . resolve ( config ) ;

  // ...省略代码

  while ( chain . length ) {
    // config会按序通过 请求拦截器 - dispatchRequest方法 - 响应拦截器
    // 关于拦截器 和 dispatchRequest方法,下面会作为一个专门的小节来介绍。
    promise = promise . then ( chain . shift ( ) , chain . shift ( ) ) ;
  }

  return promise ;
} ;
At this point, config has completed its legendary life -_- The next section will talk about the highlight: Axios.prototype.request
The code here is relatively complicated, and some methods need to be traced back to the source to figure it out, so you only need to have a simple understanding of the chain array. The involved interceptors and [ dispatchRequest ] will be introduced in detail later.
chain array is used to hold the interceptor method and dispatchRequest method. Callback functions are taken out from chain array in sequence through promises and executed one by one. Finally, the processed new promise is returned in Axios.prototype.request method, and The response or error is sent out. This is the mission of Axios.prototype.request .
View source code:
 // /lib/core/Axios.js
Axios . prototype . request = function request ( config ) {
  // ...
  var chain = [ dispatchRequest , undefined ] ;
  var promise = Promise . resolve ( config ) ;

  this . interceptors . request . forEach ( function unshiftRequestInterceptors ( interceptor ) {
    chain . unshift ( interceptor . fulfilled , interceptor . rejected ) ;
  } ) ;
  this . interceptors . response . forEach ( function pushResponseInterceptors ( interceptor ) {
    chain . push ( interceptor . fulfilled , interceptor . rejected ) ;
  } ) ;

  while ( chain . length ) {
    promise = promise . then ( chain . shift ( ) , chain . shift ( ) ) ;
  }

  return promise ;
} ;
At this point, you must be full of curiosity about the interceptor. What exactly is this interceptor? Let us find out in the next section.
 // 添加请求拦截器
const myRequestInterceptor = axios . interceptors . request . use ( config => {
    // 在发送http请求之前做些什么
    return config ; // 有且必须有一个config对象被返回
} , error => {
    // 对请求错误做些什么
    return Promise . reject ( error ) ;
} ) ;

// 添加响应拦截器
axios . interceptors . response . use ( response => {
  // 对响应数据做点什么
  return response ; // 有且必须有一个response对象被返回
} , error => {
  // 对响应错误做点什么
  return Promise . reject ( error ) ;
} ) ;

// 移除某次拦截器
axios . interceptors . request . eject ( myRequestInterceptor ) ; axios . interceptors . request . use ( config => config , error => {
// 是否可以直接 return error ?
return Promise . reject ( error ) ;
} ) ; new People ( 'whr' ) . sleep ( 3000 ) . eat ( 'apple' ) . sleep ( 5000 ) . eat ( 'durian' ) ;
// 打印结果
// (等待3s)--> 'whr eat apple' -(等待5s)--> 'whr eat durian' Regarding interceptors, a brief explanation has been given in the Glossary section.
Each axios instance has an interceptors instance attribute, and there are two attributes request and response on the interceptors object.
 function Axios ( instanceConfig ) {
  // ...
  this . interceptors = {
    request : new InterceptorManager ( ) ,
    response : new InterceptorManager ( )
  } ;
}
Both properties are an InterceptorManager instance, and this InterceptorManager constructor is used to manage interceptors.
Let's first take a look at the InterceptorManager constructor:
The InterceptorManager constructor is used to implement interceptors. There are three methods on the prototype of this constructor: use, eject, and forEach. Regarding the source code, it is actually relatively simple and is used to operate the handlers instance attributes of the constructor.
 // /lib/core/InterceptorManager.js

function InterceptorManager ( ) {
  this . handlers = [ ] ; // 存放拦截器方法,数组内每一项都是有两个属性的对象,两个属性分别对应成功和失败后执行的函数。
}

// 往拦截器里添加拦截方法
InterceptorManager . prototype . use = function use ( fulfilled , rejected ) {
  this . handlers . push ( {
    fulfilled : fulfilled ,
    rejected : rejected
  } ) ;
  return this . handlers . length - 1 ;
} ;

// 用来注销指定的拦截器
InterceptorManager . prototype . eject = function eject ( id ) {
  if ( this . handlers [ id ] ) {
    this . handlers [ id ] = null ;
  }
} ;

// 遍历this.handlers,并将this.handlers里的每一项作为参数传给fn执行
InterceptorManager . prototype . forEach = function forEach ( fn ) {
  utils . forEach ( this . handlers , function forEachHandler ( h ) {
    if ( h !== null ) {
      fn ( h ) ;
    }
  } ) ;
} ;
So when we add interceptors through axios.interceptors.request.use , how does axios internally enable these interceptors to get the data we want before and after the request?
Let’s look at the code first:
 // /lib/core/Axios.js
Axios . prototype . request = function request ( config ) {
  // ...
  var chain = [ dispatchRequest , undefined ] ;

  // 初始化一个promise对象,状态为resolved,接收到的参数为config对象
  var promise = Promise . resolve ( config ) ;

  // 注意:interceptor.fulfilled 或 interceptor.rejected 是可能为undefined
  this . interceptors . request . forEach ( function unshiftRequestInterceptors ( interceptor ) {
    chain . unshift ( interceptor . fulfilled , interceptor . rejected ) ;
  } ) ;

  this . interceptors . response . forEach ( function pushResponseInterceptors ( interceptor ) {
    chain . push ( interceptor . fulfilled , interceptor . rejected ) ;
  } ) ;

  // 添加了拦截器后的chain数组大概会是这样的:
  // [
  //   requestFulfilledFn, requestRejectedFn, ...,
  //   dispatchRequest, undefined,
  //   responseFulfilledFn, responseRejectedFn, ....,
  // ]

  // 只要chain数组长度不为0,就一直执行while循环
  while ( chain . length ) {
    // 数组的 shift() 方法用于把数组的第一个元素从其中删除,并返回第一个元素的值。
    // 每次执行while循环,从chain数组里按序取出两项,并分别作为promise.then方法的第一个和第二个参数

    // 按照我们使用InterceptorManager.prototype.use添加拦截器的规则,
    // 正好每次添加的就是我们通过InterceptorManager.prototype.use方法添加的成功和失败回调

    // 通过InterceptorManager.prototype.use往拦截器数组里添加拦截器时使用的数组的push方法,
    // 对于请求拦截器:
    // 从拦截器数组按序读到后是通过unshift方法往chain数组数里添加的,又通过shift方法从chain数组里取出的,
    // 所以得出结论:对于请求拦截器,先添加的拦截器会后执行
    // 对于响应拦截器:
    // 从拦截器数组按序读到后是通过push方法往chain数组里添加的,又通过shift方法从chain数组里取出的,
    // 所以得出结论:对于响应拦截器,添加的拦截器先执行

    // 第一个请求拦截器的fulfilled函数会接收到promise对象初始化时传入的config对象,
    // 而请求拦截器又规定用户写的fulfilled函数必须返回一个config对象,
    // 所以通过promise实现链式调用时,每个请求拦截器的fulfilled函数都会接收到一个config对象

    // 第一个响应拦截器的fulfilled函数会接受到dispatchRequest(也就是我们的请求方法)请求到的数据(也就是response对象),
    // 而响应拦截器又规定用户写的fulfilled函数必须返回一个response对象,
    // 所以通过promise实现链式调用时,每个响应拦截器的fulfilled函数都会接收到一个response对象

    // 任何一个拦截器的抛出的错误,都会被下一个拦截器的rejected函数收到,
    // 所以dispatchRequest抛出的错误才会被响应拦截器接收到。

    // 因为axios是通过promise实现的链式调用,所以我们可以在拦截器里进行异步操作,
    // 而拦截器的执行顺序还是会按照我们上面说的顺序执行,
    // 也就是 dispatchRequest 方法一定会等待所有的请求拦截器执行完后再开始执行,
    // 响应拦截器一定会等待 dispatchRequest 执行完后再开始执行。

    promise = promise . then ( chain . shift ( ) , chain . shift ( ) ) ;

  }

  return promise ;
} ;
Now, you should have a clear idea of what an interceptor is and how it works in the Axios.prototype.request method. So how does dispatchRequest in the "midstream position" send an http request?
dispatchRequest mainly does three things: 1. Get the config object and perform final processing on the config before passing it to the http request adapter; 2. The http request adapter initiates a request based on the config configuration. 3. After the http request adapter request is completed, if it succeeds Then get the response after data conversion based on header, data, and config.transformResponse (about transformResponse, the data converter below will explain it) and return it.
 // /lib/core/dispatchRequest.js
module . exports = function dispatchRequest ( config ) {
  throwIfCancellationRequested ( config ) ;

  // Support baseURL config
  if ( config . baseURL && ! isAbsoluteURL ( config . url ) ) {
    config . url = combineURLs ( config . baseURL , config . url ) ;
  }

  // Ensure headers exist
  config . headers = config . headers || { } ;

  // 对请求data进行转换
  config . data = transformData (
    config . data ,
    config . headers ,
    config . transformRequest
  ) ;

  // 对header进行合并处理
  config . headers = utils . merge (
    config . headers . common || { } ,
    config . headers [ config . method ] || { } ,
    config . headers || { }
  ) ;

  // 删除header属性里无用的属性
  utils . forEach (
    [ 'delete' , 'get' , 'head' , 'post' , 'put' , 'patch' , 'common' ] ,
    function cleanHeaderConfig ( method ) {
      delete config . headers [ method ] ;
    }
  ) ;

  // http请求适配器会优先使用config上自定义的适配器,没有配置时才会使用默认的XHR或http适配器,
  // 不过大部分时候,axios提供的默认适配器是能够满足我们的
  var adapter = config . adapter || defaults . adapter ;

  return adapter ( config ) . then ( /**/ ) ;
} ;
Okay, seeing this, it’s time for us to sort out: How does Axios use promises to build an asynchronous bridge based on XHR?
How does axios perform asynchronous processing through Promise?
 import axios from 'axios'

axios . get ( /**/ )
. then ( data => {
  // 此处可以拿到向服务端请求回的数据
} )
. catch ( error => {
  // 此处可以拿到请求失败或取消或其他处理失败的错误对象
} ) Let’s first take a diagram to briefly understand the sequence flow of reaching the user after the http request is completed in the axios project:
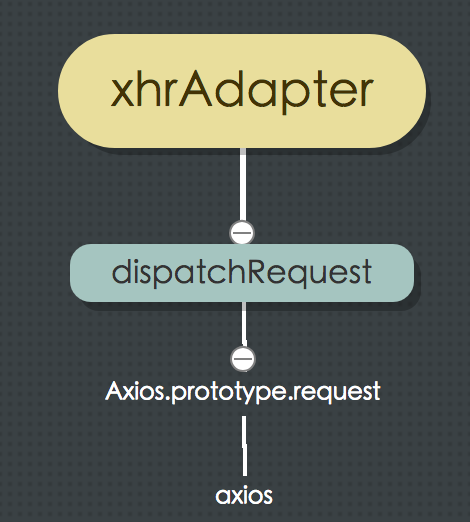
Through why axios can be used in many ways, we know that no matter how the user calls axios, he will ultimately call the Axios.prototype.request method, which ultimately returns a Promise object.
 Axios . prototype . request = function request ( config ) {
  // ...
  var chain = [ dispatchRequest , undefined ] ;
  // 将config对象当作参数传给Primise.resolve方法
  var promise = Promise . resolve ( config ) ;

  while ( chain . length ) {
    promise = promise . then ( chain . shift ( ) , chain . shift ( ) ) ;
  }

  return promise ;
} ;
Axios.prototype.request method will call dispatchRequest method, and dispatchRequest method will call xhrAdapter method. xhrAdapter method returns a Promise object.
 // /lib/adapters/xhr.js
function xhrAdapter ( config ) {
  return new Promise ( function dispatchXhrRequest ( resolve , reject ) {
    // ... 省略代码
  } ) ;
} ;
After the XHR in xhrAdapter successfully sends the request, it will execute resolve method of the Promise object and pass out the requested data. Otherwise, it will execute the reject method and pass the error information as a parameter.
 // /lib/adapters/xhr.js
var request = new XMLHttpRequest ( ) ;
var loadEvent = 'onreadystatechange' ;

request [ loadEvent ] = function handleLoad ( ) {
  // ...
  // 往下走有settle的源码
  settle ( resolve , reject , response ) ;
  // ...
} ;
request . onerror = function handleError ( ) {
  reject ( /**/ ) ;
  request = null ;
} ;
request . ontimeout = function handleTimeout ( ) {
  reject ( /**/ ) ;
  request = null ;
} ;
Verify whether the return result from the server passes the verification:
 // /lib/core/settle.js
function settle ( resolve , reject , response ) {
  var validateStatus = response . config . validateStatus ;
  if ( ! response . status || ! validateStatus || validateStatus ( response . status ) ) {
    resolve ( response ) ;
  } else {
    reject ( /**/ ) ;
  }
} ;
Return to dispatchRequest method, first get the Promise object returned by xhrAdapter method, and then process the success or failure result of the Promise object returned by xhrAdapter through the .then method. If successful, the processed response will be returned. If it fails, then Returns a Promise object with status rejected ,
  return adapter ( config ) . then ( function onAdapterResolution ( response ) {
    // ...
    return response ;
  } , function onAdapterRejection ( reason ) {
    // ...
    return Promise . reject ( reason ) ;
  } ) ;
} ;
So at this point, when the user calls axios() method, he can directly call Promise's .then or .catch for business processing.
Looking back, we talked about data conversion when introducing dispatchRequest , and axios officially introduced data conversion as a highlight. So what effect can data conversion play in using axios?
 import axios from 'axios'

// 往现有的请求转换器里增加转换方法
axios . defaults . transformRequest . push ( ( data , headers ) => {
  // ...处理data
  return data ;
} ) ;

// 重写请求转换器
axios . defaults . transformRequest = [ ( data , headers ) => {
  // ...处理data
  return data ;
} ] ;

// 往现有的响应转换器里增加转换方法
axios . defaults . transformResponse . push ( ( data , headers ) => {
  // ...处理data
  return data ;
} ) ;

// 重写响应转换器
axios . defaults . transformResponse = [ ( data , headers ) => {
  // ...处理data
  return data ;
} ] ; import axios from 'axios'
// 往已经存在的转换器里增加转换方法
axios . get ( url , {
// ...
transformRequest : [
... axios . defaults . transformRequest , // 去掉这行代码就等于重写请求转换器了
( data , headers ) => {
// ...处理data
return data ;
}
] ,
transformResponse : [
... axios . defaults . transformResponse , // 去掉这行代码就等于重写响应转换器了
( data , headers ) => {
// ...处理data
return data ;
}
] ,
} ) A request converter and a response converter have been customized in the default defaults configuration item. Take a look at the source code:
 // /lib/defaults.js
var defaults = {

  transformRequest : [ function transformRequest ( data , headers ) {
    normalizeHeaderName ( headers , 'Content-Type' ) ;
    // ...
    if ( utils . isArrayBufferView ( data ) ) {
      return data . buffer ;
    }
    if ( utils . isURLSearchParams ( data ) ) {
      setContentTypeIfUnset ( headers , 'application/x-www-form-urlencoded;charset=utf-8' ) ;
      return data . toString ( ) ;
    }
    if ( utils . isObject ( data ) ) {
      setContentTypeIfUnset ( headers , 'application/json;charset=utf-8' ) ;
      return JSON . stringify ( data ) ;
    }
    return data ;
  } ] ,

  transformResponse : [ function transformResponse ( data ) {
    if ( typeof data === 'string' ) {
      try {
        data = JSON . parse ( data ) ;
      } catch ( e ) { /* Ignore */ }
    }
    return data ;
  } ] ,

} ;
So in the axios project, where is the converter used?
The request converter is used before the http request. The request converter is used to process the request data, and then passed to the http request adapter for use.
 // /lib/core/dispatchRequest.js
function dispatchRequest ( config ) {

  config . data = transformData (
    config . data ,
    config . headers ,
    config . transformRequest
  ) ;

  return adapter ( config ) . then ( /* ... */ ) ;
} ;
Take a look at the code of the transformData method. It mainly traverses the converter array, executes each converter separately, and returns new data according to the data and headers parameters.
 // /lib/core/transformData.js
function transformData ( data , headers , fns ) {
  utils . forEach ( fns , function transform ( fn ) {
    data = fn ( data , headers ) ;
  } ) ;
  return data ;
} ;
The response converter is used to perform data conversion processing based on the return value of the http request adapter after the http request is completed:
 // /lib/core/dispatchRequest.js
return adapter ( config ) . then ( function onAdapterResolution ( response ) {
    // ...
    response . data = transformData (
      response . data ,
      response . headers ,
      config . transformResponse
    ) ;

    return response ;
  } , function onAdapterRejection ( reason ) {
    if ( ! isCancel ( reason ) ) {
      // ...
      if ( reason && reason . response ) {
        reason . response . data = transformData (
          reason . response . data ,
          reason . response . headers ,
          config . transformResponse
        ) ;
      }
    }

    return Promise . reject ( reason ) ;
} ) ; The interceptor can also realize the need to convert request and response data, but according to the author's design and comprehensive code, it can be seen that during the request, the interceptor is mainly responsible for modifying the config configuration items, and the data converter is mainly responsible for converting the request body, such as converting objects. After requesting a response for a string, the interceptor can get response . The data converter is mainly responsible for processing the response body, such as converting the string into an object.
Axios officially introduces "automatic conversion to JSON data" as an independent highlight. So how does the data converter complete this function? It’s actually very simple, let’s take a look.
By default, axios will automatically serialize the incoming data object into a JSON string and convert the JSON string in the response data into a JavaScript object.
 // 请求时,将data数据转换为JSON 字符串
// /lib/defaults.js
transformRequest: [ function transformRequest ( data , headers ) {
  // ...
    if ( utils . isObject ( data ) ) {
      setContentTypeIfUnset ( headers , 'application/json;charset=utf-8' ) ;
      return JSON . stringify ( data ) ;
    }
    return data ;
} ]

// 得到响应后,将请求到的数据转换为JSON对象
// /lib/defaults.js
transformResponse: [ function transformResponse ( data ) {
    if ( typeof data === 'string' ) {
      try {
        data = JSON . parse ( data ) ;
      } catch ( e ) { /* Ignore */ }
    }
    return data ;
} ]
At this point, the operation process of the axios project has been introduced. Have you already opened up the two channels of Ren and Du? Next, let's take a look at what other useful skills axios has brought us.
 import axios from 'axios'

// 设置通用header
axios . defaults . headers . common [ 'X-Requested-With' ] = 'XMLHttpRequest' ; // xhr标识

// 设置某种请求的header
axios . defaults . headers . post [ 'Content-Type' ] = 'application/x-www-form-urlencoded;charset=utf-8' ;

// 设置某次请求的header
axios . get ( url , {
  headers : {
    'Authorization' : 'whr1' ,
  } ,
} ) // /lib/core/dispatchRequest.js - 44行
config . headers = utils . merge (
config . headers . common || { } ,
config . headers [ config . method ] || { } ,
config . headers || { }
) ; import axios from 'axios'
// 第一种取消方法
axios . get ( url , {
cancelToken : new axios . CancelToken ( cancel => {
if ( /* 取消条件 */ ) {
cancel ( '取消日志' ) ;
}
} )
} ) ;
// 第二种取消方法
const CancelToken = axios . CancelToken ;
const source = CancelToken . source ( ) ;
axios . get ( url , {
cancelToken : source . token
} ) ;
source . cancel ( '取消日志' ) ; // /cancel/CancelToken.js - 11行
function CancelToken ( executor ) {
var resolvePromise ;
this . promise = new Promise ( function promiseExecutor ( resolve ) {
resolvePromise = resolve ;
} ) ;
var token = this ;
executor ( function cancel ( message ) {
if ( token . reason ) {
return ;
}
token . reason = new Cancel ( message ) ;
resolvePromise ( token . reason ) ;
} ) ;
}
// /lib/adapters/xhr.js - 159行
if ( config . cancelToken ) {
config . cancelToken . promise . then ( function onCanceled ( cancel ) {
if ( ! request ) {
return ;
}
request . abort ( ) ;
reject ( cancel ) ;
request = null ;
} ) ;
} The core of the cancellation function is to get the instance attribute promise through this.promise = new Promise(resolve => resolvePromise = resolve) in CancelToken. At this time, the status of promise is pending . Through this attribute, in /lib/adapters/xhr.js Continue to add the .then method to this promise instance in the file (line 159 of the xhr.js file config.cancelToken.promise.then(message => request.abort()) );
Outside CancelToken , executor parameter is used to gain control of the cancel method. In this way, when cancel method is executed, the status of promise attribute of the instance can be changed to rejected , thereby executing the request.abort() method to cancel the request.
The second way of writing above can be seen as the improvement of the first way of writing, because many times our request cancellation method is used outside the current request method. For example, if we send two requests A and B, when the request B is successful, , cancel request A.
 // 第1种写法:
let source ;
axios . get ( Aurl , {
  cancelToken : new axios . CancelToken ( cancel => {
    source = cancel ;
  } )
} ) ;
axios . get ( Burl )
. then ( ( ) => source ( 'B请求成功了' ) ) ;

// 第2种写法:
const CancelToken = axios . CancelToken ;
const source = CancelToken . source ( ) ;
axios . get ( Aurl , {
  cancelToken : source . token
} ) ;
axios . get ( Burl )
. then ( ( ) => source . cancel ( 'B请求成功了' ) ) ;
Relatively speaking, I prefer the first way of writing, because the second way of writing is too hidden and not as intuitive and easy to understand as the first way.
In the /lib/adapters/xhr.js file, shouldn’t the parameter of the onCanceled method be called message? Why is it called cancel?
In the /lib/adapters/xhr.js file, in the onCanceled method, the config information should also be passed out in reject.
 import axios from 'axios'

axios . defaults . withCredentials = true ; We have already introduced the transfer process of config in the axios project in the section on how user-configured config works. From this, we can conclude that the configuration we made through axios.defaults.withCredentials = true is in /lib/adapters/xhr.js It can be obtained from /lib/adapters/xhr.js , and then configured to the xhr object item through the following code.
 var request = new XMLHttpRequest ( ) ;

// /lib/adapters/xhr.js
if ( config . withCredentials ) {
  request . withCredentials = true ;
} import axios from 'axios'
axios . defaults . timeout = 3000 ; // /adapters/xhr.js
request . timeout = config . timeout ;
// /adapters/xhr.js
// 通过createError方法,将错误信息合为一个字符串
request . ontimeout = function handleTimeout ( ) {
reject ( createError ( 'timeout of ' + config . timeout + 'ms exceeded' ,
config , 'ECONNABORTED' , request ) ) ;
} ; axios ( ) . catch ( error => {
const { message } = error ;
if ( message . indexOf ( 'timeout' ) > - 1 ) {
// 超时处理
}
} )Customize the success and failure range of http status code
 import axios from 'axios'

axios . defaults . validateStatus = status => status >= 200 && status < 300 ; In the default configuration, the default http status code verification rules are defined, so customizing validateStatus is actually an override of the method here.
 // `/lib/defaults.js`
var defaults = {
  // ...
  validateStatus : function validateStatus ( status ) {
    return status >= 200 && status < 300 ;
  } ,
  // ...
}
When did axios start validating http status codes?
 // /lib/adapters/xhr.js
var request = new XMLHttpRequest ( ) ;
var loadEvent = 'onreadystatechange' ;

// /lib/adapters/xhr.js
// 每当 readyState 改变时,就会触发 onreadystatechange 事件
request [ loadEvent ] = function handleLoad ( ) {
  if ( ! request || ( request . readyState !== 4 && ! xDomain ) ) {
    return ;
  }
  // ...省略代码
  var response = {
      // ...
      // IE sends 1223 instead of 204 (https://github.com/axios/axios/issues/201)
      status : request . status === 1223 ? 204 : request . status ,
      config : config ,
  } ;
  settle ( resolve , reject , response ) ;
  // ...省略代码
}
// /lib/core/settle.js
function settle ( resolve , reject , response ) {
// 如果我们往上捣一捣就会发现,config对象的validateStatus就是我们自定义的validateStatus方法或默认的validateStatus方法
var validateStatus = response . config . validateStatus ;
// validateStatus验证通过,就会触发resolve方法
if ( ! response . status || ! validateStatus || validateStatus ( response . status ) ) {
resolve ( response ) ;
} else {
reject ( createError (
'Request failed with status code ' + response . status ,
response . config ,
null ,
response . request ,
response
) ) ;
}
} ;In the axios project, there are many clever ways to use JS, such as the serial operation of promises (of course you can also say that this is based on the processing methods of many asynchronous middleware), which allows us to easily handle the various processes before and after the request. Control the flow of each processing method; many practical small optimizations, such as data processing before and after requests, saving programmers from writing JSON.xxx over and over again; supporting both browser and node environments, for projects using node It is undoubtedly excellent.
In short, this star who can gain 42K+ on github (as of 2018.05.27) is by no means an estimate of his strength and is worth talking to!


