DALLE2 pytorch
1.15.6
Implementación de DALL-E 2, la red neuronal de síntesis de texto a imagen actualizada de OpenAI, en Pytorch.
Resumen de Yannic Kilcher | Explicador de AsambleaAI
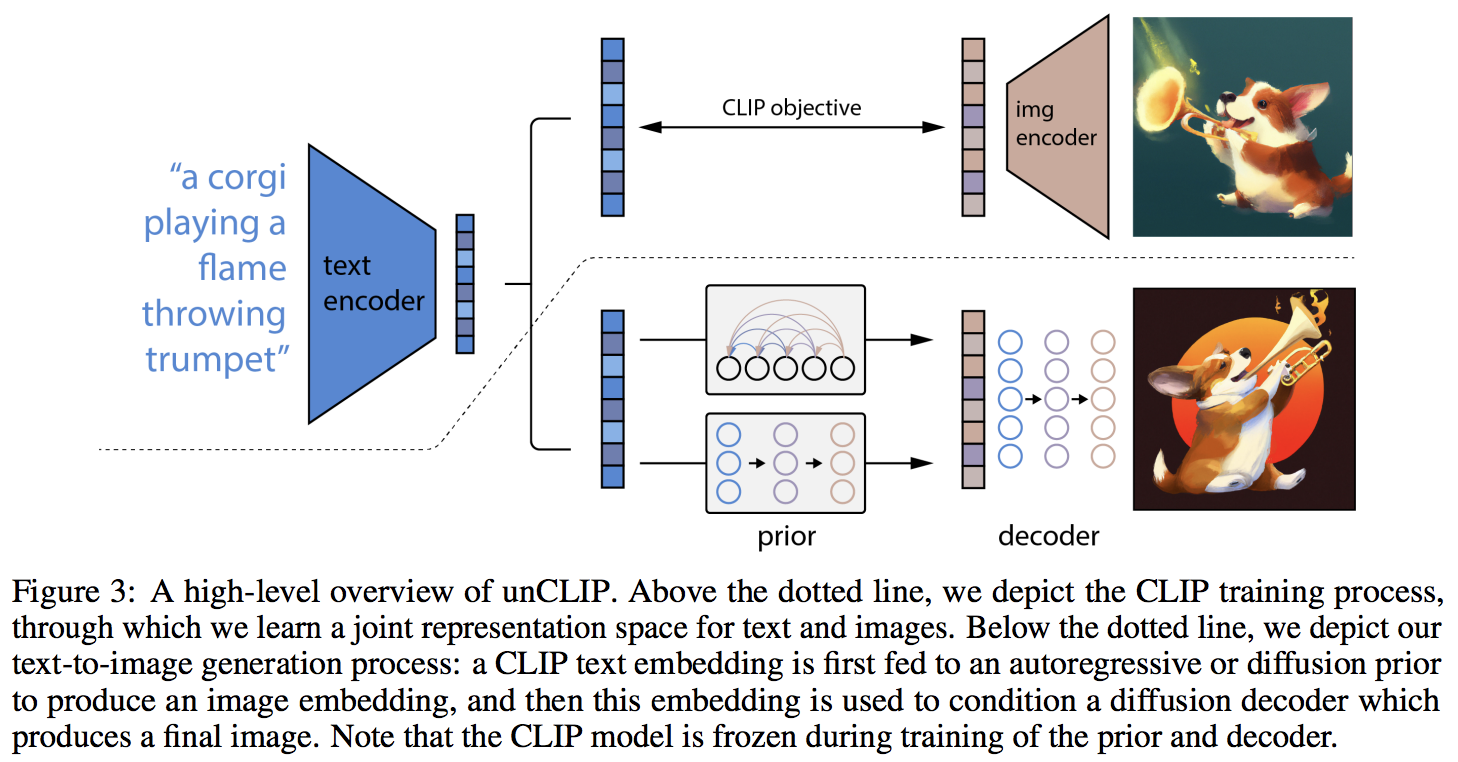
La principal novedad parece ser una capa adicional de indirección con la red anterior (ya sea un transformador autorregresivo o una red de difusión), que predice una incrustación de imagen basada en la incrustación de texto de CLIP. Específicamente, este repositorio solo construirá la red de difusión previa, ya que es la variante de mejor rendimiento (pero, por cierto, ¿qué implica un transformador causal como red de eliminación de ruido?)
Este modelo es SOTA para texto a imagen por ahora.
Únase si está interesado en ayudar con la replicación con la comunidad LAION | Entrevista a Yannic
A partir del 23/05/22, ya no es SOTA. SOTA estará aquí. Las versiones de Jax, así como el proyecto de texto a vídeo, se trasladarán a la arquitectura Imagen, ya que es mucho más sencilla.
Un grupo de investigación ha utilizado el código de este repositorio para entrenar una difusión funcional previa para sus generaciones CLIP. Compartirán su trabajo una vez que publiquen su preimpresión. Esto, y los propios experimentos de Katherine, validan el hallazgo de OpenAI de que el adelanto adicional aumenta la variedad de generaciones.
Ahora se ha verificado que el decodificador funciona para la generación incondicional en mi configuración experimental para flores de Oxford. 2 investigadores también han confirmado que Decoder está funcionando para ellos.
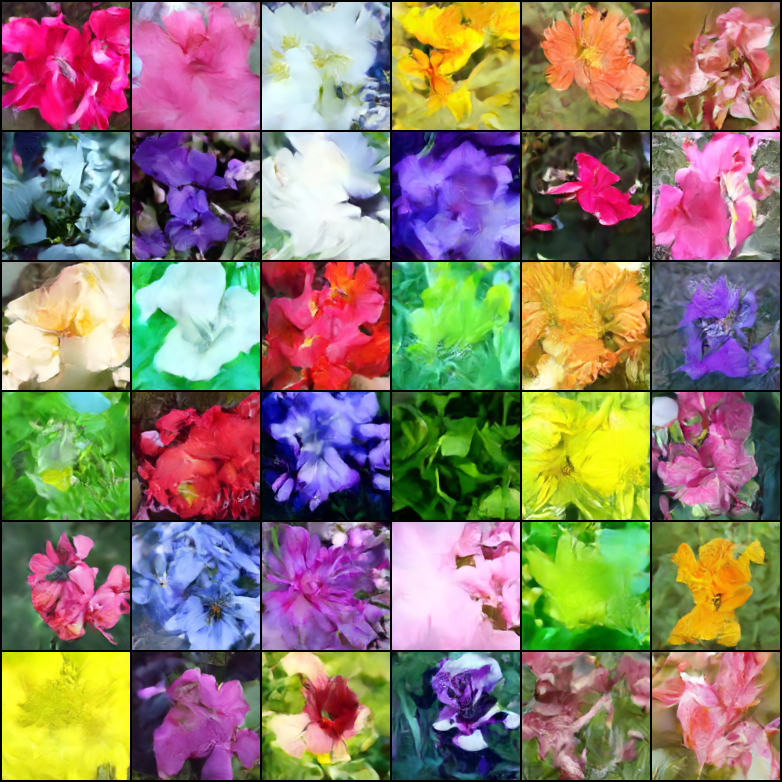
en curso a 21k pasos
Justin Pinkney entrenó con éxito la difusión previa en el repositorio de su aplicación de conversión de texto a imagen CLIP to Stylegan2
Romain ha ampliado el entrenamiento a 800 GPU con los scripts disponibles sin ningún problema
Esta biblioteca no habría llegado a este estado de funcionamiento sin la ayuda de
... y muchos otros. ¡Gracias!
$ pip install dalle2-pytorchEntrenar a DALLE-2 es un proceso de 3 pasos, siendo el entrenamiento de CLIP el más importante.
Para entrenar CLIP, puede usar el paquete x-clip o unirse a LAION discord, donde ya se están realizando muchos esfuerzos de replicación.
Este repositorio demostrará la integración con x-clip para empezar
 import torch
from dalle2_pytorch import CLIP

clip = CLIP (
    dim_text = 512 ,
    dim_image = 512 ,
    dim_latent = 512 ,
    num_text_tokens = 49408 ,
    text_enc_depth = 1 ,
    text_seq_len = 256 ,
    text_heads = 8 ,
    visual_enc_depth = 1 ,
    visual_image_size = 256 ,
    visual_patch_size = 32 ,
    visual_heads = 8 ,
    use_all_token_embeds = True ,            # whether to use fine-grained contrastive learning (FILIP)
    decoupled_contrastive_learning = True ,  # use decoupled contrastive learning (DCL) objective function, removing positive pairs from the denominator of the InfoNCE loss (CLOOB + DCL)
    extra_latent_projection = True ,         # whether to use separate projections for text-to-image vs image-to-text comparisons (CLOOB)
    use_visual_ssl = True ,                  # whether to do self supervised learning on images
    visual_ssl_type = 'simclr' ,             # can be either 'simclr' or 'simsiam', depending on using DeCLIP or SLIP
    use_mlm = False ,                        # use masked language learning (MLM) on text (DeCLIP)
    text_ssl_loss_weight = 0.05 ,            # weight for text MLM loss
    image_ssl_loss_weight = 0.05            # weight for image self-supervised learning loss
). cuda ()

# mock data

text = torch . randint ( 0 , 49408 , ( 4 , 256 )). cuda ()
images = torch . randn ( 4 , 3 , 256 , 256 ). cuda ()

# train

loss = clip (
    text ,
    images ,
    return_loss = True              # needs to be set to True to return contrastive loss
)

loss . backward ()

# do the above with as many texts and images as possible in a loop
Luego, necesitarás entrenar el decodificador, que aprende a generar imágenes basadas en la incrustación de imágenes provenientes del CLIP entrenado arriba.
 import torch
from dalle2_pytorch import Unet , Decoder , CLIP

# trained clip from step 1

clip = CLIP (
    dim_text = 512 ,
    dim_image = 512 ,
    dim_latent = 512 ,
    num_text_tokens = 49408 ,
    text_enc_depth = 1 ,
    text_seq_len = 256 ,
    text_heads = 8 ,
    visual_enc_depth = 1 ,
    visual_image_size = 256 ,
    visual_patch_size = 32 ,
    visual_heads = 8
). cuda ()

# unet for the decoder

unet = Unet (
    dim = 128 ,
    image_embed_dim = 512 ,
    cond_dim = 128 ,
    channels = 3 ,
    dim_mults = ( 1 , 2 , 4 , 8 )
). cuda ()

# decoder, which contains the unet and clip

decoder = Decoder (
    unet = unet ,
    clip = clip ,
    timesteps = 100 ,
    image_cond_drop_prob = 0.1 ,
    text_cond_drop_prob = 0.5
). cuda ()

# mock images (get a lot of this)

images = torch . randn ( 4 , 3 , 256 , 256 ). cuda ()

# feed images into decoder

loss = decoder ( images )
loss . backward ()

# do the above for many many many many steps
# then it will learn to generate images based on the CLIP image embeddings
Finalmente, la principal contribución del artículo. El repositorio ofrece la red de difusión previa. Toma las incrustaciones de texto CLIP e intenta generar las incrustaciones de imágenes CLIP. Nuevamente, necesitará el CLIP entrenado del primer paso.
 import torch
from dalle2_pytorch import DiffusionPriorNetwork , DiffusionPrior , CLIP

# get trained CLIP from step one

clip = CLIP (
    dim_text = 512 ,
    dim_image = 512 ,
    dim_latent = 512 ,
    num_text_tokens = 49408 ,
    text_enc_depth = 6 ,
    text_seq_len = 256 ,
    text_heads = 8 ,
    visual_enc_depth = 6 ,
    visual_image_size = 256 ,
    visual_patch_size = 32 ,
    visual_heads = 8 ,
). cuda ()

# setup prior network, which contains an autoregressive transformer

prior_network = DiffusionPriorNetwork (
    dim = 512 ,
    depth = 6 ,
    dim_head = 64 ,
    heads = 8
). cuda ()

# diffusion prior network, which contains the CLIP and network (with transformer) above

diffusion_prior = DiffusionPrior (
    net = prior_network ,
    clip = clip ,
    timesteps = 100 ,
    cond_drop_prob = 0.2
). cuda ()

# mock data

text = torch . randint ( 0 , 49408 , ( 4 , 256 )). cuda ()
images = torch . randn ( 4 , 3 , 256 , 256 ). cuda ()

# feed text and images into diffusion prior network

loss = diffusion_prior ( text , images )
loss . backward ()

# do the above for many many many steps
# now the diffusion prior can generate image embeddings from the text embeddings
En el artículo, en realidad utilizaron una técnica descubierta recientemente, del propio Jonathan Ho (autor original de DDPM, la técnica central utilizada en DALL-E v2) para la síntesis de imágenes de alta resolución.
Esto se puede utilizar fácilmente dentro de este marco como tal.
 import torch
from dalle2_pytorch import Unet , Decoder , CLIP

# trained clip from step 1

clip = CLIP (
    dim_text = 512 ,
    dim_image = 512 ,
    dim_latent = 512 ,
    num_text_tokens = 49408 ,
    text_enc_depth = 6 ,
    text_seq_len = 256 ,
    text_heads = 8 ,
    visual_enc_depth = 6 ,
    visual_image_size = 256 ,
    visual_patch_size = 32 ,
    visual_heads = 8
). cuda ()

# 2 unets for the decoder (a la cascading DDPM)

unet1 = Unet (
    dim = 32 ,
    image_embed_dim = 512 ,
    cond_dim = 128 ,
    channels = 3 ,
    dim_mults = ( 1 , 2 , 4 , 8 )
). cuda ()

unet2 = Unet (
    dim = 32 ,
    image_embed_dim = 512 ,
    cond_dim = 128 ,
    channels = 3 ,
    dim_mults = ( 1 , 2 , 4 , 8 , 16 )
). cuda ()

# decoder, which contains the unet(s) and clip

decoder = Decoder (
    clip = clip ,
    unet = ( unet1 , unet2 ),            # insert both unets in order of low resolution to highest resolution (you can have as many stages as you want here)
    image_sizes = ( 256 , 512 ),         # resolutions, 256 for first unet, 512 for second. these must be unique and in ascending order (matches with the unets passed in)
    timesteps = 1000 ,
    image_cond_drop_prob = 0.1 ,
    text_cond_drop_prob = 0.5
). cuda ()

# mock images (get a lot of this)

images = torch . randn ( 4 , 3 , 512 , 512 ). cuda ()

# feed images into decoder, specifying which unet you want to train
# each unet can be trained separately, which is one of the benefits of the cascading DDPM scheme

loss = decoder ( images , unet_number = 1 )
loss . backward ()

loss = decoder ( images , unet_number = 2 )
loss . backward ()

# do the above for many steps for both unets
Finalmente, generar las imágenes DALL-E2 a partir de texto. Inserte el DiffusionPrior entrenado así como el Decoder (que envuelve CLIP , el transformador causal y unet(s))
 from dalle2_pytorch import DALLE2

dalle2 = DALLE2 (
    prior = diffusion_prior ,
    decoder = decoder
)

# send the text as a string if you want to use the simple tokenizer from DALLE v1
# or you can do it as token ids, if you have your own tokenizer

texts = [ 'glistening morning dew on a flower petal' ]
images = dalle2 ( texts ) # (1, 3, 256, 256)
¡Eso es todo!
Veamos el guión completo a continuación.
 import torch
from dalle2_pytorch import DALLE2 , DiffusionPriorNetwork , DiffusionPrior , Unet , Decoder , CLIP

clip = CLIP (
    dim_text = 512 ,
    dim_image = 512 ,
    dim_latent = 512 ,
    num_text_tokens = 49408 ,
    text_enc_depth = 6 ,
    text_seq_len = 256 ,
    text_heads = 8 ,
    visual_enc_depth = 6 ,
    visual_image_size = 256 ,
    visual_patch_size = 32 ,
    visual_heads = 8
). cuda ()

# mock data

text = torch . randint ( 0 , 49408 , ( 4 , 256 )). cuda ()
images = torch . randn ( 4 , 3 , 256 , 256 ). cuda ()

# train

loss = clip (
    text ,
    images ,
    return_loss = True
)

loss . backward ()

# do above for many steps ...

# prior networks (with transformer)

prior_network = DiffusionPriorNetwork (
    dim = 512 ,
    depth = 6 ,
    dim_head = 64 ,
    heads = 8
). cuda ()

diffusion_prior = DiffusionPrior (
    net = prior_network ,
    clip = clip ,
    timesteps = 1000 ,
    sample_timesteps = 64 ,
    cond_drop_prob = 0.2
). cuda ()

loss = diffusion_prior ( text , images )
loss . backward ()

# do above for many steps ...

# decoder (with unet)

unet1 = Unet (
    dim = 128 ,
    image_embed_dim = 512 ,
    text_embed_dim = 512 ,
    cond_dim = 128 ,
    channels = 3 ,
    dim_mults = ( 1 , 2 , 4 , 8 ),
    cond_on_text_encodings = True    # set to True for any unets that need to be conditioned on text encodings
). cuda ()

unet2 = Unet (
    dim = 16 ,
    image_embed_dim = 512 ,
    cond_dim = 128 ,
    channels = 3 ,
    dim_mults = ( 1 , 2 , 4 , 8 , 16 )
). cuda ()

decoder = Decoder (
    unet = ( unet1 , unet2 ),
    image_sizes = ( 128 , 256 ),
    clip = clip ,
    timesteps = 100 ,
    image_cond_drop_prob = 0.1 ,
    text_cond_drop_prob = 0.5
). cuda ()

for unet_number in ( 1 , 2 ):
    loss = decoder ( images , text = text , unet_number = unet_number ) # this can optionally be decoder(images, text) if you wish to condition on the text encodings as well, though it was hinted in the paper it didn't do much
    loss . backward ()

# do above for many steps

dalle2 = DALLE2 (
    prior = diffusion_prior ,
    decoder = decoder
)

images = dalle2 (
    [ 'cute puppy chasing after a squirrel' ],
    cond_scale = 2. # classifier free guidance strength (> 1 would strengthen the condition)
)

# save your image (in this example, of size 256x256)
Todo el contenido de este archivo Léame debería ejecutarse sin errores.
También puede entrenar el decodificador en imágenes de mayor tamaño que el tamaño (digamos 512x512) en el que se entrenó CLIP (256x256). Las imágenes cambiarán de tamaño a una resolución de imagen CLIP para las incrustaciones de imágenes.
Para el profano, no se preocupe, toda la capacitación se automatizará en una herramienta CLI, al menos para la capacitación a pequeña escala.
Es probable que, al ampliar, primero preproceses tus imágenes y texto en las incrustaciones correspondientes antes de entrenar la red anterior. Puede hacerlo fácilmente simplemente pasando image_embed , text_embed y, opcionalmente, text_encodings
Ejemplo de trabajo a continuación
 import torch
from dalle2_pytorch import DiffusionPriorNetwork , DiffusionPrior , CLIP

# get trained CLIP from step one

clip = CLIP (
    dim_text = 512 ,
    dim_image = 512 ,
    dim_latent = 512 ,
    num_text_tokens = 49408 ,
    text_enc_depth = 6 ,
    text_seq_len = 256 ,
    text_heads = 8 ,
    visual_enc_depth = 6 ,
    visual_image_size = 256 ,
    visual_patch_size = 32 ,
    visual_heads = 8 ,
). cuda ()

# setup prior network, which contains an autoregressive transformer

prior_network = DiffusionPriorNetwork (
    dim = 512 ,
    depth = 6 ,
    dim_head = 64 ,
    heads = 8
). cuda ()

# diffusion prior network, which contains the CLIP and network (with transformer) above

diffusion_prior = DiffusionPrior (
    net = prior_network ,
    clip = clip ,
    timesteps = 100 ,
    cond_drop_prob = 0.2 ,
    condition_on_text_encodings = False  # this probably should be true, but just to get Laion started
). cuda ()

# mock data

text = torch . randint ( 0 , 49408 , ( 4 , 256 )). cuda ()
images = torch . randn ( 4 , 3 , 256 , 256 ). cuda ()

# precompute the text and image embeddings
# here using the diffusion prior class, but could be done with CLIP alone

clip_image_embeds = diffusion_prior . clip . embed_image ( images ). image_embed
clip_text_embeds = diffusion_prior . clip . embed_text ( text ). text_embed

# feed text and images into diffusion prior network

loss = diffusion_prior (
    text_embed = clip_text_embeds ,
    image_embed = clip_image_embeds
)

loss . backward ()

# do the above for many many many steps
# now the diffusion prior can generate image embeddings from the text embeddings
También puede usar CLIP por completo, en cuyo caso deberá pasar image_embed_dim a DiffusionPrior en la inicialización.
 import torch
from dalle2_pytorch import DiffusionPriorNetwork , DiffusionPrior

# setup prior network, which contains an autoregressive transformer

prior_network = DiffusionPriorNetwork (
    dim = 512 ,
    depth = 6 ,
    dim_head = 64 ,
    heads = 8
). cuda ()

# diffusion prior network, which contains the CLIP and network (with transformer) above

diffusion_prior = DiffusionPrior (
    net = prior_network ,
    image_embed_dim = 512 ,               # this needs to be set
    timesteps = 100 ,
    cond_drop_prob = 0.2 ,
    condition_on_text_encodings = False  # this probably should be true, but just to get Laion started
). cuda ()

# mock data

text = torch . randint ( 0 , 49408 , ( 4 , 256 )). cuda ()
images = torch . randn ( 4 , 3 , 256 , 256 ). cuda ()

# precompute the text and image embeddings
# here using the diffusion prior class, but could be done with CLIP alone

clip_image_embeds = torch . randn ( 4 , 512 ). cuda ()
clip_text_embeds = torch . randn ( 4 , 512 ). cuda ()

# feed text and images into diffusion prior network

loss = diffusion_prior (
    text_embed = clip_text_embeds ,
    image_embed = clip_image_embeds
)

loss . backward ()

# do the above for many many many steps
# now the diffusion prior can generate image embeddings from the text embeddings Aunque existe la posibilidad de que estén usando un CLIP inédito y más potente, puedes usar uno de los publicados si no deseas entrenar tu propio CLIP desde cero. Esto también permitirá a la comunidad validar más rápidamente las conclusiones del artículo.
Para usar un CLIP OpenAI previamente entrenado, simplemente importe OpenAIClipAdapter y páselo a DiffusionPrior o Decoder así
 import torch
from dalle2_pytorch import DALLE2 , DiffusionPriorNetwork , DiffusionPrior , Unet , Decoder , OpenAIClipAdapter

# openai pretrained clip - defaults to ViT-B/32

clip = OpenAIClipAdapter ()

# mock data

text = torch . randint ( 0 , 49408 , ( 4 , 256 )). cuda ()
images = torch . randn ( 4 , 3 , 256 , 256 ). cuda ()

# prior networks (with transformer)

prior_network = DiffusionPriorNetwork (
    dim = 512 ,
    depth = 6 ,
    dim_head = 64 ,
    heads = 8
). cuda ()

diffusion_prior = DiffusionPrior (
    net = prior_network ,
    clip = clip ,
    timesteps = 100 ,
    cond_drop_prob = 0.2
). cuda ()

loss = diffusion_prior ( text , images )
loss . backward ()

# do above for many steps ...

# decoder (with unet)

unet1 = Unet (
    dim = 128 ,
    image_embed_dim = 512 ,
    cond_dim = 128 ,
    channels = 3 ,
    dim_mults = ( 1 , 2 , 4 , 8 ),
    text_embed_dim = 512 ,
    cond_on_text_encodings = True  # set to True for any unets that need to be conditioned on text encodings (ex. first unet in cascade)
). cuda ()

unet2 = Unet (
    dim = 16 ,
    image_embed_dim = 512 ,
    cond_dim = 128 ,
    channels = 3 ,
    dim_mults = ( 1 , 2 , 4 , 8 , 16 )
). cuda ()

decoder = Decoder (
    unet = ( unet1 , unet2 ),
    image_sizes = ( 128 , 256 ),
    clip = clip ,
    timesteps = 1000 ,
    sample_timesteps = ( 250 , 27 ),
    image_cond_drop_prob = 0.1 ,
    text_cond_drop_prob = 0.5
). cuda ()

for unet_number in ( 1 , 2 ):
    loss = decoder ( images , text = text , unet_number = unet_number ) # this can optionally be decoder(images, text) if you wish to condition on the text encodings as well, though it was hinted in the paper it didn't do much
    loss . backward ()

# do above for many steps

dalle2 = DALLE2 (
    prior = diffusion_prior ,
    decoder = decoder
)

images = dalle2 (
    [ 'a butterfly trying to escape a tornado' ],
    cond_scale = 2. # classifier free guidance strength (> 1 would strengthen the condition)
)

# save your image (in this example, of size 256x256)
Alternativamente, también puedes usar Open Clip
$ pip install open-clip-torchEx. utilizando el modelo SOTA Open Clip entrenado por Romain


