YouCompleteMe
1.0.0
Vous cherchez de l'aide, des conseils ou du soutien? Vous avez des problèmes pour que YCM fonctionne?
Lisez d'abord soigneusement les instructions d'installation de votre système d'exploitation. Nous vous recommandons d'utiliser l' install.py fournie.py - le guide d'installation "complet" est destiné à des cas d'utilisation rares et avancés et la plupart des utilisateurs doivent utiliser install.py .
Si le serveur ne démarre pas et que vous obtenez une erreur "YouCompleteme Incondable", vérifiez le guide de dépannage.
Ensuite, consultez la section Guide de l'utilisateur sur le complexe sémantique que vous utilisez. Pour C / C ++ / Objective-C / Objective-C ++ / CUDA, vous devez lire cette section.
Enfin, vérifiez la FAQ.
Si, après avoir lu les guides d'installation et d'utilisateur et de vérifier la FAQ, vous avez toujours des problèmes, vérifiez la section Contacts ci-dessous pour savoir comment contacter.
Veuillez ne pas aller sur #vim sur Freenode pour obtenir de la prise en charge. Veuillez contacter directement les maintenseurs YouCompleme en utilisant les coordonnées ci-dessous.
Veuillez noter que les instructions ci-dessous suggèrent d'utiliser Vundle. Actuellement, il y a des problèmes avec Vundle, alors voici quelques instructions alternatives à l'aide de packages VIM.
YouCompleTeMe est un moteur, compréhension et refactorisation rapide, de type Fuzzy-Search Achèvement, compréhension et refactoring pour VIM.
Il dispose de plusieurs moteurs d'achèvement intégrés et prend en charge tout serveur de langue conforme au protocole, il peut donc travailler avec pratiquement n'importe quelle langue. YouCompleteMe contient:
Voici une explication de ce qui s'est passé dans la dernière démo GIF ci-dessus.
Tout d'abord, réalisez qu'aucun raccourci clavier n'a dû être enfoncé pour obtenir la liste des candidats à tout moment de la démo. L'utilisateur type et les suggestions apparaissent par eux-mêmes. Si l'utilisateur ne trouve pas les suggestions d'achèvement pertinentes et / ou veut simplement taper, il peut le faire; Le moteur d'achèvement n'interférera pas.
Lorsque l'utilisateur voit une chaîne d'achèvement utile offerte, il appuyé sur la touche de l'abat pour l'accepter. Cela insère la chaîne d'achèvement. Appuyez sur les pressions répétées du cycle de la touche de tabulation à travers les compléments offerts.
Si les compléments offerts ne sont pas suffisamment pertinents, l'utilisateur peut continuer à taper pour filtrer davantage les compléments indésirables.
Une chose critique à remarquer est que le filtrage d'achèvement n'est pas basé sur l'entrée étant un préfixe de chaîne de l'achèvement (mais cela fonctionne également). L'entrée doit être une correspondance de sous-séquence d'un achèvement. C'est une façon sophistiquée de dire que tous les caractères d'entrée doivent être présents dans une chaîne d'achèvement dans l'ordre dans lequel ils apparaissent dans l'entrée. abc est donc une sous-séquence de xaybgc , mais pas de xbyxaxxc . Après le filtre, un système de tri compliqué classe les chaînes d'achèvement afin que les plus pertinentes montent en haut du menu (vous devez donc généralement appuyer sur l'onglet une seule fois).
Tout ce qui précède fonctionne avec n'importe quel langage de programmation en raison du moteur d'achèvement basé sur l'identifiant. Il recueille tous les identificateurs dans le fichier actuel et les autres fichiers que vous visitez (et vos fichiers de balises) et les recherche lorsque vous tapez (les identifiants sont placés dans des groupes par filetype).
La démo montre également le moteur sémantique utilisé. Lorsque l'utilisateur appuie . , -> ou :: Tout en tapant en mode insert (pour C ++; différents déclencheurs sont utilisés pour d'autres langues), le moteur sémantique est déclenché (il peut également être déclenché avec un raccourci clavier; voir le reste des documents).
La dernière chose que vous pouvez voir dans la démo est les fonctionnalités d'affichage de diagnostic de YCM (le petit X Red qui apparaît dans la gouttière gauche; inspiré par la syntastique) si vous modifiez un fichier de famille C. Comme le moteur final compile votre fichier et détecte des avertissements ou des erreurs, ils seront présentés de diverses manières. Vous n'avez pas besoin d'enregistrer votre fichier ou d'appuyer sur un raccourci de clavier pour déclencher cela, il "juste arrive" en arrière-plan.
Et ce n'est pas tout ...
YCM pourrait être le seul moteur de complétion VIM avec le support Unicode correct. Bien que nous supposons UTF-8 partout.
YCM propose également des fonctionnalités sémantiques de type IDE dans un certain nombre de langues, notamment:
Par exemple, voici une démo d'aide à la signature:
Ci-dessous, nous pouvons voir YCM pouvoir faire quelques choses:
auto en C ++FixItGoToImplementation et GoToType pour les serveurs qui le soutiennent.Et voici quelques documents affichés dans une popup en vol stationnaire, automatiquement et manuellement:
Les fonctionnalités varient selon le type de fichier, alors assurez-vous de consulter le résumé des fonctionnalités de type de fichier et la liste complète des sous-commandes complètes pour savoir ce qui est disponible pour vos langues préférées.
Vous constaterez également que YCM a des completeurs FilePath (essayez de taper ./ dans un fichier) et un complexe qui s'intègre aux UltiSnips.
| Temps d'exécution | Version min | Version recommandée (support complet) | Python |
|---|---|---|---|
| Vim | 9.1.0016 | 9.1.0016 | 3.8 |
| Néovim | 0,5 | VIM 9.1.0016 | 3.8 |
Notre politique est de soutenir la version VIM qui est dans les derniers LTS d'Ubuntu.
VIM doit avoir un runtime Python 3 fonctionnel.
Pour les utilisateurs de Neovim, notre politique est de nécessiter la dernière version publiée. Actuellement, Neovim 0.5.0 est requis. Veuillez noter que certaines fonctionnalités ne sont pas disponibles dans Neovim et que Neovim n'est pas officiellement soutenu.
YCM a deux composants: un serveur et un client. Le serveur et le client nécessitent une version Python 3.8 ou ultérieure 3.x.
Pour le client VIM, VIM doit être, compilé avec --enable-shared (ou --enable-framework sur macOS). Vous pouvez vérifier si cela fonctionne avec :py3 import sys; print( sys.version) . Il devrait dire quelque chose comme 3.8.2 (...) .
Pour Neovim, vous devez avoir un runtime Python 3.8 et les extensions de Neovim Python. Voir Neovim's :help provider-python pour savoir comment configurer cela.
Pour le serveur, vous devez exécuter le script install.py avec un runtime Python 3.8 (ou ultérieure). Anaconda etc. ne sont pas pris en charge. YCM se souviendra de l'exécution que vous avez utilisé pour exécuter install.py et l'utilisera lors du lancement du serveur, donc si vous utilisez généralement Anaconda, assurez-vous d'utiliser le chemin complet vers une /usr/bin/python3 install.py --all etc.
Notre politique est de prendre en charge la version Python3 disponible dans les derniers Ubuntu LTS (similaire à notre stratégie de version VIM). Nous n'augmenons pas la version d'exécution Python sans raison, cependant. En règle générale, nous le faisons lorsque la version Python actuelle que nous utilisons est indépendante. À ce moment-là, nous choisirons généralement une version qui sera prise en charge pendant plusieurs années.
Afin de fournir les meilleures performances et stabilité possibles, YCMD a mis à jour son code vers C ++ 17. Cela nécessite une version de version des compilateurs pris en charge minimum. Les nouvelles exigences sont:
| Compilateur | Min actuel |
|---|---|
| GCC | 8 |
| Bruit | 7 |
| Msvc | 15.7 (vs 2017) |
YCM nécessite Cmake 3.13 ou plus. Si votre CMake est trop ancien, vous pourrez peut-être simplement pip install --user cmake pour obtenir une très nouvelle version.
Lors de la prise en charge du langage pour une langue particulière, il peut y avoir des exigences d'exécution, comme la nécessité d'un kit de développement Java très récent pour le support Java. En général, YCM ne contrôle pas les versions requises pour les compilateurs en aval, bien que nous fassions de notre mieux pour signaler où nous les connaissons.
$ brew install cmake python go nodejs
Installer Mono à partir du projet Mono (Remarque: Sur Intel Macs, vous pouvez également brew install mono . Sur les macs de bras, vous pouvez avoir besoin de Rosetta)
Pour le support Java, vous devez installer un JDK, une façon de le faire est avec Homebrew:
 $ brew install java
$ sudo ln -sfn $(brew --prefix java)/libexec/openjdk.jdk /Library/Java/JavaVirtualMachines/openjdk.jdk
Le système MacOS préinstallé VIM ne prend pas en charge Python 3. Vous devez donc installer un VIM qui prend en charge Python 3 ou MacVim avec Homebrew:
brew install vim
brew install macvim
Compiler YCM.
Pour les Mac Intel et ARM64, le travail Bundled LibClang / Clangd:
 cd ~/.vim/bundle/YouCompleteMe
python3 install.py --all
Si vous avez des problèmes de recherche de cadres système ou de bibliothèque standard C ++, essayez d'utiliser le HomeBrew LLVM:
 brew install llvm
cd ~/.vim/bundle/YouCompleteMe
python3 install.py --system-libclang --all
Et modifiez votre VIMRC pour ajouter la ligne suivante pour utiliser le Clangd de Homebrew LLVM:
 " Use homebrew's clangd
let g: ycm_clangd_binary_path = trim ( system ( ' brew --prefix llvm ' )). ' /bin/clangd '
Pour utiliser un serveur LSP arbitraire, vérifiez la section pertinente
Ces instructions (utilisant install.py ) sont le moyen le plus rapide d'installer YouCompleteMe, mais ils peuvent ne pas fonctionner pour tout le monde. Si les instructions suivantes ne fonctionnent pas pour vous, consultez le guide d'installation complet.
Une version VIM prise en charge avec Python 3 est requise. MacVim est une bonne option, même si vous n'utilisez que le terminal. YCM ne fonctionnera pas avec le VIM préinstallé d'Apple car son support Python est cassé. Si vous n'utilisez pas déjà un VIM qui prend en charge Python 3 ou MacVim, installez-le avec Homebrew. Installez également CMake:
brew install vim cmake
OU
brew install macvim cmake
Installez YouCompleteMe avec Vundle.
N'oubliez pas: YCM est un plugin avec un composant compilé. Si vous mettez à jour YCM à l'aide de Vundle et que les API de la bibliothèque ycm_core ont changé (se produit rarement), YCM vous informera de le recompiler. Vous devez ensuite relancer le processus d'installation.
Remarque: Si vous souhaitez l'achèvement de la famille en C, vous devez avoir le dernier Xcode installé avec les derniers outils de ligne de commande (ils sont installés automatiquement lorsque vous exécutez clang pour la première fois, ou manuellement en exécutant xcode-select --install )
Compilation YCM avec un support sémantique pour les langues en c .
 cd ~/.vim/bundle/YouCompleteMe
./install.py --clangd-completer
Compilation YCM sans support sémantique pour les langues de famille C:
 cd ~/.vim/bundle/YouCompleteMe
./install.py
Les options de support linguistique supplémentaires suivantes sont disponibles:
--cs-completer lorsque vous appelez install.py .--go-completer lors de l'appel install.py .--ts-completer lors de l'appel install.py .--rust-completer lors de l'appel install.py .--java-completer lors de l'appel install.py . Pour simplement compiler avec tout ce qui est activé, il y a un --all le drapeau. Ainsi, pour installer avec toutes les fonctionnalités linguistiques, assurez-vous que les outils xbuild , go , node et npm sont installés et sur votre PATH , puis exécutez simplement:
 cd ~/.vim/bundle/YouCompleteMe
./install.py --all
C'est ça. Vous avez terminé. Reportez-vous à la section Guide de l'utilisateur sur la façon d'utiliser YCM. N'oubliez pas que si vous voulez que le moteur d'achèvement sémantique C-Family fonctionne, vous devrez fournir les drapeaux de compilation pour votre projet à YCM. Tout est dans le guide de l'utilisateur.
YCM est livré avec des défauts sains pour ses options, mais vous pouvez toujours jeter un œil à ce qui est disponible pour la configuration. Il existe quelques options intéressantes qui sont désactivées de manière conservatrice par défaut que vous voudrez peut-être s'allumer.
Ce qui suit suppose que vous utilisez Ubuntu 24.04.
apt install build-essential cmake vim-nox python3-dev
apt install mono-complete golang nodejs openjdk-17-jdk openjdk-17-jre npm
 cd ~/.vim/bundle/YouCompleteMe
python3 install.py --all
Ces instructions (utilisant install.py ) sont le moyen le plus rapide d'installer YouCompleteMe, mais ils peuvent ne pas fonctionner pour tout le monde. Si les instructions suivantes ne fonctionnent pas pour vous, consultez le guide d'installation complet.
Assurez-vous d'avoir une version prise en charge de VIM avec le support Python 3 et un compilateur pris en charge. Le dernier LTS d'Ubuntu est la plate-forme minimale pour une installation simple. Pour les versions antérieures ou d'autres distributions, vous devrez peut-être faire un certain travail pour acquérir les dépendances.
Si votre version VIM est trop ancienne, vous devrez peut-être compiler VIM à partir de Source (ne vous inquiétez pas, c'est facile).
Installez YouCompleteMe avec Vundle.
N'oubliez pas: YCM est un plugin avec un composant compilé. Si vous mettez à jour YCM à l'aide de Vundle et que les API de la bibliothèque ycm_core ont changé (ce qui se produit rarement), YCM vous informera de le recompiler. Vous devez ensuite relancer le processus d'installation.
Installer des outils de développement, des en-têtes Cmake et Python:
sudo dnf install cmake gcc-c++ make python3-devel
sudo apt install build-essential cmake3 python3-dev
Compilation YCM avec un support sémantique pour les langues en c .
 cd ~/.vim/bundle/YouCompleteMe
python3 install.py --clangd-completer
Compilation YCM sans support sémantique pour les langues de famille C:
 cd ~/.vim/bundle/YouCompleteMe
python3 install.py
Les options de support linguistique supplémentaires suivantes sont disponibles:
--cs-completer lors de l'appel install.py .--go-completer lors de l'appel install.py .--ts-completer lors de l'appel install.py .--rust-completer lors de l'appel install.py .--java-completer lors de l'appel install.py . Pour simplement compiler avec tout ce qui est activé, il y a un --all le drapeau. Ainsi, pour installer avec toutes les fonctionnalités linguistiques, assurez-vous que les outils xbuild , go , node et npm sont installés et sur votre PATH , puis exécutez simplement:
 cd ~/.vim/bundle/YouCompleteMe
python3 install.py --all
C'est ça. Vous avez terminé. Reportez-vous à la section Guide de l'utilisateur sur la façon d'utiliser YCM. N'oubliez pas que si vous voulez que le moteur d'achèvement sémantique C-Family fonctionne, vous devrez fournir les drapeaux de compilation pour votre projet à YCM. Tout est dans le guide de l'utilisateur.
YCM est livré avec des défauts sains pour ses options, mais vous pouvez toujours jeter un œil à ce qui est disponible pour la configuration. Il existe quelques options intéressantes qui sont désactivées de manière conservatrice par défaut que vous voudrez peut-être s'allumer.
 cd YouCompleteMe
python3 install.py --all
set encoding=utf-8 à votre VIMRC Ces instructions (utilisant install.py ) sont le moyen le plus rapide d'installer YouCompleteMe, mais ils peuvent ne pas fonctionner pour tout le monde. Si les instructions suivantes ne fonctionnent pas pour vous, consultez le guide d'installation complet.
Important: nous supposons que vous utilisez l'invite de commande cmd.exe et que vous savez comment ajouter un exécutable à la variable d'environnement de chemin.
Assurez-vous d'avoir une version VIM prise en charge avec la prise en charge de Python 3. Vous pouvez vérifier la version et quel python est pris en charge en tapant :version à l'intérieur de VIM. Regardez les fonctionnalités incluses: +python3/dyn pour Python 3. Prenez note de l'architecture VIM, IE 32 ou 64 bits. Il sera important lors du choix du programme d'installation Python. Nous vous recommandons d'utiliser un client 64 bits. Les installateurs quotidiens mis à jour de 32 bits et 64 bits VIM avec une prise en charge Python 3 sont disponibles.
Ajoutez la ligne suivante à votre VIMRC si ce n'est pas déjà présent.:
set encoding = utf - 8 Cette option est requise par YCM. Notez que cela ne vous empêche pas de modifier un fichier dans un autre encodage que UTF-8. Vous pouvez le faire en spécifiant l'argument ++enc à la commande :e .
Installez YouCompleteMe avec Vundle.
N'oubliez pas: YCM est un plugin avec un composant compilé. Si vous mettez à jour YCM à l'aide de Vundle et que les API de la bibliothèque ycm_core ont changé (se produit rarement), YCM vous informera de le recompiler. Vous devez ensuite relancer le processus d'installation.
Téléchargez et installez le logiciel suivant:
:version et regardez le bas de la page sur la liste des drapeaux du compilateur. Recherchez des drapeaux qui ressemblent à -DDYNAMIC_PYTHON3_DLL="python36.dll" . Cela indique que VIM recherche Python 3.6. Vous aurez besoin de l'un ou de l'autre installé, correspondant exactement au numéro de version.Compilation YCM avec un support sémantique pour les langues de famille C à travers Clangd :
 cd %USERPROFILE%/vimfiles/bundle/YouCompleteMe
python install.py --clangd-completer
Compilation YCM sans support sémantique pour les langues de famille C:
 cd %USERPROFILE%/vimfiles/bundle/YouCompleteMe
python install.py
Les options de support linguistique supplémentaires suivantes sont disponibles:
--cs-completer lors de l'appel install.py . Assurez-vous que msbuild Utility Build est sur votre chemin.--go-completer lors de l'appel install.py .--ts-completer lors de l'appel install.py .--rust-completer lors de l'appel install.py .--java-completer lors de l'appel install.py . Pour simplement compiler avec tout ce qui est activé, il y a un --all le drapeau. Ainsi, pour installer avec toutes les fonctionnalités linguistiques, assurez-vous que les outils msbuild , go , node et npm sont installés et sur votre PATH , puis exécutez simplement:
 cd %USERPROFILE%/vimfiles/bundle/YouCompleteMe
python install.py --all
Vous pouvez spécifier la version Microsoft Visual C ++ (MSVC) à l'aide de l'option --msvc . YCM soutient officiellement MSVC 15 (2017), MSVC 16 (Visual Studio 2019) et MSVC 17 (Visual Studio 17 2022).
C'est ça. Vous avez terminé. Reportez-vous à la section Guide de l'utilisateur sur la façon d'utiliser YCM. N'oubliez pas que si vous voulez que le moteur d'achèvement sémantique C-Family fonctionne, vous devrez fournir les drapeaux de compilation pour votre projet à YCM. Tout est dans le guide de l'utilisateur.
YCM est livré avec des défauts sains pour ses options, mais vous pouvez toujours jeter un œil à ce qui est disponible pour la configuration. Il existe quelques options intéressantes qui sont désactivées de manière conservatrice par défaut que vous voudrez peut-être s'allumer.
Le guide d'installation complet a été déplacé vers le wiki.
GoTo , etc.)GoToAlternateFileGoToSymbol ), avec une recherche interactiveGoToDocumentOutline ), avec recherche interactiveGetDoc )GetType )FixIt )FixIt )GoToReferences )RefactorRename <new name> )Format )GoTo , etc.)GoToImplementation )GoToSymbol ), avec une recherche interactiveGetDoc )GetType )FixIt )FixIt )RefactorRename <new name> )Format )GoTo )GoToSymbol ), avec une recherche interactiveGoToReferences )GetDoc )GetType )RefactorRename <new name> )GoTo , etc.)GoToType )GoToImplementation )GoToDocumentOutline ), avec recherche interactiveFixIt )FixIt )GetDoc )GetType )Format )goplsGoTo , GoToDefinition et GoToDeclaration sont identiques)GoToType )GoToImplementation )GoToSymbol ), avec une recherche interactiveGoToReferences )GetDoc )GetType )FixIt )FixIt )RefactorRename <new name> )Format )OrganizeImports )TSServerGoTo , etc.)GoToImplementation )GoToReferences )GoToDocumentOutline ), avec recherche interactiveGetDoc )FixIt )FixIt )GetType )RefactorRename <new name> )Format )rust-analyzerGoTo , GoToDefinition et GoToDeclaration sont identiques)GoToType )GoToImplementation )GoToSymbol ), avec une recherche interactiveGoToReferences )GoToDocumentOutline ), avec recherche interactiveGetDoc )GetType )FixIt )RefactorRename <new name> )Format )OrganizeImports )ExecuteCommand <args> )jdt.lsSi les compléments offerts sont trop larges, continuez à taper des caractères; YCM continuera à affiner les compléments offerts en fonction de votre contribution.
Le filtrage est "Smart-Case" et "Smart-diacritic" sensible; Si vous tapez uniquement des lettres minuscules, alors elle est insensible à la casse. Si votre entrée contient des lettres majuscules, les lettres majuscules de votre requête doivent correspondre aux lettres majuscules dans les chaînes d'achèvement (les lettres minuscules correspondent toujours aux deux). En plus de cela, une lettre sans marques diacritiques correspondra à cette lettre avec ou sans marques:
| matchs | foo | fôo | foo | fôo |
|---|---|---|---|---|
| foo | ✔️ | ✔️ | ✔️ | ✔️ |
| fôo | ✔️ | ✔️ | ||
| foo | ✔️ | ✔️ | ||
| fôo | ✔️ |
Utilisez la touche Tab pour accepter une réalisation et continuez à appuyer sur l'onglet pour parcourir les compléments. Utilisez le tour de quart pour faire du vélo vers l'arrière. Notez que si vous utilisez Console VIM (c'est-à-dire pas GVIM ou MacVIM), il est probable que la liaison de la tab de décalage ne fonctionnera pas car la console ne le passera pas à VIM. Vous pouvez remapper les clés; Voir la section Options ci-dessous.
Connaître un peu le fonctionnement de YCM en interne empêchera la confusion. YCM dispose de plusieurs moteurs d'achèvement: un complexe basé sur l'identifiant qui collecte tous les identifiants dans le fichier actuel et autres fichiers que vous visitez (et vos fichiers de balises) et les recherche lorsque vous tapez (les identifiants sont placés dans des groupes par filetype).
Il existe également plusieurs moteurs sémantiques en YCM. Il existe des accomplissants basés sur LibClang et basés sur Clangd qui fournissent l'achèvement sémantique pour les langues de la famille C. Il y a un complet basé sur des Jedi pour l'achèvement sémantique pour Python. Il existe également un complexe basé sur omnifunc qui utilise des données du système omniconcomplet de VIM pour fournir des compléments sémantiques lorsqu'aucun complexe natif n'existe pour cette langue dans YCM.
Il existe également d'autres moteurs d'achèvement, comme le final UltiSnips et le Filepath Emlever.
YCM détecte automatiquement quel moteur d'achèvement serait le meilleur dans toute situation. À l'occasion, il en interroge plusieurs à la fois, fusionne les sorties et vous présente les résultats.
YCM a une architecture client-serveur; La partie VIM de YCM n'est qu'un client mince qui parle au serveur YCMD HTTP + JSON qui a la grande majorité de la logique et de la fonctionnalité YCM. Le serveur est démarré et arrêté automatiquement lorsque vous commencez et arrêtez VIM.
Le filtre de la sous-séquence supprime tous les compléments qui ne correspondent pas à l'entrée, mais le système de tri entre en jeu. Il est en fait très compliqué et utilise beaucoup de facteurs, mais il suffit de dire que les correspondances de personnages de la "limite de mot" (WB) sont "vaut" "Plus que les matchs non-WB. En effet, cela signifie que, étant donné une entrée de "GUA", l'achèvement "GetUserAccount" serait classé plus haut dans la liste que l'achèvement "Fooguxa" (qui sont tous deux des matchs de sous-séquence). Les caractères limités de mots sont tous des caractères de capital, des caractères précédés d'un soulignement et du premier caractère de lettre dans la chaîne d'achèvement.
Les signatures valides sont affichées dans un deuxième menu contextuel et la signature actuelle est mise en évidence avec l'argument actuel.
L'aide de signature est déclenchée en mode insert automatiquement lorsque g:ycm_auto_trigger est activé et n'est pas pris en charge lorsqu'il n'est pas activé.
La fenêtre contextuelle des signatures est masquée lorsqu'il n'y a pas de signatures correspondantes ou lorsque vous quittez le mode d'insertion. Si vous souhaitez contrôler manuellement lorsqu'il est visible, vous pouvez cartographier quelque chose pour <plug>YCMToggleSignatureHelp (voir ci-dessous).
Pour plus de détails sur cette fonctionnalité et quelques démos, consultez le RP qui l'a proposé.
La popup d'aide à la signature gêne parfois. Vous pouvez basculer sa visibilité avec une cartographie. YCM fournit le mappage "Plug" <Plug>(YCMToggleSignatureHelp) pour cela.
Par exemple, pour masquer / afficher la popup d'aide de signature en appuyant sur Ctrl + L en mode insert: imap <silent> <Cl> <Plug>(YCMToggleSignatureHelp) .
Remarque : aucun mappage par défaut n'est fourni car les mappages d'insert sont très difficiles à créer sans casser ou remplacer certaines fonctionnalités existantes. Ctrl-l n'est pas une suggestion, juste un exemple.
La mise en évidence sémantique est le processus où le texte tampon est coloré en fonction du type sémantique sous-jacent du mot, plutôt que de la syntaxe classique en surbrillance basée sur des expressions régulières. Cela peut être de puissantes données supplémentaires que nous pouvons traiter très rapidement.
Cette fonctionnalité n'est prise en charge que dans VIM.
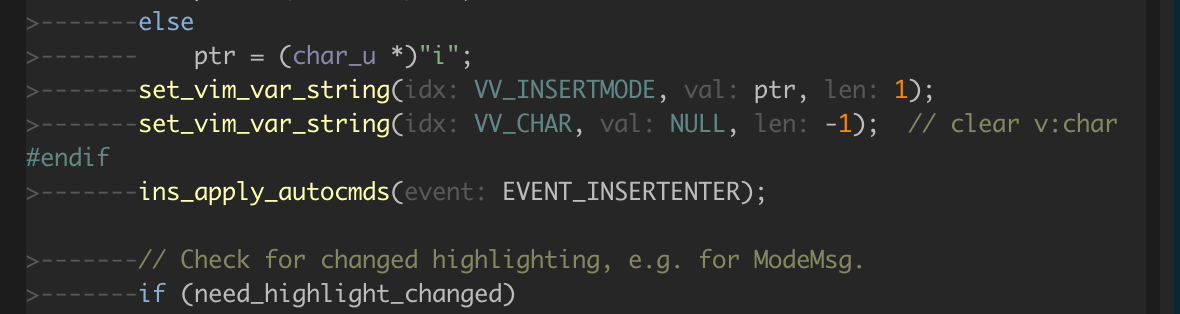
Par exemple, voici une fonction avec une mise en évidence classique:
Et voici la même fonction avec la mise en évidence sémantique:
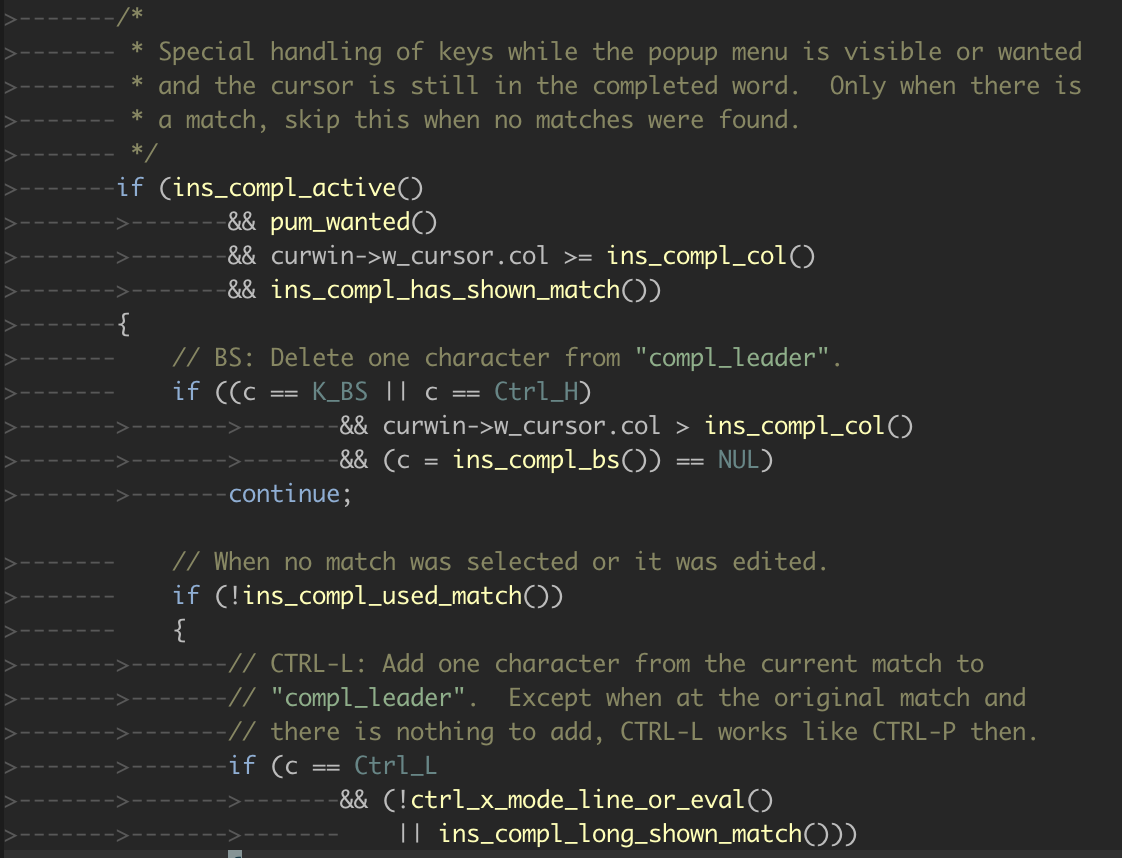
Comme vous pouvez le voir, les appels de fonction, les macros, etc. sont correctement identifiés.
Cela peut être activé globalement avec let g:ycm_enable_semantic_highlighting=1 ou par tampon, en définissant b:ycm_enable_semantic_highlighting .
YCM utilise les propriétés du texte (voir :help text-prop-intro ) pour la mise en évidence sémantique. Afin de personnaliser la coloration, vous pouvez définir les propriétés du texte utilisées.
Si vous définissez une propriété de texte nommée YCM_HL_<token type> , elle sera utilisée à la place des valeurs par défaut. Le type <token type> est défini comme le type de jeton sémantique protocole de serveur de langue, défini dans la spécification LSP.
Certains serveurs utilisent également des valeurs personnalisées. Dans ce cas, YCM imprime un avertissement comprenant le nom de type de jeton que vous pouvez personnaliser.
Par exemple, pour rendre les jetons parameter à l'aide du groupe de surbrillance Normal , vous pouvez le faire:
call prop_type_add ( ' YCM_HL_parameter ' , { ' highlight ' : ' Normal ' } )Plus généralement, ce modèle peut être utile pour personnaliser les groupes:
 let MY_YCM_HIGHLIGHT_GROUP = {
         ' typeParameter ' : ' PreProc ' ,
         ' parameter ' : ' Normal ' ,
         ' variable ' : ' Normal ' ,
         ' property ' : ' Normal ' ,
         ' enumMember ' : ' Normal ' ,
         ' event ' : ' Special ' ,
         ' member ' : ' Normal ' ,
         ' method ' : ' Normal ' ,
         ' class ' : ' Special ' ,
         ' namespace ' : ' Special ' ,
       }

for tokenType in keys ( MY_YCM_HIGHLIGHT_GROUP )
  call prop_type_add ( ' YCM_HL_ ' . tokenType,
                     { ' highlight ' : MY_YCM_HIGHLIGHT_GROUP[ tokenType ] } )
endfor Remarque : caractéristique hautement expérimentale, nécessitant VIM 9.0.214 ou version ultérieure (non prise en charge dans Neovim).
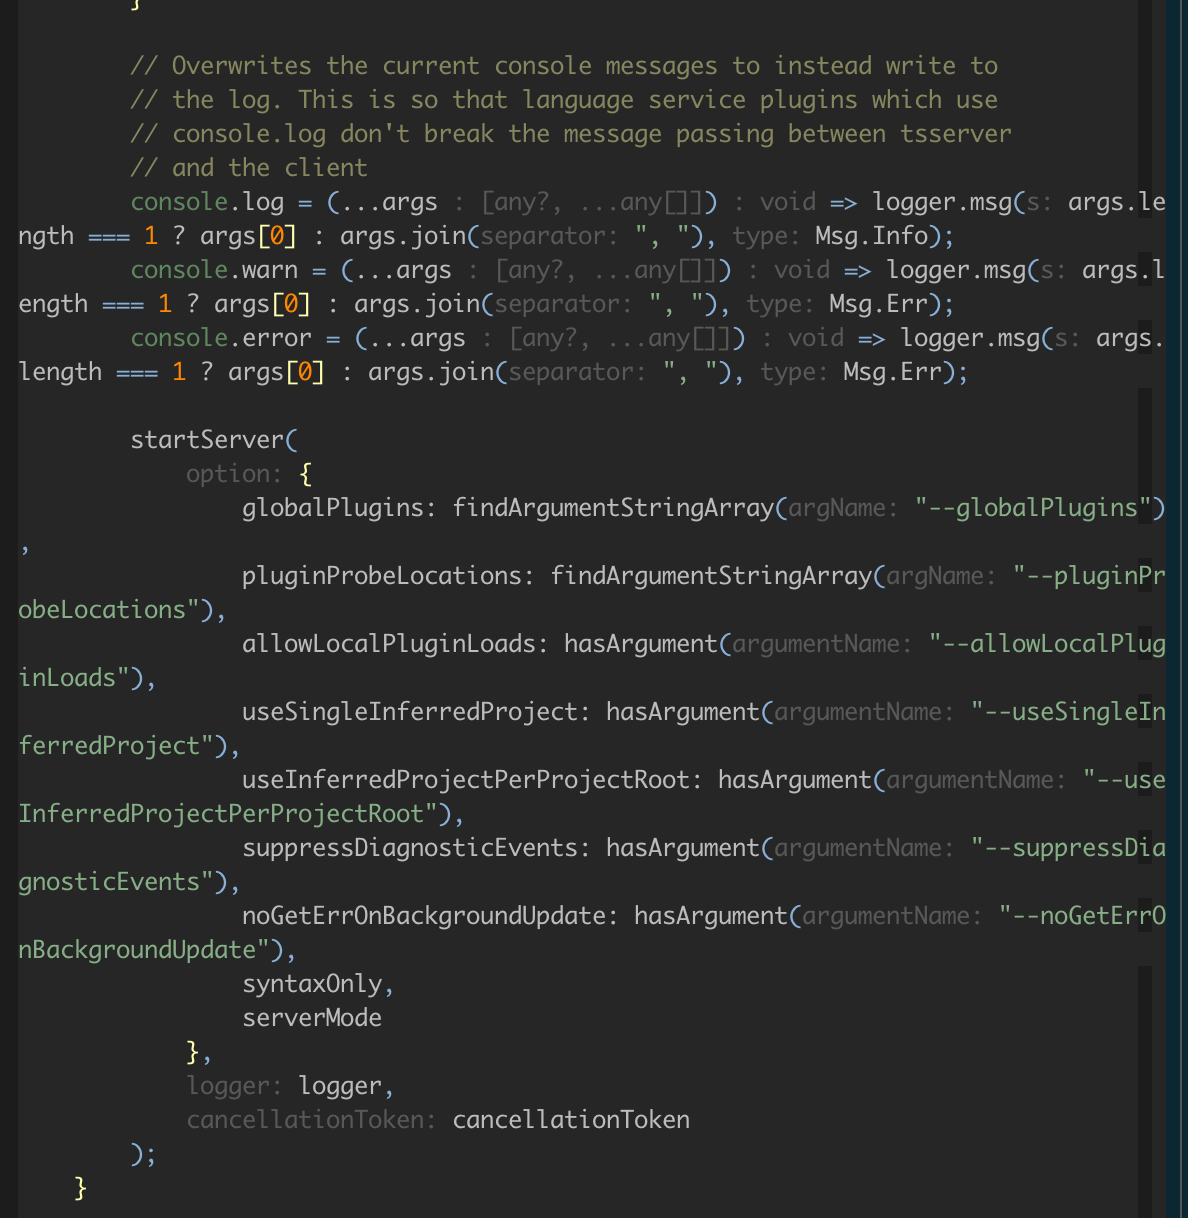
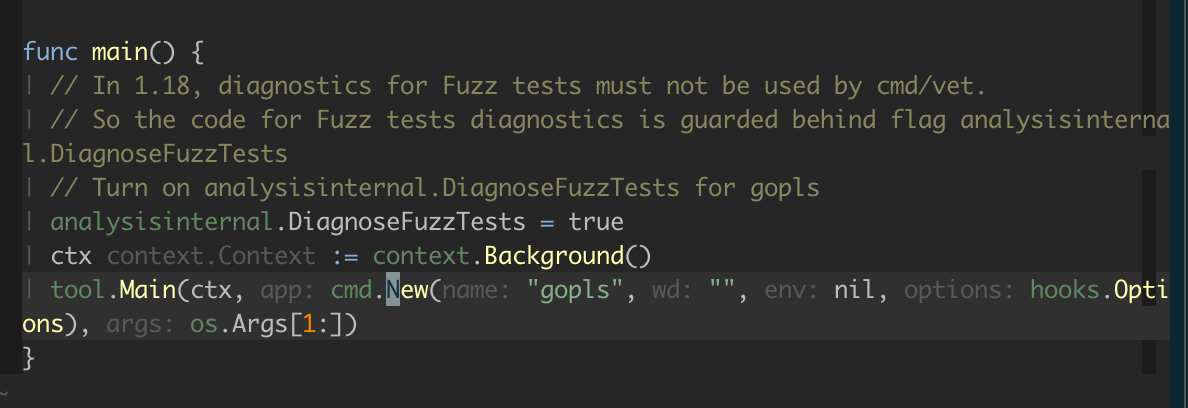
Lorsque g:ycm_enable_inlay_hints (globalement) ou b:ycm_enable_inlay_hints (pour un tampon spécifique) est défini sur 1 , alors ycm inséra des indices d'incrustation comme le soutient le moteur sémantique linguistique.
Un indice d'incrustation est un texte rendu sur l'écran qui ne fait pas partie du tampon et est souvent utilisé pour marquer le type ou le nom des arguments, des paramètres, etc. qui aident le développeur à comprendre la sémantique du code.
Voici quelques exemples:
Par défaut, YCM rend les indices d'incrustation avec le groupe de surbrillance NonText . Pour remplacer cela, définissez le mettant en évidence YcmInlayHint , par exemple dans votre .vimrc :
hi link YcmInlayHint CommentSemblable à la mise en évidence sémantique ci-dessus, vous pouvez remplacer la surbrillance spécifique pour différents types d'indices d'incrustation en définissant les propriétés de texte nommées d'après le type d'indice d'incrustation, par exemple:
call prop_type_add ( ' YCM_INLAY_Type ' , #{ highlight : ' Comment ' } ) La liste des types d'inscription d'incorage peut être trouvée dans python/ycm/inlay_hints.py
g:ycm_enable_inlay_hints ou b:ycm_enable_inlay_hints - activer / désactiver à l'échelle mondiale ou pour un tampon localg:ycm_clear_inlay_hints_in_insert_mode - Réglez sur 1 pour supprimer tous les astuces d'incrustation lors de la saisie du mode d'insertion et réintégrez-les lorsque vous sortez du mode d'insertion Les indices d'incrustation peuvent ajouter beaucoup de texte à l'écran et peuvent être distrayants. Vous pouvez les basculer instantanément sur / éteindre, en mappant quelque chose à <Plug>(YCMToggleInlayHints) , par exemple:
nnoremap <silent> <localleader> h <Plug> (YCMToggleInlayHints)Aucun mappage par défaut n'est fourni pour cela en raison de la nature personnelle des mappages.
Vous pouvez utiliser l'espace Ctrl + pour déclencher les suggestions d'achèvement n'importe où, même sans préfixe de chaîne. Ceci est utile pour voir quelles fonctions de niveau supérieur sont disponibles pour une utilisation.
Remarque: YCM a initialement utilisé le moteur à base libclang pour la famille C, mais les utilisateurs doivent migrer vers Clangd, car il offre plus de fonctionnalités et de meilleures performances. Les utilisateurs qui comptent sur override_filename dans leur .ycm_extra_conf.py devront rester sur l'ancien moteur libclang . Des instructions sur la façon de rester sur l'ancien moteur sont disponibles sur le wiki.
Certaines des caractéristiques de Clangd:
#include insertions for those items. On supported architectures, the install.py script will download a suitable clangd ( --clangd-completer ) or libclang ( --clang-completer ) for you. Supported architectures are:
clangd :
Typically, clangd is installed by the YCM installer (either with --all or with --clangd-completer ). This downloads a pre-built clangd binary for your architecture. If your OS or architecture is not supported or is too old, you can install a compatible clangd and use g:ycm_clangd_binary_path to point to it.
libclang :
libclang can be enabled also with --all or --clang-completer . As with clangd , YCM will try and download a version of libclang that is suitable for your environment, but again if your environment can't be supported, you can build or acquire libclang for yourself and specify it when building, as:
$ EXTRA_CMAKE_ARGS='-DPATH_TO_LLVM_ROOT=/path/to/your/llvm' ./install.py --clang-completer --system-libclang
Please note that if using custom clangd or libclang it must match the version that YCM requires. Currently YCM requires clang 17.0.1 .
In order to perform semantic analysis such as code completion, GoTo , and diagnostics, YouCompleteMe uses clangd , which makes use of clang compiler, sometimes also referred to as LLVM. Like any compiler, clang also requires a set of compile flags in order to parse your code. Simply put: If clang can't parse your code, YouCompleteMe can't provide semantic analysis.
There are 2 methods that can be used to provide compile flags to clang:
The easiest way to get YCM to compile your code is to use a compilation database. A compilation database is usually generated by your build system (eg CMake ) and contains the compiler invocation for each compilation unit in your project.
For information on how to generate a compilation database, see the clang documentation. En bref:
-DCMAKE_EXPORT_COMPILE_COMMANDS=ON when configuring (or add set( CMAKE_EXPORT_COMPILE_COMMANDS ON ) to CMakeLists.txt ) and copy or symlink the generated database to the root of your project.compdb tool ( -t compdb ) in its docs..ycm_extra_conf.py below. If no .ycm_extra_conf.py is found, YouCompleteMe automatically tries to load a compilation database if there is one.
YCM looks for a file named compile_commands.json in the directory of the opened file or in any directory above it in the hierarchy (recursively); when the file is found before a local .ycm_extra_conf.py , YouCompleteMe stops searching the directories and lets clangd take over and handle the flags.
If you don't have a compilation database or aren't able to generate one, you have to tell YouCompleteMe how to compile your code some other way.
Every C-family project is different. It is not possible for YCM to guess what compiler flags to supply for your project. Fortunately, YCM provides a mechanism for you to generate the flags for a particular file with arbitrary complexity . This is achieved by requiring you to provide a Python module that implements a trivial function that, given the file name as an argument, returns a list of compiler flags to use to compile that file.
YCM looks for a .ycm_extra_conf.py file in the directory of the opened file or in any directory above it in the hierarchy (recursively); when the file is found, it is loaded (only once!) as a Python module. YCM calls a Settings method in that module which should provide it with the information necessary to compile the current file. You can also provide a path to a global configuration file with the g:ycm_global_ycm_extra_conf option, which will be used as a fallback. To prevent the execution of malicious code from a file you didn't write YCM will ask you once per .ycm_extra_conf.py if it is safe to load. This can be disabled and you can white-/blacklist files. See the g:ycm_confirm_extra_conf and g:ycm_extra_conf_globlist options respectively.
This system was designed this way so that the user can perform any arbitrary sequence of operations to produce a list of compilation flags YCM should hand to Clang.
NOTE : It is highly recommended to include -x <language> flag to libclang. This is so that the correct language is detected, particularly for header files. Common values are -xc for C, -x c++ for C++, -x objc for Objective-C, and -x cuda for CUDA.
To give you an impression, if your C++ project is trivial, and your usual compilation command is: g++ -Wall -Wextra -Werror -o FILE.o FILE.cc , then the following .ycm_extra_conf.py is enough to get semantic analysis from YouCompleteMe:
 def Settings ( ** kwargs ):
  return {
    'flags' : [ '-x' , 'c++' , '-Wall' , '-Wextra' , '-Werror' ],
  }
As you can see from the trivial example, YCM calls the Settings method which returns a dictionary with a single element 'flags' . This element is a list of compiler flags to pass to libclang for the current file. The absolute path of that file is accessible under the filename key of the kwargs dictionary. C'est ça! This is actually enough for most projects, but for complex projects it is not uncommon to integrate directly with an existing build system using the full power of the Python language.
For a more elaborate example, see ycmd's own .ycm_extra_conf.py . You should be able to use it as a starting point . Don't just copy/paste that file somewhere and expect things to magically work; your project needs different flags . Hint: just replace the strings in the flags variable with compilation flags necessary for your project. That should be enough for 99% of projects.
You could also consider using YCM-Generator to generate the ycm_extra_conf.py file.
If Clang encounters errors when compiling the header files that your file includes, then it's probably going to take a long time to get completions. When the completion menu finally appears, it's going to have a large number of unrelated completion strings (type/function names that are not actually members). This is because Clang fails to build a precompiled preamble for your file if there are any errors in the included headers and that preamble is key to getting fast completions.
Call the :YcmDiags command to see if any errors or warnings were detected in your file.
Ensure that you have enabled the Java completer. See the installation guide for details.
Create a project file (gradle or maven) file in the root directory of your Java project, by following the instructions below.
(Optional) Configure the LSP server. The jdt.ls configuration options can be found in their codebase.
If you previously used Eclim or Syntastic for Java, disable them for Java.
Edit a Java file from your project.
In order to provide semantic analysis, the Java completion engine requires knowledge of your project structure. In particular, it needs to know the class path to use, when compiling your code. Fortunately jdt.ls supports eclipse project files, maven projects and gradle projects.
NOTE: Our recommendation is to use either Maven or Gradle projects.
The native support for Java includes YCM's native real-time diagnostics display. This can conflict with other diagnostics plugins like Syntastic, so when enabling Java support, please manually disable Syntastic Java diagnostics .
Add the following to your vimrc :
let g: syntastic_java_checkers = []The native support for Java includes YCM's native real-time diagnostics display. This can conflict with other diagnostics plugins like Eclim, so when enabling Java support, please manually disable Eclim Java diagnostics .
Add the following to your vimrc :
let g: EclimFileTypeValidate = 0 NOTE : We recommend disabling Eclim entirely when editing Java with YCM's native Java support. This can be done temporarily with :EclimDisable .
Eclipse-style projects require two files: .project and .classpath.
If your project already has these files due to previously being set up within Eclipse, then no setup is required. jdt.ls should load the project just fine (it's basically eclipse after all).
However, if not, it is possible (easy in fact) to craft them manually, though it is not recommended. You're better off using Gradle or Maven (see below).
A simple eclipse style project example can be found in the ycmd test directory. Normally all that is required is to copy these files to the root of your project and to edit the .classpath to add additional libraries, such as:
  < classpathentry kind = " lib " path = " /path/to/external/jar " />
  < classpathentry kind = " lib " path = " /path/to/external/java/source " />
It may also be necessary to change the directory in which your source files are located (paths are relative to the .project file itself):
< classpathentry kind = " src " output = " target/classes " path = " path/to/src/ " />NOTE : The eclipse project and classpath files are not a public interface and it is highly recommended to use Maven or Gradle project definitions if you don't already use Eclipse to manage your projects.
Maven needs a file named pom.xml in the root of the project. Once again a simple pom.xml can be found in the ycmd source.
The format of pom.xml files is way beyond the scope of this document, but we do recommend using the various tools that can generate them for you, if you're not familiar with them already.
Gradle projects require a build.gradle. Again, there is a trivial example in ycmd's tests.
The format of build.gradle files are way beyond the scope of this document, but we do recommend using the various tools that can generate them for you if you're not familiar with them already.
Some users have experienced issues with their jdt.ls when using the Groovy language for their build.gradle. As such, try using Kotlin instead.
If you're not getting completions or diagnostics, check the server health:
:YcmDebugInfo . Ensure that the following lines are present: -- jdt.ls Java Language Server running
-- jdt.ls Java Language Server Startup Status: Ready
:YcmToggleLogs . The jdt.ls log file is called .log (for some reason).If you get a message about "classpath is incomplete", then make sure you have correctly configured the project files.
If you get messages about unresolved imports, then make sure you have correctly configured the project files, in particular check that the classpath is set correctly.
YCM relies on OmniSharp-Roslyn to provide completion and code navigation. OmniSharp-Roslyn needs a solution file for a C# project and there are two ways of letting YCM know about your solution files.
YCM will scan all parent directories of the file currently being edited and look for a file with .sln extension.
If YCM loads .ycm_extra_conf.py which contains CSharpSolutionFile function, YCM will try to use that to determine the solution file. This is useful when one wants to override the default behaviour and specify a solution file that is not in any of the parent directories of the currently edited file. Exemple:
 def CSharpSolutionFile ( filepath ):
  # `filepath` is the path of the file user is editing
  return '/path/to/solution/file' # Can be relative to the `.ycm_extra_conf.py`
If the path returned by CSharpSolutionFile is not an actual file, YCM will fall back to the other way of finding the file.
YCM ships with older version of OmniSharp-Roslyn based on Mono runtime. It is possible to use it with .NET 6.0 and newer, but it requires manual setup.
g:ycm_roslyn_binary_path to the unpacked executable OmniSharpdotnet new sln at the root of your projectdotnet sln add <project1.csproj> <project2.csproj> ... for all of your projects:YcmRestartServer YCM relies on the Jedi engine to provide completion and code navigation. By default, it will pick the version of Python running the ycmd server and use its sys.path . While this is fine for simple projects, this needs to be configurable when working with virtual environments or in a project with third-party packages. The next sections explain how to do that.
A common practice when working on a Python project is to install its dependencies in a virtual environment and develop the project inside that environment. To support this, YCM needs to know the interpreter path of the virtual environment. You can specify it by creating a .ycm_extra_conf.py file at the root of your project with the following contents:
 def Settings ( ** kwargs ):
  return {
    'interpreter_path' : '/path/to/virtual/environment/python'
  }
Here, /path/to/virtual/environment/python is the path to the Python used by the virtual environment you are working in. Typically, the executable can be found in the Scripts folder of the virtual environment directory on Windows and in the bin folder on other platforms.
If you don't like having to create a .ycm_extra_conf.py file at the root of your project and would prefer to specify the interpreter path with a Vim option, read the Configuring through Vim options section.
Another common practice is to put the dependencies directly into the project and add their paths to sys.path at runtime in order to import them. YCM needs to be told about this path manipulation to support those dependencies. This can be done by creating a .ycm_extra_conf.py file at the root of the project. This file must define a Settings( **kwargs ) function returning a dictionary with the list of paths to prepend to sys.path under the sys_path key. For instance, the following .ycm_extra_conf.py adds the paths /path/to/some/third_party/package and /path/to/another/third_party/package at the start of sys.path :
 def Settings ( ** kwargs ):
  return {
    'sys_path' : [
      '/path/to/some/third_party/package' ,
      '/path/to/another/third_party/package'
    ]
  }
If you would rather prepend paths to sys.path with a Vim option, read the Configuring through Vim options section.
If you need further control on how to add paths to sys.path , you should define the PythonSysPath( **kwargs ) function in the .ycm_extra_conf.py file. Its keyword arguments are sys_path which contains the default sys.path , and interpreter_path which is the path to the Python interpreter. Here's a trivial example that inserts the /path/to/third_party/package path at the second position of sys.path :
 def PythonSysPath ( ** kwargs ):
  sys_path = kwargs [ 'sys_path' ]
  sys_path . insert ( 1 , '/path/to/third_party/package' )
  return sys_path
A more advanced example can be found in YCM's own .ycm_extra_conf.py .
You may find it inconvenient to have to create a .ycm_extra_conf.py file at the root of each one of your projects in order to set the path to the Python interpreter and/or add paths to sys.path and would prefer to be able to configure those through Vim options. Don't worry, this is possible by using the g:ycm_extra_conf_vim_data option and creating a global extra configuration file. Let's take an example. Suppose that you want to set the interpreter path with the g:ycm_python_interpreter_path option and prepend paths to sys.path with the g:ycm_python_sys_path option. Suppose also that you want to name the global extra configuration file global_extra_conf.py and that you want to put it in your HOME folder. You should then add the following lines to your vimrc:
 let g: ycm_python_interpreter_path = ' '
let g: ycm_python_sys_path = []
let g: ycm_extra_conf_vim_data = [
    ' g:ycm_python_interpreter_path ' ,
    ' g:ycm_python_sys_path '
  ]
let g: ycm_global_ycm_extra_conf = ' ~/global_extra_conf.py '
Then, create the ~/global_extra_conf.py file with the following contents:
 def Settings ( ** kwargs ):
  client_data = kwargs [ 'client_data' ]
  return {
    'interpreter_path' : client_data [ 'g:ycm_python_interpreter_path' ],
    'sys_path' : client_data [ 'g:ycm_python_sys_path' ]
  }
C'est ça. Vous avez terminé. Note that you don't need to restart the server when setting one of the options. YCM will automatically pick the new values.
YCM uses rust-analyzer for Rust semantic completion.
NOTE: Previously, YCM used rls for rust completion. This is no longer supported, as the Rust community has decided on rust-analyzer as the future of Rust tooling.
Completions and GoTo commands within the current crate and its dependencies should work out of the box with no additional configuration (provided that you built YCM with the --rust-completer flag; see the Installation section for details). The install script takes care of installing the Rust source code, so no configuration is necessary.
rust-analyzer supports a myriad of options. These are configured using LSP configuration, and are documented here.
Completions and GoTo commands should work out of the box (provided that you built YCM with the --go-completer flag; see the Installation section for details). The server only works for projects with the "canonical" layout.
gopls also has a load of documented options.
You can set these in your .ycm_extra_conf.py . For example, to set the build tags:
 def Settings ( ** kwargs ):
  if kwargs [ 'language' ] == 'go' :
    return {
       'ls' : {
         'build.buildFlags' : [ '-tags=debug' ] }
       }
} NOTE: YCM originally used the Tern engine for JavaScript but due to Tern not being maintained anymore by its main author and the TSServer engine offering more features, YCM is moving to TSServer. This won't affect you if you were already using Tern but you are encouraged to do the switch by deleting the third_party/ycmd/third_party/tern_runtime/node_modules directory in YCM folder. If you are a new user but still want to use Tern, you should pass the --js-completer option to the install.py script during installation. Further instructions on how to set up YCM with Tern are available on the wiki.
All JavaScript and TypeScript features are provided by the TSServer engine, which is included in the TypeScript SDK. To enable these features, install Node.js 18+ and npm and call the install.py script with the --ts-completer flag.
TSServer relies on the jsconfig.json file for JavaScript and the tsconfig.json file for TypeScript to analyze your project. Ensure the file exists at the root of your project.
To get diagnostics in JavaScript, set the checkJs option to true in your jsconfig.json file:
{
    "compilerOptions" : {
        "checkJs" : true
    }
}C-family, C#, Go, Java, Python, Rust, and JavaScript/TypeScript languages are supported natively by YouCompleteMe using the Clang, OmniSharp-Roslyn, Gopls, jdt.ls, Jedi, rust-analyzer, and TSServer engines, respectively. Check the installation section for instructions to enable these features if desired.
Similar to other LSP clients, YCM can use an arbitrary LSP server with the help of g:ycm_language_server option. An example of a value of this option would be:
 let g: ycm_language_server =
   [
     {
       ' name ' : ' yaml ' ,
       ' cmdline ' : [ ' /path/to/yaml/server/yaml-language-server ' , ' --stdio ' ],
       ' filetypes ' : [ ' yaml ' ]
     },
     {
       ' name ' : ' csharp ' ,
       ' cmdline ' : [ ' OmniSharp ' , ' -lsp ' ],
       ' filetypes ' : [ ' csharp ' ],
       ' project_root_files ' : [ ' *.csproj ' , ' *.sln ' ]
     },
     {
       ' name ' : ' godot ' ,
       ' filetypes ' : [ ' gdscript ' ],
       ' port ' : 6008 ,
       ' project_root_files ' : [ ' project.godot ' ]
      }
   ]
Each dictionary contains the following keys:
name (string, mandatory): When configuring a LSP server the value of the name key will be used as the kwargs[ 'language' ] . Can be anything you like.filetypes (list of string, mandatory): List of Vim filetypes this server should be used for.project_root_files (list of string, optional): List of filenames to search for when trying to determine the project's root. Uses python's pathlib for glob matching.cmdline (list of strings, optional): If supplied, the server is started with this command line (each list element is a command line word). Typically, the server should be started with STDIO communication. If not supplied, port must be supplied.port (number, optional): If supplied, ycmd will connect to the server at localhost:<port> using TCP (remote servers are not supported).capabilities (dict, optional): If supplied, this is a dictionary that is merged with the LSP client capabilities reported to the language server. This can be used to enable or disable certain features, such as the support for configuration sections ( workspace/configuration ).See the LSP Examples project for more examples of configuring the likes of PHP, Ruby, Kotlin, and D.
Many LSP servers allow some level of user configuration. YCM enables this with the help of .ycm_extra_conf.py files. Here's an example of jdt.ls user examples of configuring the likes of PHP, Ruby, Kotlin, D, and many, many more.
 def Settings ( ** kwargs ):
  if kwargs [ 'language' ] == 'java' :
    return {
      'ls' : {
        'java.format.onType.enabled' : True
      }
    }
The ls key tells YCM that the dictionary should be passed to the LSP server. For each of the LSP server's configuration, you should look up the respective server's documentation.
Some servers request settings from arbitrary 'sections' of configuration. There is no concept of configuration sections in Vim, so you can specify an additional config_sections dictionary which maps section to a dictionary of config required by the server. Par exemple:
 def Settings ( ** kwargs ):
  if kwargs [ 'language' ] == 'java' :
    return {
      'ls' : {
        'java.format.onType.enabled' : True
      },
      'config_sections' : {
        'some section' : {
          'some option' : 'some value'
        }
    }
The sections and options/values are completely server-specific and rarely well documented.
omnifunc for semantic completion YCM will use your omnifunc (see :h omnifunc in Vim) as a source for semantic completions if it does not have a native semantic completion engine for your file's filetype. Vim comes with rudimentary omnifuncs for various languages like Ruby, PHP, etc. It depends on the language.
You can get a stellar omnifunc for Ruby with Eclim. Just make sure you have the latest Eclim installed and configured (this means Eclim >= 2.2.* and Eclipse >= 4.2.* ).
After installing Eclim remember to create a new Eclipse project within your application by typing :ProjectCreate <path-to-your-project> -n ruby inside Vim and don't forget to have let g:EclimCompletionMethod = 'omnifunc' in your vimrc. This will make YCM and Eclim play nice; YCM will use Eclim's omnifuncs as the data source for semantic completions and provide the auto-triggering and subsequence-based matching (and other YCM features) on top of it.
You have two options here: writing an omnifunc for Vim's omnicomplete system that YCM will then use through its omni-completer, or a custom completer for YCM using the Completer API.
Here are the differences between the two approaches:
If you want to use the omnifunc system, see the relevant Vim docs with :h complete-functions . For the Completer API, see the API docs.
If you want to upstream your completer into YCM's source, you should use the Completer API.
YCM will display diagnostic notifications for the C-family, C#, Go, Java, JavaScript, Rust, and TypeScript languages. Since YCM continuously recompiles your file as you type, you'll get notified of errors and warnings in your file as fast as possible.
Here are the various pieces of the diagnostic UI:
gvim and a red background in vim ).The new diagnostics (if any) will be displayed the next time you press any key on the keyboard. So if you stop typing and just wait for the new diagnostics to come in, that will not work . You need to press some key for the GUI to update.
Having to press a key to get the updates is unfortunate, but cannot be changed due to the way Vim internals operate; there is no way that a background task can update Vim's GUI after it has finished running. You have to press a key. This will make YCM check for any pending diagnostics updates.
You can force a full, blocking compilation cycle with the :YcmForceCompileAndDiagnostics command (you may want to map that command to a key; try putting nnoremap <F5> :YcmForceCompileAndDiagnostics<CR> in your vimrc). Calling this command will force YCM to immediately recompile your file and display any new diagnostics it encounters. Do note that recompilation with this command may take a while and during this time the Vim GUI will be blocked.
YCM will display a short diagnostic message when you move your cursor to the line with the error. You can get a detailed diagnostic message with the <leader>d key mapping (can be changed in the options) YCM provides when your cursor is on the line with the diagnostic.
You can also see the full diagnostic message for all the diagnostics in the current file in Vim's locationlist , which can be opened with the :lopen and :lclose commands (make sure you have set let g:ycm_always_populate_location_list = 1 in your vimrc). A good way to toggle the display of the locationlist with a single key mapping is provided by another (very small) Vim plugin called ListToggle (which also makes it possible to change the height of the locationlist window), also written by yours truly.
You can change the styling for the highlighting groups YCM uses. For the signs in the Vim gutter, the relevant groups are:
YcmErrorSign , which falls back to group SyntasticErrorSign and then error if they existYcmWarningSign , which falls back to group SyntasticWarningSign and then todo if they existYou can also style the line that has the warning/error with these groups:
YcmErrorLine , which falls back to group SyntasticErrorLine if it existsYcmWarningLine , which falls back to group SyntasticWarningLine if it exists Finally, you can also style the popup for the detailed diagnostics (it is shown if g:ycm_show_detailed_diag_in_popup is set) using the group YcmErrorPopup , which falls back to ErrorMsg .
Note that the line highlighting groups only work when the g:ycm_enable_diagnostic_signs option is set. If you want highlighted lines but no signs in the Vim gutter, set the signcolumn option to no in your vimrc:
set signcolumn = noThe syntax groups used to highlight regions of text with errors/warnings:
YcmErrorSection , which falls back to group SyntasticError if it exists and then SpellBadYcmWarningSection , which falls back to group SyntasticWarning if it exists and then SpellCapHere's how you'd change the style for a group:
highlight YcmErrorLine guibg = # 3 f0000This feature requires Vim and is not supported in Neovim
YCM provides a way to search for and jump to a symbol in the current project or document when using supported languages.
You can search for symbols in the current workspace when the GoToSymbol request is supported and the current document when GoToDocumentOutline is supported.
Here's a quick demo:
As you can see, you can type and YCM filters down the list as you type. The current set of matches are displayed in a popup window in the centre of the screen and you can select an entry with the keyboard, to jump to that position. Any matches are then added to the quickfix list.
To enable:
nmap <something> <Plug>(YCMFindSymbolInWorkspace)nmap <something> <Plug>(YCMFindSymbolInDocument)par exemple
nmap <leader>yfw <Plug>(YCMFindSymbolInWorkspace)nmap <leader>yfd <Plug>(YCMFindSymbolInDocument) When searching, YCM opens a prompt buffer at the top of the screen for the input and puts you in insert mode. This means that you can hit <Esc> to go into normal mode and use any other input commands that are supported in prompt buffers. As you type characters, the search is updated.
Initially, results are queried from all open filetypes. You can hit <Cf> to switch to just the current filetype while the popup is open.
While the popup is open, the following keys are intercepted:
<Cj> , <Down> , <Cn> , <Tab> - select the next item<Ck> , <Up> , <Cp> , <S-Tab> - select the previous item<PageUp> , <kPageUp> - jump up one screenful of items<PageDown> , <kPageDown> - jump down one screenful of items<Home> , <kHome> - jump to first item<End> , <kEnd> - jump to last item<CR> - jump to the selected item<Cc> cancel/dismiss the popup<Cf> - toggle results from all file types or just the current filetype The search is also cancelled if you leave the prompt buffer window at any time, so you can use window commands <Cw>... for example.
NOTE : Pressing <Esc> does not close the popup - you must use Ctrl-c for that, or use a window command (eg <Ctrl-w>j ) or the mouse to leave the prompt buffer window.
This feature requires Vim and is not supported in Neovim
NOTE : This feature is highly experimental and offered in the hope that it is useful. Please help us by reporting issues and offering feedback.
YCM provides a way to view and navigate hierarchies. The following hierarchies are supported:
<Plug>(YCMTypeHierarchy) : Display subtypes and supertypes of the symbol under cursor. Expand down to subtypes and up to supertypes.<Plug>(YCMCallHierarchy) : Display callees and callers of the symbol under cursor. Expand down to callers and up to callees.Take a look at this for brief demo.
Hierarchy UI can be initiated by mapping something to the indicated plug mappings, for example:
 nmap <leader> yth <Plug> (YCMTypeHierarchy)
nmap <leader> ych <Plug> (YCMCallHierarchy)
This opens a "modal" popup showing the current element in the hierarchy tree. The current tree root is aligned to the left and child and parent nodes are expanded to the right. Expand the tree "down" with <Tab> and "up" with `.
The "root" of the tree can be re-focused to the selected item with <S-Tab> and further <S-Tab> will show the parents of the selected item. This can take a little getting used to, but it's particularly important with multiple inheritance where a "child" of the current root may actually have other, invisible, parent links. <S-Tab> on that row will show these by setting the display root to the selected item.
When the hierarchy is displayed, the following keys are intercepted:
<Tab> : Drill into the hierarchy at the selected item: expand and show children of the selected item.<S-Tab> : Show parents of the selected item. When applied to sub-types, this will re-root the tree at that type, so that all parent types (are displayed). Similar for callers.<CR> : Jump to the symbol currently selected.<Down> , <Cn> , <Cj> , j : Select the next item<Up> , <Cp> , <Ck> , k ; Select the previous itemNote: you might think the call hierarchy tree is inverted, but we think this way round is more intuitive because this is the typical way that call stacks are displayed (with the current function at the top, and its callers below).
:YcmRestartServer commandIf the ycmd completion server suddenly stops for some reason, you can restart it with this command.
:YcmForceCompileAndDiagnostics commandCalling this command will force YCM to immediately recompile your file and display any new diagnostics it encounters. Do note that recompilation with this command may take a while and during this time the Vim GUI will be blocked.
You may want to map this command to a key; try putting nnoremap <F5> :YcmForceCompileAndDiagnostics<CR> in your vimrc.
:YcmDiags command Calling this command will fill Vim's locationlist with errors or warnings if any were detected in your file and then open it. If a given error or warning can be fixed by a call to :YcmCompleter FixIt , then (FixIt available) is appended to the error or warning text. See the FixIt completer subcommand for more information.
NOTE: The absence of (FixIt available) does not strictly imply a fix-it is not available as not all completers are able to provide this indication. For example, the c-sharp completer provides many fix-its but does not add this additional indication.
The g:ycm_open_loclist_on_ycm_diags option can be used to prevent the location list from opening, but still have it filled with new diagnostic data. See the Options section for details.
:YcmShowDetailedDiagnostic commandThis command shows the full diagnostic text when the user's cursor is on the line with the diagnostic.
An options argument can be passed. If the argument is popup the diagnostic text will be displayed in a popup at the cursor position.
If you prefer the detailed diagnostic to always be shown in a popup, then let g:ycm_show_detailed_diag_in_popup=1 .
:YcmDebugInfo commandThis will print out various debug information for the current file. Useful to see what compile commands will be used for the file if you're using the semantic completion engine.
:YcmToggleLogs command This command presents the list of logfiles created by YCM, the ycmd server, and the semantic engine server for the current filetype, if any. One of these logfiles can be opened in the editor (or closed if already open) by entering the corresponding number or by clicking on it with the mouse. Additionally, this command can take the logfile names as arguments. Use the <TAB> key (or any other key defined by the wildchar option) to complete the arguments or to cycle through them (depending on the value of the wildmode option). Each logfile given as an argument is directly opened (or closed if already open) in the editor. Only for debugging purposes.
:YcmCompleter commandThis command gives access to a number of additional IDE-like features in YCM, for things like semantic GoTo, type information, FixIt, and refactoring.
This command accepts a range that can either be specified through a selection in one of Vim's visual modes (see :h visual-use ) or on the command line. For instance, :2,5YcmCompleter will apply the command from line 2 to line 5. This is useful for the Format subcommand.
Call YcmCompleter without further arguments for a list of the commands you can call for the current completer.
See the file type feature summary for an overview of the features available for each file type. See the YcmCompleter subcommands section for more information on the available subcommands and their usage.
Some commands, like Format accept a range, like :%YcmCompleter Format .
Some commands like GetDoc and the various GoTo commands respect modifiers, like :rightbelow YcmCompleter GetDoc , :vertical YcmCompleter GoTo .
NOTE: See the docs for the YcmCompleter command before tackling this section.
The invoked subcommand is automatically routed to the currently active semantic completer, so :YcmCompleter GoToDefinition will invoke the GoToDefinition subcommand on the Python semantic completer if the currently active file is a Python one and on the Clang completer if the currently active file is a C-family language one.
You may also want to map the subcommands to something less verbose; for instance, nnoremap <leader>jd :YcmCompleter GoTo<CR> maps the <leader>jd sequence to the longer subcommand invocation.
These commands are useful for jumping around and exploring code. When moving the cursor, the subcommands add entries to Vim's jumplist so you can use CTRL-O to jump back to where you were before invoking the command (and CTRL-I to jump forward; see :h jumplist for details). If there is more than one destination, the quickfix list (see :h quickfix ) is populated with the available locations and opened to the full width at the bottom of the screen. You can change this behavior by using the YcmQuickFixOpened autocommand.
GoToInclude subcommandLooks up the current line for a header and jumps to it.
Supported in filetypes: c, cpp, objc, objcpp, cuda
GoToAlternateFile subcommandJump to the associated file, as defined by the language server. Typically this will jump you to the associated header file for a C or C++ translation unit.
Supported in filetypes: c, cpp, objc, objcpp, cuda (clangd only)
GoToDeclaration subcommandLooks up the symbol under the cursor and jumps to its declaration.
Supported in filetypes: c, cpp, objc, objcpp, cuda, cs, go, java, javascript, python, rust, typescript
GoToDefinition subcommandLooks up the symbol under the cursor and jumps to its definition.
NOTE: For C-family languages this only works in certain situations , namely when the definition of the symbol is in the current translation unit. A translation unit consists of the file you are editing and all the files you are including with #include directives (directly or indirectly) in that file.
Supported in filetypes: c, cpp, objc, objcpp, cuda, cs, go, java, javascript, python, rust, typescript
GoTo subcommandThis command tries to perform the "most sensible" GoTo operation it can. Currently, this means that it tries to look up the symbol under the cursor and jumps to its definition if possible; if the definition is not accessible from the current translation unit, jumps to the symbol's declaration. For C-family languages, it first tries to look up the current line for a header and jump to it. For C#, implementations are also considered and preferred.
Supported in filetypes: c, cpp, objc, objcpp, cuda, cs, go, java, javascript, python, rust, typescript
GoToImprecise subcommandWARNING: This command trades correctness for speed!
Same as the GoTo command except that it doesn't recompile the file with libclang before looking up nodes in the AST. This can be very useful when you're editing files that take time to compile but you know that you haven't made any changes since the last parse that would lead to incorrect jumps. When you're just browsing around your codebase, this command can spare you quite a bit of latency.
Supported in filetypes: c, cpp, objc, objcpp, cuda
GoToSymbol <symbol query> subcommandFinds the definition of all symbols matching a specified string. Note that this does not use any sort of smart/fuzzy matching. However, an interactive symbol search is also available.
Supported in filetypes: c, cpp, objc, objcpp, cuda, cs, java, javascript, python, typescript
GoToReferences subcommandThis command attempts to find all of the references within the project to the identifier under the cursor and populates the quickfix list with those locations.
Supported in filetypes: c, cpp, objc, objcpp, cuda, java, javascript, python, typescript, rust
GoToImplementation subcommandLooks up the symbol under the cursor and jumps to its implementation (ie non-interface). If there are multiple implementations, instead provides a list of implementations to choose from.
Supported in filetypes: cs, go, java, rust, typescript, javascript
GoToImplementationElseDeclaration subcommandLooks up the symbol under the cursor and jumps to its implementation if one, else jump to its declaration. If there are multiple implementations, instead provides a list of implementations to choose from.
Supported in filetypes: cs
GoToType subcommandLooks up the symbol under the cursor and jumps to the definition of its type eg if the symbol is an object, go to the definition of its class.
Supported in filetypes: go, java, javascript, typescript
GoToDocumentOutline subcommandProvides a list of symbols in the current document, in the quickfix list. See also interactive symbol search.
Supported in filetypes: c, cpp, objc, objcpp, cuda, go, java, rust
GoToCallers and GoToCallees subcommandsNote: A much more powerful call and type hierarchy can be viewd interactively. See interactive type and call hierarchy.
Populate the quickfix list with the callers, or callees respectively, of the function associated with the current cursor position. The semantics of this differ depending on the filetype and language server.
Only supported for LSP servers that provide the callHierarchyProvider capability.
These commands are useful for finding static information about the code, such as the types of variables, viewing declarations, and documentation strings.
GetType subcommandEchos the type of the variable or method under the cursor, and where it differs, the derived type.
Par exemple:
std::string s; Invoking this command on s returns std::string => std::basic_string<char>
NOTE: Causes re-parsing of the current translation unit.
Supported in filetypes: c, cpp, objc, objcpp, cuda, java, javascript, go, python, typescript, rust
GetTypeImprecise subcommandWARNING: This command trades correctness for speed!
Same as the GetType command except that it doesn't recompile the file with libclang before looking up nodes in the AST. This can be very useful when you're editing files that take time to compile but you know that you haven't made any changes since the last parse that would lead to incorrect type. When you're just browsing around your codebase, this command can spare you quite a bit of latency.
Supported in filetypes: c, cpp, objc, objcpp, cuda
GetParent subcommandEchos the semantic parent of the point under the cursor.
The semantic parent is the item that semantically contains the given position.
Par exemple:
 class C {
    void f ();
};

void C::f () {

}
In the out-of-line definition of C::f , the semantic parent is the class C , of which this function is a member.
In the example above, both declarations of C::f have C as their semantic context, while the lexical context of the first C::f is C and the lexical context of the second C::f is the translation unit.
For global declarations, the semantic parent is the translation unit.
NOTE: Causes re-parsing of the current translation unit.
Supported in filetypes: c, cpp, objc, objcpp, cuda
GetDoc subcommandDisplays the preview window populated with quick info about the identifier under the cursor. Depending on the file type, this includes things like:
The documentation is opened in the preview window, and options like previewheight are respected. If you would like to customise the height and position of this window, we suggest a custom command that:
previewheight temporarilyGetDoc command with supplied modifierspreviewheight .Par exemple:
 command - count ShowDocWithSize
   let g: ph = & previewheight
   <bar> set previewheight = <count>
   <bar> <mods> YcmCompleter GetDoc
   <bar> let & previewheight = g: ph
You can then use something like :botright vertical 80ShowDocWithSize . Here's an example of that: https://asciinema.org/a/hE6Pi1gU6omBShwFna8iwGEe9
Supported in filetypes: c, cpp, objc, objcpp, cuda, cs, go, java, javascript, python, typescript, rust
GetDocImprecise subcommandWARNING: This command trades correctness for speed!
Same as the GetDoc command except that it doesn't recompile the file with libclang before looking up nodes in the AST. This can be very useful when you're editing files that take long to compile but you know that you haven't made any changes since the last parse that would lead to incorrect docs. When you're just browsing around your codebase, this command can spare you quite a bit of latency.
Supported in filetypes: c, cpp, objc, objcpp, cuda
These commands make changes to your source code in order to perform refactoring or code correction. YouCompleteMe does not perform any action which cannot be undone, and never saves or writes files to the disk.
FixIt subcommandWhere available, attempts to make changes to the buffer to correct diagnostics, or perform refactoring, on the current line or selection. Where multiple suggestions are available (such as when there are multiple ways to resolve a given warning, or where multiple diagnostics are reported for the current line, or multiple refactoring tweaks are available), the options are presented and one can be selected.
Completers that provide diagnostics may also provide trivial modifications to the source in order to correct the diagnostic. Examples include syntax errors such as missing trailing semi-colons, spurious characters, or other errors which the semantic engine can deterministically suggest corrections. A small demo presenting how diagnostics can be fixed with clangd:
Completers (LSPs) may also provide refactoring tweaks, which may be available even when no diagnostic is presented for the current line. These include function extraction, variable extraction, switch population, constructor generation, ... The tweaks work for a selection as well. Consult your LSP for available refactorings. A demonstration of refactoring capabilities with clangd:
If no fix-it is available for the current line, or there is no diagnostic on the current line, this command has no effect on the current buffer. If any modifications are made, the number of changes made to the buffer is echo'd and the user may use the editor's undo command to revert.
When a diagnostic is available, and g:ycm_echo_current_diagnostic is enabled, then the text (FixIt) is appended to the echo'd diagnostic when the completer is able to add this indication. The text (FixIt available) is also appended to the diagnostic text in the output of the :YcmDiags command for any diagnostics with available fix-its (where the completer can provide this indication).
NOTE: Causes re-parsing of the current translation unit.
Supported in filetypes: c, cpp, objc, objcpp, cuda, cs, go, java, javascript, rust, typescript
RefactorRename <new name> subcommandIn supported file types, this command attempts to perform a semantic rename of the identifier under the cursor. This includes renaming declarations, definitions, and usages of the identifier, or any other language-appropriate action. The specific behavior is defined by the semantic engine in use.
Similar to FixIt , this command applies automatic modifications to your source files. Rename operations may involve changes to multiple files, which may or may not be open in Vim buffers at the time. YouCompleteMe handles all of this for you. The behavior is described in the following section.
Supported in filetypes: c, cpp, objc, objcpp, cuda, java, javascript, python, typescript, rust, cs
The following additional commands are supported for Python:
RefactorInlineRefactorExtractVariableRefactorExtractFunctionSee the jedi docs for what they do.
Supported in filetypes: python
When a Refactor or FixIt command touches multiple files, YouCompleteMe attempts to apply those modifications to any existing open, visible buffer in the current tab. If no such buffer can be found, YouCompleteMe opens the file in a new small horizontal split at the top of the current window, applies the change, and then hides the window. NOTE: The buffer remains open, and must be manually saved. A confirmation dialog is opened prior to doing this to remind you that this is about to happen.
Once the modifications have been made, the quickfix list (see :help quickfix ) is populated with the locations of all modifications. This can be used to review all automatic changes made by using :copen . Typically, use the CTRL-W <enter> combination to open the selected file in a new split. It is possible to customize how the quickfix window is opened by using the YcmQuickFixOpened autocommand.
The buffers are not saved automatically. That is, you must save the modified buffers manually after reviewing the changes from the quickfix list. Changes can be undone using Vim's powerful undo features (see :help undo ). Note that Vim's undo is per-buffer, so to undo all changes, the undo commands must be applied in each modified buffer separately.
NOTE: While applying modifications, Vim may find files that are already open and have a swap file. The command is aborted if you select Abort or Quit in any such prompts. This leaves the Refactor operation partially complete and must be manually corrected using Vim's undo features. The quickfix list is not populated in this case. Inspect :buffers or equivalent (see :help buffers ) to see the buffers that were opened by the command.
Format subcommand This command formats the whole buffer or some part of it according to the value of the Vim options shiftwidth and expandtab (see :h 'sw' and :h et respectively). To format a specific part of your document, you can either select it in one of Vim's visual modes (see :h visual-use ) and run the command or directly enter the range on the command line, eg :2,5YcmCompleter Format to format it from line 2 to line 5.
Supported in filetypes: c, cpp, objc, objcpp, cuda, java, javascript, go, typescript, rust, cs
OrganizeImports subcommandThis command removes unused imports and sorts imports in the current file. It can also group imports from the same module in TypeScript and resolve imports in Java.
Supported in filetypes: java, javascript, typescript
These commands are for general administration, rather than IDE-like features. They cover things like the semantic engine server instance and compilation flags.
ExecuteCommand <args> subcommandSome LSP completers (currently only Java completers) support executing server-specific commands. Consult the jdt.ls documentation to find out what commands are supported and which arguments are expected.
The support for ExecuteCommand was implemented to support plugins like Vimspector to debug java, but isn't limited to that specific use case.
RestartServer subcommandRestarts the downstream semantic engine server for those semantic engines that work as separate servers that YCM talks to.
Supported in filetypes: c, cpp, objc, objcpp, cuda, cs, go, java, javascript, rust, typescript
ReloadSolution subcommandInstruct the Omnisharp-Roslyn server to clear its cache and reload all files from the disk. This is useful when files are added, removed, or renamed in the solution, files are changed outside of Vim, or whenever Omnisharp-Roslyn cache is out-of-sync.
Supported in filetypes: cs
youcompleteme#GetErrorCount functionGet the number of YCM Diagnostic errors. If no errors are present, this function returns 0.
Par exemple:
call youcompleteme#GetErrorCount () Both this function and youcompleteme#GetWarningCount can be useful when integrating YCM with other Vim plugins. For example, a lightline user could add a diagnostics section to their statusline which would display the number of errors and warnings.
youcompleteme#GetWarningCount functionGet the number of YCM Diagnostic warnings. If no warnings are present, this function returns 0.
Par exemple:
call youcompleteme#GetWarningCount ()youcompleteme#GetCommandResponse( ... ) function Run a completer subcommand and return the result as a string. This can be useful for example to display the GetDoc output in a popup window, eg:
 let s: ycm_hover_popup = -1
function s: Hover ()
  let response = youcompleteme#GetCommandResponse ( ' GetDoc ' )
  if response == ' '
    return
  endif

  call popup_hide ( s: ycm_hover_popup )
  let s: ycm_hover_popup = popup_atcursor ( balloon_split ( response ), {} )
endfunction

" CursorHold triggers in normal mode after a delay
autocmd CursorHold * call s: Hover ()
" Or, if you prefer, a mapping:
nnoremap <silent> <leader> D :call <SID> Hover() <CR>
NOTE : This is only an example, for real hover support, see g:ycm_auto_hover .
If the completer subcommand result is not a string (for example, it's a FixIt or a Location), or if the completer subcommand raises an error, an empty string is returned, so that calling code does not have to check for complex error conditions.
The arguments to the function are the same as the arguments to the :YcmCompleter ex command, eg the name of the subcommand, followed by any additional subcommand arguments. As with the YcmCompleter command, if the first argument is ft=<filetype> the request is targeted at the specified filetype completer. This is an advanced usage and not necessary in most cases.
NOTE: The request is run synchronously and blocks Vim until the response is received, so we do not recommend running this as part of an autocommand that triggers frequently.
youcompleteme#GetCommandResponseAsync( callback, ... ) function This works exactly like youcompleteme#GetCommandResponse , except that instead of returning the result, you supply a callback argument. This argument must be a FuncRef to a function taking a single argument response . This callback will be called with the command response at some point later, or immediately.
As with youcompleteme#GetCommandResponse() , this function will call the callback with '' (an empty string) if the request is not sent, or if there was some sort of error.
Here's an example that's similar to the one above:
 let s: ycm_hover_popup = -1
function ! s: ShowDataPopup ( response ) abort
  if response == ' '
    return
  endif

  call popup_hide ( s: ycm_hover_popup )
  let s: ycm_hover_popup = popup_atcursor ( balloon_split ( response ), {} )
endfunction

function ! s: GetData () abort
  call youcompleteme#GetCommandResponseAsync (
     function ( ' s:ShowDataPopup ' ),
     ' GetDoc ' )
endfunction

autocommand CursorHold * call s: GetData ()
Again, see g:ycm_auto_hover for proper hover support.
NOTE : The callback may be called immediately, in the stack frame that called this function.
NOTE : Only one command request can be outstanding at once. Attempting to request a second response while the first is outstanding will result in the second callback being immediately called with '' .
YcmLocationOpened autocommand This User autocommand is fired when YCM opens the location list window in response to the YcmDiags command. By default, the location list window is opened to the bottom of the current window and its height is set to fit all entries. This behavior can be overridden by using the YcmLocationOpened autocommand which is triggered while the cursor is in the location list window. Par exemple:
 function ! s: CustomizeYcmLocationWindow ()
  " Move the window to the top of the screen.
  wincmd K
  " Set the window height to 5.
  5 wincmd _
  " Switch back to the working window.
  wincmd p
endfunction

autocmd User YcmLocationOpened call s: CustomizeYcmLocationWindow ()YcmQuickFixOpened autocommand This User autocommand is fired when YCM opens the quickfix window in response to the GoTo* and RefactorRename subcommands. By default, the quickfix window is opened to full width at the bottom of the screen and its height is set to fit all entries. This behavior can be overridden by using the YcmQuickFixOpened autocommand which is triggered while the cursor is in the quickfix window. Par exemple:
 function ! s: CustomizeYcmQuickFixWindow ()
  " Move the window to the top of the screen.
  wincmd K
  " Set the window height to 5.
  5 wincmd _
endfunction

autocmd User YcmQuickFixOpened call s: CustomizeYcmQuickFixWindow ()All options have reasonable defaults so if the plug-in works after installation you don't need to change any options. These options can be configured in your vimrc script by including a line like this:
let g: ycm_min_num_of_chars_for_completion = 1 Note that after changing an option in your vimrc script you have to restart ycmd with the :YcmRestartServer command for the changes to take effect.
g:ycm_min_num_of_chars_for_completion option This option controls the number of characters the user needs to type before identifier-based completion suggestions are triggered. For example, if the option is set to 2 , then when the user types a second alphanumeric character after a whitespace character, completion suggestions will be triggered. This option is NOT used for semantic completion.
Setting this option to a high number like 99 effectively turns off the identifier completion engine and just leaves the semantic engine.
Default: 2
let g: ycm_min_num_of_chars_for_completion = 2g:ycm_min_num_identifier_candidate_chars optionThis option controls the minimum number of characters that a completion candidate coming from the identifier completer must have to be shown in the popup menu.
A special value of 0 means there is no limit.
NOTE: This option only applies to the identifier completer; it has no effect on the various semantic completers.
Default: 0
let g: ycm_min_num_identifier_candidate_chars = 0g:ycm_max_num_candidates option This option controls the maximum number of semantic completion suggestions shown in the completion menu. This only applies to suggestions from semantic completion engines; see the g:ycm_max_identifier_candidates option to limit the number of suggestions from the identifier-based engine.
A special value of 0 means there is no limit.
NOTE: Setting this option to 0 or to a value greater than 100 is not recommended as it will slow down completion when there is a very large number of suggestions.
Default: 50
let g: ycm_max_num_candidates = 50g:ycm_max_num_candidates_to_detail option Some completion engines require completion candidates to be 'resolved' in order to get detailed info such as inline documentation, method signatures, etc. This information is displayed by YCM in the preview window, or if completeopt contains popup , in the info popup next to the completion menu.
By default, if the info popup is in use, and there are more than 10 candidates, YCM will defer resolving candidates until they are selected in the completion menu. Otherwise, YCM must resolve the details upfront, which can be costly.
If neither popup nor preview are in completeopt , YCM disables resolving altogether as the information would not be displayed.
This setting can be used to override these defaults and controls the number of completion candidates that should be resolved upfront. Typically users do not need to change this, as YCM will work out an appropriate value based on your completeopt and g:ycm_add_preview_to_completeopt settings. However, you may override this calculation by setting this value to a number:
-1 - Resolve all candidates upfront0 - Never resolve any candidates upfront.> 0 - Resolve up to this many candidates upfront. If the number of candidates is greater than this value, no candidates are resolved. In the latter two cases, if completeopt contains popup , then candidates are resolved on demand asynchronously.
Défaut:
0 if neither popup nor preview are in completeopt .10 if popup is in completeopt.-1 if preview is in completeopt.Exemple:
let g: ycm_max_num_candidates_to_detail = 0g:ycm_max_num_identifier_candidates optionThis option controls the maximum number of completion suggestions from the identifier-based engine shown in the completion menu.
A special value of 0 means there is no limit.
NOTE: Setting this option to 0 or to a value greater than 100 is not recommended as it will slow down completion when there is a very large number of suggestions.
Default: 10
let g: ycm_max_num_identifier_candidates = 10g:ycm_auto_trigger option When set to 0 , this option turns off YCM's identifier completer (the as-you-type popup) and the semantic triggers (the popup you'd get after typing . or -> in say C++). You can still force semantic completion with the <C-Space> shortcut.
If you want to just turn off the identifier completer but keep the semantic triggers, you should set g:ycm_min_num_of_chars_for_completion to a high number like 99 .
When g:ycm_auto_trigger is 0 , YCM sets the completefunc , so that you can manually trigger normal completion using Cx Cu .
If you want to map something else to trigger completion, such as Cd , then you can map it to <plug>(YCMComplete) . Par exemple:
 let g: ycm_auto_trigger = 0
imap <c-d> <plug> (YCMComplete)
NOTE: It's not possible to map one of the keys in g:ycm_key_list_select_completion (or similar) to <plug>(YCMComplete) . In practice that means that you can't use <Tab> for this.
Default: 1
let g: ycm_auto_trigger = 1g:ycm_filetype_whitelist option This option controls for which Vim filetypes (see :h filetype ) should YCM be turned on. The option value should be a Vim dictionary with keys being filetype strings (like python , cpp , etc.) and values being unimportant (the dictionary is used like a hash set, meaning that only the keys matter).
The * key is special and matches all filetypes. By default, the whitelist contains only this * key.
YCM also has a g:ycm_filetype_blacklist option that lists filetypes for which YCM shouldn't be turned on. YCM will work only in filetypes that both the whitelist and the blacklist allow (the blacklist "allows" a filetype by not having it as a key).
For example, let's assume you want YCM to work in files with the cpp filetype. The filetype should then be present in the whitelist either directly ( cpp key in the whitelist) or indirectly through the special * key. It should not be present in the blacklist.
Filetypes that are blocked by either of the lists will be completely ignored by YCM, meaning that neither the identifier-based completion engine nor the semantic engine will operate in them.
You can get the filetype of the current file in Vim with :set ft? .
Default: {'*': 1}
let g: ycm_filetype_whitelist = { ' * ' : 1 }** Completion in buffers with no filetype **
There is one exception to the above rule. YCM supports completion in buffers with no filetype set, but this must be explicitly whitelisted. To identify buffers with no filetype, we use the ycm_nofiletype pseudo-filetype. To enable completion in buffers with no filetype, set:
 let g: ycm_filetype_whitelist = {
   ' * ' : 1 ,
   ' ycm_nofiletype ' : 1
}g:ycm_filetype_blacklist option This option controls for which Vim filetypes (see :h filetype ) should YCM be turned off. The option value should be a Vim dictionary with keys being filetype strings (like python , cpp , etc.) and values being unimportant (the dictionary is used like a hash set, meaning that only the keys matter).
See the g:ycm_filetype_whitelist option for more details on how this works.
Default: [see next line]
 let g: ycm_filetype_blacklist = {
       ' tagbar ' : 1 ,
       ' notes ' : 1 ,
       ' markdown ' : 1 ,
       ' netrw ' : 1 ,
       ' unite ' : 1 ,
       ' text ' : 1 ,
       ' vimwiki ' : 1 ,
       ' pandoc ' : 1 ,
       ' infolog ' : 1 ,
       ' leaderf ' : 1 ,
       ' mail ' : 1
      }
In addition, ycm_nofiletype (representing buffers with no filetype set) is blacklisted if ycm_nofiletype is not explicitly whitelisted (using g:ycm_filetype_whitelist ).
g:ycm_filetype_specific_completion_to_disable option This option controls for which Vim filetypes (see :h filetype ) should the YCM semantic completion engine be turned off. The option value should be a Vim dictionary with keys being filetype strings (like python , cpp , etc.) and values being unimportant (the dictionary is used like a hash set, meaning that only the keys matter). The listed filetypes will be ignored by the YCM semantic completion engine, but the identifier-based completion engine will still trigger in files of those filetypes.
Note that even if semantic completion is not turned off for a specific filetype, you will not get semantic completion if the semantic engine does not support that filetype.
You can get the filetype of the current file in Vim with :set ft? .
Default: [see next line]
 let g: ycm_filetype_specific_completion_to_disable = {
       ' gitcommit ' : 1
}g:ycm_filepath_blacklist option This option controls for which Vim filetypes (see :h filetype ) should filepath completion be disabled. The option value should be a Vim dictionary with keys being filetype strings (like python , cpp , etc.) and values being unimportant (the dictionary is used like a hash set, meaning that only the keys matter).
The * key is special and matches all filetypes. Use this key if you want to completely disable filepath completion:
let g: ycm_filepath_blacklist = { ' * ' : 1 } You can get the filetype of the current file in Vim with :set ft? .
Default: [see next line]
 let g: ycm_filepath_blacklist = {
       ' html ' : 1 ,
       ' jsx ' : 1 ,
       ' xml ' : 1 ,
}g:ycm_show_diagnostics_ui optionWhen set, this option turns on YCM's diagnostic display features. See the Diagnostic display section in the User Manual for more details.
Specific parts of the diagnostics UI (like the gutter signs, text highlighting, diagnostic echo, and auto location list population) can be individually turned on or off. See the other options below for details.
Note that YCM's diagnostics UI is only supported for C-family languages.
When set, this option also makes YCM remove all Syntastic checkers set for the c , cpp , objc , objcpp , and cuda filetypes since this would conflict with YCM's own diagnostics UI.
If you're using YCM's identifier completer in C-family languages but cannot use the clang-based semantic completer for those languages and want to use the GCC Syntastic checkers, unset this option.
Default: 1
let g: ycm_show_diagnostics_ui = 1g:ycm_error_symbol optionYCM will use the value of this option as the symbol for errors in the Vim gutter.
This option is part of the Syntastic compatibility layer; if the option is not set, YCM will fall back to the value of the g:syntastic_error_symbol option before using this option's default.
Default: >>
let g: ycm_error_symbol = ' >> 'g:ycm_warning_symbol optionYCM will use the value of this option as the symbol for warnings in the Vim gutter.
This option is part of the Syntastic compatibility layer; if the option is not set, YCM will fall back to the value of the g:syntastic_warning_symbol option before using this option's default.
Default: >>
let g: ycm_warning_symbol = ' >> 'g:ycm_enable_diagnostic_signs option When this option is set, YCM will put icons in Vim's gutter on lines that have a diagnostic set. Turning this off will also turn off the YcmErrorLine and YcmWarningLine highlighting.
This option is part of the Syntastic compatibility layer; if the option is not set, YCM will fall back to the value of the g:syntastic_enable_signs option before using this option's default.
Default: 1
let g: ycm_enable_diagnostic_signs = 1g:ycm_enable_diagnostic_highlighting optionWhen this option is set, YCM will highlight regions of text that are related to the diagnostic that is present on a line, if any.
This option is part of the Syntastic compatibility layer; if the option is not set, YCM will fall back to the value of the g:syntastic_enable_highlighting option before using this option's default.
Default: 1
let g: ycm_enable_diagnostic_highlighting = 1g:ycm_echo_current_diagnostic option When this option is set to 1, YCM will echo the text of the diagnostic present on the current line when you move your cursor to that line. If a FixIt is available for the current diagnostic, then (FixIt) is appended.
If you have a Vim that supports virtual text, you can set this option to the string virtual-text , and the diagnostic will be displayed inline with the text, right aligned in the window and wrapping to the next line if there is not enough space , Par exemple:


NOTE : It's strongly recommended to also set g:ycm_update_diagnostics_in_insert_mode to 0 when using virtual-text for diagnostics. This is due to the increased amount of distraction provided by drawing diagnostics next to your input position.
This option is part of the Syntastic compatibility layer; if the option is not set, YCM will fall back to the value of the g:syntastic_echo_current_error option before using this option's default.
Default: 1
Valid values:
0 - disabled1 - echo diagnostic to the command area'virtual-text' - display the dignostic to the right of the line in the window using virtual text let g: ycm_echo_current_diagnostic = 1
" Or, when you have Vim supporting virtual text
let g: ycm_echo_current_diagnostic = ' virtual-text 'g:ycm_auto_hover optionThis option controls whether or not YCM shows documentation in a popup at the cursor location after a short delay. Only supported in Vim.
When this option is set to 'CursorHold' , the popup is displayed on the CursorHold autocommand. See :help CursorHold for the details, but this means that it is displayed after updatetime milliseconds. When set to an empty string, the popup is not automatically displayed.
In addition to this setting, there is the <plug>(YCMHover) mapping, which can be used to manually trigger or hide the popup (it works like a toggle). Par exemple:
nmap <leader> D <plug> (YCMHover) After dismissing the popup with this mapping, it will not be automatically triggered again until the cursor is moved (ie CursorMoved autocommand).
The displayed documentation depends on what the completer for the current language supports. It's selected heuristically in this order of preference:
GetHover with markdown syntaxGetDoc with no syntaxGetType with the syntax of the current file. You can customise this by manually setting up b:ycm_hover to your liking. This buffer-local variable can be set to a dictionary with the following keys:
command : The YCM completer subcommand which should be run on hoversyntax : The syntax to use (as in set syntax= ) in the popup window for highlighting.popup_params : The params passed to a popup window which gets opened.For example, to use C/C++ syntax highlighting in the popup for C-family languages, add something like this to your vimrc:
 augroup MyYCMCustom
  autocmd !
  autocmd FileType c,cpp let b: ycm_hover = {
     ' command ' : ' GetDoc ' ,
     ' syntax ' : & filetype
     }
augroup END
You can also modify the opened popup with popup_params key. For example, you can limit the popup's maximum width and add a border to it:
 augroup MyYCMCustom
  autocmd !
  autocmd FileType c,cpp let b: ycm_hover = {
     ' command ' : ' GetDoc ' ,
     ' syntax ' : & filetype
     ' popup_params ' : {
         ' maxwidth ' : 80 ,
         ' border ' : [],
         ' borderchars ' : [ ' ─ ' , ' │ ' , ' ─ ' , ' │ ' , ' ┌ ' , ' ┐ ' , ' ┘ ' , ' └ ' ],
       },
     }
augroup END
See :help popup_create-arguments for the list of available popup window options.
Default: 'CursorHold'
g:ycm_filter_diagnostics optionThis option controls which diagnostics will be rendered by YCM. This option holds a dictionary of key-values, where the keys are Vim's filetype strings delimited by commas and values are dictionaries describing the filter.
A filter is a dictionary of key-values, where the keys are the type of filter, and the value is a list of arguments to that filter. In the case of just a single item in the list, you may omit the brackets and just provide the argument directly. If any filter matches a diagnostic, it will be dropped and YCM will not render it.
The following filter types are supported:
re.search , not re.match )level: "error" will remove all errors from the diagnostics.NOTE: The regex syntax is NOT Vim's, it's Python's.
Défaut: {}
The following example will do, for Java filetype only:
ta<something>co let g: ycm_filter_diagnostics = {
" java " : {
" regex " : [ " ta.+co " , ... ],
" level " : " error " ,
...
}
}g:ycm_always_populate_location_list optionWhen this option is set, YCM will populate the location list automatically every time it gets new diagnostic data. This option is off by default so as not to interfere with other data you might have placed in the location list.
See :help location-list in Vim to learn more about the location list.
This option is part of the Syntastic compatibility layer; if the option is not set, YCM will fall back to the value of the g:syntastic_always_populate_loc_list option before using this option's default.
Note: if YCM's errors aren't visible, it might be that YCM is updating an older location list. See :help :lhistory and :lolder .
Default: 0
let g: ycm_always_populate_location_list = 0g:ycm_open_loclist_on_ycm_diags option When this option is set, :YcmDiags will automatically open the location list after forcing a compilation and filling the list with diagnostic data.
See :help location-list in Vim to learn more about the location list.
Default: 1
let g: ycm_open_loclist_on_ycm_diags = 1g:ycm_complete_in_comments option When this option is set to 1 , YCM will show the completion menu even when typing inside comments.
Default: 0
let g: ycm_complete_in_comments = 0g:ycm_complete_in_strings option When this option is set to 1 , YCM will show the completion menu even when typing inside strings.
Note that this is turned on by default so that you can use the filename completion inside strings. This is very useful for instance in C-family files where typing #include " will trigger the start of filename completion. If you turn off this option, you will turn off filename completion in such situations as well.
Default: 1
let g: ycm_complete_in_strings = 1g:ycm_collect_identifiers_from_comments_and_strings option When this option is set to 1 , YCM's identifier completer will also collect identifiers from strings and comments. Otherwise, the text in comments and strings will be ignored.
Default: 0
let g: ycm_collect_identifiers_from_comments_and_strings = 0g:ycm_collect_identifiers_from_tags_files option When this option is set to 1 , YCM's identifier completer will also collect identifiers from tags files. The list of tags files to examine is retrieved from the tagfiles() Vim function which examines the tags Vim option. See :h 'tags' for details.
YCM will re-index your tags files if it detects that they have been modified.
The only supported tag format is the Exuberant Ctags format. The format from "plain" ctags is NOT supported. Ctags needs to be called with the --fields=+l option (that's a lowercase L , not a one) because YCM needs the language:<lang> field in the tags output.
See the FAQ for pointers if YCM does not appear to read your tag files.
This option is off by default because it makes Vim slower if your tags are on a network directory.
Default: 0
let g: ycm_collect_identifiers_from_tags_files = 0g:ycm_seed_identifiers_with_syntax option When this option is set to 1 , YCM's identifier completer will seed its identifier database with the keywords of the programming language you're writing.
Since the keywords are extracted from the Vim syntax file for the filetype, all keywords may not be collected, depending on how the syntax file was written. Usually at least 95% of the keywords are successfully extracted.
Default: 0
let g: ycm_seed_identifiers_with_syntax = 0g:ycm_extra_conf_vim_data option If you're using semantic completion for C-family files, this option might come handy; it's a way of sending data from Vim to your Settings function in your .ycm_extra_conf.py file.
This option is supposed to be a list of VimScript expression strings that are evaluated for every request to the ycmd server and then passed to your Settings function as a client_data keyword argument.
For instance, if you set this option to ['v:version'] , your Settings function will be called like this:
 # The '801' value is of course contingent on Vim 8.1; in 8.0 it would be '800'
Settings ( ..., client_data = { 'v:version' : 801 } )
So the client_data parameter is a dictionary mapping Vim expression strings to their values at the time of the request.
The correct way to define parameters for your Settings function:
def Settings ( ** kwargs ): You can then get to client_data with kwargs['client_data'] .
Défaut: []
let g: ycm_extra_conf_vim_data = []g:ycm_server_python_interpreter optionYCM will by default search for an appropriate Python interpreter on your system. You can use this option to override that behavior and force the use of a specific interpreter of your choosing.
NOTE: This interpreter is only used for the ycmd server. The YCM client running inside Vim always uses the Python interpreter that's embedded inside Vim.
Défaut: ''
let g: ycm_server_python_interpreter = ' 'g:ycm_keep_logfiles option When this option is set to 1 , YCM and the ycmd completion server will keep the logfiles around after shutting down (they are deleted on shutdown by default).
To see where the log files are, call :YcmDebugInfo .
Default: 0
let g: ycm_keep_logfiles = 0g:ycm_log_level optionThe logging level that YCM and the ycmd completion server use. Valid values are the following, from most verbose to least verbose:
debuginfowarningerrorcritical Note that debug is very verbose.
Default: info
let g: ycm_log_level = ' info 'g:ycm_auto_start_csharp_server option When set to 1 , the OmniSharp-Roslyn server will be automatically started (once per Vim session) when you open a C# file.
Default: 1
let g: ycm_auto_start_csharp_server = 1g:ycm_auto_stop_csharp_server option When set to 1 , the OmniSharp-Roslyn server will be automatically stopped upon closing Vim.
Default: 1
let g: ycm_auto_stop_csharp_server = 1g:ycm_csharp_server_port option When g:ycm_auto_start_csharp_server is set to 1 , specifies the port for the OmniSharp-Roslyn server to listen on. When set to 0 uses an unused port provided by the OS.
Default: 0
let g: ycm_csharp_server_port = 0g:ycm_csharp_insert_namespace_expr option By default, when YCM inserts a namespace, it will insert the using statement under the nearest using statement. You may prefer that the using statement is inserted somewhere, for example, to preserve sorting. If so, you can set this option to override this behavior.
When this option is set, instead of inserting the using statement itself, YCM will set the global variable g:ycm_namespace_to_insert to the namespace to insert, and then evaluate this option's value as an expression. The option's expression is responsible for inserting the namespace - the default insertion will not occur.
Défaut: ''
let g: ycm_csharp_insert_namespace_expr = ' 'g:ycm_add_preview_to_completeopt option When this option is set to 1 , YCM will add the preview string to Vim's completeopt option (see :h completeopt ). If your completeopt option already has preview set, there will be no effect. Alternatively, when set to popup and your version of Vim supports popup windows (see :help popup ), the popup string will be used instead. You can see the current state of your completeopt setting with :set completeopt? (yes, the question mark is important).
When preview is present in completeopt , YCM will use the preview window at the top of the file to store detailed information about the current completion candidate (but only if the candidate came from the semantic engine). For instance, it would show the full function prototype and all the function overloads in the window if the current completion is a function name.
When popup is present in completeopt , YCM will instead use a popup window to the side of the completion popup for storing detailed information about the current completion candidate. In addition, YCM may truncate the detailed completion information in order to give the popup sufficient room to display that detailed information.
Default: 0
let g: ycm_add_preview_to_completeopt = 0g:ycm_autoclose_preview_window_after_completion option When this option is set to 1 , YCM will auto-close the preview window after the user accepts the offered completion string. If there is no preview window triggered because there is no preview string in completeopt , this option is irrelevant. See the g:ycm_add_preview_to_completeopt option for more details.
Default: 0
let g: ycm_autoclose_preview_window_after_completion = 0g:ycm_autoclose_preview_window_after_insertion option When this option is set to 1 , YCM will auto-close the preview window after the user leaves insert mode. This option is irrelevant if g:ycm_autoclose_preview_window_after_completion is set or if no preview window is triggered. See the g:ycm_add_preview_to_completeopt option for more details.
Default: 0
let g: ycm_autoclose_preview_window_after_insertion = 0g:ycm_max_diagnostics_to_display optionThis option controls the maximum number of diagnostics shown to the user when errors or warnings are detected in the file. This option is only relevant for the C-family, C#, Java, JavaScript, and TypeScript languages.
A special value of 0 means there is no limit.
Default: 30
let g: ycm_max_diagnostics_to_display = 30g:ycm_key_list_select_completion optionThis option controls the key mappings used to select the first completion string. Invoking any of them repeatedly cycles forward through the completion list.
Some users like adding <Enter> to this list.
Default: ['<TAB>', '<Down>']
let g: ycm_key_list_select_completion = [ ' <TAB> ' , ' <Down> ' ]g:ycm_key_list_previous_completion optionThis option controls the key mappings used to select the previous completion string. Invoking any of them repeatedly cycles backward through the completion list.
Note that one of the defaults is <S-TAB> which means Shift-TAB. That mapping will probably only work in GUI Vim (Gvim or MacVim) and not in plain console Vim because the terminal usually does not forward modifier key combinations to Vim.
Default: ['<S-TAB>', '<Up>']
let g: ycm_key_list_previous_completion = [ ' <S-TAB> ' , ' <Up> ' ]g:ycm_key_list_stop_completion option This option controls the key mappings used to close the completion menu. This is useful when the menu is blocking the view, when you need to insert the <TAB> character, or when you want to expand a snippet from UltiSnips and navigate through it.
Default: ['<Cy>']
let g: ycm_key_list_stop_completion = [ ' <C-y> ' ]g:ycm_key_invoke_completion option This option controls the key mapping used to invoke the completion menu for semantic completion. By default, semantic completion is triggered automatically after typing characters appropriate for the language, such as . , -> , :: , etc. in insert mode (if semantic completion support has been compiled in). This key mapping can be used to trigger semantic completion anywhere. Useful for searching for top-level functions and classes.
Console Vim (not Gvim or MacVim) passes <Nul> to Vim when the user types <C-Space> so YCM will make sure that <Nul> is used in the map command when you're editing in console Vim, and <C-Space> in GUI Vim. This means that you can just press <C-Space> in both the console and GUI Vim and YCM will do the right thing.
Setting this option to an empty string will make sure no mapping is created.
Default: <C-Space>
let g: ycm_key_invoke_completion = ' <C-Space> 'g:ycm_key_detailed_diagnostics option This option controls the key mapping used to show the full diagnostic text when the user's cursor is on the line with the diagnostic. It basically calls :YcmShowDetailedDiagnostic .
Setting this option to an empty string will make sure no mapping is created.
If you prefer the detailed diagnostic to be shown in a popup, then let g:ycm_show_detailed_diag_in_popup=1 .
Default: <leader>d
let g: ycm_key_detailed_diagnostics = ' <leader>d 'g:ycm_show_detailed_diag_in_popup option Makes :YcmShowDetailedDiagnostic always show in a popup rather than echoing to the command line.
Default: 0
let g: ycm_show_detailed_diag_in_popup = 0g:ycm_global_ycm_extra_conf option Normally, YCM searches for a .ycm_extra_conf.py file for compilation flags (see the User Guide for more details on how this works). This option specifies a fallback path to a config file which is used if no .ycm_extra_conf.py is found.
You can place such a global file anywhere in your filesystem.
Défaut: ''
let g: ycm_global_ycm_extra_conf = ' 'g:ycm_confirm_extra_conf option When this option is set to 1 YCM will ask once per .ycm_extra_conf.py file if it is safe to be loaded. This is to prevent the execution of malicious code from a .ycm_extra_conf.py file you didn't write.
To selectively get YCM to ask/not ask about loading certain .ycm_extra_conf.py files, see the g:ycm_extra_conf_globlist option.
Default: 1
let g: ycm_confirm_extra_conf = 1g:ycm_extra_conf_globlist option This option is a list that may contain several globbing patterns. If a pattern starts with a ! all .ycm_extra_conf.py files matching that pattern will be blacklisted, that is they won't be loaded and no confirmation dialog will be shown. If a pattern does not start with a ! all files matching that pattern will be whitelisted. Note that this option is not used when confirmation is disabled using g:ycm_confirm_extra_conf and that items earlier in the list will take precedence over the later ones.
Règles:
* matches everything? matches any single character[seq] matches any character in seq[!seq] matches any char not in seqExemple:
let g: ycm_extra_conf_globlist = [ ' ~/dev/* ' , ' !~/* ' ]~/dev directory so .ycm_extra_conf.py files from there will be loaded..ycm_extra_conf.py file from there won't be loaded.~/dev directory will be blacklisted. NOTE: The glob pattern is first expanded with Python's os.path.expanduser() and then resolved with os.path.abspath() before being matched against the filename.
Défaut: []
let g: ycm_extra_conf_globlist = []g:ycm_filepath_completion_use_working_dir option By default, YCM's filepath completion will interpret relative paths like ../ as being relative to the folder of the file of the currently active buffer. Setting this option will force YCM to always interpret relative paths as being relative to Vim's current working directory.
Default: 0
let g: ycm_filepath_completion_use_working_dir = 0g:ycm_semantic_triggers optionThis option controls the character-based triggers for the various semantic completion engines. The option holds a dictionary of key-values, where the keys are Vim's filetype strings delimited by commas and values are lists of strings, where the strings are the triggers.
Setting key-value pairs on the dictionary adds semantic triggers to the internal default set (listed below). You cannot remove the default triggers, only add new ones.
A "trigger" is a sequence of one or more characters that trigger semantic completion when typed. For instance, C++ ( cpp filetype) has . listed as a trigger. So when the user types foo. , the semantic engine will trigger and serve foo 's list of member functions and variables. Since C++ also has -> listed as a trigger, the same thing would happen when the user typed foo-> .
It's also possible to use a regular expression as a trigger. You have to prefix your trigger with re! to signify it's a regex trigger. For instance, re!w+. would only trigger after the w+. regex matches.
NOTE: The regex syntax is NOT Vim's, it's Python's.
Default: [see next line]
 let g: ycm_semantic_triggers =  {
     ' c ' : [ ' -> ' , ' . ' ],
     ' objc ' : [ ' -> ' , ' . ' , ' re![[_a-zA-Z]+w*s ' , ' re!^s*[^Wd]w*s ' ,
              ' re![.*]s ' ],
     ' ocaml ' : [ ' . ' , ' # ' ],
     ' cpp,cuda,objcpp ' : [ ' -> ' , ' . ' , ' :: ' ],
     ' perl ' : [ ' -> ' ],
     ' php ' : [ ' -> ' , ' :: ' ],
     ' cs,d,elixir,go,groovy,java,javascript,julia,perl6,python,scala,typescript,vb ' : [ ' . ' ],
     ' ruby,rust ' : [ ' . ' , ' :: ' ],
     ' lua ' : [ ' . ' , ' : ' ],
     ' erlang ' : [ ' : ' ],
}g:ycm_cache_omnifunc optionSome omnicompletion engines do not work well with the YCM cache—in particular, they might not produce all possible results for a given prefix. By unsetting this option you can ensure that the omnicompletion engine is re-queried on every keypress. That will ensure all completions will be presented but might cause stuttering and lag if the omnifunc is slow.
Default: 1
let g: ycm_cache_omnifunc = 1g:ycm_use_ultisnips_completer optionBy default, YCM will query the UltiSnips plugin for possible completions of snippet triggers. This option can turn that behavior off.
Default: 1
let g: ycm_use_ultisnips_completer = 1g:ycm_goto_buffer_command option Defines where GoTo* commands result should be opened. Can take one of the following values: 'same-buffer' , 'split' , or 'split-or-existing-window' . If this option is set to the 'same-buffer' but current buffer can not be switched (when buffer is modified and nohidden option is set), then result will be opened in a split. When the option is set to 'split-or-existing-window' , if the result is already open in a window of the current tab page (or any tab pages with the :tab modifier; see below), it will jump to that fenêtre. Otherwise, the result will be opened in a split as if the option was set to 'split' .
To customize the way a new window is split, prefix the GoTo* command with one of the following modifiers: :aboveleft , :belowright , :botright , :leftabove , :rightbelow , :topleft , and :vertical . For instance, to split vertically to the right of the current window, run the command:
: rightbelow vertical YcmCompleter GoTo To open in a new tab page, use the :tab modifier with the 'split' or 'split-or-existing-window' options eg:
: tab YcmCompleter GoTo Default: 'same-buffer'
let g: ycm_goto_buffer_command = ' same-buffer 'g:ycm_disable_for_files_larger_than_kb optionDefines the max size (in Kb) for a file to be considered for completion. If this option is set to 0 then no check is made on the size of the file you're opening.
Default: 1000
let g: ycm_disable_for_files_larger_than_kb = 1000g:ycm_use_clangd option This option controls whether clangd should be used as a completion engine for C-family languages. Can take one of the following values: 1 , 0 , with meanings:
1 : YCM will use clangd if clangd binary exists in third party or it was provided with ycm_clangd_binary_path option.0 : YCM will never use clangd completer. Default: 1
let g: ycm_use_clangd = 1g:ycm_clangd_binary_path option When ycm_use_clangd option is set to 1 , this option sets the path to clangd binary.
Défaut: ''
let g: ycm_clangd_binary_path = ' 'g:ycm_clangd_args optionThis option controls the command line arguments passed to the clangd binary. It appends new options and overrides the existing ones.
Défaut: []
let g: ycm_clangd_args = []g:ycm_clangd_uses_ycmd_caching optionThis option controls which ranking and filtering algorithm to use for completion items. It can take values:
1 : Uses ycmd's caching and filtering logic.0 : Uses clangd's caching and filtering logic. Default: 1
let g: ycm_clangd_uses_ycmd_caching = 1g:ycm_language_server optionThis option lets YCM use an arbitrary Language Server Protocol (LSP) server, not unlike many other completion systems. The officially supported completers are favoured over custom LSP ones, so overriding an existing completer means first making sure YCM won't choose that existing completer in the first place.
A simple working example of this option can be found in the section called "Semantic Completion for Other Languages".
Many working examples can be found in the YCM lsp-examples repo.
Défaut: []
let g: ycm_language_server = []g:ycm_disable_signature_help optionThis option allows you to disable all signature help for all completion engines. There is no way to disable it per-completer.
Default: 0
 " Disable signature help
let g: ycm_disable_signature_help = 1g:ycm_signature_help_disable_syntax optionSet this to 1 to disable syntax highlighting in the signature help popup. Thiis can help if your colourscheme doesn't work well with the default highliting and inverse video.
Default: 0
 " Disable signature help syntax highliting
let g: ycm_signature_help_disable_syntax = 1g:ycm_gopls_binary_path option In case the system-wide gopls binary is newer than the bundled one, setting this option to the path of the system-wide gopls would make YCM use that one instead.
If the path is just gopls , YCM will search in $PATH .
g:ycm_gopls_args option Similar to the g:ycm_clangd_args , this option allows passing additional flags to the gopls command line.
Défaut: []
let g: ycm_gopls_args = []g:ycm_rls_binary_path and g:ycm_rustc_binary_path optionsYCM no longer uses RLS for rust, and these options are therefore no longer supported.
To use a custom rust-analyzer, see g:ycm_rust_toolchain_root .
g:ycm_rust_toolchain_root option Optionally specify the path to a custom rust toolchain including at least a supported version of rust-analyzer .
g:ycm_tsserver_binary_path option Similar to the gopls path, this option tells YCM where is the TSServer executable located.
g:ycm_roslyn_binary_path option Similar to the gopls path, this option tells YCM where is the Omnisharp-Roslyn executable located.
g:ycm_update_diagnostics_in_insert_mode optionWith async diagnostics, LSP servers might send new diagnostics mid-typing. If seeing these new diagnostics while typing is not desired, this option can be set to 0.
When this option is set to 0 , diagnostic signs, virtual text, and highlights are cleared when entering insert mode and replaced when leaving insert mode. This reduces visual noise while editing.
In addition, this option is recommended when g:ycm_echo_current_diagnostic is set to virtual-text as it prevents updating the virtual text while you are typing.
Default: 1
let g: ycm_update_diagnostics_in_insert_mode = 1 The FAQ section has been moved to the wiki.
Please note that this project is released with a Contributor Code of Conduct. By participating in this project you agree to abide by its terms.
If you have questions about the plugin or need help, please join the Gitter room or use the ycm-users mailing list.
If you have bug reports or feature suggestions, please use the issue tracker. Before you do, please carefully read CONTRIBUTING.md as this asks for important diagnostics which the team will use to help get you going.
The latest version of the plugin is available at https://ycm-core.github.io/YouCompleteMe/.
The author's homepage is https://val.markovic.io.
Please do NOT go to #vim, Reddit, or Stack Overflow for support. Please contact the YouCompleteMe maintainers directly using the contact details.
This software is licensed under the GPL v3 license. © 2015-2018 YouCompleteMe contributors
If you like YCM so much that you're willing to part with your hard-earned cash, please consider donating to one of the following charities, which are meaningful to the current maintainers (in no particular order):
Please note: The YCM maintainers do not specifically endorse nor necessarily have any relationship with the above charities. Disclosure: It is noted that one key maintainer is a family with Trustees of Greyhound Rescue Wales.


