conda create -n pixart python=3.9
conda activate pixart
pip install torch==2.1.1 torchvision==0.16.1 torchaudio==2.1.1 --index-url https://download.pytorch.org/whl/cu118

git clone https://github.com/PixArt-alpha/PixArt-alpha.git
cd PixArt-alpha
pip install -r requirements.txtすべてのモデルが自動的にダウンロードされます。この URL から手動でダウンロードすることもできます。
| モデル | #Params | URL | OpenXLab でダウンロードする |
|---|---|---|---|
| T5 | 4.3B | T5 | T5 |
| VAE | 80M | VAE | VAE |
| PixArt-α-SAM-256 | 0.6B | PixArt-XL-2-SAM-256x256.pth またはディフューザー バージョン | 256-SAM |
| PixArt-α-256 | 0.6B | PixArt-XL-2-256x256.pth またはディフューザー バージョン | 256 |
| PixArt-α-256-MSCOCO-FID7.32 | 0.6B | PixArt-XL-2-256x256.pth | 256 |
| PixArt-α-512 | 0.6B | PixArt-XL-2-512x512.pth またはディフューザー バージョン | 512 |
| PixArt-α-1024 | 0.6B | PixArt-XL-2-1024-MS.pth またはディフューザーのバージョン | 1024 |
| PixArt-δ-1024-LCM | 0.6B | ディフューザーバージョン | |
| ControlNet-HED-エンコーダ | 30M | ControlNetHED.pth | |
| PixArt-δ-512-ControlNet | 0.9B | PixArt-XL-2-512-ControlNet.pth | 512 |
| PixArt-δ-1024-ControlNet | 0.9B | PixArt-XL-2-1024-ControlNet.pth | 1024 |
また、OpenXLab_PixArt-alpha ですべてのモデルを検索します
初めに。
@kopyl のおかげで、ノートブックを使用して HugginFace からのポケモン データセットの完全な微調整トレーニング フローを再現できます。
それでは、さらに詳しく。
ここでは例として SAM データセットのトレーニング構成を取り上げますが、もちろん、この方法に従って独自のデータセットを準備することもできます。
config の設定ファイルとデータセットのdataloaderのみを変更する必要があります。
python -m torch.distributed.launch --nproc_per_node=2 --master_port=12345 train_scripts/train.py configs/pixart_config/PixArt_xl2_img256_SAM.py --work-dir output/train_SAM_256SAM データセットのディレクトリ構造は次のとおりです。
 cd ./data

SA1B
├──images/  (images are saved here)
│  ├──sa_xxxxx.jpg
│  ├──sa_xxxxx.jpg
│  ├──......
├──captions/    (corresponding captions are saved here, same name as images)
│  ├──sa_xxxxx.txt
│  ├──sa_xxxxx.txt
├──partition/   (all image names are stored txt file where each line is a image name)
│  ├──part0.txt
│  ├──part1.txt
│  ├──......
├──caption_feature_wmask/   (run tools/extract_caption_feature.py to generate caption T5 features, same name as images except .npz extension)
│  ├──sa_xxxxx.npz
│  ├──sa_xxxxx.npz
│  ├──......
├──img_vae_feature/  (run tools/extract_img_vae_feature.py to generate image VAE features, same name as images except .npy extension)
│  ├──train_vae_256/
│  │  ├──noflip/
│  │  │  ├──sa_xxxxx.npy
│  │  │  ├──sa_xxxxx.npy
│  │  │  ├──......
ここでは、理解を深めるために data_toy を準備します。
 cd ./data

git lfs install
git clone https://huggingface.co/datasets/PixArt-alpha/data_toy
次に、partition/part0.txt ファイルの例を示します。
さらに、json ファイルによるガイド付きトレーニングについては、よりよく理解できるよう、おもちゃの json ファイルをここに示します。
Pixart + DreamBoothトレーニング ガイダンスに従う
PixArt + LCMトレーニング ガイダンスに従う
PixArt + ControlNetトレーニング ガイダンスに従う
pip install peft==0.6.2

accelerate launch --num_processes=1 --main_process_port=36667  train_scripts/train_pixart_lora_hf.py --mixed_precision= " fp16 "
  --pretrained_model_name_or_path=PixArt-alpha/PixArt-XL-2-1024-MS
  --dataset_name=lambdalabs/pokemon-blip-captions --caption_column= " text "
  --resolution=1024 --random_flip
  --train_batch_size=16
  --num_train_epochs=200 --checkpointing_steps=100
  --learning_rate=1e-06 --lr_scheduler= " constant " --lr_warmup_steps=0
  --seed=42
  --output_dir= " pixart-pokemon-model "
  --validation_prompt= " cute dragon creature " --report_to= " tensorboard "
  --gradient_checkpointing --checkpoints_total_limit=10 --validation_epochs=5
--rank=16推論には、このリポジトリを使用すると少なくとも23GBの GPU メモリが必要ですが、? で使用すると11GB and 8GB必要になります。ディフューザー。
現在サポートしているもの:
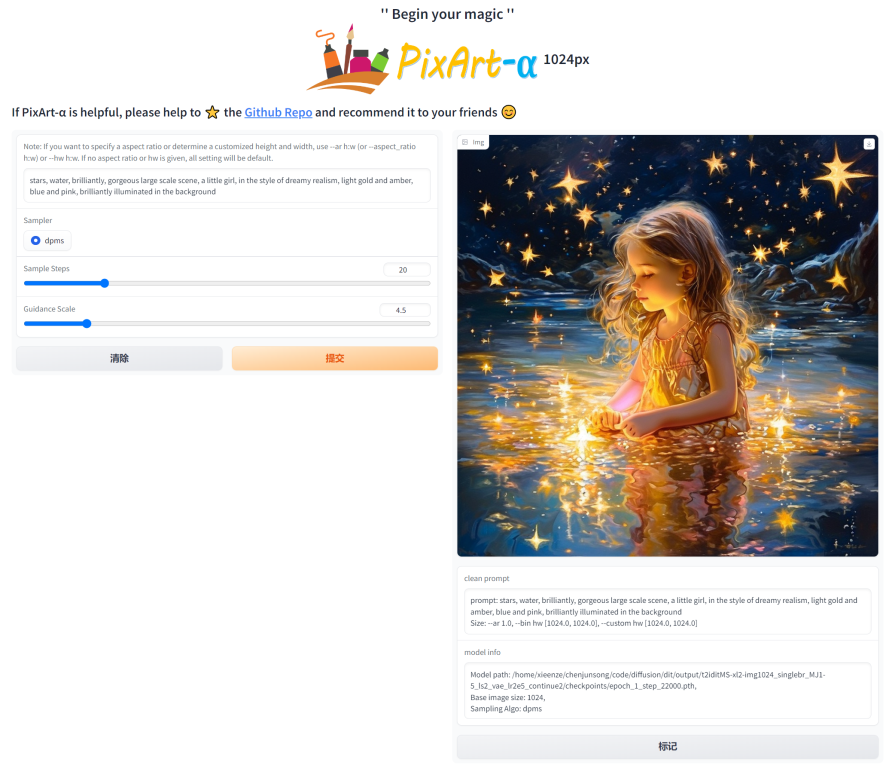
開始するには、まず必要な依存関係をインストールします。モデルを Output/pretrained_models フォルダーにダウンロードしたことを確認し、ローカル コンピューターで実行します。
DEMO_PORT=12345 python app/app.py代わりに、Gradio アプリを起動するランタイム コンテナーを作成するためのサンプル Dockerfile が提供されています。
docker build . -t pixart
docker run --gpus all -it -p 12345:12345 -v < path_to_huggingface_cache > :/root/.cache/huggingface pixart
または、docker-compose を使用します。アプリのコンテキストを 1024 から 512 または LCM バージョンに変更する場合は、docker-compose.yml ファイル内の APP_CONTEXT 環境変数を変更するだけであることに注意してください。デフォルトは 1024 です
docker compose build
docker compose up http://your-server-ip:12345を使用した簡単な例を見てみましょう。
次のライブラリの更新バージョンがあることを確認してください。
pip install -U transformers accelerate diffusers SentencePiece ftfy beautifulsoup4その後:
 import torch
from diffusers import PixArtAlphaPipeline , ConsistencyDecoderVAE , AutoencoderKL
device = torch . device ( "cuda:0" if torch . cuda . is_available () else "cpu" )

# You can replace the checkpoint id with "PixArt-alpha/PixArt-XL-2-512x512" too.
pipe = PixArtAlphaPipeline . from_pretrained ( "PixArt-alpha/PixArt-XL-2-1024-MS" , torch_dtype = torch . float16 , use_safetensors = True )

# If use DALL-E 3 Consistency Decoder
# pipe.vae = ConsistencyDecoderVAE.from_pretrained("openai/consistency-decoder", torch_dtype=torch.float16)

# If use SA-Solver sampler
# from diffusion.sa_solver_diffusers import SASolverScheduler
# pipe.scheduler = SASolverScheduler.from_config(pipe.scheduler.config, algorithm_type='data_prediction')

# If loading a LoRA model
# transformer = Transformer2DModel.from_pretrained("PixArt-alpha/PixArt-LCM-XL-2-1024-MS", subfolder="transformer", torch_dtype=torch.float16)
# transformer = PeftModel.from_pretrained(transformer, "Your-LoRA-Model-Path")
# pipe = PixArtAlphaPipeline.from_pretrained("PixArt-alpha/PixArt-LCM-XL-2-1024-MS", transformer=transformer, torch_dtype=torch.float16, use_safetensors=True)
# del transformer

# Enable memory optimizations.
# pipe.enable_model_cpu_offload()

pipe . to ( device )

prompt = "A small cactus with a happy face in the Sahara desert."
image = pipe ( prompt ). images [ 0 ]
image . save ( "./catcus.png" )
SA-Solver Sampler の詳細については、ドキュメントを参照してください。
この統合により、11 GB の GPU VRAM 未満でバッチ サイズ 4 のパイプラインを実行できるようになります。詳細については、ドキュメントを参照してください。
PixArtAlphaPipeline実行する8 GB 未満の GPU VRAM 消費がサポートされるようになりました。詳細については、ドキュメントを参照してください。
開始するには、まず必要な依存関係をインストールしてから、ローカル マシンで実行します。
 # diffusers version
DEMO_PORT=12345 python app/app.py http://your-server-ip:12345を使用した簡単な例を見てみましょう。
ここをクリックして Google Colab の無料トライアルを利用することもできます。
python tools/convert_pixart_alpha_to_diffusers.py --image_size your_img_size --multi_scale_train (True if you use PixArtMS else False) --orig_ckpt_path path/to/pth --dump_path path/to/diffusers --only_transformer=True
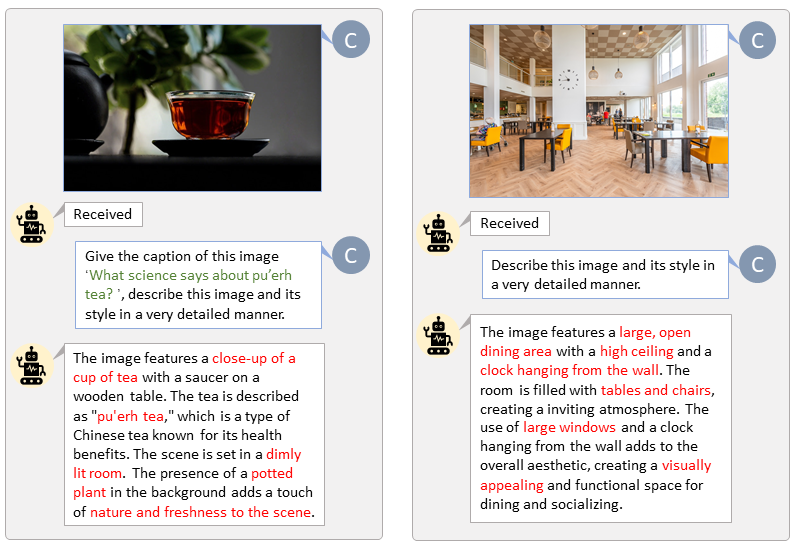
LLaVA-Lightning-MPT のコード ベースのおかげで、次の起動コードで LAION および SAM データセットにキャプションを付けることができます。
python tools/VLM_caption_lightning.py --output output/dir/ --data-root data/root/path --index path/to/data.jsonLAION (左) と SAM (右) のカスタム プロンプトを使用した自動ラベル付けを示します。緑色で強調表示された単語は LAION の元のキャプションを表し、赤色でマークされた単語は LLaVA によってラベル付けされた詳細なキャプションを示します。

T5 テキスト機能と VAE 画像機能を事前に準備すると、トレーニング プロセスが高速化され、GPU メモリが節約されます。
python tools/extract_features.py --img_size=1024
    --json_path " data/data_info.json "
    --t5_save_root " data/SA1B/caption_feature_wmask "
    --vae_save_root " data/SA1B/img_vae_features "
    --pretrained_models_dir " output/pretrained_models "
--dataset_root " data/SA1B/Images/ " PixArt と現在最も強力な Text-to-Image モデルを比較するビデオを作成します。
 @misc{chen2023pixartalpha,
      title={PixArt-$alpha$: Fast Training of Diffusion Transformer for Photorealistic Text-to-Image Synthesis},
      author={Junsong Chen and Jincheng Yu and Chongjian Ge and Lewei Yao and Enze Xie and Yue Wu and Zhongdao Wang and James Kwok and Ping Luo and Huchuan Lu and Zhenguo Li},
      year={2023},
      eprint={2310.00426},
      archivePrefix={arXiv},
      primaryClass={cs.CV}
}
@misc{chen2024pixartdelta,
      title={PIXART-{delta}: Fast and Controllable Image Generation with Latent Consistency Models},
      author={Junsong Chen and Yue Wu and Simian Luo and Enze Xie and Sayak Paul and Ping Luo and Hang Zhao and Zhenguo Li},
      year={2024},
      eprint={2401.05252},
      archivePrefix={arXiv},
      primaryClass={cs.CV}
}