loopgpt
v0.1.1
L♾️pGPT
モジュール式 Auto-GPT フレームワーク
L♾️pGPT は、人気のある Auto-GPT プロジェクトを適切な Python パッケージとして再実装したもので、モジュール性と拡張性を念頭に置いて作成されています。
?これにより、L♾️pGPT の最新の安定バージョンがインストールされます。これはほとんどのユーザーに推奨されます。
pip install loopgpt以下の 2 つの方法では、L♾️pGPT の最新開発バージョンをインストールします。このバージョンは不安定である可能性があることに注意してください。
pip install git+https://www.github.com/farizrahman4u/loopgpt.git@maingit clone https://www.github.com/farizrahman4u/loopgpt.git
cd loopgpt
pip install -e .git clone https://www.github.com/farizrahman4u/loopgpt.git
cd loopgpt
docker build -t loopgpt:local-dev . .envファイル経由現在の作業ディレクトリ (L♾️pGPT を実行する場所) に.envファイルを作成し、次の行をそれに追加します。
OPENAI_API_KEY= " <your-openai-api-key> "?重要?
Windows ユーザーの場合は、ファイル エクスプローラーで「ファイル拡張子の表示」が有効になっていることを確認してください。それ以外の場合、ファイルの名前は.envではなく.env.txtになります。
OPENAI_API_KEYという環境変数を OpenAI API キーに設定します。
環境変数を設定する方法:
新しい Python スクリプトでエージェントを作成しましょう。
 from loopgpt . agent import Agent

agent = Agent ()
L♾️pGPT はデフォルトでgpt-3.5-turbo使用し、ここに示されているすべての出力はそれを使用して作成されます。 GPT-4 ユーザーは、代わりにmodel="gpt-4"を設定できます。
agent = Agent ( model = "gpt-4" ) agent . name = "ResearchGPT"
agent . description = "an AI assistant that researches and finds the best tech products"
agent . goals = [
"Search for the best headphones on Google" ,
"Analyze specs, prices and reviews to find the top 5 best headphones" ,
"Write the list of the top 5 best headphones and their prices to a file" ,
"Summarize the pros and cons of each headphone and write it to a different file called 'summary.txt'" ,
]そして出発です!エージェントの CLI を実行してみましょう。
agent . cli () Python ファイルをresearch_gpt.pyとして保存し、実行します。
python research_gpt.py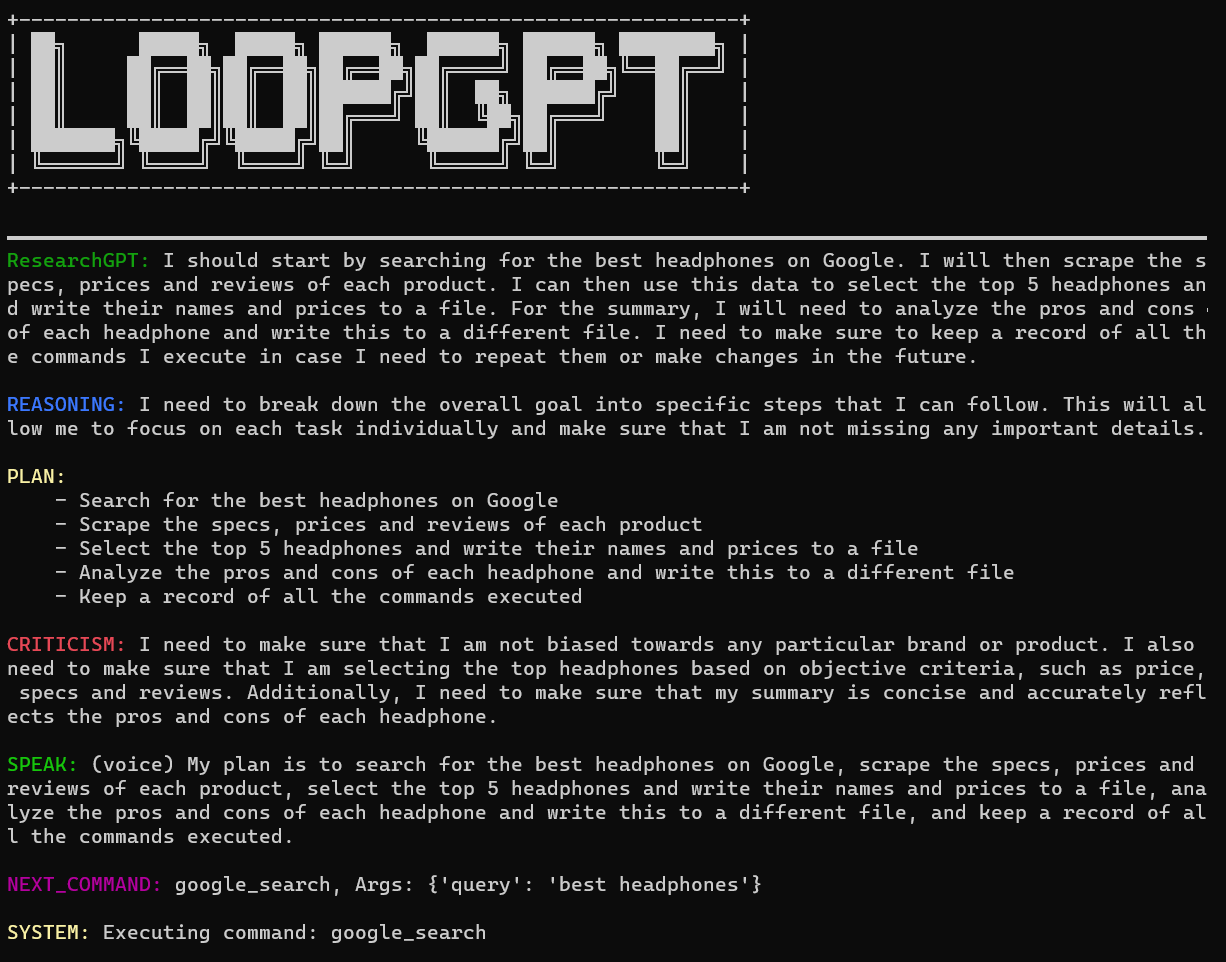
「exit」と入力すると、CLI を終了できます。
continuousがTrueに設定されている場合、エージェントはユーザーにコマンドを実行する許可を求めません。無限ループに陥る可能性があるので、自己責任でご利用ください。
agent . cli ( continuous = True )Python コードを記述することなく、コマンド ラインから直接 L♾️pGPT を実行できます。
loopgpt run利用可能なオプションをすべて表示するには、 loopgpt --helpを実行します。
Docker を使用して、前述のモードで L♾️pGPT を実行できます。
 # CLI mode
docker run -i --rm loopgpt:local-dev loopgpt run

# Script mode example
docker run -i --rm -v " $( pwd ) /scripts:/scripts " loopgpt:local-dev python /scripts/myscript.py
L♾️pGPT エージェントには、Web 検索、ファイルシステム操作などのさまざまな基本タスクを実行できる一連の組み込みツールが付属しています。これらのツールはprint(agent.tools)で表示できます。
これらの組み込みツールに加えて、独自のツールをエージェントのツールボックスに追加することもできます。
天気に関するあらゆることをサポートする AI アシスタント、WeatherGPT を作成しましょう。
ツールはBaseToolから継承されており、ツールを起動して実行するには docstring を記述するだけです。
 from loopgpt . tools import BaseTool

class GetWeather ( BaseTool ):
    """Quickly get the weather for a given city

    Args:
        city (str): name of the city

    Returns:
        dict: The weather report for the city
    """

    def run ( self , city ):
        ...
L♾️pGPT はツールにデフォルト ID を与えますが、必要に応じてそれらをオーバーライドできます。
 class GetWeather ( BaseTool ):
    """Quickly get the weather for a given city

    Args:
        city (str): name of the city

    Returns:
        dict: The weather report for the city
    """

    @ property
    def id ( self ):
return "get_weather_command"次に、ツールがrunメソッドで何を行うかを定義しましょう。
 import requests

# Define your custom tool
class GetWeather ( BaseTool ):
    """Quickly get the weather for a given city

    Args:
        city (str): name of the city

    Returns:
        dict: The weather report for the city
    """

    def run ( self , city ):
        try :
            url = "https://wttr.in/{}?format=%l+%C+%h+%t+%w+%p+%P" . format ( city )
            data = requests . get ( url ). text . split ( " " )
            keys = ( "location" , "condition" , "humidity" , "temperature" , "wind" , "precipitation" , "pressure" )
            data = dict ( zip ( keys , data ))
            return data
        except Exception as e :
            return f"An error occurred while getting the weather: { e } ."
それでおしまい!最初のカスタム ツールを構築しました。新しいエージェントに登録して実行してみましょう。
 from loopgpt . tools import WriteToFile
import loopgpt

# Register custom tool type
# This is actually not required here, but is required when you load a saved agent with custom tools.
loopgpt . tools . register_tool_type ( GetWeather )

# Create Agent
agent = loopgpt . Agent ( tools = [ GetWeather , WriteToFile ])
agent . name = "WeatherGPT"
agent . description = "an AI assistant that tells you the weather"
agent . goals = [
    "Get the weather for NewYork and Beijing" ,
    "Give the user tips on how to dress for the weather in NewYork and Beijing" ,
    "Write the tips to a file called 'dressing_tips.txt'"
]

# Run the agent's CLI
agent . cli ()
WeatherGPT が作成したdressing_tips.txtファイルを見てみましょう。
着付けのヒント.txt
 - It's Clear outside with a temperature of +10°C in Beijing. Wearing a light jacket and pants is recommended.
- It's Overcast outside with a temperature of +11°C in New York. Wearing a light jacket, pants, and an umbrella is recommended.
Auto-GPT とは異なり、ユーザーがコマンドの実行を拒否してもエージェントは終了しません。代わりに、軌道を修正するためにユーザーにフィードバックを求めます。
エージェントの方針を修正するには、実行を拒否してフィードバックを提供するだけです。

エージェントは行動方針を更新しました。

次のコマンドを使用して、エージェントの状態を json ファイルに保存できます。
agent . save ( "ResearchGPT.json" )これにより、エージェントの設定 (モデル、名前、説明など) および内部状態 (会話状態、メモリ、ツールの状態など) が保存されます。 include_state=False agent.save()に渡すことで、構成のみを保存することもできます。
agent . save ( "ResearchGPT.json" , include_state = False )次に、中断したところから再開します。
 import loopgpt
agent = loopgpt . Agent . load ( "ResearchGPT.json" )
agent . cli ()
または、保存したエージェントをコマンド ラインから実行します。
loopgpt run ResearchGPT.jsonファイルに書き込む代わりに、エージェントの状態を JSON 互換の Python 辞書に変換できます。
agent_config = agent . config ()内部状態を取得せずに構成のみを取得するには、次のようにします。
agent_config = agent . config ( include_state = False )構成からエージェントをリロードするには、次を使用します。
 import loopgpt

agent = loopgpt . Agent . from_config ( agent_config )公式の Google 検索をサポートするには、2 つの環境変数キーGOOGLE_API_KEYとCUSTOM_SEARCH_ENGINE_IDを設定する必要があります。これらを取得する方法は次のとおりです。
CUSTOM_SEARCH_ENGINE_ID環境変数に使用されます。GOOGLE_API_KEY環境変数を設定します。これらが存在しない場合、L♾️pGPT は DuckDuckGo Search の使用に戻ります。
たくさんの助けが必要です!貢献したい場合は、問題または PR を開いてください。
助けが必要ですか? Discord に参加してください。


