クイックスタート|構成|マックOS |ノートブックの例|よくある質問
AirLLM は推論メモリの使用量を最適化し、量子化、蒸留、枝刈りを行わずに 70B の大規模言語モデルを 1 枚の 4GB GPU カードで推論を実行できるようにします。そして、 8GB vramで405B Llama3.1 を実行できるようになりました。
[2024/08/20] v2.11.0: Qwen2.5をサポート
[2024/08/18] v2.10.1 CPU推論をサポートしました。非シャードモデルをサポートします。 @NavodPeiris の素晴らしい仕事に感謝します!
[2024/07/30] Llama3.1 405B (サンプルノート) をサポートしました。 8ビット/4ビット量子化をサポートします。
[2024/04/20] AirLLM は既に Llama3 をネイティブでサポートしています。 Llama3 70B を 4GB シングル GPU で実行します。
[2023/12/25] v2.8.2: 70B の大きな言語モデルを実行する MacOS をサポート。
[2023/12/20] v2.7: AirLLMMixtral に対応しました。
[2023/12/20] v2.6: AutoModel を追加しました。モデル タイプを自動的に検出し、モデルを初期化するためのモデル クラスを提供する必要はありません。
[2023/12/18] v2.5: モデルの読み込みと計算をオーバーラップするためのプリフェッチを追加しました。 10% の速度向上。
[2023/12/03] ChatGLM 、 QWen 、 Baichuan 、 Mistral 、 InternLMのサポートを追加しました!
[2023/12/02] セーフテンサーのサポートを追加しました。オープン LLM リーダーボードのトップ 10 モデルをすべてサポートするようになりました。
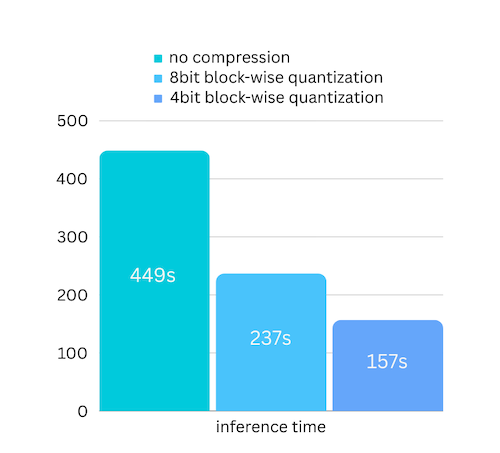
[2023/12/01] airllm 2.0。圧縮をサポート:実行時間が 3 倍スピードアップ!
[2023/11/20] airllm 初期バージョン!
まず、airllm pip パッケージをインストールします。
pip install airllm次に、AirLLMLlama2 を初期化し、使用されているモデルの ハグフェイス リポジトリ ID またはローカル パスを渡すと、通常のトランスフォーマー モデルと同様に推論を実行できます。
( AirLLMLlama2 の初期化時に、 layer_shards_ Saving_pathを通じて分割されたレイヤー モデルを保存するパスを指定することもできます。
 from airllm import AutoModel

MAX_LENGTH = 128
# could use hugging face model repo id:
model = AutoModel . from_pretrained ( "garage-bAInd/Platypus2-70B-instruct" )

# or use model's local path...
#model = AutoModel.from_pretrained("/home/ubuntu/.cache/huggingface/hub/models--garage-bAInd--Platypus2-70B-instruct/snapshots/b585e74bcaae02e52665d9ac6d23f4d0dbc81a0f")

input_text = [
        'What is the capital of United States?' ,
        #'I like',
    ]

input_tokens = model . tokenizer ( input_text ,
    return_tensors = "pt" ,
    return_attention_mask = False ,
    truncation = True ,
    max_length = MAX_LENGTH ,
    padding = False )

generation_output = model . generate (
    input_tokens [ 'input_ids' ]. cuda (),
    max_new_tokens = 20 ,
    use_cache = True ,
    return_dict_in_generate = True )

output = model . tokenizer . decode ( generation_output . sequences [ 0 ])

print ( output )
注: 推論中、最初に元のモデルが分解され、レイヤーごとに保存されます。ハグフェイス キャッシュ ディレクトリに十分なディスク容量があることを確認してください。
ブロック単位の量子化ベースのモデル圧縮に基づいたモデル圧縮を追加しました。これにより、ほぼ無視できる精度の損失で、推論速度がさらに最大3 倍高速化されます。 (パフォーマンス評価の詳細と、このペーパーでブロック単位の量子化を使用する理由を参照してください)

pip install -U bitsandbytesによって bitsandbytes がインストールされていることを確認します。pip install -U airllm model = AutoModel . from_pretrained ( "garage-bAInd/Platypus2-70B-instruct" ,
compression = '4bit' # specify '8bit' for 8-bit block-wise quantization
)量子化では通常、処理を本当に高速化するために重みとアクティベーションの両方を量子化する必要があります。そのため、精度を維持し、あらゆる種類の入力における外れ値の影響を回避することが困難になります。
この場合、ボトルネックは主にディスクの読み込みにありますが、必要なのはモデルの読み込みサイズを小さくすることだけです。したがって、重みの部分のみを量子化できるため、精度を確保することが容易になります。
モデルを初期化するとき、次の構成がサポートされます。
airllm をインストールし、Linux の場合と同じようにコードを実行するだけです。詳細については、「クイック スタート」を参照してください。
例 [Python ノートブック] (https://github.com/lyogavin/airllm/blob/main/air_llm/examples/run_on_macos.ipynb)
colab の例は次のとおりです。
 from airllm import AutoModel
MAX_LENGTH = 128
model = AutoModel . from_pretrained ( "THUDM/chatglm3-6b-base" )
input_text = [ 'What is the capital of China?' ,]
input_tokens = model . tokenizer ( input_text ,
    return_tensors = "pt" ,
    return_attention_mask = False ,
    truncation = True ,
    max_length = MAX_LENGTH ,
    padding = True )
generation_output = model . generate (
    input_tokens [ 'input_ids' ]. cuda (),
    max_new_tokens = 5 ,
    use_cache = True ,
    return_dict_in_generate = True )
model . tokenizer . decode ( generation_output . sequences [ 0 ]) from airllm import AutoModel
MAX_LENGTH = 128
model = AutoModel . from_pretrained ( "Qwen/Qwen-7B" )
input_text = [ 'What is the capital of China?' ,]
input_tokens = model . tokenizer ( input_text ,
return_tensors = "pt" ,
return_attention_mask = False ,
truncation = True ,
max_length = MAX_LENGTH )
generation_output = model . generate (
input_tokens [ 'input_ids' ]. cuda (),
max_new_tokens = 5 ,
use_cache = True ,
return_dict_in_generate = True )
model . tokenizer . decode ( generation_output . sequences [ 0 ]) from airllm import AutoModel
MAX_LENGTH = 128
model = AutoModel . from_pretrained ( "baichuan-inc/Baichuan2-7B-Base" )
#model = AutoModel.from_pretrained("internlm/internlm-20b")
#model = AutoModel.from_pretrained("mistralai/Mistral-7B-Instruct-v0.1")
input_text = [ 'What is the capital of China?' ,]
input_tokens = model . tokenizer ( input_text ,
return_tensors = "pt" ,
return_attention_mask = False ,
truncation = True ,
max_length = MAX_LENGTH )
generation_output = model . generate (
input_tokens [ 'input_ids' ]. cuda (),
max_new_tokens = 5 ,
use_cache = True ,
return_dict_in_generate = True )
model . tokenizer . decode ( generation_output . sequences [ 0 ])コードの多くは、Kaggle 試験コンテストでの SimJeg の素晴らしい成果に基づいています。 SimJeg への大きなエール:
GitHub アカウント @SimJeg、Kaggle のコード、関連するディスカッション。
safetensors_rust.SafetensorError: ヘッダーの逆シリアル化中にエラーが発生しました: MetadataIncompleteBuffer
このエラーが発生した場合、最も考えられる原因は、ディスク容量が不足していることです。モデルを分割するプロセスは非常にディスクを消費します。これを見てください。ディスク容量を拡張し、huggingface .cache をクリアして再実行する必要がある場合があります。
おそらく、QWen または ChatGLM モデルを Llama2 クラスでロードしていると思われます。次のことを試してください。
QWen モデルの場合:
 from airllm import AutoModel #<----- instead of AirLLMLlama2
AutoModel . from_pretrained (...)
ChatGLM モデルの場合:
 from airllm import AutoModel #<----- instead of AirLLMLlama2
AutoModel . from_pretrained (...)一部のモデルはゲート付きモデルであり、huggingface API トークンが必要です。 hf_token を指定できます。
model = AutoModel . from_pretrained ( "meta-llama/Llama-2-7b-hf" , #hf_token='HF_API_TOKEN')一部のモデルのトークナイザーにはパディング トークンがないため、パディング トークンを設定するか、単にパディング構成をオフにすることができます。
 input_tokens = model . tokenizer ( input_text ,
   return_tensors = "pt" ,
   return_attention_mask = False ,
   truncation = True ,
   max_length = MAX_LENGTH ,
   padding = False  #<-----------   turn off padding
)
AirLLM が研究に役立つと感じ、引用したい場合は、次の BibTex エントリを使用してください。
 @software{airllm2023,
  author = {Gavin Li},
  title = {AirLLM: scaling large language models on low-end commodity computers},
  url = {https://github.com/lyogavin/airllm/},
  version = {0.0},
  year = {2023},
}
貢献、アイデア、ディスカッションを歓迎します。
役に立ったと思ったら、コーヒーをおごってください!