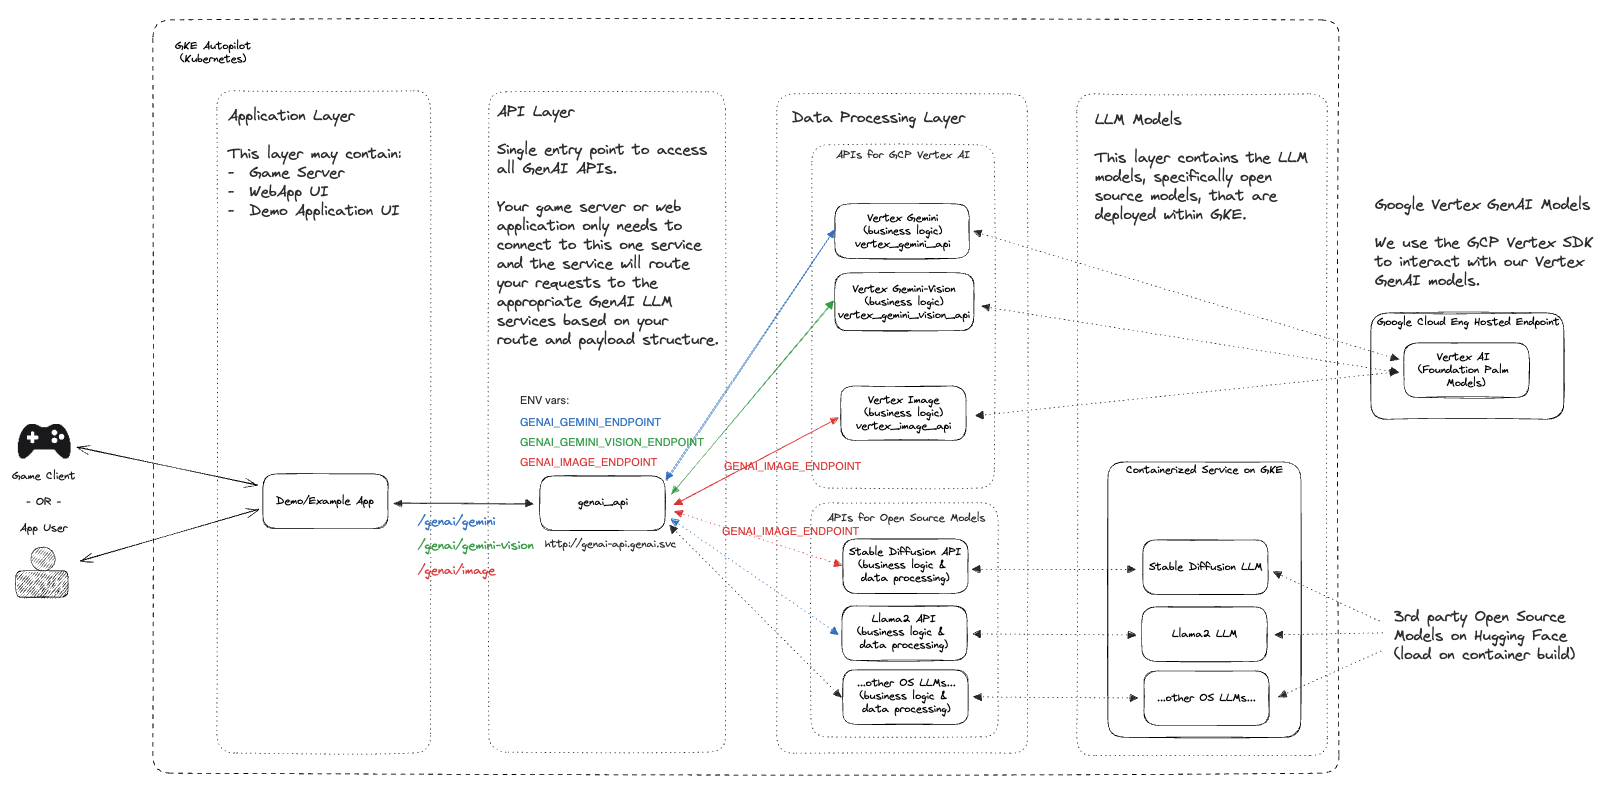
このプロジェクトは、Google Cloud プロダクトとオープンソース ゲーム ソリューションを使用して、ライブ ゲーム環境内で GenAI の統合とパーソナライゼーションを加速することを目的とした一連のクイックスタートを提供します。
今日のゲーム業界では、プレーヤーにパーソナライズされた魅力的なエクスペリエンスを提供することが重要です。このプロジェクトは、GenAI の機能をライブ ゲーム環境に統合するのに役立つ一連のクイックスタート リソースをゲーム開発者に提供します。 Google Cloud プロダクトとオープンソース ゲーム ソリューションを活用することで、プレーヤーのエンゲージメントを強化し、Generative AI で新しいユースケースを開拓し、記憶に残るゲーム体験を生み出すことができます。
注: これは急速に進化しているリポジトリであり、さまざまなユースケースに適応されています。貢献したい場合、またはバグに気づきたい場合は、問題をオープンするか、レビューのためにお気軽に PR を送信してください。
このプロジェクトを使用している場合は、このリポジトリにスターを付けて関心を示してください。
| フォルダ | 説明 |
|---|---|
| テラフォーム | Terraform に基づくインフラストラクチャ展開スクリプト |
| 例 | ユースケースに基づいてテストおよび展開できる個別のクイックスタート |
| 送信元 | クイックスタートの一部として使用されるコア ソース コード |

以下の手順では、 GenAI クイックスタートのセットアップ ガイドを説明します。このプロセスでは、適切なGoogle Cloud API の有効化、 Terraform を介したリソースの作成、プロジェクトの実行に必要なKubernetes マニフェストのデプロイを順を追って説明します。
注:これらの手順は、リソースをデプロイするための IAM 権限を持っている、Google Cloud で実行中のプロジェクトがすでにあることを前提としています。
 git clone https://github.com/googleforgames/GenAI-quickstart.git

cd GenAI-quickstart
Google Cloud に固有のプロジェクト ID を設定する
 # To just use your current project
export PROJECT_ID=$(gcloud config list --format 'value(core.project)' 2>/dev/null)

# Otherwise set it to the project you wish to use.
Google Cloud のデフォルトの場所を設定する
export LOCATION=us-central1
このクイックスタート ガイドをよりよく理解するには、 CUR_DIR環境変数を設定します。
export CUR_DIR=$(pwd)
gcloud auth list
認証に問題がなく、 PROJECT_IDが有効であるかどうかを確認してください。
gcloud projects describe ${PROJECT_ID:?}
PROJECT_ID ACTIVE状態でリストに表示されるはずです。
 gcloud services enable --project ${PROJECT_ID:?}
  aiplatform.googleapis.com
  artifactregistry.googleapis.com
  cloudbuild.googleapis.com
  cloudresourcemanager.googleapis.com
  compute.googleapis.com
  container.googleapis.com
  containerfilesystem.googleapis.com
  containerregistry.googleapis.com
  iam.googleapis.com
  servicecontrol.googleapis.com
  spanner.googleapis.com
 cd ${CUR_DIR:?}/terraform

cat terraform.example.tfvars | sed -e "s:your-unique-project-id:${PROJECT_ID:?}:g" > terraform.tfvars

terraform init

terraform plan

terraform apply
クラウド リソースのデプロイには 5 ~ 10 分かかる場合があります。デプロイされたリソースの詳細については、 terraformディレクトリの README を参照してください。
Terraform を使用してクラウド リソースが正常にデプロイされたら、新しく作成された GKE クラスタの認証情報を取得します。
gcloud container clusters get-credentials genai-quickstart --region us-central1 --project ${PROJECT_ID:?}
Kubernetes クライアントの認証情報をテストします。
kubectl get nodes
genaiディレクトリに切り替えて、一意のプロジェクト ID を使用する共通テンプレートをレンダリングします。
 # Find all files named .template.yaml, replace `your-unique-project-id` with PROJECT_ID, and output to .yaml.
cd ${CUR_DIR:?}/genai && find common -type f -name "*.template.yaml" -exec
  bash -c "template_path={}; sed "s:your-unique-project-id:${PROJECT_ID:?}:g" < ${template_path} > ${template_path/%.template.yaml/.yaml} " ;
Skaffoldを使用して GenAI ワークロードを構築して実行する
 gcloud auth configure-docker ${LOCATION:?}-docker.pkg.dev

export SKAFFOLD_DEFAULT_REPO=${LOCATION:?}-docker.pkg.dev/${PROJECT_ID:?}/repo-genai-quickstart

cd ${CUR_DIR:?}/genai

# To run all apis and models (requires a GPU node for stable-diffusion)
skaffold run --build-concurrency=0
ワークロードがデプロイされた後、代わりに GPU デプロイメントの使用に切り替えることができます。
 # Scale up a 2xL4 Mixtral 8x7B Deployment:
kubectl scale -n genai deployment huggingface-tgi-mixtral-small --replicas=1

# Or scale up a 8xL4 Mixtral 8x7B Deployment:
kubectl scale -n genai deployment huggingface-tgi-mixtral-big --replicas=1

# Scale down CPU Deployment:
kubectl scale -n genai deployment huggingface-tgi-mistral-cpu --replicas=0

# Note that the `huggingface-tgi-api` Service matches all of the huggingface-tgi-*
# Deployments, so if you have multiple replicas running, it will load balance
# between them.
個々のバックエンドを個別に実行することもできます。
 # To run only stable-diffusion (requires a GPU node)
#skaffold run --module stable-diffusion-api-cfg,stable-diffusion-endpt-cfg

# To run only Vertex chat (Vertex AI is required)
#skaffold run --module vertex-chat-api-cfg
API にアクセスします - ここからアプリケーションとすべての API をテストできます :)
クラスターは、内部パススルー ネットワーク ロード バランサー (ILB) を作成します。 API にアクセスするには、次のコマンドを実行します。
kubectl port-forward svc/genai-api -n genai 8080:80
次に、別のウィンドウで次を実行します。
 export EXT_IP=localhost:8080
echo "Browse to http://${EXT_IP}/genai_docs to try out the GenAI APIs!"
ブラウザで URL に移動します。
curlを使用して API をテストします。
 curl -X 'POST' "http://${EXT_IP}/genai/text"
  -H 'accept: application/json'
  -H 'Content-Type: application/json'
  -d '{"prompt": "Who are the founders of Google?"}'
または、クラスター内のapi-callerコンテナーを使用して API をテストします。
 # See available service endpoints. The `genai` endpoint wraps them all.
kubectl get svc -ngenai

# Start `api-caller` pod interactively
kubectl run -it -ngenai --rm --restart=Never api-caller --image=${SKAFFOLD_DEFAULT_REPO}/api-caller:latest

# Examples:

# See available example scripts
root@api-caller:/app# ls
embeddings.py  genai_api.py  huggingface_tgi.py  npc_chat_api.py  stable_diffusion_api.py  vertex_chat_api.py  vertex_code_api.py  vertex_gemini_api.py  vertex_image_api.py  vertex_text_api.py

# The genai_api script works for text prompts
root@api-caller:/app# python3 genai_api.py --endpoint=http://genai-api/genai/text --prompt "Describe a wombat"
INFO:root:Status Code: 200
INFO:root:Response:    "A wombat is a marsupial native to Australia. [...]"

# To try the Smart NPC, first reset the world data:
root@api-caller:/app# python3 npc_chat_api.py --endpoint http://genai-api/genai/npc_chat/reset_world_data --empty
INFO:root:Status Code: 200
INFO:root:Response:    {"status":"ok"}

# Then you can use the interactive chat:
root@api-caller:/app# python3 npc_chat_api.py --endpoint http://genai-api/genai/npc_chat --chat
>>> hey, how are you?
<<< I am doing my best here at the distribution center. It's a tough situation, but I am staying focused on helping those in need. How about you? How are you holding up?

# You can also interact with the services underneath, e.g.: Hugging Face TGI supports an interactive chat
root@api-caller:/app# python3 huggingface_tgi.py --endpoint=http://huggingface-tgi-api:8080/v1
>>> hello!
INFO:httpx:HTTP Request: POST http://huggingface-tgi-api:8080/v1/chat/completions "HTTP/1.1 200 OK"
<<<  Hello! How can I help you today? If you have any questions or need assistance with something, feel free to ask and I'll do my best to help. If you just want to chat, we can talk about pretty much anything. What's on your mind?
genaiディレクトリ内
 cd ${CUR_DIR:?}/genai

skaffold delete
terraformディレクトリ内
 cd ${CUR_DIR:?}/terraform

terraform destroy
Google Cloud Shell で上記のプロジェクトを実行していない場合は、目的のプロジェクトにログインし、認証されていることを確認してください。
 gcloud auth application-default login

gcloud config set project ${PROJECT_ID:?}
そして認証フローに従います。
リポジトリ全体を複製してそのまま使用することもできますが、多くの場合、このリポジトリをフォークして、ユースケースに最も有用で関連性のあるコード ベースを保持することを選択することもできます。貢献したい場合は、貢献ガイドに詳細情報が記載されています。