 WOR-フラッシャー
Linux マシンを使用して、Windows 10 または Windows 11 を Raspberry Pi SD カードにインストールします。
2020年には、これはまったく不可能でした。
2021 年では、これには複雑なチュートリアルに従う必要がありました。
新しい WoR フラッシャーを使用すれば、簡単です。
RPi 上で WoR-flasher を実行する最速の方法は、Raspberry Pi 用の Pi-Apps アプリ ストアを使用することです。 
Pi-Apps から WoR-flasher をインストールすると、スタート メニューに便利なボタンが作成され、ワンクリックでアンインストールが完了し、更新がシームレスに処理されるなど、いくつかの利点があります。
git clone https://github.com/Botspot/wor-flasher
これにより、スクリプトがwor-flasherという名前の新しいディレクトリにダウンロードされます。
依存関係:パッケージを手動でインストールする必要はありません。スクリプトを実行すると、次のものが自動的にインストールされます: yad aria2 cabextract wimtools chntpw genisoimage exfat-fuse exfat-utils wget
~/wor-flasher/install-wor-gui.sh
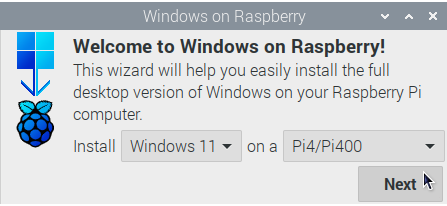


install-wor.shスクリプトが実行されます。 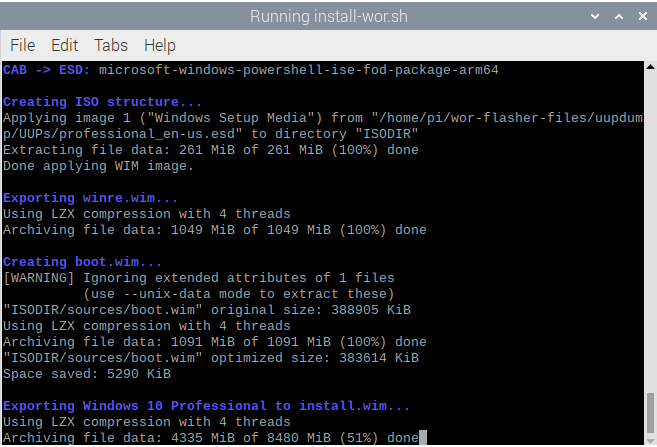
~/wor-flasher/install-wor.sh
$ ~/wor-flasher/install-wor.sh
Choose Windows version:
1) Windows 11
2) Windows 10
3) Custom...
Enter 1, 2 or 3: 1
Choose language: en-us
Choose Raspberry Pi model to deploy Windows on:
1) Raspberry Pi 4 / 400
2) Raspberry Pi 2 rev 1.2 / 3 / CM3
Enter 1 or 2: 1
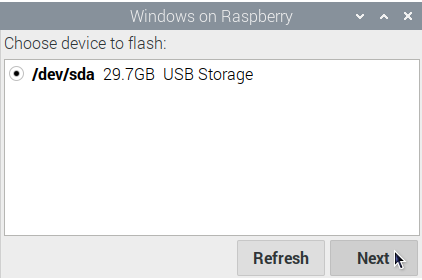
Available devices:
/dev/sdb - 59.5GB - USB Storage
Choose a device to flash the Windows setup files to: /dev/sdb
1) Create an installation drive (minimum 25 GB) capable of installing Windows to itself
2) Create a recovery drive (minimum 7 GB) to install Windows on other >16 GB drives
Choose the installation mode (1 or 2): 1
Input configuration:
DL_DIR: /home/pi/wor-flasher-files
RUN_MODE: cli
RPI_MODEL: 4
DEVICE: /dev/sdb
CAN_INSTALL_ON_SAME_DRIVE: 1
UUID: 6f7de912-4143-431b-b605-924c22ab9b1f
WIN_LANG: en-us
Formatting /dev/sdb
Generating partitions
Generating filesystems
# script output continues... It generates a Windows image legally, downloads all necessary drivers, the BIOS, the bootloader, and the modified kernel. Once done it ejects the drive.
install-wor.shスクリプトは、他の大きな bash スクリプト内で使用するように設計されています。自動化とカスタマイズのために、 install-wor.sh特定の環境変数を検出してに従います。
DL_DIR : デフォルトのダウンロード場所を変更するには、この変数を設定します。デフォルトでは、 ~/wor-flasher-filesです。BID : 正確な Windows バージョン ID を選択するには、この変数を設定します。値の例:「 22631.2861 」。この変数が設定されている場合、 install-wor.shどの Windows バージョンを使用するかをユーザーに尋ねません。WIN_LANG : Windows イメージの言語を選択するには、この変数を設定します。値の例:「 en-us 」。この変数が設定されている場合、 install-wor.shユーザーにどの言語を使用するかを尋ねません。RPI_MODEL : Raspberry Pi モデルを選択するには、この変数を設定します。許可される値:「 3 」、「 4 」。この変数が設定されている場合、 install-wor.shどの Raspberry Pi モデルを使用するかをユーザーに尋ねません。DEVICE : この変数をフラッシュしたいデバイスに設定します。値の例:「 /dev/sda 」。この変数が設定されている場合、 install-wor.shユーザーにどのデバイスを使用するかを尋ねません。CAN_INSTALL_ON_SAME_DRIVE : デバイスが 25 GB を超え、それ自体に Windows をインストールする場合は、この変数を「 1 」に設定します。それ以外の場合は「 0 」に設定してください。CONFIG_TXT : 結果として得られるドライブの/boot/config.txtカスタマイズするには、この変数を設定します。これは通常、オーバークロックまたは HDMI 設定の変更に使用されます。これがデフォルト値です。RUN_MODE : install-wor.shにグラフィカルなエラー メッセージを表示させる場合は、これを「 gui 」に設定します。DRY_RUN : この変数を「 1 」に設定すると、通常どおりセットアップが続行されますが、すべてをダウンロードした後に終了します。これにより、デバイスのフラッシュが防止されます。使用例:
DL_DIR=/media/pi/my-big-flash-drive DEVICE=/dev/sdg DRY_RUN=1 UUID=db8ec987-d136-4421-afb8-2ef109396b00 RPI_MODEL=4 WIN_LANG=en-us ~/wor-flasher/install-wor-gui.sh
install-wor.shスクリプトは、他の大きな bash スクリプト内で使用するように設計されています。統合を向上させるために、 install-wor.shは、 install-wor-gui.shなどのフロントエンド スクリプトで使用できるさまざまな便利な機能が装備されています。
関数を使用できるようにスクリプトをソースするには:
source ~/wor-flasher/install-wor.sh source
質問: なぜそのコマンドは「 source 」を 2 回言うのですか?回答: 最初の「 source 」はコマンドで、2 番目の「 source 」はスクリプトに渡されて、スクリプトをソースしていることを知らせるコマンドライン フラグです。スクリプトを取得すると、次の新しいコマンド (関数とも呼ばれます) が使用可能になります。
error - Botspot が bash スクリプトで使用する単純な関数で、何かが失敗したことをユーザーに警告し、失敗コードを表示してスクリプトを終了します。 (1) command-that-downloads-windows || error "Windows failed to download! Check your internet connection and try again."
echo_white - echoコマンドのシンプルなフロントエンドで、目的のメッセージを通常のライトグレーではなく白いテキストとして表示します。 echo_white "Now, downloading windows... please wait"
package_available - パッケージを apt リポジトリからインストールできるかどうかを決定します 入力: パッケージの 1 つの名前 使用法: if package_available yad ;then
echo "yad can be installed"
fi
install_packages - 引用されたパッケージのリストを確認してインストールします。 install_packages 'yad aria2 cabextract wimtools chntpw genisoimage exfat-fuse exfat-utils wget'
download_from_gdrive - パブリックに共有されている大きなファイルを Google ドライブからダウンロードします。これを参考にして改造したチュートリアルです。 download_from_gdrive 1WHyHFYjM4WPAAGH2PICGEhT4R5TlxlJC WoR-PE_Package.zip
get_partition - パーティションのブロックデバイスを決定するクリーンで信頼性の高い方法。 get_partition /dev/sda 2
#Assuming partition 2 exists, the above command returns "/dev/sda2"
get_partition /dev/mmcblk0 2
#Assuming partition 2 exists, the above command returns "/dev/mmcblk0p2"
get_partition /dev/mmcblk0 all
#Returns every partition within the drive, each one on a line
get_name - 指定されたストレージ ドライブの人間が判読できる名前を決定します。 get_name /dev/sda
get_size_raw - ドライブのサイズをバイト単位で決定します。 get_size_raw /dev/sda
list_devs - 利用可能なストレージドライブを人間が判読できる色付き形式でリストします。 list_devs
get_bid - Windows 10 または Windows 11 の最新の Windows ビルド ID を取得します。10 」または「 11 」使用法: get_bid 11
get_space_free - フォルダーの利用可能なディスク容量を取得します get_space_free ~/wor-flasher-files
get_os_name - 人間が判読できるオペレーティング システムの名前を取得します。 get_os_name 22631.2861
このコードは、Windows 11 を非対話的に/dev/sdaにフラッシュし、オーバークロック設定を追加します。コードをコピーしてターミナルに貼り付けるか、シェル スクリプトとして保存できます。
 # make all variables we set to be visible to the script (only necessary if you run this in a terminal)
set -a

# First, source the script so its functions are available
source ~ /wor-flasher/install-wor.sh source

# Determine the latest Windows 11 update ID using a function
BID= " $( get_bid 11 ) "

# set destination RPi model
RPI_MODEL=4

# choose language
WIN_LANG=en-us

# set the device to flash
DEVICE=/dev/sda

# set a custom config.txt
CONFIG_TXT= " over_voltage=6
arm_freq=2147
gpu_freq=750

# don't change anything below this point #
arm_64bit=1
enable_uart=1
uart_2ndstage=1
enable_gic=1
armstub=RPI_EFI.fd
disable_commandline_tags=1
disable_overscan=1
device_tree_address=0x1f0000
device_tree_end=0x200000
dtoverlay=miniuart-bt "

# indicate that drive is large enough to install Windows to itself
CAN_INSTALL_ON_SAME_DRIVE=1

~ /wor-flasher/install-wor.sh

