DALLE2 pytorch
1.15.6
Pytorch での OpenAI の更新されたテキストから画像への合成ニューラル ネットワークである DALL-E 2 の実装。
ヤニック・キルチャーの概要 | AssemblyAI解説者
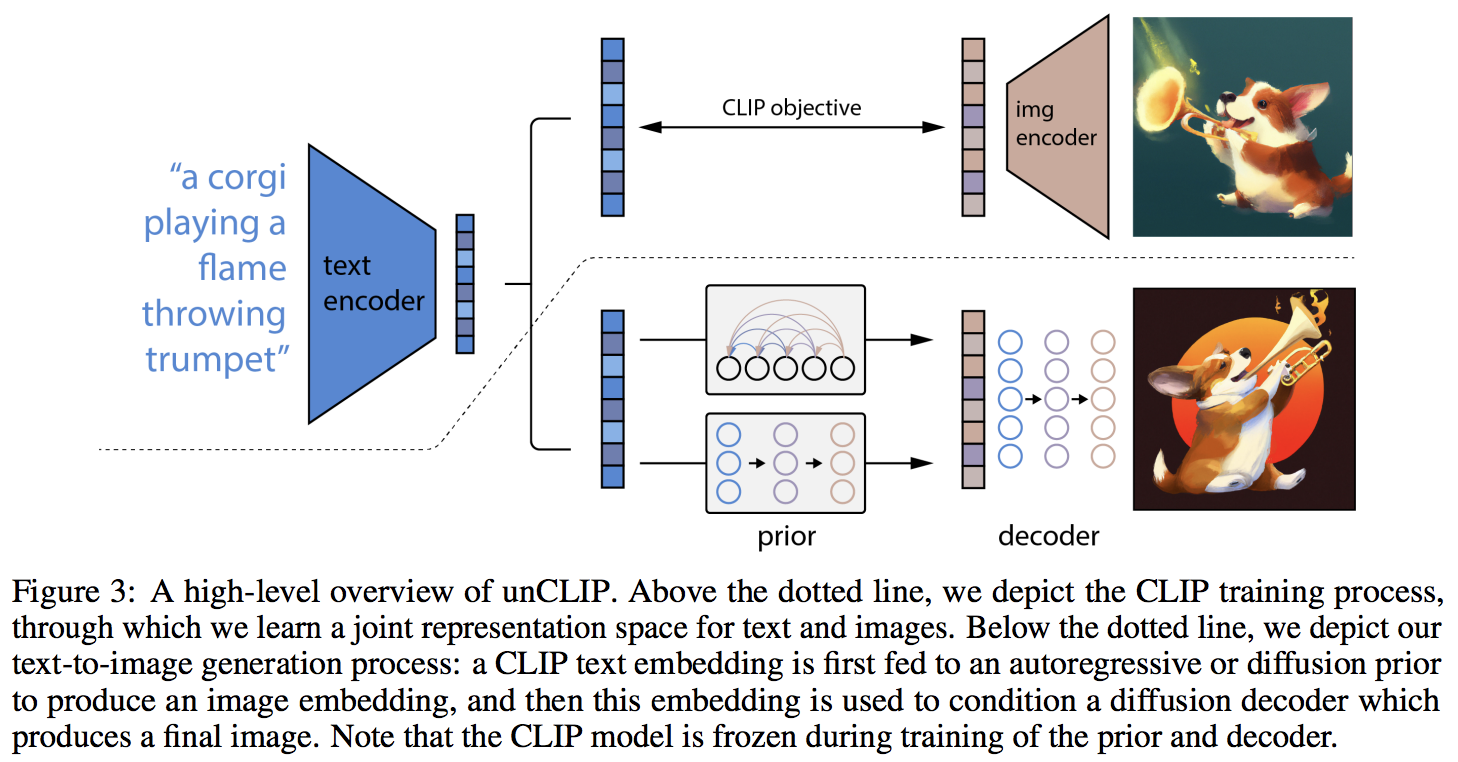
主な目新しさは、CLIP からのテキスト埋め込みに基づいて画像埋め込みを予測する、以前のネットワーク (自己回帰変換器か拡散ネットワークかを問わず) による間接層の追加のようです。具体的には、このリポジトリは、最もパフォーマンスの高いバリアントである拡散事前ネットワークのみを構築します (ただし、これにはノイズ除去ネットワークとして因果変換器が含まれます?)
このモデルは今のところテキストから画像への SOTA です。
LAION コミュニティでレプリケーションを支援することに興味がある場合は、参加してください |ヤニックインタビュー
2022 年 5 月 23 日の時点で、SOTA ではなくなりました。 SOTAが来ます。 Jax バージョンと text-to-video プロジェクトは、より単純な Imagen アーキテクチャに移行する予定です。
研究グループは、このリポジトリのコードを使用して、CLIP 世代に先立って機能の拡散をトレーニングしました。プレプリントをリリースしたら、その成果を共有する予定です。これとキャサリン自身の実験は、余分な事前分布によって世代の多様性が増加するという OpenAI の発見を裏付けています。
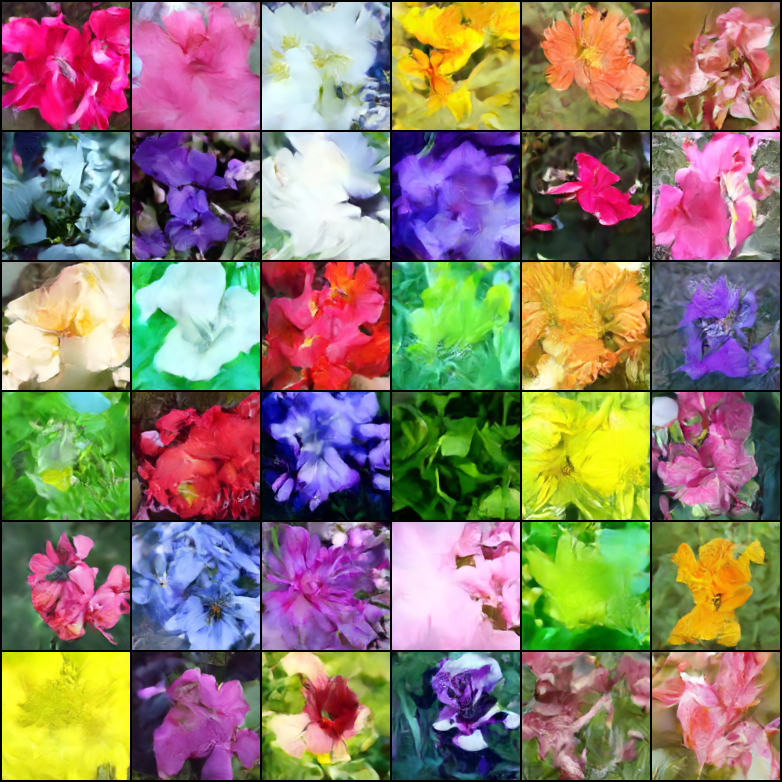
オックスフォードの花の実験セットアップで、デコーダーが無条件生成で動作することが確認されました。 2人の研究者も、Decoderが彼らのために機能していることを確認しました。
21kステップで進行中
Justin Pinkney は、CLIP to Stylegan2 テキストから画像へのアプリケーションのリポジトリで事前に拡散をトレーニングすることに成功しました。
Romain は、利用可能なスクリプトを使用してトレーニングを 800 GPU まで問題なくスケールアップしました。
このライブラリは、次の助けがなければこの動作状態に到達することはできませんでした。
...その他にもたくさんあります。ありがとう!
$ pip install dalle2-pytorchDALLE-2 のトレーニングには 3 つのステップがありますが、CLIP のトレーニングが最も重要です。
CLIP をトレーニングするには、x-clip パッケージを使用するか、多くのレプリケーションの取り組みがすでに進行中の LAION discord に参加することができます。
このリポジトリでは、初心者向けにx-clipとの統合をデモンストレーションします。
 import torch
from dalle2_pytorch import CLIP

clip = CLIP (
    dim_text = 512 ,
    dim_image = 512 ,
    dim_latent = 512 ,
    num_text_tokens = 49408 ,
    text_enc_depth = 1 ,
    text_seq_len = 256 ,
    text_heads = 8 ,
    visual_enc_depth = 1 ,
    visual_image_size = 256 ,
    visual_patch_size = 32 ,
    visual_heads = 8 ,
    use_all_token_embeds = True ,            # whether to use fine-grained contrastive learning (FILIP)
    decoupled_contrastive_learning = True ,  # use decoupled contrastive learning (DCL) objective function, removing positive pairs from the denominator of the InfoNCE loss (CLOOB + DCL)
    extra_latent_projection = True ,         # whether to use separate projections for text-to-image vs image-to-text comparisons (CLOOB)
    use_visual_ssl = True ,                  # whether to do self supervised learning on images
    visual_ssl_type = 'simclr' ,             # can be either 'simclr' or 'simsiam', depending on using DeCLIP or SLIP
    use_mlm = False ,                        # use masked language learning (MLM) on text (DeCLIP)
    text_ssl_loss_weight = 0.05 ,            # weight for text MLM loss
    image_ssl_loss_weight = 0.05            # weight for image self-supervised learning loss
). cuda ()

# mock data

text = torch . randint ( 0 , 49408 , ( 4 , 256 )). cuda ()
images = torch . randn ( 4 , 3 , 256 , 256 ). cuda ()

# train

loss = clip (
    text ,
    images ,
    return_loss = True              # needs to be set to True to return contrastive loss
)

loss . backward ()

# do the above with as many texts and images as possible in a loop
次に、デコーダをトレーニングする必要があります。デコーダは、上記のトレーニング済み CLIP からの画像埋め込みに基づいて画像を生成することを学習します。
 import torch
from dalle2_pytorch import Unet , Decoder , CLIP

# trained clip from step 1

clip = CLIP (
    dim_text = 512 ,
    dim_image = 512 ,
    dim_latent = 512 ,
    num_text_tokens = 49408 ,
    text_enc_depth = 1 ,
    text_seq_len = 256 ,
    text_heads = 8 ,
    visual_enc_depth = 1 ,
    visual_image_size = 256 ,
    visual_patch_size = 32 ,
    visual_heads = 8
). cuda ()

# unet for the decoder

unet = Unet (
    dim = 128 ,
    image_embed_dim = 512 ,
    cond_dim = 128 ,
    channels = 3 ,
    dim_mults = ( 1 , 2 , 4 , 8 )
). cuda ()

# decoder, which contains the unet and clip

decoder = Decoder (
    unet = unet ,
    clip = clip ,
    timesteps = 100 ,
    image_cond_drop_prob = 0.1 ,
    text_cond_drop_prob = 0.5
). cuda ()

# mock images (get a lot of this)

images = torch . randn ( 4 , 3 , 256 , 256 ). cuda ()

# feed images into decoder

loss = decoder ( images )
loss . backward ()

# do the above for many many many many steps
# then it will learn to generate images based on the CLIP image embeddings
最後に、この論文の主な貢献です。リポジトリは拡散事前ネットワークを提供します。 CLIP テキストの埋め込みを取得し、CLIP 画像の埋め込みを生成しようとします。繰り返しますが、最初のステップでトレーニングされた CLIP が必要になります。
 import torch
from dalle2_pytorch import DiffusionPriorNetwork , DiffusionPrior , CLIP

# get trained CLIP from step one

clip = CLIP (
    dim_text = 512 ,
    dim_image = 512 ,
    dim_latent = 512 ,
    num_text_tokens = 49408 ,
    text_enc_depth = 6 ,
    text_seq_len = 256 ,
    text_heads = 8 ,
    visual_enc_depth = 6 ,
    visual_image_size = 256 ,
    visual_patch_size = 32 ,
    visual_heads = 8 ,
). cuda ()

# setup prior network, which contains an autoregressive transformer

prior_network = DiffusionPriorNetwork (
    dim = 512 ,
    depth = 6 ,
    dim_head = 64 ,
    heads = 8
). cuda ()

# diffusion prior network, which contains the CLIP and network (with transformer) above

diffusion_prior = DiffusionPrior (
    net = prior_network ,
    clip = clip ,
    timesteps = 100 ,
    cond_drop_prob = 0.2
). cuda ()

# mock data

text = torch . randint ( 0 , 49408 , ( 4 , 256 )). cuda ()
images = torch . randn ( 4 , 3 , 256 , 256 ). cuda ()

# feed text and images into diffusion prior network

loss = diffusion_prior ( text , images )
loss . backward ()

# do the above for many many many steps
# now the diffusion prior can generate image embeddings from the text embeddings
この論文では、ジョナサン ホー氏 (DALL-E v2 で使用されているコア技術である DDPM の原著者) が最近発見した技術を高解像度画像合成に実際に使用しました。
これはこのフレームワーク内で簡単に使用できます。
 import torch
from dalle2_pytorch import Unet , Decoder , CLIP

# trained clip from step 1

clip = CLIP (
    dim_text = 512 ,
    dim_image = 512 ,
    dim_latent = 512 ,
    num_text_tokens = 49408 ,
    text_enc_depth = 6 ,
    text_seq_len = 256 ,
    text_heads = 8 ,
    visual_enc_depth = 6 ,
    visual_image_size = 256 ,
    visual_patch_size = 32 ,
    visual_heads = 8
). cuda ()

# 2 unets for the decoder (a la cascading DDPM)

unet1 = Unet (
    dim = 32 ,
    image_embed_dim = 512 ,
    cond_dim = 128 ,
    channels = 3 ,
    dim_mults = ( 1 , 2 , 4 , 8 )
). cuda ()

unet2 = Unet (
    dim = 32 ,
    image_embed_dim = 512 ,
    cond_dim = 128 ,
    channels = 3 ,
    dim_mults = ( 1 , 2 , 4 , 8 , 16 )
). cuda ()

# decoder, which contains the unet(s) and clip

decoder = Decoder (
    clip = clip ,
    unet = ( unet1 , unet2 ),            # insert both unets in order of low resolution to highest resolution (you can have as many stages as you want here)
    image_sizes = ( 256 , 512 ),         # resolutions, 256 for first unet, 512 for second. these must be unique and in ascending order (matches with the unets passed in)
    timesteps = 1000 ,
    image_cond_drop_prob = 0.1 ,
    text_cond_drop_prob = 0.5
). cuda ()

# mock images (get a lot of this)

images = torch . randn ( 4 , 3 , 512 , 512 ). cuda ()

# feed images into decoder, specifying which unet you want to train
# each unet can be trained separately, which is one of the benefits of the cascading DDPM scheme

loss = decoder ( images , unet_number = 1 )
loss . backward ()

loss = decoder ( images , unet_number = 2 )
loss . backward ()

# do the above for many steps for both unets
最後に、テキストから DALL-E2 イメージを生成します。トレーニングされたDiffusionPriorとDecoder ( CLIP 、因果変換器、および unet をラップする) を挿入します。
 from dalle2_pytorch import DALLE2

dalle2 = DALLE2 (
    prior = diffusion_prior ,
    decoder = decoder
)

# send the text as a string if you want to use the simple tokenizer from DALLE v1
# or you can do it as token ids, if you have your own tokenizer

texts = [ 'glistening morning dew on a flower petal' ]
images = dalle2 ( texts ) # (1, 3, 256, 256)
それでおしまい!
以下のスクリプト全体を見てみましょう
 import torch
from dalle2_pytorch import DALLE2 , DiffusionPriorNetwork , DiffusionPrior , Unet , Decoder , CLIP

clip = CLIP (
    dim_text = 512 ,
    dim_image = 512 ,
    dim_latent = 512 ,
    num_text_tokens = 49408 ,
    text_enc_depth = 6 ,
    text_seq_len = 256 ,
    text_heads = 8 ,
    visual_enc_depth = 6 ,
    visual_image_size = 256 ,
    visual_patch_size = 32 ,
    visual_heads = 8
). cuda ()

# mock data

text = torch . randint ( 0 , 49408 , ( 4 , 256 )). cuda ()
images = torch . randn ( 4 , 3 , 256 , 256 ). cuda ()

# train

loss = clip (
    text ,
    images ,
    return_loss = True
)

loss . backward ()

# do above for many steps ...

# prior networks (with transformer)

prior_network = DiffusionPriorNetwork (
    dim = 512 ,
    depth = 6 ,
    dim_head = 64 ,
    heads = 8
). cuda ()

diffusion_prior = DiffusionPrior (
    net = prior_network ,
    clip = clip ,
    timesteps = 1000 ,
    sample_timesteps = 64 ,
    cond_drop_prob = 0.2
). cuda ()

loss = diffusion_prior ( text , images )
loss . backward ()

# do above for many steps ...

# decoder (with unet)

unet1 = Unet (
    dim = 128 ,
    image_embed_dim = 512 ,
    text_embed_dim = 512 ,
    cond_dim = 128 ,
    channels = 3 ,
    dim_mults = ( 1 , 2 , 4 , 8 ),
    cond_on_text_encodings = True    # set to True for any unets that need to be conditioned on text encodings
). cuda ()

unet2 = Unet (
    dim = 16 ,
    image_embed_dim = 512 ,
    cond_dim = 128 ,
    channels = 3 ,
    dim_mults = ( 1 , 2 , 4 , 8 , 16 )
). cuda ()

decoder = Decoder (
    unet = ( unet1 , unet2 ),
    image_sizes = ( 128 , 256 ),
    clip = clip ,
    timesteps = 100 ,
    image_cond_drop_prob = 0.1 ,
    text_cond_drop_prob = 0.5
). cuda ()

for unet_number in ( 1 , 2 ):
    loss = decoder ( images , text = text , unet_number = unet_number ) # this can optionally be decoder(images, text) if you wish to condition on the text encodings as well, though it was hinted in the paper it didn't do much
    loss . backward ()

# do above for many steps

dalle2 = DALLE2 (
    prior = diffusion_prior ,
    decoder = decoder
)

images = dalle2 (
    [ 'cute puppy chasing after a squirrel' ],
    cond_scale = 2. # classifier free guidance strength (> 1 would strengthen the condition)
)

# save your image (in this example, of size 256x256)
この Readme に記載されているものはすべてエラーなしで実行できるはずです
CLIP がトレーニングされたサイズ (256x256) より大きいサイズ (たとえば 512x512) の画像でデコーダーをトレーニングすることもできます。画像は、画像埋め込み用の CLIP 画像解像度にサイズ変更されます。
素人でも心配する必要はありません。少なくとも小規模なトレーニングの場合、トレーニングはすべて CLI ツールで自動化されます。
スケールアップする場合は、以前のネットワークをトレーニングする前に、まず画像とテキストを対応する埋め込みに前処理する可能性があります。 image_embed 、 text_embed 、およびオプションでtext_encodings渡すだけで簡単にこれを行うことができます。
以下の実際の例
 import torch
from dalle2_pytorch import DiffusionPriorNetwork , DiffusionPrior , CLIP

# get trained CLIP from step one

clip = CLIP (
    dim_text = 512 ,
    dim_image = 512 ,
    dim_latent = 512 ,
    num_text_tokens = 49408 ,
    text_enc_depth = 6 ,
    text_seq_len = 256 ,
    text_heads = 8 ,
    visual_enc_depth = 6 ,
    visual_image_size = 256 ,
    visual_patch_size = 32 ,
    visual_heads = 8 ,
). cuda ()

# setup prior network, which contains an autoregressive transformer

prior_network = DiffusionPriorNetwork (
    dim = 512 ,
    depth = 6 ,
    dim_head = 64 ,
    heads = 8
). cuda ()

# diffusion prior network, which contains the CLIP and network (with transformer) above

diffusion_prior = DiffusionPrior (
    net = prior_network ,
    clip = clip ,
    timesteps = 100 ,
    cond_drop_prob = 0.2 ,
    condition_on_text_encodings = False  # this probably should be true, but just to get Laion started
). cuda ()

# mock data

text = torch . randint ( 0 , 49408 , ( 4 , 256 )). cuda ()
images = torch . randn ( 4 , 3 , 256 , 256 ). cuda ()

# precompute the text and image embeddings
# here using the diffusion prior class, but could be done with CLIP alone

clip_image_embeds = diffusion_prior . clip . embed_image ( images ). image_embed
clip_text_embeds = diffusion_prior . clip . embed_text ( text ). text_embed

# feed text and images into diffusion prior network

loss = diffusion_prior (
    text_embed = clip_text_embeds ,
    image_embed = clip_image_embeds
)

loss . backward ()

# do the above for many many many steps
# now the diffusion prior can generate image embeddings from the text embeddings完全にCLIPにすることもできます。その場合、初期化時にimage_embed_dimをDiffusionPriorに渡す必要があります。
 import torch
from dalle2_pytorch import DiffusionPriorNetwork , DiffusionPrior

# setup prior network, which contains an autoregressive transformer

prior_network = DiffusionPriorNetwork (
    dim = 512 ,
    depth = 6 ,
    dim_head = 64 ,
    heads = 8
). cuda ()

# diffusion prior network, which contains the CLIP and network (with transformer) above

diffusion_prior = DiffusionPrior (
    net = prior_network ,
    image_embed_dim = 512 ,               # this needs to be set
    timesteps = 100 ,
    cond_drop_prob = 0.2 ,
    condition_on_text_encodings = False  # this probably should be true, but just to get Laion started
). cuda ()

# mock data

text = torch . randint ( 0 , 49408 , ( 4 , 256 )). cuda ()
images = torch . randn ( 4 , 3 , 256 , 256 ). cuda ()

# precompute the text and image embeddings
# here using the diffusion prior class, but could be done with CLIP alone

clip_image_embeds = torch . randn ( 4 , 512 ). cuda ()
clip_text_embeds = torch . randn ( 4 , 512 ). cuda ()

# feed text and images into diffusion prior network

loss = diffusion_prior (
    text_embed = clip_text_embeds ,
    image_embed = clip_image_embeds
)

loss . backward ()

# do the above for many many many steps
# now the diffusion prior can generate image embeddings from the text embeddings 未リリースのより強力な CLIP が使用されている可能性がありますが、独自の CLIP を最初からトレーニングしたくない場合は、リリース済みの CLIP のいずれかを使用できます。これにより、コミュニティが論文の結論をより迅速に検証できるようになります。
事前トレーニングされた OpenAI CLIP を使用するには、 OpenAIClipAdapterをインポートし、次のようにDiffusionPriorまたはDecoderに渡すだけです。
 import torch
from dalle2_pytorch import DALLE2 , DiffusionPriorNetwork , DiffusionPrior , Unet , Decoder , OpenAIClipAdapter

# openai pretrained clip - defaults to ViT-B/32

clip = OpenAIClipAdapter ()

# mock data

text = torch . randint ( 0 , 49408 , ( 4 , 256 )). cuda ()
images = torch . randn ( 4 , 3 , 256 , 256 ). cuda ()

# prior networks (with transformer)

prior_network = DiffusionPriorNetwork (
    dim = 512 ,
    depth = 6 ,
    dim_head = 64 ,
    heads = 8
). cuda ()

diffusion_prior = DiffusionPrior (
    net = prior_network ,
    clip = clip ,
    timesteps = 100 ,
    cond_drop_prob = 0.2
). cuda ()

loss = diffusion_prior ( text , images )
loss . backward ()

# do above for many steps ...

# decoder (with unet)

unet1 = Unet (
    dim = 128 ,
    image_embed_dim = 512 ,
    cond_dim = 128 ,
    channels = 3 ,
    dim_mults = ( 1 , 2 , 4 , 8 ),
    text_embed_dim = 512 ,
    cond_on_text_encodings = True  # set to True for any unets that need to be conditioned on text encodings (ex. first unet in cascade)
). cuda ()

unet2 = Unet (
    dim = 16 ,
    image_embed_dim = 512 ,
    cond_dim = 128 ,
    channels = 3 ,
    dim_mults = ( 1 , 2 , 4 , 8 , 16 )
). cuda ()

decoder = Decoder (
    unet = ( unet1 , unet2 ),
    image_sizes = ( 128 , 256 ),
    clip = clip ,
    timesteps = 1000 ,
    sample_timesteps = ( 250 , 27 ),
    image_cond_drop_prob = 0.1 ,
    text_cond_drop_prob = 0.5
). cuda ()

for unet_number in ( 1 , 2 ):
    loss = decoder ( images , text = text , unet_number = unet_number ) # this can optionally be decoder(images, text) if you wish to condition on the text encodings as well, though it was hinted in the paper it didn't do much
    loss . backward ()

# do above for many steps

dalle2 = DALLE2 (
    prior = diffusion_prior ,
    decoder = decoder
)

images = dalle2 (
    [ 'a butterfly trying to escape a tornado' ],
    cond_scale = 2. # classifier free guidance strength (> 1 would strengthen the condition)
)

# save your image (in this example, of size 256x256)
または、「クリップを開く」を使用することもできます。
$ pip install open-clip-torch元。 Romain によってトレーニングされた SOTA Open Clip モデルを使用


