ai chat accelerator
1.0.0
構築するための基盤となる AWS 上の AI チャット アプリケーションを使用して、すぐに起動して実行できます。
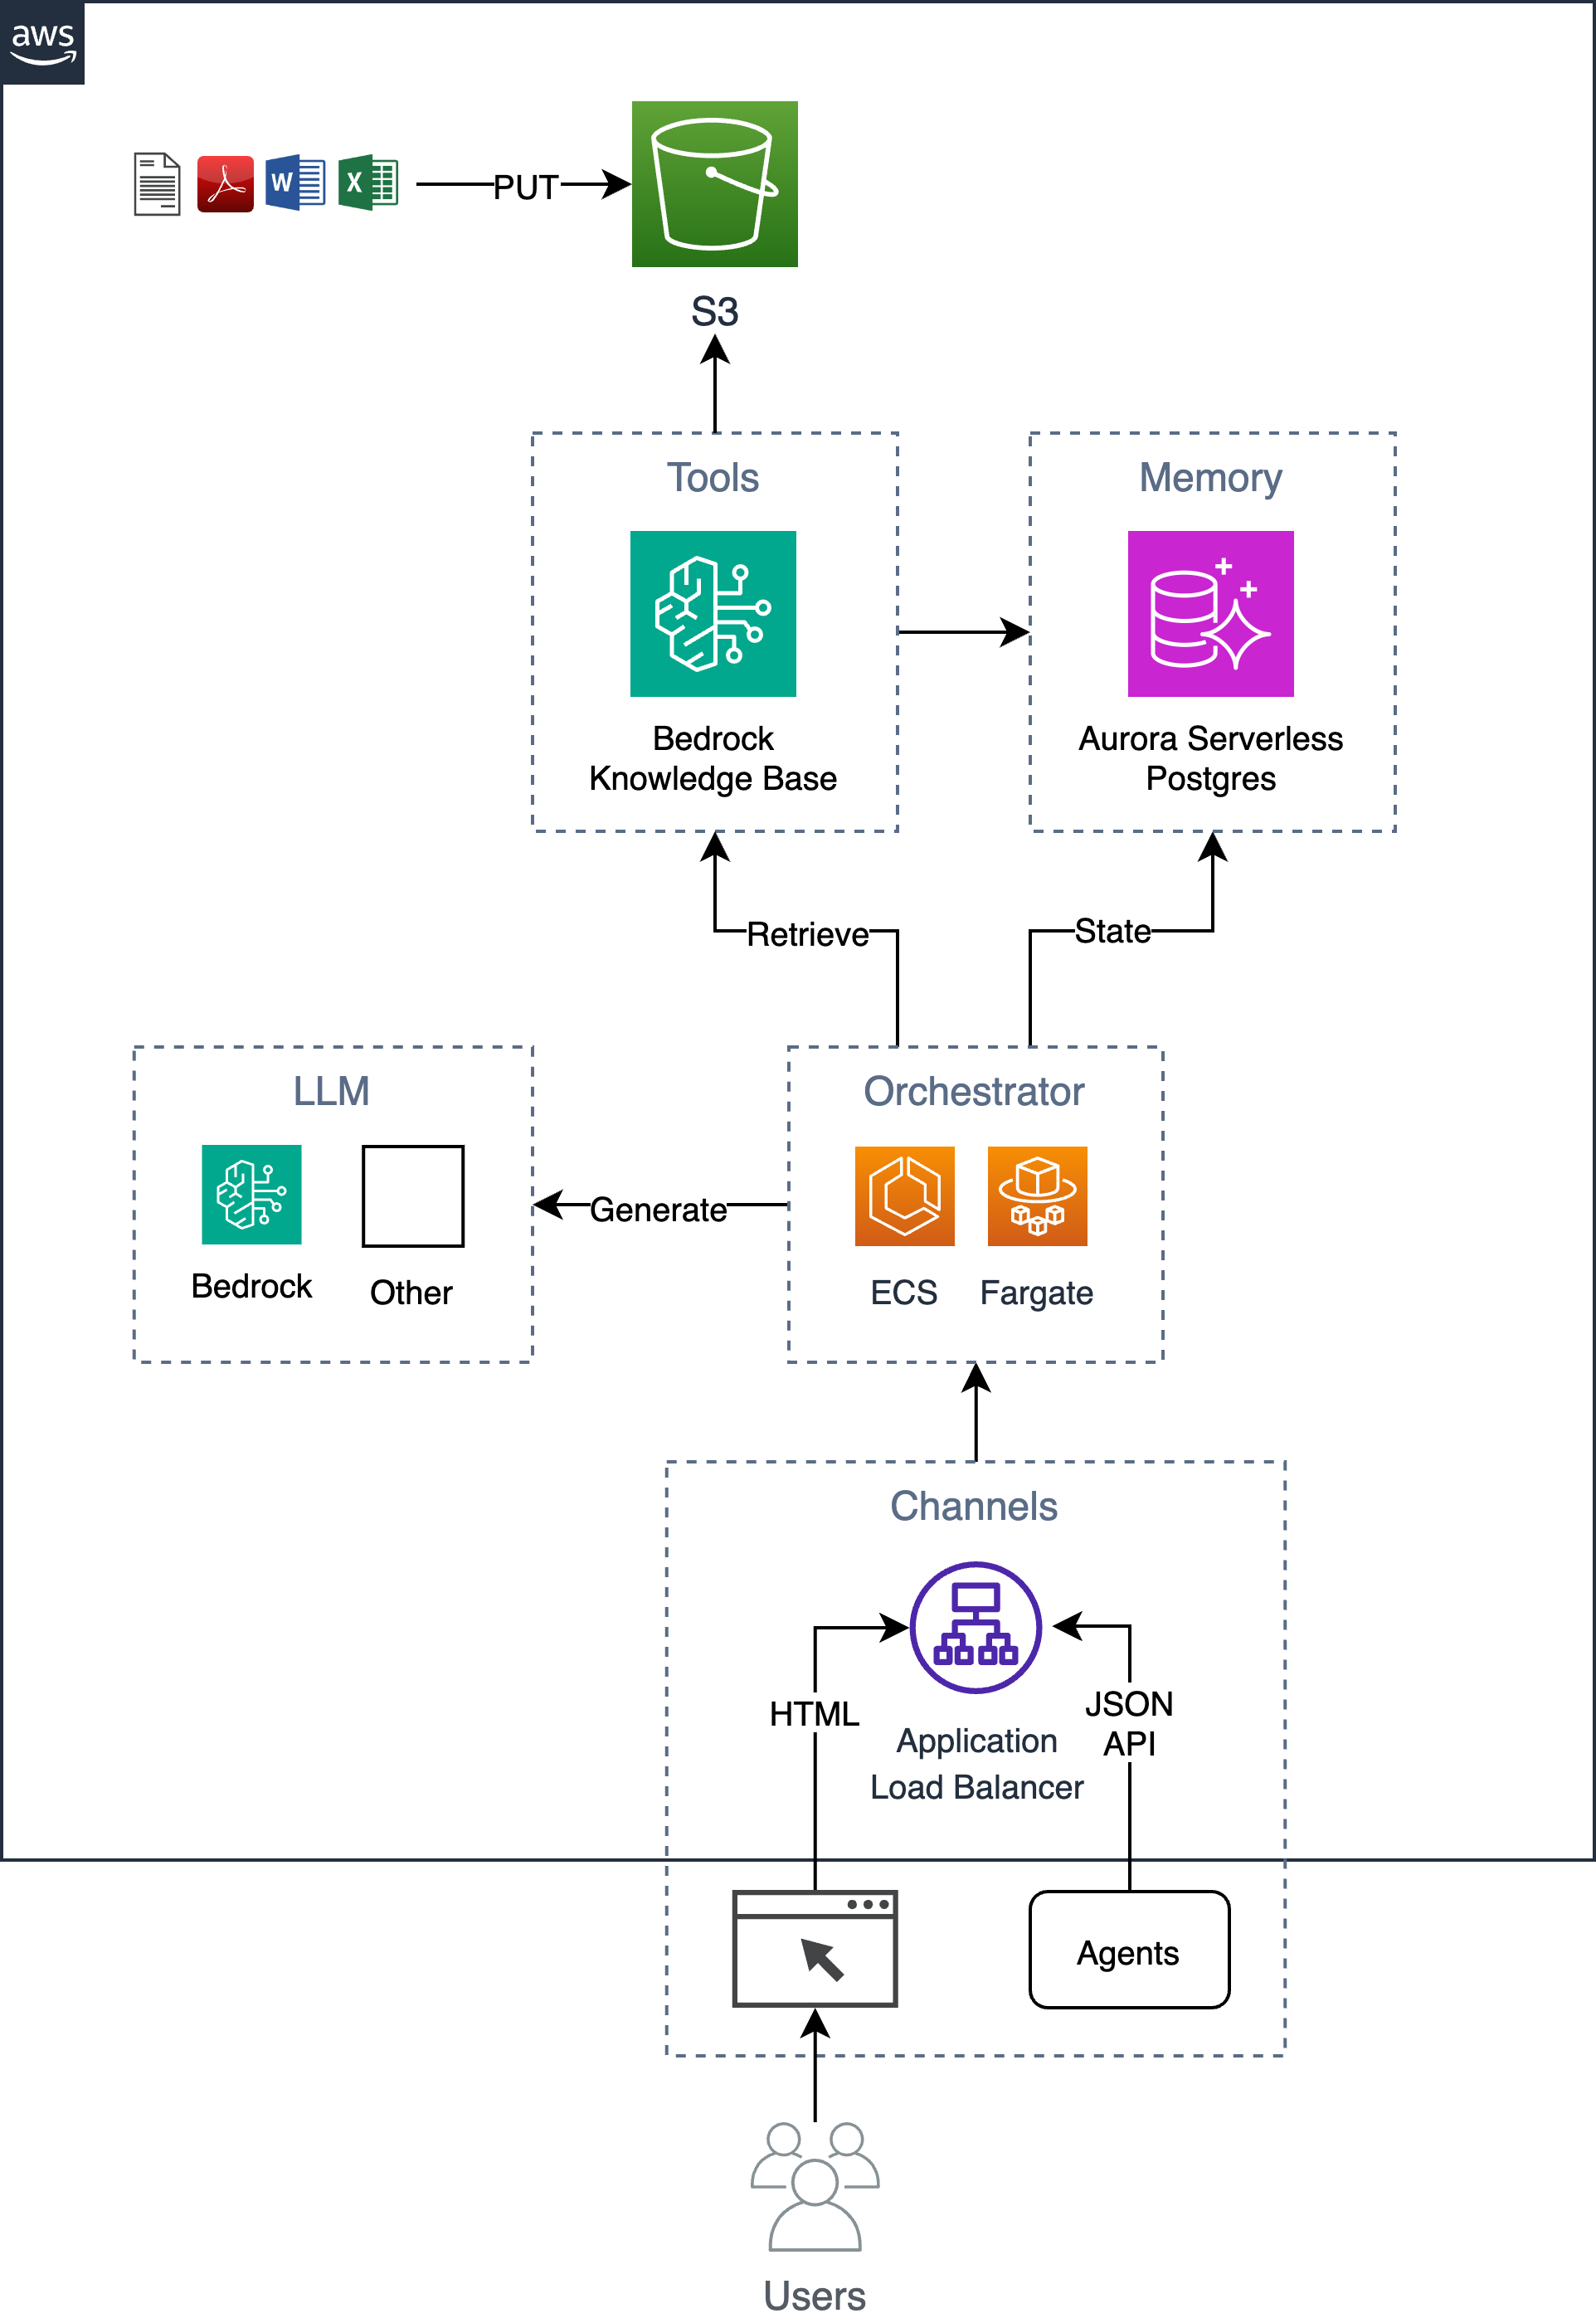
Python フレームワーク/ライブラリに依存せずに、検索拡張生成 (RAG) パターンを実装する、シンプルでありながらスケーラブルなエンタープライズ対応チャットボットの例。 Bedrock Knowledge Bases を使用してドキュメントを S3 バケットに取り込み、インデックス付きベクトルを Aurora Serverless でホストされている Postgres データベースに保存します。このデータベースは、ユーザーの会話履歴などの情報を格納するアプリケーションデータベースとしても機能します。このアプリは、Web GUI と HTTP JSON API の両方を実装し、ALB を備えた ECS Fargate 上で実行されるコンテナとしてホストされます。アプリは Flask と HTMX を使用して構築されています。
このソリューションを AWS アカウントにデプロイするには、以下の 6 つのステップのプロセスに従ってください。
必要な環境変数をエクスポートします。
 export AWS_REGION= $( aws configure get region || echo " us-east-1 " )
export ACCOUNT= $( aws sts get-caller-identity --query Account --output text )
export BUCKET=tf-state- ${ACCOUNT}
必要に応じて、Terraform 状態を保存するための s3 バケットを作成します (初期 DB パスワードが状態に保存されるため、これをお勧めします)。すでに s3 バケットがある場合は、バケットの名前でBUCKET変数を更新できます (たとえば、 export BUCKET=my-s3-bucket )。
aws s3 mb s3:// ${BUCKET} terraform.tfvarsのアプリnameなどのテンプレート入力パラメーターを設定します。
 cd iac
cat << EOF > terraform.tfvars
name = "ai-chatbot"
tags = {
  app = "ai-chatbot"
}
EOF
Terraform を使用してデプロイします。
terraform init -backend-config= " bucket= ${BUCKET} " -backend-config= " key=ai-chatbot.tfstate "
terraform applyインフラストラクチャがデプロイされたので、アプリ コンテナを構築してインフラストラクチャ上にデプロイできます。
アプリ名をai-chatbotから別の名前に変更した場合は、 appパラメーターを使用してそれを make コマンドに渡す必要があります (またはMakefileの先頭で変更します)。
導入する前に、特定の要件に合わせてシステムとユーザー プロンプトを変更することを検討する必要があります。
初めてデプロイするときは、次のコマンドを実行して、ベース イメージとアプリ イメージを一緒に構築できます。
 cd ../
make baseimage && make deploy
最初のデプロイメントの後は、コード層を再構築して再デプロイするだけで、コードの変更をより迅速に繰り返すことができます。
make deploy
# OR
# make deploy app=my-cool-chatbot cd iac
export DOCS_BUCKET= $( terraform output -raw s3_bucket_name )
aws s3 cp /path/to/docs/ s3:// ${DOCS_BUCKET} / --recursive cd iac
make syncこのスクリプトはbedrock-agent start-ingestion-job API を呼び出すことに注意してください。チャットボットがドキュメントに関する質問に回答できるようになるには、このジョブが正常に完了する必要があります。
open $( terraform output -raw endpoint ) シンプルな HTMX GUI に加えて、次のアクションをサポートする HTTP JSON API があります。
export endpoint= $( terraform output -raw endpoint )質問して答えを返してください。
curl -s -X POST -H " Content-Type: application/json " $endpoint /api/ask
-d ' { "question": "Who are you?" } ' | jq{
"answer" : " ... " ,
"conversationId" : " 46ac5045-49b4-487c-b3a0-64d82462ad76 "
}会話の一部としてフォローアップの質問をするには、URL に会話 ID を含めます。
curl -s -X POST -H " Content-Type: application/json " $endpoint /api/ask/46ac5045-49b4-487c-b3a0-64d82462ad76 -d ' { "question": What are you capable of?" } ' | jq{
"answer" : " ... " ,
"conversationId" : " 46ac5045-49b4-487c-b3a0-64d82462ad76 "
}最新の 10 件の会話を返します
curl -s $endpoint /api/conversations | jq[
{
  "conversationId" : " d61e143c-a32d-4b4f-aa4e-a0fe94082e77 " ,
  "created" : " 2024-04-10T22:04:36.813819+00:00 " ,
  "questions" : [
    {
      "a" : " ... " ,
      "created" : " 2024-04-10 22:04:40.657402+00:00 " ,
      "q" : " ... "
    }
  ],
  "userId" : " 1 "
},
{
"conversationId" : " aaddc6aa-7c51-4b0a-800d-53e72b05524f " ,
"created" : " 2024-04-10T22:01:16.071982+00:00 " ,
"questions" : [
{
"a" : " ... " ,
"created" : " 2024-04-10 22:01:18.500971+00:00 " ,
"q" : " ... "
},
{
"a" : " ... " ,
"created" : " 2024-04-10 22:01:27.328482+00:00 " ,
"q" : " ... "
}
],
"userId" : " 1 "
}
]指定された会話に関する情報を返します
curl -s $endpoint /api/conversations/d61e143c-a32d-4b4f-aa4e-a0fe94082e77 | jq{
"conversationId" : " d61e143c-a32d-4b4f-aa4e-a0fe94082e77 " ,
"created" : " 2024-04-10T22:04:36.813819+00:00 " ,
"questions" : [
{
"a" : " ... " ,
"created" : " 2024-04-10 22:04:40.657402+00:00 " ,
"q" : " ... "
}
],
"userId" : " 1 "
}ユーザーの最新の 10 件の会話を返します
curl -s $endpoint /api/conversations/users/1 | jq[
{
"conversationId" : " d61e143c-a32d-4b4f-aa4e-a0fe94082e77 " ,
"created" : " 2024-04-10T22:04:36.813819+00:00 " ,
"questions" : [
{
"a" : " ... " ,
"created" : " 2024-04-10 22:04:40.657402+00:00 " ,
"q" : " ... "
}
],
"userId" : " 1 "
},
{
"conversationId" : " aaddc6aa-7c51-4b0a-800d-53e72b05524f " ,
"created" : " 2024-04-10T22:01:16.071982+00:00 " ,
"questions" : [
{
"a" : " ... " ,
"created" : " 2024-04-10 22:01:18.500971+00:00 " ,
"q" : " ... "
},
{
"a" : " ... " ,
"created" : " 2024-04-10 22:01:27.328482+00:00 " ,
"q" : " ... "
}
],
"userId" : " 1 "
}
] Choose a make command to run
init run this once to initialize a new python project
install install project dependencies
start run local project
baseimage build base image
deploy build and deploy container
up run the app locally using docker compose
down stop the app
start-docker run local project using docker compose
アプリをローカルで実行するには、次の変数を使用して.envという名前のローカル ファイルを作成します。変数KNOWLEDGE_BASE_IDは、Terraform 出力 ( cd iac && terraform output ) から取得されます。
POSTGRES_DB=postgres
POSTGRES_USER=postgres
POSTGRES_PASSWORD=xyz
KNOWLEDGE_BASE_ID= .envファイルを設定した後、AWS にデプロイする前に、Docker でアプリをローカルに実行してコードの変更を繰り返すことができます。アプリをローカルで実行する場合、アプリはローカルの postgres データベースと通信し、リモートの Amazon Bedrock Knowledge Base API を使用します。有効な AWS 認証情報があることを確認してください。 make upコマンドを実行すると、postgres データベース インスタンスと Web コンテナが起動します。
make up環境を停止するには、次のコマンドを実行するだけです。
make down

