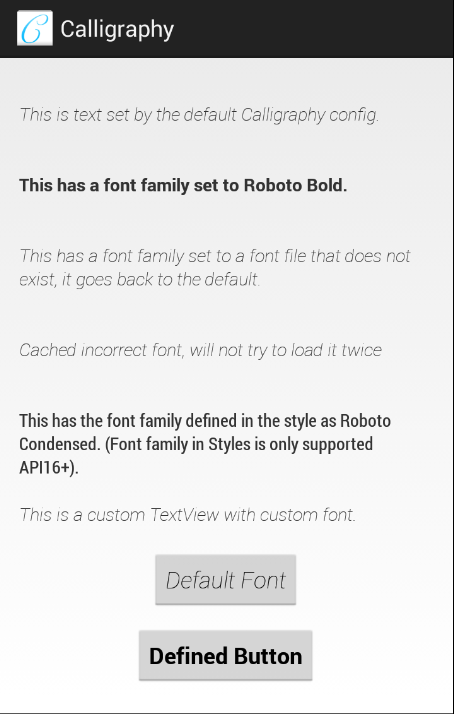
AndroidのカスタムフォントはOK方法です。
フォントを設定するためにカスタムビューにうんざりしていますか?または、テキストビューを見つけるためにビューツリーを横断しますか?ええ、私も。

依存関係のダウンロード(.aar)を含めます:
dependencies {
    compile ' uk.co.chrisjenx:calligraphy:2.3.0 '
}カスタムフォントをassets/に追加します。すべてのフォント定義は、このパスに関連しています。
Gradleを使用していると仮定すると、プロジェクトディレクトリにまだ存在しない場合は、 src/main/の下にAssets Directoryを作成する必要があります。 Gradleでマルチプロジェクトビルドを使用することが人気があるため、パスは通常app/src/main/assets/であり、 appプロジェクト名です。
Assets Directoryにfonts/サブディレクトリを作成することを検討する場合があります(例のように)。
< TextView fontPath = " fonts/MyFont.ttf " />注:欠落している名前空間、これは意図的です。
#onCreate()メソッドのApplicationクラスで、 CalligraphyConfig使用してデフォルトのフォントを定義します。
 @ Override
public void onCreate () {
    super . onCreate ();
    CalligraphyConfig . initDefault ( new CalligraphyConfig . Builder ()
                            . setDefaultFontPath ( "fonts/Roboto-RobotoRegular.ttf" )
                            . setFontAttrId ( R . attr . fontPath )
                            . build ()
            );
    //....
}
注: CalligraphyConfig定義する必要はありませんが、ライブラリはデフォルトのフォントを適用せず、 R.attr.fontPathのデフォルト属性を使用します。
Activityコンテキストをラップします:
 @ Override
protected void attachBaseContext ( Context newBase ) {
    super . attachBaseContext ( CalligraphyContextWrapper . wrap ( newBase ));
}
あなたは行ってもいいです!
< TextView
    android : text = " @string/hello_world "
    android : layout_width = " wrap_content "
    android : layout_height = " wrap_content "
    fontPath = " fonts/Roboto-Bold.ttf " />
注:人気のあるIDE(Android Studio、Intellij)は、これを正しいにもかかわらずエラーとしてマークする可能性があります。 tools:ignore="MissingPrefix" 。この「無視」属性にアクセスするには、ツール名空間を追加する必要があります。 xmlns:tools=" http://schemas.android.com/tools" 。 https://code.google.com/p/android/issues/detail?id=65176を参照してください。
< style name = " TextAppearance.FontPath " parent = " android:TextAppearance " >
    <!-- Custom Attr -->
    < item name = " fontPath " >fonts/RobotoCondensed-Regular.ttf</ item >
</ style >
< TextView
android : text = " @string/hello_world "
android : layout_width = " wrap_content "
android : layout_height = " wrap_content "
android : textAppearance = " @style/TextAppearance.FontPath " />
< style name = " TextViewCustomFont " >
    < item name = " fontPath " >fonts/RobotoCondensed-Regular.ttf</ item >
</ style >< style name = " AppTheme " parent = " android:Theme.Holo.Light.DarkActionBar " >
< item name = " android:textViewStyle " >@style/AppTheme.Widget.TextView</ item >
</ style >
< style name = " AppTheme.Widget " />
< style name = " AppTheme.Widget.TextView " parent = " android:Widget.Holo.Light.TextView " >
< item name = " fontPath " >fonts/Roboto-ThinItalic.ttf</ item >
</ style >CalligraphyFactory 、かなり具体的な順序でフォントを探します。ほとんどの場合、 Androidフレームワークが属性を解決する方法と非常によく似ています。
View - ここで定義されている属性は常に優先されます。Style XML-ここで定義されている属性が次にチェックされます。TextAppearance XML -ATTRが次にチェックされます。これの唯一の注意点は、 Styleで定義されたフォントとViewで定義されたTextAttributeがある場合です。 Style属性が最初に選択されます。Theme - 定義されている場合、これが使用されます。Default CalligraphyConfigで定義されている場合、これは上記のいずれでもないか、上記のいずれかが無効なフォントを返す場合は使用されません。当初はそうしましたが、実際にその属性を使用したいユーザーと矛盾しているため、カスタム属性を定義する必要があります。
フォント噴射フローを改善するために、書道付きのカスタムIDを発送する必要がありました。残念ながら、これはaarでなければならないことを意味します。しかし、あなたはとにかく今グラードルを今使用していますよね?
TextView内で複数の書体を使用することは可能です。これはAndroidにとって新しいコンセプトではありません。
これは、次のコードのようなものを使用して達成できます。
 SpannableStringBuilder sBuilder = new SpannableStringBuilder ();
sBuilder . append ( "Hello!" ) // Bold this
        . append ( "I use Calligraphy" ); // Default TextView font.
// Create the Typeface you want to apply to certain text
CalligraphyTypefaceSpan typefaceSpan = new CalligraphyTypefaceSpan ( TypefaceUtils . load ( getAssets (), "fonts/Roboto-Bold.ttf" ));
// Apply typeface to the Spannable 0 - 6 "Hello!" This can of course by dynamic.
sBuilder . setSpan ( typefaceSpan , 0 , 6 , Spanned . SPAN_EXCLUSIVE_EXCLUSIVE );
setText ( sBuilder , TextView . BufferType . SPANNABLE );
もちろん、これは単なる例です。あなたの走行距離は異なる場合があります。
私たちの知る限り( grep -r -e "void set[^(]*(Typeface " <android source dir> )2つの標準的なAndroidウィジェットが書体を設定するための複数のメソッドがあります。
どちらも、スイッチ内に書体を設定するsetSwitchTypefaceというメソッドを持っています(ON/OFF、はい/いいえ)。 SetTypefaceラベルの書体を設定します。 setTypefaceをオーバーライドし、 super.setTypefaceとsuper.setSwitchTypeface両方を呼び出す独自のサブクラスを作成する必要があります。
このライブラリは、AndroidのXMLファイルでカスタムフォントを宣言することができないため、作成されました。
これが可能であると思われる場合は、公式のAndroidバグトラッカーにこの問題を主演させてください。
 Copyright 2013 Christopher Jenkins

Licensed under the Apache License, Version 2.0 (the "License");
you may not use this file except in compliance with the License.
You may obtain a copy of the License at

    http://www.apache.org/licenses/LICENSE-2.0

Unless required by applicable law or agreed to in writing, software
distributed under the License is distributed on an "AS IS" BASIS,
WITHOUT WARRANTIES OR CONDITIONS OF ANY KIND, either express or implied.
See the License for the specific language governing permissions and
limitations under the License.