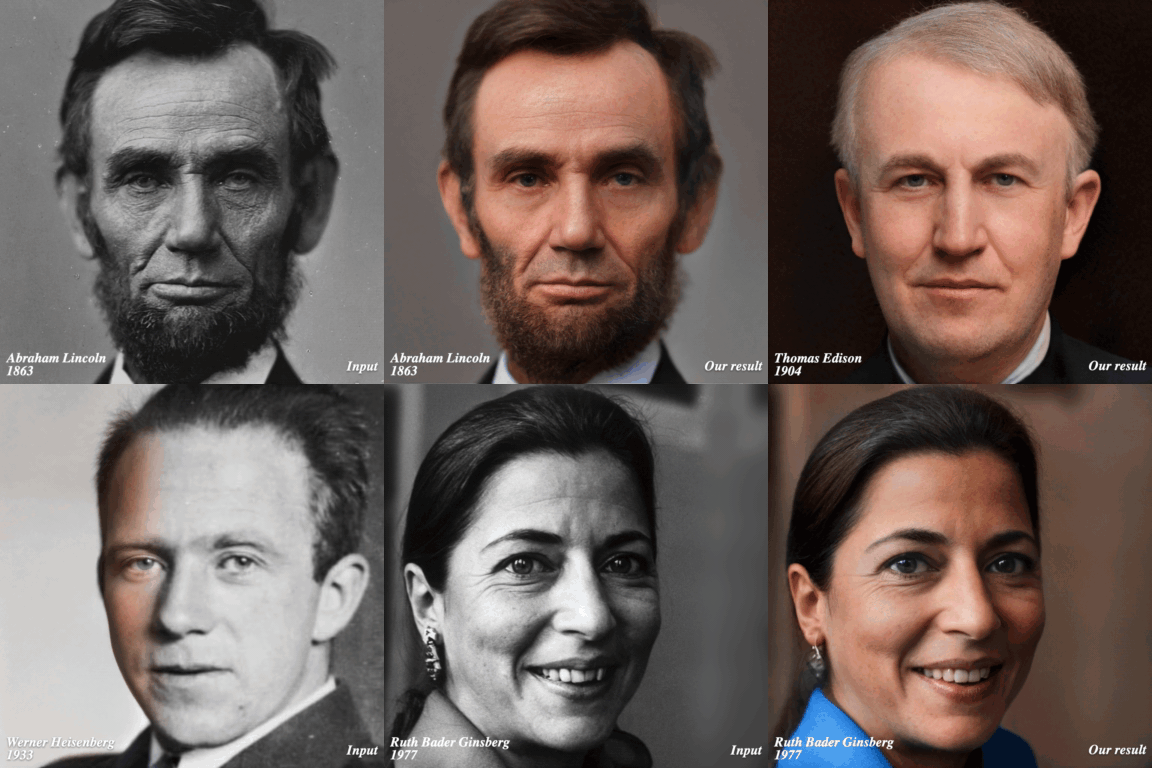
多くの歴史的な人々は、初期のカメラの制限と時間の経過により歪んでいる、色あせた、色あせた、白と白の写真によってしか捉えられていませんでした。このペーパーでは、有名な主題を再撮影するために、現代のカメラで時間をさかのぼることをシミュレートします。除去、着色、超解像度などの独立した操作を適用する従来の画像修復フィルターとは異なり、StyleGan2フレームワークを活用して、古い写真を最新の高解像度写真の空間に投影し、統一されたフレームワークでこれらすべての効果を達成します。このアプローチでのユニークな課題は、元の写真で主題のアイデンティティとポーズを保持しながら、低品質のアンティーク写真で頻繁に見られる多くのアーティファクトを破棄することです。現在の最先端の修復フィルターとの比較は、さまざまな重要な歴史的な人々にとって大幅な改善と説得力のある結果を示しています。
タイムトラベルrephotography
Xuan Luo、Xuaner Zhang、Paul Yoo、Ricardo Martin-Brualla、Jason Lawrence、Steven M. Seitz
シググラフアジア2021年。
Google Colabを使用して、簡単に開始できるデモを提供します! Colabを使用すると、Google ColabでクラウドGPUを使用して、サンプルAbraham Lincolnの写真または自分の写真で私たちの方法を試すことができます。
または、以下の指示に従って、自分のマシンでメソッドを実行することもできます。
サードパーティのパッケージを引きます。
git submodule update --init --recursive
Pythonパッケージをインストールします。
conda create --name rephotography python=3.8.5
conda activate rephotography
conda install pytorch==1.4.0 torchvision==0.5.0 cudatoolkit=10.1 -c pytorch
pip install -r requirements.txt
アブラハムリンカーンの例の写真でメソッドを実行します。
モデルのダウンロード:
./scripts/download_checkpoints.sh
走る:
./scripts/run.sh b "dataset/Abraham Lincoln_01.png" 0.75
最適化プロセスを検査できます
tensorboard --logdir "log/Abraham Lincoln_01"
以下のように結果を見つけることができます。
results/
  Abraham Lincoln_01/       # intermediate outputs for histogram matching and face parsing
  Abraham Lincoln_01_b.png  # the input after matching the histogram of the sibling image
  Abraham Lincoln_01-b-G0.75-init(10,18)-s256-vgg1-vggface0.3-eye0.1-color1.0e+10-cx0.1(relu3_4,relu2_2,relu1_2)-NR5.0e+04-lr0.1_0.01-c32-wp(250,750)-init.png        # the sibling image
  Abraham Lincoln_01-b-G0.75-init(10,18)-s256-vgg1-vggface0.3-eye0.1-color1.0e+10-cx0.1(relu3_4,relu2_2,relu1_2)-NR5.0e+04-lr0.1_0.01-c32-wp(250,750)-init.pt         # the sibing latent codes and initialized noise maps
  Abraham Lincoln_01-b-G0.75-init(10,18)-s256-vgg1-vggface0.3-eye0.1-color1.0e+10-cx0.1(relu3_4,relu2_2,relu1_2)-NR5.0e+04-lr0.1_0.01-c32-wp(250,750).png             # the output result
  Abraham Lincoln_01-b-G0.75-init(10,18)-s256-vgg1-vggface0.3-eye0.1-color1.0e+10-cx0.1(relu3_4,relu2_2,relu1_2)-NR5.0e+04-lr0.1_0.01-c32-wp(250,750).pt              # the final optimized latent codes and noise maps
  Abraham Lincoln_01-b-G0.75-init(10,18)-s256-vgg1-vggface0.3-eye0.1-color1.0e+10-cx0.1(relu3_4,relu2_2,relu1_2)-NR5.0e+04-lr0.1_0.01-c32-wp(250,750)-rand.png        # the result with the final latent codes but random noise maps
画像のヘッド領域を収穫して調整します。
python -m tools.data.align_images <input_raw_image_dir> <aligned_image_dir>
走る:
./scripts/run.sh <spectral_sensitivity> <input_image_path> <blur_radius>
spectral_sensitivity 、 b (青敏感)、 gb (オルソクロマティック)、またはg (パンクロマティック)である可能性があります。次のように、写真のspectral_sensitivity大まかに推定できます。 1873年以前の写真には青信感のあるモデルを使用し、1873年から1906年までの画像に対して青感受性とオルトクロマティックを手動で選択し、その後撮影した写真のすべてのモデルの間で手動で選択します。
入力フォトが1024x1024にサイズ変更されている場合、 blur_radiusはピクセルで推定ガウスブラー半径です。
| パス | サイズ | 説明 |
|---|---|---|
| 歴史的なwiki Face Dataset.zip | 148 MB | 画像 |
| Spectral_sensitivity.json | 6 kb | スペクトル感度( b 、 gb 、またはg )。 |
| blur_radius.json | 6 kb | ピクセルのぼかし半径 |
json Sは、入力名を対応するスペクトル感度またはぼかし半径にマッピングする辞書です。著作権の制約により、 Historical Wiki Face Dataset.zipは、Mao Zedongの写真を除き、ユーザー調査で使用された履歴Wiki Faceデータセットのすべての画像が含まれています。別々にダウンロードして、上記のようにトリミングできます。
私たちのコードが便利だと思うなら、私たちの論文を引用することを検討してください:
@article{Luo-Rephotography-2021,
  author    = {Luo, Xuan and Zhang, Xuaner and Yoo, Paul and Martin-Brualla, Ricardo and Lawrence, Jason and Seitz, Steven M.},
  title     = {Time-Travel Rephotography},
  journal = {ACM Transactions on Graphics (Proceedings of ACM SIGGRAPH Asia 2021)},
  publisher = {ACM New York, NY, USA},
  volume = {40},
  number = {6},
  articleno = {213},
  doi = {https://doi.org/10.1145/3478513.3480485},
  year = {2021},
  month = {12}
}この作業は、MITライセンスに基づいてライセンスされています。詳細については、ライセンスを参照してください。
StyleGan2モデルのコードは、https://github.com/rosinality/stylegan2-pytorchからのものです。
ドライプレートの写真を撮ってくれたNick Brandrethに感謝します。洞察に富んだアドバイスをしてくれたBo Zhang、Qingnan Fan、Roy Or-El、Aleksander Holynski、Keunhong Parkに感謝します。 Xiaojie FengがColab Demoに貢献してくれたことに感謝します。