Telegram Web API Cheatsheet
1.0.0
Para começar a usar a API, coloque isto em seu HTML:
< script src =" https://telegram.org/js/telegram-web-app.js " > </ script > Ao adicioná-lo ao seu HTML, você obtém o objeto window.Telegram e também algumas variáveis de estilo CSS.
A maior parte do seu trabalho com a API do Telegram será com window.Telegram.WebApp , que contém muitos métodos e propriedades úteis.
Você pode usar as variáveis CSS da API para que seu aplicativo web corresponda ao tema Telegram do usuário escolhido; você não precisa fazer nada, as variáveis CSS estão prontas para uso!
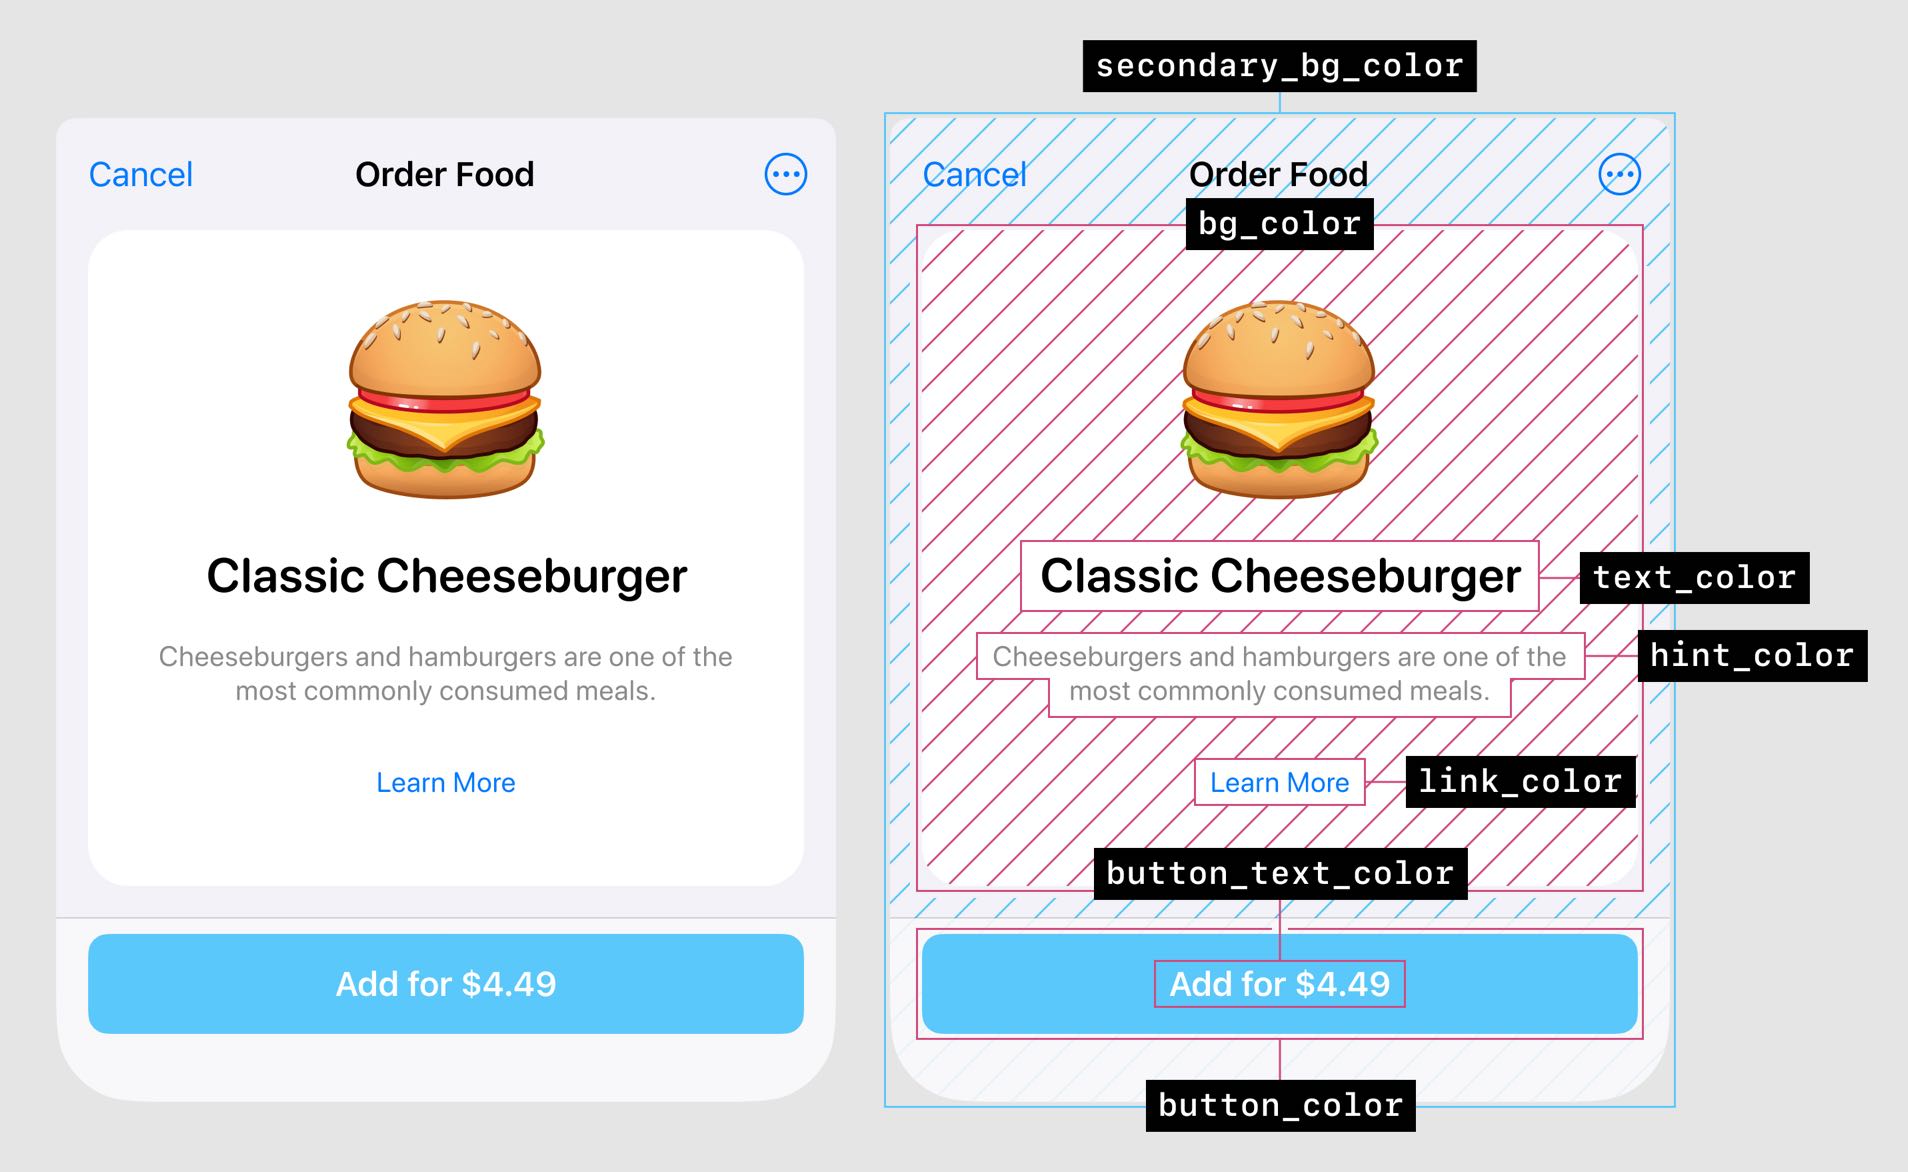
 var ( --tg-theme-bg-color )
var ( --tg-theme-text-color )
var ( --tg-theme-hint-color )
var ( --tg-theme-link-color )
var ( --tg-theme-button-color )
var ( --tg-theme-button-text-color )
var ( --tg-theme-secondary-bg-color )
Você também pode acessá-los usando JavaScript:
 const {
  bg_color ,
  text_color ,
  hint_color ,
  button_color ,
  button_text_color ,
  secondary_bg_color ,
} = Telegram . WebApp . themeParams ; Para ter certeza de que os usuários que estão usando seu aplicativo são reais e também para ter certeza de que estão usando seu aplicativo no aplicativo Telegram, você precisa autenticar seus usuários; este é um passo importante, então não pule!
Primeiro, você precisa obter o Telegram.WebApp.initData do usuário, que é uma string que contém uma consulta com estes parâmetros:
auth_date : hora Unix em que o formulário foi aberto.hash : um hash de todos os parâmetros passados, que o servidor bot pode usar para verificar sua validade.query_id : opcional. Um identificador exclusivo para a sessão do Web App, necessário para enviar mensagens por meio do método answerWebAppQuery .user :idfirst_namelast_nameusernamelanguage_code , por exemplo enExemplo:
query_id = < query_id > &user=%7B%22id%22%3A < user_id > %2C%22first_name%22%3A%22 < first_name > %22%2C%22last_name%22%3A%22 < last_name > %22%2C%22username%22%3A%22 < username > %22%2C%22language_code%22%3A%22 < language_code > %22%7D&auth_date= < auth_date > &hash= < hash >Em segundo lugar, você precisa passar essa consulta ao back-end para validar os dados.
É assim que você faz:
 data_check_string = ...
secret_key = HMAC_SHA256 ( < bot_token > , "WebAppData")
if (hex(HMAC_SHA256(data_check_string, secret_key)) == hash) {
  // Data is from Telegram
}
Usando JavaScript, você pode validar os dados assim:
 const verifyTelegramWebAppData = ( telegramInitData : string ) => {
  // The data is a query string, which is composed of a series of field-value pairs.
  const encoded = decodeURIComponent ( telegramInitData ) ;

  // HMAC-SHA-256 signature of the bot's token with the constant string WebAppData used as a key.
  const secret = crypto . createHmac ( "sha256" , "WebAppData" ) . update ( botToken ) ;

  // Data-check-string is a chain of all received fields'.
  const arr = encoded . split ( "&" ) ;
  const hashIndex = arr . findIndex ( ( str ) => str . startsWith ( "hash=" ) ) ;
  const hash = arr . splice ( hashIndex ) [ 0 ] . split ( "=" ) [ 1 ] ;
  // Sorted alphabetically
  arr . sort ( ( a , b ) => a . localeCompare ( b ) ) ;
  // In the format key=<value> with a line feed character ('n', 0x0A) used as separator
  // e.g., 'auth_date=<auth_date>nquery_id=<query_id>nuser=<user>
  const dataCheckString = arr . join ( "n" ) ;

  // The hexadecimal representation of the HMAC-SHA-256 signature of the data-check-string with the secret key
  const _hash = crypto
    . createHmac ( "sha256" , secret . digest ( ) )
    . update ( dataCheckString )
    . digest ( "hex" ) ;

  // If hash is equal, the data may be used on your server.
  // Complex data types are represented as JSON-serialized objects.
  return _hash === hash ;
} ;
Agora você se certificou de que o usuário que usa seu aplicativo é o real e também usa o aplicativo Telegram; agora seu aplicativo está seguro!
Depois de autenticar o usuário no backend, podemos voltar ao frontend e obter os dados do usuário:
 const params = new URLSearchParams ( Telegram . WebApp . initData ) ;

const userData = Object . fromEntries ( params ) ;
userData . user = JSON . parse ( userData . user ) ;

// Now userData is ready to use! 
 const tg = Telegram . WebApp ;

// Show the back button
tg . BackButton . show ( ) ;

// Check if the button is visible
tg . BackButton . isVisible ;

// Click Event
const goBack = ( ) => {
  // Callback code
} ;

tg . BackButton . onClick ( goBack ) ;

// Remove Click Event
tg . BackButton . offClick ( goBack ) ;

// Hide the back button
tg . BackButton . hide ( ) ; 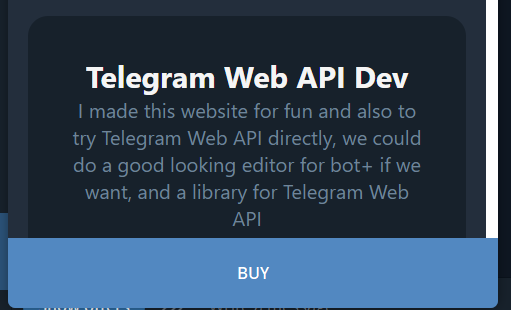
 const tg = Telegram . WebApp . MainButton ;

// Properties
tg . text ; // You can change the value
tg . color ; // You can change the value
tg . textColor ; // You can change the value
tg . isVisible ;
tg . isActive ;
tg . isProgressVisible ;

// Events
tg . onClick ( callback ) ;
tg . offClick ( callback ) ;

// Methods
tg . setText ( "buy" ) ;
tg . show ( ) ;
tg . hide ( ) ;
tg . enable ( ) ; // Default
tg . disable ( ) ; // If the button is disabled, then it will not work when clicked
tg . showProgress ( true ) ; // Shows a spinning icon; if you passed into it `false`, then it will disable the button when loading
tg . hideProgress ( ) ; 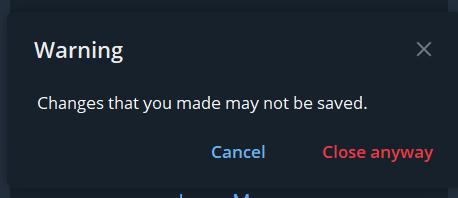
Ao chamar esse método, ele aguardará até que o usuário tente fechar o aplicativo; então ele pedirá uma confirmação
 const tg = Telegram . WebApp ;
tg . enableClosingConfirmation ( ) ;
tg . disableClosingConfirmation ( ) ; Em um navegador
 const tg = window . Telegram . WebApp ;
tg . openLink ( "https://youtube.com" ) ; 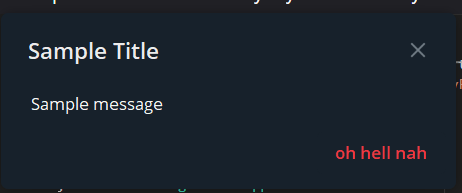
 const tg = Telegram . WebApp ;
tg . showPopup (
  {
    title : "Sample Title" , // Optional
    message : "Sample message" ,
    buttons : [ { type : "destructive" , text : "oh hell nah" } ] , // Optional
  } ,
  callback
) ;
Mais sobre tipos de botão aqui
Se um parâmetro opcional de retorno de chamada for passado, a função de retorno de chamada será chamada e o id do campo do botão pressionado será passado como primeiro argumento.
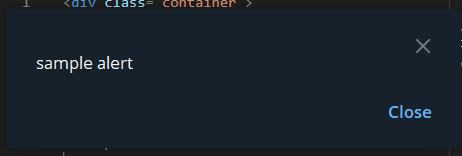
 const tg = window . Telegram . WebApp ;
tg . showAlert ( "sample alert" , callback ) ;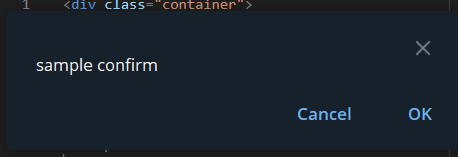
Se um parâmetro de retorno de chamada opcional foi passado, a função de retorno de chamada será chamada quando o pop-up for fechado, e o primeiro argumento será um booleano indicando se o usuário pressionou o botão 'OK'.
Se um parâmetro de retorno de chamada opcional for passado, a função de retorno de chamada será chamada e o texto do código QR será passado como primeiro argumento. Retornar true dentro desta função de retorno de chamada faz com que o pop-up seja fechado.
 const tg = window . Telegram . WebApp ;

tg . showScanQrPopup ( { text : "capture" } , callback ) ;

tg . closeScanQrPopup ( ) ; Método que informa ao aplicativo Telegram que o Web App está pronto para ser exibido.
 const tg = window . Telegram . WebApp ;
tg . ready ( ) ; const tg = window . Telegram . WebApp ;
tg . isExpanded ;
tg . expand ( ) ; Sinta-se à vontade para contribuir com esta folha de dicas!


