DALLE2 pytorch
1.15.6
Реализация DALL-E 2, обновленной нейронной сети синтеза текста в изображение OpenAI, в Pytorch.
Янник Килчер, краткое содержание | Объяснение сборки AI
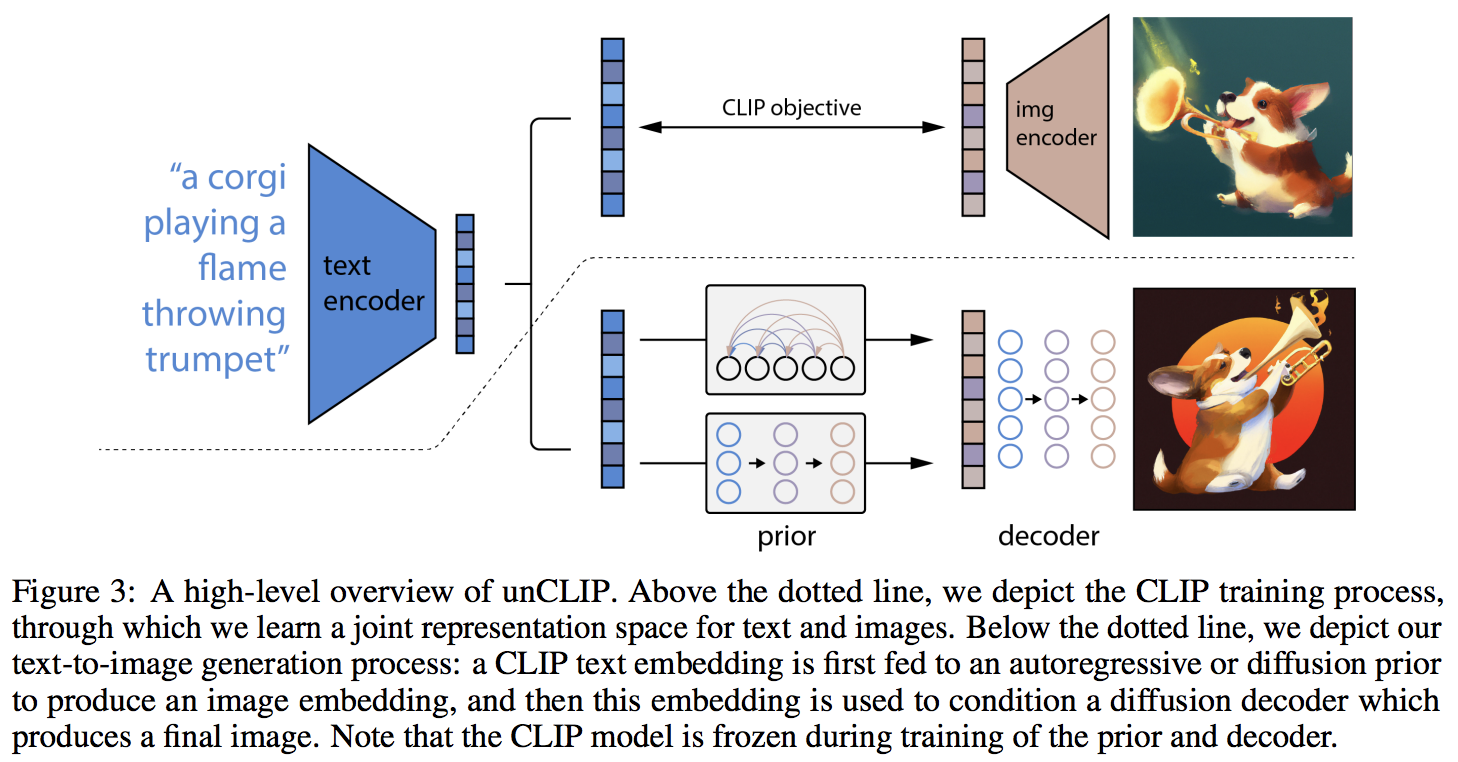
Главной новинкой, по-видимому, является дополнительный уровень косвенности с предшествующей сетью (будь то авторегрессионный преобразователь или диффузионная сеть), который предсказывает встраивание изображения на основе встраивания текста из CLIP. В частности, этот репозиторий будет строить только априорную диффузионную сеть, поскольку это наиболее эффективный вариант (но который, кстати, включает в себя причинный преобразователь в качестве сети шумоподавления?)
На данный момент эта модель SOTA для преобразования текста в изображение.
Пожалуйста, присоединяйтесь, если вы заинтересованы в помощи в воспроизведении с сообществом LAION | Янник, интервью
По состоянию на 23.05.22 это уже не SOTA. СОТА будет здесь. Версии Jax, а также проект преобразования текста в видео будут переориентированы на архитектуру Imagen, поскольку она намного проще.
Исследовательская группа использовала код из этого репозитория для обучения функциональному распространению перед поколениями CLIP. Поделимся своей работой, как только они выпустят препринт. Это, а также собственные эксперименты Кэтрин подтверждают выводы OpenAI о том, что дополнительный априор увеличивает разнообразие поколений.
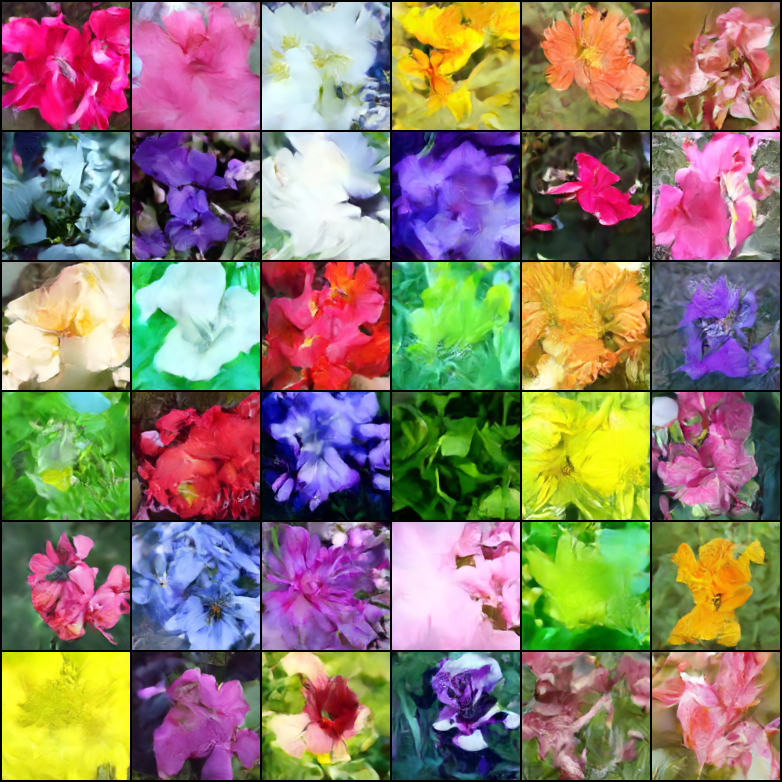
Теперь декодер работает для безусловной генерации на моей экспериментальной установке для оксфордских цветов. Двое исследователей также подтвердили, что Decoder работает на них.
продолжается на 21 тыс. шагов
Джастин Пинкни успешно обучил диффузию в репозитории для своего приложения преобразования текста в изображение CLIP to Stylegan2.
Ромен без проблем увеличил объем обучения до 800 графических процессоров с помощью доступных сценариев.
Эта библиотека не дошла бы до такого рабочего состояния без помощи
... и многие другие. Спасибо!
$ pip install dalle2-pytorchОбучение DALLE-2 состоит из трех этапов, наиболее важным из которых является обучение CLIP.
Для обучения CLIP вы можете либо использовать пакет x-clip, либо присоединиться к дискорду LAION, где уже ведется большая работа по репликации.
Этот репозиторий для начала продемонстрирует интеграцию с x-clip
 import torch
from dalle2_pytorch import CLIP

clip = CLIP (
    dim_text = 512 ,
    dim_image = 512 ,
    dim_latent = 512 ,
    num_text_tokens = 49408 ,
    text_enc_depth = 1 ,
    text_seq_len = 256 ,
    text_heads = 8 ,
    visual_enc_depth = 1 ,
    visual_image_size = 256 ,
    visual_patch_size = 32 ,
    visual_heads = 8 ,
    use_all_token_embeds = True ,            # whether to use fine-grained contrastive learning (FILIP)
    decoupled_contrastive_learning = True ,  # use decoupled contrastive learning (DCL) objective function, removing positive pairs from the denominator of the InfoNCE loss (CLOOB + DCL)
    extra_latent_projection = True ,         # whether to use separate projections for text-to-image vs image-to-text comparisons (CLOOB)
    use_visual_ssl = True ,                  # whether to do self supervised learning on images
    visual_ssl_type = 'simclr' ,             # can be either 'simclr' or 'simsiam', depending on using DeCLIP or SLIP
    use_mlm = False ,                        # use masked language learning (MLM) on text (DeCLIP)
    text_ssl_loss_weight = 0.05 ,            # weight for text MLM loss
    image_ssl_loss_weight = 0.05            # weight for image self-supervised learning loss
). cuda ()

# mock data

text = torch . randint ( 0 , 49408 , ( 4 , 256 )). cuda ()
images = torch . randn ( 4 , 3 , 256 , 256 ). cuda ()

# train

loss = clip (
    text ,
    images ,
    return_loss = True              # needs to be set to True to return contrastive loss
)

loss . backward ()

# do the above with as many texts and images as possible in a loop
Затем вам нужно будет обучить декодер, который научится генерировать изображения на основе встраивания изображений, полученных из обученного CLIP выше.
 import torch
from dalle2_pytorch import Unet , Decoder , CLIP

# trained clip from step 1

clip = CLIP (
    dim_text = 512 ,
    dim_image = 512 ,
    dim_latent = 512 ,
    num_text_tokens = 49408 ,
    text_enc_depth = 1 ,
    text_seq_len = 256 ,
    text_heads = 8 ,
    visual_enc_depth = 1 ,
    visual_image_size = 256 ,
    visual_patch_size = 32 ,
    visual_heads = 8
). cuda ()

# unet for the decoder

unet = Unet (
    dim = 128 ,
    image_embed_dim = 512 ,
    cond_dim = 128 ,
    channels = 3 ,
    dim_mults = ( 1 , 2 , 4 , 8 )
). cuda ()

# decoder, which contains the unet and clip

decoder = Decoder (
    unet = unet ,
    clip = clip ,
    timesteps = 100 ,
    image_cond_drop_prob = 0.1 ,
    text_cond_drop_prob = 0.5
). cuda ()

# mock images (get a lot of this)

images = torch . randn ( 4 , 3 , 256 , 256 ). cuda ()

# feed images into decoder

loss = decoder ( images )
loss . backward ()

# do the above for many many many many steps
# then it will learn to generate images based on the CLIP image embeddings
Наконец, основной вклад статьи. Репозиторий предлагает априорную сеть распространения. Он принимает встраивания текста CLIP и пытается сгенерировать встраивания изображений CLIP. Опять же, вам понадобится обученный CLIP с первого шага.
 import torch
from dalle2_pytorch import DiffusionPriorNetwork , DiffusionPrior , CLIP

# get trained CLIP from step one

clip = CLIP (
    dim_text = 512 ,
    dim_image = 512 ,
    dim_latent = 512 ,
    num_text_tokens = 49408 ,
    text_enc_depth = 6 ,
    text_seq_len = 256 ,
    text_heads = 8 ,
    visual_enc_depth = 6 ,
    visual_image_size = 256 ,
    visual_patch_size = 32 ,
    visual_heads = 8 ,
). cuda ()

# setup prior network, which contains an autoregressive transformer

prior_network = DiffusionPriorNetwork (
    dim = 512 ,
    depth = 6 ,
    dim_head = 64 ,
    heads = 8
). cuda ()

# diffusion prior network, which contains the CLIP and network (with transformer) above

diffusion_prior = DiffusionPrior (
    net = prior_network ,
    clip = clip ,
    timesteps = 100 ,
    cond_drop_prob = 0.2
). cuda ()

# mock data

text = torch . randint ( 0 , 49408 , ( 4 , 256 )). cuda ()
images = torch . randn ( 4 , 3 , 256 , 256 ). cuda ()

# feed text and images into diffusion prior network

loss = diffusion_prior ( text , images )
loss . backward ()

# do the above for many many many steps
# now the diffusion prior can generate image embeddings from the text embeddings
В статье они фактически использовали недавно открытую технику самого Джонатана Хо (первоначальный автор DDPM, основного метода, используемого в DALL-E v2) для синтеза изображений с высоким разрешением.
Это можно легко использовать в рамках этой структуры, так
 import torch
from dalle2_pytorch import Unet , Decoder , CLIP

# trained clip from step 1

clip = CLIP (
    dim_text = 512 ,
    dim_image = 512 ,
    dim_latent = 512 ,
    num_text_tokens = 49408 ,
    text_enc_depth = 6 ,
    text_seq_len = 256 ,
    text_heads = 8 ,
    visual_enc_depth = 6 ,
    visual_image_size = 256 ,
    visual_patch_size = 32 ,
    visual_heads = 8
). cuda ()

# 2 unets for the decoder (a la cascading DDPM)

unet1 = Unet (
    dim = 32 ,
    image_embed_dim = 512 ,
    cond_dim = 128 ,
    channels = 3 ,
    dim_mults = ( 1 , 2 , 4 , 8 )
). cuda ()

unet2 = Unet (
    dim = 32 ,
    image_embed_dim = 512 ,
    cond_dim = 128 ,
    channels = 3 ,
    dim_mults = ( 1 , 2 , 4 , 8 , 16 )
). cuda ()

# decoder, which contains the unet(s) and clip

decoder = Decoder (
    clip = clip ,
    unet = ( unet1 , unet2 ),            # insert both unets in order of low resolution to highest resolution (you can have as many stages as you want here)
    image_sizes = ( 256 , 512 ),         # resolutions, 256 for first unet, 512 for second. these must be unique and in ascending order (matches with the unets passed in)
    timesteps = 1000 ,
    image_cond_drop_prob = 0.1 ,
    text_cond_drop_prob = 0.5
). cuda ()

# mock images (get a lot of this)

images = torch . randn ( 4 , 3 , 512 , 512 ). cuda ()

# feed images into decoder, specifying which unet you want to train
# each unet can be trained separately, which is one of the benefits of the cascading DDPM scheme

loss = decoder ( images , unet_number = 1 )
loss . backward ()

loss = decoder ( images , unet_number = 2 )
loss . backward ()

# do the above for many steps for both unets
Наконец, чтобы сгенерировать изображения DALL-E2 из текста. Вставьте обученный DiffusionPrior , а также Decoder (который обертывает CLIP , причинный преобразователь и unet(s))
 from dalle2_pytorch import DALLE2

dalle2 = DALLE2 (
    prior = diffusion_prior ,
    decoder = decoder
)

# send the text as a string if you want to use the simple tokenizer from DALLE v1
# or you can do it as token ids, if you have your own tokenizer

texts = [ 'glistening morning dew on a flower petal' ]
images = dalle2 ( texts ) # (1, 3, 256, 256)
Вот и все!
Давайте посмотрим весь скрипт ниже
 import torch
from dalle2_pytorch import DALLE2 , DiffusionPriorNetwork , DiffusionPrior , Unet , Decoder , CLIP

clip = CLIP (
    dim_text = 512 ,
    dim_image = 512 ,
    dim_latent = 512 ,
    num_text_tokens = 49408 ,
    text_enc_depth = 6 ,
    text_seq_len = 256 ,
    text_heads = 8 ,
    visual_enc_depth = 6 ,
    visual_image_size = 256 ,
    visual_patch_size = 32 ,
    visual_heads = 8
). cuda ()

# mock data

text = torch . randint ( 0 , 49408 , ( 4 , 256 )). cuda ()
images = torch . randn ( 4 , 3 , 256 , 256 ). cuda ()

# train

loss = clip (
    text ,
    images ,
    return_loss = True
)

loss . backward ()

# do above for many steps ...

# prior networks (with transformer)

prior_network = DiffusionPriorNetwork (
    dim = 512 ,
    depth = 6 ,
    dim_head = 64 ,
    heads = 8
). cuda ()

diffusion_prior = DiffusionPrior (
    net = prior_network ,
    clip = clip ,
    timesteps = 1000 ,
    sample_timesteps = 64 ,
    cond_drop_prob = 0.2
). cuda ()

loss = diffusion_prior ( text , images )
loss . backward ()

# do above for many steps ...

# decoder (with unet)

unet1 = Unet (
    dim = 128 ,
    image_embed_dim = 512 ,
    text_embed_dim = 512 ,
    cond_dim = 128 ,
    channels = 3 ,
    dim_mults = ( 1 , 2 , 4 , 8 ),
    cond_on_text_encodings = True    # set to True for any unets that need to be conditioned on text encodings
). cuda ()

unet2 = Unet (
    dim = 16 ,
    image_embed_dim = 512 ,
    cond_dim = 128 ,
    channels = 3 ,
    dim_mults = ( 1 , 2 , 4 , 8 , 16 )
). cuda ()

decoder = Decoder (
    unet = ( unet1 , unet2 ),
    image_sizes = ( 128 , 256 ),
    clip = clip ,
    timesteps = 100 ,
    image_cond_drop_prob = 0.1 ,
    text_cond_drop_prob = 0.5
). cuda ()

for unet_number in ( 1 , 2 ):
    loss = decoder ( images , text = text , unet_number = unet_number ) # this can optionally be decoder(images, text) if you wish to condition on the text encodings as well, though it was hinted in the paper it didn't do much
    loss . backward ()

# do above for many steps

dalle2 = DALLE2 (
    prior = diffusion_prior ,
    decoder = decoder
)

images = dalle2 (
    [ 'cute puppy chasing after a squirrel' ],
    cond_scale = 2. # classifier free guidance strength (> 1 would strengthen the condition)
)

# save your image (in this example, of size 256x256)
Все в этом файле readme должно работать без ошибок.
Вы также можете обучить декодер изображениям, размер которых превышает размер (скажем, 512x512), на котором был обучен CLIP (256x256). Размер изображений будет изменен до разрешения изображения CLIP для встраивания изображений.
Для непрофессионала не беспокойтесь: все обучение будет автоматизировано с помощью инструмента CLI, по крайней мере, для небольшого обучения.
Вполне вероятно, что при масштабировании вы сначала предварительно обработаете изображения и текст в соответствующие внедрения, прежде чем обучать предыдущую сеть. Вы можете сделать это легко, просто передав image_embed , text_embed и, при необходимости, text_encodings
Рабочий пример ниже
 import torch
from dalle2_pytorch import DiffusionPriorNetwork , DiffusionPrior , CLIP

# get trained CLIP from step one

clip = CLIP (
    dim_text = 512 ,
    dim_image = 512 ,
    dim_latent = 512 ,
    num_text_tokens = 49408 ,
    text_enc_depth = 6 ,
    text_seq_len = 256 ,
    text_heads = 8 ,
    visual_enc_depth = 6 ,
    visual_image_size = 256 ,
    visual_patch_size = 32 ,
    visual_heads = 8 ,
). cuda ()

# setup prior network, which contains an autoregressive transformer

prior_network = DiffusionPriorNetwork (
    dim = 512 ,
    depth = 6 ,
    dim_head = 64 ,
    heads = 8
). cuda ()

# diffusion prior network, which contains the CLIP and network (with transformer) above

diffusion_prior = DiffusionPrior (
    net = prior_network ,
    clip = clip ,
    timesteps = 100 ,
    cond_drop_prob = 0.2 ,
    condition_on_text_encodings = False  # this probably should be true, but just to get Laion started
). cuda ()

# mock data

text = torch . randint ( 0 , 49408 , ( 4 , 256 )). cuda ()
images = torch . randn ( 4 , 3 , 256 , 256 ). cuda ()

# precompute the text and image embeddings
# here using the diffusion prior class, but could be done with CLIP alone

clip_image_embeds = diffusion_prior . clip . embed_image ( images ). image_embed
clip_text_embeds = diffusion_prior . clip . embed_text ( text ). text_embed

# feed text and images into diffusion prior network

loss = diffusion_prior (
    text_embed = clip_text_embeds ,
    image_embed = clip_image_embeds
)

loss . backward ()

# do the above for many many many steps
# now the diffusion prior can generate image embeddings from the text embeddings
Вы также можете полностью отказаться от CLIP , и в этом случае вам нужно будет передать image_embed_dim в DiffusionPrior при инициализации.
 import torch
from dalle2_pytorch import DiffusionPriorNetwork , DiffusionPrior

# setup prior network, which contains an autoregressive transformer

prior_network = DiffusionPriorNetwork (
    dim = 512 ,
    depth = 6 ,
    dim_head = 64 ,
    heads = 8
). cuda ()

# diffusion prior network, which contains the CLIP and network (with transformer) above

diffusion_prior = DiffusionPrior (
    net = prior_network ,
    image_embed_dim = 512 ,               # this needs to be set
    timesteps = 100 ,
    cond_drop_prob = 0.2 ,
    condition_on_text_encodings = False  # this probably should be true, but just to get Laion started
). cuda ()

# mock data

text = torch . randint ( 0 , 49408 , ( 4 , 256 )). cuda ()
images = torch . randn ( 4 , 3 , 256 , 256 ). cuda ()

# precompute the text and image embeddings
# here using the diffusion prior class, but could be done with CLIP alone

clip_image_embeds = torch . randn ( 4 , 512 ). cuda ()
clip_text_embeds = torch . randn ( 4 , 512 ). cuda ()

# feed text and images into diffusion prior network

loss = diffusion_prior (
    text_embed = clip_text_embeds ,
    image_embed = clip_image_embeds
)

loss . backward ()

# do the above for many many many steps
# now the diffusion prior can generate image embeddings from the text embeddings Хотя существует вероятность того, что они используют неизданный, более мощный CLIP, вы можете использовать один из выпущенных, если не хотите обучать свой собственный CLIP с нуля. Это также позволит сообществу быстрее проверить выводы документа.
Чтобы использовать предварительно обученный OpenAI CLIP, просто импортируйте OpenAIClipAdapter и передайте его в DiffusionPrior или Decoder следующим образом.
 import torch
from dalle2_pytorch import DALLE2 , DiffusionPriorNetwork , DiffusionPrior , Unet , Decoder , OpenAIClipAdapter

# openai pretrained clip - defaults to ViT-B/32

clip = OpenAIClipAdapter ()

# mock data

text = torch . randint ( 0 , 49408 , ( 4 , 256 )). cuda ()
images = torch . randn ( 4 , 3 , 256 , 256 ). cuda ()

# prior networks (with transformer)

prior_network = DiffusionPriorNetwork (
    dim = 512 ,
    depth = 6 ,
    dim_head = 64 ,
    heads = 8
). cuda ()

diffusion_prior = DiffusionPrior (
    net = prior_network ,
    clip = clip ,
    timesteps = 100 ,
    cond_drop_prob = 0.2
). cuda ()

loss = diffusion_prior ( text , images )
loss . backward ()

# do above for many steps ...

# decoder (with unet)

unet1 = Unet (
    dim = 128 ,
    image_embed_dim = 512 ,
    cond_dim = 128 ,
    channels = 3 ,
    dim_mults = ( 1 , 2 , 4 , 8 ),
    text_embed_dim = 512 ,
    cond_on_text_encodings = True  # set to True for any unets that need to be conditioned on text encodings (ex. first unet in cascade)
). cuda ()

unet2 = Unet (
    dim = 16 ,
    image_embed_dim = 512 ,
    cond_dim = 128 ,
    channels = 3 ,
    dim_mults = ( 1 , 2 , 4 , 8 , 16 )
). cuda ()

decoder = Decoder (
    unet = ( unet1 , unet2 ),
    image_sizes = ( 128 , 256 ),
    clip = clip ,
    timesteps = 1000 ,
    sample_timesteps = ( 250 , 27 ),
    image_cond_drop_prob = 0.1 ,
    text_cond_drop_prob = 0.5
). cuda ()

for unet_number in ( 1 , 2 ):
    loss = decoder ( images , text = text , unet_number = unet_number ) # this can optionally be decoder(images, text) if you wish to condition on the text encodings as well, though it was hinted in the paper it didn't do much
    loss . backward ()

# do above for many steps

dalle2 = DALLE2 (
    prior = diffusion_prior ,
    decoder = decoder
)

images = dalle2 (
    [ 'a butterfly trying to escape a tornado' ],
    cond_scale = 2. # classifier free guidance strength (> 1 would strengthen the condition)
)

# save your image (in this example, of size 256x256)
Альтернативно вы также можете использовать Open Clip.
$ pip install open-clip-torchБывший. использование модели SOTA Open Clip, обученной Роменом


