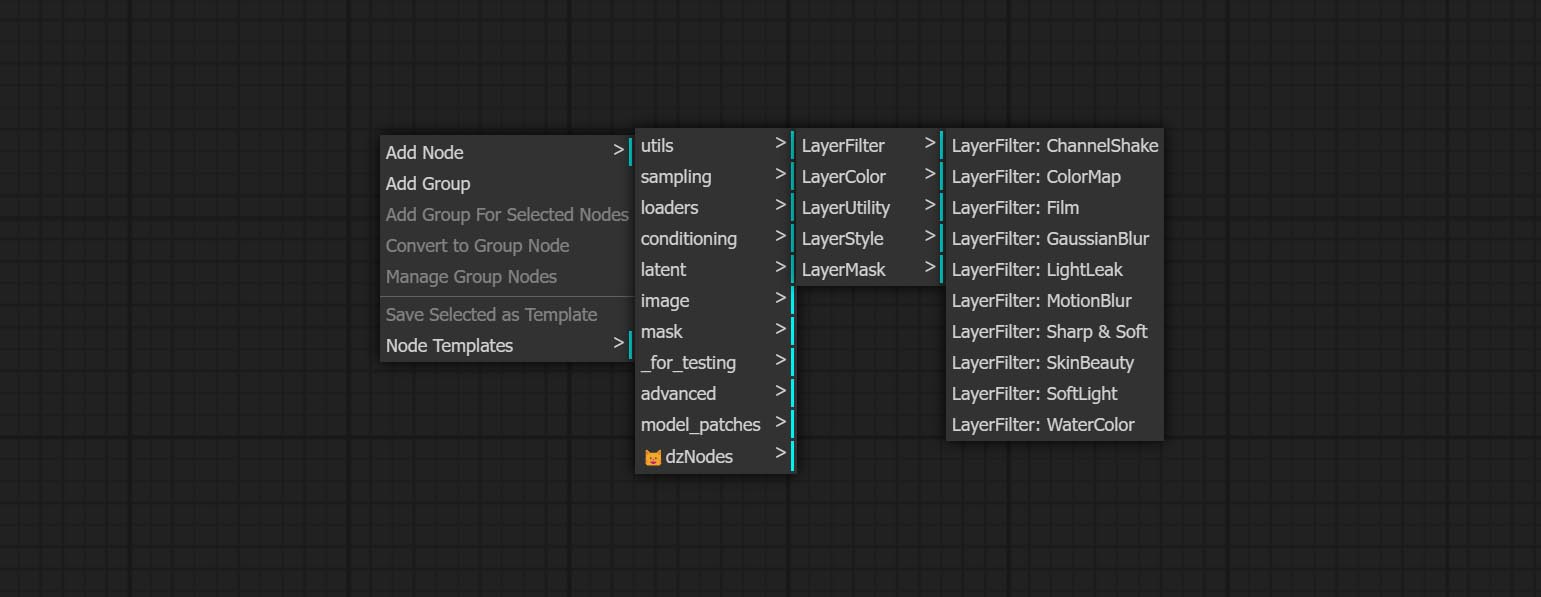
Comfyui Стиль слоя
中文说明点这里
商务合作请联系 по электронной почте [email protected].
Для бизнес -сотрудничества, пожалуйста, свяжитесь с электронной почтой [email protected].
Набор узлов для Comfyui, которые могут составить составной слой и маски для достижения функциональности Photoshop.
Он мигрирует некоторые основные функции Photoshop в Comfyui, стремясь централизовать рабочий процесс и уменьшить частоту переключения программного обеспечения.
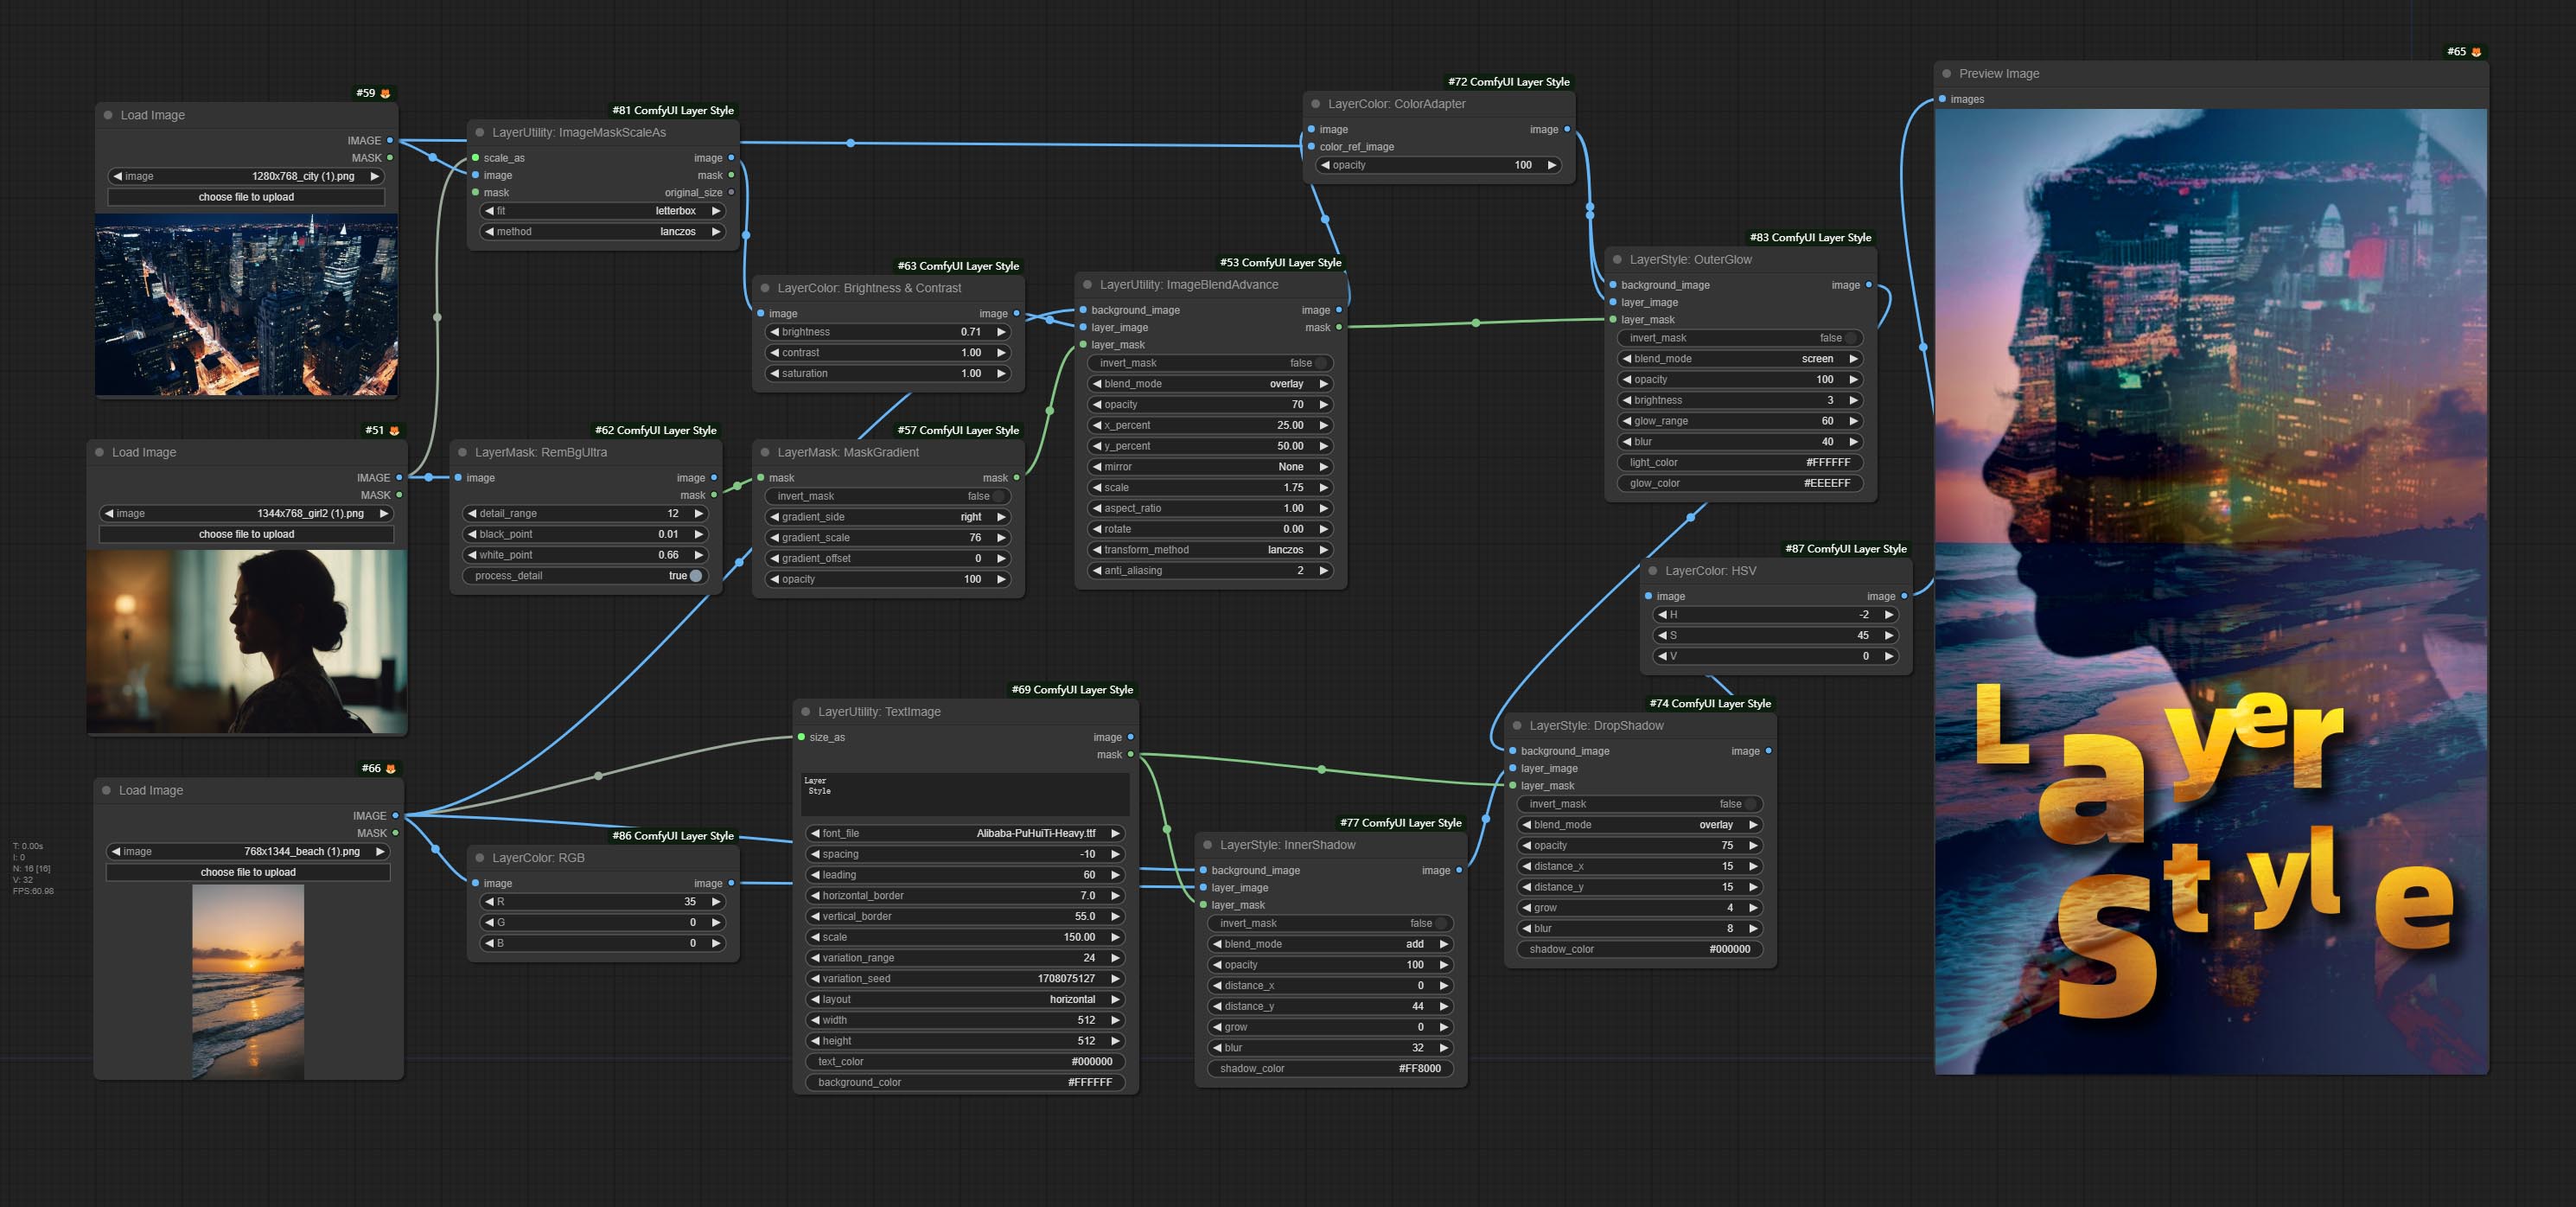
*Этот рабочий процесс (title_example_workflow.json) находится в каталоге рабочих процессов.
Пример рабочий процесс
Некоторые файлы рабочих процессов JSON в каталоге workflow , это примеры того, как эти узлы можно использовать в Comfyui.
Как установить
(Примеры официального портативного пакета Comfyui и пакет AKI Comfyui в качестве примеров, пожалуйста, измените каталог среды зависимости для других средств среды Comfyui)
Установите плагин
Рекомендуется использовать Comfyui Manager для установки.
Или откройте окно CMD в каталоге плагинов Comfyui, например, ComfyUIcustom_nodes , type
git clone https://github.com/chflame163/ComfyUI_LayerStyle.git
Или загрузите файл ZIP и извлечен, скопируйте полученную папку в ComfyUIcustom_ Nodes
Установите пакеты зависимостей
Для официального портативного пакета Comfyui дважды щелкните по install_requirements.bat в каталоге плагинов, для пакета AKI Comfyui дважды щелкните на install_requirements_aki.bat в каталоге плагина и дождитесь завершения установки.
Или установите пакеты зависимостей, откройте окно CMD в каталоге плагинов comfyui_layerstyle, например, ComfyUIcustom_ NodesComfyUI_LayerStyle и введите следующую команду,
Для официального портативного пакета Comfyui тип:
 ......python_embededpython.exe -s -m pip install .whldocopt-0.6.2-py2.py3-none-any.whl
......python_embededpython.exe -s -m pip install .whlhydra_core-1.3.2-py3-none-any.whl
......python_embededpython.exe -s -m pip install -r requirements.txt
.repair_dependency.bat
Для пакета AKI Comfyui, тип:
 ....pythonpython.exe -s -m pip install .whldocopt-0.6.2-py2.py3-none-any.whl
....pythonpython.exe -s -m pip install .whlhydra_core-1.3.2-py3-none-any.whl
....pythonpython.exe -s -m pip install -r requirements.txt
.repair_dependency.bat
Загрузите файлы модели
Внутренние пользователи китайцев из Baidunetdisk и других пользователей из hurgingface.co/chflame163/comfyui_layerstylele
Загрузите все файлы и скопируйте их в папку ComfyUImodels . Эта ссылка предоставляет все файлы модели, необходимые для этого плагина. Или загрузите файл модели в соответствии с инструкциями каждого узла.
Общие проблемы
Если узел не может загружать должным образом или есть ошибки во время использования, проверьте сообщение об ошибке в окне терминала Comfyui. Ниже приведены общие ошибки и их решения.
Предупреждение: xxxx.ini не найдено, используйте по умолчанию xxxx ..
Это предупреждающее сообщение указывает, что файл INI не может быть найден и не влияет на использование. Если вы не хотите видеть эти предупреждения, измените все файлы *.ini.example в каталоге плагинов на *.ini .
ModulenotFoundError: нет модуля с именем 'psd_tools'
Эта ошибка состоит в том, что psd_tools не были установлены правильно.
Решение:
- Закройте comfyui, откройте окно терминала в каталоге плагинов и выполните следующую команду:
../../../python_embeded/python.exe -s -m pip install psd_tools если возникает ошибка во время установки psd_tool, например, ModuleNotFoundError: No module named 'docopt' , пожалуйста, загрузите Docopt's Whl и ручной установки. Выполните следующую команду в окне терминала: ../../../python_embeded/python.exe -s -m pip stail Path/ path ../../../python_embeded/python.exe -s -m pip install path/docopt-0.6.2-py2.py3-none-any.whl Файл WHL.
Невозможно импортировать имя «GuidedFilter» из 'cv2.xixgproc'
Эта ошибка вызвана неправильной версией пакета opencv-contrib-python , или этот пакет перезаписен другими пакетами OpenCV.
NameError: имя «GuidedFilter» не определено
Причина проблемы такая же, как и выше.
Невозможно импортировать название «vitmatteimage processor» из «Трансформеров»
Эта ошибка вызвана низкой версией пакета transformers .
Insightface загрузка очень медленной
Эта ошибка вызвана низкой версией пакета protobuf .
Для проблем с тремя вышеуказанными пакетами зависимостей, пожалуйста, дважды щелкните repair_dependency.bat (для официального Comfyui Protable) или repair_dependency_aki.bat (для Comfyui-aki-V1.x) в папке плагина, чтобы автоматически исправить их.
Onnxruntime :: python :: createexecutionproviderinstance cuda_path установлен, но Cuda не мог быть загружен. Пожалуйста, установите правильную версию CUDA и CUDNN, как указано на странице требований GPU
Решение: Переустановите пакет зависимостей onnxruntime .
Ошибка загрузки модели XXX: мы не могли подключиться к huggingface.co ...
Проверьте сетевую среду. Если вы не можете получить доступ к Huggingface.co обычно в Китае, попробуйте изменить пакет huggingface_hub, чтобы заставить использование hf_mirror.
ValueError: trimap не содержал значений переднего плана (xxxx ...)
Эта ошибка вызвана тем, что область маски слишком велика или слишком мала при использовании метода PyMatting для обработки краев маски.
Решение:
- Пожалуйста, отрегулируйте параметры, чтобы изменить эффективную область маски. Или использовать другие методы для обработки краев.
Requests.exceptions.proxyerror: httpsconnectionpool (xxxx ...)
Когда эта ошибка произошла, пожалуйста, проверьте сетевую среду.
Unboundlocalerror: локальная переменная 'clip_processor' ссылается перед назначением
Unboundlocalerror: локальная переменная 'text_model' ссылается перед назначением
Если эта ошибка возникает при выполнении узла JoyCaption2 , и было подтверждено, что файл модели был размещен в правильном каталоге, проверьте версию пакета зависимостей transformers , по крайней мере, 4,43.2 или выше. Если версия transformers выше или равна 4.45.0, а также есть сообщение об ошибке:
 Error loading models: De️️scriptors cannot be created directly.
If this call came from a _pb2.py file, your generated code is out of date and must be regenerated with protoc >= 3.19.0.
......
Пожалуйста, попробуйте понизить пакет зависимости protobuf до 3.20.3 или установить переменные среды: PROTOCOL_BUFFERS_PYTHON_IMPLEMENTATION=python .
Обновлять
** Если ошибка пакета зависимостей после обновления, пожалуйста, дважды щелкните repair_dependency.bat (для официального Comfyui Protable) или repair_dependency_aki.bat (для comfyui-aki-v1.x) в папке плагина, чтобы переустановить пакеты зависимости.
Посоветуйте узлы Benultra и Loadbenmodel. Эти два узла являются реализацией проекта Pramallc/Ben в Comfyui.
Загрузите BEN_Base.pth и config.json из haggingface или baidunetdisk и скопируйте в папку ComfyUI/models/BEN .
MERGE PR, представленные Jimlee2048, добавьте узел LoadBirefnetModelV2 и поддерживайте загрузку моделей RMBG 2.0.
Загрузите файлы модели из HuggingFace или BaidUnetDisk и скопируйте в папку ComfyUI/models/BiRefNet/RMBG-2.0 .
Узлы Florence2 поддерживают Base-PromptGen-V2.0 и большой PromptGen-V2.0, загрузка base-PromptGen-v2.0 и large-PromptGen-v2.0 ДВОЙНАЯ ФОЛИКА из HuggingFace или BaidUnetDisk и копируйте в папку ComfyUI/models/florence2 Полем
SAM2ULTRA и ObjectDetector Nodes поддерживает партию изображения.
Узлы Sam2ultra и Sam2videoultra добавляют поддержку модели SAM2.1, включая модель Kijai FP16. Загрузите файлы модели с Baidunetdisk или guggingface.co/kijai/sam2-safetensors и копируйте в папку ComfyUI/models/sam2 .
Комплект JoyCaption2Split и LoadJoyCaption2Model узлы, разделяя модель в нескольких узлах JoyCaption2, повышает эффективность.
SemenmangyThingultra и SemignAnyThingulTrav2 Добавить опцию cache_model , легко гибко управлять использованием VRAM.
Из-за высоких требований к узел Llamavision для transformers , что влияет на загрузку некоторых более старых сторонних плагинов, поэтому плагин LayersTyle снизил требование по умолчанию до 4.43.2. Если вам нужно запустить Llamavision, пожалуйста, обновите до 4.45.0 или выше самостоятельно.
Комплект joycaption2 и joycaption2 extraoptions узлы. Новые пакеты зависимостей должны быть установлены. Используйте модель Joycaption-Alpha-Two для локального вывода. Можно использовать для создания быстрого слова. Этот узел-https://huggingface.co/john6666/joy-caption-alpha-two-cli-mod внедрение в Comfyui, спасибо оригинальному автору. Загрузите модели модели с Baidunetdisk и Baidunetdisk, или Huggingface/Orenguteng и Huggingface/Unsloth, затем копируйте в ComfyUI/models/LLM , загрузку модели с BaidUnetDisk или HuggingFace/Google и копирование в ComfyUI/models/clip , загрузить cgrkzexw-599808 Baidunetdisk или Huggingface/John6666 и копируйте в ComfyUI/models/Joy_caption 。
Commit Llamavision Node, используйте модель видения Llama 3.2 для локального вывода. Можно использовать для создания быстрого слова. Часть кода этого узла происходит от Comfyui-Pixtralllamamolmovision, спасибо первоначальному автору. Чтобы использовать этот узел, transformers нуждаются в обновлении до 4,45,0 или выше. Загрузите модели с Baidunetdisk или Huggingface/Seanscripts и копируйте в ComfyUI/models/LLM .
Сделайте узел RandomeGeneratorV2, добавьте наименьший случайный диапазон и параметры семян.
Commit TextJoinv2 Узел, добавьте параметры разделителя поверх TextJion.
Комплект узла GaussianBlurv2, точность параметра была улучшена до 0,01.
Commit userpromptgeneratortxtimgwithreference Узел.
Сделайте узел GreyValue, выводит значения серого, соответствующие значениям цвета RGB.
LUT Apply, TextImageV2, TextImage, узлы SimpleTextImage для поддержки определения нескольких папок в resource-dir.ini , разделенных запятыми, полуколонами или пространствами. Одновременно поддерживает освежающие обновления в реальном времени.
LUT Apply, TextImageV2, TextImage, SimpleTexTimage узлы поддерживают определение мульти каталогов и папки LUT, а также поддерживают освежающие и обновления в реальном времени.
Commit Humpartsultra Node, используемый для генерации масок частей человека. Он основан на Warrper of Metal3d/comfyui_human_parts, слава первоначальному автору. Загрузите файл модели из Baidunetdisk или Huggingface и скопируйте в папку ComfyUImodelsonnxhuman-parts .
Узлы ObjectDetector добавляют сортировку по уверенности.
Commit DrawBboxMask Узел, используемый для преобразования вывода BBOBES с помощью узла детектора объекта в маску.
Commit userpromptgeneratortxtimg и UserPromptGeneratorReplaceWord WOWRWORD, используемые для генерации подсказок текста и изображений и замены содержимого быстрого приглашения.
Комплект узла Phiprompt, используйте текстовые и визуальные модели Microsoft PHI 3.5 для локального вывода. Можно использовать для создания быстрого приглашения слов, обработки слов или вывода слов из изображений. Запуск этой модели требует не менее 16 ГБ видео памяти.
Загрузите файлы модели с BaidUnetDisk или guggingface.co/microsoft/phi-3.5-vision-instruct и huggingface.co/microsoft/phi-3.5-mini-instruct и скопируют в папку ComfyUImodelsLLM .
Комплект узел GetMainColors, он может получить 5 основных цветов изображения. Комплект Colorname Node, он может получить название цвета цвета входного цвета.
Дублируйте узел яркости и контрастности в виде яркости Contrastv2, цвет узел Shadow & Hight As Colorofshadowhighghight, а также маска Shadow & Hight для тени, чтобы маска V2, чтобы избежать ошибок в разделе «Рабочий процесс Comfyui», вызванный «&» символом в названии узла.
Комплект VQAPROMPT и LOADVQAMODEL узлов.
Загрузите модель из Baidunetdisk или guggingface.co/salesforce/blip-vqa-capfilt-large и huggingface.co/salesforce/blip-vqa-base и скопируйте в папку ComfyUImodelsVQA .
Florence2ultra, Florence2image2prompt 和 Loadflorence2 Моделиные узлы поддерживают модель Miaoshouai/Florence-2-Large-Promptgen-V1.5 и Miaoshouai/Florence-2-Promptgen-V1.5.
Загрузите модели файлы с Baidunetdisk или guggingface.co/miaoshouai/florence-2-large-promptgen-v1.5 и huggingface.co/miaoshouai/florence-2base-promptgen-v1.5, копировать в ComfyUImodelsflorence2 папка Полем
Commit Birefnetultrav2 и LoadbirefnetModel узлы, которые поддерживают использование новейшей модели Birefnet. Загрузите файл модели с Baidunetdisk или Googledrive с именем BiRefNet-general-epoch_244.pth в папку ComfyUI/Models/BiRefNet/pth . Вы также можете скачать больше моделей Birefnet и поместить их здесь.
ExtendCanVASV2 Узел Поддержка Отрицательного значения ввод, это означает, что изображение будет обрезано.
Цвет заголовка узлов по умолчанию изменяется на сине-зеленый, а узлы в LayersTyle, Layercolor, Layermask, Layerutility и Layerfilter отличаются разными цветами.
Узлы детектора объектов добавили опцию Sort Bbox, которая позволяет сортировать слева направо, сверху вниз и большие до малого, что делает выбор объекта более интуитивно понятным и удобным. Узлы, выпущенные вчера, были заброшены, пожалуйста, вручную заменить его новым узлом версии (извините).
Commit Sam2ultra, SAM2VideOltra, ObjectDetectorfl2, ObjectDeteCtoroOloworld, ObjectDeteCtoryolo8, ObjectDeteCtormask и Bboxjoin Undes. Загрузите модели с Baidunetdisk или guggingface.co/kijai/sam2-safetensors и копируйте в папку ComfyUI/models/sam2 , скачать модели из Baidunetdisk или Googledrive и копируйте в папку ComfyUI/models/yolo-world . Это обновление представляет новые зависимости, пожалуйста, переустановите пакет зависимости.
Комплект узел RandomeGenerator, используемый для генерации случайных чисел в указанном диапазоне, с выходами Int, Float и Boolean, поддерживающей генерацию партии различных случайных чисел по пакетике изображений.
Commit Evf-Samultra Node, это реализация EVF-SAM в Comfyui. Пожалуйста, загрузите файлы моделей из Baidunetdisk или Huggingface/EVF-SAM2, HurgingFace/EVF-SAM в папку ComfyUI/models/EVF-SAM (сохранение моделей в соответствующих подкатариях). Из -за введения нового пакета зависимостей после обновления плагина, пожалуйста, переустановите пакеты зависимостей.
Комплект узлов Imagetaggersave и Imageautocropv3. Используется для реализации автоматического обрезки и маркировки рабочего процесса для обучающего набора (рабочий процесс image_tagger_save.json находится в каталоге рабочих процессов).
Узел Commit checkmaskv2 добавил simple метод для быстрее обнаружения масок.
Комплект узлов Imagereel и ImagereelComposite, чтобы составить несколько изображений на холсте.
NumberCalculatorV2 и NumberCalculator Добавить метод min и max .
Оптимизируйте скорость загрузки узлов.
Florence2image2prompt Добавить поддержку моделей thwri/CogFlorence-2-Large-Freeze и thwri/CogFlorence-2.1-Large . Пожалуйста, загрузите файлы модели от Baidunetdisk или Huggingface/Cogflorence-2-Large Freeze и Huggingface/Cogflorence-2.1-Large, затем скопируйте их в папку ComfyUI/models/florence2 .
Merge Franch от Clownsharkbatwing «Используйте графический процессор для режима цветовой смеси», скорость некоторых слоев смесей более десяти раз.
Комплект Florence2ultra, Florence2image2prompt и Loadflorence2 Модельные узлы.
Узел Transparentbackgroundultra Добавить новую поддержку модели. Пожалуйста, загрузите файл модели в соответствии с инструкциями.
Commit Segformerultrav2, Segfromerfashionpipeline и Segformerclothespipeline узлы, используемые для сегментации одежды. Пожалуйста, загрузите файл модели в соответствии с инструкциями.
Commit install_requirements.bat и install_requirements_aki.bat , решение для установки пакетов зависимостей.
Сделайте узел Transparentbackgroundultra, он удаляет фон на основе модели Transparent Background.
Измените модель Vitmatte Ultra Node на локальный вызов. Пожалуйста, загрузите все файлы модели Vitmatte в папку ComfyUI/models/vitmatte .
Узел GetColortoneV2 Добавьте метод mask в опцию выбора цвета, который может точно получить основной цвет и средний цвет в маске.
ImagesCaleBySpectratiov2 Узел Добавить параметр «founal_color».
LUT Apply Apply Добавить опцию «Сила».
Commit AutoAdjustv2 узел, добавьте опциональный ввод маски и поддержку для нескольких режимов автоматической регулировки цвета.
В связи с предстоящим прекращением служб Gemini-Pro Vision, racktgagge и rackembellish добавили API «Gemini-1.5-Flash», чтобы продолжить его использование.
Ультра-узлы добавили возможность запуска VitMatte на устройстве CUDA, что привело к 5-кратному увеличению скорости бега.
Комплект Queuestop Node, используемый для прекращения операции очереди.
Оптимизируйте производительность метода VitMate для ультра-узлов при обработке большого размера изображения.
Cropbymaskv2 добавьте опцию, чтобы округлить размер резания по кратным.
Узел COMCE CHECKMAK, он обнаруживает, содержит ли маска достаточно эффективных областей. Комплект узел HSVValue, он преобразует значения цвета в значения HSV.
Booleanoperatorv2, NumberCalculatorV2, Integer, Float, Boolean Nodes Добавьте вывод строки, чтобы вывести значение в качестве строки для использования с коммутатором.
Комплект узел переключателя, переключает выход на основе соответствующей строки. Можно использовать для любого типа переключения данных.
Комплект строкового узла, используемый для вывода строки. Это упрощенный узел текстового поля.
Комплект, если узел , переключает выход на основе логического условного ввода. Можно использовать для любого типа переключения данных.
Комплект узла StringCondition, определяет, содержит ли текст или не содержит подстроки.
Commit numberCalculatorV2 Узел , Добавьте n -й корневой операции. Комплект узел BooleanoperatorV2, увеличиваясь больше/меньше, чем больше, меньше или равное логическое суждение. Два узла могут получить доступ к числовым входам и могут вводить числовые значения в узле. Примечание. Числовой вход имеет приоритет. Значения в узлах не будут действительными, когда есть вход.
Commit SD3NeGativeConditionsing узел, инкапсулируйте четыре узла отрицательного состояния в SD3 в отдельный узел.
Узел ImagereMovealpha Добавить опциональный вход маски.
Commit HlfrequencyDetailRestore Node, используя низкочастотную фильтрацию и высокочастотное сохранение для восстановления деталей изображения, слияние лучше.
Посоветуйте узлы Addgrain и Maskgrain, добавьте шум к картинке или маске.
Узел FilmV2, метод Fastgrain добавляется на основе предыдущего, а скорость генерации шума в 10 раз быстрее.
Узел Commitymask, он может быть преобразован изображение в маску. Поддерживает преобразование любого канала в режимах Lab, RGBA, YUV и HSV в маски, обеспечивая при этом регулировку цветовой шкалы. Поддержка маски необязательно вход для получения масок, которые включают только допустимые детали.
Параметры Blackpoint и WhitePoint в некоторых узлах были изменены на регулировку слайдеров для более интуитивного дисплея. Включите MaskEdgeUltradetailV2, Sementanningultrav2, Rmbgultrav2 , Personmaskultrav2 , birefnetultra, segformerb2clothesultra, Blendifmask и уровни.
Узлы ImagesCalerestorEv2 и ImagesCaleBySpectratioV2 добавляют метод total_pixel для масштабирования изображений.
Комплект MediaPipefacialSegment Узел , используется для сегмента лицевых особенностей, включая левые и правые брови, глаза, губы и зубы.
Узел Commit PatchSelector , используется для извлечения указанных изображений или масок из партийных изображений или масок.
Слоирудие создает новые подкатарии, такие как Systemio, Data и Promite. Некоторые узлы классифицируются в подкатарии.
Комплект узел Maskbycolor, генерируйте маску на основе выбранного цвета.
Комплект узел LoadPSD, он считывает формат PSD и изображения выходного слоя. Обратите внимание, что этот узел требует установки пакета зависимости psd_tools , если при установке PSD_TOOL возникает ошибка, например, ModuleNotFoundError: No module named 'docopt' , пожалуйста, загрузите DocoPt WHL и ручной установки его.
Commit Segformerb2clotheSultra Узел, он использовался для сегмента одежды для персонажей. Код сегментации модели от Starthua, благодаря первоначальному автору.
SaveImagePlus Node добавляет выходной процесс в функцию JSON, поддерживает %date и %time к дате Embeddint или времени к пути и имени файла и добавляет переключатель предварительного просмотра.
Commit SaveImagePlus node , он может настроить каталог, в котором сохранено изображение, добавить временную метку в имя файла, выберите формат сохранения, установите скорость сжатия изображения, установите, сохранить ли рабочий процесс и, необязательно добавить невидимые водяные знаки в картинку.
Commit addblindwatermark, Showblindwatermark узлы, добавьте невидимый водяной знак и декодированный водяной знак к картине. Commit CreateQrCode, узлы DecodeQRCode, он может генерировать двухмерные кодовые изображения и декодировать двумерные коды.
ImagesCalerestorev2, ImagesCaleBySpectratioV2, ImageAutocropv2 Узлы добавляют параметры для width и height , которые могут указывать ширину или высоту в качестве фиксированных значений.
Комплект чистка узел, очистите VRAM ОЗУ.
Комплект AutoAdjust Node, он может автоматически регулировать контраст изображения и баланс белого.
Комплект узел RGBValue, чтобы вывести значение цвета как единственное десятичное значение R, G, B. Эта идея от Vxinhao, спасибо.
Сделайте узел семян для вывода значения семян. ImageMaskScaleas, ImagesCaleByspectratio, ImagesCaleBySpectRatioV2, ImagesCalerestore, узлы ImagesCalerestorev2 увеличивают width , выход height .
Узел уровней совершения, он может достичь той же функции регулировки уровней цвета, что и Photoshop.Sharp & Soft, добавить опцию «Нет».
Узел Blendifmask, этот узел сотрудничает с imgaeblendv2 или imageblendadvancev2, чтобы достичь той же смеси, если функционирует как Photoshop.
Сделайте Colortemperatature и Colorbalance узлы, используемые для регулировки цветовой температуры и цветового баланса изображения.
Добавьте новые типы режима Blend V2 между изображениями. Теперь поддерживает до 30 режимов смешивания. Новый режим смеси доступен для всех версий V2, которые поддерживают узлы смешанных режимов, включая ImageBlend v2, ImageBlendAdvance V2, Dropshadow V2, Innershadow V2, OuterGlow V2, InnerGlow V2, Stroke V2, Coloroverlay V2, GradientOverlay V2.
Часть кода для BlendMode V2 взята из узлов Virtuoso для Comfyui. Спасибо оригинальным авторам.
Комплект узел yolov8detect.
Commit qwenimage2prompt Узел, этот узел-это переупаковка UForm-Gen2 Qwen Node , благодаря первоначальному автору.
Commit Booleanoperator, NumberCalculator, Textbox, Integer, Float, Booleannodes. Эти узлы могут выполнять математические и логические операции.
Commit extendCanvasv2 Узел , Поддержка значения цвета вход.
Комплект узел Autobrights , он может автоматически регулировать яркость изображения.
CreateGradientMask Узел Добавить center .
Комплект узел GetColortoneV2, может выбрать основные и средние цвета для фона или тела.
Комплект узел ImagereWardFilter, может отфильтровать фотографии низкого качества.
Ультра узлы Добавить метод VITMatte(local) , вы можете выбрать этот метод, чтобы избежать доступа к huggingface.co, если вы уже загружали модель раньше.
Узел эффекта HDR , он улучшает динамический диапазон и визуальную привлекательность входных изображений. Этот узел - переупаковка эффектов HDR (superbeasts.ai).
Комплект узел Cropboxresolve.
Commit Birefnetultra Node, используя модель Birefnet для удаления фона, имеет лучшую способность распознавания, и сведения сверхвысокого края.
Комплект узел ImageAutocropV2, он может не удалять фон, поддерживать вход маски и масштабировать по размеру длинного или короткого размера.
Commit ImageHub Node поддерживает до 9 наборов вывода переключения изображений и маски и поддерживает случайный выход.
Совершить текстовый узел.
Комплект recavletembellish Узел. Он выводит полированные слова и поддерживает вводные изображения в качестве ссылок.
Ультра -узлы были полностью обновлены до версии V2, с добавлением метода обработки Edge Edge, который подходит для обработки полупрозрачных областей. Включите MaskEdgeUltradetailV2, Sementanningultrav2, Rmbgultrav2 и узлы Personmaskultrav2.
Комплект цвета тени и выделения узла, он может отрегулировать цвет темных и ярких частей отдельно. Сделайте узел Shadow & Hight Mask, он может вывести маску для темных и ярких областей.
Комплект узла Cropbymaskv2, на основе исходного узла, он поддерживает вход crop_box , что делает его удобным для сокращения слоев того же размера.
Сделайте узел SimpleteTextImage, он генерирует простые набора изображений и маски из текста. Этот узел ссылается на некоторые функции и код Zho-zho-zho/comfyui-text_image-composite.
Комплект узел rescimtgage , вывод подсказки на основе изображения. и он может заменить ключевое слово для подсказки (необходимо подать заявку на ключ Google Studio API). Обновите Colorimagev2 и GradientImagev2 , Поддержка пользователя Настраивайте предустановленные размеры и ввод Size_as.
Commit Lama Node, он может стереть объекты с изображения на основе маски. Этот узел переупаковка от Иопаина.
Комплексные узлы ImagereMovealpha и ImageCombInealpha, альфа -канал изображения может быть удален или объединен.
Commit ImagesCalerestorev2 и ImagesCaleBySpectratiOV2 узлов поддерживает масштабирование изображений до указанных длинных или коротких размеров.
Комплект узел Personmaskultra, генерируйте маски для лица портрета, волос, кожи тела, одежды или аксессуаров. Модельный код для этого узла исходит от генератора A-Person-Mask.
Commit LightLeak Node, этот фильтр имитирует эффект утечки света пленки.
Комплект пленки, этот фильтр имитирует зерно, темный край и размытый край пленки, поддерживает карту глубины входа для имитации дефокусированного. Это реорганизуется и инкапсуляет цифровой Джон/Комфюи-Пропост.
Комплект узел ImageUtocrop, который предназначен для создания изображений для учебных моделей.
Комплект изображений.
Исправьте ошибку цветовой градации в LUT, примените рендеринг узла, и этот узел теперь поддерживает цветовое пространство журнала. *Пожалуйста, загрузите выделенный файл LUT LUT для изображения цветного пространства журнала.
Комплект узел CreateGradientMask. Комплект LayerimageTransform и LayermaskTransform узлов.
Посоветуйте узел MaskEdgeUltradeTail, он обрабатывает грубые маски с ультра -тонким узлом экспозиции.
Сделайте Sharp & Soft Node, он может улучшить или сгладить детали изображения. Сделайте MaskbyDifferent Node, он сравнивает два изображения и выводит маску. Узел CommentanyThingultra, улучшить качество краев маски. *Если сегментанинг не будет установлен, вам нужно будет вручную загрузить модель.
Все узлы имеют полностью поддерживаемые партийные изображения, обеспечивая удобство для создания видео. (Узел Cropbymask поддерживает только сокращения того же размера. Если введена пакетная mask_for_crop, будут использоваться данные с первого листа.)
Комплект REMBGULTRA и PIXELSPREAD узлов значительно улучшил качество маски. *Rembgultra требует загрузки ручной модели.
Commit TextMage Node, он генерирует текстовые изображения и маски.
Добавьте новые типы режима смешивания между изображениями. Теперь поддерживает до 19 режимов смешивания. Добавить Color_burn, Color_dodge, Linear_burn, Linear_dodge, Overlay, Soft_light, Hard_light, Vivid_light, Pin_light, Linear_light и Hard_mix . Недавно добавленный режим смешивания применим ко всем узлам, которые поддерживают режим смеси.
Сделайте узел фильтра Colmap, чтобы создать эффект тепловой карты псевдо.
Сделайте акварели и узлы Skinbeauty.
Сделайте узел ImageShift, чтобы сдвинуть изображение и вывести маску шва смещения, что делает его удобным для создания непрерывных текстур.
Комплект узел ImageMaskScaleas, чтобы настроить изображение или размер маски на основе эталонного изображения.
Сделайте ImagesCalerestore Node для работы с Cropbymask для местных высококлассных и ремонтных работ.
Сделайте Cropbymask и RestoreCropbox узлы. Комбинация этих двух может частично обрезать и перерисовать изображение перед его восстановлением.
Комплект узел колорадаптера, который может автоматически отрегулировать цветовой тон изображения.
Узел Mockstroke Commit, он может генерировать маски -контурные удары.
Добавьте группу слоя -узлов, используемая для настройки цвета изображения. Он включает в себя LUT Apply, Gamma, яркость и контраст, RGB, YUV, Lab Adn HSV.
CommiteChannelsPlit и ImageChannelmerge узлов.
Комплект узел Maskmotionblur.
Сделайте узел мягкого света.
Узел Commit Channelshake, то есть фильтр, может создавать эффект дислокации канала, аналогичный логотипу Tiktok.
Комплект узел маскаградзиента, может создать градиент в маске.
Commit getColortone Node, может получить основной цвет или средний цвет изображения. Сделайте маскирующие и маскирующие узлы.
Сделайте узел MaskBoxDetect, который может автоматически обнаружить положение через маску и вывести его в композитный узел. Совершить XY в процентный узел, чтобы преобразовать абсолютные координаты в процентные координаты. Комплект узел Гауссанблура. Комплект узел GetImagesize.
Комплект узел ExtendCanvas.
Комплект ImageBlendAdvance Узел. Этот узел обеспечивает синтез фоновых изображений и слоев разных размеров, обеспечивая более свободный опыт синтеза. Commit printInfo Узел как помощь отладки рабочего процесса.
Соберите колоримаж и узлы GradientImage, используемые для генерации сплошных и градиентных цветных изображений.
Комплект градиентверлей и колокольчиков. Добавьте недействительное входное решение маски и игнорируйте его, когда вводится недействительная маска.
Комплект узлов Innerglow, Innershadow и Motionblur.
Переименование всех завершенных узлов, узлы разделены на 4 группы: LayersTyle, Layermask, Layerutility, Layerfilter. Рабочие процессы, содержащие старые узлы версий, должны быть заменены вручную новыми узлами версий.
Узел Outerglow подвергся значительным изменениям, добавив параметры для яркости , Light_color и Glow_color .
Совершить узел maskinvert.
Комплект цветовой узел.
Совершить узел хода.
Сделайте узел Maskpreview.
Комплект узел ImageOpacity.
Layer_mask не является обязательным вводом сейчас. Это разрешено использовать слои и маски с разными формами, но размер должен быть последовательным.
Комплект узел ImageBlend.
Совершить узел Overtgglow.
Комплект узел Dropshadow.
Описание
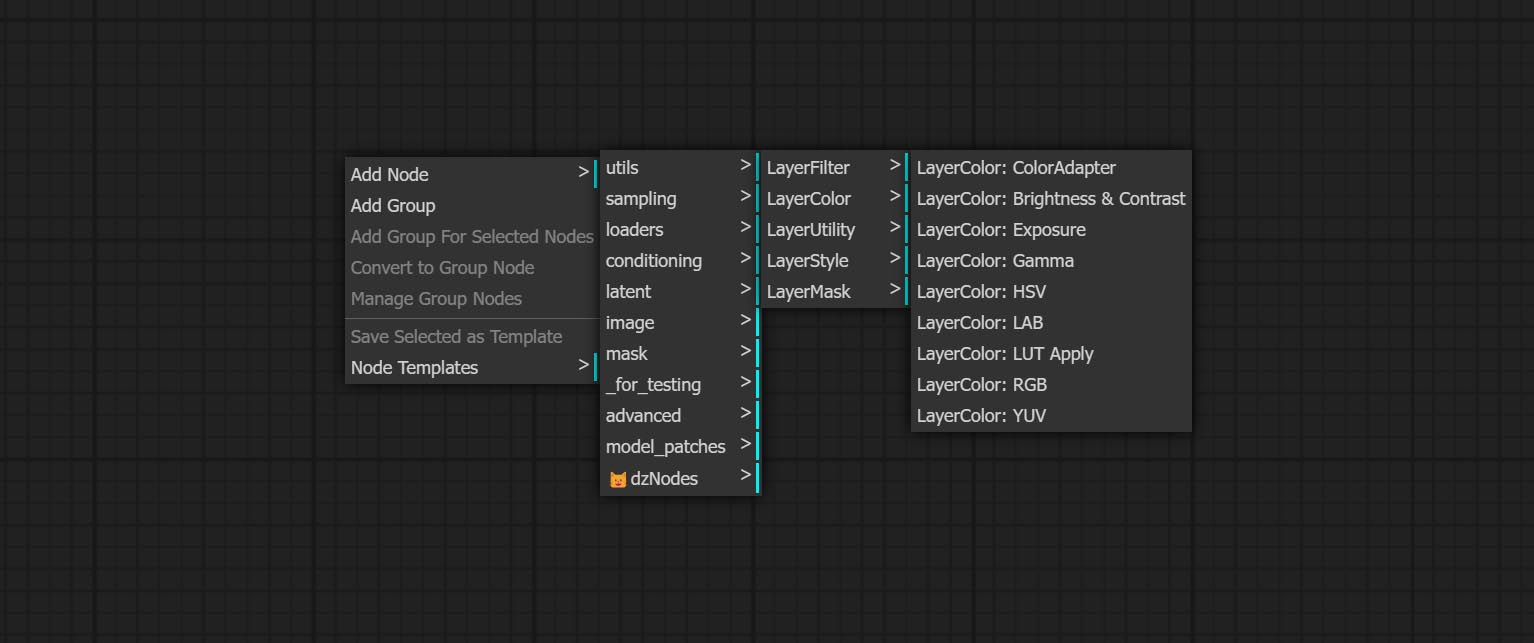
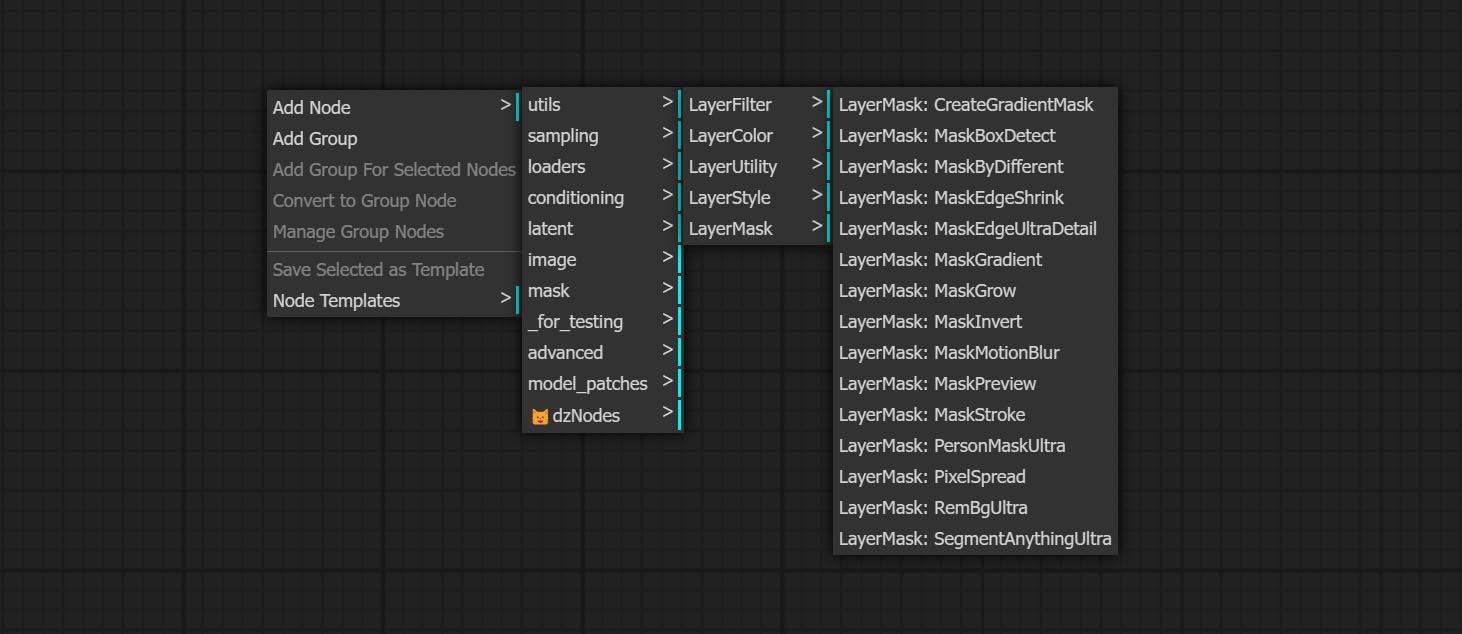
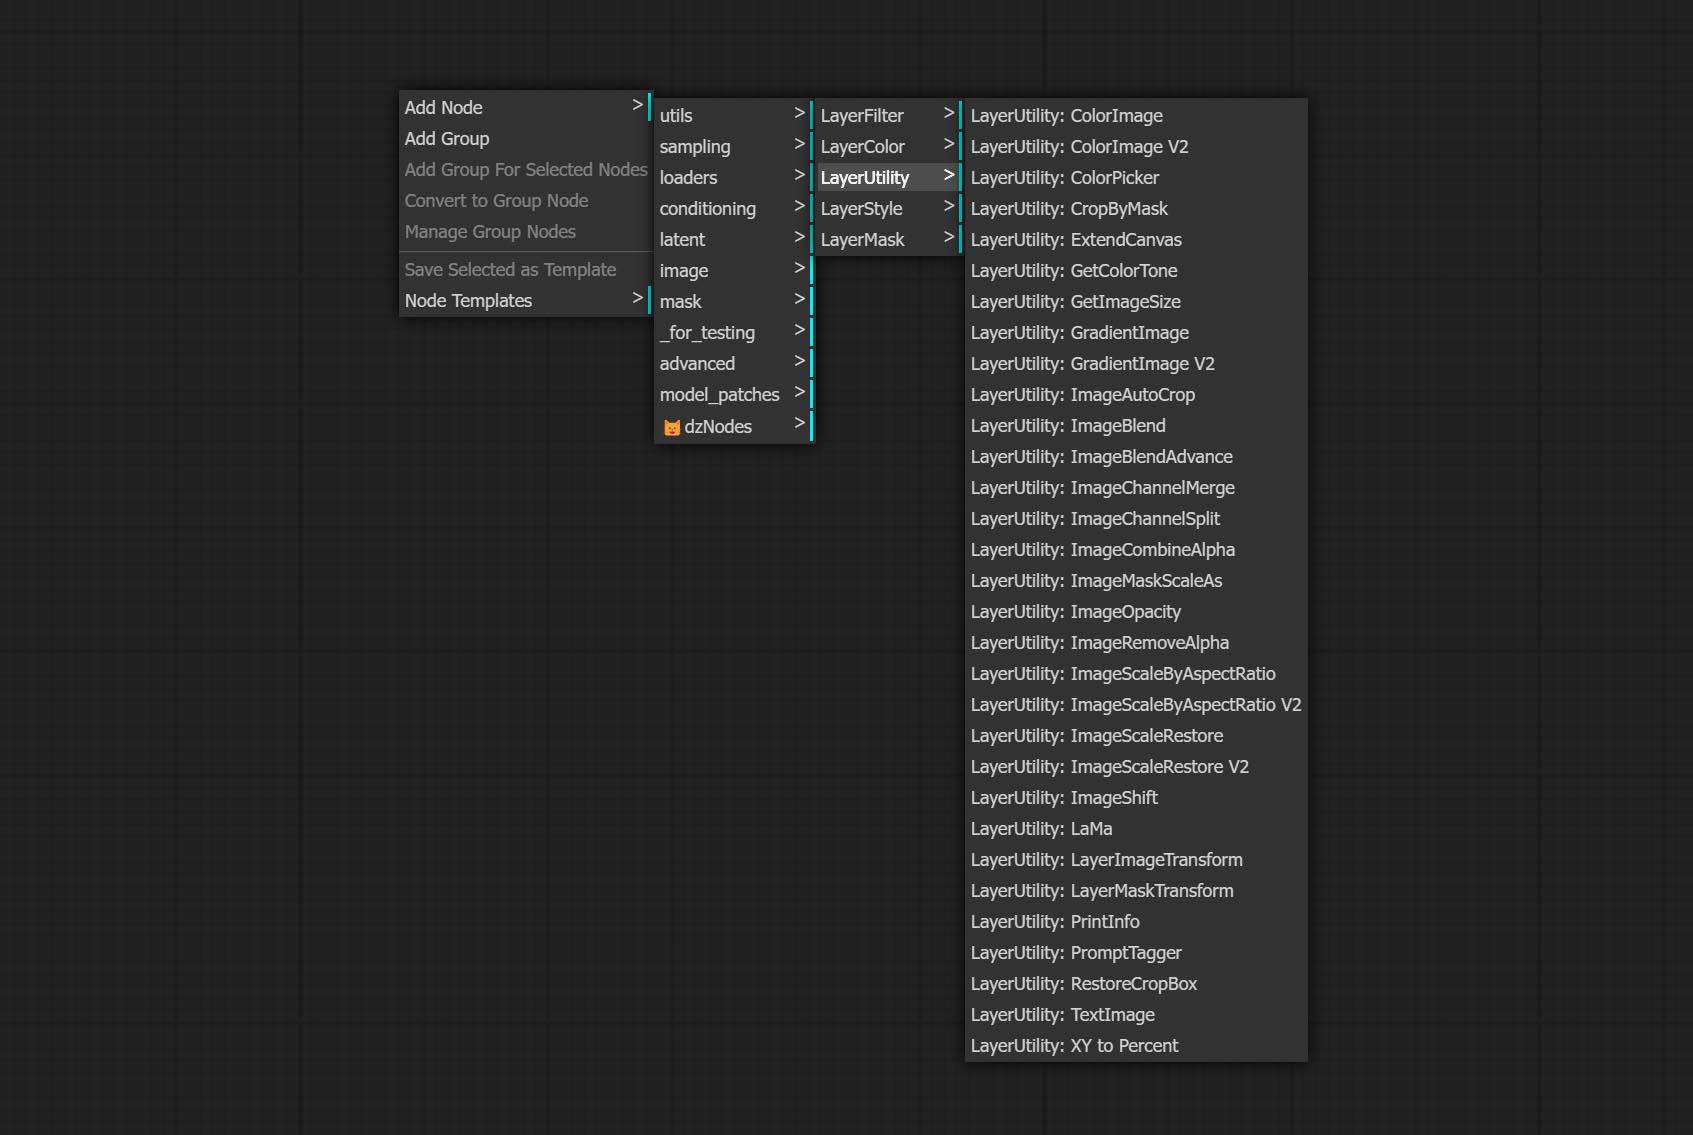
Узлы делятся на 5 групп в соответствии с их функциями: LayersTyle, Layercolor, Layermask, Layerutility и Layerfilter.
- Узлы LayersTyle обеспечивают стили слоев, которые имитируют Adobe Photoshop.

- Группа непрофессиональных узлов обеспечивает функциональность регулировки цвета.
- Layermask Nodes предоставляет инструменты помощи маски.
- Узлы слоя обеспечивают вспомогательные узлы, связанные с инструментами композиции слоя и рабочими процессами.
- Узлы LayerFilter обеспечивают фильтры эффекта изображения.
LayersTyle
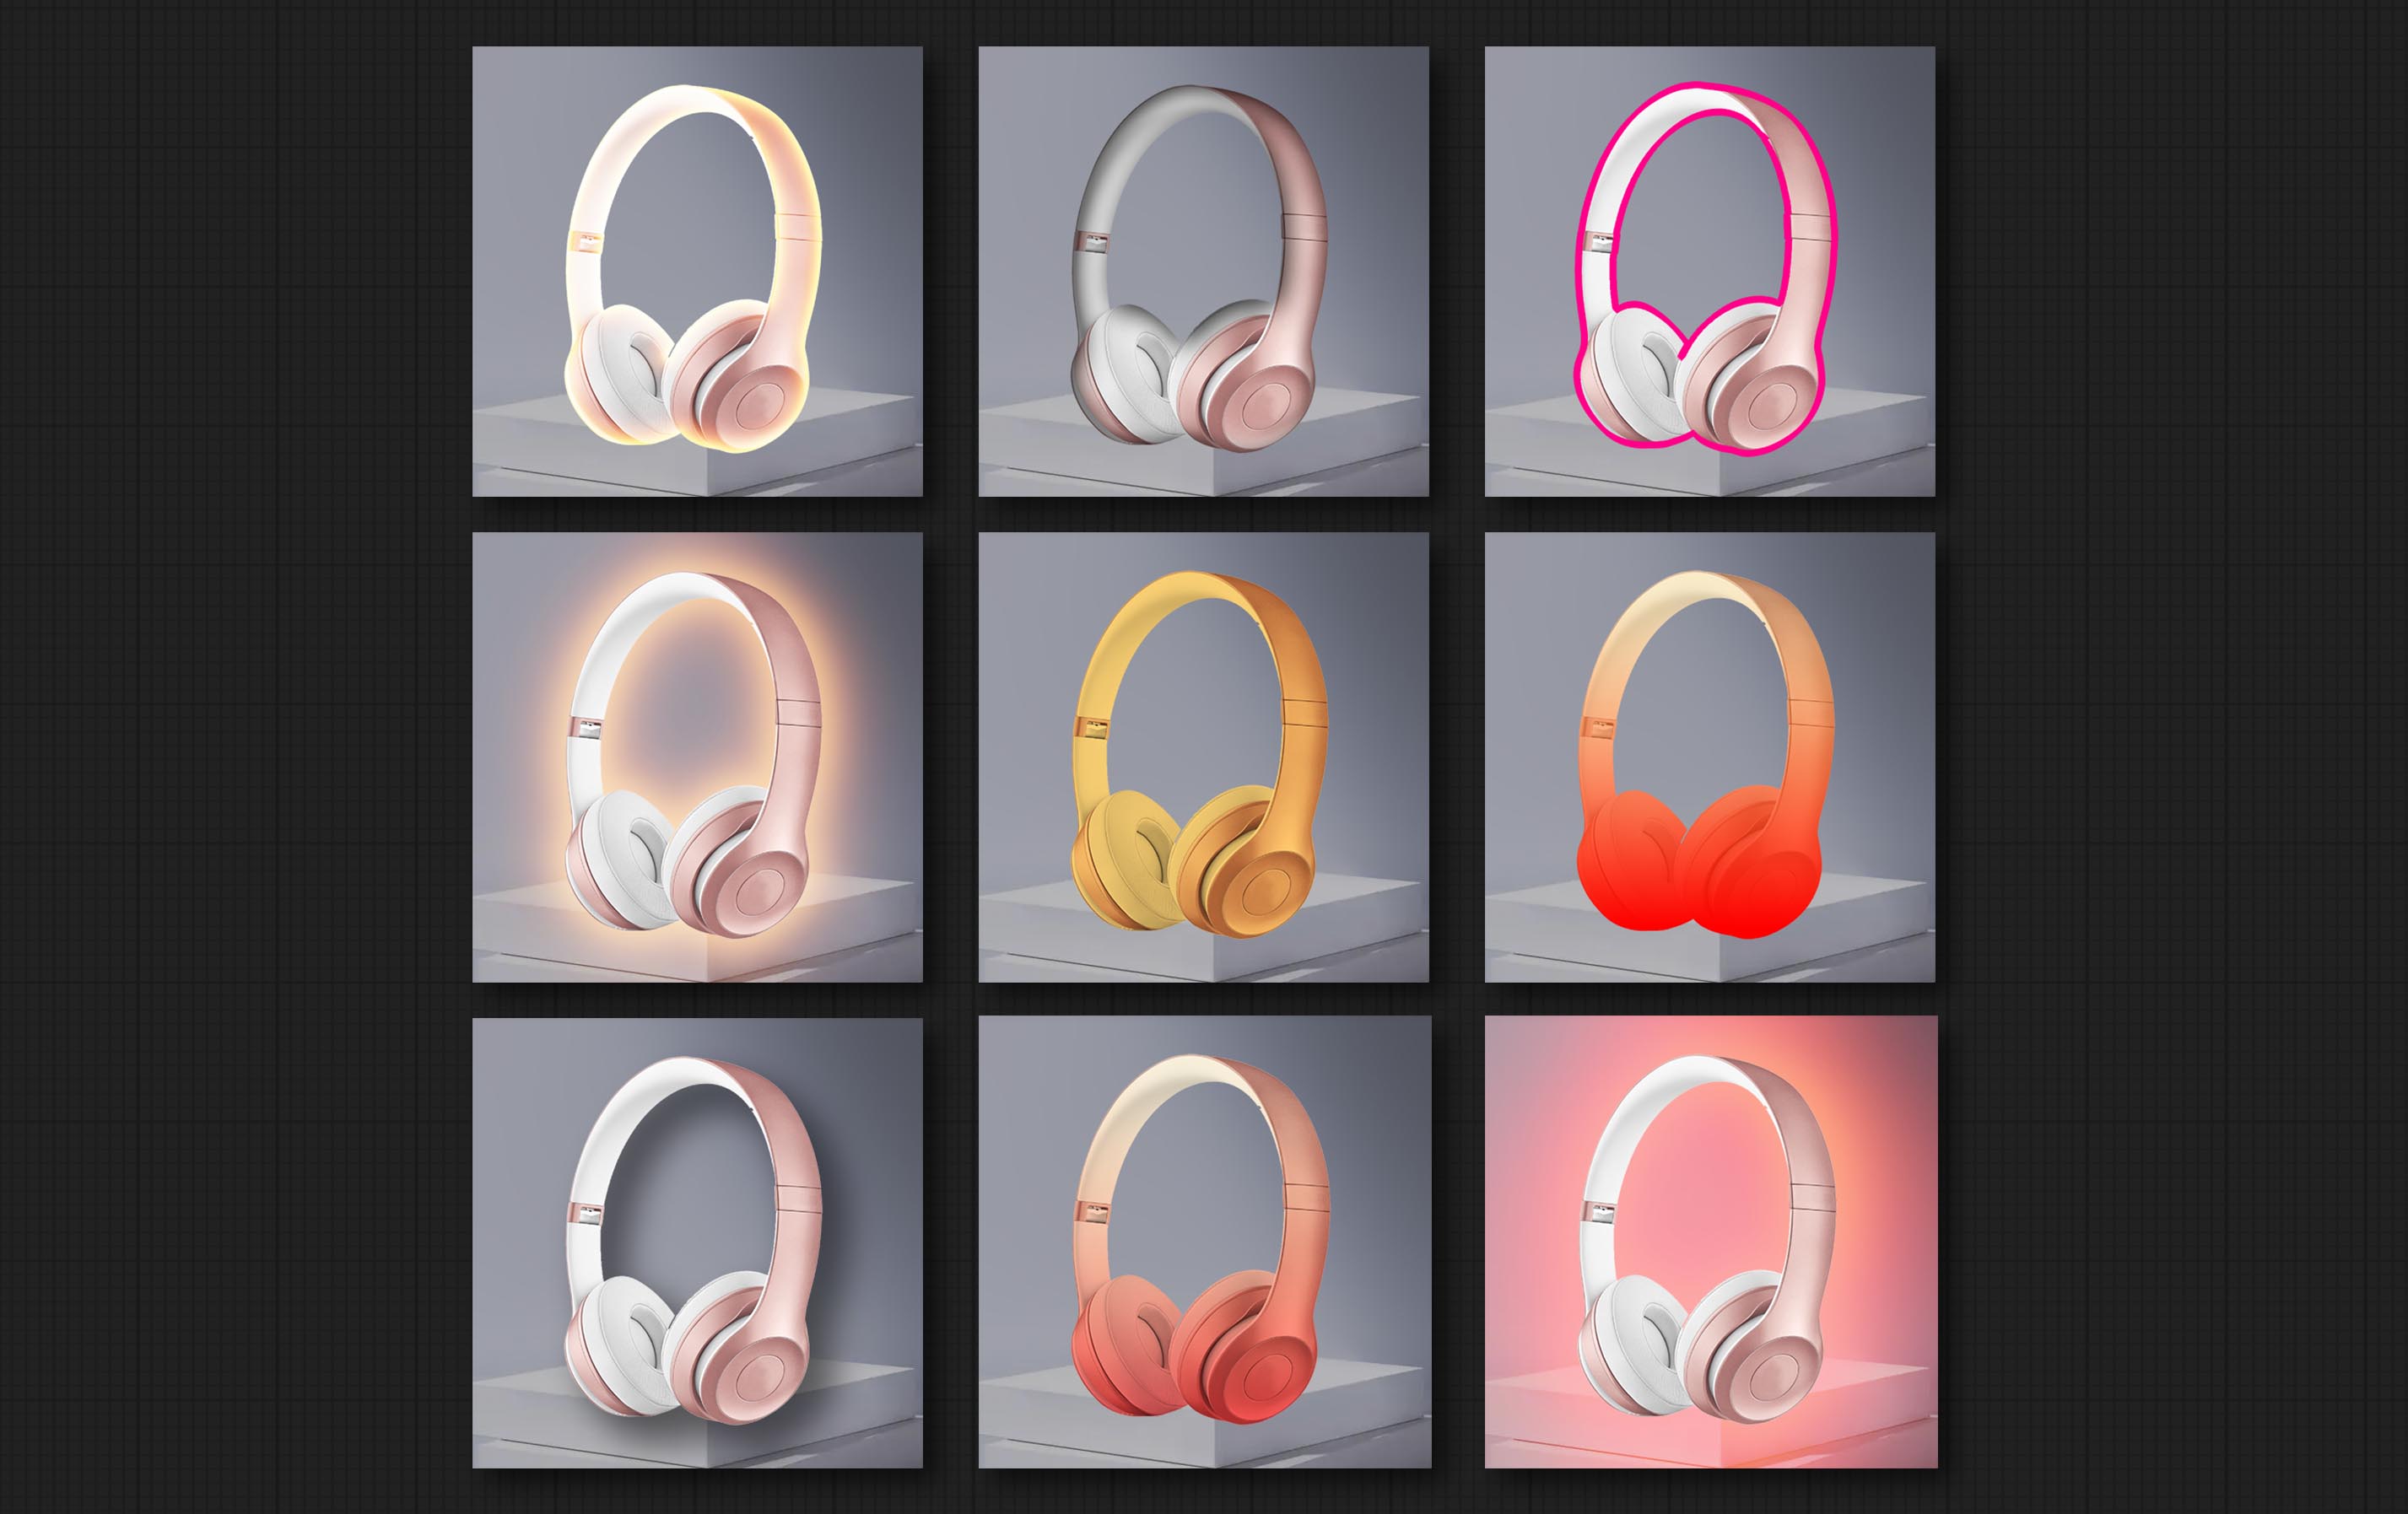
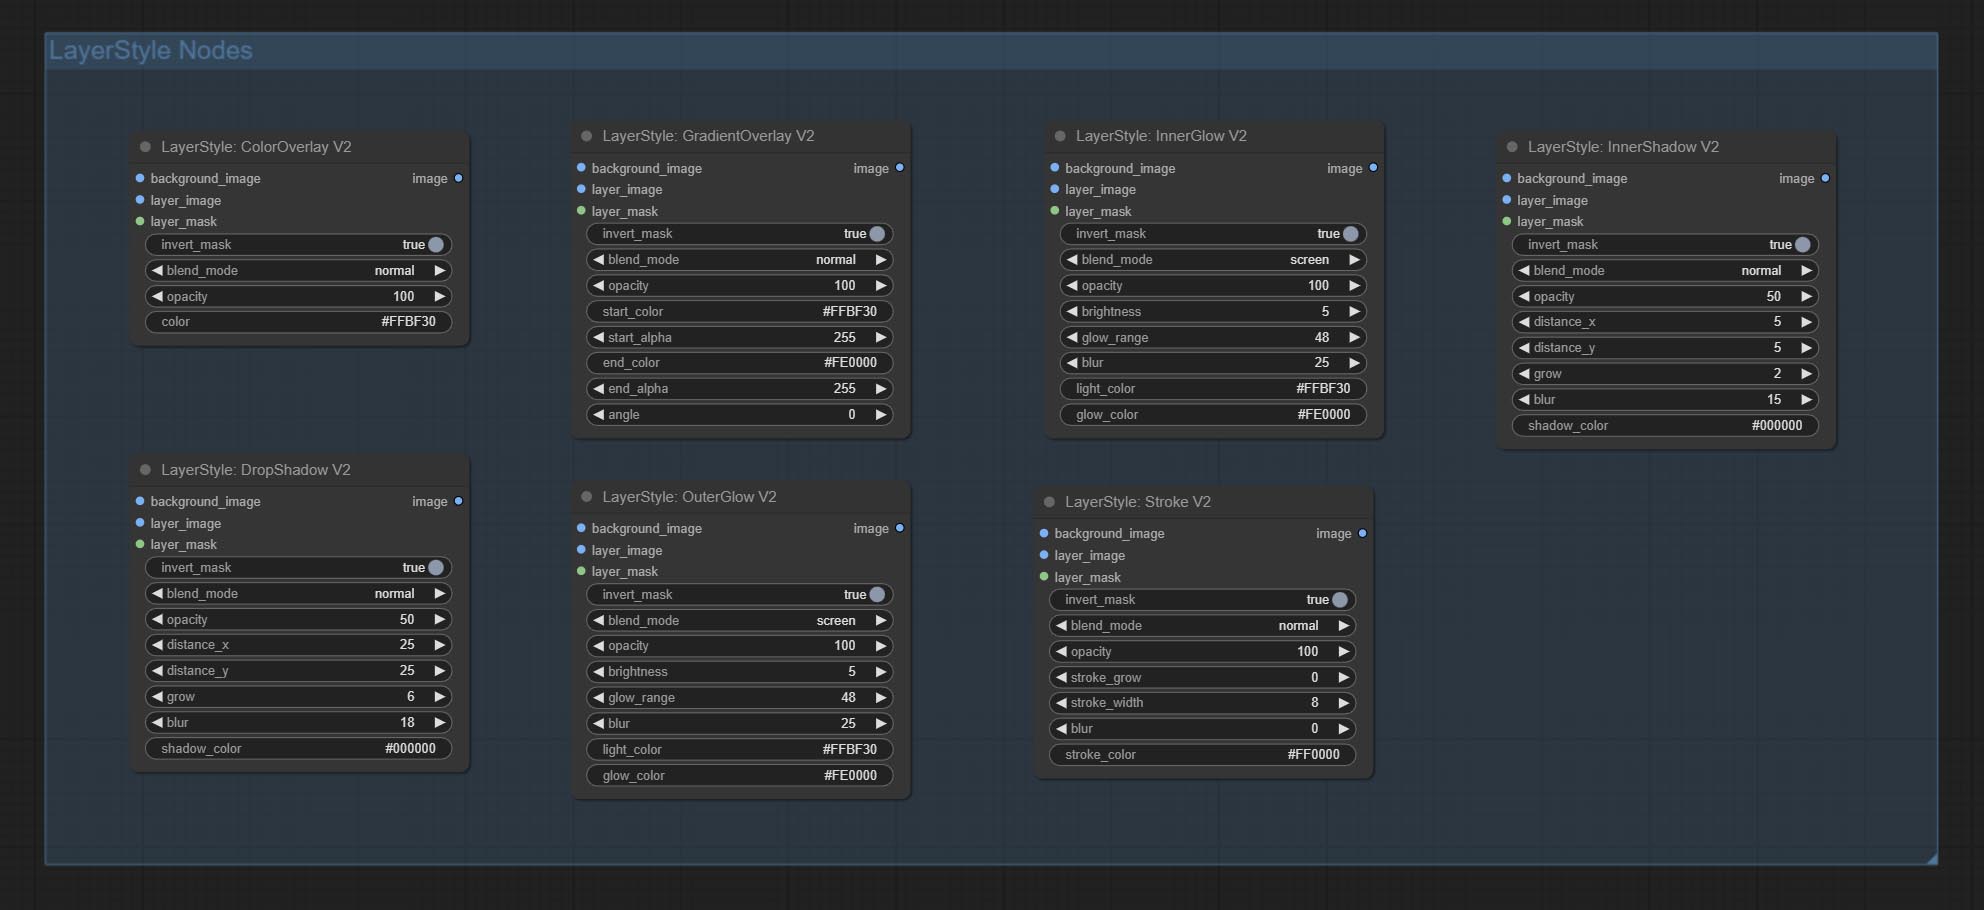
Dropshadow
Генерировать тень 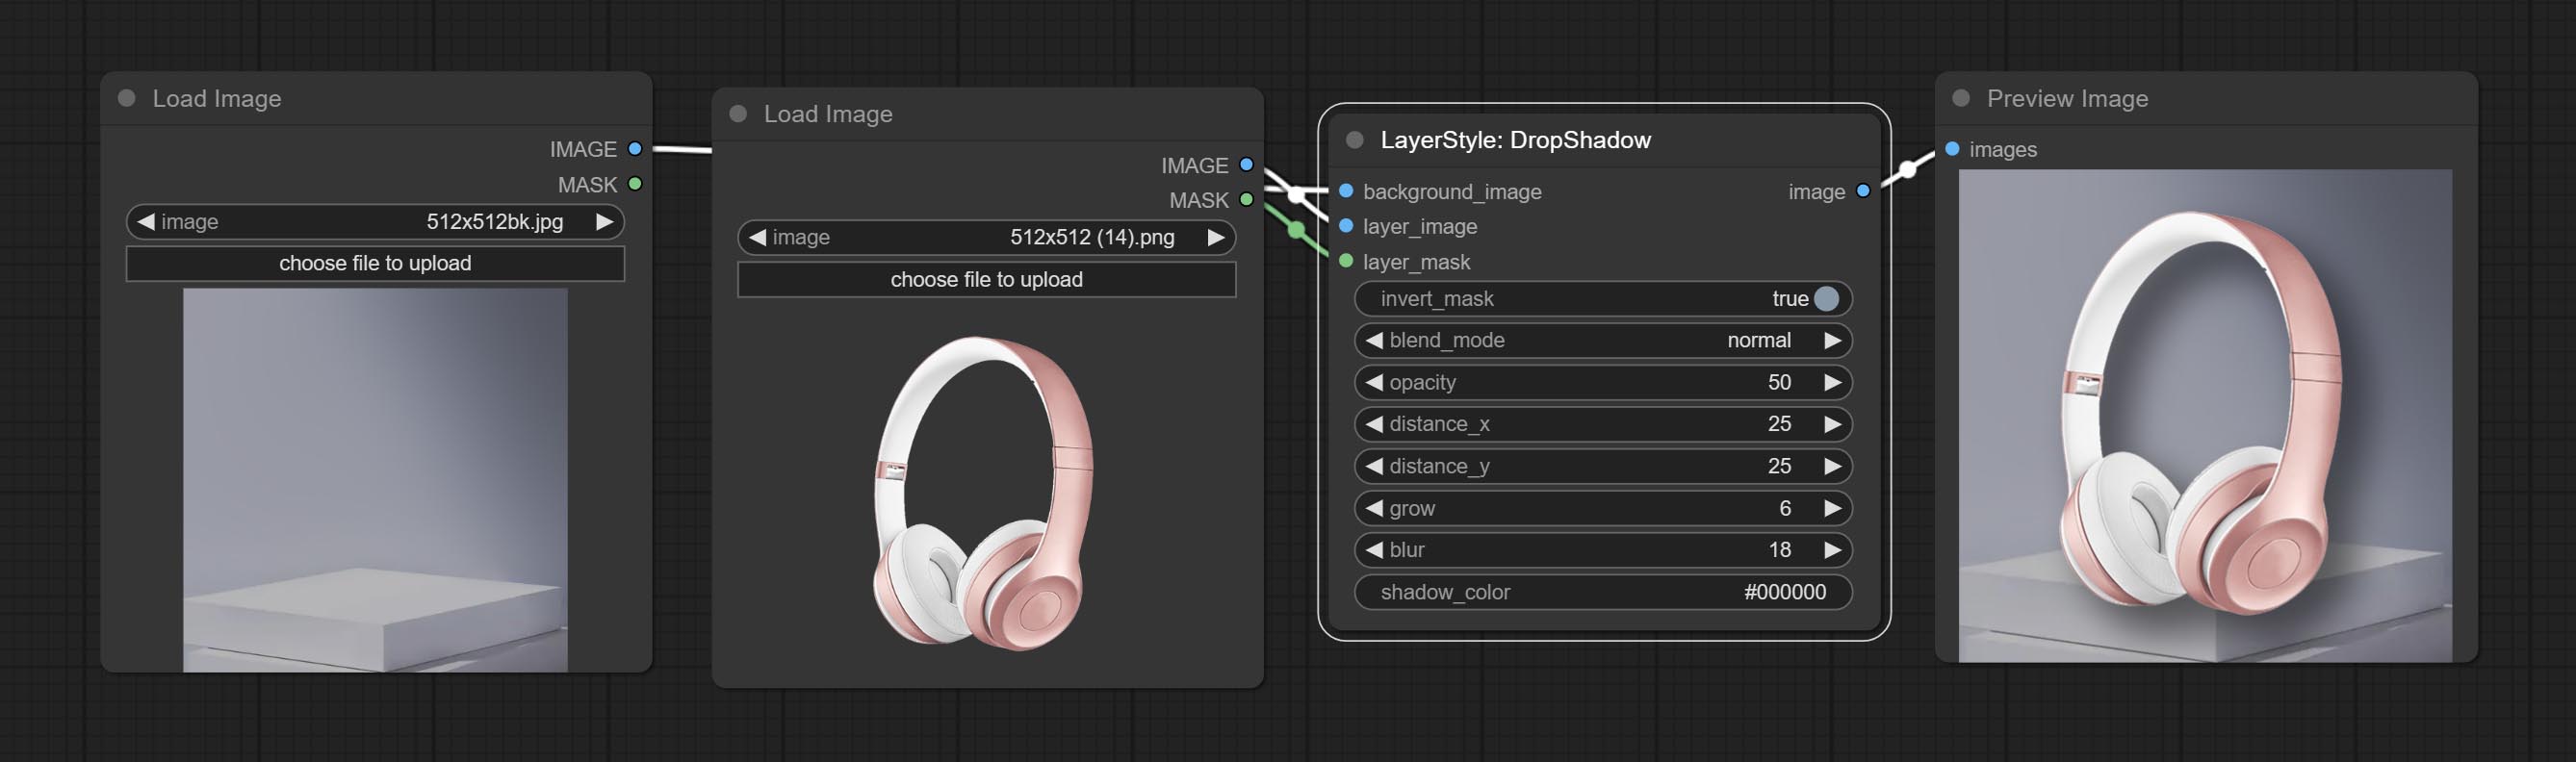
Параметры узла: 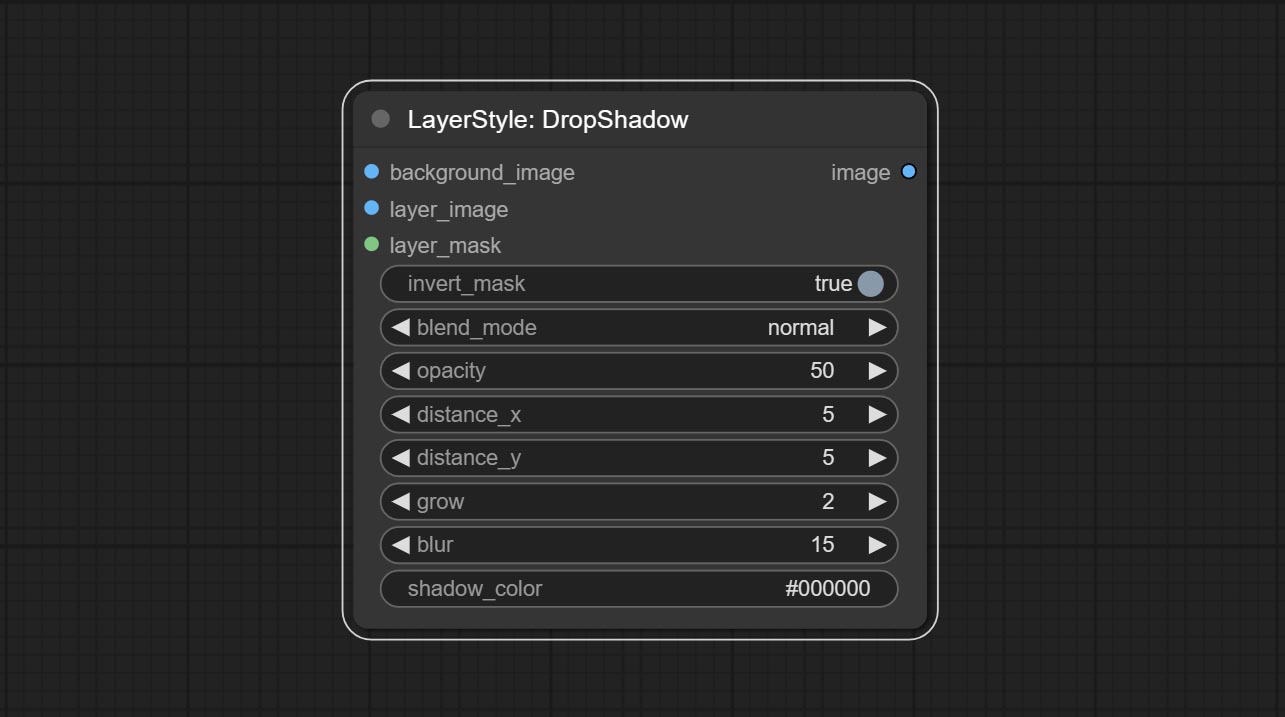
- founal_image 1 : фоновое изображение.
- Layer_Image 1 : изображение слоя для композита.
- Layer_mask 1,2 : Маска для Layer_Image, тени генерируются в соответствии с их формой.
- invert_mask: следует ли изменить маску.
- blend_mode 3 : режим смешивания теней.
- непрозрачность: непрозрачность тени.
- Distance_x: горизонтальное смещение тени.
- Distance_Y: вертикальное смещение тени.
- выращивать: амплитуда расширения тени.
- размытие: тень размытый уровень.
- Shadow_color 4 : тень.
- примечание
Верхний
Генерировать внешнее сияние 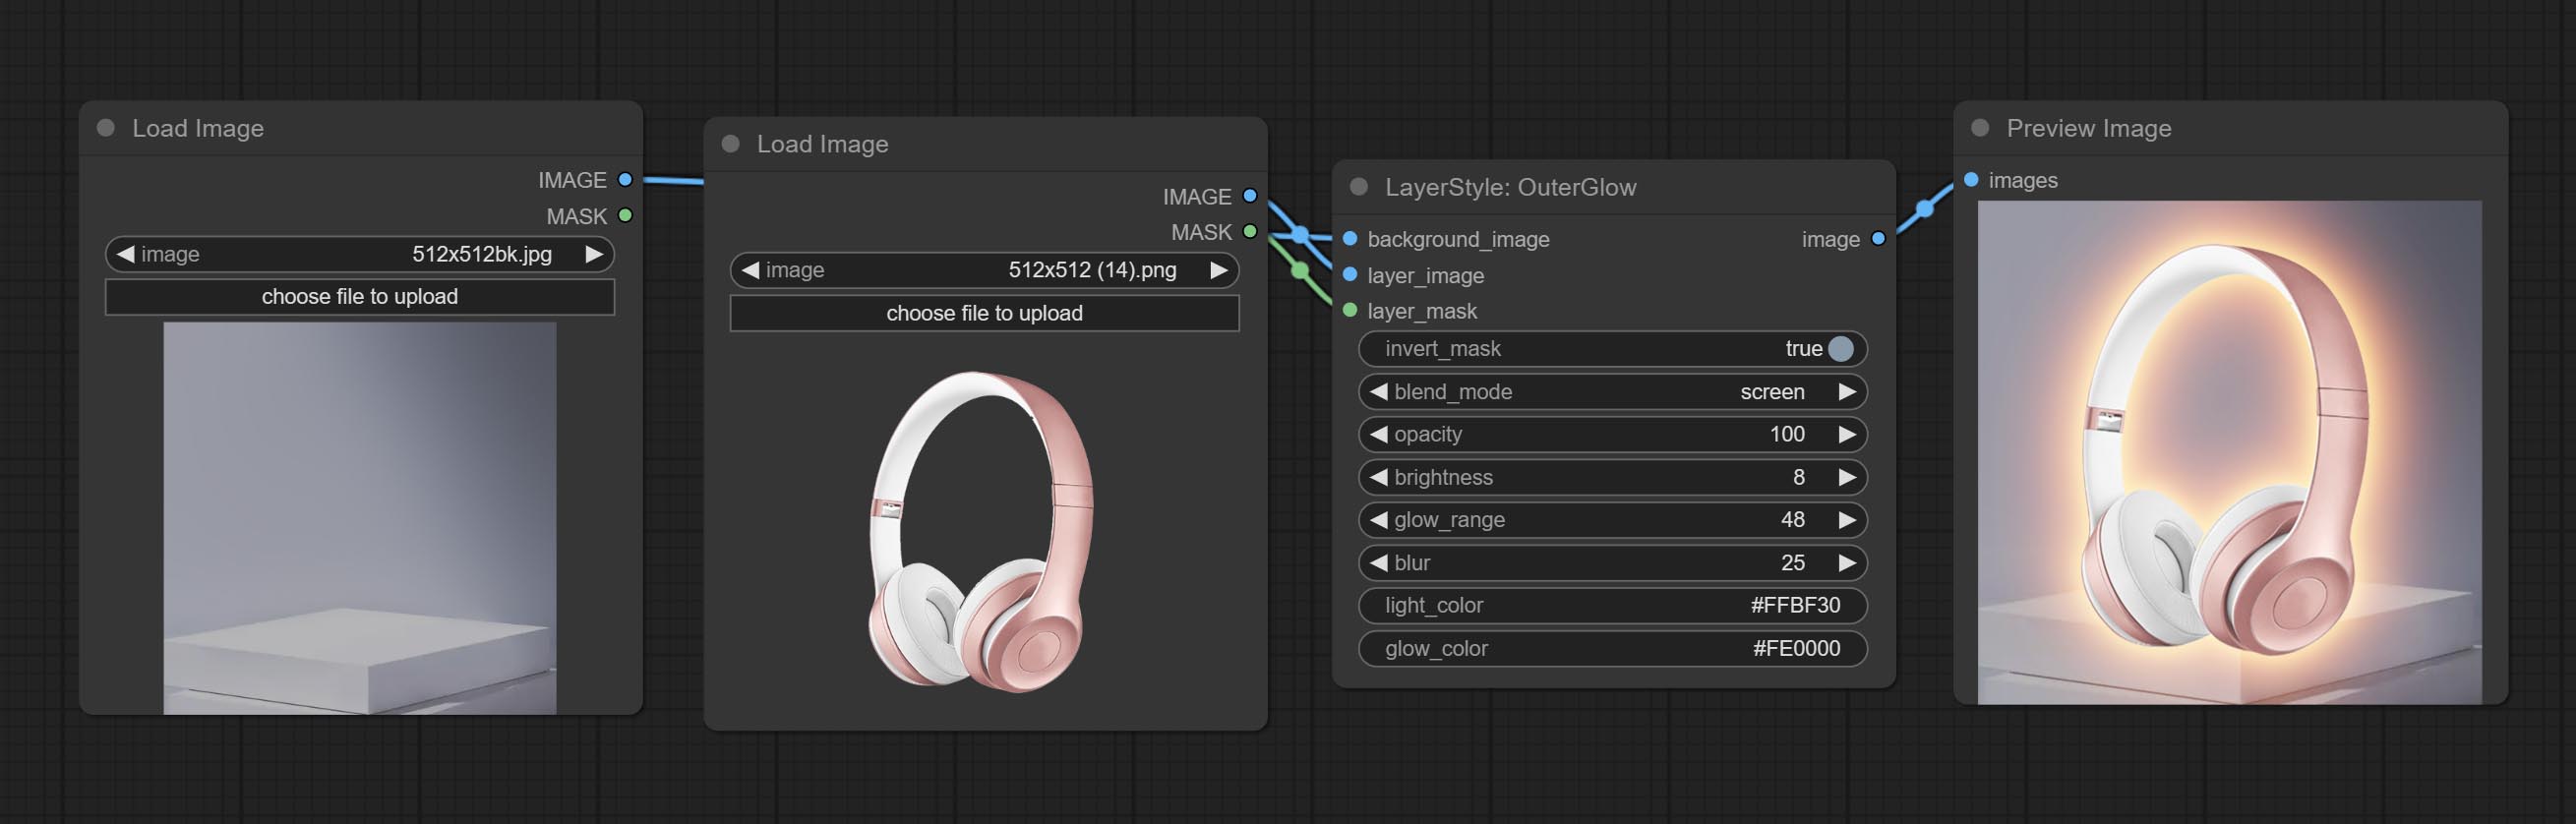
Параметры узла: 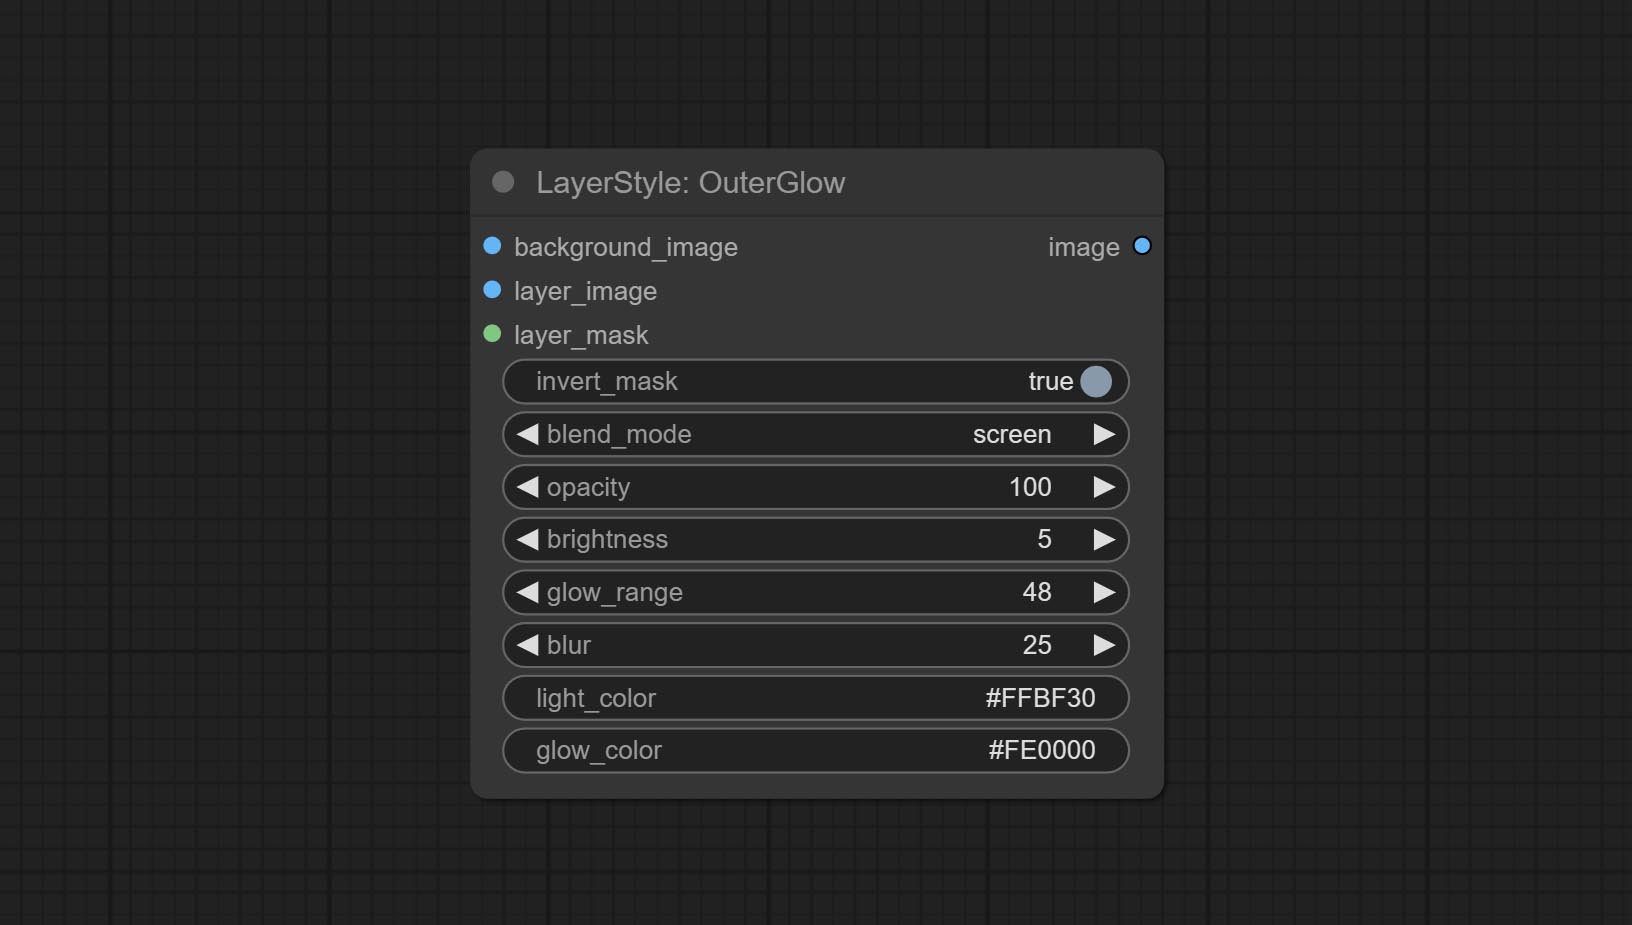
- founal_image 1 : фоновое изображение.
- Layer_Image 1 : изображение слоя для композита.
- Layer_mask 1,2 : Маска для Layer_Image, выращивание генерируется в соответствии с их формой.
- invert_mask: следует ли изменить маску.
- BLEND_MODE 3 : Режим смешивания сияния.
- непрозрачность: непрозрачность свечения.
- Яркость: яркости света.
- GLOW_RANGE: Диапазон сияния.
- Размытие : Размытие свечения.
- Light_color 4 : Центральная часть Цвет свечения.
- GLOW_COLOR 4 : Цвет края. Цвет свечения.
- примечание
Innershadow
Генерировать внутреннюю тень 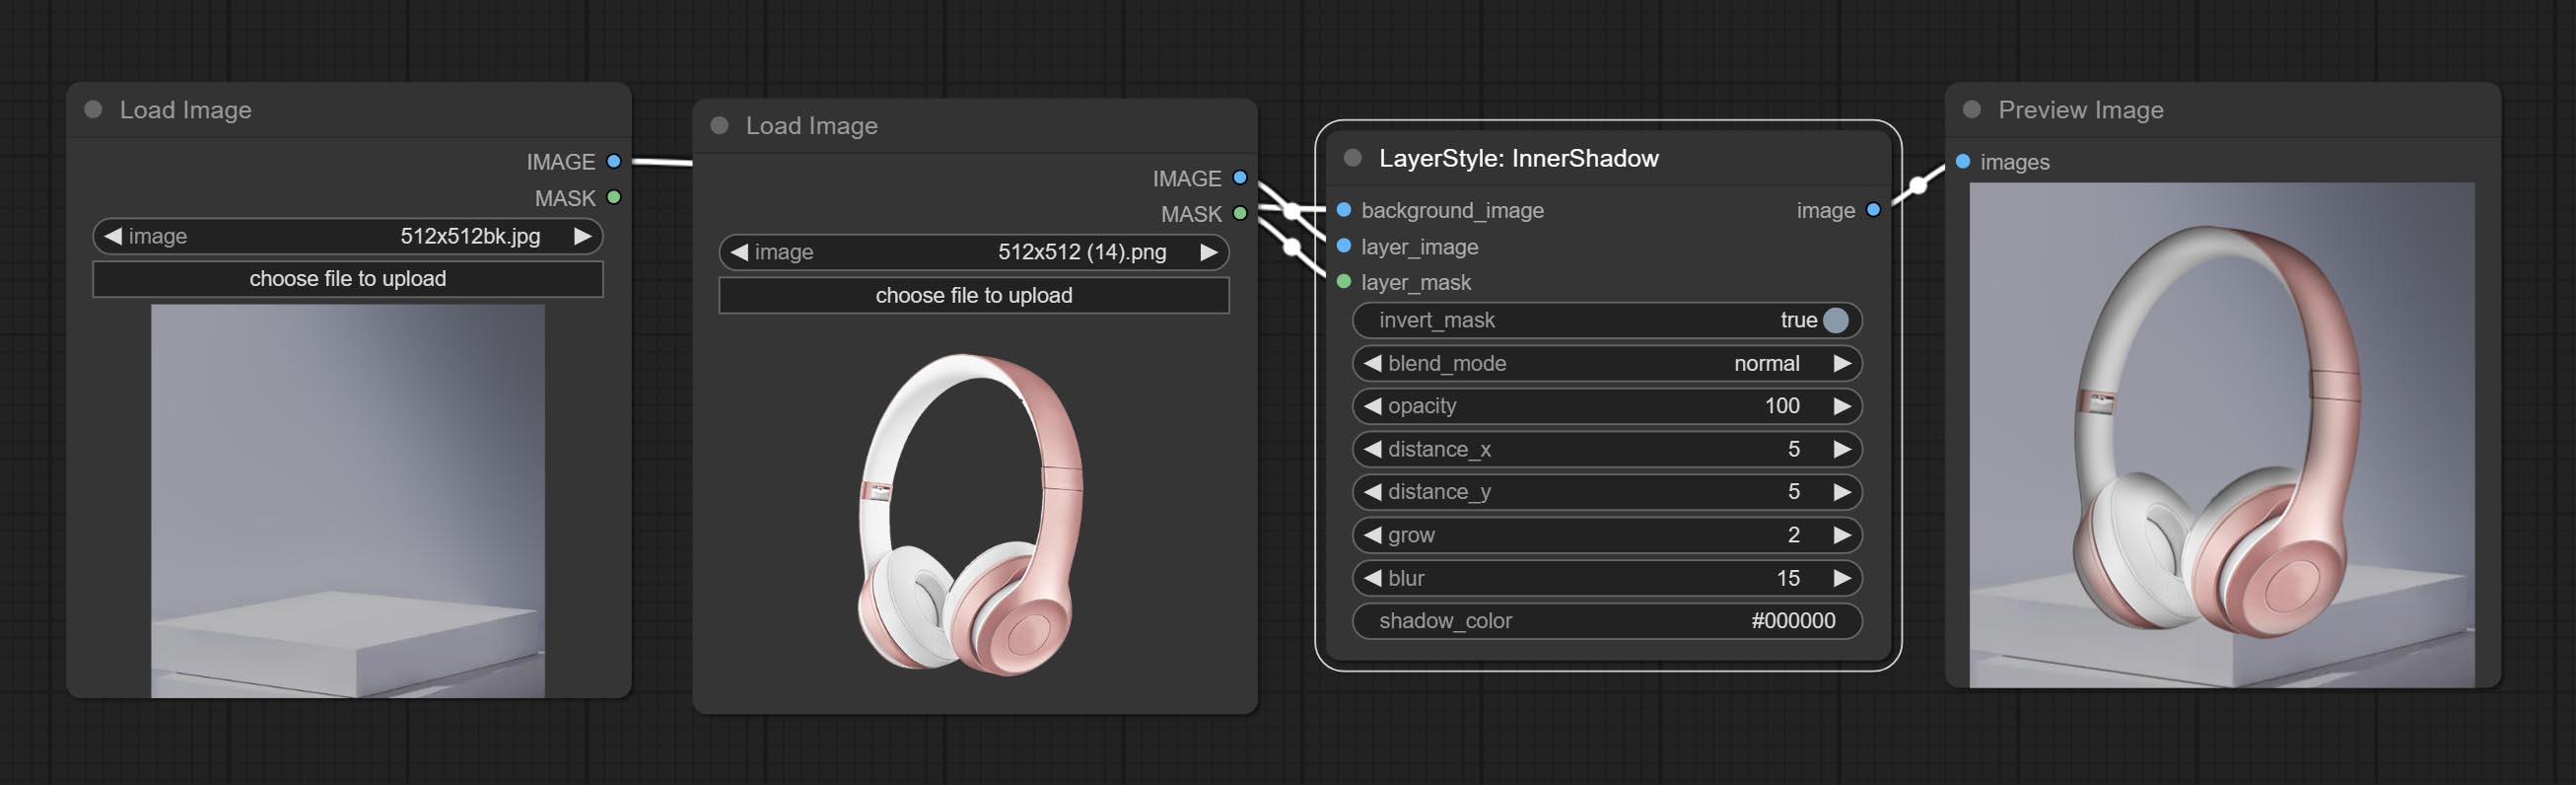
Параметры узла: 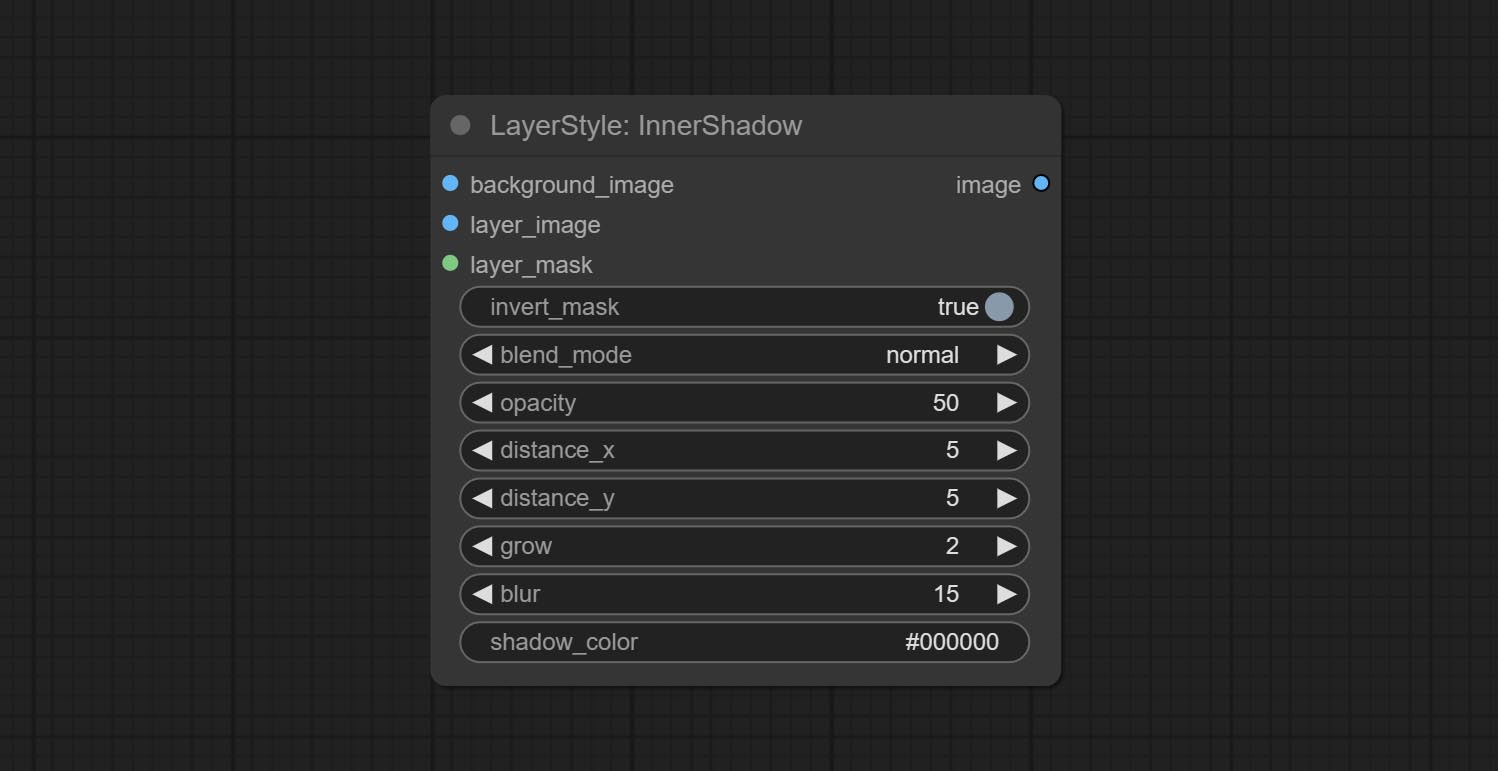
- founal_image 1 : фоновое изображение.
- Layer_Image 1 : изображение слоя для композита.
- Layer_mask 1,2 : Маска для Layer_Image, тени генерируются в соответствии с их формой.
- invert_mask: следует ли изменить маску.
- blend_mode 3 : режим смешивания теней.
- непрозрачность: непрозрачность тени.
- Distance_x: горизонтальное смещение тени.
- Distance_Y: вертикальное смещение тени.
- выращивать: амплитуда расширения тени.
- размытие: тень размытый уровень.
- Shadow_color 4 : тень.
- примечание
Innerglow
Генерировать внутреннее сияние 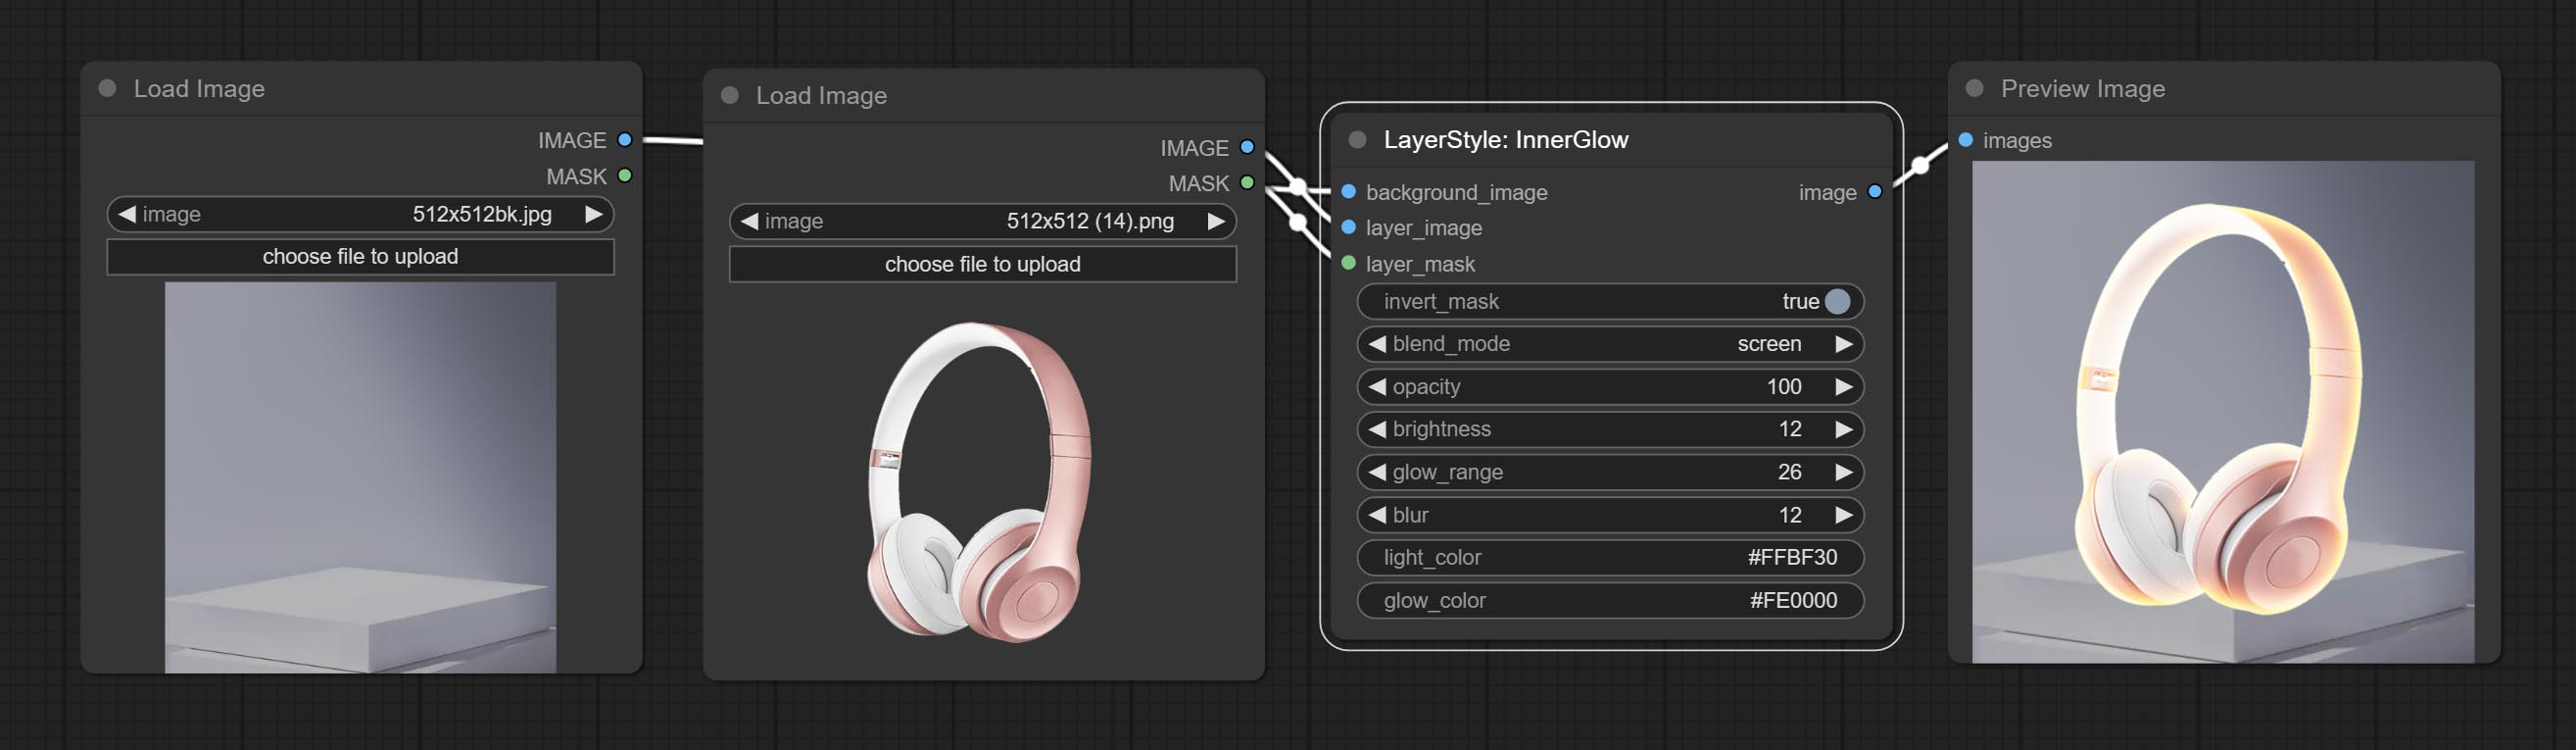
Параметры узла:
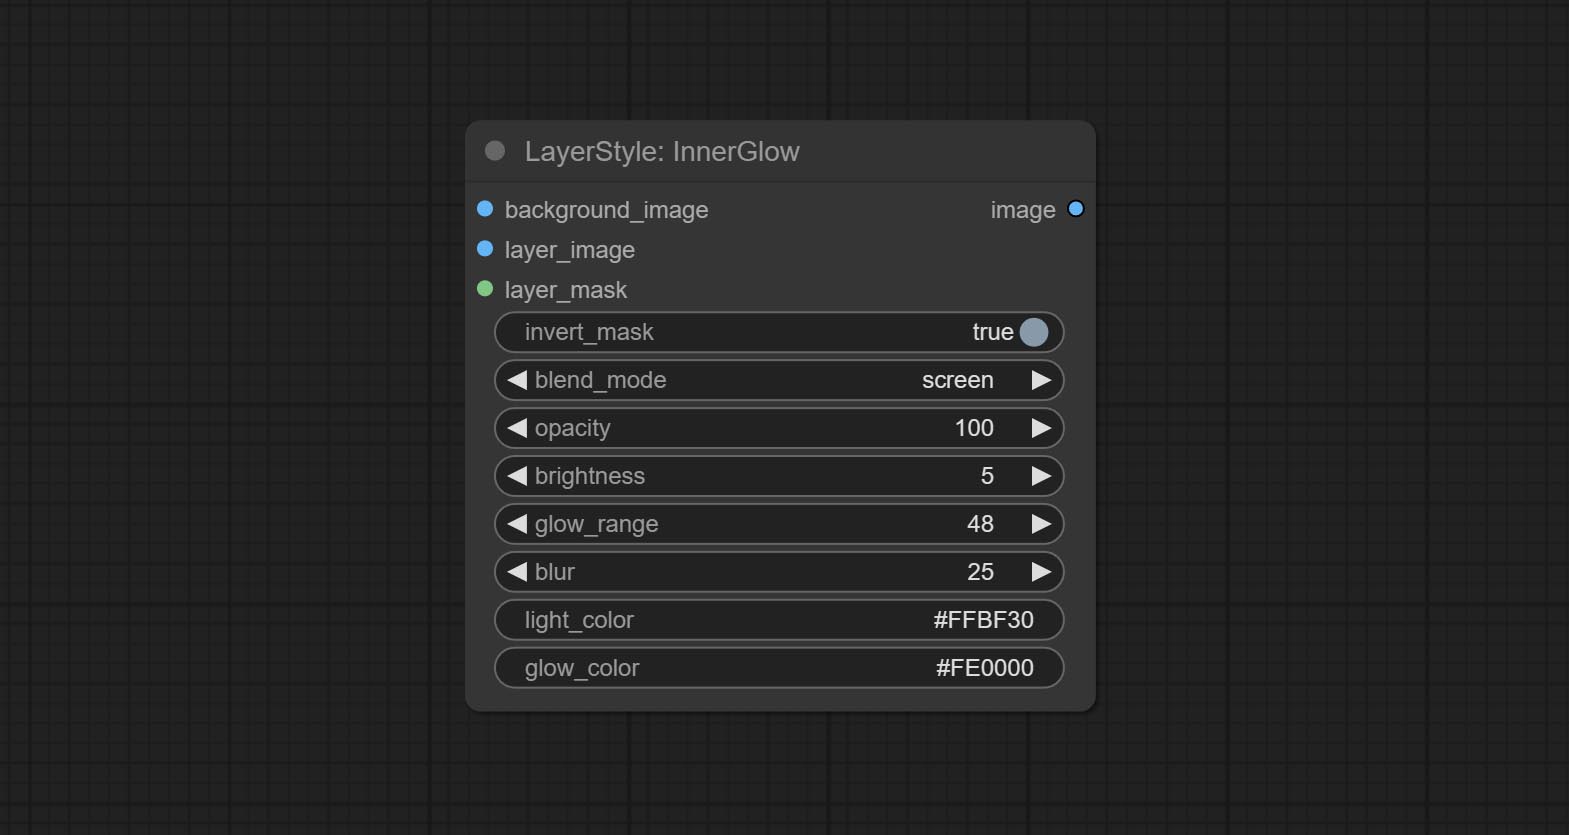
- founal_image 1 : фоновое изображение.
- Layer_Image 1 : изображение слоя для композита.
- Layer_mask 1,2 : Маска для Layer_Image, выращивание генерируется в соответствии с их формой.
- invert_mask: следует ли изменить маску.
- BLEND_MODE 3 : Режим смешивания сияния.
- непрозрачность: непрозрачность свечения.
- Яркость: яркости света.
- GLOW_RANGE: Диапазон сияния.
- Размытие : Размытие свечения.
- Light_color 4 : Центральная часть Цвет свечения.
- GLOW_COLOR 4 : Цвет края. Цвет свечения.
- примечание
Гладить
Генерировать ход слоя。 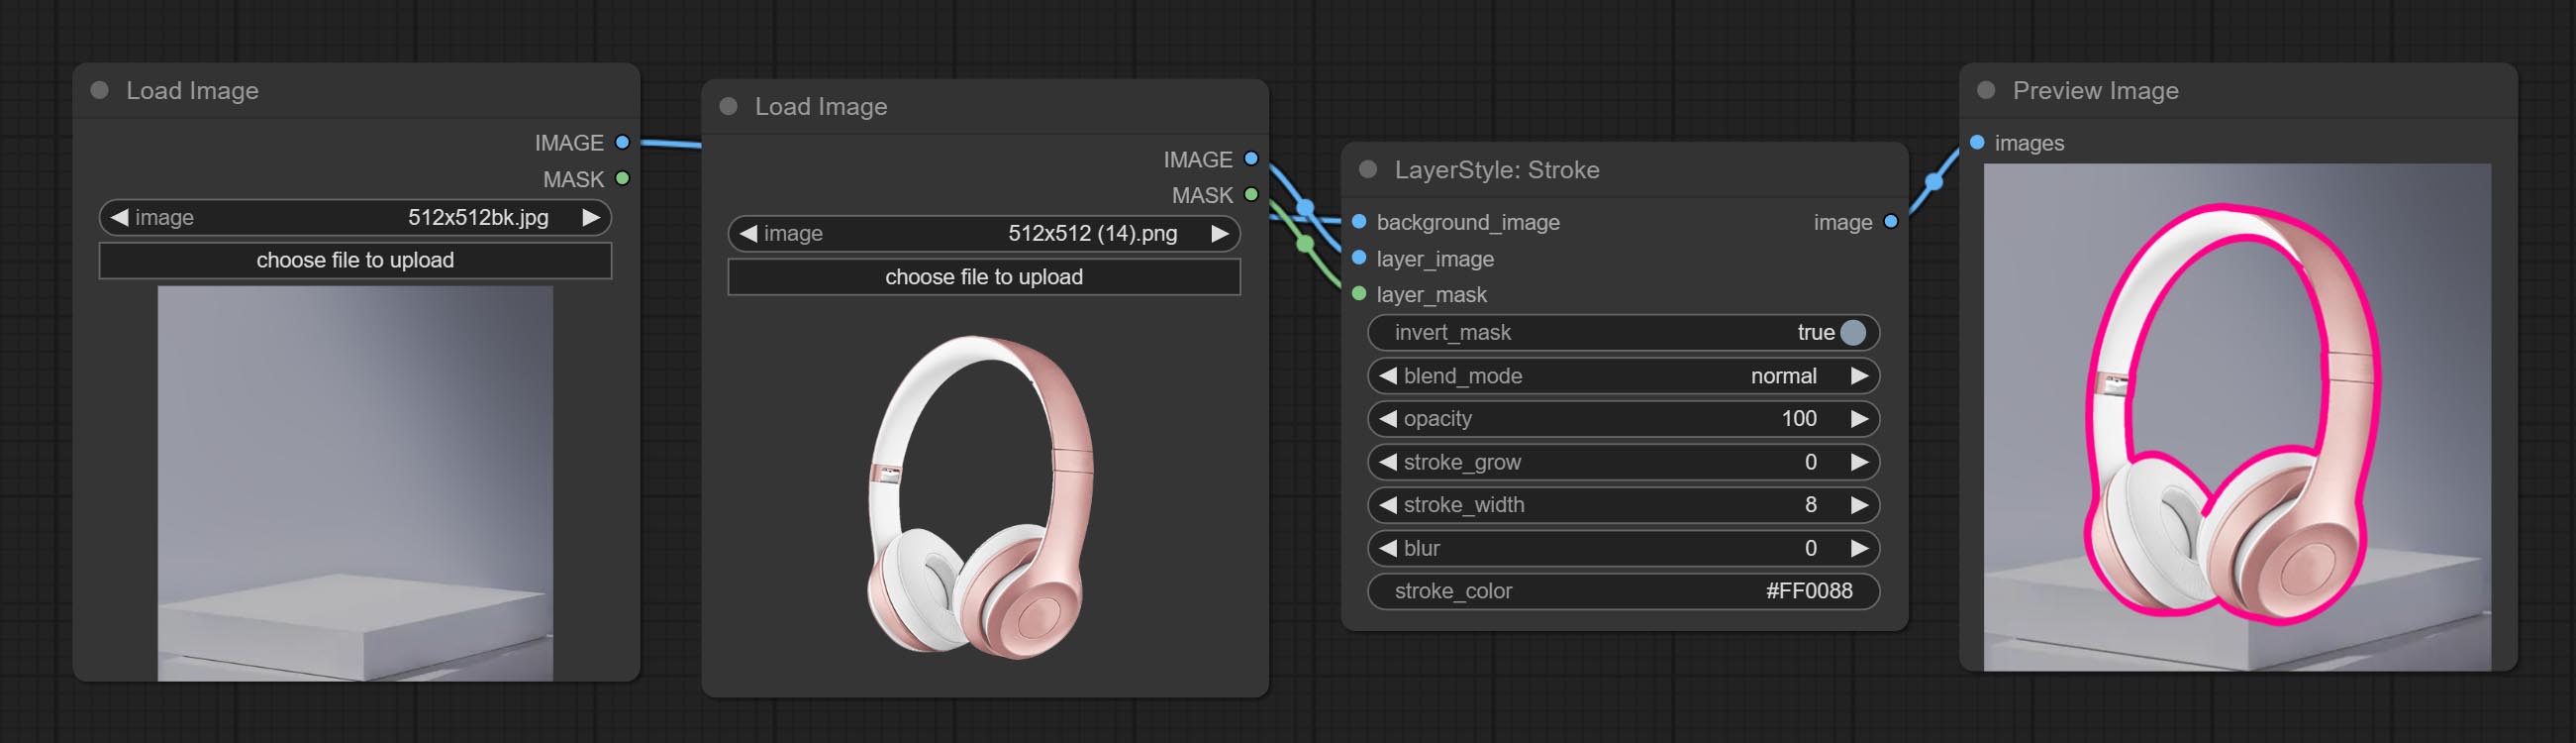
Параметры узла:
- founal_image 1 : фоновое изображение.
- Layer_Image 1 : изображение слоя для композита.
- Layer_mask 1,2 : Маска для Layer_Image, ход генерируется в соответствии с их формой.
- invert_mask: следует ли изменить маску.
- blend_mode 3 : режим смешивания хода.
- непрозрачность: непрозрачность инсульта.
- Insck_grow: амплитуда расширения/сокращения инсульта, положительные значения указывают на расширение, а отрицательные значения указывают на сокращение.
- Щелк_width: ширина хода.
- Размытие: размытие хода.
- chrouch_color 4 : Цвет инсульта, описанный в шестнадцатеричном формате RGB.
- примечание
GradientOverlay
Генерировать наложение градиента 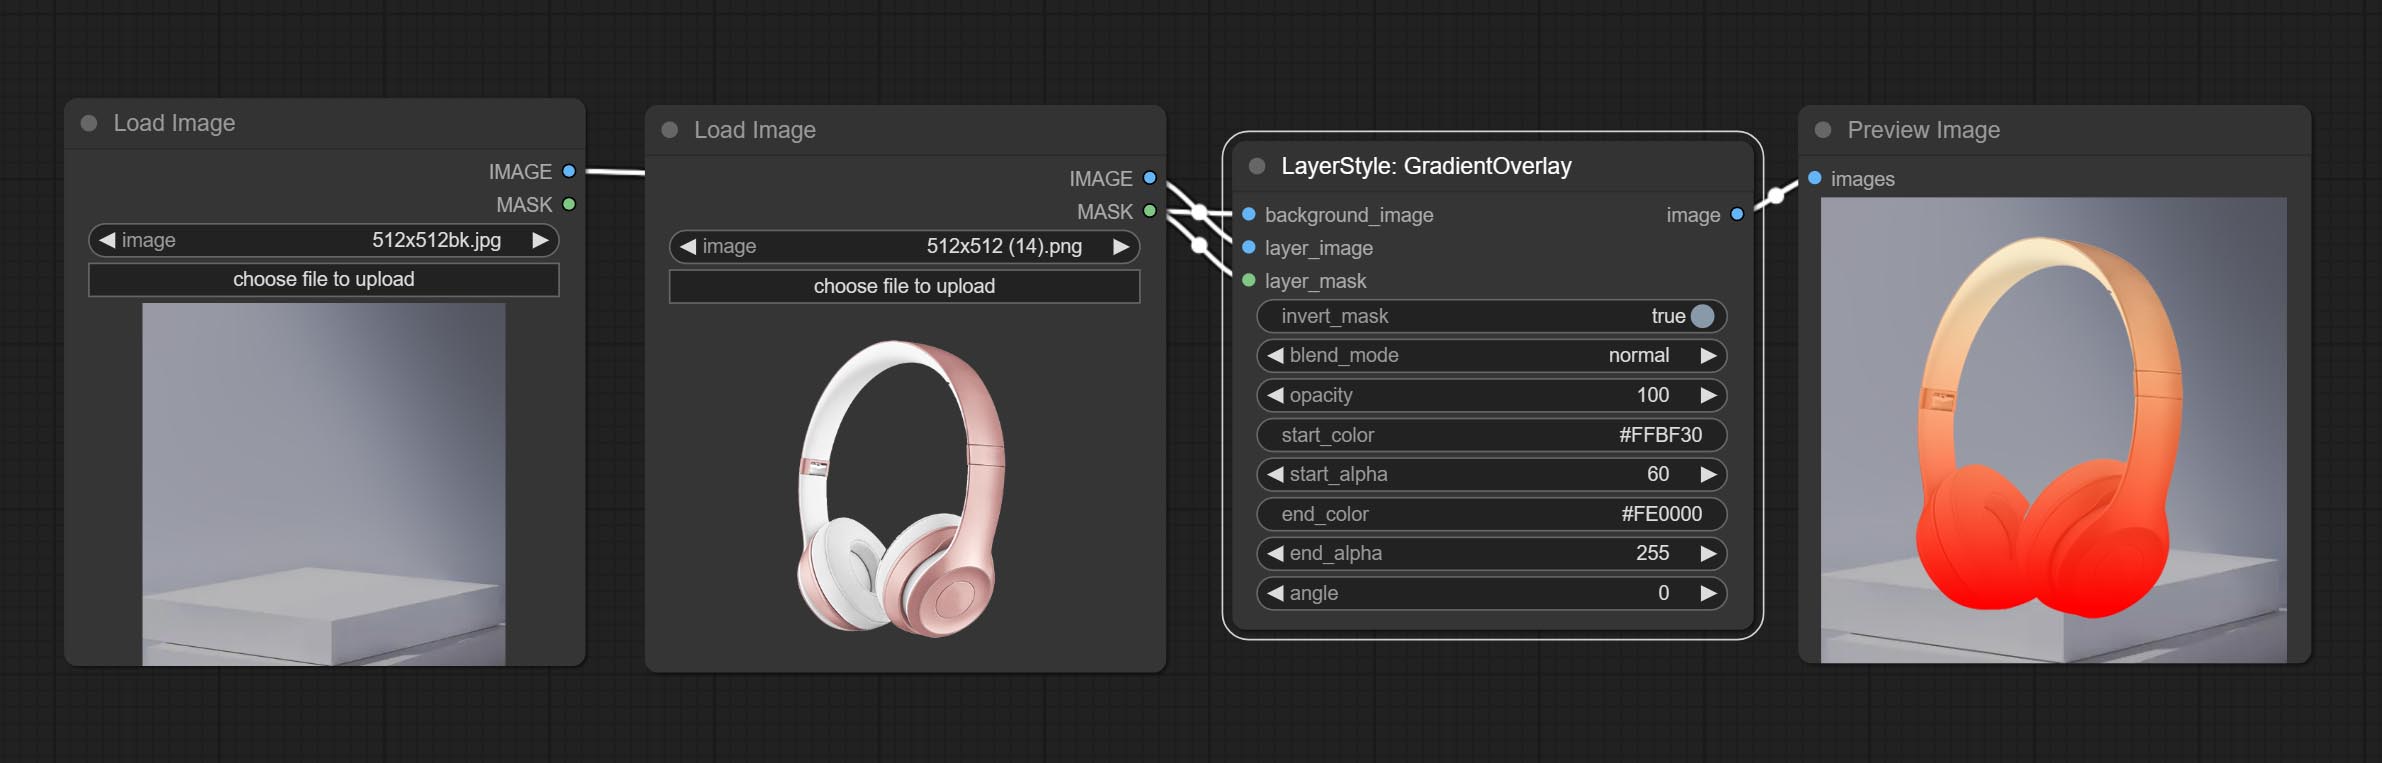
Параметры узла:
- founal_image 1 : фоновое изображение.
- Layer_Image 1 : изображение слоя для композита.
- Layer_mask 1,2 : Маска для Layer_Image.
- invert_mask: Whether to reverse the mask.
- blend_mode 3 : Blending mode of gradient.
- opacity: Opacity of stroke.
- start_color: Color at the beginning of the gradient.
- start_alpha: Transparency at the beginning of the gradient.
- end_color: Color at the end of the gradient.
- end_alpha: Transparency at the end of the gradient.
- angle: Gradient rotation angle.
- примечание
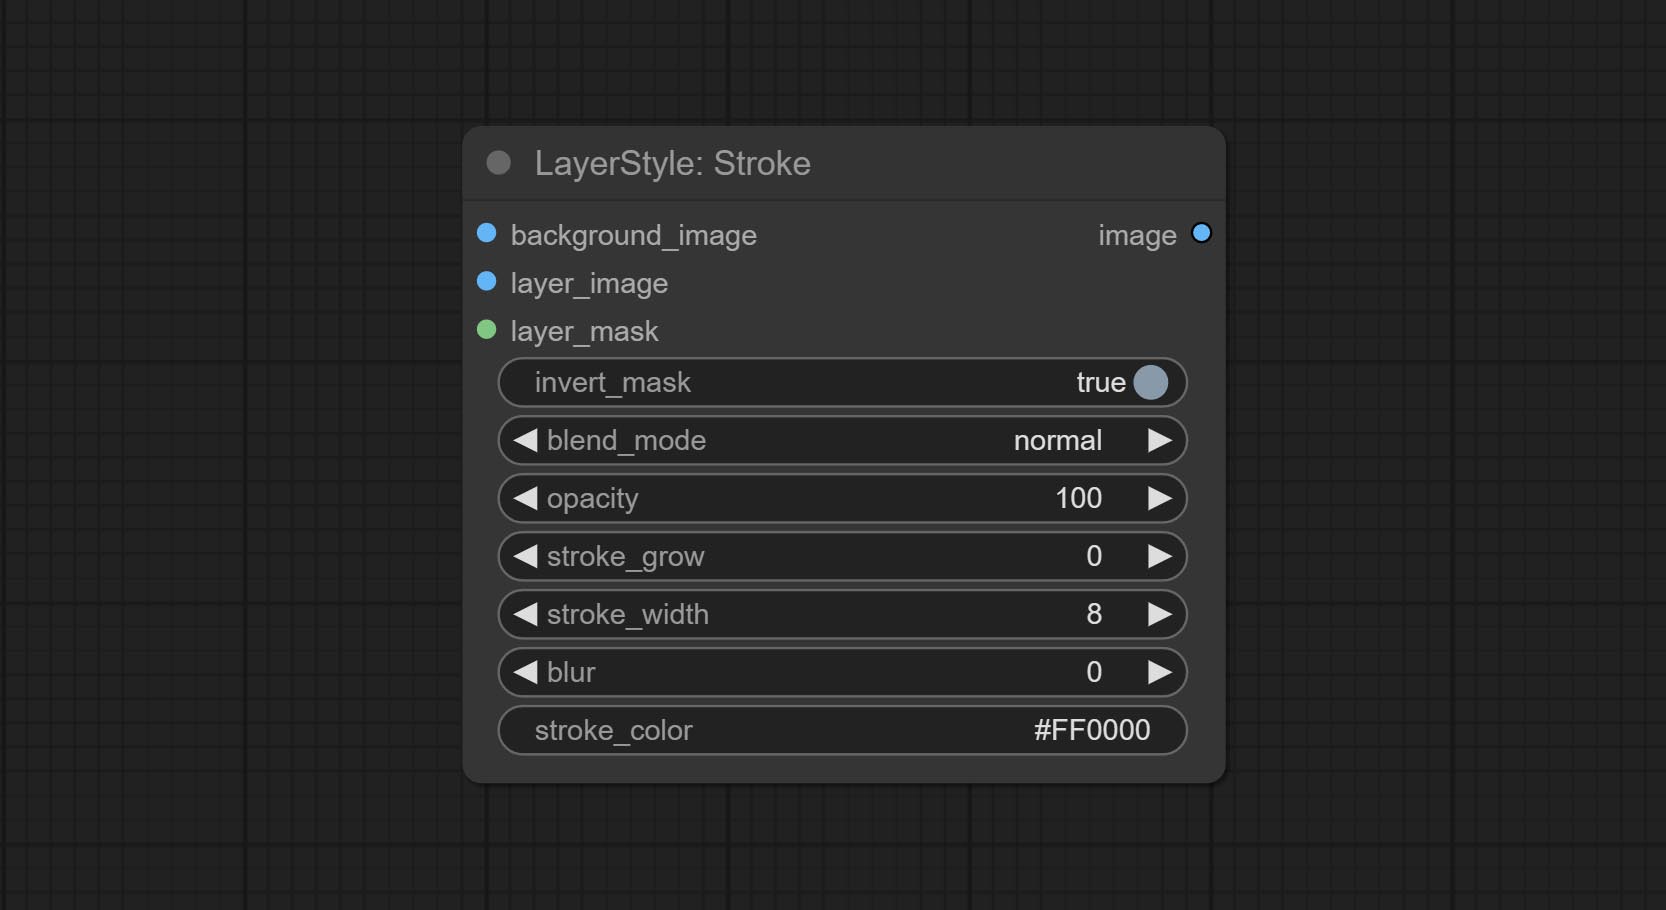
ColorOverlay
Generate color overlay 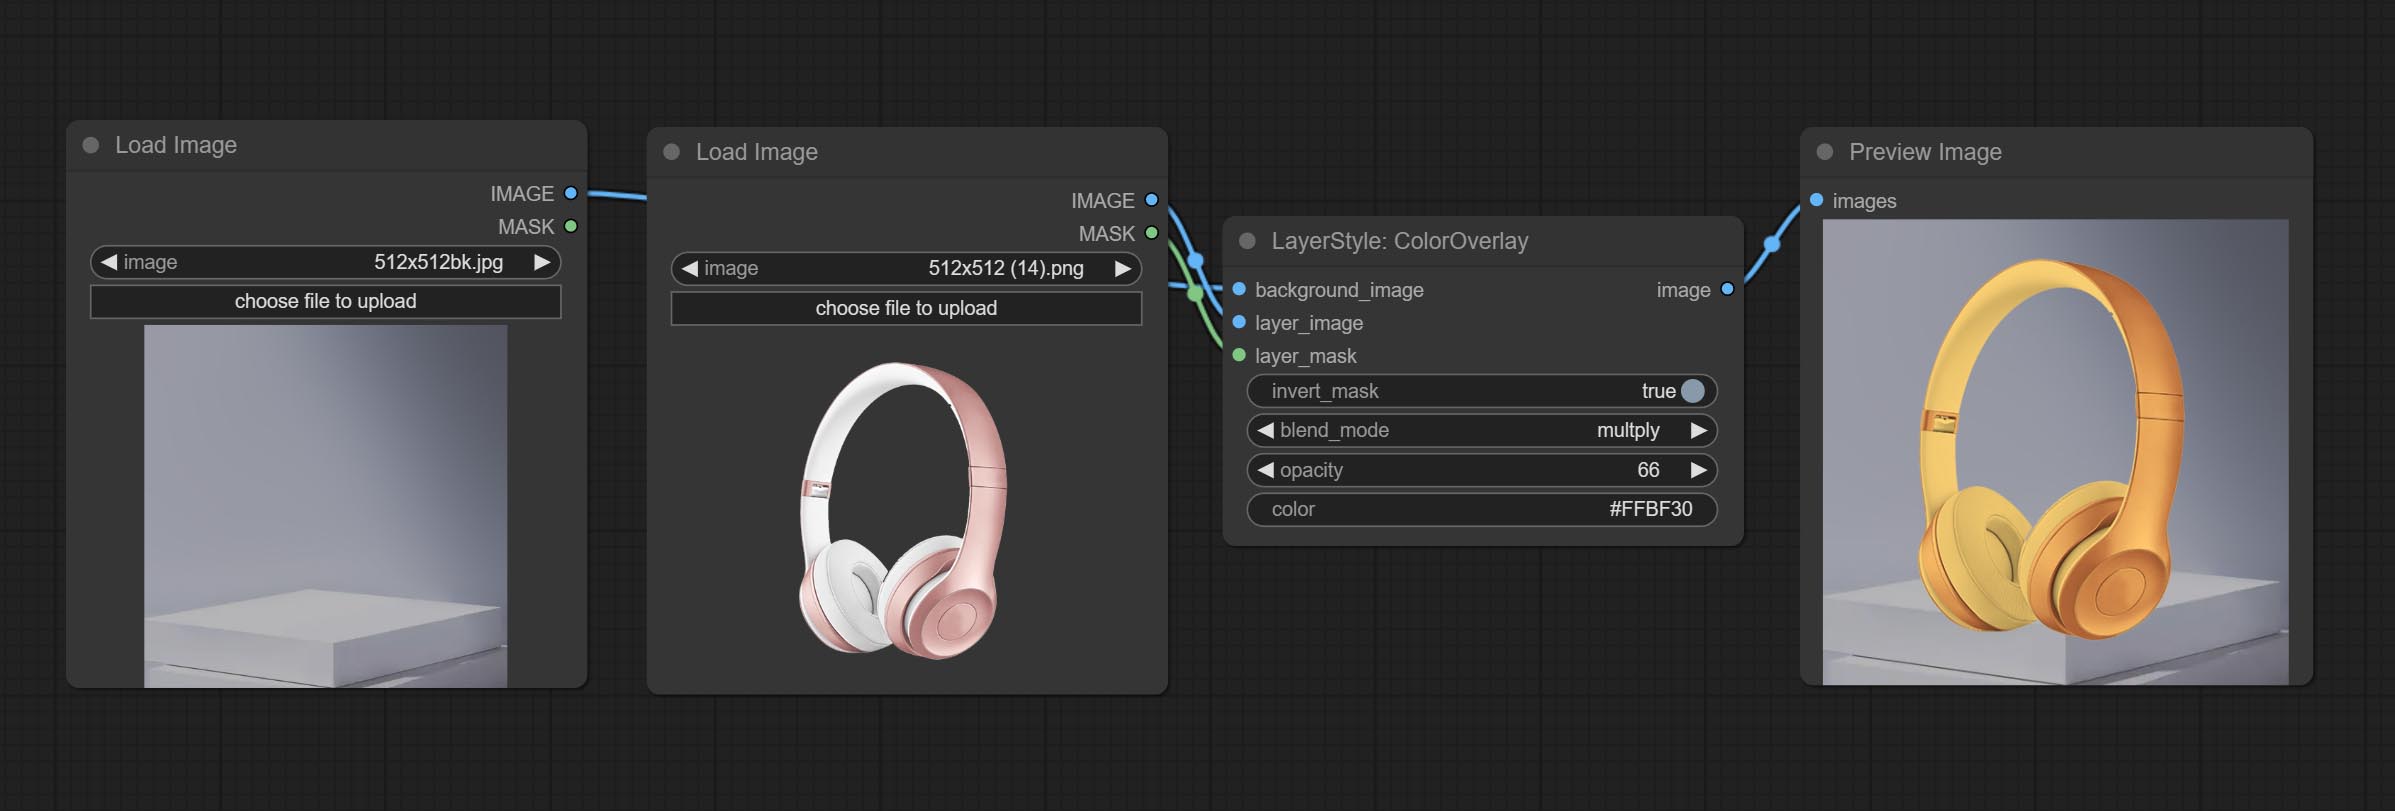
Node options: 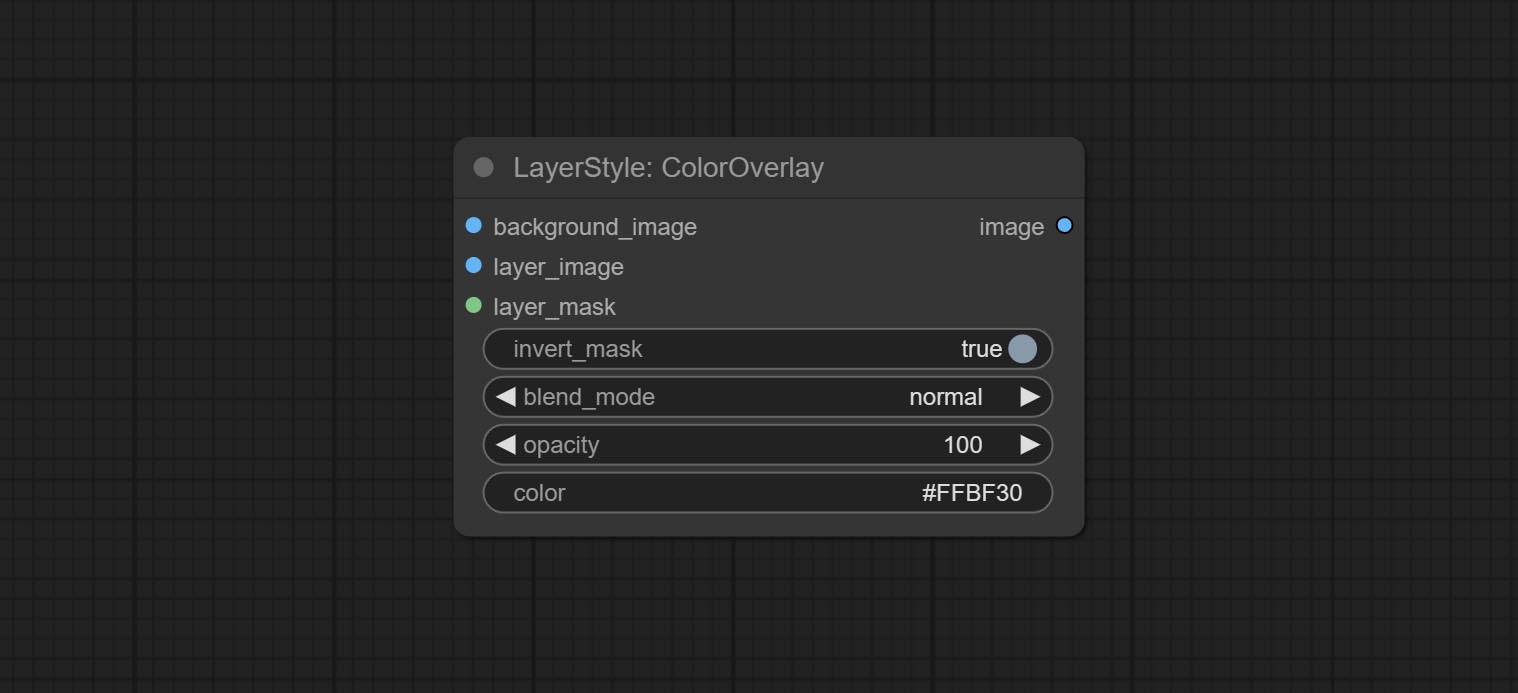
- background_image 1 : The background image.
- layer_image 1 : Layer image for composite.
- layer_mask 1,2 : Mask for layer_image.
- invert_mask: Whether to reverse the mask.
- blend_mode 3 : Blending mode of color.
- opacity: Opacity of stroke.
- color: Color of overlay.
- примечание
LayerColor
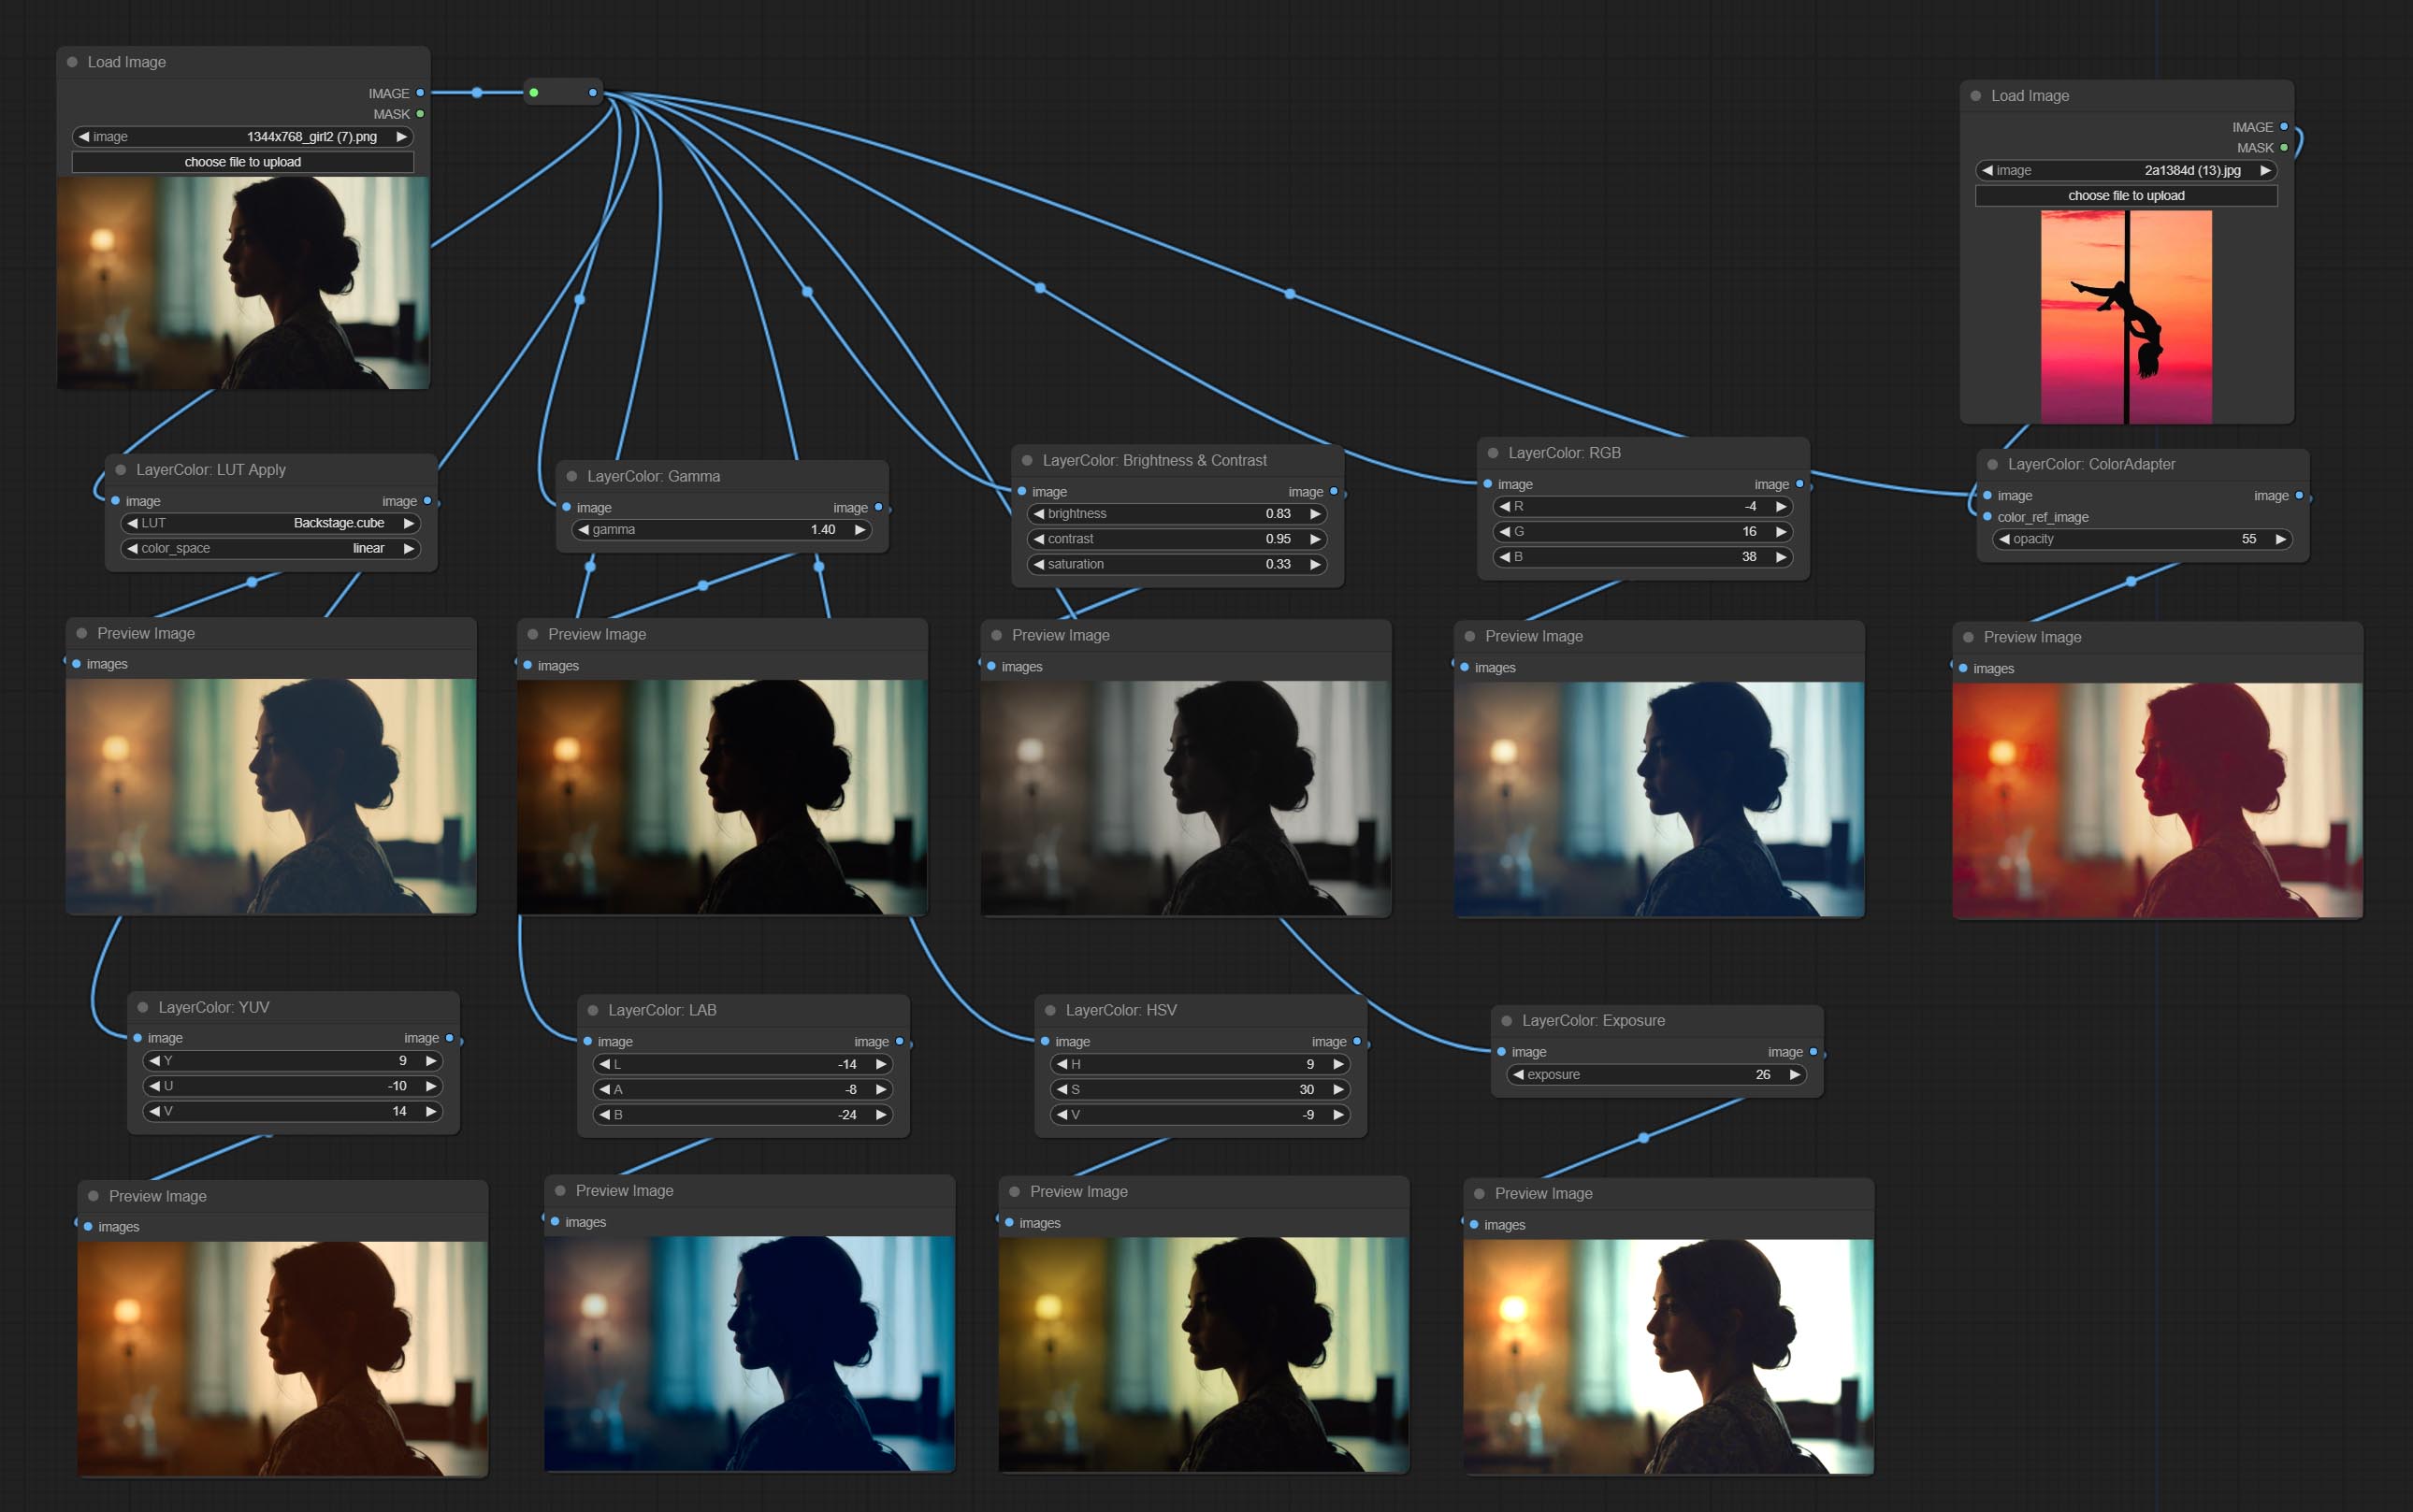
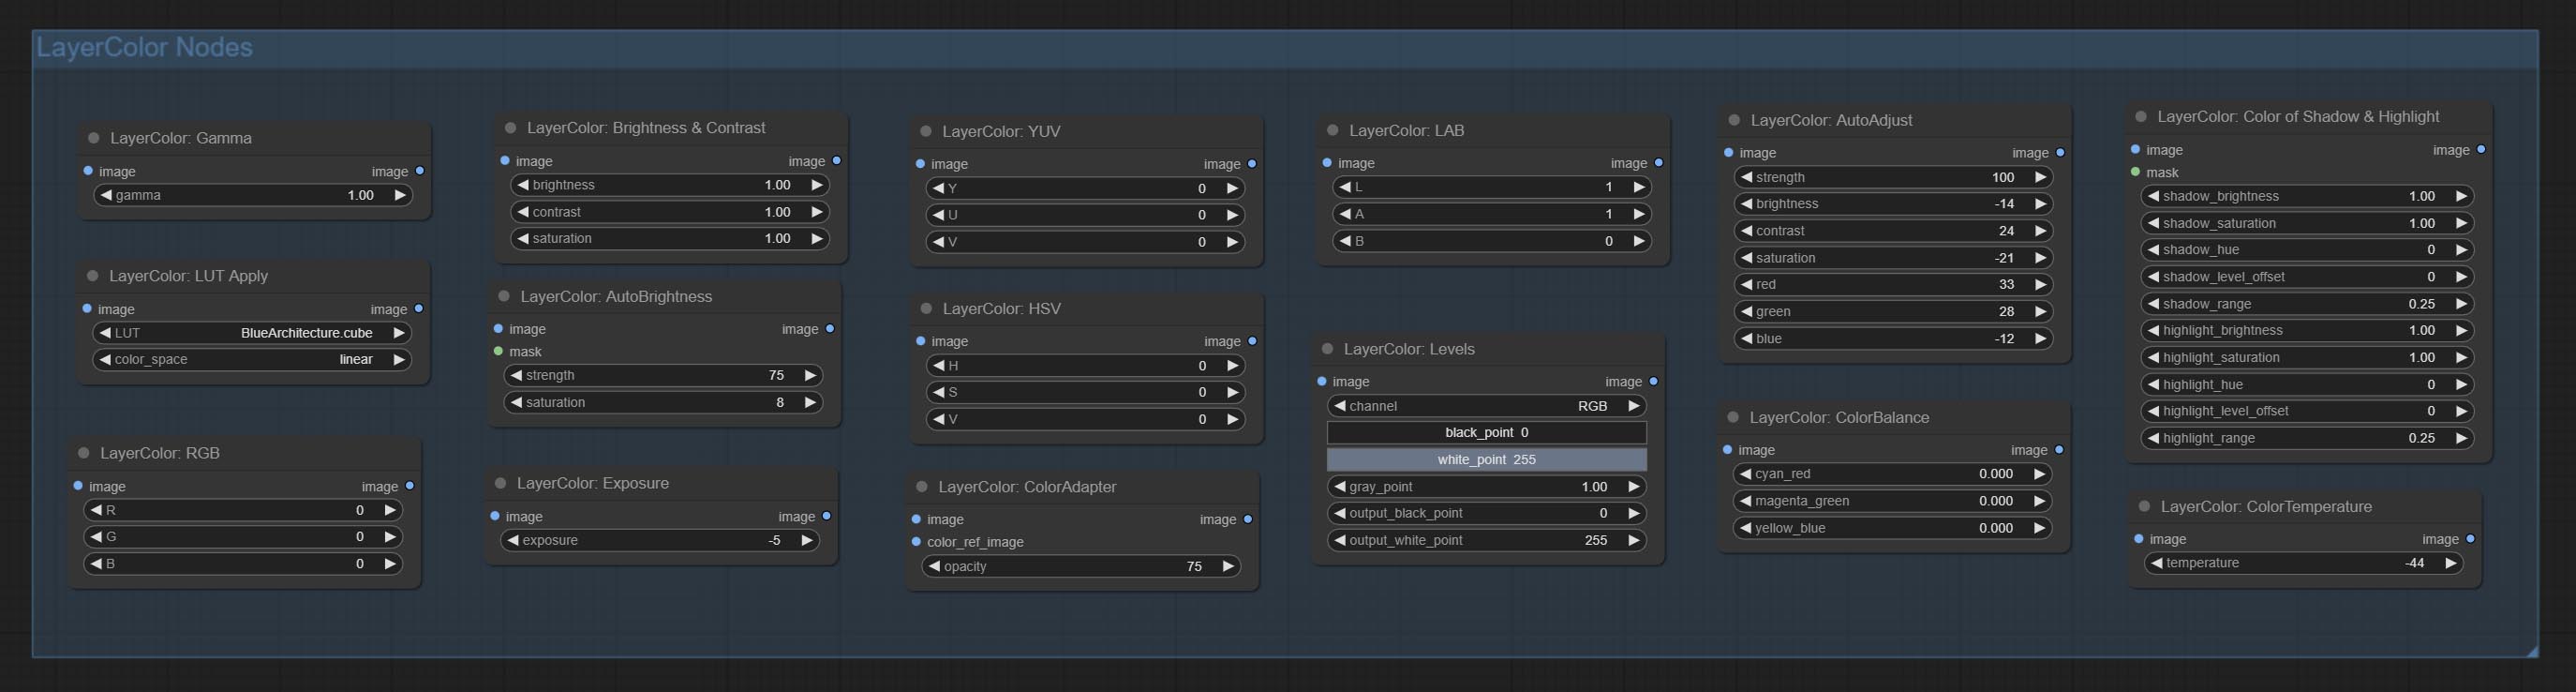
LUT Apply
Apply LUT to the image. only supports .cube format. 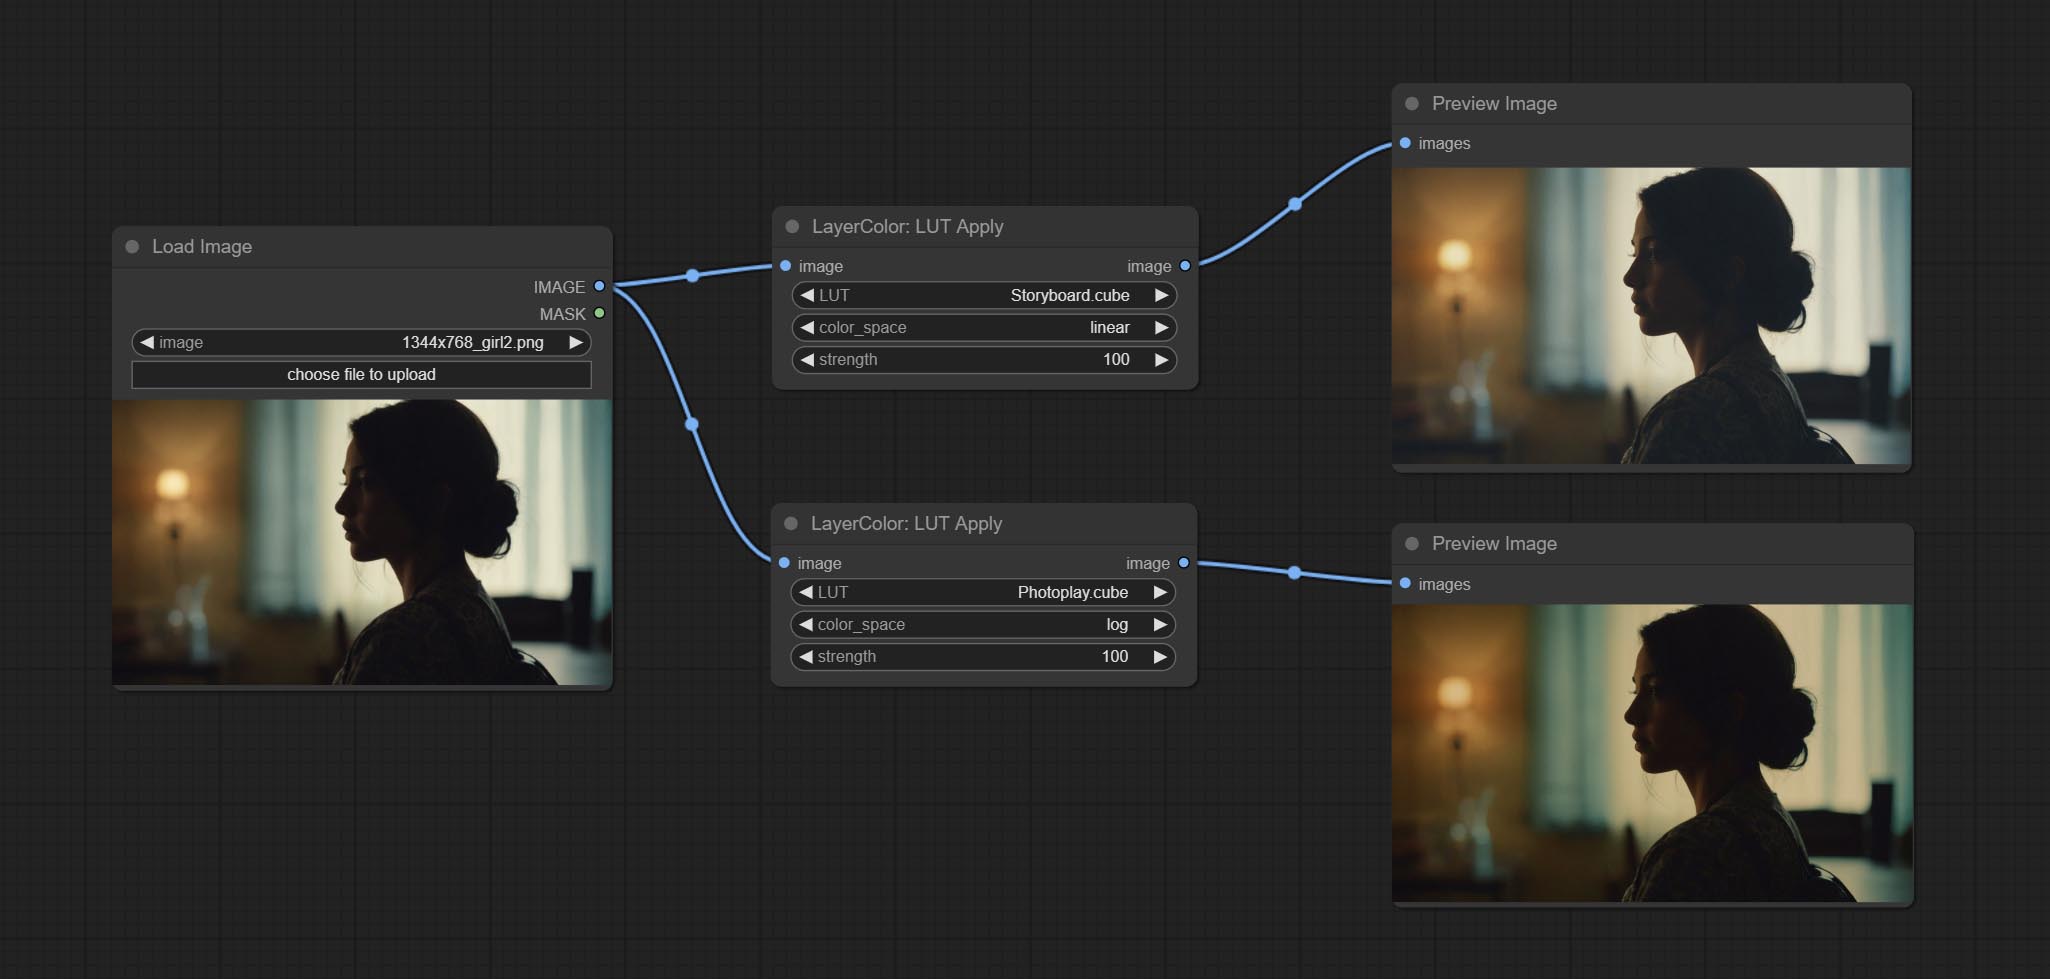
Node options:
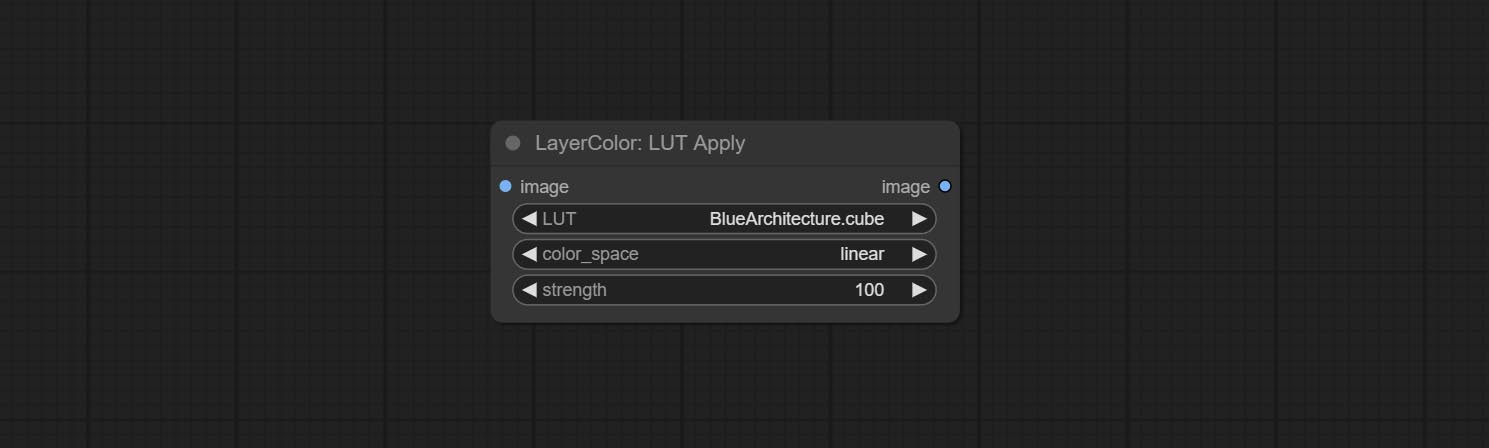
- LUT * : Here is a list of available. cube files in the LUT folder, and the selected LUT files will be applied to the image.
- color_space: For regular image, please select linear, for image in the log color space, please select log.
- strength: Range 0~100, LUT application strength. The larger the value, the greater the difference from the original image, and the smaller the value, the closer it is to the original image.
* LUT folder is defined in resource_dir.ini , this file is located in the root directory of the plug-in, and the default name is resource_dir.ini.example . to use this file for the first time, you need to change the file suffix to .ini . Open the text editing software and find the line starting with "LUT_dir=", after "=", enter the custom folder path name. support defining multiple folders in resource-dir.ini , separated by commas, semicolons, or spaces. all .cube files in this folder will be collected and displayed in the node list during ComfyUI initialization. If the folder set in ini is invalid, the LUT folder that comes with the plugin will be enabled.
AutoAdjust
Automatically adjust the brightness, contrast, and white balance of the image. Provide some manual adjustment options to compensate for the shortcomings of automatic adjustment. 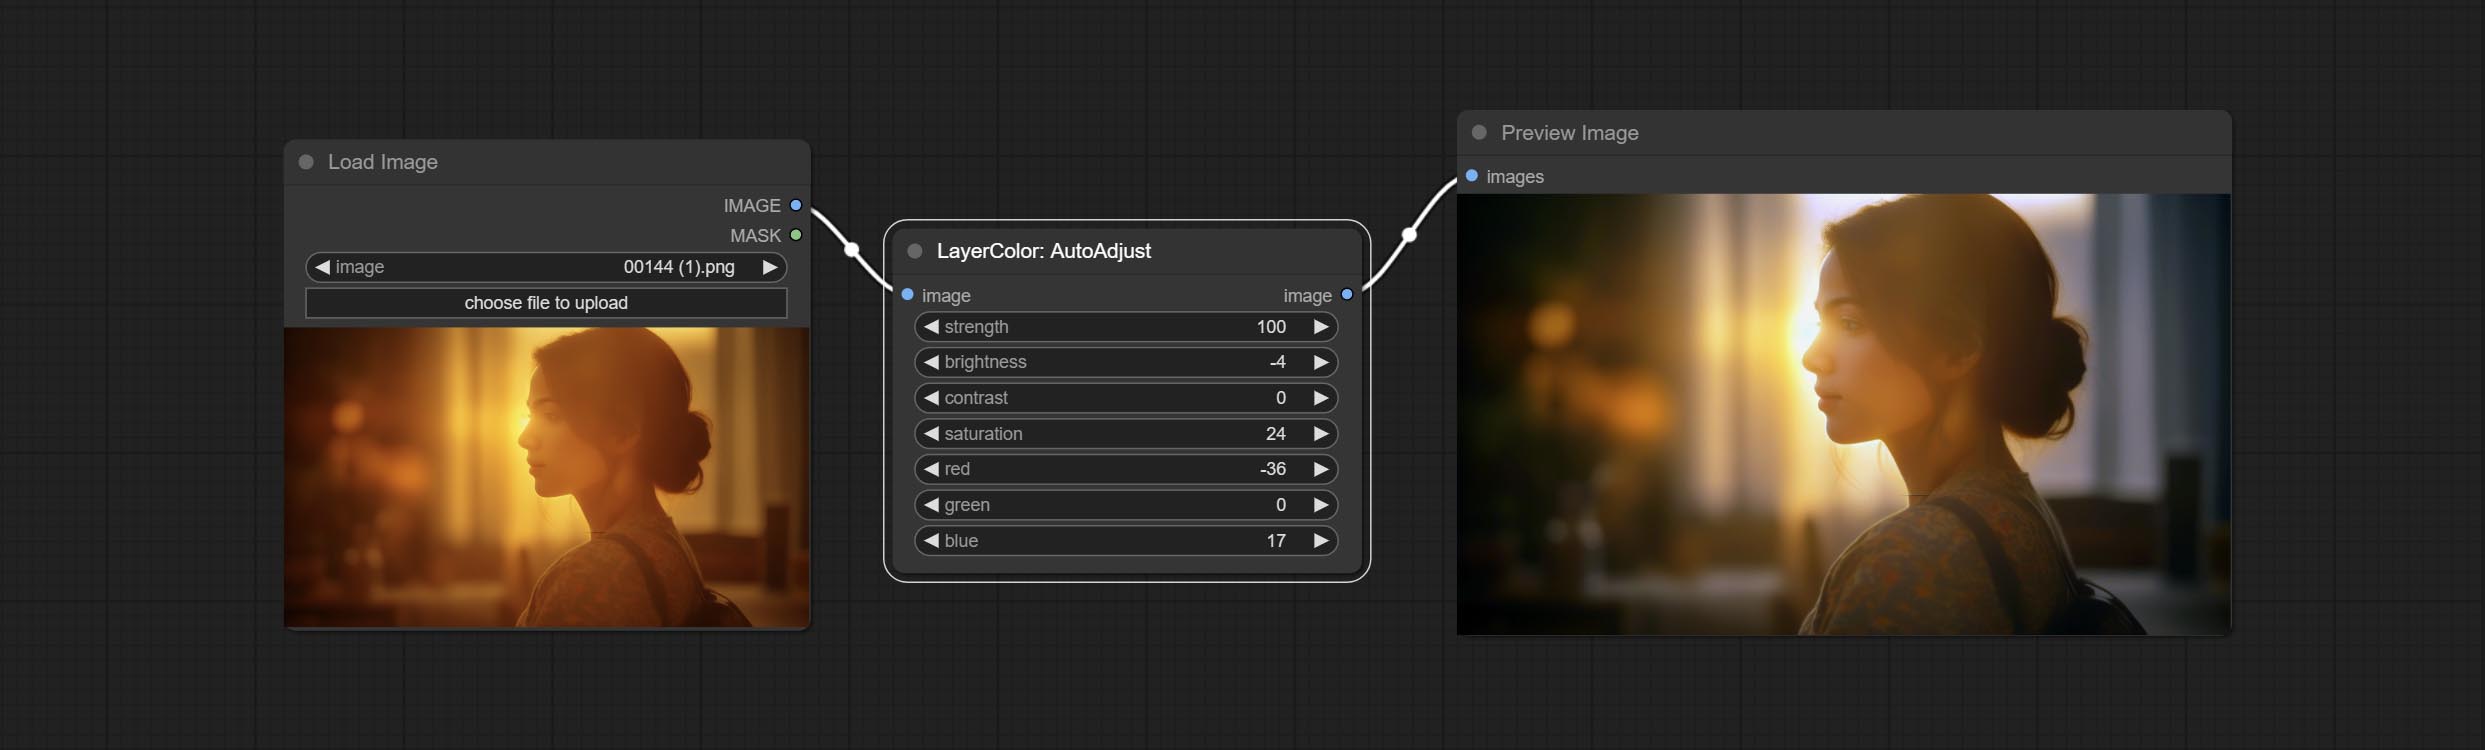
Node Options:
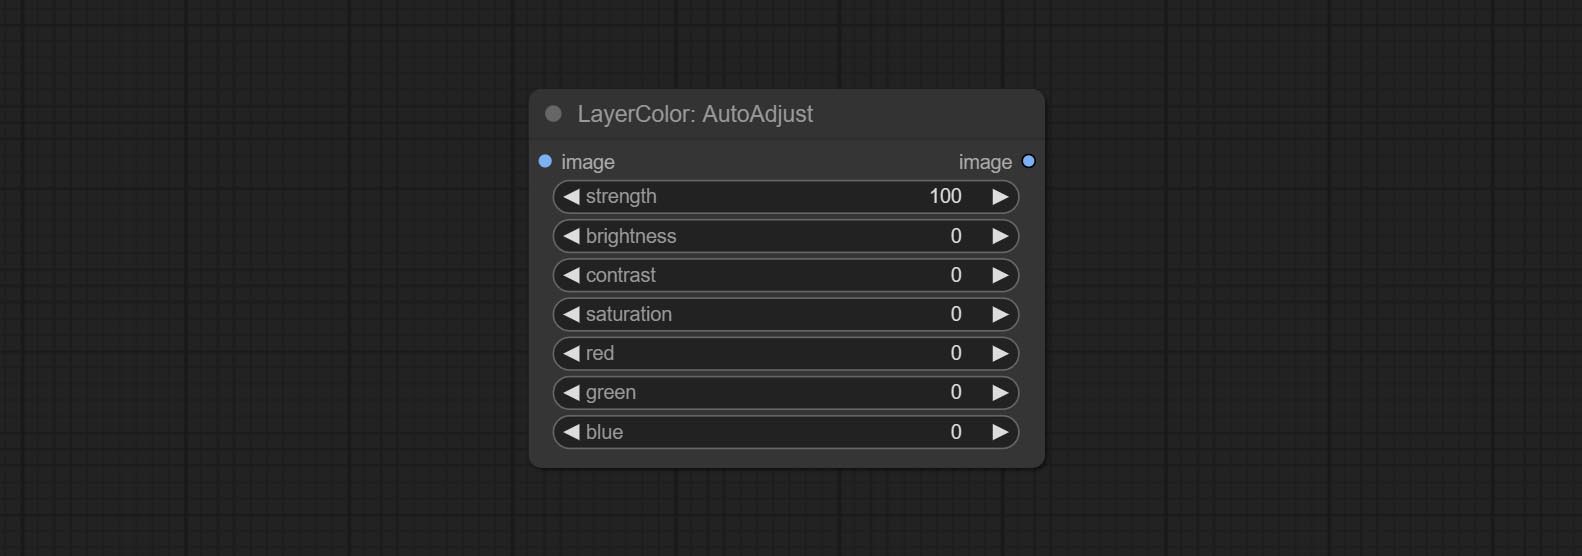
- strength: Strength of adjust. The larger the value, the greater the difference from the original image.
- brightness: Manual adjustment of brightness.
- contrast: Manual adjustment of contrast.
- saturation: Manual adjustment of saturation.
- red: Manual adjustment of the red channel.
- green: Manual adjustment of the green channel.
- blue: Manual adjustment of the blue channel.
AutoAdjustV2
On the basis of AutoAdjust, add mask input and only calculate the content inside the mask for automatic color adjustment. Add multiple automatic adjustment modes. 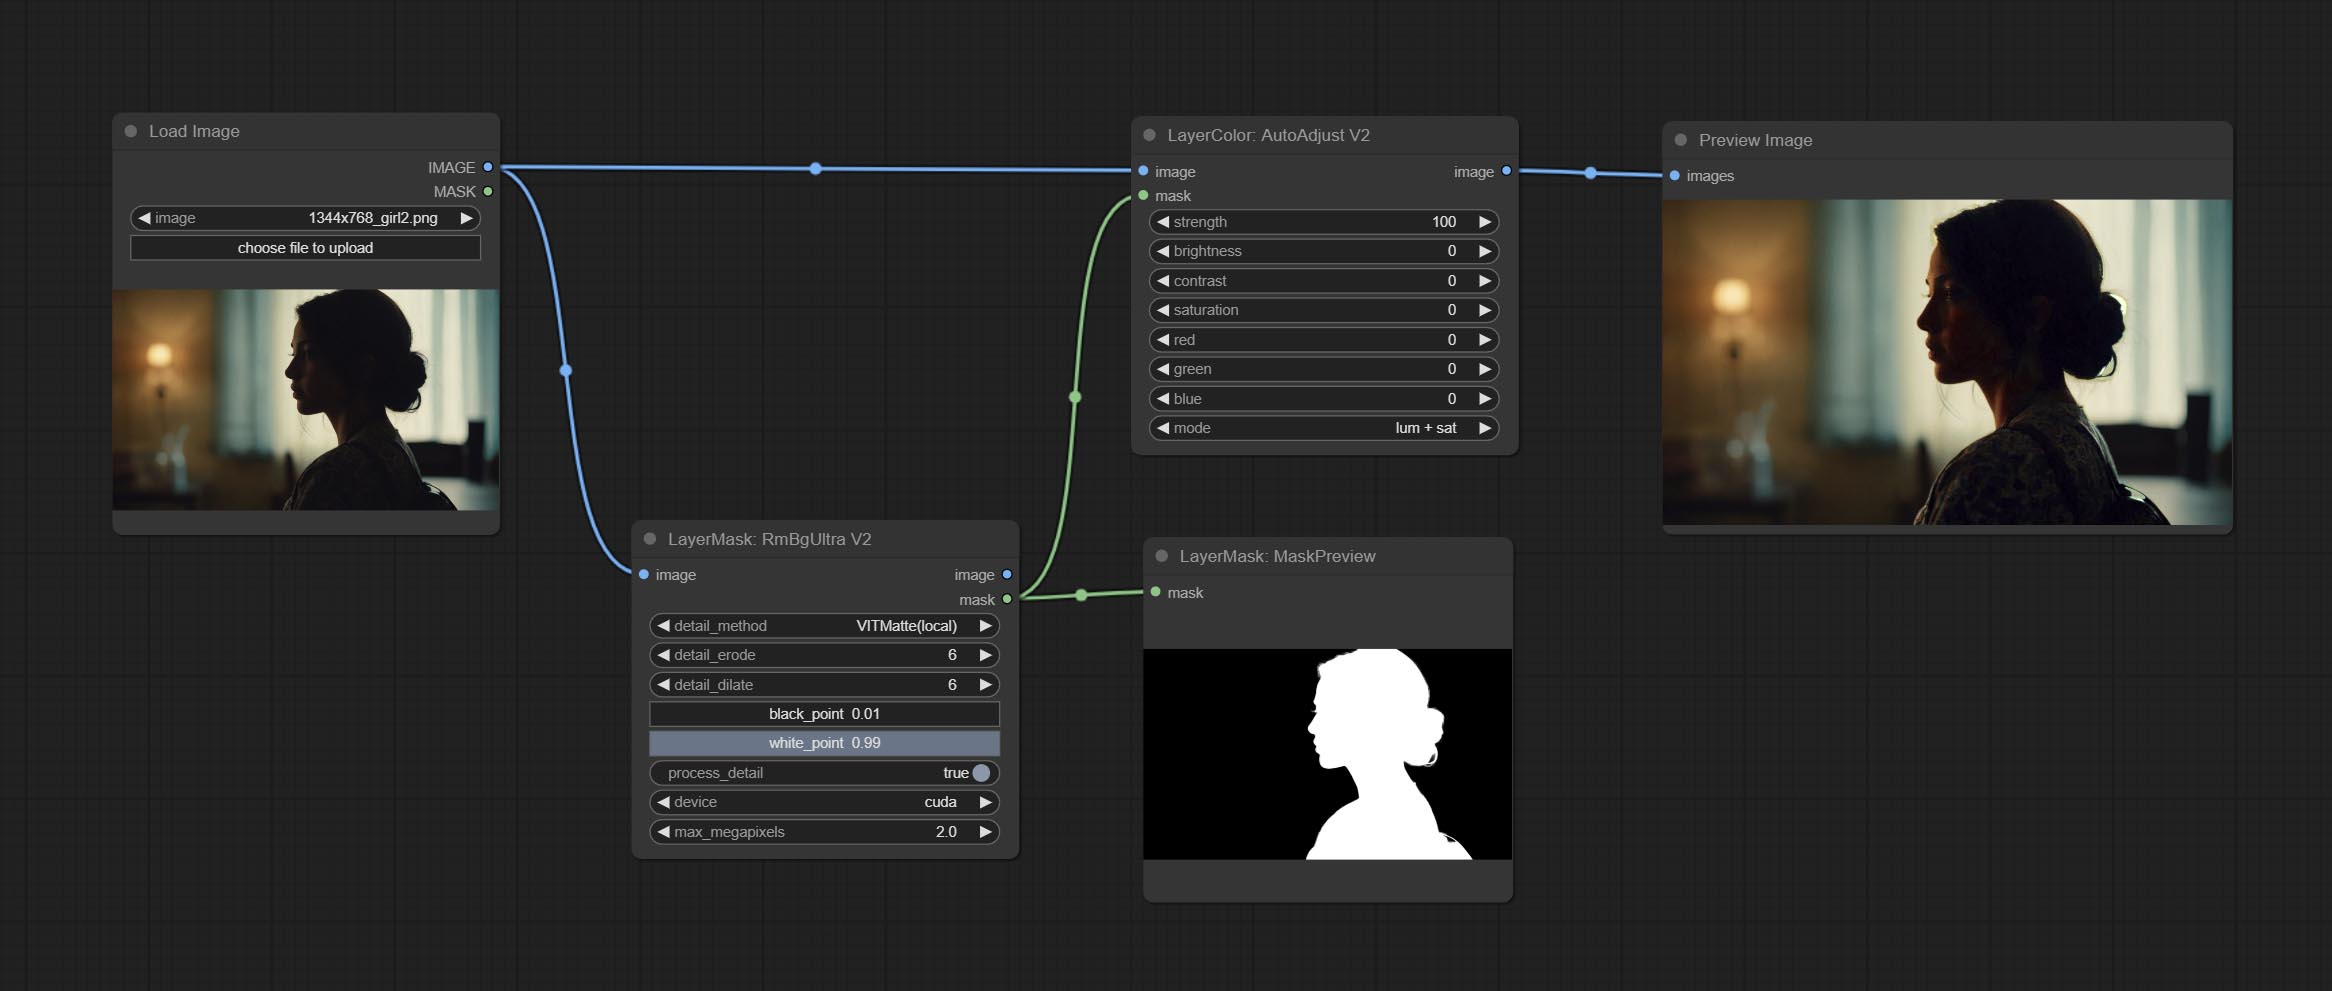
The following changes have been made based on AutoAdjust: 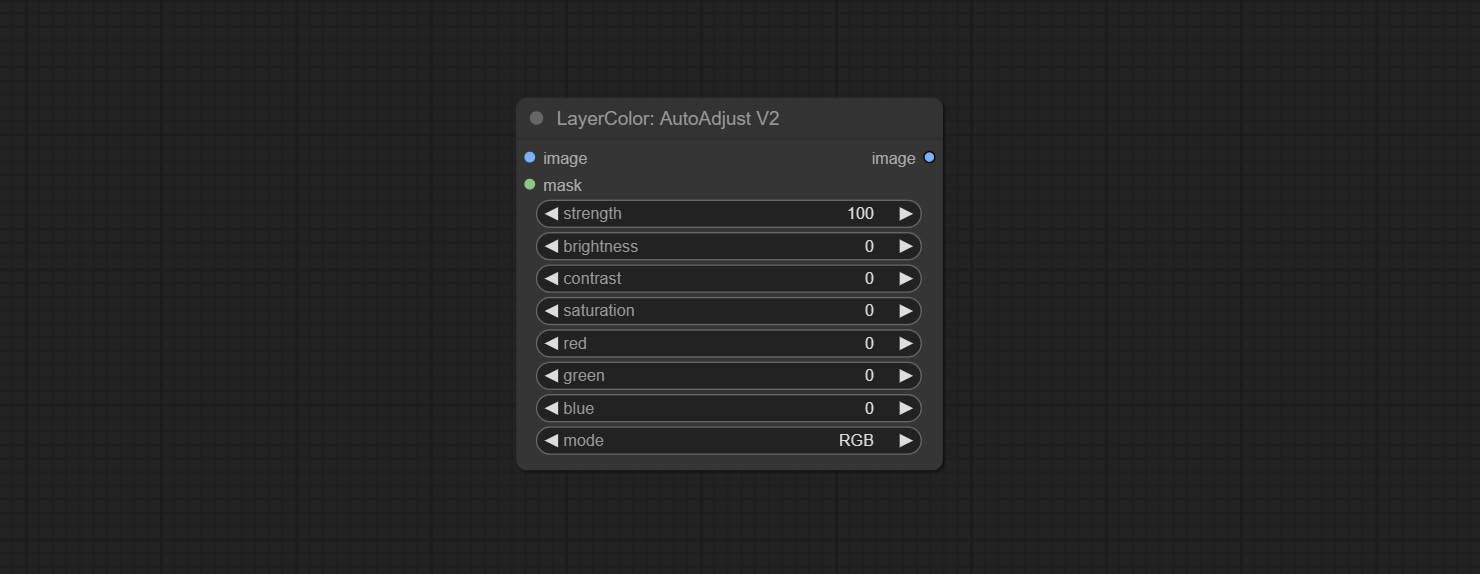
- mask: Optional mask input.
- mode: Automatic adjustment mode. "RGB" automatically adjusts according to the three channels of RGB, "lum + sat"automatically adjusts according to luminance and saturation, "luminance" automatically adjusts according to luminance, "saturation" automatically adjusts according to saturation, and "mono" automatically adjusts according to grayscale and outputs monochrome.
AutoBrightness
Automatically adjust too dark or too bright image to moderate brightness, and support mask input. When mask input, only the content of the mask part is used as the data source of the automatic brightness. The output is still the whole adjusted image. 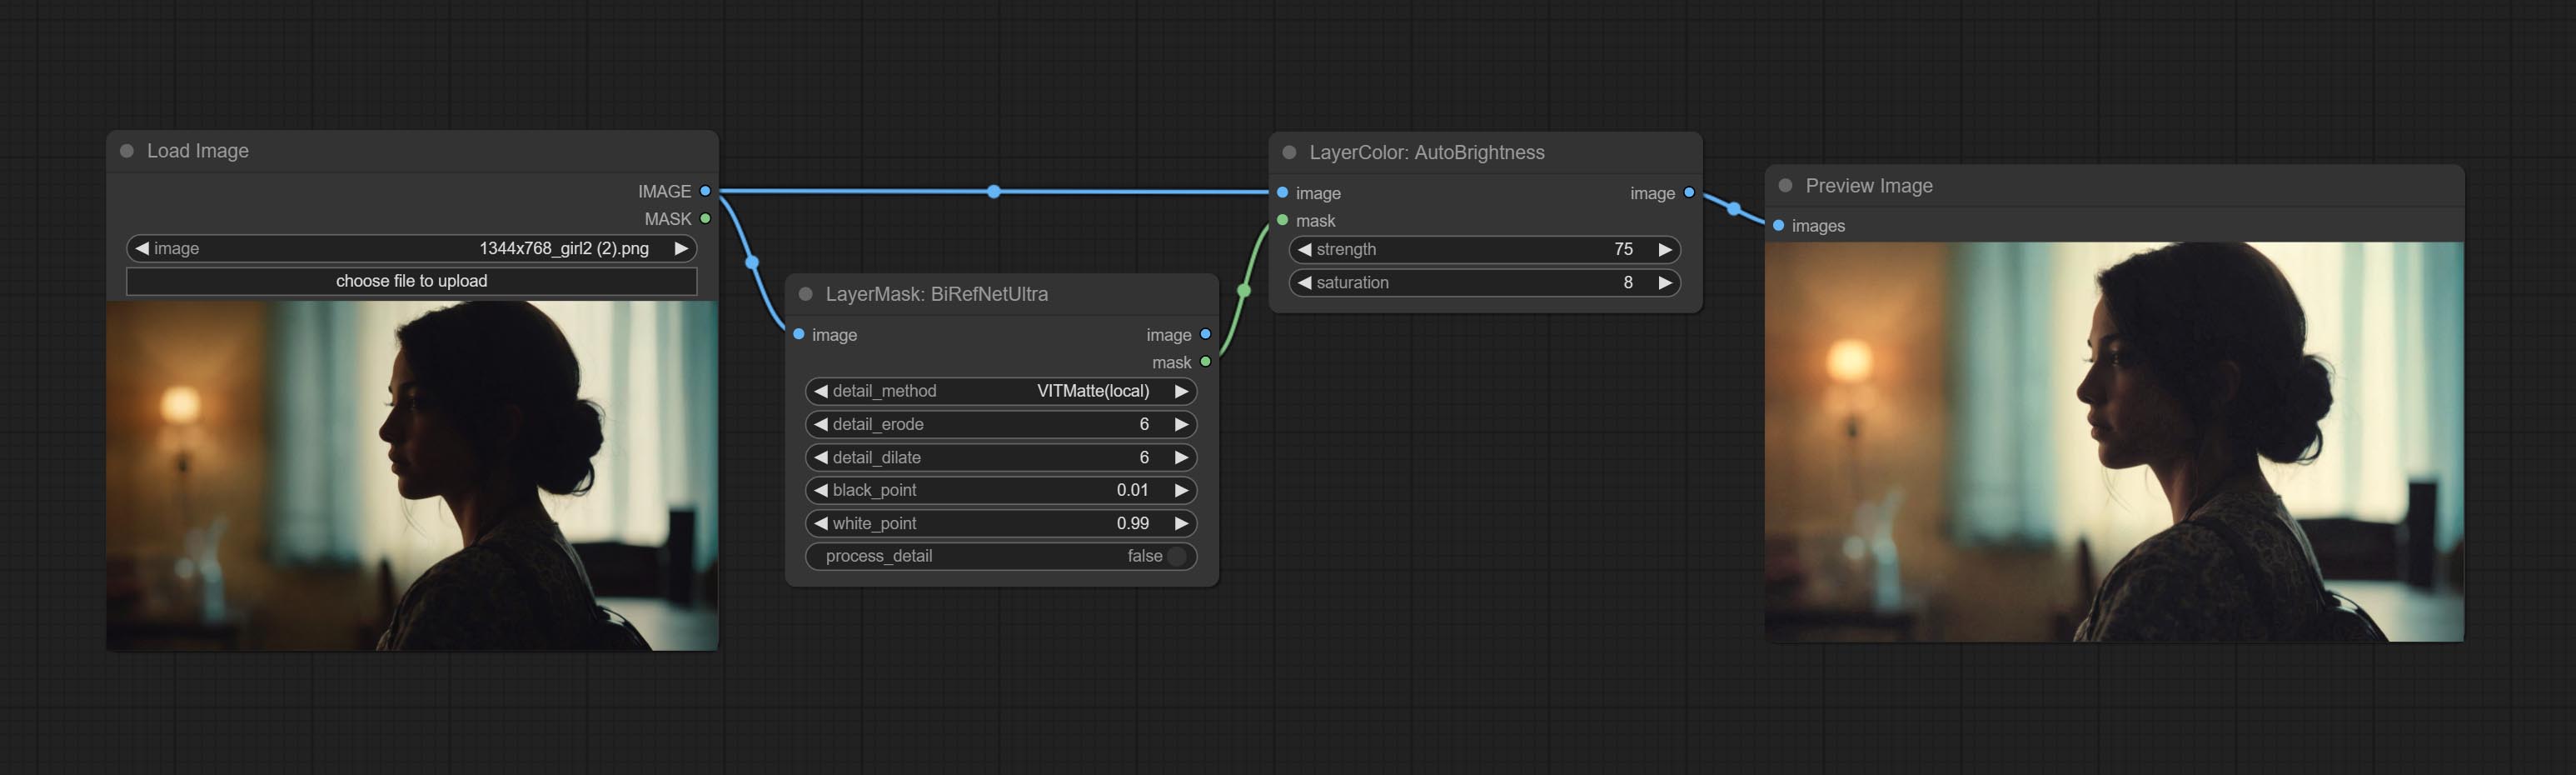
Node options:
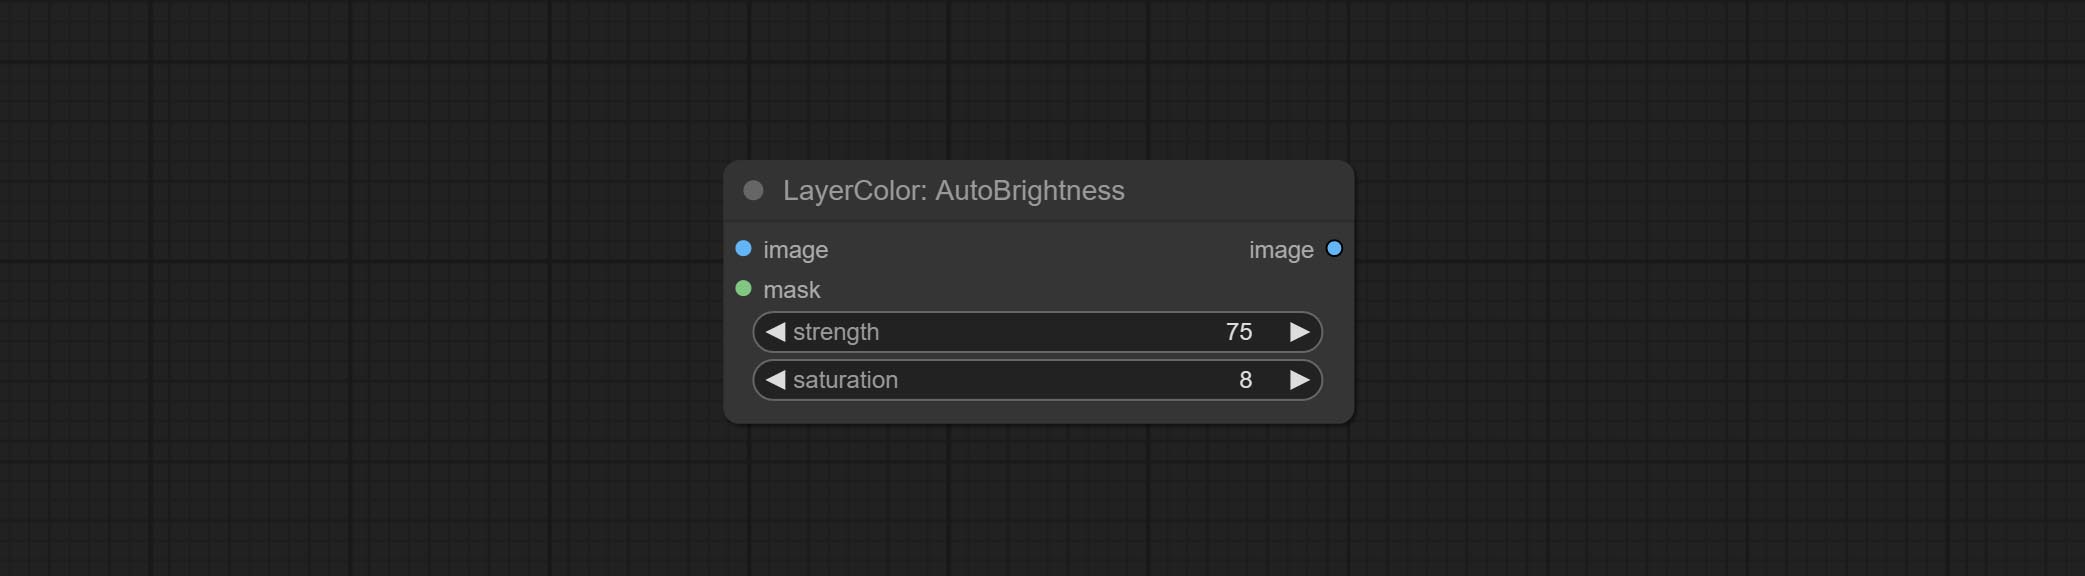
- strength: Automatically adjust the intensity of the brightness. The larger the value, the more biased towards the middle value, the greater the difference from the original picture.
- saturation: Color saturation. Changes in brightness usually result in changes in color saturation, where appropriate compensation can be adjusted.
ColorAdapter
Auto adjust the color tone of the image to resemble the reference image. 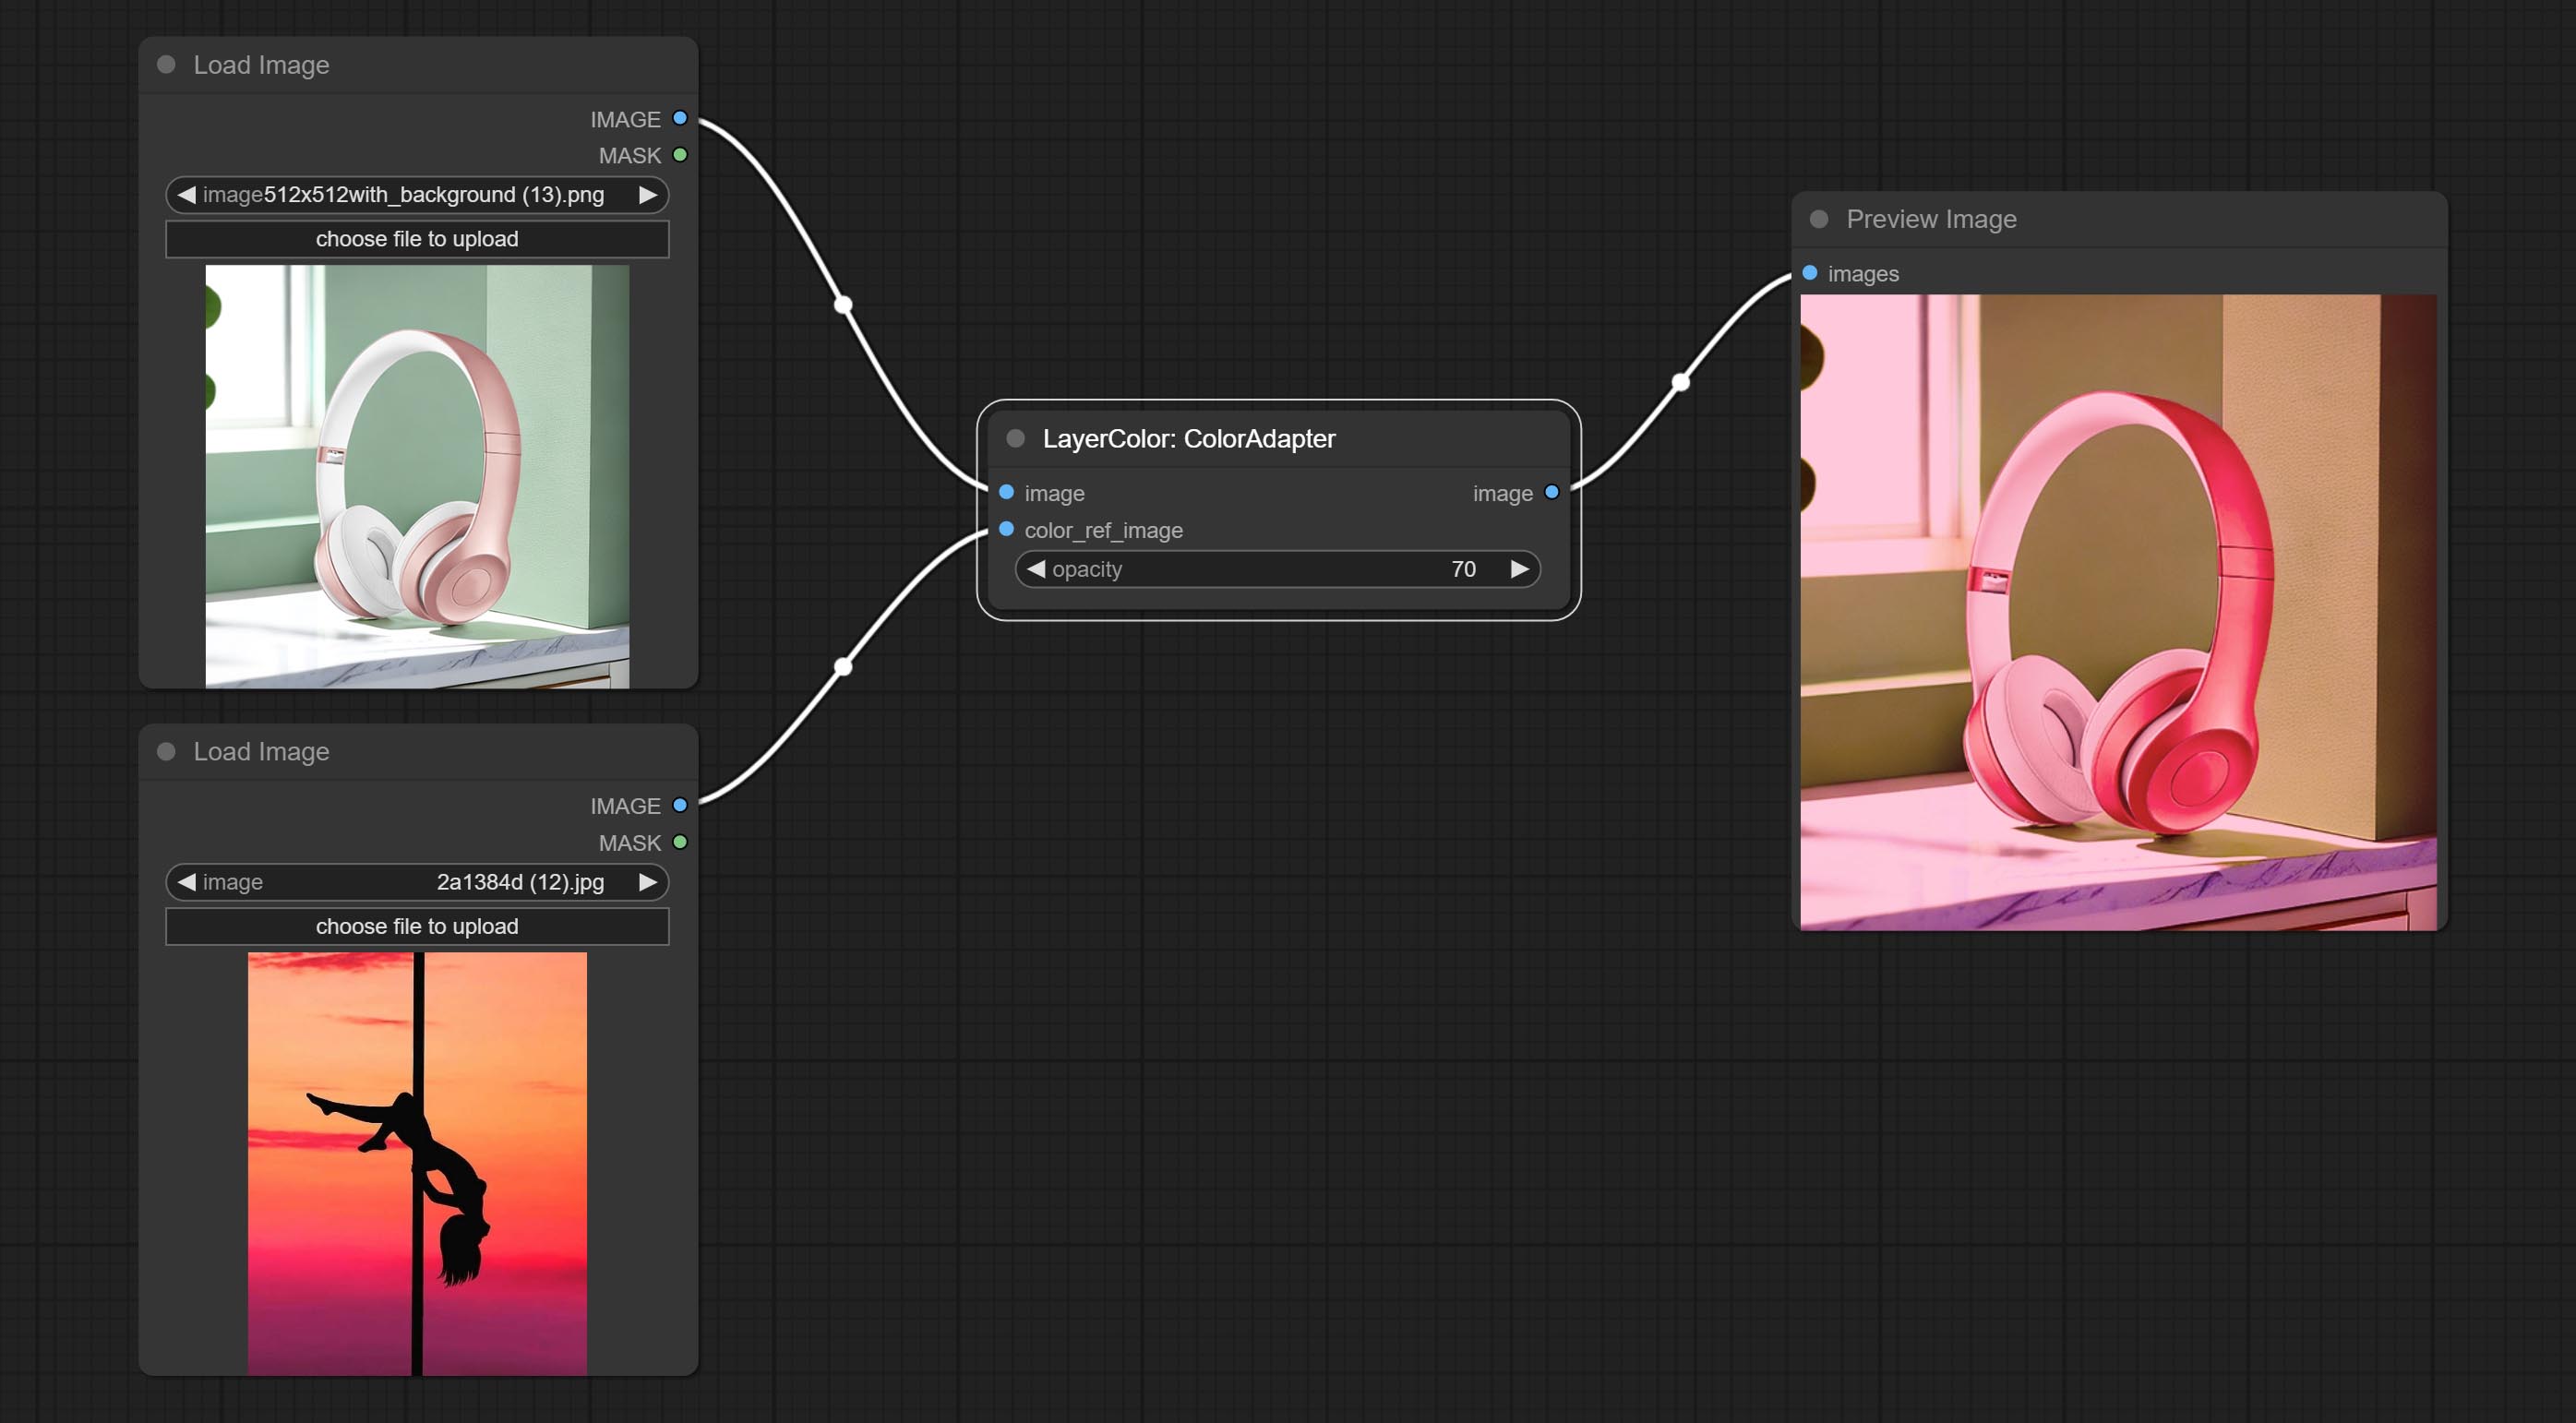
Node options:
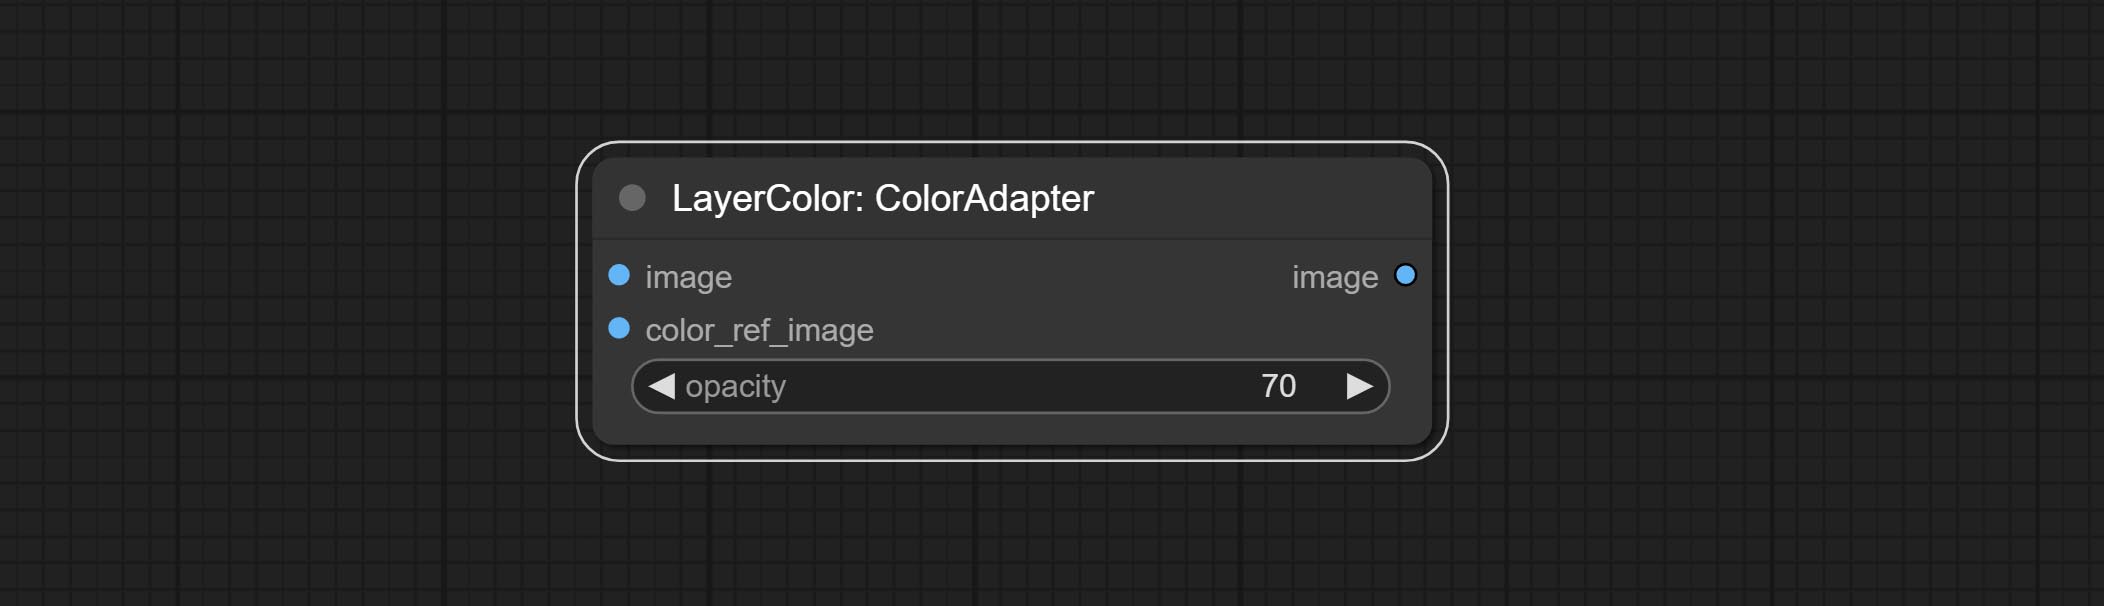
- opacity: The opacity of an image after adjusting its color tone.
Контакт
Change the exposure of the image. 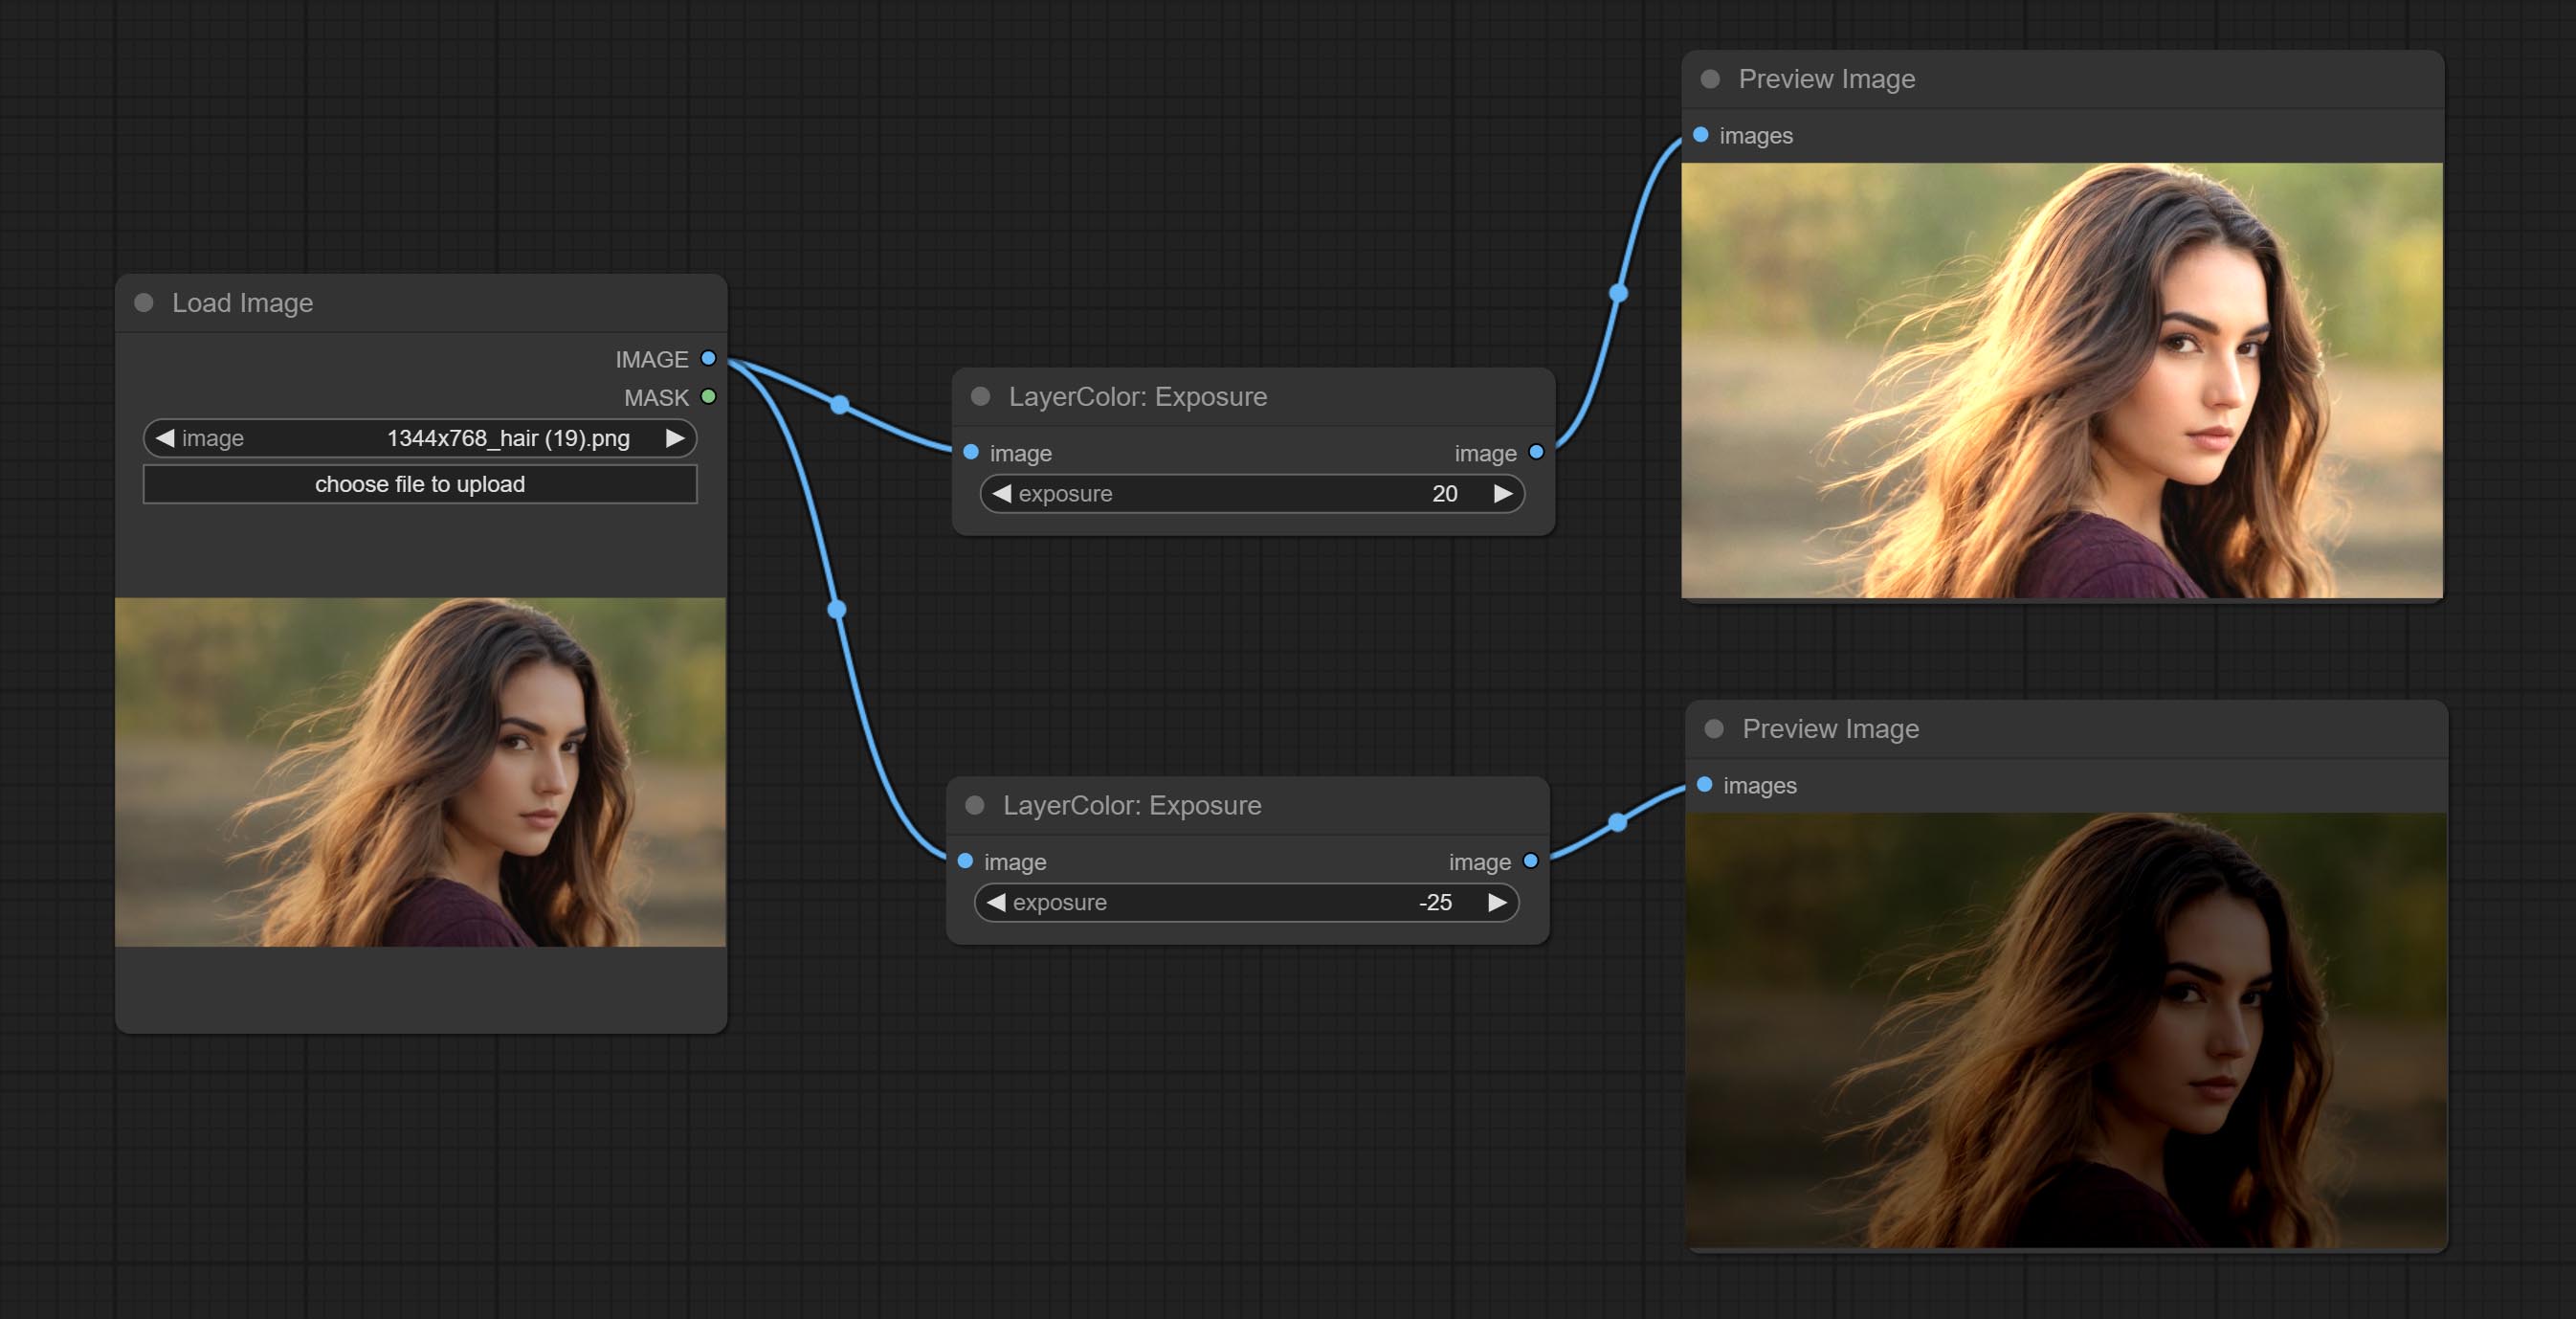
Color of Shadow & Highlight
Adjust the color of the dark and bright parts of the image. 
Node options:
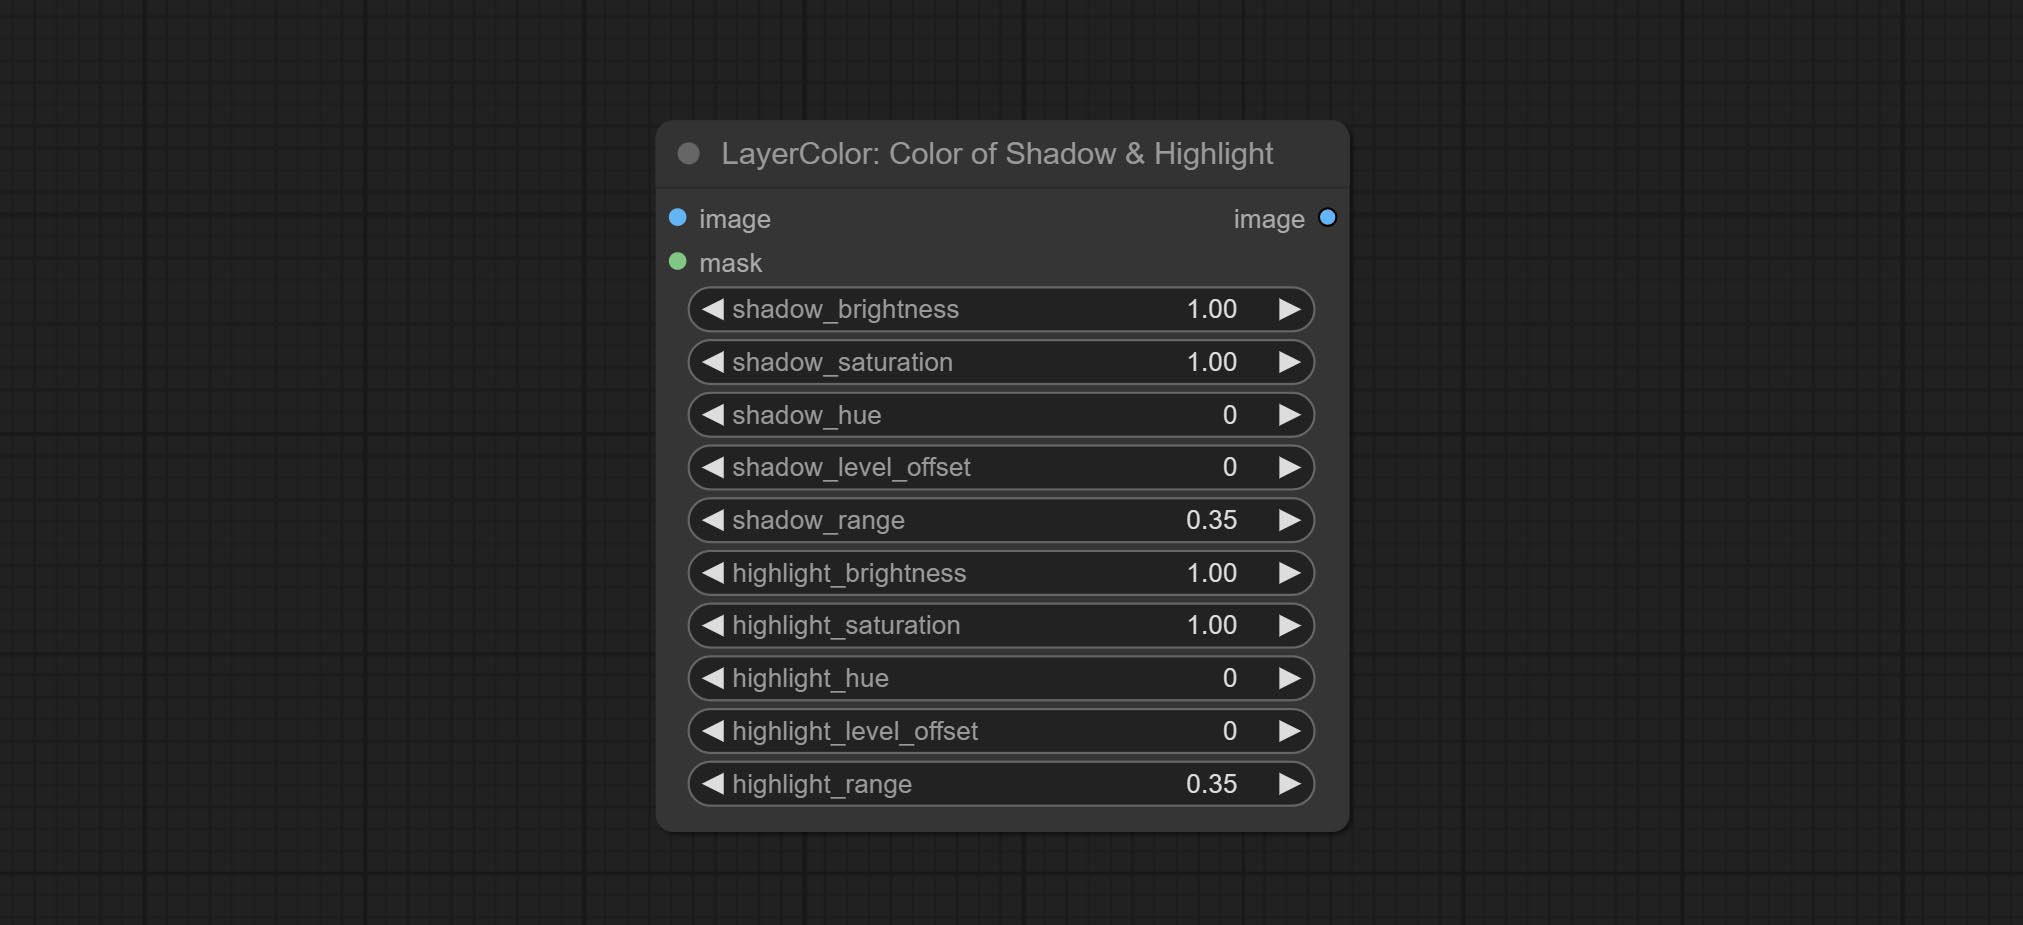
- image: The input image.
- mask: Optional input. if there is input, only the colors within the mask range will be adjusted.
- shadow_brightness: The brightness of the dark area.
- shadow_saturation: The color saturation in the dark area.
- shadow_hue: The color hue in the dark area.
- shadow_level_offset: The offset of values in the dark area, where larger values bring more areas closer to the bright into the dark area.
- shadow_range: The transitional range of the dark area.
- highlight_brightness: The brightness of the highlight area.
- highlight_saturation: The color saturation in the highlight area.
- highlight_hue: The color hue in the highlight area.
- highlight_level_offset: The offset of values in the highlight area, where larger values bring more areas closer to the dark into the highlight area.
- highlight_range: The transitional range of the highlight area.
Node option:
- exposure: Exposure value. Higher values indicate brighter image.
Color of Shadow HighlightV2
A replica of the Color of Shadow & Highlight node, with the "&" character removed from the node name to avoid ComfyUI workflow parsing errors.
ColorTemperature

Change the color temperature of the image.
Node Options:
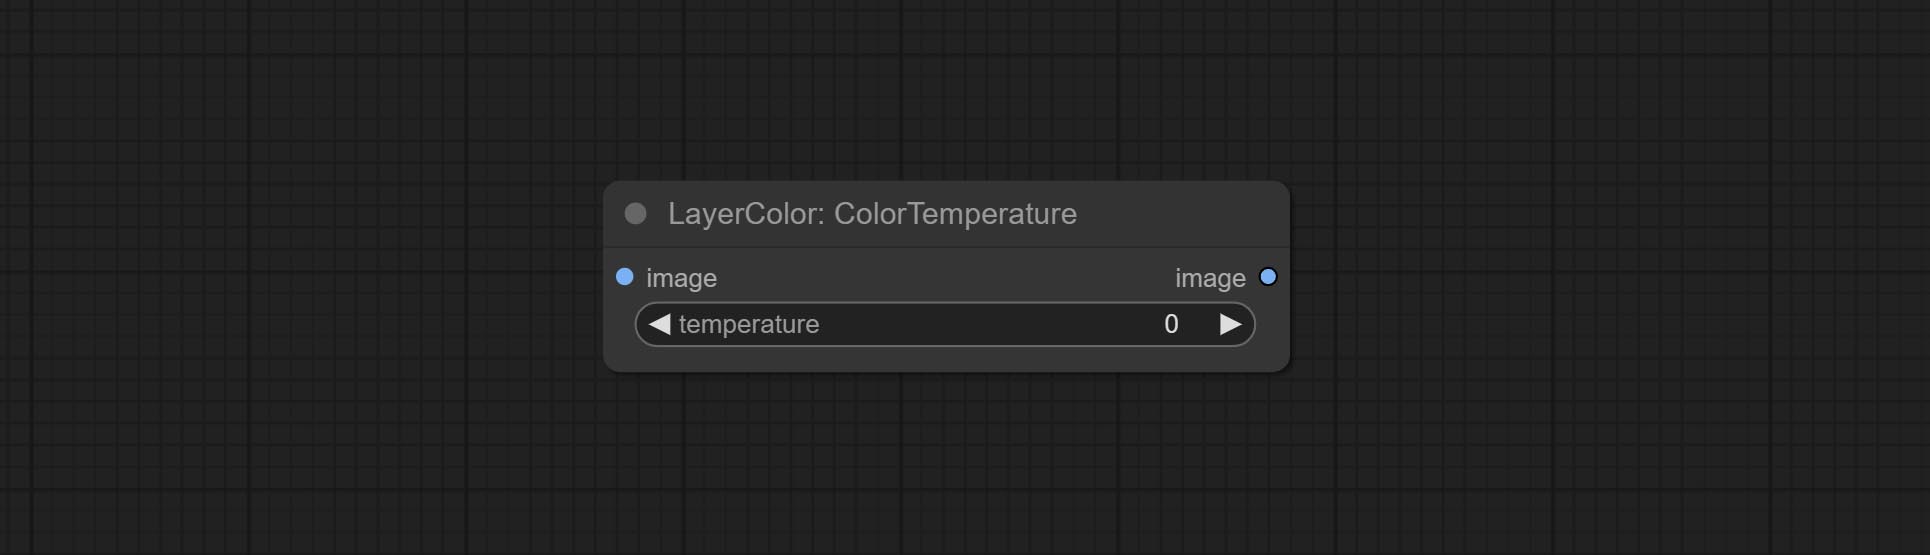
- temperature: Color temperature value. Range between-100 and 100. The higher the value, the higher the color temperature (bluer); The lower the color temperature, the lower the color temperature (yellowish).
Уровни
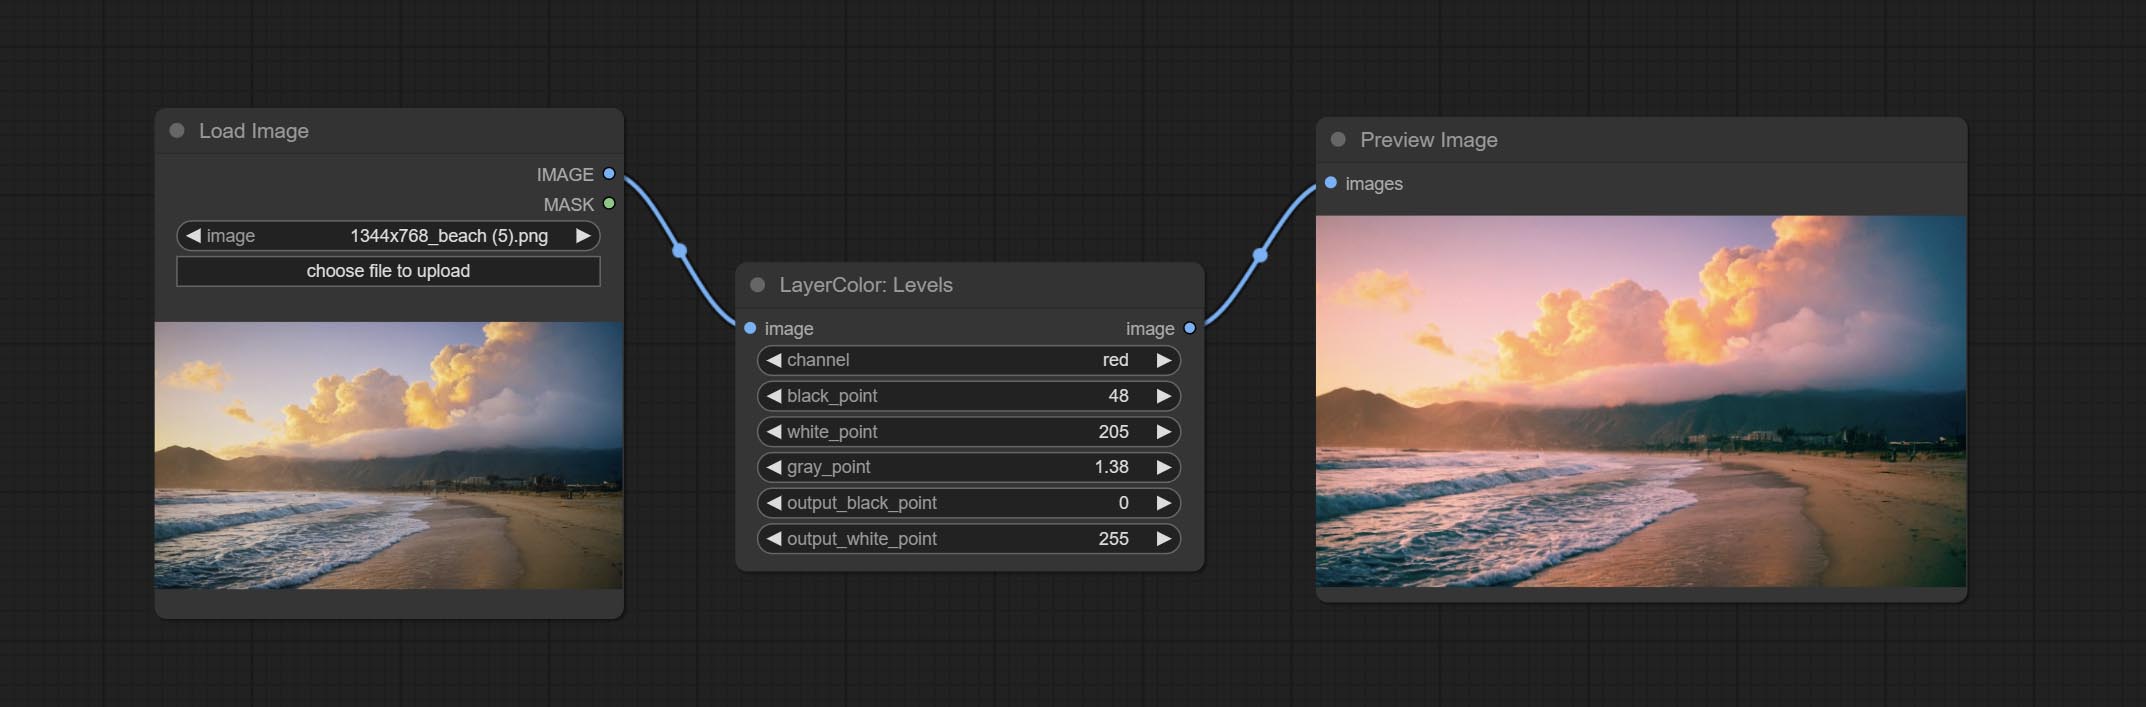
Change the levels of image.
Node Options:
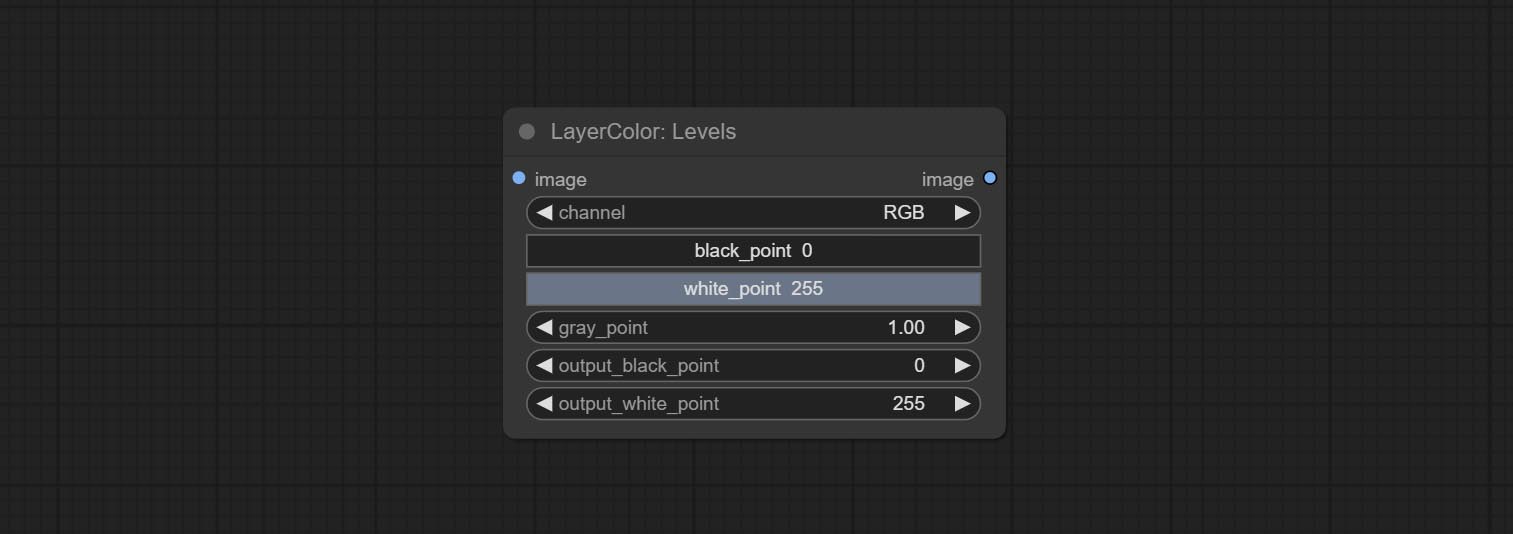
- channel: Select the channel you want to adjust. Available in RGB, red, green, blue.
- black_point * : Input black point value. Value range 0-255, default 0.
- white_point * : Input white point value. Value range 0-255, default 255.
- gray_point: Input grey point values. Value range 0.01-9.99, default 1.
- output_black_point * : Output black point value. Value range 0-255, default 0.
- output_white_point * : Output white point value. Value range 0-255, default 255.
* If the black_point or output_black_point value is greater than white_point or output_white_point, the two values are swapped, with the larger value used as white_point and the smaller value used as black_point.
ColorBalance
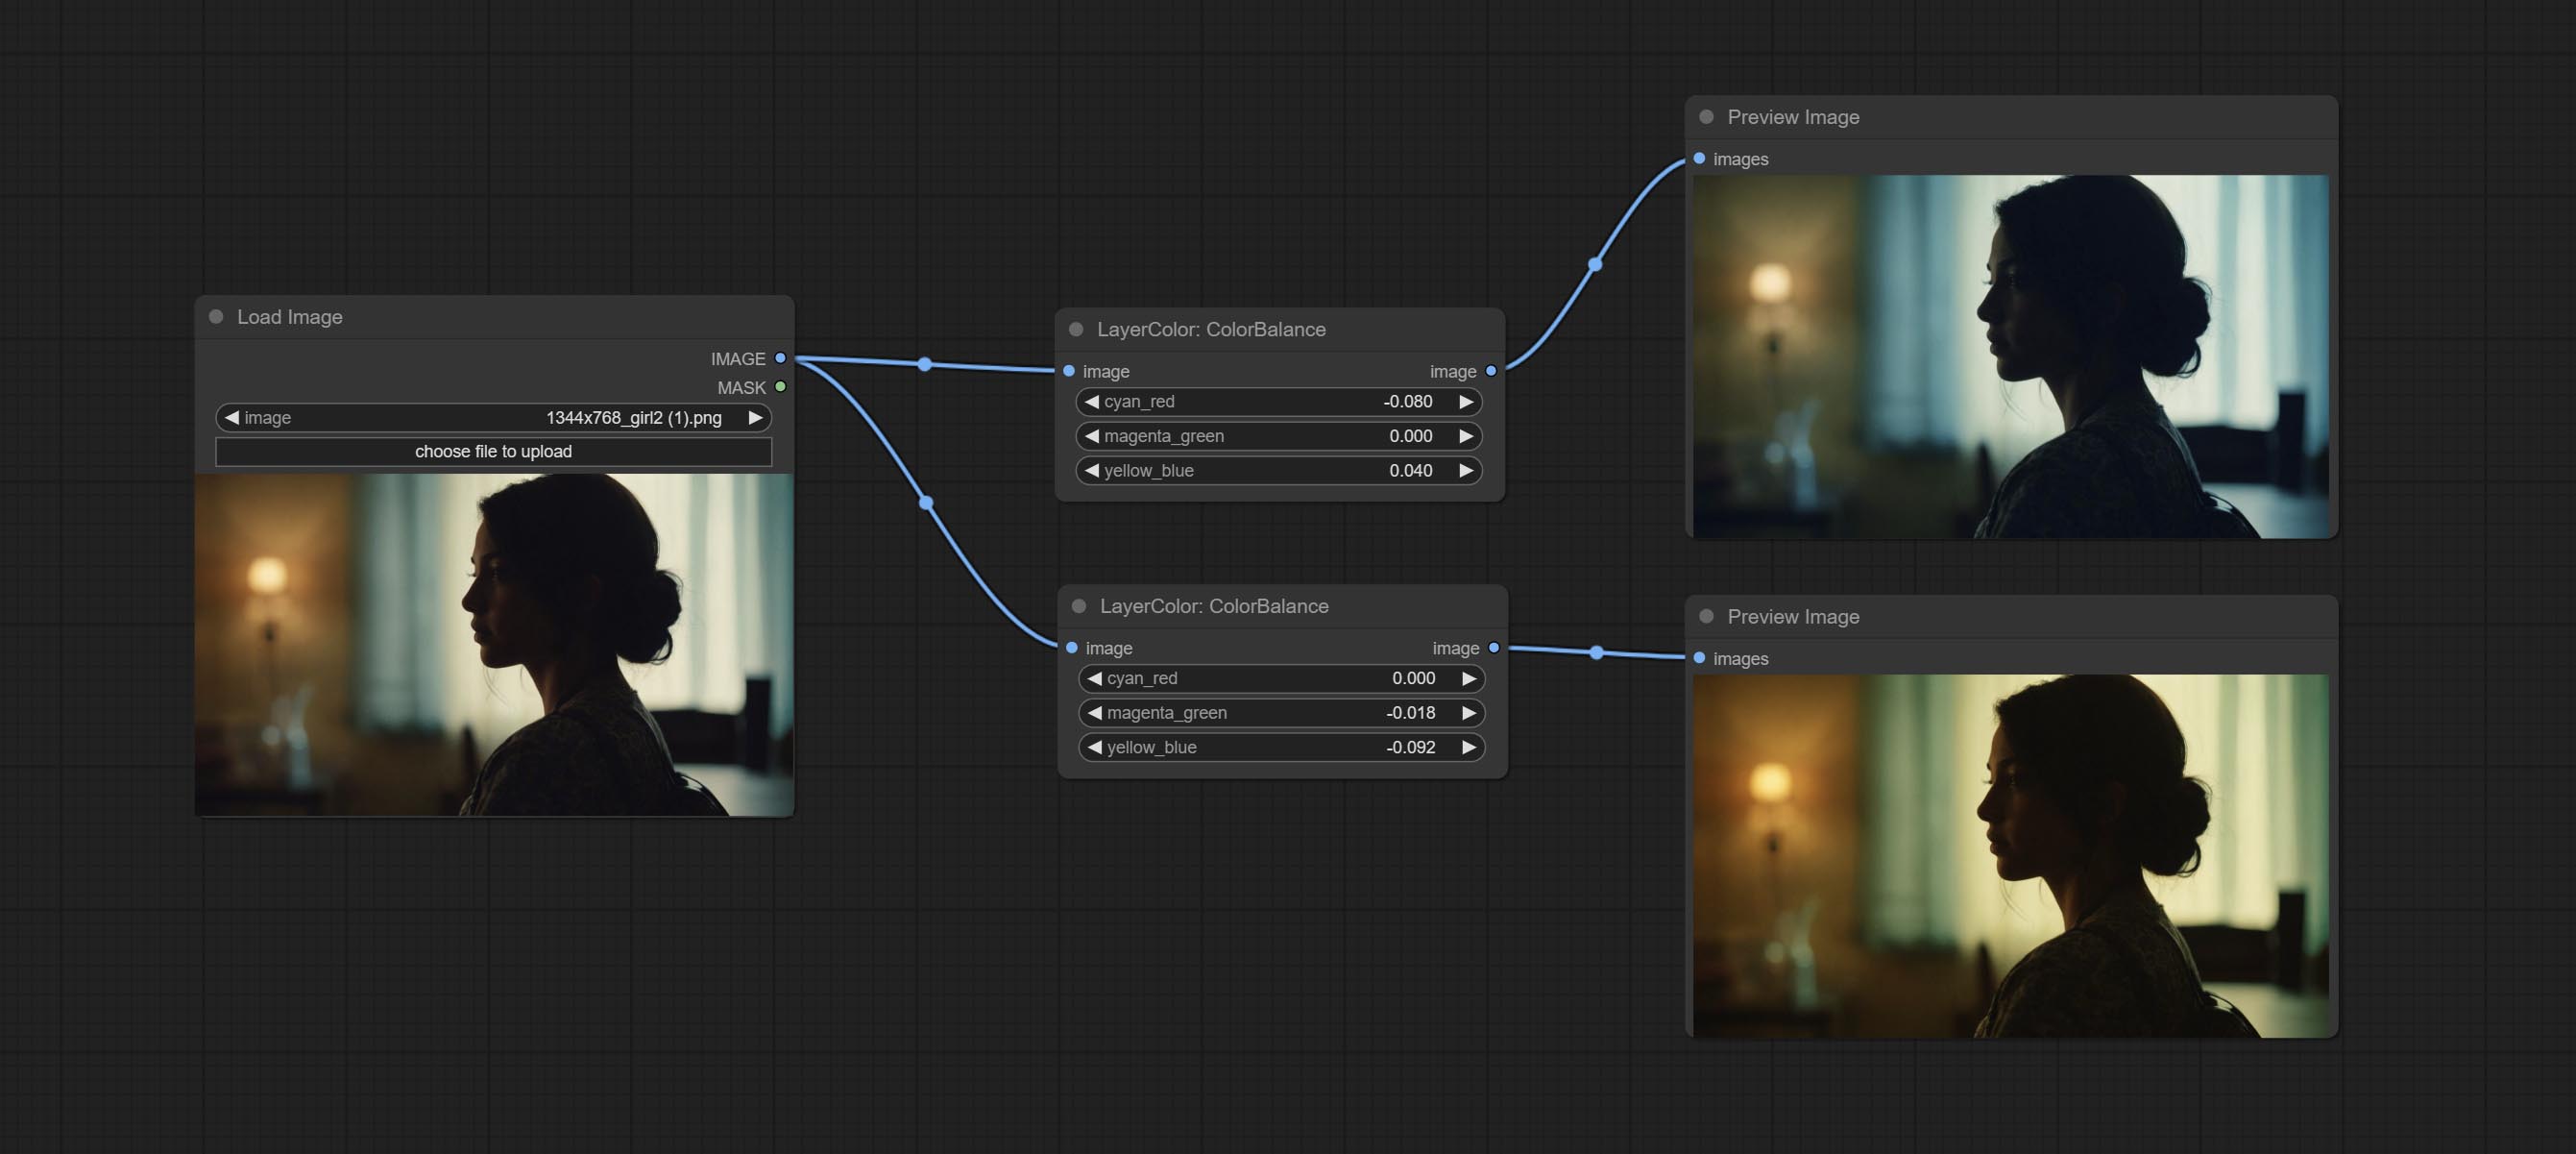
Change the color balance of an image.
Node Options:
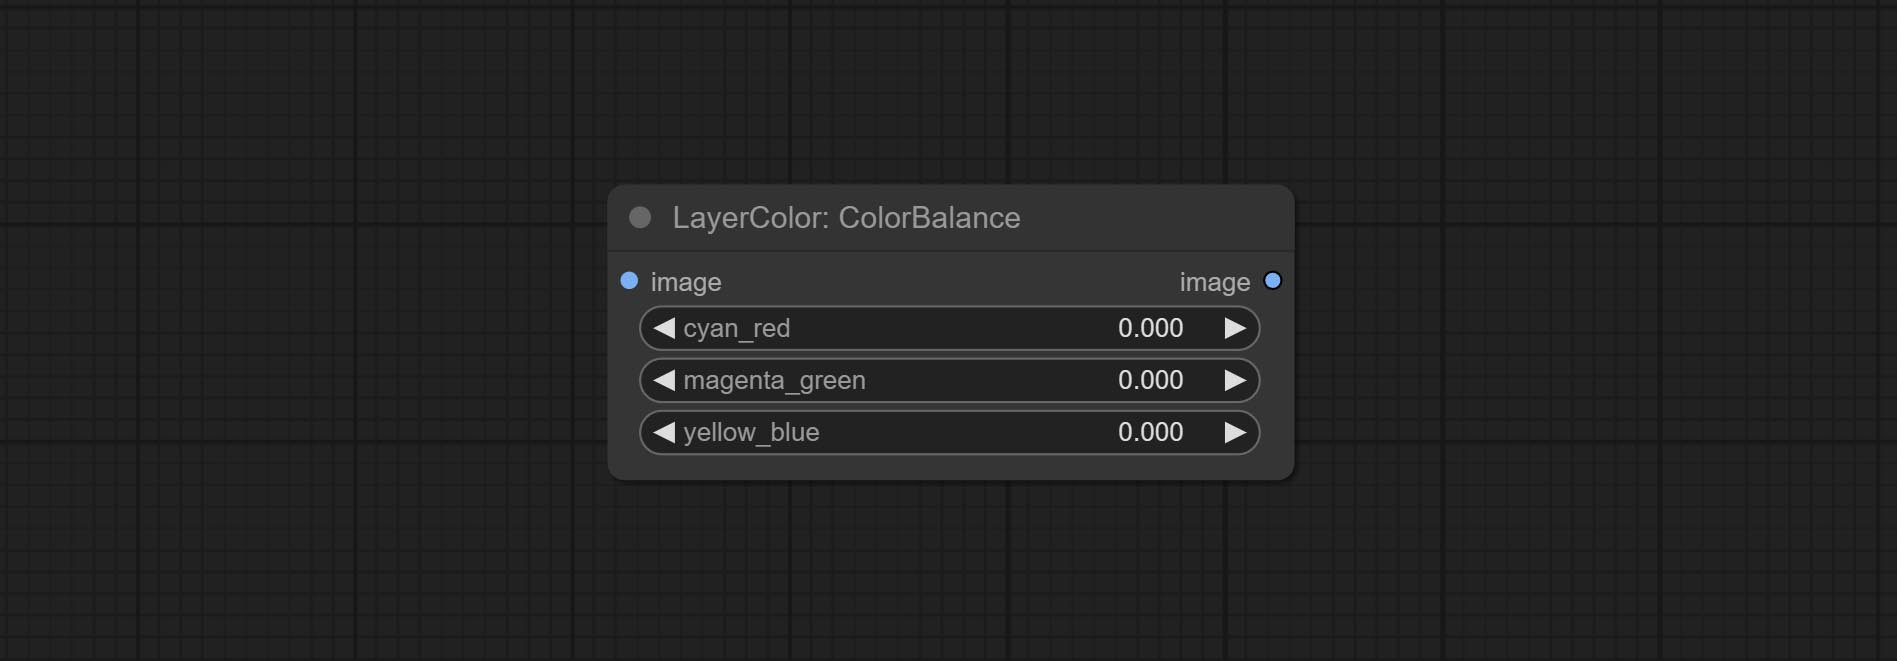
- cyan_red: Cyan-Red balance. negative values are leaning cyan, positive values are leaning red.
- magenta_green: Megenta-Green balance. negative values are leaning megenta, positive values are leaning green.
- yellow_blue: Yellow-Blue balance. negative values are leaning yellow, positive values are leaning blue.
Гамма
Change the gamma value of the image.
Node options:
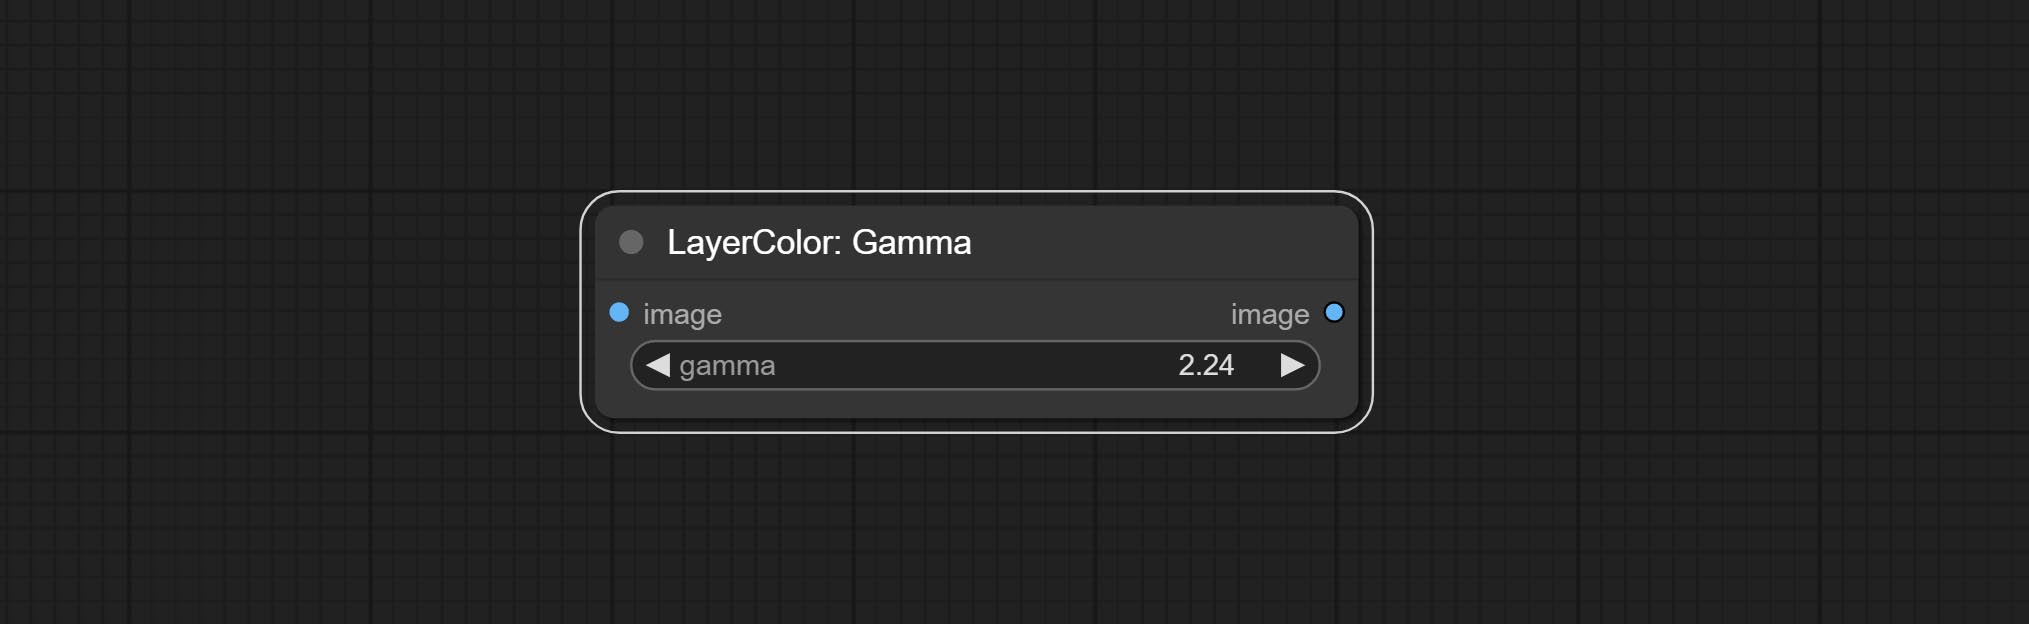
- gamma: Value of the Gamma.
Brightness & Contrast
Change the brightness, contrast, and saturation of the image.
Node options:
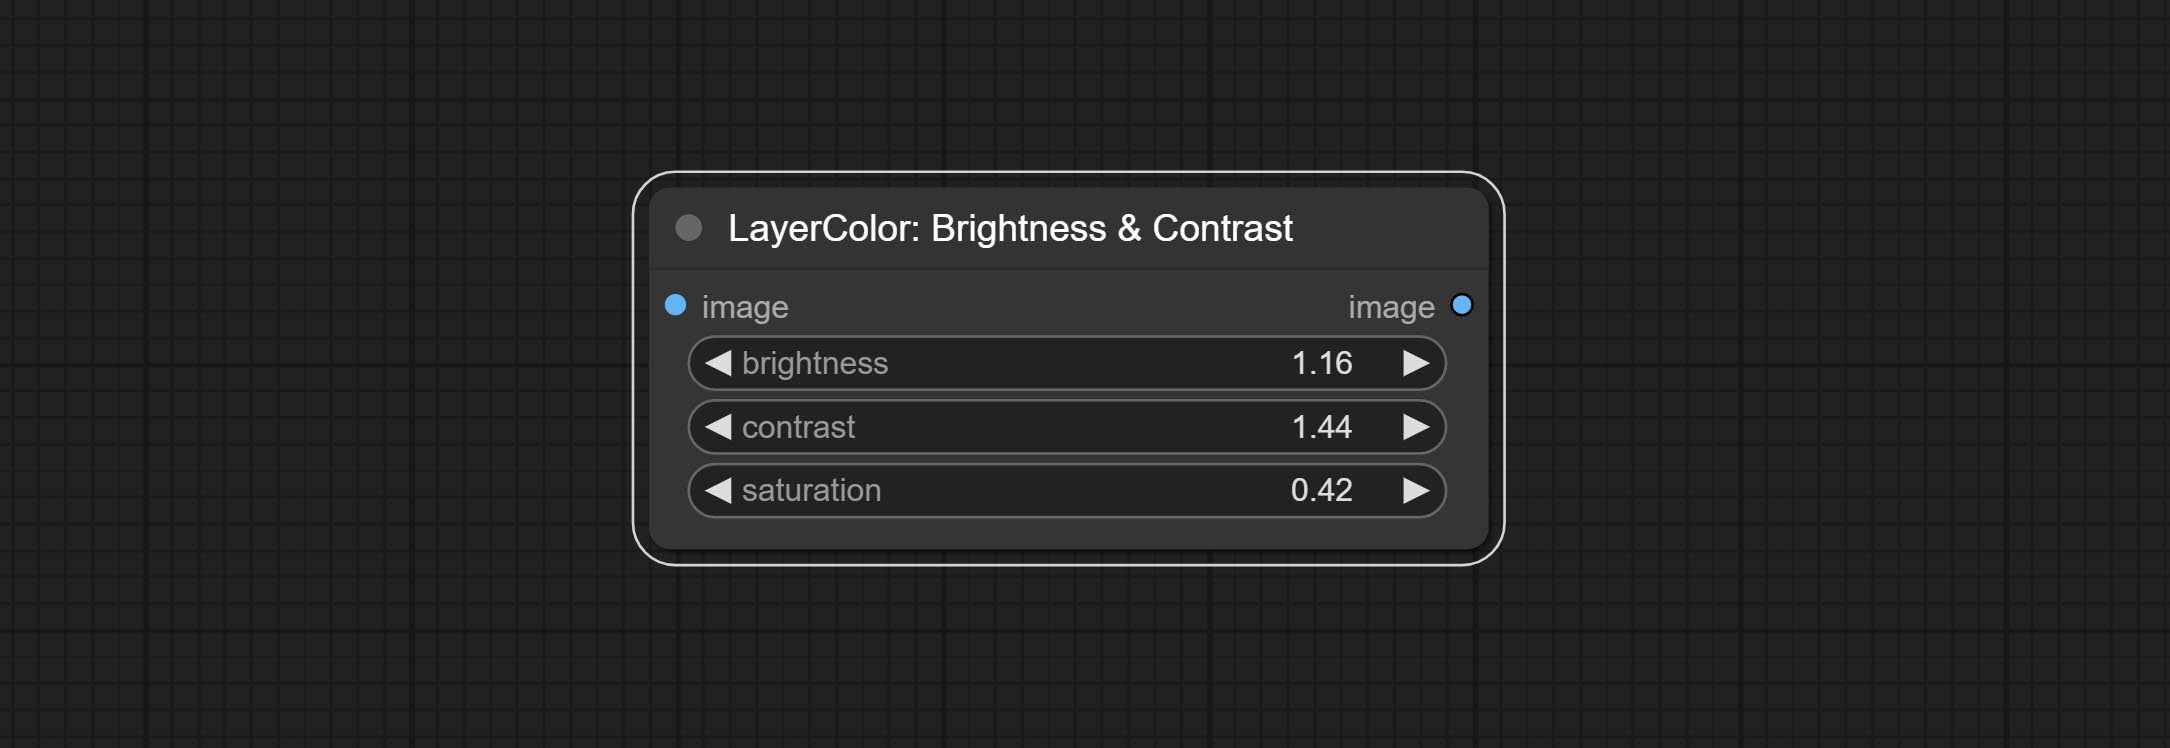
- brightness: Value of brightness.
- contrast: Value of contrast.
- saturation: Value of saturation.
BrightnessContrastV2
A replica of the Brightness & Contrast node, with the "&" character removed from the node name to avoid ComfyUI workflow parsing errors.
RGB
Adjust the RGB channels of the image.
Node options:
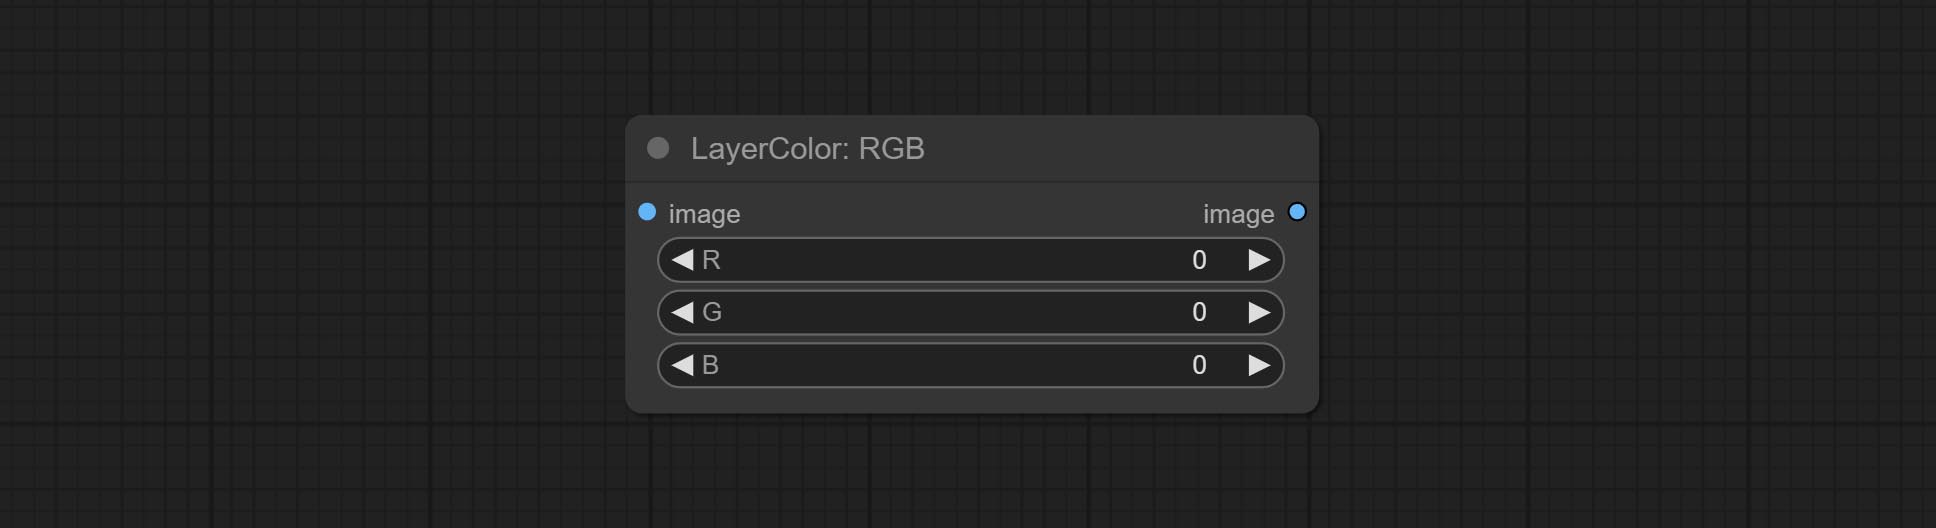
- R: R channel.
- G: G channel.
- B: B channel.
YUV
Adjust the YUV channels of the image.
Node options:
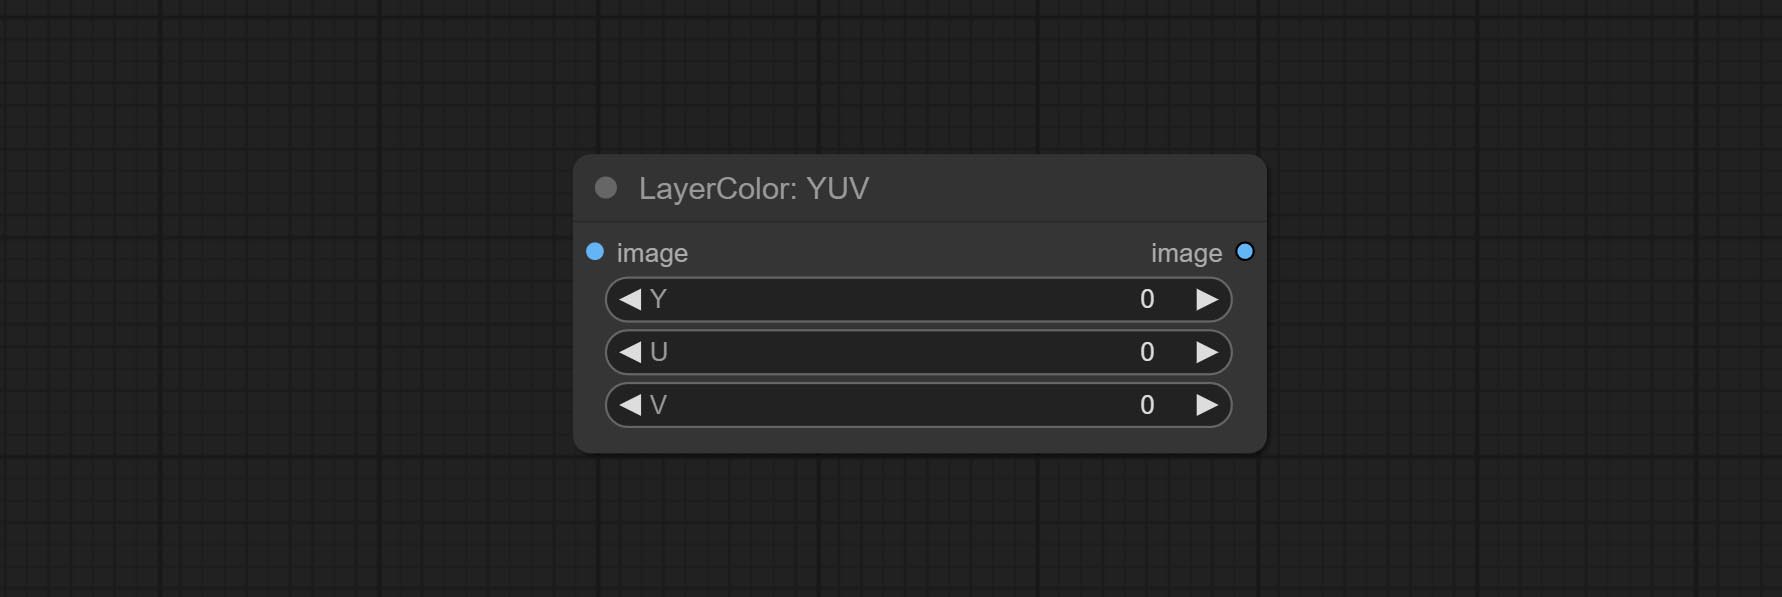
- Y: Y channel.
- U: U channel.
- V: V channel.
Лаборатория
Adjust the LAB channels of the image.
Node options:
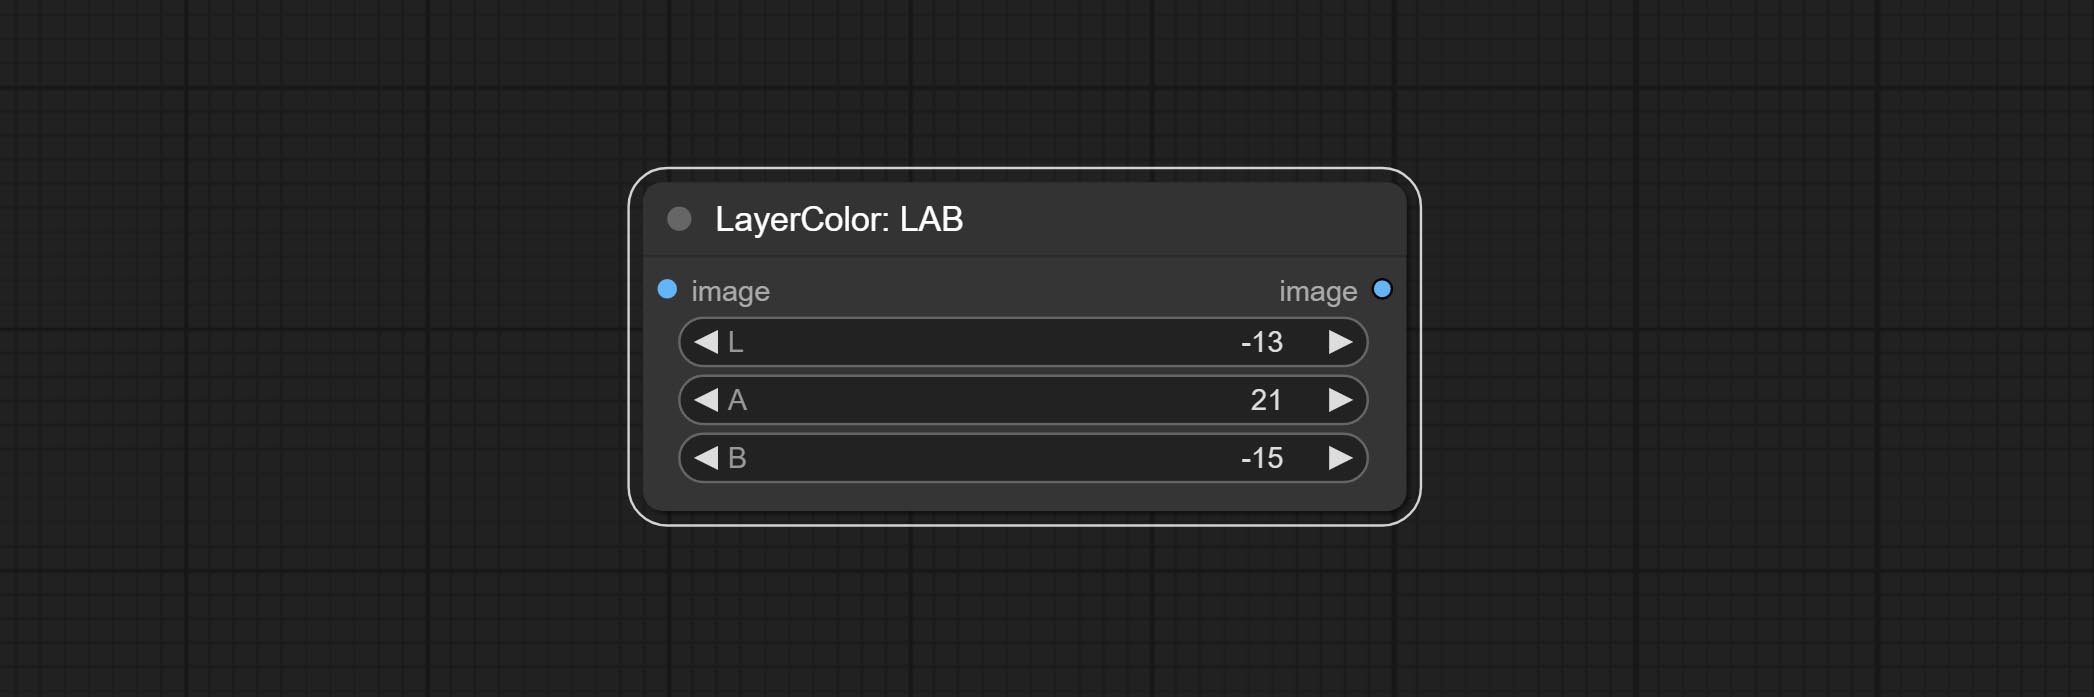
- L: L channel.
- A: A channel.
- B: B channel.
HSV
Adjust the HSV channels of the image.
Node options:
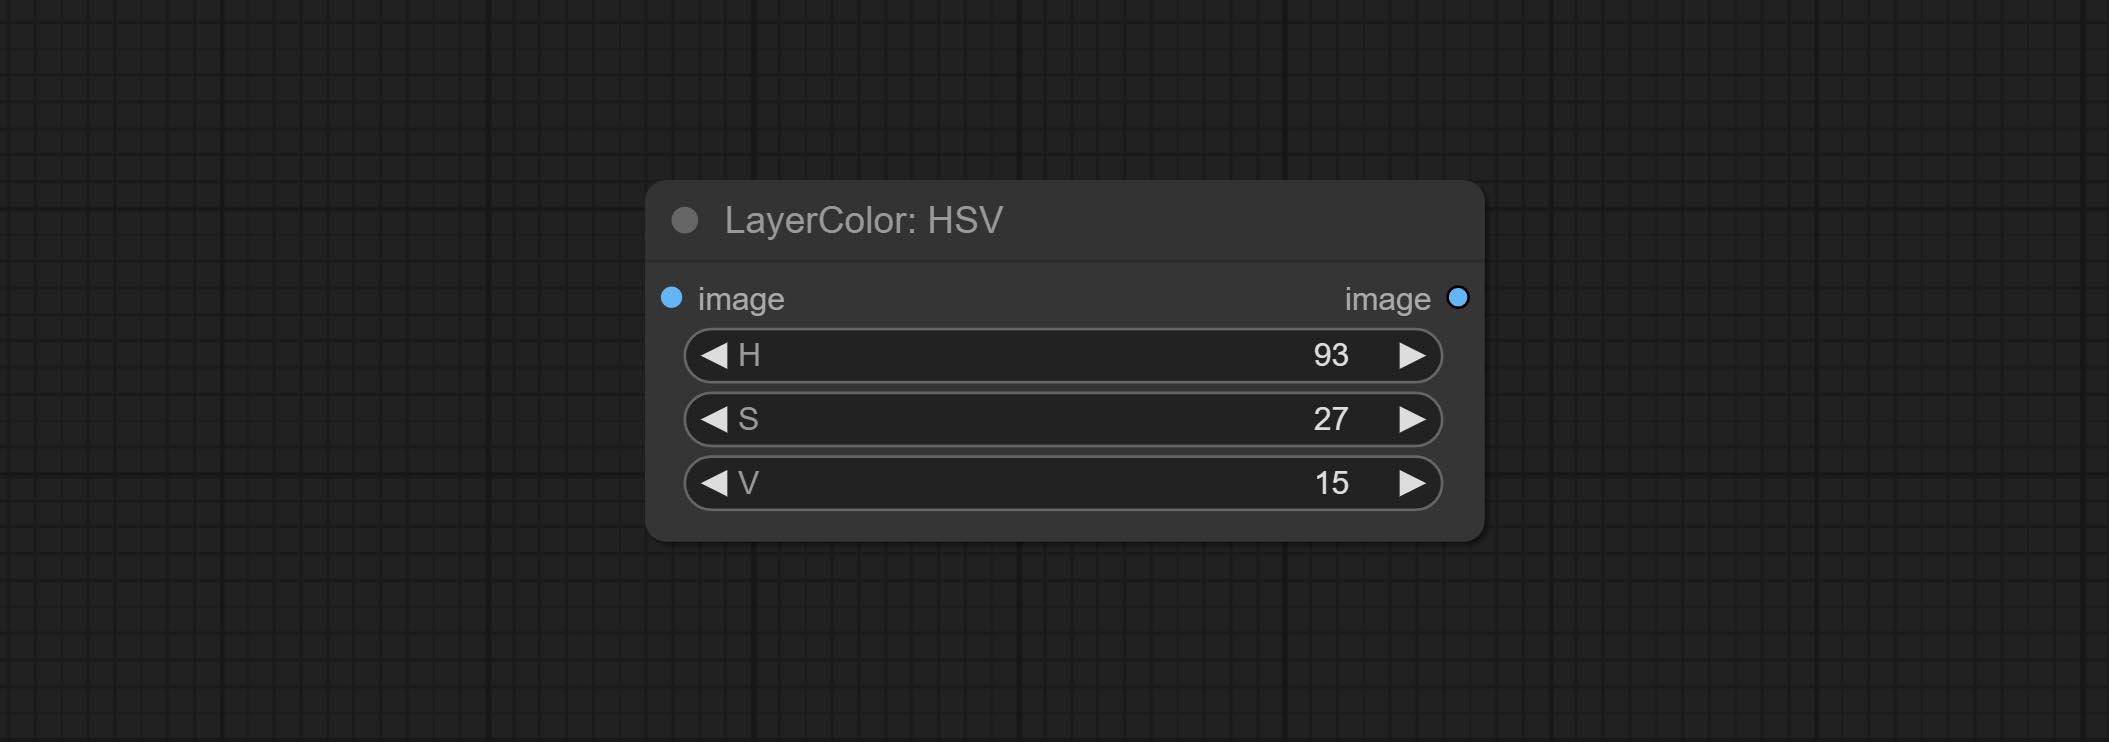
- H: H channel.
- S: S channel.
- V: V channel.
LayerUtility
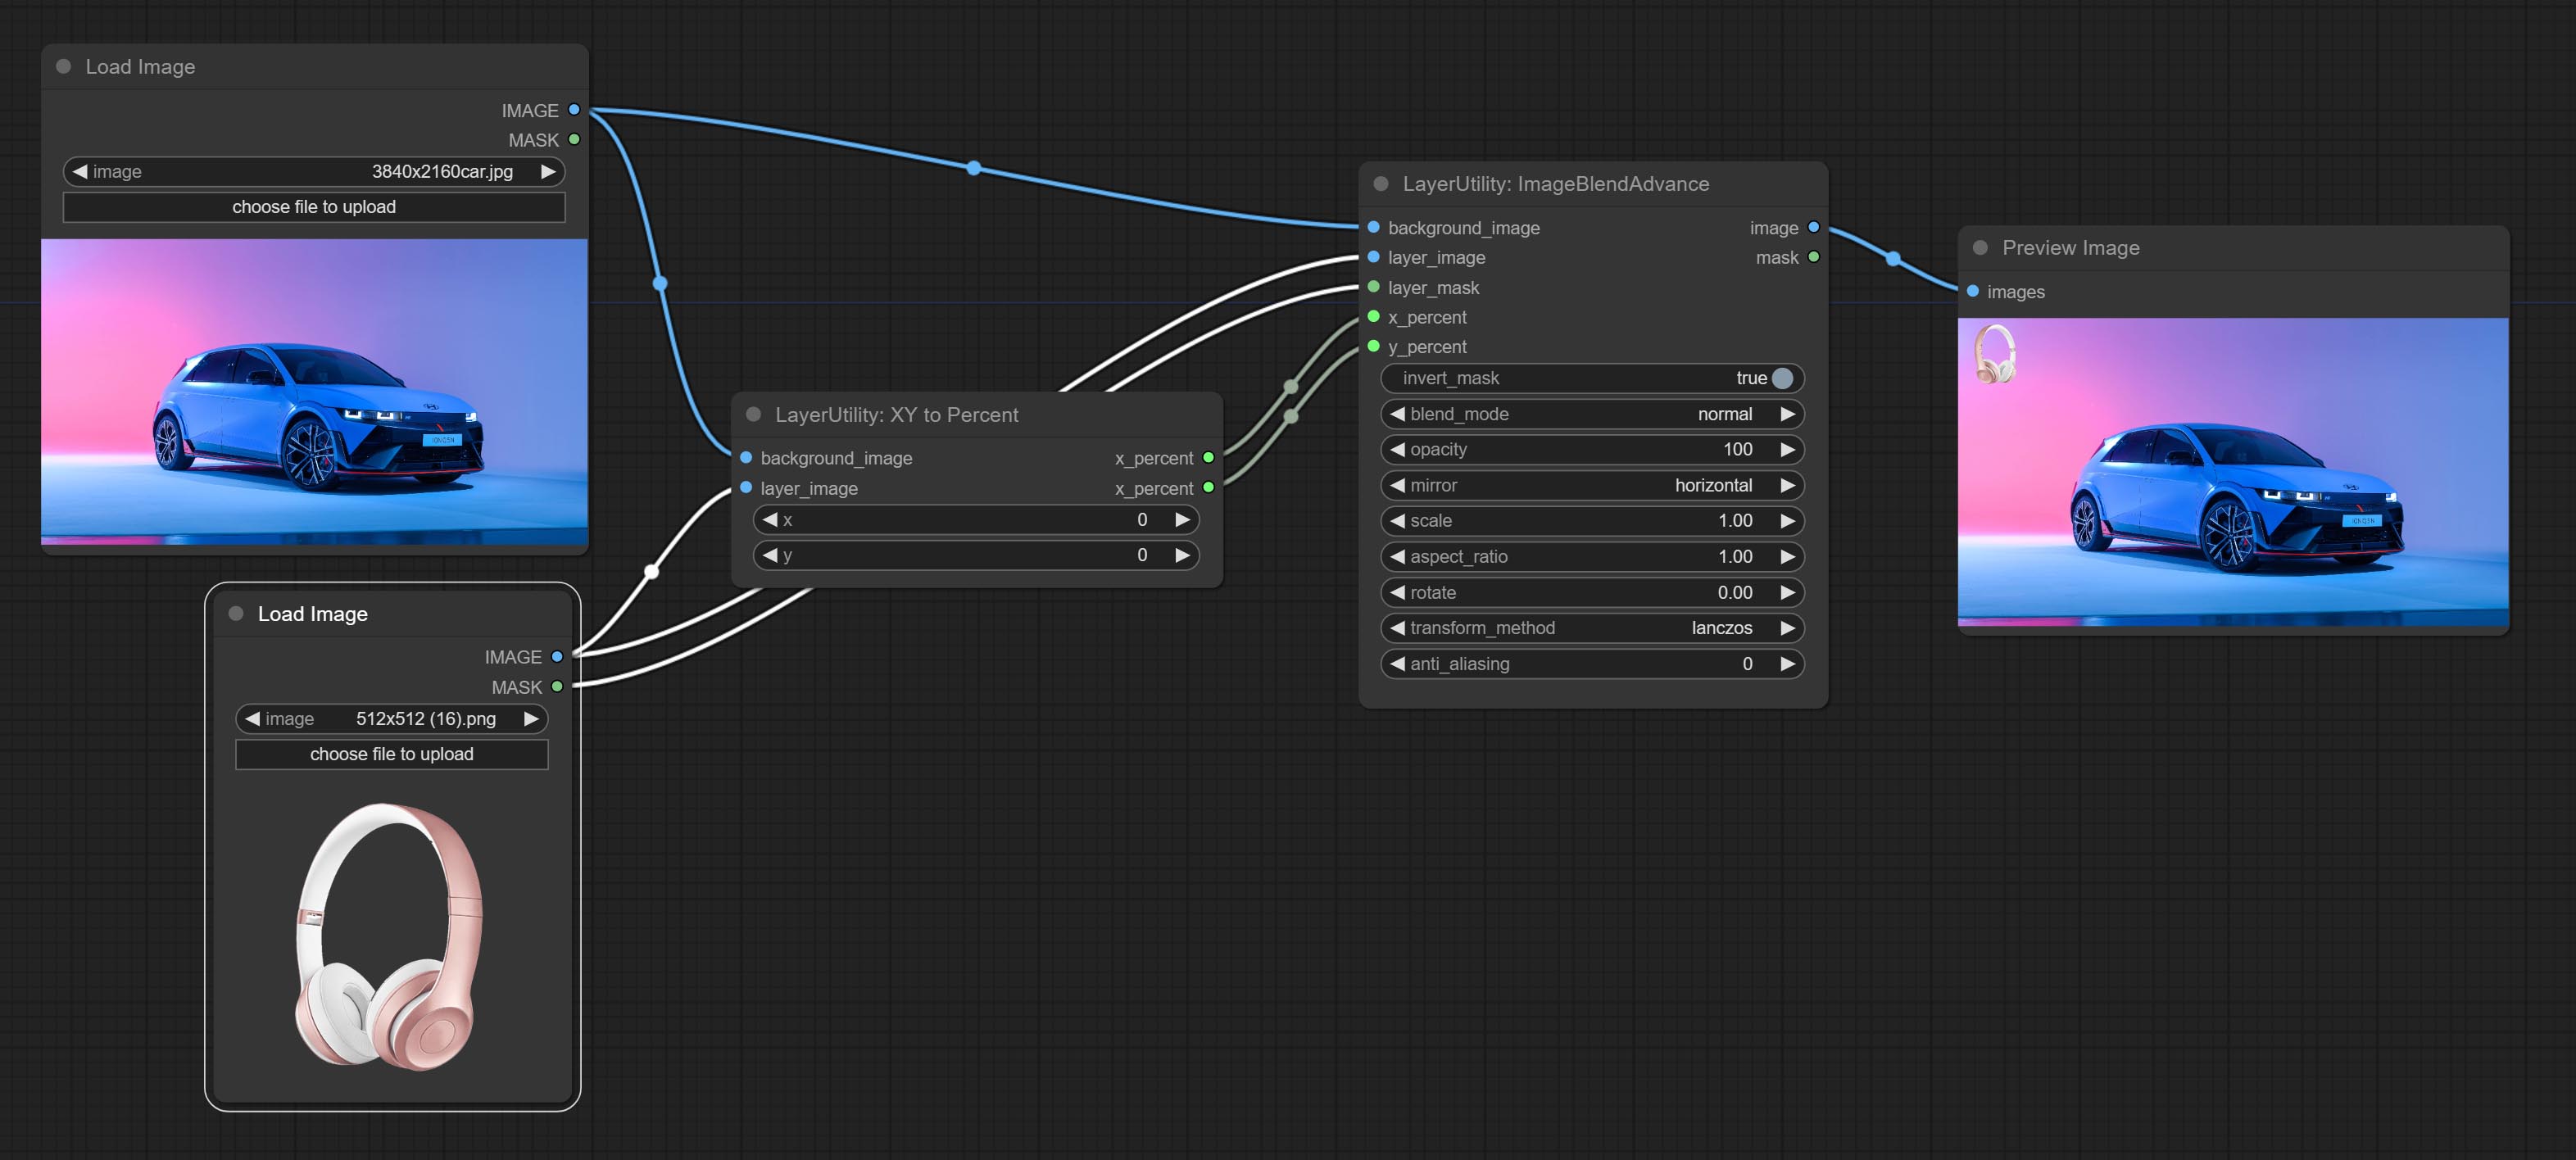
ImageBlendAdvance
Used for compositing layers, allowing for compositing layer images of different sizes on the background image, and setting positions and transformations. multiple mixing modes are available for selection, and transparency can be set.
The node provide layer transformation_methods and anti_aliasing options. helps improve the quality of synthesized images.
The node provides mask output that can be used for subsequent workflows. 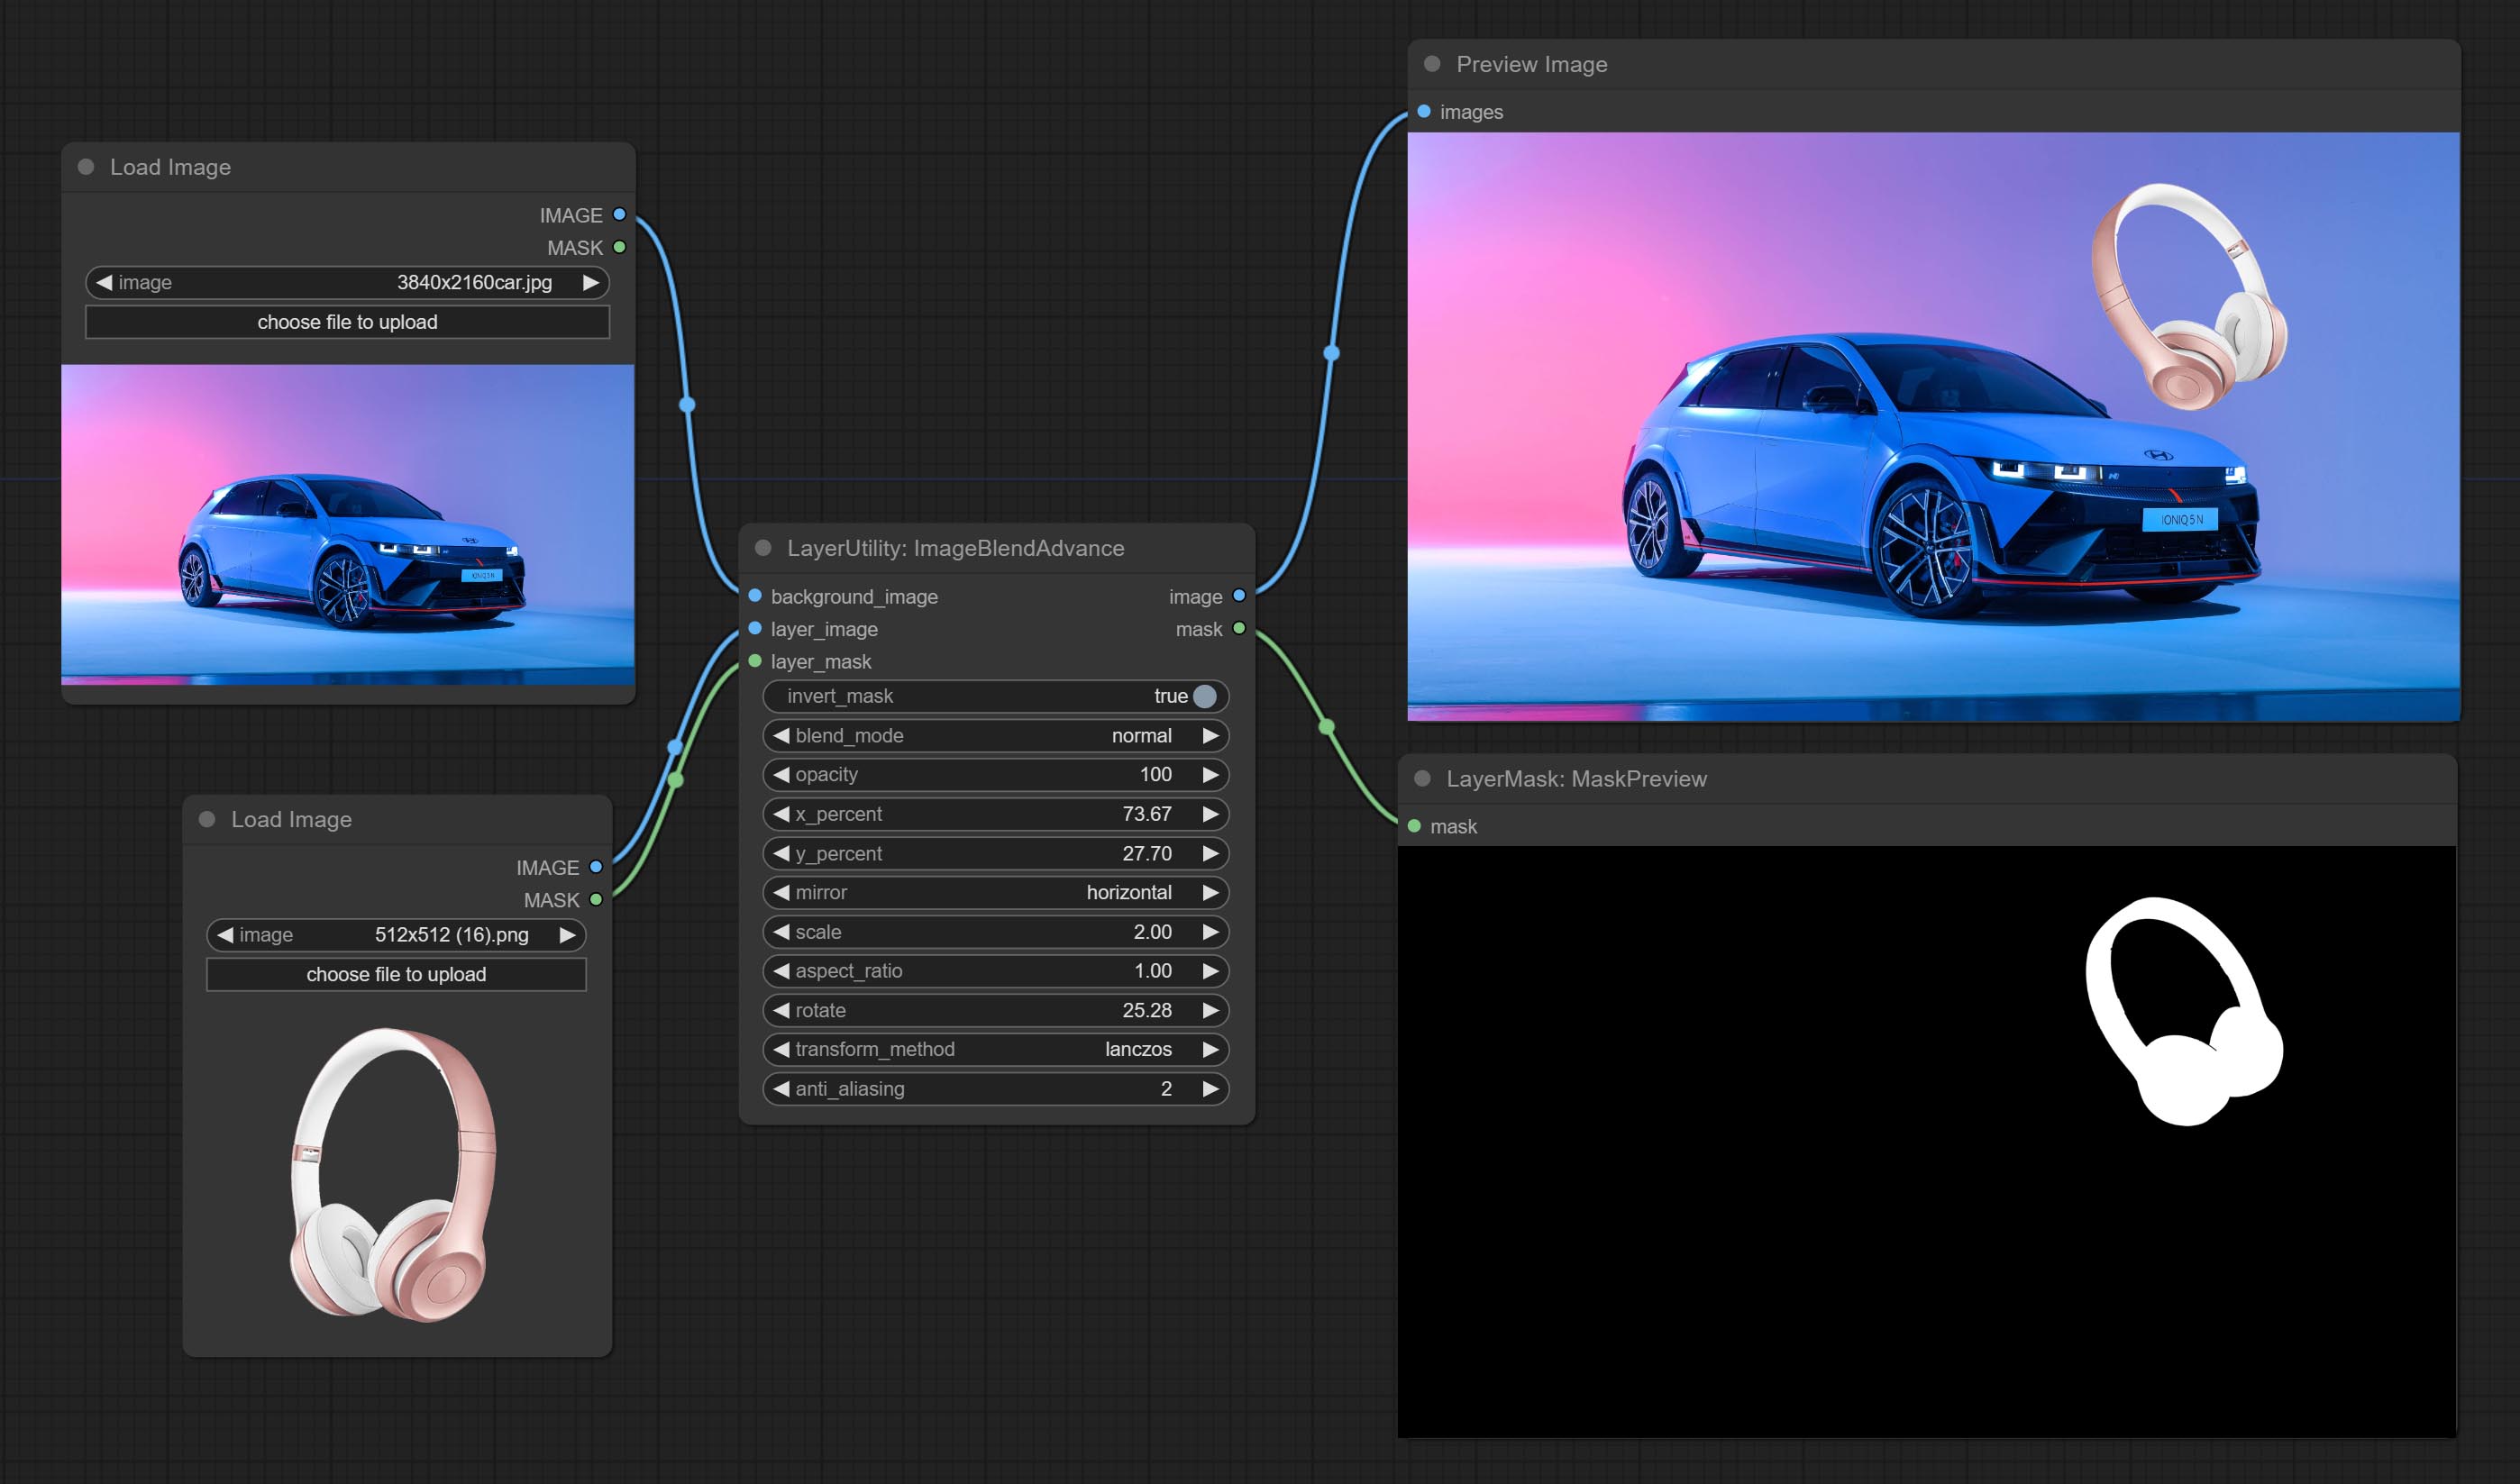
Node options:
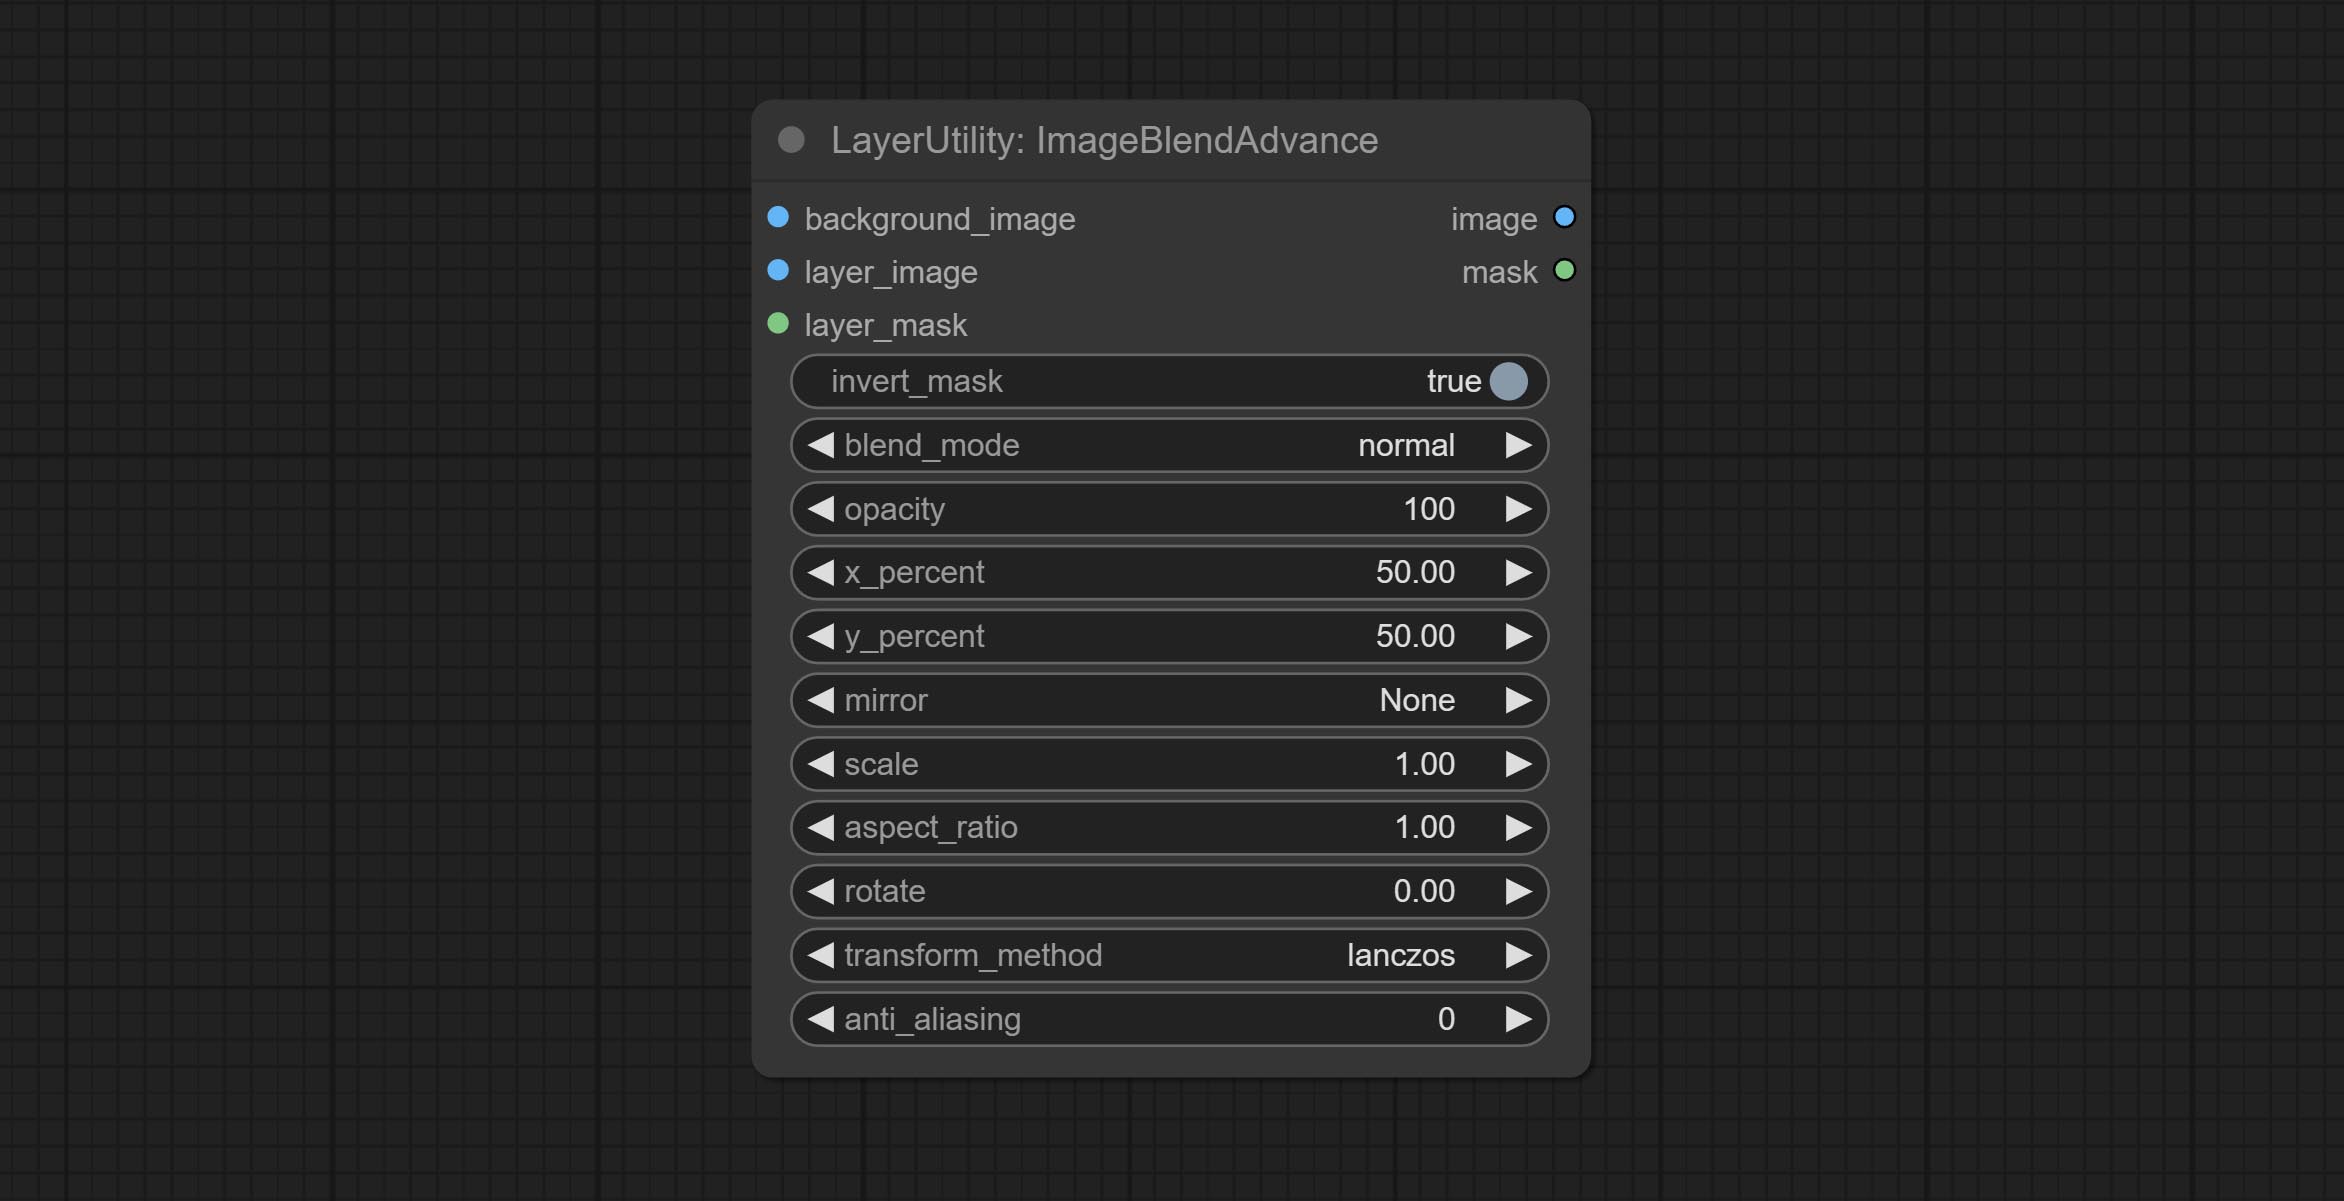
- background_image: The background image.
- layer_image 5 : Layer image for composite.
- layer_mask 2,5 : Mask for layer_image.
- invert_mask: Whether to reverse the mask.
- blend_mode 3 : Blending mode.
- opacity: Opacity of blend.
- x_percent: Horizontal position of the layer on the background image, expressed as a percentage, with 0 on the far left and 100 on the far right. It can be less than 0 or more than 100, indicating that some of the layer's content is outside the screen.
- y_percent: Vertical position of the layer on the background image, expressed as a percentage, with 0 on the top and 100 on the bottom. For example, setting it to 50 indicates vertical center, 20 indicates upper center, and 80 indicates lower center.
- mirror: Mirror flipping. Provide two flipping modes, horizontal flipping and vertical flipping.
- scale: Layer magnification, 1.0 represents the original size.
- aspect_ratio: Layer aspect ratio. 1.0 is the original ratio, a value greater than this indicates elongation, and a value less than this indicates flattening.
- rotate: Layer rotation degree.
- Sampling methods for layer enlargement and rotation, including lanczos, bicubic, hamming, bilinear, box and nearest. Different sampling methods can affect the image quality and processing time of the synthesized image.
- anti_aliasing: Anti aliasing, ranging from 0 to 16, the larger the value, the less obvious the aliasing. An excessively high value will significantly reduce the processing speed of the node.
- примечание
CropByMask
Crop the image according to the mask range, and set the size of the surrounding borders to be retained. This node can be used in conjunction with the RestoreCropBox and ImageScaleRestore nodes to crop and modify upscale parts of image, and then paste them back in place. 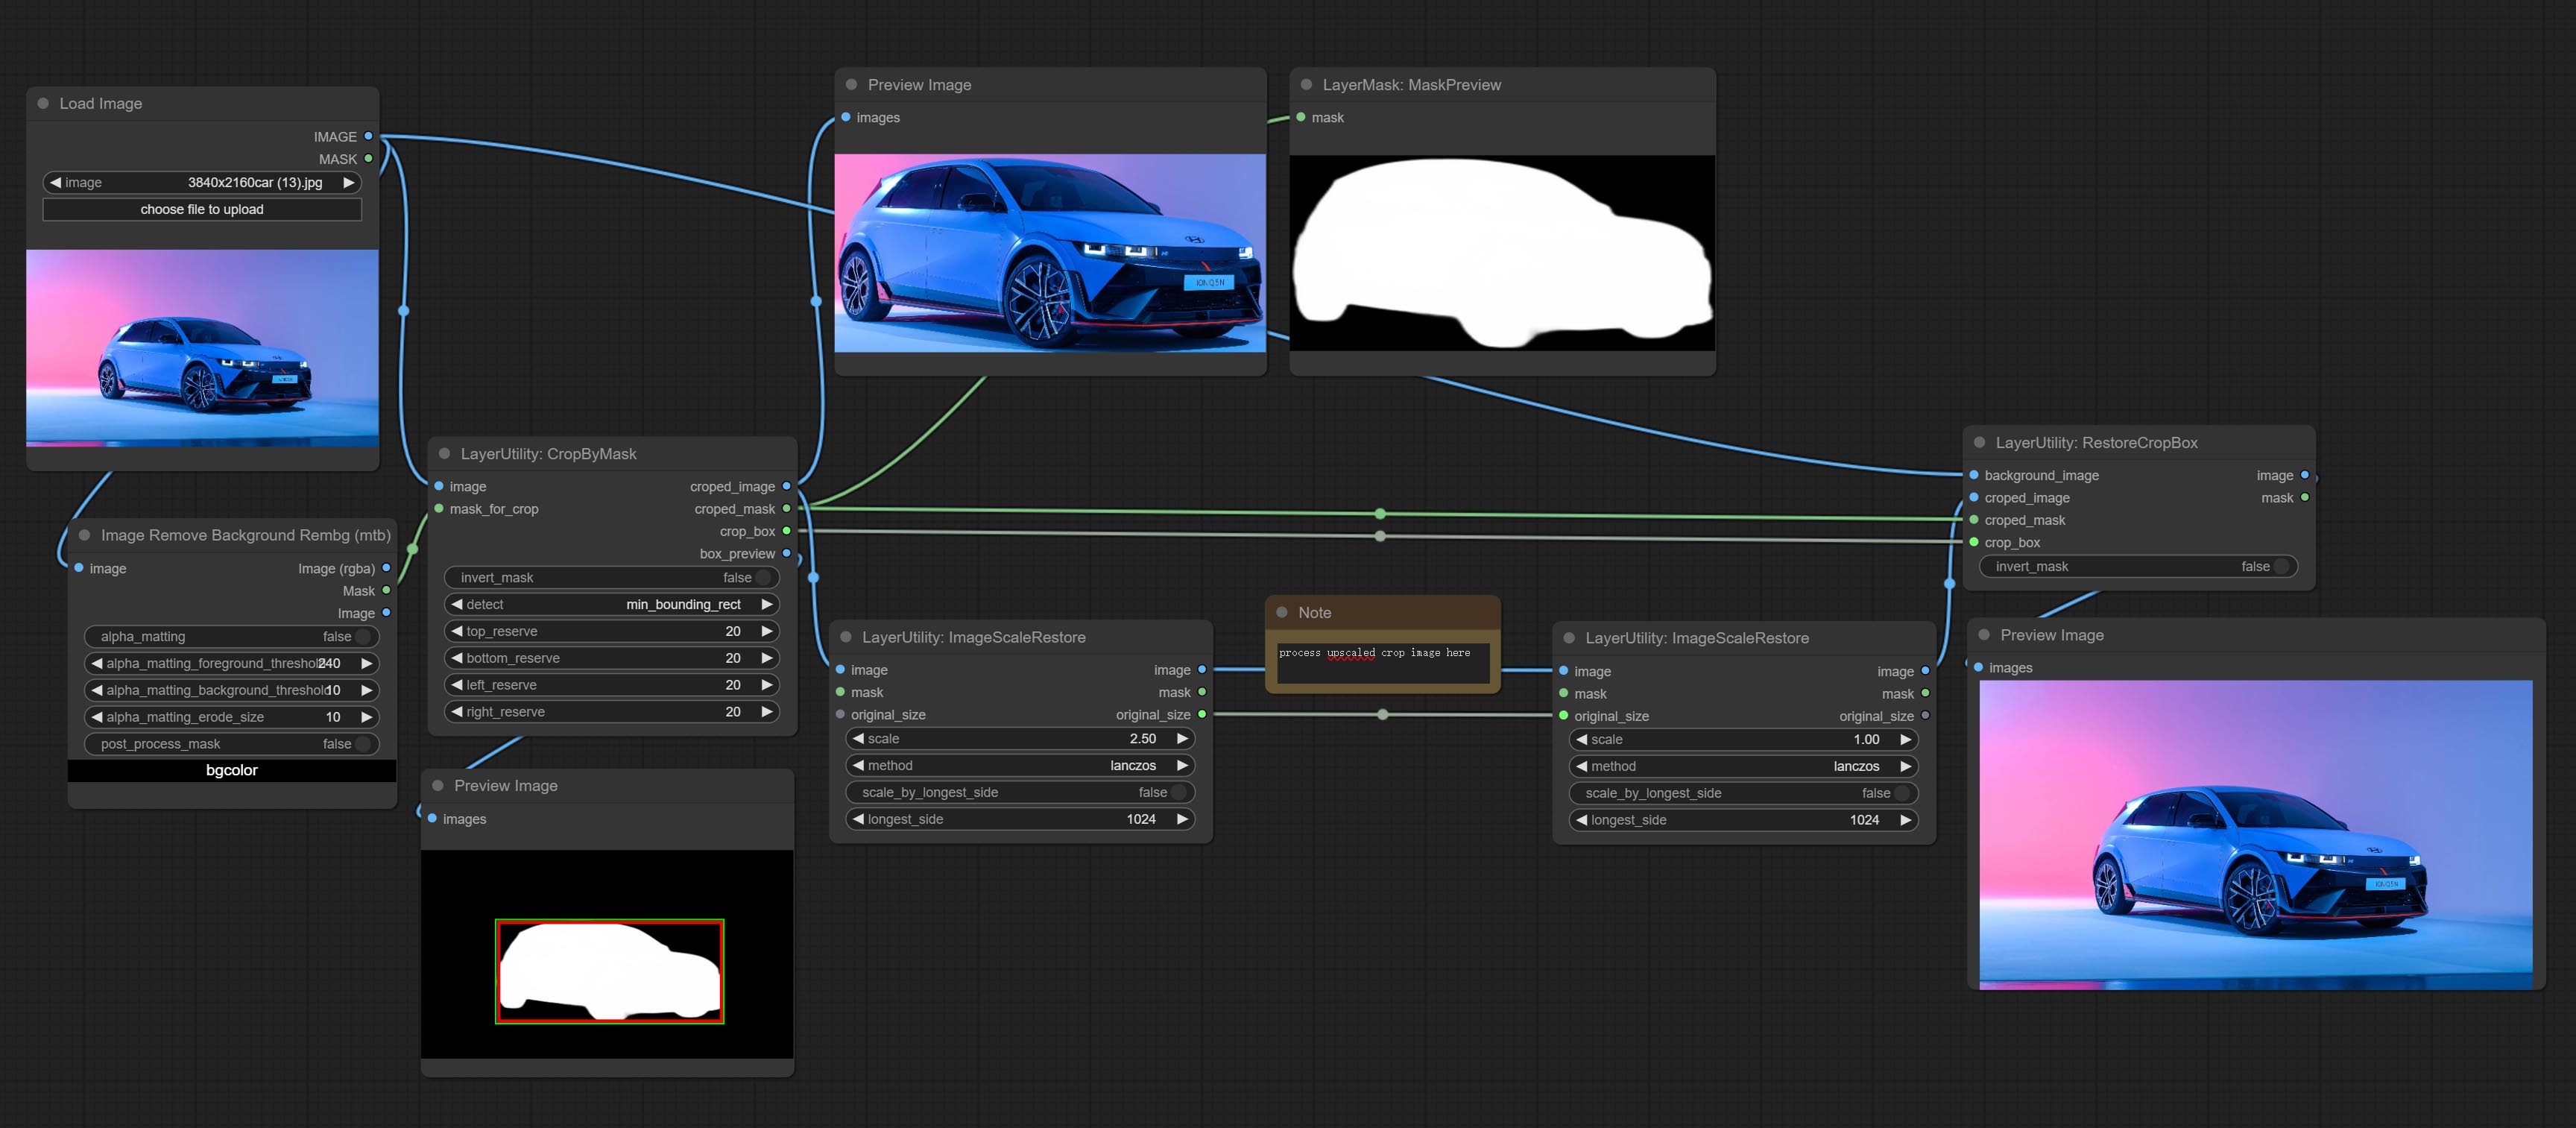
Node options:
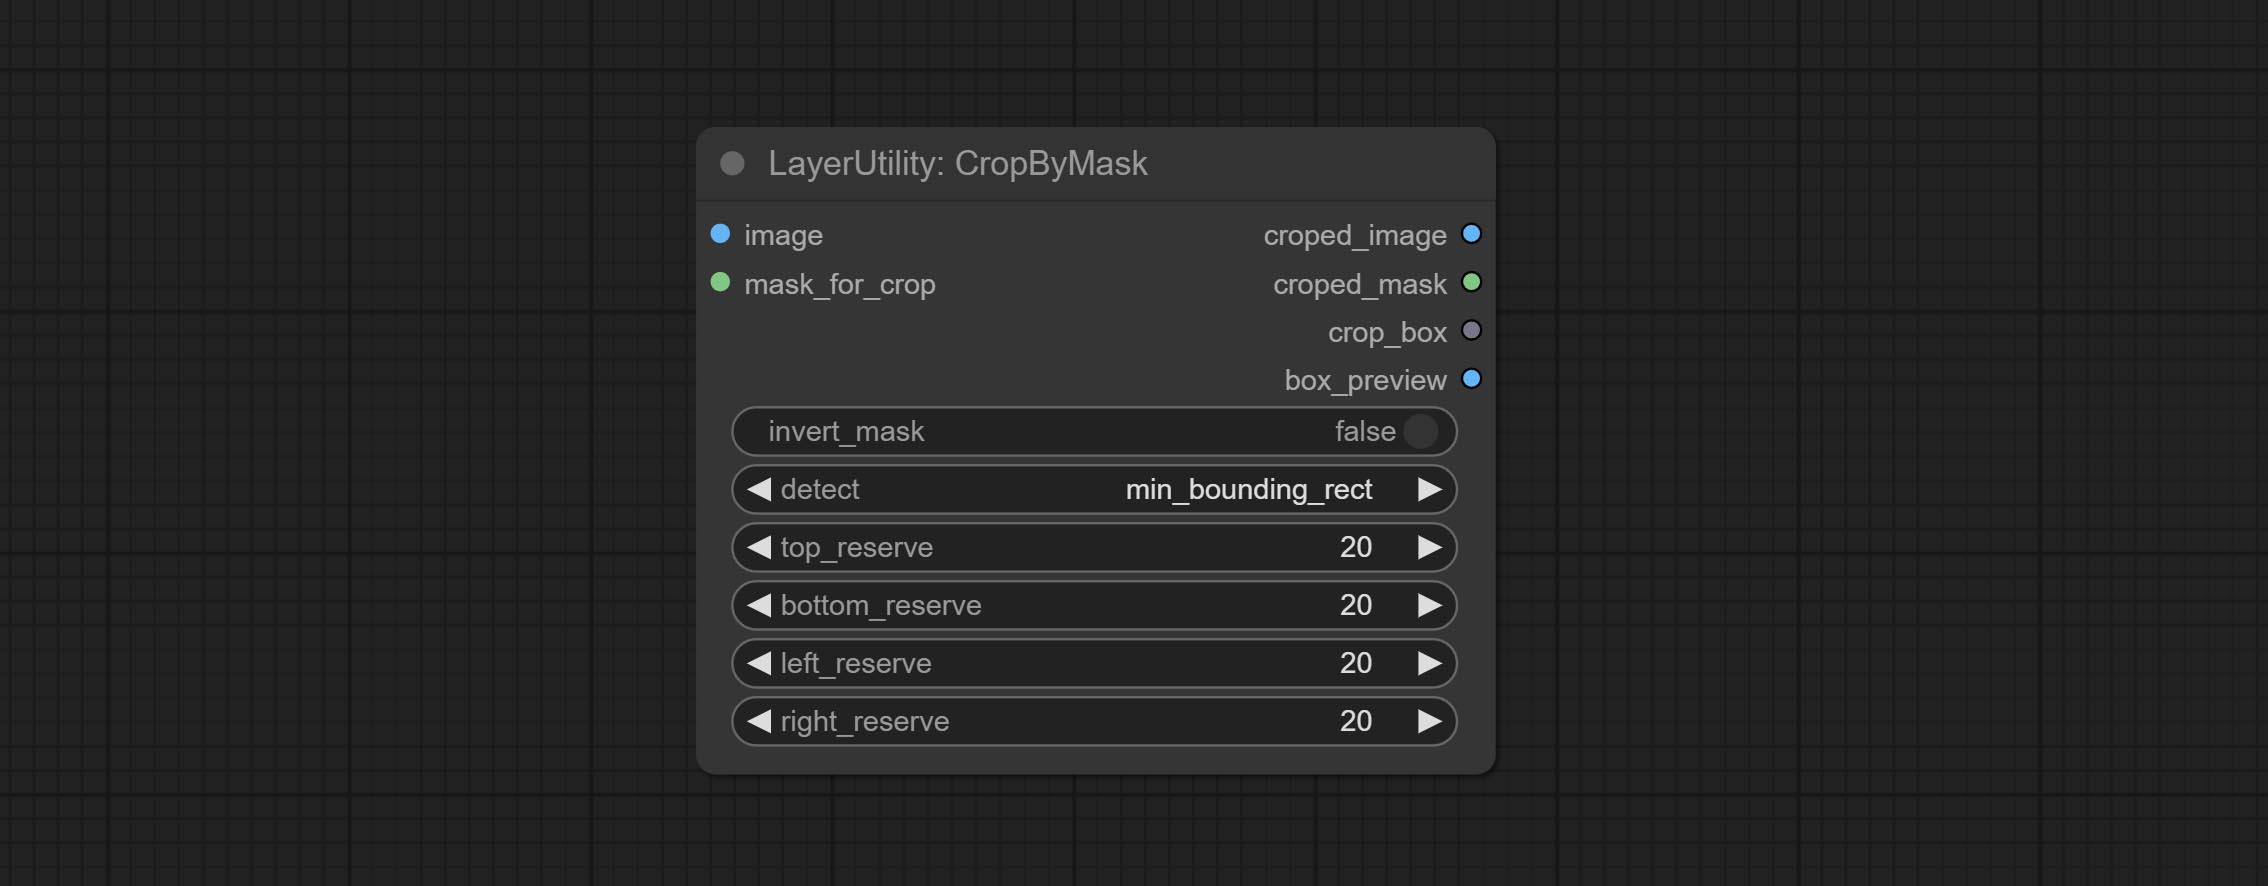
- image 5 : The input image.
- mask_for_crop 5 : Mask of the image, it will automatically be cut according to the mask range.
- invert_mask: Whether to reverse the mask.
- detect: Detection method,
min_bounding_rect is the minimum bounding rectangle of block shape, max_inscribed_rect is the maximum inscribed rectangle of block shape, and mask-area is the effective area for masking pixels. - top_reserve: Cut the top to preserve size.
- bottom_reserve: Cut the bottom to preserve size.
- left_reserve: Cut the left to preserve size.
- right_reserve: Cut the right to preserve size.
- примечание
Выход:
- croped_image: The image after crop.
- croped_mask: The mask after crop.
- crop_box: The trimmed box data is used when restoring the RestoreCropBox node.
- box_preview: Preview image of cutting position, red represents the detected range, and green represents the cutting range after adding the reserved border.
CropByMaskV2
The V2 upgraded version of CropByMask. Supports crop_box input, making it easy to cut layers of the same size.
The following changes have been made based on CropByMask: 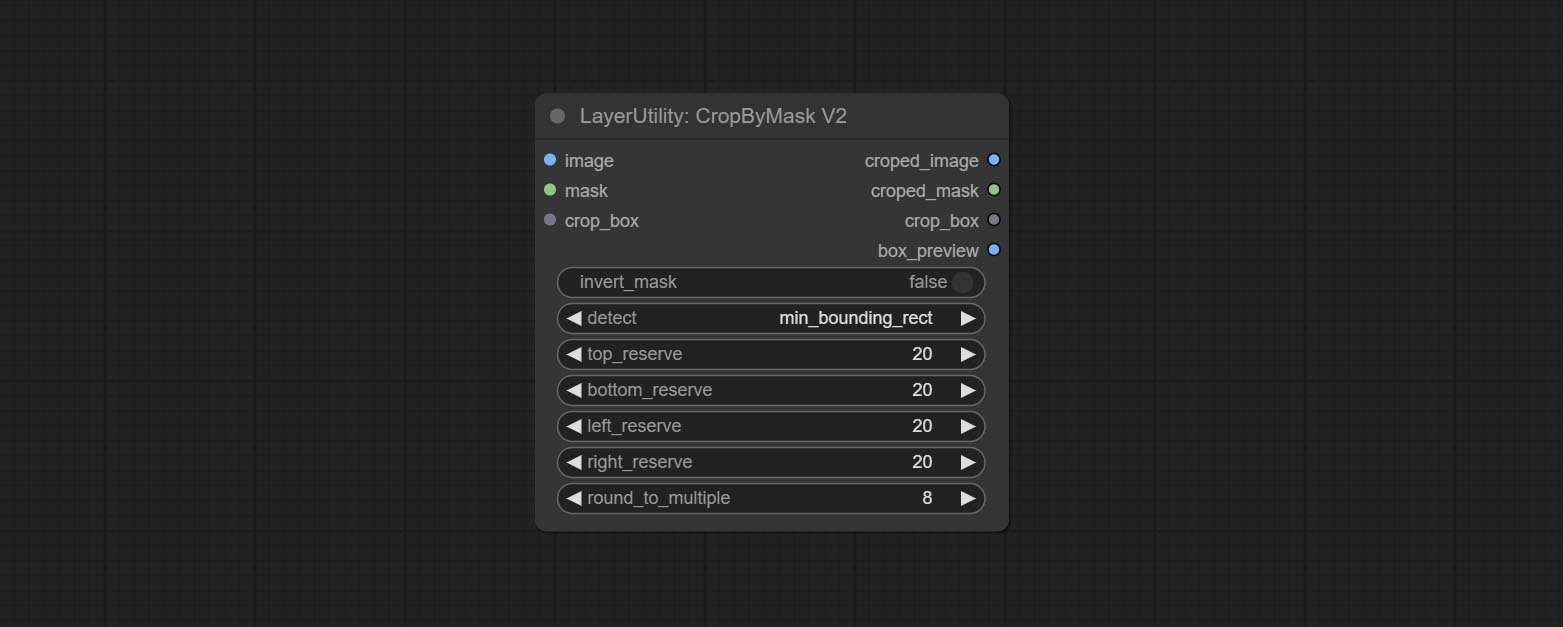
- The input
mask_for_crop reanme to mask 。 - Add optional inputs to the
crop_box . If there are inputs here, mask detection will be ignored and this data will be directly used for cropping. - Add the option
round_to_multiple to round the trimming edge length multiple. For example, setting it to 8 will force the width and height to be multiples of 8.
RestoreCropBox
Restore the cropped image to the original image by CropByMask.
Node options:
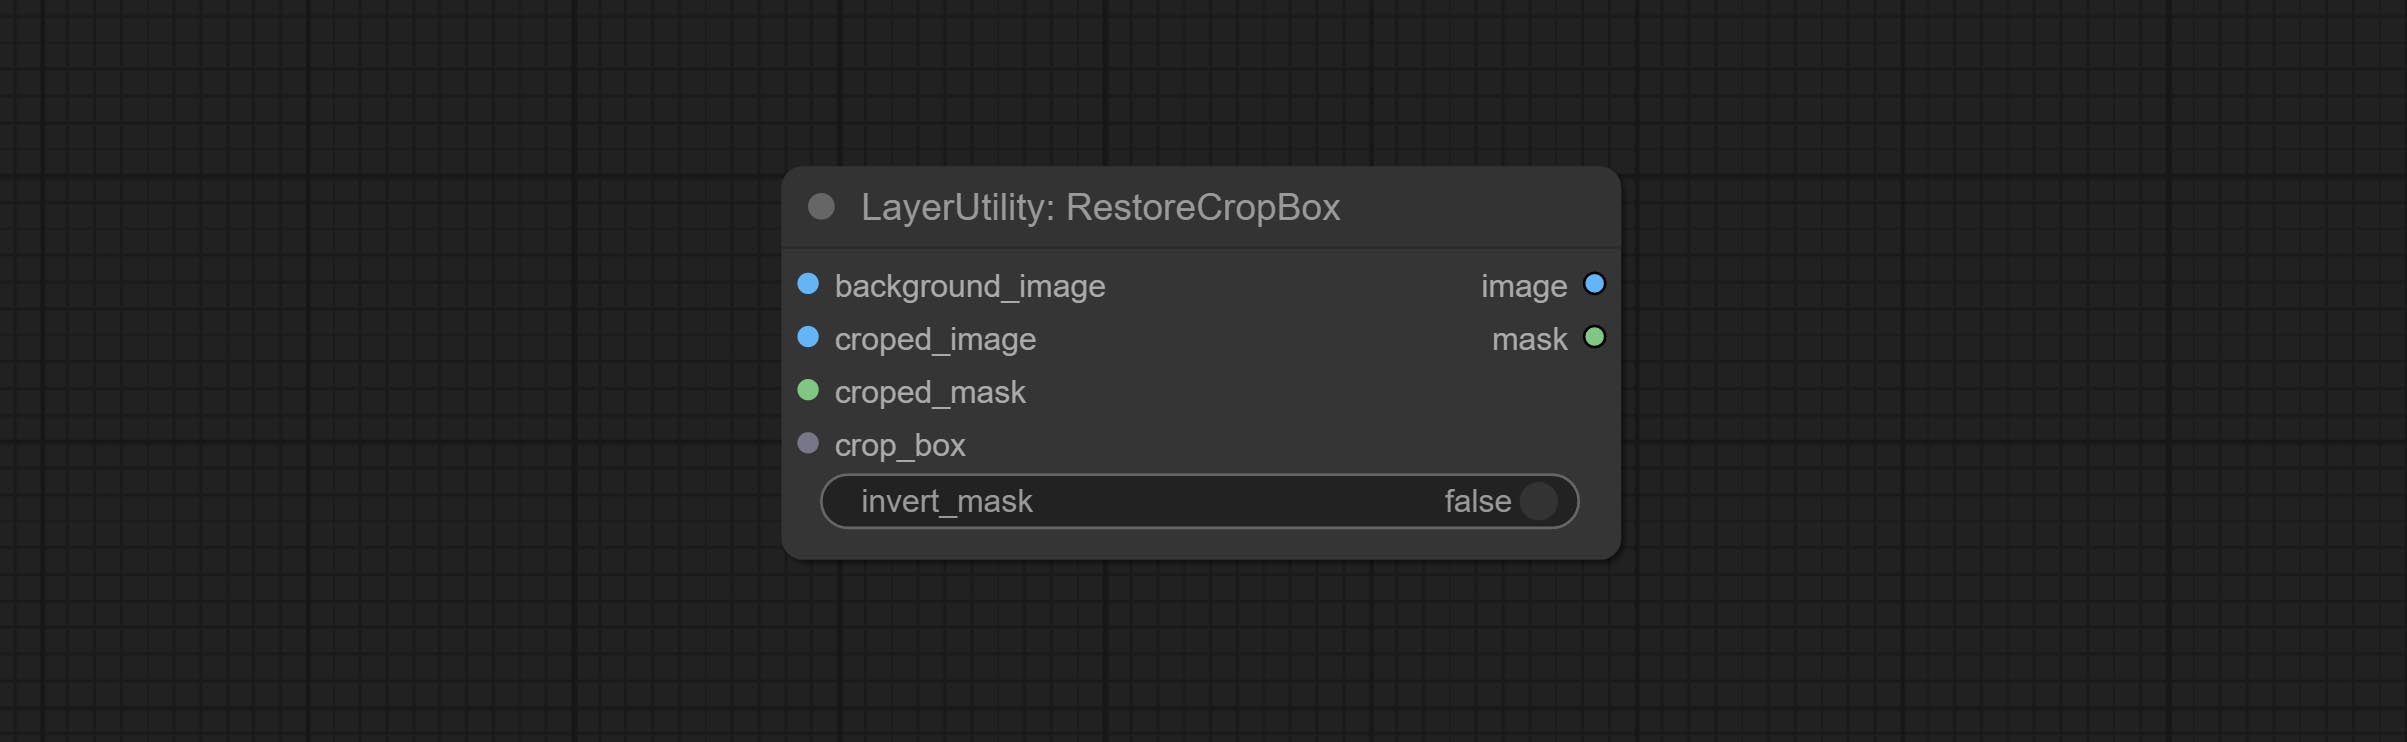
- background_image: The original image before cutting.
- croped_image 5 : The cropped image. If the middle is enlarged, the size needs to be restored before restoration.
- croped_mask 5 : The cut mask.
- crop_box: Box data during cutting.
- invert_mask: Whether to reverse the mask.
- примечание
CropBoxResolve
Parsing the corp_box to x , y , width , height . 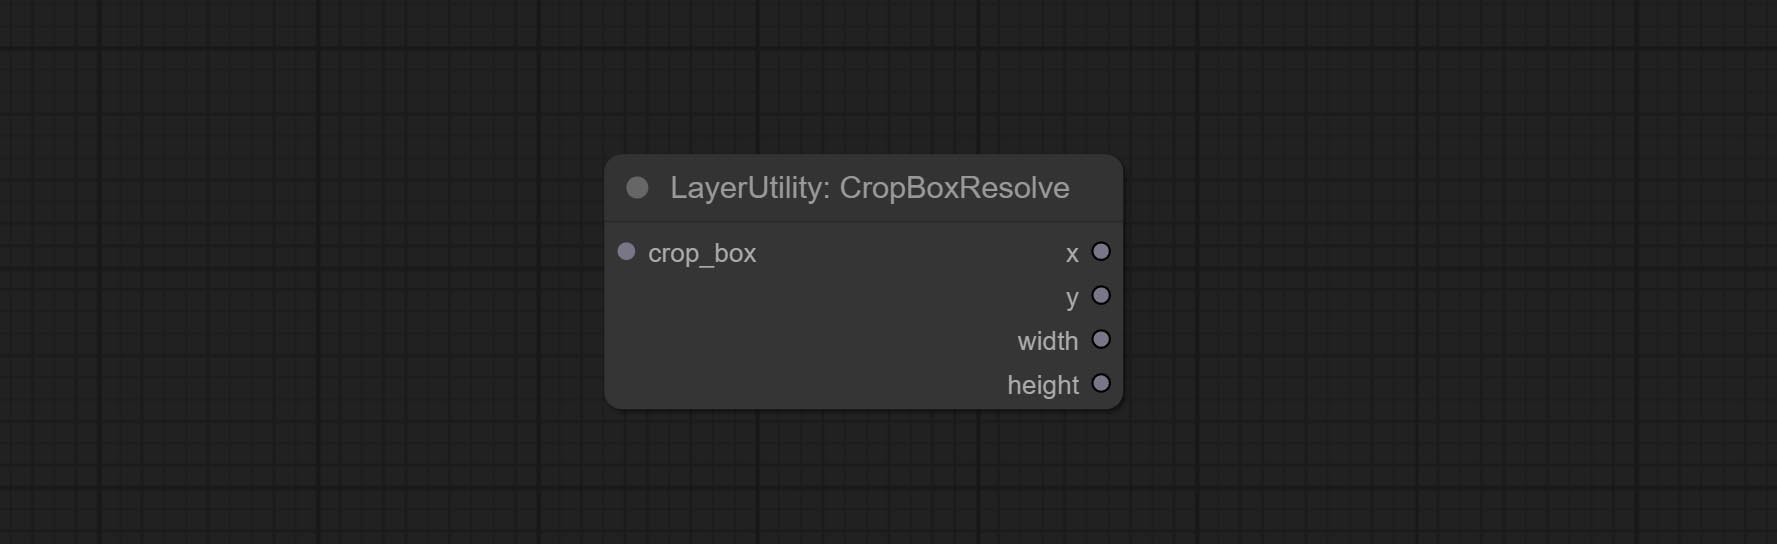
ImageScaleRestore
Image scaling. when this node is used in pairs, the image can be automatically restored to its original size on the second node. 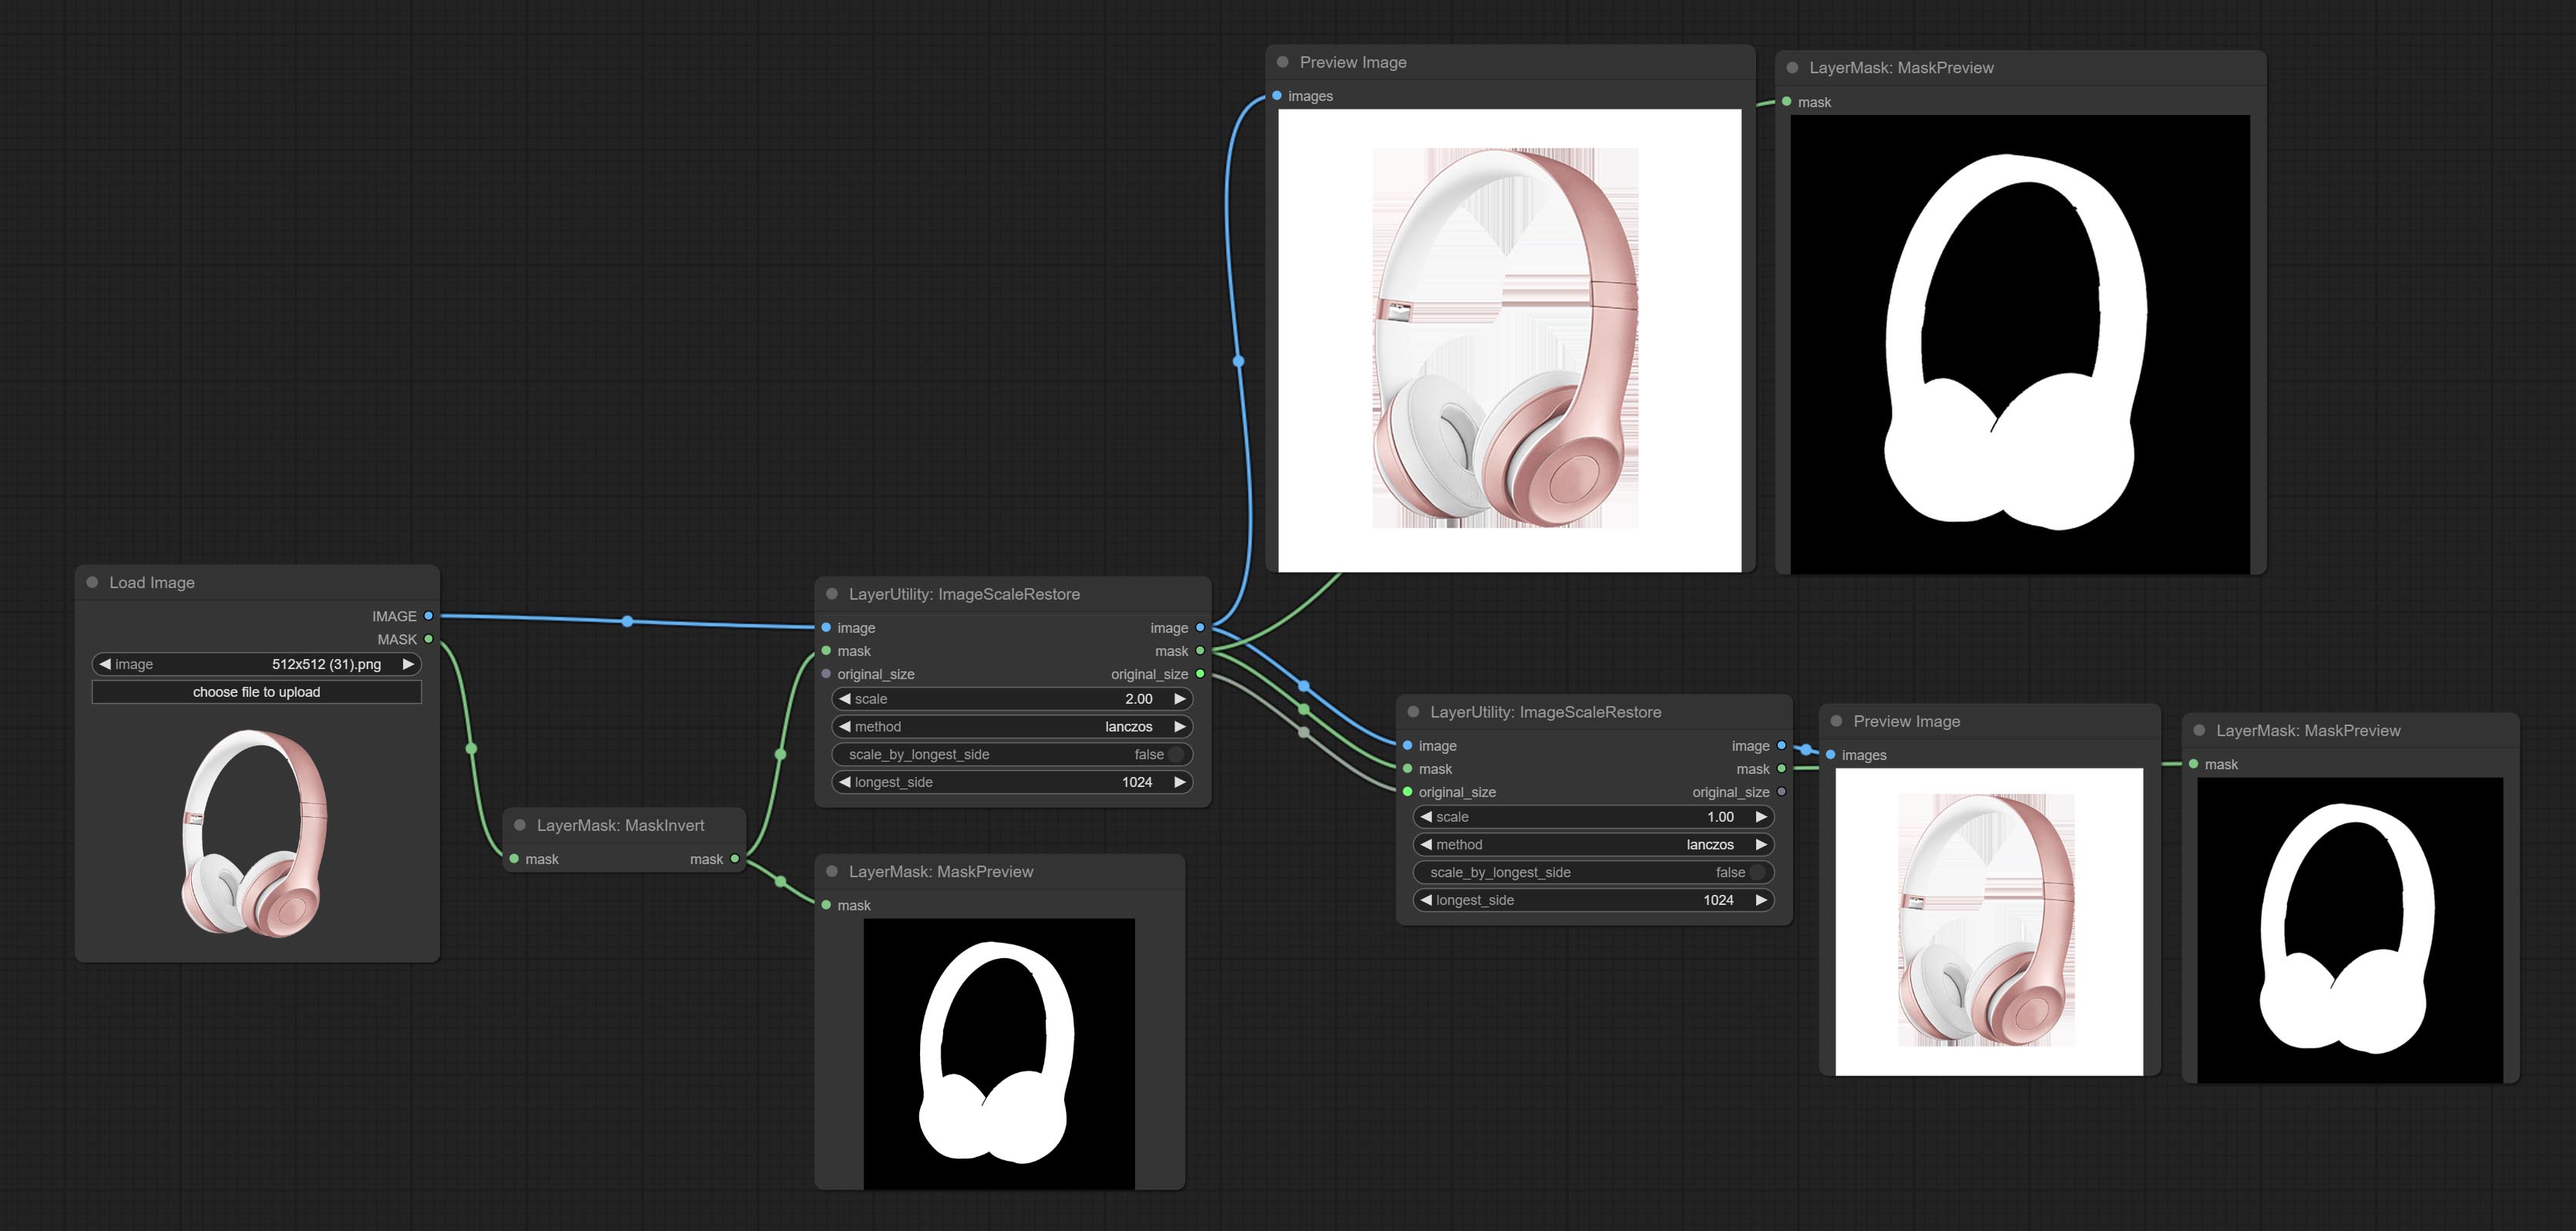
Node options:
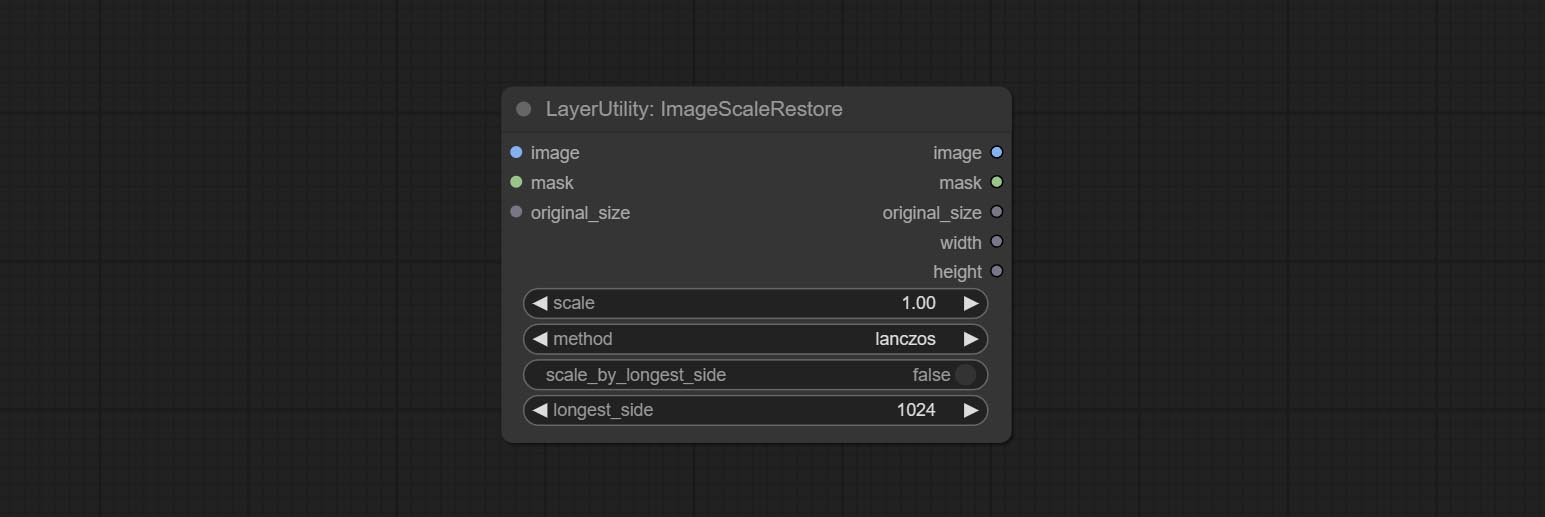
- image 5 : The input image.
- mask 2,5 : Mask of image.
- original_size: Optional input, used to restore the image to its original size.
- scale: Scale ratio. when the original_size have input, or scale_ by_longest_side is set to True, this setting will be ignored.
- scale_by_longest_side: Allow scaling by long edge size.
- longest_side: When the scale_by_longest_side is set to True, this will be used this value to the long edge of the image. when the original_size have input, this setting will be ignored.
Выходы:
- image: The scaled image.
- mask: If have mask input, the scaled mask will be output.
- original_size: The original size data of the image is used for subsequent node recovery.
- width: The output image's width.
- height: The output image's height.
ImageScaleRestoreV2
The V2 upgraded version of ImageScaleRestore.
Node options:
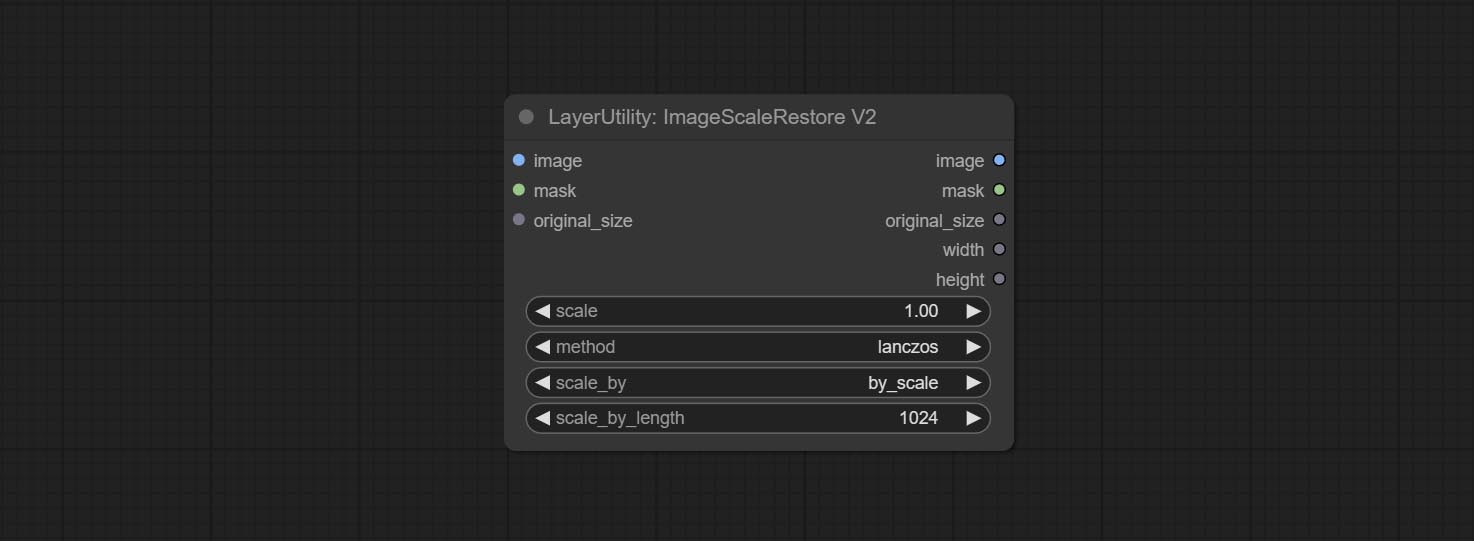
The following changes have been made based on ImageScaleRestore:
- scale_by: Allow scaling by specified dimensions for long, short, width, height, or total pixels. When this option is set to by_scale, use the scale value, and for other options, use the scale_by_length value.
- scale_by_length: The value here is used as
scale_by to specify the length of the edge.
ImageMaskScaleAs
Scale the image or mask to the size of the reference image (or reference mask). 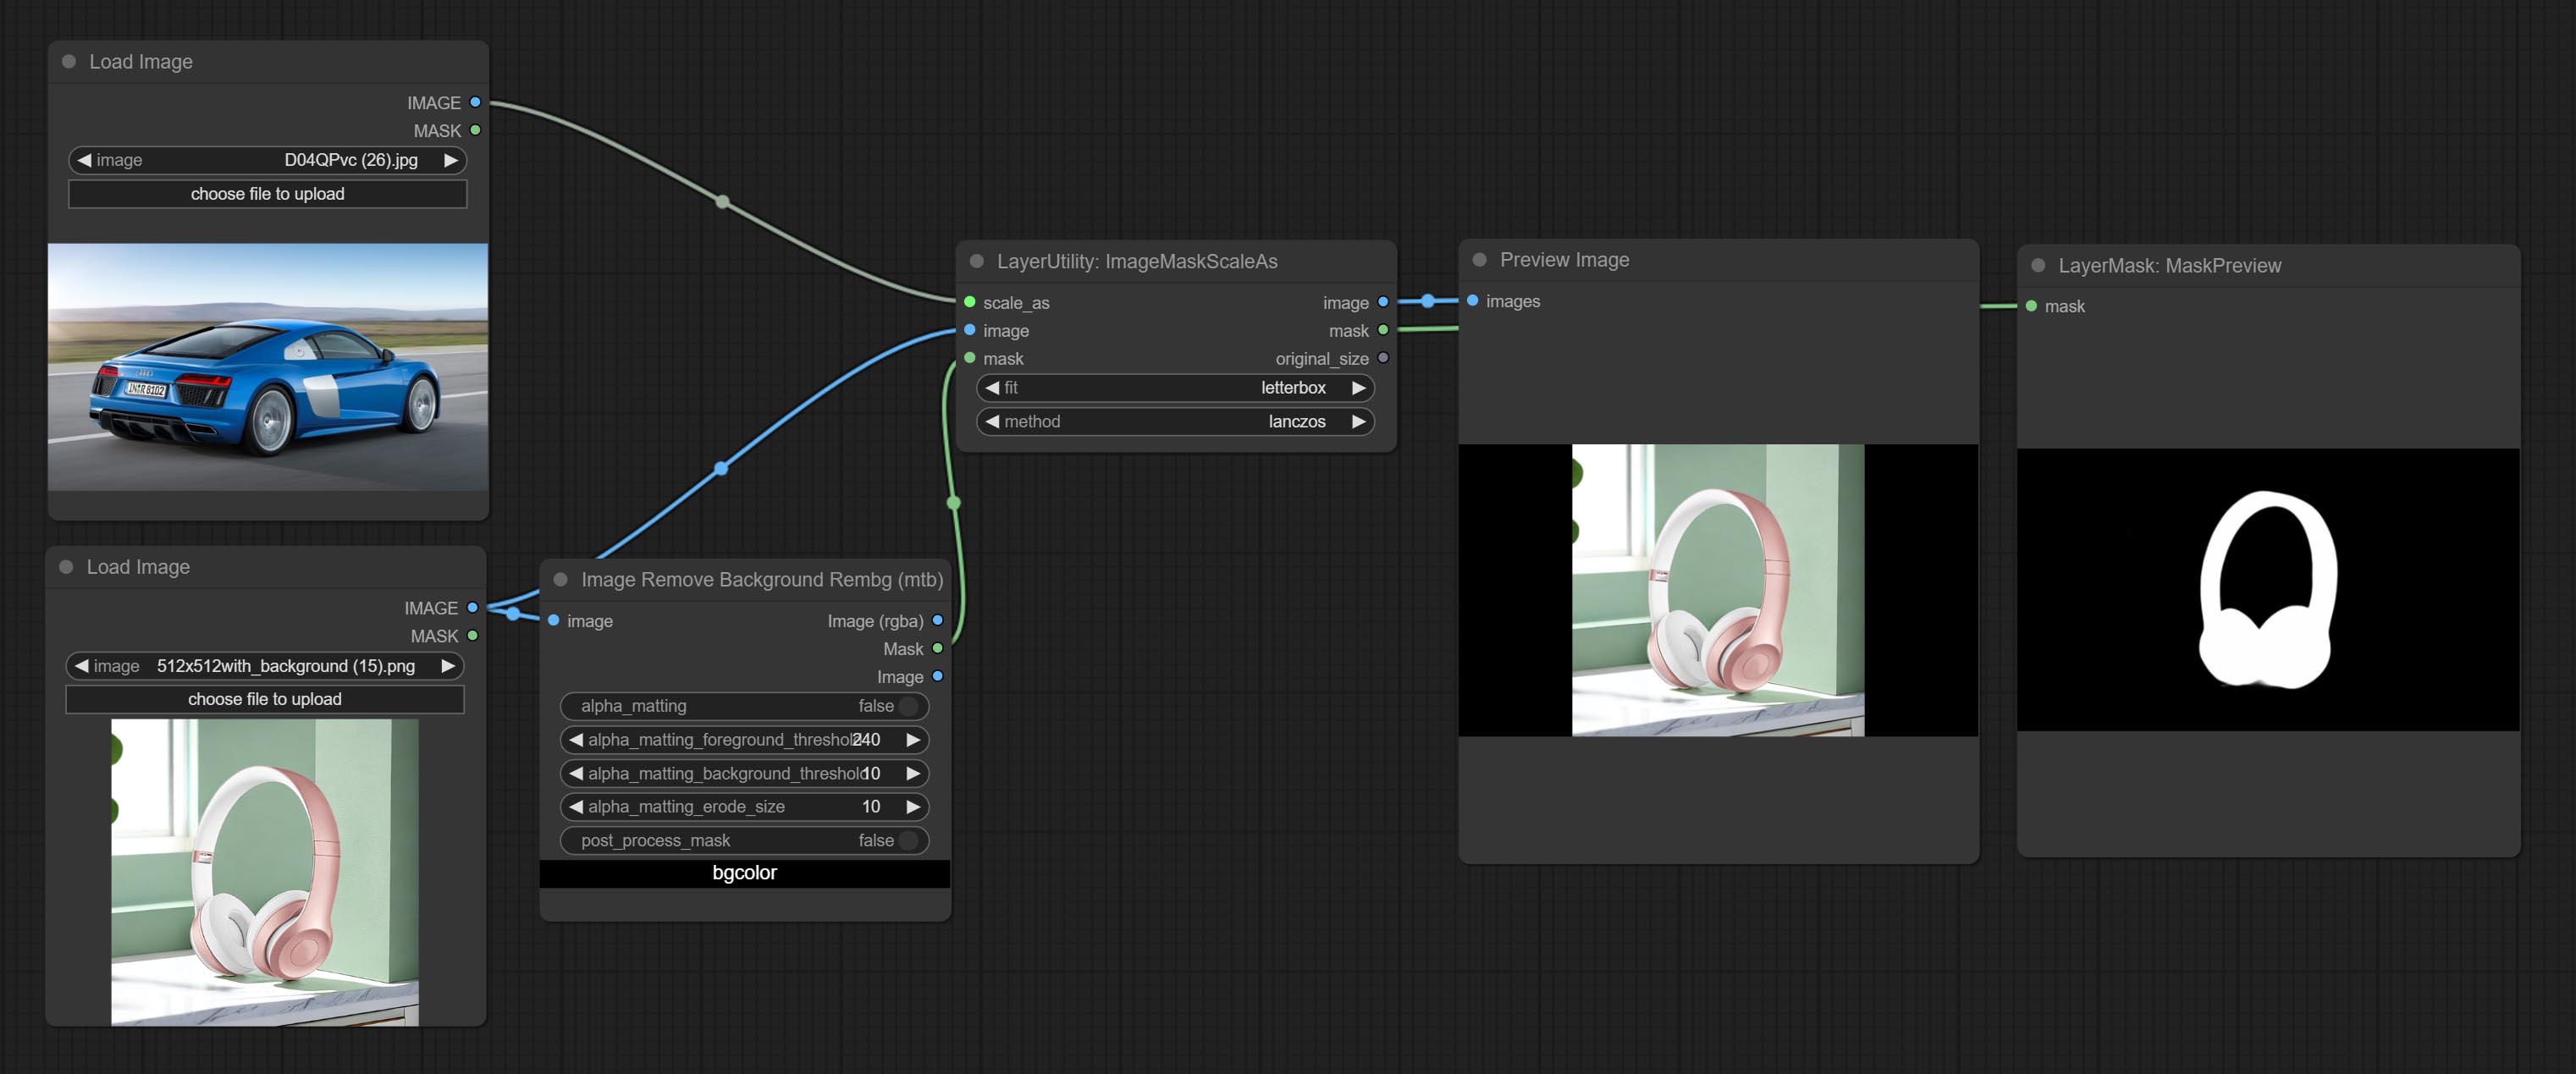
Node options: 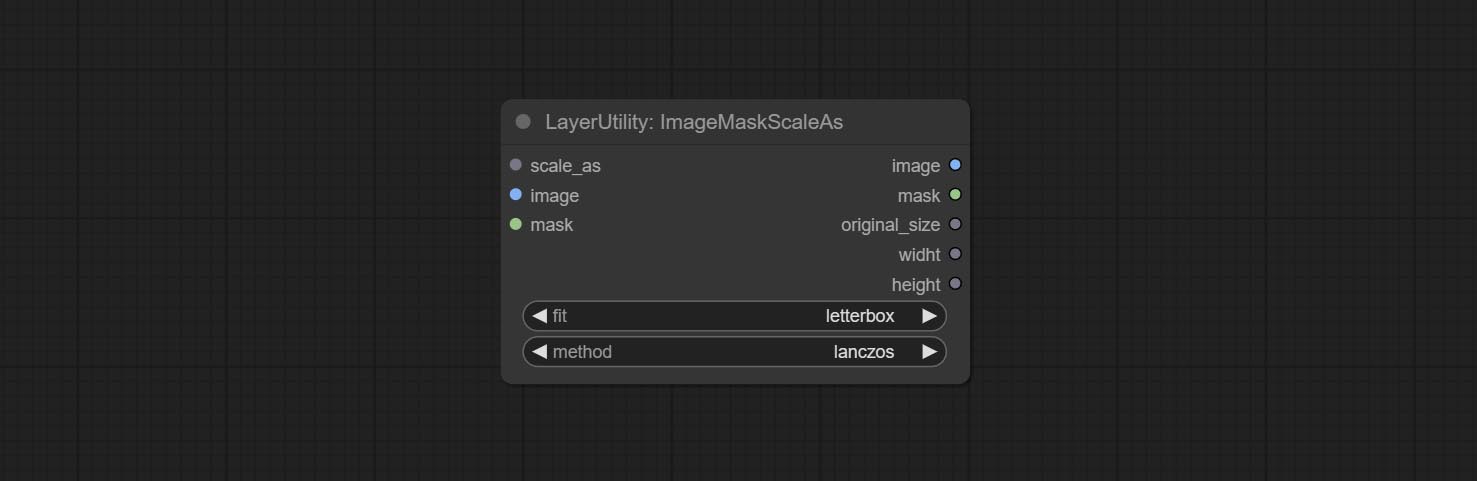
- scale_as * : Reference size. It can be an image or a mask.
- image: Image to be scaled. this option is optional input. if there is no input, a black image will be output.
- mask: Mask to be scaled. this option is optional input. if there is no input, a black mask will be output.
- fit: Scale aspect ratio mode. when the width to height ratio of the original image does not match the scaled size, there are three modes to choose from, The letterbox mode retains the complete frame and fills in the blank spaces with black; The crop mode retains the complete short edge, and any excess of the long edge will be cut off; The fill mode does not maintain frame ratio and fills the screen with width and height.
- method: Scaling sampling methods, including lanczos, bicubic, hamming, bilinear, box, and nearest.
* Only limited to input images and masks. forcing the integration of other types of inputs will result in node errors.
Выходы:
- image: If there is an image input, the scaled image will be output.
- mask: If there is a mask input, the scaled mask will be output.
- original_size: The original size data of the image is used for subsequent node recovery.
- width: The output image's width.
- height: The output image's height.
ImageScaleByAspectRatio
Scale the image or mask by aspect ratio. the scaled size can be rounded to a multiple of 8 or 16, and can be scaled to the long side size. 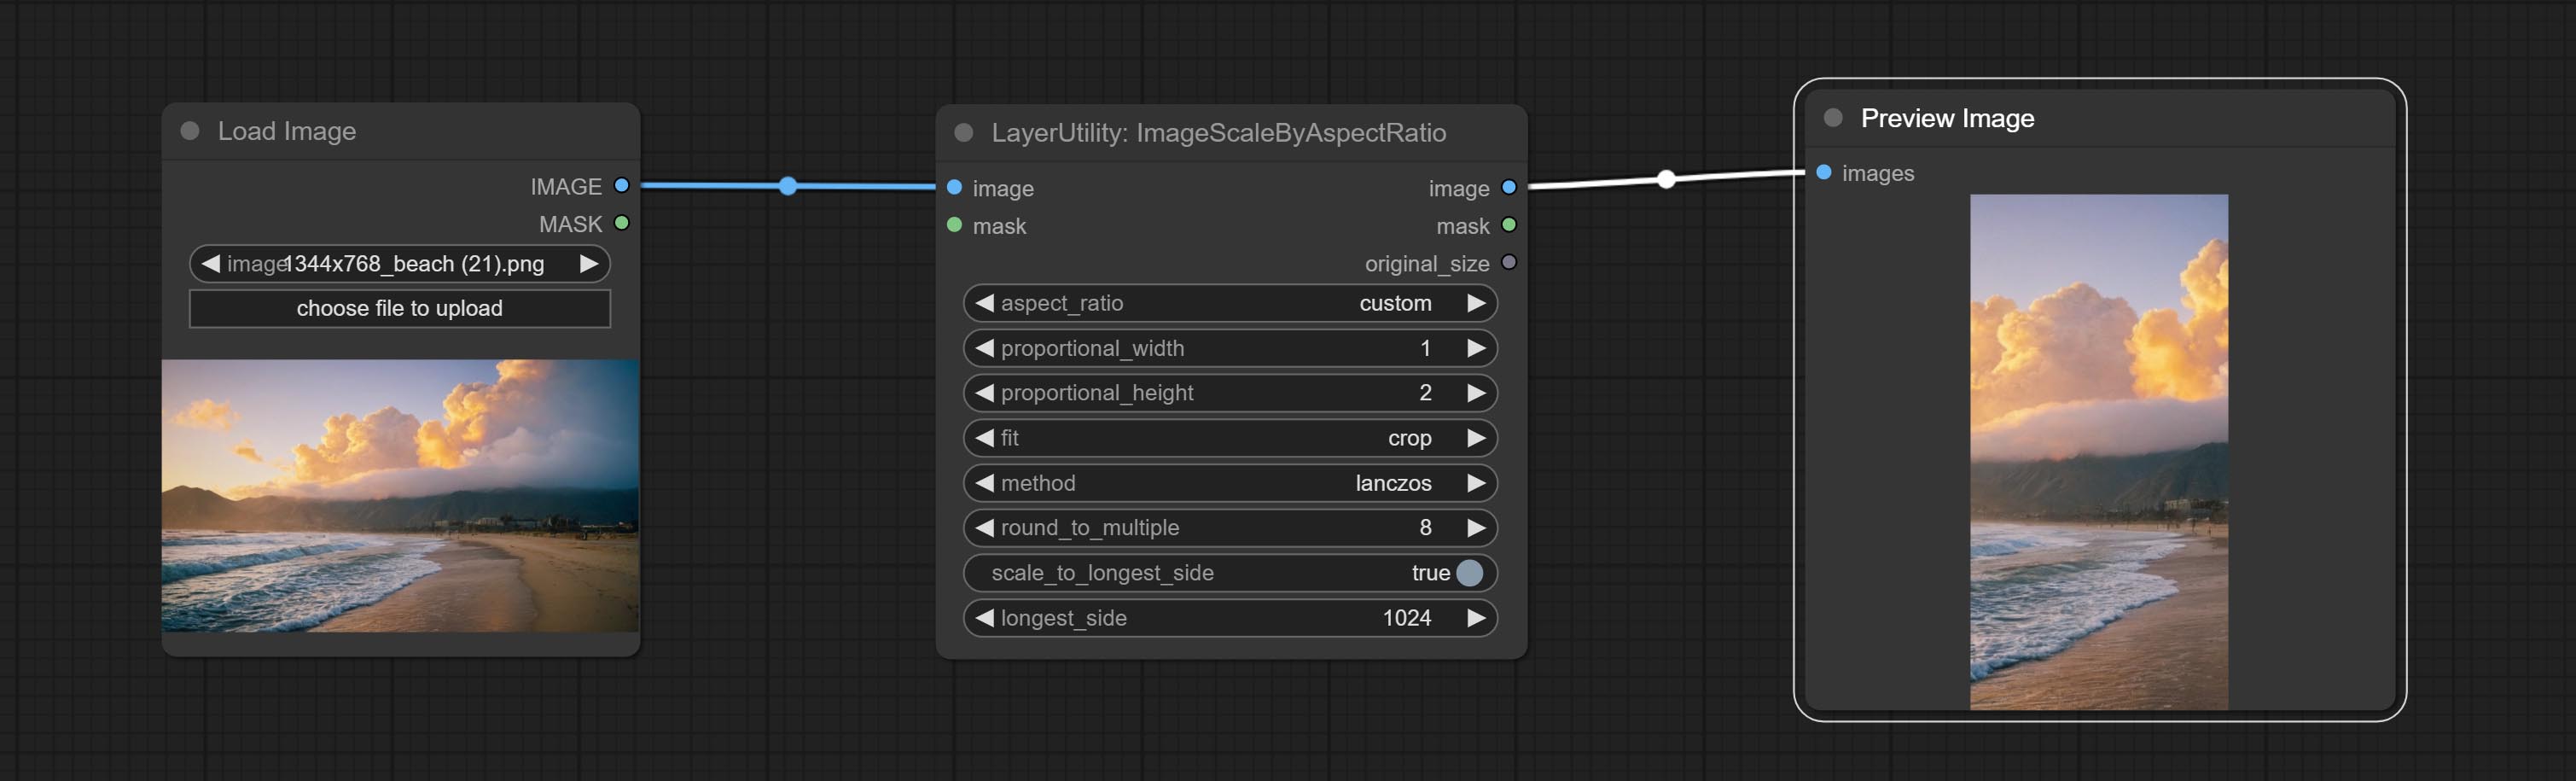
Node options:
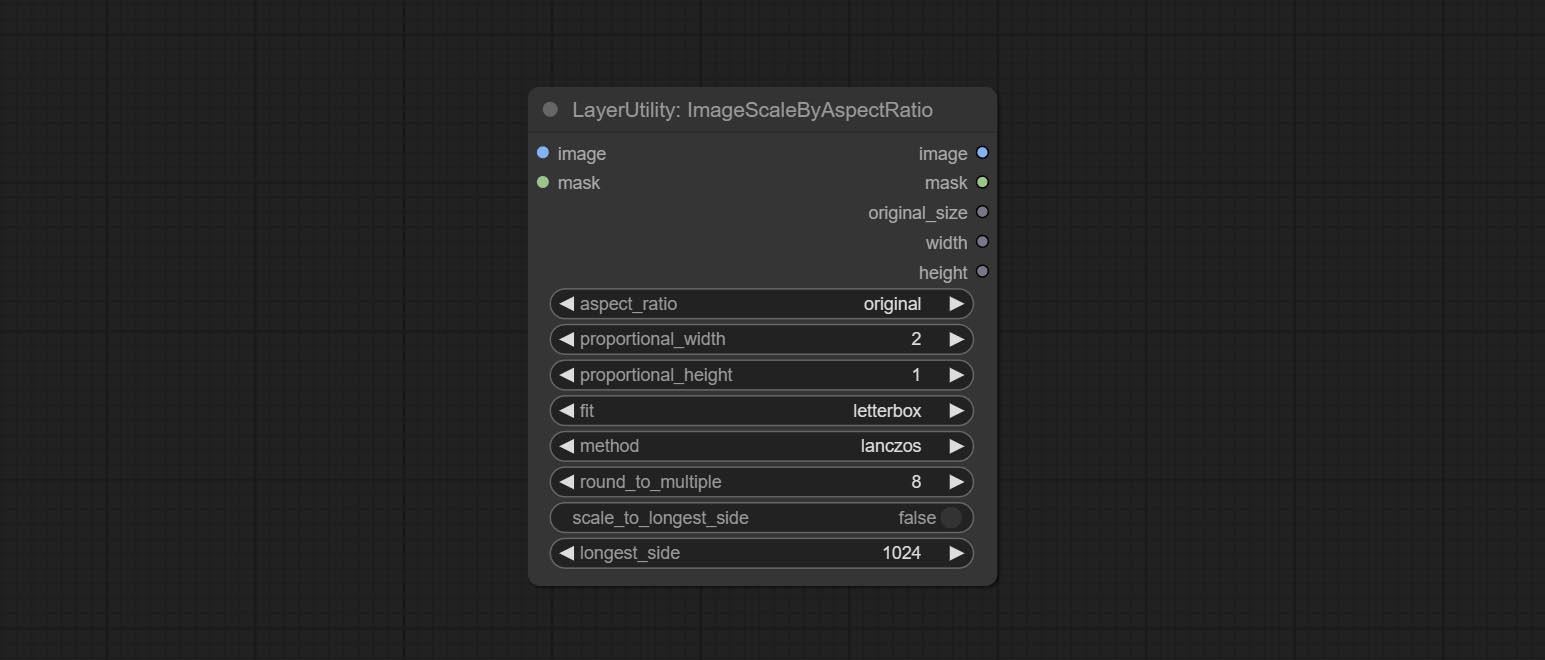
- aspect_ratio: Here are several common frame ratios provided. alternatively, you can choose "original" to keep original ratio or customize the ratio using "custom".
- proportional_width: Proportional width. if the aspect ratio option is not "custom", this setting will be ignored.
- proportional_height: Proportional height. if the aspect ratio option is not "custom", this setting will be ignored.
- fit: Scale aspect ratio mode. when the width to height ratio of the original image does not match the scaled size, there are three modes to choose from, The letterbox mode retains the complete frame and fills in the blank spaces with black; The crop mode retains the complete short edge, and any excess of the long edge will be cut off; The fill mode does not maintain frame ratio and fills the screen with width and height.
- method: Scaling sampling methods, including lanczos, bicubic, hamming, bilinear, box, and nearest.
- round_to_multiple: Round multiples. for example, setting it to 8 will force the width and height to be multiples of 8.
- scale_by_longest_side: Allow scaling by long edge size.
- longest_side: When the scale_by_longest_side is set to True, this will be used this value to the long edge of the image. when the original_size have input, this setting will be ignored.
Выходы:
- image: If have image input, the scaled image will be output.
- mask: If have mask input, the scaled mask will be output.
- original_size: The original size data of the image is used for subsequent node recovery.
- width: The output image's width.
- height: The output image's height.
ImageScaleByAspectRatioV2
V2 Upgraded Version of ImageScaleByAspectRatio
Node options:
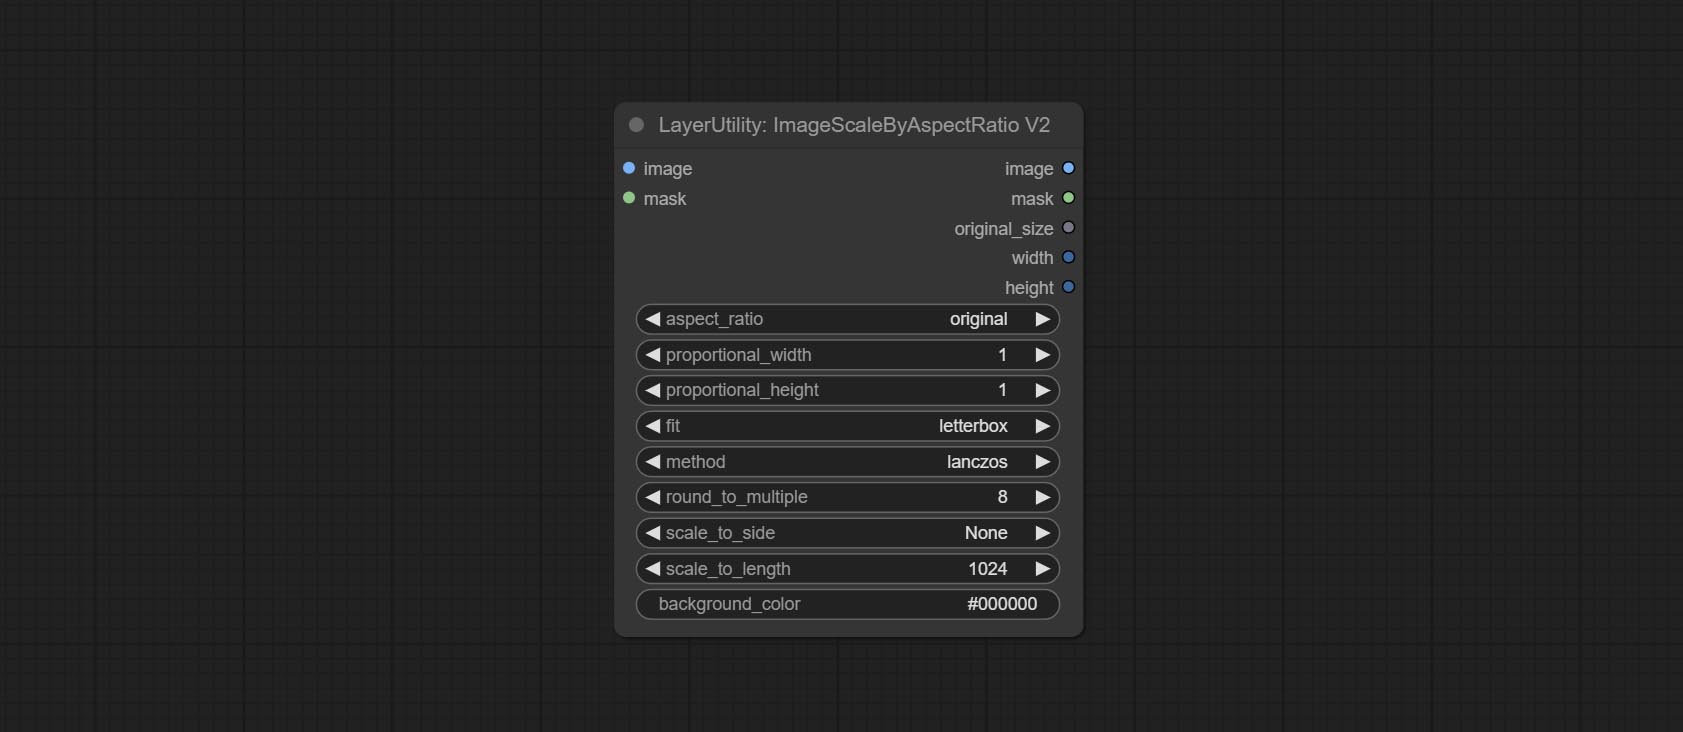
The following changes have been made based on ImageScaleByAspectRatio:
- scale_to_side: Allow scaling by specified dimensions for long, short, width, height, or total pixels.
- scale_to_length: The numerical value here serves as the length of the specified edge or the total pixels (kilo pixels) for scale_to_side.
- background_color 4 : The color of the background.
QWenImage2Prompt
Inference the prompts based on the image. this node is repackage of the ComfyUI_VLM_nodes's UForm-Gen2 Qwen Node , thanks to the original author. Download model files from huggingface or Baidu Netdisk to ComfyUI/models/LLavacheckpoints/files_for_uform_gen2_qwen folder.
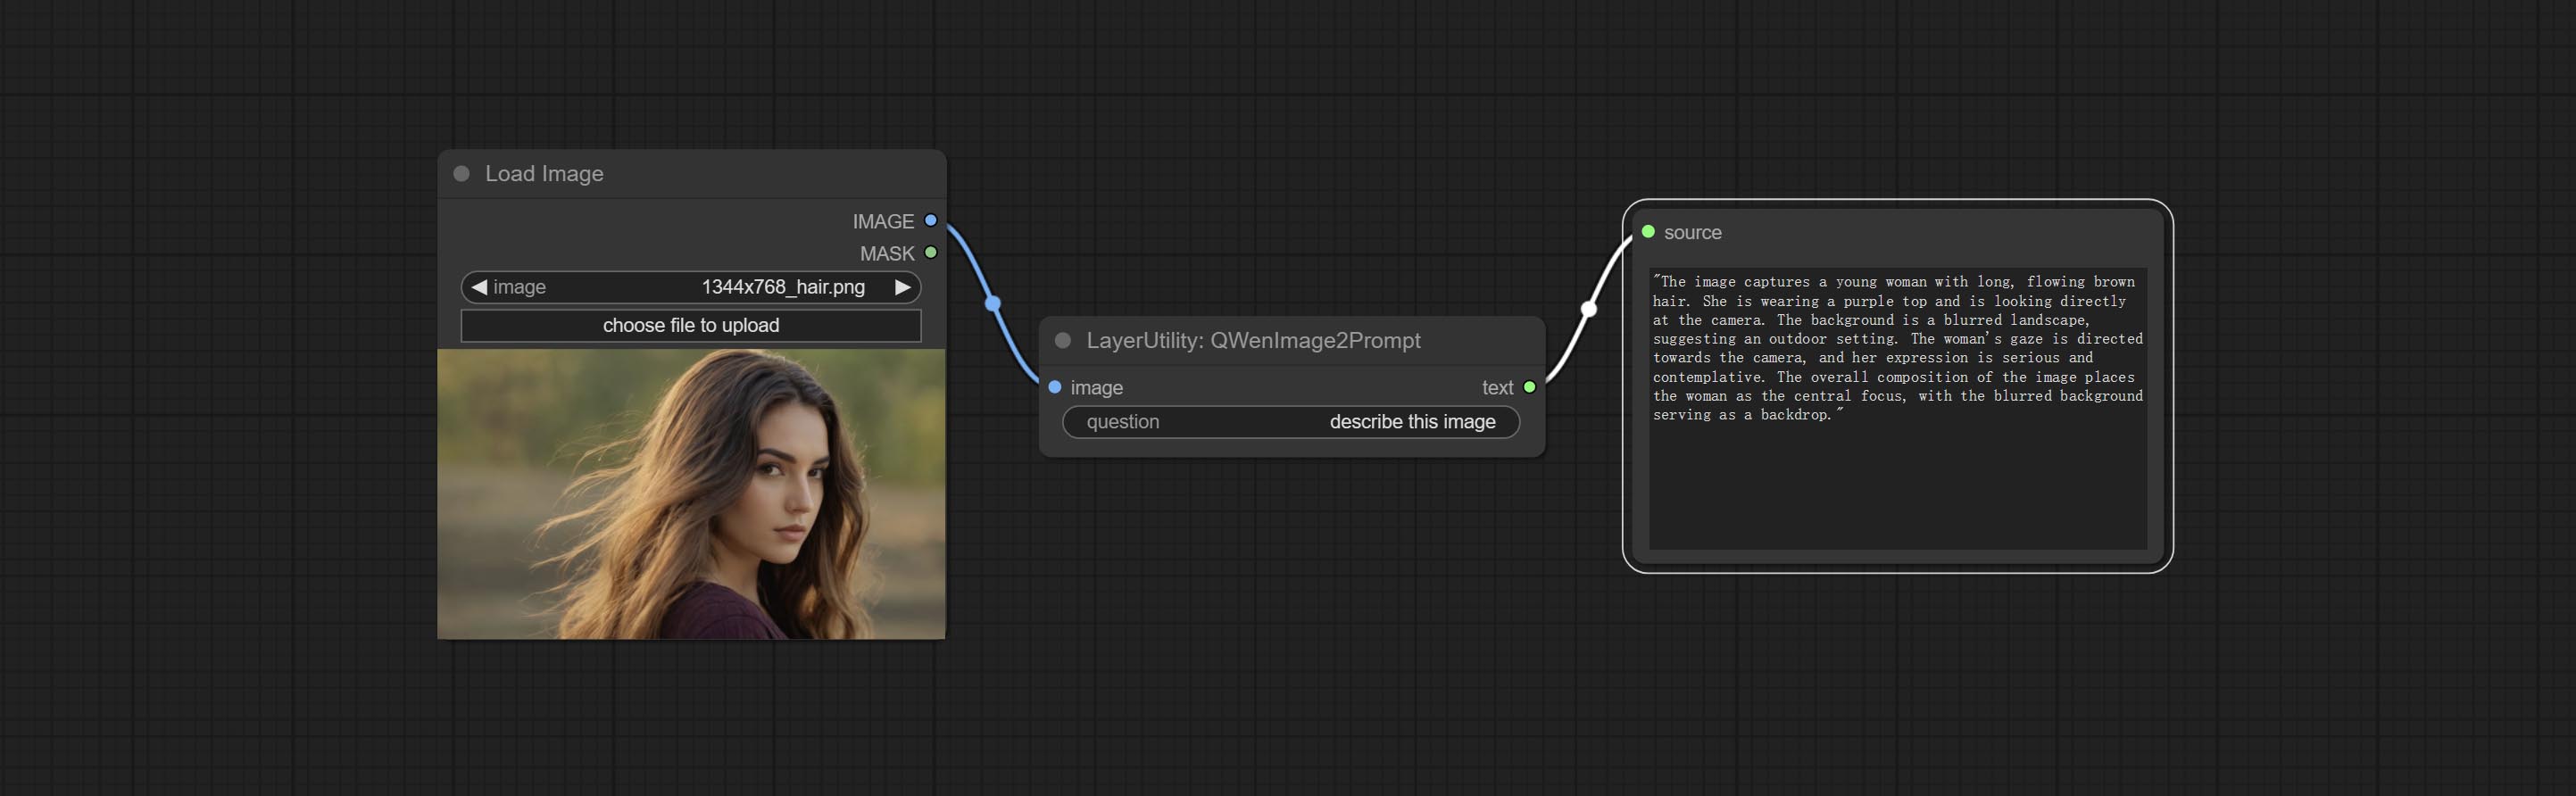
Node Options:
- question: Prompt of UForm-Gen-QWen model.
LlamaVision
Use the Llama 3.2 vision model for local inference. Can be used to generate prompt words. part of the code for this node comes from ComfyUI-PixtralLlamaMolmoVision, thank you to the original author. To use this node, the transformers need upgraded to 4.45.0 or higher. Download models from BaiduNetdisk or huggingface/SeanScripts , and copy to ComfyUI/models/LLM . 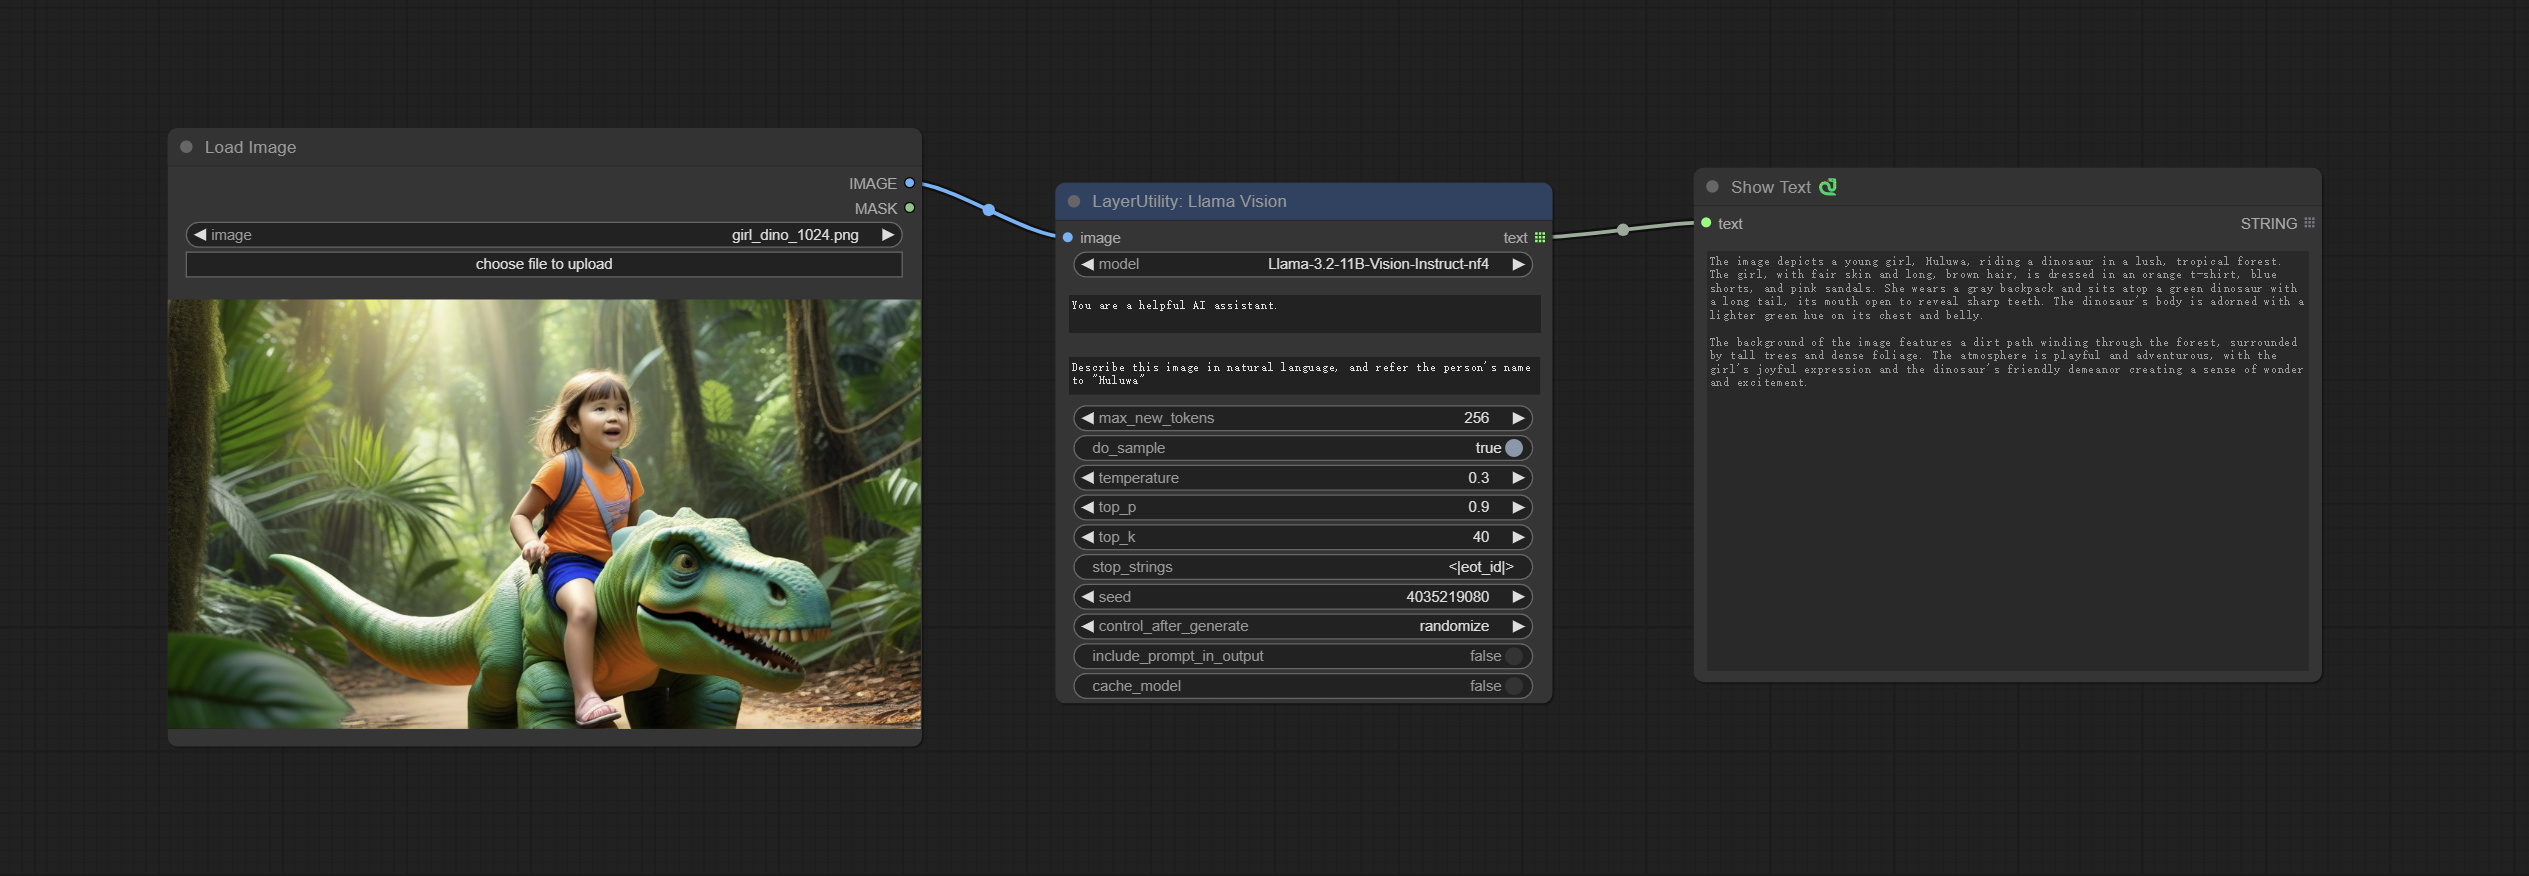
Node Options:
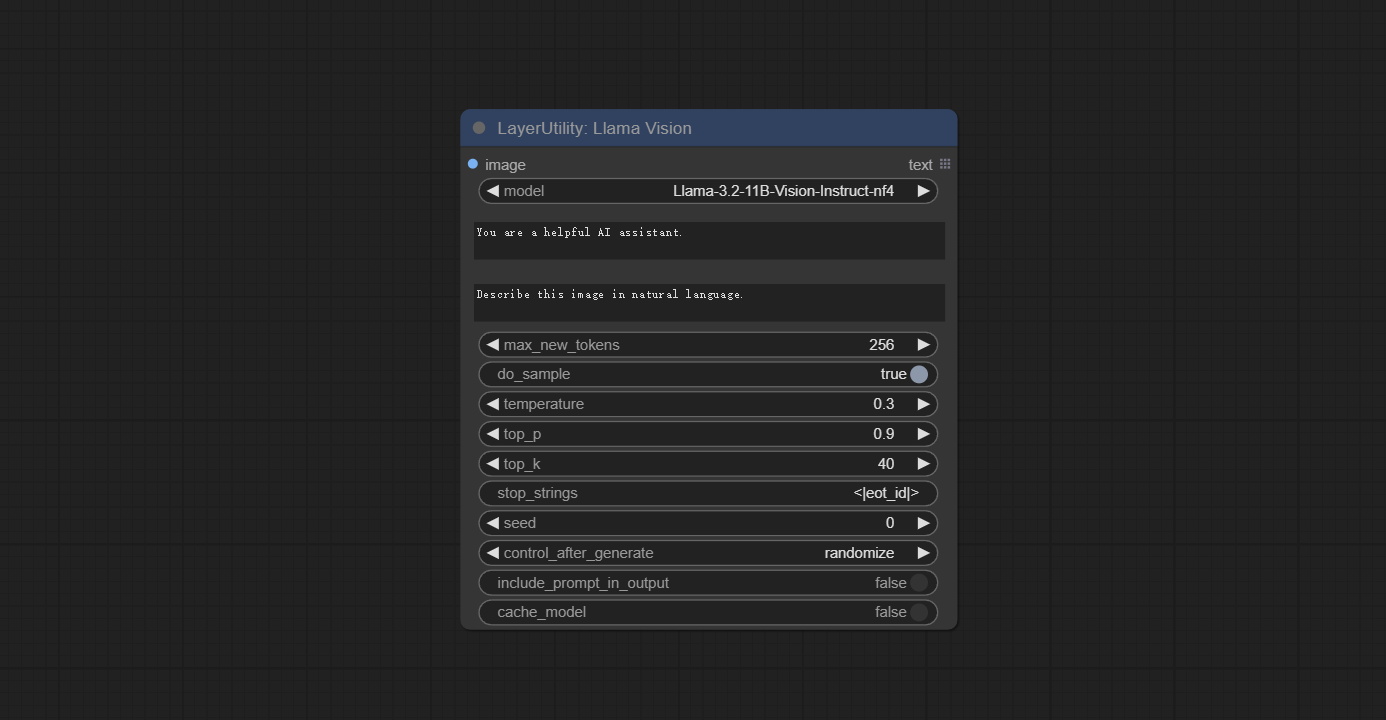
- image: Image input.
- model: Currently, only the "Llama-3.2-11B-Vision-Instruct-nf4" is available.
- system_prompt: System prompt words for LLM model.
- user_prompt: User prompt words for LLM model.
- max_new_tokens: max_new_tokens for LLM model.
- do_sample: do_sample for LLM model.
- top-p: top_p for LLM model.
- top_k: top_k for LLM model.
- stop_strings: The stop strings.
- seed: The seed of random number.
- control_after_generate: Seed change options. If this option is fixed, the generated random number will always be the same.
- include_prompt_in_output: Does the output contain prompt words.
- cache_model: Whether to cache the model.
JoyCaption2
Use the JoyCaption-alpha-two model for local inference. Can be used to generate prompt words. this node is https://huggingface.co/John6666/joy-caption-alpha-two-cli-mod Implementation in ComfyUI, thank you to the original author. Download models form BaiduNetdisk and BaiduNetdisk , or huggingface/Orenguteng and huggingface/unsloth , then copy to ComfyUI/models/LLM , Download models from BaiduNetdisk or huggingface/google , and copy to ComfyUI/models/clip , Donwload the cgrkzexw-599808 folder from BaiduNetdisk or huggingface/John6666 , and copy to ComfyUI/models/Joy_caption 。 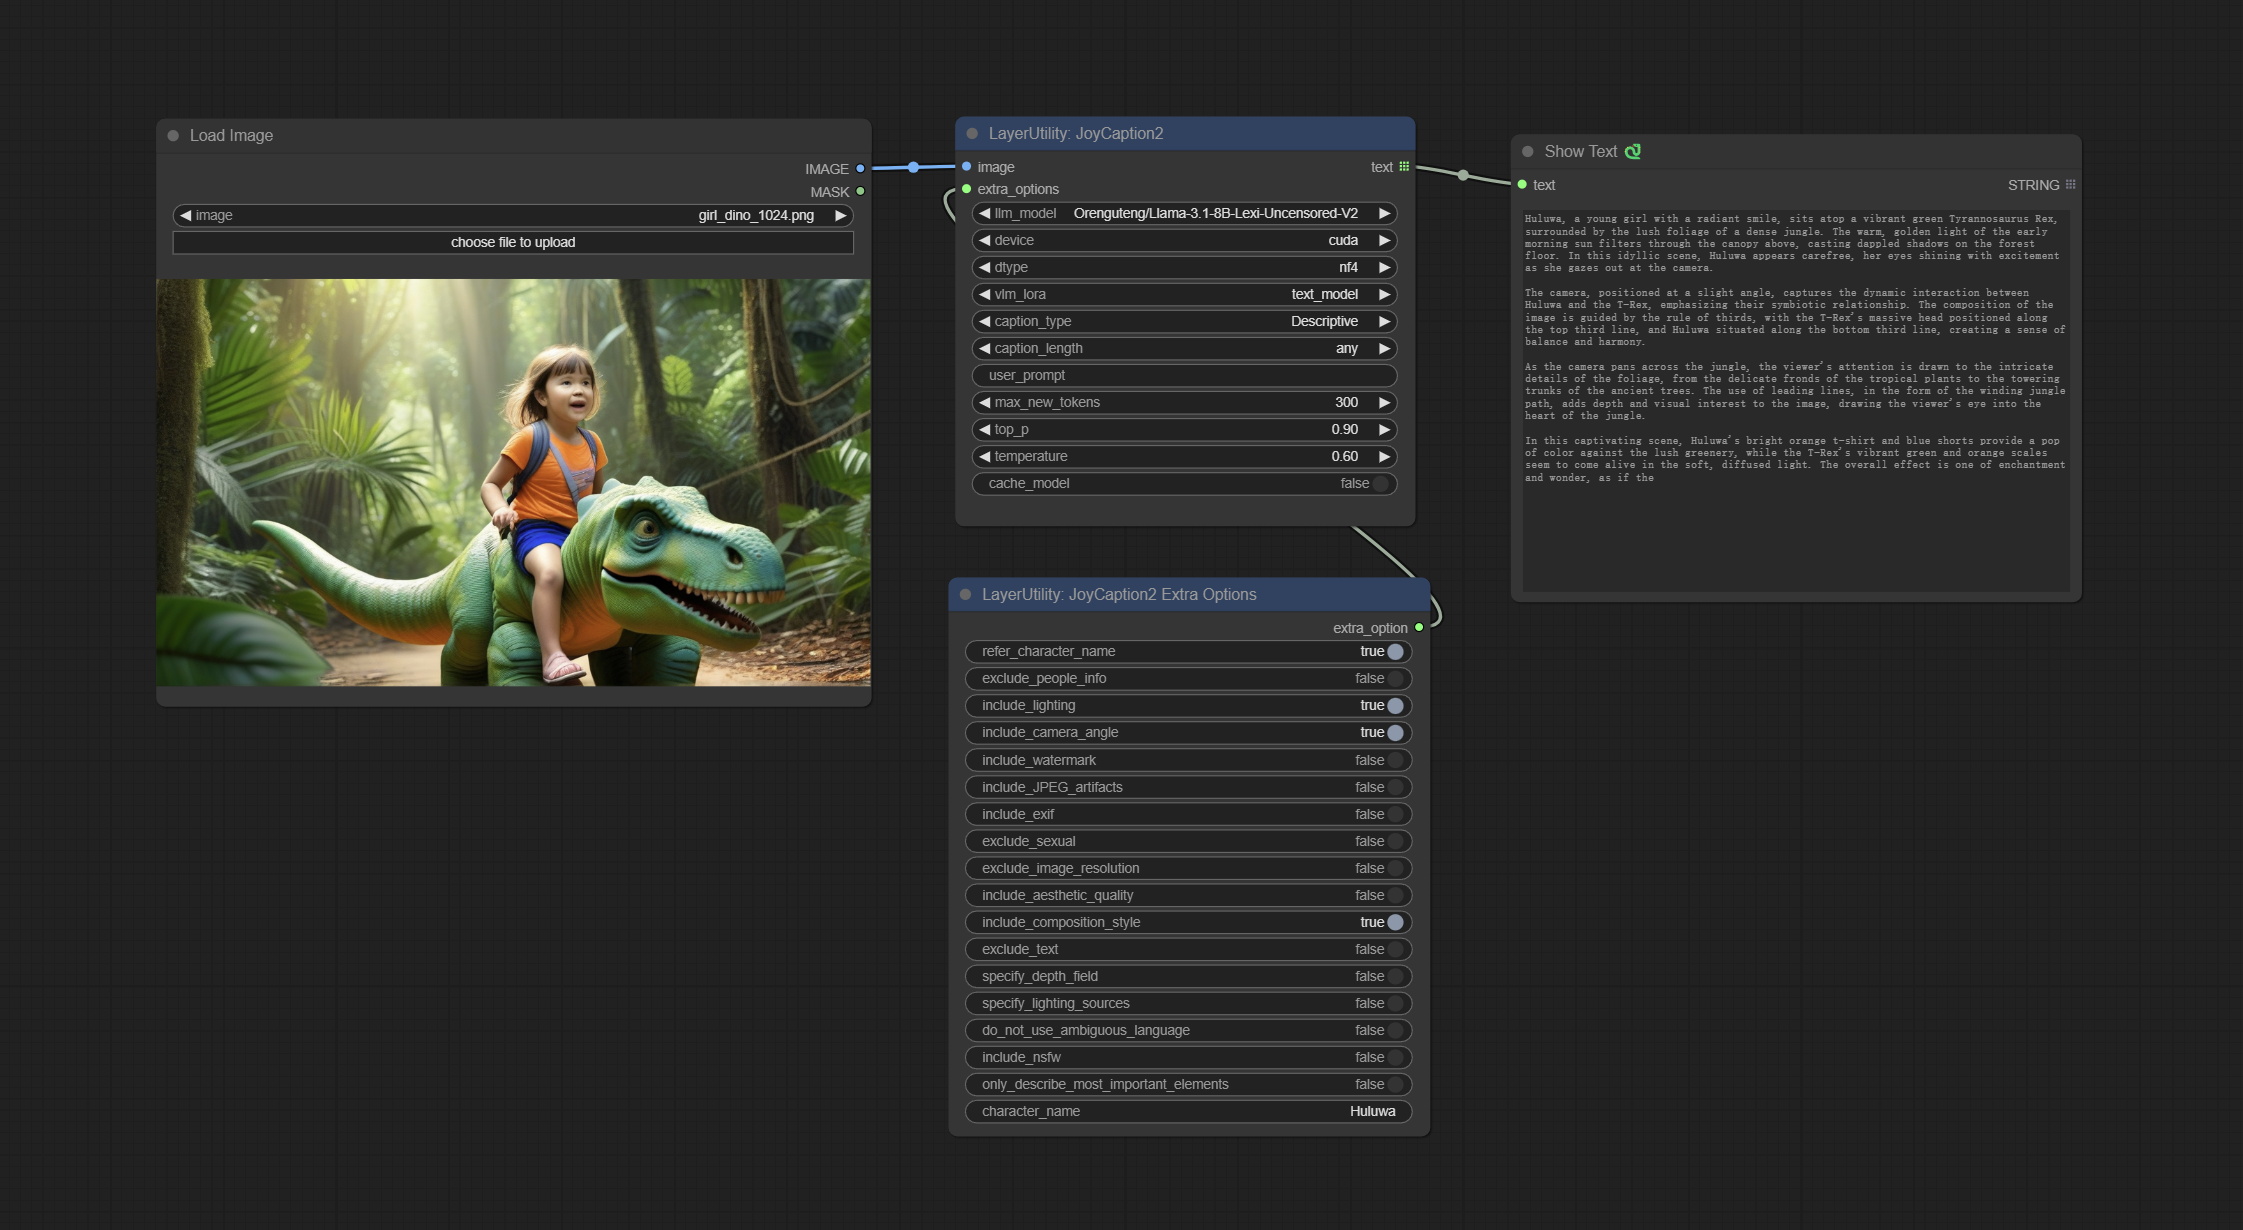
Node Options:

- image: Image input.
- extra_options: Input the extra_options.
- llm_model: There are two LLM models to choose, Orenguteng/Llama-3.1-8B-Lexi-Uncensored-V2 and unsloth/Meta-Llama-3.1-8B-Instruct.
- device: Model loading device. Currently, only CUDA is supported.
- dtype: Model precision, nf4 and bf16.
- vlm_lora: Whether to load text_madel.
- caption_type: Caption type options, including: "Descriptive", "Descriptive (Informal)", "Training Prompt", "MidJourney", "Booru tag list", "Booru-like tag list", "Art Critic", "Product Listing", "Social Media Post".
- caption_length: The length of caption.
- user_prompt: User prompt words for LLM model. If there is content here, it will overwrite all the settings for caption_type and extra_options.
- max_new_tokens: The max_new_token parameter of LLM.
- do_sample: The do_sample parameter of LLM.
- top-p: The top_p parameter of LLM.
- temperature: The temperature parameter of LLM.
- cache_model: Whether to cache the model.
JoyCaption2Split
The node of JoyCaption2 separate model loading and inference, and when multiple JoyCaption2 nodes are used, the model can be shared to improve efficiency.
Node Options:
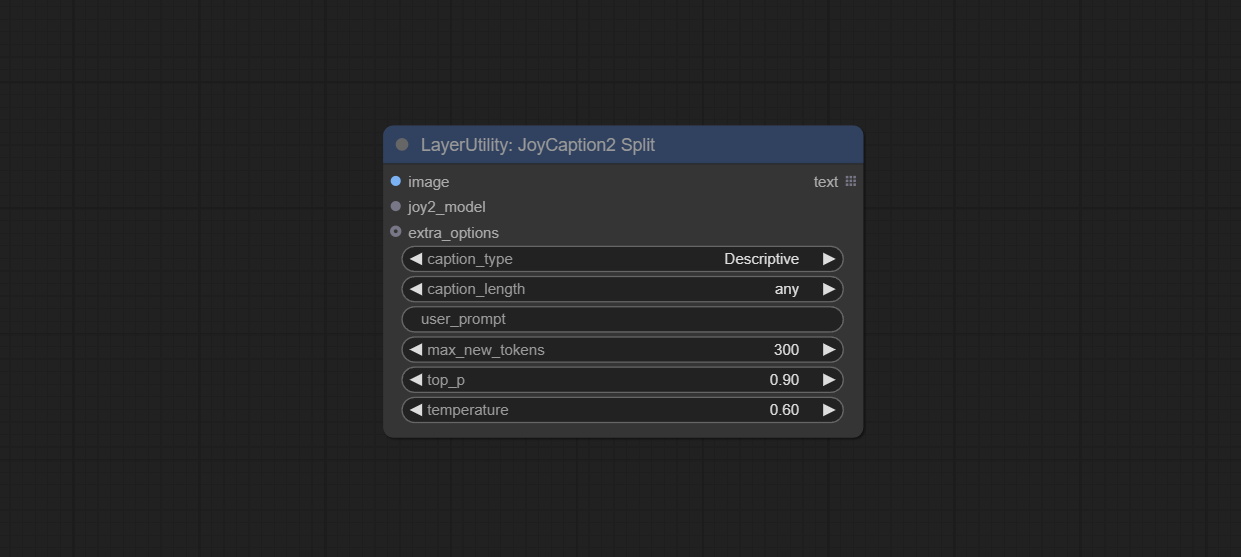
- image: Image input.。
- joy2_model: The JoyCaption model input.
- extra_options: Input the extra_options.
- caption_type: Caption type options, including: "Descriptive", "Descriptive (Informal)", "Training Prompt", "MidJourney", "Booru tag list", "Booru-like tag list", "Art Critic", "Product Listing", "Social Media Post".
- caption_length: The length of caption.
- user_prompt: User prompt words for LLM model. If there is content here, it will overwrite all the settings for caption_type and extra_options.
- max_new_tokens: The max_new_token parameter of LLM.
- do_sample: The do_sample parameter of LLM.
- top-p: The top_p parameter of LLM.
- temperature: The temperature parameter of LLM.
LoadJoyCaption2Model
JoyCaption2's model loading node, used in conjunction with JoyCaption2Split.
Node Options:
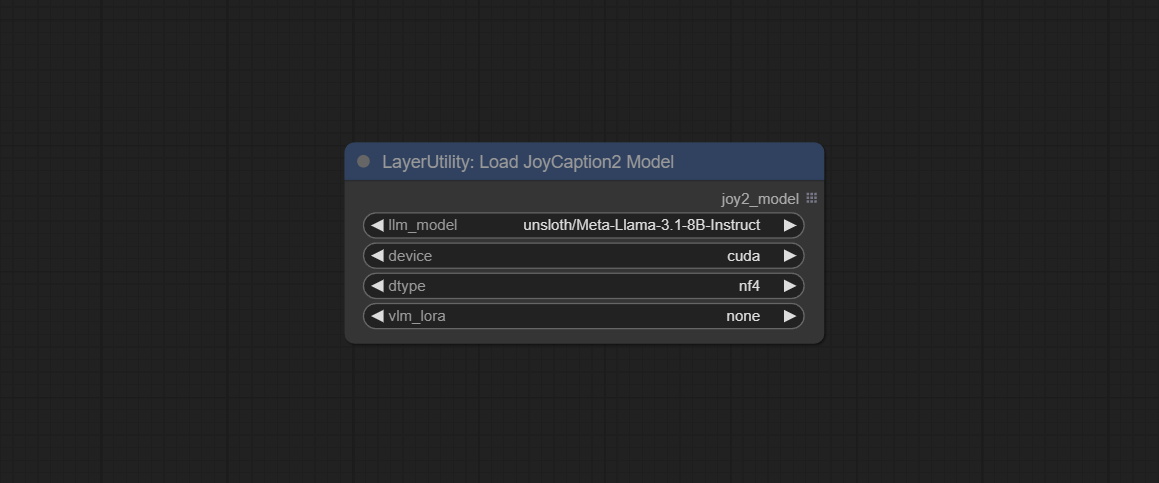
- llm_model: There are two LLM models to choose, Orenguteng/Llama-3.1-8B-Lexi-Uncensored-V2 and unsloth/Meta-Llama-3.1-8B-Instruct.
- device: Model loading device. Currently, only CUDA is supported.
- dtype: Model precision, nf4 and bf16.
- vlm_lora: Whether to load text_madel.
JoyCaption2ExtraOptions
The extra_options parameter node of JoyCaption2.
Node Options:
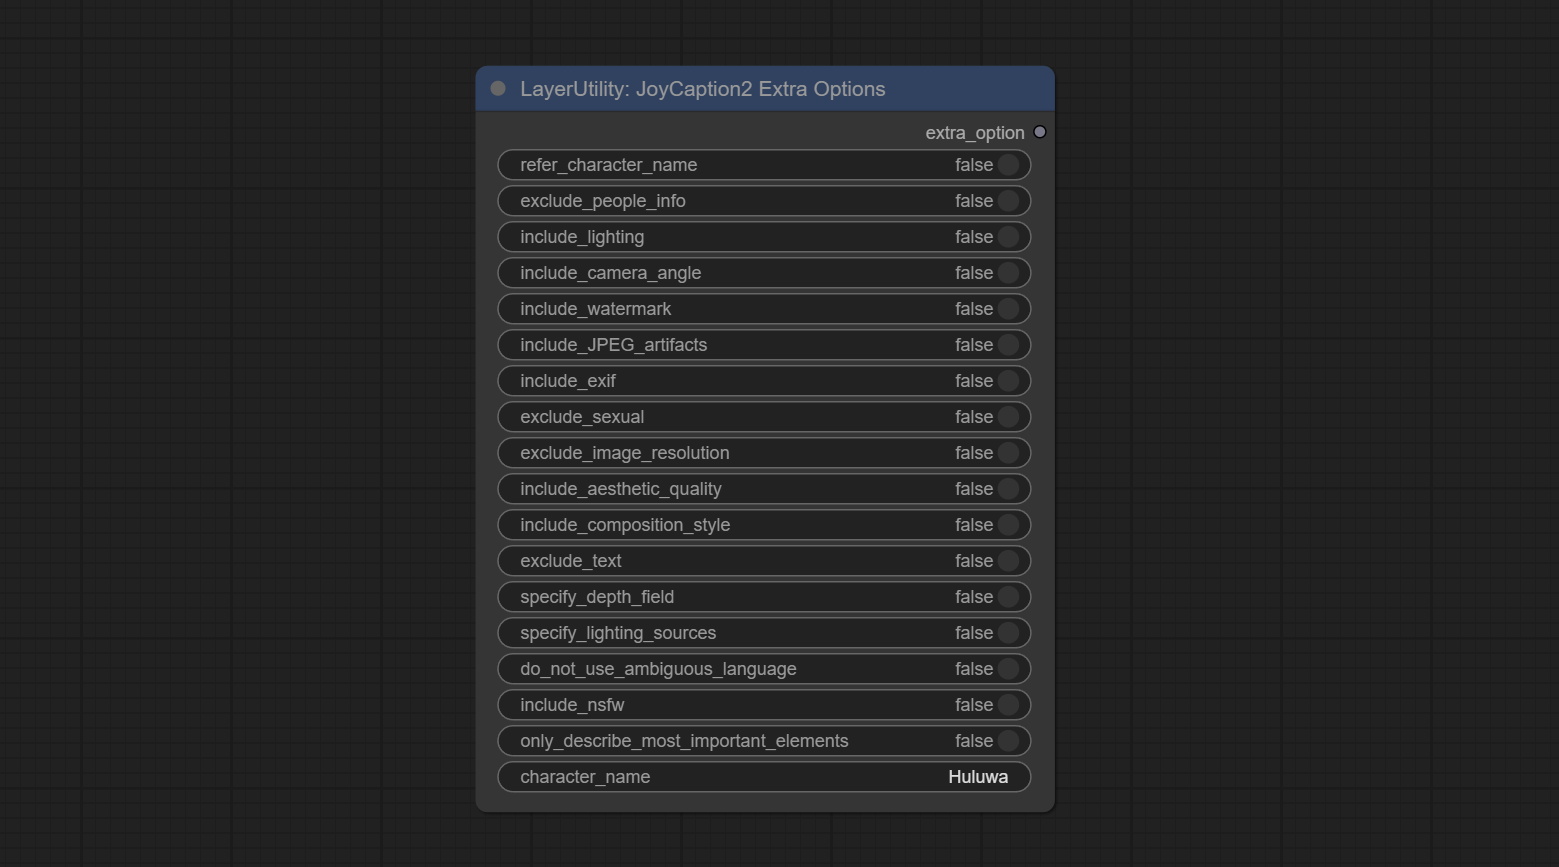
- refer_character_name: If there is a person/character in the image you must refer to them as {name}.
- exclude_people_info: Do NOT include information about people/characters that cannot be changed (like ethnicity, gender, etc), but do still include changeable attributes (like hair style).
- include_lighting: Include information about lighting.
- include_camera_angle: Include information about camera angle.
- include_watermark: Include information about whether there is a watermark or not.
- include_JPEG_artifacts: Include information about whether there are JPEG artifacts or not.
- include_exif: If it is a photo you MUST include information about what camera was likely used and details such as aperture, shutter speed, ISO, etc.
- exclude_sexual: Do NOT include anything sexual; keep it PG.
- exclude_image_resolution: Do NOT mention the image's resolution.
- include_aesthetic_quality: You MUST include information about the subjective aesthetic quality of the image from low to very high.
- include_composition_style: Include information on the image's composition style, such as leading lines, rule of thirds, or symmetry.
- exclude_text: Do NOT mention any text that is in the image.
- specify_depth_field: Specify the depth of field and whether the background is in focus or blurred.
- specify_lighting_sources: If applicable, mention the likely use of artificial or natural lighting sources.
- do_not_use_ambiguous_language: Do NOT use any ambiguous language.
- include_nsfw: Include whether the image is sfw, suggestive, or nsfw.
- only_describe_most_important_elements: ONLY describe the most important elements of the image.
- character_name: Person/Character Name, if choice
refer_character_name .
PhiPrompt
Use Microsoft Phi 3.5 text and visual models for local inference. Can be used to generate prompt words, process prompt words, or infer prompt words from images. Running this model requires at least 16GB of video memory. Download model files from BaiduNetdisk or huggingface.co/microsoft/Phi-3.5-vision-instruct and huggingface.co/microsoft/Phi-3.5-mini-instruct and copy to ComfyUImodelsLLM folder. 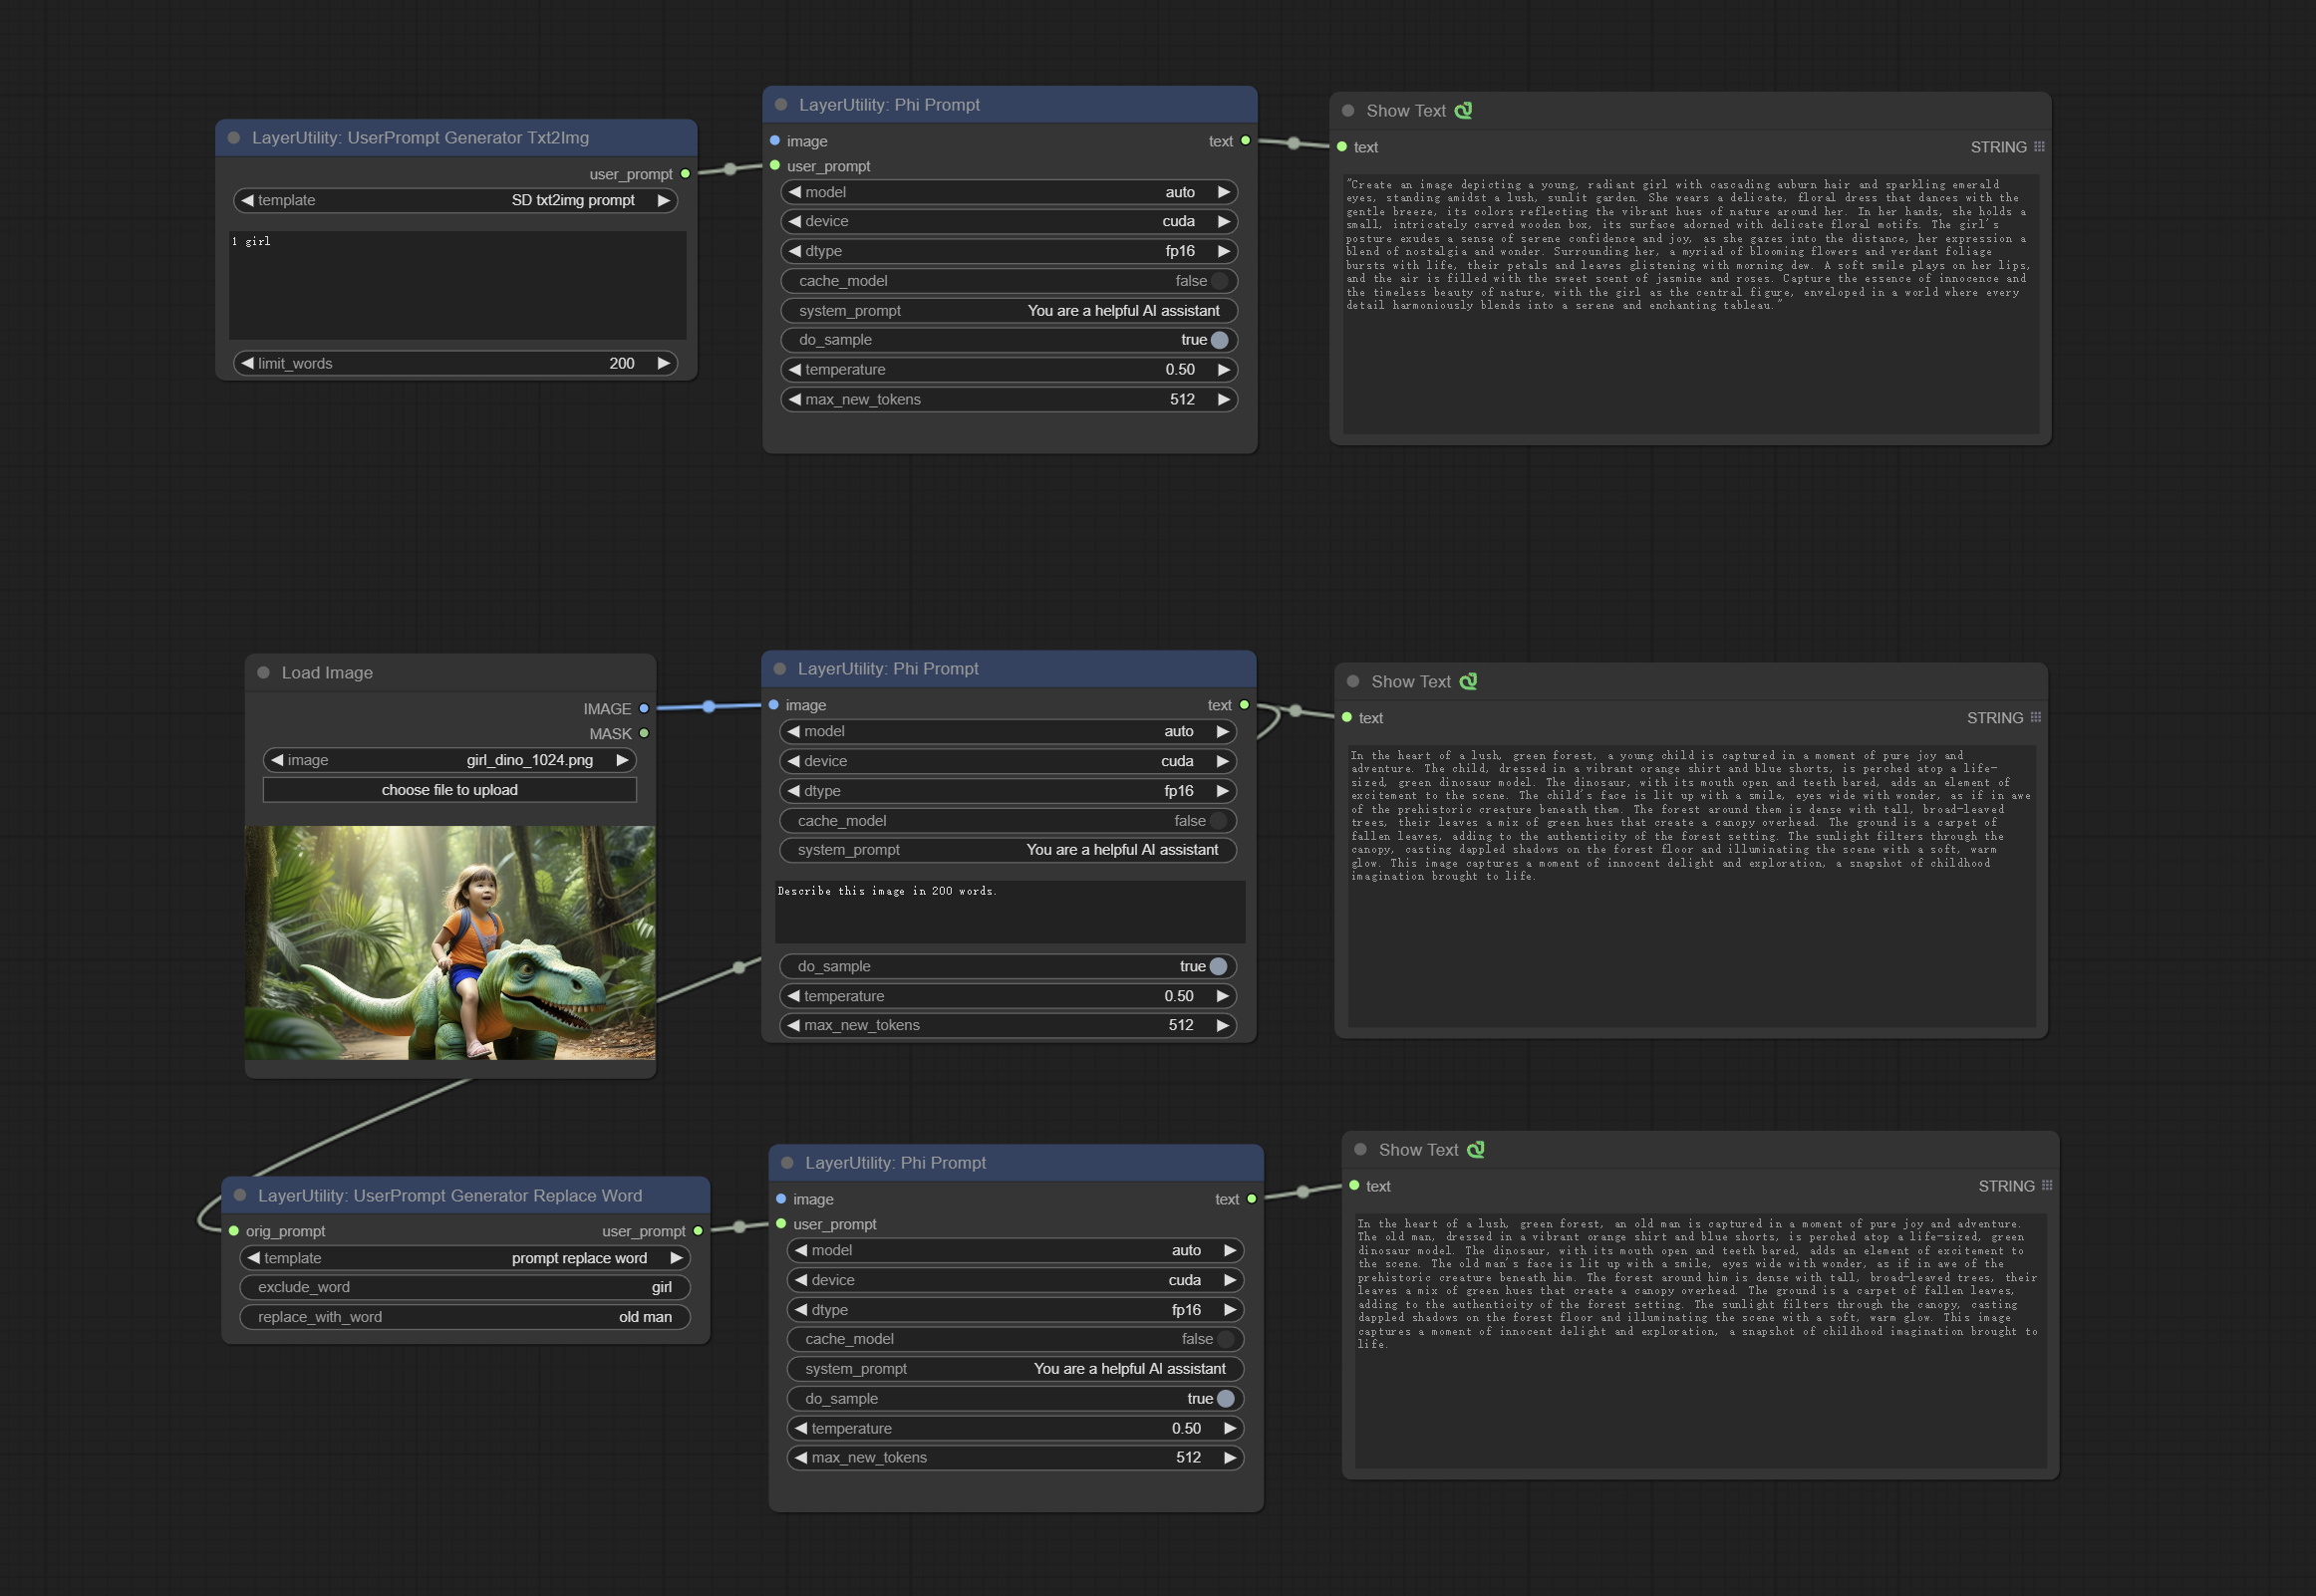
Node Options:
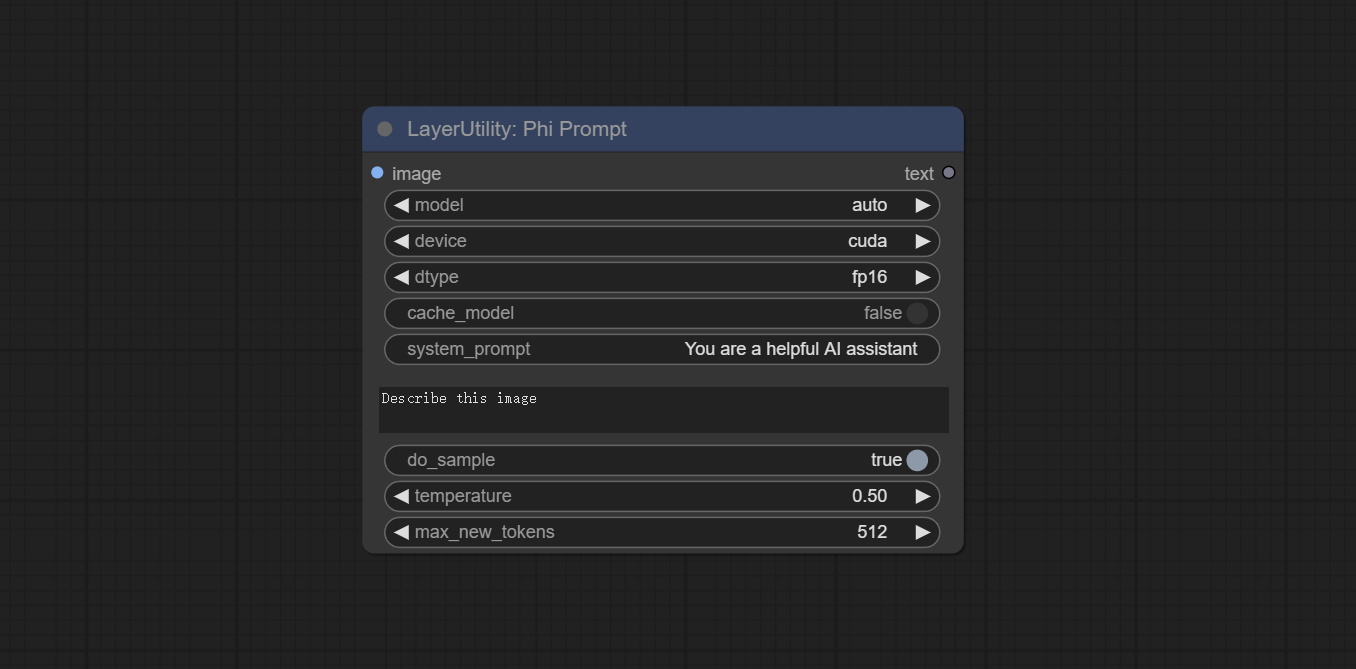
- image: Optional input. The input image will serve as the input for Phi-3.5-vision-instruct.
- model: Selectable to load Phi-3.5-vision-instruct or Phi-3.5-mini-instruct model. The default value of auto will automatically load the corresponding model based on whether there is image input.
- device: Model loading device. Supports CPU and CUDA.
- dtype: The model loading accuracy has three options: fp16, bf16, and fp32.
- cache_model: Whether to cache the model.
- system_prompt: The system prompt of Phi-3.5-mini-instruct.
- user_prompt: User prompt words for LLM model.
- do_sample: The do_Sample parameter of LLM defaults to True.
- temperature: The temperature parameter of LLM defaults to 0.5.
- max_new_tokens: The max_new_token parameter of LLM defaults to 512.
UserPromptGeneratorTxtImg
UserPrompt preset for generating SD text to image prompt words.
Node options:
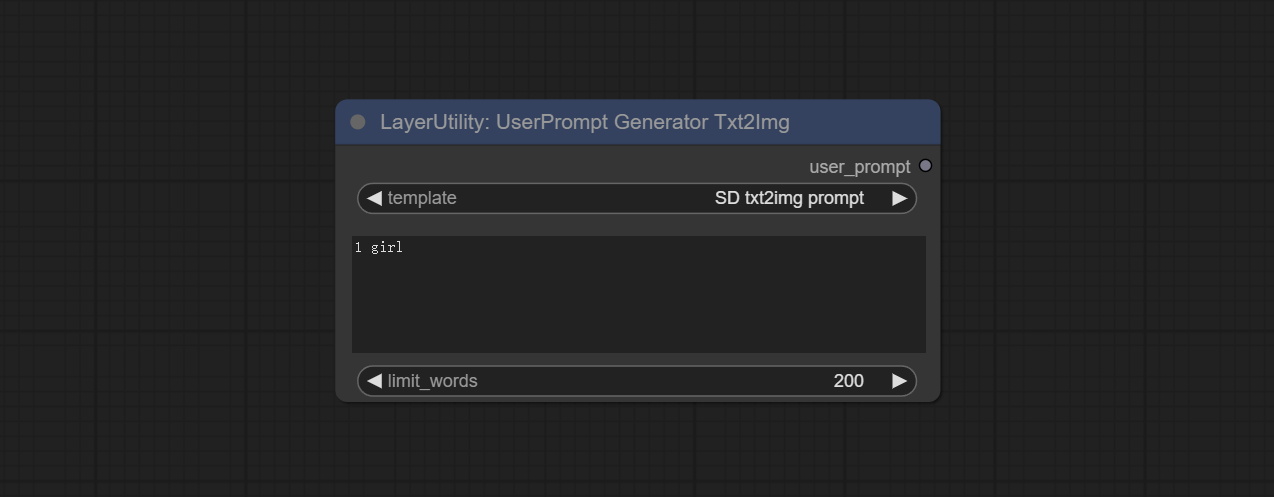
- template: Prompt word template. Currently, only the 'SD txt2img prompt' is available.
- describe: Prompt word description. Enter a simple description here.
- limit_word: Maximum length limit for output prompt words. For example, 200 means that the output text will be limited to 200 words.
UserPromptGeneratorTxtImgWithReference
UserCompt preset for generating SD text to image prompt words based on input content.
Node options:
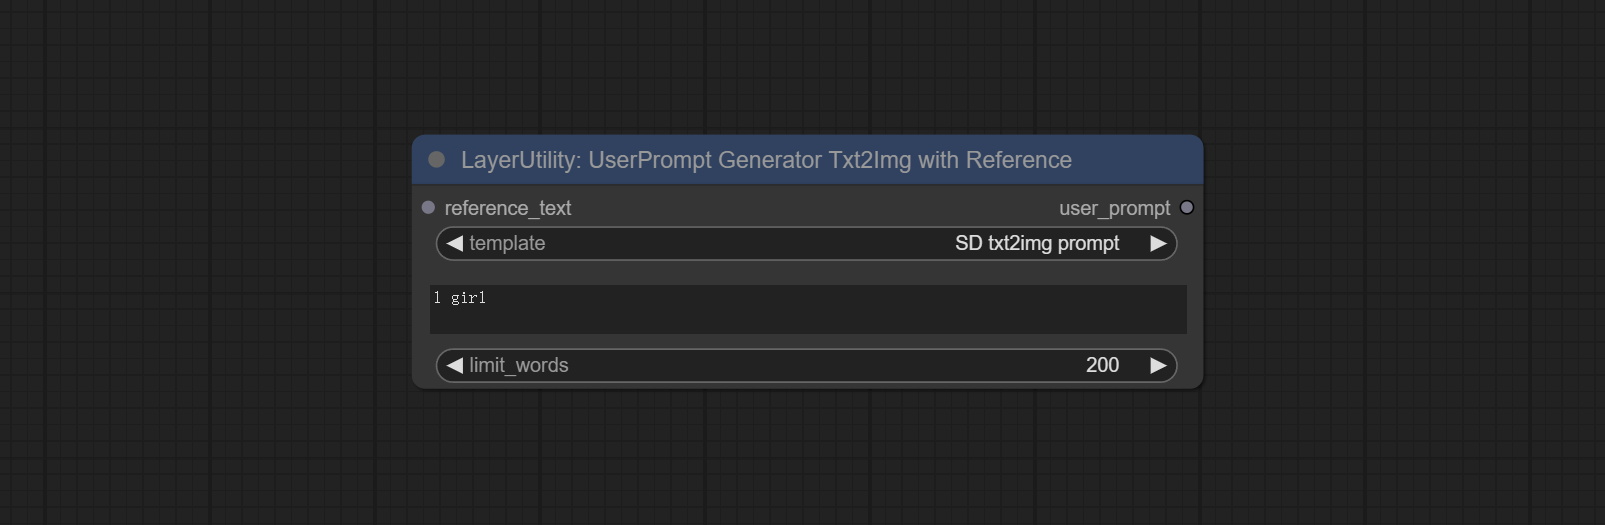
- reference_text: Reference text input. Usually it is a style description of the image.
- template: Prompt word template. Currently, only the 'SD txt2img prompt' is available.
- describe: Prompt word description. Enter a simple description here.
- limit_word: Maximum length limit for output prompt words. For example, 200 means that the output text will be limited to 200 words.
UserPromptGeneratorReplaceWord
UserPrompt preset used to replace a keyword in text with different content. This is not only a simple replacement, but also a logical sorting of the text based on the context of the prompt words to achieve the rationality of the output content.
Node options:
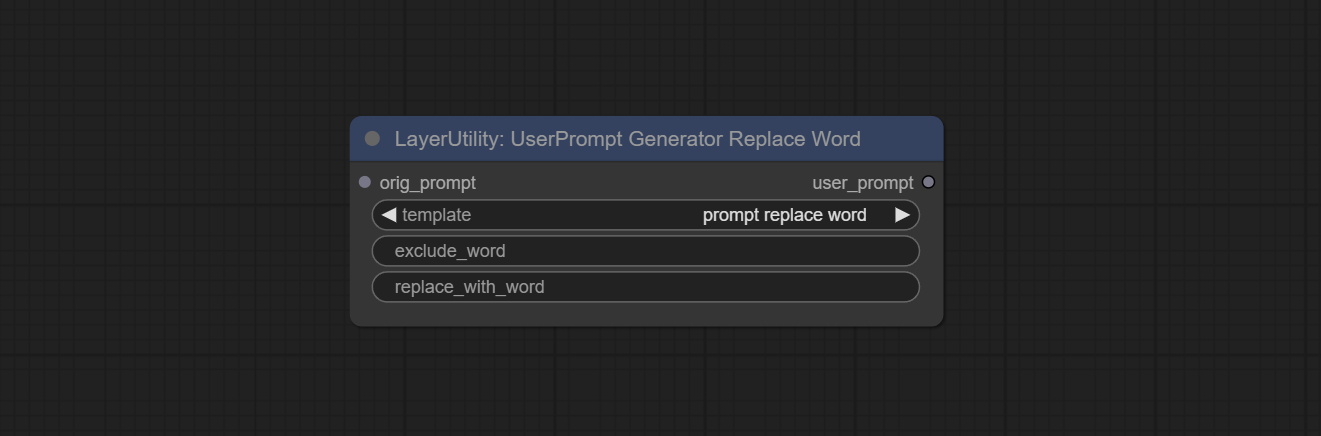
- orig_prompt: Original prompt word input.
- template: Prompt word template. Currently, only 'prompt replace word' is available.
- exclude_word: Keywords that need to be excluded.
- replace_with_word: That word will replace the exclude_word.
PromptTagger
Inference the prompts based on the image. it can replace key word for the prompt. This node currently uses Google Gemini API as the backend service. Please ensure that the network environment can use Gemini normally. Please apply for your API key on Google AI Studio, And fill it in api_key.ini , this file is located in the root directory of the plug-in, and the default name is api_key.ini.example . to use this file for the first time, you need to change the file suffix to .ini . Open it using text editing software, fill in your API key after google_api_key= and save it. 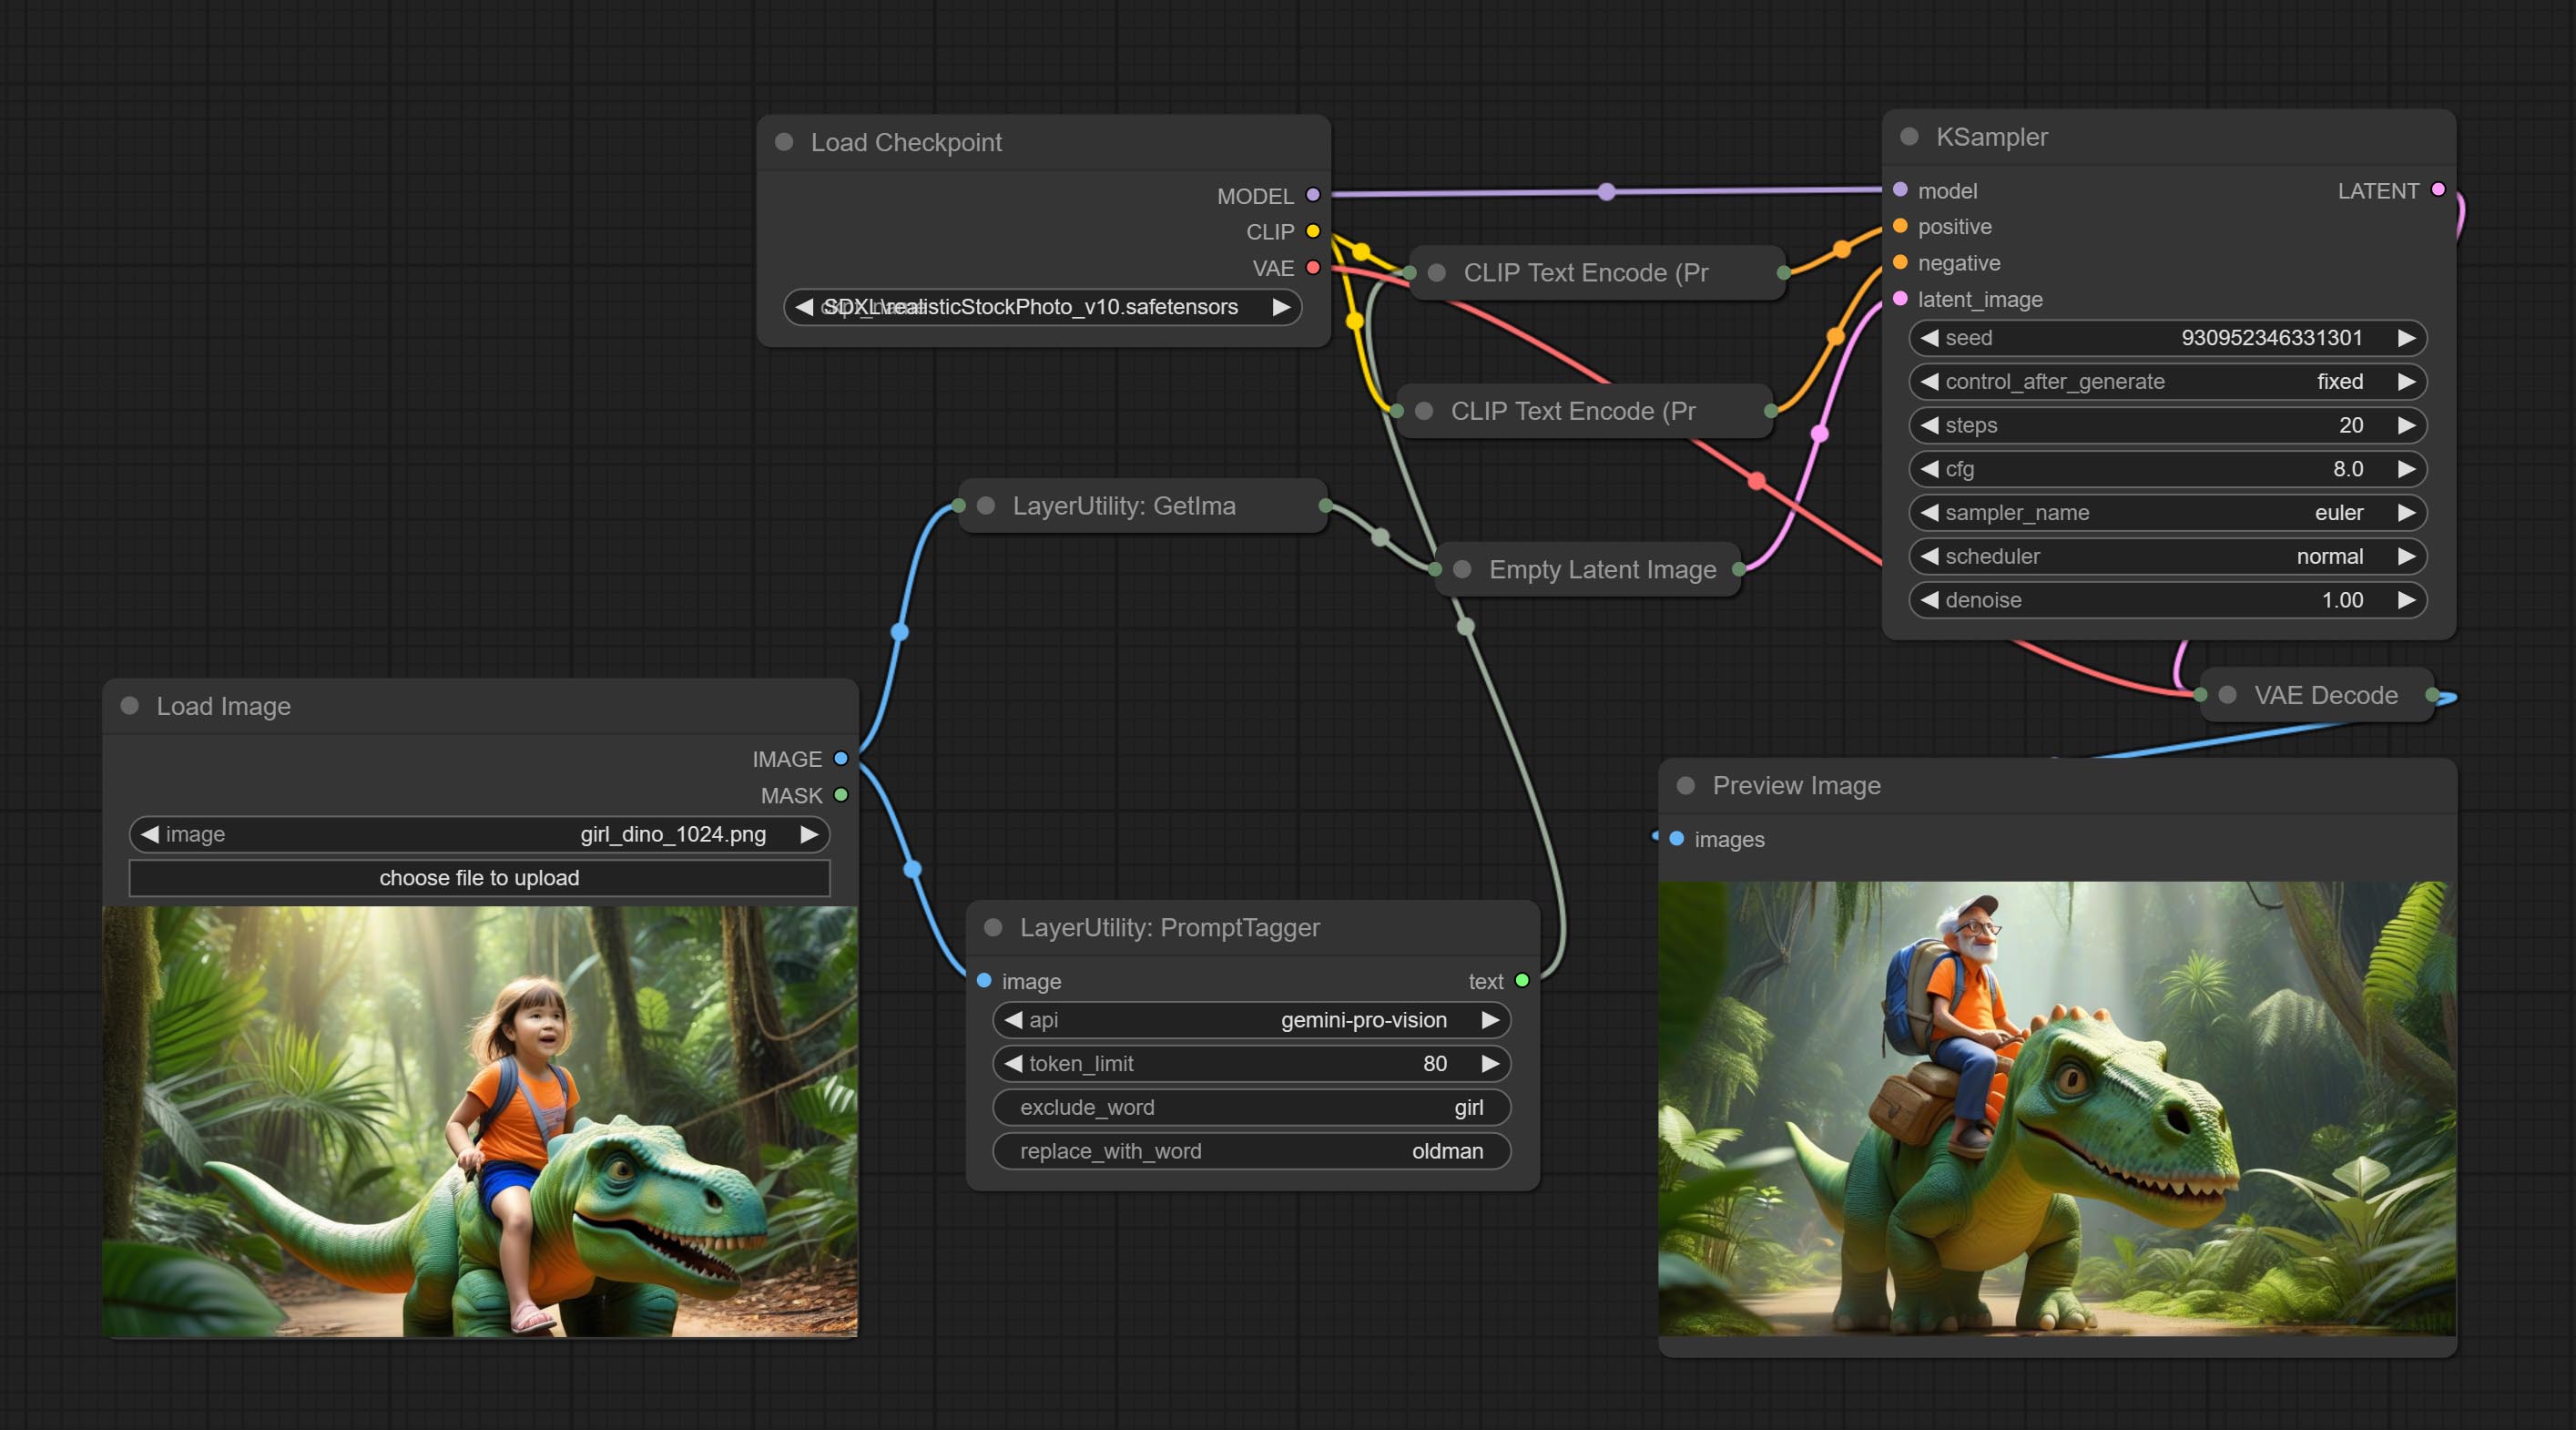
Node options:
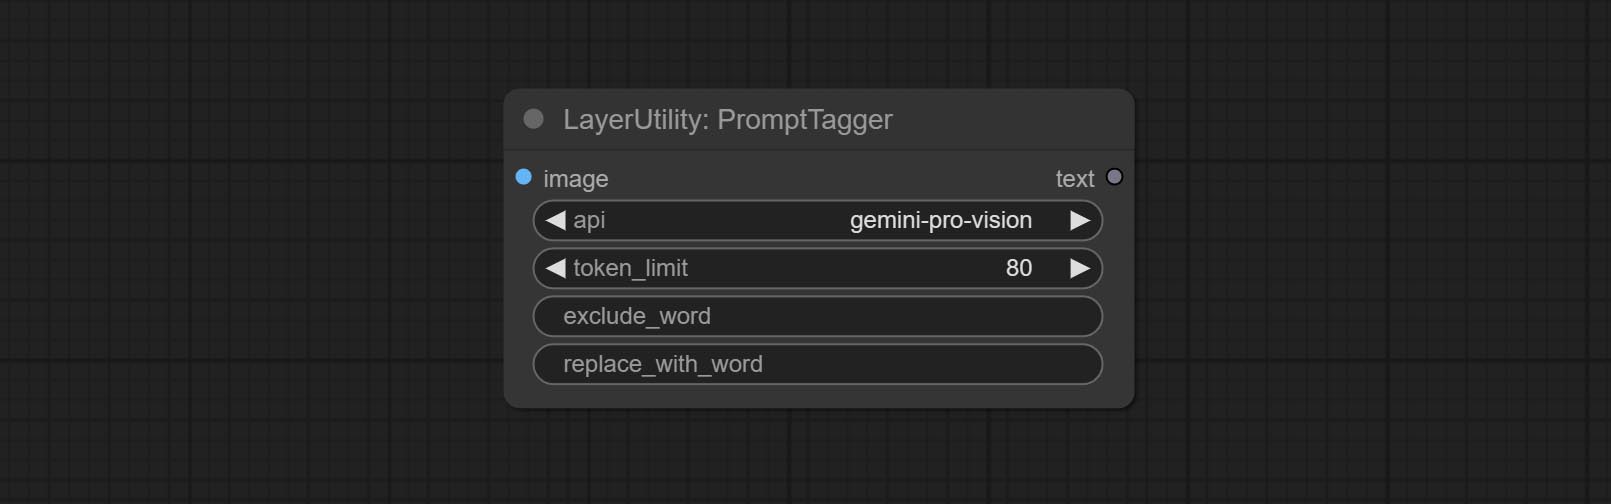
- api: The Api used. At present, there are two options "gemini-1. 5-flash" and "google-gemini".
- token_limit: The maximum token limit for generating prompt words.
- exclude_word: Keywords that need to be excluded.
- replace_with_word: That word will replace the exclude_word.
PromptEmbellish
Enter simple prompt words, output polished prompt words, and support inputting images as references, and support Chinese input. This node currently uses Google Gemini API as the backend service. Please ensure that the network environment can use Gemini normally. Please apply for your API key on Google AI Studio, And fill it in api_key.ini , this file is located in the root directory of the plug-in, and the default name is api_key.ini.example . to use this file for the first time, you need to change the file suffix to .ini . Open it using text editing software, fill in your API key after google_api_key= and save it. 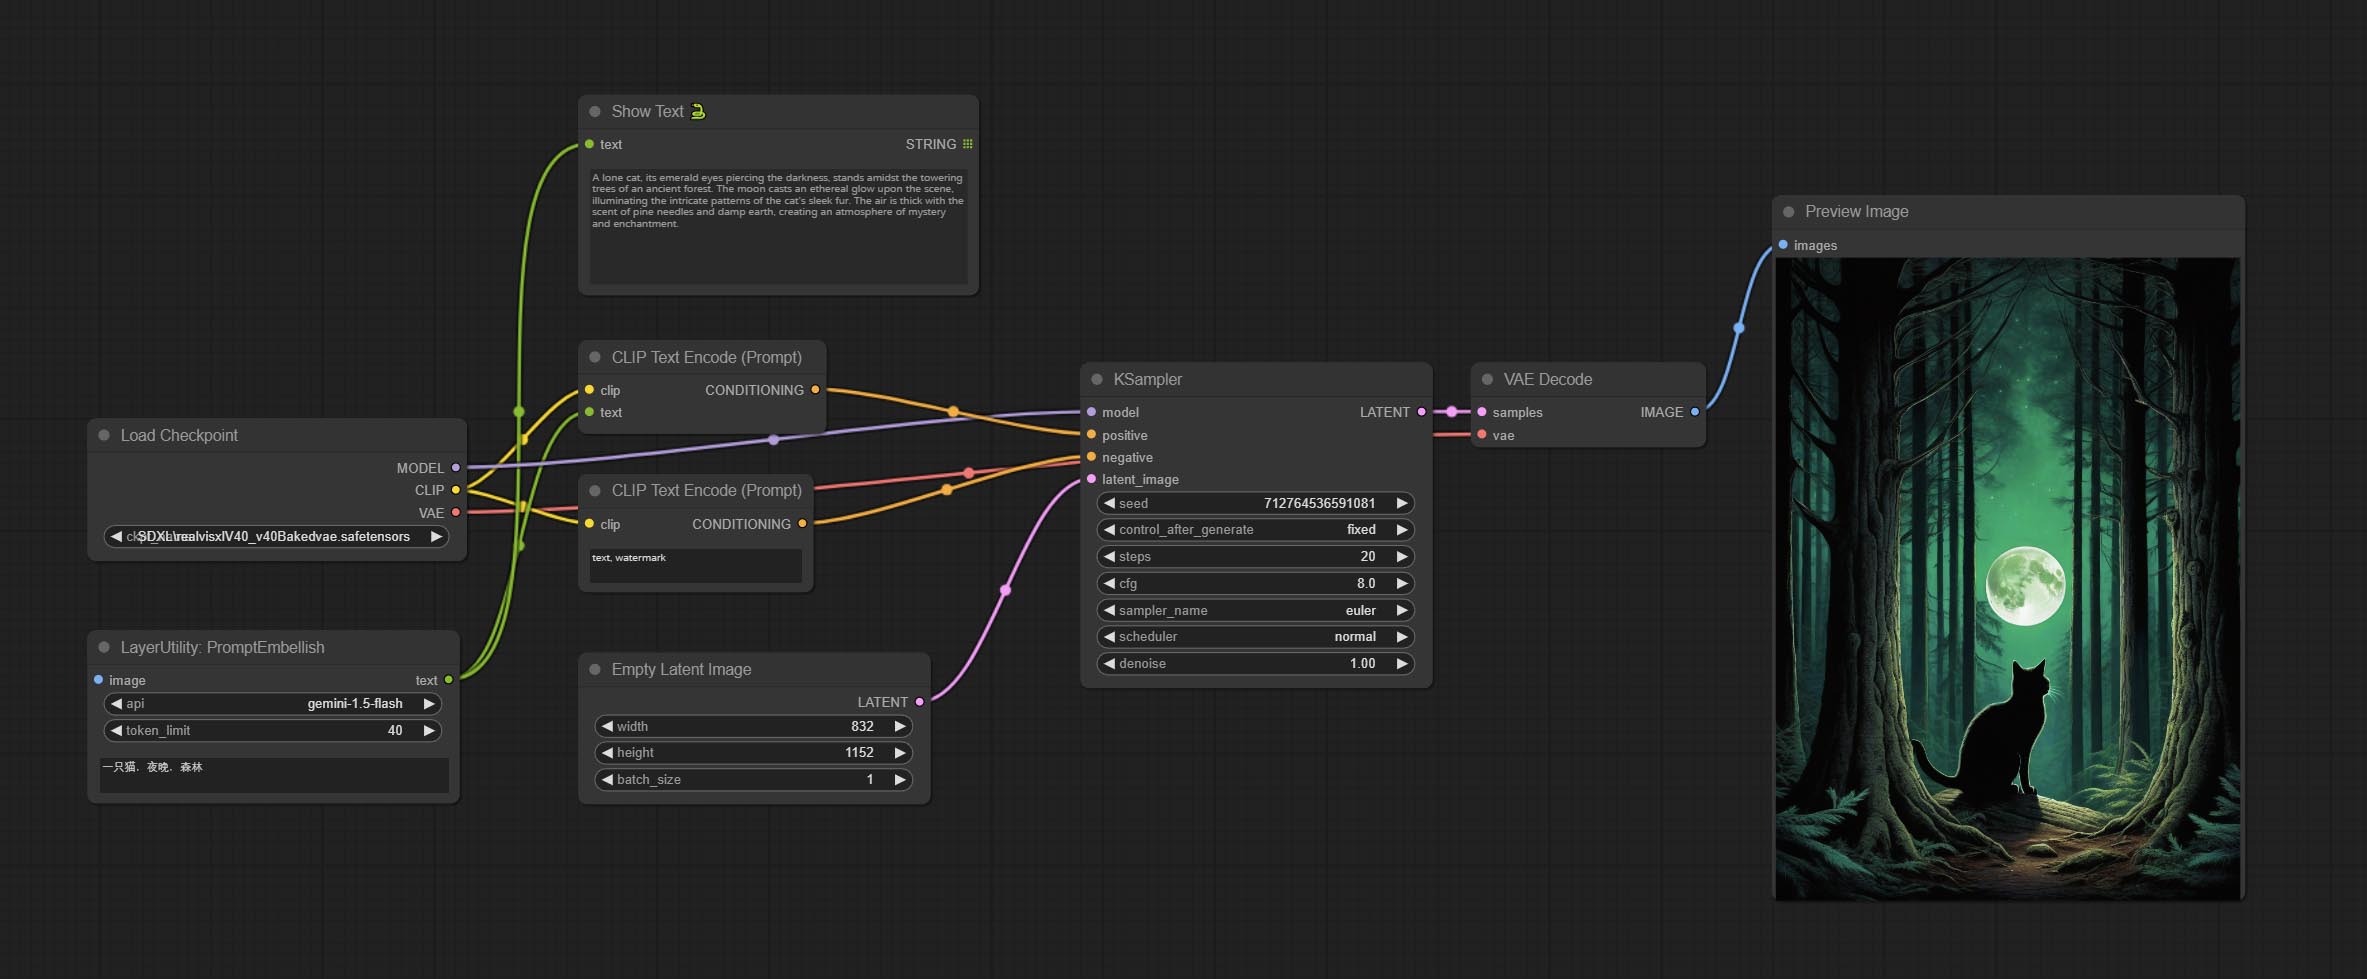
Node options:
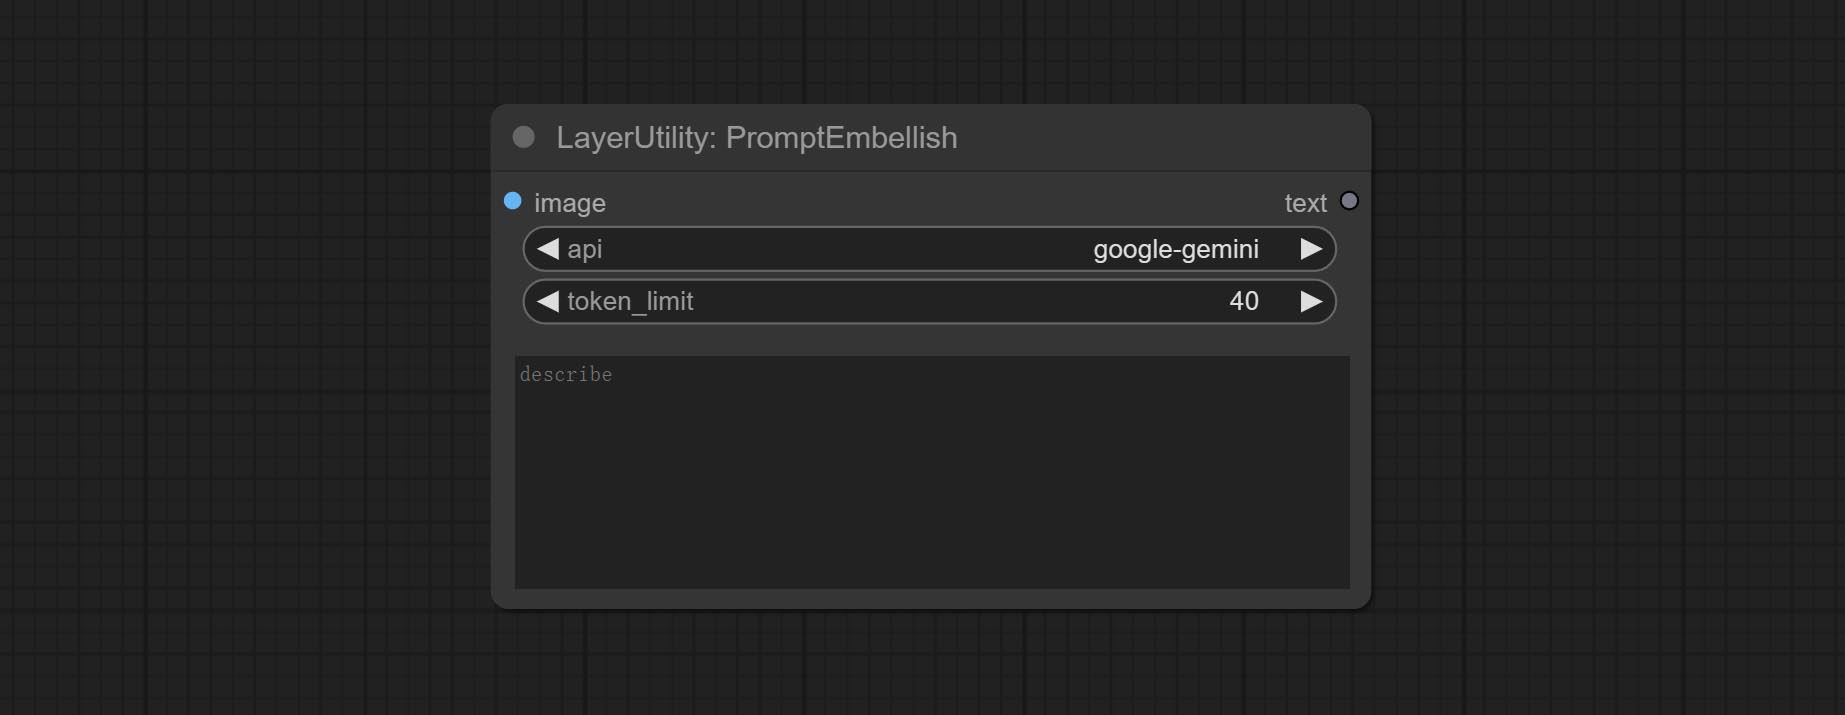
- image: Optional, input image as a reference for prompt words.
- api: The Api used. At present, there are two options "gemini-1. 5-flash" and "google-gemini".
- token_limit: The maximum token limit for generating prompt words.
- discribe: Enter a simple description here. supports Chinese text input.
Florence2Image2Prompt
Use the Florence 2 model to infer prompt words. The code for this node section is fromyiwangsimple/florence_dw, thanks to the original author. *When using it for the first time, the model will be automatically downloaded. You can also download the model file from BaiduNetdisk to ComfyUI/models/florence2 folder. 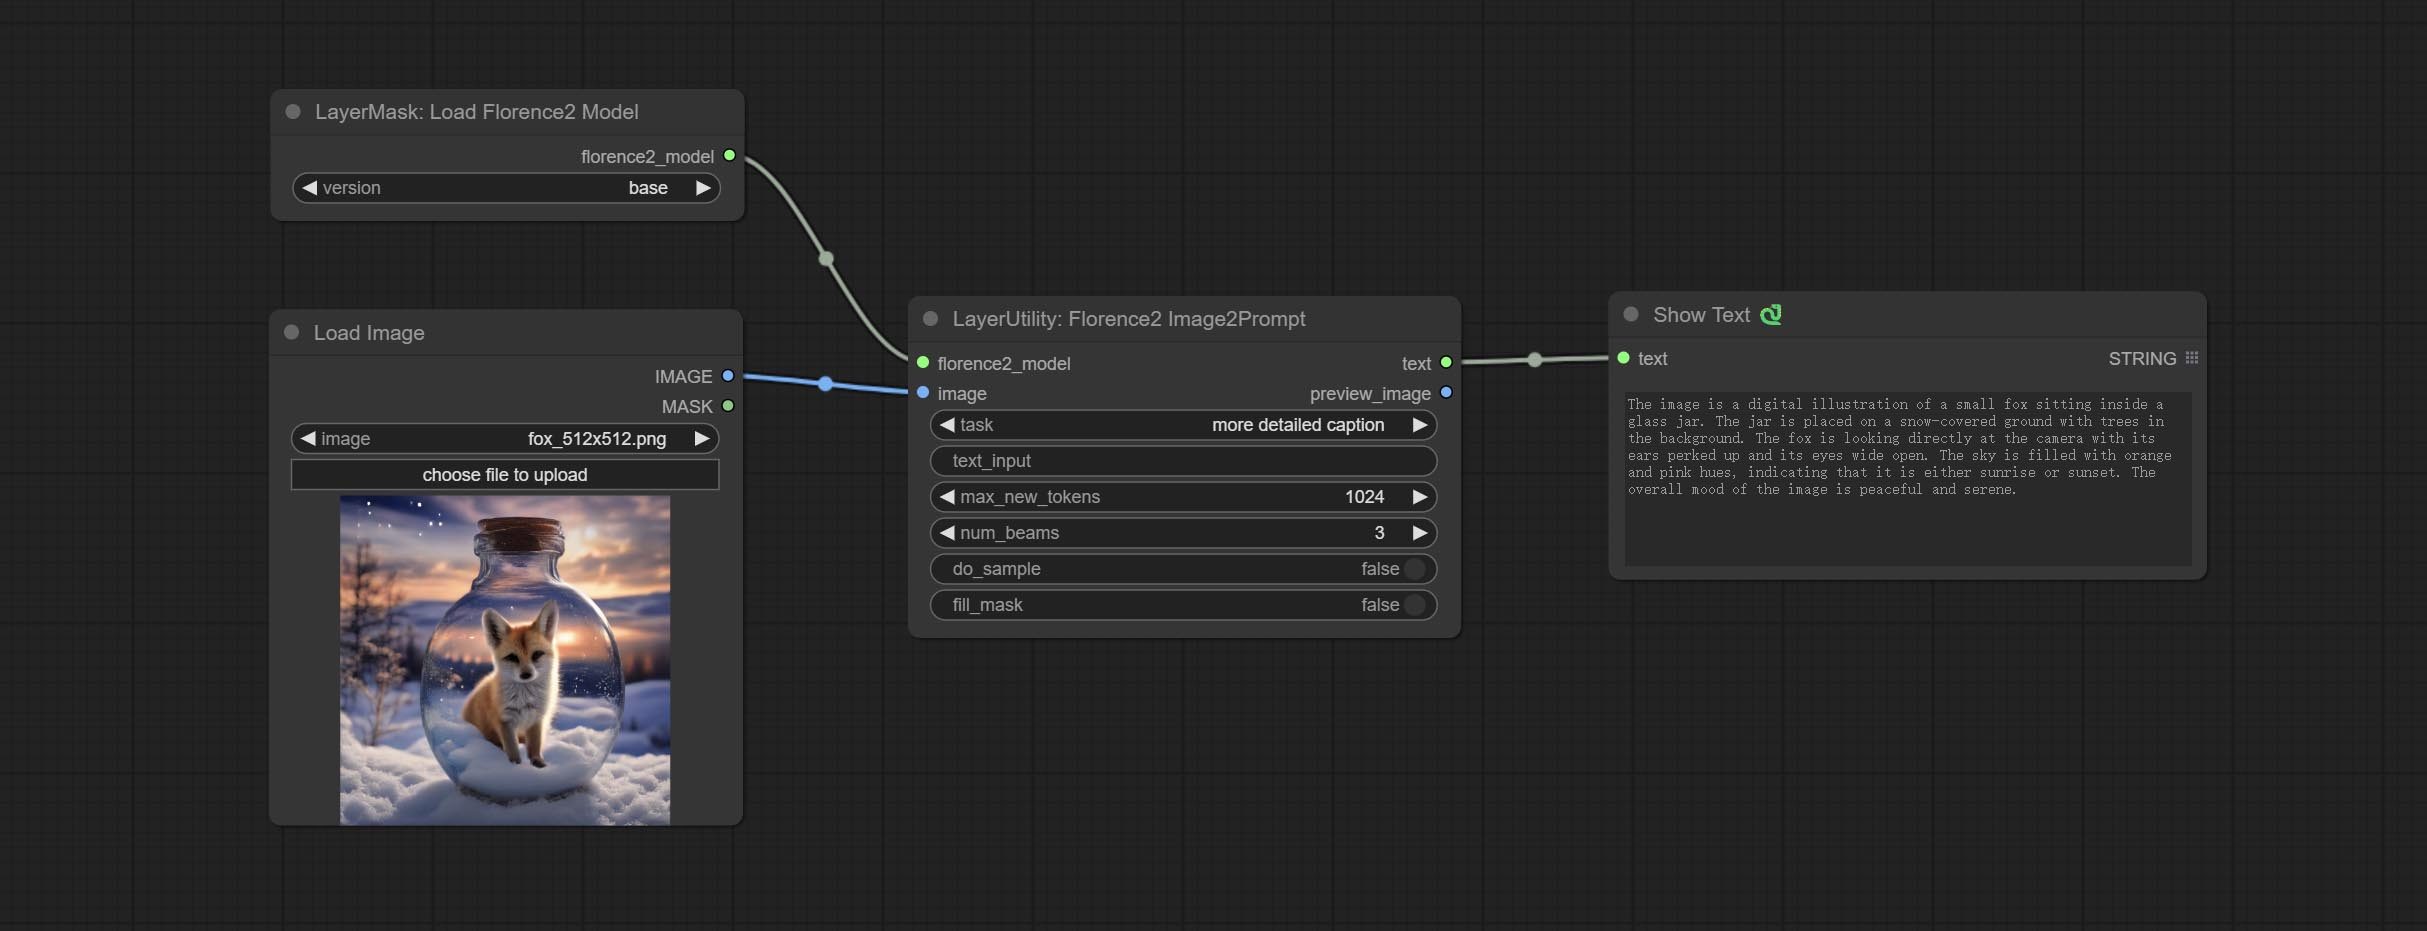
Node Options: 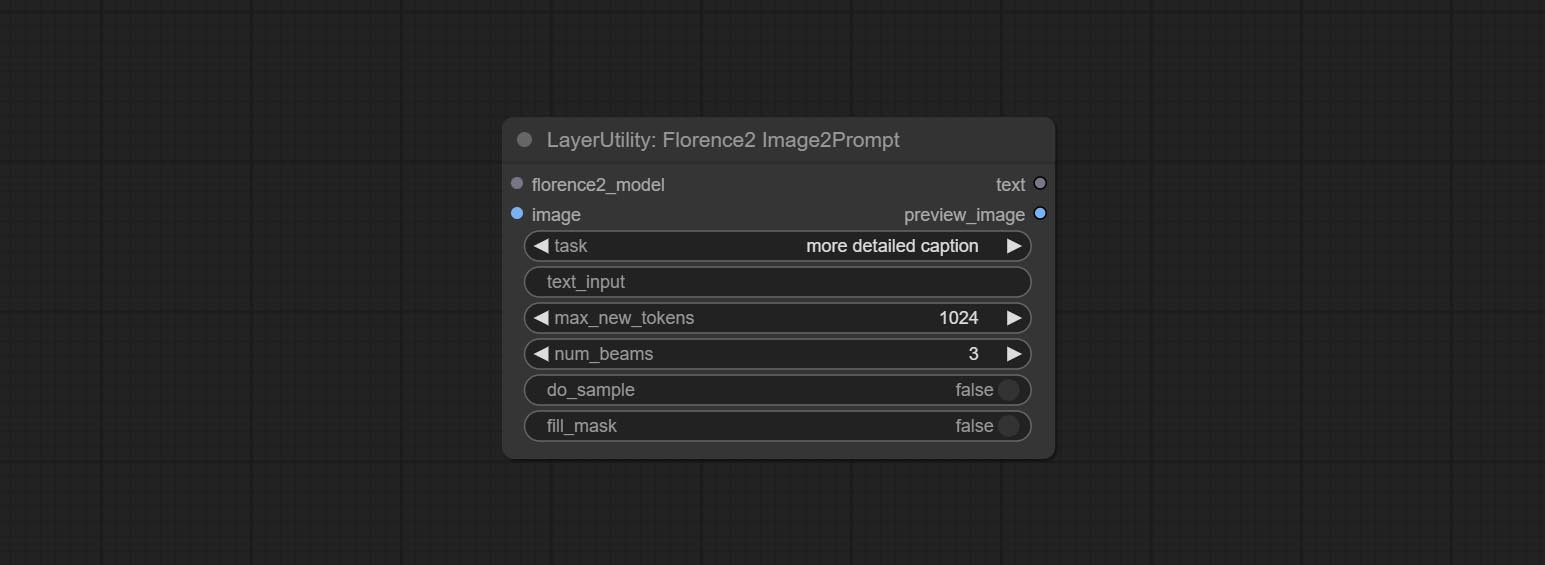
- florence2_model: Florence2 model input.
- image: Image input.
- task: Select the task for florence2.
- text_input: Text input for florence2.
- max_new_tokens: The maximum number of tokens for generating text.
- num_beams: The number of beam searches that generate text.
- do_sample: Whether to use text generated sampling.
- fill_mask: Whether to use text marker mask filling.
VQAPrompt
Use the blip-vqa model for visual question answering. Part of the code for this node is referenced from celoron/ComfyUI-VisualQueryTemplate, thanks to the original author.
*Download model files from BaiduNetdisk or huggingface.co/Salesforce/blip-vqa-capfilt-large and huggingface.co/Salesforce/blip-vqa-base and copy to ComfyUImodelsVQA folder.
Node Options: 
- image: The image input.
- vqa_model: The vqa model input, it from LoadVQAModel node.
- question: Task text input. A single question is enclosed in curly braces "{}", and the answer to the question will be replaced in its original position in the text output. Multiple questions can be defined using curly braces in a single Q&A. For example, for a picture of an item placed in a scene, the question is:"{object color} {object} on the {scene}".
LoadVQAModel
Load the blip-vqa model.
Node Options: 
- model: There are currently two models to choose from "blip-vqa-base" and "blip-vqa-capfilt-large".
- precision: The model accuracy has two options: "fp16" and "fp32".
- device: The model running device has two options: "cuda" and "cpu".
ImageShift
Shift the image. this node supports the output of displacement seam masks, making it convenient to create continuous textures. 
Node options:
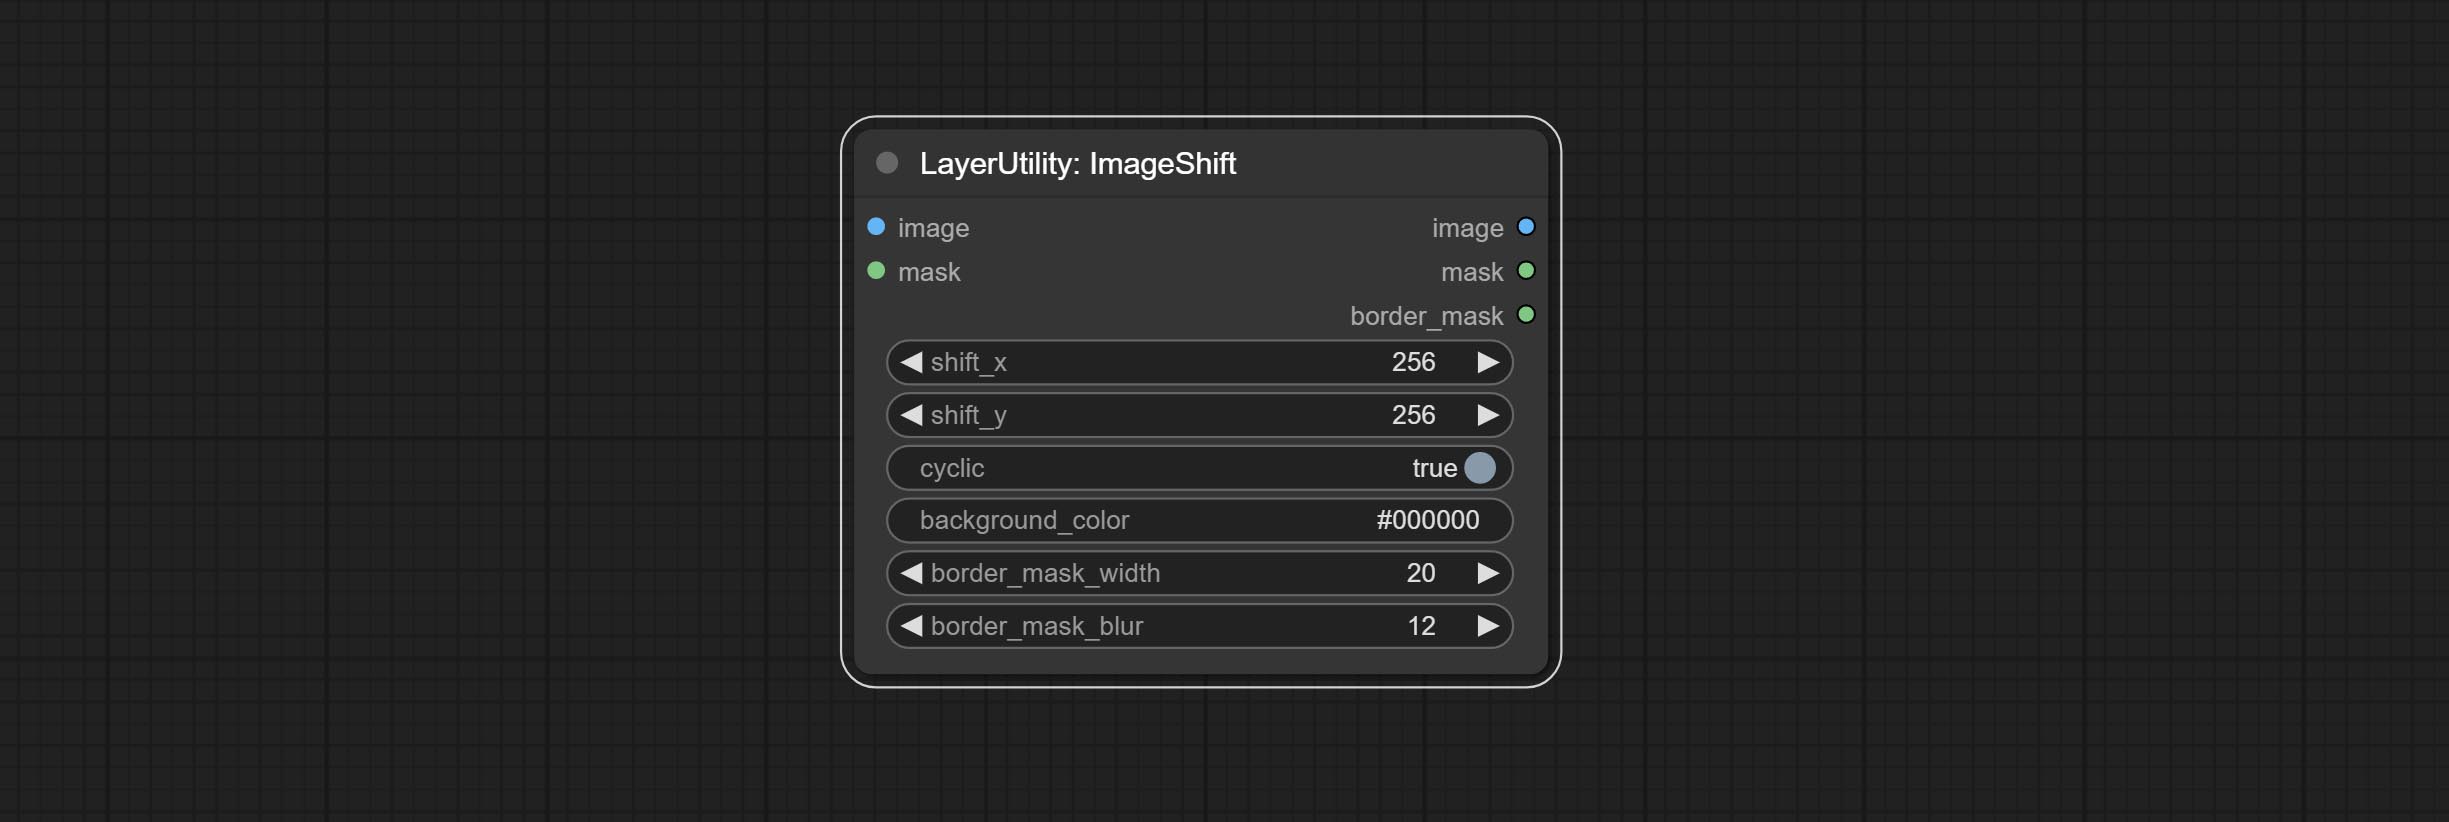
- image 5 : The input image.
- mask 2,5 : The mask of image.
- shift_x: Horizontal distance of shift.
- shift_y: Vertical distance of shift.
- cyclic: Is the part of displacement that is out of bounds cyclic.
- background_color 4 : Background color. if cyclic is set to False, the setting here will be used as the background color.
- border_mask_width: Border mask width.
- border_mask_blur: Border mask blur.
- примечание
ImageBlend
A simple node for composit layer image and background image, multiple blend modes are available for option, and transparency can be set. 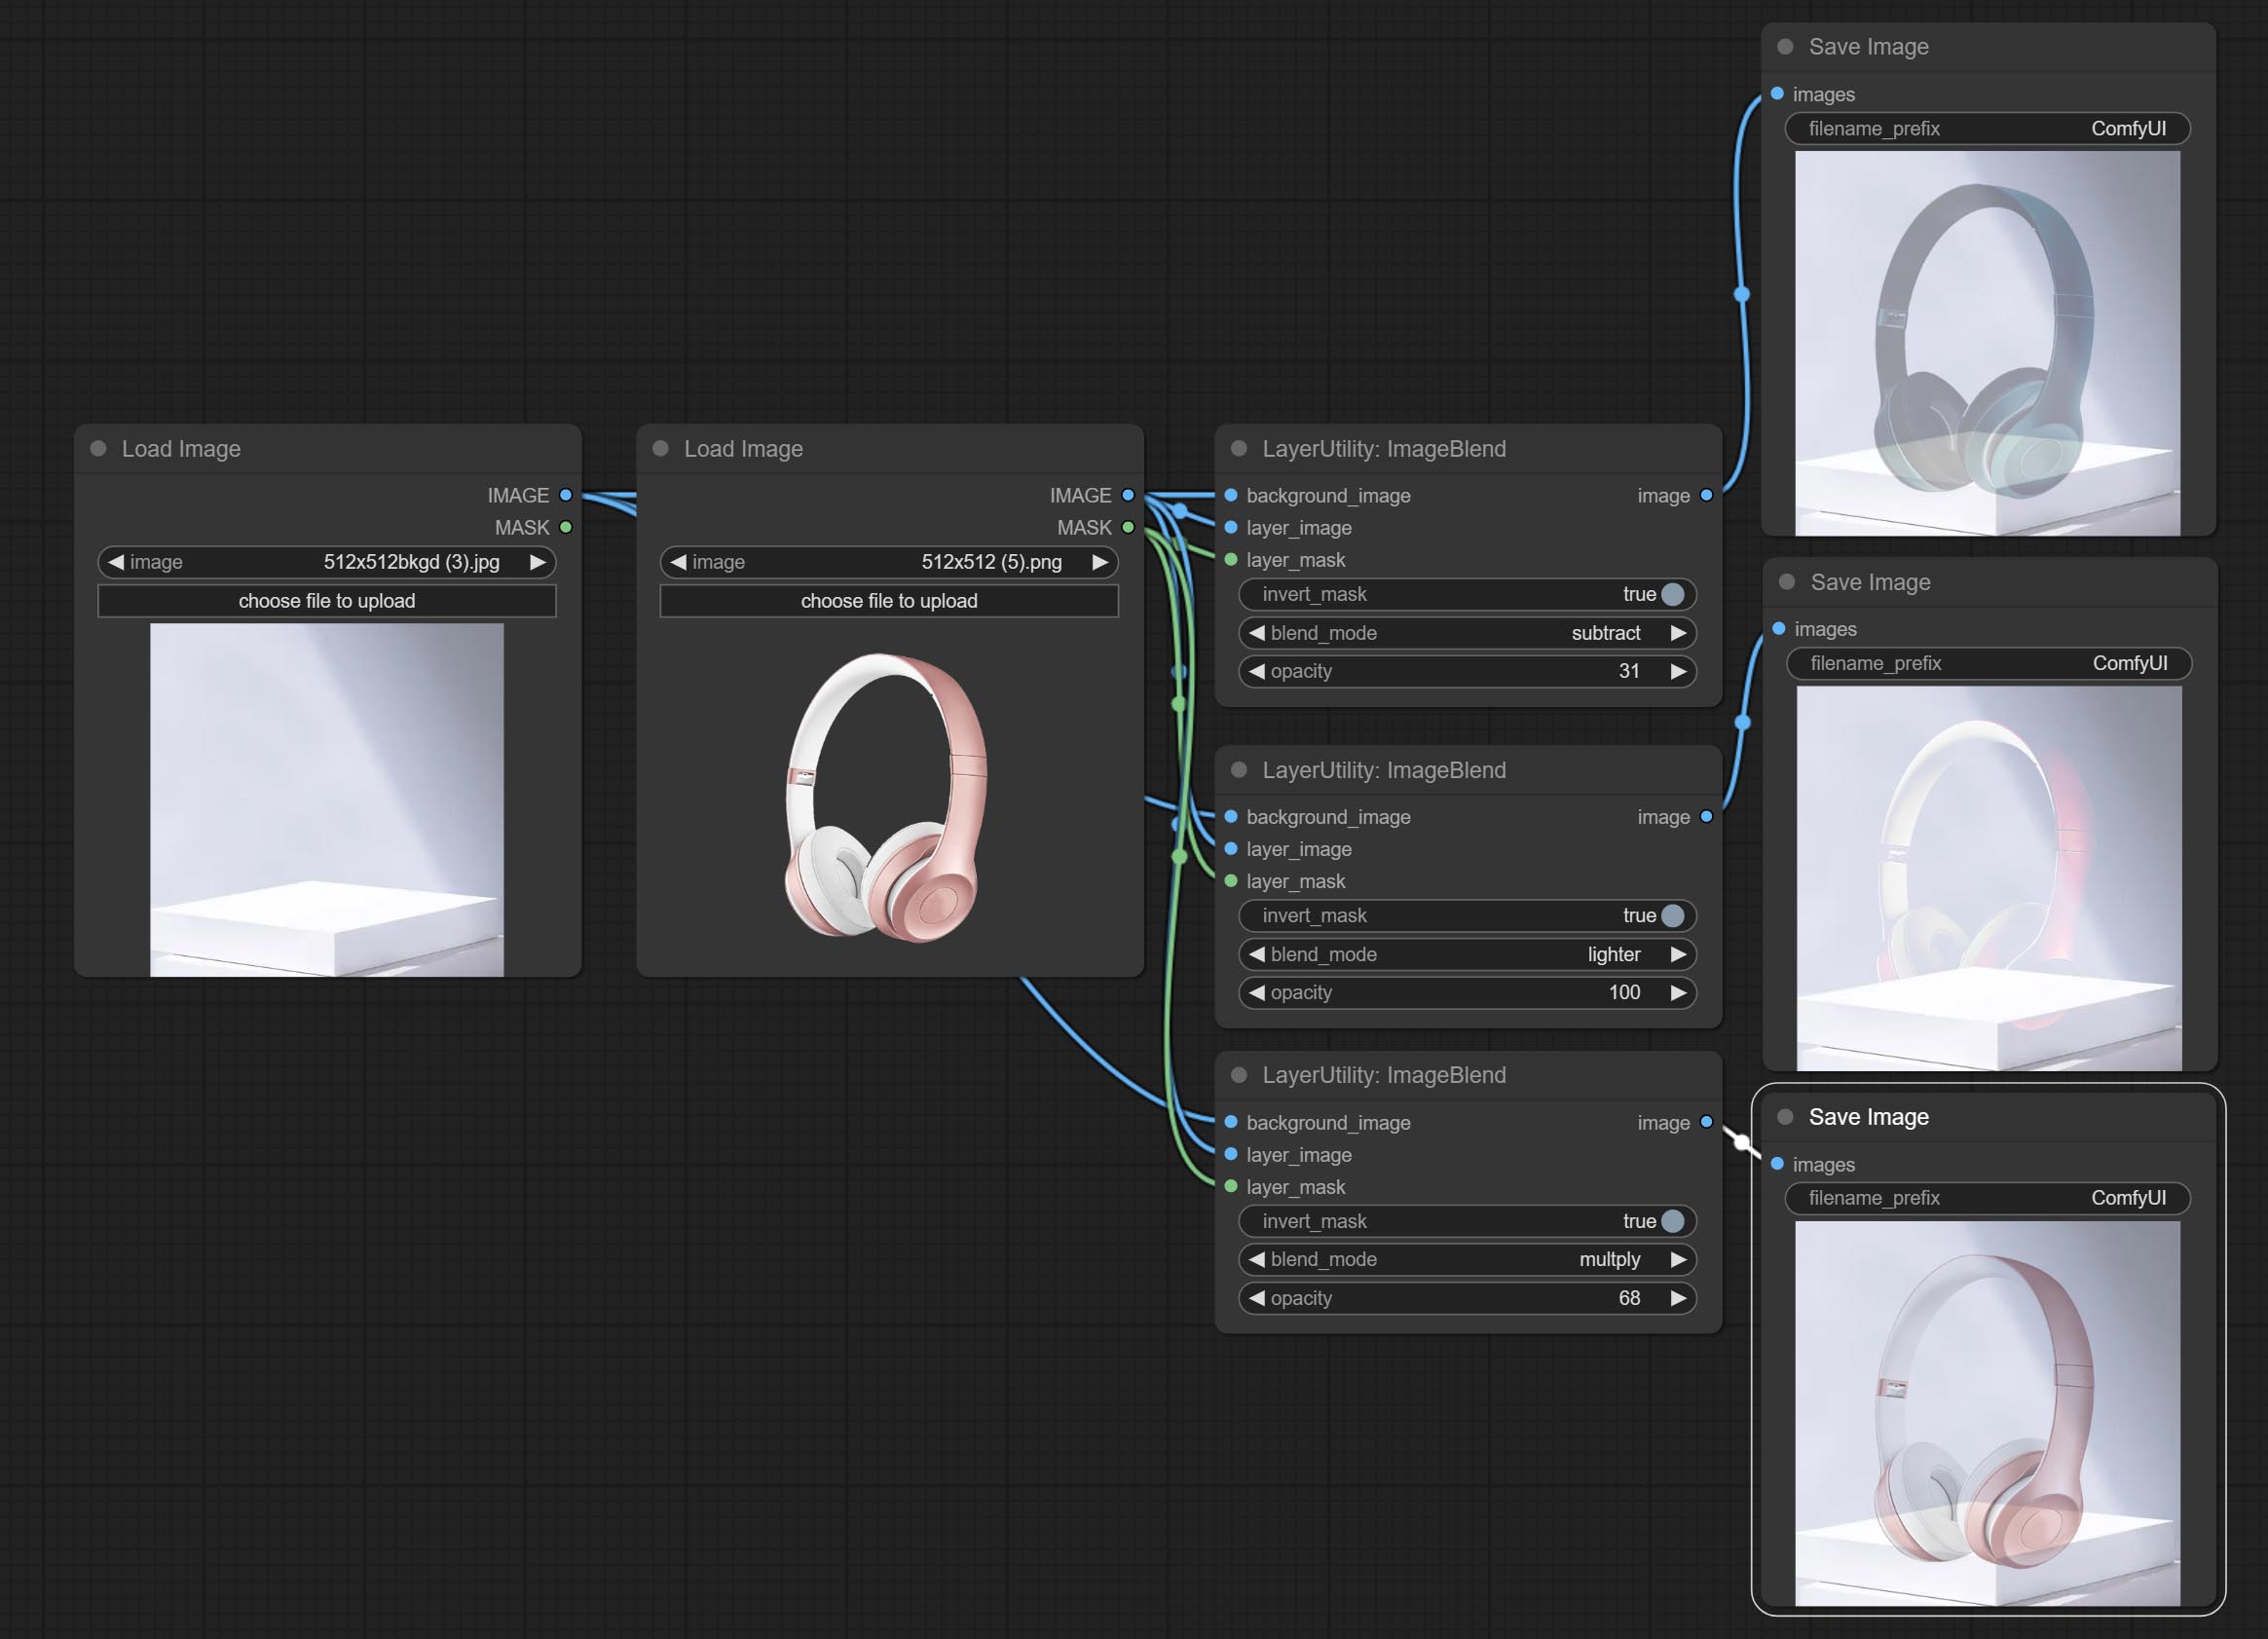
Node options: 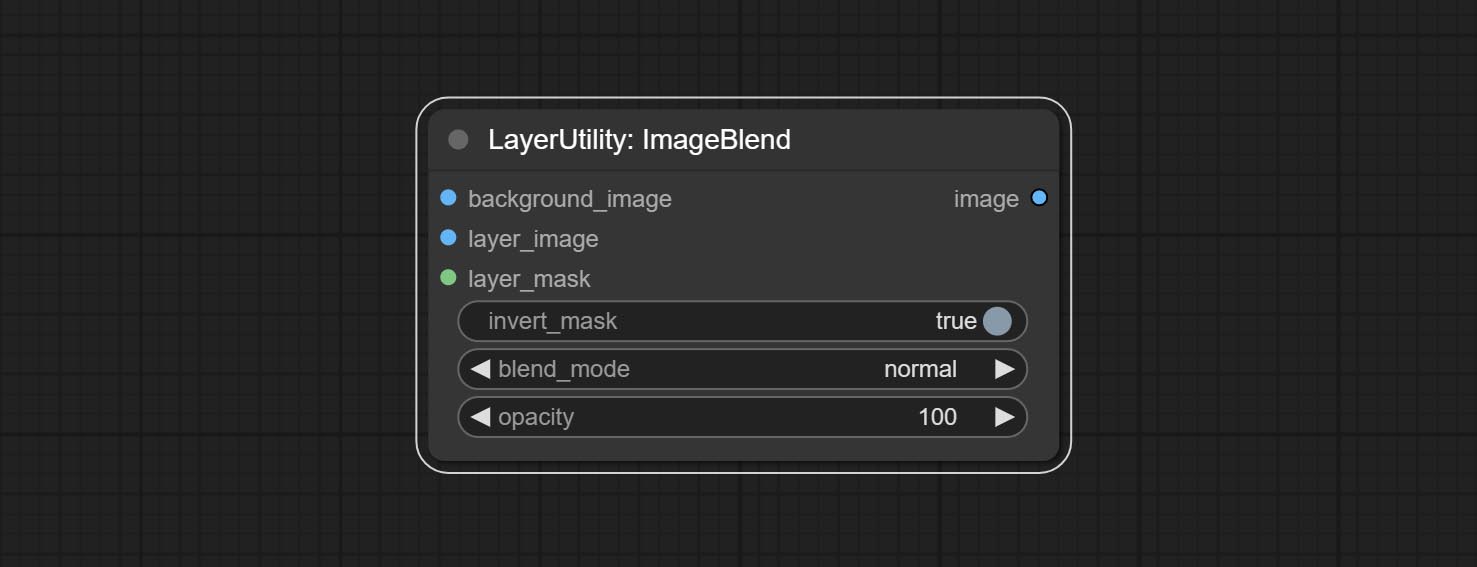
- background_image 1 : The background image.
- layer_image 1 : Layer image for composite.
- layer_mask 1,2 : Mask for layer_image.
- invert_mask: Whether to reverse the mask.
- blend_mode 3 : Blending mode.
- opacity: Opacity of blend.
- примечание
ImageReel
Display multiple images in one reel. Text annotations can be added to each image in the reel. By using the ImageReelComposite node, multiple reel can be combined into one image. 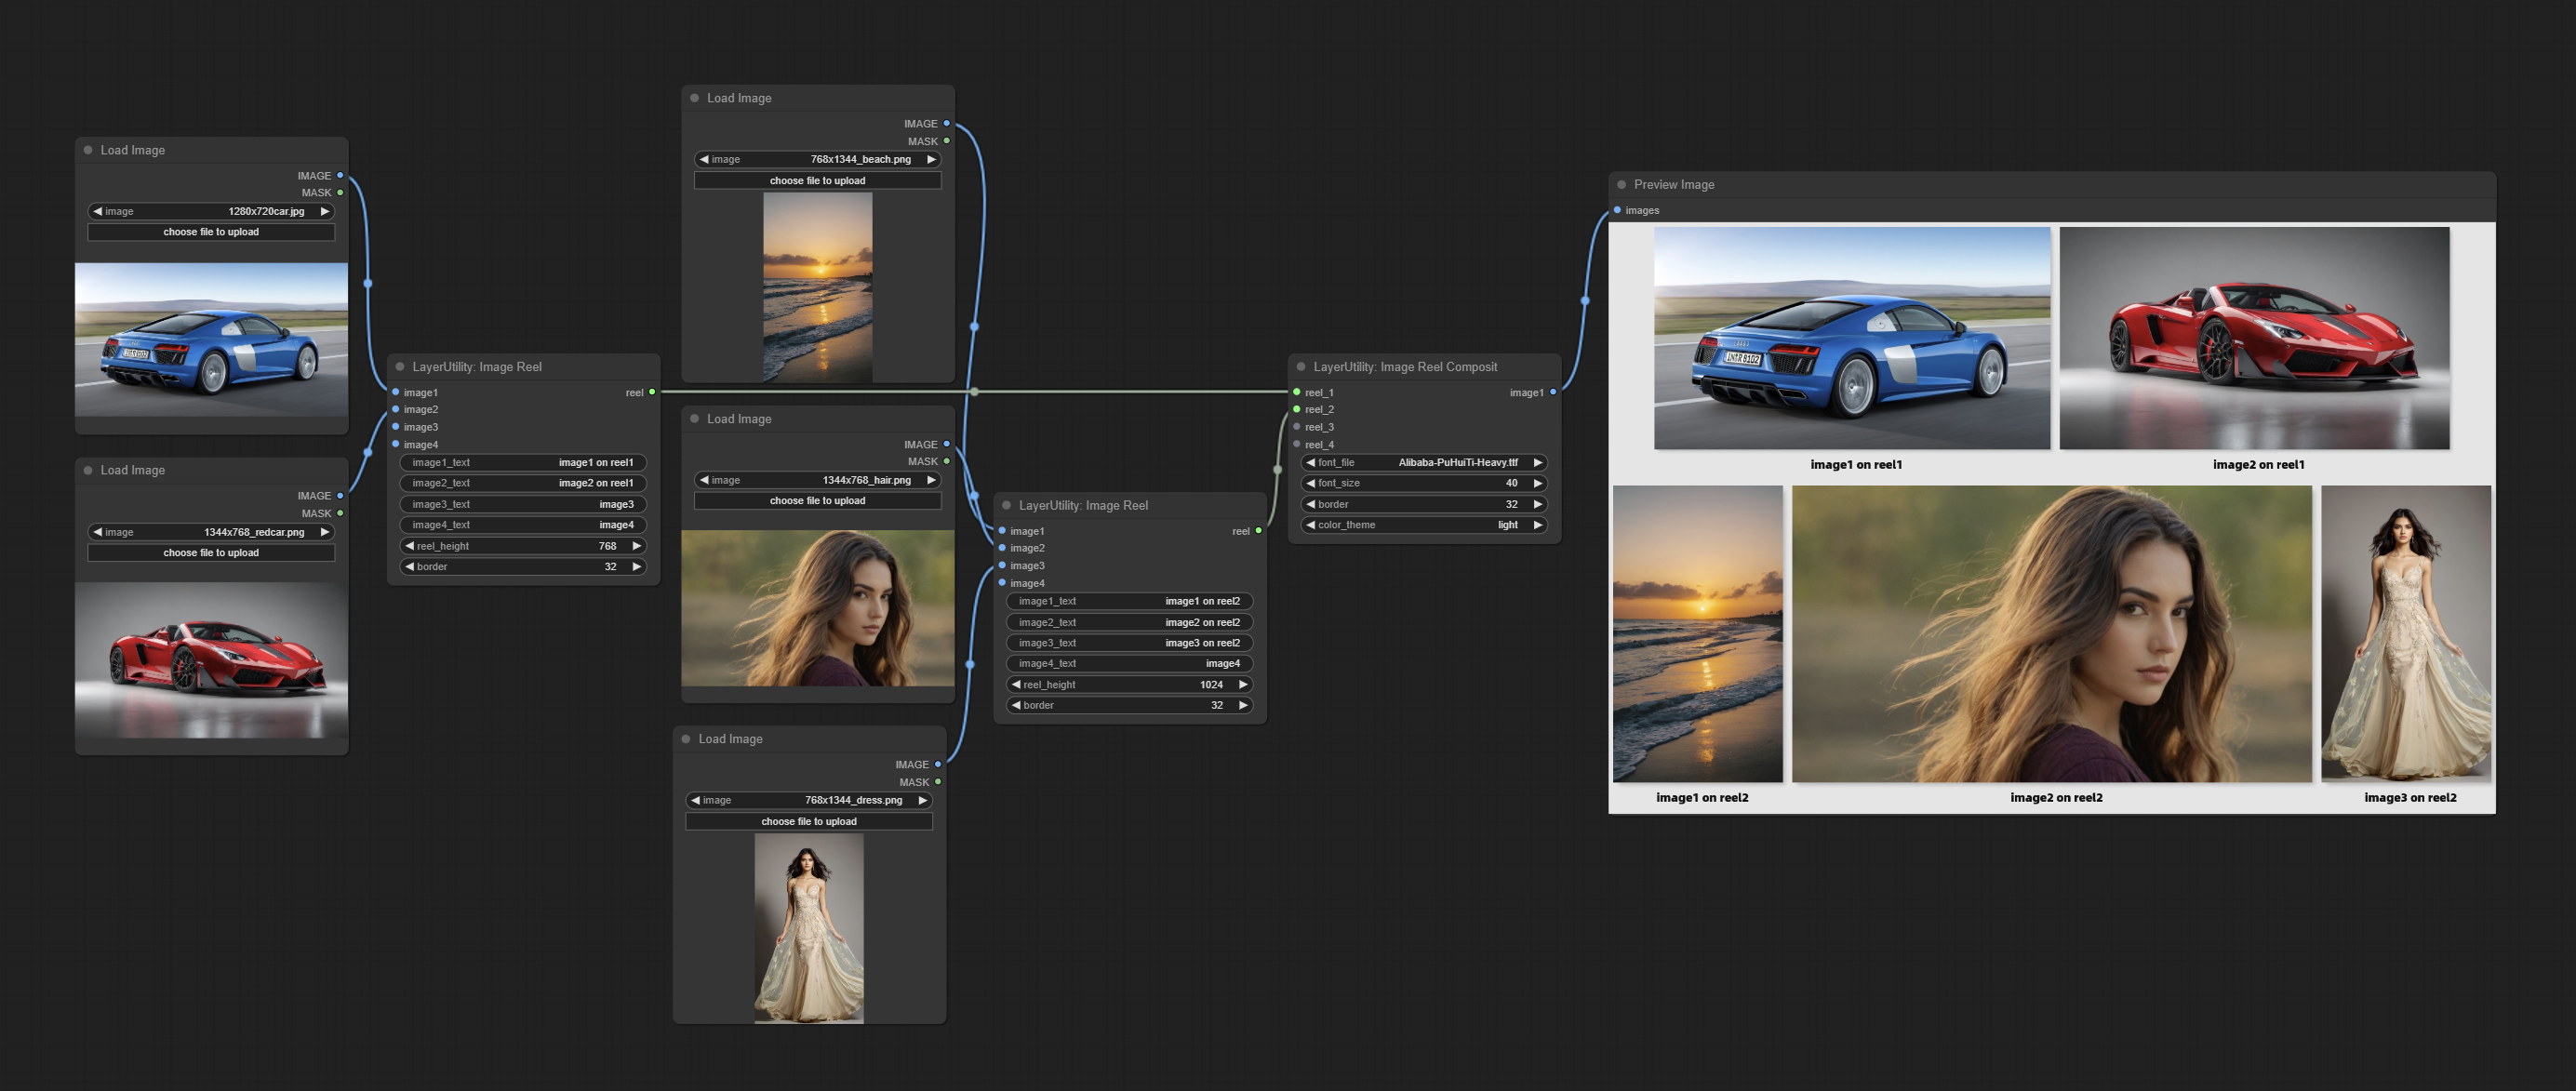
Node Options:
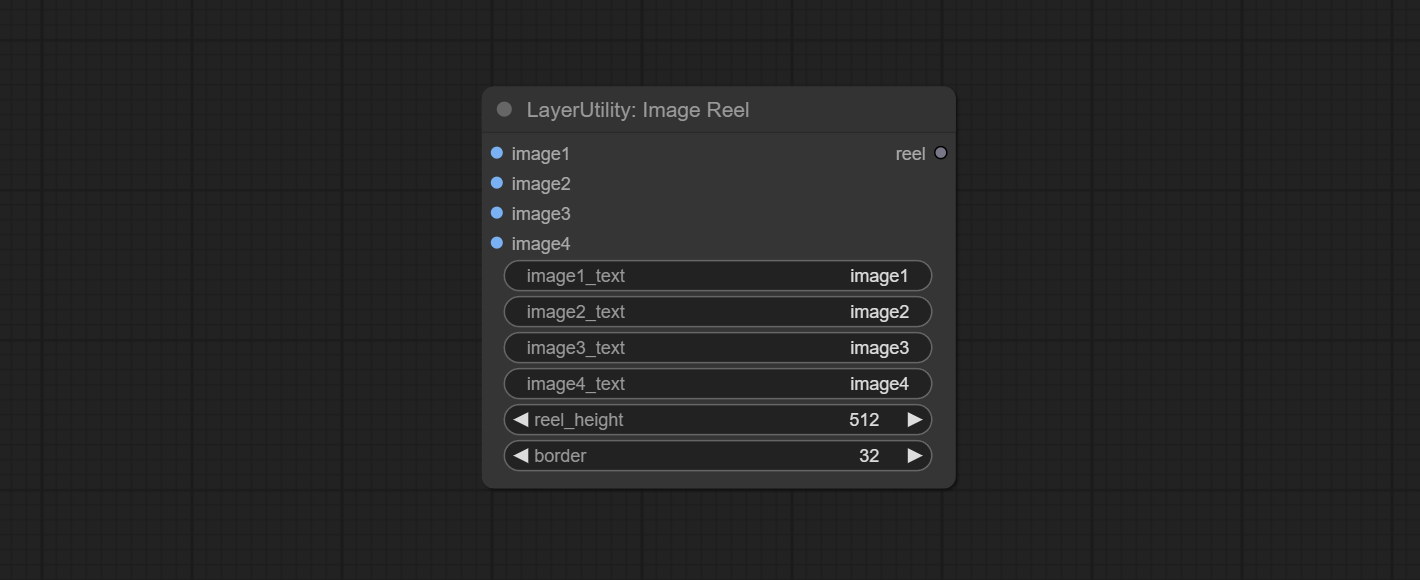
- image1: The first image. it must be input.
- image2: The second image. optional input.
- image3: The third image. optional input.
- image4: The fourth image. optional input.
- image1_text: Text annotation for the first image.
- image2_text: Text annotation for the second image.
- image3_text: Text annotation for the third image.
- image4_text: Text annotation for the fourth image.
- reel_height: The height of reel.
- border: The border width of the image in the reel.
Выход:
- reel: The reel of ImageReelComposite node input.
ImageReelComposite
Combine multiple reel into one image.
Node Options: 
- reel_1: The first reel. it must be input.
- reel_2: The second reel. optional input.
- reel_3: The third reel. optional input.
- reel_4: The fourth reel. optional input.
- font_file ** : Here is a list of available font files in the font folder, and the selected font files will be used to generate images.
- border: The border width of the reel.
- color_theme: Theme color for the output image.
* The font folder is defined in resource_dir.ini , this file is located in the root directory of the plug-in, and the default name is resource_dir.ini.example . to use this file for the first time, you need to change the file suffix to .ini . Open the text editing software and find the line starting with "FONT_dir=", after "=", enter the custom folder path name. support defining multiple folders in resource-dir.ini , separated by commas, semicolons, or spaces. all font files in this folder will be collected and displayed in the node list during ComfyUI initialization. If the folder set in ini is invalid, the font folder that comes with the plugin will be enabled.
ImageOpacity
Adjust image opacity 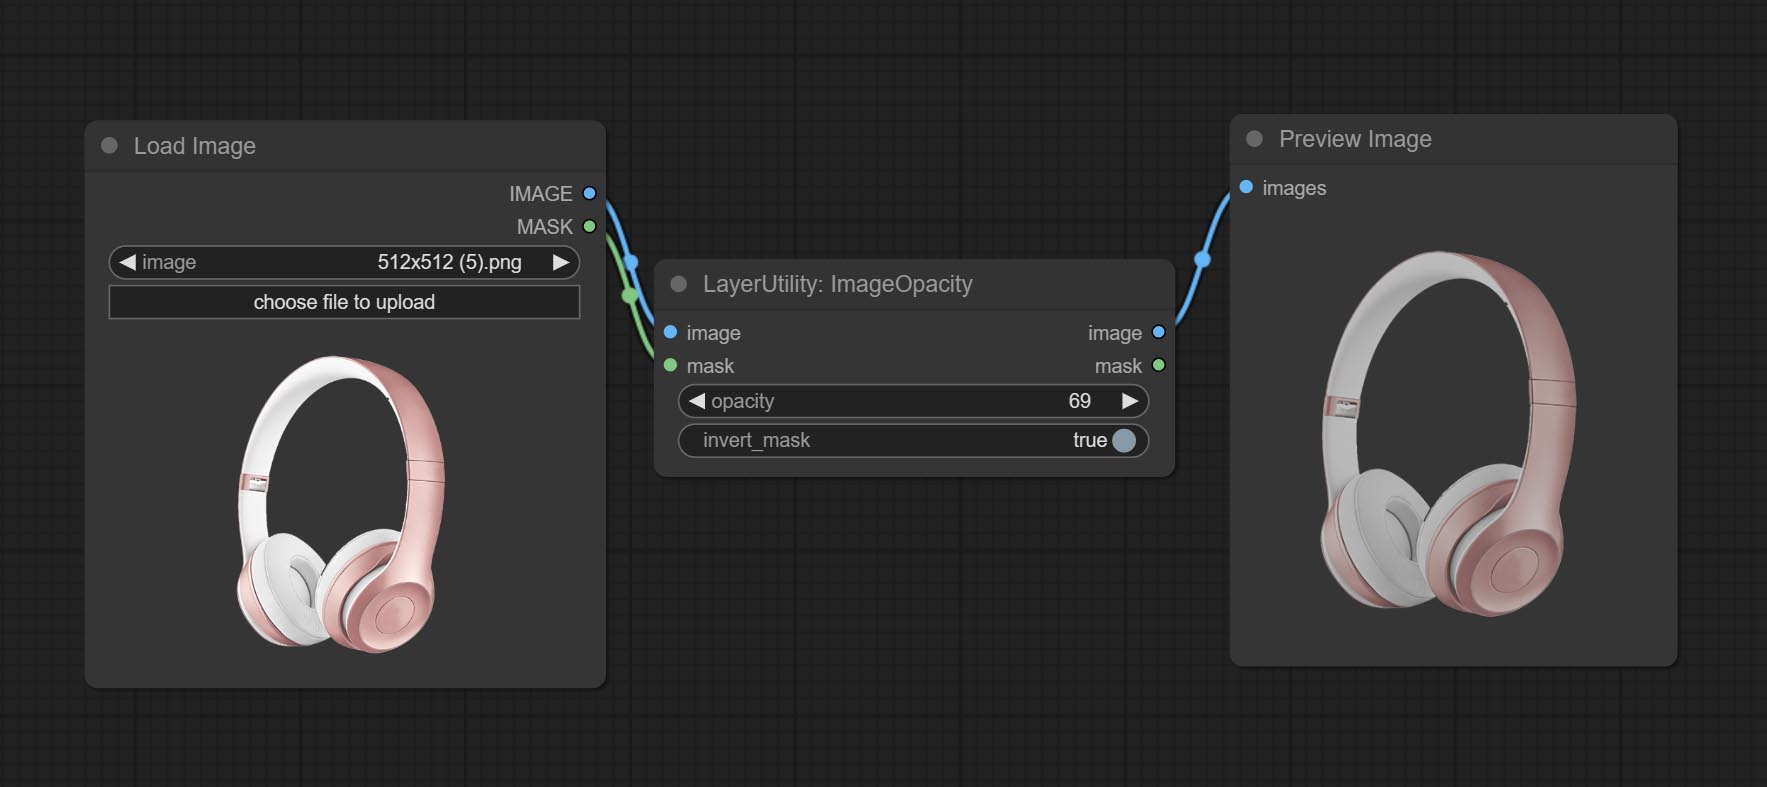
Node option:
- image 5 : Image input, supporting RGB and RGBA. if is RGB, the alpha channel of the entire image will be automatically added.
- mask 2,5 : Mask input.
- invert_mask: Whether to reverse the mask.
- opacity: Opacity of image.
- примечание
ColorPicker
Modify web extensions from mtb nodes. Select colors on the color palette and output RGB values, thanks to the original author. 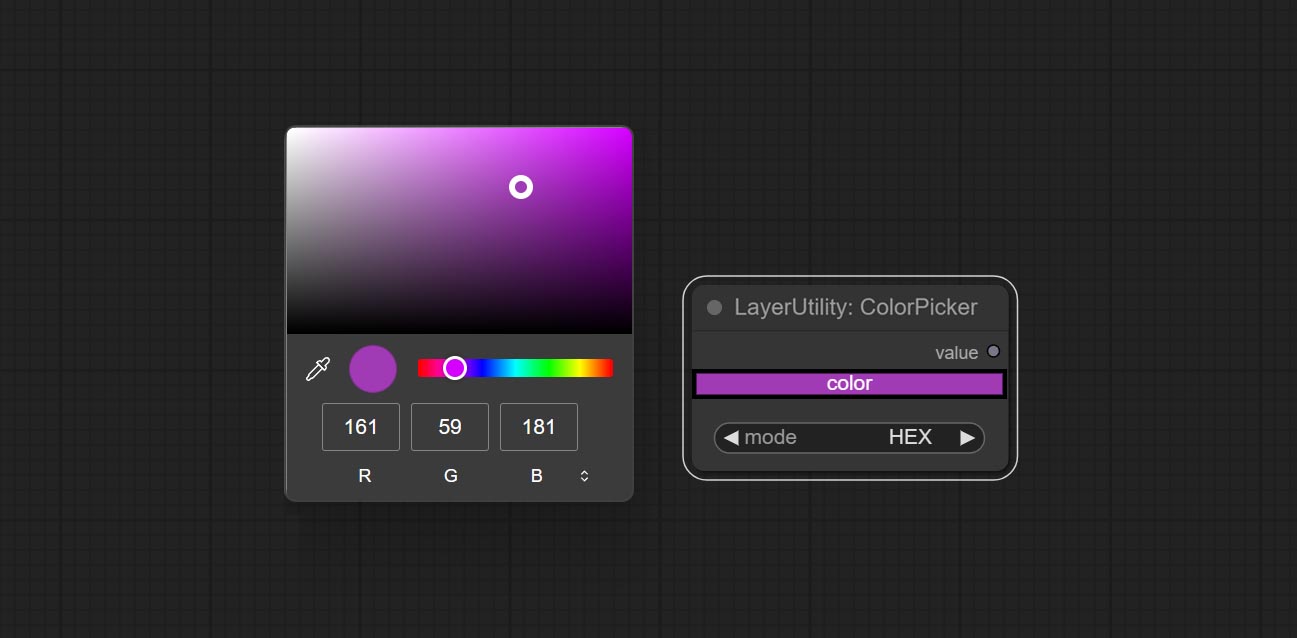
Node options:
- mode: The output format is available in hexadecimal (HEX) and decimal (DEC).
Output type:
RGBValue
Output the color value as a single R, G, B three decimal values. Supports HEX and DEC formats for ColorPicker node output.
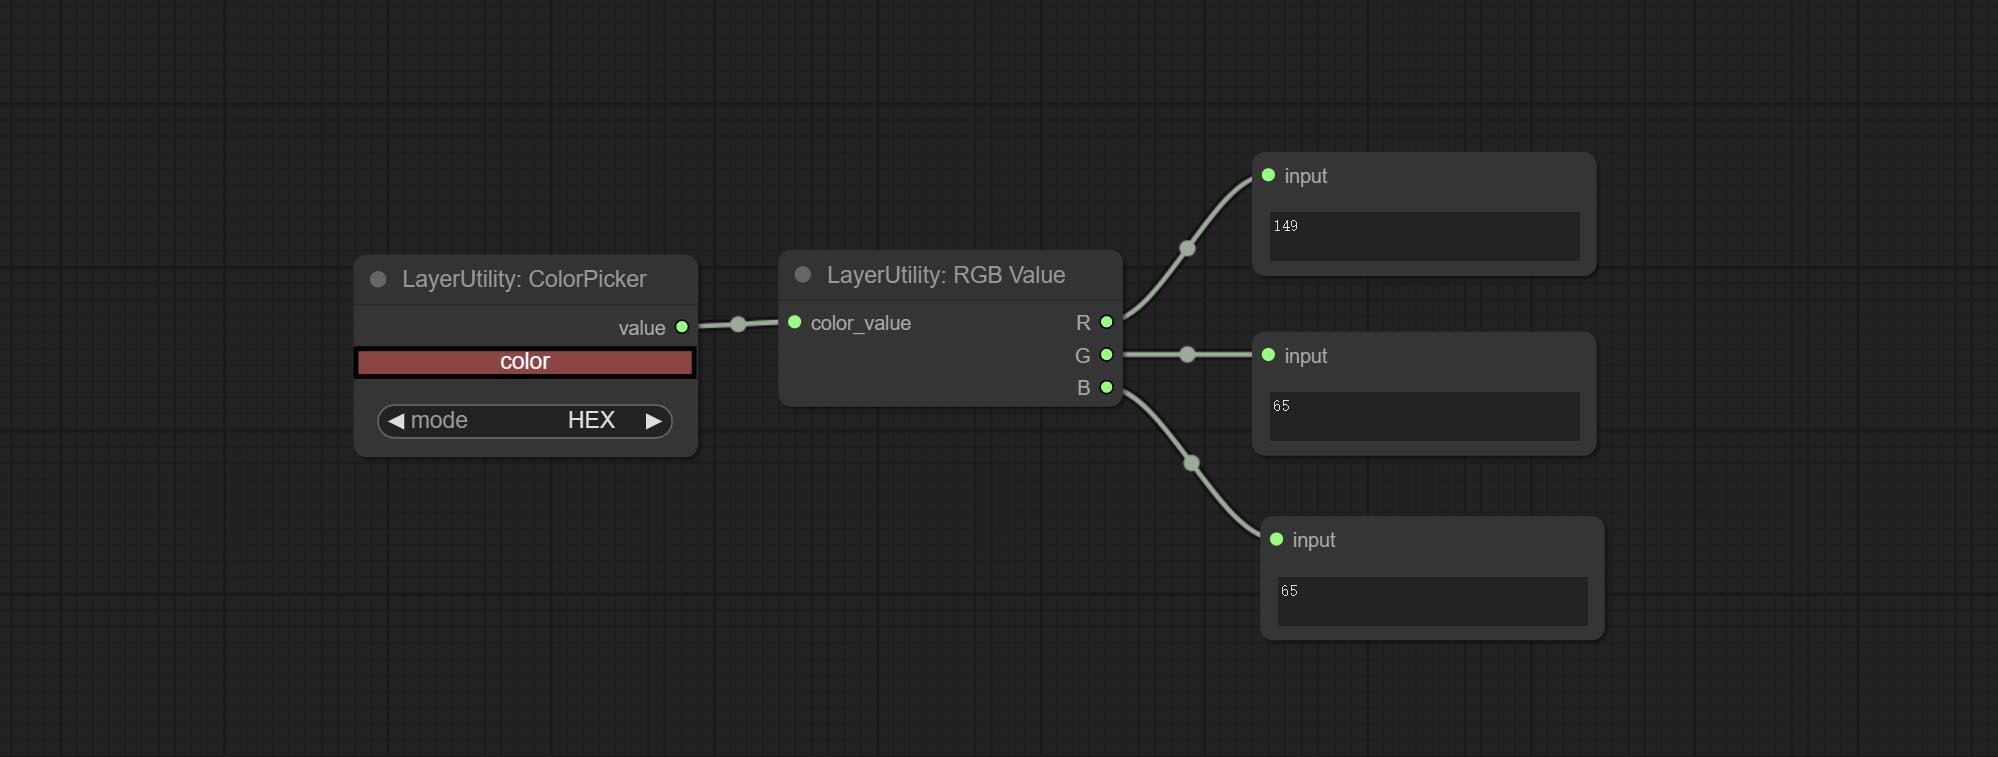
Node Options:
- color_value: Supports hexadecimal (HEX) or decimal (DEC) color values and should be of string or tuple type. Forcing in other types will result in an error.
HSVValue
Output color values as individual decimal values of H, S, and V (maximum value of 255). Supports HEX and DEC formats for ColorPicker node output. 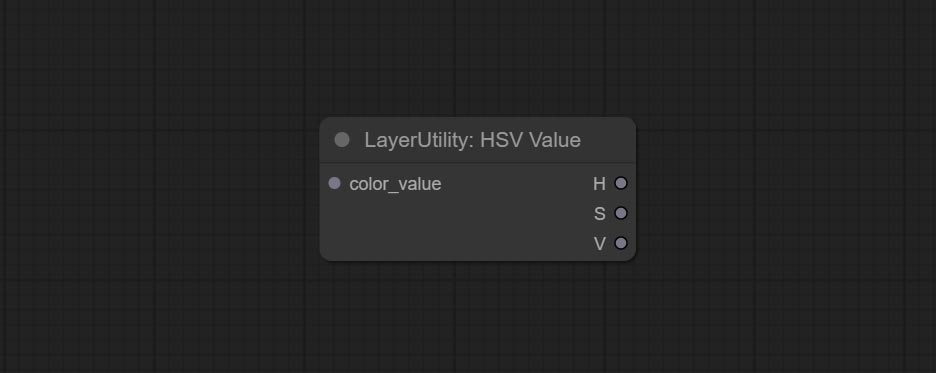
Node Options:
- color_value: Supports hexadecimal (HEX) or decimal (DEC) color values and should be of string or tuple type. Forcing in other types will result in an error.
GrayValue
Output grayscale values based on color values. Supports outputting 256 level and 100 level grayscale values. 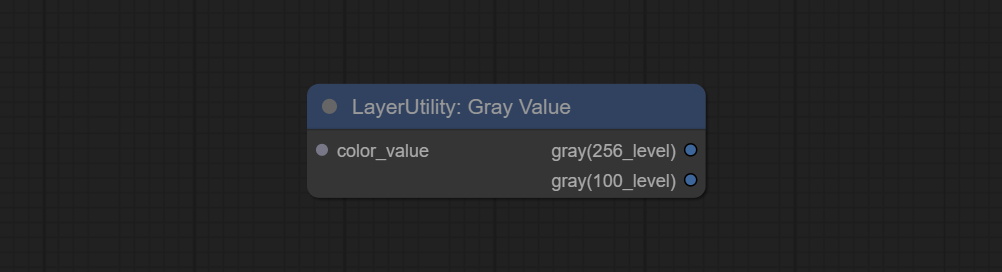
Node Options:
- color_value: Supports hexadecimal (HEX) or decimal (DEC) color values and should be of string or tuple type. Forcing in other types will result in an error.
Выходы:
- gray(256_level): 256 level grayscale value. Integer type, range 0~255.
- gray(100_level): 100 level grayscale value. Integer type, range 0~100.
GetColorTone
Obtain the main color or average color from the image and output RGB values. 
Node options: 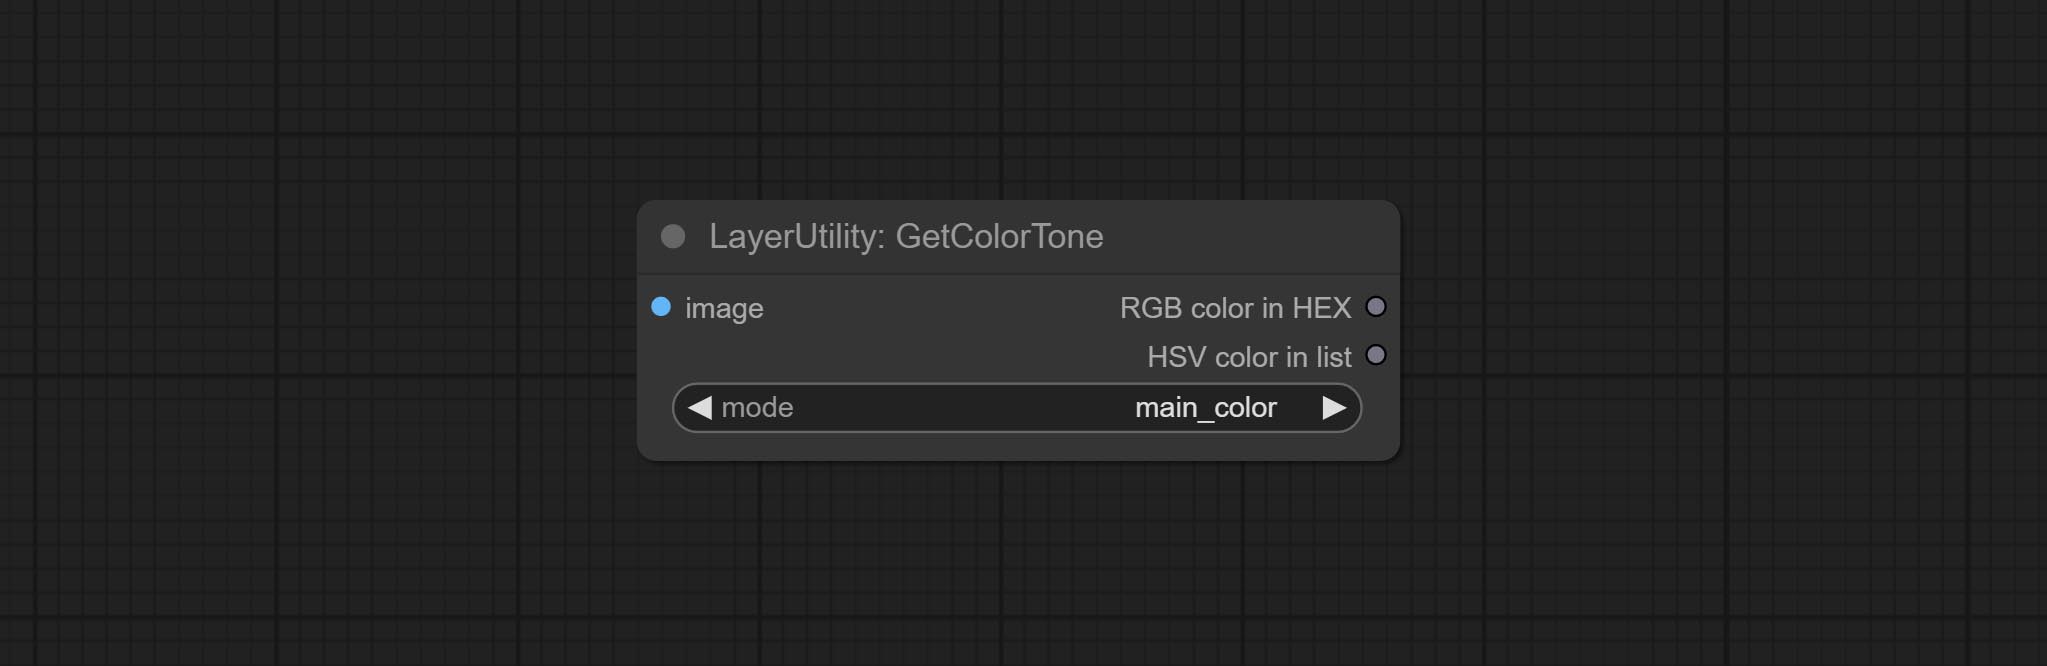
- mode: There are two modes to choose from, with the main color and average color.
Output type:
- RGB color in HEX: The RGB color described by hexadecimal RGB format, like '#FA3D86'.
- HSV color in list: The HSV color described by python's list data format.
GetColorToneV2
V2 upgrade of GetColorTone. You can specify the dominant or average color to get the body or background. 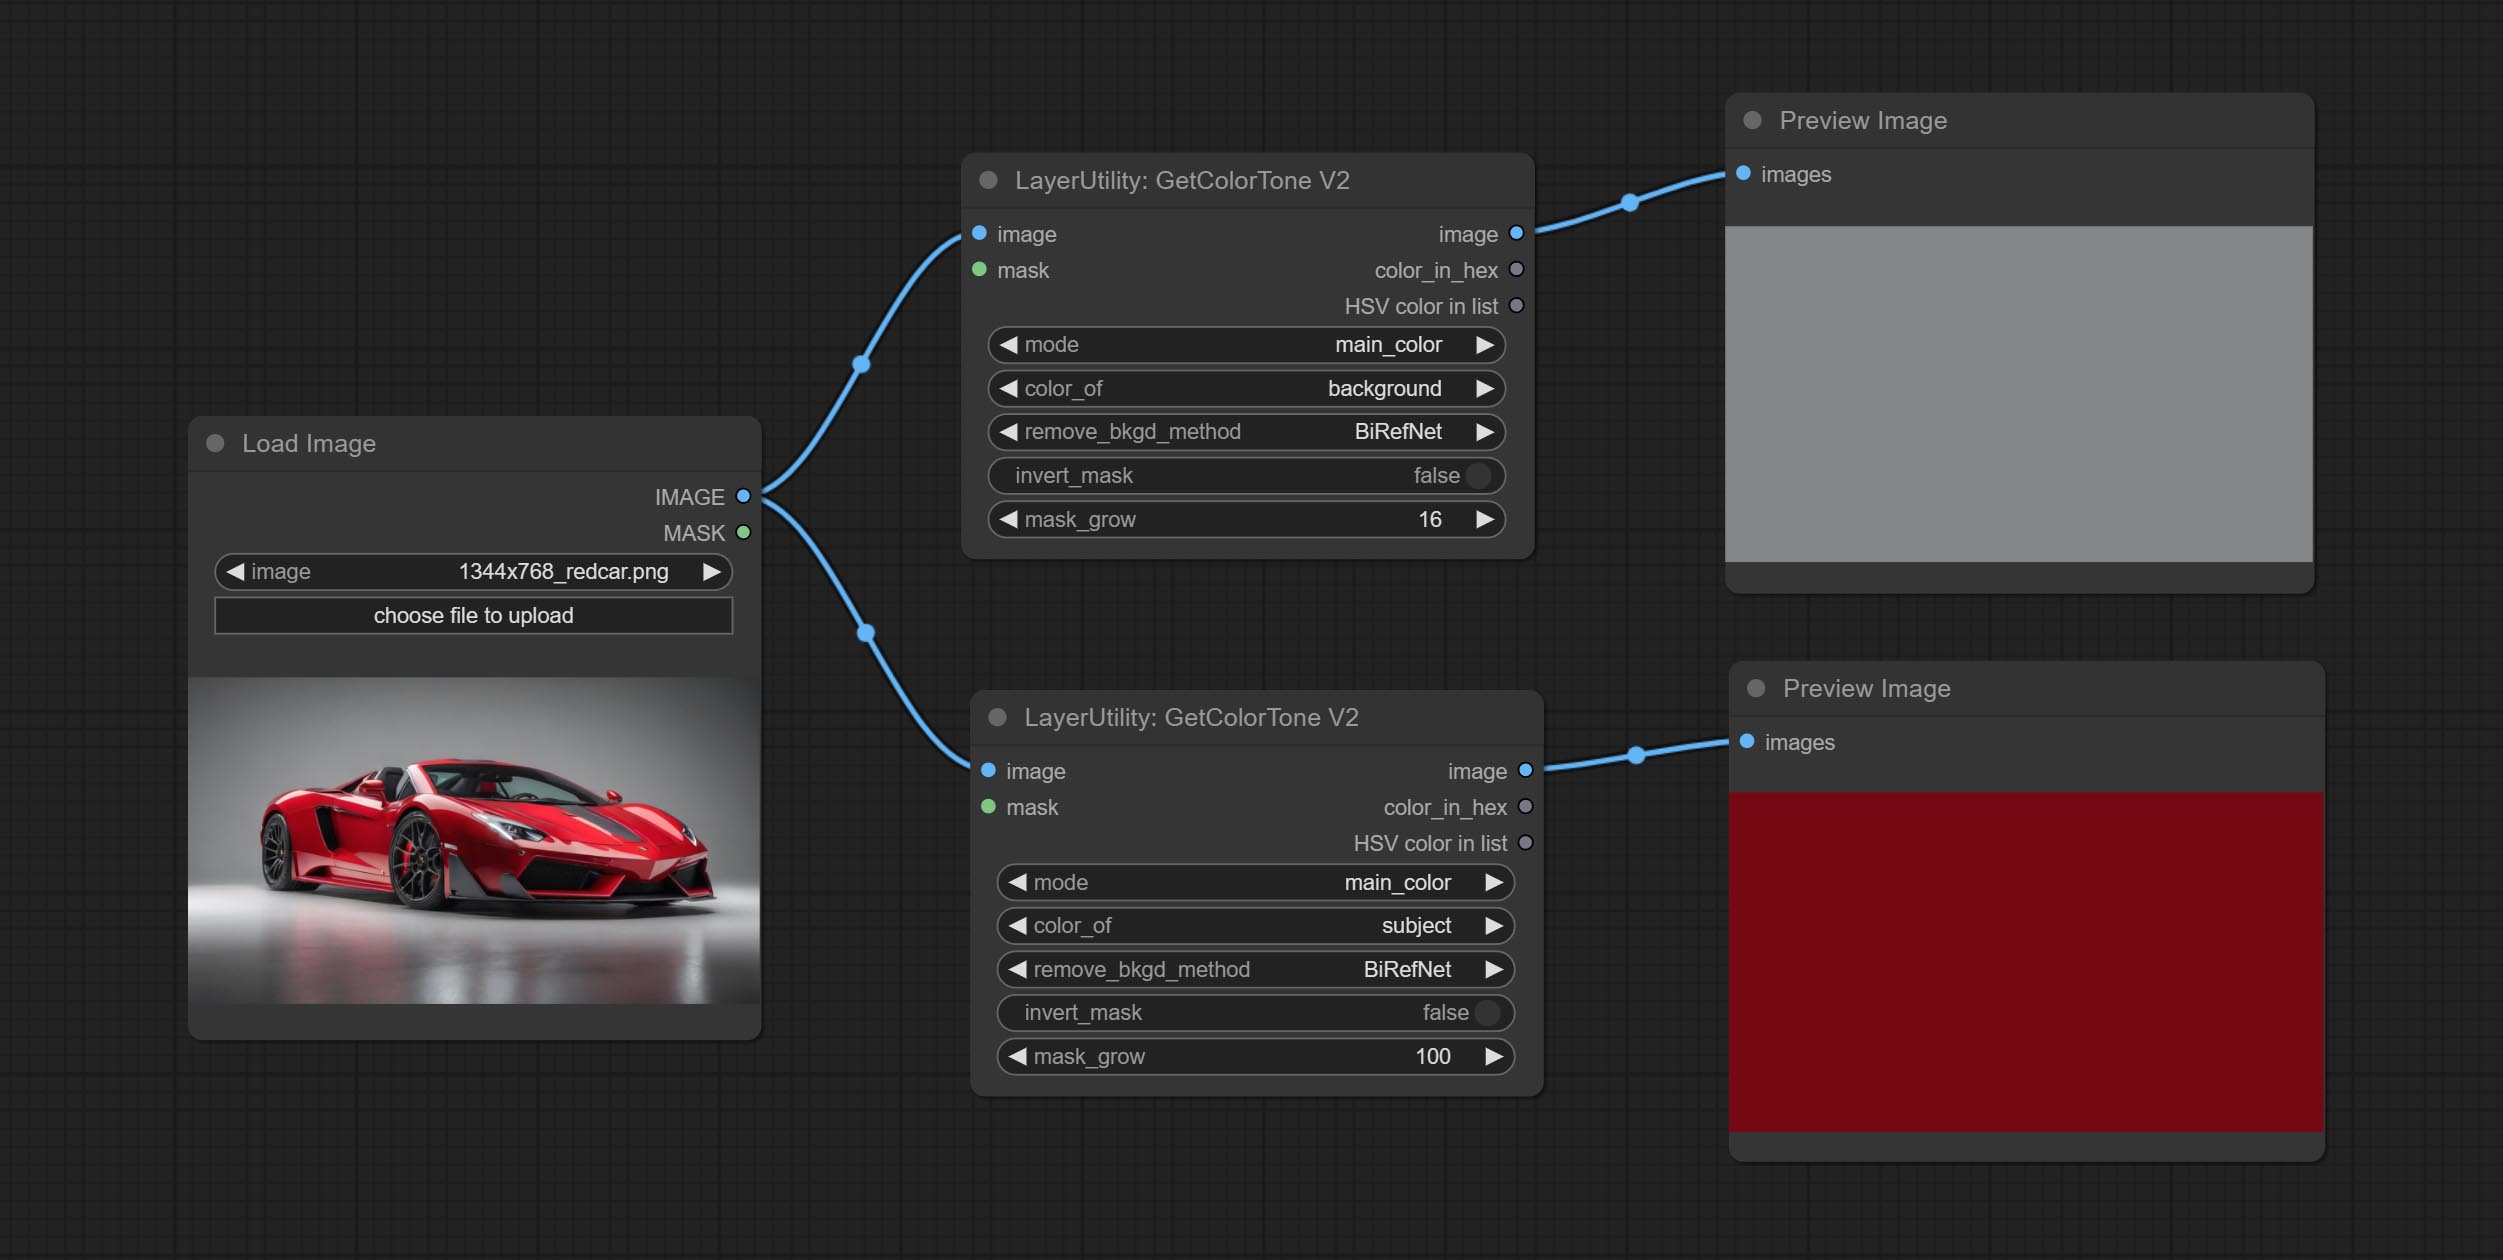
The following changes have been made on the basis of GetColorTong: 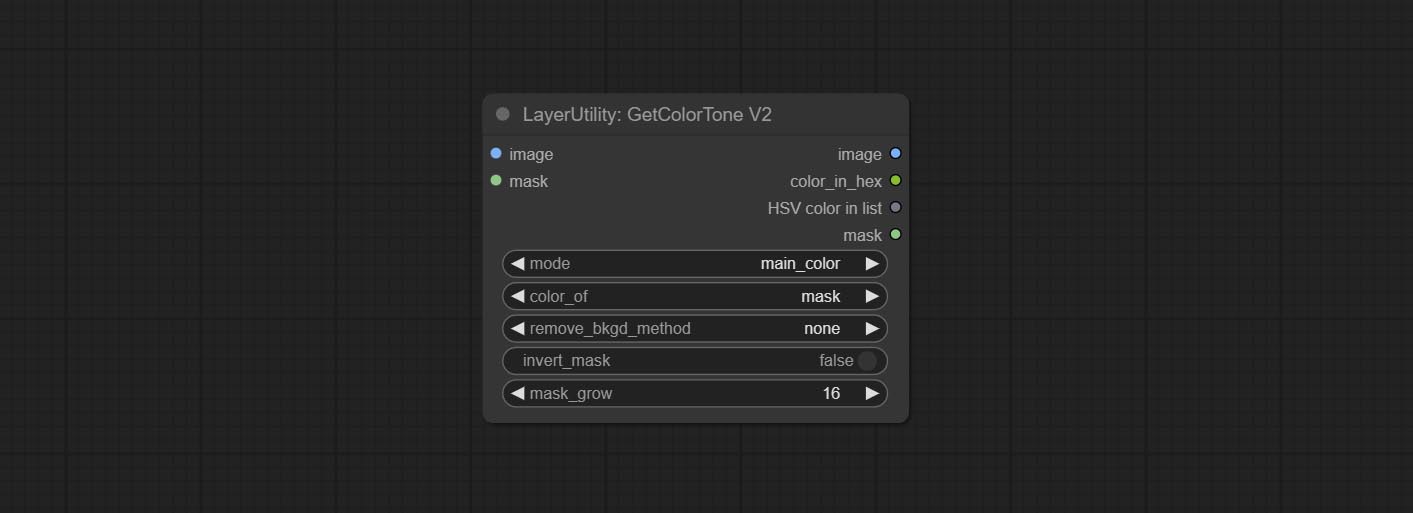
- color_of: Provides 4 options, mask, entire, background, and subject, to select the color of the mask area, entire picture, background, or subject, respectively.
- remove_background_method: There are two methods of background recognition: BiRefNet and RMBG V1.4.
- invert_mask: Whether to reverse the mask.
- mask_grow: Mask expansion. For subject, a larger value brings the obtained color closer to the color at the center of the body.
Выход:
- image: Solid color picture output, the size is the same as the input picture.
- mask: Mask output.
GetMainColors
Obtain the main color of the image. You can obtain 5 colors. 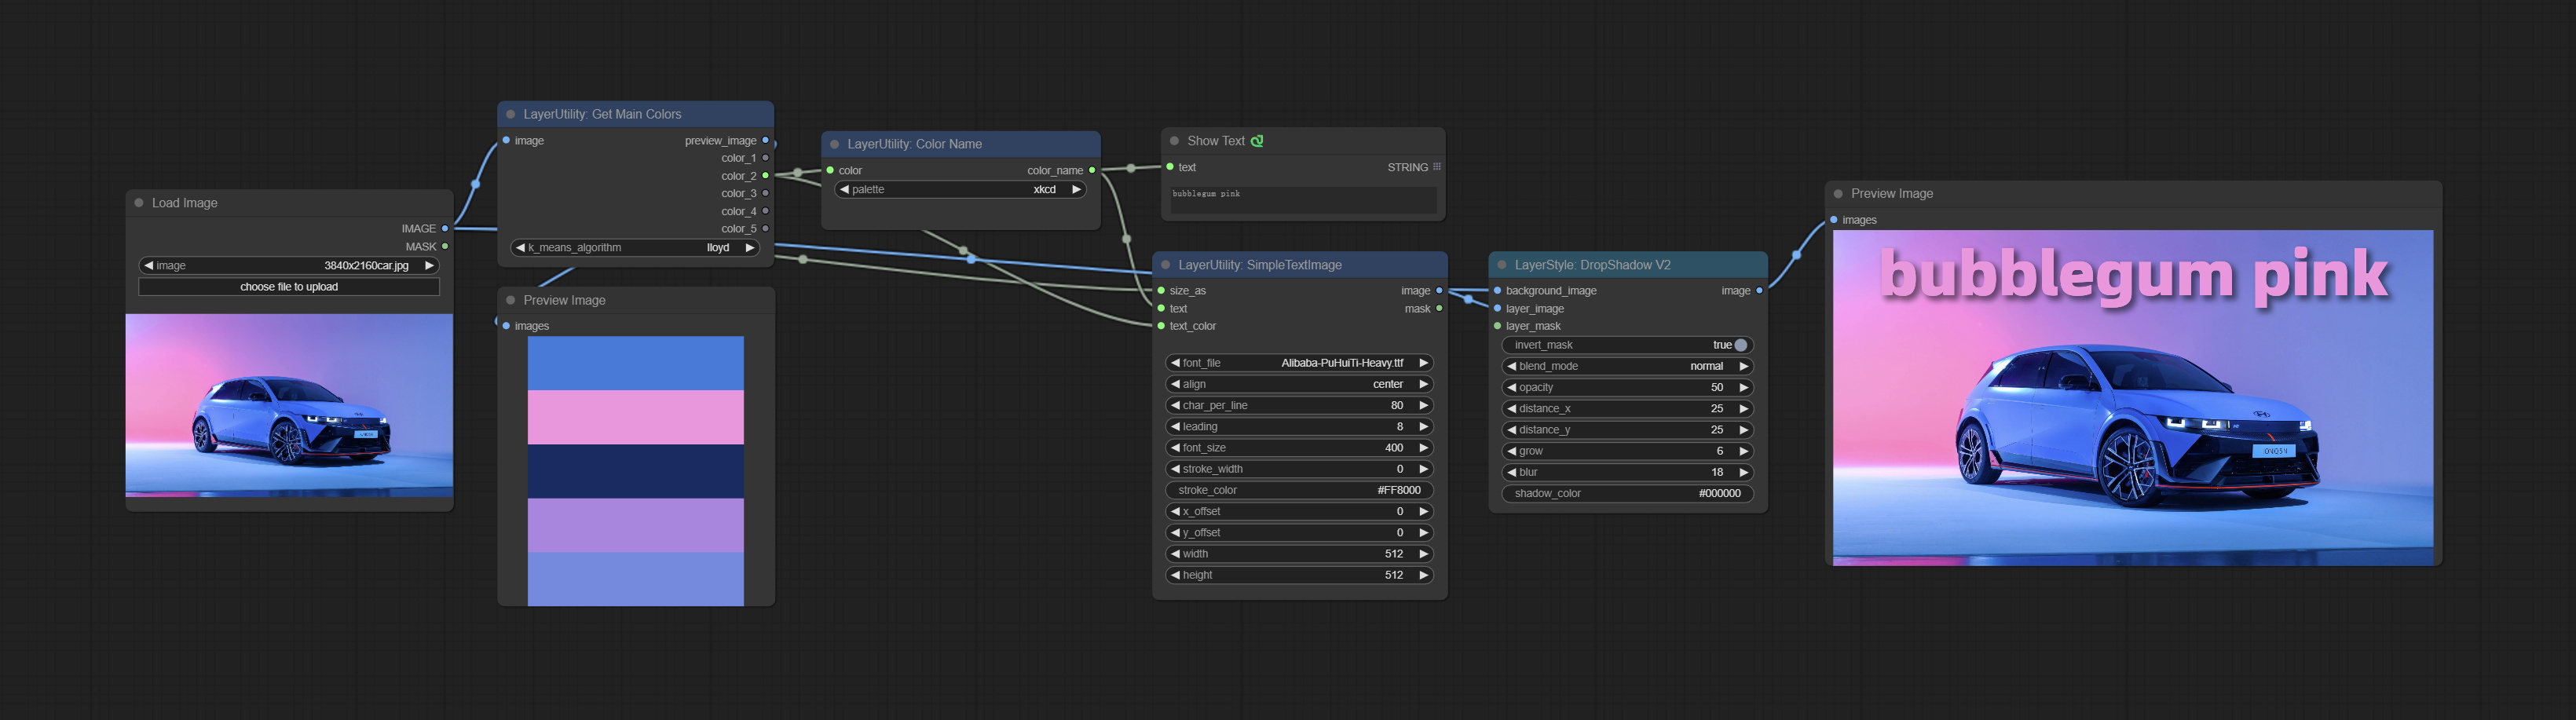
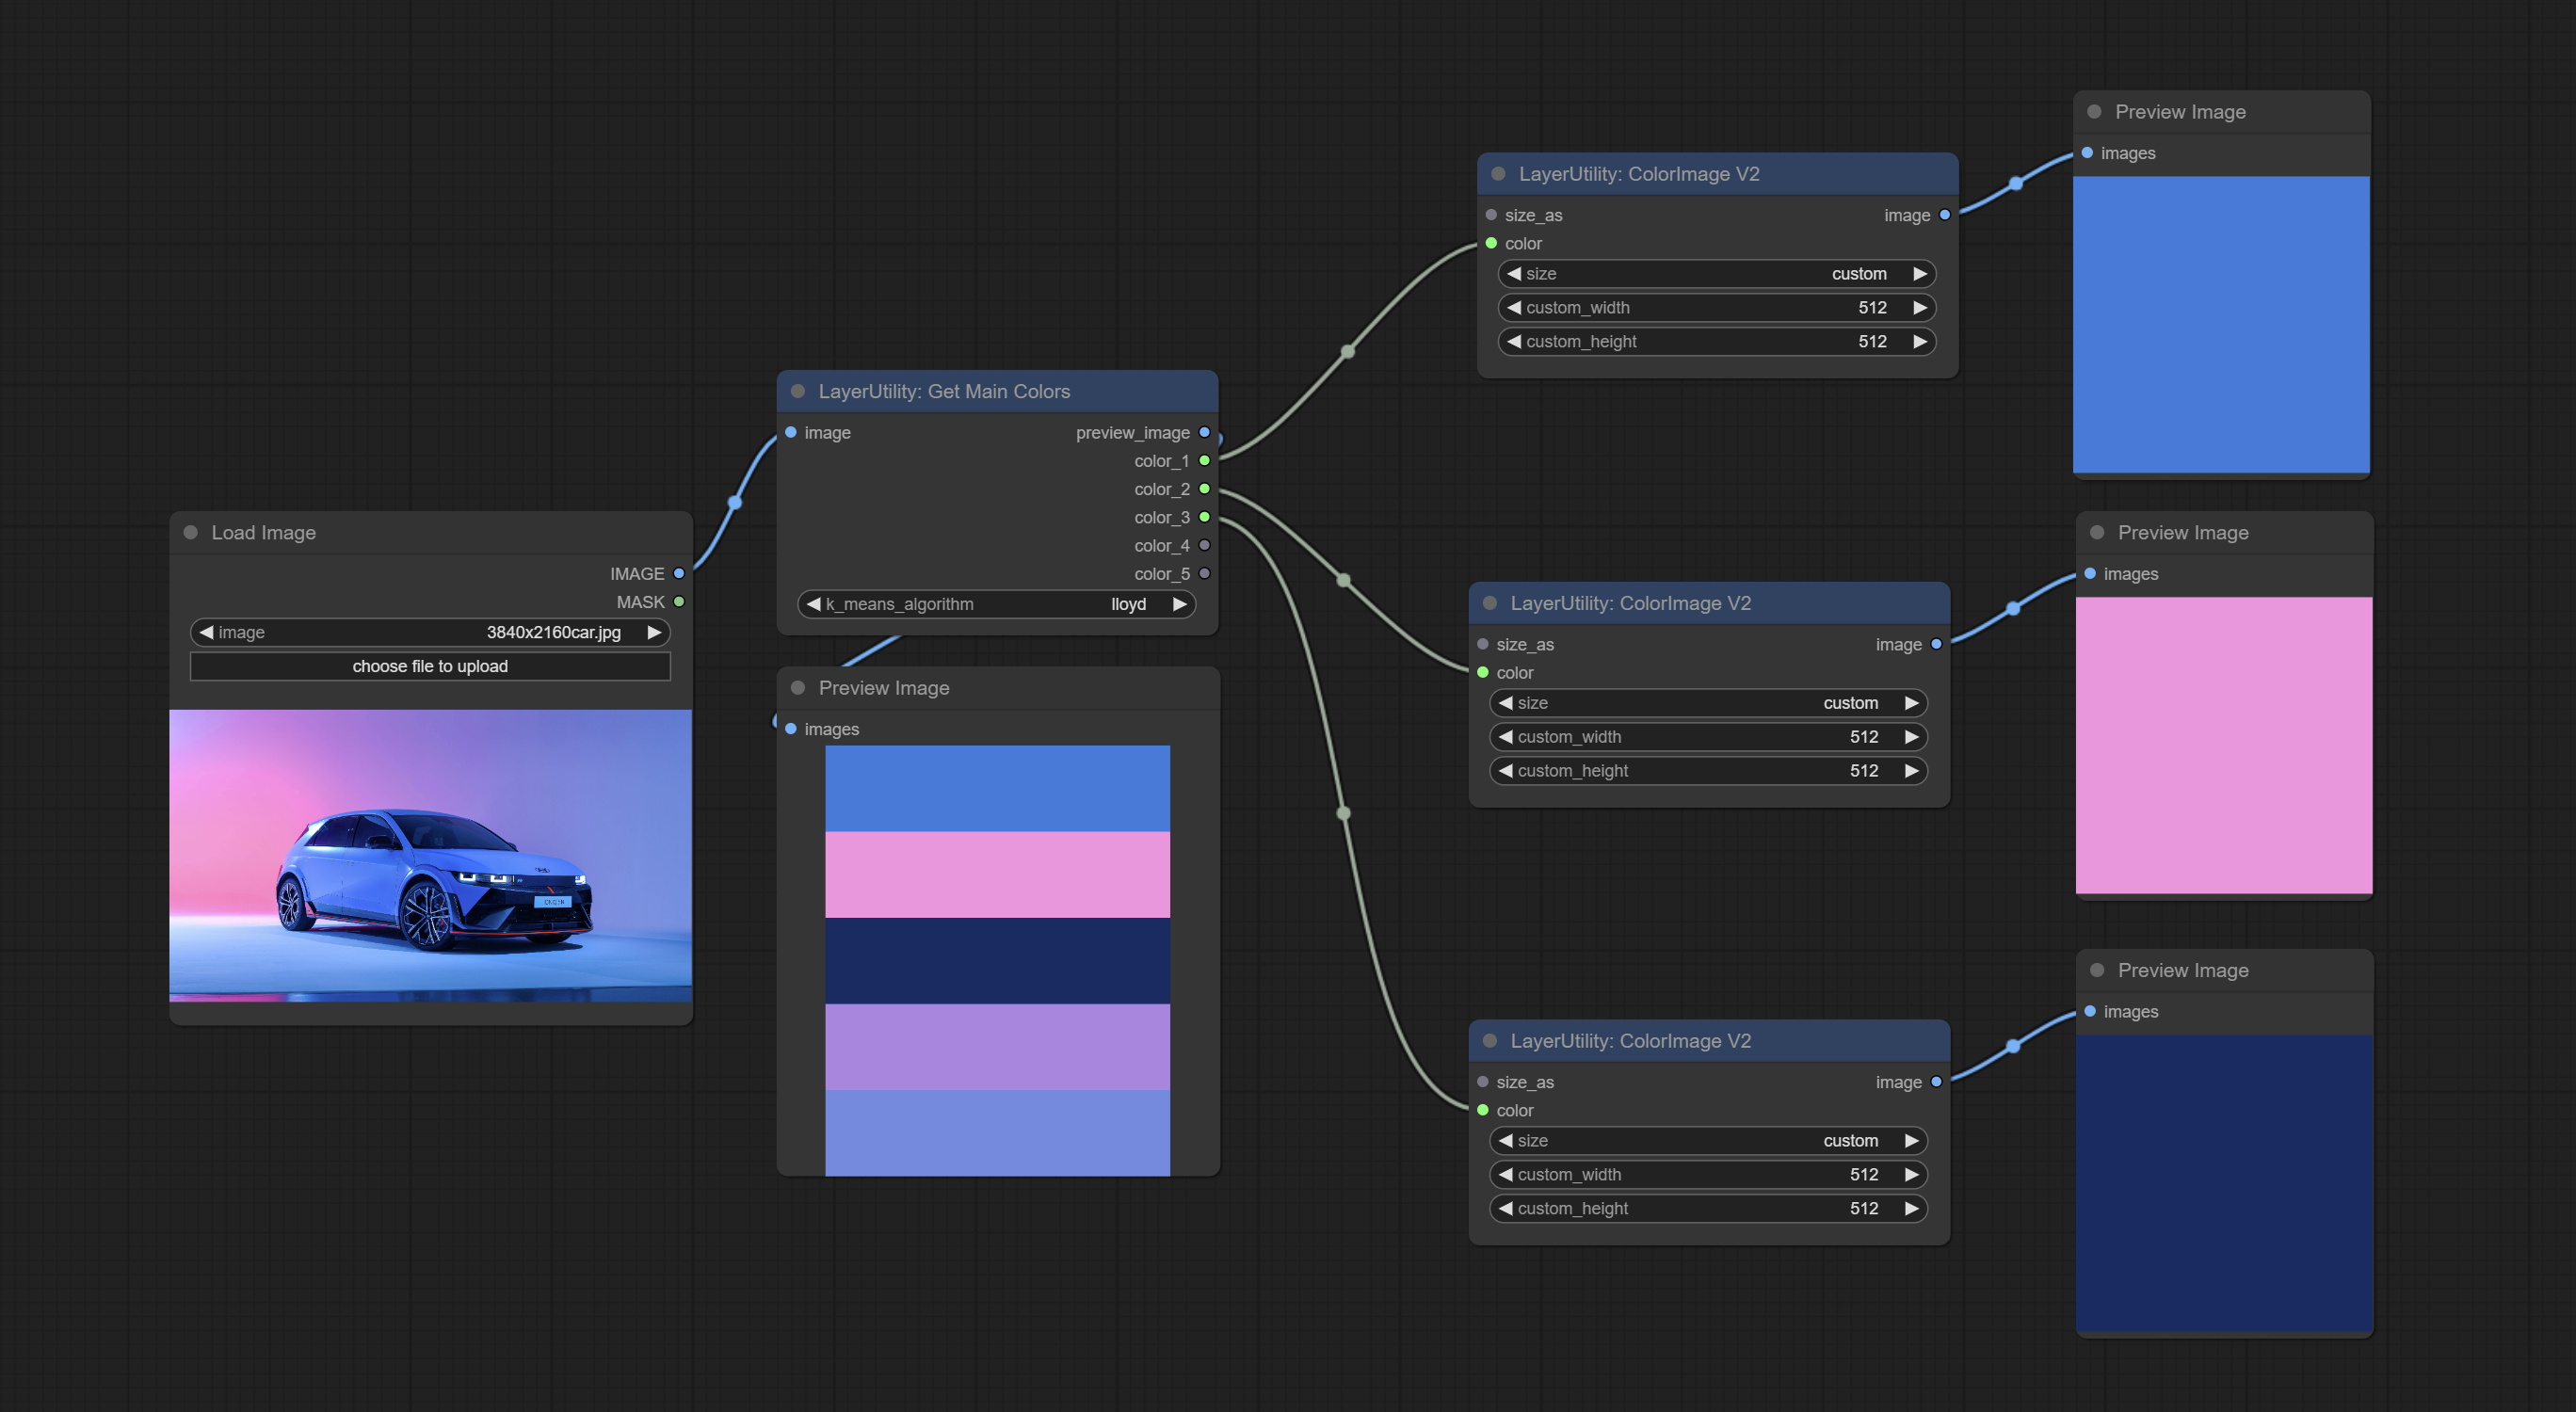
Node Options: 
- image: The image input.
- k_means_algorithm:K-Means algorithm options. "lloyd" is the standard K-Means algorithm, while "elkan" is the triangle inequality algorithm, suitable for larger images.
Выходы:
- preview_image: 5 main color preview images.
- color_1~color_5: Color value output. Output an RGB string in HEX format.
ColorName
Output the most similar color name in the color palette based on the color value. 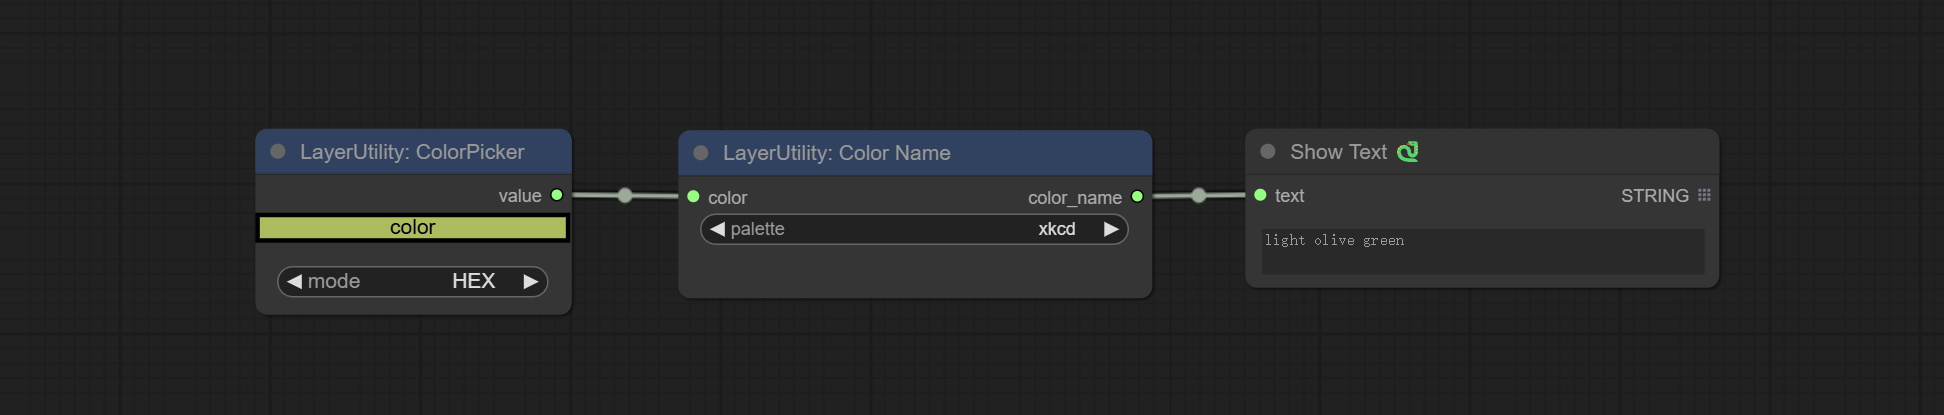
Node Options: 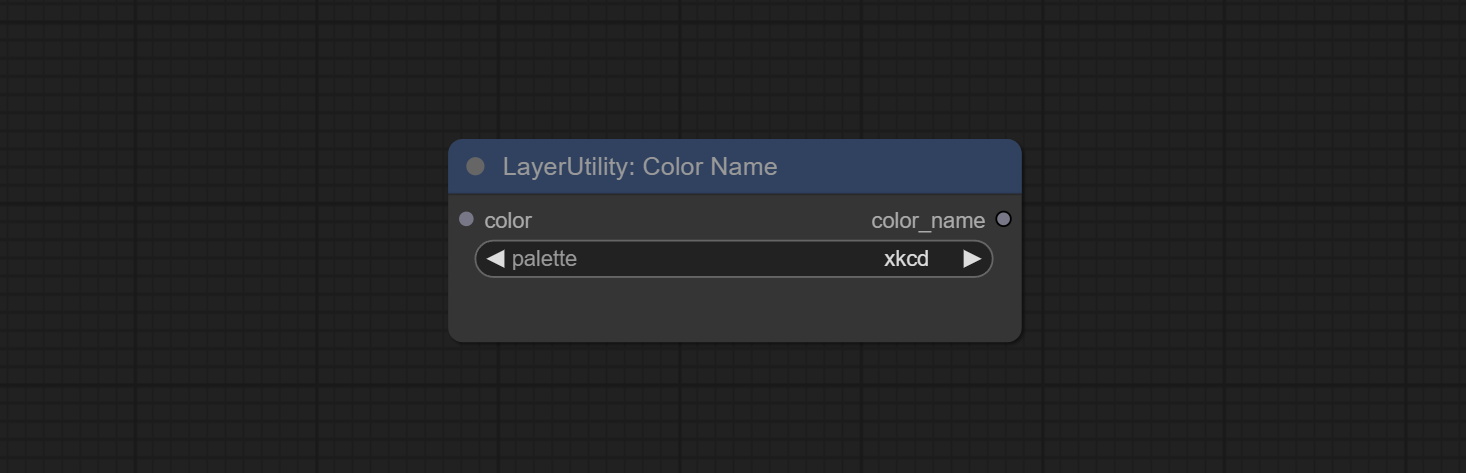
- color: Color value input, in HEX format RGB string format.
- palette: Color palette.
xkcd includes 949 colors, css3 includes 147 colors, and html4 includes 16 colors.
Выход:
- color_name: Color name in string.
ExtendCanvas
Extend the canvas 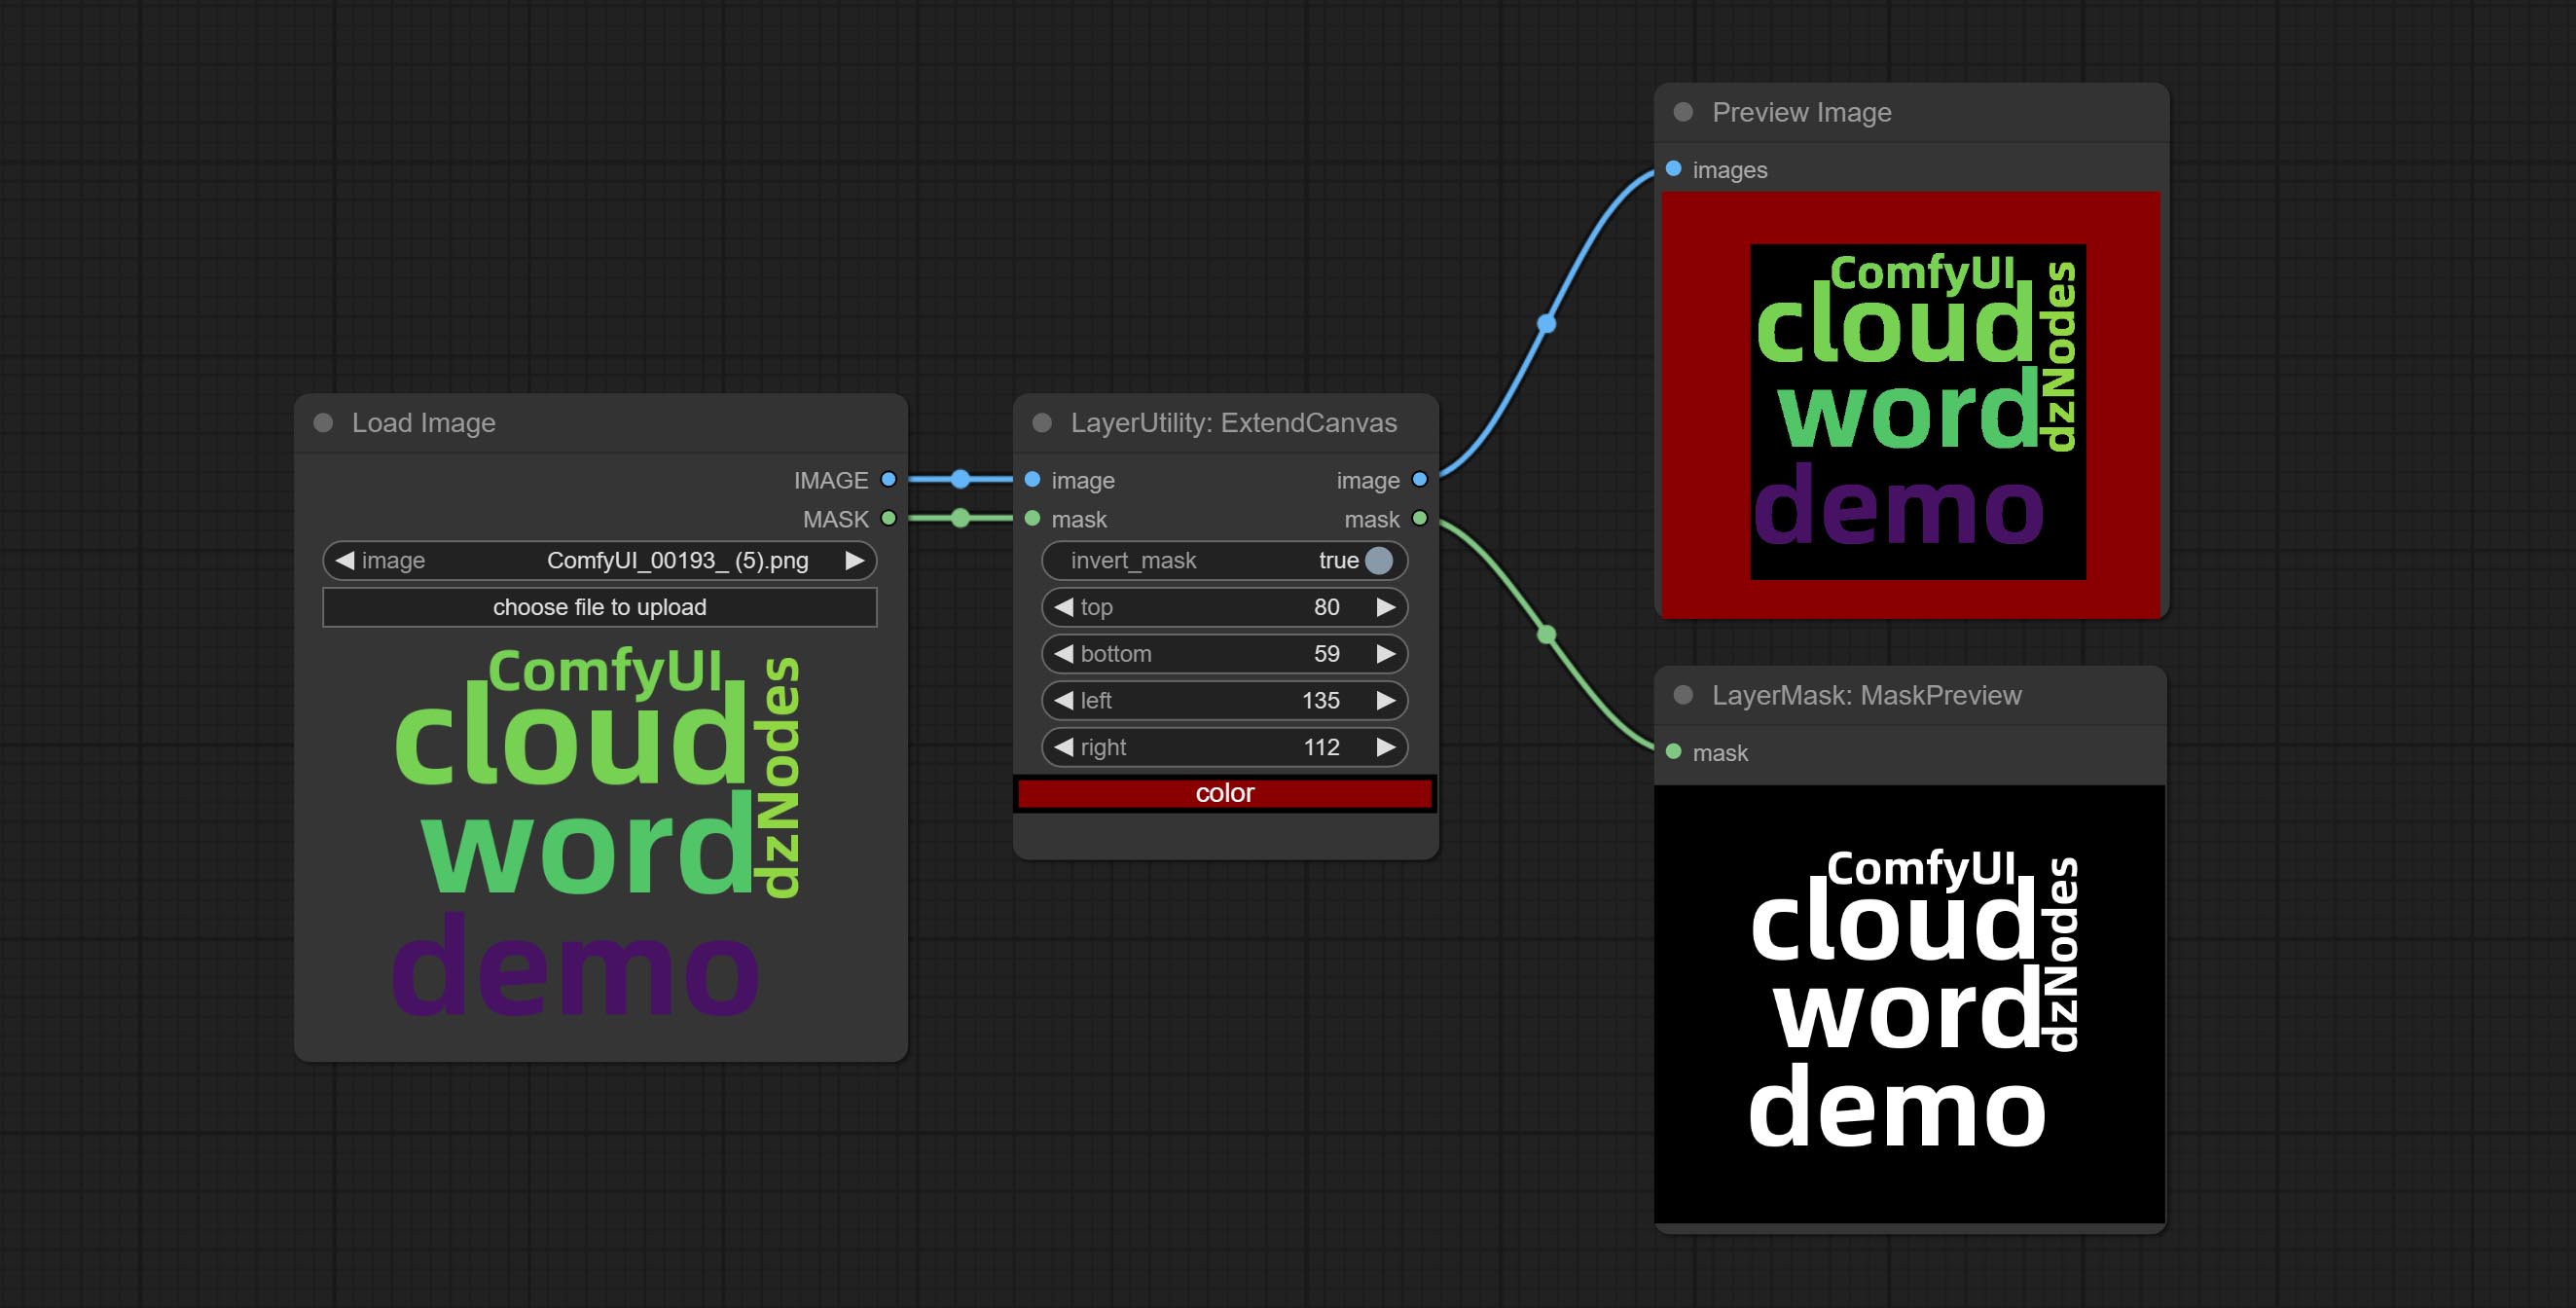
Node options: 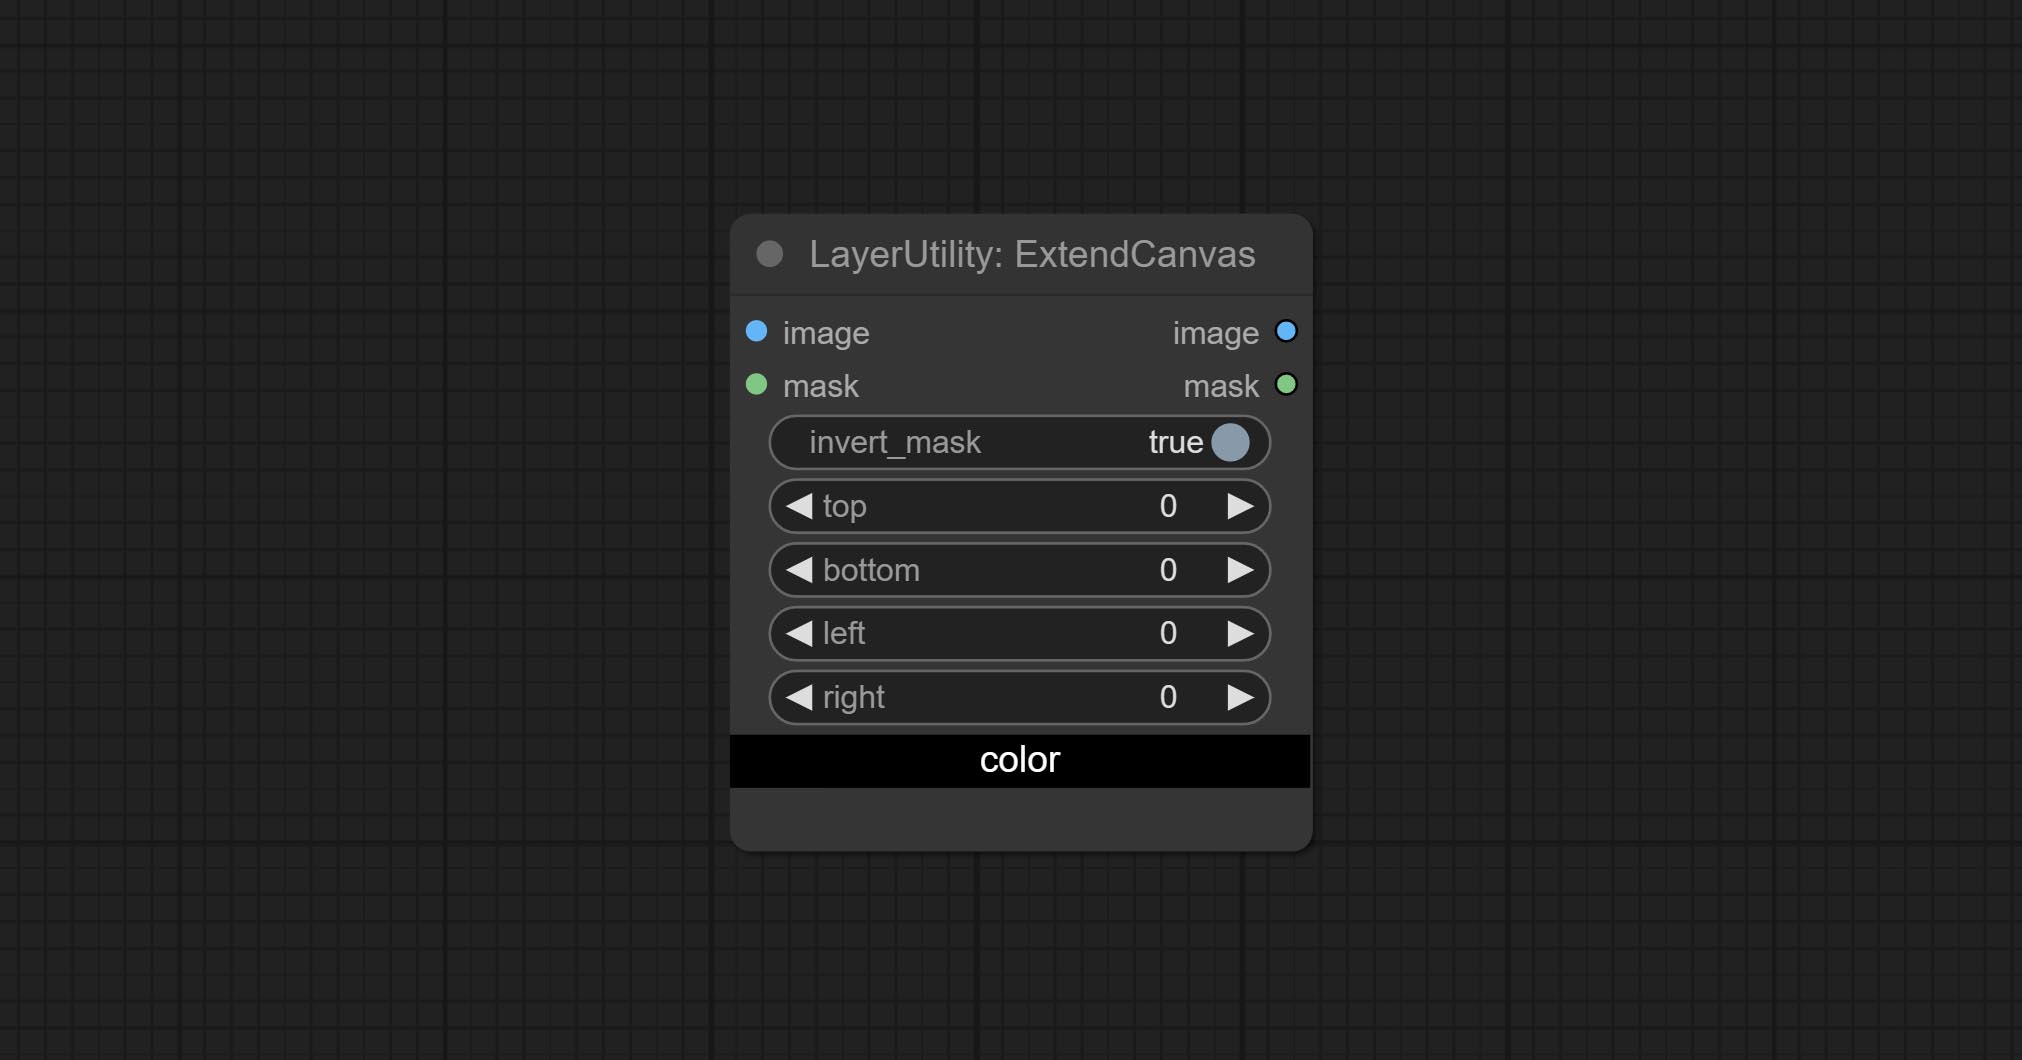
- invert_mask: Whether to reverse the mask.
- top: Top extension value.
- bottom: Bottom extension value.
- left: Left extension value.
- right: Right extension value.
- цвет; Color of canvas.
ExtendCanvasV2
V2 upgrade to ExtendCanvas.
Based on ExtendCanvas, color is modified to be a string type, and it supports external ColorPicker input, Support negative value input, it means image will be cropped. 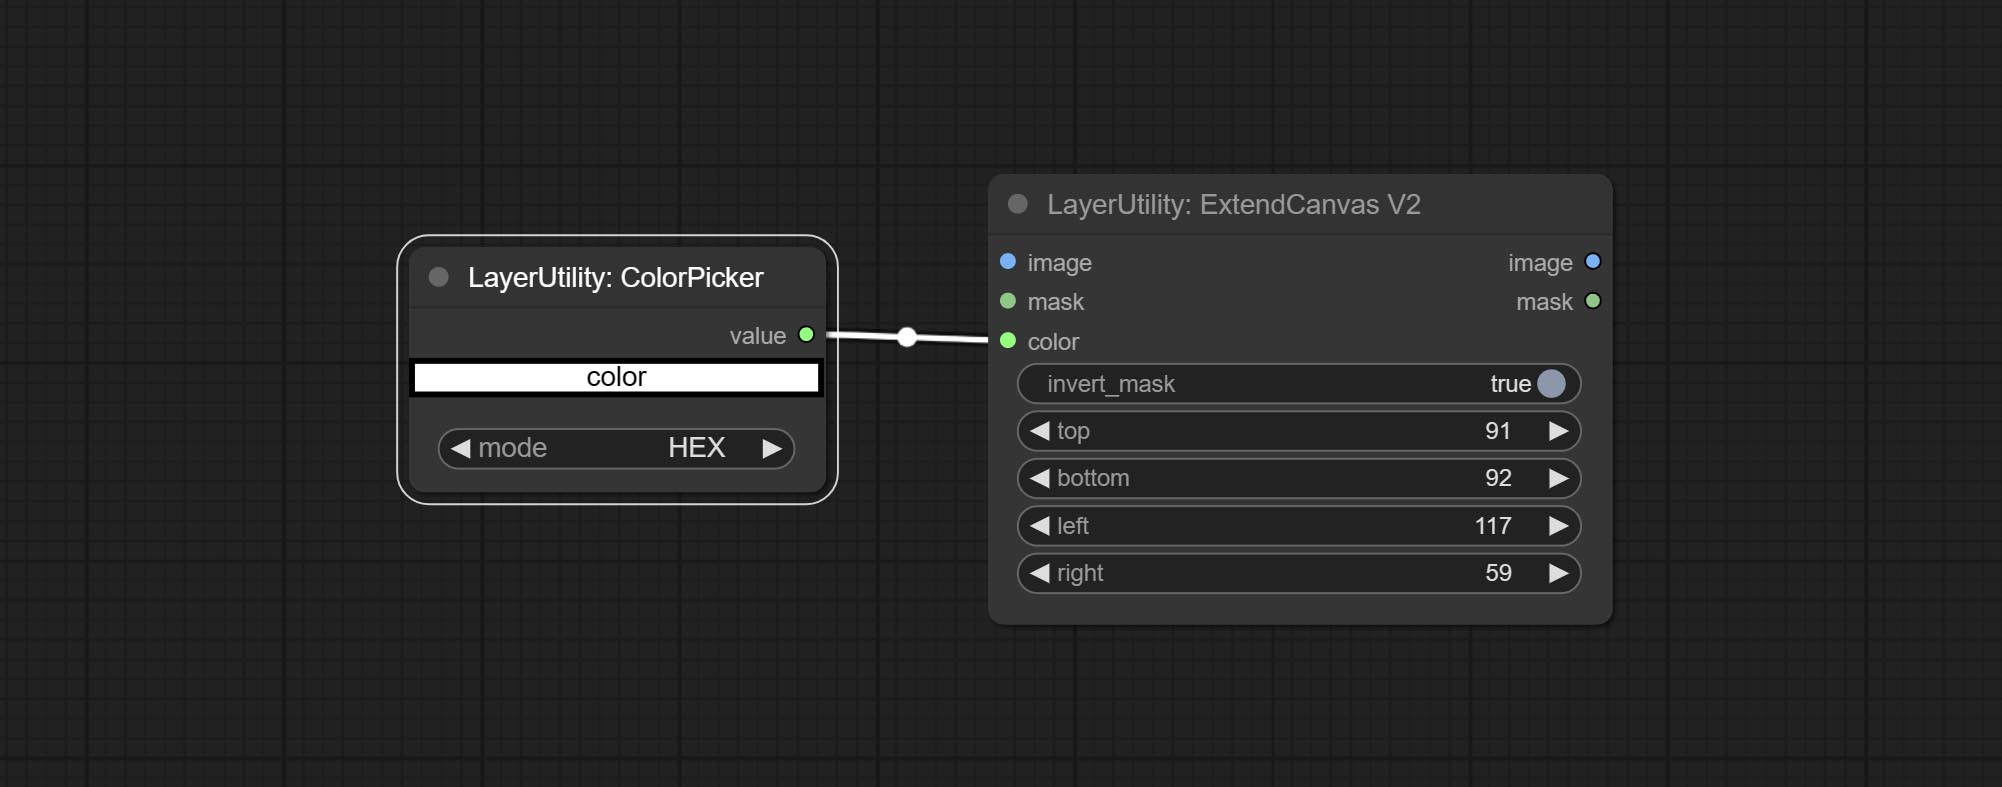
XY to Percent
Convert absolute coordinates to percentage coordinates.
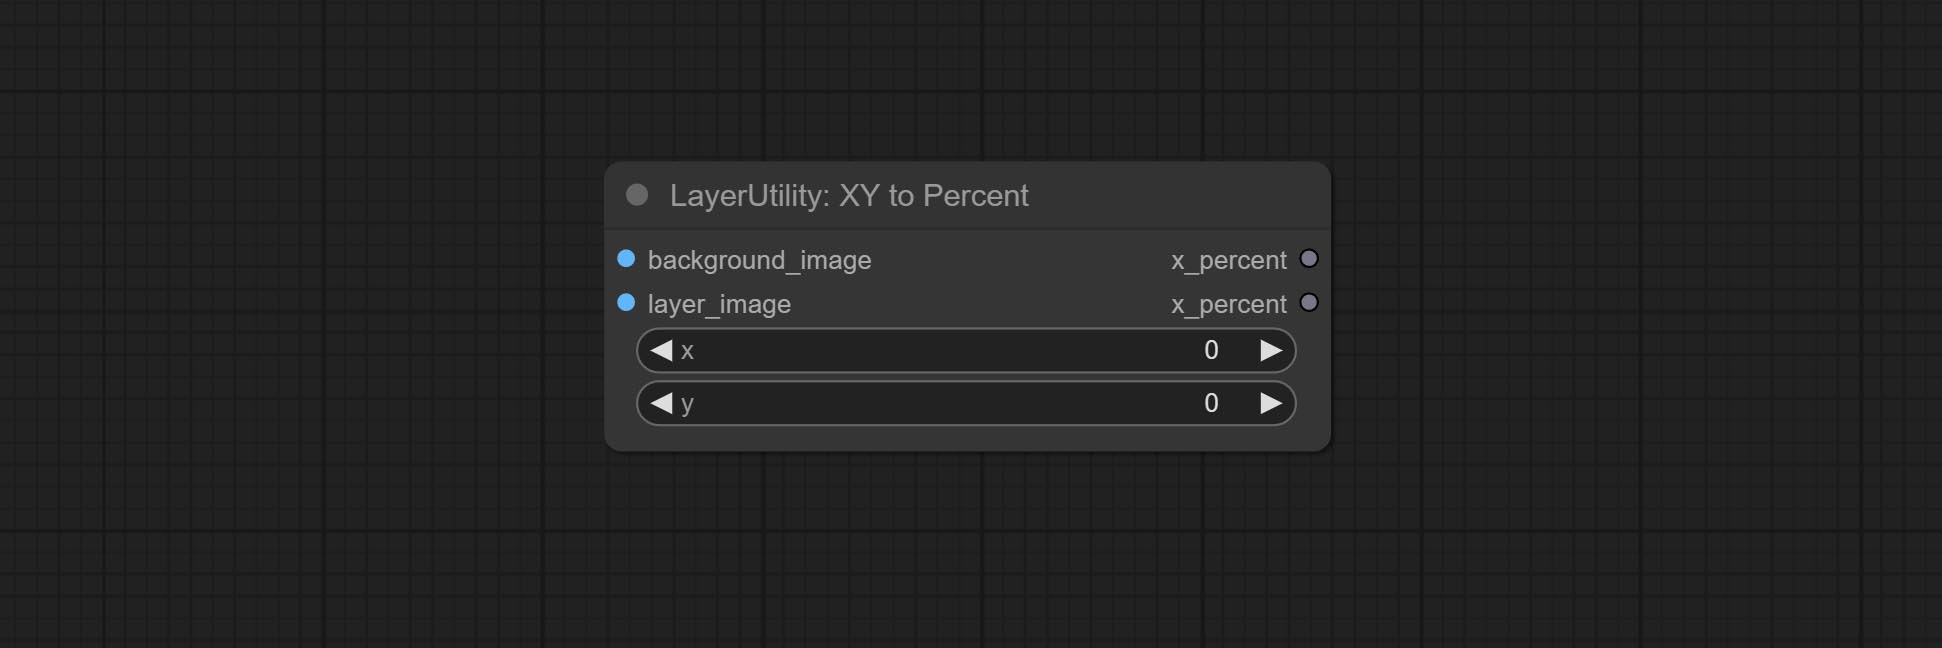
Node options:
- x: Value of X.
- y: Value of Y.
LayerImageTransform
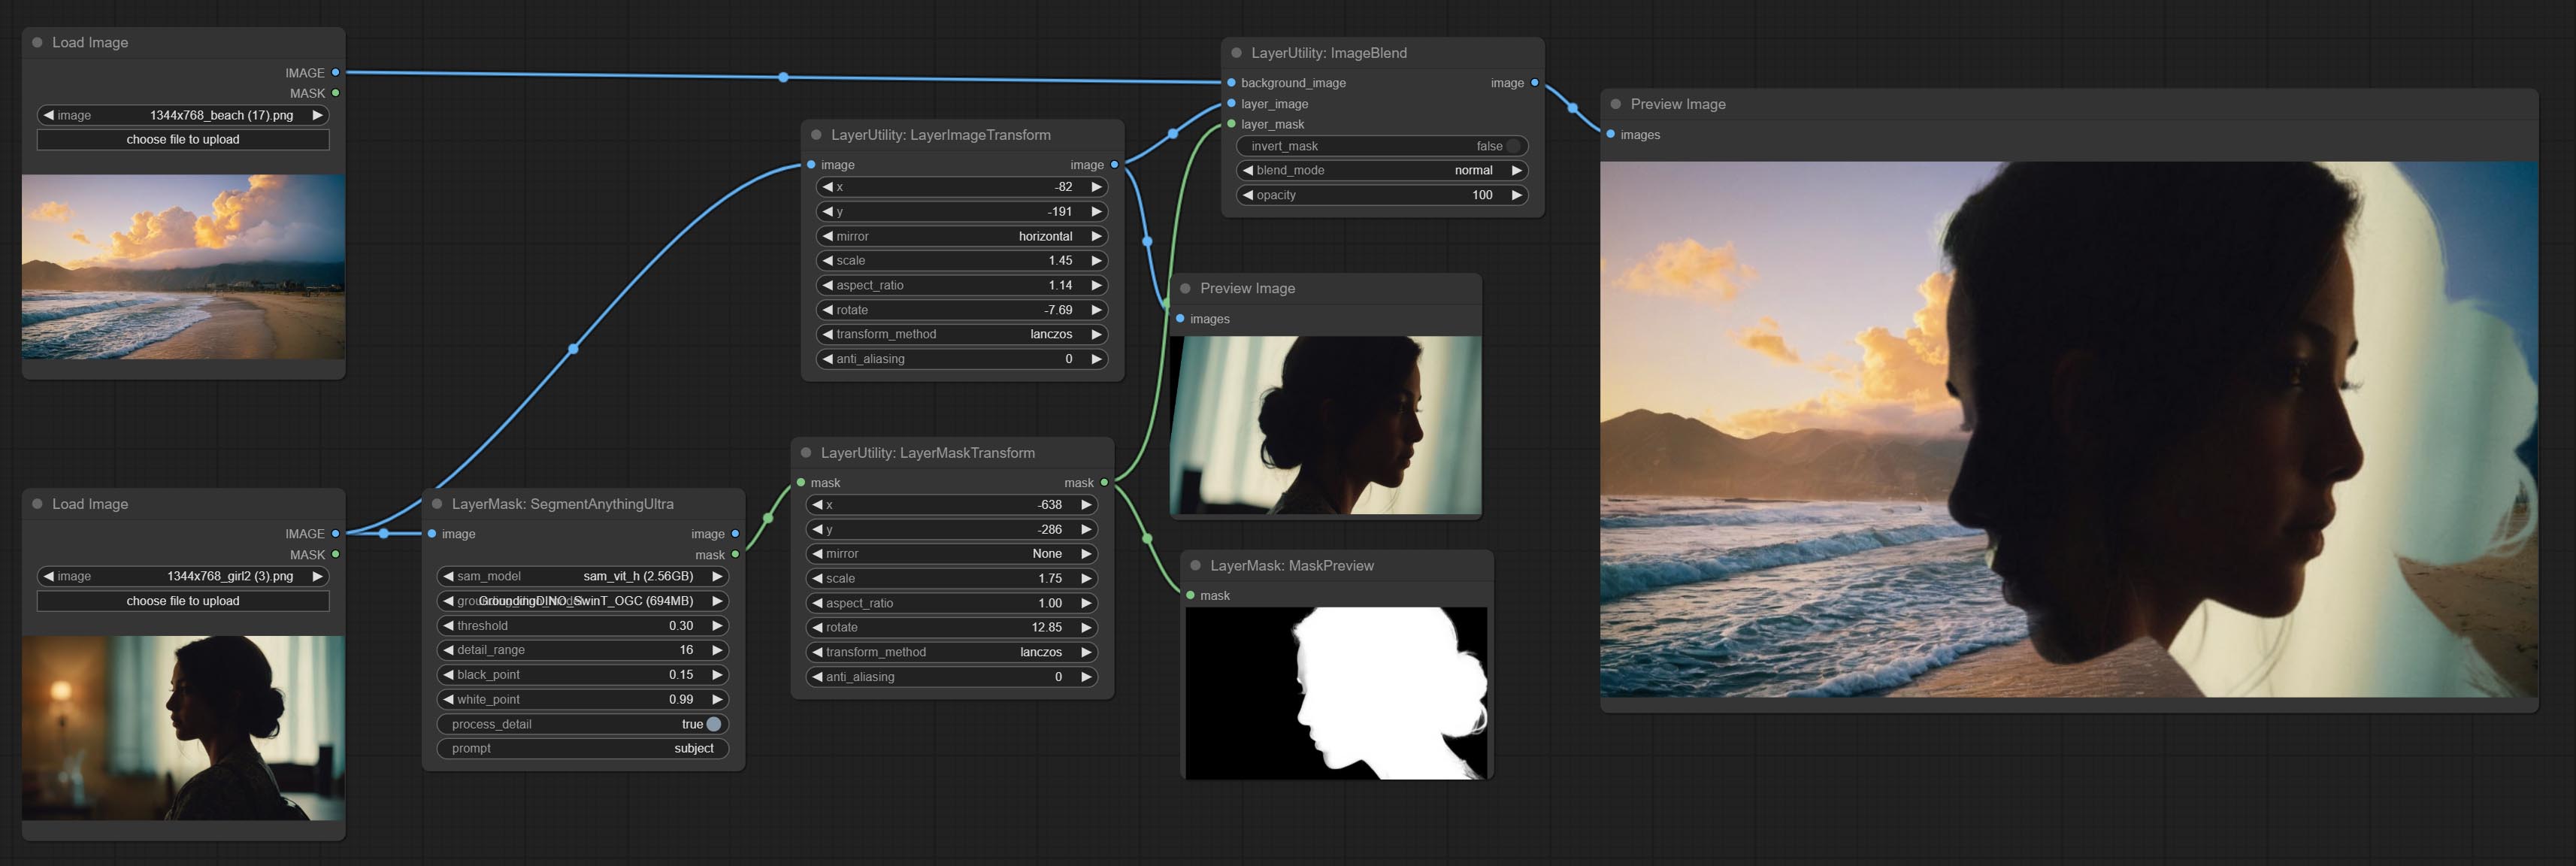
This node is used to transform layer_image separately, which can change size, rotation, aspect ratio, and mirror flip without changing the image size.
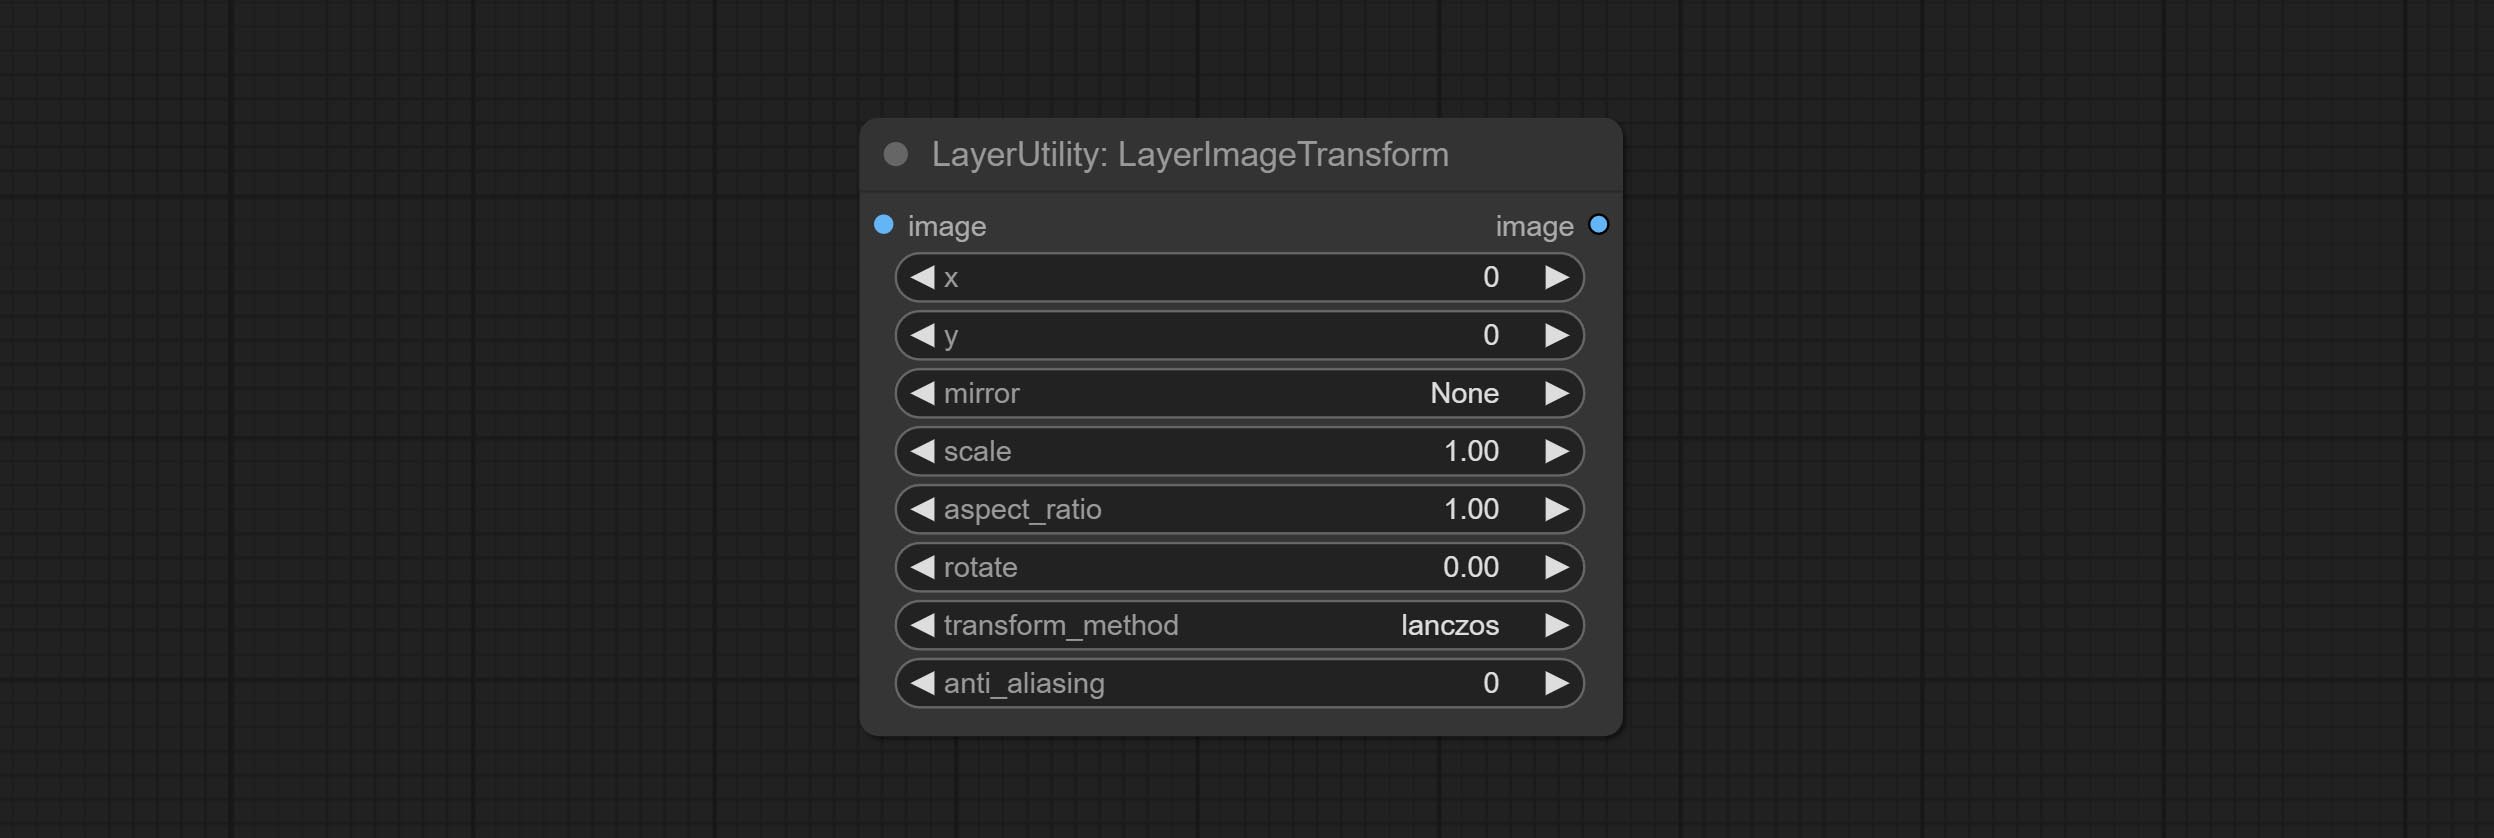
Node options:
- x: Value of X.
- y: Value of Y.
- mirror: Mirror flipping. Provide two flipping modes, horizontal flipping and vertical flipping.
- scale: Layer magnification, 1.0 represents the original size.
- aspect_ratio: Layer aspect ratio. 1.0 is the original ratio, a value greater than this indicates elongation, and a value less than this indicates flattening.
- rotate: Layer rotation degree.
- Sampling methods for layer enlargement and rotation, including lanczos, bicubic, hamming, bilinear, box and nearest. Different sampling methods can affect the image quality and processing time of the synthesized image.
- anti_aliasing: Anti aliasing, ranging from 0 to 16, the larger the value, the less obvious the aliasing. An excessively high value will significantly reduce the processing speed of the node.
LayerMaskTransform
Similar to LayerImageTransform node, this node is used to transform the layer_mask separately, which can scale, rotate, change aspect ratio, and mirror flip without changing the mask size.
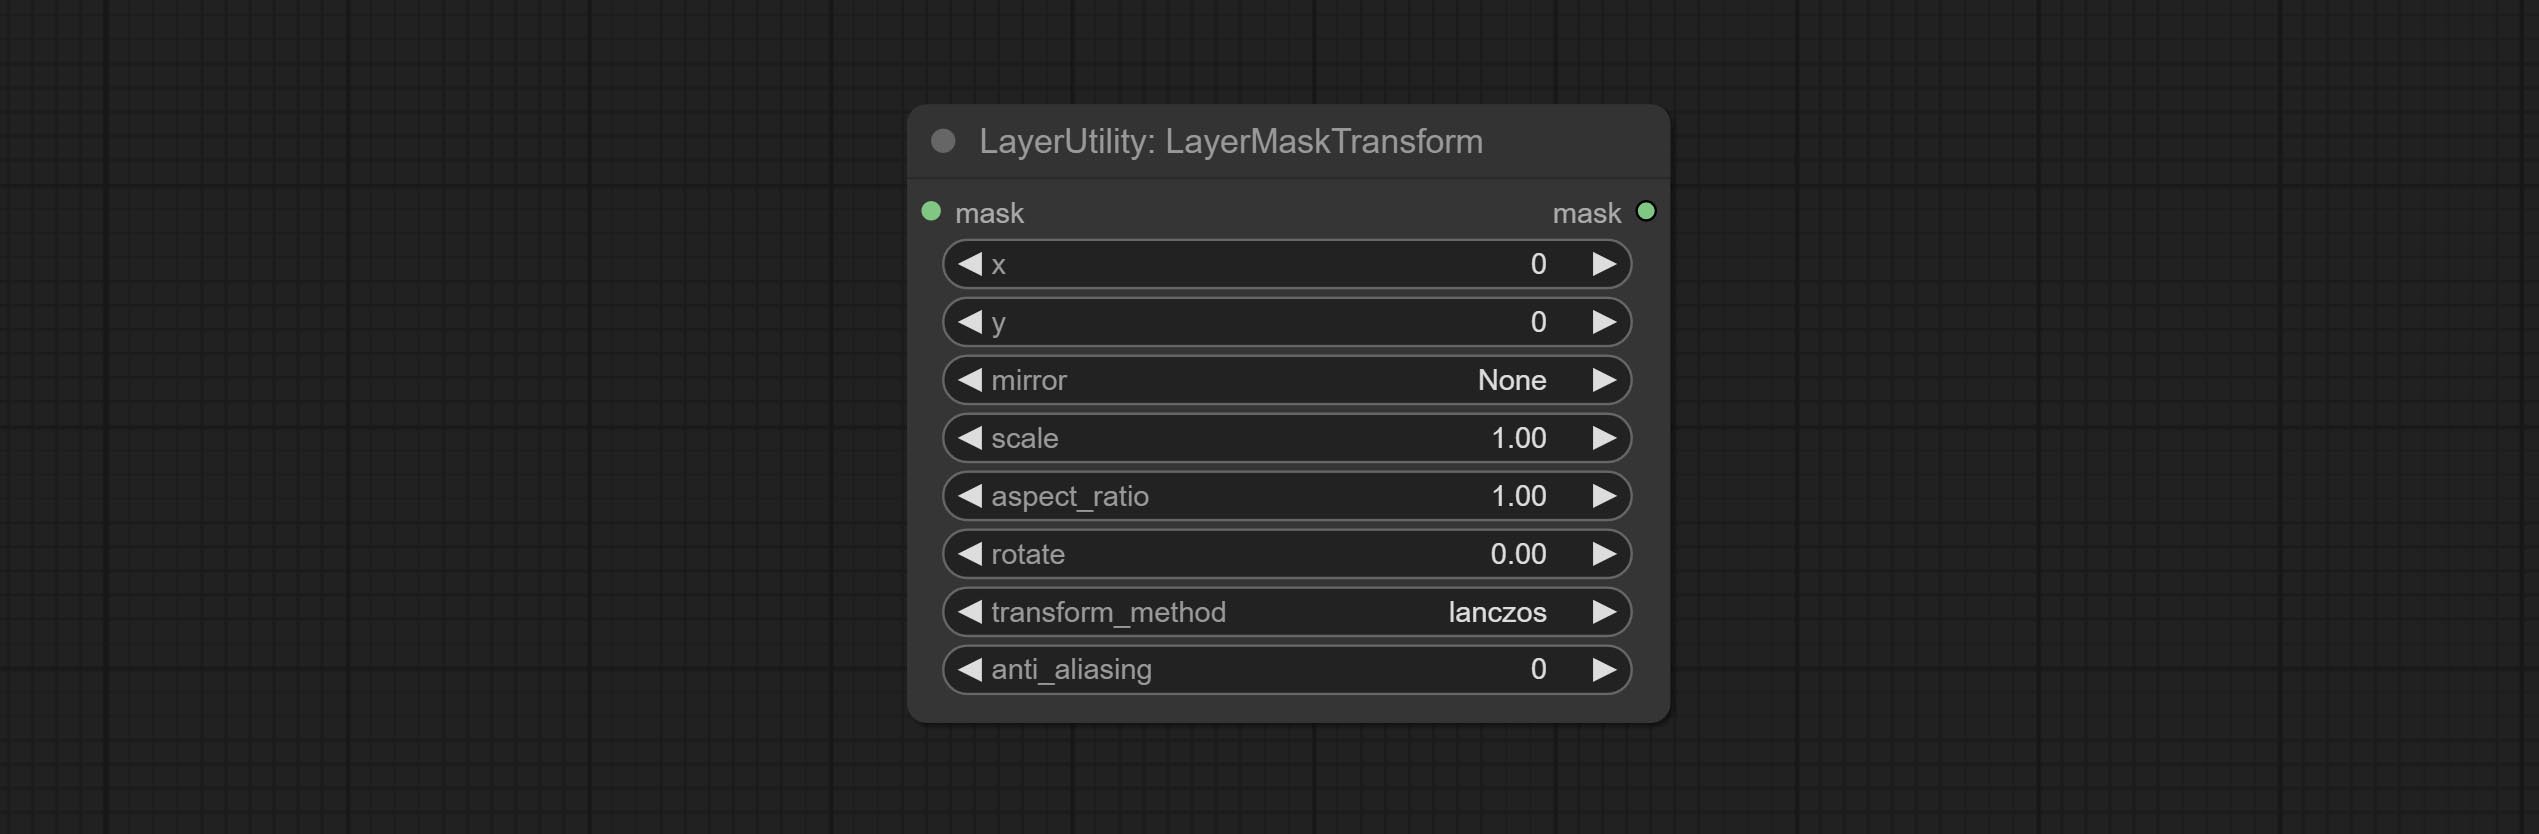
Node options:
- x: Value of X.
- y: Value of Y.
- mirror: Mirror flipping. Provide two flipping modes, horizontal flipping and vertical flipping.
- scale: Layer magnification, 1.0 represents the original size.
- aspect_ratio: Layer aspect ratio. 1.0 is the original ratio, a value greater than this indicates elongation, and a value less than this indicates flattening.
- rotate: Layer rotation degree.
- Sampling methods for layer enlargement and rotation, including lanczos, bicubic, hamming, bilinear, box and nearest. Different sampling methods can affect the image quality and processing time of the synthesized image.
- anti_aliasing: Anti aliasing, ranging from 0 to 16, the larger the value, the less obvious the aliasing. An excessively high value will significantly reduce the processing speed of the node.
ColorImage
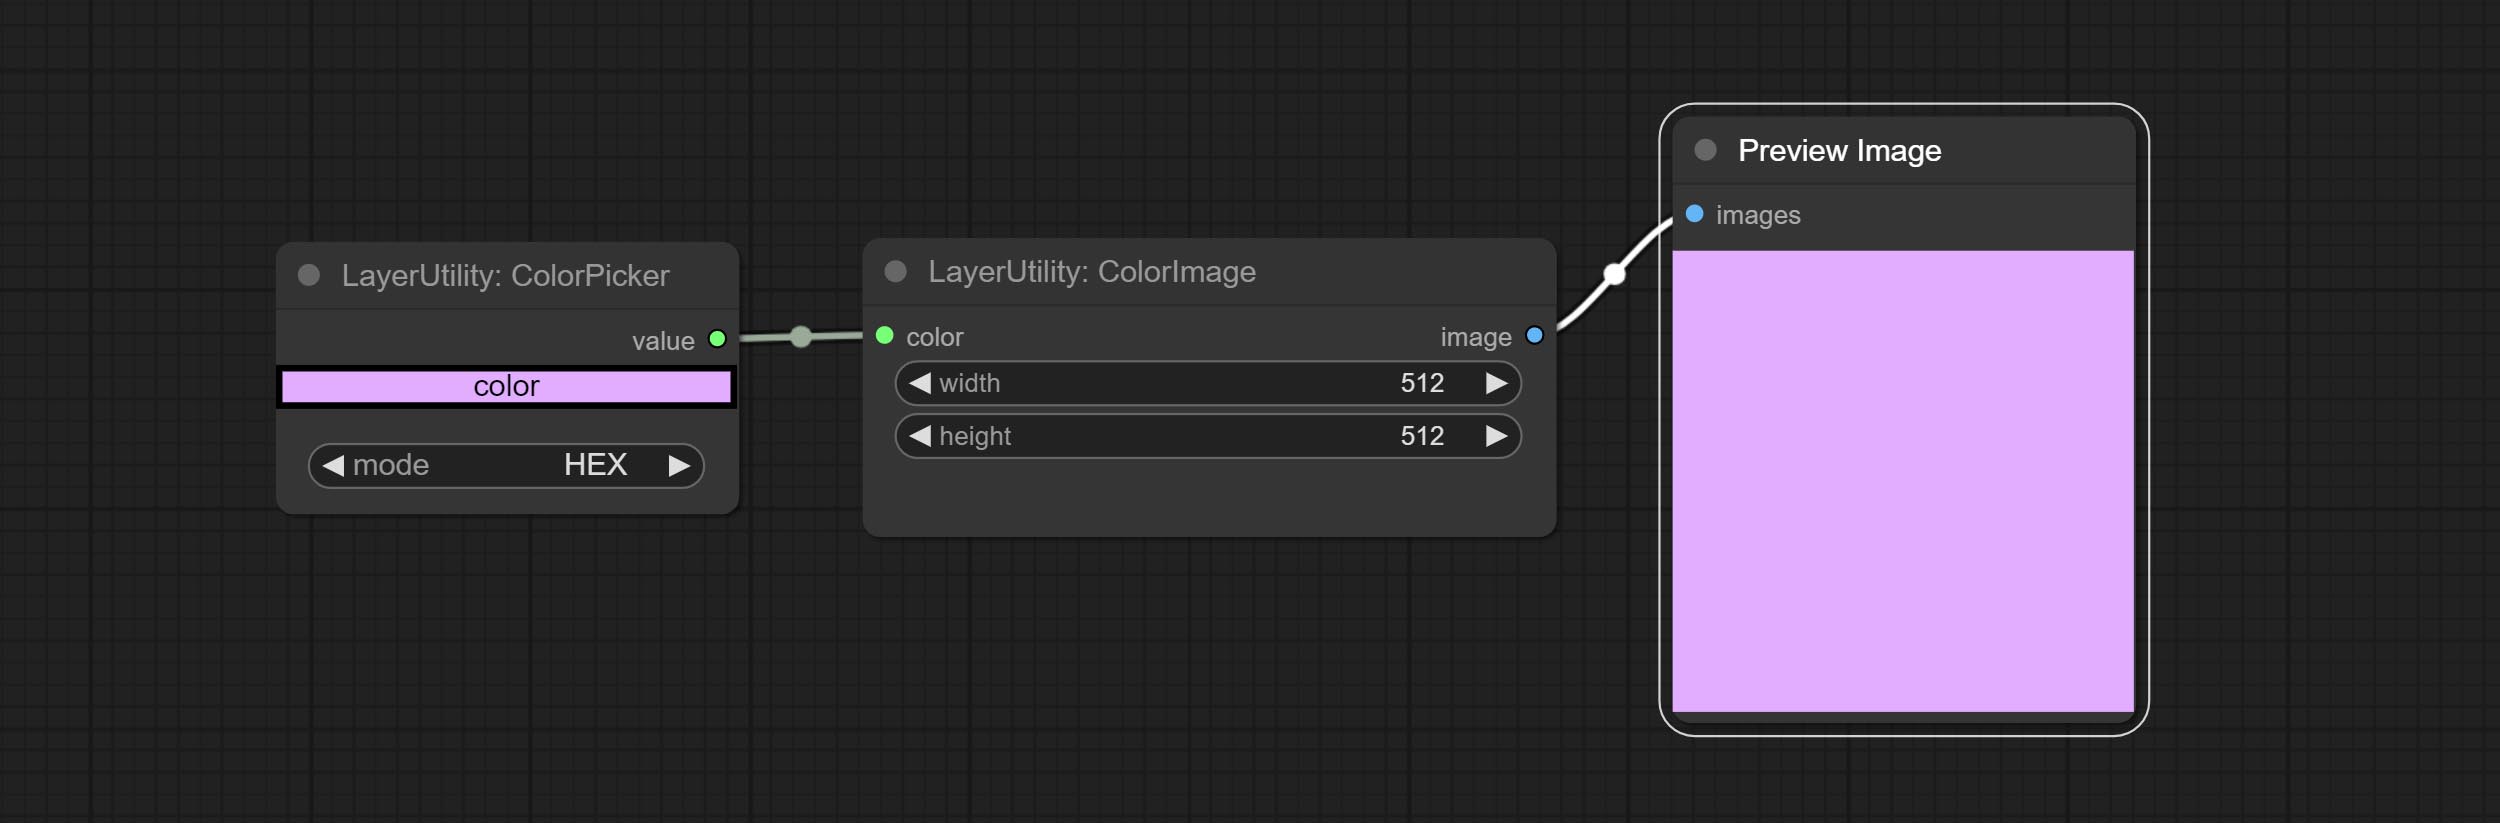
Generate an image of a specified color and size.

Node options:
- width: Width of the image.
- height: Height of the image.
- color 4 : Color of the image.
ColorImageV2
The V2 upgraded version of ColorImage.
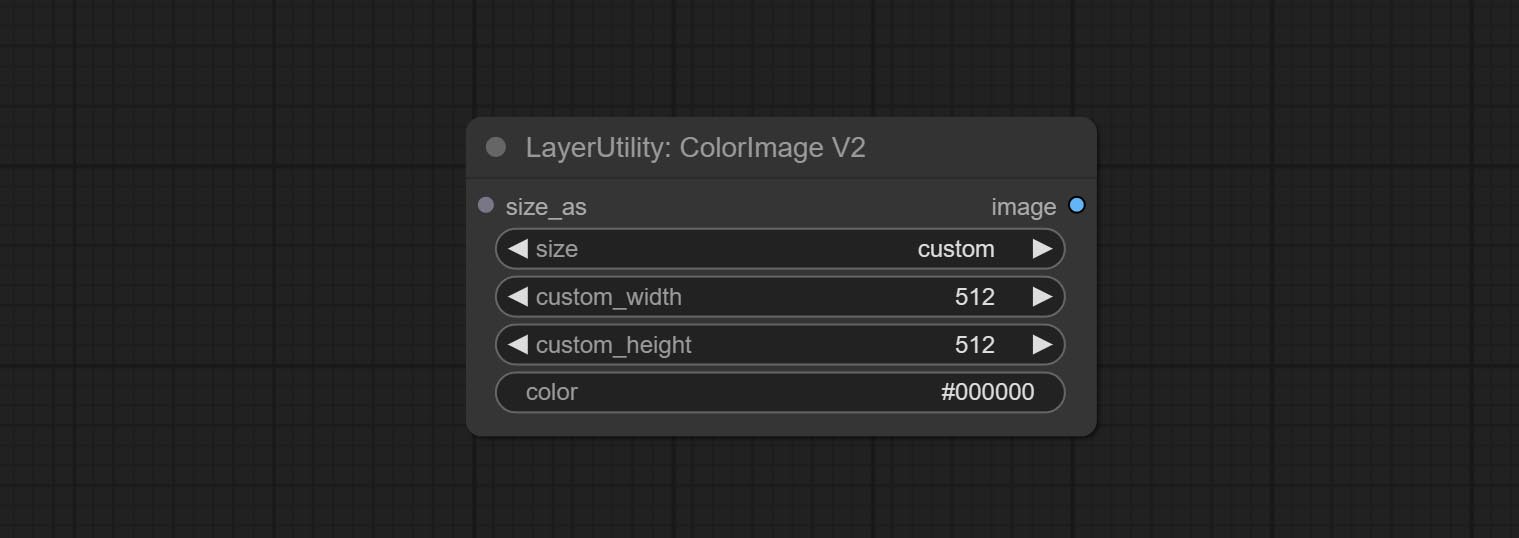
The following changes have been made based on ColorImage:
- size_as * : Input image or mask here to generate image according to its size. Note that this input takes priority over other size settings.
- size ** : Size preset. the preset can be customized by the user. if have size_as input, this option will be ignored.
- custom_width: Image width. it valid when size is set to "custom". if have size_as input, this option will be ignored.
- custom_height: Image height. it valid when size is set to "custom". if have size_as input, this option will be ignored.
* Only limited to input images and masks. forcing the integration of other types of inputs will result in node errors. ** The preset size is defined in custom_size.ini , this file is located in the root directory of the plug-in, and the default name is custom_size.ini.example . to use this file for the first time, you need to change the file suffix to .ini . Open with text editing software. Each row represents a size, with the first value being width and the second being height, separated by a lowercase "x" in the middle. To avoid errors, please do not enter extra characters.
GradientImage
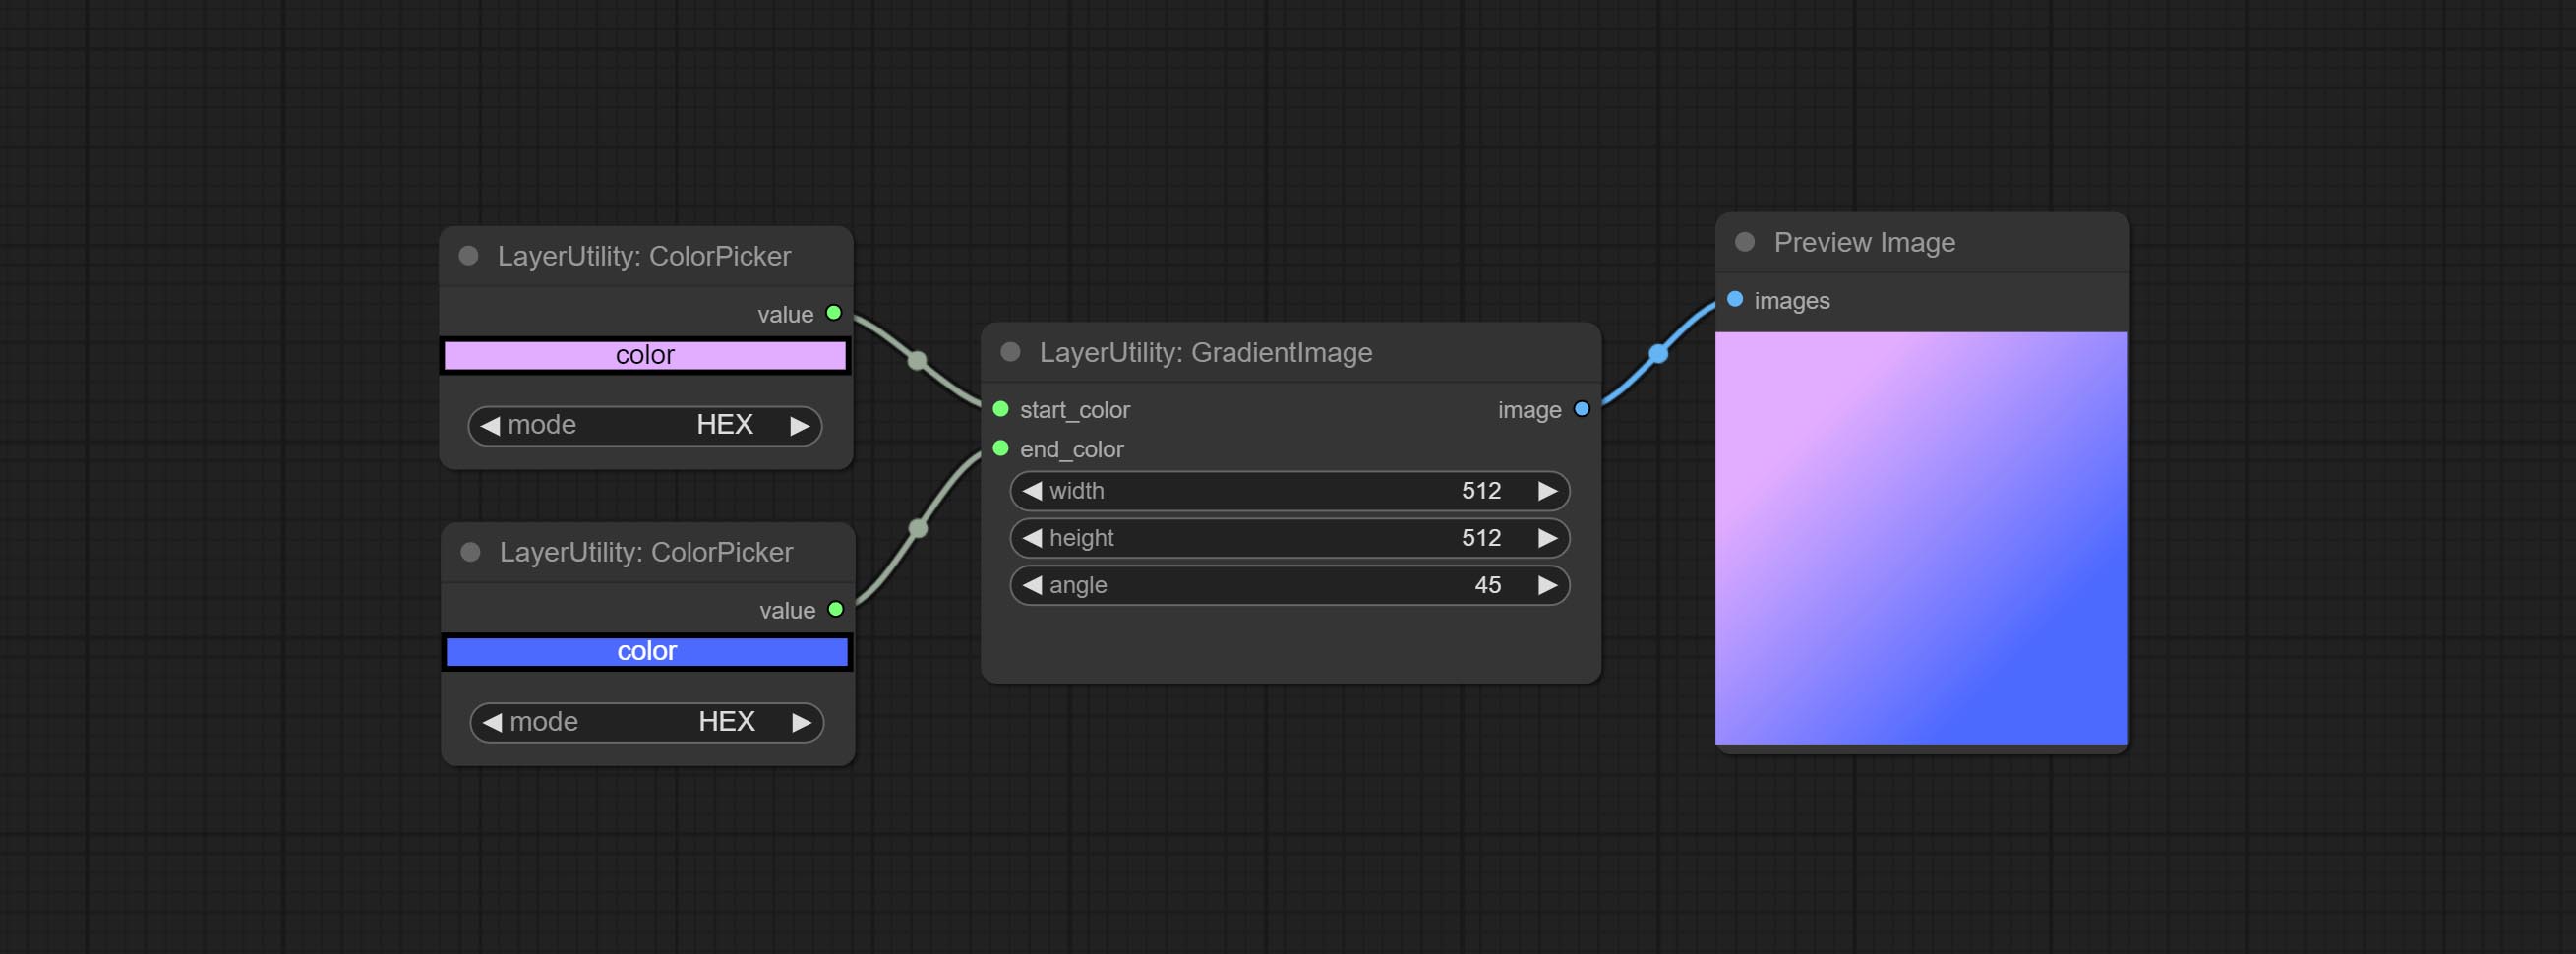
Generate an image with a specified size and color gradient.
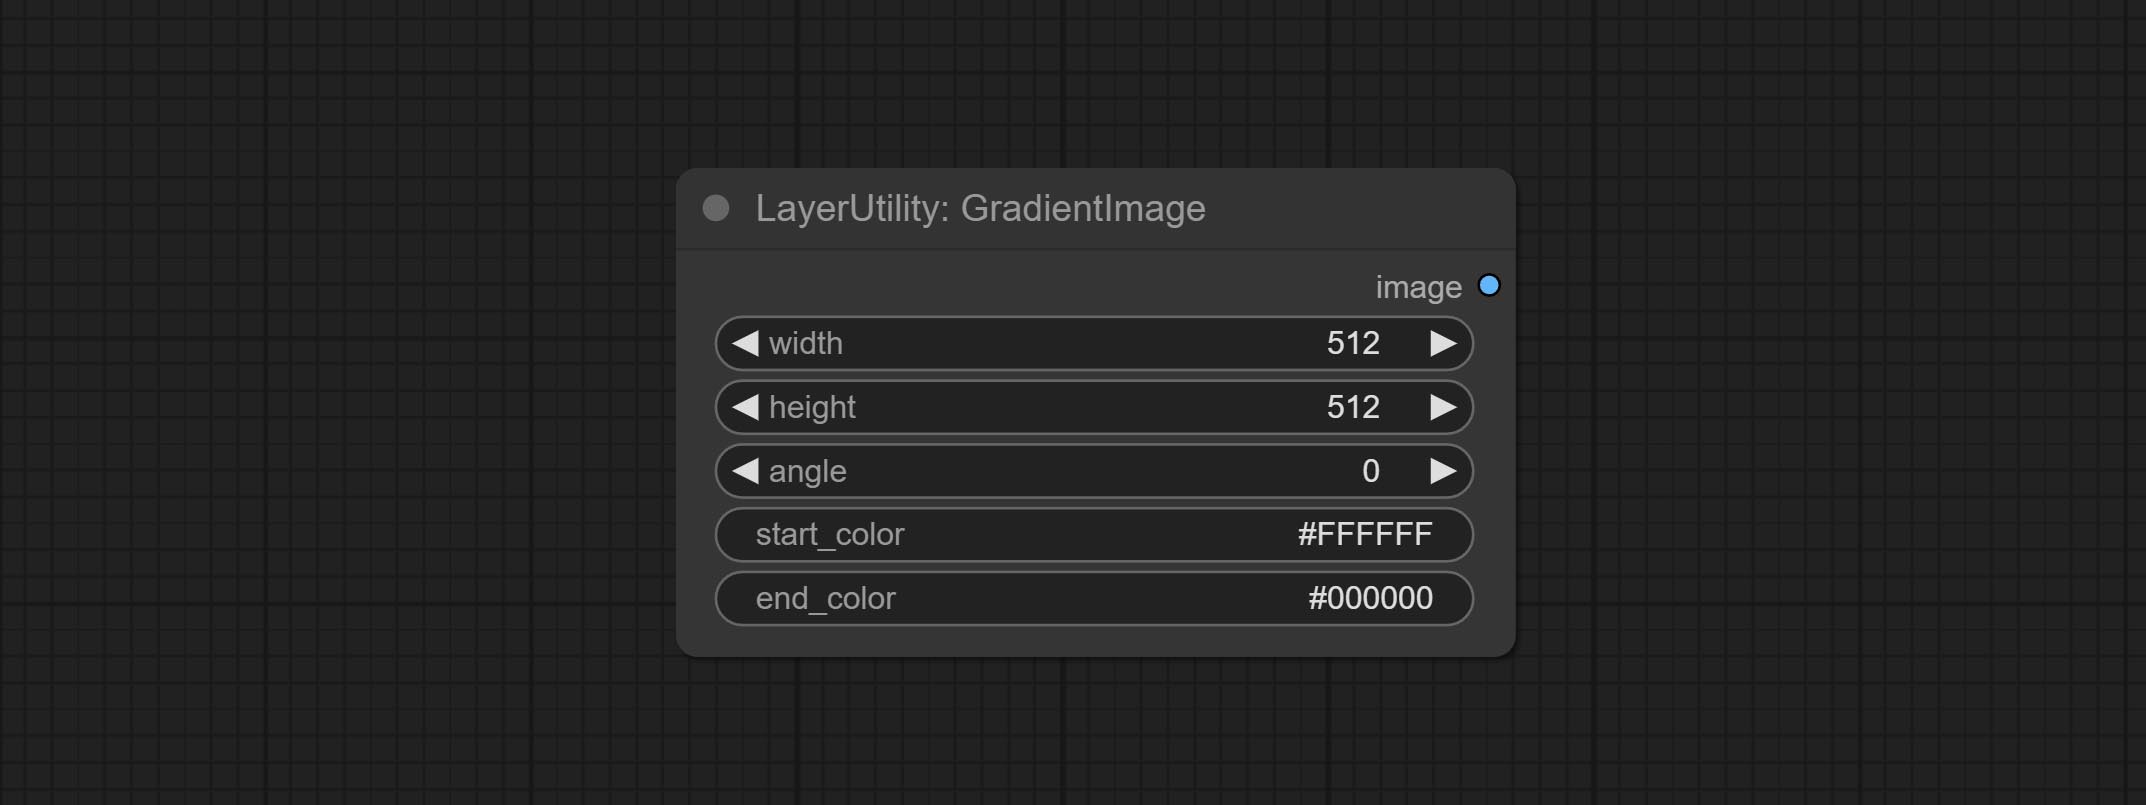
Node options:
- width: Width of the image.
- height: Height of the image.
- angle: Angle of gradient.
- start_color 4 : Color of the begging.
- end_color 4 : Color of the ending.
GradientImageV2
The V2 upgraded version of GradientImage.
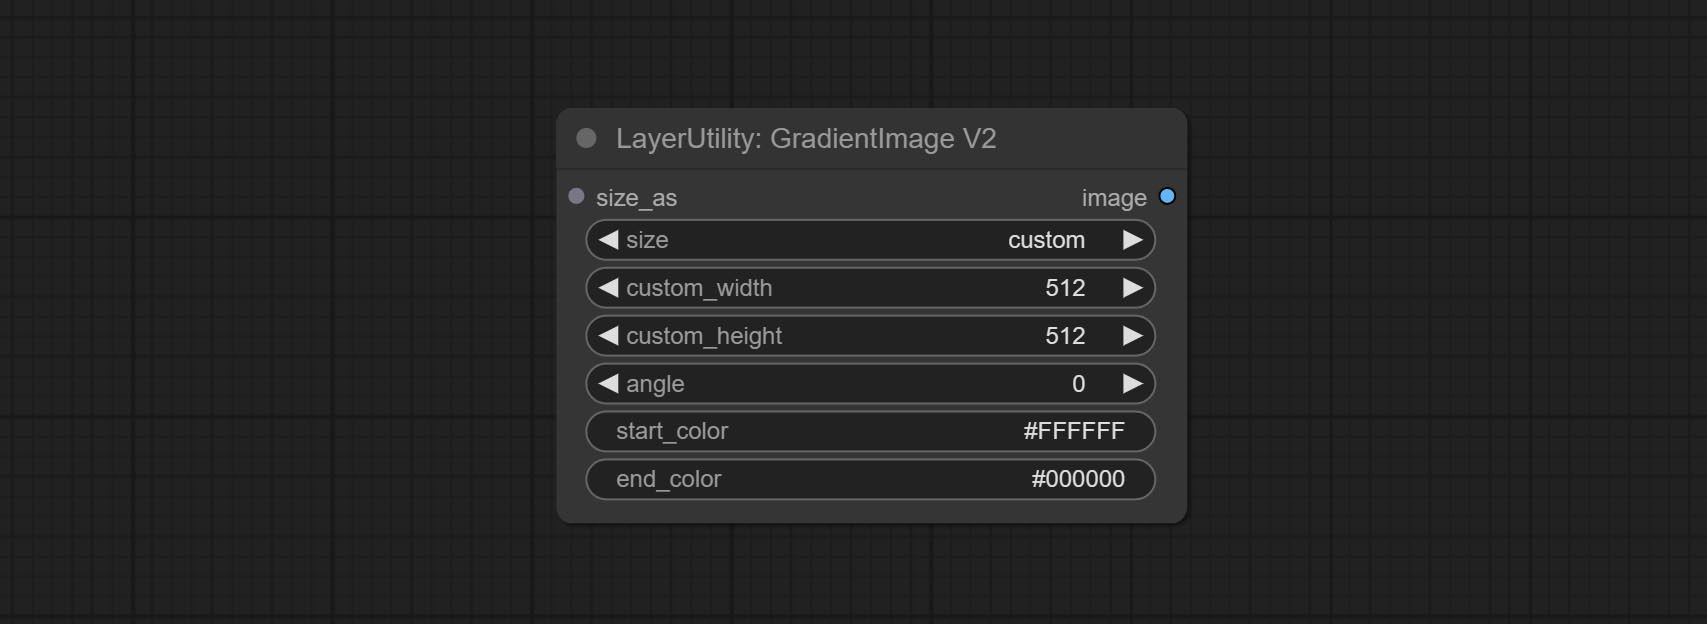
The following changes have been made based on GradientImage:
- size_as * : Input image or mask here to generate image according to its size. Note that this input takes priority over other size settings.
- size ** : Size preset. the preset can be customized by the user. if have size_as input, this option will be ignored.
- custom_width: Image width. it valid when size is set to "custom". if have size_as input, this option will be ignored.
- custom_height: Image height. it valid when size is set to "custom". if have size_as input, this option will be ignored.
* Only limited to input images and masks. forcing the integration of other types of inputs will result in node errors. ** The preset size is defined in custom_size.ini , this file is located in the root directory of the plug-in, and the default name is custom_size.ini.example . to use this file for the first time, you need to change the file suffix to .ini . Open with text editing software. Each row represents a size, with the first value being width and the second being height, separated by a lowercase "x" in the middle. To avoid errors, please do not enter extra characters.
ImageRewardFilter
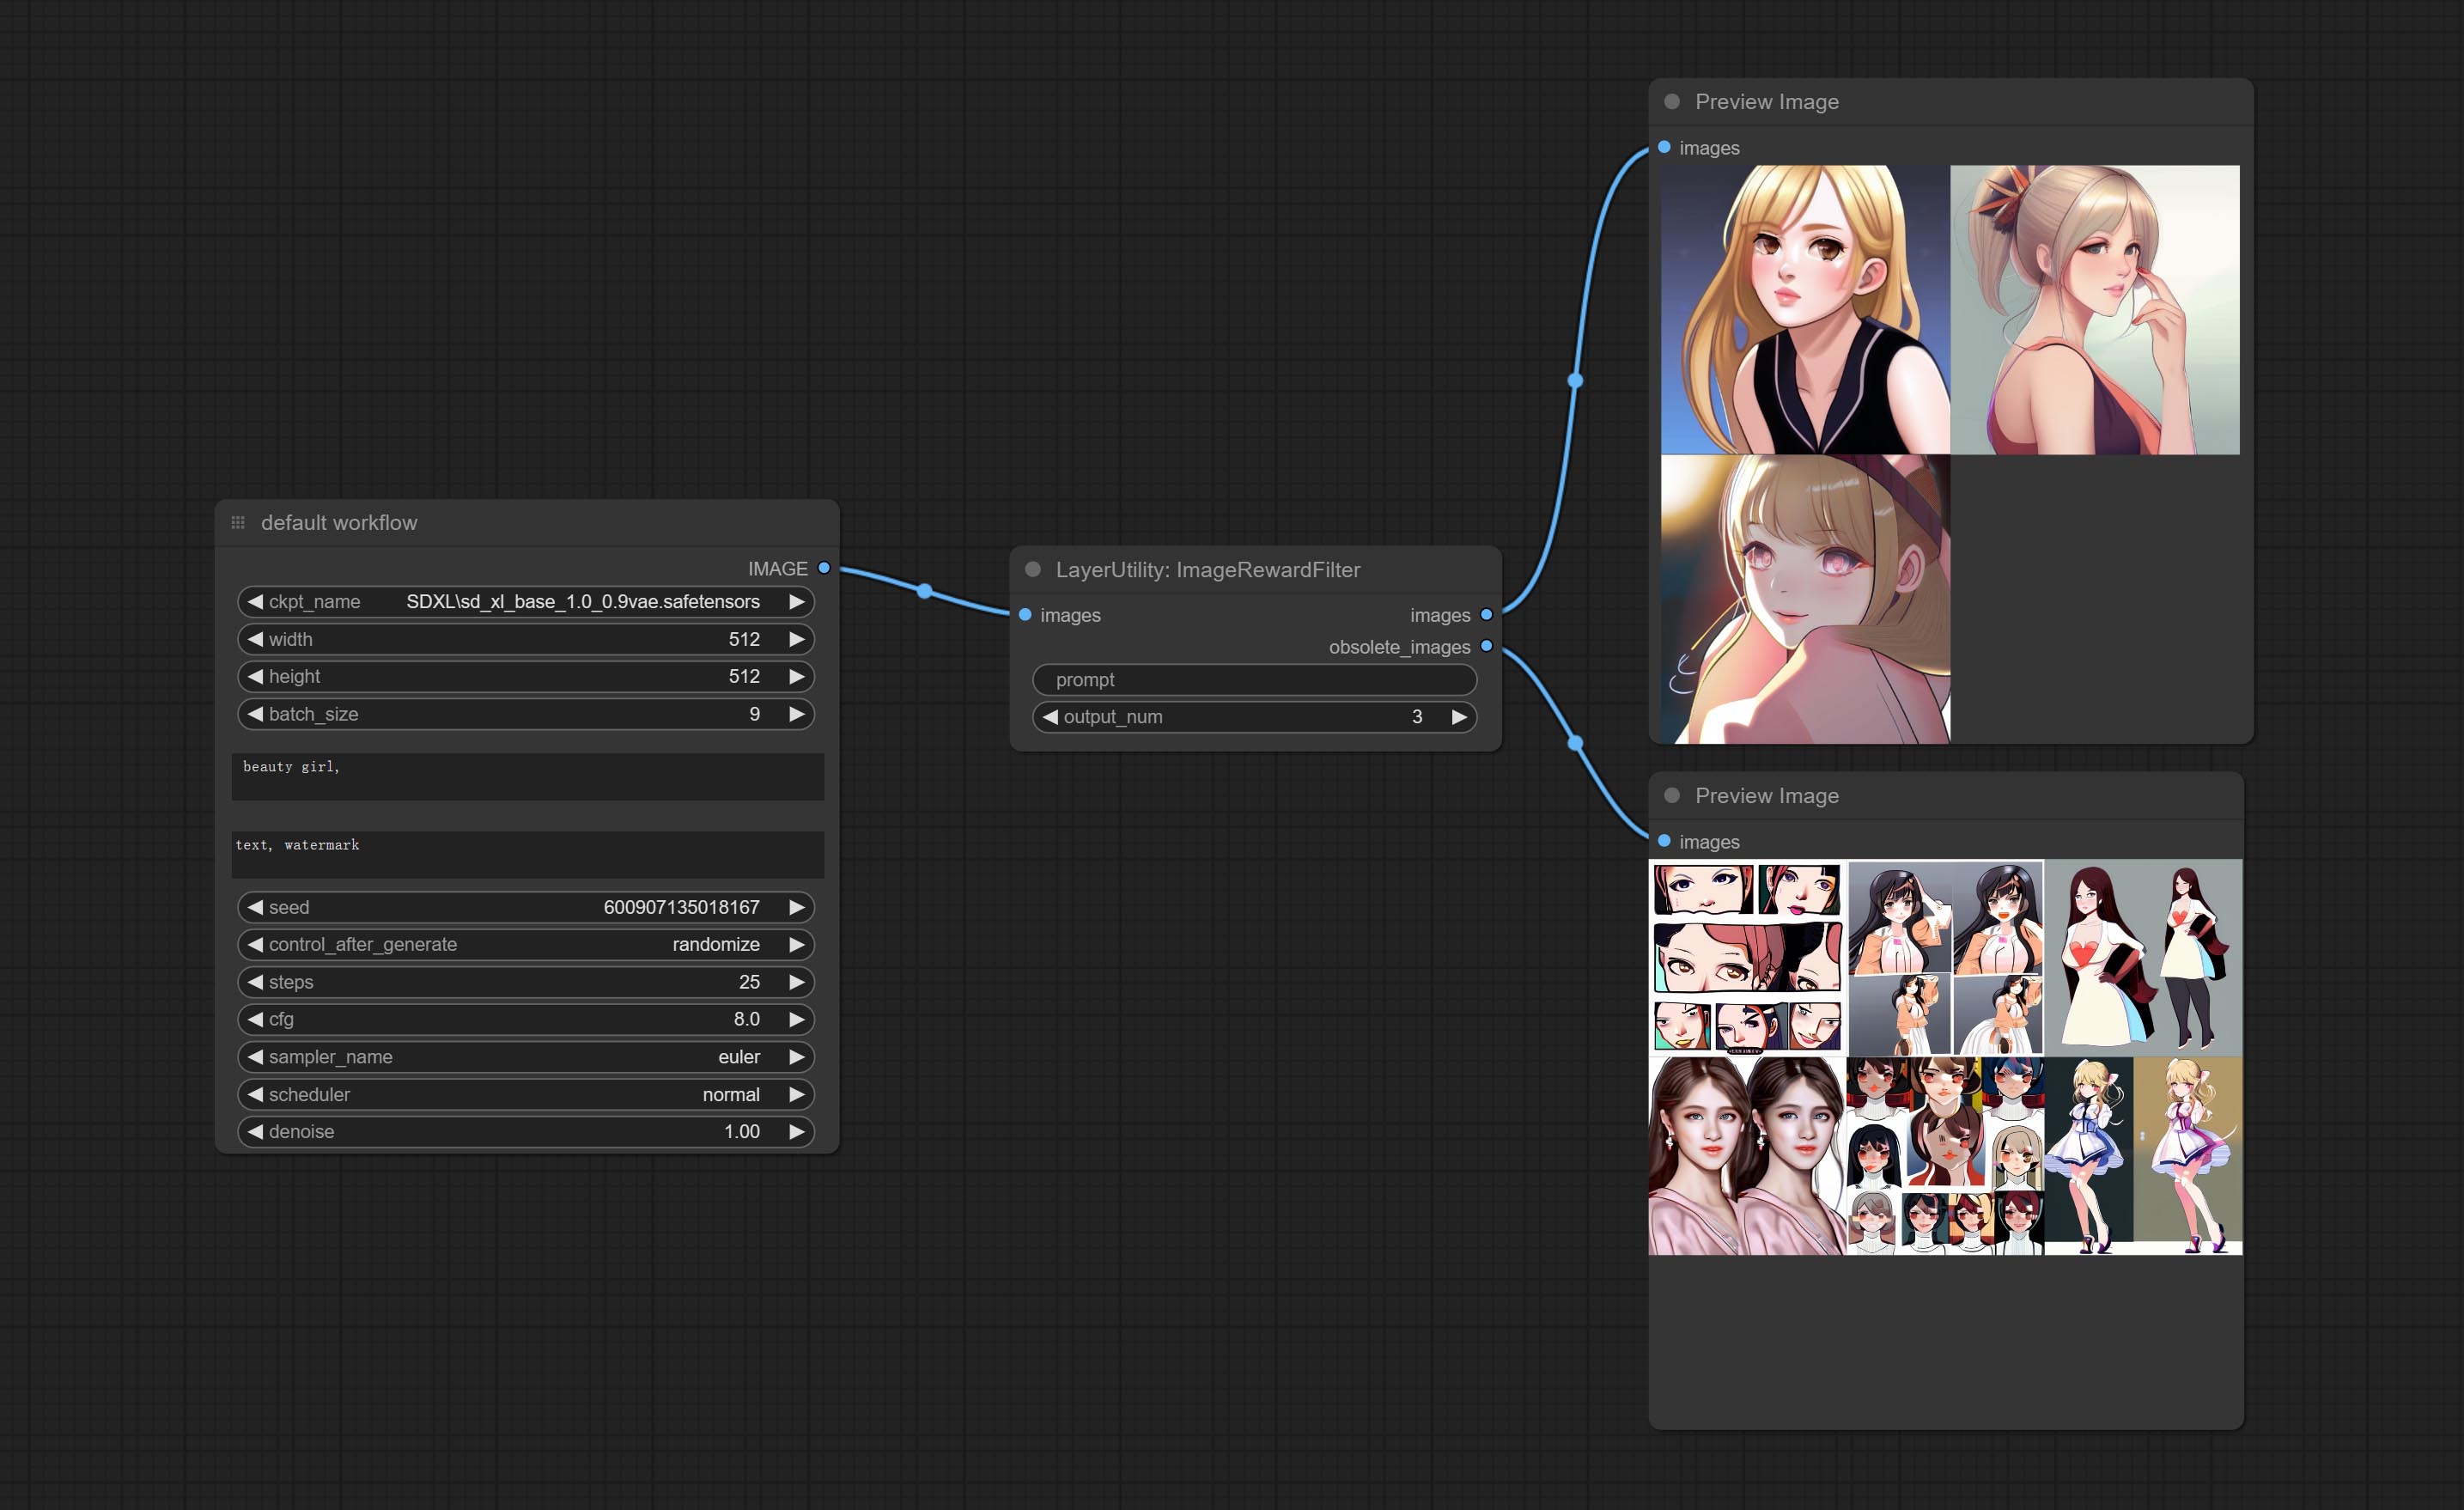
Rating bulk pictures and outputting top-ranked pictures. it used [ImageReward] (https://github.com/THUDM/ImageReward) for image scoring, thanks to the original authors.
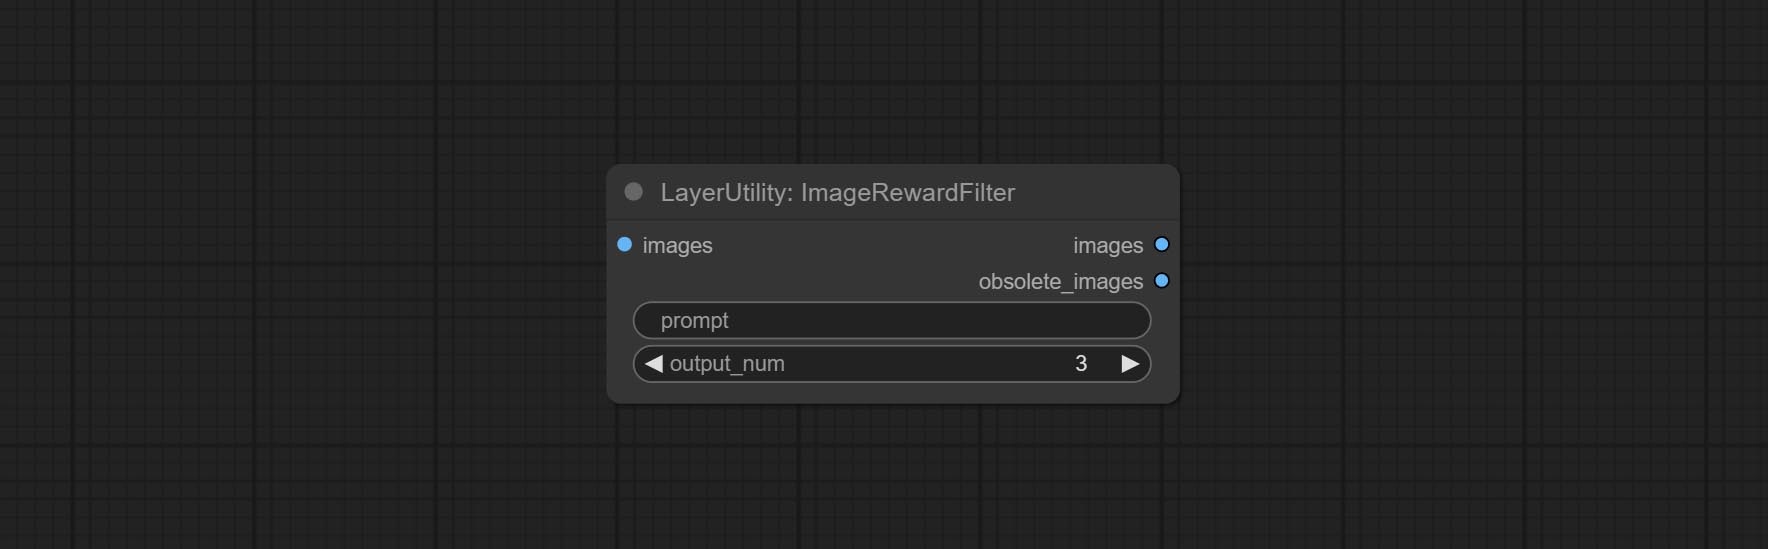
Node options:
- prompt: Optional input. Entering prompt here will be used as a basis to determine how well it matches the picture.
- output_nun: Number of pictures outputted. This value should be less than the picture batch.
Outputs:
- images: Bulk pictures output from high to low in order of rating.
- obsolete_images: Knockout pictures. Also output in order of rating from high to low.
SimpleTextImage
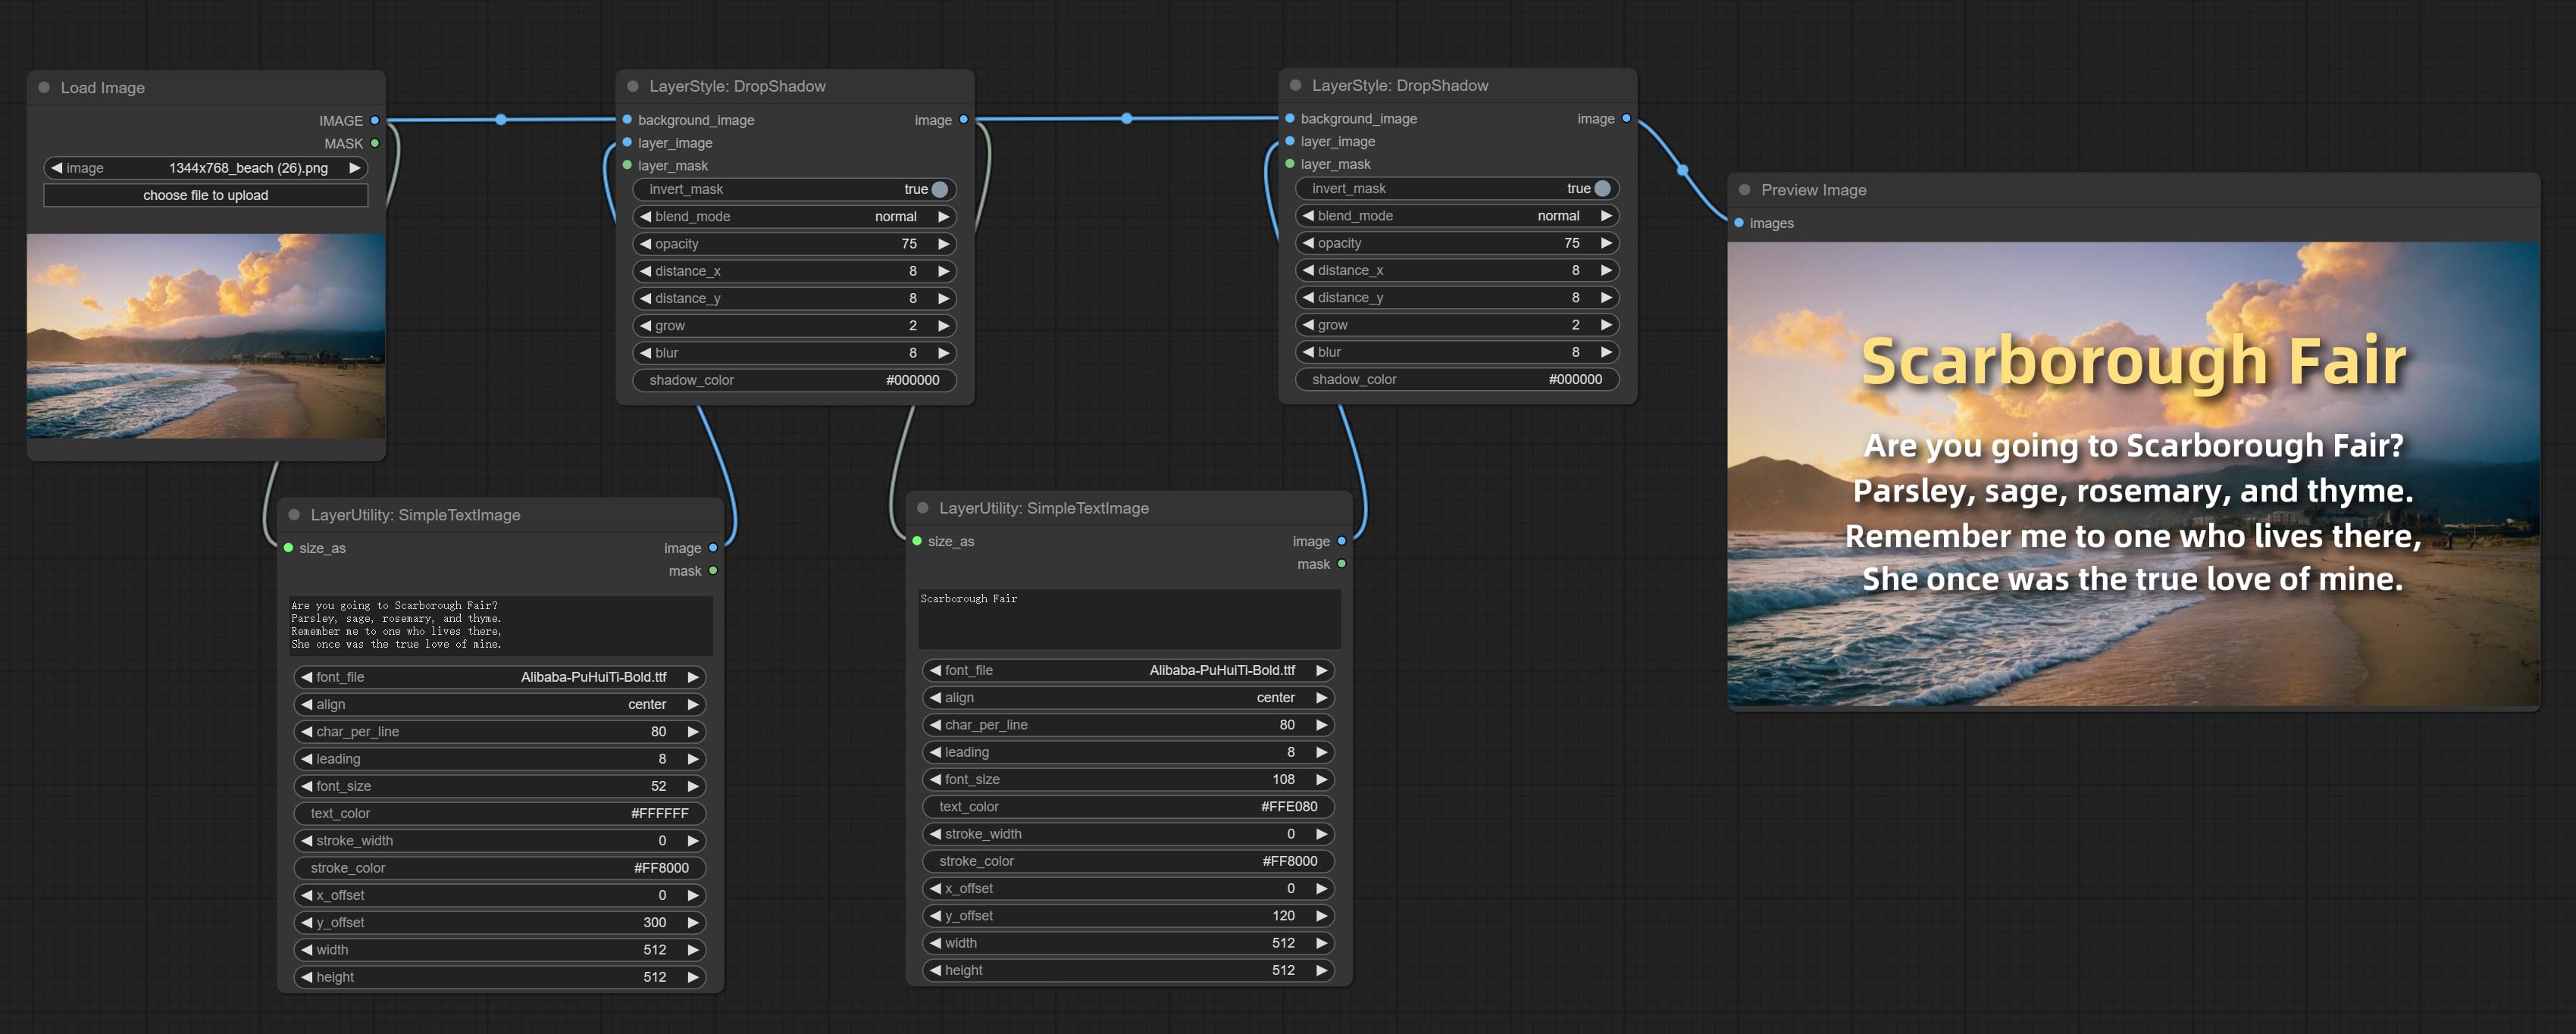
Generate simple typesetting images and masks from text. This node references some of the functionalities and code of ZHO-ZHO-ZHO/ComfyUI-Text_Image-Composite, thanks to the original author.
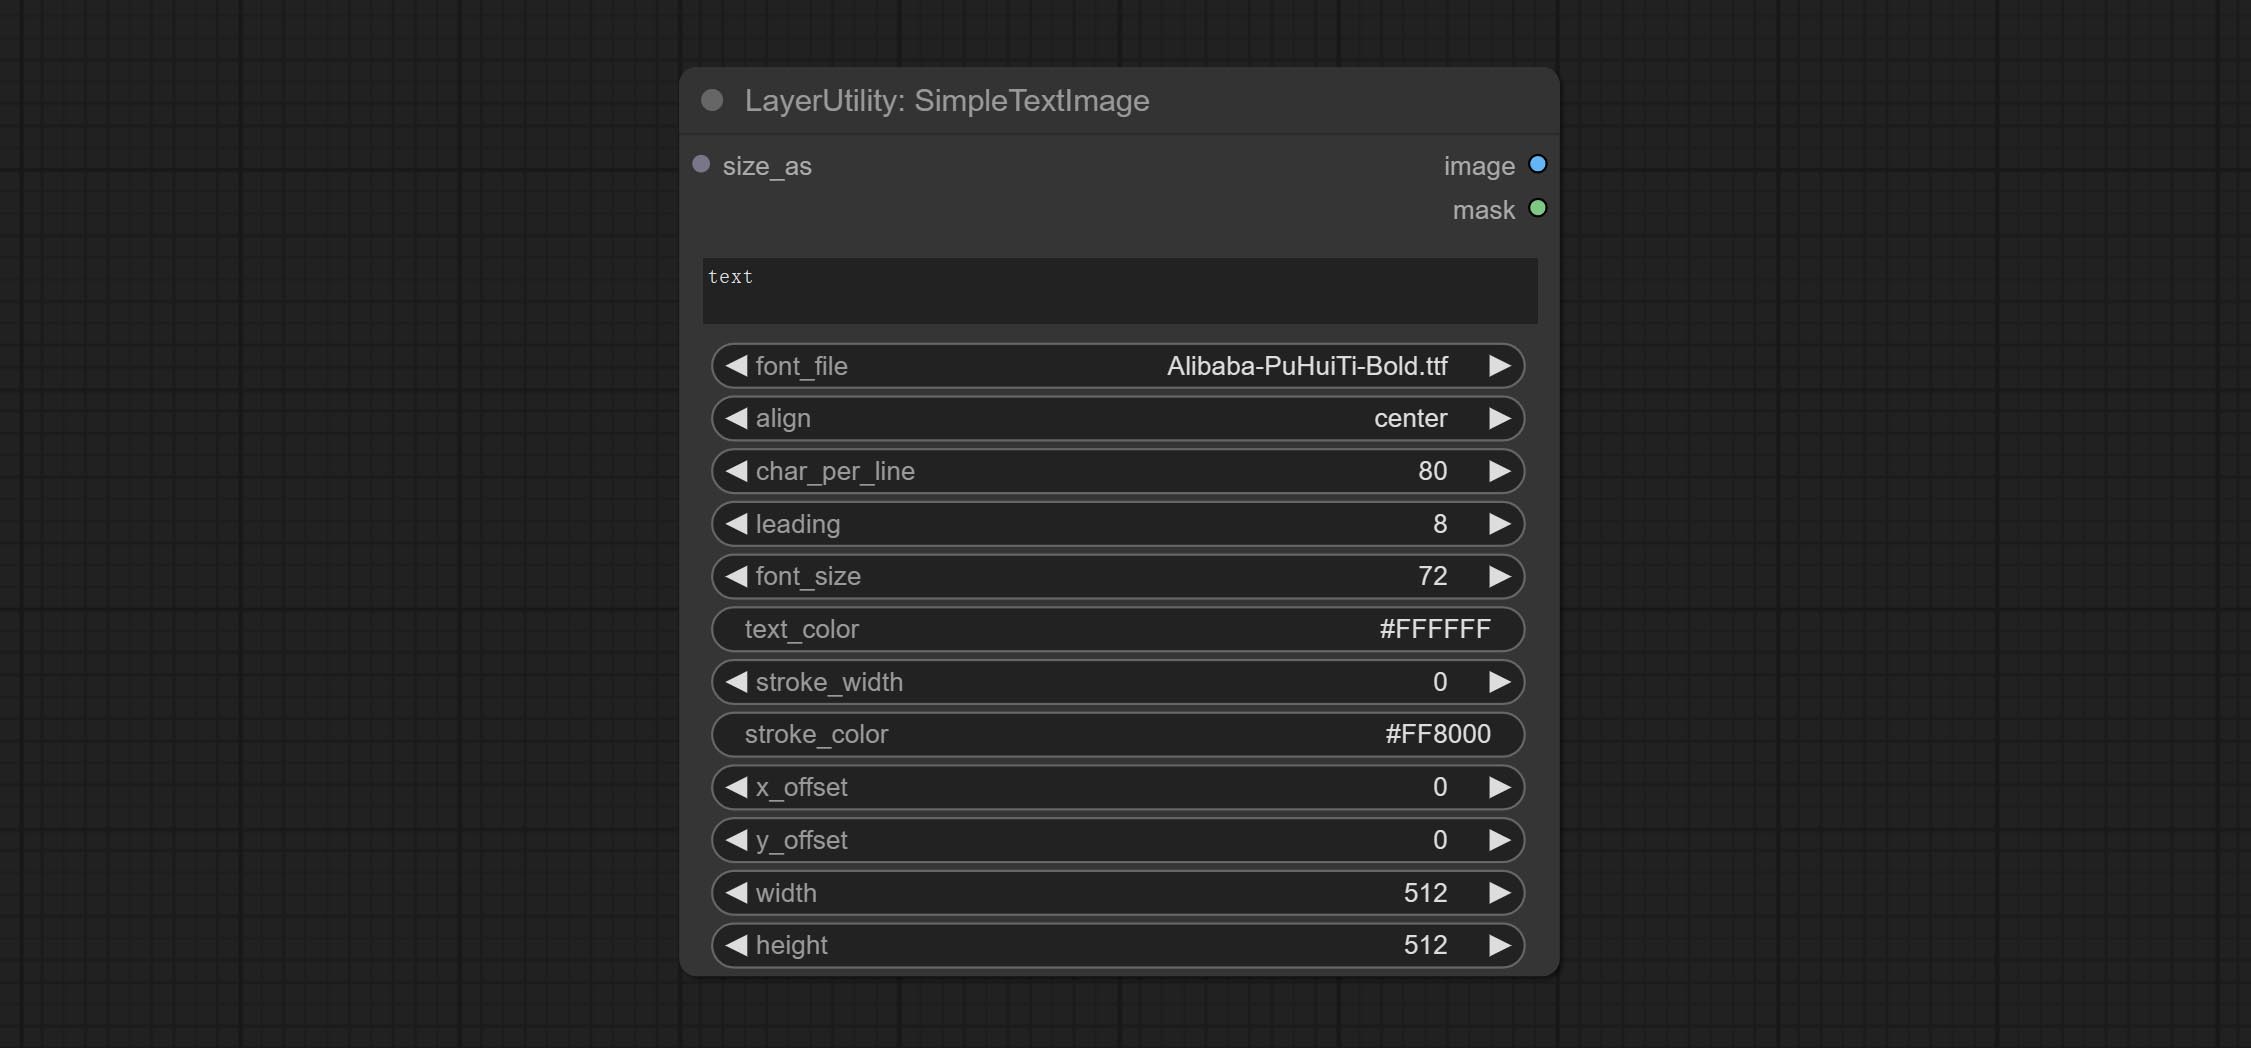
Node options:
- size_as * : The input image or mask here will generate the output image and mask according to their size. this input takes priority over the width and height below.
- font_file ** : Here is a list of available font files in the font folder, and the selected font files will be used to generate images.
- align: Alignment options. There are three options: center, left, and right.
- char_per_line: The number of characters per line, any excess will be automatically wrapped.
- leading: The leading space.
- font_size: The size of font.
- text_color: The color of text.
- stroke_width: The width of stroke.
- stroke_color: The color of stroke.
- x_offset: The horizontal offset of the text position.
- y_offset: The vertical offset of the text position.
- width: Width of the image. If there is a size_as input, this setting will be ignored.
- height: Height of the image. If there is a size_as input, this setting will be ignored.
* Only limited to input image and mask. forcing the integration of other types of inputs will result in node errors.
** The font folder is defined in resource_dir.ini , this file is located in the root directory of the plug-in, and the default name is resource_dir.ini.example . to use this file for the first time, you need to change the file suffix to .ini . Open the text editing software and find the line starting with "FONT_dir=", after "=", enter the custom folder path name. support defining multiple folders in resource-dir.ini , separated by commas, semicolons, or spaces. all font files in this folder will be collected and displayed in the node list during ComfyUI initialization. If the folder set in ini is invalid, the font folder that comes with the plugin will be enabled.
TextImage
Generate images and masks from text. support for adjusting the spacing between words and lines, horizontal and vertical adjustments, it can set random changes in each character, including size and position.
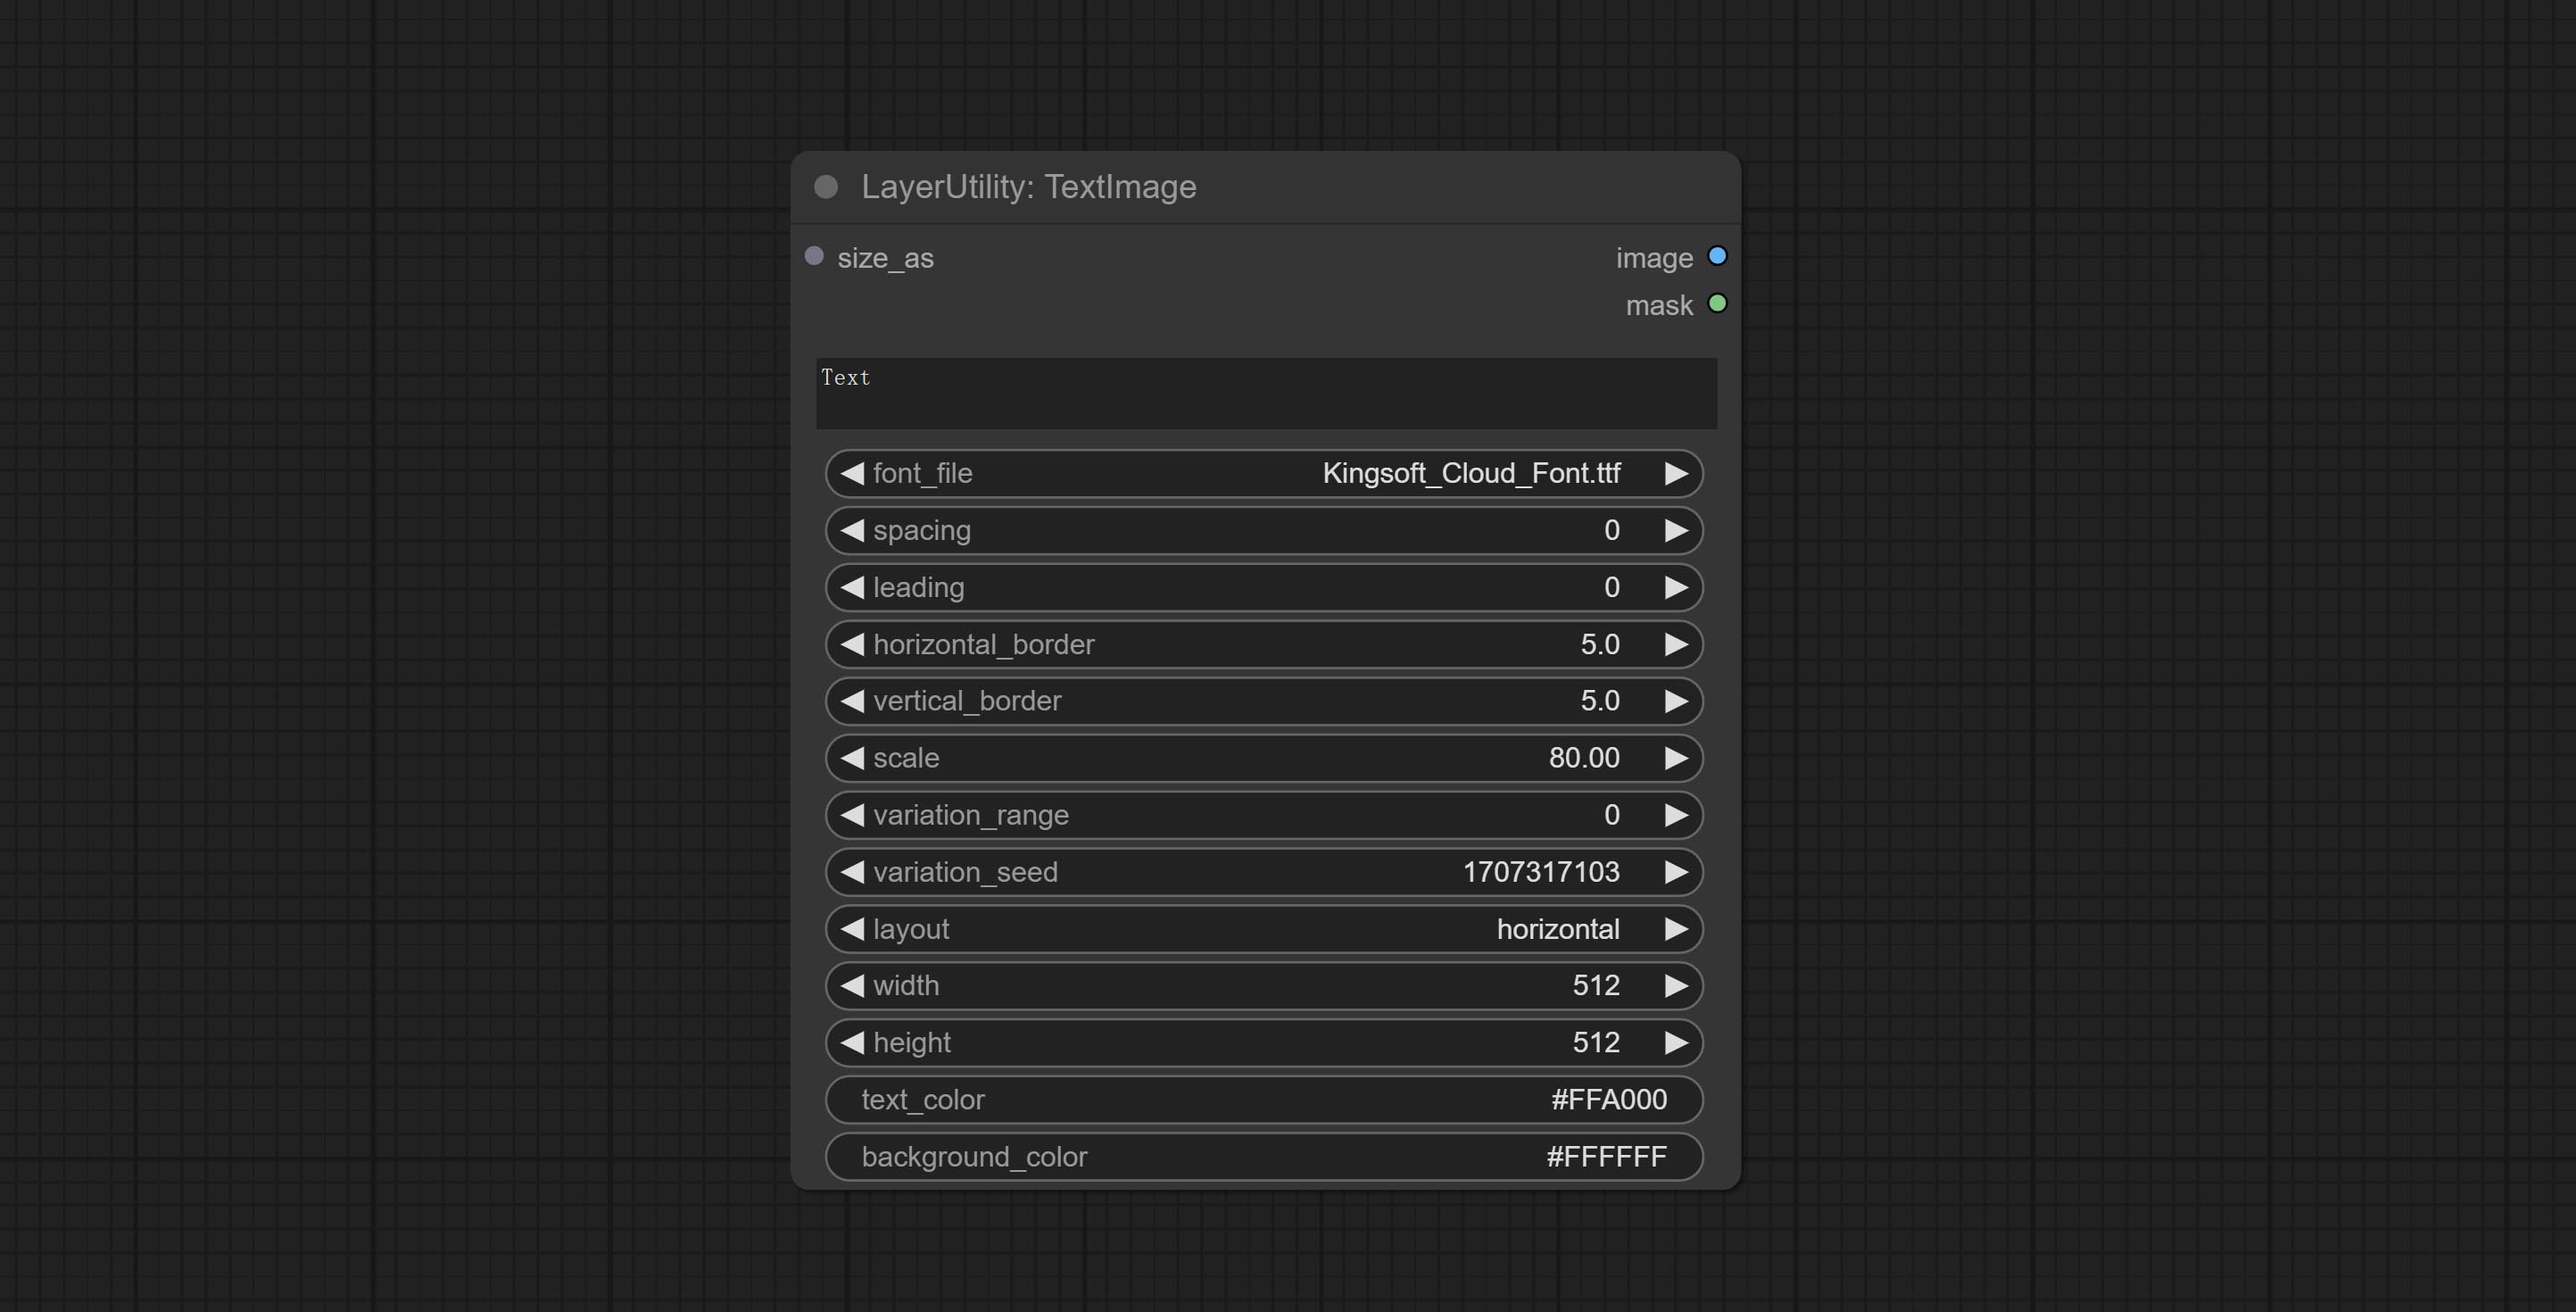
Node options:
- size_as * : The input image or mask here will generate the output image and mask according to their size. this input takes priority over the width and height below.
- font_file ** : Here is a list of available font files in the font folder, and the selected font files will be used to generate images.
- spacing: Word spacing.this value is in pixels.
- leading: Row leading.this value is in pixels.
- horizontal_border: Side margin. If the text is horizontal, it is the left margin, and if it is vertical, it is the right margin. this value is represents a percentage, for example, 50 indicates that the starting point is located in the center on both sides.
- vertical_border: Top margin. this value is represents a percentage, for example, 10 indicates that the starting point is located 10% away from the top.
- scale: The overall size of the text. the initial size of text is automatically calculated based on the screen size and text content, with the longest row or column by default adapting to the image width or height. adjusting the value here will scale the text as a whole. this value is represents a percentage, for example, 60 represents scaling to 60%.
- variation_range: The range of random changes in characters. when this value is greater than 0, the character will undergo random changes in size and position, and the larger the value, the greater the magnitude of the change.
- variation_seed: The seed for randomly. fix this value to individual characters changes generated each time will not change.
- layout: Text layout. there are horizontal and vertical options to choose from.
- width: Width of the image. If there is a size_as input, this setting will be ignored.
- height: Height of the image. If there is a size_as input, this setting will be ignored.
- text_color: The color of text.
- background_color 4 : The color of background.
* Only limited to input image and mask. forcing the integration of other types of inputs will result in node errors.
** The font folder is defined in resource_dir.ini , this file is located in the root directory of the plug-in, and the default name is resource_dir.ini.example . to use this file for the first time, you need to change the file suffix to .ini . Open the text editing software and find the line starting with "FONT_dir=", after "=", enter the custom folder path name. support defining multiple folders in resource-dir.ini , separated by commas, semicolons, or spaces. all font files in this folder will be collected and displayed in the node list during ComfyUI initialization. If the folder set in ini is invalid, the font folder that comes with the plugin will be enabled.
TextImageV2
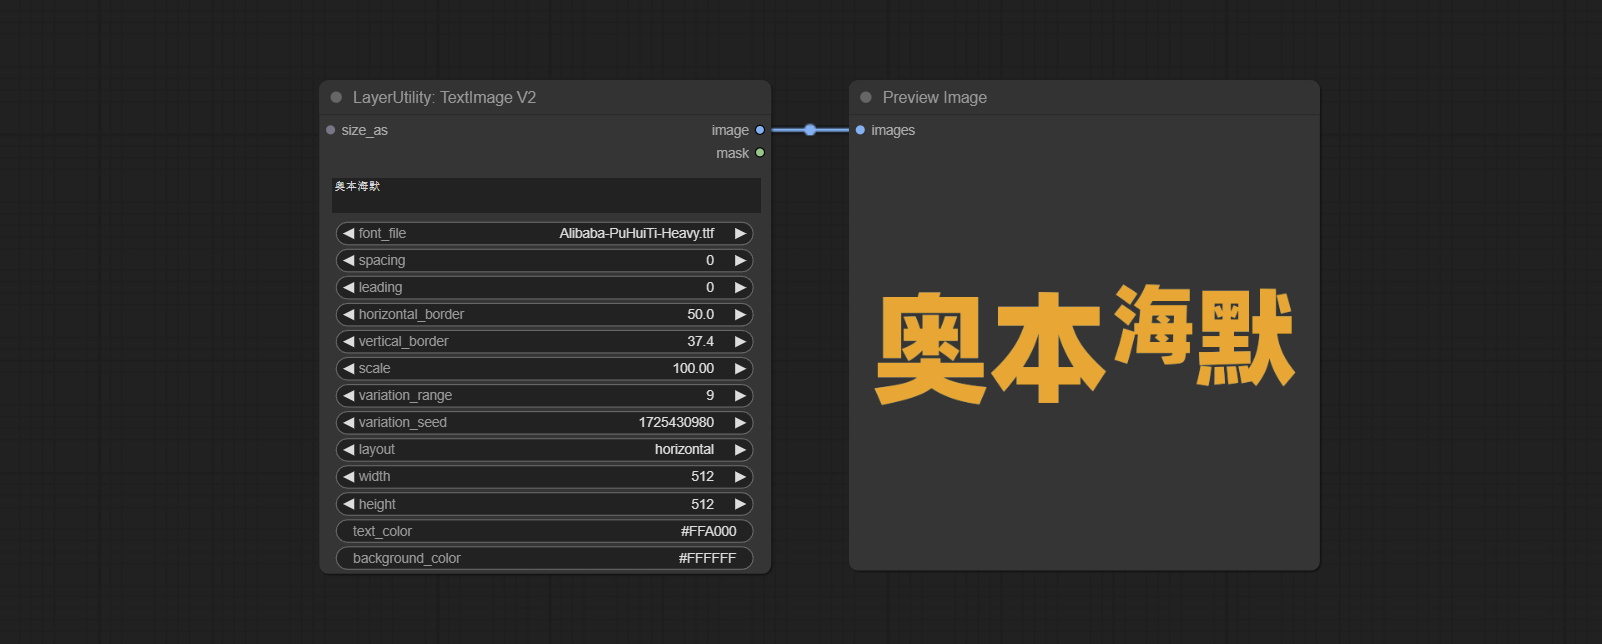
This node is merged from heshengtao. The PR modifies the scaling of the image text node based on the TextImage node. The font spacing follows the scaling, and the coordinates are no longer based on the top left corner of the text, but on the center point of the entire line of text. Thank you for the author's contribution.
LaMa
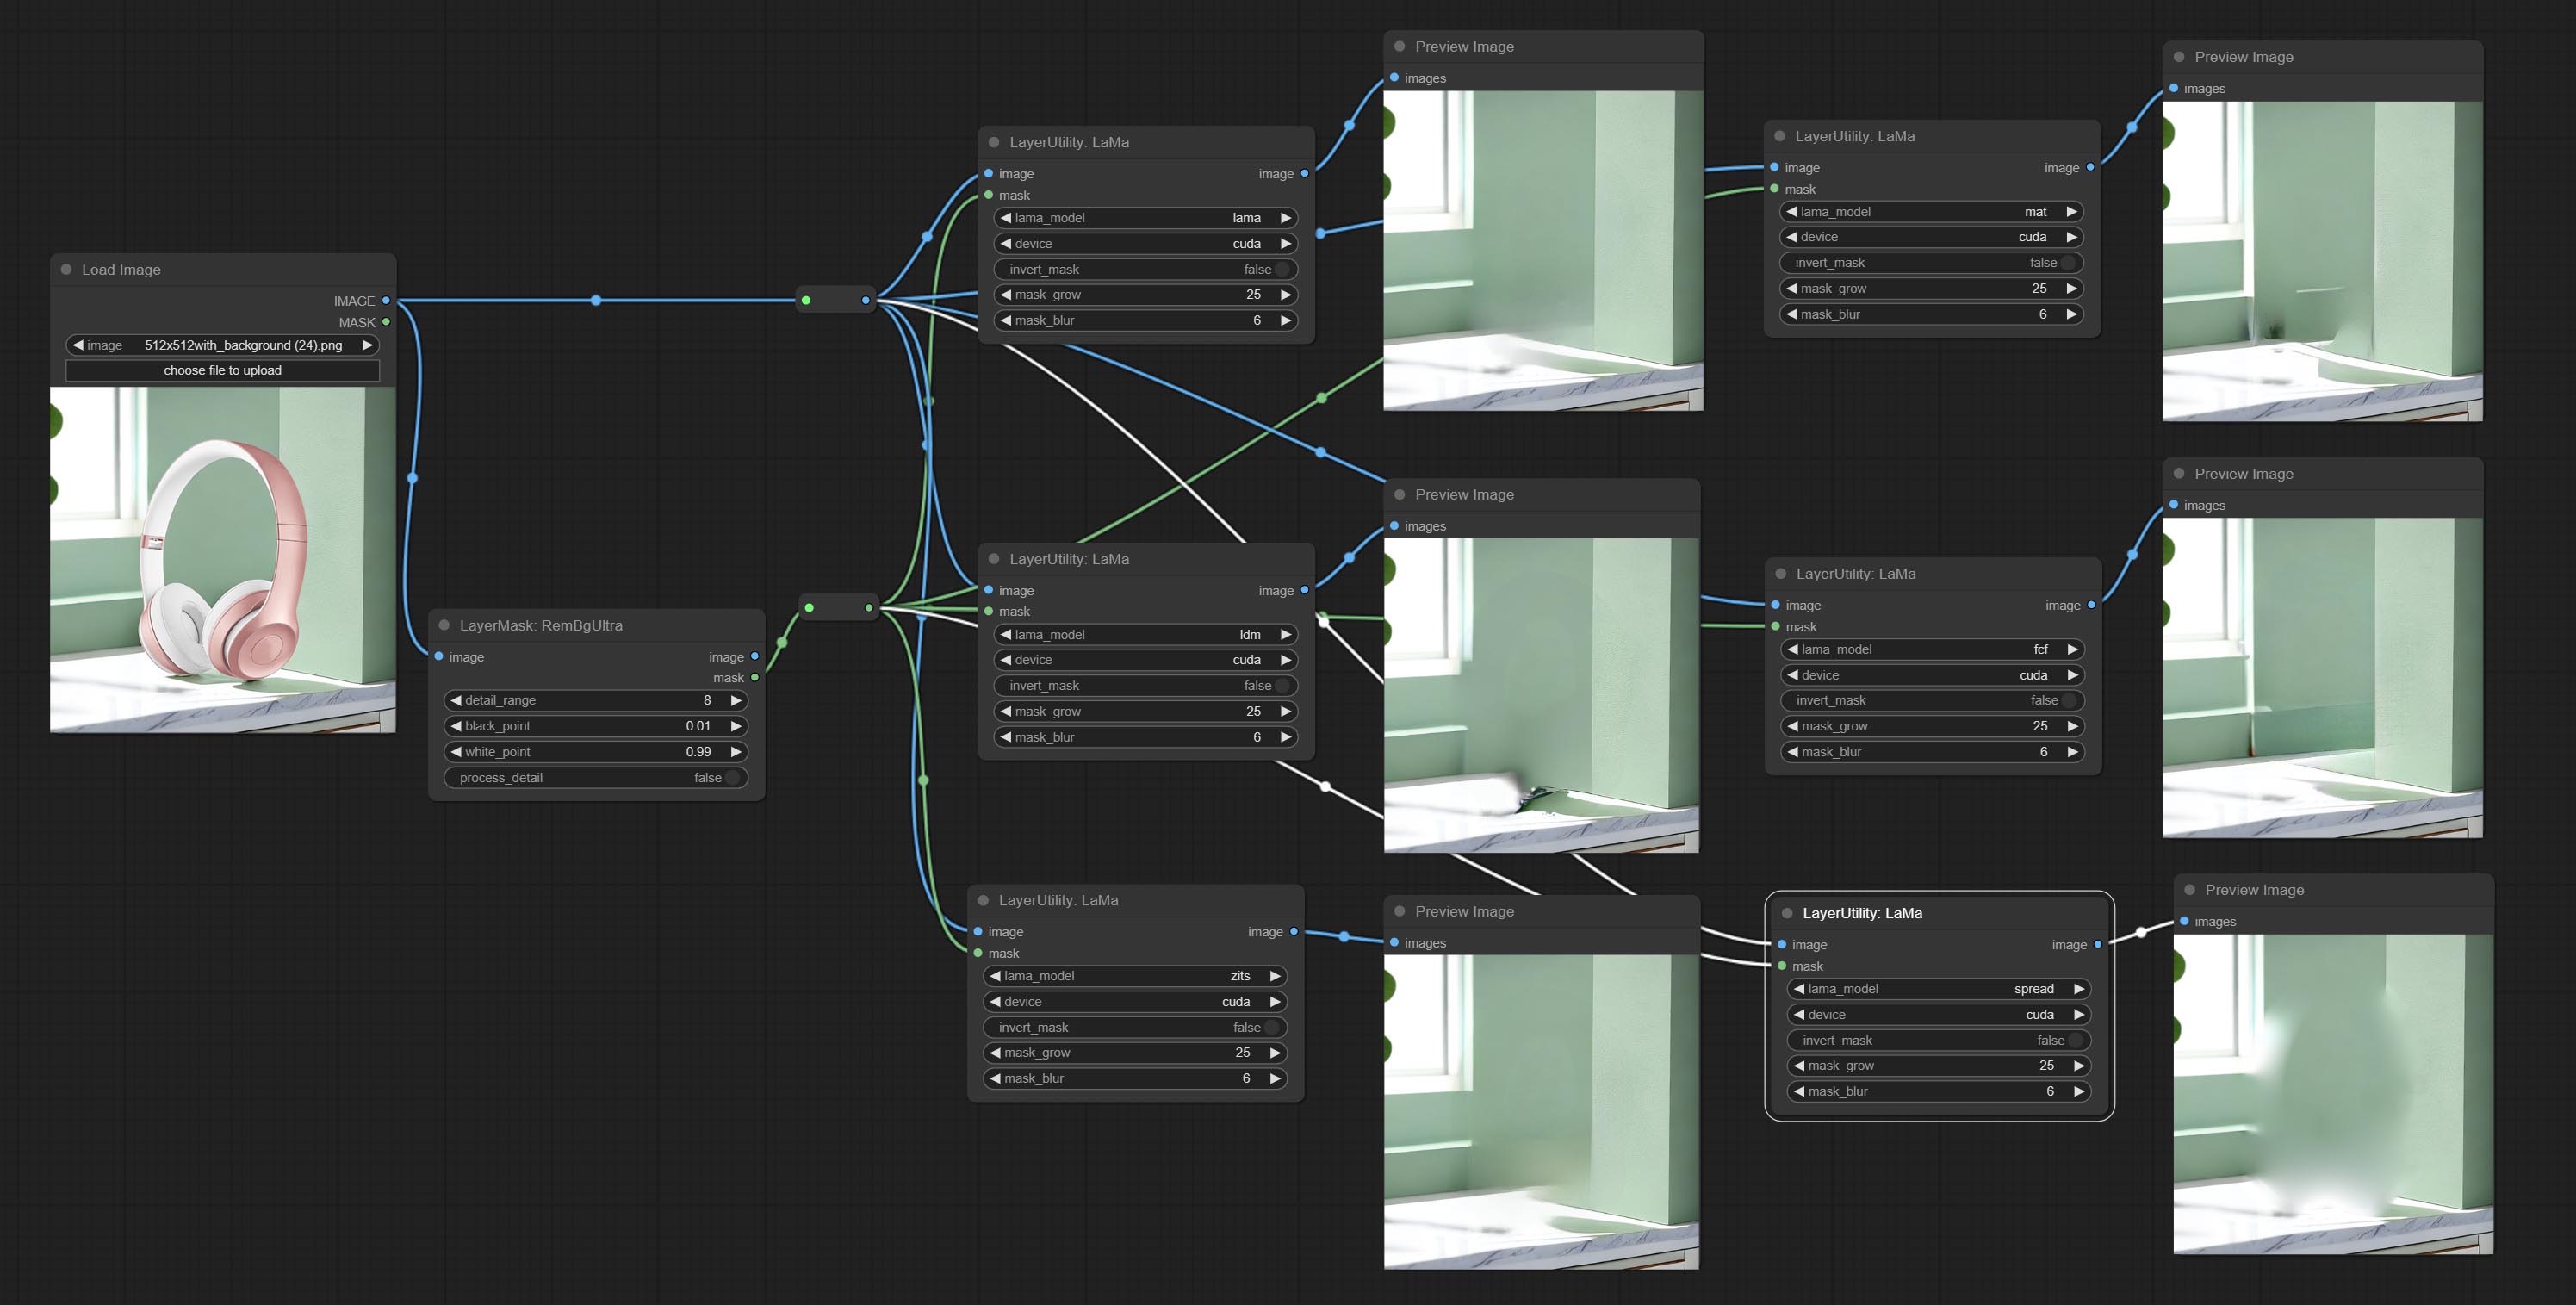
Erase objects from the image based on the mask. this node is repackage of IOPaint, powered by state-of-the-art AI models, thanks to the original author.
It is have LaMa, LDM, ZITS,MAT, FcF, Manga models and the SPREAD method to erase. Please refer to the original link for the introduction of each model.
Please download the model files from lama models(BaiduNetdisk) or lama models(Google Drive) to ComfyUI/models/lama folder.
Node optons: 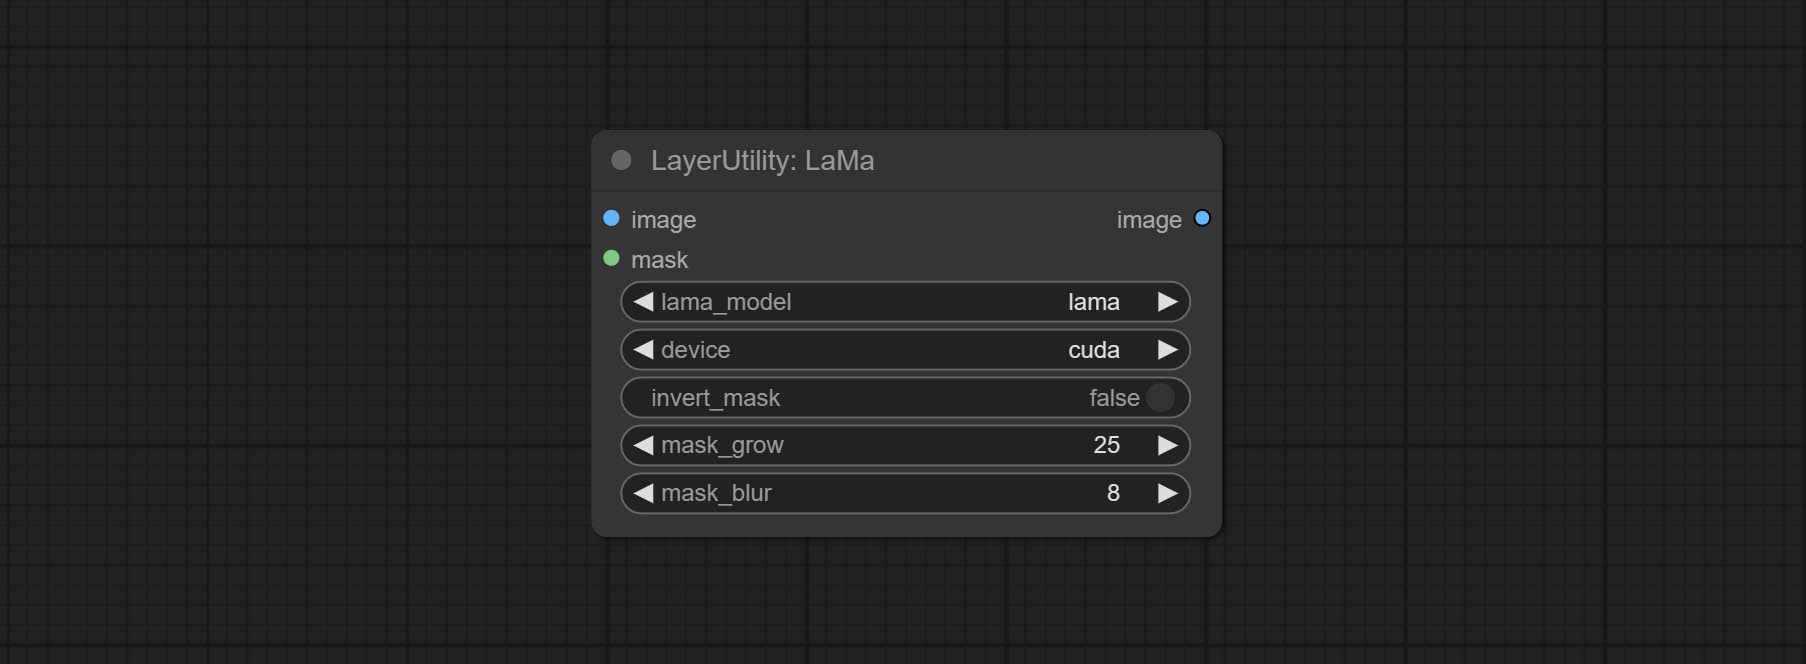
- lama_model: Choose a model or method.
- device: After correctly installing Torch and Nvidia CUDA drivers, using cuda will significantly improve running speed.
- invert_mask: Whether to reverse the mask.
- grow: Positive values expand outward, while negative values contract inward.
- blur: Blur the edge.
ImageChannelSplit
Split the image channel into individual images.
Node options: 
- mode: Channel mode, include RGBA, YCbCr, LAB adn HSV.
ImageChannelMerge
Merge each channel image into one image.
Node options: 
- mode: Channel mode, include RGBA, YCbCr, LAB adn HSV.
ImageRemoveAlpha
Remove the alpha channel from the image and convert it to RGB mode. you can choose to fill the background and set the background color.
Node options: 
- RGBA_image: The input image supports RGBA or RGB modes.
- mask: Optional input mask. If there is an input mask, it will be used first, ignoring the alpha that comes with RGBA_image.
- fill_background: Whether to fill the background.
- background_color 4 : Color of background.
ImageCombineAlpha
Merge the image and mask into an RGBA mode image containing an alpha channel.
ImageAutoCrop
Automatically cutout and crop the image according to the mask. it can specify the background color, aspect ratio, and size for output image. this node is designed to generate the image materials for training models.
*Please refer to the model installation methods for SegmentAnythingUltra and RemBgUltra.
Node options: 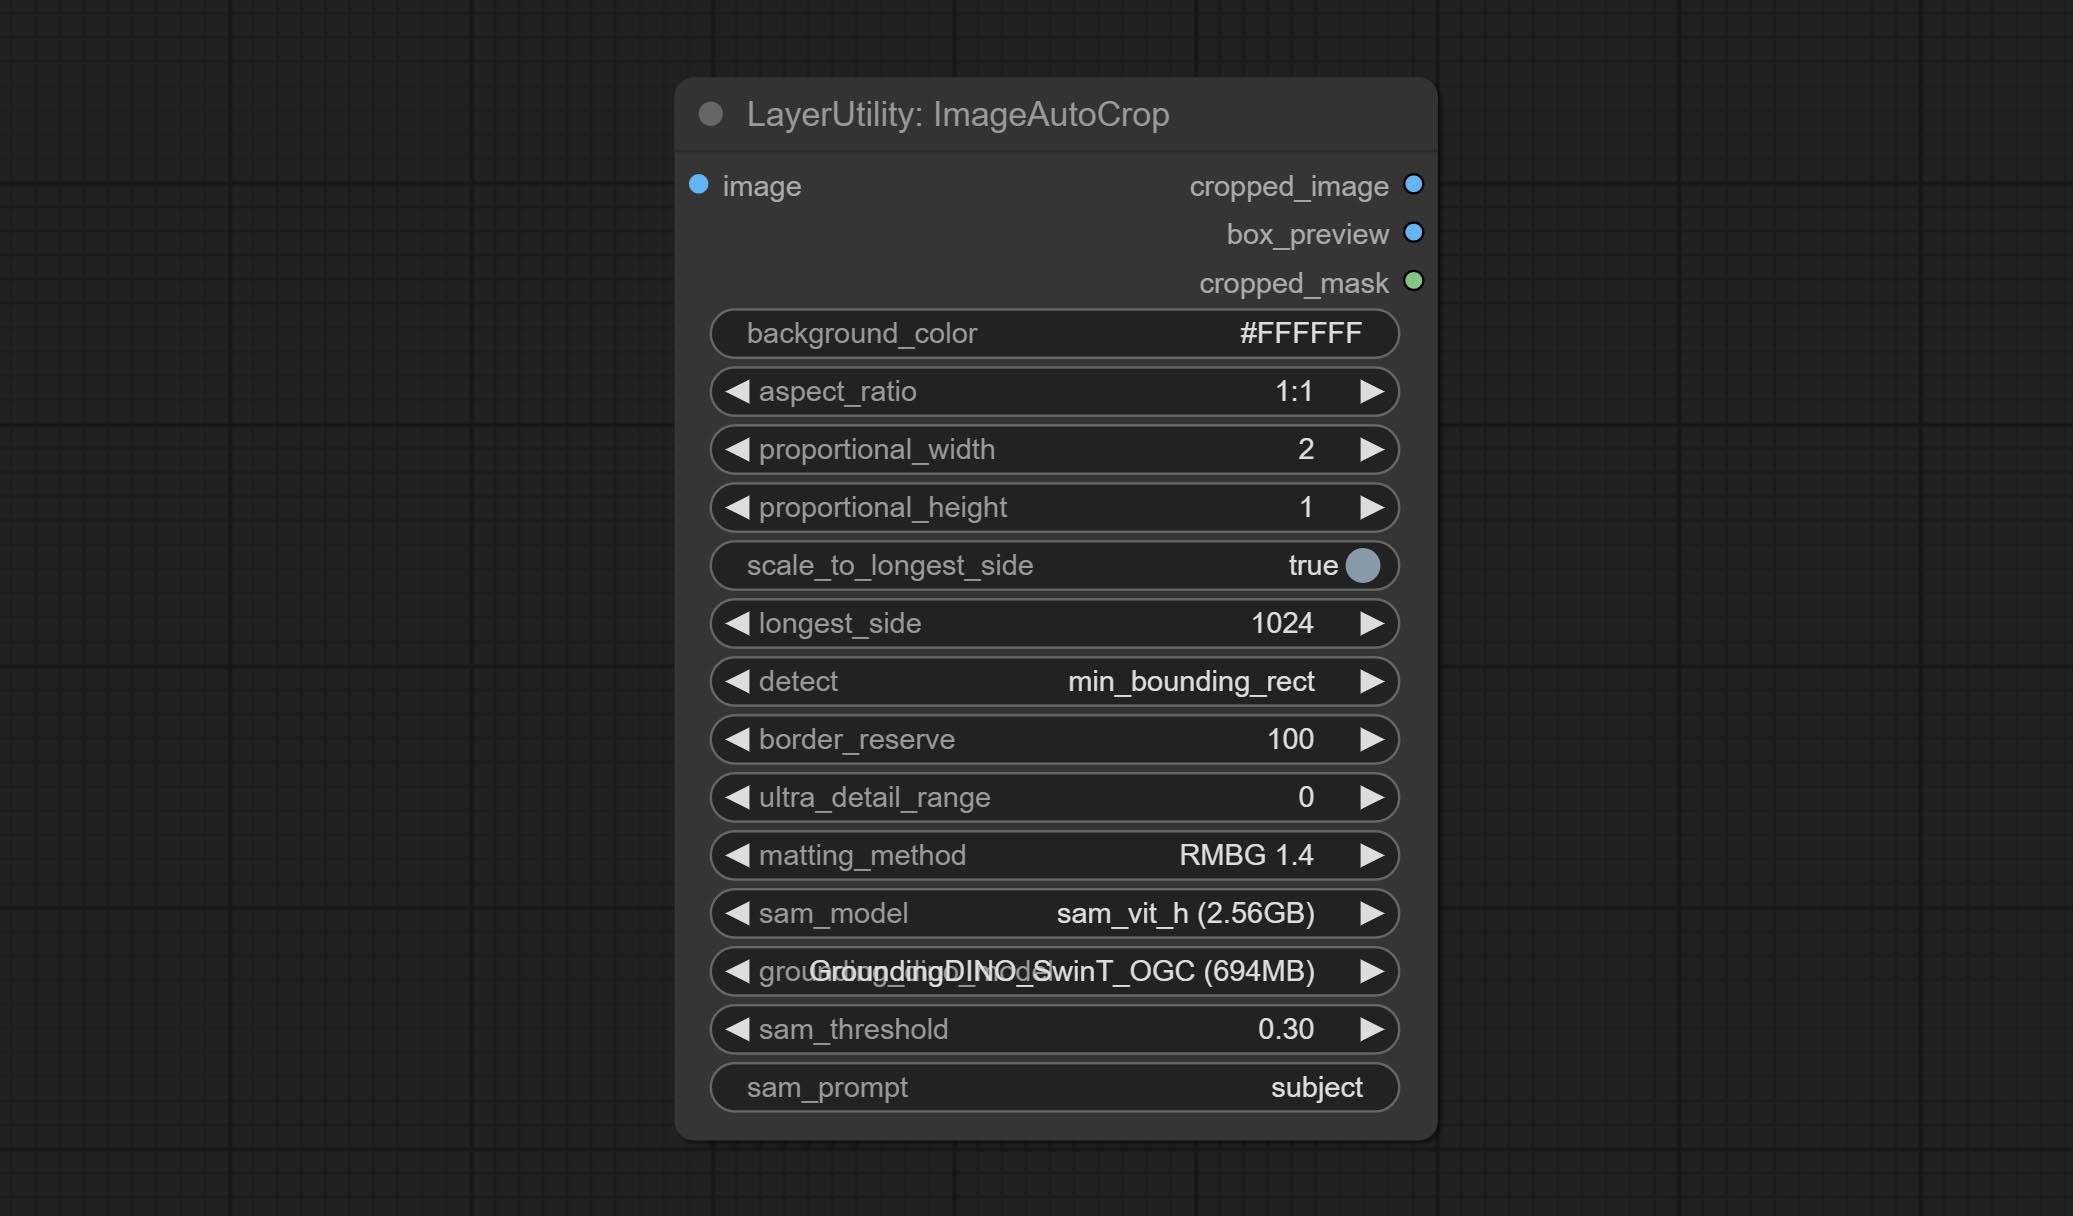
- background_color 4 : The background color.
- aspect_ratio: Here are several common frame ratios provided. alternatively, you can choose "original" to keep original ratio or customize the ratio using "custom".
- proportional_width: Proportional width. if the aspect ratio option is not "custom", this setting will be ignored.
- proportional_height: Proportional height. if the aspect ratio option is not "custom", this setting will be ignored.
- scale_by_longest_side: Allow scaling by long edge size.
- longest_side: When the scale_by_longest_side is set to True, this will be used this value to the long edge of the image. when the original_size have input, this setting will be ignored.
- detect: Detection method, min_bounding_rect is the minimum bounding rectangle, max_inscribed_rect is the maximum inscribed rectangle.
- border_reserve: Keep the border. expand the cutting range beyond the detected mask body area.
- ultra_detail_range: Mask edge ultra fine processing range, 0 is not processed, which can save generation time.
- matting_method: The method of generate masks. There are two methods available: Segment Anything and RMBG 1.4. RMBG 1.4 runs faster.
- sam_model: Select the SAM model used by Segment Anything here.
- grounding_dino_model: Select the Grounding_Dino model used by Segment Anything here.
- sam_threshold: The threshold for Segment Anything.
- sam_prompt: The prompt for Segment Anything.
Output: cropped_image: Crop and replace the background image. box_preview: Crop position preview. cropped_mask: Cropped mask.
ImageAutoCropV2
The V2 upgrad version of ImageAutoCrop , it has made the following changes based on the previous version: 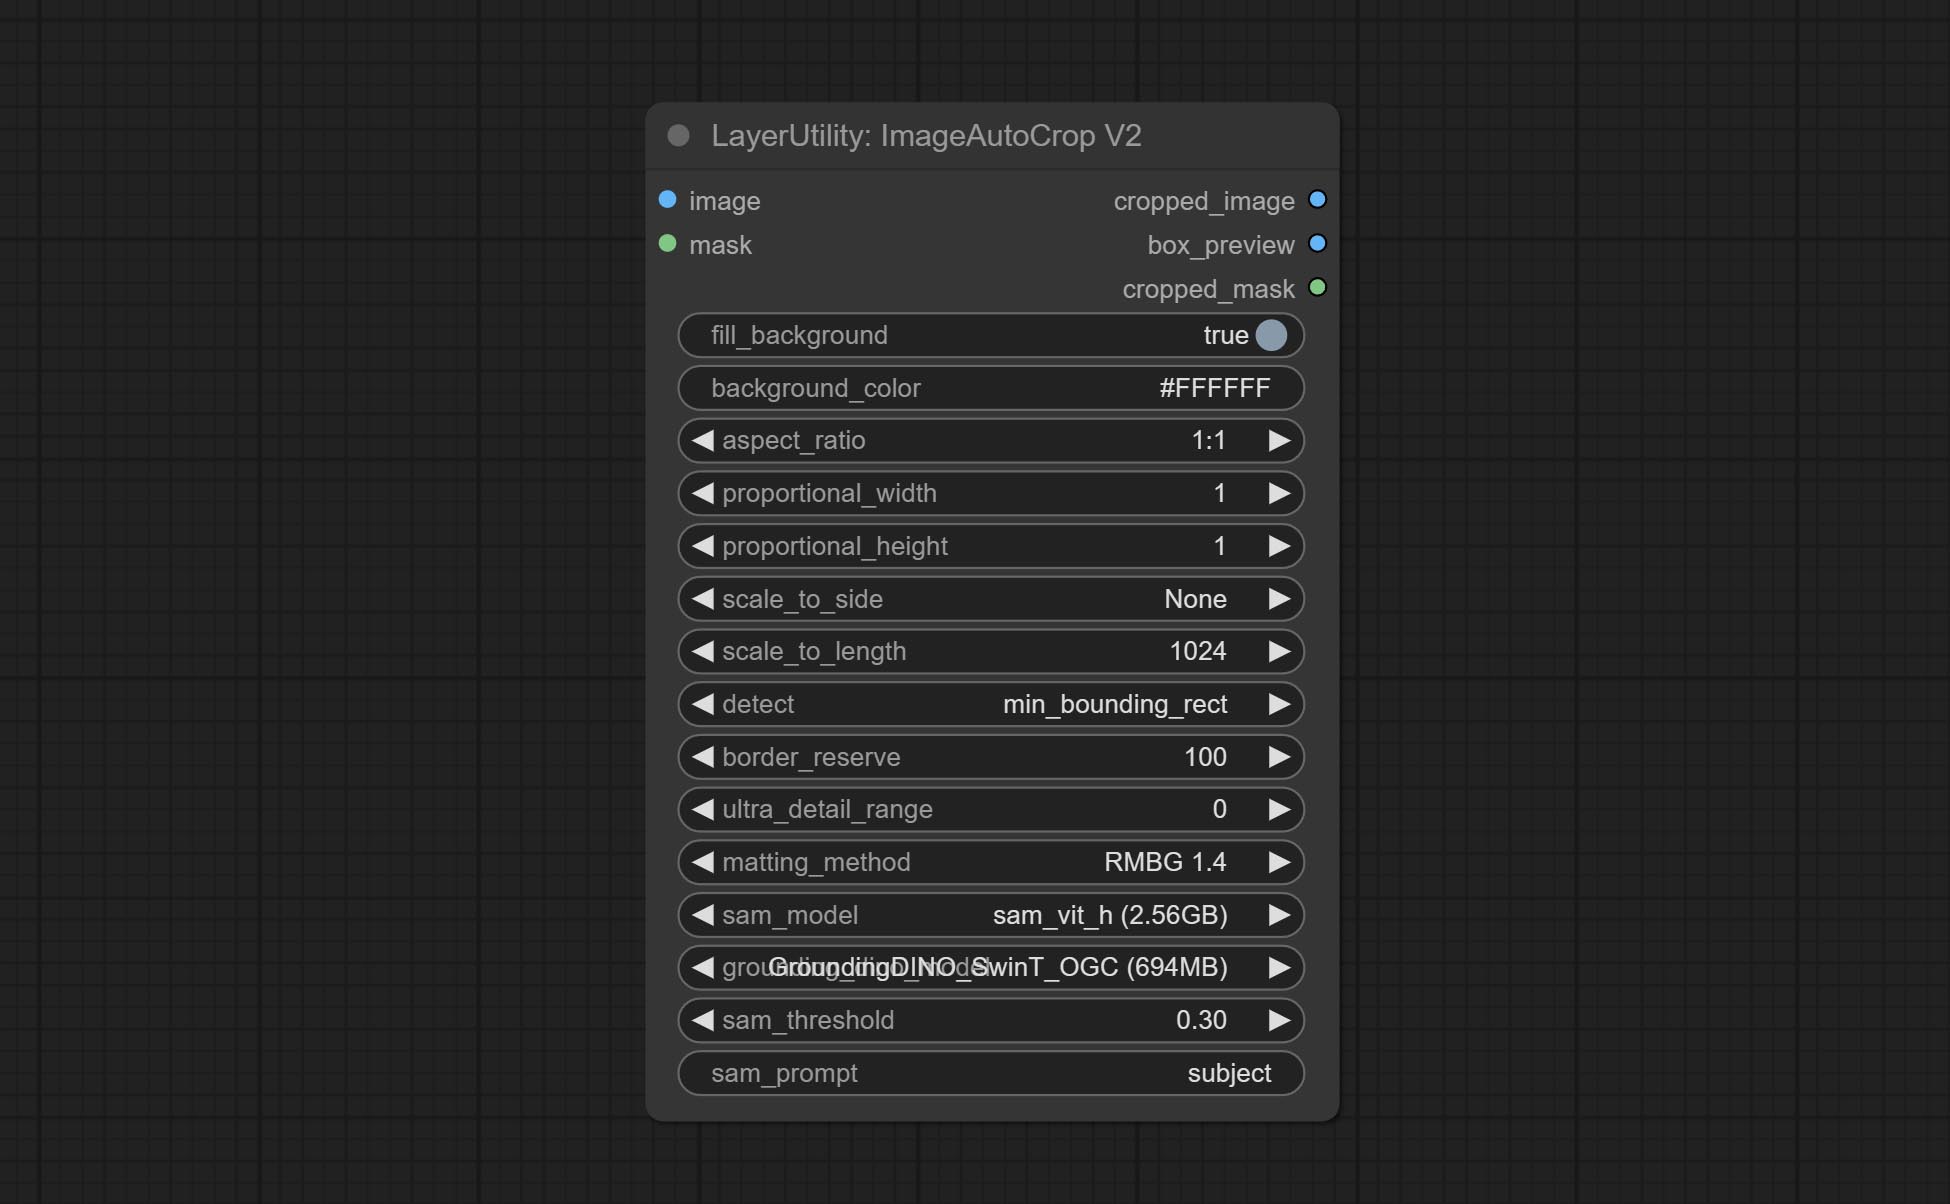
- Add optional input for mask. when there is a mask input, use that input directly to skip the built-in mask generation.
- Add
fill_background . When set to False, the background will not be processed and any parts beyond the frame will not be included in the output range. -
aspect_ratio adds the original option. - scale_by: Allow scaling by specified dimensions for longest, shortest, width, or height.
- scale_by_length: The value here is used as
scale_by to specify the length of the edge.
ImageAutoCropV3
Automatically crop the image to the specified size. You can input a mask to preserve the specified area of the mask. This node is designed to generate image materials for training the model.
Node Options: 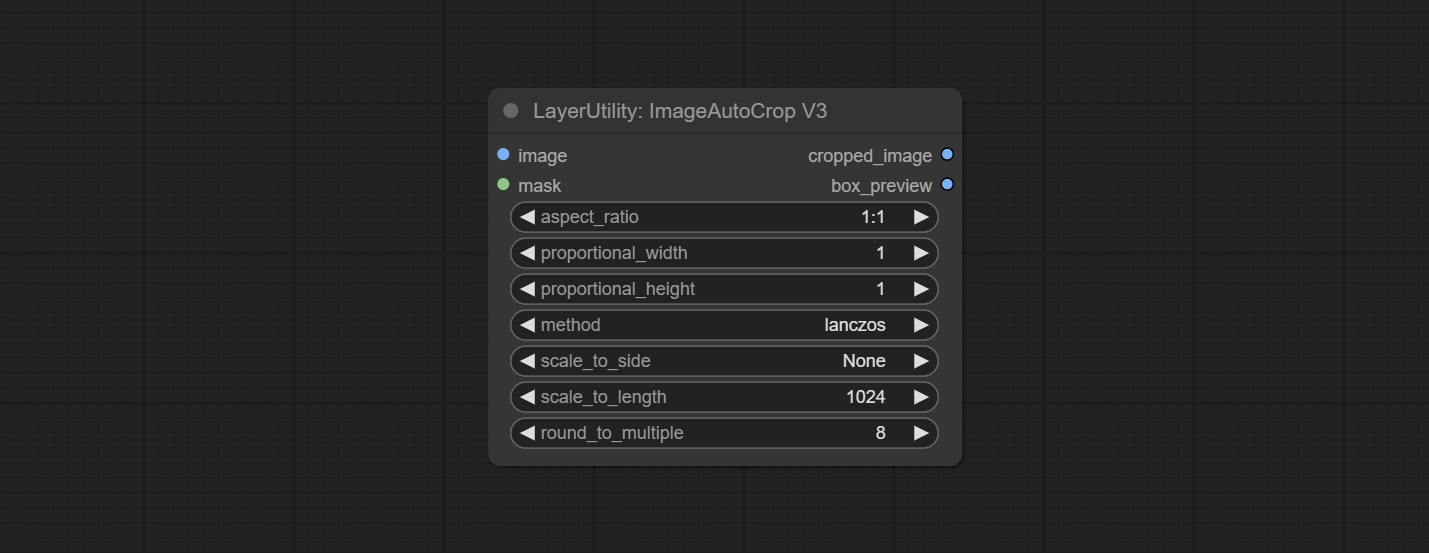
- image: The input image.
- mask: Optional input mask. The masking part will be preserved within the range of the cutting aspect ratio.
- aspect_ratio: The aspect ratio of the output. Here are common frame ratios provided, with "custom" being the custom ratio and "original" being the original frame ratio.
- proportional_width: Proportionally wide. If the aspect_ratio option is not 'custom', this setting will be ignored.
- proportional_height: High proportion. If the aspect_ratio option is not 'custom', this setting will be ignored.
- method: Scaling sampling methods include Lanczos, Bicubic, Hamming, Bilinear, Box, and Nearest.
- scale_to_side: Allow scaling to be specified by long side, short side, width, height, or total pixels.
- scale_to_length: The value here is used as the scale_to-side to specify the length of the edge or the total number of pixels (kilo pixels).
- round_to_multiple: Multiply to the nearest whole. For example, if set to 8, the width and height will be forcibly set to multiples of 8.
Outputs: cropped_image: The cropped image. box_preview: Preview of cutting position.
HLFrequencyDetailRestore
Using low frequency filtering and retaining high frequency to recover image details. Compared to kijai's DetailTransfer, this node is better integrated with the environment while retaining details. 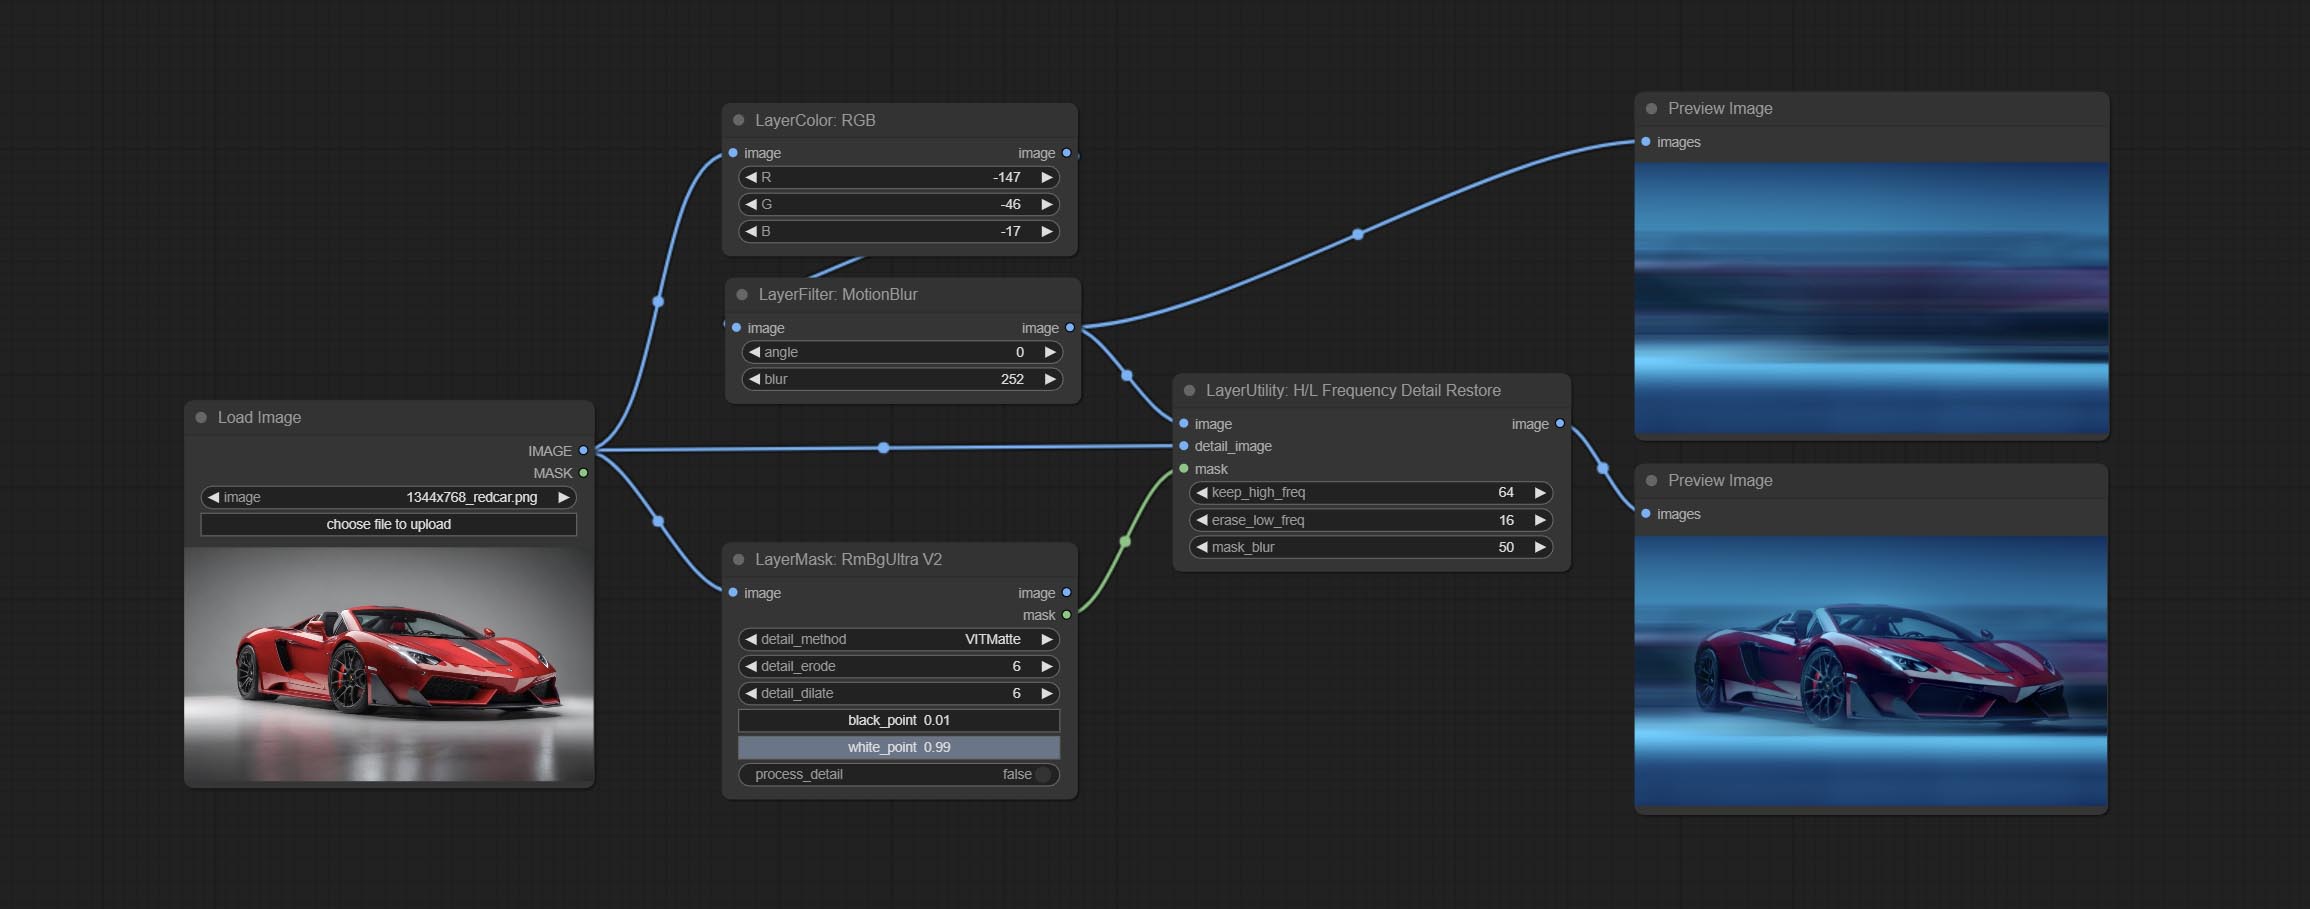
Node Options:
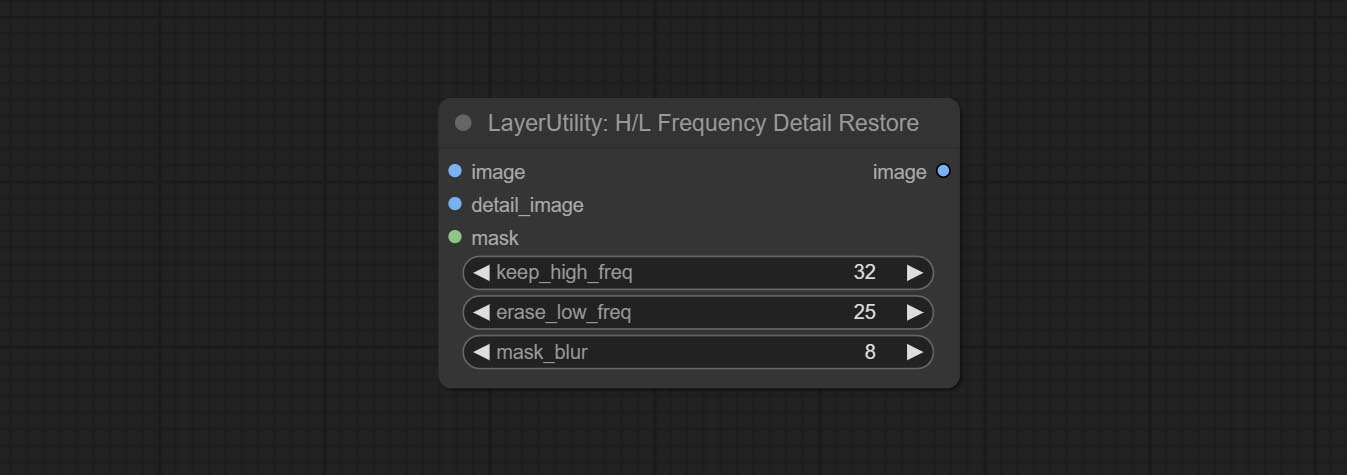
- image: Background image input.
- detail_image: Detail image input.
- mask: Optional input, if there is a mask input, only the details of the mask part are restored.
- keep_high_freq: Reserved range of high frequency parts. The larger the value, the richer the retained high-frequency details.
- erase_low_freq: The range of low frequency parts of the erasure. The larger the value, the more the low frequency range of the erasure.
- mask_blur: Mask edge blur. Valid only if there is masked input.
GetImageSize
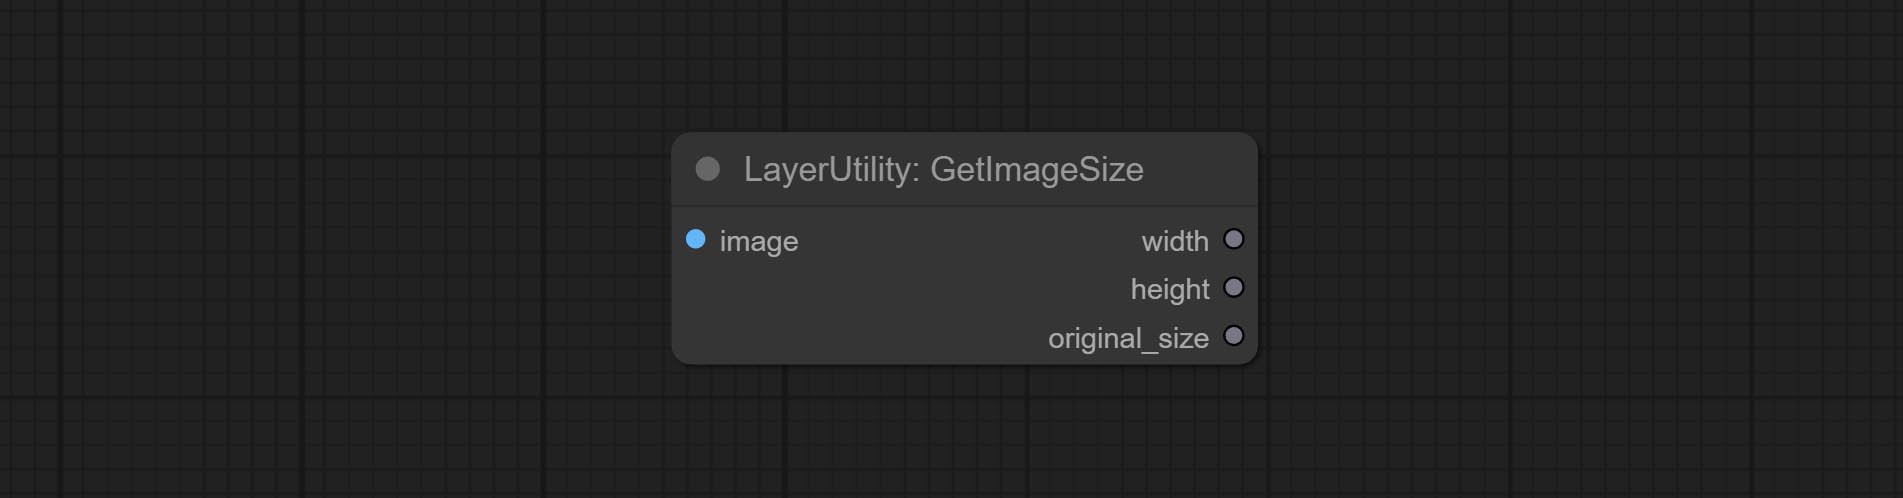
Obtain the width and height of the image.
Выход:
- width: The width of image.
- height: The height of image.
- original_size: The original size data of the image is used for subsequent node recovery.
ImageHub
Switch output from multiple input images and masks, supporting 9 sets of inputs. All input items are optional. if there is only image or mask in a set of input, the missing item will be output as None. 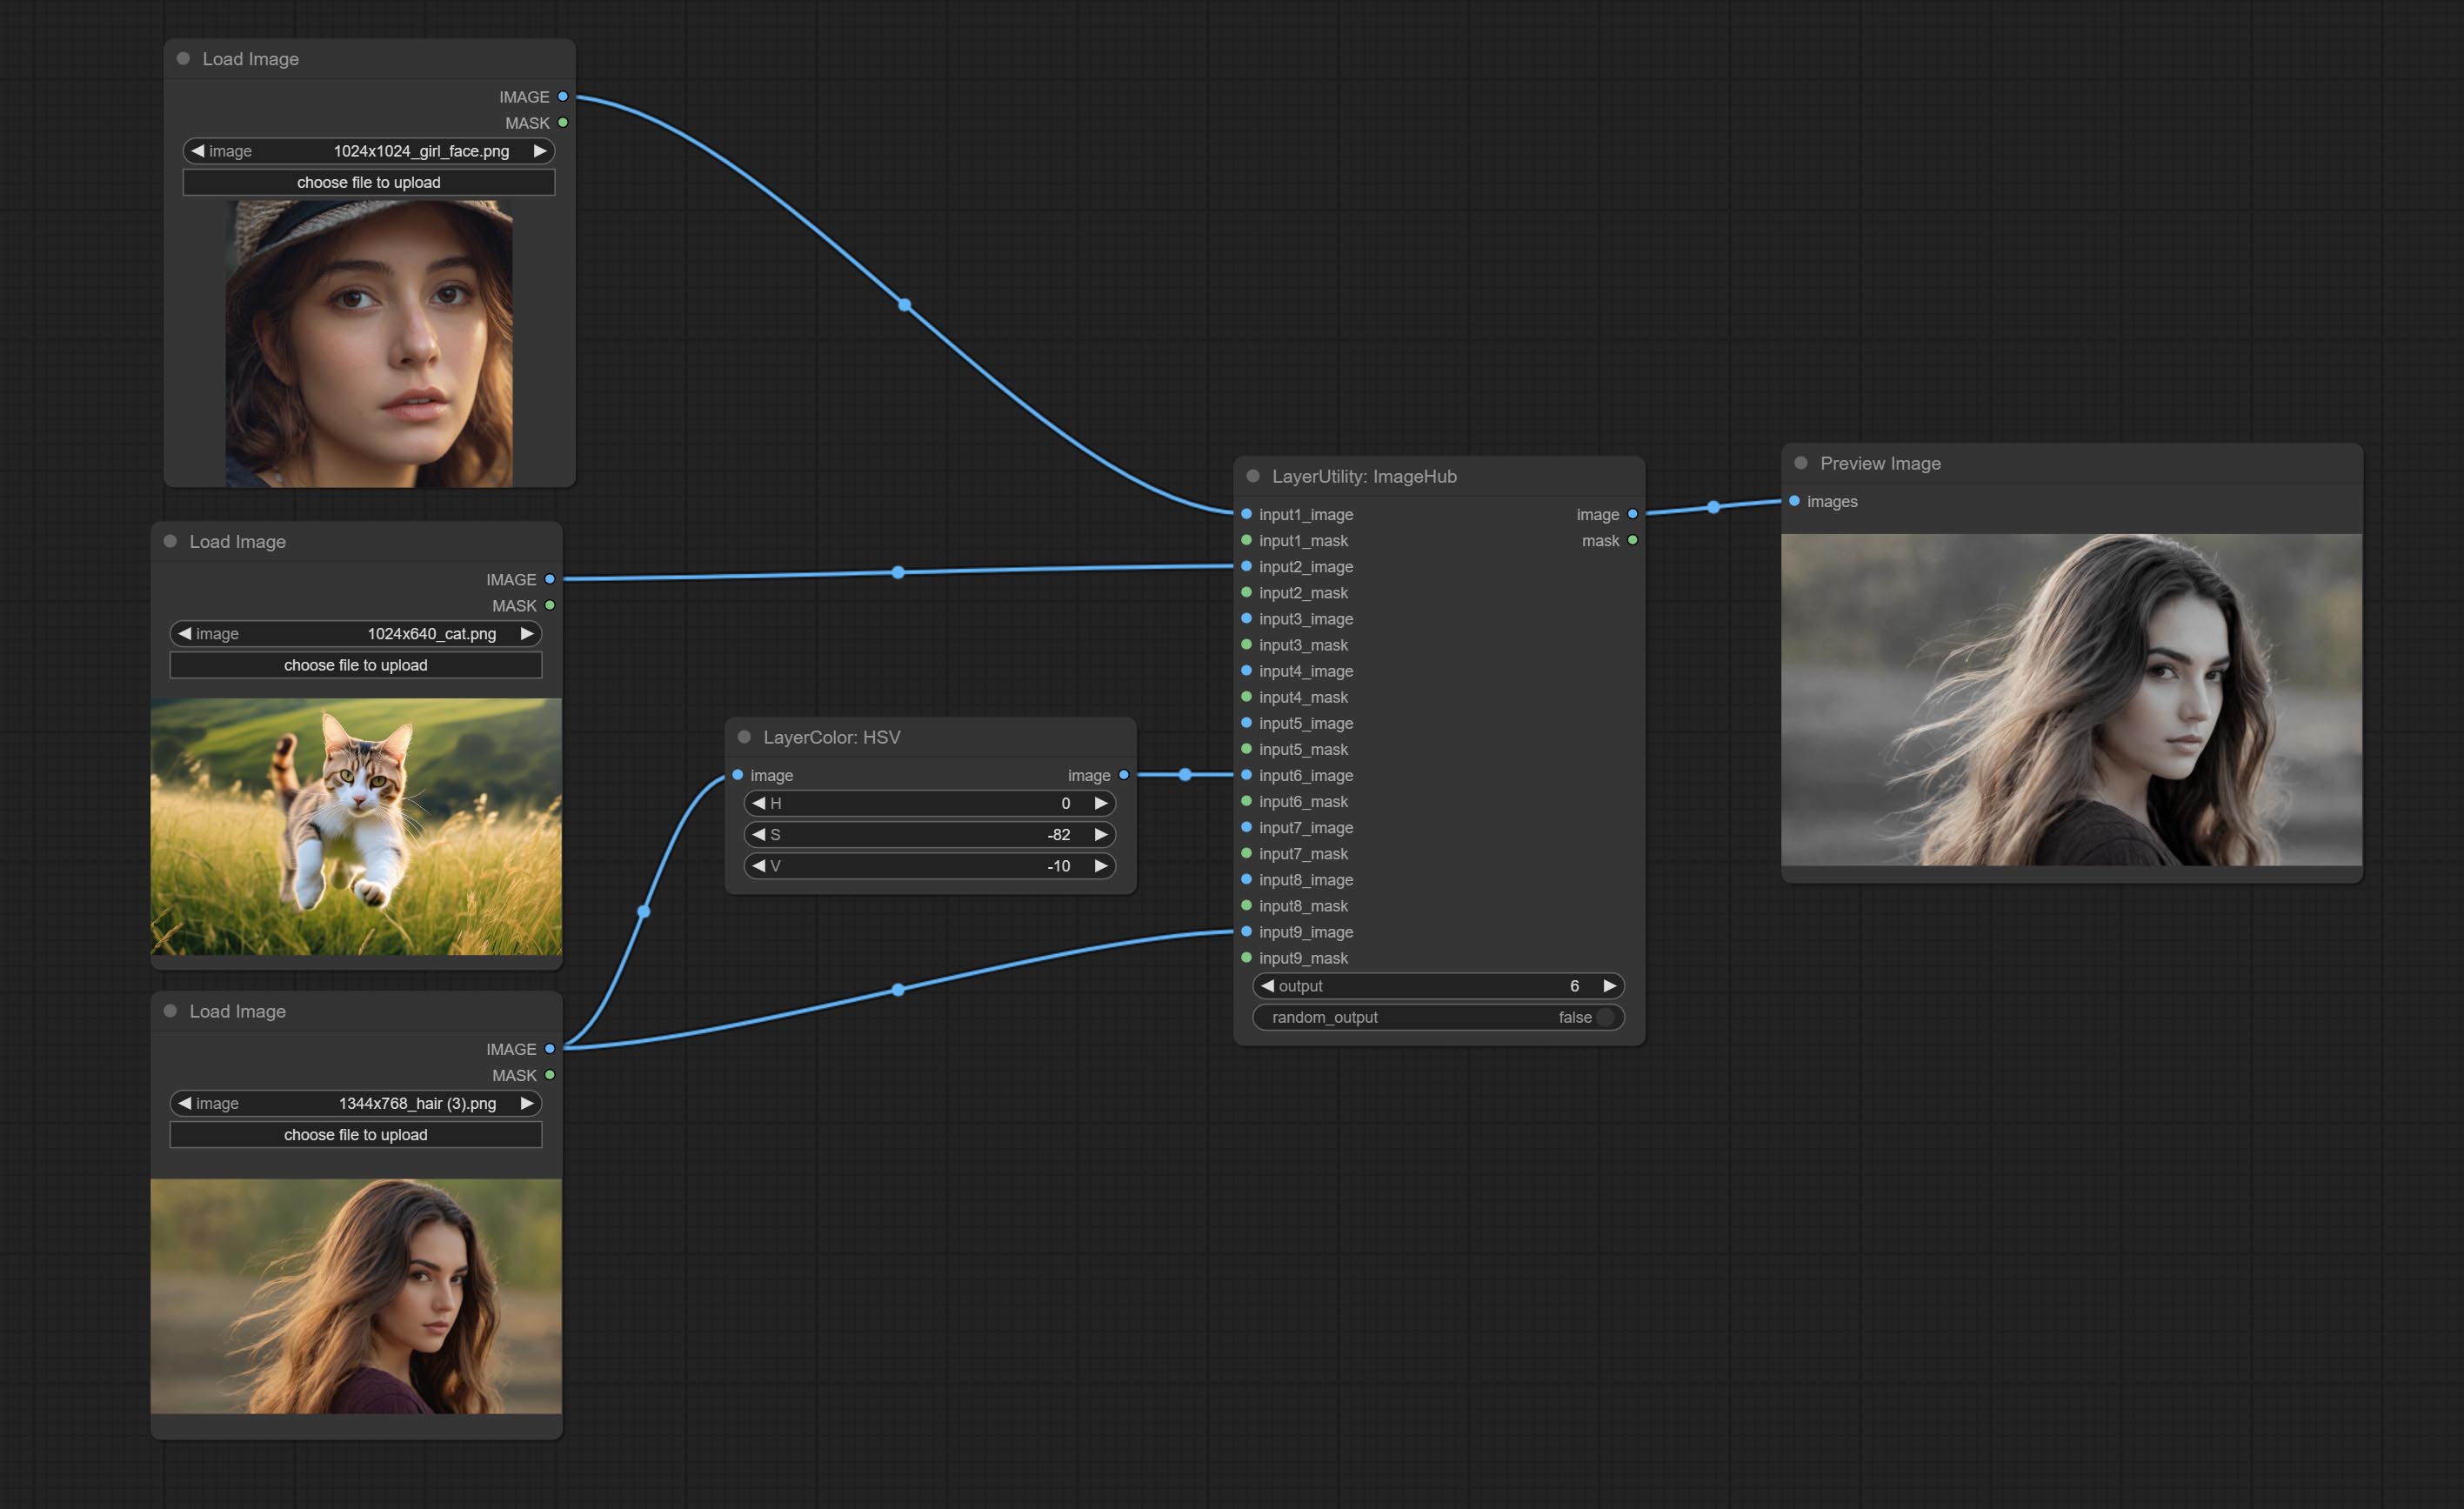
Node options:
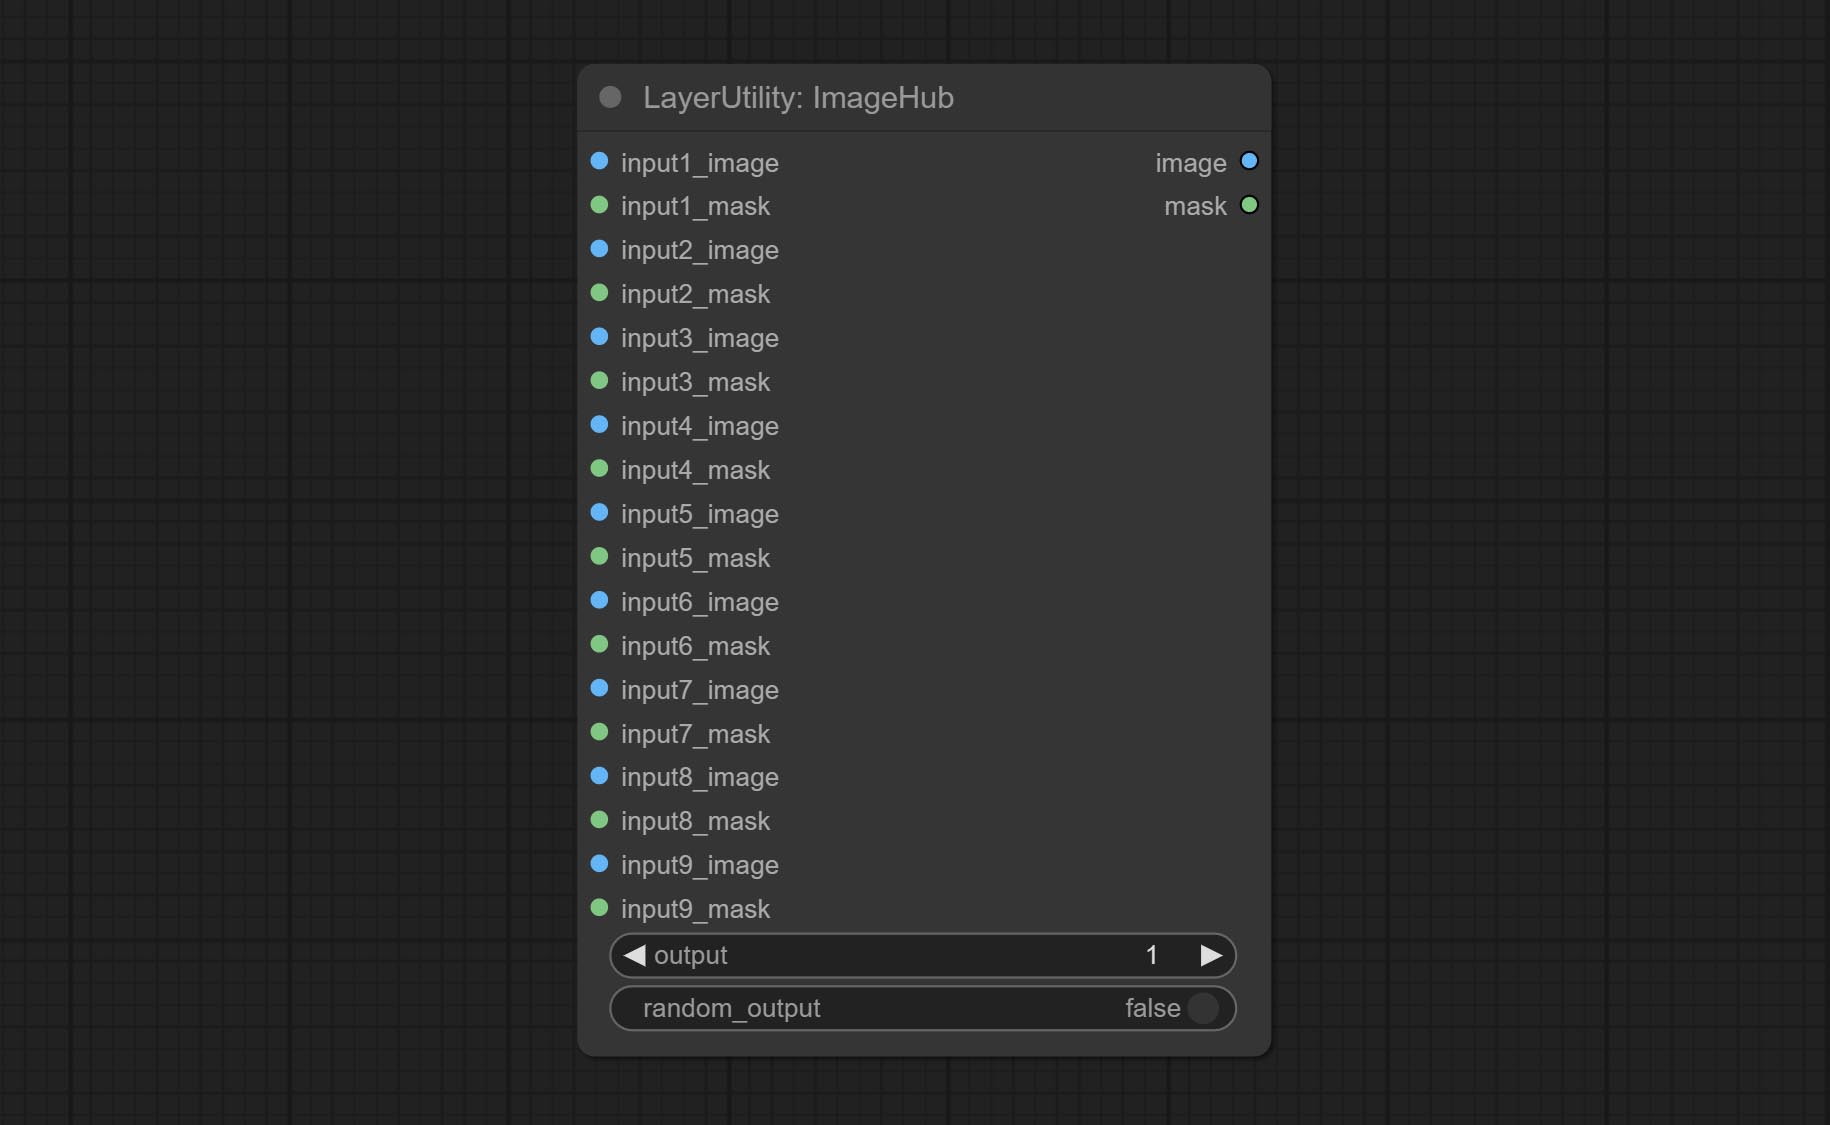
- output: Switch output. the value is the corresponding input group. when the
random-output option is True, this setting will be ignored. - random_output: When this is true, the
output setting will be ignored and a random set will be output among all valid inputs.
BatchSelector
Retrieve specified images or masks from batch images or masks. 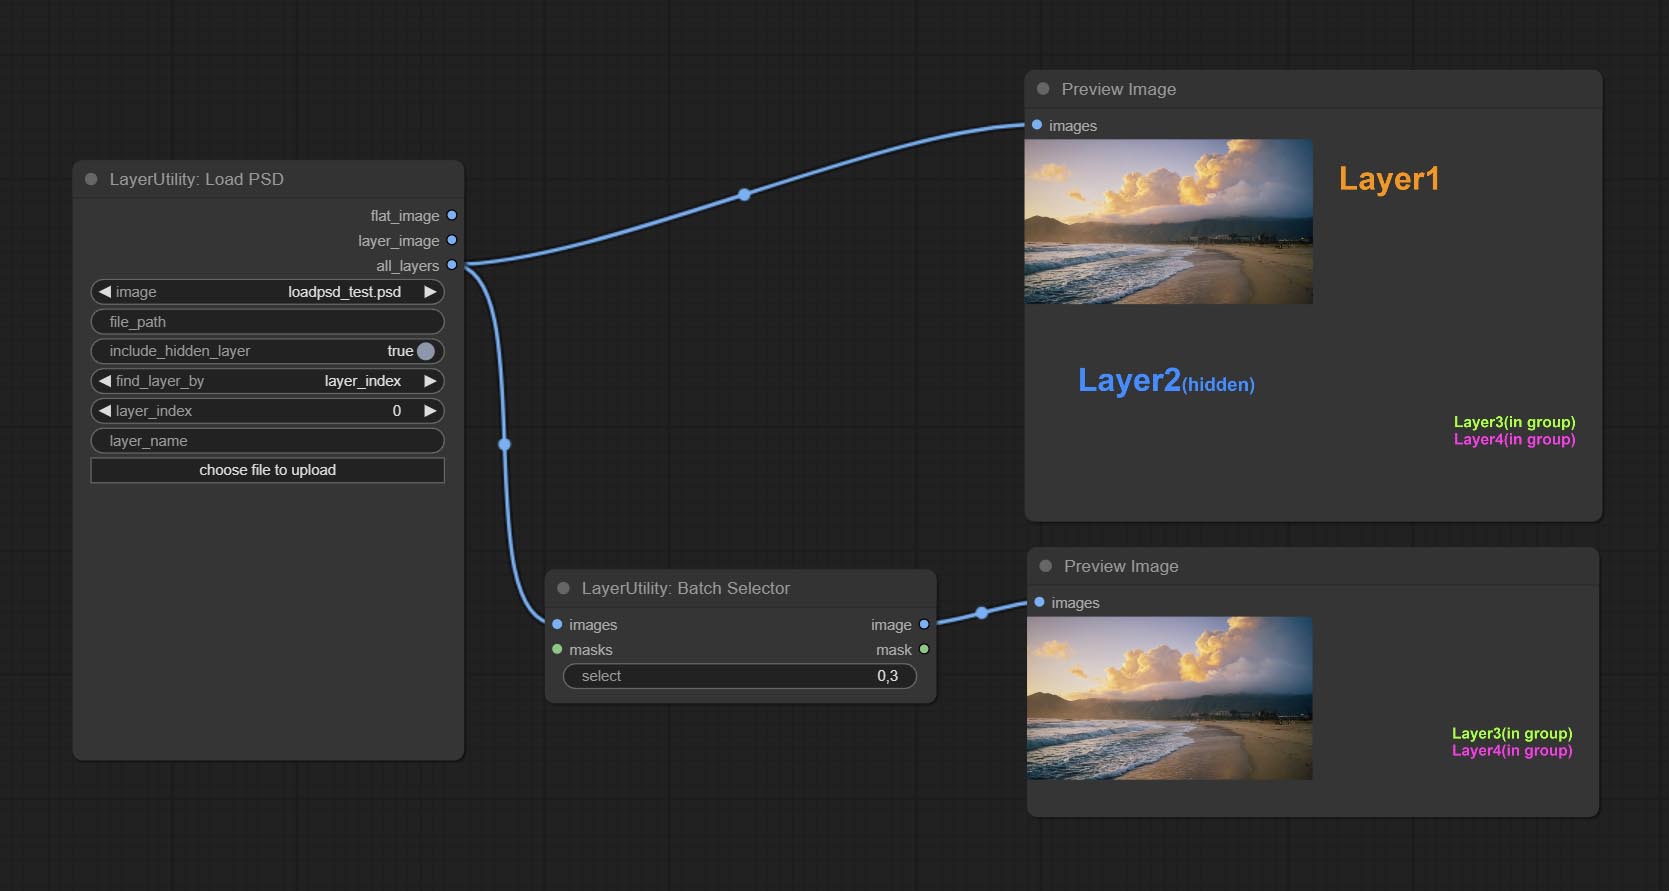
Node Options:
- images: Batch images input. This input is optional.
- masks: Batch masks input. This input is optional.
- select: Select the output image or mask at the batch index value, where 0 is the first image. Multiple values can be entered, separated by any non numeric character, including but not limited to commas, periods, semicolons, spaces or letters, and even Chinese characters. Note: If the value exceeds the batch size, the last image will be output. If there is no corresponding input, an empty 64x64 image or a 64x64 black mask will be output.
TextJoin
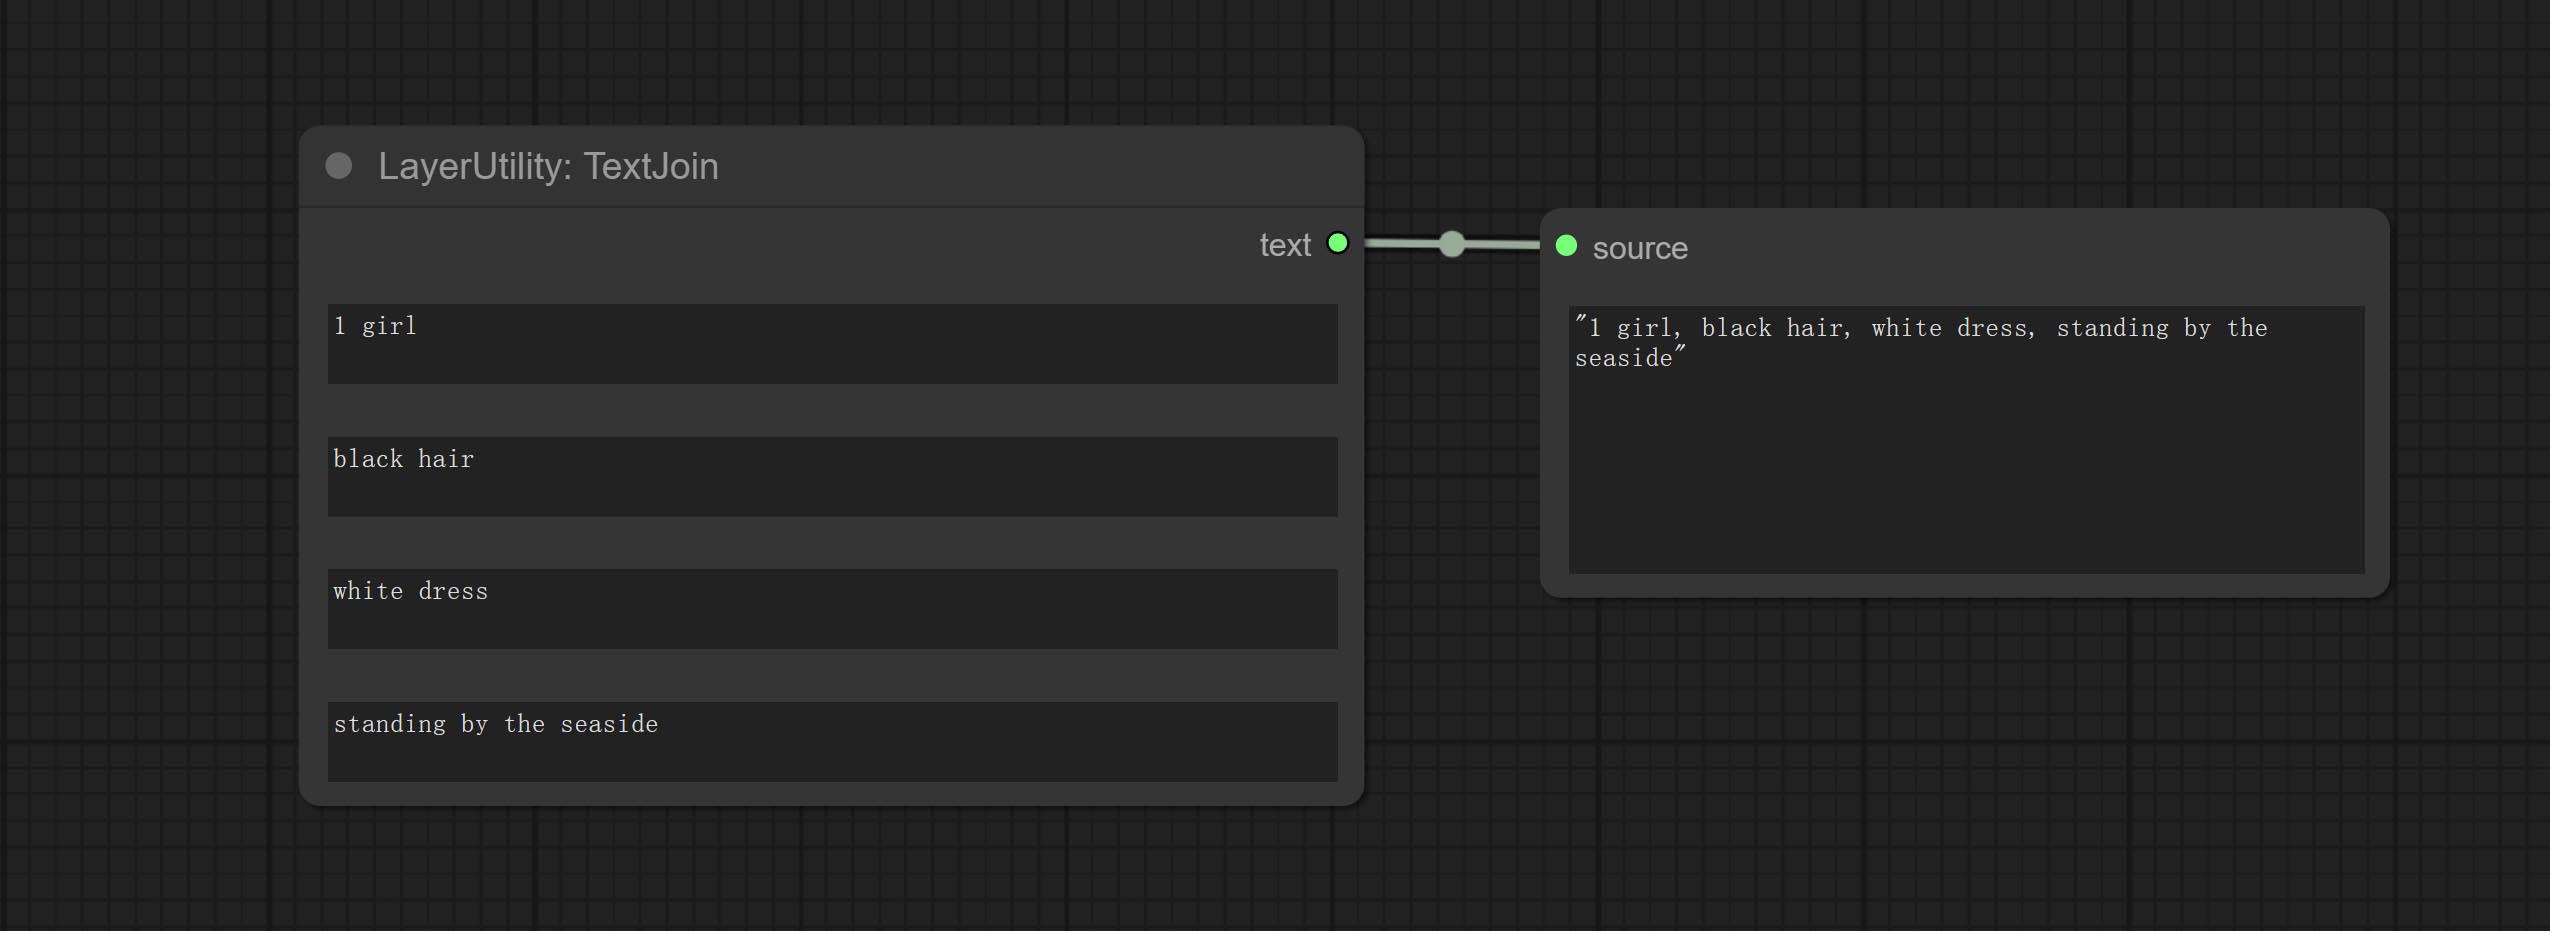
Combine multiple paragraphs of text into one.
TextJoinV2
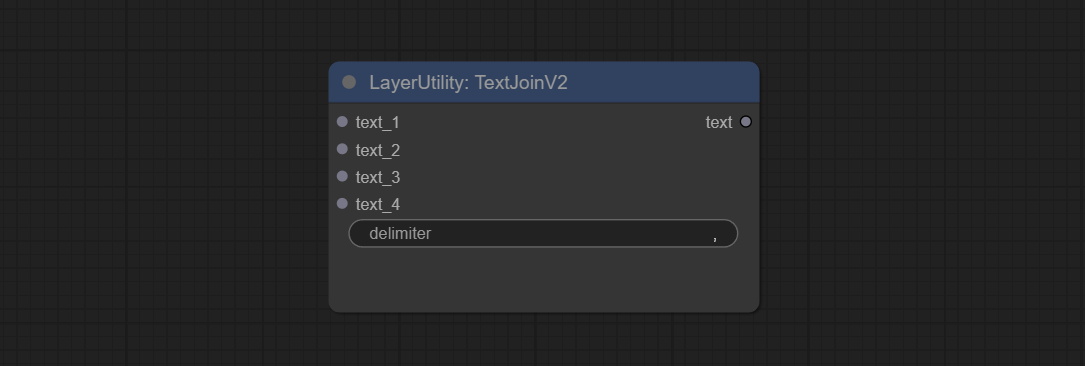
Added delimiter options on the basis of TextJoin.
PrintInfo
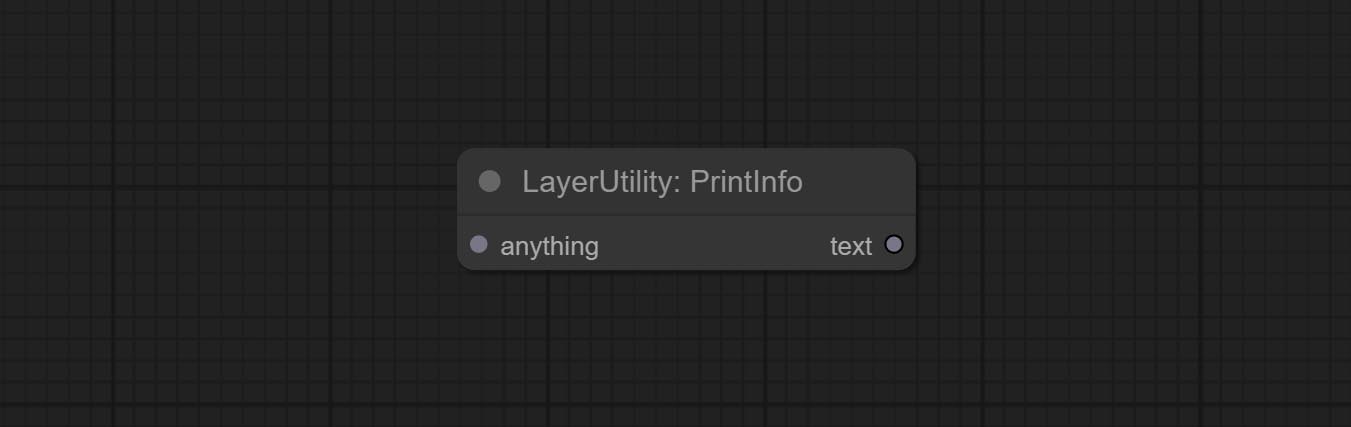
Used to provide assistance for workflow debugging. When running, the properties of any object connected to this node will be printed to the console.
This node allows any type of input.
Текстовое поле
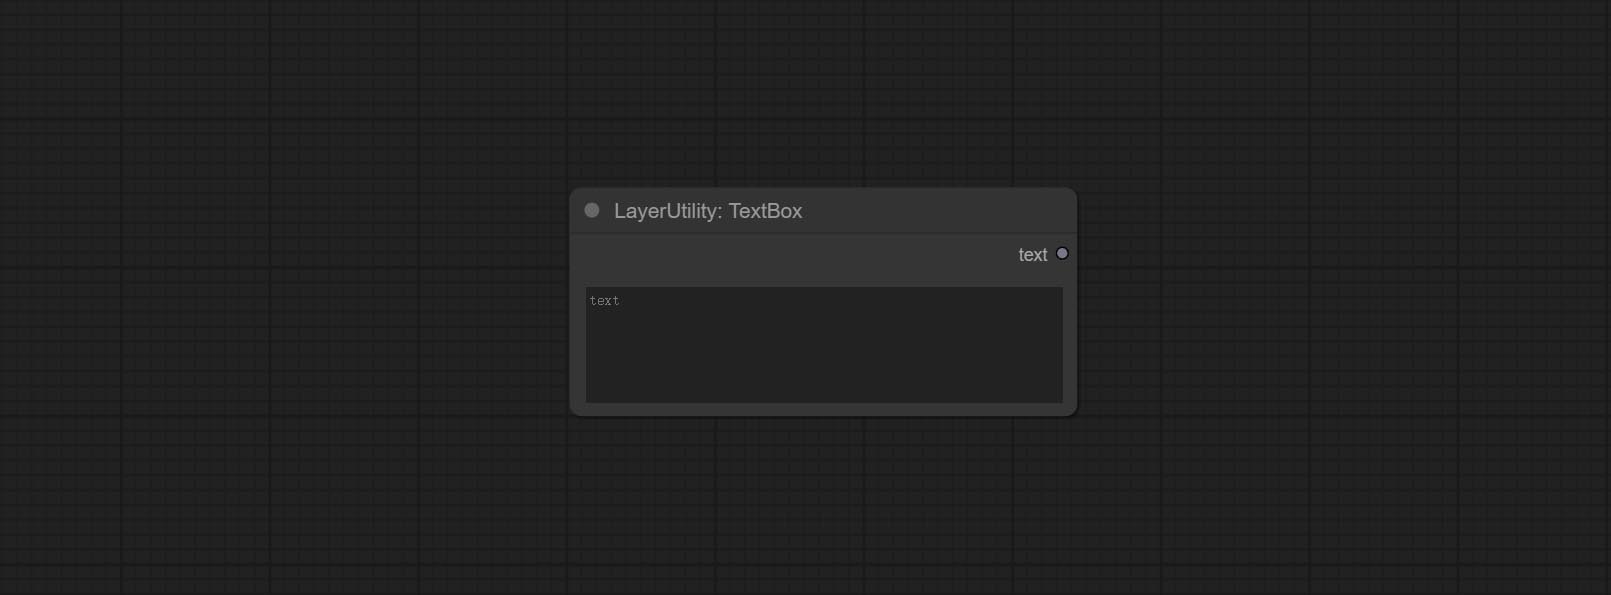
Output a string.
Нить
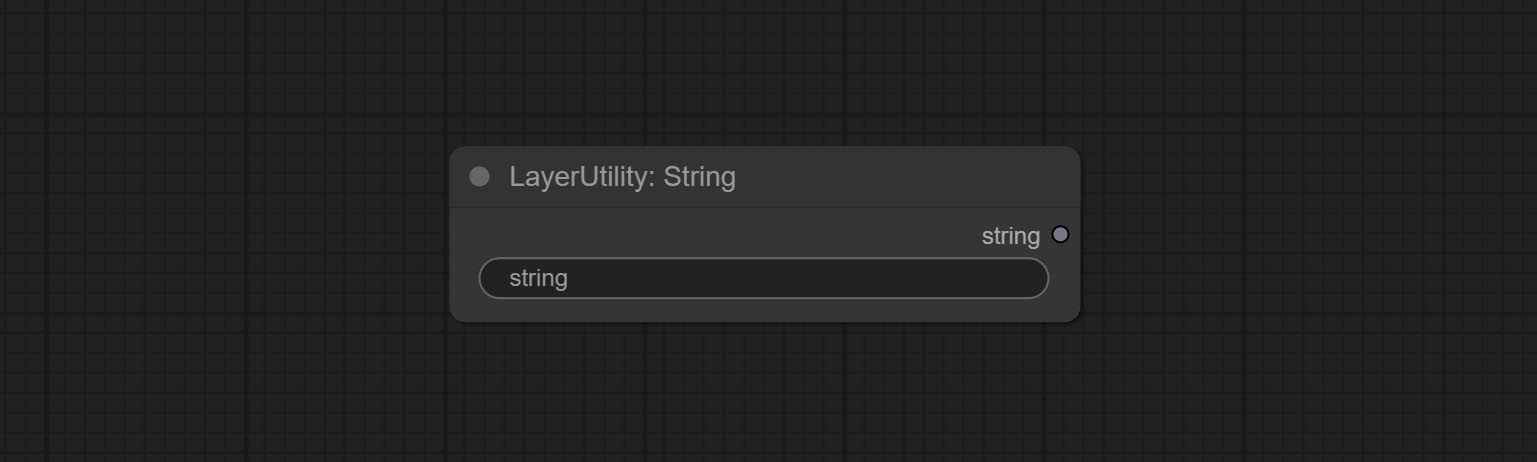
Output a string. same as TextBox.
Целое число
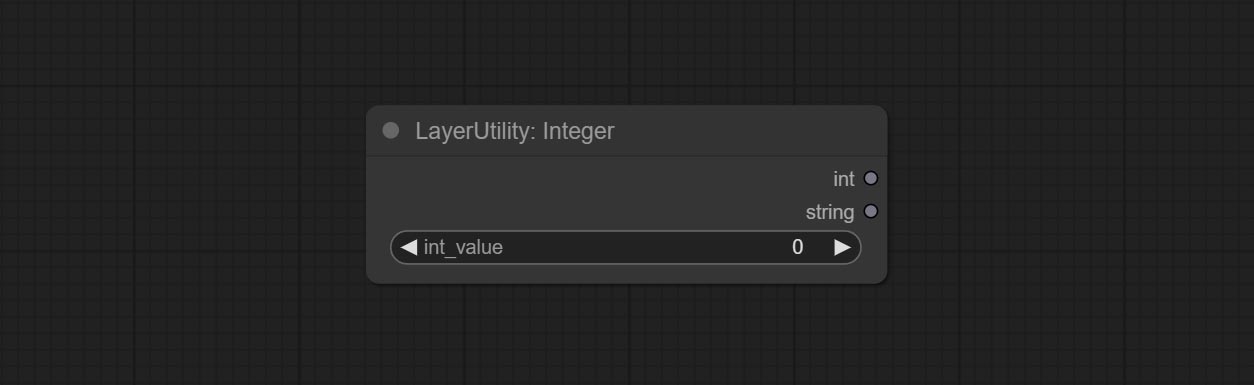
Output a integer value.
Плавать
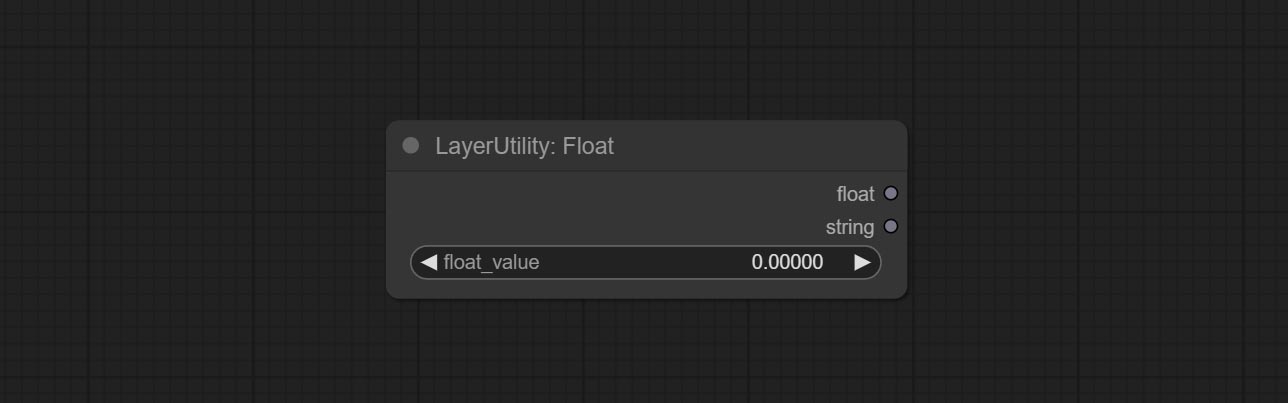
Output a floating-point value with a precision of 5 decimal places.
Логический

Output a boolean value.
RandomGenerator
Used to generate random value within a specified range, with outputs of int, float, and boolean. Supports batch and list generation, and supports batch generation of a set of different random number lists based on image batch. 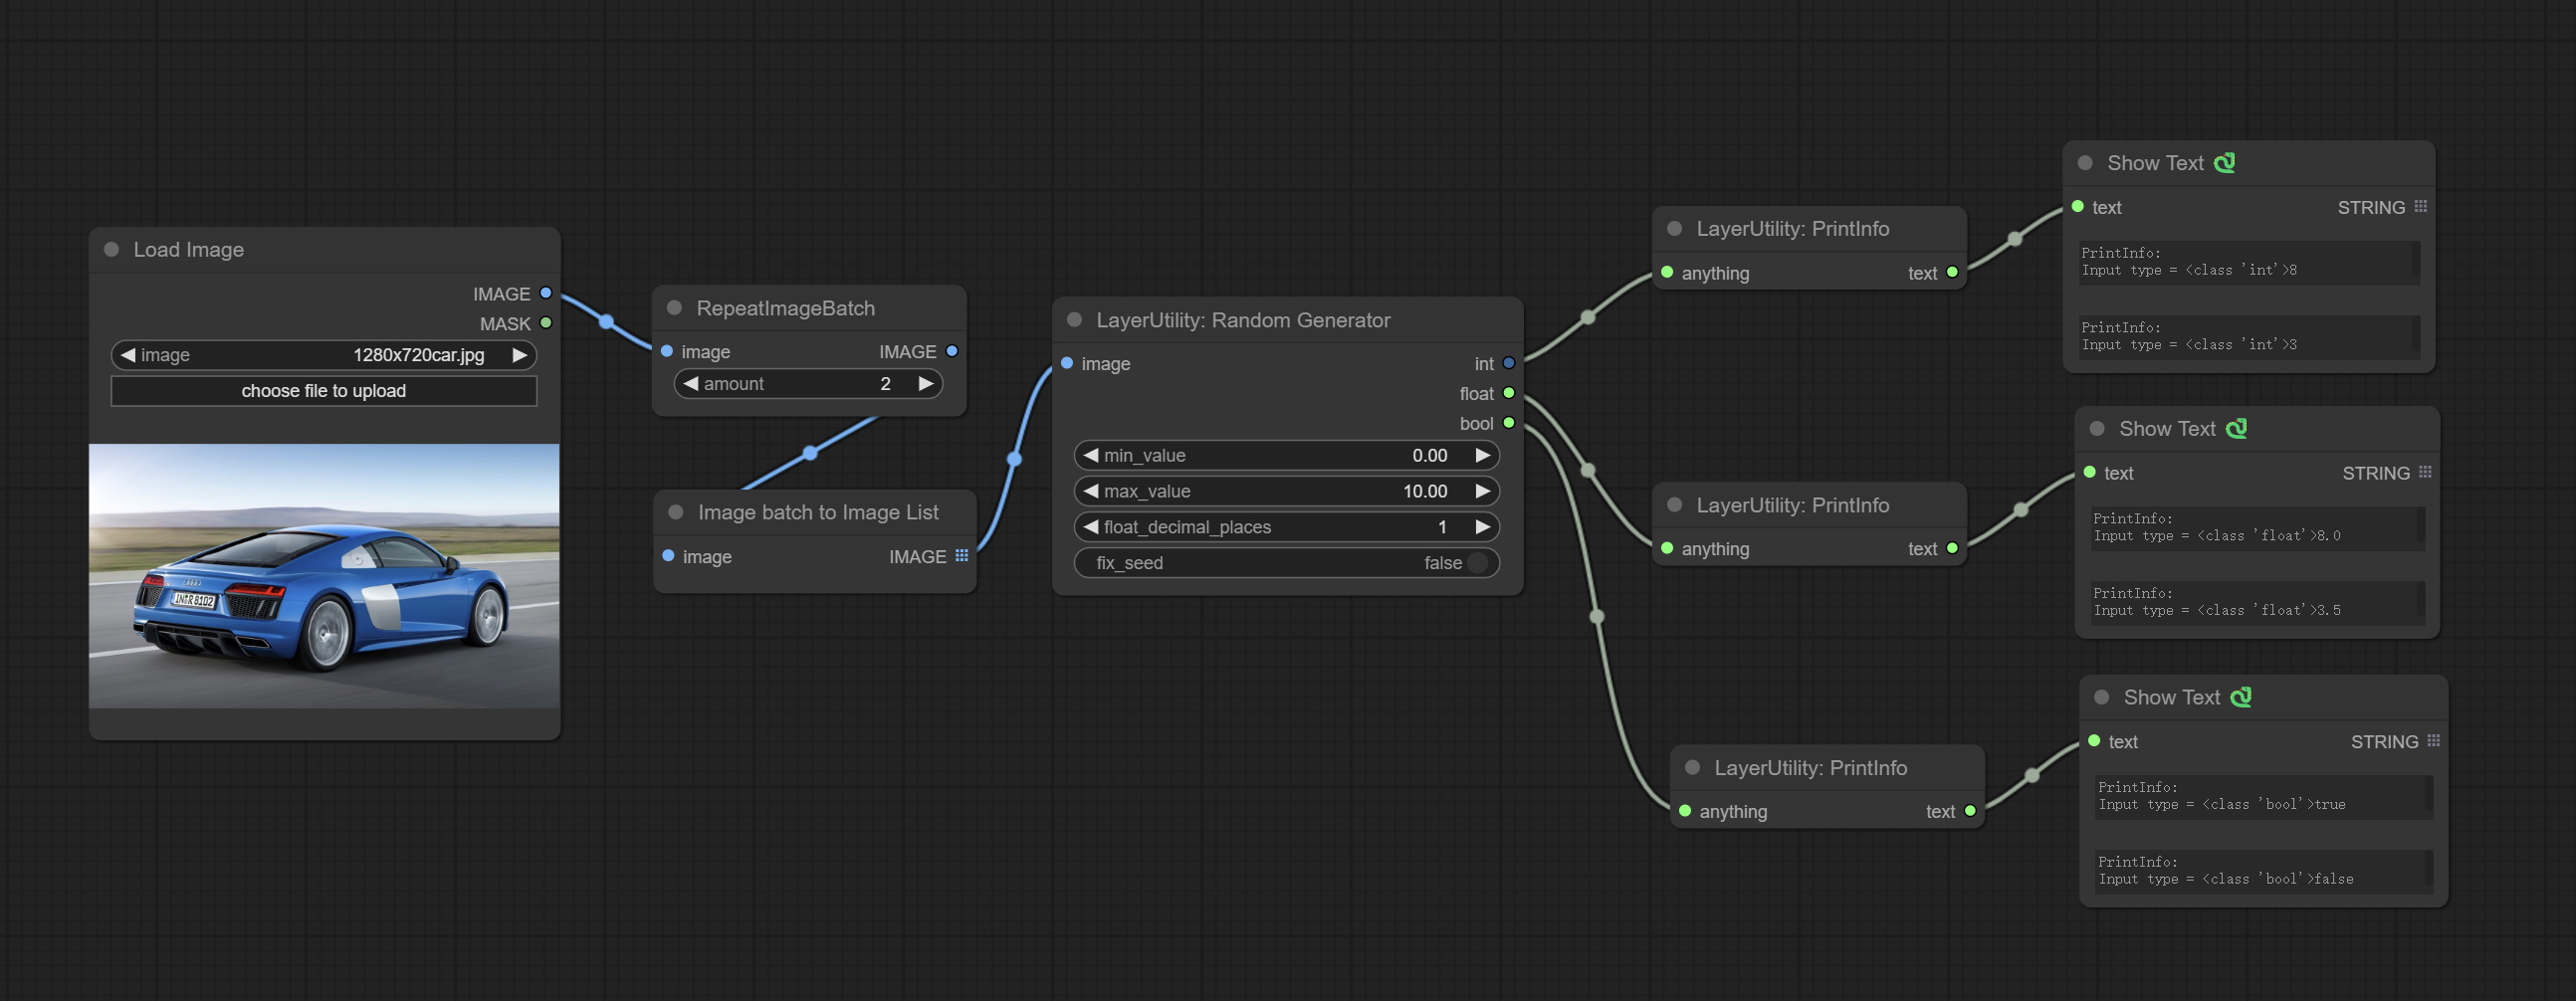
Node Options: 
- image: Optional input, generate a list of random numbers that match the quantity in batches according to the image.
- min_value: Minimum value. Random numbers will randomly take values from the minimum to the maximum.
- max_value: Maximum value. Random numbers will randomly take values from the minimum to the maximum.
- float_decimal_places: Precision of float value.
- fix_seed:Is the random number seed fixed. If this option is fixed, the generated random number will always be the same.
Outputs: int: Integer random number. float: Float random number. bool: Boolean random number.
RandomGeneratorV2
On the based of RandomGenerator, add the least random range and seed options.
Node Options: 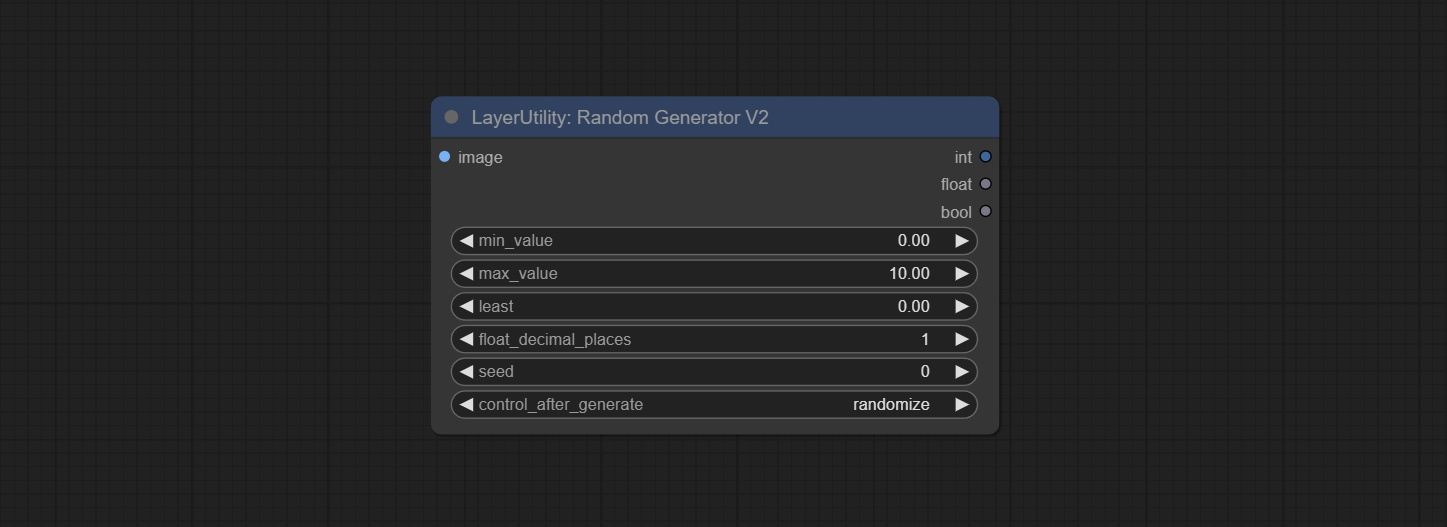
- image: Optional input, generate a list of random numbers that match the quantity in batches according to the image.
- min_value: Minimum value. Random numbers will randomly take values from the minimum to the maximum.
- max_value: Maximum value. Random numbers will randomly take values from the minimum to the maximum.
- least: Minimum random range. Random numbers will randomly at least take this value.
- float_decimal_places: Precision of float value.
- seed: The seed of random number.
- control_after_generate: Seed change options. If this option is fixed, the generated random number will always be the same.
Outputs: int: Integer random number. float: Float random number. bool: Boolean random number.
NumberCalculator
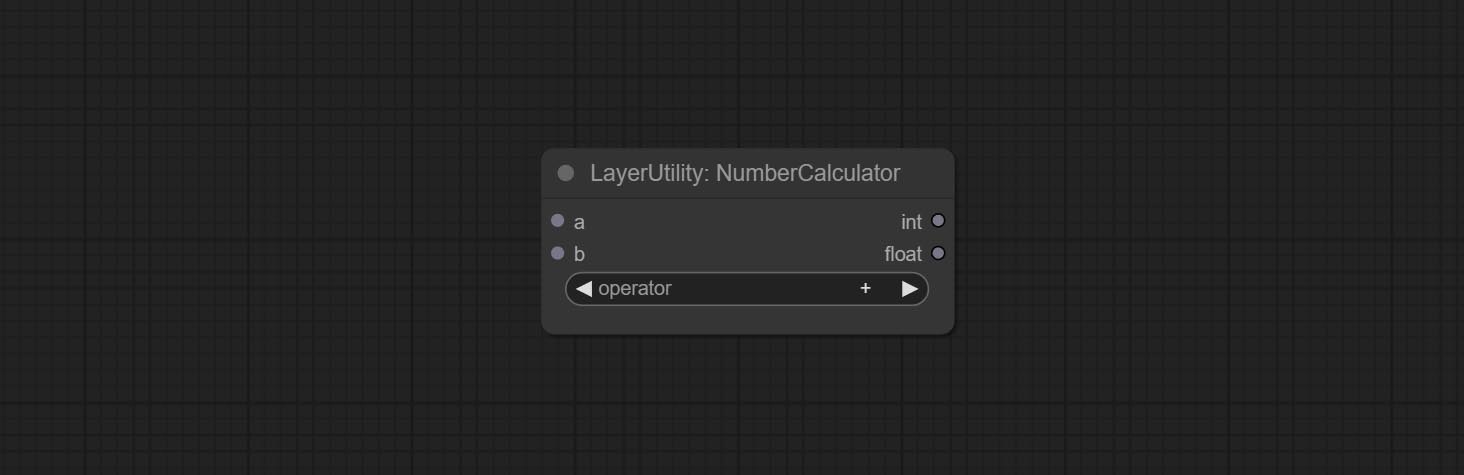
Performs mathematical operations on two numeric values and outputs integer and floating point results * . Supported operations include + , - , * , / , ** , // , % .
* The input only supports boolean, integer, and floating point numbers, forcing in other data will result in error.
NumberCalculatorV2
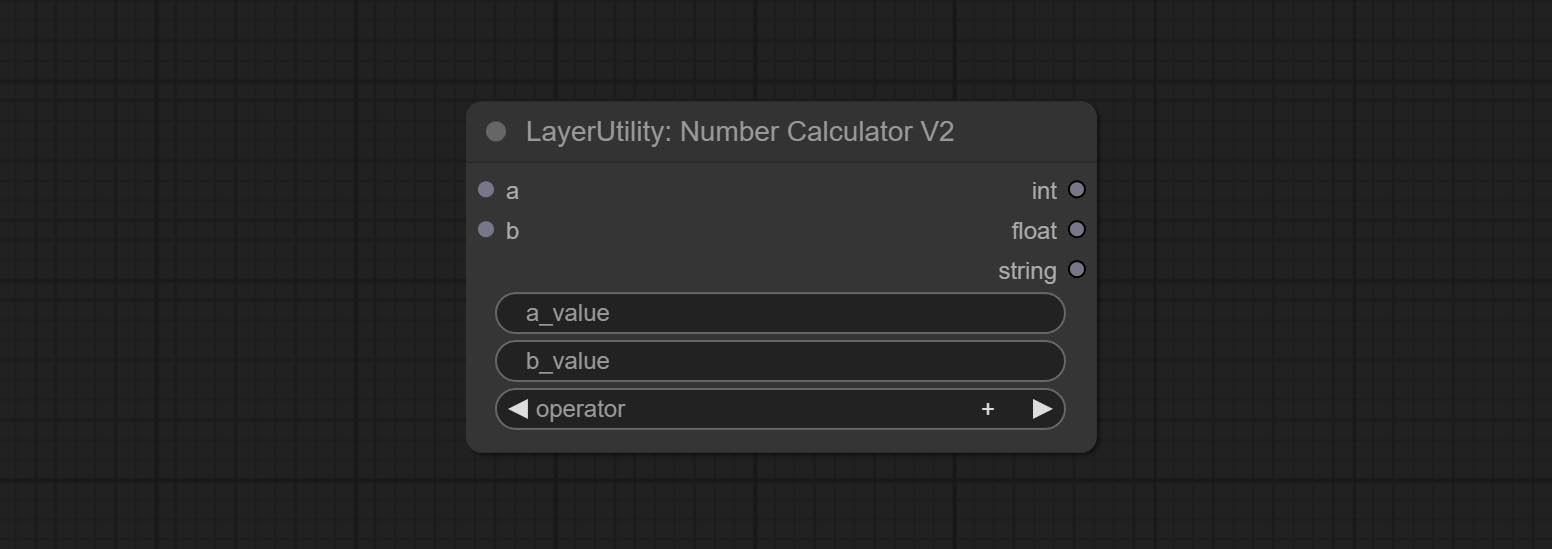
The upgraded version of NumberCalculator has added numerical inputs within nodes and square root operations. The square root operation option is nth_root Note: The input takes priority, and when there is input, the values within the node will be invalid.
BooleanOperator

Perform a Boolean operation on two numeric values and output the result * . Supported operations include == , != , and , or , xor , not , min , max .
* The input only supports boolean, integer, and floating point numbers, forcing in other data will result in error. The and operation between the values outputs a larger number, and the or operation outputs a smaller number.
BooleanOperatorV2
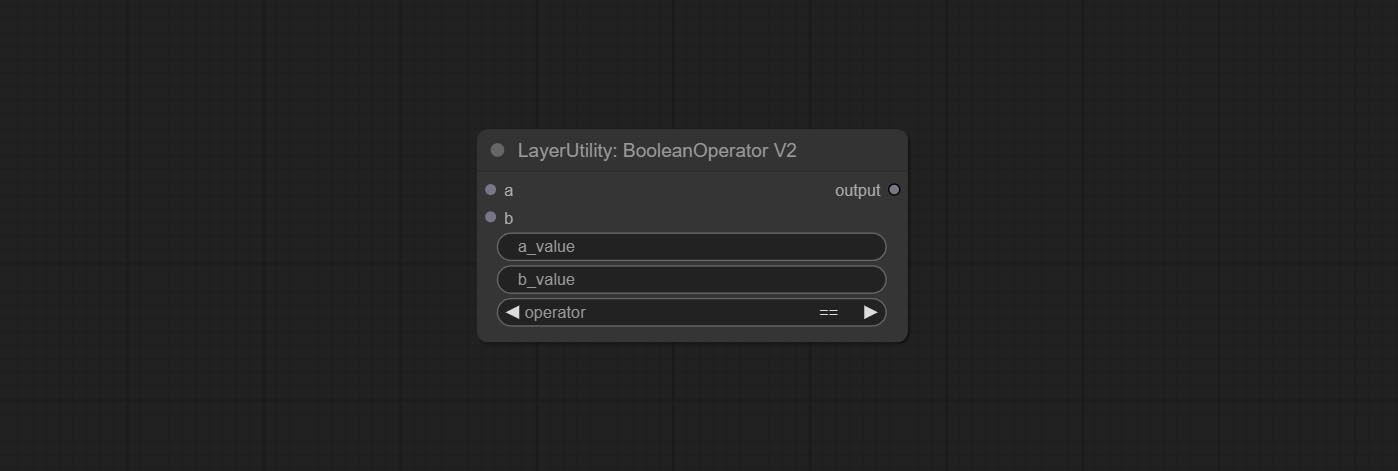
The upgraded version of Boolean Operator has added numerical inputs within nodes and added judgments for greater than, less than, greater than or equal to, and less than or equal to. Note: The input takes priority, and when there is input, the values within the node will be invalid.
StringCondition
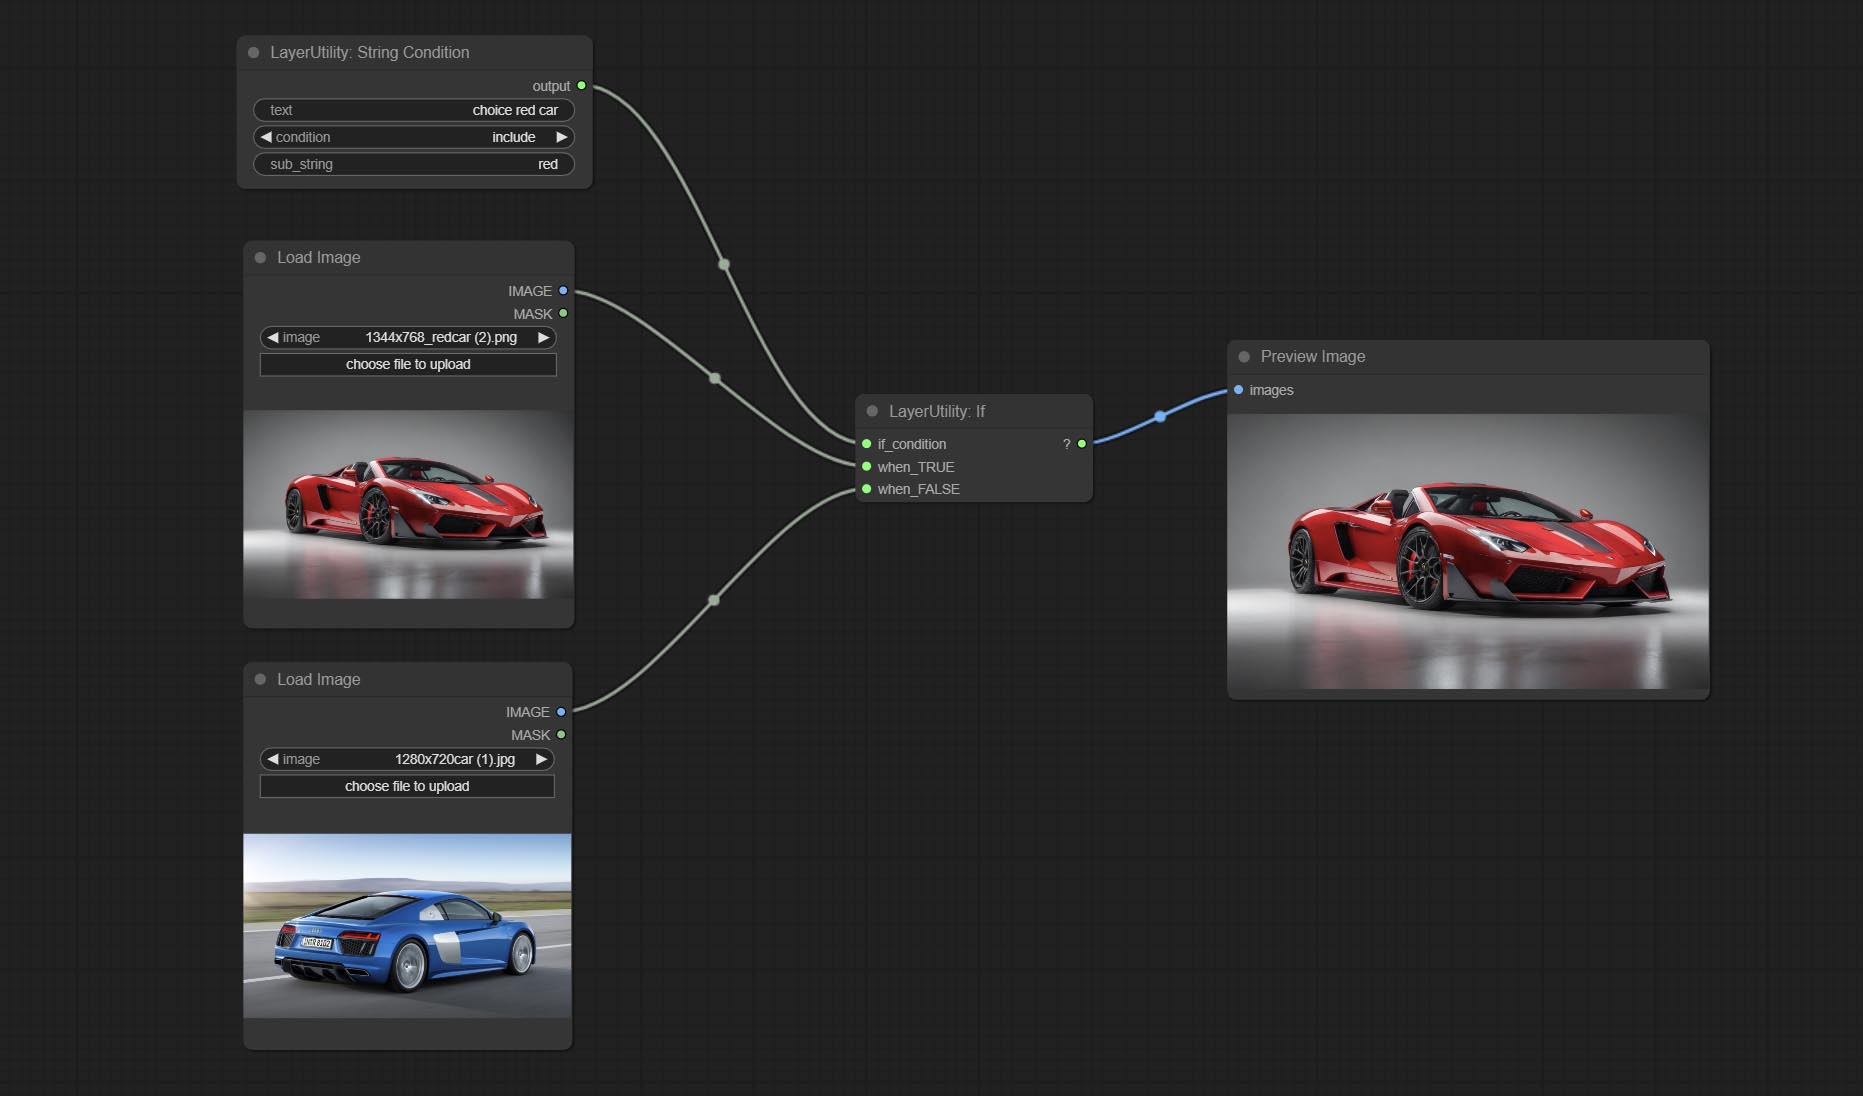
Determine whether the text contains or does not contain substrings, and output a Boolean value.
Node Options:
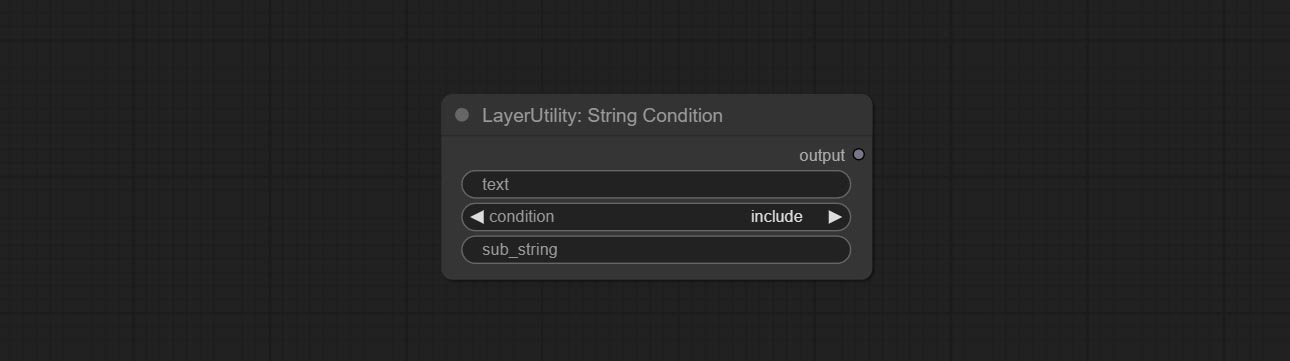
- text: Input text.
- condition: Judgment conditions.
include determines whether it contains a substring, and exclude determines whether it does not. - sub_string: Substring.
CheckMask
Check if the mask contains enough valid areas and output a Boolean value.
Node Options:
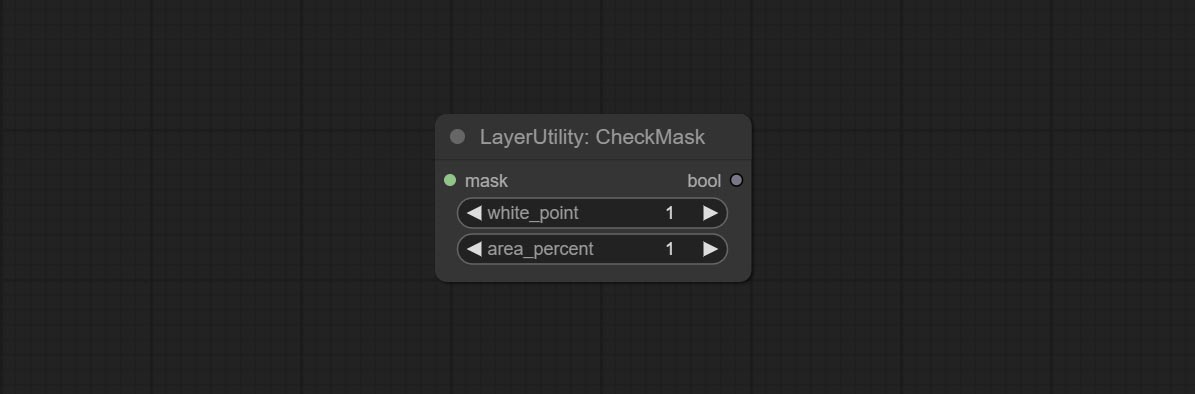
- white_point: The white point threshold used to determine whether the mask is valid is considered valid if it exceeds this value.
- area_percent: The percentage of effective areas. If the proportion of effective areas exceeds this value, output True.
CheckMaskV2
On the basis of CheckMask, the method option has been added, which allows for the selection of different detection methods. The area_percent is changed to a floating point number with an accuracy of 2 decimal places, which can detect smaller effective areas.
Node Options:
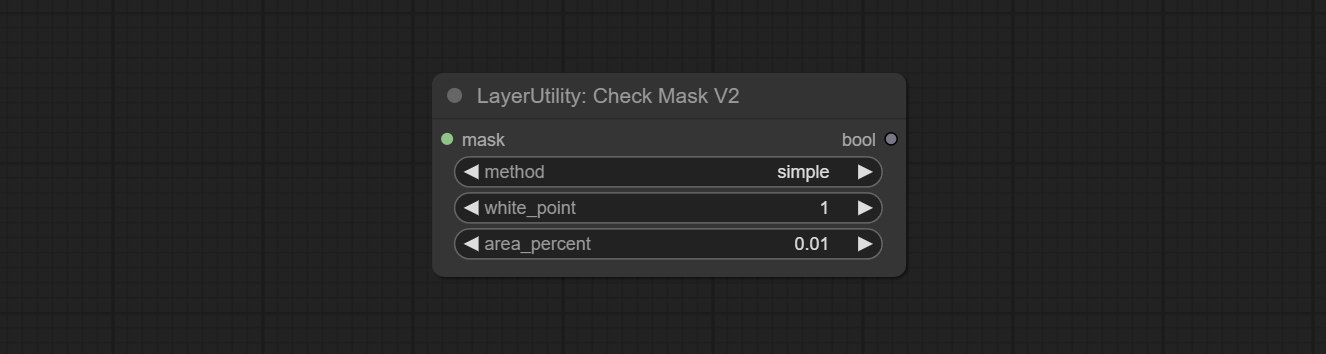
- method: There are two detection methods, which are
simple and detectability . The simple method only detects whether the mask is completely black, while the detect_percent method detects the proportion of effective areas.
Если
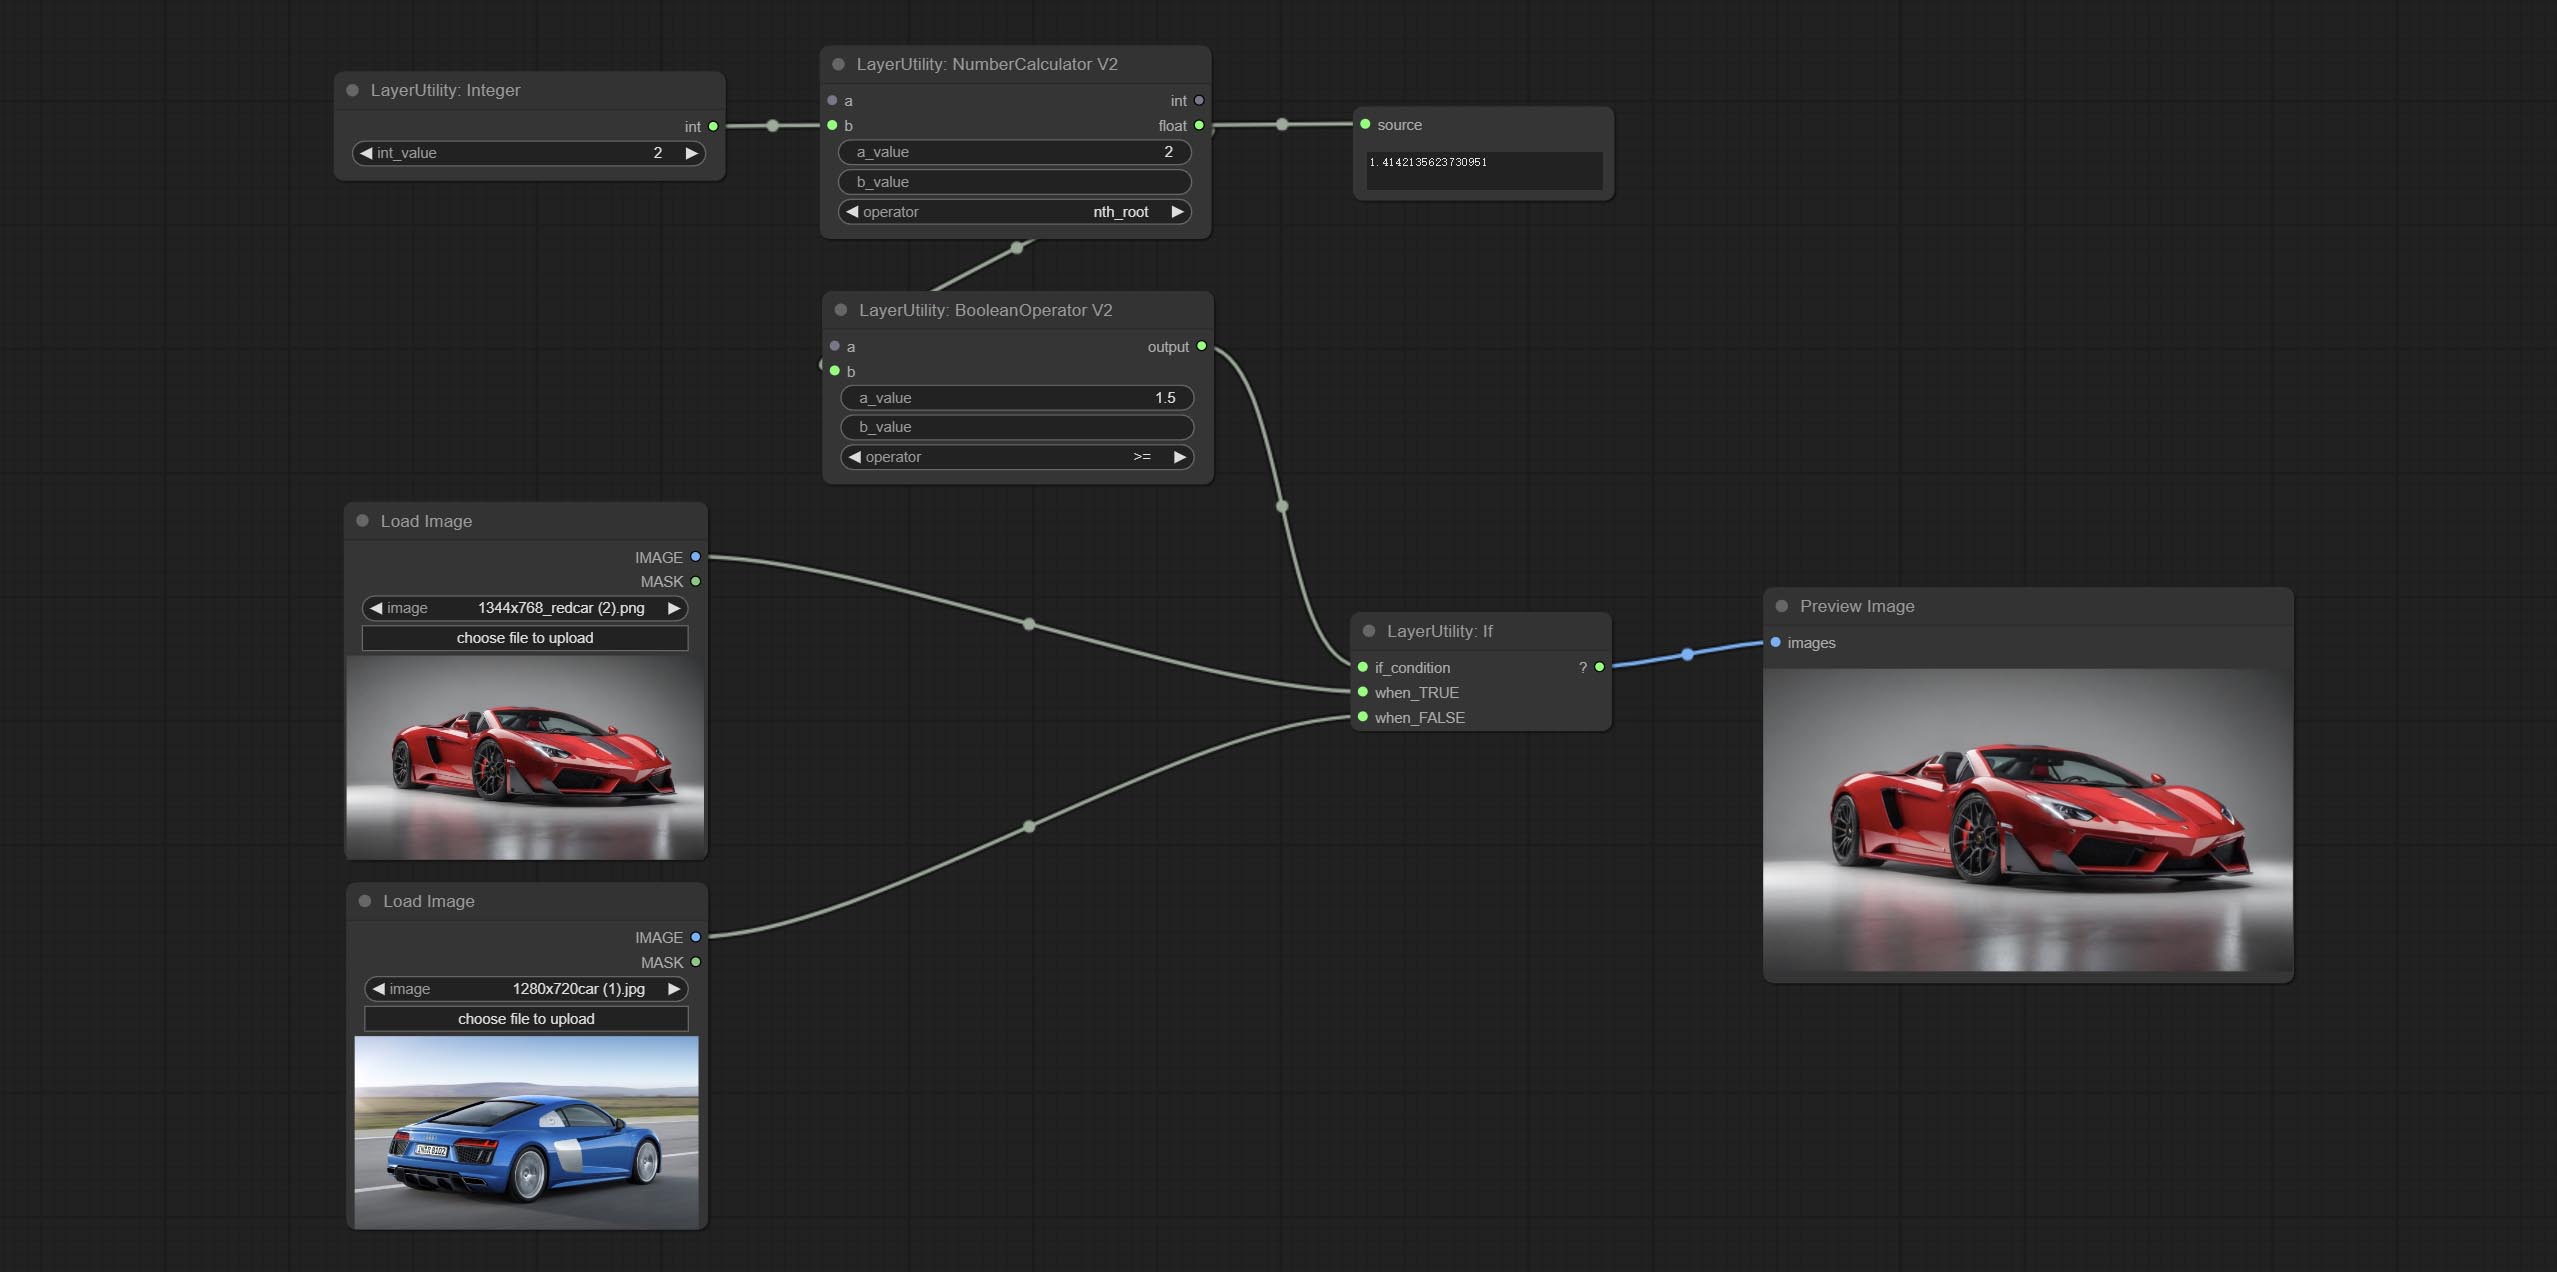
Switches output based on Boolean conditional input. It can be used for any type of data switching, including but not limited to numeric values, strings, pictures, masks, models, latent, pipe pipelines, etc.
Node Options:
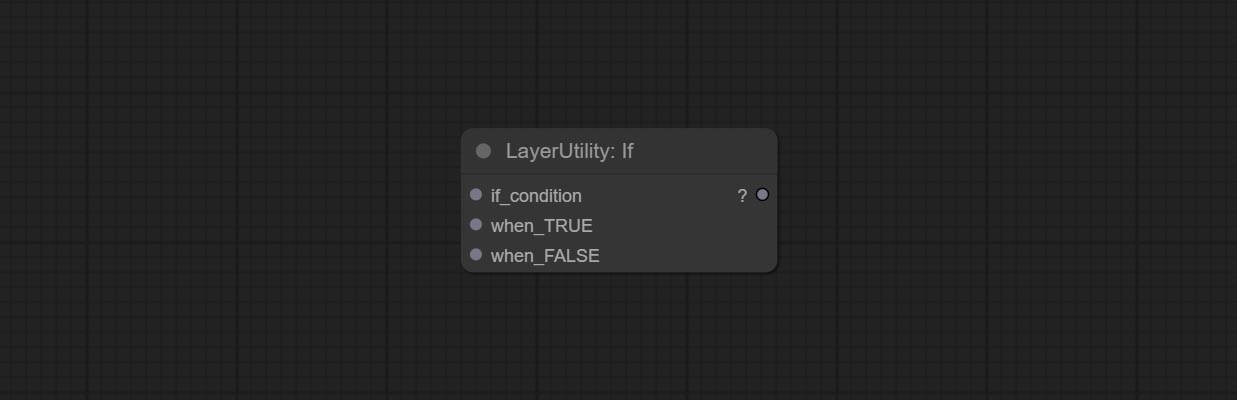
- if_condition: Conditional input. Boolean, integer, floating point, and string inputs are supported. When entering a value, 0 is judged to be False; When a string is entered, an empty string is judged as Flase.
- when_True: This item is output when the condition is True.
- when_False: This item is output when the condition is False.
SwitchCase

Switches the output based on the matching string. It can be used for any type of data switching, including but not limited to numeric values, strings, pictures, masks, models, latent, pipe pipelines, etc. Supports up to 3 sets of case switches. Compare case to switch_condition , if the same, output the corresponding input. If there are the same cases, the output is prioritized in order. If there is no matching case, the default input is output. Note that the string is case sensitive and Chinese and English full-width and half-width.
Node Options:
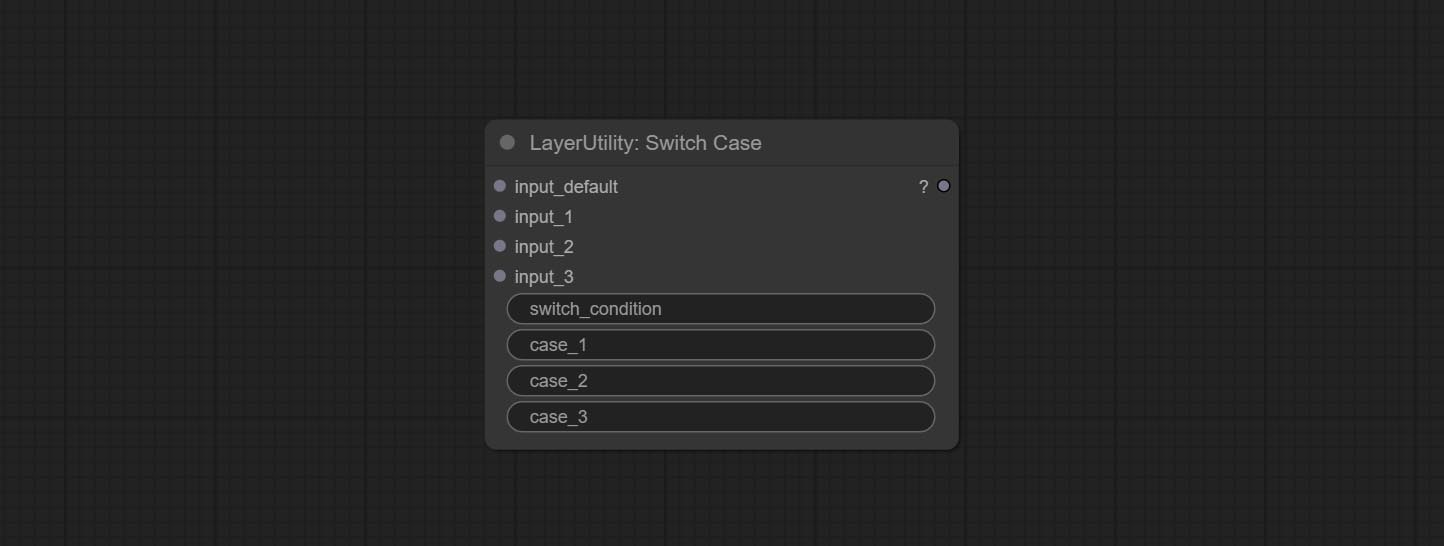
- input_default: Input entry for default output. This input is required.
- input_1: Input entry used to match
case_1 . This input is optional. - input_2: Input entry used to match
case_2 . This input is optional. - input_3: Input entry used to match
case_3 . This input is optional. - switch_condition: String used to judge with case.
- case_1: case_1 string.
- case_2: case_2 string.
- case_3: case_3 string.
QueueStop
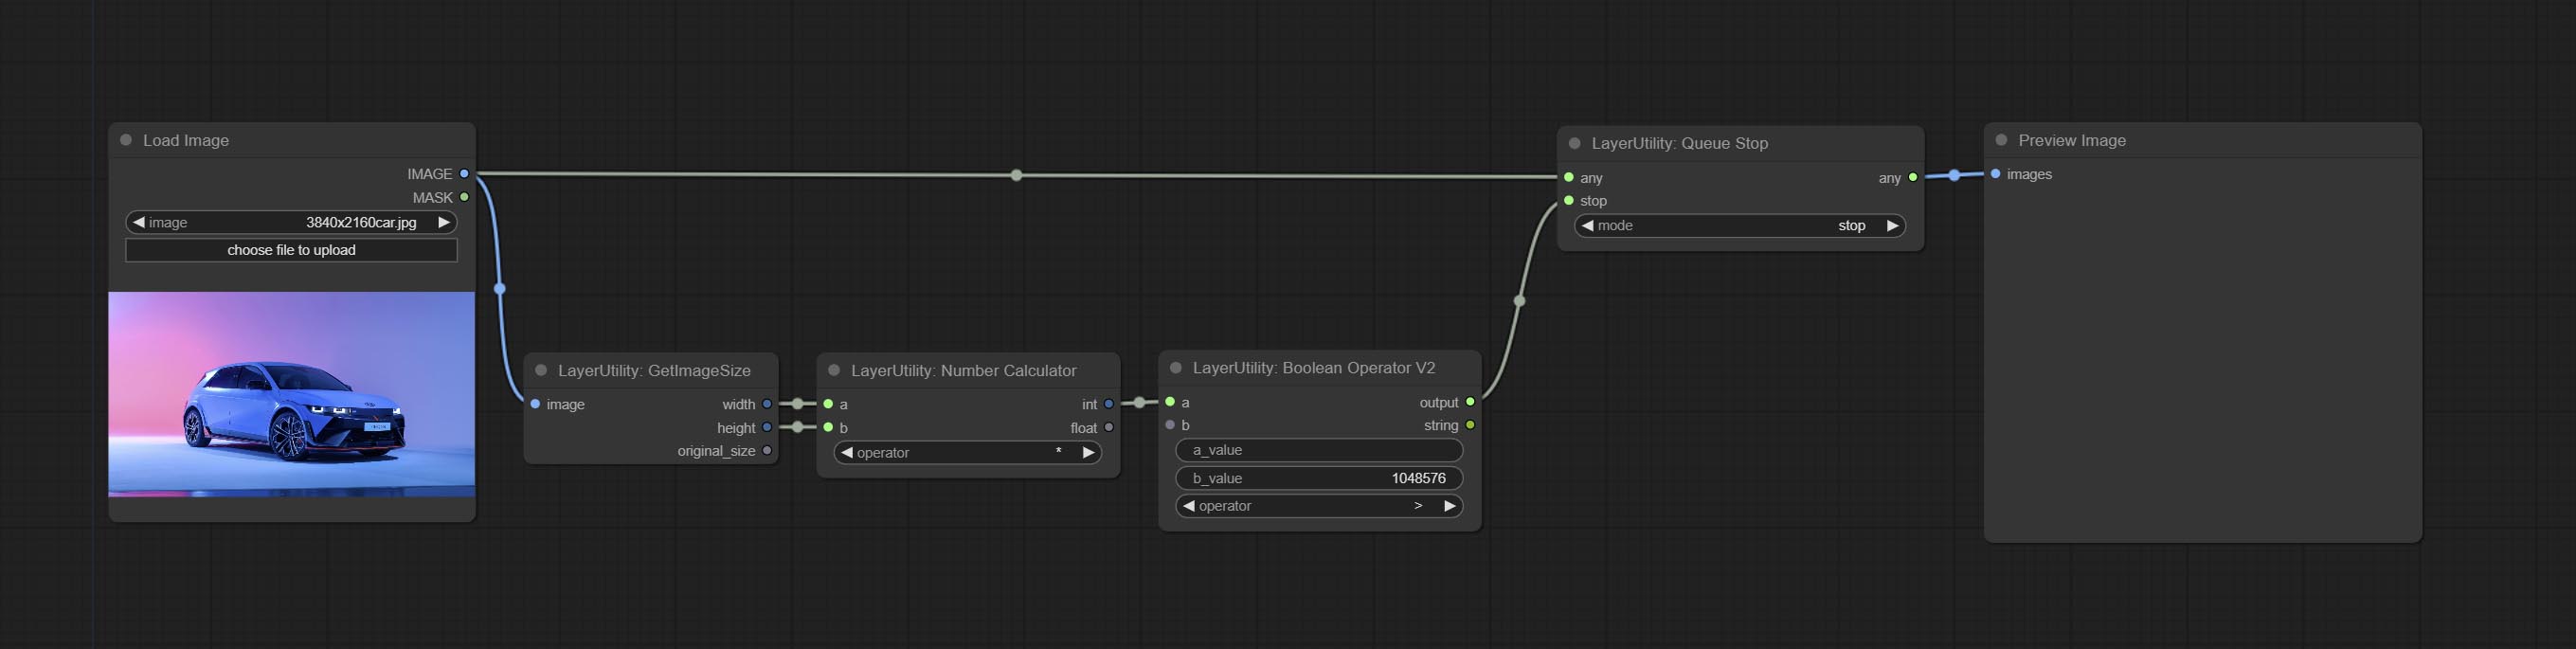
Stop the current queue. When executed at this node, the queue will stop. The workflow diagram above illustrates that if the image is larger than 1Mega pixels, the queue will stop executing.
Node Options:
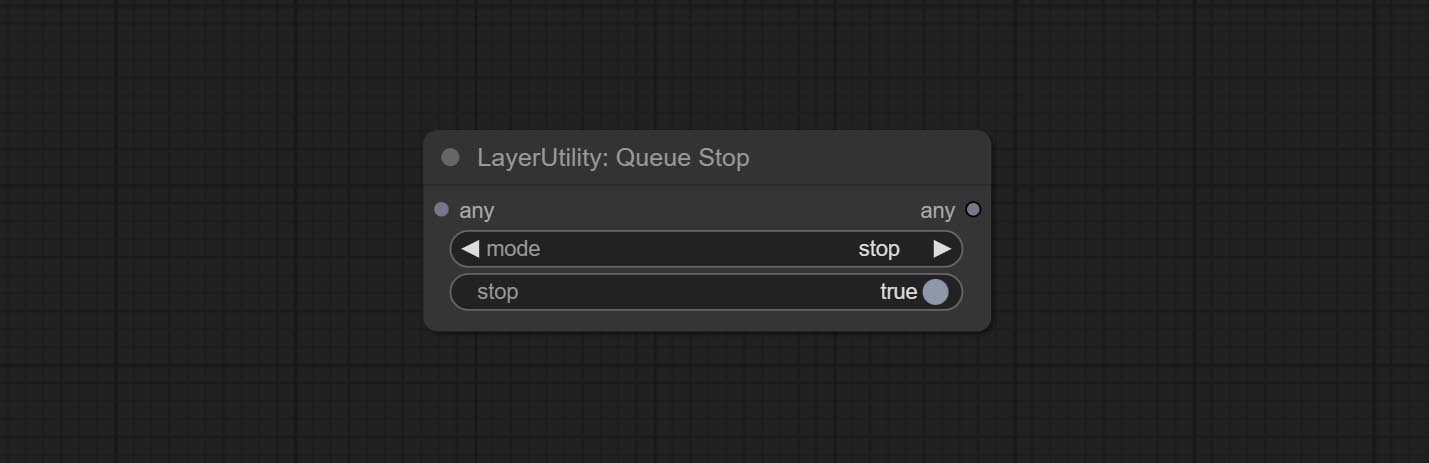
- mode: Stop mode. If you choose
stop , it will be determined whether to stop based on the input conditions. If you choose continue , ignore the condition to continue executing the queue. - stop: If true, the queue will stop. If false, the queue will continue to execute.
PurgeVRAM
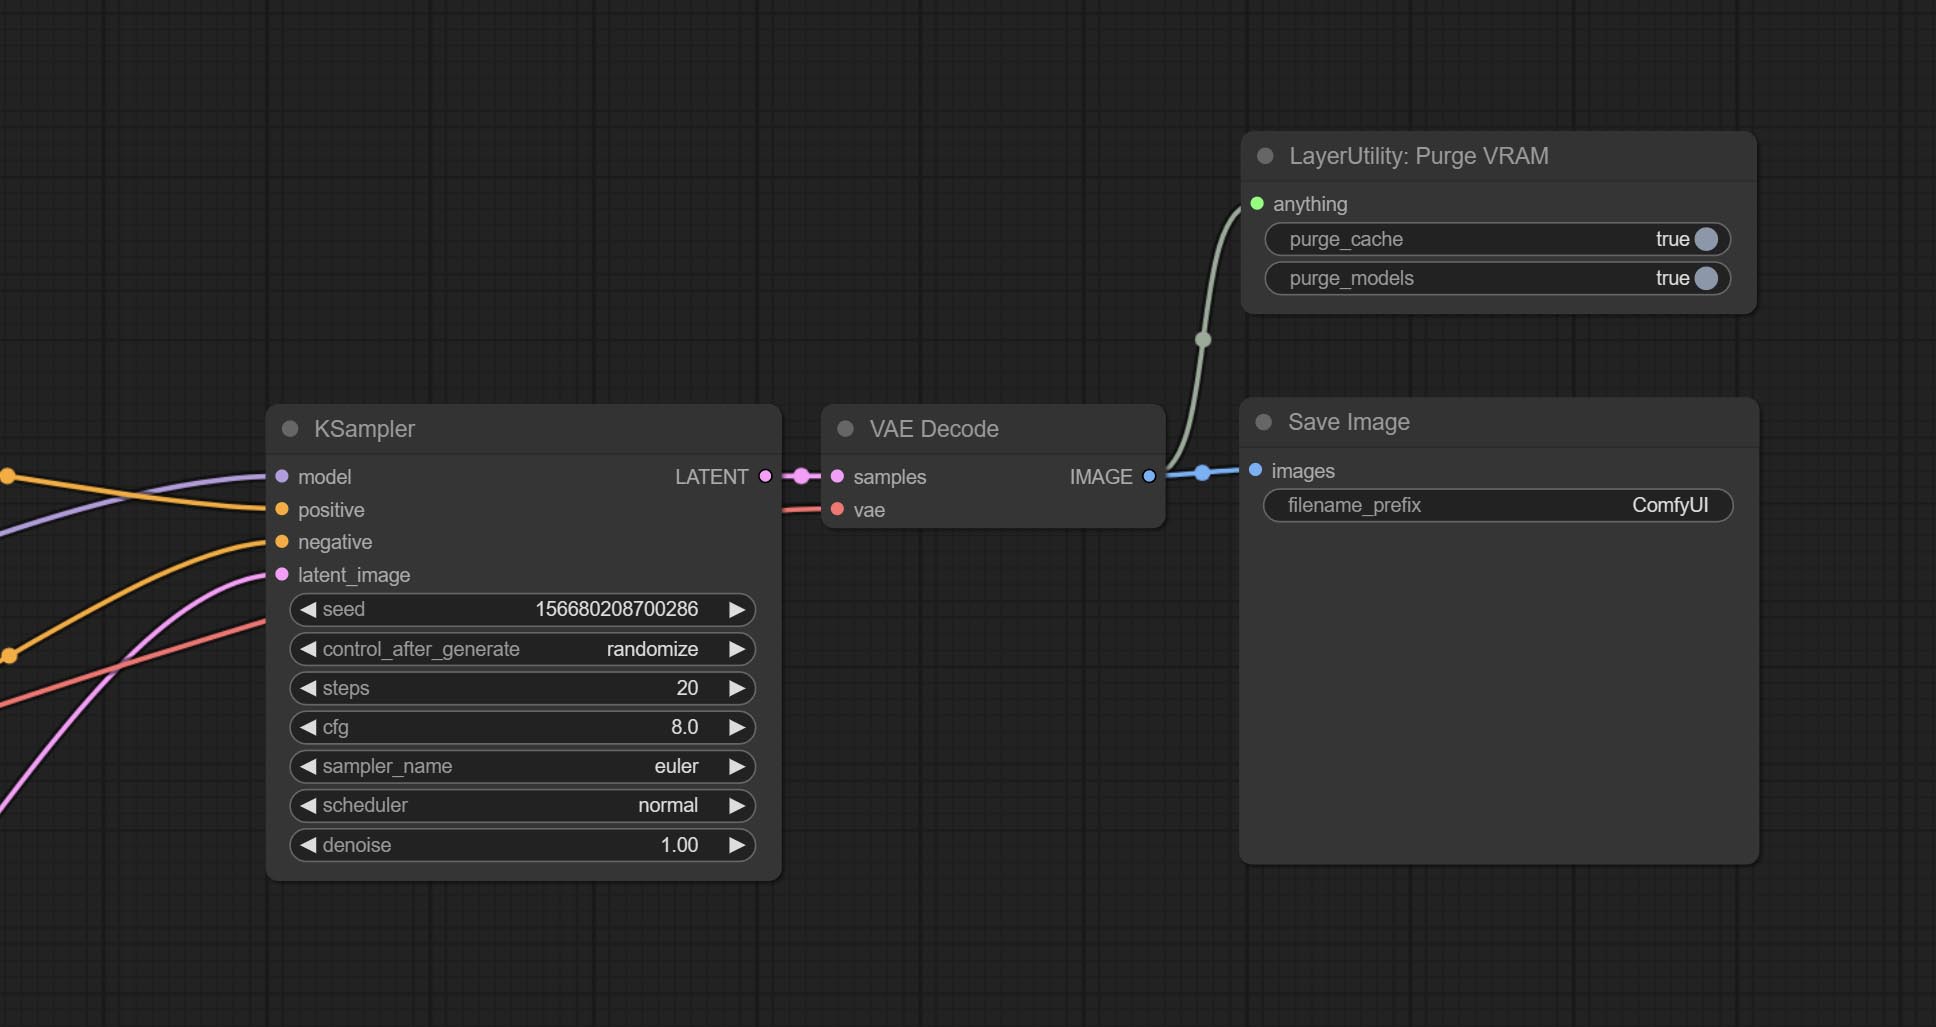
Clean up GPU VRAM and system RAM. any type of input can be accessed, and when executed to this node, the VRAM and garbage objects in the RAM will be cleaned up. Usually placed after the node where the inference task is completed, such as the VAE Decode node.
Node Options:
- purge_cache: Clean up cache。
- purge_models: Unload all loaded models。
SaveImagePlus
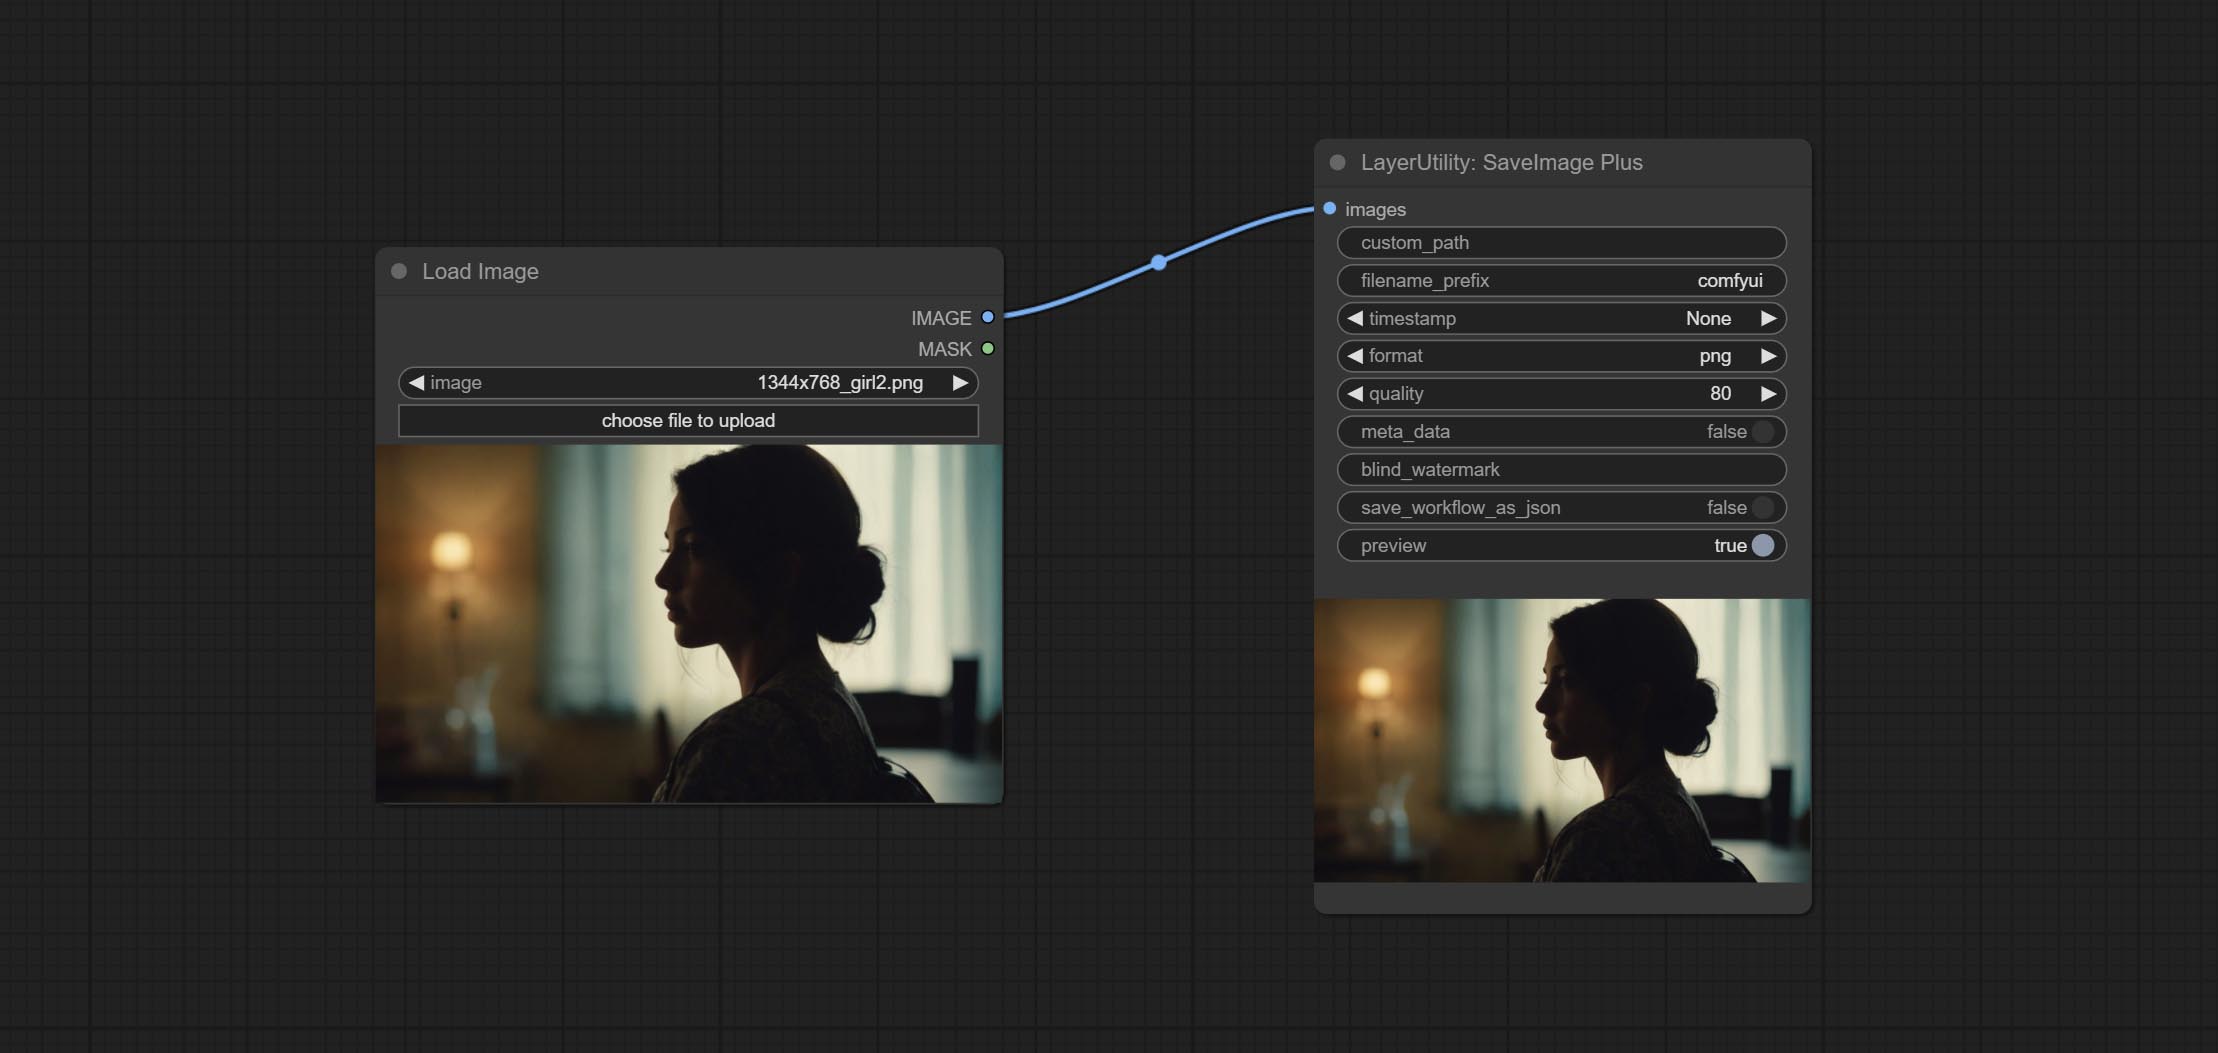
Enhanced save image node. You can customize the directory where the picture is saved, add a timestamp to the file name, select the save format, set the image compression rate, set whether to save the workflow, and optionally add invisible watermarks to the picture. (Add information in a way that is invisible to the naked eye, and use the ShowBlindWaterMark node to decode the watermark). Optionally output the json file of the workflow.
Node Options: 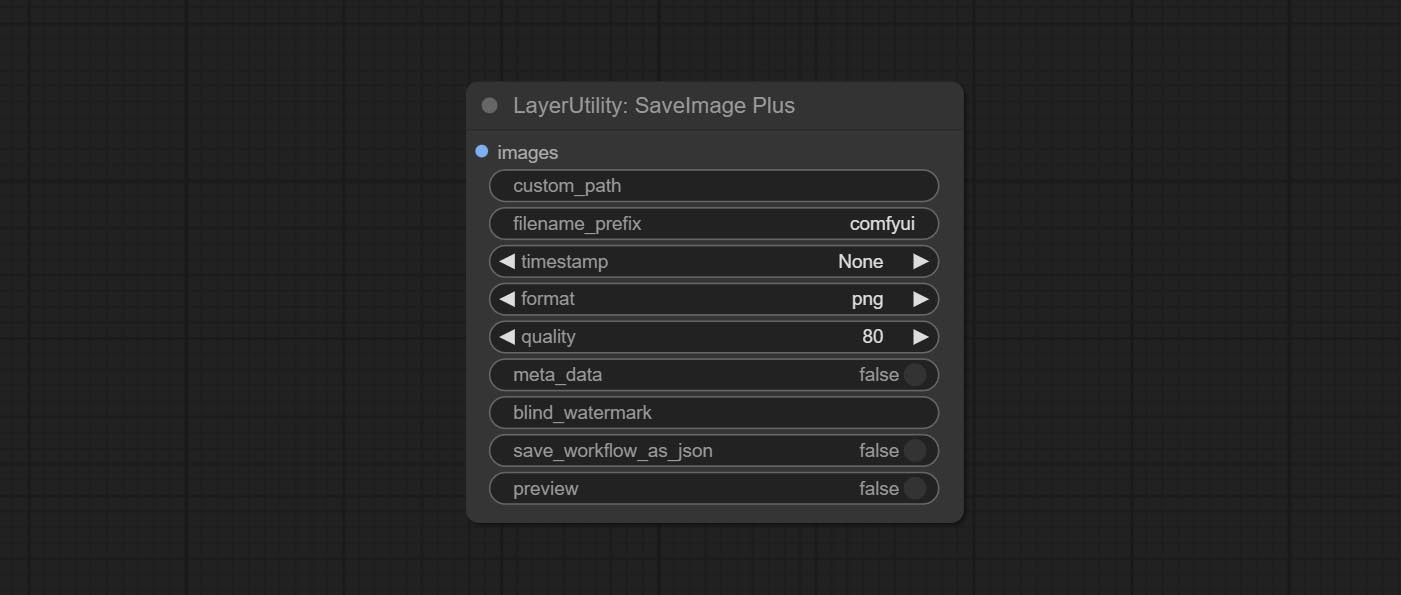
- iamge: The input image.
- custom_path * : User-defined directory, enter the directory name in the correct format. If empty, it is saved in the default output directory of ComfyUI.
- filename_prefix * : The prefix of file name.
- timestamp: Timestamp the file name, opting for date, time to seconds, and time to milliseconds.
- format: The format of image save. Currently available in
png and jpg . Note that only png format is supported for RGBA mode pictures. - quality: Image quality, the value range 10-100, the higher the value, the better the picture quality, the volume of the file also correspondingly increases.
- meta_data: Whether to save metadata to png file, that is workflow information. Set this to false if you do not want the workflow to be leaked.
- blind_watermark: The text entered here (does not support multilingualism) will be converted into a QR code and saved as an invisible watermark. Use
ShowBlindWaterMark node can decode watermarks. Note that pictures with watermarks are recommended to be saved in png format, and lower-quality jpg format will cause watermark information to be lost. - save_workflow_as_json: Whether the output workflow is a json file at the same time (the output json is in the same directory as the picture).
- preview: Preview switch.
* Enter %date for the current date (YY-mm-dd) and %time for the current time (HH-MM-SS). You can enter / for subdirectories. For example, %date/name_%tiem will output the image to the YY-mm-dd folder, with name_HH-MM-SS as the file name prefix.
ImageTaggerSave
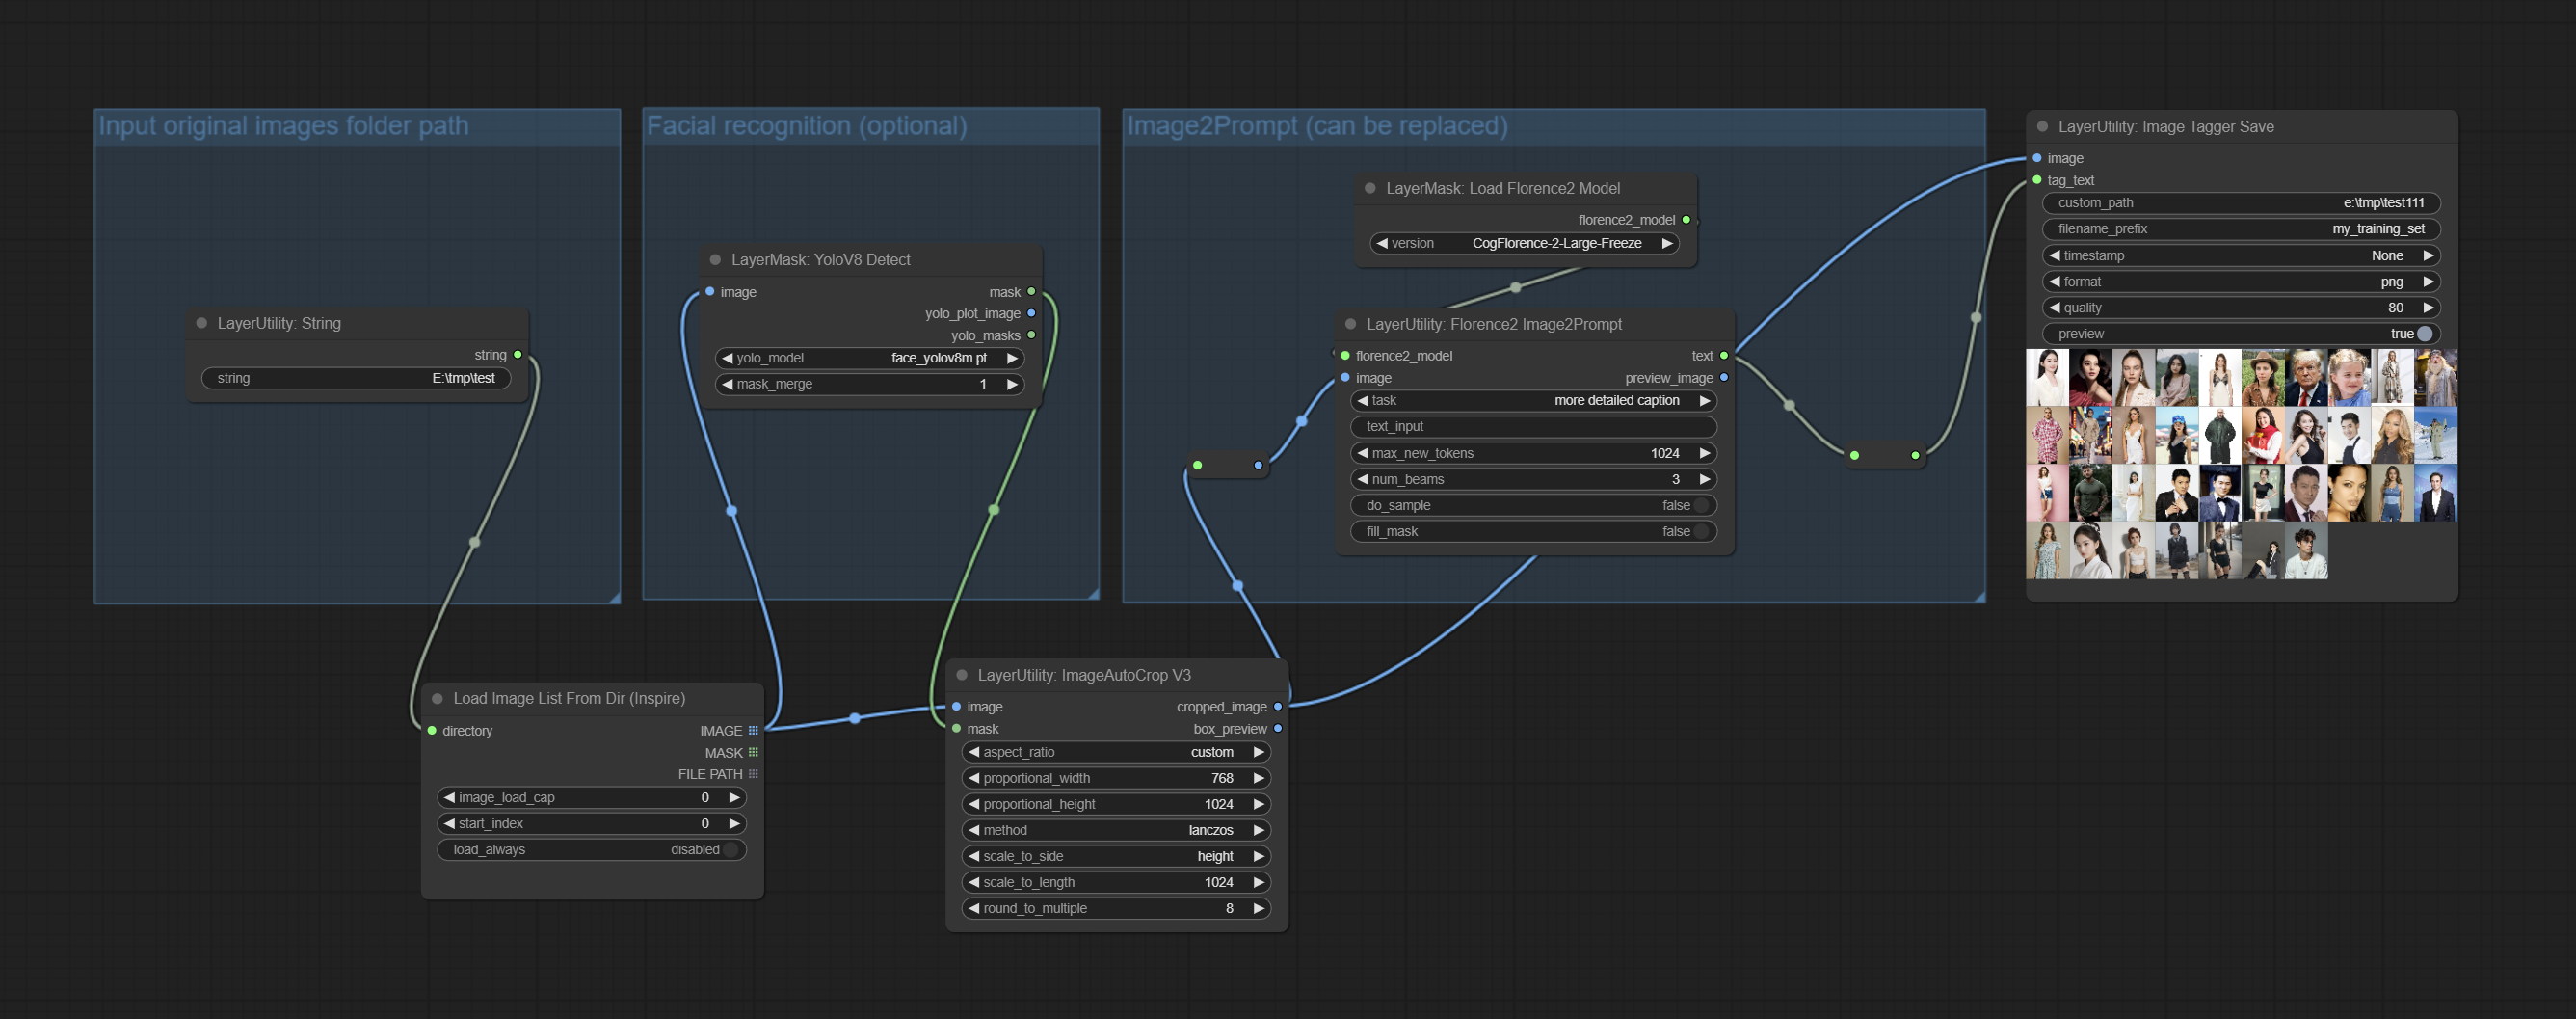
The node used to save the training set images and their text labels, where the image files and text label files have the same file name. Customizable directory for saving images, adding timestamps to file names, selecting save formats, and setting image compression rates. *The workflow image_tagger_stave.exe is located in the workflow directory.
Node Options: 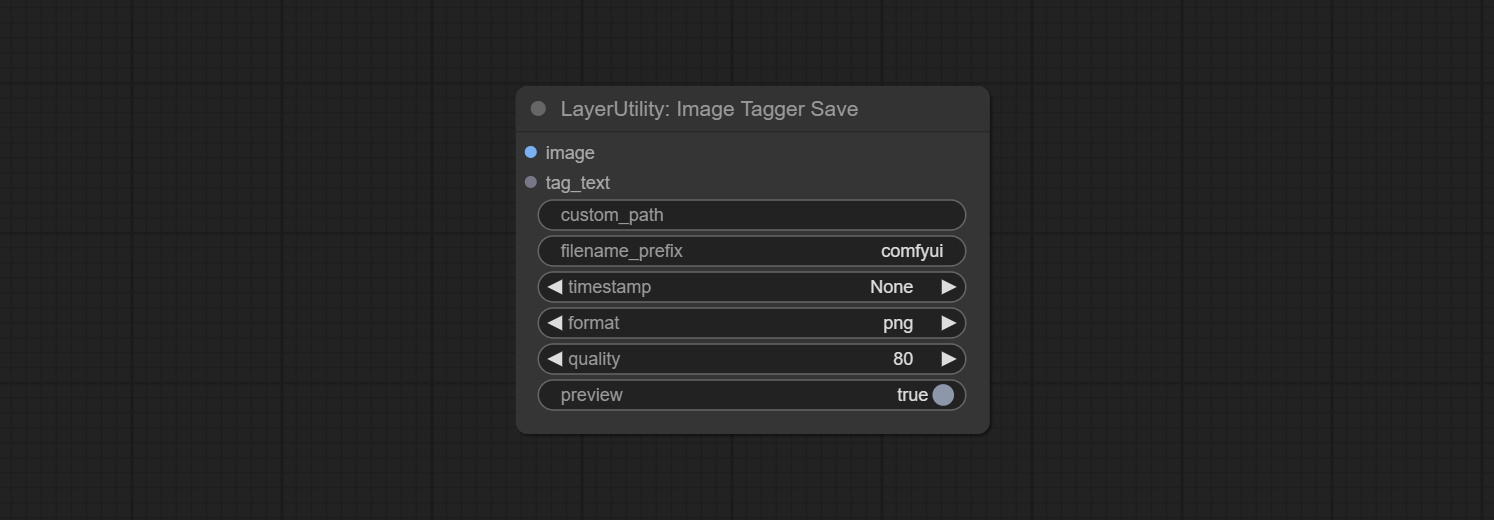
- iamge: The input image.
- tag_text: Text label of image.
- custom_path * : User-defined directory, enter the directory name in the correct format. If empty, it is saved in the default output directory of ComfyUI.
- filename_prefix * : The prefix of file name.
- timestamp: Timestamp the file name, opting for date, time to seconds, and time to milliseconds.
- format: The format of image save. Currently available in
png and jpg . Note that only png format is supported for RGBA mode pictures. - quality: Image quality, the value range 10-100, the higher the value, the better the picture quality, the volume of the file also correspondingly increases.
- preview: Preview switch.
* Enter %date for the current date (YY-mm-dd) and %time for the current time (HH-MM-SS). You can enter / for subdirectories. For example, %date/name_%tiem will output the image to the YY-mm-dd folder, with name_HH-MM-SS as the file name prefix.
AddBlindWaterMark
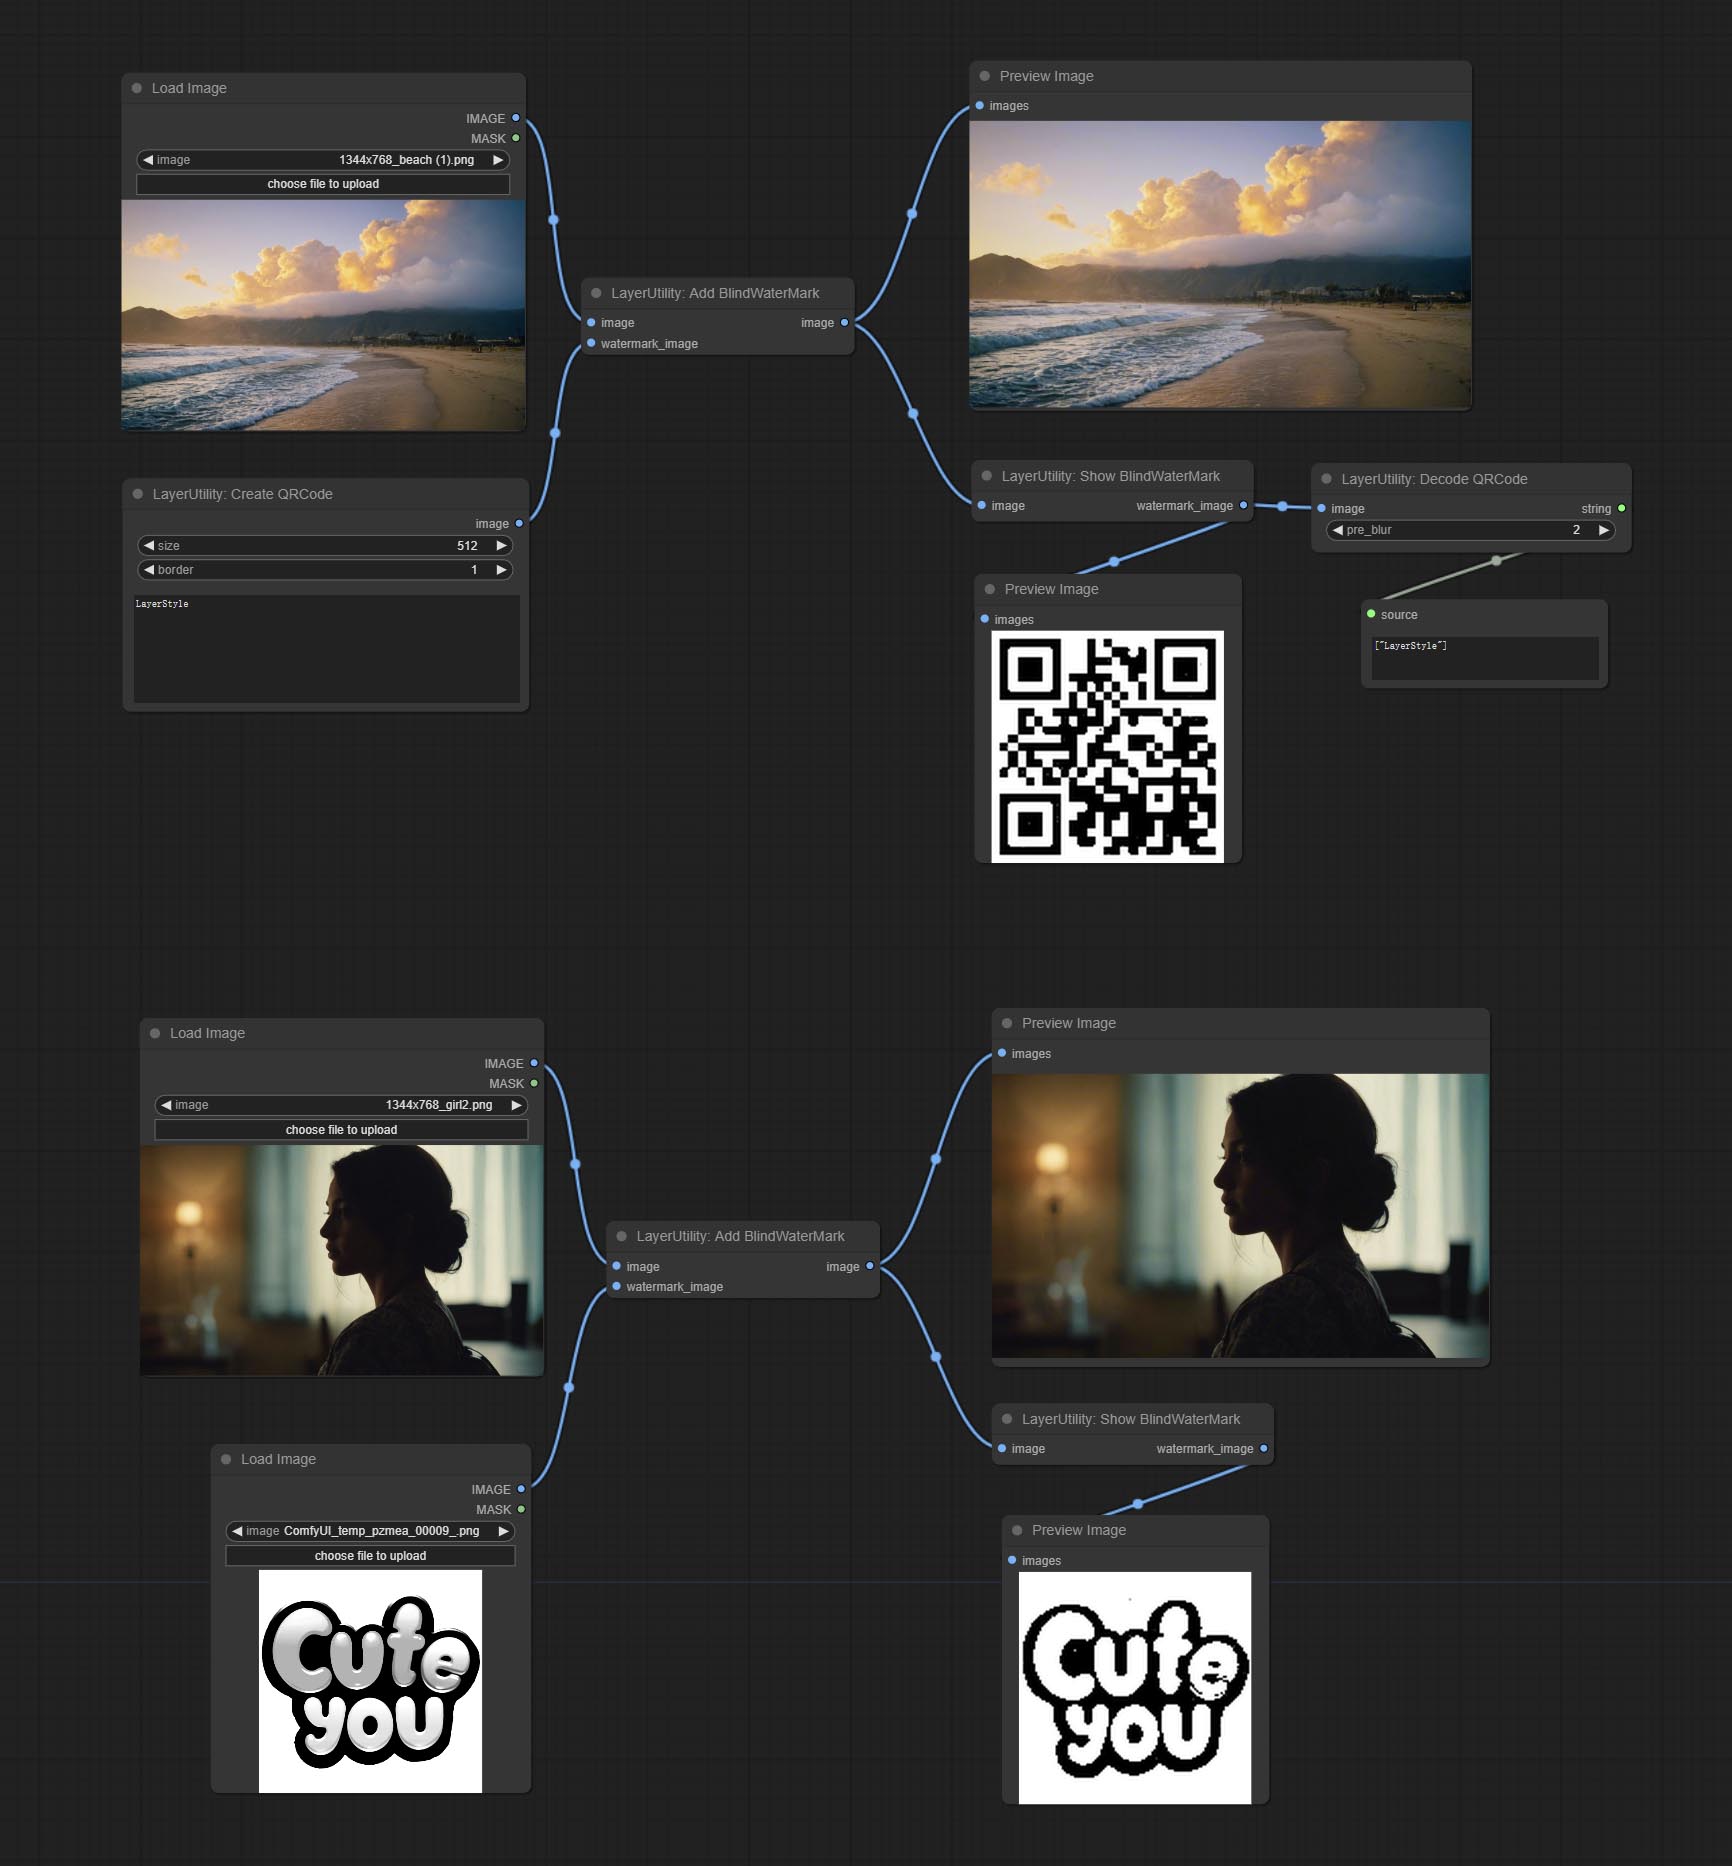
Add an invisible watermark to a picture. Add the watermark image in a way that is invisible to the naked eye, and use the ShowBlindWaterMark node to decode the watermark.
Node Options: 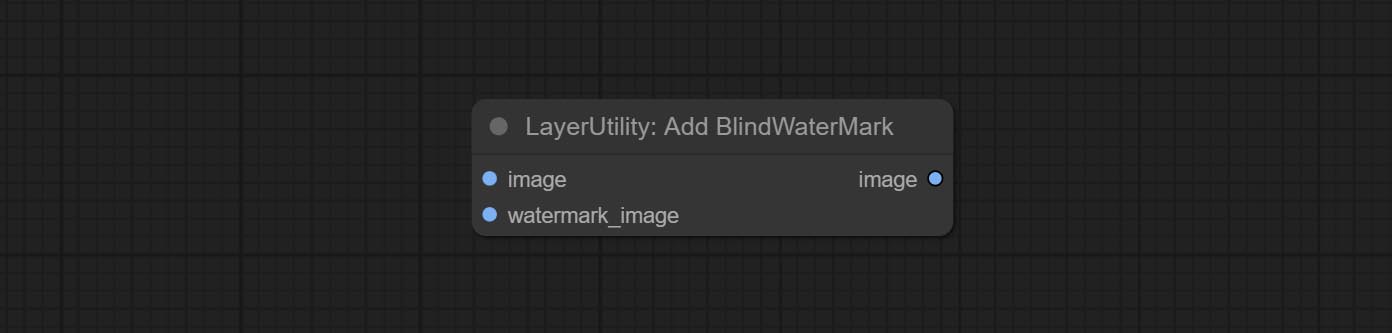
- iamge: The input image.
- watermark_image: Watermark image. The image entered here will automatically be converted to a square black and white image as a watermark. It is recommended to use a QR code as a watermark.
ShowBlindWaterMark
Decoding the invisible watermark added to the AddBlindWaterMark and SaveImagePlus nodes. 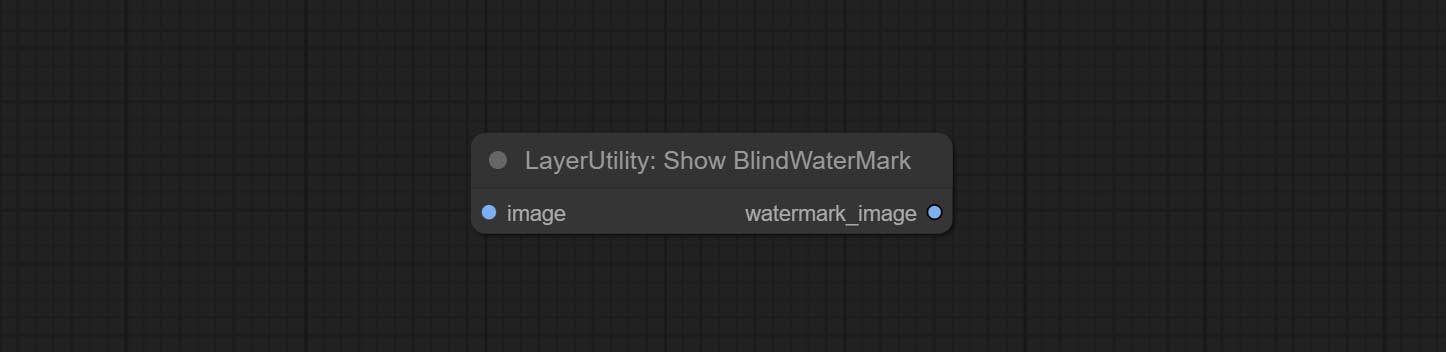
CreateQRCode
Generate a square QR code picture.
Node Options:

- size: The side length of image.
- border: The size of the border around the QR code, the larger the value, the wider the border.
- text: Enter the text content of the QR code here, and multi-language is not supported.
DecodeQRCode
Decoding the QR code.
Node Options:
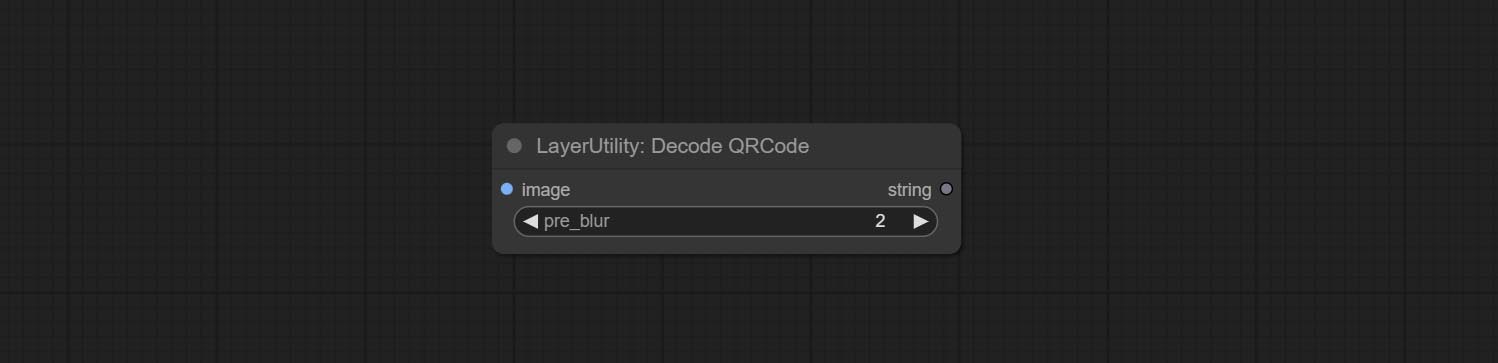
- image: The input QR code image.
- pre_blur: Pre-blurring, you can try to adjust this value for QR codes that are difficult to identify.
LoadPSD
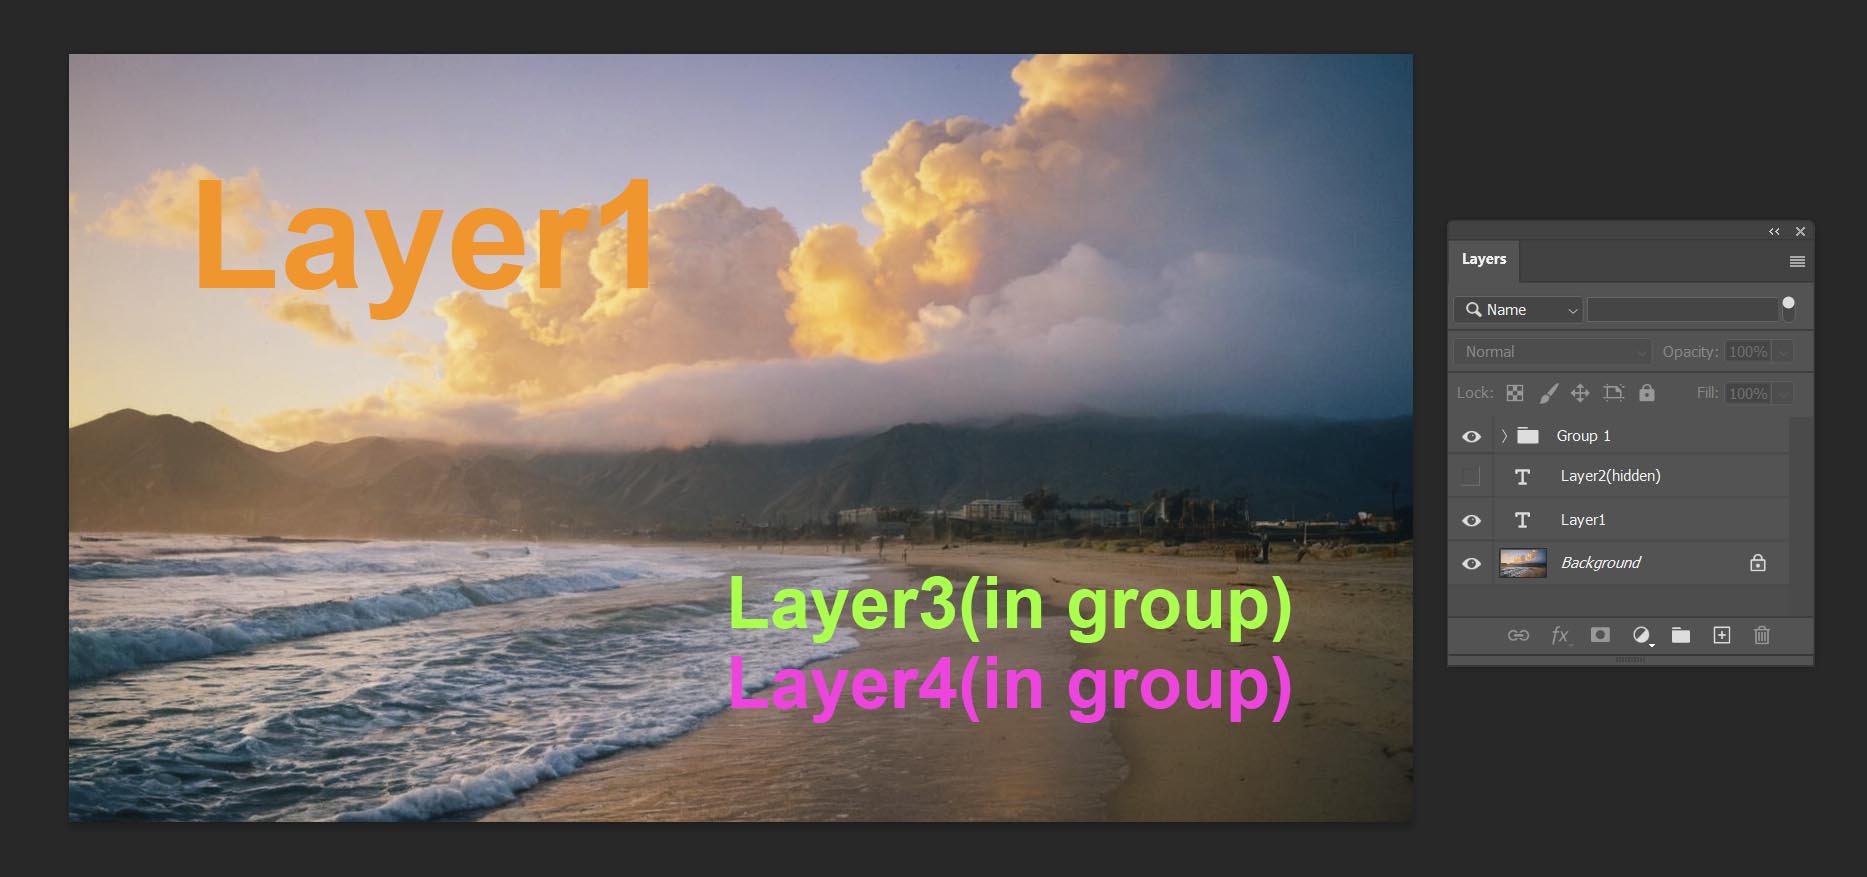
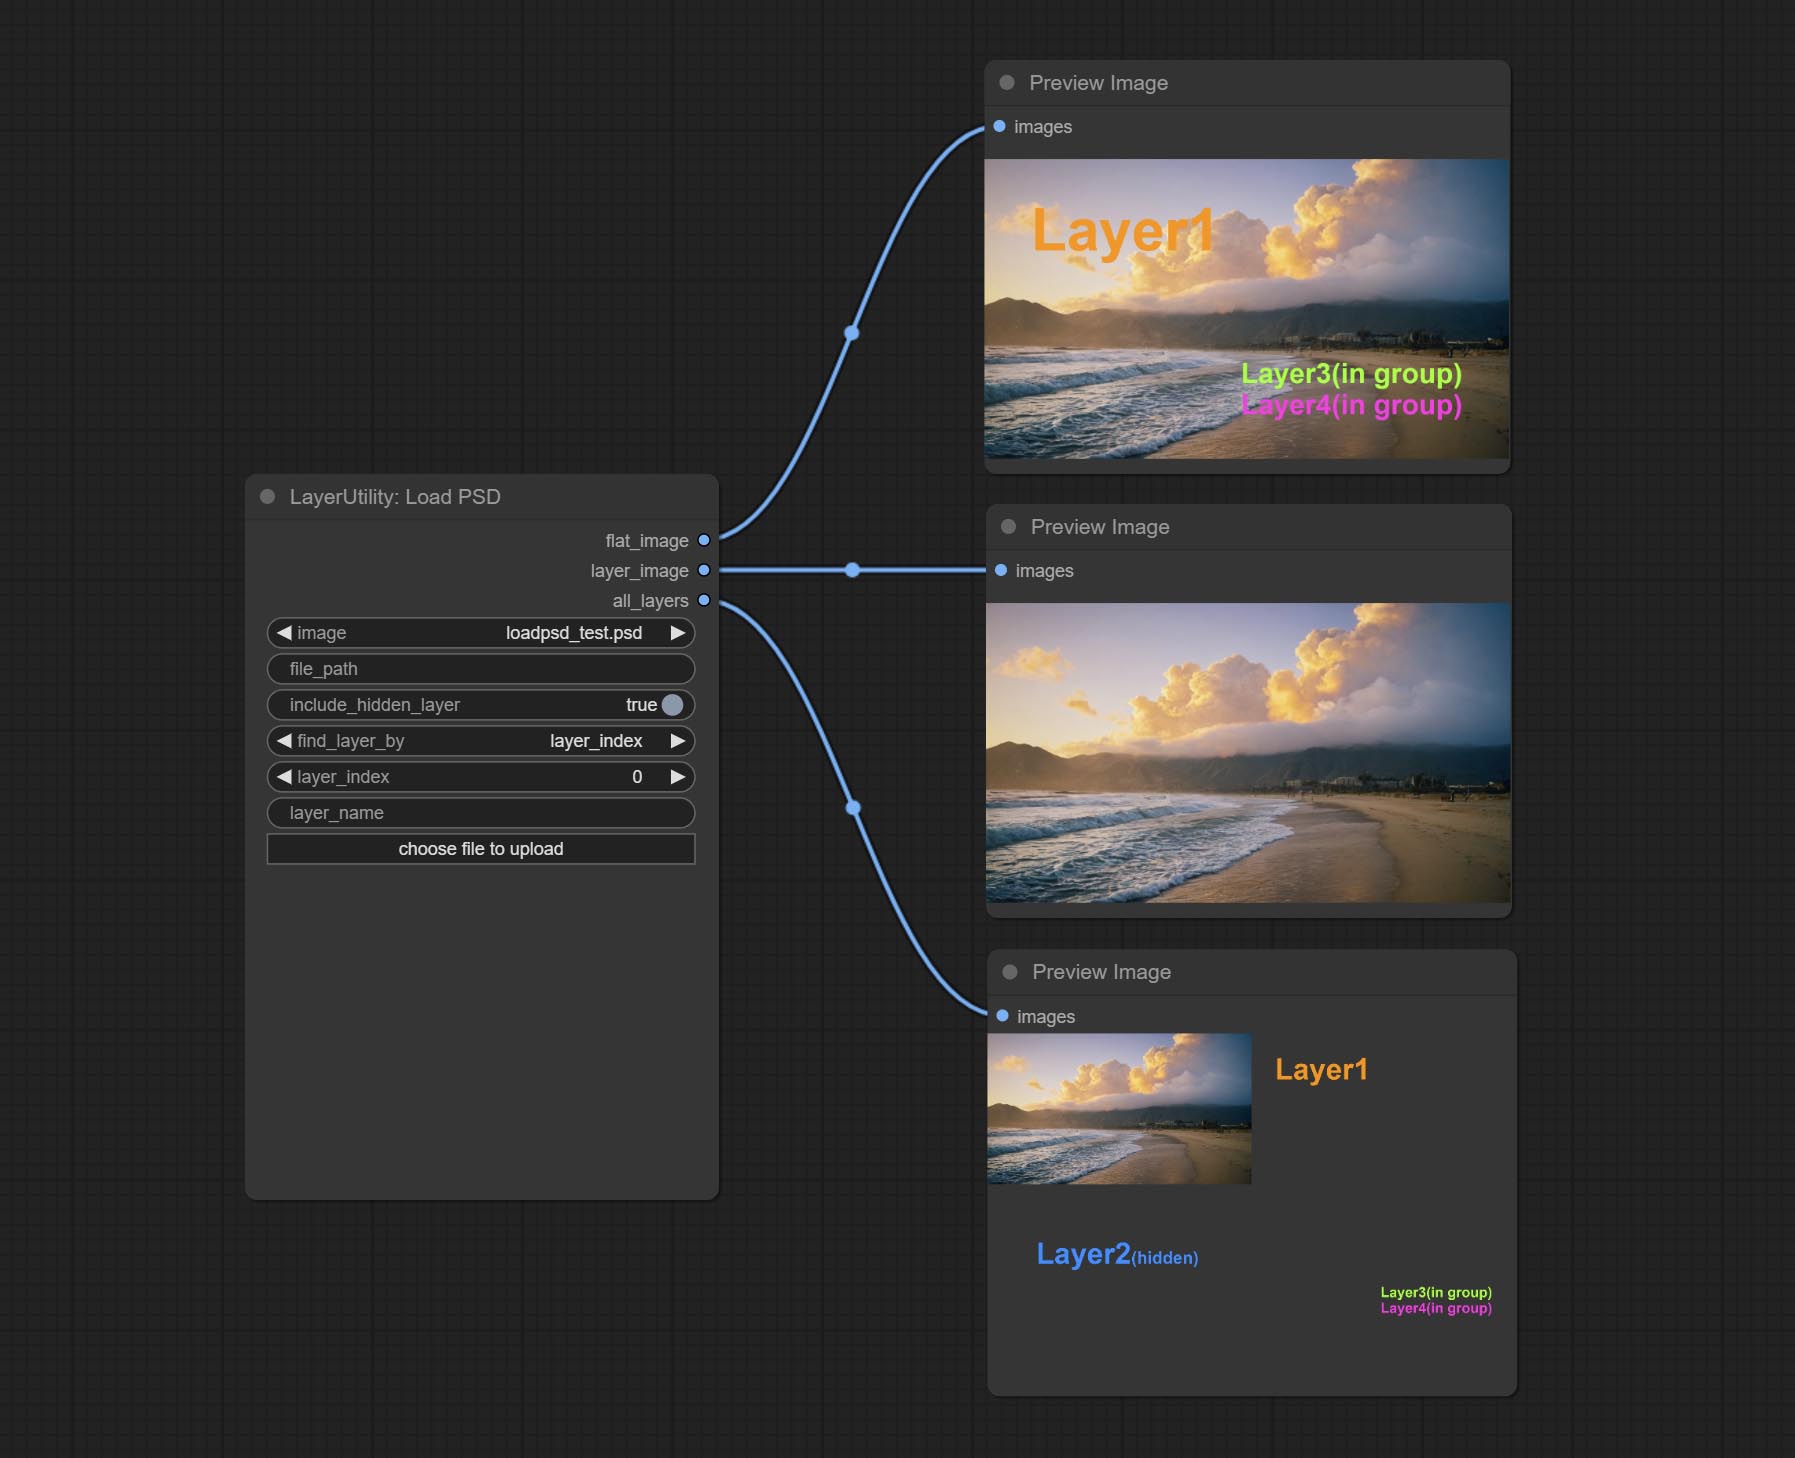
Load the PSD format file and export the layers. Note that this node requires the installation of the psd_tools dependency package, If error occurs during the installation of psd_tool, such as ModuleNotFoundError: No module named 'docopt' , please download docopt's whl and manual install it.
Node Options:
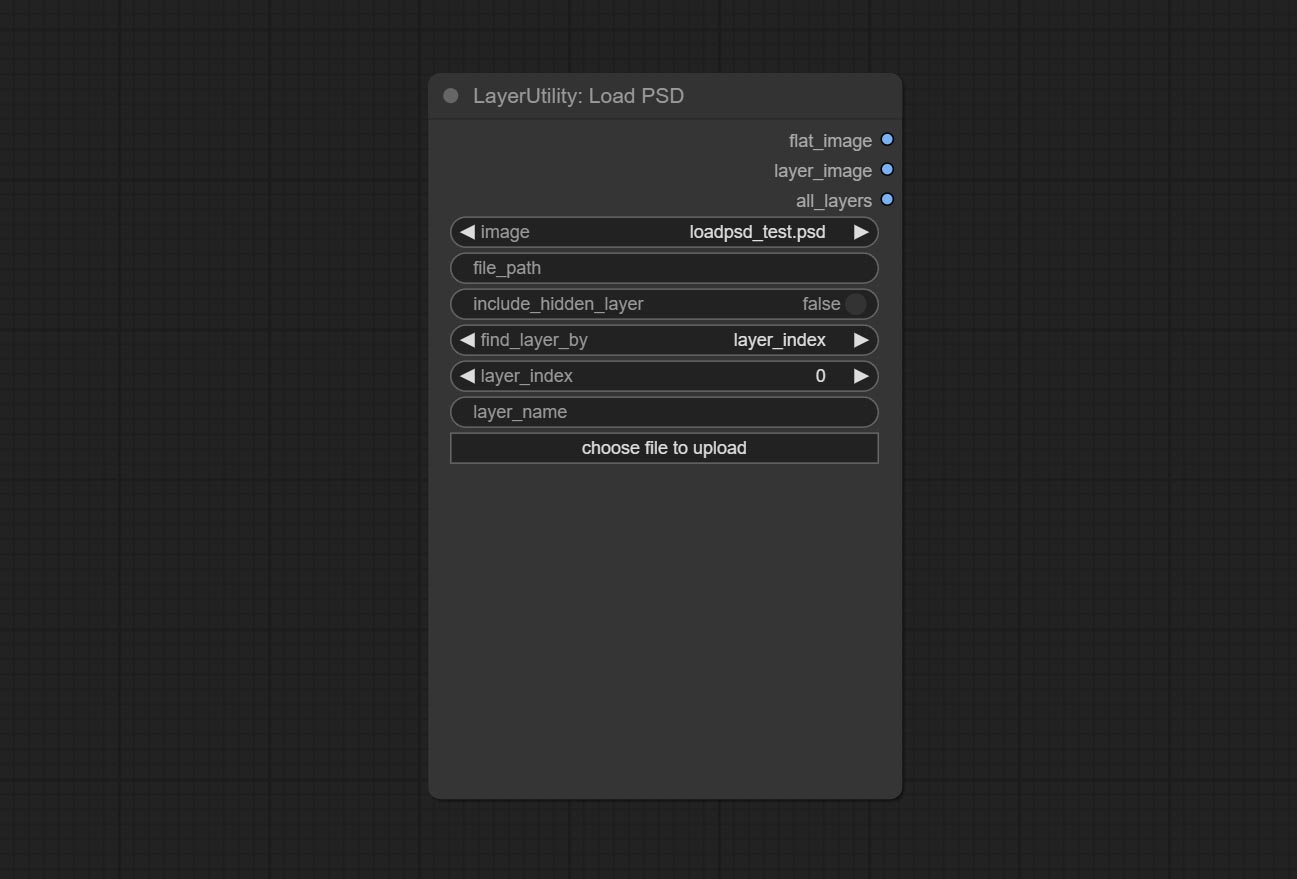
- image: Here is a list of *.psd files under
ComfyUI/input , where previously loaded psd images can be selected. - file_path: The complete path and file name of the psd file.
- include_hidden_layer: whether include hidden layers.
- find_layer_by: The method for finding layers can be selected by layer key number or layer name. Layer groups are treated as one layer.
- layer_index: The layer key number, where 0 is the bottom layer, is incremented sequentially. If include_hiddenlayer is set to false, hidden layers are not counted. Set to -1 to output the top layer.
- layer_name: Layer name. Note that capitalization and punctuation must match exactly.
Outputs: flat_image: PSD preview image. layer_iamge: Find the layer output. all_layers: Batch images containing all layers.
SD3NegativeConditioning
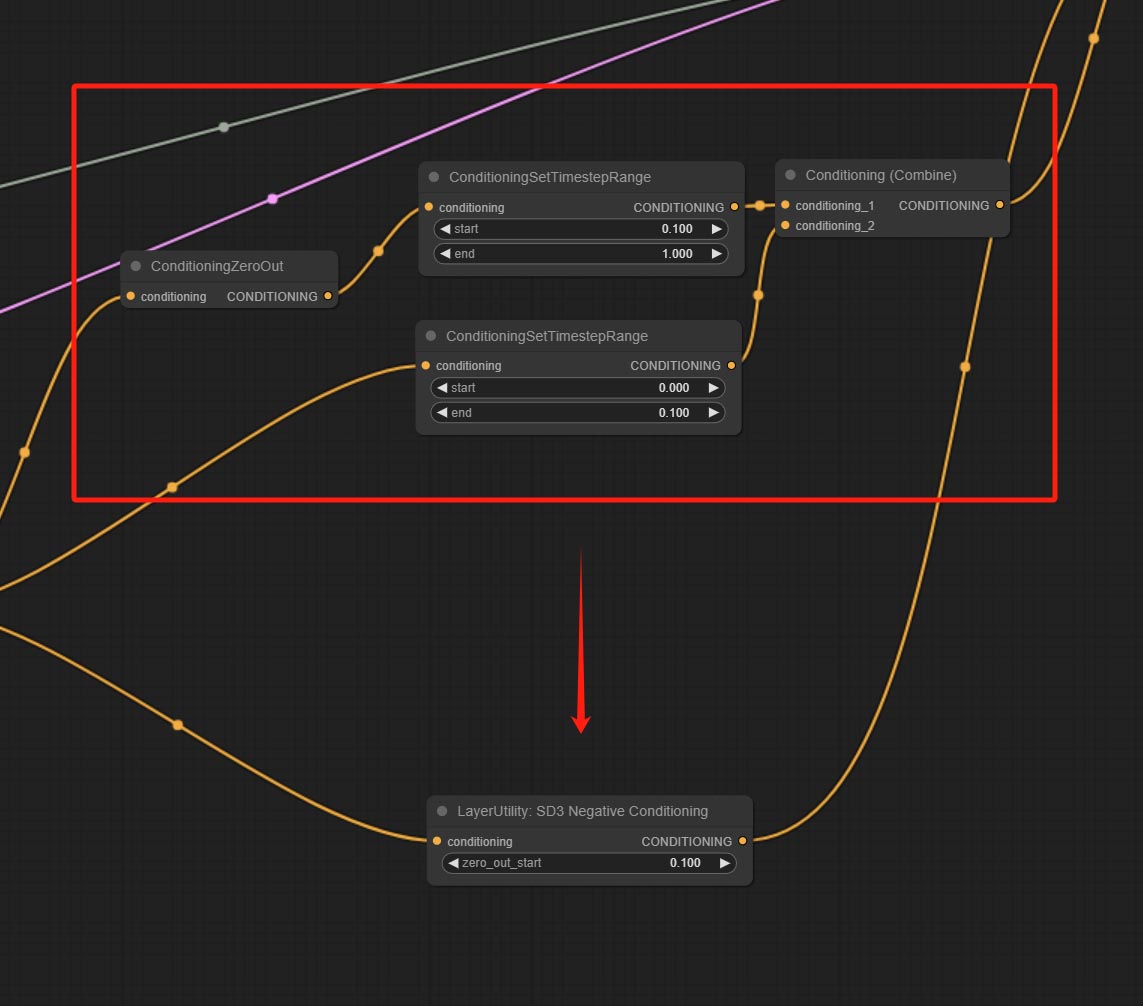
Encapsulate the four nodes of Negative Condition in SD3 into a separate node.
Node Options:
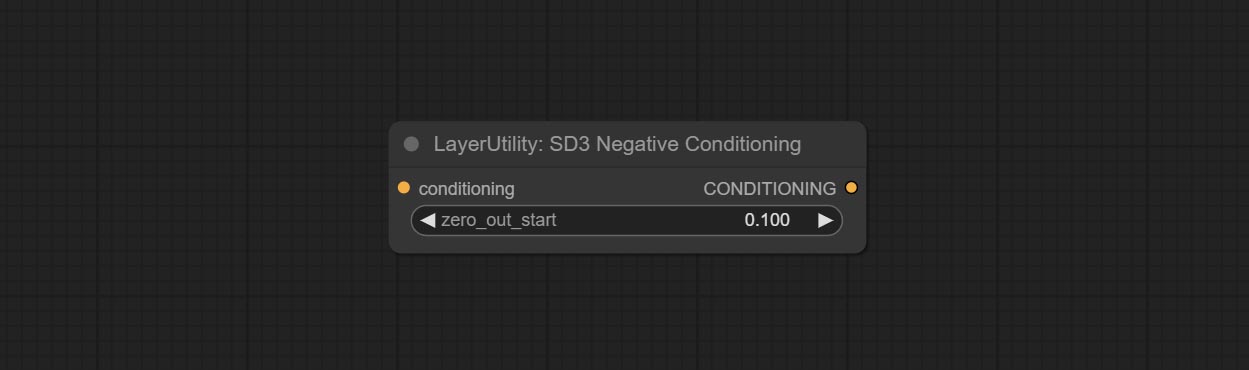
- zero_out_start: Set the ConditioningSetTimestepRange start value for Negative ConditioningZeroOut, which is the same as the ConditioningSetTimestepRange end value for Negative.
LayerMask
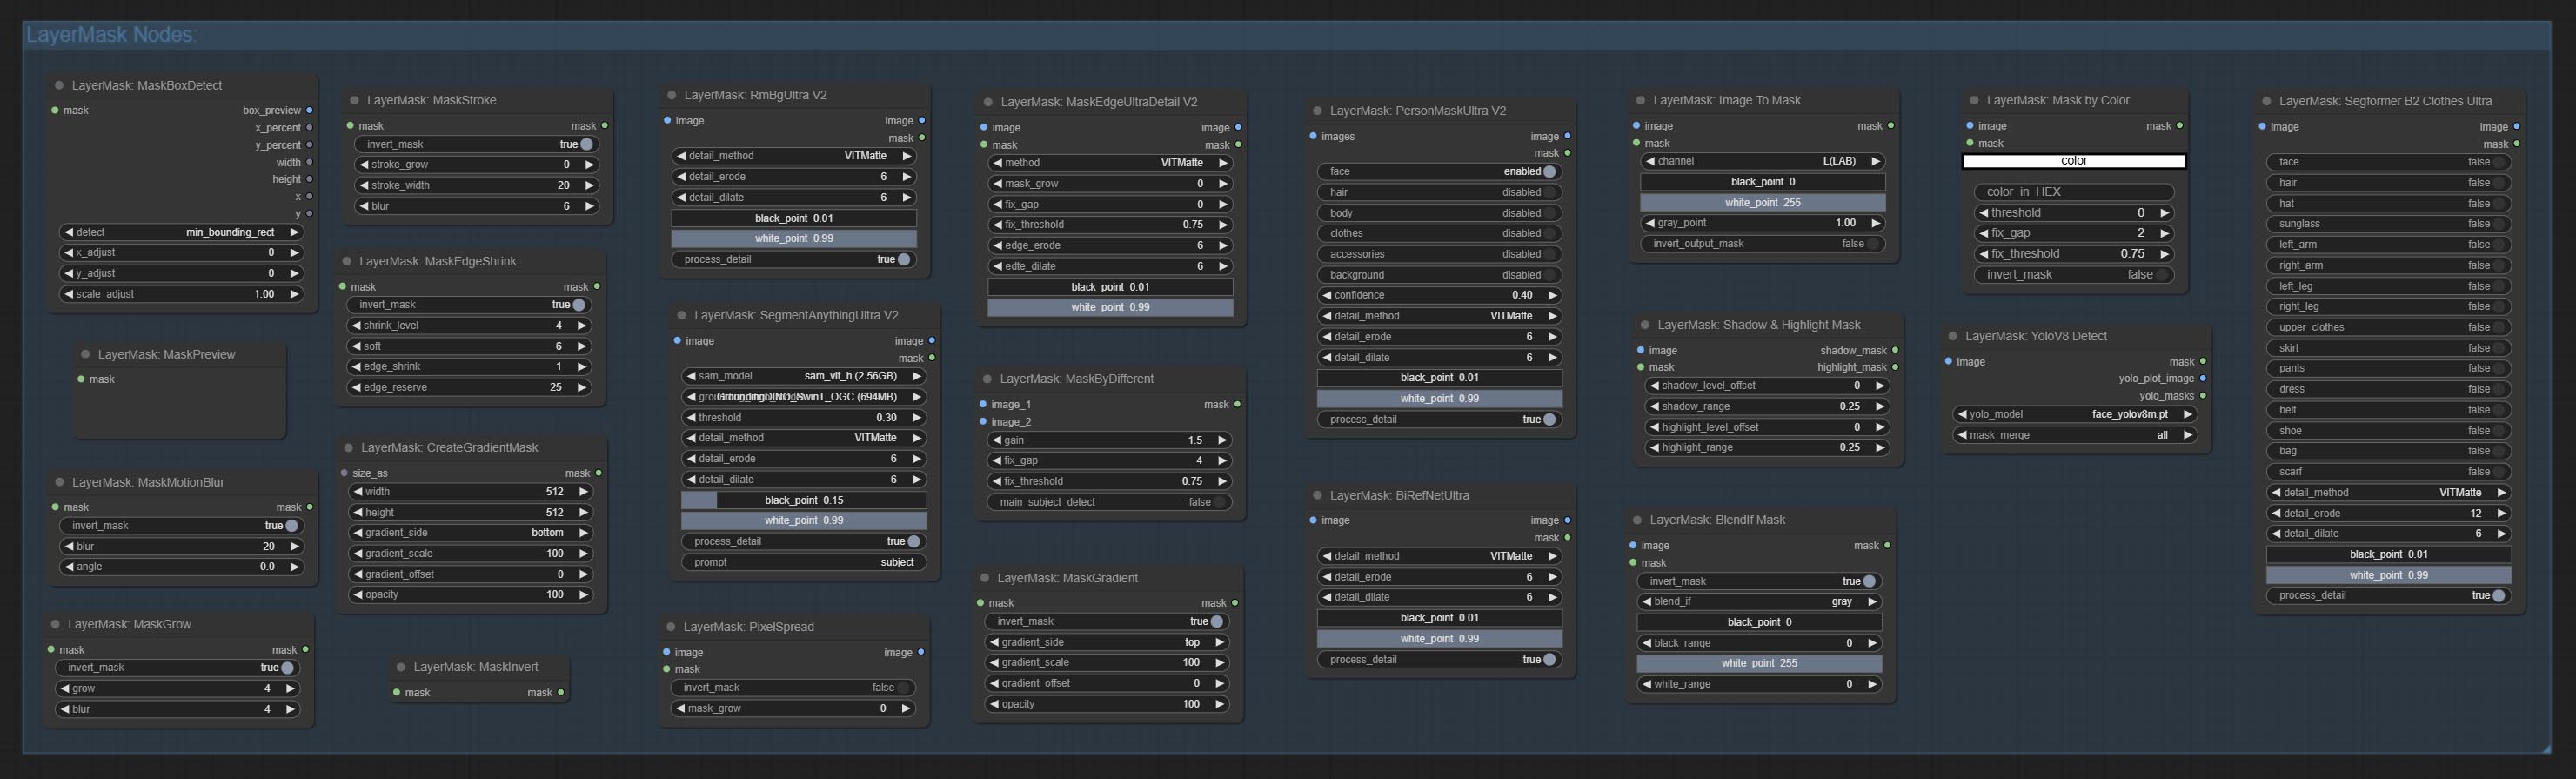
BlendIfMask
Reproduction of Photoshop's layer Style - Blend If function. This node outputs a mask for layer composition on the ImageBlend or ImageBlendAdvance nodes. mask is an optional input, and if you enter a mask here, it will act on the output. 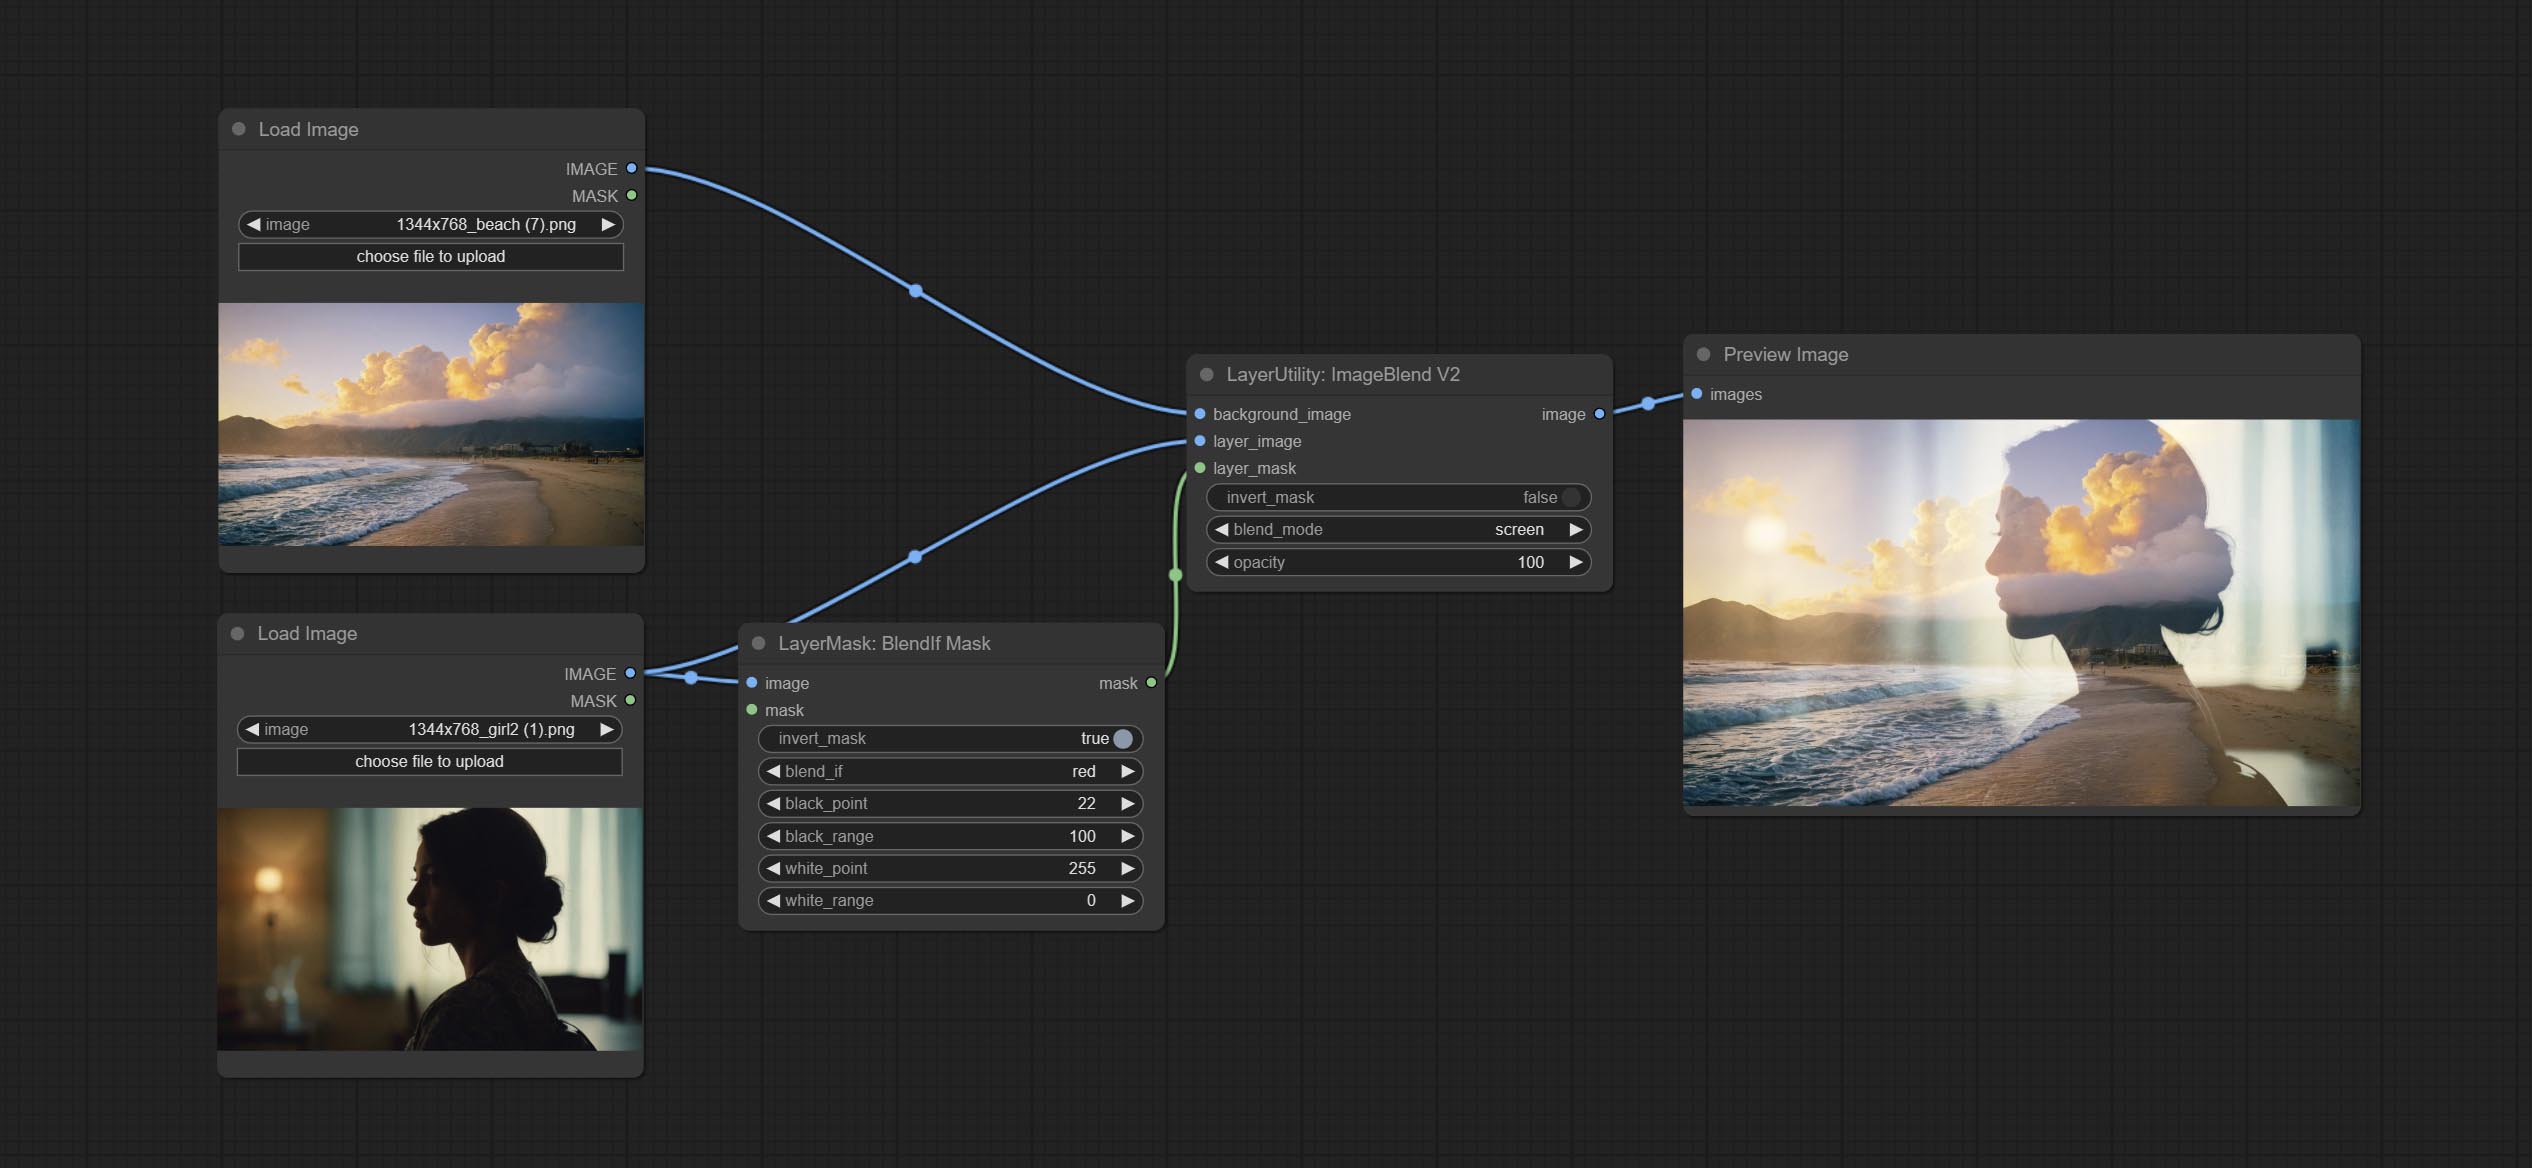
Node Options:
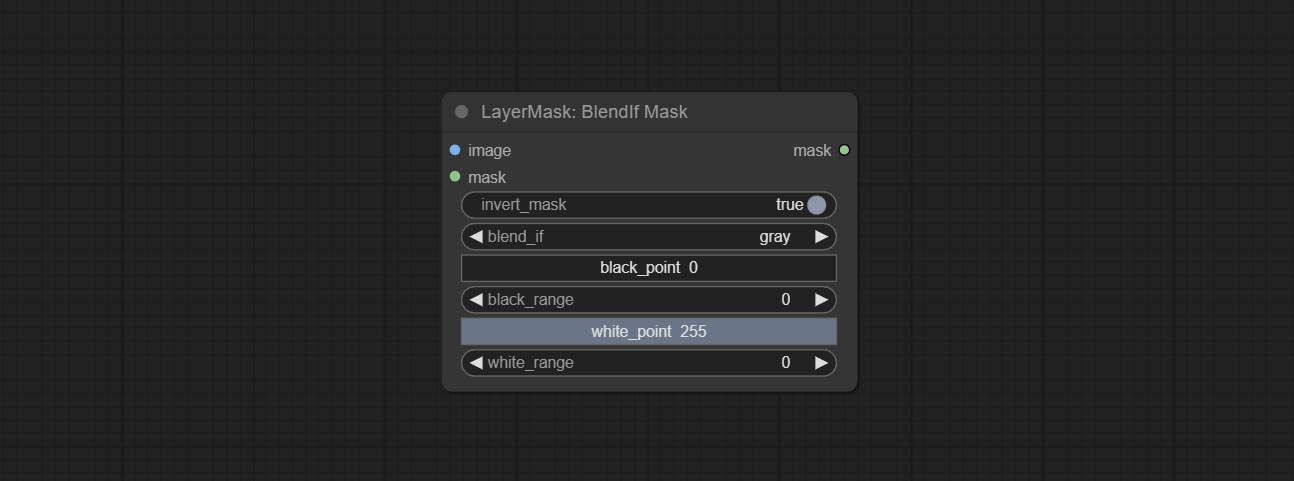
- invert_mask: Whether to reverse the mask.
- blend_if: Channel selection for Blend If. There are four options:
gray , red , green , and blue . - black_point: Black point values, ranging from 0-255.
- black_range: Dark part transition range. The larger the value, the richer the transition level of the dark part mask.
- white_point: White point values, ranging from 0-255.
- white_range: Brightness transition range. The larger the value is, the richer the transition level of the bright part mask is.
MaskBoxDetect
Detect the area where the mask is located and output its position and size. 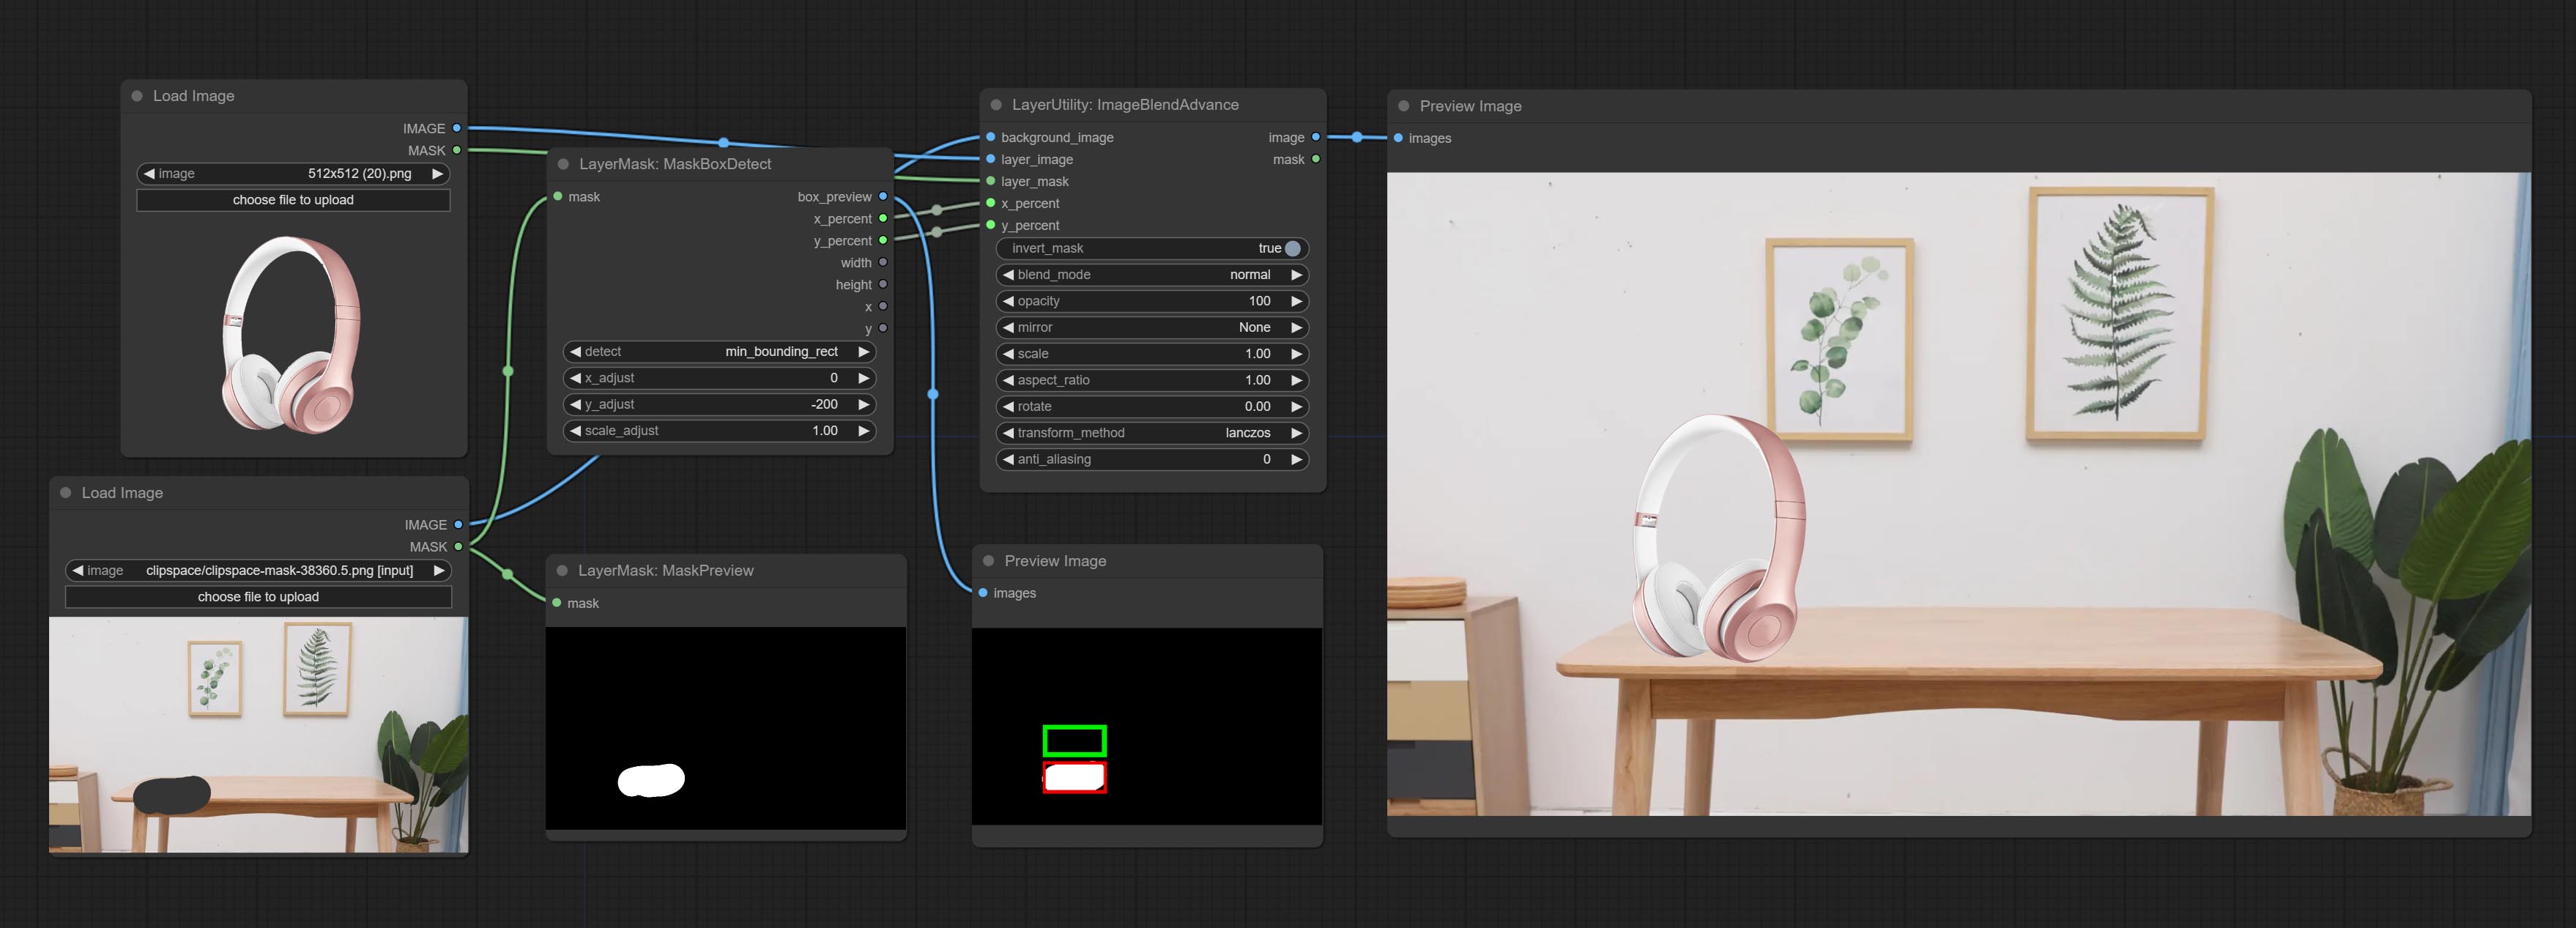
Node options:
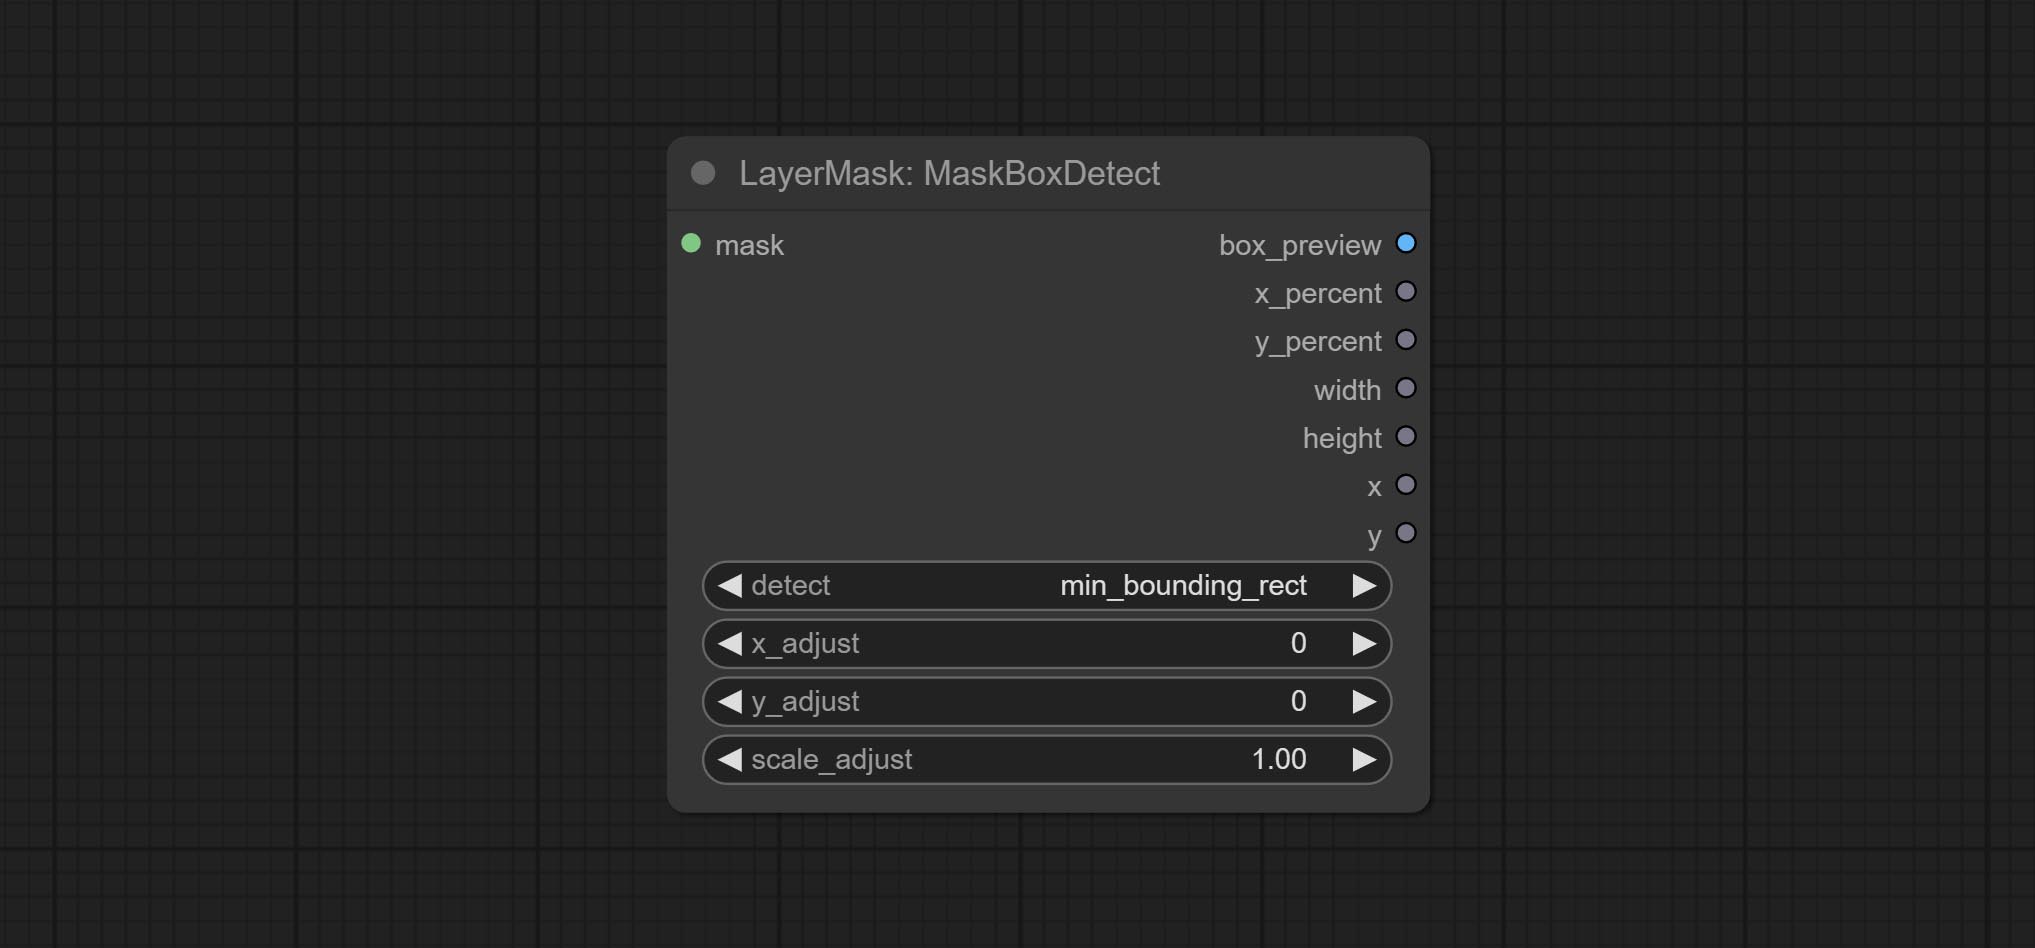
- detect: Detection method,
min_bounding_rect is the minimum bounding rectangle of block shape, max_inscribed_rect is the maximum inscribed rectangle of block shape, and mask-area is the effective area for masking pixels. - x_adjust: Adjust of horizontal deviation after detection.
- y_adjust: Adjust of vertical offset after detection.
- scale_adjust: Adjust the scaling offset after detection.
Выход:
- box_preview: Preview image of detection results. Red represents the detected result, and green represents the adjust output result.
- x_percent: Horizontal position output in percentage.
- y_percent: Vertical position output in percentage.
- width: Width.
- height: Height.
- x: The x-coordinate of the top left corner position.
- y: The y-coordinate of the top left corner position.
Ultra Nodes
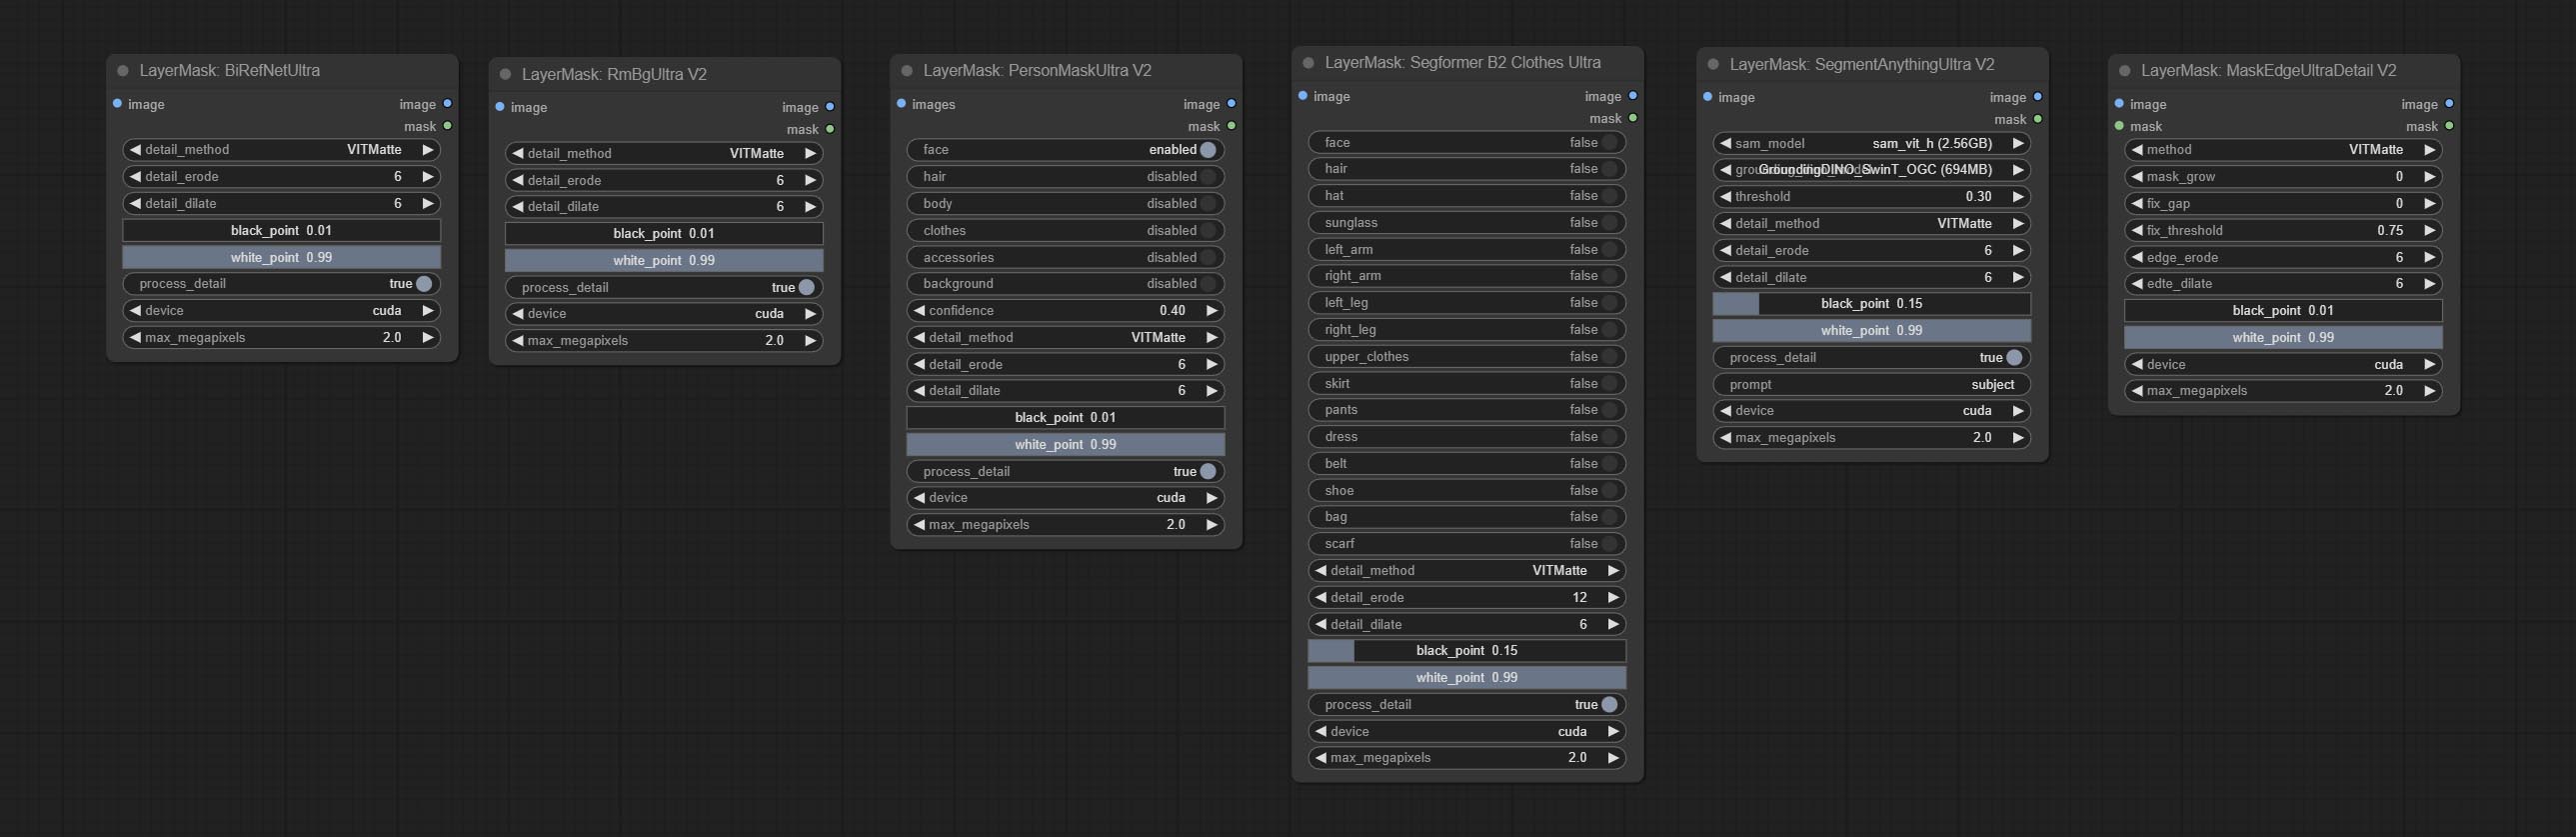
Nodes that use ultra fine edge masking processing methods, the latest version of nodes includes: SegmentAnythingUltraV2, RmBgUltraV2, BiRefNetUltra, PersonMaskUltraV2, SegformerB2ClothesUltra and MaskEdgeUltraDetailV2. There are three edge processing methods for these nodes:
-
PyMatting optimizes the edges of the mask by using a closed form matching to mask trimap. -
GuideFilter uses opencv guidedfilter to feather edges based on color similarity, and performs best when edges have strong color separation.
The code for the above two methods is from the ComfyUI-Image-Filters in spacepxl's Alpha Matte, thanks to the original author. -
VitMatte uses the transformer vit model for high-quality edge processing, preserving edge details and even generating semi transparent masks. Note: When running for the first time, you need to download the vitmate model file and wait for the automatic download to complete. If the download cannot be completed, you can run the command huggingface-cli download hustvl/vitmatte-small-composition-1k to manually download. After successfully downloading the model, you can use VITMatte(local) without accessing the network. - VitMatte's options:
device set whether to use CUDA for vitimate operations, which is about 5 times faster than CPU. max_megapixels set the maximum image size for vitmate operation, and oversized images will be reduced in size. For 16G VRAM, it is recommended to set it to 3.
*Download all model files from BaiduNetdisk or Huggingface to ComfyUI/models/vitmatte folder.
The following figure is an example of the difference in output between three methods. 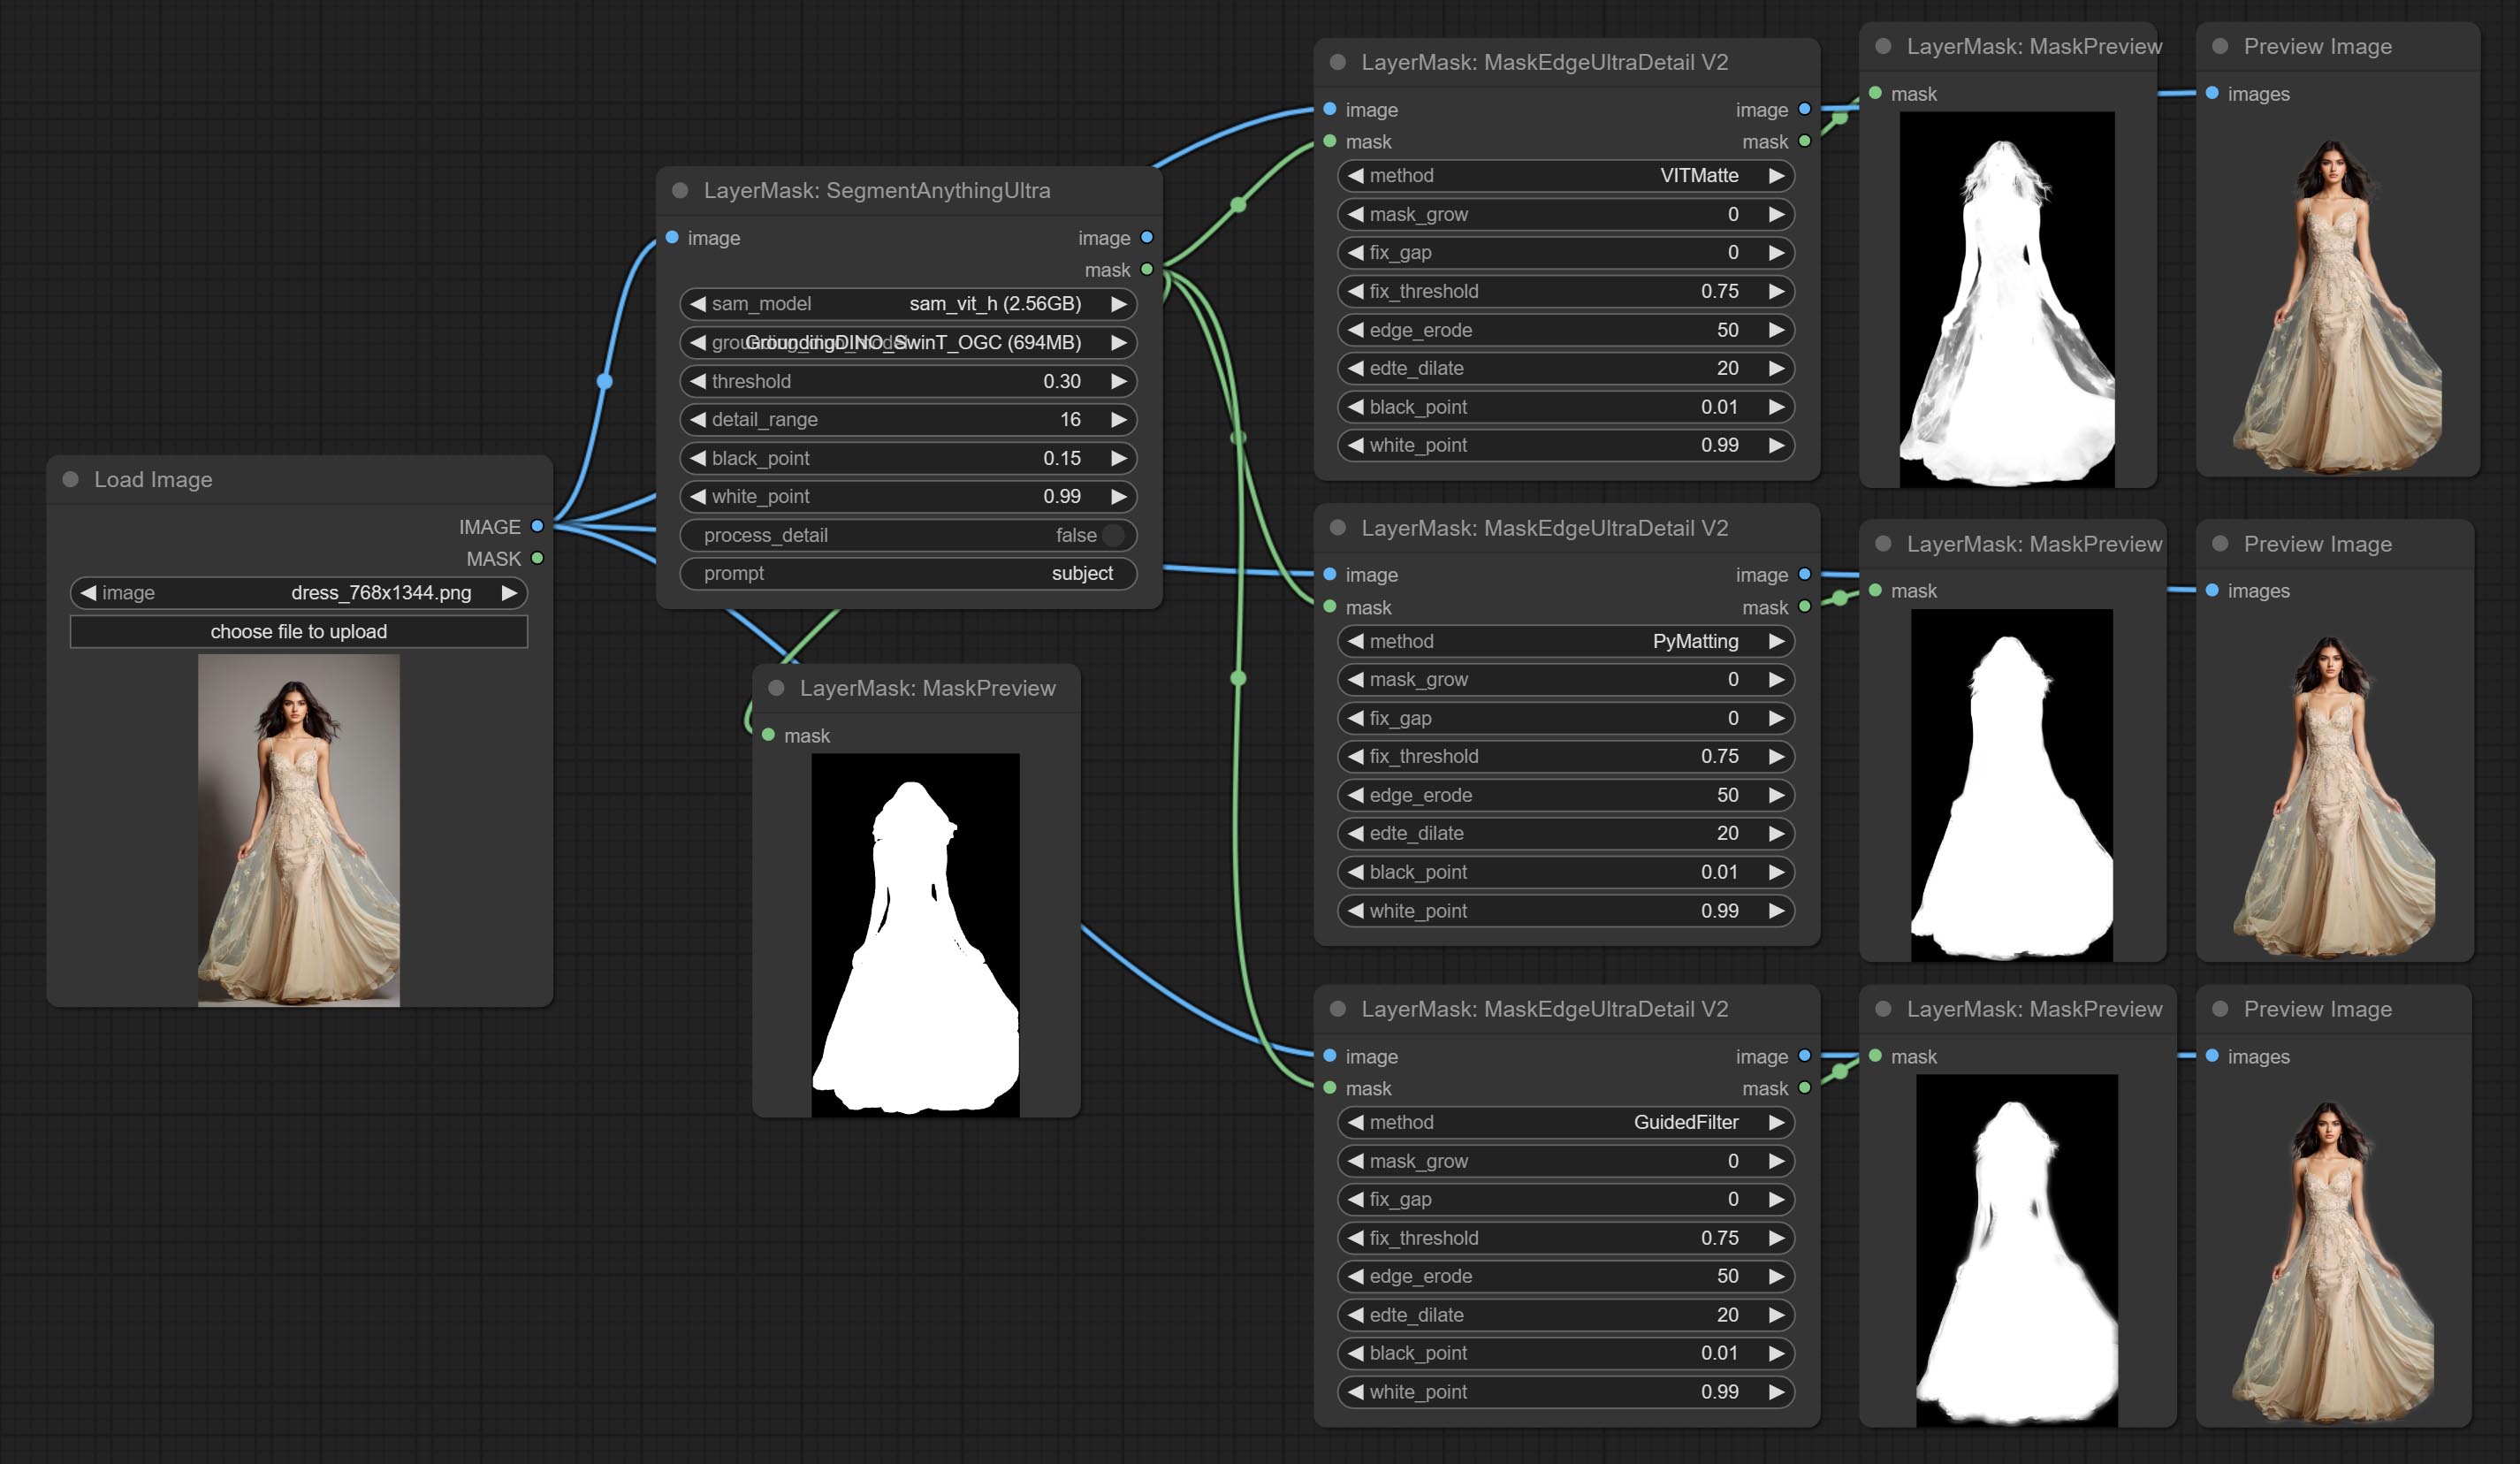
SegmentAnythingUltra
Improvements to ComfyUI Segment Anything, thanks to the original author.
*Please refer to the installation of ComfyUI Segment Anything to install the model. If ComfyUI Segment Anything has been correctly installed, you can skip this step.
- From here download the config.json,model.safetensors,tokenizer_config.json,tokenizer.json and vocab.txt 5 files to
ComfyUI/models/bert-base-uncased folder. - Download GroundingDINO_SwinT_OGC config file, GroundingDINO_SwinT_OGC model, GroundingDINO_SwinB config file, GroundingDINO_SwinB model to
ComfyUI/models/grounding-dino folder. - Download sam_vit_h,sam_vit_l, sam_vit_b, sam_hq_vit_h, sam_hq_vit_l, sam_hq_vit_b, mobile_sam to
ComfyUI/models/sams folder. *Or download them from GroundingDino models on BaiduNetdisk and SAM models on BaiduNetdisk . 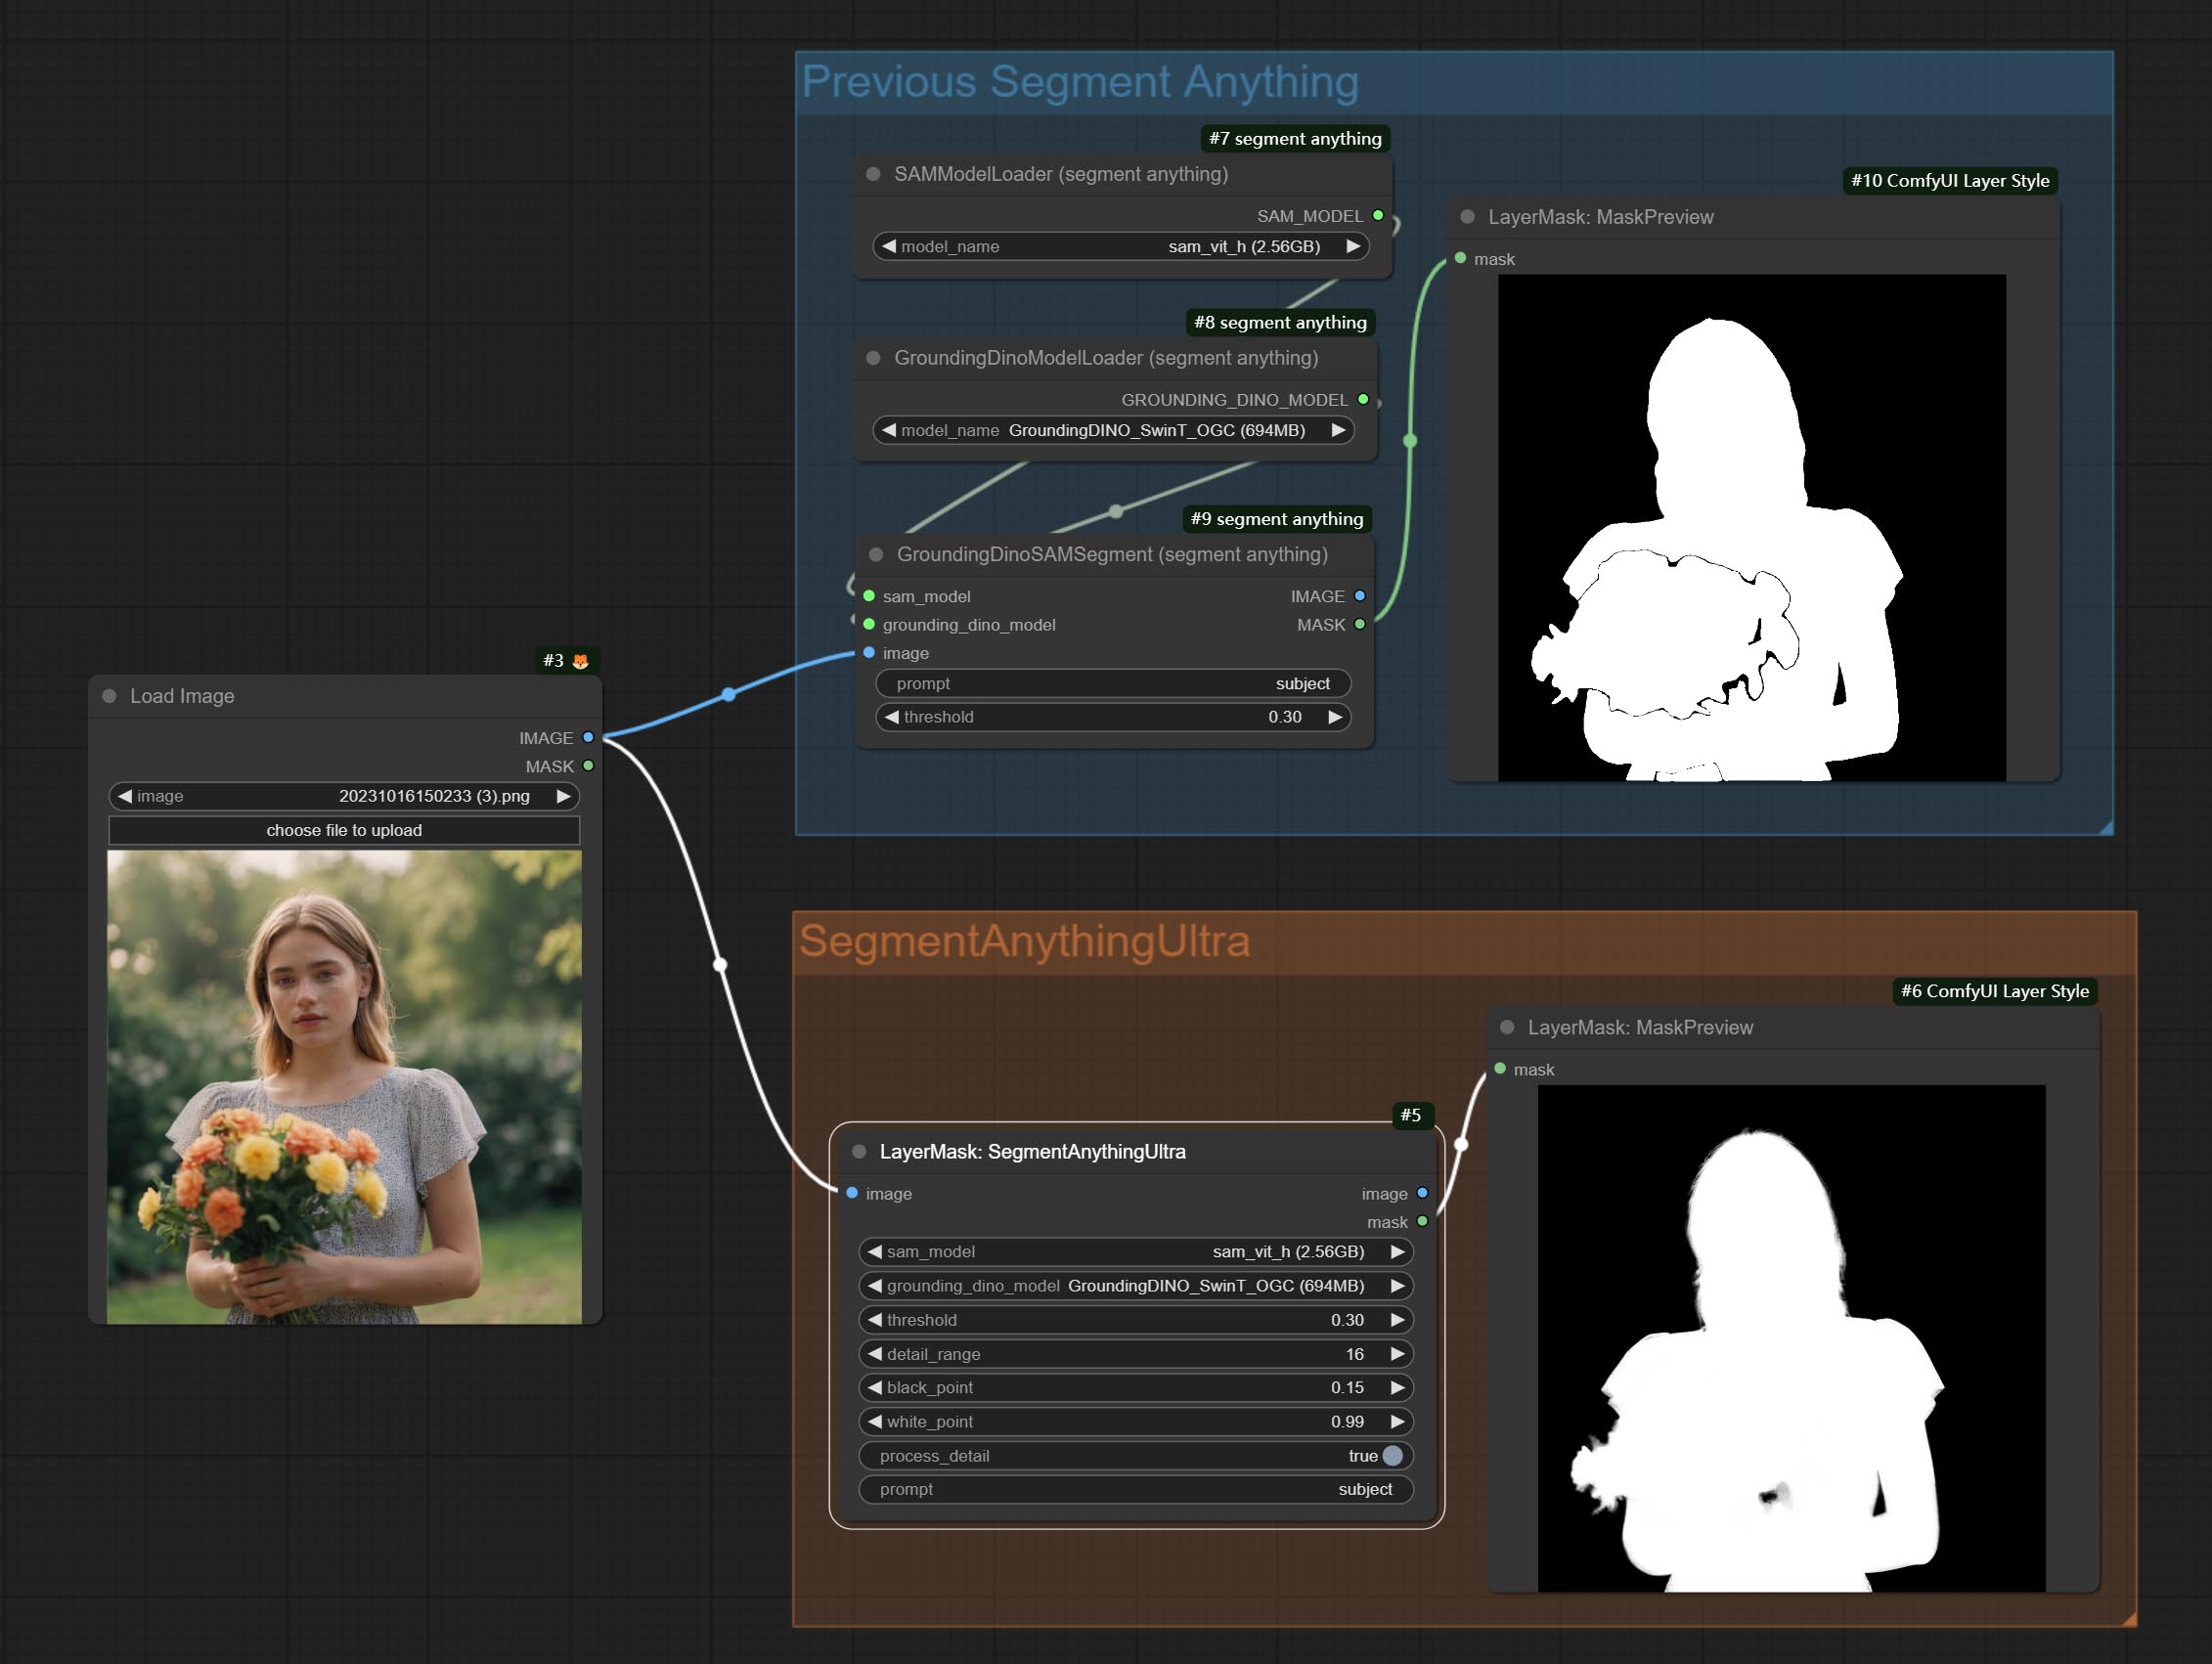
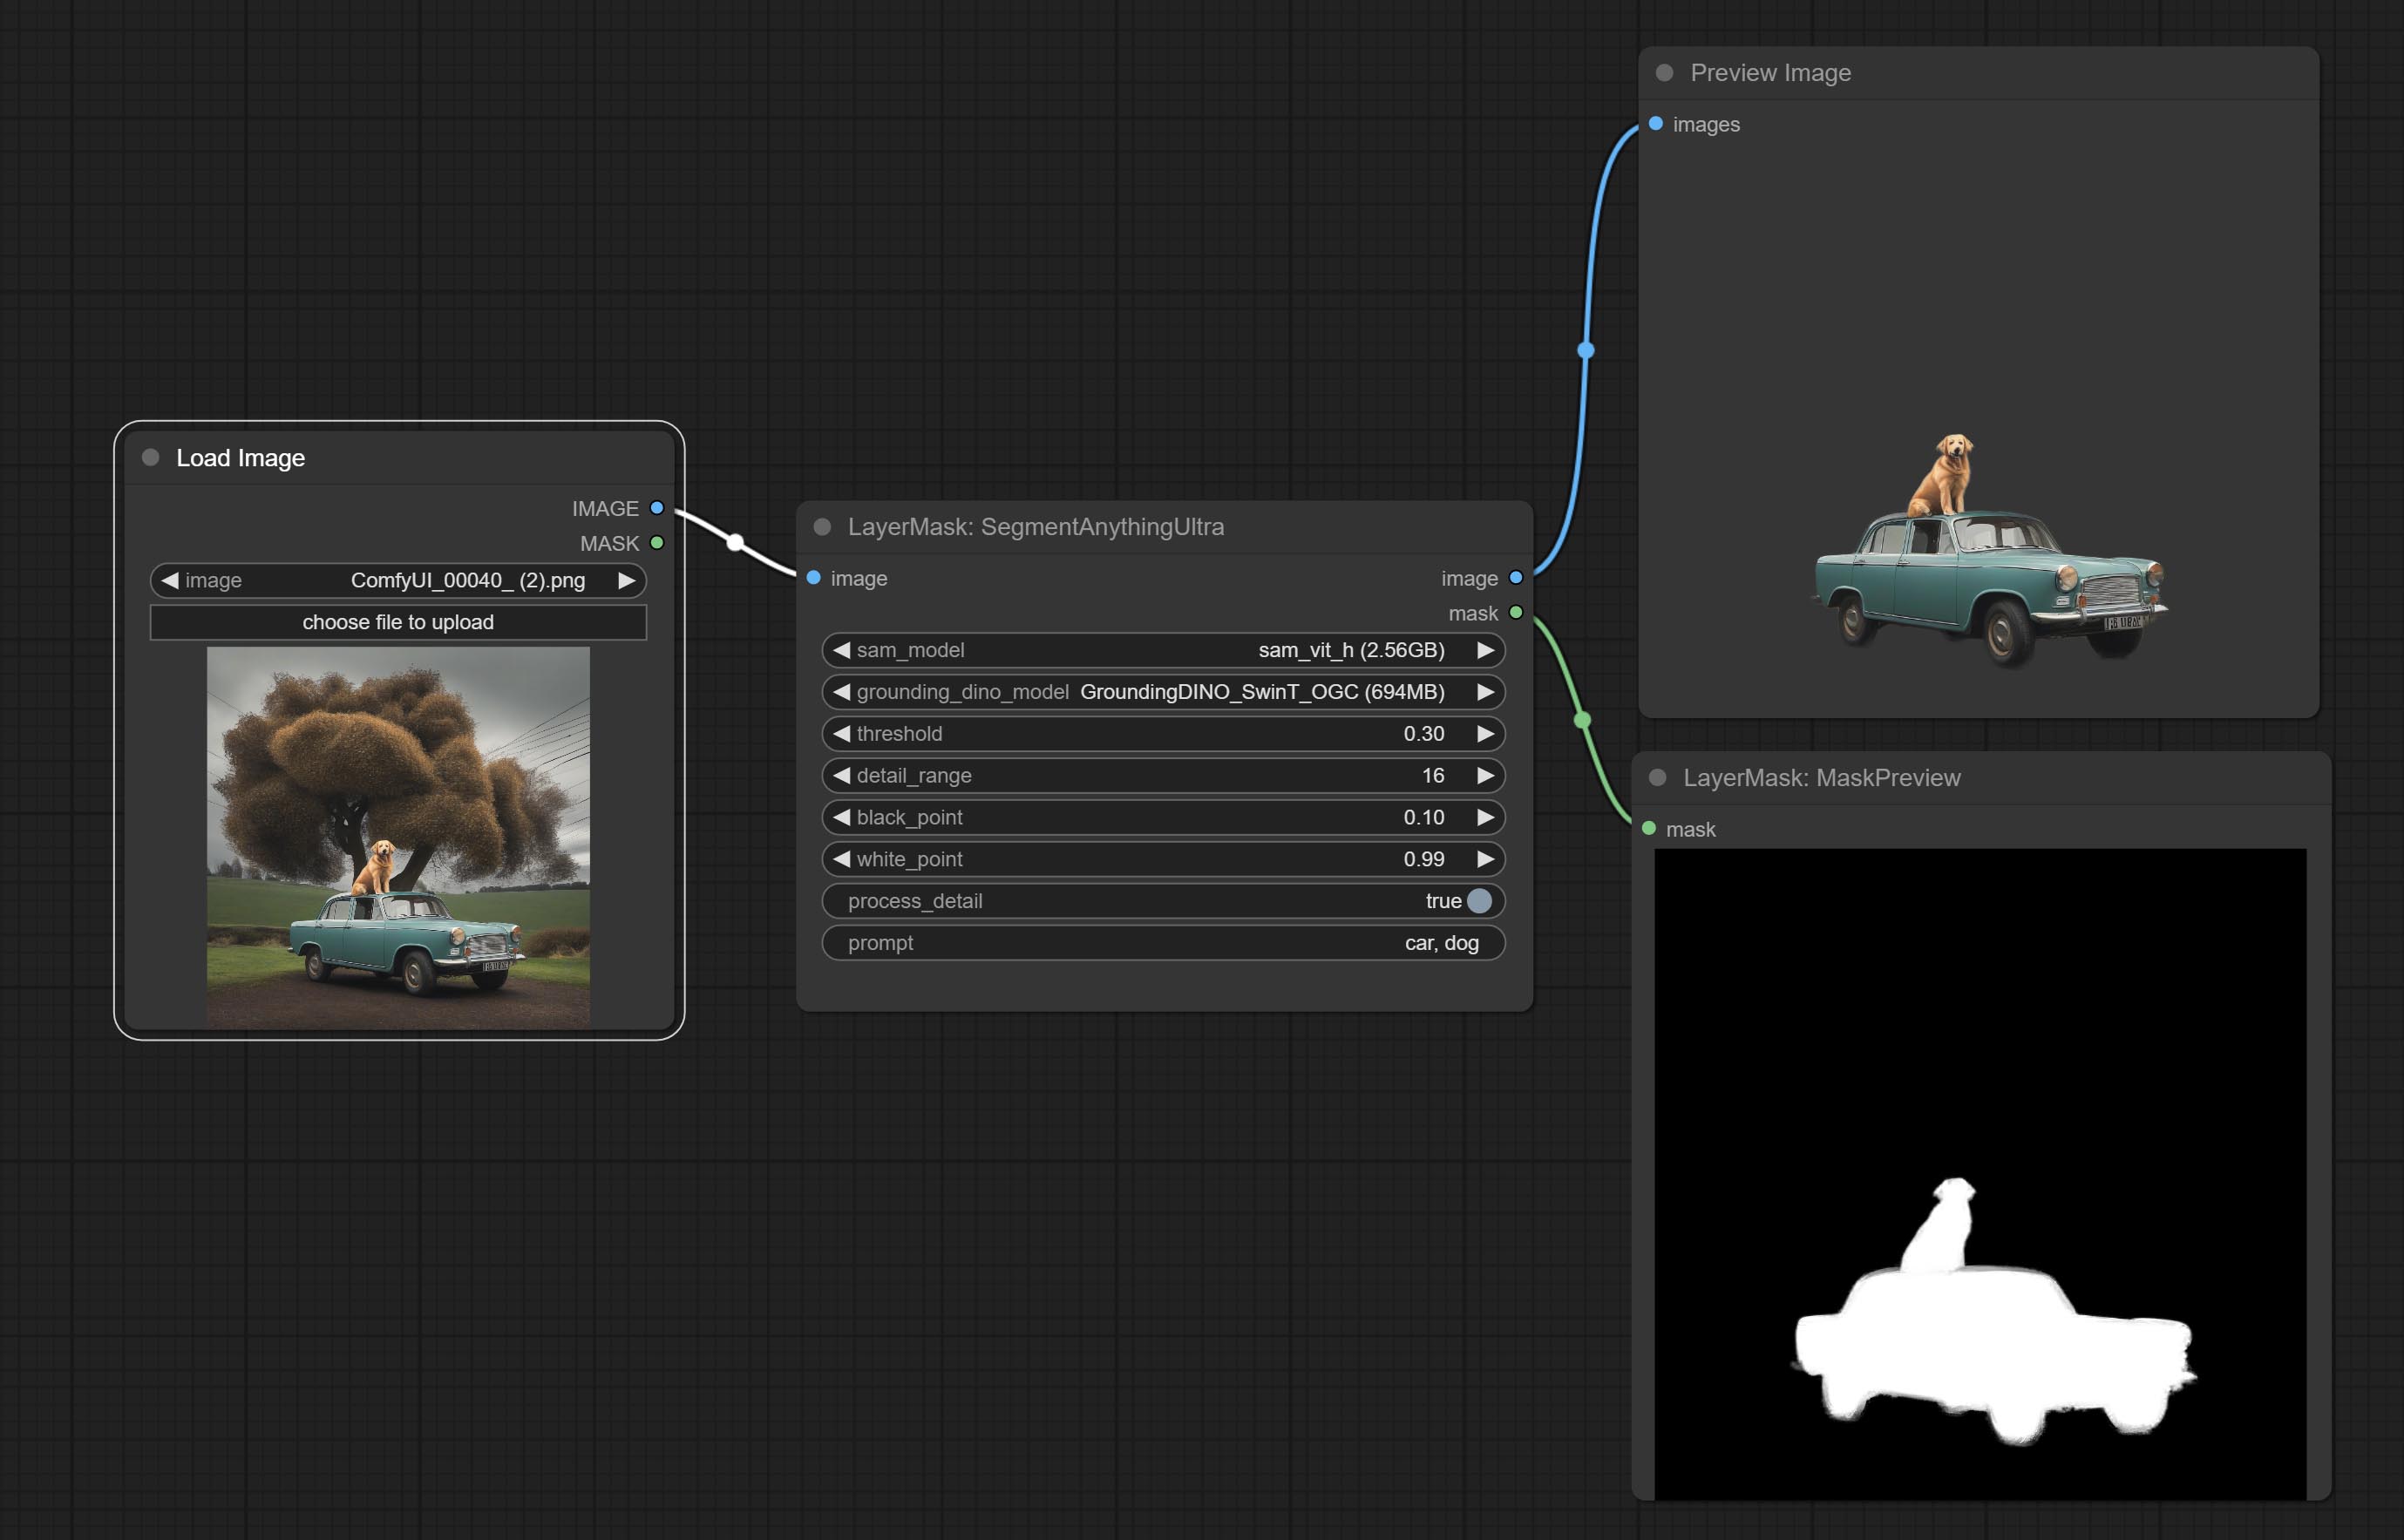
Node options:

- sam_model: Select the SAM model.
- ground_dino_model: Select the Grounding DINO model.
- threshold: The threshold of SAM.
- detail_range: Edge detail range.
- black_point: Edge black sampling threshold.
- white_point: Edge white sampling threshold.
- process_detail: Set to false here will skip edge processing to save runtime.
- prompt: Input for SAM's prompt.
- cache_model: Set whether to cache the model.
SegmentAnythingUltraV2
The V2 upgraded version of SegmentAnythingUltra has added the VITMatte edge processing method.(Note: Images larger than 2K in size using this method will consume huge memory) 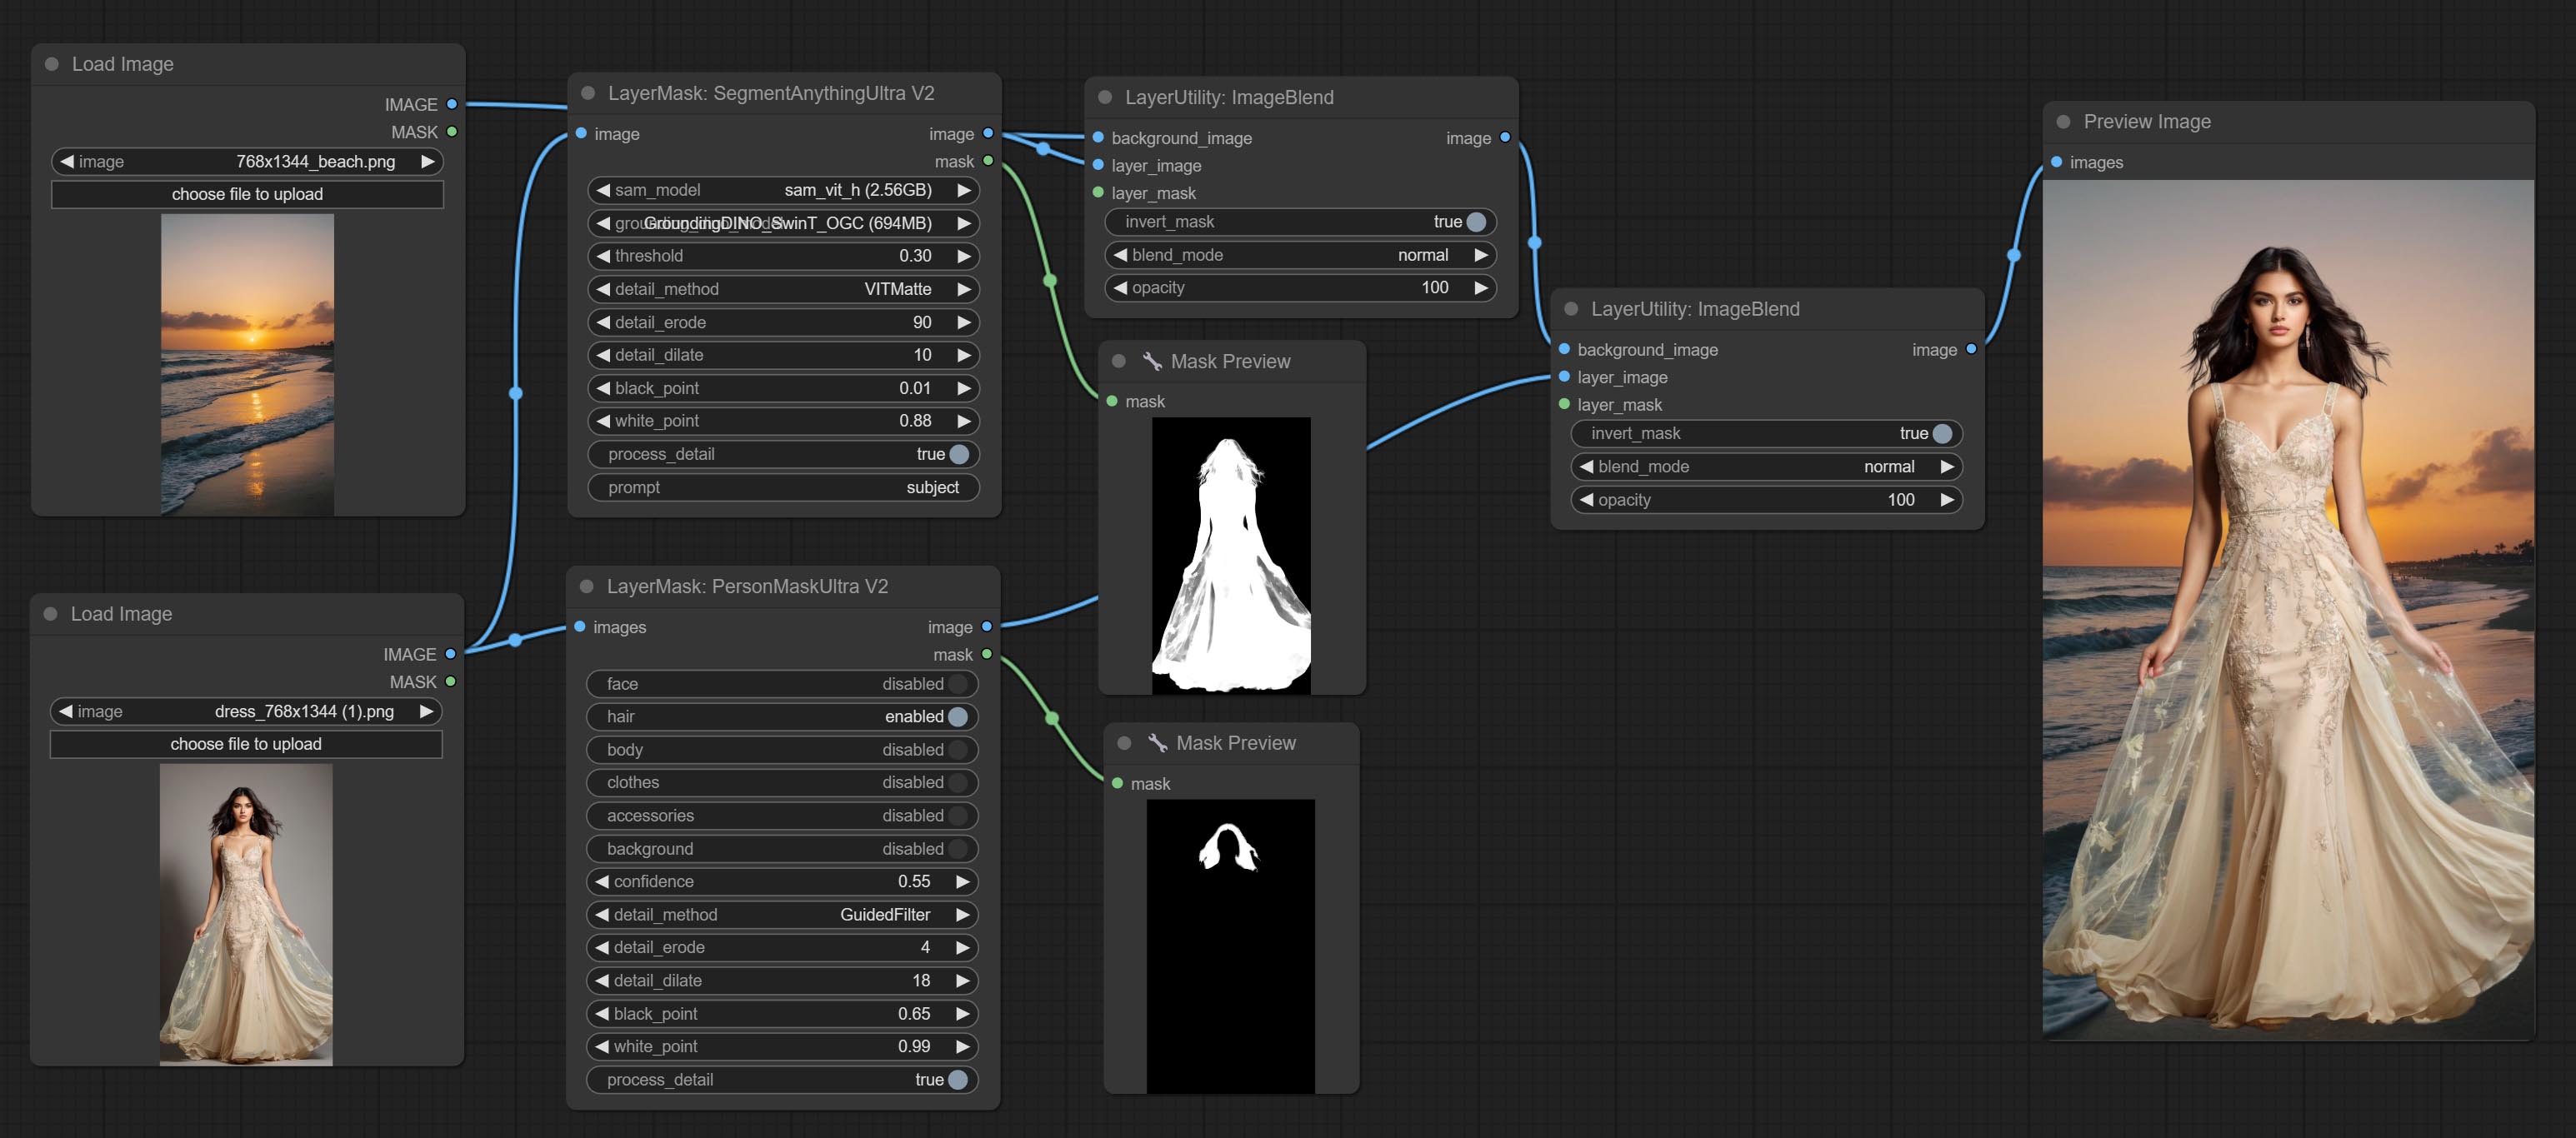
On the basis of SegmentAnythingUltra, the following changes have been made: 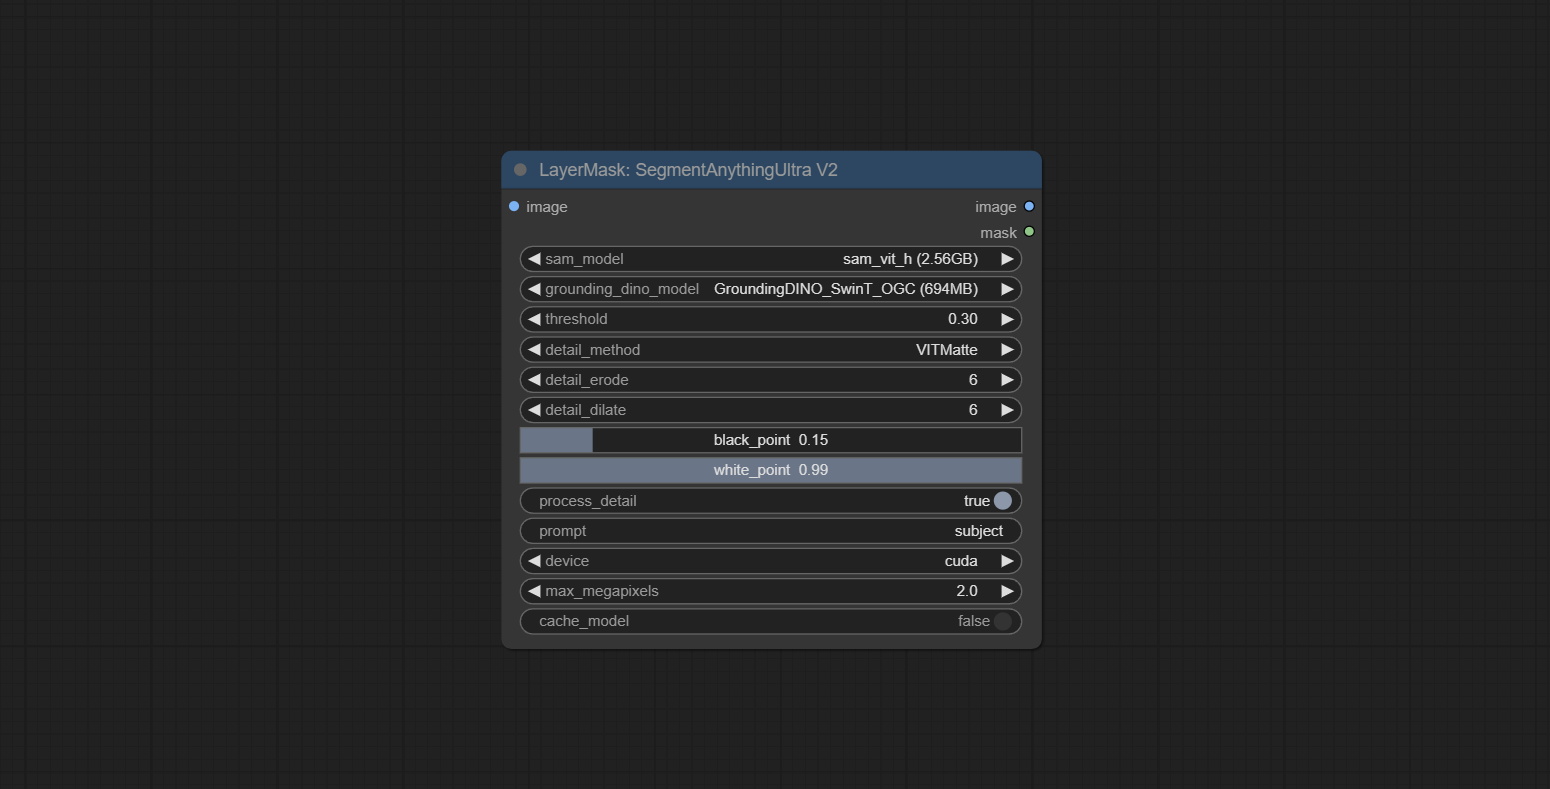
- detail_method: Edge processing methods. provides VITMatte, VITMatte(local), PyMatting, GuidedFilter. If the model has been downloaded after the first use of VITMatte, you can use VITMatte (local) afterwards.
- detail_erode: Mask the erosion range inward from the edge. the larger the value, the larger the range of inward repair.
- detail_dilate: The edge of the mask expands outward. the larger the value, the wider the range of outward repair.
- device: Set whether the VitMatte to use cuda.
- max_megapixels: Set the maximum size for VitMate operations.
SAM2Ultra
This node is modified from kijai/ComfyUI-segment-anything-2. Thank to kijai for making significant contributions to the Comfyui community.
SAM2 Ultra node only support single image. If you need to process multiple images, please first convert the image batch to image list.
*Download models from BaiduNetdisk or huggingface.co/Kijai/sam2-safetensors and copy to ComfyUI/models/sam2 folder.
Node Options:
- image: The image to segment.
- bboxes: Input recognition box data.
- sam2_model: Select the SAM2 model.
- presicion: Model's persicion. can be selected from fp16, bf16, and fp32.
- bbox_select: Select the input box data. There are three options: "all" to select all, "first" to select the box with the highest confidence, and "by_index" to specify the index of the box.
- select_index: This option is valid when bbox_delect is 'by_index'. 0 is the first one. Multiple values can be entered, separated by any non numeric character, including but not limited to commas, periods, semicolons, spaces or letters, and even Chinese.
- cache_model: Whether to cache the model. After caching the model, it will save time for model loading.
- detail_method: Edge processing methods. provides VITMatte, VITMatte(local), PyMatting, GuidedFilter. If the model has been downloaded after the first use of VITMatte, you can use VITMatte (local) afterwards.
- detail_erode: Mask the erosion range inward from the edge. the larger the value, the larger the range of inward repair.
- detail_dilate: The edge of the mask expands outward. the larger the value, the wider the range of outward repair.
- black_point: Edge black sampling threshold.
- white_point: Edge white sampling threshold.
- process_detail: Set to false here will skip edge processing to save runtime.
- device: Set whether the VitMatte to use cuda.
- max_megapixels: Set the maximum size for VitMate operations.
SAM2VideoUltra
SAM2 Video Ultra node support processing multiple frames of images or video sequences. Please define the recognition box data in the first frame of the sequence to ensure correct recognition.
sam2_video_ultra_example.mp4
2024-09-03.152625.mp4
Node Options:
- image: The image to segment.
- bboxes: Optional input of recognition bbox data.
bboxes and first_frame_mask must have least one input. If first_frame_mask inputed, bbboxes will be ignored. - first_frame_mask: Optional input of the first frame mask. The mask will be used as the first frame recognition object.
bboxes and first_frame_mask must have least one input. If first_frame_mask inputed, bbboxes will be ignored. - pre_mask: Optional input mask, which will serve as a propagation focus range limitation and help improve recognition accuracy.
- sam2_model: Select the SAM2 model.
- presicion: Model's persicion. can be selected from fp16 and bf16.
- cache_model: Whether to cache the model. After caching the model, it will save time for model loading.
- individual_object: When set to True, it will focus on identifying a single object. When set to False, attempts will be made to generate recognition boxes for multiple objects.
- mask_preview_color: Display the color of non masked areas in the preview output.
- detail_method: Edge processing methods. Only VITMatte method can be used.
- detail_erode: Mask the erosion range inward from the edge. the larger the value, the larger the range of inward repair.
- detail_dilate: The edge of the mask expands outward. the larger the value, the wider the range of outward repair.
- black_point: Edge black sampling threshold.
- white_point: Edge white sampling threshold.
- process_detail: Set to false here will skip edge processing to save runtime.
- device: Only cuda can be used.
- max_megapixels: Set the maximum size for VitMate operations.A larger size will result in finer mask edges, but it will lead to a significant decrease in computation speed.
ObjectDetectorFL2
Use the Florence2 model to identify objects in images and output recognition box data.
*Download models from BaiduNetdisk and copy to ComfyUI/models/florence2 folder.
Node Options:
- image: The image to segment.
- florence2_model: Florence2 model, it from LoadFlorence2Model node.
- prompt: Describe the object that needs to be identified.
- sort_method: The selection box sorting method has 4 options: "left_to_right", "top_to_bottom", "big_to_small" and "confidence".
- bbox_select: Select the input box data. There are three options: "all" to select all, "first" to select the box with the highest confidence, and "by_index" to specify the index of the box.
- select_index: This option is valid when bbox_delect is 'by_index'. 0 is the first one. Multiple values can be entered, separated by any non numeric character, including but not limited to commas, periods, semicolons, spaces or letters, and even Chinese.
ObjectDetectorYOLOWorld
Use the YOLO-World model to identify objects in images and output recognition box data.
*Download models from BaiduNetdisk or GoogleDrive and copy to ComfyUI/models/yolo-world folder.
Node Options:
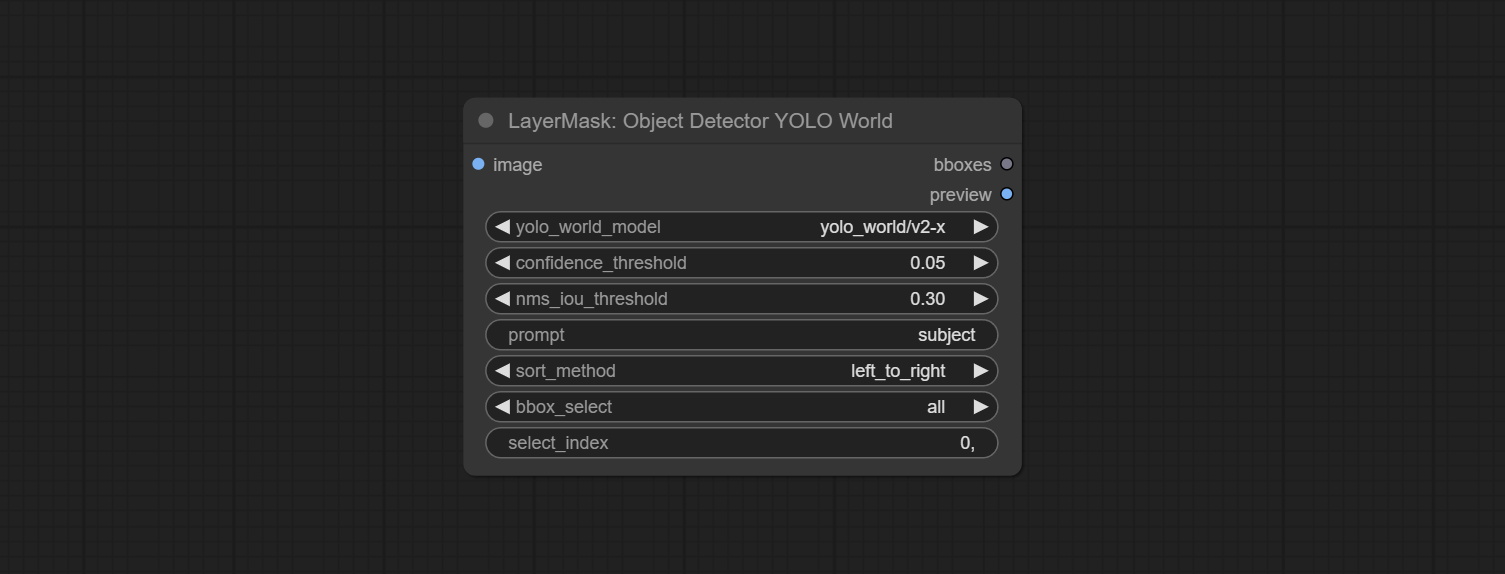
- image: The image to segment.
- confidence_threshold: The threshold of confidence.
- nms_iou_threshold: The threshold of Non-Maximum Suppression.
- prompt: Describe the object that needs to be identified.
- sort_method: The selection box sorting method has 4 options: "left_to_right", "top_to_bottom", "big_to_small" and "confidence".
- bbox_select: Select the input box data. There are three options: "all" to select all, "first" to select the box with the highest confidence, and "by_index" to specify the index of the box.
- select_index: This option is valid when bbox_delect is 'by_index'. 0 is the first one. Multiple values can be entered, separated by any non numeric character, including but not limited to commas, periods, semicolons, spaces or letters, and even Chinese.
ObjectDetectorYOLO8
Use the YOLO-8 model to identify objects in images and output recognition box data.
*Download models from GoogleDrive or BaiduNetdisk and copy to ComfyUI/models/yolo folder.
Node Options:
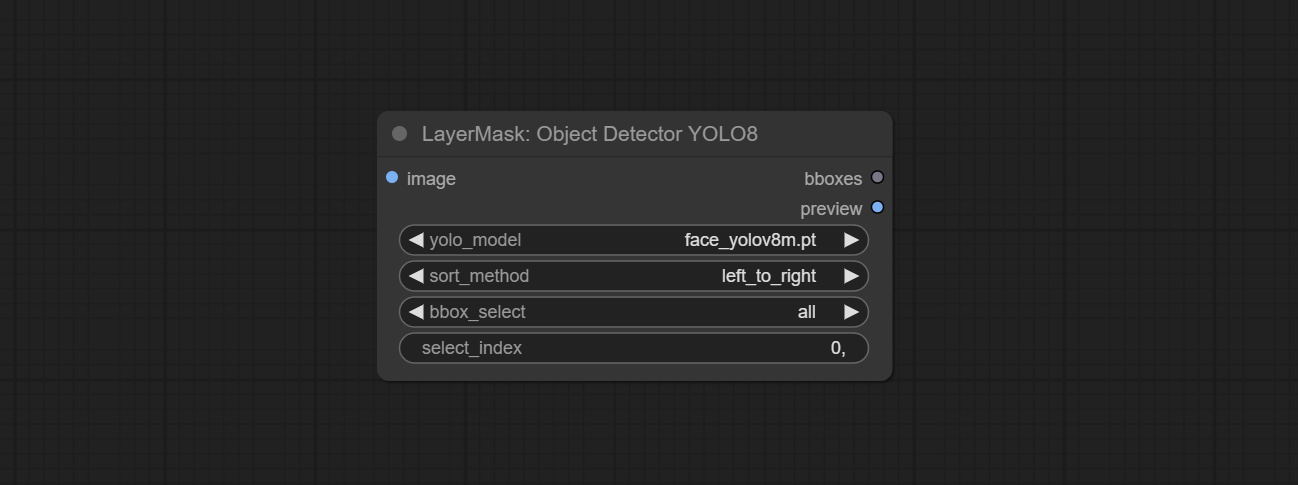
- image: The image to segment.
- yolo_model: Choose the yolo model.
- sort_method: The selection box sorting method has 4 options: "left_to_right", "top_to_bottom", "big_to_small" and "confidence".
- bbox_select: Select the input box data. There are three options: "all" to select all, "first" to select the box with the highest confidence, and "by_index" to specify the index of the box.
- select_index: This option is valid when bbox_delect is 'by_index'. 0 is the first one. Multiple values can be entered, separated by any non numeric character, including but not limited to commas, periods, semicolons, spaces or letters, and even Chinese.
ObjectDetectorMask
Use mask as recognition box data. All areas surrounded by white areas on the mask will be recognized as an object. Multiple enclosed areas will be identified separately.
Node Options:
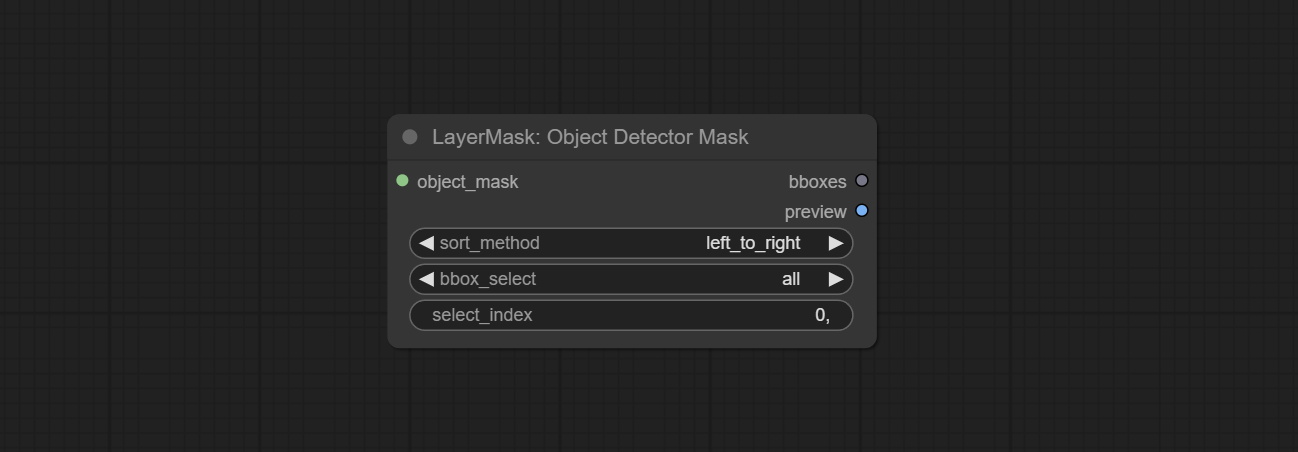
- object_mask: The mask input.
- sort_method: The selection box sorting method has 4 options: "left_to_right", "top_to_bottom", "big_to_small" and "confidence".
- bbox_select: Select the input box data. There are three options: "all" to select all, "first" to select the box with the highest confidence, and "by_index" to specify the index of the box.
- select_index: This option is valid when bbox_delect is 'by_index'. 0 is the first one. Multiple values can be entered, separated by any non numeric character, including but not limited to commas, periods, semicolons, spaces or letters, and even Chinese.
BBoxJoin
Merge recognition box data.
Node Options:
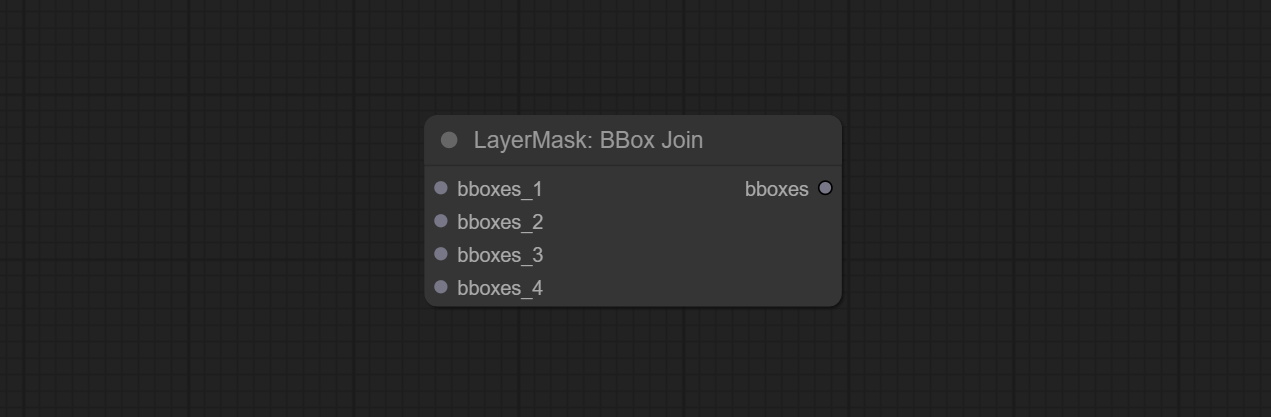
- bboxes_1: Required input. The first set of identification boxes.
- bboxes_2: Optional input. The second set of identification boxes.
- bboxes_3: Optional input. The third set of identification boxes.
- bboxes_4: Optional input. The fourth set of identification boxes.
DrawBBoxMask
Draw the recognition BBoxes data output by the Object Detector node as a mask.
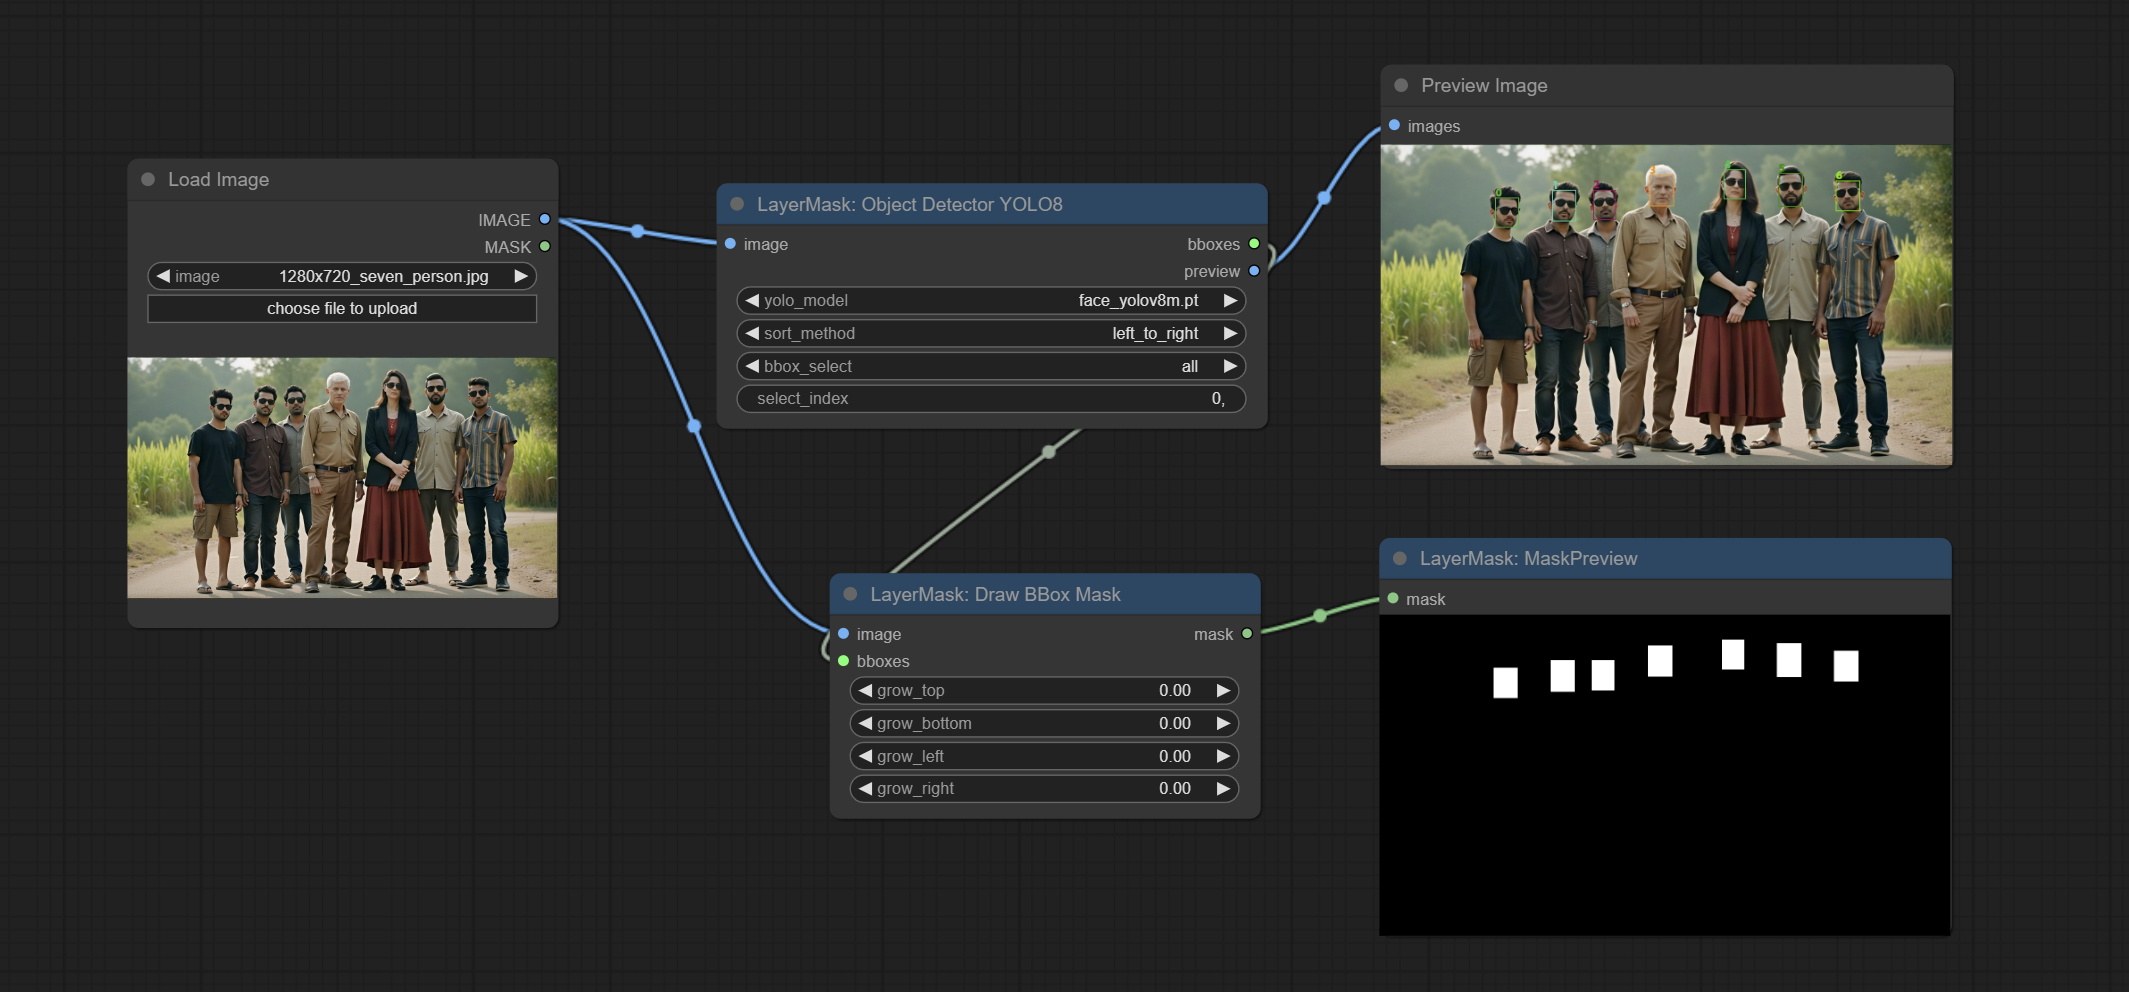
Node Options:
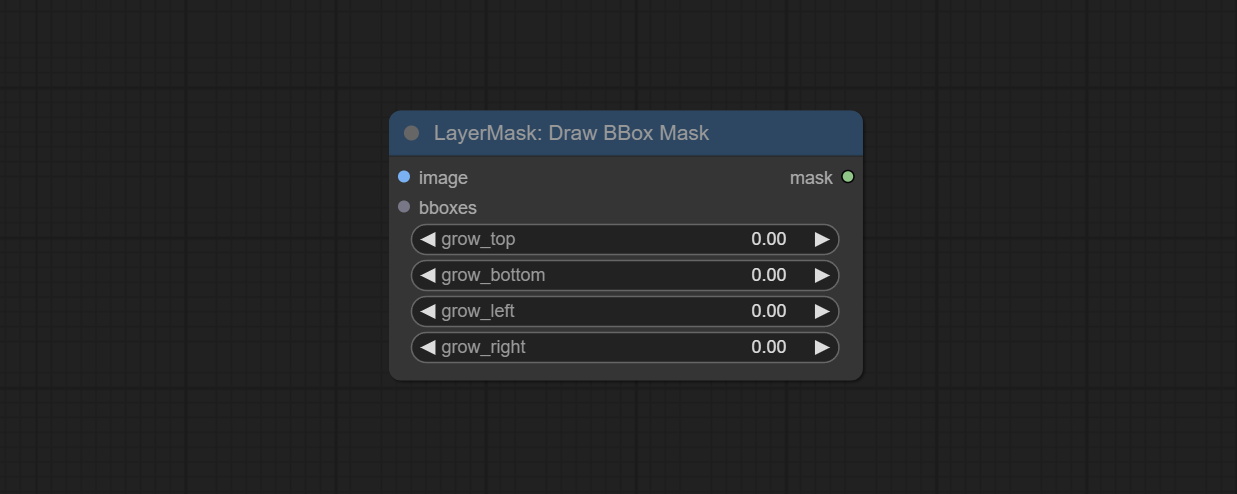
- image: Image input. It must be consistent with the image recognized by the Object Detector node.
- bboxes: Input recognition BBoxes data.
- grow_top: Each BBox expands upwards as a percentage of its height, positive values indicate upward expansion and negative values indicate downward expansion.
- grow_bottom: Each BBox expands downwards as a percentage of its height, positive values indicating downward expansion and negative values indicating upward expansion.
- grow_left: Each BBox expands to the left as a percentage of its width, positive values expand to the left and negative values expand to the right.
- grow_right: Each BBox expands to the right as a percentage of its width, positive values indicate expansion to the right and negative values indicate expansion to the left.
EVF-SAMUltra
This node is implementation of EVF-SAM in ComfyUI.
*Please download model files from BaiduNetdisk or huggingface/EVF-SAM2, huggingface/EVF-SAM to ComfyUI/models/EVF-SAM folder(save the models in their respective subdirectories). 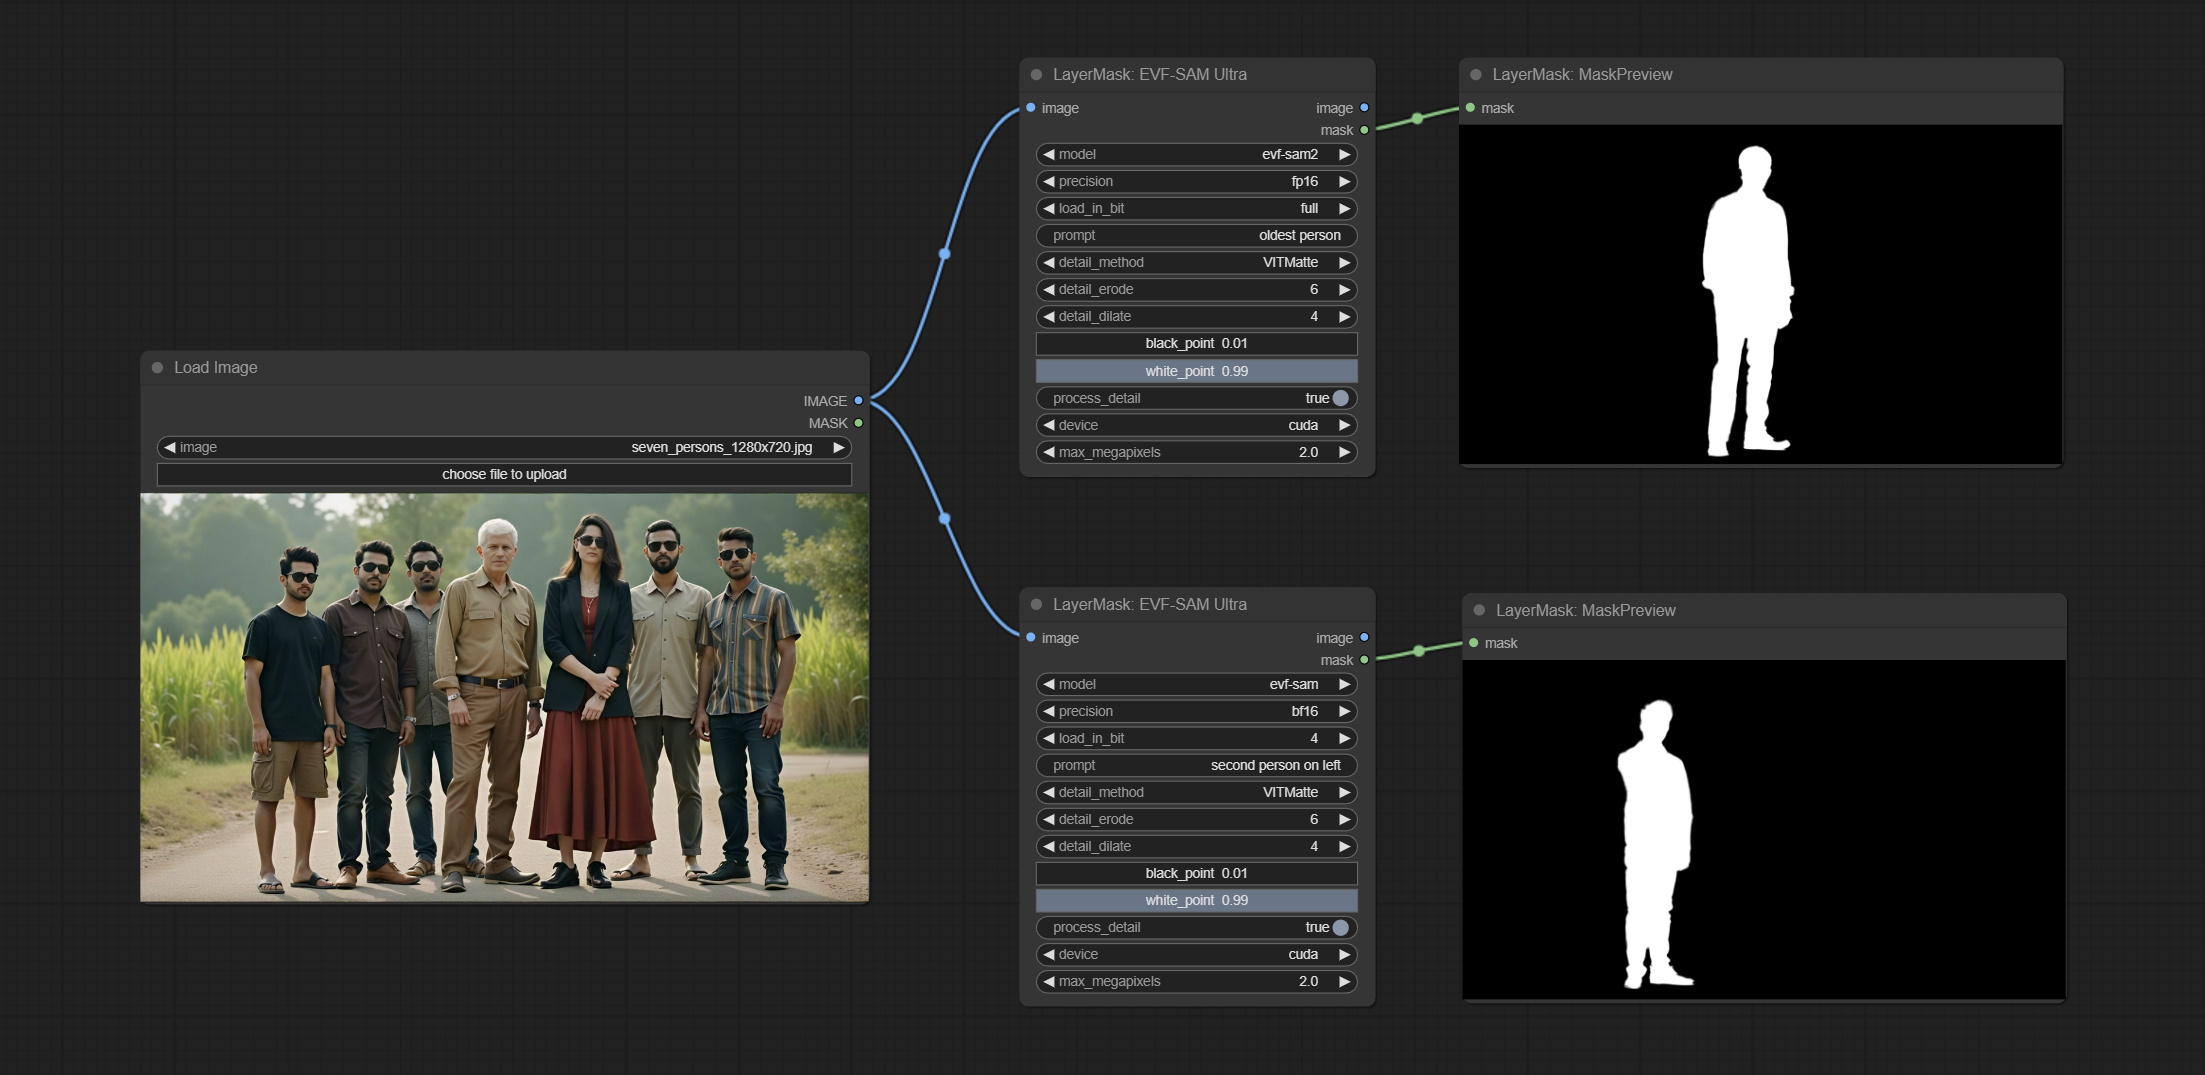
Node Options:
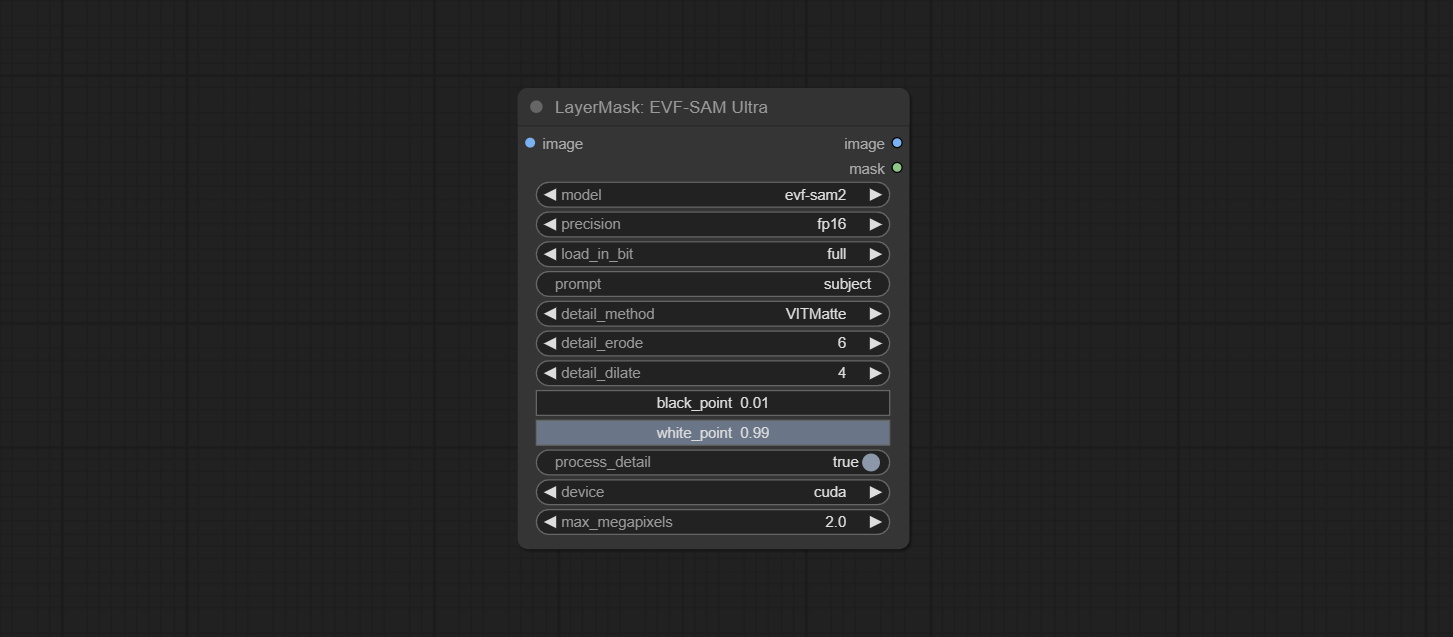
- image: The input image.
- model: Select the model. Currently, there are options for evf-sam2 and evf sam.
- presicion: Model accuracy can be selected from fp16, bf16, and fp32.
- load_in_bit: Load the model with positional accuracy. You can choose from full, 8, and 4.
- pormpt: Prompt words used for segmentation.
- detail_method: Edge processing methods. provides VITMatte, VITMatte(local), PyMatting, GuidedFilter. If the model has been downloaded after the first use of VITMatte, you can use VITMatte (local) afterwards.
- detail_erode: Mask the erosion range inward from the edge. the larger the value, the larger the range of inward repair.
- detail_dilate: The edge of the mask expands outward. the larger the value, the wider the range of outward repair.
- black_point: Edge black sampling threshold.
- white_point: Edge white sampling threshold.
- process_detail: Set to false here will skip edge processing to save runtime.
- device: Set whether the VitMatte to use cuda.
- max_megapixels: Set the maximum size for VitMate operations.
Florence2Ultra
Using the segmentation function of the Florence2 model, while also having ultra-high edge details. The code for this node section is from spacepxl/ComfyUI-Florence-2, thanks to the original author. *Download the model files from BaiduNetdisk to ComfyUI/models/florence2 folder.
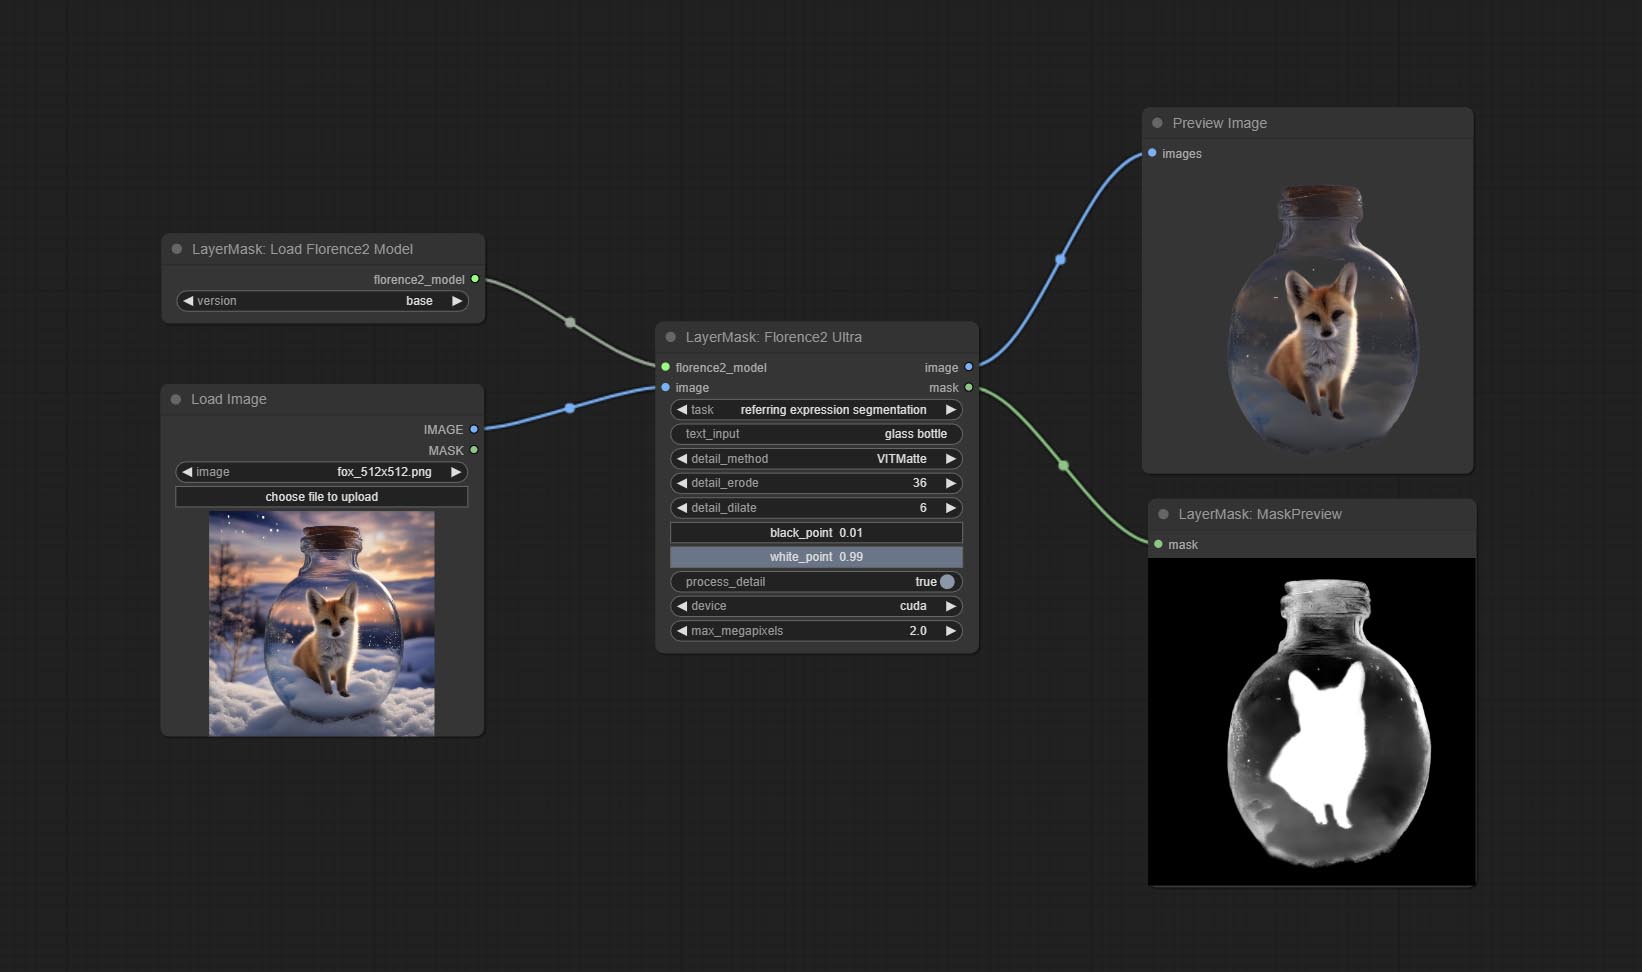
Node Options:
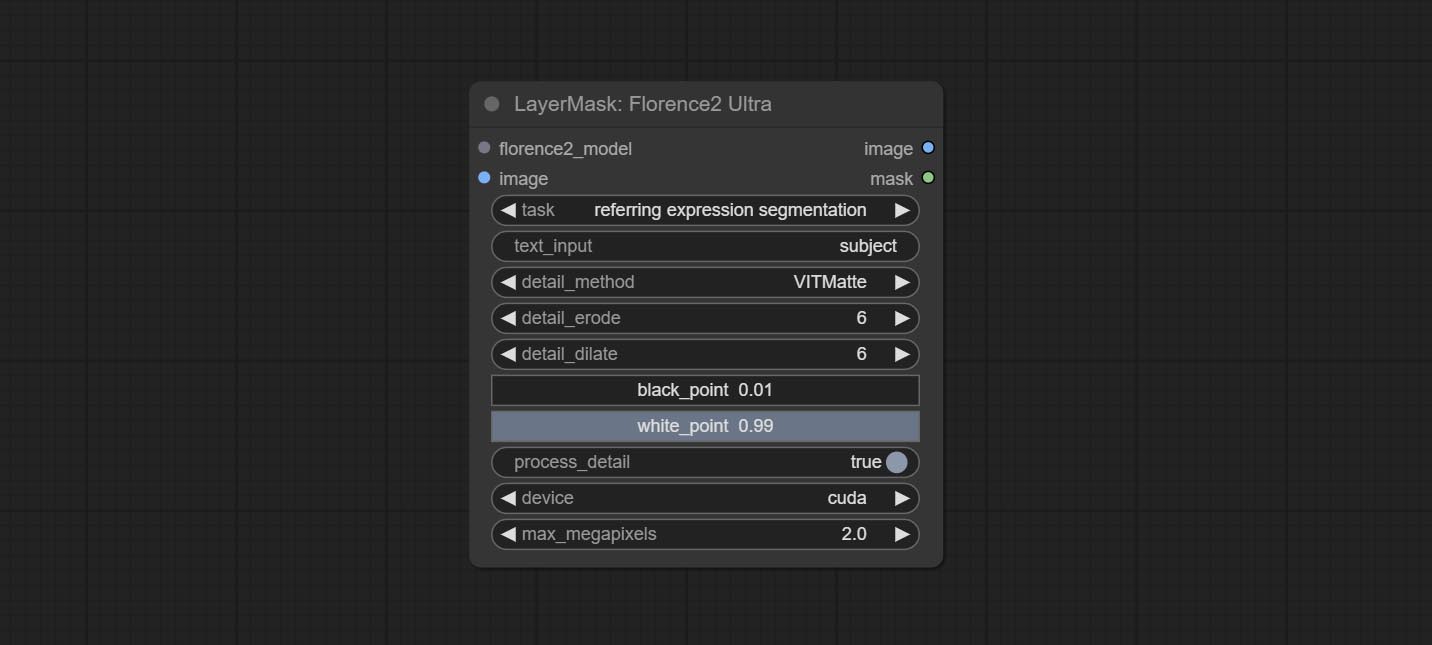
- florence2_model: Florence2 model input.
- image: Image input.
- task: Select the task for florence2.
- text_input: Text input for florence2.
- detail_method: Edge processing methods. provides VITMatte, VITMatte(local), PyMatting, GuidedFilter. If the model has been downloaded after the first use of VITMatte, you can use VITMatte (local) afterwards.
- detail_erode: Mask the erosion range inward from the edge. the larger the value, the larger the range of inward repair.
- detail_dilate: The edge of the mask expands outward. the larger the value, the wider the range of outward repair.
- black_point: Edge black sampling threshold.
- white_point: Edge white sampling threshold.
- process_detail: Set to false here will skip edge processing to save runtime.
- device: Set whether the VitMatte to use cuda.
- max_megapixels: Set the maximum size for VitMate operations.
LoadFlorence2Model
Florence2 model loader. *When using it for the first time, the model will be automatically downloaded.
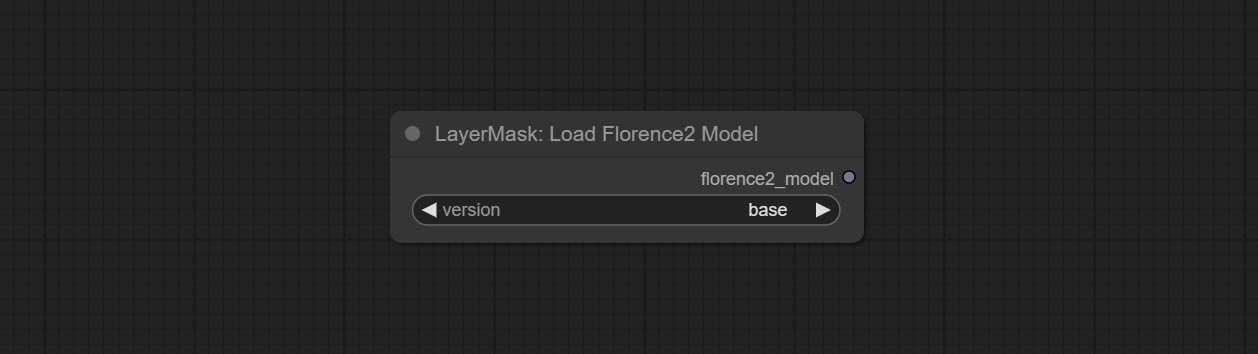
At present, there are base, base-ft, large, large-ft, DocVQA, SD3-Captioner and base-PromptGen models to choose from.
RemBgUltra
Remove background. compared to the similar background removal nodes, this node has ultra-high edge details.
This node combines the Alpha Matte node of Spacepxl's ComfyUI-Image-Filters and the functionality of ZHO-ZHO-ZHO's ComfyUI-BRIA_AI-RMBG, thanks to the original author.
*Download model files from BRIA Background Removal v1.4 or BaiduNetdisk to ComfyUI/models/rmbg/RMBG-1.4 folder. This model can be used for non-commercial purposes.
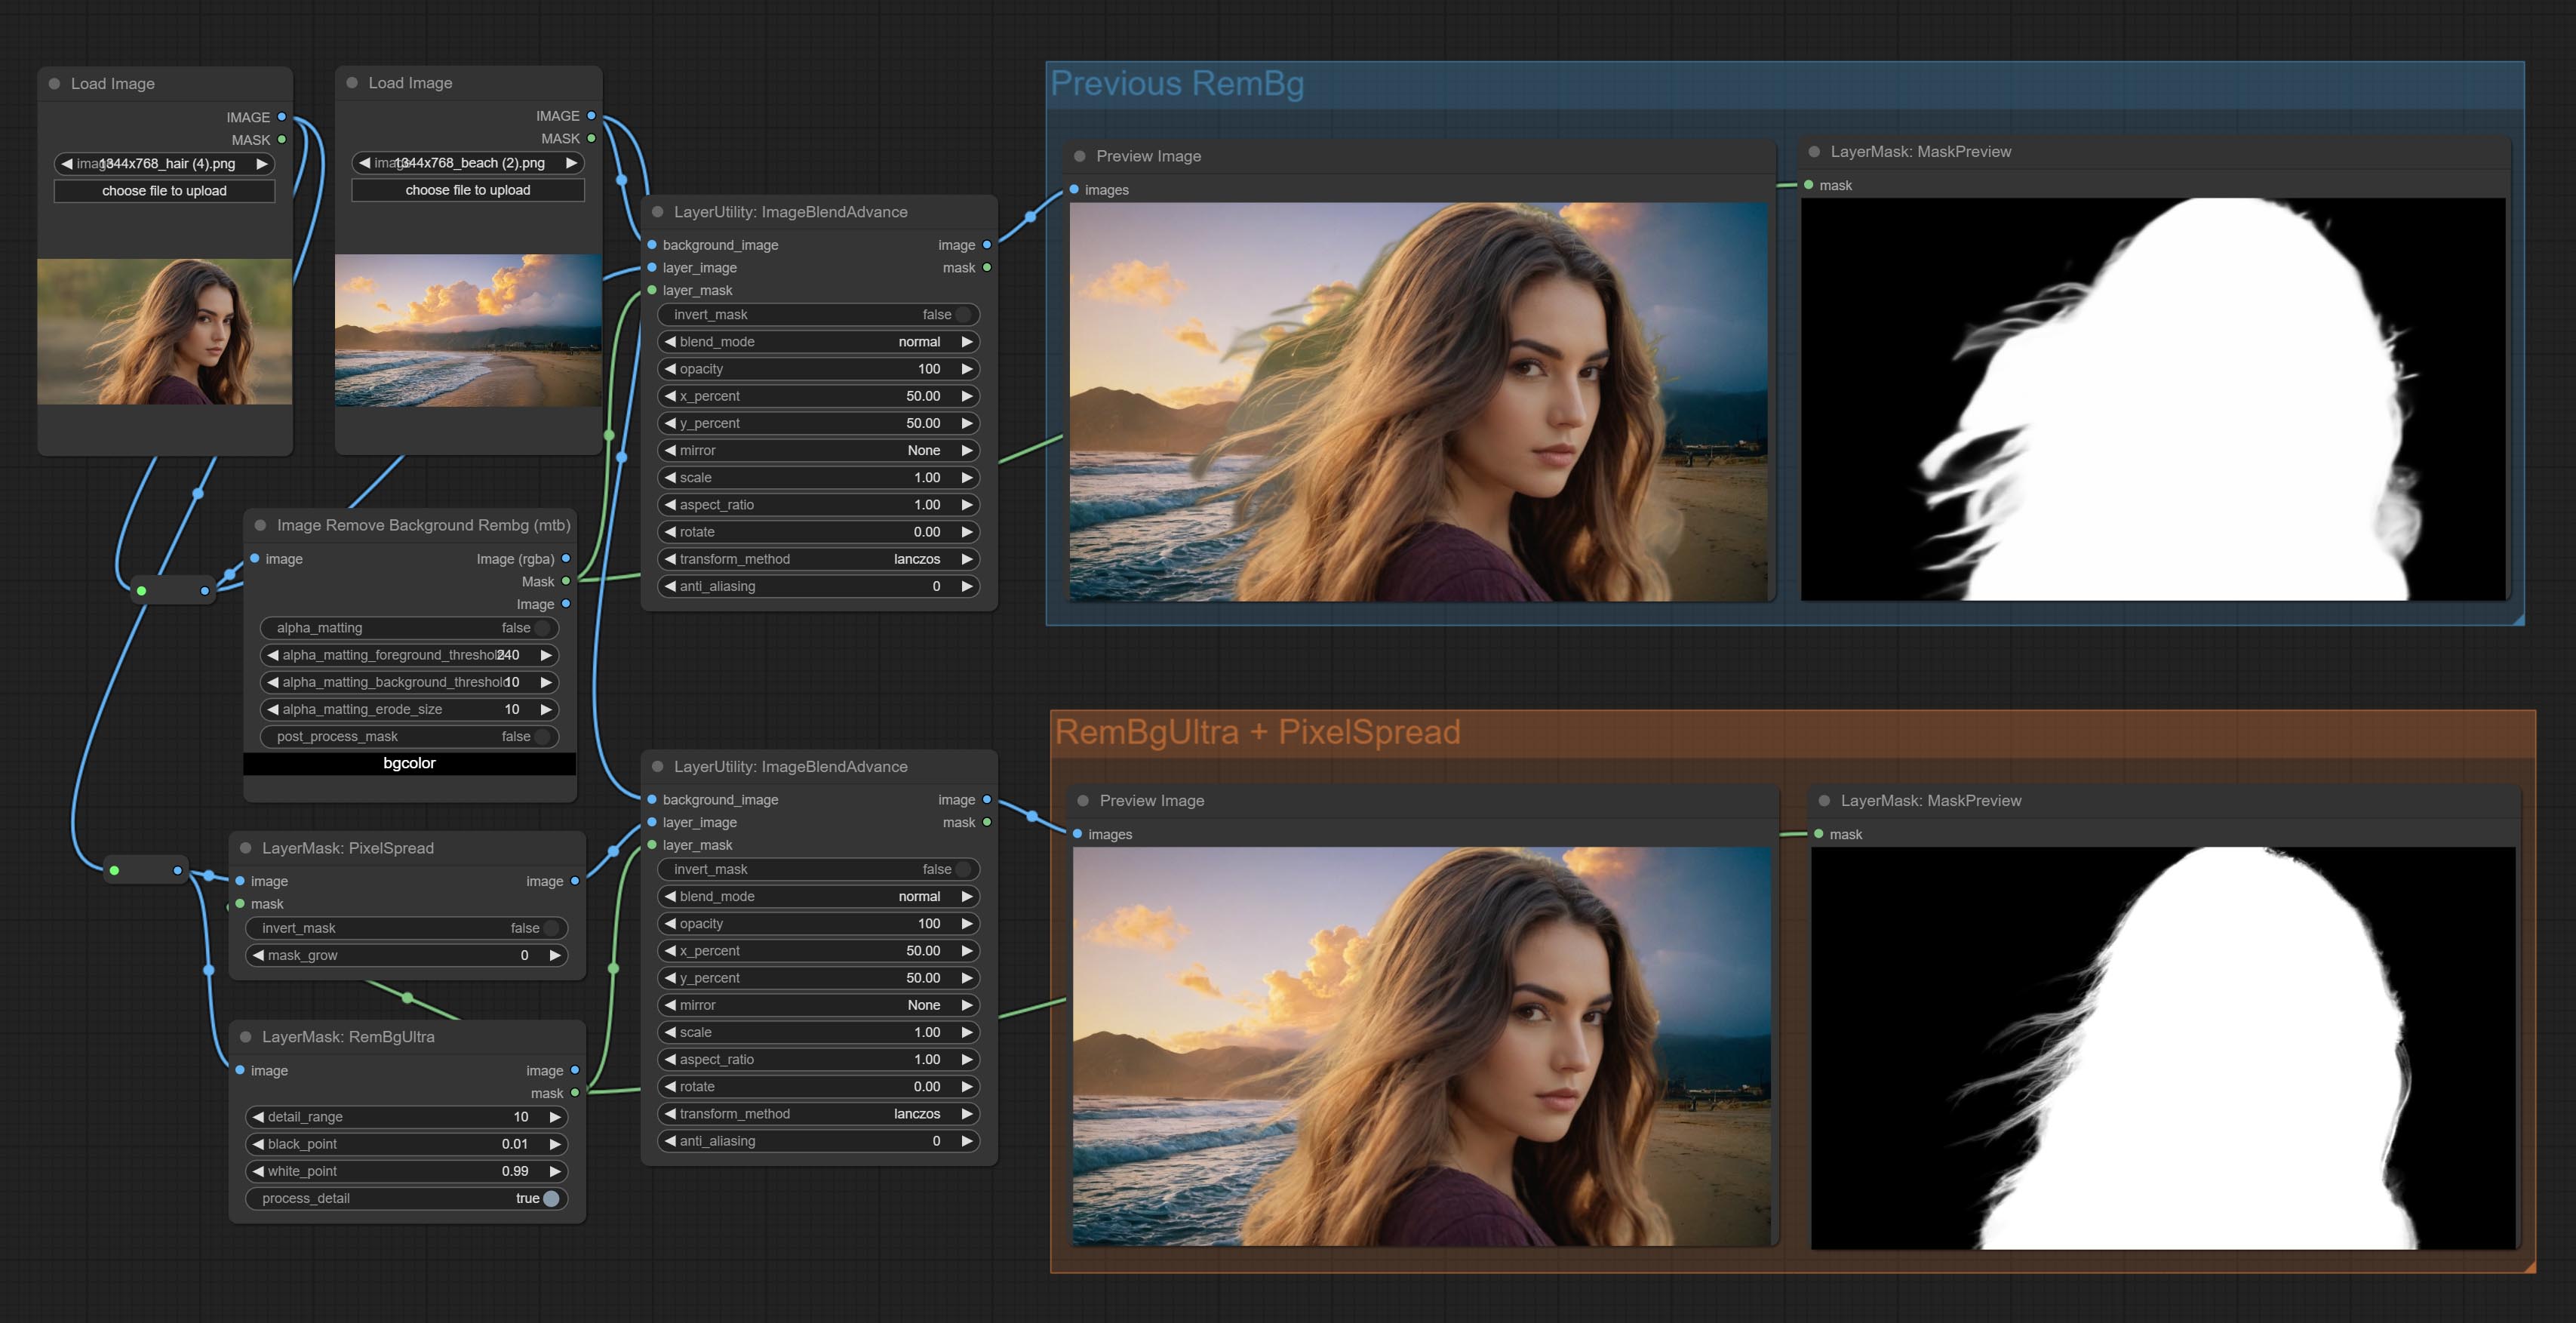
Node options:
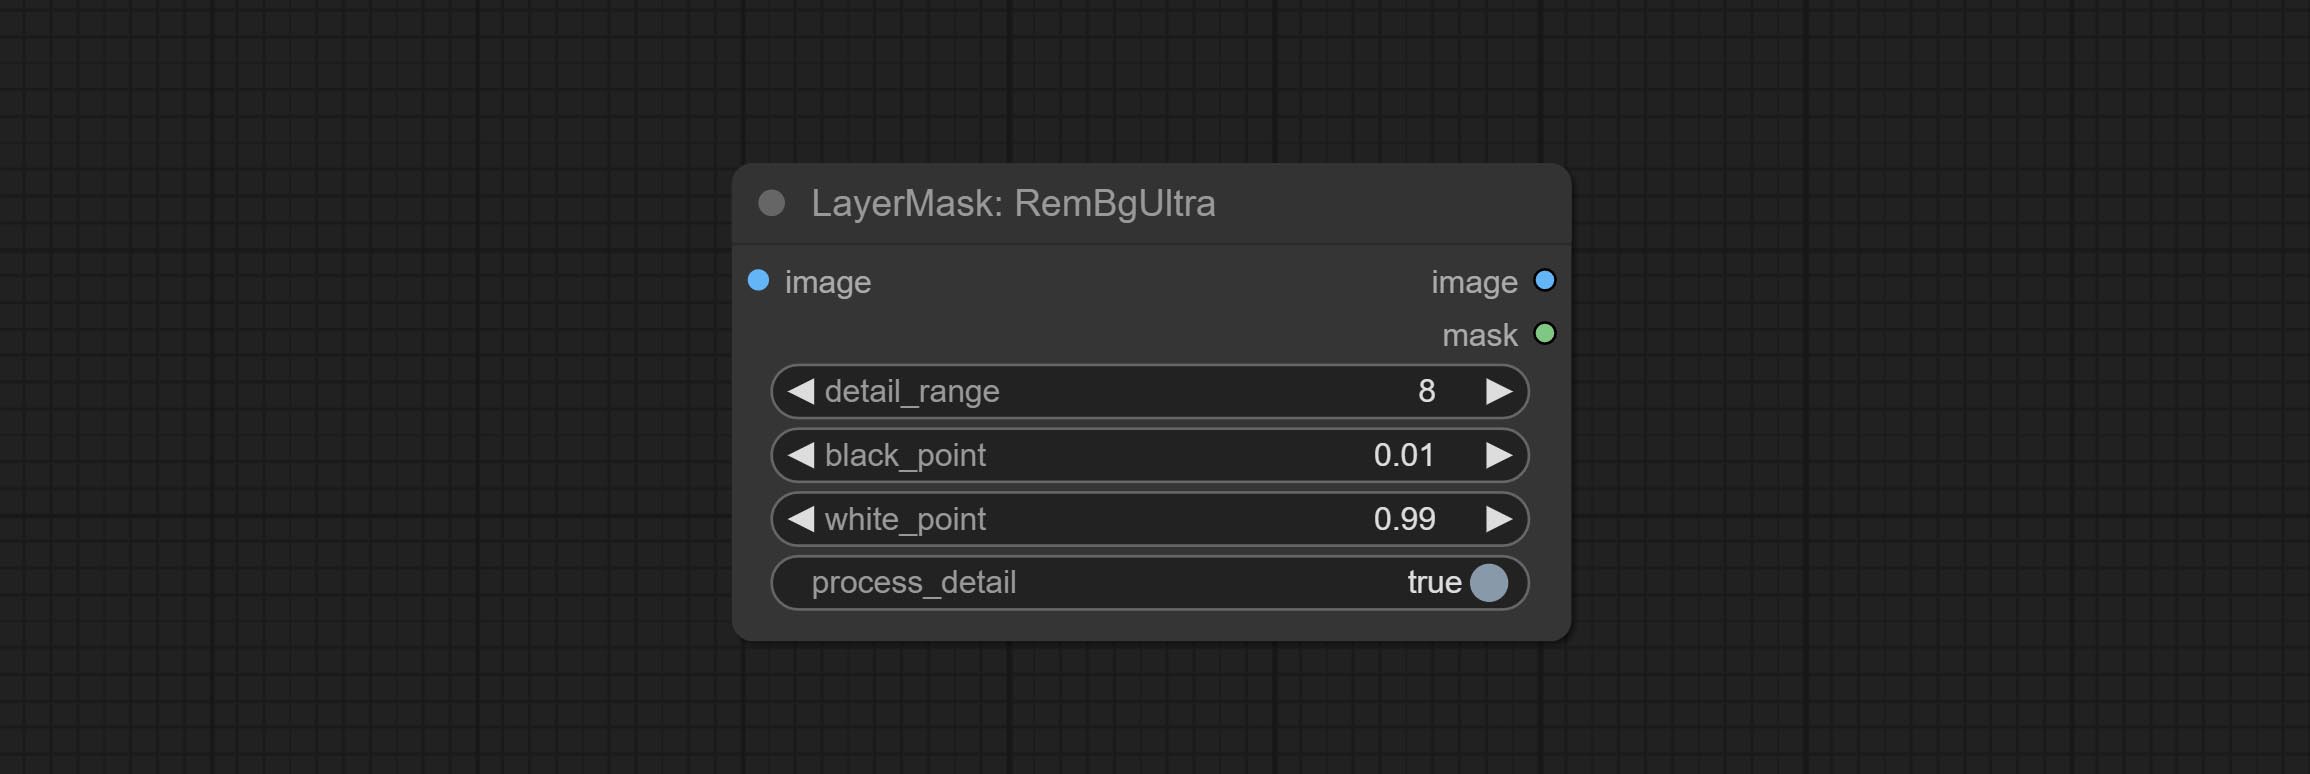
- detail_range: Edge detail range.
- black_point: Edge black sampling threshold.
- white_point: Edge white sampling threshold.
- process_detail: Set to false here will skip edge processing to save runtime.
RmBgUltraV2
The V2 upgraded version of RemBgUltra has added the VITMatte edge processing method.(Note: Images larger than 2K in size using this method will consume huge memory)
On the basis of RemBgUltra, the following changes have been made: 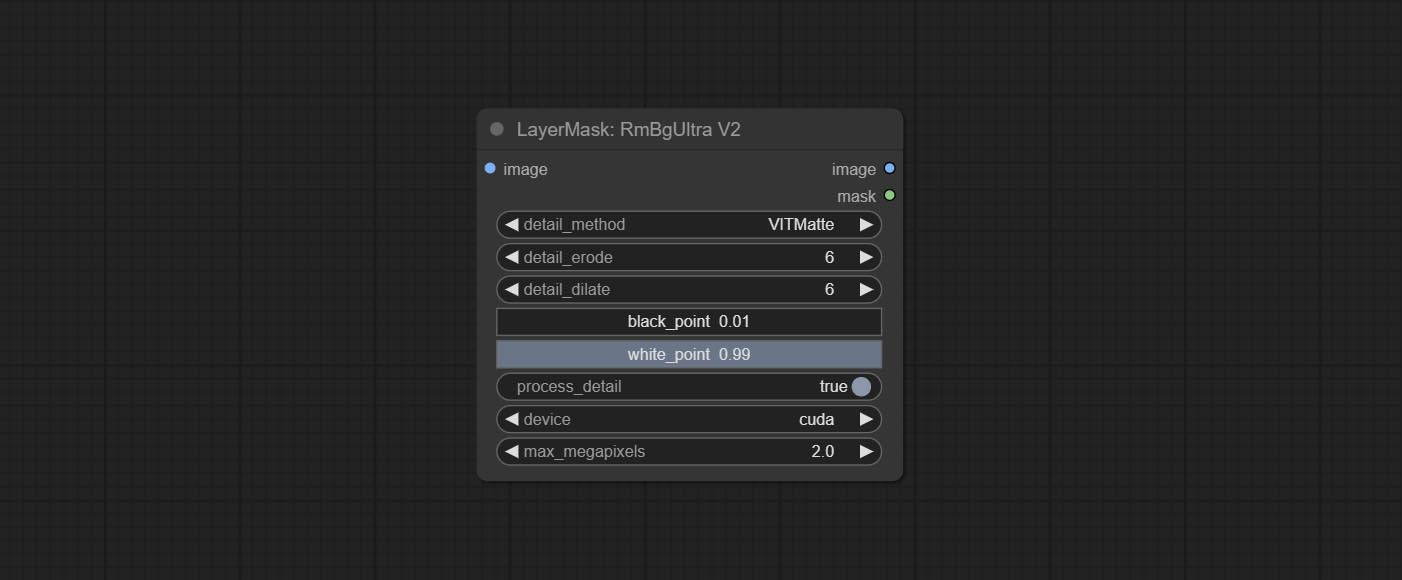
- detail_method: Edge processing methods. provides VITMatte, VITMatte(local), PyMatting, GuidedFilter. If the model has been downloaded after the first use of VITMatte, you can use VITMatte (local) afterwards.
- detail_erode: Mask the erosion range inward from the edge. the larger the value, the larger the range of inward repair.
- detail_dilate: The edge of the mask expands outward. the larger the value, the wider the range of outward repair.
- device: Set whether the VitMatte to use cuda.
- max_megapixels: Set the maximum size for VitMate operations.
BenUltra
It is the implementation of PramaLLC/BEN project in ComfyUI. Thank you to the original author.
Download the BEN_Base.pth and config.json from huggingface or BaiduNetdisk and copy to ComfyUI/models/BEN folder.
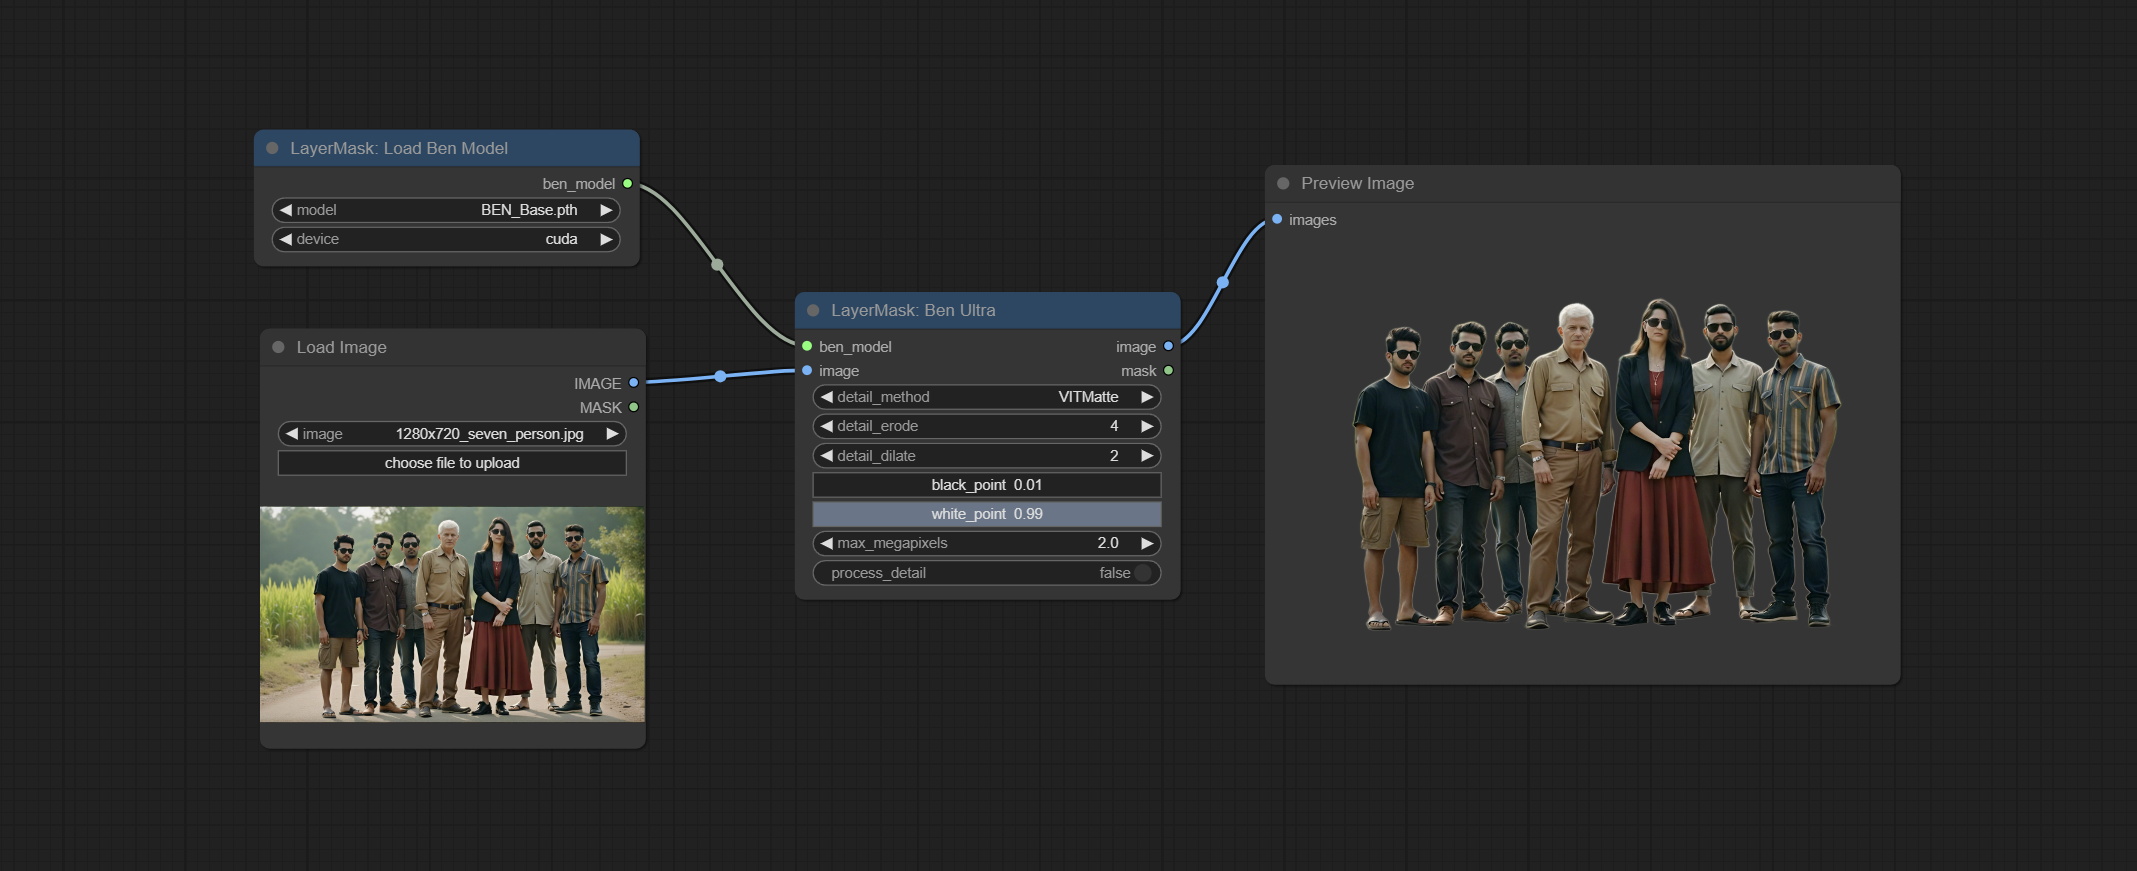
Node Options: 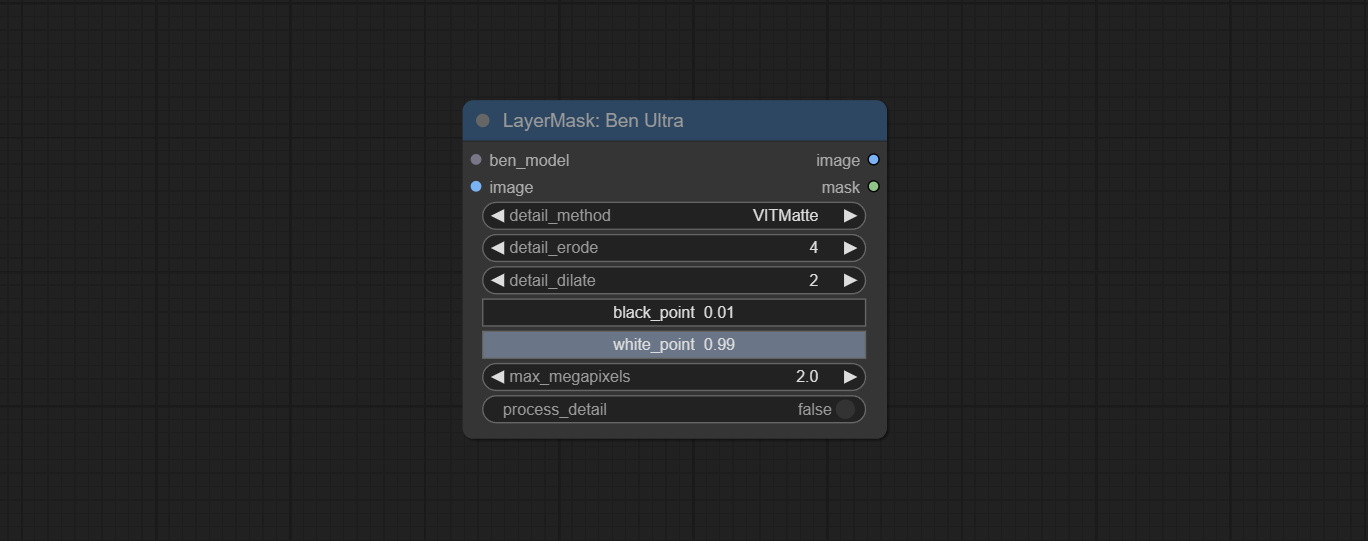
- ben_model: Ben model input.
- image: Image input.
- detail_method: Edge processing methods. provides VITMatte, VITMatte(local), PyMatting, GuidedFilter. If the model has been downloaded after the first use of VITMatte, you can use VITMatte (local) afterwards.
- detail_erode: Mask the erosion range inward from the edge. the larger the value, the larger the range of inward repair.
- detail_dilate: The edge of the mask expands outward. the larger the value, the wider the range of outward repair.
- black_point: Edge black sampling threshold.
- white_point: Edge white sampling threshold.
- process_detail: Set to false here will skip edge processing to save runtime.
- max_megapixels: Set the maximum size for VitMate operations.
LoadBenModel
Load the BEN model.
Node Options:
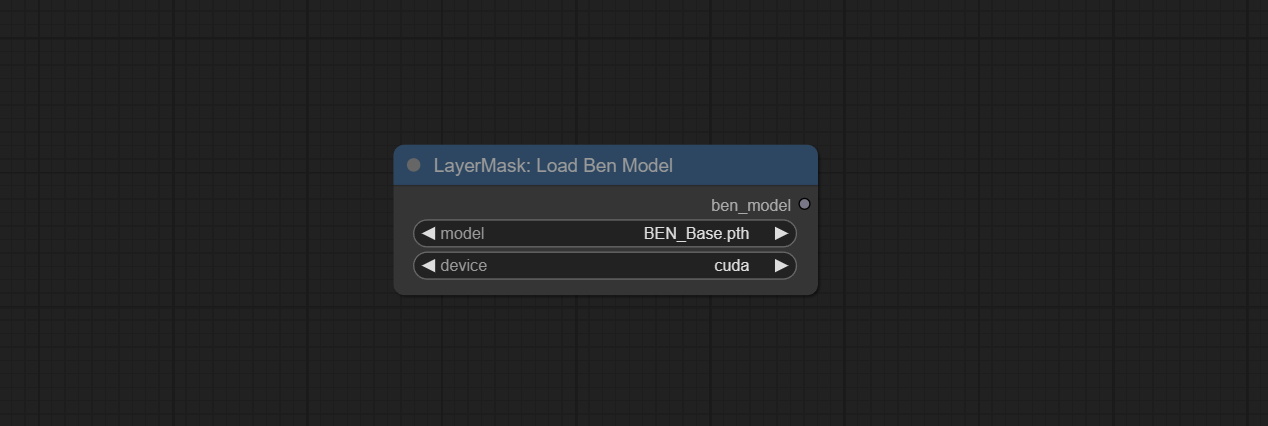
- model: Select the model. Currently, only the Ben_Sase model is available for selection.
BiRefNetUltra
Using the BiRefNet model to remove background has better recognition ability and ultra-high edge details. The code for the model part of this node comes from Viper's ComfyUI-BiRefNet,thanks to the original author.
*From https://huggingface.co/ViperYX/BiRefNet or BaiduNetdisk download the BiRefNet-ep480.pth , pvt_v2_b2.pth , pvt_v2_b5.pth , swin_base_patch4_window12_384_22kto1k.pth , swin_large_patch4_window12_384_22kto1k.pth 5 files to ComfyUI/models/BiRefNet folder.
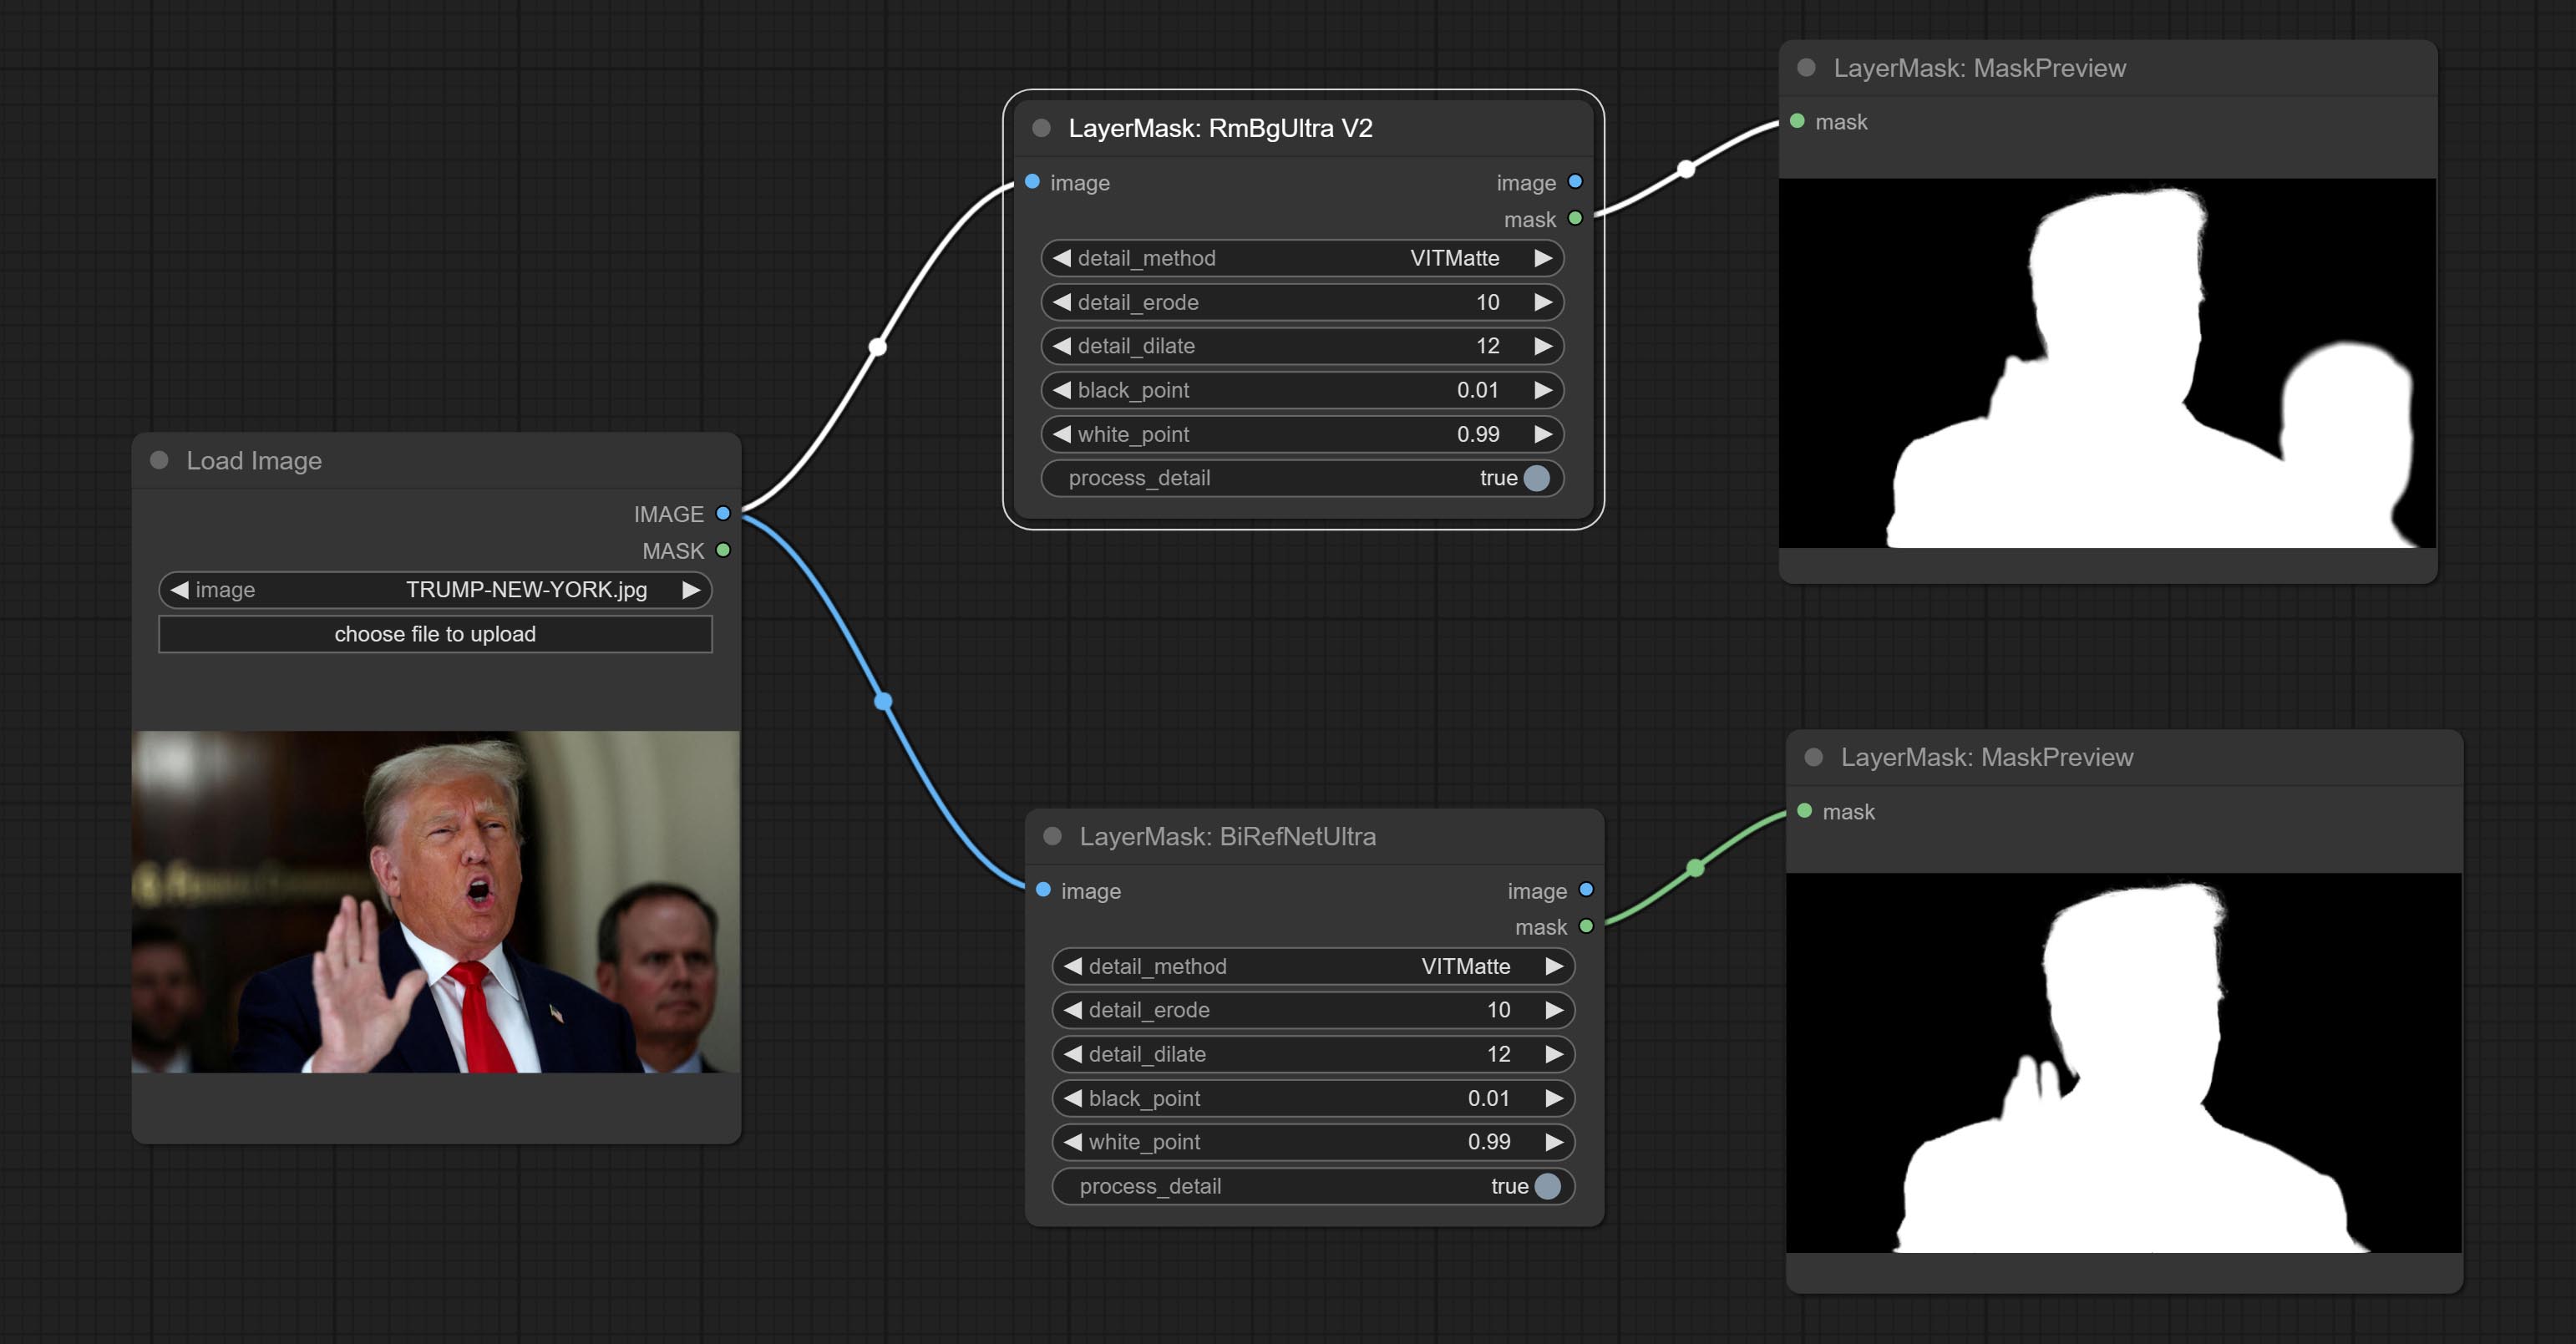
Node options:
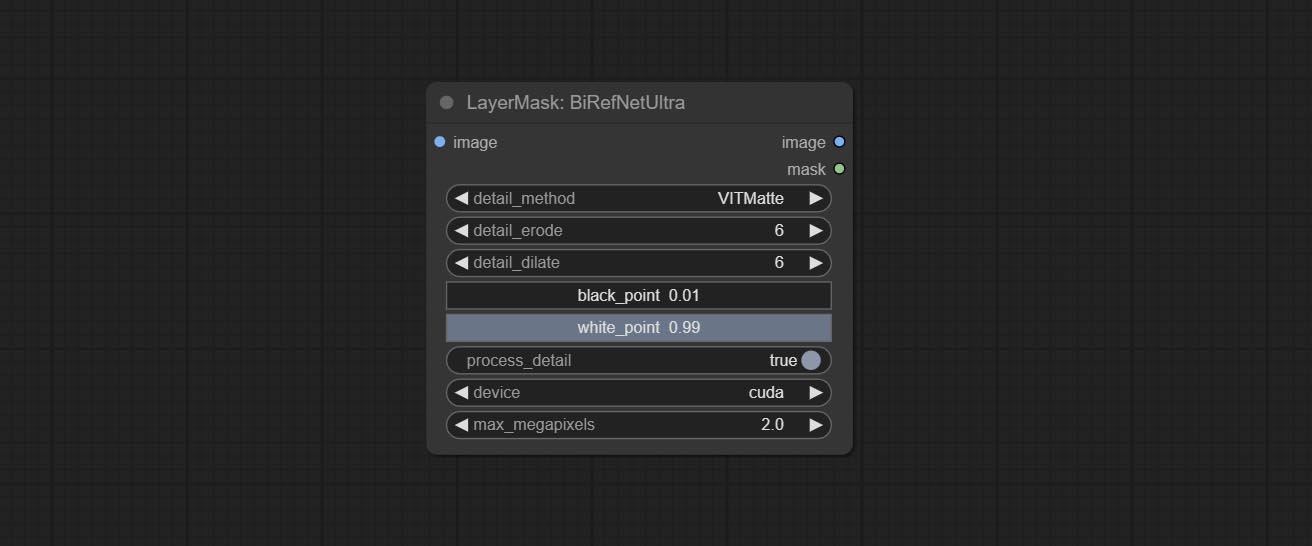
- detail_method: Edge processing methods. provides VITMatte, VITMatte(local), PyMatting, GuidedFilter. If the model has been downloaded after the first use of VITMatte, you can use VITMatte (local) afterwards.
- detail_erode: Mask the erosion range inward from the edge. the larger the value, the larger the range of inward repair.
- detail_dilate: The edge of the mask expands outward. the larger the value, the wider the range of outward repair.
- black_point: Edge black sampling threshold.
- white_point: Edge white sampling threshold.
- process_detail: Set to false here will skip edge processing to save runtime.
- device: Set whether the VitMatte to use cuda.
- max_megapixels: Set the maximum size for VitMate operations.
BiRefNetUltraV2
This node supports the use of the latest BiRefNet model. *Download model file from BaiduNetdisk or GoogleDrive named BiRefNet-general-epoch_244.pth to ComfyUI/Models/BiRefNet/pth folder. You can also download more BiRefNet models and put them here.
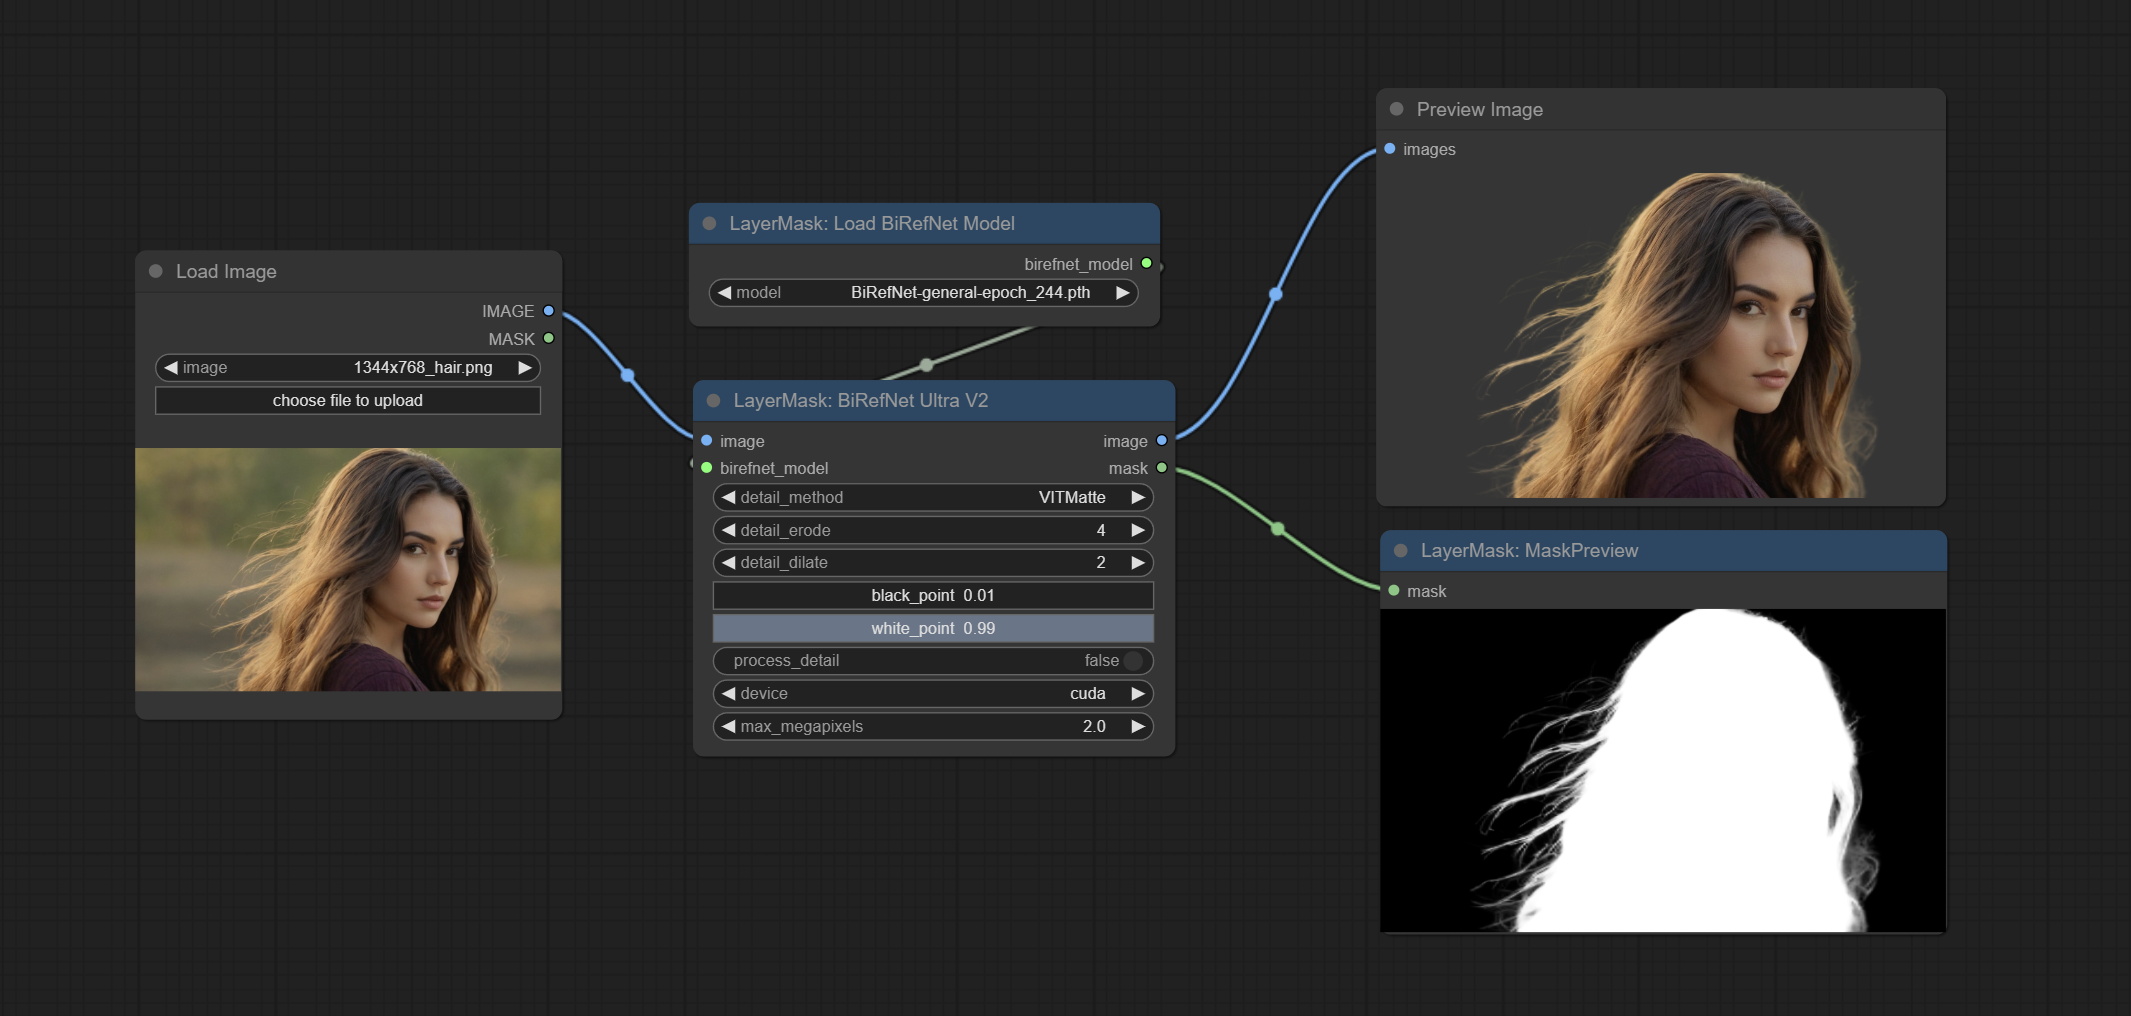
Node Options:
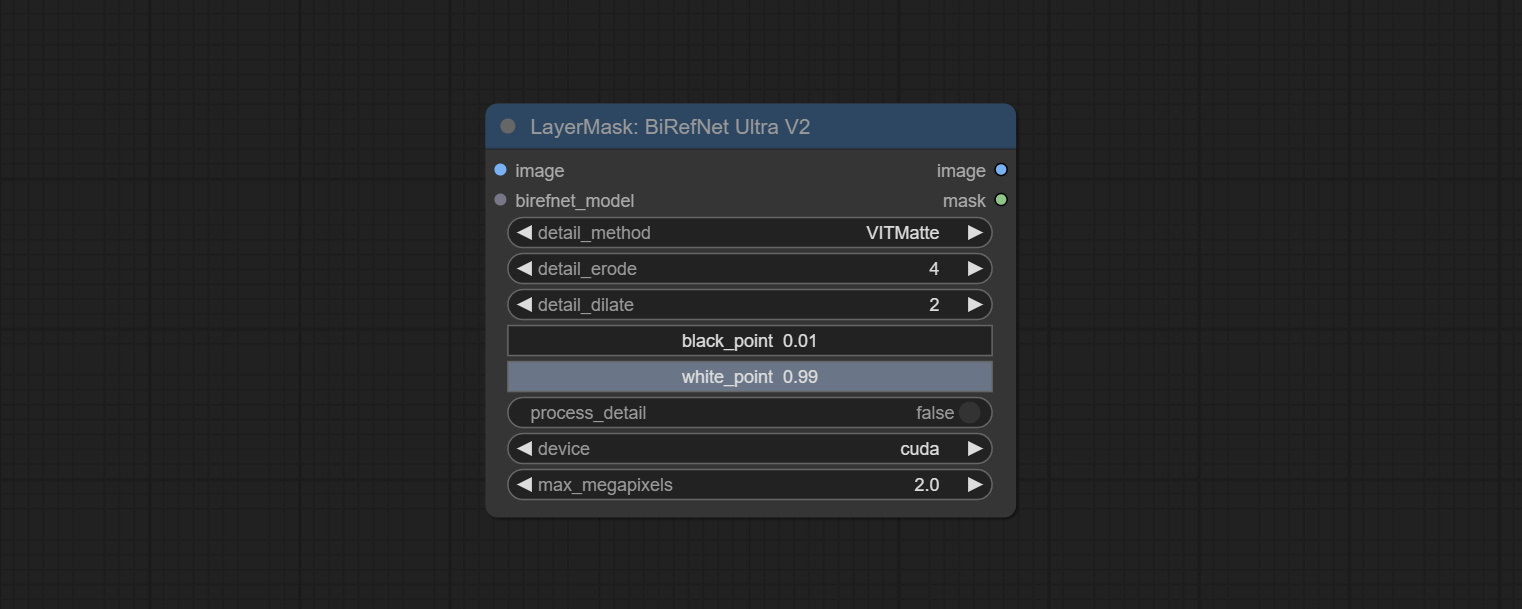
- image: The input image.
- birefnet_model: The BiRefNet model is input and it is output from the LoadBiRefNetModel node.
- detail_method: Edge processing methods. provides VITMatte, VITMatte(local), PyMatting, GuidedFilter. If the model has been downloaded after the first use of VITMatte, you can use VITMatte (local) afterwards.
- detail_erode: Mask the erosion range inward from the edge. the larger the value, the larger the range of inward repair.
- detail_dilate: The edge of the mask expands outward. the larger the value, the wider the range of outward repair.
- black_point: Edge black sampling threshold.
- white_point: Edge white sampling threshold.
- process_detail: Due to the excellent edge processing of BiRefNet, it is set to False by default here.
- device: Set whether the VitMatte to use cuda.
- max_megapixels: Set the maximum size for VitMate operations.
LoadBiRefNetModel
Load the BiRefNet model.
Node Options:
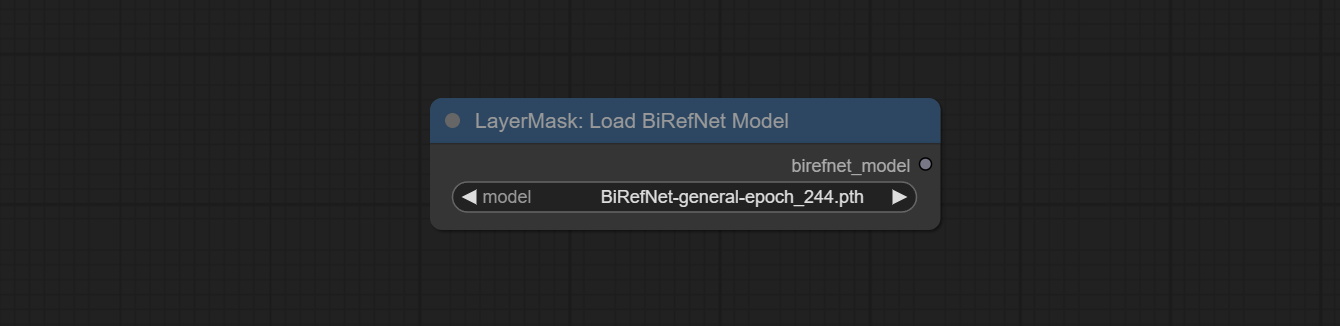
- model: Select the model. List the files in the
CoomfyUI/models/BiRefNet/pth folder for selection.
LoadBiRefNetModelV2
This node is a PR submitted by jimlee2048 and supports loading RMBG-2.0 models.
Download model files from huggingface or 百度网盘 and copy to ComfyUI/models/BiRefNet/RMBG-2.0 folder.
Node Options:
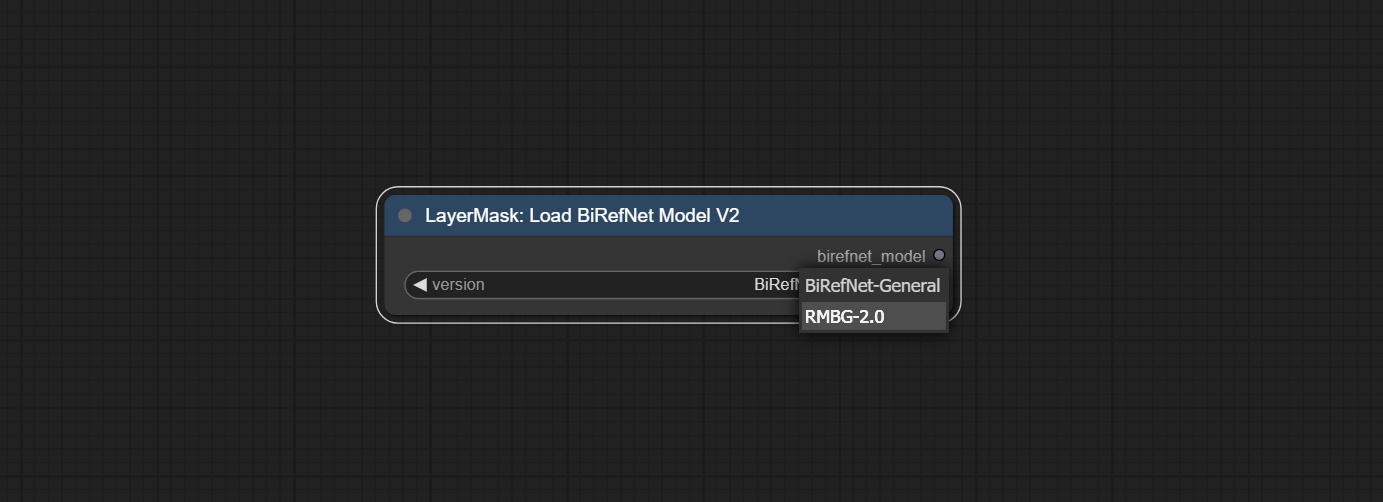
- model: Select the model. There are two options,
BiRefNet-General and RMBG-2.0 .
TransparentBackgroundUltra
Using the transparent-background model to remove background has better recognition ability and speed, while also having ultra-high edge details.
*From googledrive or BaiduNetdisk download all files to ComfyUI/models/transparent-background folder.
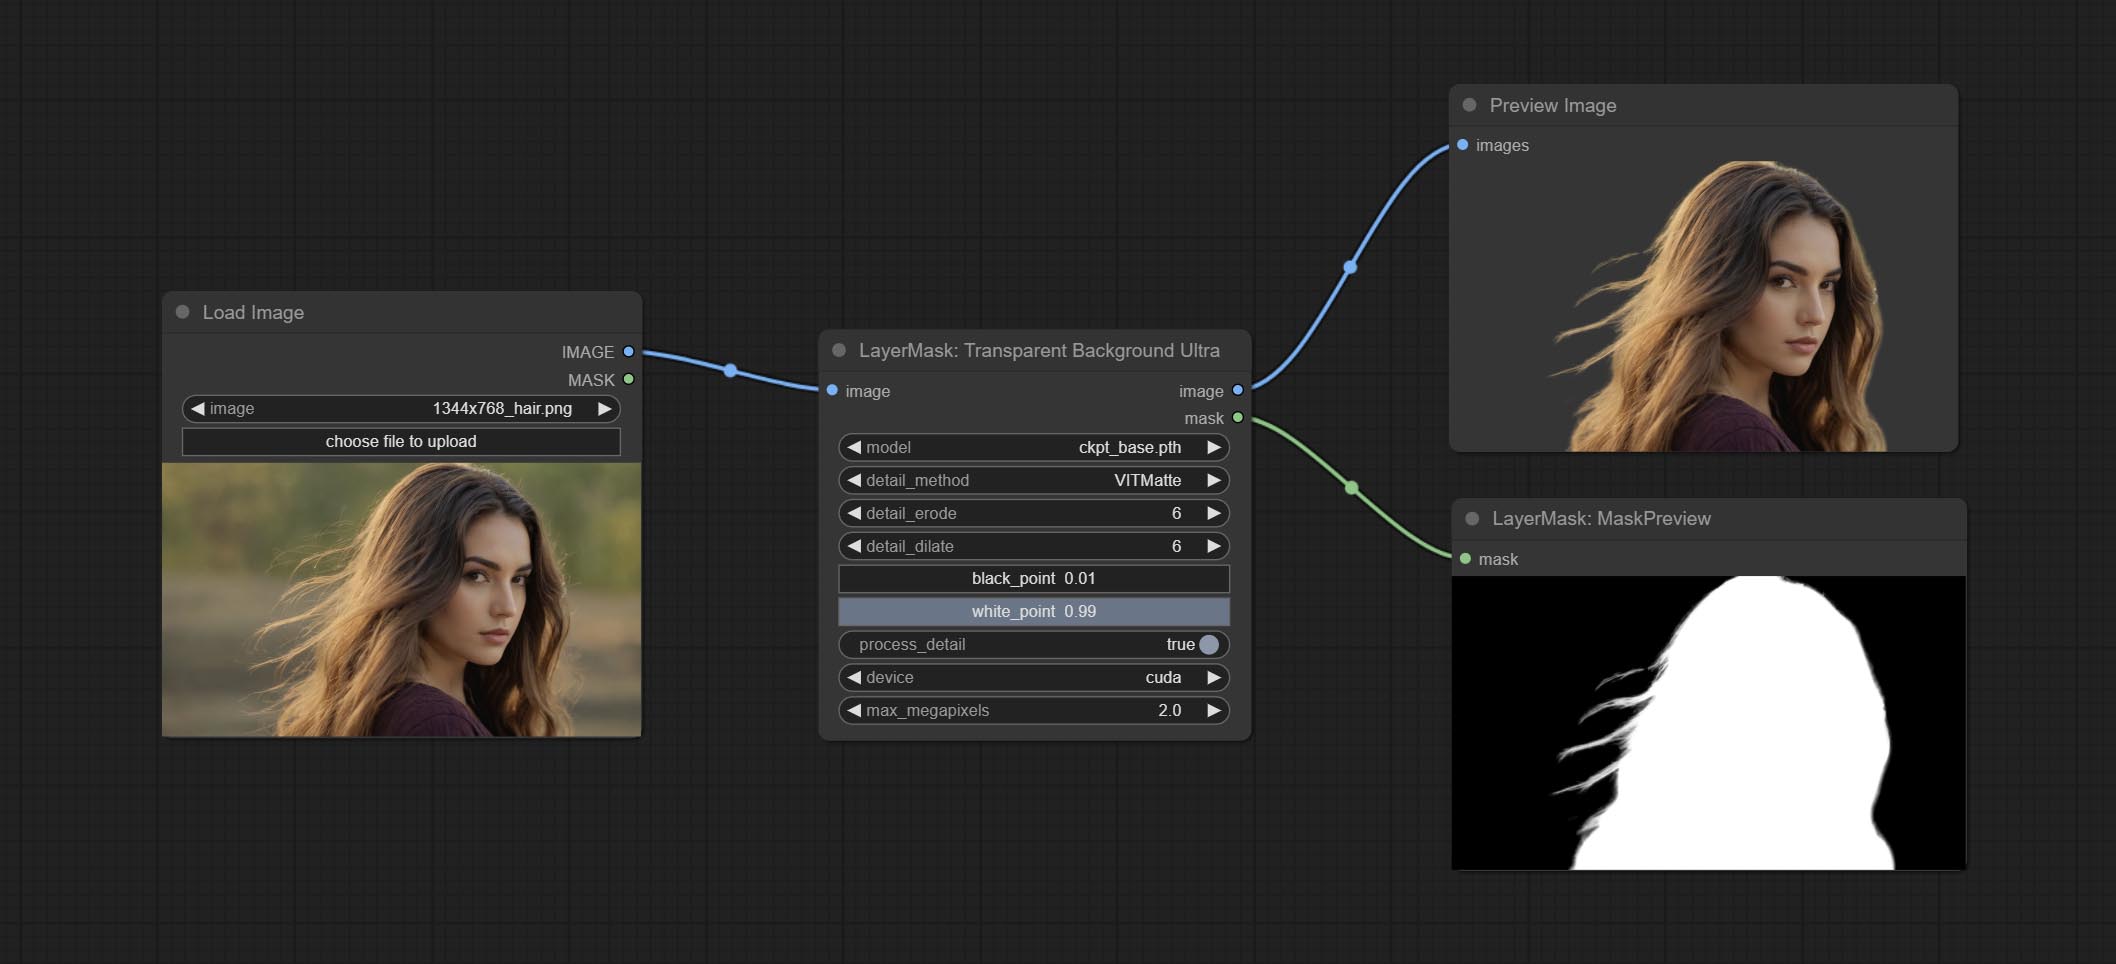
Node Options:
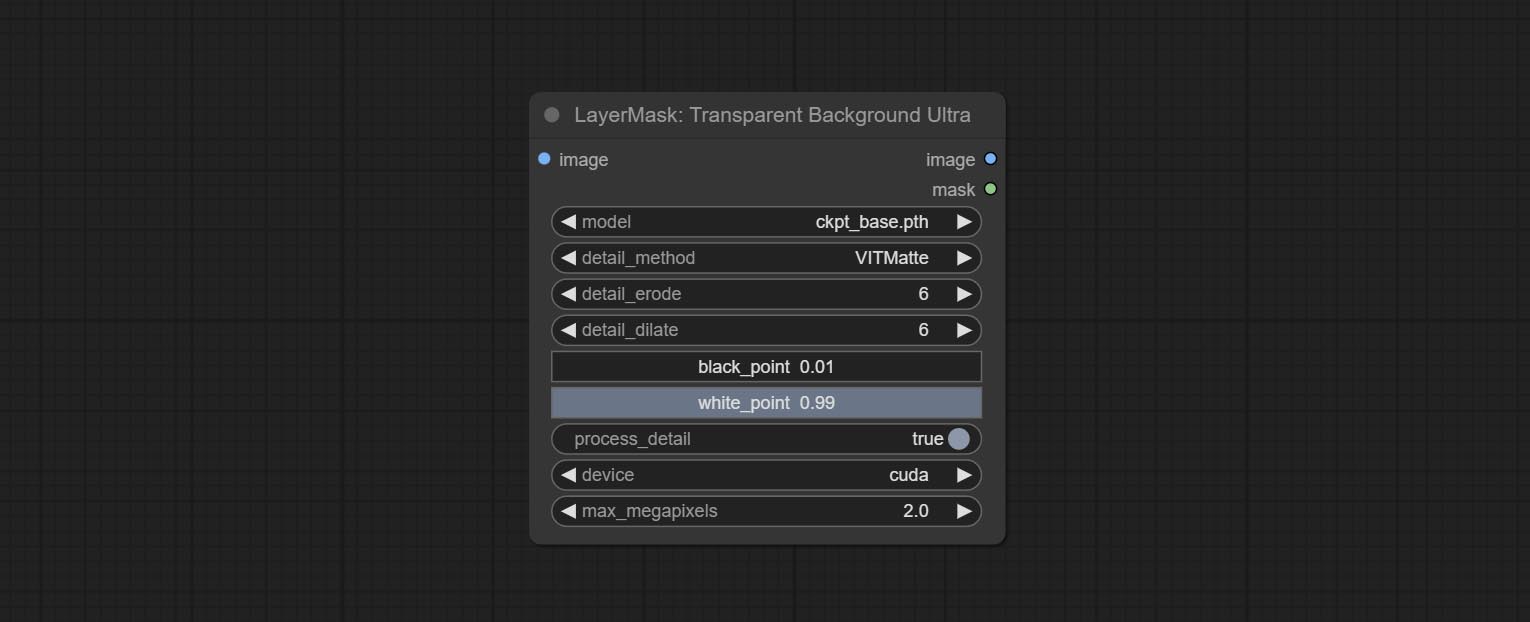
- model: Select the model.
- detail_method: Edge processing methods. provides VITMatte, VITMatte(local), PyMatting, GuidedFilter. If the model has been downloaded after the first use of VITMatte, you can use VITMatte (local) afterwards.
- detail_erode: Mask the erosion range inward from the edge. the larger the value, the larger the range of inward repair.
- detail_dilate: The edge of the mask expands outward. the larger the value, the wider the range of outward repair.
- black_point: Edge black sampling threshold.
- white_point: Edge white sampling threshold.
- process_detail: Set to false here will skip edge processing to save runtime.
- device: Set whether the VitMatte to use cuda.
- max_megapixels: Set the maximum size for VitMate operations.
PersonMaskUltra
Generate masks for portrait's face, hair, body skin, clothing, or accessories. Compared to the previous A Person Mask Generator node, this node has ultra-high edge details. The model code for this node comes from a-person-mask-generator, edge processing code from ComfyUI-Image-Filters,thanks to the original author. *Download model files from BaiduNetdisk to ComfyUI/models/mediapipe folder.
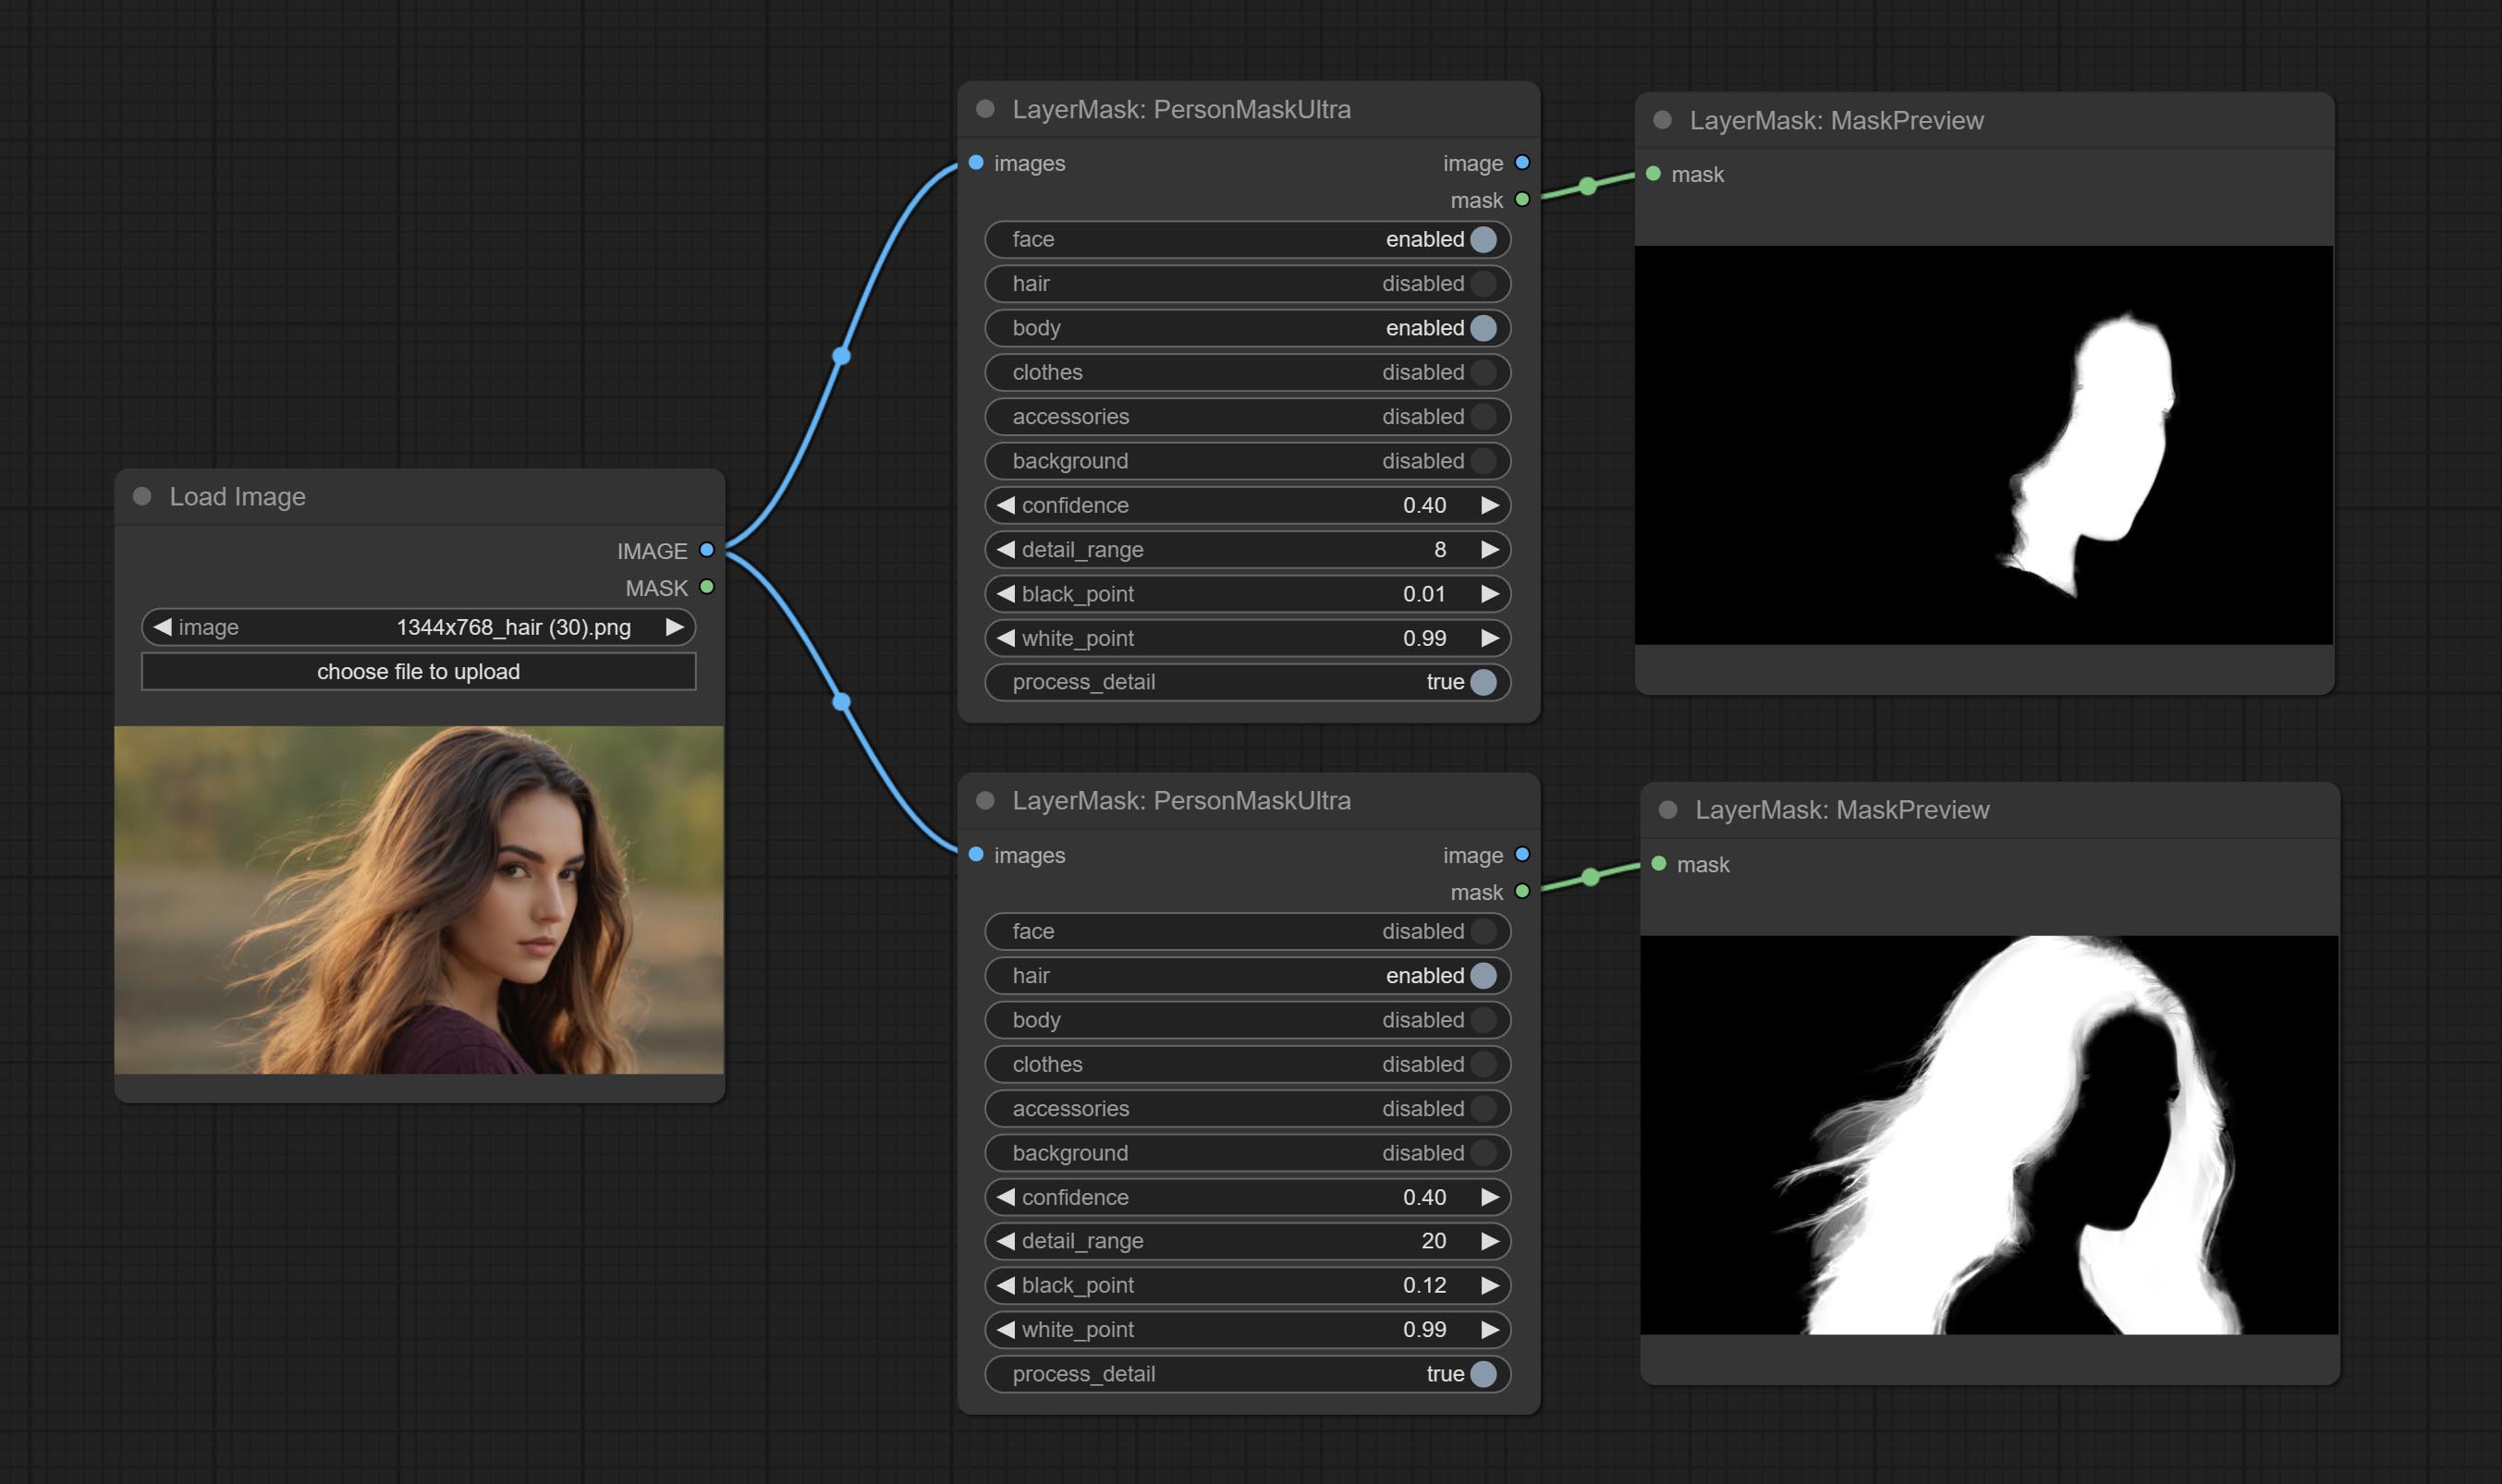
Node options:
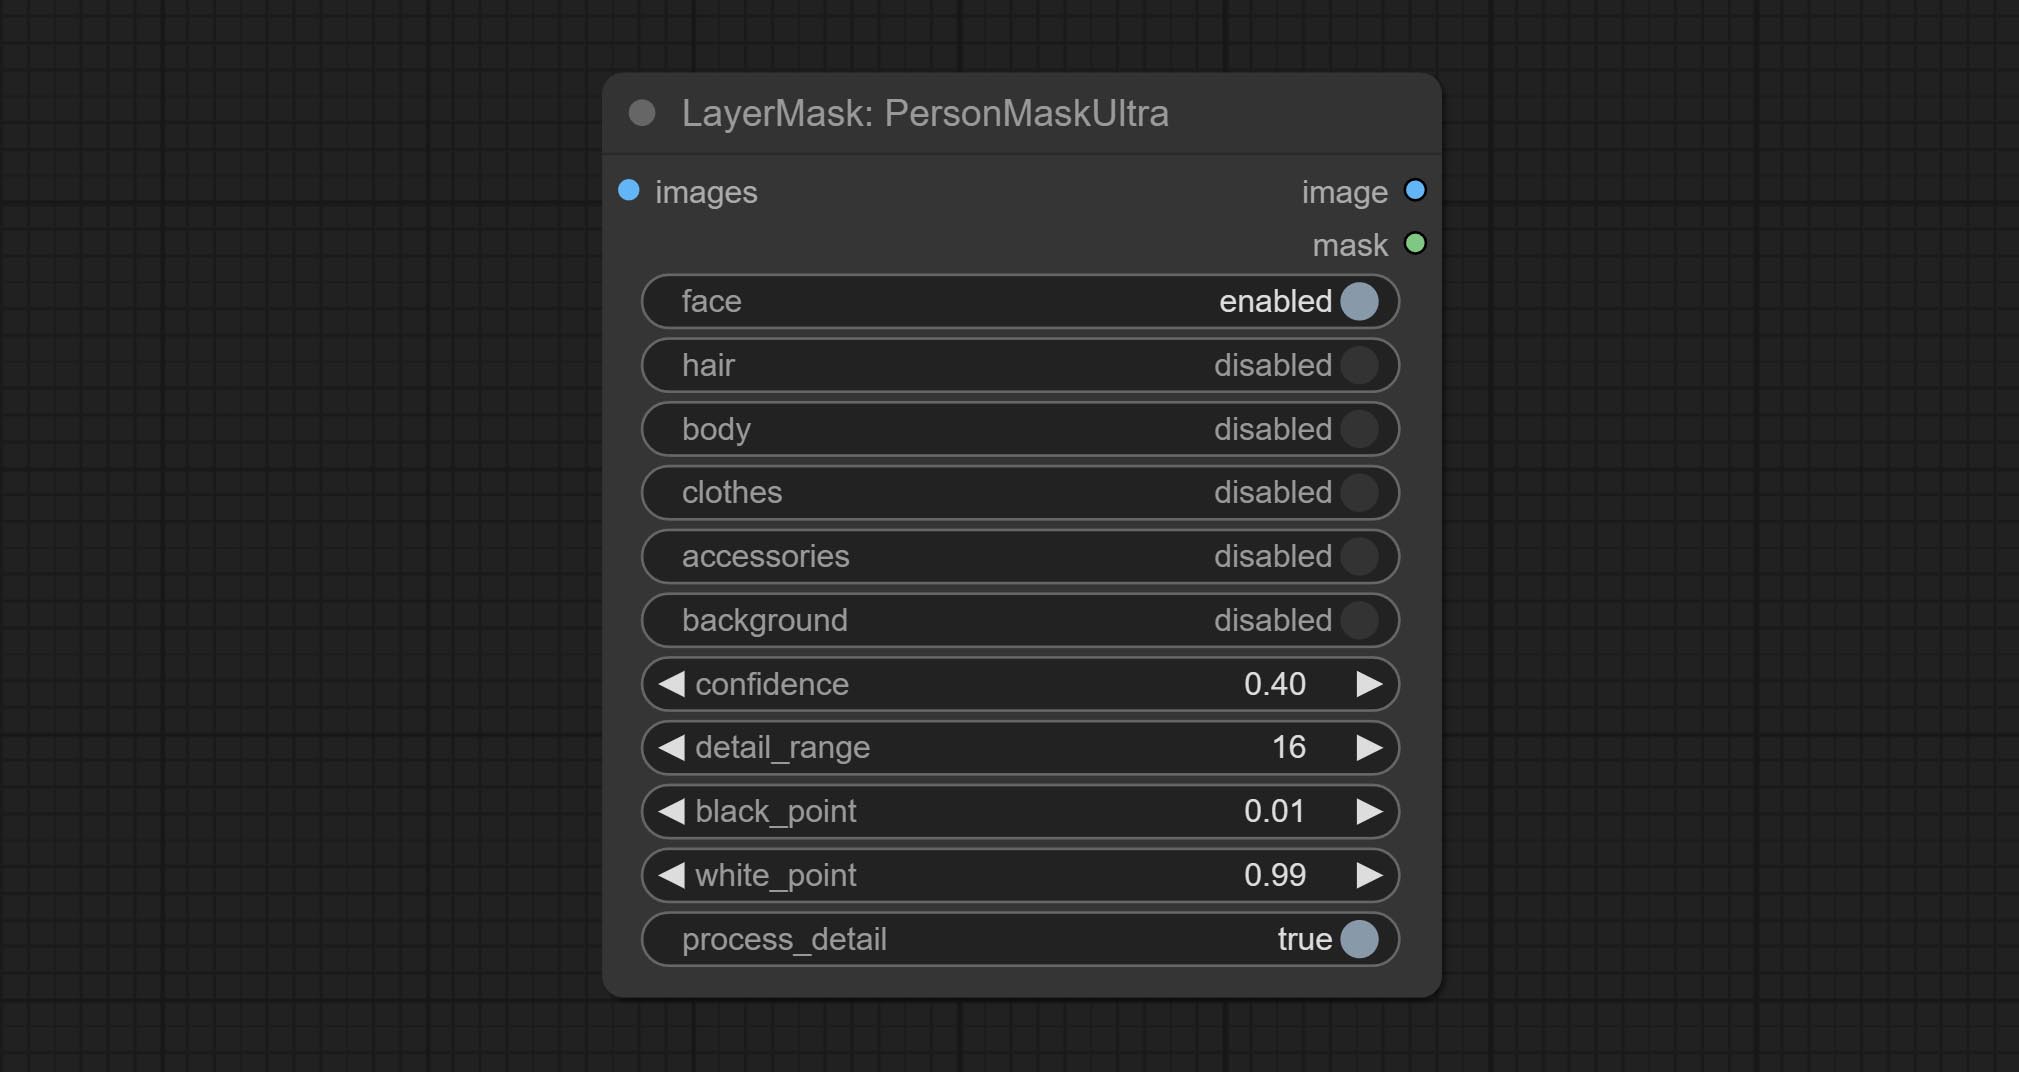
- face: Face recognition.
- hair: Hair recognition.
- body: Body skin recognition.
- clothes: Clothing recognition.
- accessories: Identification of accessories (such as backpacks).
- background: Background recognition.
- confidence: Recognition threshold, lower values will output more mask ranges.
- detail_range: Edge detail range.
- black_point: Edge black sampling threshold.
- white_point: Edge white sampling threshold.
- process_detail: Set to false here will skip edge processing to save runtime.
PersonMaskUltraV2
The V2 upgraded version of PersonMaskUltra has added the VITMatte edge processing method.(Note: Images larger than 2K in size using this method will consume huge memory)
On the basis of PersonMaskUltra, the following changes have been made: 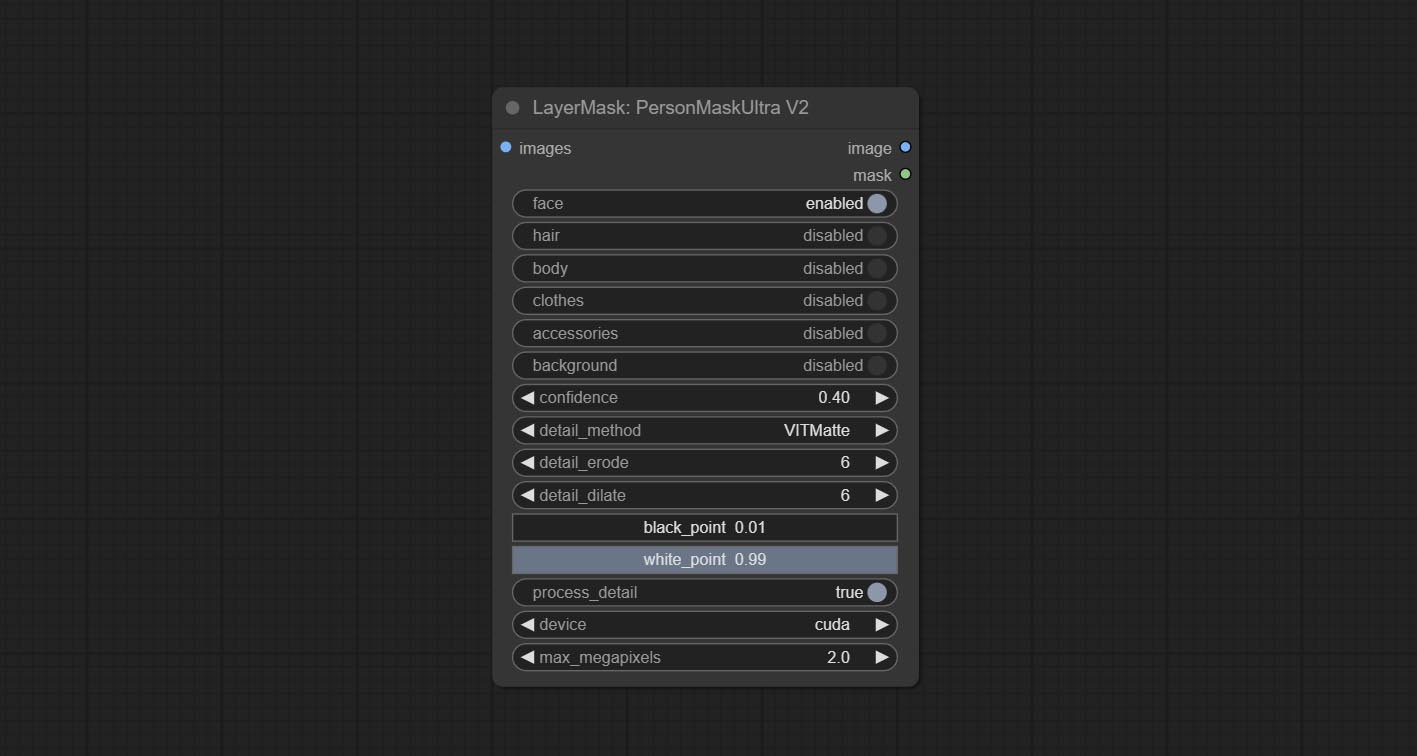
detail_method: Edge processing methods. provides VITMatte, VITMatte(local), PyMatting, GuidedFilter. If the model has been downloaded after the first use of VITMatte, you can use VITMatte (local) afterwards.
detail_erode: Mask the erosion range inward from the edge. the larger the value, the larger the range of inward repair.
detail_dilate: The edge of the mask expands outward. the larger the value, the wider the range of outward repair.
device: Set whether the VitMatte to use cuda.
max_megapixels: Set the maximum size for VitMate operations.
SegformerB2ClothesUltra

Generate masks for characters' faces, hair, arms, legs, and clothing, mainly used for segmenting clothing. The model segmentation code is fromStartHua,thanks to the original author. Compared to the comfyui_segformer_b2_clothes, this node has ultra-high edge details. (Note: Generating images with edges exceeding 2K in size using the VITMatte method will consume a lot of memory)
*Download all model files from huggingface or BaiduNetdisk to ComfyUI/models/segformer_b2_clothes folder.
Node Options:
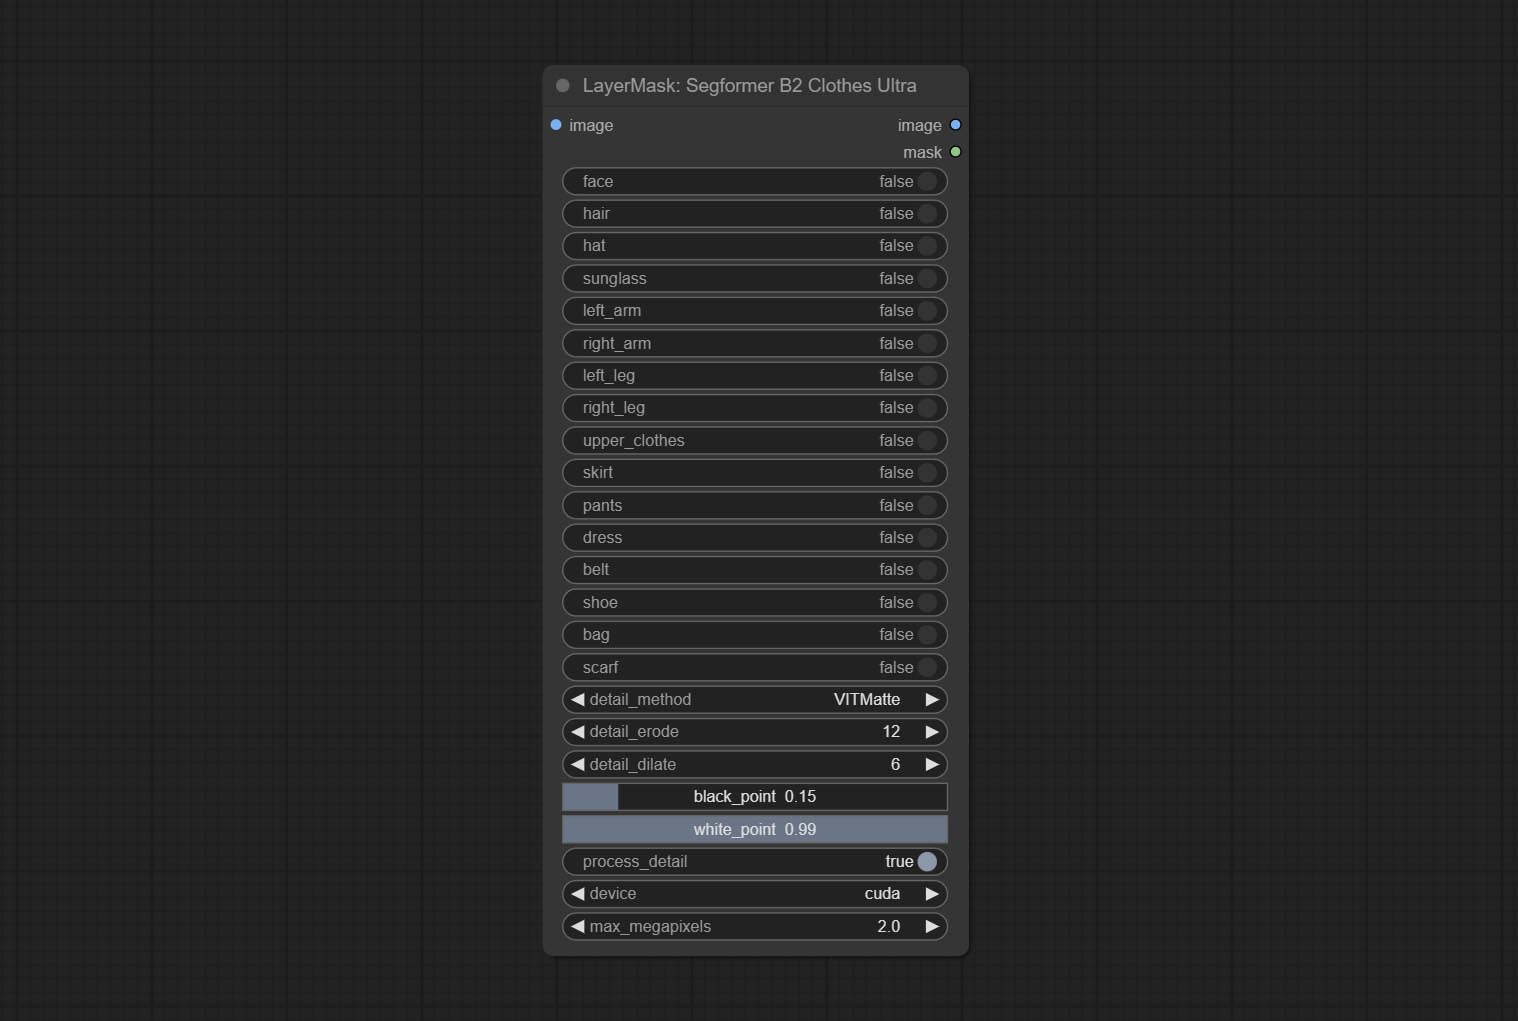
- face: Facial recognition switch.
- hair: Hair recognition switch.
- hat: Hat recognition switch.
- sunglass: Sunglass recognition switch.
- left_arm: Left arm recognition switch.
- right_arm: Right arm recognition switch.
- left_leg: Left leg recognition switch.
- right_leg: Right leg recognition switch.
- skirt: Skirt recognition switch.
- pants: Pants recognition switch.
- dress: Dress recognition switch.
- belt: Belt recognition switch.
- shoe: Shoes recognition switch.
- bag: Bag recognition switch.
- scarf: Scarf recognition switch.
- detail_method: Edge processing methods. provides VITMatte, VITMatte(local), PyMatting, GuidedFilter. If the model has been downloaded after the first use of VITMatte, you can use VITMatte (local) afterwards.
- detail_erode: Mask the erosion range inward from the edge. the larger the value, the larger the range of inward repair.
- detail_dilate: The edge of the mask expands outward. the larger the value, the wider the range of outward repair.
- black_point: Edge black sampling threshold.
- white_point: Edge white sampling threshold.
- process_detail: Set to false here will skip edge processing to save runtime.
- device: Set whether the VitMatte to use cuda.
- max_megapixels: Set the maximum size for VitMate operations.
SegformerUltraV2
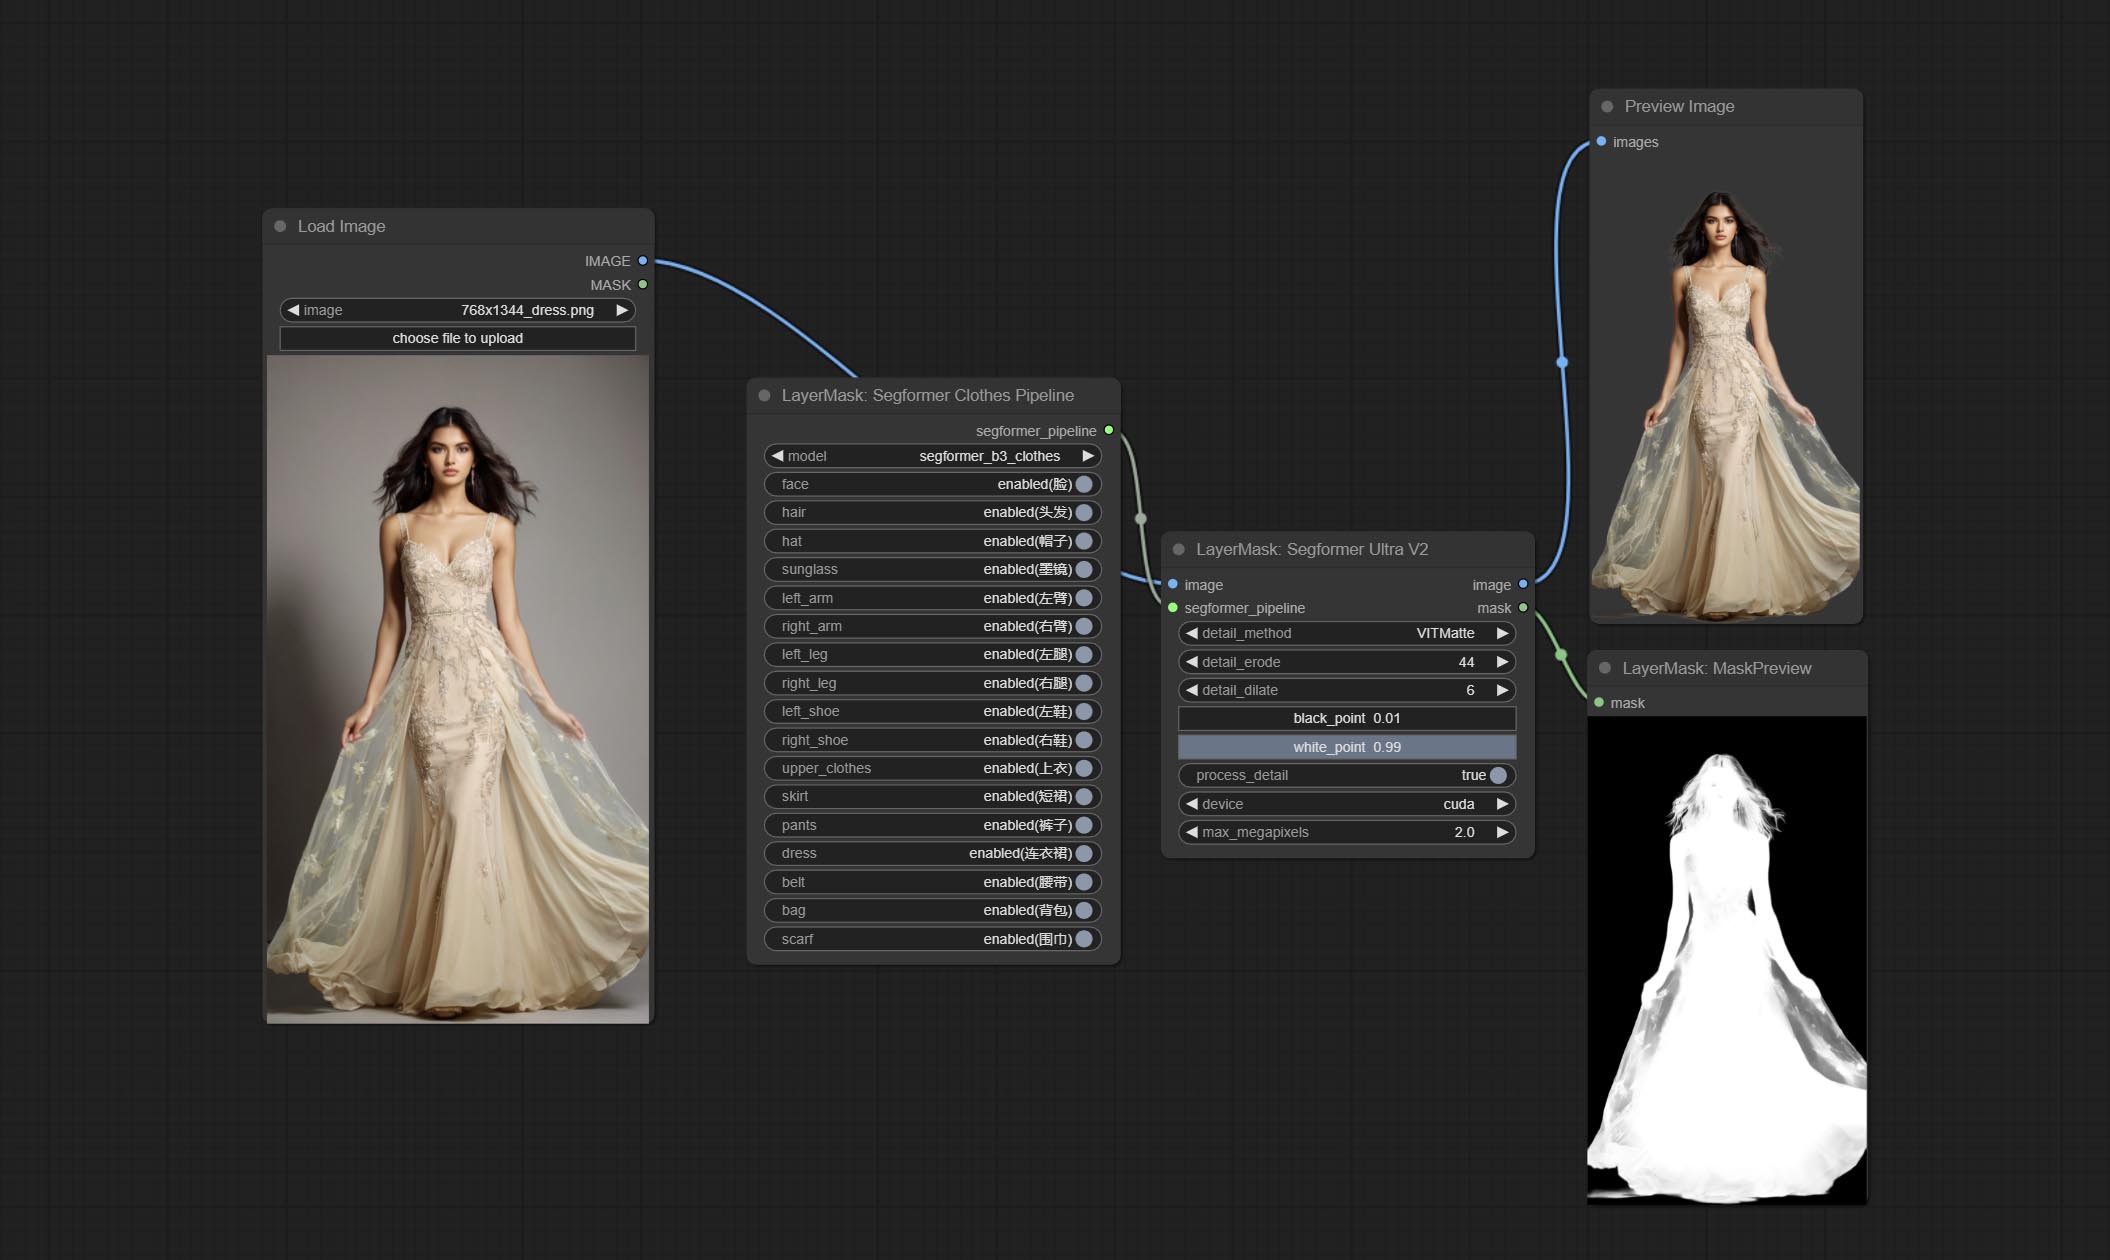
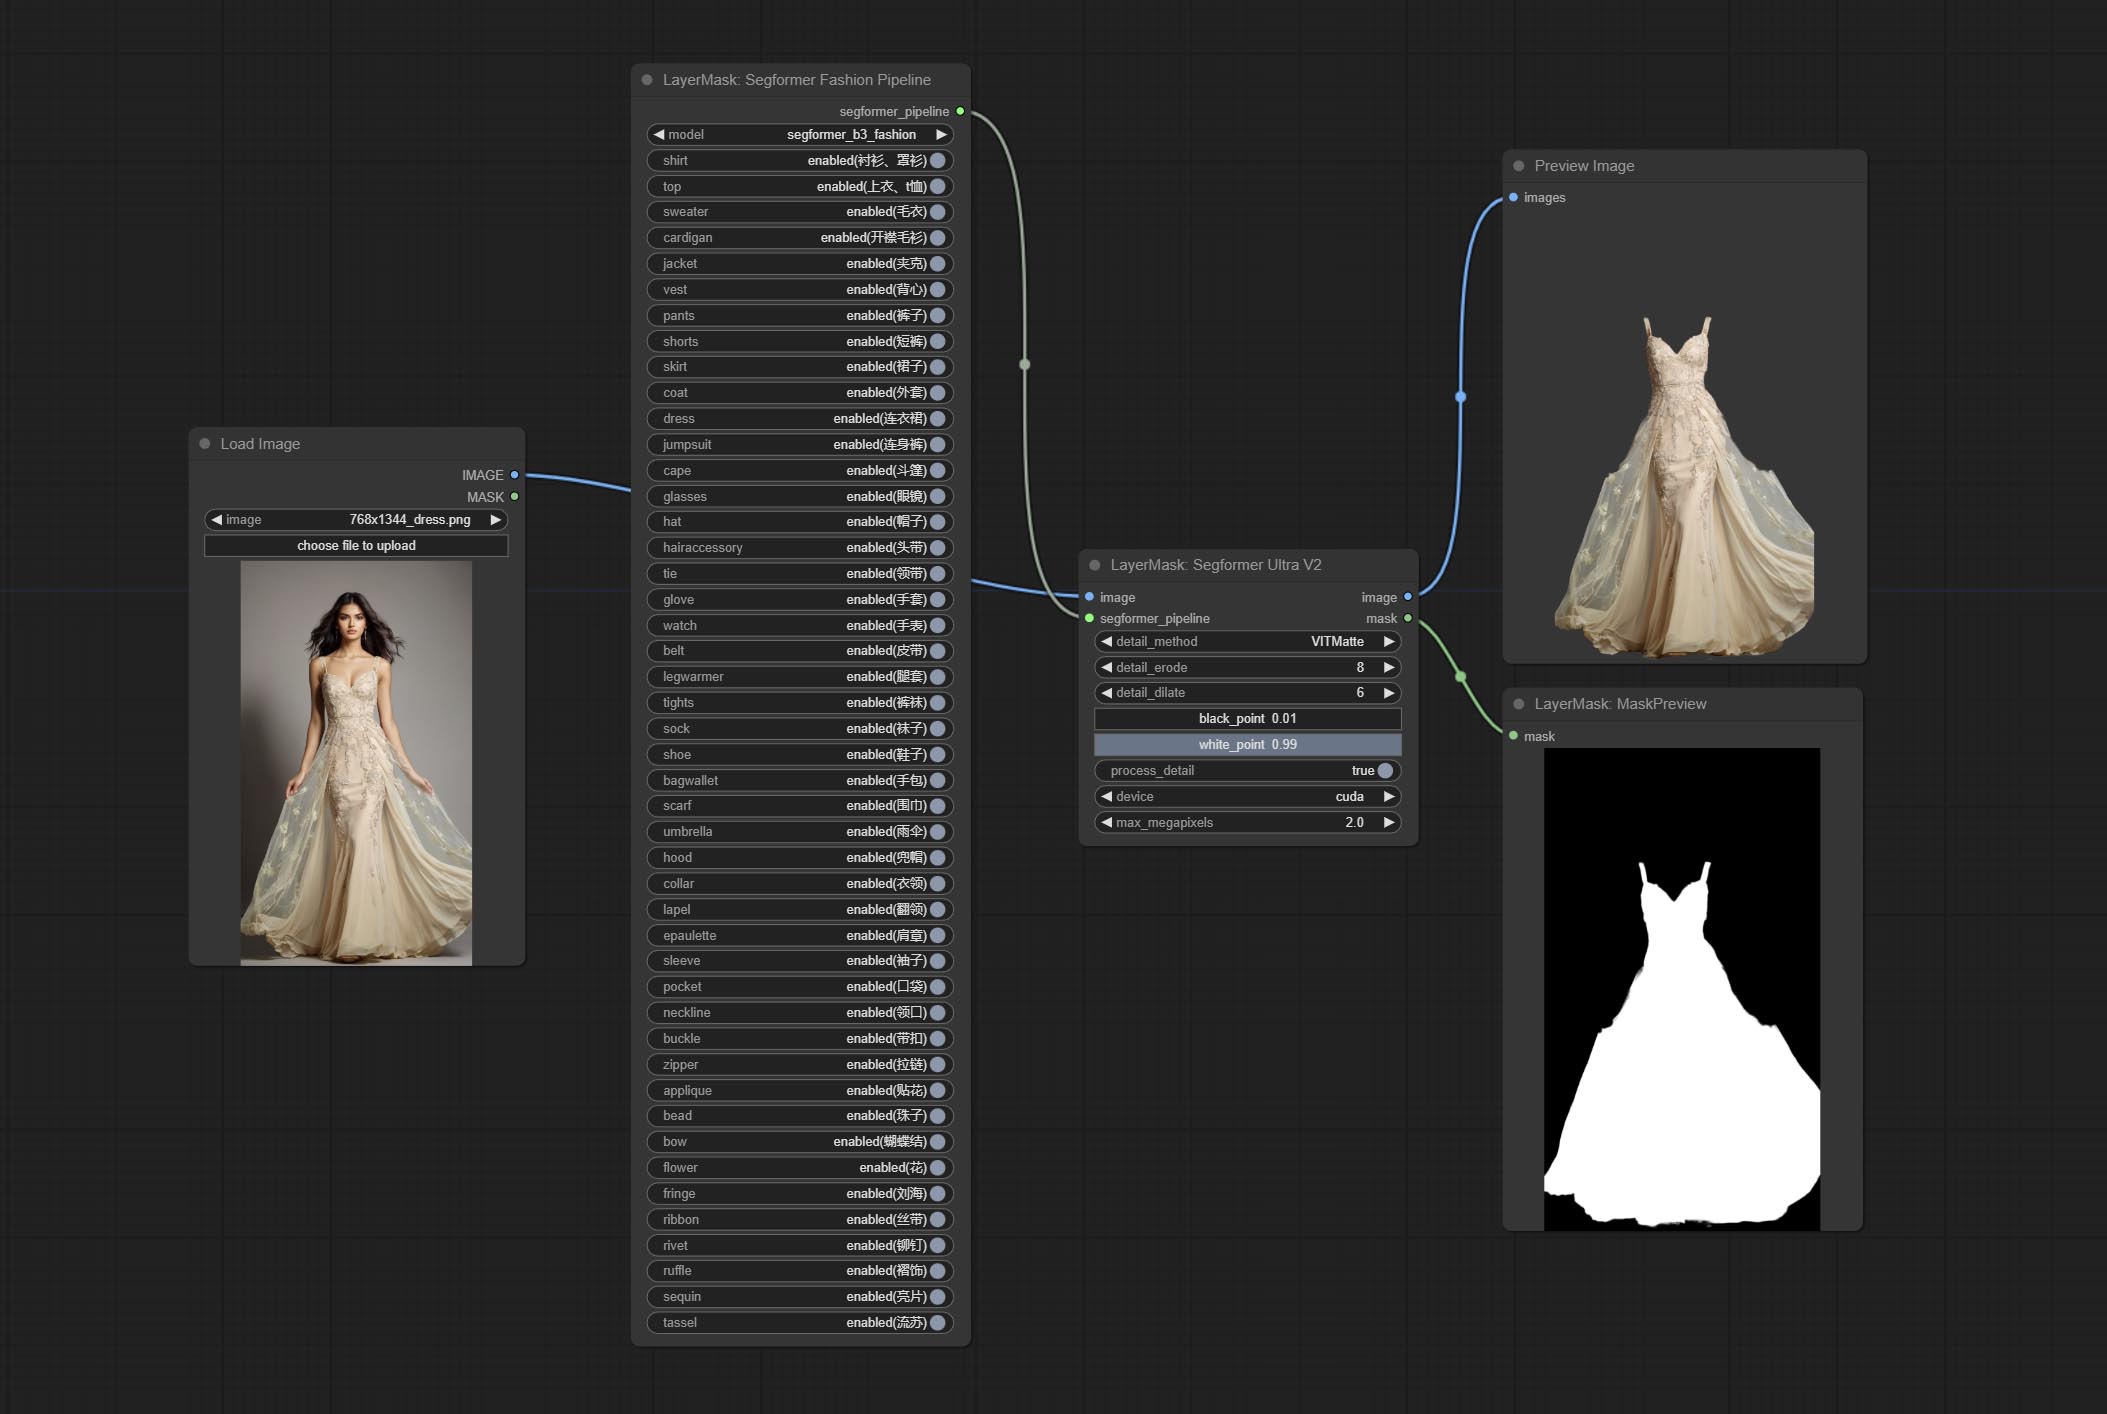
Using the segformer model to segment clothing with ultra-high edge details. Currently supports segformer b2 clothes, segformer b3 clothes and segformer b3 fashion。
*Download modelfiles from huggingface or BaiduNetdisk to ComfyUI/models/segformer_b2_clothes folder.
*Download modelfiles from huggingface or BaiduNetdisk to ComfyUI/models/segformer_b3_clothes folder.
*Download modelfiles from huggingface or BaiduNetdisk to ComfyUI/models/segformer_b3_fashion folder.
Node Options:
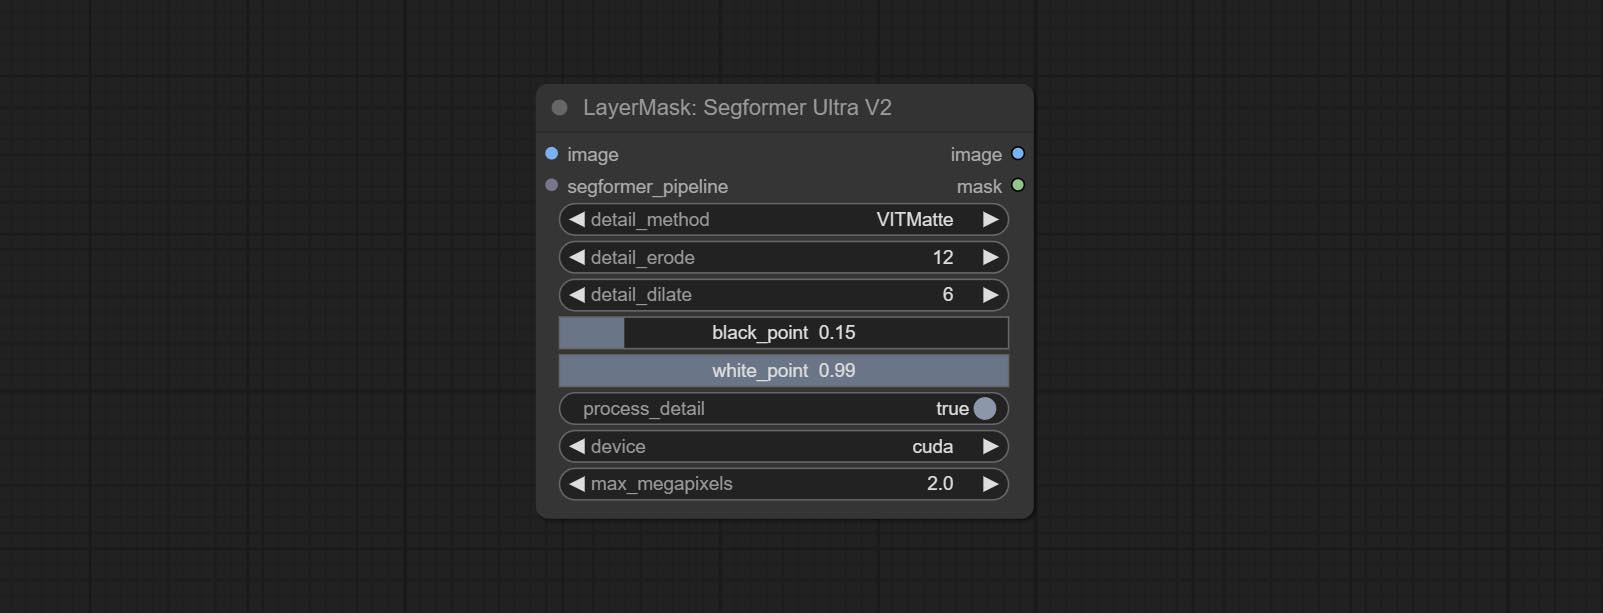
- image: The input image.
- segformer_pipeline: Segformer pipeline input. The pipeline is output by SegformerClottesPipeline and SegformerFashionPipeline node.
- detail_method: Edge processing methods. provides VITMatte, VITMatte(local), PyMatting, GuidedFilter. If the model has been downloaded after the first use of VITMatte, you can use VITMatte (local) afterwards.
- detail_erode: Mask the erosion range inward from the edge. the larger the value, the larger the range of inward repair.
- detail_dilate: The edge of the mask expands outward. the larger the value, the wider the range of outward repair.
- black_point: Edge black sampling threshold.
- white_point: Edge white sampling threshold.
- process_detail: Set to false here will skip edge processing to save runtime.
- device: Set whether the VitMatte to use cuda.
- max_megapixels: Set the maximum size for VitMate operations.
SegformerClothesPipiline
Select the segformer clothes model and choose the segmentation content.
Node Options:

- model: Model selection. There are currently two models available to choose from for segformer b2 clothes and segformer b3 clothes.
- face: Facial recognition switch.
- hair: Hair recognition switch.
- hat: Hat recognition switch.
- sunglass: Sunglass recognition switch.
- left_arm: Left arm recognition switch.
- right_arm: Right arm recognition switch.
- left_leg: Left leg recognition switch.
- right_leg: Right leg recognition switch.
- left_shoe: Left shoe recognition switch.
- right_shoe: Right shoe recognition switch.
- skirt: Skirt recognition switch.
- pants: Pants recognition switch.
- dress: Dress recognition switch.
- belt: Belt recognition switch.
- bag: Bag recognition switch.
- scarf: Scarf recognition switch.
SegformerFashionPipiline
Select the segformer fashion model and choose the segmentation content.
Node Options:
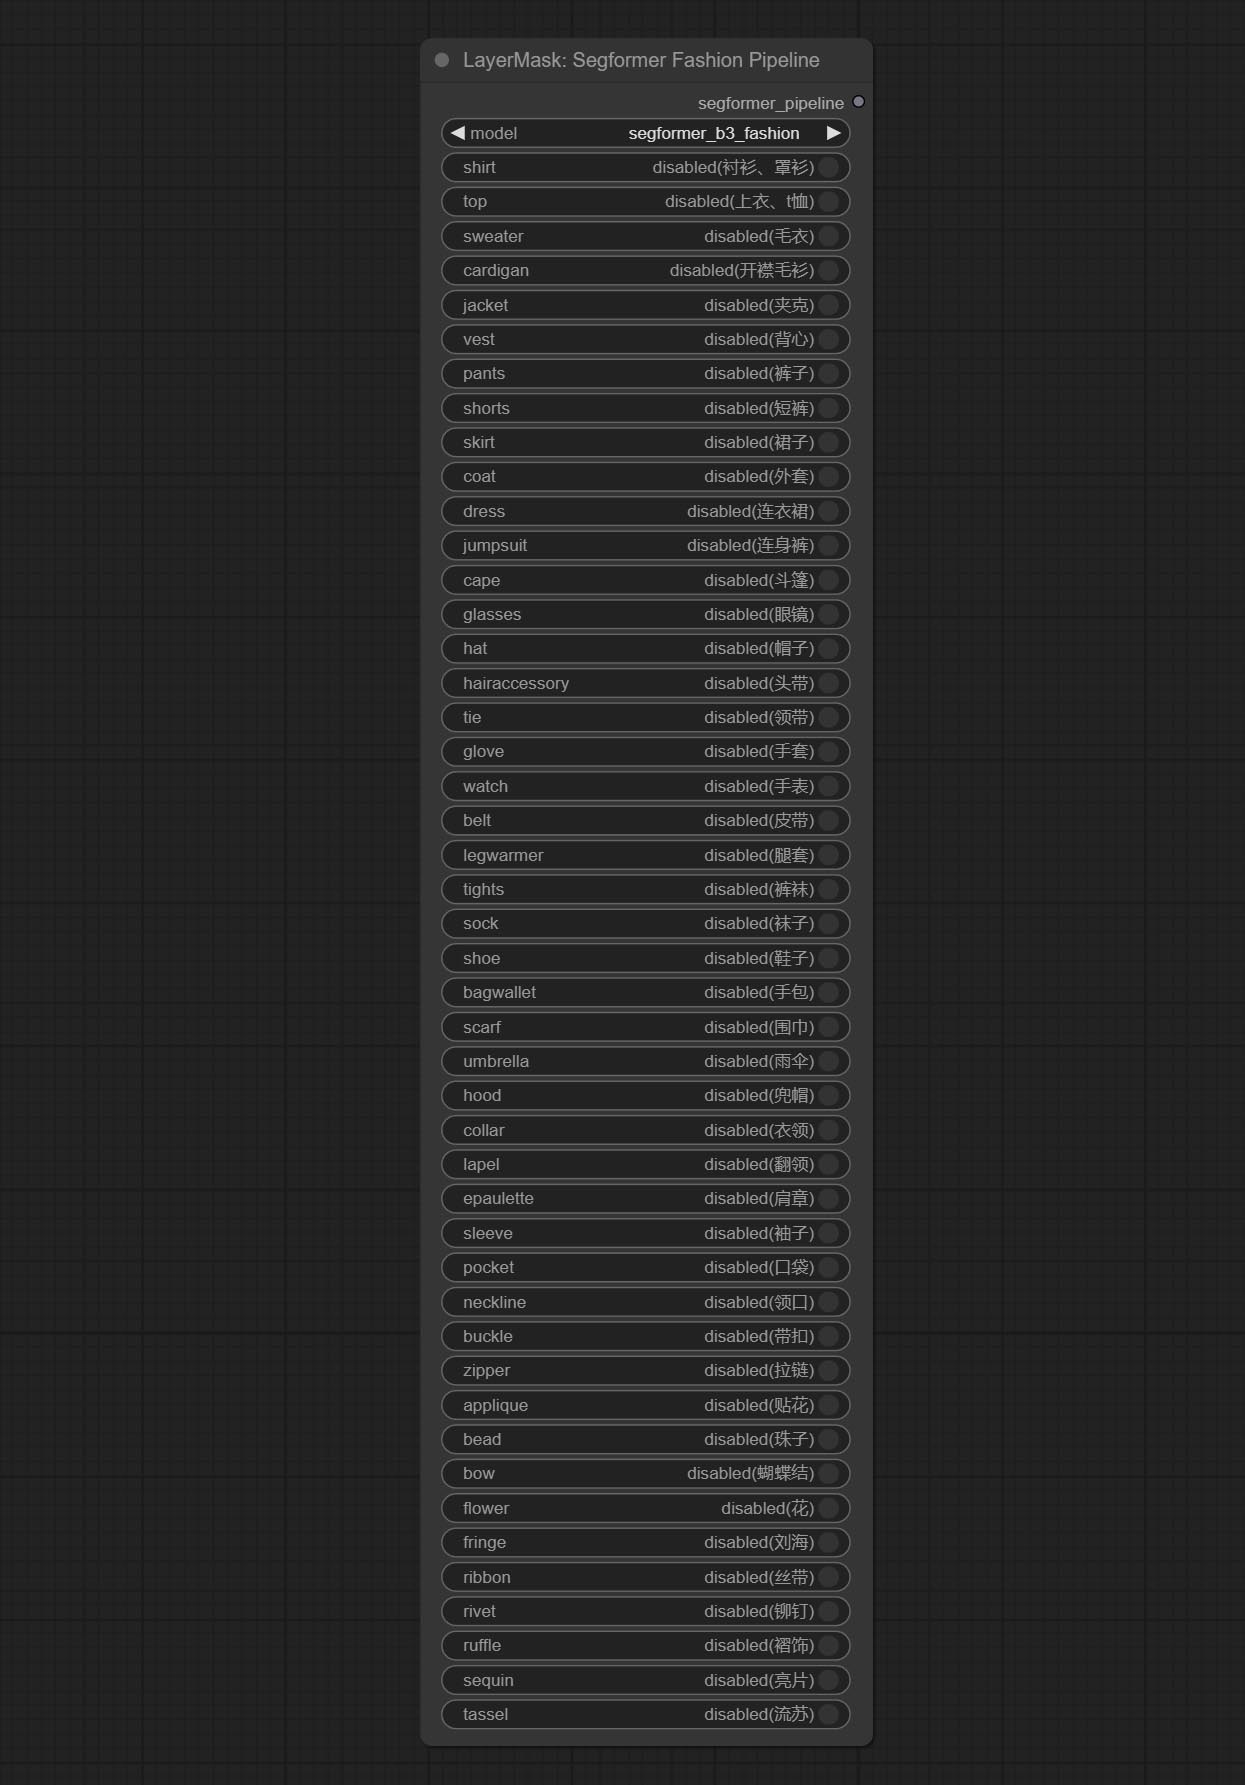
- model: Model selection. Currently, there is only one model available for selection: segformer b3 fashion。
- shirt: shirt and blouse switch.
- top: top, t-shirt, sweatshirt switch.
- sweater: sweater switch.
- cardigan: cardigan switch.
- jacket: jacket switch.
- vest: vest switch.
- pants: pants switch.
- shorts: shorts switch.
- skirt: skirt switch.
- coat: coat switch.
- dress: dress switch.
- jumpsuit: jumpsuit switch.
- cape: cape switch.
- glasses: glasses switch.
- hat: hat switch.
- hairaccessory: headband, head covering, hair accessory switch.
- tie: tie switch.
- glove: glove switch.
- watch: watch switch.
- belt: belt switch.
- legwarmer: leg warmer switch.
- tights: tights and stockings switch.
- sock: sock switch.
- shoe: shoes switch.
- bagwallet: bag and wallet switch.
- scarf: scarf switch.
- umbrella: umbrella switch.
- hood: hood switch.
- collar: collar switch.
- lapel: lapel switch.
- epaulette: epaulette switch.
- sleeve: sleeve switch.
- pocket: pocket switch.
- neckline: neckline switch.
- buckle: buckle switch.
- zipper: zipper switch.
- applique: applique switch.
- bead: bead switch.
- bow: bow switch.
- flower: flower switch.
- fringe: fringe switch.
- ribbon: ribbon switch.
- rivet: rivet switch.
- ruffle: ruffle switch.
- sequin: sequin switch.
- tassel: tassel switch.
HumanPartsUltra
Used for generate human body parts masks, it is based on the warrper of metal3d/ComfyUI_Human_Parts, thank the original author. This node has added ultra-fine edge processing based on the original work. Download model file from BaiduNetdisk or huggingface and copy to ComfyUImodelsonnxhuman-parts folder. 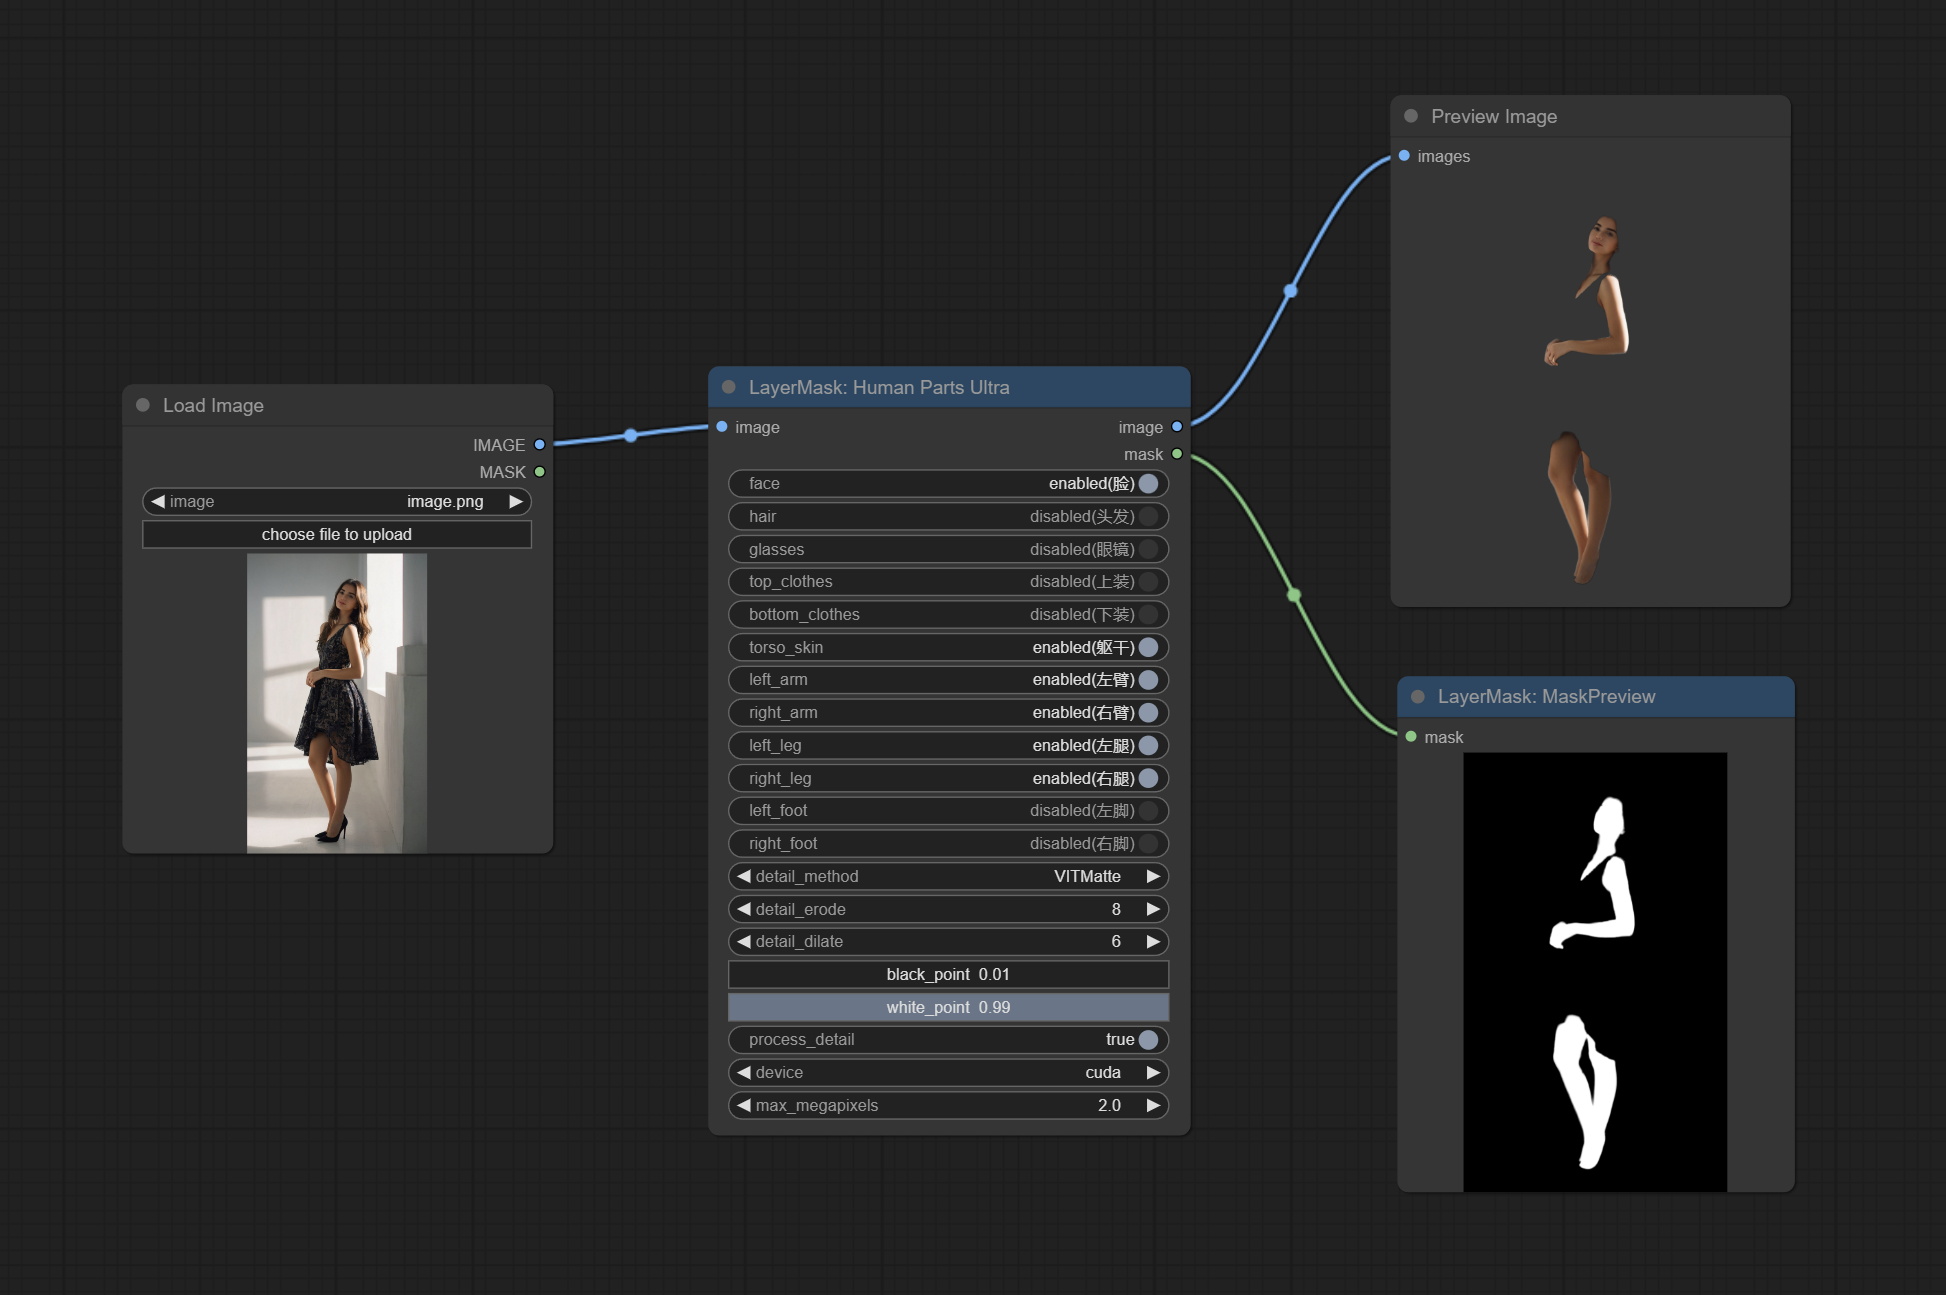
Node Options:
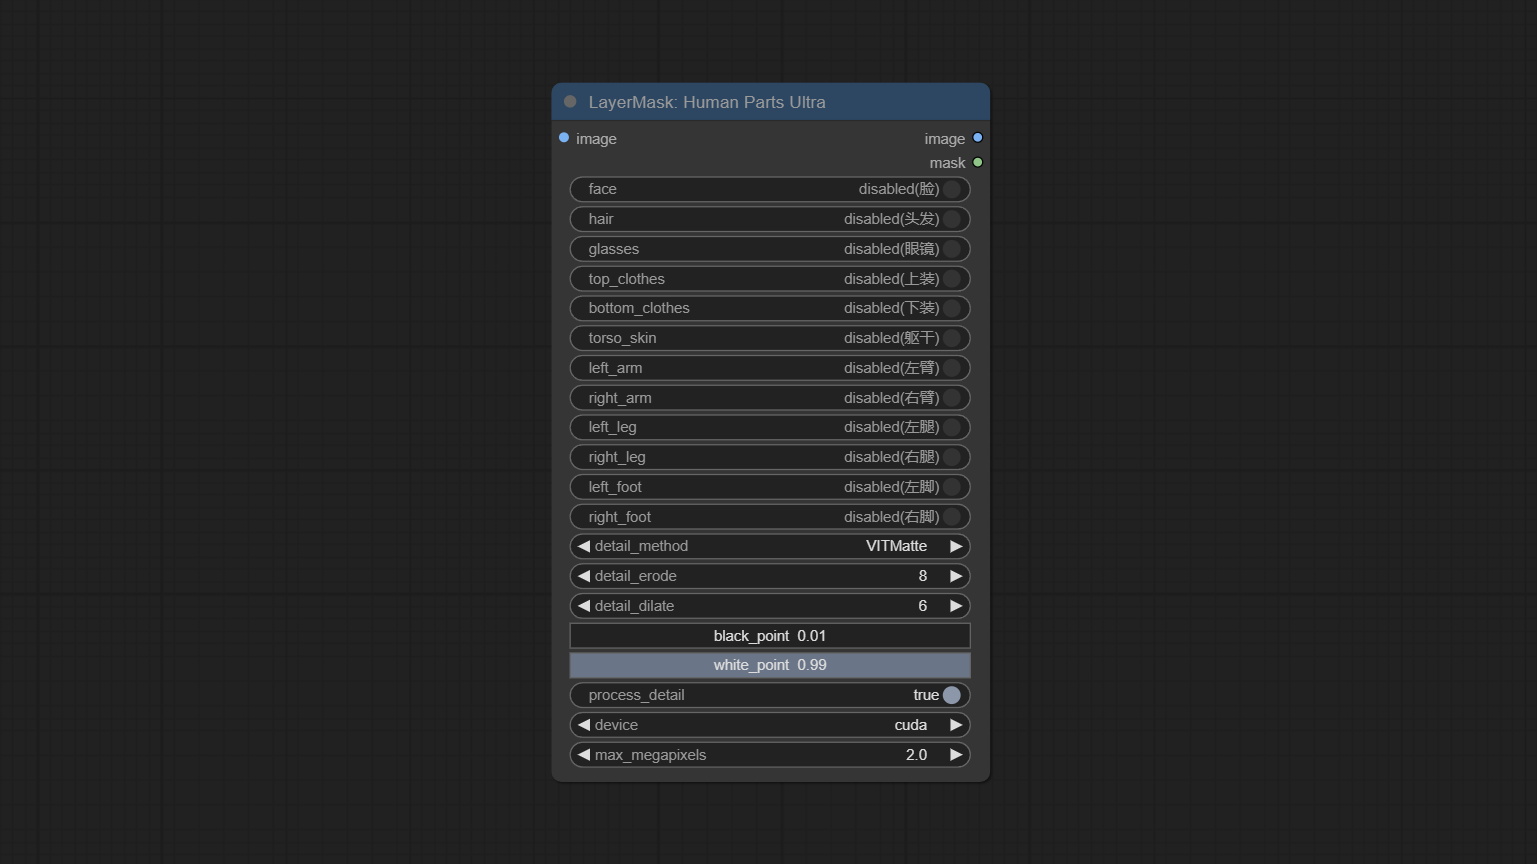
- image: The input image.
- face: Recognize face switch.
- hair: Recognize hair switch.
- galsses: Recognize glasses switch.
- top_clothes: Recognize top clothes switch.
- bottom_clothes: Recognize bottom clothes switch.
- torso_skin: Recognize torso skin switch.
- left_arm: Recognize left arm switch.
- right_arm: Recognize right arm switch.
- left_leg: Recognize left leg switch.
- right_leg: Recognize right leg switch.
- left_foot: Recognize left foot switch.
- right_foot: Recognize right foot switch.
- detail_method: Edge processing methods. provides VITMatte, VITMatte(local), PyMatting, GuidedFilter. If the model has been downloaded after the first use of VITMatte, you can use VITMatte (local) afterwards.
- detail_erode: Mask the erosion range inward from the edge. the larger the value, the larger the range of inward repair.
- detail_dilate: The edge of the mask expands outward. the larger the value, the wider the range of outward repair.
- black_point: Edge black sampling threshold.
- white_point: Edge white sampling threshold.
- process_detail: Set to false here will skip edge processing to save runtime.
- device: Set whether the VitMatte to use cuda.
- max_megapixels: Set the maximum size for VitMate operations.
MaskEdgeUltraDetail
Process rough masks to ultra fine edges. This node combines the Alpha Matte and the Guided Filter Alpha nodes functions of Spacepxl's ComfyUI-Image-Filters, thanks to the original author. 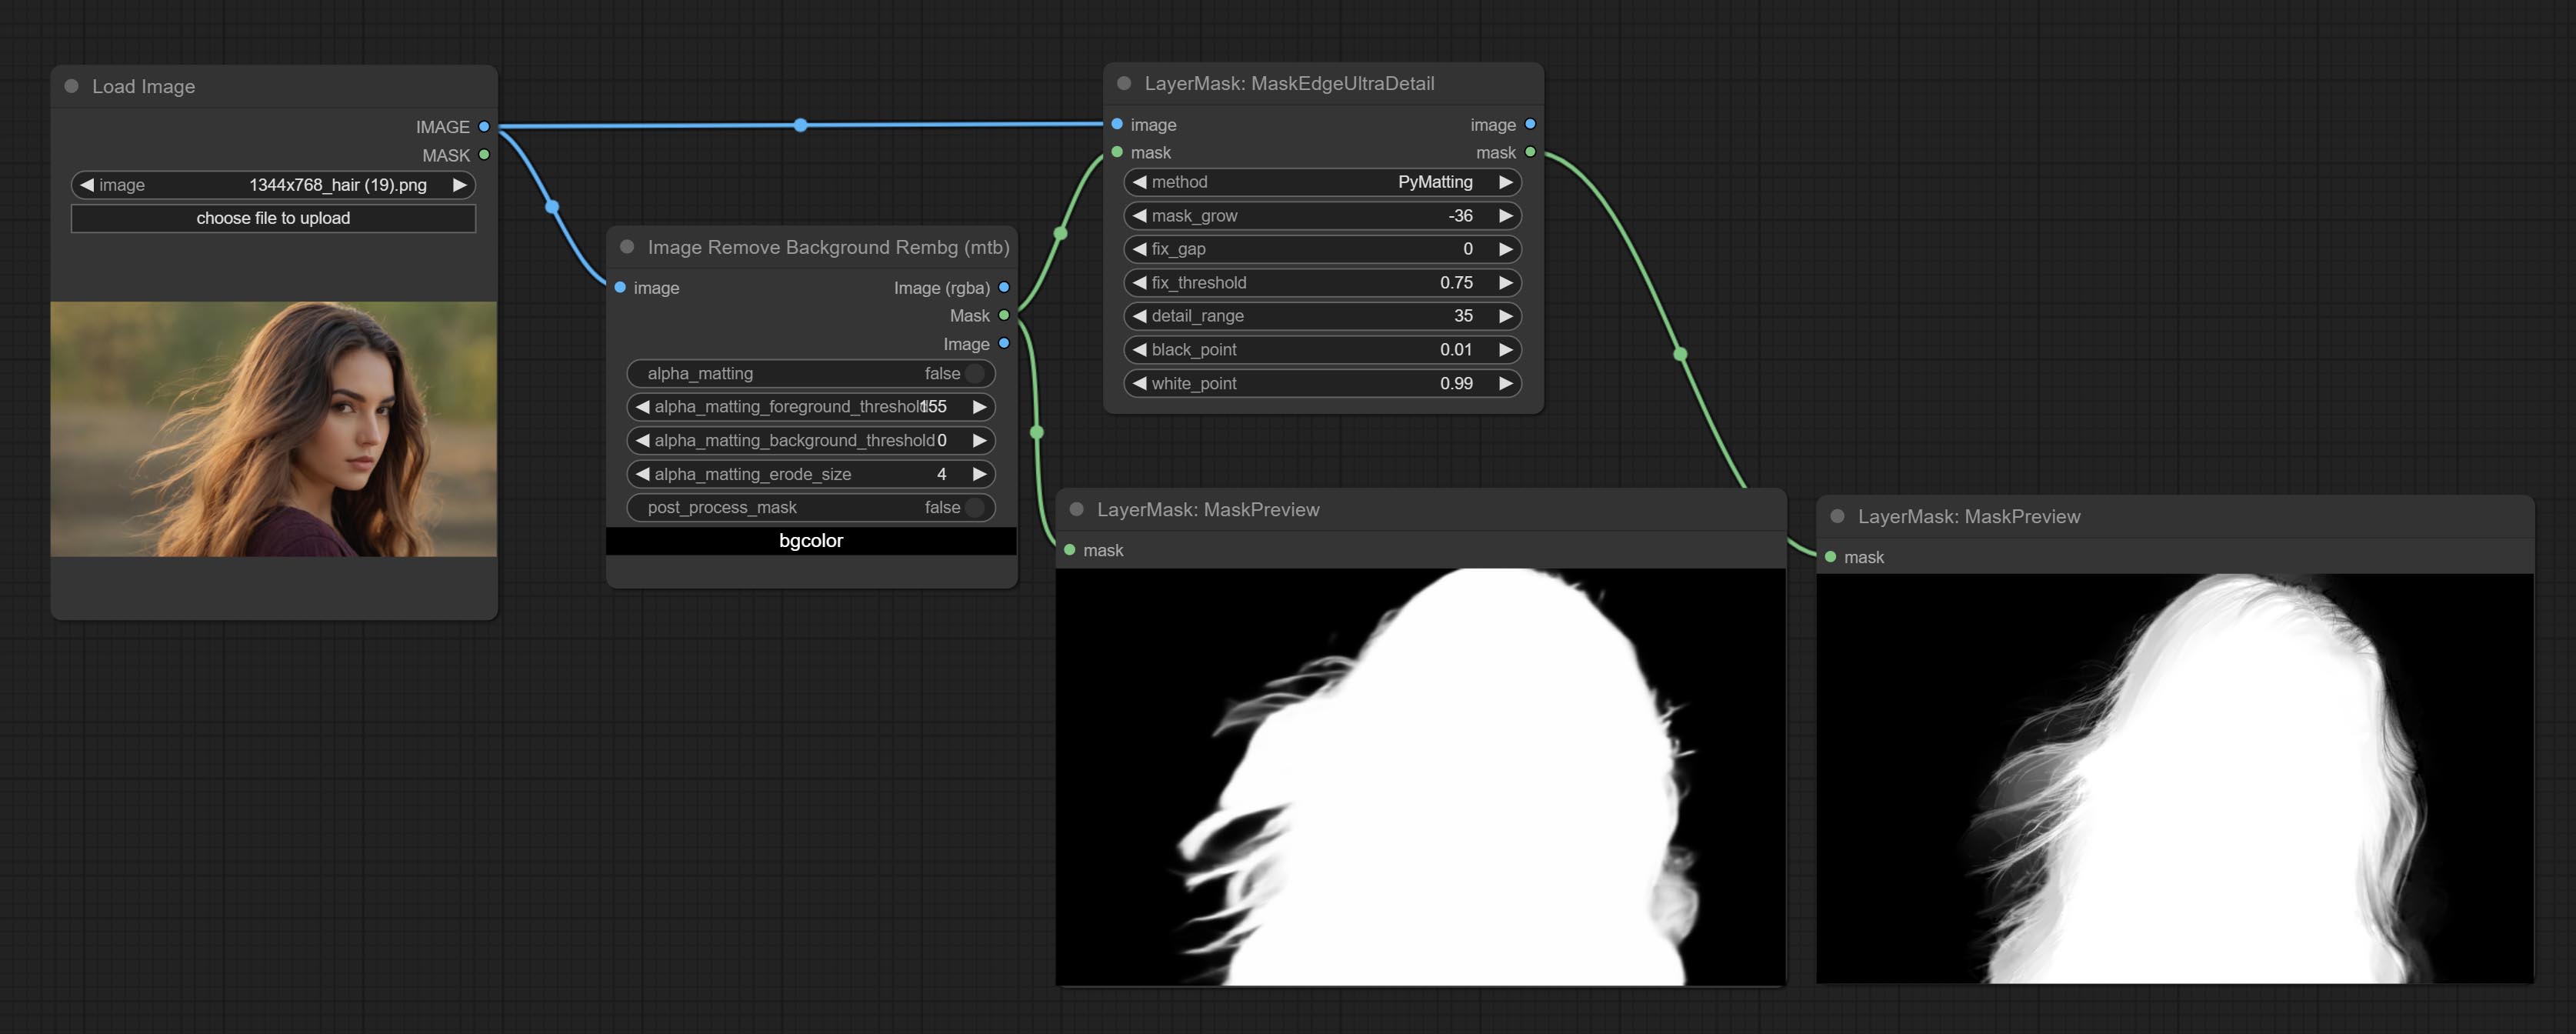
Node options:
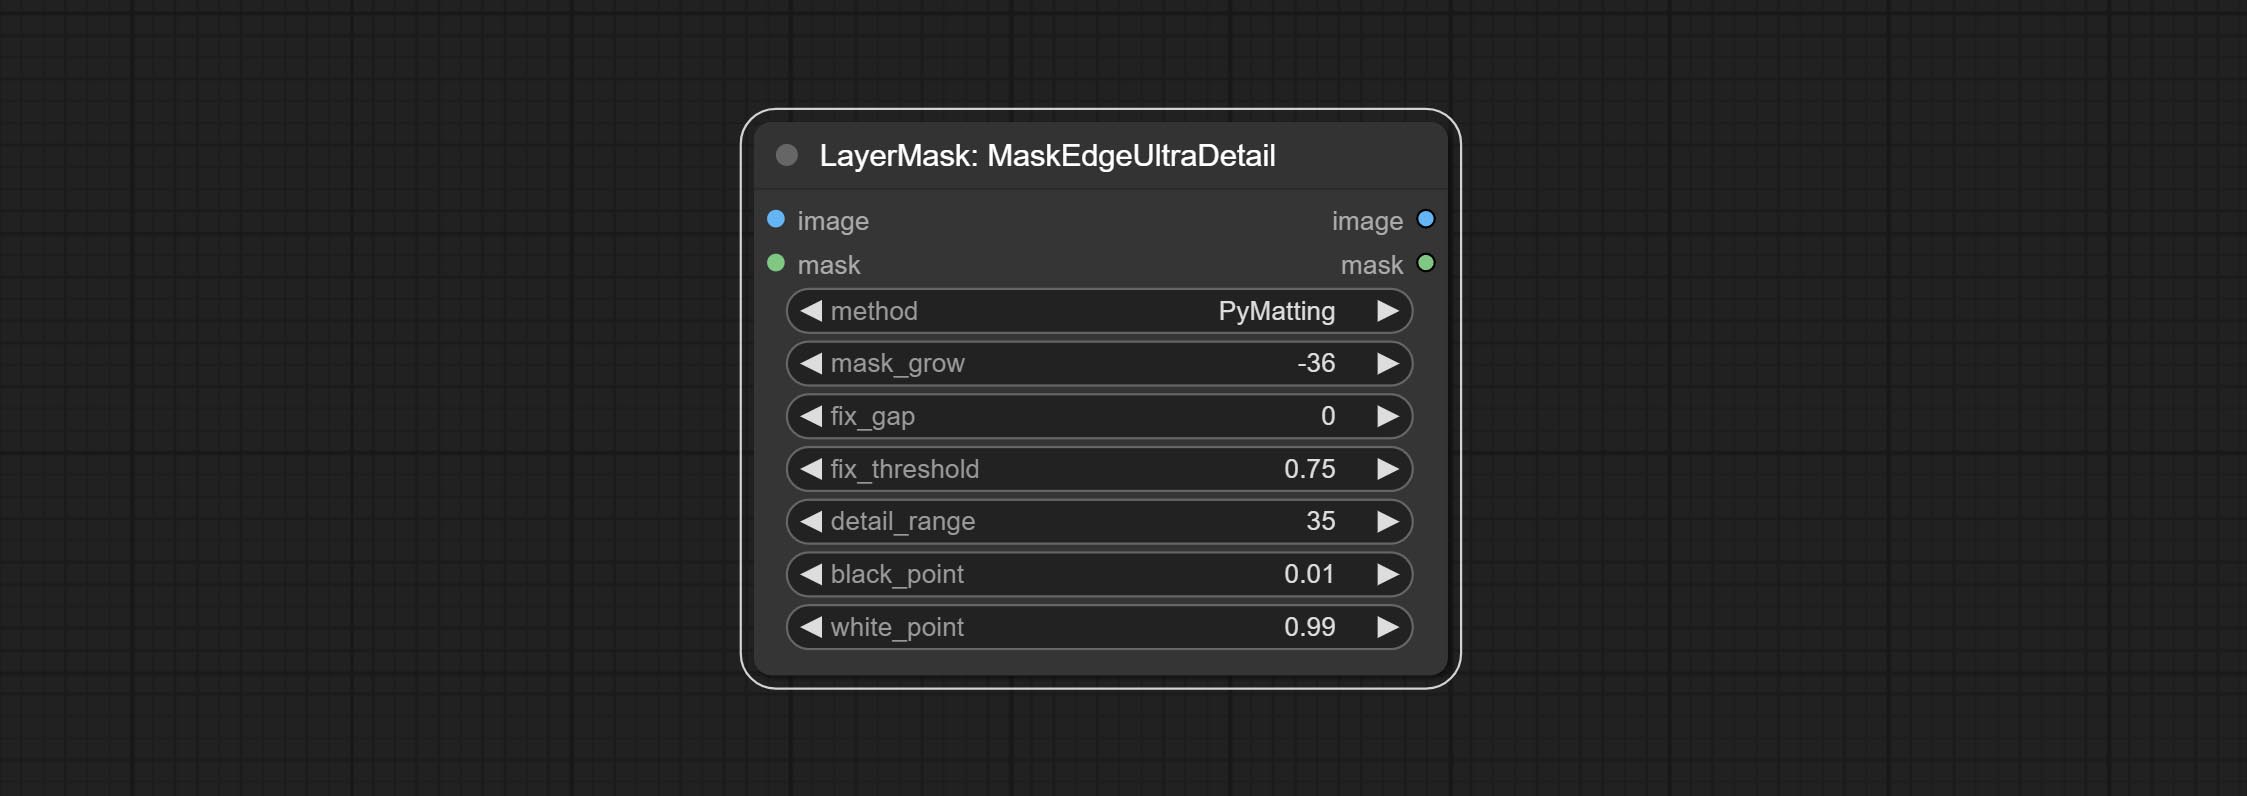
- method: Provide two methods for edge processing: PyMatting and OpenCV-GuidedFilter. PyMatching has a slower processing speed, but for video, it is recommended to use this method to obtain smoother mask sequences.
- mask_grow: Mask expansion amplitude. positive values expand outward, while negative values contract inward. For rougher masks, negative values are usually used to shrink their edges for better results.
- fix_gap: Repair the gaps in the mask. if obvious gaps in the mask, increase this value appropriately.
- fix_threshold: The threshold of fix_gap.
- detail_range: Edge detail range.
- black_point: Edge black sampling threshold.
- white_point: Edge white sampling threshold.
MaskEdgeUltraDetailV2
The V2 upgraded version of MaskEdgeUltraDetail has added the VITMatte edge processing method.(Note: Images larger than 2K in size using this method will consume huge memory)
This method is suitable for handling semi transparent areas.
On the basis of MaskEdgeUltraDetail, the following changes have been made: 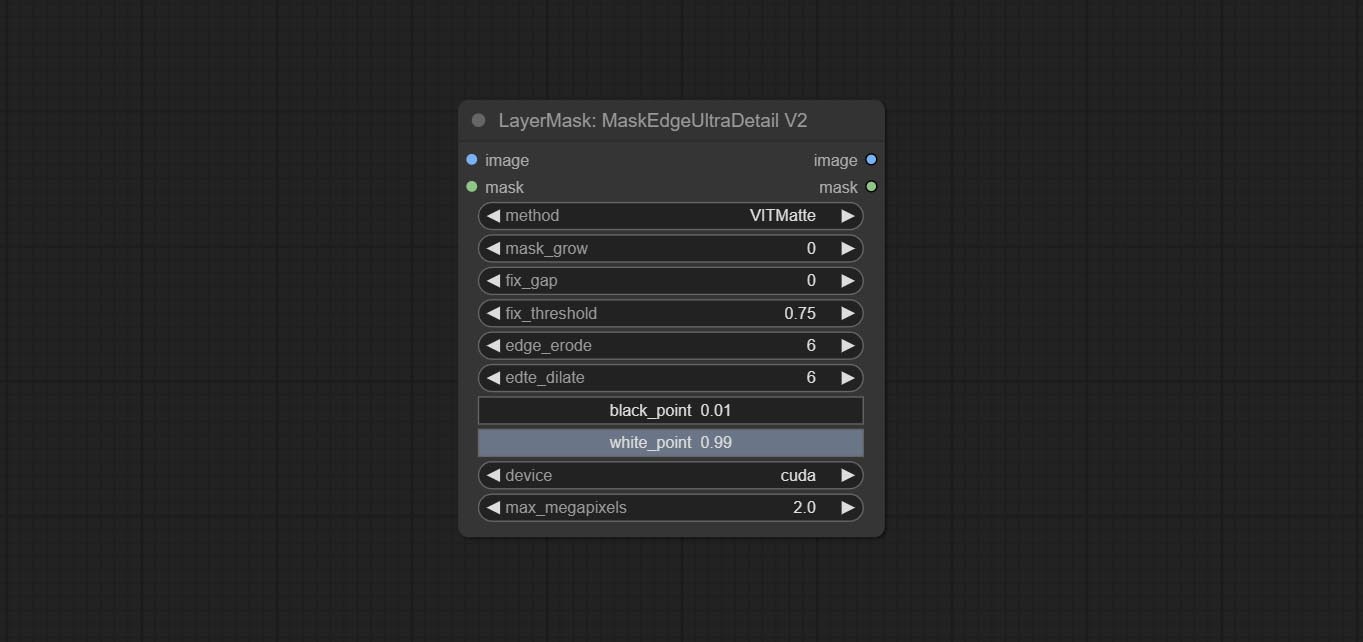
- method: Edge processing methods. provides VITMatte, VITMatte(local), PyMatting, GuidedFilter. If the model has been downloaded after the first use of VITMatte, you can use VITMatte (local) afterwards.
- edge_erode: Mask the erosion range inward from the edge. the larger the value, the larger the range of inward repair.
- edge_dilate: The edge of the mask expands outward. the larger the value, the wider the range of outward repair.
- device: Set whether the VitMatte to use cuda.
- max_megapixels: Set the maximum size for VitMate operations.
YoloV8Detect
Use the YoloV8 model to detect faces, hand box areas, or character segmentation. Supports the output of the selected number of channels. Download the model files from GoogleDrive or BaiduNetdisk to ComfyUI/models/yolo folder.
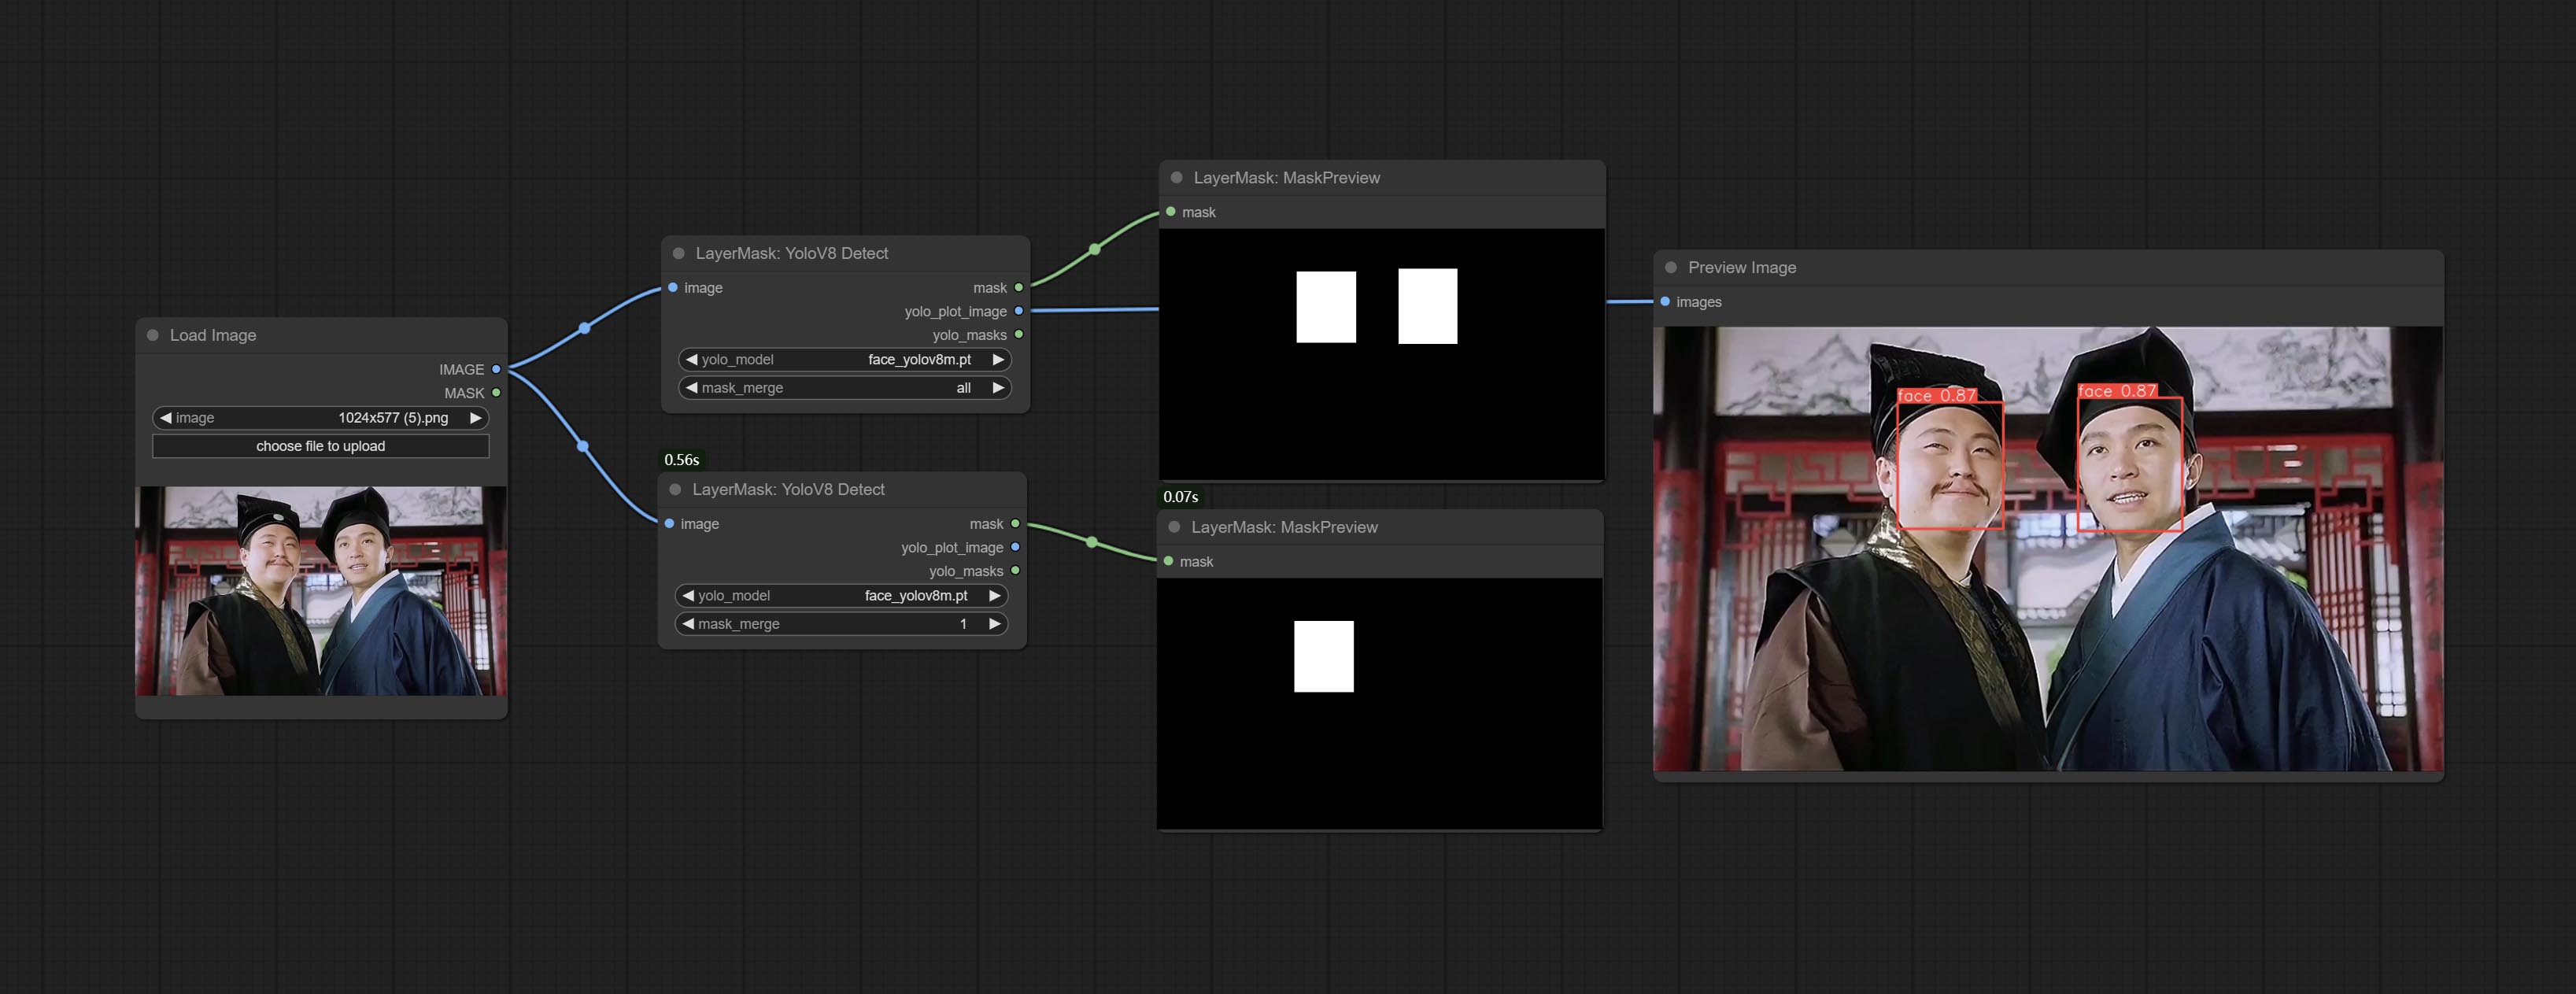
Node Options:
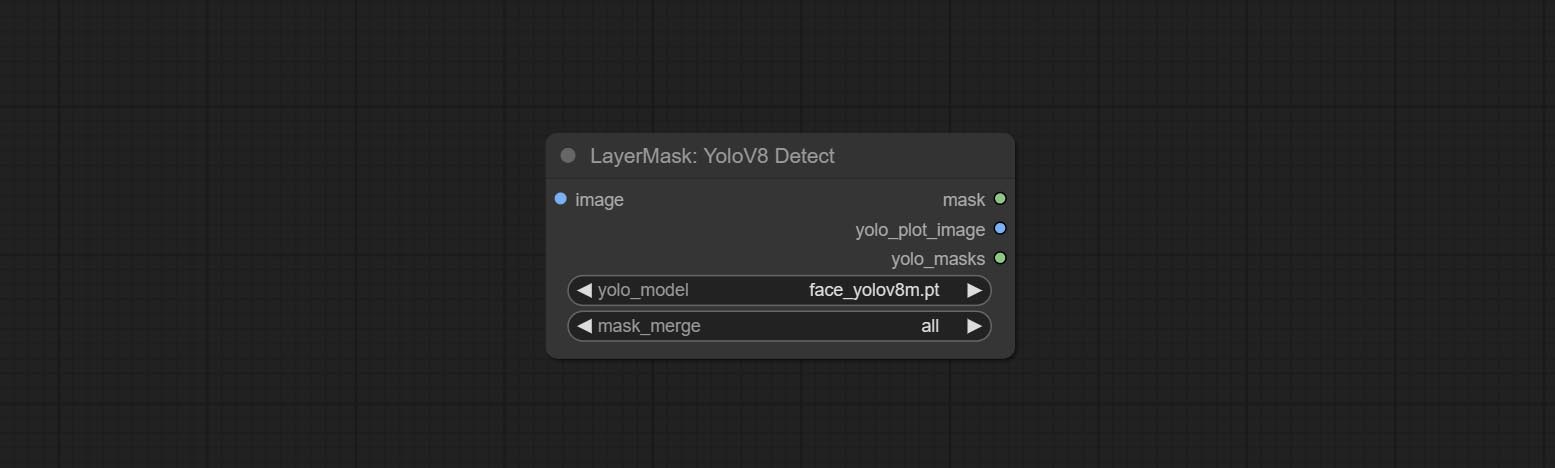
- yolo_model: Yolo model selection. the model with
seg name can output segmented masks, otherwise they can only output box masks. - mask_merge: Select the merged mask.
all is to merge all mask outputs. The selected number is how many masks to output, sorted by recognition confidence to merge the output.
Выходы:
- mask: The output mask.
- yolo_plot_image: Preview of yolo recognition results.
- yolo_masks: For all masks identified by yolo, each individual mask is output as a mask.
MediapipeFacialSegment
Use the Mediapipe model to detect facial features, segment left and right eyebrows, eyes, lips, and tooth. *Download the model files from BaiduNetdisk to ComfyUI/models/mediapipe folder.
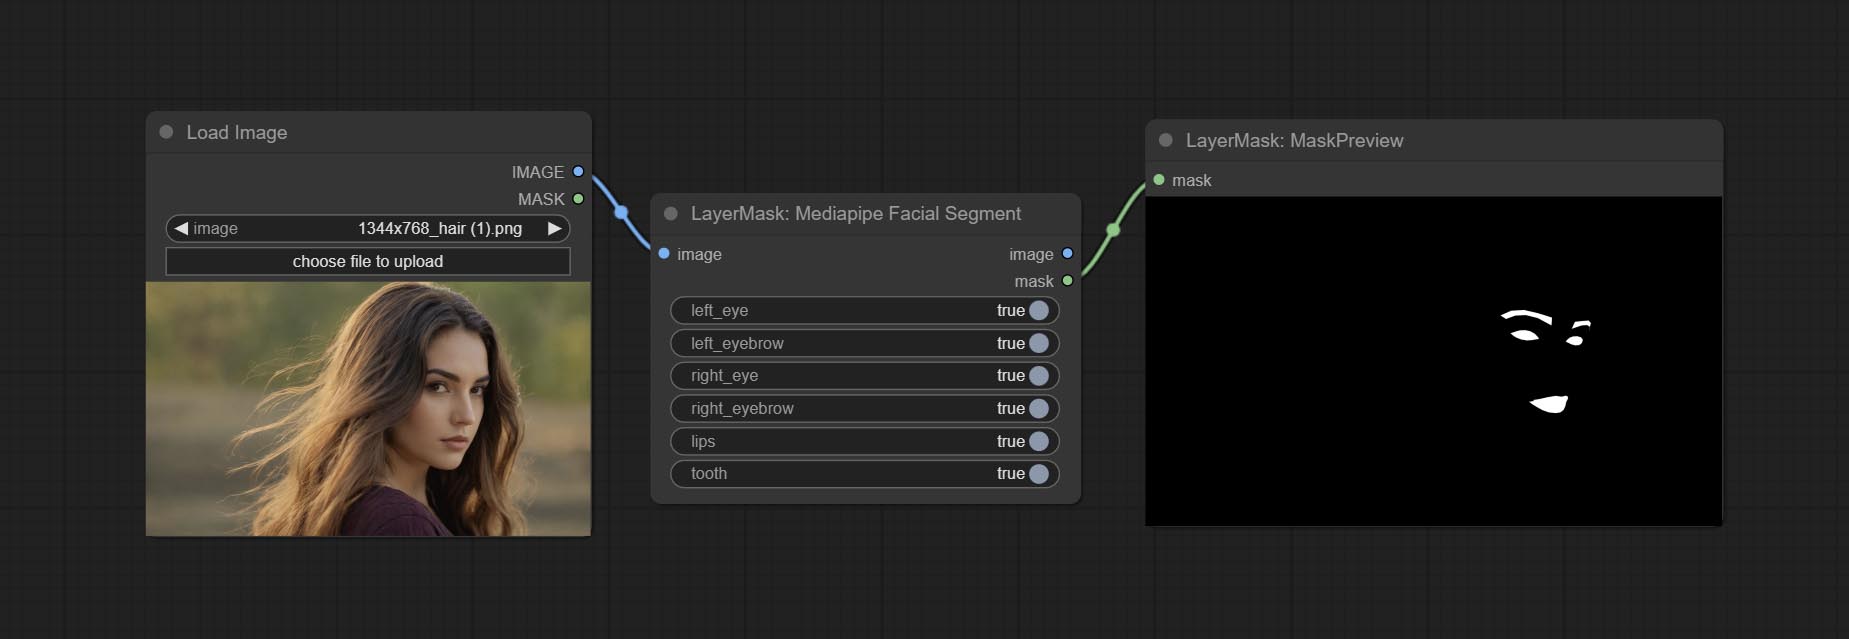
Node Options:
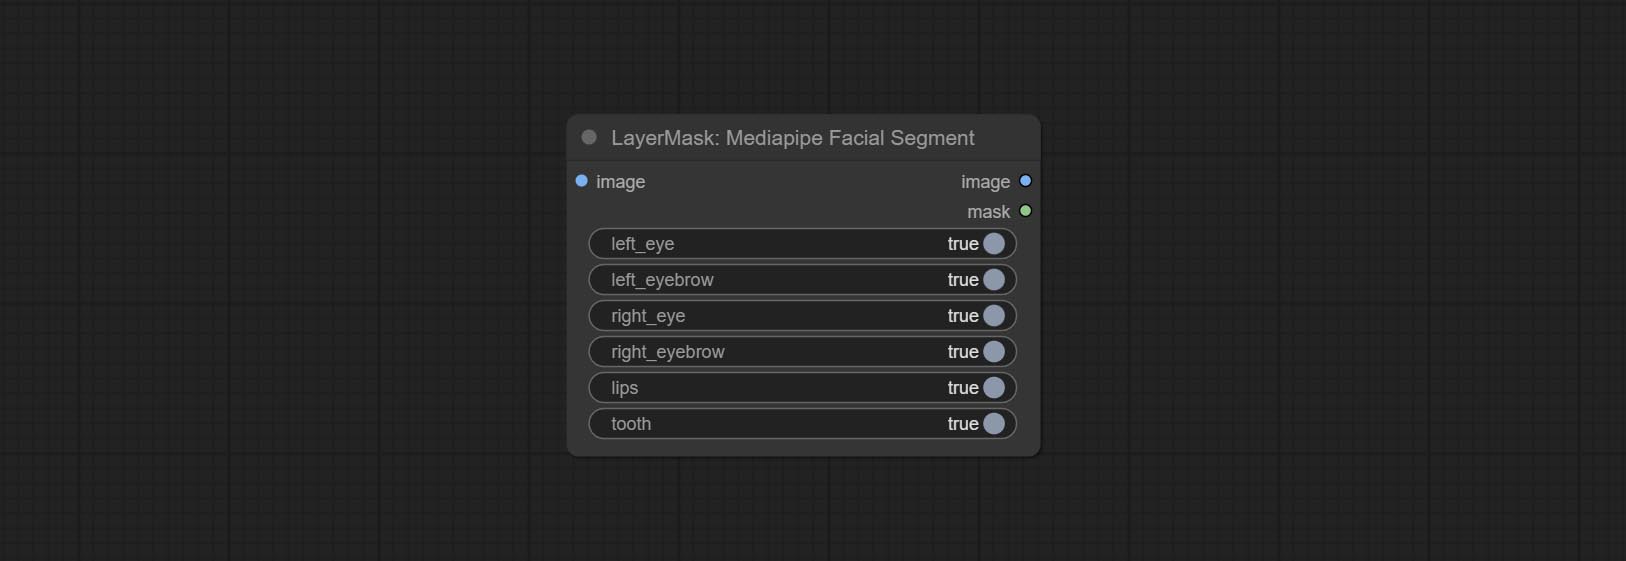
- left_eye: Recognition switch of left eye.
- left_eyebrow: Recognition switch of left eyebrow.
- right_eye: Recognition switch of right eye.
- right_eyebrow: Recognition switch of right eyebrow.
- lips: Recognition switch of lips.
- tooth: Recognition switch of tooth.
MaskByColor
Generate a mask based on the selected color. 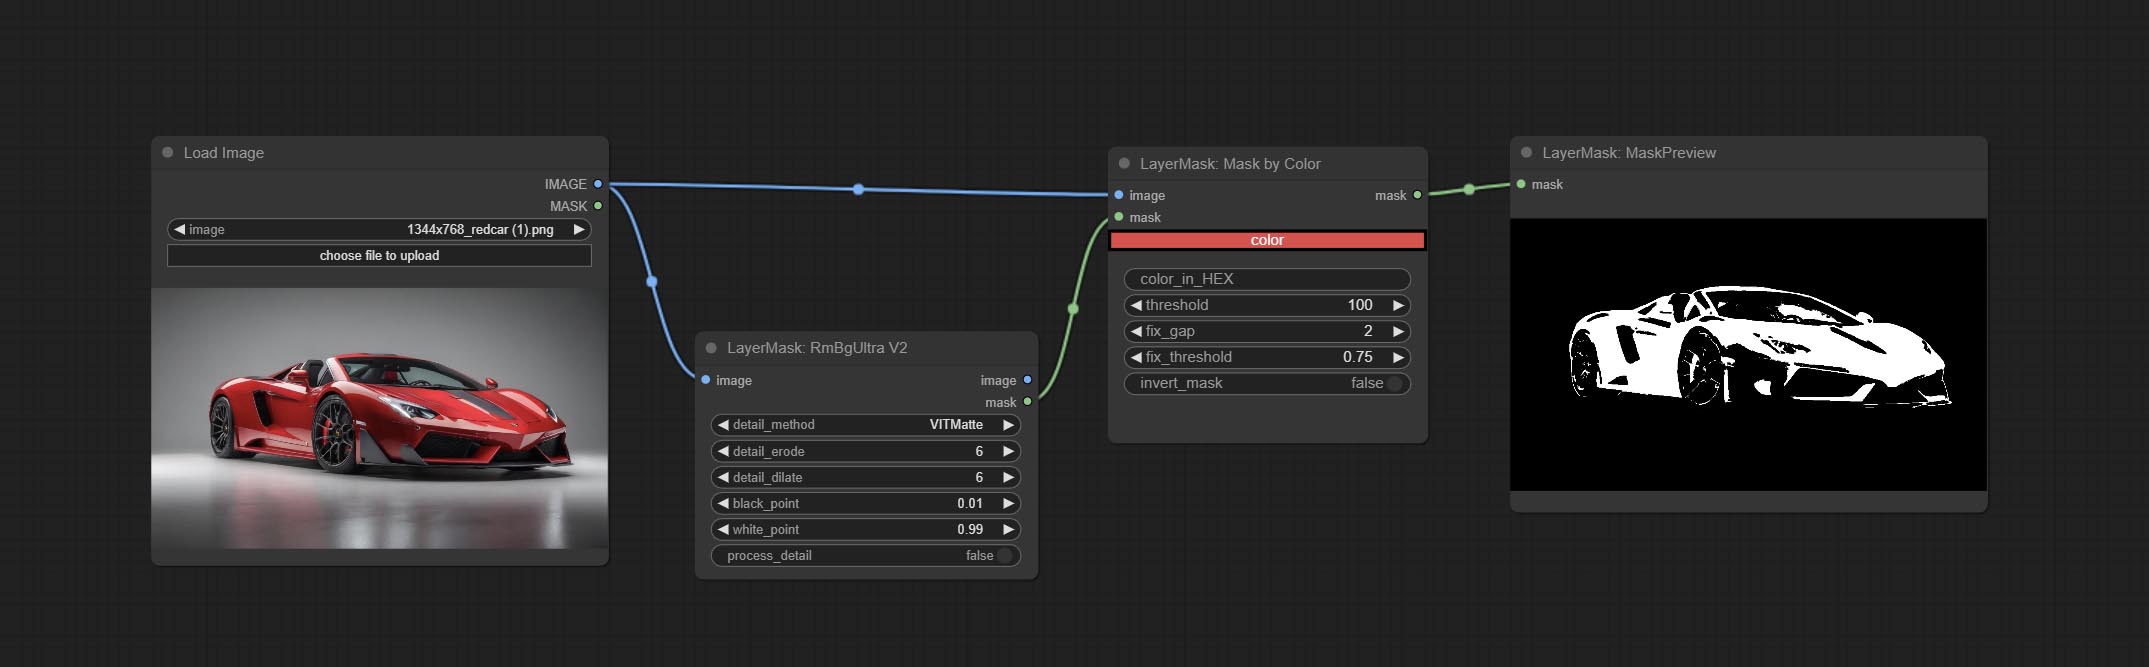
Node Options:
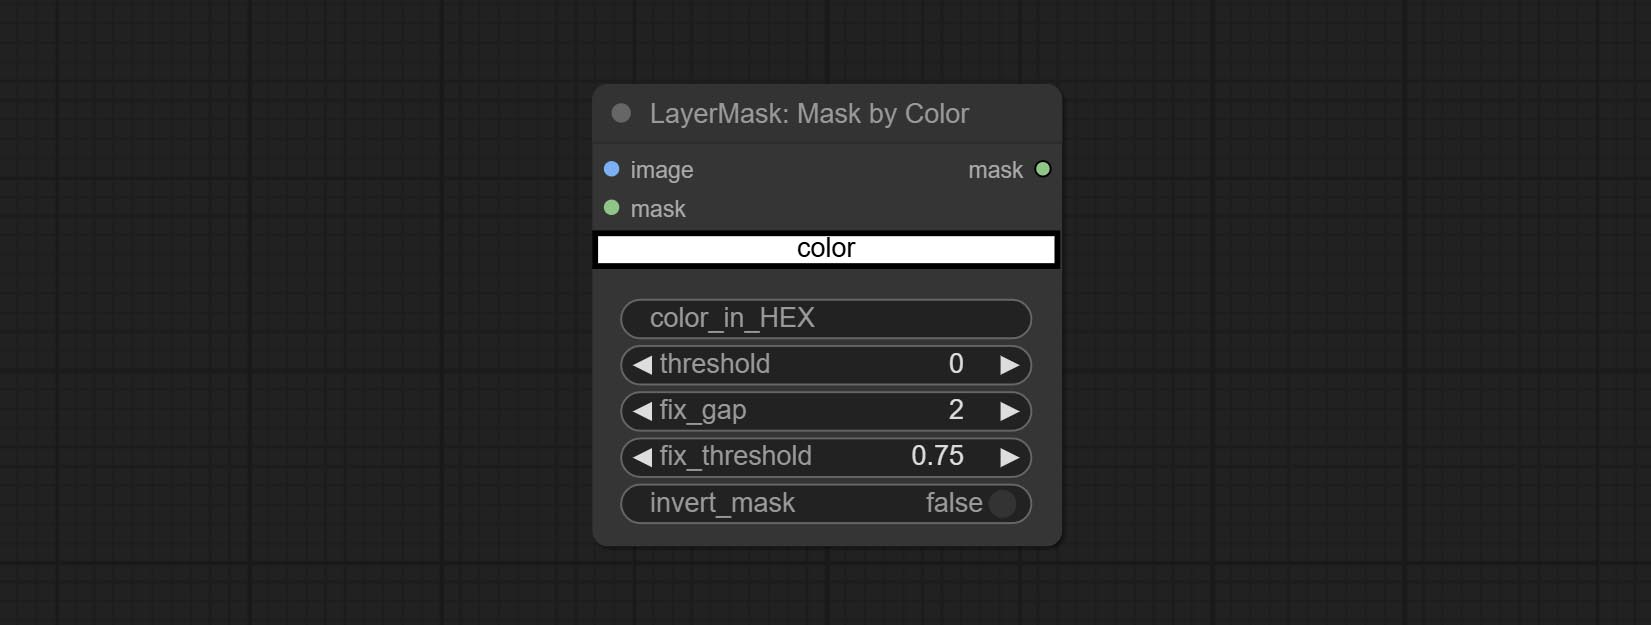
- image: Input image.
- mask: This input is optional, if there is a mask, only the colors inside the mask are included in the range.
- color: Color selector. Click on the color block to select a color, and you can use the straws on the color picker panel to pick up the screen color. Note: When using straws, maximize the browser window.
- color_in_HEX 4 : Enter color values. If this item has input, it will be used first, ignoring the color selected by the
color . - threshold: Mask range threshold, the larger the value, the larger the mask range.
- fix_gap: Repair the gaps in the mask. If there are obvious gaps in the mask, increase this value appropriately.
- fix_threshold: The threshold for repairing masks.
- invert_mask: Whether to reverse the mask.
ImageToMask
Convert the image to a mask. Supports converting any channel in LAB, RGBA, YUV, and HSV modes into masks, while providing color scale adjustment. Support mask optional input to obtain masks that only include valid parts. 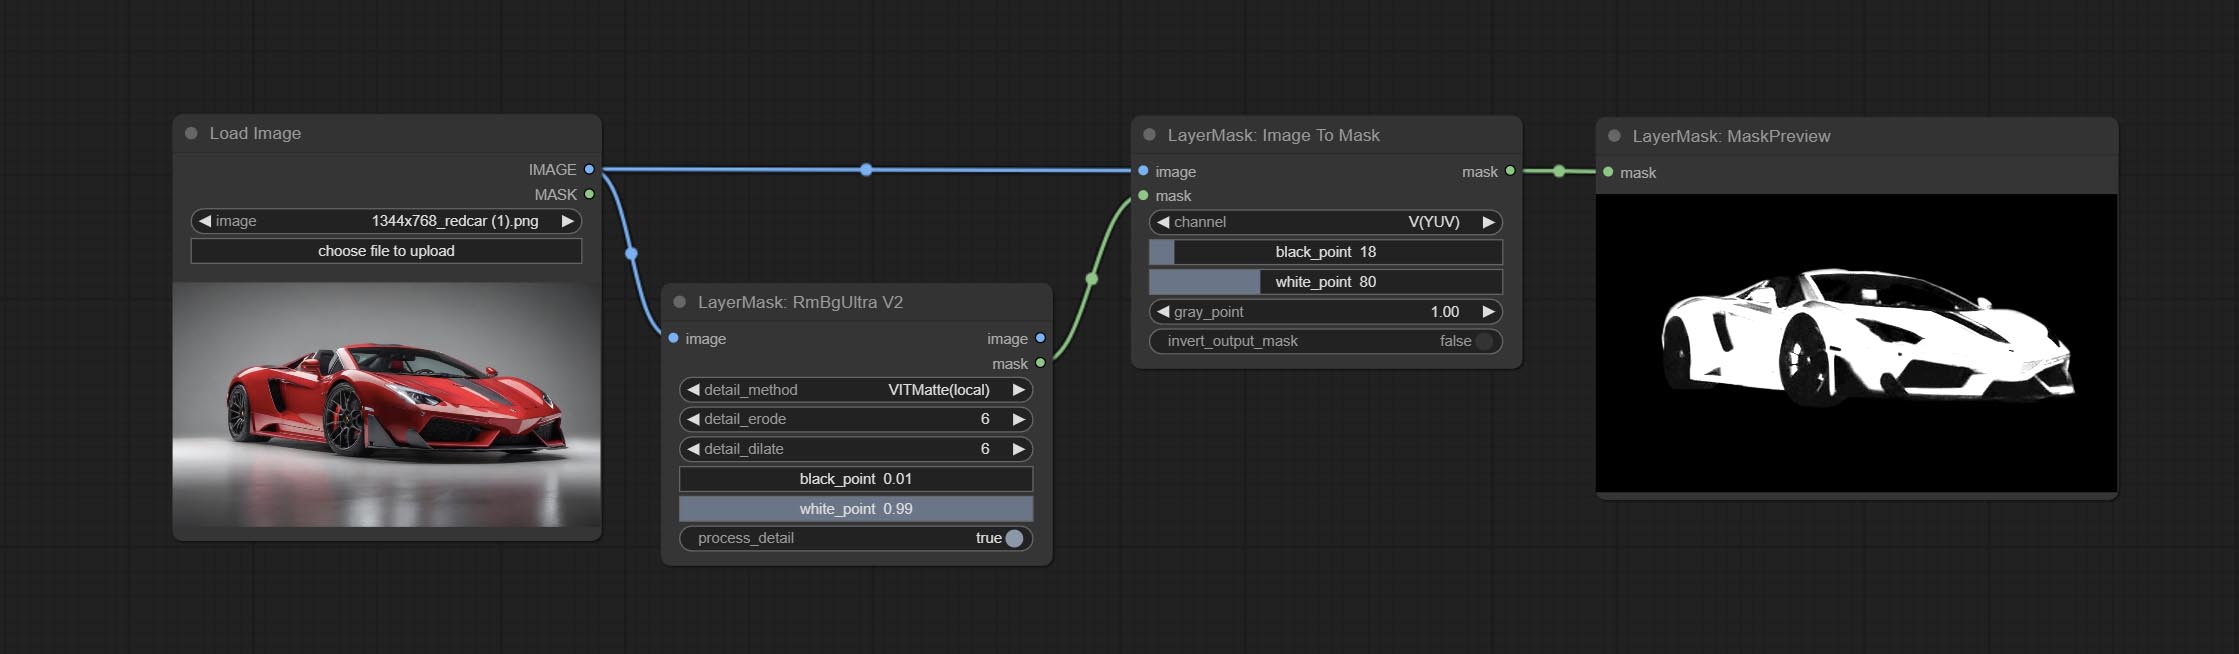
Node Options:
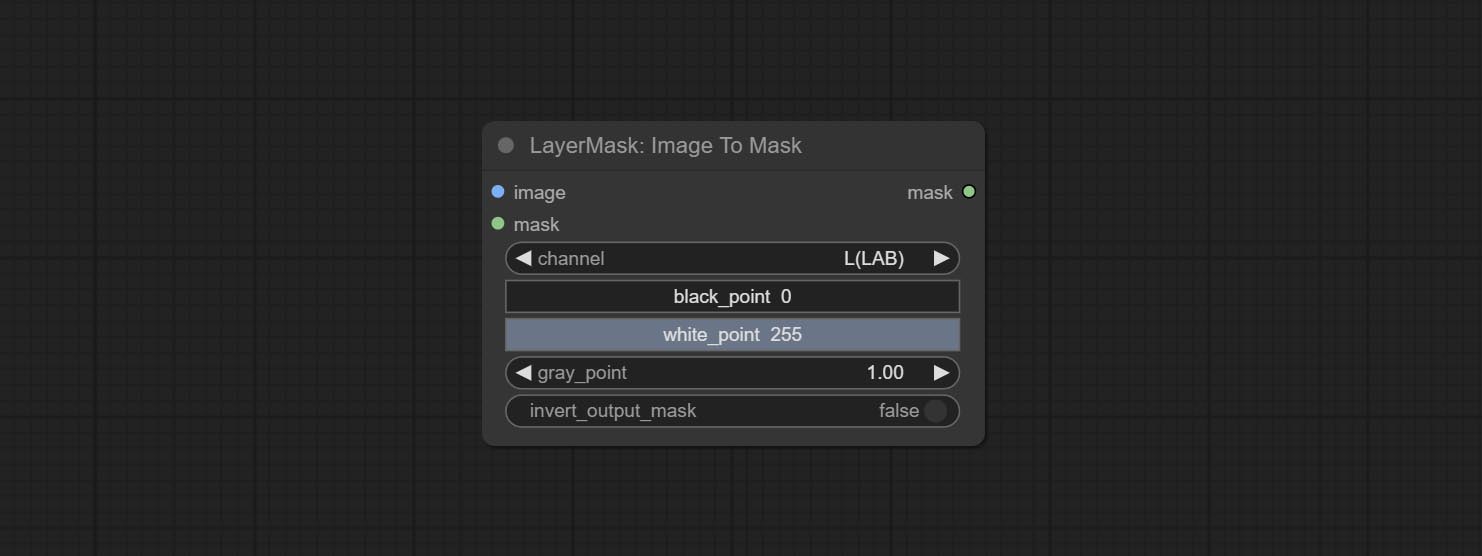
- image: Input image.
- mask: This input is optional, if there is a mask, only the colors inside the mask are included in the range.
- channel: Channel selection. You can choose any channel of LAB, RGBA, YUV, or HSV modes.
- black_point * : Black dot value for the mask. The value range is 0-255, with a default value of 0.
- white_point * : White dot value for the mask. The value range is 0-255, with a default value of 255.
- gray_point: Gray dot values for the mask. The value range is 0.01-9.99, with a default of 1.
- invert_output_mask: Whether to reverse the mask.
* If the black_point or output_black_point value is greater than white_point or output_white_point, the two values are swapped, with the larger value used as white_point and the smaller value used as black_point.
Shadow & Highlight Mask
Generate masks for the dark and bright parts of the image. 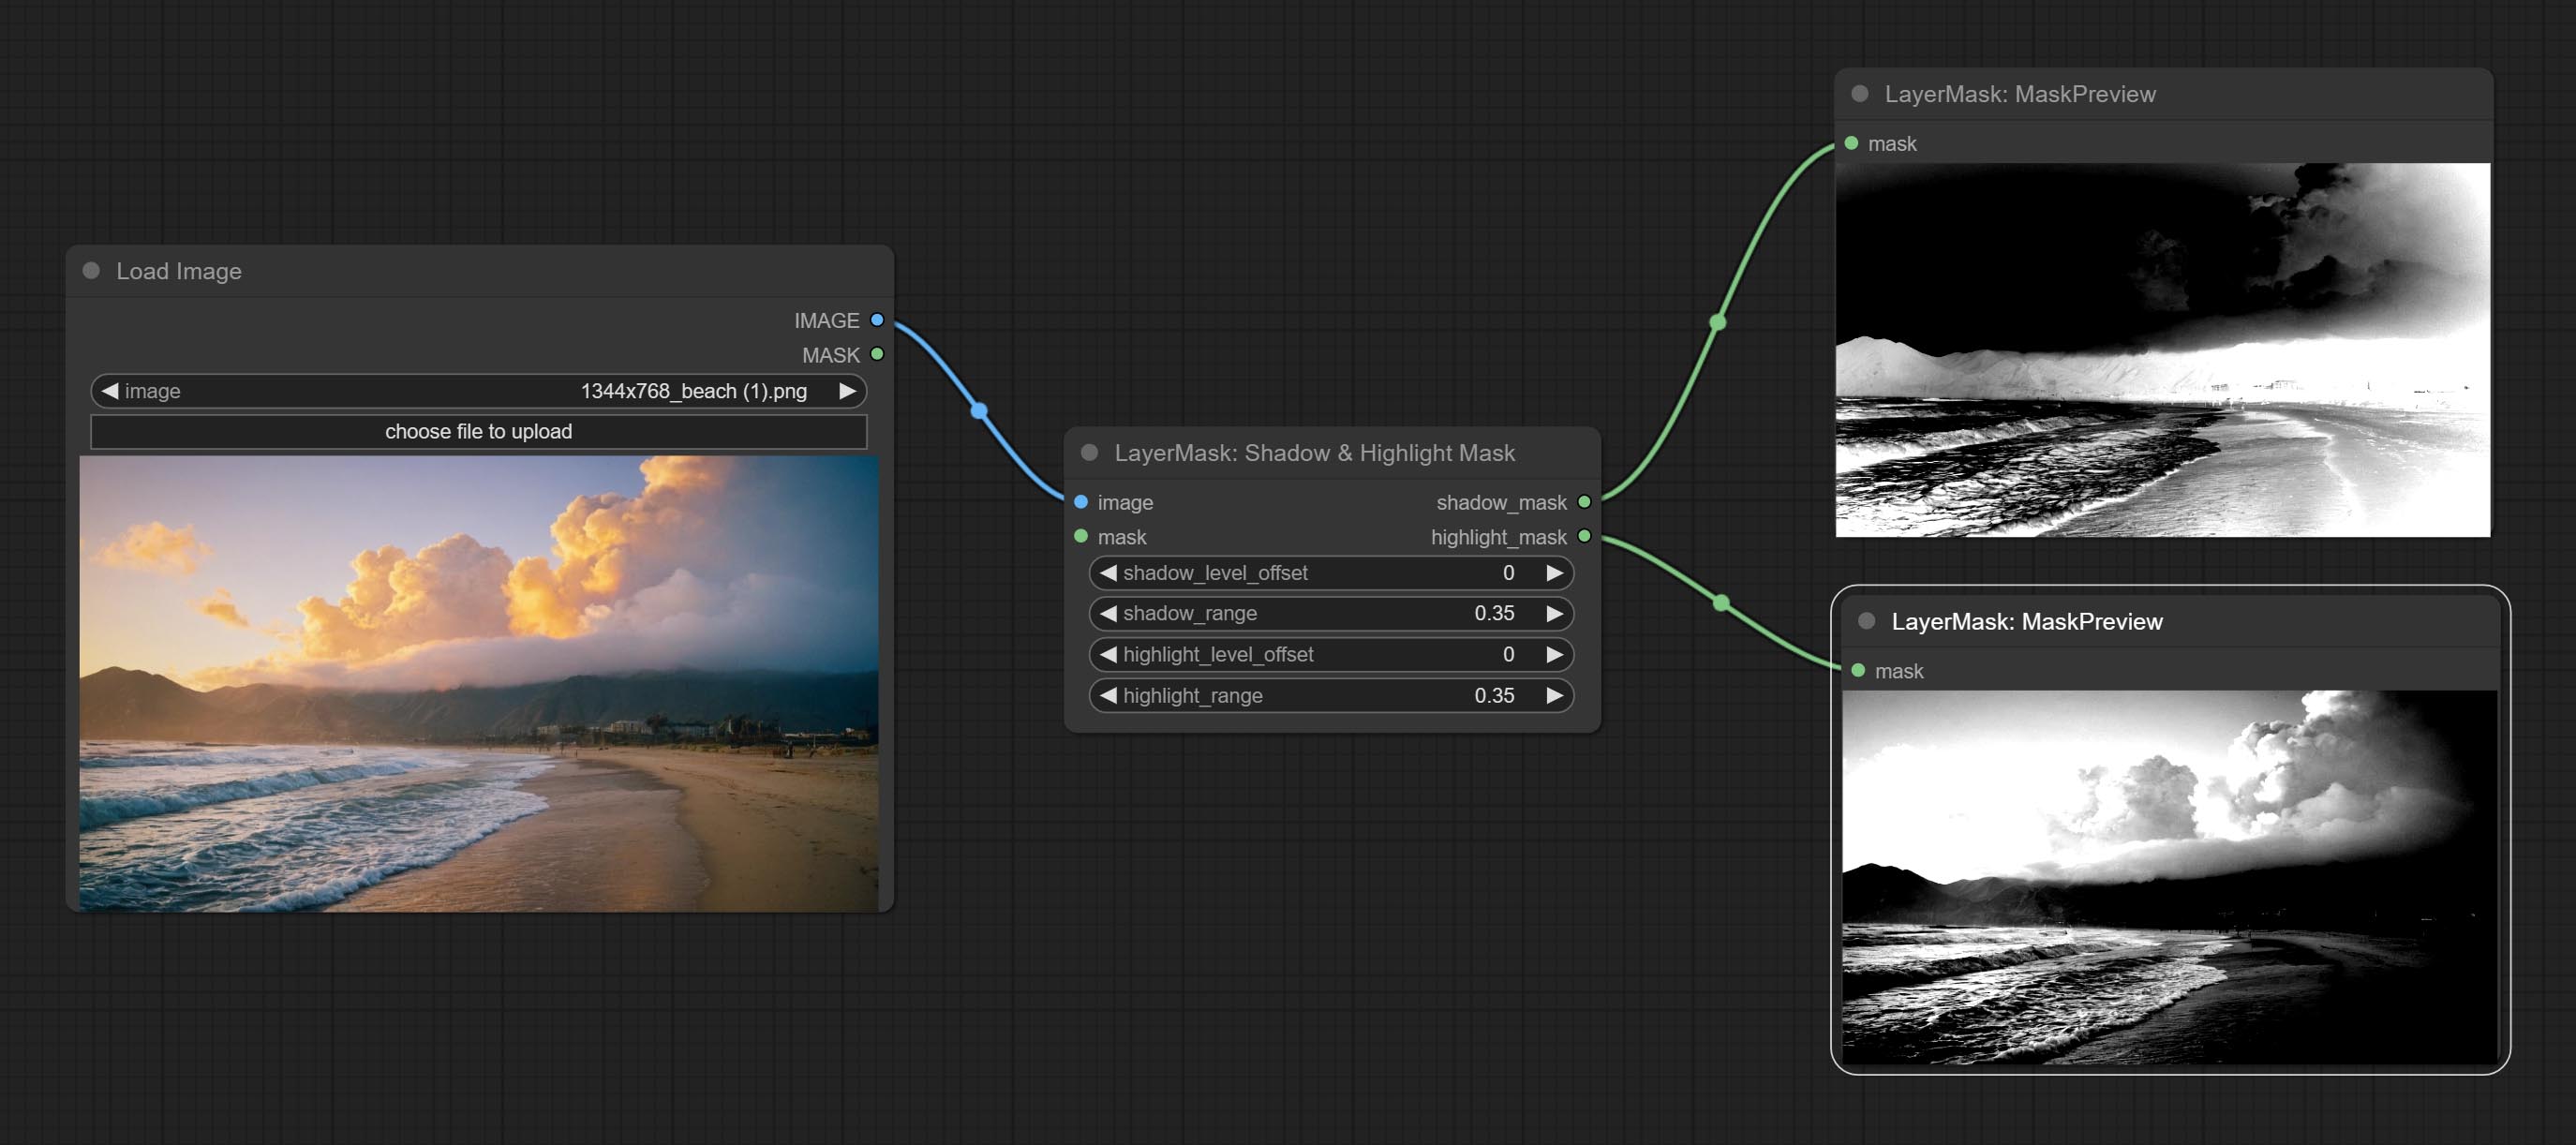
Node options:
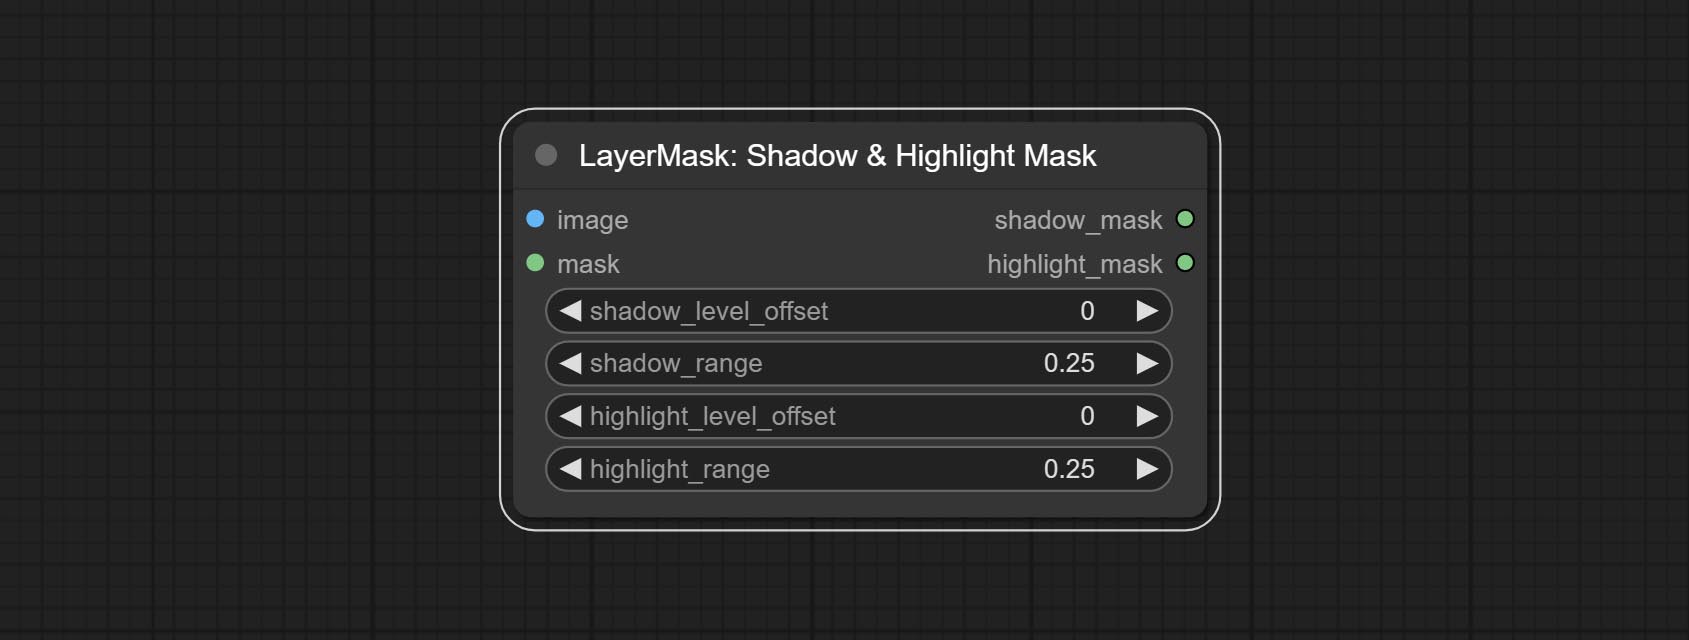
- image: The input image.
- mask: Optional input. if there is input, only the colors within the mask range will be adjusted.
- shadow_level_offset: The offset of values in the dark area, where larger values bring more areas closer to the bright into the dark area.
- shadow_range: The transitional range of the dark area.
- highlight_level_offset: The offset of values in the highlight area, where larger values bring more areas closer to the dark into the highlight area.
- highlight_range: The transitional range of the highlight area.
Shadow Highlight Mask V2
A replica of the Shadow & Highlight Mask node, with the "&" character removed from the node name to avoid ComfyUI workflow parsing errors.
PixelSpread
Pixel expansion preprocessing on the masked edge of an image can effectively improve the edges of image composit. 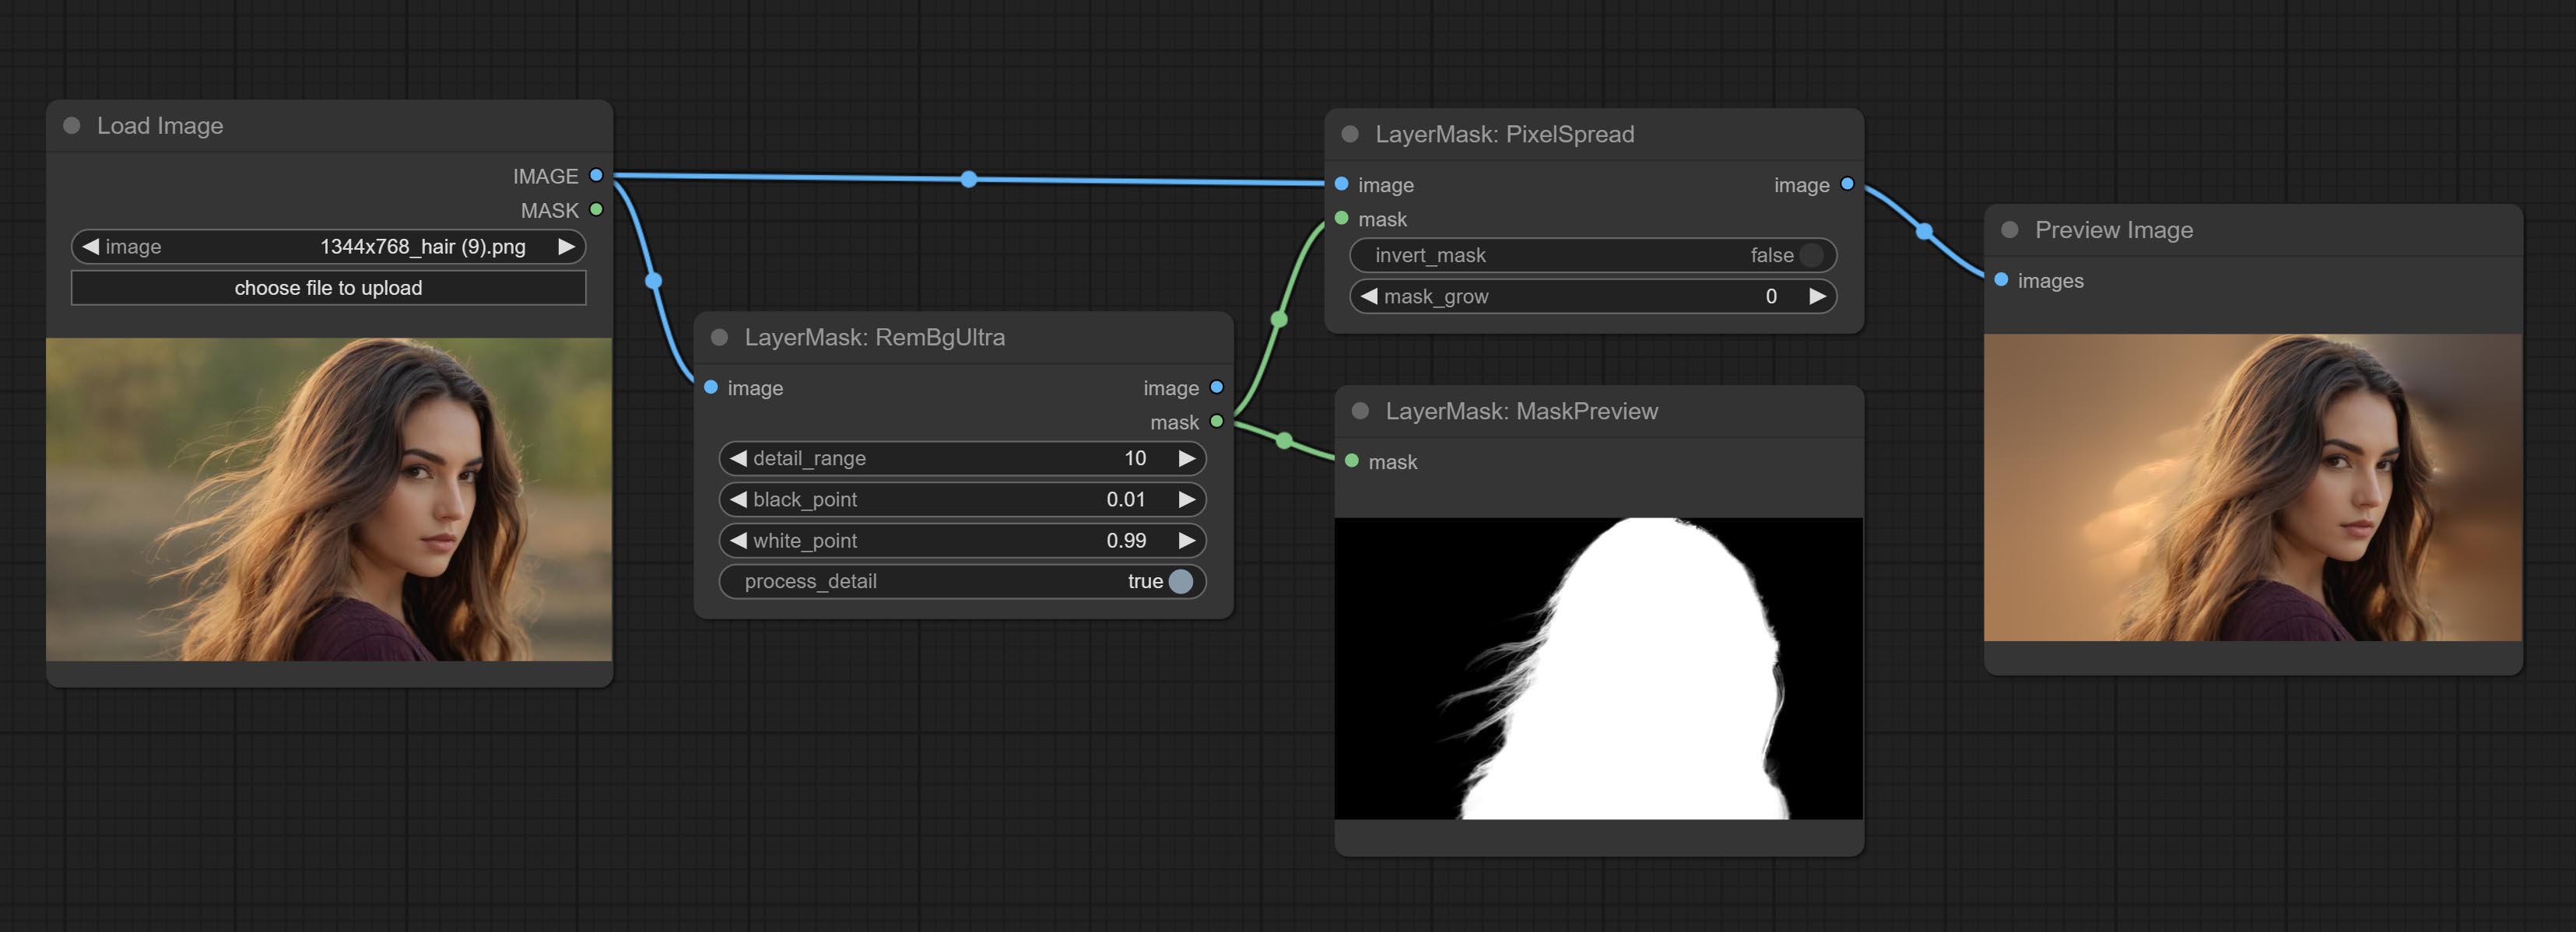
Node options:
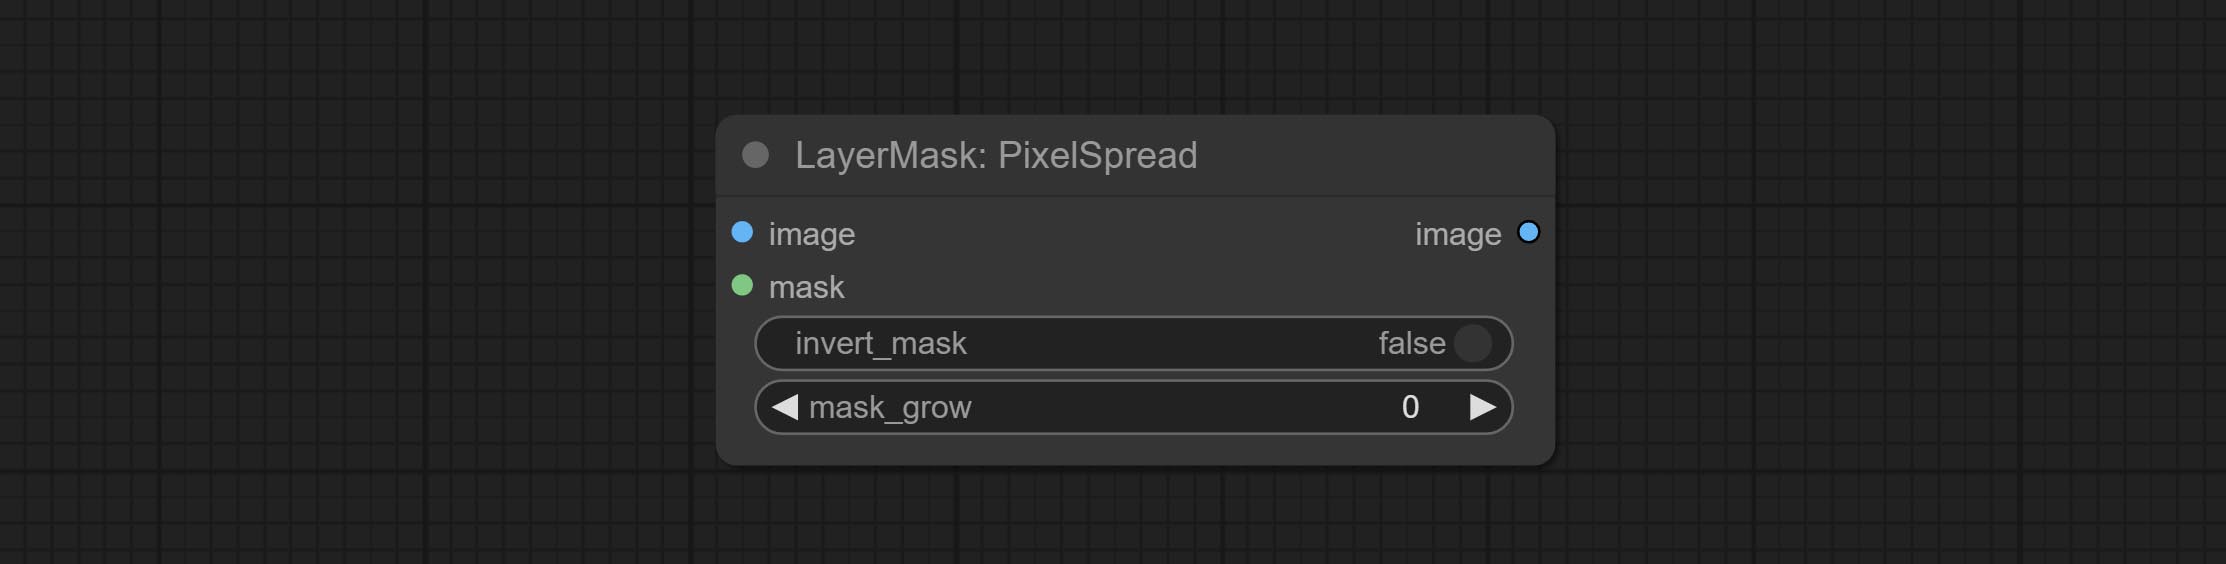
- invert_mask: Whether to reverse the mask.
- mask_grow: Mask expansion amplitude.
MaskByDifferent
Calculate the differences between two images and output them as mask. 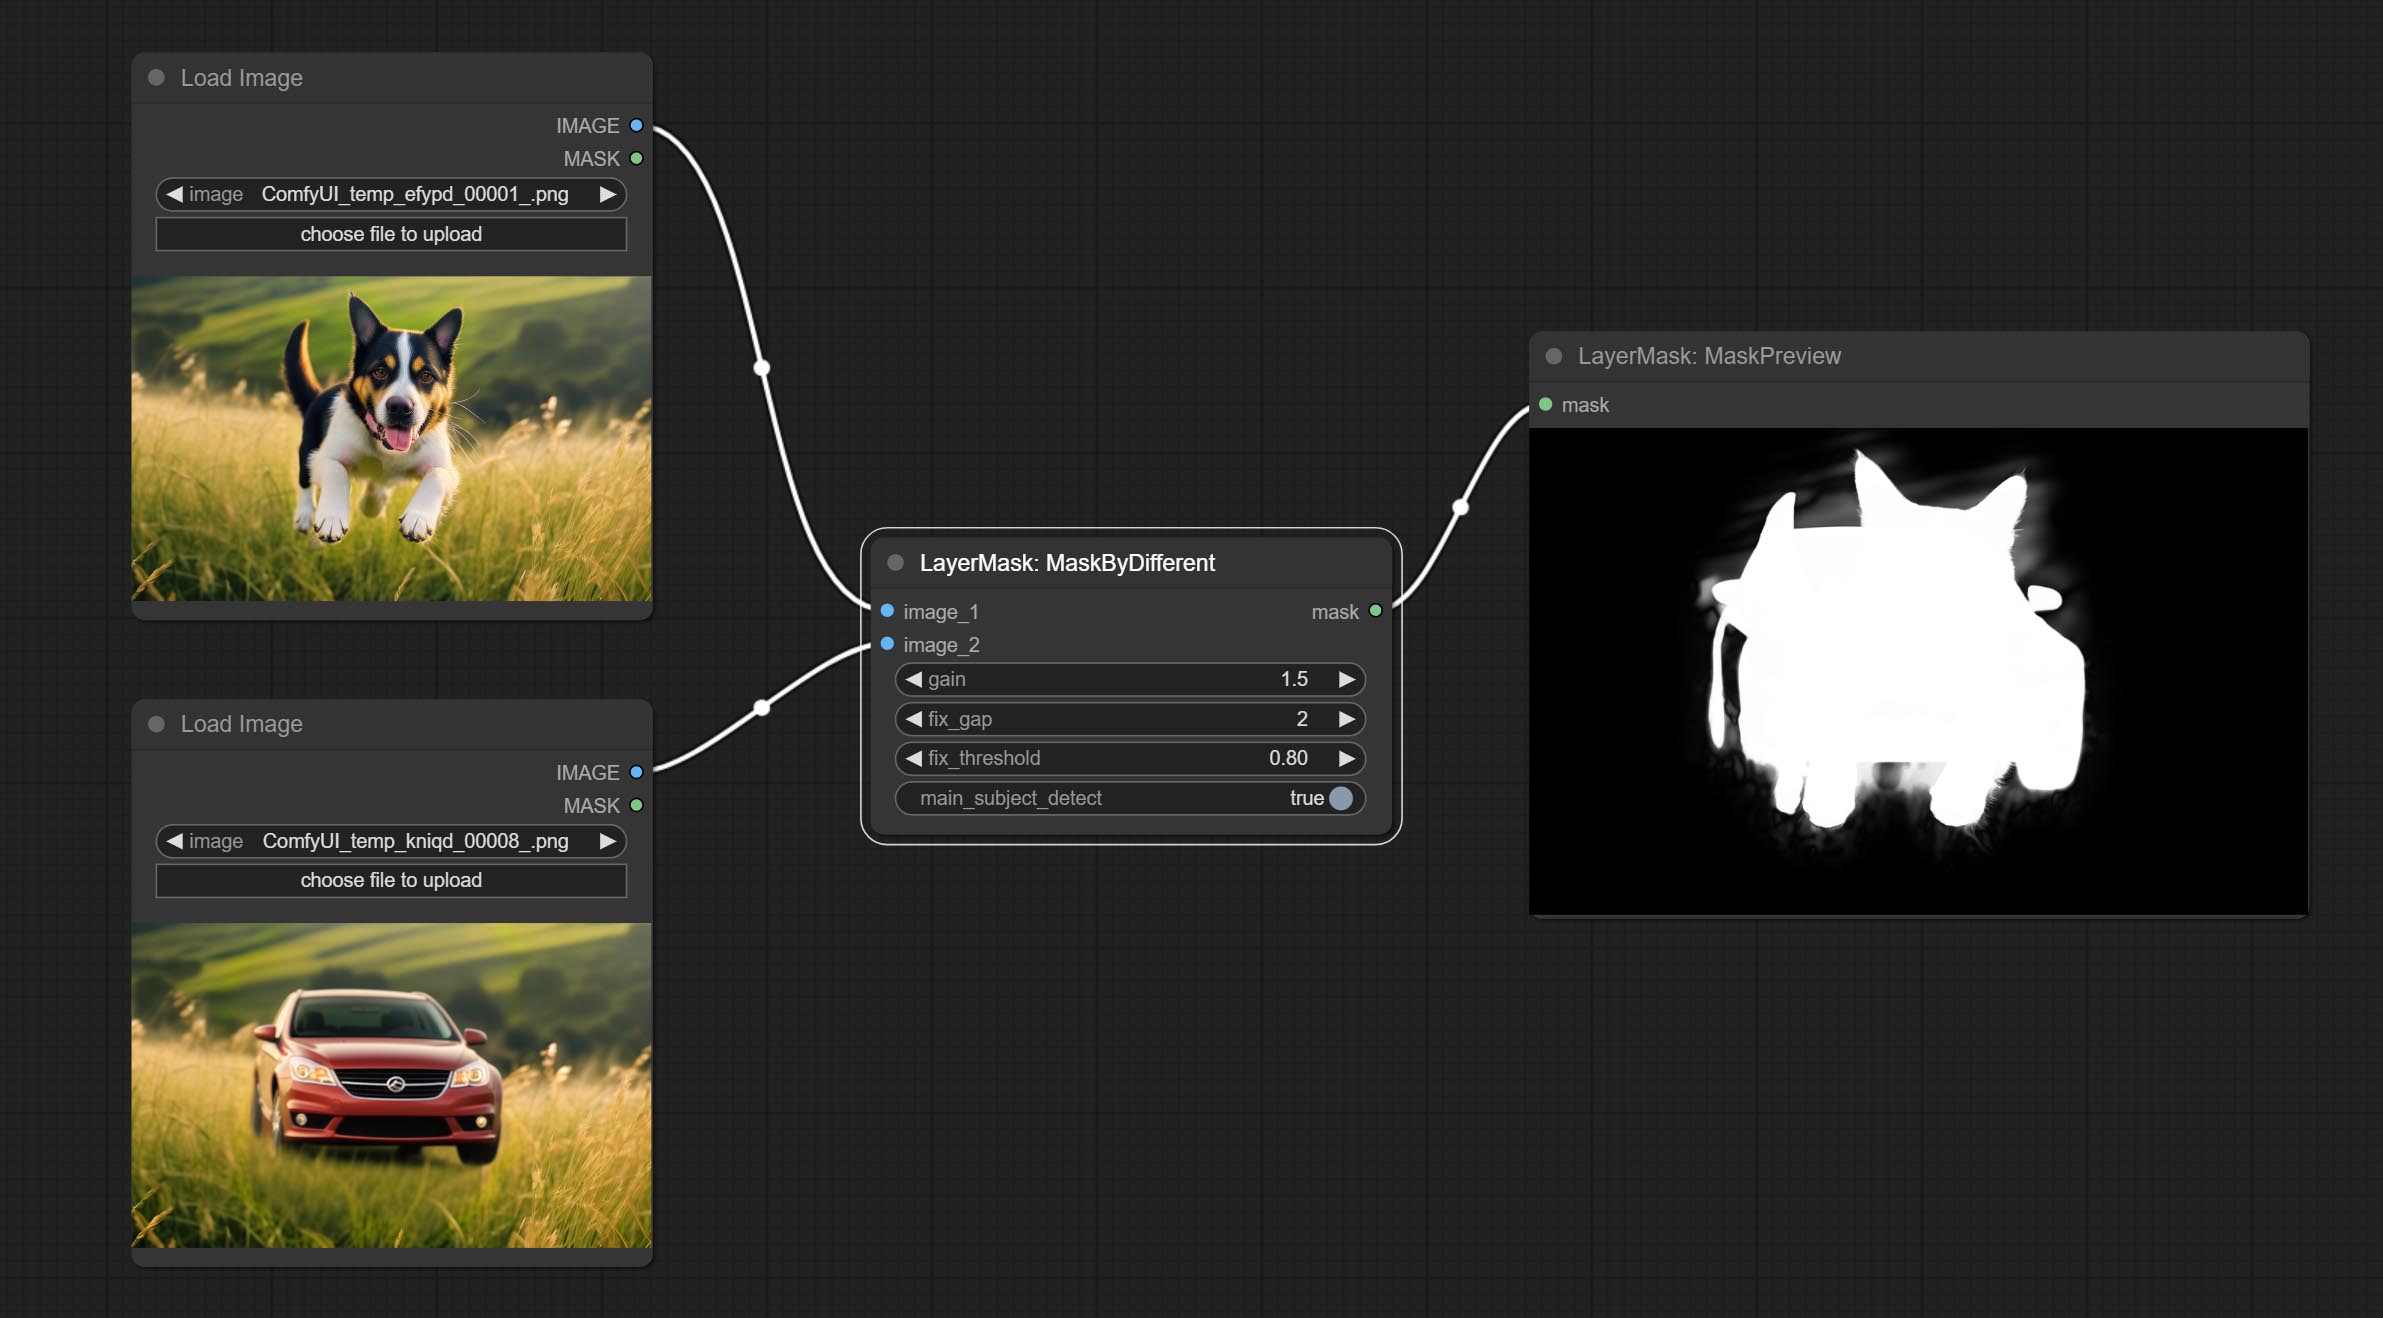
Node options:
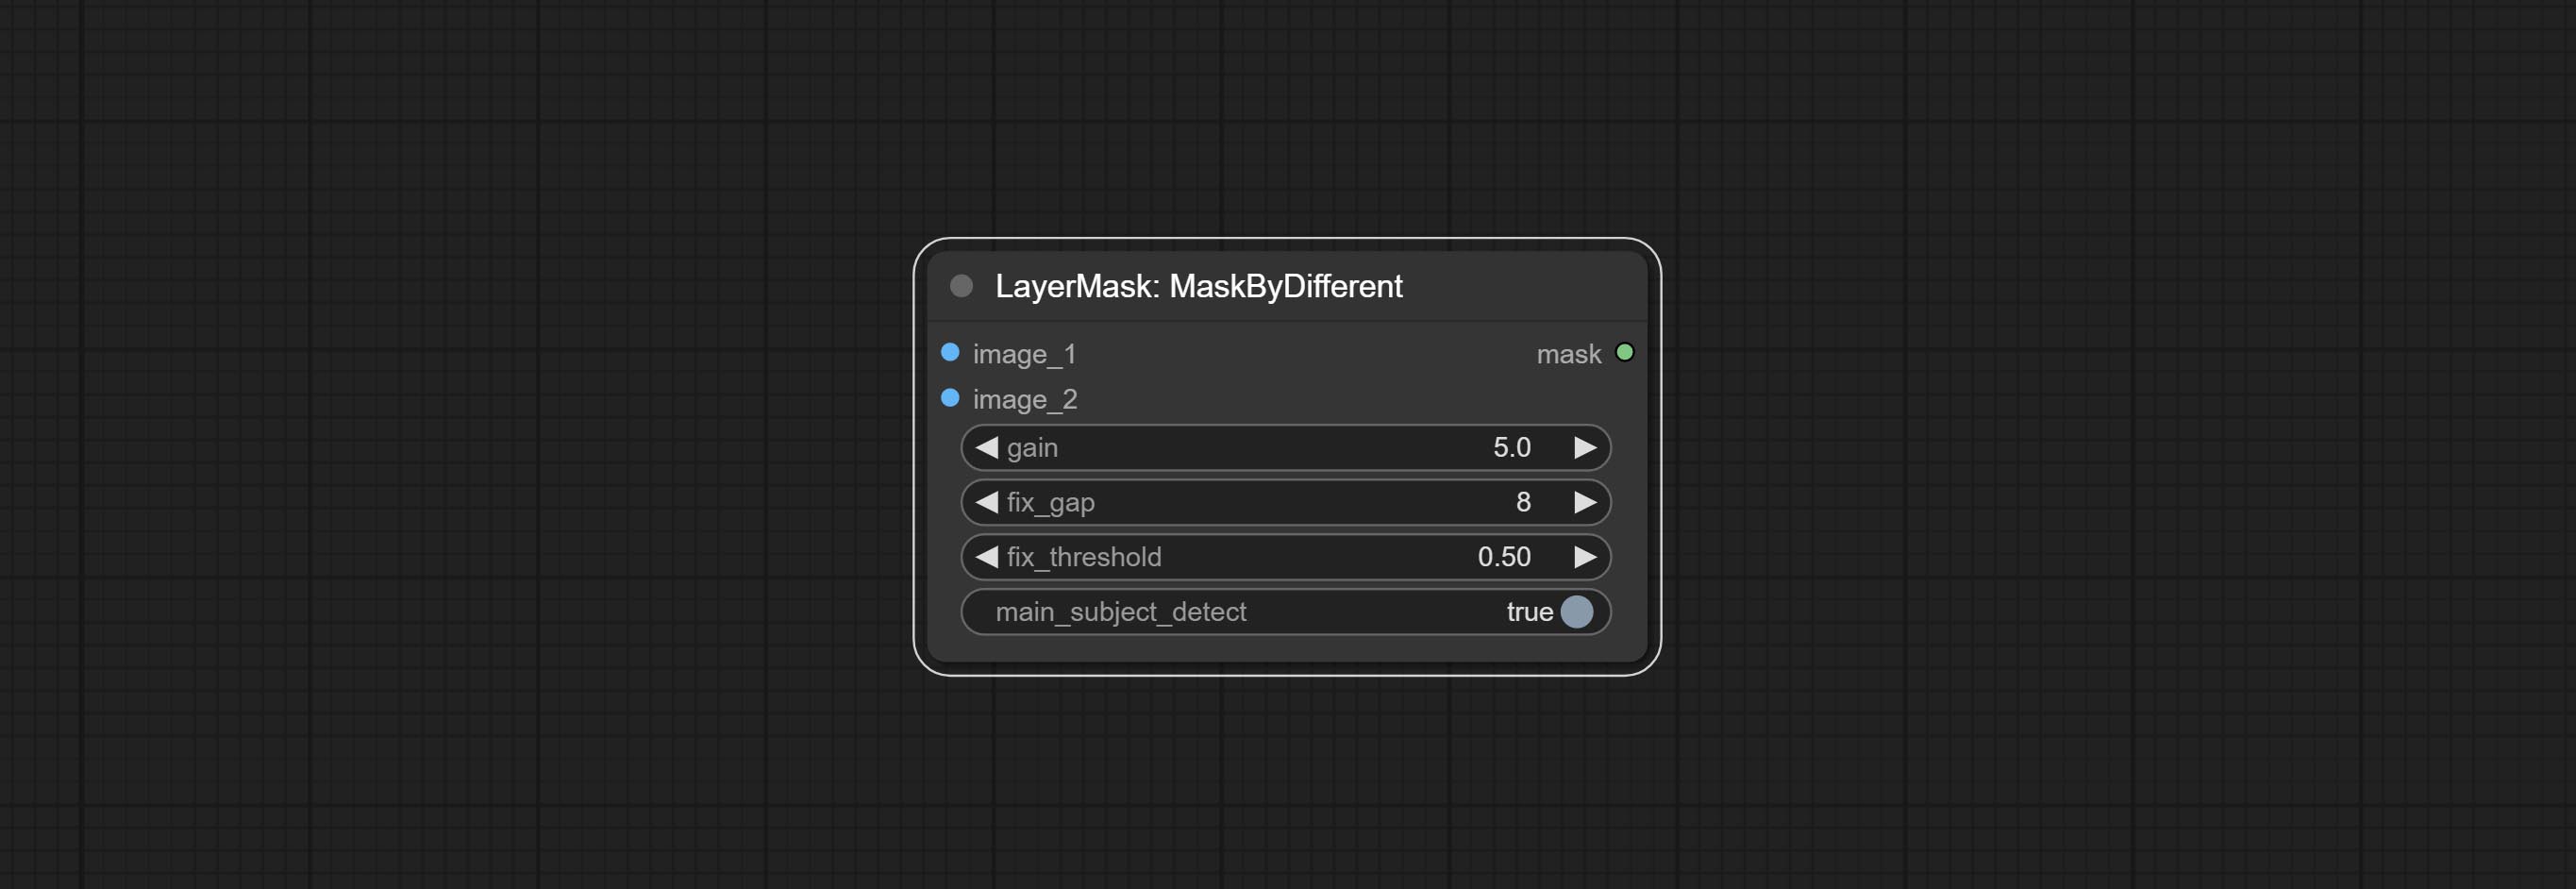
- gain: The gain of difference calculate. higher value will result in a more significant slight difference.
- fix_gap: Fix the internal gaps of the mask. higher value will repair larger gaps.
- fix_threshold: The threshold for fix_gap.
- main_subject_detect: Setting this to True will enable subject detection, ignoring differences outside of the subject.
MaskGrow
Grow and shrink edges and blur the mask 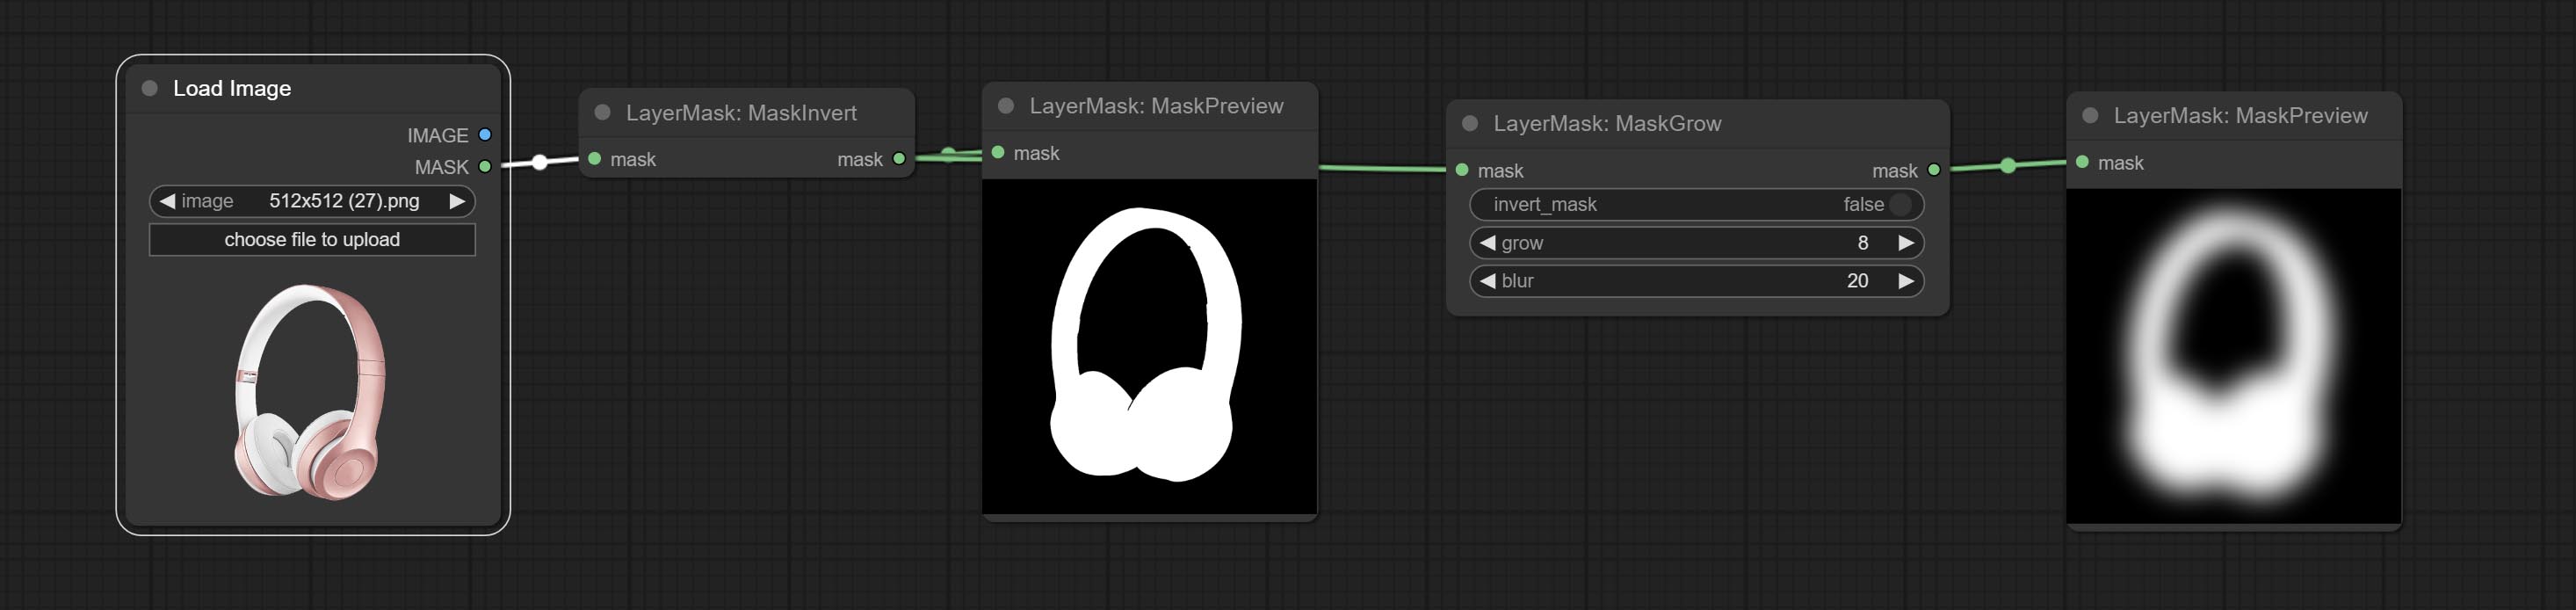
Node options: 
- invert_mask: Whether to reverse the mask.
- grow: Positive values expand outward, while negative values contract inward.
- blur: Blur the edge.
MaskEdgeShrink
Smooth transition and shrink the mask edges while preserving edge details. 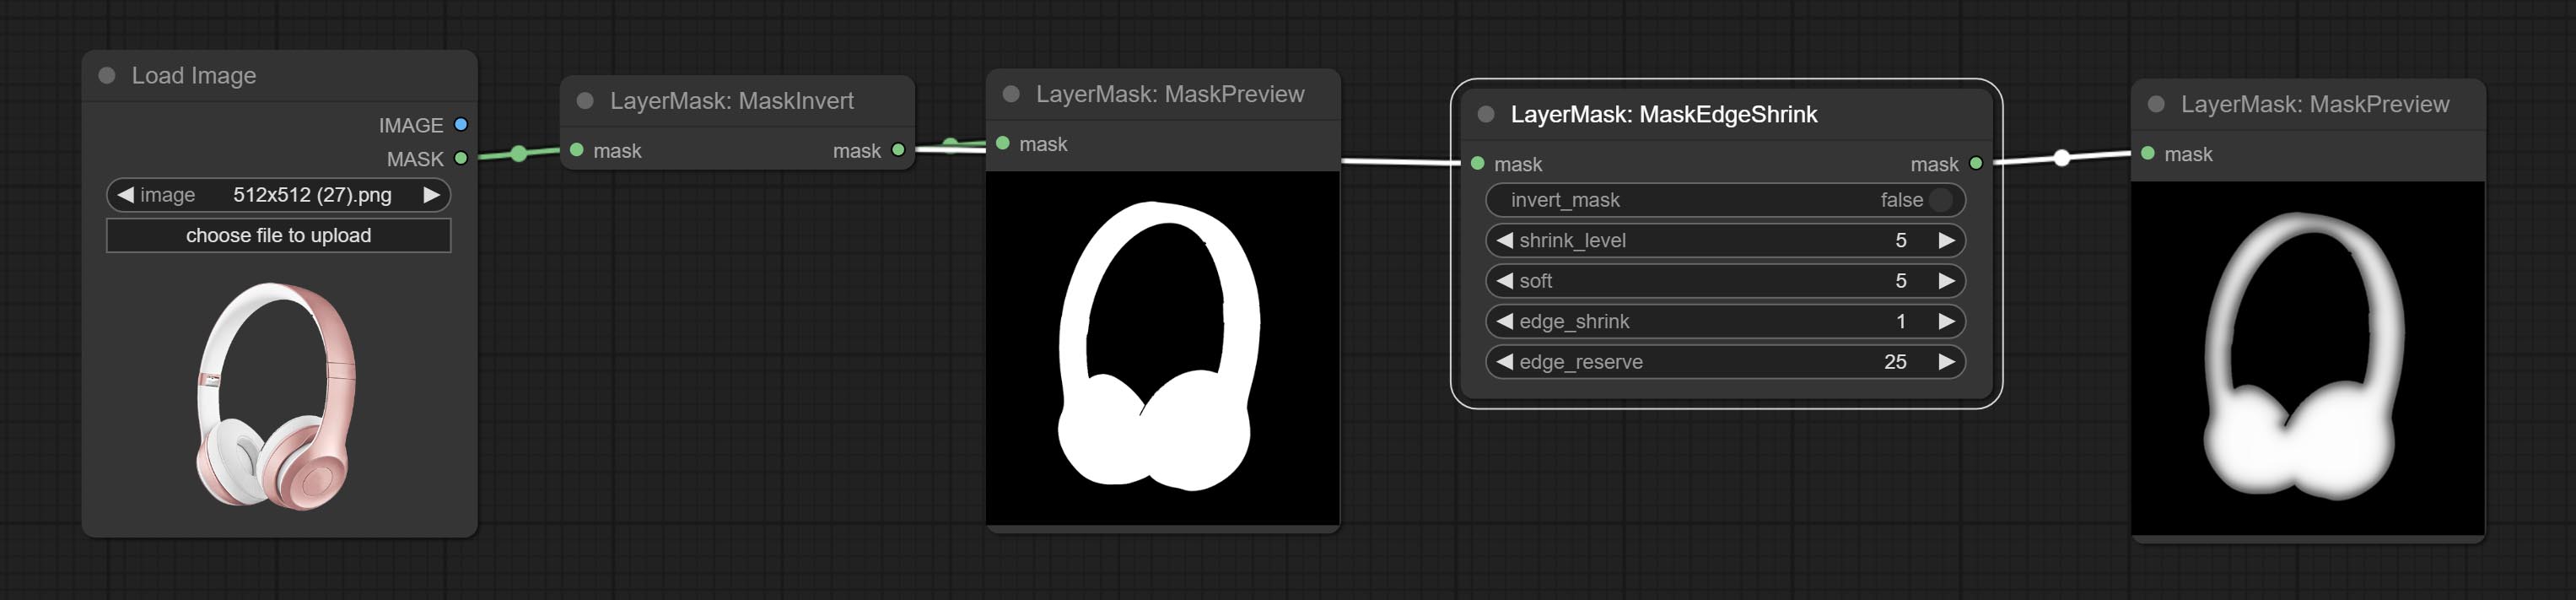
Node options: 
- invert_mask: Whether to reverse the mask.
- shrink_level: Shrink the smoothness level.
- soft: Smooth amplitude.
- edge_shrink: Edge shrinkage amplitude.
- edge_reserve: Preserve the amplitude of edge details, 100 represents complete preservation, and 0 represents no preservation at all.
Comparison of MaskGrow and MaskEdgeShrink 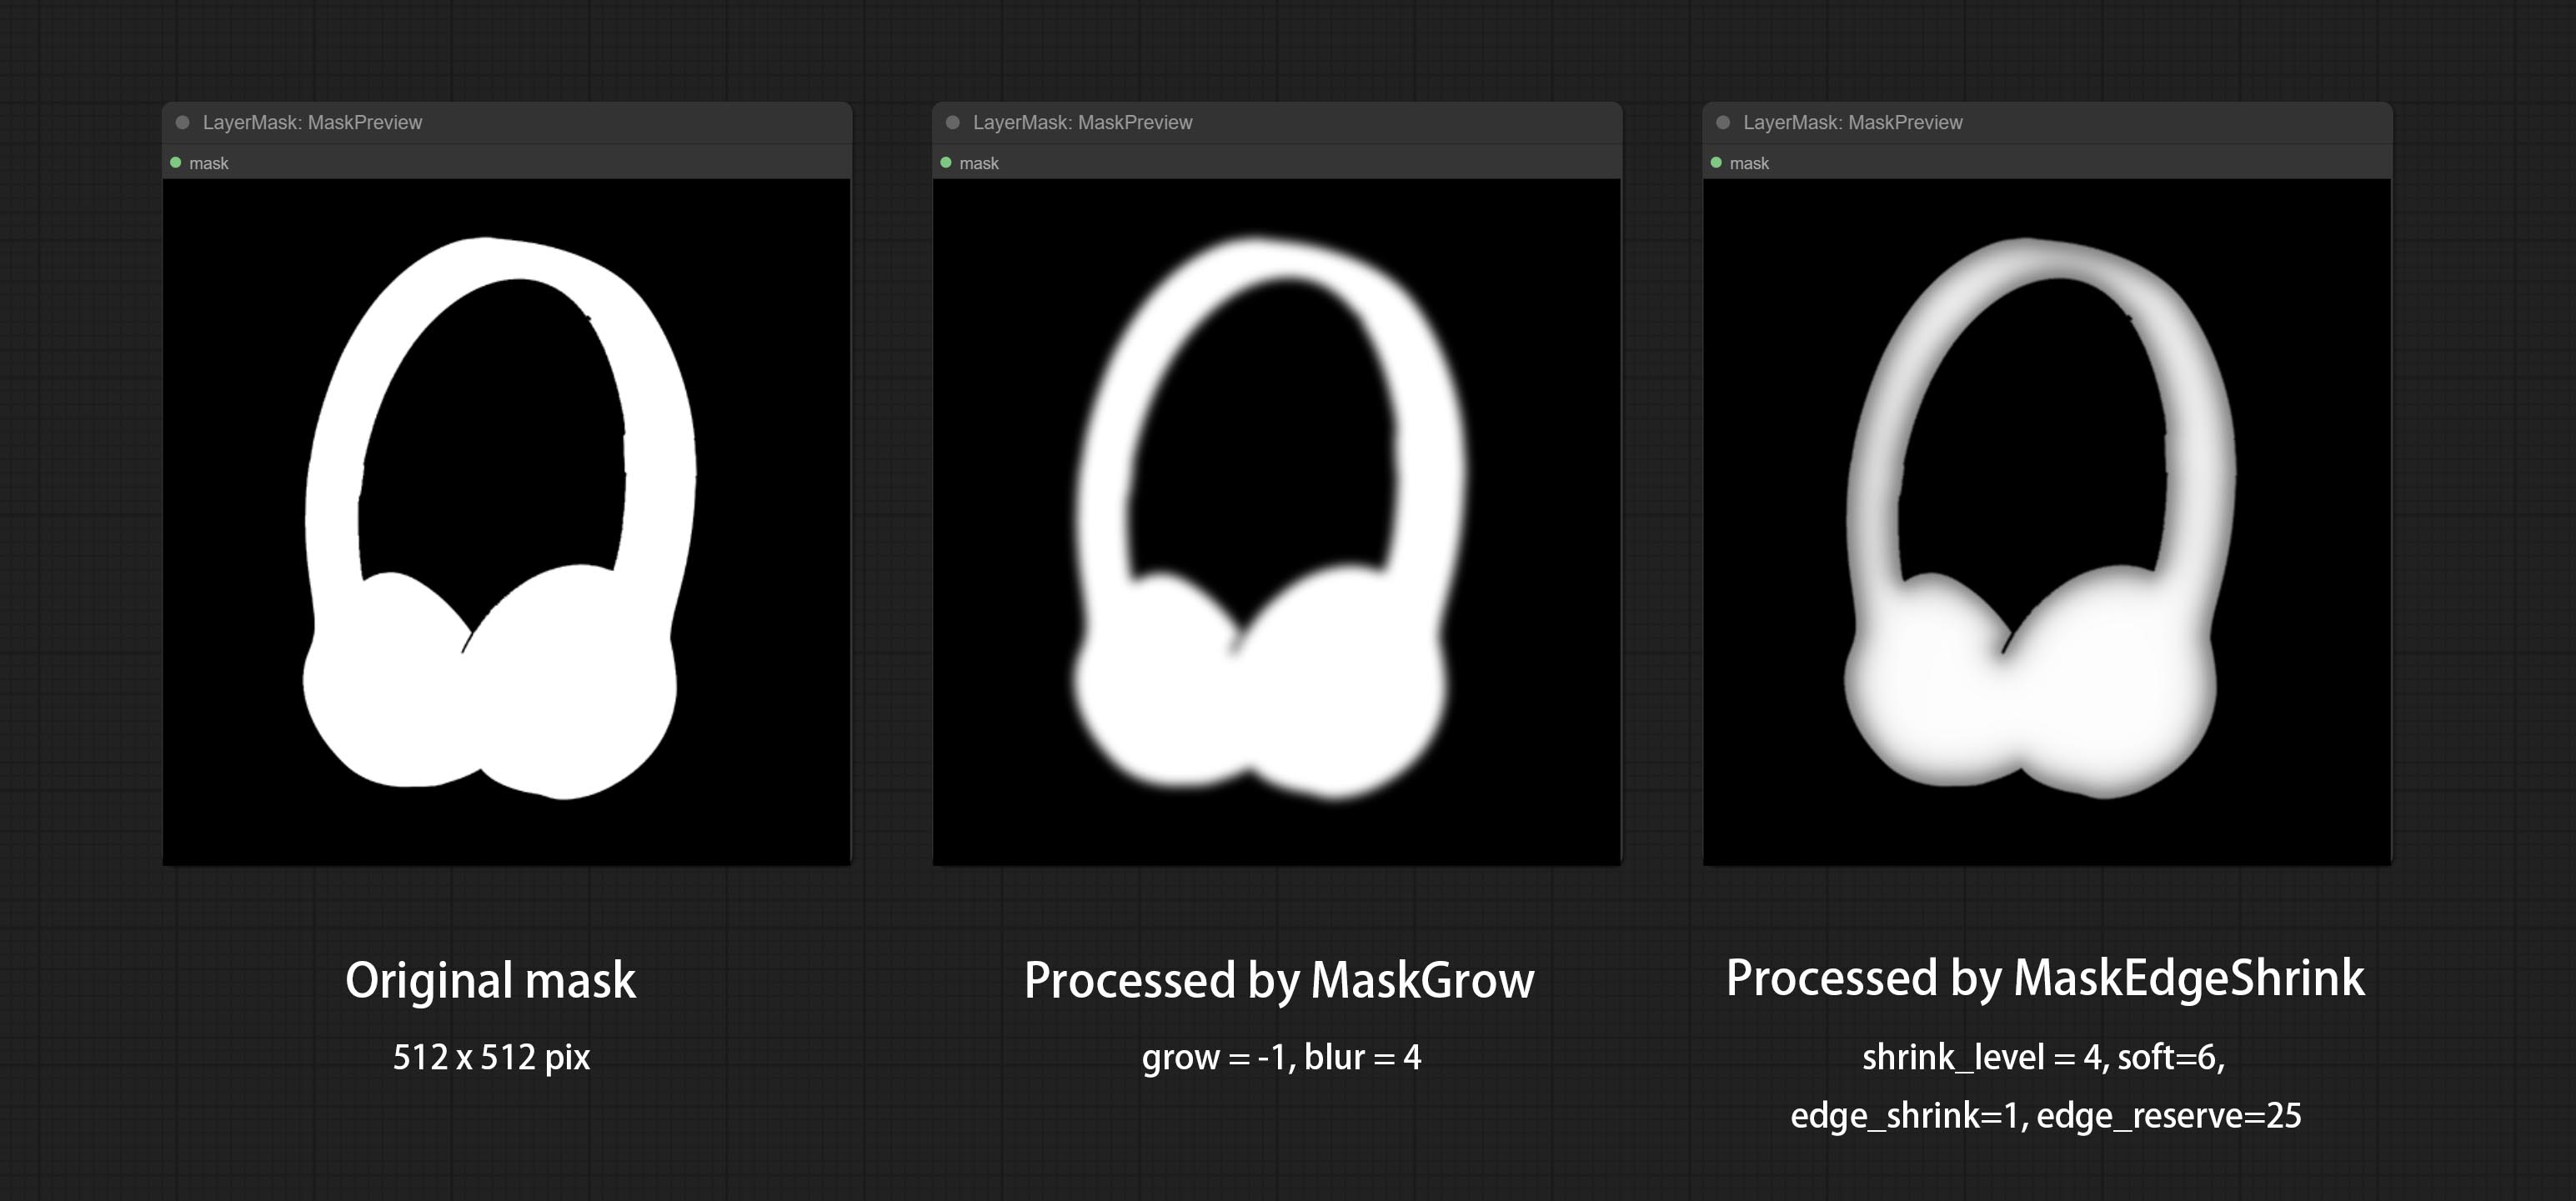
MaskMotionBlur
Create motion blur on the mask. 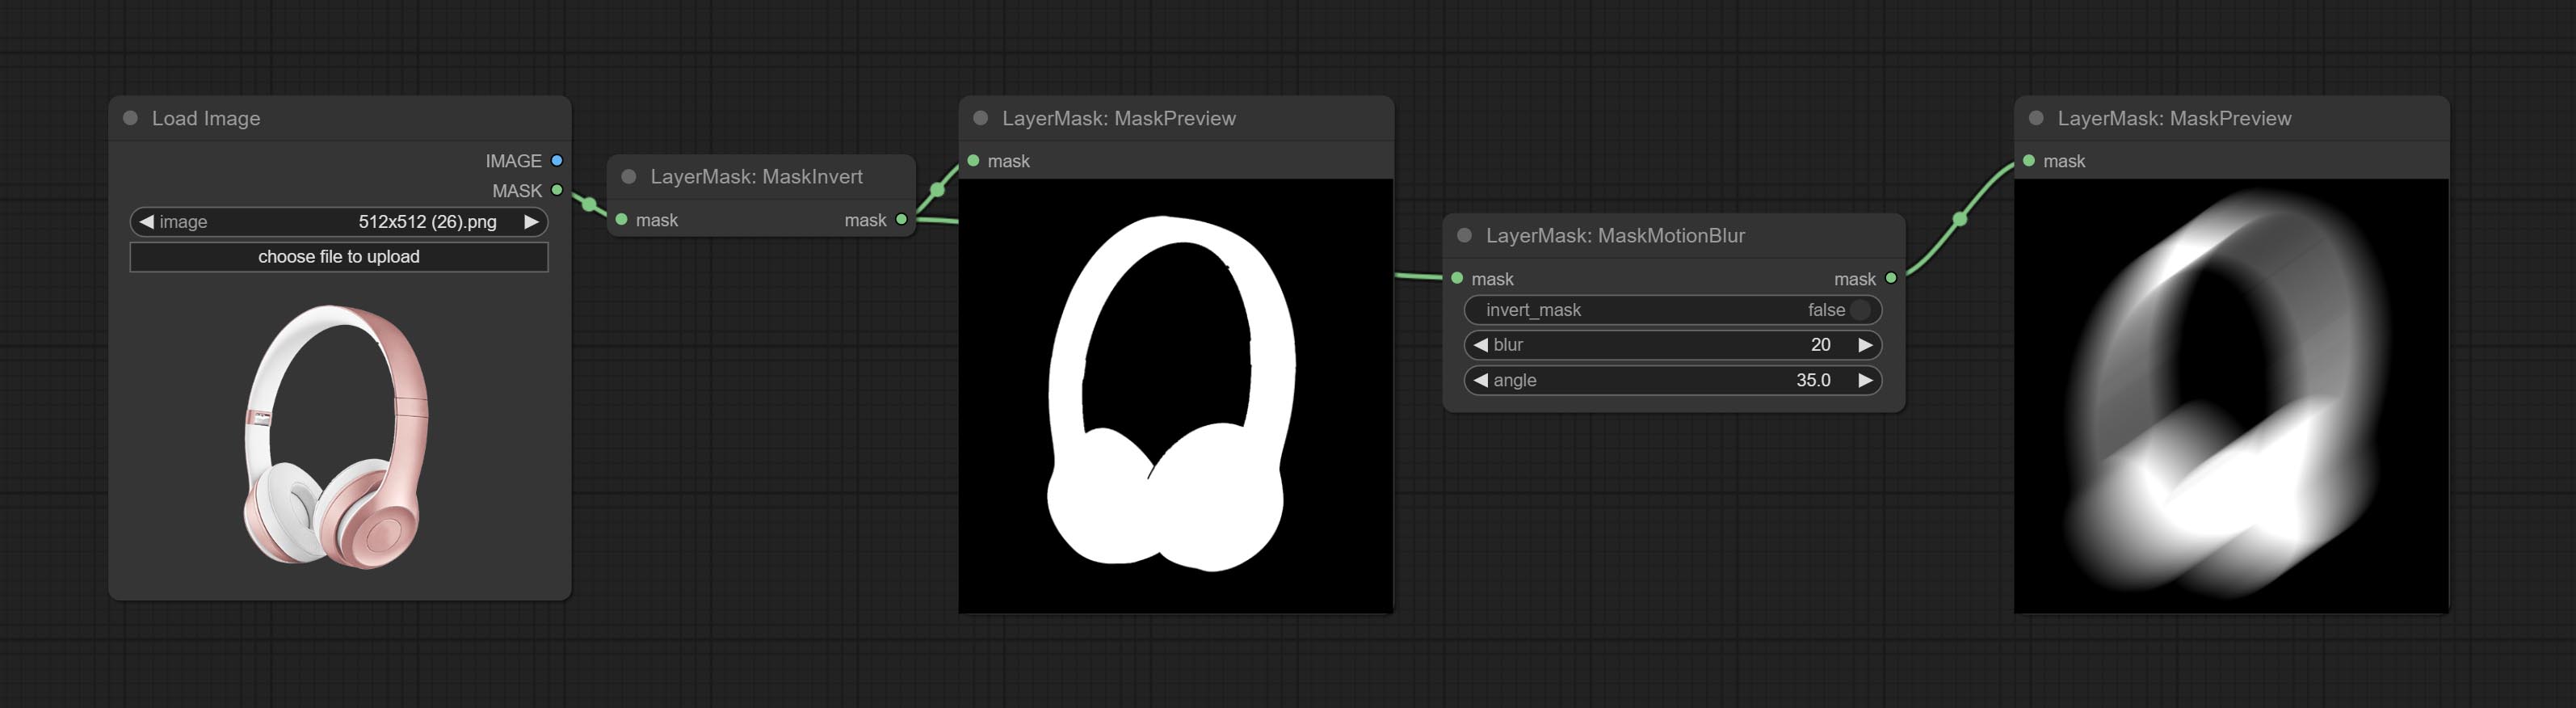
Node options:
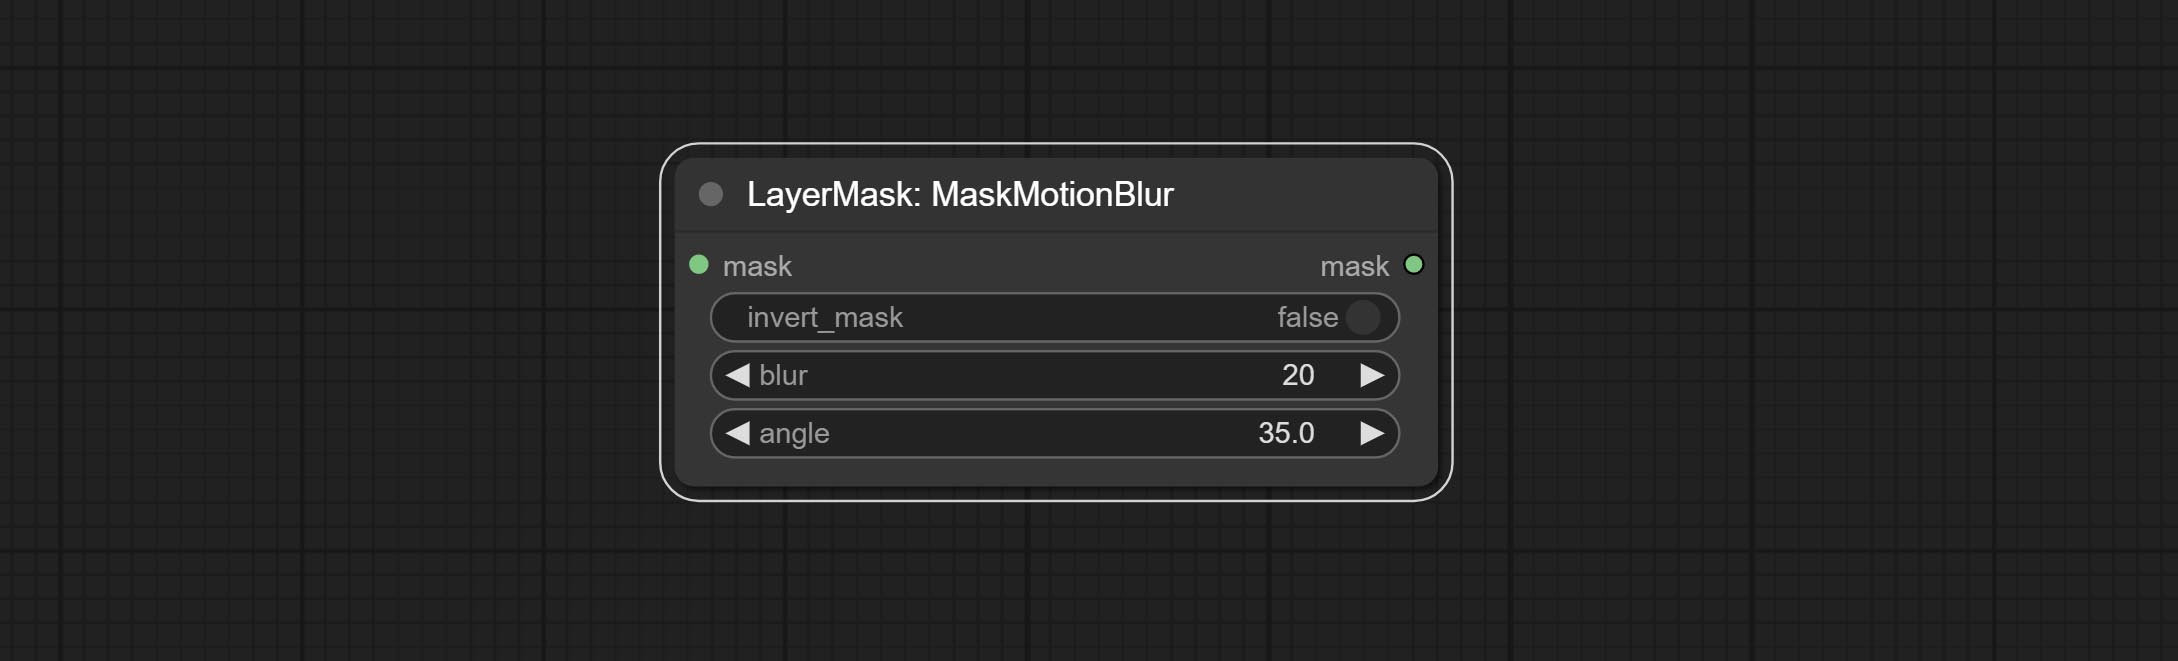
- invert_mask: Whether to reverse the mask.
- blur: The size of blur.
- angle: The angle of blur.
MaskGradient
Create a gradient for the mask from one side. please note the difference between this node and the CreateGradientMask node. 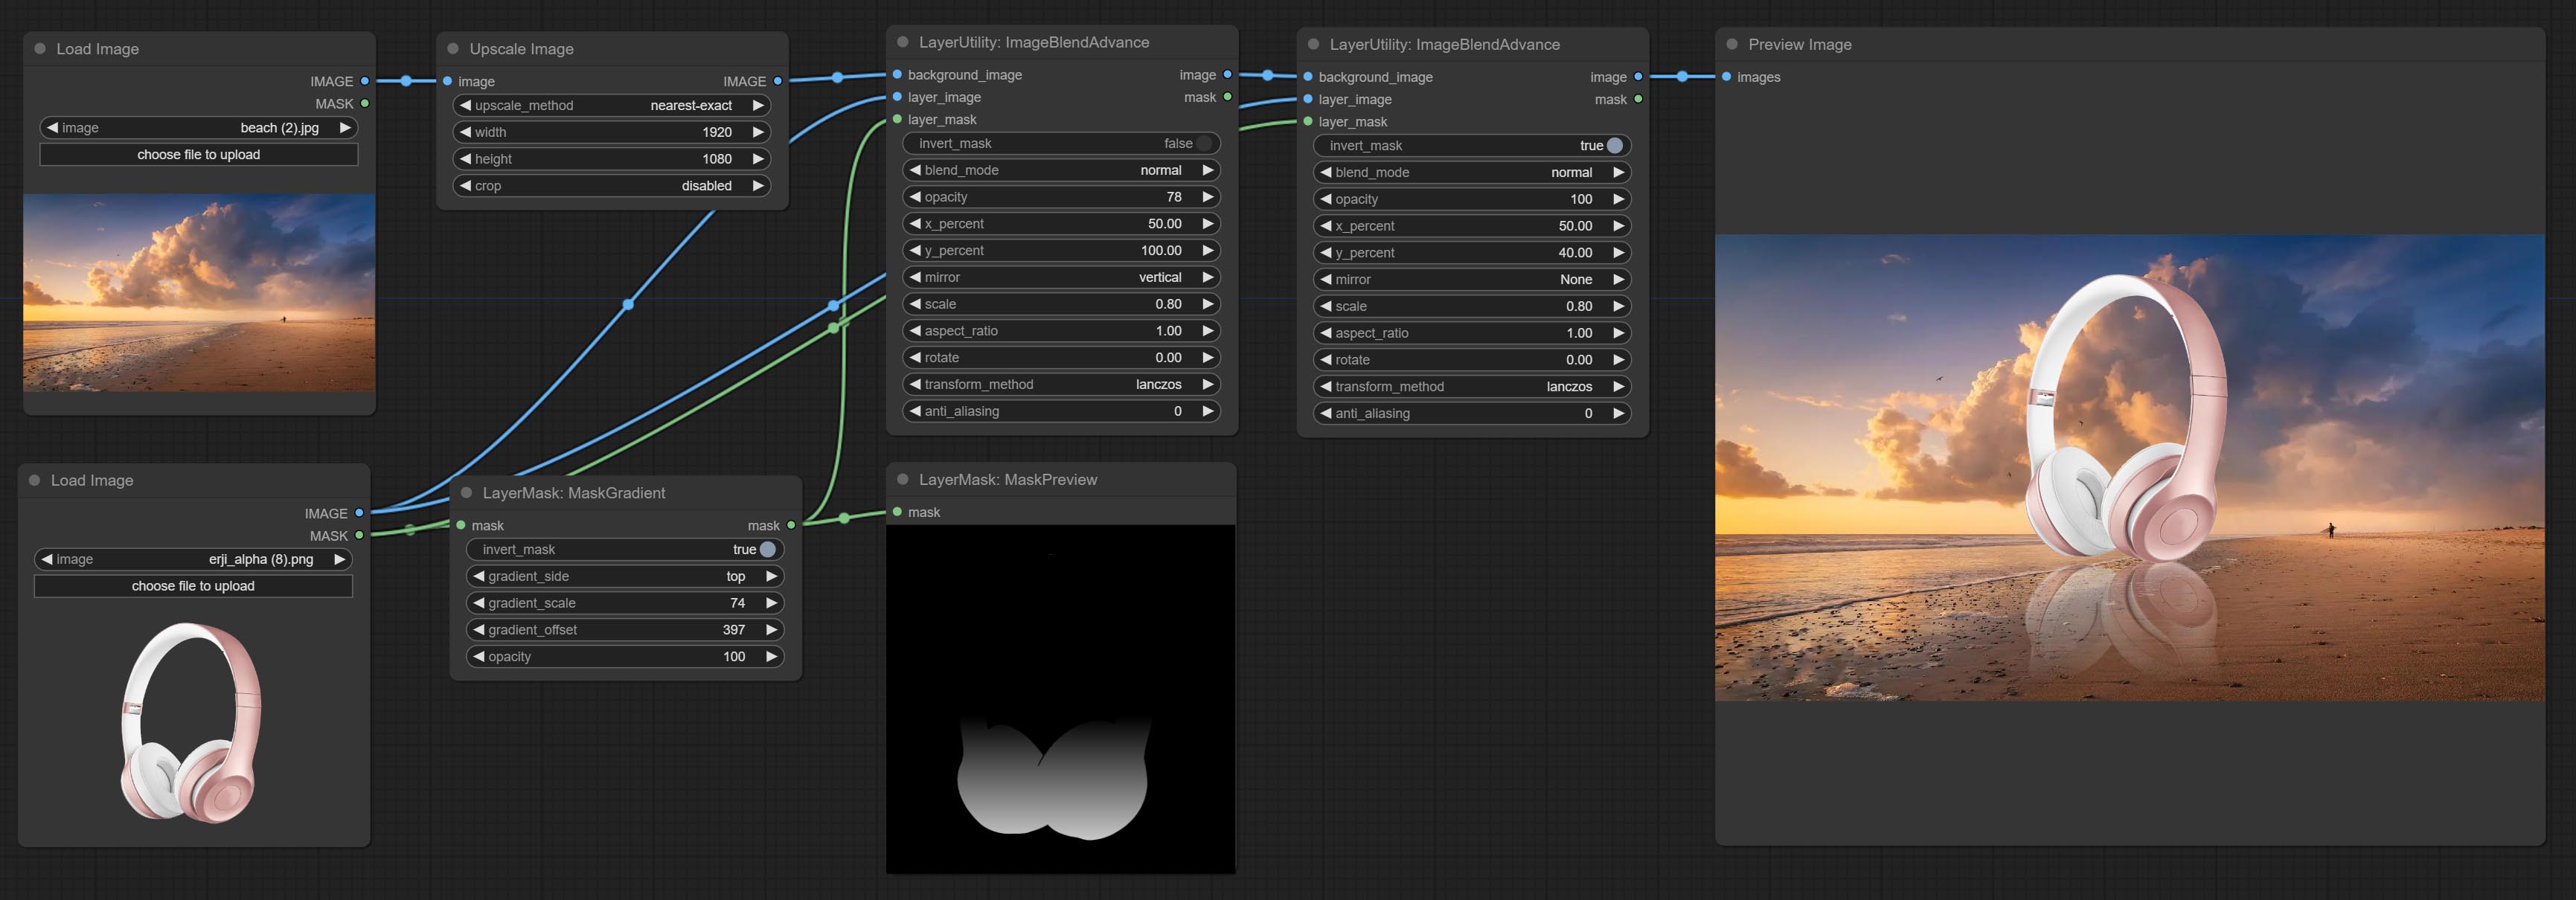
Node options: 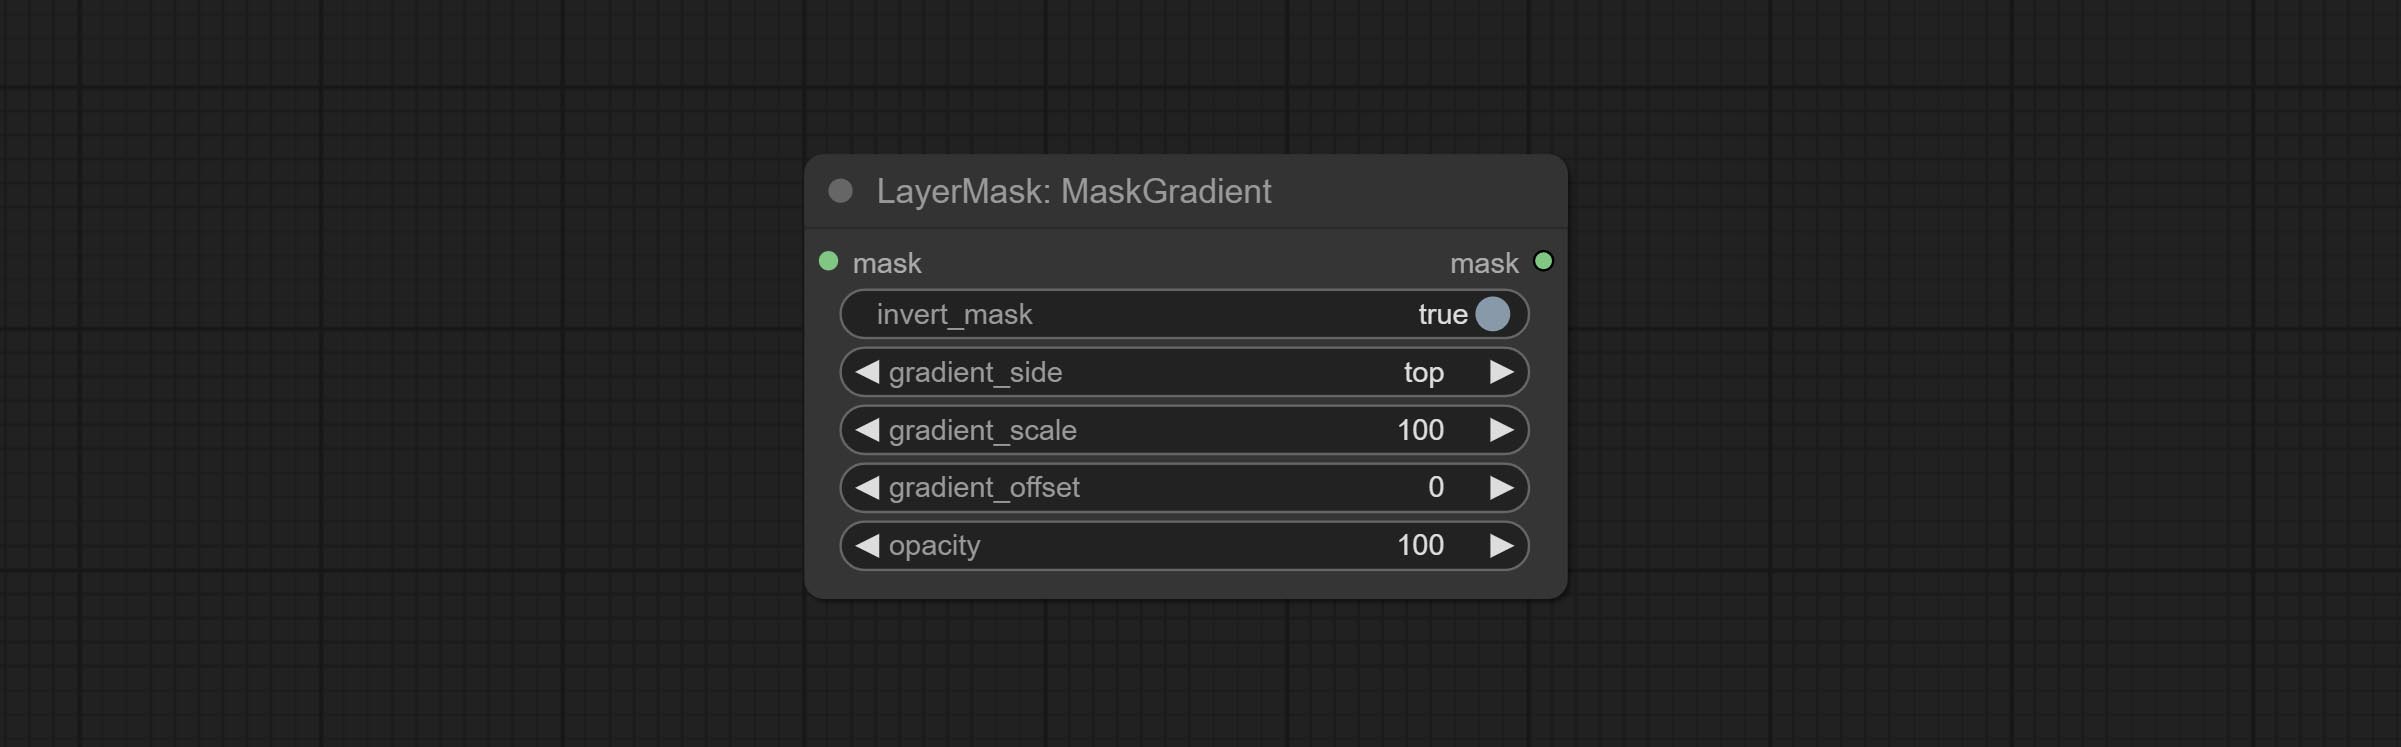
- invert_mask: Whether to reverse the mask.
- gradient_side: Generate gradient from which edge. There are four directions: top, bottom, left and right.
- gradient_scale: Gradient distance. The default value of 100 indicates that one side of the gradient is completely transparent and the other side is completely opaque. The smaller the value, the shorter the distance from transparent to opaque.
- gradient_offset: Gradient position offset.
- opacity: The opacity of the gradient.
CreateGradientMask
Create a gradient mask. please note the difference between this node and the MaskGradient node. 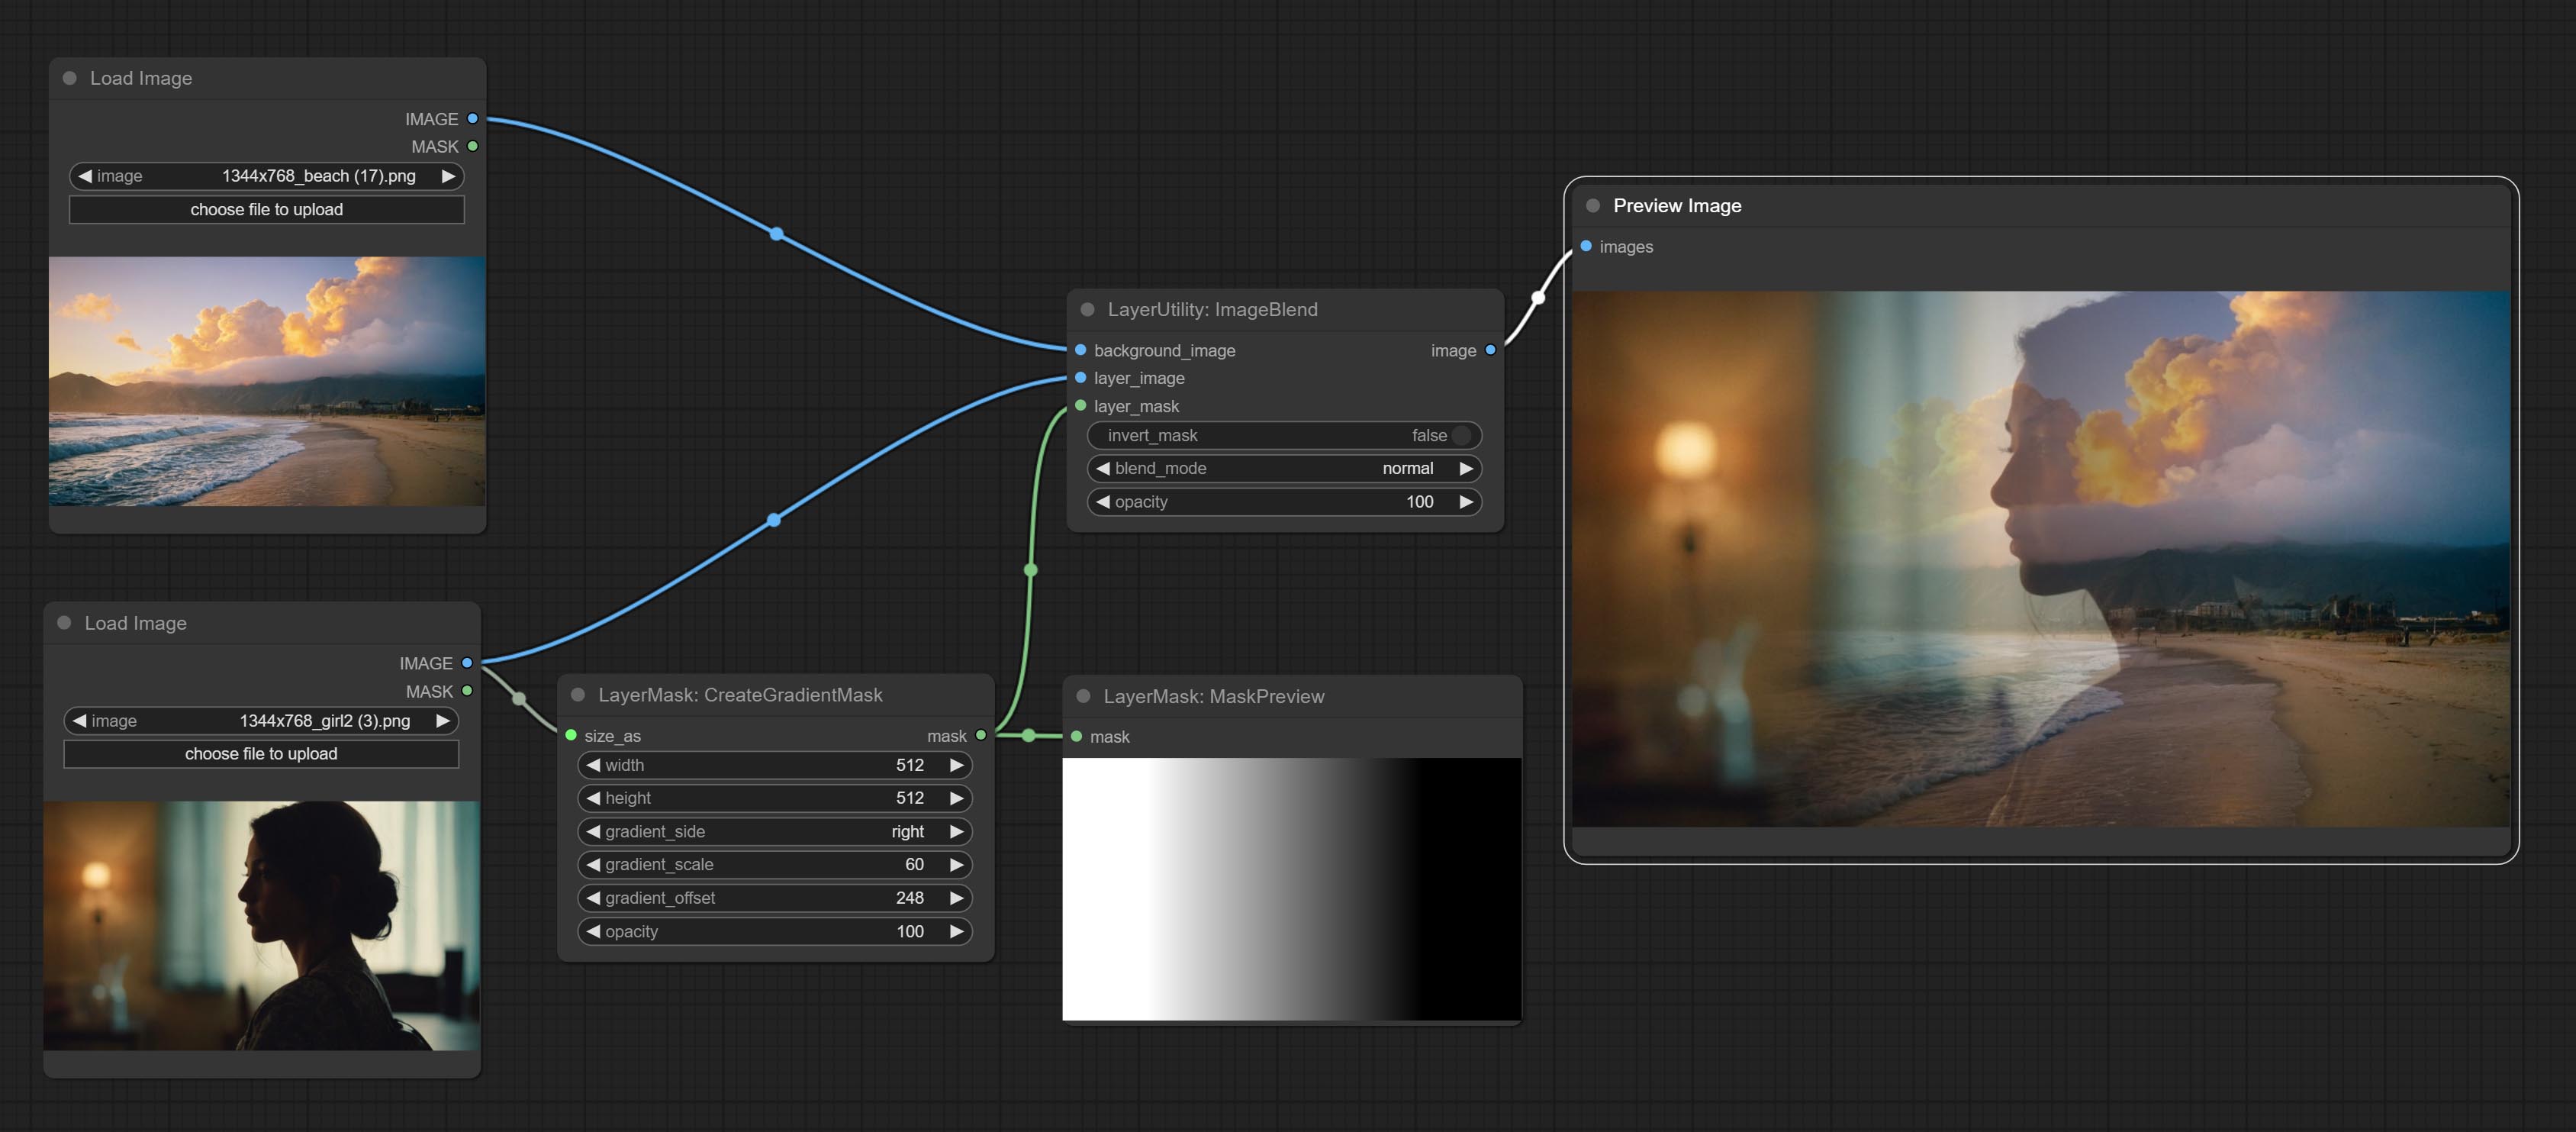
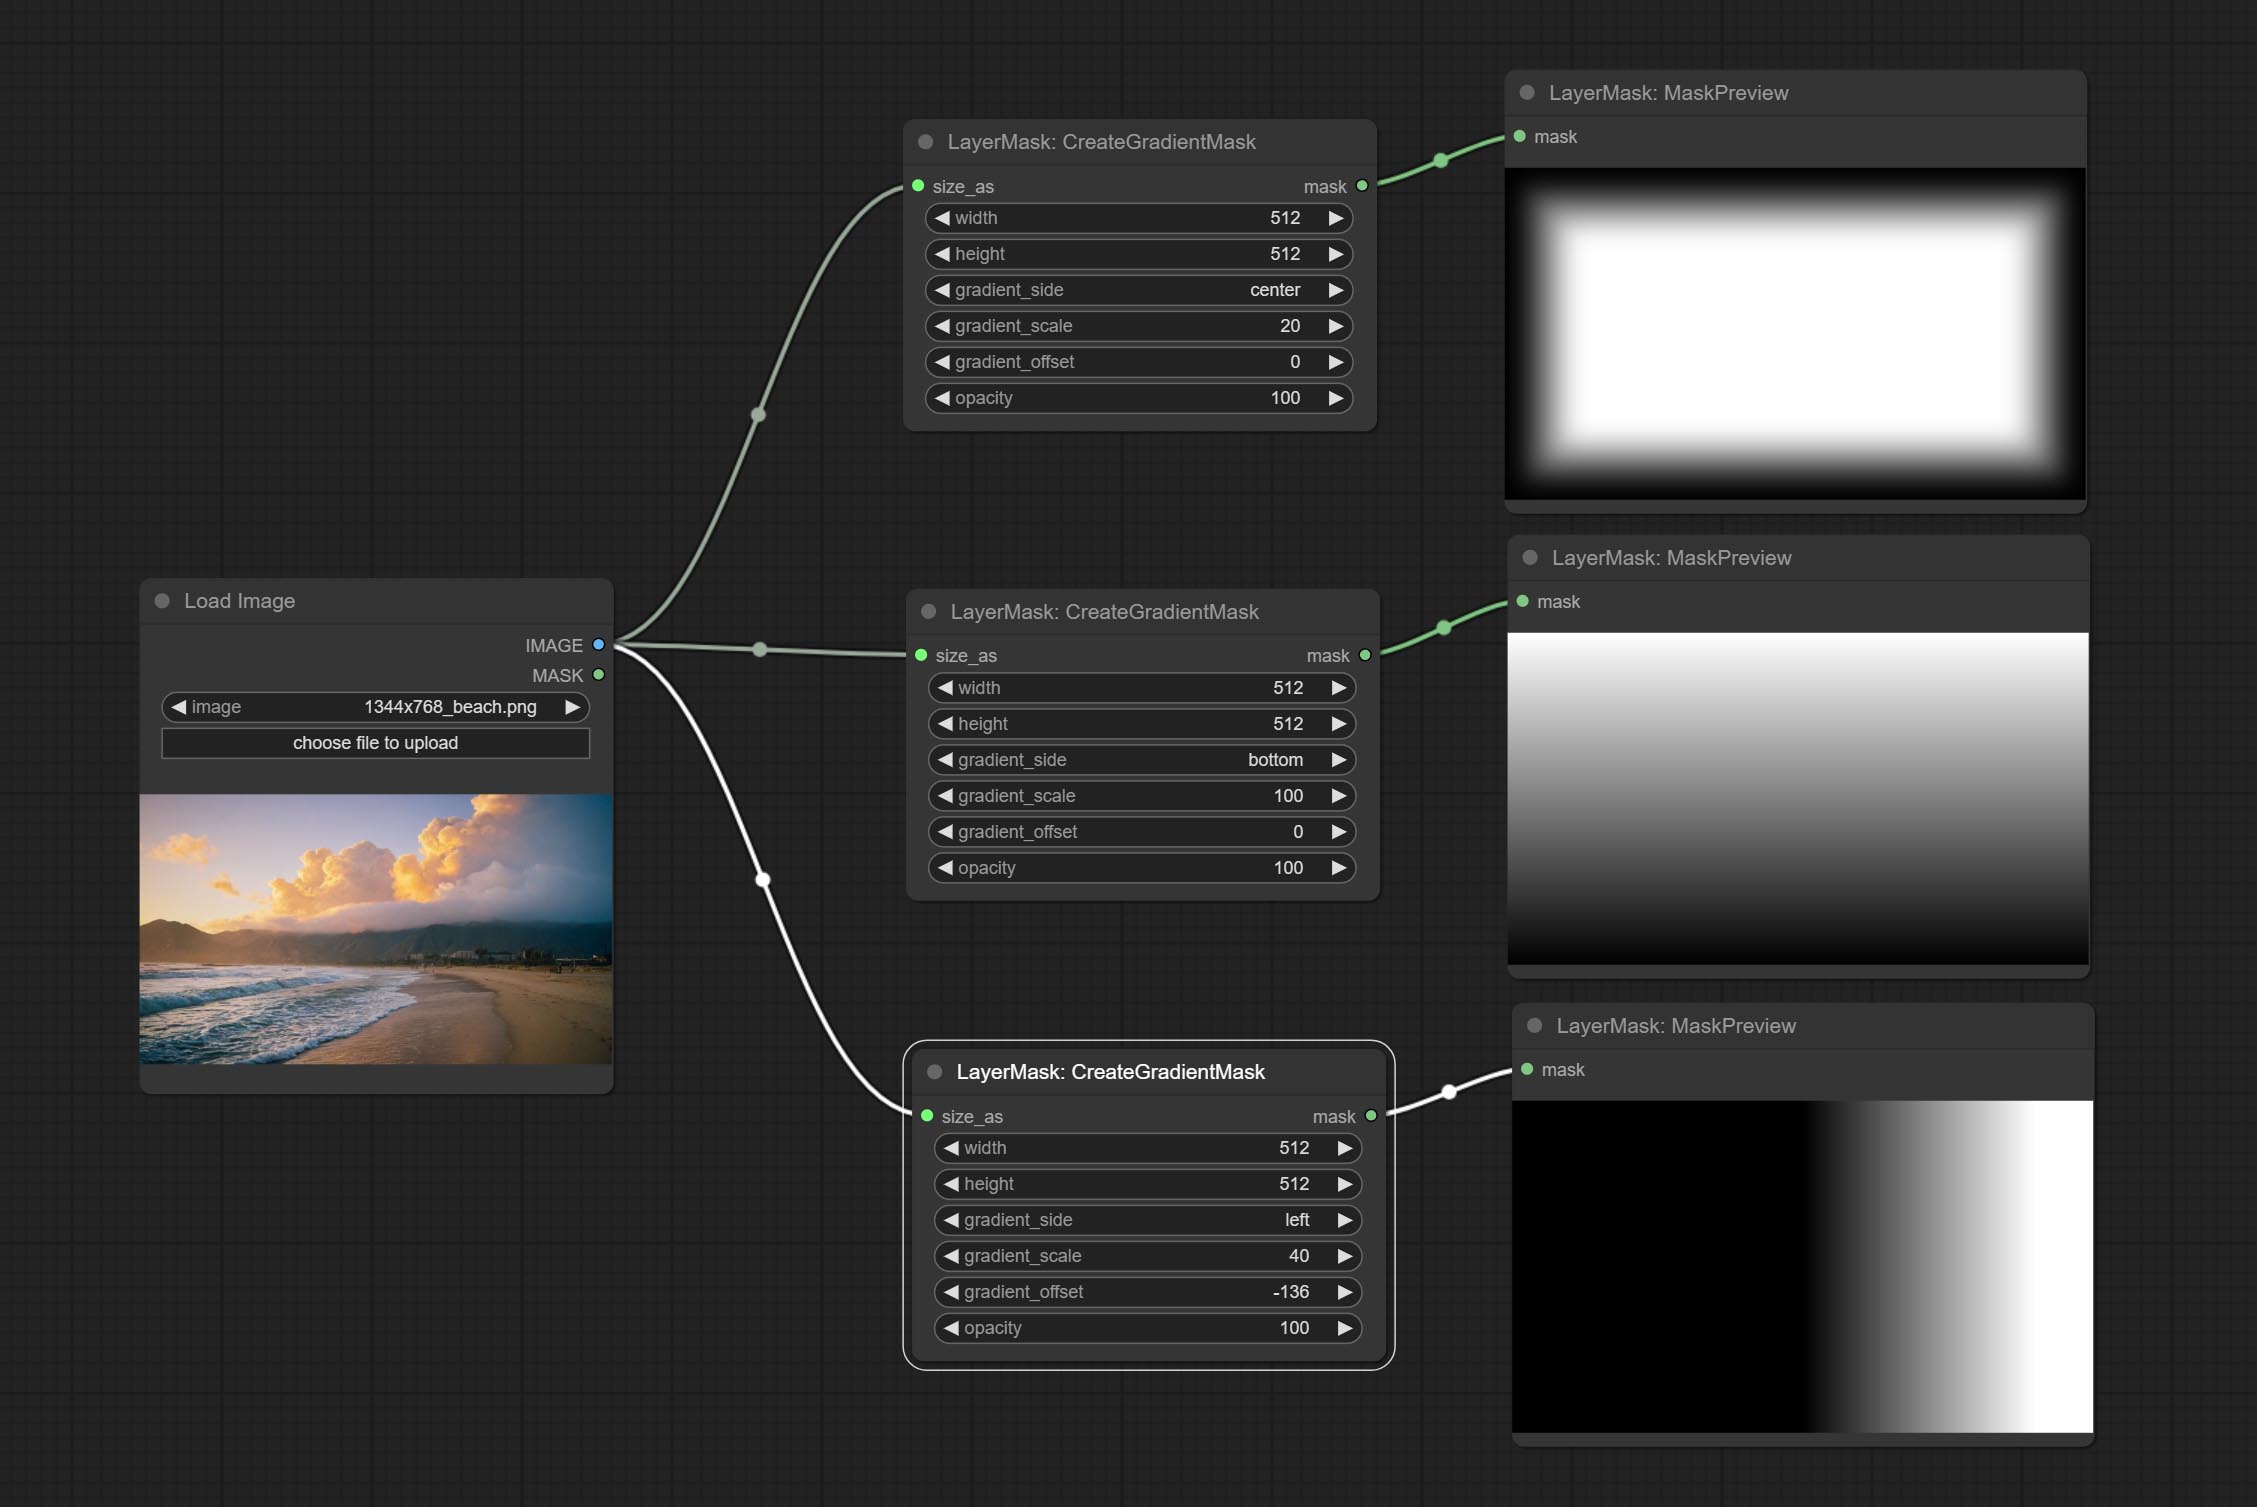
Node options:

- size_as * : The input image or mask here will generate the output image and mask according to their size. this input takes priority over the width and height below.
- width: Width of the image. If there is a size_as input, this setting will be ignored.
- height: Height of the image. If there is a size_as input, this setting will be ignored.
- gradient_side: Generate gradient from which edge. There are five directions: top, bottom, left, right and center.
- gradient_scale: Gradient distance. The default value of 100 indicates that one side of the gradient is completely transparent and the other side is completely opaque. The smaller the value, the shorter the distance from transparent to opaque.
- gradient_offset: Gradient position offset. When
gradient_side is center, the size of the gradient area is adjusted here, positive values are smaller, and negative values are enlarged. - opacity: The opacity of the gradient.
* Only limited to input image and mask. forcing the integration of other types of inputs will result in node errors.
MaskStroke
Generate mask contour strokes. 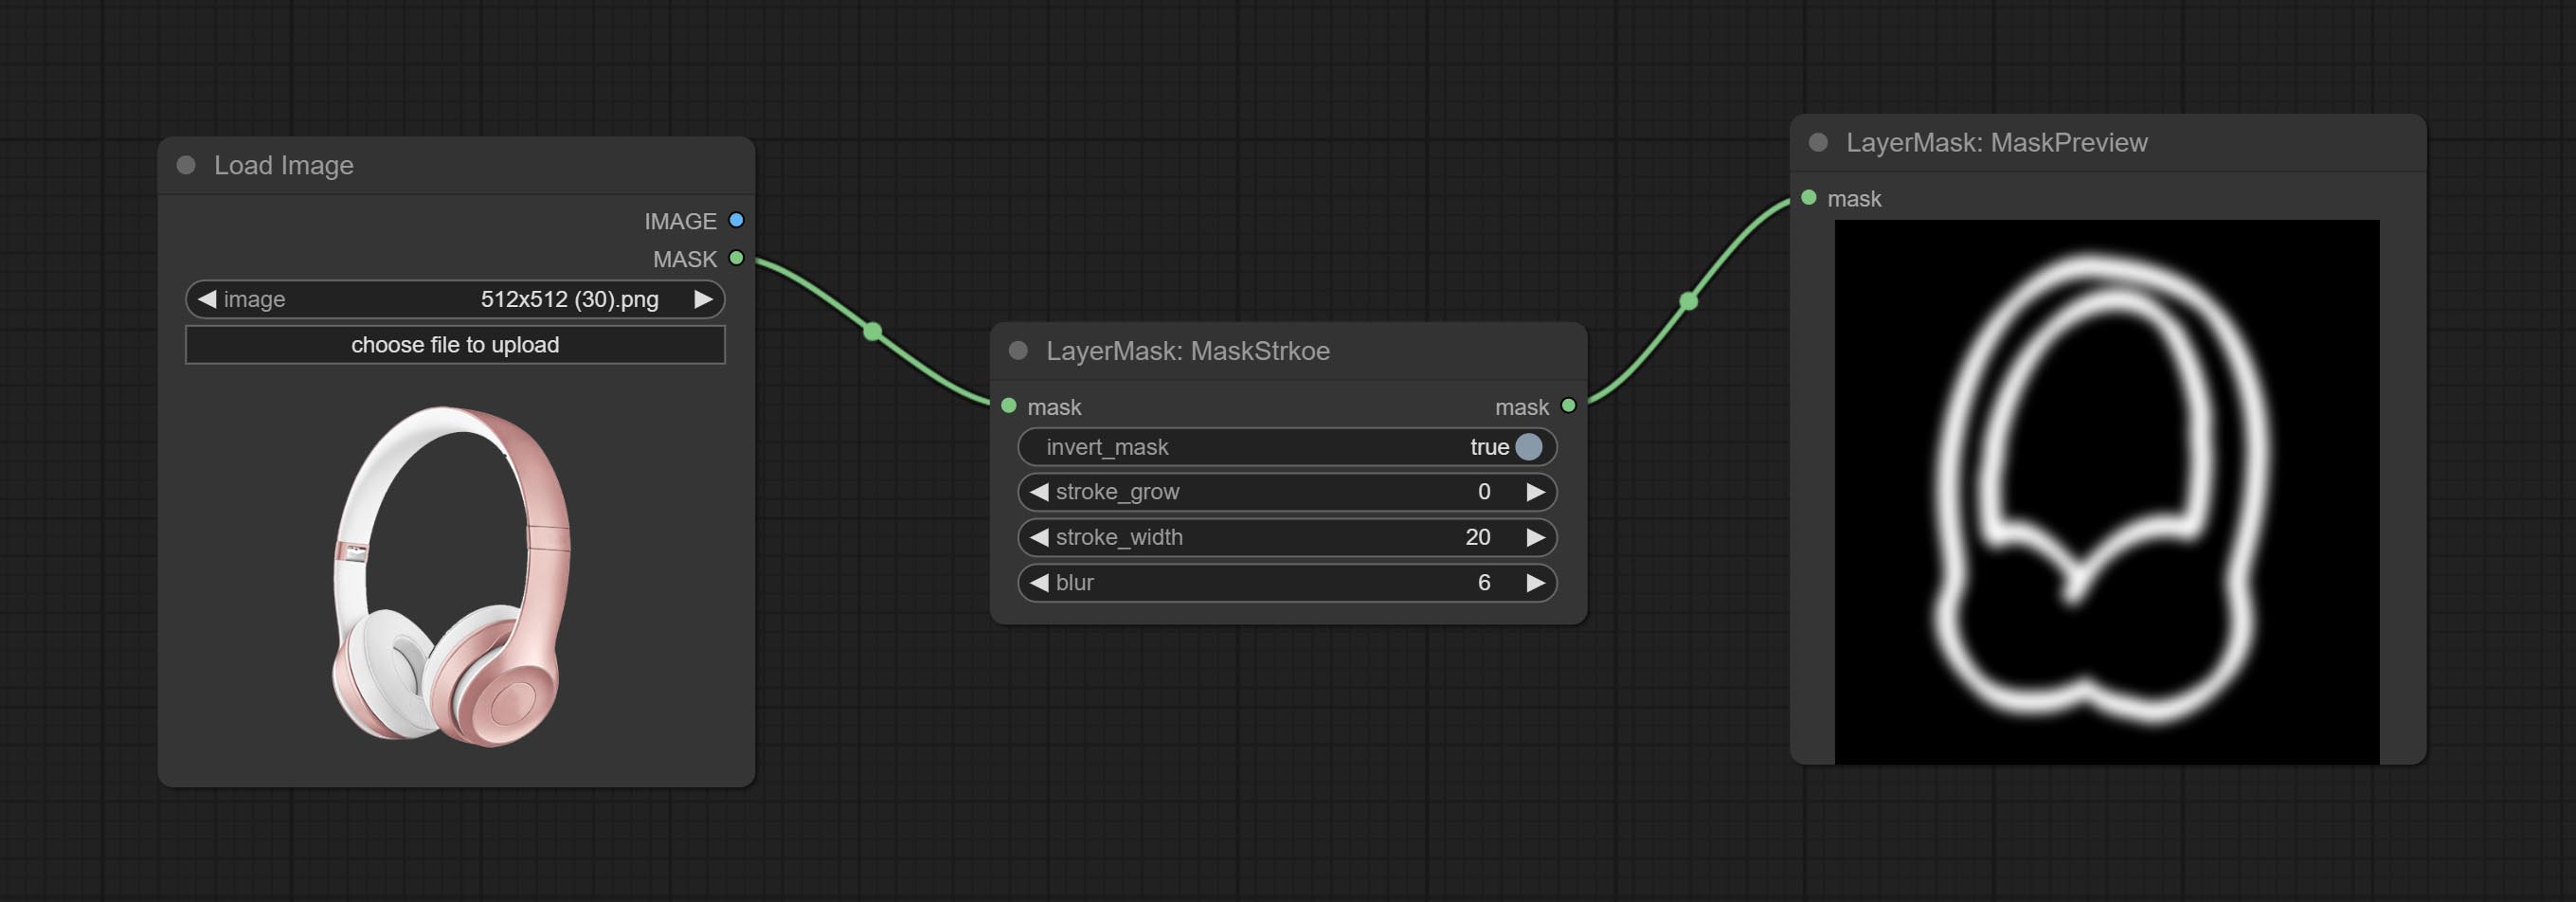
Node options:
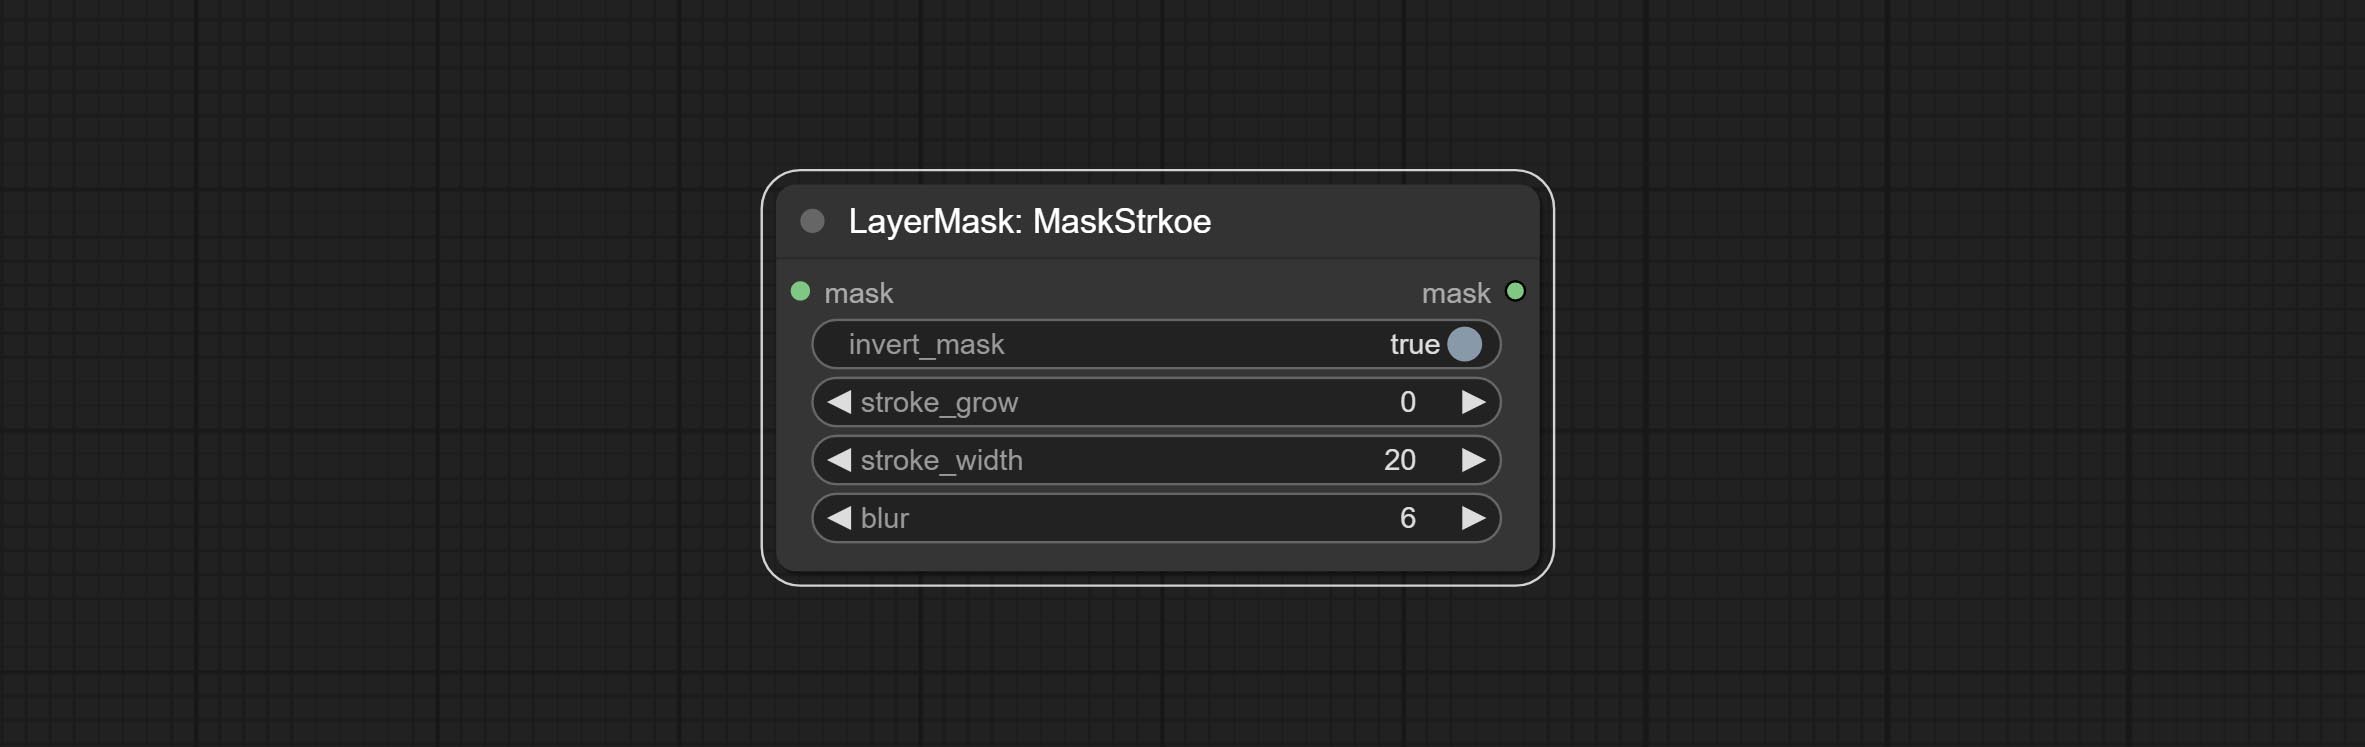
- invert_mask: Whether to reverse the mask.
- stroke_grow: Stroke expansion/contraction amplitude, positive values indicate expansion and negative values indicate contraction.
- stroke_width: Stroke width.
- blur: Blur of stroke.
MaskGrain
Generates noise for the mask. 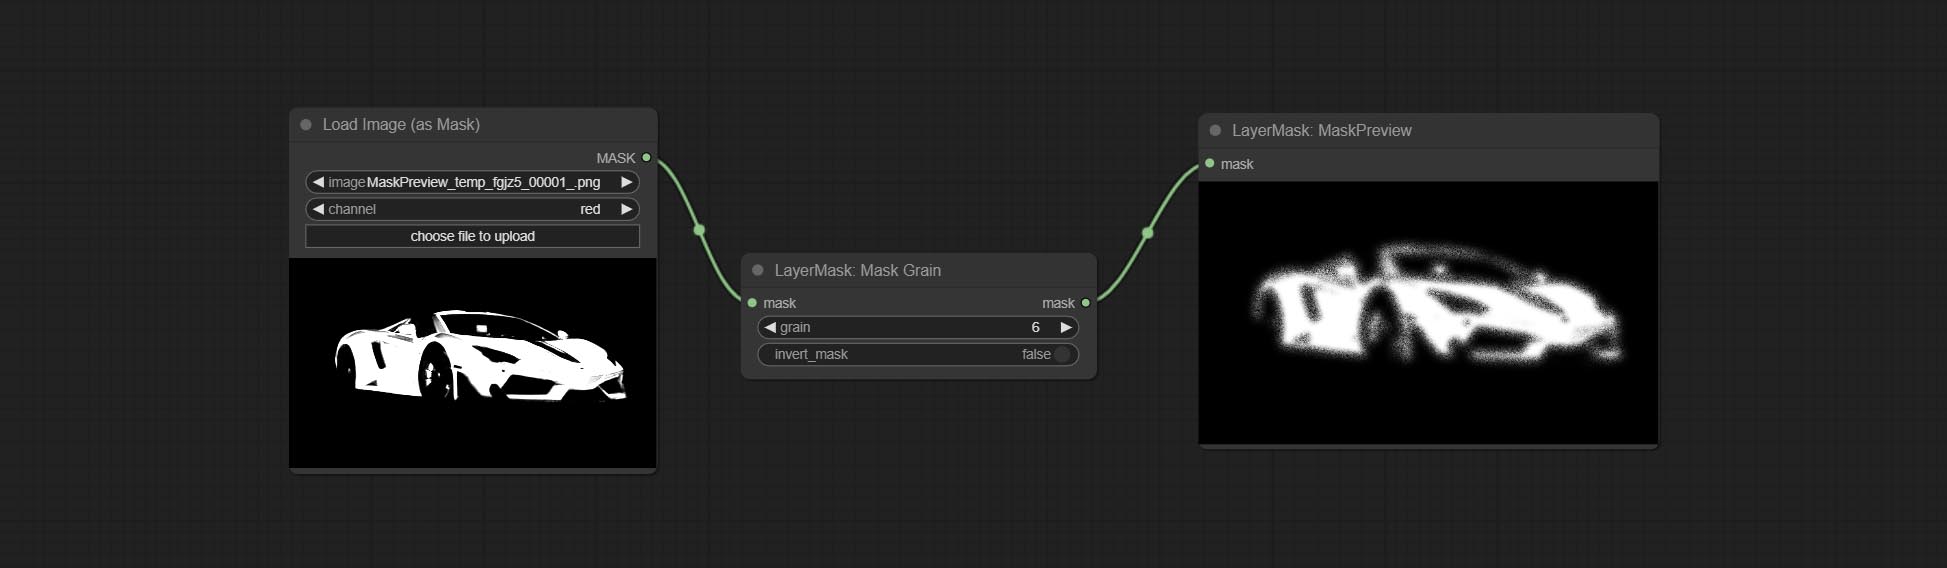
Node Options:
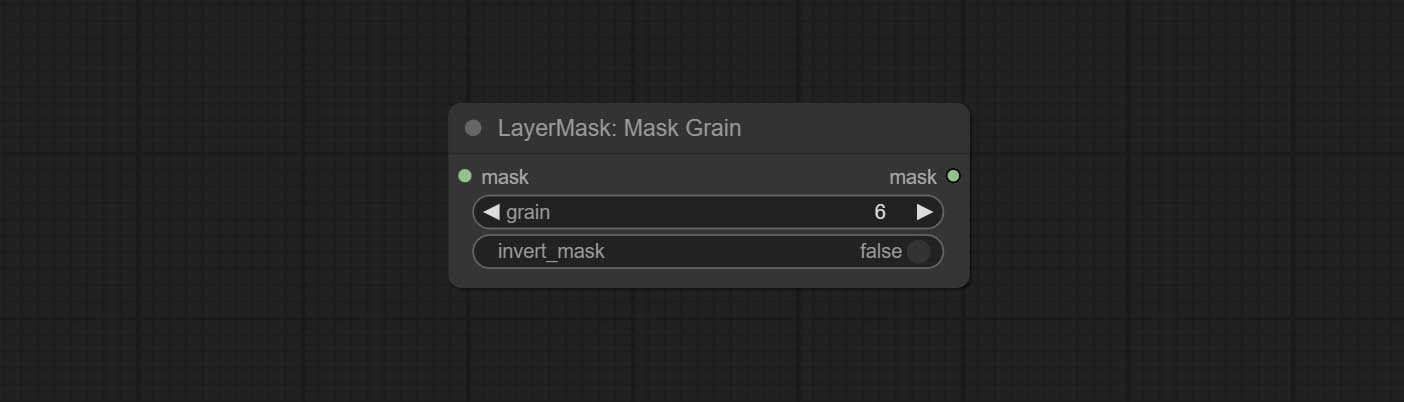
- grain: Noise intensity.
- invert_mask: Whether to reverse the mask.
MaskPreview
Preview the input mask 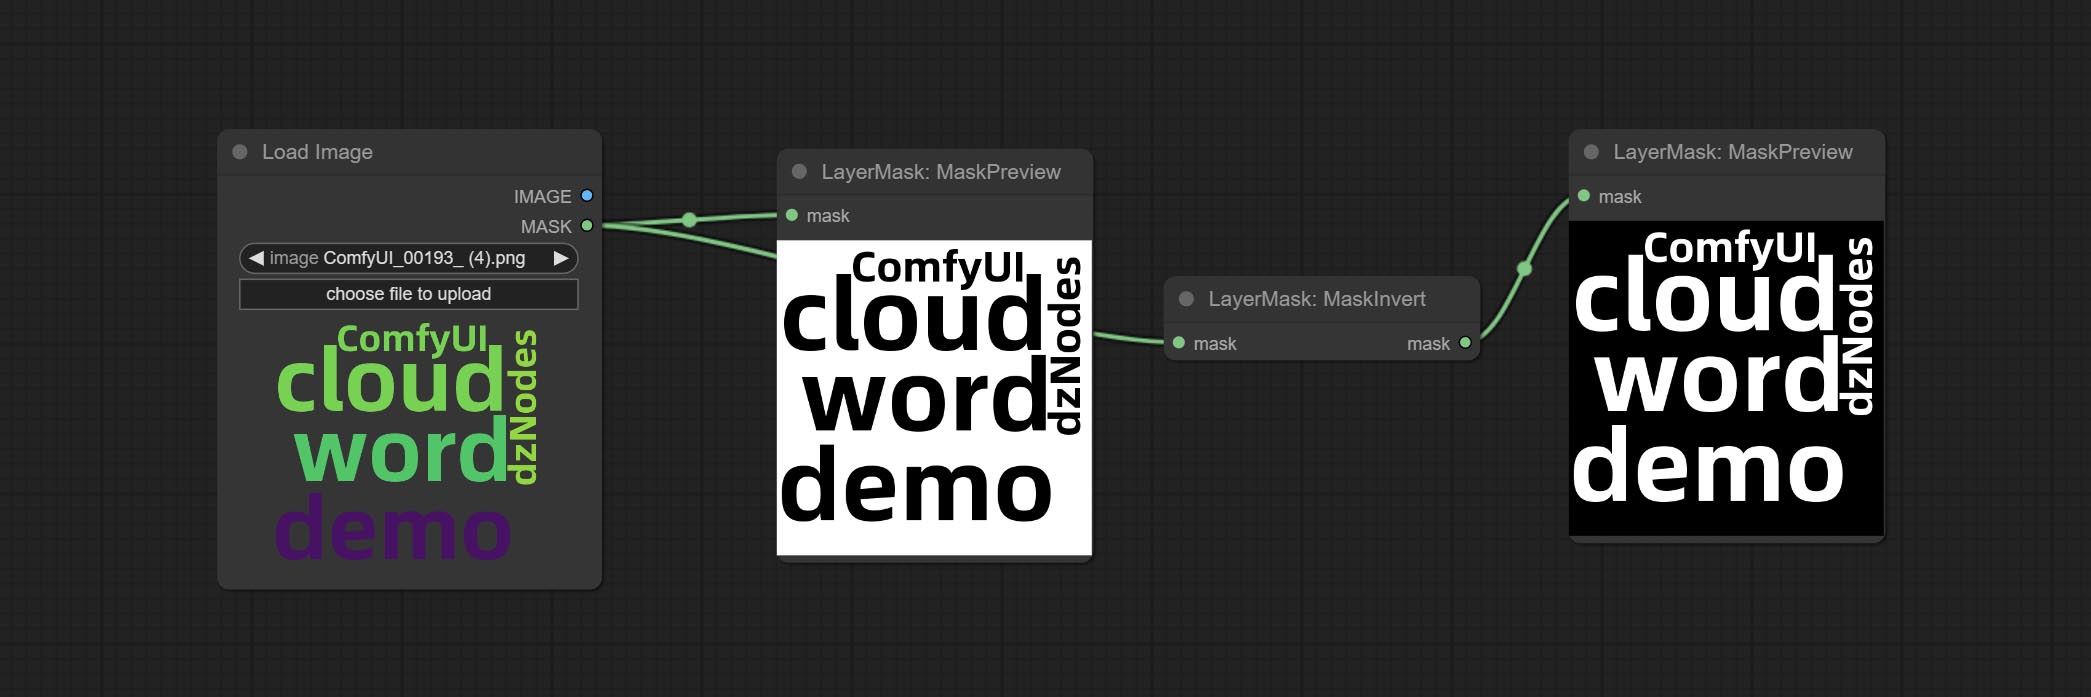
MaskInvert
Invert the mask 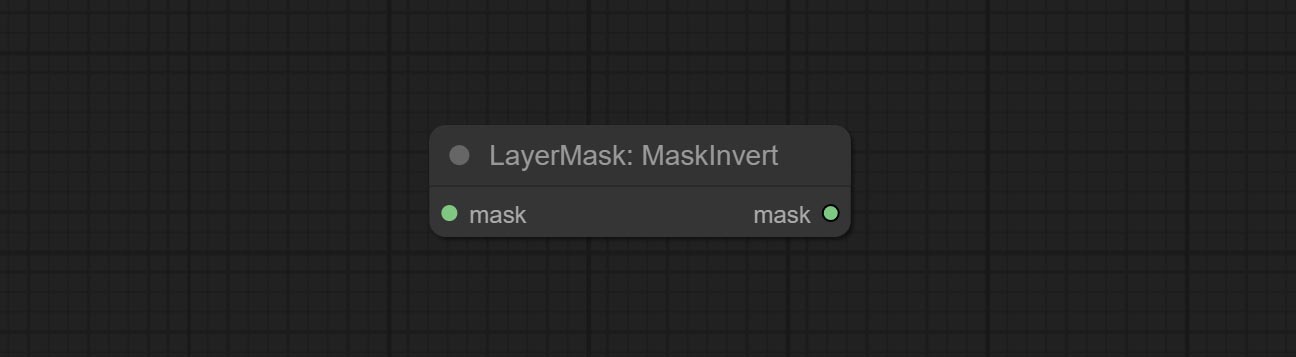
LayerFilter
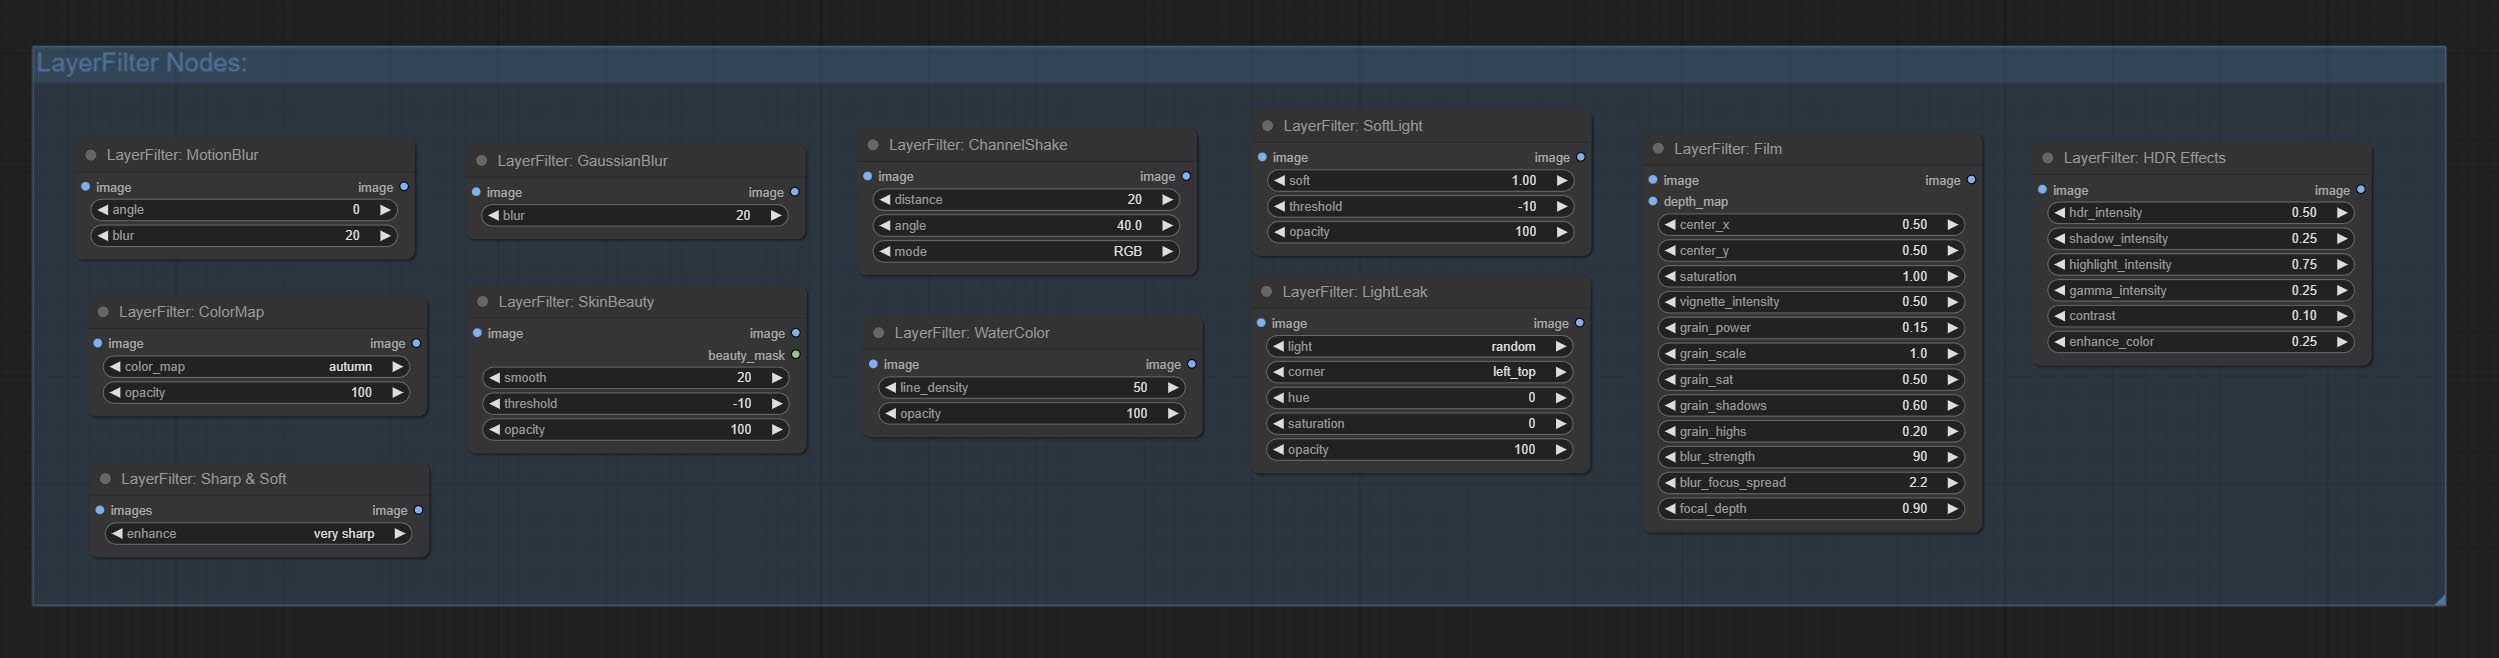
Sharp & Soft
Enhance or smooth out details for image. 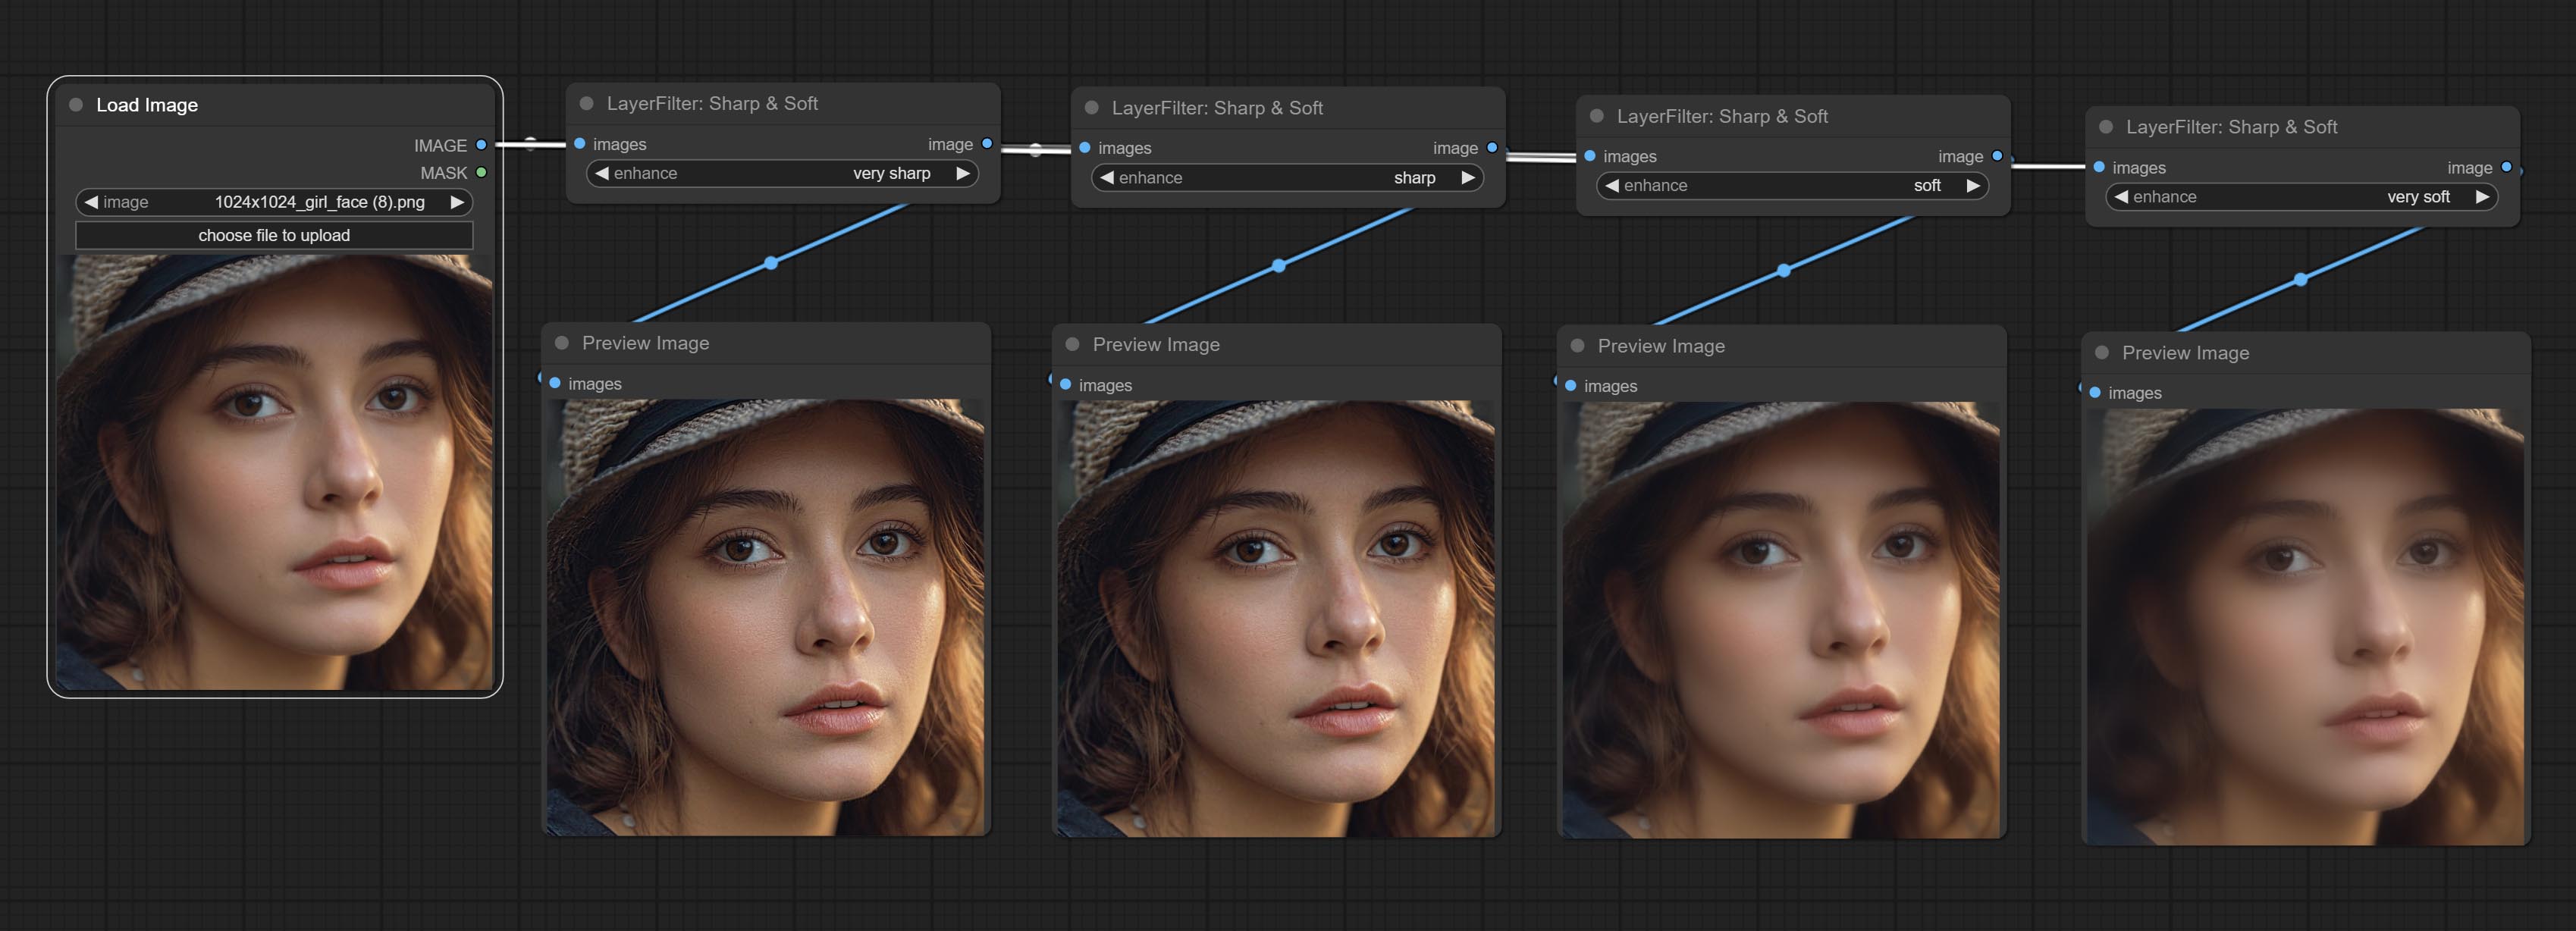
Node options: 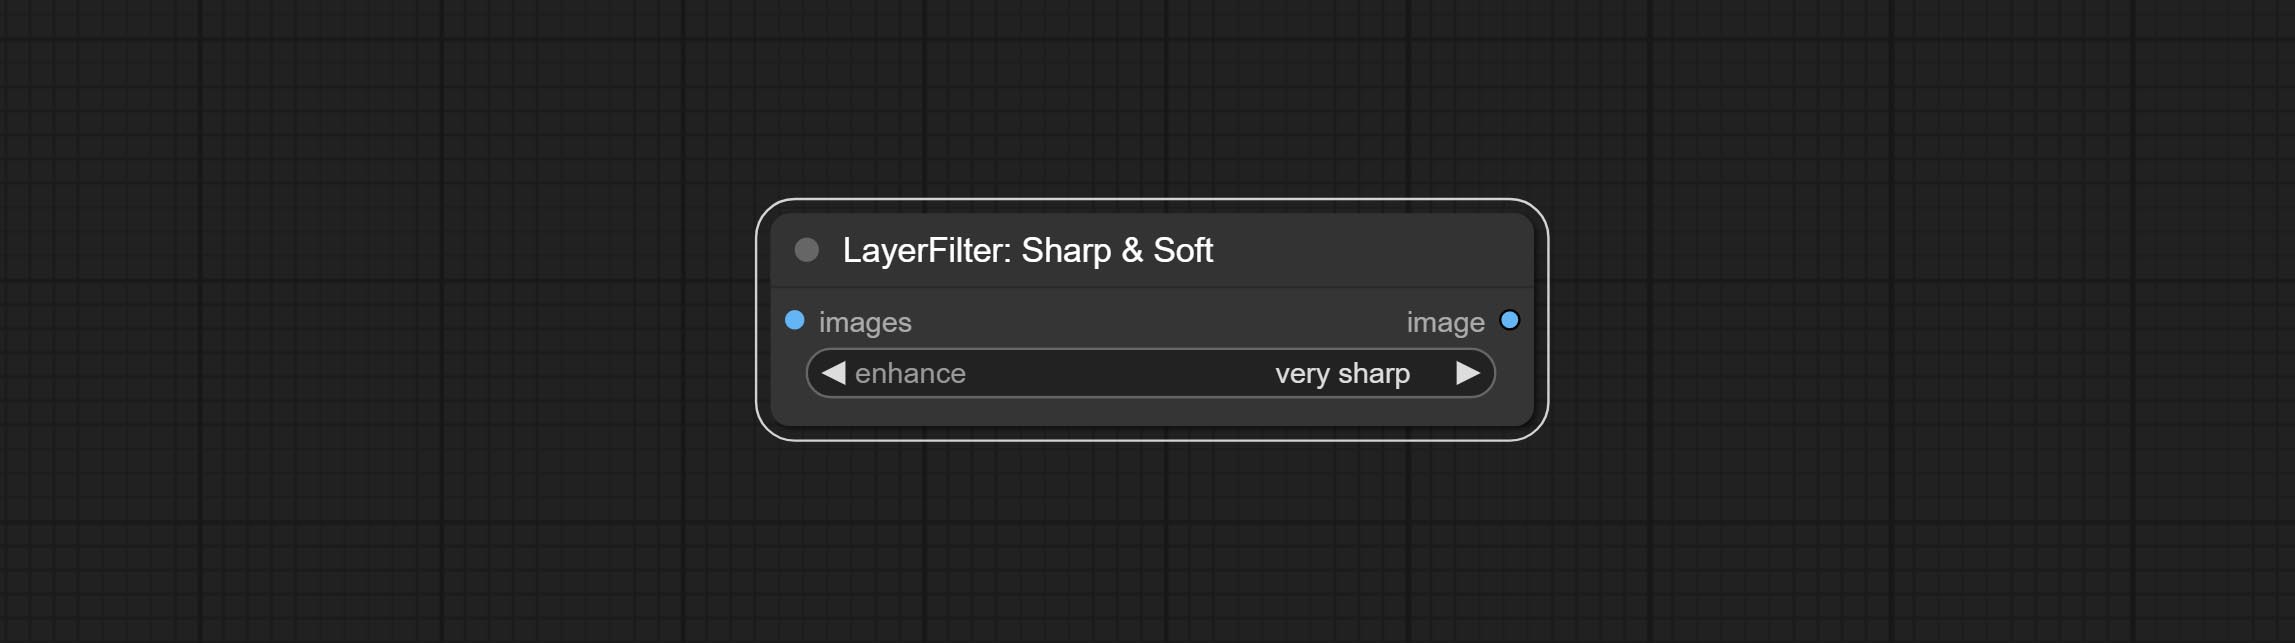
- enhance: Provide 4 presets, which are very sharp, sharp, soft and very soft. If you choose None, you will not do any processing.
SkinBeauty
Make the skin look smoother. 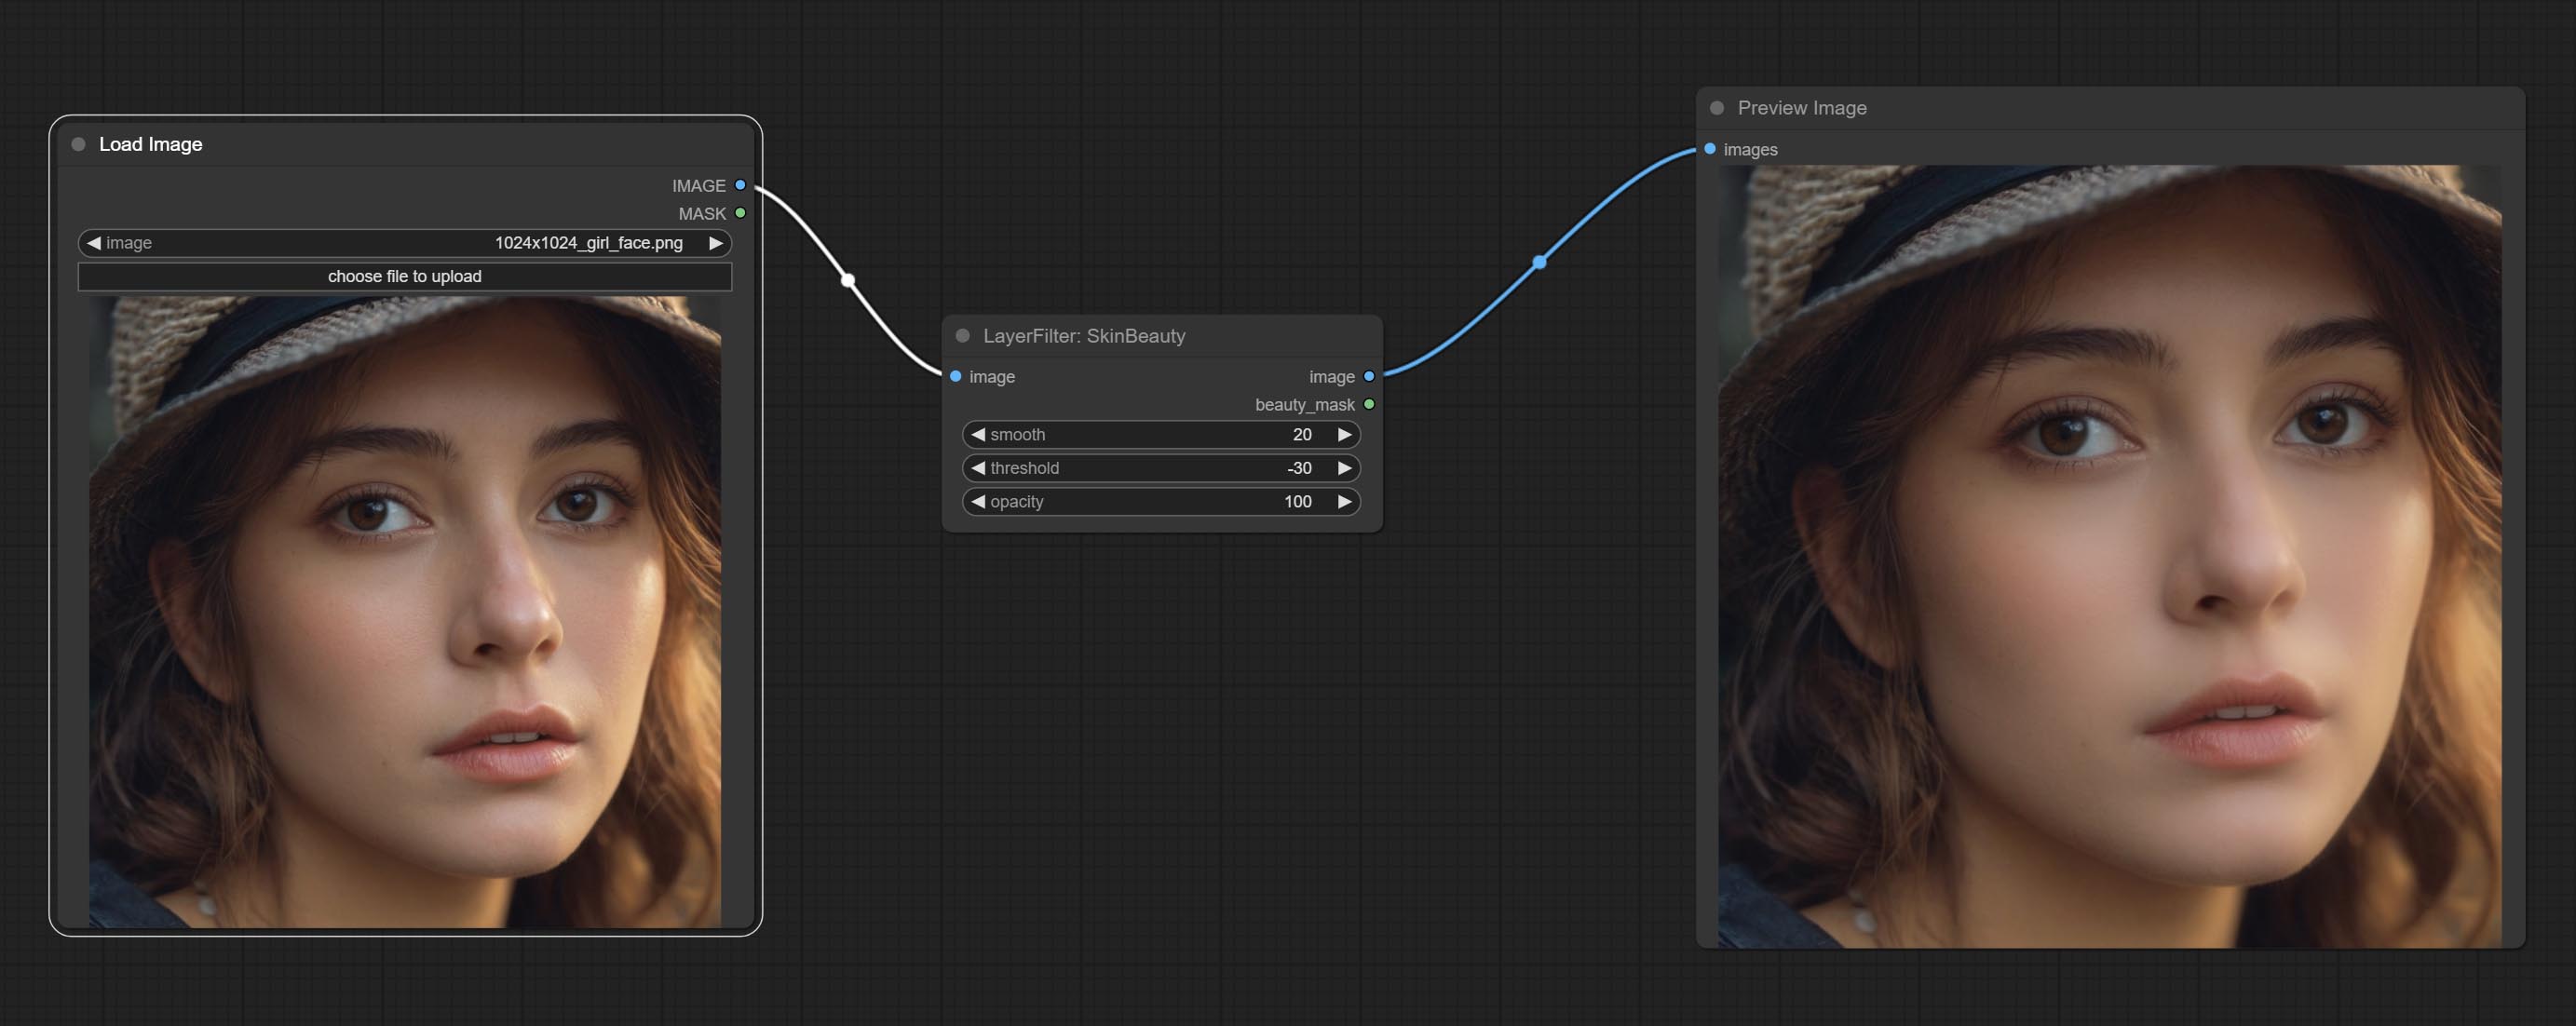
Node options: 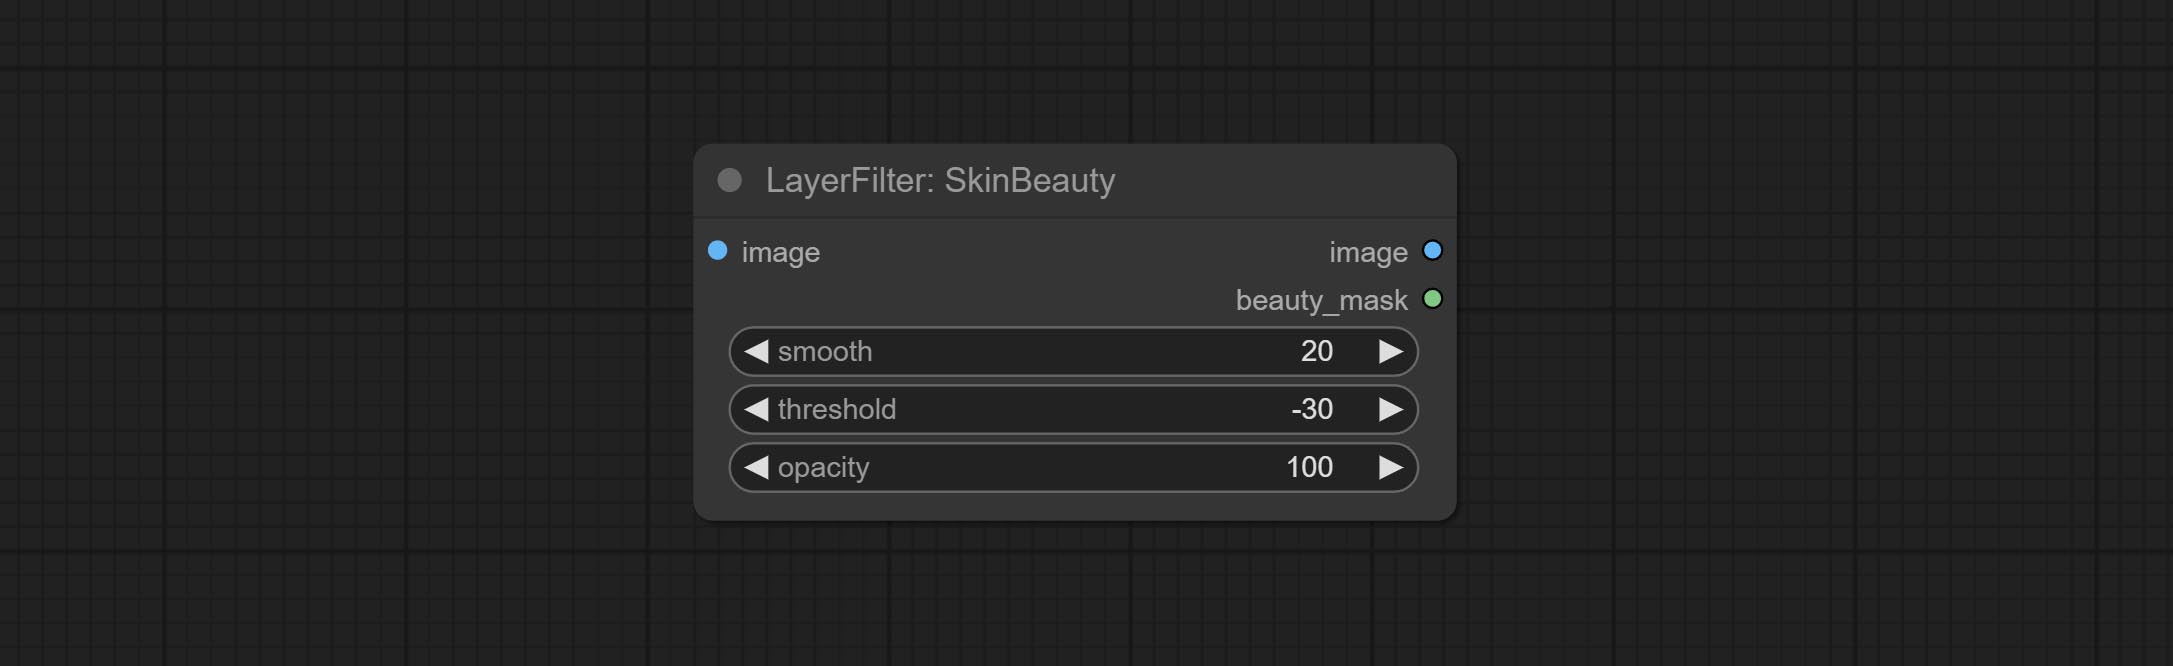
- smooth: Skin smoothness.
- threshold: Smooth range. the larger the range with the smaller value.
- opacity: The opacity of the smoothness.
Акварель
Watercolor painting effect 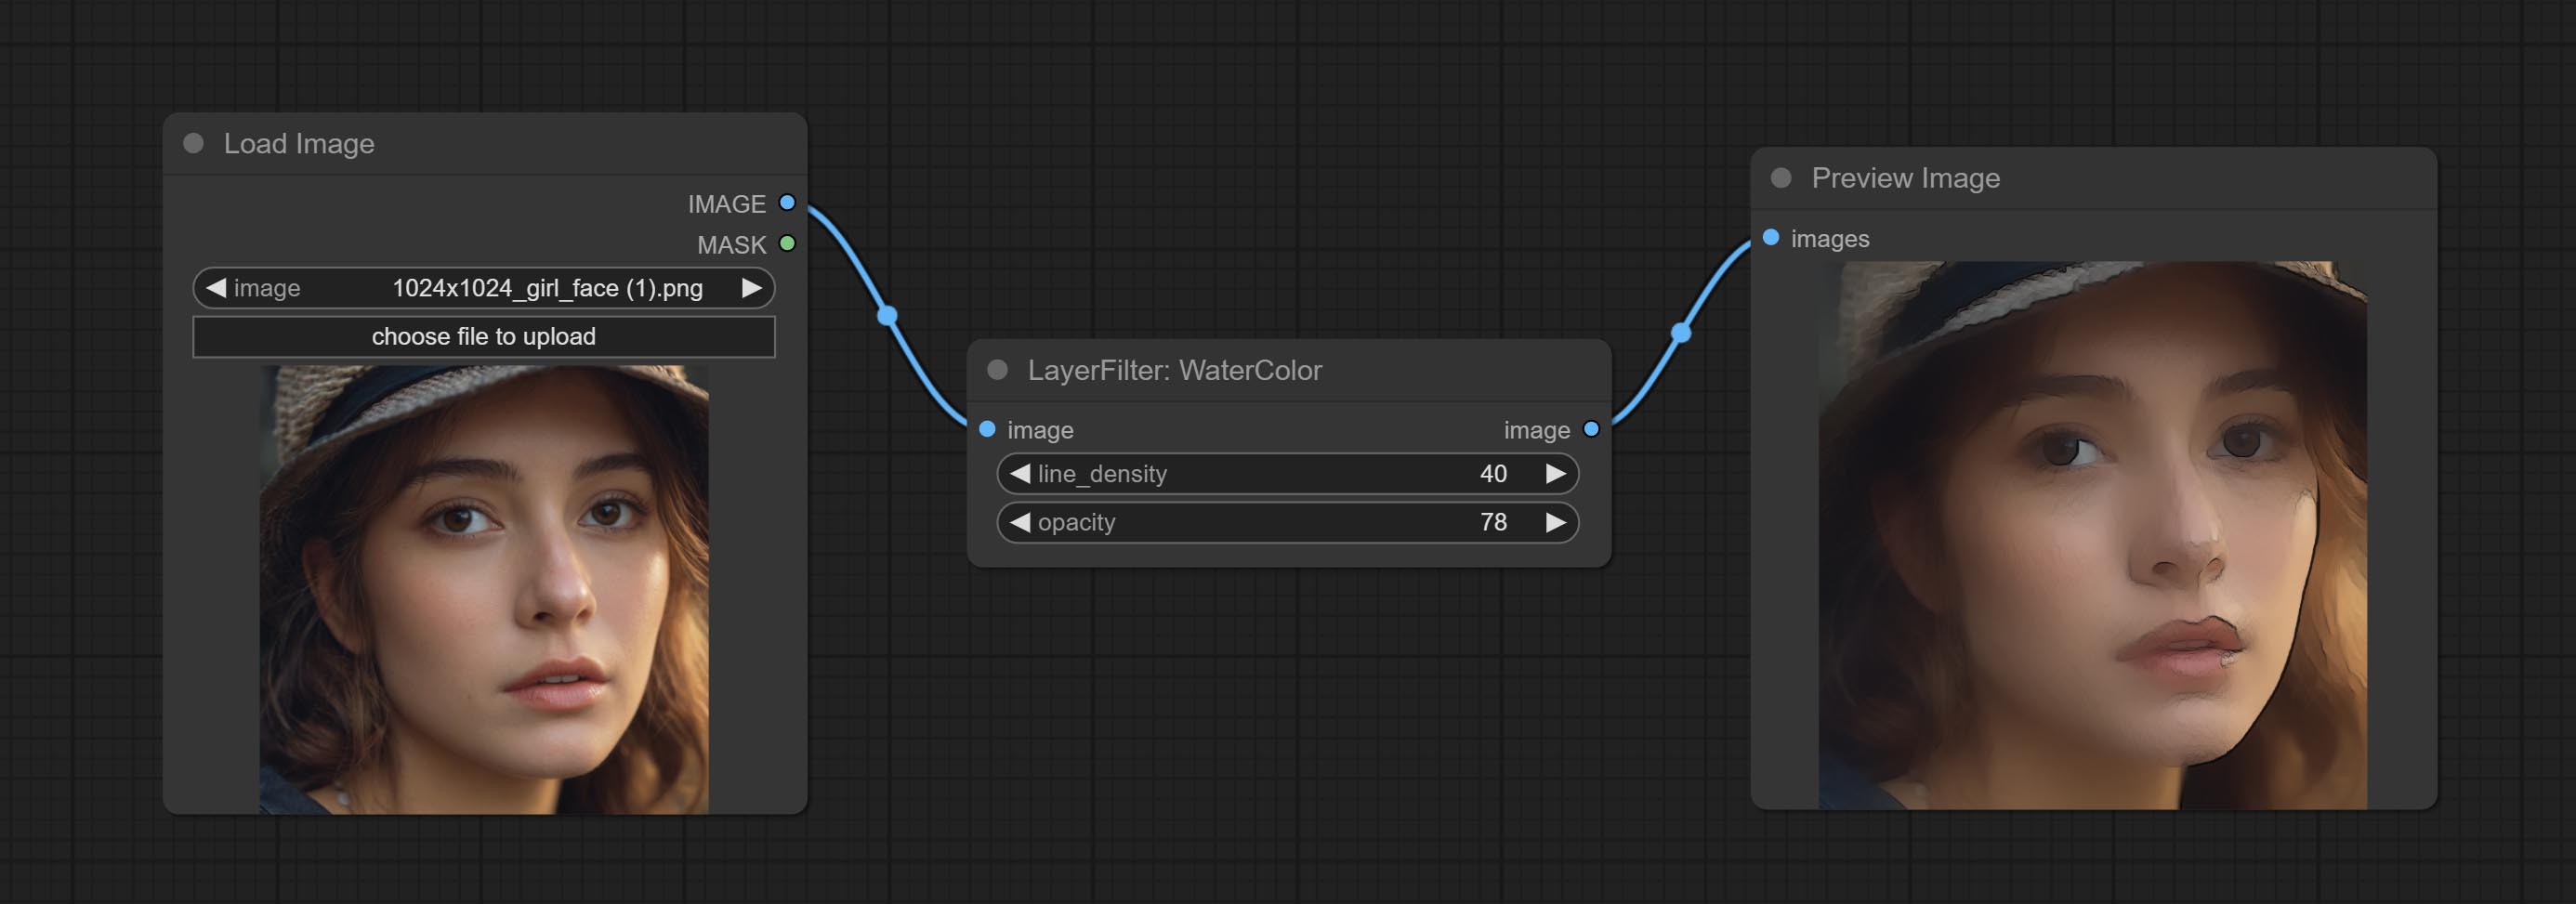
Node option: 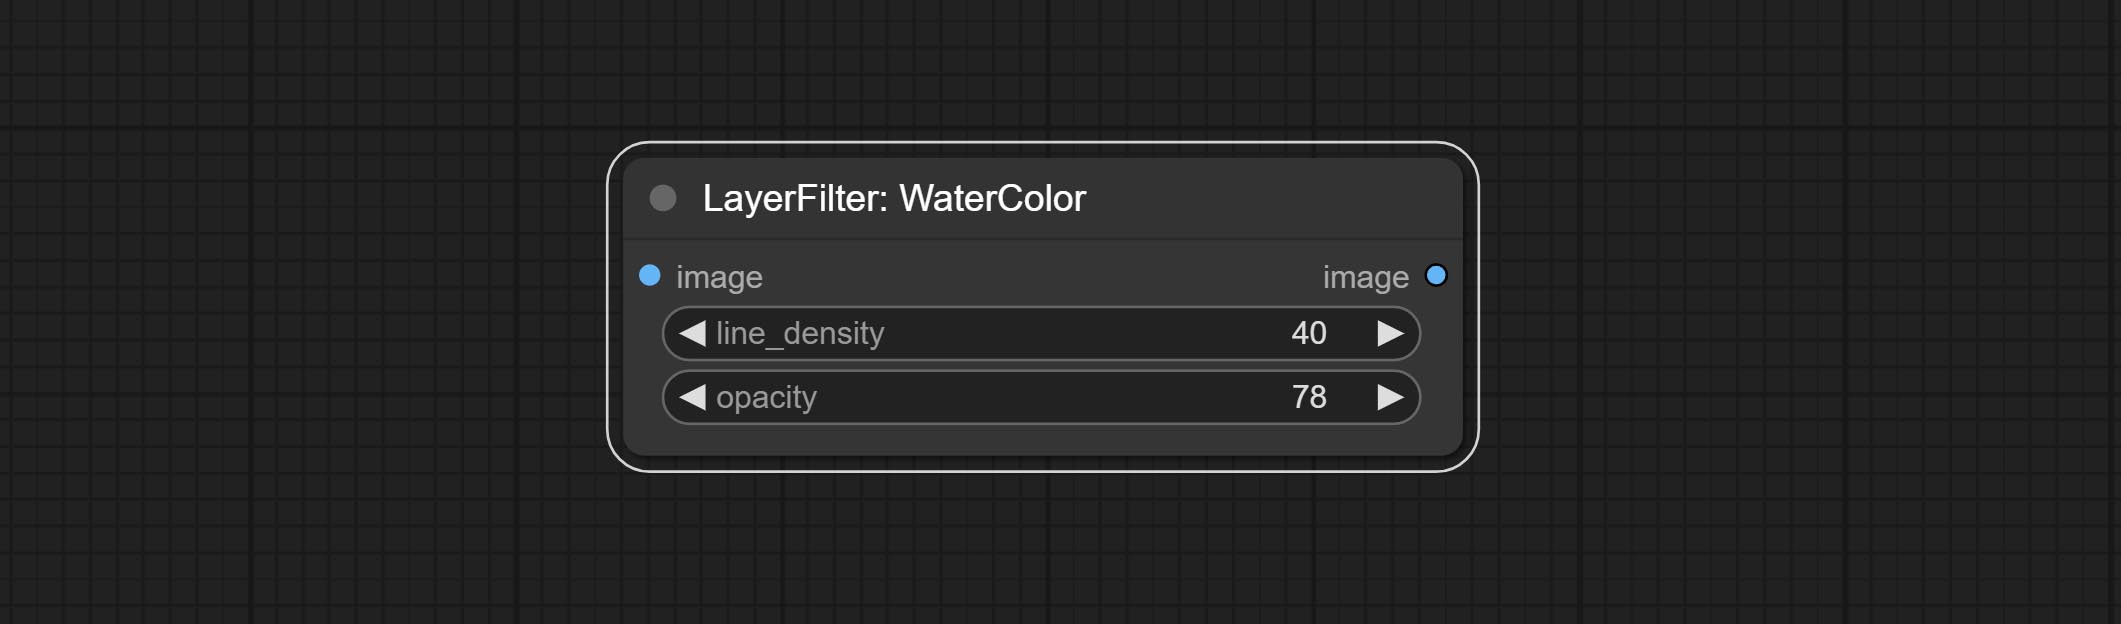
- line_density: The black line density.
- opacity: The opacity of watercolor effects.
SoftLight
Soft light effect, the bright highlights on the screen appear blurry. 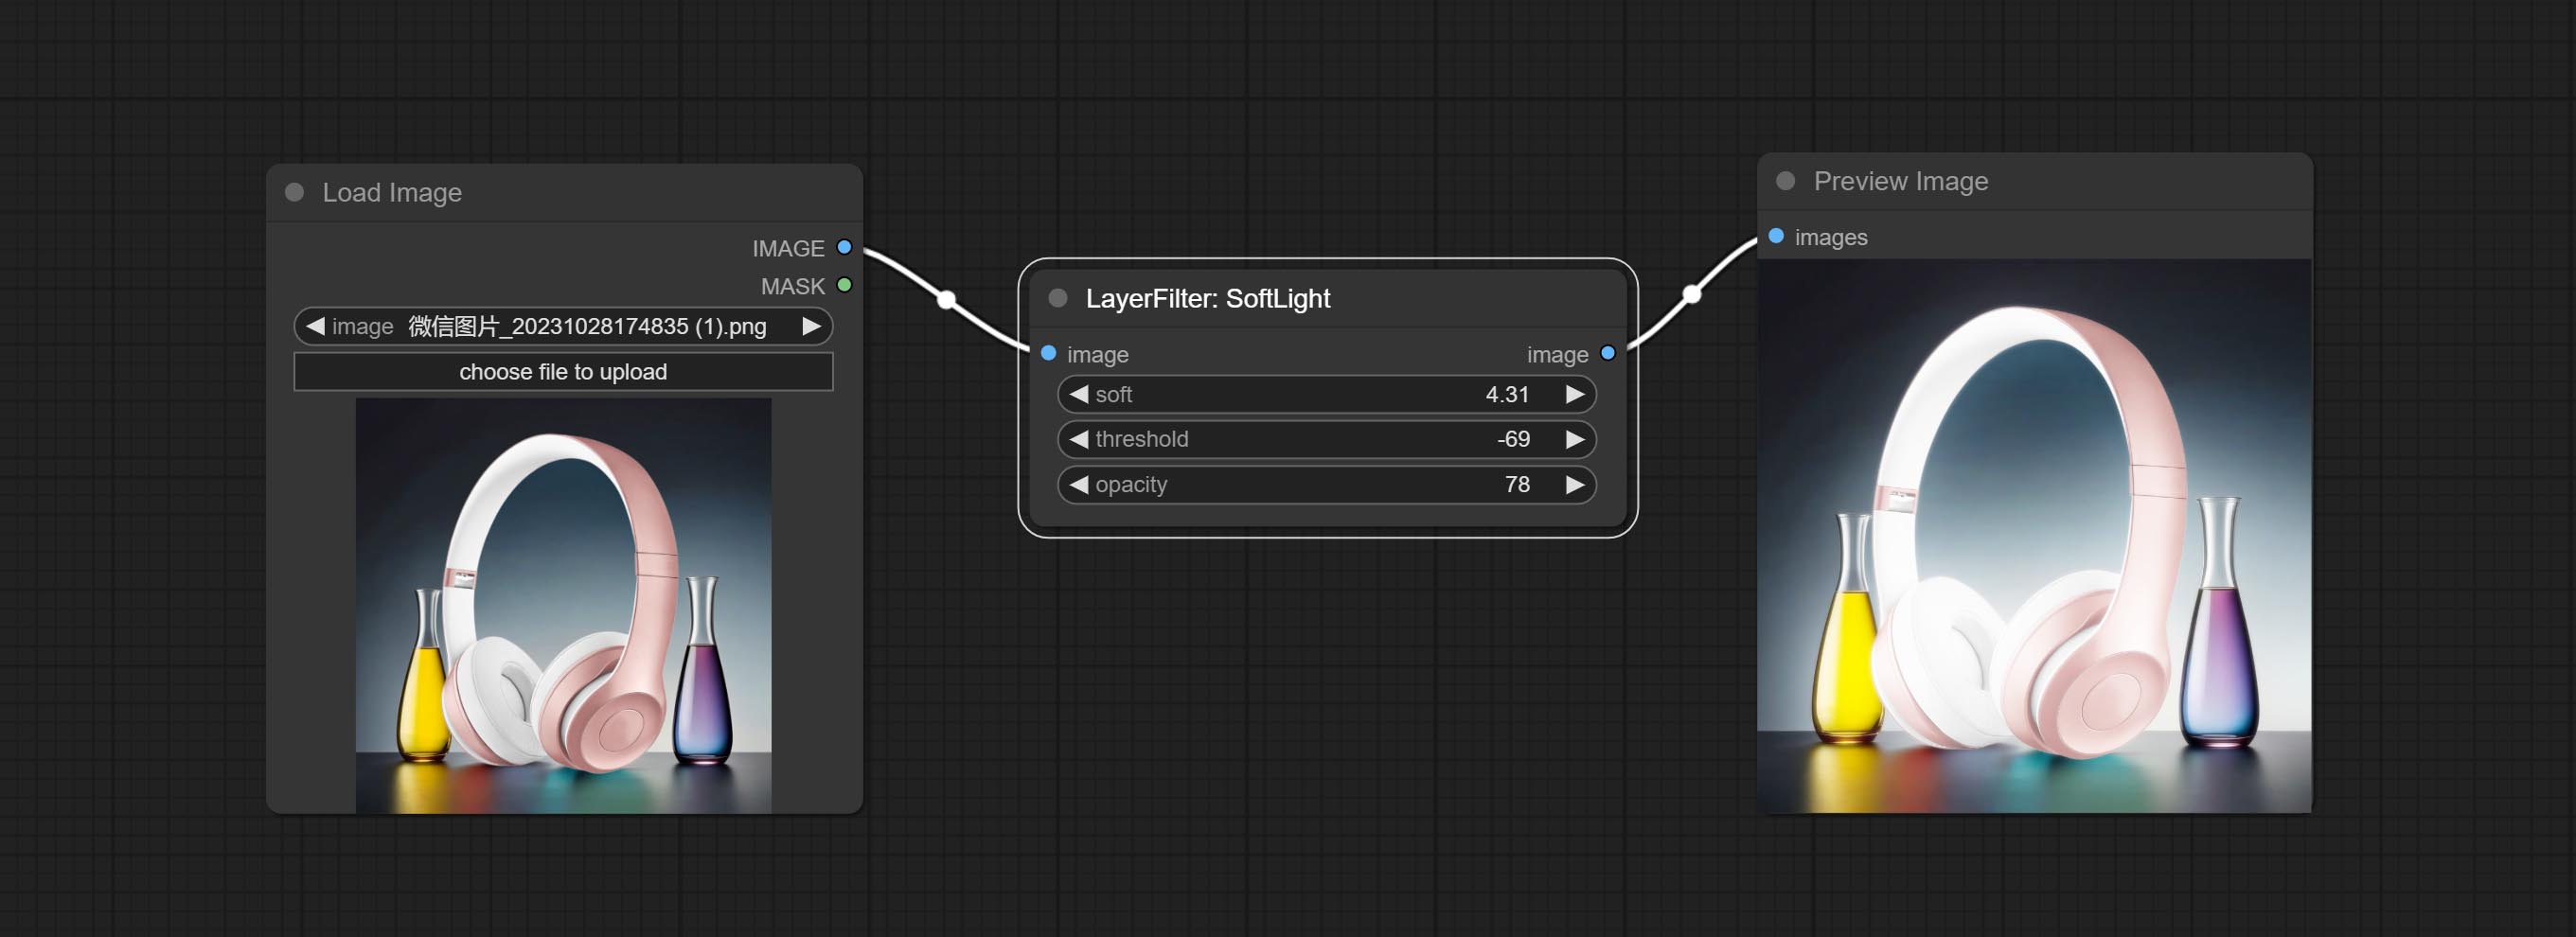
Node options: 
- soft: Size of soft light.
- threshold: Soft light range. the light appears from the brightest part of the picture. in lower value, the range will be larger, and in higher value, the range will be smaller.
- opacity: Opacity of the soft light.
ChannelShake
Channel misalignment. similar to the effect of Tiktok logo. 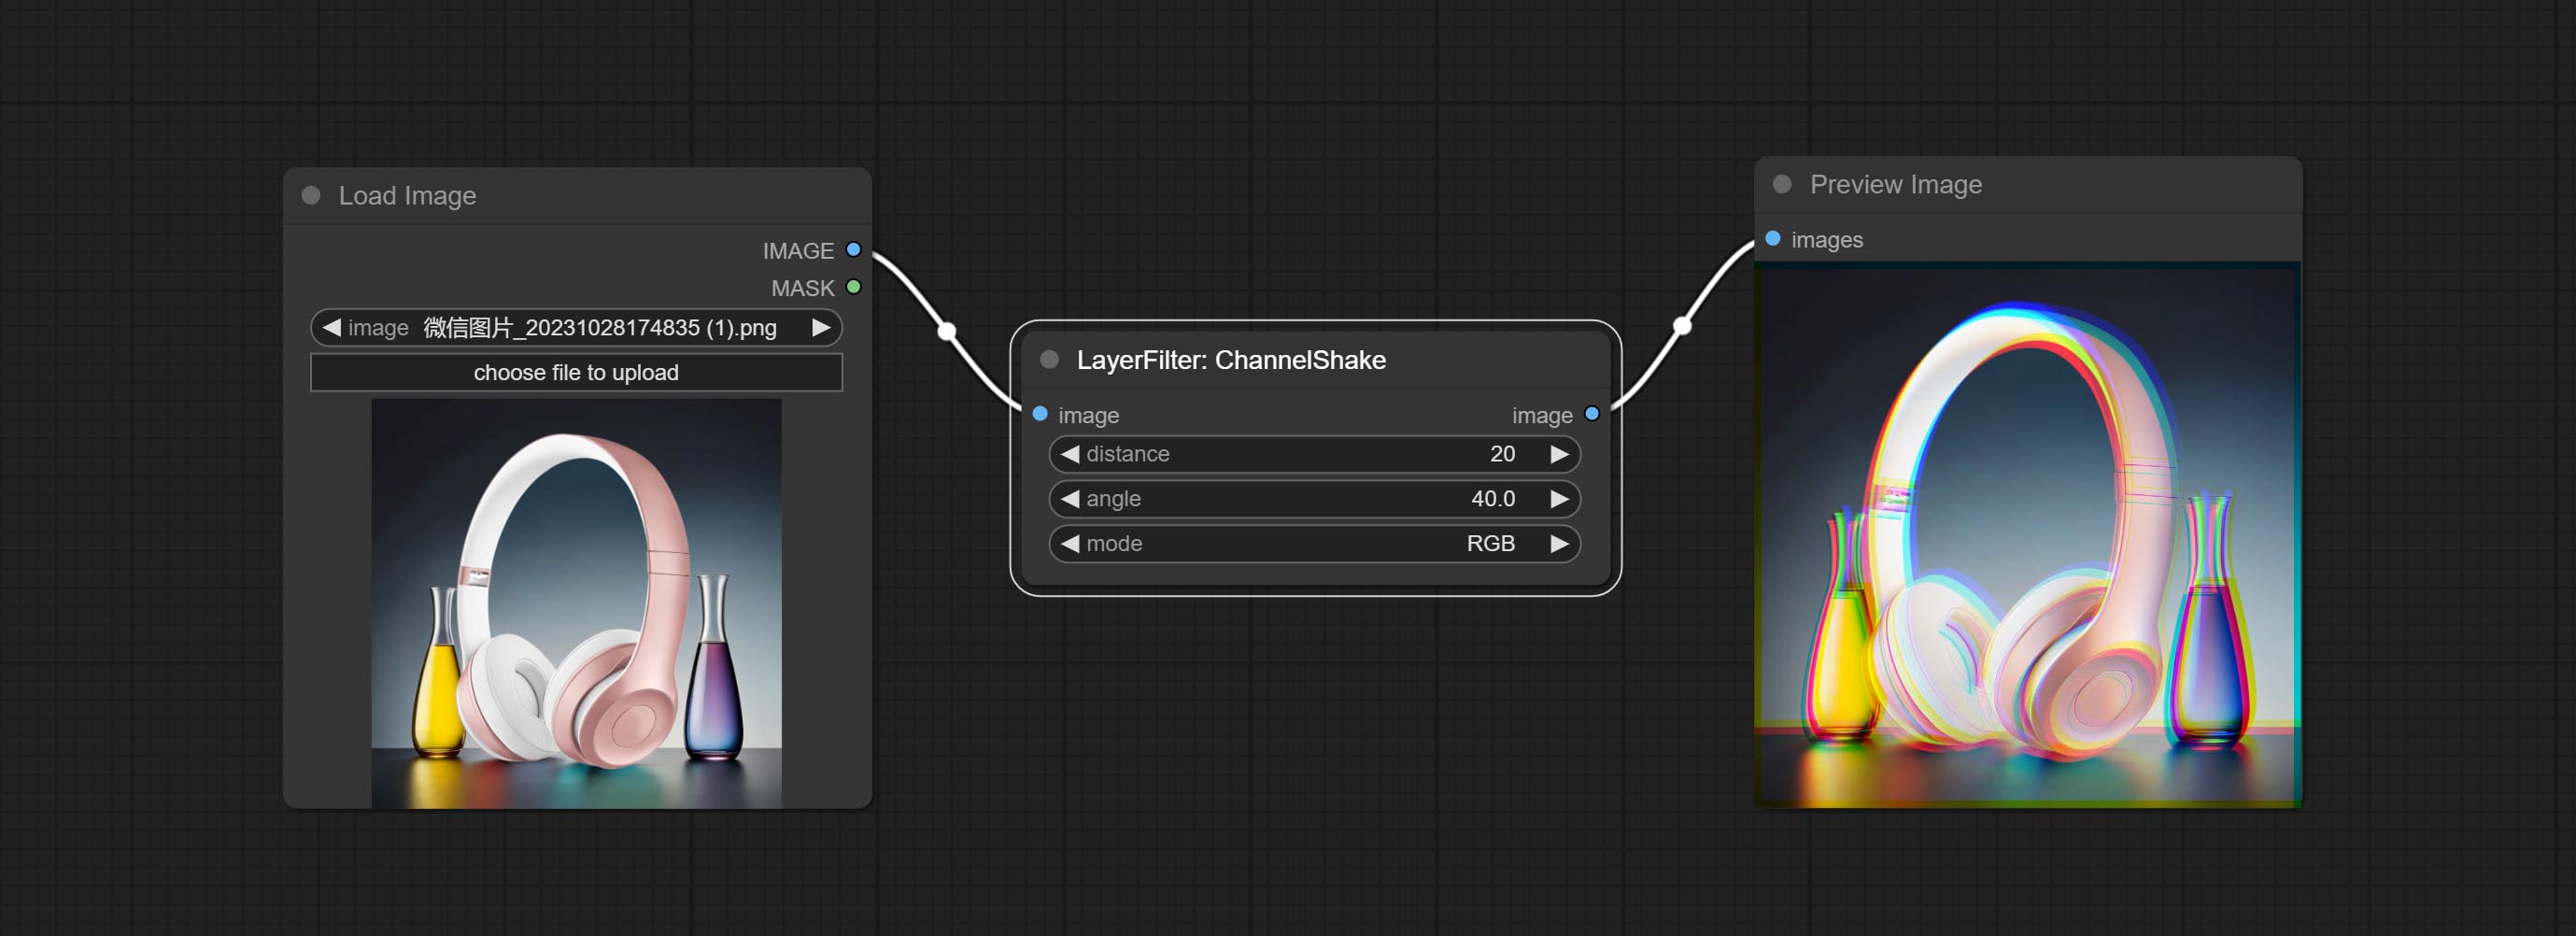
Node options: 
- distance: Distance of channel separation.
- angle: Angle of channel separation.
- mode: Channel shift arrangement order.
HDR Effects
enhances the dynamic range and visual appeal of input images. This node is reorganize and encapsulate of HDR Effects (SuperBeasts.AI), thanks to the original author. 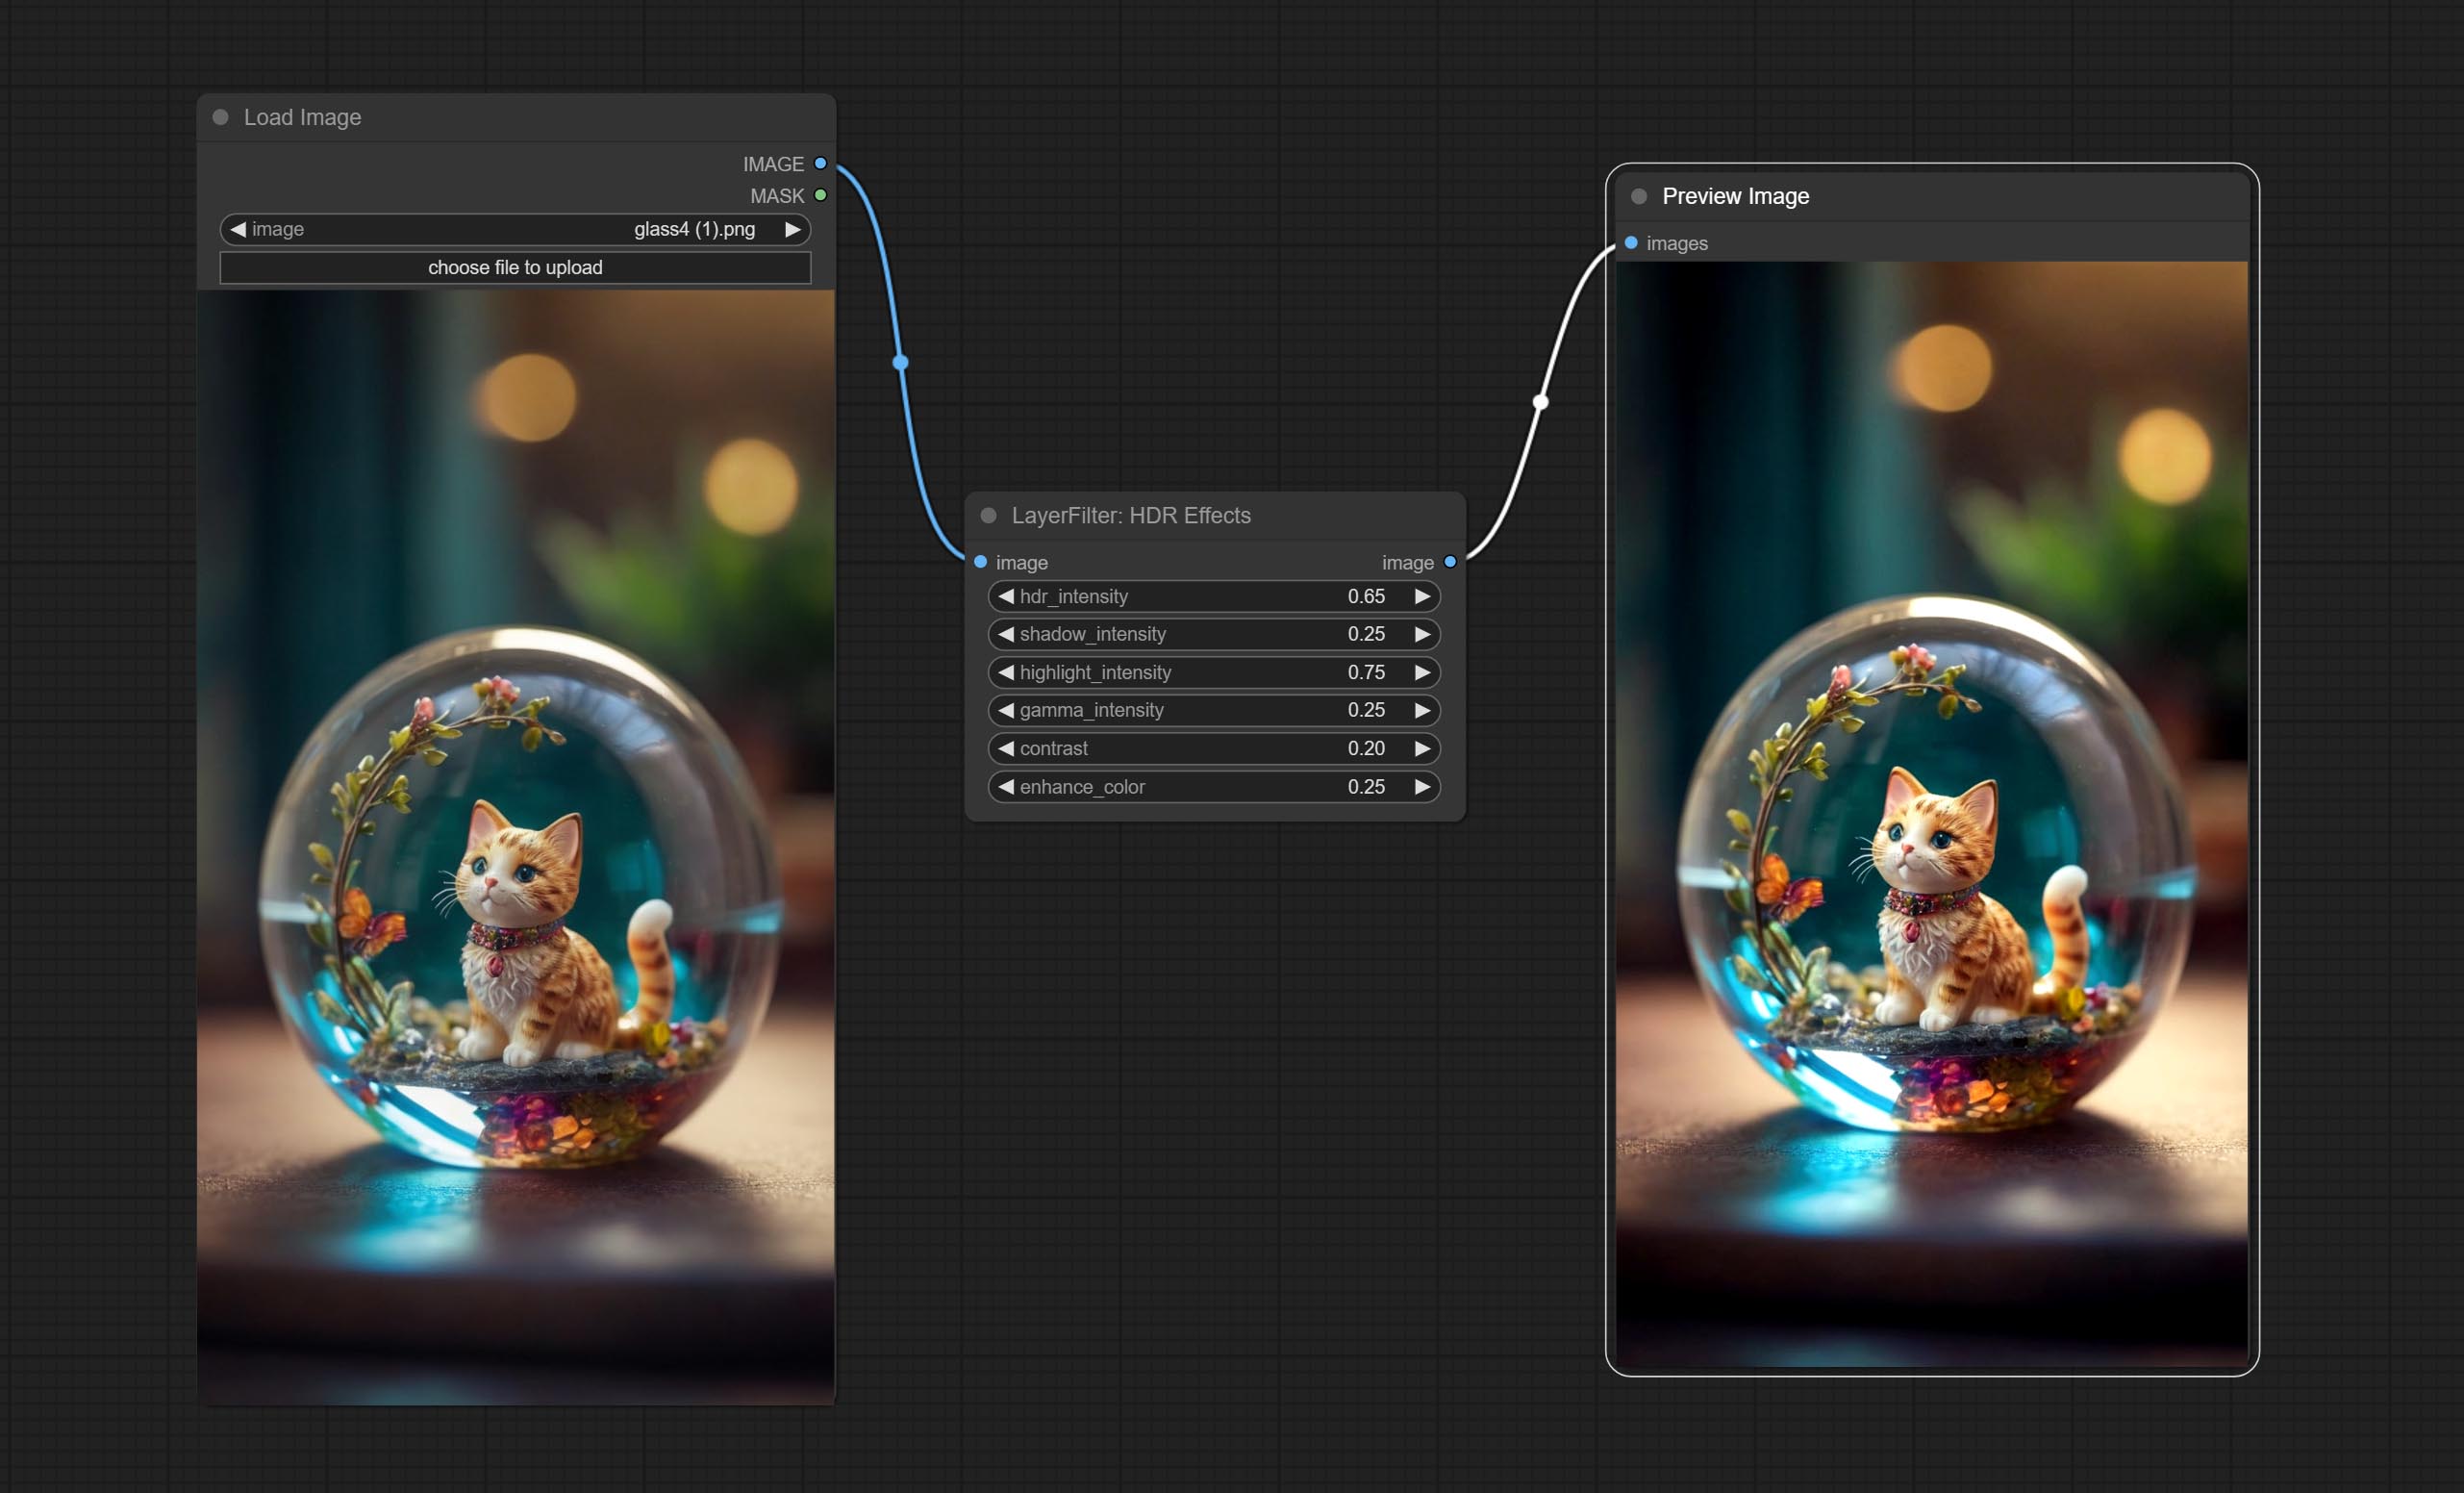
Node options: 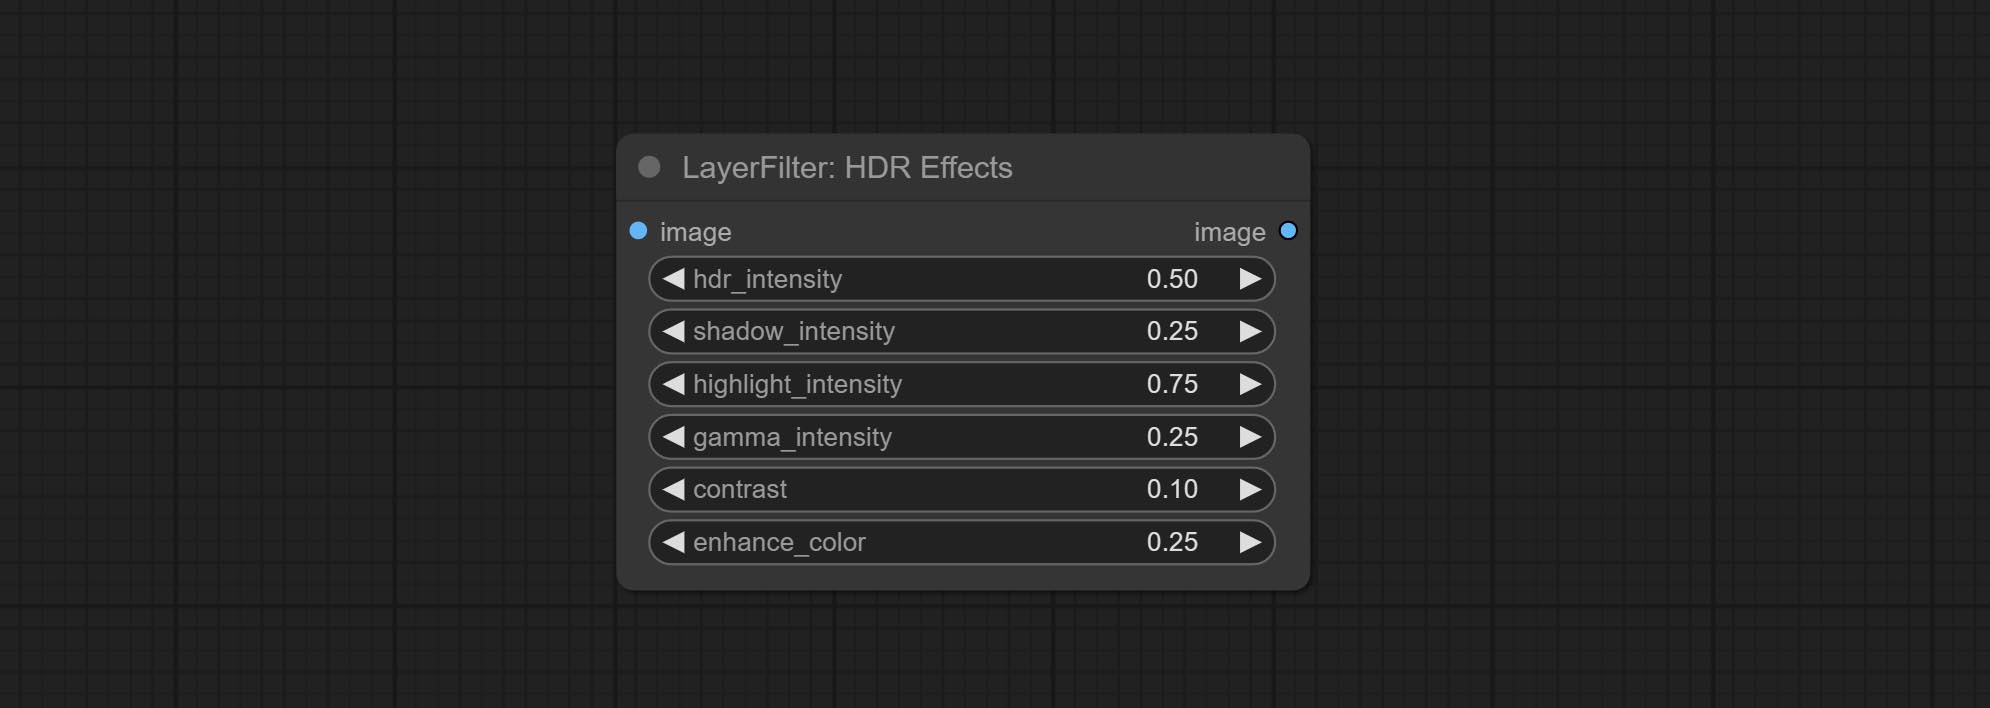
- hdr_intensity: Range: 0.0 to 5.0, Controls the overall intensity of the HDR effect, Higher values result in a more pronounced HDR effect.
- shadow_intensity: Range: 0.0 to 1.0,Adjusts the intensity of shadows in the image,Higher values darken the shadows and increase contrast.
- highlight_intensity: Range: 0.0 to 1.0,Adjusts the intensity of highlights in the image,Higher values brighten the highlights and increase contrast.
- gamma_intensity: Range: 0.0 to 1.0,Controls the gamma correction applied to the image,Higher values increase the overall brightness and contrast.
- contrast: Range: 0.0 to 1.0,Enhances the contrast of the image, Higher values result in more pronounced contrast.
- enhance_color: Range: 0.0 to 1.0,Enhances the color saturation of the image, Higher values result in more vibrant colors.
Фильм
Simulate the grain, dark edge, and blurred edge of the film, support input depth map to simulate defocus.
This node is reorganize and encapsulate of digitaljohn/comfyui-propost, thanks to the original author. 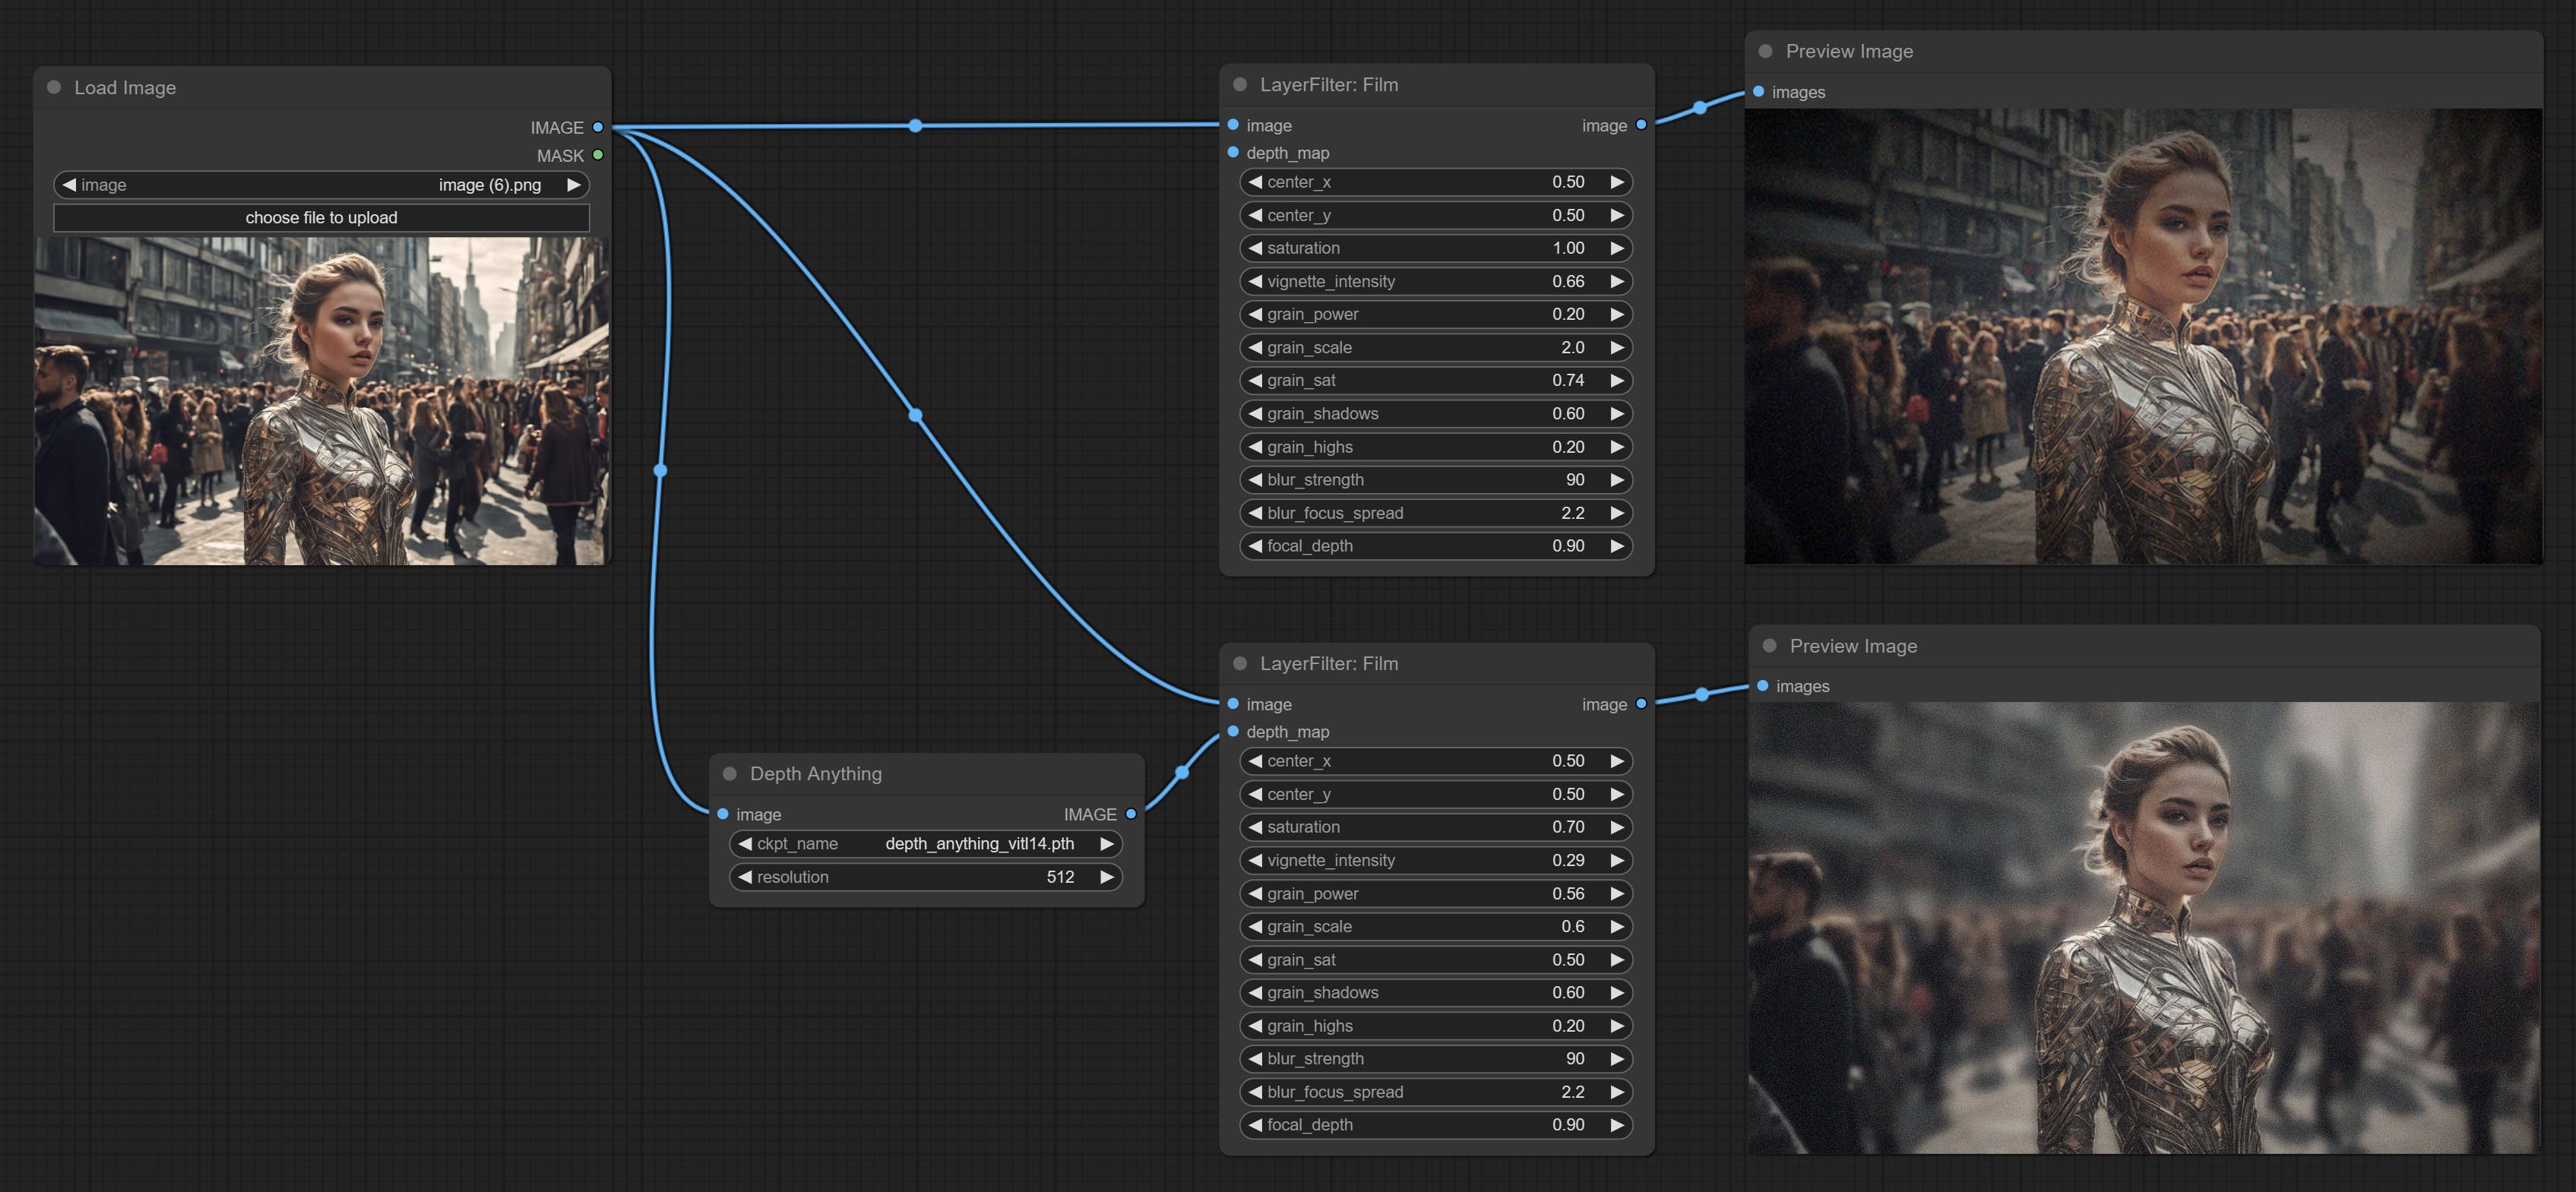
Node options: 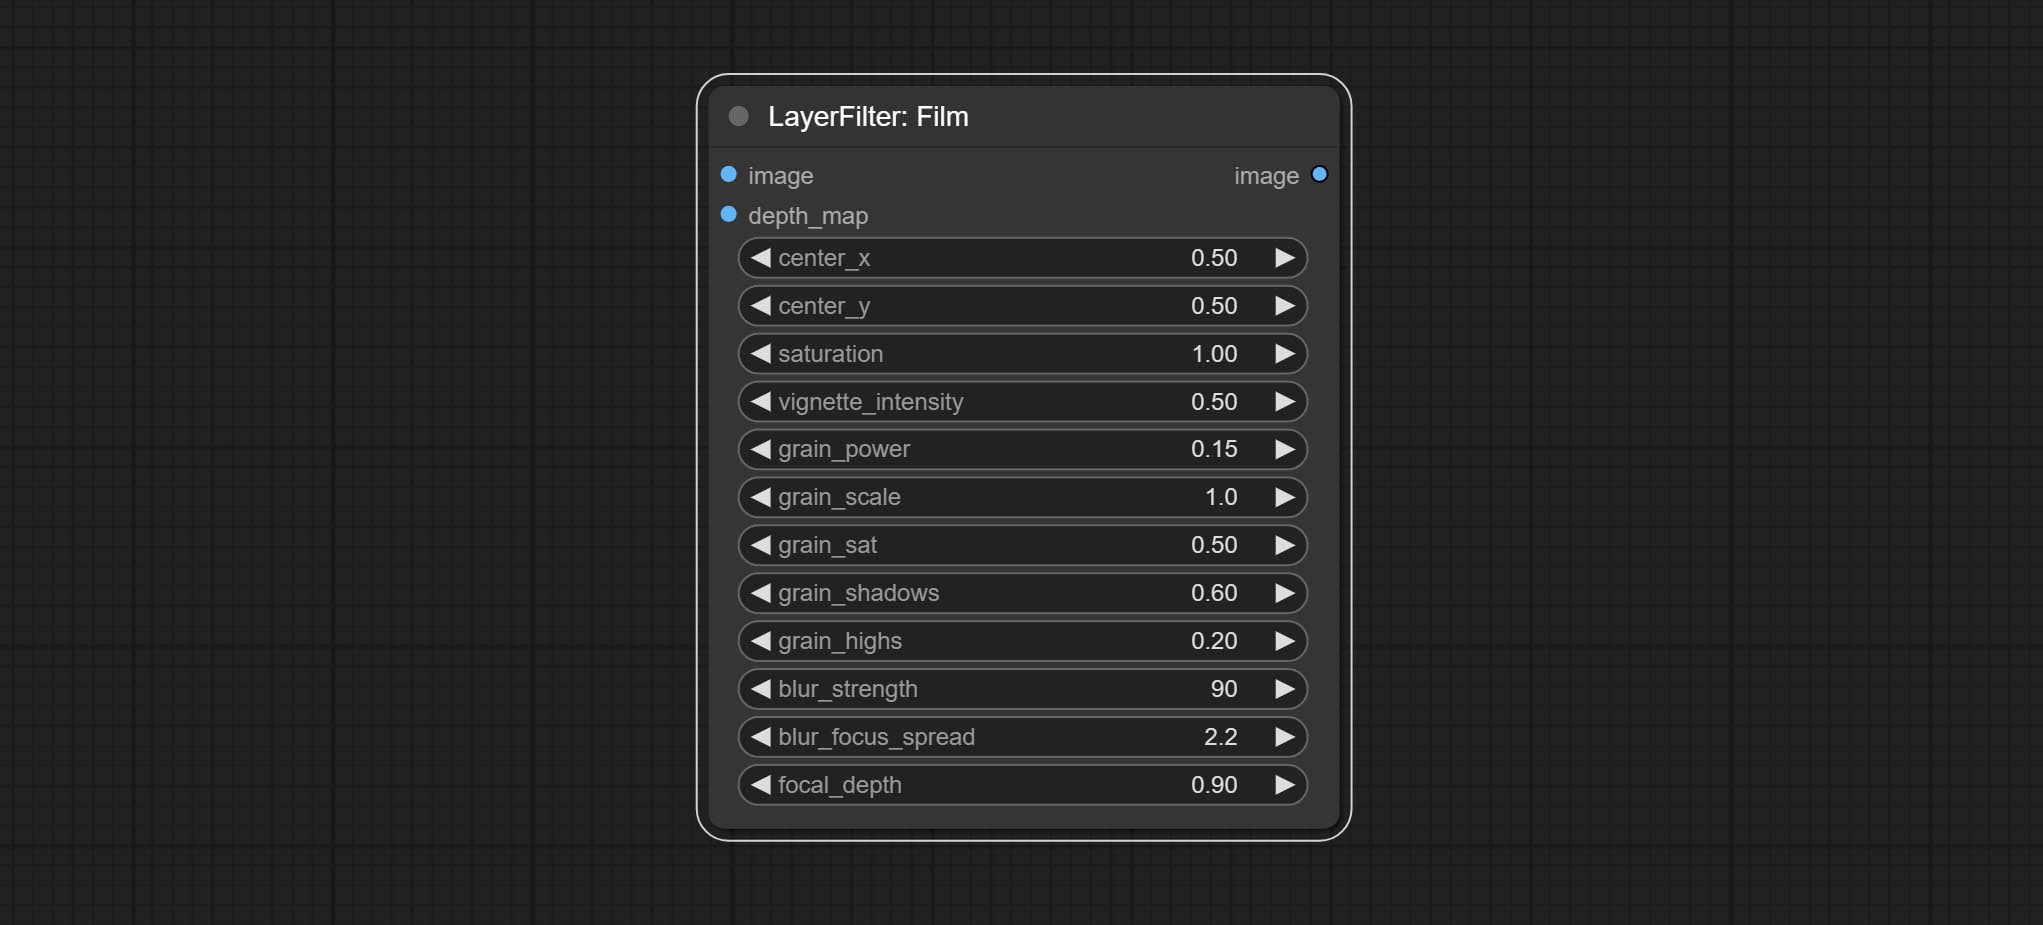
- image: The input image.
- depth_map: Input depth map to simulate defocus effect. it is an optional input. if there is no input, will simulates radial blur at the edges of the image.
- center_x: The horizontal axis of the center point position of the dark edge and radial blur, where 0 represents the leftmost side, 1 represents the rightmost side, and 0.5 represents at the center.
- center_y: The vertical axis of the center point position of the dark edge and radial blur, where 0 represents the leftmost side, 1 represents the rightmost side, and 0.5 represents at the center.
- saturation: Color saturation, 1 is the original value.
- grain_power: Grain intensity. larger value means more pronounced the noise.
- grain_scale: Grain size.
- grain_sat: The color saturation of grain. 0 represents mono noise, and the larger the value, the more prominent the color.
- grain_shadows: Grain intensity of dark part.
- grain_highs: Grain intensity of light part.
- blur_strength: The strength of blur. larger value means more blurry it becomes.
- blur_focus_spread: Focus diffusion range. larger value means larger clear range.
- focal_depth: Simulate the focal distance of defucus. 0 indicates that focus is farthest, and 1 indicates that is closest. this setting only valid when input the depth_map.
FilmV2
The upgraded version of the Film node adds the fastgrain method on the basis of the previous one, and the speed of generating noise is accelerated by 10 times. The code for fastgrain is from github.com/spacepxl/ComfyUI-Image-Filters BetterFilmGrain node, thanks to the original authors. 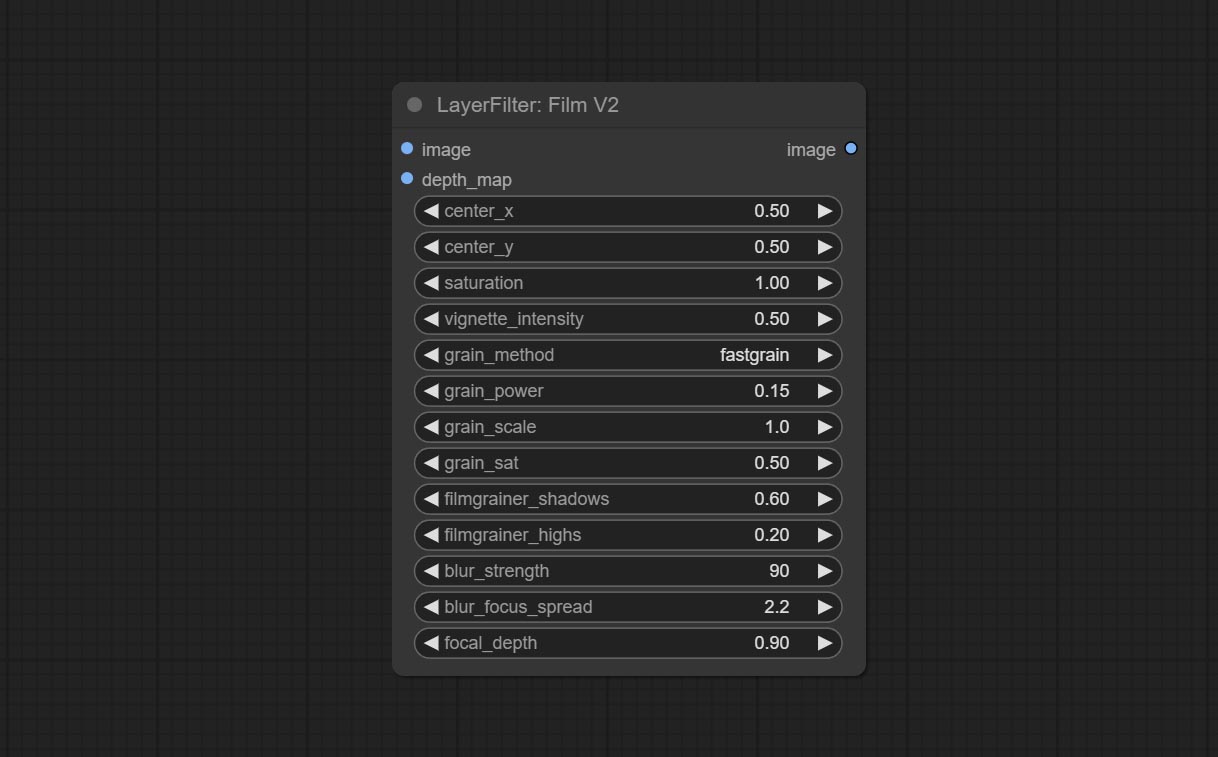
LightLeak
Simulate the light leakage effect of the film. please download model file from Baidu Netdisk or [Google Drive]([light_leak.pkl(Google Drive)(https://drive.google.com/file/d/1DcH2Zkyj7W3OiAeeGpJk1eaZpdJwdCL-/view?usp=sharing)) and copy to ComfyUI/models/layerstyle folder. 
Node options: 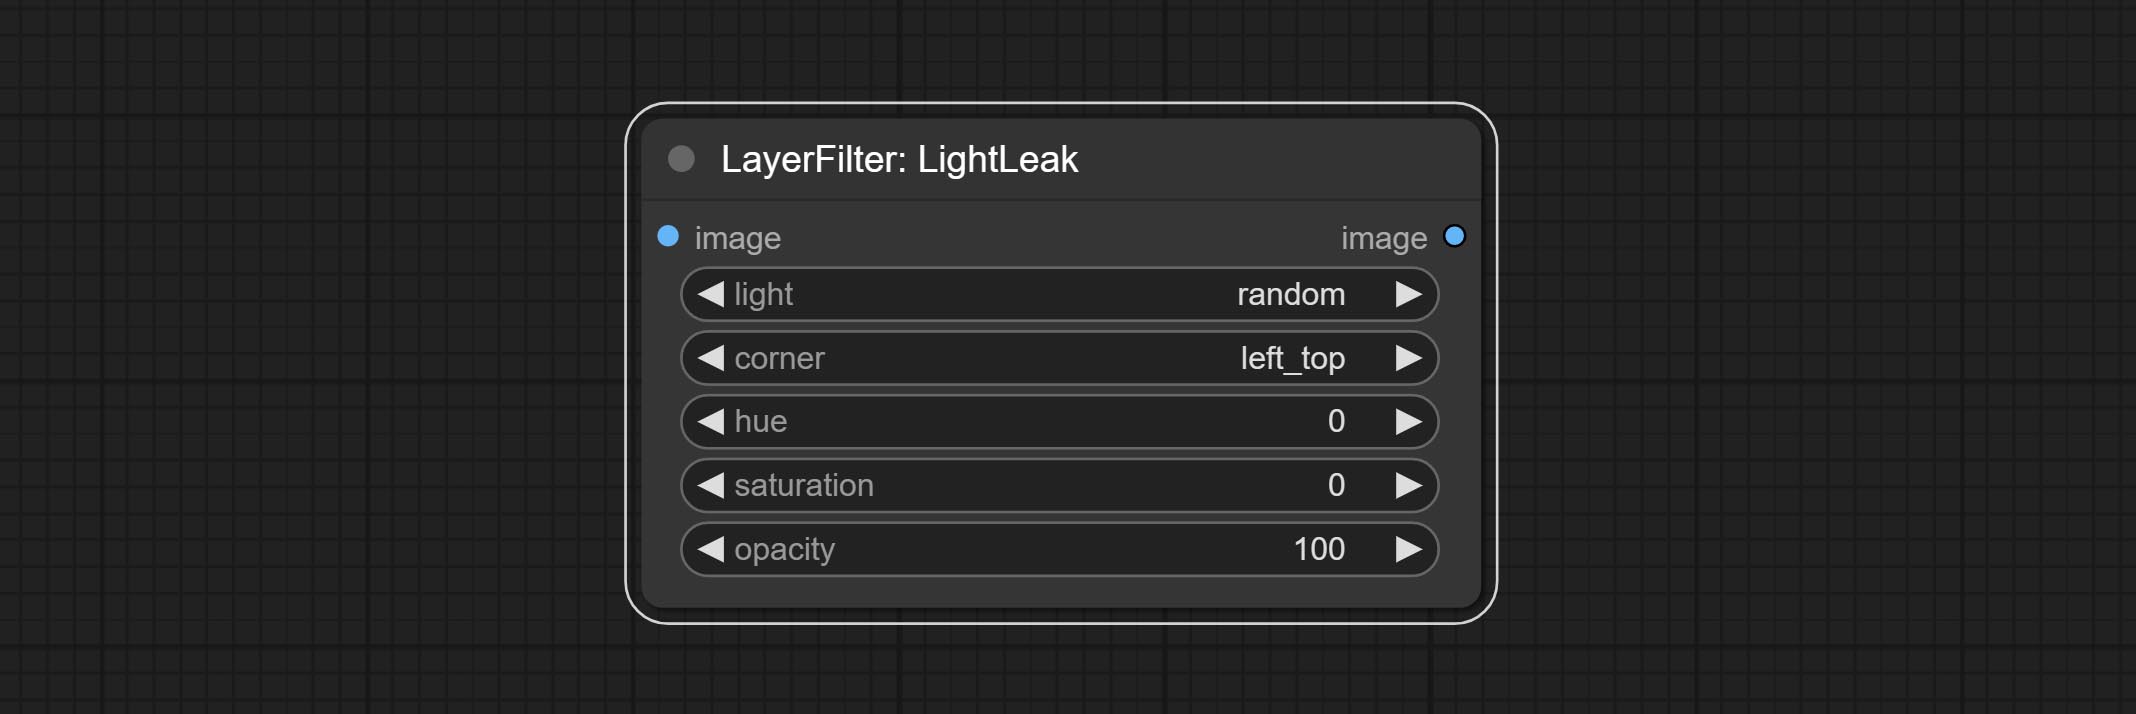
- light: 32 types of light spots are provided. random is a random selection.
- corner: There are four options for the corner where the light appears: top left, top right, bottom left, and bottom right.
- hue: The hue of the light.
- saturation: The color saturation of the light.
- opacity: The opacity of the light.
ColorMap
Pseudo color heat map effect. 
Node options: 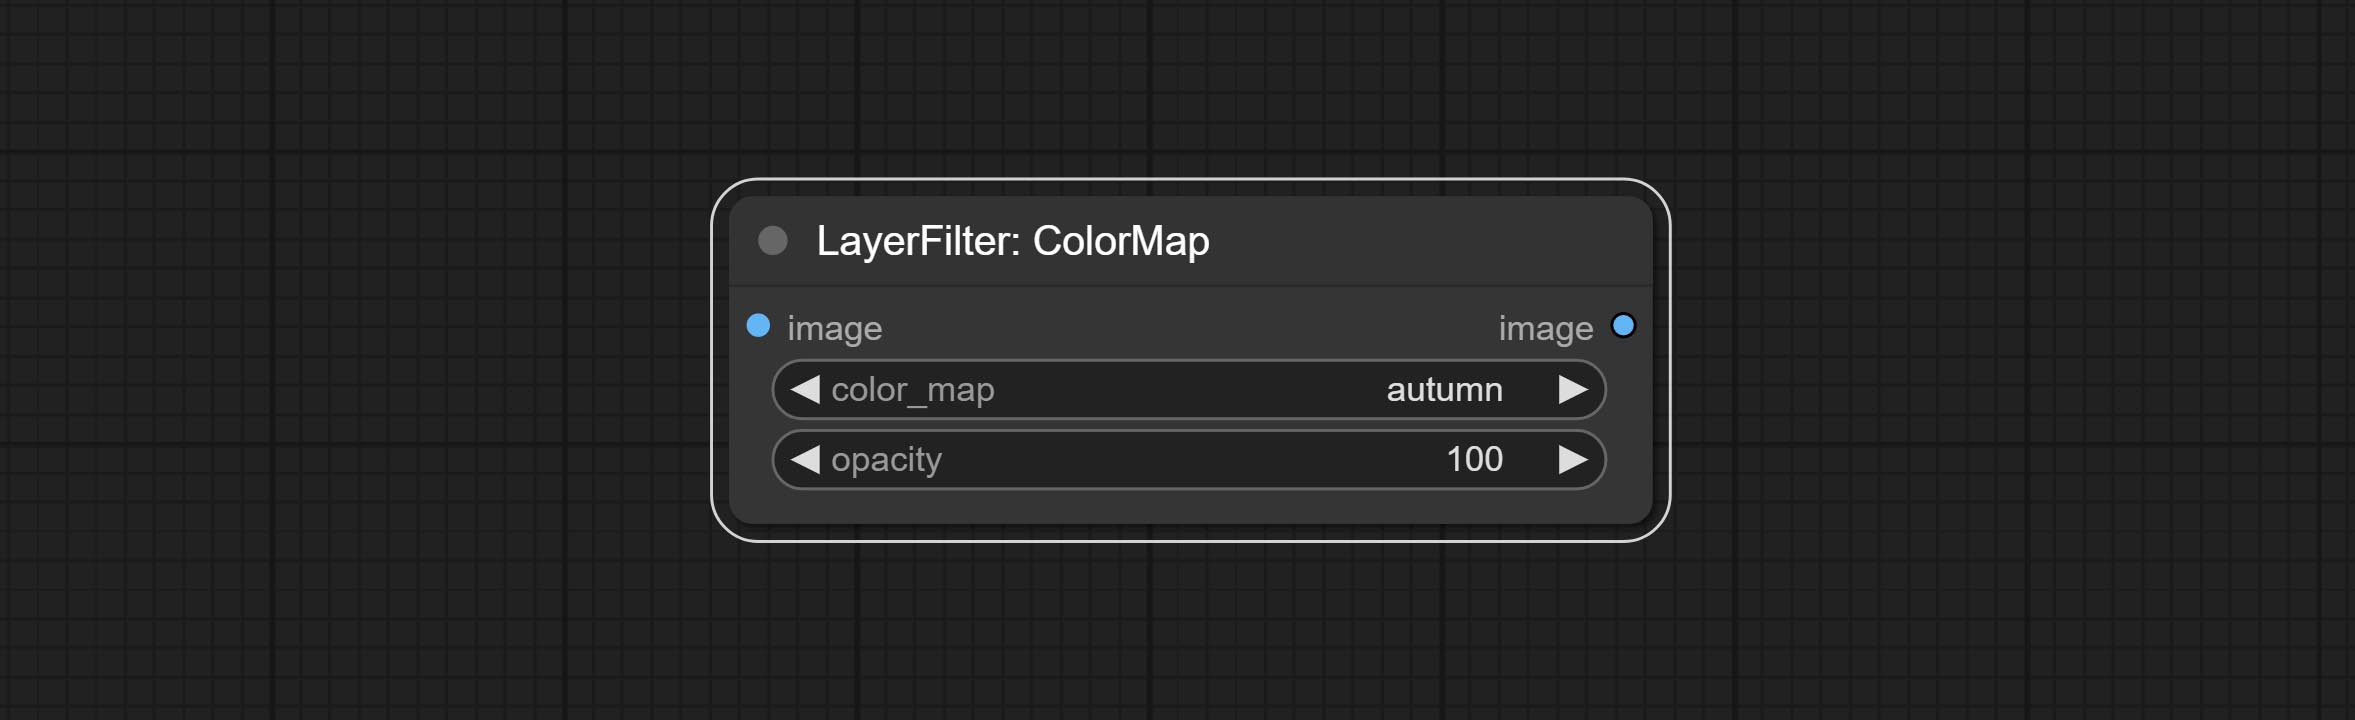
- color_map: Effect type. there are a total of 22 types of effects, as shown in the above figure.
- opacity: The opacity of the color map effect.
MotionBlur
Make the image motion blur 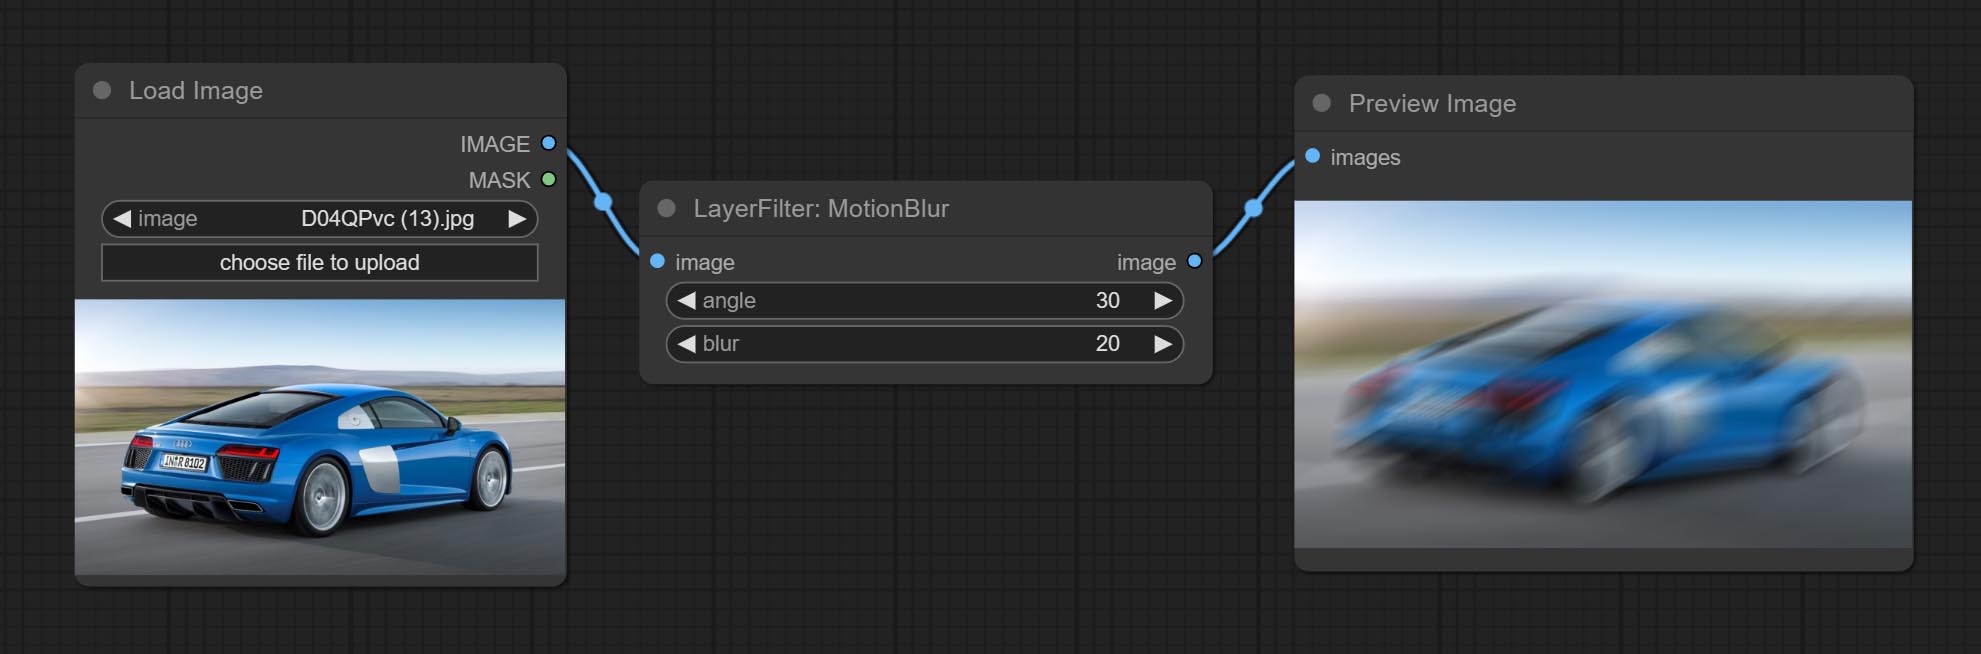
Node options:
- angle: The angle of blur.
- blur: The size of blur.
GaussianBlur
Make the image gaussian blur 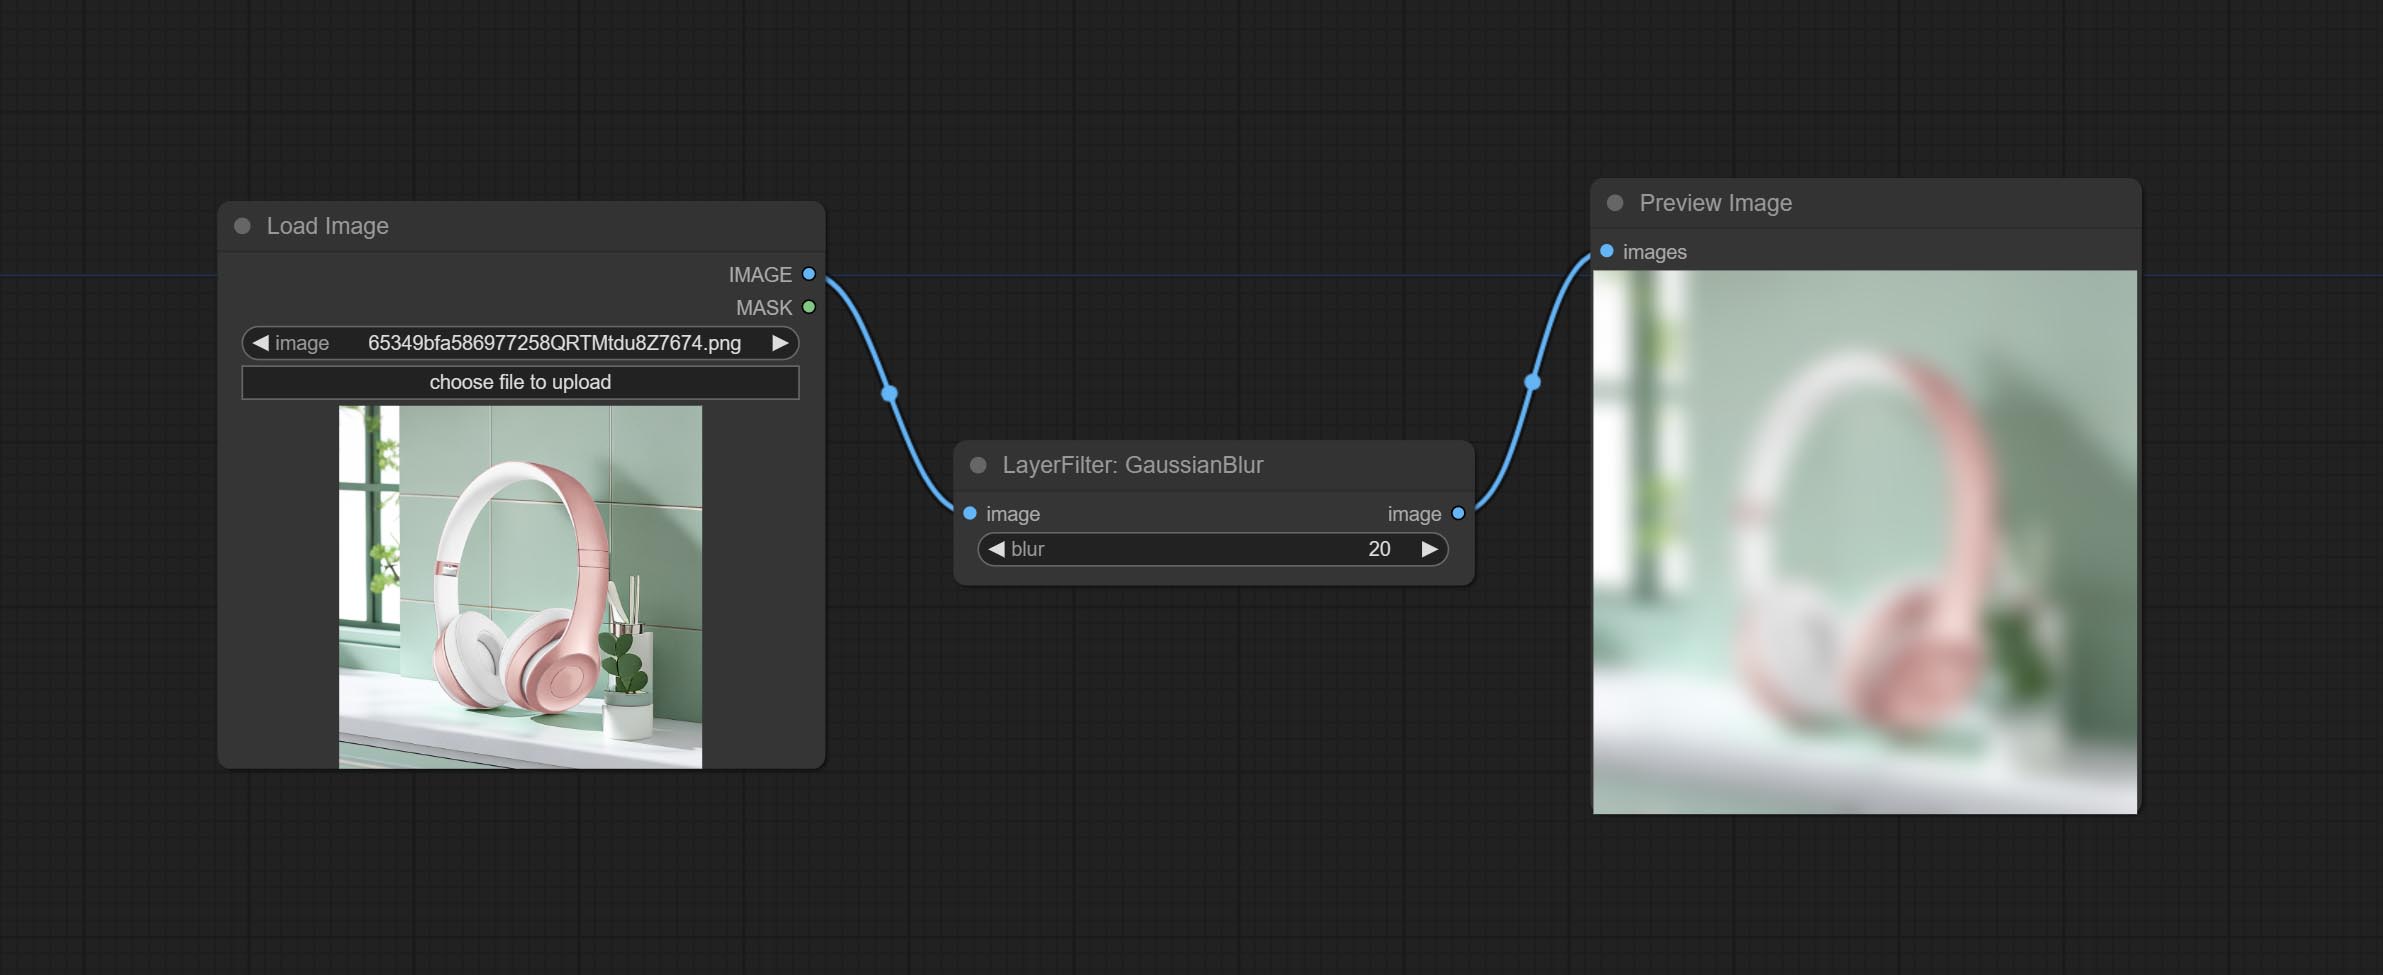
Node options:
- blur: The size of blur, integer, range 1-999.
GaussianBlurV2
Gaussian blur. Change the parameter precision to floating-point number, with a precision of 0.01
Node options: 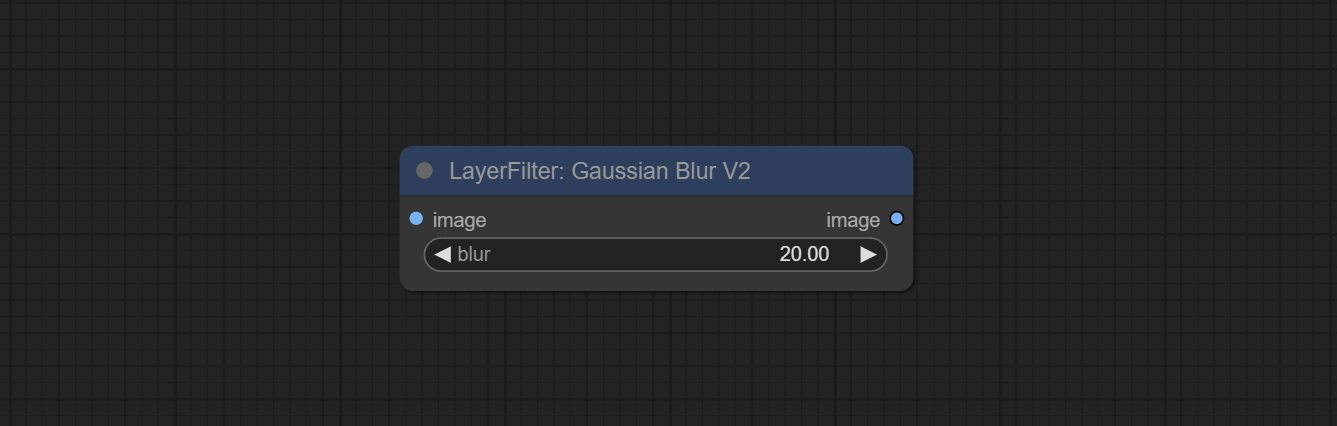
- blur: The size of blur, float, range 0 - 1000.
AddGrain
Add noise to the picture. 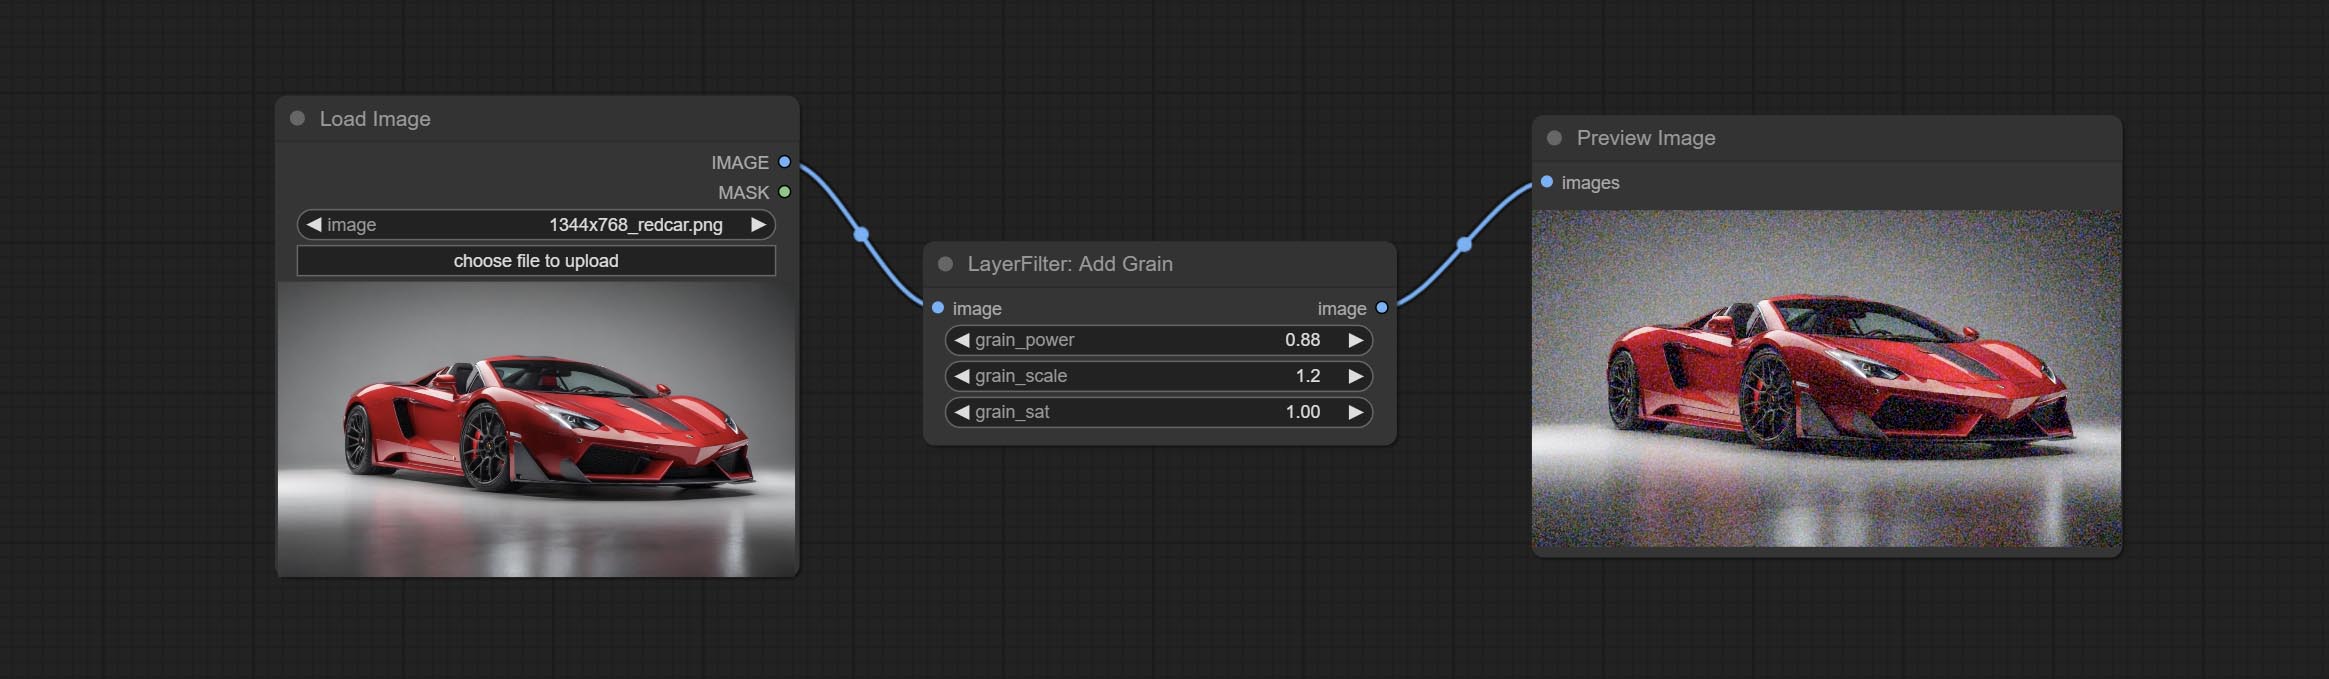
Node Options: 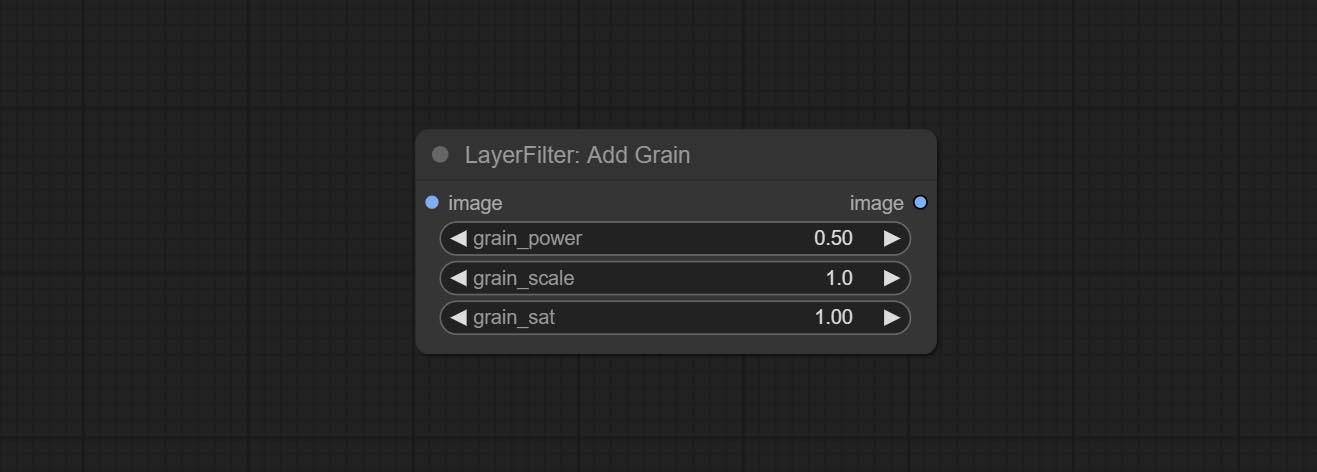
- grain_power: Noise intensity.
- grain_scale: Noise size.
- grain_sat: Color saturation of noise.
Annotation for notes
1 The layer_image, layer_mask and the background_image(if have input), These three items must be of the same size.
2 The mask not a mandatory input item. the alpha channel of the image is used by default. If the image input does not include an alpha channel, the entire image's alpha channel will be automatically created. if have masks input simultaneously, the alpha channel will be overwrite by the mask.
3 The Blend Mode include normal, multply, screen, add, subtract, difference, darker, color_burn, color_dodge, linear_burn, linear_dodge, overlay, soft_light, hard_light, vivid_light, pin_light, linear_light, and hard_mix. all of 19 blend modes in total.
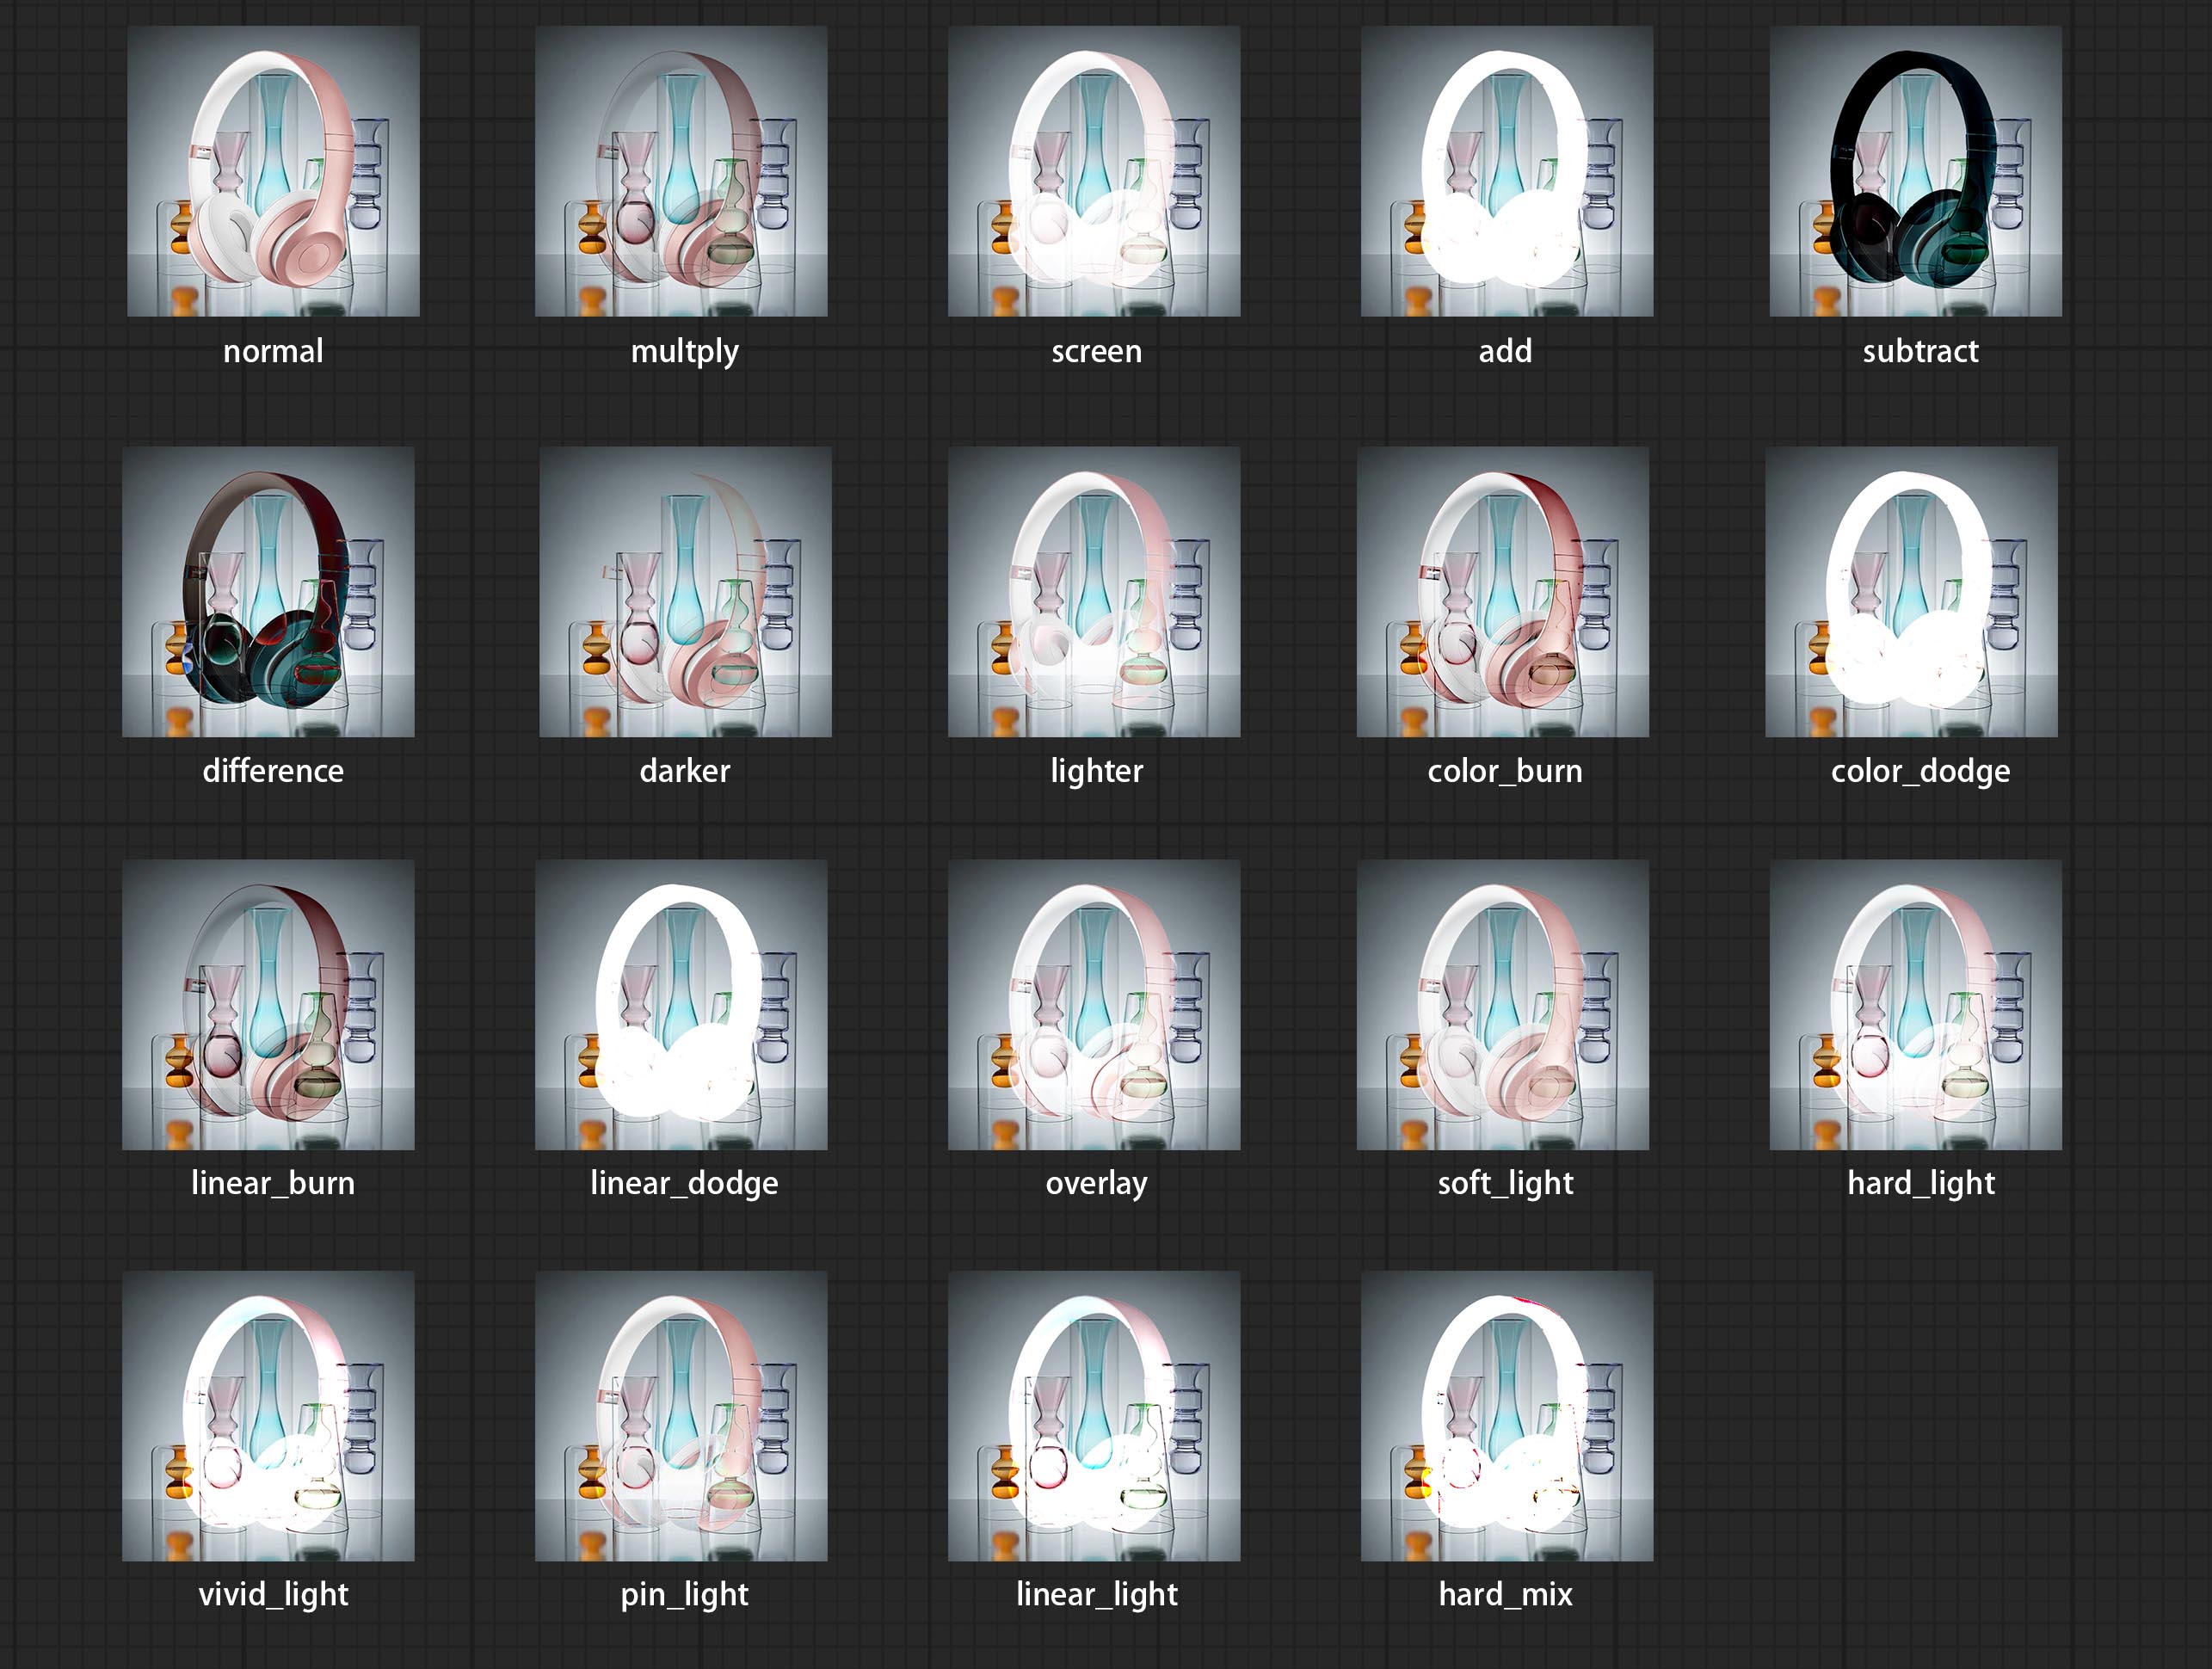
*Preview of the blend mode
3 The BlendModeV2 include normal, dissolve, darken, multiply, color burn, linear burn, darker color, lighten, screen, color dodge, linear dodge(add), lighter color, dodge, overlay, soft light, hard light, vivid light, linear light, pin light, hard mix, difference, exclusion, subtract, divide, hue, saturation, color, luminosity, grain extract, grain merge all of 30 blend modes in total.
Part of the code for BlendMode V2 is from Virtuoso Nodes for ComfyUI. Thanks to the original authors. 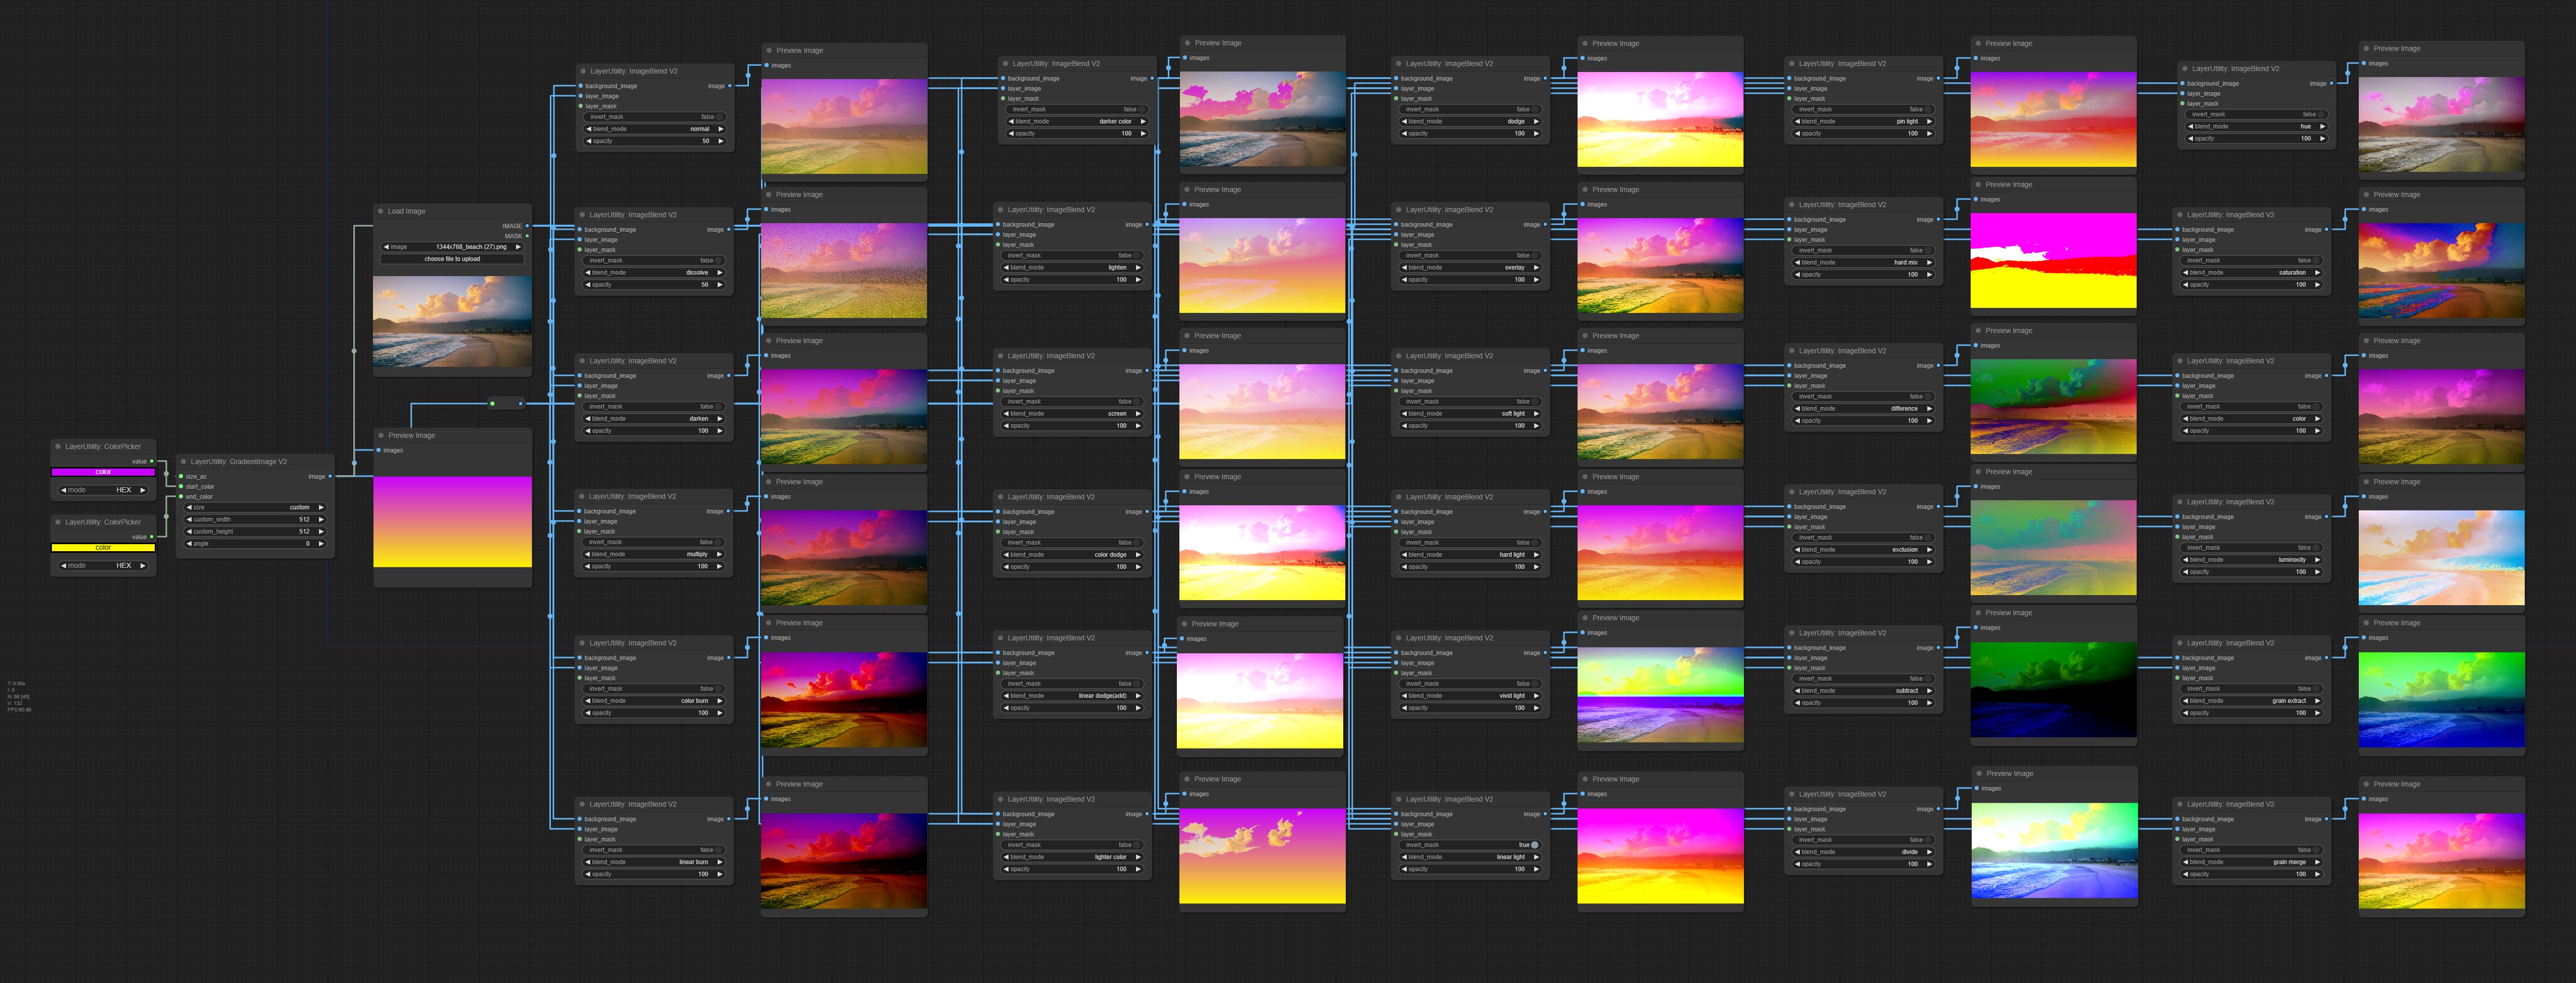
*Preview of the Blend Mode V2
4 The RGB color described by hexadecimal RGB format, like '#FA3D86'.
5 The layer_image and layer_mask must be of the same size.
Звезда
заявление
LayerStyle nodes follows the MIT license, Some of its functional code comes from other open-source projects. Thanks to the original author. If used for commercial purposes, please refer to the original project license to authorization agreement.


