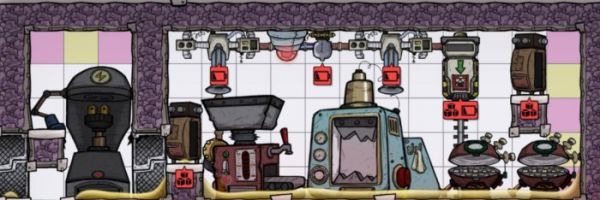
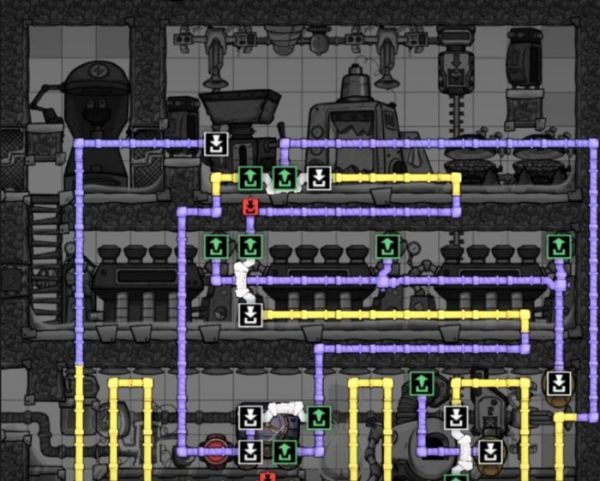
The heat production of full-speed steelmaking requires three steam engines to suppress it, while a volcanic eruption with a slightly lower volume can be suppressed by two steam engines. This means that if the heat of the metal refiner is not recovered by the module, not only will the surrounding temperature increase extremely quickly, but the construction During the process, you must pay attention to the selection of materials. You must not use the wrong steel or other materials. Later modules will pay more and more attention to temperature control. Materials are a very critical part. The first step is to build the frame; The second step is to vacuum the water pouring door; the third step is to build the building and pour water (at least one ton) into the steam room; the fourth step is to build the background building; the fifth step is the finishing work and pouring liquid.

Sharing the steps to build the steelmaking module of "Anoxic"
Why construct steelmaking module?
For steelmaking in the wild, you can temporarily obtain some steel by finding a large pool in the wild as a cooling source, but this method is unsustainable, and I recommend that you build a steelmaking module after making at least 5 tons of steel in the wild. (The steelmaking module mentioned below only requires up to 1.6 tons of steel)
Newbie friends may not have any idea about metal refiners. The mechanism of this thing is a little complicated, but to put it simply, if the metal refiner is fully powered to make steel, the average heat production will be even higher than the average heat production of a volcano in the entire cycle. Even higher!
The heat production of full-speed steelmaking requires three steam engines to suppress it, while a volcanic eruption with a slightly lower volume can be suppressed by two steam engines. This means that if the heat of the metal refiner is not recovered by the module, it will not only cause the surrounding temperature to rise rapidly (Especially some newbies also placed metal refiners near the base, which is basically equivalent to placing a volcano there), and also wasted a lot of heat that could be used to generate electricity.
Let’s not talk about the calculation content. From the conclusion, even if a villain with a mechanical attribute of 0 and no light acceleration uses a refiner with a power of up to 1200W to refine aluminum, niobium, iron, and steel, if the heat can be passed through All steam engines are recycled, and the end result is not only no electricity consumption but even a surplus of electricity!
Especially for steelmaking, the three steam engines can be fully loaded and can obtain more than 1KW of additional power. If the electronic control station is used to add a chip, more than 2KW of power can be spared, and as the villain's operation level increases and the lighting accelerates, it will further increase (the power does not increase). Change but the net surplus energy is more, energy is power times time)
If this is still a bit abstract, then open the "Colony Cycle Report" in the upper right corner, where you can see the electricity consumption and power generation (in joules) of different equipment in each cycle. At a glance, you will know that the steelmaking module can The amount of electricity produced is very considerable.

(Mainly because the module is not built, the temperature problems caused by heat and the power consumption of 1200W will cause a lot of burden)
Construction of steelmaking modules
During the construction process, you must pay attention to the selection of materials. You must not use the wrong steel or other materials. Later modules will pay more and more attention to temperature control, and materials are a very critical part.
The first step is to build the framework
It is best to choose igneous rock for insulating bricks (ceramic is better but not necessary), diamonds must be used for window bricks, and metal bricks can be used if diamonds are not available (but not lead). The overall size is 18X16, with a standard 3-story height. There is no need to stick dryboard walls, which is convenient for novices to count grids.

The second step is to vacuum the pouring door
Watergate, I suggest that it is best to choose crude oil or petroleum. Pour a little bit in each of these 3 locations, and then wipe off the excess liquid. A water gate will naturally form. It's very simple. The empty bottle container in the upper right corner can be used to pour a few more barrels, so that the upper and lower layers can be covered with oil for subsequent cooling. (Lead can be used for high load wire bonding plates)

After pouring, it will look like this. Vacuum insulation will be formed below. By the way, install the air pump to evacuate, but be careful not to evacuate the room on the upper right.

The third step is to build the building and pour water into the steam room (at least one ton)
Let’s look at the top layer first. Lead can be used as the material for the top layer, because the temperature will be controlled at around 30°C. Pay attention to build the top layer first, because this is 5 stories high, and little people can’t reach the top part. You need to build a ladder first. The top one is built. (The one next to the light is the clone motion sensor)

Since the back is out of reach, we first connect the wires, automation, and carrier rails.


Then there is the steam engine layer in the middle, which can all use lead, there is nothing to say.

Finally, there is the steam room below. Pay special attention to the materials inside! Large transformers, liquid temperature regulators, and automatic cleaners must be made of steel, glass furnaces must be made of ceramics (if you don’t have ceramics, use the kiln on the top floor to refine some now), temperature sensors and liquid pipeline temperature sensors can be made of lead, and the drain port and transportation storage The device doesn't matter.

The fourth step is to build the background building.
The first is wires. Lead can be used in wires. (If the main circuit is connected at this time, the transformer in the lower left corner will generate heat. If the module does not start up, it may be overheated and damaged. Although it can be repaired, you can also not connect power to the transformer before starting the module.)

For automation, lead can be used for signal lines, the temperature sensor is set to >135°C, and the liquid pipeline temperature sensor is first set to be greater than the maximum temperature to avoid liquid cooling startup. (This step is very important)

Transportation track, it doesn't matter how it is connected.

Finally, there is the liquid pipeline. This is the key point. It must not be modified randomly. The previous ones do not matter, but the liquid pipeline cannot be modified at all!
From easy to difficult, we first connect the drain ports of the steam engine and the glass furnace with insulated liquid pipes, preferably igneous rock (especially the section of the glass furnace).

Then there is the liquid cooling cycle that we are talking about. Friends who have read my previous issues should be familiar with it. It is still the same set of connections, but be careful not to connect the wrong or reverse pipe types and pipe bridges. Do not use lead for heat pipes. It is best to use igneous rock for heat insulating pipes. Don’t make a mistake in connecting the white port to the white port and the green port to the green port for liquid cooling. If you make a mistake, the pipe will burst.

Finally, we connect the pipe of the metal refiner, which is also the focus of the entire module, so that the coolant of the metal refiner can fully exchange heat in the steam chamber. Relying on the heat exchange between diamond bricks and heat pipes, heat can be exchanged very well even if the layout is not particularly dense. Do not use lead in heat pipes (lead may melt if used here).

The fifth step is the finishing work, pouring liquid.
First, fill the liquid cooler with liquid and contaminated water. Fill the liquid with a bridge. Do not pour it directly. Make sure that the liquid cooler is automatically disabled (or power off the liquid cooler). The liquid cooler cannot be started during the filling process. . After filling, remove the pipe bridge that fills the liquid.

Fill the metal refiner with coolant. The coolant must be "petroleum", "petroleum" must be used, "petroleum"! ! ! Don't ask me why if I filled the wrong squib. It is yellow-orange oil, not dark crude oil, nor any other liquid.
Similarly, the only difference between the bridge filling liquid and the direct filling of the refiner is that it can only store 800KG of oil. After filling, we do not dismantle the bridge first and let the villain come over and start the refiner to refine whatever it wants, so that it can be pre-filled in the pipeline. Leave 400Kg of oil, and then remove the pipeline bridge.

After everything is filled, it will probably look like this (as long as there is no oil blocked at the green port of the refiner)

In the top box, you can check metal minerals, fossils, etc. (based on your refining needs) on the left, and you can check coal and clay (based on your needs) in the box on the right. Loader ticks sand. The electronic control station generally selects lead. If there are many other metals in the future, it can be replaced with other metals.
Start the refiner first, no matter what is being refined, wait until the water in the steam chamber turns into steam, then start the liquid cooler (set the liquid pipeline temperature sensor to >30°C). Otherwise, the liquid cooler may be overheated and damaged.
At this point, the module is completed and steelmaking can be made at full speed. The maximum temperature of the steam chamber will be around 210°C.
I usually choose the specific location near the outside of the base, so that the villain can reach it quickly. Because it has been insulated, there is no need to worry about temperature issues.