first introduces the installation of node.js, and then introduces the use of node.js to build a simple web server. Finally, a simple example is used to demonstrate the implementation of data interaction between the web page and the server.
WEB server
WEB server is also called WWW server. The basic function of the WWW (World Wide Web, translated into Chinese: World Wide Web or Global Information Network) server is to provide Web information browsing services. A web server can provide documents to clients such as web browsers, can also place website files for the world to browse, and can also place data files for the world to download.
Common web server software includes Apache, Internet Information Server (Internet Information Services, IIS), etc.
Apache server: Apache server is an open source and free server software that can run on almost all computer platforms. Since Apache is open source, everyone can participate in the development of new features and continuously improve the Apache server. Apache HTTP Server (Apache for short) is an open source web page of the Apache Software Foundation. It is a modular server that can run on almost all widely used computer platforms (that is, it supports multiple platforms). It belongs to the application server.
IIS server: IIS server is Microsoft's server that allows IIS to publish trusted web servers on a public intranet or Internet. IIS can only be used under Microsoft's Windows operating system.
Without relying on the web service software mentioned earlier, you can also build a web server using Node.js.
What is Node.js ?
Simply put, Node.js is an open source and cross-platform server-side JavaScript runtime environment that allows JavaScript to be used as the backend.
Installing Node.js on Windows
To use Node.js you need to install it.
To use Node.js you need to install it. First go to the nodejs official website Node.js or go to the Chinese website to download | Node.js Chinese website download
LTS stands for "long-term support" and it is recommended that most users use this version. What I downloaded is node-v14.18.1-x64.msi.
Just double-click the downloaded installation package and install it directly. You can customize the path. Environment variables will be automatically configured during installation (by default, the installation path will be automatically added to the path environment variable). To take care of novices, the installation process is demonstrated in detail below.
Double-click the downloaded installation package to install, as shown below

Click the Next button and the following interface will appear:

Check the Accept Agreement option and click the next button. The following interface will appear:

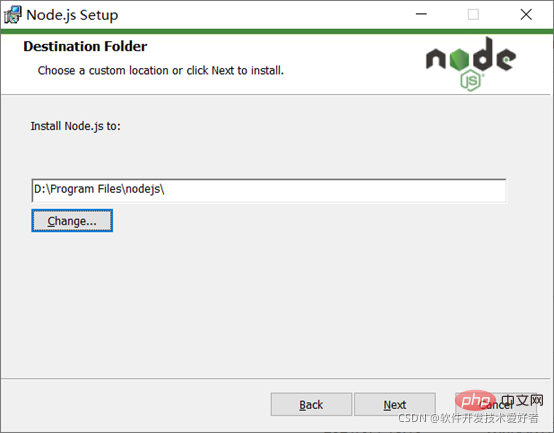
The default installation directory of Node.js is "C:Program Filesnodejs". You can modify the directory (I changed the drive letter D), and then click the next button. The following interface will appear:

You can click on the tree icon node to select the installation mode you need. Keep the default here and click the next button. The following interface will appear:

Click the checkbox if you want to install tools to compile native modules. Usually, there is no need to install these tools, so there is no need to check this box. Click the next button and the following interface will appear:

Click the Install button to start installing Node.js, and the following interface will appear:

Please wait a moment, the following interface will appear:

At this point, click the Finish button to exit the setup wizard.
The directory after installation is as shown below:

You will see npm.cmd in the directory, what is it?
When installing Node.js, npm will be automatically installed at the same time. It is a node package (module) management tool that can solve many problems in Node.js code deployment. Common usage scenarios include the following:
Allow users to download from the NPM server written by others. third-party packages for local use.
Allows users to download and install command line programs written by others from the NPM server for local use.
Allows users to upload packages or command line programs they write to the NPM server for others to use.
If you install an old version of npm, you can easily upgrade it through the npm command. For Windows systems, use the following command:
npm install npm -g
Use the npm package management tool to install third-party libraries (npm packages). There are two types Installation method: global installation and local installation:
Judging from the command line, the difference is only whether there is -g, such as
npm install X # Partial (local) installation downloads the module to the directory where the current command line is located. You may encounter the error "'X' is not an internal or external command or operable program" error.
npm install X -g # Global installation, can be used directly in the command line.
Check whether Node.js and npm are installed correctly.
Open the run with win+r and enter cmd to enter the command line interface. Then enter the node -v and npm -v commands to view the node version number and npm version number. See picture below:

The version number is displayed correctly, OK!
Use node.js to build a simple web server.
Create a file called myServer.js in the directory of your project (here, take the D:test folder as an example), and write the following code:
var http = require('http ');
http.createServer(function (request, response) {
    //Send HTTP header //HTTP status value: 200: OK
    // Content type: text/plain. And use charset=UTF-8 to solve the problem of garbled Chinese output response.writeHead(200, {'Content-Type': 'text/plain; charset=UTF-8'});

    //The next sentence is to send response data response.end('Hello World! This is a simple web server test.n');
}).listen(8888);
//The terminal prints the following information console.log('Server running at http://127.0.0.1:8888/');
Note: var http = require("http"); Use the require command to load the http module, and Assign the instantiated HTTP value to the variable http.
When you write a .js program, you need to run it through node.js. In CMD, first switch to the directory where the program is written, and then use node XXX.js to start the service. If you do not switch the path first, then Use node pathXXX.js to start the service. Then enter the corresponding listening IP address and port number in the browser. The port number here can be larger. Because it is a loopback test, 127.0.0.1 is used as the test IP.
Use node D:test foldermyServer.js, see the picture below:

The simple example ran successfully. This actually uses node.js to build a server, then listens to the access event of the port, and finally responds accordingly. It should be pointed out that when we close CMD or press CTRL+C, the service It's closed.
Now, open the browser and visit http://127.0.0.1:8888/, you will see the following web page:

Success!
Example of data interaction between web page and server
Now we will use a simple example to demonstrate the implementation of data interaction between web page and server.
This example has two parts: server code and web page code.
The server code is as follows:
//require represents the introduction package, and the introduction package refers to a special function that refers to itself var http = require("http");
 var url = require("url");
 var server = http.createServer(function(req,res){
    //Get the query part. Since true is written, it is an object var queryObj = url.parse(req.url,true).query;
     var name = queryObj.name;
     var age = queryObj.age;
     var sex = queryObj.sex;
     res.writeHead(200,{"Content-Type":"text/html;charset=UTF-8"});
     res.end("The server received the form request" + name + age + sex);
 });

 //Run the server and listen to port 3000 (the port number can be changed at will)
 server.listen(3000,"127.0.0.1");

 //The terminal prints the following information console.log('Server running at http://127.0.0.1:3000/')
and saves the file named server2.js in the directory of the project (here, take the D:test folder as an example)
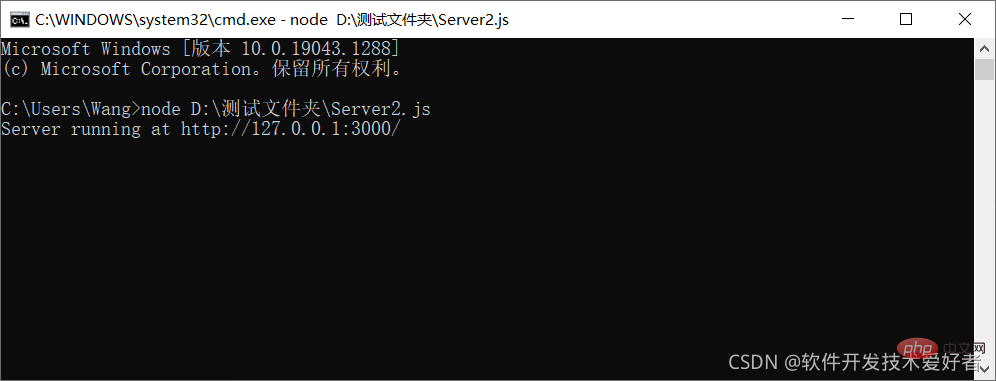
Run using node D:test folderServer2.js:

The web page code is as follows:
<!DOCTYPE html>
  <html>
  <head>
      <meta charset="UTF-8">
      <title>Interacting with the server webpage</title>
  </head>
  <body>
      <form action="http://127.0.0.1:3000/" method="GET">
          Name:
          <input type="text" name="name" /> <br />
         age:
         <input type="text" name="age" /> <br />
         <input type="radio" name="sex" value="Male"/> Male<input type="radio" name="sex" value="Female"/> Female<br />
         <input type="submit">
     </form>
 </body>
 </html>
Save the file name as Example of Interaction with the Server.html and run it with the browser:

In particular, the example is relatively simple, especially the back-end simplifies the data processing. In actual application systems, the back-end generally uses a database to save data. This is mainly to allow novices to have an intuitive and easy-to-understand perceptual understanding. There is an overall overview to help you get started quickly. With this, there is a foundation for in-depth learning.
Recommended: "Node.js Video Tutorial"
The above is a graphic and textual explanation of how to build a web server with Node.js. For more information, please pay attention to other related articles on the PHP Chinese website!
