How to play the tutorial level of "Gunfire Reborn"? There is only one teaching level, but in this level, players will face three battles. Below, the editor will bring an analysis of the teaching level of "Rebirth", let's take a look.
Part 1:
After a simple jumping tutorial, the player comes to a relatively narrow alley. A remote enemy is spawned in front of here, and there is a boulder to the left of the enemy.
The enemy models in "Gunfire Reborn" are mostly three-headed body templates, divided into knife-wielding soldiers, spear-wielding soldiers and long-range soldiers. Knife-wielding soldiers and spear-wielding soldiers are melee soldiers. When the player is in their field of vision, they will immediately approach the player and attack. Remote soldiers will only attack when the player is within their field of vision. When the player disappears from the field of view, they will stop attacking and stay still in place. When the player engages in combat, the remote enemy will slowly move left and right.
Players start with a pistol and a shield. The shield can withstand 50 points of damage from enemies. The enemy's damage will first be absorbed by the shield. When the player receives more than 50 points of damage, the shield will be broken and the player's HP will be deducted (HP will not be restored over time). When the shield is broken for a period of time, the shield will be recharged, and the restored shield value can immediately withstand damage. After players pass the tutorial level, they can unlock the sprint function: they can sprint forward a short distance immediately. This skill requires a cooling time.
After the cutscene is played, a remote enemy will be spawned about a sprint distance in front of the player to face the player, and the battle will begin immediately.
For players, in such a narrow terrain, facing long-range enemies that can only move laterally, players only need to pay attention to their own movement (left and right) and make sure their bullets hit the enemy as much as possible. There is no need to worry about being quickly approached by melee soldiers or being forced to move in all directions and other complex operations, which allows players to initially adapt to the game's shooting system.
Part 2:
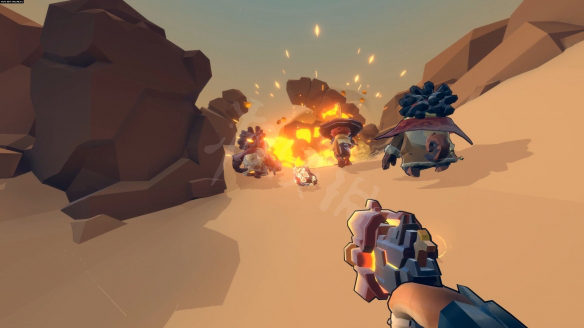
After a street battle, players arrive at a combat area consisting of an ascending staircase - a large platform.
The map will generate three enemies, two melee soldiers and one remote soldier. Melee soldier A is closer to the player and against the wall. Melee soldier B is in the center of the player's field of view and farther away from the player. The remote soldier is the farthest from the player. The two melee soldiers will rush straight towards the player when they see it, and the long-range soldiers will shoot the player in place. Compared with the battle in Part 1, a blue shield is added to the enemy's health bar. This shield can withstand the player's damage, and the enemy's shield value cannot be restored to the same level as the player.
When the player enters the battle, the system pops up a "Press E to use skill" window. The player intuitively can easily throw the skill to melee soldier A or B and kill him quickly. In addition, when melee soldiers A and B approach the player, their models will become larger in the player's field of vision, and the player's firearm hit rate and headshot rate will increase linearly.
Through this level, players can have a basic concept of the attack logic of melee and long-range enemies, allowing players to understand the role of the character's active skills, and further allowing players to become familiar with the shooting logic in the depth direction.
The following is a personal subjective guess: when a melee soldier moves towards the player, the player will intuitively easily have the idea of "I want to go back a little bit to get away from this guy rushing towards me" and move back. The consequences of this are: due to the slope, the long-range soldiers in the distance lose the player's field of vision and the bullets cannot hit the player. The player can finish dealing with the melee soldiers in front of him and then move forward to deal with the long-range soldiers. Hints at the concept of player "bunker".
Part 3:
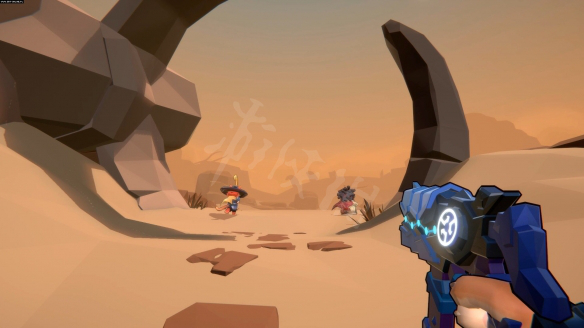
Players walk through the ramp and onto the platform above. The terrain of this area is divided into narrow channels and circular areas, and the player's initial position is in the center of the two obstacles on the left and right.
The system generates two melee soldiers and three ranged soldiers. Melee Soldier B is the closest to the player, about two sprint distances away. The remaining four soldiers are all located further away. After entering the battle, melee soldiers A and B will immediately rush to the player, while the other long-range soldiers shoot from a distance.
This Part will test the players' achievements in the previous teaching part. Compared with the first two parts, in addition to guiding players to familiarize themselves with the horizontal and vertical shooting of the game, players in the third part of this level will face greater pressure from long-range enemies. Players need to make more decisions and rely on themselves when facing enemies. Fighting with superior firepower? Or should you hide behind the bunker and wait until you have changed your bullets before coming out to deal with the enemy?
Taking a comprehensive look at Part 3, this is a small level that allows players to master Part 1 and Part 2, allowing players to familiarize themselves with how to fight in more complex combat scenes.
The above is the complete analysis of the teaching levels of "Gunfire Reborn". Friends who want to know more related strategies can continue to pay attention to this site. The latest and most complete strategies will be pushed to you every day. Don't miss it.