This section explains
Creation of ASP.NET MVC database and addition of database data.To learn ASP.NET MVC, we will build an Internet application.
Part 6: Add the database.
Visual Web Developer comes with a free SQL database called SQL Server Compact.
The database required for this tutorial can be created in a few simple steps:
Right-click the App_Data folder in the Solution Explorer window
Select Add, New Item
Select SQL Server Compact Local Database *
Name the database Movies.sdf
Click the Add button
* If SQL Server Compact Local Database is not among the options, you have not installed SQL Server Compac on your computer. Please install via the following link: SQL Server Compact
Visual Web Developer automatically creates the database in the App_Data folder.
Note: This tutorial requires you to have some basic knowledge about SQL databases. If you want to learn this topic first, please visit our SQL tutorial.
Double-click the Movies.sdf file in the App_Data folder and the Database Explorer window will open.
To create a new table in the database, right-click the Tables folder and select Create Table .
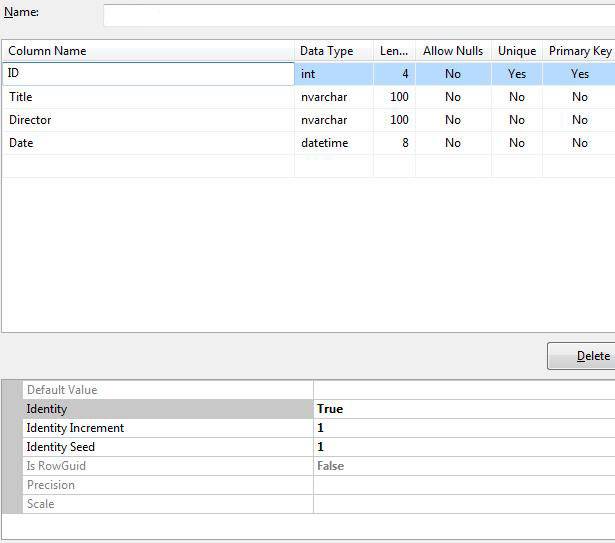
Create columns like this:
| List | type | Whether Null is allowed |
|---|---|---|
| ID | int (primary key) | No |
| Title | nvarchar(100) | No |
| Director | nvarchar(100) | No |
| Date | datetime | No |
Explanation of columns:
ID is an integer (full number) used to identify each record in the table.
Title is a 100-character text column used to store the name of the movie.
Director is a 100-character text column that stores the director's name.
Date is a date column used to store the release date of the movie.
After creating the above columns, you must set the ID column as the primary key (record identifier) of the table. To do this, click on the column name (ID) and select Primary Key . In the Column Properties window, set the Identity property to True :

When you have created the table columns, save the table and name it MovieDBs .
Note:
We intentionally named the table "MovieDBs" (ending with s). In the next chapter, you will see "MovieDB" for the data model. This may seem a bit strange, but this naming convention ensures that the controller is connected to the database table, and you must use it.
You can use Visual Web Developer to add some test records to the movie database.
Double-click the Movies.sdf file in the App_Data folder.
Right-click the MovieDBs table in the Database Explorer window and select Show Table Data .
Add some records:
| ID | Title | Director | Date |
|---|---|---|---|
| 1 | Psycho | Alfred Hitchcock | 01.01.1960 |
| 2 | La Dolce Vita | Federico Fellini | 01.01.1960 |
Note: The ID column updates automatically and you do not need to edit it.
Add the following element to the <connectionStrings> element in your Web.config file:
<add name="MovieDBContext" connectionString="Data Source=|DataDirectory|Movies.sdf" providerName="System.Data.SqlServerCe.4.0"/>