There may be many Genshin Impact students who still don’t know the list of decks to clear the level of Genshin Forge. The following is the "List of decks to clear the level of Genshin Forge" recommended by the editor of Sourcecode.com. Children who have these questions should read below. Take a look, maybe it can help everyone.
The first level: canthus and chewing teeth
The first level is very simple. You only need to bring a Noelle to set up a shield for yourself and you will basically avoid overturning. Skip it here.
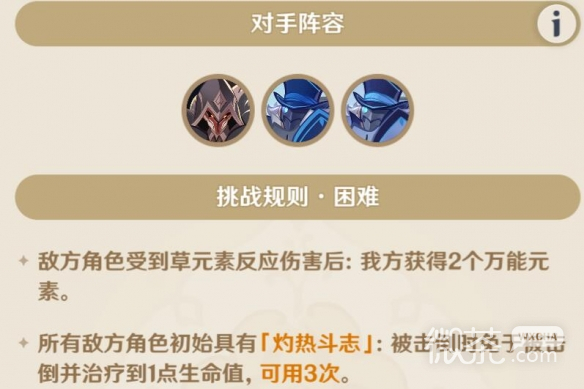
Level 2: Frost Blade Clash
On the higher difficulty of the second level, you'll need to use elemental bursts a lot to deal with the level's shield mechanic.

deck building

Since the level requires an extremely high frequency of elemental bursts, we considered choosing a Thunder General + two characters whose elemental bursts can provide high damage output.
Here we choose Keqing, who has extremely high total damage, and Kaia, who can provide a large amount of ice elements to adhere to and trigger superconducting reactions.
Operation process
The release order of elemental burst is generally Thunder General - Kaiya - Keqing.
Before other characters release elemental bursts, it is necessary to install an insulator head on the Thunder General/an exile head on the character who releases elemental bursts to ensure that the elemental bursts can cycle.
The Exile head should be installed first on Kaia, and then on Keqing.
Keqing needs to obtain the last bit of energy through Kaia's Exile Head/Double Thunder Resonance/Tian Tiezui/attack skills.
Level 3: Heavy Armor Torrent
In the higher difficulty of the third level, enemies have a considerable number of resurrections.
At the same time, the level effect provides a universal element when triggering the grass reaction.
Obviously, Nacida is the best choice to deal with this level:
First of all, it is the grass type, which can trigger grass element reactions and trigger the effect of providing universal elements;
Then, after attaching [Yunzhong Seal] to all enemies, every time [Yunzhong Seal] is triggered, all enemies will directly lose one resurrection count. This allows us to quickly clear the enemy's number of resurrections and achieve victory quickly.
deck building

Operation process
In the first round, let the princess hang an Oz to hang mines on the enemy, then click on a few support cards (preferably cards that store dice, such as Big Paimon, if you can't draw support, you can choose to restart directly), switch to Naxi Da, pass.
In the second round, Nasida used the 5-cost combat skill to apply Yun Seed, and cut into Tinari before the enemy could cut into Ice Fat.
From now on, you only need to pay attention to replenishing the number of accumulation seals, and at the same time pay more attention to [enemy intention]. Before the enemy switches to the character of the corresponding element, switch to the character with the corresponding element attached to him (generally speaking, the princess-fire-debt collector, Nasida-water -Water Fat, Tinari-Ice-Ice Fat), just to prevent the enemy from reacting with elements.
Level 4: The Front of the Mushrooms

There are a lot of enemies in this level, and extra dice are provided after switching characters.
It's obviously very suitable for Sword Demon to play superconductor.
deck building

Operation process
In the first round, Sword Demon put up the talent card, summoned the wind clone, and cut the princess into Oz. At the same time, hang support cards as much as possible.
In the second round, switch back to Sword Demon, summon the ice clone, and then use any method (one basic attack/support card/action card) to fill up the elemental burst, and click on the elemental burst. If there are still dice left, any character can make another attack.
At this time, you can stably ensure that the summoned object can trigger three superconducting reactions after the round ends, reducing the enemy's health to near the killing line. Then be careful not to let the enemy trigger elemental reactions, and slowly clean the enemy.
Level 5: The thunder of the heel
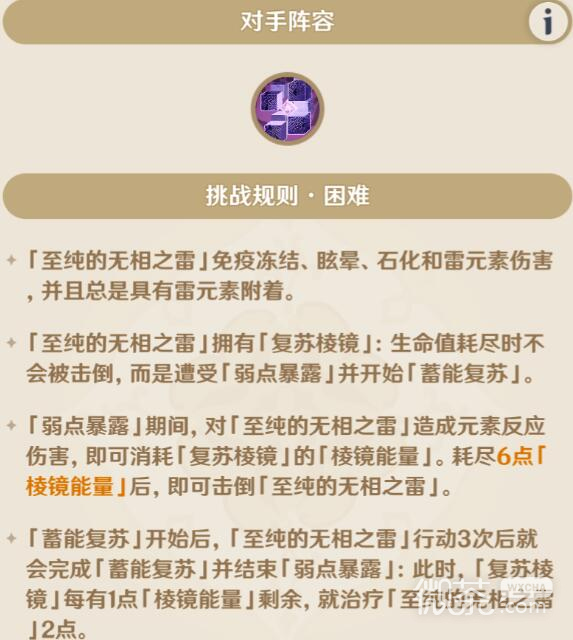
This boss has a very high blood volume for a single target, and can also increase the cost of all enemies.
On the highest difficulty level, 6 elemental reactions are required to solve the resurrection mechanism, and the boss will be resurrected after releasing three skills in the [Weakness Exposed] state, so you need to clear your health again before you can continue to deal with the resurrection mechanism.
Starting from the second round, the boss will release two skills in one round. In other words, the boss will be resurrected in one and a half turns.
Therefore, we'd better save the dice as much as possible for the shield-breaking phase of the last two turns, and give our team as much as possible in the first few turns to stack the effect of reducing skill cost consumption/production elemental dice.
deck building

In the entire deck, only Noelle can release skills, and the remaining two are just tools for resonance and camp.
The core strategy of the deck is to use Bell Sword + Crystal Shield + Double Rock Resonance + Grilled Mushroom Pizza to ensure that Noel will not die suddenly, and then bring as many cards as possible that can allow Noel to release more skills in a single round.
Of course, the bell sword can also be replaced with a ritual sword, and the effect will be similar. After switching to the ritual sword, the blood-pressing ability has been reduced (because you need to use elemental combat skills to shield), and the shield-breaking killing ability has slightly increased (using elemental combat skills to shield can return 1 elemental dice).
Operation process
Round 1: If there is a 0-cost support card, play it out first, then put the instructor head + bell sword on Noel and open the shield. If there is Grilled Mushroom Pizza/Guardian Forest, use the remaining 1 mana. If not, just go to the next turn.
Second round: If there is a 0-cost support card, play it out first, then use Noelle's elemental combat skills + elemental burst, and then use basic attacks to suppress the blood. Support/action cards that provide dice for subsequent rounds (Grand Paimon/Parametric Transformer/Rock and Contract, etc.) can be shot this round.
Round 3: If there is a 0-fee support card, play it out first, then continue to attack to suppress the blood + continue to collect dice. Be careful not to hit the boss [weakness exposed].
Round 4: Open up and hit the boss into [Weakness Exposed], then eat peppermint rolls and use normal attacks to slash [Prism Energy].
Round 5: Continue the basic attack and take away the boss. Under the above process, even if the boss is resurrected, he will usually have only 2 points of [Prism Energy] left after he is resurrected, and 8 dice + the instructor's head are enough to support you to make 4 cuts, and then consider other cost rebate effects. There is no problem in taking away the Boss stably.
That’s it for summarizing the shared list of “Genshin Impact” Forge Realm training pass deck groups. I hope this guide content will be helpful to all players when playing the game. If you have other problems, please continue to pay attention to the follow-up of this site. Update~