The reason why I recommend doing Toroha's Legacy first is because if you don't complete this series of quests, it will keep raining all around Inazuma's Narukami Island. When it rains, monsters such as the Ice Warlock, the Treasure Thieves who throw ice bottles, and the Ice Fools will keep freezing you, which is very annoying.
And during thunderstorms, if you don't protect yourself, you will be struck to death by lightning. (One thing to say, if you have never been struck by lightning, it is recommended that you take advantage of the fact that this series of tasks is not completed and quickly find a place with heavy rain to be struck by lightning to unlock the achievement. If you leave the range of this thunderstorm, you can only By the way, those thundering trees on the roadside don’t count, they have to be thunder.)
When I wrote "The Konta Incident" for travelers before, I said that the Konta Incident was just a nine-ring mission, and everyone was already driven crazy by the game process of more than three hours. Then everyone will cry very loudly when the next mission, which often involves more than ten rings, comes.
No, here comes the legacy of the Toroyu clan and the extremely lengthy Tata Taosha series.
First, we have to go to the upper right corner of Tengdou Village (zhài) and talk to a worker named "梶".

The point is not Kaji, he is just introducing us to the plot. The point is that there is a town behind Kaji. This town object is like a lantern. is the core of this mission.

To activate each town object, two props are required, one is a diamond-shaped stone and the other is a round bead.

I'm going to spoil it right away: this bead must be covered by a huge blue cover next to this town object. There must be a set of mechanisms next to this stone waiting for you to solve it.
Then, next to this town object, there is the first set of stones and beads to unlock it. If you turn around and look behind you, you will see a very huge one, which is not the same as the light effect rendering next to it. Bright blue hood.

On the edge of this cover, there will be many mechanisms. These mechanisms are used to unlock this cover.

We don’t want to look at the “Goyinpanzuo” or the “Learning from Lei Cheng”, so I’ll tell you directly,
↑In the picture, the one on the left can fire cannonballs. You can hit it with any attack, and it will fire cannonballs. If its cannonballs hit the blue cover, the cover will break.
The device on the right is used to reflect artillery shells. Can be used to adjust the angle.
Then, let’s look directly at the devices surrounding this first town object.

The first one is to launch. You click "Adjust Steering" three times and do not click "Adjust Elevation". (If you make a mistake, you can log in again, or you can try attacking the launcher yourself to see if it can be launched to the reflection device I marked in the picture.)
At this time, I recommend you bring an archer. Even if you stand far away, if you shoot an arrow, you will know whether your adjustment is correct.
After you are sure that you can launch to the second one, go to the second position.
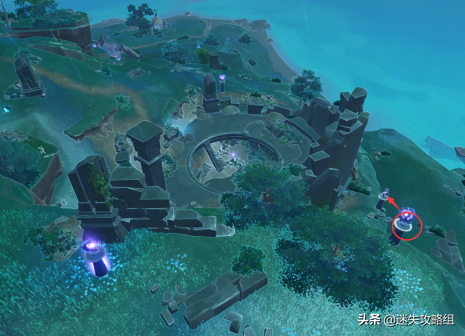
The second one is reflective, so if you want to test whether you can hit the third one, you have to shoot in the direction of the first one.
Click three times to adjust the steering and click "Adjust Elevation" once. Then, you shoot an arrow at the first mechanism and see if it can be reflected to the third mechanism. If not, exit and log in again, or look up to see if the pointer above is pointing to the third mechanism.

Look up at the top, where the pointer points is where the bullet flew.
Then, No. 3 and No. 4, don't touch them.
Elevation and steering don't move.

Just shoot an arrow directly at the mechanism that shoots bullets, and the mechanism will activate. ↓

Then the protective cover of this mechanism will open. Before flying down, look carefully at the location I marked ↓.
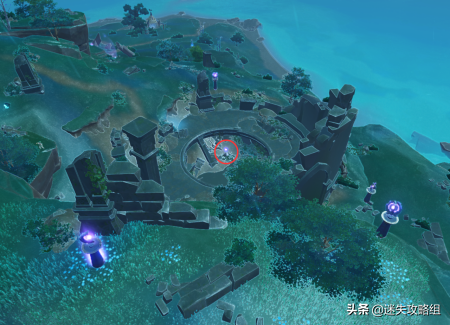
There is a purple bead suspended in mid-air here. This is the bead we are looking for.

Be careful when flying down, because it is suspended in the air, and if you don't touch it in the air, you have to do it again, which is very troublesome. (Personal test, Wendy can touch it from the ground by flying on Zhongli's pillar.)
Then, it fell to the ground. There was a warrior on the ground. Don't worry about him. The stone was next to the warrior.

Where the stones are glowing purple on the ground, just pick them up.
Then, look around and you'll see a trap on the side. After clicking on the mechanism, the door will open. After entering, there will be a treasure box, thunder seeds and a wall.

After taking the treasure chest, you can leave without having to carry the thunder seeds through the wall.
There is a river in front of you. If you stand next to this purple river, you will lose blood without thunder seeds.

Finally, let’s briefly talk about the plot:
It can be seen from the map that there is a huge snake bone at this place.
This huge snake is called the ghost god by the residents (it means "sneaky" ghost, not worshiped worship). When we went through the main mission of Inazuma before, we can learn from the mouth of the witch that this big snake is not a ghost. Not a bad snake. It taught people how to farm and separated the corals that were their own source of power, helping the Inazuma people at that time establish the current Coral Palace area.
Originally, the God of Evil was afraid of the power of the God of Thunder, and fled with his people. But later, the evil god was bewitched by his own people and led them to invade other islands of Inazuma. The God of Thunder got angry and chopped the big snake to death here with "Wu Xiang's knife". The power of the big snake was suppressed by these counterfeit objects, and it was originally unable to make any waves.
It wasn't until the battle between the Coral Palace people and Inazuma's shogunate army that the surrounding town buildings were destroyed that heavy rain began to fall in this area. The war has made it difficult for the surrounding residents to survive, but the current bad weather has given them a chance to breathe. Therefore, it is not a good idea for us to let the weather recover before Inazuma's war is over.
At this time, the strategy for the second part of the legacy of Yuanluyu Clan, if you have not completed "Suppressing the first town object around Tengdou Village (zhài)", please refer to the first ring mission.
Keep your spirits up, this is only the second round.
After lighting up the first town object in the first round of missions, return to Kaji and talk to him.
Kaji would say, "I'll leave the remaining two towns to you." This reflects one of the annoying aspects of Inazuma's mission, including the previous Konta incident. It doesn't tell you where the mission is or how to complete it, it just gives you a hint. It's just as annoying as when your mother asked you "think about the bad things you did" when you were a kid.
I'll just say it straight, after talking to Kaji, we go to the "Head of the Snake God". (Look for it directly on the map. In short, these missions will not leave the island.)

The town object is almost at the location shown in the picture. I really can't narrow it down anymore. You can look for it on the slope, which is the shrine-like pavilion. (Please remember this location, we will come three times.)

After finding this Narukami Pillar, you still need to put a stone and a bead inside it. These two things are lost, so now you need to open your elemental vision and start looking for this stone and bead around.

There is a crumpled note on the side of the road. If you are interested, you can read it.
Follow the trajectory of this elemental vision and keep going forward. In a few steps you will see the entrance to an underground palace.

Don't jump right in!
Don't jump right in!
Don't jump right in!
Let me just say it straight, there is an electric, purple river down here. It will take at least seven days to complete this river task (I will talk about how to complete it later). When you complete this branch line, you will most likely not have completed the river-related tasks. (The specific method is at the end of the previous mission. If you take the thunder seeds through the wall outside the underground palace and find that the river is not purple, then you can jump around in this cycle)
You should first keep an eye on the location of the thunder barrier below, and then float down slowly. The thunder seeds are right next to the entrance to this underground palace. You can find them by just looking for them in the grass.
Jump directly and you will find that the material of this wall has no code. Anyway, it is "impossible to climb up". In the end, you will be electrocuted alive in a river full of thunder elements. (Lessons of blood↓)

After you enter the barrier with the thunder seeds, you will find a mechanism that opens the door. After activating this mechanism, the river full of thunder elements will disappear.

After the water level drops, there will be stairs going down behind you, just follow the stairs.

At this time, as shown in the picture, the rightmost entrance is blocked by a fence. ↑
We will go to the ground, then follow the stairs all the way down, and we will find a mechanism.

There will be three annoying mobs in front of this mechanism. The method I taught you before is still the same. If you catch one and beat it, kill each one and count them as one. Then let's solve this mechanism.
Note that it is very likely that you will hit these mechanisms while fighting mobs. It doesn't matter, no matter what kind of monster you make it into, theoretically there are only 3x3x3 possibilities, so you can definitely solve this mechanism within twenty-seven times. (I directly asked Zhongli to erect a pillar between these three mechanisms, let the pillar hit randomly, and then it was unlocked.)
Pay attention, at this time, behind you,
A treasure box will be refreshed, and you just need to continue moving forward in the direction pointed by the treasure box.

After taking the treasure chest, jump down the pit. You can jump as you like, there's nothing strange underneath.
After going down, you will see a fairy (and a bunch of slimes). If you just follow the fairy, you will go in the right direction. (There is a saying that this underground palace is just a one-way street, and a fairy is hired to guide the way. MiHoYo somewhat underestimates us experienced travelers.)

There is an obelisk on the left that needs thunder elements to light up. Light it up. There is a stone in the red circle in the middle. It is a stone used for town objects. Remember to take it away. There is a thunder seed on the right. After picking up the thunder seed, you can go up directly without having to climb up.
There are also fairies who lead the way, remember to send them back.
Note that after you use thunder seeds to come out, the exit is on the hillside. There are a bunch of ice hill shooters waiting for you in this place. Because it was a thunderstorm, you could easily get frozen. Just be careful.
Then you climb to the top along the hillside behind you, and you will return to the position of the Narukami Pillar. Follow the position of my arrow and we will find the beads. (If you can't find the location, you can open the elemental vision again. Anyway, there are two directions, one is to return to the entrance of the underground palace you just entered, and the other is to go to the location of the big blue cover.)

After some distance, you can see the decryption pillar.
I'll show you the results directly, and then tell you how to deal with these columns one by one based on the results (the number of columns has increased).

The first is this pillar that fires bullets. (You can tell whether it can be fired or not. You can’t see the bullets, but you can hear the biu biu biu sound from the BGM.)
Turn the steering once and don't change the elevation angle. (If your hands get messy soon, log in again.)
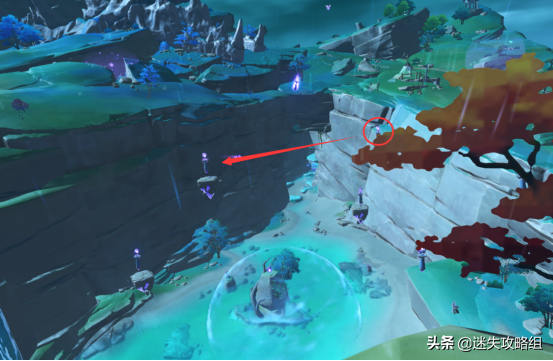
↑The circled pillar No. 2 rotates once and does not change the elevation angle.

No. 3, no movement of elevation or steering.

No. 4, don’t move the steering, move the elevation once.

No. 5, no steering, no elevation.

No. 6, move the steering once, but don’t move the elevation.

No. 7, move the steering once, but don’t move the elevation.
If you have done all the above steps correctly, you should now be able to see the ejection animations of these seven mechanisms. If you didn't get it right, check for the gaps and fill them in. Or log in again and start from scratch.
Then in the middle position, after you take away the bead, you can go back to the pillar at the beginning and deliver it.

Deliver two props.

Then, thunderstorms in this area will lift.

At this time, if you have not completed the strategy for the third part of Toro Yu's legacy, "Suppressing the first object around Tengdou Village (zhài)" and "Second object at the head of the Snake God", Please refer to the previous strategies for the first and second rings.
The third ring task is the longest one. As before, I will use the final result as a guide to help you complete this ring.
From the previous few links, everyone can feel that my words seem to be a sentence, adjusting a certain angle. But in fact, you have to climb up and down, and it takes more than ten minutes to complete what I have said in a few sentences.
I’m not trying to tell you that this part is easier.
What I want to say is, if you need to go to the toilet, go to the toilet quickly. This part will last forever.
First, we have to come to the Snake Bone Mine. (Just look for the snake bone mine on the big map)

The Narukami Pillar in this place is at the bottom of these puzzle-solving pillars, so this time we don't have to run around, we need to fly around.

The point is not the Narukami Pillar that I have lit up, but the Thunder Seed that I have circled. After this thunder seed got close, it flew into the air. The placement of the mechanisms in the Snake Bone Mine can be described as "disorganized". So, once you find that you have failed to follow my description and have placed it in the wrong direction, don't try to fly up, just fall to the bottom, use this thunder seed to fly into the air, and adjust while watching in the air. .
Without further ado, let’s go directly to the steps↓
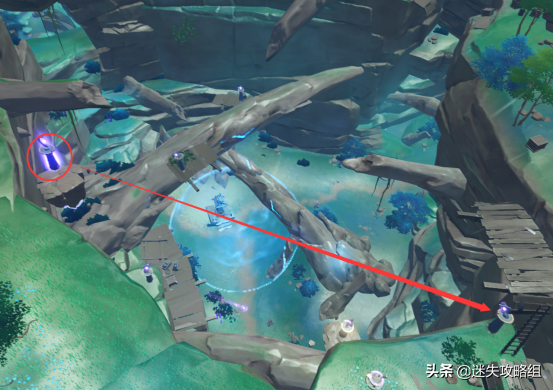
First, we need to find the position where the bullet is fired, and then turn the steering twice without changing the elevation angle.
(Beside the pillar that fires bullets, you will meet a child named "Changji". I will make a special issue to talk about his three-ring mission in the future. Now you focus on dealing with the mechanism in front of you.)

The second pillar does not move, but rotates once in elevation. (let it go down)

The third pillar does not move in direction or elevation.

For the fourth pillar, adjust the steering three times and the elevation once.

Fifth, do not adjust the steering or elevation angle.

The bottom one, when using the bird's-eye view to do the strategy, you can't see this pillar at all. Just remember, there are only two wooden boxes next to this pillar.
The sixth pillar at this position adjusts the steering three times and does not adjust the elevation angle.

Seventh, adjust a steering angle and an elevation angle.
In this way, the cover in the middle will open. (It still sounds very simple, but to adjust so many pillars in a thunderstorm, I estimate that you have been brushing for almost twenty minutes now. Don’t worry, it’s only half of the process.)
After landing, you directly open the elemental vision. Elemental vision will take you into ravines within ravines.

This path is very, very long, and there are no fairies or monsters on the road. You can only find this way by opening elemental vision all the way. (You will encounter a group of slimes along the way, and a pile of stones that can be broken open, with a small treasure chest underneath. If the description is correct, then you are basically on the right track.)
Eventually, you'll come to a thunder barrier with a thunder mage blocking the thunder seeds.

Note here that this Thunder Mage must be defeated. After you defeat it, you can rely on this Thunder Seed to pass through the barrier. However, this bead is suspended in mid-air. If you don't have a combination like Wendy, Manyo, Zhongli + Albedo to create a character that can rise up to the bead, you can just climb up the hillside and fly into the barrier from the hillside. (During this period, remember to pay attention to whether the thunder seeds are still on your body. After all, there is a time limit.)
After you get the beads, three Abyss Mages will pop out. If you don't want to fight them, just walk away. (If you are very vindictive, then beat them to death.)
Then, we came to the teleportation point next to the Golem Sword Demon. Fly directly from the transfer point in the direction of the Demonic Sword Demon, past the Demonic Sword Demon, and find a Thunder Ji.

Just follow this direction and float slowly.
The position I drew the circle is the head of the Demonic Sword Demon. Follow this direction and search around the Demonic Sword Demon, and you will see a deep pit going down (Don’t jump! Don’t jump! Don’t jump!)

From a low altitude, you can see this thunder pole, which is at this location. (Don’t jump! Don’t jump! Don’t jump! If you jump, you will not only miss the stone we are looking for, but you will also fall to death.)
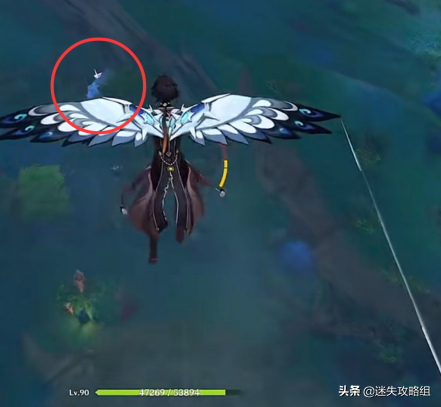
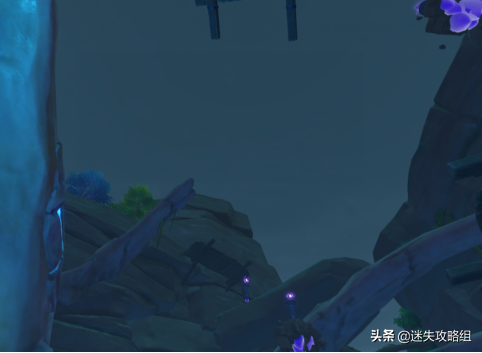
After slowly falling from the cave entrance, you will start to pay attention to the surrounding rock walls. There is a thunder seed around. (If you don’t find it the first time, or if you fall to the ground, go back to the teleportation point next to the Demon Sword Demon, then fly down from that position, and find it again. Or, if you fall to the ground, use the thunder on the ground. Seeds and Leiji take to the air to find this location.)

After finding the stone here, return to the center of gravity of the Snake Bone Mine and fall from the middle to activate the Snake Bone Mine's counterweight.
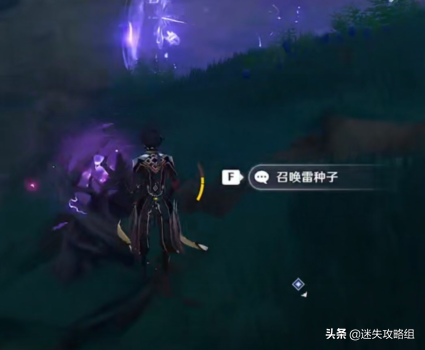
Finally, when you return to the Snake Bone Mine, just fly down towards the pillar that fires bullets.

After the ballast is activated, the thunderstorm in the area around the Snake Bone Mine will stop.
At this time, the strategy for the fourth part of the Legacy of Toroyu Clan, if you have not completed "Suppressing the first counterweight around Tengdou Village (zhài)" and "Second counterweight at the location of the snake god's head" and " "The third counterweight in the Snake Bone Mine", please refer to the previous guides for the first, second and third rings. (One of the above three rings is indispensable)
After completing the third ring mission, the NPC named "梶" will tell you that you are going to Wuming Village (zhài) next. The location is on the far left side of Inazuma's map.

Note, do not come here to solve the puzzle before completing the previous three-ring tasks. The mechanism here is hidden under the water. (It is estimated that the same code is used as the Golden Apple Islands) When there are no first three rings, the surrounding mechanisms are there, but the place in the middle to get rewards disappears, so even if you follow this tutorial to complete the adjustment of the mechanisms, there will be no Ways to get rewards.
Therefore, the first three links are checked to fill in the gaps.
After arriving at the location shown in the picture, talk to Kaji immediately, and then the mechanism in the sea will surface.
If you still see a broken bridge in the sea, it means that the previous three rings have not been completed.
The correct decryption venue is one with a big disk in the middle↓

Then we just looked at the aerial view of the puzzle that was finally solved, and then followed the steps to solve the puzzle.
There is a wave boat next to the pillar that fires bullets. To decipher the code in this area, you need to swim in the sea. If you get on the wave boat, you must "come out of the wave boat" (press and hold the jump button to escape from the wave boat). fly out of the boat), otherwise you will not be able to adjust the steering and elevation of the column. So whether to open it or not depends on your physical strength.
If you have not found both the Fengshen Pupil and the Rock God Pupil, and your stamina is not enough to swim in such a large sea area, you can make food to replenish your stamina such as "Northland Smoked Chicken", and then bring a Beidou can be obtained in this event "Dragon King's Invitation". Beidou can reduce the physical energy consumed by swimming.
My personal suggestion is that there is no need to drive a wave boat in and out, because you can stand on the edge of the pillar. (Alternatively, you have Ayaka Kamisato. Infinite swimming works too.)

The first is the pillar that fires bullets. Adjust the steering twice and do not adjust the elevation. ↓
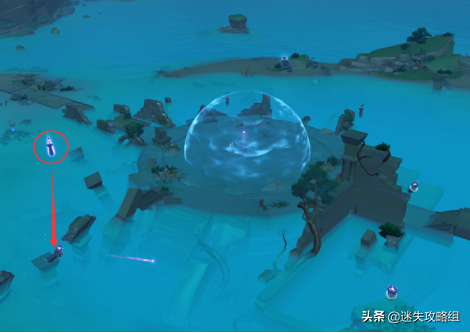
From the second pillar to the third pillar, do not adjust the steering, but adjust the elevation twice. ↓ (Bring an archer and test whether you can hit the third one. The pillars here are all crooked, so visual inspection is not as accurate as the previous puzzles.)

From the third to the fourth, adjust the steering twice and the elevation once. ↓ (You can stand on the ruins nearby and shoot an arrow to see if you can hit the next one. This pillar is too crooked.)

For the fourth to fifth pillars, adjust the steering twice and the elevation once. ↓ (At this time, you will enter a blind spot for shooting, because the huge cover in the middle will block the arrows you shoot. Just climb to the middle disc, walk over and shoot another arrow to test it.)

From the fifth to sixth pillars, adjust the steering three times, but do not adjust the elevation angle. ↓

Sixth to center mask. Adjust the steering twice and do not adjust the elevation angle. ↓

Finally, add an arrow to the pillar where the bullet is fired. If you have done everything right in the previous steps, the animation of the mask breaking after the bullet bounces will start playing. If the animation does not start playing, then check for gaps and fill in the gaps. If you don't know which step is wrong, just log out and log in again. After logging in again, all the pillars decrypted here will be restored.
After the mask is opened, the shrine inside will be exposed. Note that activating the shrine requires two props, stones and beads.
The beads are on the top of this shrine. (If you turn on the elemental vision, you will find that the elemental vision is disabled. Because the bead is right above your head, it is dark under the light.)

After the mask is opened, a demon sword demon will appear next to the shrine. This demon puppet sword demon must be defeated, otherwise another stone prop will not be displayed.
This place is different from the Golden Apple Islands. It has been raining here and the ground is full of water. Therefore, when the Demon Sword Demon is distracted and attacks with ice elements, you will be frozen all the time. Wind element attacks will also have a spread effect. Just handle it carefully. (This picture is more obvious. You can see the bead on the top of the shrine. That is not a decoration, but a decryption prop↓)

After defeating the Golem Sword Demon, you can find the stone "towards the depths of the ruins". (This prop appears out of thin air and does not flash, so it is difficult to find under the water. If you really can’t find it, you can look at the direction of the field of view in the mini map in the picture below, and then follow this direction. Just look for it. )↓

After you have found all these, return to the shrine, put the stones and beads back, activate the town object, and the rain will stop in this area.

At this time, if you go back to the shore to find Kaji and talk to him, he will say that there is a painting here for you. Then you can get the blueprint of Inazuma's four-star spear "Kitain Jumonji".

Kitain Jumonji is suitable for spear characters whose ultimate move can last for a long time, so both Koryo and Rosalia can use this weapon.
At this point, the series of missions on the legacy of the Toroyu clan has come to an end. See you again at the mission of Tatarsha.