在使用CSS進行網頁佈局時,我們一定離不開的一個東西————盒子模型。盒子模型,顧名思義,盒子就是用來裝東西的,它所裝的東西就是HTML元素的內容。或者說,每一個可見的HTML 元素都是一個盒子,下面所說的盒子都等同於HTML 元素。這裡盒子與盒子模型中的盒子又有點不同,這裡的盒子是二維的。
盒子的組成
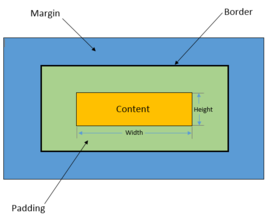
盒子模型是網頁設計中常用的一種思考模型,由四個部分構成,由內到外分別為內容區(content)、內邊距(padding)、邊框(border)和外邊距(margin) ,CSS 為這四個部分提供了一系列相關屬性,透過這些屬性的設定可以豐富盒子的表現效果。
盒子的大小
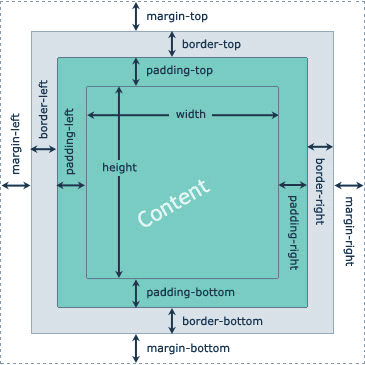
盒子的大小指的是盒子的寬度和高度。大多數初學者容易將寬度和高度誤解為width和height屬性,然而預設width和height屬性只是設定content(內容)部分的寬和高。盒子真正的寬和高按下面公式計算:
盒子的寬度= 內容寬度+ 左填充+ 右填充+ 左邊框+ 右邊框+ 左邊距+ 右邊距
盒子的高度= 內容高度+ 上填充+ 下填充+ 上邊框+ 下邊框+ 上邊距+ 下邊距
用帶有屬性的公式表示:
盒子的寬度= width + padding-left + padding-right + border-left + border-right + margin-left + margin-right
盒子的高度= height + padding-top + padding-bottom + border-top + border-bottom + margin-top + margin-bottom
1. 內容區(content)
內容區是整個盒子模型的中心,其中存放了盒子的主要內容,這些內容可以是文字、圖像等資源。內容區有width、height、overflow 三個屬性,其中width 和height 屬性用來指定盒子內容區域的寬度和高度,當內容資訊過多,超出內容區所設定的範圍時,則可以使用overflow 屬性設定溢出內容的處理方式,overflow 屬性有四個可選值:
(1)hidden:表示隱藏溢出的部分;
(2)visible:表示顯示溢出的部分(溢出的部分將顯示在盒子外部);
(3)scroll:表示為內容區新增一個捲軸,您可以透過滑動這個捲軸來查看內容區的全部內容;
(4)auto:表示由瀏覽器決定如何處理溢位部分。
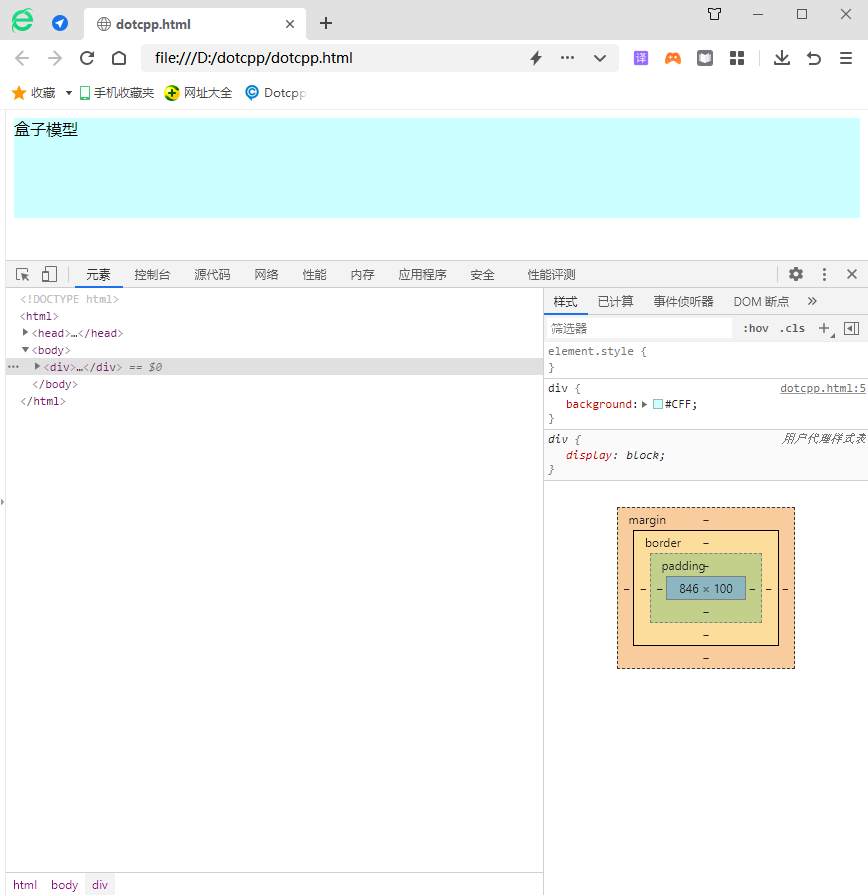
<!DOCTYPEhtml><html><head><style>div{background:#CFF;}div.box-one{width:100px;height:100px;}</style></head><body><div> <divclass=box-one>盒子模型</div></div></body></html>運行結果:(透過瀏覽器的調試工具查看的,可以快捷鍵F12來打開,或者在頁面中點擊滑鼠右鍵,在彈出的選單中選擇「檢查」選項即可。)
2.內邊距(padding)
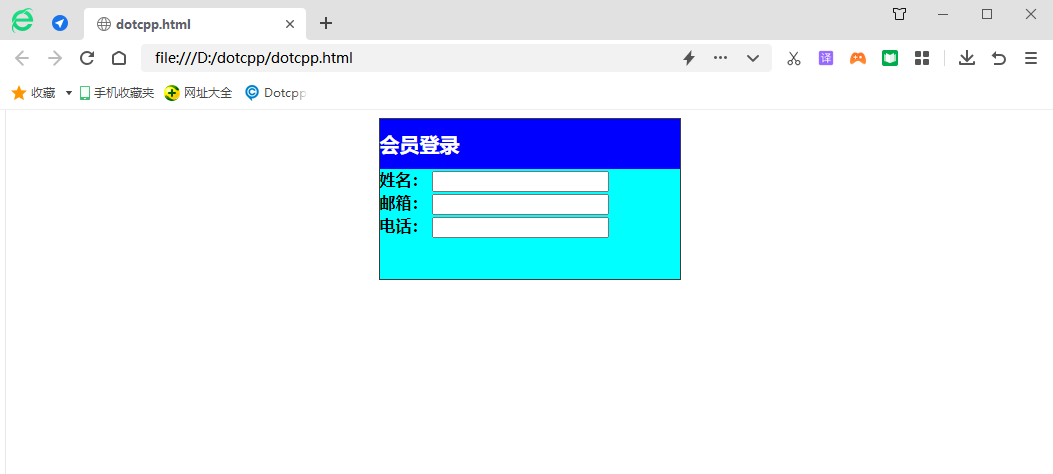
內邊距是內容區和邊框之間的空間,您可以透過padding-top、padding-right、padding-bottom、padding-left 以及它們的簡寫屬性padding 來設定內容區各個方向上與邊框之間的距離。在為盒子模型設定背景屬性時,背景屬性可以覆蓋到內邊距區域。
舉例:
<!DOCTYPEhtml><html><head><metacharset=utf-8><title></title><style>.a{border:1pxsolid#3C3C3C;width:300px;height:160px;margin:auto;}h2 {background-color:#0000FF;width:300px;height:50px;color:#FFFFFF;line-height:50px;font-size:20px;margin-top:0px;margin-bottom:0px;}form{width: 300px;height:110px;background-color:#00FFFF;}</style></head><body><divclass=a><h2>會員登入</h2><formaction=#><div><strongclass= name>姓名:</strong><inputtype=text/></div><div><strongclass=name>信箱:</strong><inputtype=text/></div><div><strongclass=name>電話:</strong><inputtype=text/></div></form></div></body></html>運行結果:
3.邊框(border)
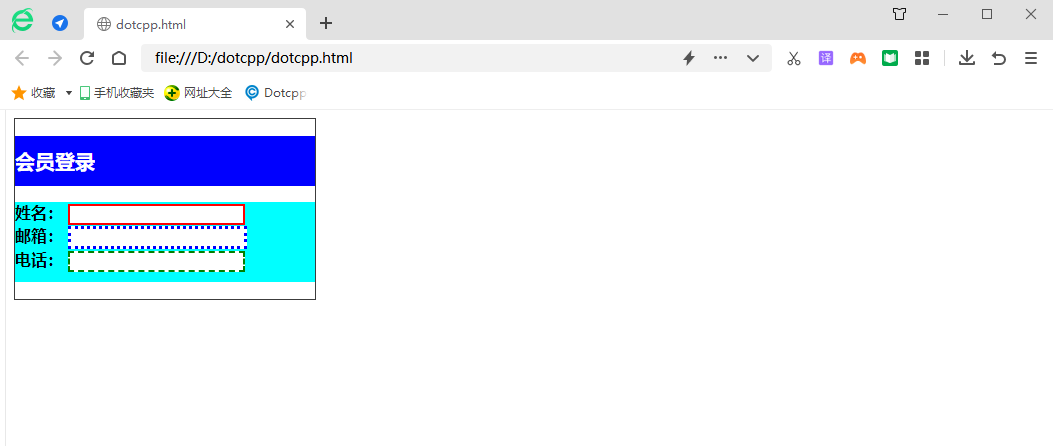
邊框是環繞內容區和內邊距的邊界,您可以使用border-style、border-width 和border-color 以及它們的簡寫屬性border 來設定邊框的樣式。其中border-style 屬性為邊框中最主要的屬性,如果沒有設定該屬性的話,其它的邊框屬性也會被忽略。
舉例:
<!DOCTYPEhtml><html><head><metacharset=utf-8><title></title><style>.a{border:1pxsolid#3C3C3C;width:300px;height:180px;}h2{background-color :#0000FF;width:300px;height:50px;color:#FFFFFF;line-height:50px;font-size:20px;}form{background-color:#00FFFF;width:300px;height:80px;}div: nth-of-type(1)input{border:2pxsolidred;}div:nth-of-type(2)input{border:3pxdottedblue;}div:nth-of-type(3)input{border:2pxdashedgreen;}< /style></head><body><divclass=a><h2>會員登入</h2><formaction=#><div><strongclass=name>姓名:</strong><inputtype=text/>< /div><div><strongclass=name>信箱:</strong><inputtype=text/></div><div><strongclass=name>電話:</strong><inputtype=text/></div ></form></div></body></html>運行結果:
4.外邊距(margin)
舉例:
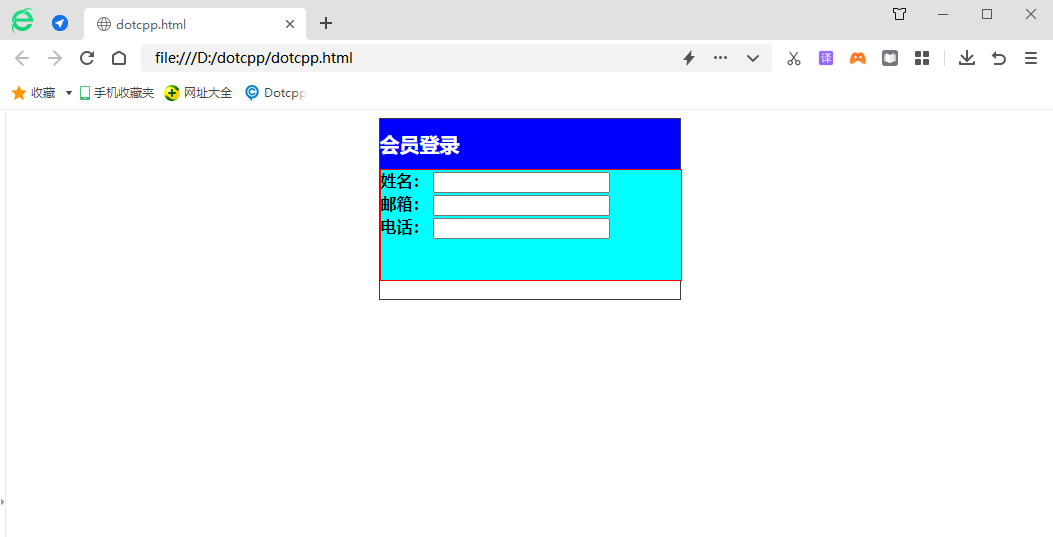
<!DOCTYPEhtml><html><head>metacharset=utf-8><title></title><style>.a{border:1pxsolid#3C3C3C;width:300px;height:180px;margin:auto;}h2{ background-color:#0000FF;width:300px;height:50px;color:#FFFFFF;line-height:50px;font-size:20px;margin-top:0px;margin-bottom:0px;}form{borderx;margin-top:0px;margin-bottom:0px;}form{border:1pxsolidred:1pxsolidred:1pxsolidred:1pxsolidred:1pxsolidred:1pxsolidred:1pxsolidred:1pxsolidred:1pxsolidred:1pxsolidred:1pxsolidred:1pxsolidred:1pxsolidred:1pxsolidred:1pxsolidred:1px):0px; ;width:300px;height:110px;background-color:#00FFFF;}</style></head><body><divclass=a><h2>會員登入</h2><formaction=#><div> <strongclass=name>姓名:</strong><inputtype=text/></div><div><strongclass=name>信箱:</strong><inputtype=text/></div><div><strongclass =name>電話:</strong><inputtype=text/></div></form></div></body></html>運行結果:
舉例:
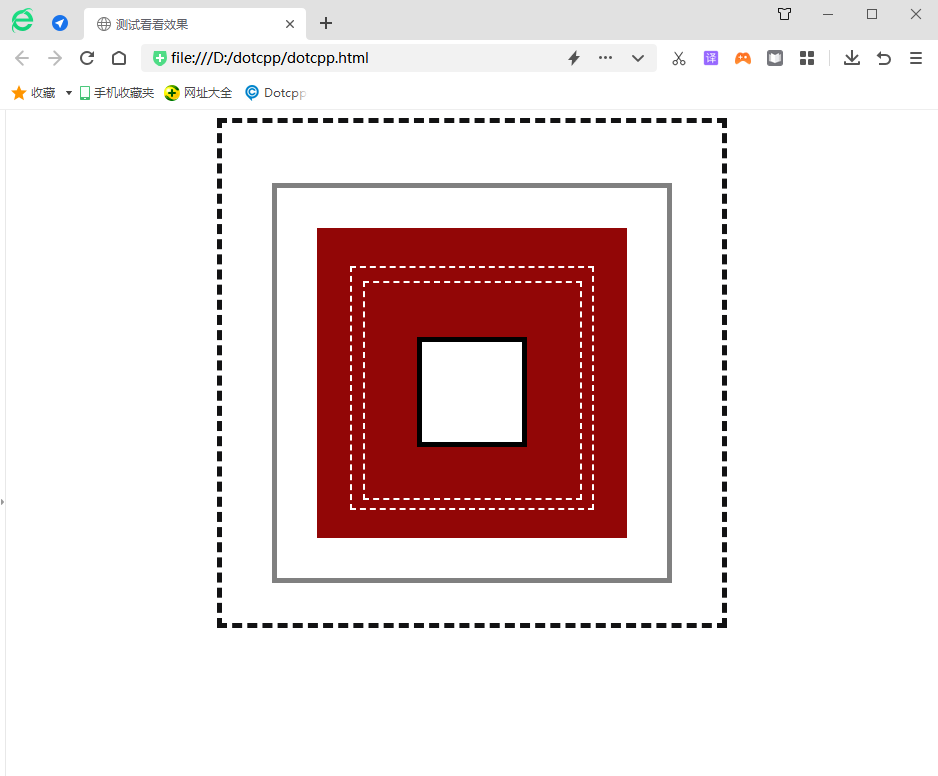
<!DOCTYPEhtml><html><head><metacharset=UTF-8><metahttp-equiv=X-UA-Compatiblecontent=IE=edge><metaname=viewportcontent=width=device-width,initial-scale=1.0>< title>測試看看效果</title></head><style>#box1{width:400px;height:400px;background-color:white;/*設定上下左右的內邊距*/padding:50px50px;borderorder :5pxdashedrgb(18,18,19);margin:0auto;margin-top:5px;/*margin-left:200px;margin-right:200px;margin-bottom:5px;*/text-align:center;}# box2{width:350px;height:350px;background-color:white;/*設定上下左右的內邊距*/padding:20px20px;border:5pxsolidgray;margin:0auto;margin-top:10px;/*margin-left :20px;margin-right:20px;margin-bottom:20px;*/text-align:center;}#box3{width:300px;height:300px;background-color:rgb(146,6,6);/*設定上下左右的內邊距*/border:5pxsolidrgb(146,6,6);margin:0auto;/*padding:5px5px;*/margin-top:20px;/*margin-left:45px;margin-right: 45px;margin-bottom:45px;*/text-align:center;}#box4{width:240px;height:240px;background-color:rgb(146,6,6);/*設定上下左右的內邊距*//*padding:5px5px;*/border:2pxdashedwhite;margin:0auto;margin-top:33px;/*margin-left:33px;margin-right:33px;margin-bottom:33px;*//*和padding效果一樣*/text-align:center;}#box5{width:215px;height:215px;background-color:rgb(146,6,6);/*設定上下左右的內邊距*/border:2pxdashedwhite; margin:0auto;/*padding:2px2px;*/margin-top:12.5px;/*margin-left:12.5px;margin-right:12.5px;margin-bottom:12.5px;*//*和padding效果一樣*/text-align:center;}#box6{width:100px;height:100px;background-color:white;/*設定上下左右的內邊距*/border:5pxsolidblack;margin:0auto;/*padding:20px20px ;*/margin-top:54.5px;/*margin-left:54.5px;margin-right:54.5px;margin-bottom:54.5px;*//*和padding效果一樣*/text-align:center;} </style><body><divid=box1><divid=box2><divid=box3><divid=box4><divid=box5><divid=box6></div></div></div>< /div></div></div></body></html>運行結果:
