نمط طبقة comfyui
中文说明点这里
商务合作请联系 البريد الإلكتروني [email protected].
للتعاون التجاري ، يرجى الاتصال بالبريد الإلكتروني [email protected].
مجموعة من العقد لـ Comfyui التي يمكنها المركب للطبقة والقناع لتحقيق فوتوشوب مثل الوظيفة.
إنه يهاجر بعض الوظائف الأساسية لـ Photoshop إلى Comfyui ، بهدف تركيز سير العمل وتقليل تواتر تبديل البرامج.
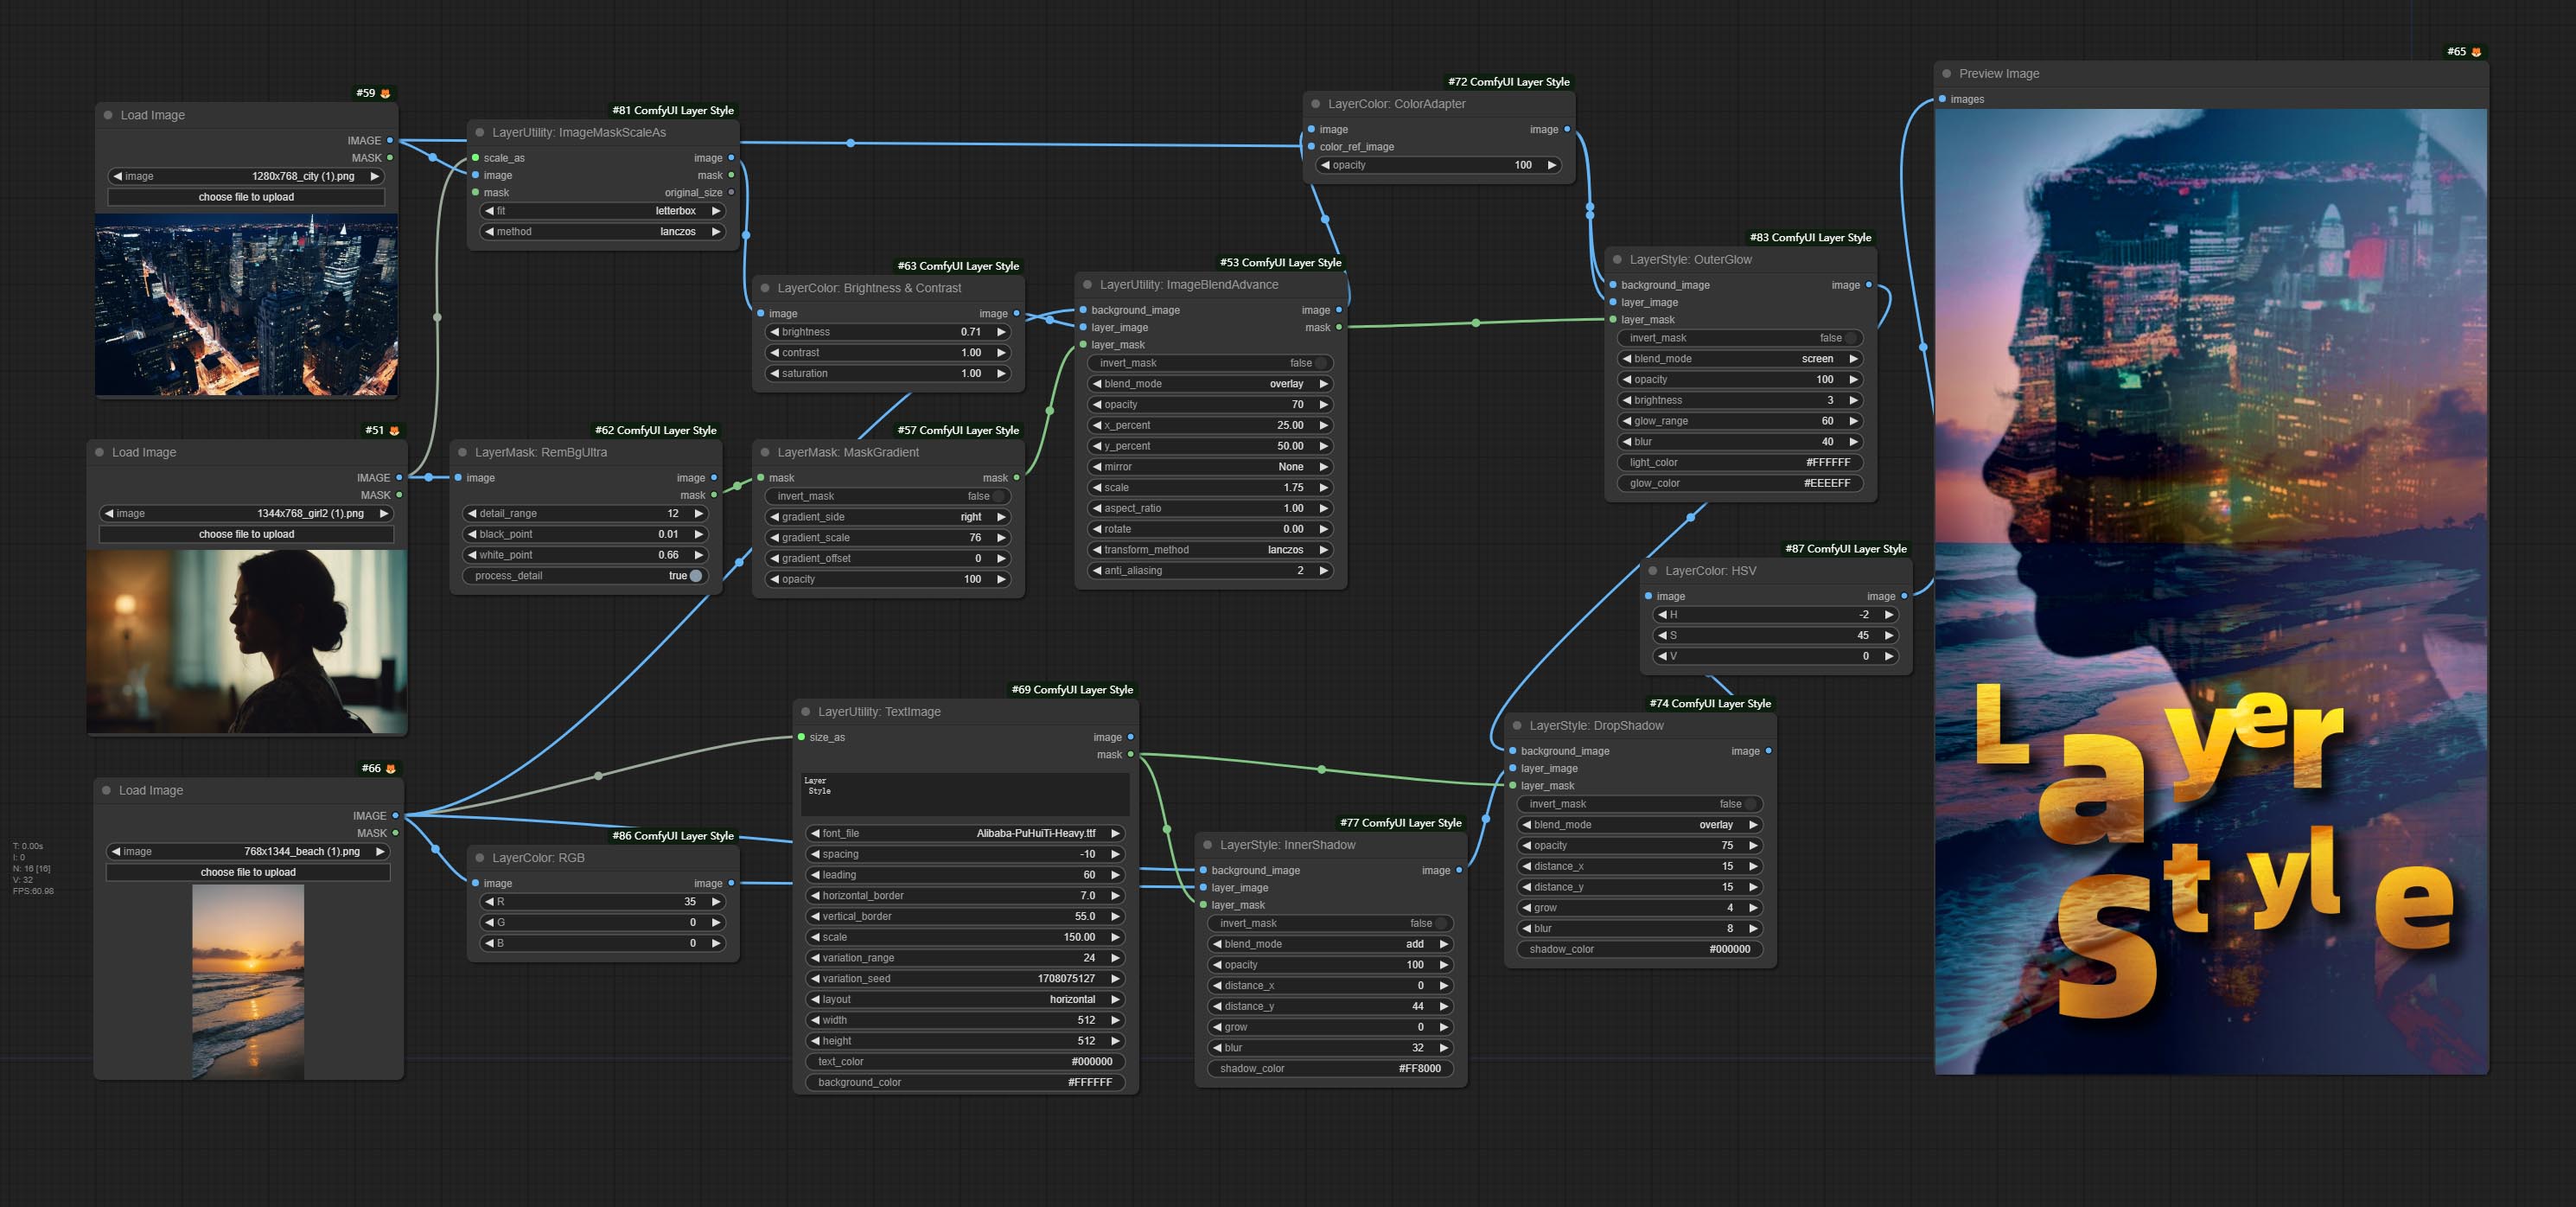
*هذا سير العمل (title_example_workflow.json) موجود في دليل سير العمل.
مثال سير العمل
بعض ملفات سير عمل JSON في دليل workflow ، وهذا أمثلة على كيفية استخدام هذه العقد في Comfyui.
كيفية التثبيت
(أخذ حزمة Comfyui الرسمية المحمولة وحزمة AKI Comfyui كأمثلة ، يرجى تعديل دليل بيئة التبعية لبيئات Comfyui الأخرى)
تثبيت البرنامج المساعد
أوصى باستخدام ComFyui Manager للتثبيت.
أو افتح نافذة CMD في دليل البرنامج المساعد لـ Comfyui ، مثل ComfyUIcustom_nodes , type
git clone https://github.com/chflame163/ComfyUI_LayerStyle.git
أو قم بتنزيل ملف zip واستخراجه ، انسخ المجلد الناتج إلى ComfyUIcustom_ Nodes
تثبيت حزم التبعية
للحزمة المحمولة الرسمية Comfyui ، انقر نقرًا مزدوجًا فوق install_requirements.bat في دليل البرنامج المساعد ، لحزمة AKI Comfyui انقر نقرًا مزدوجًا على install_requirements_aki.bat في دليل البرنامج المساعد ، وانتظر لإكمال التثبيت.
أو تثبيت حزم التبعية ، افتح نافذة CMD في دليل البرنامج المساعد Comfyui_layerstyle مثل ComfyUIcustom_ NodesComfyUI_LayerStyle وأدخل الأمر التالي ،
للحزمة المحمولة الرسمية Comfyui ، اكتب:
 ......python_embededpython.exe -s -m pip install .whldocopt-0.6.2-py2.py3-none-any.whl
......python_embededpython.exe -s -m pip install .whlhydra_core-1.3.2-py3-none-any.whl
......python_embededpython.exe -s -m pip install -r requirements.txt
.repair_dependency.bat
لحزمة AKI Comfyui ، اكتب:
 ....pythonpython.exe -s -m pip install .whldocopt-0.6.2-py2.py3-none-any.whl
....pythonpython.exe -s -m pip install .whlhydra_core-1.3.2-py3-none-any.whl
....pythonpython.exe -s -m pip install -r requirements.txt
.repair_dependency.bat
قم بتنزيل ملفات النموذج
المستخدمون المحليون الصينيون من BaidunetDisk وغيرهم من المستخدمين من Huggingface.co/Chflame163/comfyui_layerstyle
قم بتنزيل جميع الملفات ونسخها إلى مجلد ComfyUImodels . يوفر هذا الرابط جميع ملفات النموذج المطلوبة لهذا البرنامج المساعد. أو قم بتنزيل ملف النموذج وفقًا لتعليمات كل عقدة.
القضايا المشتركة
إذا لم تتمكن العقدة من تحميلها بشكل صحيح أو كانت هناك أخطاء أثناء الاستخدام ، فيرجى التحقق من رسالة الخطأ في نافذة Comfyui Terminal. فيما يلي أخطاء شائعة وحلولهم.
تحذير: xxxx.ini غير موجود ، استخدم الافتراضي xxxx ..
تشير رسالة التحذير هذه إلى أنه لا يمكن العثور على ملف INI ولا يؤثر على الاستخدام. إذا كنت لا ترغب في رؤية هذه التحذيرات ، فيرجى تعديل جميع الملفات *.ini.example في دليل البرنامج المساعد إلى *.ini .
Modulenotfounderror: لا توجد وحدة تسمى "psd_tools"
هذا الخطأ هو أنه لم يتم تثبيت psd_tools بشكل صحيح.
حل:
- أغلق comfyui وافتح نافذة الطرفية في دليل البرنامج المساعد وقم بتنفيذ الأمر التالي:
../../../python_embeded/python.exe -s -m pip install psd_tools في حالة حدوث خطأ أثناء تثبيت psd_tool ، مثل ModuleNotFoundError: No module named 'docopt' ، يرجى تنزيل WHL Docopt وتثبيته اليدوي. قم بتنفيذ الأمر التالي في النافذة الطرفية: ../../../python_embeded/python.exe -s -m pip install path/docopt-0.6.2-py2.py3-none-any.whl path هو اسم المسار من ملف WHL.
لا يمكن استيراد اسم "FacidentFilter" من "cv2.xidgproc"
يحدث هذا الخطأ بسبب إصدار غير صحيح من حزمة opencv-contrib-python , أو هذه الحزمة هي الكتابة فوقها بواسطة حزم OpenCV الأخرى.
Nameerror: اسم "مرشد المرفق" غير محدد
سبب المشكلة هو نفسه أعلاه.
لا يمكن استيراد اسم "VitmatteImageProcessor" من "المحولات"
يحدث هذا الخطأ بسبب الإصدار المنخفض من حزمة transformers .
تحميل البصيرة بطيئة جدا
يحدث هذا الخطأ بسبب الإصدار المنخفض من حزمة protobuf .
للحصول على المشكلات المتعلقة بحزم التبعية الثلاثة أعلاه ، يرجى النقر المزدوج على repair_dependency.bat (للحصول على comfyui الرسمي) أو repair_dependency_aki.bat (للحصول على comfyui-aki-v1.x) في مجلد البرنامج المساعد لإصلاحها تلقائيًا.
onnxruntime :: python :: createExecutionProviderinstance cuda_path تم تعيينه ولكن لم يكن من الممكن تحميل Cuda. يرجى تثبيت الإصدار الصحيح من CUDA و CUDNN كما هو مذكور في صفحة متطلبات GPU
الحل: أعد تثبيت حزمة التبعية onnxruntime .
خطأ في تحميل نموذج XXX: لم نتمكن من الاتصال بـ Huggingface.co ...
تحقق من بيئة الشبكة. إذا لم تتمكن من الوصول إلى HuggingFace.co عادة في الصين ، فحاول تعديل حزمة HuggingFace_Hub لإجبار استخدام HF_Mirror.
ValueRror: لم يحتوي Trimap على قيم مقدمة (xxxx ...)
يحدث هذا الخطأ بسبب أن تكون منطقة القناع كبيرة جدًا أو صغيرة جدًا عند استخدام طريقة PyMatting للتعامل مع حواف القناع.
حل:
- يرجى ضبط المعلمات لتغيير المنطقة الفعالة للقناع. أو استخدم طرقًا أخرى للتعامل مع الحواف.
requests.exceptions.proxyerror: httpsconnectionpool (xxxx ...)
عند حدوث هذا الخطأ ، يرجى التحقق من بيئة الشبكة.
Untocalocalerror: المتغير المحلي "clip_processor" المشار إليه قبل المهمة
Untocalocalerror: المتغير المحلي "text_model" مشار إليه قبل المهمة
في حالة حدوث هذا الخطأ عند تنفيذ عقدة JoyCaption2 وتم تأكيد أن ملف النموذج قد تم وضعه في الدليل الصحيح ، يرجى التحقق من إصدار حزمة تبعية transformers على الأقل 4.43.2 أو أعلى. إذا كان إصدار transformers أعلى من أو يساوي 4.45.0 ، وأيضًا رسالة خطأ:
 Error loading models: De️️scriptors cannot be created directly.
If this call came from a _pb2.py file, your generated code is out of date and must be regenerated with protoc >= 3.19.0.
......
يرجى تجربة تخفيض حزمة التبعية protobuf إلى 3.20.3 ، أو تعيين متغيرات البيئة: PROTOCOL_BUFFERS_PYTHON_IMPLEMENTATION=python .
تحديث
** إذا كان خطأ حزمة التبعية بعد التحديث ، فيرجى النقر المزدوج على repair_dependency.bat (للحصول على comfyui الرسمي) أو repair_dependency_aki.bat (ل comfyui-aki-v1.x) في مجلد البرنامج المساعد لإعادة تثبيت حزم الاعتماد.
ارتكاب Benultra و LoadBenModel العقد. هاتان العقدان هما تنفيذ مشروع Pramallc/Ben في Comfyui.
قم بتنزيل BEN_Base.pth و config.json من Huggingface أو BaidunetDisk ونسخ إلى مجلد ComfyUI/models/BEN .
دمج العلاقات العامة المقدمة من Jimlee2048 ، وأضف عقدة LoadBireFNetModelv2 ، ودعم نماذج تحميل RMBG 2.0.
قم بتنزيل ملفات النموذج من HuggingFace أو BaidunetDisk ونسخها إلى مجلد ComfyUI/models/BiRefNet/RMBG-2.0 .
تدعم العقد Florence 2 Promptgen-V2.0 و promptgen-V2.0 ، وتنزيل base-PromptGen-v2.0 و large-PromptGen-v2.0 مجلدان من Huggingface أو BaidunetDisk ونسخ إلى ComfyUI/models/florence2 مجلد المجلد .
تدعم Sam2Ultra و ObjectDetector عقد صورة الصورة.
تضيف عقد Sam2Ultra و Sam2Videoultra دعمًا لنموذج SAM2.1 ، بما في ذلك نموذج KIJAI FP16. قم بتنزيل ملفات النماذج من BaidunetDisk أو Huggingface.co/Kijai/SAM2-Safetensors ونسخها إلى مجلد ComfyUI/models/sam2 .
ارتكب joycaption2split و loadjoycaption2model ، فإن مشاركة النموذج عبر عقد joycaption2 متعددة يحسن الكفاءة.
Segmentanythingultra و Segmentanythingultrav2 أضف خيار cache_model ، من السهل إدارة استخدام VRAM بمرونة.
نظرًا لمتطلبات الإصدار العالي لعقدة Llamavision transformers ، والتي تؤثر على تحميل بعض المكونات الإضافية الطرف الثالث الأقدم ، فقد خفض المكون الإضافي Lyersstyle المتطلب الافتراضي إلى 4.43.2. إذا كنت بحاجة إلى تشغيل Llamavision ، فيرجى الترقية إلى 4.45.0 أو أعلى بمفردك.
ارتكب joycaption2 و joycaption2extraoptions العقد. يجب تثبيت حزم التبعية الجديدة. استخدم نموذج Joycaption-alpha-Two للاستدلال المحلي. يمكن استخدامها لإنشاء كلمات سريعة. هذه العقدة هي https://huggingface.co/john6666/joy-caption-alpha-two-cli-mod في comfyui ، شكرًا لك للمؤلف الأصلي. تنزيل نماذج تنزيل تشكل BaidunetDisk و BaidunetDisk ، أو Huggingface cgrkzexw-599808 Orenguteng و Huggingface/Unloth ، ثم نسخ إلى ComfyUI/models/LLM ComfyUI/models/clip BaidunetDisk أو Huggingface/John6666 ، ونسخ إلى ComfyUI/models/Joy_caption 。
ارتكاب عقدة Llamavision ، استخدم نموذج LLAMA 3.2 رؤية للاستدلال المحلي. يمكن استخدامها لإنشاء كلمات سريعة. جزء من رمز هذه العقدة يأتي من comfyui-pixtralllamllllmolmovision ، شكرا لك للمؤلف الأصلي. لاستخدام هذه العقدة ، تحتاج transformers إلى ترقية إلى 4.45.0 أو أعلى. قم بتنزيل النماذج من BaidunetDisk أو Huggingface/Seanscripts ، ونسخها إلى ComfyUI/models/LLM .
ارتكاب عقدة RandomGeneratorV2 ، أضف أقل خيارات النطاق العشوائي والبذور.
ارتكاب عقدة TextJoinv2 ، إضافة خيارات تحديد المسلح أعلى TextJion.
ارتكاب عقدة gaussianblurv2 ، تم تحسين دقة المعلمة إلى 0.01.
ارتكاب userPromptGenerAtorTxtImgwithReference عقدة.
ارتكب عقدة GrayValue ، إخراج القيم الرمادية المقابلة لقيم ألوان RGB.
LUT تطبيق ، textimagev2 ، textimage ، simpletextimage العقد لدعم تحديد مجلدات متعددة في resource-dir.ini ، مفصولة بفواصل أو فاصلة أو مسافات. يدعم في وقت واحد التحديثات المنعشة في الوقت الفعلي.
تدعم LUT تطبيق TextImageV2 و TextImage و SimpleTextimage تحديد خطوط الدليل متعددة المجلدات ومجلدات LUT ، ودعم التحديثات المنعشة والوقت الفعلي.
ارتكاب عقدة HumanPartsultra ، وتستخدم لتوليد أقنعة أجزاء الجسم البشرية. وهو يعتمد على واربر من metal3d/comfyui_human_parts ، شكرا للمؤلف الأصلي. قم بتنزيل ملف النموذج من BaidUnetDisk أو Huggingface ونسخه إلى مجلد ComfyUImodelsonnxhuman-parts .
العقد ObjectDetector أضف خيار الفرز حسب الثقة.
ارتكب عقدة DrawBboxmask ، تستخدم لتحويل إخراج Bboxes بواسطة عقدة كاشف الكائن إلى قناع.
ارتكاب userprompromptgeneratortxtimg و userPromptGenerAtorReplaceword ، وتستخدم لإنشاء مطالبات النص والصورة واستبدال المحتوى المطالب.
ارتكب عقدة phiprompt ، واستخدم نماذج النص والبصرية Microsoft PHI 3.5 للاستدلال المحلي. يمكن استخدامها لإنشاء كلمات سريعة ، أو معالجة الكلمات السريعة ، أو استنتاج الكلمات السريعة من الصور. يتطلب تشغيل هذا النموذج ما لا يقل عن 16 جيجابايت من ذاكرة الفيديو.
قم بتنزيل ملفات النماذج من BaidunetDisk أو Huggingface.co/Microsoft/Phi-3.5-vision-vision-instruct ComfyUImodelsLLM Huggingface.co/Microsoft/Phi-3.5-mini-
ارتكب عقدة getMaincolors ، يمكن الحصول على 5 ألوان رئيسية للصورة. ارتكب عقدة colorname ، يمكن أن تحصل على اسم لون قيمة لون الإدخال.
قم بتكرار عقدة السطوع والتباين مثل سطوع Contrastv2 ، ولون Shadow & Aightlization مثل ColorofShadowhighlight ، وقناع Shadow & Aightlight إلى Mask Amailial Mask V2 ، لتجنب الأخطاء في Comfyui Workflow Rakinging الناتجة عن شخصية "و" في اسم العقدة.
ارتكاب العقد Vqaprompt و LoadVqamodel.
قم بتنزيل النموذج من BaidunetDisk أو Huggingface.co/Salesforce/blip-vqa-capfilt-large و uggingface.co/salesforce/blip-vqa-base ونسخه إلى مجلد ComfyUImodelsVQA .
Florence2ultra ، Florence2Image2Prompt 和 العقد الحمل 2model تدعم Miaoshouai/Florence-2-Large-Promptgen-V1.5 و Miaoshouai/Florence-2-Base-Promptgen-V1.5.
قم بتنزيل ملفات النموذج من BaidunetDisk ComfyUImodelsflorence2 Huggingface.co/Miaoshouai/florence-2-large-promptgen-v1.5 و uggingface.co/miaoshouai/florence-2-base-prompen-v1.5 .
ارتكب birefnetultrav2 وعقد loadbirefnetmodel ، والتي تدعم استخدام أحدث نموذج birefnet. قم بتنزيل ملف نموذج من BaidunetDisk أو googledrive اسمه BiRefNet-general-epoch_244.pth إلى ComfyUI/Models/BiRefNet/pth Folder. يمكنك أيضًا تنزيل المزيد من طرز birefnet ووضعها هنا.
ExtendCanvasv2 تدعم العقدة إدخال القيمة السالبة ، فهذا يعني أن الصورة سيتم اقتصاصها.
يتم تغيير لون العنوان الافتراضي للعقد إلى اللون الأزرق والأخضر ، ويتميز العقد في Layersstyle و LayerColor و LayerMask و Layerutility و Layerfilter بألوان مختلفة.
تمت إضافة خيار الكشف عن الكشف عن BBOX ، والذي يسمح بالتصنيف من اليسار إلى اليمين ، من أعلى إلى أسفل ، وكبير إلى صغير ، مما يجعل اختيار الكائن أكثر سهولة ومريحة. تم التخلي عن العقد التي تم إصدارها أمس ، يرجى استبدالها يدويًا بعقدة الإصدار الجديدة (آسف).
ارتكب sam2ultra ، sam2videoultra ، ObjectDetectorfl2 ، ObjectDetectoryOloworld ، ObjectDetectoryolo8 ، ObjectDetectorMask و Bboxjoin. قم بتنزيل النماذج من BaidunetDisk أو Huggingface.co/Kijai/SAM2-Safetensors ونسخها إلى مجلد ComfyUI/models/sam2 ، وتنزيل النماذج من BaidunetDisk أو GoogleRive ونسخها إلى ComfyUI/models/yolo-world . يقدم هذا التحديث تبعيات جديدة ، يرجى إعادة تثبيت حزمة التبعية.
ارتكب عقدة RandomGenerator ، المستخدمة لإنشاء أرقام عشوائية ضمن نطاق محدد ، مع مخرجات int و float و boolean ، تدعم توليد الدُفعات من الأرقام العشوائية المختلفة بواسطة دفعة صورة.
ارتكاب عقدة EVF-Samultra ، إنها تنفيذ EVF-SAM في Comfyui. يرجى تنزيل ملفات النماذج من BaidunetDisk أو Huggingface/EVF-Sam2 ، Huggingface/EVF-SAM إلى مجلد ComfyUI/models/EVF-SAM (حفظ النماذج في أول توجيهها الفرعي). نظرًا لإدخال حزمة التبعيات الجديدة ، بعد ترقية البرنامج المساعد ، يرجى إعادة تثبيت حزم التبعية.
ارتكاب العقد ImageTaggersave و ImageAutocropv3. تستخدم لتنفيذ سير العمل التلقائي وعلم العلامات لمجموعة التدريب (يوجد سير العمل image_tagger_save.json في دليل سير العمل).
ارتكاب عقدة checkmaskv2 ، أضاف الطريقة simple للكشف عن الأقنعة بسرعة أكبر.
ارتكب العقد ImageReel و Imagereelcomposite لتركيب صور متعددة على قماش.
NumberCalculatorV2 و NumberCalculator إضافة طريقة min و max .
تحسين سرعة تحميل العقدة.
Flor2Image2Prompt أضف دعمًا لنماذج thwri/CogFlorence-2-Large-Freeze و thwri/CogFlorence-2.1-Large . يرجى تنزيل ملفات النماذج من BaidunetDisk أو Huggingface/Cogflorence-2-large-freeze و uggingface/cogflorence-2.1-large ، ثم نسخها إلى مجلد ComfyUI/models/florence2 .
دمج فرع من ClownSharkBatwing "استخدام GPU لوضع مزيج الألوان" ، وسرعة بعض الخلطات الطبقة بأكثر من عشر مرات.
Complish Florence2ultra ، Florence2Image2Prompt و Loadflorence2Model العقد.
TRAMPRENTBACKGROUNGULTRA NODE أضف دعم نموذج جديد. يرجى تنزيل ملف النموذج وفقًا للتعليمات.
ارتكب segformerultrav2 ، segfromerfashionpipeline و segformerclothespipeline ، المستخدمة لتجزئة الملابس. يرجى تنزيل ملف النموذج وفقًا للتعليمات.
ارتكب install_requirements.bat و install_requirements_aki.bat ، حل نقرة واحدة لتثبيت حزم التبعية.
ارتكاب عقدة TransPrentBackgroundultra ، فإنه يزيل الخلفية استنادًا إلى نموذج الظهارة الشفافة.
قم بتغيير نموذج Vitmatte للعقدة الفائقة إلى مكالمة محلية. يرجى تنزيل جميع ملفات نموذج Vitmatte إلى مجلد ComfyUI/models/vitmatte .
GetColorToneV2 Node أضف طريقة mask إلى خيار اختيار اللون ، والذي يمكنه الحصول على اللون الرئيسي ومتوسط اللون بدقة داخل القناع.
NODE ImagesCaleByaspectRatiov2 إضافة خيار "background_color".
LUT تطبيق إضافة خيار "القوة".
ارتكب عقدة AutoAdJustV2 ، أضف إدخال قناع اختياري ودعم أوضاع ضبط الألوان التلقائية المتعددة.
نظرًا للتوقف القادم لخدمات Gemini-Pro Vision ، أضافت Promstgagger و PromperMebellish واجهة برمجة تطبيقات "Gemini-1.5-Flash" لمواصلة استخدامه.
أضافت العقد الفائقة خيار تشغيل VitMatte على جهاز CUDA ، مما يؤدي إلى زيادة 5 أضعاف في سرعة التشغيل.
ارتكب عقدة QueUestop ، تستخدم لإنهاء عملية قائمة الانتظار.
قم بتحسين أداء طريقة VitMate للعقد الفائقة عند معالجة الصورة ذات الحجم الكبير.
CropBymaskv2 إضافة خيار لتجول حجم القطع بالمضاعفات.
ارتكاب عقدة checkmask ، يكتشف ما إذا كان القناع يحتوي على مناطق فعالة كافية. ارتكاب عقدة HSVValue ، فإنها تقوم بتحويل قيم الألوان إلى قيم HSV.
BooleAnoperv2 ، numberCalculatorV2 ، عدد صحيح ، عائم ، العقد المنطقية تضيف إخراج السلسلة لإخراج القيمة كسلسلة للاستخدام مع SwitchCase.
ارتكاب عقدة SwitchCase ، يقوم بتبديل الإخراج بناءً على سلسلة المطابقة. يمكن استخدامه لأي نوع من تبديل البيانات.
ارتكب عقدة السلسلة ، تستخدم لإخراج سلسلة. إنها العقدة المبسطة مربع النص.
ارتكب إذا كانت العقدة , تبديل الإخراج بناءً على المدخلات الشرطية المنطقية. يمكن استخدامه لأي نوع من تبديل البيانات.
ارتكب عقدة stringCondition ، يحدد ما إذا كان النص يحتوي على أو لا يحتوي على فرعية.
ارتكاب NumberCalculatorV2 عقدة , إضافة عملية الجذر التاسع. ارتكب عقدة booleanoperv2 ، زيادة أكبر/أقل من ، أكبر/أقل أو الحكم المنطقي متساو. يمكن للعقدتين الوصول إلى المدخلات الرقمية ويمكنها إدخال القيم الرقمية داخل العقدة. ملاحظة: المدخلات الرقمية تأخذ الأسبقية. لن تكون القيم في العقد صالحة عندما يكون هناك إدخال.
ارتكاب عقدة SD3NegativeConditioning ، قم بتغليف العقد الأربعة للحالة السلبية في SD3 في عقدة منفصلة.
ImageremoveAlpha العقدة إضافة إدخال قناع اختياري.
ارتكب عقدة HlfrequencyDetailrestore ، باستخدام تصفية التردد المنخفض والحفاظ على التردد العالي لاستعادة تفاصيل الصورة ، يكون الانصهار أفضل.
ارتكب العقد الإضافية والقناع ، أضف ضوضاء إلى صورة أو قناع.
ارتكاب عقدة Filmv2 ، تتم إضافة طريقة Fastgrain على أساس واحد سابق ، وسرعة توليد الضوضاء أسرع 10 مرات.
ارتكاب عقدة ImageTomask ، يمكن تحويلها إلى قناع. يدعم تحويل أي قناة في أوضاع LAB و RGBA و YUV و HSV إلى أقنعة ، مع توفير ضبط مقياس اللون. دعم قناع المدخلات الاختيارية للحصول على أقنعة لا تتضمن سوى أجزاء صالحة.
تم تغيير خيارات Blackpoint و WhitePoint في بعض العقد لتعديل التمرير لعرض أكثر سهولة. تشمل MaskEdgeUltradetailv2 ، SegmentAnythingultrav2 ، rmbgultrav2 , personmaskultrav2 , birefnetultra ، segformerb2clothesultra ، blendifmask ومستويات.
ImagesCalerestorev2 و ImagesCaleByaspectRatiov2 تضيف طريقة total_pixel لتوسيع نطاق الصور.
ارتكب عقدة MediPipipipacialSegment , المستخدمة في تقسيم ميزات الوجه ، بما في ذلك الحواجب اليسرى واليمنى ، العيون ، الشفاه ، والأسنان.
ارتكب عقدة BatchSelector , تستخدم لاسترداد الصور أو الأقنعة المحددة من الصور أو الأقنعة الدُفعة.
تنشئ Layerutility دليلًا فرعيًا جديدًا مثل النظام والبيانات والمطالبة. يتم تصنيف بعض العقد في الدلائل الفرعية.
ارتكب عقدة MaskByColor ، قم بإنشاء قناع يعتمد على اللون المحدد.
ارتكب عقدة loadpsd ، يقرأ تنسيق PSD ، وصور طبقة الإخراج. لاحظ أن هذه العقدة تتطلب تثبيت حزمة تبعية psd_tools ، إذا حدث خطأ أثناء تثبيت PSD_Tool ، مثل ModuleNotFoundError: No module named 'docopt' ، يرجى تنزيل WHL Docopt وتثبيته اليدوي.
ارتكب عقدة segformerb2clothesultra ، تستخدم لقطع ملابس الأحرف. رمز تجزئة النموذج هو من STARTHUA ، وذلك بفضل المؤلف الأصلي.
تضيف SaveImagePlus Node سير عمل الإخراج إلى وظيفة JSON ، ويدعم %date و %time لتضمين تاريخ أو وقت للمسار والاسم ، ويضيف مفتاح المعاينة.
ارتكاب SaveImagePlus Node , يمكنه تخصيص الدليل الذي يتم حفظ الصورة فيه ، وإضافة طابع زمني إلى اسم الملف ، وحدد تنسيق حفظ ، وتعيين معدل ضغط الصورة ، وتعيين ما إذا كان يجب حفظ سير العمل ، وإضافة علامات مائية غير مرئية اختياريًا إلى الصورة.
ارتكب AddBlindwatermark ، العقد showblindwatermark ، أضف علامة مائية غير مرئية والعلامة المائية التي تم فك تشفيرها إلى الصورة. ارتكب CreateQrcode ، وعقد decodeqrcode ، يمكن أن ينشئ صور رمز ثنائية الأبعاد ورموز ثنائية الأبعاد فك الرموز.
تضيف ImageCalerestorev2 ، و ImagesCaleByaspectRatiov2 ، وعقد ImageAutocroPV2 خيارات width height ، والتي يمكن أن تحدد العرض أو الارتفاع كقيم ثابتة.
ارتكب عقدة purgevram ، تنظيف vram رام.
ارتكب عقدة adoadjust التلقائية ، يمكنها ضبط تباين الصورة تلقائيا وتوازن الأبيض.
ارتكب عقدة RGBValue لإخراج قيمة اللون كقيمة عشرية واحدة لـ R ، G ، B. هذه الفكرة من Vxinhao ، شكرًا.
ارتكب عقدة البذور لإخراج قيمة البذور. ImageMaskScaleas ، PicturesCalebyspectRatio ، PicturesCaleByspectRatiov2 ، ImagesCalerestore ، NothersCalerestorev2 العقد تزيد من width ، ناتج height .
ارتكاب عقدة مستويات ، يمكن أن تحقق نفس وظيفة ضبط مستويات الألوان مثل photoshop.sharp & soft إضافة خيار "لا شيء".
ارتكاب عقدة blendifmask ، تتعاون هذه العقدة مع imgaeblendv2 أو ImageBlendadvancev2 لتحقيق نفس المزيج إذا كانت photoshop.
ارتكب عقد درجة حرارة colortmature و colordalance ، وتستخدم لضبط درجة حرارة اللون وتوازن اللون في الصورة.
أضف أنواعًا جديدة من Mode Mode V2 بين الصور. يدعم الآن ما يصل إلى 30 وضع مزيج. يتوفر وضع المزيج الجديد لجميع إصدارات V2 التي تدعم عقد الوضع المختلط ، بما في ذلك ImageBlend V2 و ImageBlendadvance V2 و Dropshadow V2 و Innershadow V2 و Outerglow V2 و Innerglow V2 و Stroke V2 و Coloroverlay V2 و BradientOverlay V2.
جزء من رمز BLENDMODE V2 هو من العقد البارزة لـ COMFYUI. بفضل المؤلفين الأصليين.
ارتكاب عقدة yolov8detect.
ارتكاب عقدة QWenimage2Prompt ، هذه العقدة هي إعادة تعبئة UForm-Gen2 Qwen Node ، وذلك بفضل المؤلف الأصلي.
ارتكب booleanoperator ، numberCalculator ، مربع النص ، عدد صحيح ، تعويم ، booleannodes. يمكن لهذه العقد إجراء عمليات رياضية ومنطقية.
ارتكاب تمديد العقدة extendcanvasv2 , دعم إدخال قيمة اللون.
ارتكب عقدة Autobrightness , يمكنها ضبط سطوع الصورة تلقائيًا.
CreateGradientMask العقدة إضافة خيار center .
ارتكاب عقدة getColorToneV2 ، يمكن تحديد الألوان الرئيسية والمتوسطة للخلفية أو الجسم.
ارتكاب عقدة ImagerWardFilter ، يمكن تصفية الصور ذات الجودة الرديئة.
تضيف العقد الفائقة طريقة VITMatte(local) ، يمكنك اختيار هذه الطريقة لتجنب الوصول إلى HuggingFace.co إذا كنت قد قمت بتنزيل النموذج بالفعل من قبل.
ارتكاب عقدة تأثير HDR , يعزز النطاق الديناميكي والجاذبية البصرية لصور المدخلات. هذه العقدة هي إعادة تعبئة تأثيرات HDR (Superbeasts.ai).
ارتكاب عقدة CropBoxResolve.
ارتكاب عقدة birefnetultra ، باستخدام نموذج BirefNet لإزالة الخلفية لديه قدرة أفضل على التعرف وتفاصيل الحافة العالية للغاية.
ارتكاب عقدة ImageAutocroPV2 ، يمكن أن تختار عدم إزالة الخلفية ، ودعم إدخال قناع ، وتوسيع نطاقه حسب الحجم الطويل أو القصير.
ارتكاب عقدة ImageHub ، ويدعم ما يصل إلى 9 مجموعات من إخراج تبديل الصور والقناع ، ويدعم الإخراج العشوائي.
ارتكاب نود.
ارتكب عقدة orderembellish. يخرج كلمات موجهة مصقولة ، ودعم إدخال الصور كمراجع.
تمت ترقية العقد الفائقة بالكامل إلى إصدار V2 ، مع إضافة طريقة معالجة Edget ، وهي مناسبة للتعامل مع المناطق الشفافة. تشمل MaskEdgeDtRadeTailv2 ، SegmentAnythingultrav2 ، RMBGultrav2 وعقد personmaskultrav2.
ارتكب لون الظل وتوضيح العقدة ، يمكنه ضبط لون الأجزاء المظلمة والمشرقة بشكل منفصل. ارتكب عقدة قناع الظل وتسليط الضوء ، يمكنه إخراج قناع للمناطق المظلمة والمشرقة.
ارتكاب عقدة CropBymaskv2 ، على أساس العقدة الأصلية ، فإنه يدعم إدخال crop_box ، مما يجعلها مريحة لقطع الطبقات من نفس الحجم.
ارتكاب عقدة SimpleTextimage ، فإنها تولد صورًا وأقنعة بسيطة من النص. تشير هذه العقدة إلى بعض وظائف ورمز Zho-Zho-Zho/Comfyui-text_image-Composite.
ارتكب عقدة ordertgagr , الاستدلال على المطالبات بناءً على الصورة. ويمكنه استبدال كلمة المفتاح للمطالبة (Need Pray for Google Studio API Key). ترقية colorimagev2 و gradientimagev2 , دعم المستخدم تخصيص أحجام مسبق وإدخال size_as.
ارتكاب عقدة Lama ، يمكن أن تمحو الكائنات من الصورة بناءً على القناع. هذه العقدة هي إعادة تعبئة iopaint.
الالتزام ImageremoveAlpha وعقد ImageCombinealpha ، يمكن إزالة أو دمج قناة ألفا للصورة.
ارتكاب ImagesCalerestorev2 و ImagesCaleByaspectRatiov2 ، يدعم تحجيم الصور إلى أحجام طويلة أو قصيرة المحددة.
ارتكب عقدة informaskultra ، وتوليد أقنعة لوجه الصورة أو الشعر أو بشرة الجسم أو الملابس أو الملحقات. يأتي رمز النماذج لهذه العقدة من مولد القناع A-Mass.
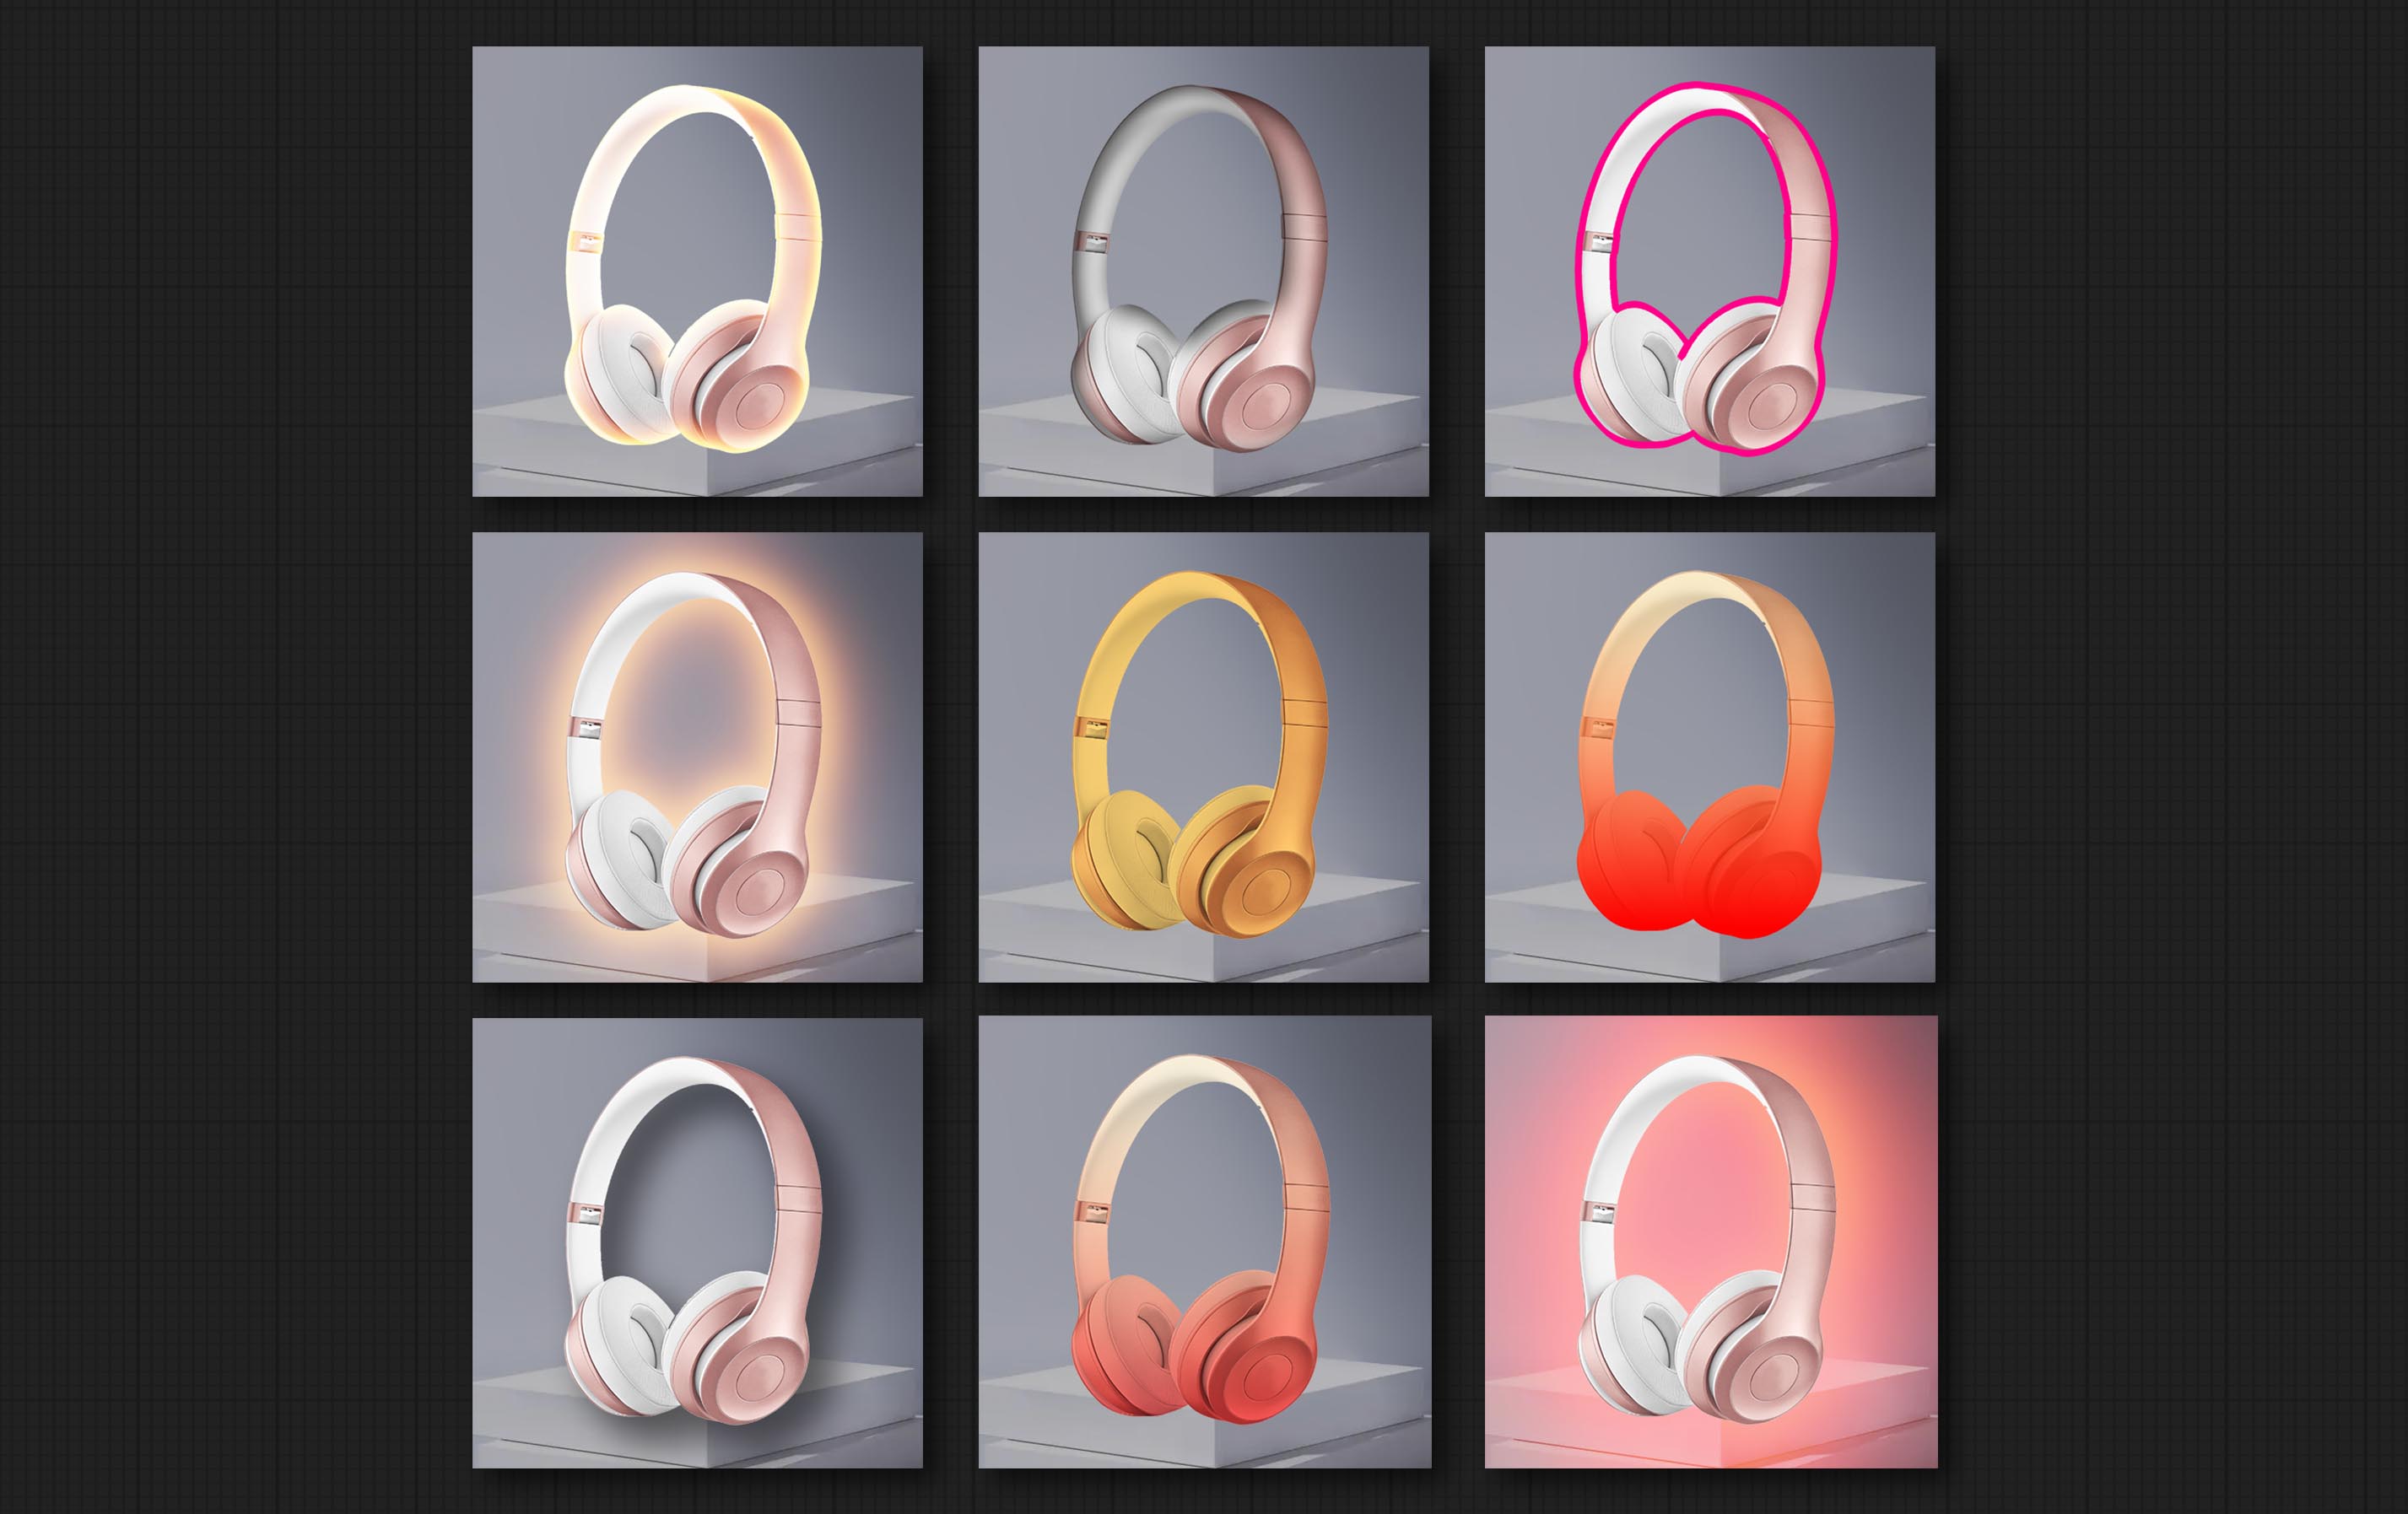
ارتكب عقدة LightLeak ، يحاكي هذا المرشح تأثير تسرب الضوء للفيلم.
ارتكاب عقدة فيلم ، يحاكي هذا المرشح حافة الحبوب والحافة المظلمة والحافة غير الواضحة للفيلم ، ودعم خريطة عمق الإدخال لمحاكاة التركيز. يتم إعادة تنظيم وتغليف DigitalJohn/Comfyui-propost.
ارتكب عقدة ImageAutocrop ، والتي تم تصميمها لإنشاء مواد صور لنماذج التدريب.
ارتكاب NoteCcaleByaspectRatio Node ، يمكن تحجيم صورة أو قناع وفقًا لنسبة الإطار.
إصلاح خطأ تدرج اللون في LUT ، قم بتطبيق عرض العقدة ، وتدعم هذه العقدة الآن مساحة لون السجل. *يرجى تحميل ملف LUG LUT المخصص لصورة مساحة لون السجل.
ارتكاب عقدة creategradientmask. ارتكاب العقد طبقة LayerimAtrans و LayerMaskTransform.
ارتكاب عقدة MaskEdgeDtRadetail ، معالجة أقنعة تقريبية إلى Ultra Fine Adges.Commit Node.
ارتكب عقدة حادة وناعمة ، يمكن أن تعزز أو تخلص من تفاصيل الصورة. ارتكاب عقدة MaskByDifferent ، فإنها تقارن صورتين وإخراج قناع. ارتكاب عقدة spessionanythingultra ، تحسين جودة حواف القناع. *إذا لم يتم تثبيت Segmentanything ، فستحتاج إلى تنزيل النموذج يدويًا.
تحتوي جميع العقد على صور دفعية مدعومة بالكامل ، مما يوفر الراحة لإنشاء الفيديو. (تدعم عقدة CropBymask فقط التخفيضات من نفس الحجم. إذا تم إدخال Mask_For_Crop الدُفعات ، فسيتم استخدام البيانات من الورقة الأولى.)
ارتكاب العقد rembgultra و pixelspread تحسن بشكل ملحوظ جودة القناع. *يتطلب Rembgultra تنزيل النموذج اليدوي.
ارتكب عقدة textimage ، فإنها تنشئ صورًا وأقنعة نصية.
أضف أنواعًا جديدة من وضع المزيج بين الصور. يدعم الآن ما يصل إلى 19 وضع مزيج. أضف color_burn ، color_dodge ، linear_burn ، linear_dodge ، overlay ، soft_light ، hard_light ، vivid_light ، pin_light ، linear_light و hard_mix . ينطبق وضع المزيج المضافة حديثًا على جميع العقد التي تدعم وضع مزيج.
ارتكب عقدة مرشح Colormap لإنشاء تأثير خريطة حرارة اللون الزائفة.
ارتكب ألوان مائية و SkinBeauty - هذه مرشحات الصور التي تولد آثار ألوان مائية وسلاسة الجلد.
ارتكب عقدة ImageShift لتغيير الصورة وإخراج قناع التماس الإزاحة ، مما يجعلها مريحة لإنشاء قوام مستمر.
ارتكب عقدة ImageMasksCaleas لضبط الصورة أو حجم القناع بناءً على الصورة المرجعية.
ارتكاب NODE ImagesCalerestore للعمل مع CropBymask من أجل الأعمال الراقية والإصلاح المحلية.
ارتكب العقد brocbymask وترميم box. يمكن لمزيج هذين الاثنين أن يحصل جزئياً على الصورة وإعادة رسم الصورة قبل استعادتها.
ارتكب عقدة ColorAdapter ، والتي يمكن أن تعدل تلقائيًا نغمة اللون للصورة.
ارتكاب عقدة Maskstroke ، يمكنها إنشاء ضربات محيط قناع.
أضف مجموعة عقدة LayerColor ، تستخدم لضبط لون الصورة. ويشمل تطبيق LUT ، غاما ، السطوع والتباين ، RGB ، YUV ، LAB ADN HSV.
ارتكاب العقد ImageChannelsplit و ImageChannelmerge.
ارتكاب عقدة maskmotionblur.
ارتكب ضوء softlight.
ارتكاب عقدة القناة ، التي هي مرشح ، يمكن أن تنتج تأثير خلع القناة مماثل مثل شعار Tiktok.
ارتكاب عقدة Maskgradient ، يمكن أن تخلق التدرج في القناع.
ارتكاب عقدة getColortone ، يمكن الحصول على اللون الرئيسي أو متوسط لون الصورة. ارتكاب قناع وعقد MaskedGeshrink.
ارتكب عقدة MaskBoxDetect ، والتي يمكن أن تكتشف الموقف تلقائيًا من خلال القناع وإخراجه إلى العقدة المركبة. ارتكب عقدة xy إلى النسبة المئوية لتحويل الإحداثيات المطلقة إلى الإحداثيات في المئة. ارتكب عقدة غوسيانبلور. ارتكاب عقدة getImagesize.
ارتكاب عقدة تمتد.
ارتكاب عقدة ImageBlendvance. تتيح هذه العقدة توليف صور الخلفية وطبقات ذات أحجام مختلفة ، مما يوفر تجربة توليف أكثر حرة. ارتكب عقدة printinfo كمساعد تصحيح تصحيح سير العمل.
ارتكب العقد الملونة والتقدم ، وتستخدم لتوليد صور ملونة صلبة ومتعلمين.
ارتكاب العقد التدرجية والعقد الملونة. أضف حكم إدخال القناع غير صالح وتجاهله عند إدخال قناع غير صالح.
ارتكاب العقد الداخلية ، innershadow و motionblur.
إعادة تسمية جميع العقد المكتملة ، تنقسم العقد إلى 4 مجموعات : layersstyle ، layermask ، layerutility ، layerfilter. يجب استبدال سالات العمل التي تحتوي على العقد القديمة يدويًا بعقد إصدار جديدة.
خضعت عقدة Outerglow تعديلات كبيرة عن طريق إضافة خيارات للسطوع ، Light_Color ، و Glow_Color .
ارتكاب عقدة maskinvert.
ارتكاب عقدة colorpick.
ارتكب عقدة السكتة الدماغية.
ارتكاب عقدة MaskPreview.
ارتكاب عقدة الصور.
layer_mask ليس مدخلات إلزامية الآن. يُسمح باستخدام الطبقات والأقنعة ذات الأشكال المختلفة ، ولكن يجب أن يكون الحجم متسقًا.
ارتكاب عقدة ImageBlend.
ارتكاب عقدة الزجاج الخارجي.
ارتكاب عقدة dropshadow.
وصف
تنقسم العقد إلى 5 مجموعات وفقًا لوظائفها: layersstyle ، layercolor ، layermask ، layerutility و layerfilter.
- توفر العقد Layersstyle أنماط طبقة تحاكي Adobe Photoshop.

- توفر مجموعة عقدة LayerColor وظائف ضبط اللون.
- توفر العقد LayerMask أدوات مساعدة القناع.
- توفر العقد الطبقة العقد الإضافية المتعلقة بأدوات وسير العمل.
- توفر العقد Layerfilter مرشحات تأثير الصورة.
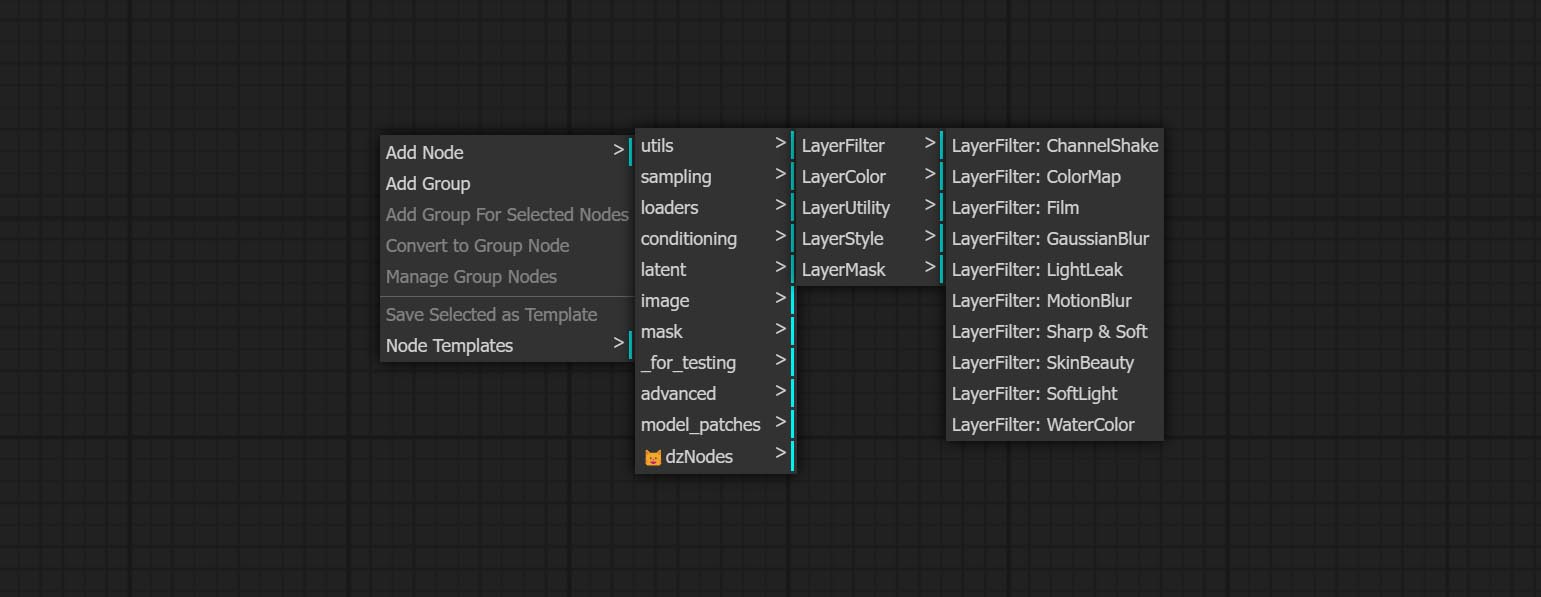
layersstyle
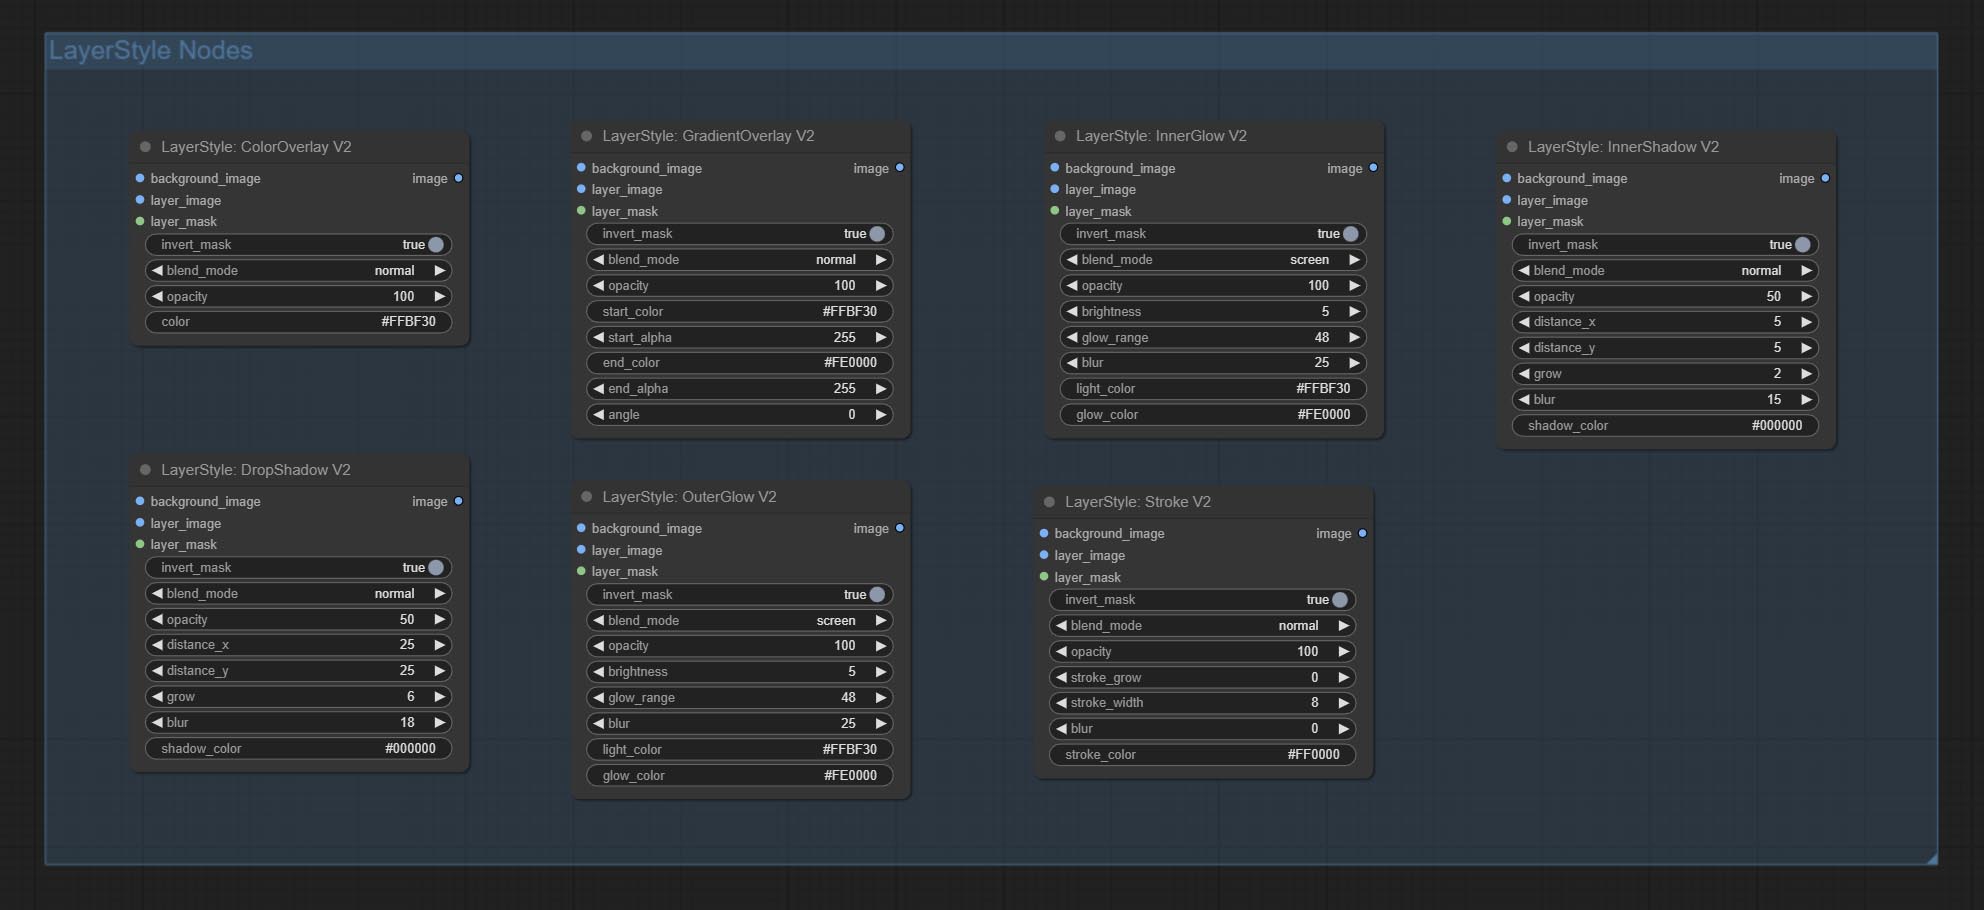
Dropshadow
توليد الظل 
خيارات العقدة: 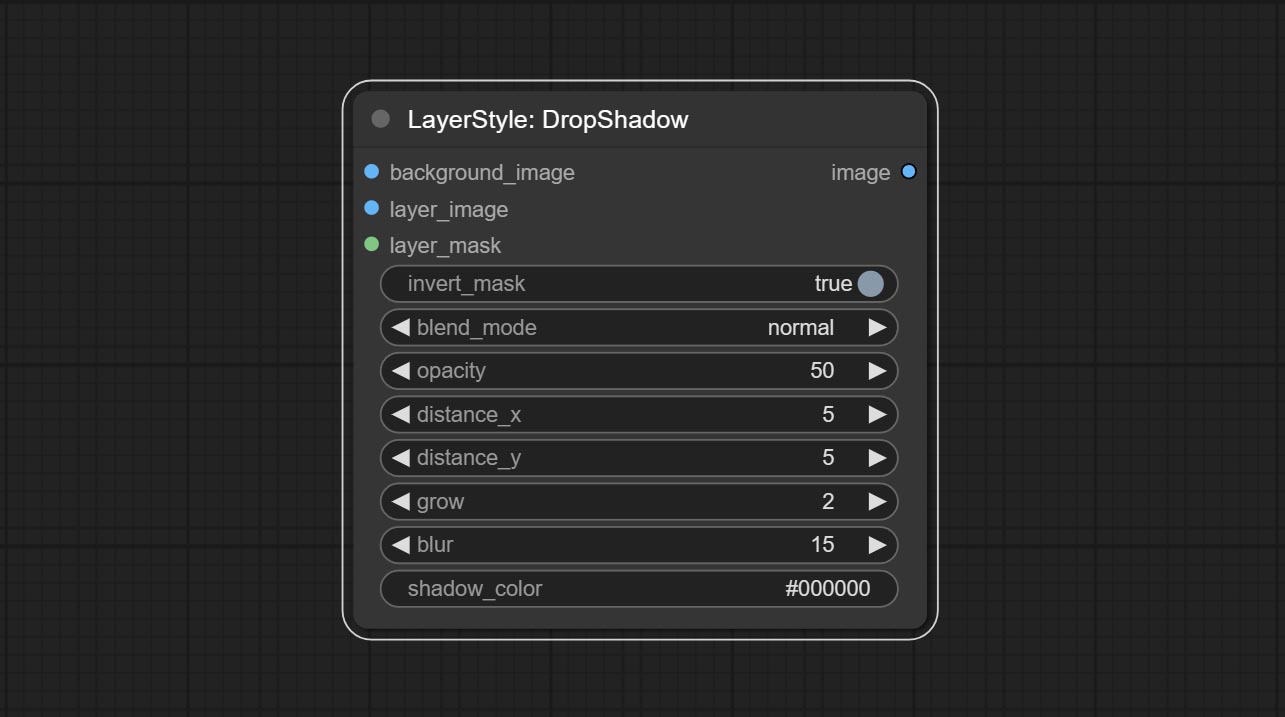
- background_image 1 : صورة الخلفية.
- layer_image 1 : صورة طبقة للمركب.
- layer_mask 1،2 : قناع Layer_image ، يتم إنشاء الظلال وفقًا لشكلها.
- invert_mask: سواء لعكس القناع.
- blend_mode 3 : نمط المزيج للظلال.
- عتامة: عتامة الظل.
- المسافة_x: إزاحة أفقية للظل.
- المسافة_y: إزاحة رأسية للظل.
- النمو: سعة توسع الظل.
- طمس: مستوى طمس الظل.
- Shadow_Color 4 : لون الظل.
- ملحوظة
الجلسة الخارجية
توليد التوهج الخارجي 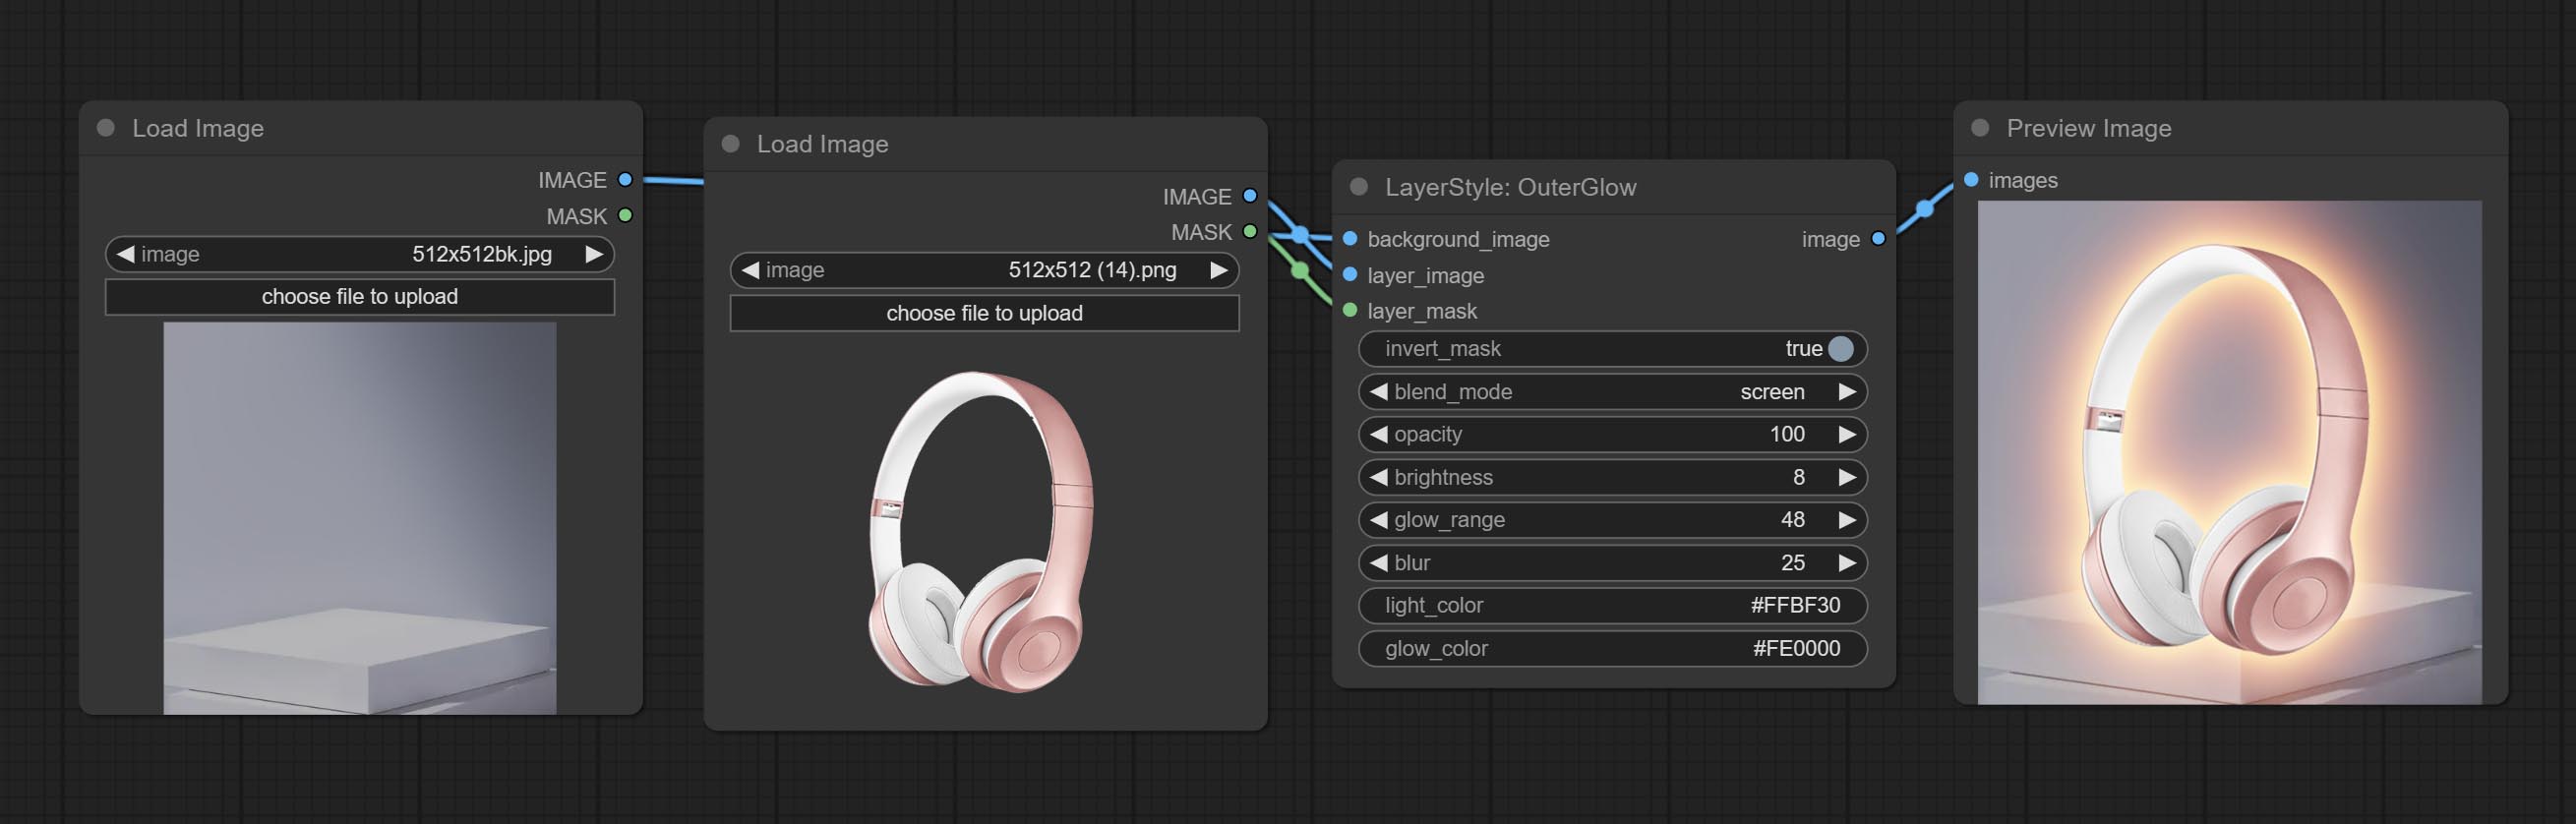
خيارات العقدة: 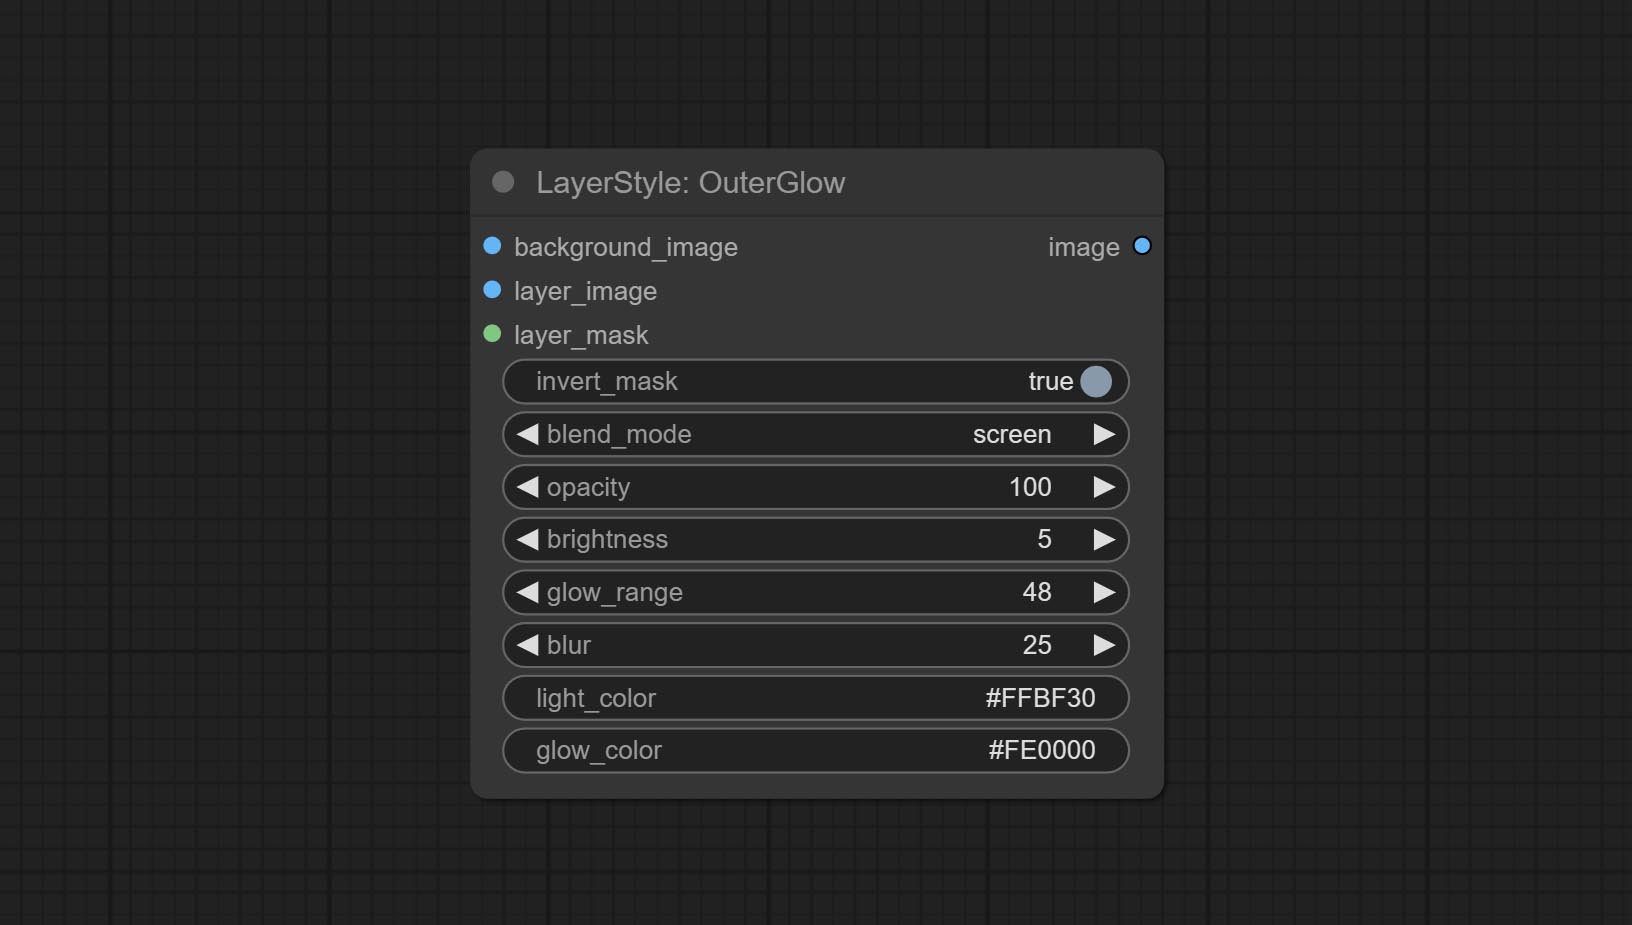
- background_image 1 : صورة الخلفية.
- layer_image 1 : صورة طبقة للمركب.
- Layer_mask 1،2 : قناع Layer_image ، يتم إنشاء النمو وفقًا لشكلها.
- invert_mask: سواء لعكس القناع.
- BLEND_MODE 3 : نمط الوهج.
- عتامة: عتامة الوهج.
- السطوع: نصوص الضوء.
- glow_range: مجموعة من التوهج.
- طمس : طمس الوهج.
- Light_Color 4 : Center Part Color of Glow.
- Glow_Color 4 : لون جزء من التوهج.
- ملحوظة
Innershadow
توليد الظل الداخلي 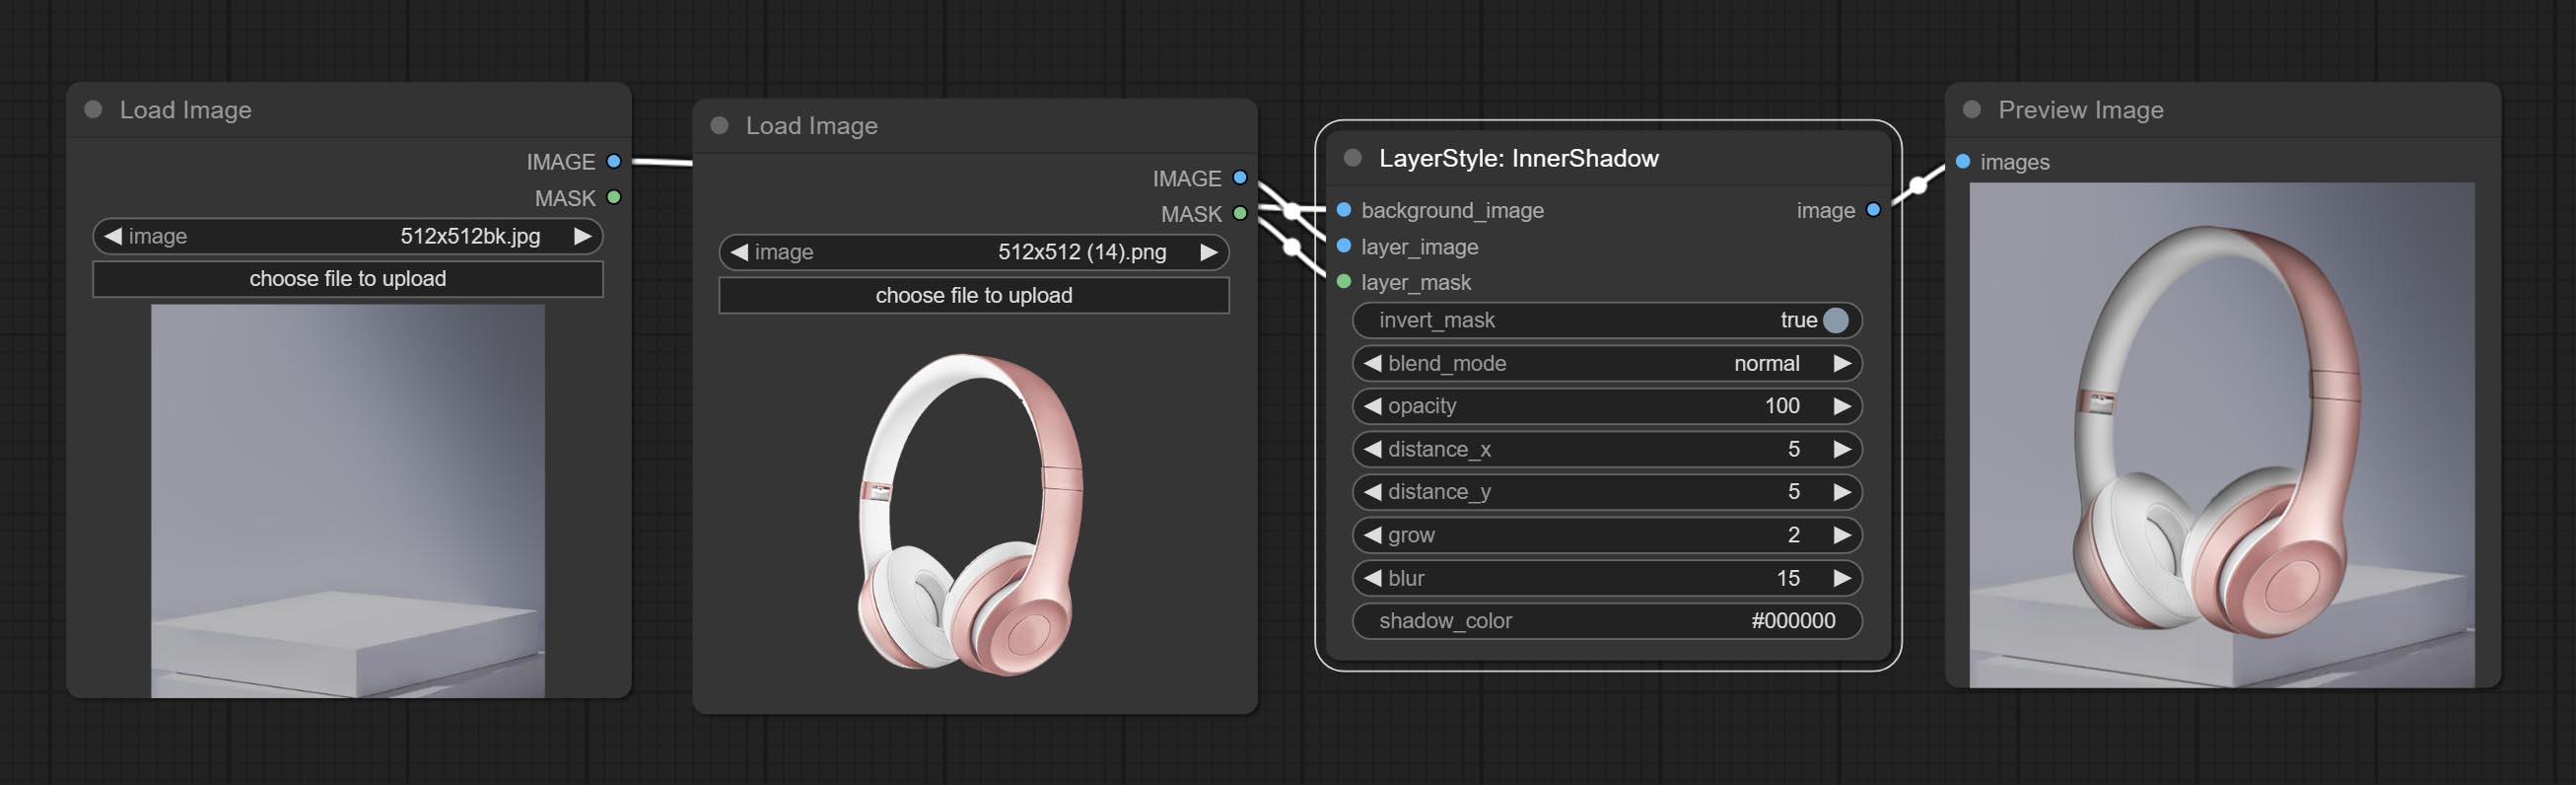
خيارات العقدة: 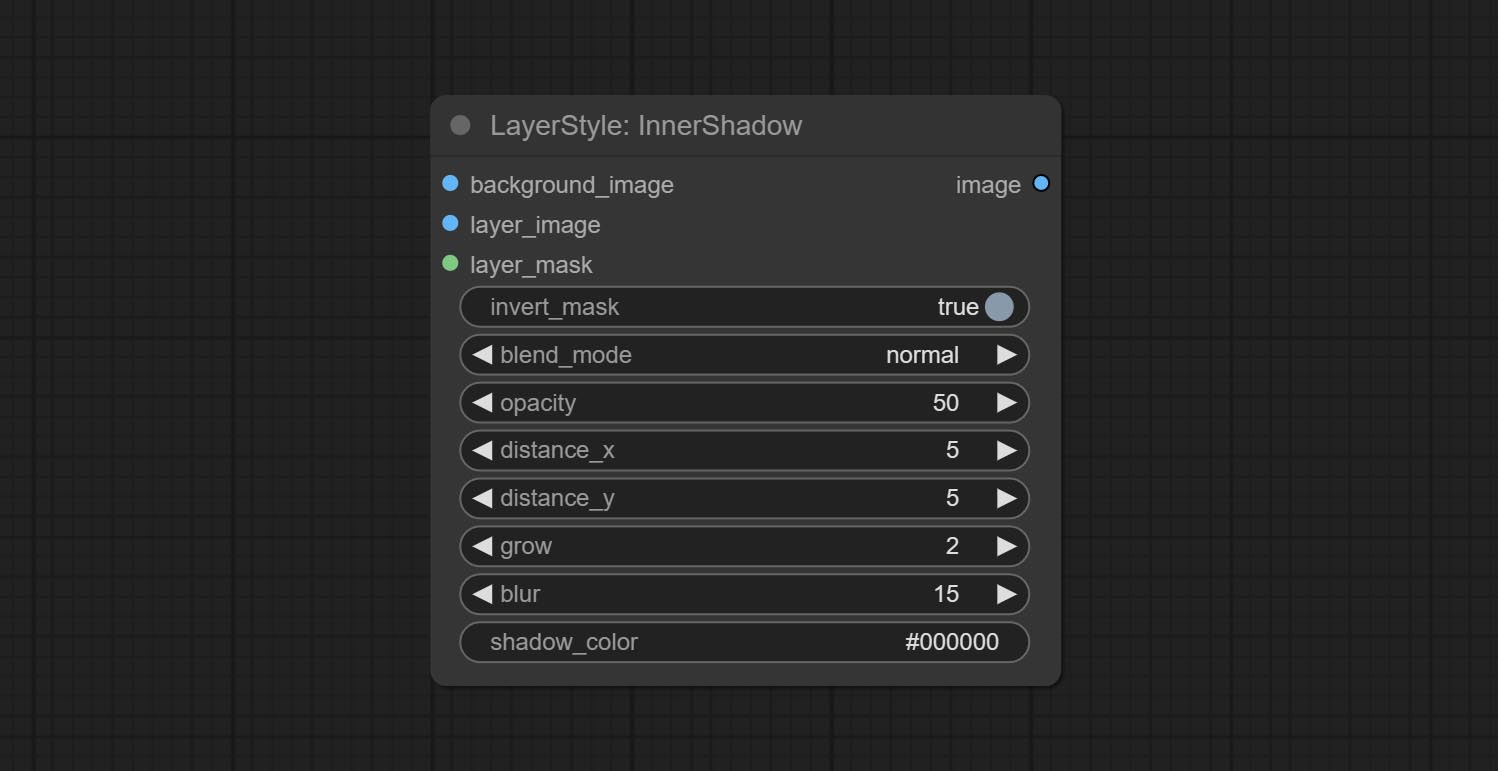
- background_image 1 : صورة الخلفية.
- layer_image 1 : صورة طبقة للمركب.
- layer_mask 1،2 : قناع Layer_image ، يتم إنشاء الظلال وفقًا لشكلها.
- invert_mask: سواء لعكس القناع.
- blend_mode 3 : نمط المزيج للظلال.
- عتامة: عتامة الظل.
- المسافة_x: إزاحة أفقية للظل.
- المسافة_y: إزاحة رأسية للظل.
- النمو: سعة توسع الظل.
- طمس: مستوى طمس الظل.
- Shadow_Color 4 : لون الظل.
- ملحوظة
innerglow
توليد التوهج الداخلي 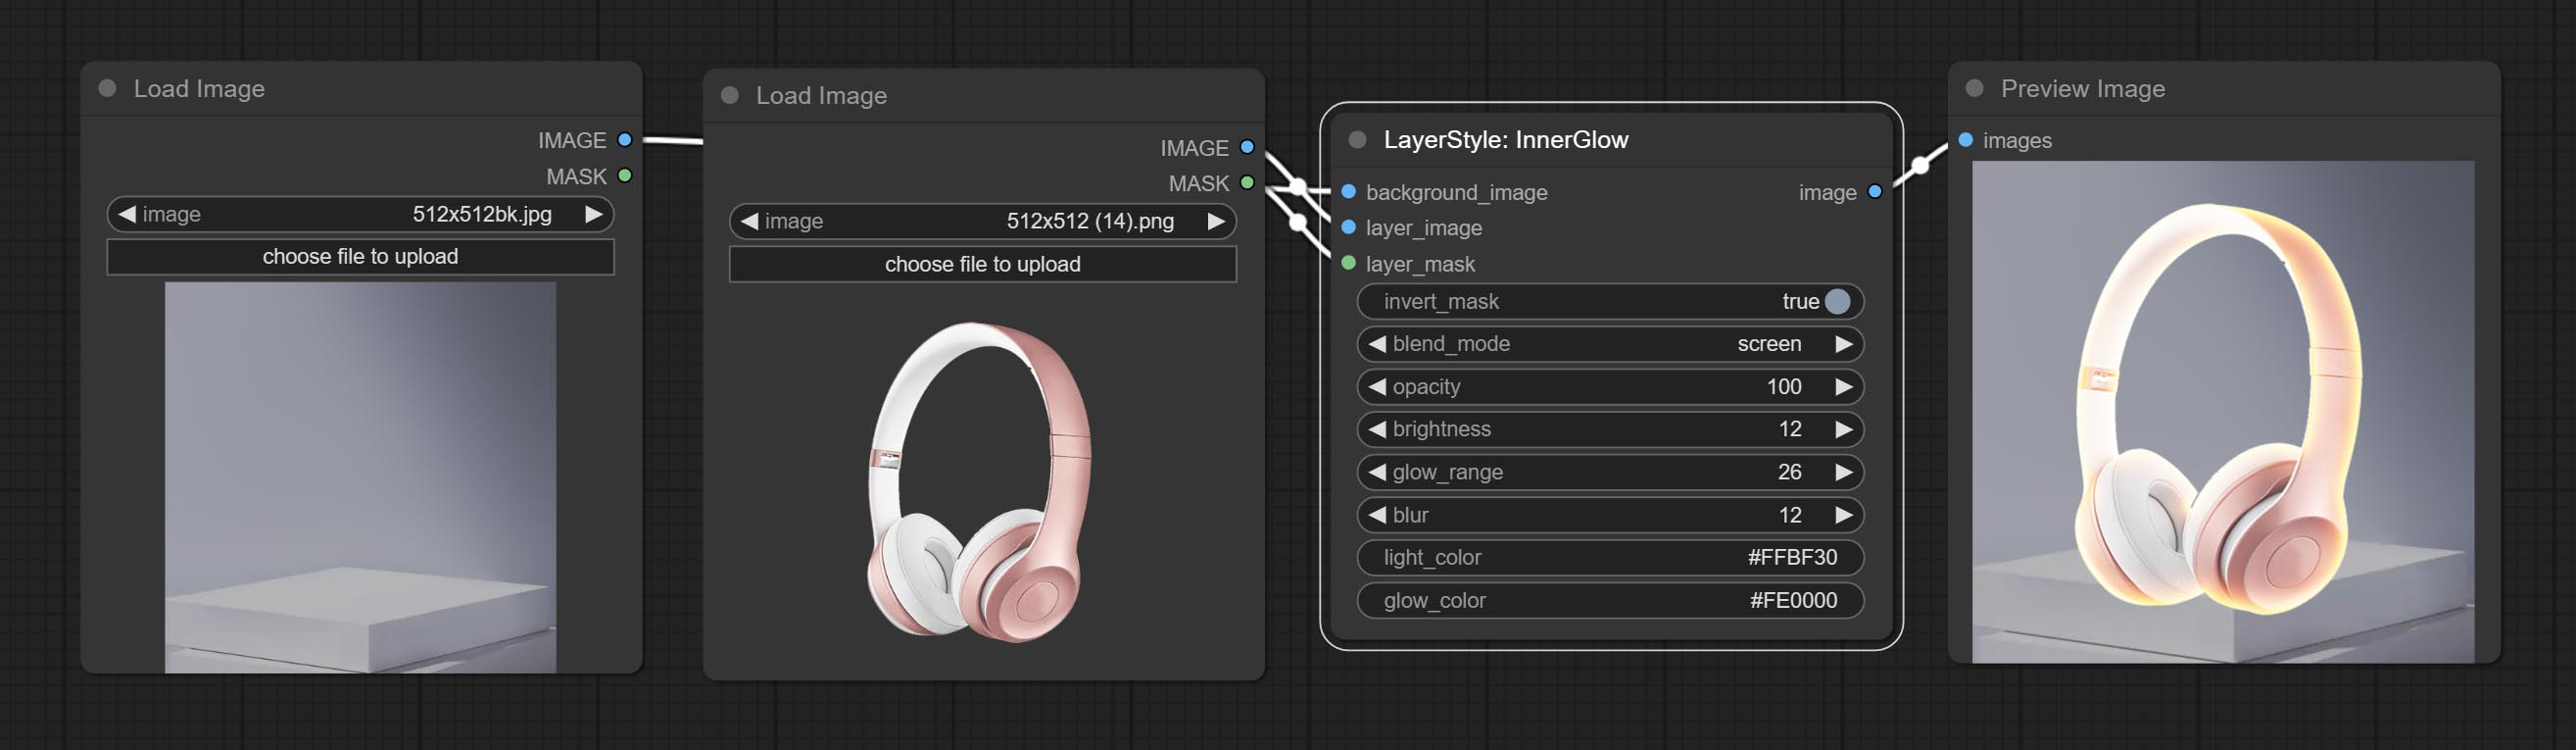
خيارات العقدة:
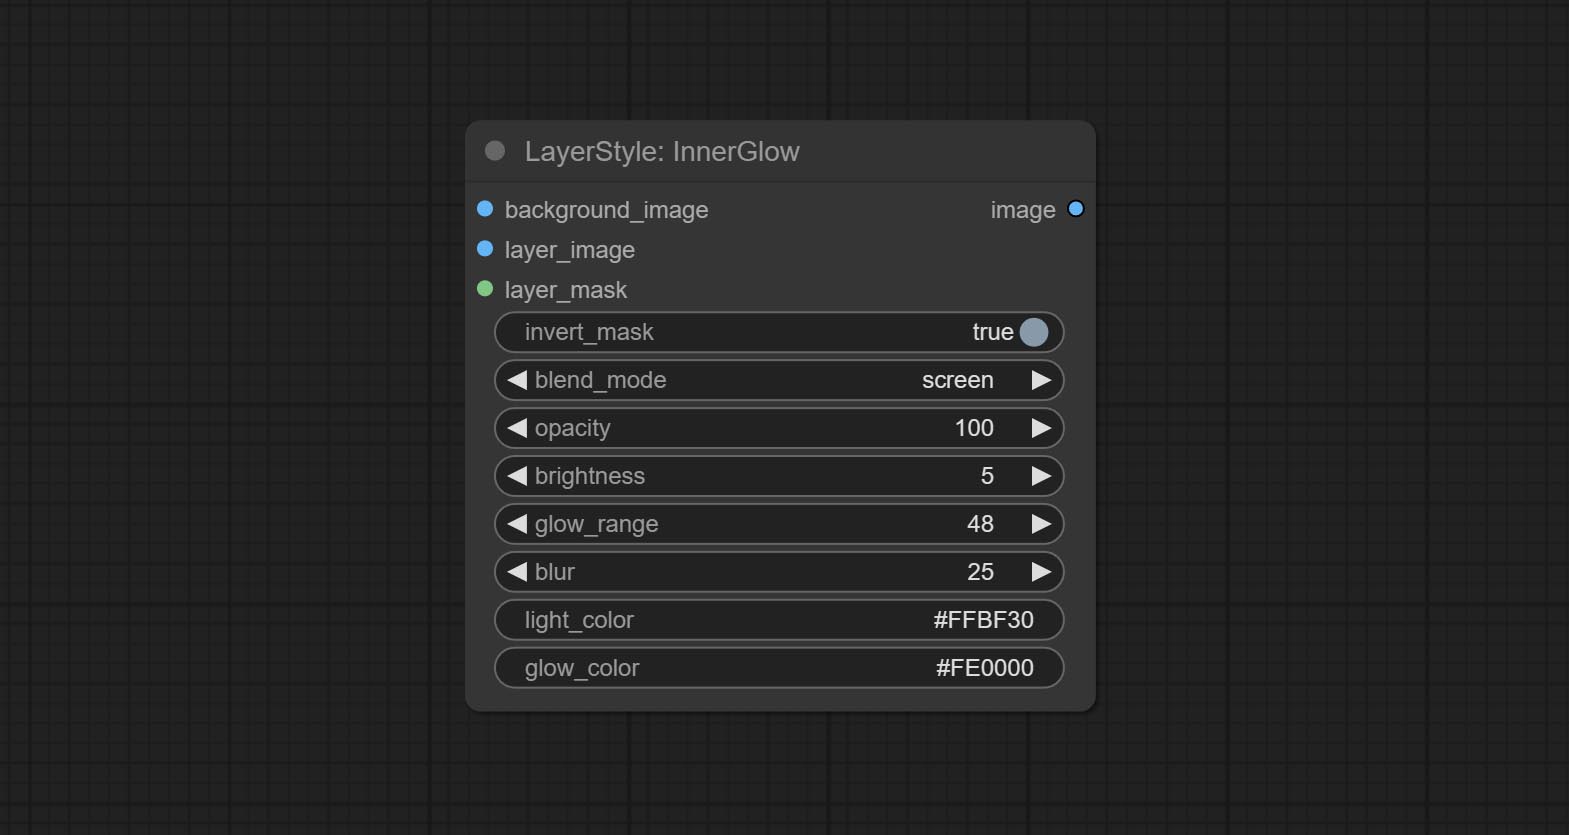
- background_image 1 : صورة الخلفية.
- layer_image 1 : صورة طبقة للمركب.
- Layer_mask 1،2 : قناع Layer_image ، يتم إنشاء النمو وفقًا لشكلها.
- invert_mask: سواء لعكس القناع.
- BLEND_MODE 3 : نمط الوهج.
- عتامة: عتامة الوهج.
- السطوع: نصوص الضوء.
- glow_range: مجموعة من التوهج.
- طمس : طمس الوهج.
- Light_Color 4 : Center Part Color of Glow.
- Glow_Color 4 : لون جزء من التوهج.
- ملحوظة
سكتة دماغية
توليد ضربة من الطبقة。 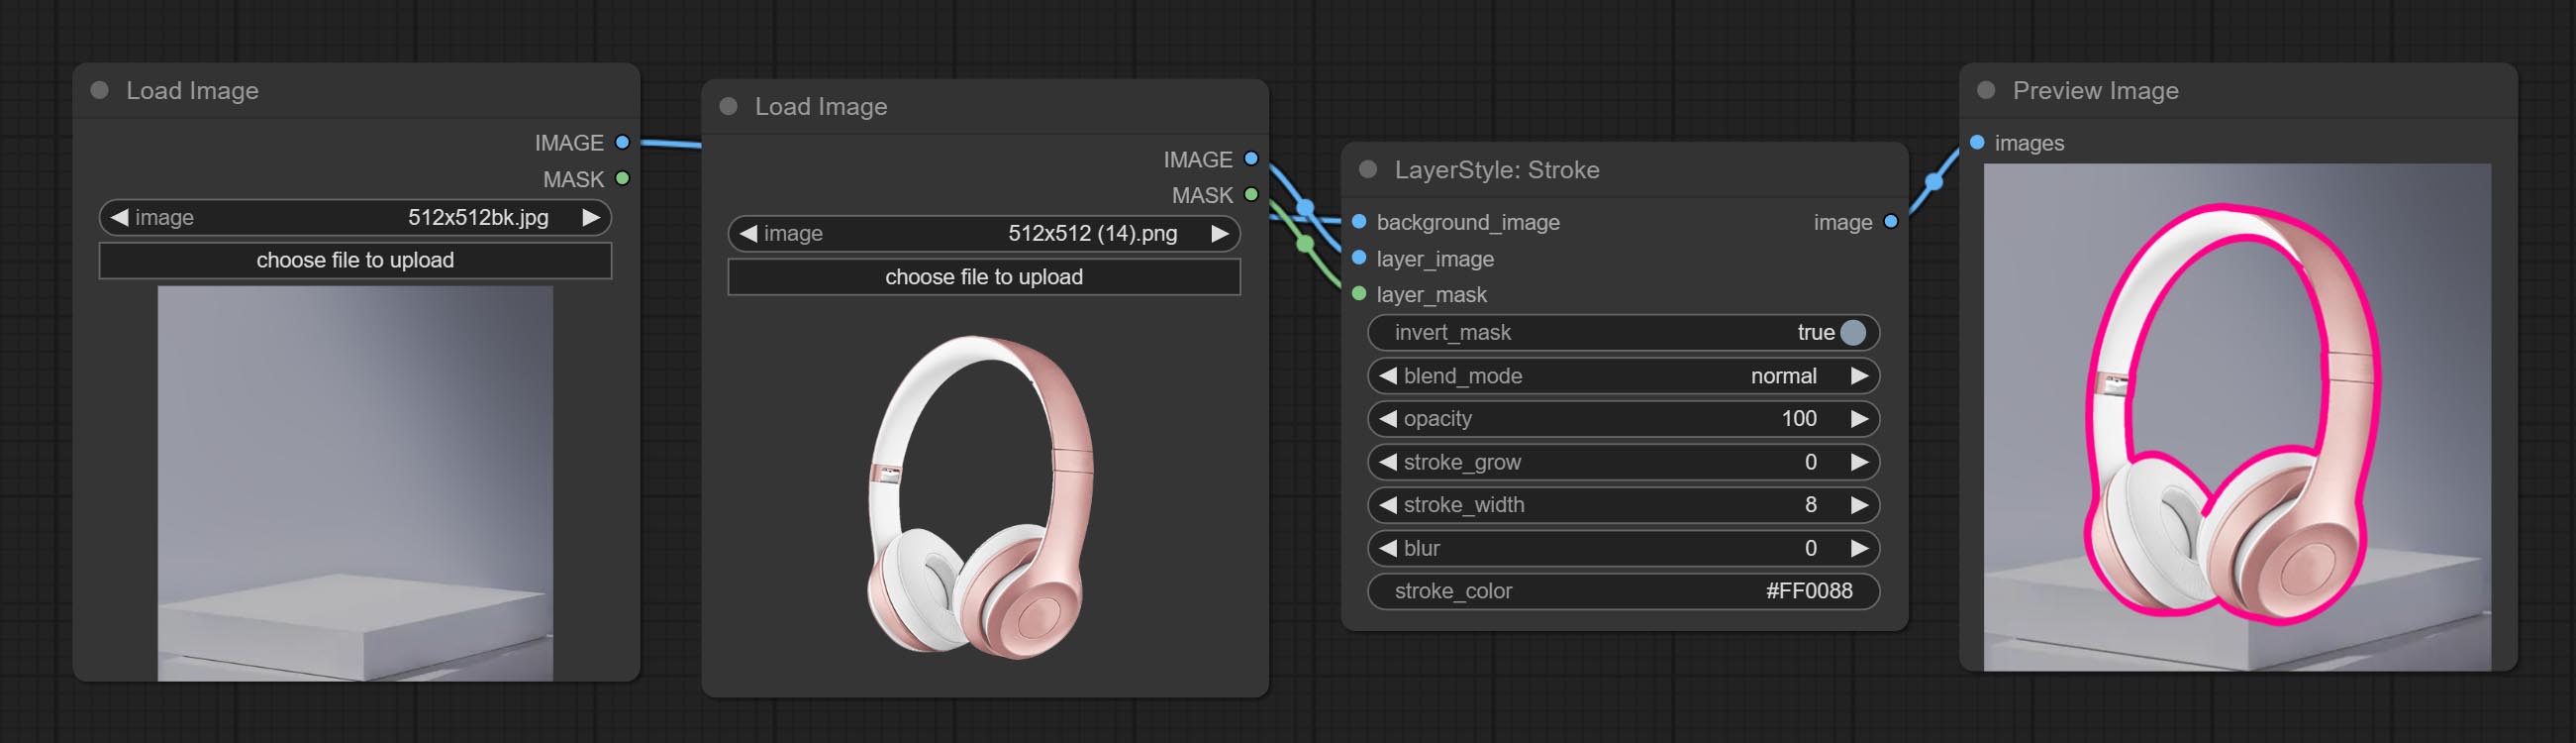
خيارات العقدة:
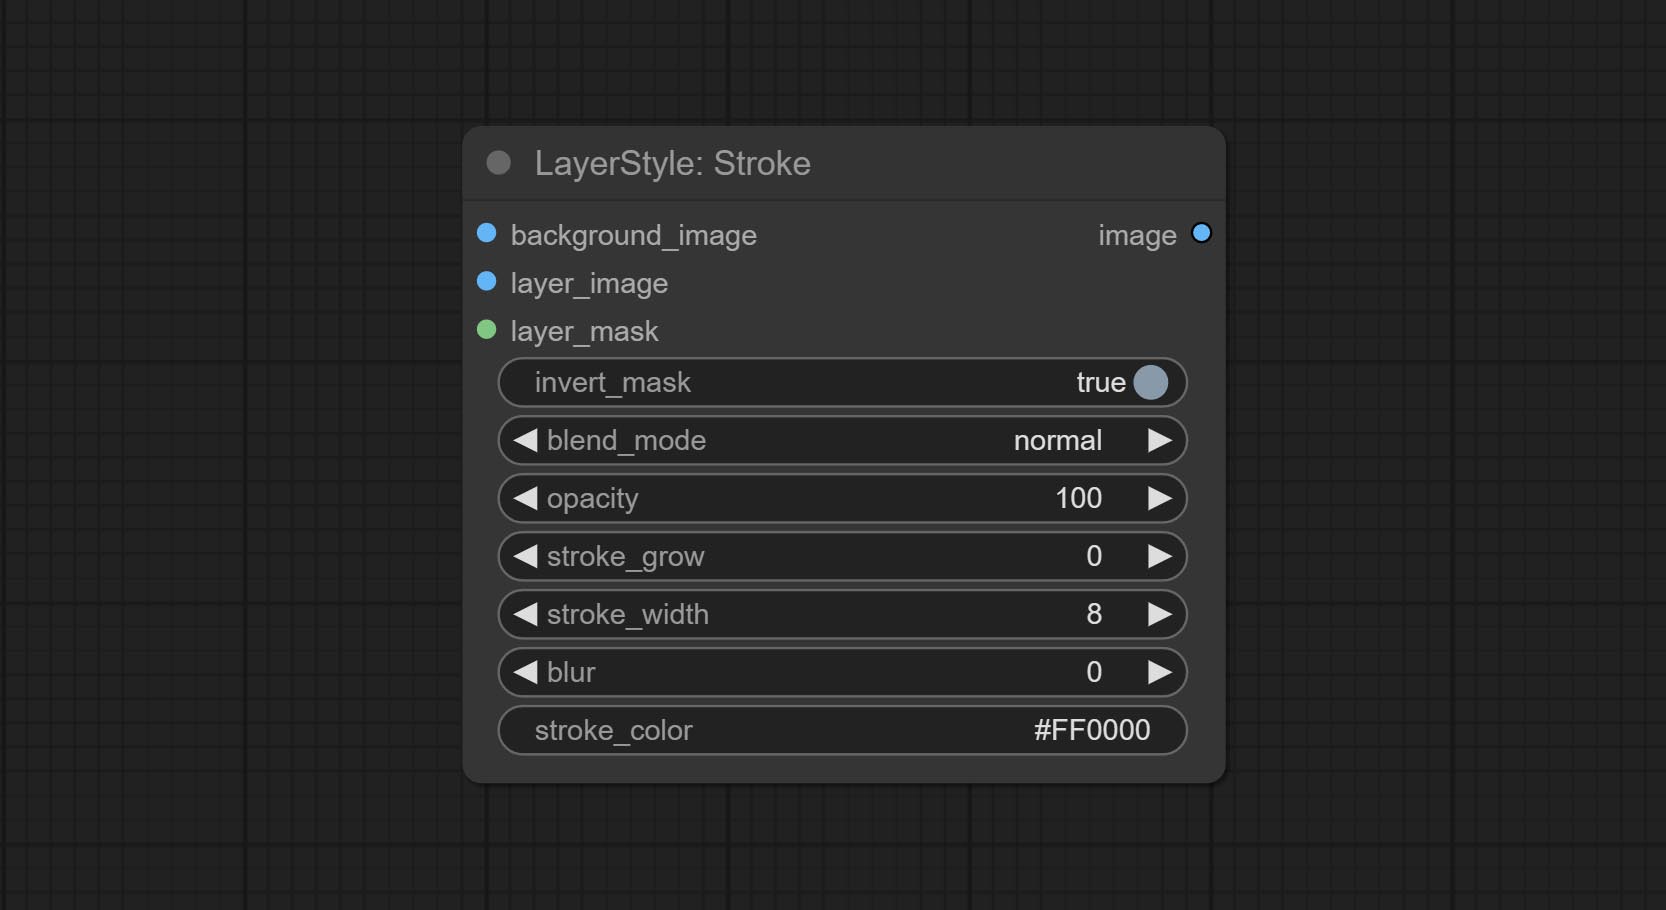
- background_image 1 : صورة الخلفية.
- layer_image 1 : صورة طبقة للمركب.
- layer_mask 1،2 : قناع Layer_image ، يتم إنشاء السكتة الدماغية وفقًا لشكلها.
- invert_mask: سواء لعكس القناع.
- BLEND_MODE 3 : وضع مزج السكتة الدماغية.
- عتامة: عتامة السكتة الدماغية.
- Stroke_Grow: تشير السعة التوسع/التقلص ، القيم الموجبة إلى التوسع والقيم السلبية تشير إلى الانكماش.
- stroke_width: عرض السكتة الدماغية.
- طمس: طمس السكتة الدماغية.
- stroke_color 4 : لون السكتة الدماغية ، الموصوفة بتنسيق RGB سداسي عشري.
- ملحوظة
التدرج
توليد تراكب التدرج 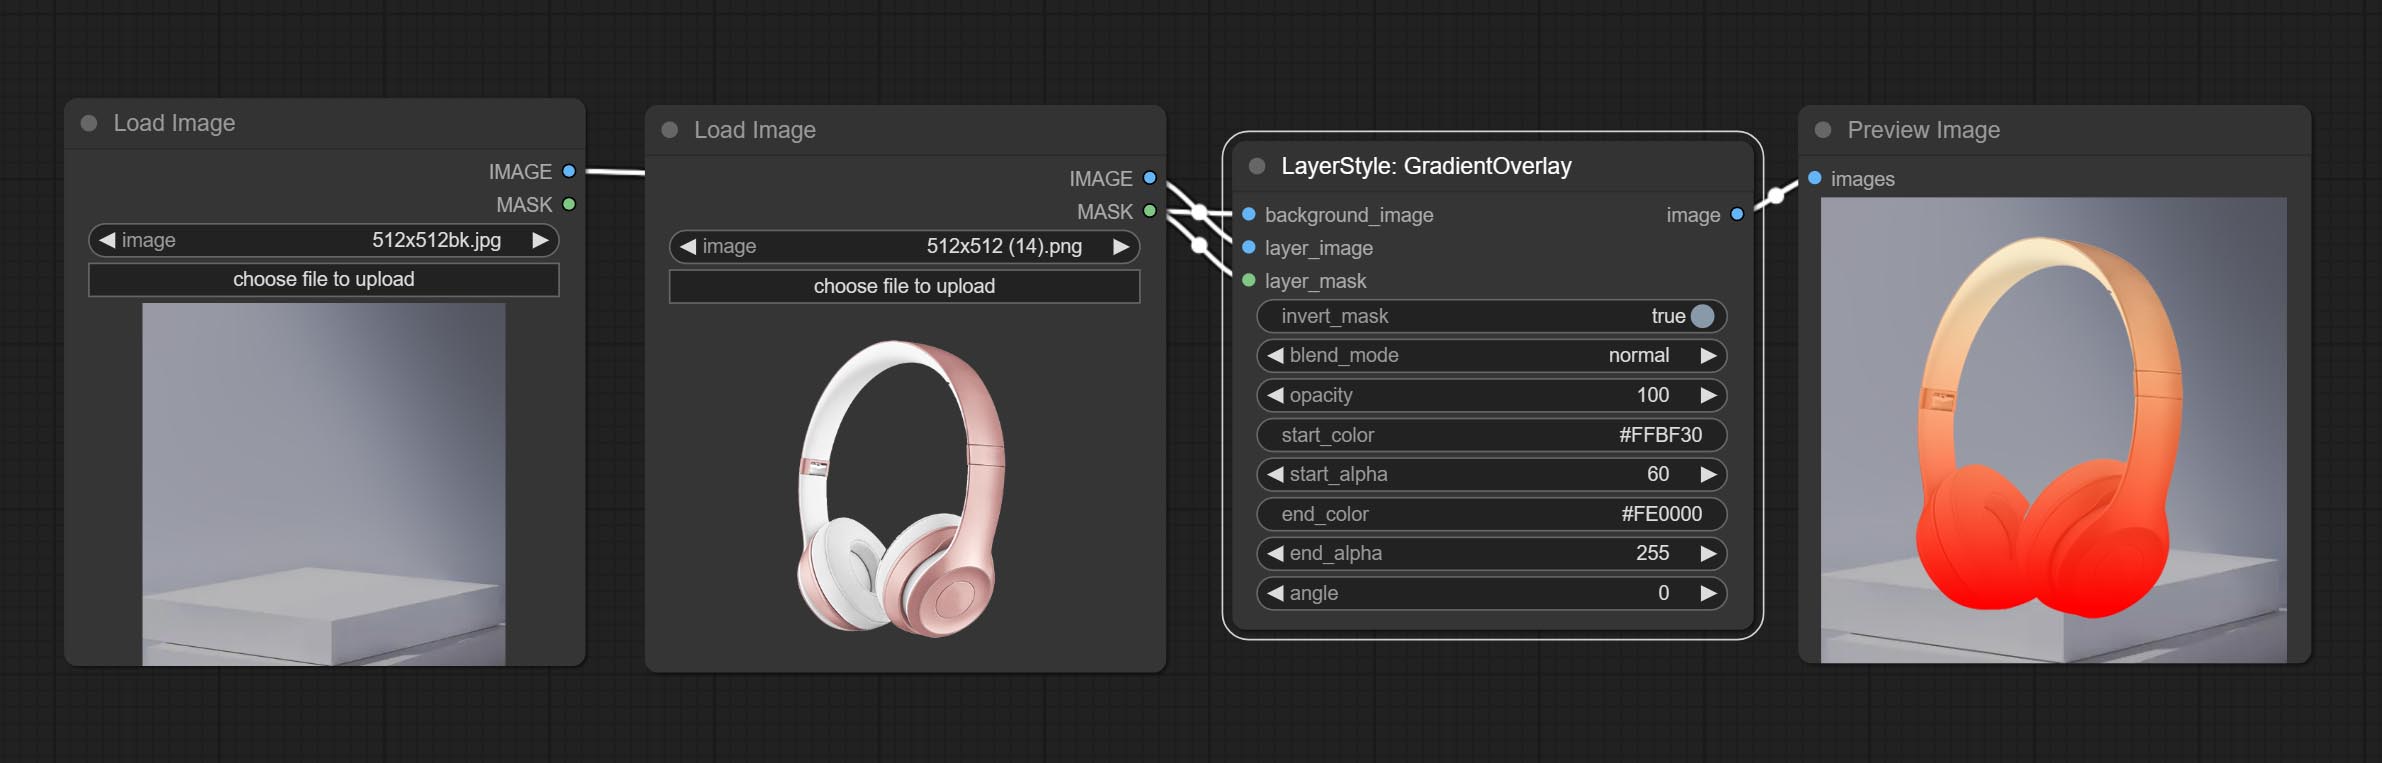
خيارات العقدة:
- background_image 1 : صورة الخلفية.
- layer_image 1 : صورة طبقة للمركب.
- layer_mask 1،2 : قناع ل Layer_image.
- invert_mask: Whether to reverse the mask.
- blend_mode 3 : Blending mode of gradient.
- opacity: Opacity of stroke.
- start_color: Color at the beginning of the gradient.
- start_alpha: Transparency at the beginning of the gradient.
- end_color: Color at the end of the gradient.
- end_alpha: Transparency at the end of the gradient.
- angle: Gradient rotation angle.
- ملحوظة
ColorOverlay
Generate color overlay 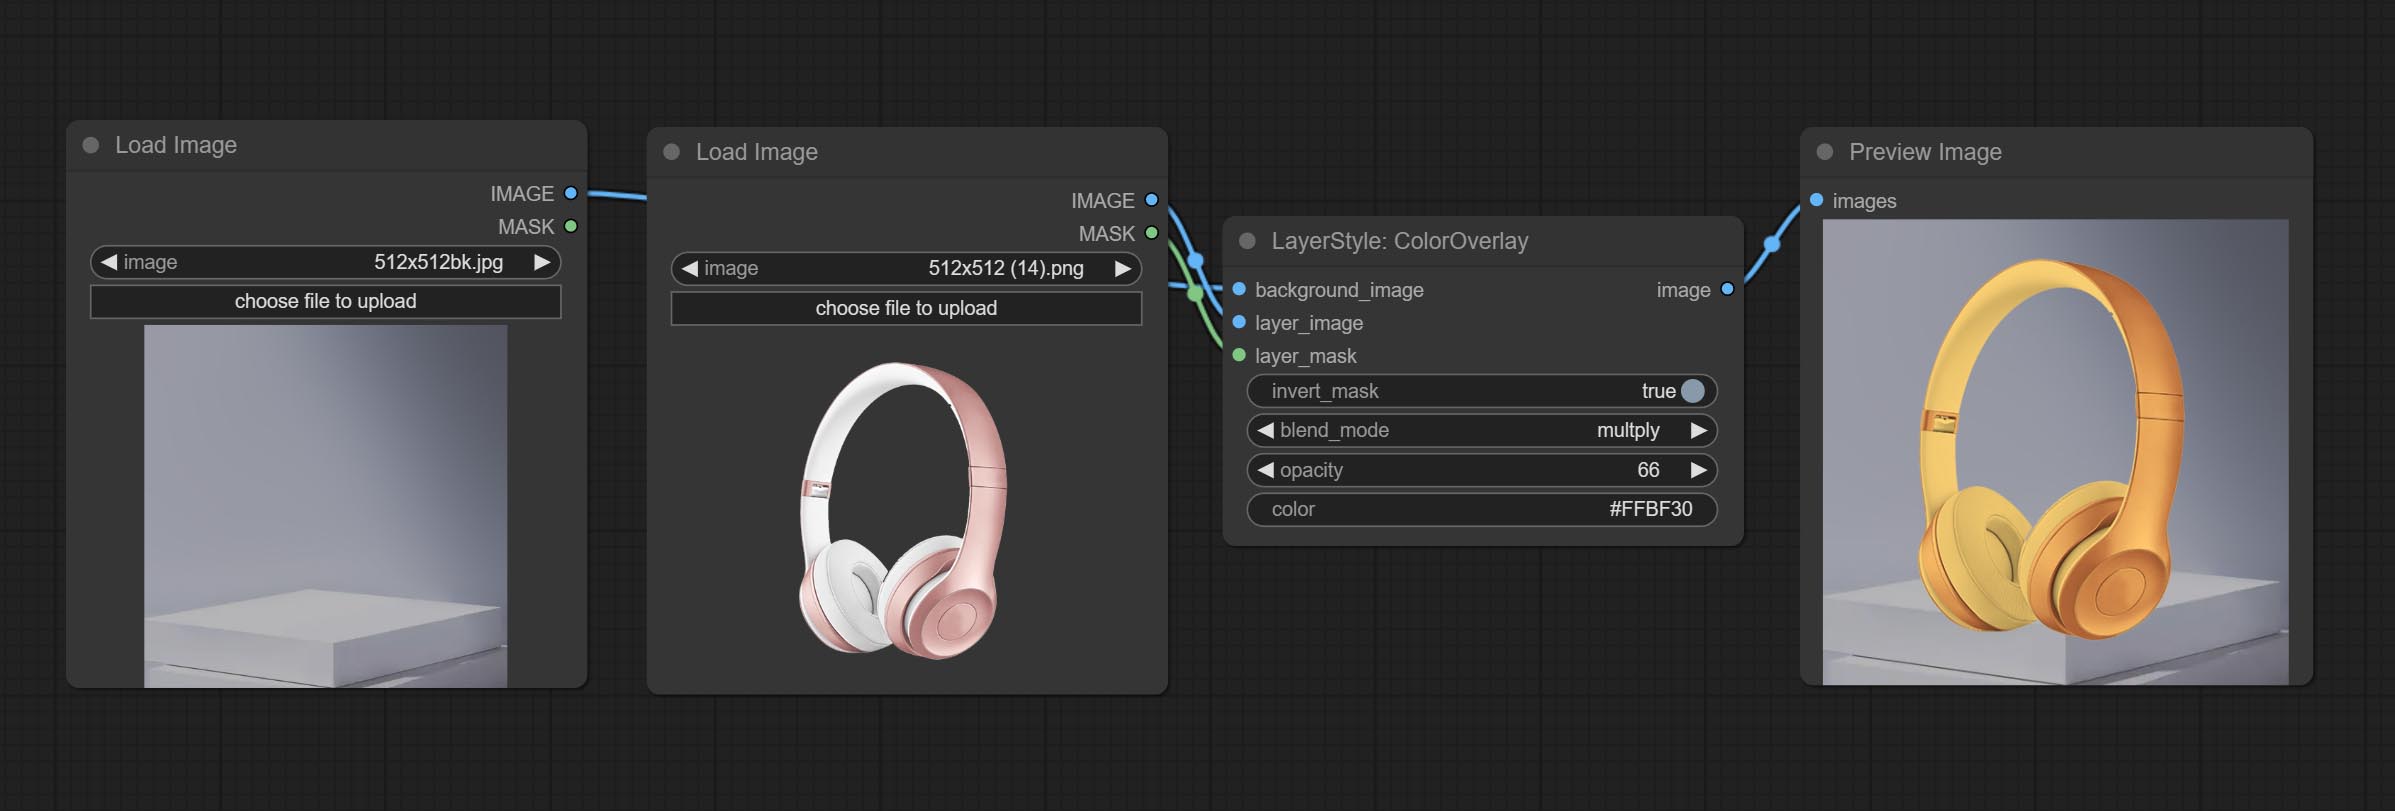
Node options: 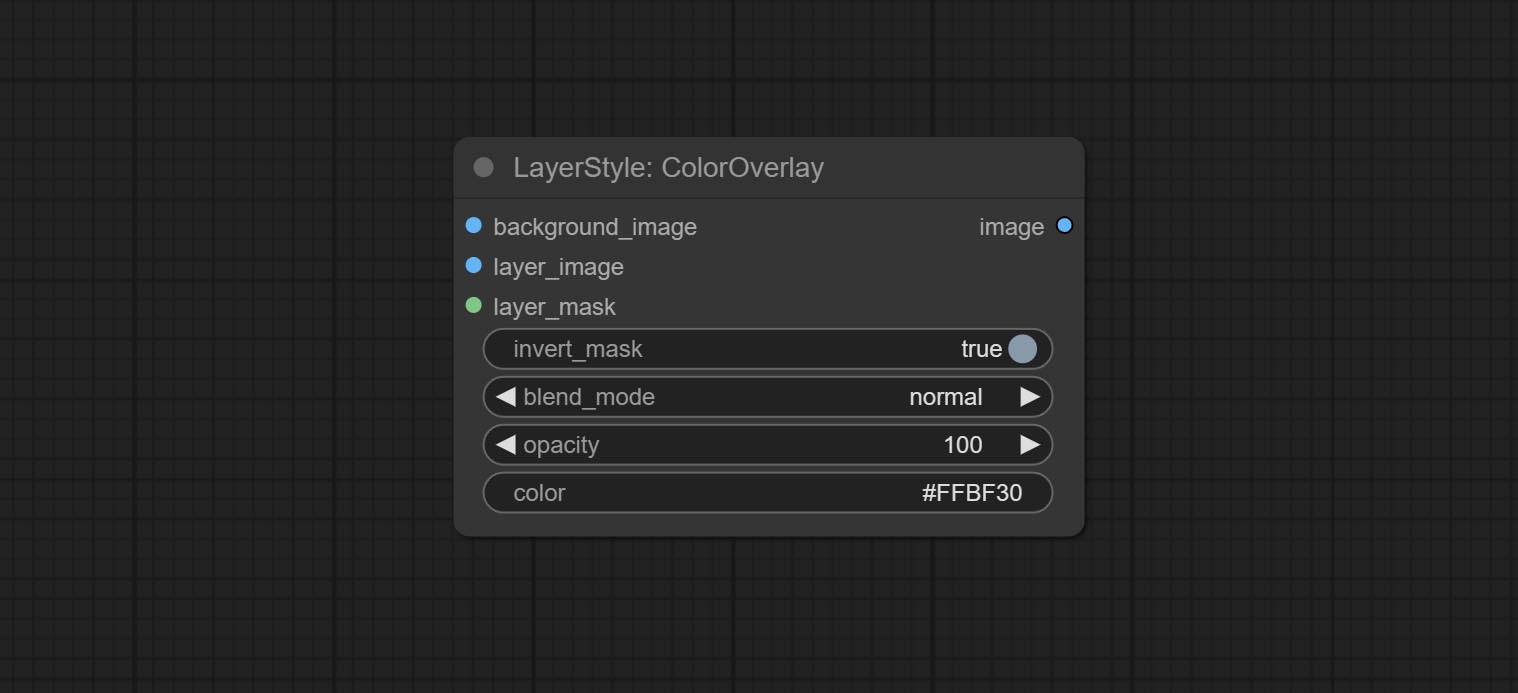
- background_image 1 : The background image.
- layer_image 1 : Layer image for composite.
- layer_mask 1,2 : Mask for layer_image.
- invert_mask: Whether to reverse the mask.
- blend_mode 3 : Blending mode of color.
- opacity: Opacity of stroke.
- color: Color of overlay.
- ملحوظة
LayerColor
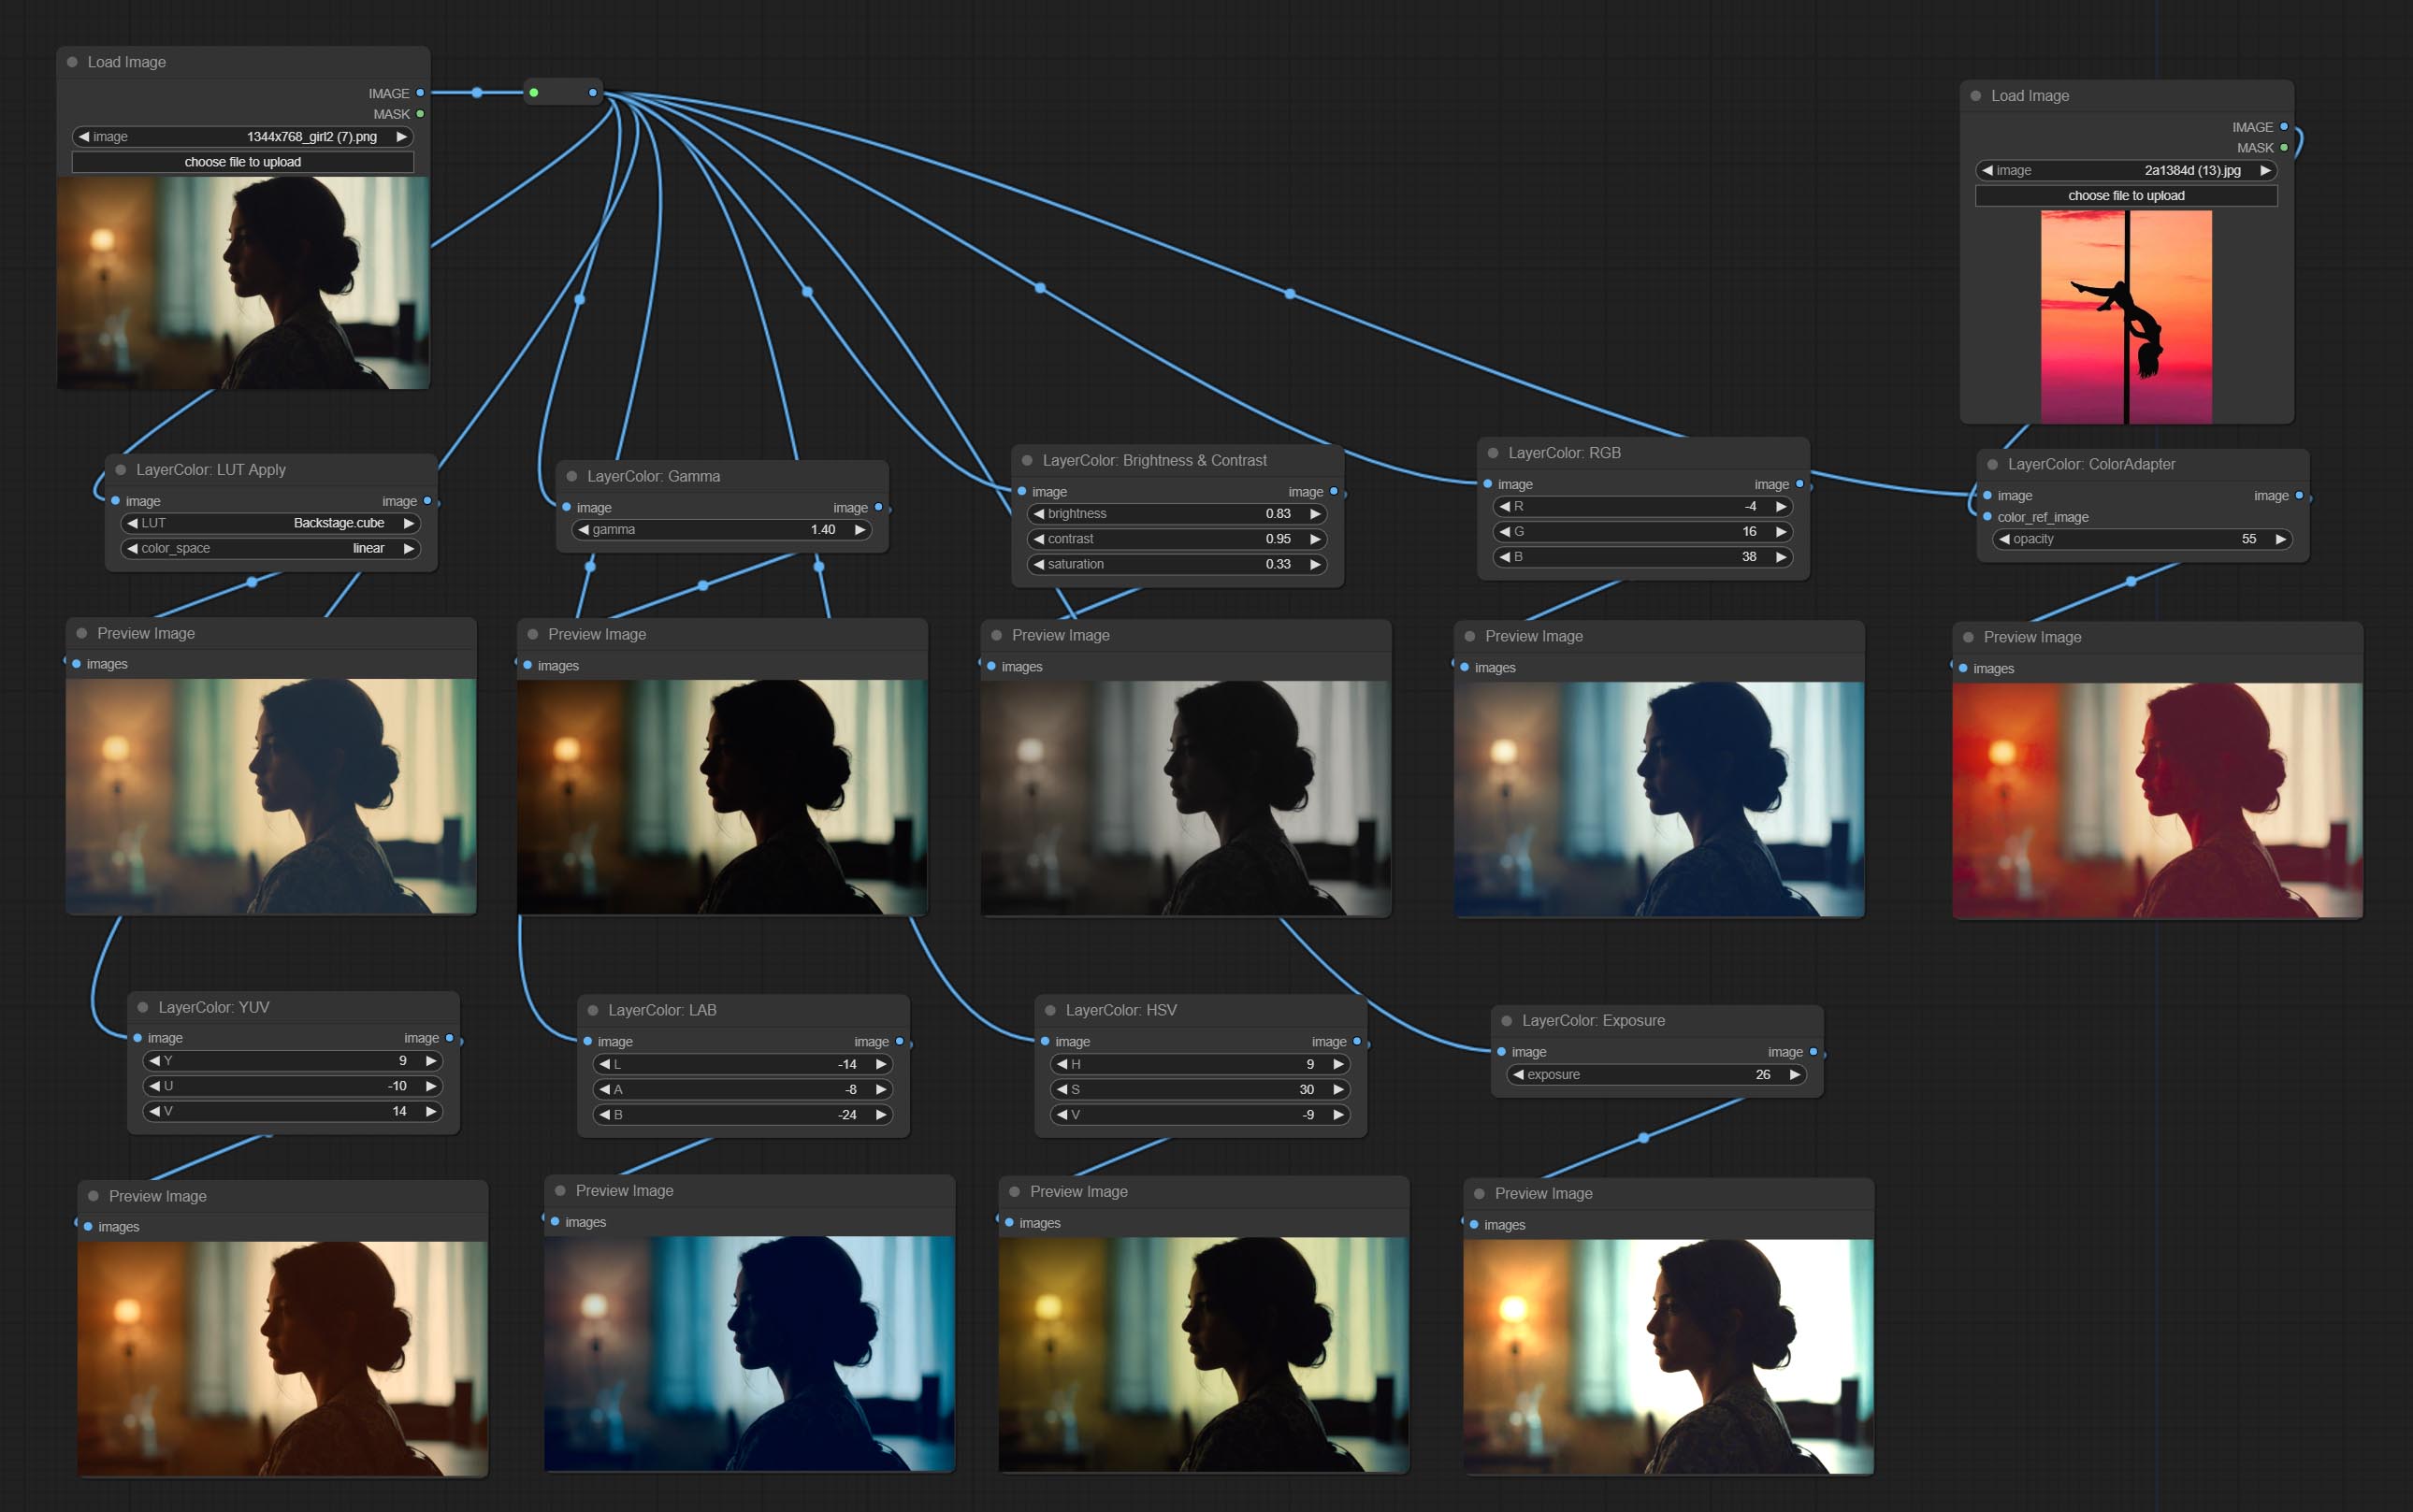
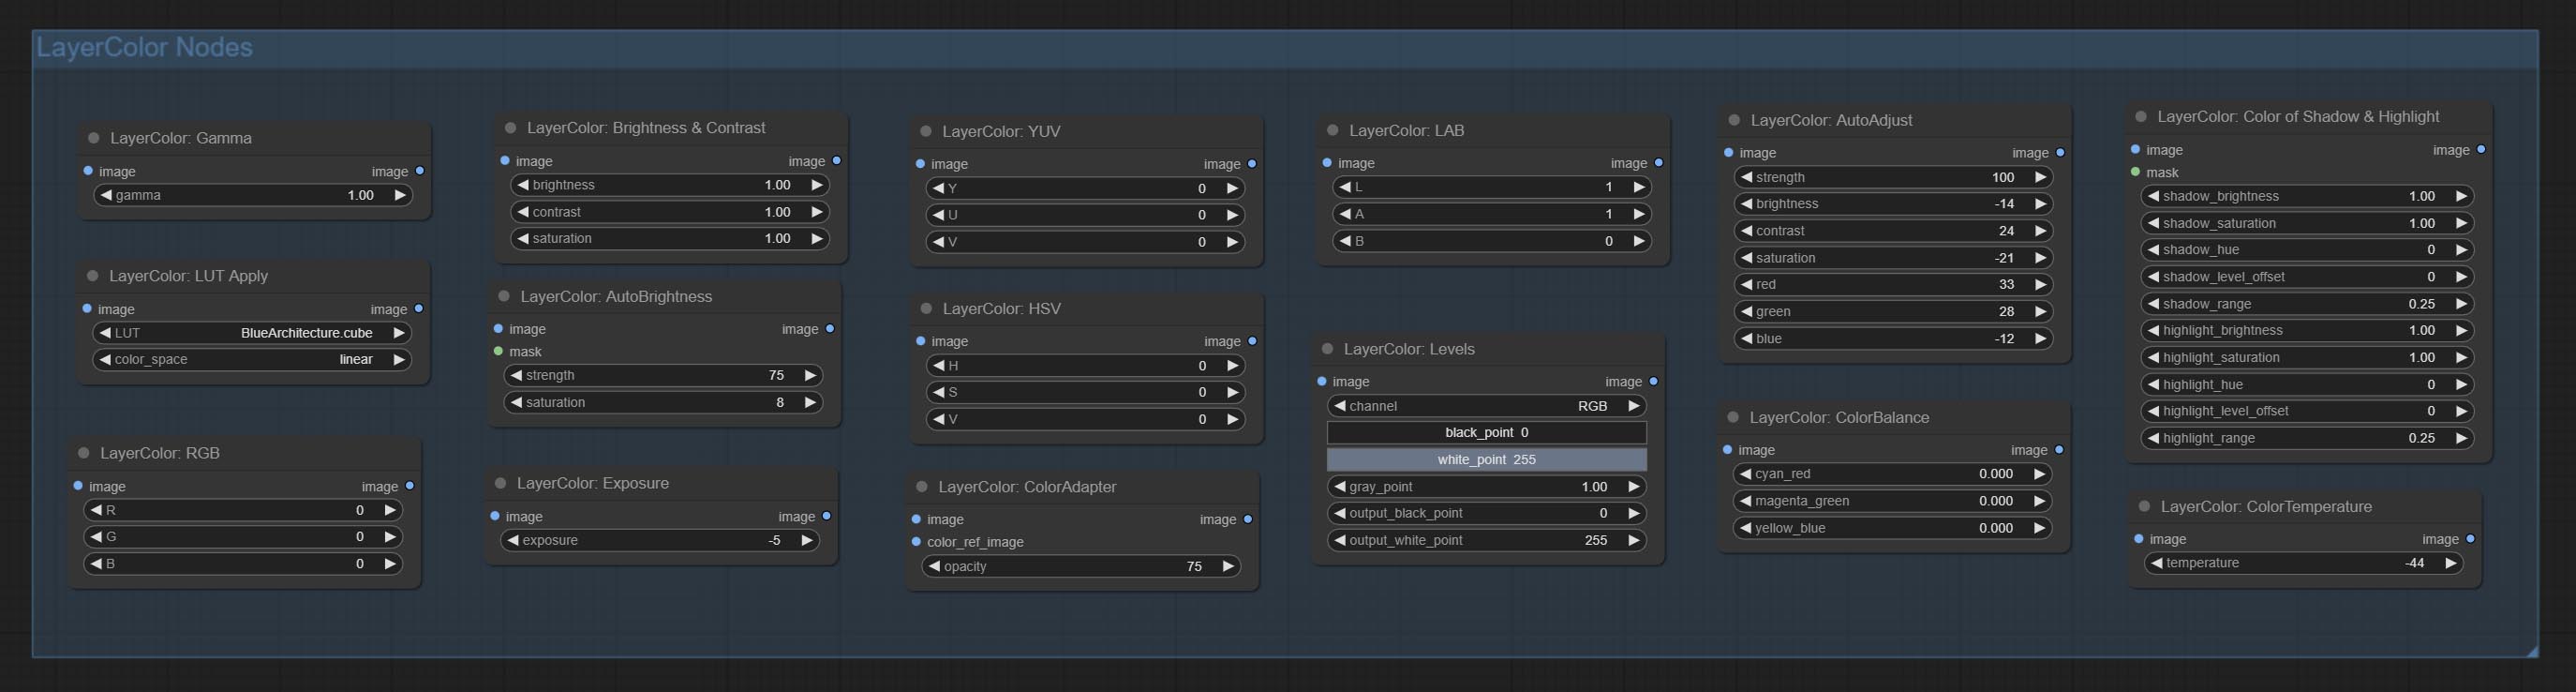
LUT Apply
Apply LUT to the image. only supports .cube format. 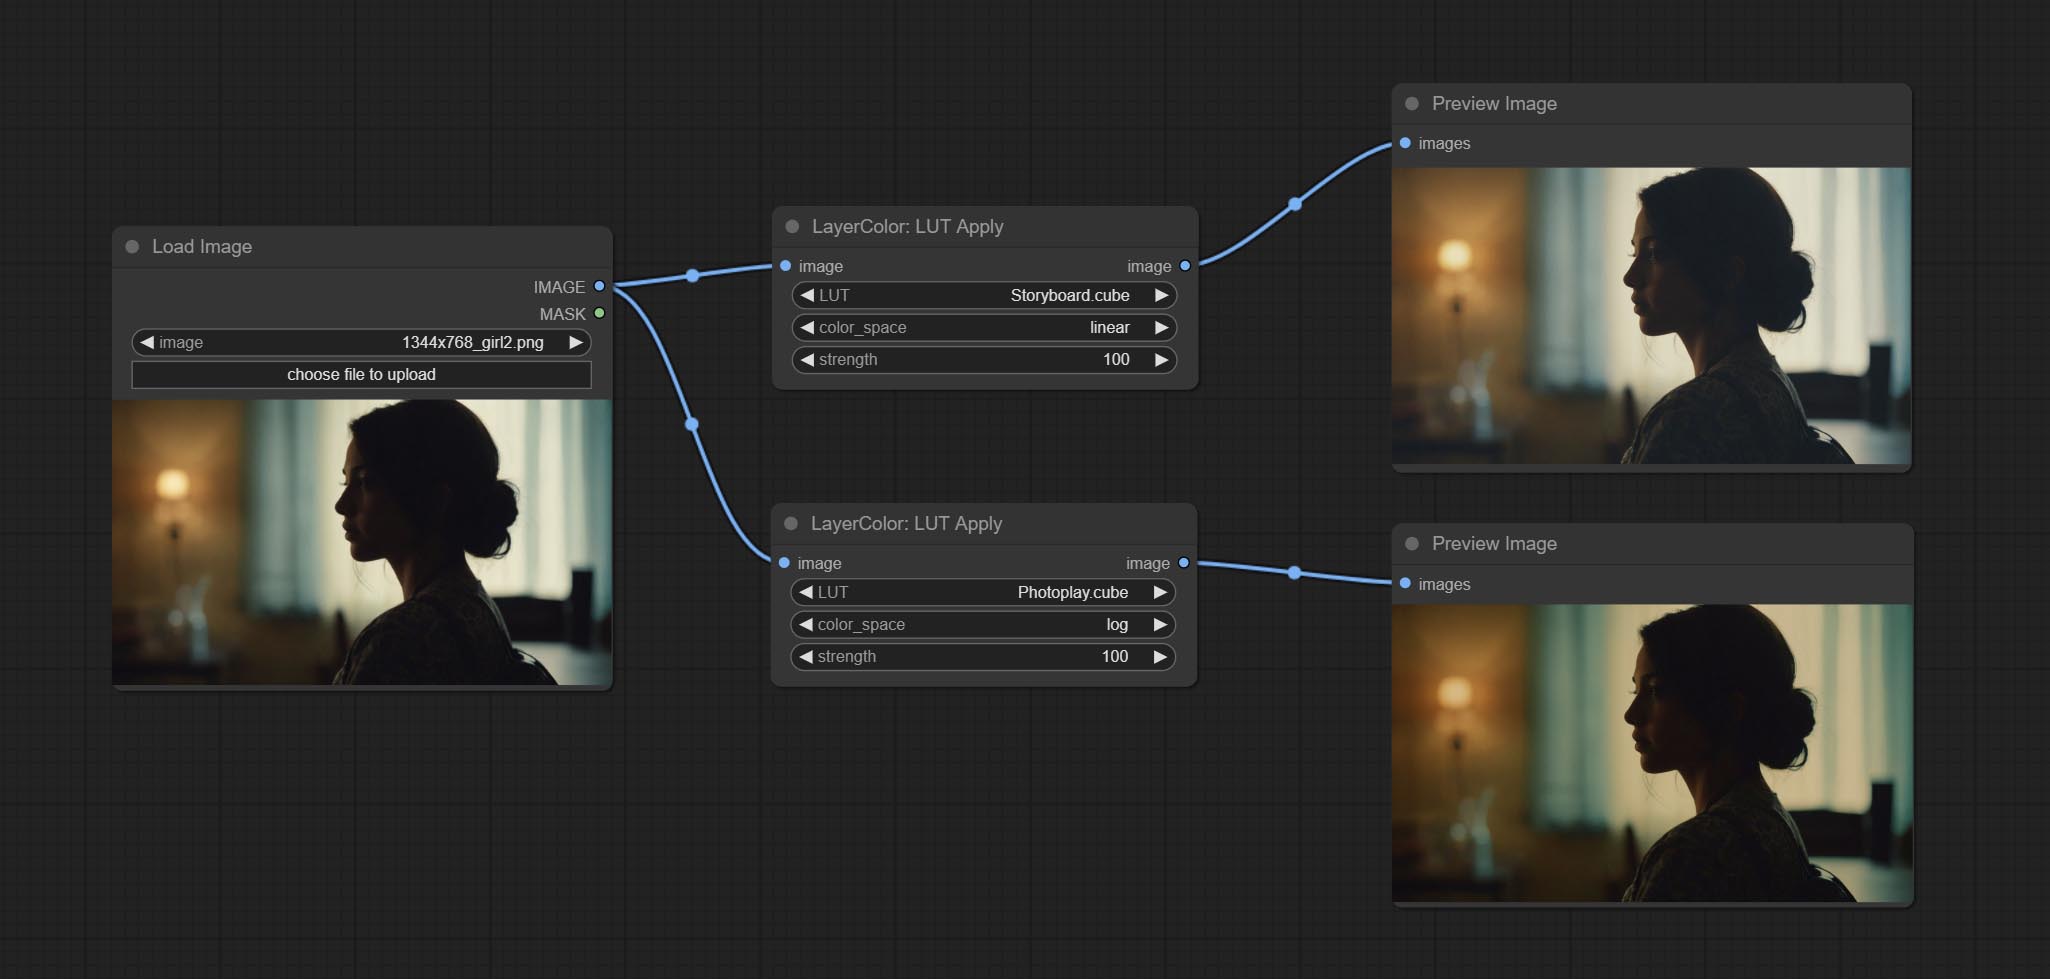
Node options:
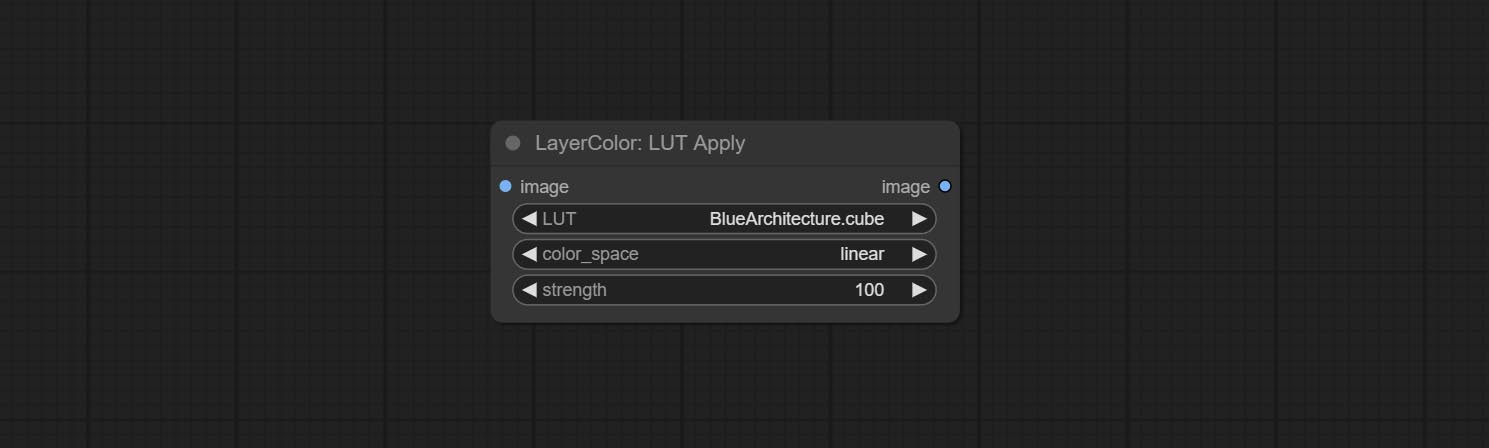
- LUT * : Here is a list of available. cube files in the LUT folder, and the selected LUT files will be applied to the image.
- color_space: For regular image, please select linear, for image in the log color space, please select log.
- strength: Range 0~100, LUT application strength. The larger the value, the greater the difference from the original image, and the smaller the value, the closer it is to the original image.
* LUT folder is defined in resource_dir.ini , this file is located in the root directory of the plug-in, and the default name is resource_dir.ini.example . to use this file for the first time, you need to change the file suffix to .ini . Open the text editing software and find the line starting with "LUT_dir=", after "=", enter the custom folder path name. support defining multiple folders in resource-dir.ini , separated by commas, semicolons, or spaces. all .cube files in this folder will be collected and displayed in the node list during ComfyUI initialization. If the folder set in ini is invalid, the LUT folder that comes with the plugin will be enabled.
AutoAdjust
Automatically adjust the brightness, contrast, and white balance of the image. Provide some manual adjustment options to compensate for the shortcomings of automatic adjustment. 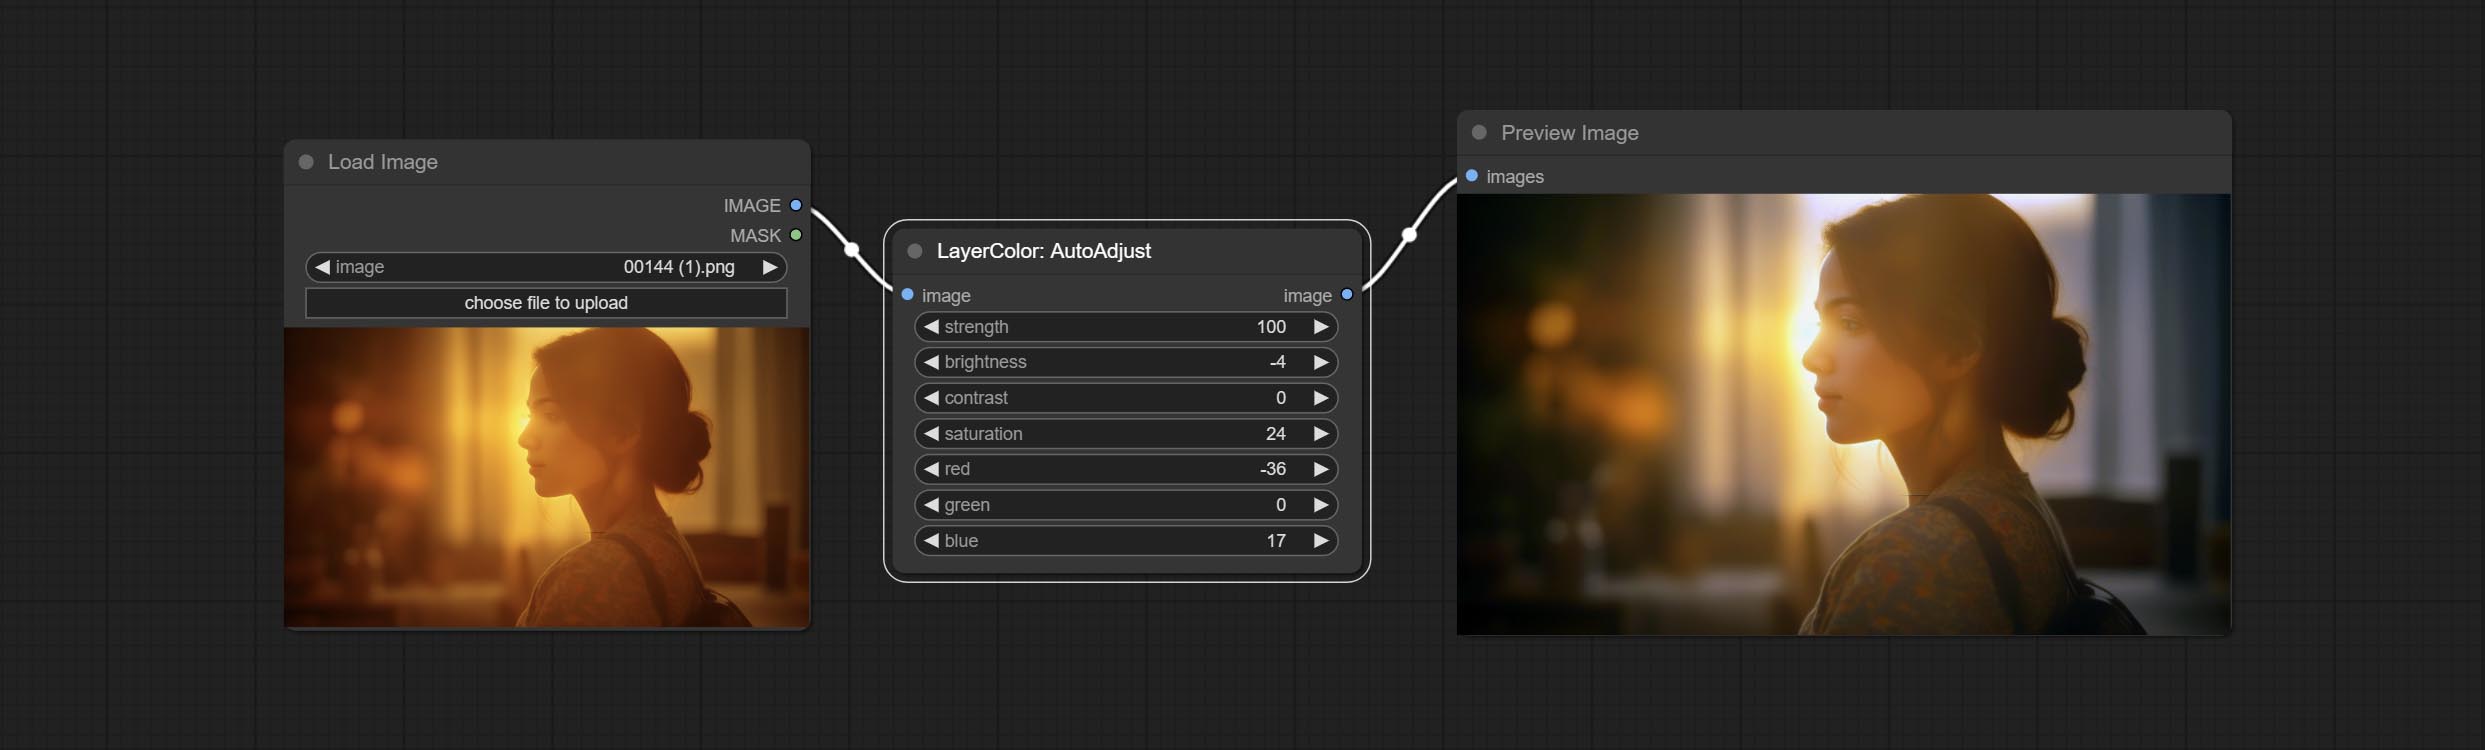
Node Options:
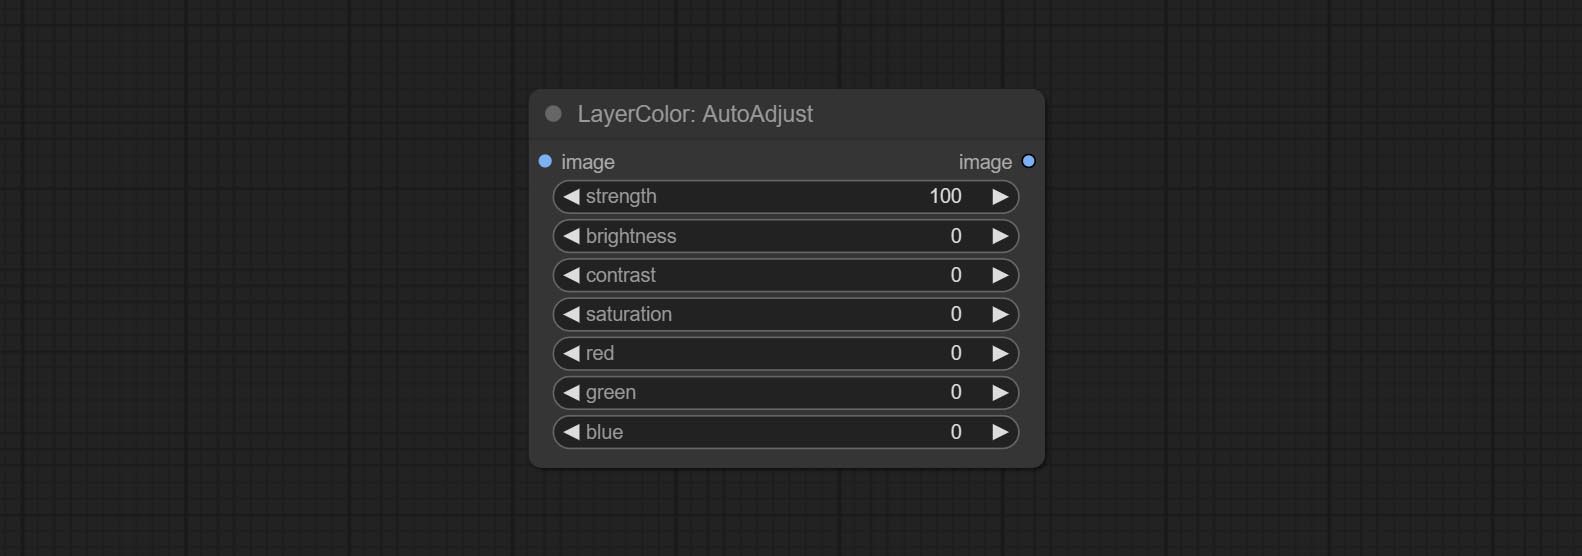
- strength: Strength of adjust. The larger the value, the greater the difference from the original image.
- brightness: Manual adjustment of brightness.
- contrast: Manual adjustment of contrast.
- saturation: Manual adjustment of saturation.
- red: Manual adjustment of the red channel.
- green: Manual adjustment of the green channel.
- blue: Manual adjustment of the blue channel.
AutoAdjustV2
On the basis of AutoAdjust, add mask input and only calculate the content inside the mask for automatic color adjustment. Add multiple automatic adjustment modes. 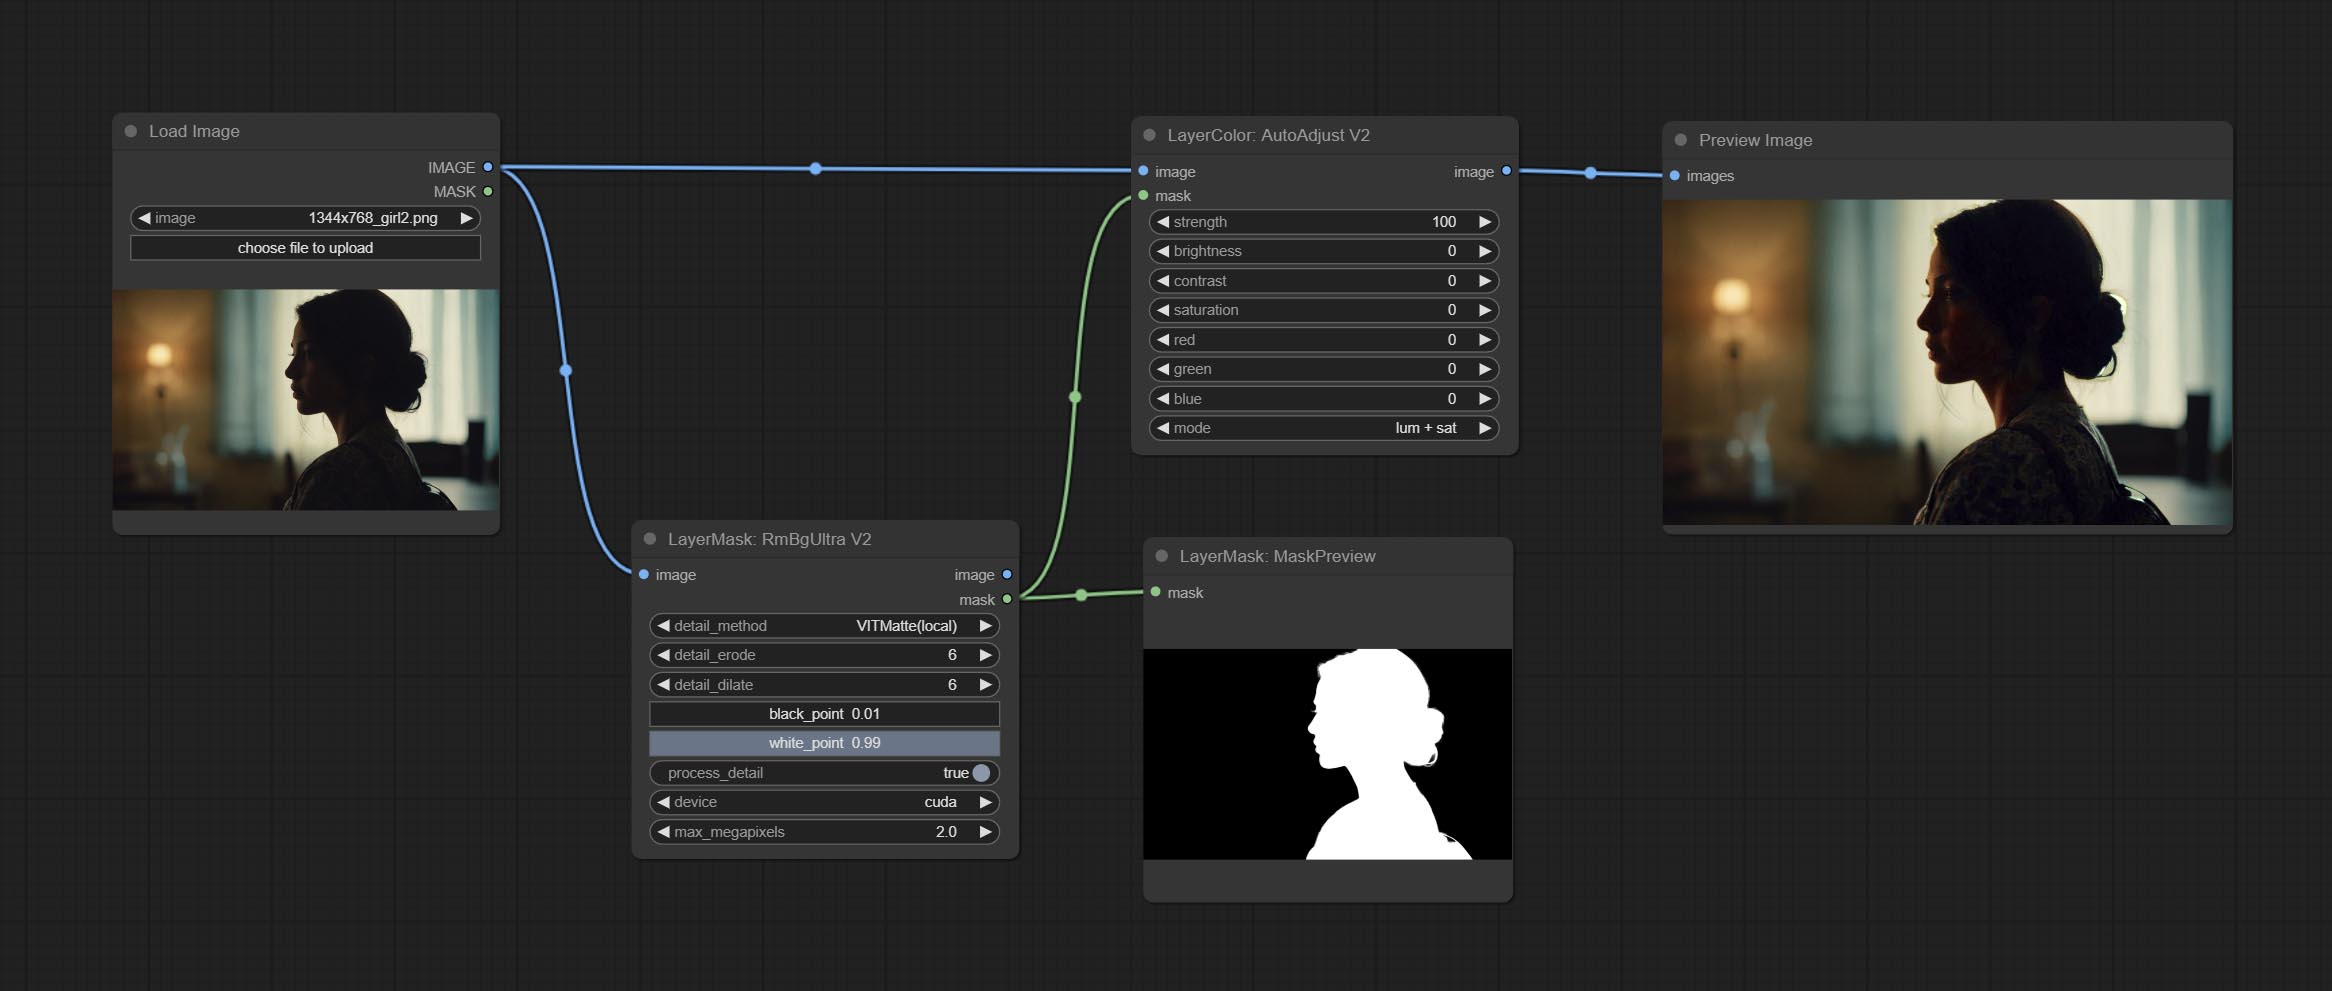
The following changes have been made based on AutoAdjust: 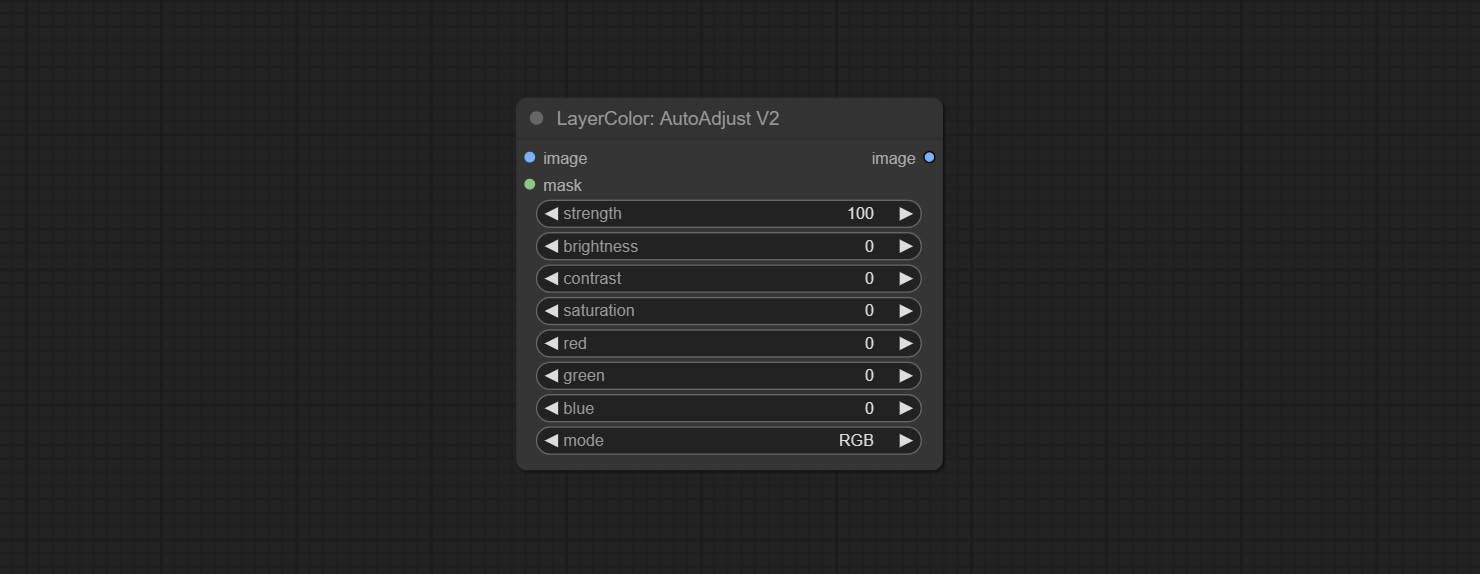
- mask: Optional mask input.
- mode: Automatic adjustment mode. "RGB" automatically adjusts according to the three channels of RGB, "lum + sat"automatically adjusts according to luminance and saturation, "luminance" automatically adjusts according to luminance, "saturation" automatically adjusts according to saturation, and "mono" automatically adjusts according to grayscale and outputs monochrome.
AutoBrightness
Automatically adjust too dark or too bright image to moderate brightness, and support mask input. When mask input, only the content of the mask part is used as the data source of the automatic brightness. The output is still the whole adjusted image. 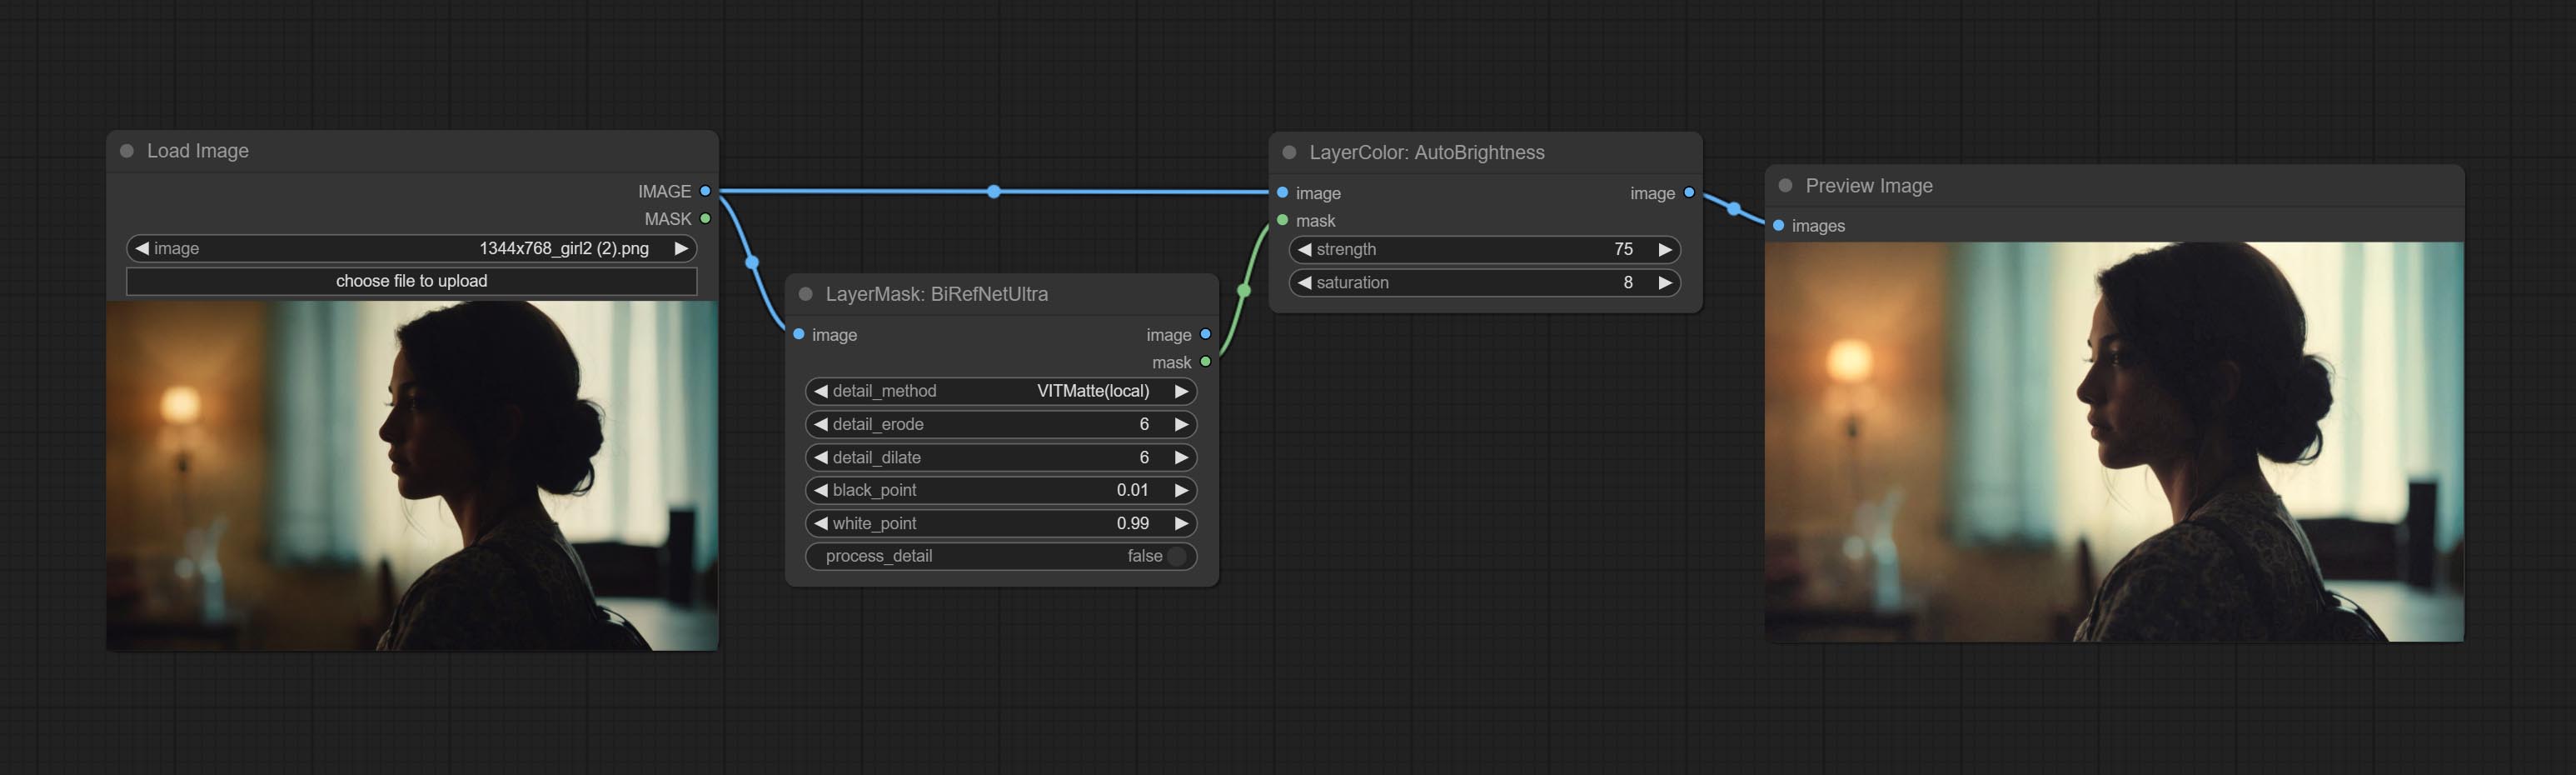
Node options:
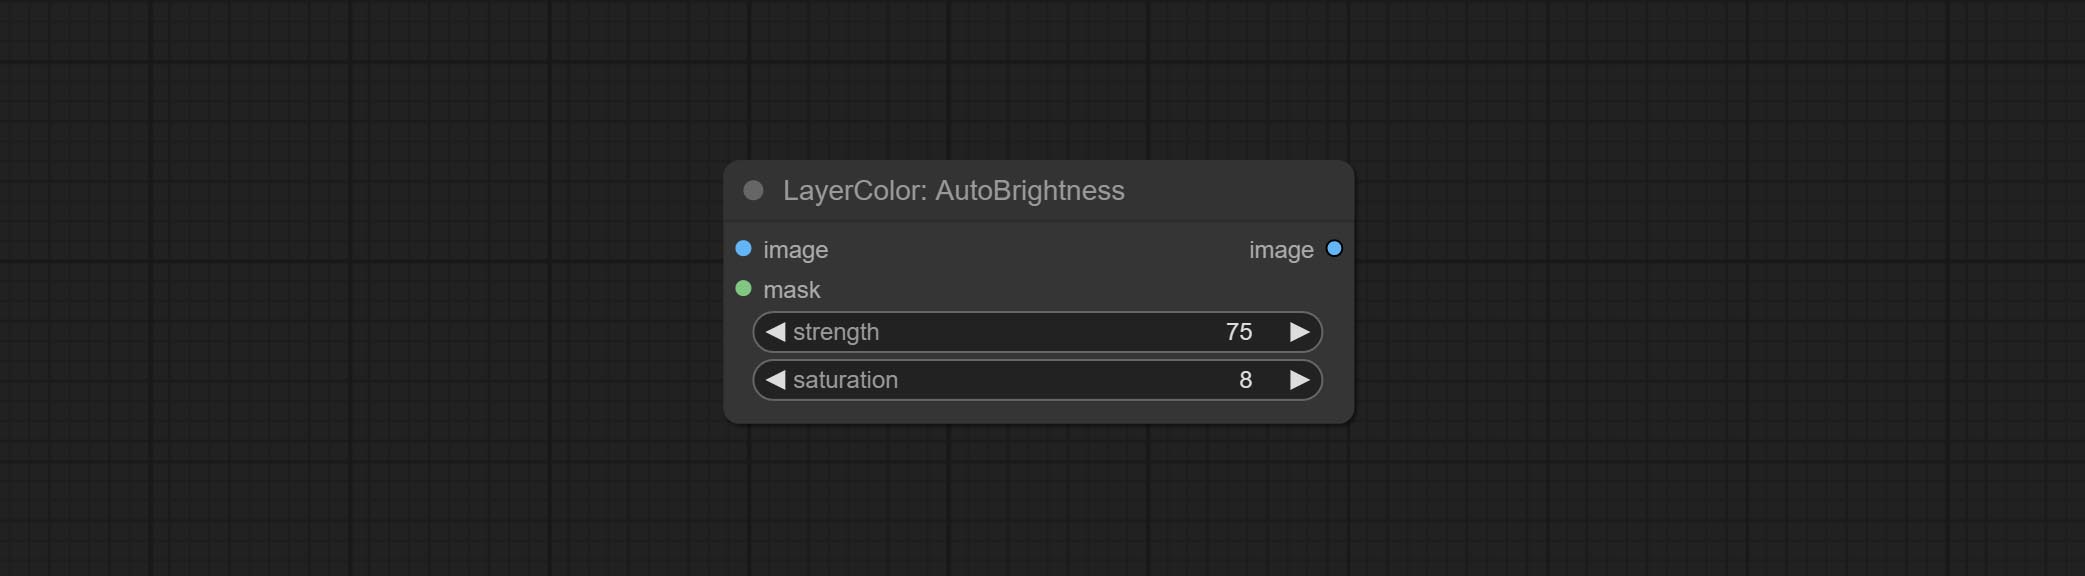
- strength: Automatically adjust the intensity of the brightness. The larger the value, the more biased towards the middle value, the greater the difference from the original picture.
- saturation: Color saturation. Changes in brightness usually result in changes in color saturation, where appropriate compensation can be adjusted.
ColorAdapter
Auto adjust the color tone of the image to resemble the reference image. 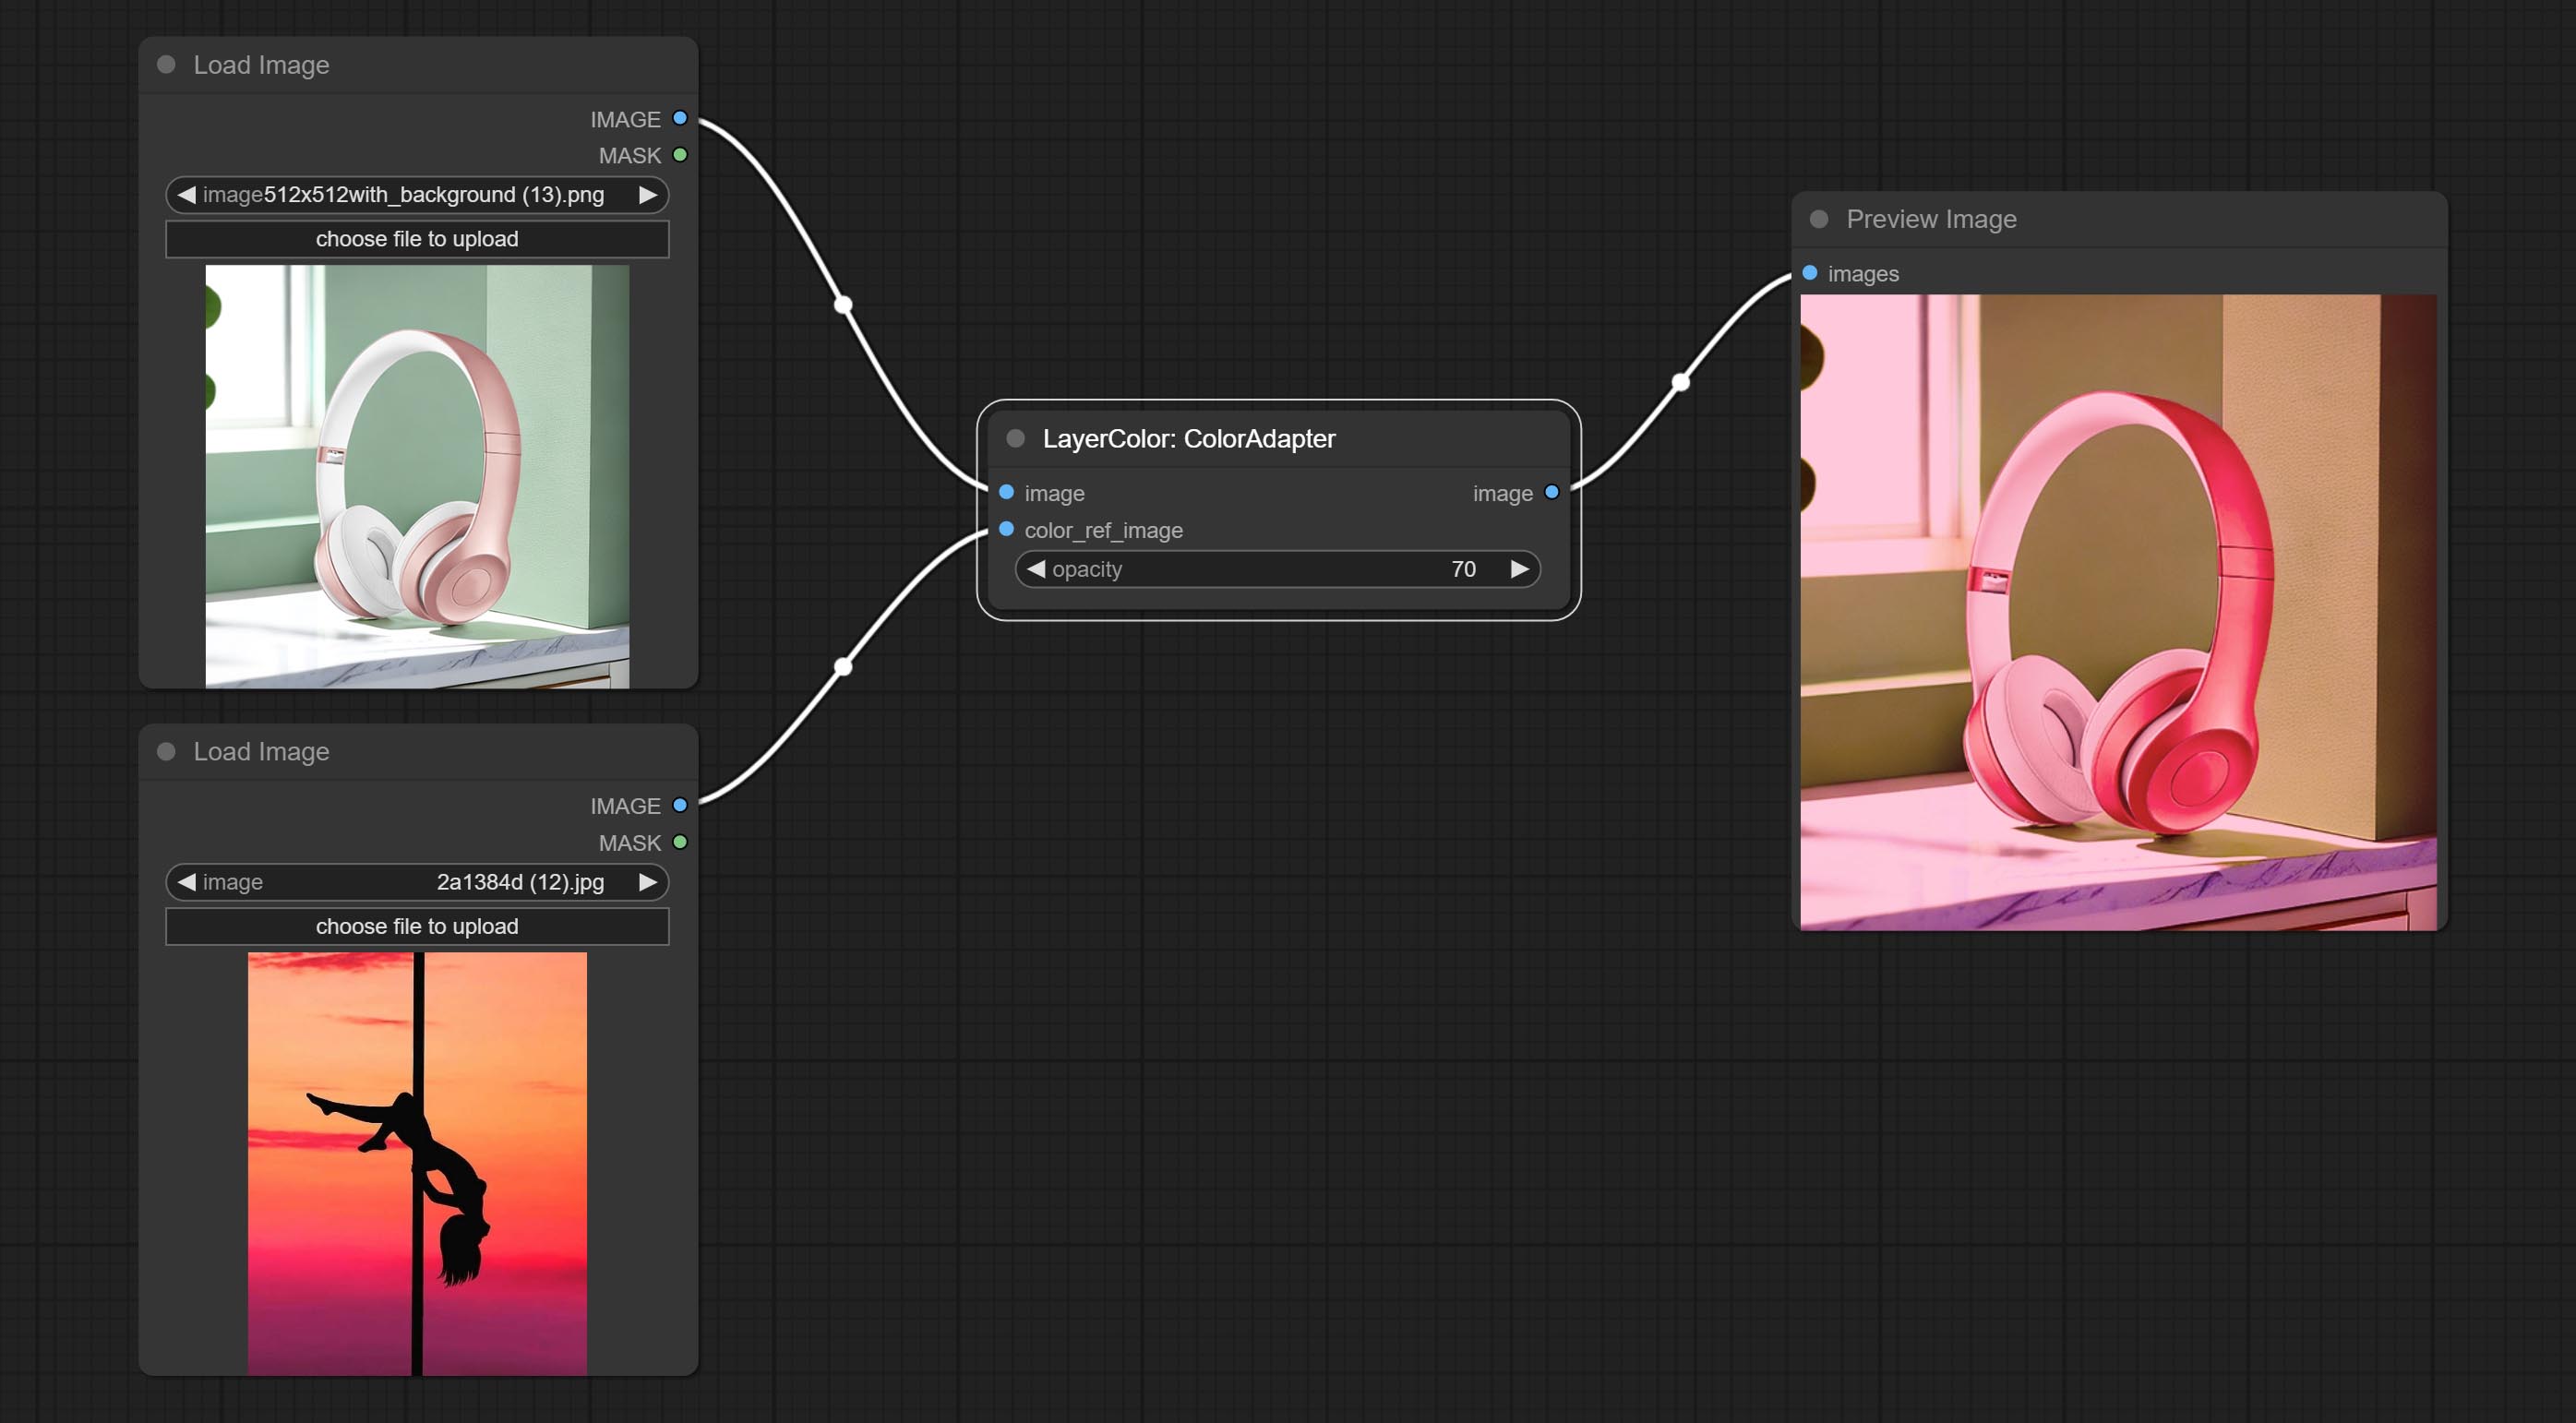
Node options:
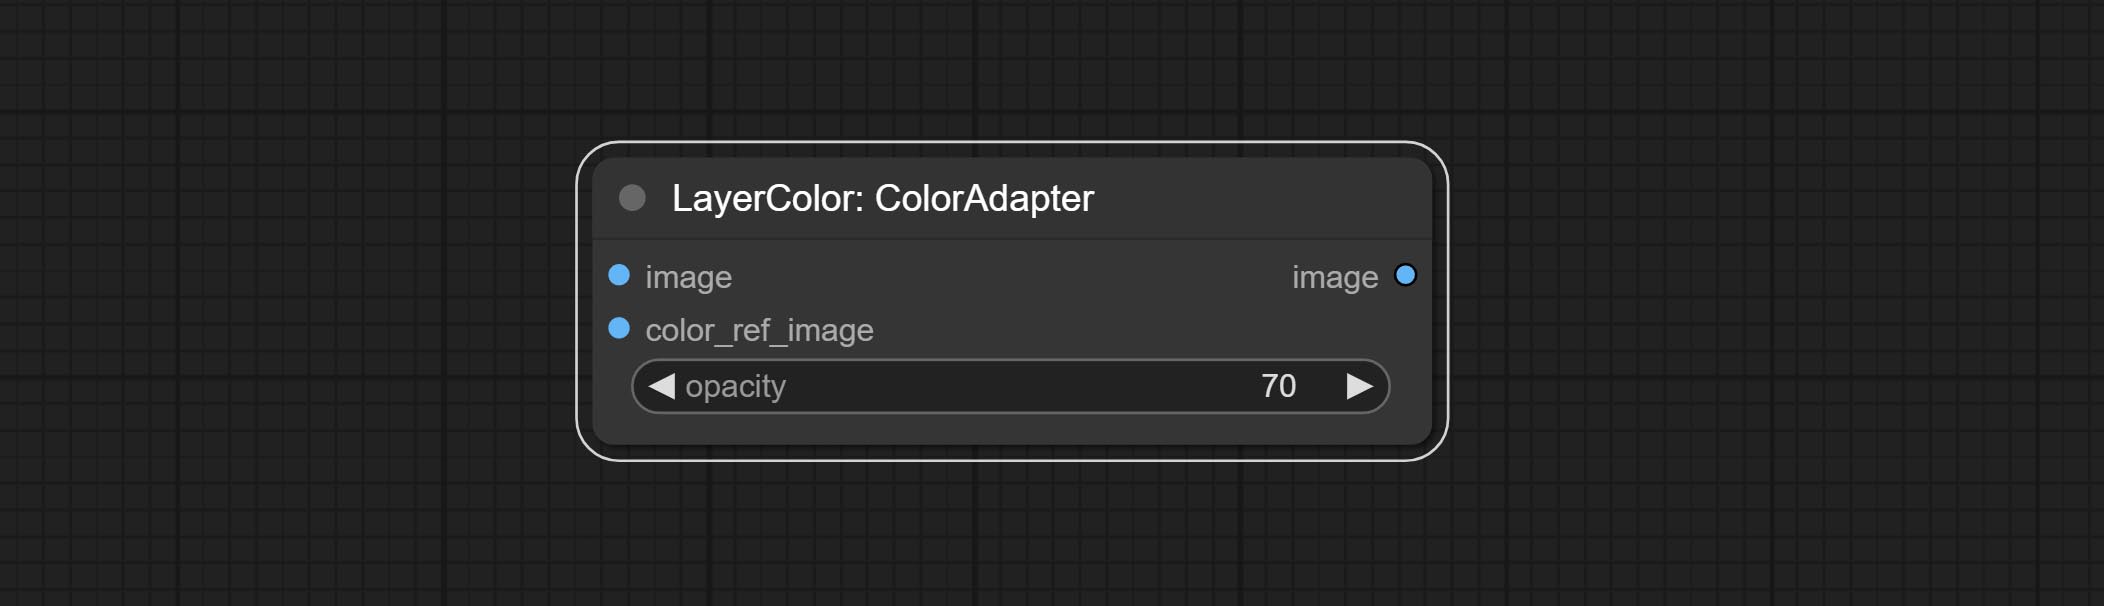
- opacity: The opacity of an image after adjusting its color tone.
التعرض
Change the exposure of the image. 
Color of Shadow & Highlight
Adjust the color of the dark and bright parts of the image. 
Node options:
- image: The input image.
- mask: Optional input. if there is input, only the colors within the mask range will be adjusted.
- shadow_brightness: The brightness of the dark area.
- shadow_saturation: The color saturation in the dark area.
- shadow_hue: The color hue in the dark area.
- shadow_level_offset: The offset of values in the dark area, where larger values bring more areas closer to the bright into the dark area.
- shadow_range: The transitional range of the dark area.
- highlight_brightness: The brightness of the highlight area.
- highlight_saturation: The color saturation in the highlight area.
- highlight_hue: The color hue in the highlight area.
- highlight_level_offset: The offset of values in the highlight area, where larger values bring more areas closer to the dark into the highlight area.
- highlight_range: The transitional range of the highlight area.
Node option:
- exposure: Exposure value. Higher values indicate brighter image.
Color of Shadow HighlightV2
A replica of the Color of Shadow & Highlight node, with the "&" character removed from the node name to avoid ComfyUI workflow parsing errors.
ColorTemperature

Change the color temperature of the image.
Node Options:
- temperature: Color temperature value. Range between-100 and 100. The higher the value, the higher the color temperature (bluer); The lower the color temperature, the lower the color temperature (yellowish).
مستويات
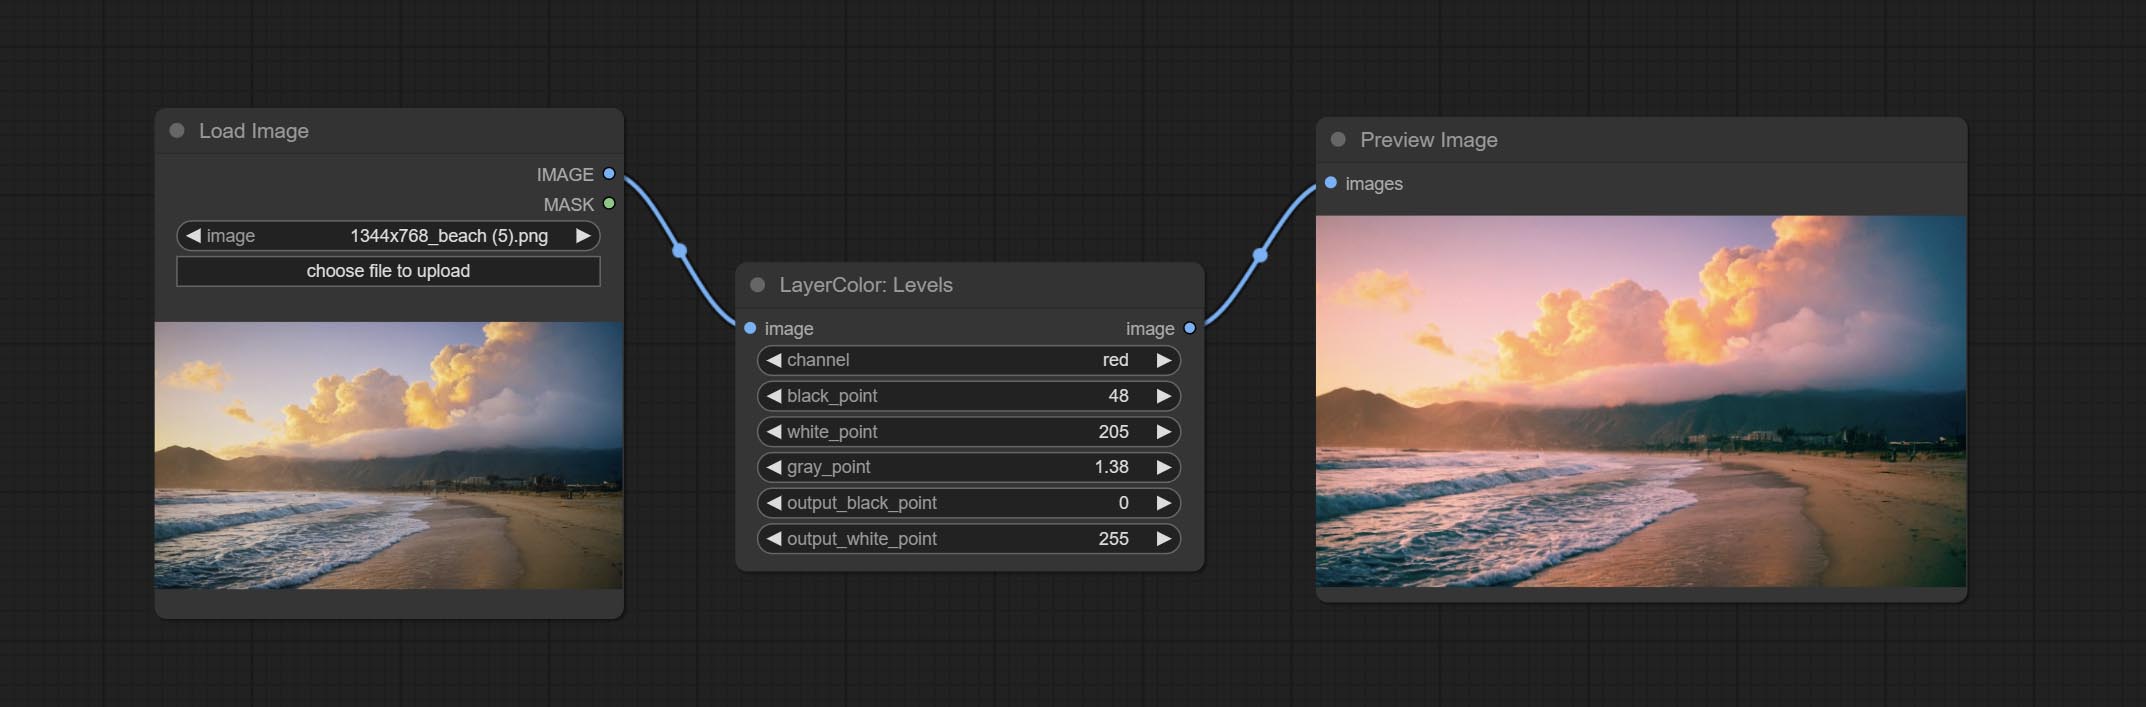
Change the levels of image.
Node Options:
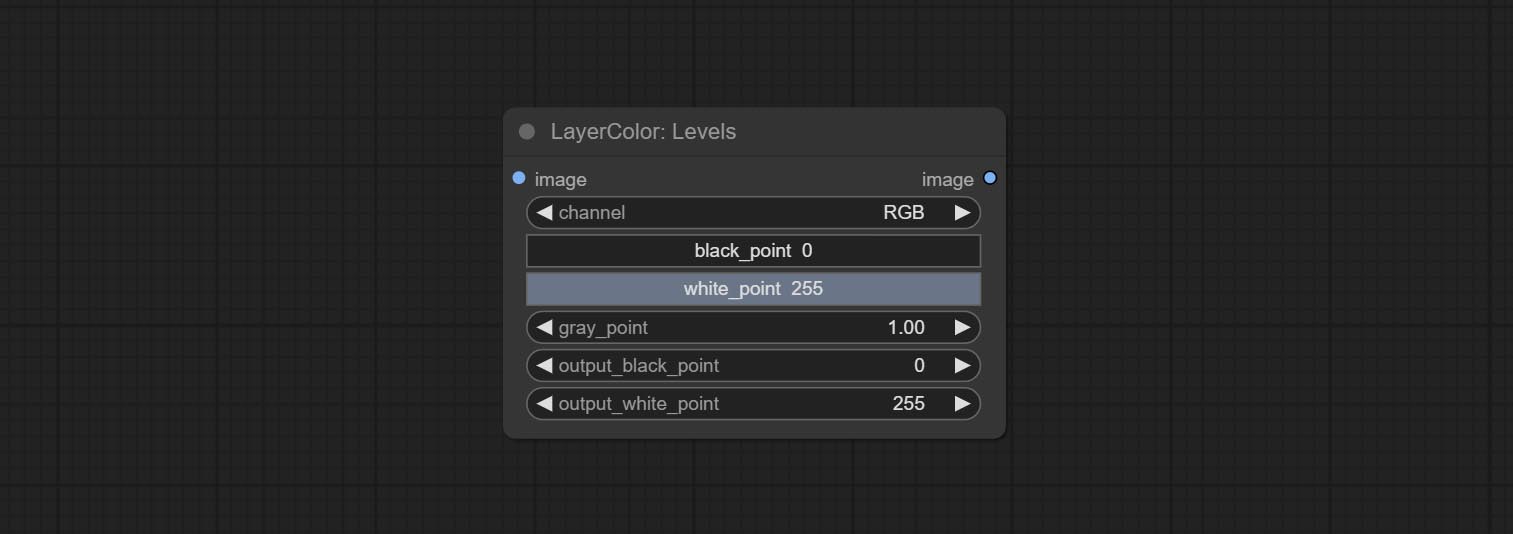
- channel: Select the channel you want to adjust. Available in RGB, red, green, blue.
- black_point * : Input black point value. Value range 0-255, default 0.
- white_point * : Input white point value. Value range 0-255, default 255.
- gray_point: Input grey point values. Value range 0.01-9.99, default 1.
- output_black_point * : Output black point value. Value range 0-255, default 0.
- output_white_point * : Output white point value. Value range 0-255, default 255.
* If the black_point or output_black_point value is greater than white_point or output_white_point, the two values are swapped, with the larger value used as white_point and the smaller value used as black_point.
ColorBalance
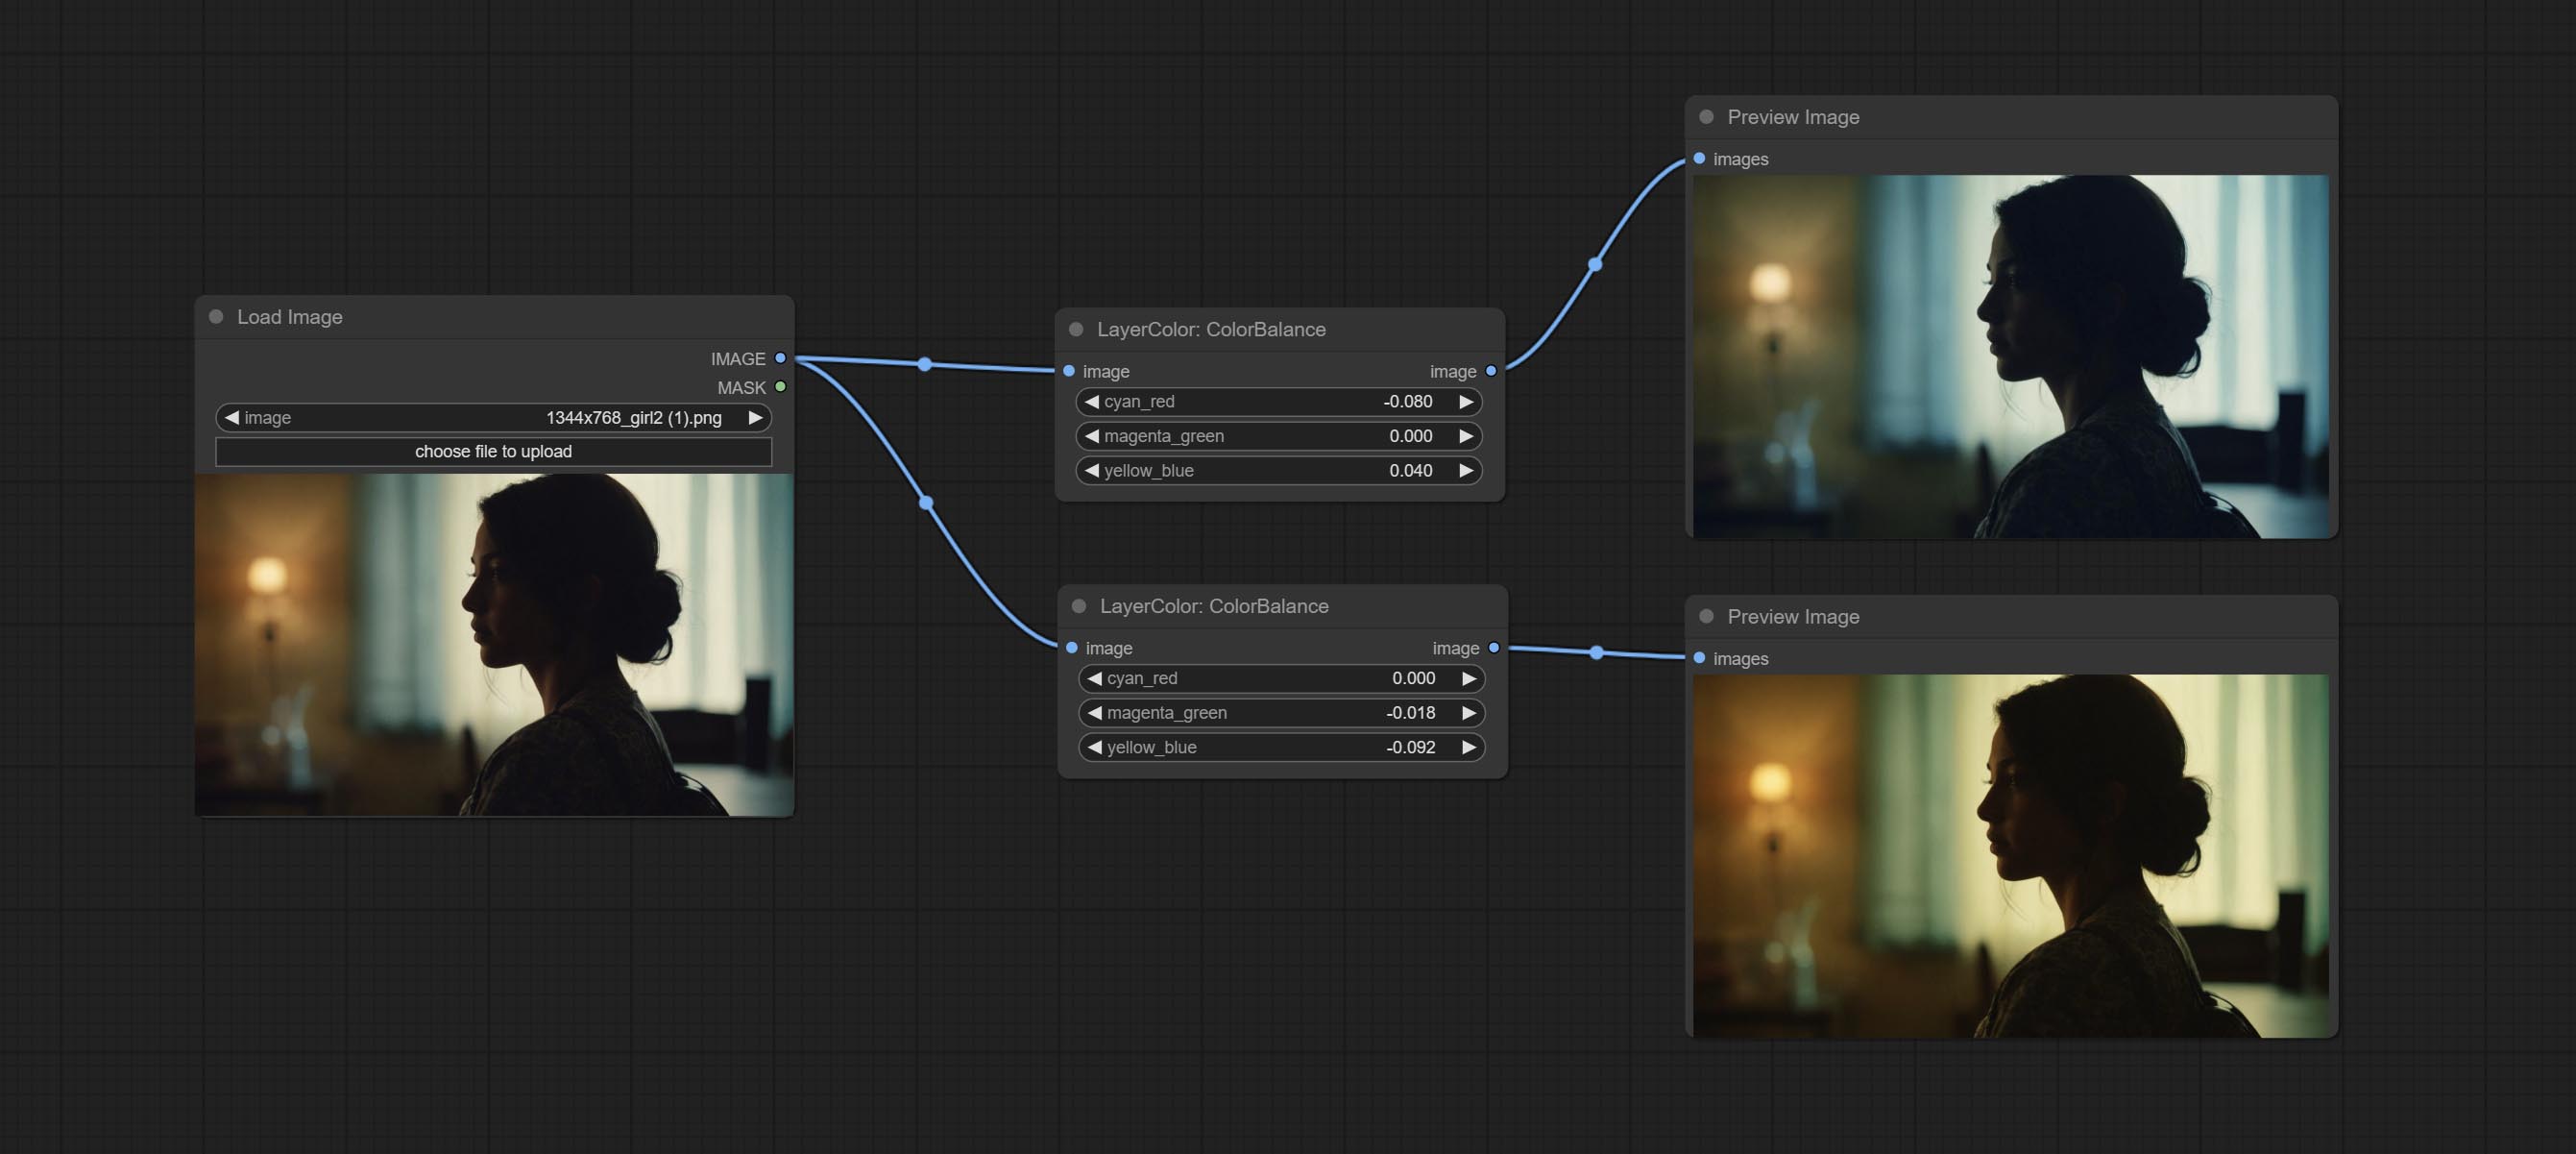
Change the color balance of an image.
Node Options:
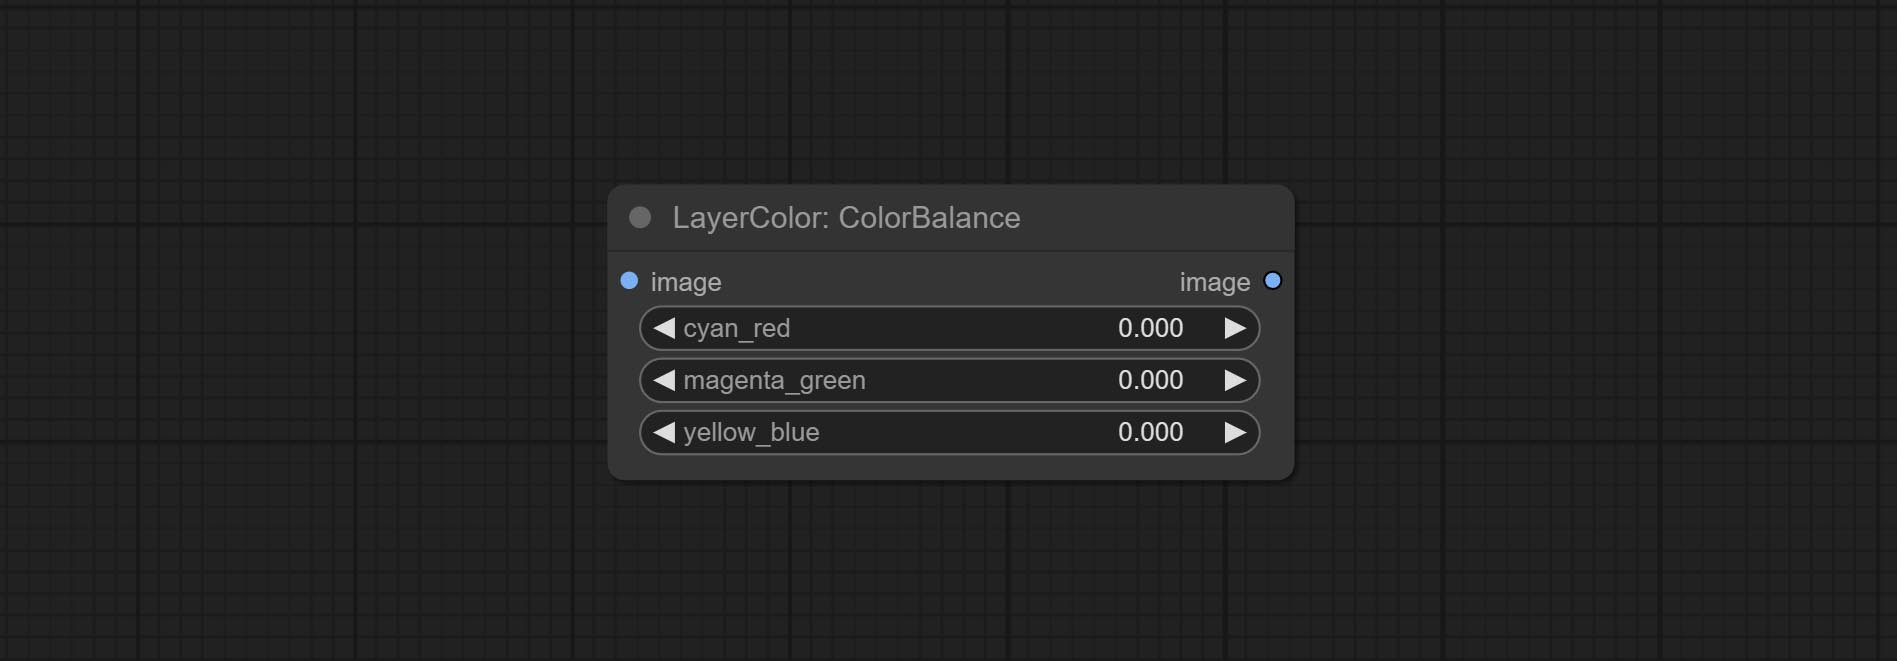
- cyan_red: Cyan-Red balance. negative values are leaning cyan, positive values are leaning red.
- magenta_green: Megenta-Green balance. negative values are leaning megenta, positive values are leaning green.
- yellow_blue: Yellow-Blue balance. negative values are leaning yellow, positive values are leaning blue.
Gamma
Change the gamma value of the image.
Node options:
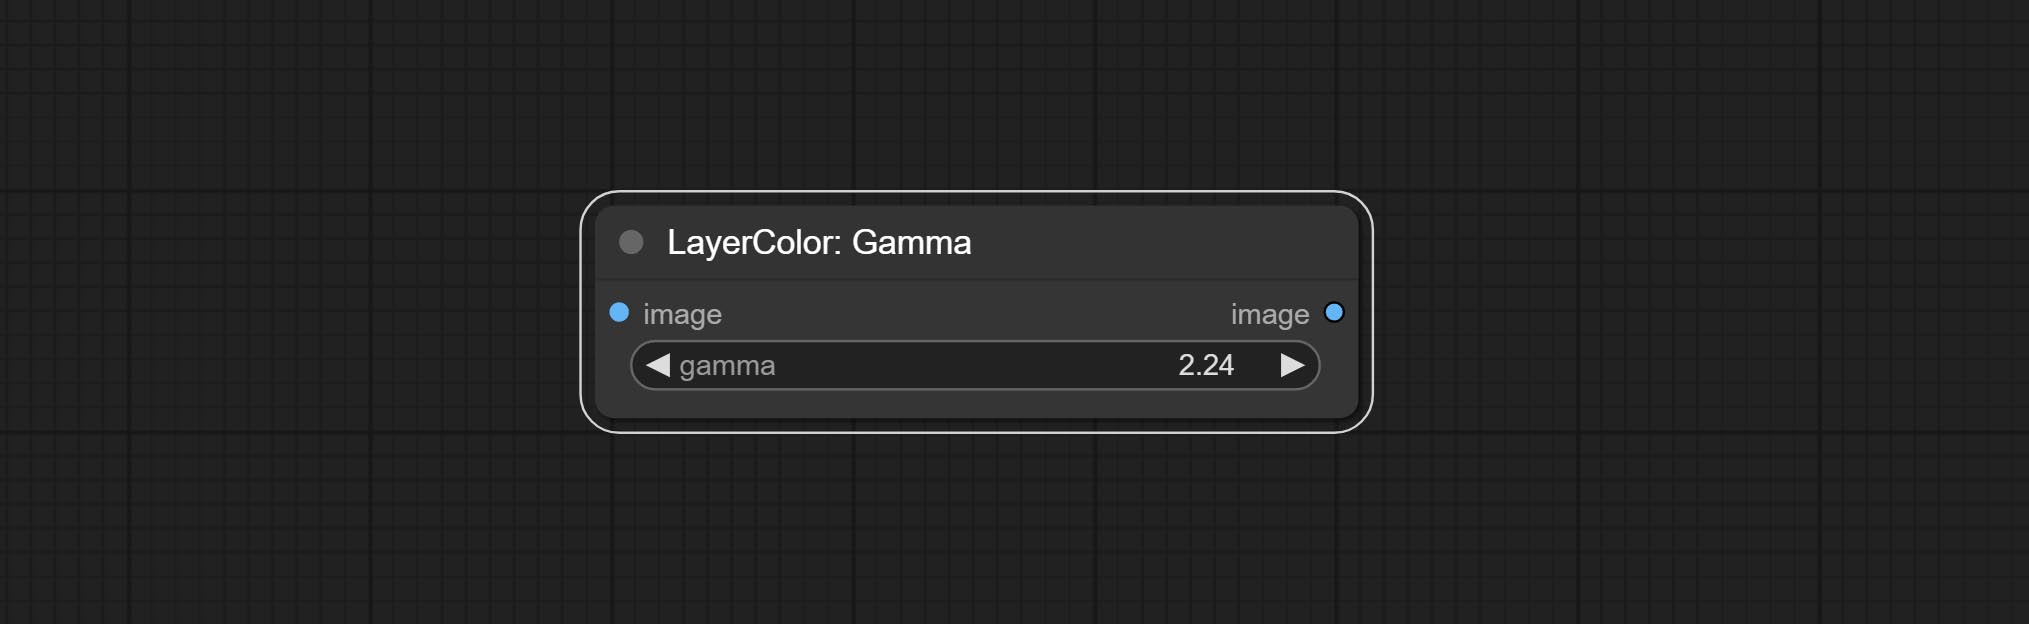
- gamma: Value of the Gamma.
Brightness & Contrast
Change the brightness, contrast, and saturation of the image.
Node options:
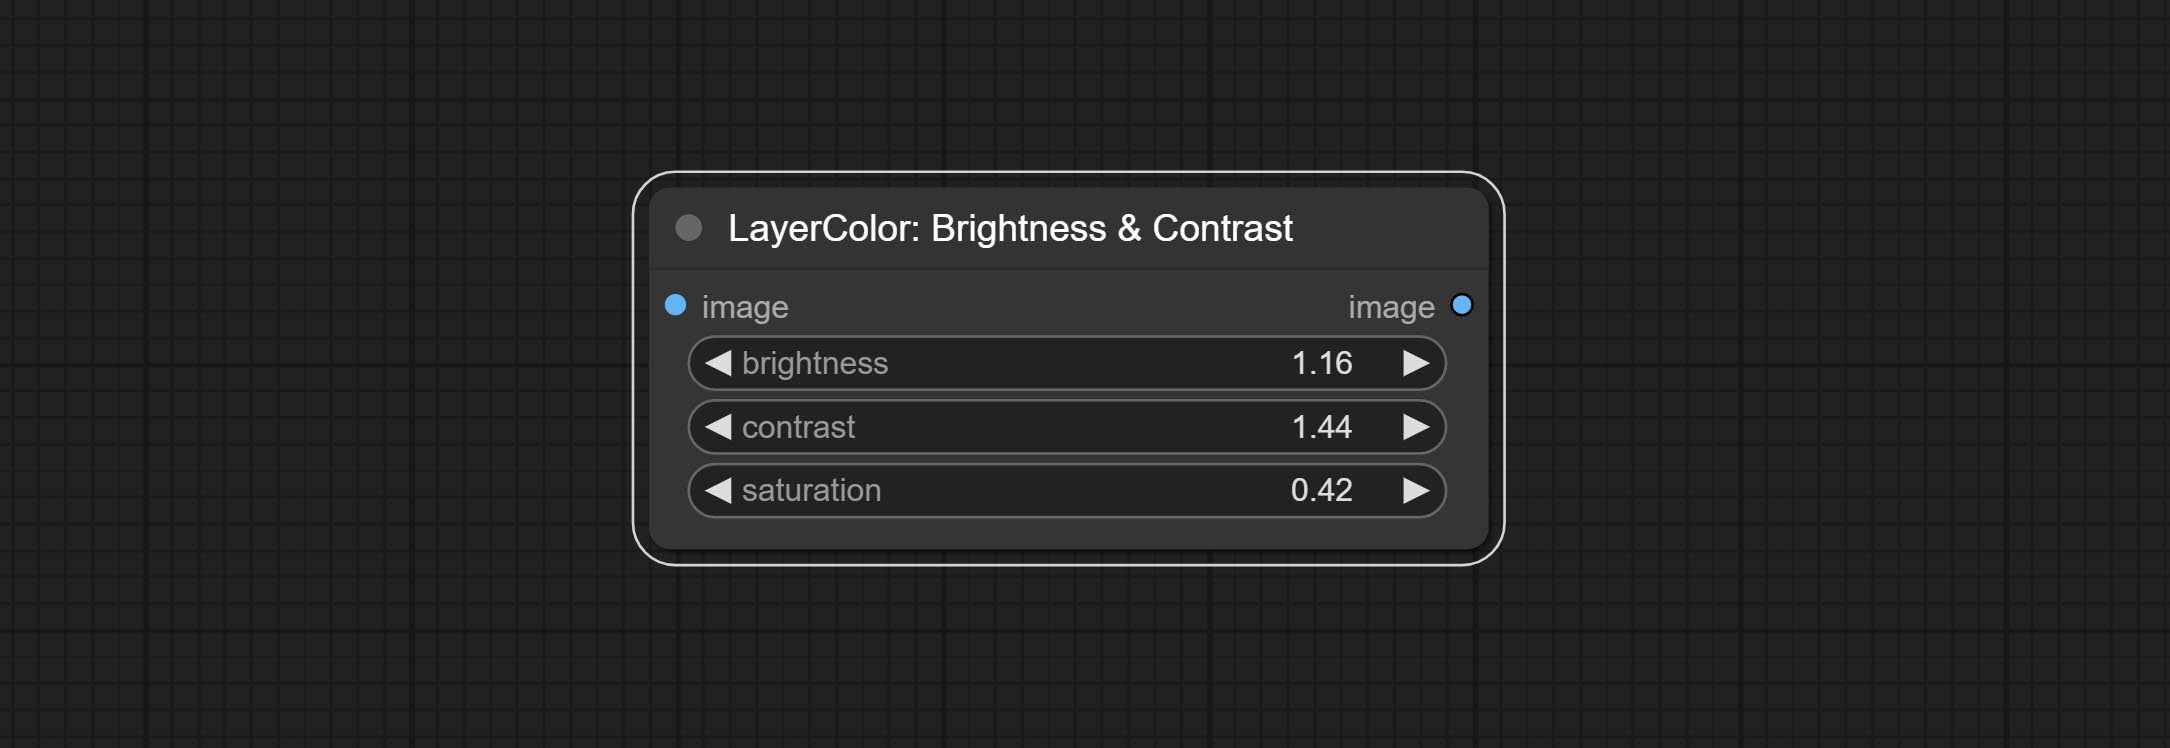
- brightness: Value of brightness.
- contrast: Value of contrast.
- saturation: Value of saturation.
BrightnessContrastV2
A replica of the Brightness & Contrast node, with the "&" character removed from the node name to avoid ComfyUI workflow parsing errors.
RGB
Adjust the RGB channels of the image.
Node options:
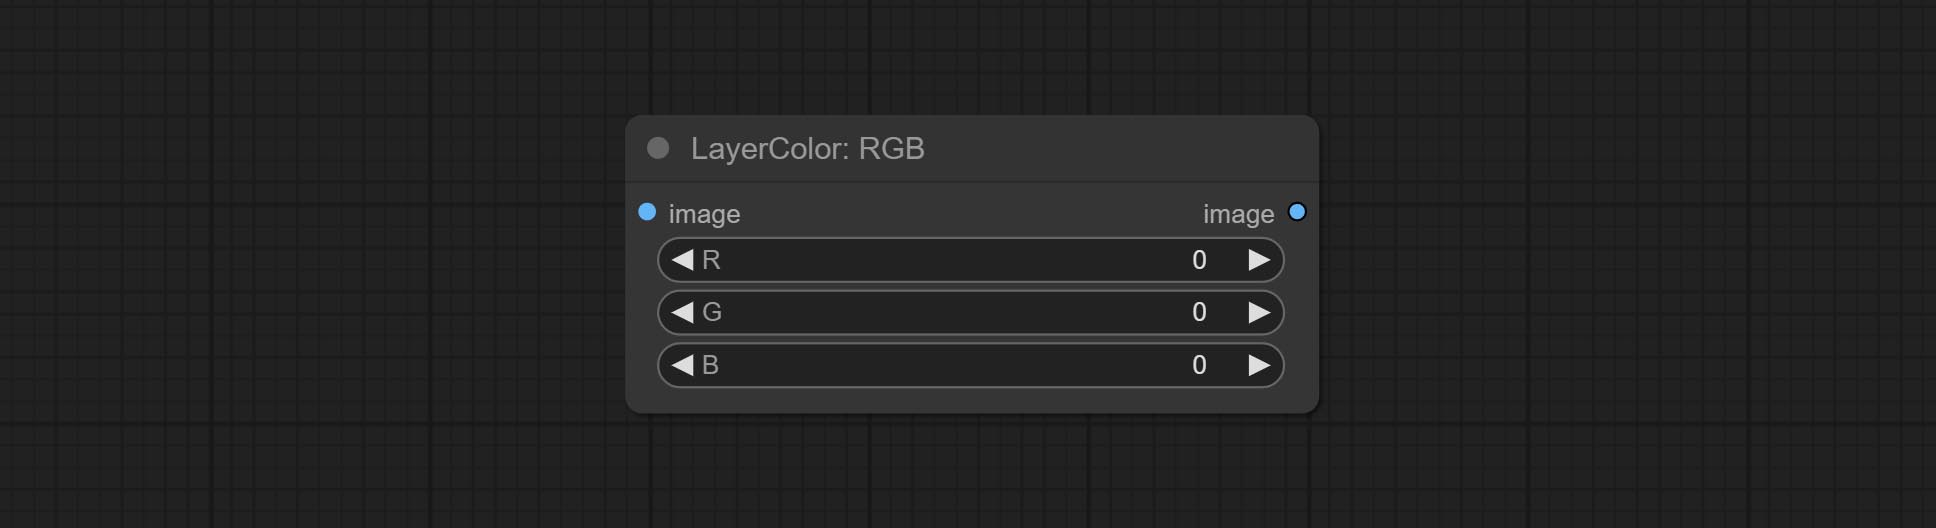
- R: R channel.
- G: G channel.
- B: B channel.
YUV
Adjust the YUV channels of the image.
Node options:
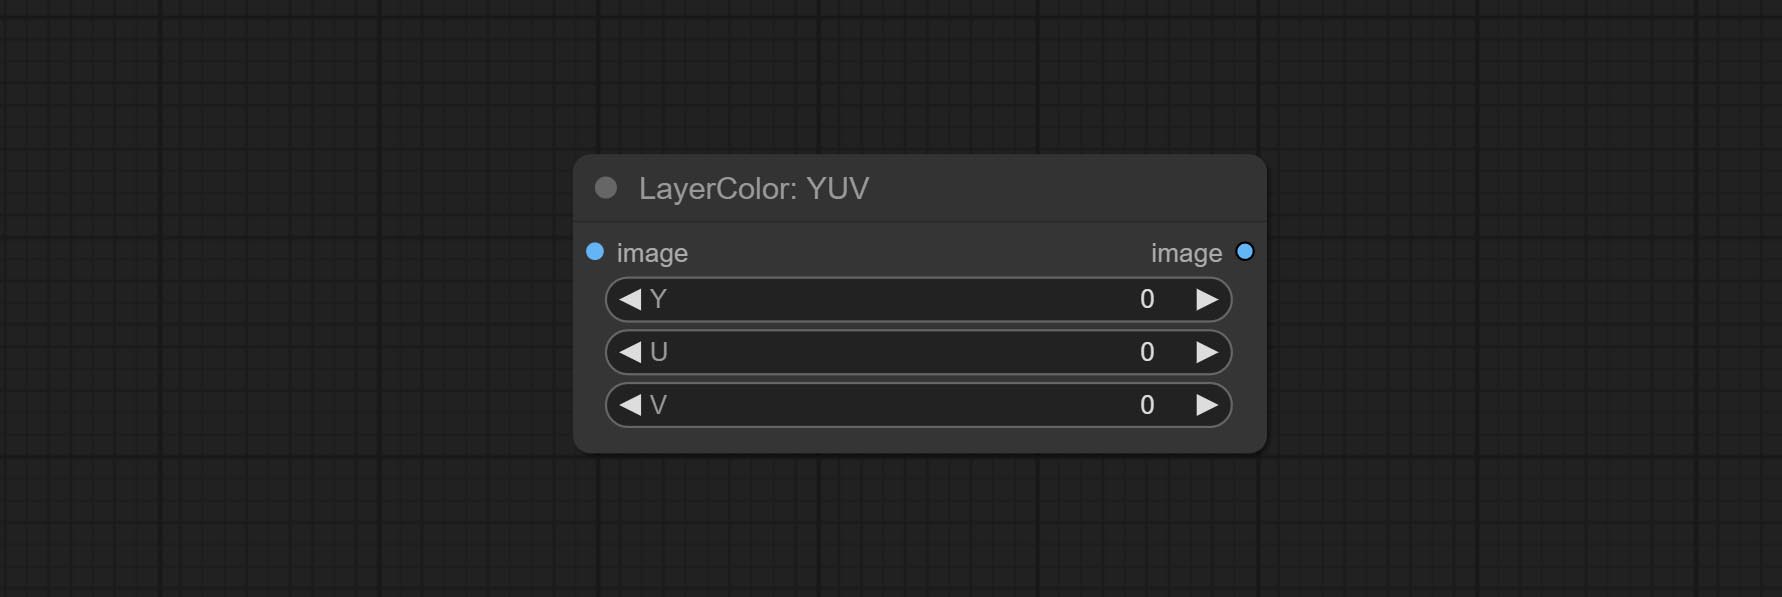
- Y: Y channel.
- U: U channel.
- V: V channel.
مختبر
Adjust the LAB channels of the image.
Node options:
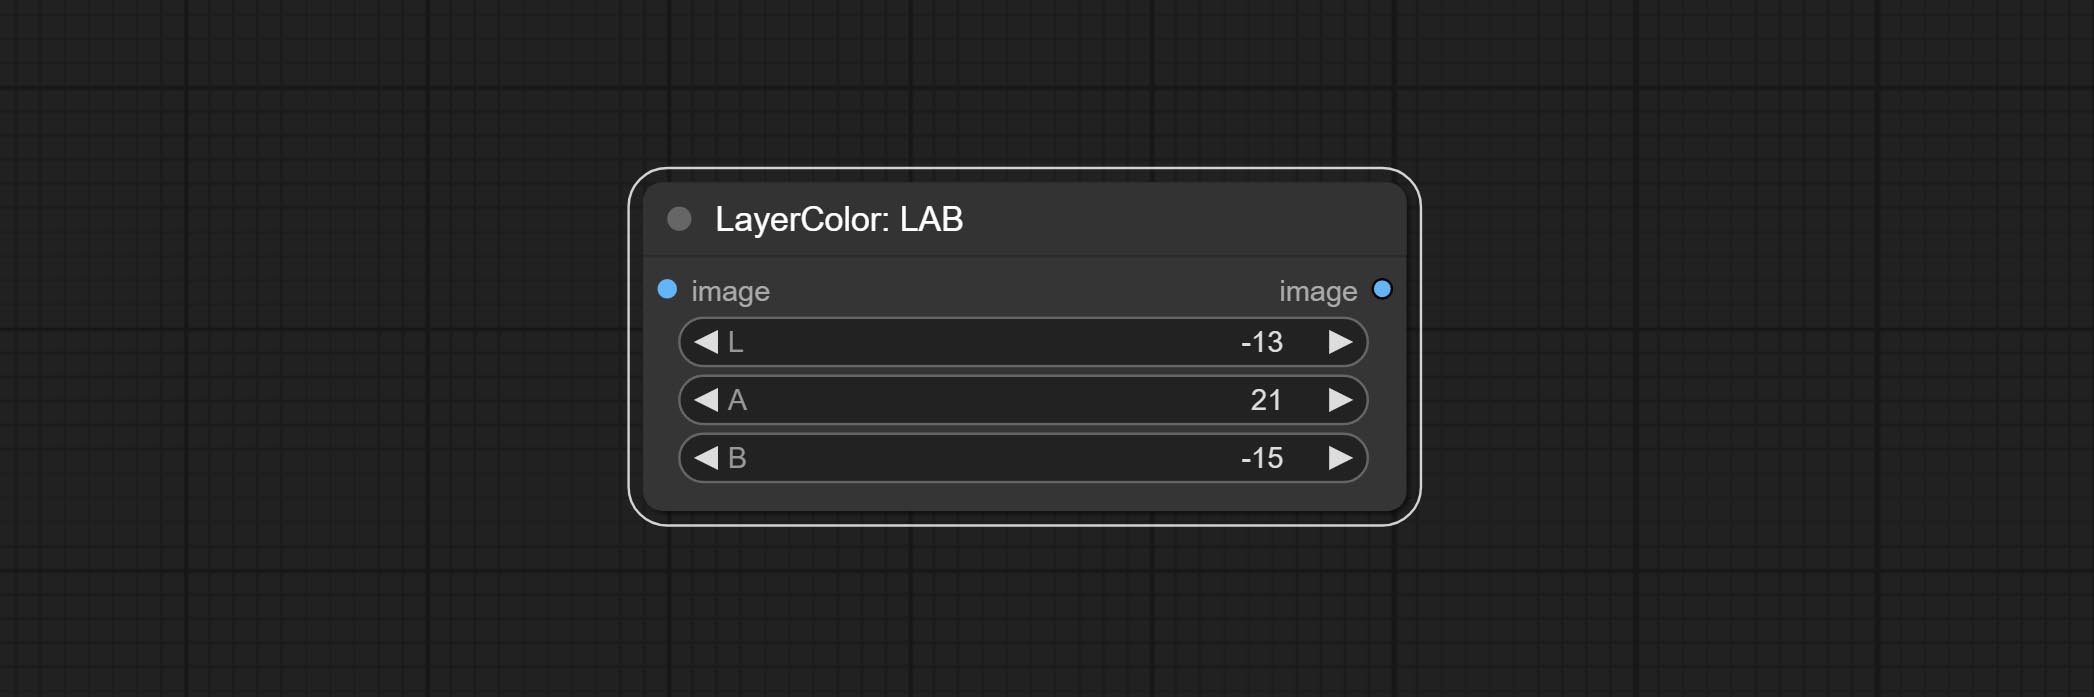
- L: L channel.
- A: A channel.
- B: B channel.
HSV
Adjust the HSV channels of the image.
Node options:
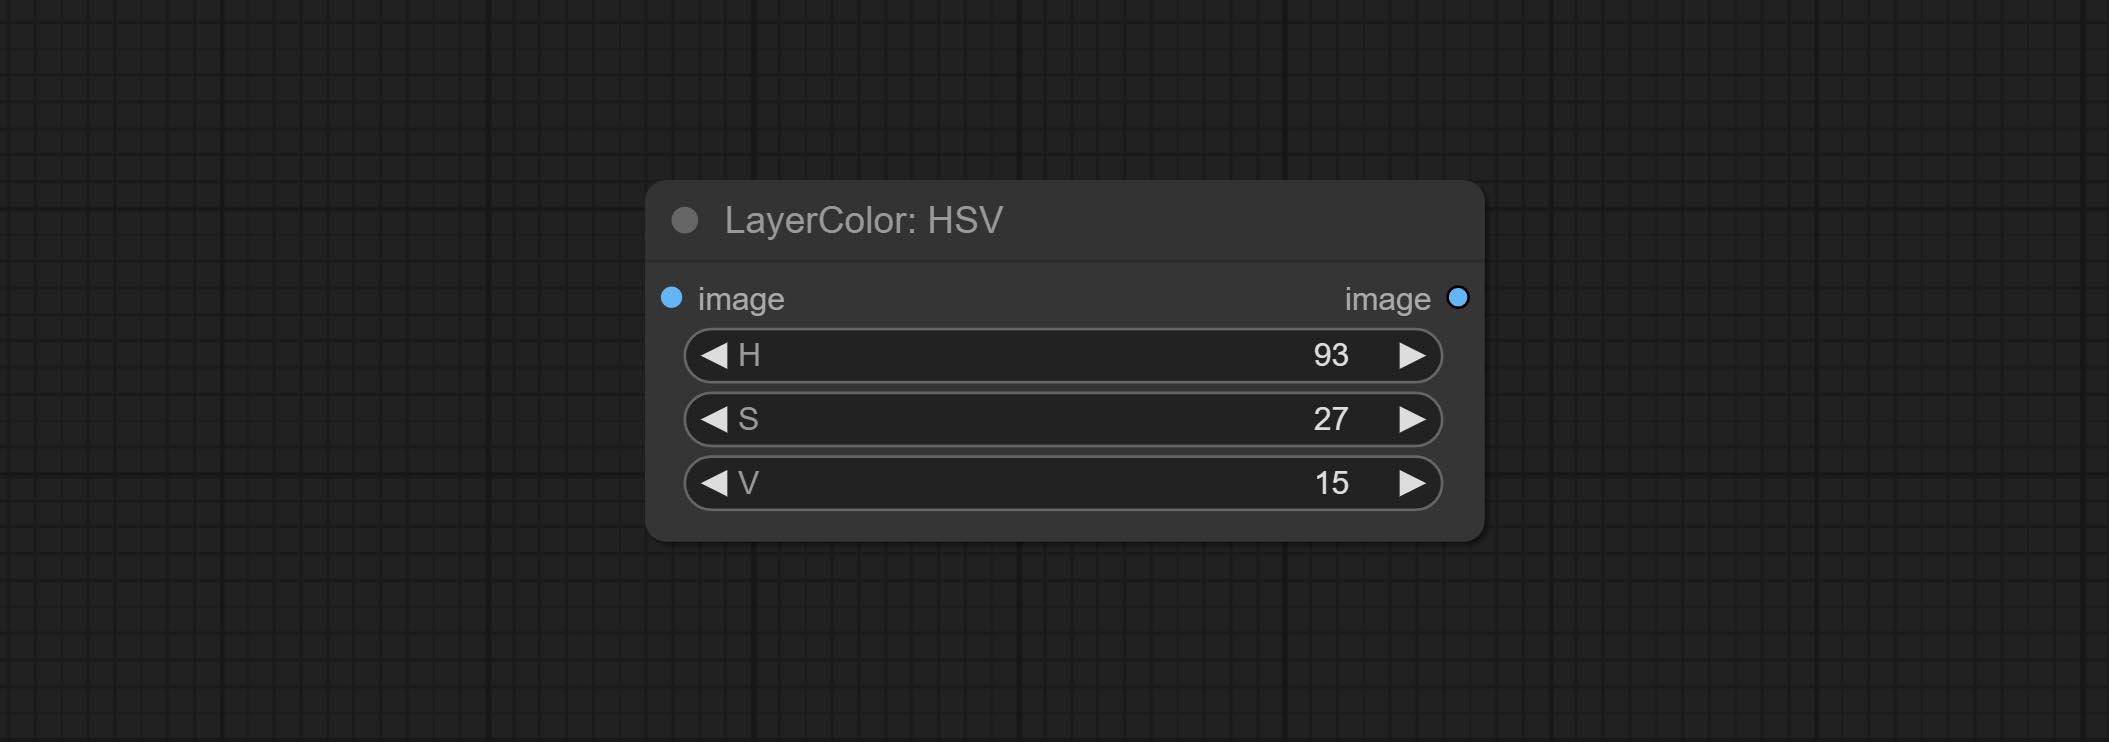
- H: H channel.
- S: S channel.
- V: V channel.
LayerUtility
ImageBlendAdvance
Used for compositing layers, allowing for compositing layer images of different sizes on the background image, and setting positions and transformations. multiple mixing modes are available for selection, and transparency can be set.
The node provide layer transformation_methods and anti_aliasing options. helps improve the quality of synthesized images.
The node provides mask output that can be used for subsequent workflows. 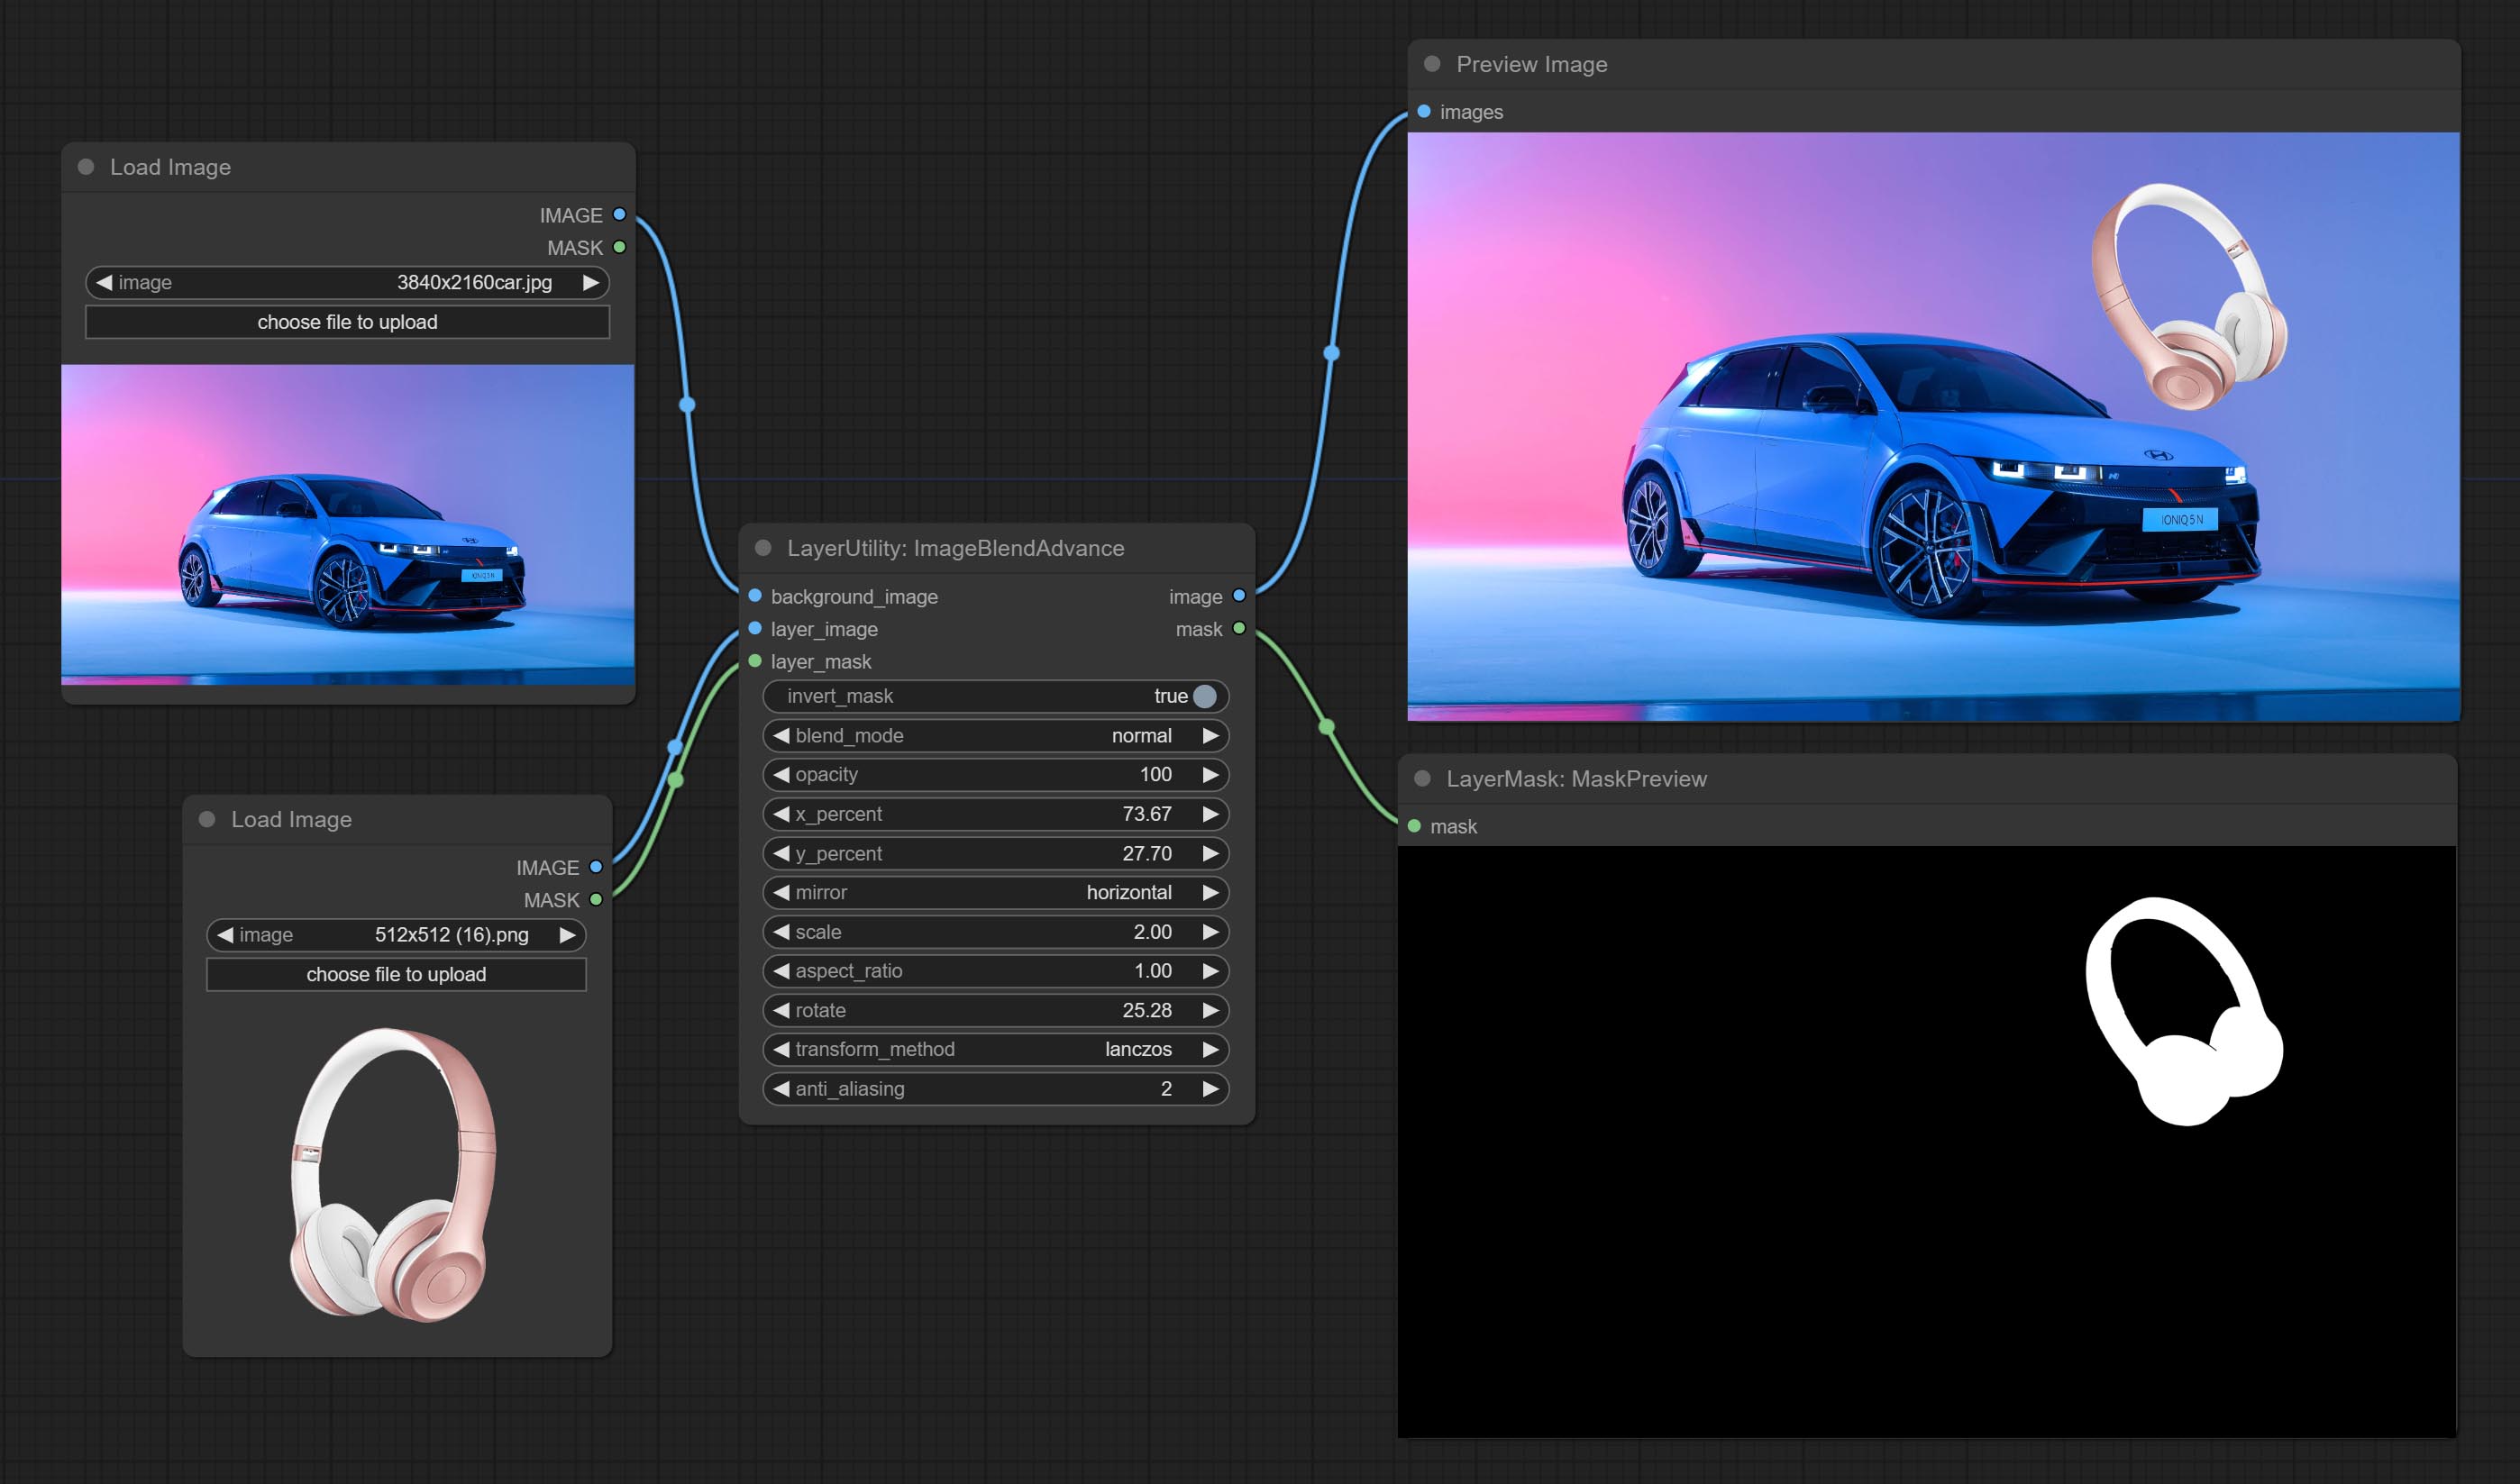
Node options:
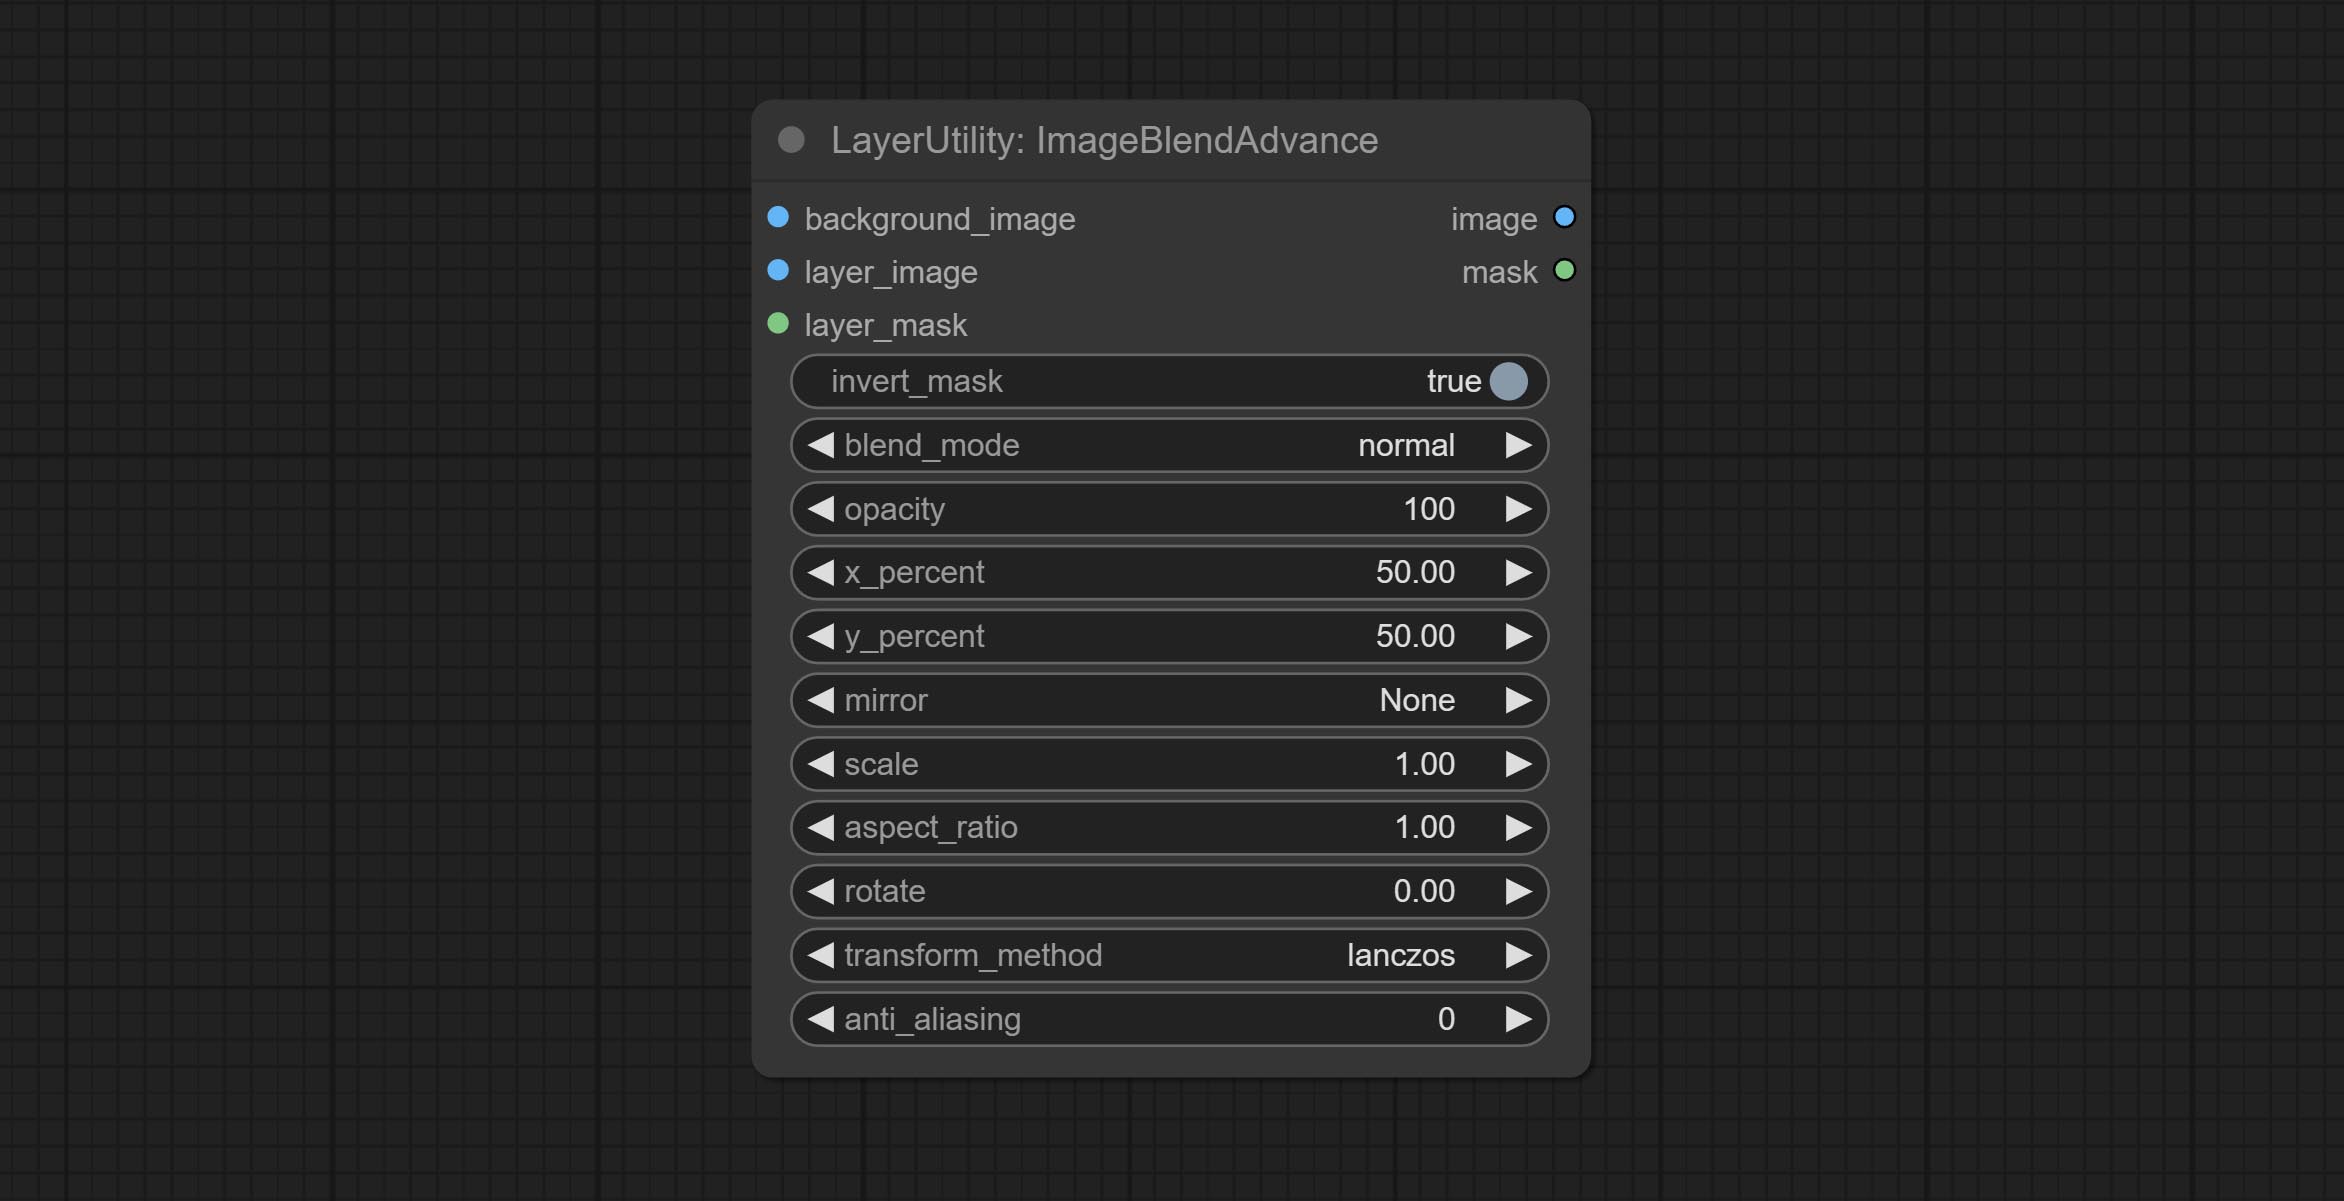
- background_image: The background image.
- layer_image 5 : Layer image for composite.
- layer_mask 2,5 : Mask for layer_image.
- invert_mask: Whether to reverse the mask.
- blend_mode 3 : Blending mode.
- opacity: Opacity of blend.
- x_percent: Horizontal position of the layer on the background image, expressed as a percentage, with 0 on the far left and 100 on the far right. It can be less than 0 or more than 100, indicating that some of the layer's content is outside the screen.
- y_percent: Vertical position of the layer on the background image, expressed as a percentage, with 0 on the top and 100 on the bottom. For example, setting it to 50 indicates vertical center, 20 indicates upper center, and 80 indicates lower center.
- mirror: Mirror flipping. Provide two flipping modes, horizontal flipping and vertical flipping.
- scale: Layer magnification, 1.0 represents the original size.
- aspect_ratio: Layer aspect ratio. 1.0 is the original ratio, a value greater than this indicates elongation, and a value less than this indicates flattening.
- rotate: Layer rotation degree.
- Sampling methods for layer enlargement and rotation, including lanczos, bicubic, hamming, bilinear, box and nearest. Different sampling methods can affect the image quality and processing time of the synthesized image.
- anti_aliasing: Anti aliasing, ranging from 0 to 16, the larger the value, the less obvious the aliasing. An excessively high value will significantly reduce the processing speed of the node.
- ملحوظة
CropByMask
Crop the image according to the mask range, and set the size of the surrounding borders to be retained. This node can be used in conjunction with the RestoreCropBox and ImageScaleRestore nodes to crop and modify upscale parts of image, and then paste them back in place. 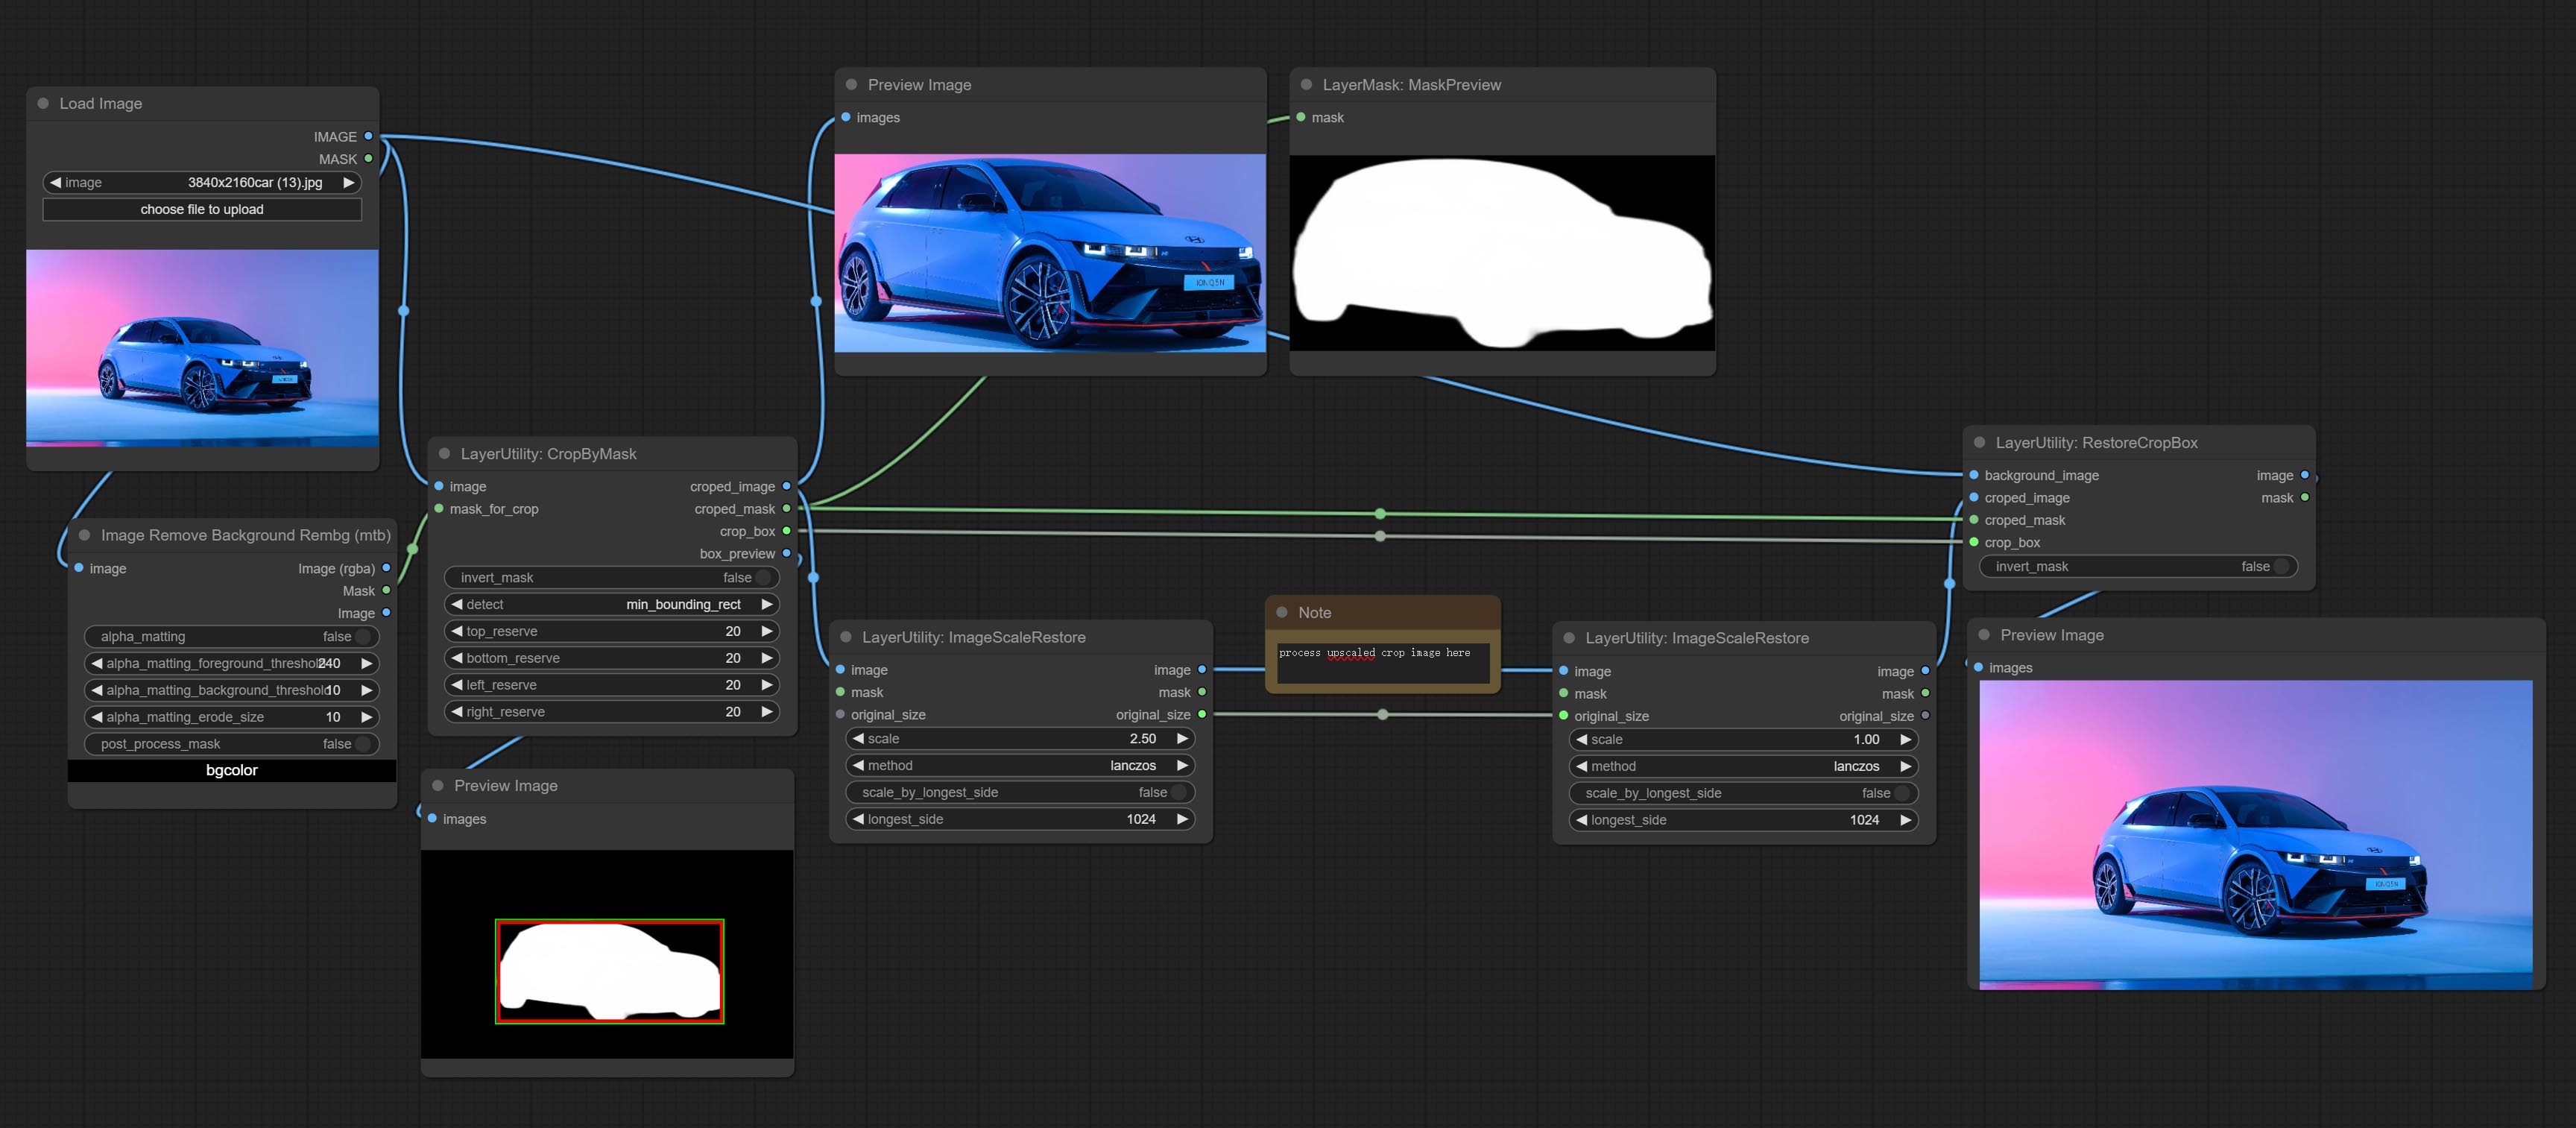
Node options:
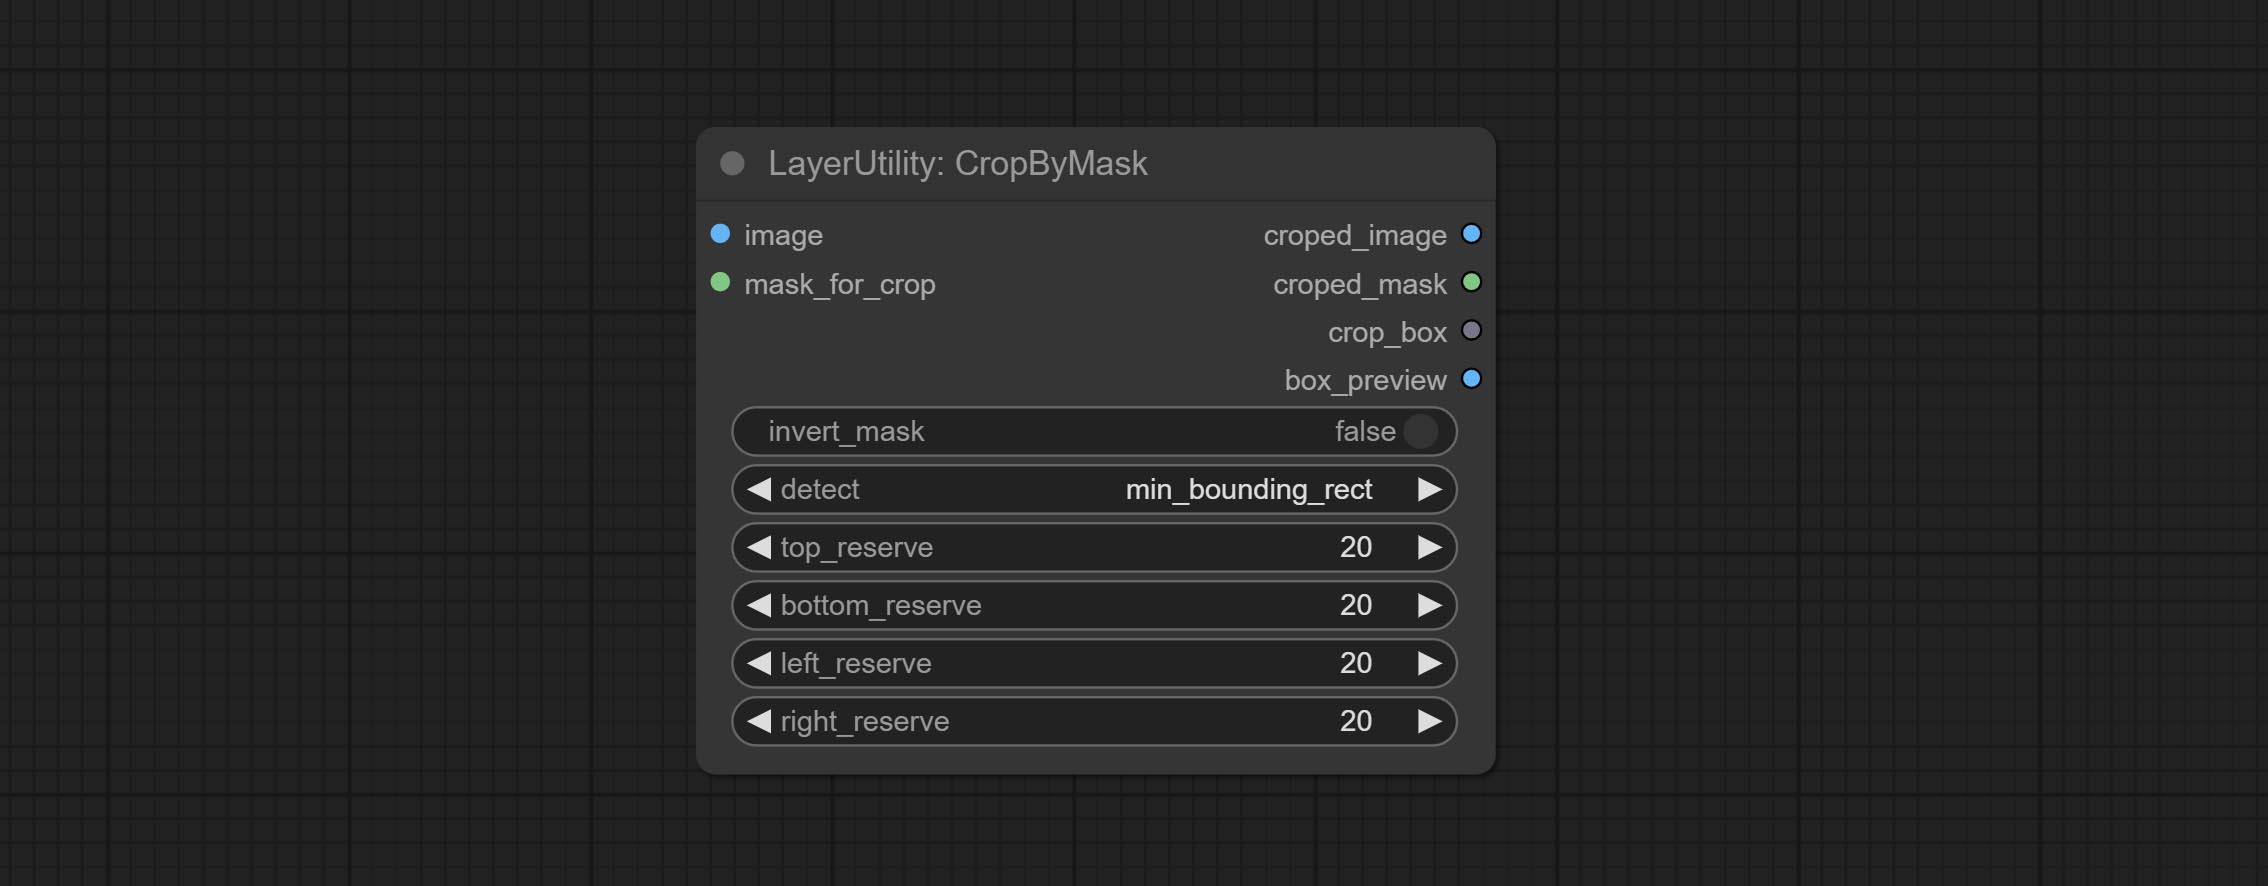
- image 5 : The input image.
- mask_for_crop 5 : Mask of the image, it will automatically be cut according to the mask range.
- invert_mask: Whether to reverse the mask.
- detect: Detection method,
min_bounding_rect is the minimum bounding rectangle of block shape, max_inscribed_rect is the maximum inscribed rectangle of block shape, and mask-area is the effective area for masking pixels. - top_reserve: Cut the top to preserve size.
- bottom_reserve: Cut the bottom to preserve size.
- left_reserve: Cut the left to preserve size.
- right_reserve: Cut the right to preserve size.
- ملحوظة
Output:
- croped_image: The image after crop.
- croped_mask: The mask after crop.
- crop_box: The trimmed box data is used when restoring the RestoreCropBox node.
- box_preview: Preview image of cutting position, red represents the detected range, and green represents the cutting range after adding the reserved border.
CropByMaskV2
The V2 upgraded version of CropByMask. Supports crop_box input, making it easy to cut layers of the same size.
The following changes have been made based on CropByMask: 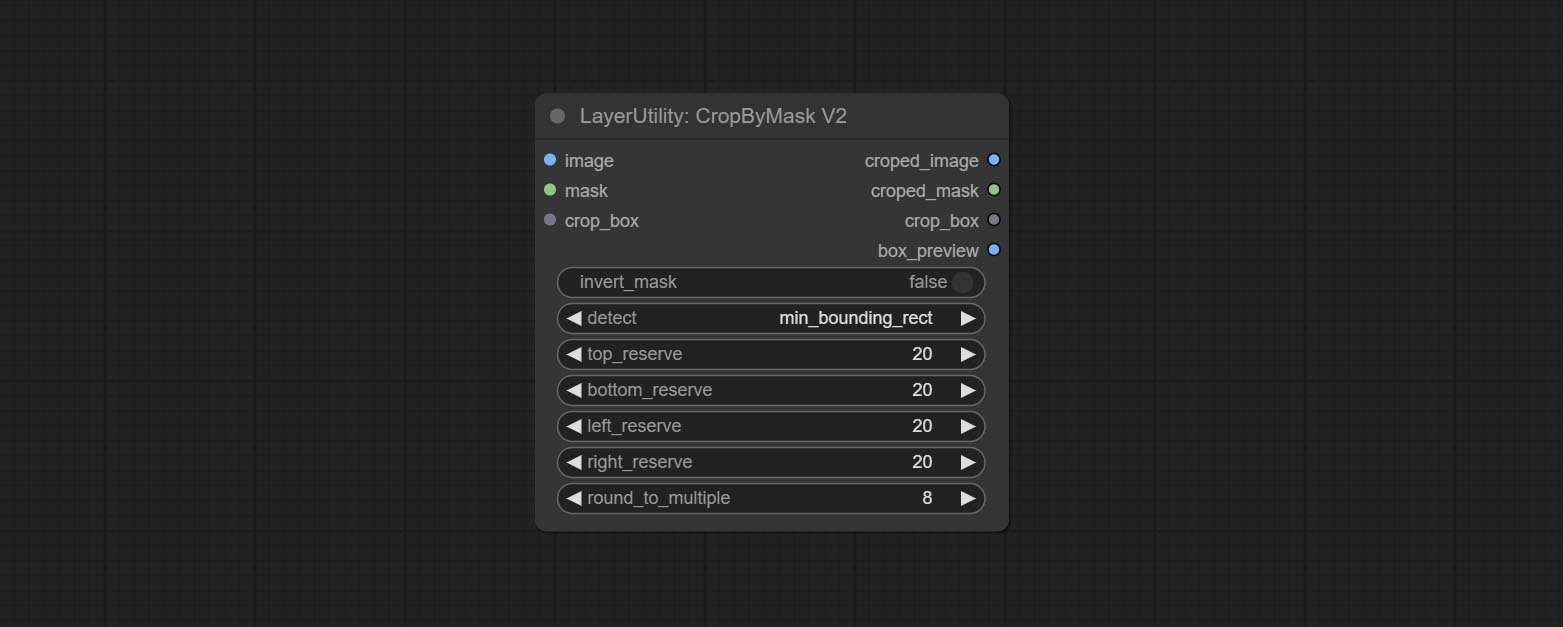
- The input
mask_for_crop reanme to mask 。 - Add optional inputs to the
crop_box . If there are inputs here, mask detection will be ignored and this data will be directly used for cropping. - Add the option
round_to_multiple to round the trimming edge length multiple. For example, setting it to 8 will force the width and height to be multiples of 8.
RestoreCropBox
Restore the cropped image to the original image by CropByMask.
Node options:
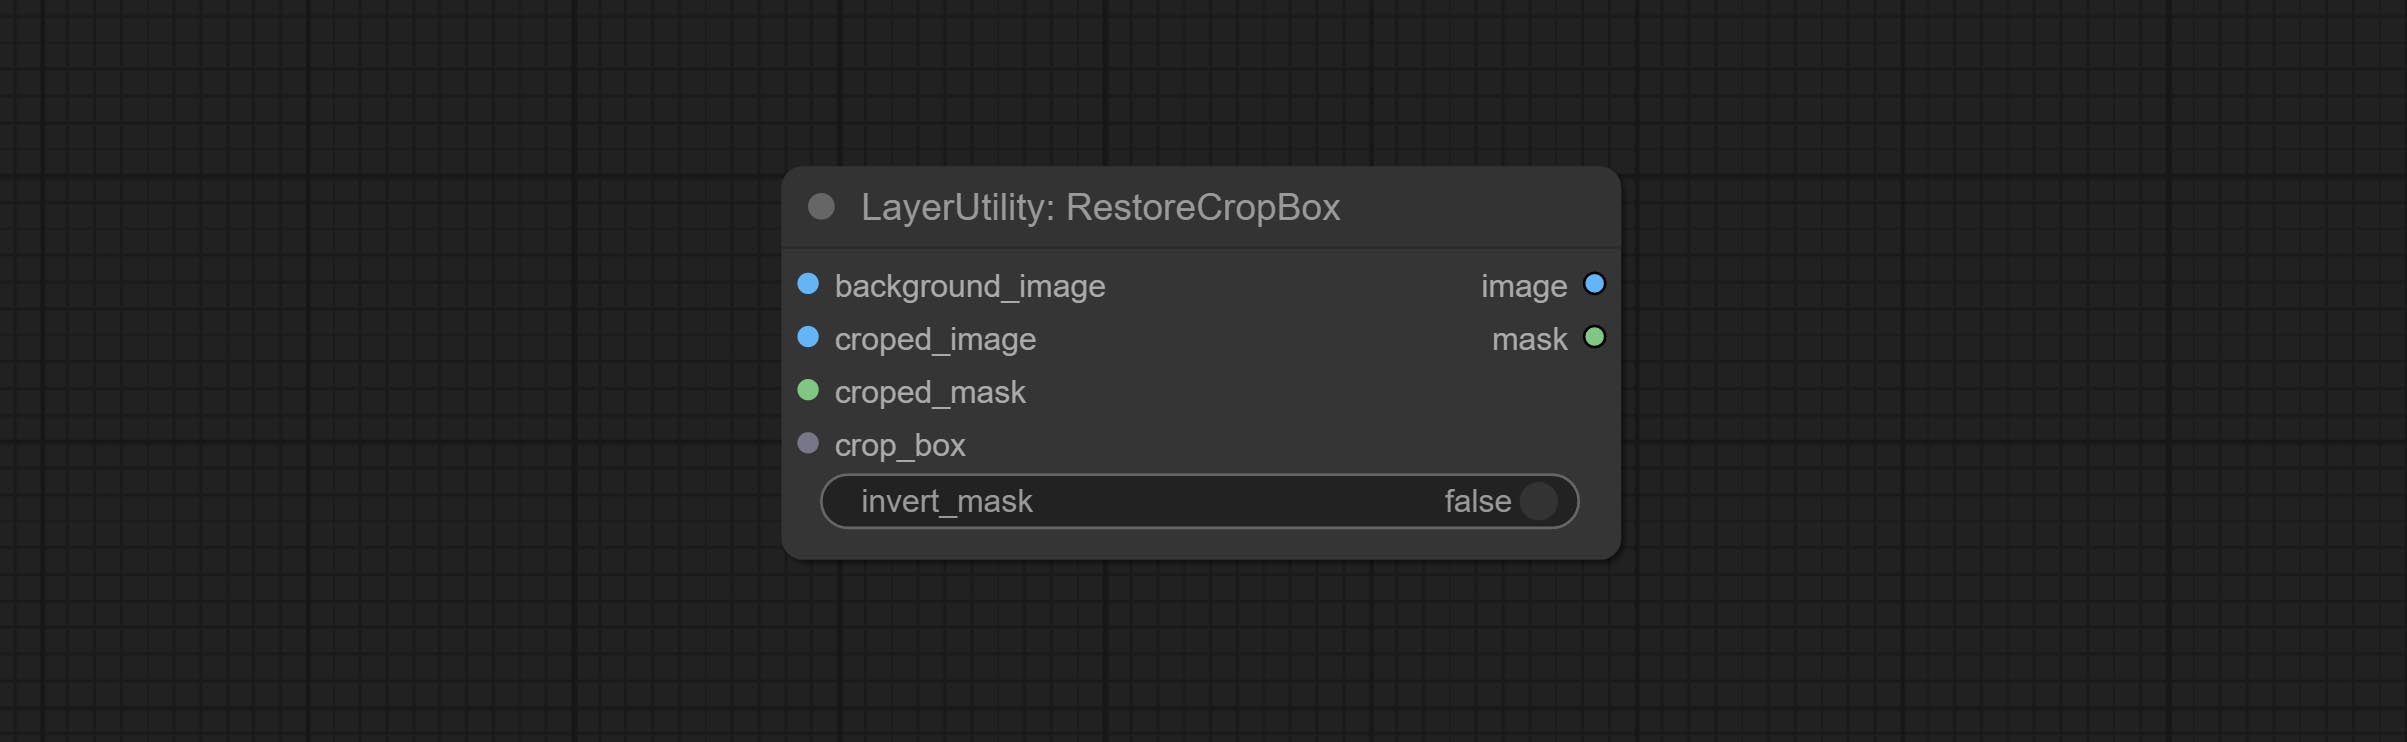
- background_image: The original image before cutting.
- croped_image 5 : The cropped image. If the middle is enlarged, the size needs to be restored before restoration.
- croped_mask 5 : The cut mask.
- crop_box: Box data during cutting.
- invert_mask: Whether to reverse the mask.
- ملحوظة
CropBoxResolve
Parsing the corp_box to x , y , width , height . 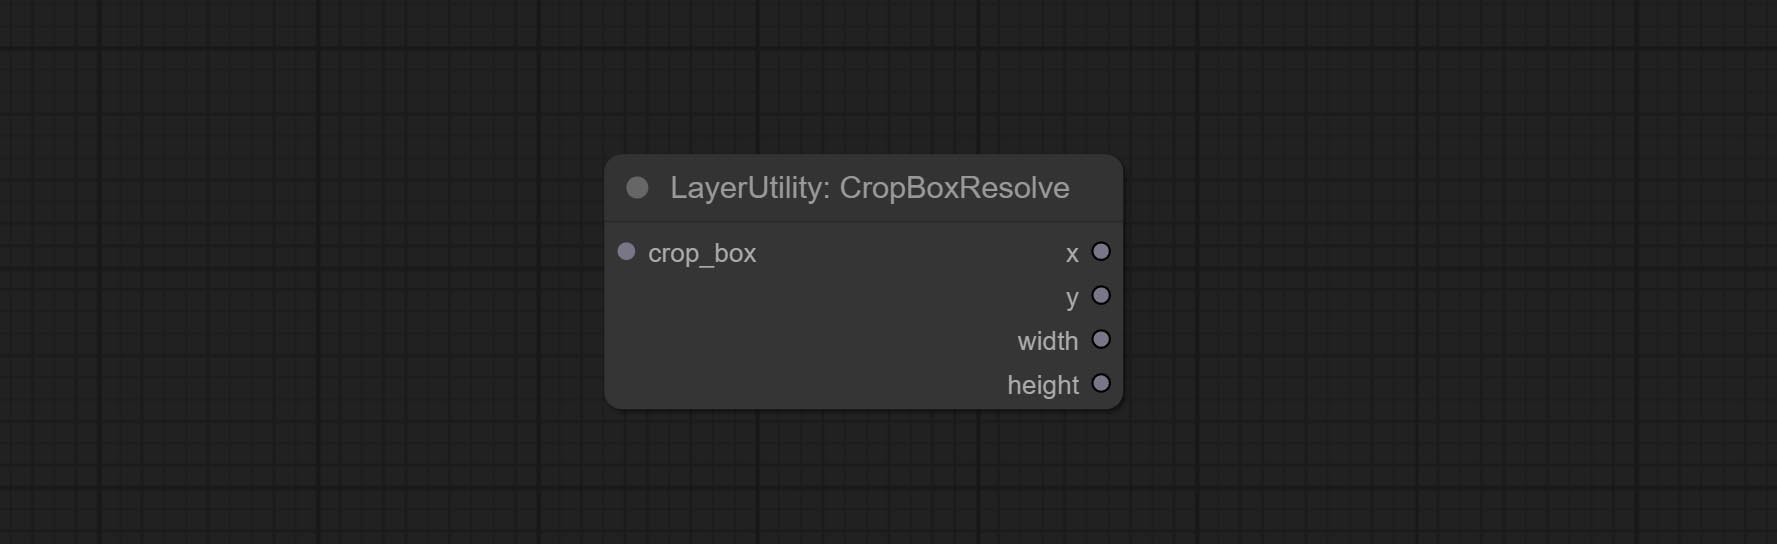
ImageScaleRestore
Image scaling. when this node is used in pairs, the image can be automatically restored to its original size on the second node. 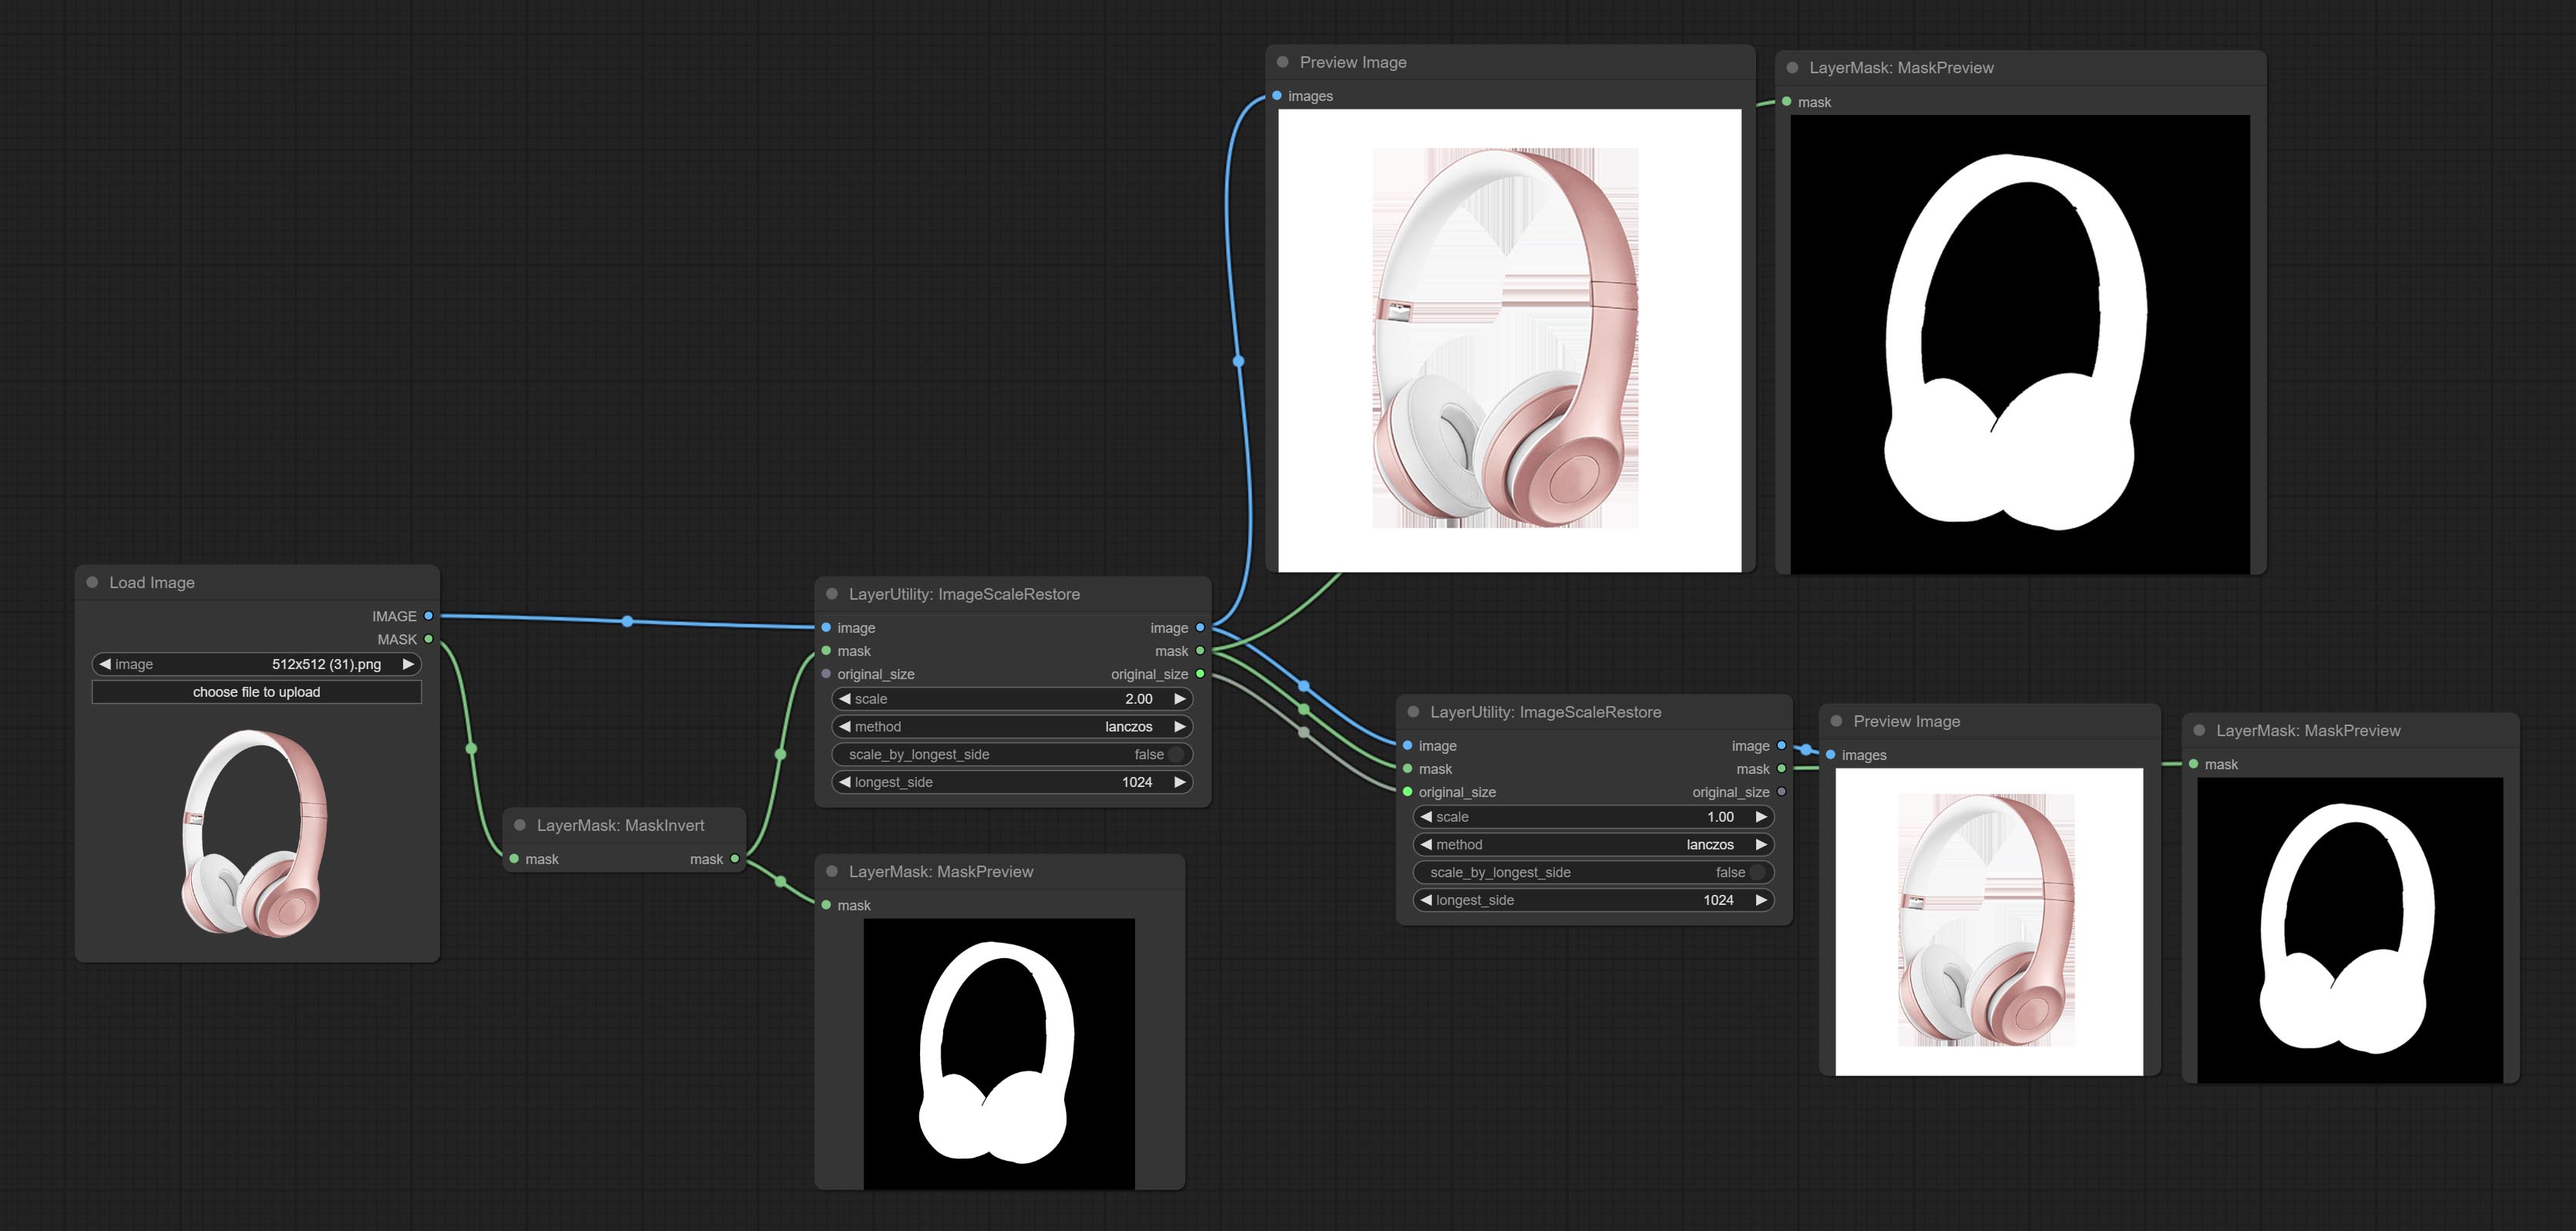
Node options:
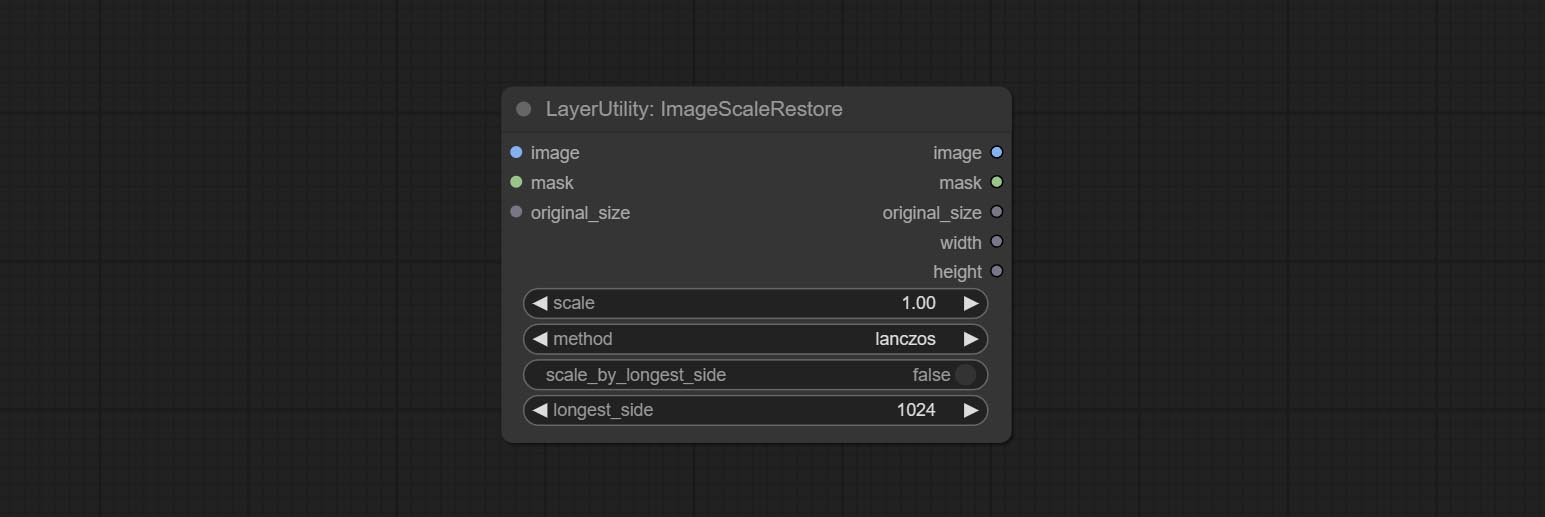
- image 5 : The input image.
- mask 2,5 : Mask of image.
- original_size: Optional input, used to restore the image to its original size.
- scale: Scale ratio. when the original_size have input, or scale_ by_longest_side is set to True, this setting will be ignored.
- scale_by_longest_side: Allow scaling by long edge size.
- longest_side: When the scale_by_longest_side is set to True, this will be used this value to the long edge of the image. when the original_size have input, this setting will be ignored.
Outputs:
- image: The scaled image.
- mask: If have mask input, the scaled mask will be output.
- original_size: The original size data of the image is used for subsequent node recovery.
- width: The output image's width.
- height: The output image's height.
ImageScaleRestoreV2
The V2 upgraded version of ImageScaleRestore.
Node options:
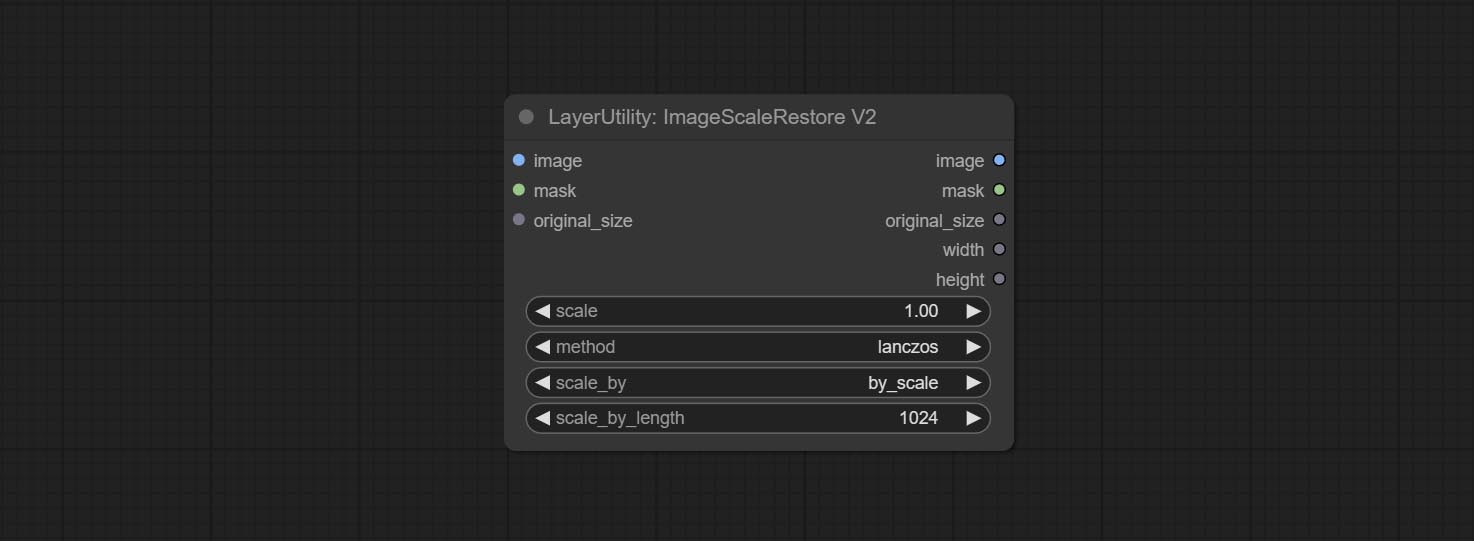
The following changes have been made based on ImageScaleRestore:
- scale_by: Allow scaling by specified dimensions for long, short, width, height, or total pixels. When this option is set to by_scale, use the scale value, and for other options, use the scale_by_length value.
- scale_by_length: The value here is used as
scale_by to specify the length of the edge.
ImageMaskScaleAs
Scale the image or mask to the size of the reference image (or reference mask). 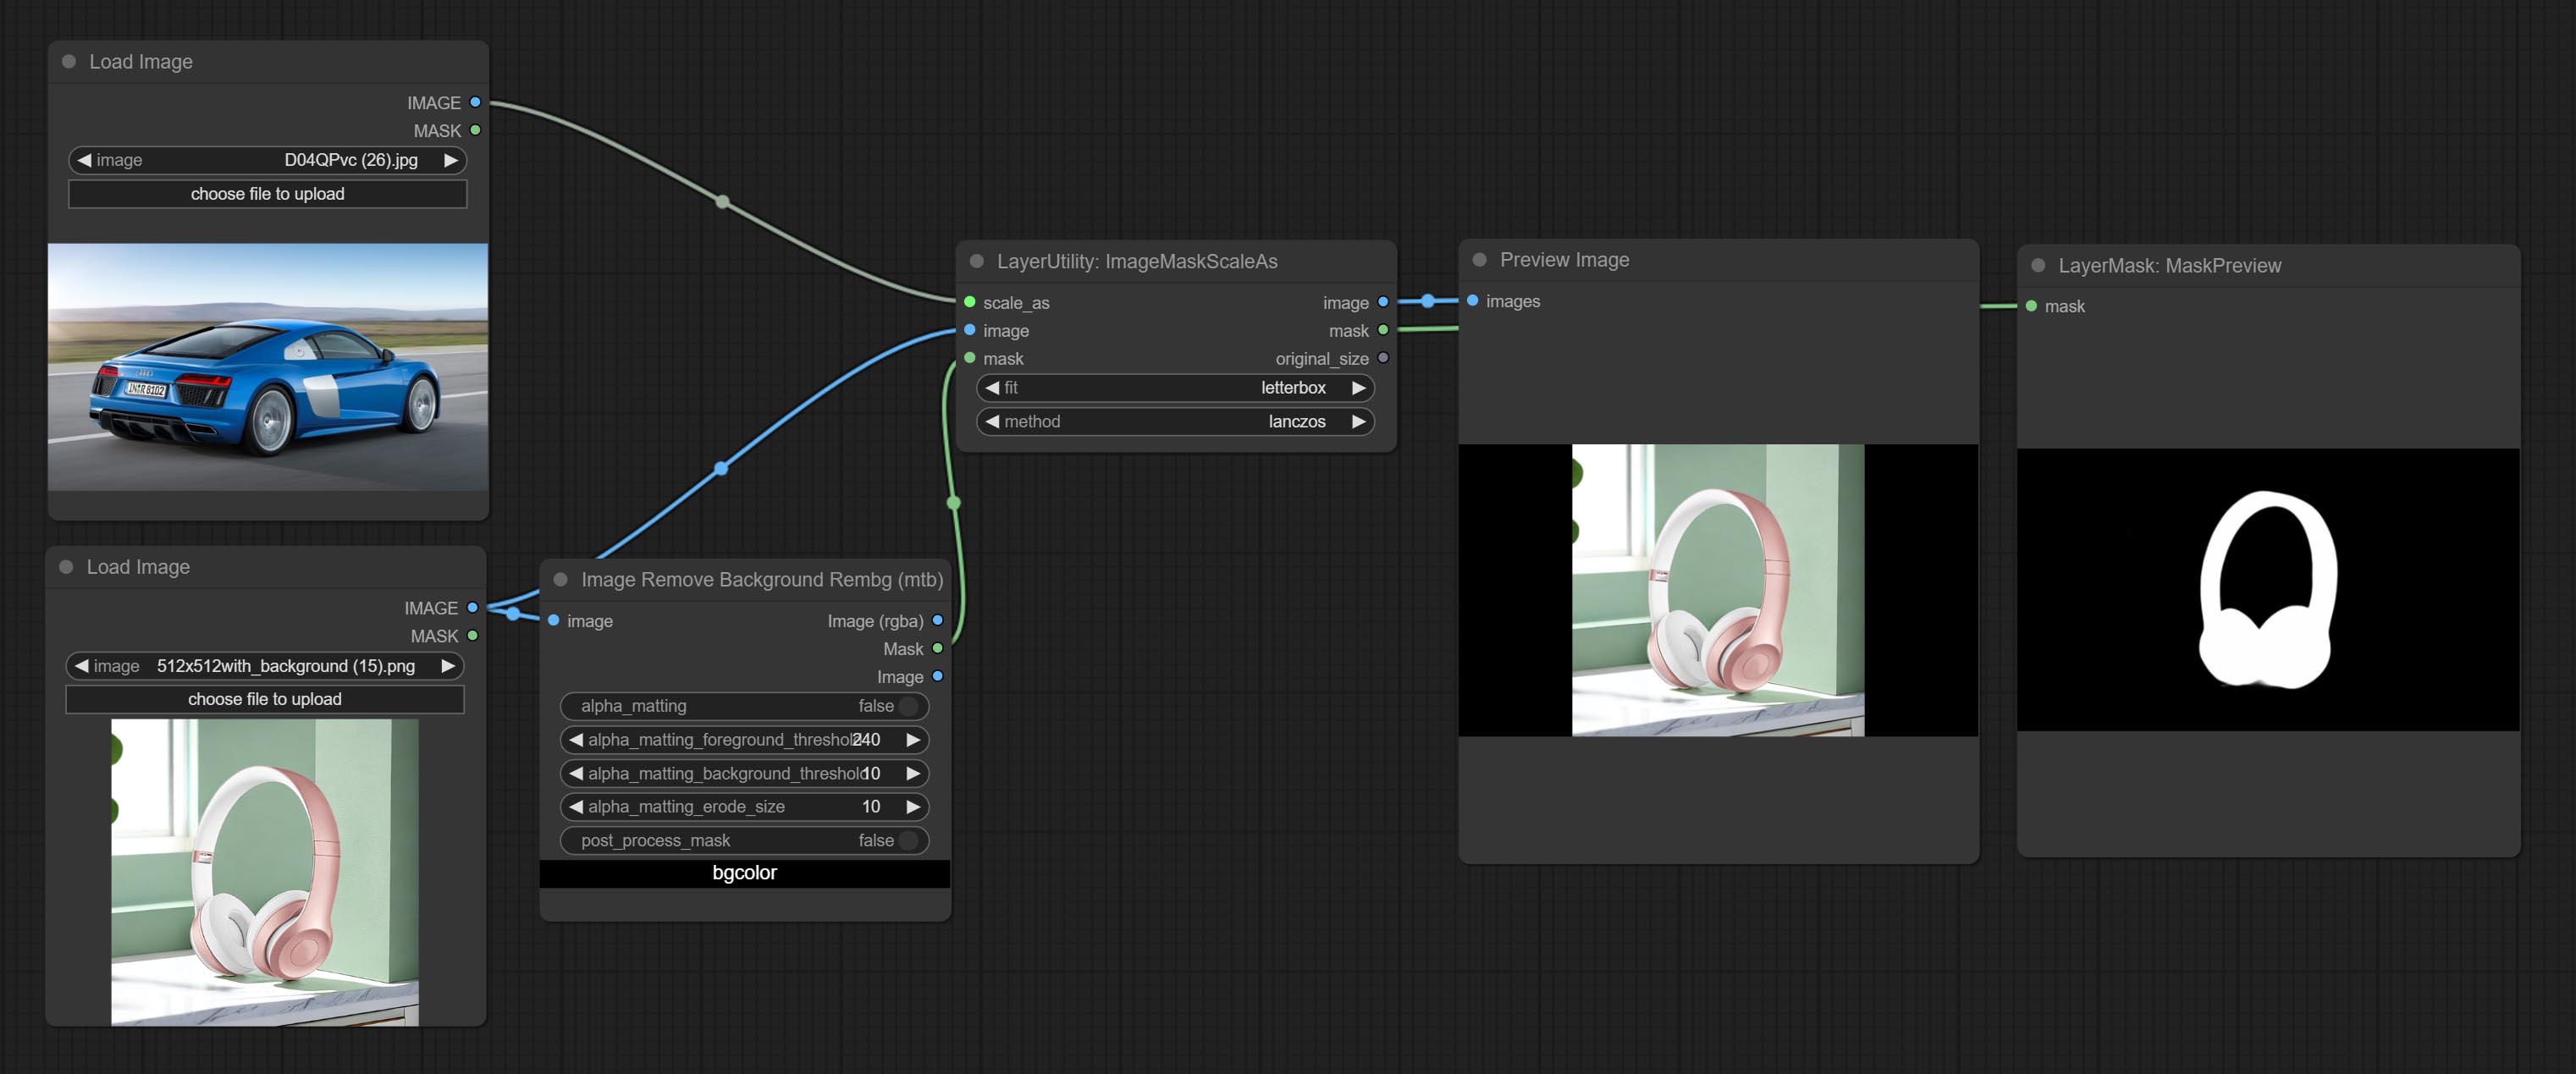
Node options: 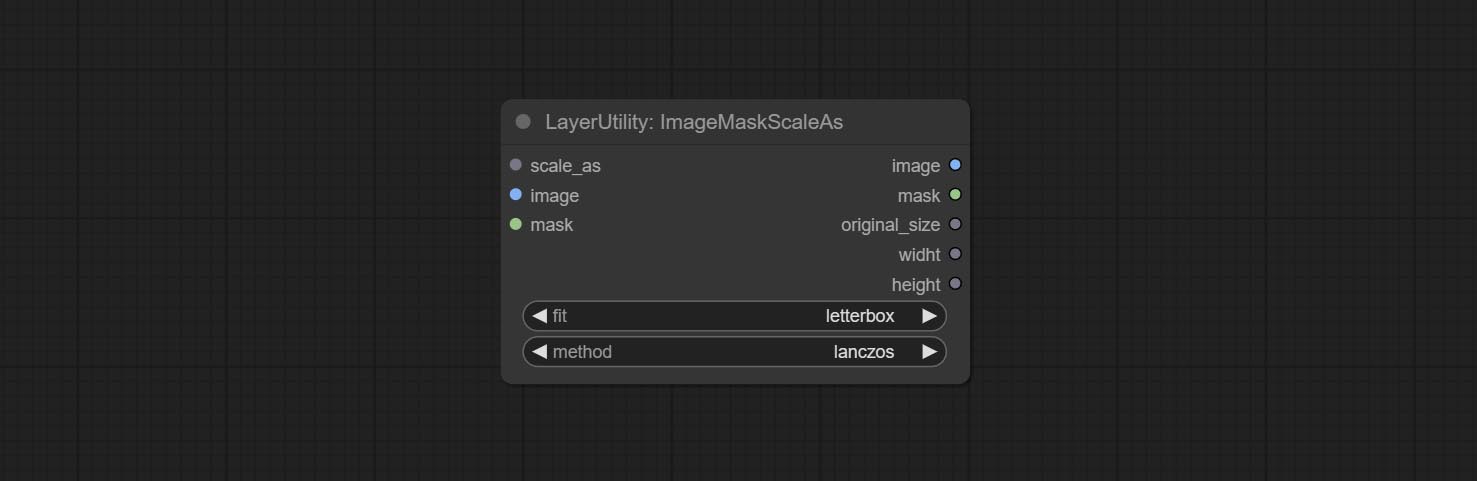
- scale_as * : Reference size. It can be an image or a mask.
- image: Image to be scaled. this option is optional input. if there is no input, a black image will be output.
- mask: Mask to be scaled. this option is optional input. if there is no input, a black mask will be output.
- fit: Scale aspect ratio mode. when the width to height ratio of the original image does not match the scaled size, there are three modes to choose from, The letterbox mode retains the complete frame and fills in the blank spaces with black; The crop mode retains the complete short edge, and any excess of the long edge will be cut off; The fill mode does not maintain frame ratio and fills the screen with width and height.
- method: Scaling sampling methods, including lanczos, bicubic, hamming, bilinear, box, and nearest.
* Only limited to input images and masks. forcing the integration of other types of inputs will result in node errors.
Outputs:
- image: If there is an image input, the scaled image will be output.
- mask: If there is a mask input, the scaled mask will be output.
- original_size: The original size data of the image is used for subsequent node recovery.
- width: The output image's width.
- height: The output image's height.
ImageScaleByAspectRatio
Scale the image or mask by aspect ratio. the scaled size can be rounded to a multiple of 8 or 16, and can be scaled to the long side size. 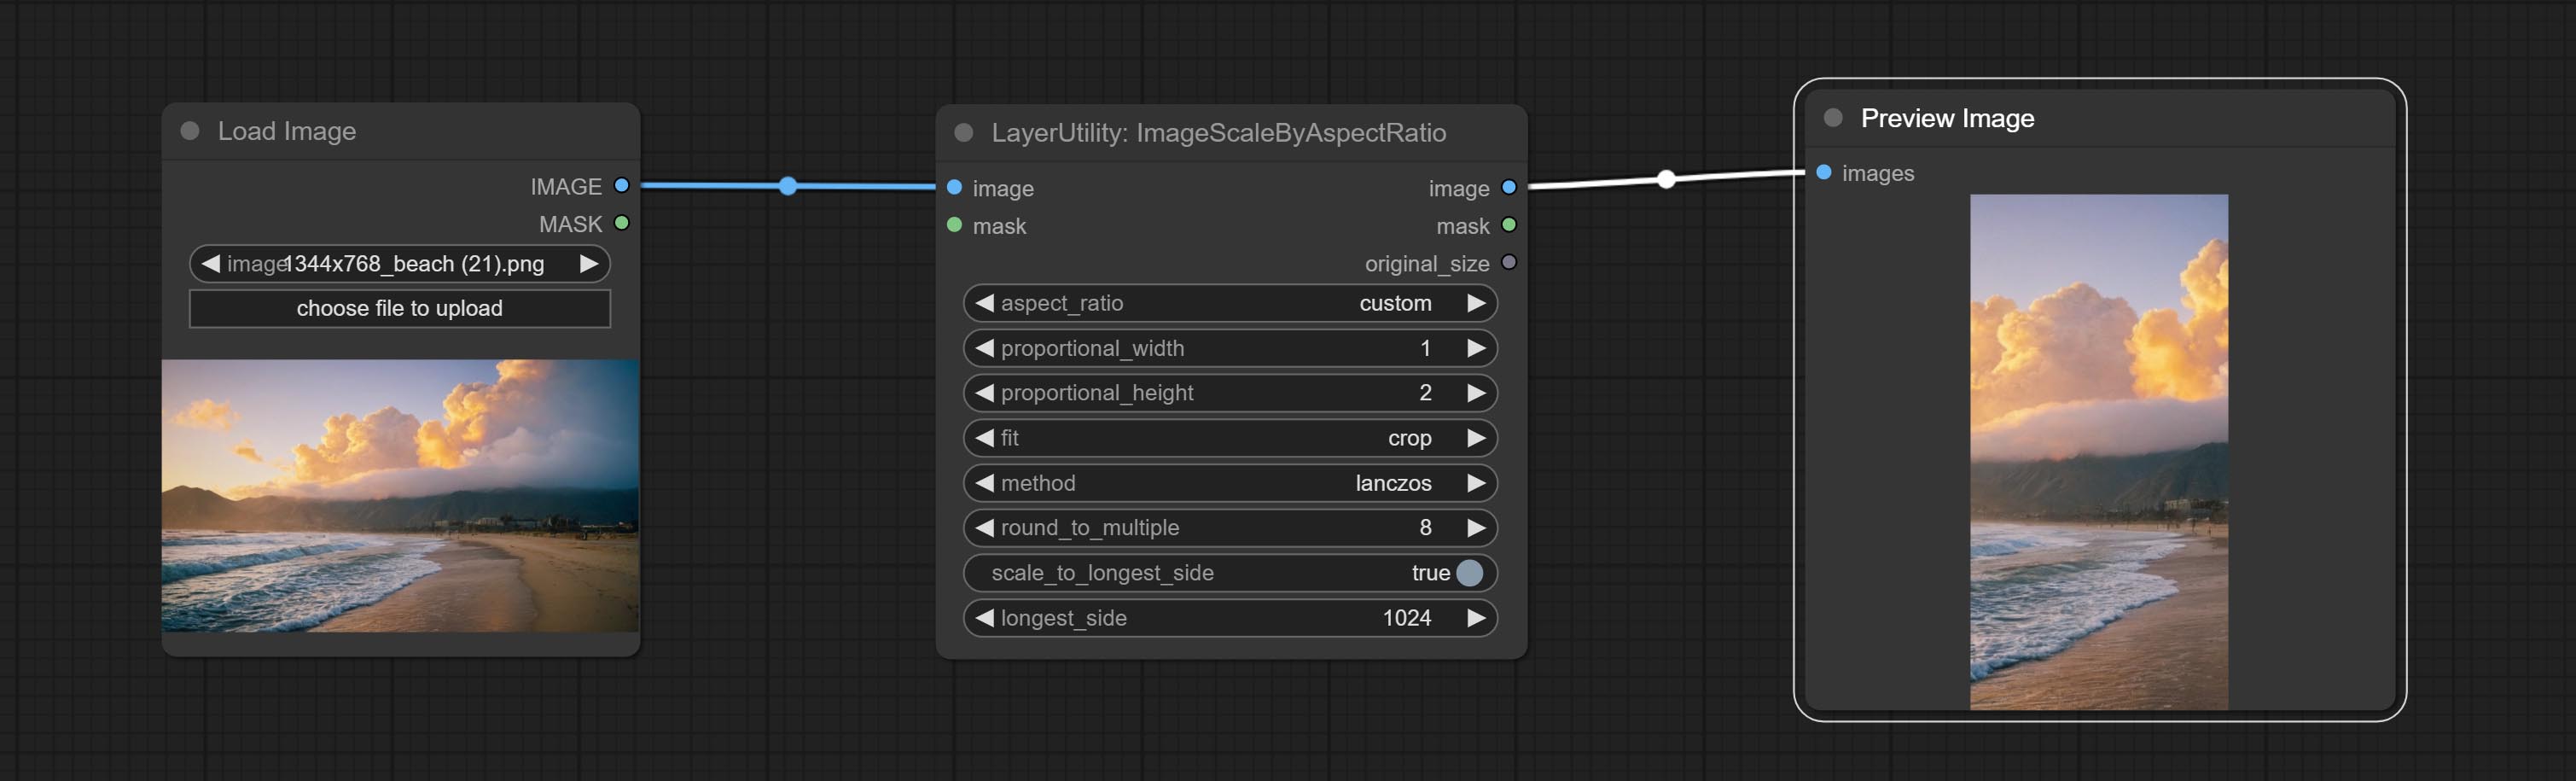
Node options:
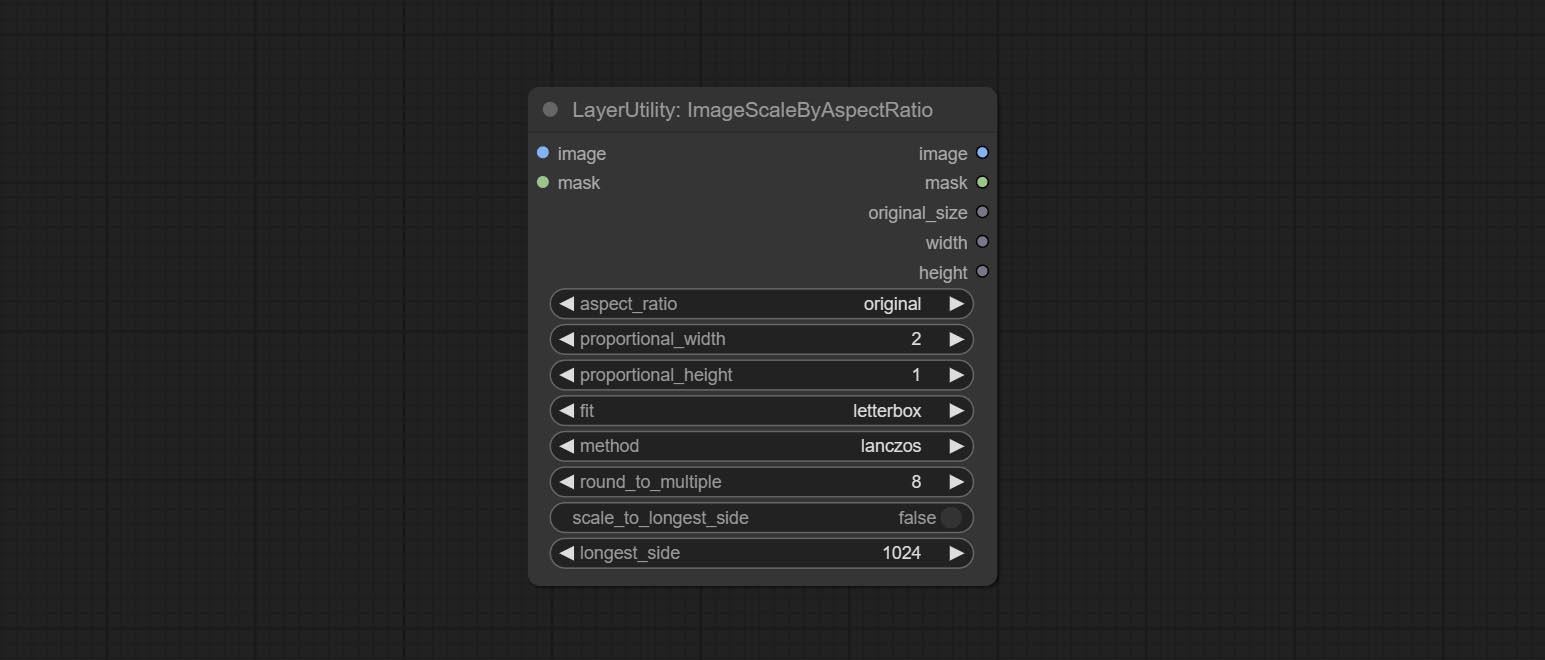
- aspect_ratio: Here are several common frame ratios provided. alternatively, you can choose "original" to keep original ratio or customize the ratio using "custom".
- proportional_width: Proportional width. if the aspect ratio option is not "custom", this setting will be ignored.
- proportional_height: Proportional height. if the aspect ratio option is not "custom", this setting will be ignored.
- fit: Scale aspect ratio mode. when the width to height ratio of the original image does not match the scaled size, there are three modes to choose from, The letterbox mode retains the complete frame and fills in the blank spaces with black; The crop mode retains the complete short edge, and any excess of the long edge will be cut off; The fill mode does not maintain frame ratio and fills the screen with width and height.
- method: Scaling sampling methods, including lanczos, bicubic, hamming, bilinear, box, and nearest.
- round_to_multiple: Round multiples. for example, setting it to 8 will force the width and height to be multiples of 8.
- scale_by_longest_side: Allow scaling by long edge size.
- longest_side: When the scale_by_longest_side is set to True, this will be used this value to the long edge of the image. when the original_size have input, this setting will be ignored.
Outputs:
- image: If have image input, the scaled image will be output.
- mask: If have mask input, the scaled mask will be output.
- original_size: The original size data of the image is used for subsequent node recovery.
- width: The output image's width.
- height: The output image's height.
ImageScaleByAspectRatioV2
V2 Upgraded Version of ImageScaleByAspectRatio
Node options:
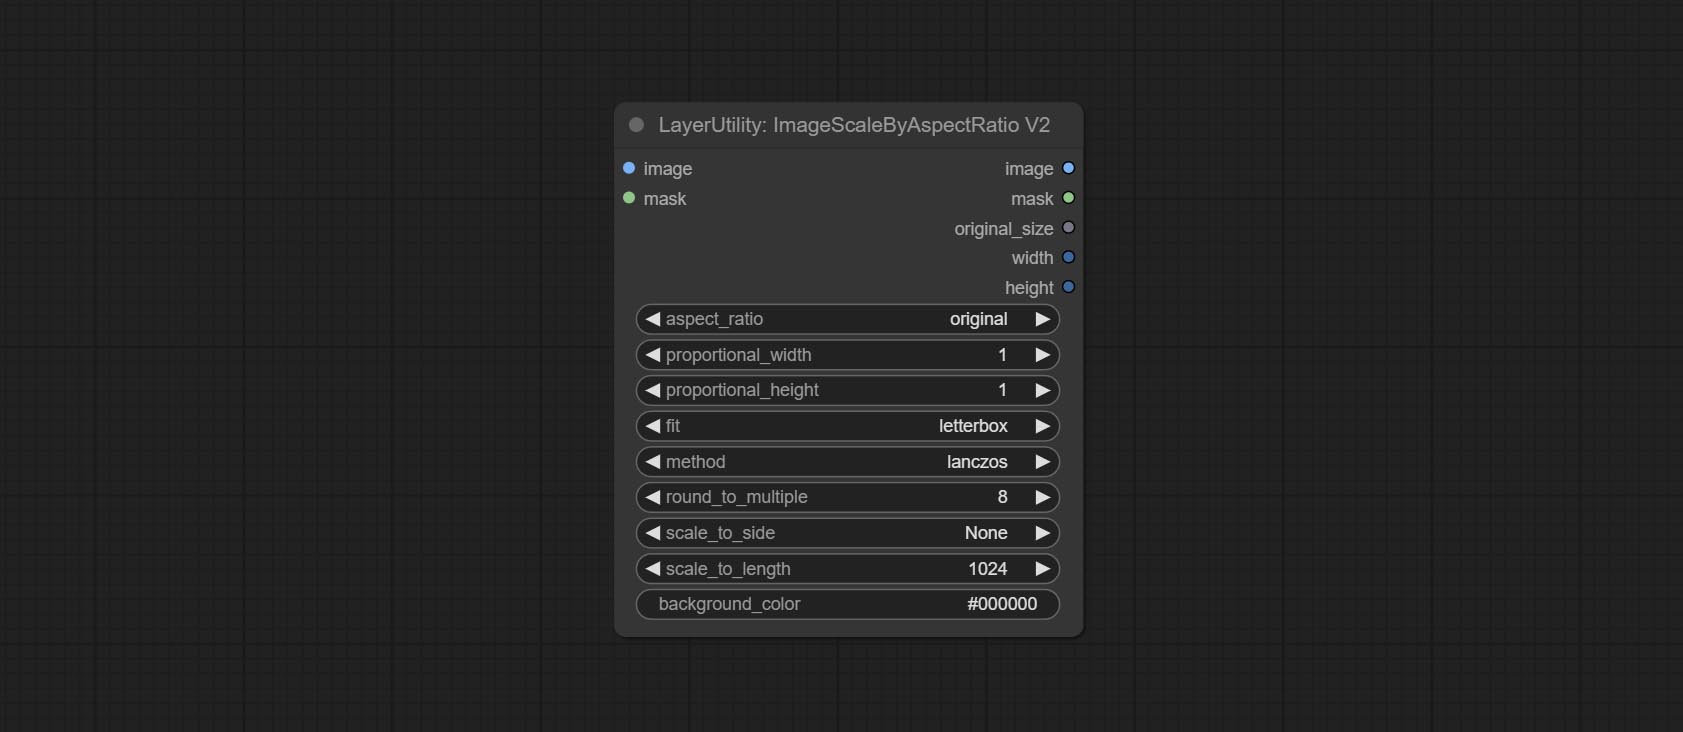
The following changes have been made based on ImageScaleByAspectRatio:
- scale_to_side: Allow scaling by specified dimensions for long, short, width, height, or total pixels.
- scale_to_length: The numerical value here serves as the length of the specified edge or the total pixels (kilo pixels) for scale_to_side.
- background_color 4 : The color of the background.
QWenImage2Prompt
Inference the prompts based on the image. this node is repackage of the ComfyUI_VLM_nodes's UForm-Gen2 Qwen Node , thanks to the original author. Download model files from huggingface or Baidu Netdisk to ComfyUI/models/LLavacheckpoints/files_for_uform_gen2_qwen folder.
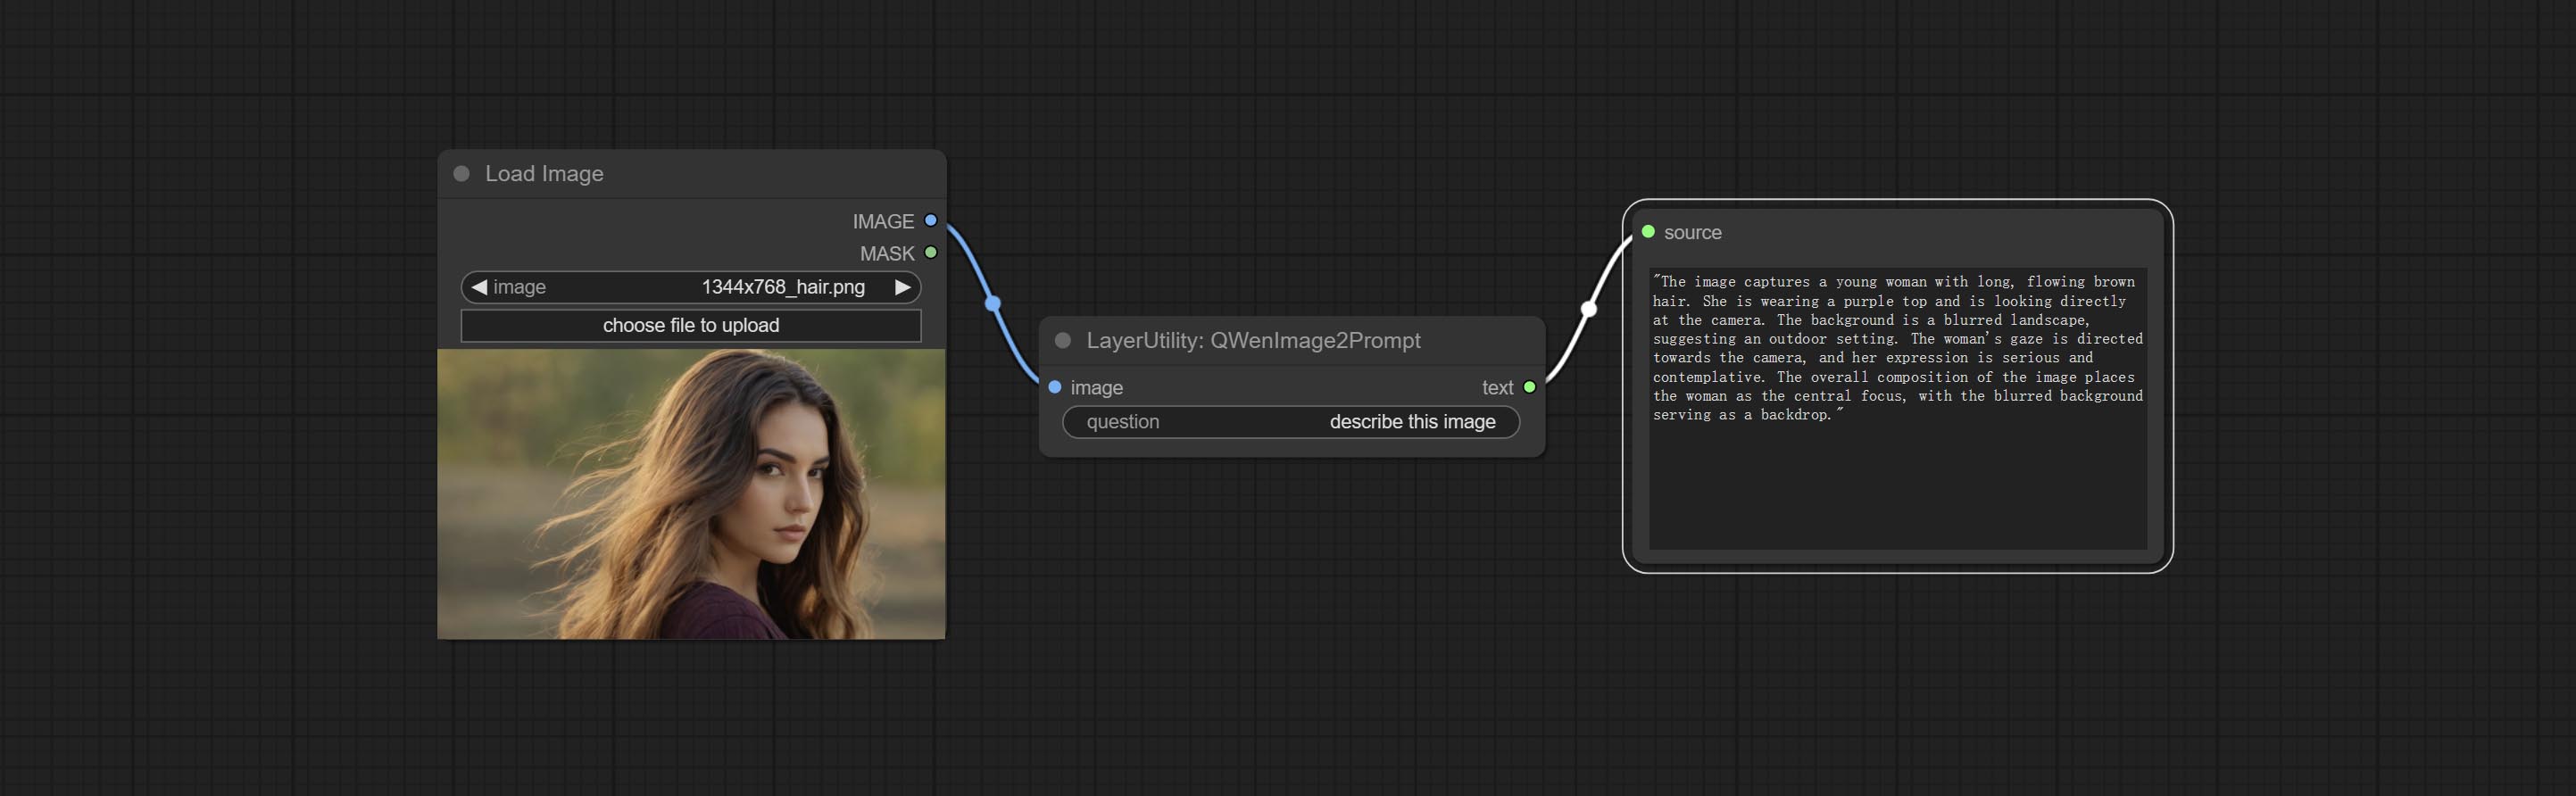
Node Options:
- question: Prompt of UForm-Gen-QWen model.
LlamaVision
Use the Llama 3.2 vision model for local inference. Can be used to generate prompt words. part of the code for this node comes from ComfyUI-PixtralLlamaMolmoVision, thank you to the original author. To use this node, the transformers need upgraded to 4.45.0 or higher. Download models from BaiduNetdisk or huggingface/SeanScripts , and copy to ComfyUI/models/LLM . 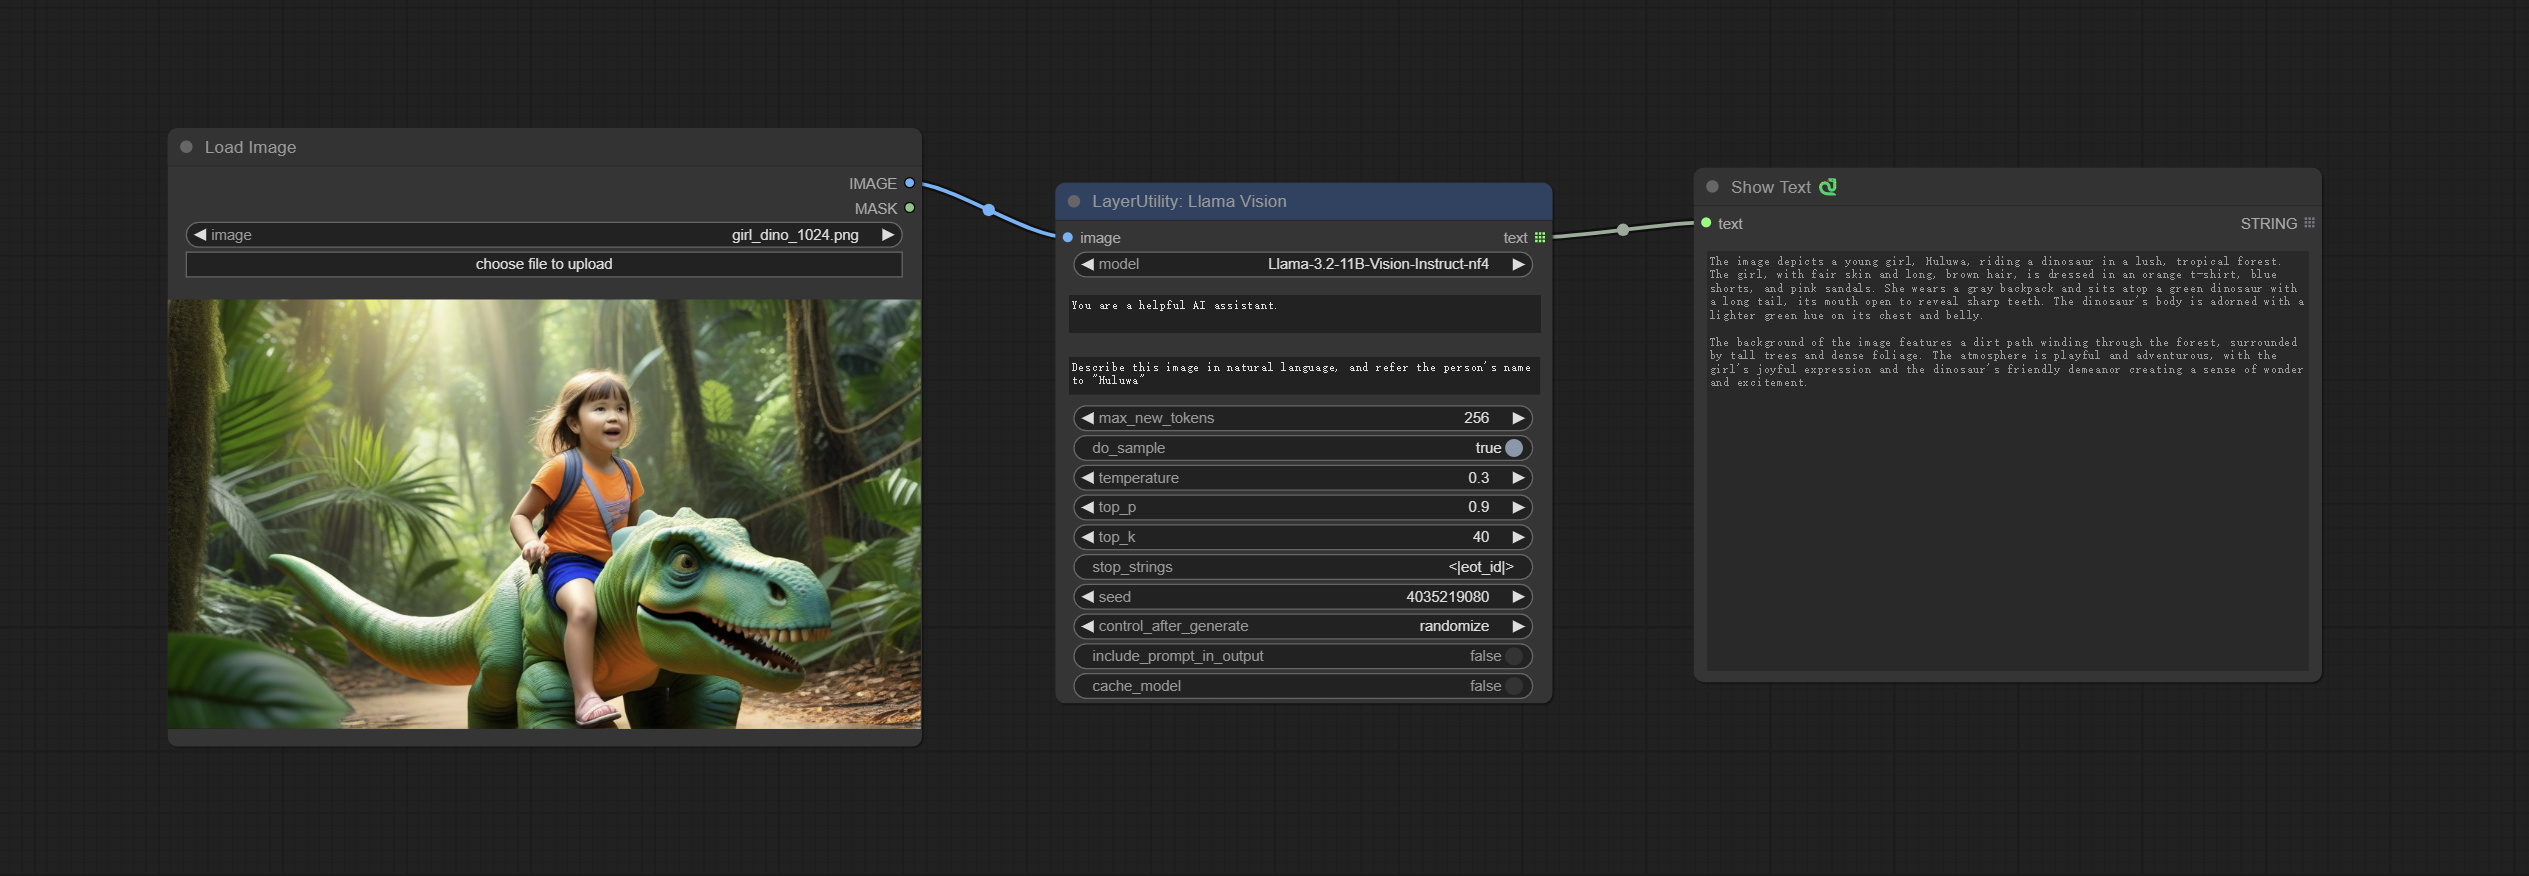
Node Options:
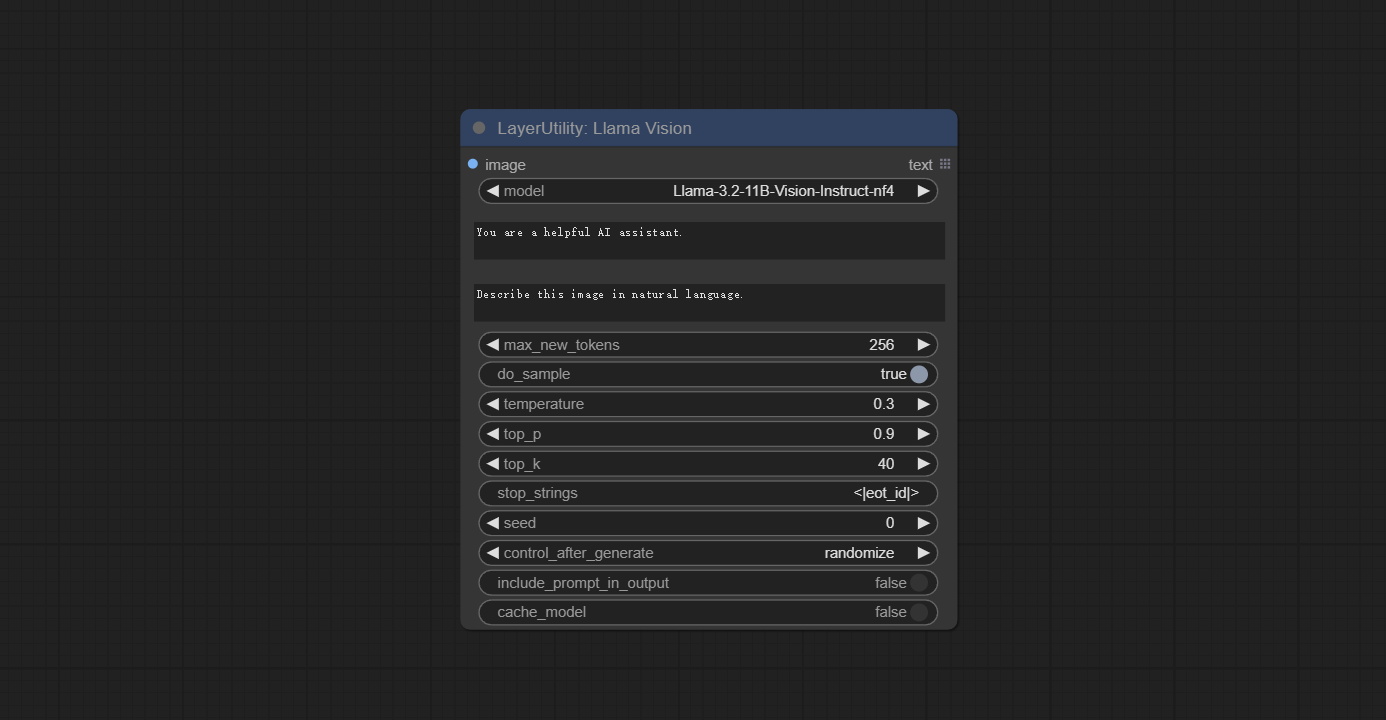
- image: Image input.
- model: Currently, only the "Llama-3.2-11B-Vision-Instruct-nf4" is available.
- system_prompt: System prompt words for LLM model.
- user_prompt: User prompt words for LLM model.
- max_new_tokens: max_new_tokens for LLM model.
- do_sample: do_sample for LLM model.
- top-p: top_p for LLM model.
- top_k: top_k for LLM model.
- stop_strings: The stop strings.
- seed: The seed of random number.
- control_after_generate: Seed change options. If this option is fixed, the generated random number will always be the same.
- include_prompt_in_output: Does the output contain prompt words.
- cache_model: Whether to cache the model.
JoyCaption2
Use the JoyCaption-alpha-two model for local inference. Can be used to generate prompt words. this node is https://huggingface.co/John6666/joy-caption-alpha-two-cli-mod Implementation in ComfyUI, thank you to the original author. Download models form BaiduNetdisk and BaiduNetdisk , or huggingface/Orenguteng and huggingface/unsloth , then copy to ComfyUI/models/LLM , Download models from BaiduNetdisk or huggingface/google , and copy to ComfyUI/models/clip , Donwload the cgrkzexw-599808 folder from BaiduNetdisk or huggingface/John6666 , and copy to ComfyUI/models/Joy_caption 。 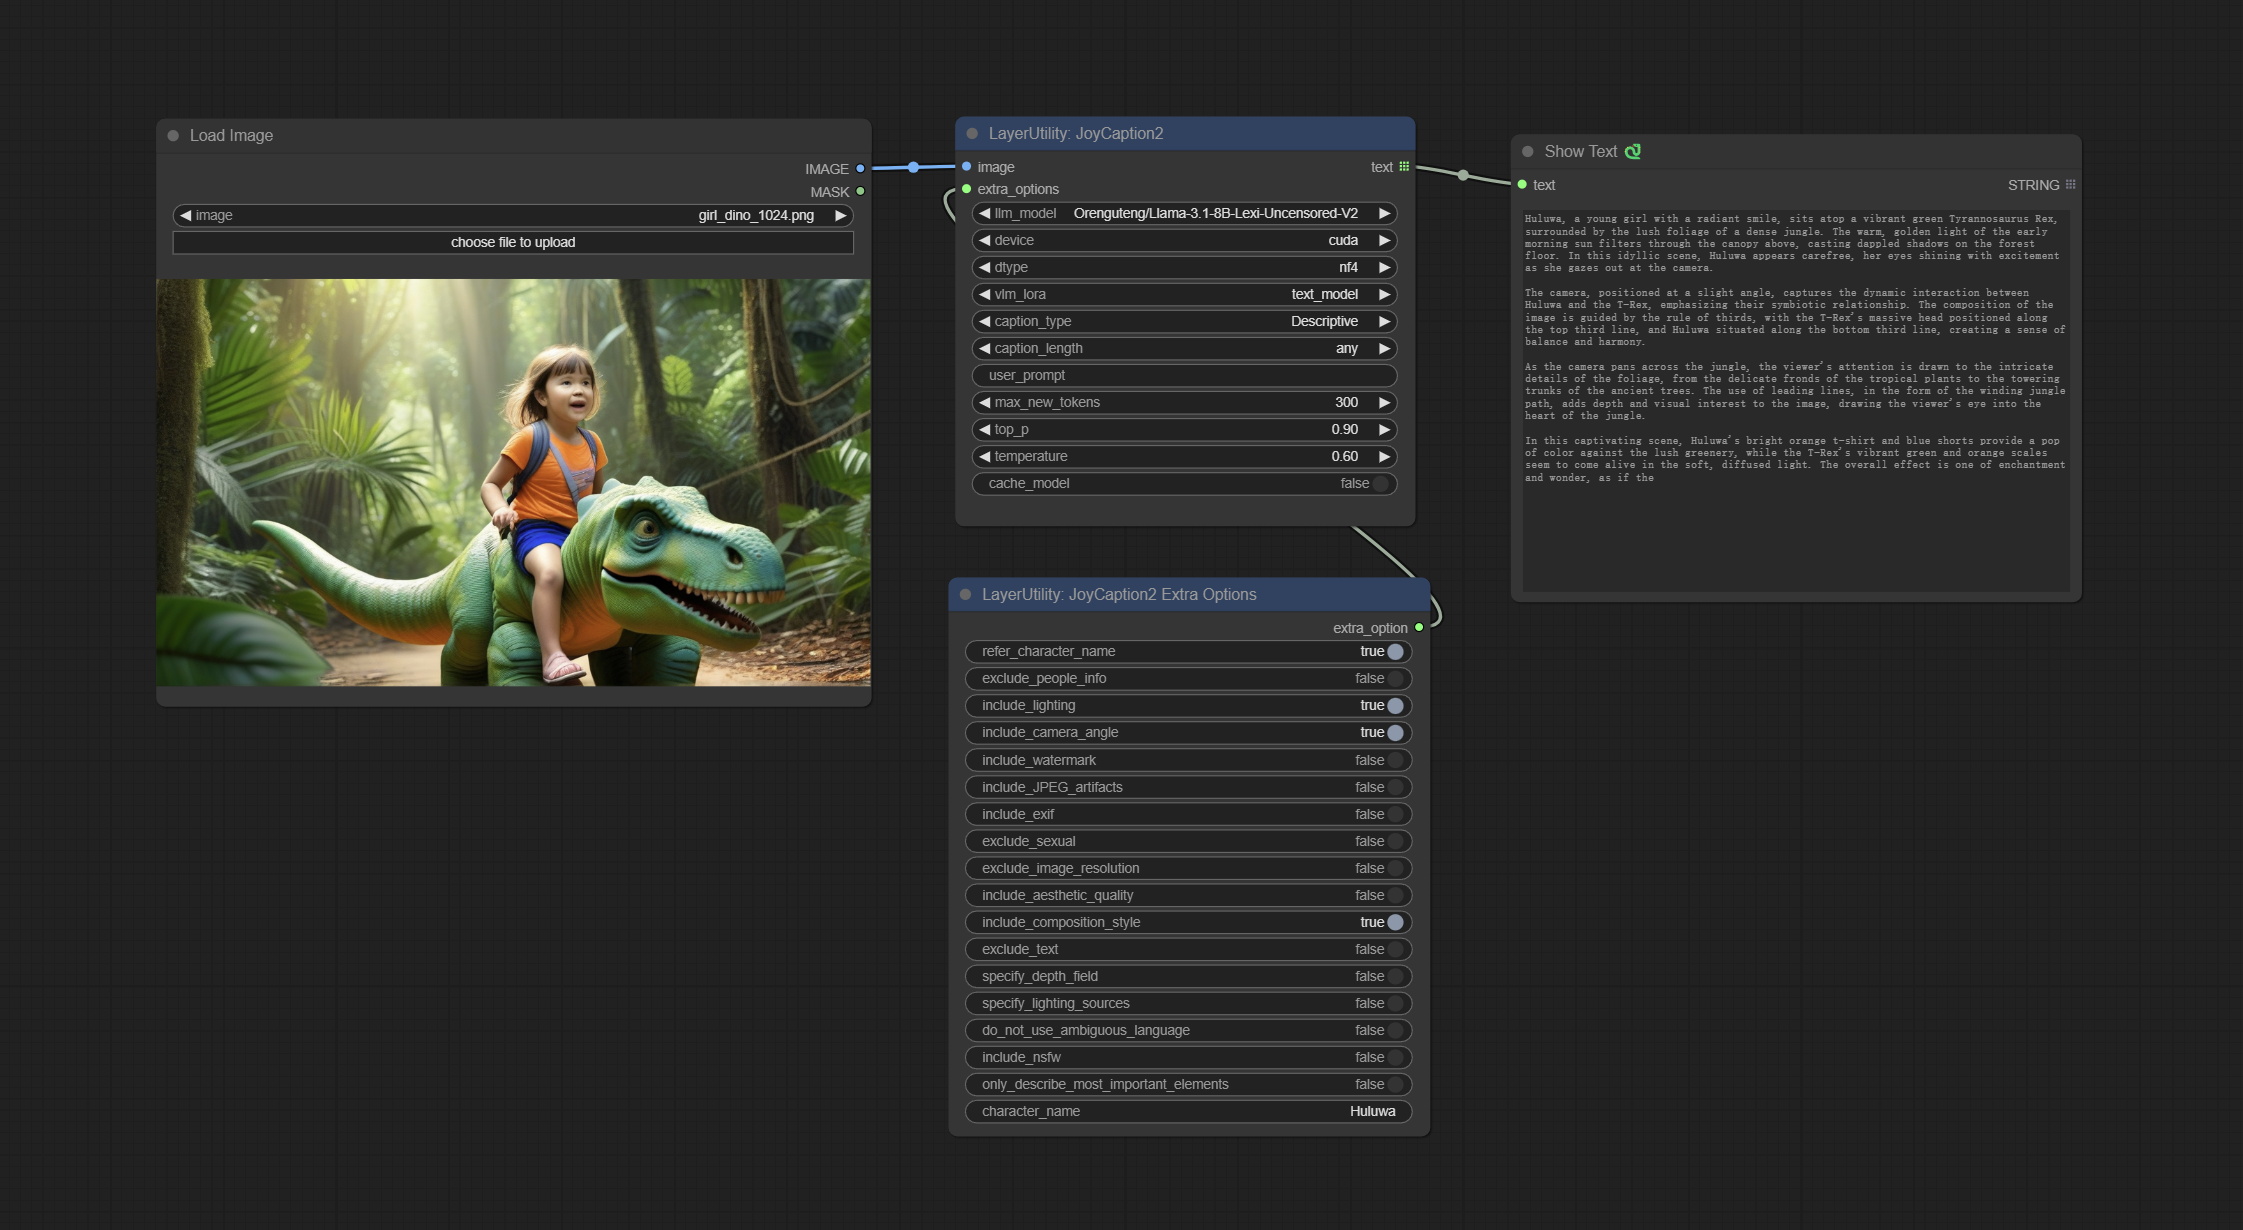
Node Options:

- image: Image input.
- extra_options: Input the extra_options.
- llm_model: There are two LLM models to choose, Orenguteng/Llama-3.1-8B-Lexi-Uncensored-V2 and unsloth/Meta-Llama-3.1-8B-Instruct.
- device: Model loading device. Currently, only CUDA is supported.
- dtype: Model precision, nf4 and bf16.
- vlm_lora: Whether to load text_madel.
- caption_type: Caption type options, including: "Descriptive", "Descriptive (Informal)", "Training Prompt", "MidJourney", "Booru tag list", "Booru-like tag list", "Art Critic", "Product Listing", "Social Media Post".
- caption_length: The length of caption.
- user_prompt: User prompt words for LLM model. If there is content here, it will overwrite all the settings for caption_type and extra_options.
- max_new_tokens: The max_new_token parameter of LLM.
- do_sample: The do_sample parameter of LLM.
- top-p: The top_p parameter of LLM.
- temperature: The temperature parameter of LLM.
- cache_model: Whether to cache the model.
JoyCaption2Split
The node of JoyCaption2 separate model loading and inference, and when multiple JoyCaption2 nodes are used, the model can be shared to improve efficiency.
Node Options:
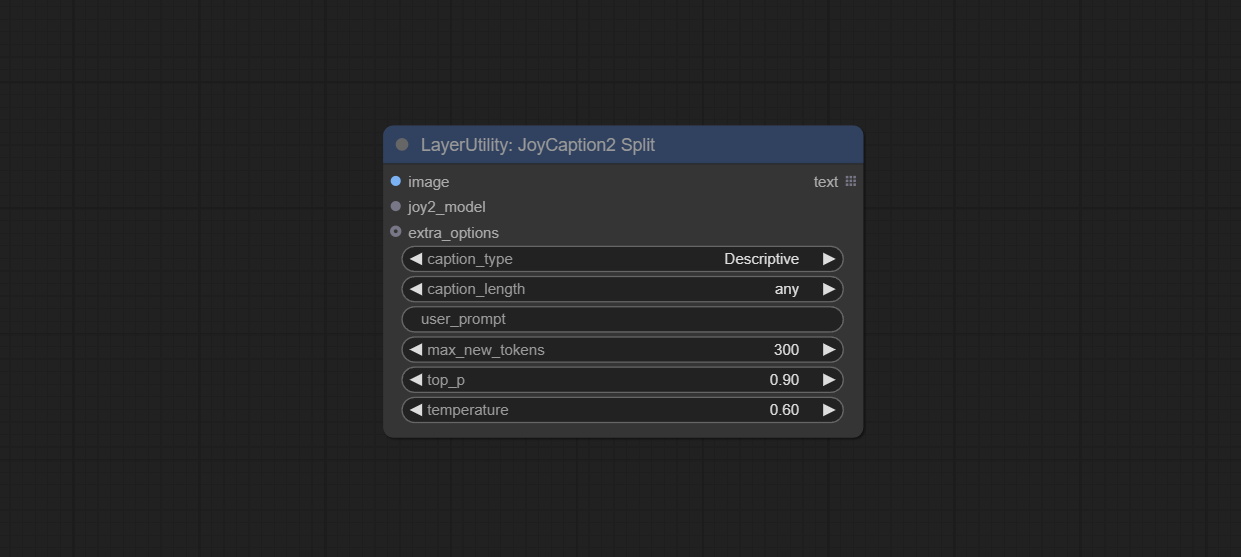
- image: Image input.。
- joy2_model: The JoyCaption model input.
- extra_options: Input the extra_options.
- caption_type: Caption type options, including: "Descriptive", "Descriptive (Informal)", "Training Prompt", "MidJourney", "Booru tag list", "Booru-like tag list", "Art Critic", "Product Listing", "Social Media Post".
- caption_length: The length of caption.
- user_prompt: User prompt words for LLM model. If there is content here, it will overwrite all the settings for caption_type and extra_options.
- max_new_tokens: The max_new_token parameter of LLM.
- do_sample: The do_sample parameter of LLM.
- top-p: The top_p parameter of LLM.
- temperature: The temperature parameter of LLM.
LoadJoyCaption2Model
JoyCaption2's model loading node, used in conjunction with JoyCaption2Split.
Node Options:
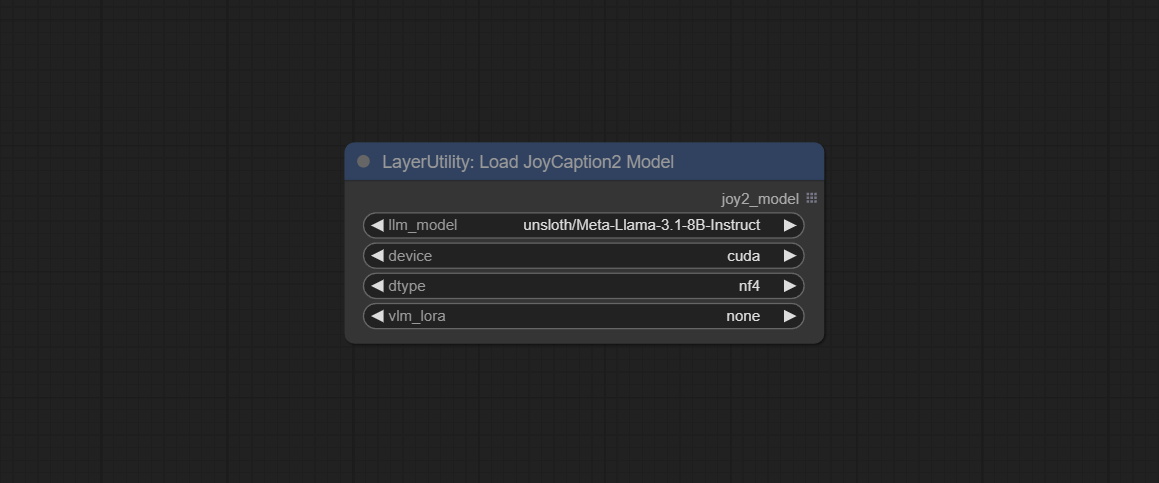
- llm_model: There are two LLM models to choose, Orenguteng/Llama-3.1-8B-Lexi-Uncensored-V2 and unsloth/Meta-Llama-3.1-8B-Instruct.
- device: Model loading device. Currently, only CUDA is supported.
- dtype: Model precision, nf4 and bf16.
- vlm_lora: Whether to load text_madel.
JoyCaption2ExtraOptions
The extra_options parameter node of JoyCaption2.
Node Options:
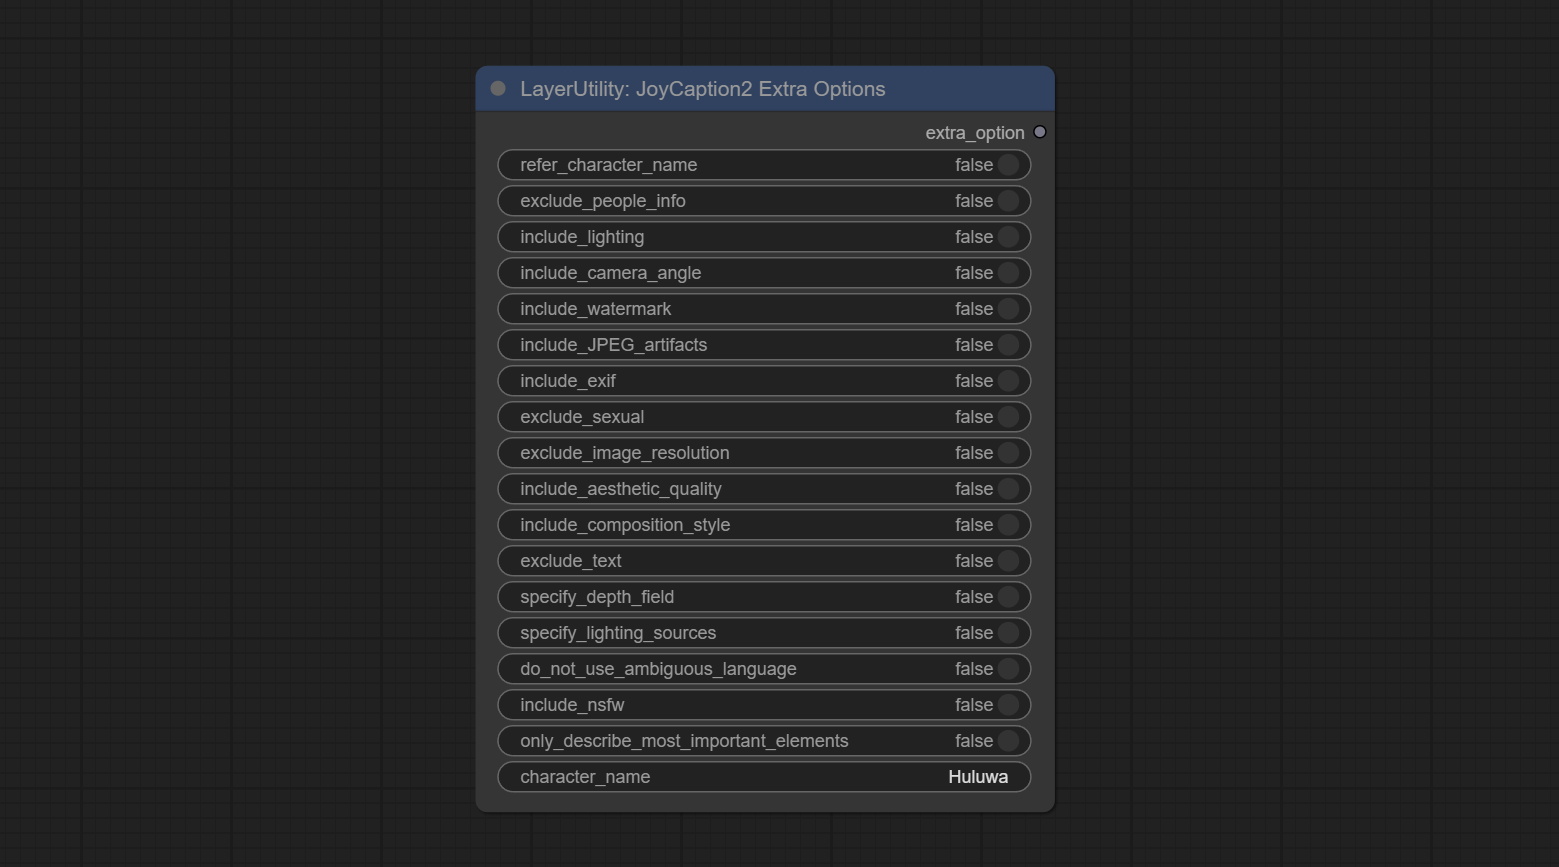
- refer_character_name: If there is a person/character in the image you must refer to them as {name}.
- exclude_people_info: Do NOT include information about people/characters that cannot be changed (like ethnicity, gender, etc), but do still include changeable attributes (like hair style).
- include_lighting: Include information about lighting.
- include_camera_angle: Include information about camera angle.
- include_watermark: Include information about whether there is a watermark or not.
- include_JPEG_artifacts: Include information about whether there are JPEG artifacts or not.
- include_exif: If it is a photo you MUST include information about what camera was likely used and details such as aperture, shutter speed, ISO, etc.
- exclude_sexual: Do NOT include anything sexual; keep it PG.
- exclude_image_resolution: Do NOT mention the image's resolution.
- include_aesthetic_quality: You MUST include information about the subjective aesthetic quality of the image from low to very high.
- include_composition_style: Include information on the image's composition style, such as leading lines, rule of thirds, or symmetry.
- exclude_text: Do NOT mention any text that is in the image.
- specify_depth_field: Specify the depth of field and whether the background is in focus or blurred.
- specify_lighting_sources: If applicable, mention the likely use of artificial or natural lighting sources.
- do_not_use_ambiguous_language: Do NOT use any ambiguous language.
- include_nsfw: Include whether the image is sfw, suggestive, or nsfw.
- only_describe_most_important_elements: ONLY describe the most important elements of the image.
- character_name: Person/Character Name, if choice
refer_character_name .
PhiPrompt
Use Microsoft Phi 3.5 text and visual models for local inference. Can be used to generate prompt words, process prompt words, or infer prompt words from images. Running this model requires at least 16GB of video memory. Download model files from BaiduNetdisk or huggingface.co/microsoft/Phi-3.5-vision-instruct and huggingface.co/microsoft/Phi-3.5-mini-instruct and copy to ComfyUImodelsLLM folder. 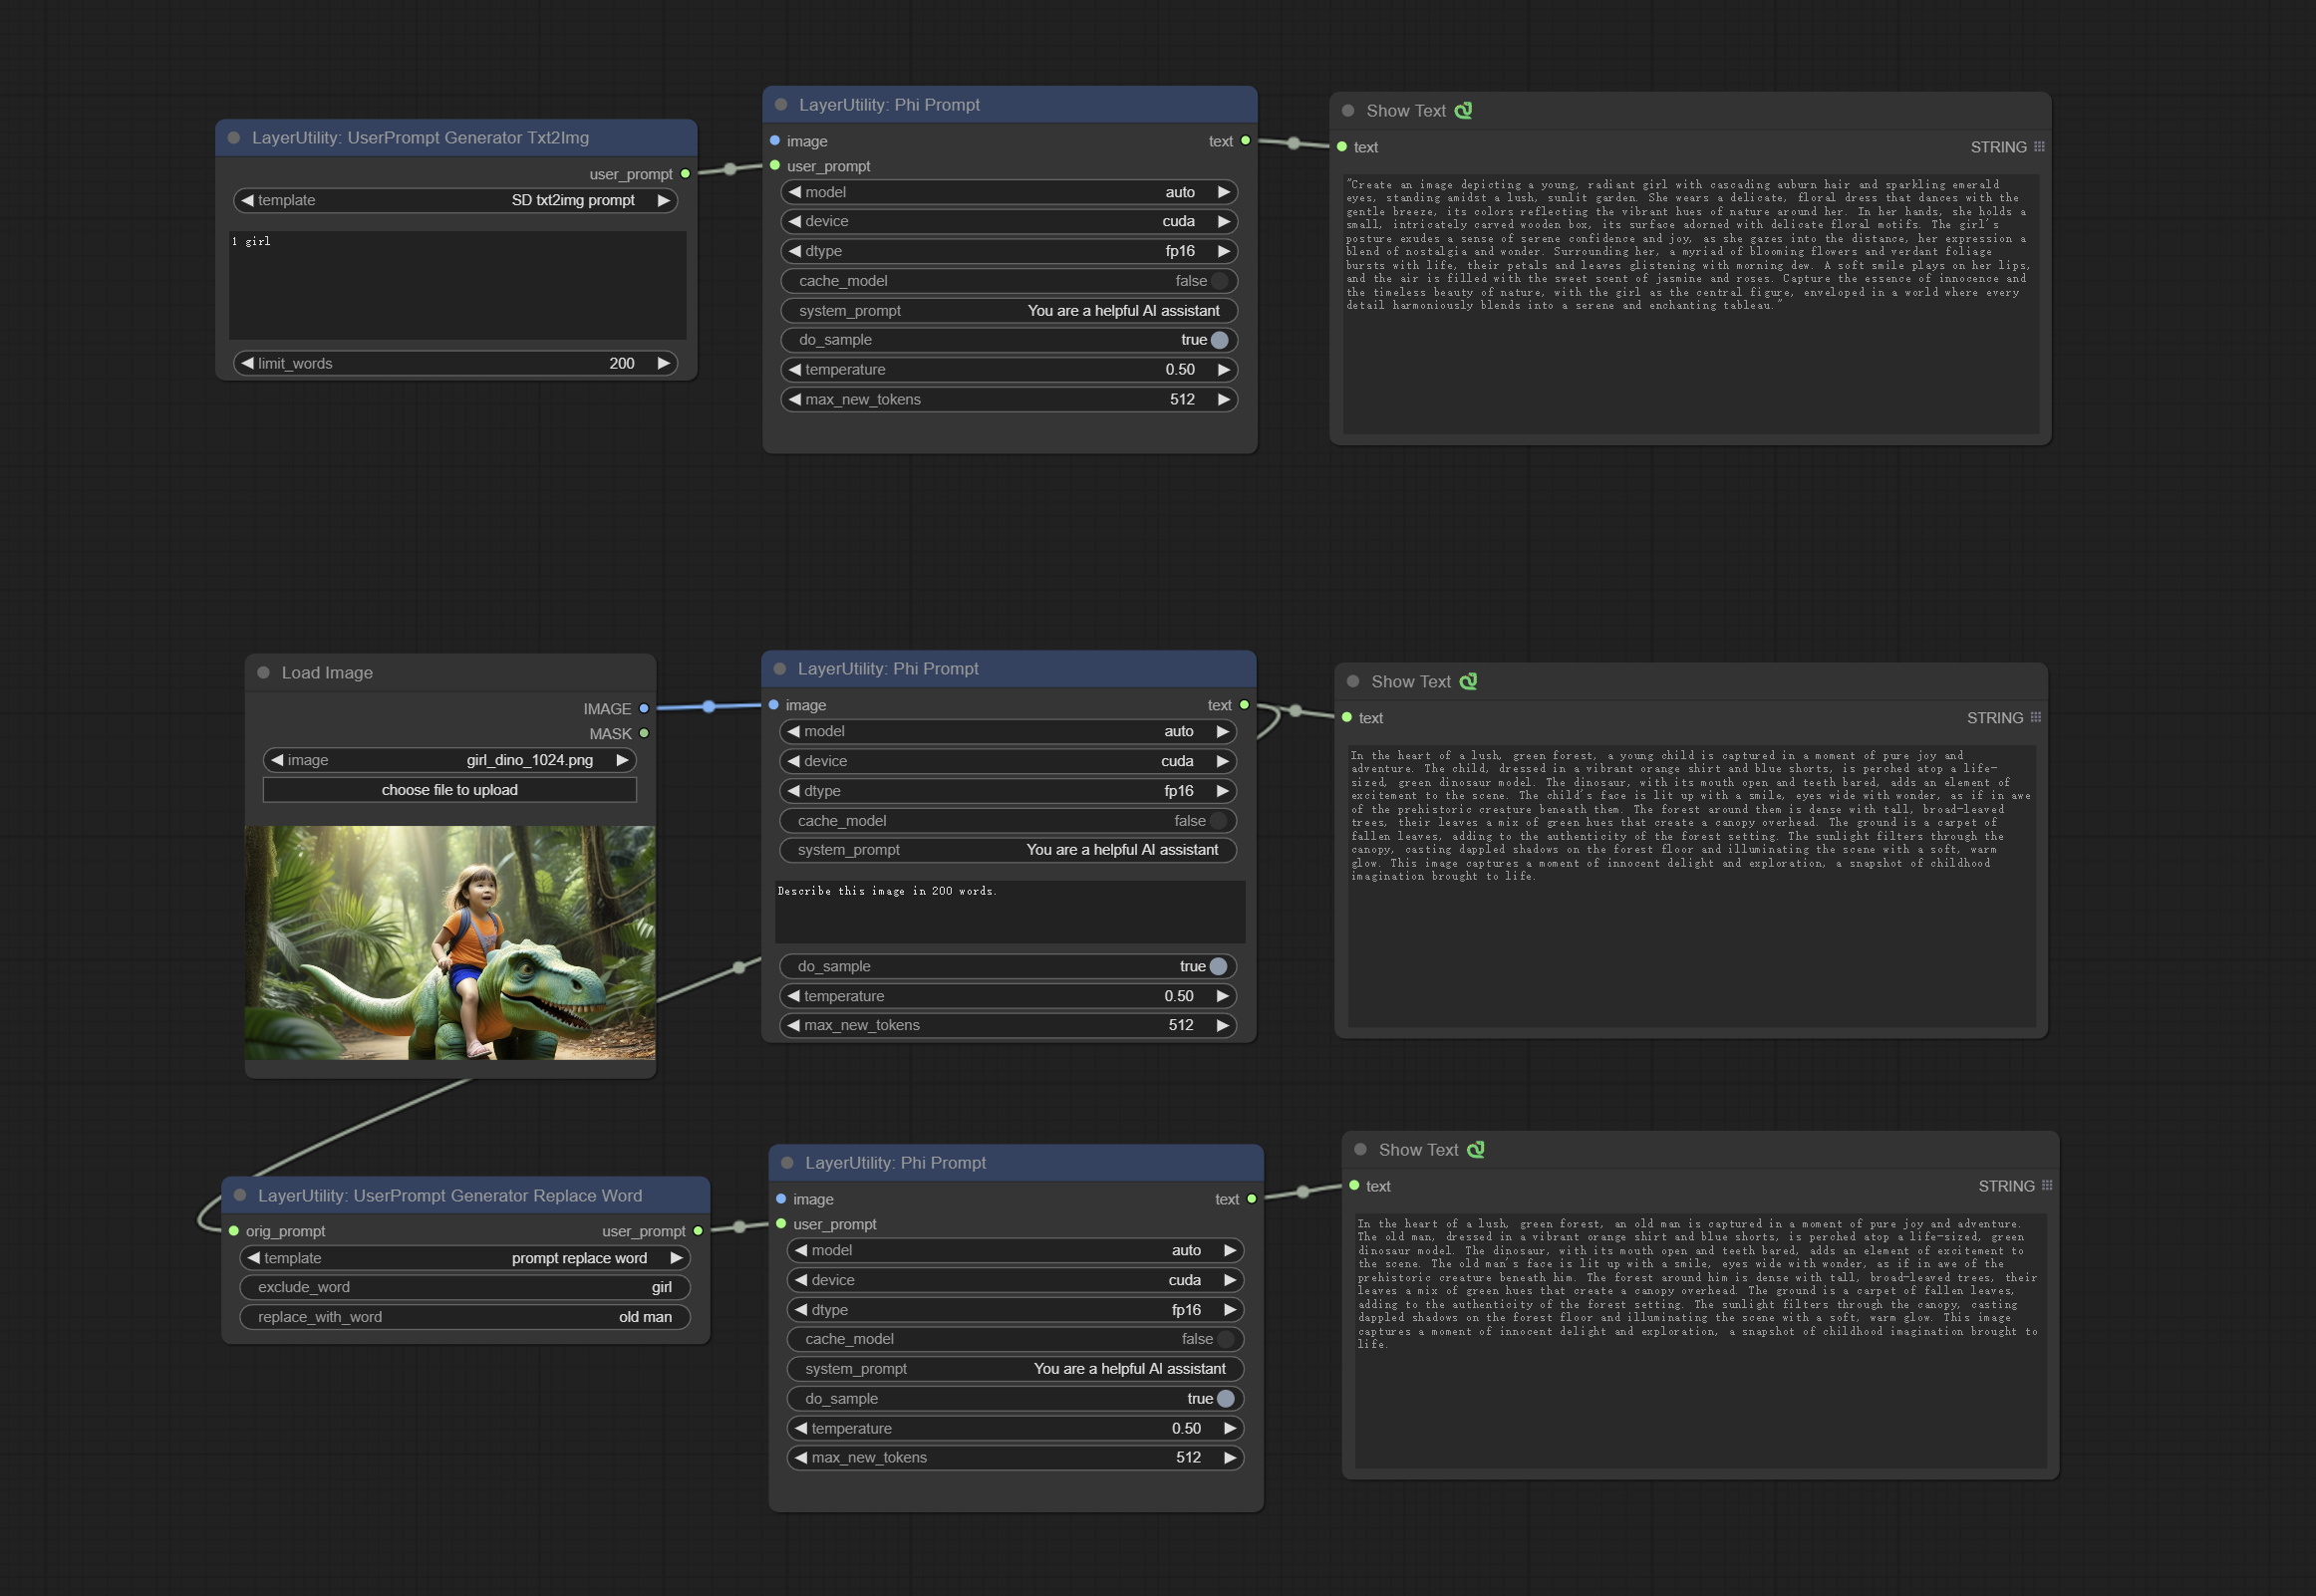
Node Options:
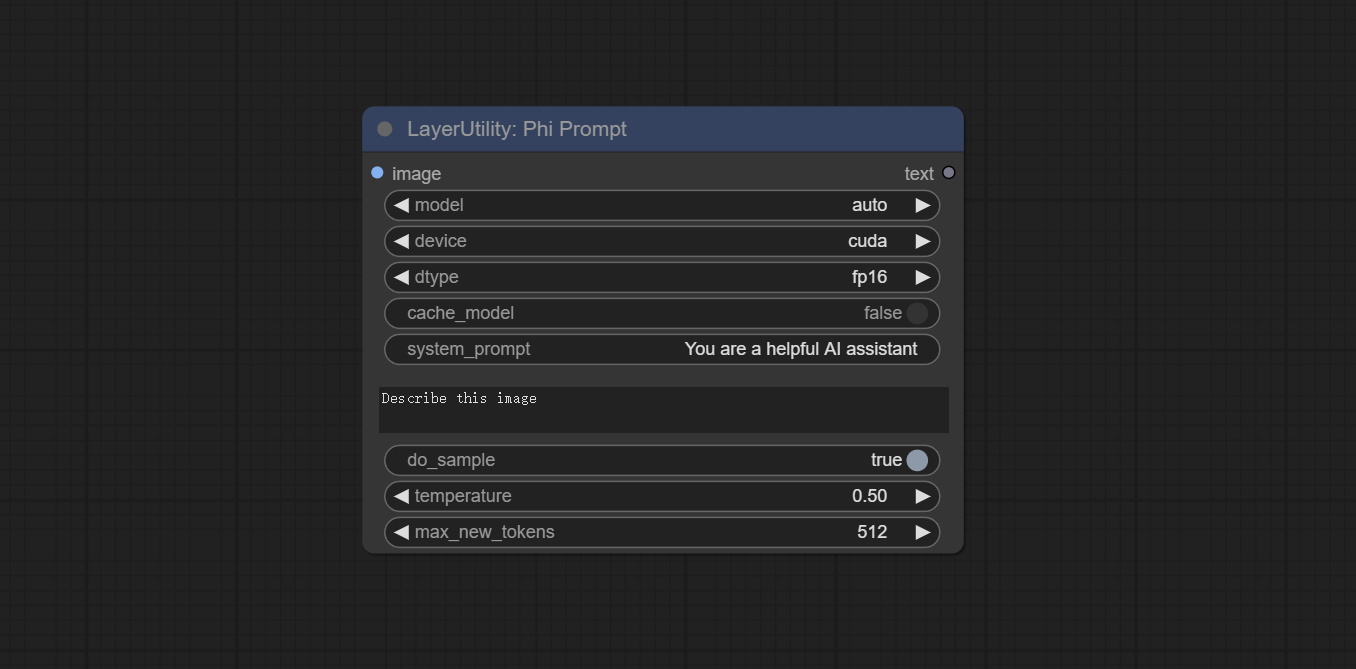
- image: Optional input. The input image will serve as the input for Phi-3.5-vision-instruct.
- model: Selectable to load Phi-3.5-vision-instruct or Phi-3.5-mini-instruct model. The default value of auto will automatically load the corresponding model based on whether there is image input.
- device: Model loading device. Supports CPU and CUDA.
- dtype: The model loading accuracy has three options: fp16, bf16, and fp32.
- cache_model: Whether to cache the model.
- system_prompt: The system prompt of Phi-3.5-mini-instruct.
- user_prompt: User prompt words for LLM model.
- do_sample: The do_Sample parameter of LLM defaults to True.
- temperature: The temperature parameter of LLM defaults to 0.5.
- max_new_tokens: The max_new_token parameter of LLM defaults to 512.
UserPromptGeneratorTxtImg
UserPrompt preset for generating SD text to image prompt words.
Node options:
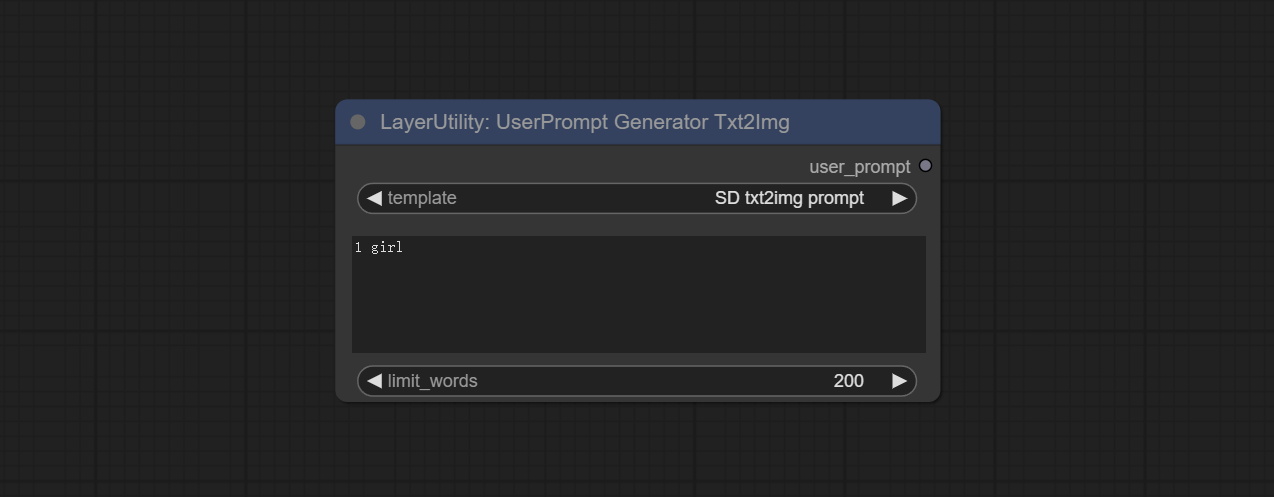
- template: Prompt word template. Currently, only the 'SD txt2img prompt' is available.
- describe: Prompt word description. Enter a simple description here.
- limit_word: Maximum length limit for output prompt words. For example, 200 means that the output text will be limited to 200 words.
UserPromptGeneratorTxtImgWithReference
UserCompt preset for generating SD text to image prompt words based on input content.
Node options:
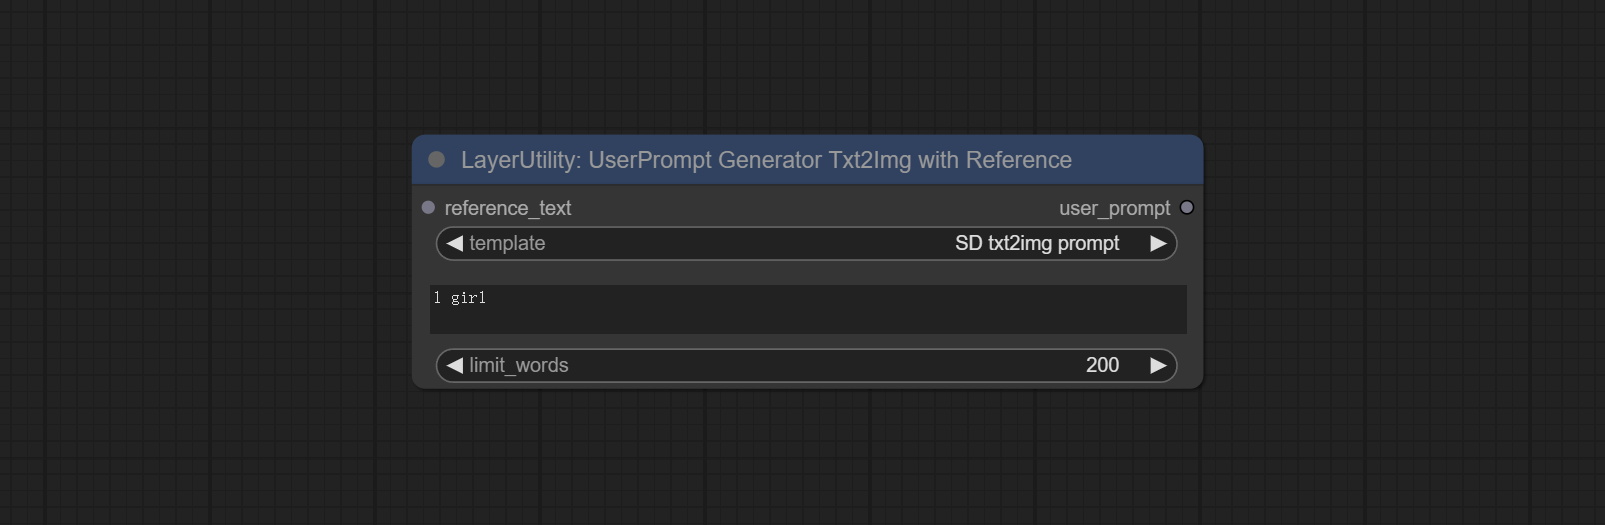
- reference_text: Reference text input. Usually it is a style description of the image.
- template: Prompt word template. Currently, only the 'SD txt2img prompt' is available.
- describe: Prompt word description. Enter a simple description here.
- limit_word: Maximum length limit for output prompt words. For example, 200 means that the output text will be limited to 200 words.
UserPromptGeneratorReplaceWord
UserPrompt preset used to replace a keyword in text with different content. This is not only a simple replacement, but also a logical sorting of the text based on the context of the prompt words to achieve the rationality of the output content.
Node options:
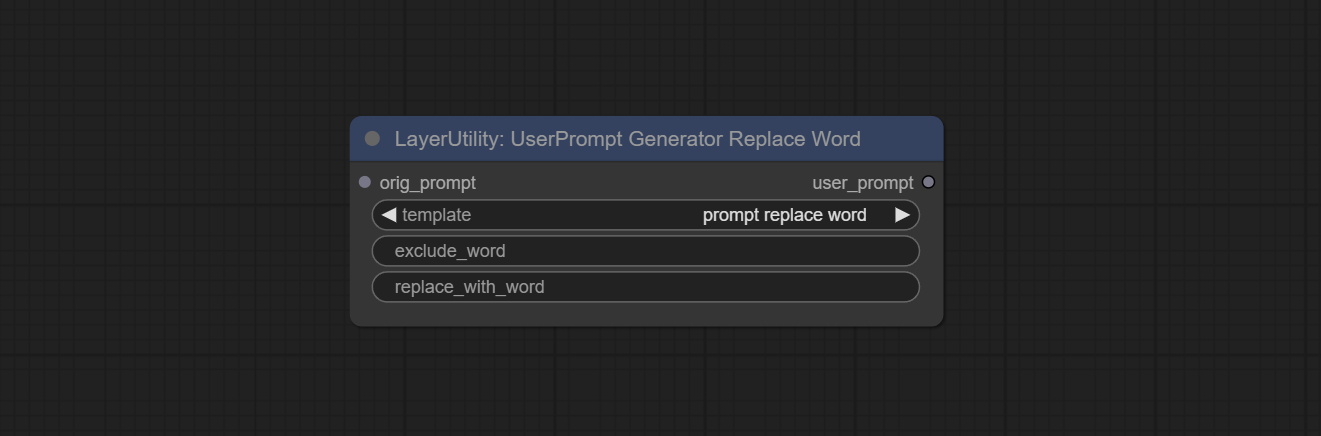
- orig_prompt: Original prompt word input.
- template: Prompt word template. Currently, only 'prompt replace word' is available.
- exclude_word: Keywords that need to be excluded.
- replace_with_word: That word will replace the exclude_word.
PromptTagger
Inference the prompts based on the image. it can replace key word for the prompt. This node currently uses Google Gemini API as the backend service. Please ensure that the network environment can use Gemini normally. Please apply for your API key on Google AI Studio, And fill it in api_key.ini , this file is located in the root directory of the plug-in, and the default name is api_key.ini.example . to use this file for the first time, you need to change the file suffix to .ini . Open it using text editing software, fill in your API key after google_api_key= and save it. 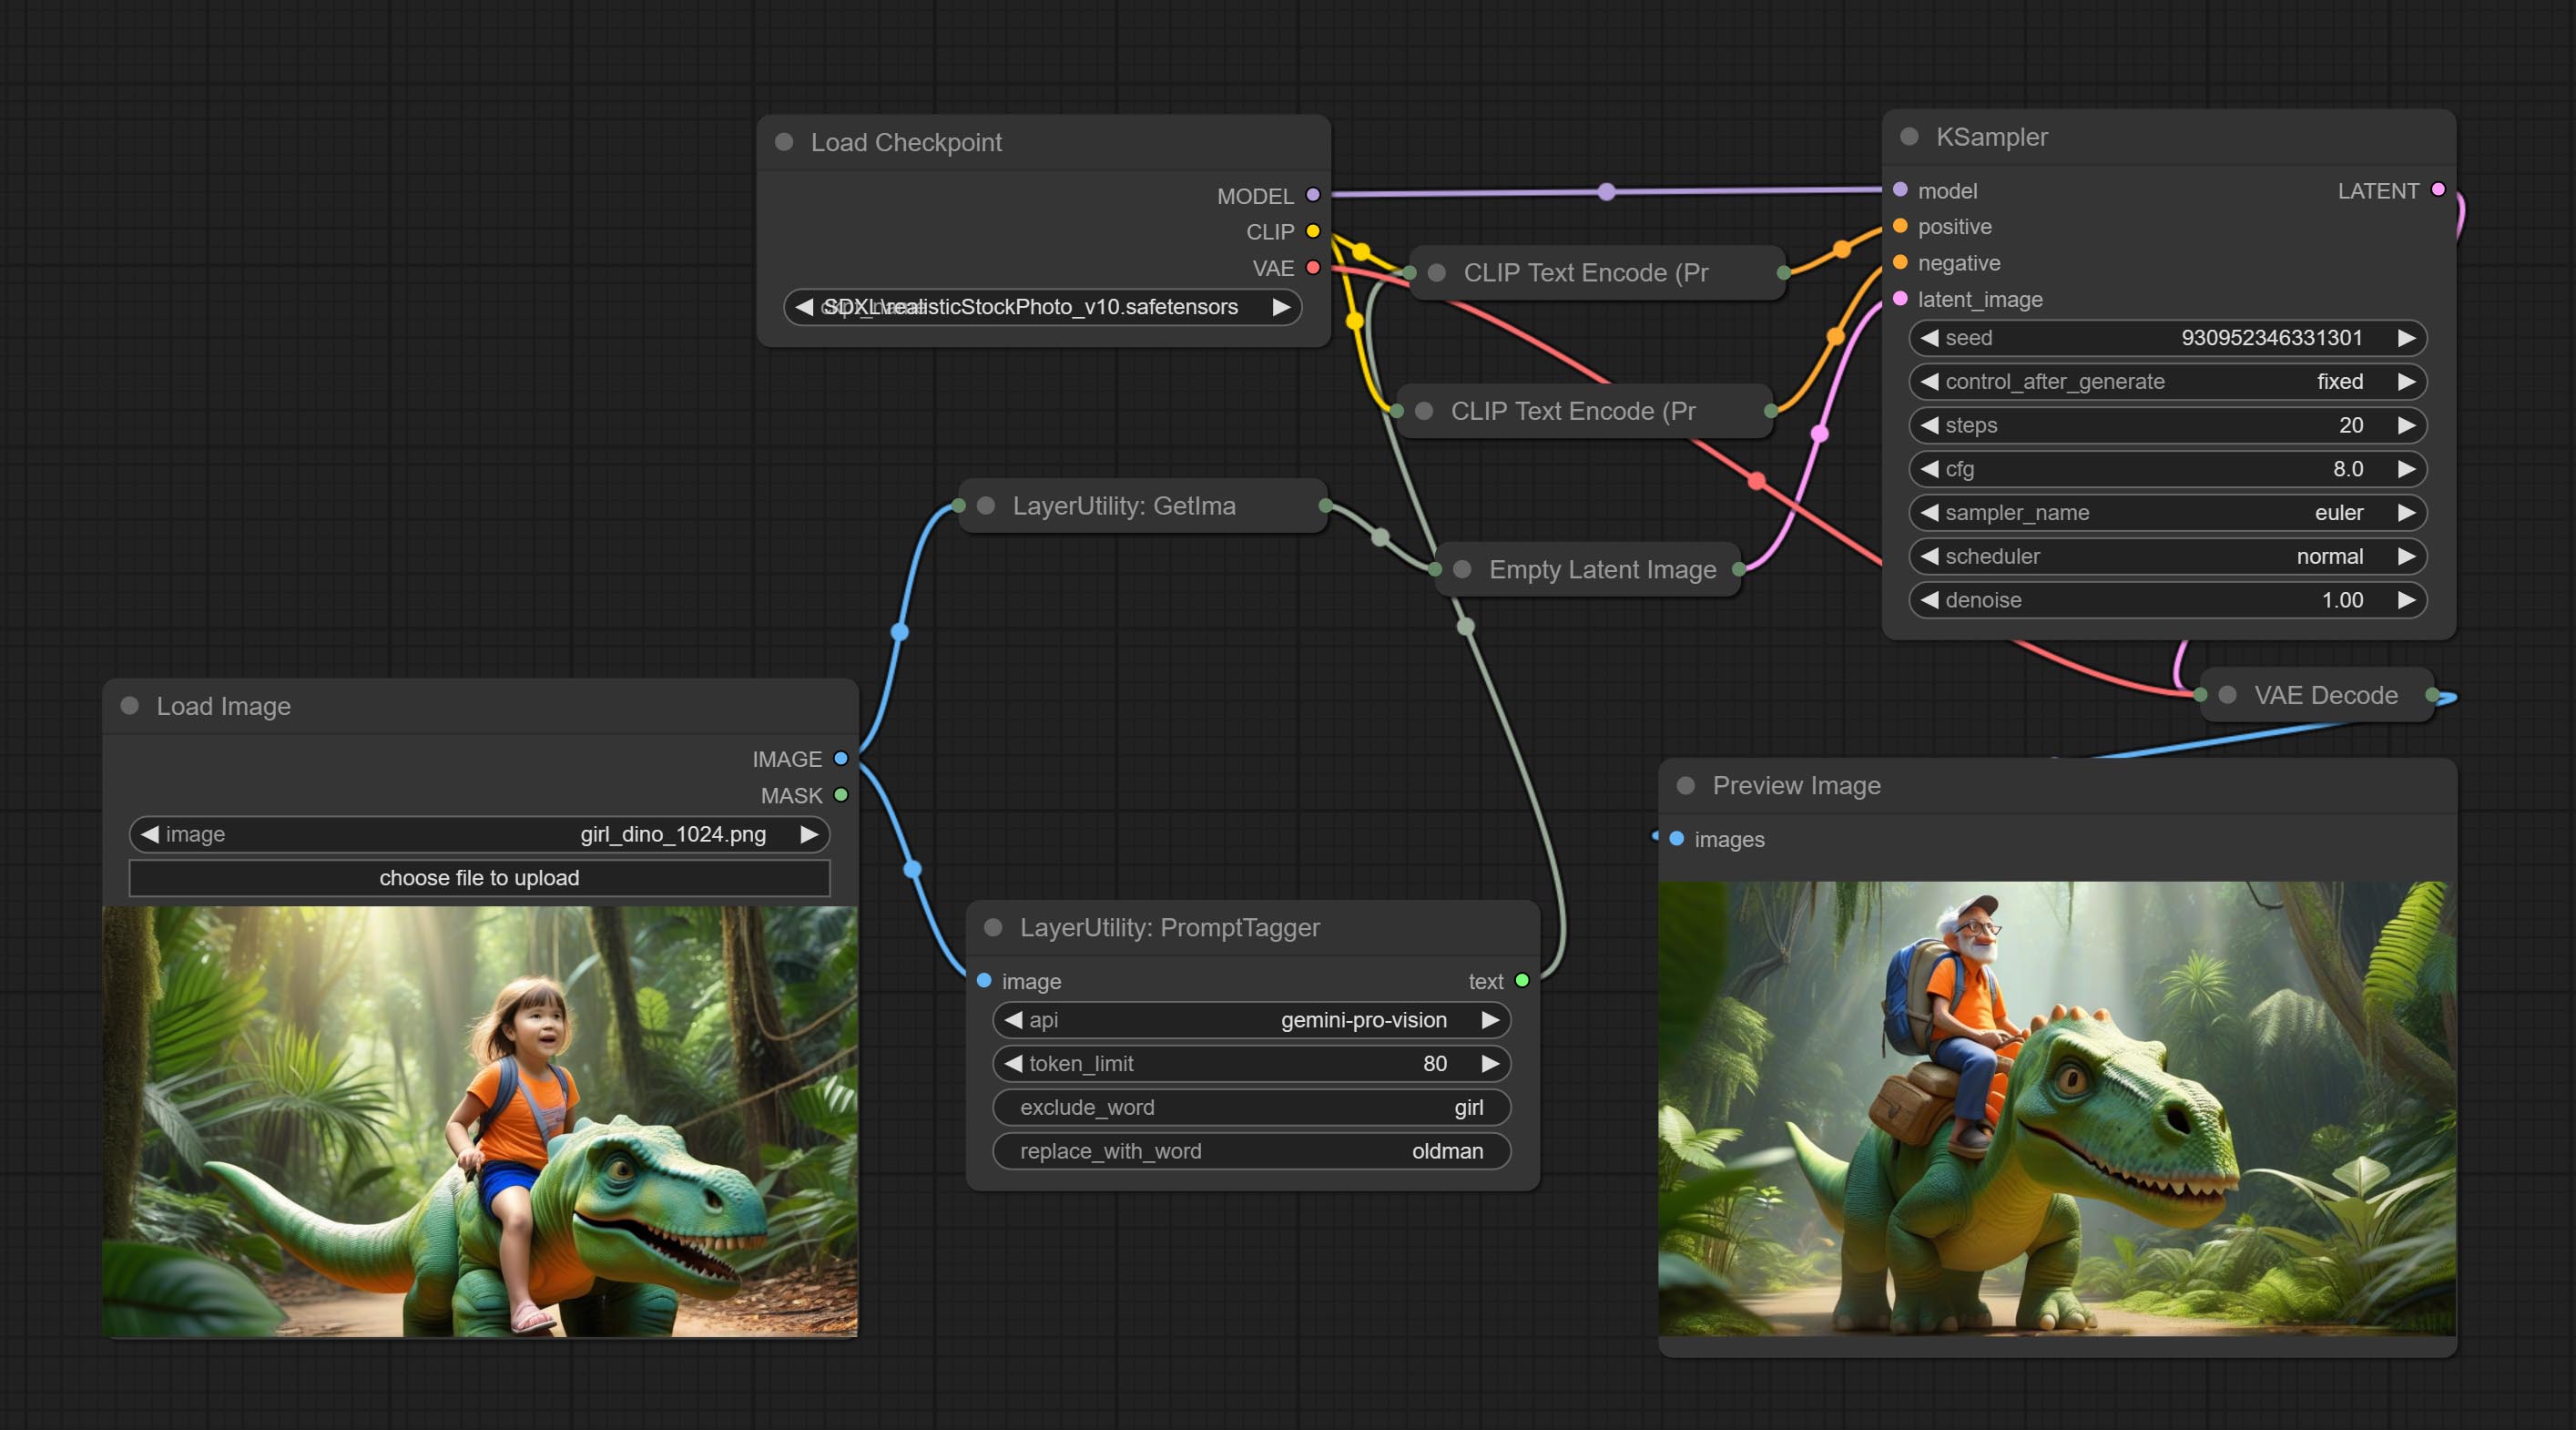
Node options:
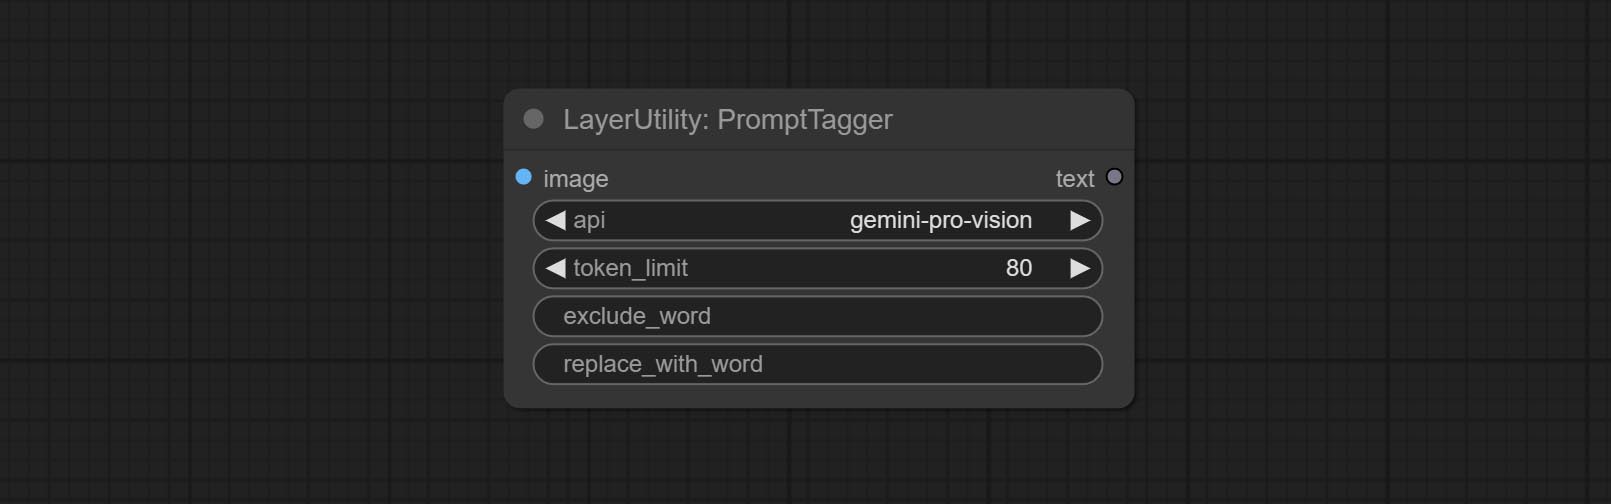
- api: The Api used. At present, there are two options "gemini-1. 5-flash" and "google-gemini".
- token_limit: The maximum token limit for generating prompt words.
- exclude_word: Keywords that need to be excluded.
- replace_with_word: That word will replace the exclude_word.
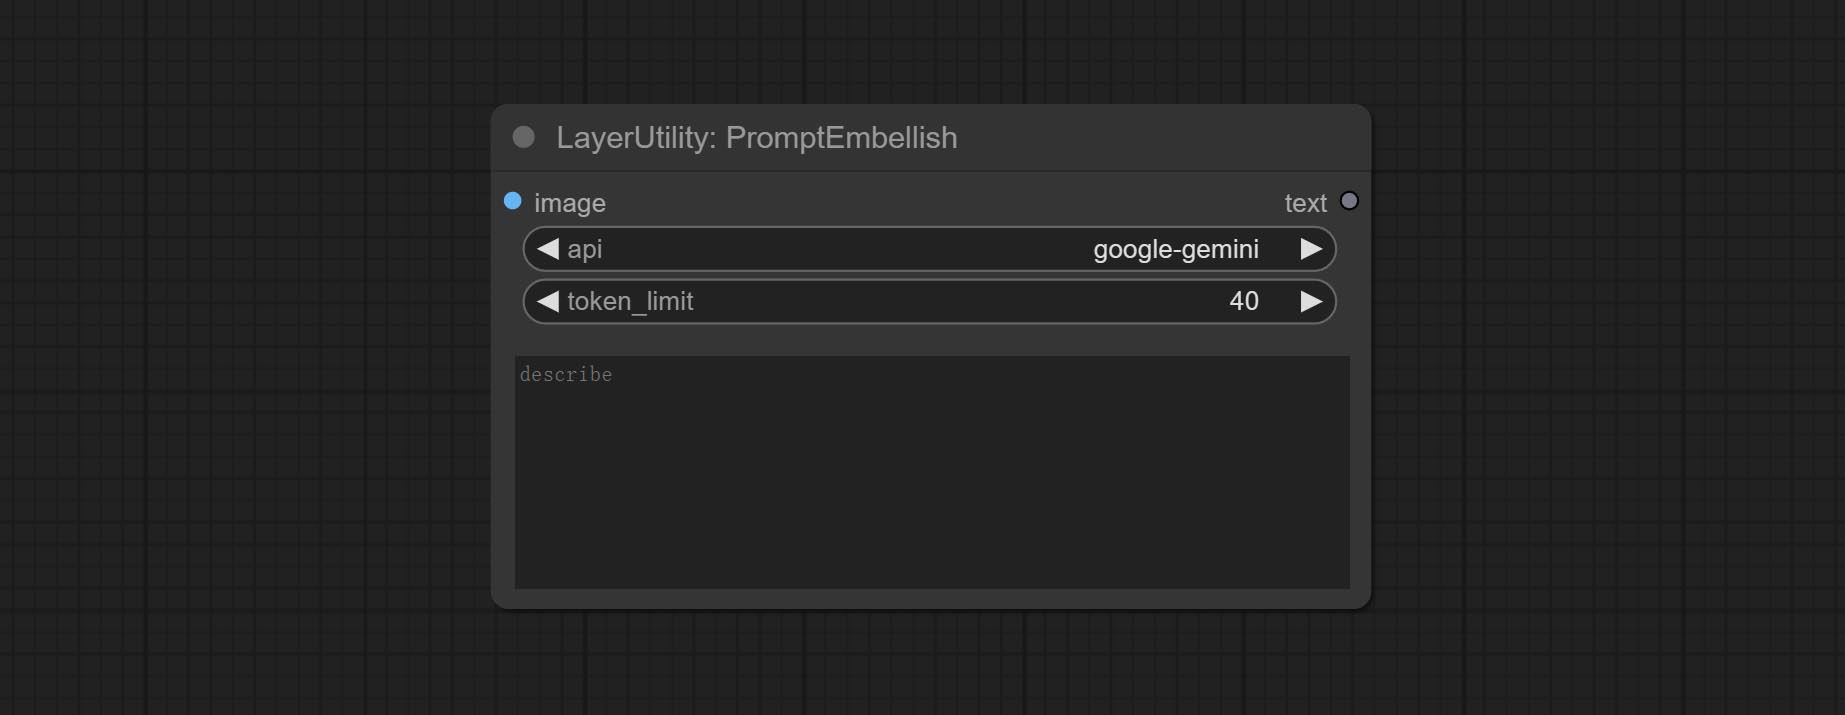
PromptEmbellish
Enter simple prompt words, output polished prompt words, and support inputting images as references, and support Chinese input. This node currently uses Google Gemini API as the backend service. Please ensure that the network environment can use Gemini normally. Please apply for your API key on Google AI Studio, And fill it in api_key.ini , this file is located in the root directory of the plug-in, and the default name is api_key.ini.example . to use this file for the first time, you need to change the file suffix to .ini . Open it using text editing software, fill in your API key after google_api_key= and save it. 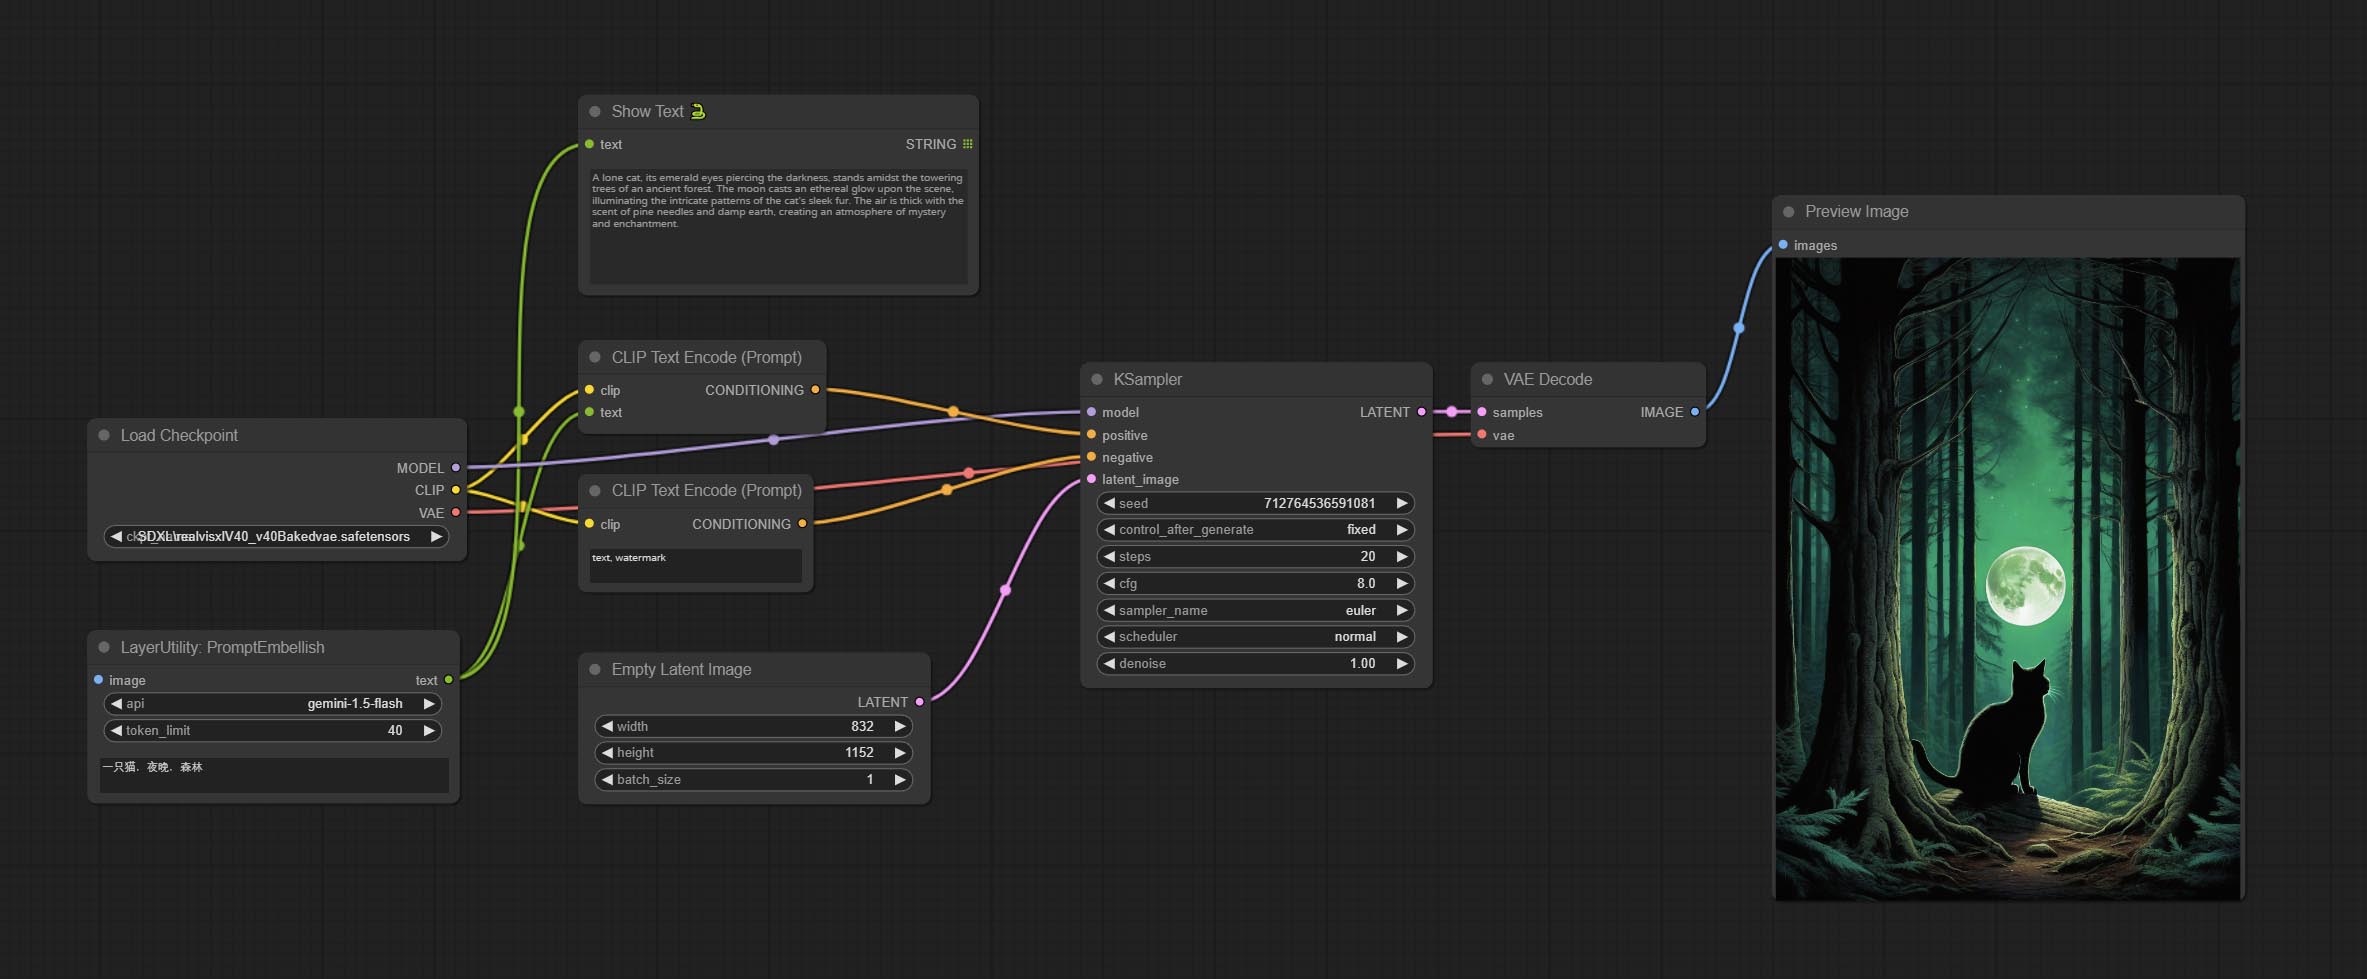
Node options:
- image: Optional, input image as a reference for prompt words.
- api: The Api used. At present, there are two options "gemini-1. 5-flash" and "google-gemini".
- token_limit: The maximum token limit for generating prompt words.
- discribe: Enter a simple description here. supports Chinese text input.
Florence2Image2Prompt
Use the Florence 2 model to infer prompt words. The code for this node section is fromyiwangsimple/florence_dw, thanks to the original author. *When using it for the first time, the model will be automatically downloaded. You can also download the model file from BaiduNetdisk to ComfyUI/models/florence2 folder. 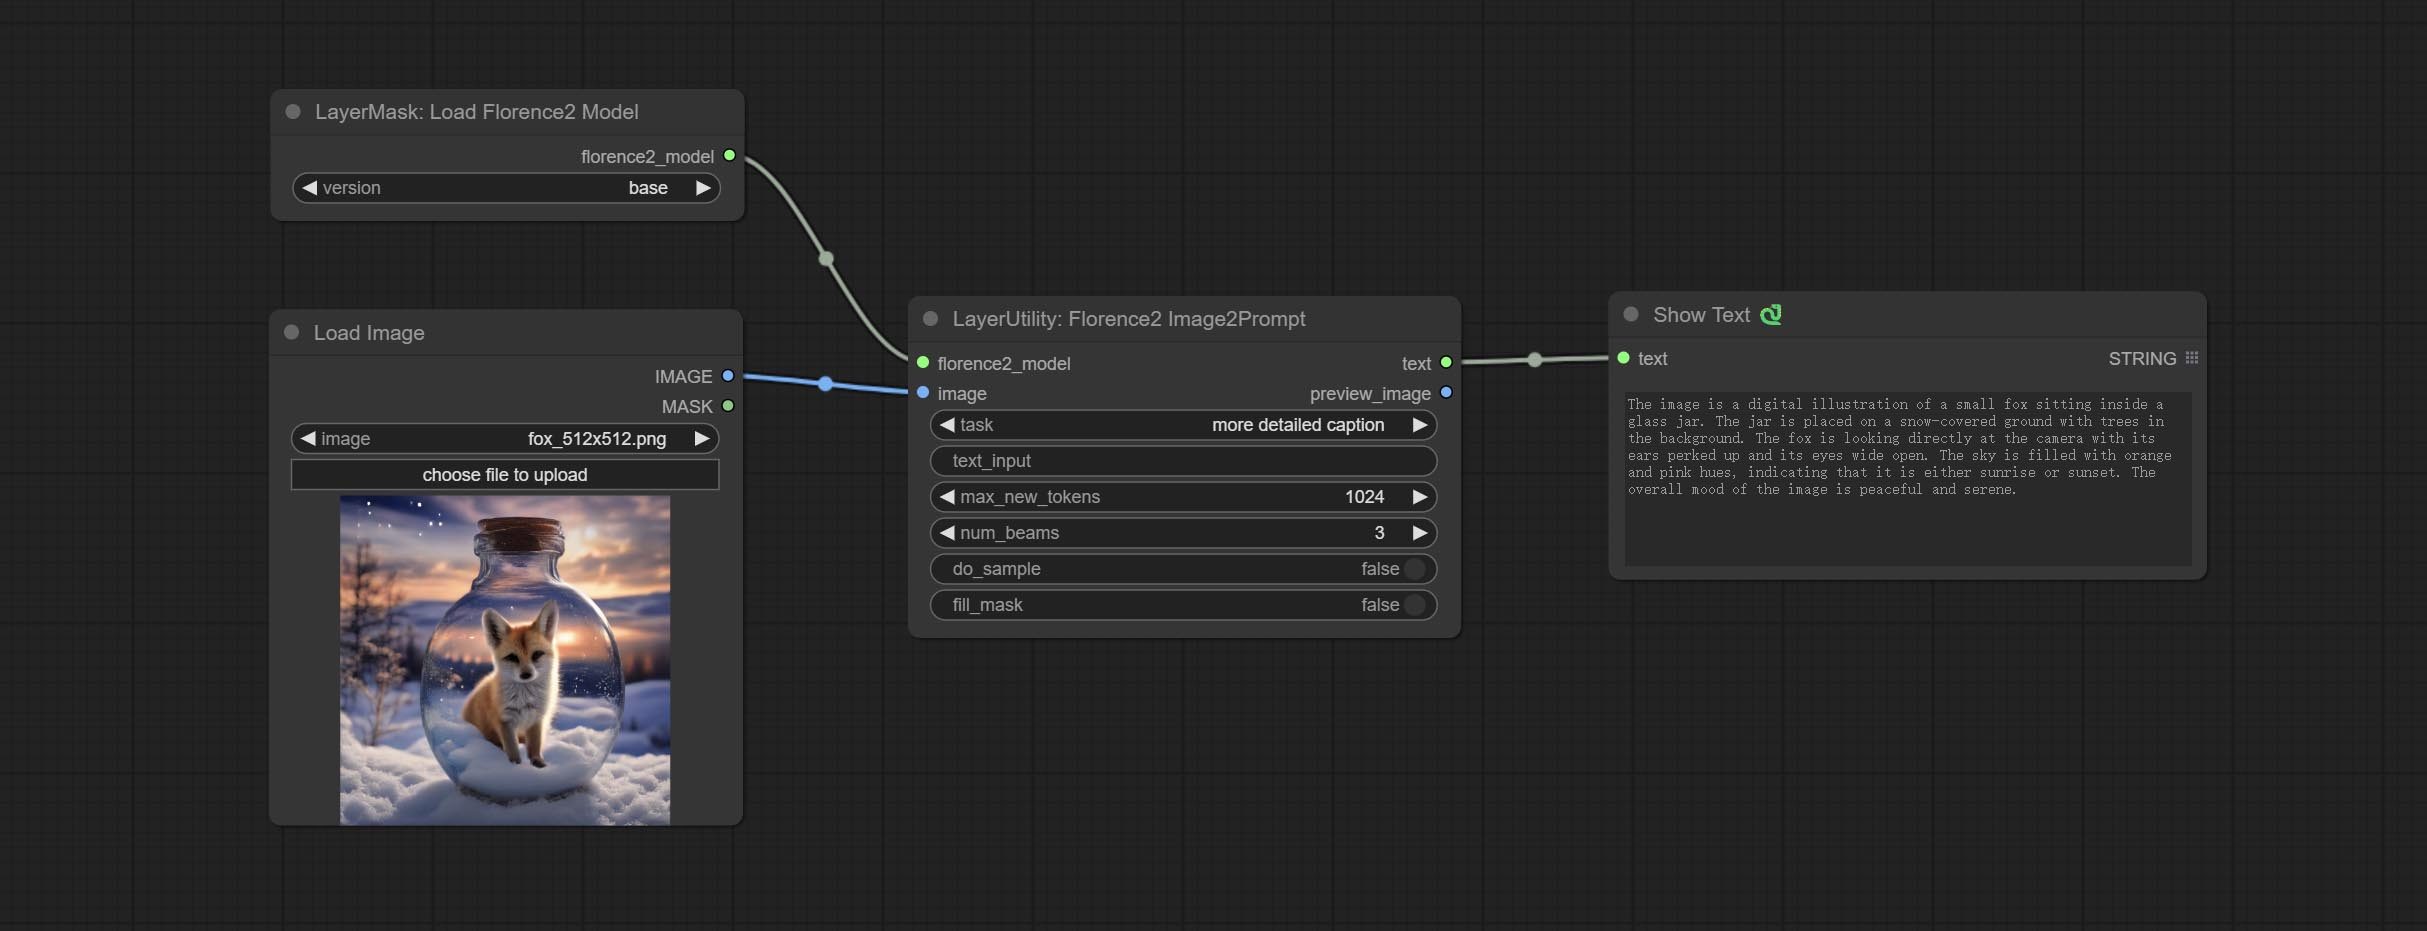
Node Options: 
- florence2_model: Florence2 model input.
- image: Image input.
- task: Select the task for florence2.
- text_input: Text input for florence2.
- max_new_tokens: The maximum number of tokens for generating text.
- num_beams: The number of beam searches that generate text.
- do_sample: Whether to use text generated sampling.
- fill_mask: Whether to use text marker mask filling.
VQAPrompt
Use the blip-vqa model for visual question answering. Part of the code for this node is referenced from celoron/ComfyUI-VisualQueryTemplate, thanks to the original author.
*Download model files from BaiduNetdisk or huggingface.co/Salesforce/blip-vqa-capfilt-large and huggingface.co/Salesforce/blip-vqa-base and copy to ComfyUImodelsVQA folder.
Node Options: 
- image: The image input.
- vqa_model: The vqa model input, it from LoadVQAModel node.
- question: Task text input. A single question is enclosed in curly braces "{}", and the answer to the question will be replaced in its original position in the text output. Multiple questions can be defined using curly braces in a single Q&A. For example, for a picture of an item placed in a scene, the question is:"{object color} {object} on the {scene}".
LoadVQAModel
Load the blip-vqa model.
Node Options: 
- model: There are currently two models to choose from "blip-vqa-base" and "blip-vqa-capfilt-large".
- precision: The model accuracy has two options: "fp16" and "fp32".
- device: The model running device has two options: "cuda" and "cpu".
ImageShift
Shift the image. this node supports the output of displacement seam masks, making it convenient to create continuous textures. 
Node options:
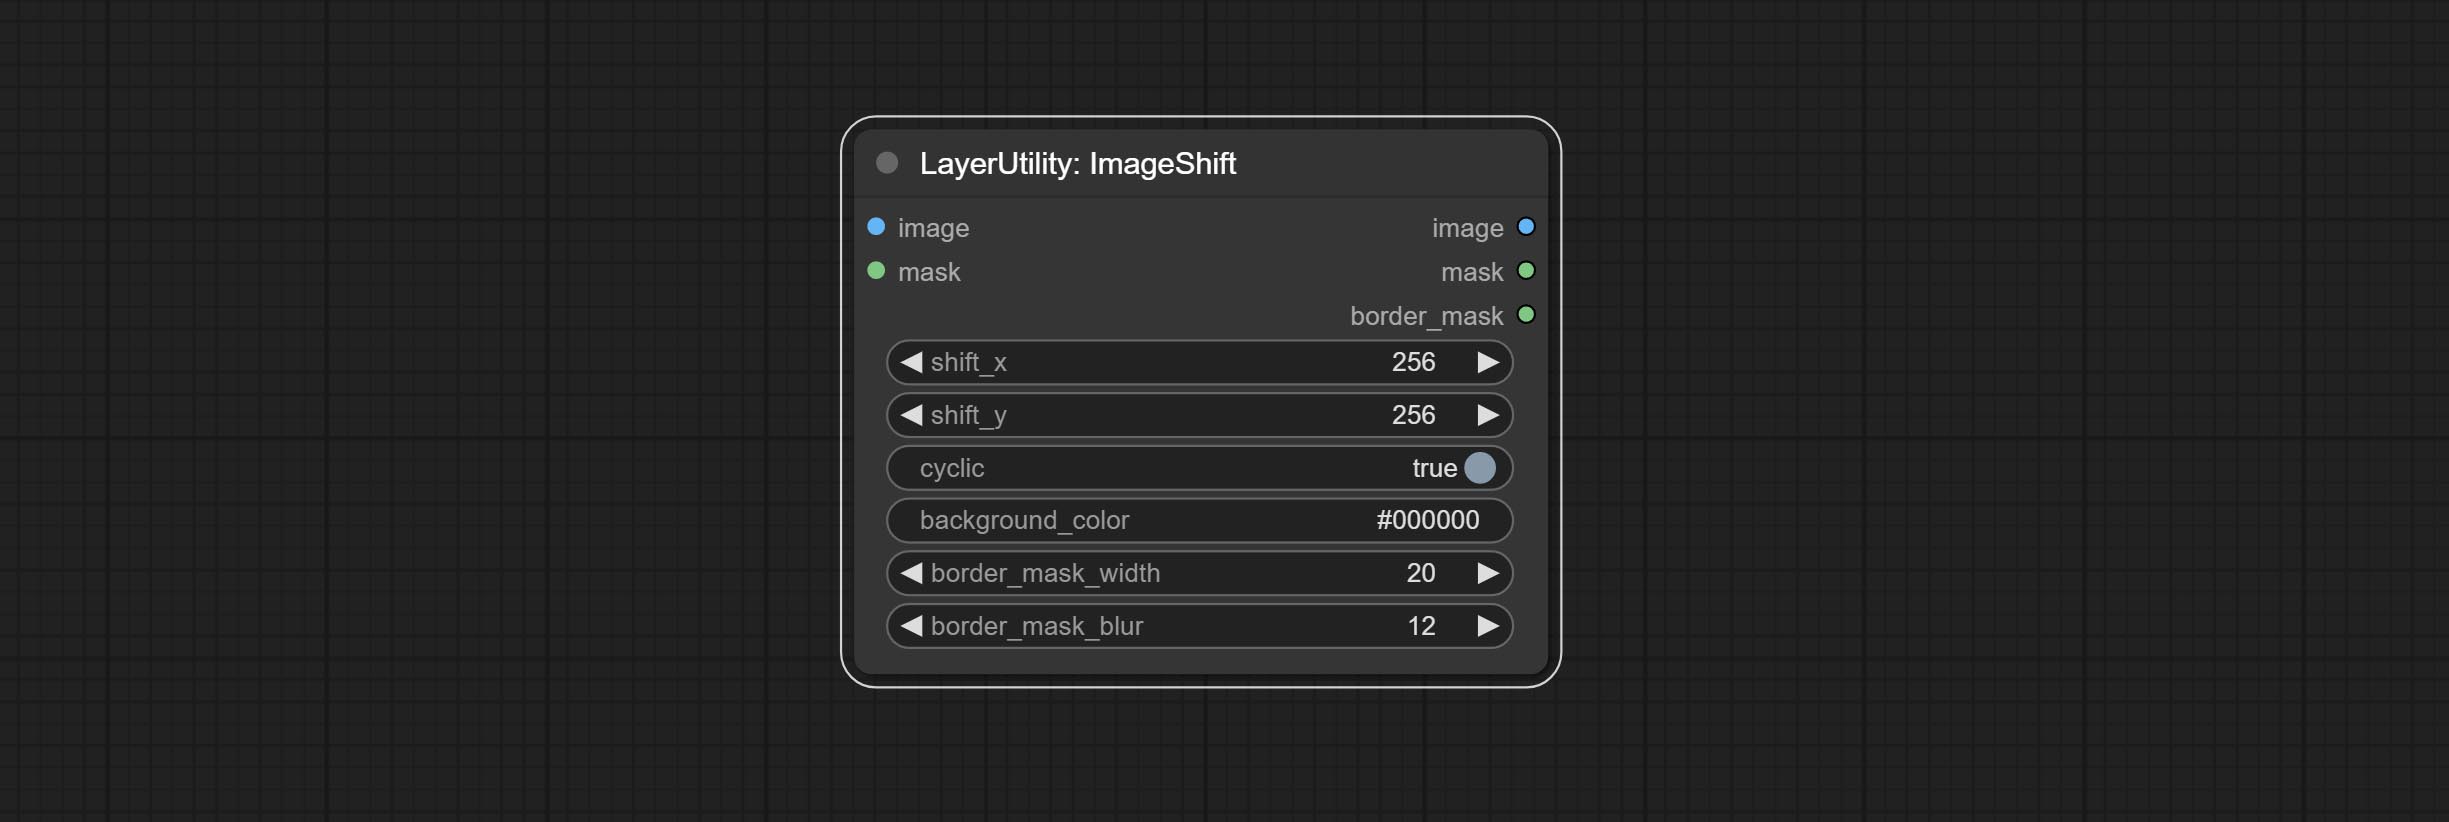
- image 5 : The input image.
- mask 2,5 : The mask of image.
- shift_x: Horizontal distance of shift.
- shift_y: Vertical distance of shift.
- cyclic: Is the part of displacement that is out of bounds cyclic.
- background_color 4 : Background color. if cyclic is set to False, the setting here will be used as the background color.
- border_mask_width: Border mask width.
- border_mask_blur: Border mask blur.
- ملحوظة
ImageBlend
A simple node for composit layer image and background image, multiple blend modes are available for option, and transparency can be set. 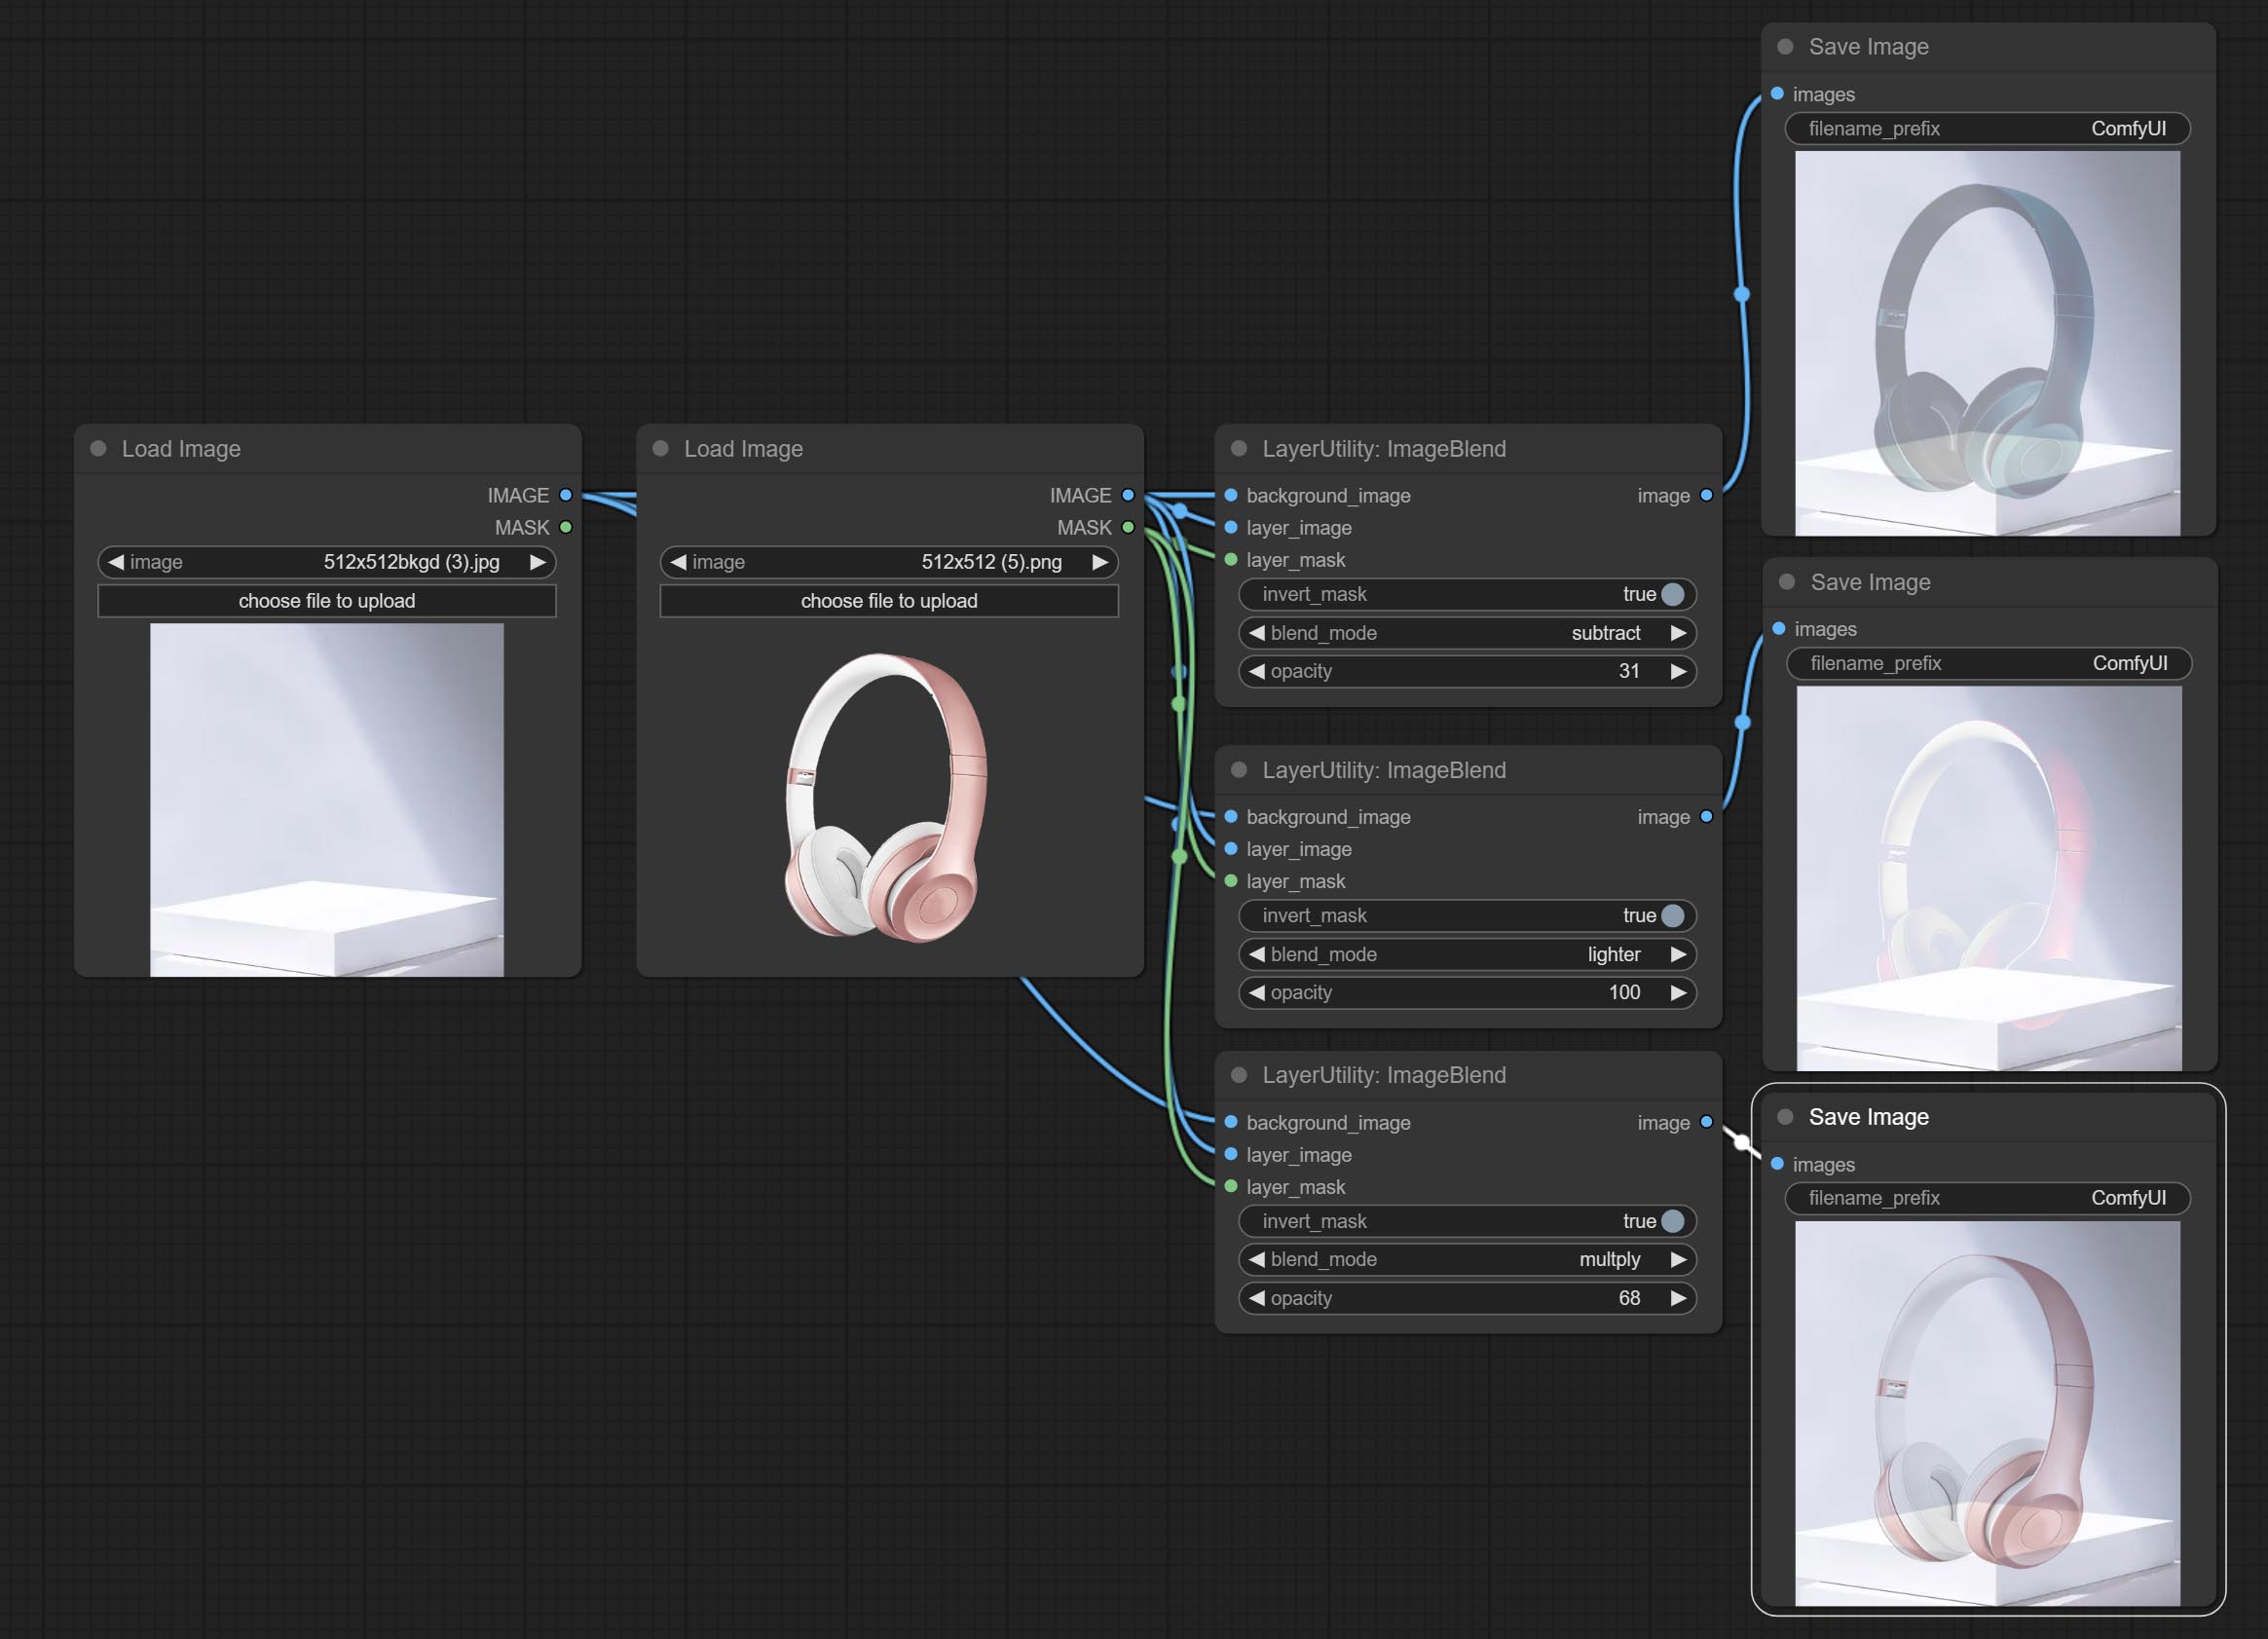
Node options: 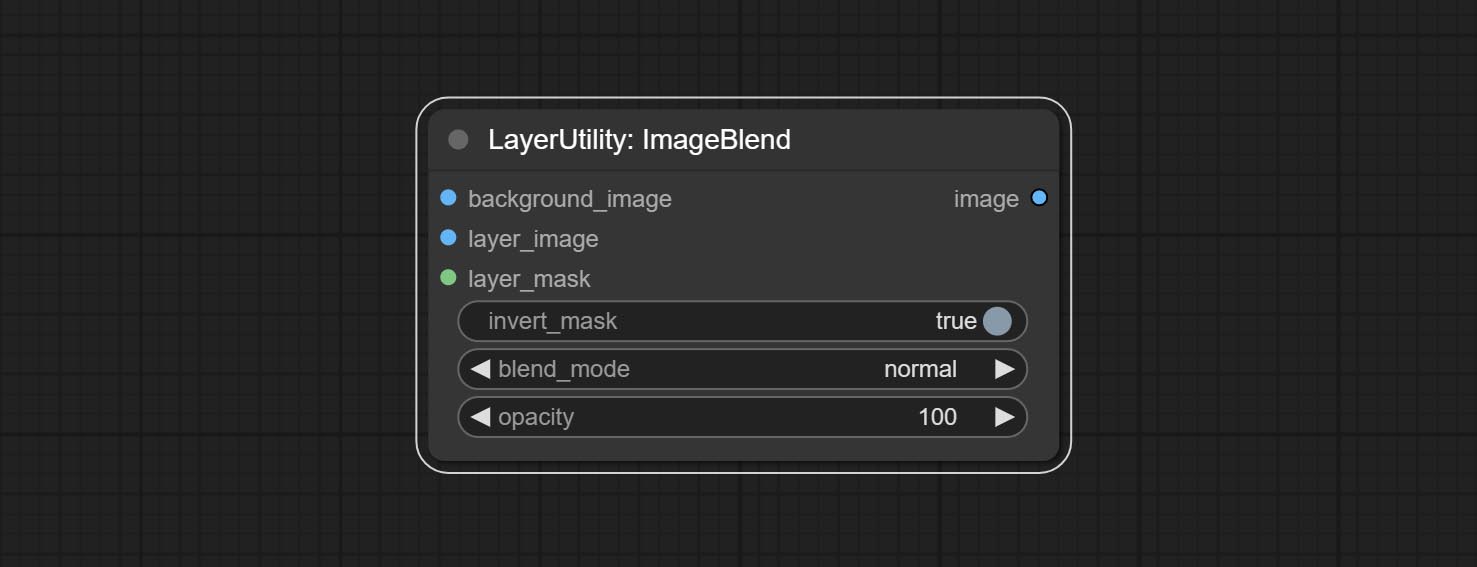
- background_image 1 : The background image.
- layer_image 1 : Layer image for composite.
- layer_mask 1,2 : Mask for layer_image.
- invert_mask: Whether to reverse the mask.
- blend_mode 3 : Blending mode.
- opacity: Opacity of blend.
- ملحوظة
ImageReel
Display multiple images in one reel. Text annotations can be added to each image in the reel. By using the ImageReelComposite node, multiple reel can be combined into one image. 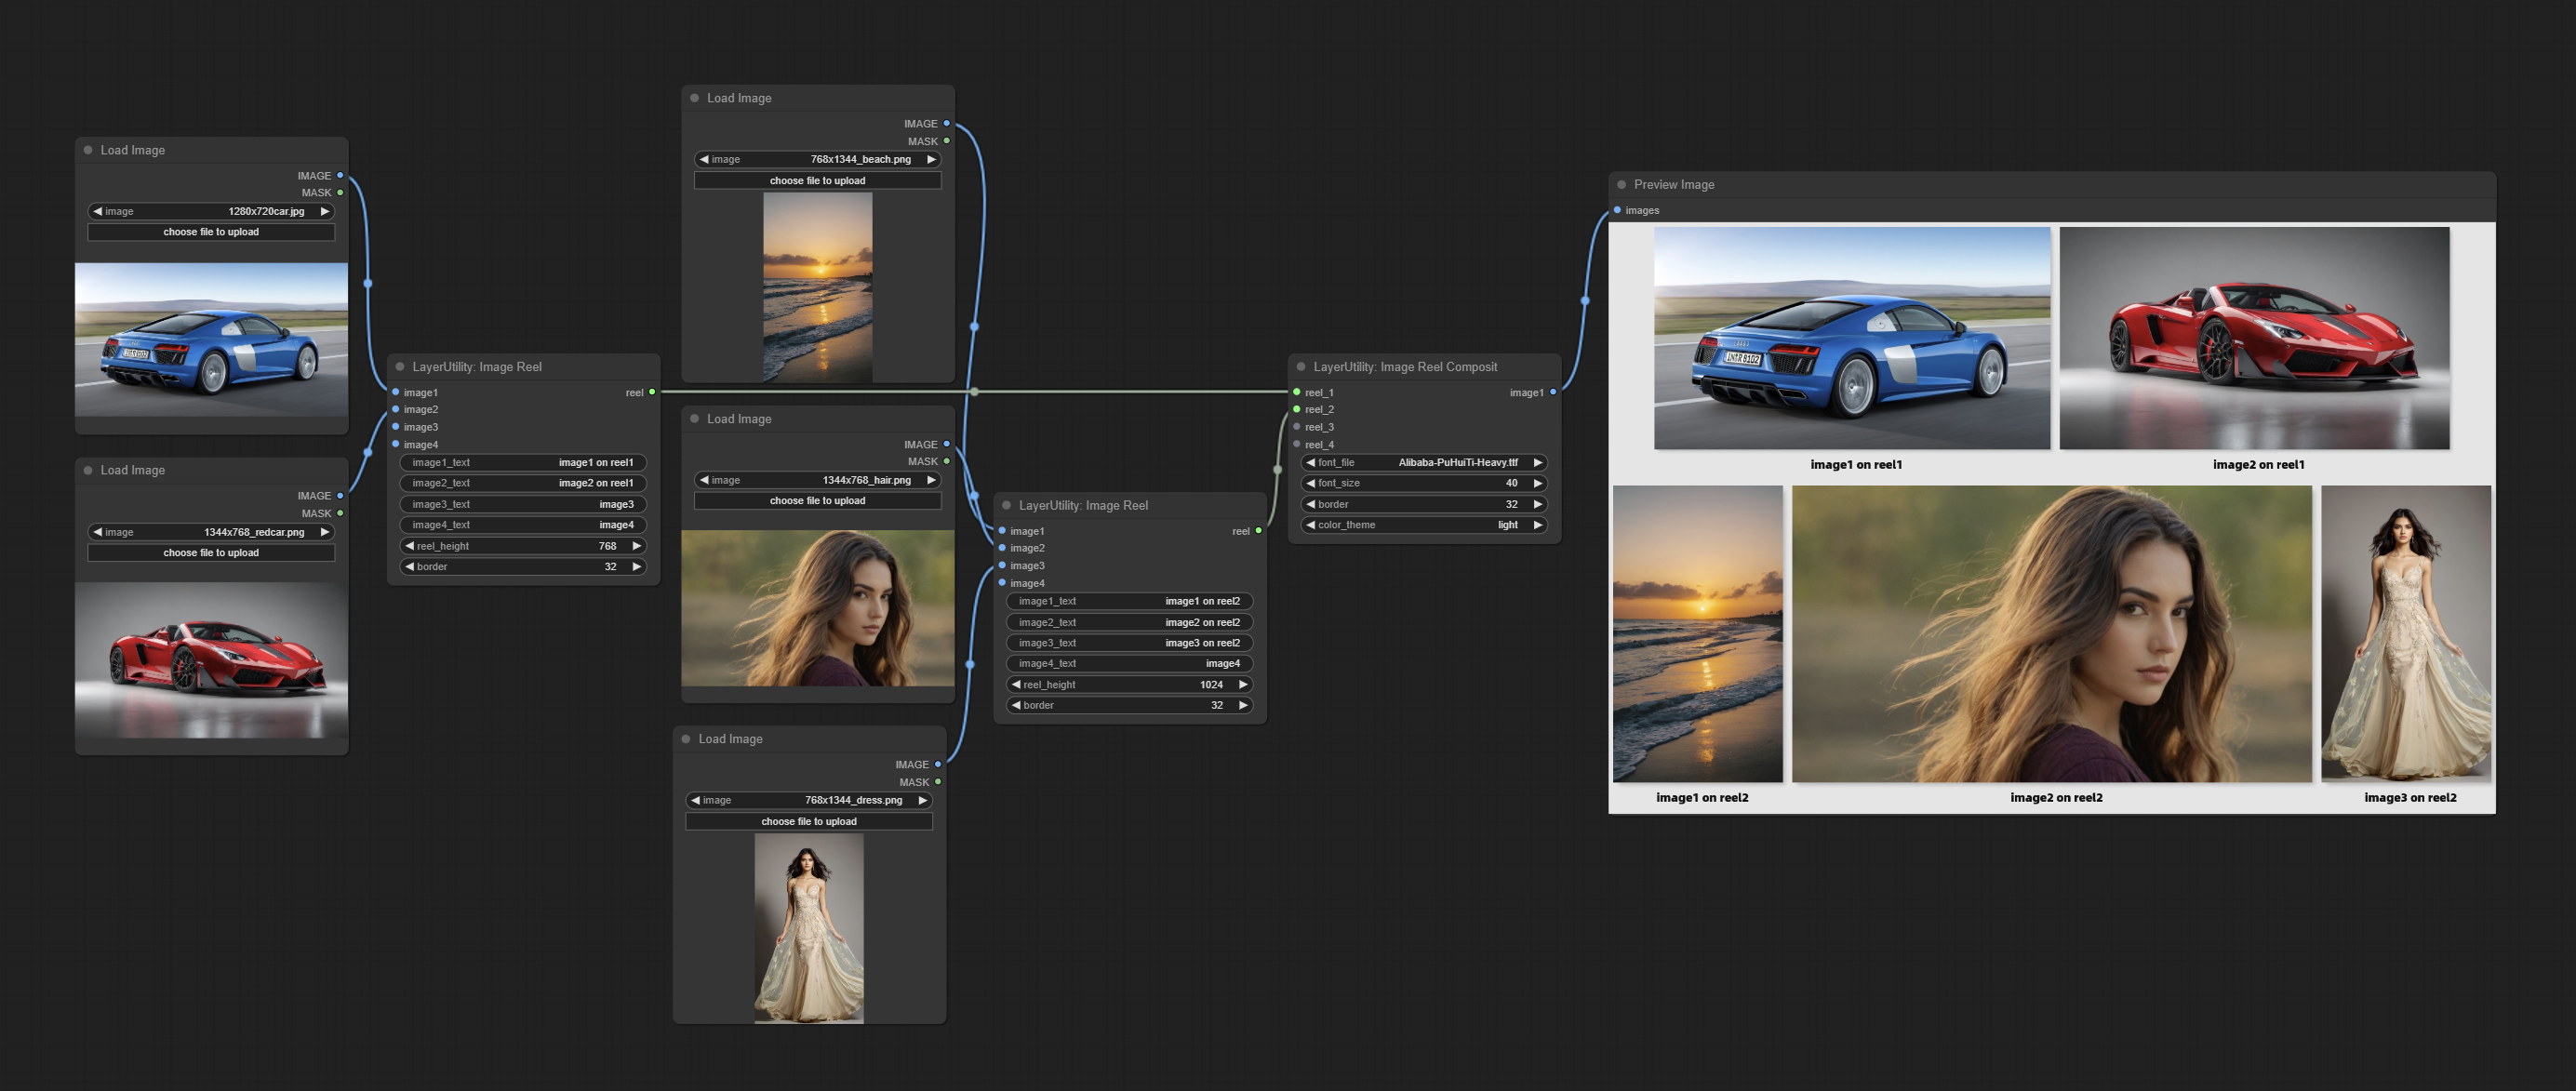
Node Options:
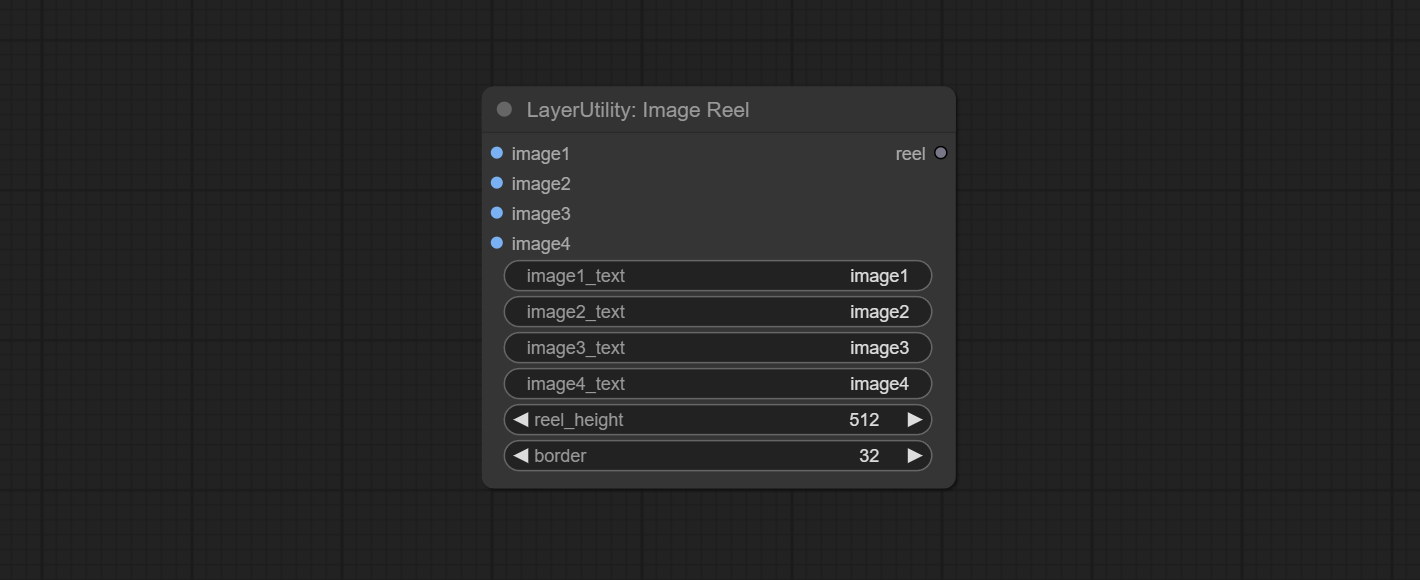
- image1: The first image. it must be input.
- image2: The second image. optional input.
- image3: The third image. optional input.
- image4: The fourth image. optional input.
- image1_text: Text annotation for the first image.
- image2_text: Text annotation for the second image.
- image3_text: Text annotation for the third image.
- image4_text: Text annotation for the fourth image.
- reel_height: The height of reel.
- border: The border width of the image in the reel.
Output:
- reel: The reel of ImageReelComposite node input.
ImageReelComposite
Combine multiple reel into one image.
Node Options: 
- reel_1: The first reel. it must be input.
- reel_2: The second reel. optional input.
- reel_3: The third reel. optional input.
- reel_4: The fourth reel. optional input.
- font_file ** : Here is a list of available font files in the font folder, and the selected font files will be used to generate images.
- border: The border width of the reel.
- color_theme: Theme color for the output image.
* The font folder is defined in resource_dir.ini , this file is located in the root directory of the plug-in, and the default name is resource_dir.ini.example . to use this file for the first time, you need to change the file suffix to .ini . Open the text editing software and find the line starting with "FONT_dir=", after "=", enter the custom folder path name. support defining multiple folders in resource-dir.ini , separated by commas, semicolons, or spaces. all font files in this folder will be collected and displayed in the node list during ComfyUI initialization. If the folder set in ini is invalid, the font folder that comes with the plugin will be enabled.
ImageOpacity
Adjust image opacity 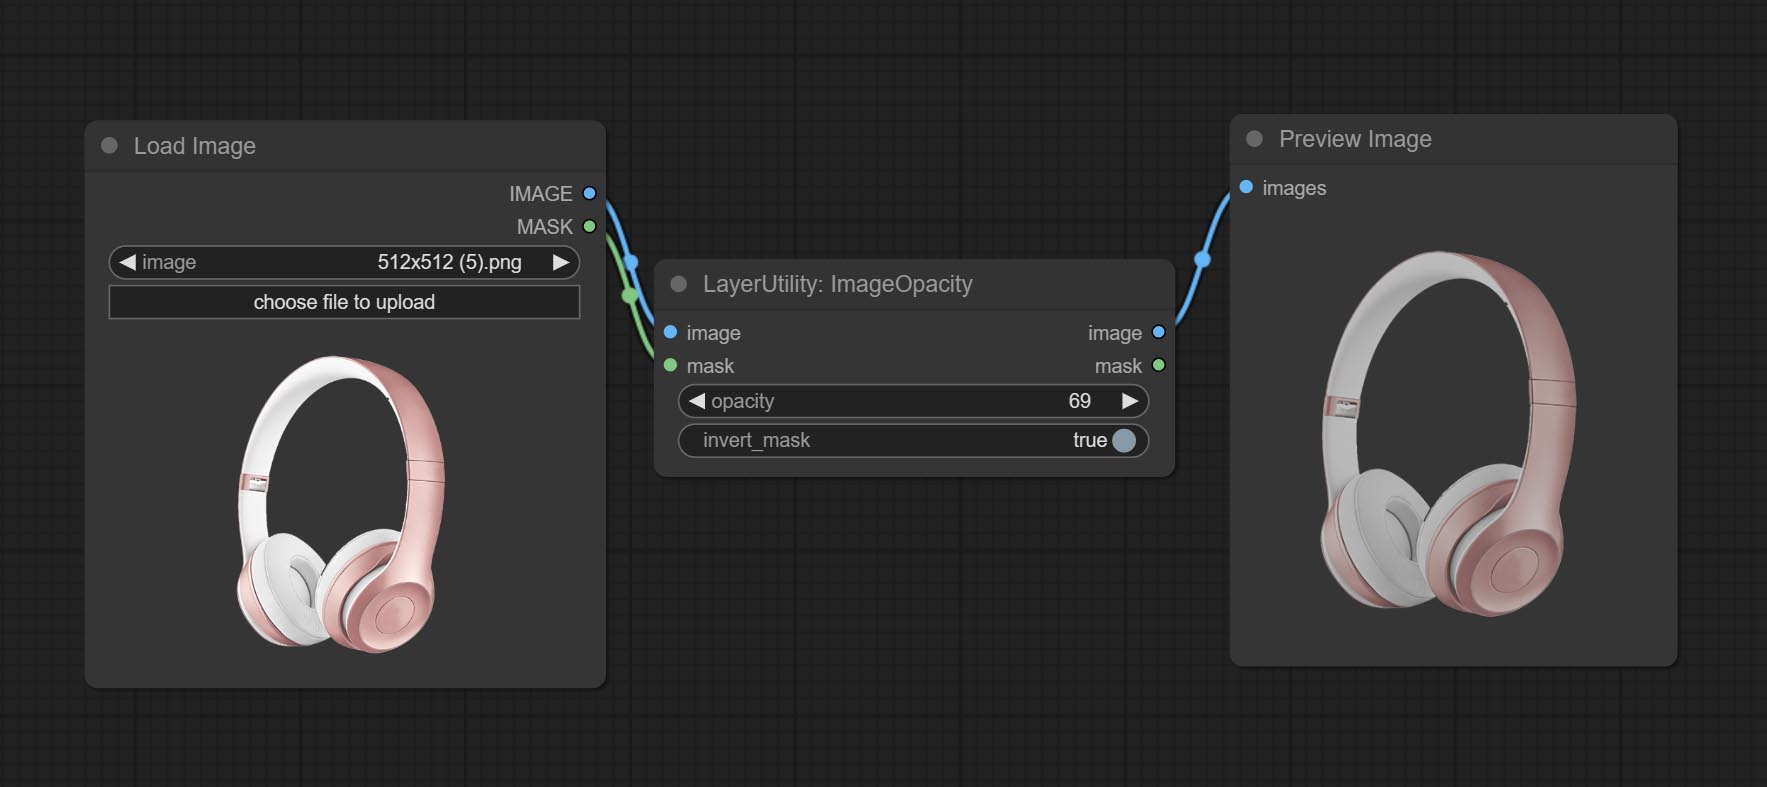
Node option:
- image 5 : Image input, supporting RGB and RGBA. if is RGB, the alpha channel of the entire image will be automatically added.
- mask 2,5 : Mask input.
- invert_mask: Whether to reverse the mask.
- opacity: Opacity of image.
- ملحوظة
ColorPicker
Modify web extensions from mtb nodes. Select colors on the color palette and output RGB values, thanks to the original author. 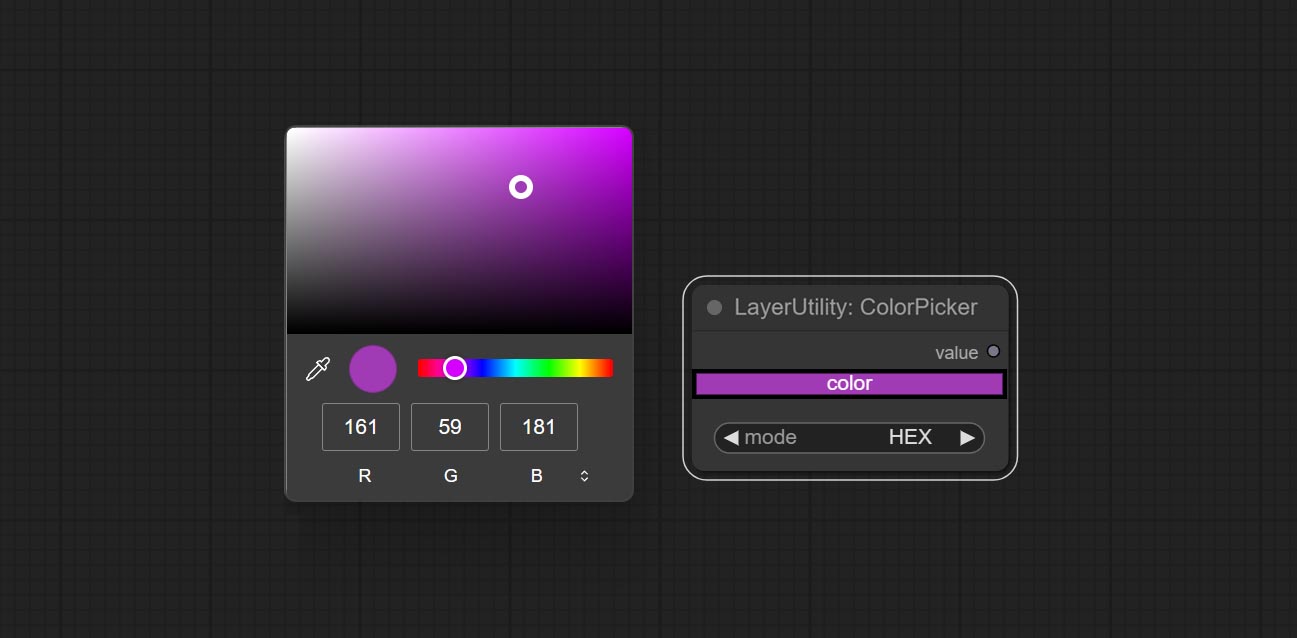
Node options:
- mode: The output format is available in hexadecimal (HEX) and decimal (DEC).
Output type:
RGBValue
Output the color value as a single R, G, B three decimal values. Supports HEX and DEC formats for ColorPicker node output.
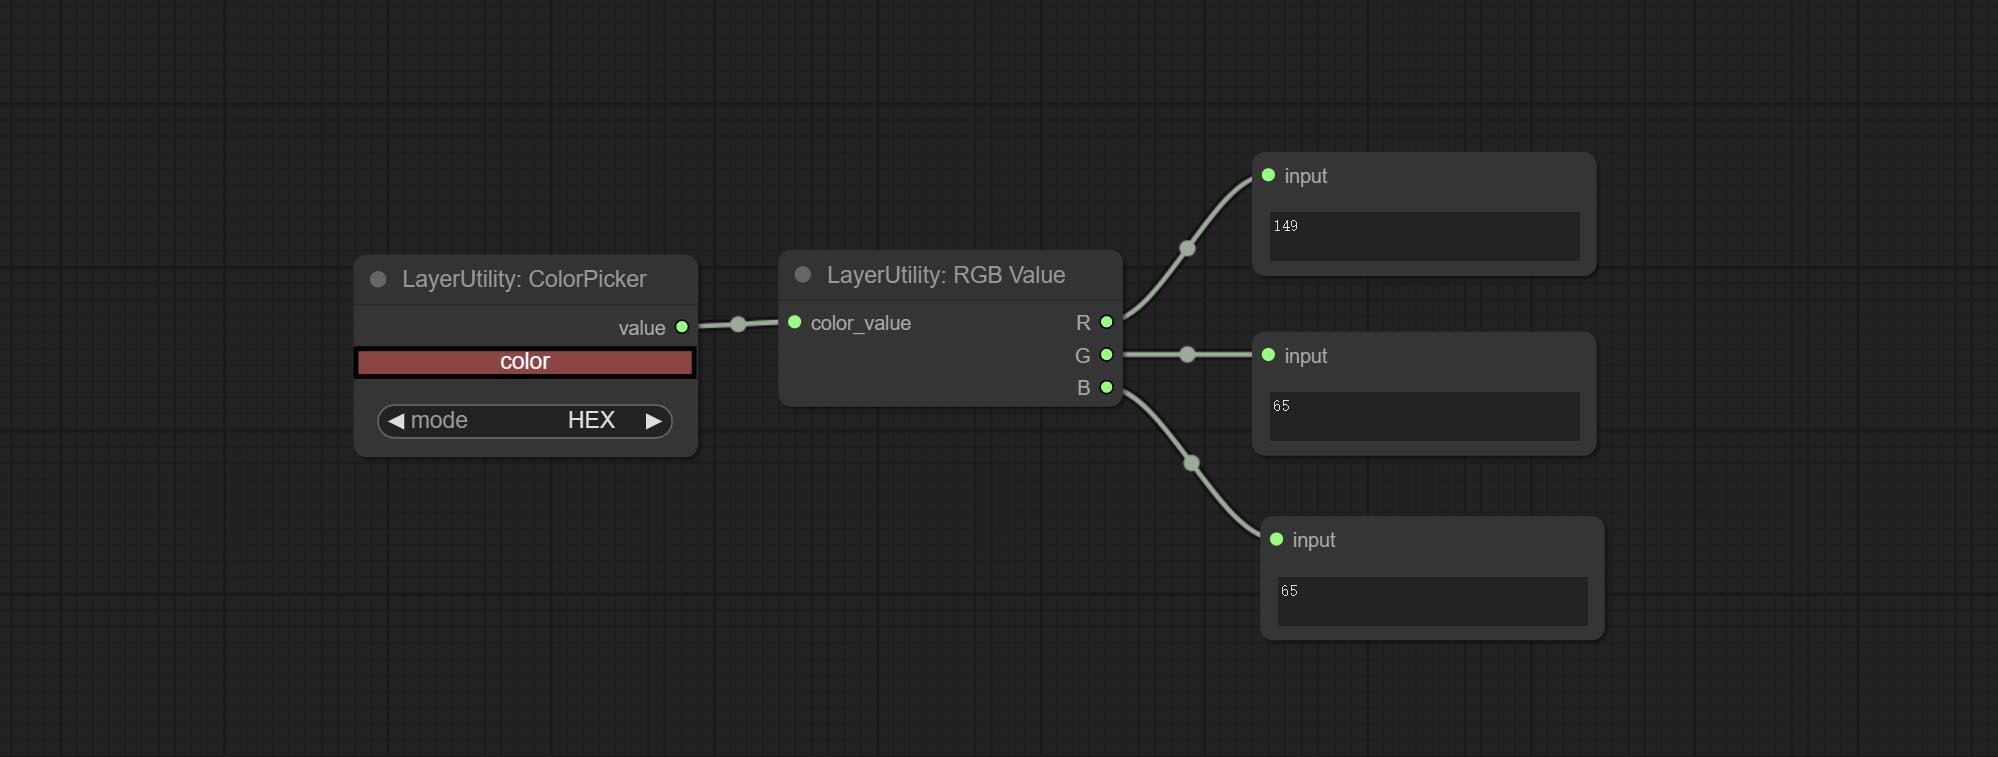
Node Options:
- color_value: Supports hexadecimal (HEX) or decimal (DEC) color values and should be of string or tuple type. Forcing in other types will result in an error.
HSVValue
Output color values as individual decimal values of H, S, and V (maximum value of 255). Supports HEX and DEC formats for ColorPicker node output. 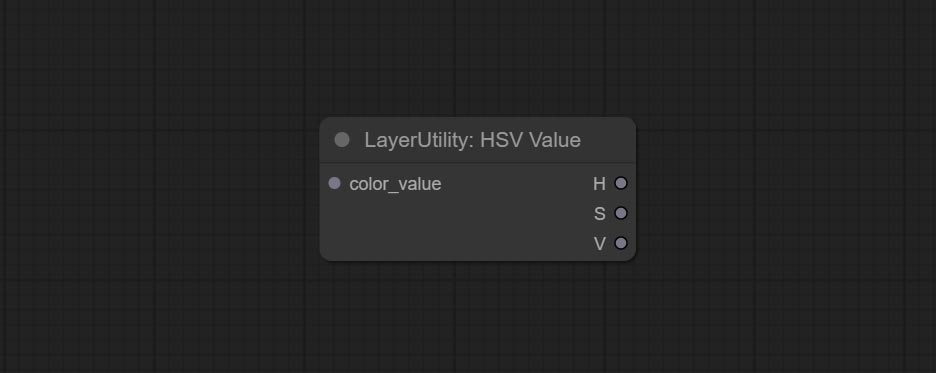
Node Options:
- color_value: Supports hexadecimal (HEX) or decimal (DEC) color values and should be of string or tuple type. Forcing in other types will result in an error.
GrayValue
Output grayscale values based on color values. Supports outputting 256 level and 100 level grayscale values. 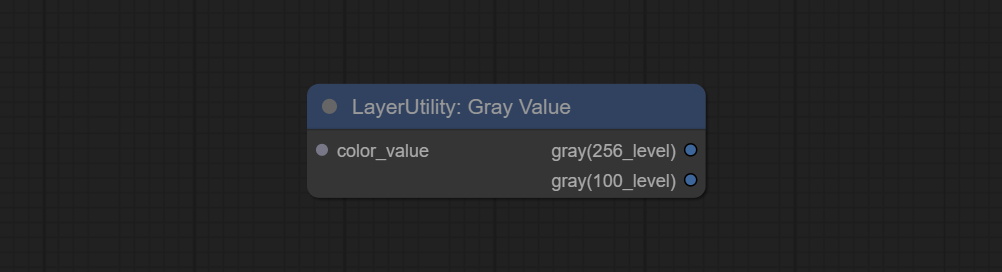
Node Options:
- color_value: Supports hexadecimal (HEX) or decimal (DEC) color values and should be of string or tuple type. Forcing in other types will result in an error.
Outputs:
- gray(256_level): 256 level grayscale value. Integer type, range 0~255.
- gray(100_level): 100 level grayscale value. Integer type, range 0~100.
GetColorTone
Obtain the main color or average color from the image and output RGB values. 
Node options: 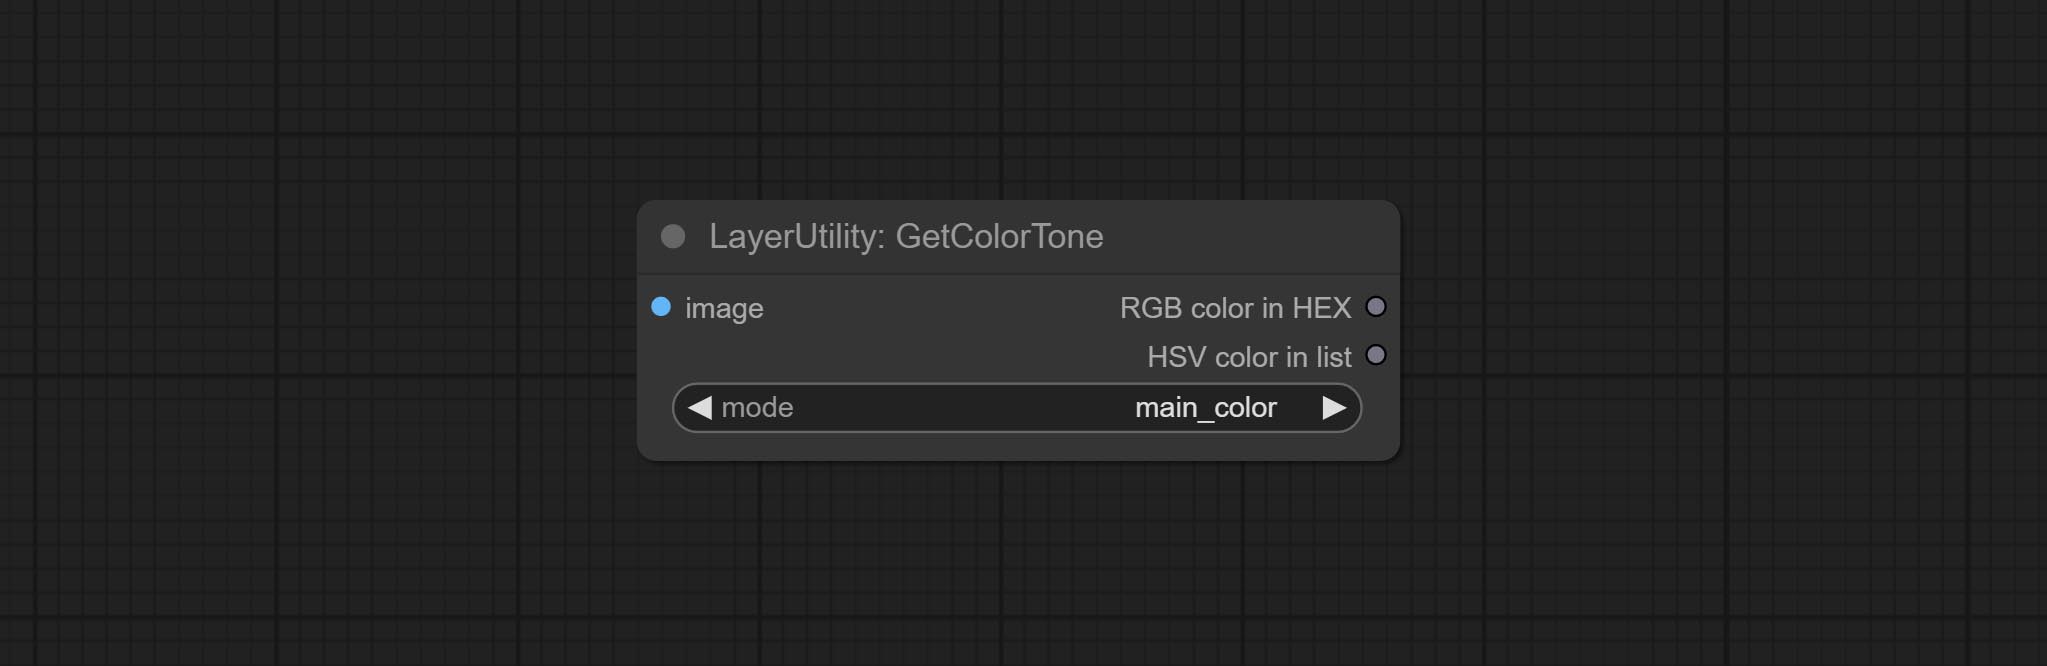
- mode: There are two modes to choose from, with the main color and average color.
Output type:
- RGB color in HEX: The RGB color described by hexadecimal RGB format, like '#FA3D86'.
- HSV color in list: The HSV color described by python's list data format.
GetColorToneV2
V2 upgrade of GetColorTone. You can specify the dominant or average color to get the body or background. 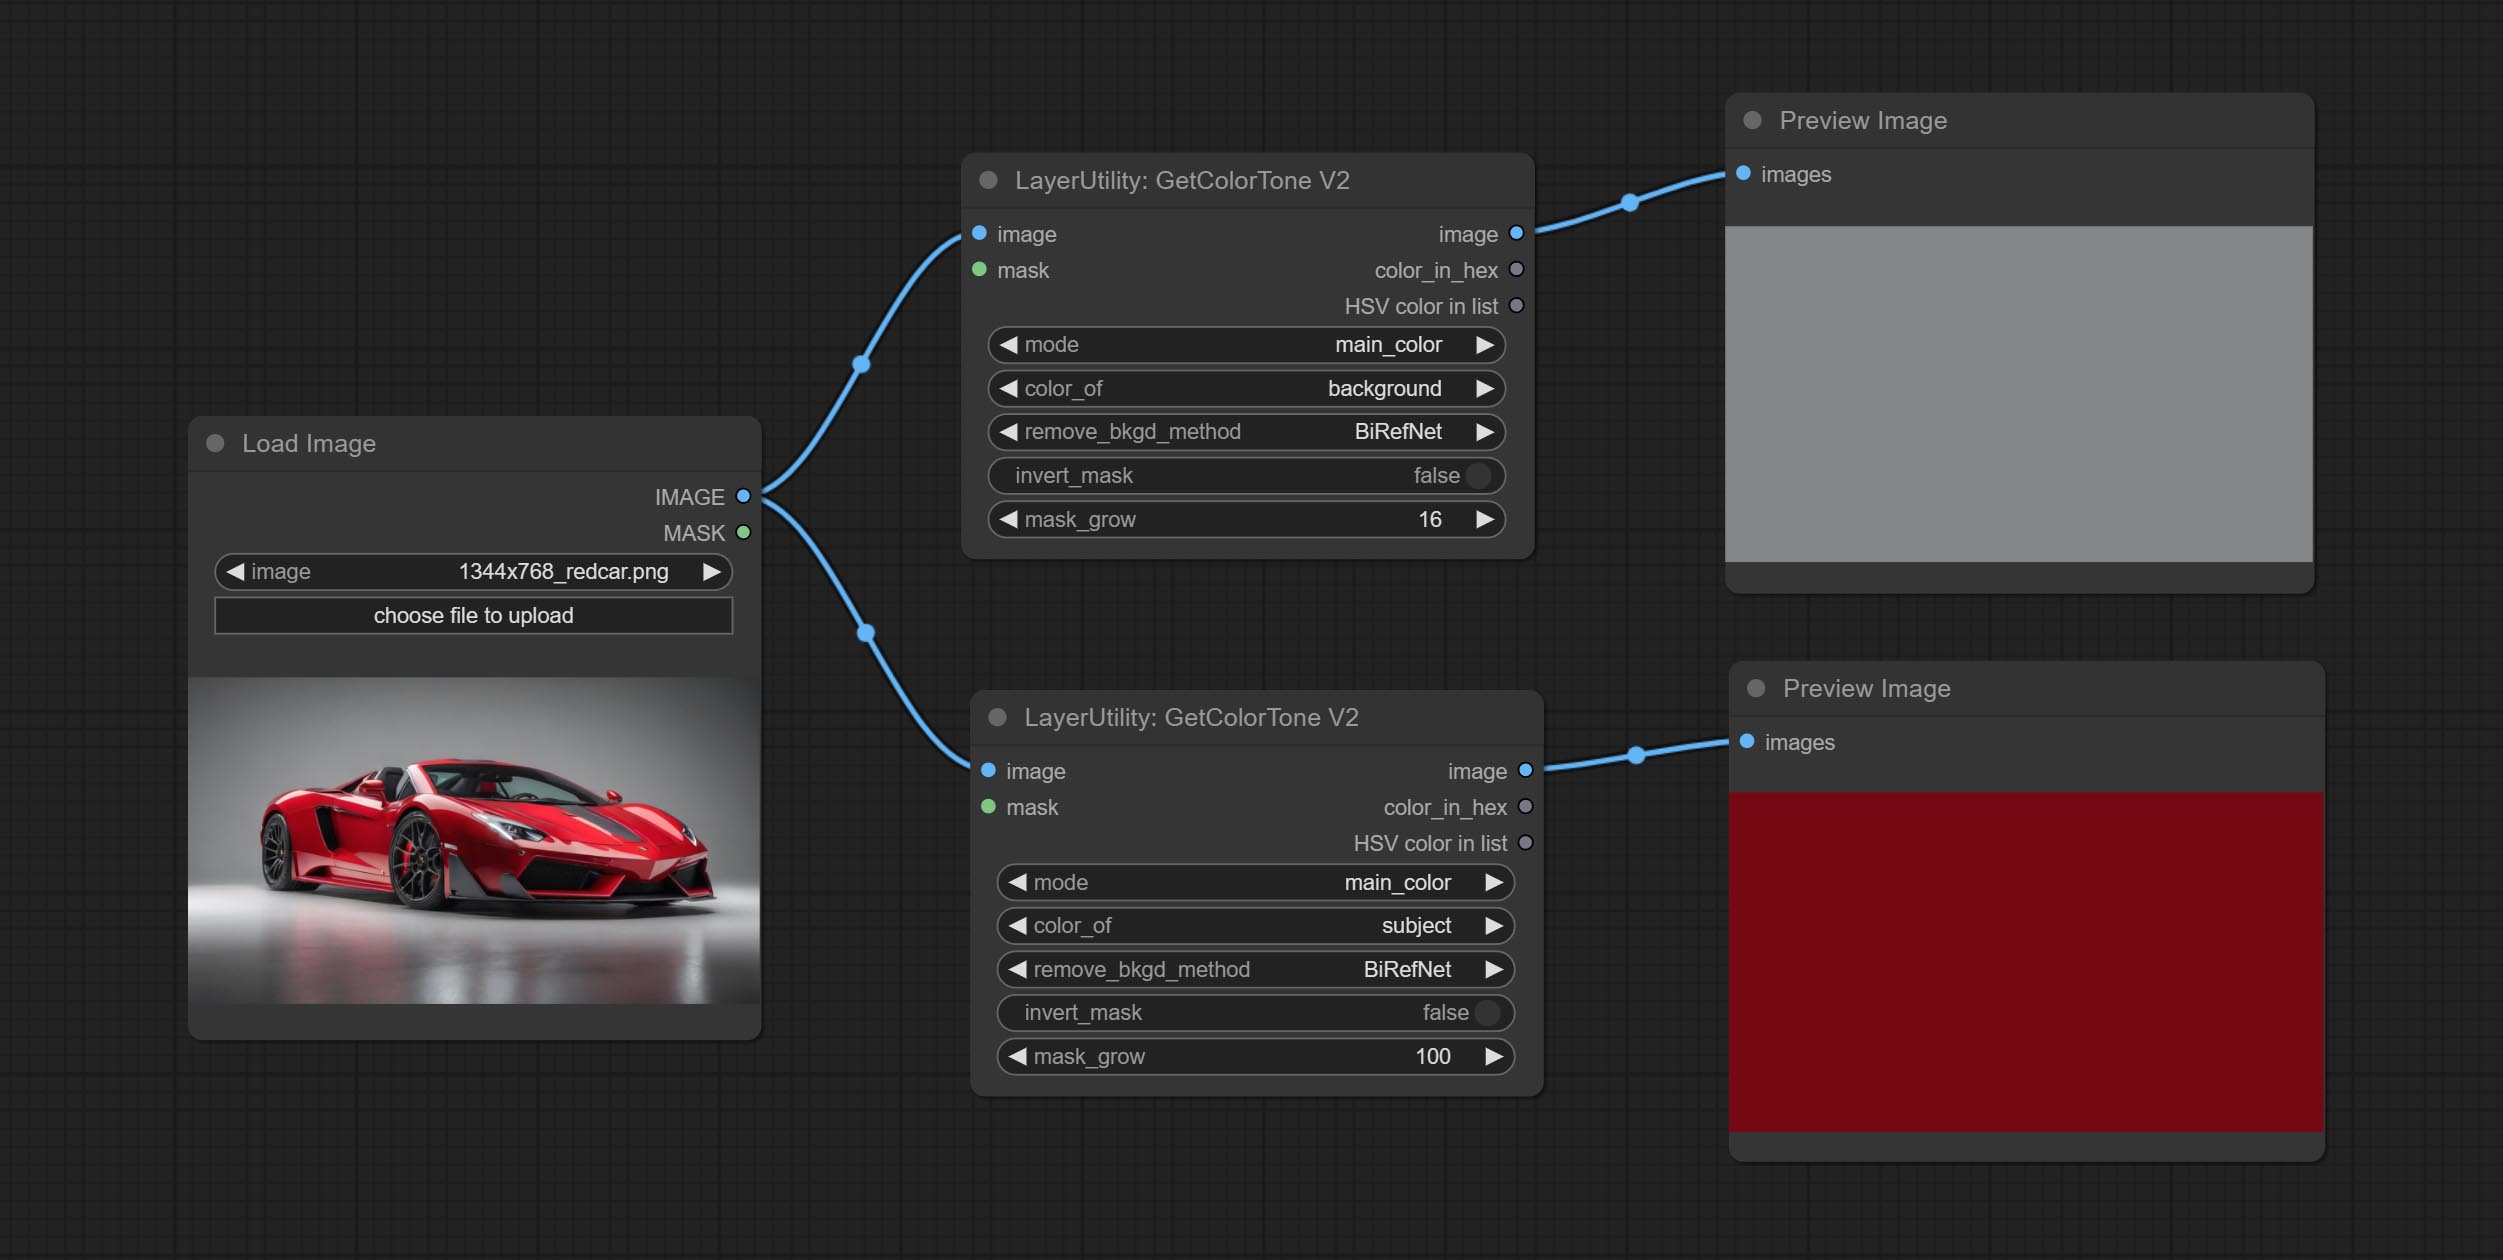
The following changes have been made on the basis of GetColorTong: 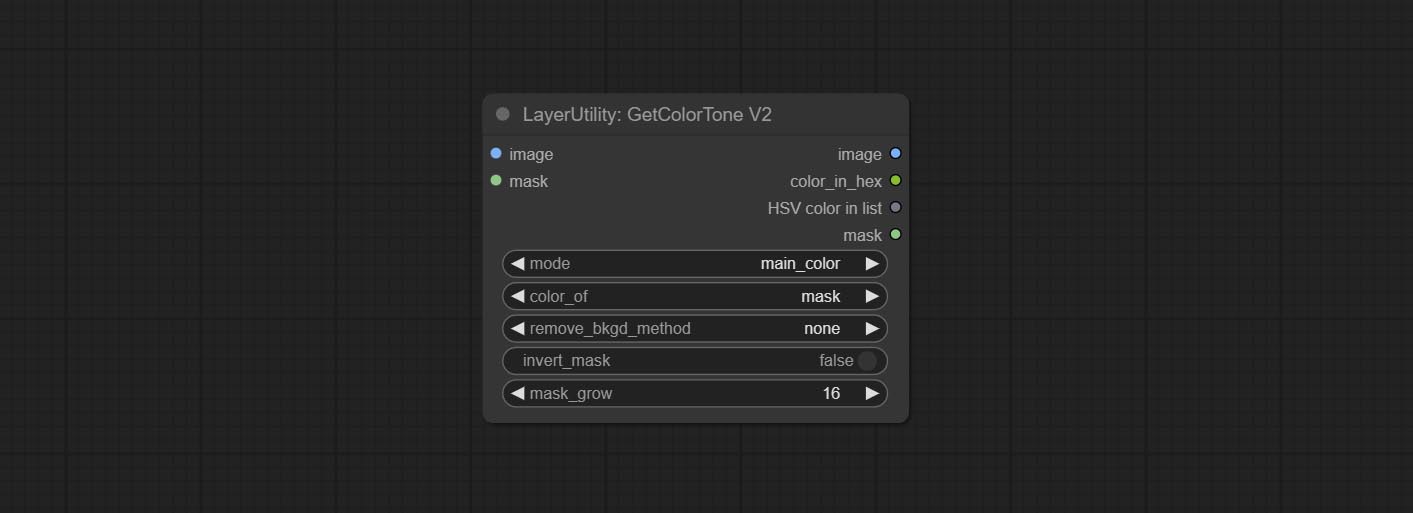
- color_of: Provides 4 options, mask, entire, background, and subject, to select the color of the mask area, entire picture, background, or subject, respectively.
- remove_background_method: There are two methods of background recognition: BiRefNet and RMBG V1.4.
- invert_mask: Whether to reverse the mask.
- mask_grow: Mask expansion. For subject, a larger value brings the obtained color closer to the color at the center of the body.
Output:
- image: Solid color picture output, the size is the same as the input picture.
- mask: Mask output.
GetMainColors
Obtain the main color of the image. You can obtain 5 colors. 
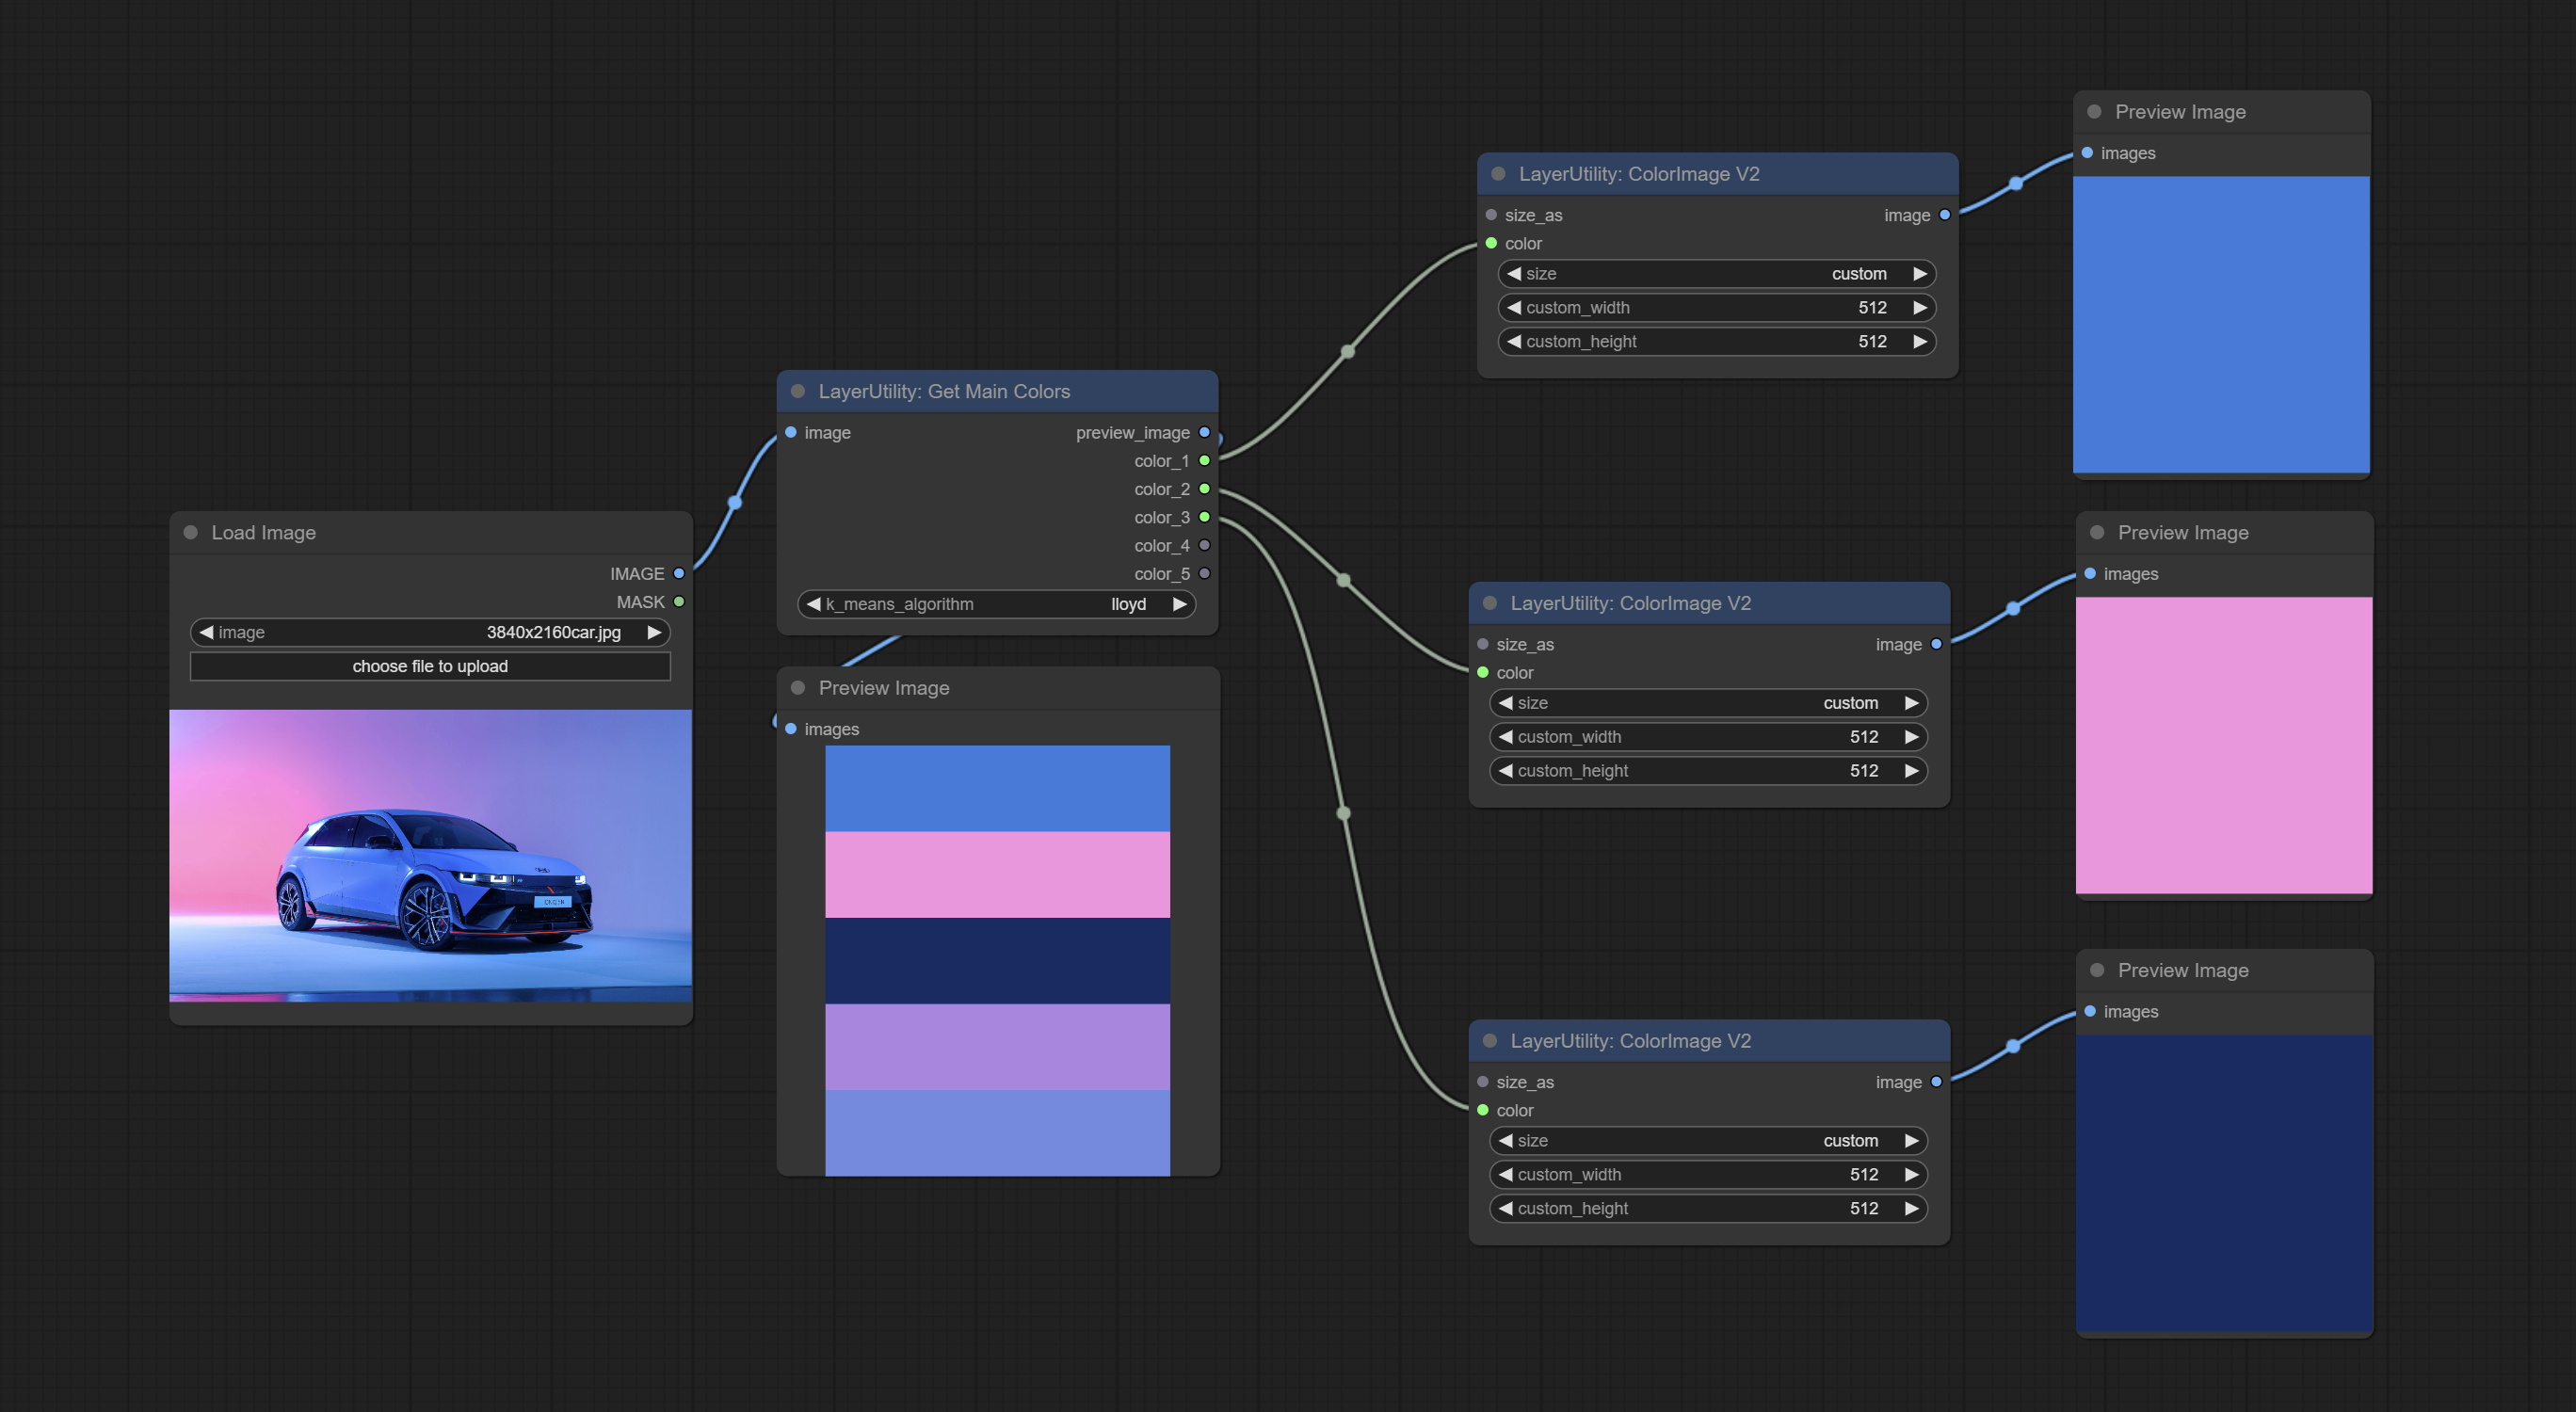
Node Options: 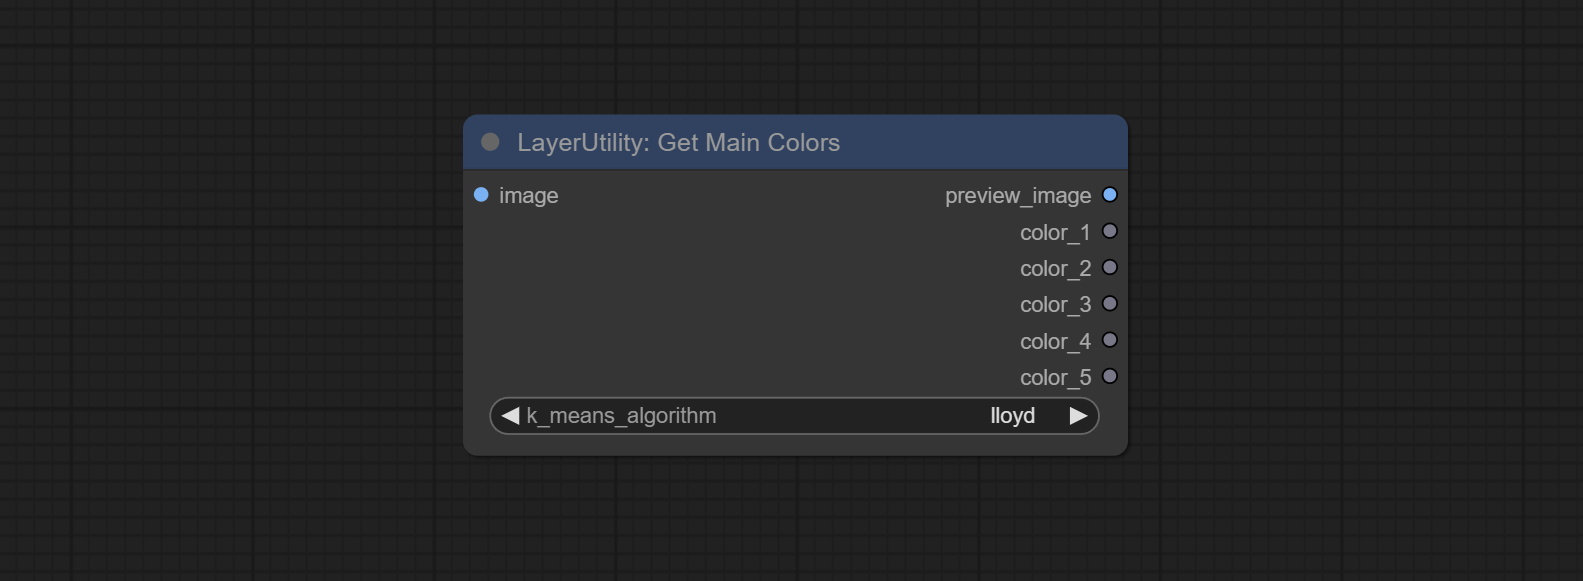
- image: The image input.
- k_means_algorithm:K-Means algorithm options. "lloyd" is the standard K-Means algorithm, while "elkan" is the triangle inequality algorithm, suitable for larger images.
Outputs:
- preview_image: 5 main color preview images.
- color_1~color_5: Color value output. Output an RGB string in HEX format.
ColorName
Output the most similar color name in the color palette based on the color value. 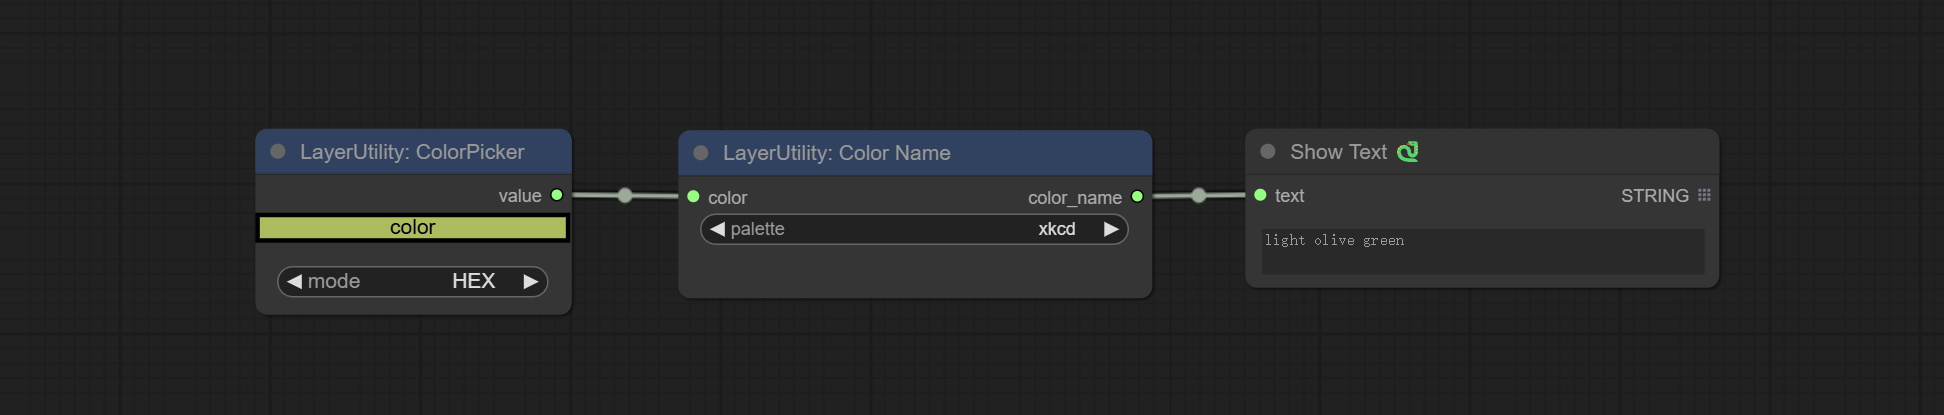
Node Options: 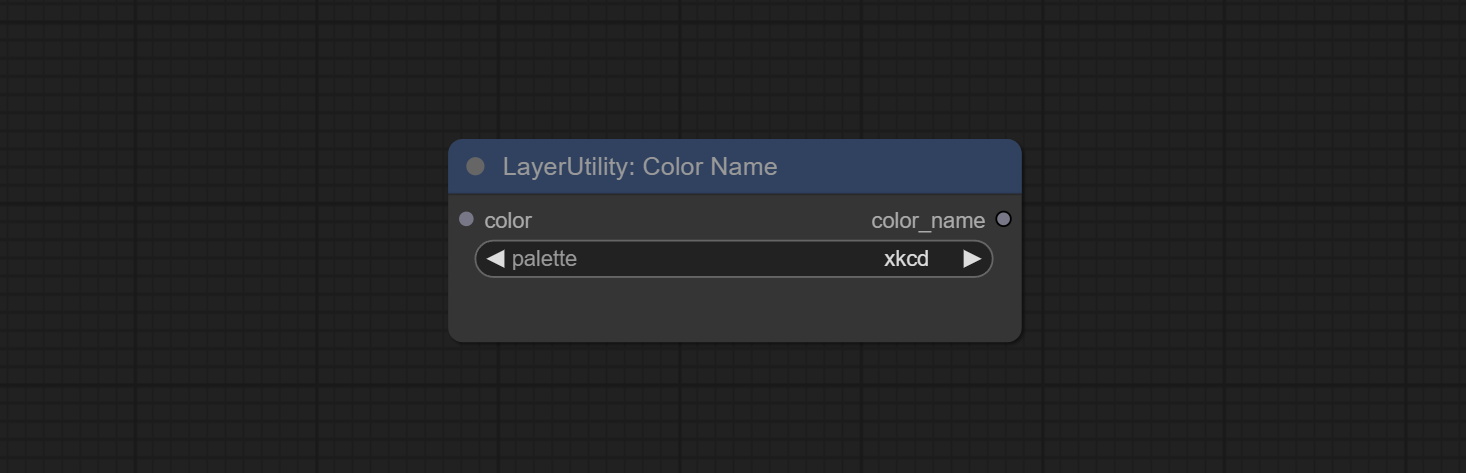
- color: Color value input, in HEX format RGB string format.
- palette: Color palette.
xkcd includes 949 colors, css3 includes 147 colors, and html4 includes 16 colors.
Output:
- color_name: Color name in string.
ExtendCanvas
Extend the canvas 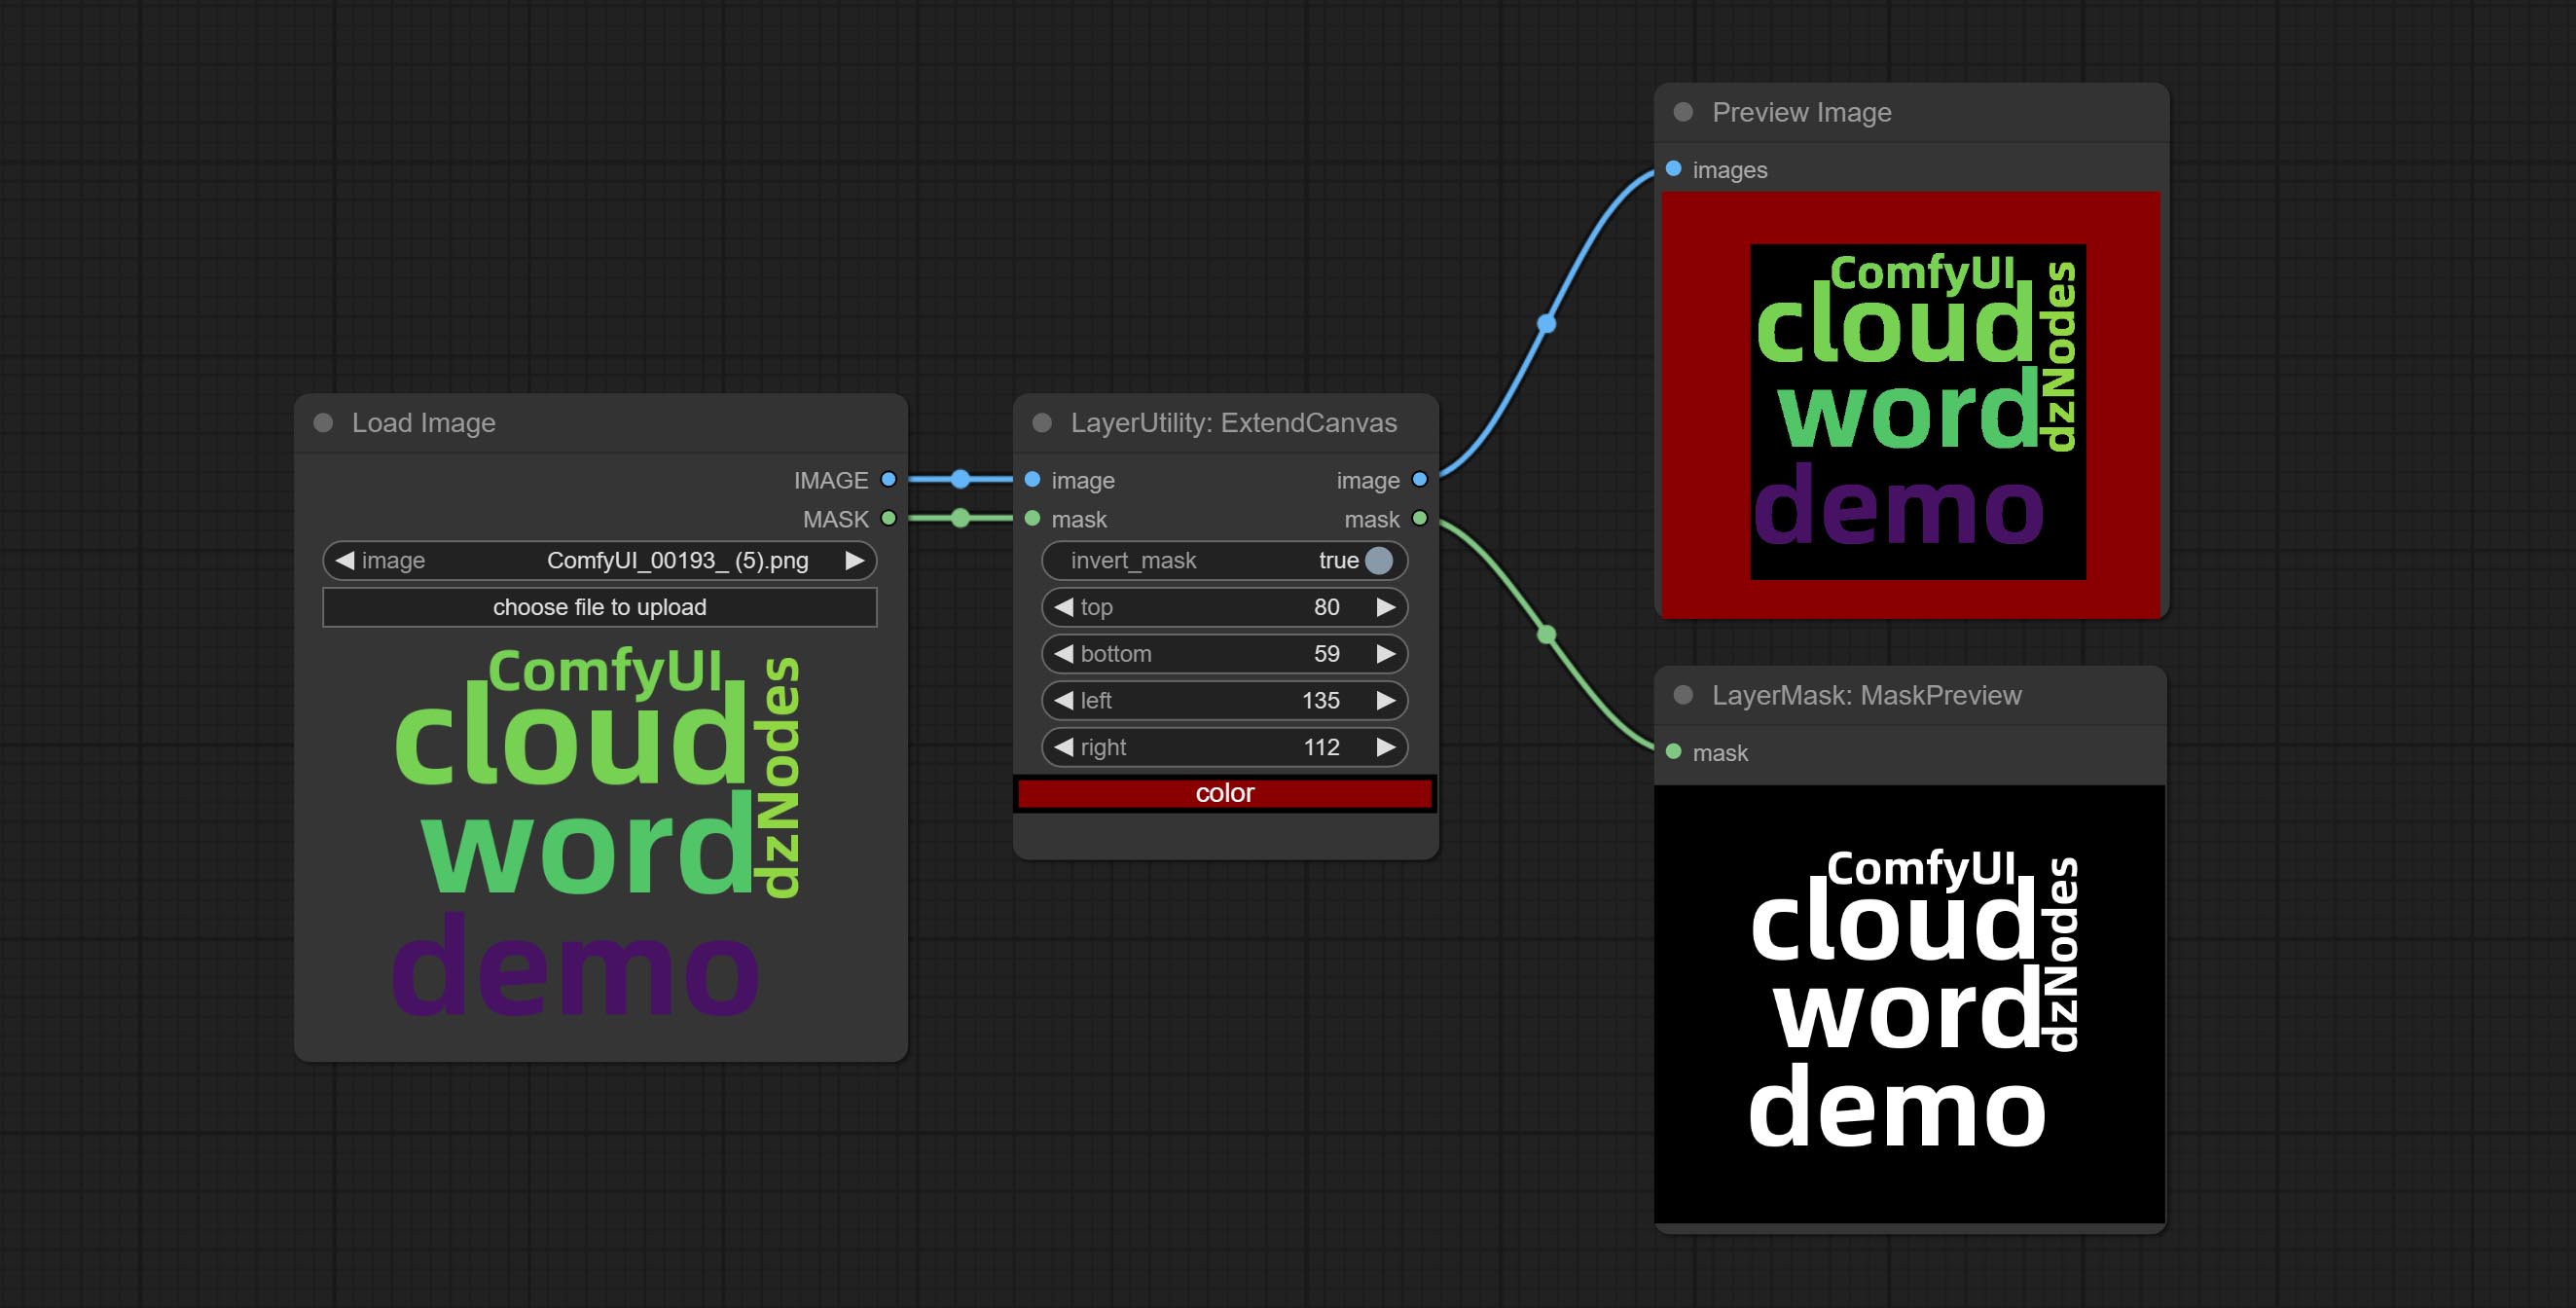
Node options: 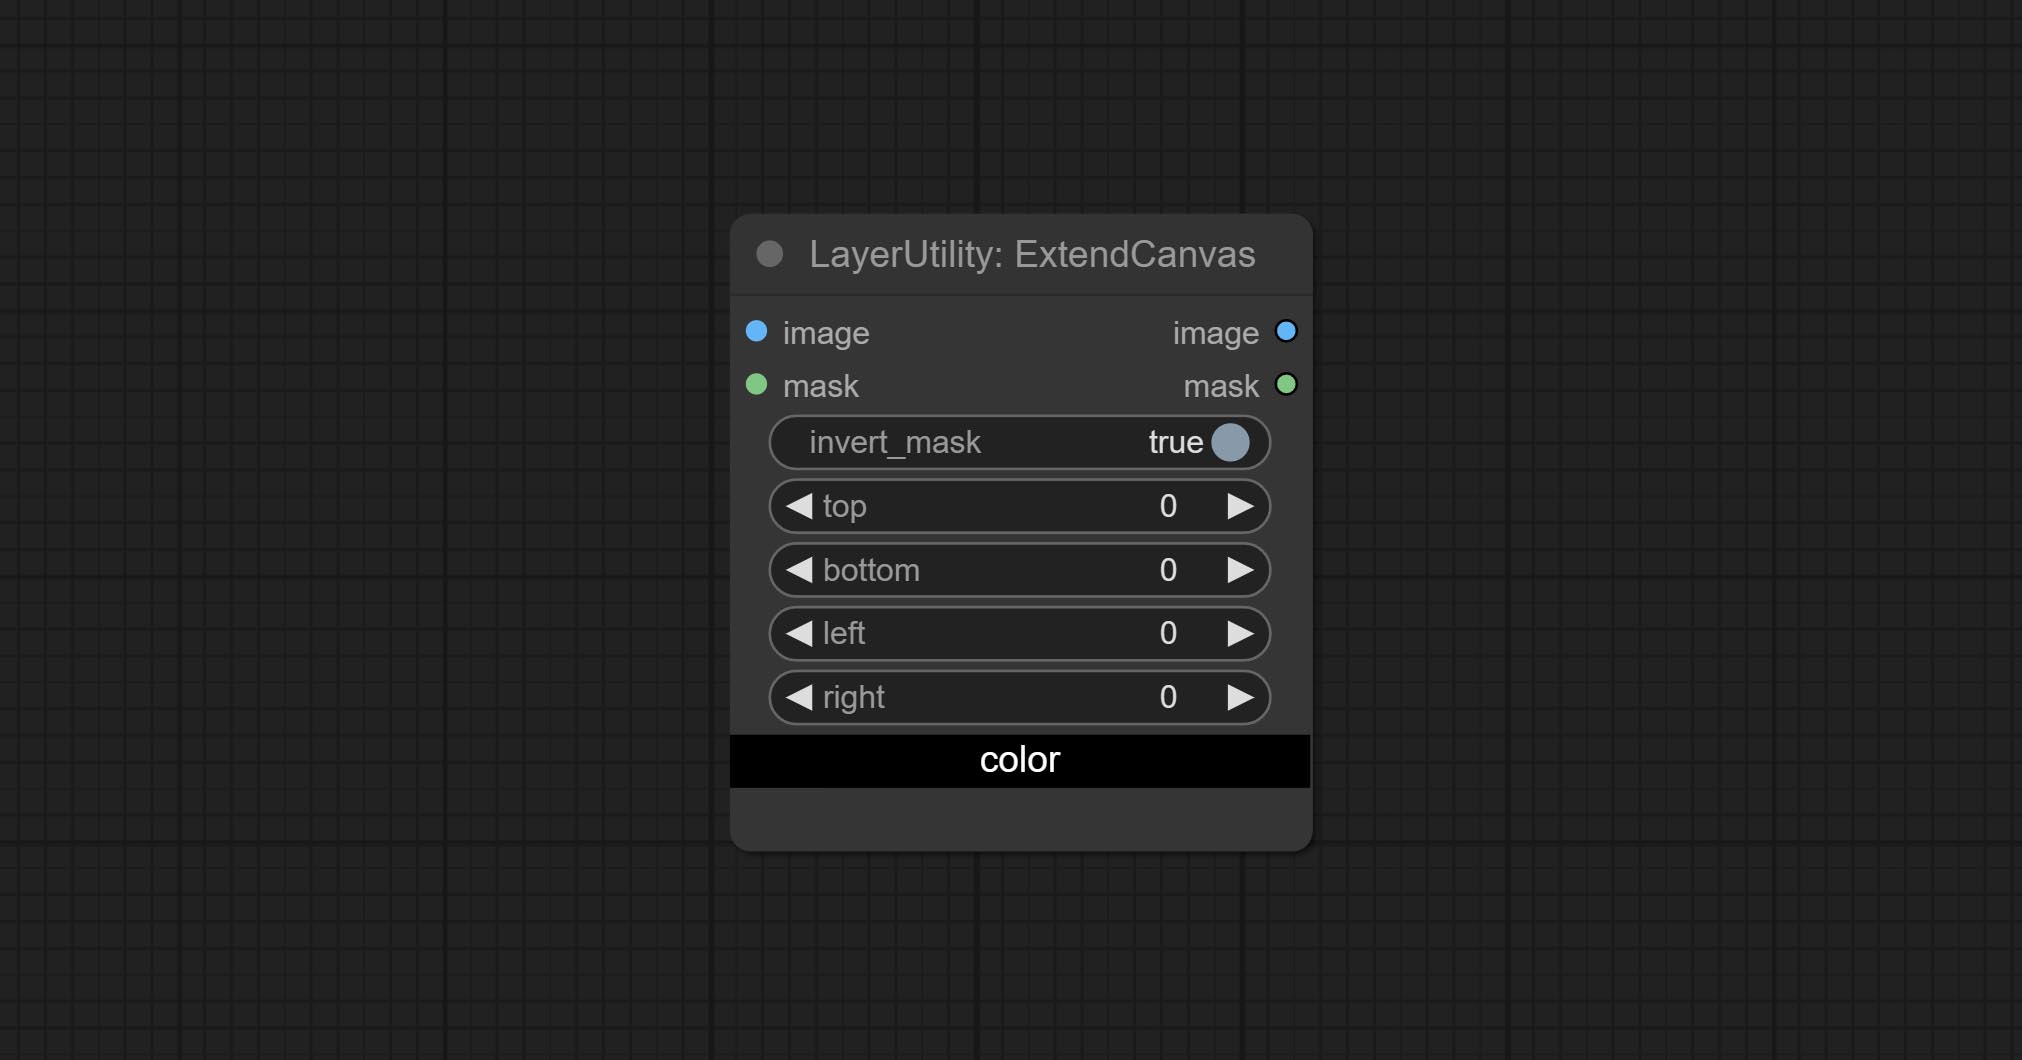
- invert_mask: Whether to reverse the mask.
- top: Top extension value.
- bottom: Bottom extension value.
- left: Left extension value.
- right: Right extension value.
- لون؛ Color of canvas.
ExtendCanvasV2
V2 upgrade to ExtendCanvas.
Based on ExtendCanvas, color is modified to be a string type, and it supports external ColorPicker input, Support negative value input, it means image will be cropped. 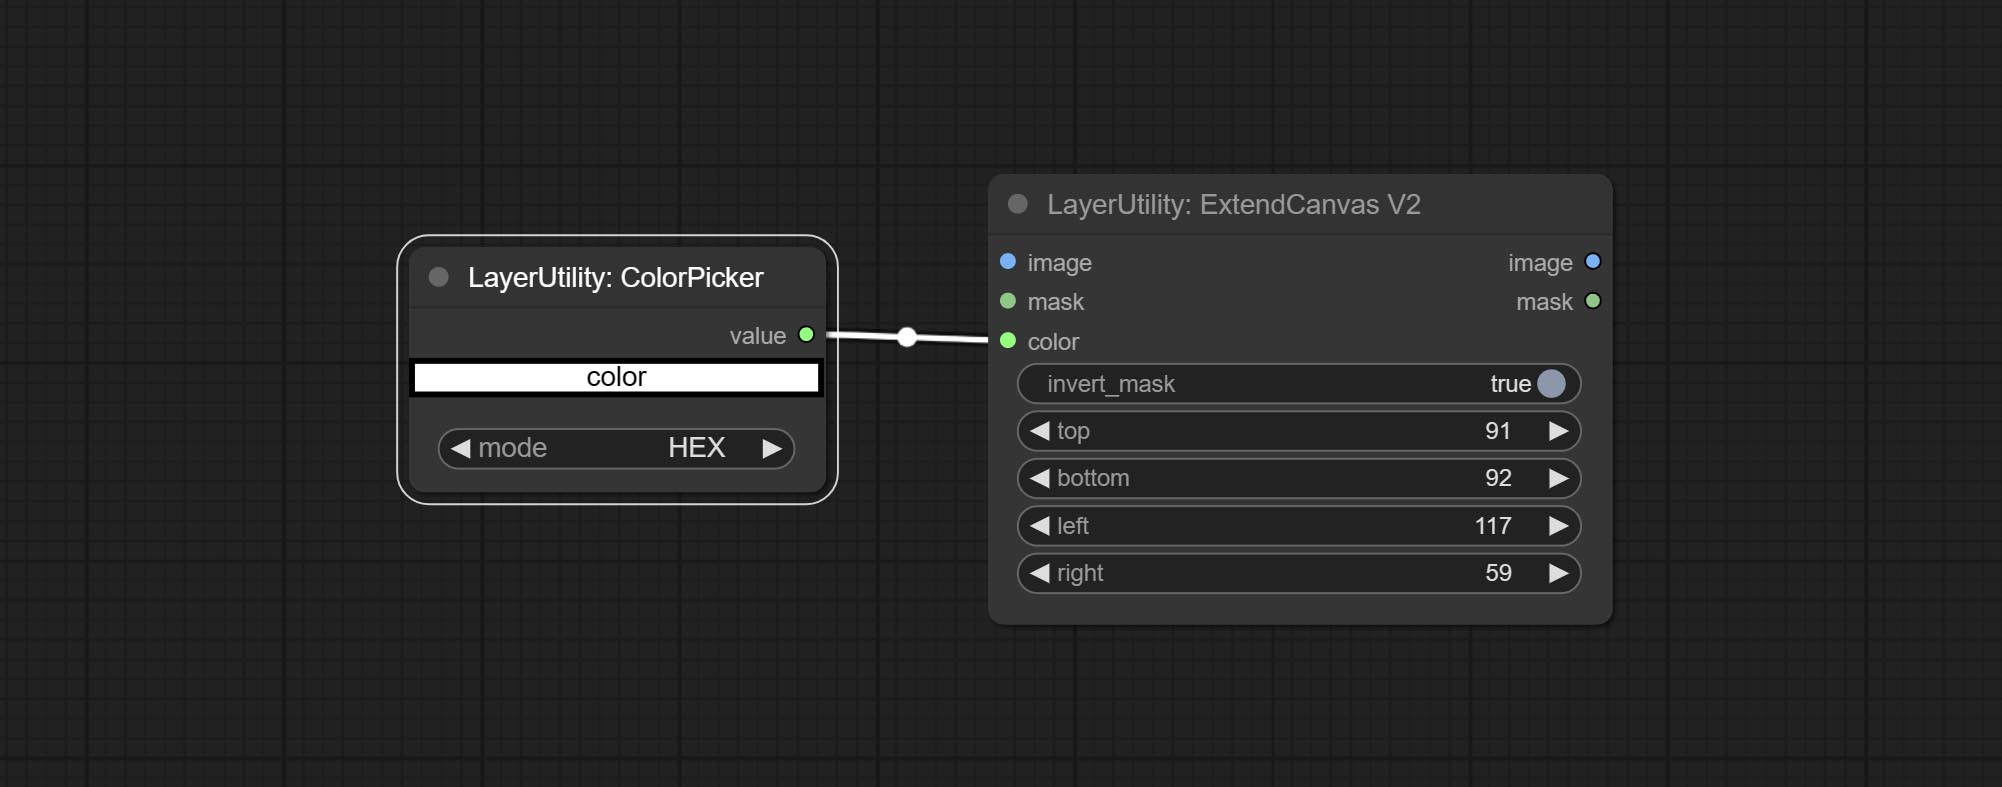
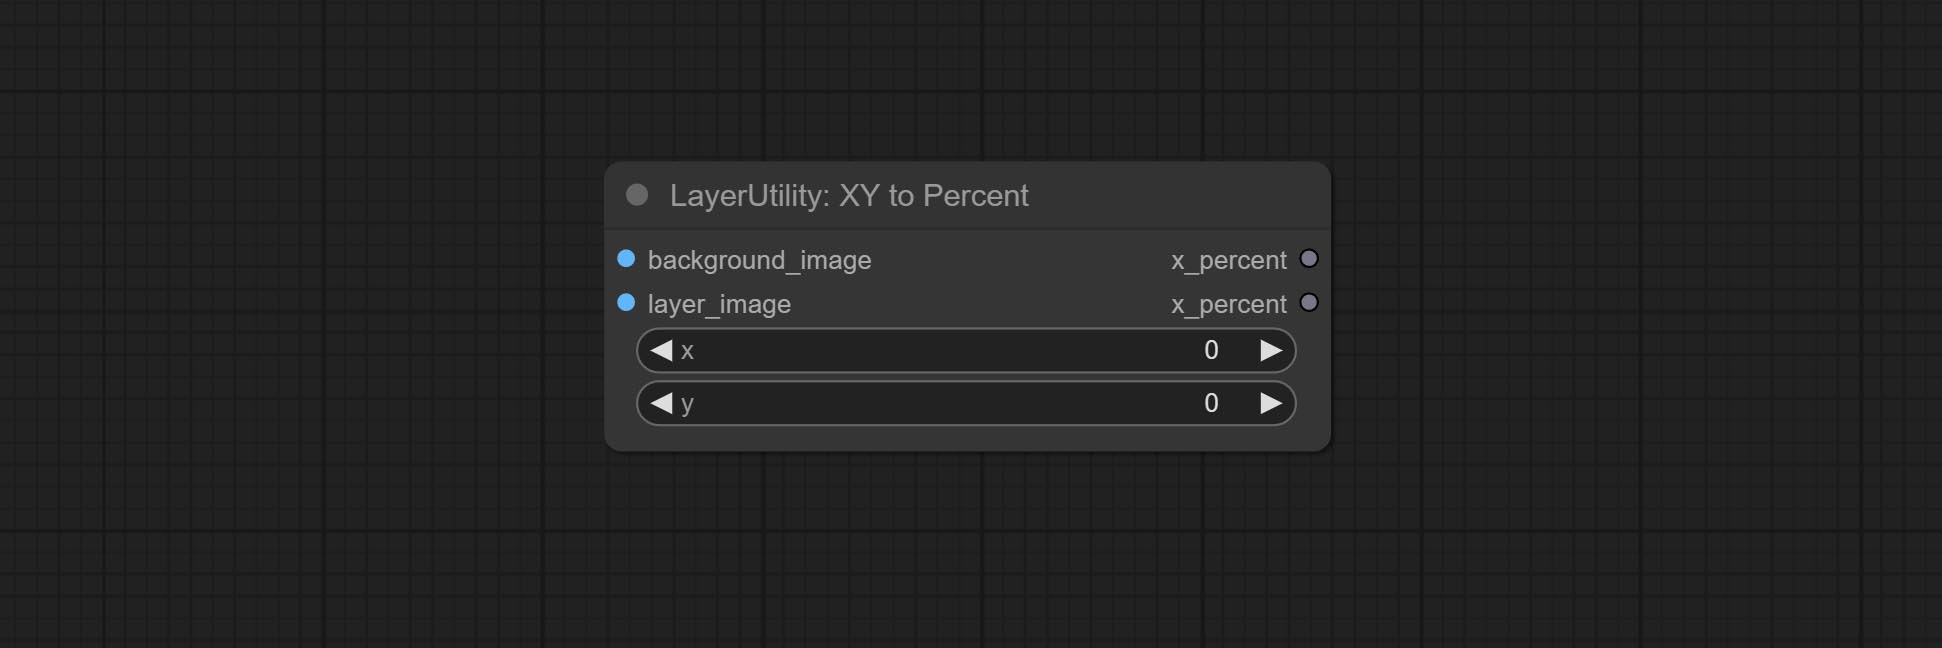
XY to Percent
Convert absolute coordinates to percentage coordinates.
Node options:
- x: Value of X.
- y: Value of Y.
LayerImageTransform
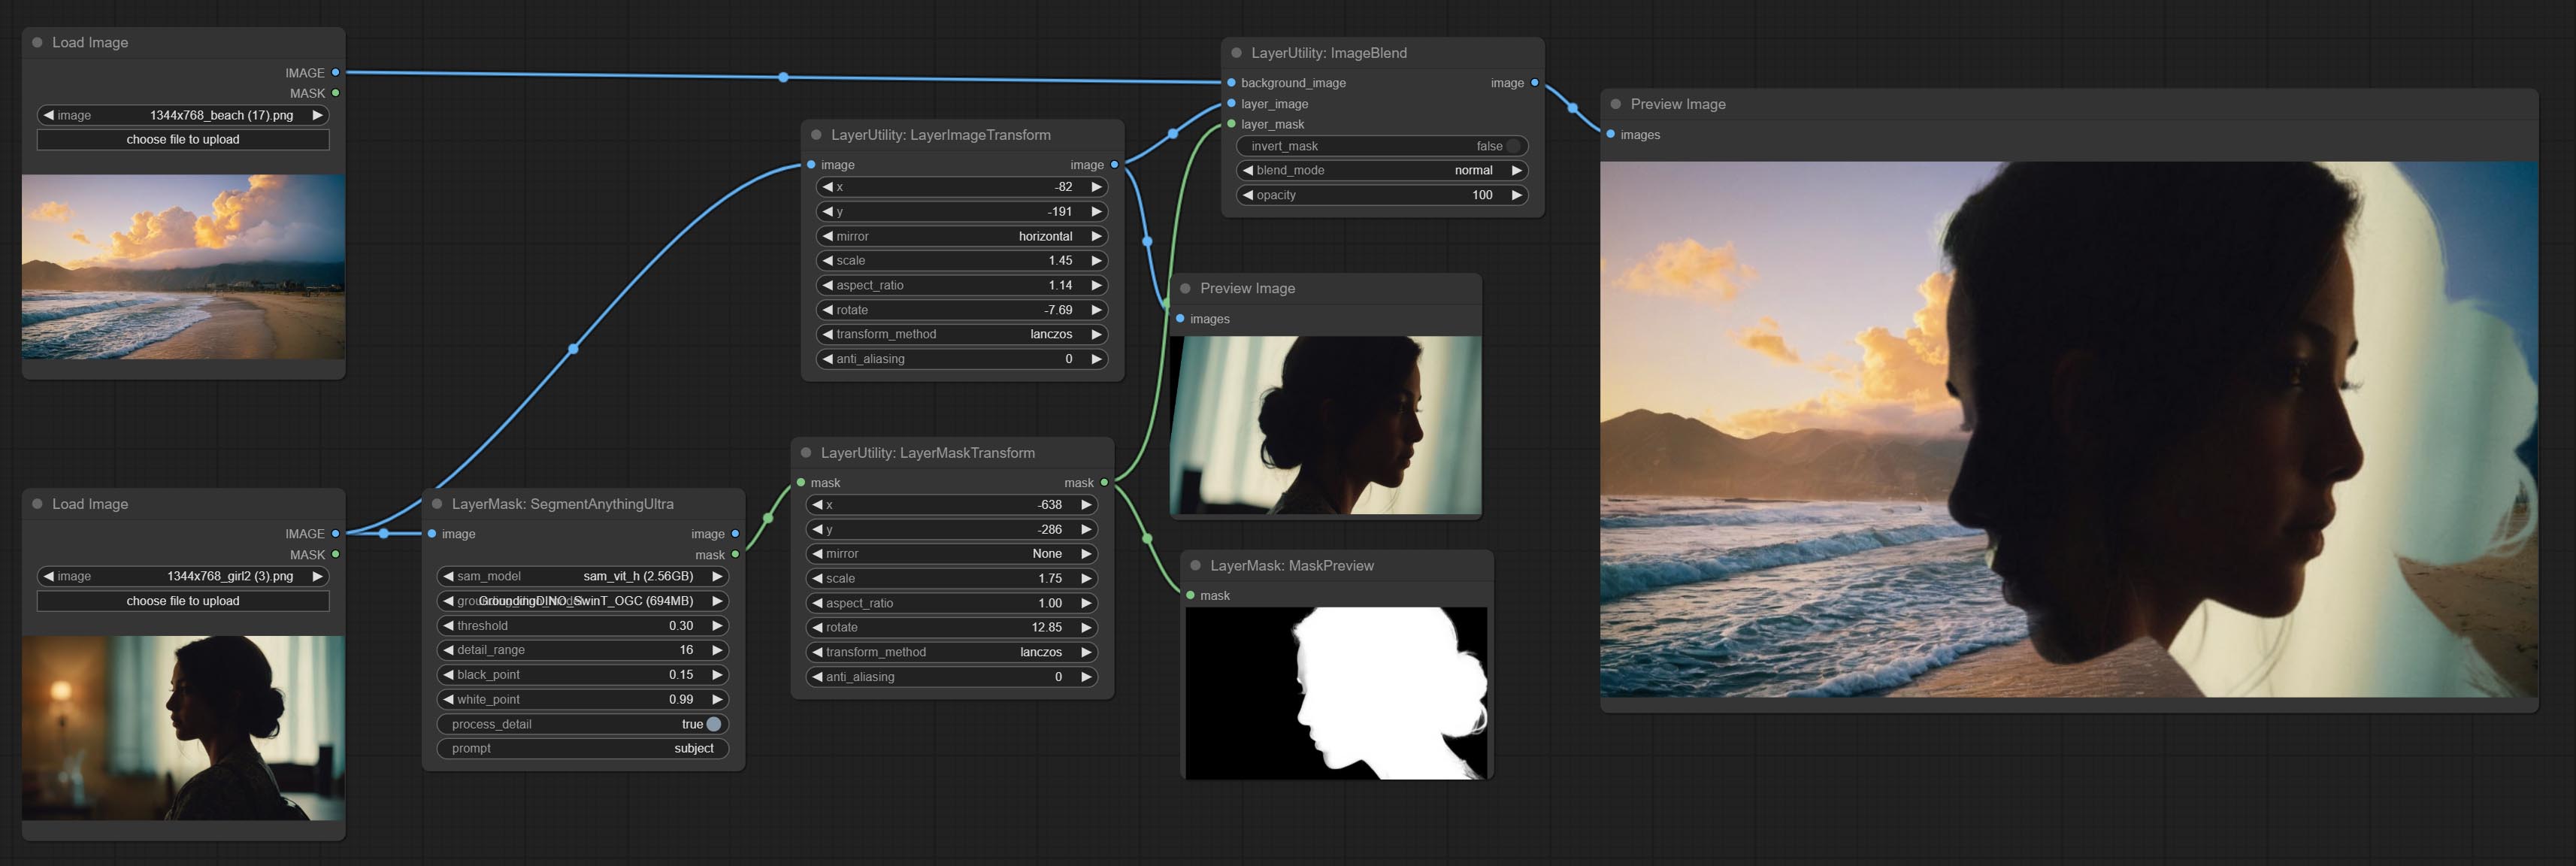
This node is used to transform layer_image separately, which can change size, rotation, aspect ratio, and mirror flip without changing the image size.
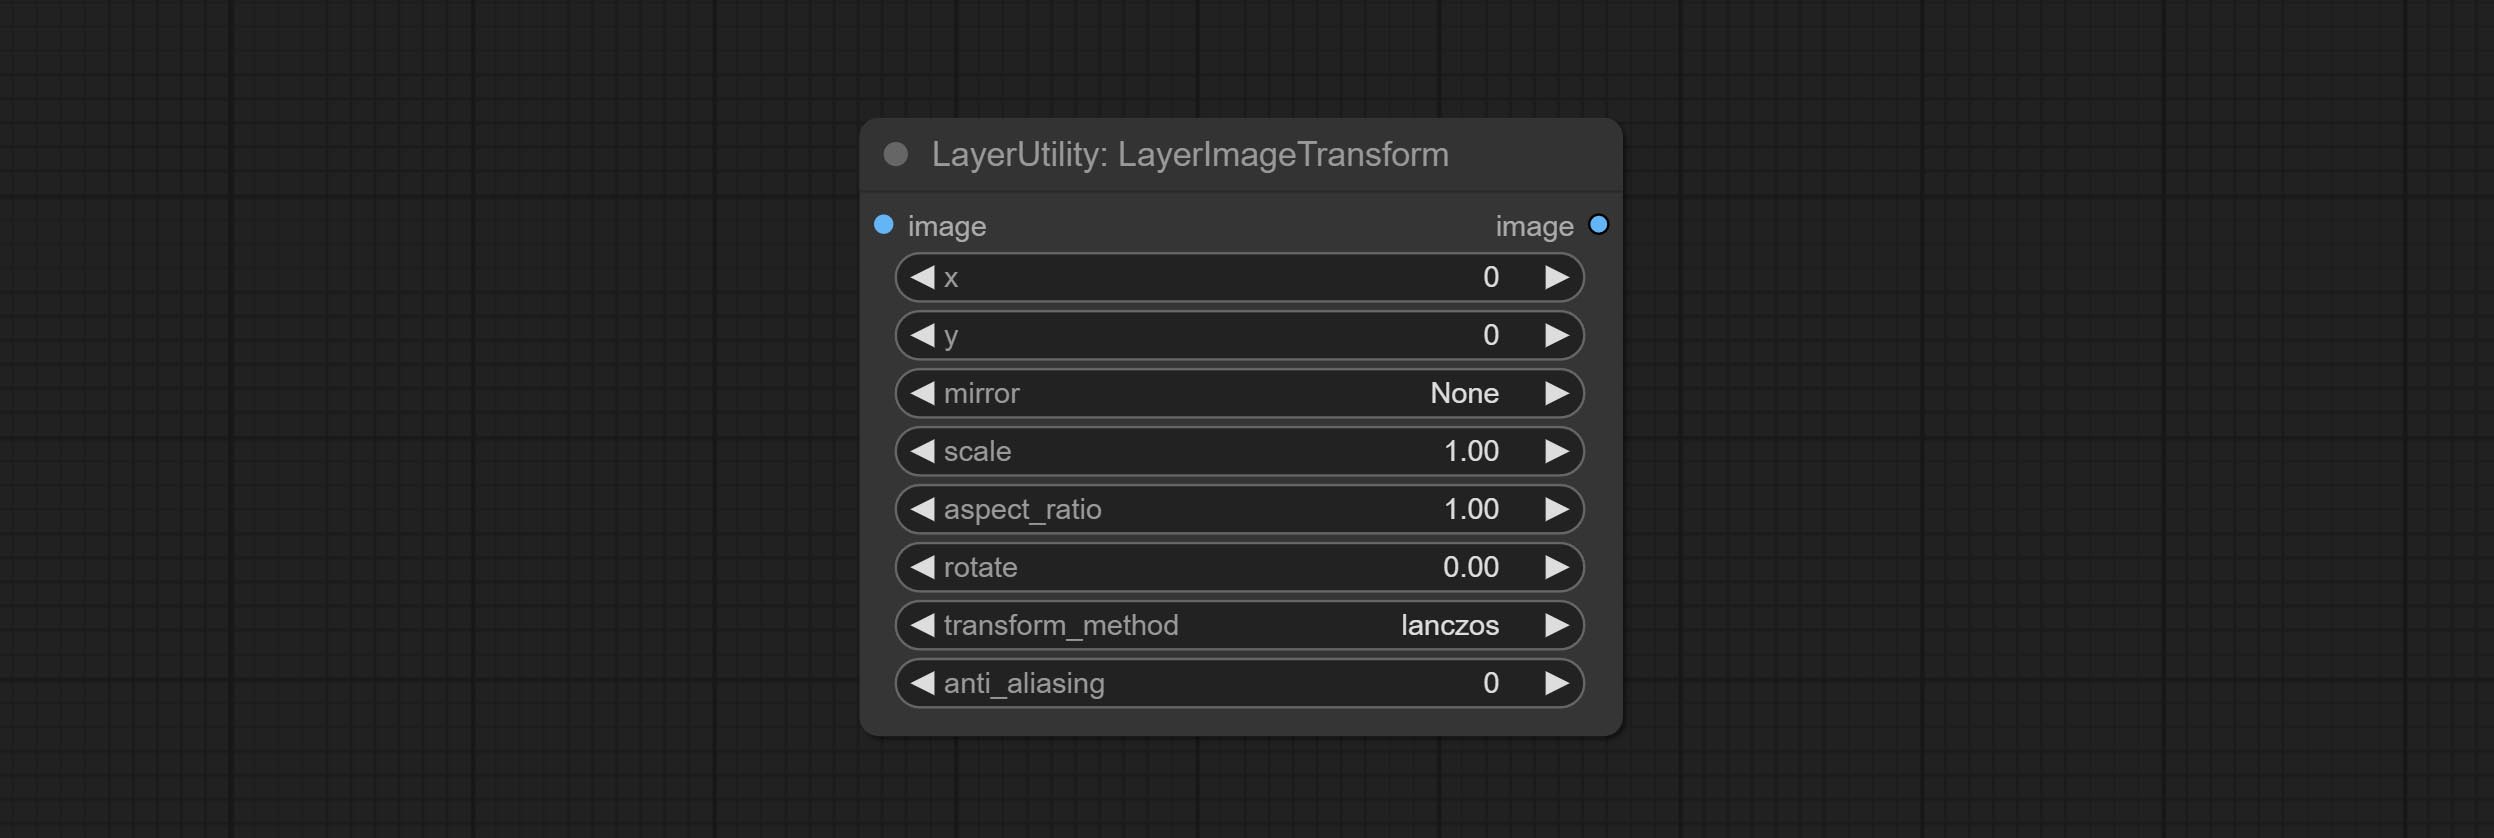
Node options:
- x: Value of X.
- y: Value of Y.
- mirror: Mirror flipping. Provide two flipping modes, horizontal flipping and vertical flipping.
- scale: Layer magnification, 1.0 represents the original size.
- aspect_ratio: Layer aspect ratio. 1.0 is the original ratio, a value greater than this indicates elongation, and a value less than this indicates flattening.
- rotate: Layer rotation degree.
- Sampling methods for layer enlargement and rotation, including lanczos, bicubic, hamming, bilinear, box and nearest. Different sampling methods can affect the image quality and processing time of the synthesized image.
- anti_aliasing: Anti aliasing, ranging from 0 to 16, the larger the value, the less obvious the aliasing. An excessively high value will significantly reduce the processing speed of the node.
LayerMaskTransform
Similar to LayerImageTransform node, this node is used to transform the layer_mask separately, which can scale, rotate, change aspect ratio, and mirror flip without changing the mask size.
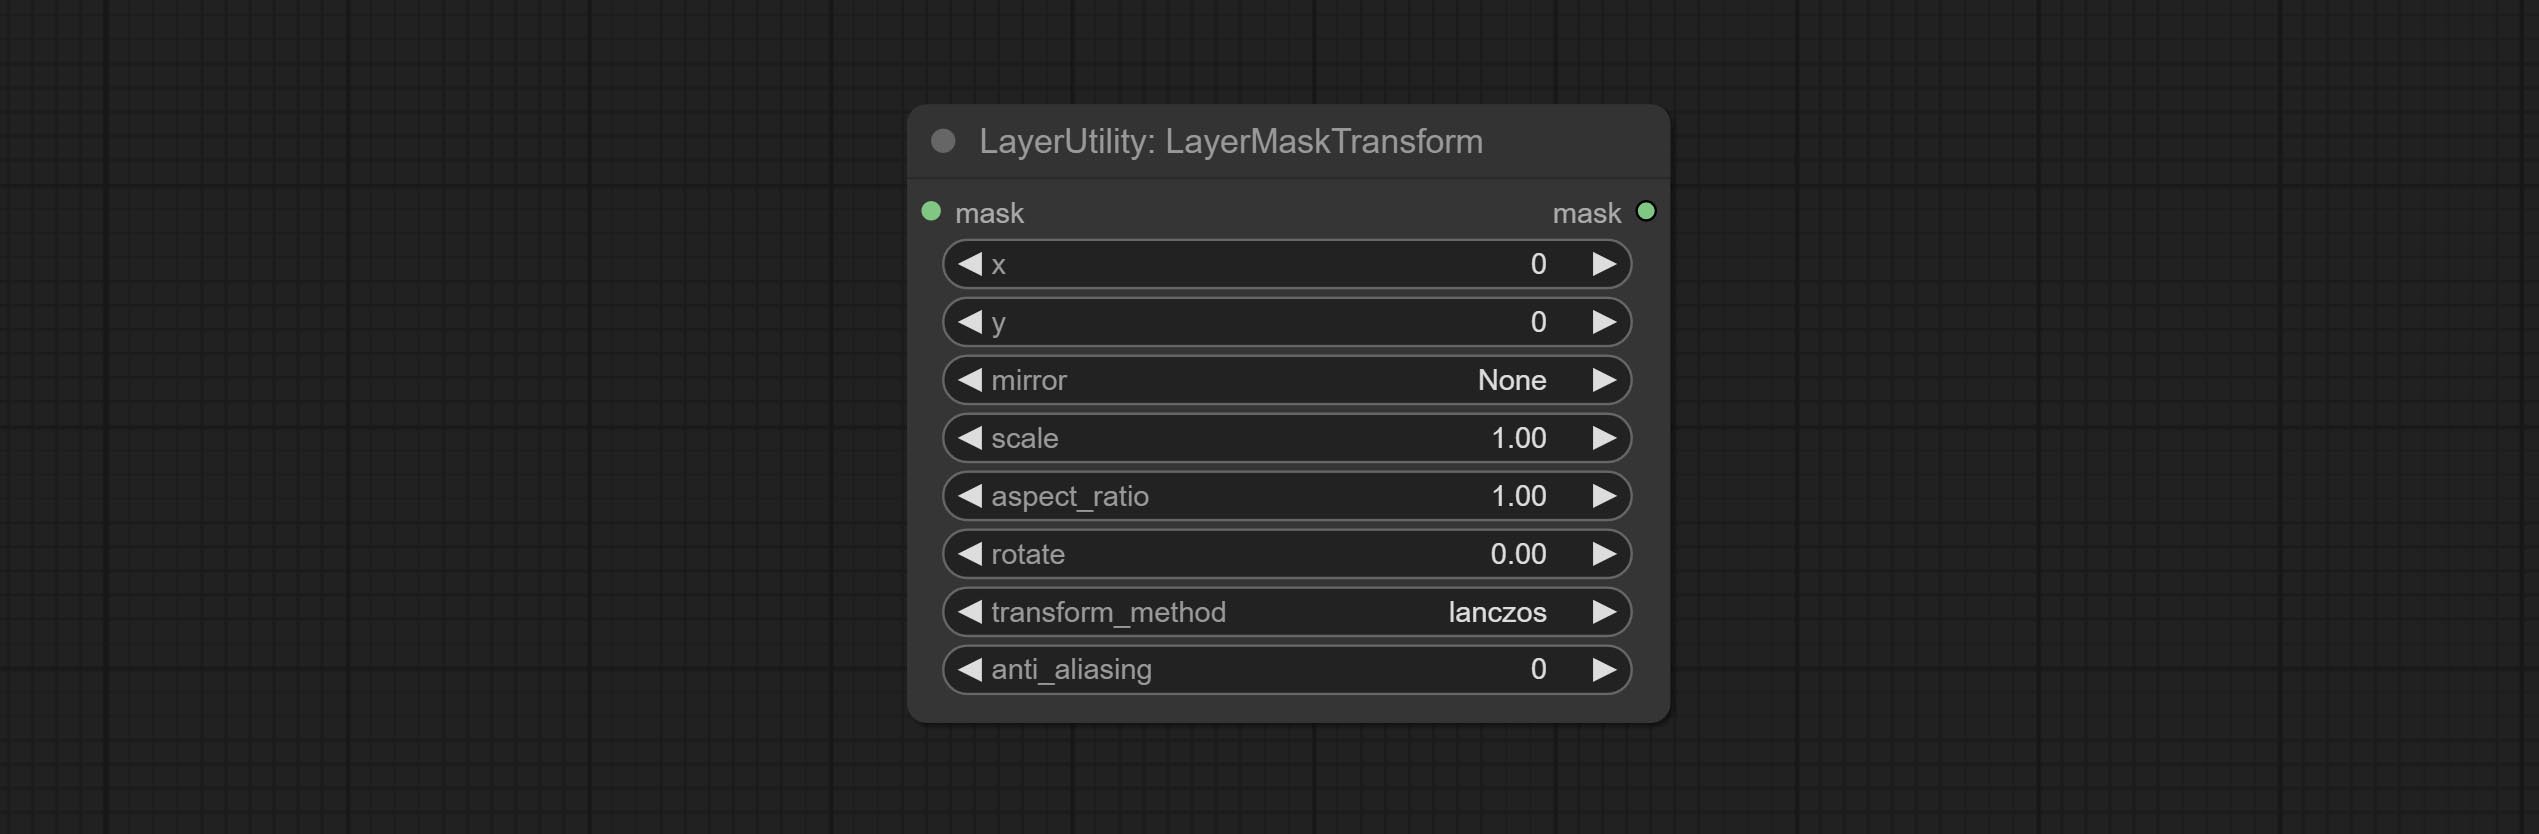
Node options:
- x: Value of X.
- y: Value of Y.
- mirror: Mirror flipping. Provide two flipping modes, horizontal flipping and vertical flipping.
- scale: Layer magnification, 1.0 represents the original size.
- aspect_ratio: Layer aspect ratio. 1.0 is the original ratio, a value greater than this indicates elongation, and a value less than this indicates flattening.
- rotate: Layer rotation degree.
- Sampling methods for layer enlargement and rotation, including lanczos, bicubic, hamming, bilinear, box and nearest. Different sampling methods can affect the image quality and processing time of the synthesized image.
- anti_aliasing: Anti aliasing, ranging from 0 to 16, the larger the value, the less obvious the aliasing. An excessively high value will significantly reduce the processing speed of the node.
ColorImage
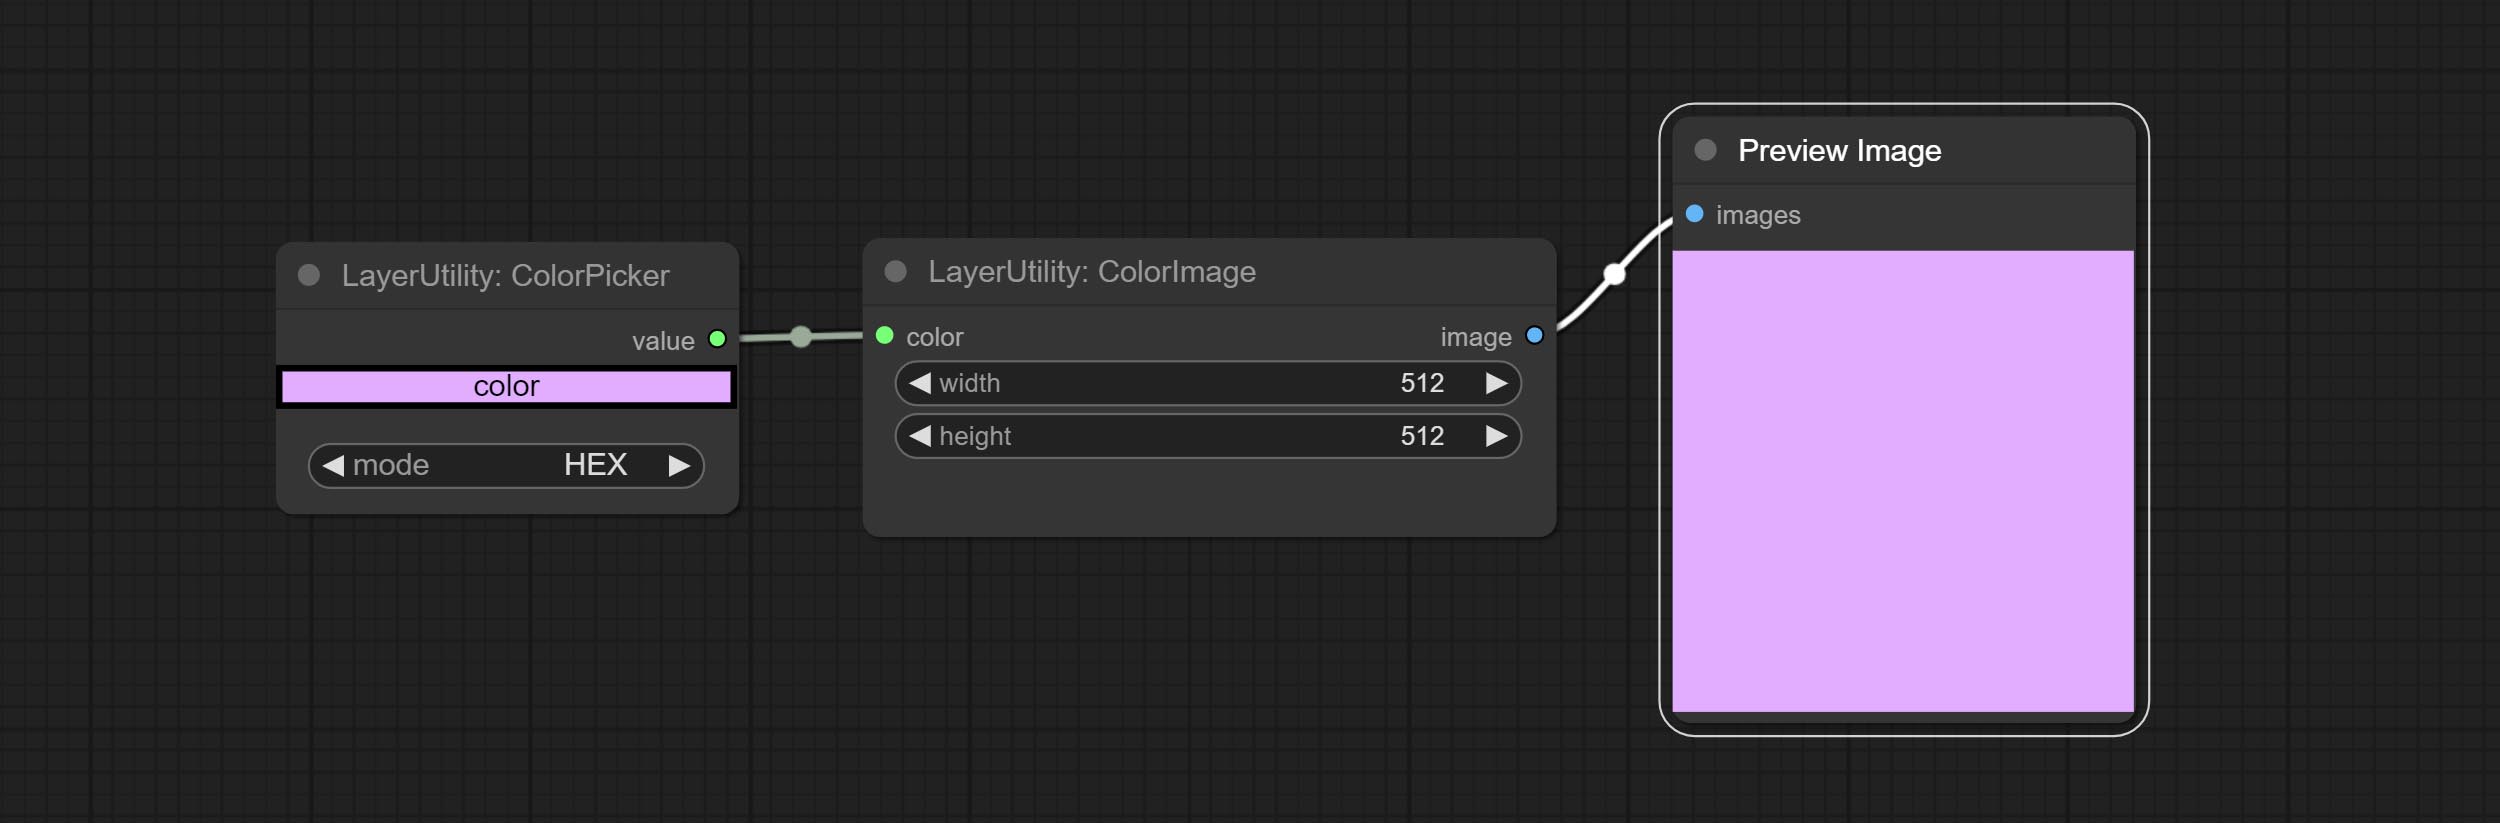
Generate an image of a specified color and size.

Node options:
- width: Width of the image.
- height: Height of the image.
- color 4 : Color of the image.
ColorImageV2
The V2 upgraded version of ColorImage.
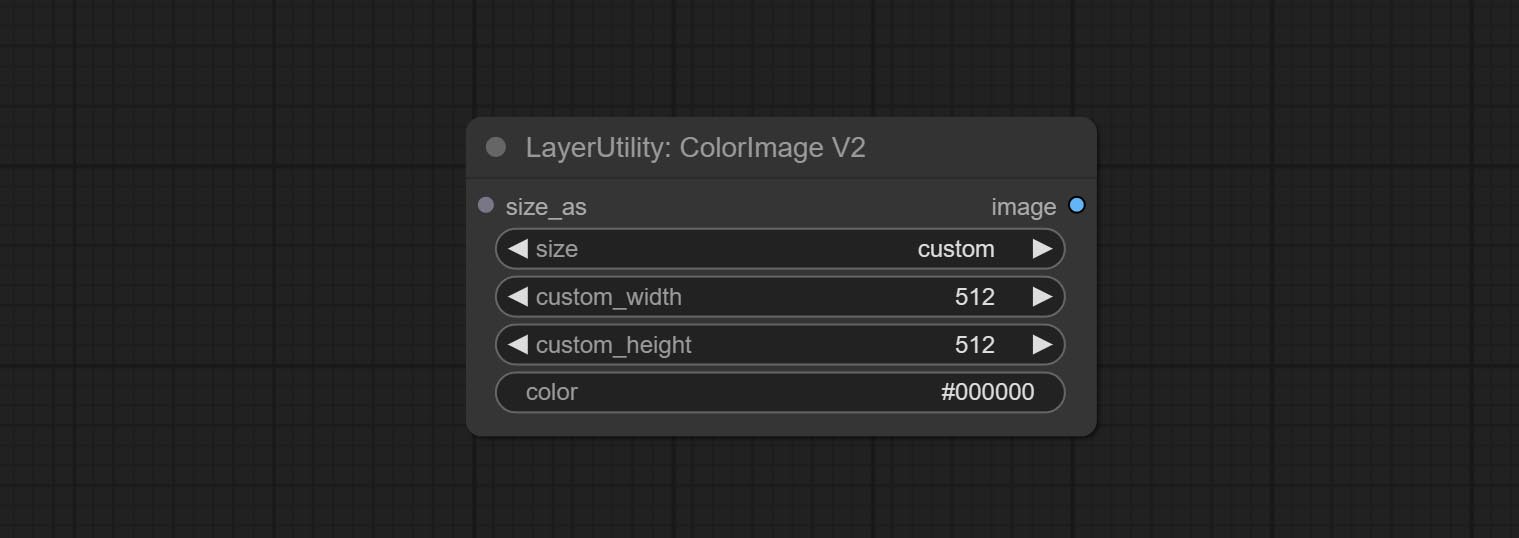
The following changes have been made based on ColorImage:
- size_as * : Input image or mask here to generate image according to its size. Note that this input takes priority over other size settings.
- size ** : Size preset. the preset can be customized by the user. if have size_as input, this option will be ignored.
- custom_width: Image width. it valid when size is set to "custom". if have size_as input, this option will be ignored.
- custom_height: Image height. it valid when size is set to "custom". if have size_as input, this option will be ignored.
* Only limited to input images and masks. forcing the integration of other types of inputs will result in node errors. ** The preset size is defined in custom_size.ini , this file is located in the root directory of the plug-in, and the default name is custom_size.ini.example . to use this file for the first time, you need to change the file suffix to .ini . Open with text editing software. Each row represents a size, with the first value being width and the second being height, separated by a lowercase "x" in the middle. To avoid errors, please do not enter extra characters.
GradientImage
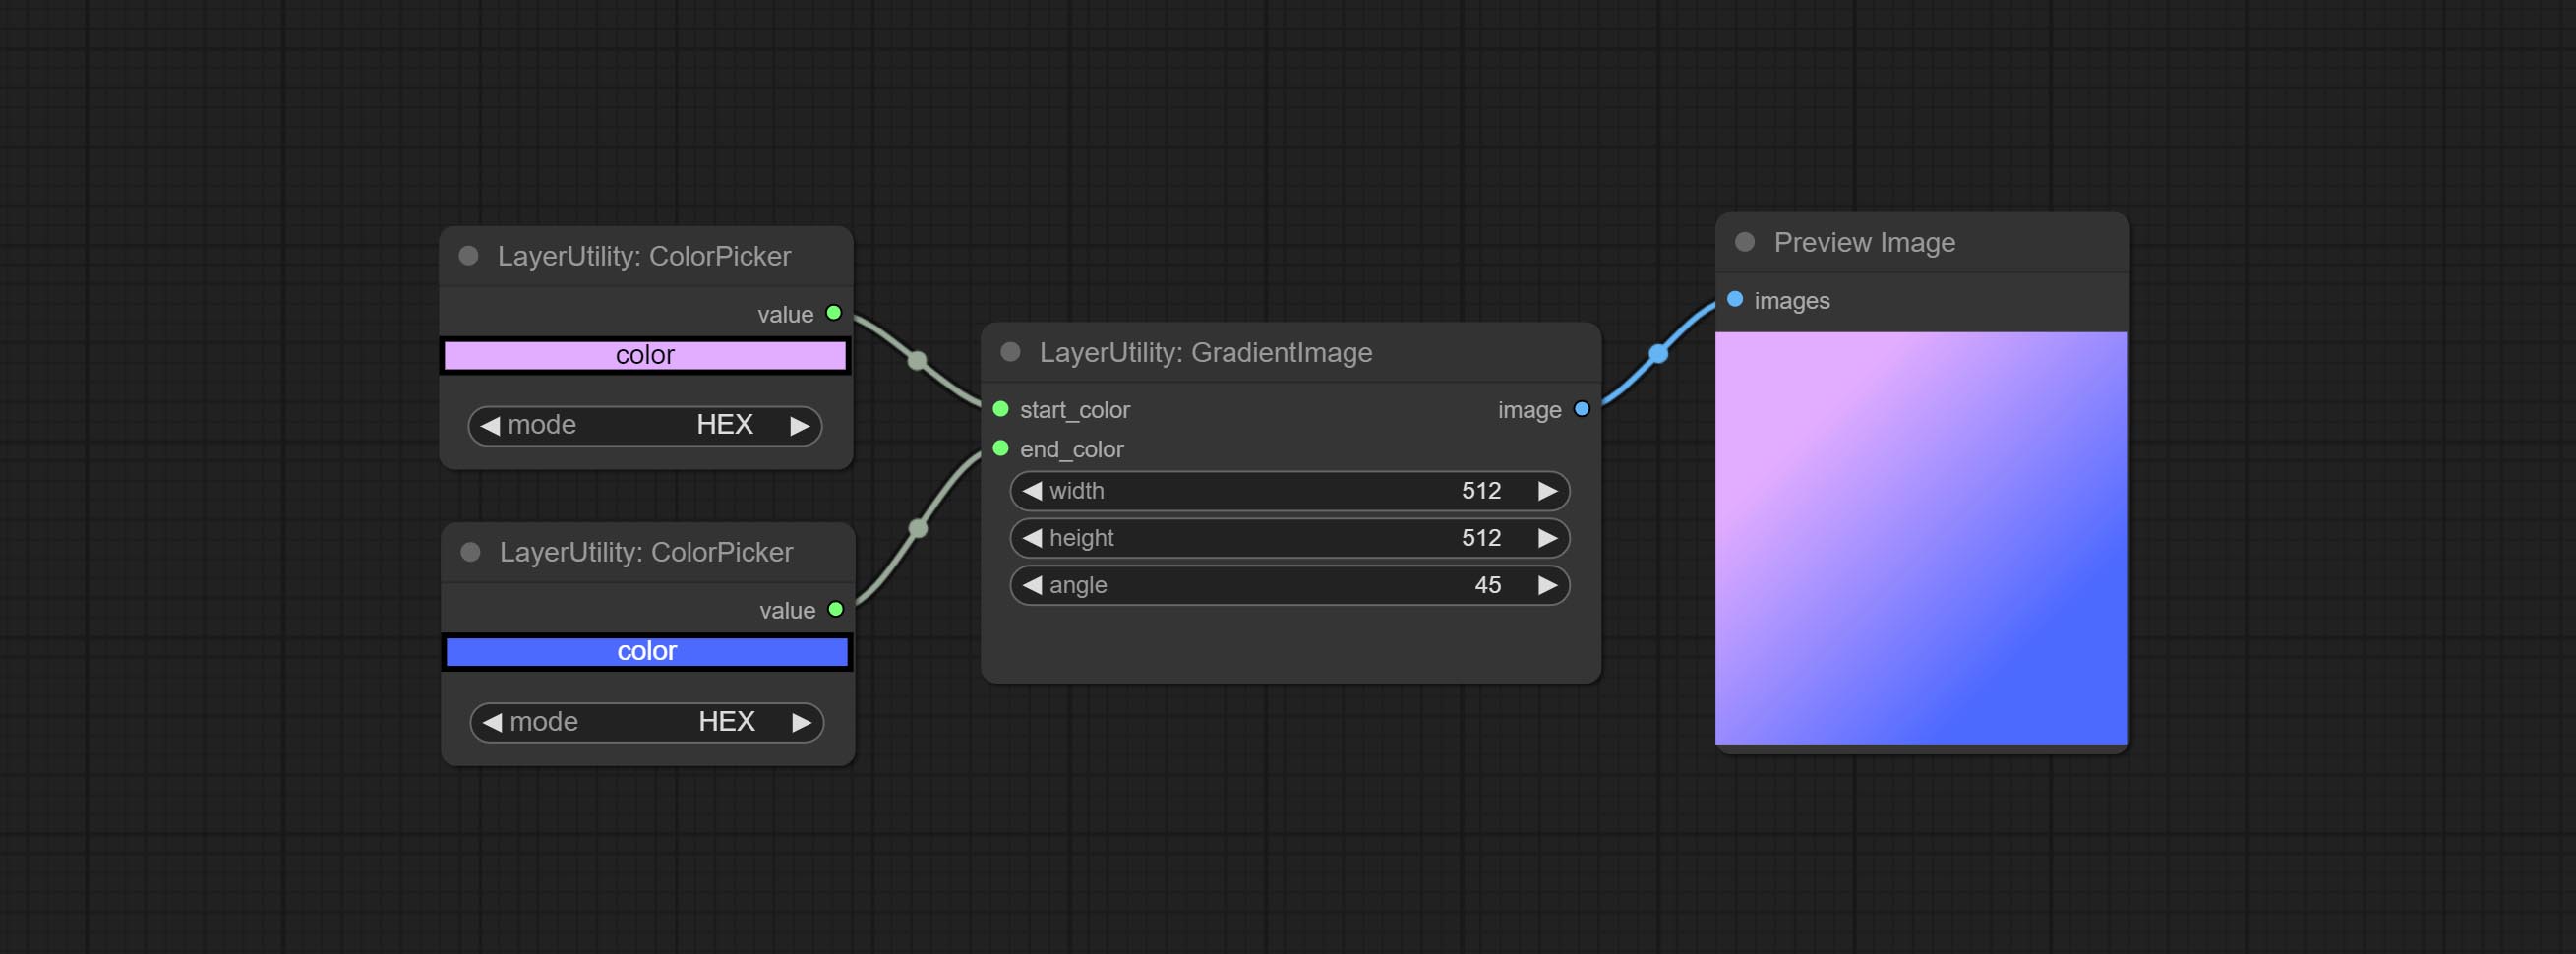
Generate an image with a specified size and color gradient.
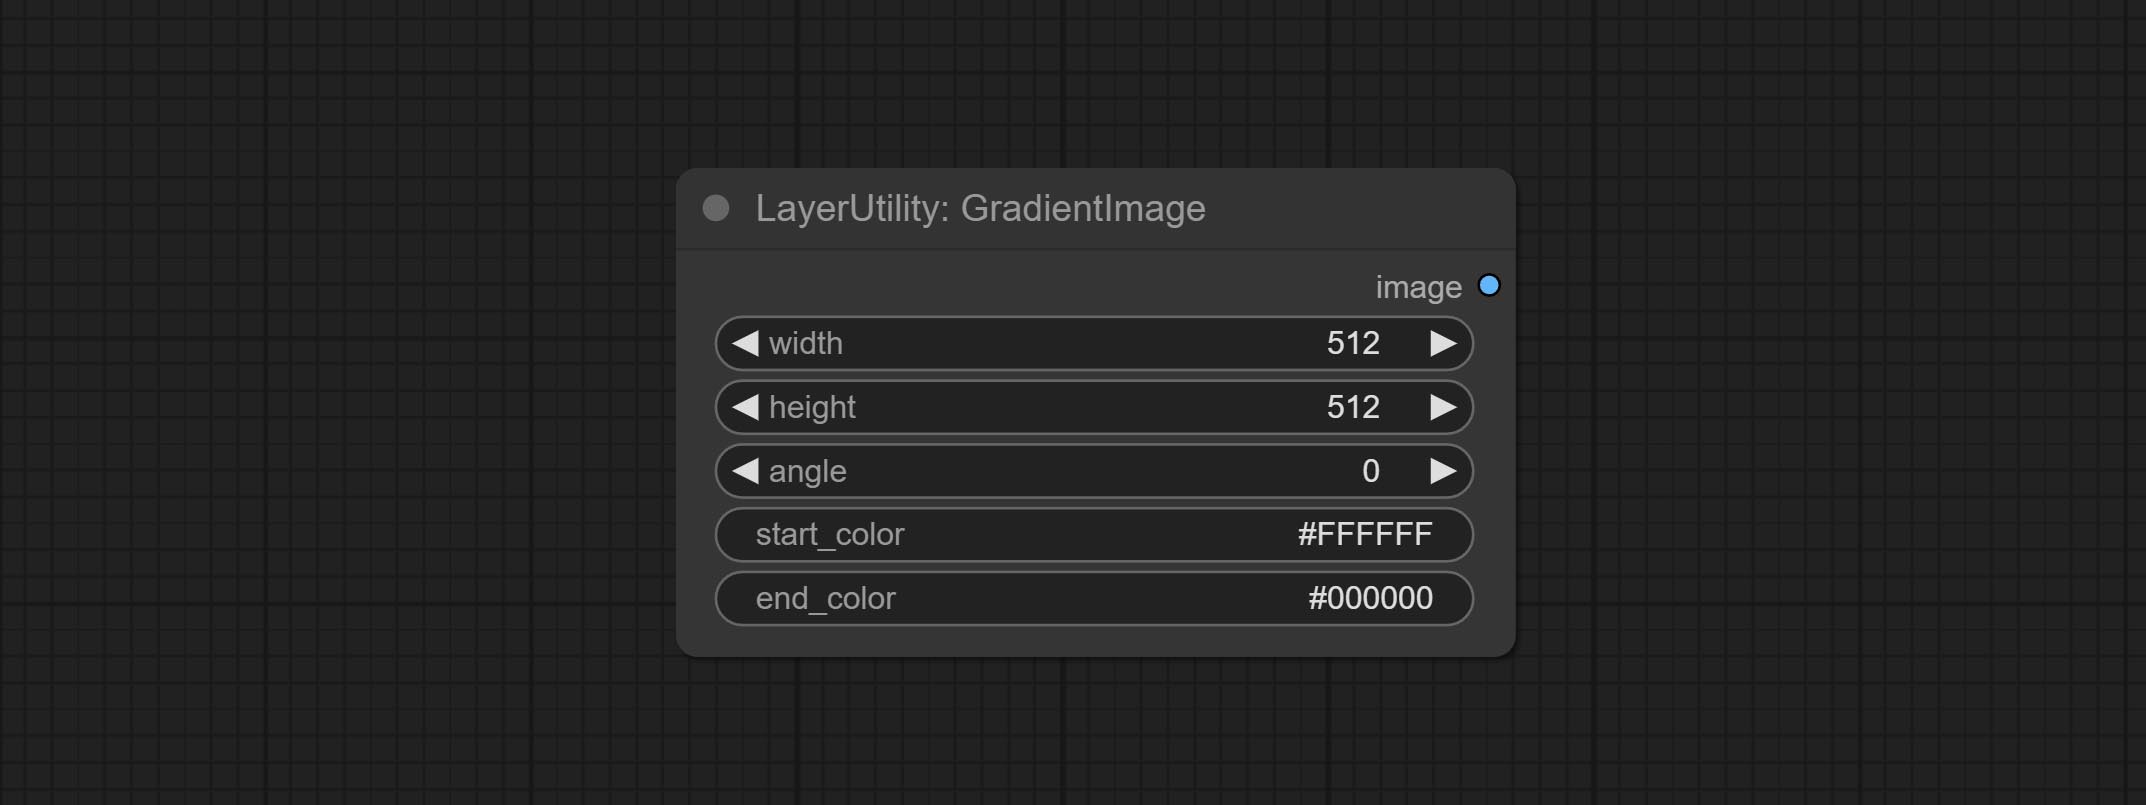
Node options:
- width: Width of the image.
- height: Height of the image.
- angle: Angle of gradient.
- start_color 4 : Color of the begging.
- end_color 4 : Color of the ending.
GradientImageV2
The V2 upgraded version of GradientImage.
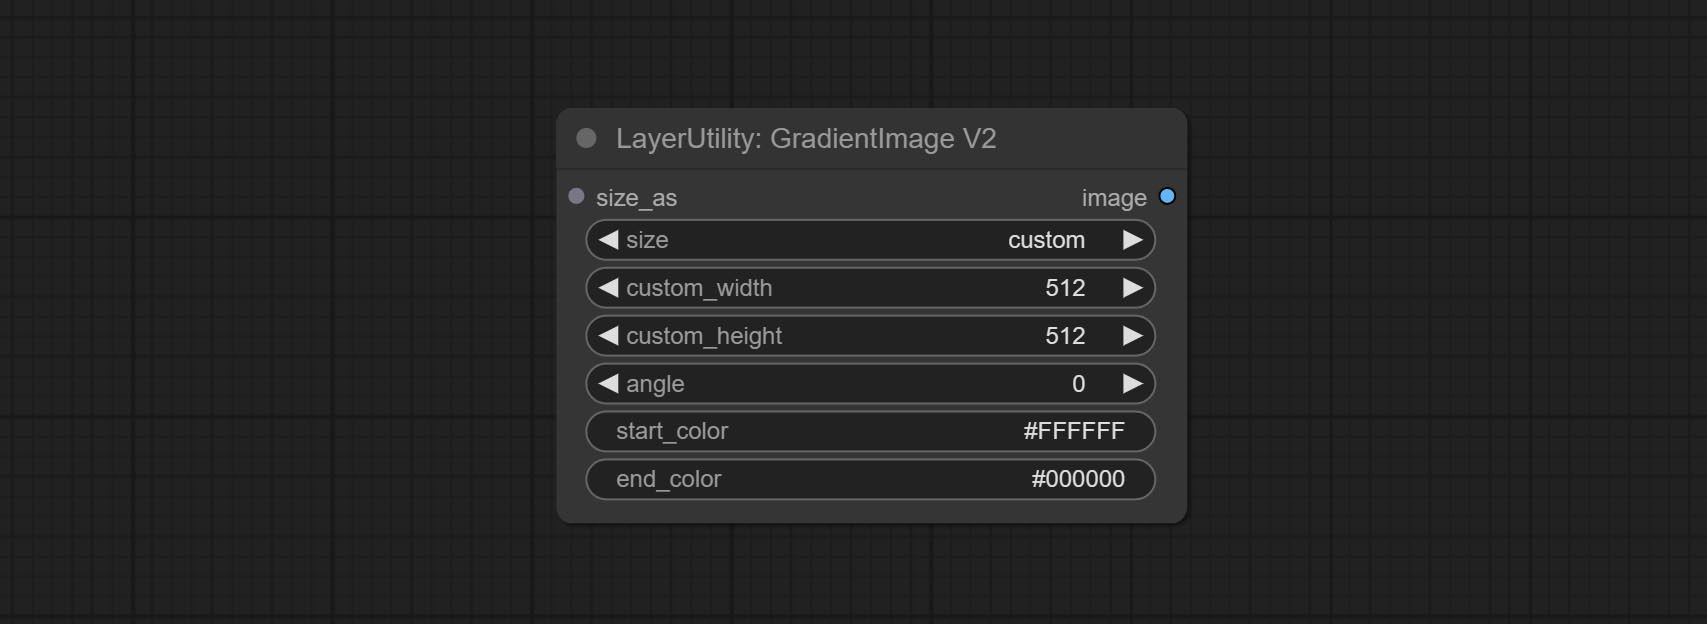
The following changes have been made based on GradientImage:
- size_as * : Input image or mask here to generate image according to its size. Note that this input takes priority over other size settings.
- size ** : Size preset. the preset can be customized by the user. if have size_as input, this option will be ignored.
- custom_width: Image width. it valid when size is set to "custom". if have size_as input, this option will be ignored.
- custom_height: Image height. it valid when size is set to "custom". if have size_as input, this option will be ignored.
* Only limited to input images and masks. forcing the integration of other types of inputs will result in node errors. ** The preset size is defined in custom_size.ini , this file is located in the root directory of the plug-in, and the default name is custom_size.ini.example . to use this file for the first time, you need to change the file suffix to .ini . Open with text editing software. Each row represents a size, with the first value being width and the second being height, separated by a lowercase "x" in the middle. To avoid errors, please do not enter extra characters.
ImageRewardFilter
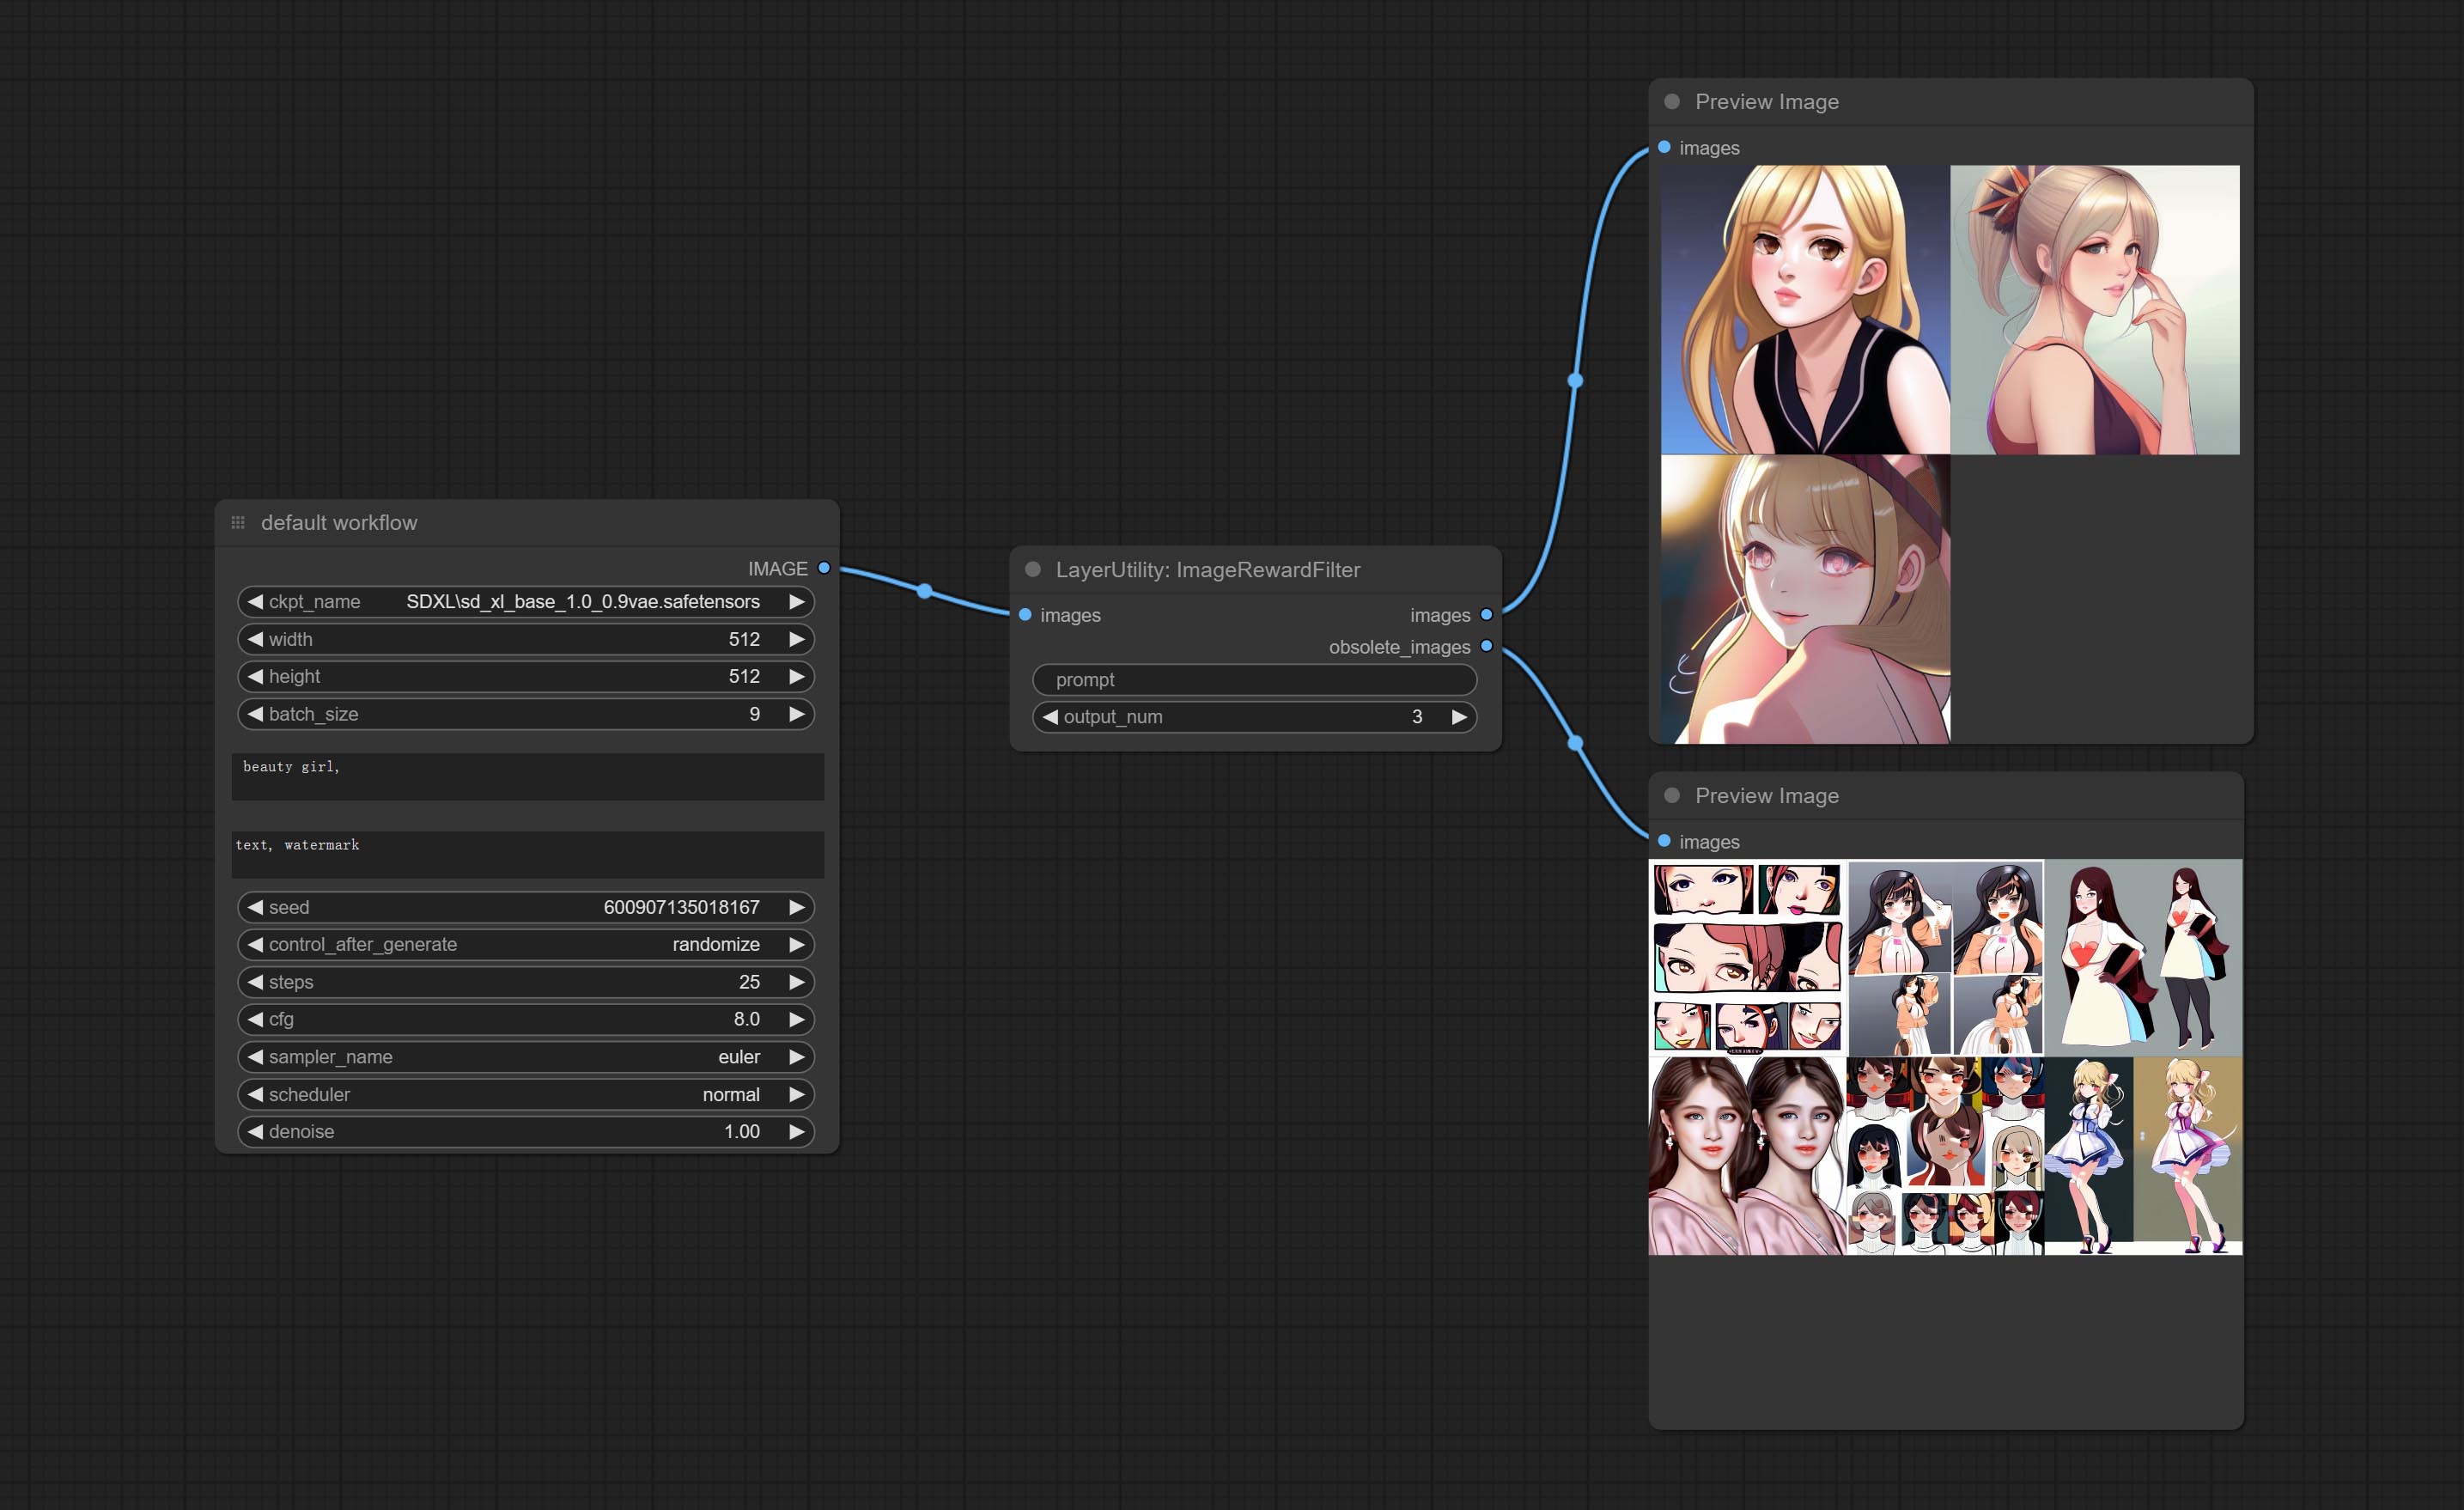
Rating bulk pictures and outputting top-ranked pictures. it used [ImageReward] (https://github.com/THUDM/ImageReward) for image scoring, thanks to the original authors.
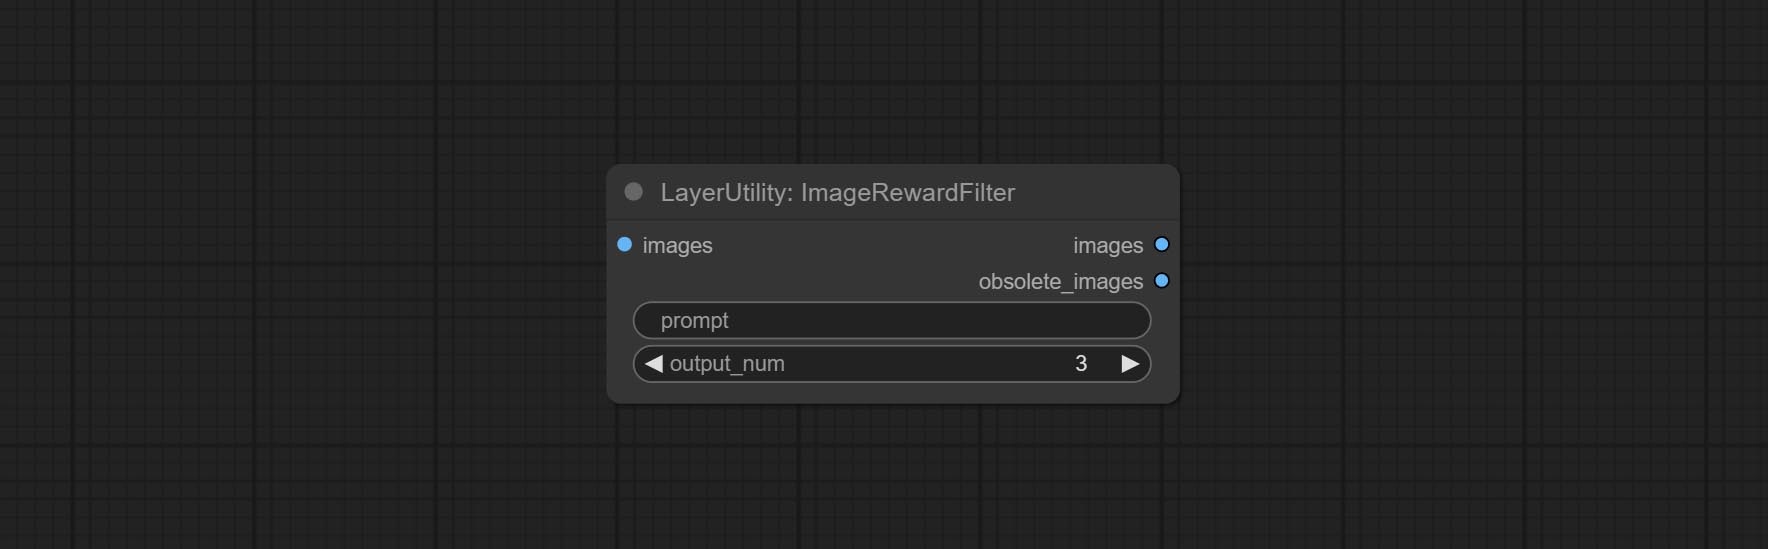
Node options:
- prompt: Optional input. Entering prompt here will be used as a basis to determine how well it matches the picture.
- output_nun: Number of pictures outputted. This value should be less than the picture batch.
Outputs:
- images: Bulk pictures output from high to low in order of rating.
- obsolete_images: Knockout pictures. Also output in order of rating from high to low.
SimpleTextImage
Generate simple typesetting images and masks from text. This node references some of the functionalities and code of ZHO-ZHO-ZHO/ComfyUI-Text_Image-Composite, thanks to the original author.
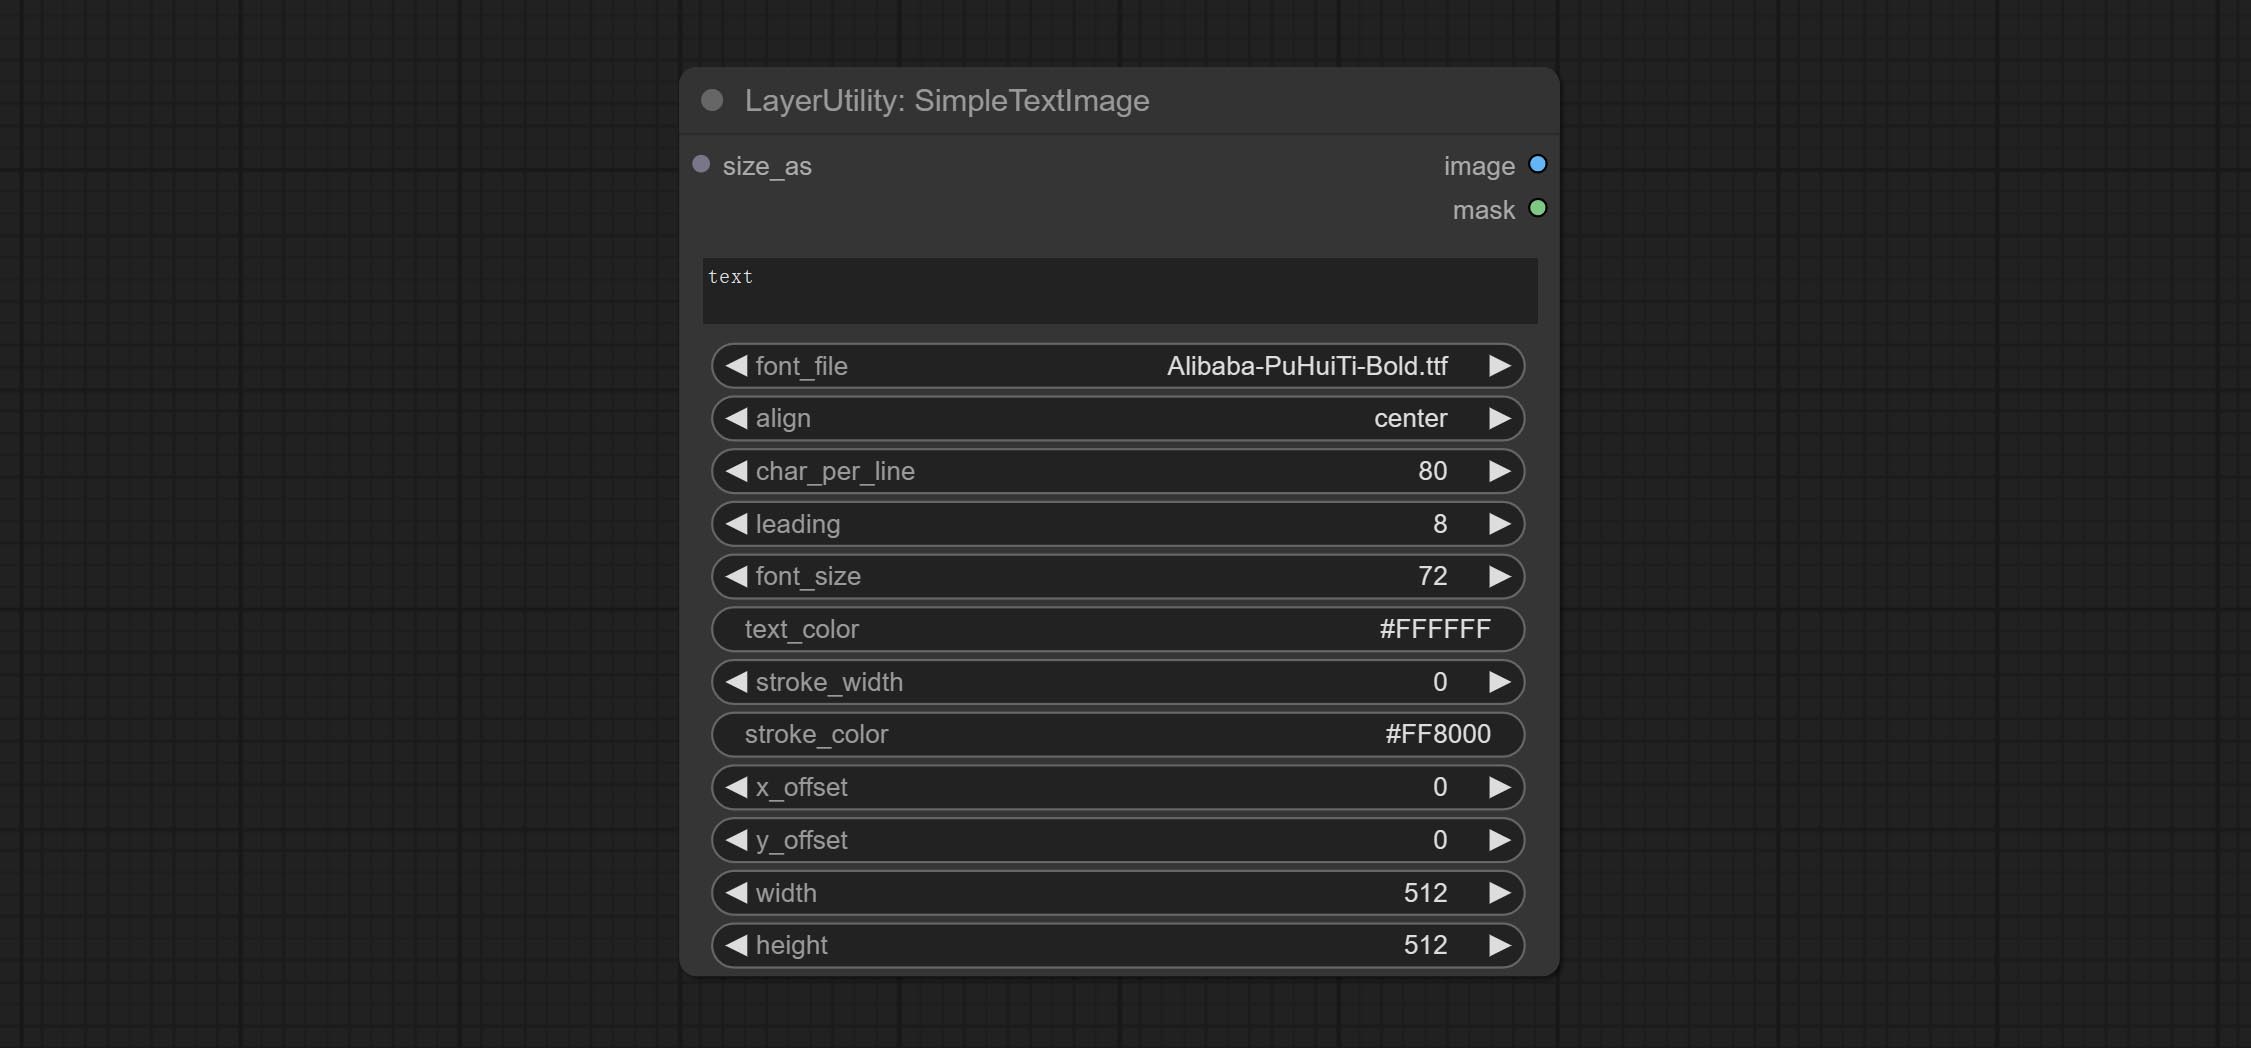
Node options:
- size_as * : The input image or mask here will generate the output image and mask according to their size. this input takes priority over the width and height below.
- font_file ** : Here is a list of available font files in the font folder, and the selected font files will be used to generate images.
- align: Alignment options. There are three options: center, left, and right.
- char_per_line: The number of characters per line, any excess will be automatically wrapped.
- leading: The leading space.
- font_size: The size of font.
- text_color: The color of text.
- stroke_width: The width of stroke.
- stroke_color: The color of stroke.
- x_offset: The horizontal offset of the text position.
- y_offset: The vertical offset of the text position.
- width: Width of the image. If there is a size_as input, this setting will be ignored.
- height: Height of the image. If there is a size_as input, this setting will be ignored.
* Only limited to input image and mask. forcing the integration of other types of inputs will result in node errors.
** The font folder is defined in resource_dir.ini , this file is located in the root directory of the plug-in, and the default name is resource_dir.ini.example . to use this file for the first time, you need to change the file suffix to .ini . Open the text editing software and find the line starting with "FONT_dir=", after "=", enter the custom folder path name. support defining multiple folders in resource-dir.ini , separated by commas, semicolons, or spaces. all font files in this folder will be collected and displayed in the node list during ComfyUI initialization. If the folder set in ini is invalid, the font folder that comes with the plugin will be enabled.
TextImage
Generate images and masks from text. support for adjusting the spacing between words and lines, horizontal and vertical adjustments, it can set random changes in each character, including size and position.
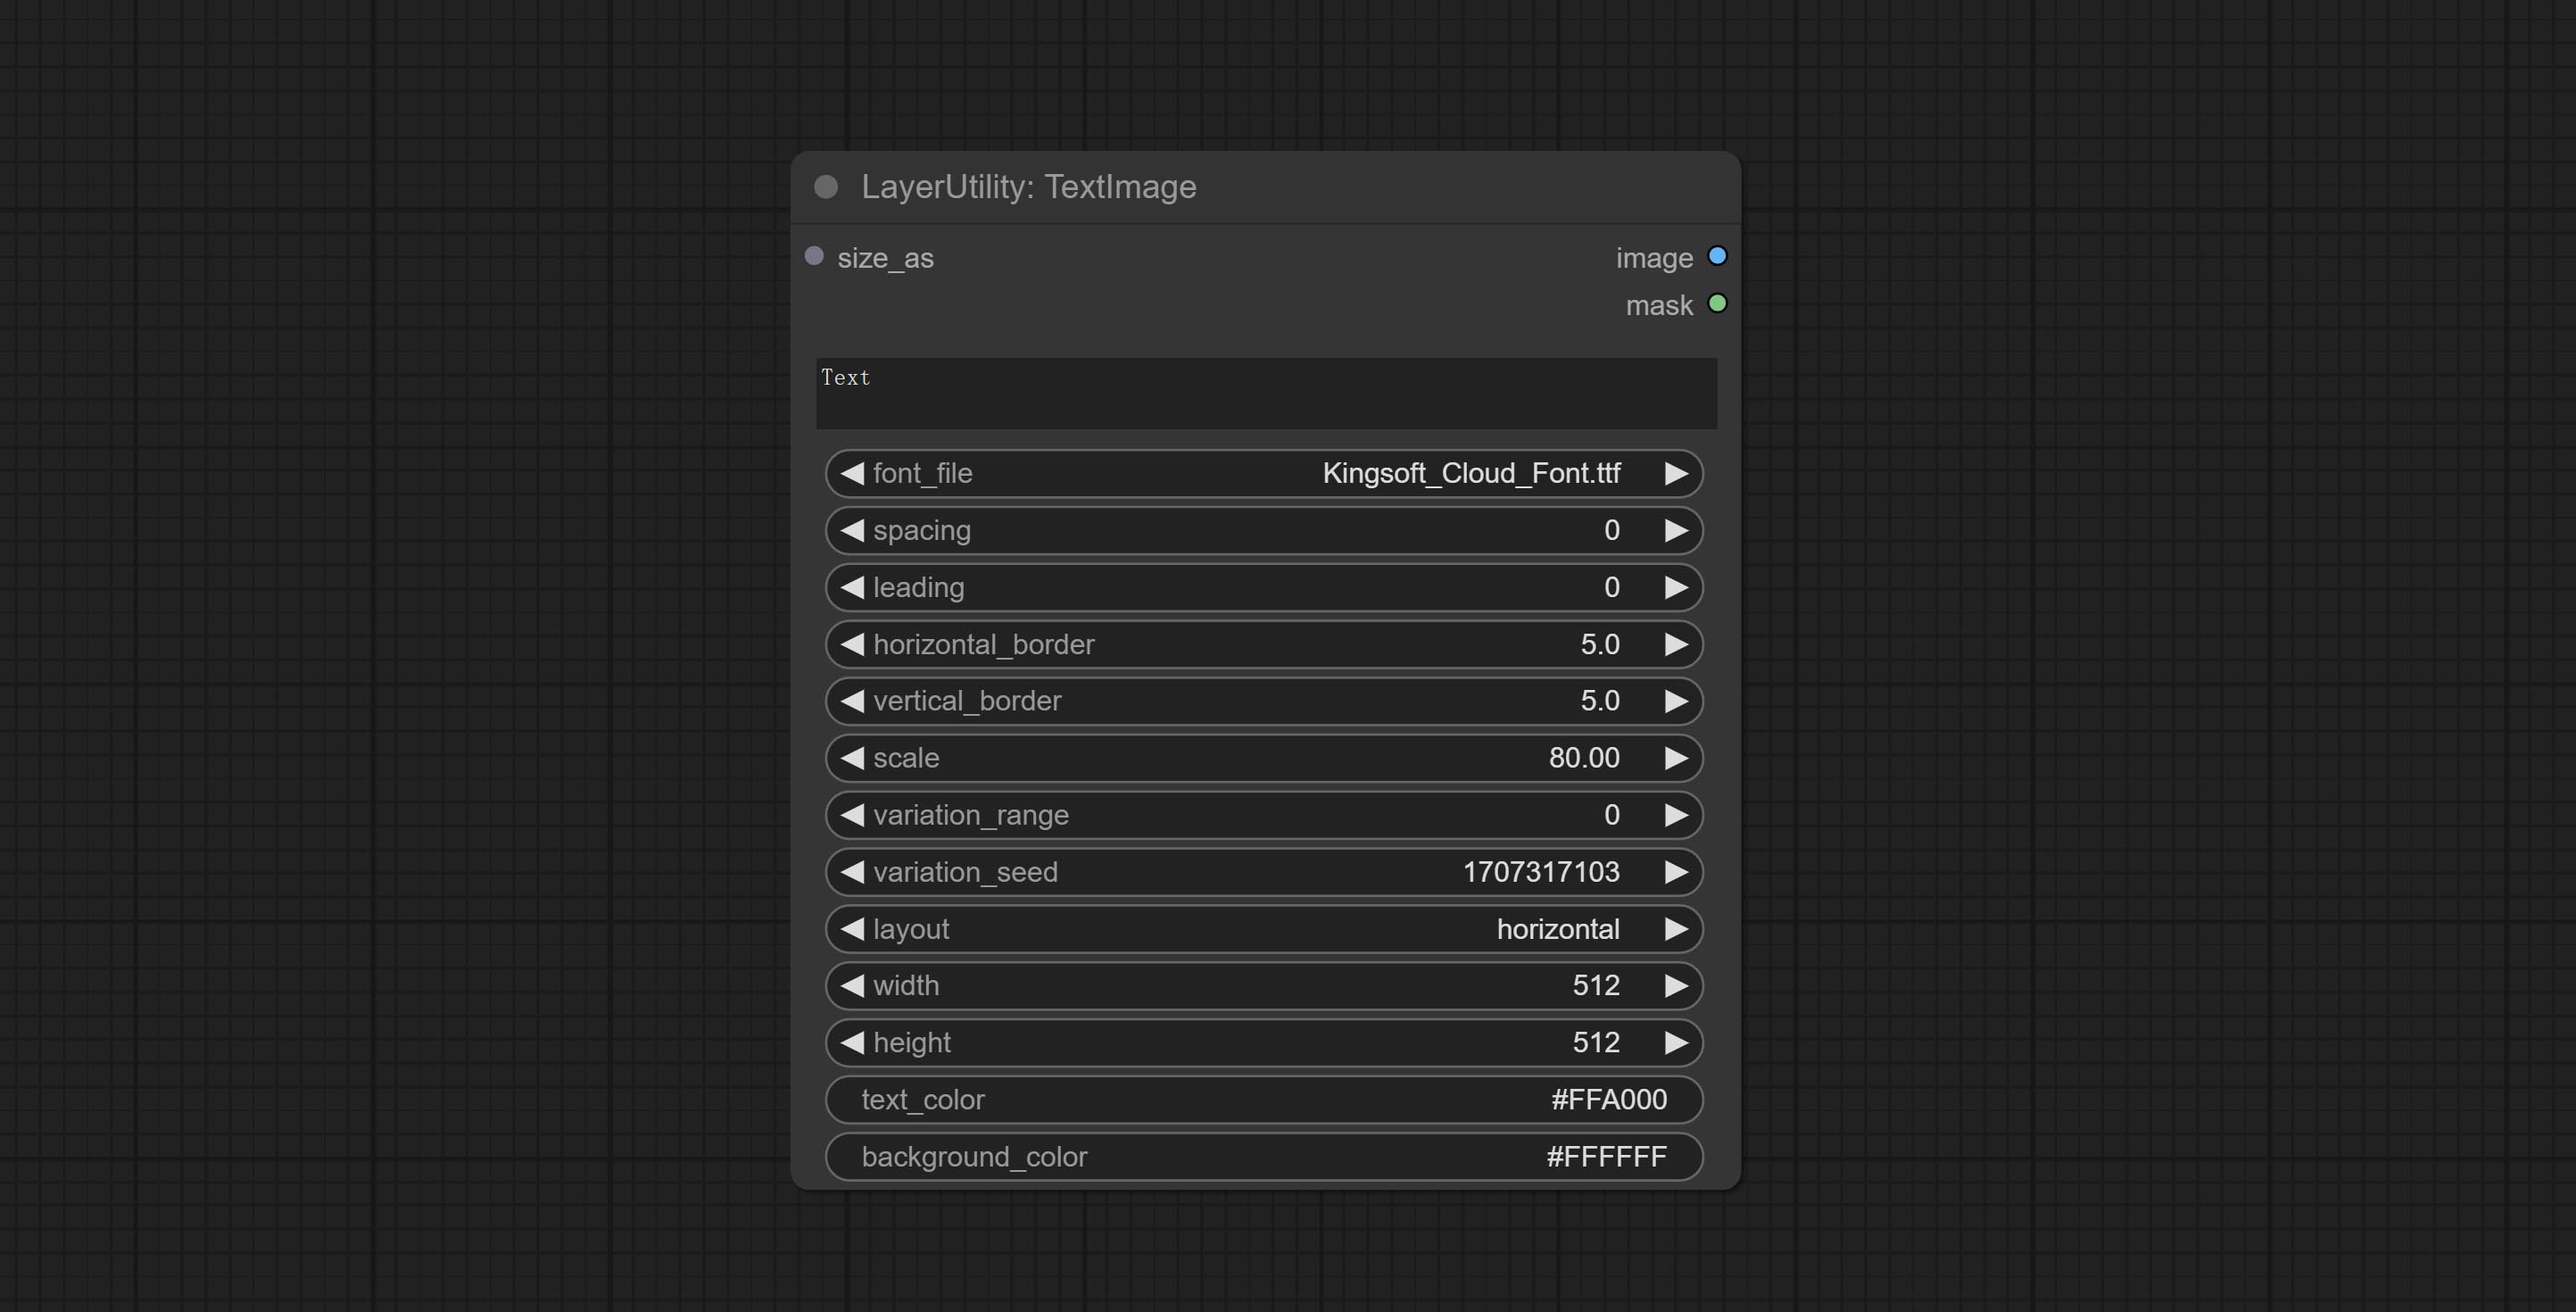
Node options:
- size_as * : The input image or mask here will generate the output image and mask according to their size. this input takes priority over the width and height below.
- font_file ** : Here is a list of available font files in the font folder, and the selected font files will be used to generate images.
- spacing: Word spacing.this value is in pixels.
- leading: Row leading.this value is in pixels.
- horizontal_border: Side margin. If the text is horizontal, it is the left margin, and if it is vertical, it is the right margin. this value is represents a percentage, for example, 50 indicates that the starting point is located in the center on both sides.
- vertical_border: Top margin. this value is represents a percentage, for example, 10 indicates that the starting point is located 10% away from the top.
- scale: The overall size of the text. the initial size of text is automatically calculated based on the screen size and text content, with the longest row or column by default adapting to the image width or height. adjusting the value here will scale the text as a whole. this value is represents a percentage, for example, 60 represents scaling to 60%.
- variation_range: The range of random changes in characters. when this value is greater than 0, the character will undergo random changes in size and position, and the larger the value, the greater the magnitude of the change.
- variation_seed: The seed for randomly. fix this value to individual characters changes generated each time will not change.
- layout: Text layout. there are horizontal and vertical options to choose from.
- width: Width of the image. If there is a size_as input, this setting will be ignored.
- height: Height of the image. If there is a size_as input, this setting will be ignored.
- text_color: The color of text.
- background_color 4 : The color of background.
* Only limited to input image and mask. forcing the integration of other types of inputs will result in node errors.
** The font folder is defined in resource_dir.ini , this file is located in the root directory of the plug-in, and the default name is resource_dir.ini.example . to use this file for the first time, you need to change the file suffix to .ini . Open the text editing software and find the line starting with "FONT_dir=", after "=", enter the custom folder path name. support defining multiple folders in resource-dir.ini , separated by commas, semicolons, or spaces. all font files in this folder will be collected and displayed in the node list during ComfyUI initialization. If the folder set in ini is invalid, the font folder that comes with the plugin will be enabled.
TextImageV2
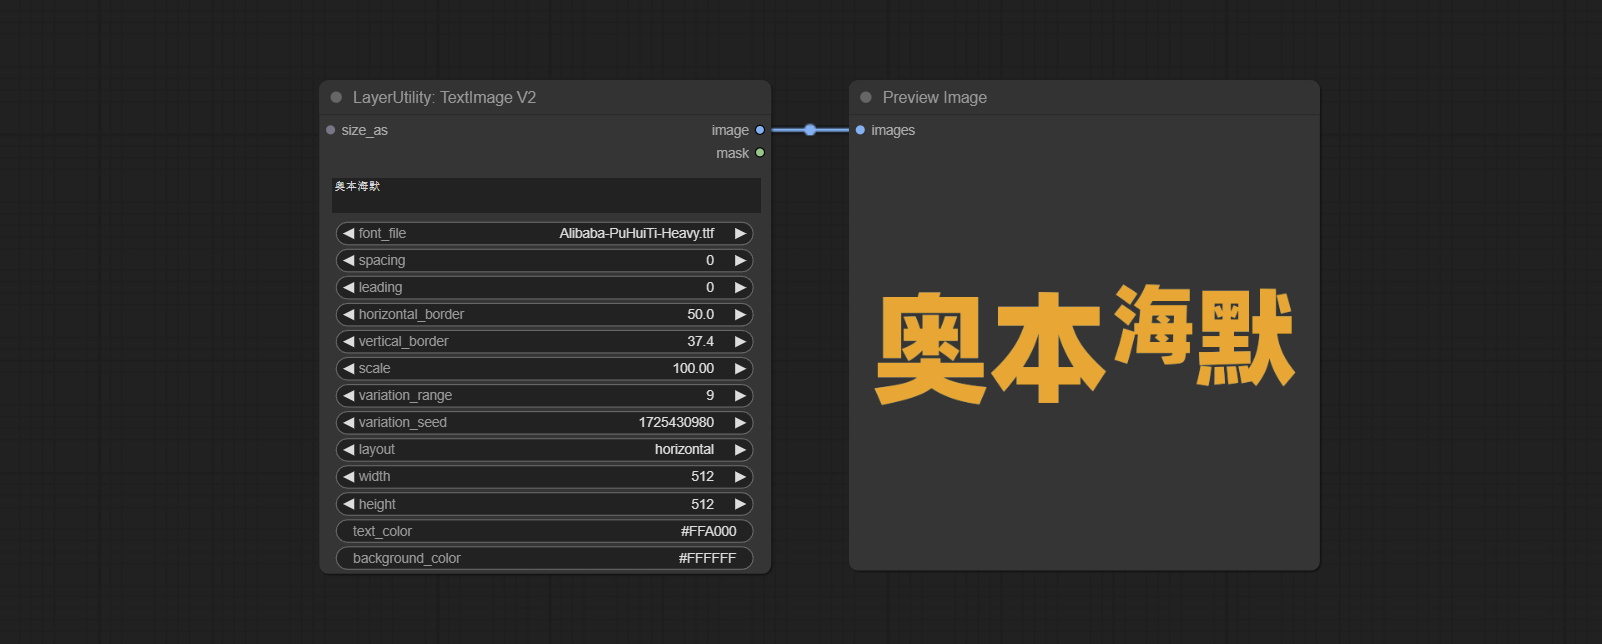
This node is merged from heshengtao. The PR modifies the scaling of the image text node based on the TextImage node. The font spacing follows the scaling, and the coordinates are no longer based on the top left corner of the text, but on the center point of the entire line of text. Thank you for the author's contribution.
LaMa
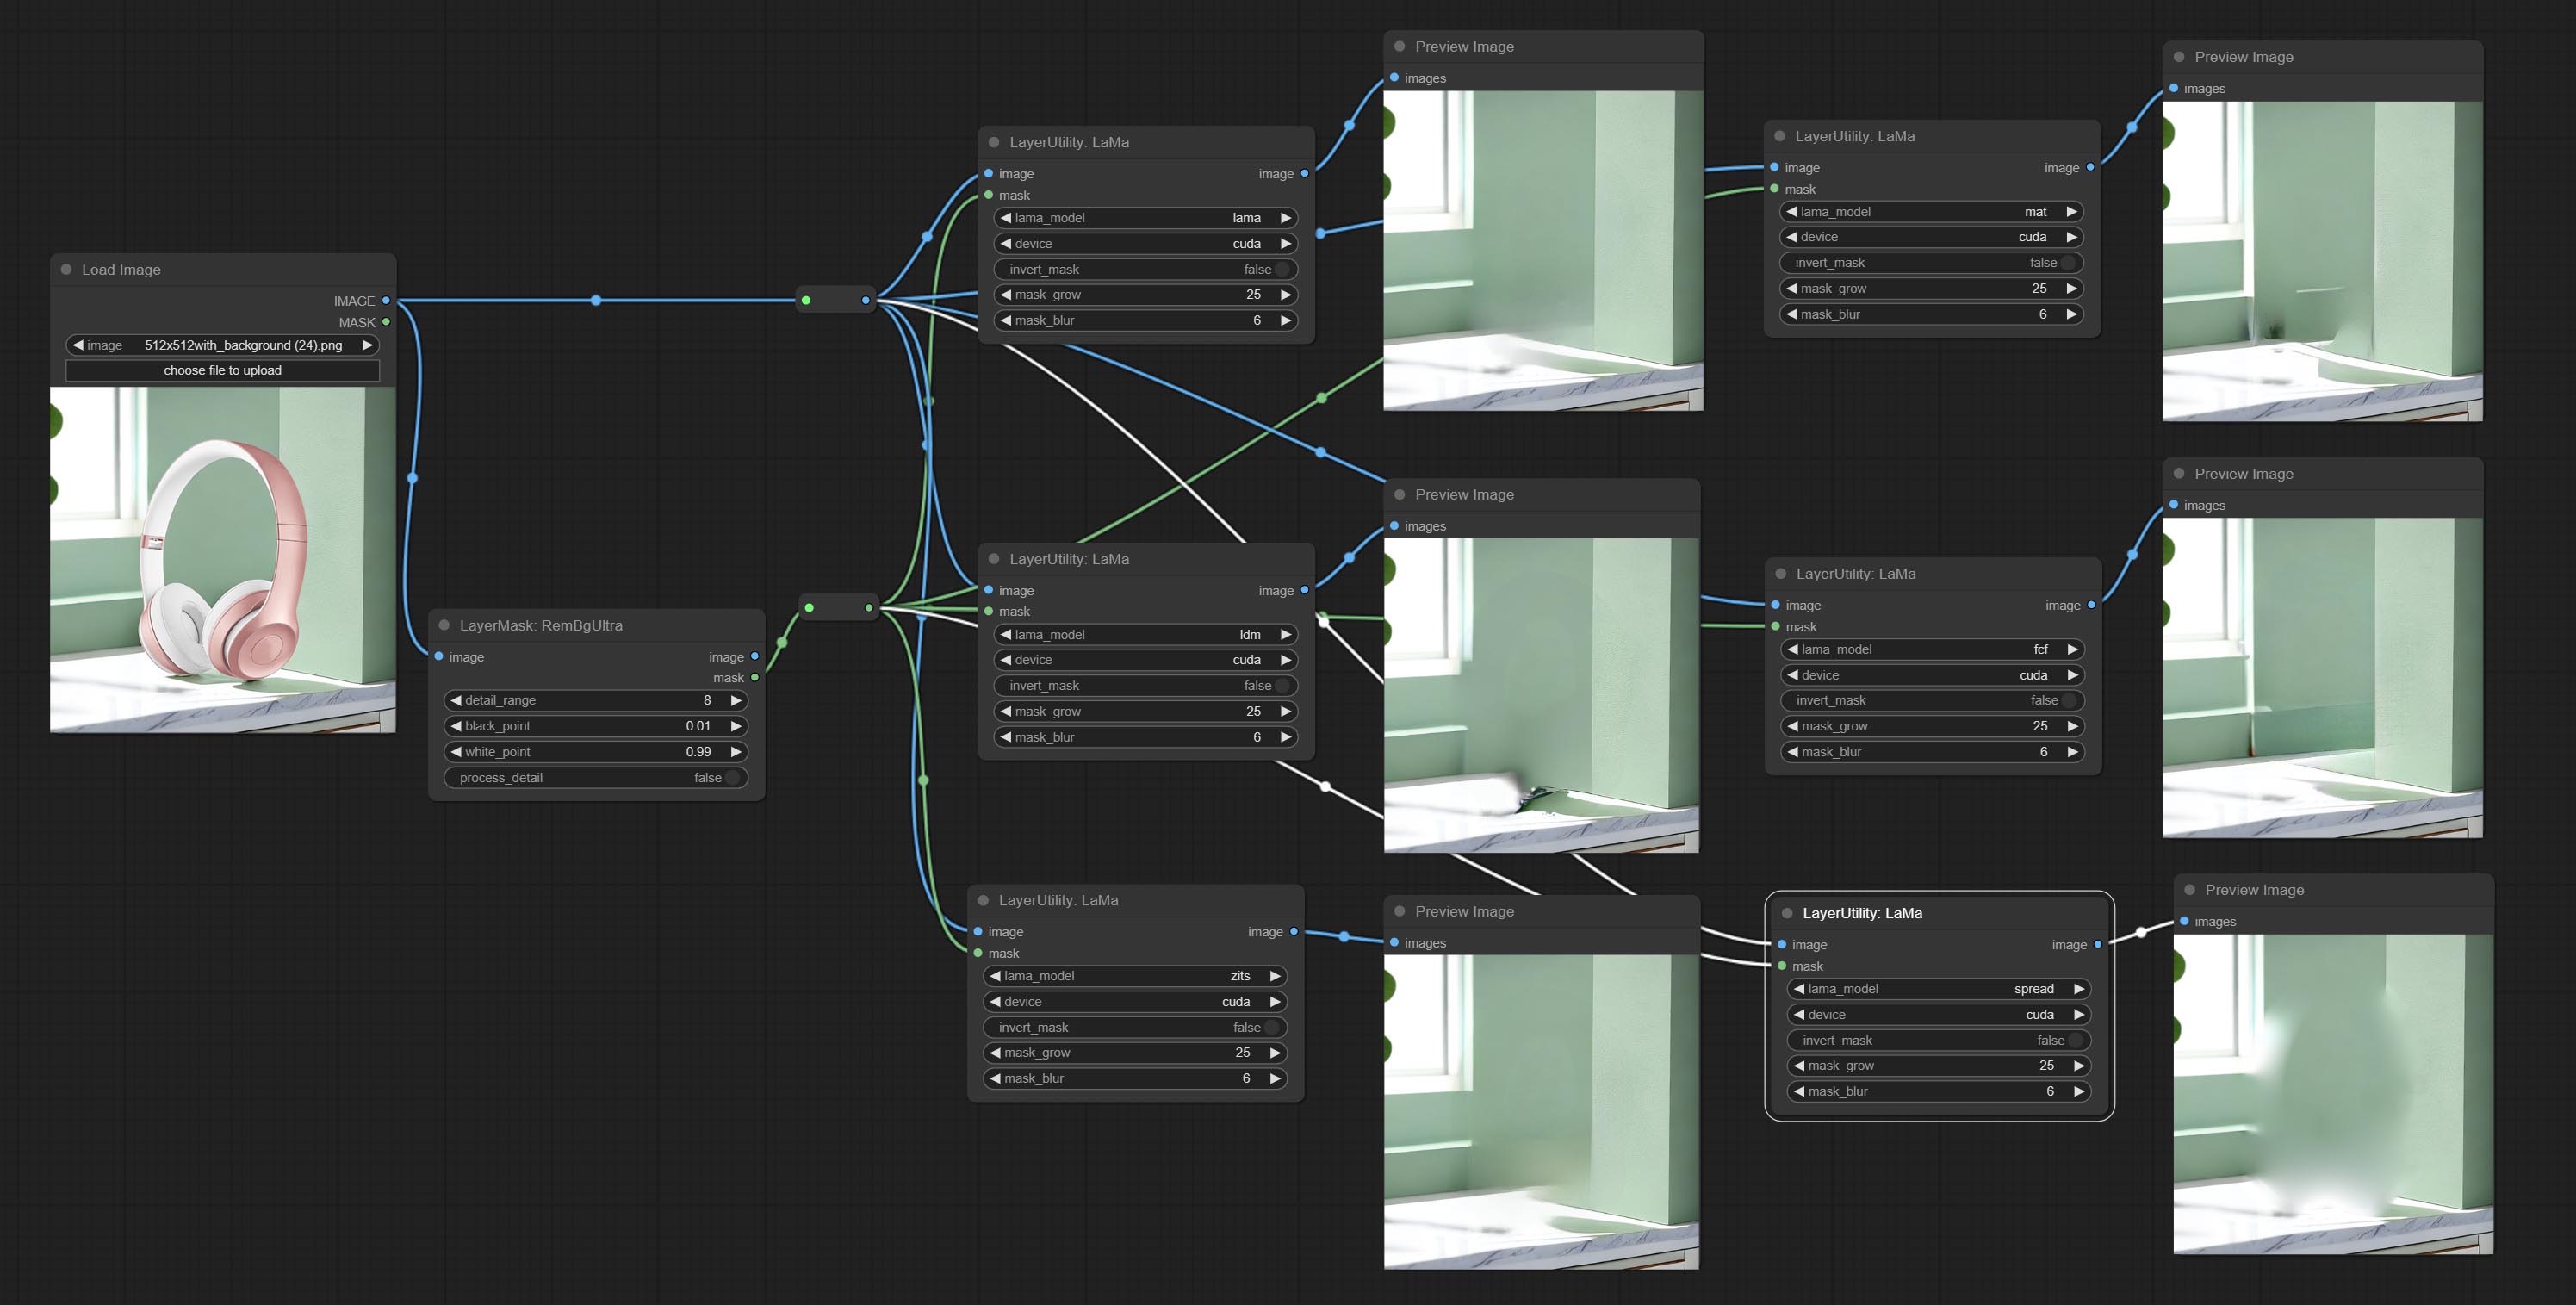
Erase objects from the image based on the mask. this node is repackage of IOPaint, powered by state-of-the-art AI models, thanks to the original author.
It is have LaMa, LDM, ZITS,MAT, FcF, Manga models and the SPREAD method to erase. Please refer to the original link for the introduction of each model.
Please download the model files from lama models(BaiduNetdisk) or lama models(Google Drive) to ComfyUI/models/lama folder.
Node optons: 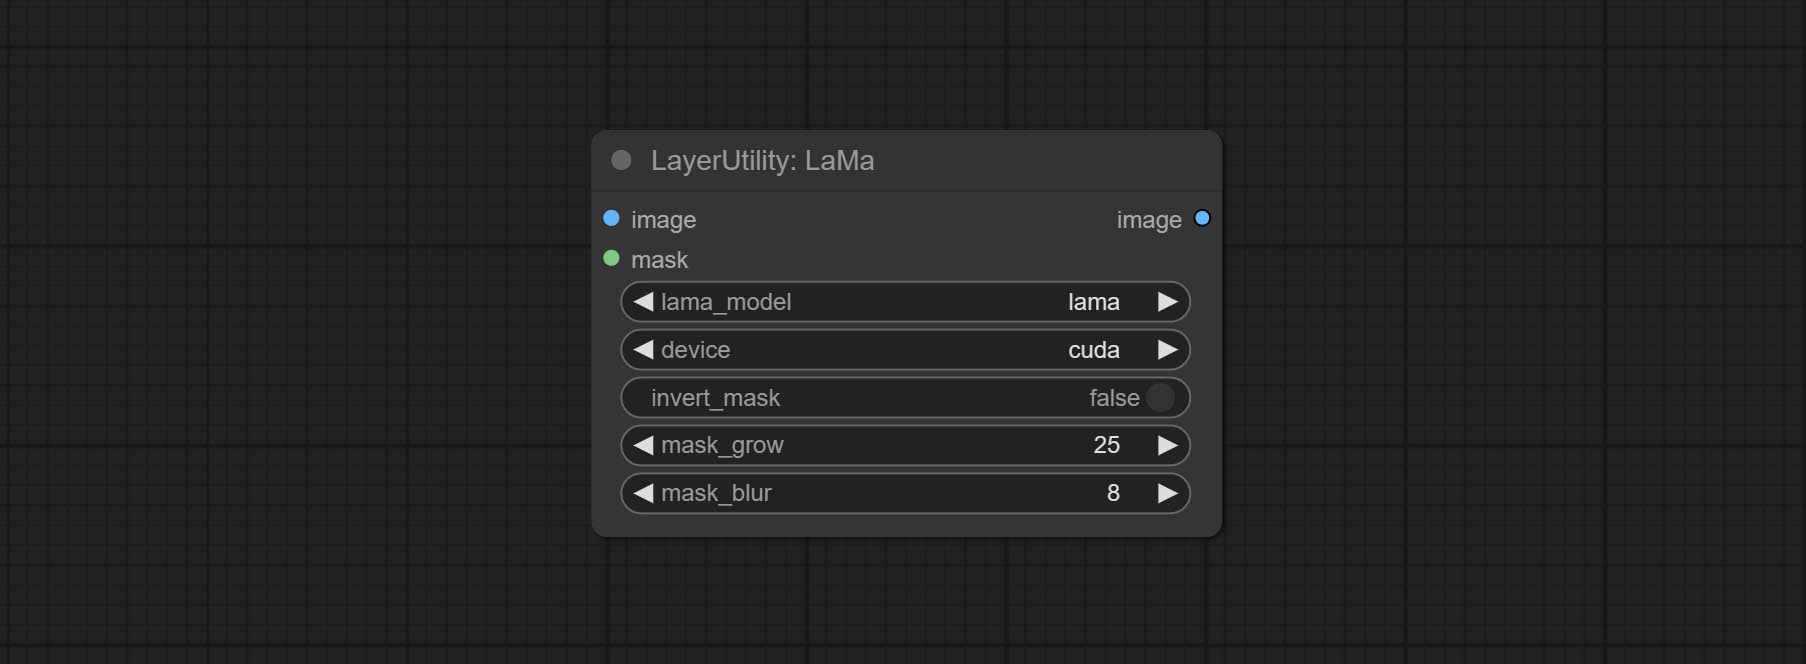
- lama_model: Choose a model or method.
- device: After correctly installing Torch and Nvidia CUDA drivers, using cuda will significantly improve running speed.
- invert_mask: Whether to reverse the mask.
- grow: Positive values expand outward, while negative values contract inward.
- blur: Blur the edge.
ImageChannelSplit
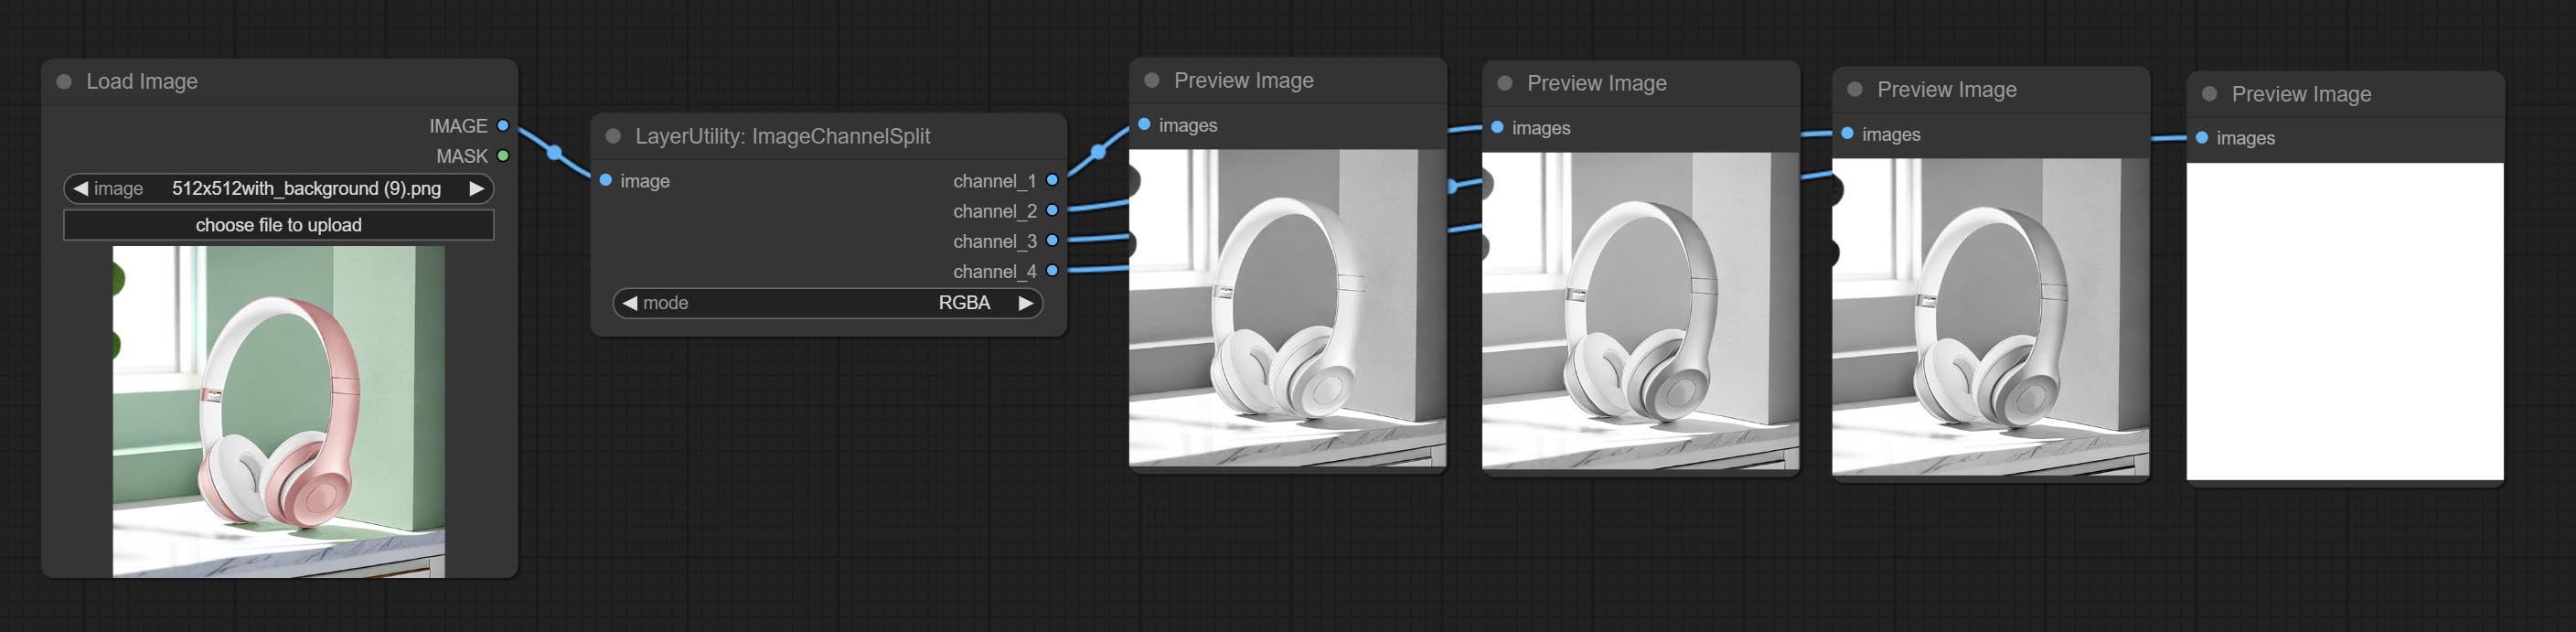
Split the image channel into individual images.
Node options: 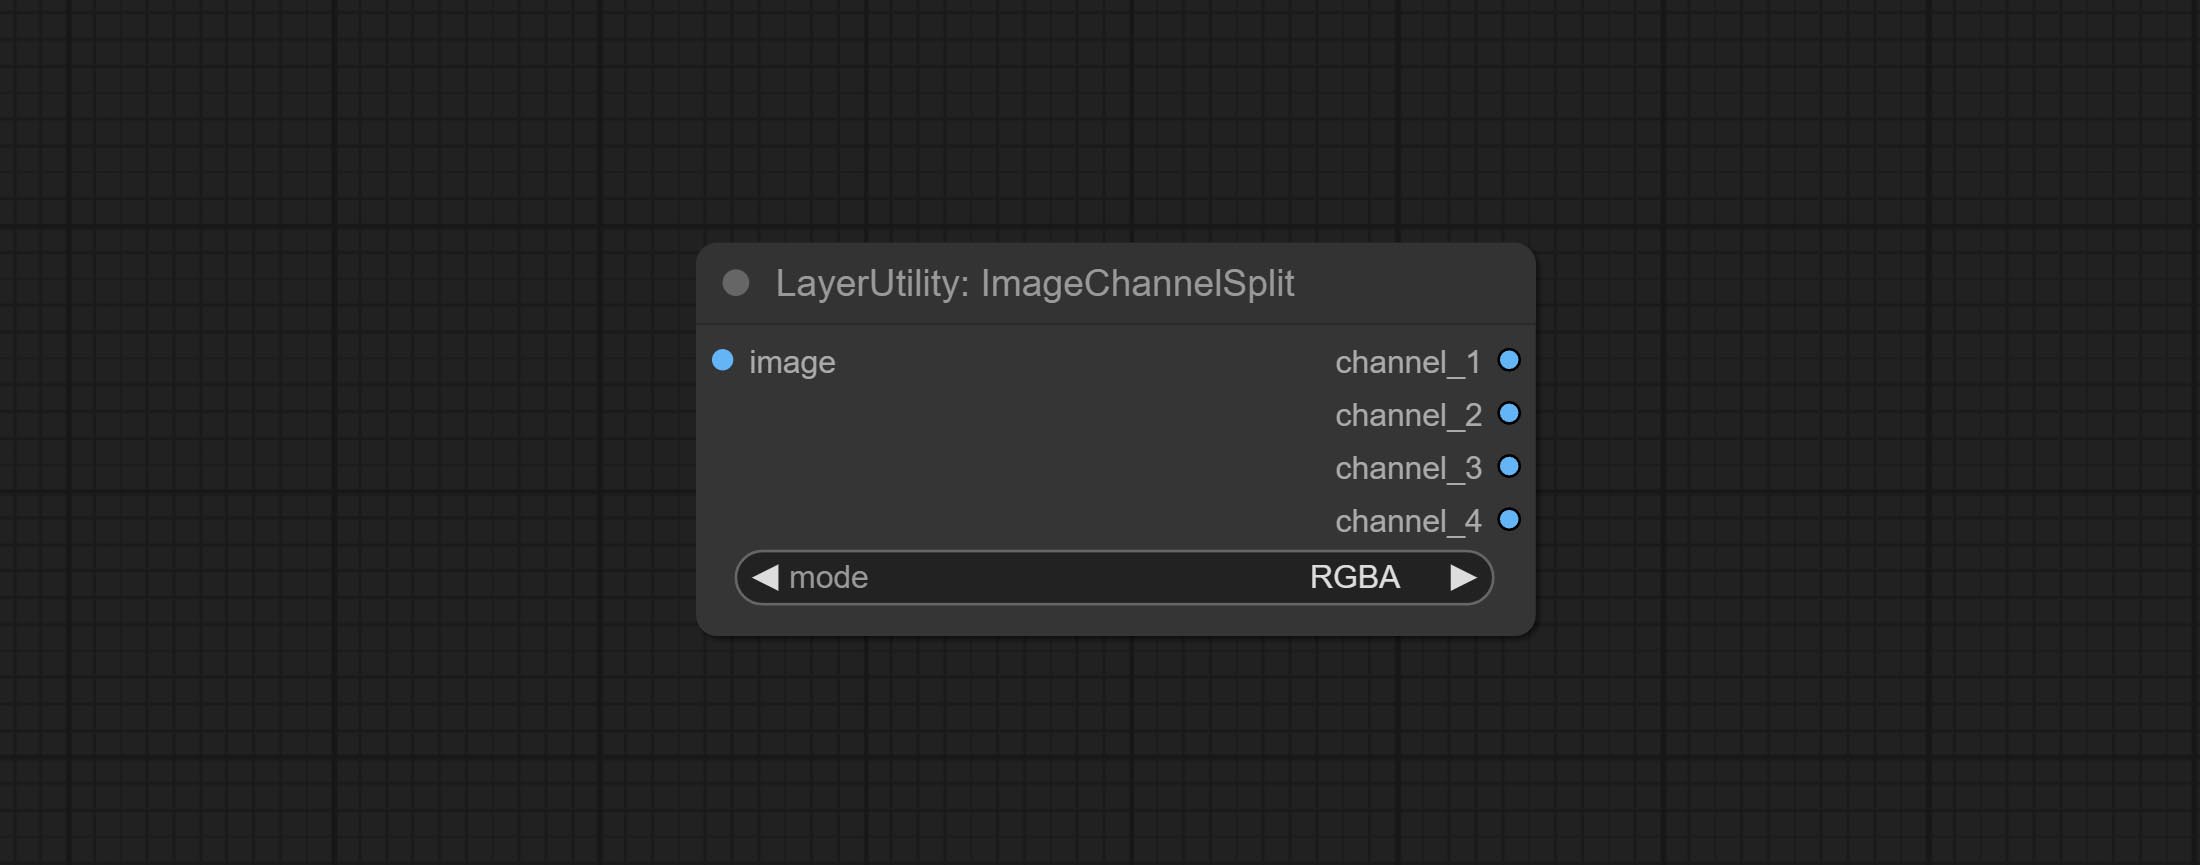
- mode: Channel mode, include RGBA, YCbCr, LAB adn HSV.
ImageChannelMerge
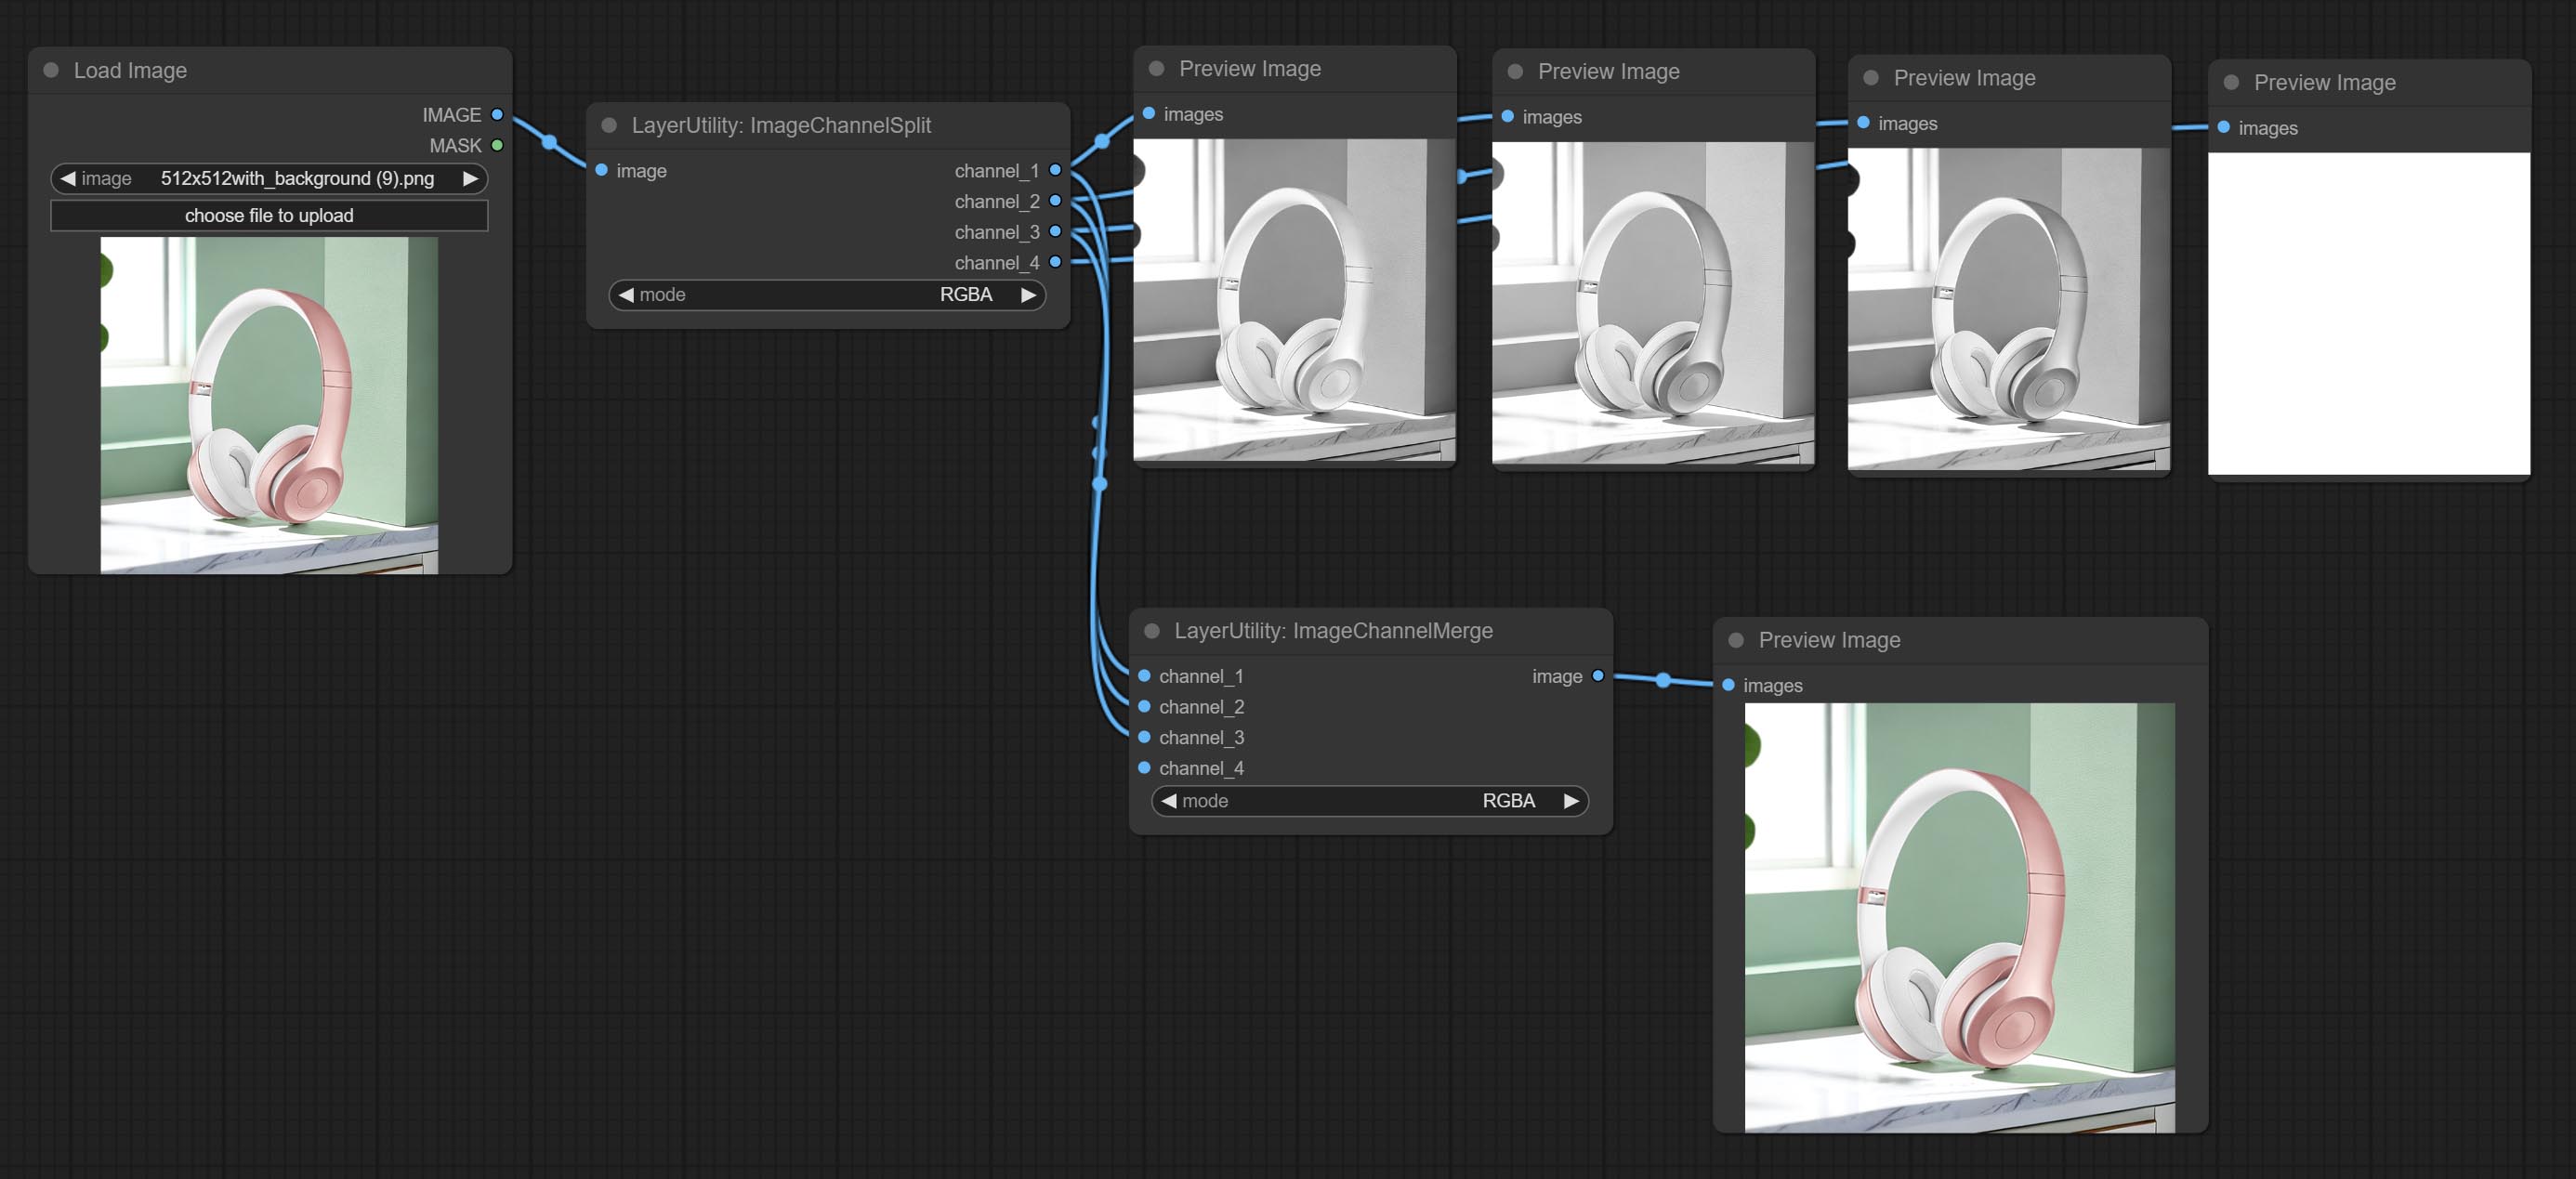
Merge each channel image into one image.
Node options: 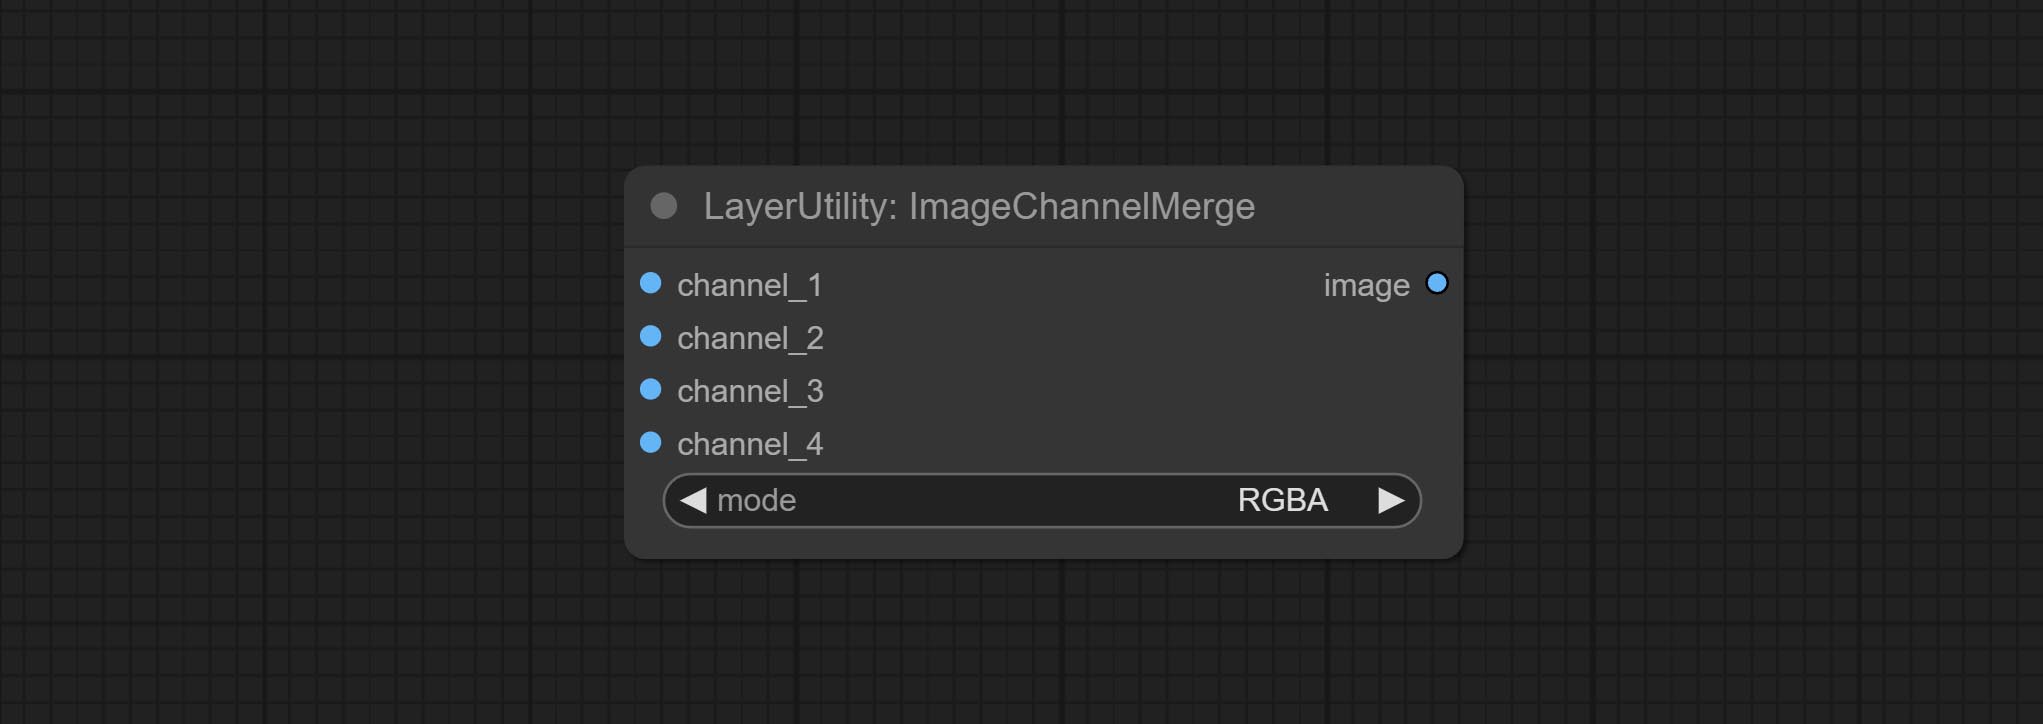
- mode: Channel mode, include RGBA, YCbCr, LAB adn HSV.
ImageRemoveAlpha
Remove the alpha channel from the image and convert it to RGB mode. you can choose to fill the background and set the background color.
Node options: 
- RGBA_image: The input image supports RGBA or RGB modes.
- mask: Optional input mask. If there is an input mask, it will be used first, ignoring the alpha that comes with RGBA_image.
- fill_background: Whether to fill the background.
- background_color 4 : Color of background.
ImageCombineAlpha
Merge the image and mask into an RGBA mode image containing an alpha channel.
ImageAutoCrop
Automatically cutout and crop the image according to the mask. it can specify the background color, aspect ratio, and size for output image. this node is designed to generate the image materials for training models.
*Please refer to the model installation methods for SegmentAnythingUltra and RemBgUltra.
Node options: 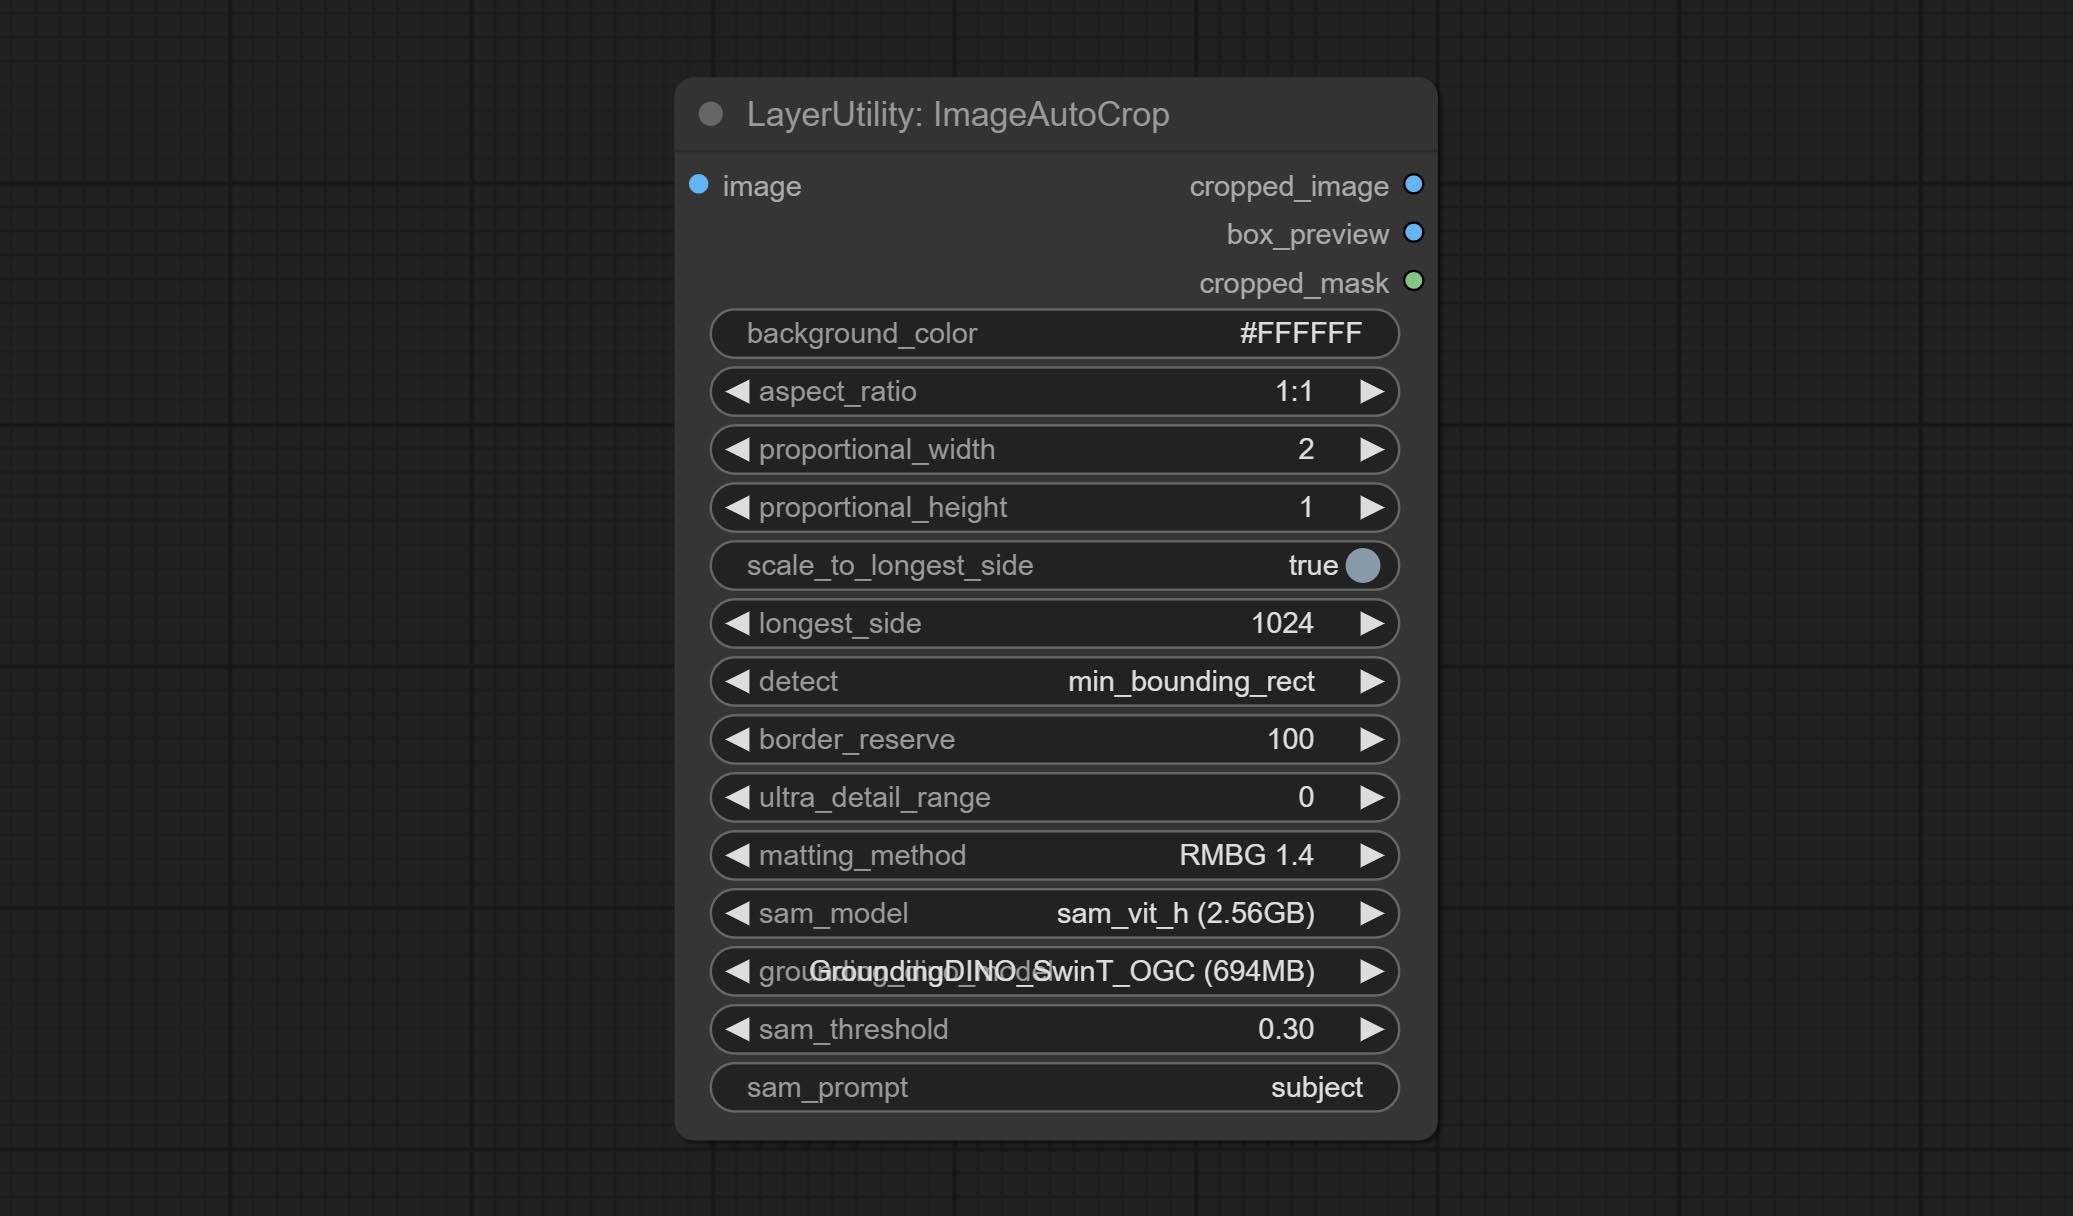
- background_color 4 : The background color.
- aspect_ratio: Here are several common frame ratios provided. alternatively, you can choose "original" to keep original ratio or customize the ratio using "custom".
- proportional_width: Proportional width. if the aspect ratio option is not "custom", this setting will be ignored.
- proportional_height: Proportional height. if the aspect ratio option is not "custom", this setting will be ignored.
- scale_by_longest_side: Allow scaling by long edge size.
- longest_side: When the scale_by_longest_side is set to True, this will be used this value to the long edge of the image. when the original_size have input, this setting will be ignored.
- detect: Detection method, min_bounding_rect is the minimum bounding rectangle, max_inscribed_rect is the maximum inscribed rectangle.
- border_reserve: Keep the border. expand the cutting range beyond the detected mask body area.
- ultra_detail_range: Mask edge ultra fine processing range, 0 is not processed, which can save generation time.
- matting_method: The method of generate masks. There are two methods available: Segment Anything and RMBG 1.4. RMBG 1.4 runs faster.
- sam_model: Select the SAM model used by Segment Anything here.
- grounding_dino_model: Select the Grounding_Dino model used by Segment Anything here.
- sam_threshold: The threshold for Segment Anything.
- sam_prompt: The prompt for Segment Anything.
Output: cropped_image: Crop and replace the background image. box_preview: Crop position preview. cropped_mask: Cropped mask.
ImageAutoCropV2
The V2 upgrad version of ImageAutoCrop , it has made the following changes based on the previous version: 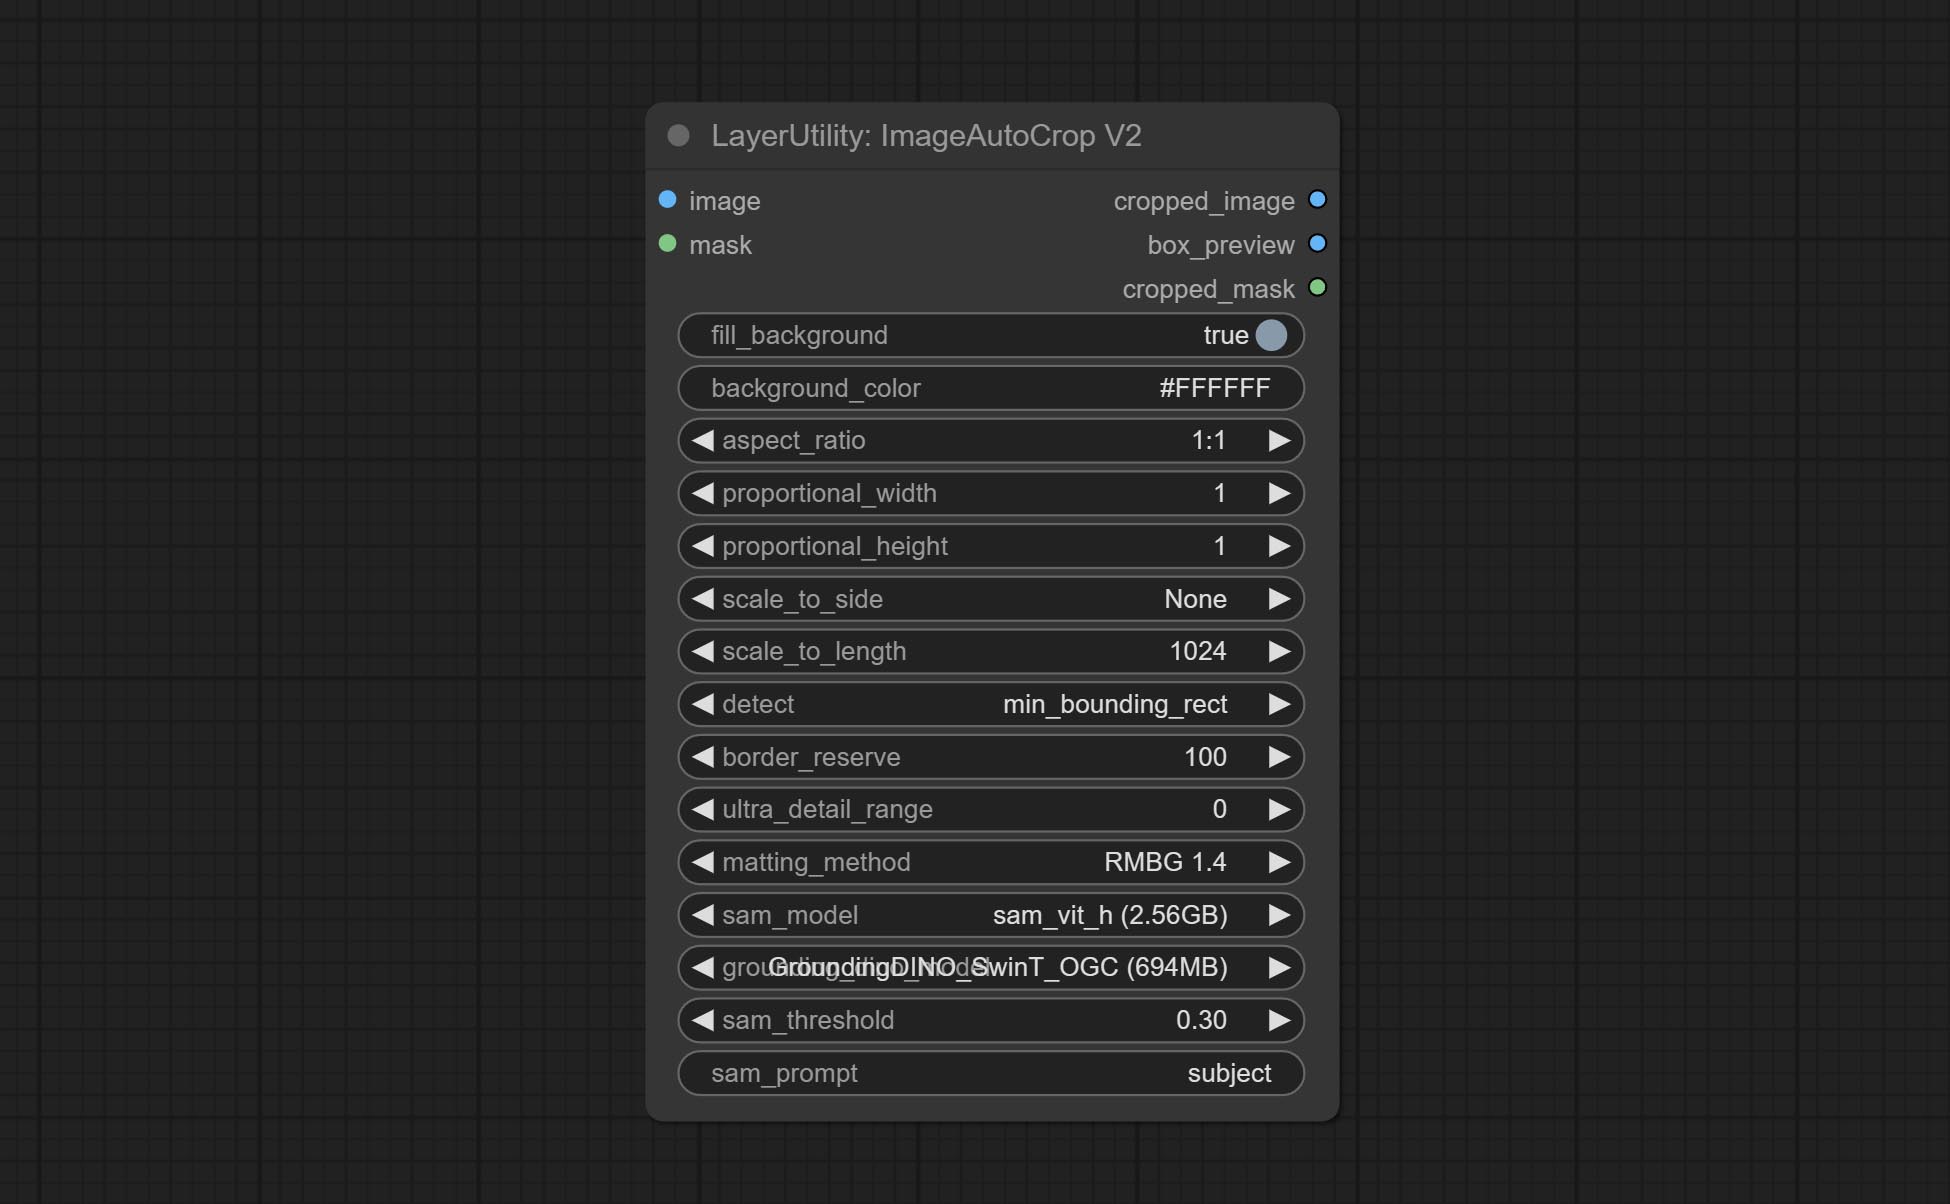
- Add optional input for mask. when there is a mask input, use that input directly to skip the built-in mask generation.
- Add
fill_background . When set to False, the background will not be processed and any parts beyond the frame will not be included in the output range. -
aspect_ratio adds the original option. - scale_by: Allow scaling by specified dimensions for longest, shortest, width, or height.
- scale_by_length: The value here is used as
scale_by to specify the length of the edge.
ImageAutoCropV3
Automatically crop the image to the specified size. You can input a mask to preserve the specified area of the mask. This node is designed to generate image materials for training the model.
Node Options: 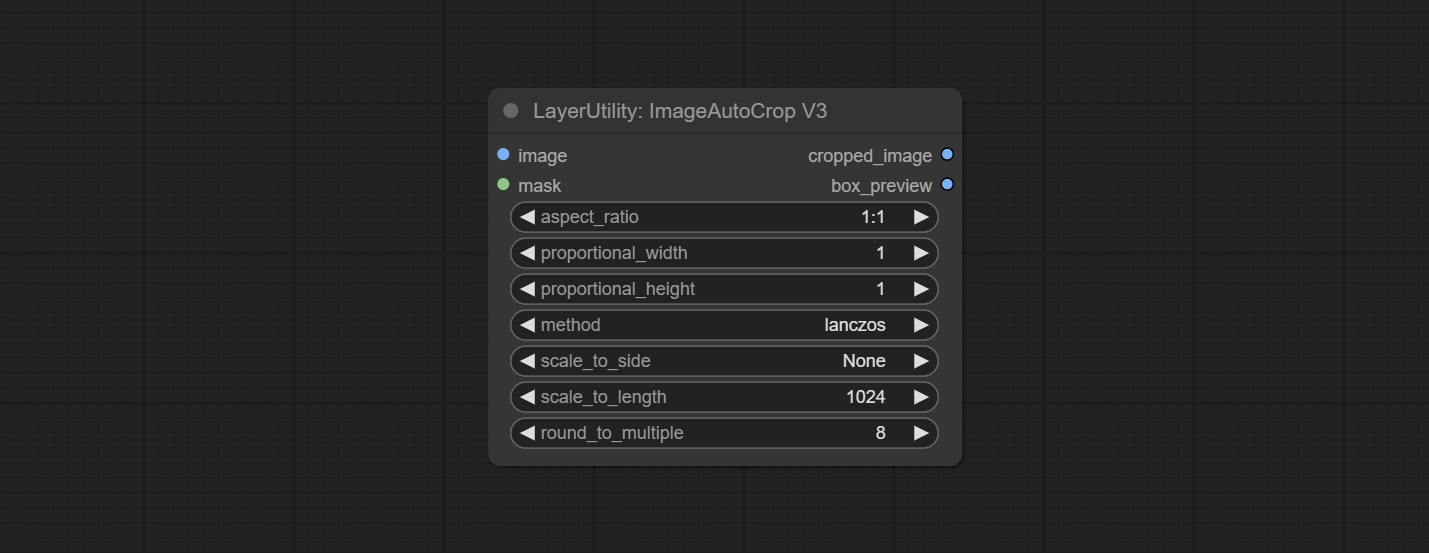
- image: The input image.
- mask: Optional input mask. The masking part will be preserved within the range of the cutting aspect ratio.
- aspect_ratio: The aspect ratio of the output. Here are common frame ratios provided, with "custom" being the custom ratio and "original" being the original frame ratio.
- proportional_width: Proportionally wide. If the aspect_ratio option is not 'custom', this setting will be ignored.
- proportional_height: High proportion. If the aspect_ratio option is not 'custom', this setting will be ignored.
- method: Scaling sampling methods include Lanczos, Bicubic, Hamming, Bilinear, Box, and Nearest.
- scale_to_side: Allow scaling to be specified by long side, short side, width, height, or total pixels.
- scale_to_length: The value here is used as the scale_to-side to specify the length of the edge or the total number of pixels (kilo pixels).
- round_to_multiple: Multiply to the nearest whole. For example, if set to 8, the width and height will be forcibly set to multiples of 8.
Outputs: cropped_image: The cropped image. box_preview: Preview of cutting position.
HLFrequencyDetailRestore
Using low frequency filtering and retaining high frequency to recover image details. Compared to kijai's DetailTransfer, this node is better integrated with the environment while retaining details. 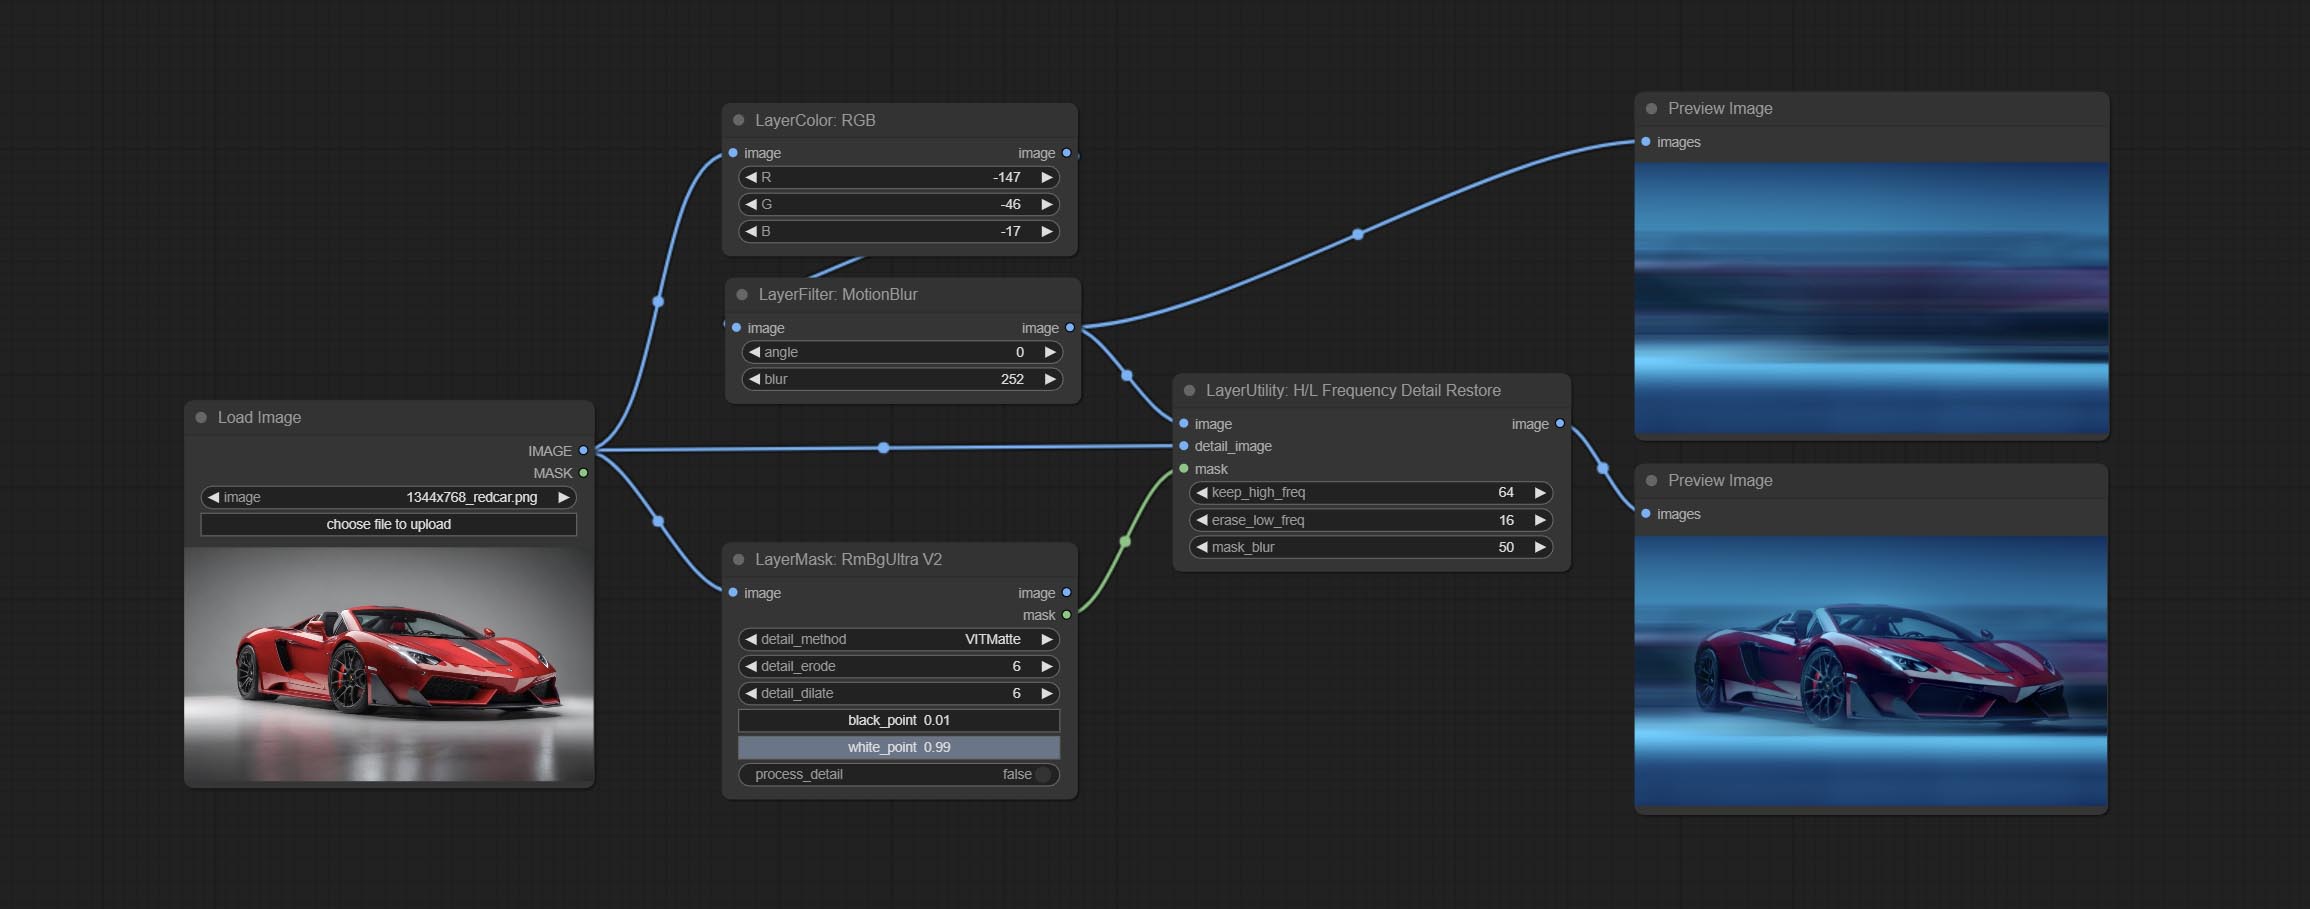
Node Options:
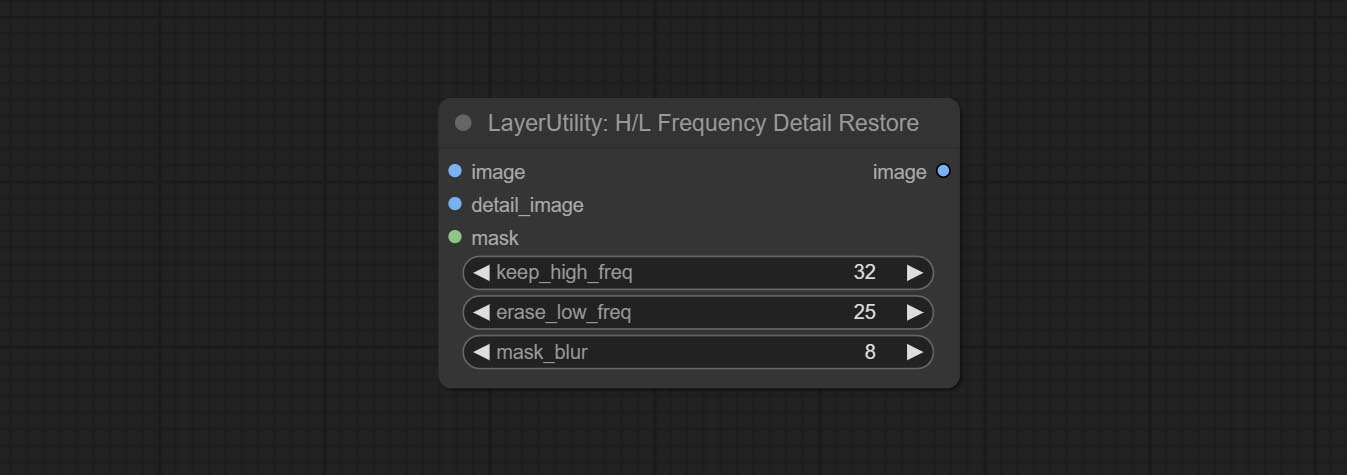
- image: Background image input.
- detail_image: Detail image input.
- mask: Optional input, if there is a mask input, only the details of the mask part are restored.
- keep_high_freq: Reserved range of high frequency parts. The larger the value, the richer the retained high-frequency details.
- erase_low_freq: The range of low frequency parts of the erasure. The larger the value, the more the low frequency range of the erasure.
- mask_blur: Mask edge blur. Valid only if there is masked input.
GetImageSize
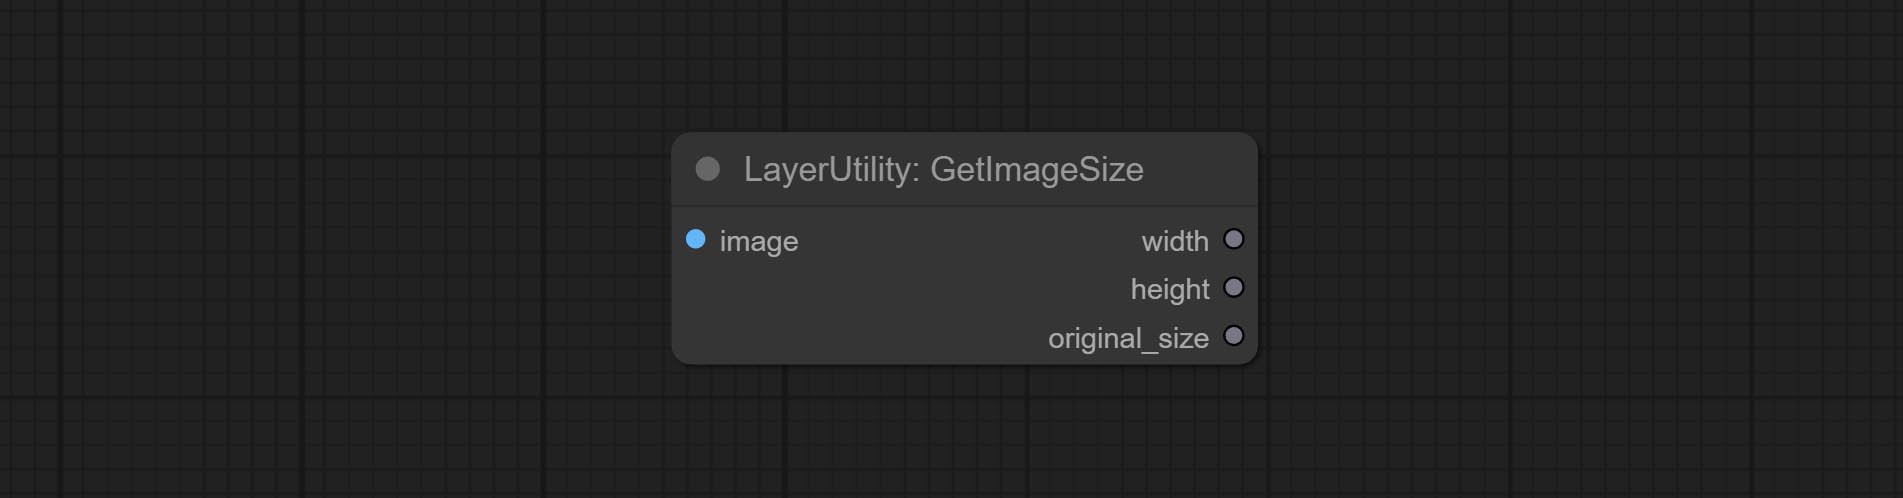
Obtain the width and height of the image.
Output:
- width: The width of image.
- height: The height of image.
- original_size: The original size data of the image is used for subsequent node recovery.
ImageHub
Switch output from multiple input images and masks, supporting 9 sets of inputs. All input items are optional. if there is only image or mask in a set of input, the missing item will be output as None. 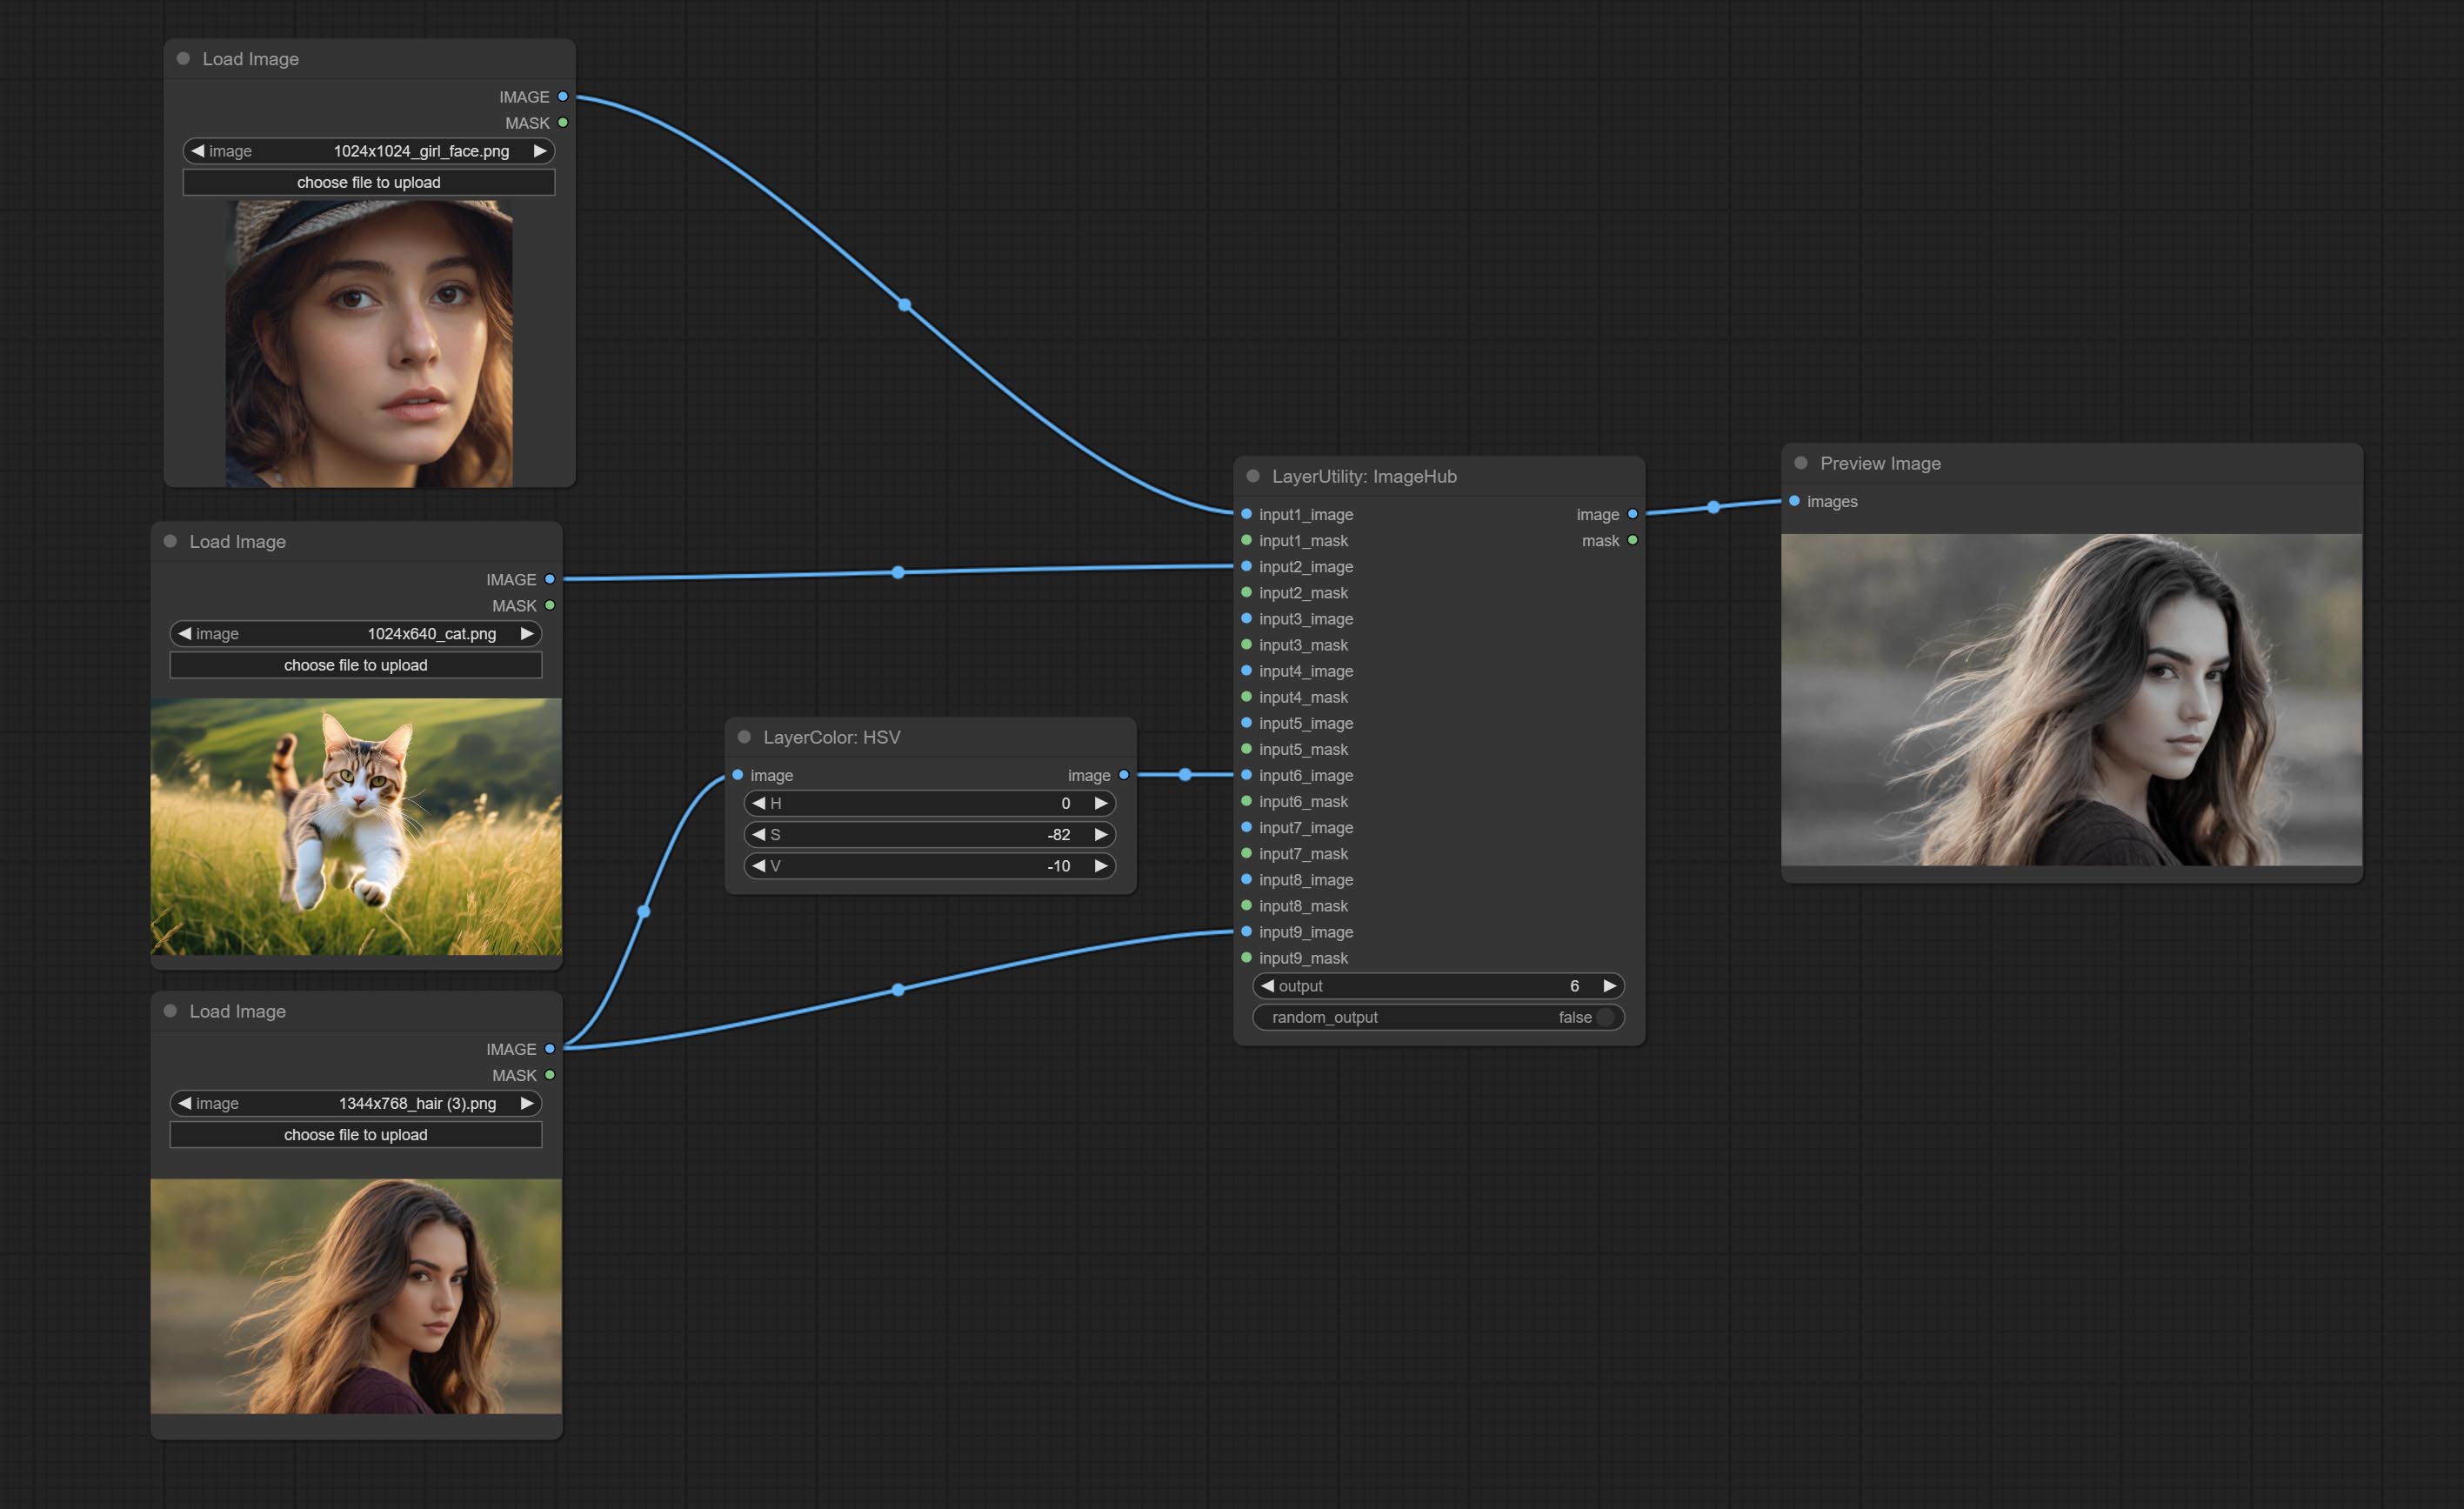
Node options:
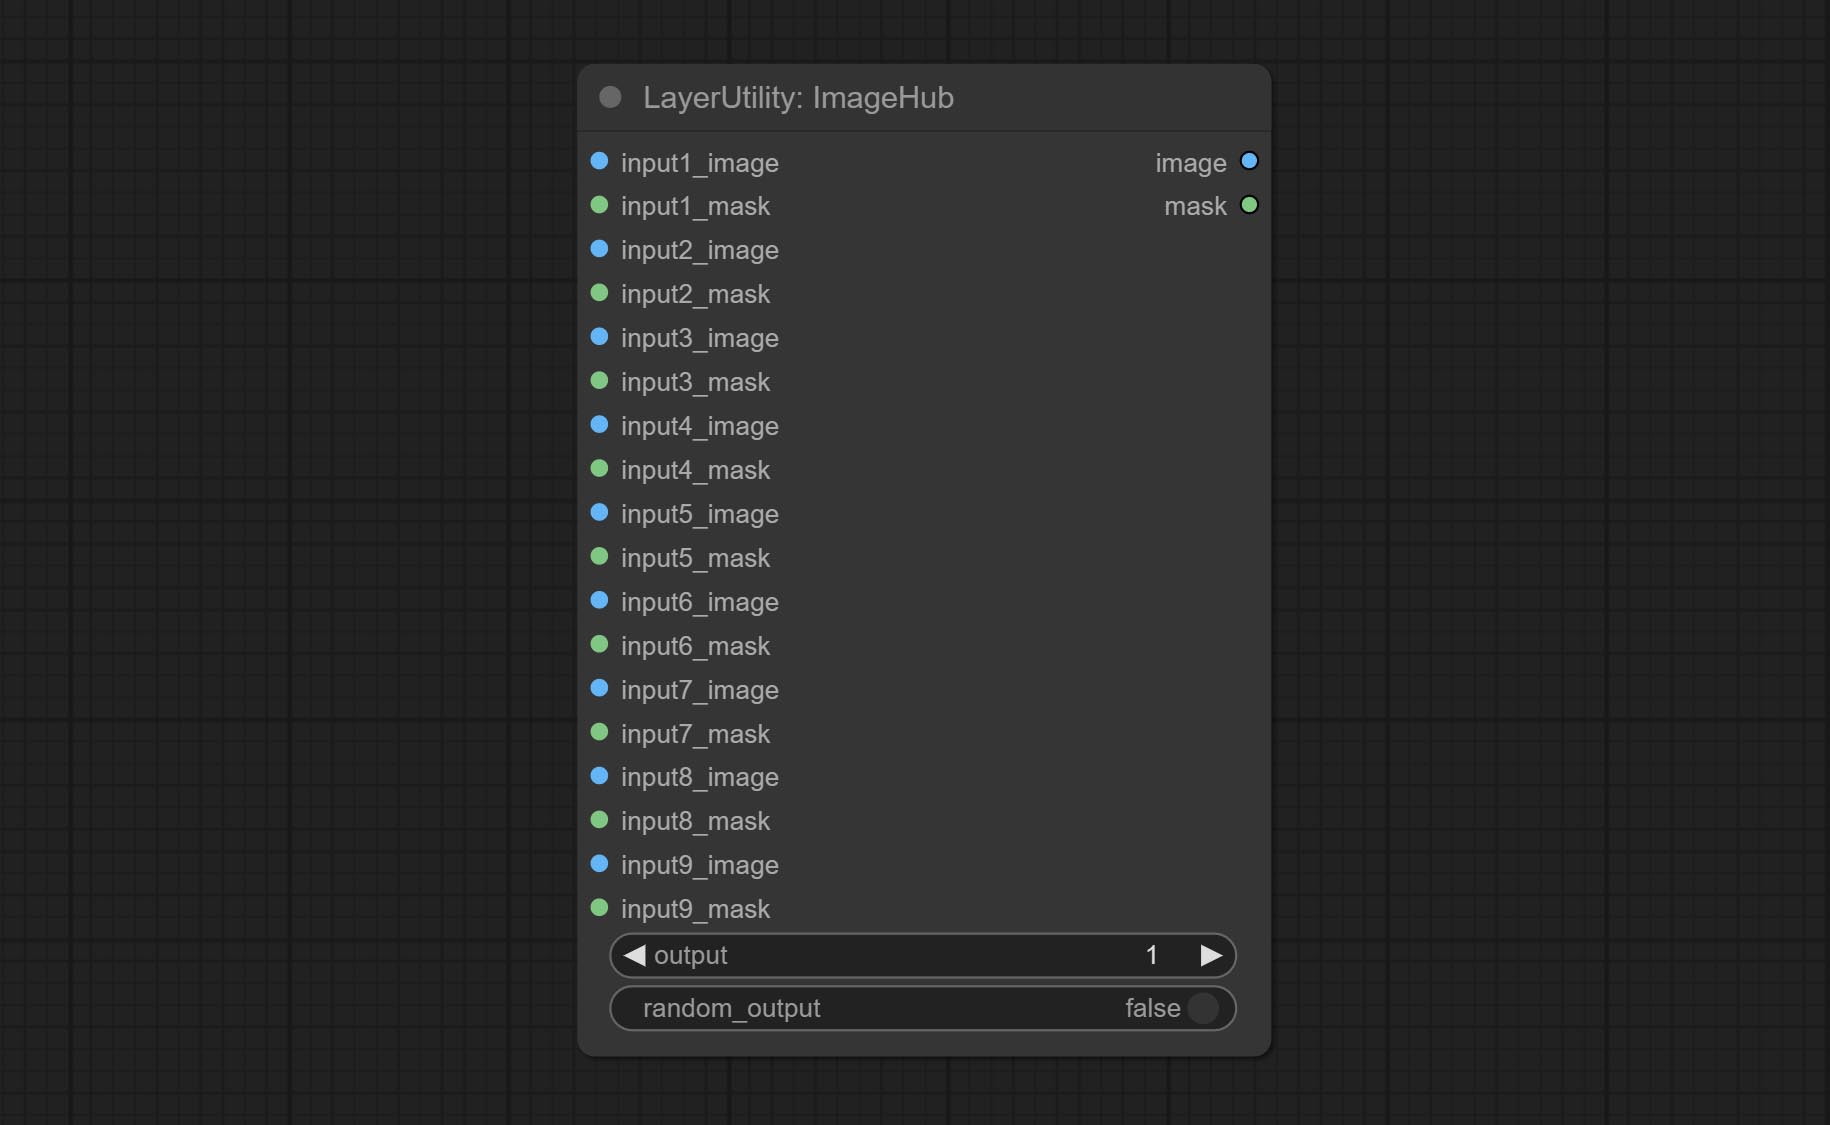
- output: Switch output. the value is the corresponding input group. when the
random-output option is True, this setting will be ignored. - random_output: When this is true, the
output setting will be ignored and a random set will be output among all valid inputs.
BatchSelector
Retrieve specified images or masks from batch images or masks. 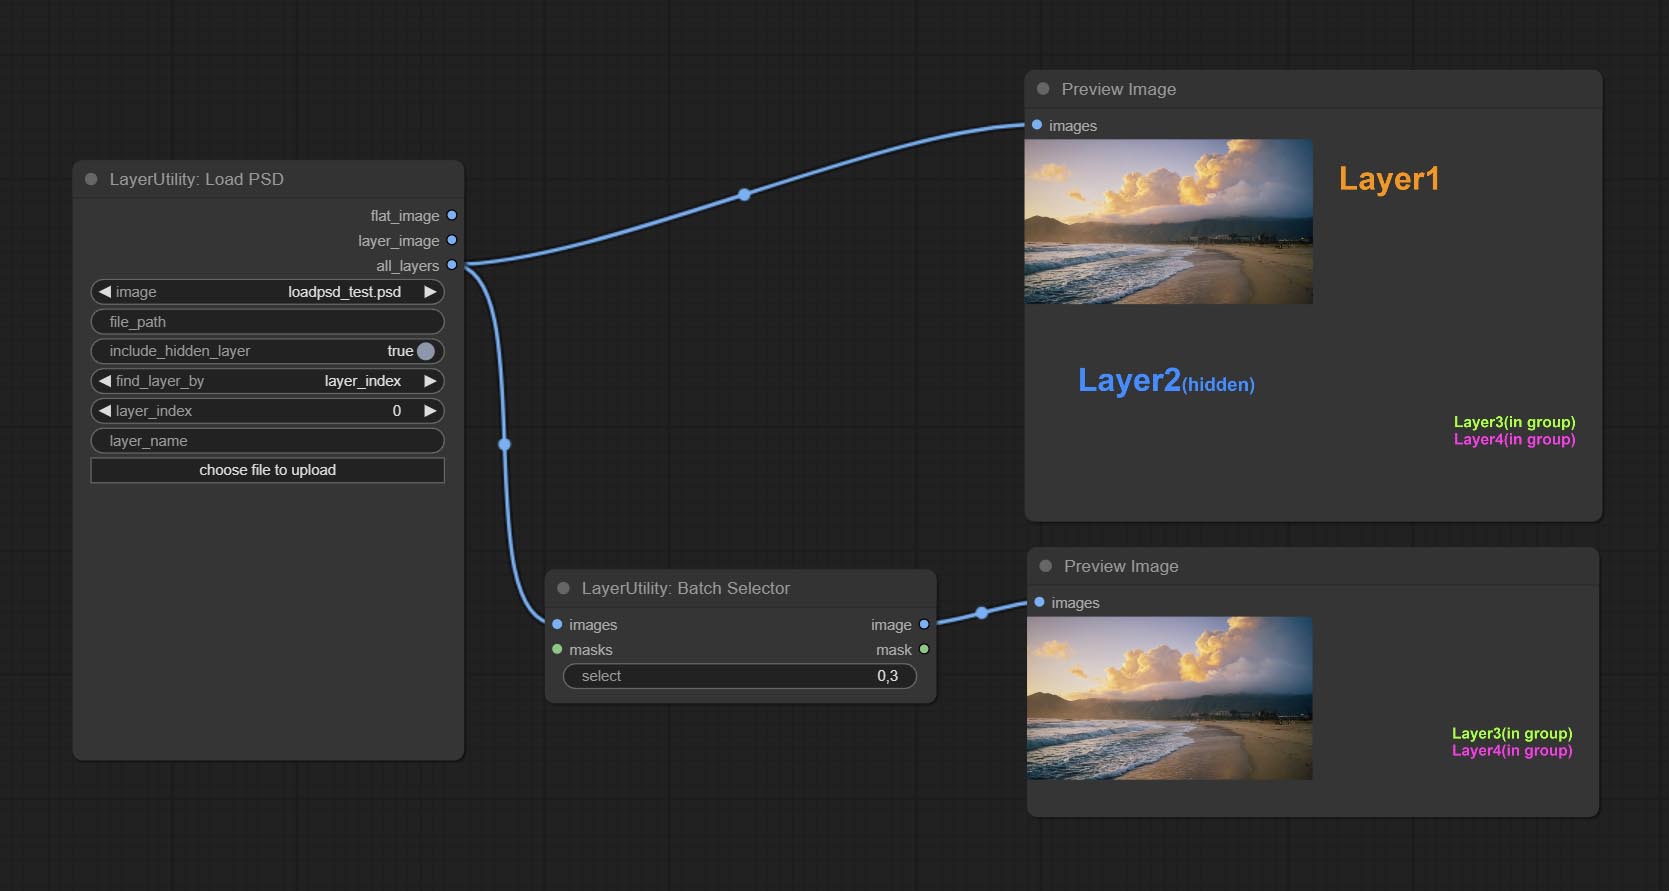
Node Options:
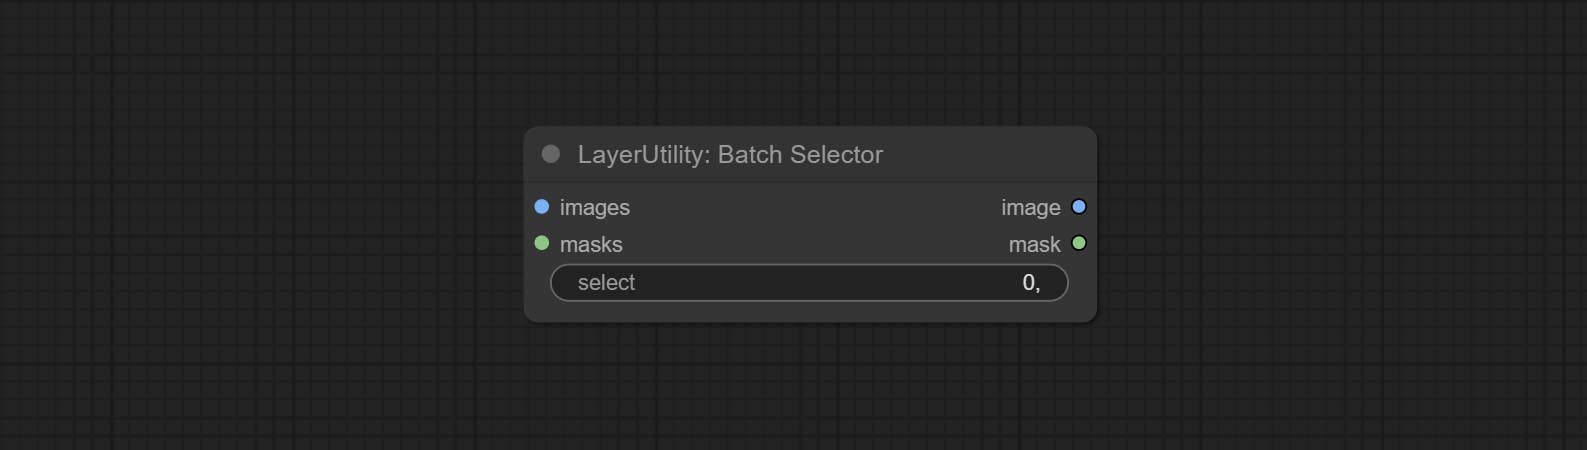
- images: Batch images input. This input is optional.
- masks: Batch masks input. This input is optional.
- select: Select the output image or mask at the batch index value, where 0 is the first image. Multiple values can be entered, separated by any non numeric character, including but not limited to commas, periods, semicolons, spaces or letters, and even Chinese characters. Note: If the value exceeds the batch size, the last image will be output. If there is no corresponding input, an empty 64x64 image or a 64x64 black mask will be output.
TextJoin
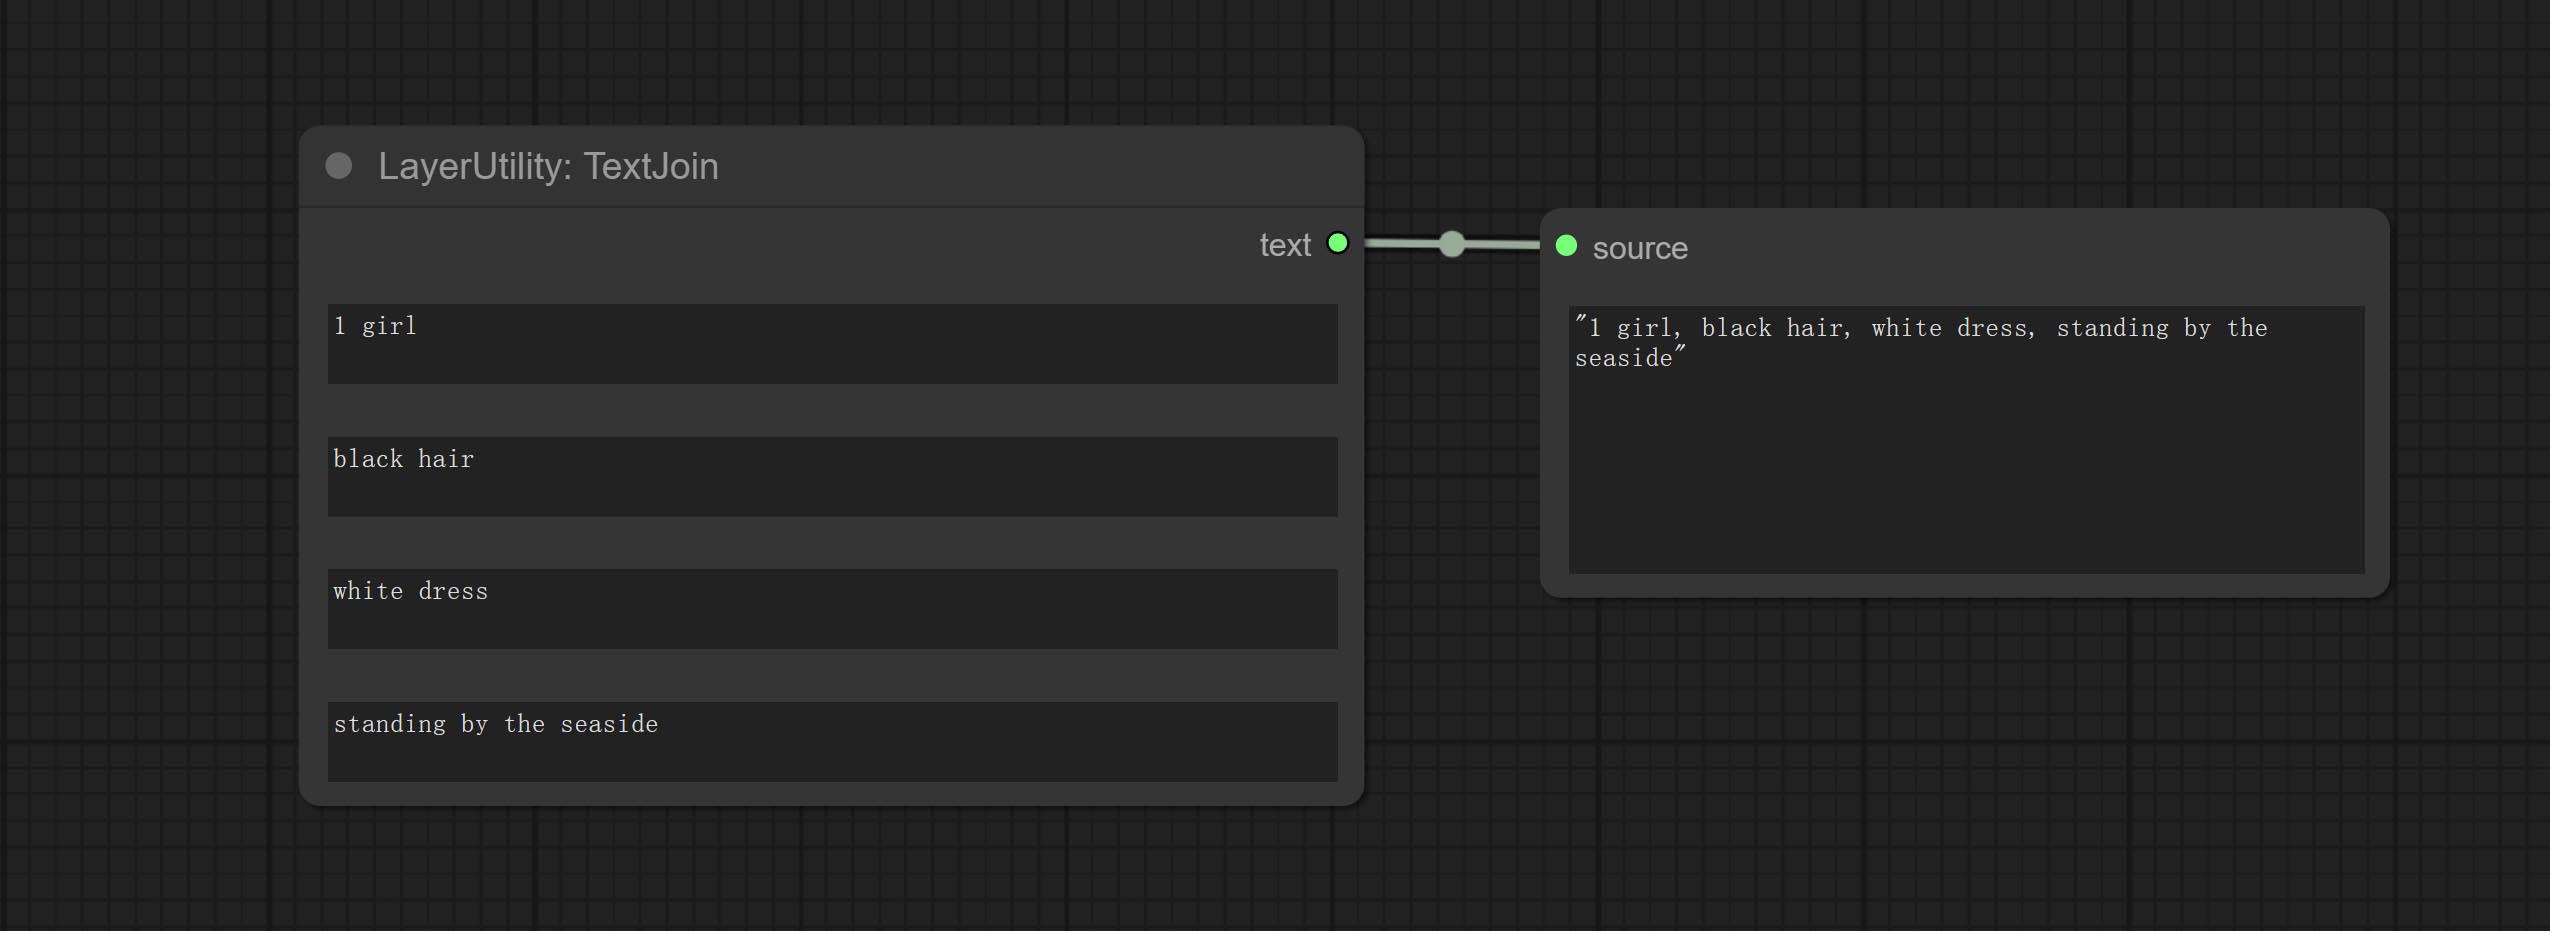
Combine multiple paragraphs of text into one.
TextJoinV2
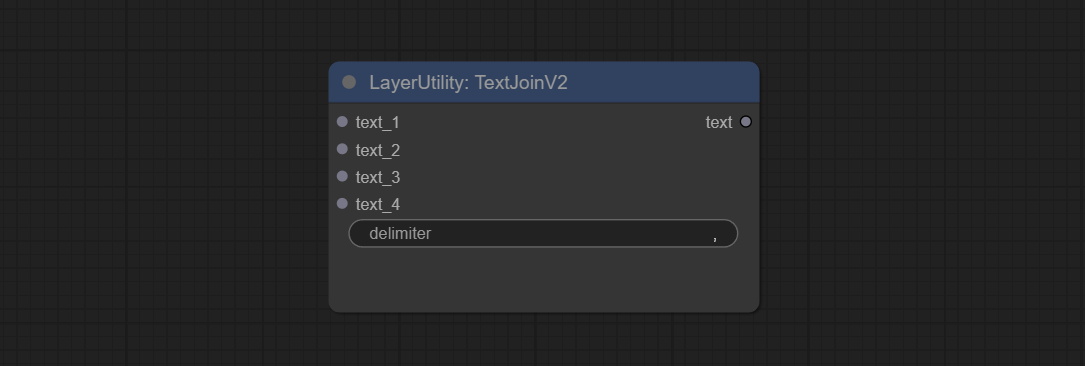
Added delimiter options on the basis of TextJoin.
PrintInfo
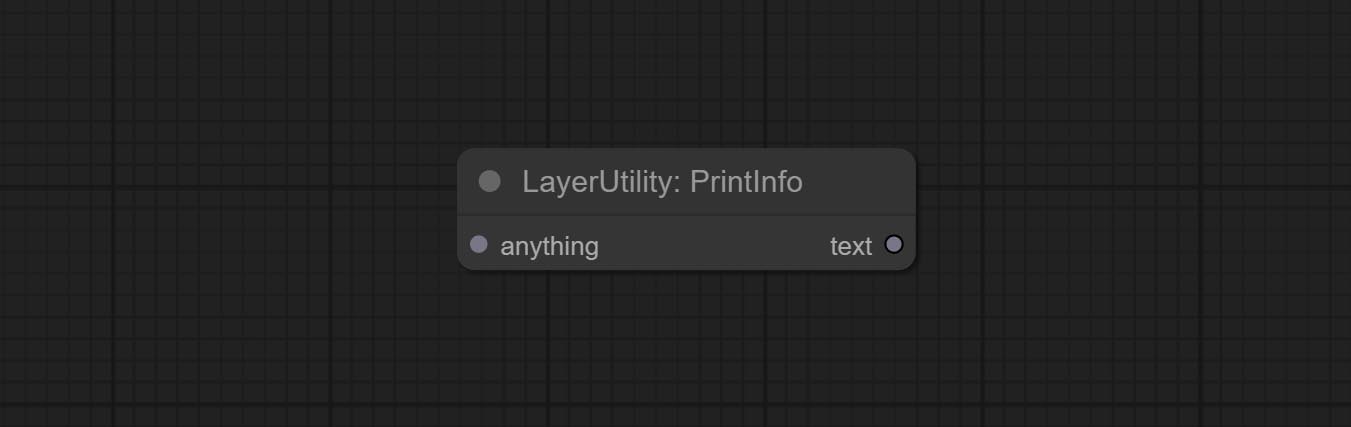
Used to provide assistance for workflow debugging. When running, the properties of any object connected to this node will be printed to the console.
This node allows any type of input.
TextBox
Output a string.
خيط
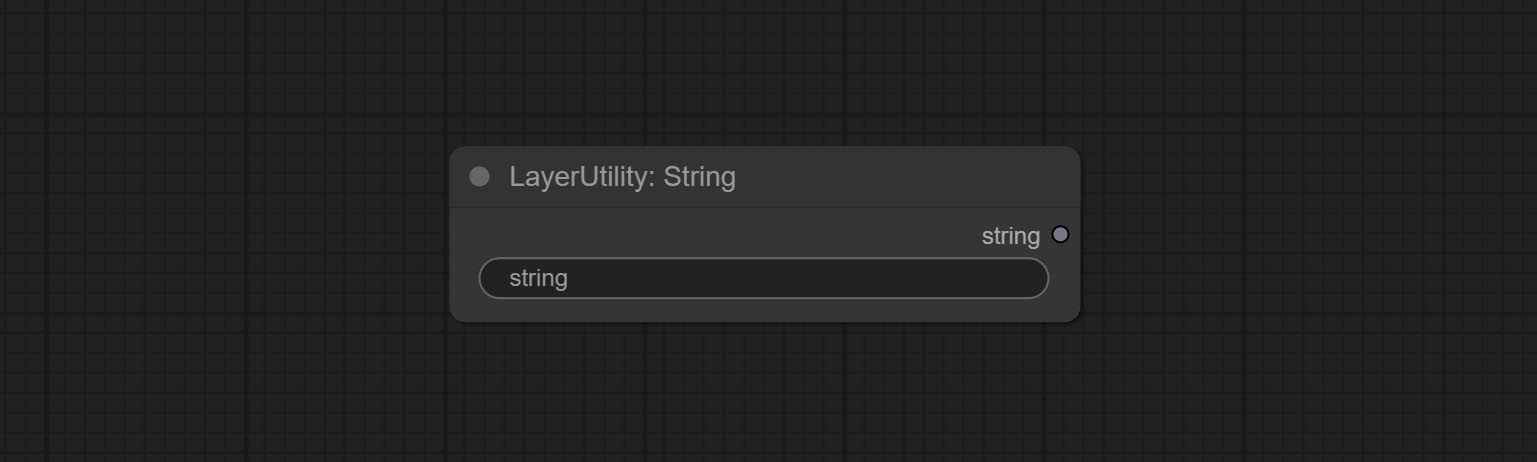
Output a string. same as TextBox.
عدد صحيح
Output a integer value.
يطفو
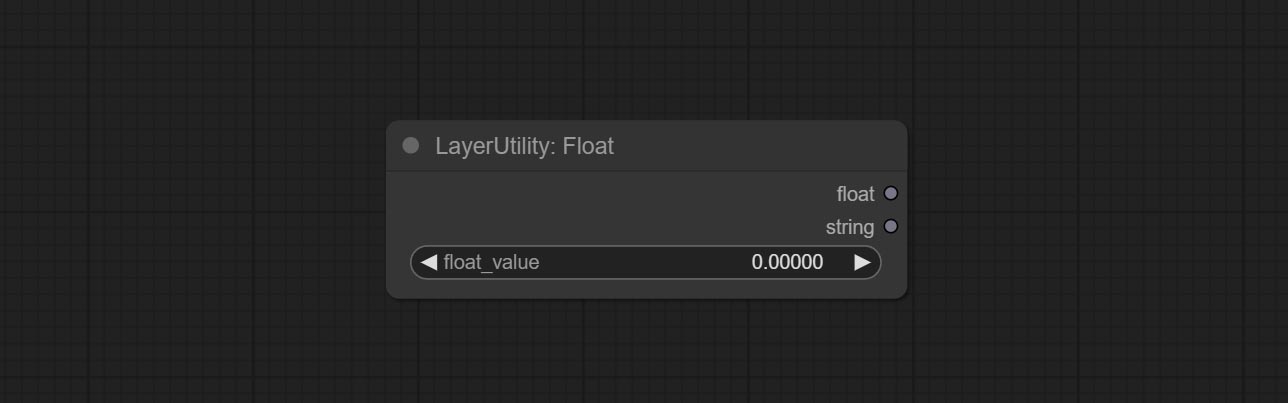
Output a floating-point value with a precision of 5 decimal places.
Boolean

Output a boolean value.
RandomGenerator
Used to generate random value within a specified range, with outputs of int, float, and boolean. Supports batch and list generation, and supports batch generation of a set of different random number lists based on image batch. 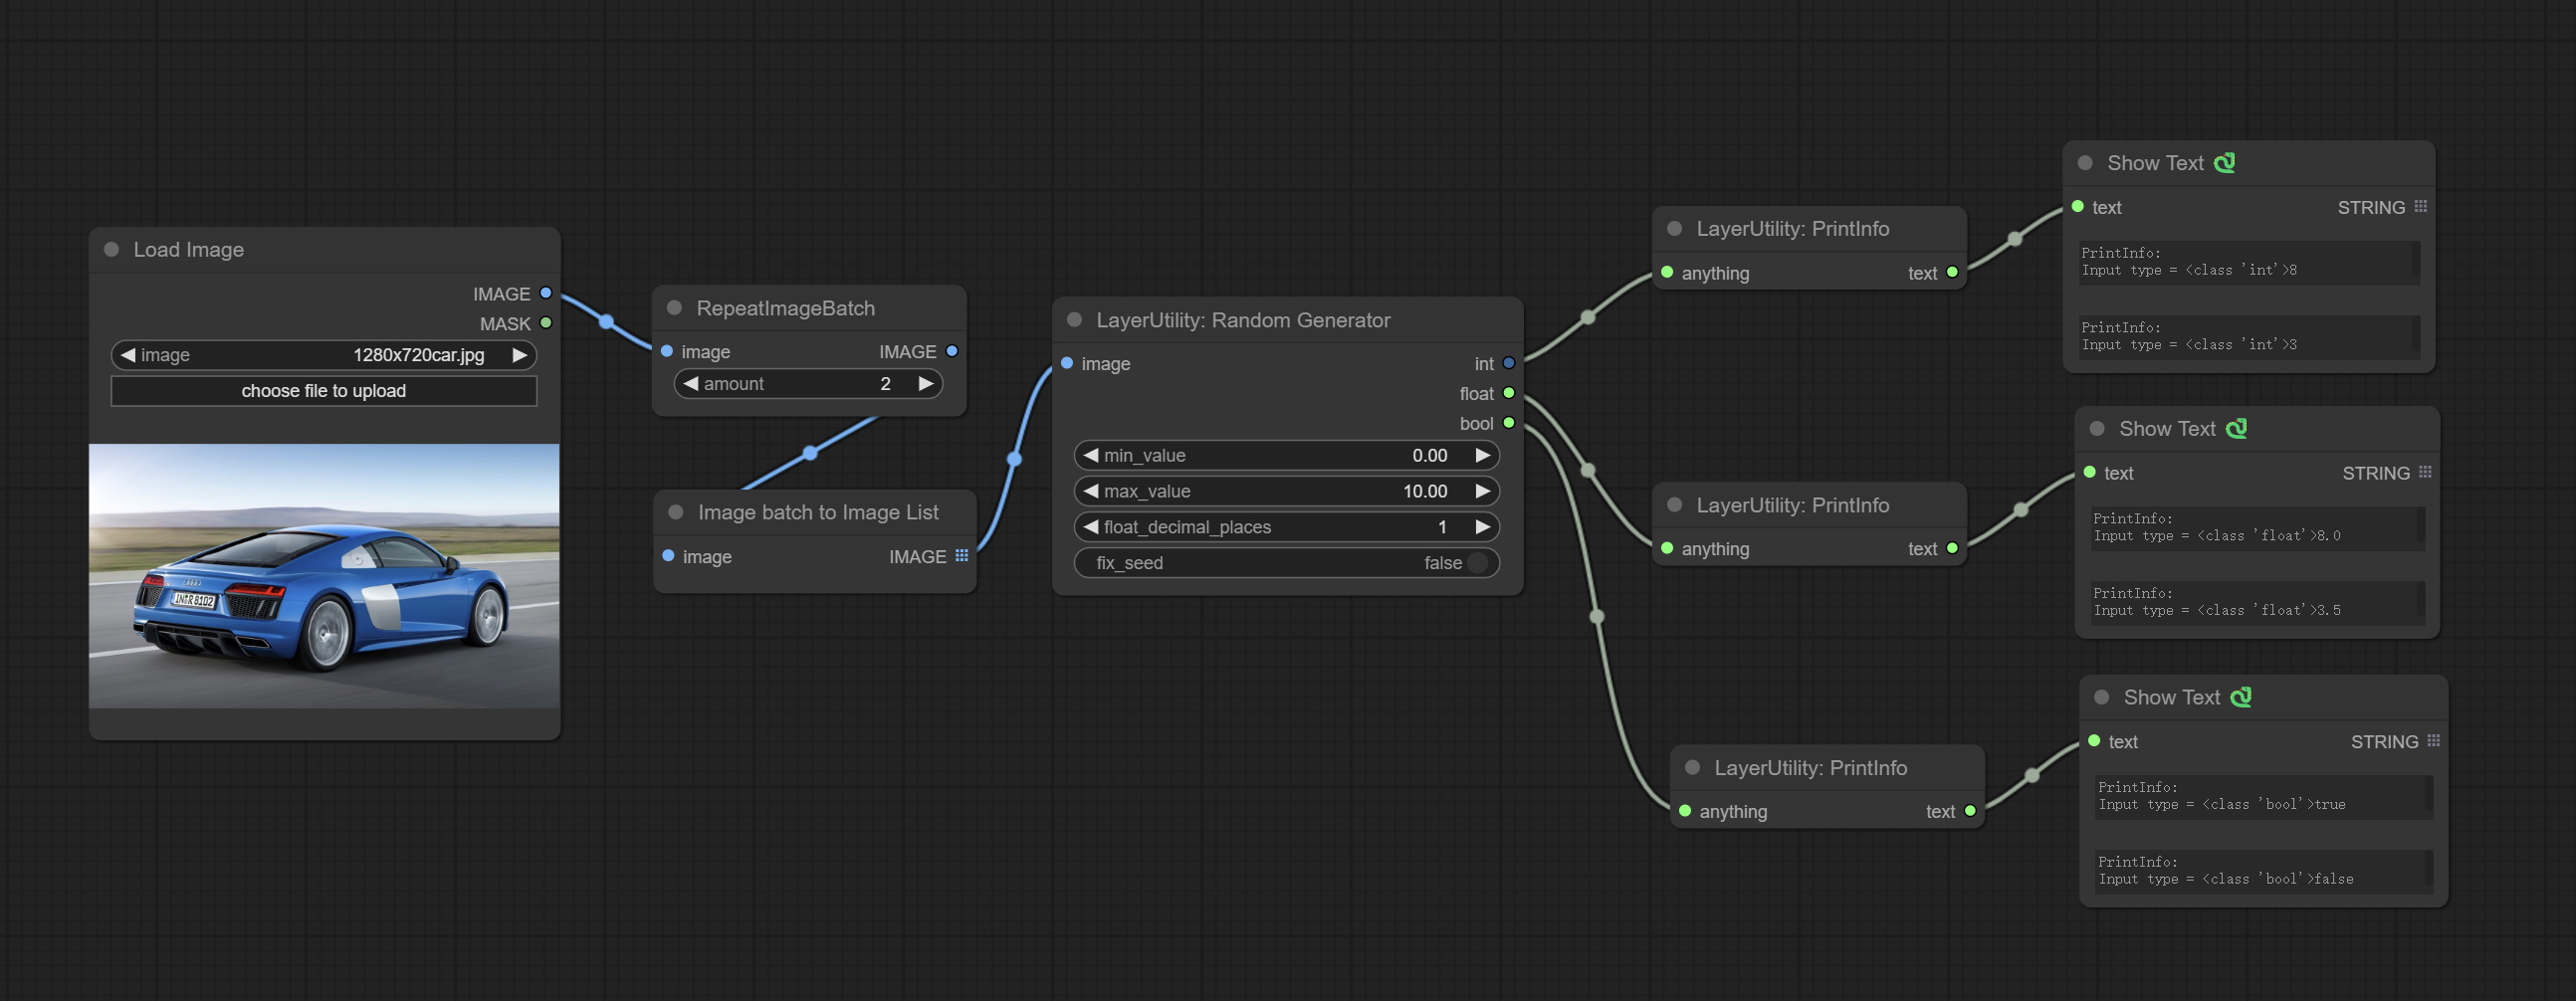
Node Options: 
- image: Optional input, generate a list of random numbers that match the quantity in batches according to the image.
- min_value: Minimum value. Random numbers will randomly take values from the minimum to the maximum.
- max_value: Maximum value. Random numbers will randomly take values from the minimum to the maximum.
- float_decimal_places: Precision of float value.
- fix_seed:Is the random number seed fixed. If this option is fixed, the generated random number will always be the same.
Outputs: int: Integer random number. float: Float random number. bool: Boolean random number.
RandomGeneratorV2
On the based of RandomGenerator, add the least random range and seed options.
Node Options: 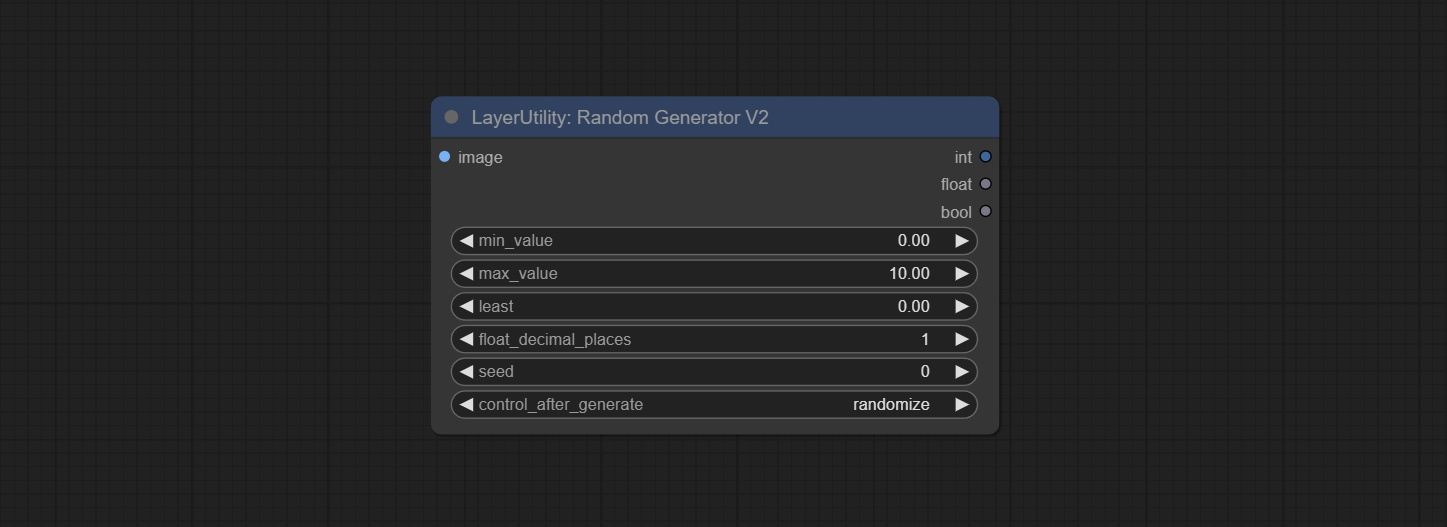
- image: Optional input, generate a list of random numbers that match the quantity in batches according to the image.
- min_value: Minimum value. Random numbers will randomly take values from the minimum to the maximum.
- max_value: Maximum value. Random numbers will randomly take values from the minimum to the maximum.
- least: Minimum random range. Random numbers will randomly at least take this value.
- float_decimal_places: Precision of float value.
- seed: The seed of random number.
- control_after_generate: Seed change options. If this option is fixed, the generated random number will always be the same.
Outputs: int: Integer random number. float: Float random number. bool: Boolean random number.
NumberCalculator
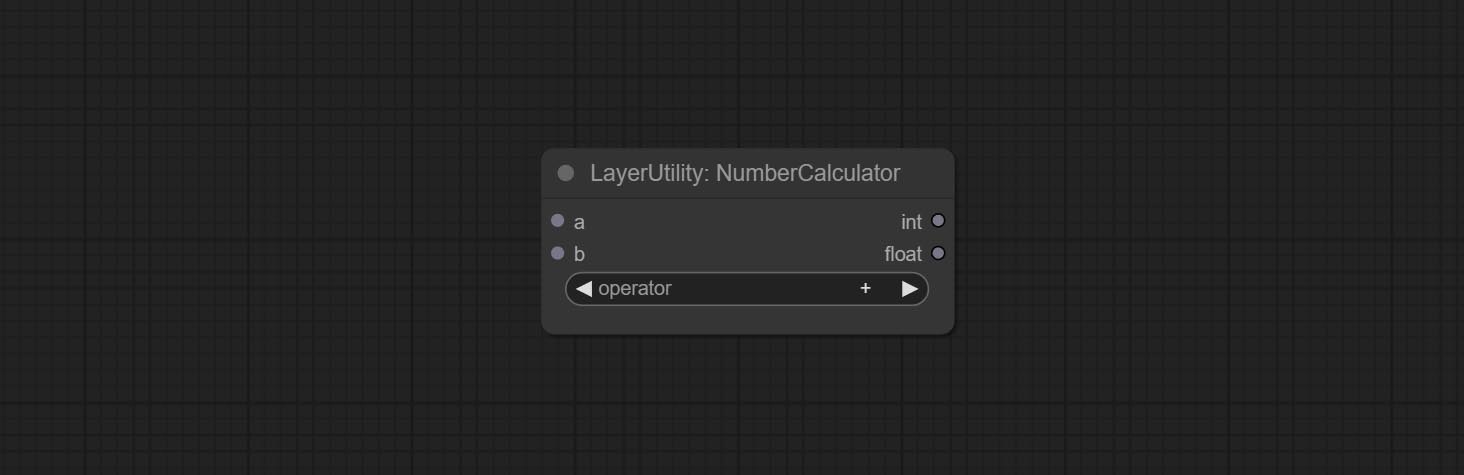
Performs mathematical operations on two numeric values and outputs integer and floating point results * . Supported operations include + , - , * , / , ** , // , % .
* The input only supports boolean, integer, and floating point numbers, forcing in other data will result in error.
NumberCalculatorV2
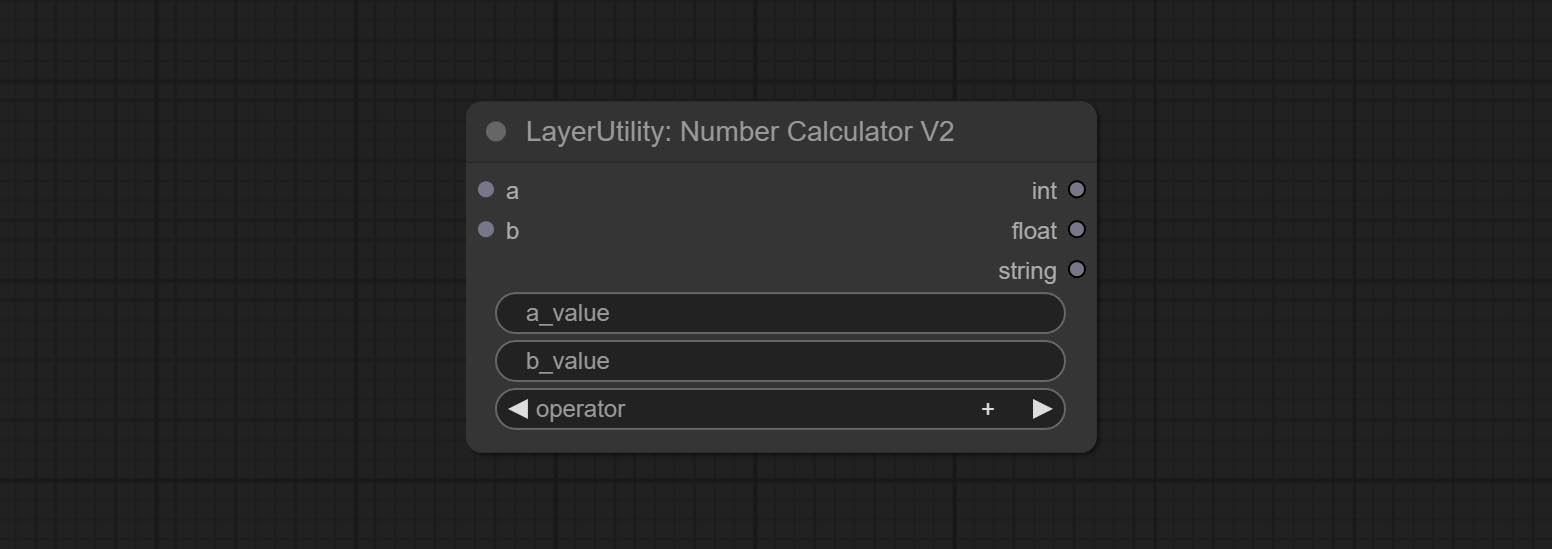
The upgraded version of NumberCalculator has added numerical inputs within nodes and square root operations. The square root operation option is nth_root Note: The input takes priority, and when there is input, the values within the node will be invalid.
BooleanOperator
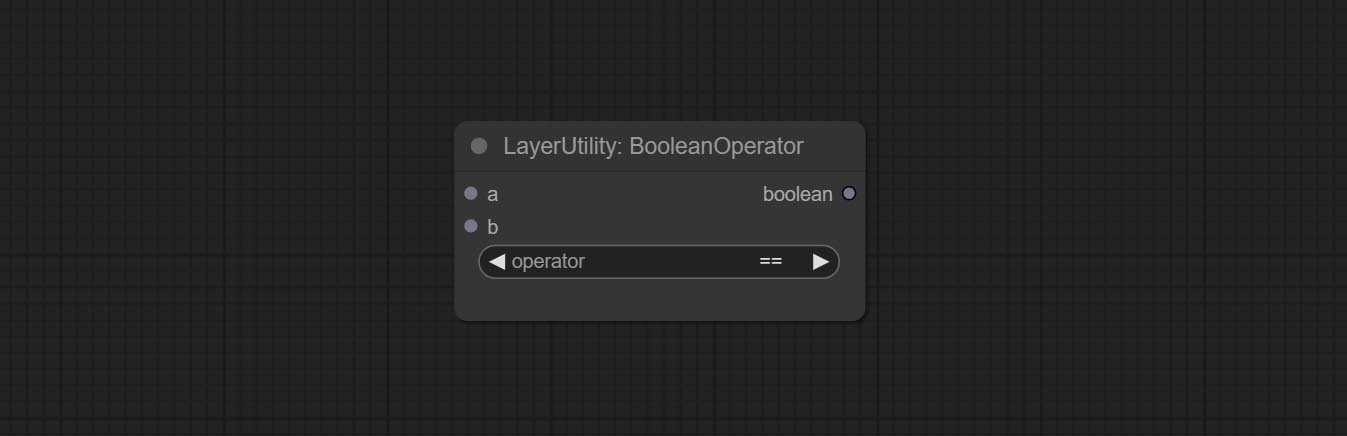
Perform a Boolean operation on two numeric values and output the result * . Supported operations include == , != , and , or , xor , not , min , max .
* The input only supports boolean, integer, and floating point numbers, forcing in other data will result in error. The and operation between the values outputs a larger number, and the or operation outputs a smaller number.
BooleanOperatorV2
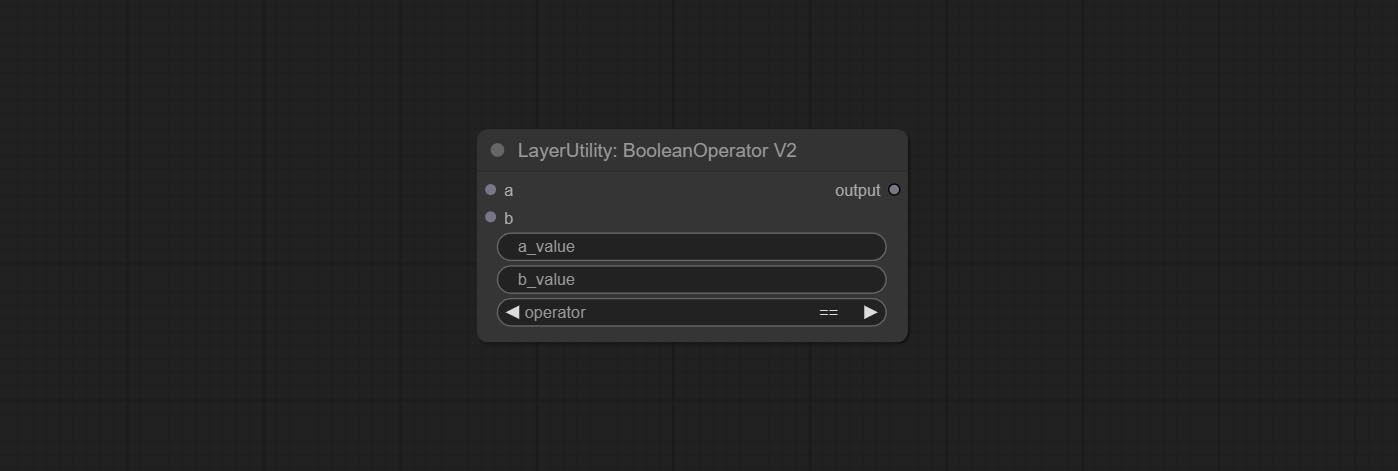
The upgraded version of Boolean Operator has added numerical inputs within nodes and added judgments for greater than, less than, greater than or equal to, and less than or equal to. Note: The input takes priority, and when there is input, the values within the node will be invalid.
StringCondition
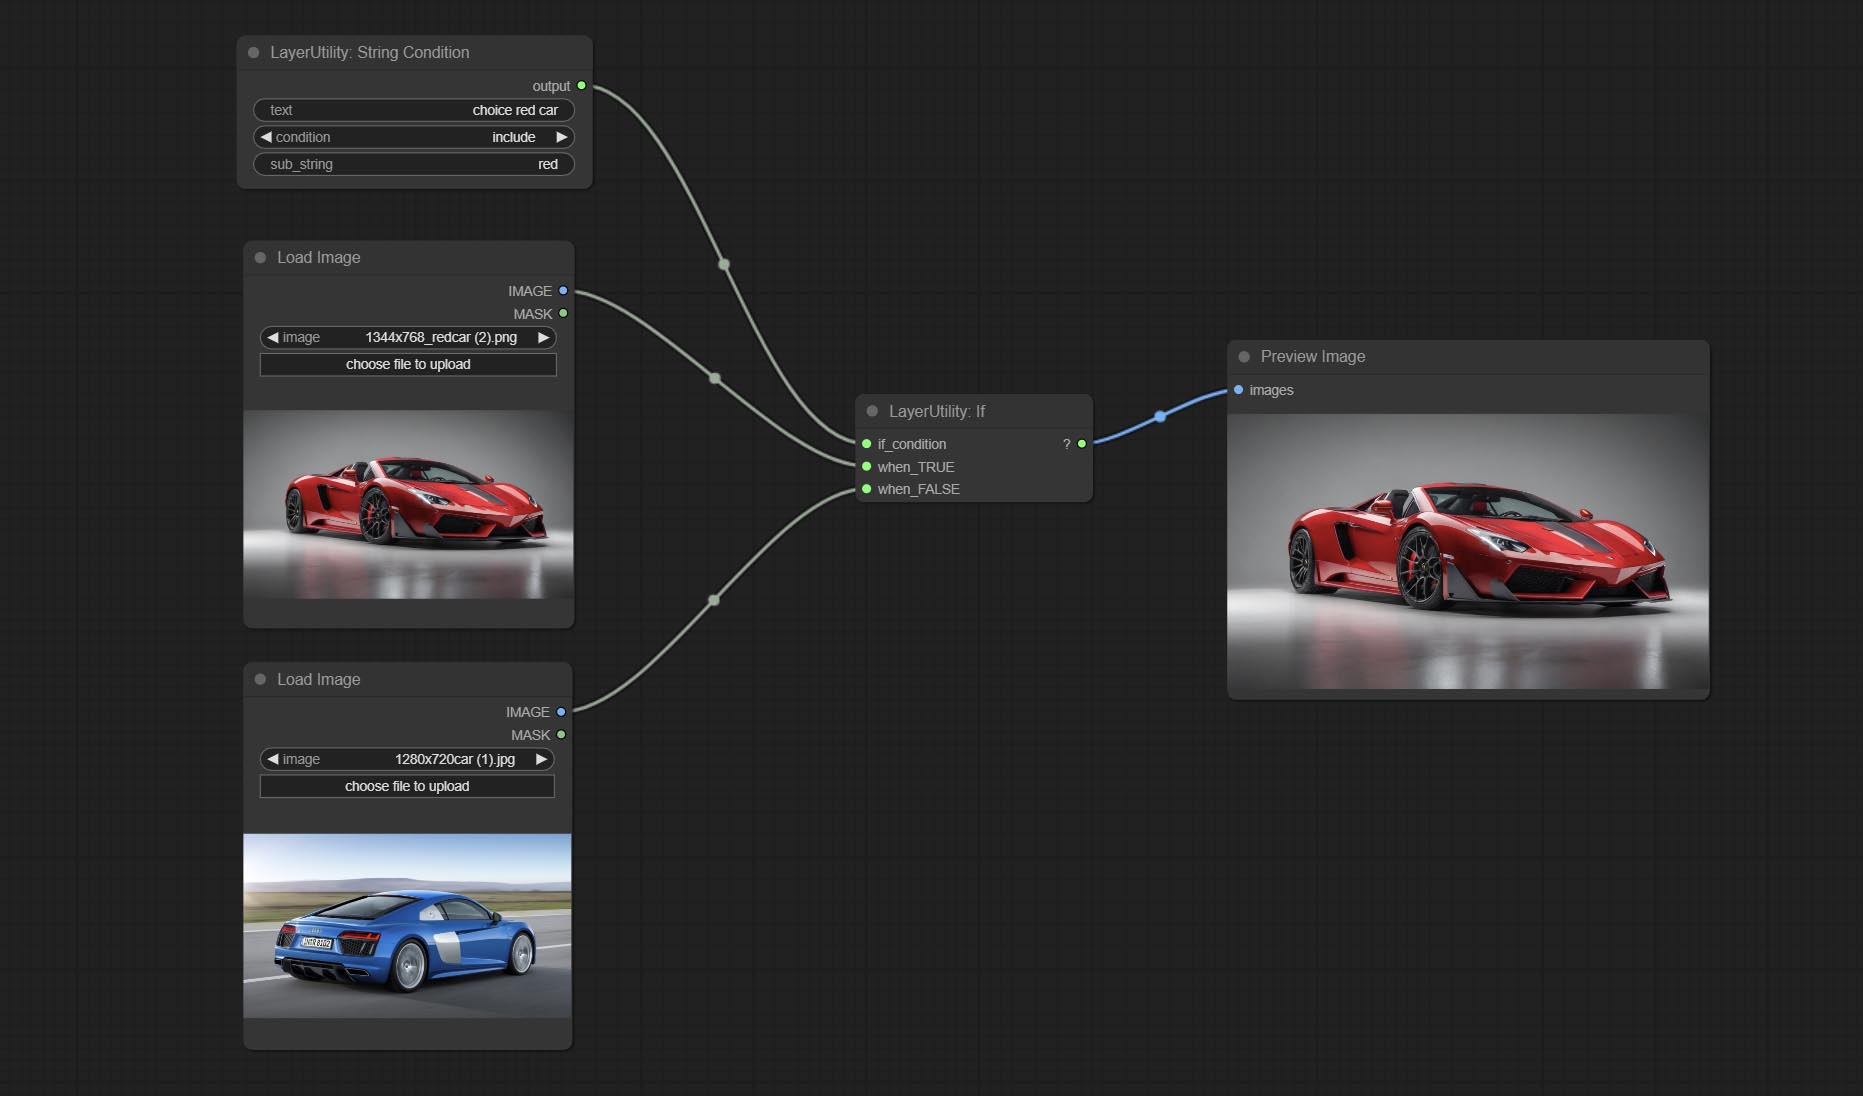
Determine whether the text contains or does not contain substrings, and output a Boolean value.
Node Options:
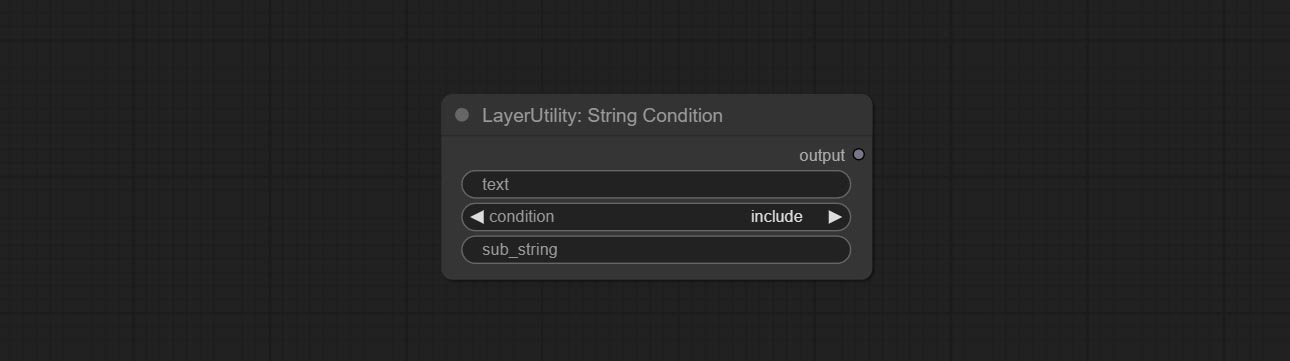
- text: Input text.
- condition: Judgment conditions.
include determines whether it contains a substring, and exclude determines whether it does not. - sub_string: Substring.
CheckMask
Check if the mask contains enough valid areas and output a Boolean value.
Node Options:
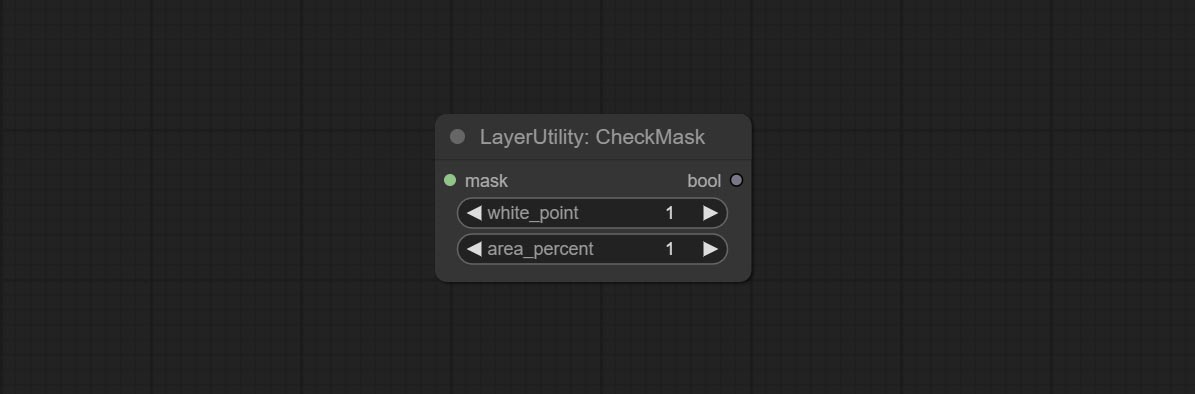
- white_point: The white point threshold used to determine whether the mask is valid is considered valid if it exceeds this value.
- area_percent: The percentage of effective areas. If the proportion of effective areas exceeds this value, output True.
CheckMaskV2
On the basis of CheckMask, the method option has been added, which allows for the selection of different detection methods. The area_percent is changed to a floating point number with an accuracy of 2 decimal places, which can detect smaller effective areas.
Node Options:
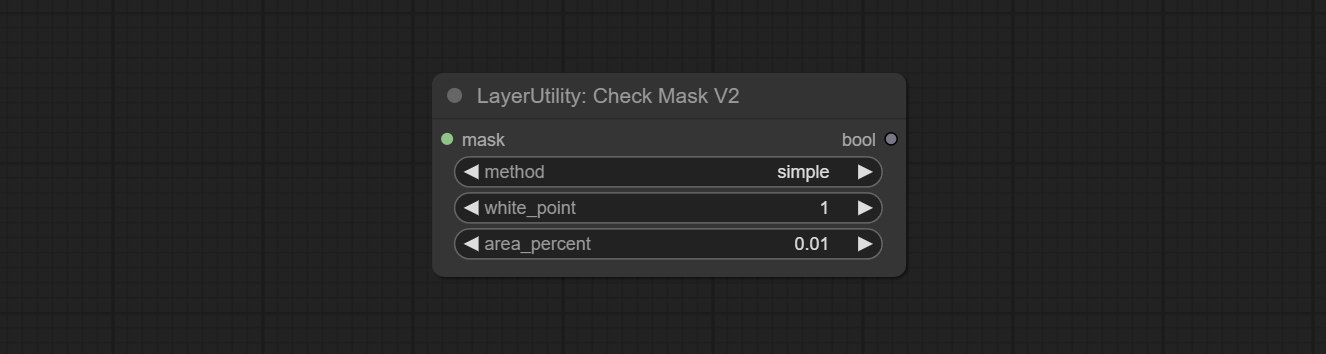
- method: There are two detection methods, which are
simple and detectability . The simple method only detects whether the mask is completely black, while the detect_percent method detects the proportion of effective areas.
لو
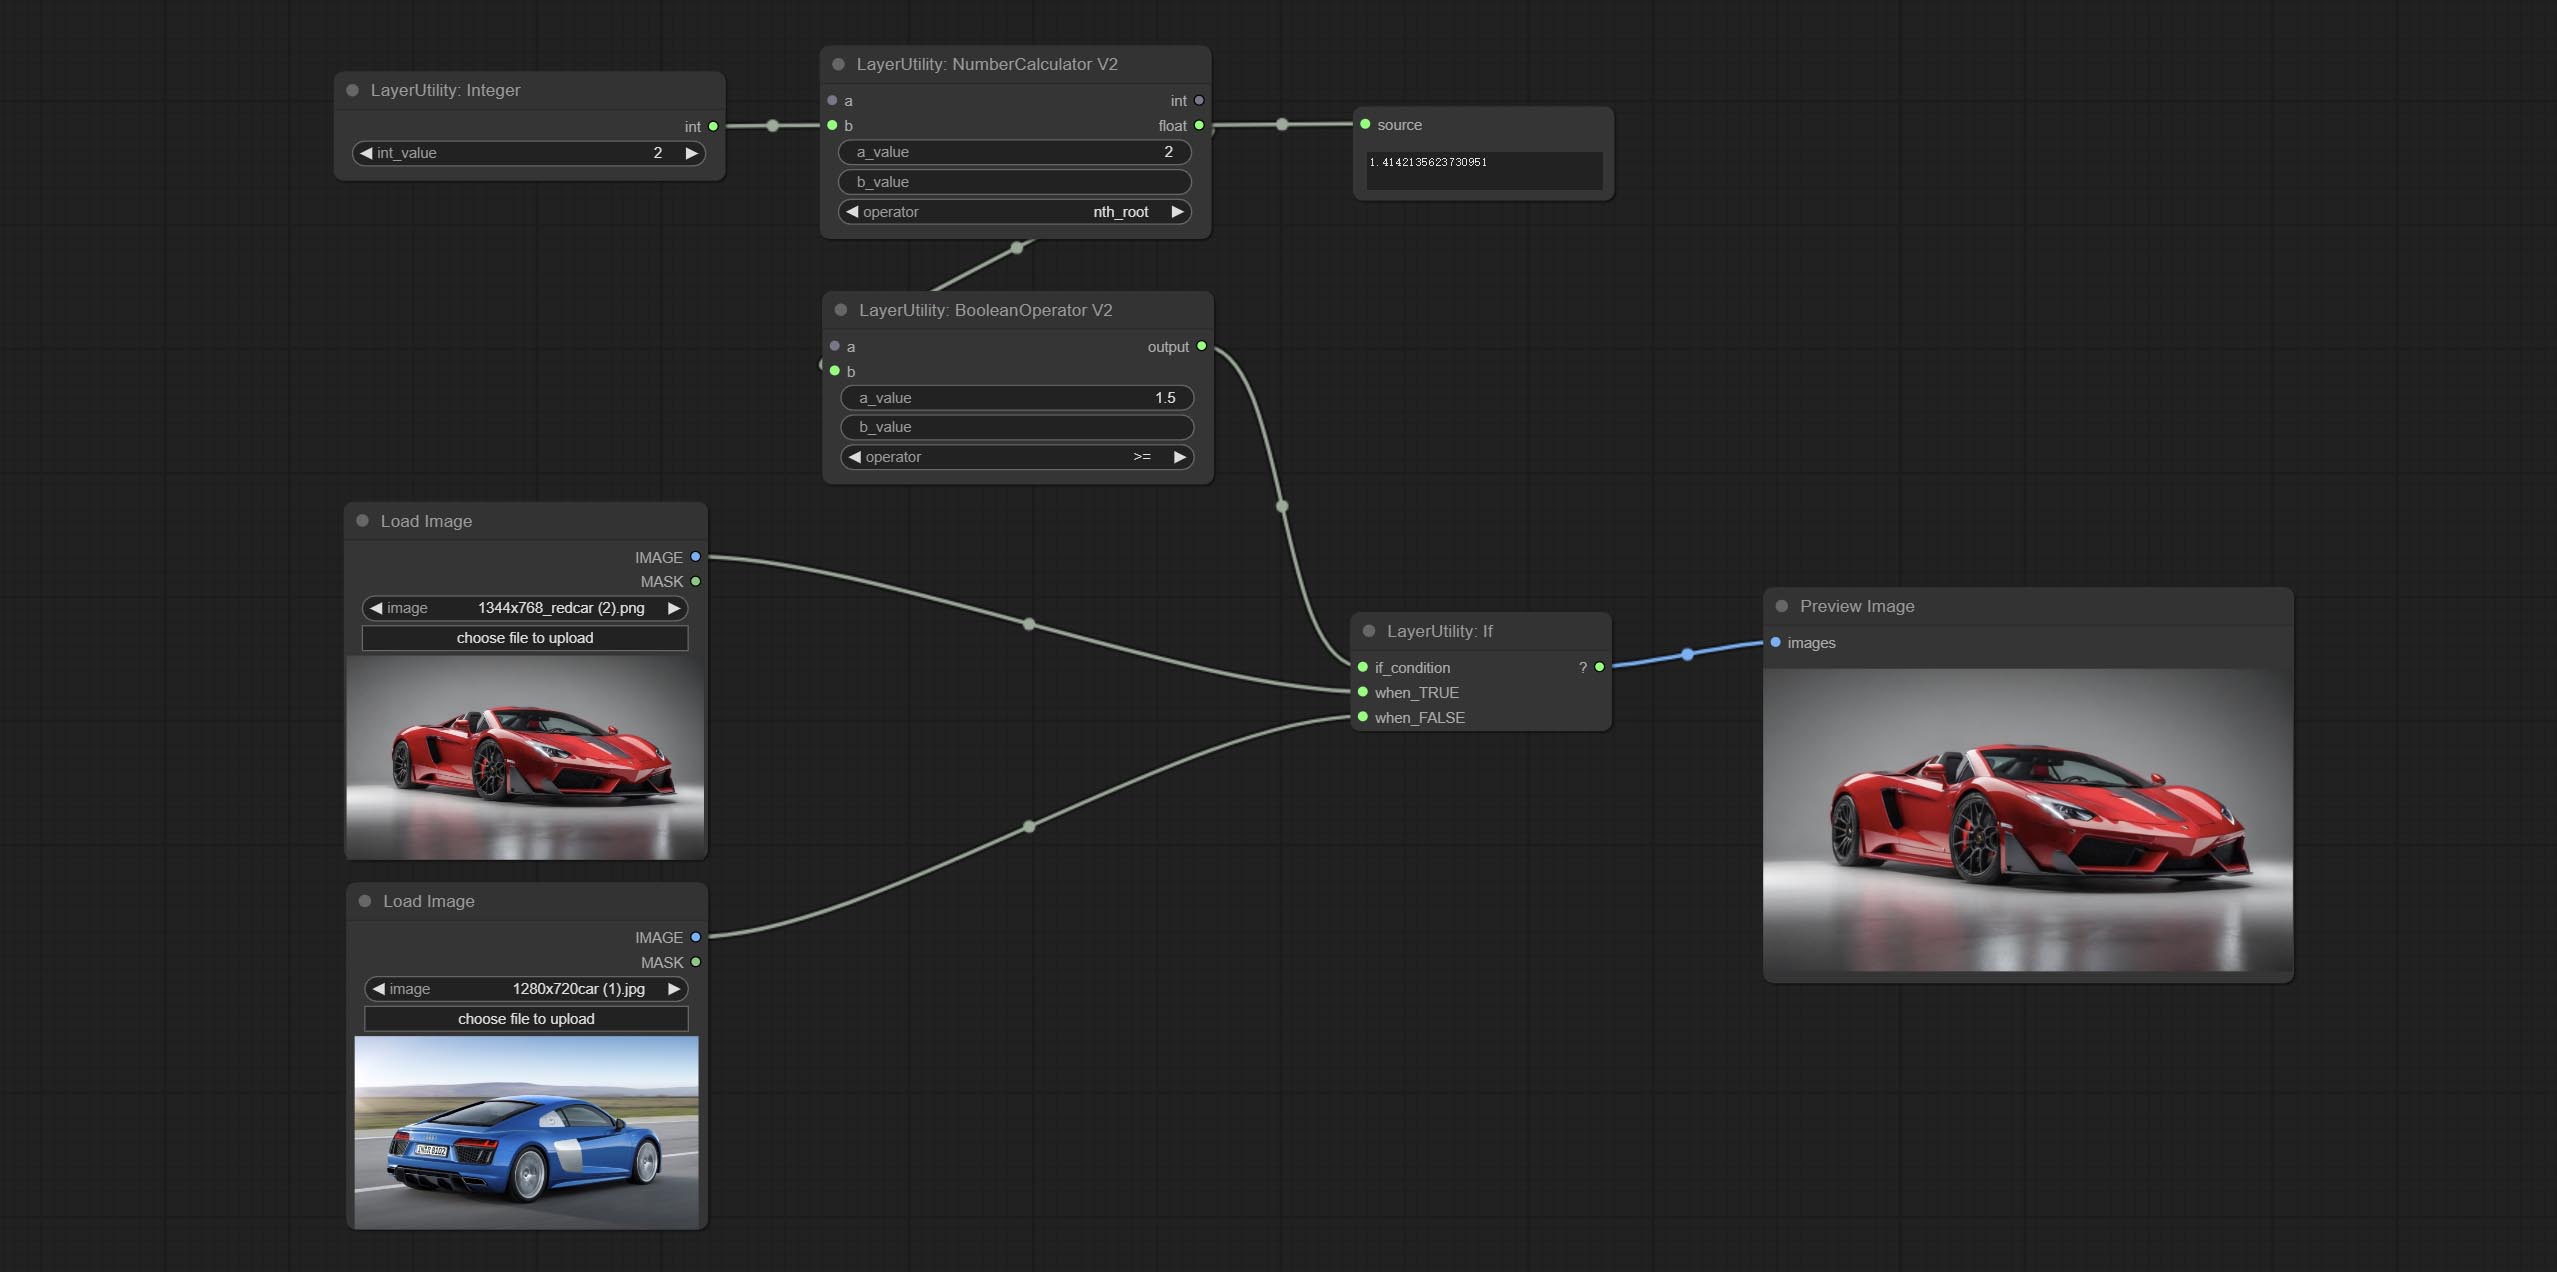
Switches output based on Boolean conditional input. It can be used for any type of data switching, including but not limited to numeric values, strings, pictures, masks, models, latent, pipe pipelines, etc.
Node Options:
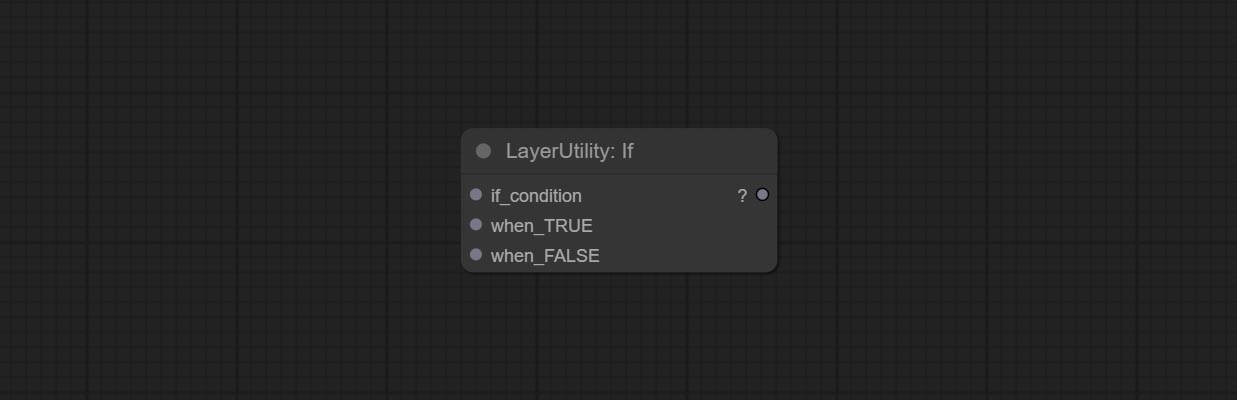
- if_condition: Conditional input. Boolean, integer, floating point, and string inputs are supported. When entering a value, 0 is judged to be False; When a string is entered, an empty string is judged as Flase.
- when_True: This item is output when the condition is True.
- when_False: This item is output when the condition is False.
SwitchCase

Switches the output based on the matching string. It can be used for any type of data switching, including but not limited to numeric values, strings, pictures, masks, models, latent, pipe pipelines, etc. Supports up to 3 sets of case switches. Compare case to switch_condition , if the same, output the corresponding input. If there are the same cases, the output is prioritized in order. If there is no matching case, the default input is output. Note that the string is case sensitive and Chinese and English full-width and half-width.
Node Options:
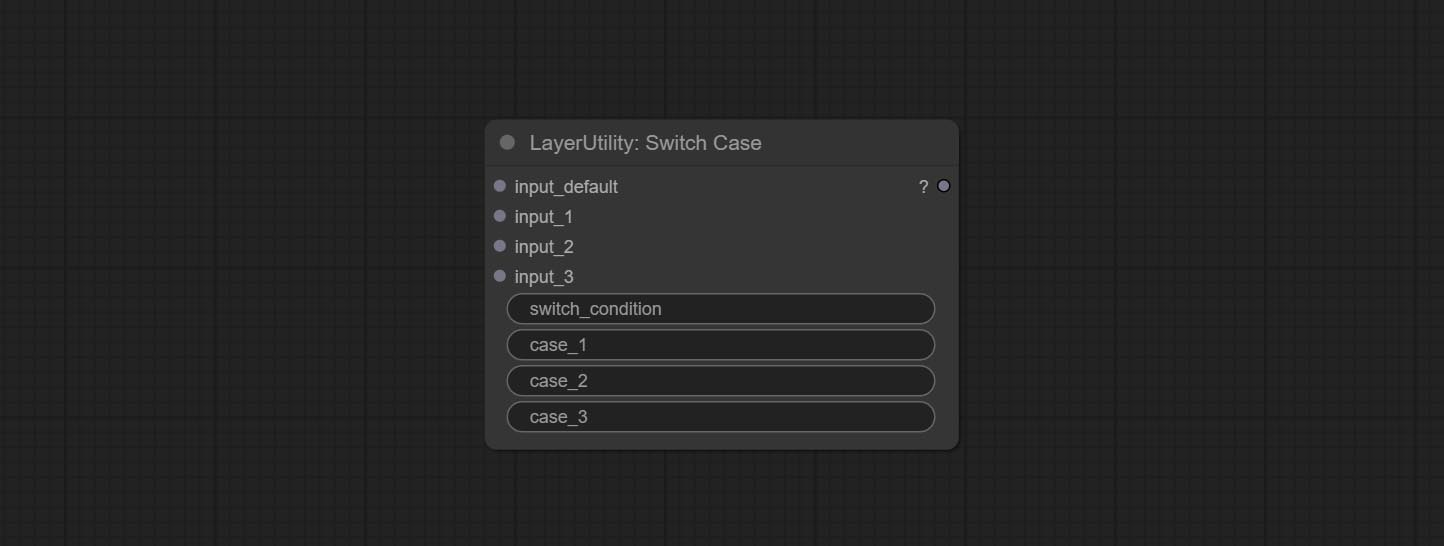
- input_default: Input entry for default output. This input is required.
- input_1: Input entry used to match
case_1 . This input is optional. - input_2: Input entry used to match
case_2 . This input is optional. - input_3: Input entry used to match
case_3 . This input is optional. - switch_condition: String used to judge with case.
- case_1: case_1 string.
- case_2: case_2 string.
- case_3: case_3 string.
QueueStop
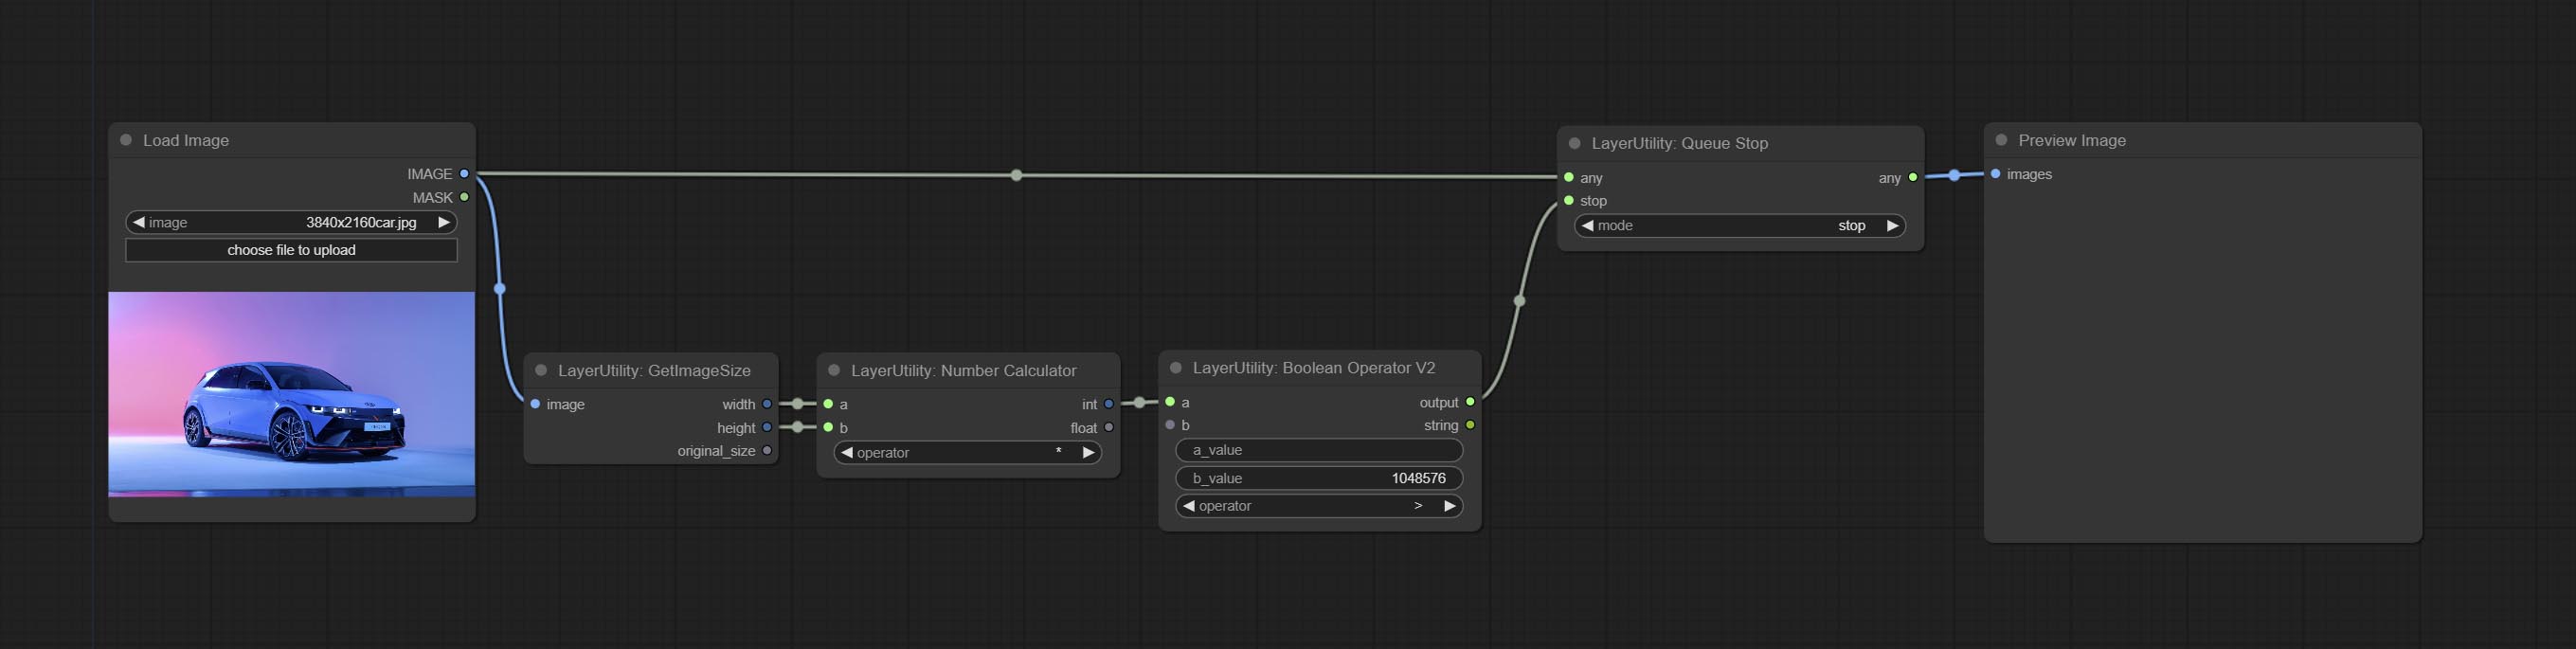
Stop the current queue. When executed at this node, the queue will stop. The workflow diagram above illustrates that if the image is larger than 1Mega pixels, the queue will stop executing.
Node Options:
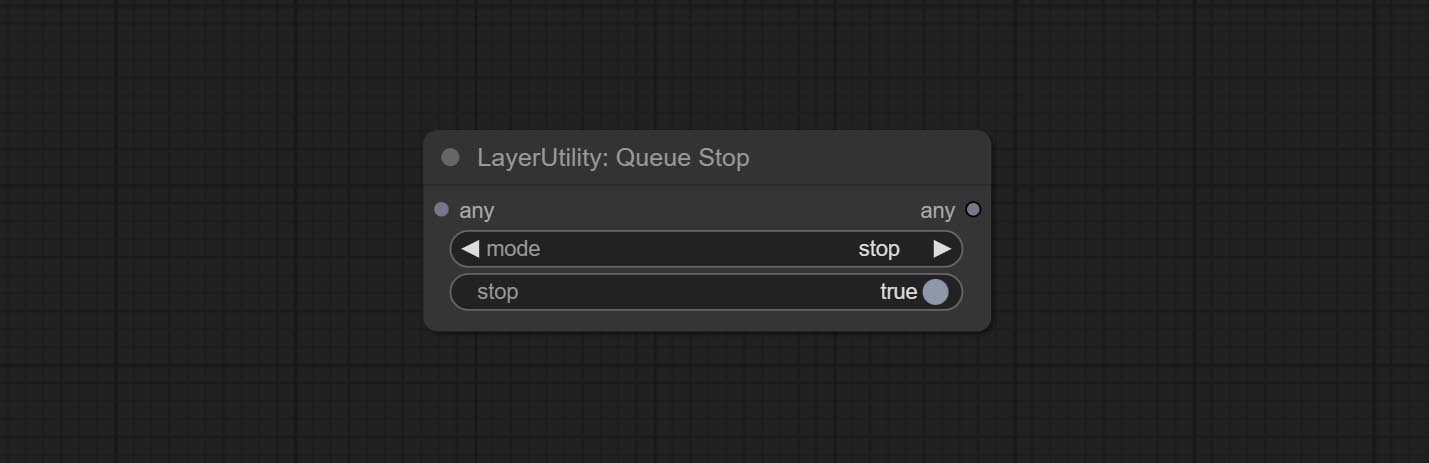
- mode: Stop mode. If you choose
stop , it will be determined whether to stop based on the input conditions. If you choose continue , ignore the condition to continue executing the queue. - stop: If true, the queue will stop. If false, the queue will continue to execute.
PurgeVRAM
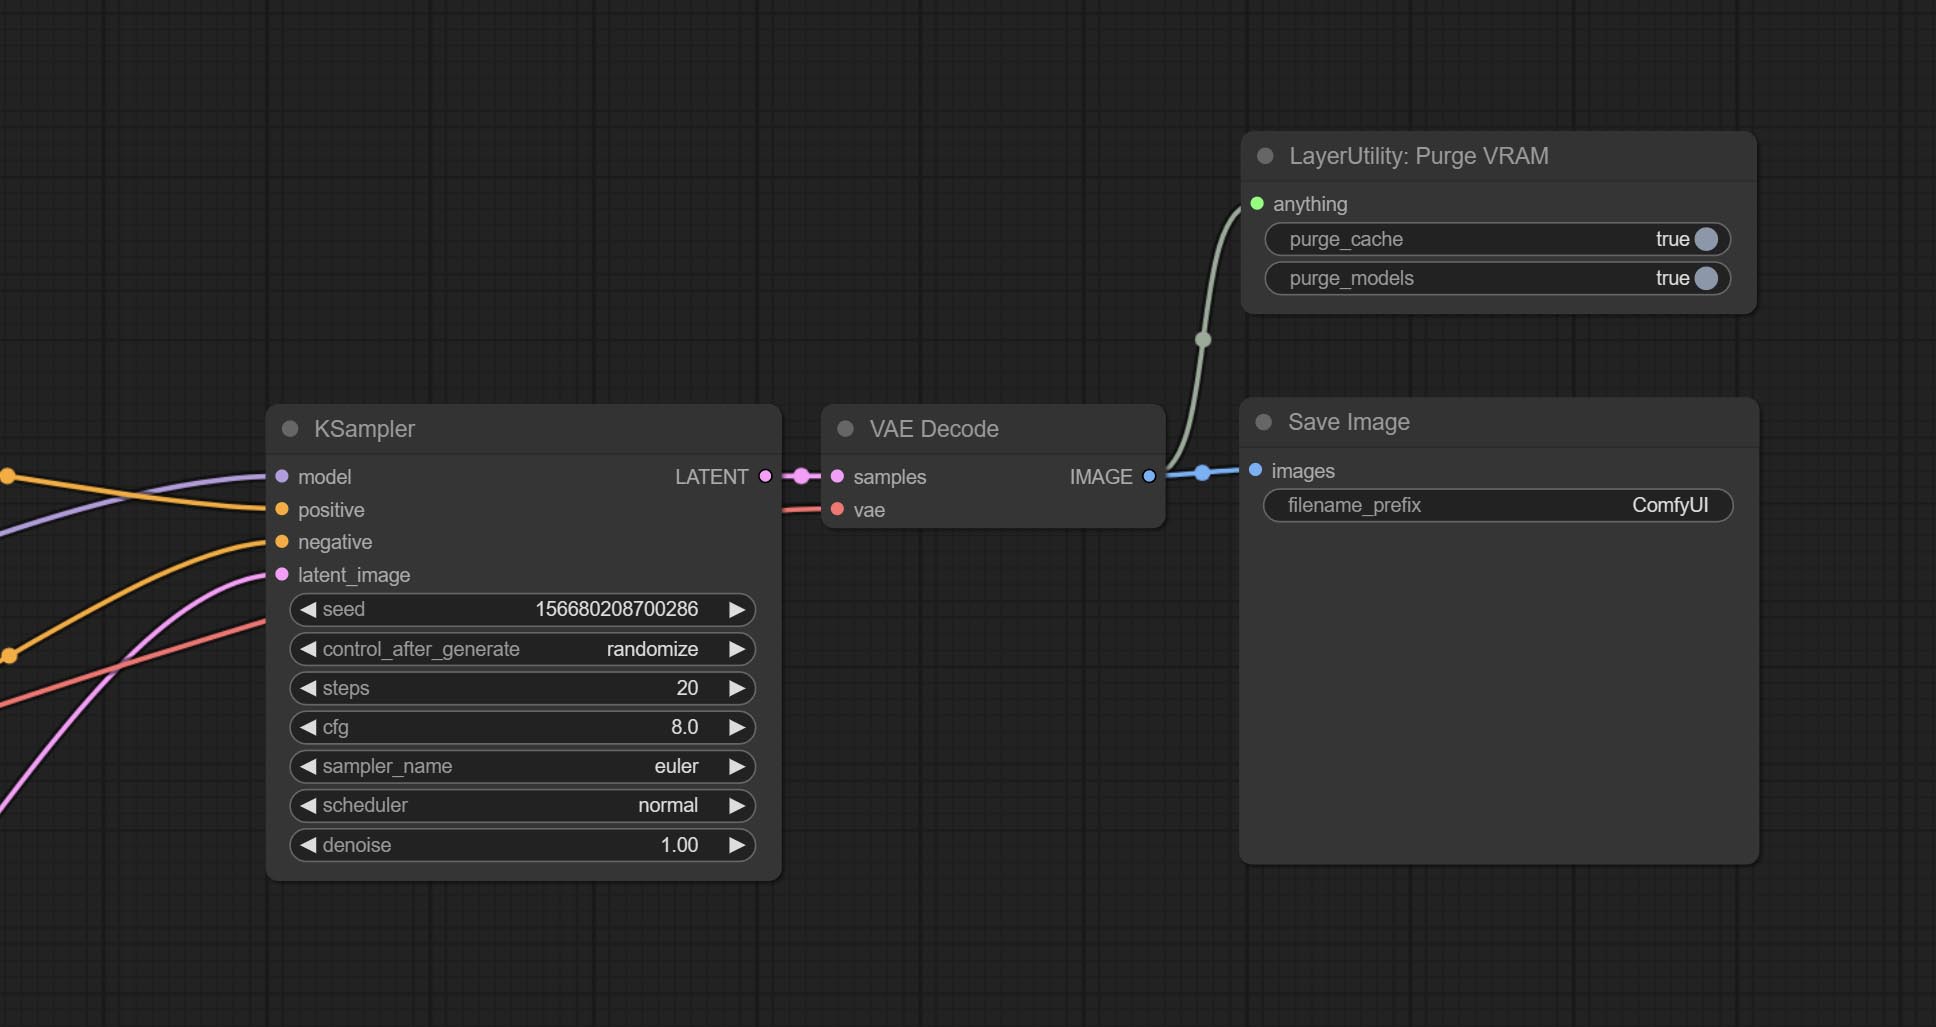
Clean up GPU VRAM and system RAM. any type of input can be accessed, and when executed to this node, the VRAM and garbage objects in the RAM will be cleaned up. Usually placed after the node where the inference task is completed, such as the VAE Decode node.
Node Options:
- purge_cache: Clean up cache。
- purge_models: Unload all loaded models。
SaveImagePlus
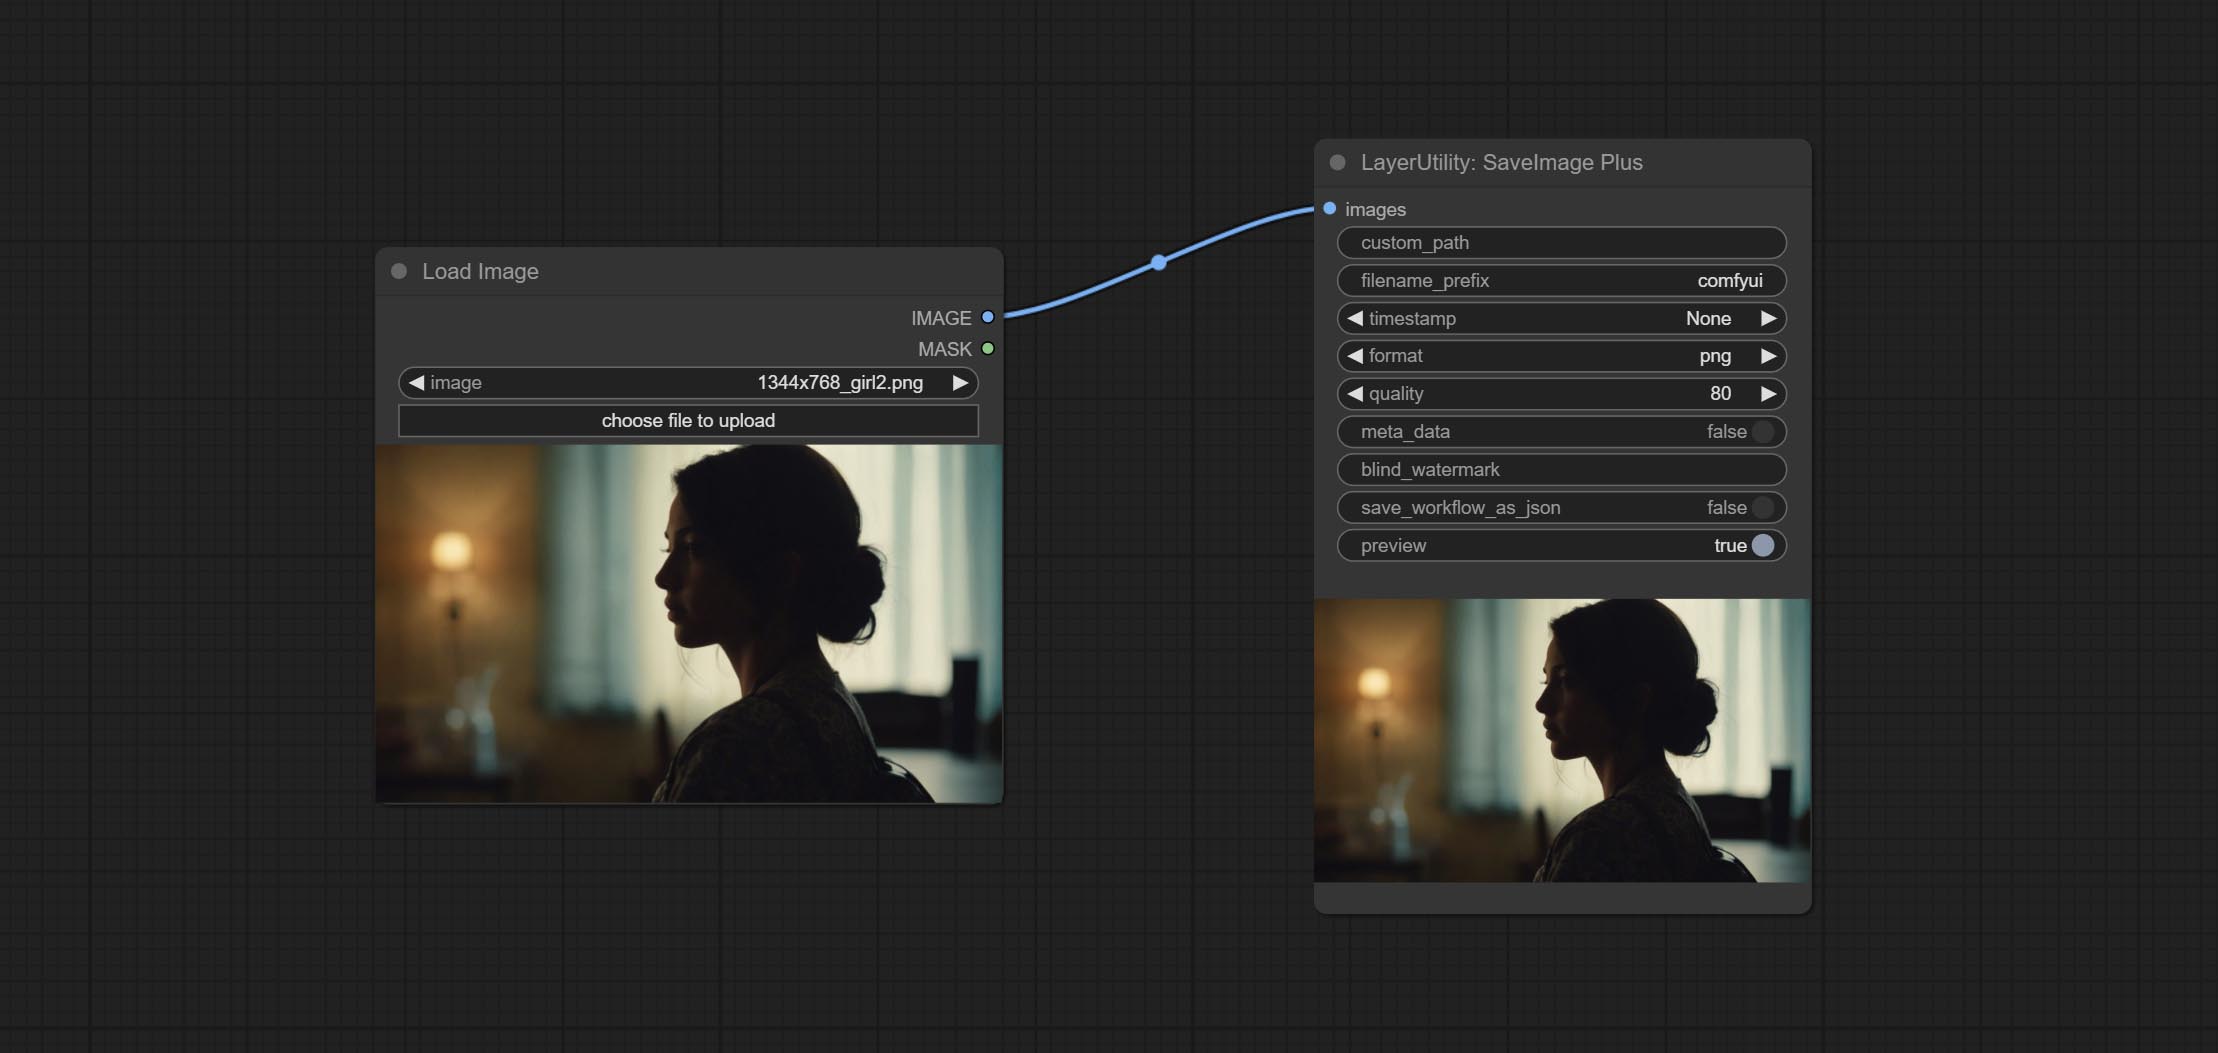
Enhanced save image node. You can customize the directory where the picture is saved, add a timestamp to the file name, select the save format, set the image compression rate, set whether to save the workflow, and optionally add invisible watermarks to the picture. (Add information in a way that is invisible to the naked eye, and use the ShowBlindWaterMark node to decode the watermark). Optionally output the json file of the workflow.
Node Options: 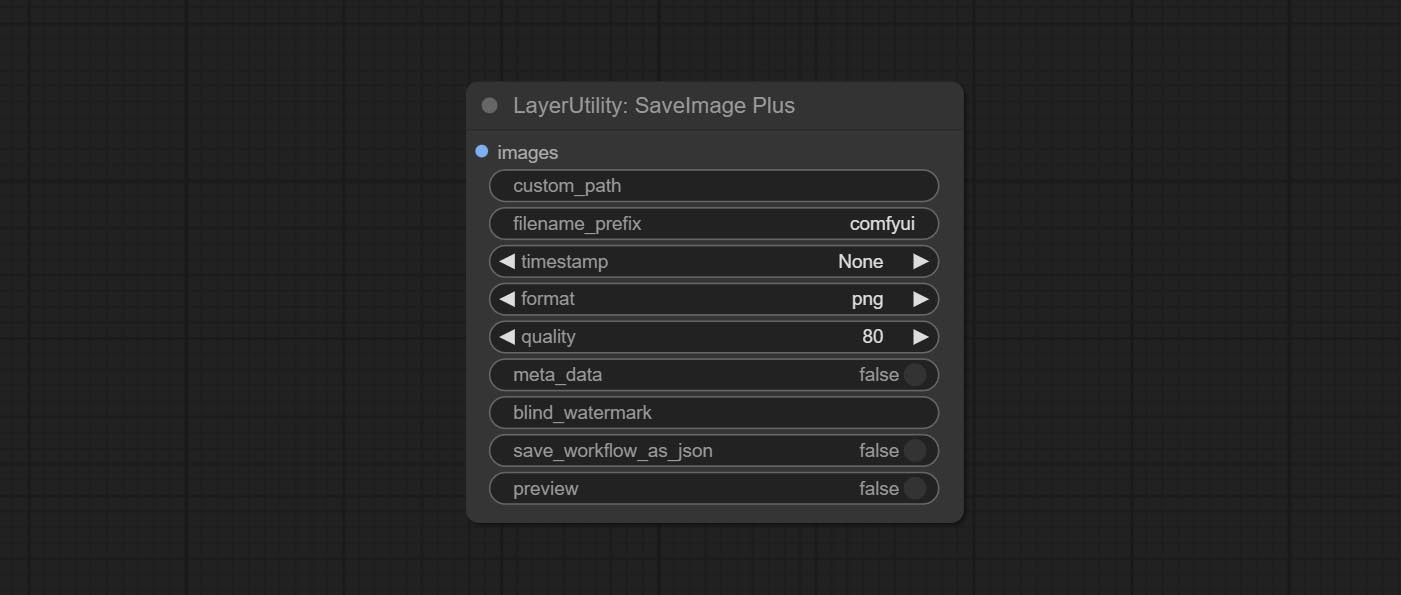
- iamge: The input image.
- custom_path * : User-defined directory, enter the directory name in the correct format. If empty, it is saved in the default output directory of ComfyUI.
- filename_prefix * : The prefix of file name.
- timestamp: Timestamp the file name, opting for date, time to seconds, and time to milliseconds.
- format: The format of image save. Currently available in
png and jpg . Note that only png format is supported for RGBA mode pictures. - quality: Image quality, the value range 10-100, the higher the value, the better the picture quality, the volume of the file also correspondingly increases.
- meta_data: Whether to save metadata to png file, that is workflow information. Set this to false if you do not want the workflow to be leaked.
- blind_watermark: The text entered here (does not support multilingualism) will be converted into a QR code and saved as an invisible watermark. Use
ShowBlindWaterMark node can decode watermarks. Note that pictures with watermarks are recommended to be saved in png format, and lower-quality jpg format will cause watermark information to be lost. - save_workflow_as_json: Whether the output workflow is a json file at the same time (the output json is in the same directory as the picture).
- preview: Preview switch.
* Enter %date for the current date (YY-mm-dd) and %time for the current time (HH-MM-SS). You can enter / for subdirectories. For example, %date/name_%tiem will output the image to the YY-mm-dd folder, with name_HH-MM-SS as the file name prefix.
ImageTaggerSave
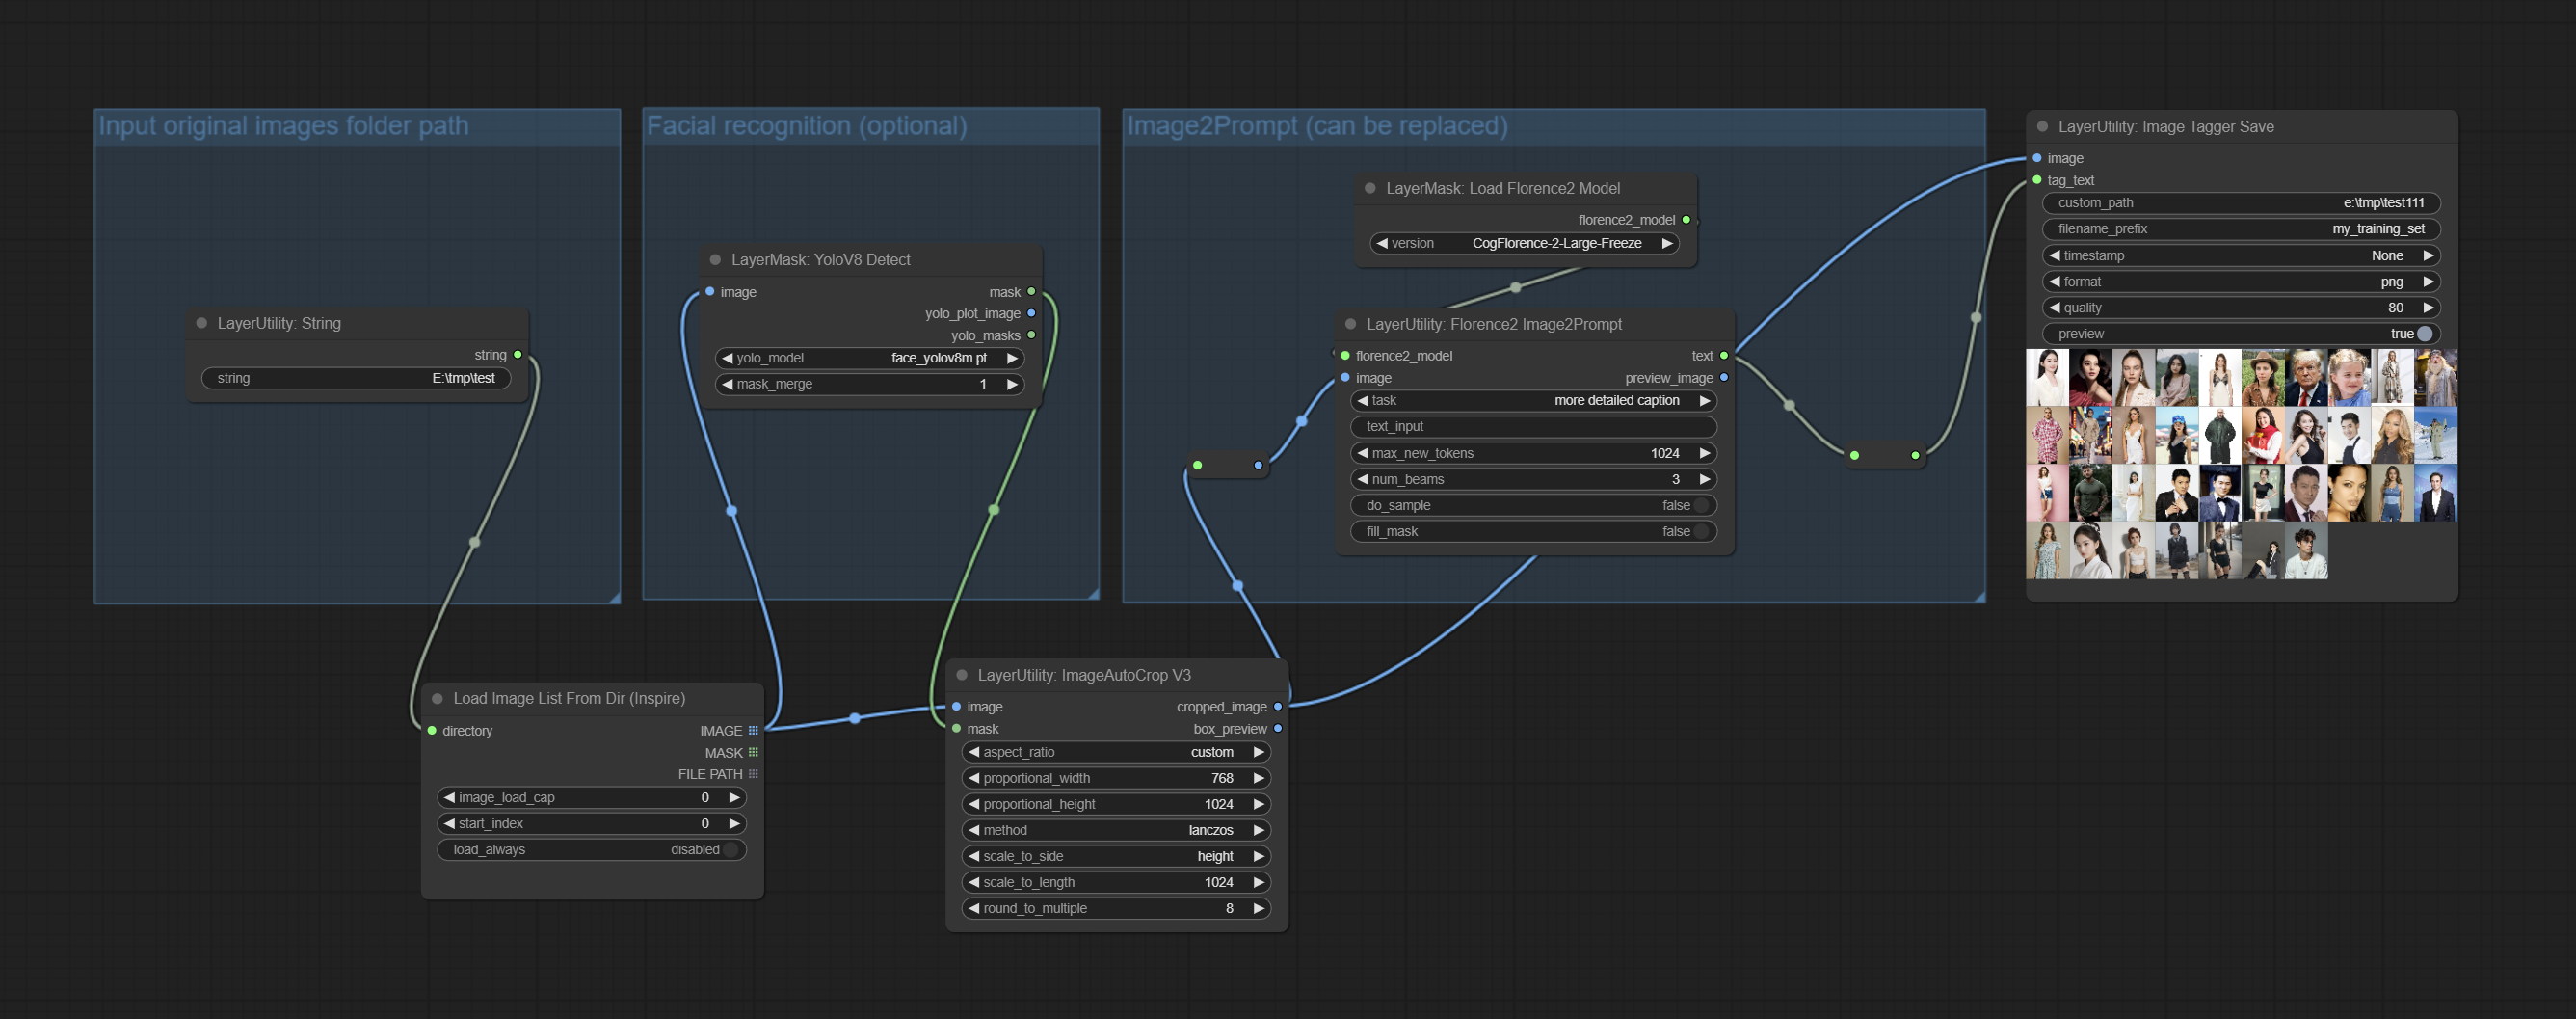
The node used to save the training set images and their text labels, where the image files and text label files have the same file name. Customizable directory for saving images, adding timestamps to file names, selecting save formats, and setting image compression rates. *The workflow image_tagger_stave.exe is located in the workflow directory.
Node Options: 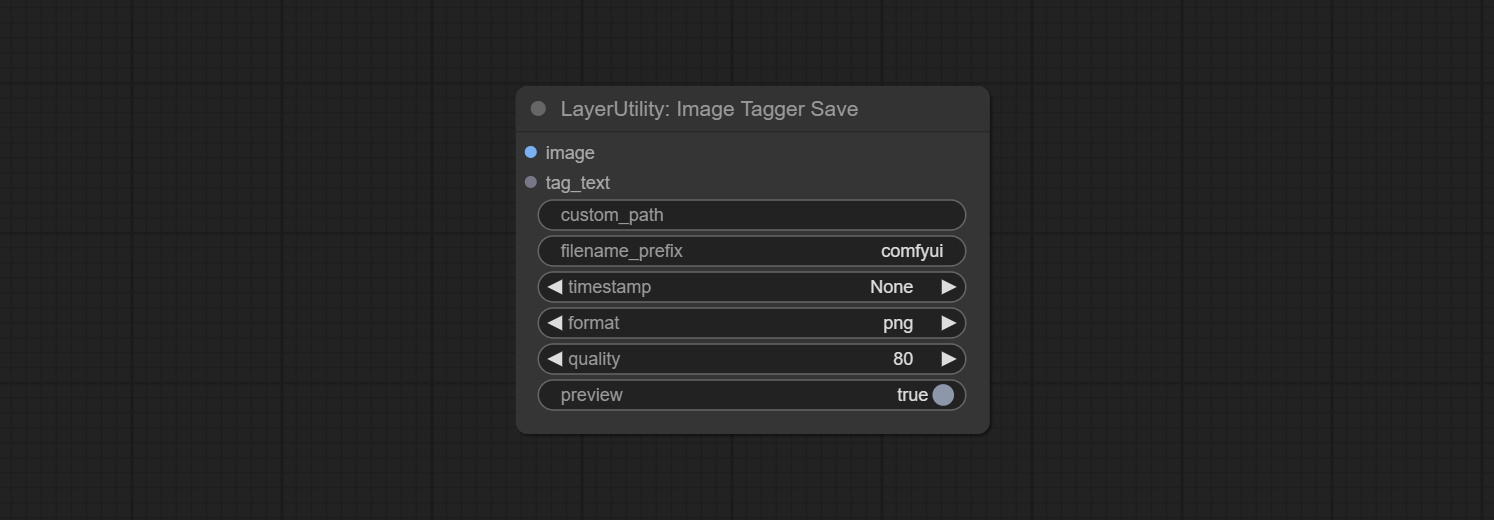
- iamge: The input image.
- tag_text: Text label of image.
- custom_path * : User-defined directory, enter the directory name in the correct format. If empty, it is saved in the default output directory of ComfyUI.
- filename_prefix * : The prefix of file name.
- timestamp: Timestamp the file name, opting for date, time to seconds, and time to milliseconds.
- format: The format of image save. Currently available in
png and jpg . Note that only png format is supported for RGBA mode pictures. - quality: Image quality, the value range 10-100, the higher the value, the better the picture quality, the volume of the file also correspondingly increases.
- preview: Preview switch.
* Enter %date for the current date (YY-mm-dd) and %time for the current time (HH-MM-SS). You can enter / for subdirectories. For example, %date/name_%tiem will output the image to the YY-mm-dd folder, with name_HH-MM-SS as the file name prefix.
AddBlindWaterMark
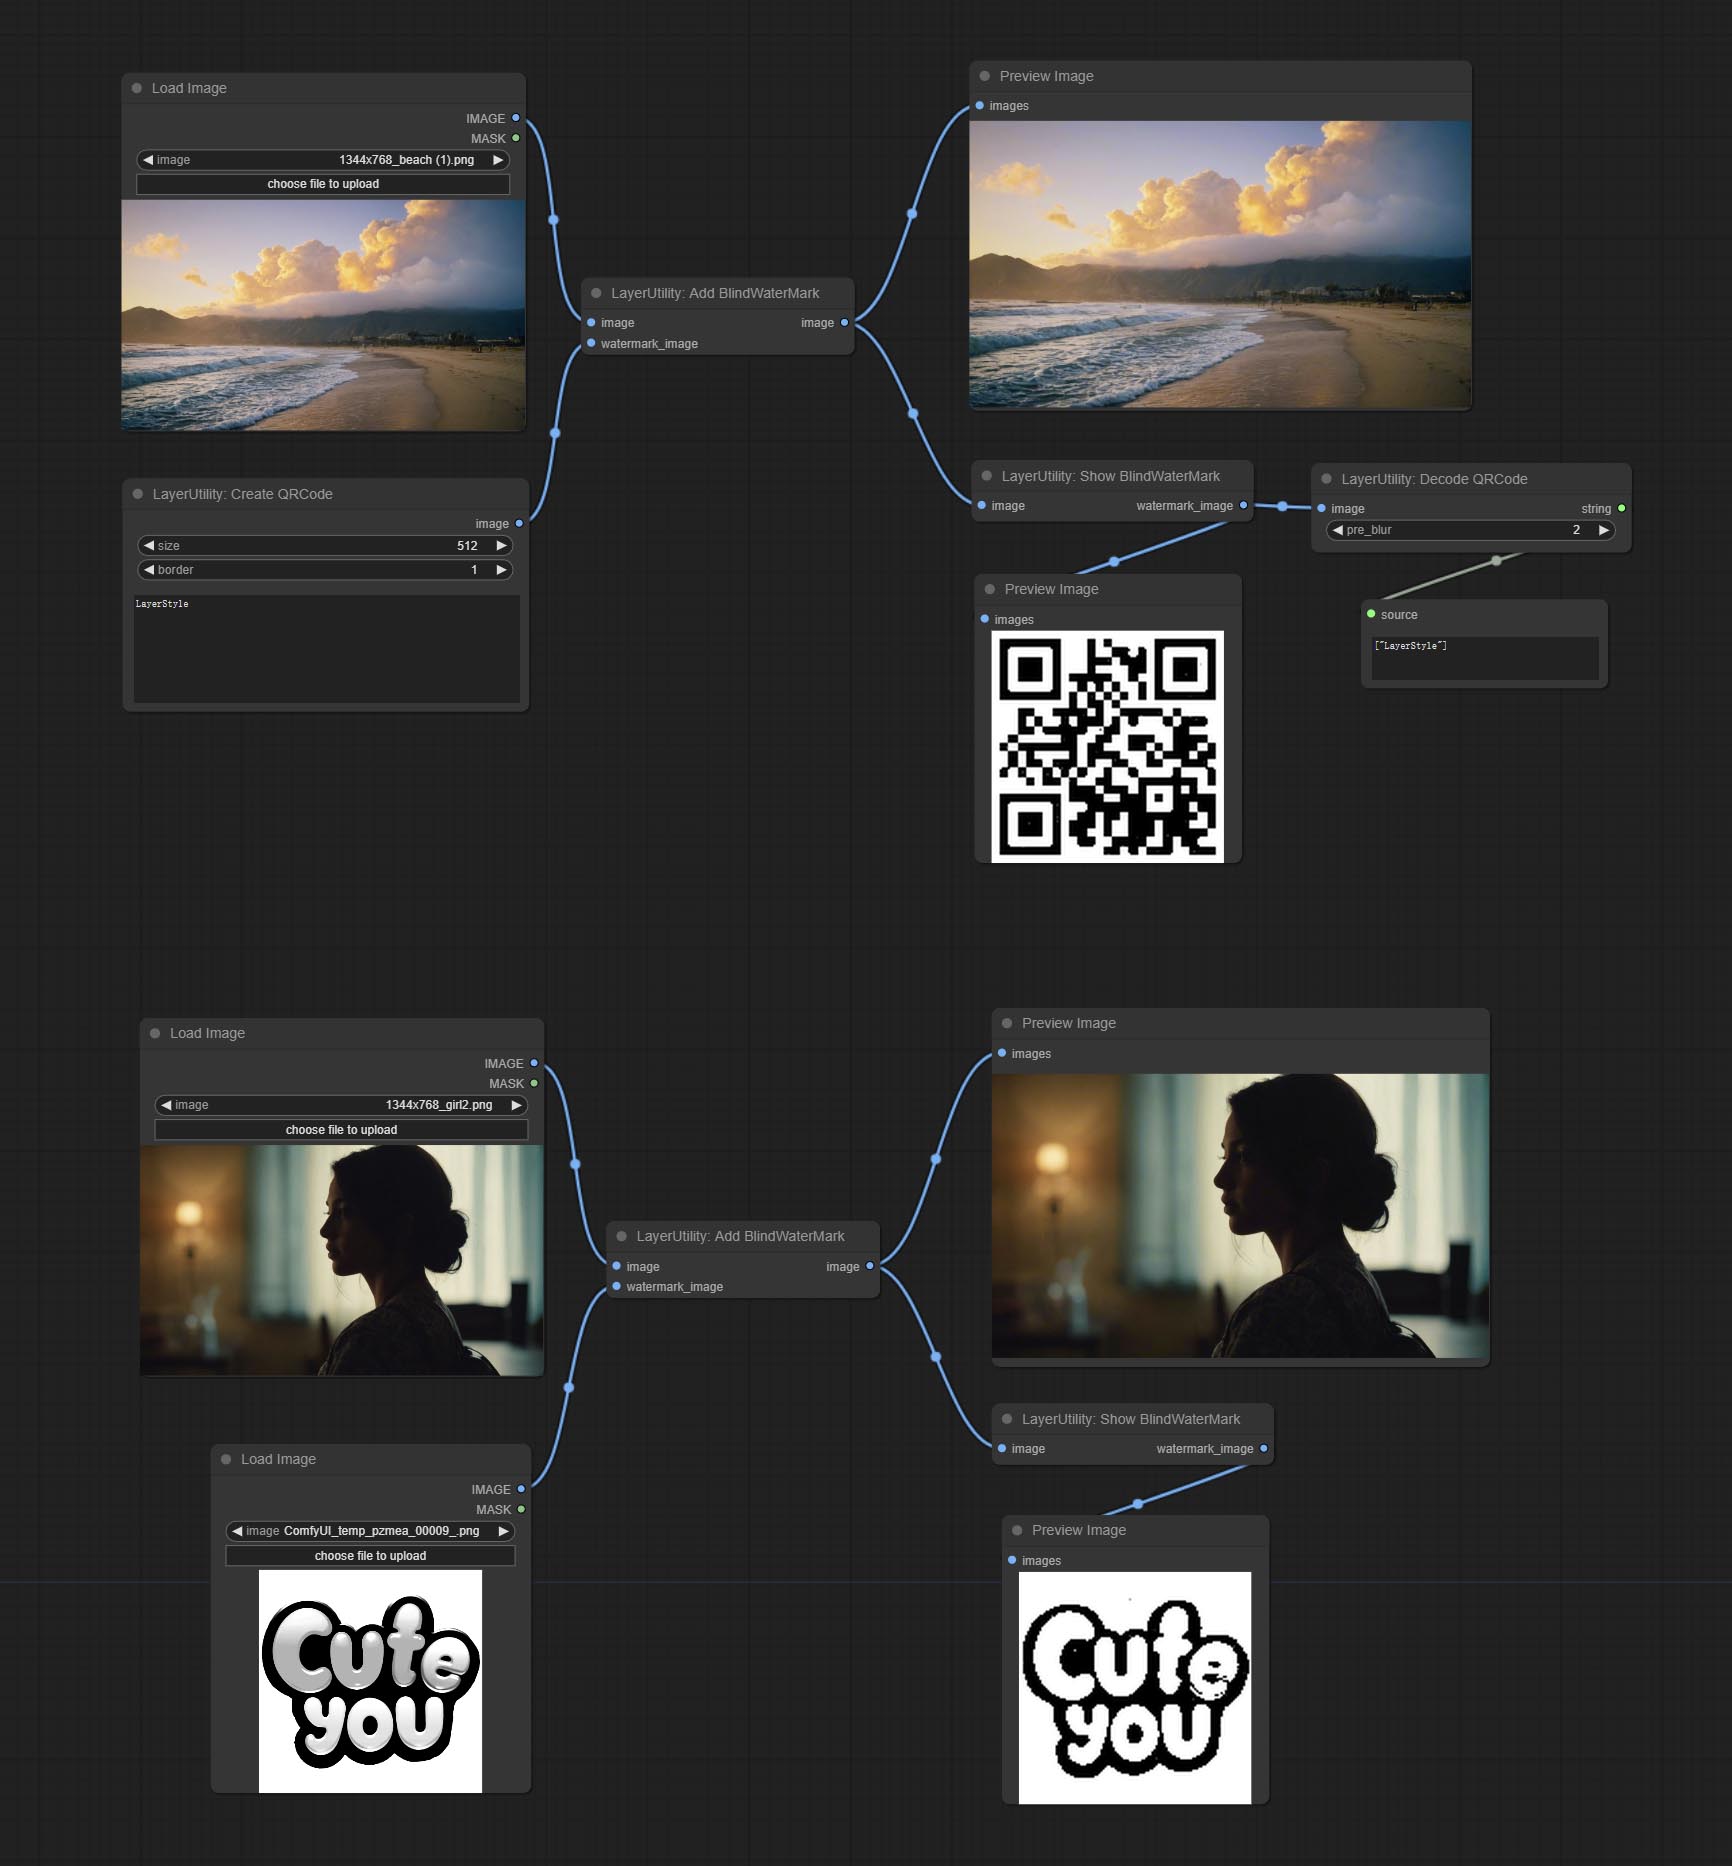
Add an invisible watermark to a picture. Add the watermark image in a way that is invisible to the naked eye, and use the ShowBlindWaterMark node to decode the watermark.
Node Options: 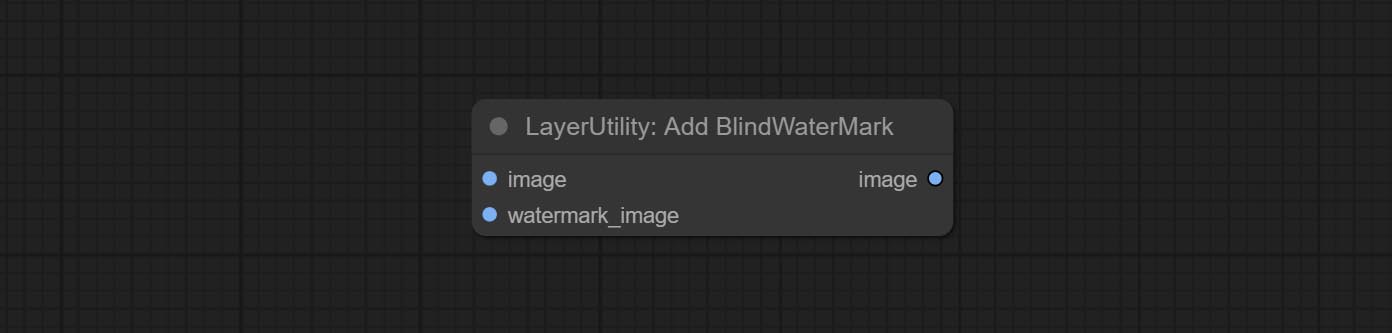
- iamge: The input image.
- watermark_image: Watermark image. The image entered here will automatically be converted to a square black and white image as a watermark. It is recommended to use a QR code as a watermark.
ShowBlindWaterMark
Decoding the invisible watermark added to the AddBlindWaterMark and SaveImagePlus nodes. 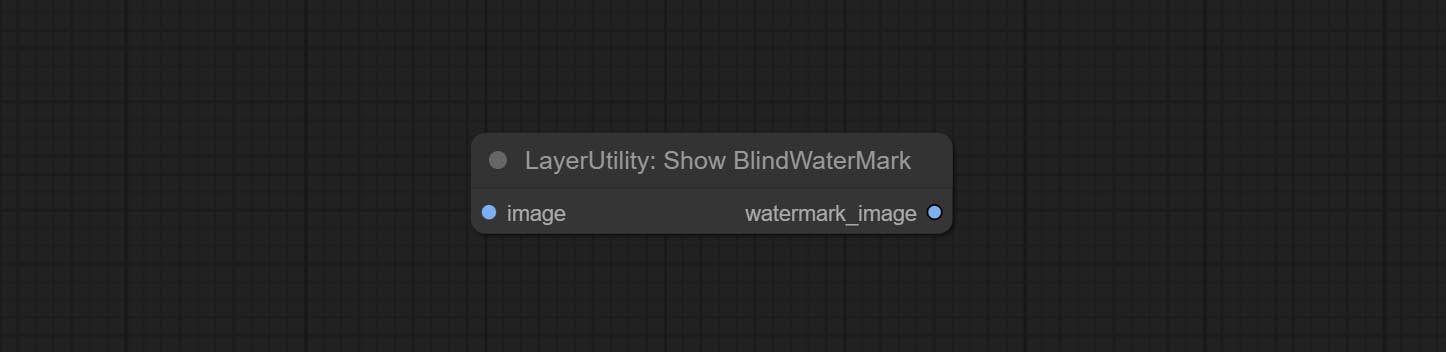
CreateQRCode
Generate a square QR code picture.
Node Options:

- size: The side length of image.
- border: The size of the border around the QR code, the larger the value, the wider the border.
- text: Enter the text content of the QR code here, and multi-language is not supported.
DecodeQRCode
Decoding the QR code.
Node Options:
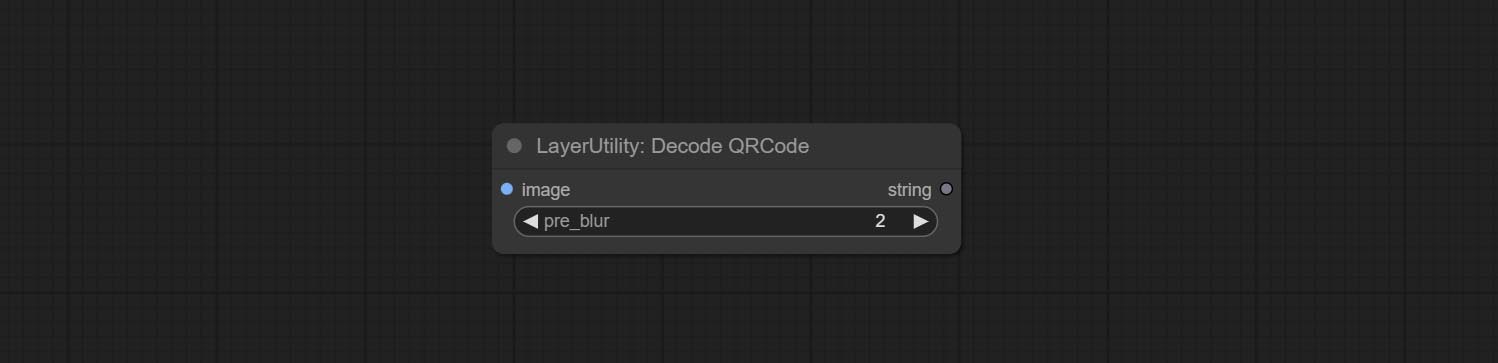
- image: The input QR code image.
- pre_blur: Pre-blurring, you can try to adjust this value for QR codes that are difficult to identify.
LoadPSD
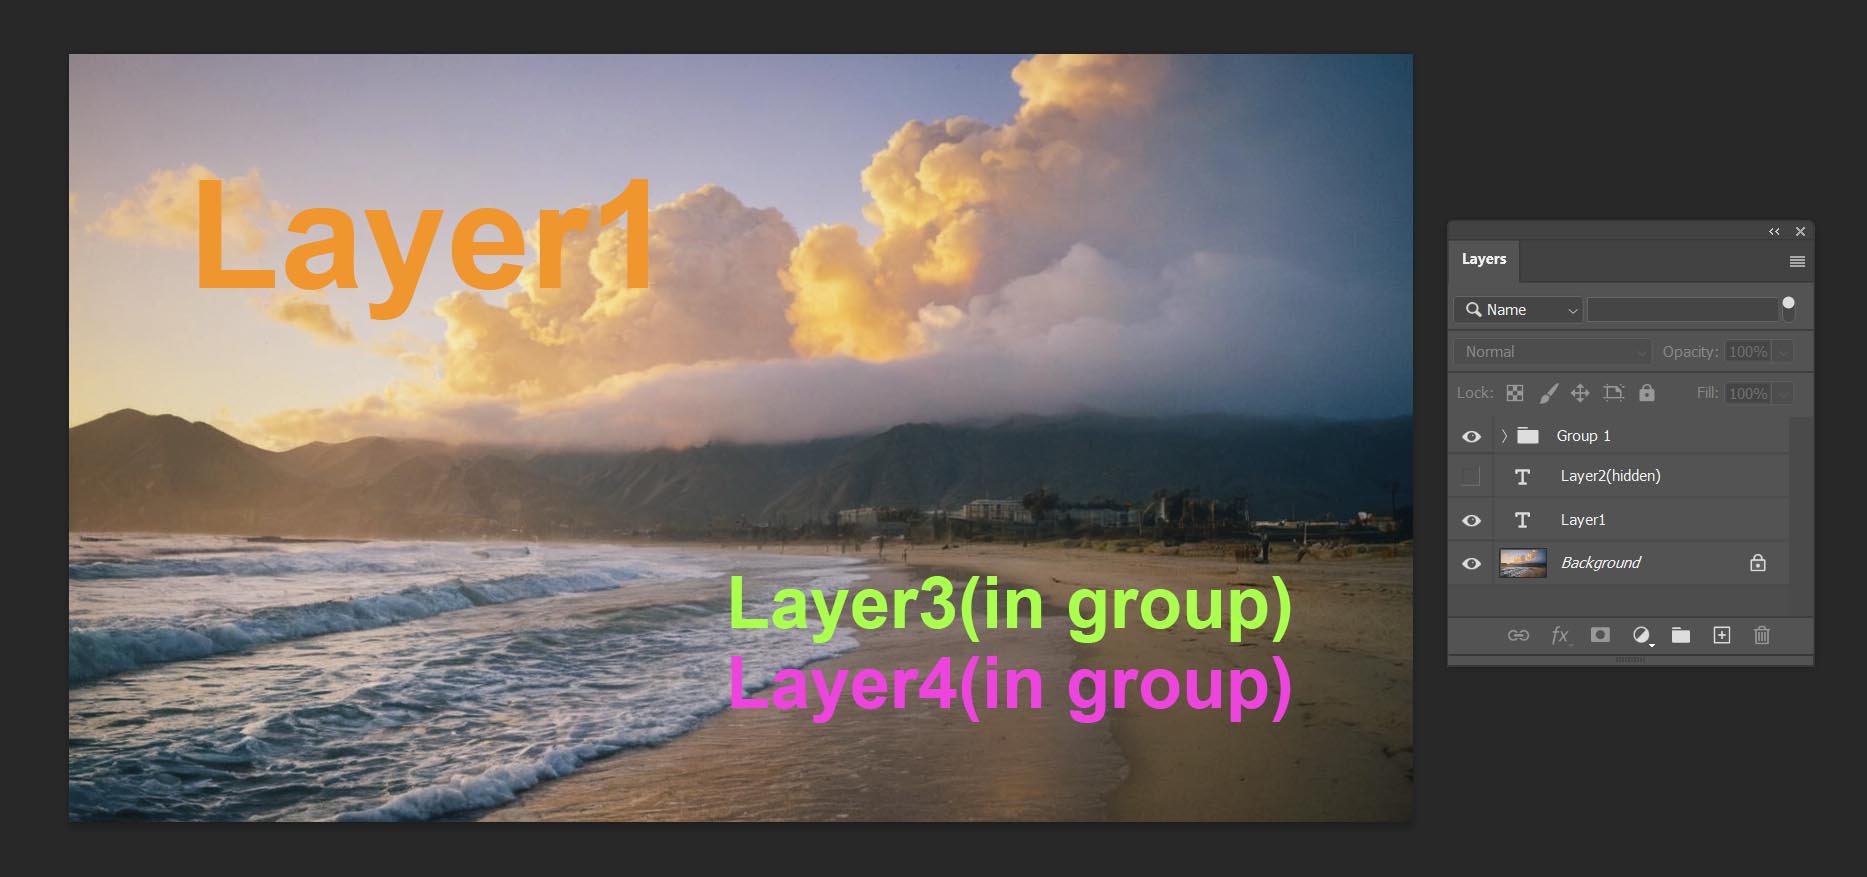
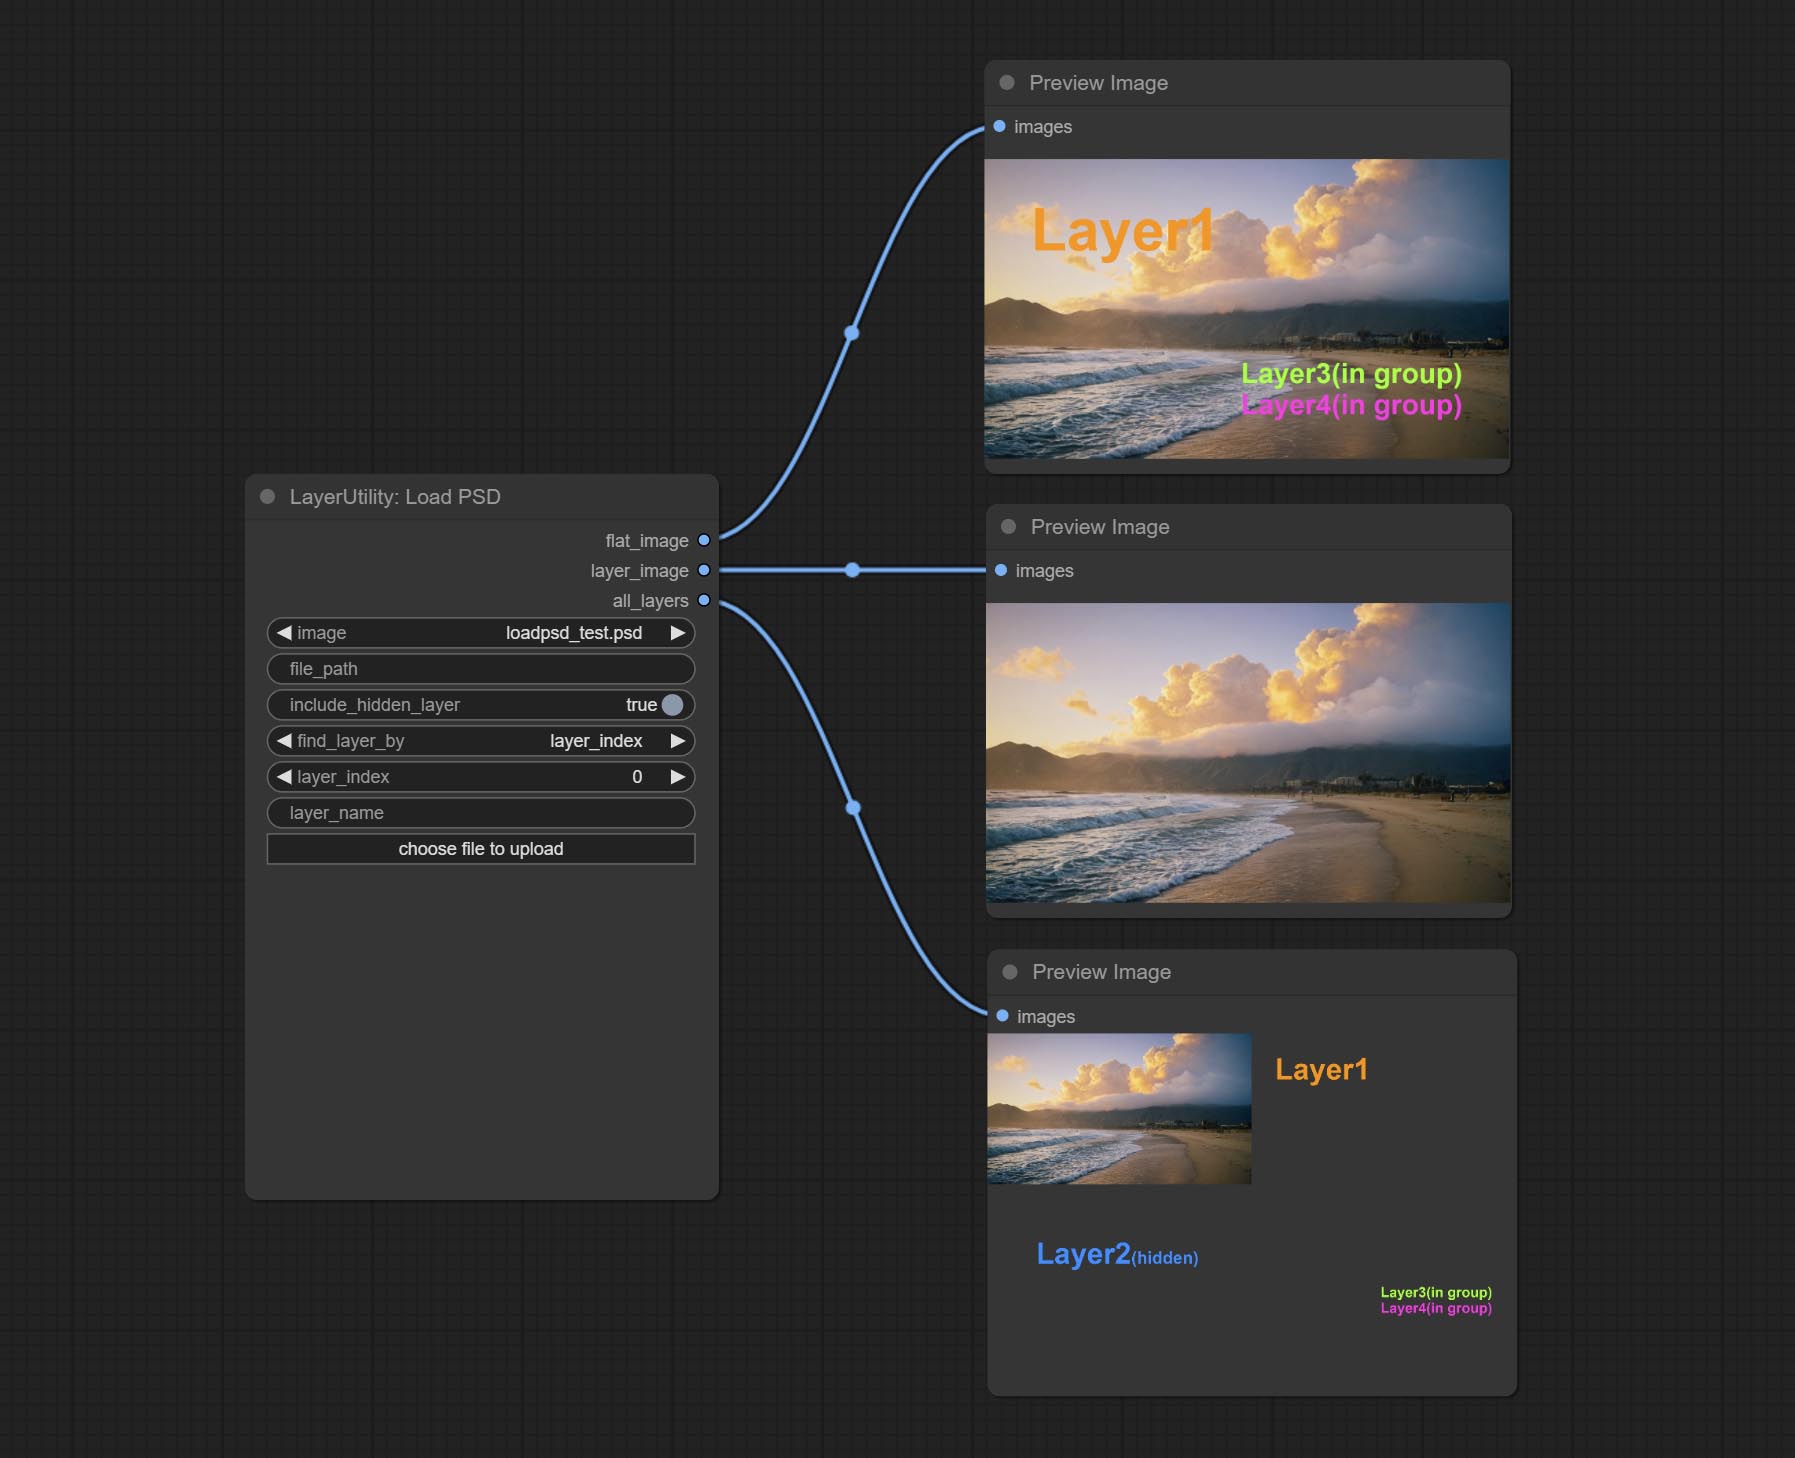
Load the PSD format file and export the layers. Note that this node requires the installation of the psd_tools dependency package, If error occurs during the installation of psd_tool, such as ModuleNotFoundError: No module named 'docopt' , please download docopt's whl and manual install it.
Node Options:
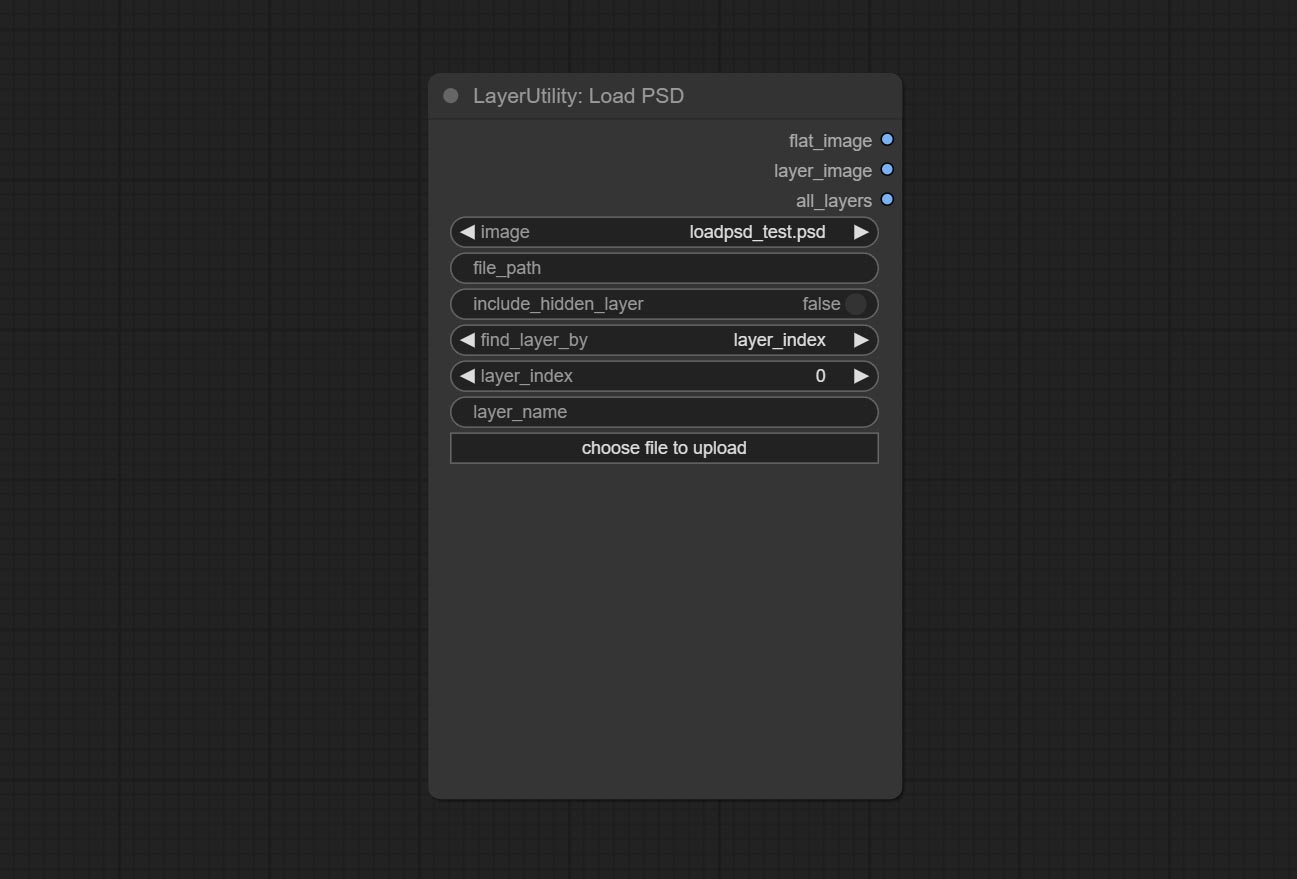
- image: Here is a list of *.psd files under
ComfyUI/input , where previously loaded psd images can be selected. - file_path: The complete path and file name of the psd file.
- include_hidden_layer: whether include hidden layers.
- find_layer_by: The method for finding layers can be selected by layer key number or layer name. Layer groups are treated as one layer.
- layer_index: The layer key number, where 0 is the bottom layer, is incremented sequentially. If include_hiddenlayer is set to false, hidden layers are not counted. Set to -1 to output the top layer.
- layer_name: Layer name. Note that capitalization and punctuation must match exactly.
Outputs: flat_image: PSD preview image. layer_iamge: Find the layer output. all_layers: Batch images containing all layers.
SD3NegativeConditioning
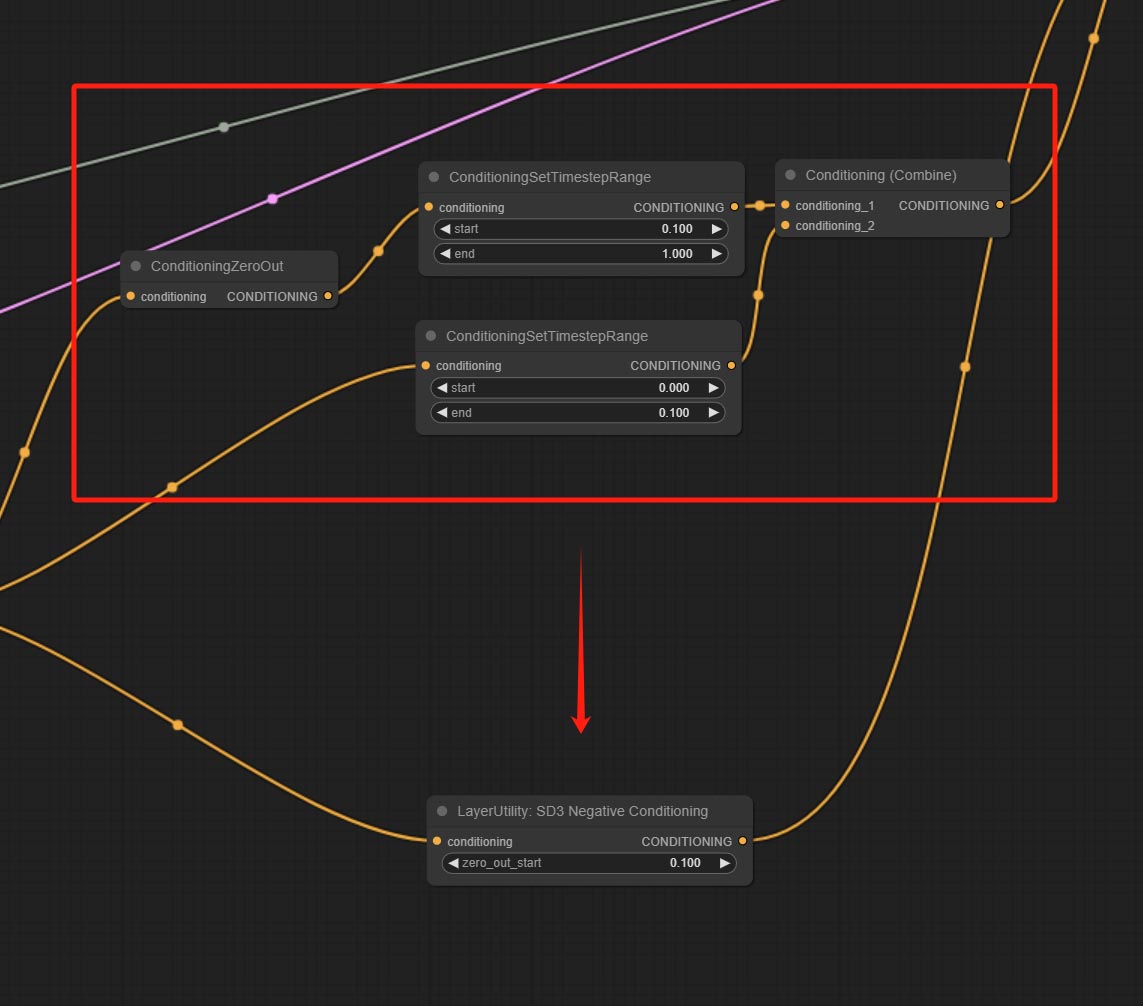
Encapsulate the four nodes of Negative Condition in SD3 into a separate node.
Node Options:
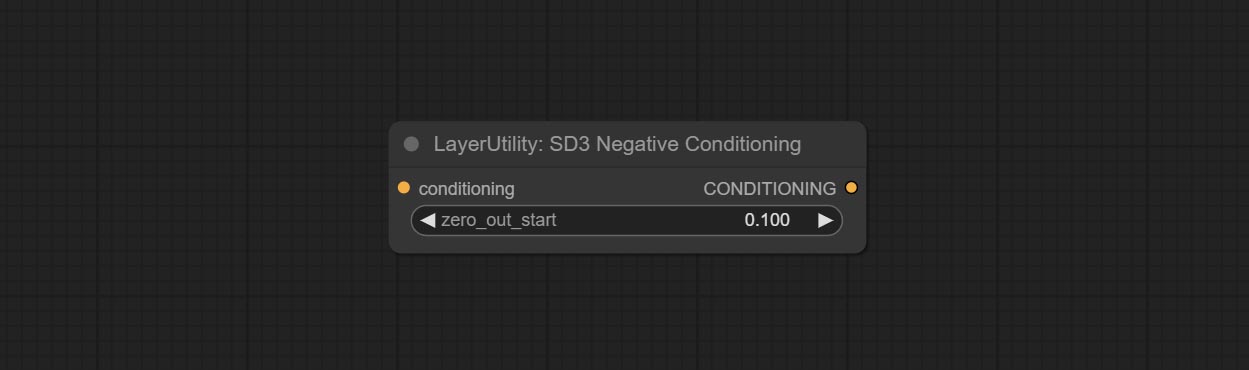
- zero_out_start: Set the ConditioningSetTimestepRange start value for Negative ConditioningZeroOut, which is the same as the ConditioningSetTimestepRange end value for Negative.
LayerMask
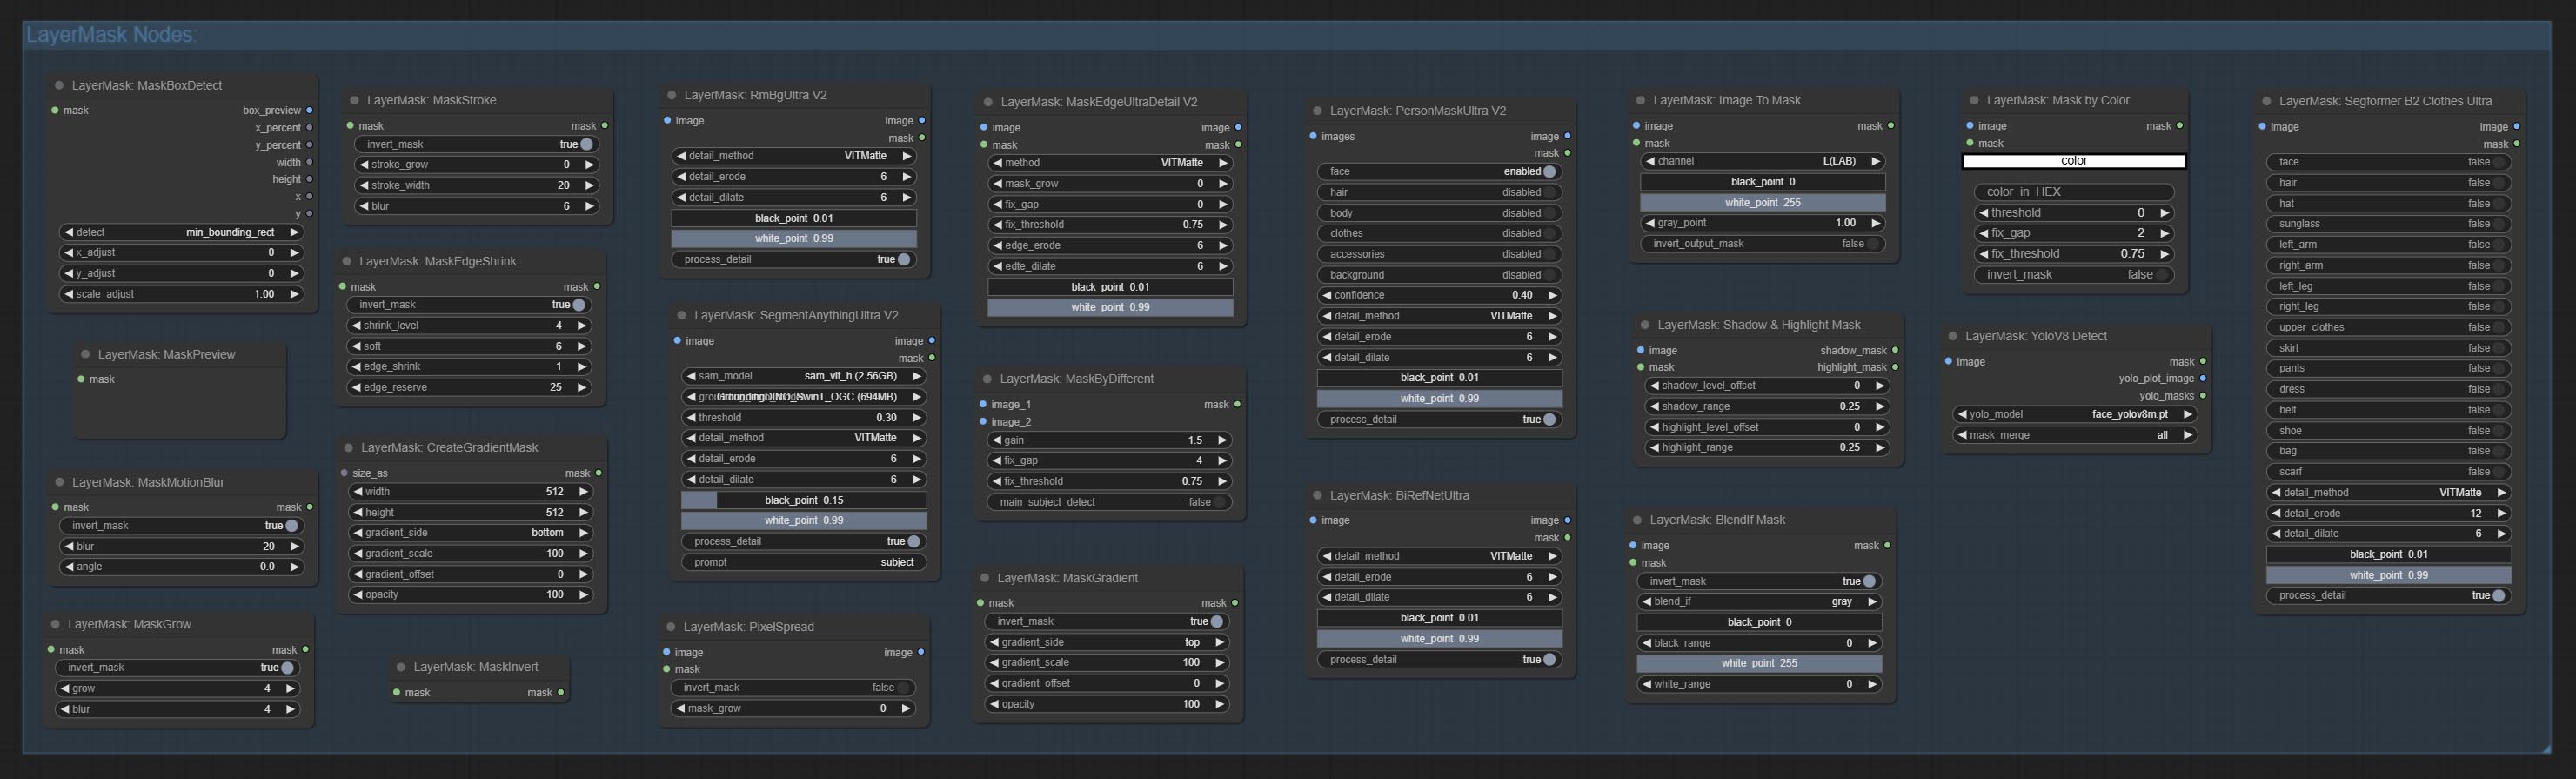
BlendIfMask
Reproduction of Photoshop's layer Style - Blend If function. This node outputs a mask for layer composition on the ImageBlend or ImageBlendAdvance nodes. mask is an optional input, and if you enter a mask here, it will act on the output. 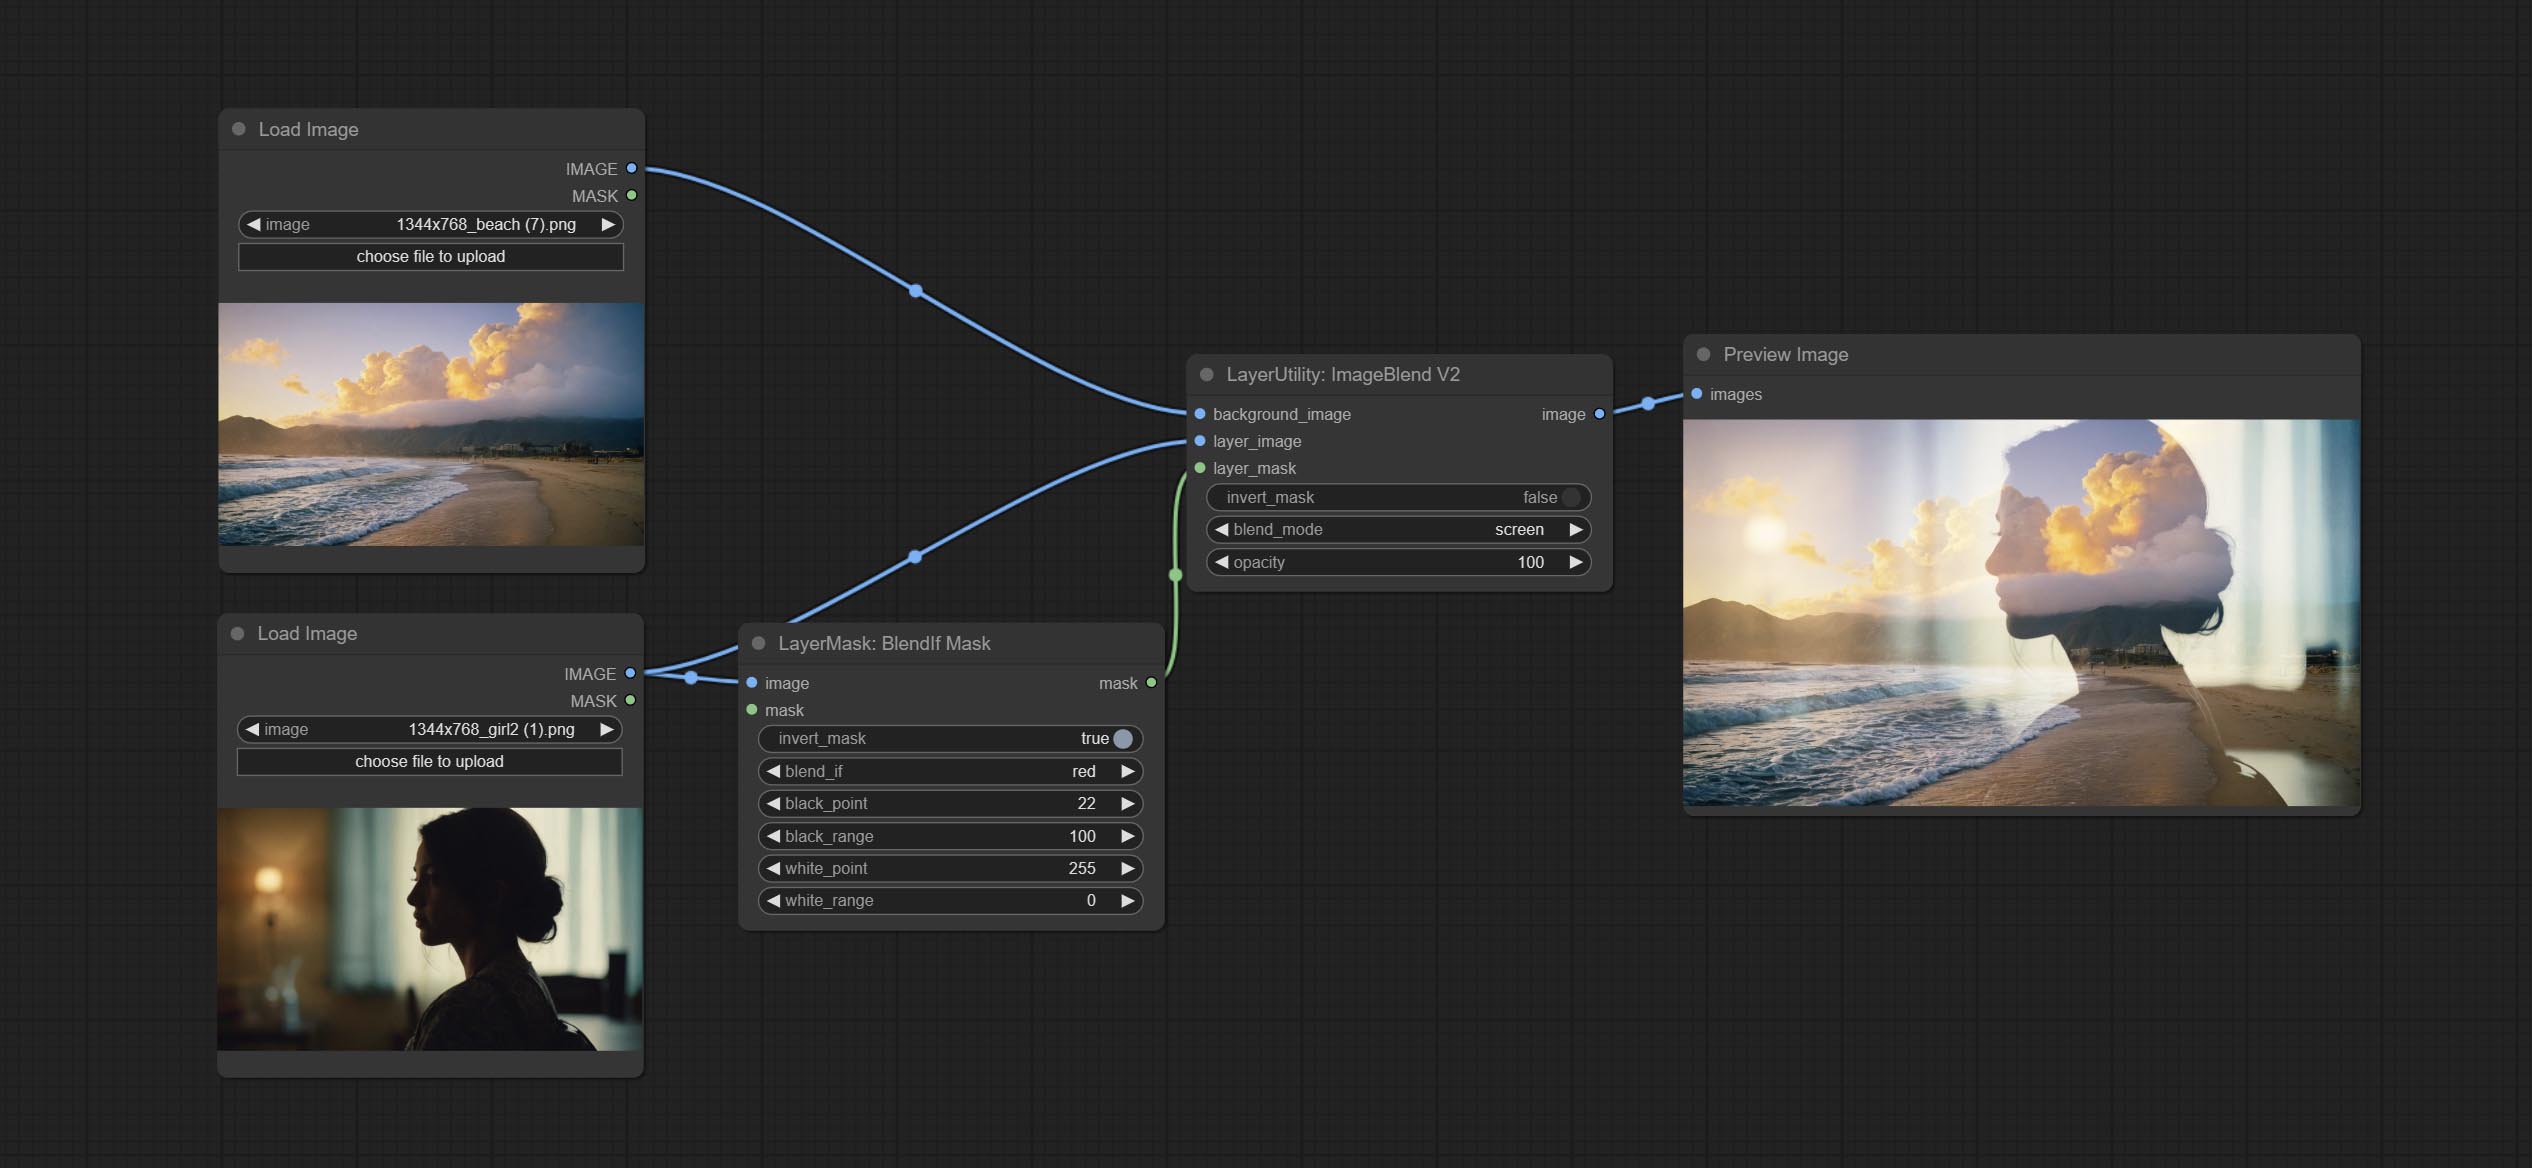
Node Options:
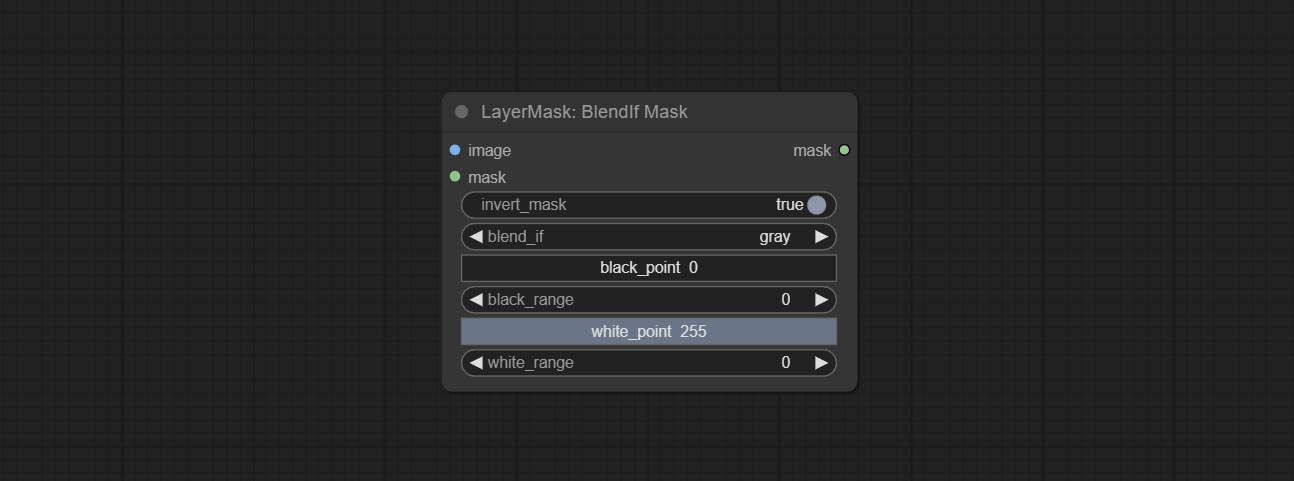
- invert_mask: Whether to reverse the mask.
- blend_if: Channel selection for Blend If. There are four options:
gray , red , green , and blue . - black_point: Black point values, ranging from 0-255.
- black_range: Dark part transition range. The larger the value, the richer the transition level of the dark part mask.
- white_point: White point values, ranging from 0-255.
- white_range: Brightness transition range. The larger the value is, the richer the transition level of the bright part mask is.
MaskBoxDetect
Detect the area where the mask is located and output its position and size. 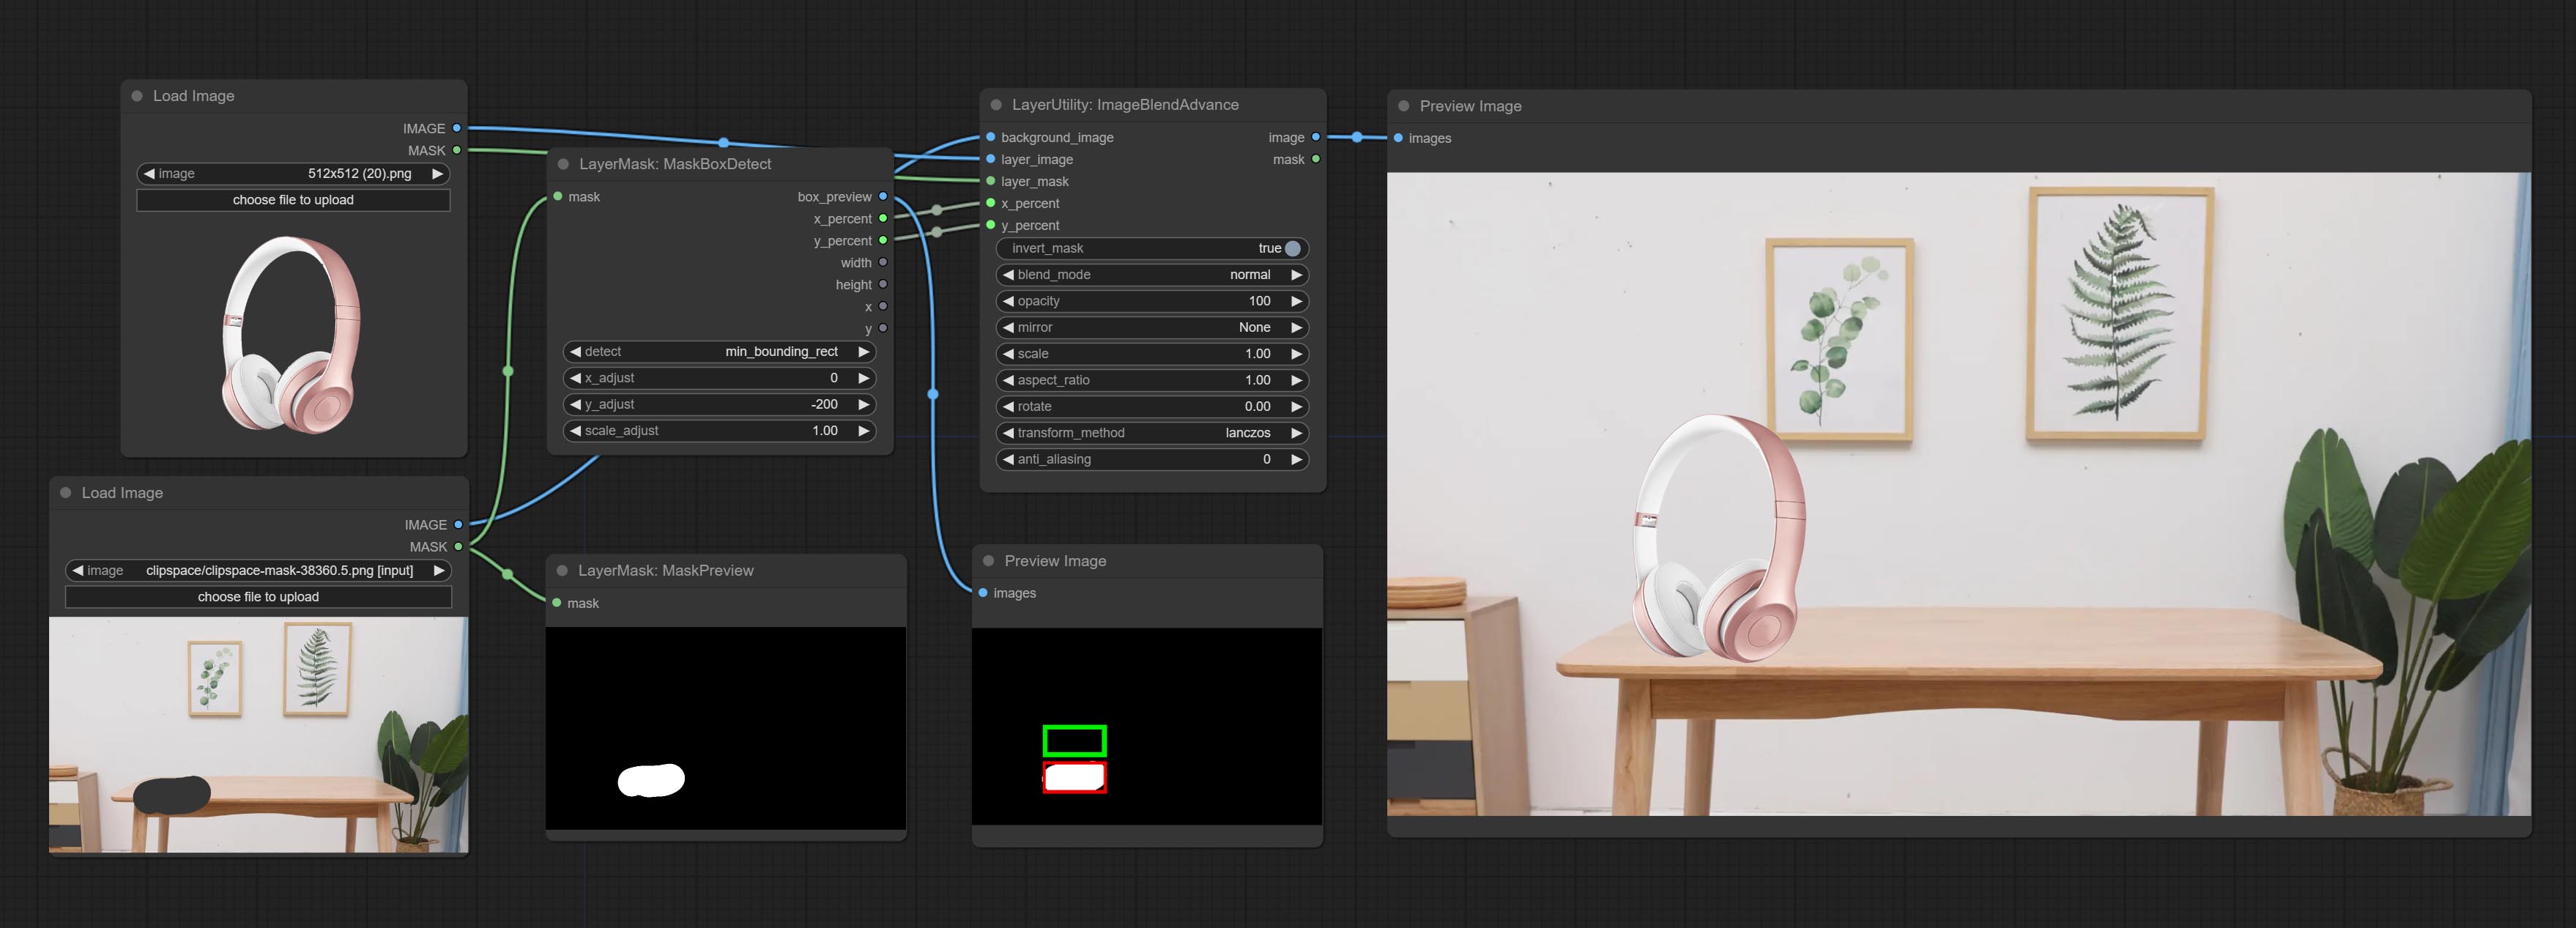
Node options:
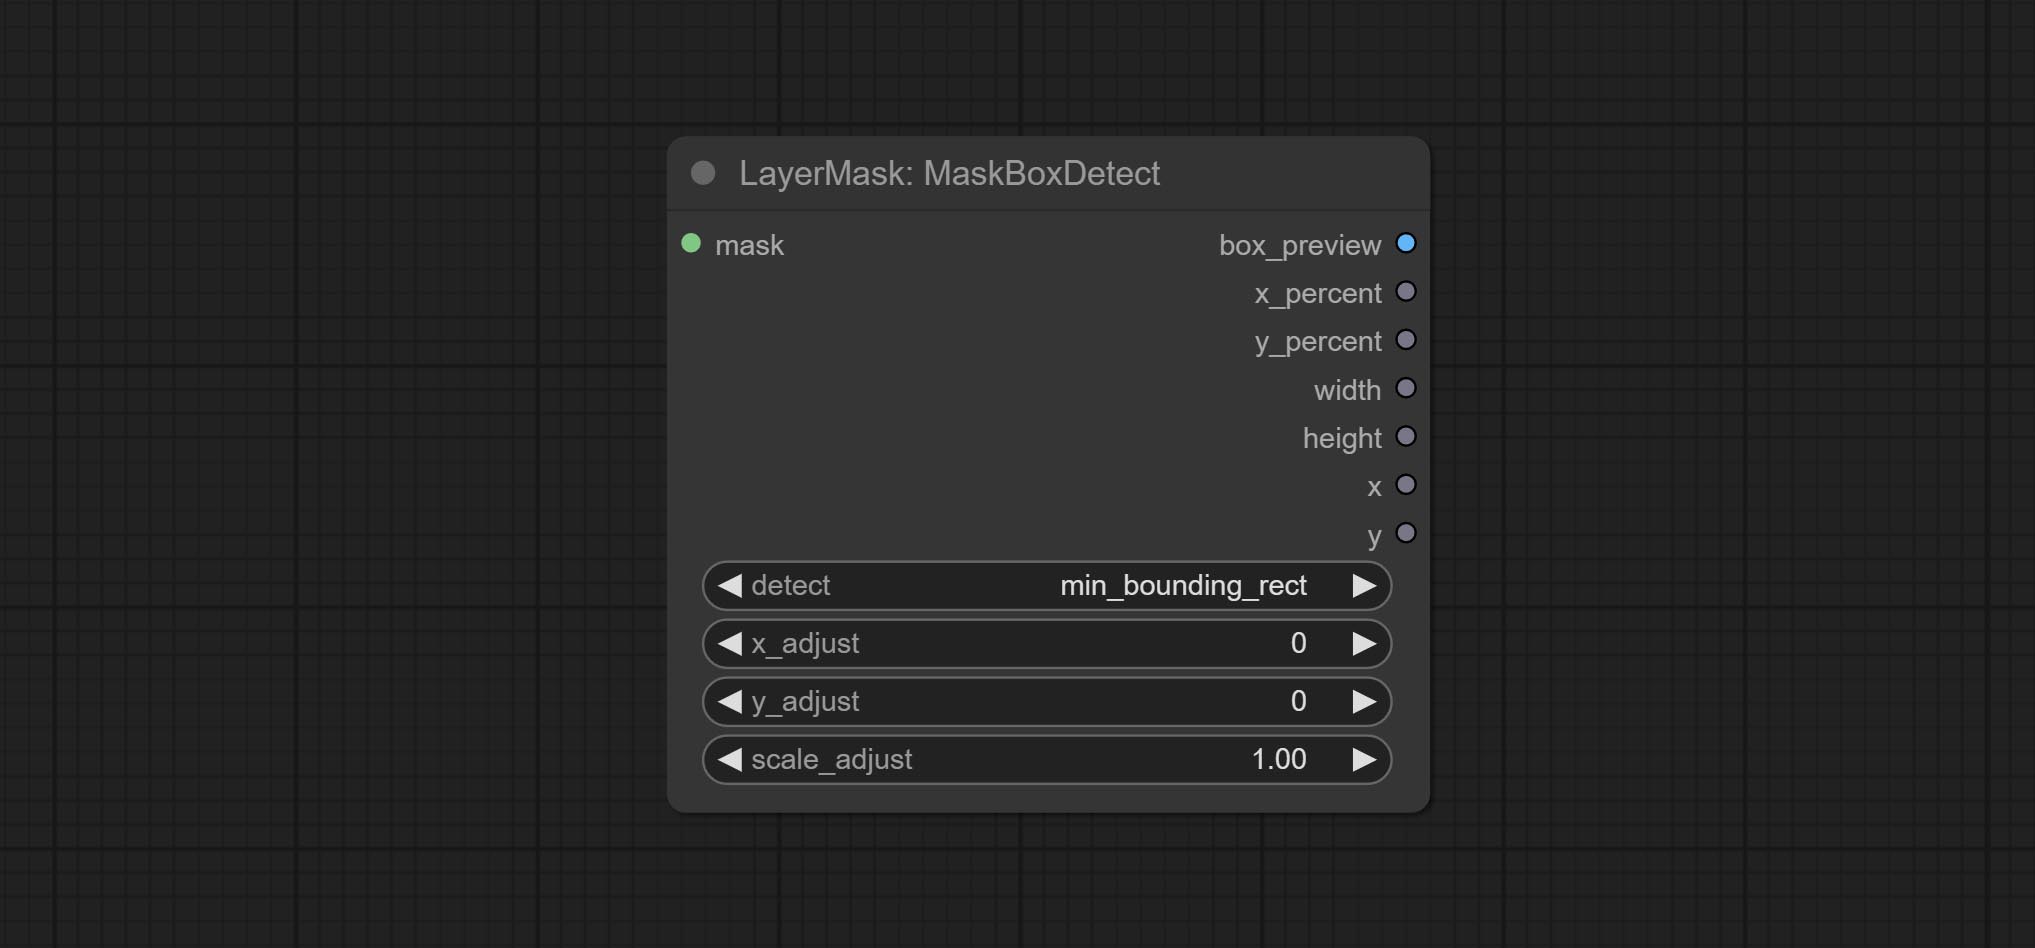
- detect: Detection method,
min_bounding_rect is the minimum bounding rectangle of block shape, max_inscribed_rect is the maximum inscribed rectangle of block shape, and mask-area is the effective area for masking pixels. - x_adjust: Adjust of horizontal deviation after detection.
- y_adjust: Adjust of vertical offset after detection.
- scale_adjust: Adjust the scaling offset after detection.
Output:
- box_preview: Preview image of detection results. Red represents the detected result, and green represents the adjust output result.
- x_percent: Horizontal position output in percentage.
- y_percent: Vertical position output in percentage.
- width: Width.
- height: Height.
- x: The x-coordinate of the top left corner position.
- y: The y-coordinate of the top left corner position.
Ultra Nodes
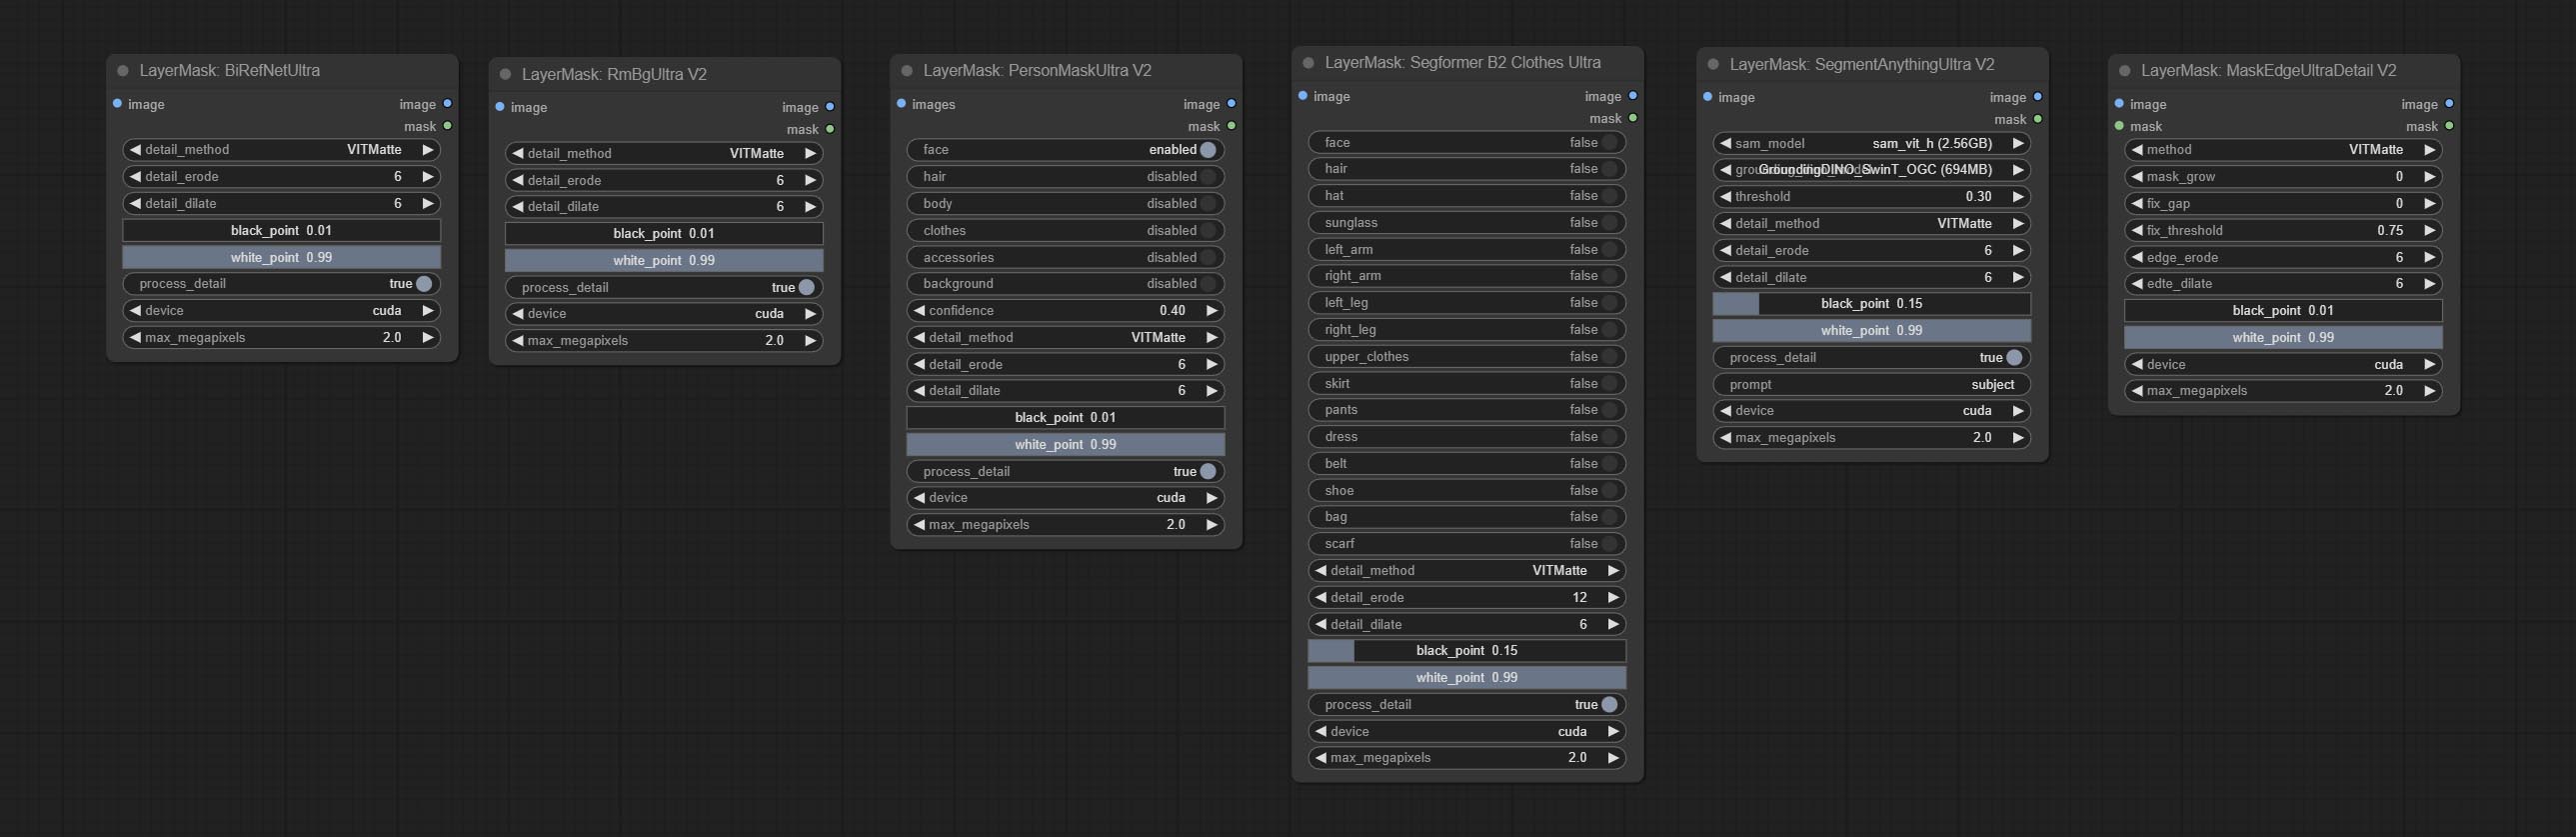
Nodes that use ultra fine edge masking processing methods, the latest version of nodes includes: SegmentAnythingUltraV2, RmBgUltraV2, BiRefNetUltra, PersonMaskUltraV2, SegformerB2ClothesUltra and MaskEdgeUltraDetailV2. There are three edge processing methods for these nodes:
-
PyMatting optimizes the edges of the mask by using a closed form matching to mask trimap. -
GuideFilter uses opencv guidedfilter to feather edges based on color similarity, and performs best when edges have strong color separation.
The code for the above two methods is from the ComfyUI-Image-Filters in spacepxl's Alpha Matte, thanks to the original author. -
VitMatte uses the transformer vit model for high-quality edge processing, preserving edge details and even generating semi transparent masks. Note: When running for the first time, you need to download the vitmate model file and wait for the automatic download to complete. If the download cannot be completed, you can run the command huggingface-cli download hustvl/vitmatte-small-composition-1k to manually download. After successfully downloading the model, you can use VITMatte(local) without accessing the network. - VitMatte's options:
device set whether to use CUDA for vitimate operations, which is about 5 times faster than CPU. max_megapixels set the maximum image size for vitmate operation, and oversized images will be reduced in size. For 16G VRAM, it is recommended to set it to 3.
*Download all model files from BaiduNetdisk or Huggingface to ComfyUI/models/vitmatte folder.
The following figure is an example of the difference in output between three methods. 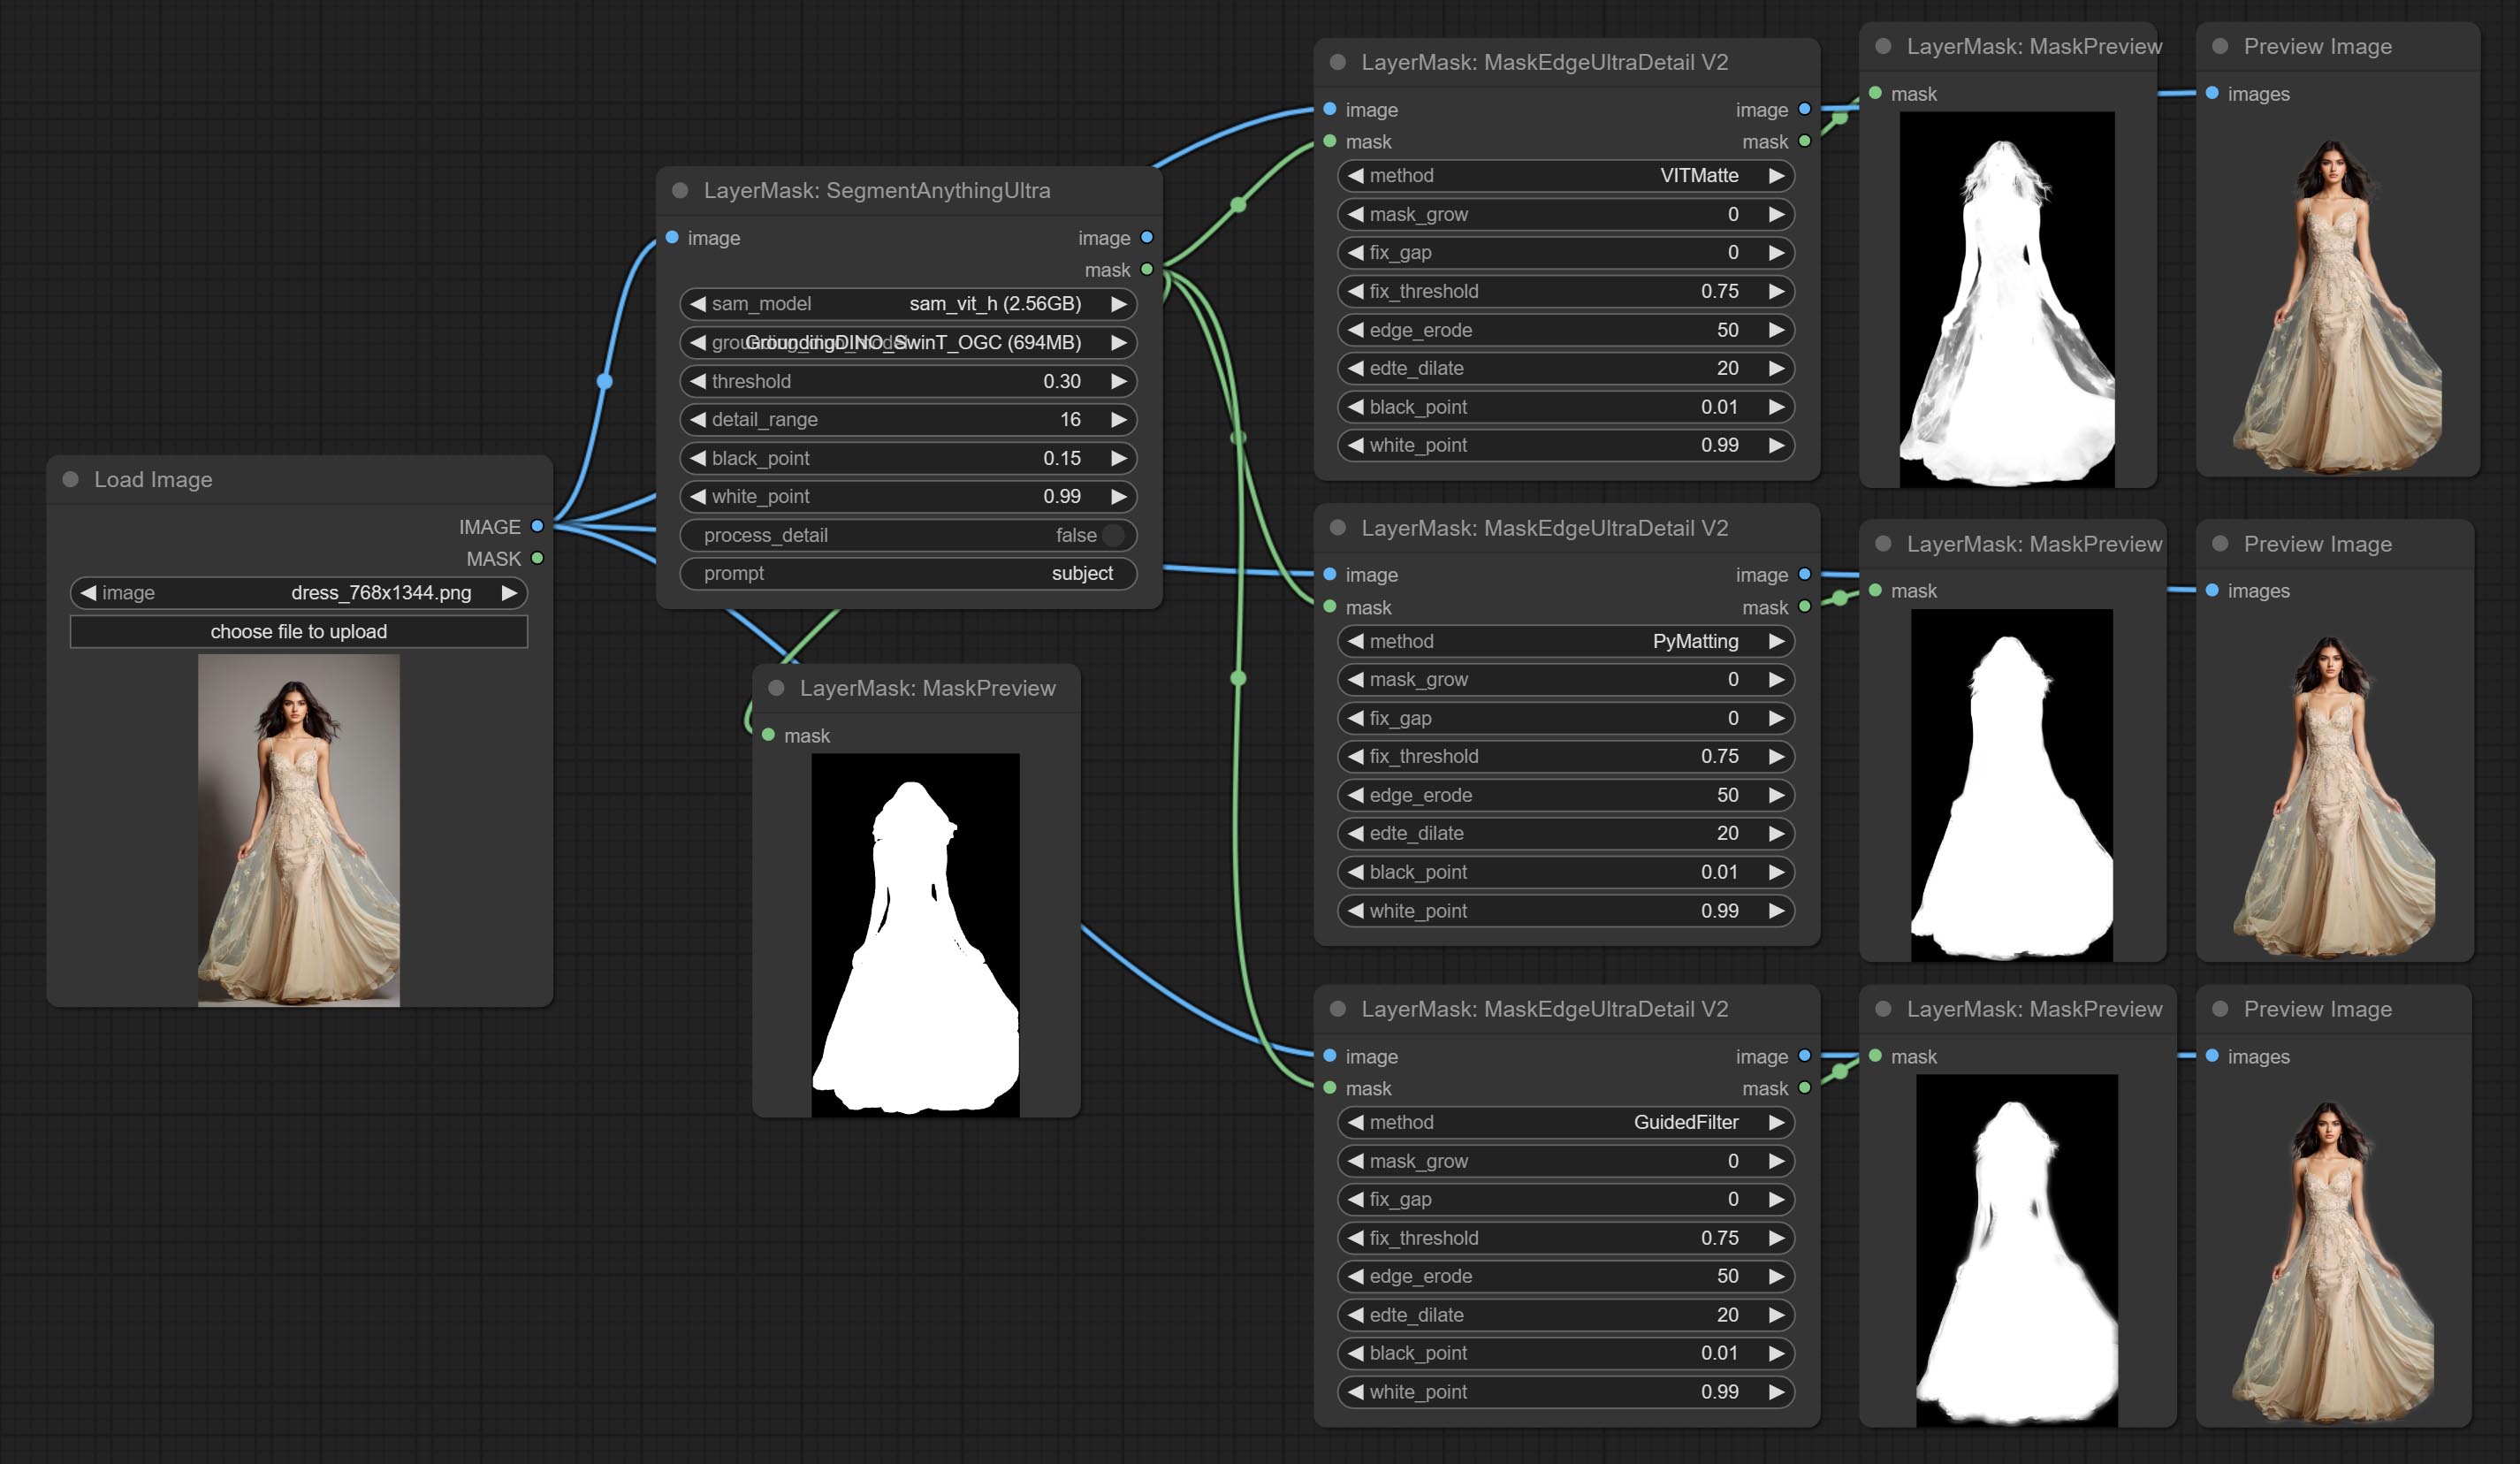
SegmentAnythingUltra
Improvements to ComfyUI Segment Anything, thanks to the original author.
*Please refer to the installation of ComfyUI Segment Anything to install the model. If ComfyUI Segment Anything has been correctly installed, you can skip this step.
- From here download the config.json,model.safetensors,tokenizer_config.json,tokenizer.json and vocab.txt 5 files to
ComfyUI/models/bert-base-uncased folder. - Download GroundingDINO_SwinT_OGC config file, GroundingDINO_SwinT_OGC model, GroundingDINO_SwinB config file, GroundingDINO_SwinB model to
ComfyUI/models/grounding-dino folder. - Download sam_vit_h,sam_vit_l, sam_vit_b, sam_hq_vit_h, sam_hq_vit_l, sam_hq_vit_b, mobile_sam to
ComfyUI/models/sams folder. *Or download them from GroundingDino models on BaiduNetdisk and SAM models on BaiduNetdisk . 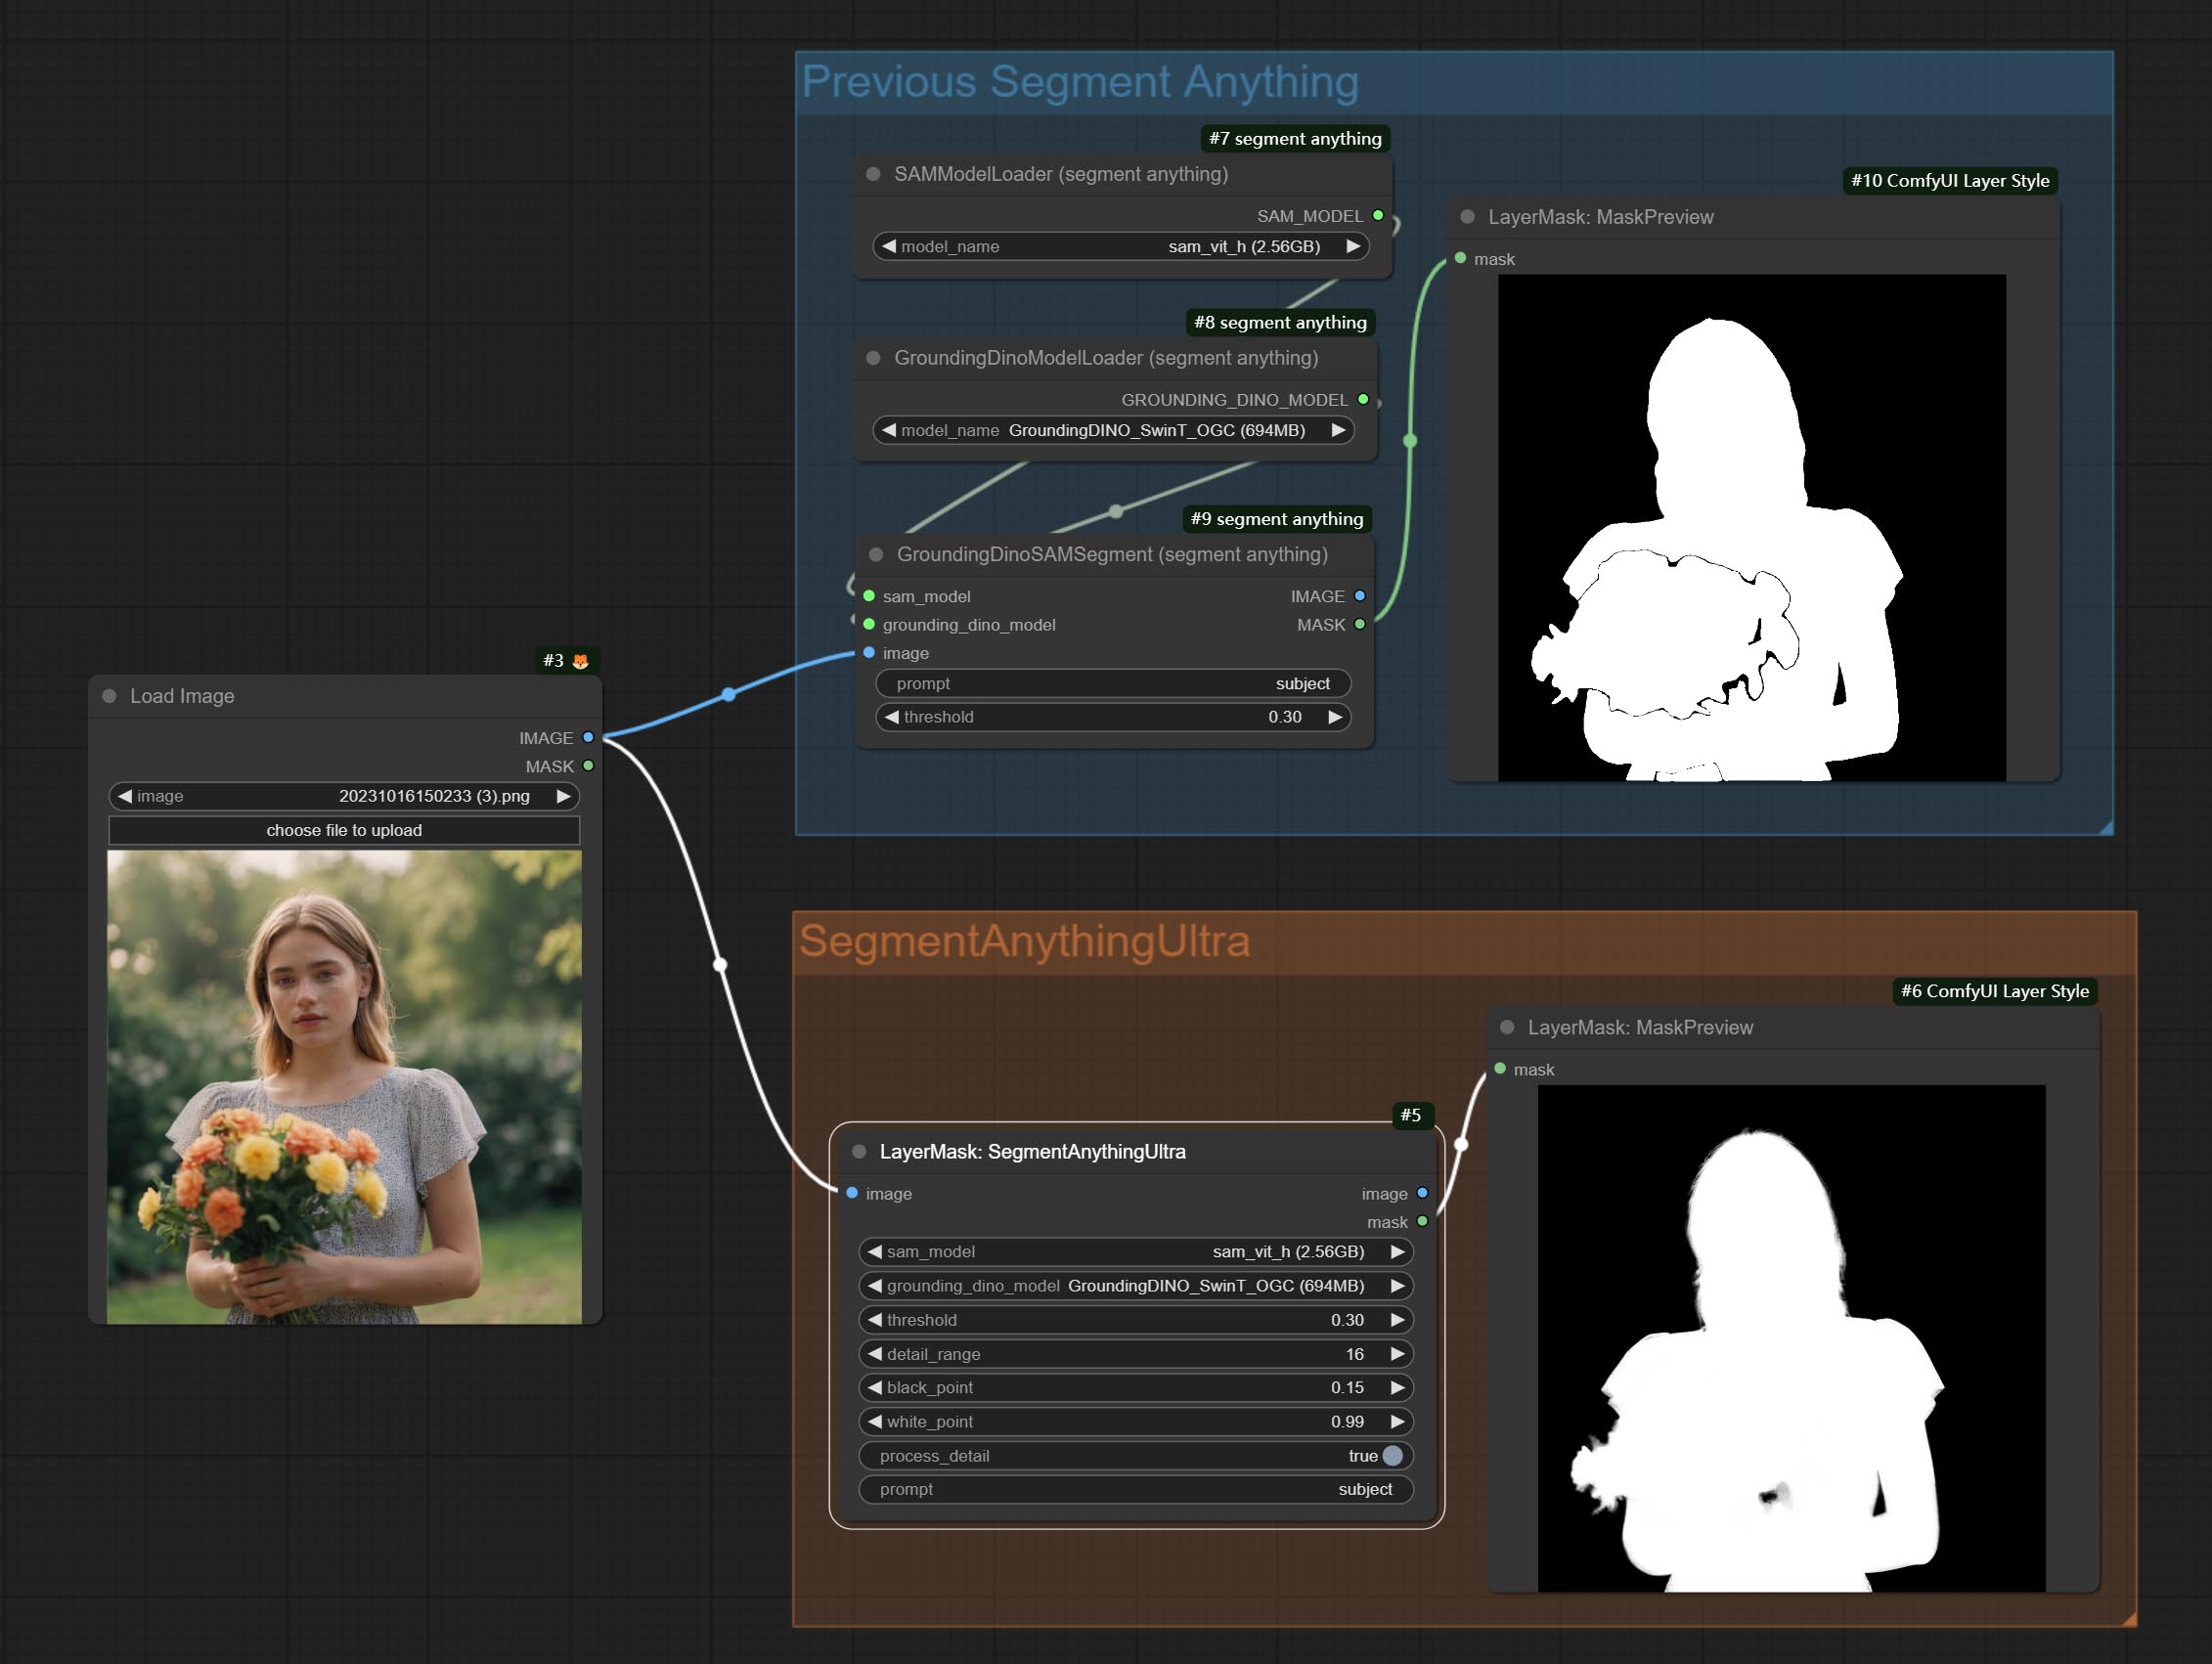
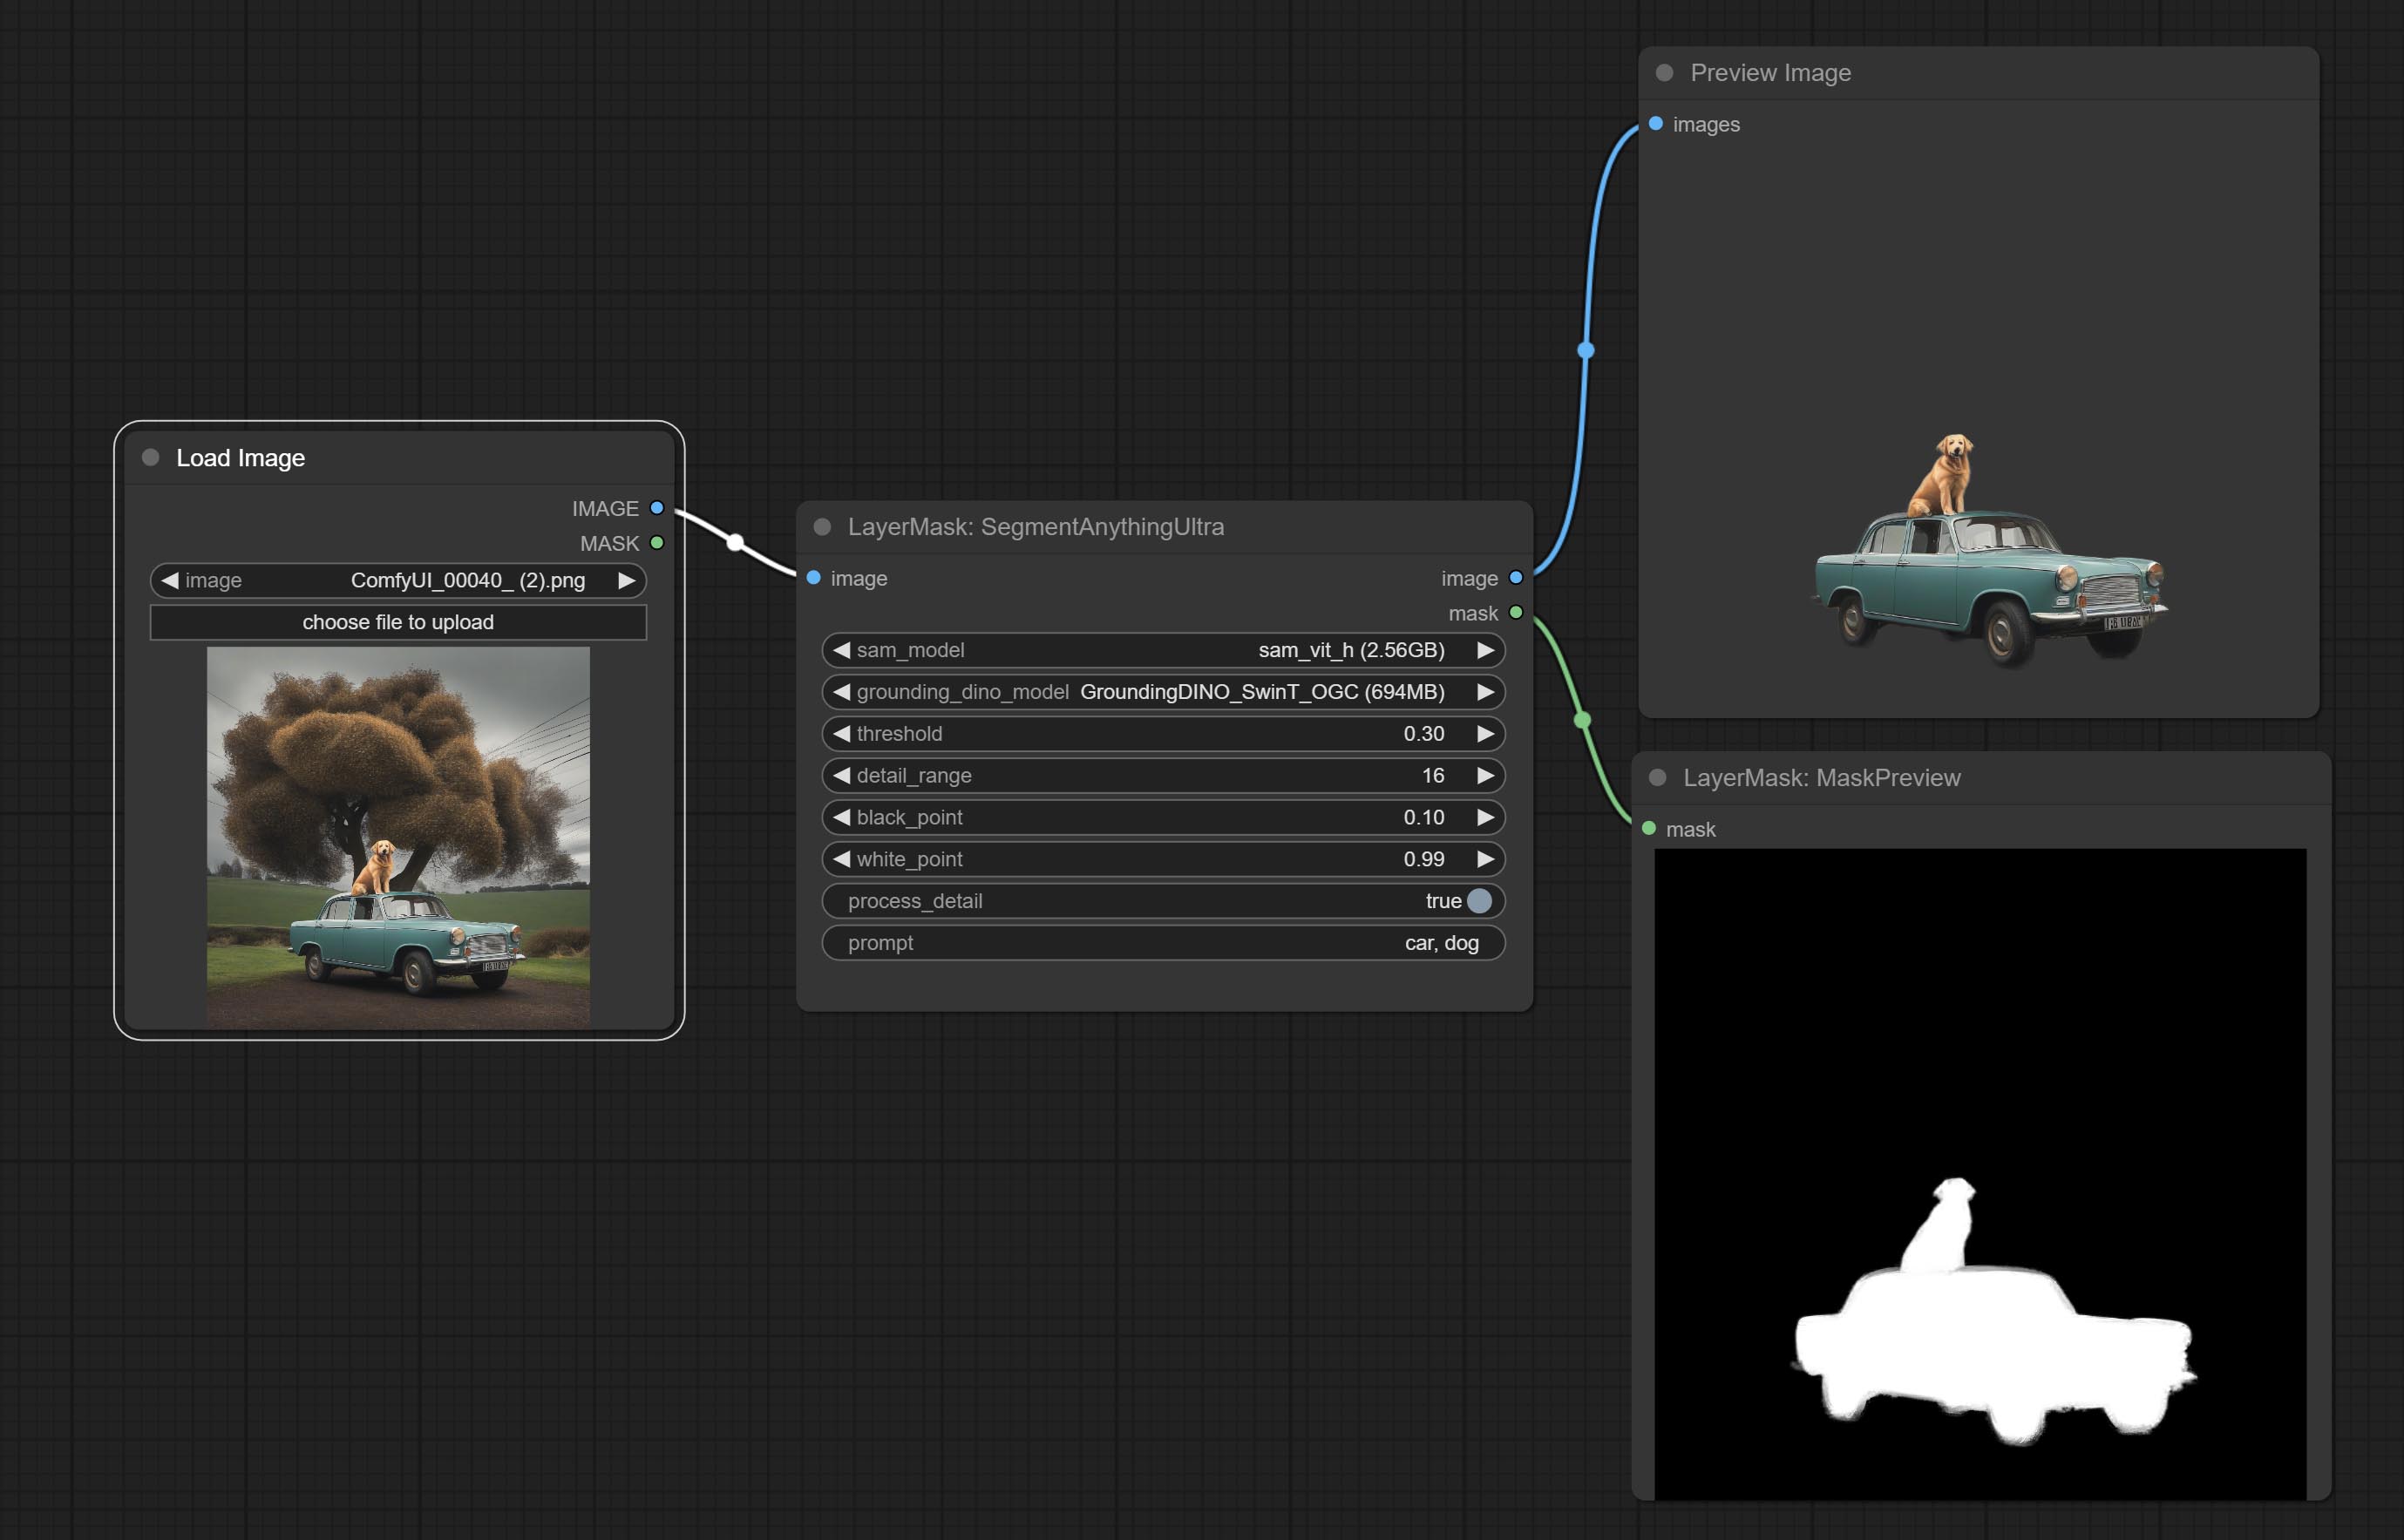
Node options:

- sam_model: Select the SAM model.
- ground_dino_model: Select the Grounding DINO model.
- threshold: The threshold of SAM.
- detail_range: Edge detail range.
- black_point: Edge black sampling threshold.
- white_point: Edge white sampling threshold.
- process_detail: Set to false here will skip edge processing to save runtime.
- prompt: Input for SAM's prompt.
- cache_model: Set whether to cache the model.
SegmentAnythingUltraV2
The V2 upgraded version of SegmentAnythingUltra has added the VITMatte edge processing method.(Note: Images larger than 2K in size using this method will consume huge memory) 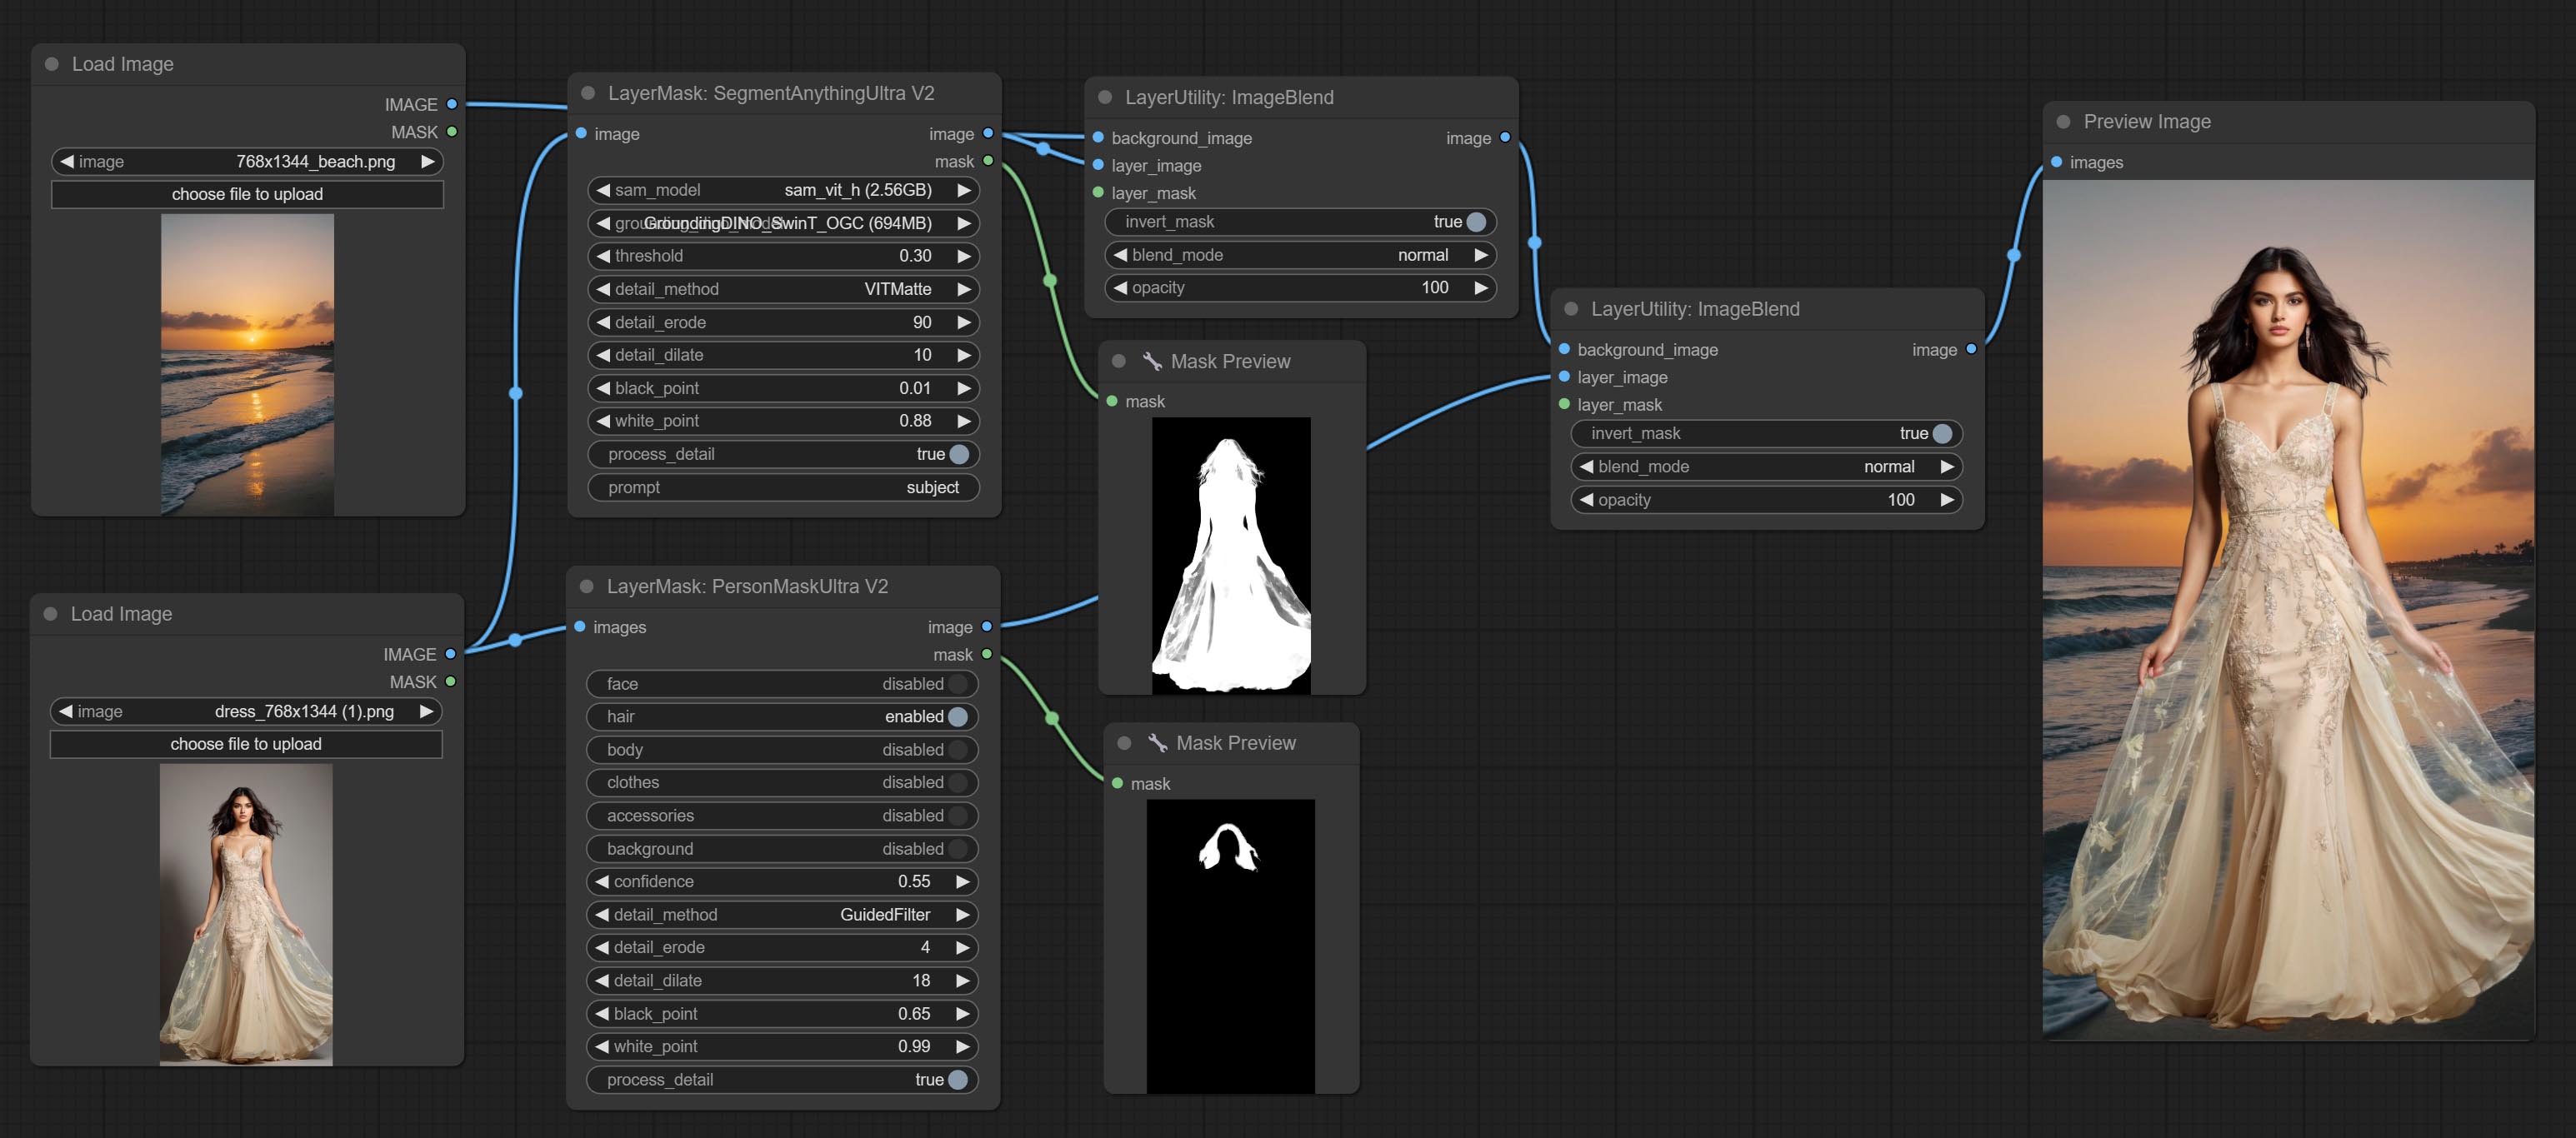
On the basis of SegmentAnythingUltra, the following changes have been made: 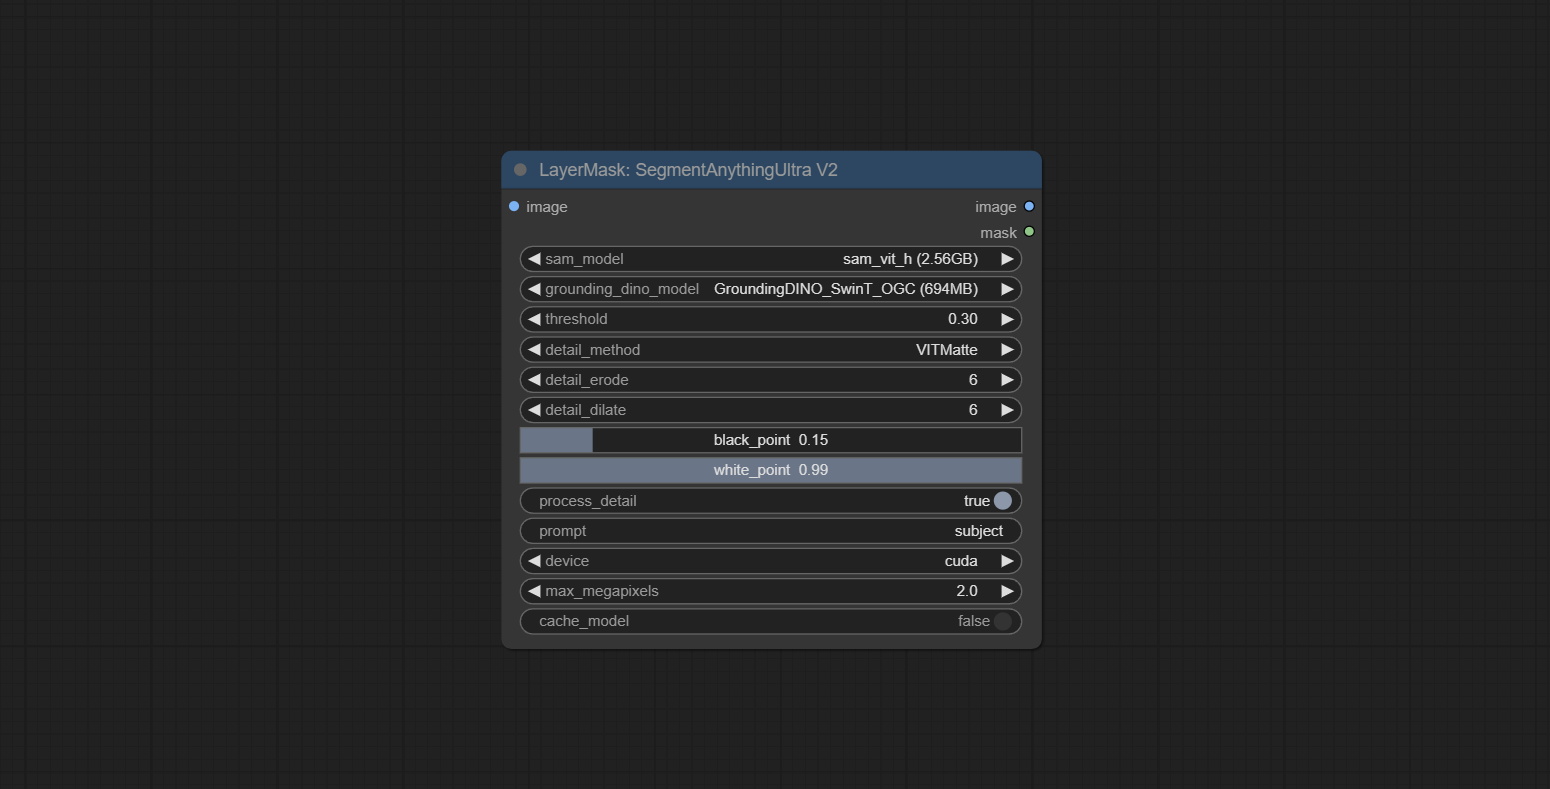
- detail_method: Edge processing methods. provides VITMatte, VITMatte(local), PyMatting, GuidedFilter. If the model has been downloaded after the first use of VITMatte, you can use VITMatte (local) afterwards.
- detail_erode: Mask the erosion range inward from the edge. the larger the value, the larger the range of inward repair.
- detail_dilate: The edge of the mask expands outward. the larger the value, the wider the range of outward repair.
- device: Set whether the VitMatte to use cuda.
- max_megapixels: Set the maximum size for VitMate operations.
SAM2Ultra
This node is modified from kijai/ComfyUI-segment-anything-2. Thank to kijai for making significant contributions to the Comfyui community.
SAM2 Ultra node only support single image. If you need to process multiple images, please first convert the image batch to image list.
*Download models from BaiduNetdisk or huggingface.co/Kijai/sam2-safetensors and copy to ComfyUI/models/sam2 folder.
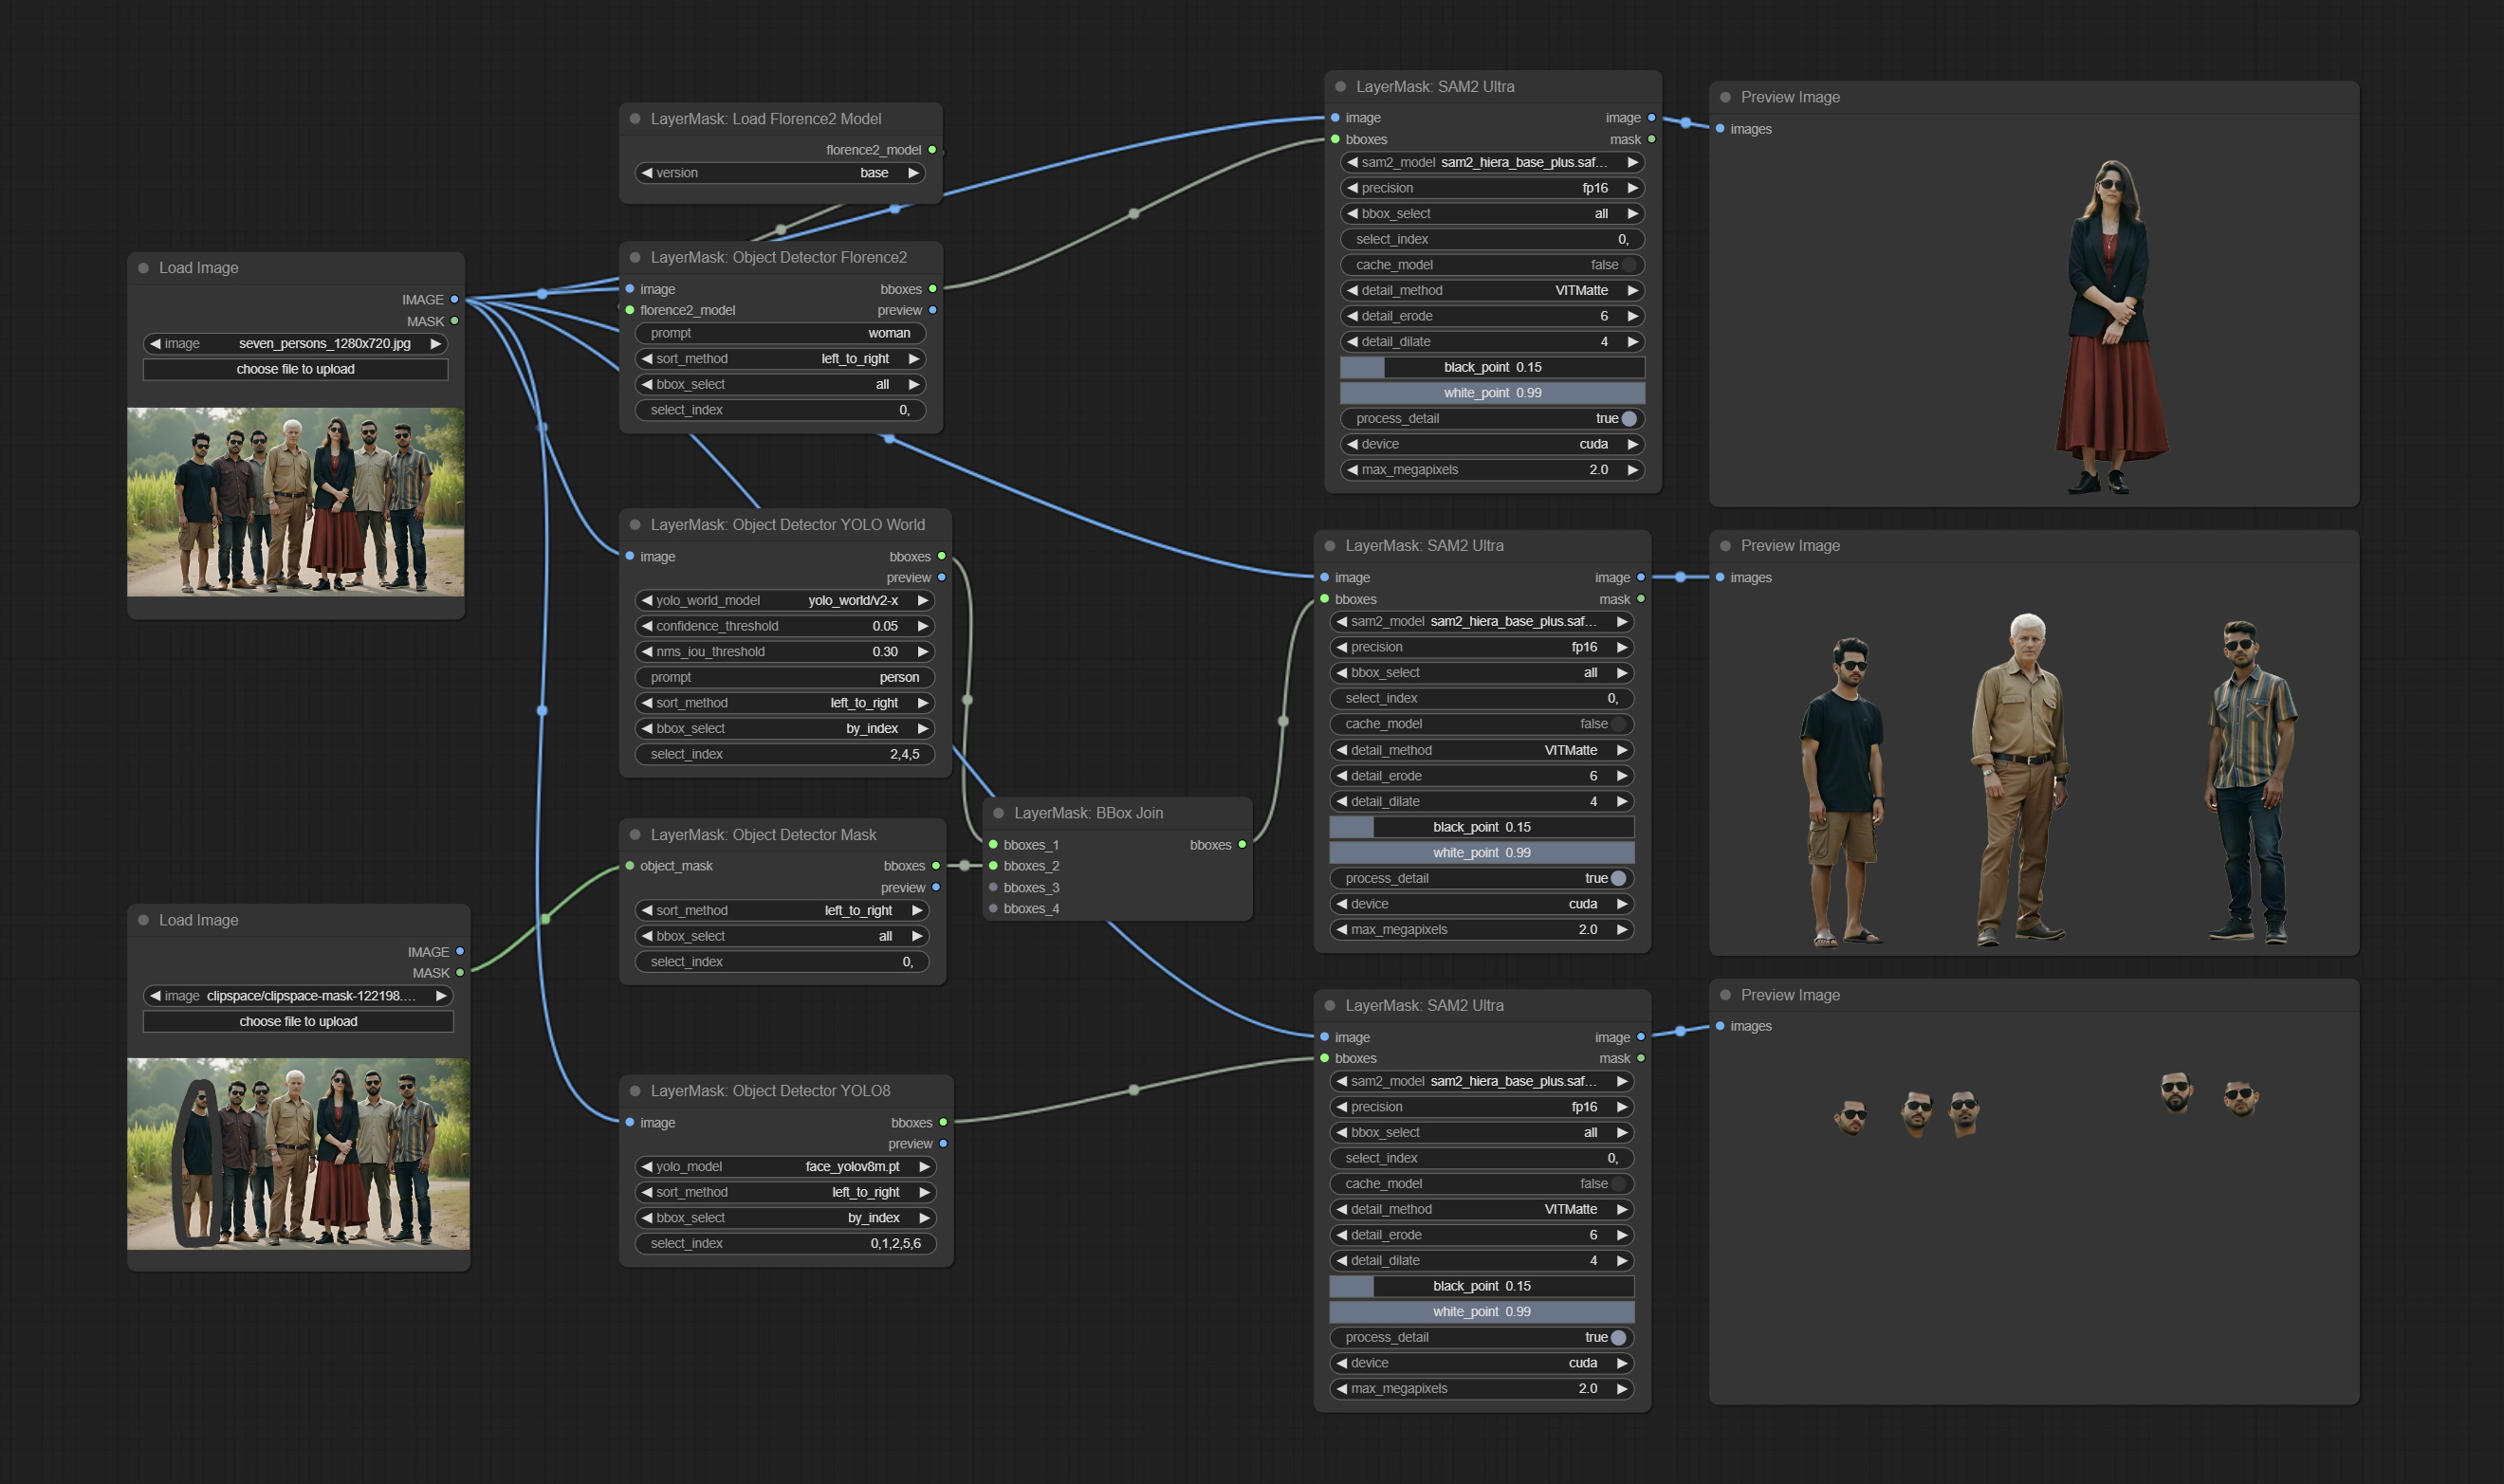
Node Options:
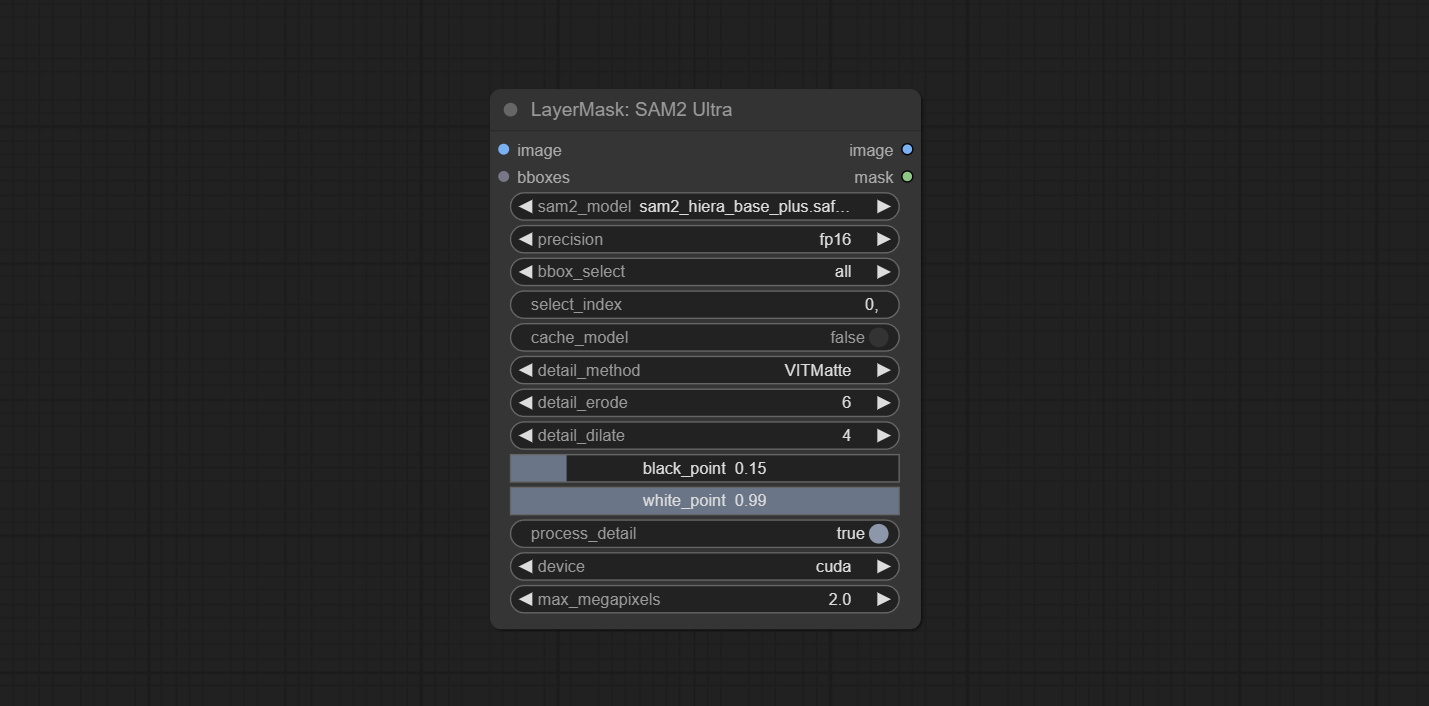
- image: The image to segment.
- bboxes: Input recognition box data.
- sam2_model: Select the SAM2 model.
- presicion: Model's persicion. can be selected from fp16, bf16, and fp32.
- bbox_select: Select the input box data. There are three options: "all" to select all, "first" to select the box with the highest confidence, and "by_index" to specify the index of the box.
- select_index: This option is valid when bbox_delect is 'by_index'. 0 is the first one. Multiple values can be entered, separated by any non numeric character, including but not limited to commas, periods, semicolons, spaces or letters, and even Chinese.
- cache_model: Whether to cache the model. After caching the model, it will save time for model loading.
- detail_method: Edge processing methods. provides VITMatte, VITMatte(local), PyMatting, GuidedFilter. If the model has been downloaded after the first use of VITMatte, you can use VITMatte (local) afterwards.
- detail_erode: Mask the erosion range inward from the edge. the larger the value, the larger the range of inward repair.
- detail_dilate: The edge of the mask expands outward. the larger the value, the wider the range of outward repair.
- black_point: Edge black sampling threshold.
- white_point: Edge white sampling threshold.
- process_detail: Set to false here will skip edge processing to save runtime.
- device: Set whether the VitMatte to use cuda.
- max_megapixels: Set the maximum size for VitMate operations.
SAM2VideoUltra
SAM2 Video Ultra node support processing multiple frames of images or video sequences. Please define the recognition box data in the first frame of the sequence to ensure correct recognition.
sam2_video_ultra_example.mp4
2024-09-03.152625.mp4
Node Options:
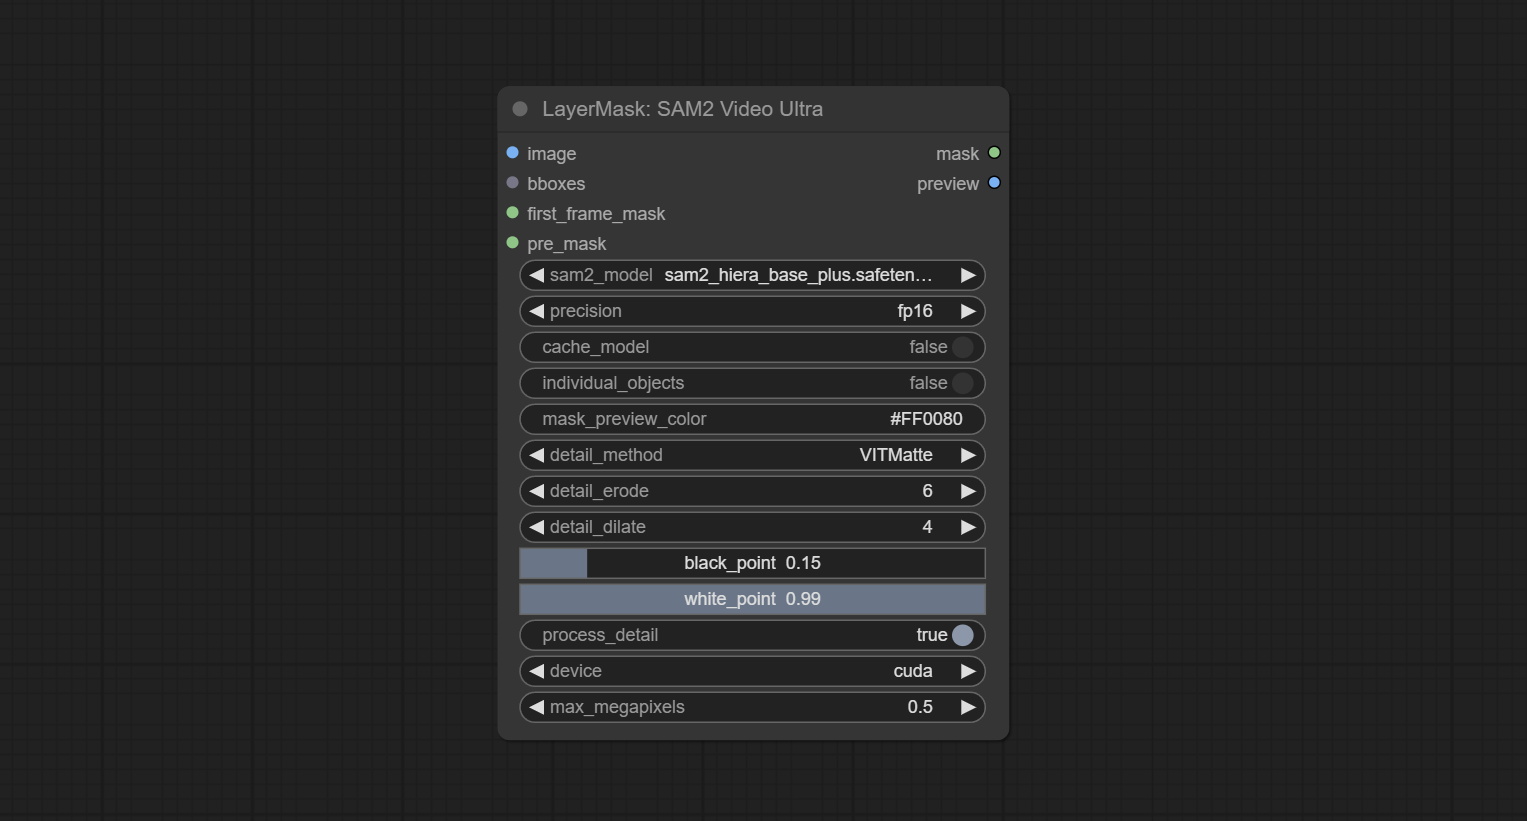
- image: The image to segment.
- bboxes: Optional input of recognition bbox data.
bboxes and first_frame_mask must have least one input. If first_frame_mask inputed, bbboxes will be ignored. - first_frame_mask: Optional input of the first frame mask. The mask will be used as the first frame recognition object.
bboxes and first_frame_mask must have least one input. If first_frame_mask inputed, bbboxes will be ignored. - pre_mask: Optional input mask, which will serve as a propagation focus range limitation and help improve recognition accuracy.
- sam2_model: Select the SAM2 model.
- presicion: Model's persicion. can be selected from fp16 and bf16.
- cache_model: Whether to cache the model. After caching the model, it will save time for model loading.
- individual_object: When set to True, it will focus on identifying a single object. When set to False, attempts will be made to generate recognition boxes for multiple objects.
- mask_preview_color: Display the color of non masked areas in the preview output.
- detail_method: Edge processing methods. Only VITMatte method can be used.
- detail_erode: Mask the erosion range inward from the edge. the larger the value, the larger the range of inward repair.
- detail_dilate: The edge of the mask expands outward. the larger the value, the wider the range of outward repair.
- black_point: Edge black sampling threshold.
- white_point: Edge white sampling threshold.
- process_detail: Set to false here will skip edge processing to save runtime.
- device: Only cuda can be used.
- max_megapixels: Set the maximum size for VitMate operations.A larger size will result in finer mask edges, but it will lead to a significant decrease in computation speed.
ObjectDetectorFL2
Use the Florence2 model to identify objects in images and output recognition box data.
*Download models from BaiduNetdisk and copy to ComfyUI/models/florence2 folder.
Node Options:
- image: The image to segment.
- florence2_model: Florence2 model, it from LoadFlorence2Model node.
- prompt: Describe the object that needs to be identified.
- sort_method: The selection box sorting method has 4 options: "left_to_right", "top_to_bottom", "big_to_small" and "confidence".
- bbox_select: Select the input box data. There are three options: "all" to select all, "first" to select the box with the highest confidence, and "by_index" to specify the index of the box.
- select_index: This option is valid when bbox_delect is 'by_index'. 0 is the first one. Multiple values can be entered, separated by any non numeric character, including but not limited to commas, periods, semicolons, spaces or letters, and even Chinese.
ObjectDetectorYOLOWorld
Use the YOLO-World model to identify objects in images and output recognition box data.
*Download models from BaiduNetdisk or GoogleDrive and copy to ComfyUI/models/yolo-world folder.
Node Options:
- image: The image to segment.
- confidence_threshold: The threshold of confidence.
- nms_iou_threshold: The threshold of Non-Maximum Suppression.
- prompt: Describe the object that needs to be identified.
- sort_method: The selection box sorting method has 4 options: "left_to_right", "top_to_bottom", "big_to_small" and "confidence".
- bbox_select: Select the input box data. There are three options: "all" to select all, "first" to select the box with the highest confidence, and "by_index" to specify the index of the box.
- select_index: This option is valid when bbox_delect is 'by_index'. 0 is the first one. Multiple values can be entered, separated by any non numeric character, including but not limited to commas, periods, semicolons, spaces or letters, and even Chinese.
ObjectDetectorYOLO8
Use the YOLO-8 model to identify objects in images and output recognition box data.
*Download models from GoogleDrive or BaiduNetdisk and copy to ComfyUI/models/yolo folder.
Node Options:
- image: The image to segment.
- yolo_model: Choose the yolo model.
- sort_method: The selection box sorting method has 4 options: "left_to_right", "top_to_bottom", "big_to_small" and "confidence".
- bbox_select: Select the input box data. There are three options: "all" to select all, "first" to select the box with the highest confidence, and "by_index" to specify the index of the box.
- select_index: This option is valid when bbox_delect is 'by_index'. 0 is the first one. Multiple values can be entered, separated by any non numeric character, including but not limited to commas, periods, semicolons, spaces or letters, and even Chinese.
ObjectDetectorMask
Use mask as recognition box data. All areas surrounded by white areas on the mask will be recognized as an object. Multiple enclosed areas will be identified separately.
Node Options:
- object_mask: The mask input.
- sort_method: The selection box sorting method has 4 options: "left_to_right", "top_to_bottom", "big_to_small" and "confidence".
- bbox_select: Select the input box data. There are three options: "all" to select all, "first" to select the box with the highest confidence, and "by_index" to specify the index of the box.
- select_index: This option is valid when bbox_delect is 'by_index'. 0 is the first one. Multiple values can be entered, separated by any non numeric character, including but not limited to commas, periods, semicolons, spaces or letters, and even Chinese.
BBoxJoin
Merge recognition box data.
Node Options:
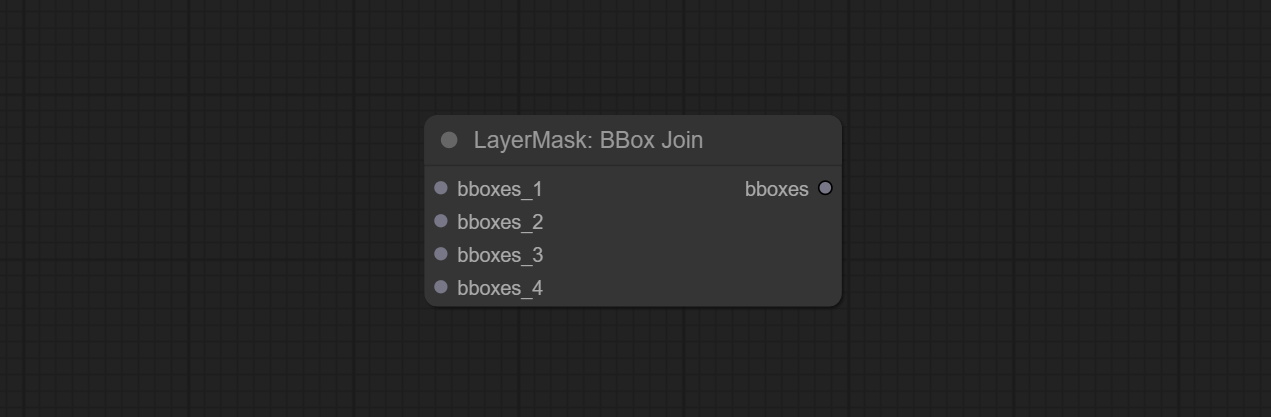
- bboxes_1: Required input. The first set of identification boxes.
- bboxes_2: Optional input. The second set of identification boxes.
- bboxes_3: Optional input. The third set of identification boxes.
- bboxes_4: Optional input. The fourth set of identification boxes.
DrawBBoxMask
Draw the recognition BBoxes data output by the Object Detector node as a mask.
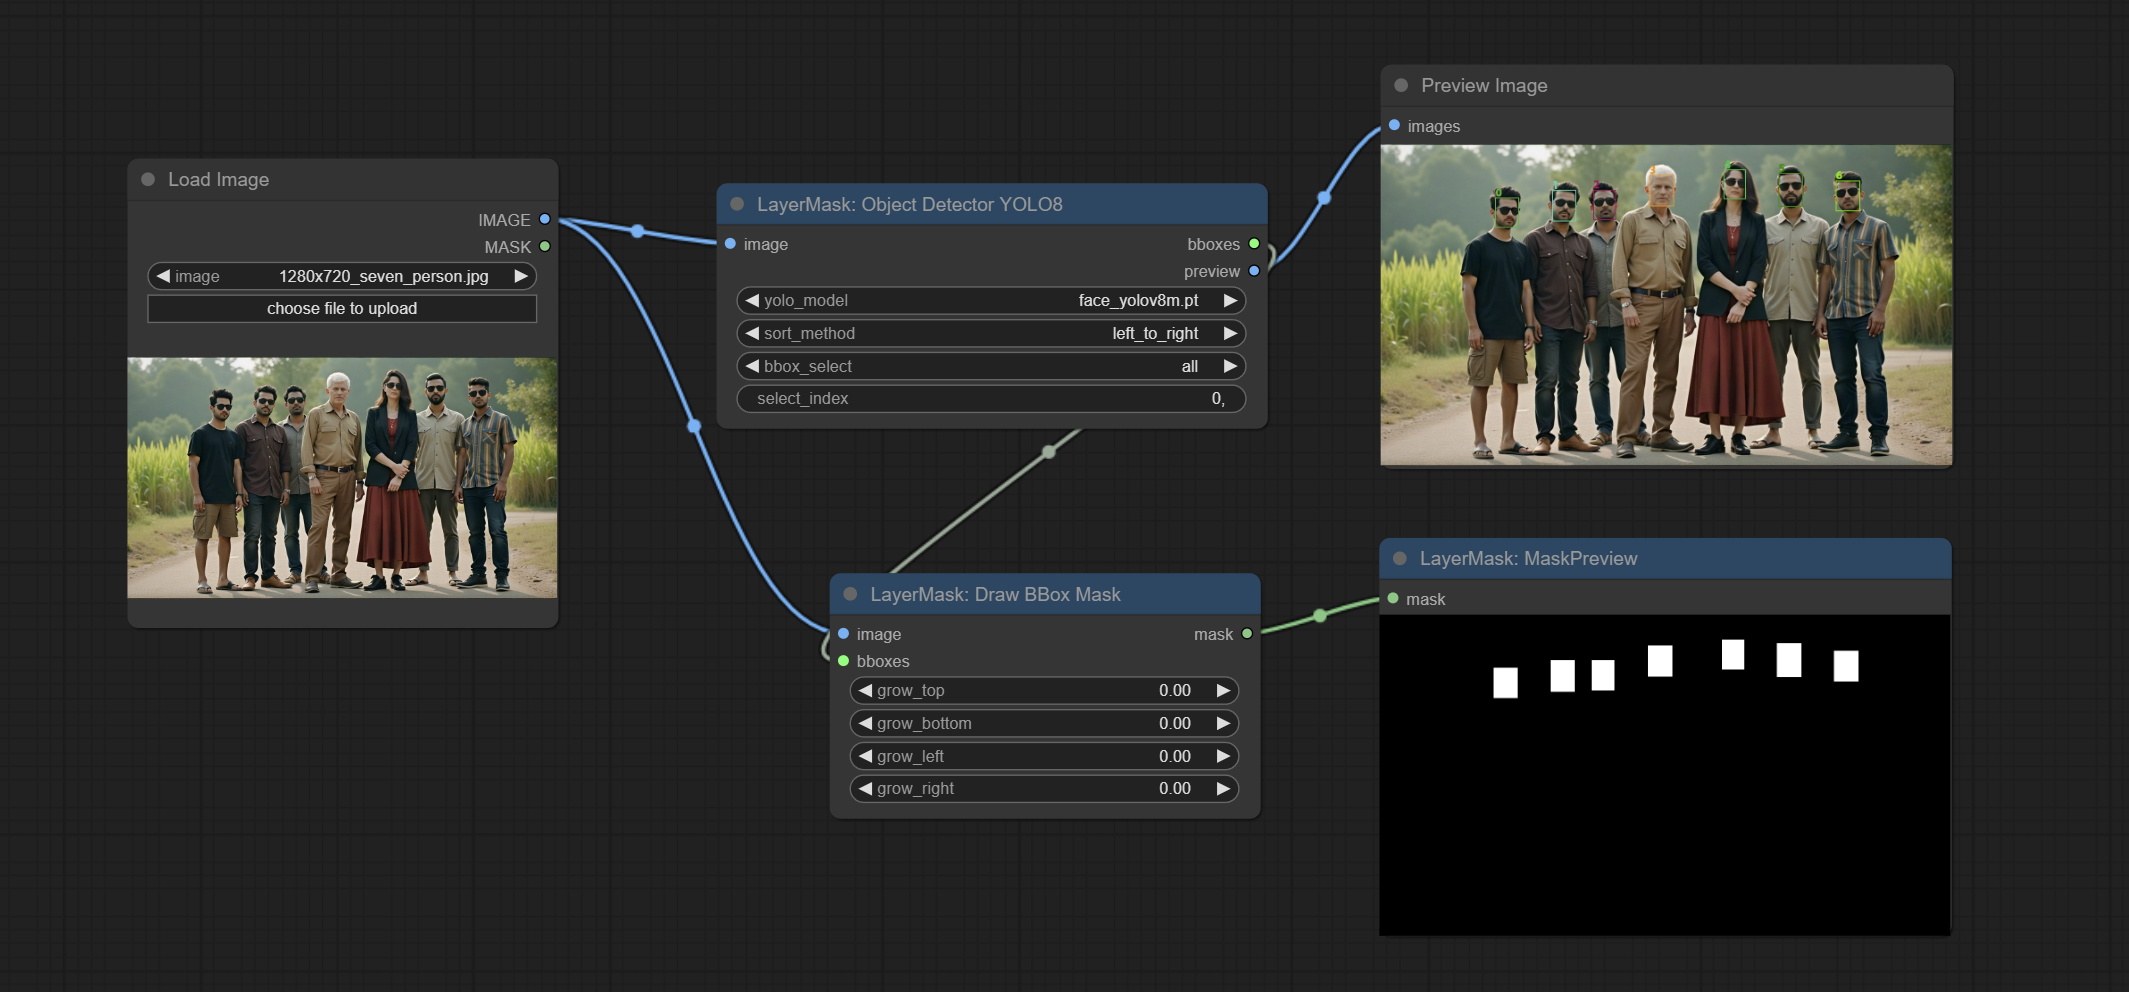
Node Options:
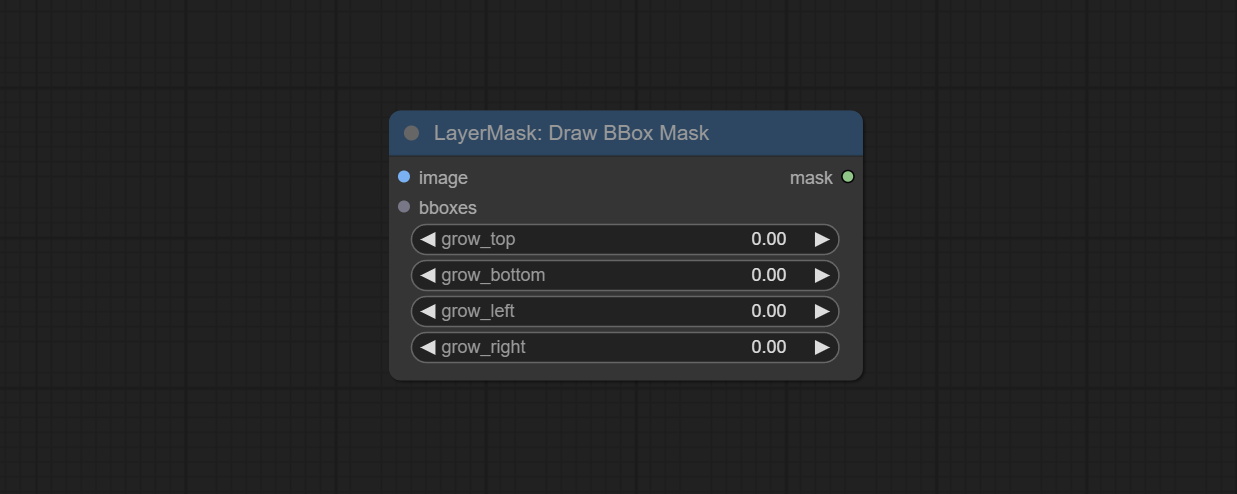
- image: Image input. It must be consistent with the image recognized by the Object Detector node.
- bboxes: Input recognition BBoxes data.
- grow_top: Each BBox expands upwards as a percentage of its height, positive values indicate upward expansion and negative values indicate downward expansion.
- grow_bottom: Each BBox expands downwards as a percentage of its height, positive values indicating downward expansion and negative values indicating upward expansion.
- grow_left: Each BBox expands to the left as a percentage of its width, positive values expand to the left and negative values expand to the right.
- grow_right: Each BBox expands to the right as a percentage of its width, positive values indicate expansion to the right and negative values indicate expansion to the left.
EVF-SAMUltra
This node is implementation of EVF-SAM in ComfyUI.
*Please download model files from BaiduNetdisk or huggingface/EVF-SAM2, huggingface/EVF-SAM to ComfyUI/models/EVF-SAM folder(save the models in their respective subdirectories). 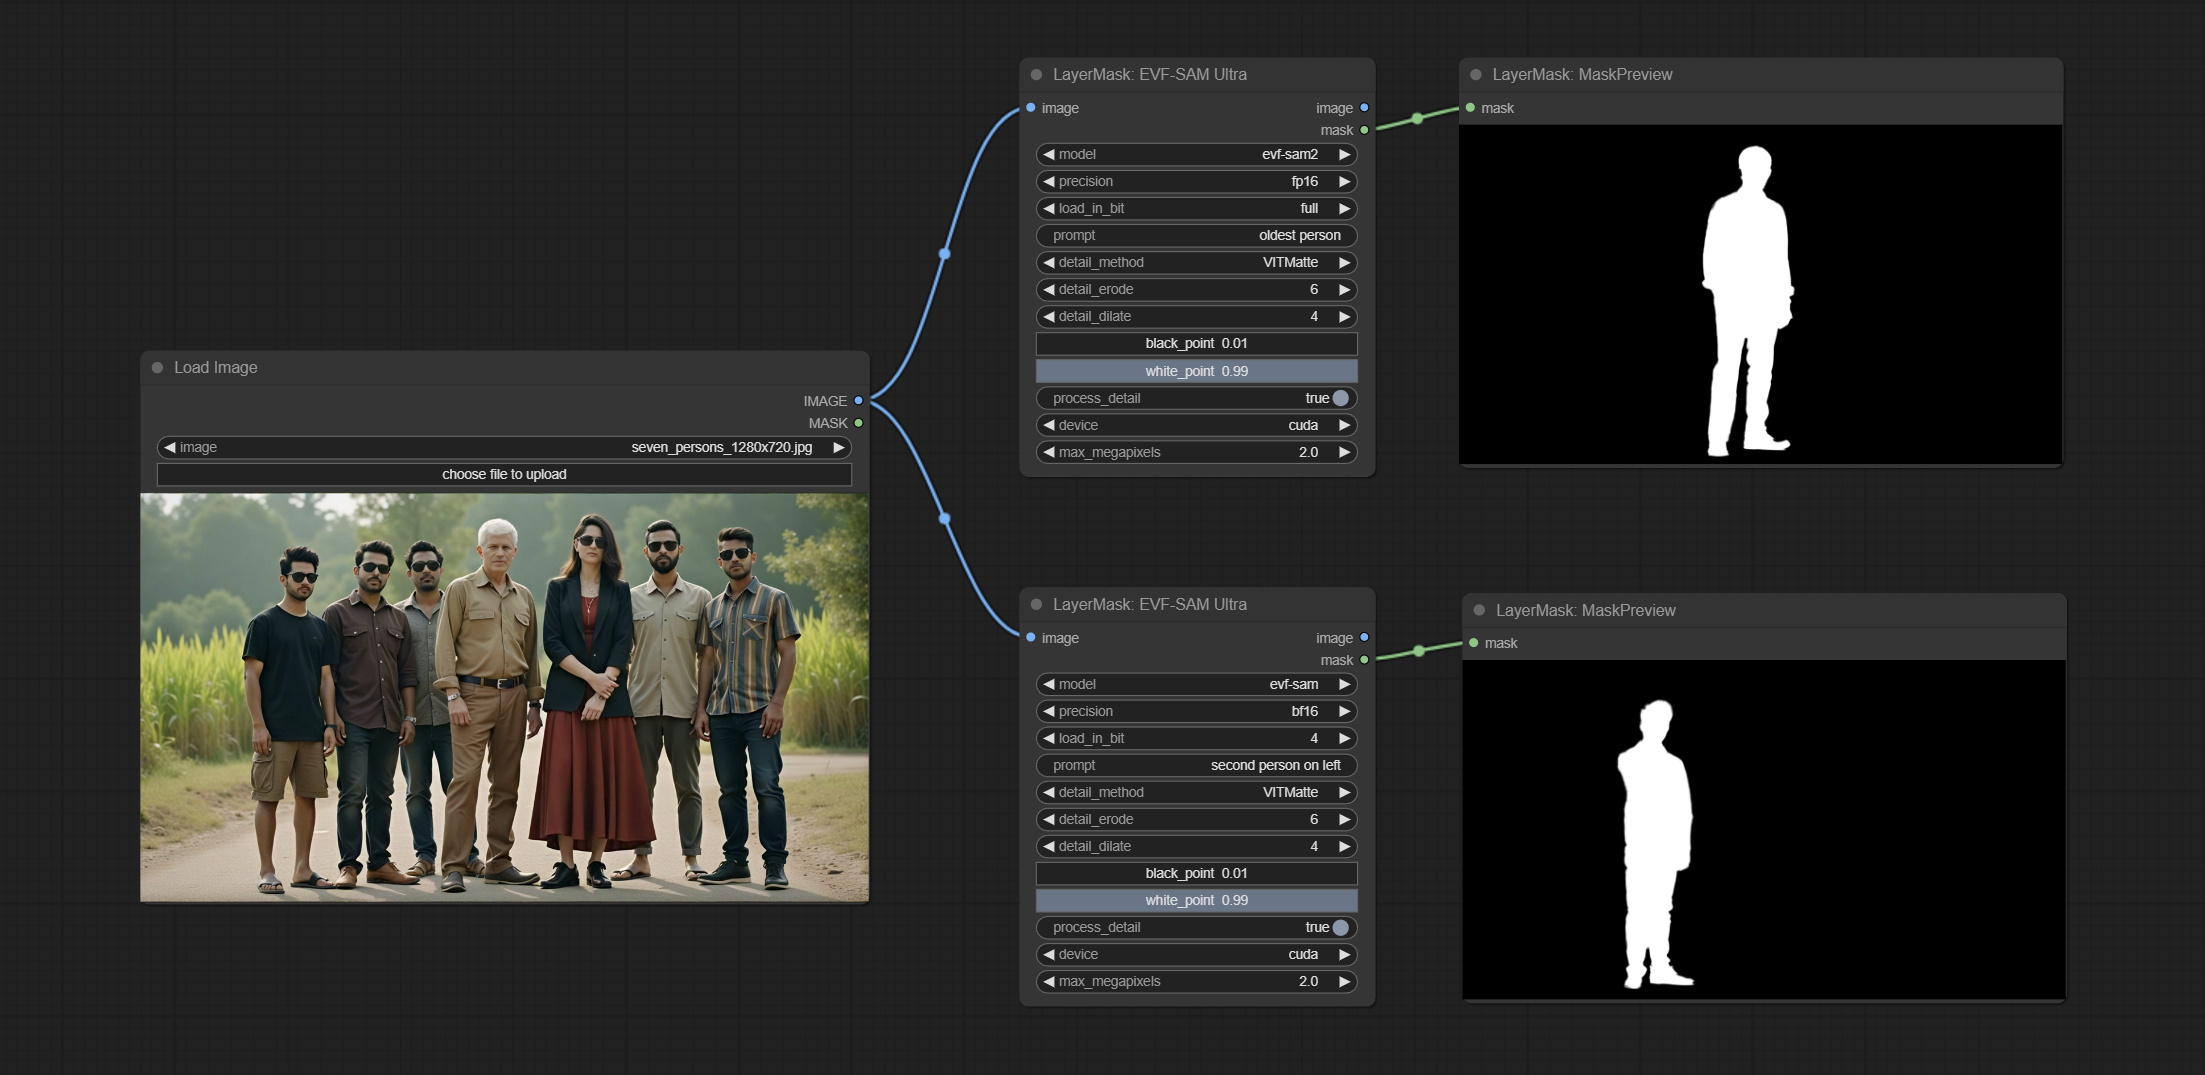
Node Options:
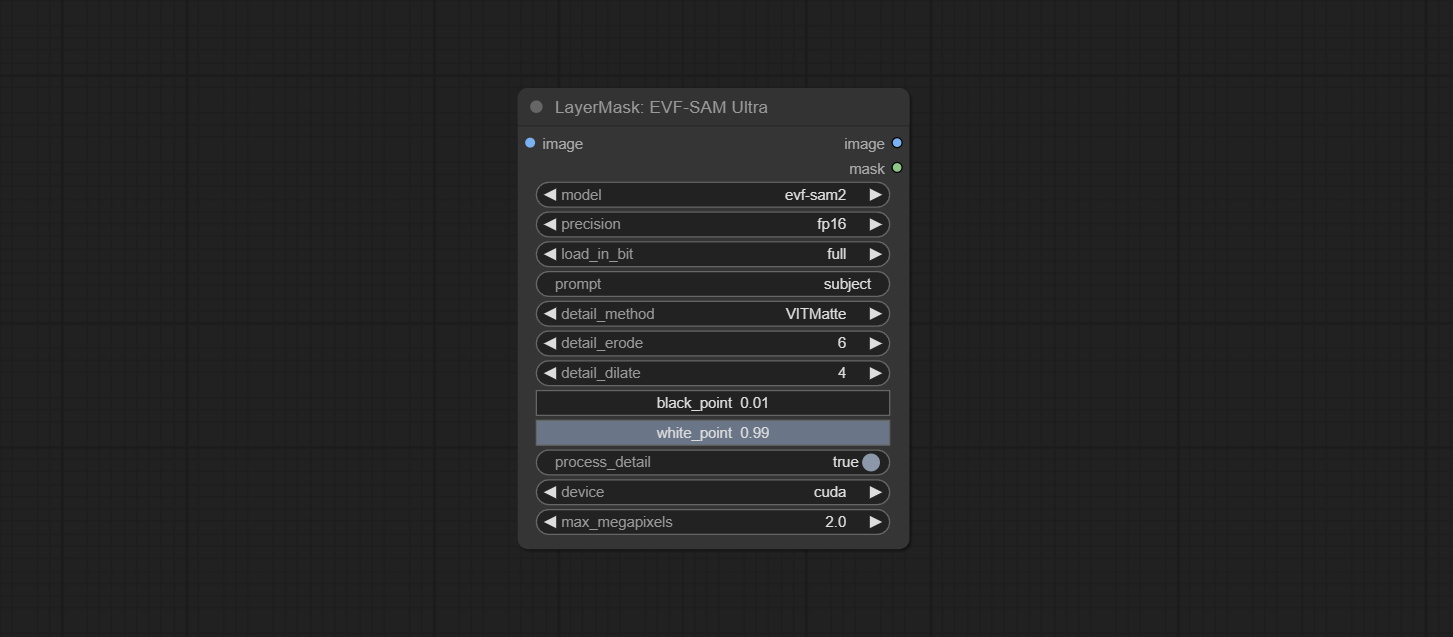
- image: The input image.
- model: Select the model. Currently, there are options for evf-sam2 and evf sam.
- presicion: Model accuracy can be selected from fp16, bf16, and fp32.
- load_in_bit: Load the model with positional accuracy. You can choose from full, 8, and 4.
- pormpt: Prompt words used for segmentation.
- detail_method: Edge processing methods. provides VITMatte, VITMatte(local), PyMatting, GuidedFilter. If the model has been downloaded after the first use of VITMatte, you can use VITMatte (local) afterwards.
- detail_erode: Mask the erosion range inward from the edge. the larger the value, the larger the range of inward repair.
- detail_dilate: The edge of the mask expands outward. the larger the value, the wider the range of outward repair.
- black_point: Edge black sampling threshold.
- white_point: Edge white sampling threshold.
- process_detail: Set to false here will skip edge processing to save runtime.
- device: Set whether the VitMatte to use cuda.
- max_megapixels: Set the maximum size for VitMate operations.
Florence2Ultra
Using the segmentation function of the Florence2 model, while also having ultra-high edge details. The code for this node section is from spacepxl/ComfyUI-Florence-2, thanks to the original author. *Download the model files from BaiduNetdisk to ComfyUI/models/florence2 folder.
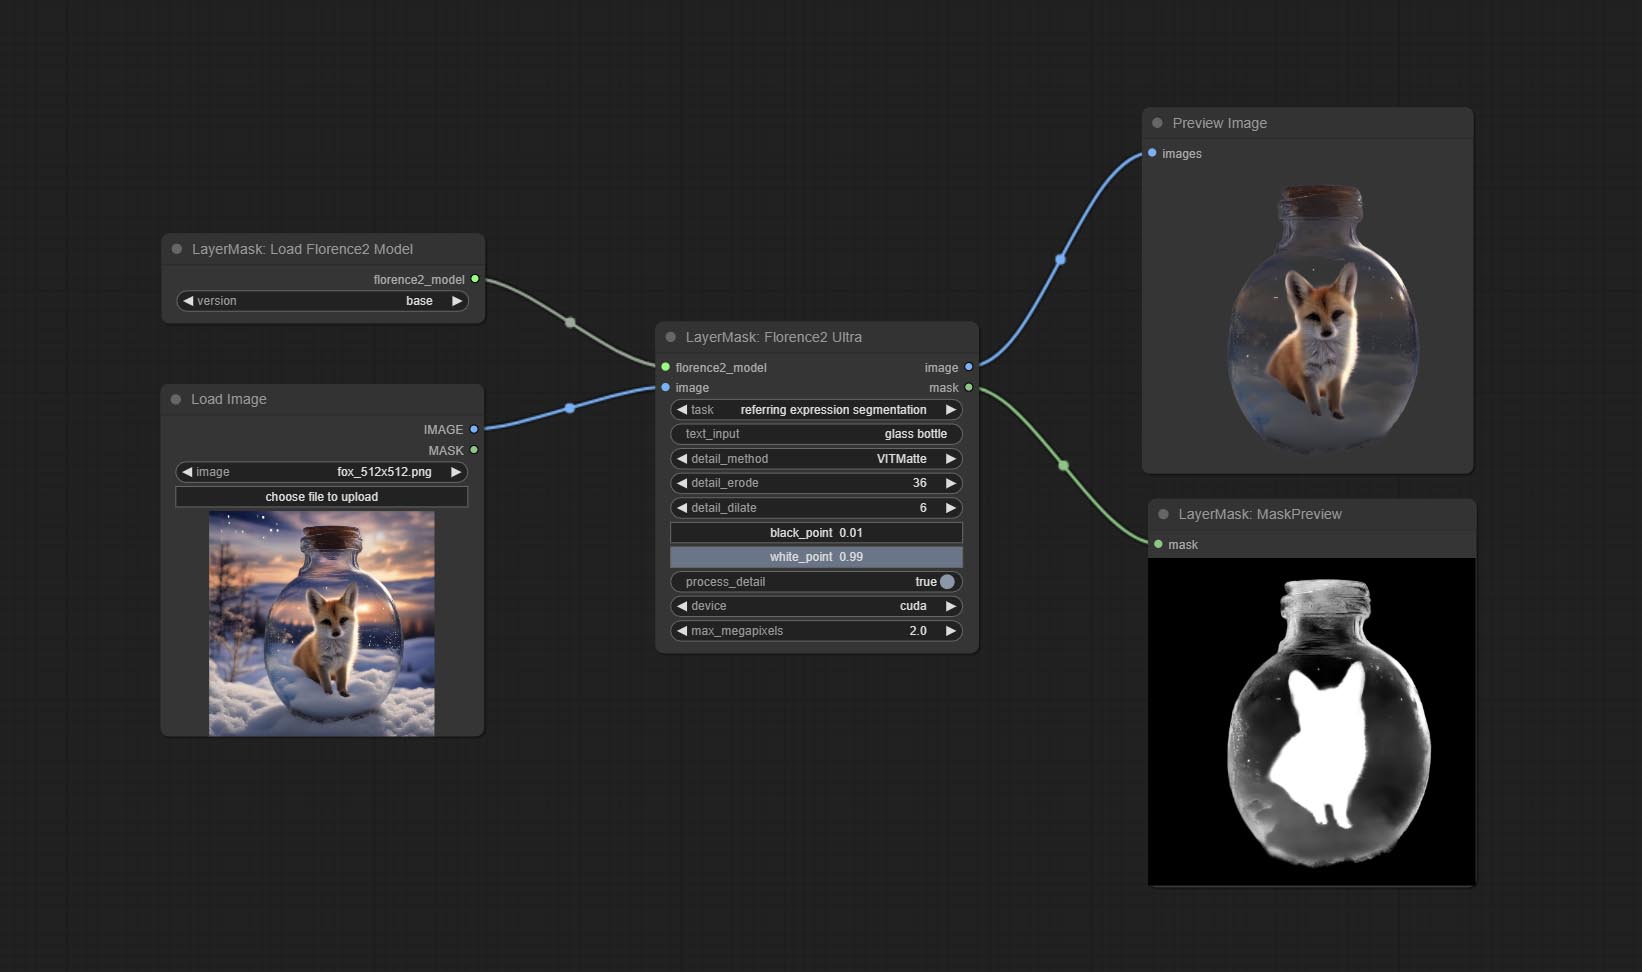
Node Options:
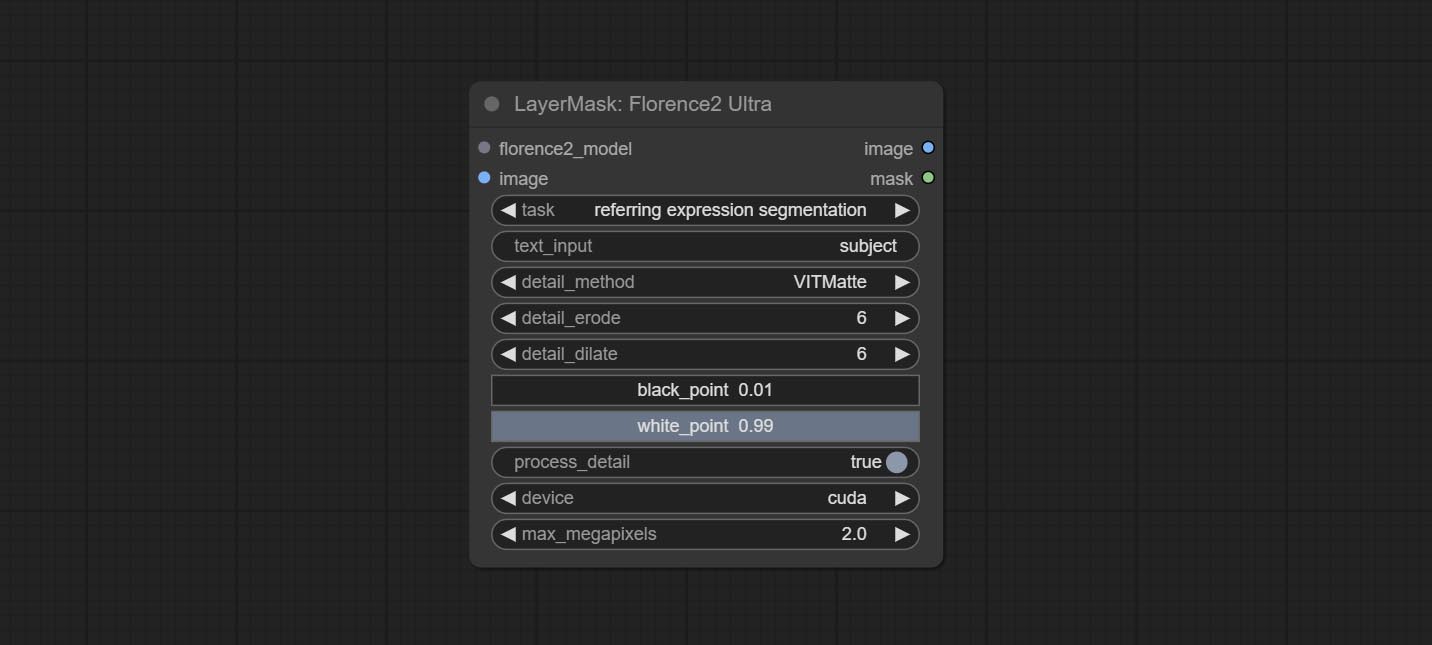
- florence2_model: Florence2 model input.
- image: Image input.
- task: Select the task for florence2.
- text_input: Text input for florence2.
- detail_method: Edge processing methods. provides VITMatte, VITMatte(local), PyMatting, GuidedFilter. If the model has been downloaded after the first use of VITMatte, you can use VITMatte (local) afterwards.
- detail_erode: Mask the erosion range inward from the edge. the larger the value, the larger the range of inward repair.
- detail_dilate: The edge of the mask expands outward. the larger the value, the wider the range of outward repair.
- black_point: Edge black sampling threshold.
- white_point: Edge white sampling threshold.
- process_detail: Set to false here will skip edge processing to save runtime.
- device: Set whether the VitMatte to use cuda.
- max_megapixels: Set the maximum size for VitMate operations.
LoadFlorence2Model
Florence2 model loader. *When using it for the first time, the model will be automatically downloaded.
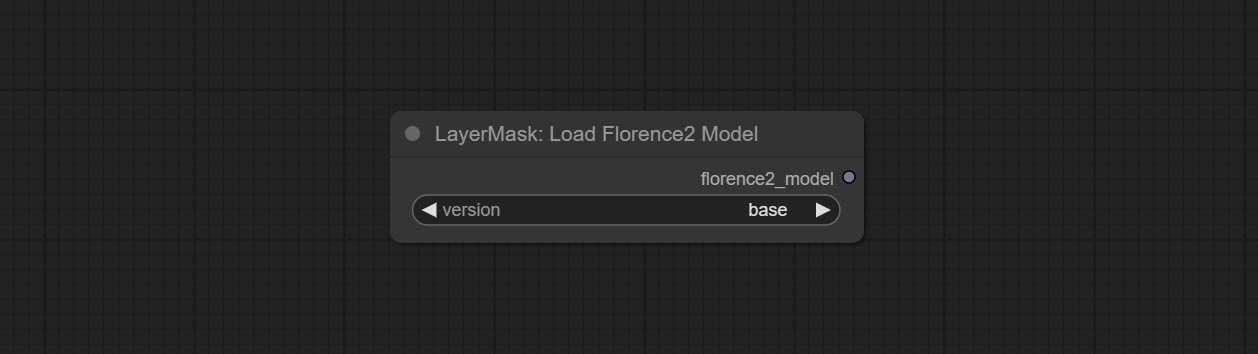
At present, there are base, base-ft, large, large-ft, DocVQA, SD3-Captioner and base-PromptGen models to choose from.
RemBgUltra
Remove background. compared to the similar background removal nodes, this node has ultra-high edge details.
This node combines the Alpha Matte node of Spacepxl's ComfyUI-Image-Filters and the functionality of ZHO-ZHO-ZHO's ComfyUI-BRIA_AI-RMBG, thanks to the original author.
*Download model files from BRIA Background Removal v1.4 or BaiduNetdisk to ComfyUI/models/rmbg/RMBG-1.4 folder. This model can be used for non-commercial purposes.
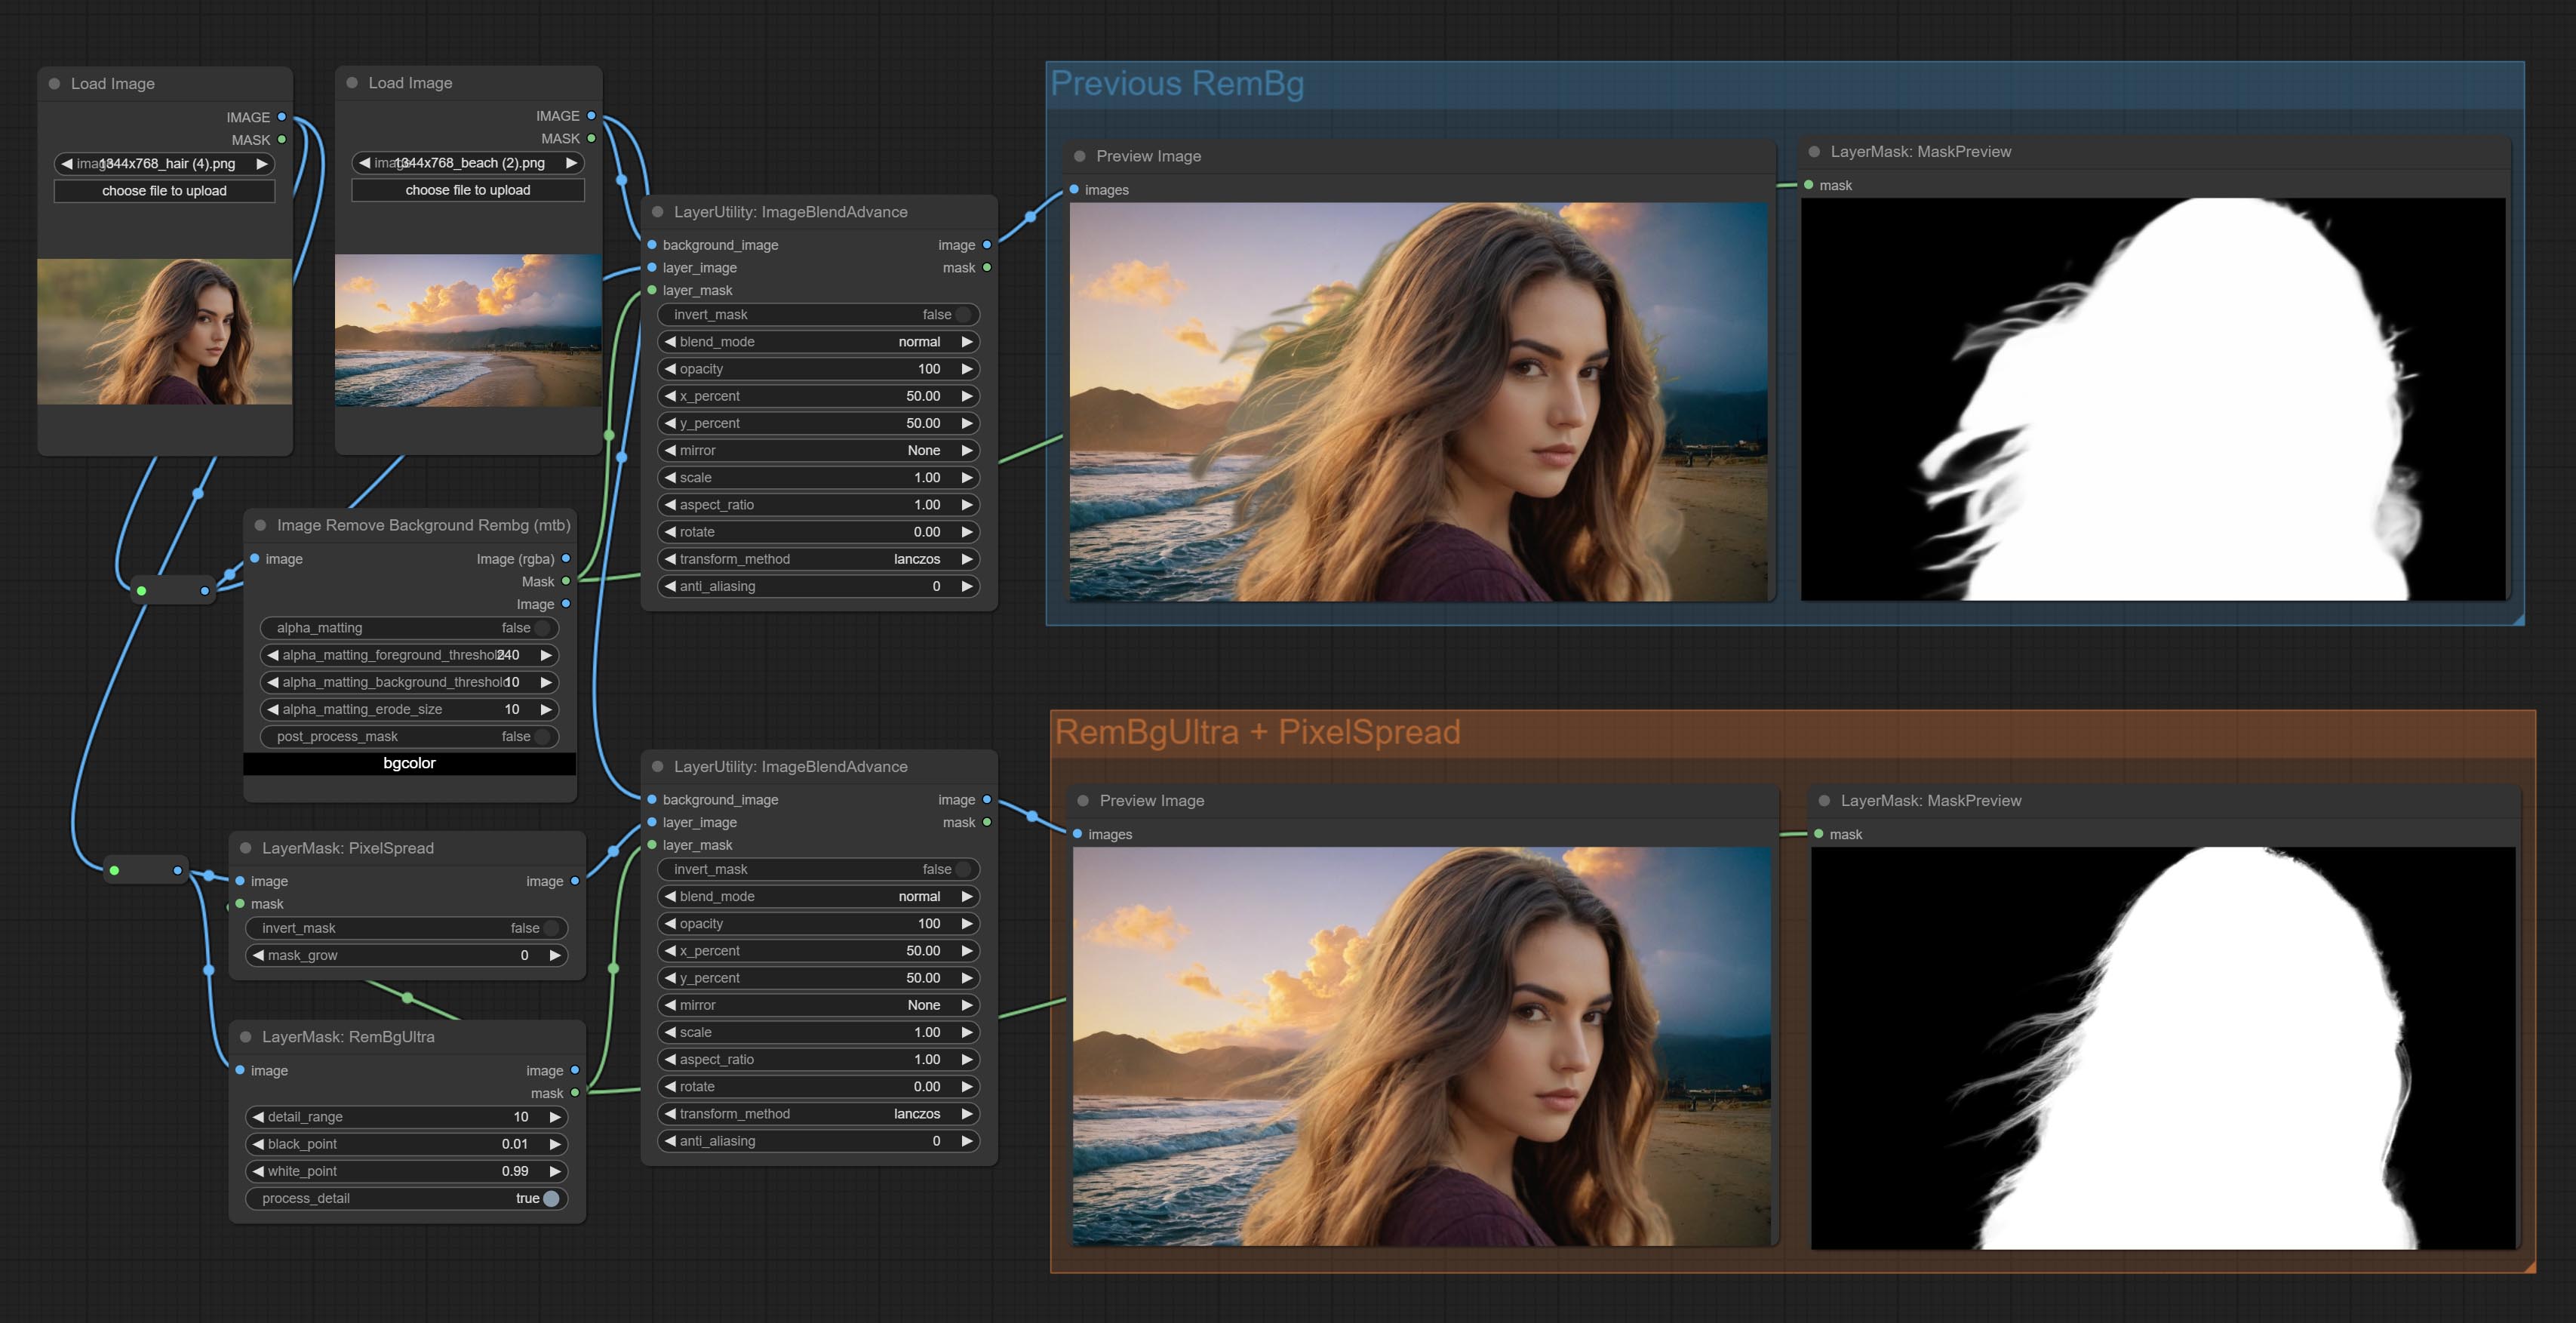
Node options:
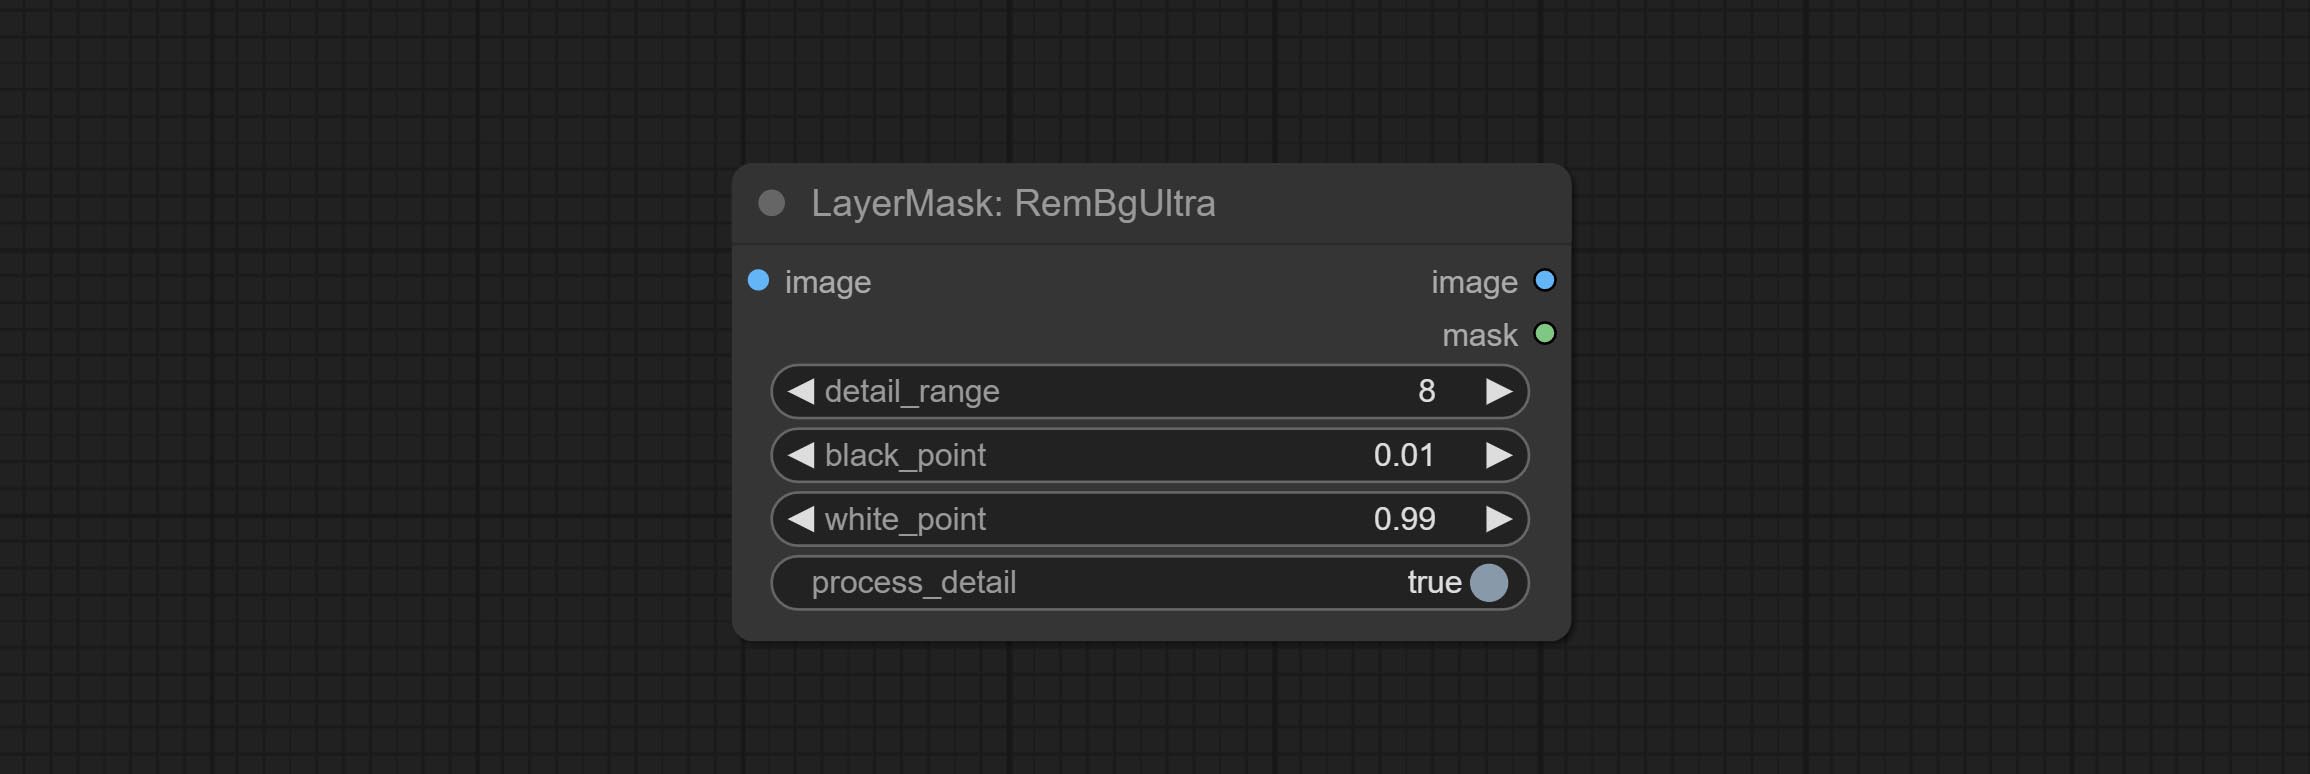
- detail_range: Edge detail range.
- black_point: Edge black sampling threshold.
- white_point: Edge white sampling threshold.
- process_detail: Set to false here will skip edge processing to save runtime.
RmBgUltraV2
The V2 upgraded version of RemBgUltra has added the VITMatte edge processing method.(Note: Images larger than 2K in size using this method will consume huge memory)
On the basis of RemBgUltra, the following changes have been made: 
- detail_method: Edge processing methods. provides VITMatte, VITMatte(local), PyMatting, GuidedFilter. If the model has been downloaded after the first use of VITMatte, you can use VITMatte (local) afterwards.
- detail_erode: Mask the erosion range inward from the edge. the larger the value, the larger the range of inward repair.
- detail_dilate: The edge of the mask expands outward. the larger the value, the wider the range of outward repair.
- device: Set whether the VitMatte to use cuda.
- max_megapixels: Set the maximum size for VitMate operations.
BenUltra
It is the implementation of PramaLLC/BEN project in ComfyUI. Thank you to the original author.
Download the BEN_Base.pth and config.json from huggingface or BaiduNetdisk and copy to ComfyUI/models/BEN folder.
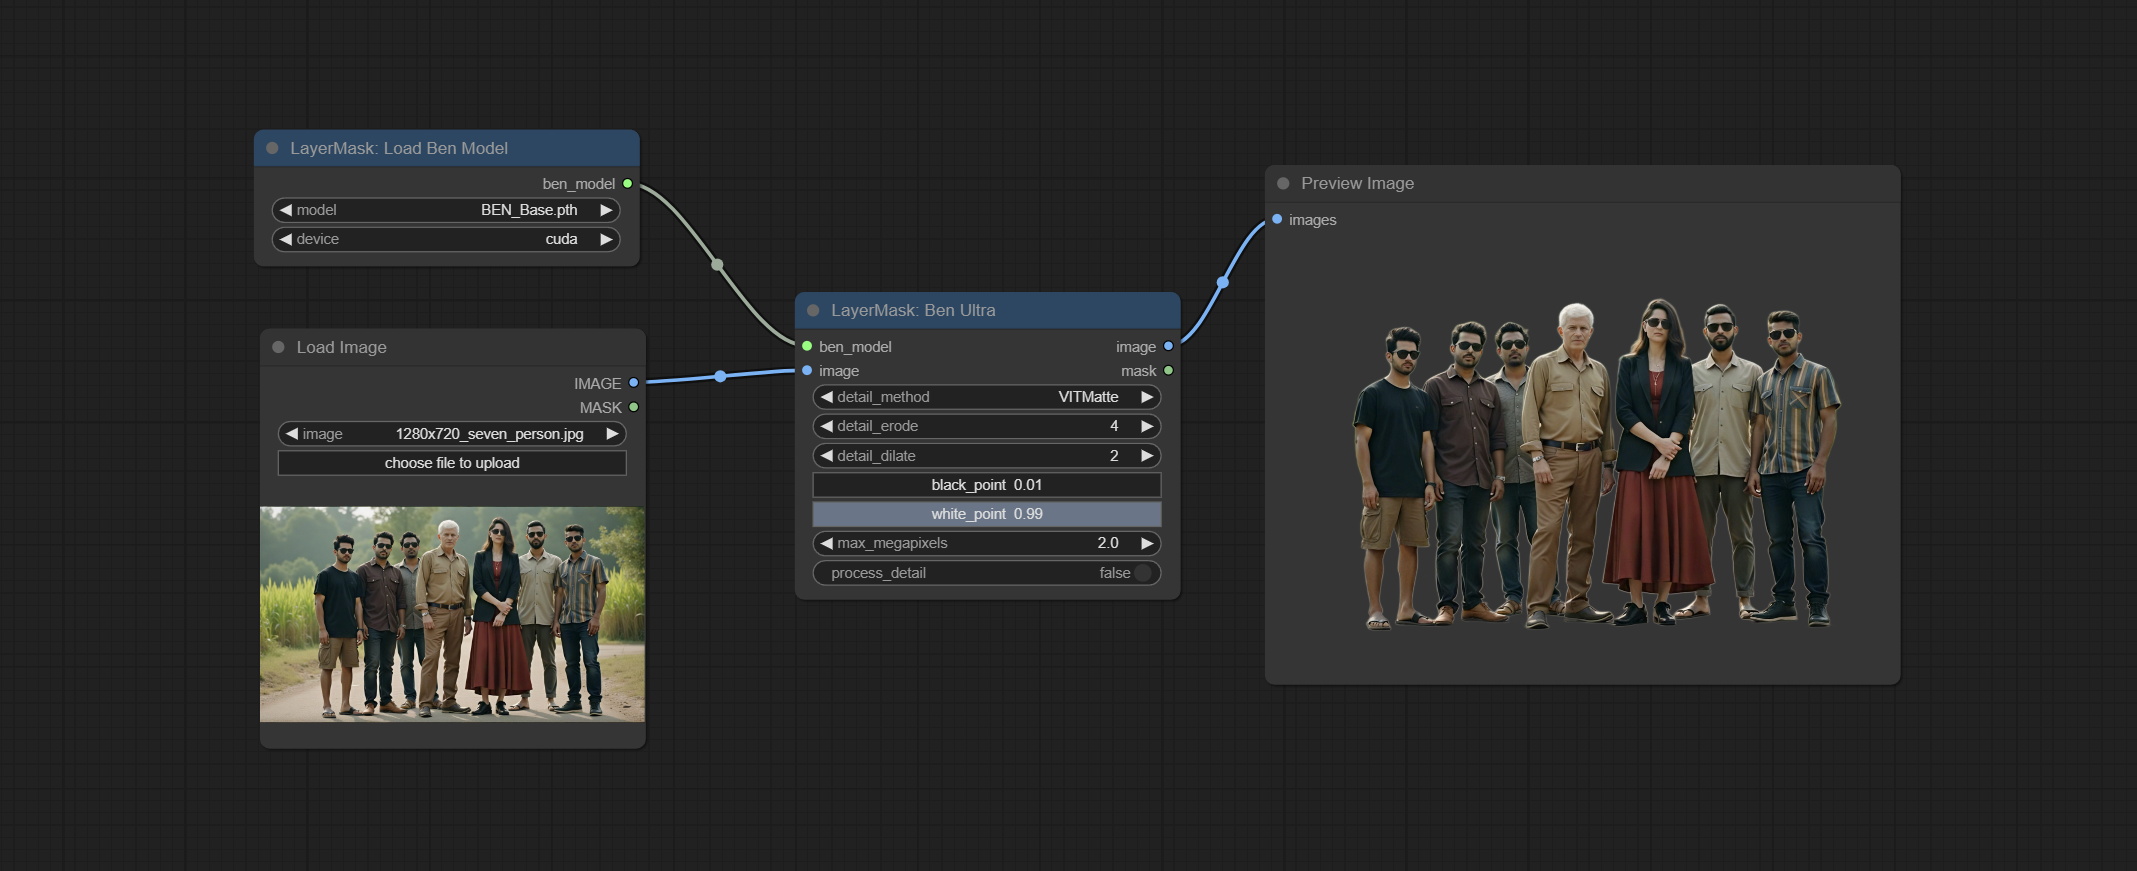
Node Options: 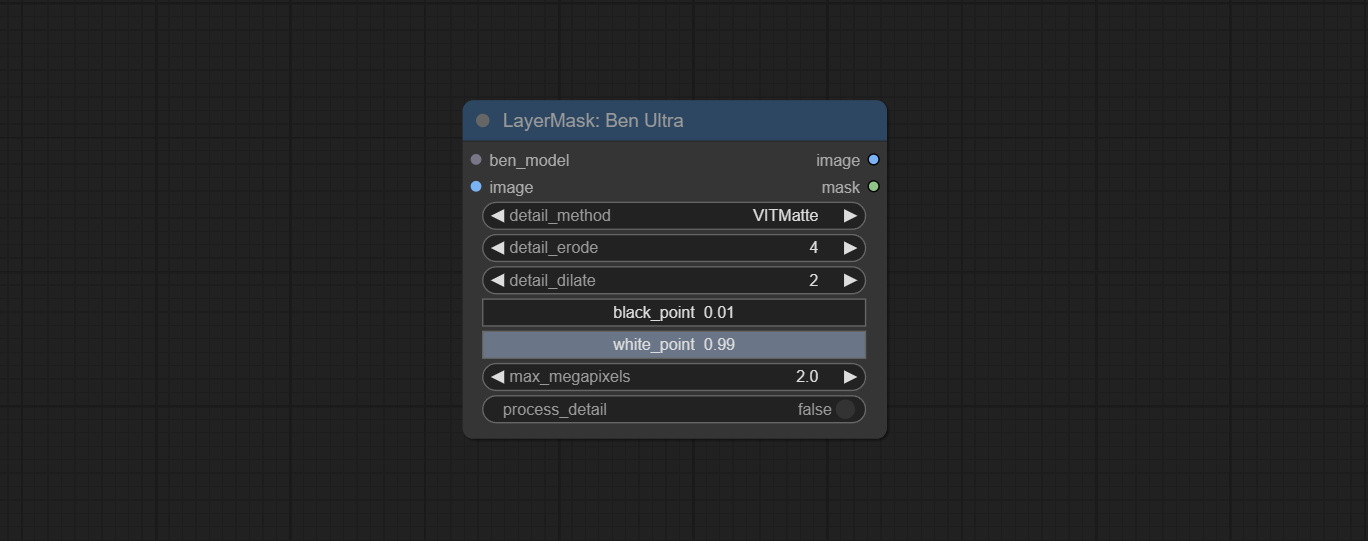
- ben_model: Ben model input.
- image: Image input.
- detail_method: Edge processing methods. provides VITMatte, VITMatte(local), PyMatting, GuidedFilter. If the model has been downloaded after the first use of VITMatte, you can use VITMatte (local) afterwards.
- detail_erode: Mask the erosion range inward from the edge. the larger the value, the larger the range of inward repair.
- detail_dilate: The edge of the mask expands outward. the larger the value, the wider the range of outward repair.
- black_point: Edge black sampling threshold.
- white_point: Edge white sampling threshold.
- process_detail: Set to false here will skip edge processing to save runtime.
- max_megapixels: Set the maximum size for VitMate operations.
LoadBenModel
Load the BEN model.
Node Options:
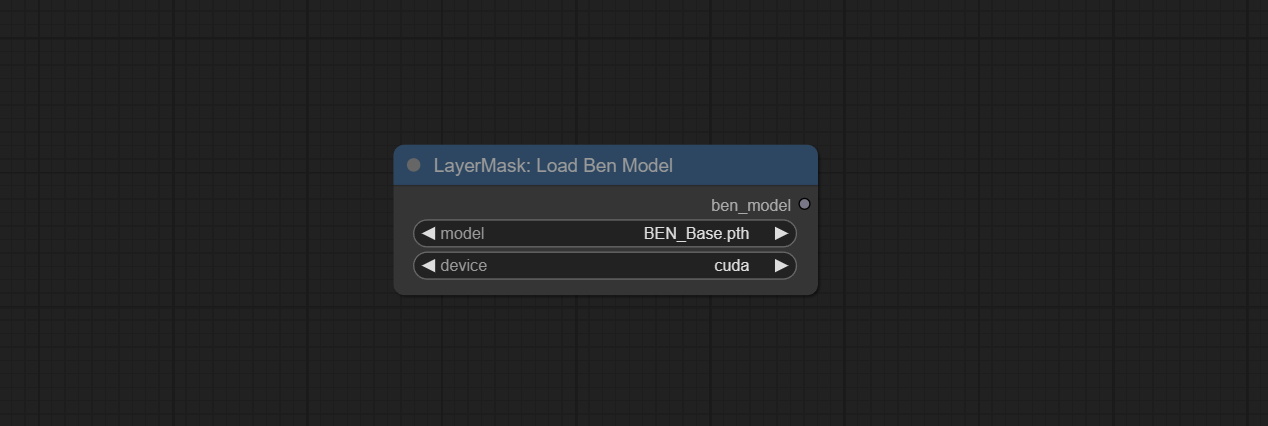
- model: Select the model. Currently, only the Ben_Sase model is available for selection.
BiRefNetUltra
Using the BiRefNet model to remove background has better recognition ability and ultra-high edge details. The code for the model part of this node comes from Viper's ComfyUI-BiRefNet,thanks to the original author.
*From https://huggingface.co/ViperYX/BiRefNet or BaiduNetdisk download the BiRefNet-ep480.pth , pvt_v2_b2.pth , pvt_v2_b5.pth , swin_base_patch4_window12_384_22kto1k.pth , swin_large_patch4_window12_384_22kto1k.pth 5 files to ComfyUI/models/BiRefNet folder.
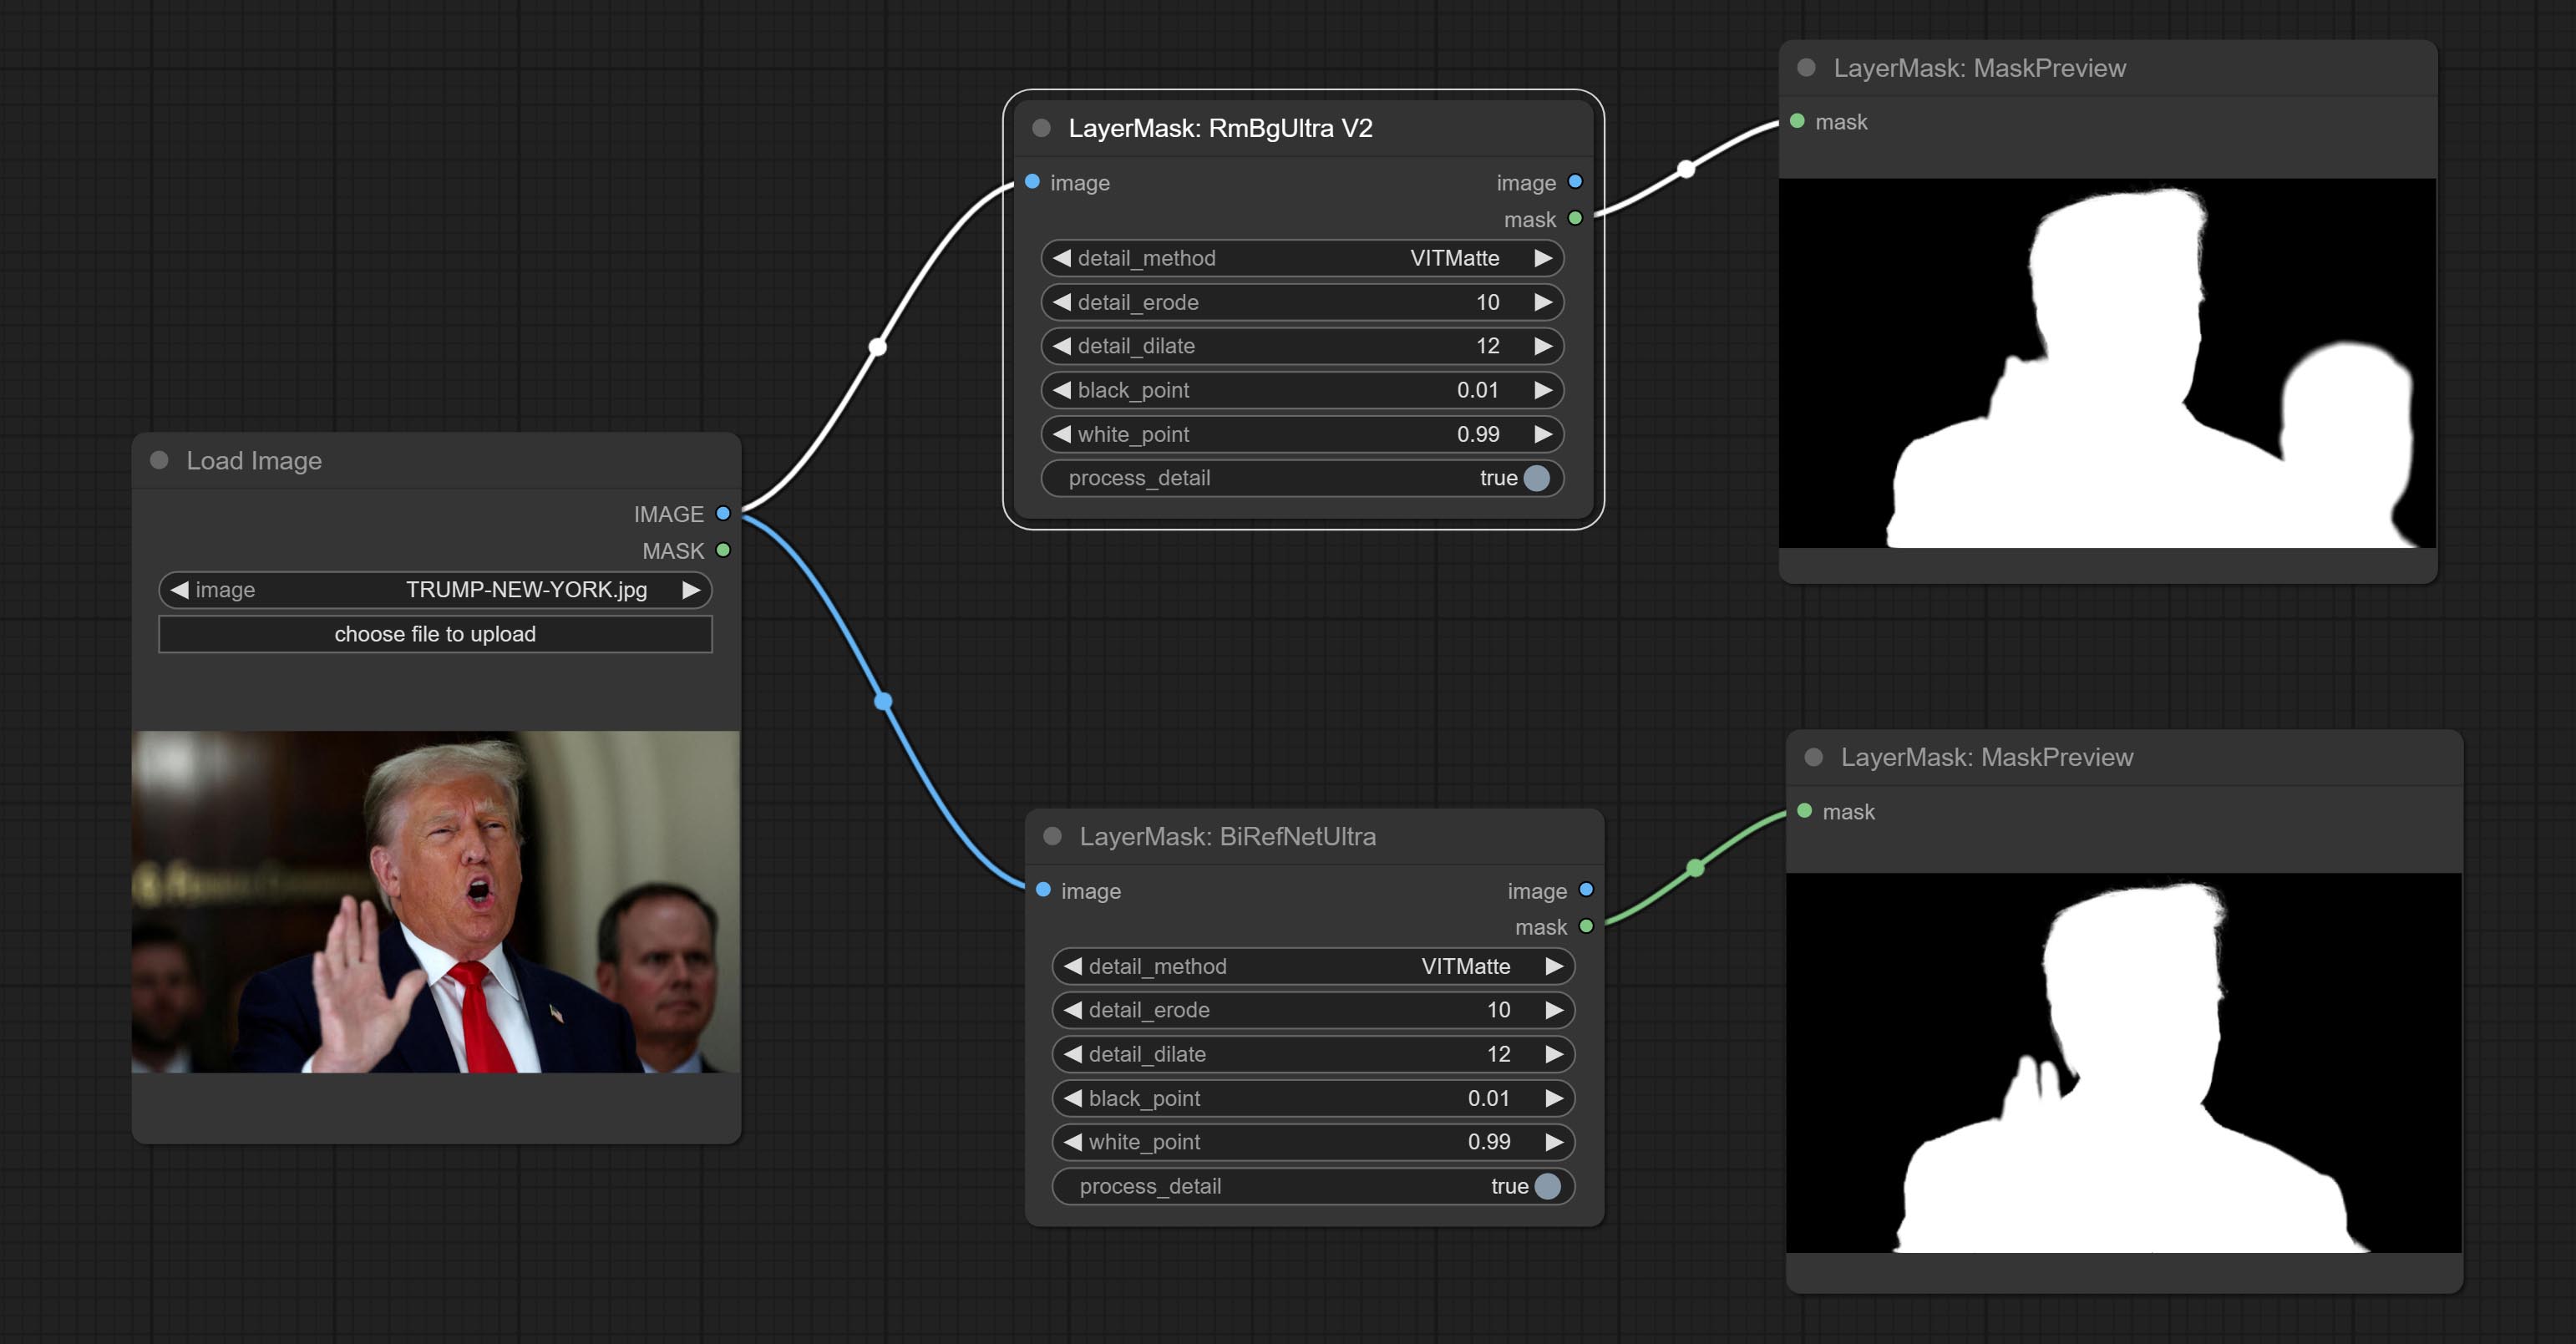
Node options:
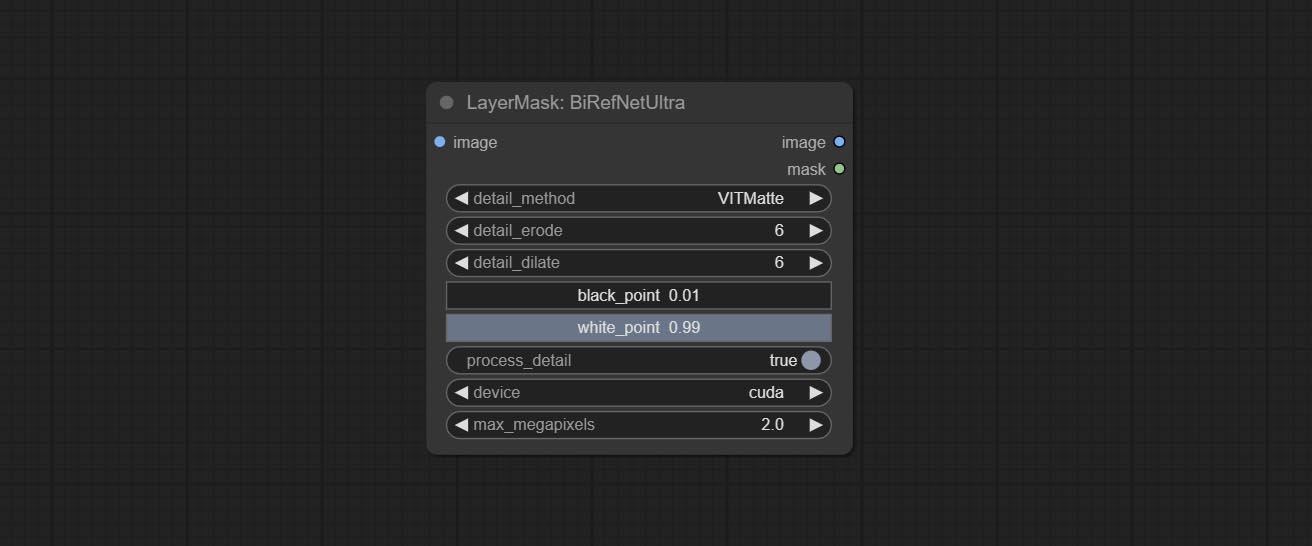
- detail_method: Edge processing methods. provides VITMatte, VITMatte(local), PyMatting, GuidedFilter. If the model has been downloaded after the first use of VITMatte, you can use VITMatte (local) afterwards.
- detail_erode: Mask the erosion range inward from the edge. the larger the value, the larger the range of inward repair.
- detail_dilate: The edge of the mask expands outward. the larger the value, the wider the range of outward repair.
- black_point: Edge black sampling threshold.
- white_point: Edge white sampling threshold.
- process_detail: Set to false here will skip edge processing to save runtime.
- device: Set whether the VitMatte to use cuda.
- max_megapixels: Set the maximum size for VitMate operations.
BiRefNetUltraV2
This node supports the use of the latest BiRefNet model. *Download model file from BaiduNetdisk or GoogleDrive named BiRefNet-general-epoch_244.pth to ComfyUI/Models/BiRefNet/pth folder. You can also download more BiRefNet models and put them here.
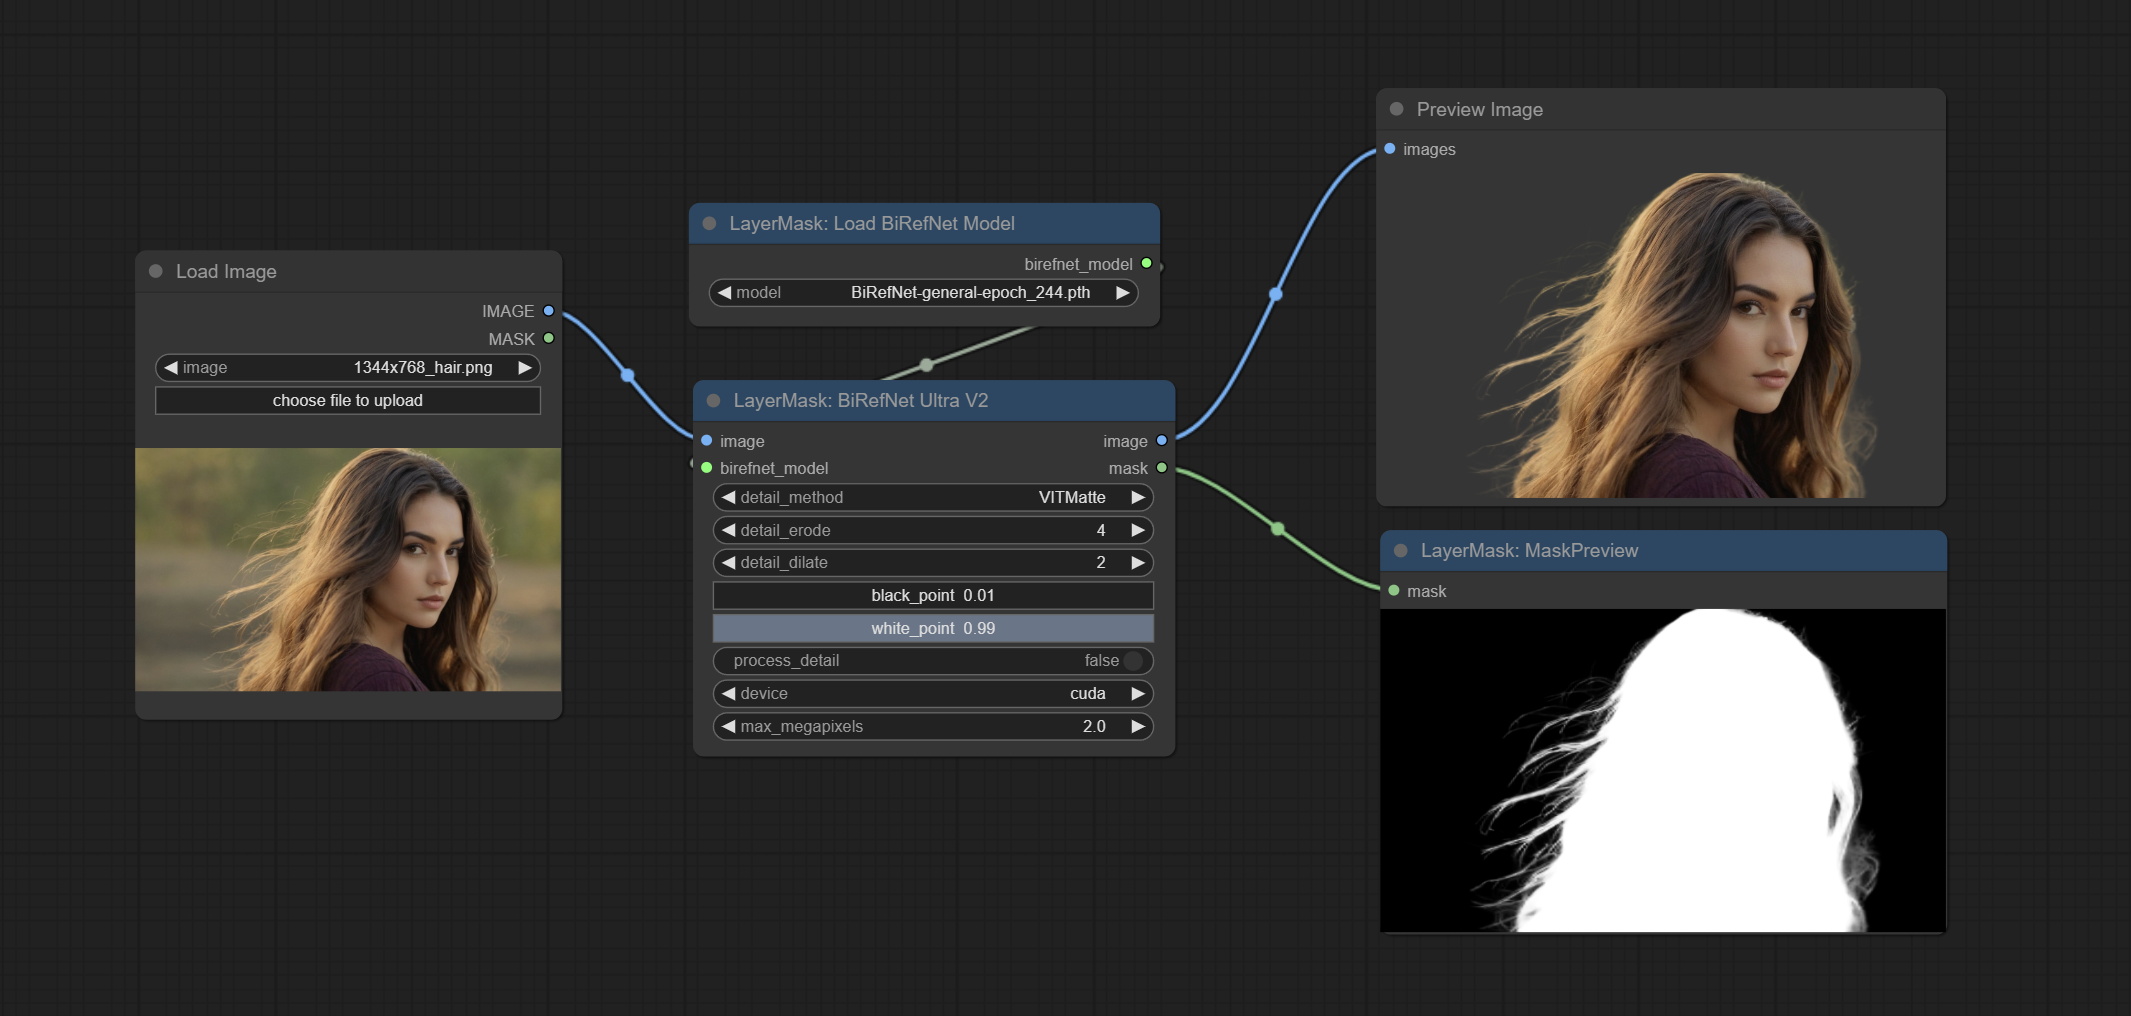
Node Options:
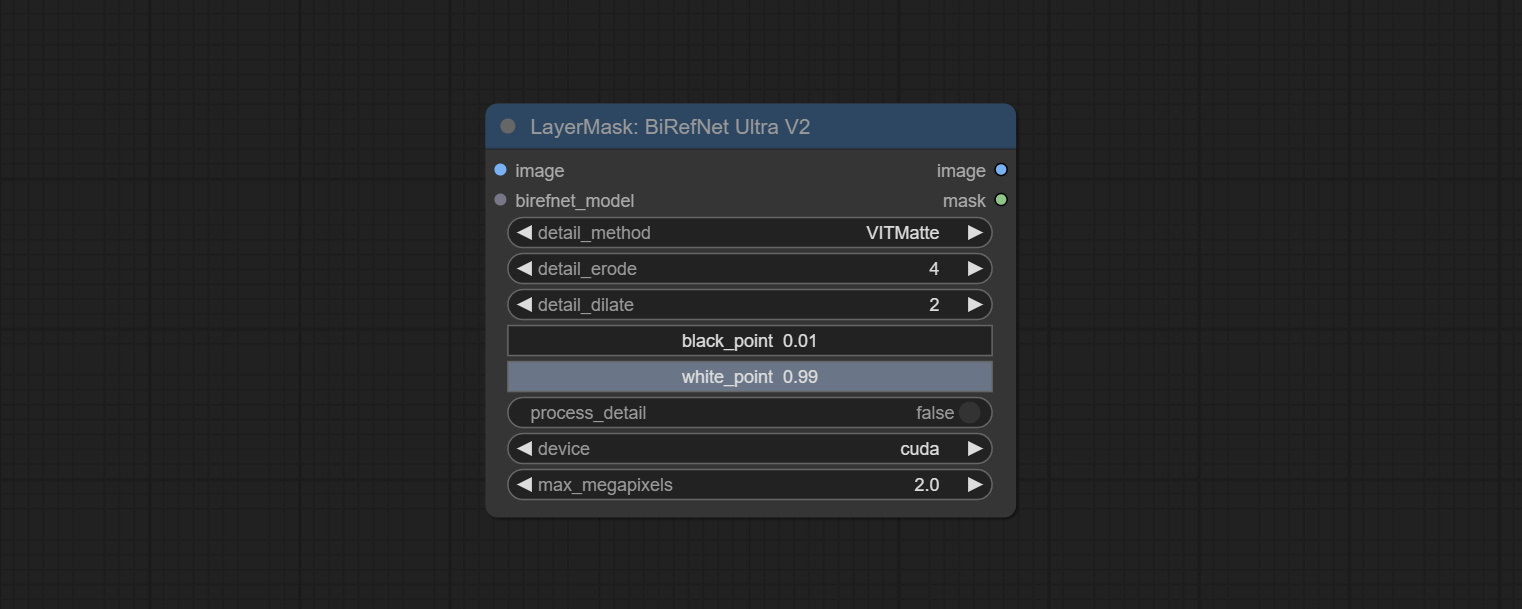
- image: The input image.
- birefnet_model: The BiRefNet model is input and it is output from the LoadBiRefNetModel node.
- detail_method: Edge processing methods. provides VITMatte, VITMatte(local), PyMatting, GuidedFilter. If the model has been downloaded after the first use of VITMatte, you can use VITMatte (local) afterwards.
- detail_erode: Mask the erosion range inward from the edge. the larger the value, the larger the range of inward repair.
- detail_dilate: The edge of the mask expands outward. the larger the value, the wider the range of outward repair.
- black_point: Edge black sampling threshold.
- white_point: Edge white sampling threshold.
- process_detail: Due to the excellent edge processing of BiRefNet, it is set to False by default here.
- device: Set whether the VitMatte to use cuda.
- max_megapixels: Set the maximum size for VitMate operations.
LoadBiRefNetModel
Load the BiRefNet model.
Node Options:
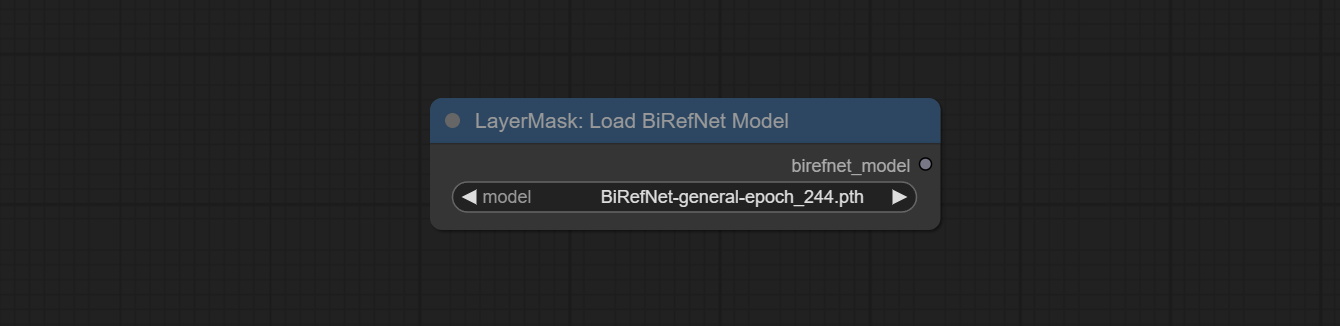
- model: Select the model. List the files in the
CoomfyUI/models/BiRefNet/pth folder for selection.
LoadBiRefNetModelV2
This node is a PR submitted by jimlee2048 and supports loading RMBG-2.0 models.
Download model files from huggingface or 百度网盘 and copy to ComfyUI/models/BiRefNet/RMBG-2.0 folder.
Node Options:
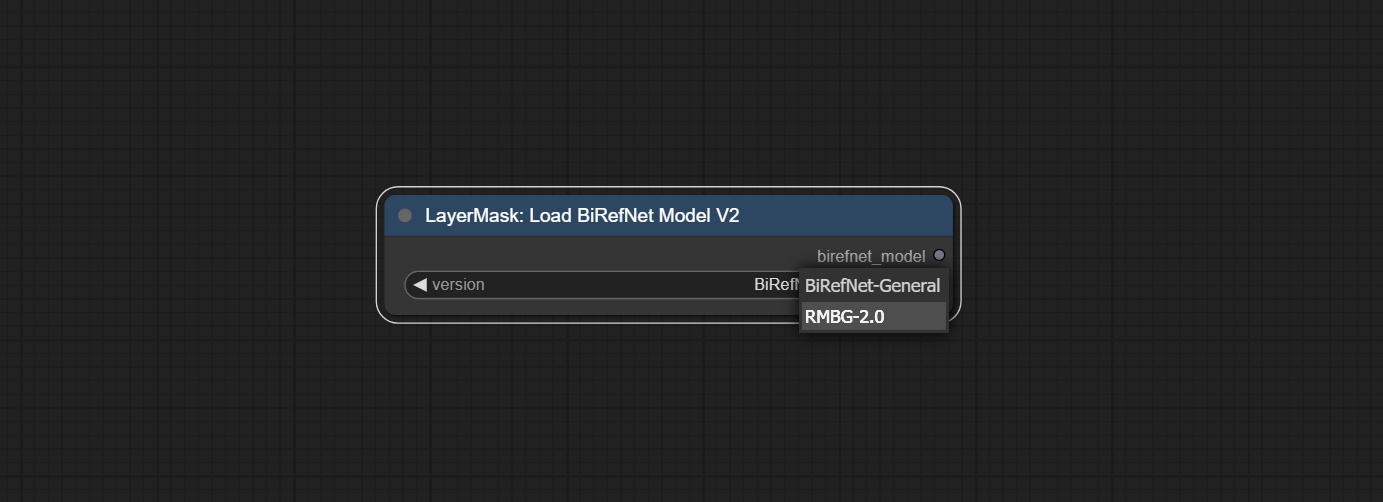
- model: Select the model. There are two options,
BiRefNet-General and RMBG-2.0 .
TransparentBackgroundUltra
Using the transparent-background model to remove background has better recognition ability and speed, while also having ultra-high edge details.
*From googledrive or BaiduNetdisk download all files to ComfyUI/models/transparent-background folder.
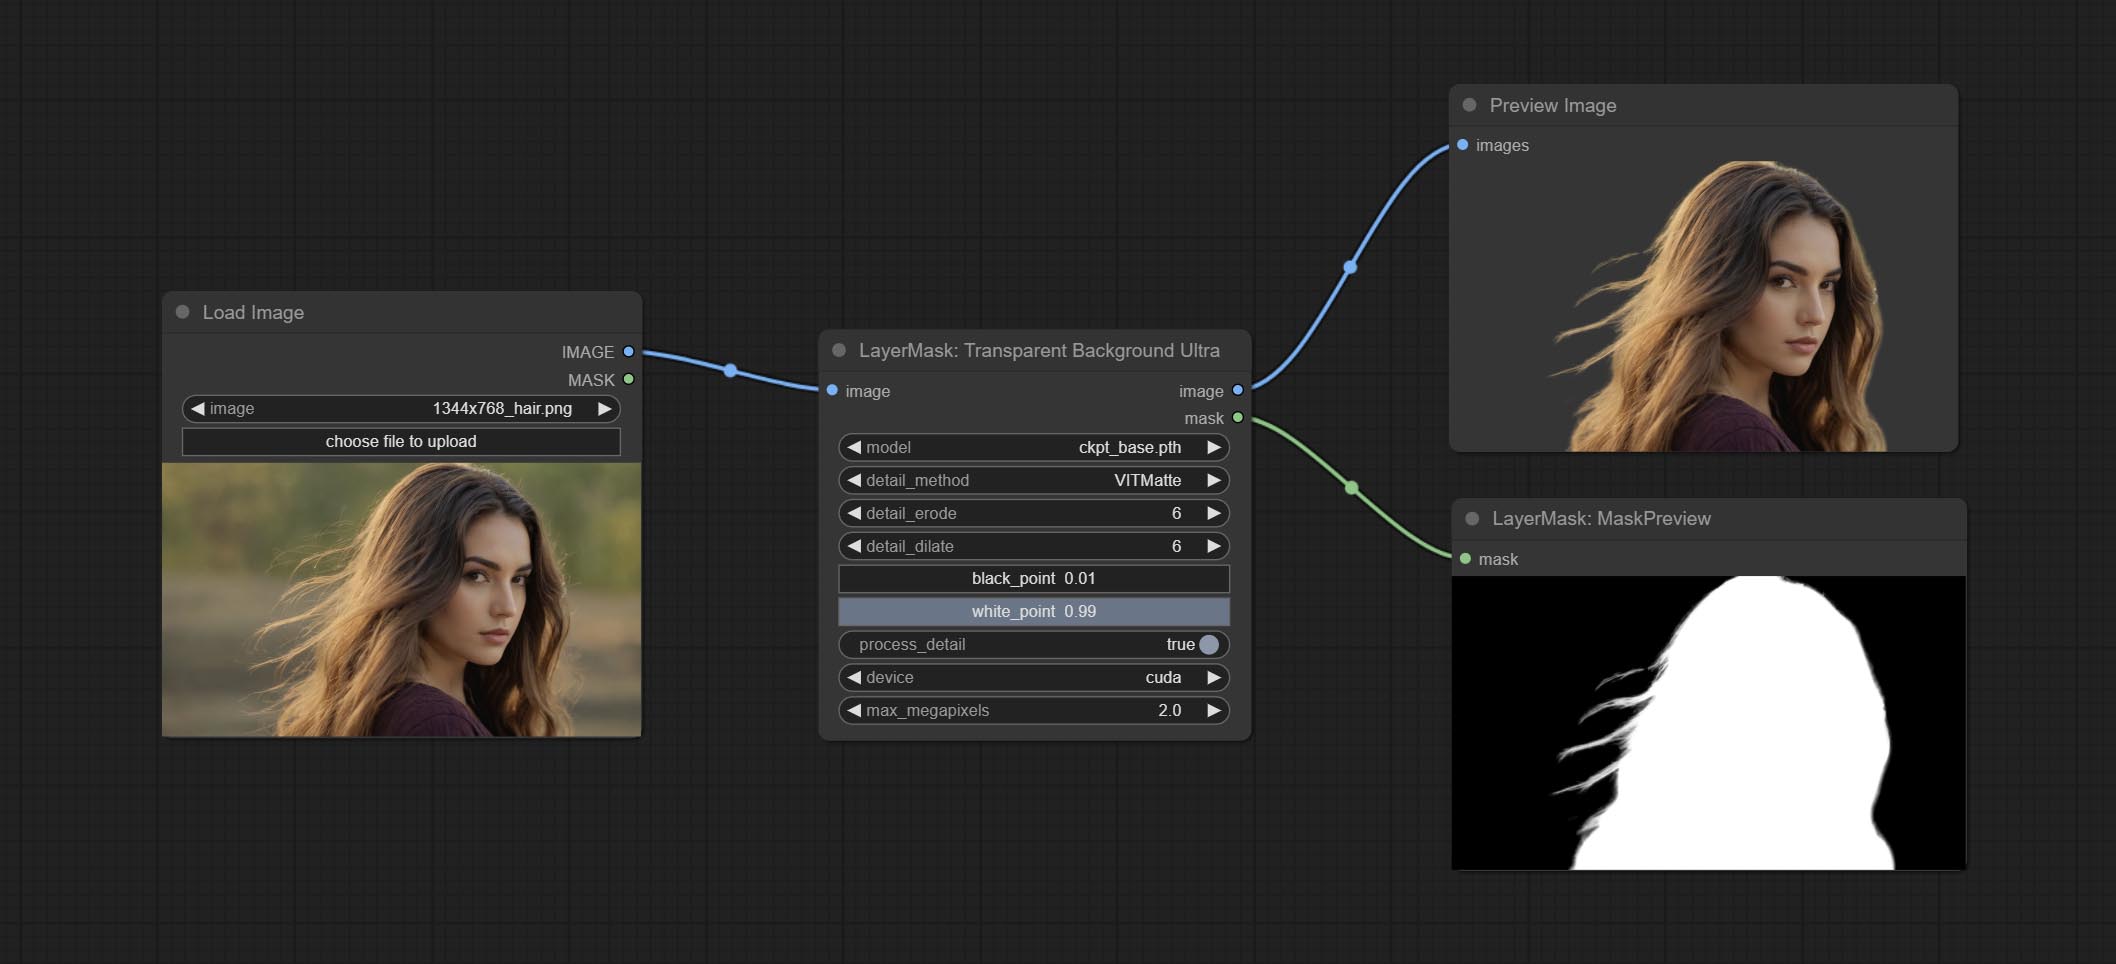
Node Options:
- model: Select the model.
- detail_method: Edge processing methods. provides VITMatte, VITMatte(local), PyMatting, GuidedFilter. If the model has been downloaded after the first use of VITMatte, you can use VITMatte (local) afterwards.
- detail_erode: Mask the erosion range inward from the edge. the larger the value, the larger the range of inward repair.
- detail_dilate: The edge of the mask expands outward. the larger the value, the wider the range of outward repair.
- black_point: Edge black sampling threshold.
- white_point: Edge white sampling threshold.
- process_detail: Set to false here will skip edge processing to save runtime.
- device: Set whether the VitMatte to use cuda.
- max_megapixels: Set the maximum size for VitMate operations.
PersonMaskUltra
Generate masks for portrait's face, hair, body skin, clothing, or accessories. Compared to the previous A Person Mask Generator node, this node has ultra-high edge details. The model code for this node comes from a-person-mask-generator, edge processing code from ComfyUI-Image-Filters,thanks to the original author. *Download model files from BaiduNetdisk to ComfyUI/models/mediapipe folder.
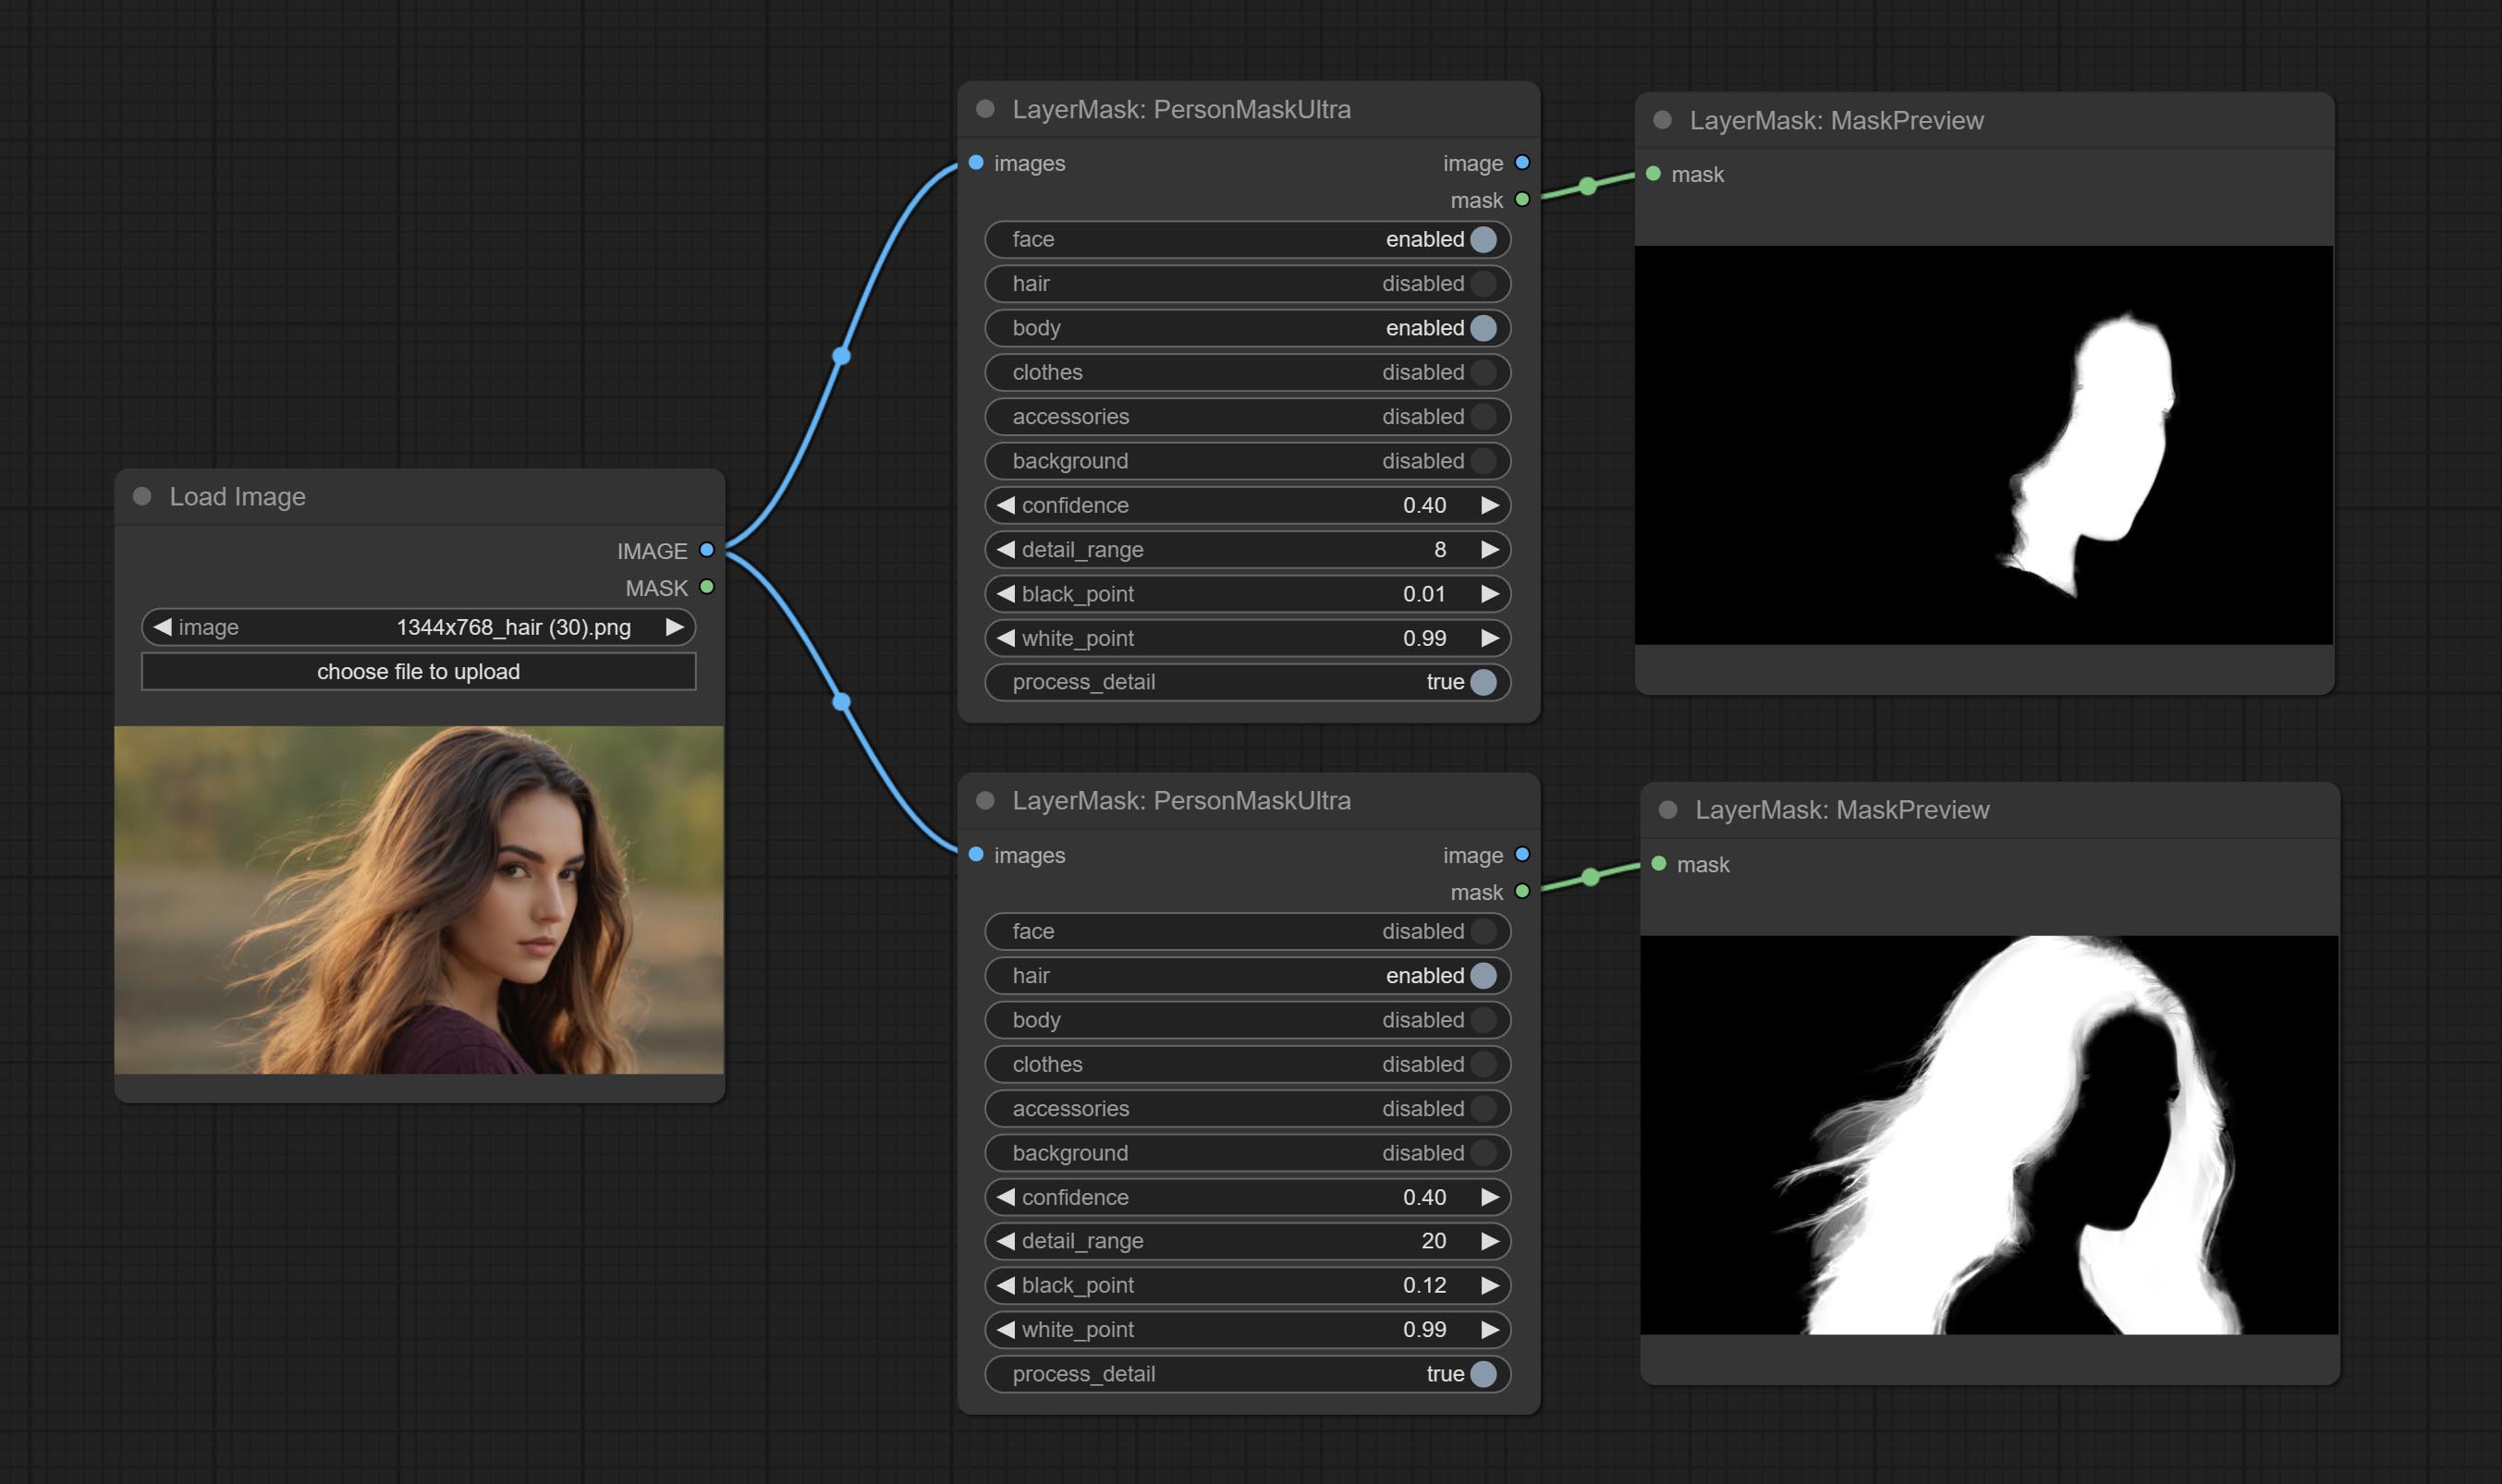
Node options:
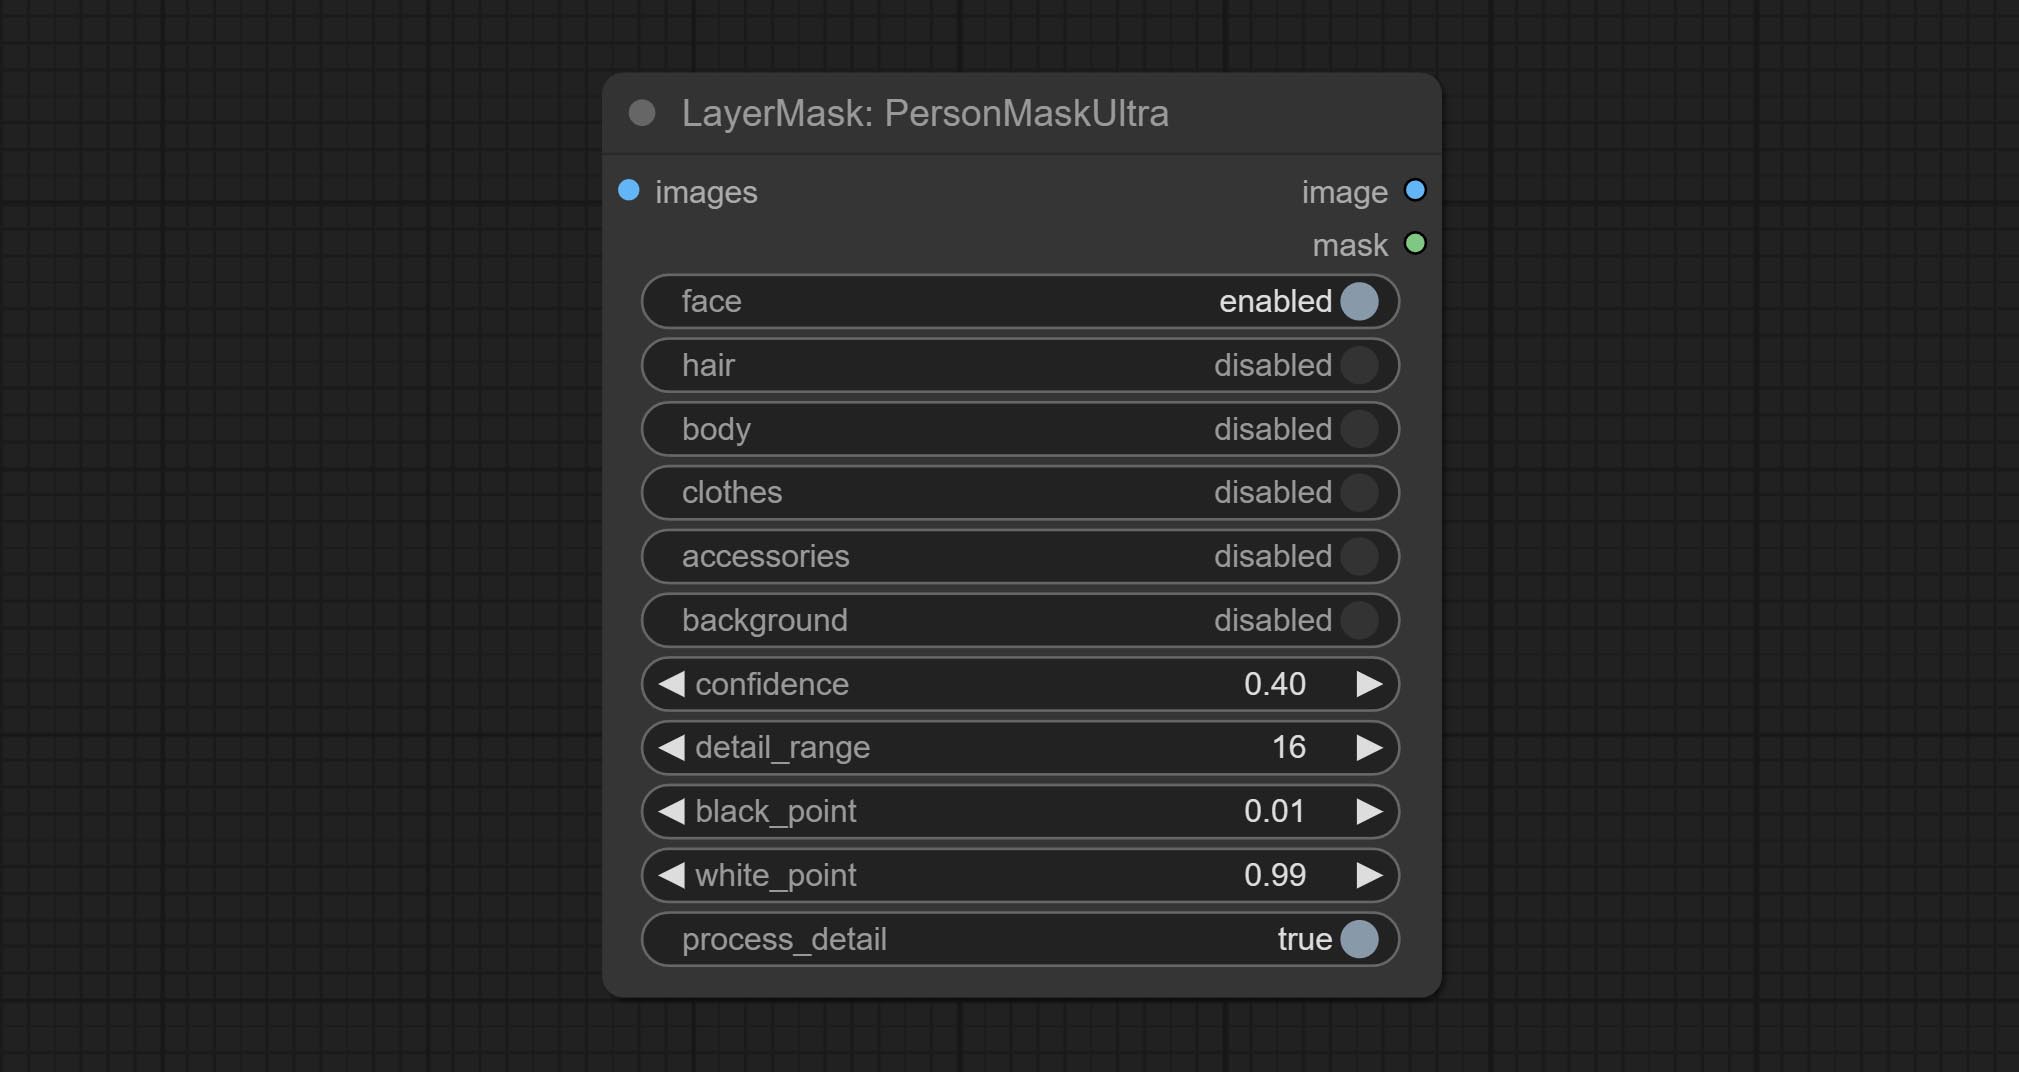
- face: Face recognition.
- hair: Hair recognition.
- body: Body skin recognition.
- clothes: Clothing recognition.
- accessories: Identification of accessories (such as backpacks).
- background: Background recognition.
- confidence: Recognition threshold, lower values will output more mask ranges.
- detail_range: Edge detail range.
- black_point: Edge black sampling threshold.
- white_point: Edge white sampling threshold.
- process_detail: Set to false here will skip edge processing to save runtime.
PersonMaskUltraV2
The V2 upgraded version of PersonMaskUltra has added the VITMatte edge processing method.(Note: Images larger than 2K in size using this method will consume huge memory)
On the basis of PersonMaskUltra, the following changes have been made: 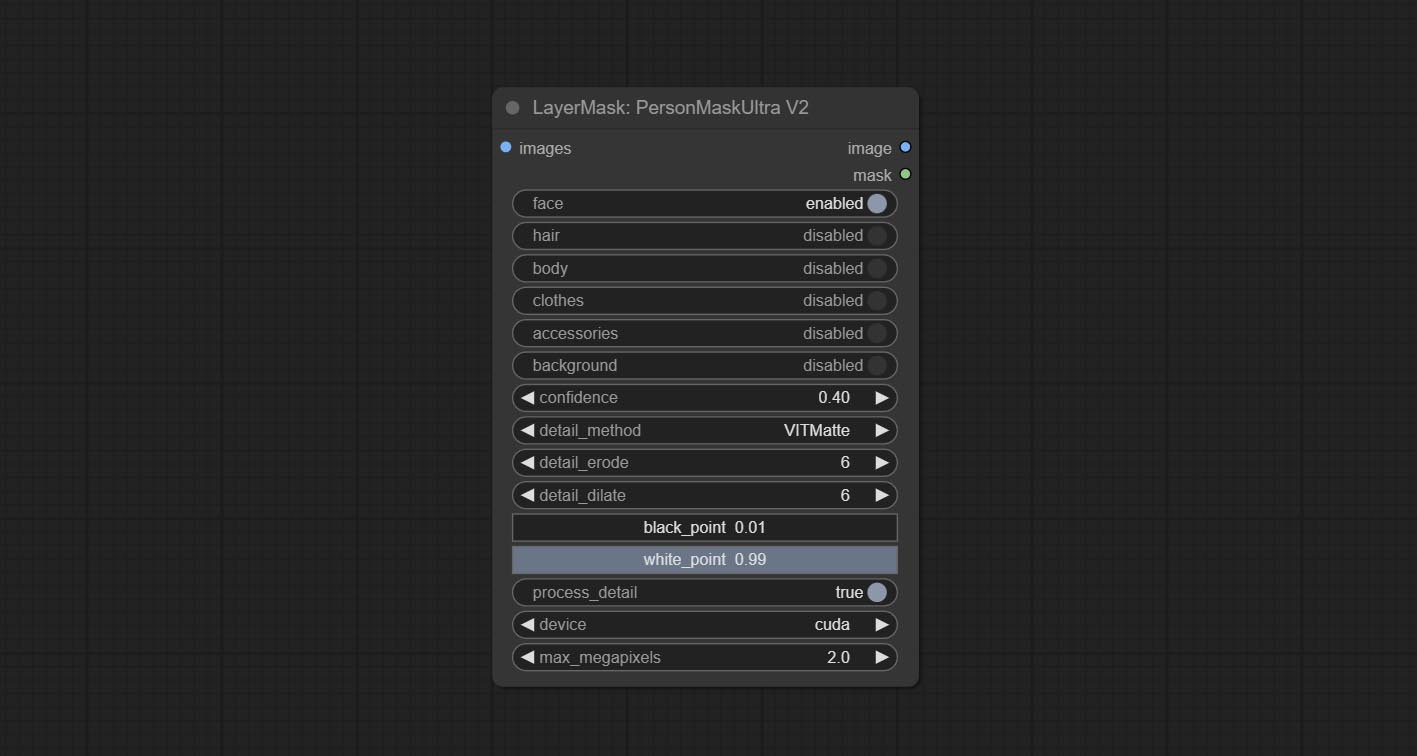
detail_method: Edge processing methods. provides VITMatte, VITMatte(local), PyMatting, GuidedFilter. If the model has been downloaded after the first use of VITMatte, you can use VITMatte (local) afterwards.
detail_erode: Mask the erosion range inward from the edge. the larger the value, the larger the range of inward repair.
detail_dilate: The edge of the mask expands outward. the larger the value, the wider the range of outward repair.
device: Set whether the VitMatte to use cuda.
max_megapixels: Set the maximum size for VitMate operations.
SegformerB2ClothesUltra

Generate masks for characters' faces, hair, arms, legs, and clothing, mainly used for segmenting clothing. The model segmentation code is fromStartHua,thanks to the original author. Compared to the comfyui_segformer_b2_clothes, this node has ultra-high edge details. (Note: Generating images with edges exceeding 2K in size using the VITMatte method will consume a lot of memory)
*Download all model files from huggingface or BaiduNetdisk to ComfyUI/models/segformer_b2_clothes folder.
Node Options:
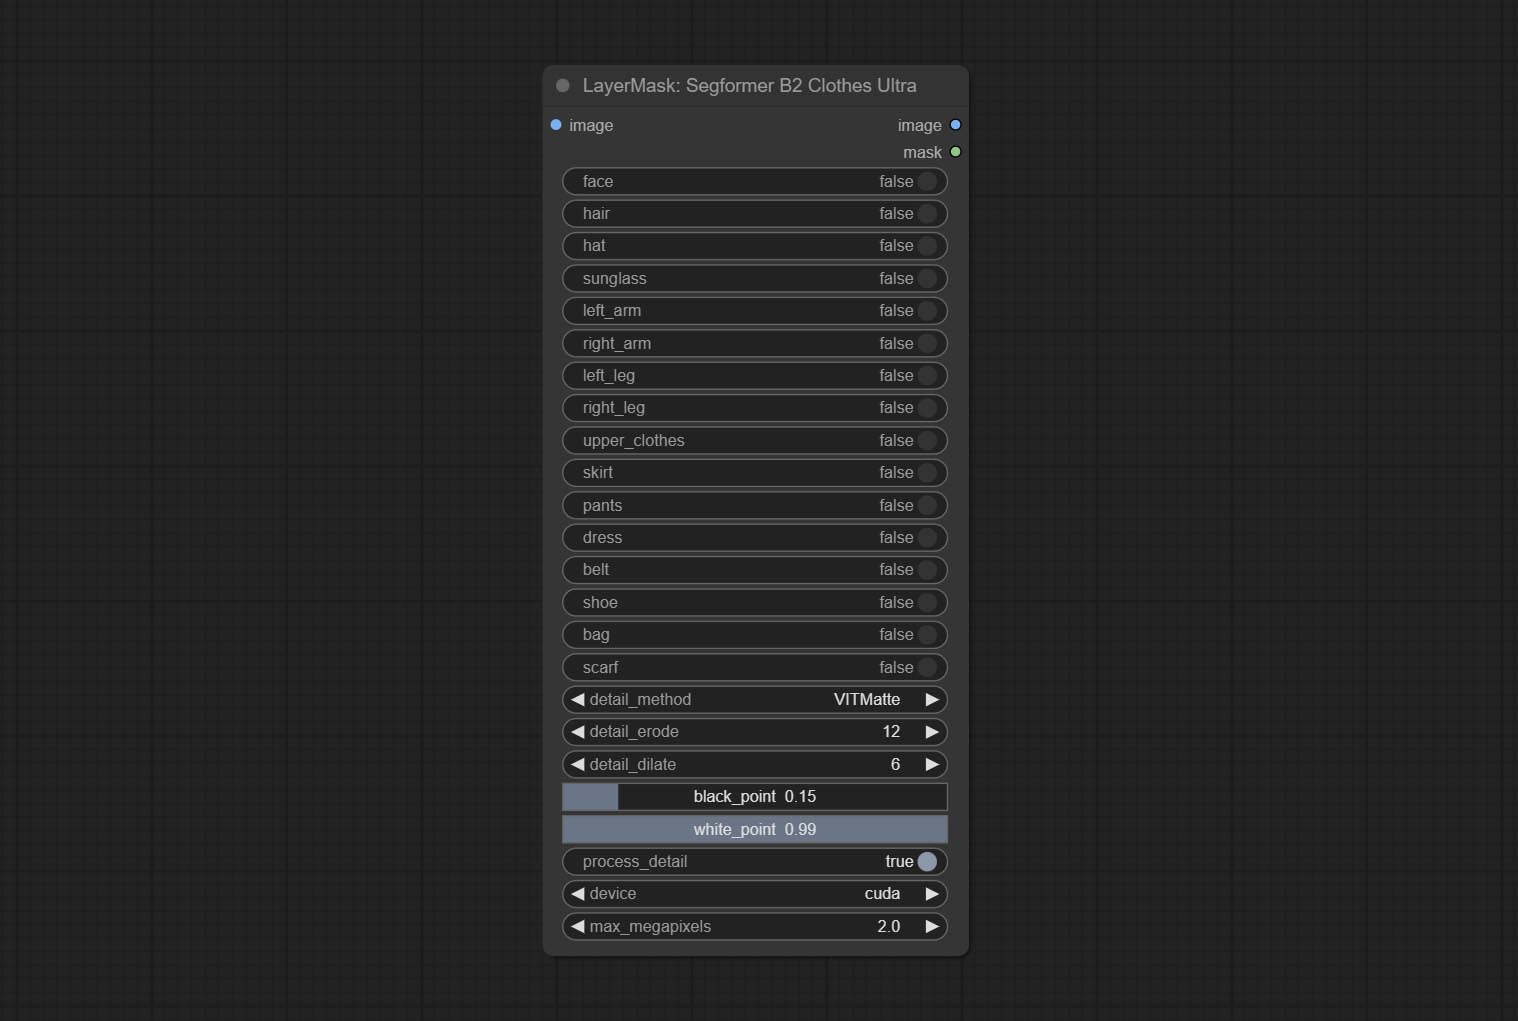
- face: Facial recognition switch.
- hair: Hair recognition switch.
- hat: Hat recognition switch.
- sunglass: Sunglass recognition switch.
- left_arm: Left arm recognition switch.
- right_arm: Right arm recognition switch.
- left_leg: Left leg recognition switch.
- right_leg: Right leg recognition switch.
- skirt: Skirt recognition switch.
- pants: Pants recognition switch.
- dress: Dress recognition switch.
- belt: Belt recognition switch.
- shoe: Shoes recognition switch.
- bag: Bag recognition switch.
- scarf: Scarf recognition switch.
- detail_method: Edge processing methods. provides VITMatte, VITMatte(local), PyMatting, GuidedFilter. If the model has been downloaded after the first use of VITMatte, you can use VITMatte (local) afterwards.
- detail_erode: Mask the erosion range inward from the edge. the larger the value, the larger the range of inward repair.
- detail_dilate: The edge of the mask expands outward. the larger the value, the wider the range of outward repair.
- black_point: Edge black sampling threshold.
- white_point: Edge white sampling threshold.
- process_detail: Set to false here will skip edge processing to save runtime.
- device: Set whether the VitMatte to use cuda.
- max_megapixels: Set the maximum size for VitMate operations.
SegformerUltraV2
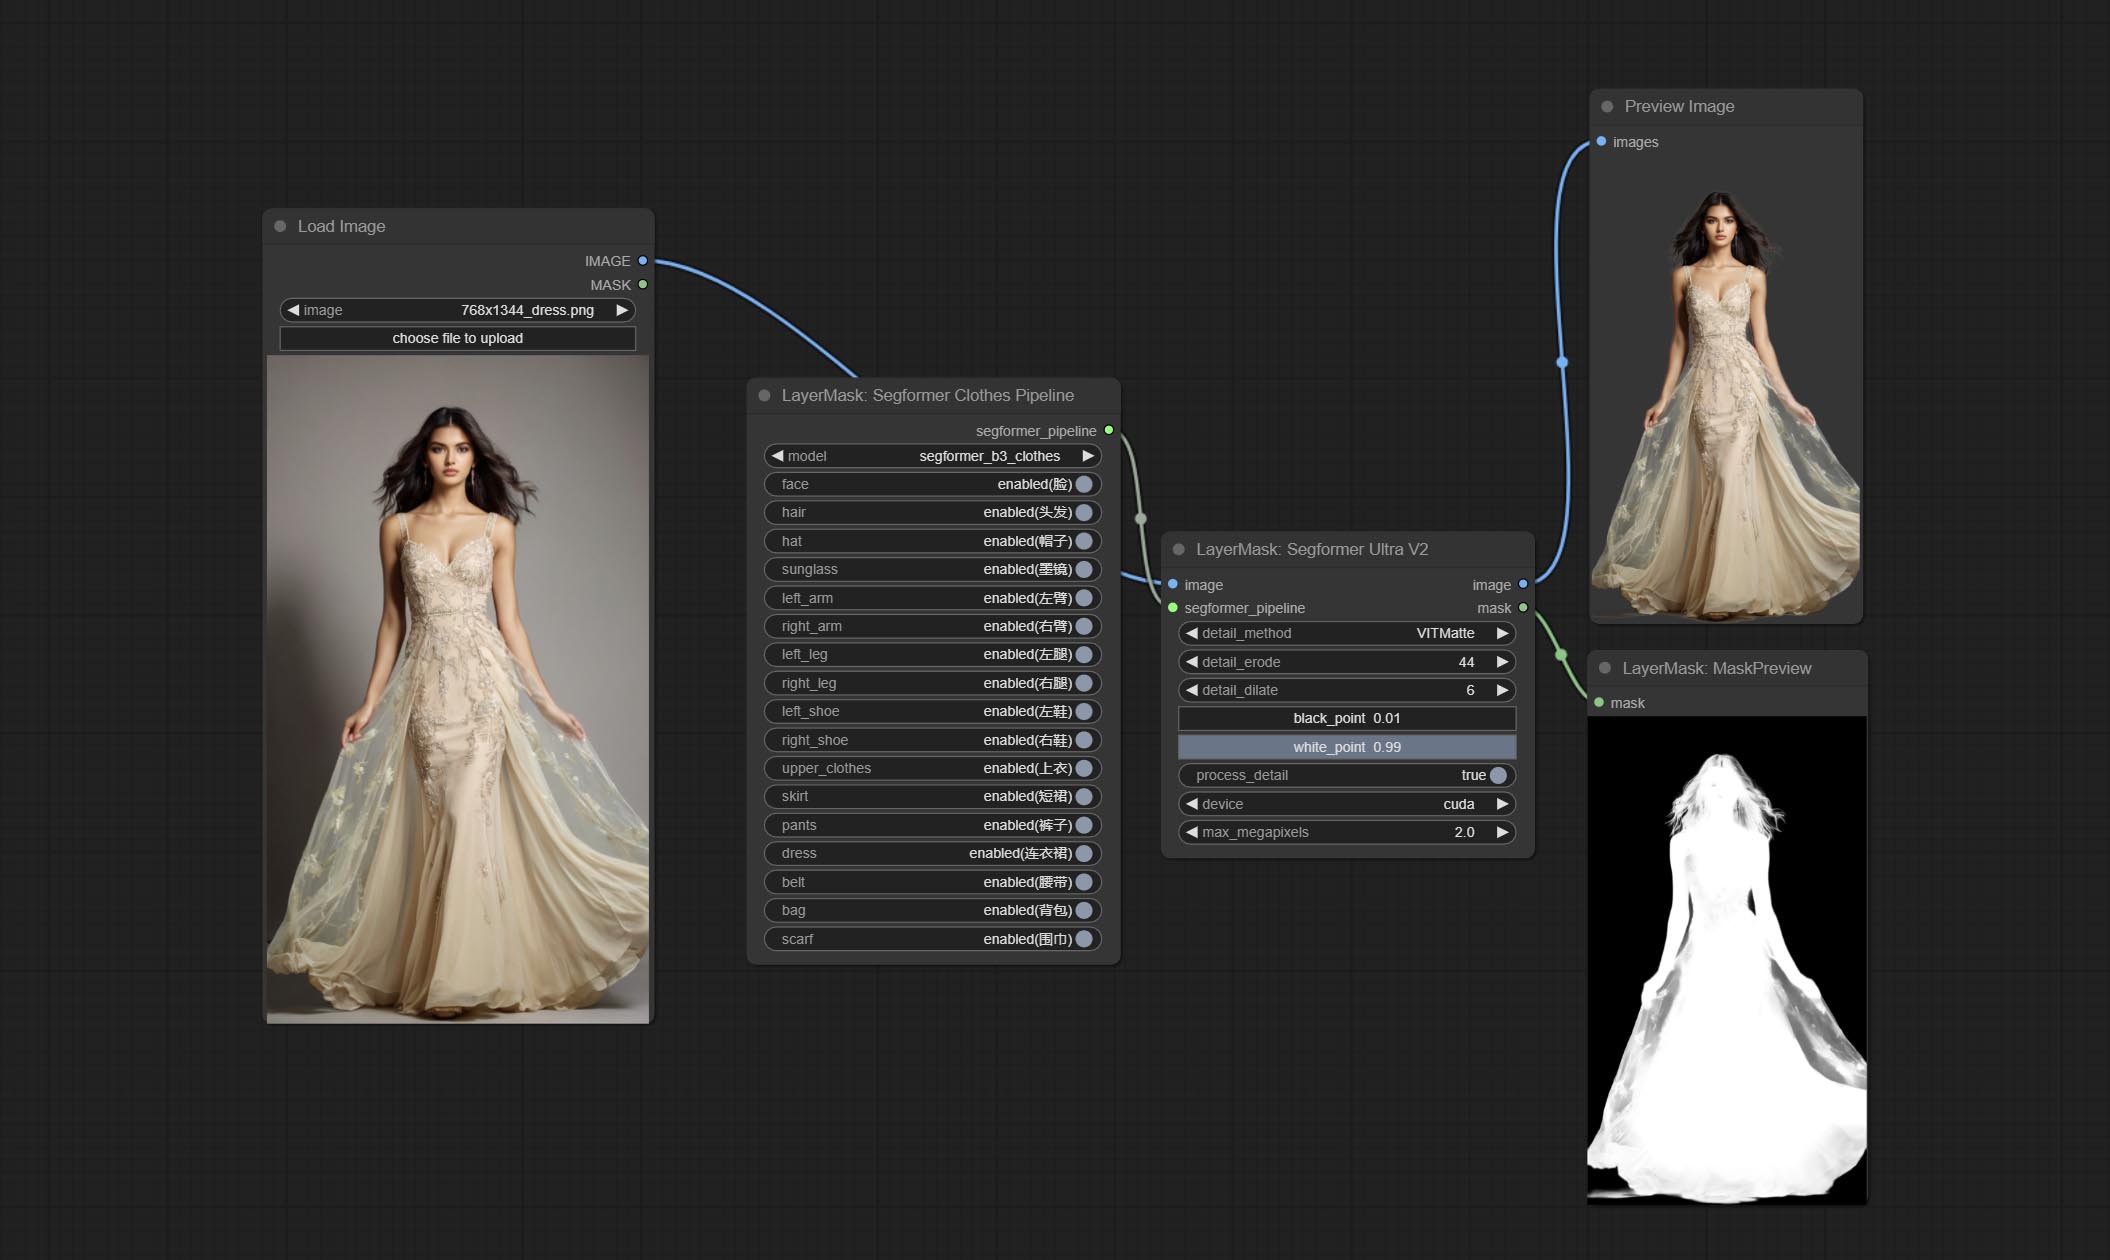
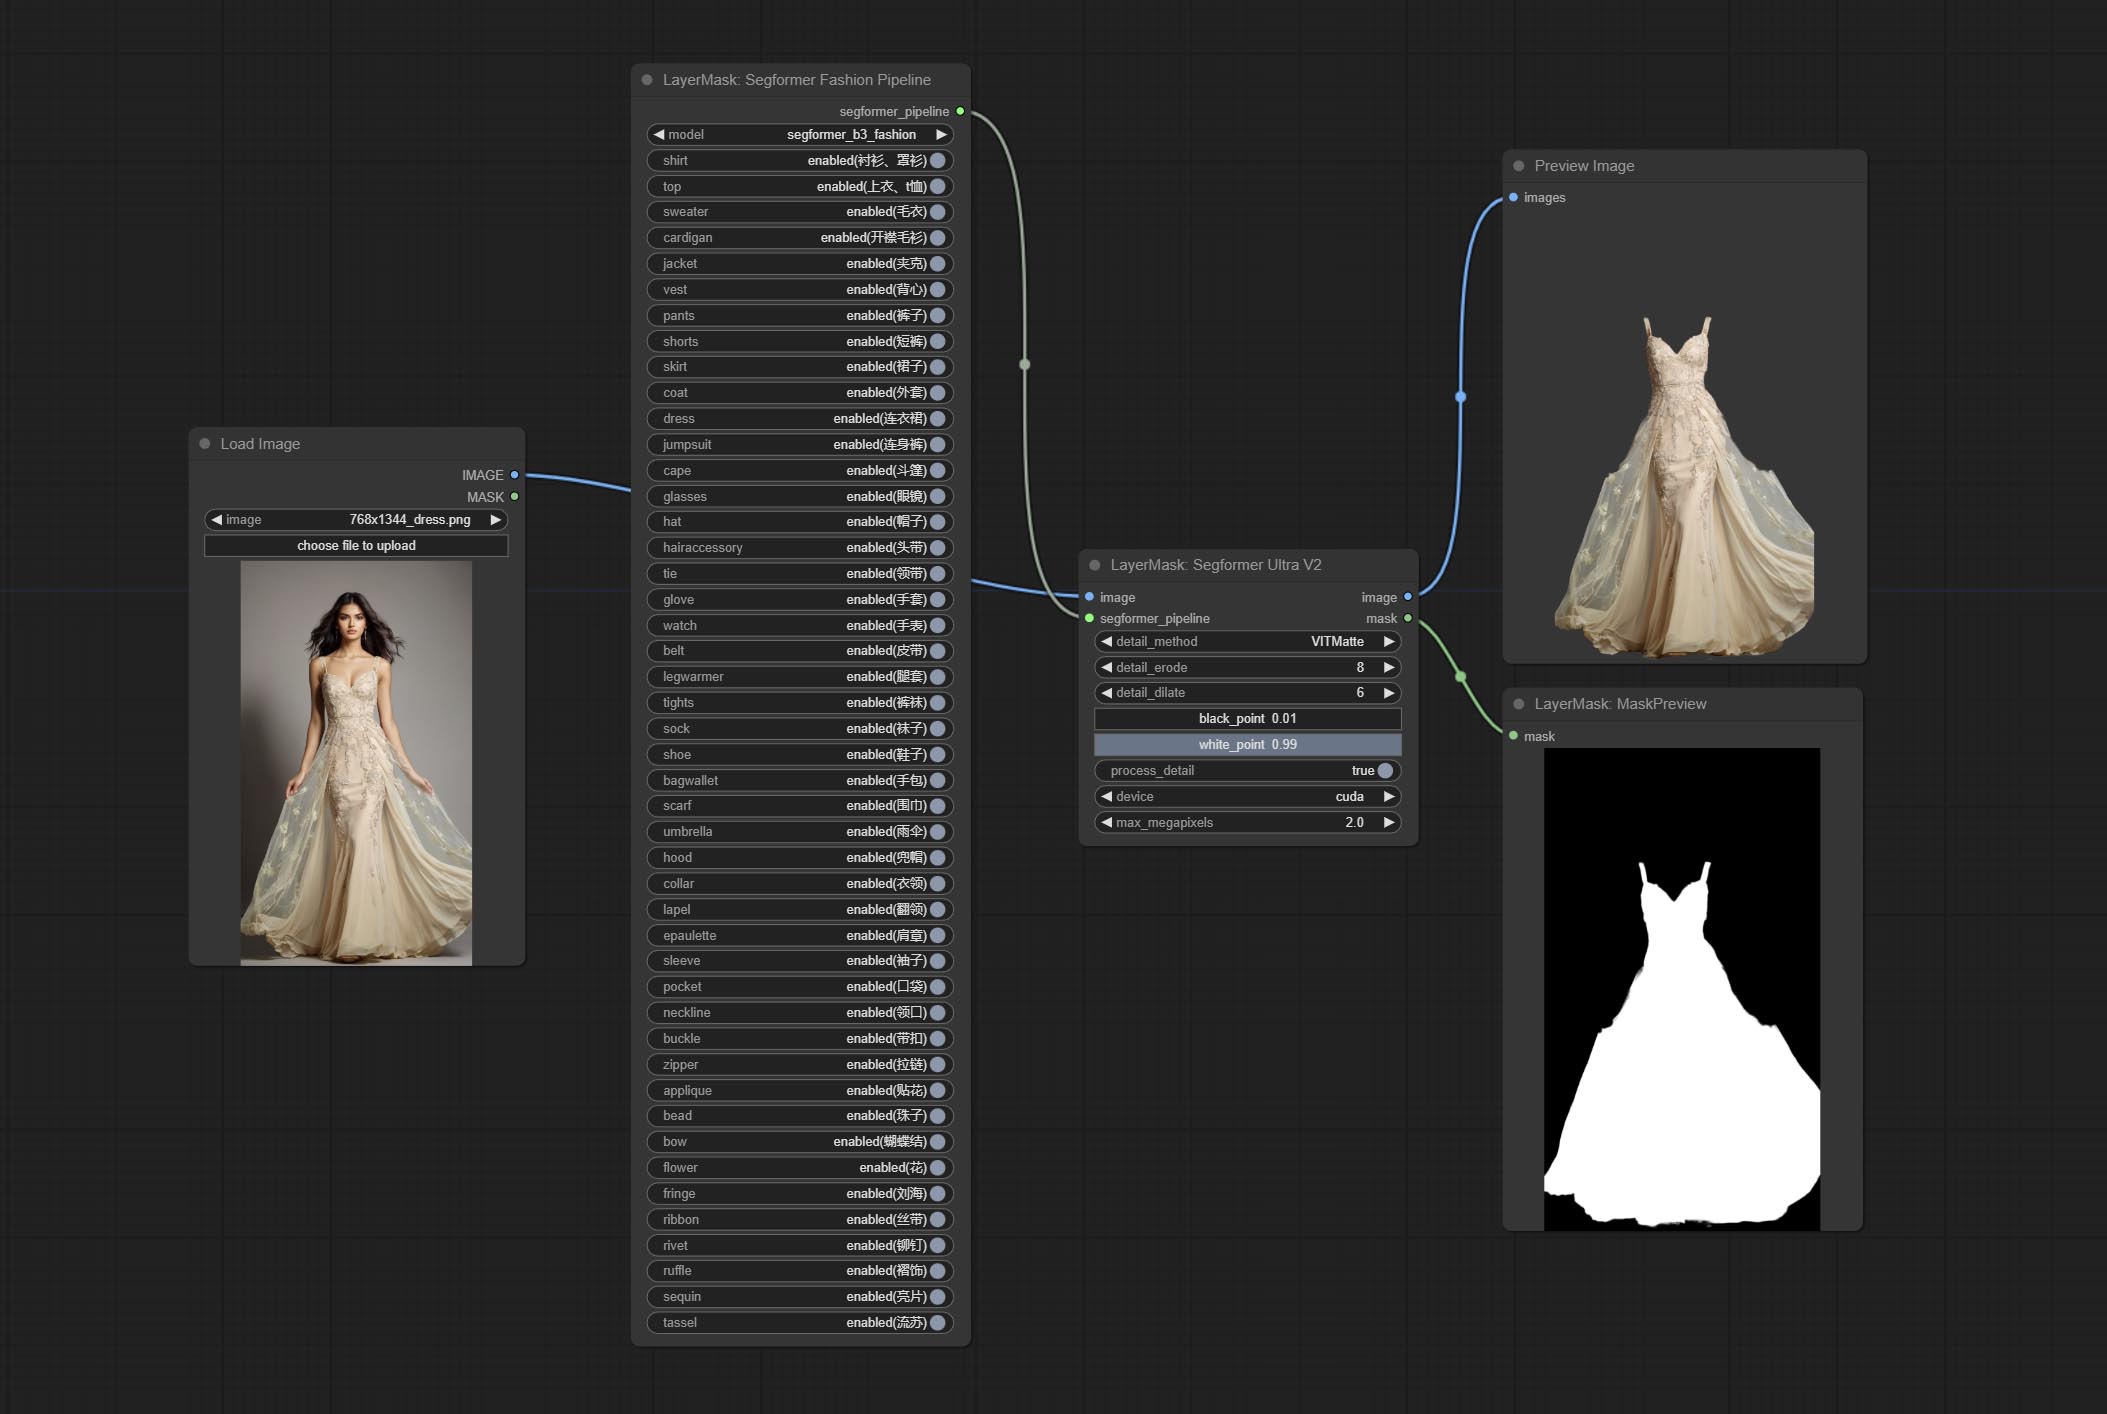
Using the segformer model to segment clothing with ultra-high edge details. Currently supports segformer b2 clothes, segformer b3 clothes and segformer b3 fashion。
*Download modelfiles from huggingface or BaiduNetdisk to ComfyUI/models/segformer_b2_clothes folder.
*Download modelfiles from huggingface or BaiduNetdisk to ComfyUI/models/segformer_b3_clothes folder.
*Download modelfiles from huggingface or BaiduNetdisk to ComfyUI/models/segformer_b3_fashion folder.
Node Options:
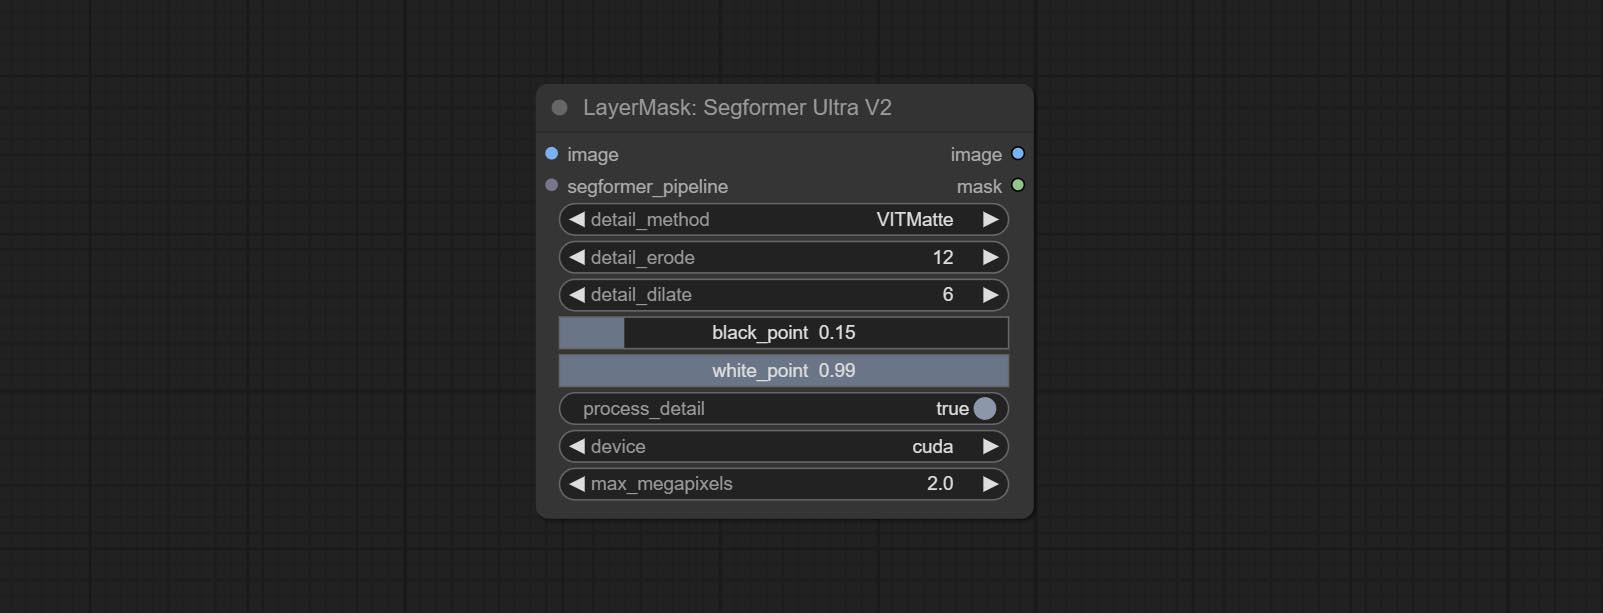
- image: The input image.
- segformer_pipeline: Segformer pipeline input. The pipeline is output by SegformerClottesPipeline and SegformerFashionPipeline node.
- detail_method: Edge processing methods. provides VITMatte, VITMatte(local), PyMatting, GuidedFilter. If the model has been downloaded after the first use of VITMatte, you can use VITMatte (local) afterwards.
- detail_erode: Mask the erosion range inward from the edge. the larger the value, the larger the range of inward repair.
- detail_dilate: The edge of the mask expands outward. the larger the value, the wider the range of outward repair.
- black_point: Edge black sampling threshold.
- white_point: Edge white sampling threshold.
- process_detail: Set to false here will skip edge processing to save runtime.
- device: Set whether the VitMatte to use cuda.
- max_megapixels: Set the maximum size for VitMate operations.
SegformerClothesPipiline
Select the segformer clothes model and choose the segmentation content.
Node Options:

- model: Model selection. There are currently two models available to choose from for segformer b2 clothes and segformer b3 clothes.
- face: Facial recognition switch.
- hair: Hair recognition switch.
- hat: Hat recognition switch.
- sunglass: Sunglass recognition switch.
- left_arm: Left arm recognition switch.
- right_arm: Right arm recognition switch.
- left_leg: Left leg recognition switch.
- right_leg: Right leg recognition switch.
- left_shoe: Left shoe recognition switch.
- right_shoe: Right shoe recognition switch.
- skirt: Skirt recognition switch.
- pants: Pants recognition switch.
- dress: Dress recognition switch.
- belt: Belt recognition switch.
- bag: Bag recognition switch.
- scarf: Scarf recognition switch.
SegformerFashionPipiline
Select the segformer fashion model and choose the segmentation content.
Node Options:
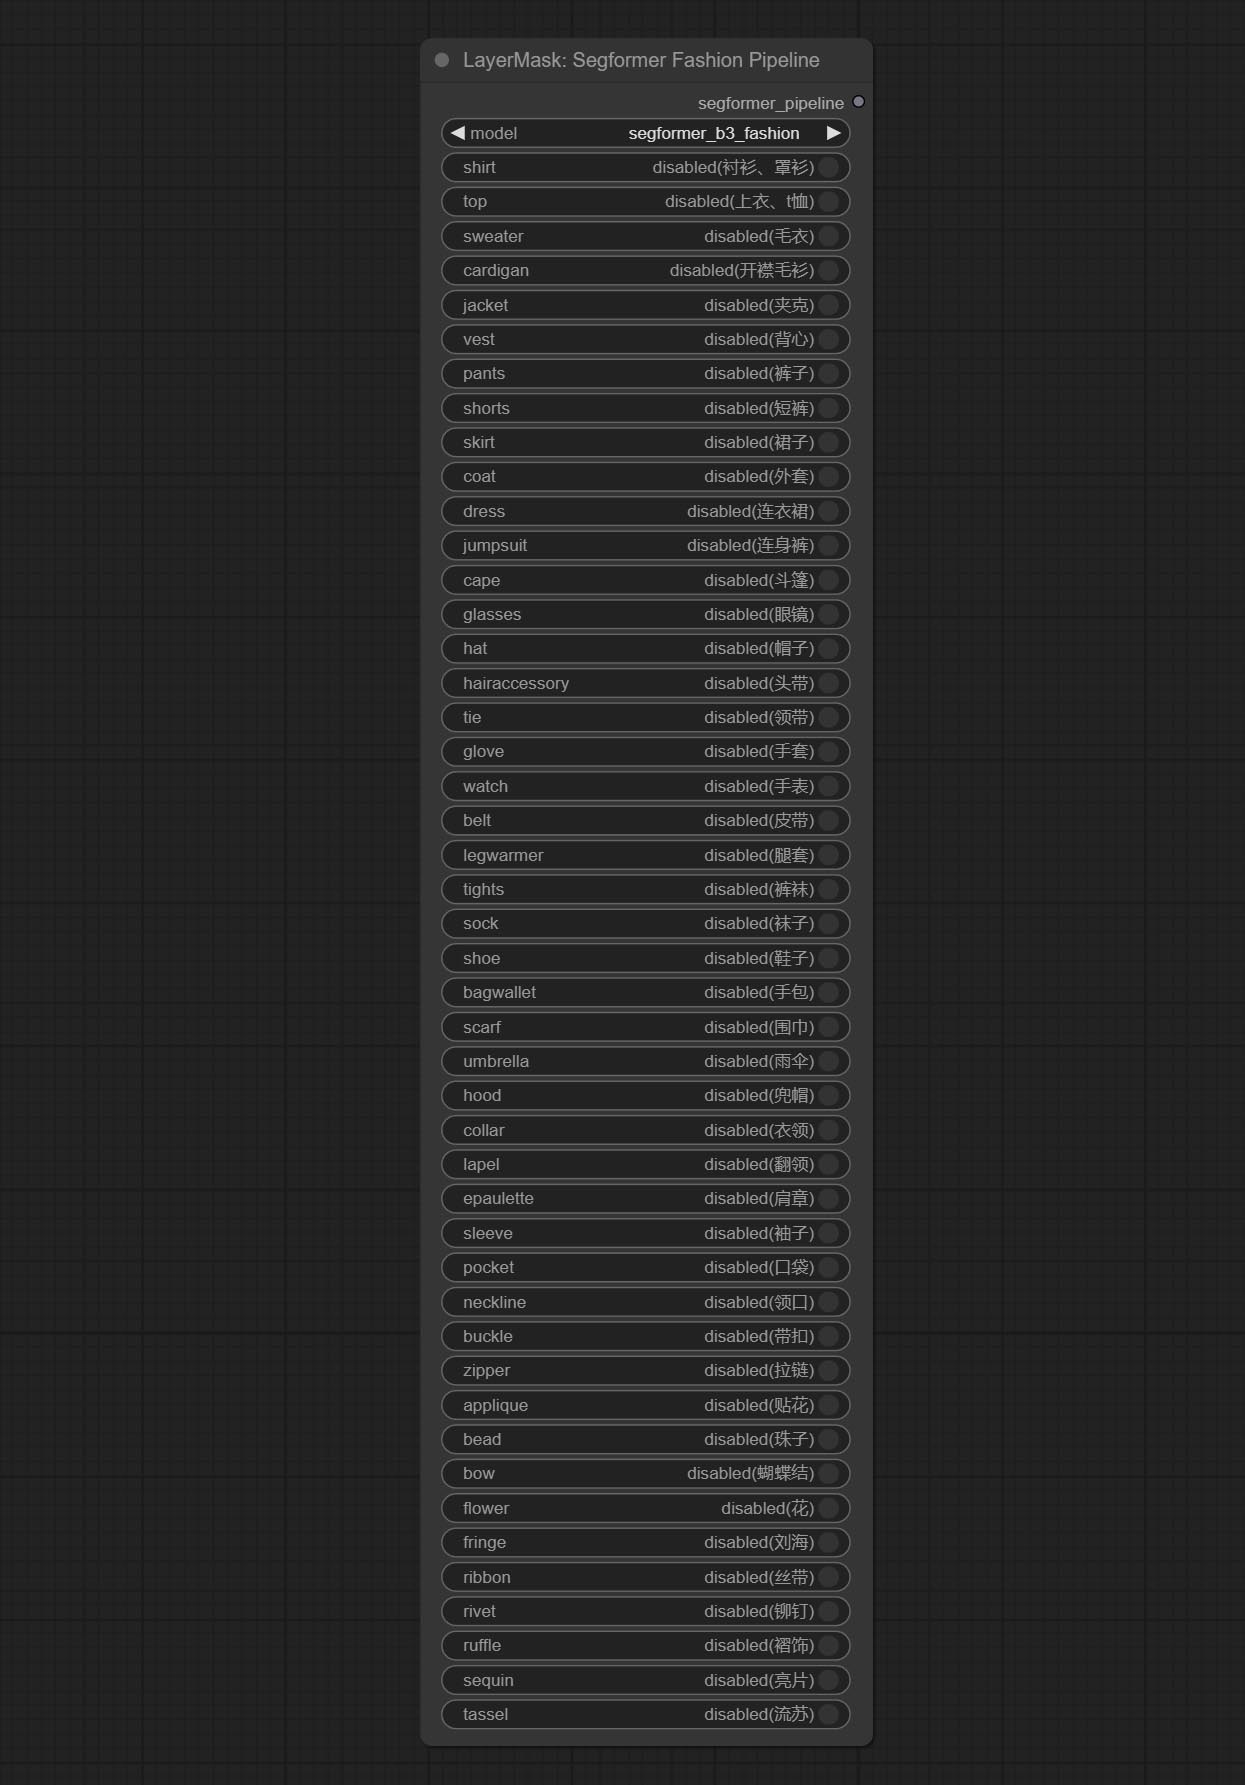
- model: Model selection. Currently, there is only one model available for selection: segformer b3 fashion。
- shirt: shirt and blouse switch.
- top: top, t-shirt, sweatshirt switch.
- sweater: sweater switch.
- cardigan: cardigan switch.
- jacket: jacket switch.
- vest: vest switch.
- pants: pants switch.
- shorts: shorts switch.
- skirt: skirt switch.
- coat: coat switch.
- dress: dress switch.
- jumpsuit: jumpsuit switch.
- cape: cape switch.
- glasses: glasses switch.
- hat: hat switch.
- hairaccessory: headband, head covering, hair accessory switch.
- tie: tie switch.
- glove: glove switch.
- watch: watch switch.
- belt: belt switch.
- legwarmer: leg warmer switch.
- tights: tights and stockings switch.
- sock: sock switch.
- shoe: shoes switch.
- bagwallet: bag and wallet switch.
- scarf: scarf switch.
- umbrella: umbrella switch.
- hood: hood switch.
- collar: collar switch.
- lapel: lapel switch.
- epaulette: epaulette switch.
- sleeve: sleeve switch.
- pocket: pocket switch.
- neckline: neckline switch.
- buckle: buckle switch.
- zipper: zipper switch.
- applique: applique switch.
- bead: bead switch.
- bow: bow switch.
- flower: flower switch.
- fringe: fringe switch.
- ribbon: ribbon switch.
- rivet: rivet switch.
- ruffle: ruffle switch.
- sequin: sequin switch.
- tassel: tassel switch.
HumanPartsUltra
Used for generate human body parts masks, it is based on the warrper of metal3d/ComfyUI_Human_Parts, thank the original author. This node has added ultra-fine edge processing based on the original work. Download model file from BaiduNetdisk or huggingface and copy to ComfyUImodelsonnxhuman-parts folder. 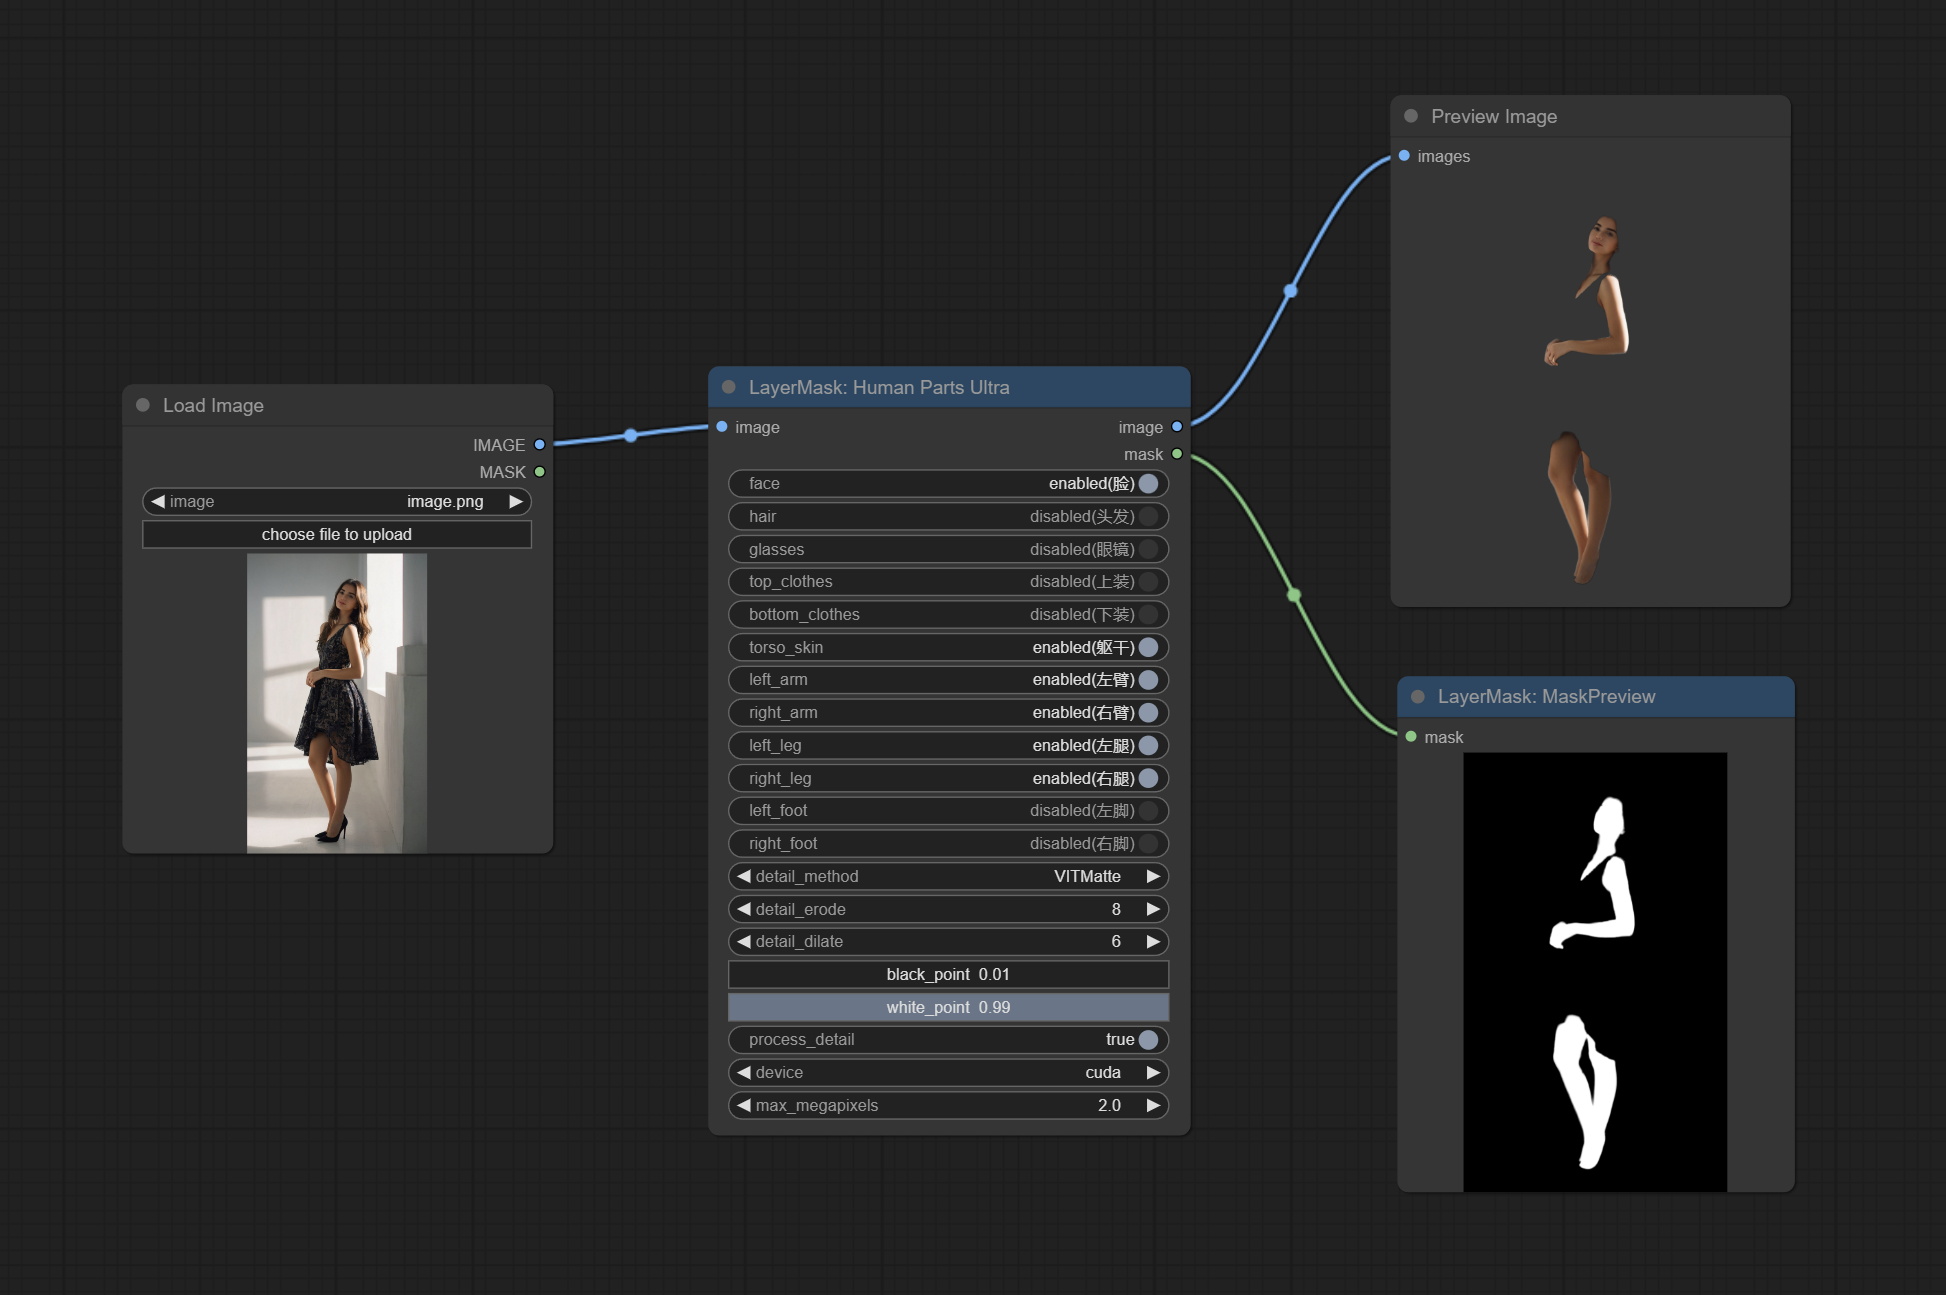
Node Options:
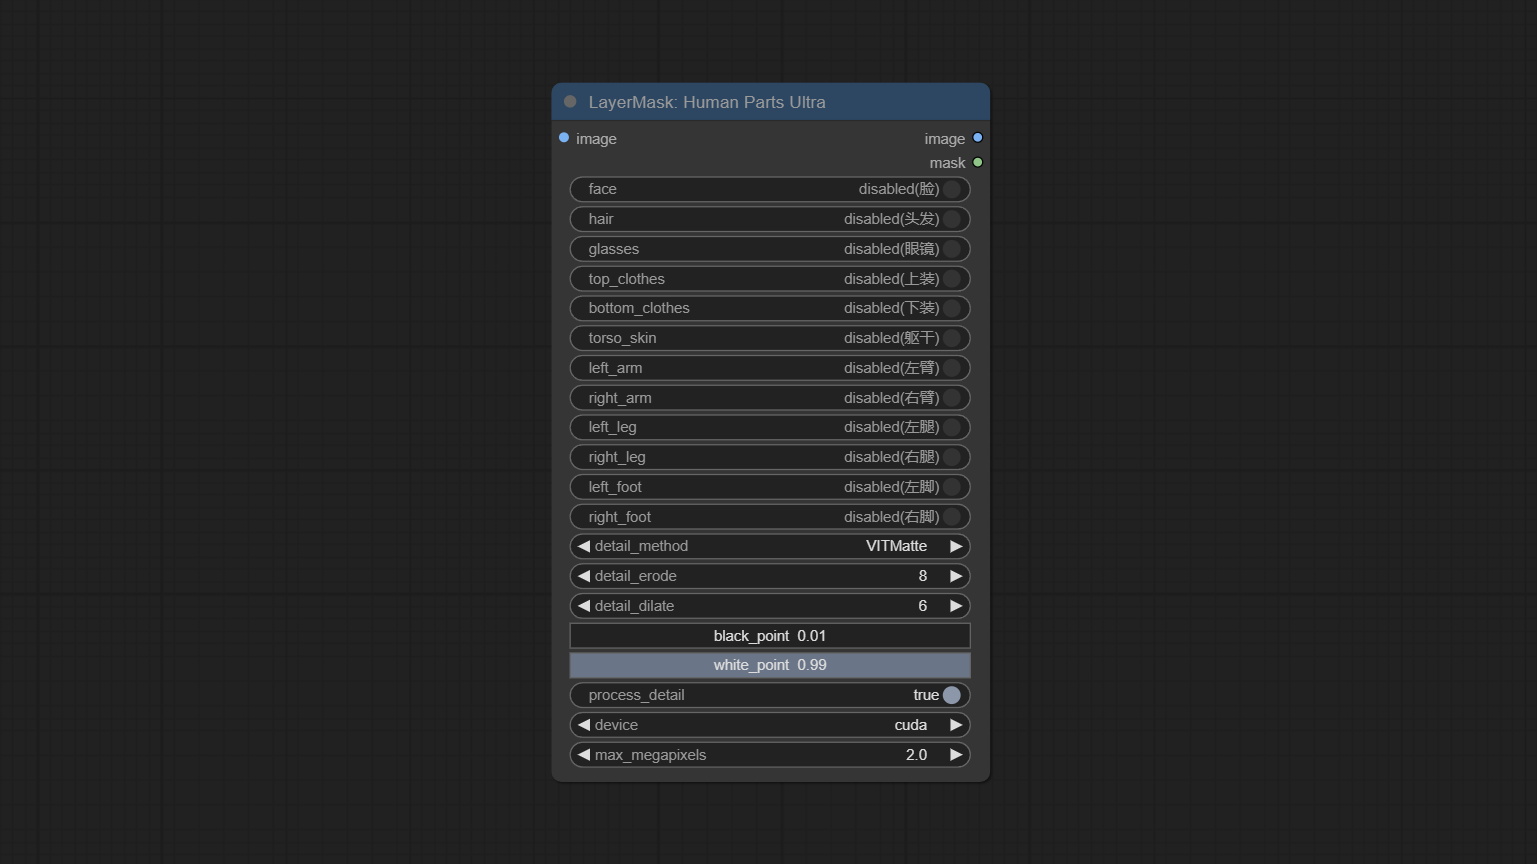
- image: The input image.
- face: Recognize face switch.
- hair: Recognize hair switch.
- galsses: Recognize glasses switch.
- top_clothes: Recognize top clothes switch.
- bottom_clothes: Recognize bottom clothes switch.
- torso_skin: Recognize torso skin switch.
- left_arm: Recognize left arm switch.
- right_arm: Recognize right arm switch.
- left_leg: Recognize left leg switch.
- right_leg: Recognize right leg switch.
- left_foot: Recognize left foot switch.
- right_foot: Recognize right foot switch.
- detail_method: Edge processing methods. provides VITMatte, VITMatte(local), PyMatting, GuidedFilter. If the model has been downloaded after the first use of VITMatte, you can use VITMatte (local) afterwards.
- detail_erode: Mask the erosion range inward from the edge. the larger the value, the larger the range of inward repair.
- detail_dilate: The edge of the mask expands outward. the larger the value, the wider the range of outward repair.
- black_point: Edge black sampling threshold.
- white_point: Edge white sampling threshold.
- process_detail: Set to false here will skip edge processing to save runtime.
- device: Set whether the VitMatte to use cuda.
- max_megapixels: Set the maximum size for VitMate operations.
MaskEdgeUltraDetail
Process rough masks to ultra fine edges. This node combines the Alpha Matte and the Guided Filter Alpha nodes functions of Spacepxl's ComfyUI-Image-Filters, thanks to the original author. 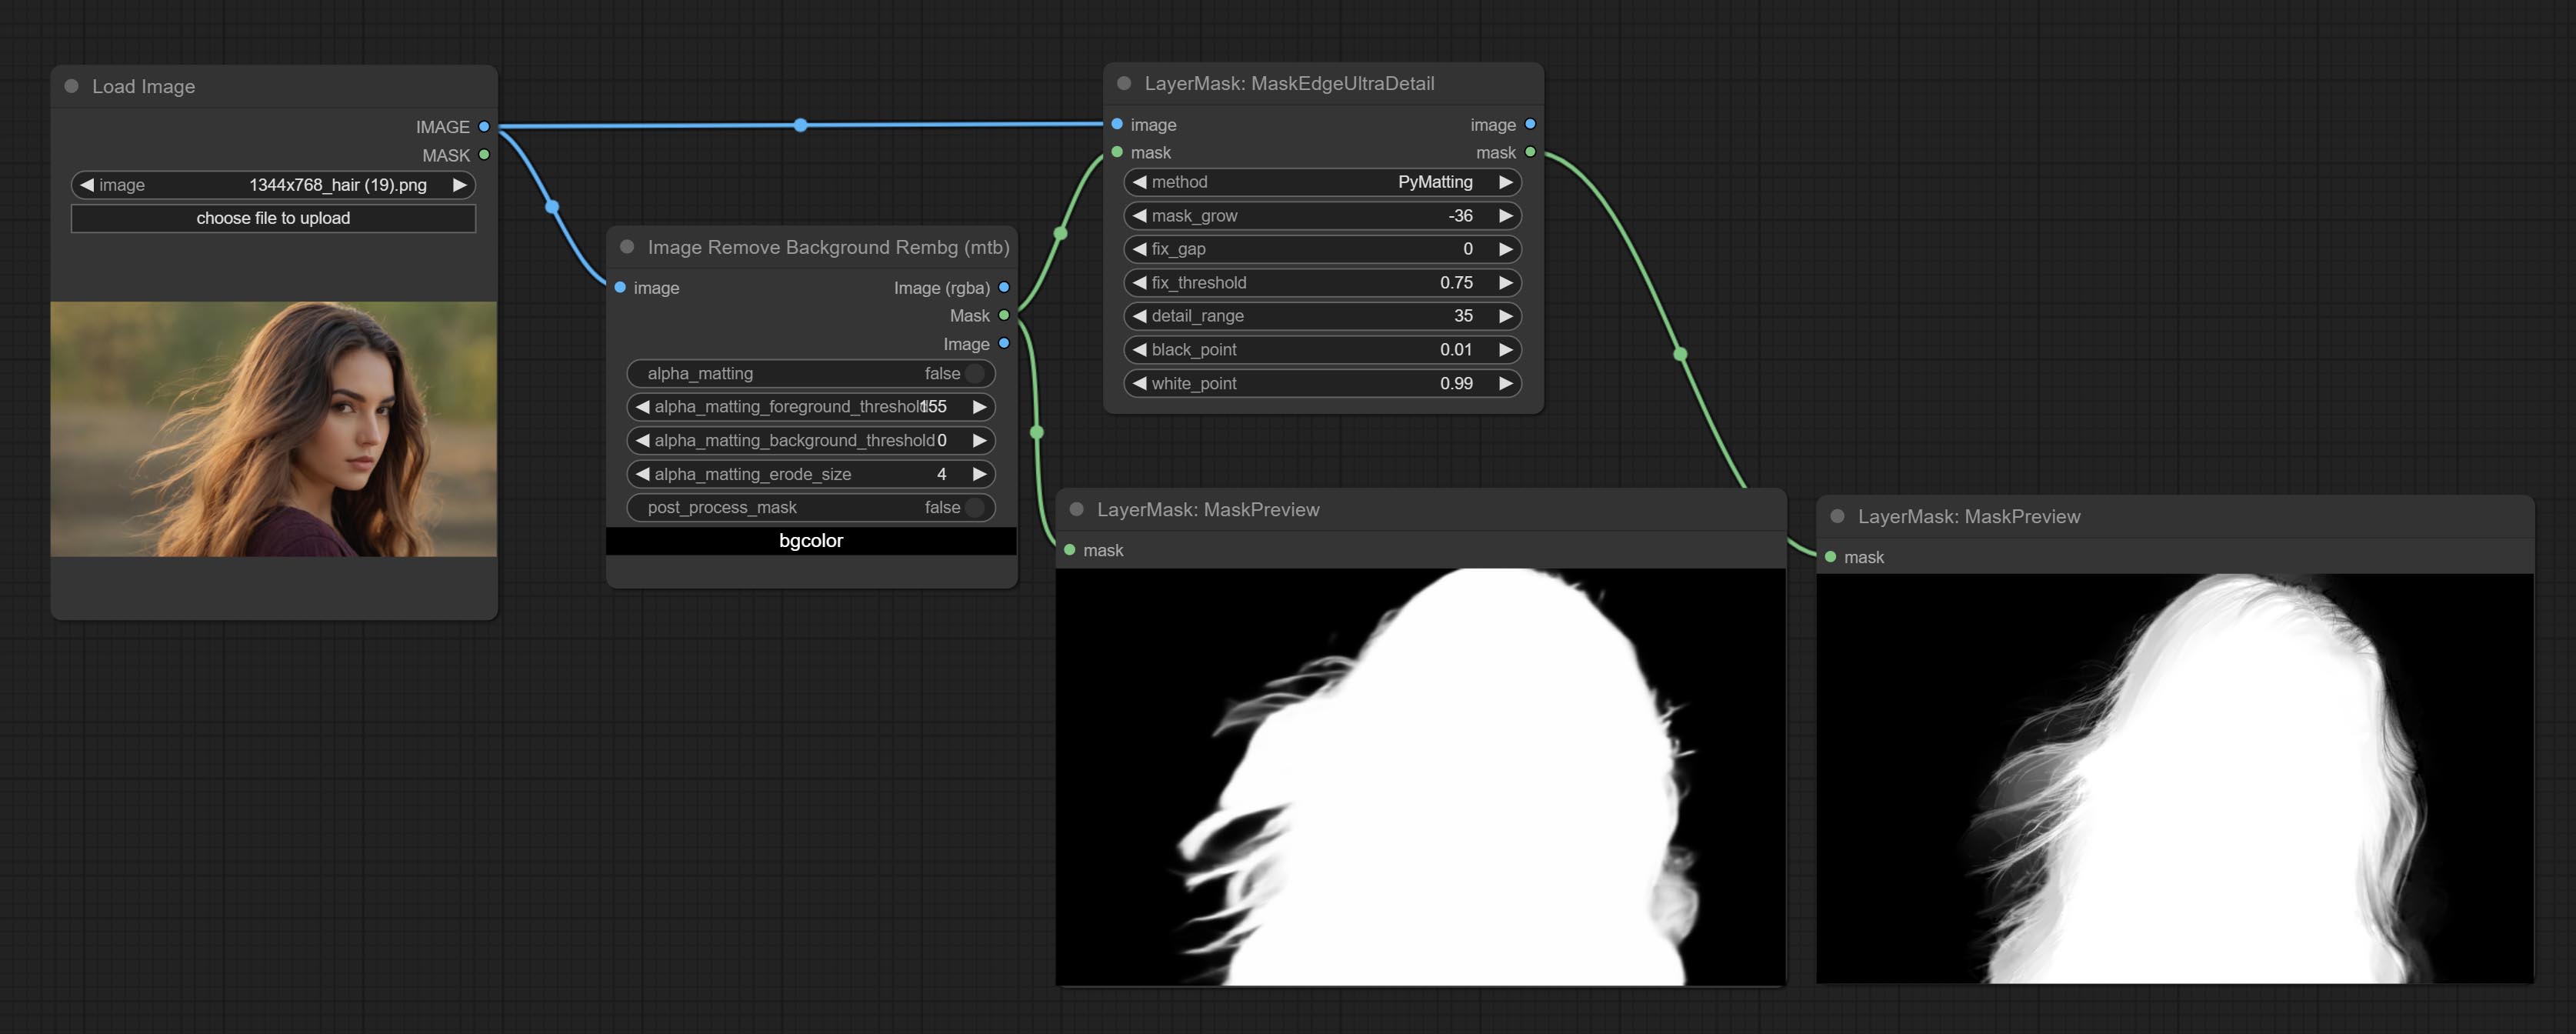
Node options:
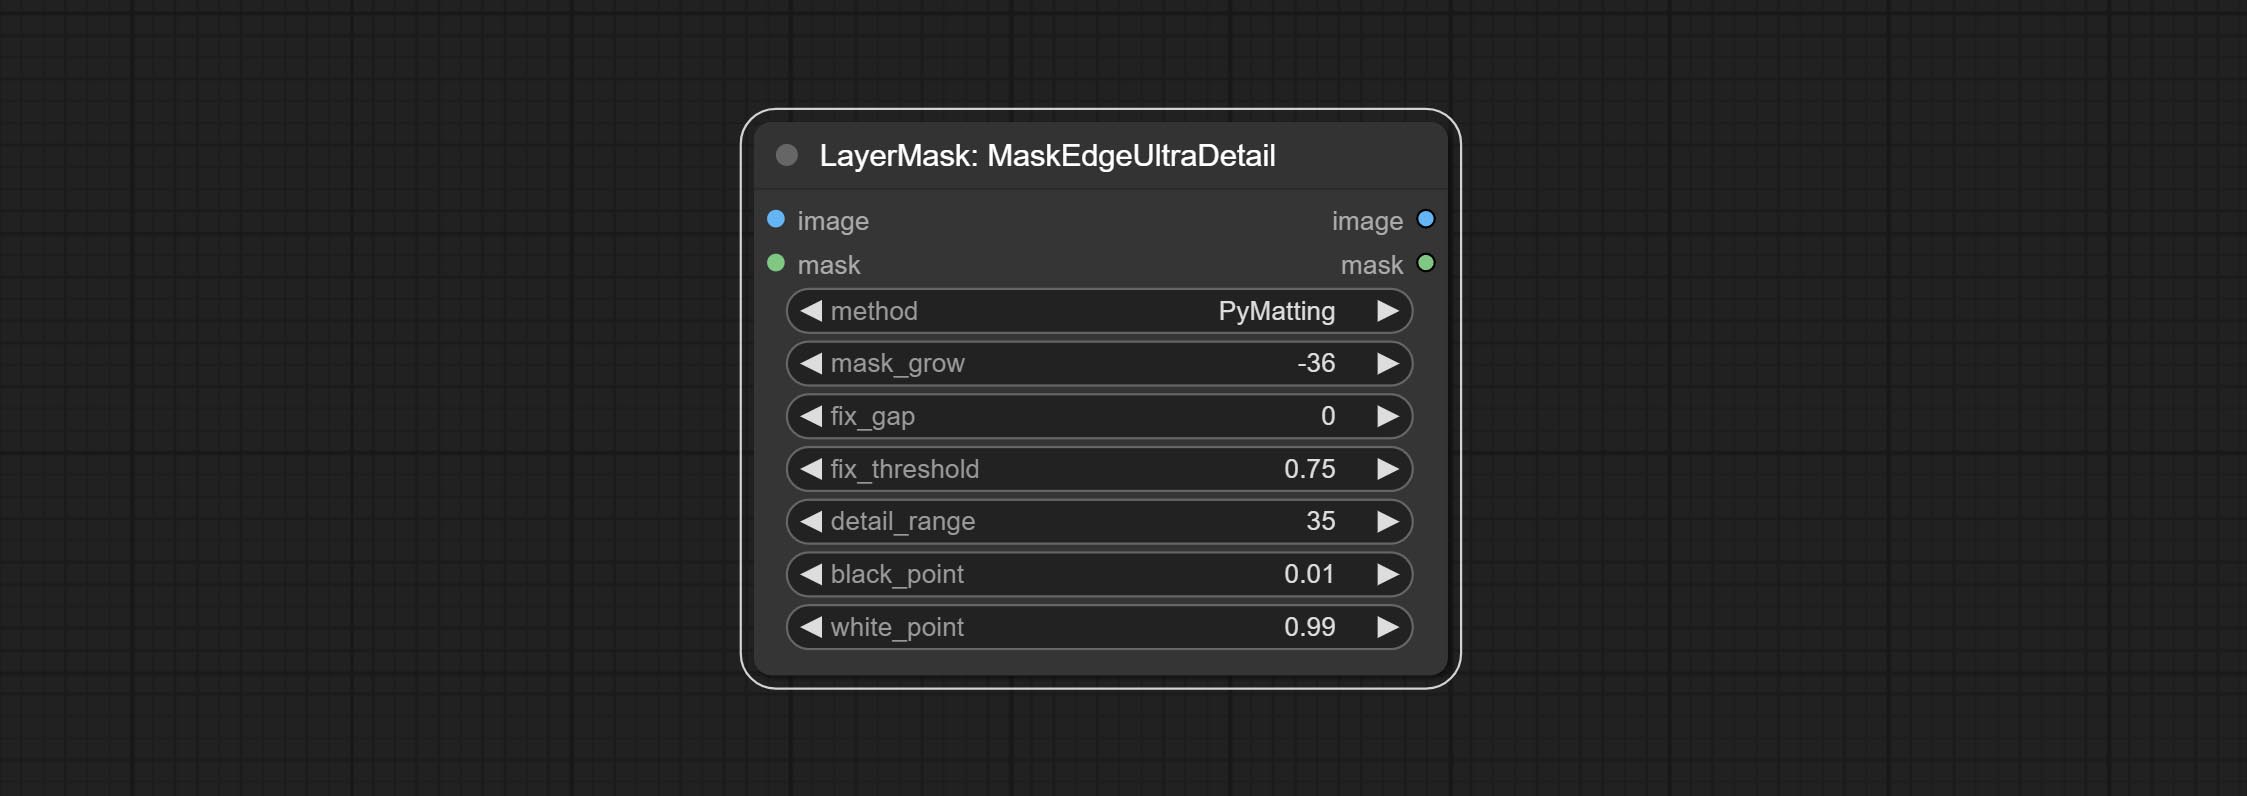
- method: Provide two methods for edge processing: PyMatting and OpenCV-GuidedFilter. PyMatching has a slower processing speed, but for video, it is recommended to use this method to obtain smoother mask sequences.
- mask_grow: Mask expansion amplitude. positive values expand outward, while negative values contract inward. For rougher masks, negative values are usually used to shrink their edges for better results.
- fix_gap: Repair the gaps in the mask. if obvious gaps in the mask, increase this value appropriately.
- fix_threshold: The threshold of fix_gap.
- detail_range: Edge detail range.
- black_point: Edge black sampling threshold.
- white_point: Edge white sampling threshold.
MaskEdgeUltraDetailV2
The V2 upgraded version of MaskEdgeUltraDetail has added the VITMatte edge processing method.(Note: Images larger than 2K in size using this method will consume huge memory)
This method is suitable for handling semi transparent areas.
On the basis of MaskEdgeUltraDetail, the following changes have been made: 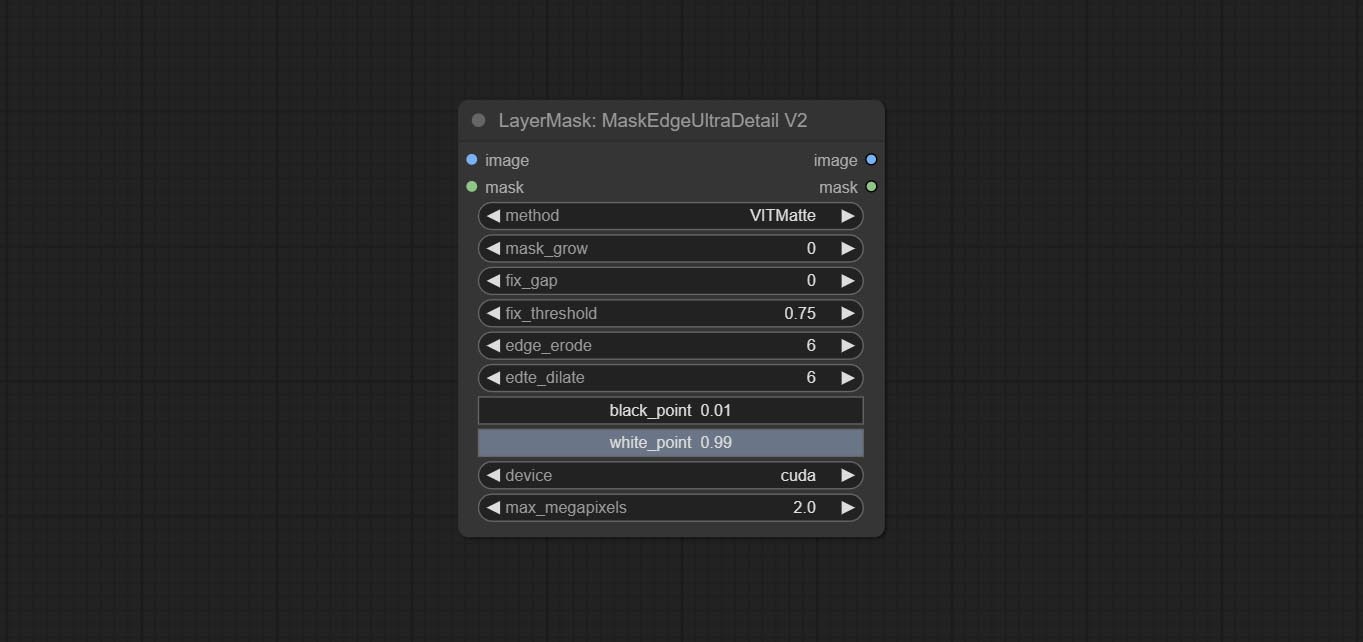
- method: Edge processing methods. provides VITMatte, VITMatte(local), PyMatting, GuidedFilter. If the model has been downloaded after the first use of VITMatte, you can use VITMatte (local) afterwards.
- edge_erode: Mask the erosion range inward from the edge. the larger the value, the larger the range of inward repair.
- edge_dilate: The edge of the mask expands outward. the larger the value, the wider the range of outward repair.
- device: Set whether the VitMatte to use cuda.
- max_megapixels: Set the maximum size for VitMate operations.
YoloV8Detect
Use the YoloV8 model to detect faces, hand box areas, or character segmentation. Supports the output of the selected number of channels. Download the model files from GoogleDrive or BaiduNetdisk to ComfyUI/models/yolo folder.
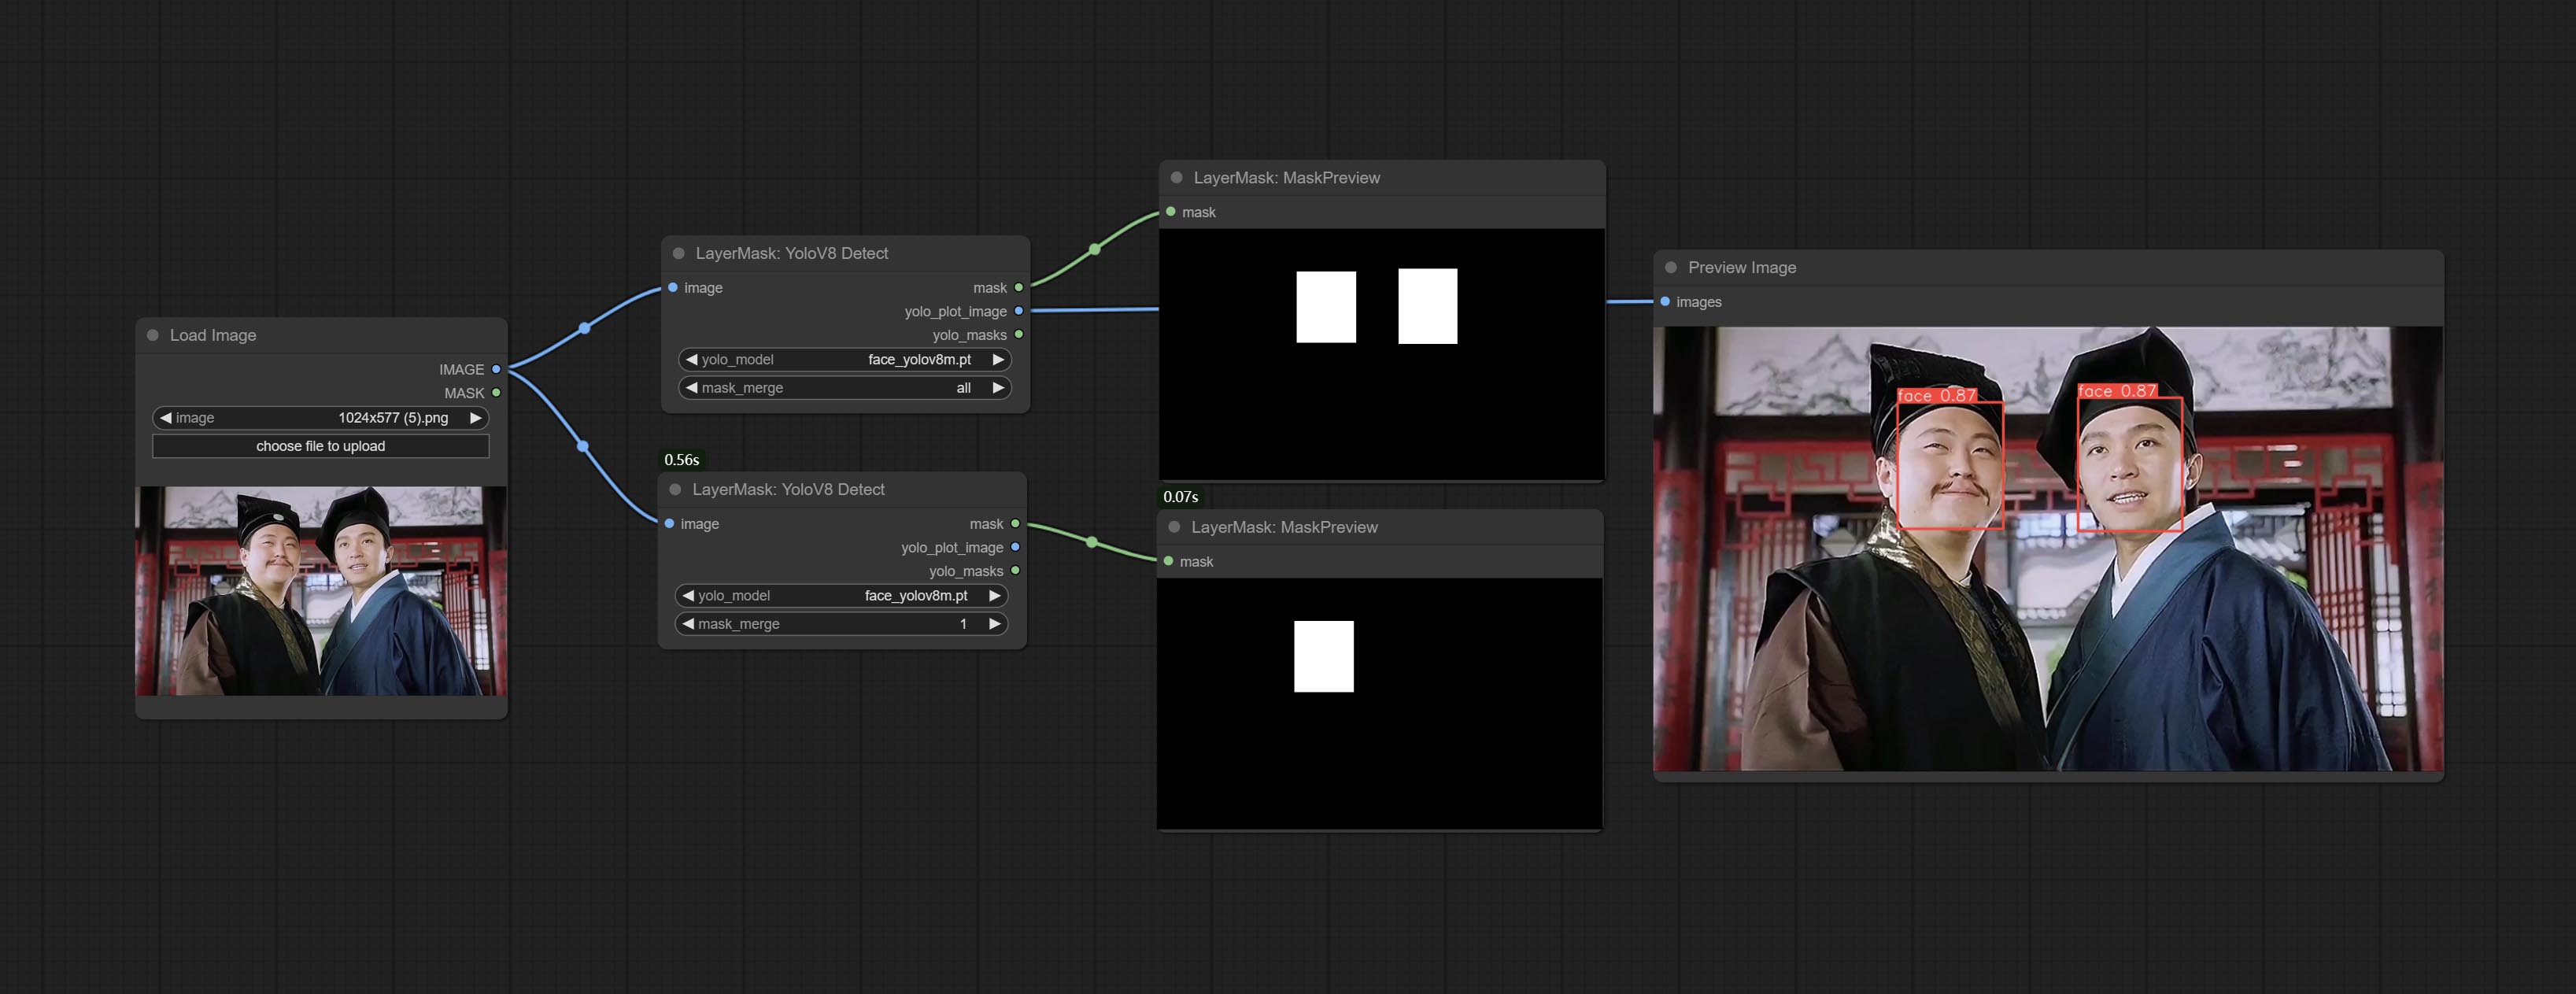
Node Options:
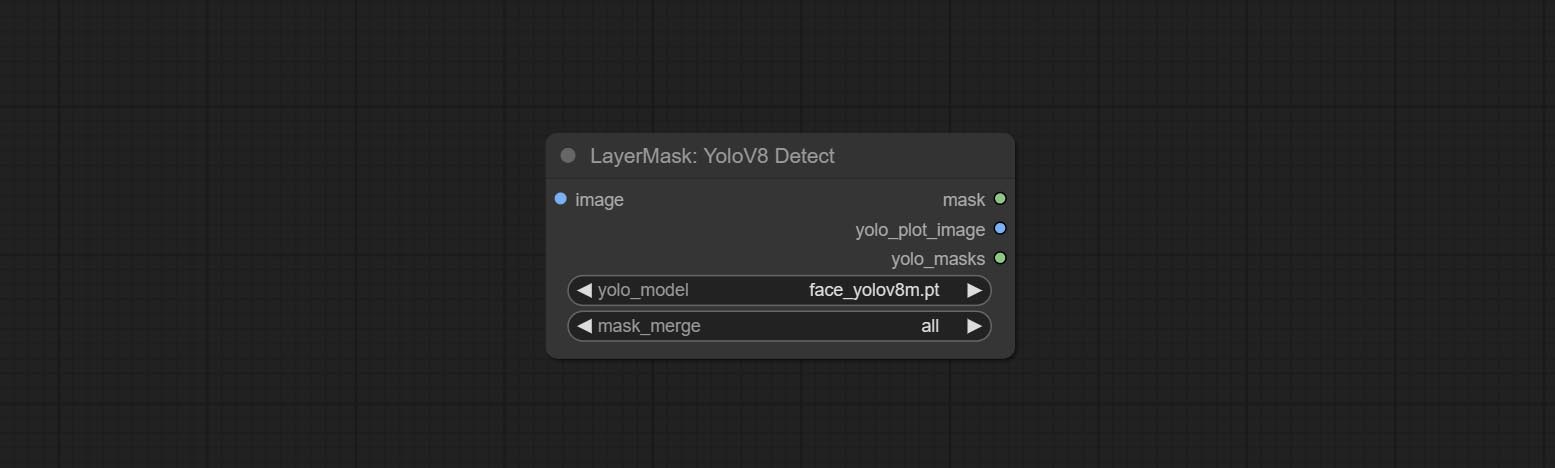
- yolo_model: Yolo model selection. the model with
seg name can output segmented masks, otherwise they can only output box masks. - mask_merge: Select the merged mask.
all is to merge all mask outputs. The selected number is how many masks to output, sorted by recognition confidence to merge the output.
Outputs:
- mask: The output mask.
- yolo_plot_image: Preview of yolo recognition results.
- yolo_masks: For all masks identified by yolo, each individual mask is output as a mask.
MediapipeFacialSegment
Use the Mediapipe model to detect facial features, segment left and right eyebrows, eyes, lips, and tooth. *Download the model files from BaiduNetdisk to ComfyUI/models/mediapipe folder.
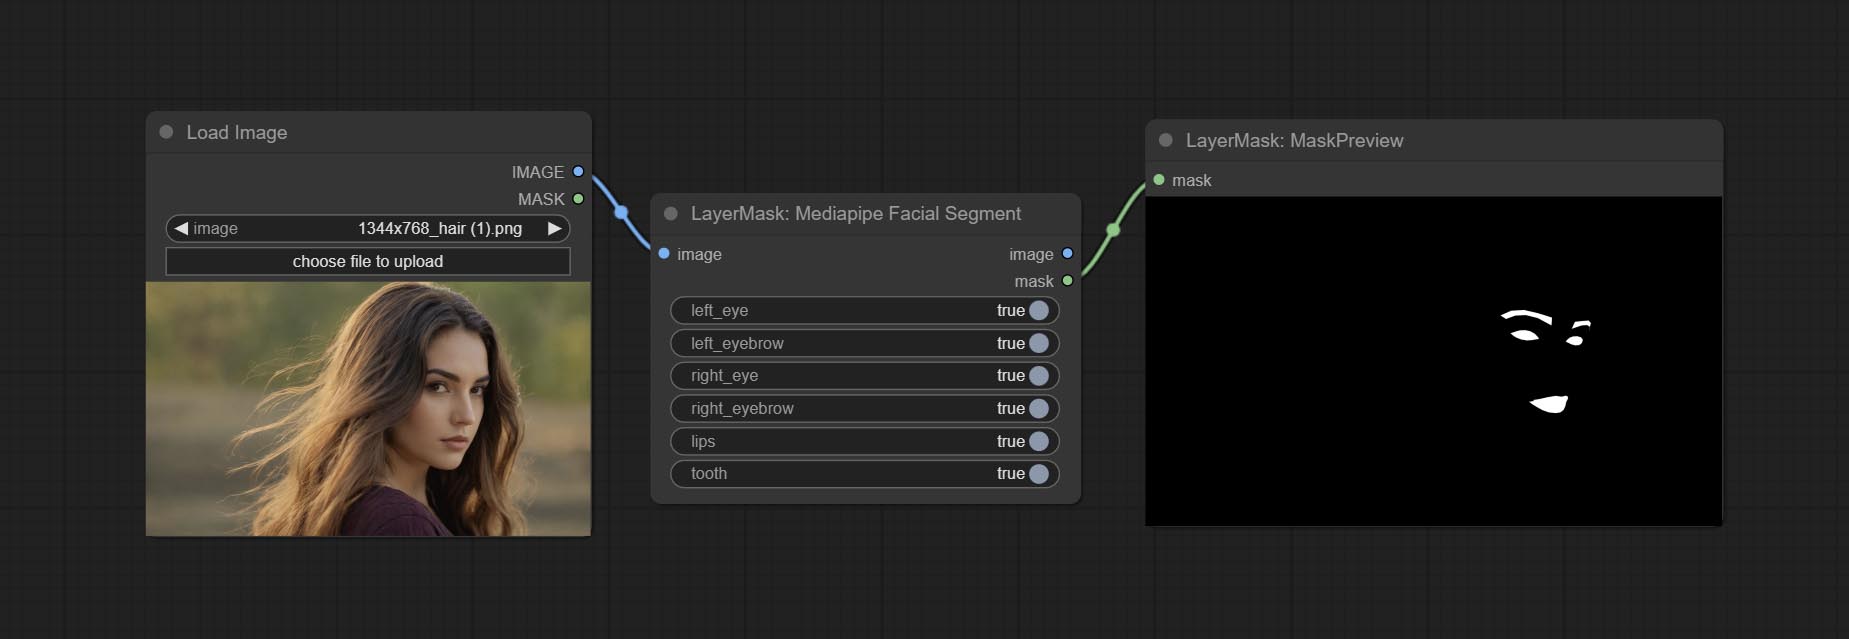
Node Options:
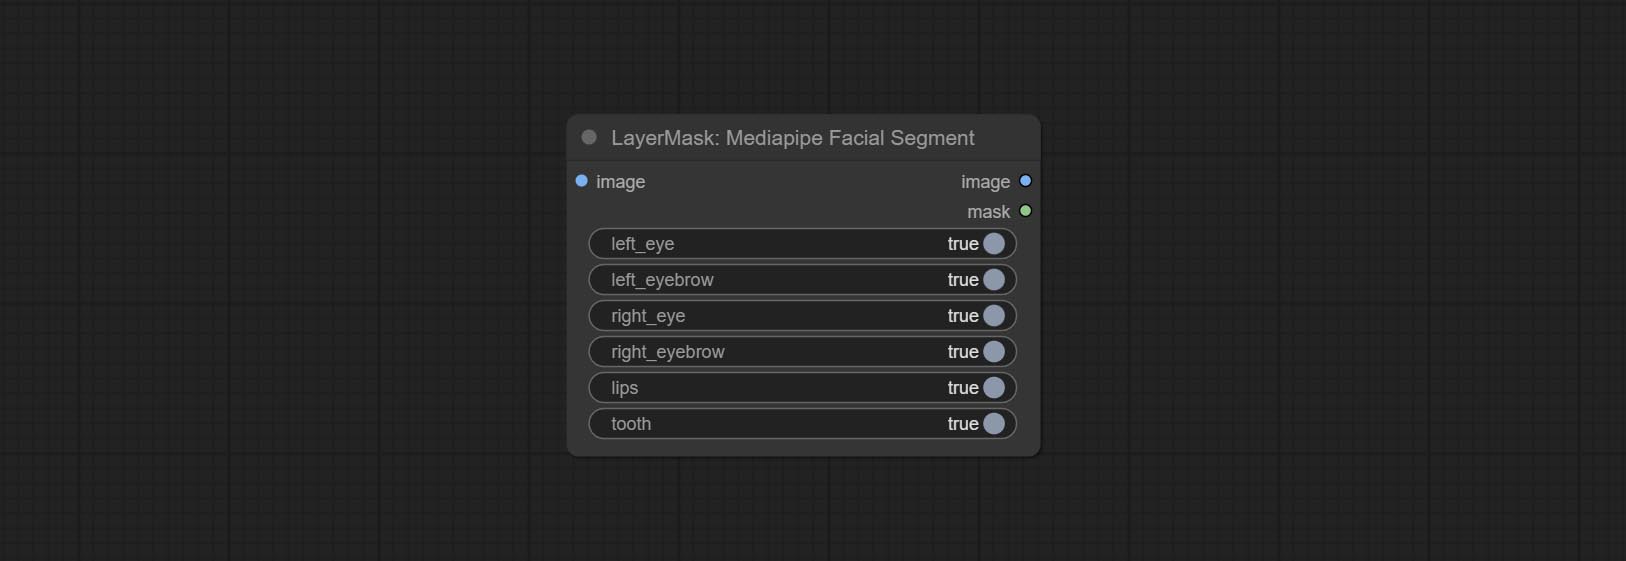
- left_eye: Recognition switch of left eye.
- left_eyebrow: Recognition switch of left eyebrow.
- right_eye: Recognition switch of right eye.
- right_eyebrow: Recognition switch of right eyebrow.
- lips: Recognition switch of lips.
- tooth: Recognition switch of tooth.
MaskByColor
Generate a mask based on the selected color. 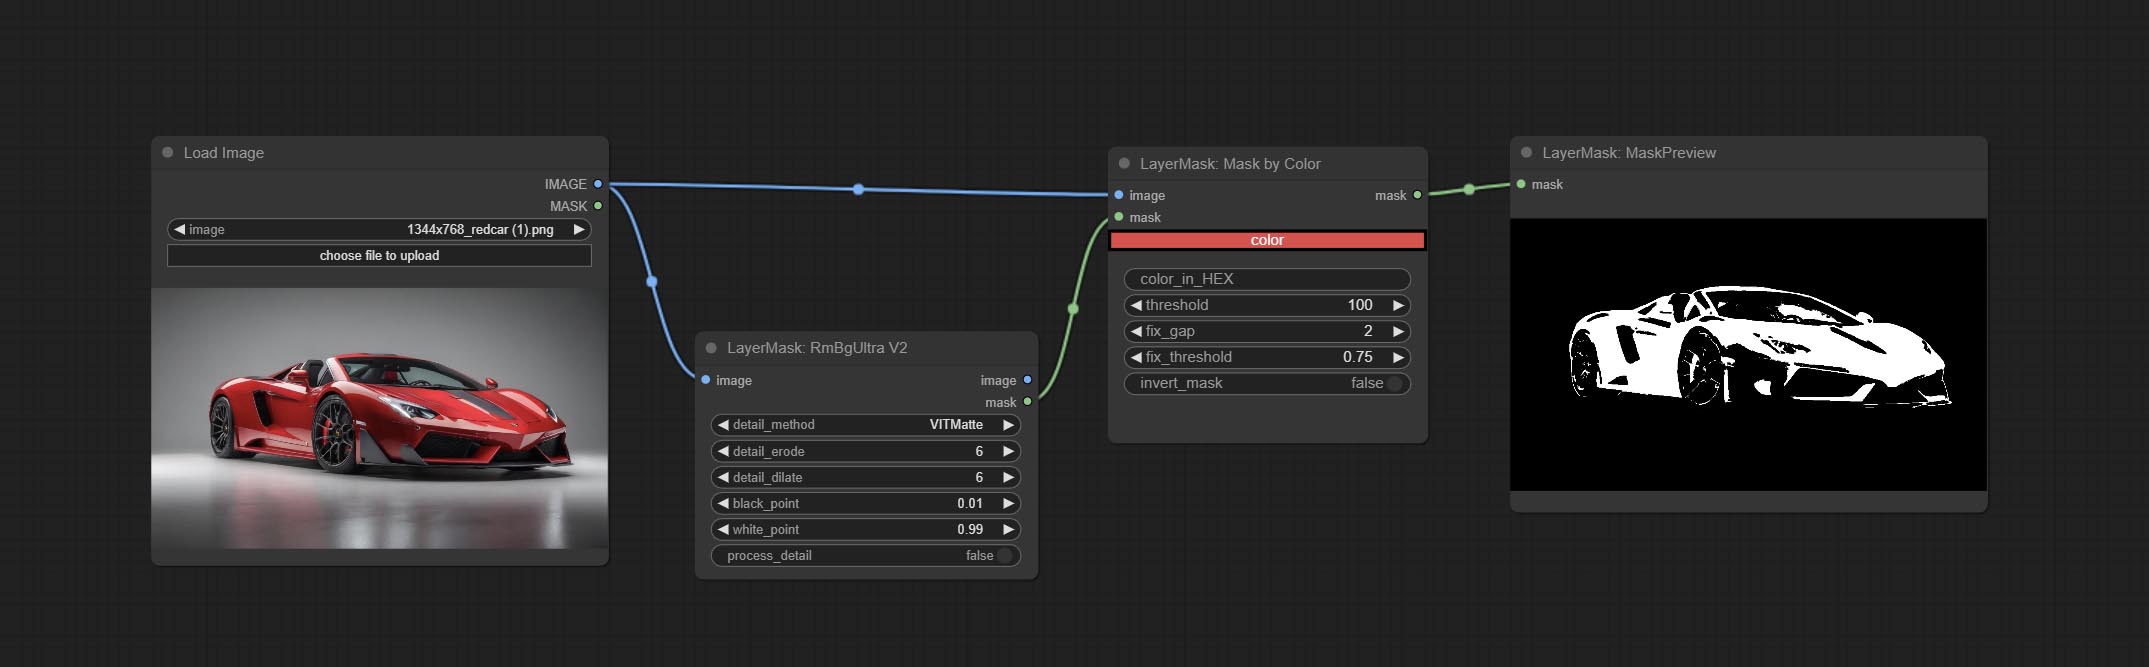
Node Options:
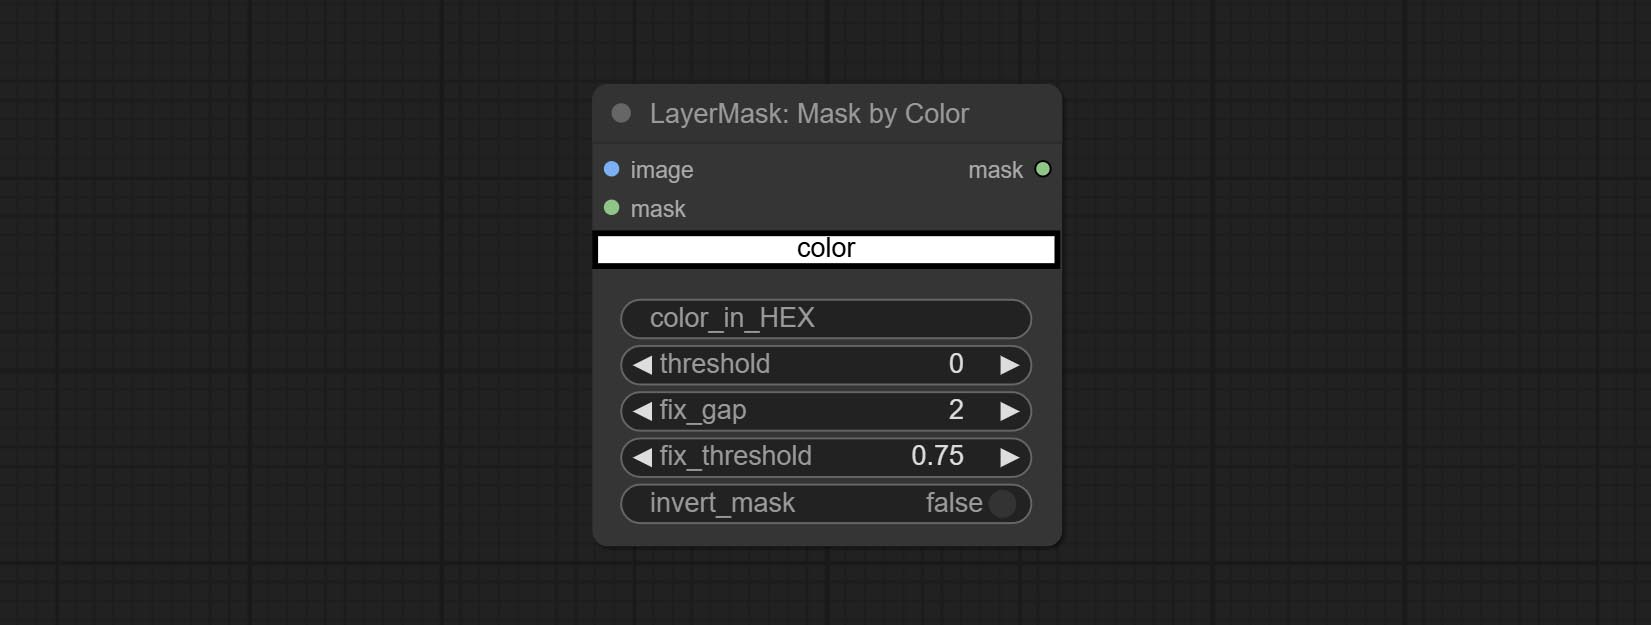
- image: Input image.
- mask: This input is optional, if there is a mask, only the colors inside the mask are included in the range.
- color: Color selector. Click on the color block to select a color, and you can use the straws on the color picker panel to pick up the screen color. Note: When using straws, maximize the browser window.
- color_in_HEX 4 : Enter color values. If this item has input, it will be used first, ignoring the color selected by the
color . - threshold: Mask range threshold, the larger the value, the larger the mask range.
- fix_gap: Repair the gaps in the mask. If there are obvious gaps in the mask, increase this value appropriately.
- fix_threshold: The threshold for repairing masks.
- invert_mask: Whether to reverse the mask.
ImageToMask
Convert the image to a mask. Supports converting any channel in LAB, RGBA, YUV, and HSV modes into masks, while providing color scale adjustment. Support mask optional input to obtain masks that only include valid parts. 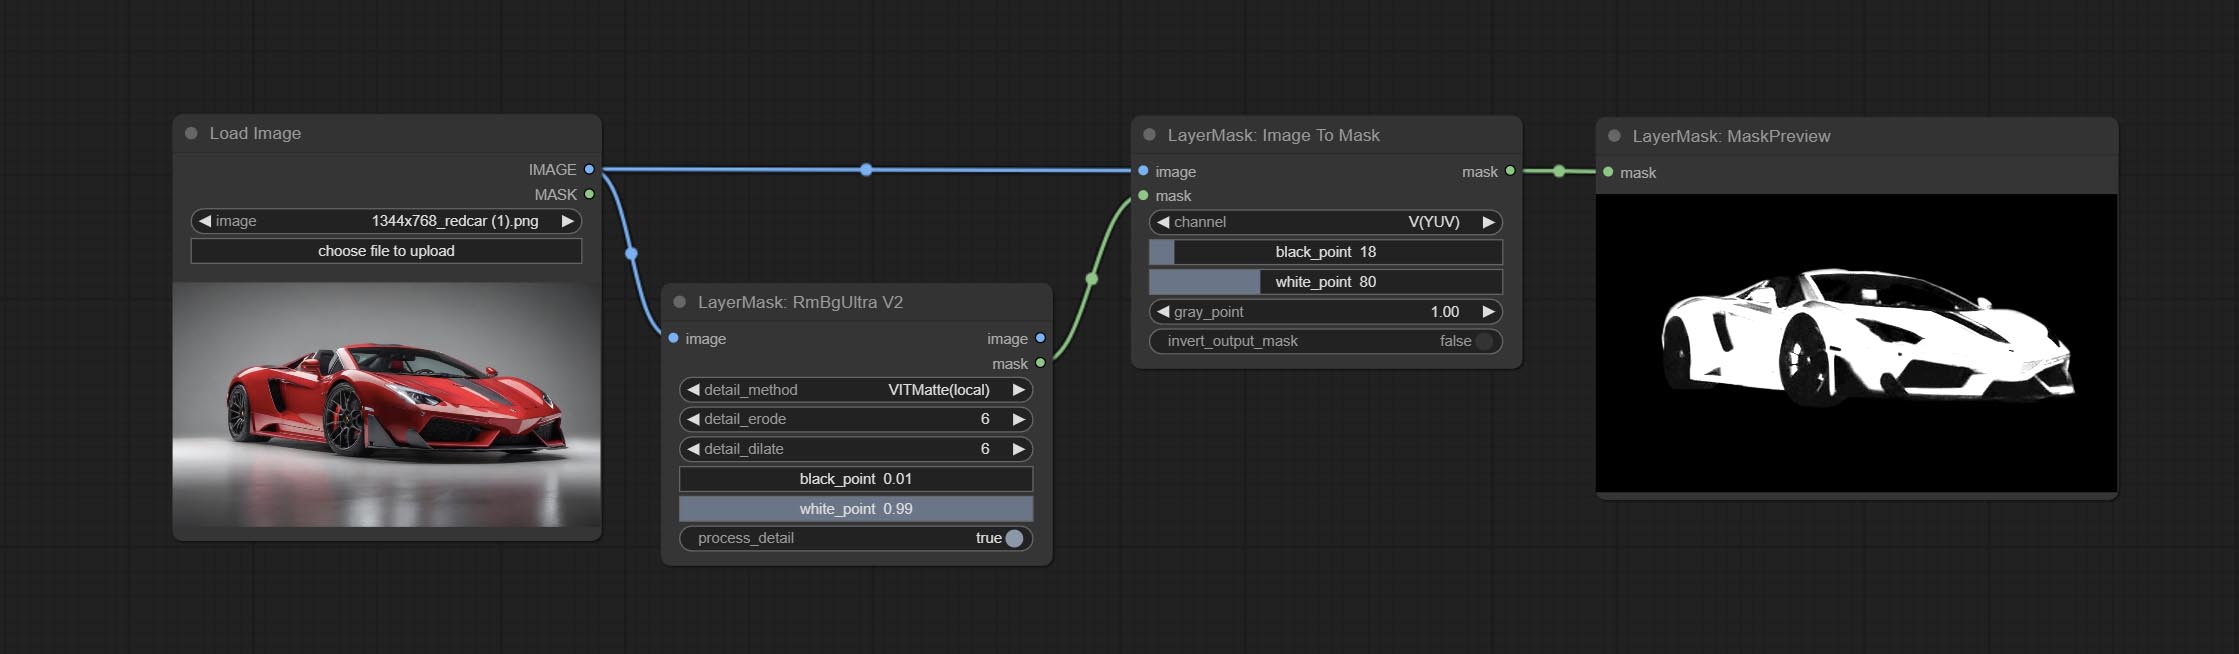
Node Options:
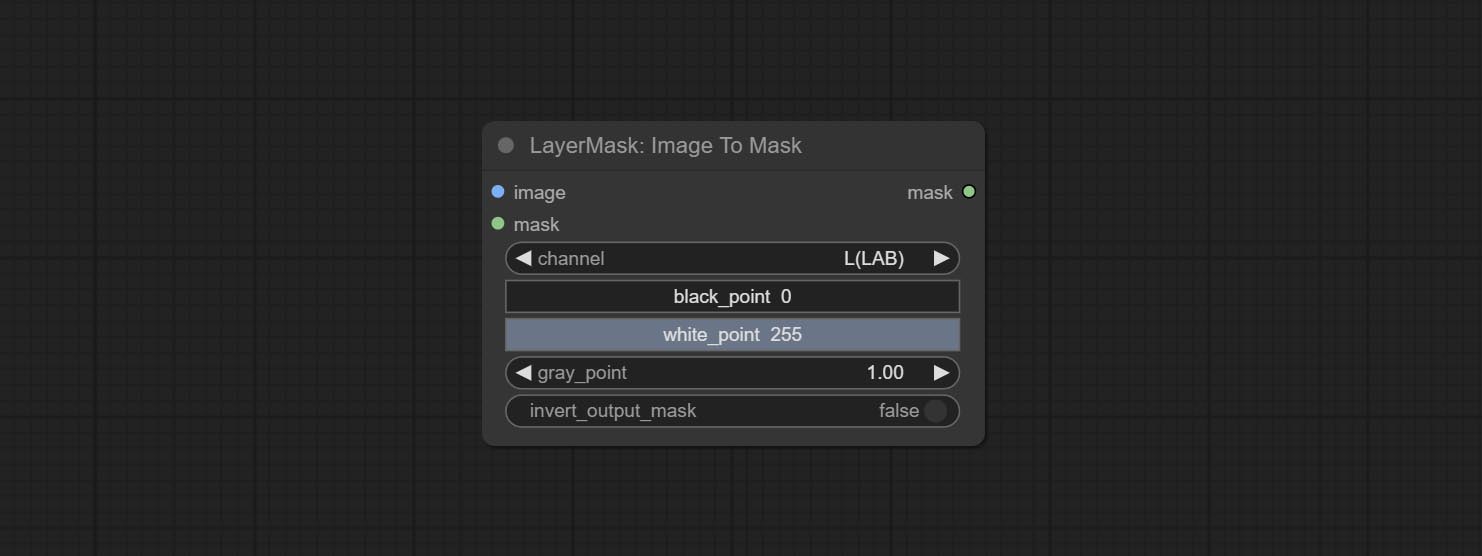
- image: Input image.
- mask: This input is optional, if there is a mask, only the colors inside the mask are included in the range.
- channel: Channel selection. You can choose any channel of LAB, RGBA, YUV, or HSV modes.
- black_point * : Black dot value for the mask. The value range is 0-255, with a default value of 0.
- white_point * : White dot value for the mask. The value range is 0-255, with a default value of 255.
- gray_point: Gray dot values for the mask. The value range is 0.01-9.99, with a default of 1.
- invert_output_mask: Whether to reverse the mask.
* If the black_point or output_black_point value is greater than white_point or output_white_point, the two values are swapped, with the larger value used as white_point and the smaller value used as black_point.
Shadow & Highlight Mask
Generate masks for the dark and bright parts of the image. 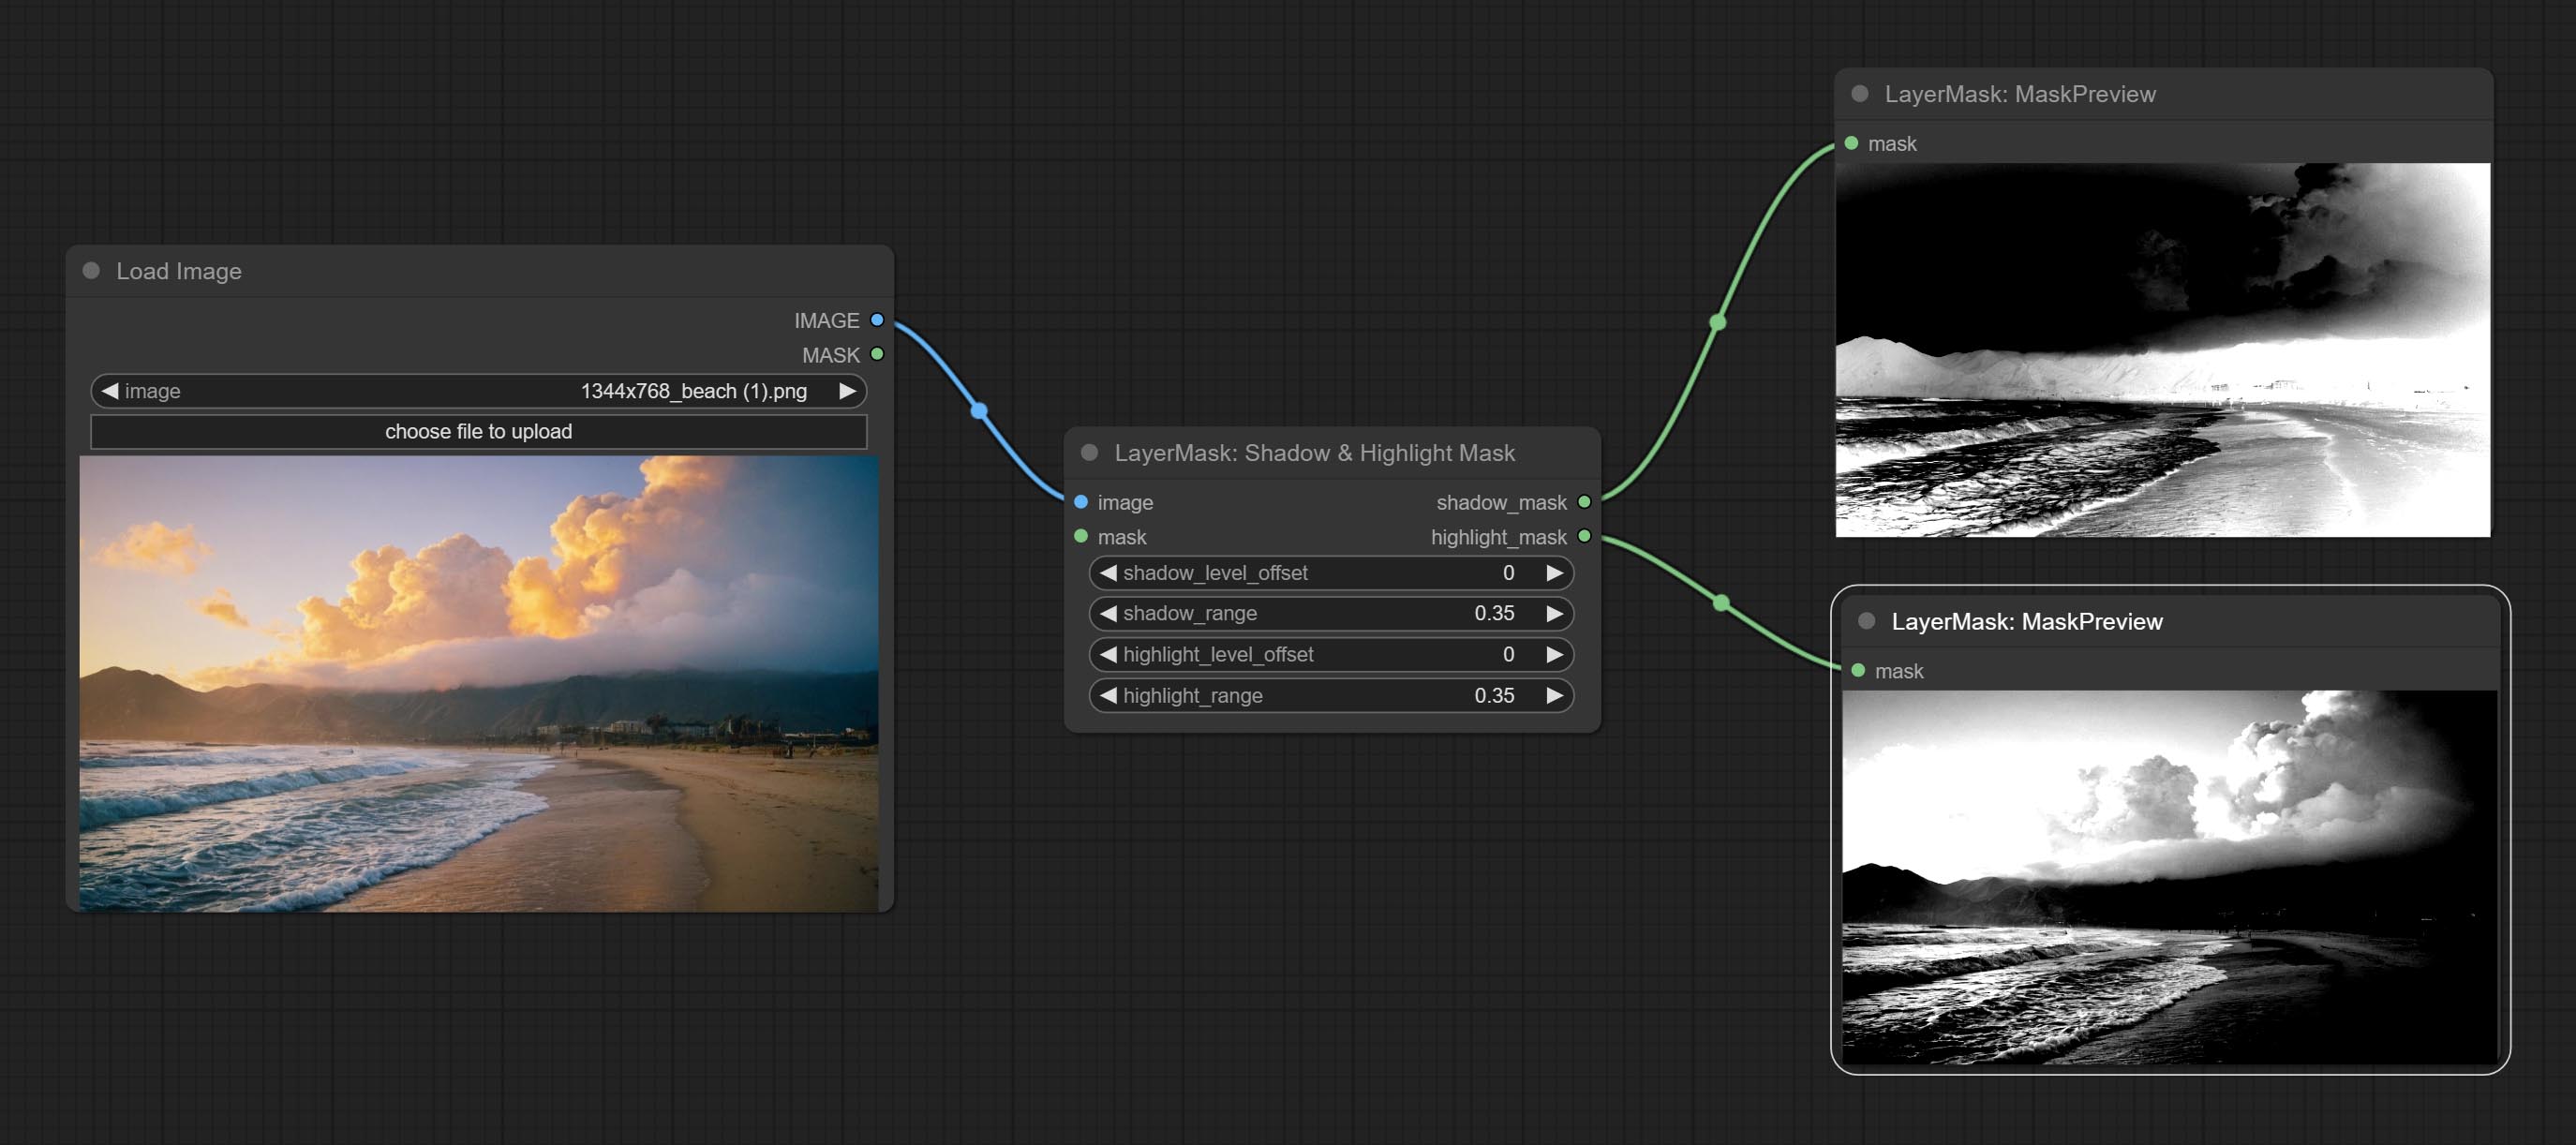
Node options:
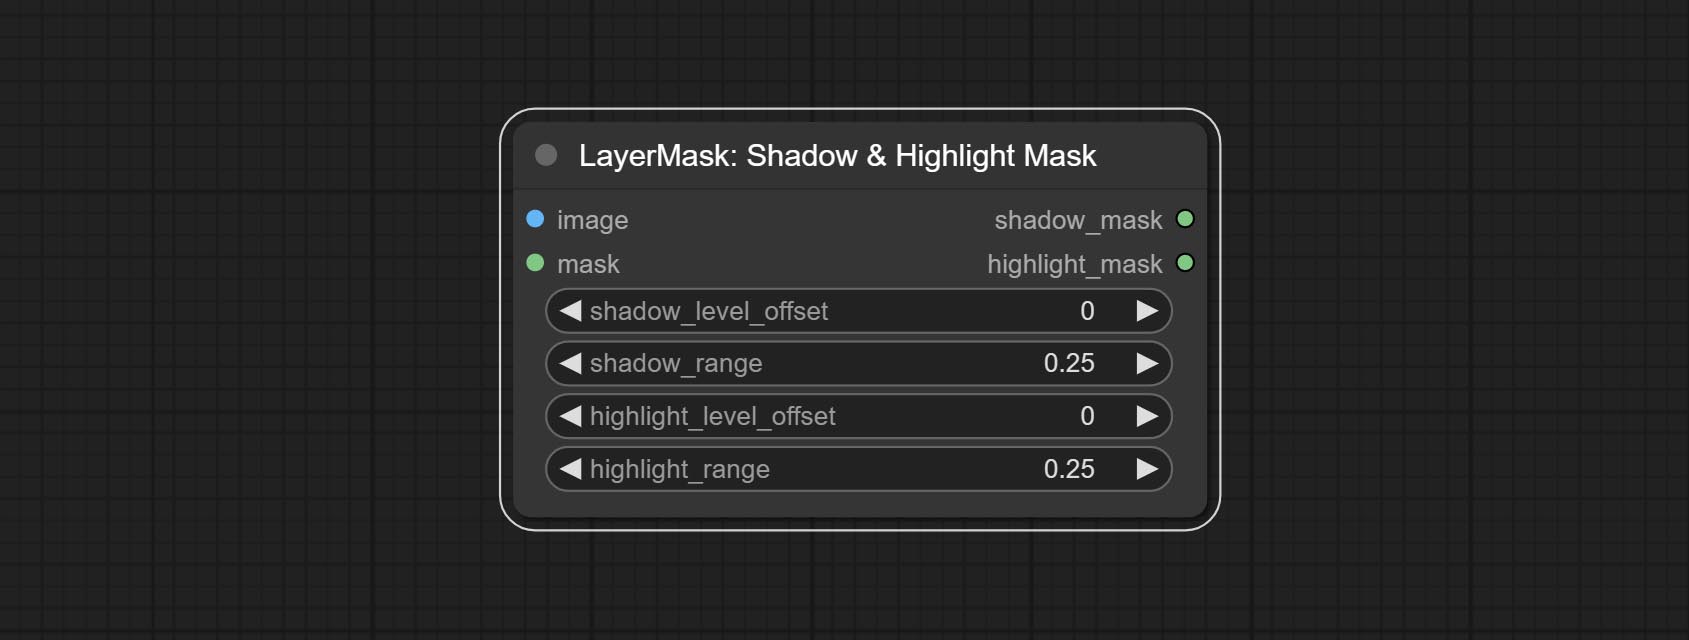
- image: The input image.
- mask: Optional input. if there is input, only the colors within the mask range will be adjusted.
- shadow_level_offset: The offset of values in the dark area, where larger values bring more areas closer to the bright into the dark area.
- shadow_range: The transitional range of the dark area.
- highlight_level_offset: The offset of values in the highlight area, where larger values bring more areas closer to the dark into the highlight area.
- highlight_range: The transitional range of the highlight area.
Shadow Highlight Mask V2
A replica of the Shadow & Highlight Mask node, with the "&" character removed from the node name to avoid ComfyUI workflow parsing errors.
PixelSpread
Pixel expansion preprocessing on the masked edge of an image can effectively improve the edges of image composit. 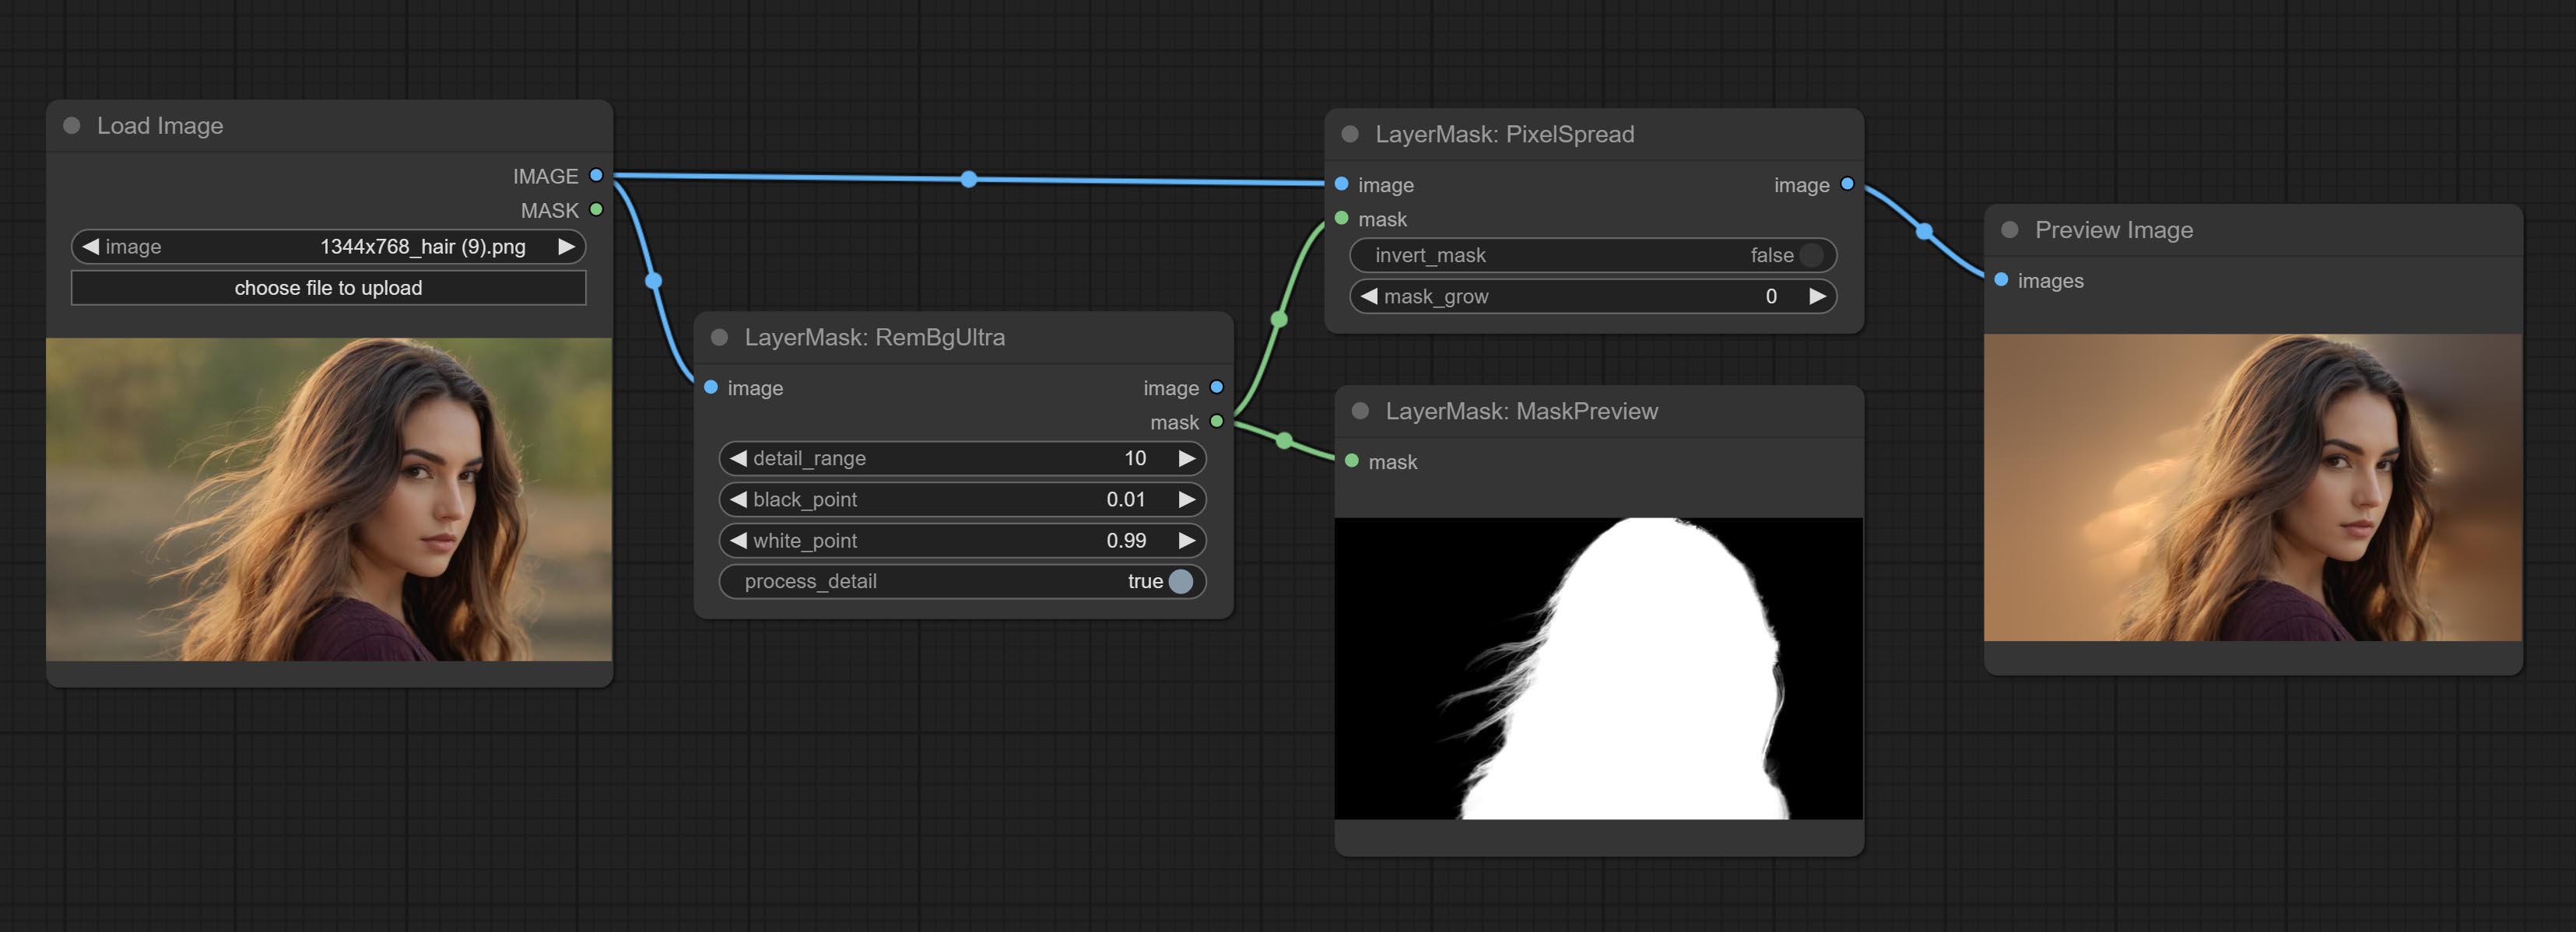
Node options:
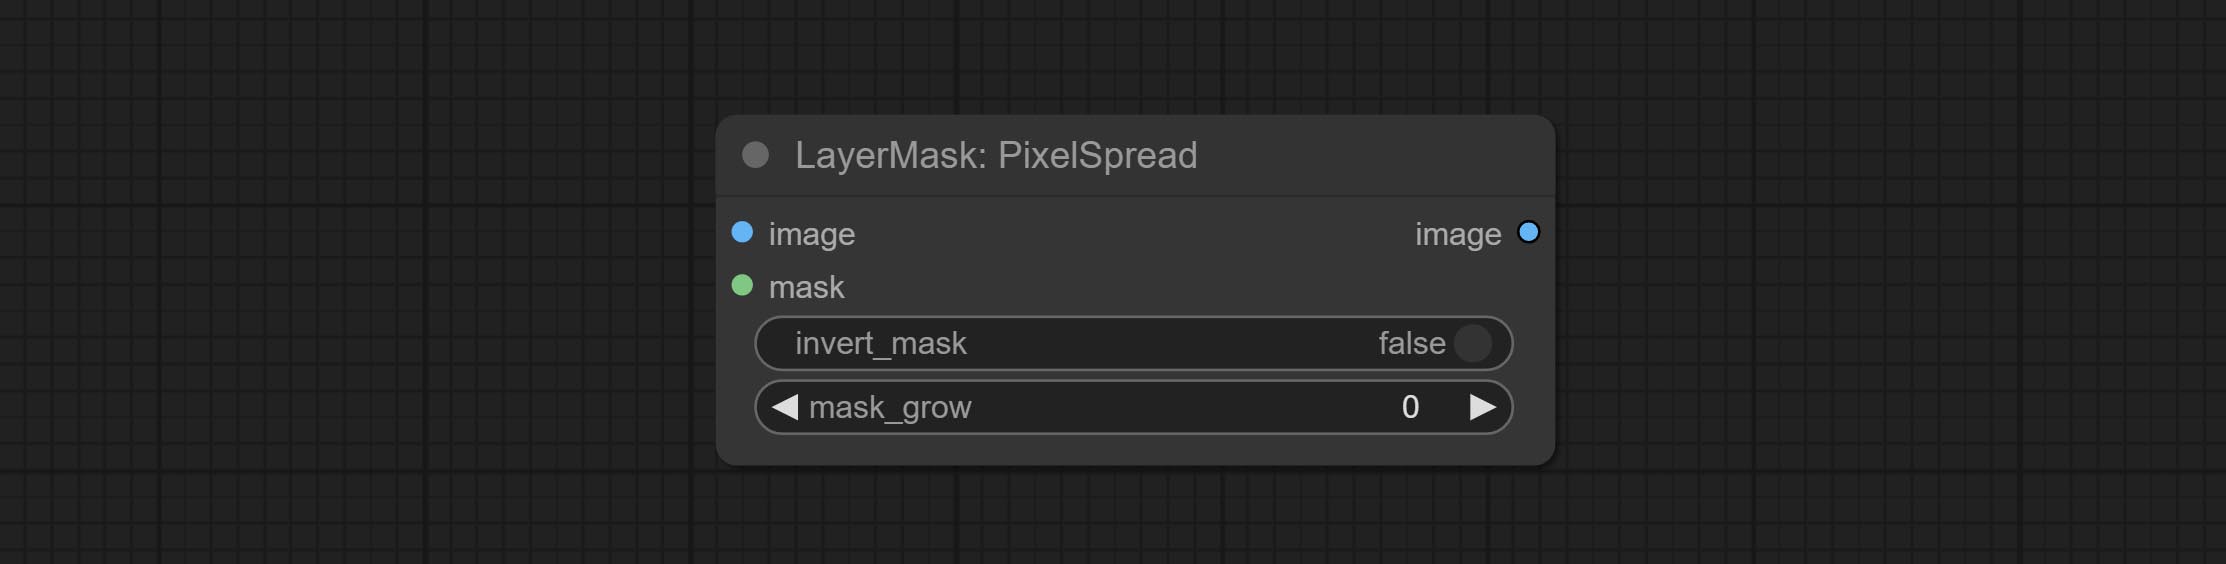
- invert_mask: Whether to reverse the mask.
- mask_grow: Mask expansion amplitude.
MaskByDifferent
Calculate the differences between two images and output them as mask. 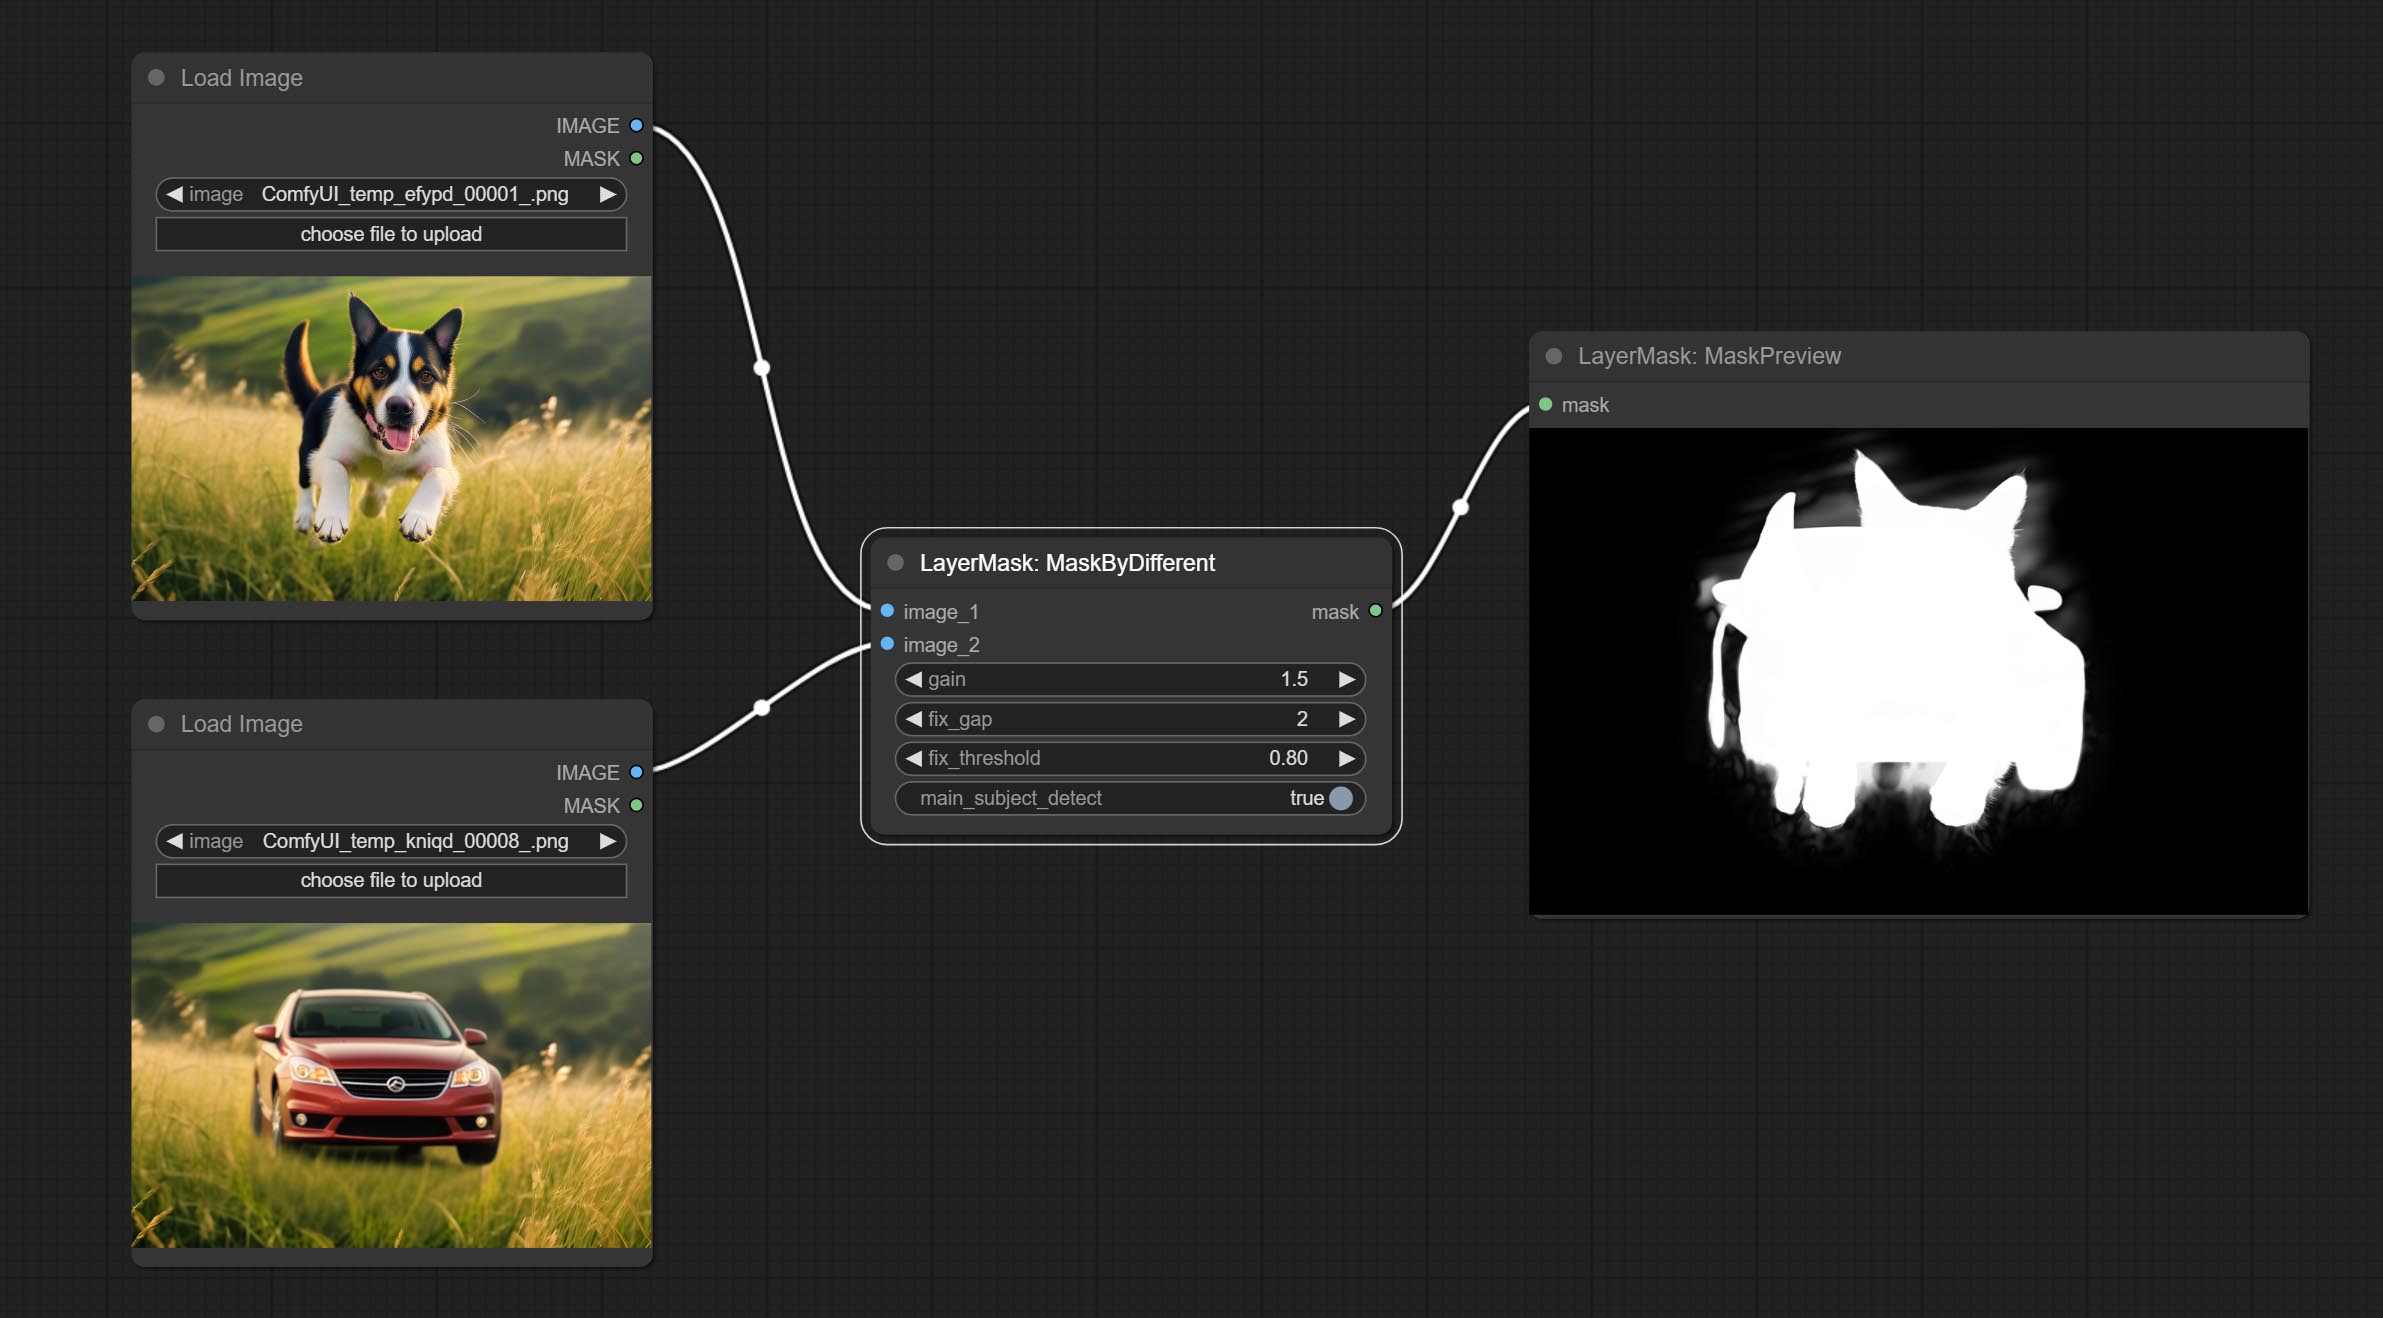
Node options:
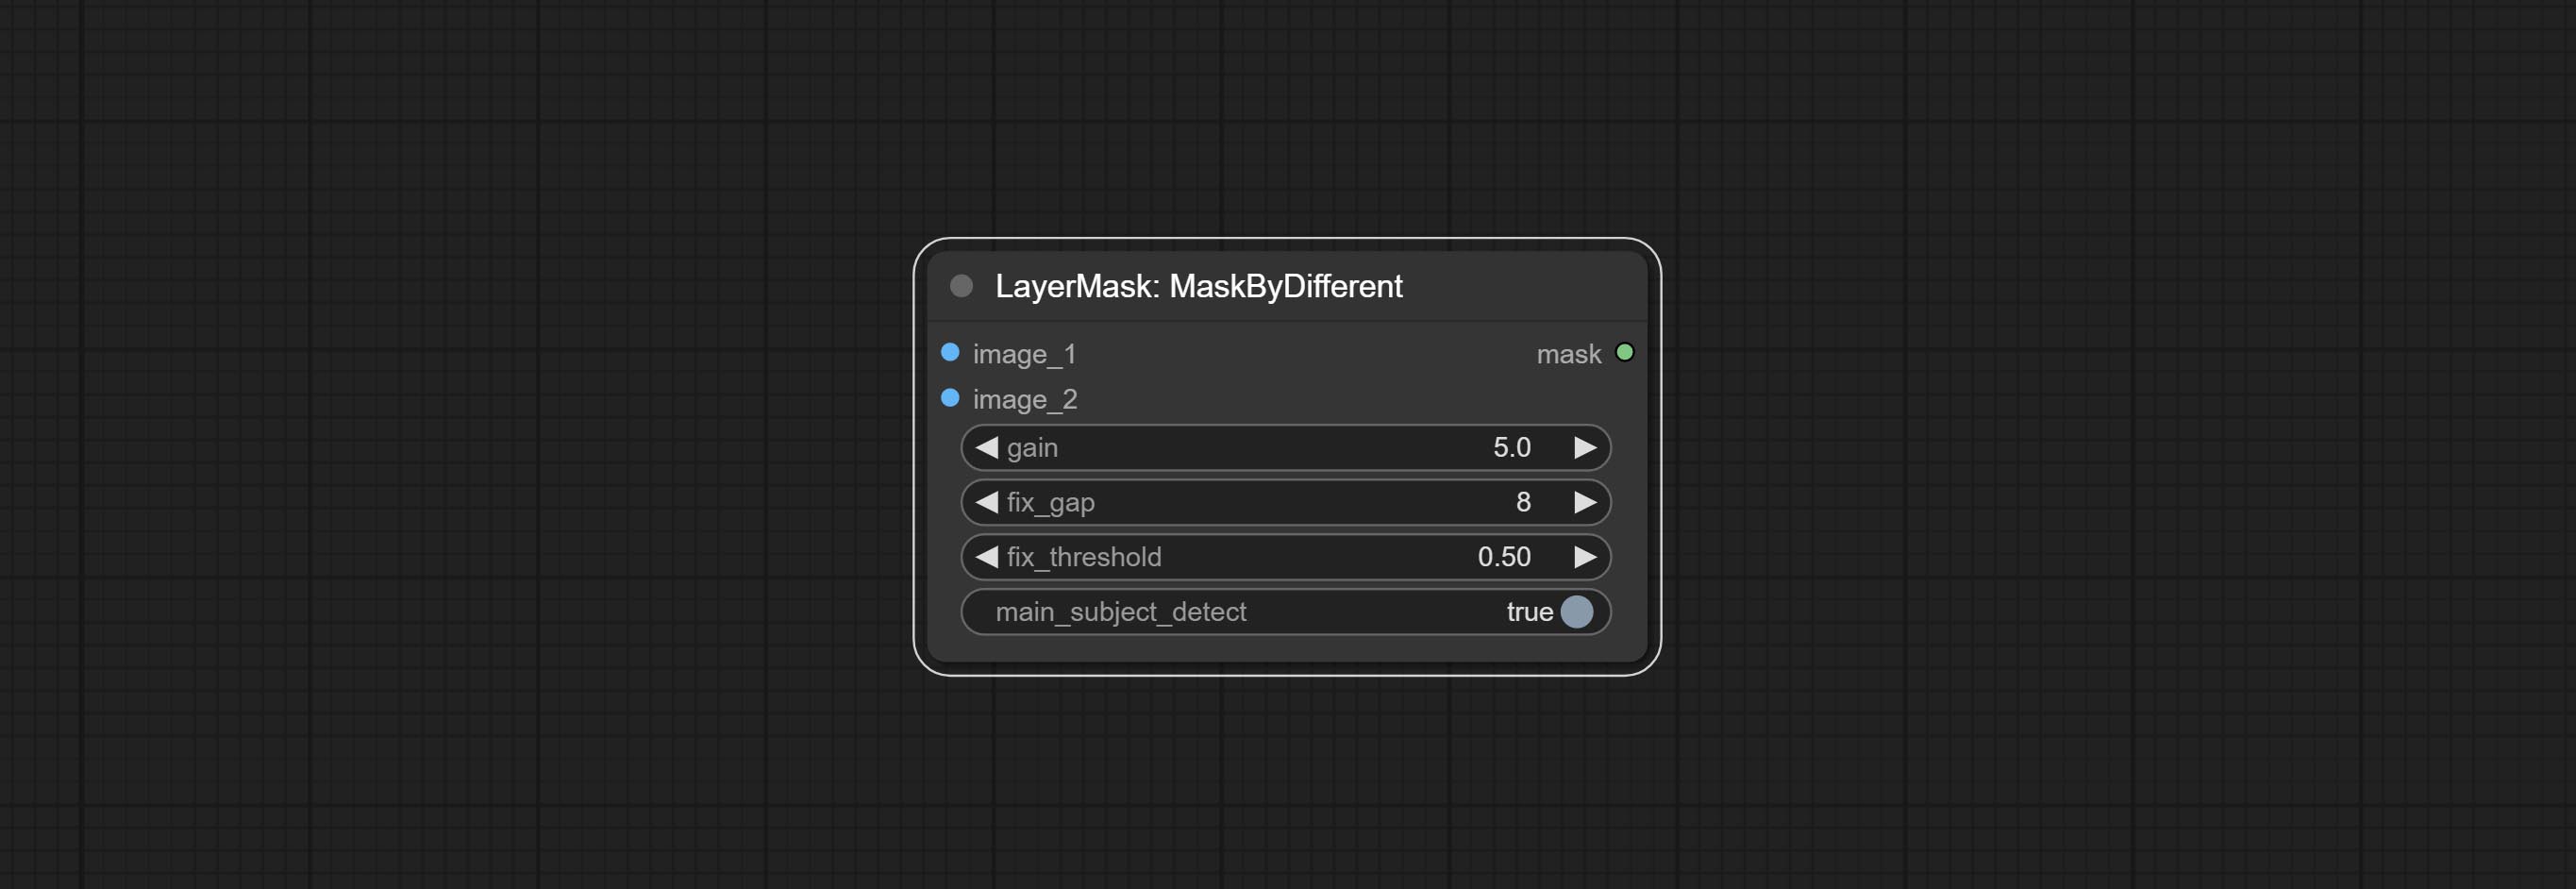
- gain: The gain of difference calculate. higher value will result in a more significant slight difference.
- fix_gap: Fix the internal gaps of the mask. higher value will repair larger gaps.
- fix_threshold: The threshold for fix_gap.
- main_subject_detect: Setting this to True will enable subject detection, ignoring differences outside of the subject.
MaskGrow
Grow and shrink edges and blur the mask 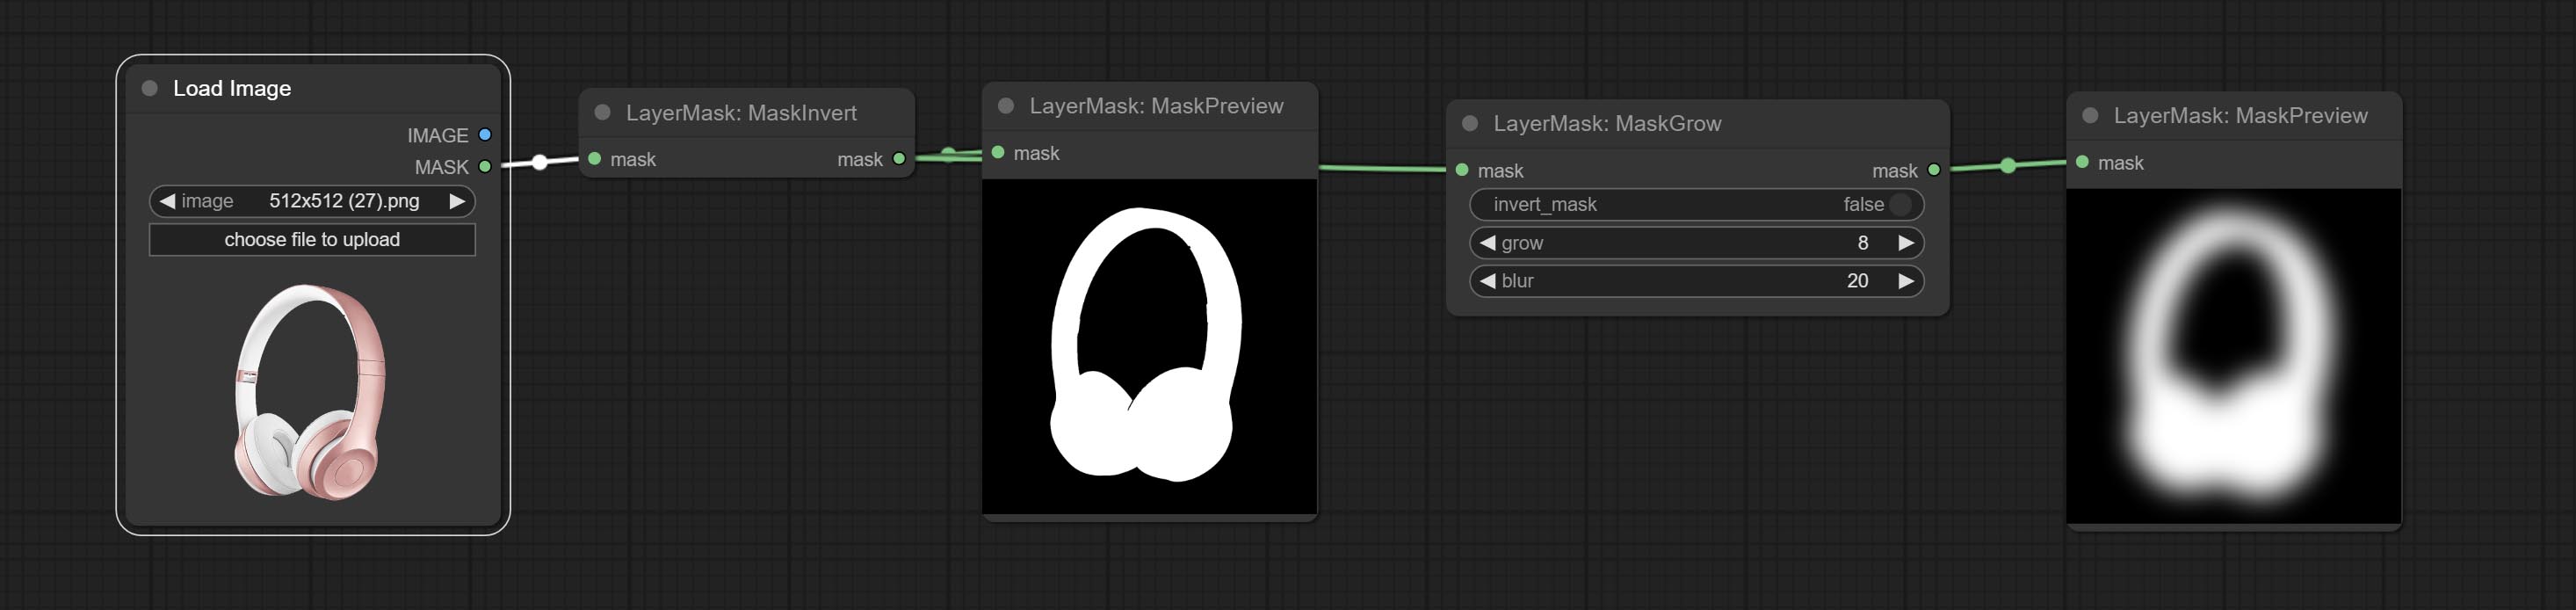
Node options: 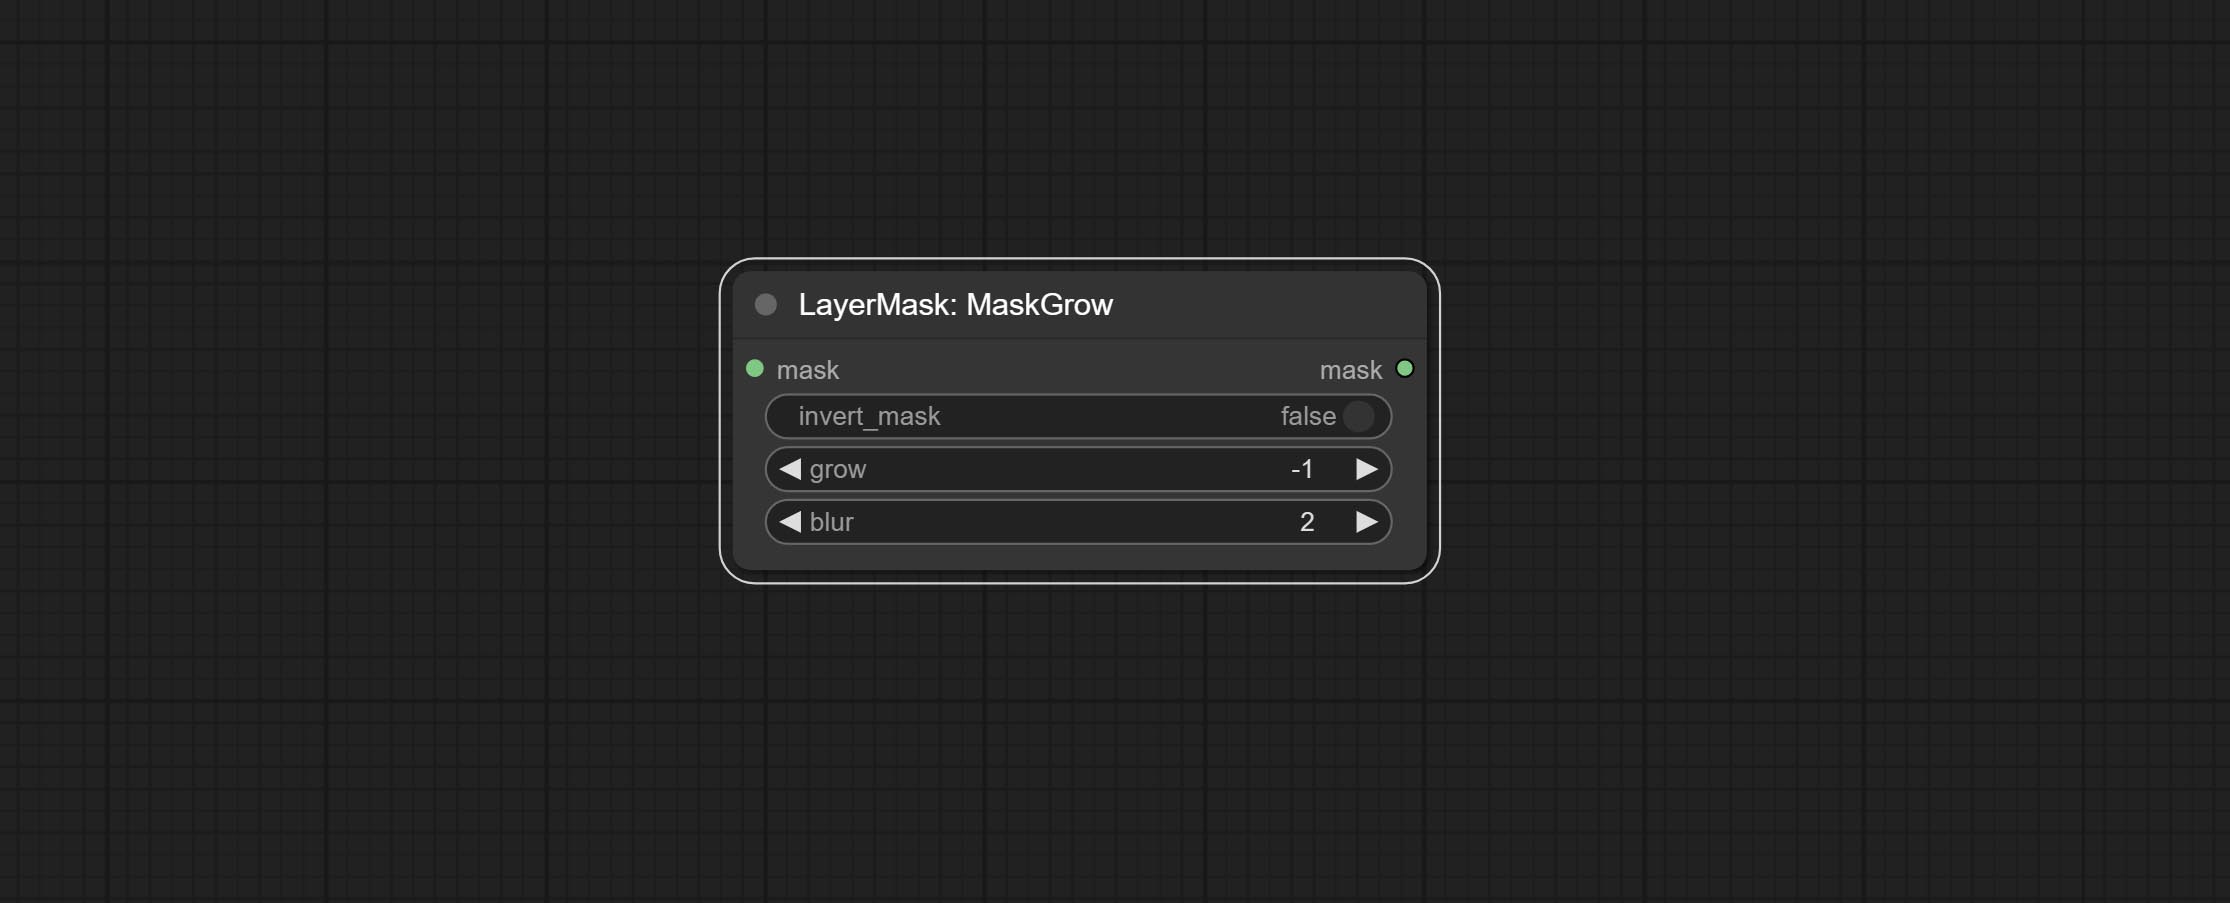
- invert_mask: Whether to reverse the mask.
- grow: Positive values expand outward, while negative values contract inward.
- blur: Blur the edge.
MaskEdgeShrink
Smooth transition and shrink the mask edges while preserving edge details. 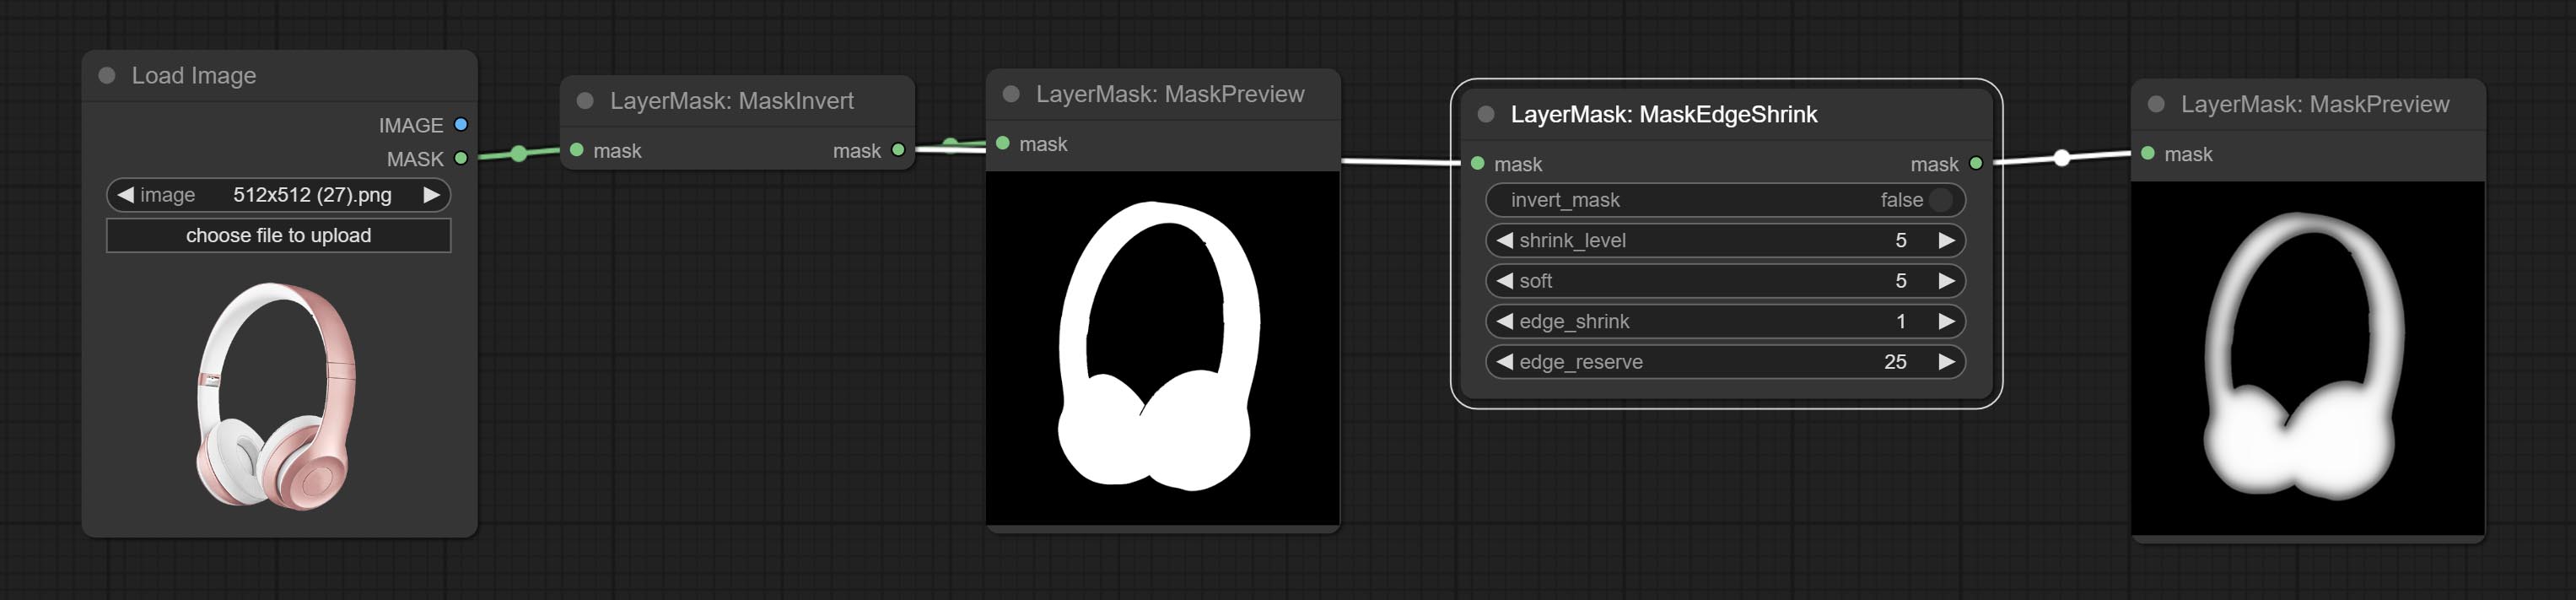
Node options: 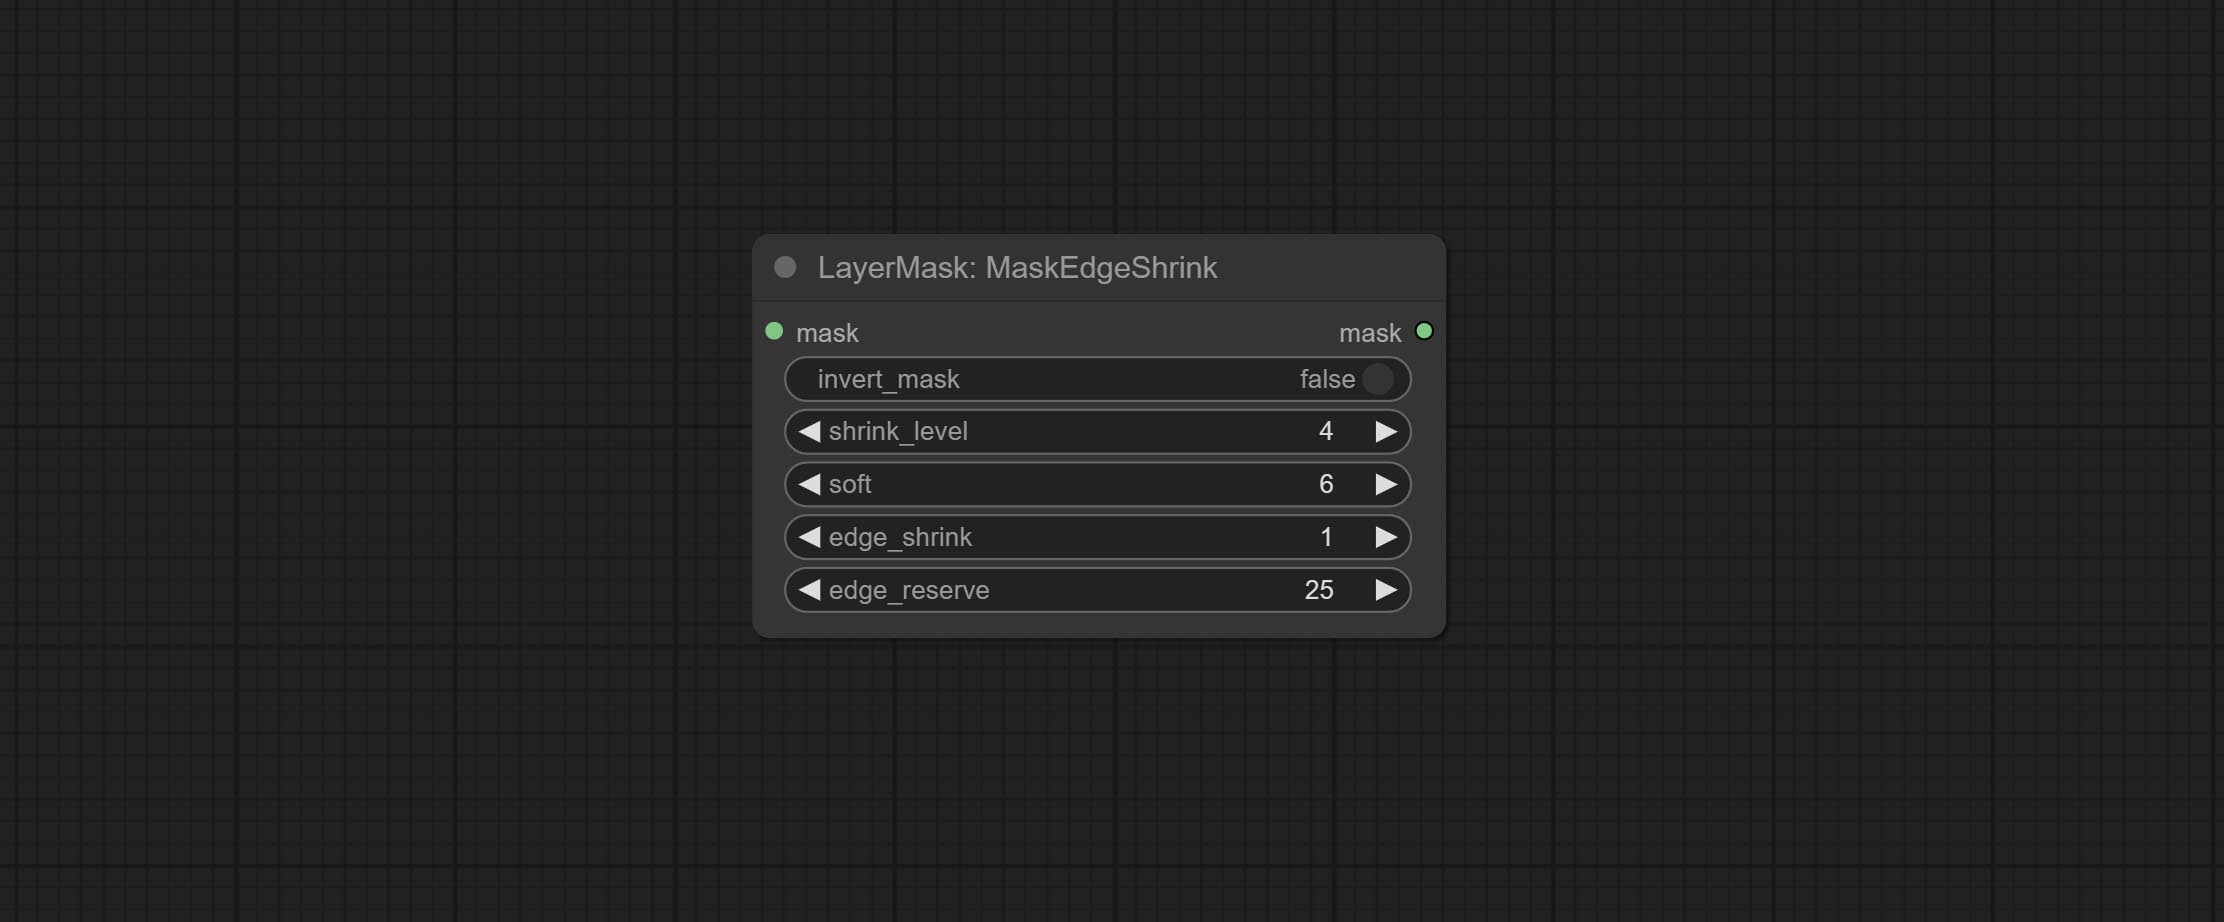
- invert_mask: Whether to reverse the mask.
- shrink_level: Shrink the smoothness level.
- soft: Smooth amplitude.
- edge_shrink: Edge shrinkage amplitude.
- edge_reserve: Preserve the amplitude of edge details, 100 represents complete preservation, and 0 represents no preservation at all.
Comparison of MaskGrow and MaskEdgeShrink 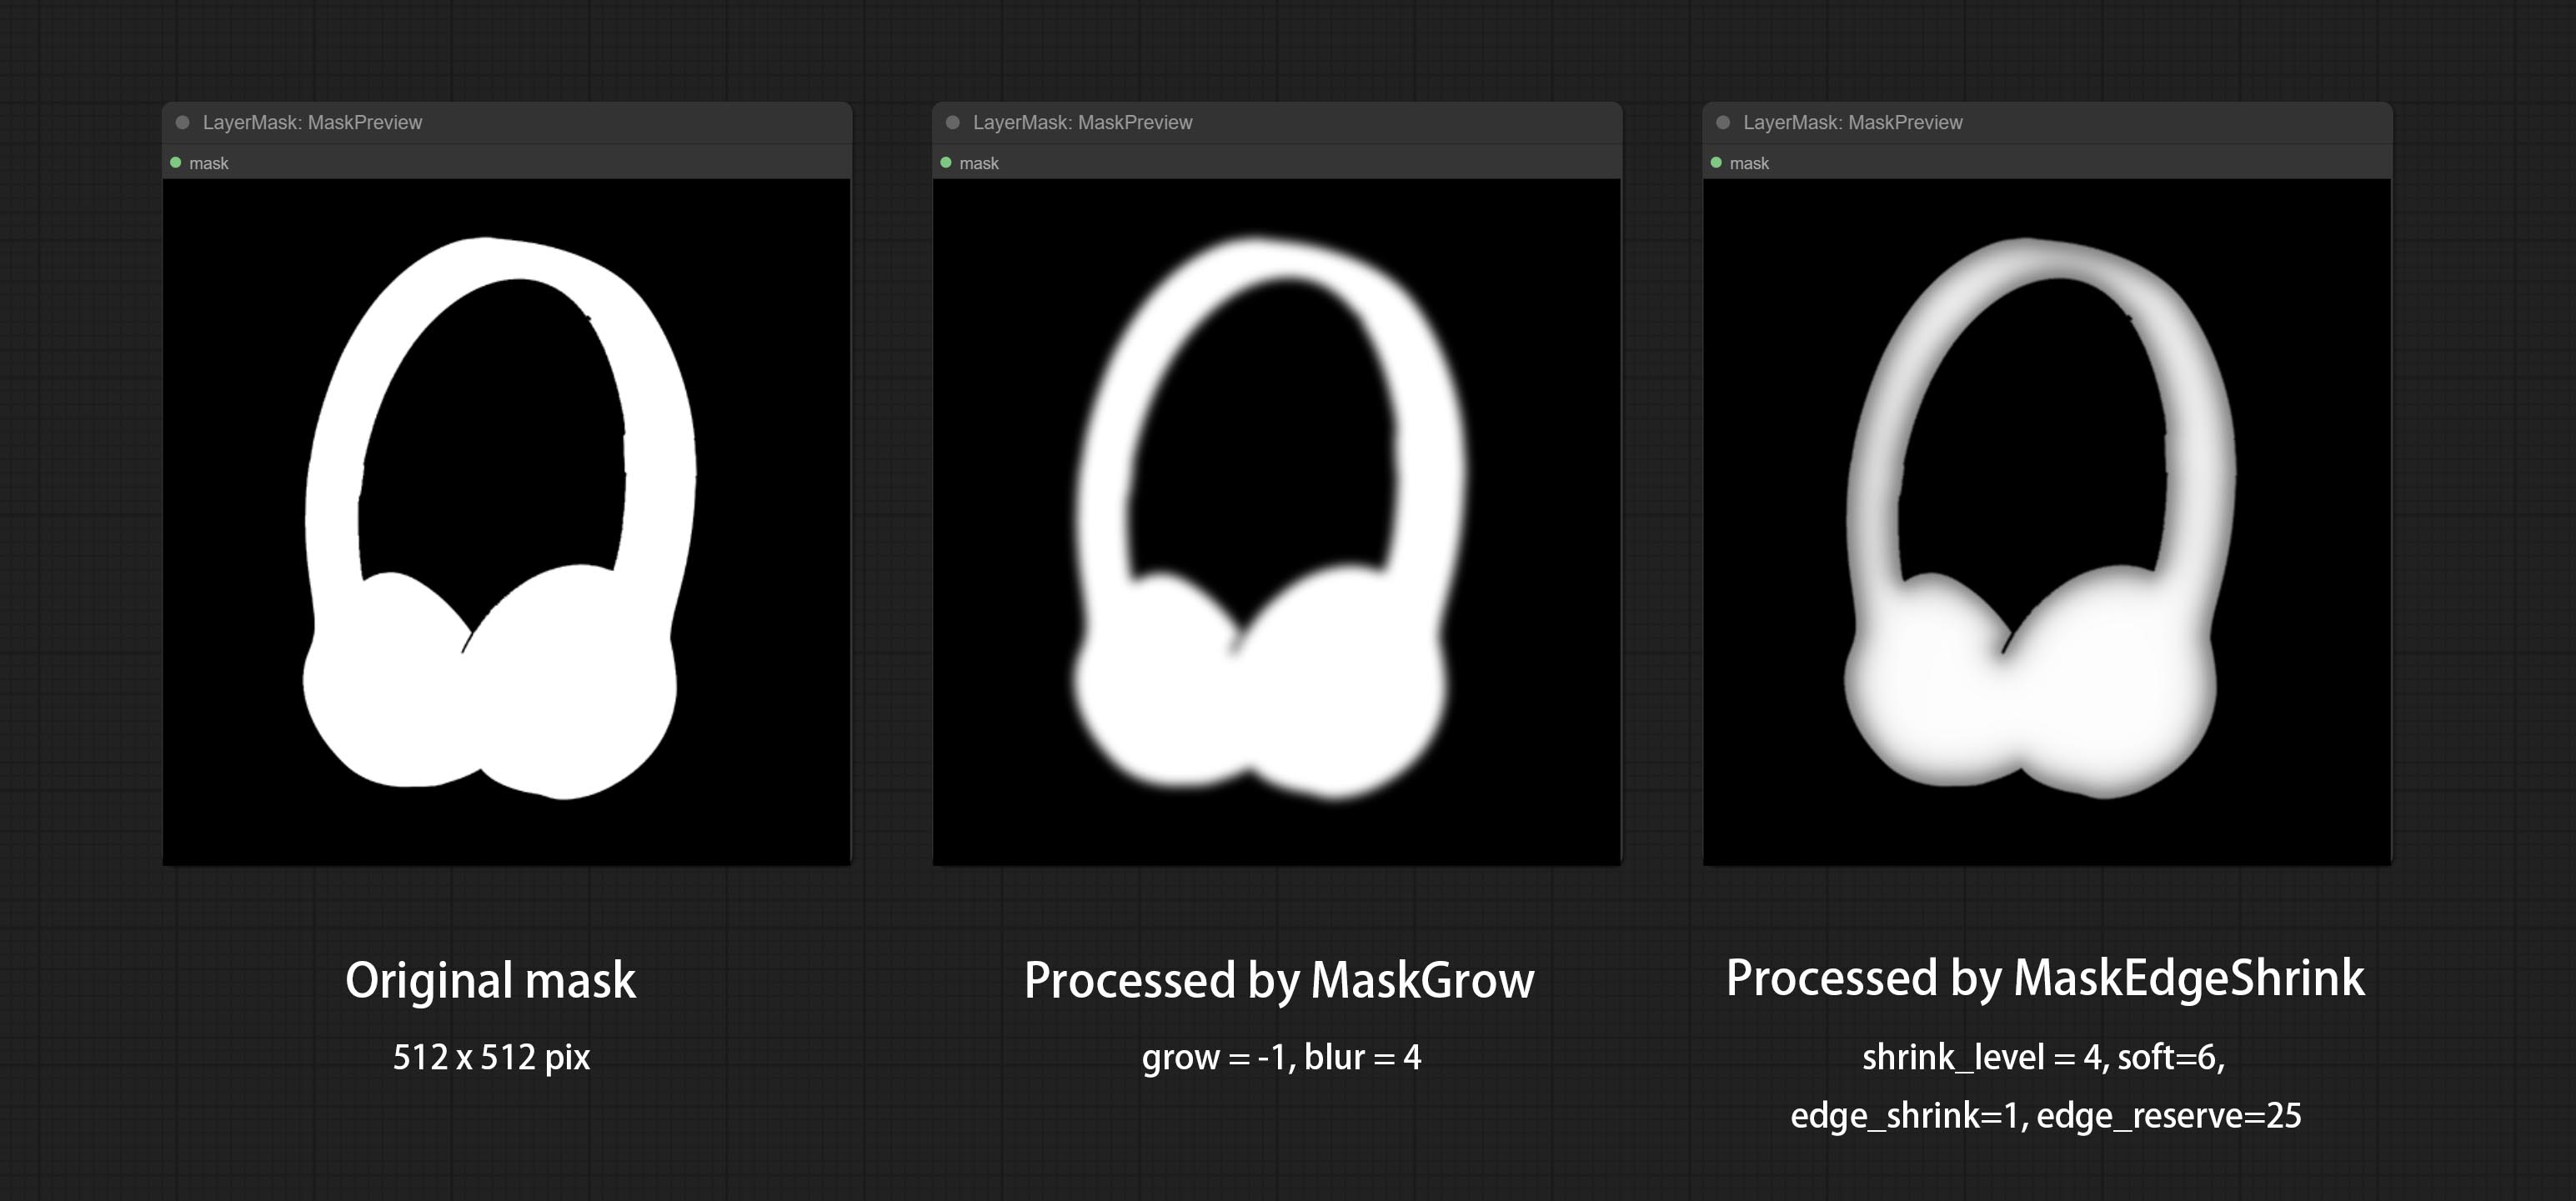
MaskMotionBlur
Create motion blur on the mask. 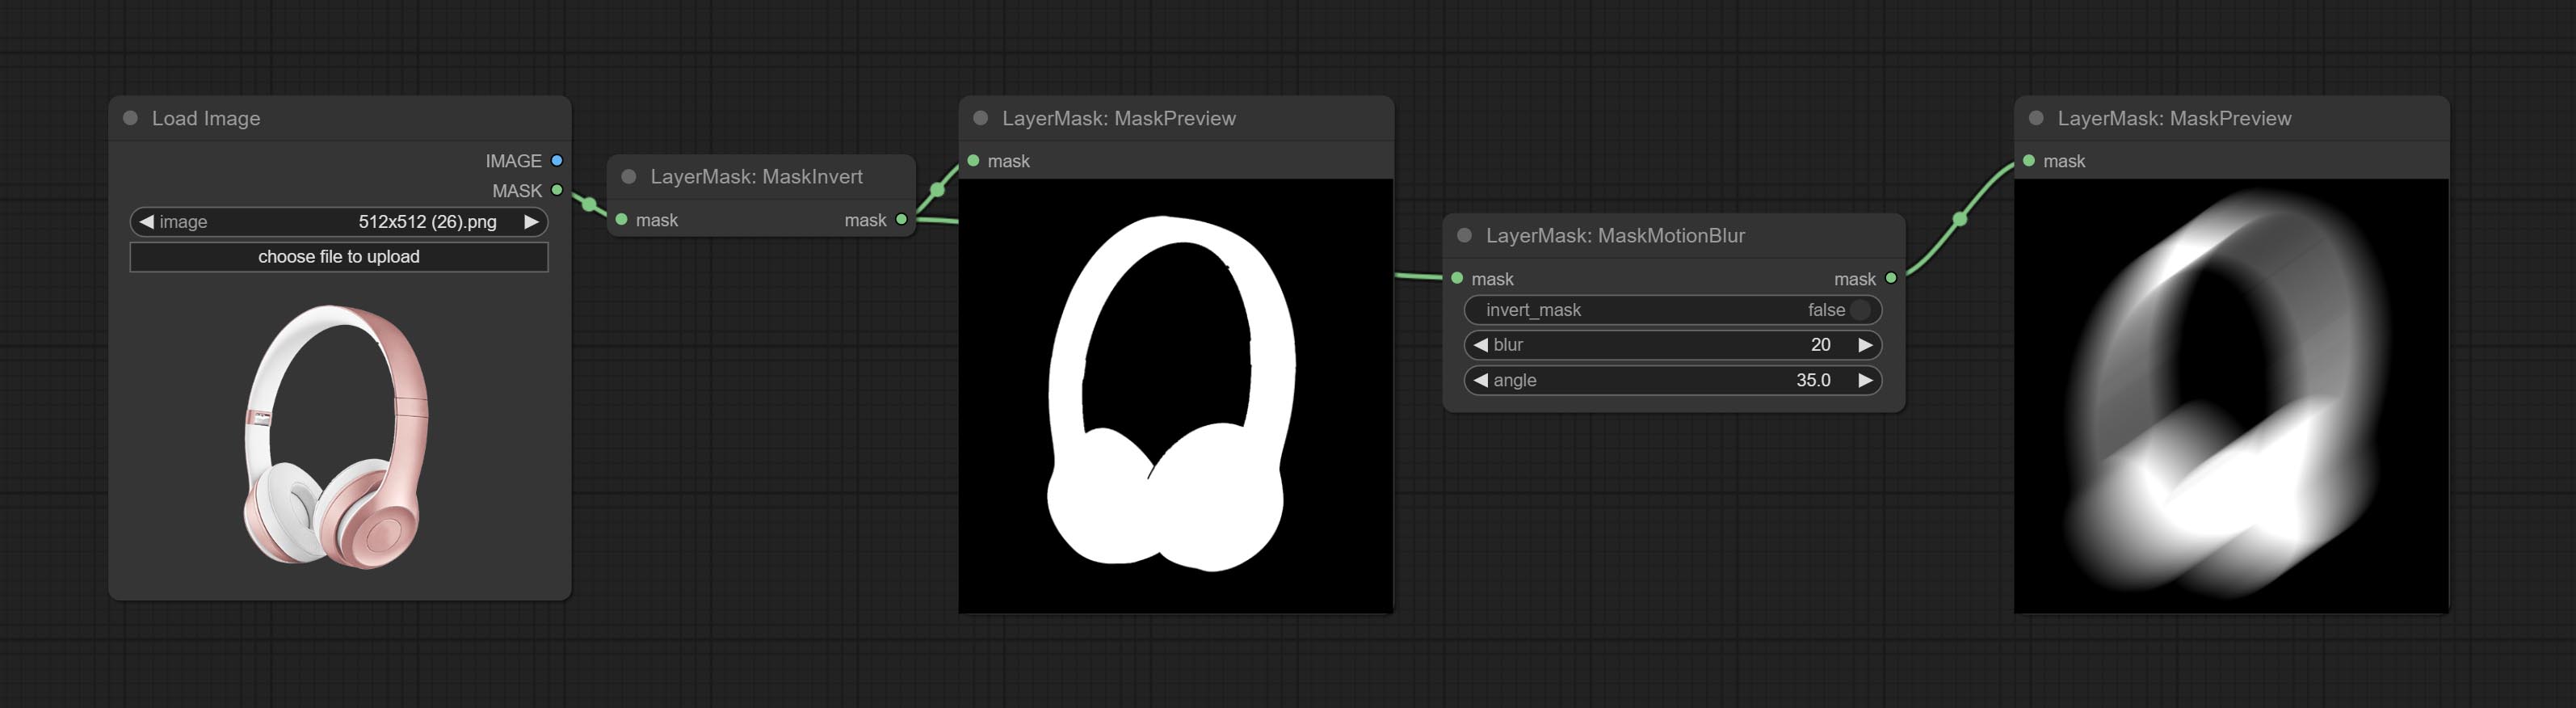
Node options:
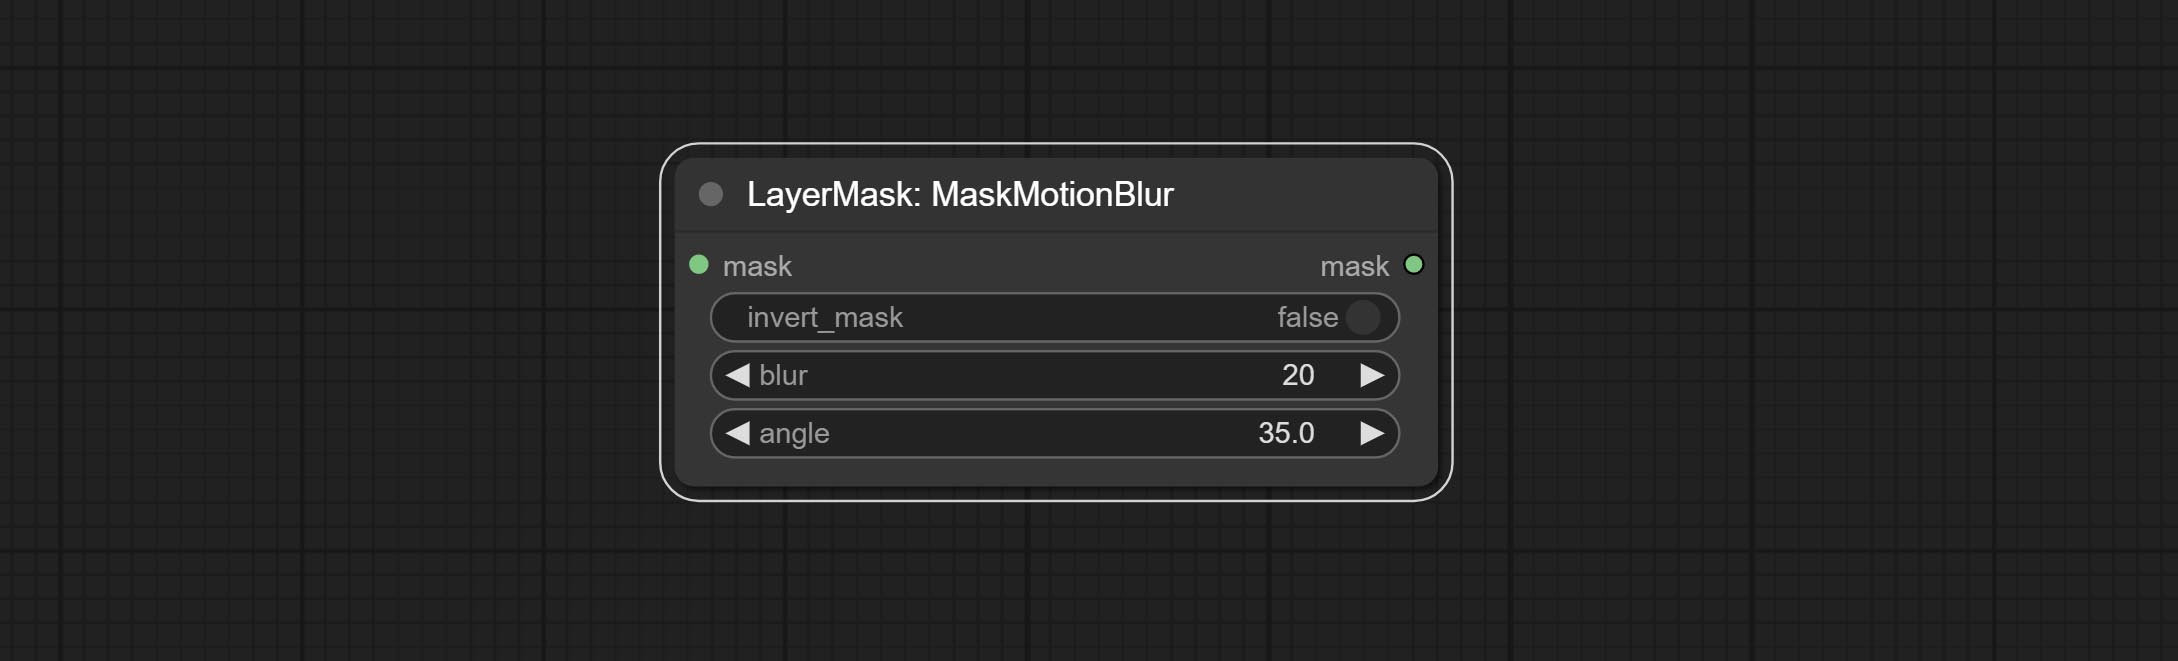
- invert_mask: Whether to reverse the mask.
- blur: The size of blur.
- angle: The angle of blur.
MaskGradient
Create a gradient for the mask from one side. please note the difference between this node and the CreateGradientMask node. 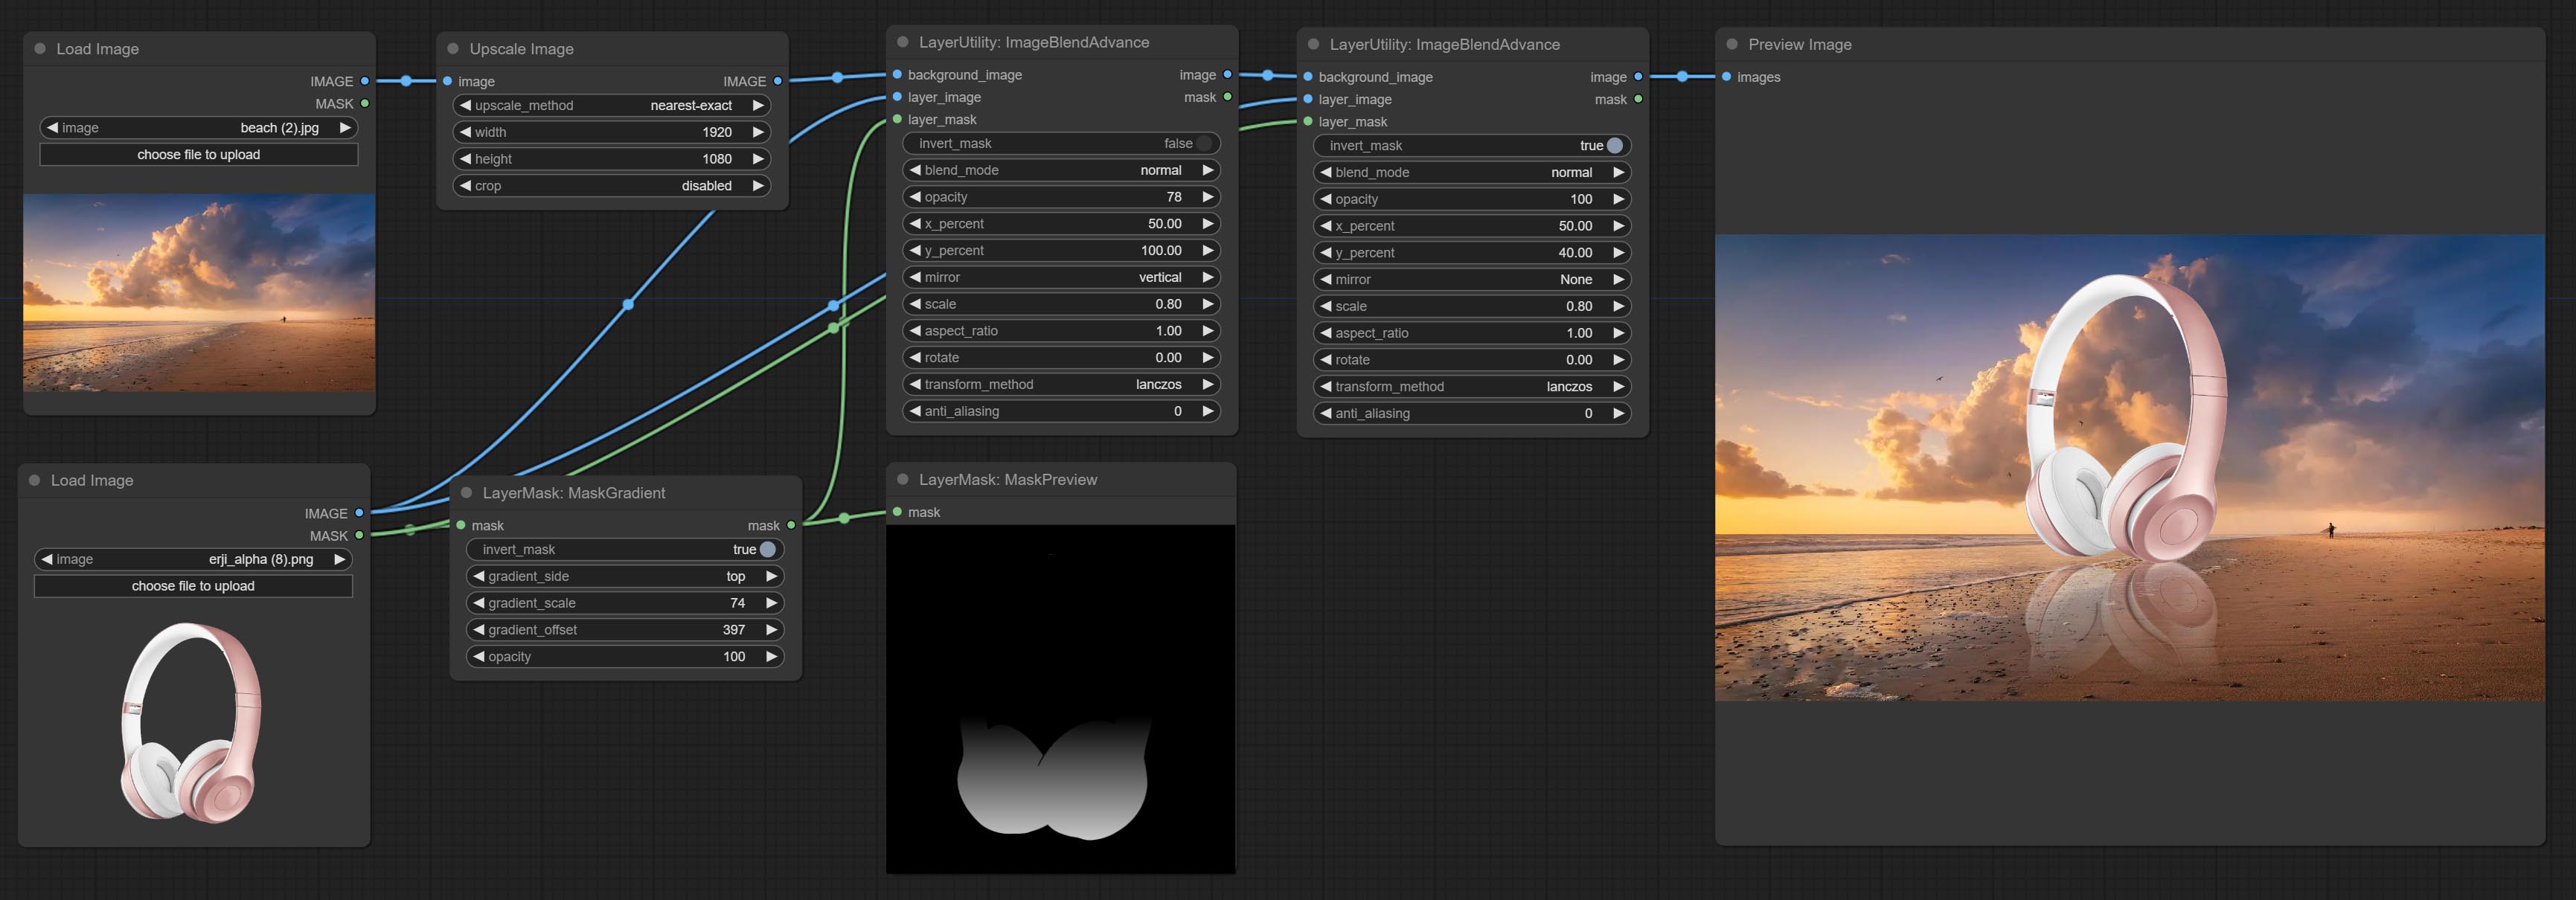
Node options: 
- invert_mask: Whether to reverse the mask.
- gradient_side: Generate gradient from which edge. There are four directions: top, bottom, left and right.
- gradient_scale: Gradient distance. The default value of 100 indicates that one side of the gradient is completely transparent and the other side is completely opaque. The smaller the value, the shorter the distance from transparent to opaque.
- gradient_offset: Gradient position offset.
- opacity: The opacity of the gradient.
CreateGradientMask
Create a gradient mask. please note the difference between this node and the MaskGradient node. 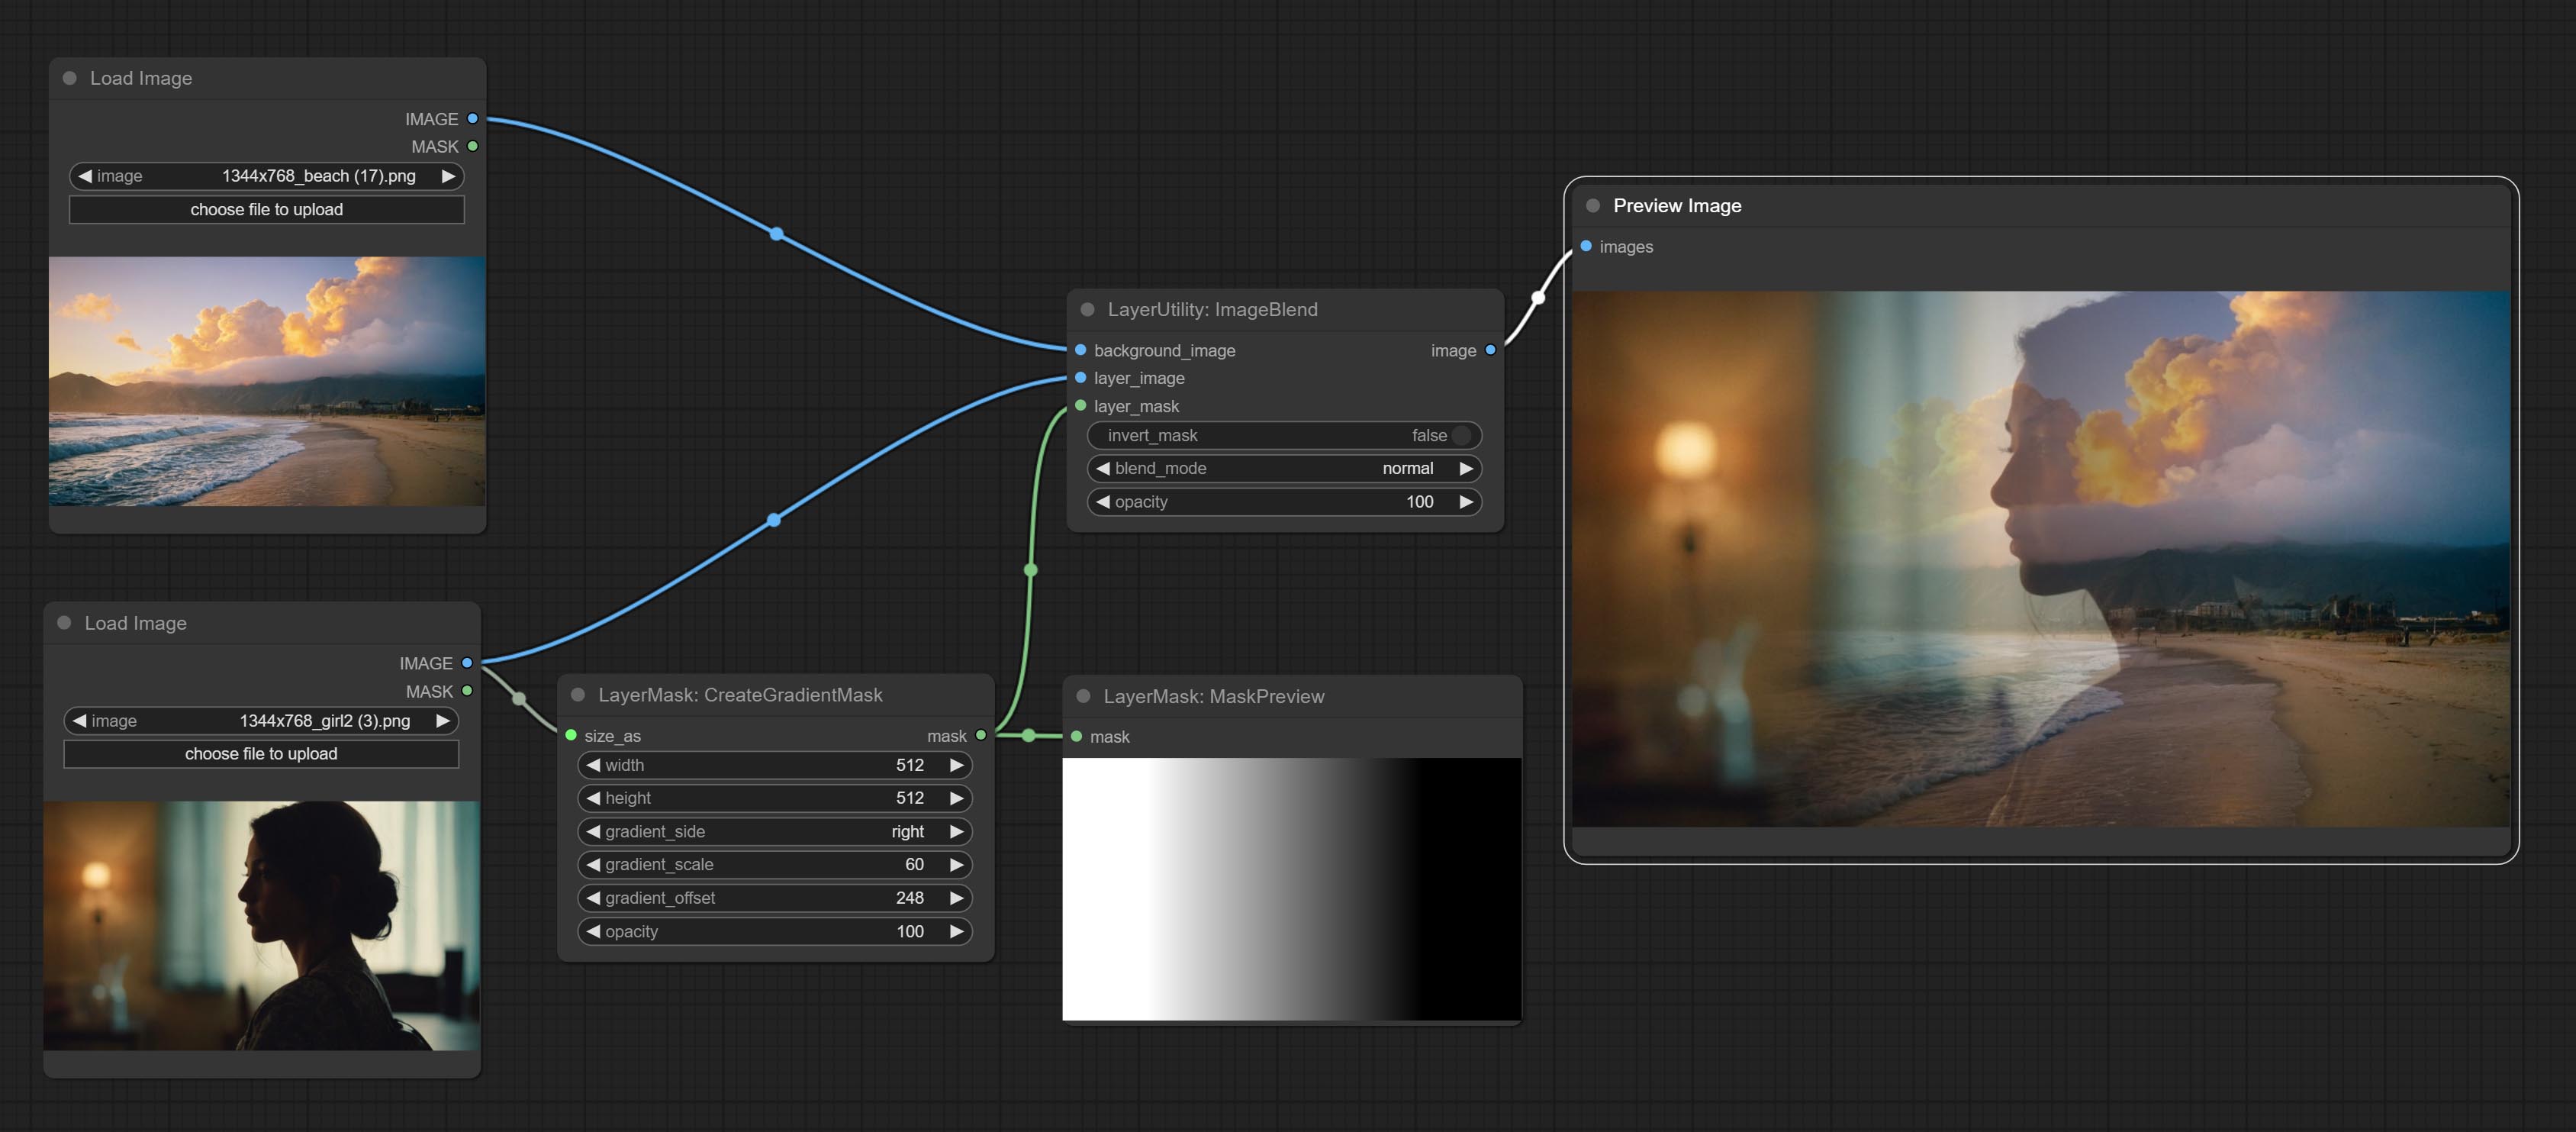
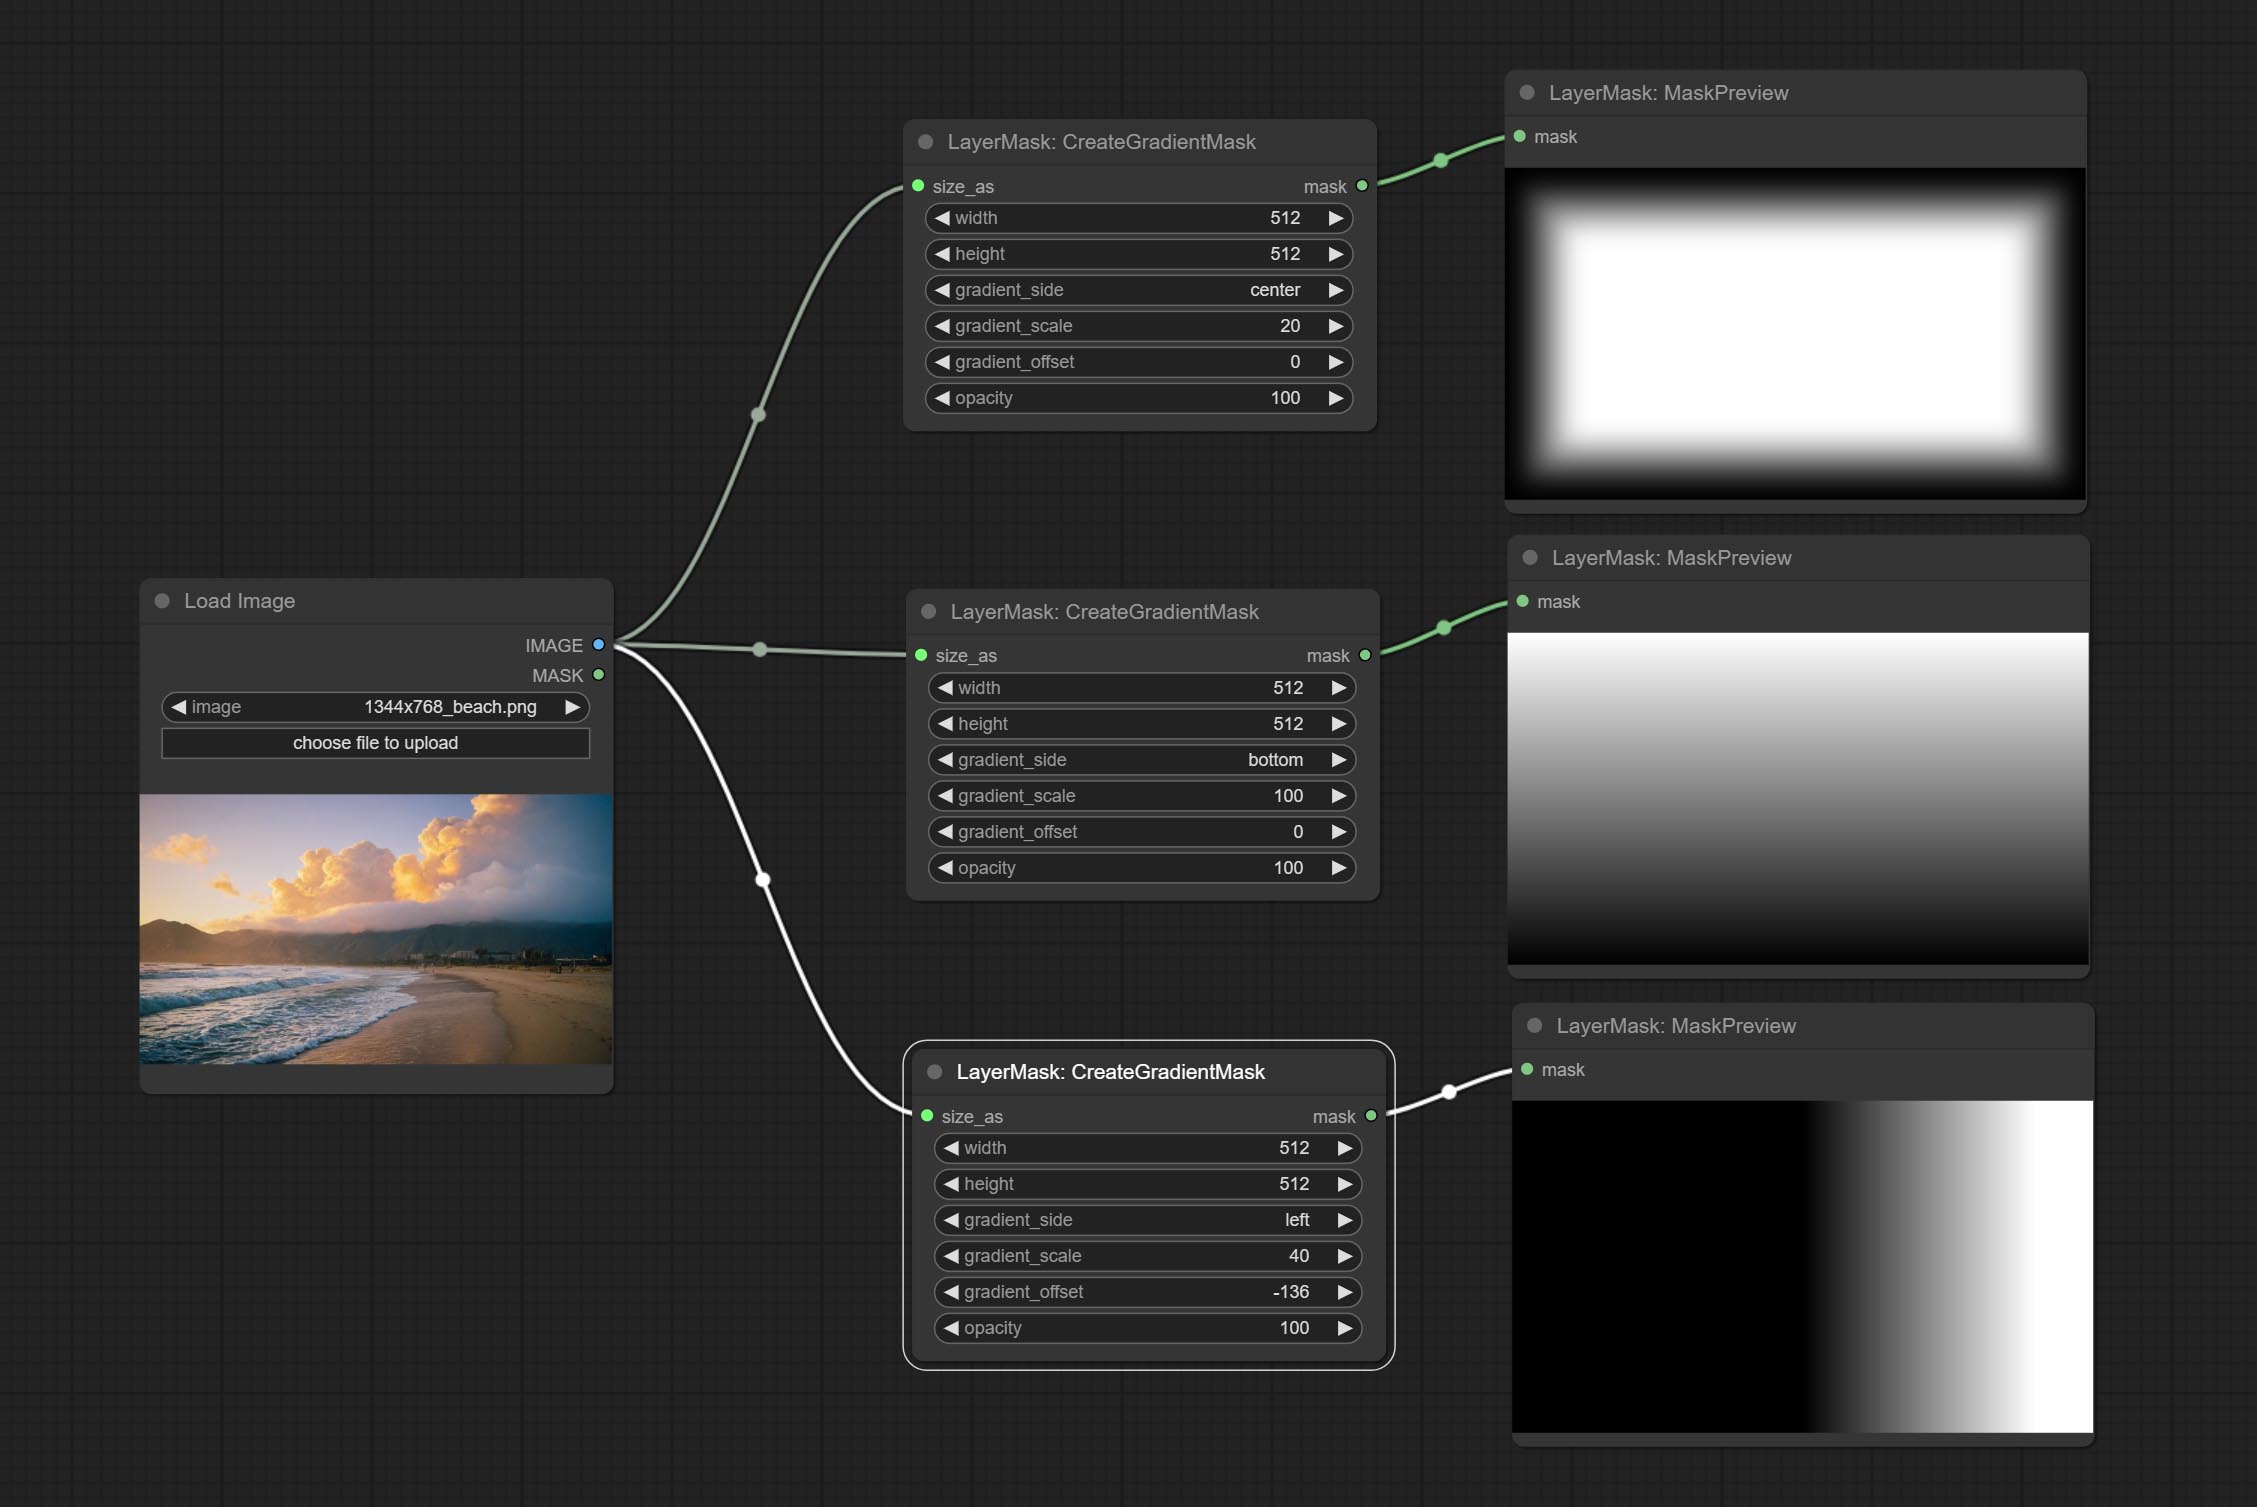
Node options:

- size_as * : The input image or mask here will generate the output image and mask according to their size. this input takes priority over the width and height below.
- width: Width of the image. If there is a size_as input, this setting will be ignored.
- height: Height of the image. If there is a size_as input, this setting will be ignored.
- gradient_side: Generate gradient from which edge. There are five directions: top, bottom, left, right and center.
- gradient_scale: Gradient distance. The default value of 100 indicates that one side of the gradient is completely transparent and the other side is completely opaque. The smaller the value, the shorter the distance from transparent to opaque.
- gradient_offset: Gradient position offset. When
gradient_side is center, the size of the gradient area is adjusted here, positive values are smaller, and negative values are enlarged. - opacity: The opacity of the gradient.
* Only limited to input image and mask. forcing the integration of other types of inputs will result in node errors.
MaskStroke
Generate mask contour strokes. 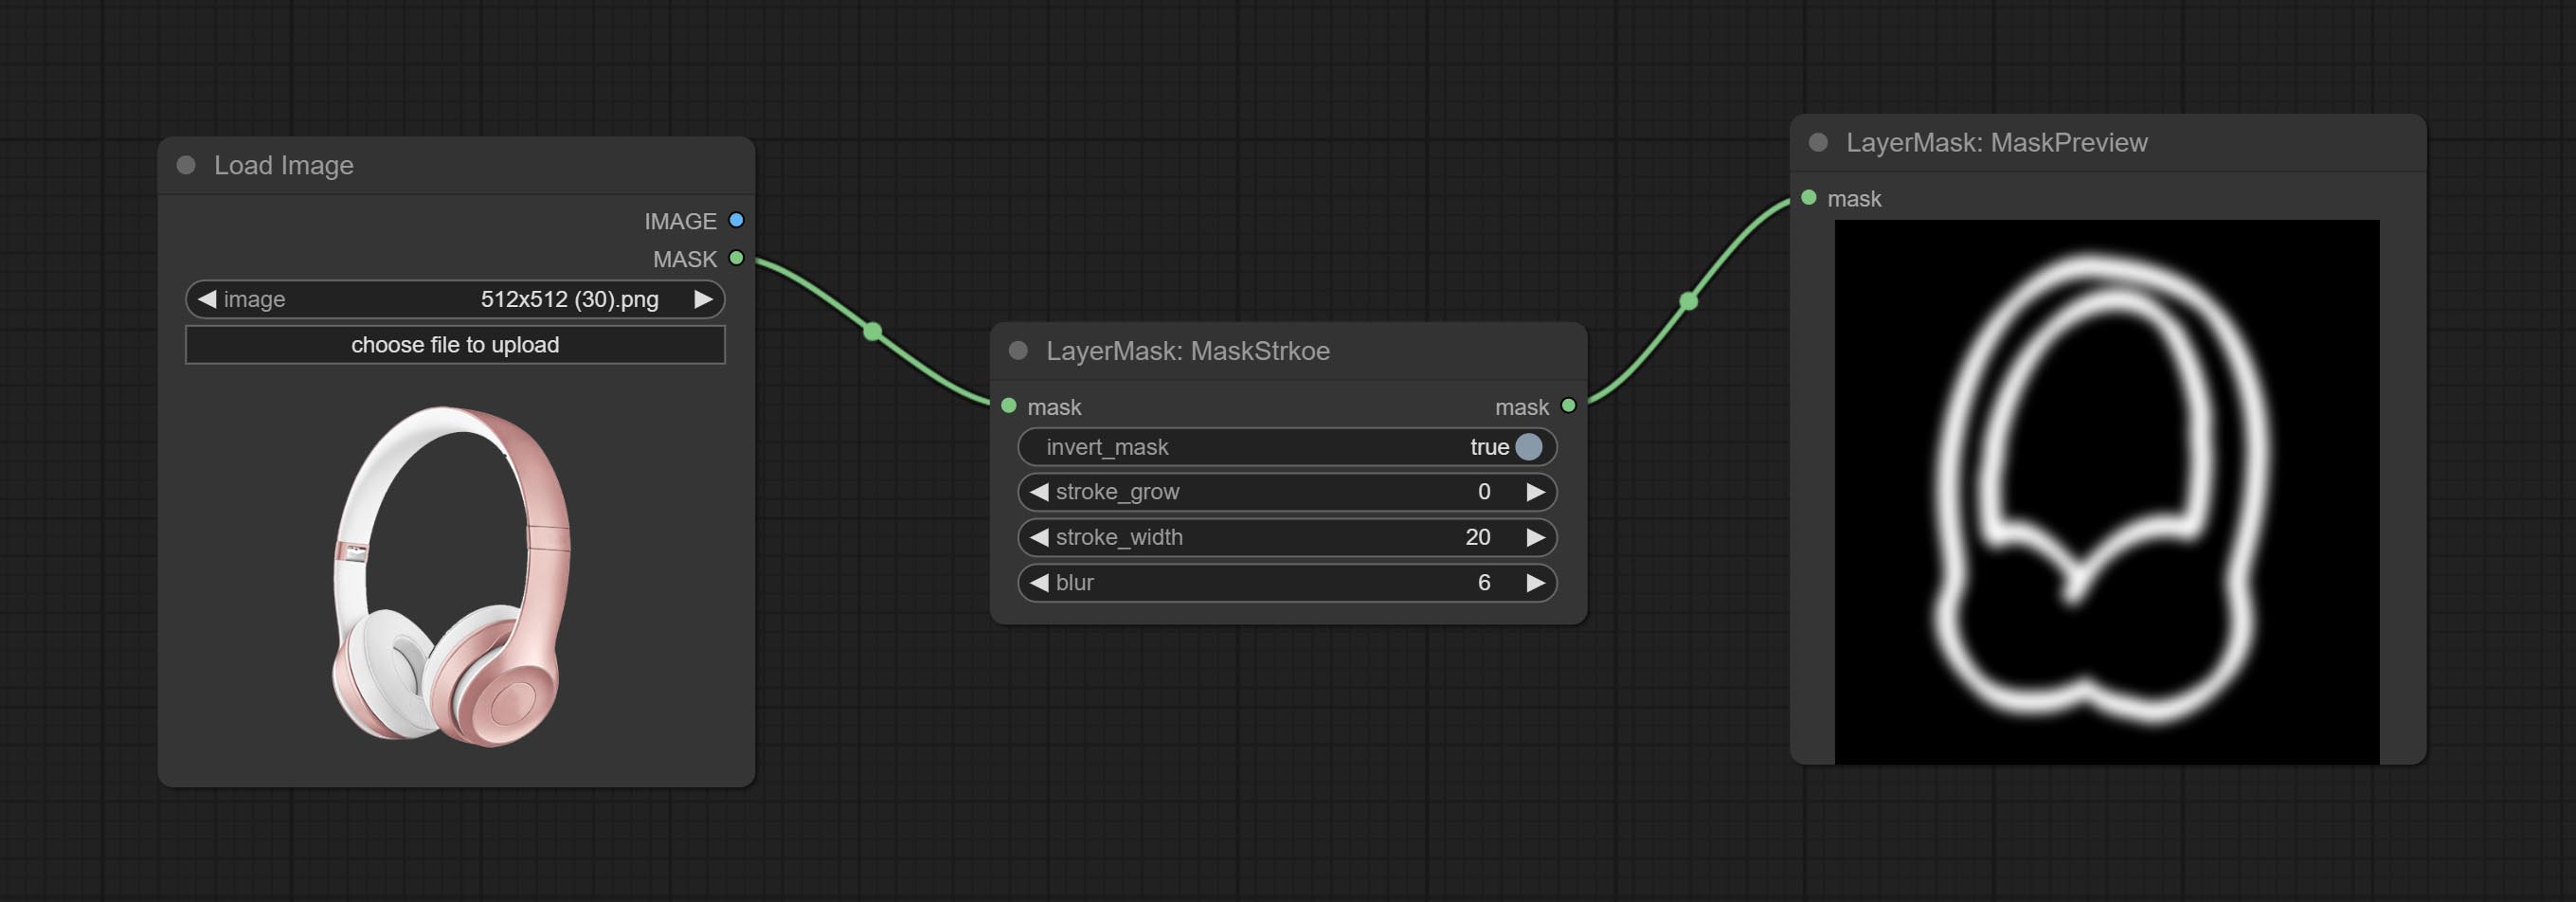
Node options:
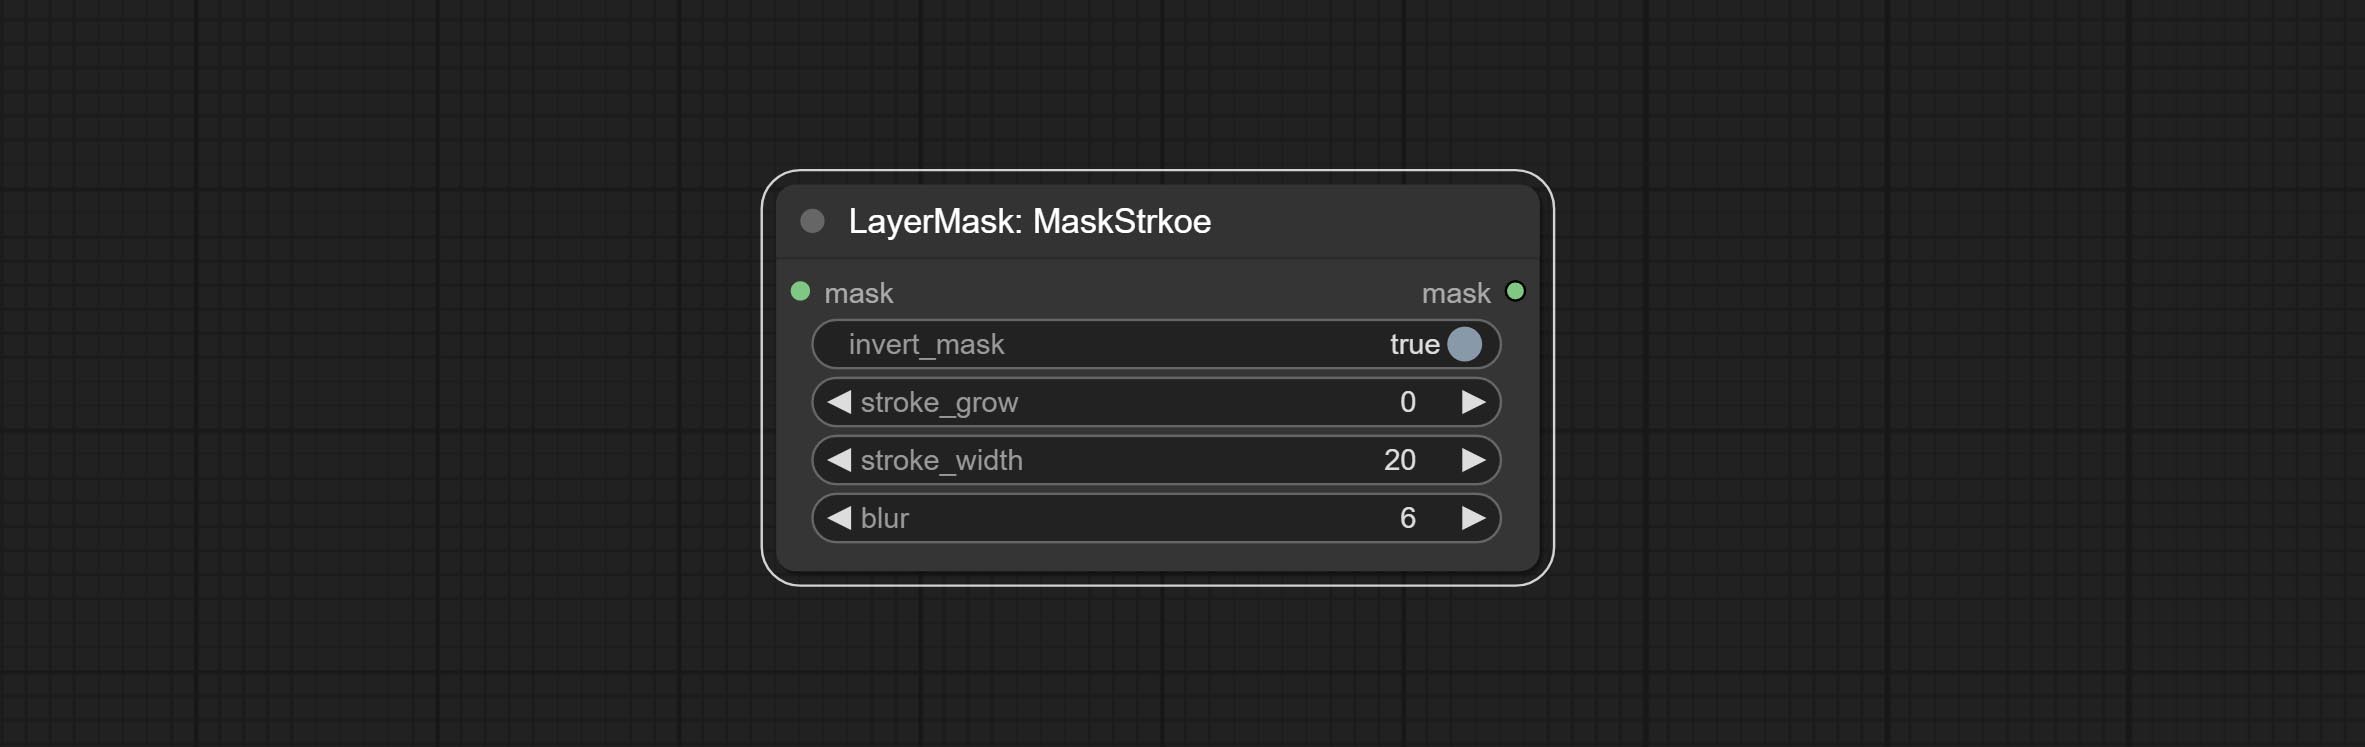
- invert_mask: Whether to reverse the mask.
- stroke_grow: Stroke expansion/contraction amplitude, positive values indicate expansion and negative values indicate contraction.
- stroke_width: Stroke width.
- blur: Blur of stroke.
MaskGrain
Generates noise for the mask. 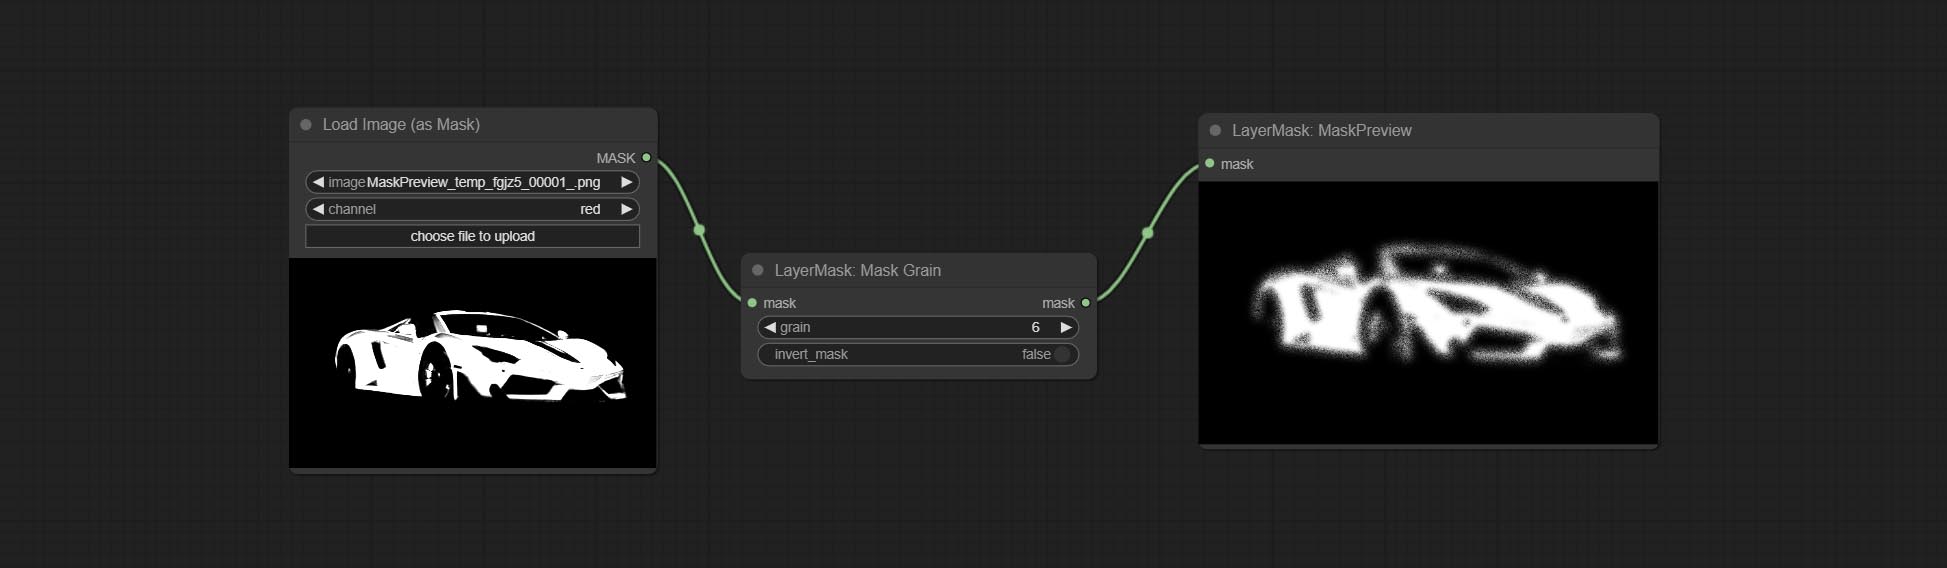
Node Options:
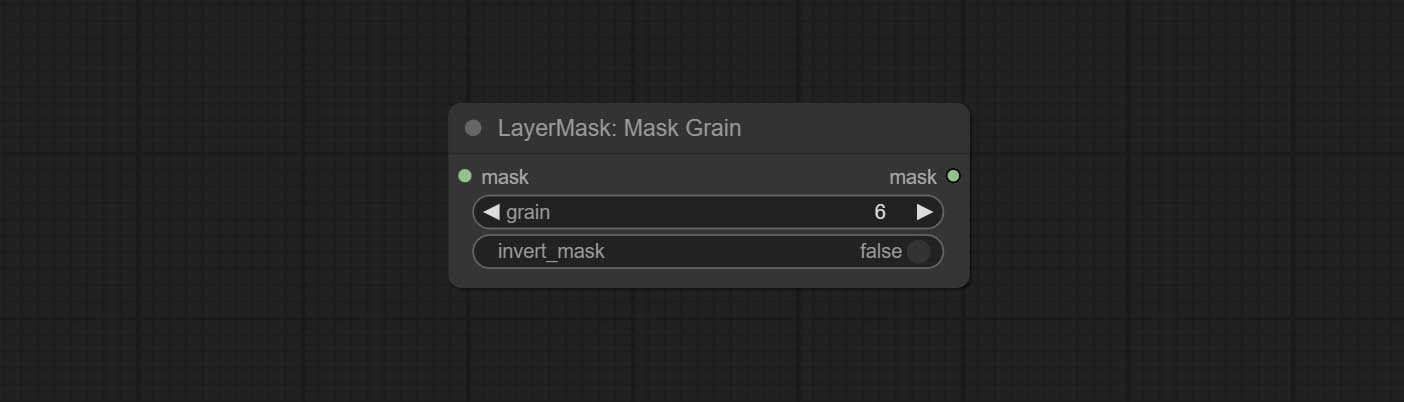
- grain: Noise intensity.
- invert_mask: Whether to reverse the mask.
MaskPreview
Preview the input mask 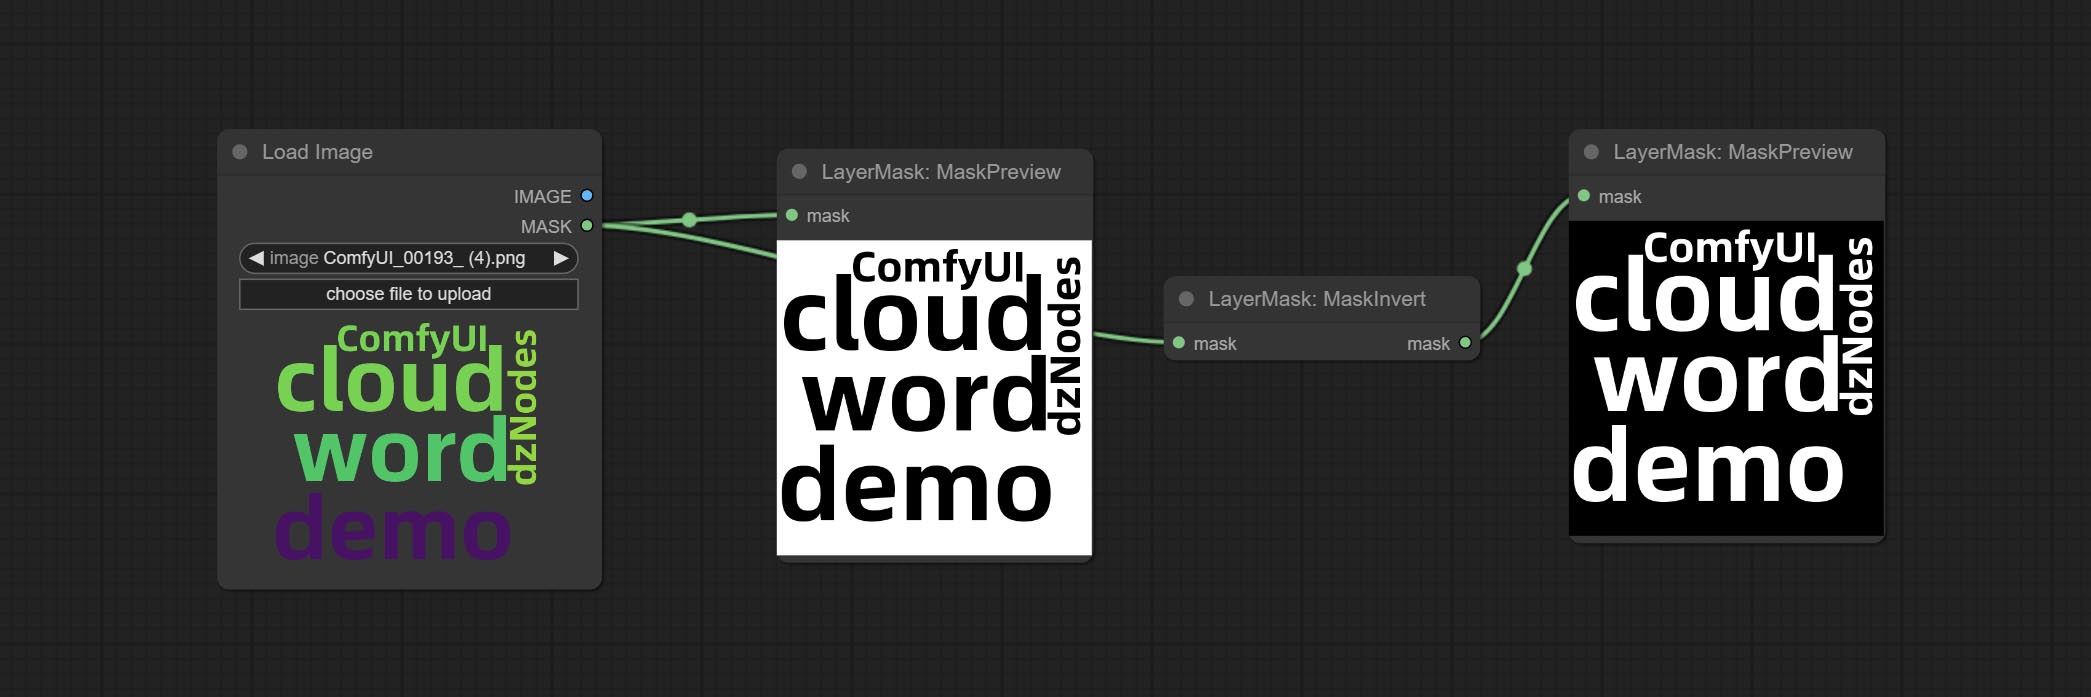
MaskInvert
Invert the mask 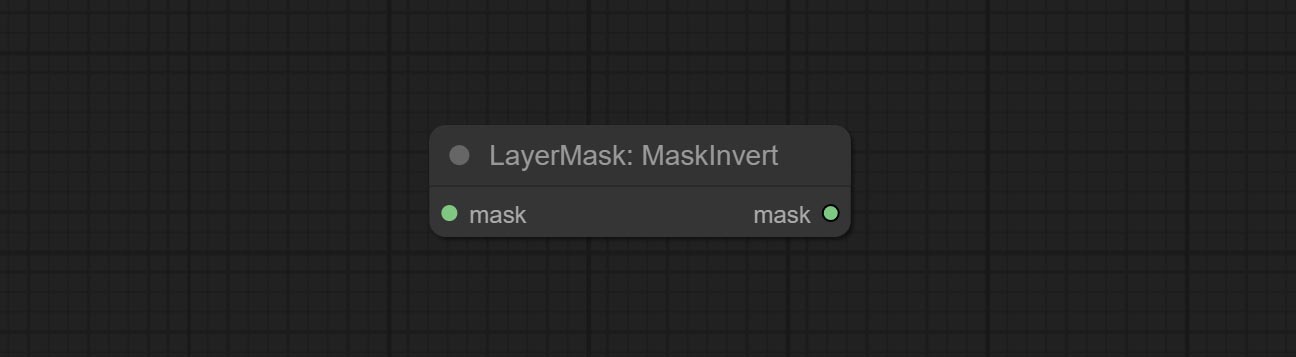
LayerFilter
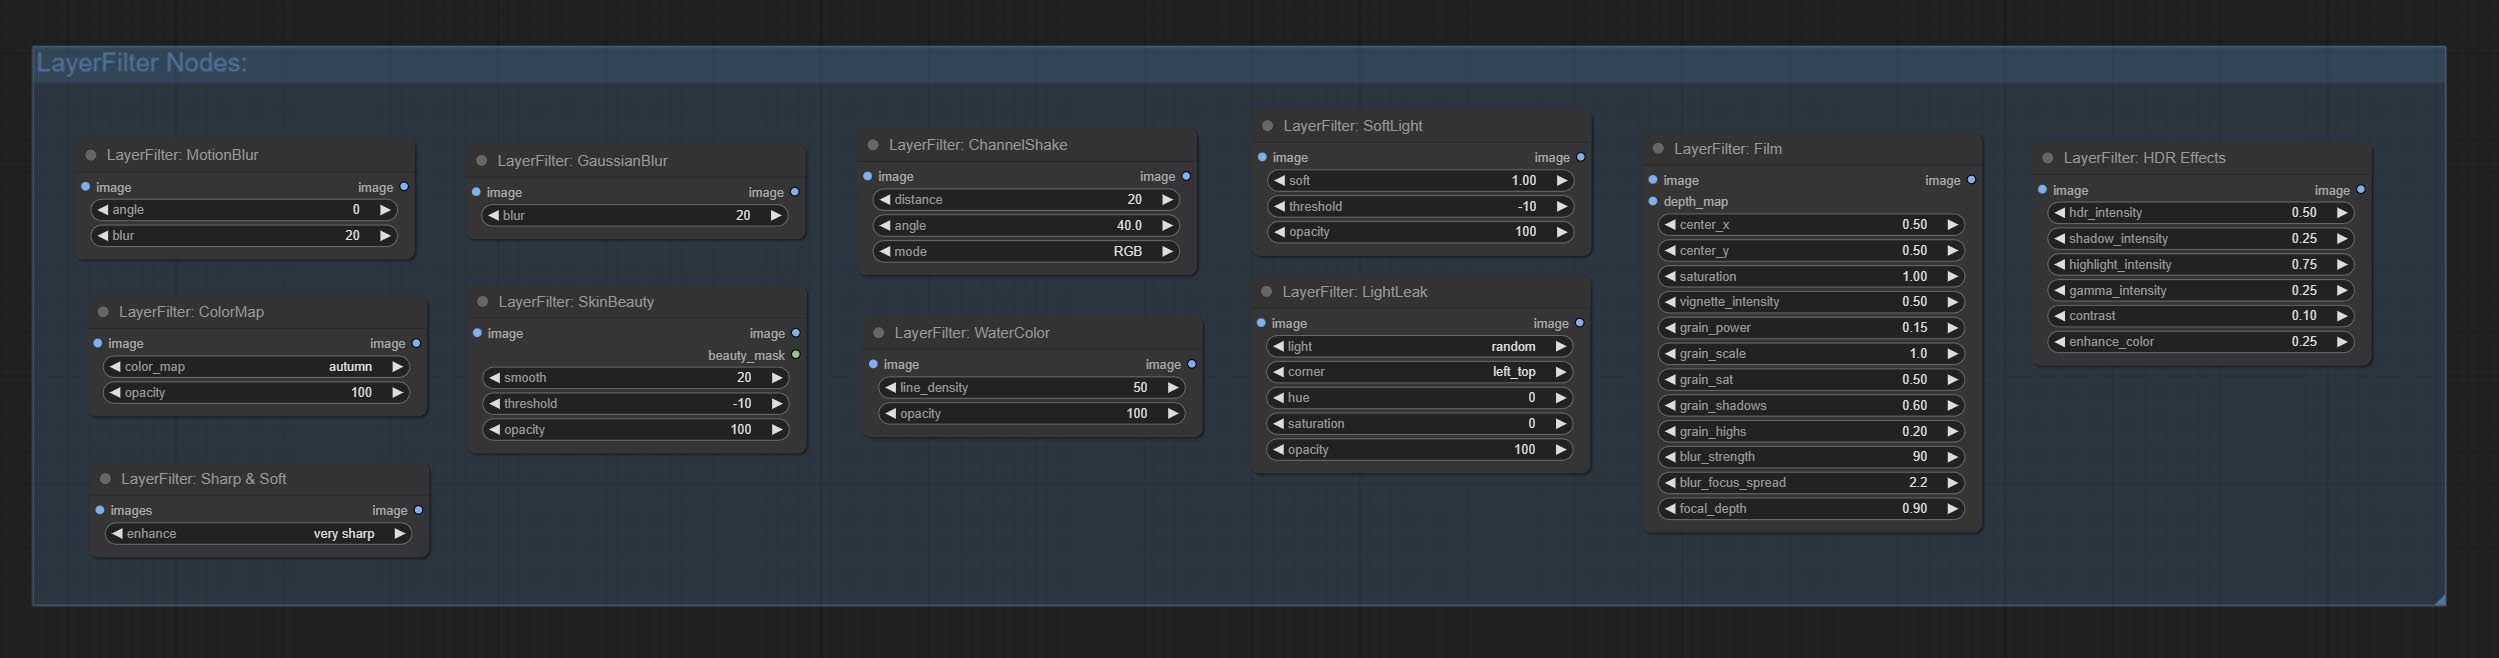
Sharp & Soft
Enhance or smooth out details for image. 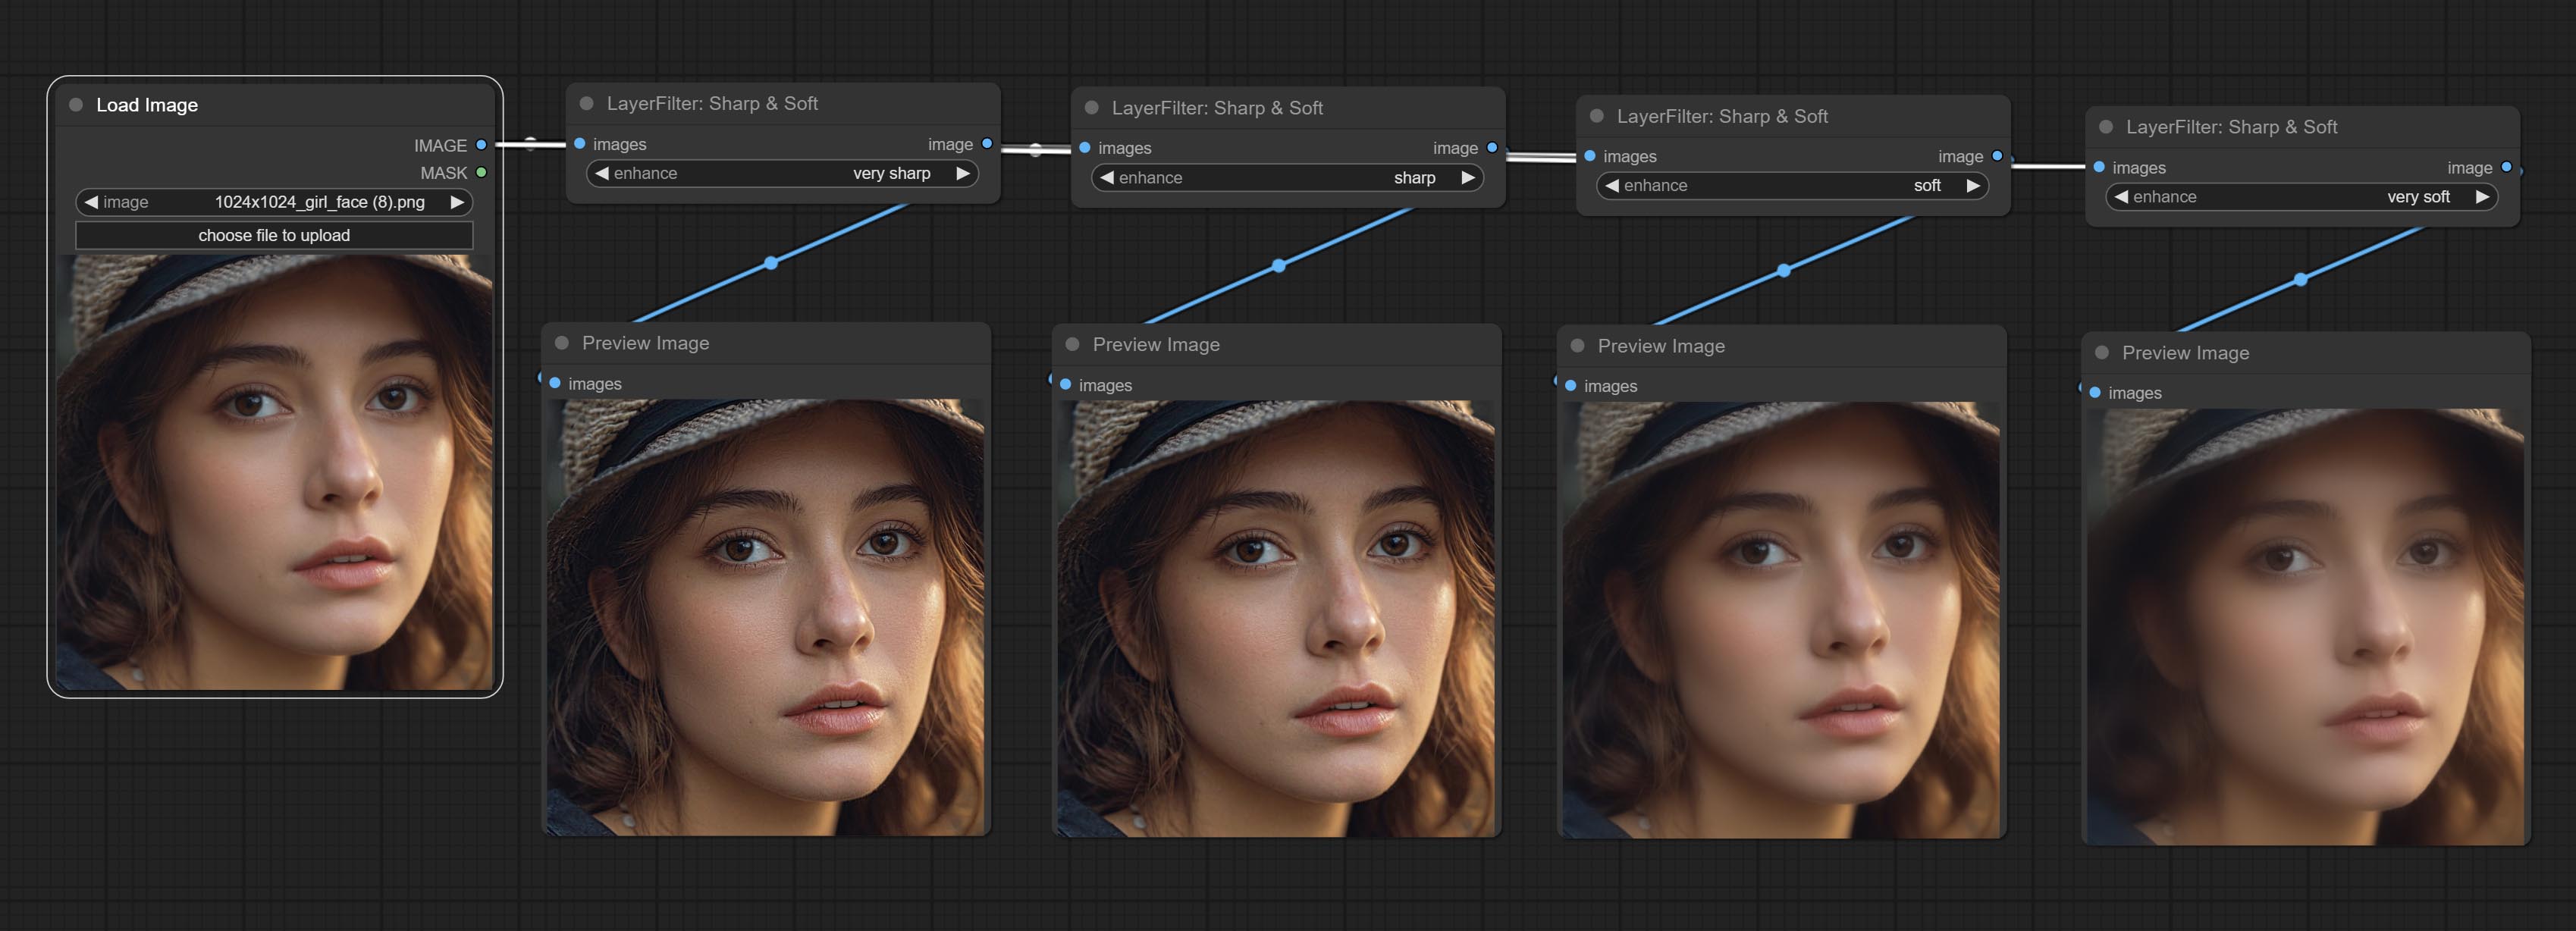
Node options: 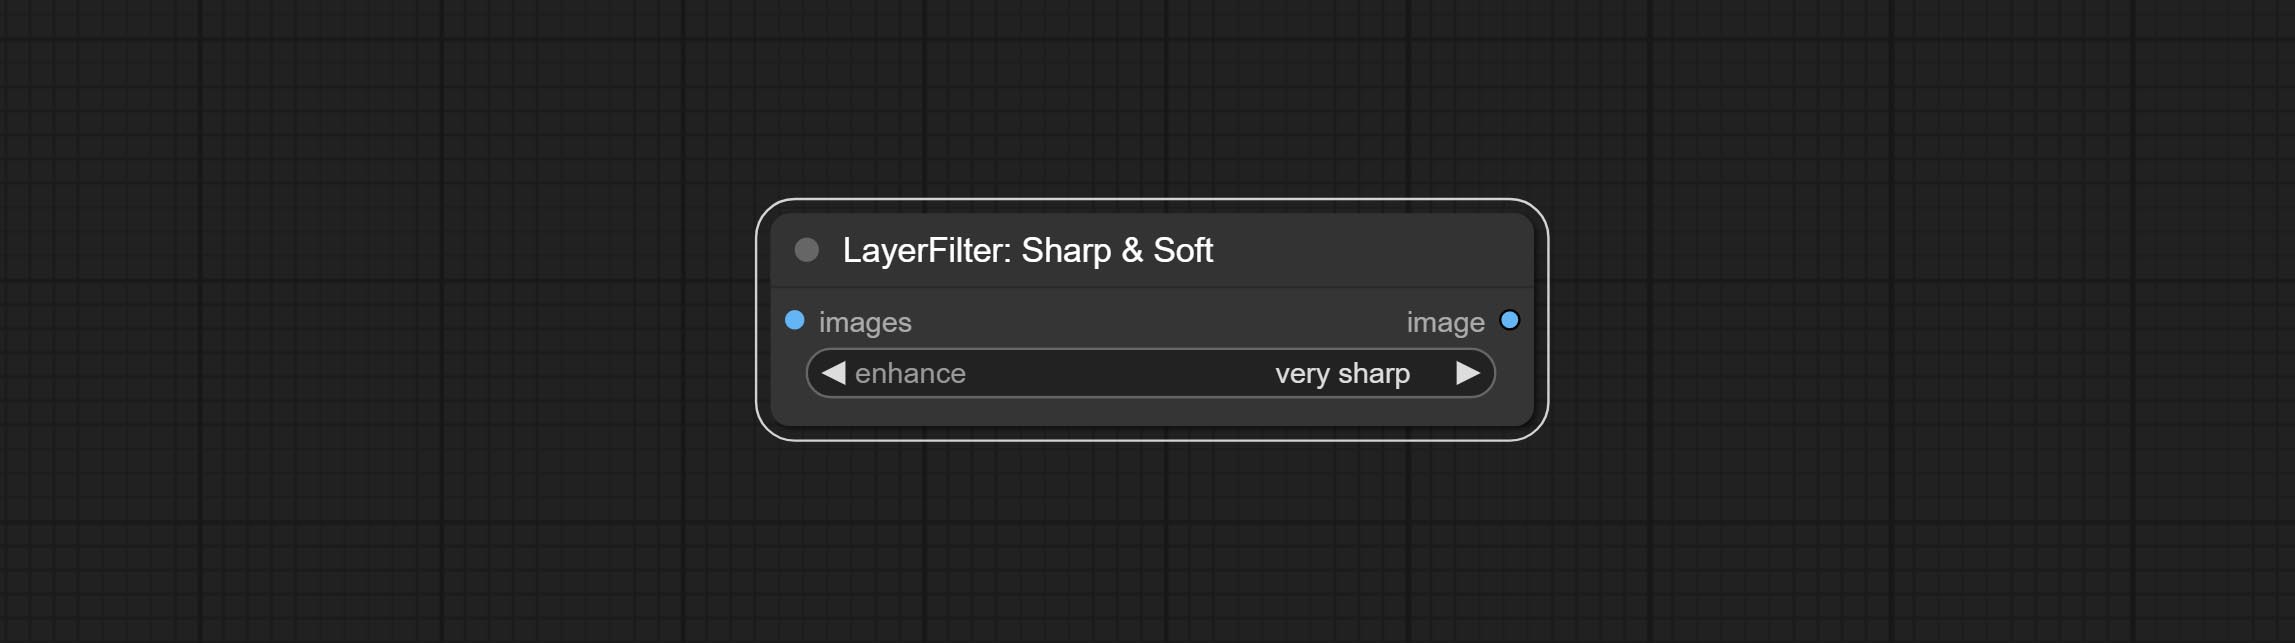
- enhance: Provide 4 presets, which are very sharp, sharp, soft and very soft. If you choose None, you will not do any processing.
SkinBeauty
Make the skin look smoother. 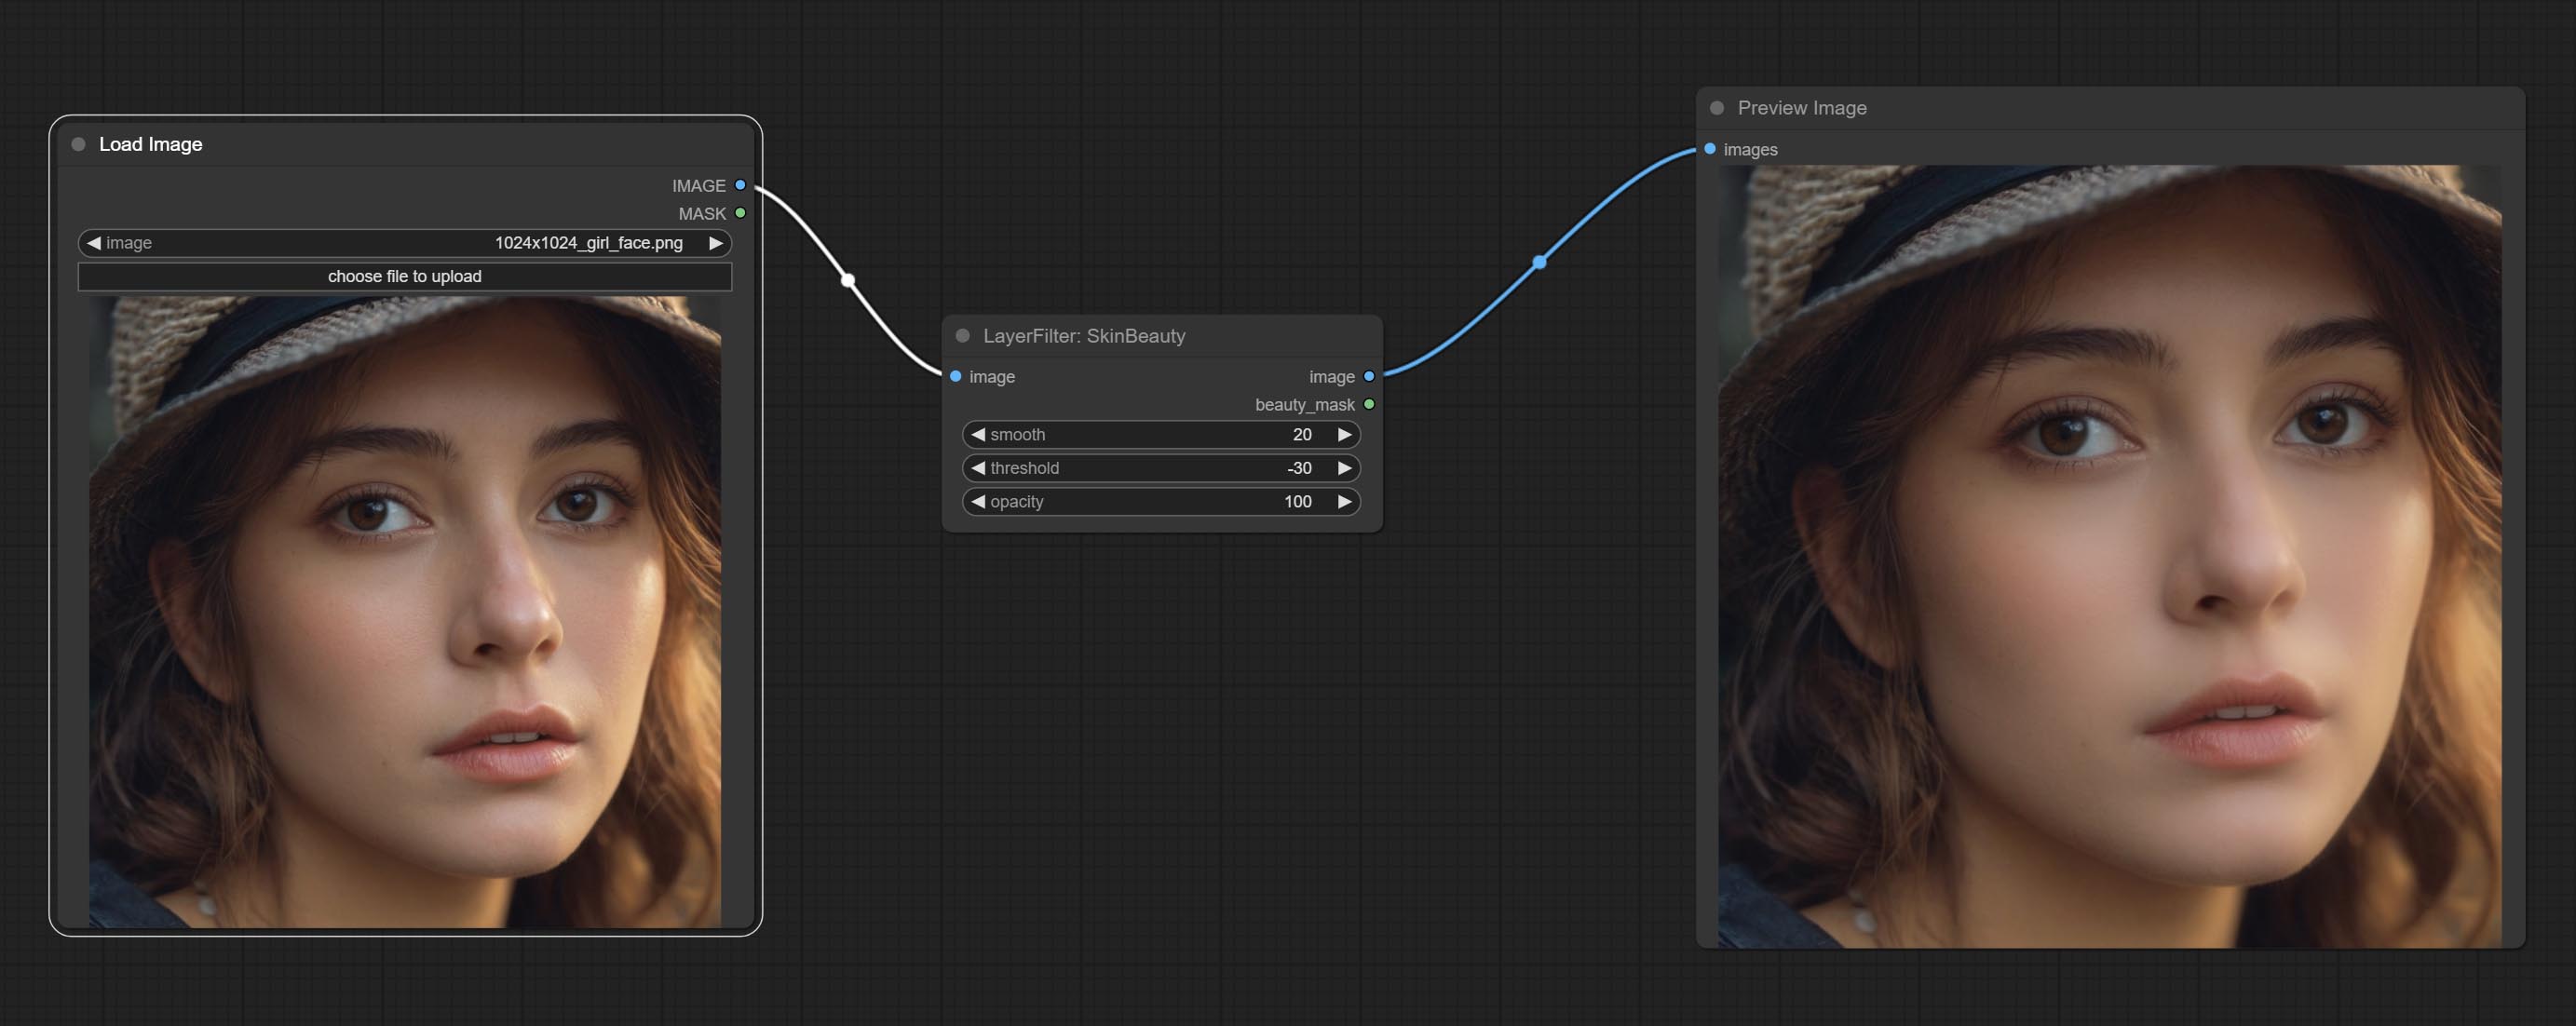
Node options: 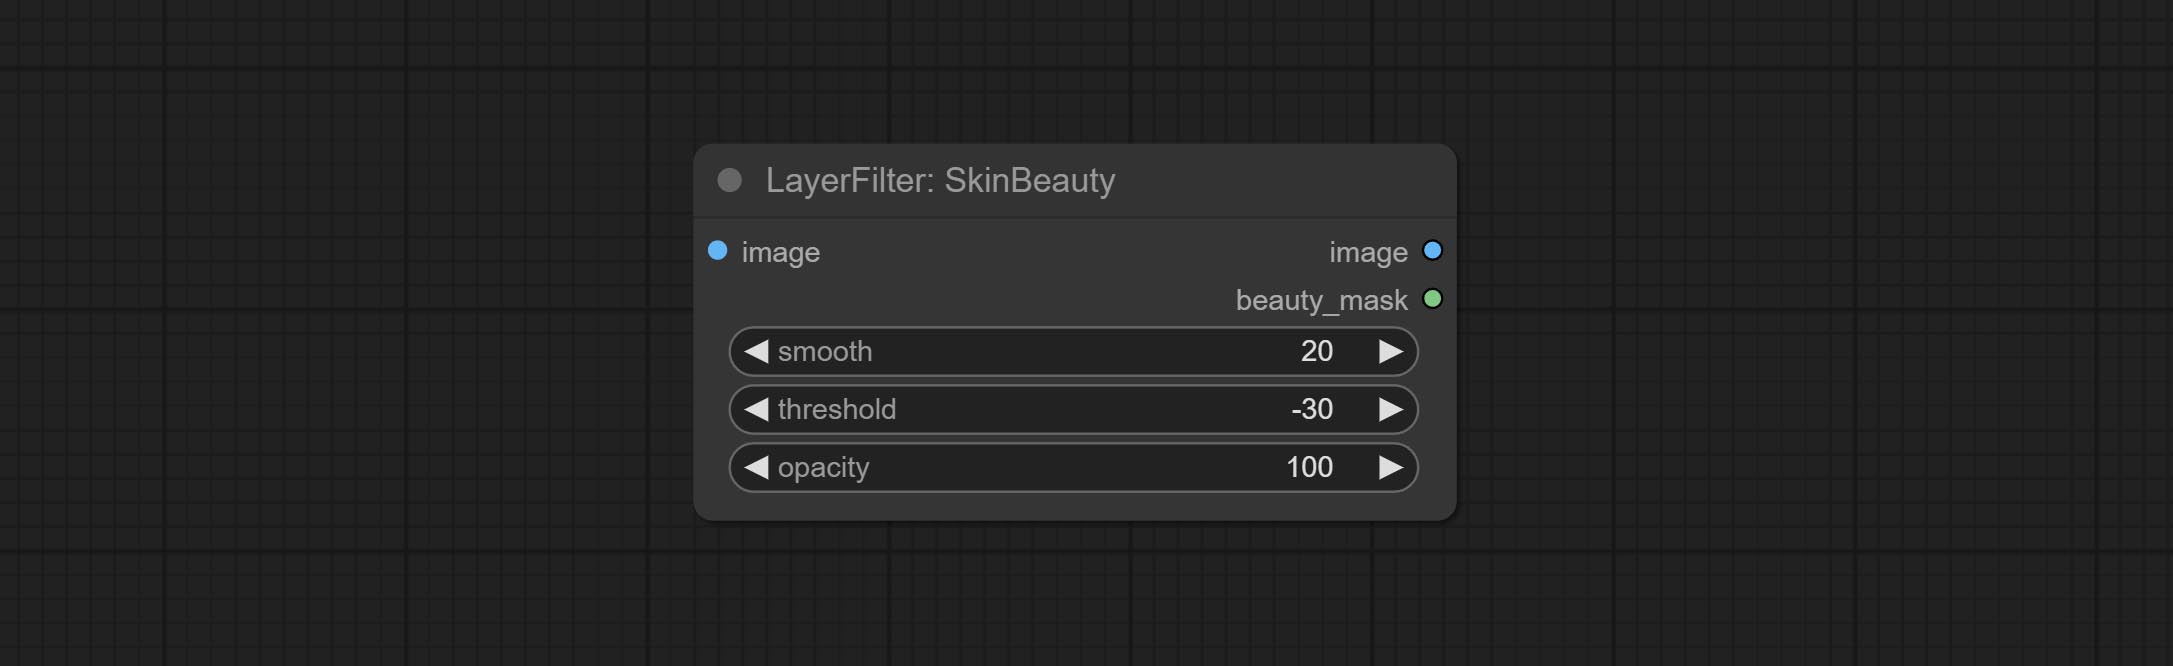
- smooth: Skin smoothness.
- threshold: Smooth range. the larger the range with the smaller value.
- opacity: The opacity of the smoothness.
WaterColor
Watercolor painting effect 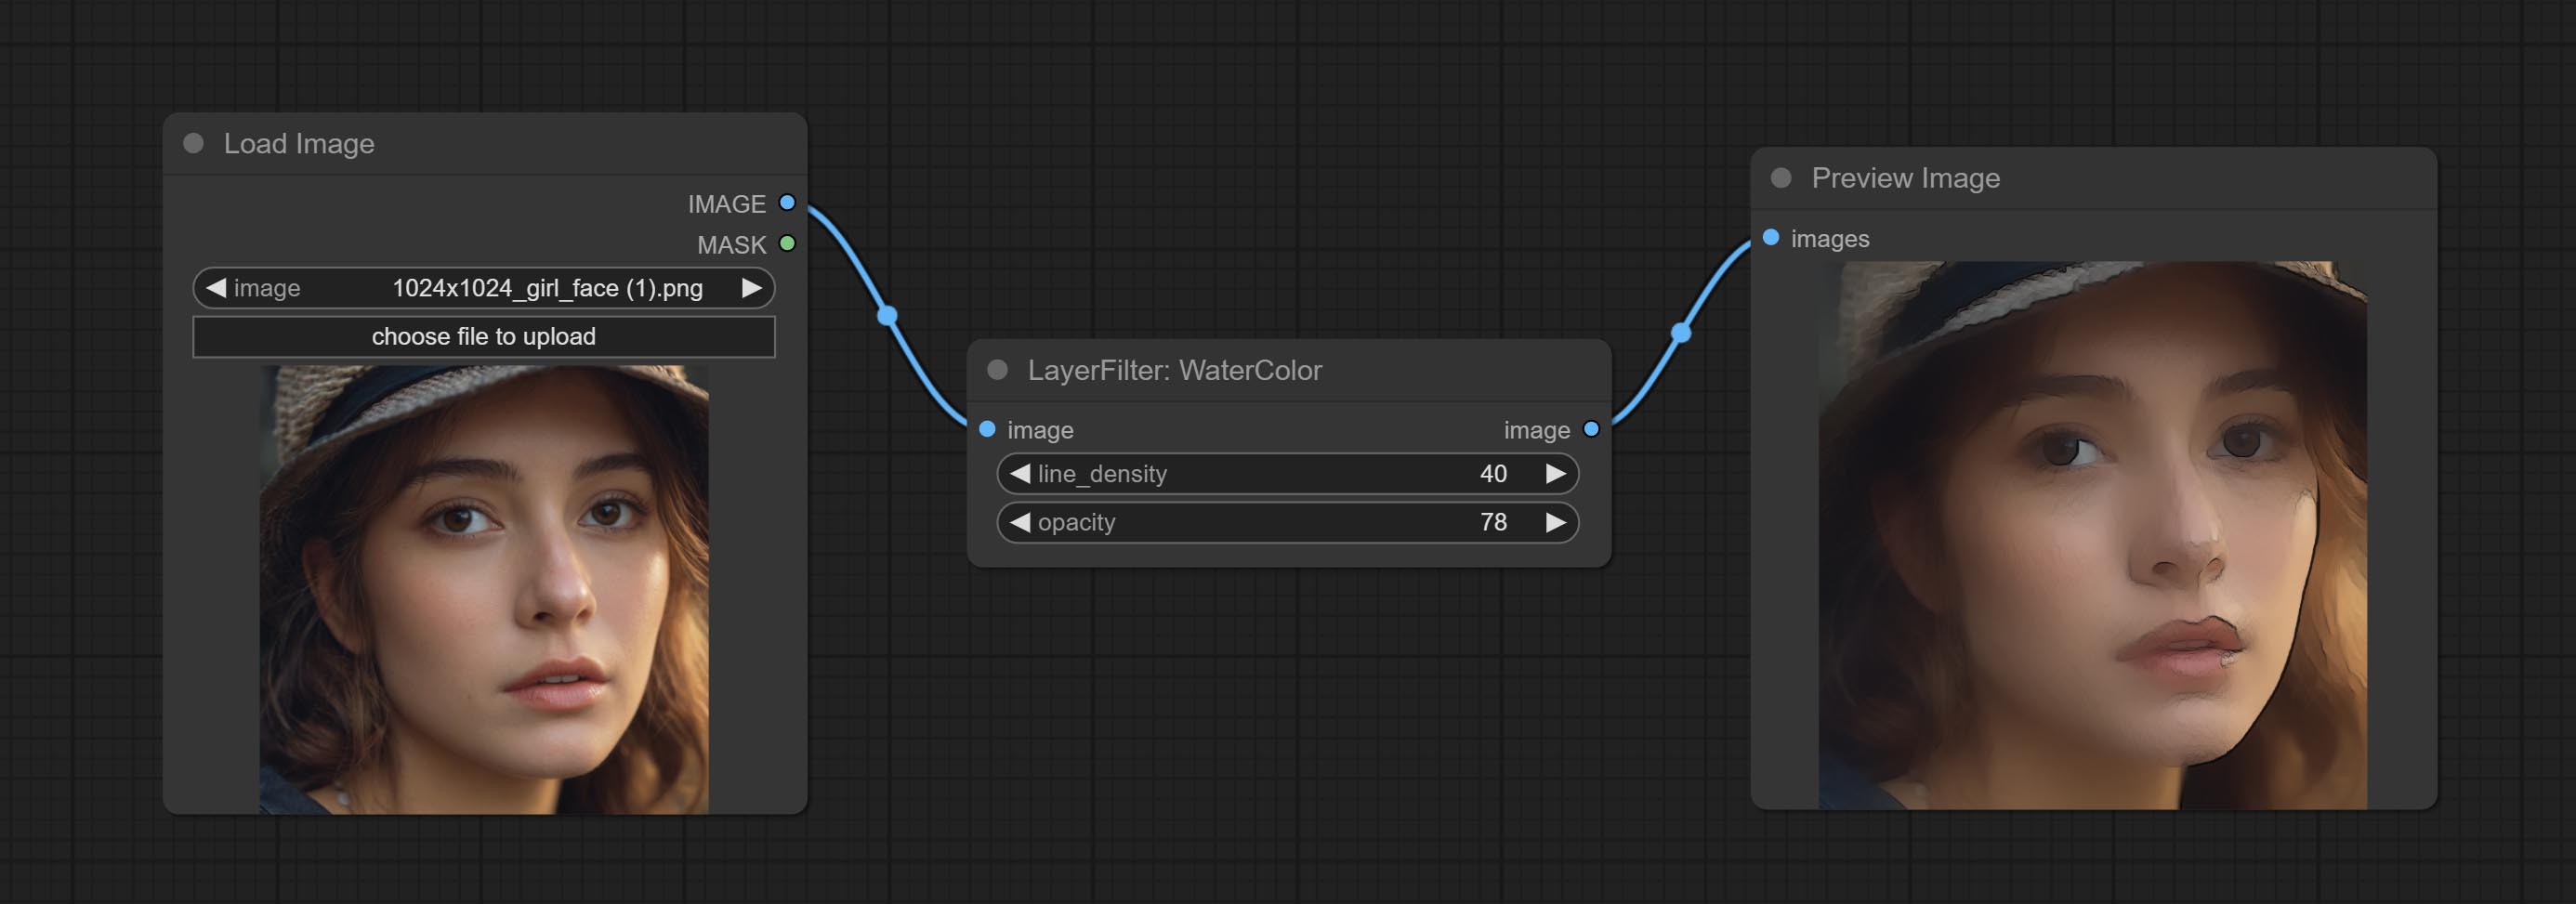
Node option: 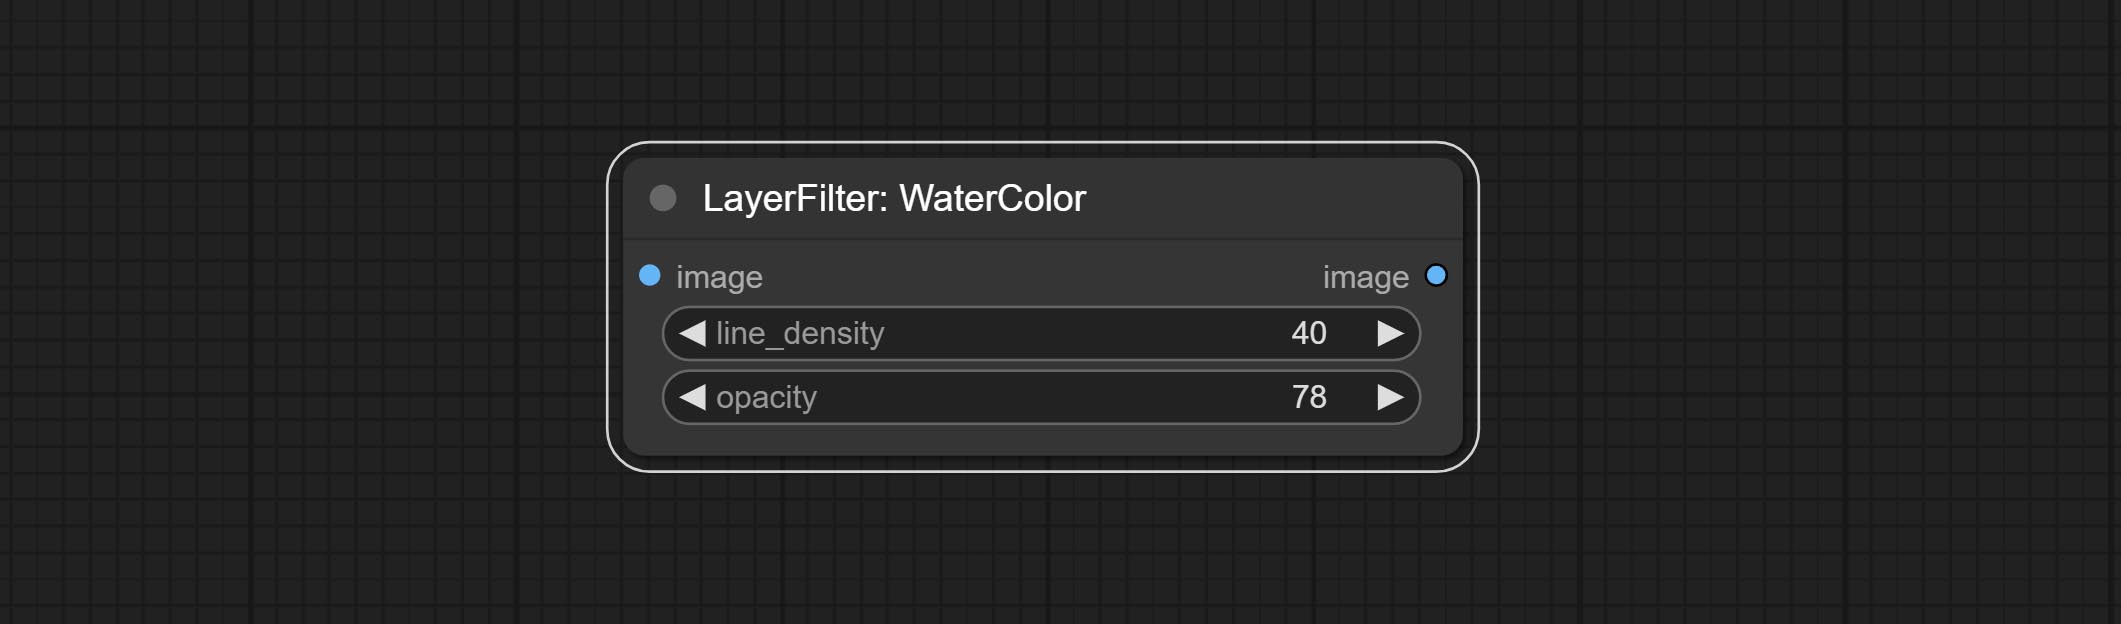
- line_density: The black line density.
- opacity: The opacity of watercolor effects.
SoftLight
Soft light effect, the bright highlights on the screen appear blurry. 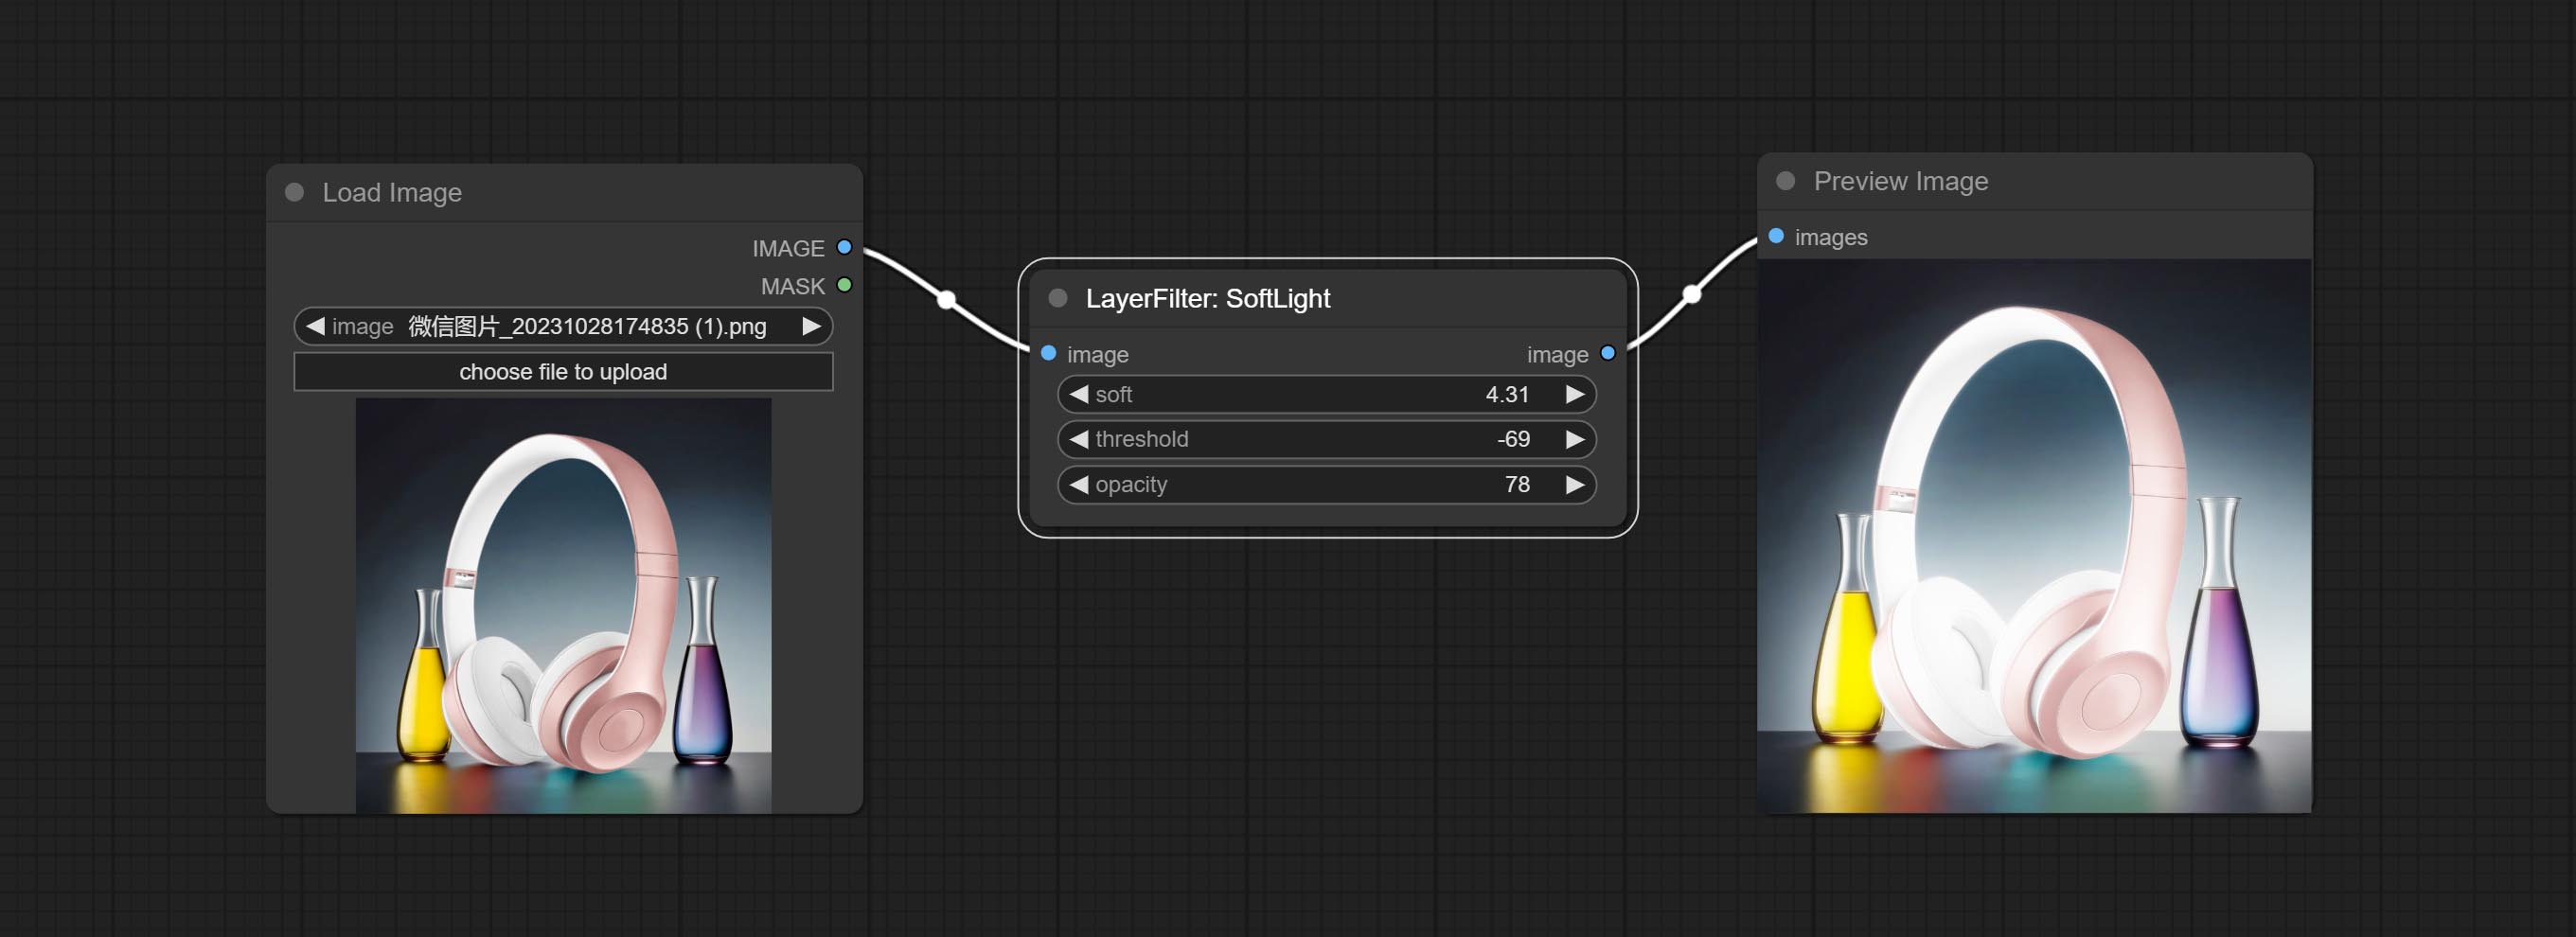
Node options: 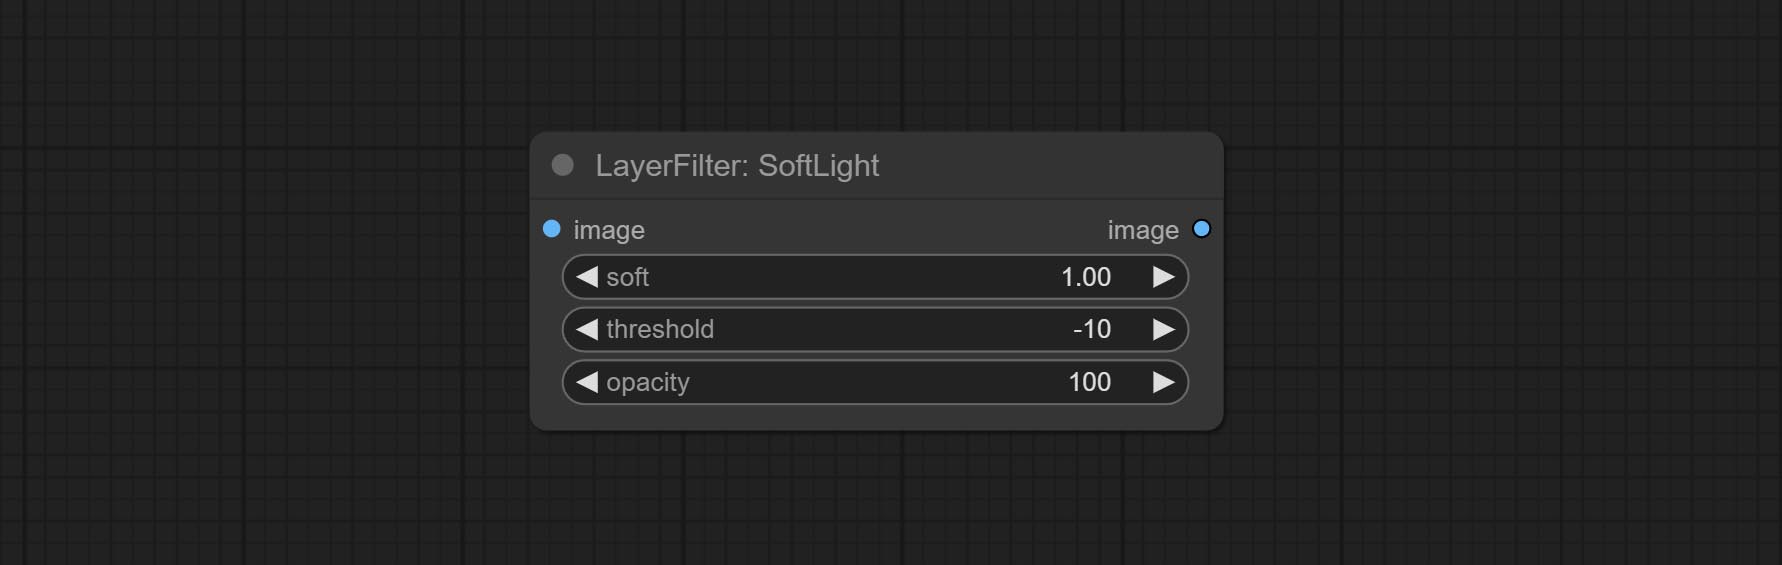
- soft: Size of soft light.
- threshold: Soft light range. the light appears from the brightest part of the picture. in lower value, the range will be larger, and in higher value, the range will be smaller.
- opacity: Opacity of the soft light.
ChannelShake
Channel misalignment. similar to the effect of Tiktok logo. 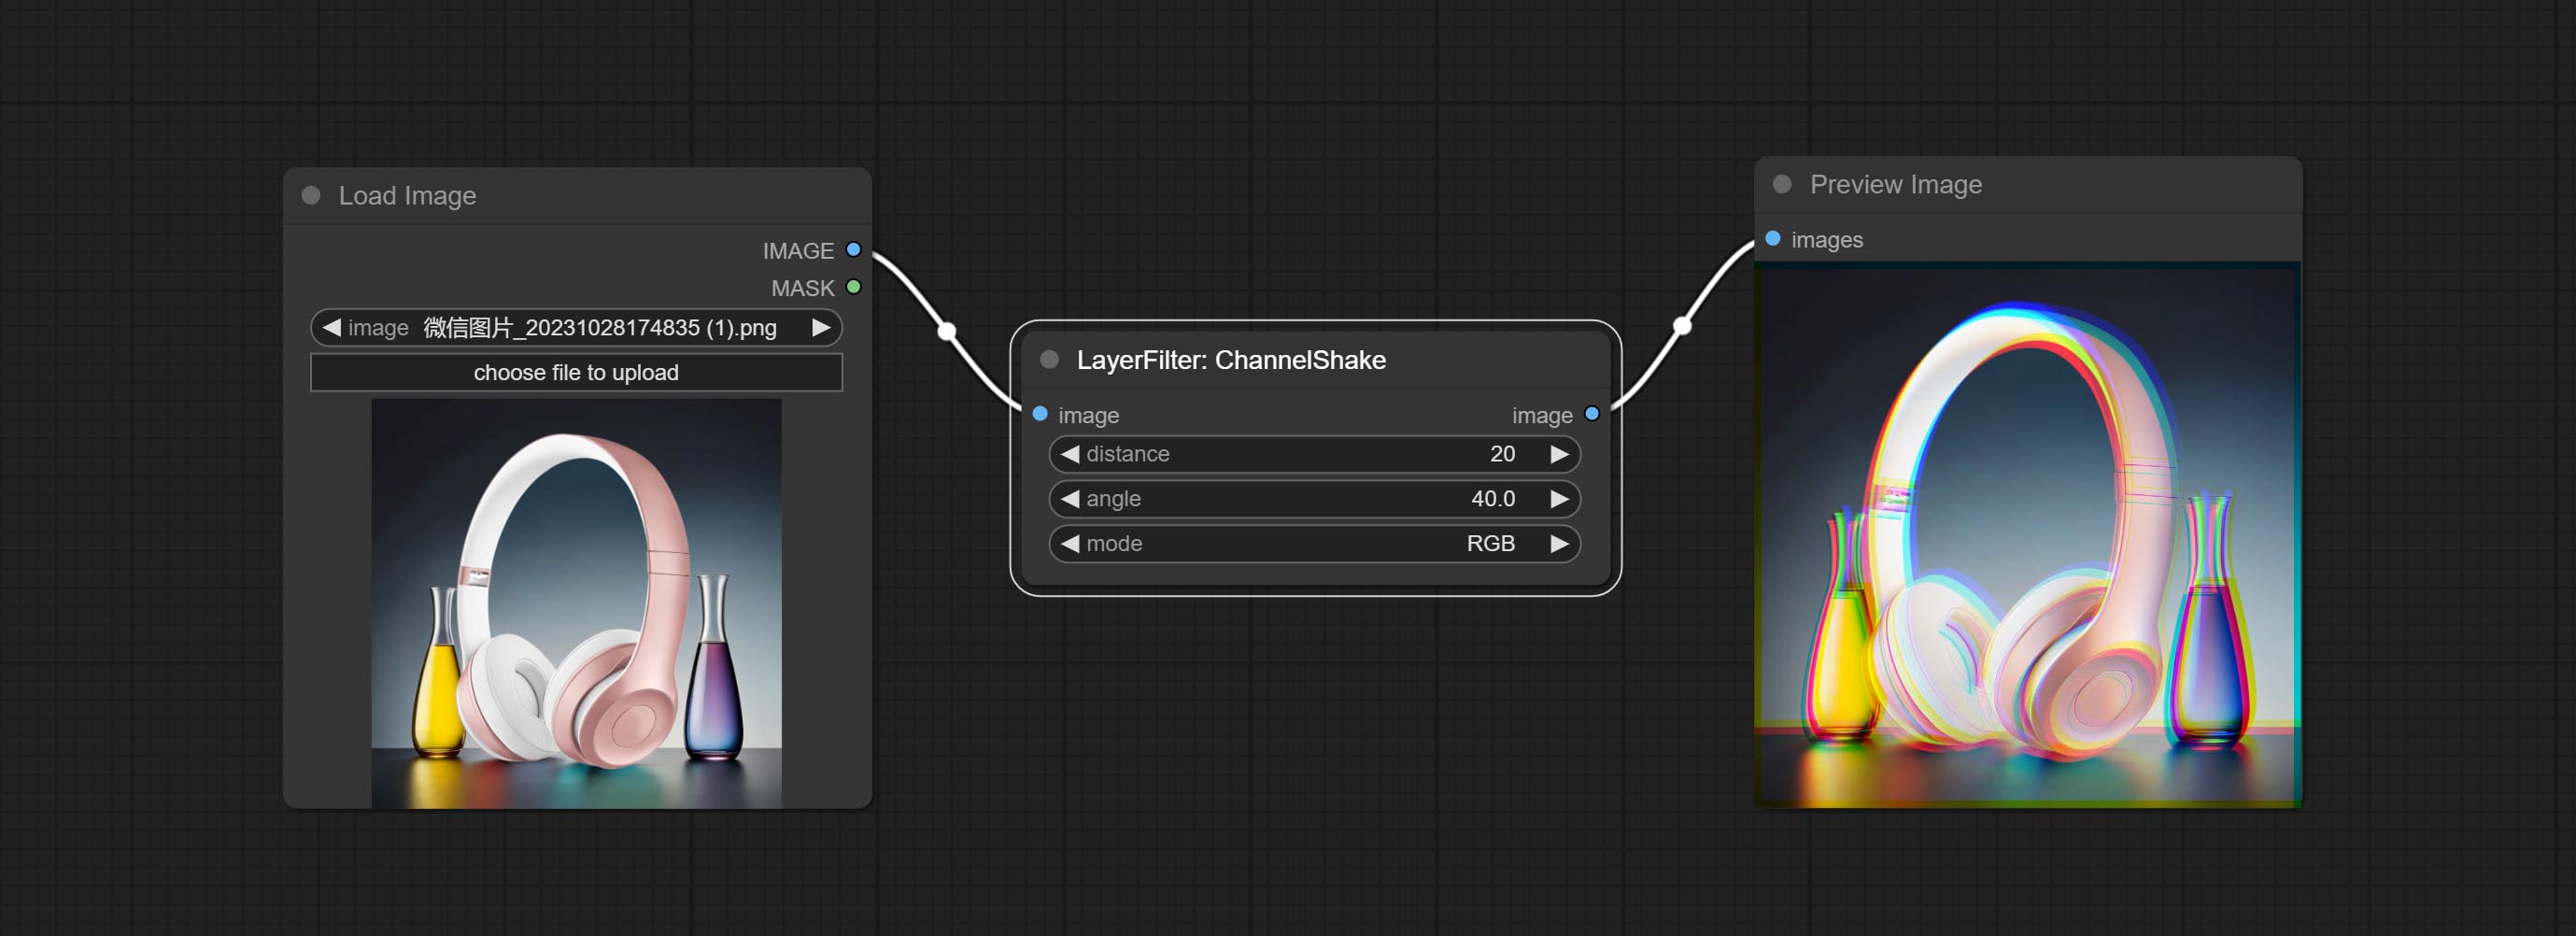
Node options: 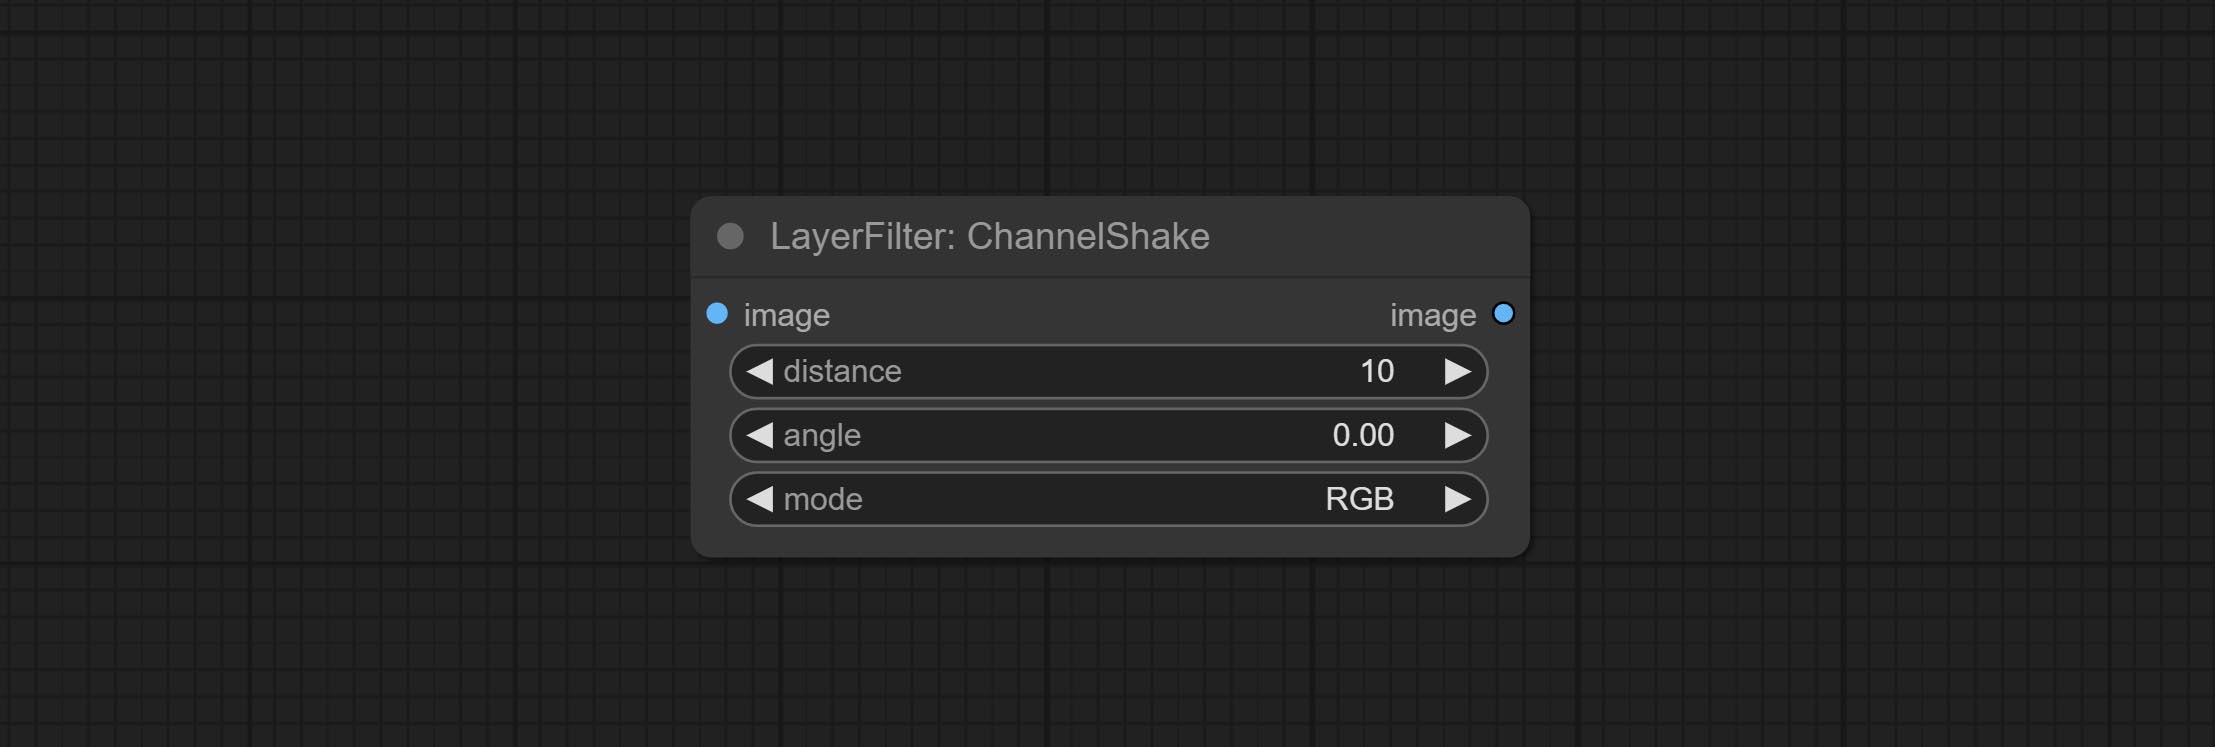
- distance: Distance of channel separation.
- angle: Angle of channel separation.
- mode: Channel shift arrangement order.
HDR Effects
enhances the dynamic range and visual appeal of input images. This node is reorganize and encapsulate of HDR Effects (SuperBeasts.AI), thanks to the original author. 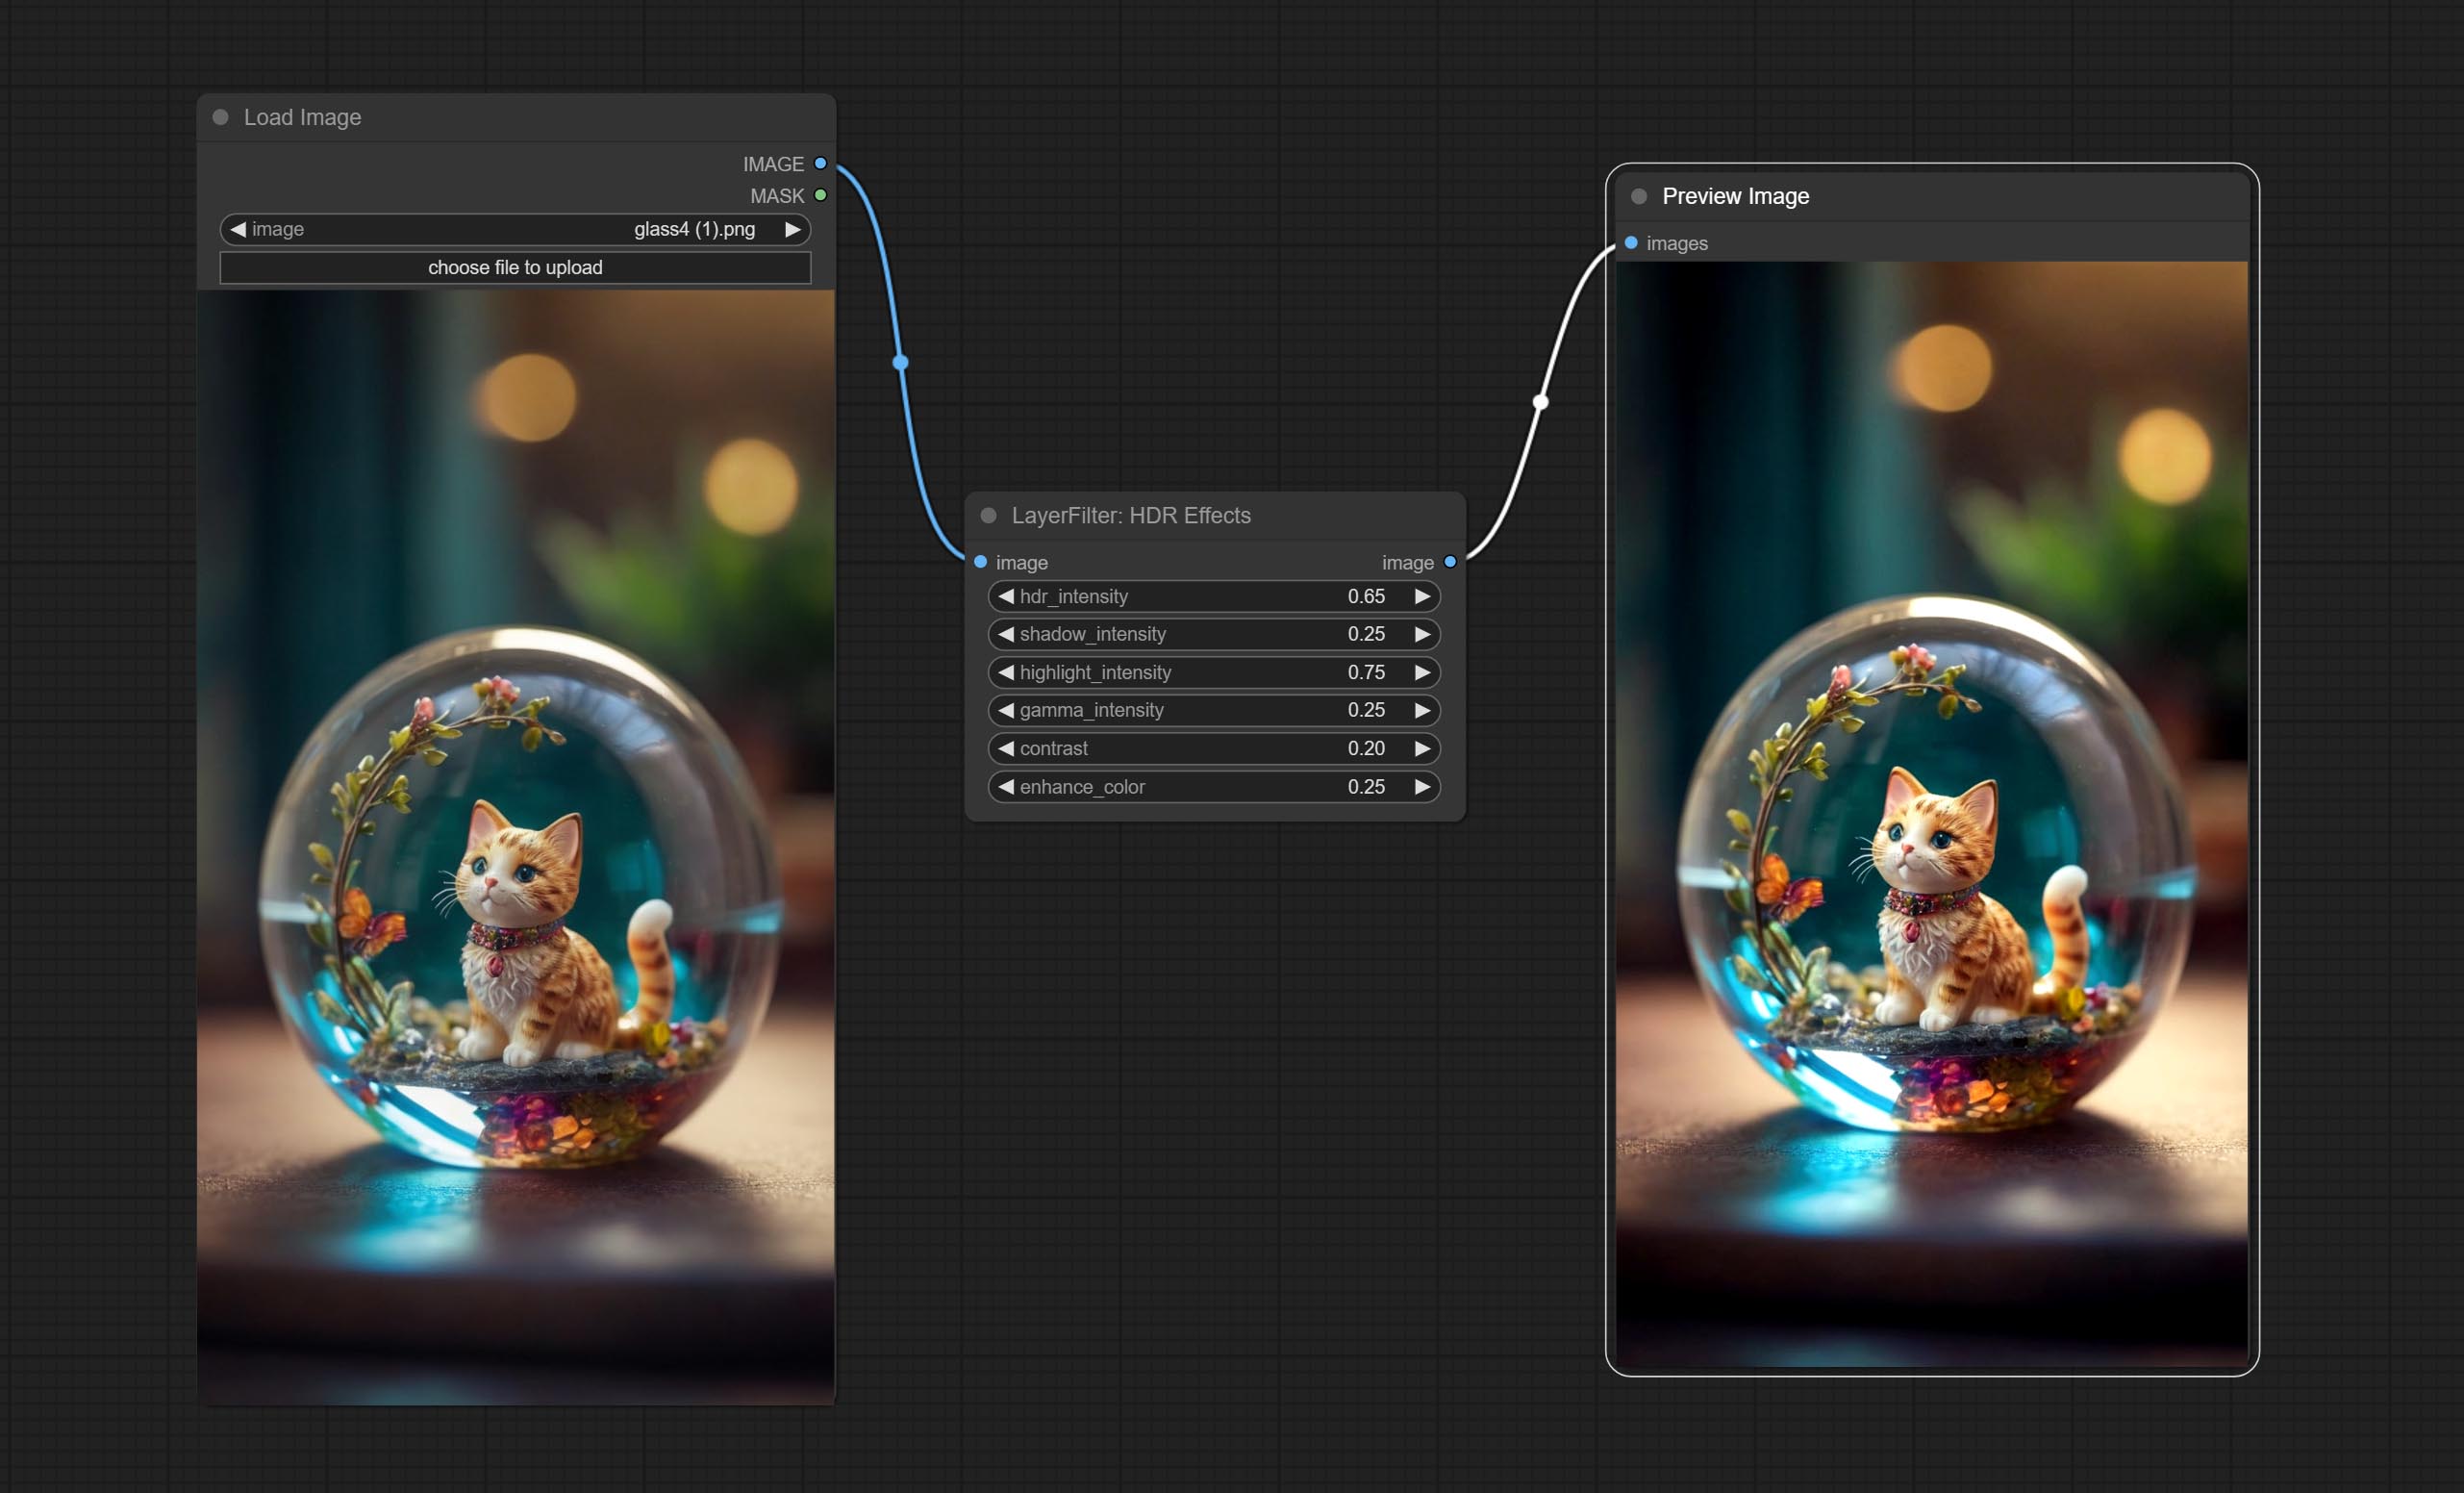
Node options: 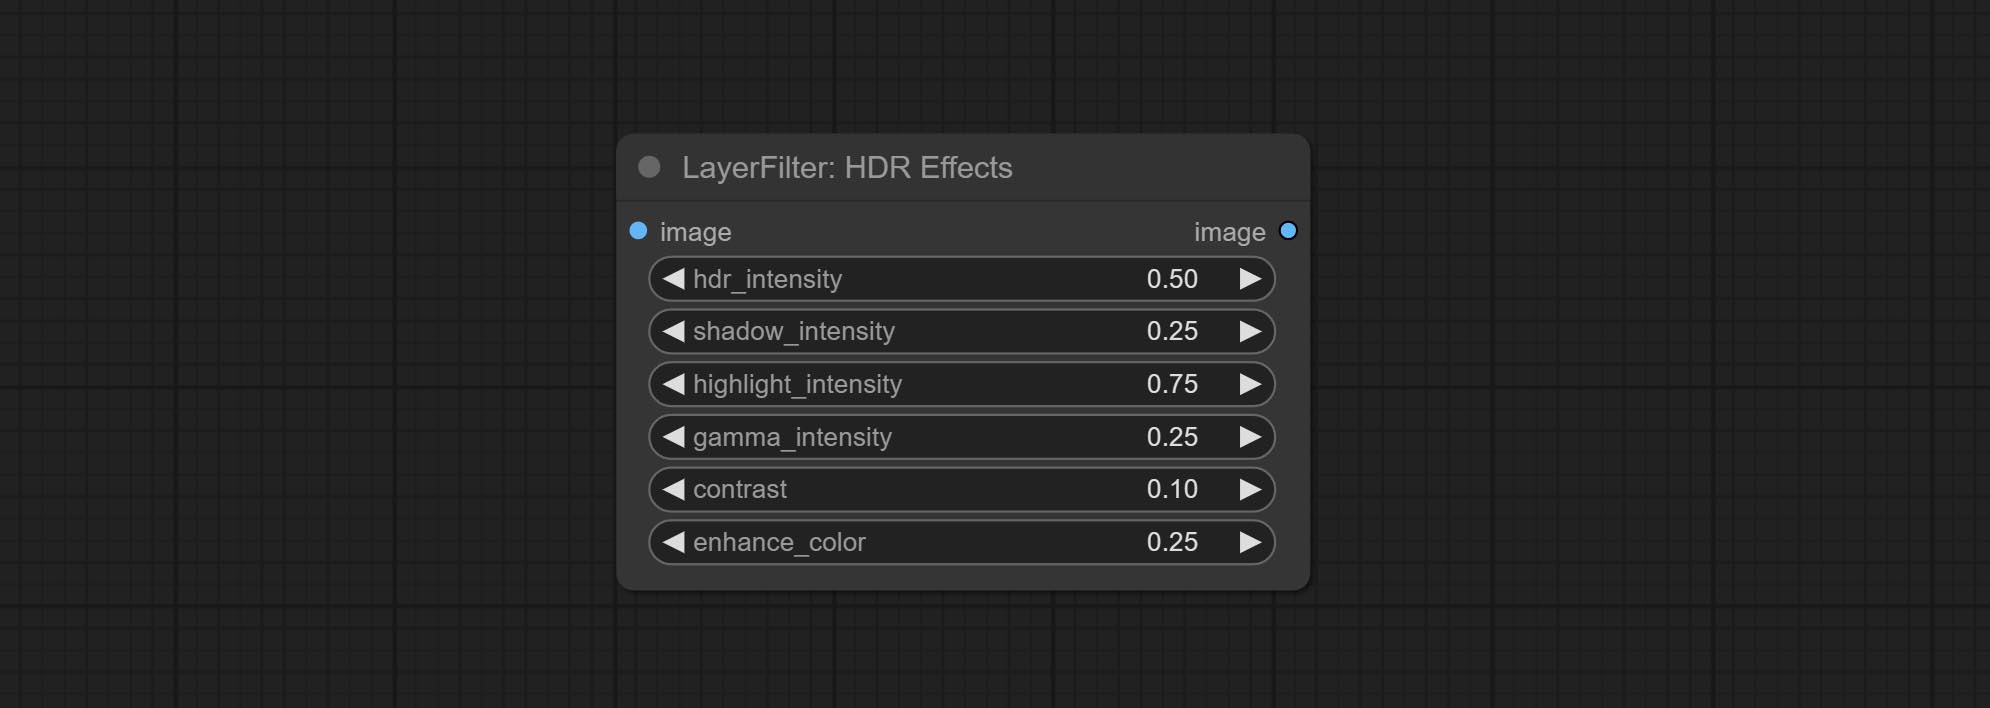
- hdr_intensity: Range: 0.0 to 5.0, Controls the overall intensity of the HDR effect, Higher values result in a more pronounced HDR effect.
- shadow_intensity: Range: 0.0 to 1.0,Adjusts the intensity of shadows in the image,Higher values darken the shadows and increase contrast.
- highlight_intensity: Range: 0.0 to 1.0,Adjusts the intensity of highlights in the image,Higher values brighten the highlights and increase contrast.
- gamma_intensity: Range: 0.0 to 1.0,Controls the gamma correction applied to the image,Higher values increase the overall brightness and contrast.
- contrast: Range: 0.0 to 1.0,Enhances the contrast of the image, Higher values result in more pronounced contrast.
- enhance_color: Range: 0.0 to 1.0,Enhances the color saturation of the image, Higher values result in more vibrant colors.
فيلم
Simulate the grain, dark edge, and blurred edge of the film, support input depth map to simulate defocus.
This node is reorganize and encapsulate of digitaljohn/comfyui-propost, thanks to the original author. 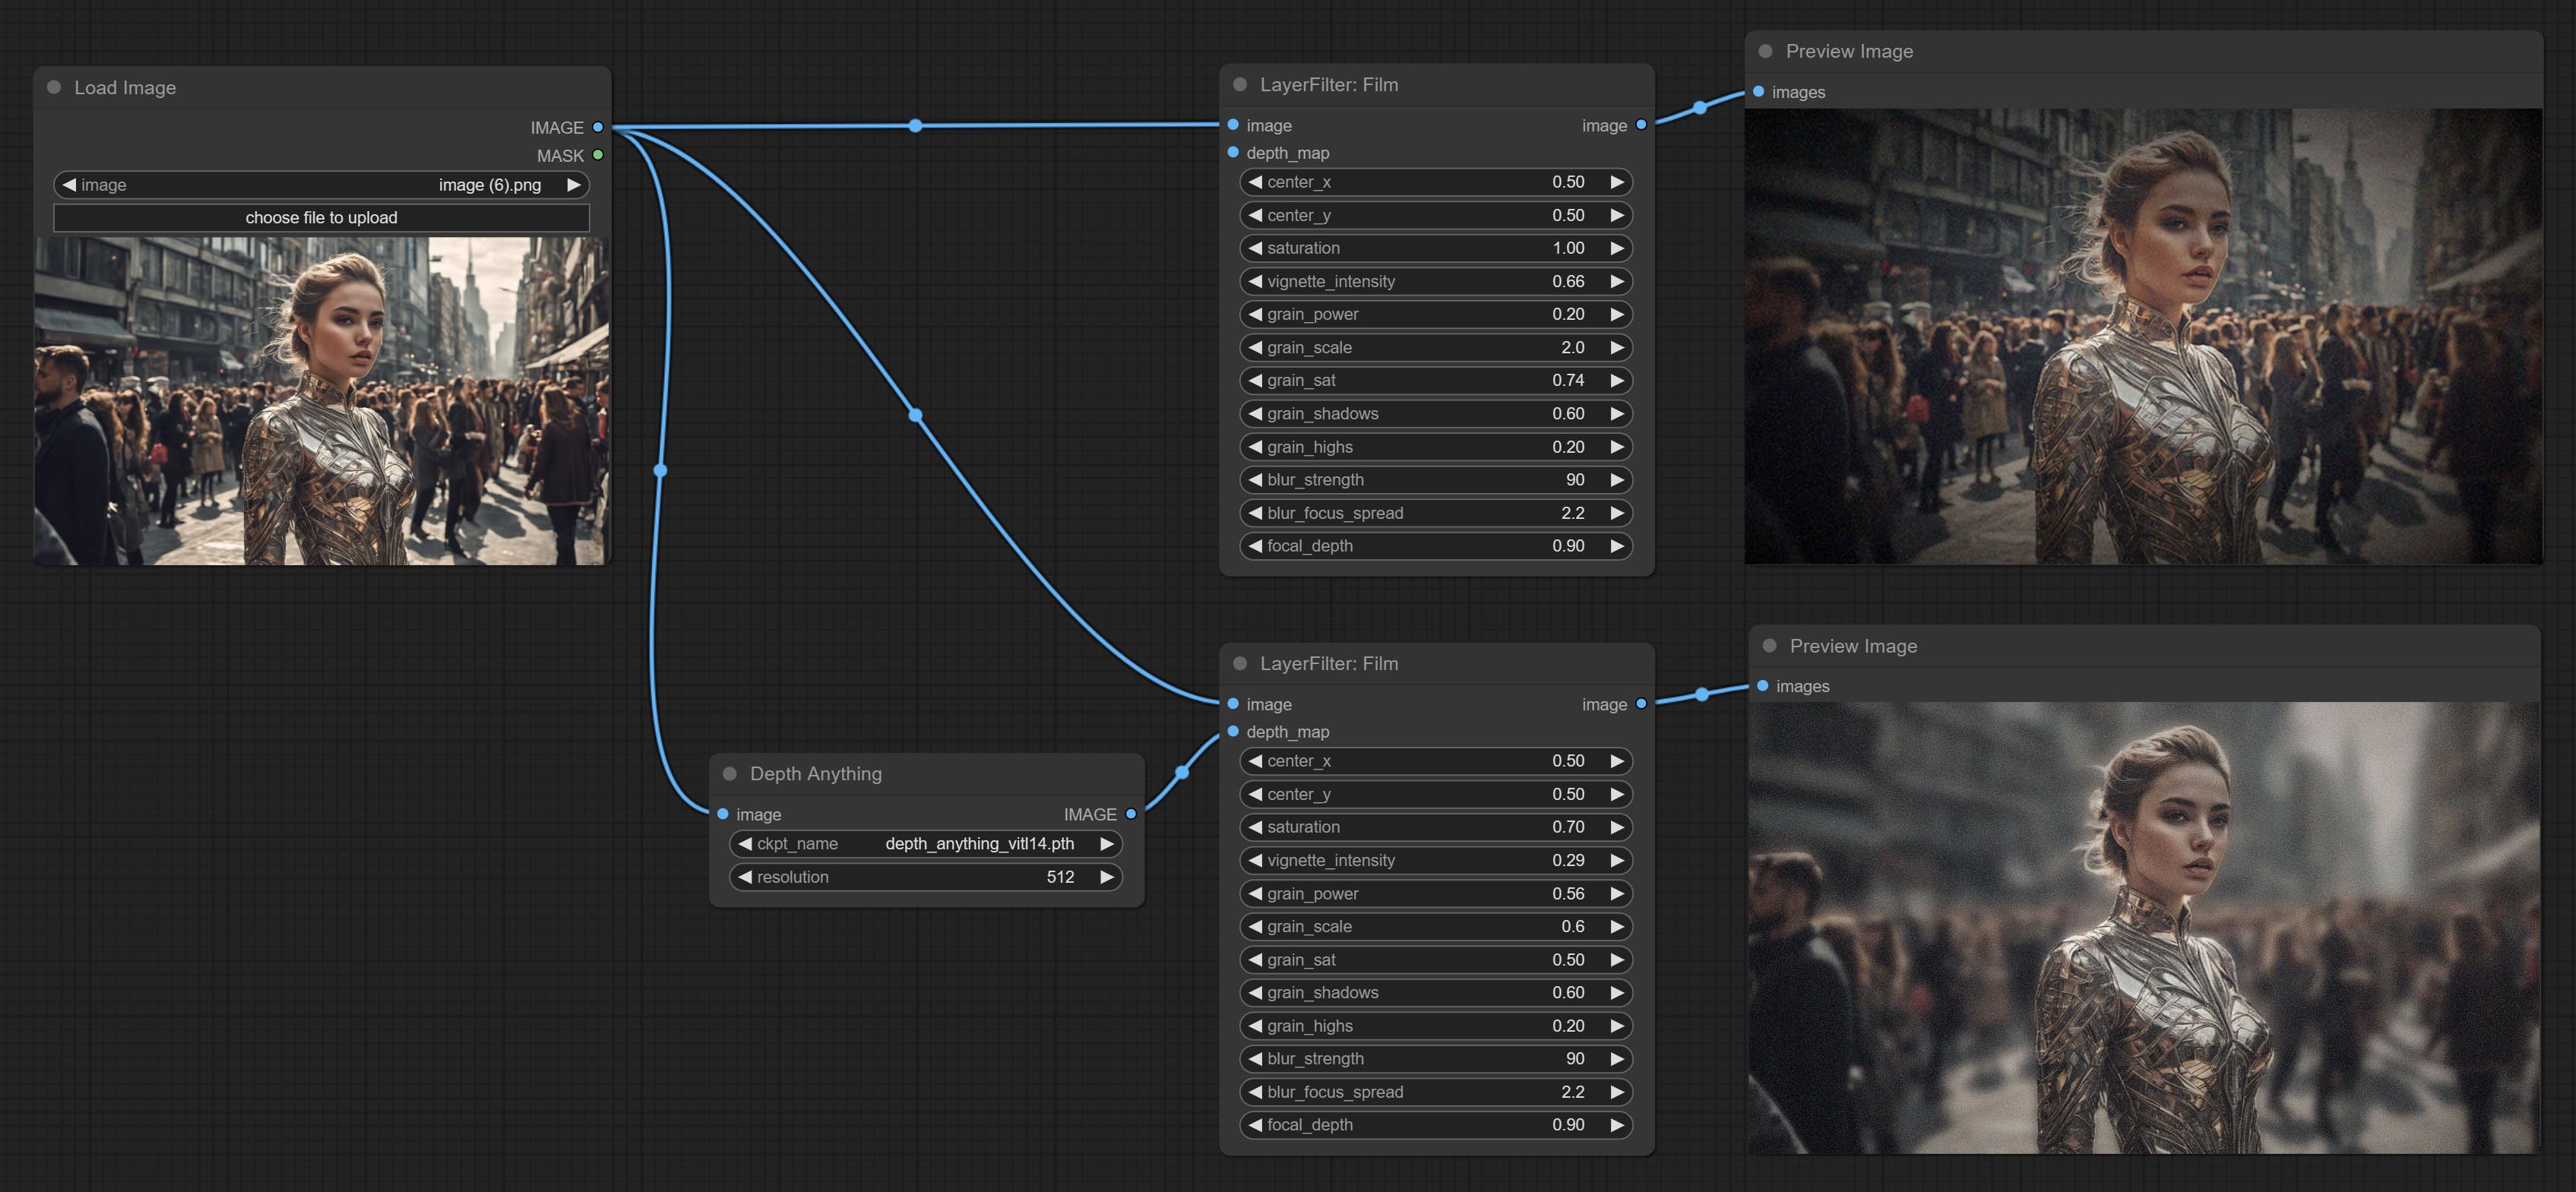
Node options: 
- image: The input image.
- depth_map: Input depth map to simulate defocus effect. it is an optional input. if there is no input, will simulates radial blur at the edges of the image.
- center_x: The horizontal axis of the center point position of the dark edge and radial blur, where 0 represents the leftmost side, 1 represents the rightmost side, and 0.5 represents at the center.
- center_y: The vertical axis of the center point position of the dark edge and radial blur, where 0 represents the leftmost side, 1 represents the rightmost side, and 0.5 represents at the center.
- saturation: Color saturation, 1 is the original value.
- grain_power: Grain intensity. larger value means more pronounced the noise.
- grain_scale: Grain size.
- grain_sat: The color saturation of grain. 0 represents mono noise, and the larger the value, the more prominent the color.
- grain_shadows: Grain intensity of dark part.
- grain_highs: Grain intensity of light part.
- blur_strength: The strength of blur. larger value means more blurry it becomes.
- blur_focus_spread: Focus diffusion range. larger value means larger clear range.
- focal_depth: Simulate the focal distance of defucus. 0 indicates that focus is farthest, and 1 indicates that is closest. this setting only valid when input the depth_map.
FilmV2
The upgraded version of the Film node adds the fastgrain method on the basis of the previous one, and the speed of generating noise is accelerated by 10 times. The code for fastgrain is from github.com/spacepxl/ComfyUI-Image-Filters BetterFilmGrain node, thanks to the original authors. 
LightLeak
Simulate the light leakage effect of the film. please download model file from Baidu Netdisk or [Google Drive]([light_leak.pkl(Google Drive)(https://drive.google.com/file/d/1DcH2Zkyj7W3OiAeeGpJk1eaZpdJwdCL-/view?usp=sharing)) and copy to ComfyUI/models/layerstyle folder. 
Node options: 
- light: 32 types of light spots are provided. random is a random selection.
- corner: There are four options for the corner where the light appears: top left, top right, bottom left, and bottom right.
- hue: The hue of the light.
- saturation: The color saturation of the light.
- opacity: The opacity of the light.
ColorMap
Pseudo color heat map effect. 
Node options: 
- color_map: Effect type. there are a total of 22 types of effects, as shown in the above figure.
- opacity: The opacity of the color map effect.
MotionBlur
Make the image motion blur 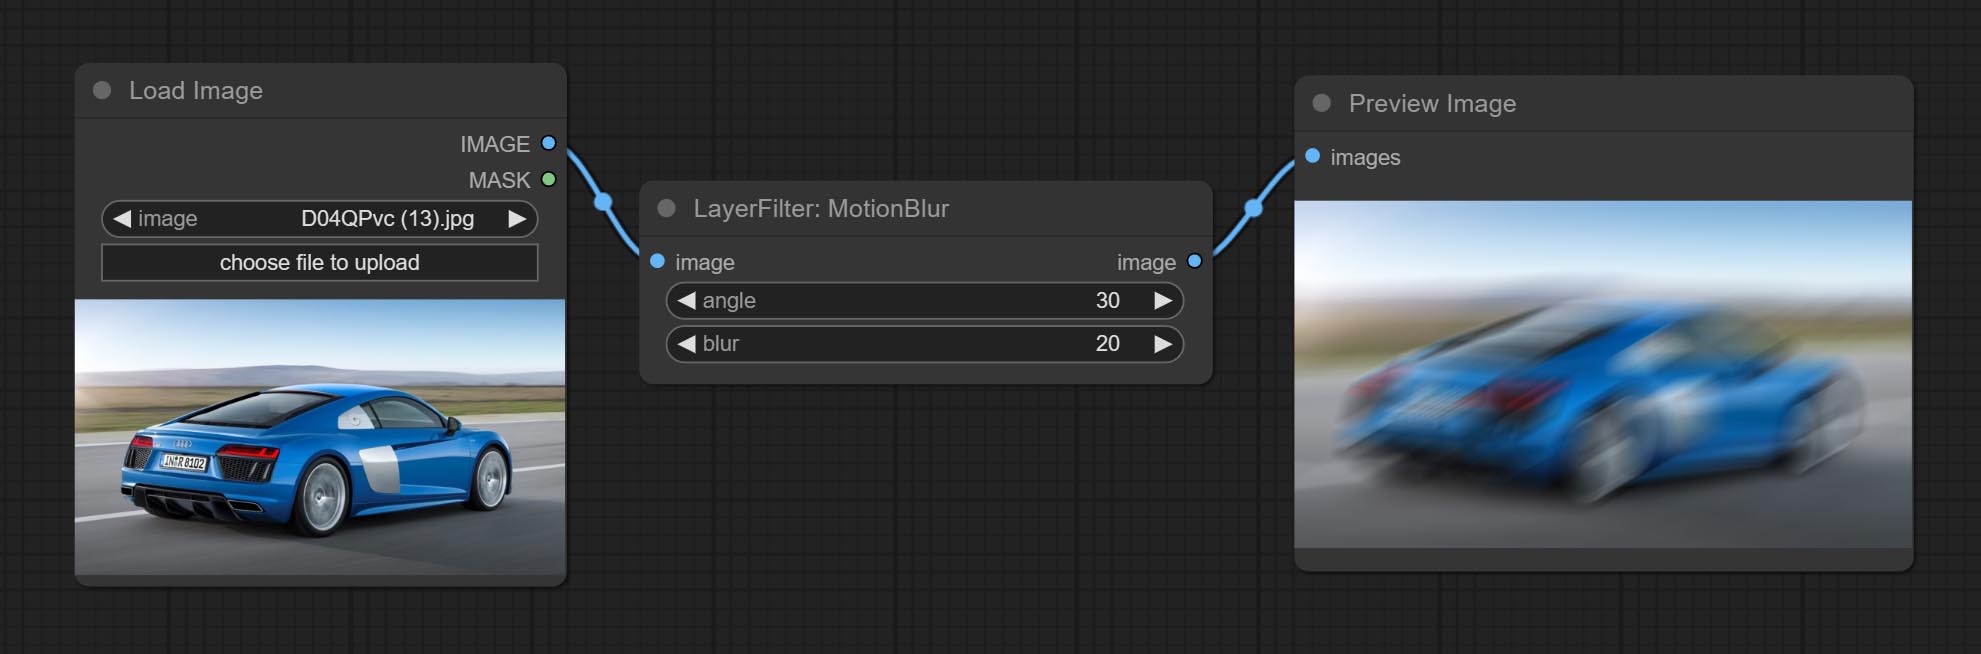
Node options:
- angle: The angle of blur.
- blur: The size of blur.
GaussianBlur
Make the image gaussian blur 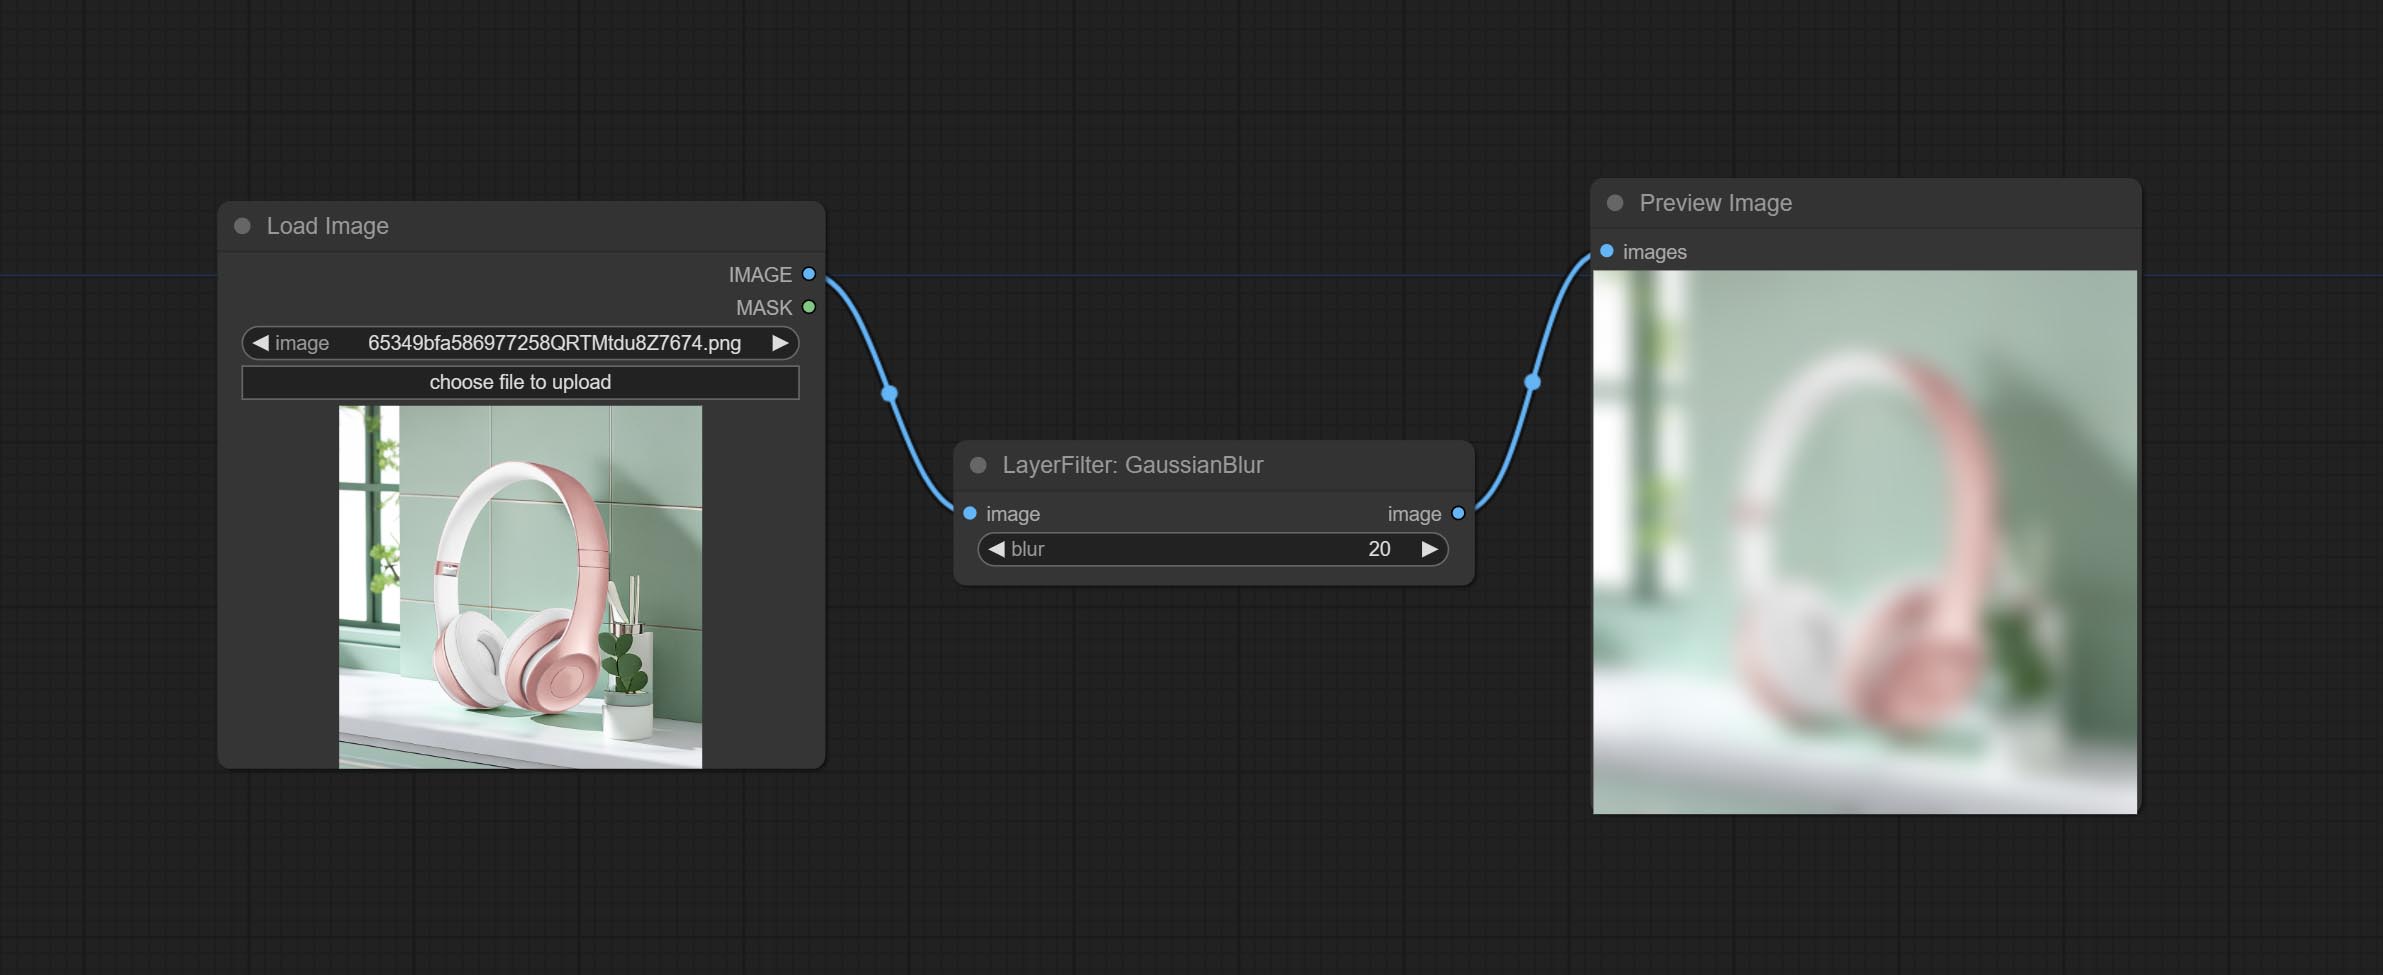
Node options:
- blur: The size of blur, integer, range 1-999.
GaussianBlurV2
Gaussian blur. Change the parameter precision to floating-point number, with a precision of 0.01
Node options: 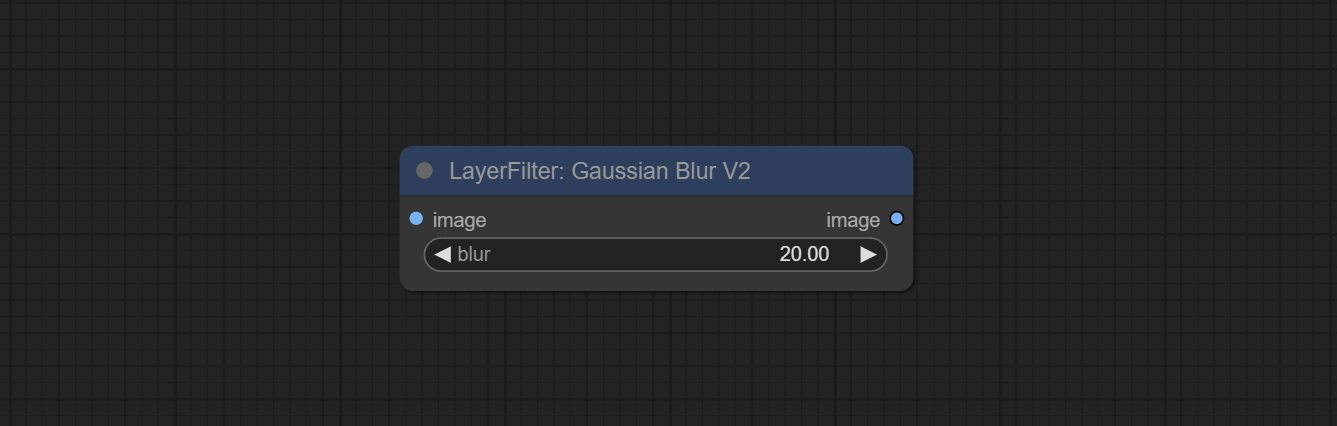
- blur: The size of blur, float, range 0 - 1000.
AddGrain
Add noise to the picture. 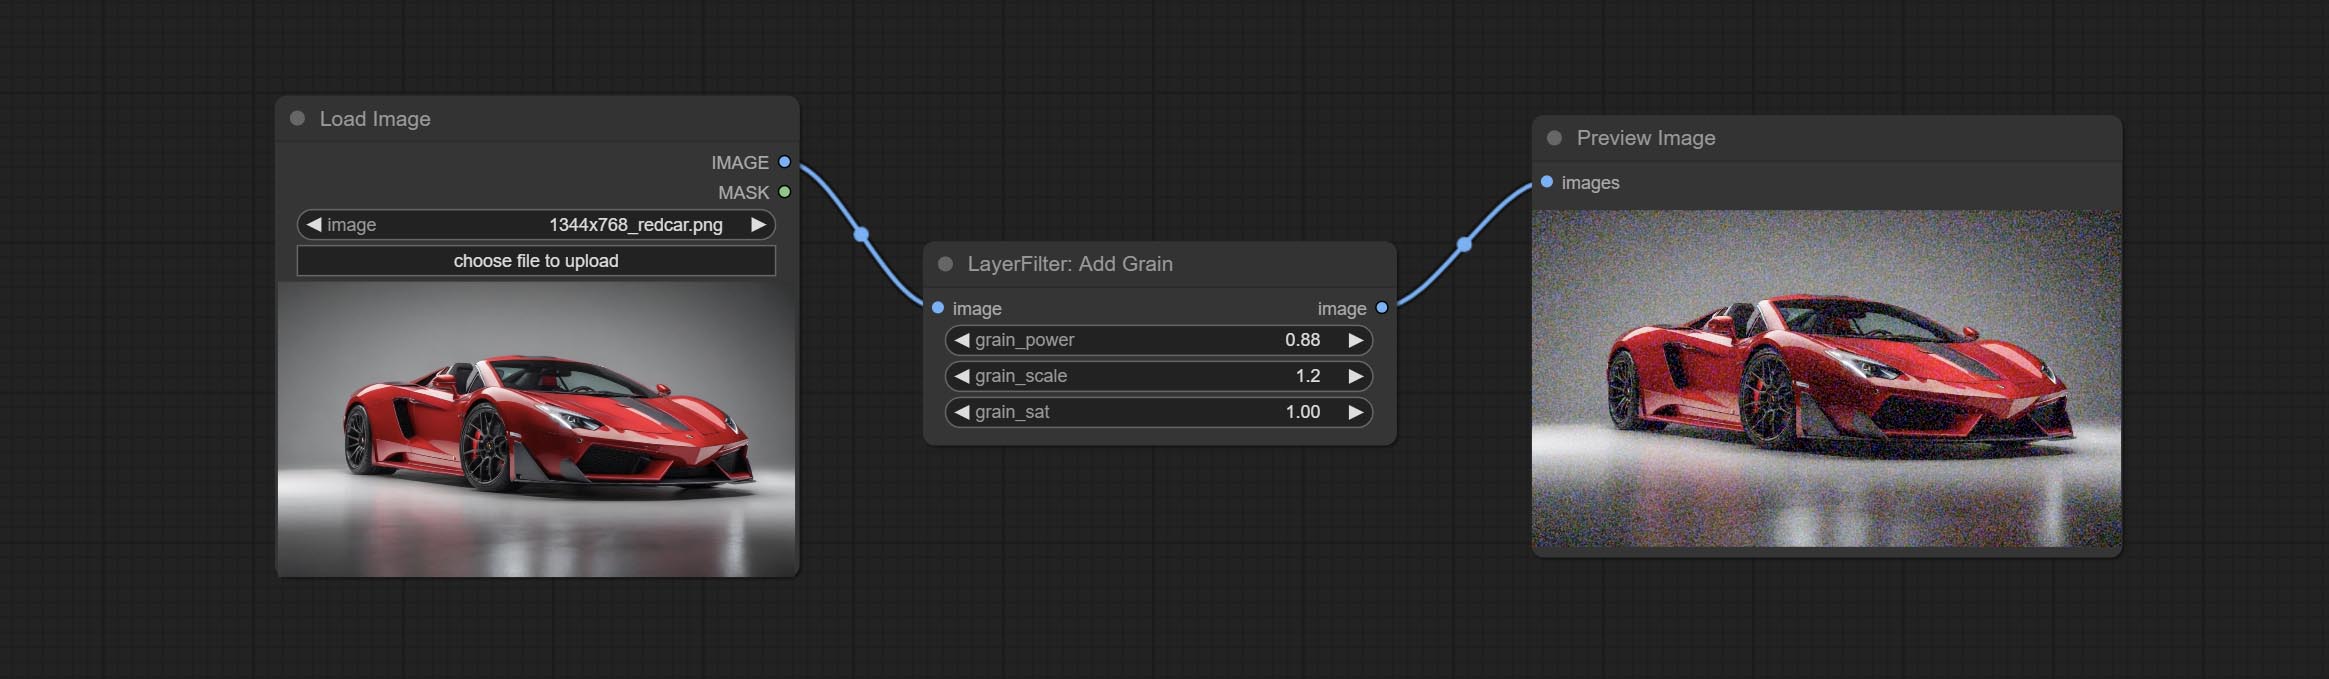
Node Options: 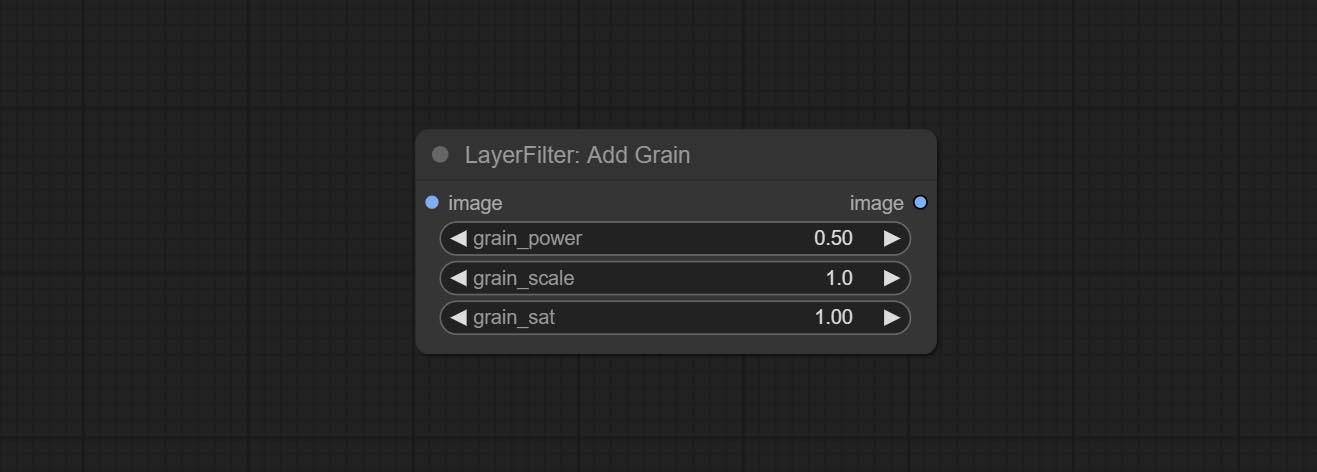
- grain_power: Noise intensity.
- grain_scale: Noise size.
- grain_sat: Color saturation of noise.
Annotation for notes
1 The layer_image, layer_mask and the background_image(if have input), These three items must be of the same size.
2 The mask not a mandatory input item. the alpha channel of the image is used by default. If the image input does not include an alpha channel, the entire image's alpha channel will be automatically created. if have masks input simultaneously, the alpha channel will be overwrite by the mask.
3 The Blend Mode include normal, multply, screen, add, subtract, difference, darker, color_burn, color_dodge, linear_burn, linear_dodge, overlay, soft_light, hard_light, vivid_light, pin_light, linear_light, and hard_mix. all of 19 blend modes in total.
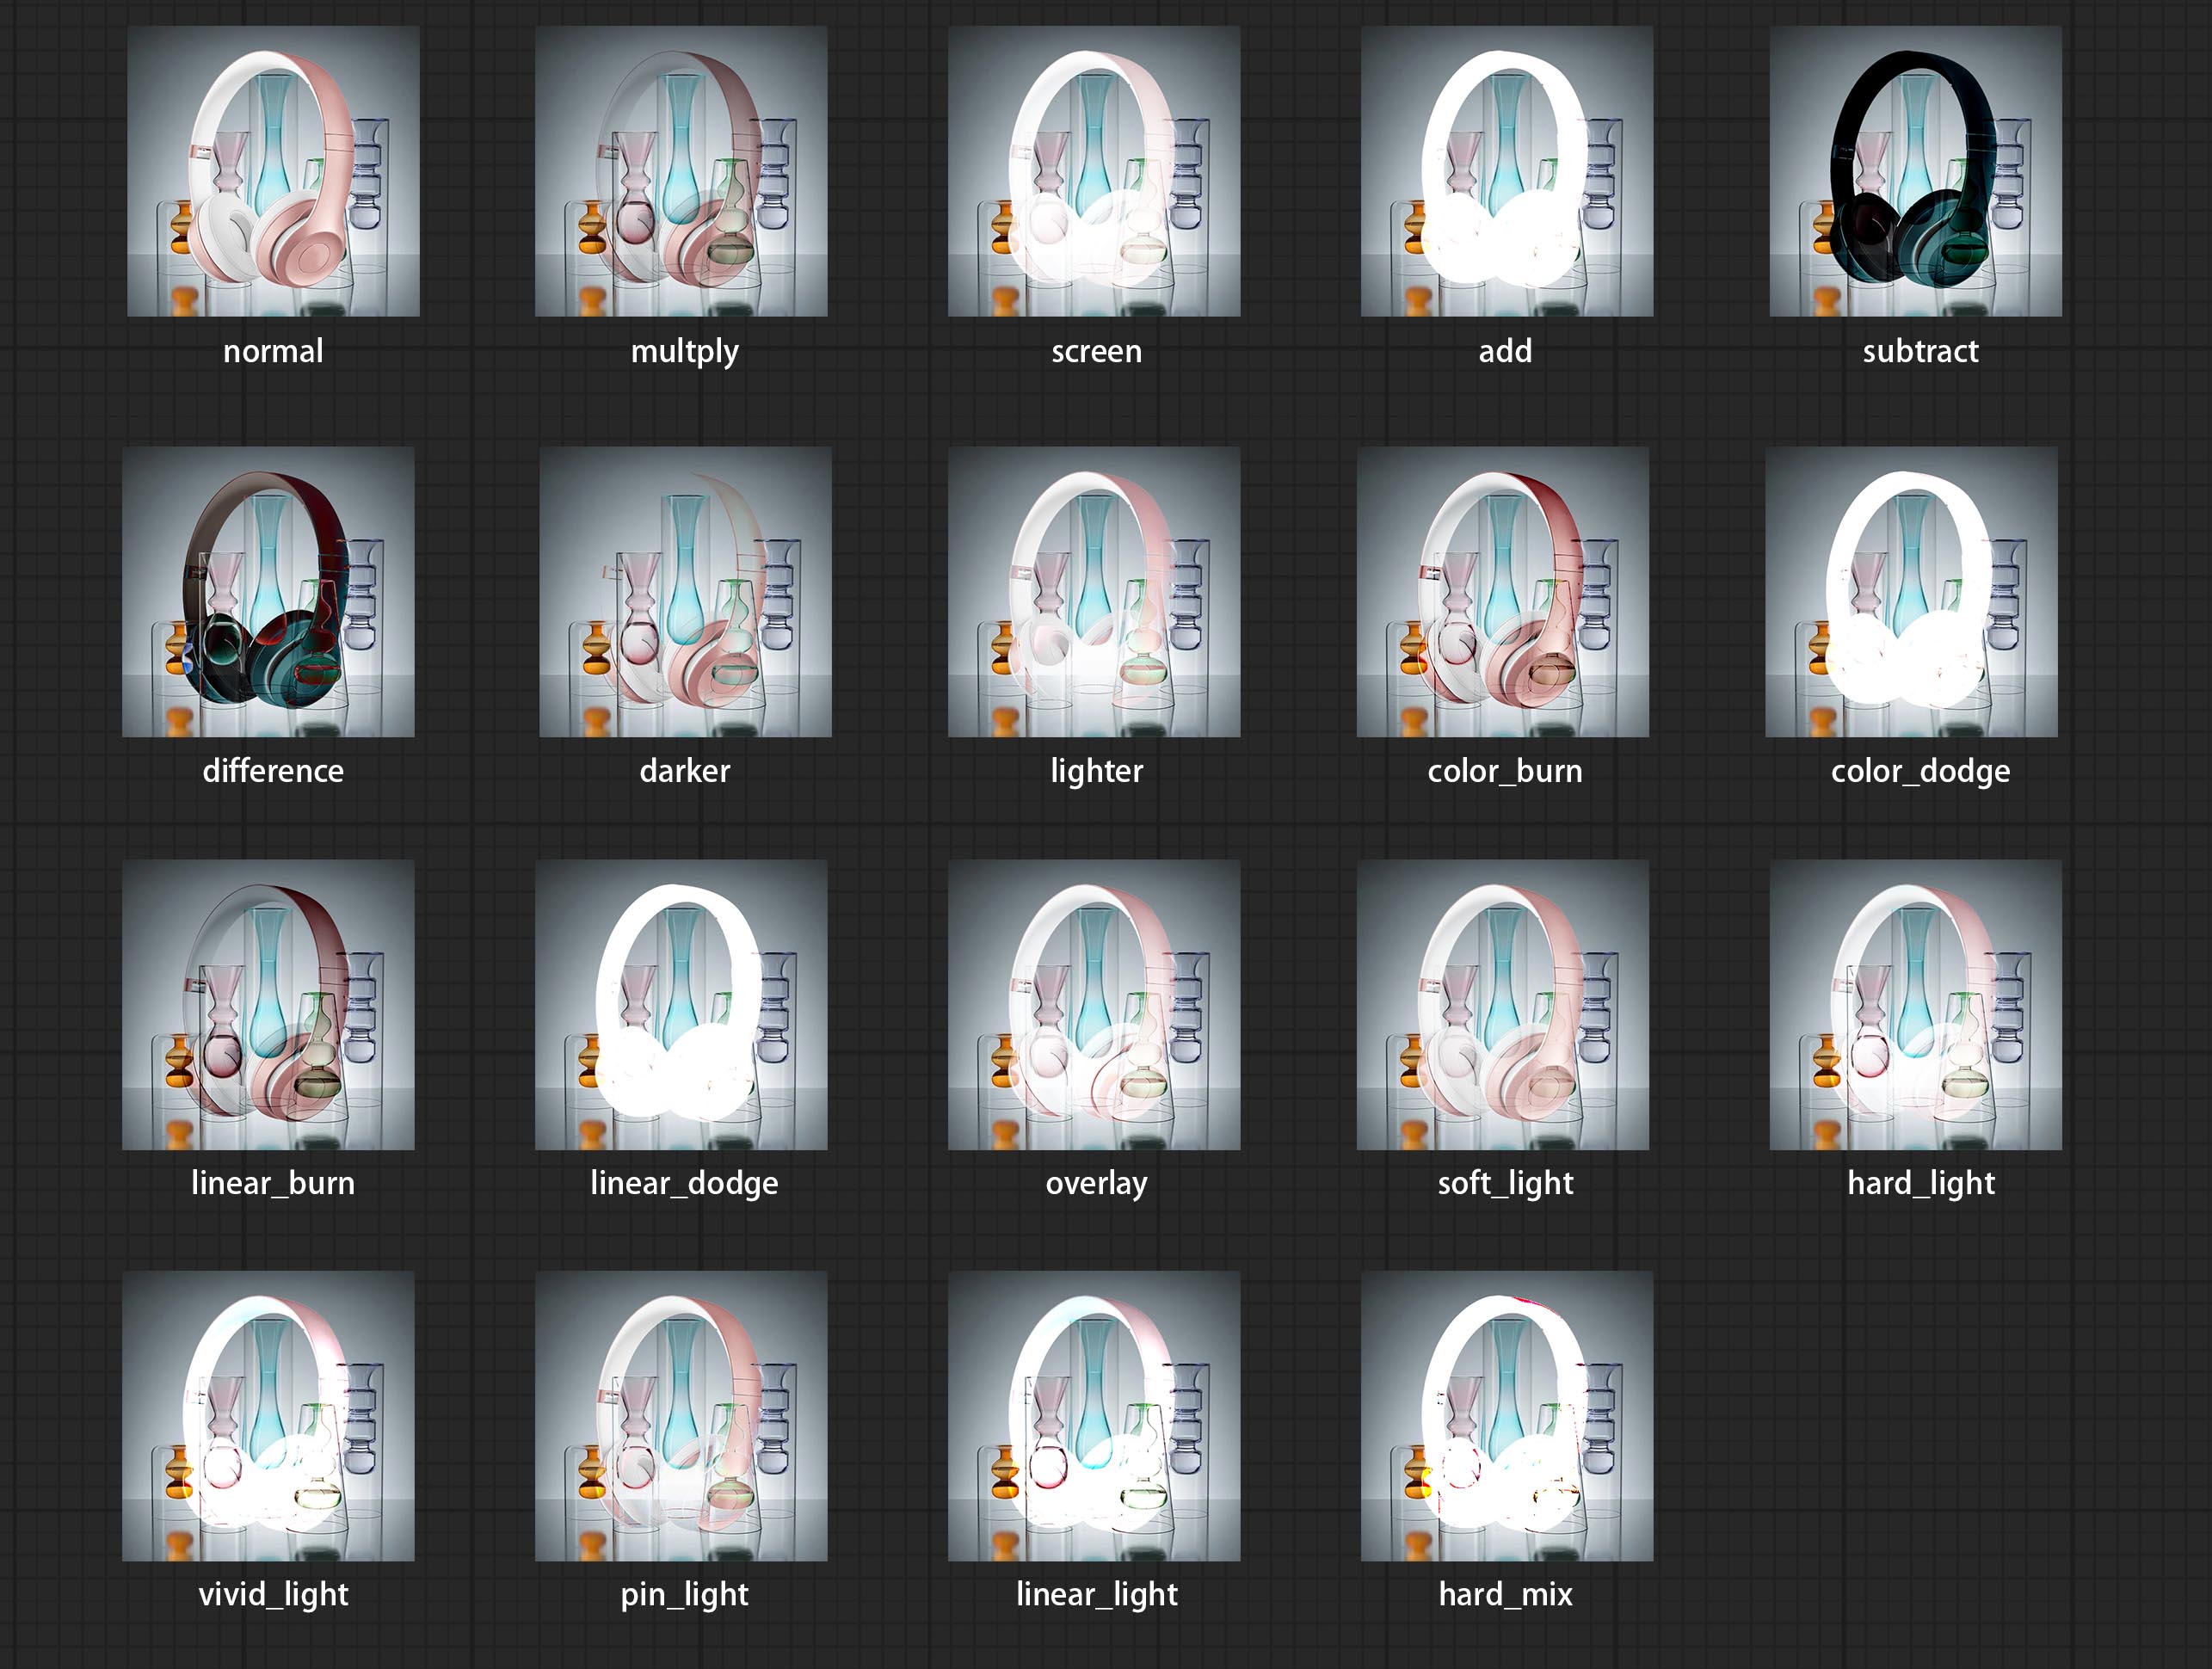
*Preview of the blend mode
3 The BlendModeV2 include normal, dissolve, darken, multiply, color burn, linear burn, darker color, lighten, screen, color dodge, linear dodge(add), lighter color, dodge, overlay, soft light, hard light, vivid light, linear light, pin light, hard mix, difference, exclusion, subtract, divide, hue, saturation, color, luminosity, grain extract, grain merge all of 30 blend modes in total.
Part of the code for BlendMode V2 is from Virtuoso Nodes for ComfyUI. Thanks to the original authors.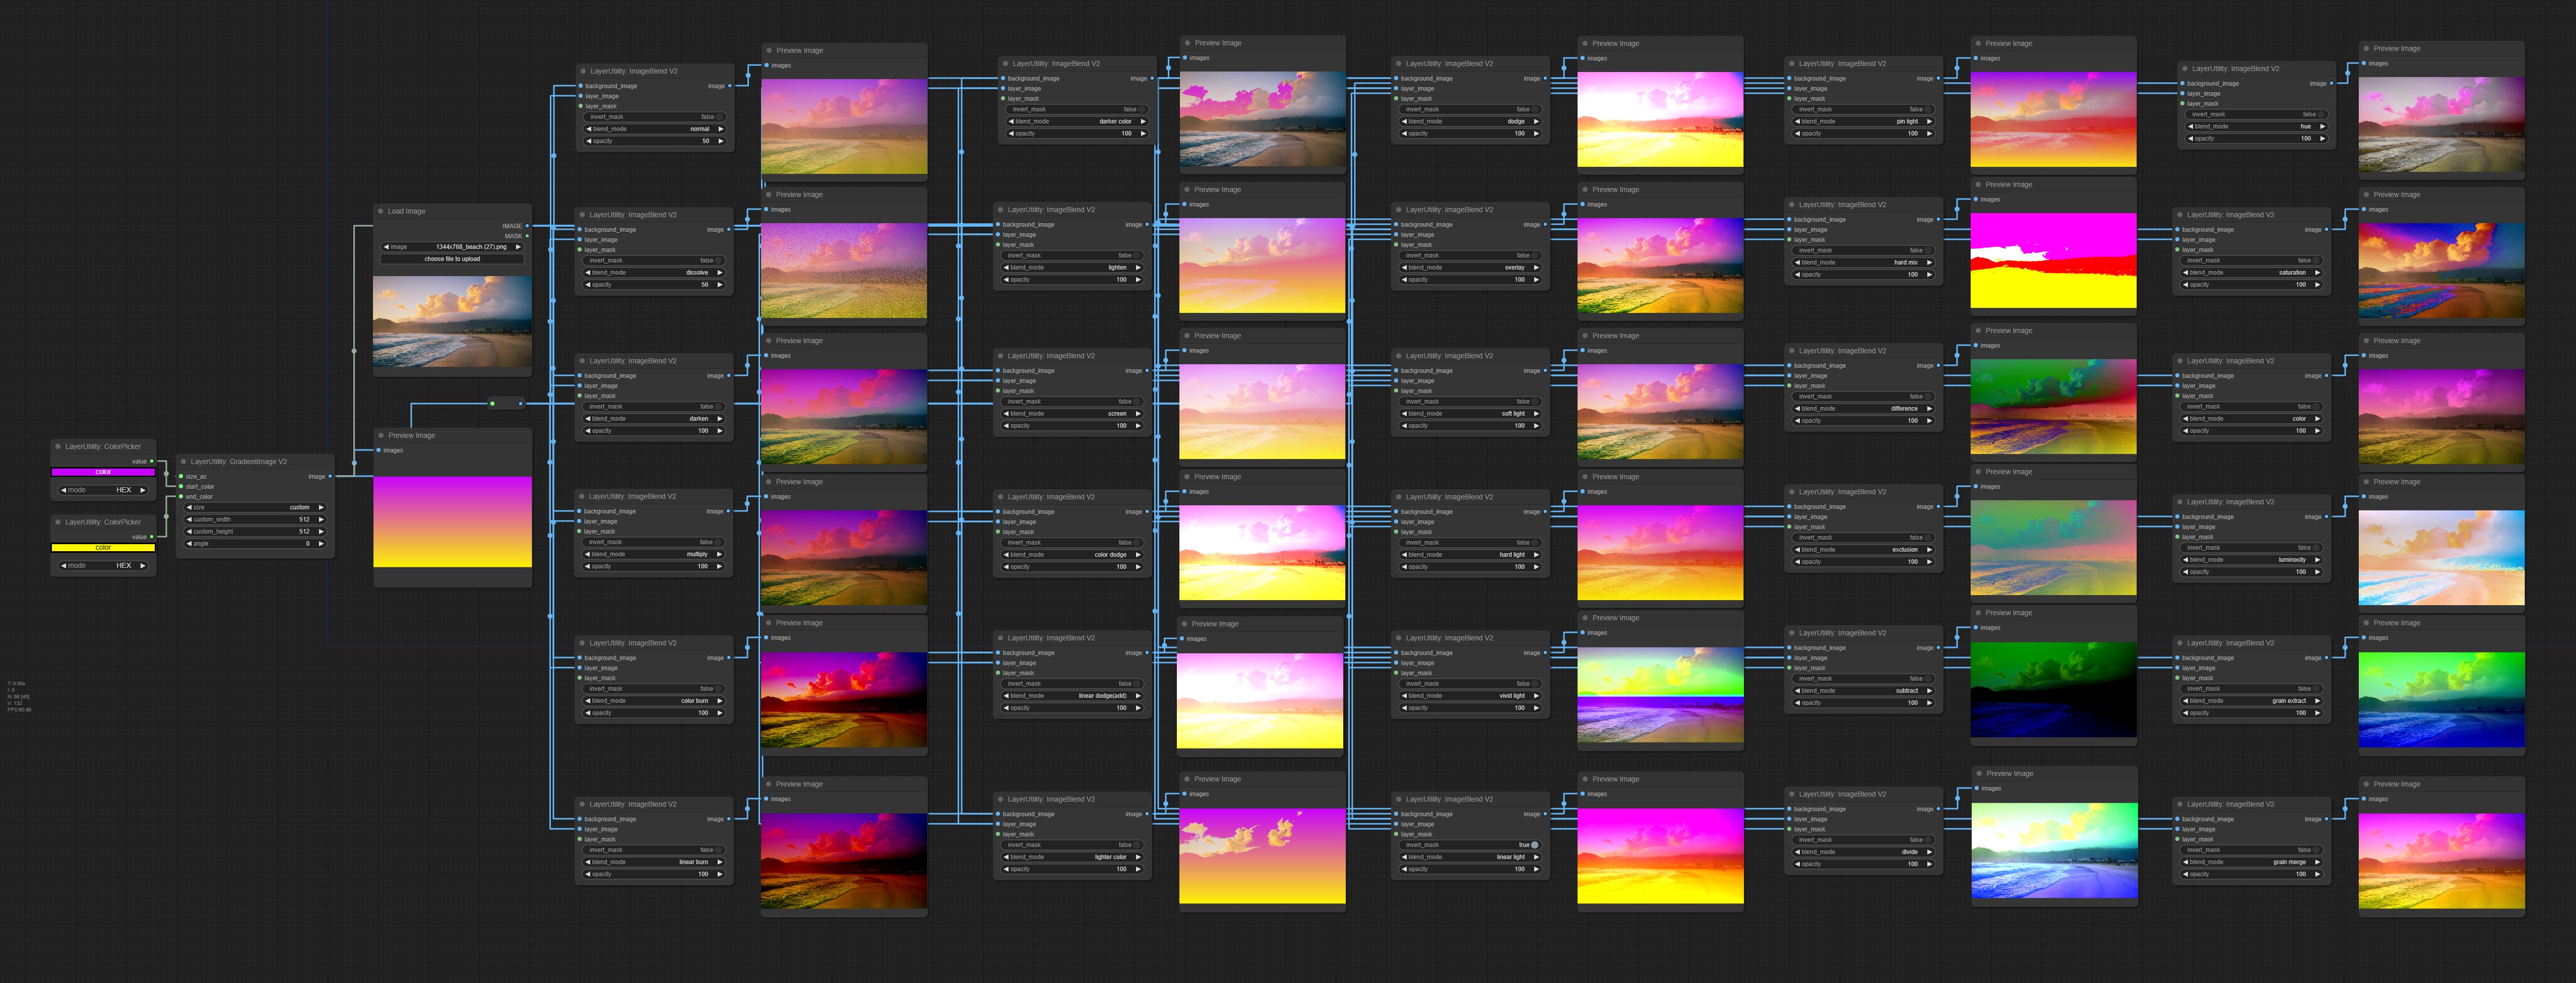
*Preview of the Blend Mode V2
4 The RGB color described by hexadecimal RGB format, like '#FA3D86'.
5 The layer_image and layer_mask must be of the same size.
Stars
إفادة
LayerStyle nodes follows the MIT license, Some of its functional code comes from other open-source projects. Thanks to the original author. If used for commercial purposes, please refer to the original project license to authorization agreement.


