all in one
v9.8.0
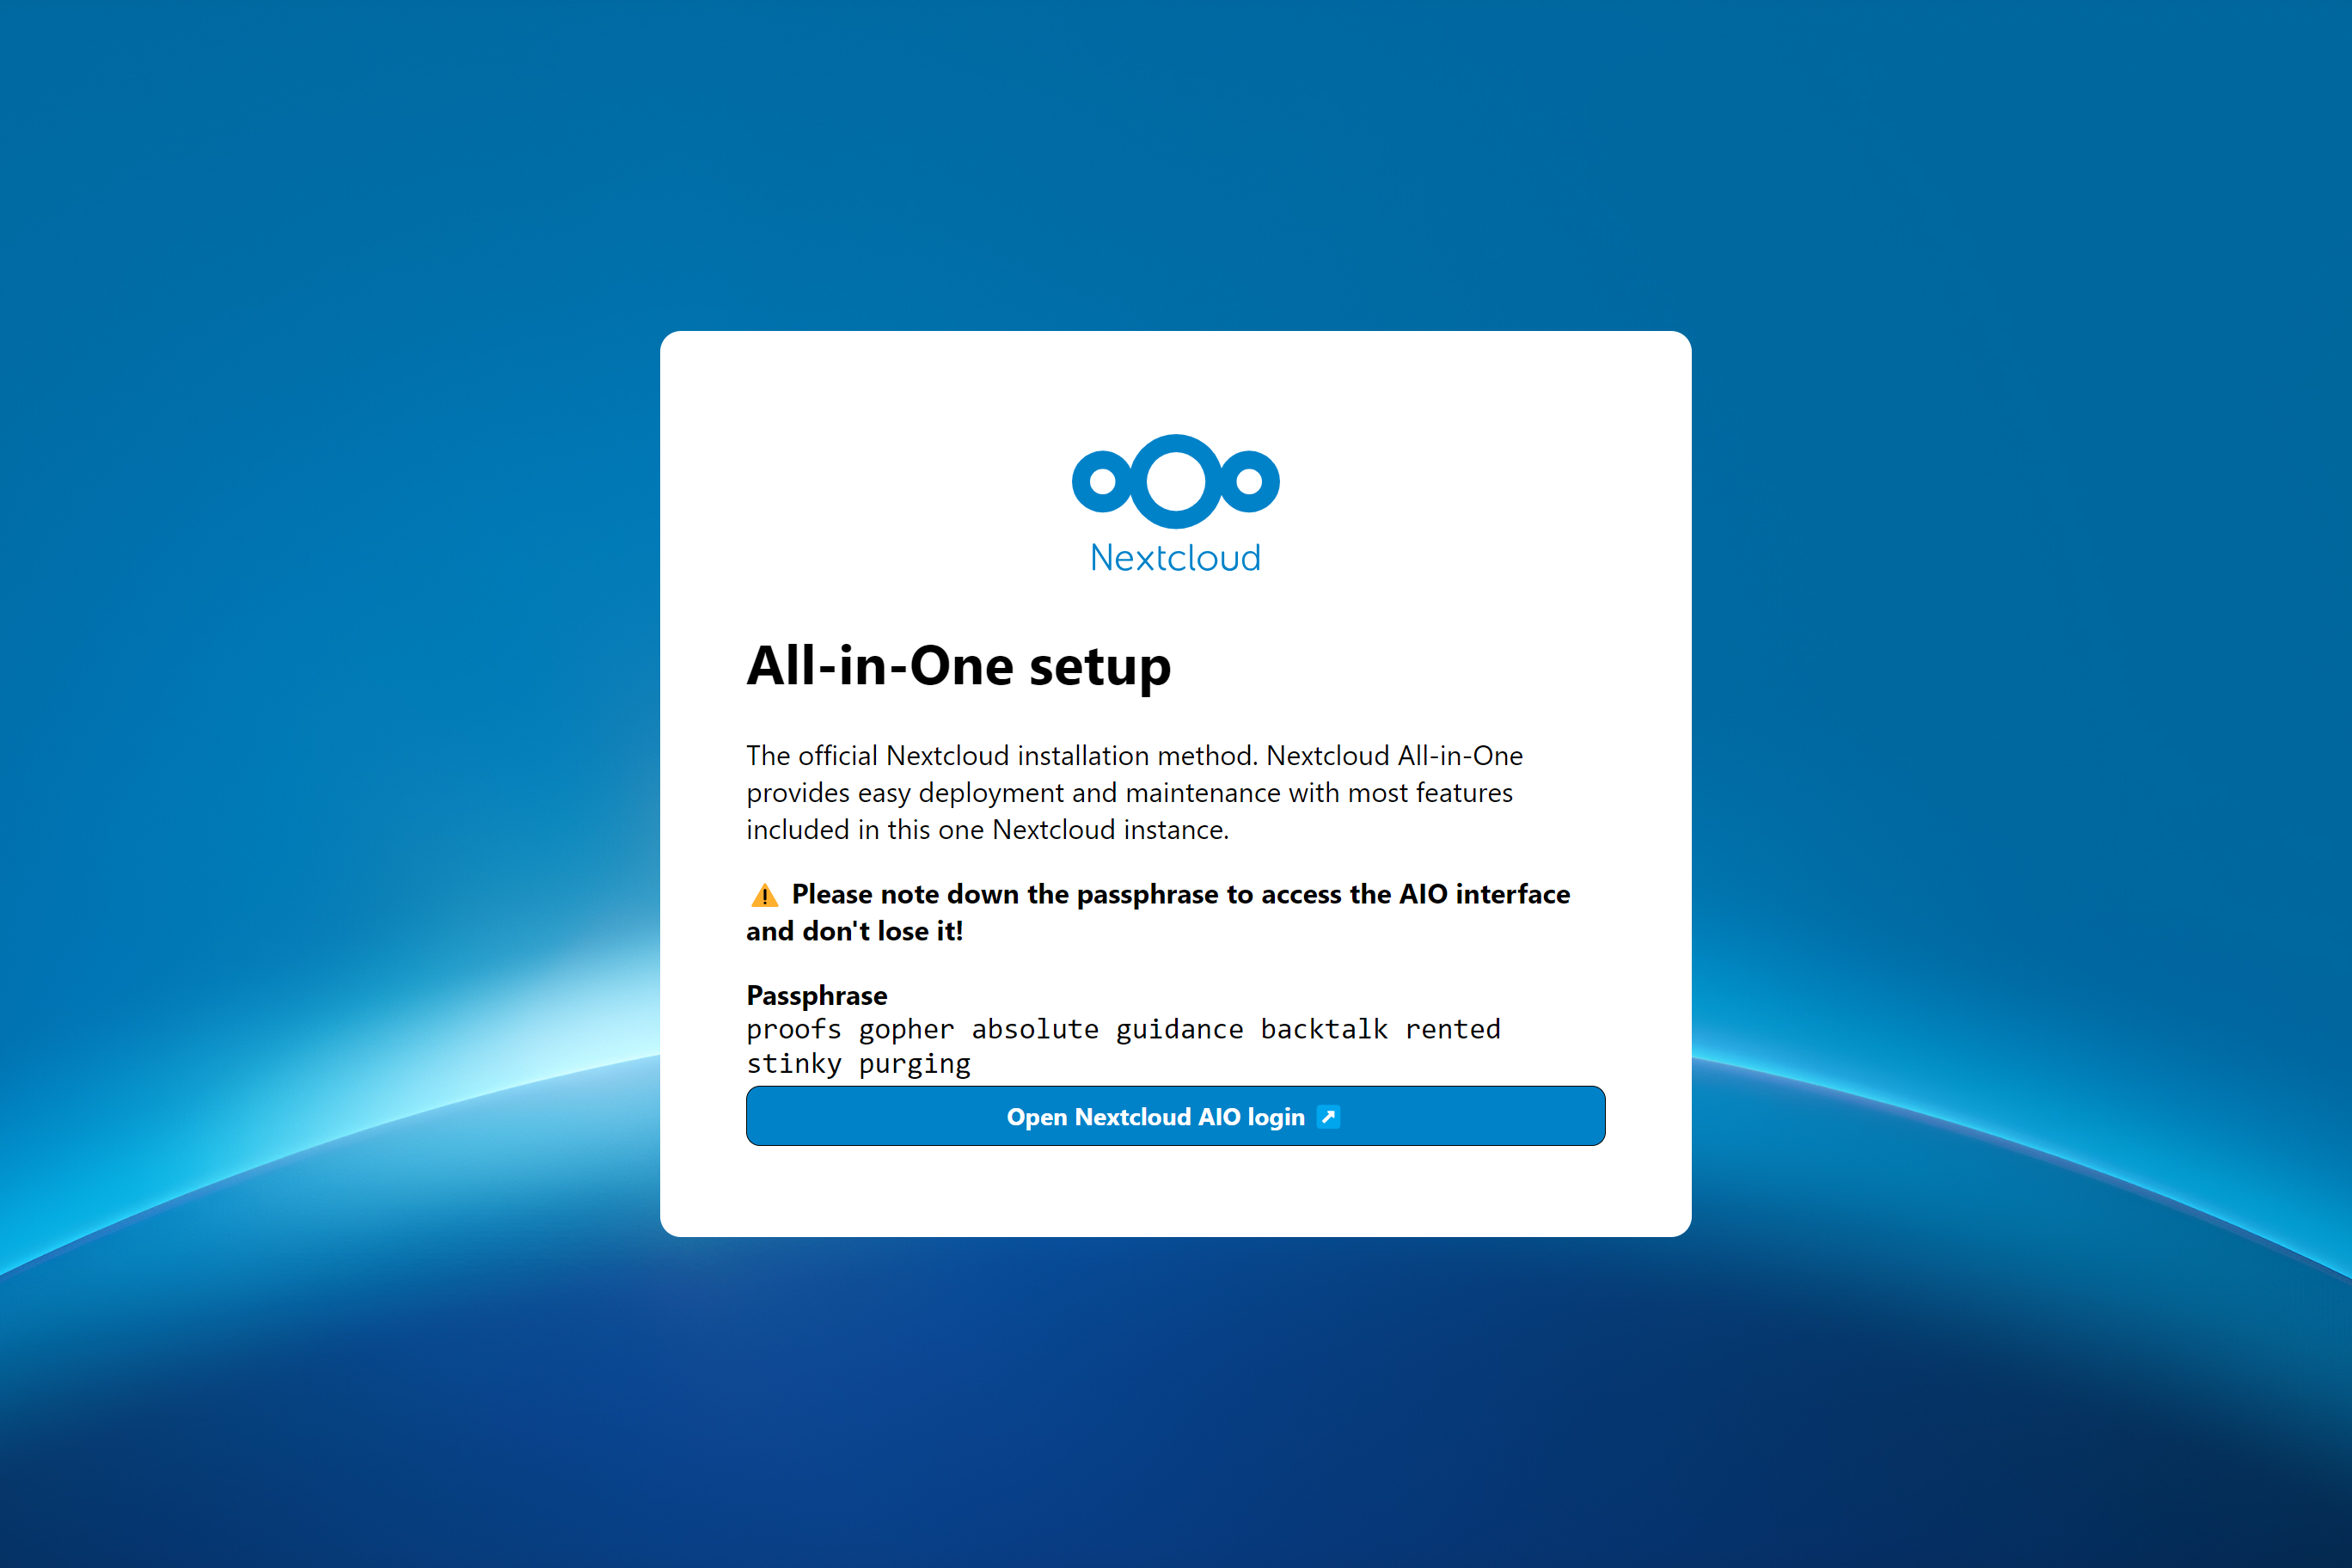
طريقة تثبيت NextCloud الرسمية. يوفر NextCloud AIO سهلاً للنشر والصيانة مع معظم الميزات المدرجة في مثيل NextCloud هذا.
متضمنة:
ffmpeg و smbclient و libreoffice و nodejs افتراضيًا| الإعداد الأول | بعد التثبيت |
|---|---|
 |  |
تعني الإرشادات التالية للتثبيتات بدون خادم ويب أو وكيل عكسي (مثل Apache و Nginx و Caddy و CloudFlare Tunnel وغير ذلك) في مكانه. إذا كنت ترغب في تشغيل AIO خلف خادم ويب أو وكيل عكسي (مثل Apache و Nginx و Caddy و CloudFlare Tunnel وإلا) ، راجع وثائق الوكيل العكسي. أيضا ، التعليمات أدناه مخصصة بشكل خاص للينكس. للاطلاع على MacOS ، انظر Windows ، انظر إلى هذا ، وللنظر إلى هذا.
تحذير
يمكنك استخدام البرنامج النصي المريح أدناه لتثبيت Docker. ومع ذلك ، فإننا نوصي بعدم تنزيل وتنفيذ البرامج النصية كـ Sudo. ولكن إذا كنت تشعر بذلك ، يمكنك بالطبع استخدامه. انظر أدناه:
curl -fsSL https://get.docker.com | sudo shإذا كنت بحاجة إلى دعم IPv6 ، فيجب عليك تمكينه باتباع https://github.com/nextcloud/all-in-one/blob/main/docker-ipv6-support.md.
قم بتشغيل الأمر أدناه من أجل بدء تشغيل الحاوية على Linux وبدون خادم ويب أو عكس الوكيل (مثل Apache و Nginx و Caddy و CloudFlare Tunnel وإلا) في مكانه:
 # For Linux and without a web server or reverse proxy (like Apache, Nginx, Caddy, Cloudflare Tunnel and else) already in place:
sudo docker run
--init
--sig-proxy=false
--name nextcloud-aio-mastercontainer
--restart always
--publish 80:80
--publish 8080:8080
--publish 8443:8443
--volume nextcloud_aio_mastercontainer:/mnt/docker-aio-config
--volume /var/run/docker.sock:/var/run/docker.sock:ro
nextcloud/all-in-one:latest
sudo docker run هذا الأمر يدور حول حاوية Docker جديدة. يمكن استخدام أوامر Docker اختياريًا بدون sudo إذا تمت إضافة المستخدم إلى مجموعة Docker (هذا ليس هو نفسه Docker بدون جذور ، انظر الأسئلة الشائعة أدناه).--init هذا الخيار ، يتأكد من عدم إنشاء عمليات غيبوبة على الإطلاق. انظر وثائق Docker.--sig-proxy=false يسمح هذا الخيار بالخروج من قشرة الحاوية التي يتم توصيلها تلقائيًا عند استخدام docker run باستخدام [CTRL] + [C] دون إيقاف الحاوية.--name nextcloud-aio-mastercontainer هذا هو اسم الحاوية. لا يُسمح بتغيير هذا الخط ، لأن تحديثات MasterContainer ستفشل.--restart always هذه هي "سياسة إعادة التشغيل". يعني always أن الحاوية يجب أن تبدأ دائمًا مع Docker Daemon. راجع وثائق Docker لمزيد من التفاصيل حول سياسات إعادة التشغيل: https://docs.docker.com/config/containers/start-containers-eutomally/--publish 80:80 هذا يعني أن المنفذ 80 من الحاوية يجب أن يتم نشره على المضيف باستخدام المنفذ 80. يتم استخدامه للحصول على شهادات صالحة لواجهة AIO إذا كنت تريد استخدام المنفذ 8443. AIO خلف خادم الويب أو الوكيل العكسي ويمكن إزالته في هذه الحالة حيث يمكنك ببساطة استخدام المنفذ 8080 لواجهة AIO ثم.--publish 8080:8080 هذا يعني أن المنفذ 8080 من الحاوية يجب أن يتم نشره على المضيف باستخدام المنفذ 8080. يتم استخدام هذا المنفذ لواجهة AIO ويستخدم شهادة موقعة ذاتيًا افتراضيًا. يمكنك أيضًا استخدام منفذ مضيف مختلف إذا تم استخدام المنفذ 8080 بالفعل على مضيفك ، على سبيل المثال --publish 8081:8080 (يمكن تغيير المنفذ الأول فقط للمضيف ، والمنفذ الثاني مخصص للحاوية ويجب أن يبقى في 8080 ).--publish 8443:8443 هذا يعني أنه يجب نشر المنفذ 8443 من الحاوية على المضيف باستخدام المنفذ 8443. إذا قمت بنشر المنفذ 80 و 8443 على الإنترنت العام ، فيمكنك الوصول إلى واجهة AIO عبر هذا المنفذ مع شهادة صالحة. ليس من الضروري أن تقوم بتشغيل AIO خلف خادم ويب أو وكيل عكسي ويمكنك إزالته في هذه الحالة حيث يمكنك ببساطة استخدام المنفذ 8080 لواجهة AIO ثم.--volume nextcloud_aio_mastercontainer:/mnt/docker-aio-config هذا يعني أن الملفات التي يتم إنشاؤها بواسطة MasterContainer سيتم تخزينها في حجم Docker يسمى nextcloud_aio_mastercontainer . لا يُسمح بتغيير هذا الخط ، لأن النسخ الاحتياطية المدمجة ستفشل لاحقًا.--volume /var/run/docker.sock:/var/run/docker.sock:ro rocke يتم تثبيت مقبس Docker في الحاوية التي يتم استخدامها لدور جميع الحاويات الأخرى ولمزيد من الميزات. يجب ضبطه على Windows/MacOS وعلى Docker بدون جذور. انظر الوثائق المعمول بها على هذا. إذا تم ضبط ، لا تنس أيضًا تعيين WATCHTOWER_DOCKER_SOCKET_PATH ! إذا كنت لا تحب هذا ، راجع https://github.com/nextcloud/all-in-one/tree/main/manual-install.nextcloud/all-in-one:latest هذه هي صورة حاوية Docker التي يتم استخدامها.--env NEXTCLOUD_DATADIR="/mnt/ncdata" (هذا مثال على Linux. انظر هذا لنظام التشغيل الآخر "وتفسير لما تفعله هذه القيمة. هذه الاحتياجات المحددة. ليتم تحديدها عند بدء التشغيل الأول إذا كنت ترغب في تغييره إلى مسار معين بدلاً من حجم Docker الافتراضي). للاطلاع على تفسيرات وأمثلة لمزيد من المتغيرات (مثل تغيير موقع Datadir من NextCloud أو تصاعد بعض المواقع كتخزين خارجي في الحاوية التالية Cloud) ، اقرأ من خلال هذا ReadMe وانظر إلى ملف Docker-Corms: https://github.com/ NextCloud/All-in-One/Blob/Main/Compose.yamlملاحظة: قد تكون مهتمًا بتعديل Datadir من NextCloud لتخزين الملفات في موقع مختلف عن مستوى Docker الافتراضي. انظر هذا الوثائق حول كيفية القيام بذلك.
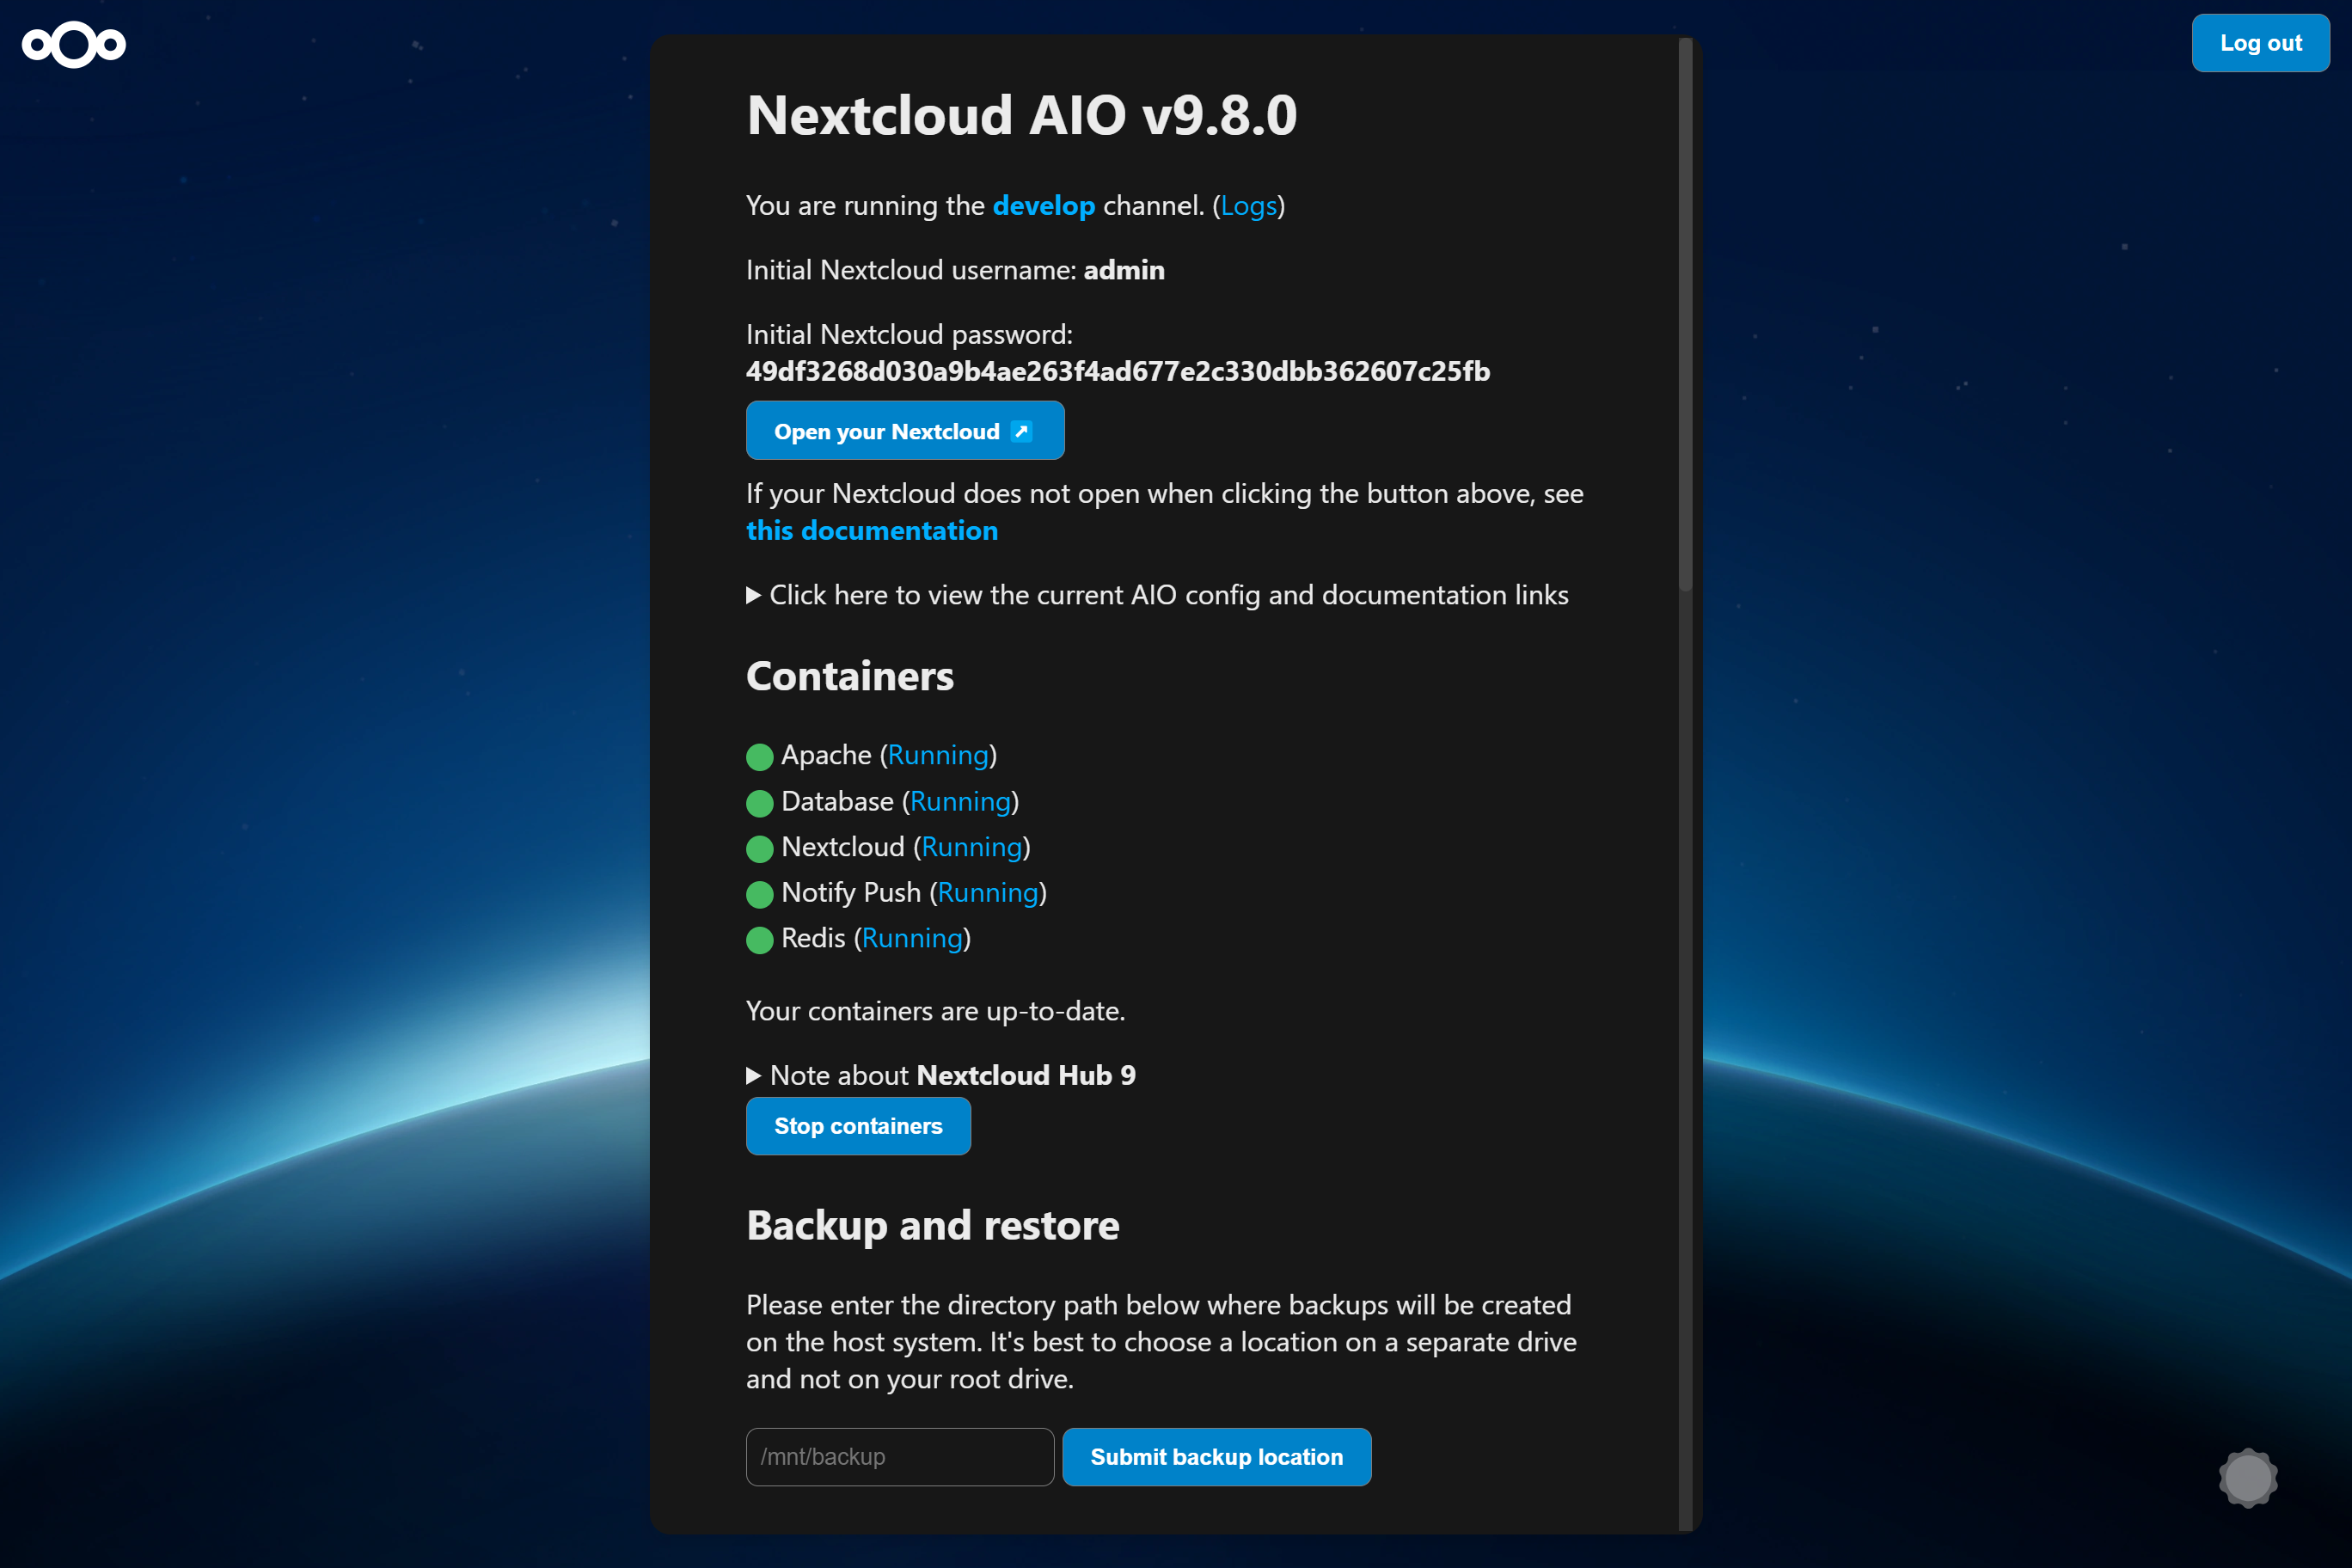
بعد بدء التشغيل الأولي ، يجب أن تكون قادرًا على فتح واجهة AIO التالية الآن على المنفذ 8080 من هذا الخادم.
على سبيل المثال https://ip.address.of.this.server:8080
إذا كان لدى جدار الحماية/جهاز التوجيه المنفذ 80 و 8443 مفتوحًا/تم إعادة توجيهه وقمت بتوجيه مجال إلى الخادم الخاص بك ، فيمكنك الحصول على شهادة صالحة تلقائيًا عن طريق فتح واجهة AIO التالية عبر:
https://your-domain-that-points-to-this-server.tld:8443
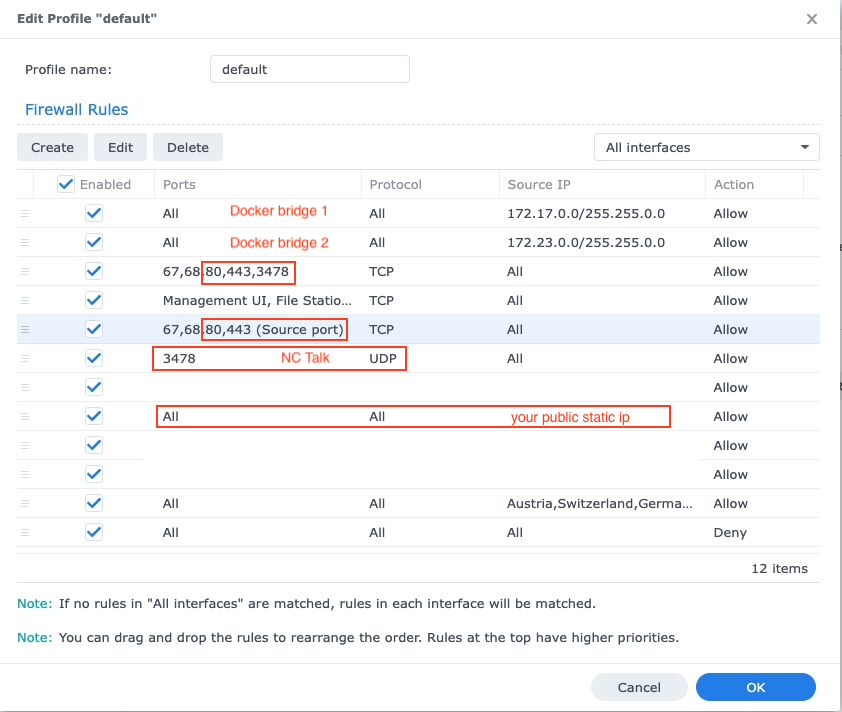
من فضلك لا تنس فتح المنفذ 3478/TCP و 3478/UDP في جدار الحماية/جهاز التوجيه لحاوية الحديث!
NextCloud Aio مستوحى من مشاريع مثل Portainer التي تدير Docker Daemon من خلال التحدث إليه من خلال مقبس Docker مباشرة. يسمح هذا المفهوم للمستخدم بتثبيت حاوية واحدة فقط مع أمر واحد يقوم بالرفع الثقيل لإنشاء وإدارة جميع الحاويات المطلوبة من أجل توفير تثبيت NextCloud مع معظم الميزات المضمنة. كما أنه يجعل تحديث نسيم ولا يرتبط بالنظام المضيف (وتحديثاته البطيئة) بعد الآن لأن كل شيء في الحاويات. بالإضافة إلى ذلك ، من السهل جدًا التعامل معها من منظور المستخدم لأنه يتم توفير واجهة بسيطة لإدارة تثبيت AIO التالي.
راجع هذه المشكلة للحصول على قائمة بطلبات الميزات التي تحتاج إلى مساعدة من قبل المساهمين.
نعم. يرجى الرجوع إلى الوثائق التالية حول هذا: عكس proxy.md
يمكنك التحقق من ذلك على Linux عن طريق التشغيل: uname -m
هؤلاء فقط (إذا قمت بالوصول إلى واجهة MasterContainer داخليًا عبر المنفذ 8080):
443/TCP لحاوية Apache443/UDP إذا كنت تريد تمكين HTTP3 لحاوية Apache3478/TCP و 3478/UDP لحاوية الحديث8080/TCP : واجهة MasterContainer مع شهادة موقعة ذاتيا (تعمل دائمًا ، وأيضًا إذا كان الوصول فقط عبر IP-Address ممكنًا ، على سبيل المثال https://ip.address.of.this.server:8080/ )80/TCP : إعادة التوجيه إلى NextCloud (يستخدم للحصول على الشهادة عبر ACME HTTP-Callenge لـ MasterContainer)8443/TCP : واجهة MasterContainer مع شهادة صالحة (يعملان فقط إذا كان المنفذ 80 و 8443 مفتوحين/يتم إعادة توجيههم في جدار الحماية/جهاز التوجيه وتوجه نطاقًا إلى الخادم الخاص بك. إنه ينشئ شهادة صالحة ثم تلقائيًا والوصول عبر EG https://public.domain.com:8443/ ممكن.)443/TCP : سيتم استخدامها بواسطة حاوية Apache لاحقًا ويجب أن تكون مفتوحة/إعادة توجيهها في جدار الحماية/جهاز التوجيه الخاص بك443/UDP : سيتم استخدامها بواسطة حاوية Apache لاحقًا ويجب أن تكون مفتوحة/إعادة توجيهها في جدار الحماية/جهاز التوجيه إذا كنت ترغب في تمكين HTTP33478/TCP و 3478/UDP : سيتم استخدامه بواسطة Turnserver داخل حاوية الحديث ويجب أن يتم فتحه/إعادة توجيهه في جدار الحماية/جهاز التوجيه الخاص بك على MacOS ، لا يوجد سوى شيء واحد مختلف بالمقارنة مع Linux: بدلاً من استخدام --volume /var/run/docker.sock:/var/run/docker.sock:ro ، تحتاج إلى استخدام --volume /var/run/docker.sock.raw:/var/run/docker.sock:ro لتشغيله بعد تثبيت سطح مكتب Docker (ولا تنس تمكين IPv6 إذا كنت بحاجة إلى ذلك). بصرف النظر عن ذلك ، يجب أن يعمل ويتصرف مثل Linux.
أيضًا ، قد تكون مهتمًا بضبط Datadir من NextCloud لتخزين الملفات على نظام المضيف. انظر هذا الوثائق حول كيفية القيام بذلك.
على Windows ، قم بتثبيت سطح المكتب Docker (ولا تنس تمكين IPv6 إذا كنت بحاجة إلى ذلك) وتشغيل الأمر التالي في موجه الأوامر:
 docker run ^
--init ^
--sig-proxy=false ^
--name nextcloud-aio-mastercontainer ^
--restart always ^
--publish 80:80 ^
--publish 8080:8080 ^
--publish 8443:8443 ^
--volume nextcloud_aio_mastercontainer:/mnt/docker-aio-config ^
--volume //var/run/docker.sock:/var/run/docker.sock:ro ^
nextcloud/all-in-one:latest
أيضًا ، قد تكون مهتمًا بضبط Datadir من NextCloud لتخزين الملفات على نظام المضيف. انظر هذا الوثائق حول كيفية القيام بذلك.
ملحوظة
تقريبا جميع الأوامر في وثائق هذا المشروع تستخدم sudo docker ... نظرًا لأن sudo غير متوفر على Windows ، يمكنك ببساطة إزالة sudo من الأوامر ويجب أن تعمل.
على Synology ، هناك شيئان مختلفان مقارنة بـ Linux: بدلاً من استخدام --volume /var/run/docker.sock:/var/run/docker.sock:ro ، تحتاج إلى استخدام --volume /volume1/docker/docker.sock:/var/run/docker.sock:ro لتشغيله. تحتاج أيضًا إلى إضافة- --env WATCHTOWER_DOCKER_SOCKET_PATH="/volume1/docker/docker.sock" إلى الأمر docker Run of the MasterContainer (ولكن قبل السطر الأخير nextcloud/all-in-one:latest ). بصرف النظر عن ذلك ، يجب أن يعمل ويتصرف مثل Linux. من الواضح أن Synology Docker GUI لن يعمل مع ذلك ، لذا ستحتاج إما إلى استخدام SSH أو إنشاء مهمة نص معرفة من قبل المستخدم في جدولة المهمة باعتبارها "جذر" المستخدم من أجل تشغيل الأمر.
ملحوظة
من الممكن أن يقع مقبس Docker على Synology في /var/run/docker.sock مثل الافتراضي على Linux. بعد ذلك ، يمكنك فقط استخدام أمر Linux دون الحاجة إلى تغيير أي شيء - ستلاحظ ذلك عندما تحاول بدء الحاوية ويقول إن Mint Mount فشل. مثل docker: Error response from daemon: Bind mount failed: '/volume1/docker/docker.sock' does not exists.
أيضًا ، قد تكون مهتمًا بضبط Datadir من NextCloud لتخزين الملفات على نظام المضيف. انظر هذا الوثائق حول كيفية القيام بذلك.
ستحتاج أيضًا إلى ضبط جدار الحماية في Synology ، انظر أدناه:
إن Synology DSM عرضة للهجمات مع المنافذ المفتوحة وواجهات تسجيل الدخول ، ولهذا السبب يوصى دائمًا بإعداد جدار الحماية. إذا تم تنشيط جدار الحماية ، فمن الضروري أن يكون لديك استثناءات للمنافذ 80،443 ، والشبكة الفرعية لجسر Docker الذي يتضمن حاويات Cloud التالية ، IP الثابت العام الخاص بك (إذا لم تستخدم DDNs) وإذا كان ذلك كذلك +UDP:
إذا كان لديك إعداد NAS على شبكتك المحلية (وهو في أغلب الأحيان) ، فستحتاج إلى إعداد DNS Synology لتتمكن من الوصول إلى NextCloud من شبكتك عبر مجالها. لا تنس أيضًا إضافة DNS الجديد إلى خادم DHCP الخاص بك وإعدادات IP الثابتة:

أسهل طريقة لتشغيلها مع Portainer على Linux هي استخدام ميزة Stacks Portainer واستخدام ملف Docker-Corms من أجل بدء AIO بشكل صحيح.
مع إصدار مقياس Truenas 24.10.0 (الذي تم إصداره رسميًا في 29 أكتوبر 2024 كإصدار مستقر) ، قامت أنظمة IX بتخلي عن تكامل Kubernetes ونفذت بيئة Docker بالكامل.
للحصول على دليل أكثر اكتمالا ، راجع هذا الدليل بواسطة ZoBster: #5506
في إصدارات مقياس Truenas الأقدم مع بيئة Kubernetes ، هناك طريقتان لتشغيل AIO. الشخص المفضل هو تشغيل AIO داخل VM. هذا ضروري نظرًا لأنهم لا يعرضون مقبس Docker للحاويات على المضيف ، فلا يمكنك أيضًا استخدام Docker-Corms على ذلك ، وبالتالي ، ومن غير الممكن أيضًا تشغيل مخططات الدفاع المخصصة التي لم تتم كتابتها بشكل صريح لمقياس Truenas.
هناك طريقة أخرى ولكن لم يتم اختبارها وهي تثبيت Portainer على مقياس Truenas الخاص بك من هنا https://truecharts.org/charts/stable/portainer/installation-notes وإضافة مستودع Helm-Chart https://nextcloud.github.io/all--- في واحد/في portainer باتباع https://docs.portainer.io/user/kubernetes/helm. تتوفر المزيد من المستندات على مخطط Helm AIOS هنا: https://github.com/nextcloud/all-in-one/tree/main/nextcloud-aio-helm-chart#nextcloud-aio-helm-chart.
https://yourdomain.com/settings/admin/richdocumentshttps://yourdomain.com/settings/admin/talk .على الرغم من أنه لا يبدو أنه هو الحال ولكن من منظور AIO ، يعمل نفق CloudFlare مثل الوكيل العكسي. لذا ، يرجى اتباع وثائق الوكيل العكسي حيث يتم توثيق كيفية تشغيله خلف نفق CloudFlare. ومع ذلك ، يرجى الاطلاع على التحذيرات قبل المتابعة.
للحصول على دليل مثال على الوكيل العكسي لـ Tailscale ، راجع هذا الدليل بواسطة flll: #5439
/proc/user_beancounters وعلى الأرجح numproc فمن المحتمل أن يسيء التصرف في الخادم الخاص بك بمجرد وصوله إلى هذا الحد الذي يتم الوصول إليه بسرعة كبيرة من قبل AIO ، انظر هنا.بشكل عام ، فإن VPS الموصى بها هي تلك التي هي KVM/غير معروفة مع Docker يجب أن تعمل بشكل أفضل عليهم.
يمكنك تثبيت AIO في وضع الوكيل العكسي حيث يتم توثيق أيضًا كيفية تشغيله باستخدام ACME DNS-Callenge للحصول على شهادة صالحة لـ AIO. انظر وثائق الوكيل العكسي. (يعني هو Caddy with ACME DNS-challenge ). راجع أيضًا https://github.com/dani-garcia/vaultwarden/wiki/running-a-private-vaultenden-instance-with-let٪27S-Encrypt-certs#getting-a-custom-caddy build للحصول على مستندات إضافية حول هذا الموضوع.
إذا كنت لا ترغب في فتح NextCloud على الإنترنت العام ، فقد تُلقي نظرة على الوثائق التالية حول كيفية إعداده محليًا: المحلية. .
لا ولن تتم إضافته. إذا كنت ترغب فقط في تشغيله محليًا ، فقد تُلقي نظرة على الوثائق التالية: instance.md المحلي للتكوين بدون مجال تقليدي. أو فكر في استخدام NextCloudPI للوصول إلى IP-Address محليًا (إنه يحدد ميزات أقل من AIO).
لا. هذا غير ممكن ولن تتم إضافته لأسباب متعددة: تحديث الشيكات ، يتم تثبيت التطبيق عبر متجر التطبيقات ، وتنزيل صور Docker إضافية عند الطلب والمزيد.
لا ولن يكونوا. إذا كنت ترغب في تشغيله محليًا ، دون فتح NextCloud على الإنترنت العام ، فيرجى إلقاء نظرة على وثائق المثيل المحلي.
لا ولن تتم إضافته. ومع ذلك ، يمكنك استخدام هذه الميزة من أجل إنشاء مثيلات AIO متعددة ، واحدة لكل مجال.
لا ولن يكونوا. يرجى استخدام مجال مخصص لـ NextCloud وإعداده بشكل صحيح باتباع وثائق الوكيل العكسي. إذا تم حظر المنفذ 443 و/أو 80 بالنسبة لك ، فيمكنك استخدام نفق CloudFlare إذا كنت ترغب في نشره عبر الإنترنت. يمكنك أيضًا استخدام ACME DNS-Callenge للحصول على شهادة صالحة. ومع ذلك ، في جميع الحالات ، ستعيدك واجهة CloT Nextregle إلى المنفذ 443.
لا ولن تتم إضافته. يرجى استخدام مجال مخصص (فرعي) لـ NextCloud وإعداده بشكل صحيح باتباع وثائق الوكيل العكسي.
يرجى ملاحظة أن الوصول المحلي غير ممكن إذا كنت تقوم بتشغيل AIO خلف نفق CloudFlare لأن Proxying TLS في هذه الحالة تم تفريغها إلى البنية التحتية CloudFlares. يمكنك إصلاح هذا عن طريق إعداد الوكيل العكسي الخاص بك الذي يتولى TLS Proxying محليًا وسيقوم بخطوات العمل أدناه.
يرجى التأكد من أنك إذا كنت تقوم بتشغيل AIO خلف وكيل عكسي ، فسيتم تكوين الوكيل العكسي لاستخدام المنفذ 443 على الخادم الذي يديره. وإلا فإن الخطوات أدناه لن تعمل.
الآن وبعد أن أصبح هذا بعيدًا عن الطريق ، تتمثل الطريقة الموصى بها في كيفية الوصول إلى NextCloud محليًا ، في إعداد خادم DNS محلي مثل حفرة PI وإعداد سجل DNS مخصص لهذا المجال الذي يشير إلى IP الداخلي- AddDress من الخادم الخاص بك الذي يعمل NextCloud AIO. فيما يلي بعض الأدلة:
إذا كنت متأكدًا تمامًا من قيامك بتكوين كل شيء بشكل صحيح ولم تتمكن من تمرير التحقق من صحة المجال ، فيمكنك تخطي التحقق من الصحة عن طريق إضافة --env SKIP_DOMAIN_VALIDATION=true إلى أمر تشغيل Docker في MasterContainer (ولكن قبل السطر الأخير nextcloud/all-in-one:latest !
من المعروف أن نظام Linux الذي يستخدم جدار الحماية حيث أن الخفيون جدار الحماية الخاص بهم يعاني من مشاكل مع شبكات Docker. في حالة عدم قدرة الحاويات على التواصل مع بعضها البعض ، يمكنك تغيير جدار الحماية الخاص بك لاستخدام الواجهة الخلفية IPTABLES عن طريق التشغيل:
 sudo sed -i 's/FirewallBackend=nftables/FirewallBackend=iptables/g' /etc/firewalld/firewalld.conf
sudo systemctl restart firewalld docker
بعد ذلك يجب أن تعمل.
انظر https://dev.to/ozorest/fedora-32-how-to-solution-docker-internal-network-issue-22me لمزيد من التفاصيل حول هذا. هذا القيد مذكور على موقع الويب الرسمي على الويب: https://firewalld.org/#who-is-using-it
نعم. إذا تم تمكين SELInux ، فقد تحتاج إلى إضافة --security-opt label:disable خيار Run Run of the MasterContainer للسماح لها بالوصول إلى مقبس Docker (أو security_opt: ["label:disable"] في compose.yaml). انظر #485
occ ؟ ما عليك سوى تشغيل ما يلي: sudo docker exec --user www-data -it nextcloud-aio-nextcloud php occ your-command . بالطبع ، يجب تبادل your-command مع الأمر الذي تريد تشغيله.
Security & setup warnings displays the "missing default phone region" after initial install ؟ ما عليك سوى تشغيل الأمر التالي: sudo docker exec --user www-data nextcloud-aio-nextcloud php occ config:system:set default_phone_region --value="yourvalue" . بالطبع تحتاج إلى تعديل yourvalue بناءً على موقعك. أمثلة هي DE ، US و GB . راجع هذه القائمة لمزيد من الرموز: https://en.wikipedia.org/wiki/iso_3166-1_alpha-2#official_assigned_code_elements
راجع إجراءات متعددة. md للحصول على بعض الوثائق حول هذا الموضوع.
يتميز NextCloud بحماية مدمجة في مجال الغشاش والتي قد يتم تشغيلها وستمنع معمل IP أو تعطيل المستخدم. يمكنك إلغاء حظر IP-Address عن طريق تشغيل sudo docker exec --user www-data -it nextcloud-aio-nextcloud php occ security:bruteforce:reset <ip-address> وتمكين مستخدم معطل عن طريق تشغيل sudo docker exec --user www-data -it nextcloud-aio-nextcloud php occ user:enable <name of user> . انظر https://docs.nextcloud.com/server/latest/admin_manual/Configuration_server/occ_command.html#security لمزيد من المعلومات.
يقدر هذا المشروع الاستقرار على ميزات جديدة. هذا يعني أنه عندما يتم تقديم تحديث جديد لـ NextCloud ، سننتظر على الأقل حتى إصدار التصحيح الأول ، على سبيل المثال 24.0.1 قبل الترقية إليه. كما سننتظر الترقية حتى تتوافق جميع التطبيقات المهمة مع الإصدار الرئيسي الجديد. سيتم تحديث الإصدارات الصغيرة أو التصحيح لـ NextCloud وجميع التبعيات وكذلك جميع الحاويات إلى إصدارات جديدة في أقرب وقت ممكن ، لكننا نحاول تقديم جميع التحديثات أولاً جولة اختبار جيدة قبل دفعها. هذا يعني أن الأمر قد يستغرق حوالي أسبوعين قبل أن تصل التحديثات الجديدة إلى latest القناة. إذا كنت ترغب في المساعدة في الاختبار ، فيمكنك التبديل إلى قناة beta باتباع هذه الوثائق التي ستمنحك أيضًا التحديثات في وقت سابق.
يمكنك التبديل إلى قناة مختلفة مثل على سبيل المثال قناة بيتا أو من قناة بيتا إلى أحدث قناة من خلال إيقاف MasterContainer ، وإزالتها (لن يتم فقد أي بيانات) وإعادة إنشاء الحاوية باستخدام نفس الأمر الذي استخدمته في البداية لإنشاء الماستركونتن. تحتاج ببساطة إلى تغيير السطر الأخير nextcloud/all-in-one:latest إلى nextcloud/all-in-one:beta and Vice.
إذا دفعنا حاويات جديدة إلى latest ، فسترى في واجهة AIO أسفل قسم containers التي تم العثور على تحديثات حاويات جديدة. في هذه الحالة ، ما عليك سوى الضغط على Stop containers Start and update containers من أجل تحديث الحاويات. لدى MasterContainer إجراء التحديث الخاص به. انظر أدناه. ولا تنسَ احتياطيًا للحالة الحالية لمثيلك باستخدام حل النسخ الاحتياطي المدمج قبل بدء الحاويات مرة أخرى! وإلا فلن تتمكن من استعادة مثيلك بسهولة إذا كان هناك شيء يجب أن ينهار أثناء التحديث.
If a new mastercontainer update was found, you'll see a note below the Stop containers button that allows to show the changelog. If you click that button and the containers are stopped, you will see a new button that allows to update the mastercontainer. After doing so and after the update is gone through, you will have the option again to Start and update containers . It is recommended to create a backup before clicking the Start and update containers button.
Additionally, there is a cronjob that runs once a day that checks for container and mastercontainer updates and sends a notification to all Nextcloud admins if a new update was found.
AIO ships its own update notifications implementation. It checks if container updates are available. If so, it sends a notification with the title Container updates available! on saturdays to Nextcloud users that are part of the admin group. If the Nextcloud container image should be older than 90 days (~3 months) and thus badly outdated, AIO sends a notification to all Nextcloud users with the title AIO is outdated! . Thus admins should make sure to update the container images at least once every 3 months in order to make sure that the instance gets all security bugfixes as soon as possible.
If your Nextcloud is running and you are logged in as admin in your Nextcloud, you can easily log in to the AIO interface by opening https://yourdomain.tld/settings/admin/overview which will show a button on top that enables you to log in to the AIO interface by just clicking on this button.
ملحوظة
You can change the domain/ip-address/port of the button by simply stopping the containers, visiting the AIO interface from the correct and desired domain/ip-address/port and clicking once on Start containers .
ملحوظة
Editing the configuration.json manually and making a mistake may break your instance so please create a backup first!
If you set up a new AIO instance, you need to enter a domain. Currently there is no way to change this domain afterwards from the AIO interface. So in order to change it, you need to edit the configuration.json manually using sudo docker run -it --rm --volume nextcloud_aio_mastercontainer:/mnt/docker-aio-config:rw alpine sh -c "apk add --no-cache nano && nano /mnt/docker-aio-config/data/configuration.json" , substitute each occurrence of your old domain with your new domain and save and write out the file. Afterwards restart your containers from the AIO interface and everything should work as expected if the new domain is correctly configured.
If you are running AIO behind a web server or reverse proxy (like Apache, Nginx, Caddy, Cloudflare Tunnel and else), you need to obviously also change the domain in your reverse proxy config.
Additionally, after restarting the containers, you need to open the admin settings and update some values manually that cannot be changed automatically. Here is a list of some known places:
https://your-nc-domain.com/settings/admin/talk for Turn/Stun server and Signaling Server if you enabled Talk via the AIO interfacehttps://your-nc-domain.com/settings/admin/theming for the theming URLhttps://your-nc-domain.com/settings/admin/app_api for the deploy daemon if you enabled the App API via the AIO interfaceIf something goes unexpected routes during the initial installation, you might want to reset the AIO installation to be able to start from scratch.
ملحوظة
If you already have it running and have data on your instance, you should not follow these instructions as it will delete all data that is coupled to your AIO instance.
Here is how to reset the AIO instance properly:
sudo docker stop nextcloud-aio-mastercontainersudo docker stop nextcloud-aio-domainchecksudo docker ps --format {{.Names}} . If no nextcloud-aio containers are listed, you can proceed with the steps below. If there should be some, you will need to stop them with sudo docker stop <container_name> until no one is listed anymore.sudo docker ps --filter "status=exited"sudo docker container prunesudo docker network rm nextcloud-aiosudo docker volume ls --filter "dangling=true"sudo docker volume prune --filter all=1 (on Windows you might need to remove some volumes afterwards manually with docker volume rm nextcloud_aio_backupdir , docker volume rm nextcloud_aio_nextcloud_datadir ).NEXTCLOUD_DATADIR to a path on your host instead of the default volume, you need to clean that up as well. (Eg by simply deleting the directory).sudo docker volume ls --format {{.Name}} . If no nextcloud-aio volumes are listed, you can proceed with the steps below. If there should be some, you will need to remove them with sudo docker volume rm <volume_name> until no one is listed anymore.sudo docker image prune -a .Nextcloud AIO provides a backup solution based on BorgBackup. These backups act as a restore point in case the installation gets corrupted. By using this tool, backups are incremental, differential, compressed and encrypted – so only the first backup will take a while. Further backups should be fast as only changes are taken into account.
It is recommended to create a backup before any container update. By doing this, you will be safe regarding any possible complication during updates because you will be able to restore the whole instance with basically one click.
For local backups, the restore process should be pretty fast as rsync is used to restore the chosen backup which only transfers changed files and deletes additional ones. For remote borg backups, the whole backup archive is extracted from the remote, which depending on how clever borg extract is, may require downloading the whole archive.
If you connect an external drive to your host, and choose the backup directory to be on that drive, you are also kind of safe against drive failures of the drive where the docker volumes are stored on.
/mnt/backup ./mnt/backup .Create Backup which should create the first backup on the external disk.If you want to back up directly to a remote borg repository:
Create backup , this will create an ssh key pair and fail because the remote doesn't trust this key yet. Copy the public key shown in AIO and add it to your authorized keys on the remote. Backups can be created and restored in the AIO interface using the buttons Create Backup and Restore selected backup . Additionally, a backup check is provided that checks the integrity of your backups but it shouldn't be needed in most situations.
The backups themselves get encrypted with an encryption key that gets shown to you in the AIO interface. Please save that at a safe place as you will not be able to restore from backup without this key.
Daily backups can get enabled after the initial backup is done. Enabling this also allows to enable an option that allows to automatically update all containers, Nextcloud and its apps.
Be aware that this solution does not back up files and folders that are mounted into Nextcloud using the external storage app - but you can add further Docker volumes and host paths that you want to back up after the initial backup is done.
Backed up will get all important data of your Nextcloud AIO instance like the database, your files and configuration files of the mastercontainer and else. Files and folders that are mounted into Nextcloud using the external storage app are not getting backed up. There is currently no way to exclude the data directory because it would require hacks like running files:scan and would make the backup solution much more unreliable (since the database and your files/folders need to stay in sync). If you still don't want your datadirectory to be backed up, see https://github.com/nextcloud/all-in-one#how-to-enable-automatic-updates-without-creating-a-backup-beforehand for options (there is a hint what needs to be backed up in which order).
The built-in borg-based backup solution has by default a retention policy of --keep-within=7d --keep-weekly=4 --keep-monthly=6 . See https://borgbackup.readthedocs.io/en/stable/usage/prune.html for what these values mean. You can adjust the retention policy by providing --env BORG_RETENTION_POLICY="--keep-within=7d --keep-weekly=4 --keep-monthly=6" to the docker run command of the mastercontainer (but before the last line nextcloud/all-in-one:latest ! If it was started already, you will need to stop the mastercontainer, remove it (no data will be lost) and recreate it using the docker run command that you initially used) and customize the value to your fitting.
Backing up directly to a remote borg repository is supported. This avoids having to store a local copy of your backups, supports append-only borg keys to counter ransomware and allows using the AIO interface to manage your backups.
Some alternatives, which do not have all the above benefits:
If you are running AIO in a LXC container, you need to make sure that FUSE is enabled in the LXC container settings. Also, if using Alpine Linux as host OS, make sure to add fuse via apk add fuse . Otherwise the backup container will not be able to start as FUSE is required for it to work.
As stated in the AIO interface, it is possible to use a docker volume as backup target. Before you can use that, you need to create it first. Here is an example how to create one on Windows:
 docker volume create ^
--driver local ^
--name nextcloud_aio_backupdir ^
-o device="/host_mnt/e/your/backup/path" ^
-o type="none" ^
-o o="bind"
In this example, it would mount E:yourbackuppath into the volume so for a different location you need to adjust /host_mnt/e/your/backup/path accordingly. Afterwards enter nextcloud_aio_backupdir in the AIO interface as backup location.
You can open the BorgBackup archives on your host by following these steps:
(instructions for Ubuntu Desktop)
 # Install borgbackup on the host
sudo apt update && sudo apt install borgbackup

# In any shell where you use borg, you must first export this variable
# If you are using the default backup location /mnt/backup/borg
export BORG_REPO= ' /mnt/backup/borg '
# or if you are using a remote repository
export BORG_REPO= ' user@host:/path/to/repo '

# Mount the archives to /tmp/borg
sudo mkdir -p /tmp/borg && sudo borg mount " $BORG_REPO " /tmp/borg

# After entering your repository key successfully, you should be able to access all archives in /tmp/borg
# You can now do whatever you want by syncing them to a different place using rsync or doing other things
# E.g. you can open the file manager on that location by running:
xhost +si:localuser:root && sudo nautilus /tmp/borg

# When you are done, simply close the file manager and run the following command to unmount the backup archives:
sudo umount /tmp/borg You can delete BorgBackup archives on your host manually by following these steps:
(instructions for Debian based OS' like Ubuntu)
 # Install borgbackup on the host
sudo apt update && sudo apt install borgbackup

# In any shell where you use borg, you must first export this variable
# If you are using the default backup location /mnt/backup/borg
export BORG_REPO= ' /mnt/backup/borg '
# or if you are using a remote repository
export BORG_REPO= ' user@host:/path/to/repo '

# List all archives (if you are using the default backup location /mnt/backup/borg)
sudo borg list

# After entering your repository key successfully, you should now see a list of all backup archives
# An example backup archive might be called 20220223_174237-nextcloud-aio
# Then you can simply delete the archive with:
sudo borg delete --stats --progress " ::20220223_174237-nextcloud-aio "

# If borg 1.2.0 or higher is installed, you then need to run borg compact in order to clean up the freed space
sudo borg --version
# If version number of the command above is higher than 1.2.0 you need to run the command below:
sudo borg compact
After doing so, make sure to update the backup archives list in the AIO interface!
You can do so by clicking on the Check backup integrity button or Create backup button.
For increased backup security, you might consider syncing the local backup repository regularly to another drive.
To do that, first add the drive to /etc/fstab so that it is able to get automatically mounted and then create a script that does all the things automatically. Here is an example for such a script:
 #! /bin/bash

# Please modify all variables below to your needings:
SOURCE_DIRECTORY= " /mnt/backup/borg "
DRIVE_MOUNTPOINT= " /mnt/backup-drive "
TARGET_DIRECTORY= " /mnt/backup-drive/borg "

# #######################################
# Please do NOT modify anything below! #
# #######################################

if [ " $EUID " -ne 0 ] ; then
    echo " Please run as root "
    exit 1
fi

if ! [ -d " $SOURCE_DIRECTORY " ] ; then
    echo " The source directory does not exist. "
    exit 1
fi

if [ -z " $( ls -A " $SOURCE_DIRECTORY / " ) " ] ; then
    echo " The source directory is empty which is not allowed. "
    exit 1
fi

if ! [ -d " $DRIVE_MOUNTPOINT " ] ; then
    echo " The drive mountpoint must be an existing directory "
    exit 1
fi

if ! grep -q " $DRIVE_MOUNTPOINT " /etc/fstab ; then
    echo " Could not find the drive mountpoint in the fstab file. Did you add it there? "
    exit 1
fi

if ! mountpoint -q " $DRIVE_MOUNTPOINT " ; then
    mount " $DRIVE_MOUNTPOINT "
    if ! mountpoint -q " $DRIVE_MOUNTPOINT " ; then
        echo " Could not mount the drive. Is it connected? "
        exit 1
    fi
fi

if [ -f " $SOURCE_DIRECTORY /lock.roster " ] ; then
    echo " Cannot run the script as the backup archive is currently changed. Please try again later. "
    exit 1
fi

mkdir -p " $TARGET_DIRECTORY "
if ! [ -d " $TARGET_DIRECTORY " ] ; then
    echo " Could not create target directory "
    exit 1
fi

if [ -f " $SOURCE_DIRECTORY /aio-lockfile " ] ; then
    echo " Not continuing because aio-lockfile already exists. "
    exit 1
fi

touch " $SOURCE_DIRECTORY /aio-lockfile "

if ! rsync --stats --archive --human-readable --delete " $SOURCE_DIRECTORY / " " $TARGET_DIRECTORY " ; then
    echo " Failed to sync the backup repository to the target directory. "
    exit 1
fi

rm " $SOURCE_DIRECTORY /aio-lockfile "
rm " $TARGET_DIRECTORY /aio-lockfile "

umount " $DRIVE_MOUNTPOINT "

if docker ps --format " {{.Names}} " | grep " ^nextcloud-aio-nextcloud$ " ; then
    docker exec -it nextcloud-aio-nextcloud bash /notify.sh " Rsync backup successful! " " Synced the backup repository successfully. "
else
    echo " Synced the backup repository successfully. "
fi
You can simply copy and paste the script into a file eg named backup-script.sh eg here: /root/backup-script.sh . Do not forget to modify the variables to your requirements!
Afterwards apply the correct permissions with sudo chown root:root /root/backup-script.sh and sudo chmod 700 /root/backup-script.sh . Then you can create a cronjob that runs eg at 20:00 each week on Sundays like this:
sudo crontab -u root -e (and choose your editor of choice if not already done. I'd recommend nano).0 20 * * 7 /root/backup-script.sh which will run the script at 20:00 on Sundays each week.Ctrl + o -> Enter and close the editor with Ctrl + x ).تحذير
The below script will only work after the initial setup of AIO. So you will always need to first visit the AIO interface, type in your domain and start the containers the first time or restore an older AIO instance from its borg backup before you can use the script.
You can do so by running the /daily-backup.sh script that is stored in the mastercontainer. It accepts the following environment variables:
AUTOMATIC_UPDATES if set to 1 , it will automatically stop the containers, update them and start them including the mastercontainer. If the mastercontainer gets updated, this script's execution will stop as soon as the mastercontainer gets stopped. You can then wait until it is started again and run the script with this flag again in order to update all containers correctly afterwards.DAILY_BACKUP if set to 1 , it will automatically stop the containers and create a backup. If you want to start them again afterwards, you may have a look at the START_CONTAINERS option.START_CONTAINERS if set to 1 , it will automatically start the containers without updating them.STOP_CONTAINERS if set to 1 , it will automatically stop the containers.CHECK_BACKUP if set to 1 , it will start the backup check. This is not allowed to be enabled at the same time like DAILY_BACKUP . Please be aware that this option is non-blocking which means that the backup check is not done when the process is finished since it only start the borgbackup container with the correct configuration. One example for this would be sudo docker exec -it --env DAILY_BACKUP=1 nextcloud-aio-mastercontainer /daily-backup.sh , which you can run via a cronjob or put it in a script.
ملحوظة
None of the option returns error codes. So you need to check for the correct result yourself.
If you already have a backup solution in place, you may want to hide the backup section. You can do so by adding --env AIO_DISABLE_BACKUP_SECTION=true to the docker run command of the mastercontainer (but before the last line nextcloud/all-in-one:latest ! If it was started already, you will need to stop the mastercontainer, remove it (no data will be lost) and recreate it using the docker run command that you initially used).
تحذير
Do not set or adjust this value after the initial Nextcloud installation is done! If you still want to do it afterwards, see this on how to do it.
You can configure the Nextcloud container to use a specific directory on your host as data directory. You can do so by adding the environmental variable NEXTCLOUD_DATADIR to the docker run command of the mastercontainer (but before the last line nextcloud/all-in-one:latest ! If it was started already, you will need to stop the mastercontainer, remove it (no data will be lost) and recreate it using the docker run command that you initially used). Allowed values for that variable are strings that start with / and are not equal to / . The chosen directory or volume will then be mounted to /mnt/ncdata inside the container.
--env NEXTCLOUD_DATADIR="/mnt/ncdata" ./mnt/ncdata , make sure to choose a subfolder like eg /mnt/ncdata/nextcloud as datadir, since the root folder is not suited as datadir in that case . See #2696.--env NEXTCLOUD_DATADIR="/var/nextcloud-data"--env NEXTCLOUD_DATADIR="/volume1/docker/nextcloud/data" .--env NEXTCLOUD_DATADIR="/run/desktop/mnt/host/c/ncdata" . (This path is equivalent to C:ncdata on your Windows host so you need to translate the path accordingly. Hint: the path that you enter needs to start with /run/desktop/mnt/host/ . Append to that the exact location on your windows host, eg c/ncdata which is equivalent to C:ncdata .)--env NEXTCLOUD_DATADIR="nextcloud_aio_nextcloud_datadir" . This volume needs to be created beforehand manually by you in order to be able to use it. eg on Windows with: docker volume create ^
--driver local ^
--name nextcloud_aio_nextcloud_datadir ^
-o device="/host_mnt/e/your/data/path" ^
-o type="none" ^
-o o="bind"
E:yourdatapath into the volume so for a different location you need to adjust /host_mnt/e/your/data/path accordingly. بالتأكيد. Add this to the /etc/fstab file on the host system:
<your-storage-host-and-subpath> <your-mount-dir> cifs rw,mfsymlinks,seal,credentials=<your-credentials-file>,uid=33,gid=0,file_mode=0770,dir_mode=0770 0 0
(Of course you need to modify <your-storage-host-and-subpath> , <your-mount-dir> and <your-credentials-file> for your specific case.)
One example could look like this:
//your-storage-host/subpath /mnt/storagebox cifs rw,mfsymlinks,seal,credentials=/etc/storage-credentials,uid=33,gid=0,file_mode=0770,dir_mode=0770 0 0
and add into /etc/storage-credentials :
 username=<smb/cifs username>
password=<password>
(Of course you need to modify <smb/cifs username> and <password> for your specific case.)
Now you can use /mnt/storagebox as Nextcloud's datadir like described in the section above this one.
By default, the Nextcloud container is confined and cannot access directories on the host OS. You might want to change this when you are planning to use local external storage in Nextcloud to store some files outside the data directory and can do so by adding the environmental variable NEXTCLOUD_MOUNT to the docker run command of the mastercontainer (but before the last line nextcloud/all-in-one:latest ! If it was started already, you will need to stop the mastercontainer, remove it (no data will be lost) and recreate it using the docker run command that you initially used). Allowed values for that variable are strings that start with / and are not equal to / .
--env NEXTCLOUD_MOUNT="/mnt/" and --env NEXTCLOUD_MOUNT="/media/" .--env NEXTCLOUD_MOUNT="/Volumes/your_drive/"--env NEXTCLOUD_MOUNT="/volume1/" .--env NEXTCLOUD_MOUNT="/run/desktop/mnt/host/d/your-folder/" . (This path is equivalent to D:your-folder on your Windows host so you need to translate the path accordingly. Hint: the path that you enter needs to start with /run/desktop/mnt/host/ . Append to that the exact location on your windows host, eg d/your-folder/ which is equivalent to D:your-folder .) After using this option, please make sure to apply the correct permissions to the directories that you want to use in Nextcloud. Eg sudo chown -R 33:0 /mnt/your-drive-mountpoint and sudo chmod -R 750 /mnt/your-drive-mountpoint should make it work on Linux when you have used --env NEXTCLOUD_MOUNT="/mnt/" . On Windows you could do this eg with docker exec -it nextcloud-aio-nextcloud chown -R 33:0 /run/desktop/mnt/host/d/your-folder/ and docker exec -it nextcloud-aio-nextcloud chmod -R 750 /run/desktop/mnt/host/d/your-folder/ .
You can then navigate to https://your-nc-domain.com/settings/apps/disabled , activate the external storage app, navigate to https://your-nc-domain.com/settings/admin/externalstorages and add a local external storage directory that will be accessible inside the container at the same place that you've entered. Eg /mnt/your-drive-mountpoint will be mounted to /mnt/your-drive-mountpoint inside the container, etc.
Be aware though that these locations will not be covered by the built-in backup solution - but you can add further Docker volumes and host paths that you want to back up after the initial backup is done.
ملحوظة
If you can't see the type "local storage" in the external storage admin options, a restart of the containers from the AIO interface may be required.
By default will the talk container use port 3478/UDP and 3478/TCP for connections. You can adjust the port by adding eg --env TALK_PORT=3478 to the docker run command of the mastercontainer (but before the last line nextcloud/all-in-one:latest ! If it was started already, you will need to stop the mastercontainer, remove it (no data will be lost) and recreate it using the docker run command that you initially used) and adjusting the port to your desired value. Best is to use a port over 1024, so eg 3479 to not run into this: #2517
By default, public uploads to Nextcloud are limited to a max of 10G (logged in users can upload much bigger files using the webinterface or the mobile/desktop clients, since chunking is used in that case). You can adjust the upload limit by providing --env NEXTCLOUD_UPLOAD_LIMIT=10G to the docker run command of the mastercontainer (but before the last line nextcloud/all-in-one:latest ! If it was started already, you will need to stop the mastercontainer, remove it (no data will be lost) and recreate it using the docker run command that you initially used) and customize the value to your fitting. It must start with a number and end with G eg 10G .
By default, uploads to Nextcloud are limited to a max of 3600s. You can adjust the upload time limit by providing --env NEXTCLOUD_MAX_TIME=3600 to the docker run command of the mastercontainer (but before the last line nextcloud/all-in-one:latest ! If it was started already, you will need to stop the mastercontainer, remove it (no data will be lost) and recreate it using the docker run command that you initially used) and customize the value to your fitting. It must be a number eg 3600 .
By default, each PHP process in the Nextcloud container is limited to a max of 512 MB. You can adjust the memory limit by providing --env NEXTCLOUD_MEMORY_LIMIT=512M to the docker run command of the mastercontainer (but before the last line nextcloud/all-in-one:latest ! If it was started already, you will need to stop the mastercontainer, remove it (no data will be lost) and recreate it using the docker run command that you initially used) and customize the value to your fitting. It must start with a number and end with M eg 1024M .
If you get an error during the domain validation which states that your ip-address is an internal or reserved ip-address, you can fix this by first making sure that your domain indeed has the correct public ip-address that points to the server and then adding --add-host yourdomain.com:<public-ip-address> to the docker run command of the mastercontainer (but before the last line nextcloud/all-in-one:latest ! If it was started already, you will need to stop the mastercontainer, remove it (no data will be lost) and recreate it using the docker run command that you initially used) which will allow the domain validation to work correctly. And so that you know: even if the A record of your domain should change over time, this is no problem since the mastercontainer will not make any attempt to access the chosen domain after the initial domain validation.
نعم. For that to work, you need to use and follow the manual-install documentation.
نعم. For that to work, you need to use and follow the helm-chart documentation.
You can run AIO also with docker rootless. How to do this is documented here: docker-rootless.md
Since Podman is not 100% compatible with the Docker API, Podman is not supported (since that would add yet another platform where the maintainer would need to test on). However you can use and follow the manual-install documentation to get AIO's containers running with Podman or use Docker rootless, as described in the above section. Also there is this now: #3487
You might want to adjust the Nextcloud apps that are installed upon the first startup of the Nextcloud container. You can do so by adding --env NEXTCLOUD_STARTUP_APPS="deck twofactor_totp tasks calendar contacts notes" to the docker run command of the mastercontainer (but before the last line nextcloud/all-in-one:latest ! If it was started already, you will need to stop the mastercontainer, remove it (no data will be lost) and recreate it using the docker run command that you initially used) and customize the value to your fitting. It must be a string with small letters az, 0-9, spaces and hyphens or '_'. You can disable shipped and by default enabled apps by adding a hyphen in front of the appid. Eg -contactsinteraction .
Some Nextcloud apps require additional external dependencies that must be bundled within Nextcloud container in order to work correctly. As we cannot put each and every dependency for all apps into the container - as this would make the project quickly unmaintainable - there is an official way in which you can add additional dependencies into the Nextcloud container. However note that doing this is disrecommended since we do not test Nextcloud apps that require external dependencies.
You can do so by adding --env NEXTCLOUD_ADDITIONAL_APKS="imagemagick dependency2 dependency3" to the docker run command of the mastercontainer (but before the last line nextcloud/all-in-one:latest ! If it was started already, you will need to stop the mastercontainer, remove it (no data will be lost) and recreate it using the docker run command that you initially used) and customize the value to your fitting. It must be a string with small letters az, digits 0-9, spaces, dots and hyphens or '_'. You can find available packages here: https://pkgs.alpinelinux.org/packages?branch=v3.20. By default imagemagick is added. If you want to keep it, you need to specify it as well.
Some Nextcloud apps require additional php extensions that must be bundled within Nextcloud container in order to work correctly. As we cannot put each and every dependency for all apps into the container - as this would make the project quickly unmaintainable - there is an official way in which you can add additional php extensions into the Nextcloud container. However note that doing this is disrecommended since we do not test Nextcloud apps that require additional php extensions.
You can do so by adding --env NEXTCLOUD_ADDITIONAL_PHP_EXTENSIONS="imagick extension1 extension2" to the docker run command of the mastercontainer (but before the last line nextcloud/all-in-one:latest ! If it was started already, you will need to stop the mastercontainer, remove it (no data will be lost) and recreate it using the docker run command that you initially used) and customize the value to your fitting. It must be a string with small letters az, digits 0-9, spaces, dots and hyphens or '_'. You can find available extensions here: https://pecl.php.net/packages.php. By default imagick is added. If you want to keep it, you need to specify it as well.
The facerecognition app requires the pdlib PHP extension to be installed. Unfortunately, it is not available on PECL nor via PHP core, so there is no way to add this into AIO currently. However you can use this community container in order to run facerecognition.
تحذير
This only works if the /dev/dri device is present on the host! If it does not exists on your host, don't proceed as otherwise the Nextcloud container will fail to start! If you are unsure about this, better do not proceed with the instructions below.
The memories app allows to enable hardware transcoding for videos. In order to use that, you need to add --env NEXTCLOUD_ENABLE_DRI_DEVICE=true to the docker run command of the mastercontainer (but before the last line nextcloud/all-in-one:latest ! If it was started already, you will need to stop the mastercontainer, remove it (no data will be lost) and recreate it using the docker run command that you initially used) which will mount the /dev/dri device into the container. There is now a community container which allows to easily add the transcoding container of Memories to AIO: https://github.com/nextcloud/all-in-one/tree/main/community-containers/memories
In certain situations you might want to keep Nextcloud apps that are disabled in the AIO interface and not uninstall them if they should be installed in Nextcloud. You can do so by adding --env NEXTCLOUD_KEEP_DISABLED_APPS=true to the docker run command of the mastercontainer (but before the last line nextcloud/all-in-one:latest ! If it was started already, you will need to stop the mastercontainer, remove it (no data will be lost) and recreate it using the docker run command that you initially used).
تحذير
Doing this might cause unintended problems in Nextcloud if an app that requires an external dependency is still installed but the external dependency not for example.
If you should run into issues with huge docker logs, you can adjust the log size by following https://docs.docker.com/config/containers/logging/local/#usage. However for the included AIO containers, this should usually not be needed because almost all of them have the log level set to warn so they should not produce many logs.
The files and folders that you add to Nextcloud are by default stored in the following docker directory: nextcloud_aio_nextcloud:/mnt/ncdata/ (usually /var/lib/docker/volumes/nextcloud_aio_nextcloud_data/_data/ on linux host systems). If needed, you can modify/add/delete files/folders there but ATTENTION : be very careful when doing so because you might corrupt your AIO installation! Best is to create a backup using the built-in backup solution before editing/changing files/folders in there because you will then be able to restore your instance to the backed up state.
After you are done modifying/adding/deleting files/folders, don't forget to apply the correct permissions by running: sudo docker exec nextcloud-aio-nextcloud chown -R 33:0 /mnt/ncdata/ and sudo docker exec nextcloud-aio-nextcloud chmod -R 750 /mnt/ncdata/ and rescan the files with sudo docker exec --user www-data -it nextcloud-aio-nextcloud php occ files:scan --all .
You can move the whole docker library and all its files including all Nextcloud AIO files and folders to a separate drive by first mounting the drive in the host OS (NTFS is not supported and ext4 is recommended as FS) and then following this tutorial: https://www.guguweb.com/2019/02/07/how-to-move-docker-data-directory-to-another-location-on-ubuntu/
(Of course docker needs to be installed first for this to work.)
docker rm nextcloud-aio-collabora ) AND the Collabora image ( docker image rm nextcloud/aio-collabora ).docker system prune ) (no data will be lost).This should solve the problem.
You can edit Nextclouds config.php file directly from the host with your favorite text editor. Eg like this: sudo docker run -it --rm --volume nextcloud_aio_nextcloud:/var/www/html:rw alpine sh -c "apk add --no-cache nano && nano /var/www/html/config/config.php" . Make sure to not break the file though which might corrupt your Nextcloud instance otherwise. In best case, create a backup using the built-in backup solution before editing the file.
All users see a set of default files and folders as dictated by Nextcloud's configuration. To change these default files and folders a custom skeleton directory must first be created; this can be accomplished by copying your skeleton files sudo docker cp --follow-link /path/to/nextcloud/skeleton/ nextcloud-aio-nextcloud:/mnt/ncdata/skeleton/ , applying the correct permissions with sudo docker exec nextcloud-aio-nextcloud chown -R 33:0 /mnt/ncdata/skeleton/ and sudo docker exec nextcloud-aio-nextcloud chmod -R 750 /mnt/ncdata/skeleton/ and setting the skeleton directory option with sudo docker exec --user www-data -it nextcloud-aio-nextcloud php occ config:system:set skeletondirectory --value="/mnt/ncdata/skeleton" . Further information is available in the Nextcloud documentation on configuration parameters for the skeleton directory.
You can configure your server to block certain ip-addresses using fail2ban as bruteforce protection. Here is how to set it up: https://docs.nextcloud.com/server/stable/admin_manual/installation/harden_server.html#setup-fail2ban. The logpath of AIO is by default /var/lib/docker/volumes/nextcloud_aio_nextcloud/_data/data/nextcloud.log . Do not forget to add chain=DOCKER-USER to your nextcloud jail config ( nextcloud.local ) otherwise the nextcloud service running on docker will still be accessible even if the IP is banned. Also, you may change the blocked ports to cover all AIO ports: by default 80,443,8080,8443,3478 (see this). Apart from that there is now a community container that can be added to the AIO stack: https://github.com/nextcloud/all-in-one/tree/main/community-containers/fail2ban
It is possible to connect to an existing LDAP server. You need to make sure that the LDAP server is reachable from the Nextcloud container. Then you can enable the LDAP app and configure LDAP in Nextcloud manually. If you don't have a LDAP server yet, recommended is to use this docker container: https://hub.docker.com/r/nitnelave/lldap. Make sure here as well that Nextcloud can talk to the LDAP server. The easiest way is by adding the LDAP docker container to the docker network nextcloud-aio . Then you can connect to the LDAP container by its name from the Nextcloud container. There is now a community container which allows to easily add LLDAP to AIO: https://github.com/nextcloud/all-in-one/tree/main/community-containers/lldap
Netdata allows you to monitor your server using a GUI. You can install it by following https://learn.netdata.cloud/docs/agent/packaging/docker#create-a-new-netdata-agent-container. Apart from that there is now a way for the community to add containers: #392 (comment)
If you want to use the user_sql app, the easiest way is to create an additional database container and add it to the docker network nextcloud-aio . Then the Nextcloud container should be able to talk to the database container using its name.
It is possible to install any of these to get a GUI for your AIO database. The pgAdmin container is recommended. You can get some docs on it here: https://www.pgadmin.org/docs/pgadmin4/latest/container_deployment.html. For the container to connect to the aio-database, you need to connect the container to the docker network nextcloud-aio and use nextcloud-aio-database as database host, oc_nextcloud as database username and the password that you get when running sudo docker exec nextcloud-aio-nextcloud grep dbpassword config/config.php as the password. Apart from that there is now a way for the community to add containers: #3061 (comment)
You can configure one yourself by using either of these four recommended projects: Docker Mailserver, Mailu, Maddy Mail Server, Mailcow or Stalwart. There is now a community container which allows to easily add Stalwart Mail server to AIO: https://github.com/nextcloud/all-in-one/tree/main/community-containers/stalwart
Please see the following documentation on this: migration.md
For integrating new containers, they must pass specific requirements for being considered to get integrated in AIO itself. Even if not considered, we may add some documentation on it. Also there is this now: https://github.com/nextcloud/all-in-one/tree/main/community-containers#community-containers
ما هي المتطلبات؟
For some applications it might be necessary to establish a secure connection to another host/server which is using a certificate issued by a Certification Authority that is not trusted out of the box. An example could be configuring LDAPS against a domain controller (Active Directory or Samba-based) of an organization.
You can make the Nextcloud container trust any Certification Authority by providing the environmental variable NEXTCLOUD_TRUSTED_CACERTS_DIR to the docker run command of the mastercontainer (but before the last line nextcloud/all-in-one:latest ! If it was started already, you will need to stop the mastercontainer, remove it (no data will be lost) and recreate it using the docker run command that you initially used). The value of the variables should be set to the absolute paths of the directory on the host, which contains one or more Certification Authorities certificates. You should use X.509 certificates, Base64 encoded. (Other formats may work but have not been tested!) All the certificates in the directory will be trusted.
When using docker run , the environmental variable can be set with --env NEXTCLOUD_TRUSTED_CACERTS_DIR=/path/to/my/cacerts .
In order for the value to be valid, the path should start with / and not end with / and point to an existing directory . Pointing the variable directly to a certificate file will not work and may also break things.
The Collabora container enables Seccomp by default, which is a security feature of the Linux kernel. On systems without this kernel feature enabled, you need to provide --env COLLABORA_SECCOMP_DISABLED=true to the initial docker run command in order to make it work.
If you have an external backup solution, you might want to enable automatic updates without creating a backup first. However note that doing this is disrecommended since you will not be able to easily create and restore a backup from the AIO interface anymore and you need to make sure to shut down all the containers properly before creating the backup, eg by stopping them from the AIO interface first.
But anyhow, is here a guide that helps you automate the whole procedure:
 #! /bin/bash

# Stop the containers
docker exec --env STOP_CONTAINERS=1 nextcloud-aio-mastercontainer /daily-backup.sh

# Below is optional if you run AIO in a VM which will shut down the VM afterwards
# poweroff
You can simply copy and paste the script into a file eg named shutdown-script.sh eg here: /root/shutdown-script.sh .
Afterwards apply the correct permissions with sudo chown root:root /root/shutdown-script.sh and sudo chmod 700 /root/shutdown-script.sh . Then you can create a cronjob that runs it on a schedule eg runs the script at 04:00 each day like this:
sudo crontab -u root -e (and choose your editor of choice if not already done. I'd recommend nano).0 4 * * * /root/shutdown-script.sh which will run the script at 04:00 each day.Ctrl + o and then Enter to save, and close the editor with Ctrl + x ).After that is in place, you should schedule a backup from your backup solution that creates a backup after AIO is shut down properly. Hint: If your backup runs on the same host, make sure to at least back up all docker volumes and additionally Nextcloud's datadir if it is not stored in a docker volume.
Afterwards, you can create a second script that automatically updates the containers:
 #! /bin/bash

# Run container update once
if ! docker exec --env AUTOMATIC_UPDATES=1 nextcloud-aio-mastercontainer /daily-backup.sh ; then
    while docker ps --format " {{.Names}} " | grep -q " ^nextcloud-aio-watchtower$ " ; do
        echo " Waiting for watchtower to stop "
        sleep 30
    done

    while ! docker ps --format " {{.Names}} " | grep -q " ^nextcloud-aio-mastercontainer$ " ; do
        echo " Waiting for Mastercontainer to start "
        sleep 30
    done

    # Run container update another time to make sure that all containers are updated correctly.
    docker exec --env AUTOMATIC_UPDATES=1 nextcloud-aio-mastercontainer /daily-backup.sh
fi
You can simply copy and paste the script into a file eg named automatic-updates.sh eg here: /root/automatic-updates.sh .
Afterwards apply the correct permissions with sudo chown root:root /root/automatic-updates.sh and sudo chmod 700 /root/automatic-updates.sh . Then you can create a cronjob that runs eg at 05:00 each day like this:
sudo crontab -u root -e (and choose your editor of choice if not already done. I'd recommend nano).0 5 * * * /root/automatic-updates.sh which will run the script at 05:00 each day.Ctrl + o then Enter to save, and close the editor with Ctrl + x ).By design, Caddy that runs inside the mastercontainer, which handles automatic TLS certificate generation for the AIO interface, is vulnerable to receiving DNS challenges for arbitrary hostnames from anyone on the internet. While this does not compromise your server's security, it can result in cluttered logs and rejected certificate renewal attempts due to rate limit abuse. To mitigate this issue, it is recommended to place the AIO interface behind a VPN and/or limit its public exposure.


