fbcp ili9341
1.0.0
انتهى عصر FBCP-ILI9341. تم تصميم FBCP-ILI9341 على رأس Videocore Pide في Raspberry Pi.
ومع ذلك ، فقد تم إهمال API هذه من قبل مؤسسة Raspberry Pi لفترة من الوقت الآن ، وأخيراً عفا عليها الزمن (= غير متوفر) على Raspberry Pi 5 وما بعده.
لم تعد توزيعات Raspberry Pi في وقت لاحق تنشطًا بشكل افتراضي حتى بالنسبة لـ PI0-PI4 ، ولكن بدلاً من ذلك انتقلت Raspberry Pi إلى مكدس Cms Driver الأحدث ، والذي يحتوي على تجريد مختلف لدمج برامج عرض SPI. يقوم أشخاص آخرون بتطوير برامج تشغيل عرض SPI لـ PI المتوافقة مع كومة KMS. توجه إلى موضوع منتدى Raspberry Pi لمعرفة المزيد.
من الجيد اعتبار هذا المستودع مؤشفة/قديمة ، على الرغم من أنني لا أؤيد إلى أرشفة باستخدام ميزة GitHub ، لأن هذه الميزة من المفترض أن تجعل القضية تعقب القضية فقط. لا تتردد في مواصلة مناقشة القضايا على المتتبع.
يقوم هذا المستودع بتنفيذ برنامج تشغيل لبعض شاشات LCD المستندة إلى SPI لـ Raspberry Pi A و B و 2 و 3 و 4 و Zero.

كان العمل مدفوعًا بالفضول بعد رؤية هذه السلسلة من مقاطع الفيديو على قناة youtube retromancave:
في مقاطع الفيديو هذه ، يشار إلى حافلة SPI (GPIO) إلى عنق الزجاجة. يعرض SPI تحديثًا على ناقل بيانات التسلسلي ، ويقوم بنقل دورة واحدة لكل ساعة على الحافلة. يتطلب شاشة عرض 320 × 240 × 16BPP معدل ساعة ناقل SPI من 73.728 ميجا هرتز لتحقيق تردد تحديث كامل 60 إطارًا في الثانية. لا يمكن للعديد من وحدات تحكم LCD SPI أن تنقل هذا بسرعة في الممارسة العملية ، ولكنها مقيدة على سبيل المثال سرعة ساعة ناقل SPI 16-50 ميجا هرتز ، مما يحدد الحد الأقصى لمعدل التحديث بشكل كبير. هل يمكننا فعل أي شيء حيال هذا؟
بدأ مشروع FBCP-ILI9341 كبرنامج عرض عرض لوحدة ADAFRUIT 2.8 "320x240 TFT w/ touch شاشة Raspberry Pi التي تستخدم وحدة تحكم ILI9341. يتم عرض ذلك.
بالنظر إلى أن حافلة SPI يمكن أن تكون مقيدة للغاية على النطاق الترددي ، كيف يبدو أن FBCP-ILI9341 قادر على التحديث حتى 60 إطارًا في الثانية؟ الطريقة التي يتم بها تحقيق ذلك هي ما يمكن أن يسمى تحديثات دفق العرض التكيفي . بدلاً من تحميل كل بكسل في كل دورة تحديث عرض ، يتم إرسال وحدات البكسل التي تم تغييرها فعليًا على الشاشة إلى الشاشة. هذا أمر قابل للتنفيذ لأن وحدة تحكم ILI9341 ، مثل العديد من وحدات التحكم الشهيرة الأخرى ، لها وظائف واجهة اتصال تسمح بتحديث تحديثات الشاشة الجزئية ، وصولاً إلى الأبعاد الفرعية أو حتى مستويات البكسل الفردية. يتيح ذلك التغلب على حد النطاق الترددي: على سبيل المثال في الزلزال ، على الرغم من أنها لعبة سرعة سريعة ، في المتوسط حوالي 46 ٪ فقط من جميع وحدات البكسل على الشاشة تغير كل إطار تم تقديمه. بعض الأجزاء ، مثل واجهة المستخدم تظل ثابتة عمليا عبر إطارات متعددة.
كما يتم استخدام تحسينات أخرى للضغط على المزيد من الأداء:
#define NO_INTERLACING في ملف config.h )والنتيجة هي أن حافلة SPI يمكن أن تبقى على مقربة من تشبع 100 ٪ ، حوالي 94-97 ٪ المعتاد ، لزيادة معدل استخدام الحافلة إلى الحد الأقصى ، مع انتقال عملياً فقط الحد الأدنى لعدد البايتات اللازمة لوصف كل إطار جديد.
تم فحص السائق للعمل (على الأقل نقطة ما في الماضي) على الأنظمة التالية:
على الرغم من أنه لا يتم اختبار جميع اللوحات بنشاط ، لذا فإن YMMV خاصة على الألواح القديمة. (إصلاحات الأخطاء مرحبًا بك ، استخدم https://elinux.org/rpi_hardwarehistory لتحديد اللوحة التي تعمل عليها)
تم اختبار شاشات LCD التالية:
تحقق من الأقسام التالية لإعداد برنامج التشغيل.
لا يستخدم برنامج التشغيل برنامج تشغيل Notro/FBTFT FrameBuffer ، بحيث يجب تعطيله إذا نشط. هذا هو ، إذا كان ملف /boot/config.txt يحتوي على خطوط تبدو مثل dtoverlay=pitft28r, ... ، dtoverlay=waveshare32b, ... أو dtoverlay=flexfb, ... ، يجب إزالة هذه.
لا يستخدم هذا البرنامج برنامج تشغيل SPI الافتراضي ، لذلك يجب أيضًا إزالة سطر مثل dtparam=spi=on in /boot/config.txt حتى لا يسبب تعارضات.
وبالمثل ، إذا كان لديك أي dtoverlays ذات الصلة باللمس النشط ، مثل dtoverlay=ads7846,... أو أي شيء يحتوي على penirq= توجيه ، يجب إزالة تلك هذه لتجنب النزاعات. سيكون من الممكن إضافة دعم اللمس إلى FBCP-ILI9341 إذا أراد شخص ما أخذ طعنة عليه.
قم بالتشغيل في وحدة التحكم في Raspberry Pi:
sudo apt-get install cmake
cd ~
git clone https://github.com/juj/fbcp-ili9341.git
cd fbcp-ili9341
mkdir build
cd build
cmake [options] ..
make -j
sudo ./fbcp-ili9341
لاحظ بشكل خاص النقطتين .. على خط Cmake ، والذي يدل على "Up One Directory" في هذه الحالة (بدلاً من الإشارة إلى "المزيد من العناصر Go").
راجع القسم التالي لمعرفة ما يجب إدخاله ضمن [الخيارات] .
إذا كنت تقوم بتشغيل برنامج تشغيل fbcp الموجود ، فتأكد من إزالة ذلك على سبيل المثال عبر sudo pkill fbcp أولاً (أثناء تشغيله في مطالبة SSH أو متصلاً بشاشة HDMI) ، لا يمكن أن يعمل هذان الاثنان في نفس الوقت. if /etc/rc.local أو /etc/init.d يحتوي على إدخال لبدء fbcp في التمهيد ، يجب حذف هذا التوجيه.
هناك عمومًا طريقتان لتكوين خيارات الإنشاء ، في سطر أوامر CMake ، وفي ملف config.h.
في سطر أوامر CMake ، يمكن تكوين الخيارات التالية:
عند استخدام أحد الشاشات التي تتراكم فوق PI والتي تم التعرف عليها بالفعل بواسطة FBCP-ILI9341 ، لا تحتاج إلى تحديد تعيينات PIN GPIO ، ولكن رمز FBCP-ILI9341 يحتوي بالفعل على تلك. تمرير أحد توجيهات CMake التالية للقبعات:
-DADAFRUIT_ILI9341_PITFT=ON : إذا كنت تعمل على ADAFRUIT 2.8 "320x240 Tft w/ touch شاشة Touch for Raspberry Pi (أو Adafruit Pitft 2.2" HAT MINI KIT - 320X240 2.2 " علَم.-DADAFRUIT_HX8357D_PITFT=ON : إذا كان لديك Adafruit pitft - تم تجميعها 480 × 320 3.5 "TFT+شاشة لمس لشاشة Raspberry PI ، أضف هذا الخط.-DFREEPLAYTECH_WAVESHARE32B=ON : إذا كنت تعمل على جهاز Freeplay CM3 أو Zero ، فالمرض هذه العلامة. (هذه ليست قبعة ، لكنها لا تزال مهمة دبوس مُصابة)-DWAVESHARE35B_ILI9486=ON : إذا تم تحديدها ، يستهدف عرض Waveshare 3.5 "480x320 ILI9486.-DTONTEC_MZ61581=ON : إذا كنت تعمل على عرض Tontec 3.5 "320 × 480 LCD ، فقم بتمرير هذا.-DPIRATE_AUDIO_ST7789_HAT=ON : إذا تم تحديده ، يستهدف صوت القراصنة 240x240 ، 1.3 بوصة IPS قبعة عرض LCD لـ Raspberry PI مع وحدة تحكم العرض ST7789-DWAVESHARE_ST7789VW_HAT=ON : إذا تم تحديده ، يستهدف قبعة عرض IPS LCD 240x240 ، 1.3 بوصة IPS لـ Raspberry PI مع وحدة التحكم في عرض ST7789VW.-DWAVESHARE_ST7735S_HAT=ON : إذا تم تحديده ، يستهدف قبعة عرض 128 × 128 ، 1.44 بوصة LCD لـ Raspberry PI مع وحدة تحكم عرض ST7735S.-DKEDEI_V63_MPI3501=ON : إذا تم تحديده ، يستهدف KEDEI 3.5 بوصة SPI TFTLCD 480*320 16BIT/18BIT الإصدار 6.3 2018/4/9 مع وحدة التحكم في العرض MPI3501. إذا قمت بتوصيل الأسلاك مباشرة على PI بدلاً من استخدام قبعة من القائمة أعلاه ، فستحتاج إلى استخدام توجيهات التكوين أدناه. بالإضافة إلى تحديد العرض ، ستحتاج أيضًا إلى إخبار FBCP-ILI9341 الذي يلبس GPIO الاتصالات إلى. لتكوين وحدة تحكم العرض ، مرر واحد من:
-DILI9341=ON : إذا كنت تعمل على أي شاشة ILI9341 عامة أخرى ، أو على شاشة WAVESHARE32B المستقلة وليس على جهاز Freeplaytech CM3/Zero ، تمرير هذه العلامة.-DILI9340=ON : إذا كان لديك شاشة ILI9340 ، فمرر هذا التوجيه. تتشابه شريحة ILI9340 و ILI9341 ، لكن ILI9340 لا يدعم جميع الميزات على ILI9341 وسيتم تعطيلها أو تخفيضها.-DHX8357D=ON : إذا كان لديك شاشة HX8357D ، فمرر هذا التوجيه.-DSSD1351=ON : إذا كان لديك شاشة OLED SSD1351 ، فاستخدم هذا.-DST7735R=ON : إذا كان لديك شاشة ST7735R ، استخدم هذا.-DST7789=ON : إذا كان لديك شاشة ST7789 ، فاستخدم هذا.-DST7789VW=ON : إذا كان لديك شاشة ST7789VW ، استخدم هذا.-DST7735S=ON : إذا كان لديك شاشة ST7735S ، فاستخدم هذا.-DILI9486=ON : إذا كان لديك شاشة ILI9486 ، فالمرض هذا التوجيه.-DILI9486L=ON : إذا كان لديك شاشة ILI9486L ، فالمرض هذا التوجيه. لاحظ أن ILI9486 و ILI9486L مختلفين تمامًا ، ولا توجد رقائق تحكم غير متوافقة مع بعضها البعض ، لذا كن حذرًا هنا في تحديد أي منها لديك. (أو فقط حاول الاثنين ، لا ينبغي أن تنكسر إذا كنت خاطئًا)-DILI9488=ON : إذا كان لديك شاشة ILI9488 ، فمرر هذا التوجيه.-DMPI3501=ON : إذا تم تحديده ، يستهدف عرض مع وحدة تحكم عرض MPI3501.بالإضافة إلى ذلك ، مرر ما يلي لتخصيص تعيينات دبوس GPIO التي استخدمتها:
-DGPIO_TFT_DATA_CONTROL=number : يحدد/يتجاوز أي دبوس GPIO لاستخدامه في خط البيانات/التحكم (DC) على اتصال SPI 4-WAR. يتم تحديد رقم التعريف الشخصي هذا في أرقام دبوس BCM. إذا كان لديك شاشة SPI ذات 3 أسلاك لا تحتوي على سطر بيانات/تحكم ، فقم بتعيين هذه القيمة على -1 ، أي -DGPIO_TFT_DATA_CONTROL=-1 لإخبار FBCP-ILI9341 لاستهداف 3-ware ("9-bit") spi تواصل.-DGPIO_TFT_RESET_PIN=number : يحدد/يتجاوز أي دبوس GPIO لاستخدامه في سطر إعادة تعيين العرض. يتم تحديد رقم التعريف الشخصي هذا في أرقام دبوس BCM. إذا تم حذفه ، فمن المفترض أن الشاشة لا تحتوي على دبوس إعادة تعيين ، ويتم دائمًا تشغيله.-DGPIO_TFT_BACKLIGHT=number : يحدد/يتجاوز أي دبوس GPIO لاستخدامه في خط الإضاءة الخلفية. يتم تحديد رقم التعريف الشخصي هذا في أرقام دبوس BCM. إذا تم حذفه ، فمن المفترض أن الشاشة لا تحتوي على دبوس خلفي يتم التحكم فيه GPIO ، وهو دائمًا. إذا وضع هذا ، راجع أيضًا خيار #define BACKLIGHT_CONTROL في config.h .يستخدم FBCP-ILI9341 دائمًا منفذ الأجهزة SPI0 ، وبالتالي فإن دبابيس MISO و MOSI و CLK و CE0 هي نفسها ولا يمكن تغييرها. لا يتم استخدام دبوس ميسو (في الوقت الحالي على الأقل) ، بحيث يمكنك فقط تخطي توصيل ذلك. إذا كان العرض الخاص بك عبارة عن خط مارقة يتجاهل خط تمكين الرقاقة ، فيمكنك حذف توصيل ذلك أيضًا ، أو قد تكون قادرًا أيضًا على الابتعاد عن طريق توصيل ذلك بالأرض إذا كنت مضغوطًا بشدة لتبسيط الأسلاك (اعتمادًا على الشاشة).
للحصول على أداء جيد من الشاشات ، ستقود الشاشات العليا فوق مواصفات السرعة المقدرة (العائد المواصفات المصنفة حوالي 10 إطار في الثانية حسب العرض). بسبب هذا ، ستحتاج إلى تكوين سرعة الهدف بشكل صريح الذي تريد قيادته على الشاشة ، لأنه نظرًا لتباين التصنيع ، تصل كل نسخة عرض إلى أقصى سرعة مختلفة. لا توجد "سرعة افتراضية" التي سيستخدمها FBCP-ILI9341. يتم تحديد السرعة عبر الخيار
-DSPI_BUS_CLOCK_DIVISOR=even_number : يعين رقم المقسوم على مدار الساعة والذي يحدد إلى جانب PI CORE_FREQ = الخيار في /boot/config.txt السرعة الإجمالية التي يتم تشغيل ناقل اتصال SPI بشكل عام. SPI_frequency = core_freq/divisor . يجب أن يكون SPI_BUS_CLOCK_DIVISOR رقمًا زوجيًا. الافتراضي PI 3B و Zero W core_freq هو 400 ميجا هرتز ، وعمومًا ، يبدو أن القيمة -DSPI_BUS_CLOCK_DIVISOR=6 هي الأفضل التي يمكن أن تفعلها شاشة ILI9341. جرب قيمة أكبر إذا أظهرت الشاشة إخراج تالف ، أو قيمة أصغر للحصول على عرض ترددي أعلى. انظر ILI9341.H و WAVESHARE35B.H للحصول على نقاط البيانات على ضبط أداء SPI الأقصى. يمكن أن تكون القيمة الأولية الآمنة مثل -DSPI_BUS_CLOCK_DIVISOR=30 . هناك خياران للقول صراحة أي لوحة PI التي تريد استهدافها. يجب أن يتم ضبطها تلقائيًا بالنسبة لك ولا تكون هناك حاجة إليها بشكل عام ، ولكن على سبيل المثال ، إذا كنت تقوم بتجميع لوحة PI أخرى من نظام آخر ، أو تريد أن تكون صريحًا ، يمكنك المحاولة:
-DSINGLE_CORE_BOARD=ON : تمرير هذا الخيار إذا كنت تعمل على PI يحتوي على مؤشر ترابط أجهزة واحد فقط (PI Model A ، PI Model B ، COMPUTE MODULE 1 ، PI Zero/Zero W). إن لم يكن موجودًا ، تم تحديد تلقائيًا.-DARMV6Z=ON : تمرير هذا الخيار لتحسين مجموعة تعليمات ARMV6Z على وجه التحديد (PI 1A ، 1A+، 1B ، 1B+، Zero ، Zero W). إن لم يكن موجودًا ، تم تحديد تلقائيًا.-DARMV7A=ON : تمرير هذا الخيار لتحسين مجموعة التعليمات ARMV7-A على وجه التحديد (PI 2B <Rev 1.2). إن لم يكن موجودًا ، تم تحديد تلقائيًا.-DARMV8A=ON : تمرير هذا الخيار لتحسين مجموعة التعليمات ARMV8-A على وجه التحديد (PI 2B> = Rev. 1.2 ، 3B ، 3B+، CM3 ، CM3 Lite ، 4B ، CM4 ، PI400). إن لم يكن موجودًا ، تم تحديد تلقائيًا. خيارات الإنشاء التالية هي عامة لجميع العروض ولوحات PI ، فإنها تخصيص البناء:
-DBACKLIGHT_CONTROL=ON : IF ، يمكّن FBCP-ILI9341 من التحكم في الإضاءة الخلفية في العرض في دبوس الإضاءة الخلفية المحددة. ستذهب الشاشة إلى النوم بعد فترة من عدم النشاط على الشاشة. إذا لم يكن كذلك ، لم يتم لمس الإضاءة الخلفية.-DDISPLAY_CROPPED_INSTEAD_OF_SCALING=ON : إذا تم تعيينه ، وإطار الفيديو المصدر أكبر من دقة فيديو عرض SPI ، يتم تقديم الفيديو المصدر على شاشة SPI عن طريق اقتصاص أجزاء منه في جميع الاتجاهات ، بدلاً من التوسع لتناسب.-DDISPLAY_BREAK_ASPECT_RATIO_WHEN_SCALING=ON : عند تحجيم الفيديو المصدر إلى عرض SPI ، يتم إجراء التحجيم بشكل افتراضي نسبة العرض إلى الارتفاع التالية ، مع إضافة مربعات الحروف/صناديق الدعامة حسب الحاجة. إذا تم تعيين هذا ، يتم تنفيذ التمدد نسبة العرض إلى الارتفاع.-DSTATISTICS=number : يحدد مستوى إحصائيات التراكب لإظهاره على الشاشة. 0: معطل ، 1: ممكّن ، 2: ممكّن ، وإظهار الرسم البياني للفاصل الزمني لمعدل الإطارات أيضًا. القيمة الافتراضية هي 1 (تمكين).-DUSE_DMA_TRANSFERS=OFF : إذا تم تحديدها ، فإن تعطيل نقل DMA (على حساب كبير لاستخدام وحدة المعالجة المركزية المفقودة). تمرير هذا التوجيه إذا كان DMA يعطي بعض المشكلات ، على سبيل المثال كخطوة استكشاف الأخطاء وإصلاحها إذا كان هناك شيء لا يبدو صحيحًا.-DDMA_TX_CHANNEL=<num> : يحدد رقم قناة DMA لاستخدامه في أوامر SPI SEND. تغيير هذا إذا وجدت صراع قناة DMA.-DDMA_RX_CHANNEL=<num> : يحدد رقم قناة DMA لاستخدامه لأوامر تلقي SPI. تغيير هذا إذا وجدت صراع قناة DMA.-DDISPLAY_SWAP_BGR=ON : إذا تم تمرير هذا الخيار ، يتم عكس قنوات الألوان الحمراء والزرقاء (RGB <-> BGR). تحتوي بعض الشاشات على تخطيط فرعي للوحة اللون المعاكسة التي لا يفسرها وحدة تحكم العرض تلقائيًا ، لذا حدد ذلك إذا تم خلط الأزرق والأحمر.-DDISPLAY_INVERT_COLORS=ON : إذا تم تمرير هذا الخيار ، يتم عكس تفسير قيمة لون البكسل (أبيض = 0 ، أسود = 31/63). الافتراضي: أسود = 0 ، أبيض = 31/63. مرر هذا الخيار إذا كانت صورة العرض تبدو وكأنها لون سلبي للألوان الفعلية.-DDISPLAY_ROTATE_180_DEGREES=ON : إذا تم تعيينه ، يتم تدوير العرض 180 درجة. هذا لا يؤثر على إخراج HDMI ، فقط إخراج شاشة SPI.-DLOW_BATTERY_PIN=<num> : يحدد دبوس GPIO الذي يمكن استطلاعه للحصول على حالة البطارية. بشكل افتراضي ، عند تعيين ذلك ، سيتم عرض رمز البطارية المنخفضة إذا تم سحب الدبوس منخفض (انظر config.h للحصول على طرق يمكن من خلالها تعديل ذلك). بالإضافة إلى توجيهات CMAKE أعلاه ، هناك العديد من التعريفات المنتشرة حول قاعدة البيانات ، معظمها في config.h ، التي تتحكم في خيارات وقت التشغيل المختلفة. تحرير تلك مباشرة لضبط سلوك البرنامج. على وجه الخصوص ، بعد الانتهاء من الإعداد ، قد ترغب في البناء باستخدام -DSTATISTICS=0 في خط تكوين CMake.
فيما يلي مثال كامل على ما يجب الكتابة عليه للبناء والتشغيل ، إذا كان لديك Adafruit 2.8 "320 × 240 TFT W/ شاشة تعمل باللمس لشركة Raspberry PI مع وحدة تحكم ILI9341:
 cd ~
sudo apt-get install cmake
git clone https://github.com/juj/fbcp-ili9341.git
cd fbcp-ili9341
mkdir build
cd build
cmake -DSPI_BUS_CLOCK_DIVISOR=6 -DADAFRUIT_ILI9341_PITFT=ON ..
make -j
sudo ./fbcp-ili9341
إذا لم ينجح ما سبق ، فحاول تحديد -DSPI_BUS_CLOCK_DIVISOR=8 أو =10 لجعل الشاشة تعمل بتشغيل أبطأ قليلاً ، أو حاول مع -DUSE_DMA_TRANSFERS=OFF استكشاف الأخطاء وإصلاحها إذا كانت DMA هي المشكلة. إذا كنت تستخدم وحدة تحكم عرض أخرى من ILI9341 ، فقد تكون هناك حاجة إلى قيمة أعلى بكثير ، مثل 30 أو 40. عند تغيير خيارات CMake ، يمكنك إعادة إصدار خط توجيه CMake دون الحاجة إلى إعادة إنشاء دليل build أو إعادة إنشاءه. ومع ذلك ، قد تحتاج إلى حذف ملف cmakeCache.txt يدويًا بين الخيارات لتجنب تذكر الإعدادات القديمة.
إذا كنت ترغب في القيام بإعادة بناء كاملة من نقطة الصفر ، فيمكنك rm -rf build لحذف دليل الإنشاء وإعادة إنشائها لإعادة بناء نظيفة من نقطة الصفر. لا يوجد شيء مميز حول اسم أو موقع هذا الدليل ، إنه مجرد اتفاقي المعتاد. يمكنك أيضًا القيام بالبناء في دليل آخر بالنسبة لدليل FBCP-ILI9341 إذا أردت.
لإعداد برنامج التشغيل لإطلاقه عند بدء التشغيل ، قم بتحرير الملف /etc/rc.local في وضع sudo ، وإضافة سطر
sudo /path/to/fbcp-ili9341/build/fbcp-ili9341 & حتى النهاية. لاحظ أن ampersand المطلوبة & نهاية هذا الخط.
على سبيل المثال ، إذا استخدمت خطوات سطر الأوامر المدرجة أعلاه للبناء ، فستتلقى ملف /etc/rc.local خطًا
sudo /home/pi/fbcp-ili9341/build/fbcp-ili9341 & إذا كان اسم المستخدم لتثبيت Raspberry Pi الخاص بك شيءًا آخر غير pi الافتراضي ، فقم بتغيير الدليل وفقًا لذلك للإشارة إلى الدليل الرئيسي للمستخدم. (استخدم pwd لمعرفة الدليل الحالي في المحطة)
systemd بدلاً من ذلك ، بدلاً من تعديل /etc/rc.local ، استخدم ملف وحدة systemd المتوفر على النحو التالي:
sudo install -m 0644 -t /etc fbcp-ili9341.conf
sudo install -m 0644 -t /etc/systemd/system fbcp-ili9341.service
sudo systemctl daemon-reload
sudo systemctl enable fbcp && sudo systemctl start fbcp إذا كان حجم إخراج HDMI الافتراضي /dev/fb0 يختلف عن دقة الشاشة ، فسيتم إزالة حجم الفيديو المصدر افتراضيًا لتناسب حجم شاشة SPI. سيقوم FBCP-ILI9341 بإدارة إنشاء هذا الإنشاء إذا لزم الأمر ، وسيتم ذلك بواسطة وحدة معالجة الرسومات ، لذلك لا ينبغي أن يتأثر الأداء كثيرًا. ومع ذلك ، إذا لم تتطابق القرارات ، فمن المحتمل أن يبدو النص الصغير غير مقروء. سيتم تغيير حجمها بطريقة تحافظ على نسبة العرض إلى الارتفاع ، لذلك إذا لم تتطابق نسب العرض إلى الحدود السوداء الأفقية أو العمودية على الشاشة. إذا لم تستخدم إخراج HDMI على الإطلاق ، فمن الأفضل تكوين إخراج HDMI لمطابقة حجم عرض SPI بحيث لن تكون هناك حاجة إلى عملية إزالة. يمكن القيام بذلك عن طريق تعيين الأسطر التالية في /boot/config.txt :
 hdmi_group=2
hdmi_mode=87
hdmi_cvt=320 240 60 1 0 0 0
hdmi_force_hotplug=1
إذا كانت شاشة SPI الخاصة بك تحتوي على دقة مختلفة عن 320 × 240 ، فقم بتغيير الجزء 320 240 إلى 480 320 .
تلمح هذه الخطوط التطبيقات الأصلية حول وضع العرض الافتراضي ، والسماح لها بالتقديم إلى الدقة الأصلية لشاشة TFT. ومع ذلك ، يمكن أن يمنع هذا استخدام موصل HDMI ، إذا كانت شاشة HDMI المتصلة لا تدعم مثل هذه الدقة الصغيرة. كحل وسط ، إذا أراد كل من شاشات HDMI و SPI استخدامه في نفس الوقت ، فيمكن استخدام بعض الدقة المتوافقة الأخرى مثل 640x480. راجع وثائق Raspberry Pi HDMI للخيارات المتاحة للقيام بذلك.
يتم إملاء سرعة التحديث للشاشة بسرعة ساعة ناقل SPI الذي يتم توصيل الشاشة به. نظرًا للطريقة التي تعمل بها رقاقة BCM2835 على أعمال Raspberry PI ، لا يوجد خيار بسيط speed=xxx Mhz يمكن تعيينه لتحديد سرعة الحافلة. بدلاً من ذلك ، يتم اشتقاق سرعة ناقل SPI من معلمتين منفصلتين: التردد الأساسي لـ BCM2835 SOC بشكل عام ( core_freq in /boot/config.txt ) ، وإعداد SPI المحيطي CDIV (مقسم الساعة). معا ، يتم حساب سرعة ناقل SPI الناتجة مع الصيغة SPI_speed=core_freq/CDIV .
لتحسين الشاشة لتشغيلها بأسرع ما يمكن ،
اضبط قيمة CDIV بتمرير توجيه -DSPI_BUS_CLOCK_DIVISOR=number في سطر الأوامر CMAKE. القيم المحتملة هي حتى الأرقام 2 ، 4 ، 6 ، 8 ، ... لاحظ أنه نظرًا لأن CDIV يظهر في المقام في صيغة SPI_speed ، فإن القيم الأصغر تؤدي إلى سرعات ناقل أعلى ، في حين أن القيم العليا تجعل الشاشة أبطأ. في البداية عندما لا تعرف مدى سرعة تشغيل العرض الخاص بك ، حاول البدء بإعداد عالي آمن ، مثل -DSPI_BUS_CLOCK_DIVISOR=30 ، واتارك طريقك إلى أرقام أصغر للعثور على السرعة القصوى التي يمكن أن تتعامل معها. راجع الجدول في نهاية README لسرعات الحافلة القصوى المرصودة المحددة لعرض مختلف.
ضمان سرعة توربو. هذا أمر بالغ الأهمية لمعدلات الإطارات الجيدة. على طراز Raspberry PI 3 B ، يتم تشغيل Core BCM2835 افتراضيًا عند 400 ميجا هرتز (مما أدى إلى سرعة 400/CDIV MHZ SPI) إذا كانت هناك طاقة كافية ل PI ، وإذا لم تتجاوز درجة حرارة وحدة المعالجة المركزية الحدود الحرارية. إذا كانت وحدة المعالجة المركزية في وضع الخمول ، أو كان الجهد منخفضًا ، فسوف يعود BCM2835 Core بدلاً من ذلك إلى حالة 250 ميجا هرتز ، مما يؤدي إلى 250/CDIV MHZ SPI سرعة. يعد هذا التأثير لسرعة التوربو على الأداء كبيرًا ، حيث أن 400 ميجا هرتز مقابل 250 ميجا هرتز لا توربو 250 ميجا هرتز يصل إلى +60 ٪ من عرض النطاق الترددي. غالبًا ما يتطلب الحصول على 60 إطارًا في الثانية في الزلزال ، Sonic أو Tyrian هذا التردد التوربيني هذا ، ولكن يمكن أن تصل ألعاب NES و C64 المحاكاة إلى 60 إطارًا في الثانية حتى مع سهم 250 ميجا هرتز. إذا كانت الحماية من الجهد غير المنخفض لسبب ما يتم ركلها حتى عندما يجب تغذية طاقة كافية ، فيمكنك التوربو القابلة للإنجاب عندما يكون الجهد المنخفض موجودًا عن طريق ضبط القيمة avoid_warnings=2 في الملف /boot/config.txt .
ربما قليلا من الناحية المضادة للضوء ، ترتكز النقل الأساسي. يمكن أن يؤدي وضع تردد أساسي أصغر من Turbo 400MHz الافتراضي إلى تمكين استخدام مقسم أصغر على مدار الساعة للحصول على سرعة ناقل SPI أعلى. على سبيل المثال ، إذا كان مع core_freq 400MHz/8=50MHz core_freq=400 spi CDIV=8 CDIV=6 core_freq=360 400MHz/6=66.67MHz أدى core_freq=360 وضبط CDIV=6 للحصول على سرعة حافلة SPI فعالة تبلغ 360MHz/6=60MHz ، وهي أرضية وسط بين الاثنين قد تعمل. يتيح موازنة core_freq= و CDIV خيارات العثور على الحد الأقصى لحافلة SPI إلى ما يصل إلى KHz القليلة الماضية التي يمكن أن تتحملها وحدة تحكم العرض. يمكن للمرء أيضًا تجربة الاتجاه المعاكس ونسران فيركلوك ، لكن هذا بالطبع لديه كل المشكلات التي تأتي عند رفع تردد التشغيل. إن Drowlocking لديه العيب الذي يجعل تشغيل PI أبطأ بشكل عام ، لذلك هذا بالتأكيد مفاضلة.
من ناحية أخرى ، من المستحسن التحكم في مقدار وقت وحدة المعالجة المركزية FBCP-ILI9341. يتم ضبط إعدادات الإنشاء الافتراضية لزيادة معدل تحديث العرض على حساب استهلاك الطاقة على PI 3B. على Pi Zero ، يتم ذلك العكس ، أي افتراضيًا ، يقوم برنامج التشغيل بتحسينه لتوفير البطارية بدلاً من سرعة تحديث العرض القصوى. يمكن التحكم في الخيارات التالية لتحقيق التوازن بين هذين:
الخيار الرئيسي للتحكم في استخدام وحدة المعالجة المركزية مقابل جانب الأداء هو الخيار #define ALL_TASKS_SHOULD_DMA في config.h . إن تمكين هذا الخيار سيقلل بشكل كبير من استخدام وحدة المعالجة المركزية. إذا تم تعطيل هذا الخيار ، يتم تعظيم استخدام ناقل SPI ولكن استخدام وحدة المعالجة المركزية يمكن أن يصل إلى 80 ٪ -120 ٪. عند تمكين هذا الخيار ، يكون استخدام وحدة المعالجة المركزية عمومًا يصل إلى حوالي 15 ٪ إلى 30 ٪. يحدث استخدام وحدة المعالجة المركزية القصوى عند مشاهدة مقطع فيديو ، أو تشغيل لعبة سريعة الحركة. إذا لم يكن هناك شيء يتغير على الشاشة ، فيجب أن ينخفض استهلاك وحدة المعالجة المركزية للسائق من 0 إلى 5 ٪. بشكل افتراضي ، يتم تمكين #define ALL_TASKS_SHOULD_DMA لـ pi Zero ، ولكن تم تعطيل PI 3B.
يجب دائمًا تمكين خيار CMake -DUSE_DMA_TRANSFERS=ON لاستخدام وحدة المعالجة المركزية منخفضة جيدة. إذا تم تعطيل عمليات نقل DMA ، فسيتم تشغيل السائق في وضع SPI المصور بالاقتران ، والذي يستخدم عمومًا نواة واحدة مخصصة من وقت وحدة المعالجة المركزية. إذا كانت عمليات نقل DMA تسبب مشكلات ، فحاول ضبط القنوات التي ترسل وتلقي DMA لاستخدامها في اتصال SPI مع -DDMA_TX_CHANNEL=<num> و -DDMA_RX_CHANNEL=<num> CMAKE.
تراكب الإحصائيات تطبع معلومات مفصلة تمامًا حول حالة التنفيذ. تعطيل التراكب مع -DSTATISTICS=0 خيار CMake يحسن الأداء ويقلل من استخدام وحدة المعالجة المركزية. إذا كنت ترغب في الحفاظ على إحصائيات الطباعة ، فيمكنك محاولة زيادة الفاصل الزمني باستخدام خيار #define STATISTICS_REFRESH_INTERVAL <timeInMicroseconds> في config.h.
إن تمكين #define USE_GPU_VSYNC يقلل من استهلاك وحدة المعالجة المركزية ، ولكن بسبب Raspberrypi/userland #440 يمكن أن يسبب التأثر. يؤدي تعطيل #defined USE_GPU_VSYNC إلى تأثر أقل ، ولكن بسبب Raspberrypi/userland #440 ، يزيد من استهلاك طاقة وحدة المعالجة المركزية.
يمكن استخدام الخيار #define SELF_SYNCHRONIZE_TO_GPU_VSYNC_PRODUCED_NEW_FRAMES بالاقتران مع #define USE_GPU_VSYNC لمحاولة العثور على ميدان ميدلي بين مشكلات Raspberrypi/userland #440 - معتدلة حتى لا تحاول التوافق كثيرًا. حاول تجربة تمكين أو تعطيل هذا الإعداد.
هناك عدد من خيارات #define SAVE_BATTERY_BY_x في config.h ، والتي يتم تمكينها جميعًا. يجب أن تكون هذه آمنة للاستخدام دائمًا بدون مقايضات. إذا كنت تعاني من مشكلات زمنية أو ذات صلة بالأداء ، فيمكنك محاولة تبديلها لاستكشاف الأخطاء وإصلاحها.
الخيار #define DISPLAY_FLIP_ORIENTATION_IN_SOFTWARE لا يتسبب في استخدام وحدة المعالجة المركزية الإضافية ، لذا فإن تعطيله سيخفف من تحميل وحدة المعالجة المركزية قليلاً.
إذا كان ناقل عرض SPI الخاص بك قادرًا على التشغيل بسرعة كبيرة مقارنة بحجم الشاشة ومقدار تغيير المحتوى على الشاشة ، فيمكنك محاولة تمكين #define UPDATE_FRAMES_IN_SINGLE_RECTANGULAR_DIFF خيار في config.h لتقليل استخدام وحدة المعالجة المركزية على حساب زيادة زيادة في زيادة مستوى المعالجة المركزية عدد البايتات المرسلة عبر الحافلة. وقد لوحظ أن هذا له تأثير كبير على Pi Zero ، لذلك يستحق التحقق بشكل خاص هناك.
إذا كان ناقل عرض SPI قادرًا على التشغيل سريعًا حقًا (أو كنت لا تهتم بمعدل الإطارات ، ولكن فقط حول استخدام وحدة المعالجة المركزية المنخفضة) ، يمكنك محاولة تمكين خيار #define UPDATE_FRAMES_WITHOUT_DIFFING في config.h للتخلي عن دلتا التكييف الخيار تماما. سيعود هذا إلى تحديثات الإطار الكامل الساذج للحصول على الحد الأدنى من استخدام وحدة المعالجة المركزية بشكل عام.
يمكن تمكين الخيار #define RUN_WITH_REALTIME_THREAD_PRIORITY لجعل برنامج التشغيل يعمل في أولوية العملية الحقيقية. هذا يمكن أن يحبس النظام ، ولكن لا يزال متاحا للتجربة المتقدمة.
في display.h هناك خيار #define TARGET_FRAME_RATE <number> . سيؤدي تعيين هذا إلى قيمة أصغر ، مثل 30 ، إلى تداول معدل التحديث لتقليل استهلاك وحدة المعالجة المركزية.
يتمثل أحد الجوانب المذهلة في FBCP-ILI9341 في أنه يقدم القليل جدًا من الكمون النفقات العامة: على شاشة ILI9341 المنعشة 119 هرتز ، يحصل FBCP-ILI9341 على وحدات البكسل كاستجابة من مدخلات GPIO إلى الشاشة في أقل من 16.66 ميجا ثانية. ليس لدي سوى كاميرا تسجيل 120 إطارًا في الثانية ، لذلك لا يمكنني قياس التأخير أقصر بسهولة ، ولكن التقدير الإحصائي الخشن لمقطع الفيديو البطيء يشير إلى أن هذا التأخير قد يكون منخفضًا من 2-3 مللي ثانية ، يهيمن عليه معدل تحديث لوحة ~ 8.4msecs من ILI9341.
هذا لا يعني أن الإدخال العام لعرض الكمون في الألعاب سيكون فوريًا للغاية. يشير اختبار لعبة NES المحاكاة لفترة وجيزة إلى Retropie إلى زمن انتقال إجمالي يبلغ حوالي 60-80 مللي ثانية. يحدث هذا الكمون بسبب النفقات العامة لمحاكي لعبة NES والكمون الإضافي الذي تمت إضافته بواسطة Linux ، Dispmanx و GPU عرض ، و GPU FrameBuffer Snapshotting. (إذا قمت بتشغيل FBCP-ILI9341 كمكتبة ثابتة تتجاوز dispmanx ومكدس GPU ، وربط مباشرة إدخال GPIO وتطبيق منطق التطبيق في FBCP-ILI9341 ، ستتمكن من الوصول إلى هذا القليل من MSECs من الكمون العام ، كما هو موضح في فوق فيديو إدخال GPIO)
ومن المثير للاهتمام ، أن FBCP-ILI9341 حوالي 33 مللي ثانية أسرع من شاشة KEDEI HDMI رخيصة. زمن الوفاء النفقات العامة.
لسوء الحظ ، هناك قيود على شاشات العرض المتصلة بـ SPI هي أن إشارة خط VSYNC غير متوفرة على وحدات التحكم في العرض عند تشغيلها في وضع SPI ، لذلك لا يمكن إجراء تحديثات مقفلة VSYNC حتى لو كانت عرض ناقل SPI على الشاشة سريعًا بما يكفي . على سبيل المثال ، يمكن تشغيل شاشات العرض 4 ILI9341 التي لدي جميعها بشكل أسرع من 75 ميجا هرتز ، لذا فإن عرض النطاق الترددي لحافلة SPI ، كلهم سيكونون قادرين على تحديث إطار كامل في أقل من فاصل VSYNC ، ولكن لا يمكن مزامنة التحديثات إلى أقل من فاصل VSYNC vsync since the display controllers do not report it. (If you do know of a display that does actually expose a vsync clock signal even in SPI mode, you can try implementing support to locking on to it)
You can however choose between two distinct types of tearing artifacts: straight line tearing and diagonal tearing . Whichever looks better is a bit subjective, which is why both options exist. I prefer the straight line tearing artifact, it seems to be less intrusive than the diagonal tearing one. To toggle this, edit the option #define DISPLAY_FLIP_ORIENTATION_IN_SOFTWARE in config.h . When this option is enabled, fbcp-ili9341 produces straight line tearing, and consumes a tiny few % more CPU power. By default Pi 3B builds with straight line tearing, and Pi Zero with the faster diagonal tearing. Check out the video Latency and tearing test #2: GPIO input to display latency in fbcp-ili9341 and tearing modes to see in slow motion videos how these two tearing modes look like.
Another option that is known to affect how the tearing artifact looks like is the internal panel refresh rate. For ILI9341 displays this refresh rate can be adjusted in ili9341.h , and this can be set to range between ILI9341_FRAMERATE_61_HZ and ILI9341_FRAMERATE_119_HZ (default). Slower refresh rates produce less tearing, but have higher input-to-display latency, whereas higher refresh rates will result in the opposite. Again visually the resulting effect is a bit subjective.
To get tearing free updates, you should use a DPI display, or a good quality HDMI display. Beware that cheap small 3.5" HDMI displays such as KeDei do also tear - that is, even if they are controlled via HDMI, they don't actually seem to implement VSYNC timed internal operation.
Having no vsync is not all bad though, since with the lack of vsync, SPI displays have the opportunity to obtain smoother animation on content that is not updating at 60Hz. It is possible that content on the SPI display will stutter even less than what DPI or HDMI displays on the Pi can currently provide (although I have not been able to test this in detail, except for the KeDei case above).
The main option that affects smoothness of display updates is the #define USE_GPU_VSYNC line in config.h . If this is enabled, then the internal Pi GPU HDMI vsync clock is used to drive frames onto the display. The Pi GPU clock runs at a fixed rate that is independent of the content. This rate can be discovered by running tvservice -s on the Pi console, and is usually 59Hz or 60Hz. If your application renders at this rate, animation will look smooth, but if not, there will be stuttering. For example playing a PAL NES game that updates at 50Hz with HDMI clock set at 60Hz will cause bad microstuttering in video output if #define USE_GPU_VSYNC is enabled.
If USE_GPU_VSYNC is disabled, then a busy spinning GPU frame snapshotting thread is used to drive the updates. This will produce smoother animation in content that does not maintain a fixed 60Hz rate. Especially in OpenTyrian, a game that renders at a fixed 36fps and has slowly scrolling scenery, the stuttering caused by USE_GPU_VSYNC is particularly visible. Running on Pi 3B without USE_GPU_VSYNC enabled produces visually smoother looking scrolling on an Adafruit 2.8" ILI9341 PiTFT set to update at 119Hz, compared to enabling USE_GPU_VSYNC on the same setup. Without USE_GPU_VSYNC , the dedicated frame polling loop thread "finds" the 36Hz update rate of the game, and then pushes pixels to the display at this exact rate. This works nicely since SPI displays disregard vsync - the result is that frames are pushed out to the SPI display immediately as they become available, instead of pulling them at a fixed 60Hz rate like HDMI does.
A drawback is that this kind of polling consumes more CPU time than the vsync option. The extra overhead is around +34% of CPU usage compared to the vsync method. It also requires using a background thread, and because of this, it is not feasible to be used on a single core Pi Zero. If this polling was unnecessary, this mode would also work on a Pi Zero, and without the added +34% CPU overhead on Pi 3B. See the Known Issues section below for more details.

There are two other main options that affect frame delivery timings, #define SELF_SYNCHRONIZE_TO_GPU_VSYNC_PRODUCED_NEW_FRAMES and #define SAVE_BATTERY_BY_PREDICTING_FRAME_ARRIVAL_TIMES . Check out the video fbcp-ili9341 frame delivery smoothness test on Pi 3B and Adafruit ILI9341 at 119Hz for a detailed side by side comparison of these different modes. The conclusions drawn from the four tested scenarios in the video are:
1. vc_dispmanx_vsync_callback() (top left) , set #define USE_GPU_VSYNC and unset #define SELF_SYNCHRONIZE_TO_GPU_VSYNC_PRODUCED_NEW_FRAMES :
This mode uses the DispmanX HDMI vsync signal callback to drive frames to the display.
الايجابيات:
سلبيات:
2. vc_dispmanx_vsync_callback() + self synchronization (top right) , set #define USE_GPU_VSYNC and #define SELF_SYNCHRONIZE_TO_GPU_VSYNC_PRODUCED_NEW_FRAMES :
This mode uses the GPU vsync signal, but also aims to find and synchronize to the edge trigger when content is producing frames. This is the default build mode on Pi Zero.
الايجابيات:
سلبيات:
3. gpu polling thread + sleep heuristic (bottom left) , unset #define USE_GPU_VSYNC and set #define SAVE_BATTERY_BY_PREDICTING_FRAME_ARRIVAL_TIMES :
This mode runs a dedicated background thread that drives frames from the GPU to the SPI display. This is the default build mode on Pi 3B.
الايجابيات:
سلبيات:
4. gpu polling thread without sleeping (bottom right) , unset #define USE_GPU_VSYNC and unset #define SAVE_BATTERY_BY_PREDICTING_FRAME_ARRIVAL_TIMES :
This mode runs the dedicated GPU thread as fast as possible, without attempting to sleep CPU.
الايجابيات:
سلبيات:
Be aware of the following limitations:
vc_dispmanx_snapshot() API, and the obtained pixels are then routed on to the SPI-based display. This kind of polling is performed, since there does not exist an event-based mechanism to get new frames from the GPU as they are produced. The result is inefficient and can easily cause stuttering, since different applications produce frames at different paces. Ideally the code would ask the VideoCore API to receive finished frames in callback notifications immediately after they are rendered , but this kind of functionality does not exist in the current GPU driver stack. In the absence of such event delivery mechanism, the code has to resort to polling snapshots of the display framebuffer using carefully timed heuristics to balance between keeping latency and stuttering low, while not causing excessive power consumption. These heuristics keep continuously guessing the update rate of the animation on screen, and they have been tuned to ensure that CPU usage goes down to 0% when there is no detected activity on screen, but it is certainly not perfect. This GPU limitation is discussed at raspberrypi/userland#440. If you'd like to see fbcp-ili9341 operation reduce latency, stuttering and power consumption, please throw a (kind!) comment or a thumbs up emoji in that bug thread to share that you care about this, and perhaps Raspberry Pi engineers might pick the improvement up on the development roadmap. If this issue is resolved, all of the #define USE_GPU_VSYNC , #define SAVE_BATTERY_BY_PREDICTING_FRAME_ARRIVAL_TIMES and #define SELF_SYNCHRONIZE_TO_GPU_VSYNC_PRODUCED_NEW_FRAMES hacks from the previous section could be deleted from the driver, hopefully leading to a best of all worlds scenario without drawbacks. /boot/config.txt and configure all applications to never change that at runtime. 400/250=+60% as well. Therefore when choosing the SPI CDIV value to use, one has to pick one that works for both idle and turbo clock speeds. Conversely, the BCM core reverts to non-turbo speed when there is only light CPU load active, and this slows down the display, so if an application is graphically intensive but light on CPU, the SPI display bus does not get a chance to run at maximum speeds. A way to work around this is to force the BCM core to always stay in its turbo state with force_turbo=1 option in /boot/config.txt , but this has an unfortunate effect of causing the ARM CPU to always run in turbo speed as well, consuming excessive amounts of power. At the time of writing, there does not yet exist a good solution to have both power saving and good performance. This limitation is being discussed in more detail at raspberrypi/firmware#992. For more known issues and limitations, check out the bug tracker, especially the entries marked retired , for items that are beyond current scope.
By default fbcp-ili9341 builds with a statistics overlay enabled. See the video fbcp-ili9341 ported to ILI9486 WaveShare 3.5" (B) SpotPear 320x480 SPI display to find details on what each field means. Build with CMake option -DSTATISTICS=0 to disable displaying the statistics. You can also try building with CMake option -DSTATISTICS=2 to show a more detailed frame delivery timings histogram view, see screenshot and video above.
The fbcp part in the name means framebuffer copy ; specifically for the ILI9341 controller. fbcp-ili9341 is not actually a framebuffer copying driver, it does not create a secondary framebuffer that it would copy bytes across to from the primary framebuffer. It is also no longer a driver only for the ILI9341 controller. A more appropriate name might be userland-raspi-spi-display-driver or something like that, but the original name stuck.
Yes, it does, although not quite as well as on Pi 3B. If you'd like it to run better on a Pi Zero, leave a thumbs up at raspberrypi/userland#440 - hard problems are difficult to justify prioritizing unless it is known that many people care about them.
Edit the file config.h and comment out the line #define DISPLAY_OUTPUT_LANDSCAPE . This will make the display output in portrait mode, effectively rotating it by 90 degrees. Note that this only affects the pixel memory reading mode of the display. It is not possible to change the panel scan order to run between landscape and portrait, the SPI displays typically always scan in portrait mode. The result is that it will change the panel vsync tearing mode from "straight line tearing" over to "diagonal tearing" (see the section About Tearing above).
If you do not want to have diagonal tearing, but would prefer straight line tearing, then additionally enable the option #define DISPLAY_FLIP_ORIENTATION_IN_SOFTWARE in config.h . That will restore straight line tearing, but it will also increase overall CPU consumption.
Enable the option #define DISPLAY_ROTATE_180_DEGREES in config.h . This should rotate the SPI display to show up the other way around, while keeping the HDMI connected display orientation unchanged. Another option is to utilize a /boot/config.txt option display_rotate=2, which rotates both the SPI output and the HDMI output.
Note that the setting DISPLAY_ROTATE_180_DEGREES only affects the pixel memory reading mode of the display. It is not possible to flip the panel scan to run inverted by 180 degrees. This means that adjusting these settings will also have effects of changing the visual appearance of the vsync tearing artifact. If you have the ability to mount the display 180 degrees around in your project, it is recommended to do that instead of using the DISPLAY_ROTATE_180_DEGREES option.
Edit the file config.h in a text editor (a command line one such as pico , vim , nano , or SSH map the drive to your host), and find the appropriate line in the file. Add comment lines // in front of that text to disable the option, or remove the // characters to enable it.
After having edited and saved the file, reissue make -j in the build directory and restart fbcp-ili9341.
Some options are passed to the build from the CMake configuration script. You can run with make VERBOSE=1 to see which configuration items the CMake build is passing. See the above Configuring Build Options section to customize the CMake configure items. For example, to remove the statistics overlay, pass -DSTATISTICS=0 directive to CMake.
Building requires CMake to be installed on the Pi: try sudo apt-get install cmake .
Try deleting CMakeCache.txt between changing CMake settings.
Yes, both work fine. For linux command line terminal, the /dev/tty1 console should be set to output to Linux framebuffer 0 ( /dev/fb0 ). This is the default mode of operation and there do not exist other framebuffers in a default distribution of Raspbian, but if you have manually messed with the con2fbmap command in your installation, you may have inadvertently changed this configuration. Run con2fbmap 1 to see which framebuffer the /dev/tty1 console is outputting to, it should print console 1 is mapped to framebuffer 0 . Type con2fbmap 1 0 to reset console 1 back to outputting to framebuffer 0.
Likewise, the X windowing system should be configured to render to framebuffer 0. This is by default the case. The target framebuffer for X windowing service is usually configured via the FRAMEBUFFER environment variable before launching X. If X is not working by default, you can try overriding the framebuffer by launching X with FRAMEBUFFER=/dev/fb0 startx instead of just running startx .
I don't know, I don't currently have any to test. Perhaps the code does need some model specific configuration, or perhaps it might work out of the box. I only have Pi 3B, Pi 3B+, Pi Zero W and a Pi 3 Compute Module based systems to experiment on. Pi 2 B has been reported to work by users (#17).
If the display controller is one of the currently tested ones (see the list above), and it is wired up to run using 4-line SPI, then it should work. Pay attention to configure the Data/Control GPIO pin number correctly, and also specify the Reset GPIO pin number if the device has one.
If the display controller is not one of the tested ones, it may still work if it is similar to one of the existing ones. For example, ILI9340 and ILI9341 are practically the same controller. You can just try with a specific one to see how it goes.
If fbcp-ili9341 does not support your display controller, you will have to write support for it. fbcp-ili9341 does not have a "generic SPI TFT driver routine" that might work across multiple devices, but needs specific code for each. If you have the spec sheet available, you can ask for advice, but please do not request to add support to a display controller "blind", that is not possible.
ربما. This is a more recent experimental feature that may not be as stable, and there are some limitations, but 3-wire ("9-bit") SPI display support is now available. If you have a 3-wire SPI display, ie one that does not have a Data/Control (DC) GPIO pin to connect, configure it via CMake with directive -DGPIO_TFT_DATA_CONTROL=-1 to tell fbcp-ili9341 that it should be driving the display with 3-wire protocol.
Current limitations of 3-wire communication are:
ALL_TASKS_SHOULD_DMA is currently not supported, there is an issue with DMA chaining that prevents this from being enabled. As result, CPU usage on 3-wire displays will be slightly higher than on 4-wire displays.OFFLOAD_PIXEL_COPY_TO_DMA_CPP is currently not supported. As a result, 3-wire displays may not work that well on single core Pis like Pi Zero.No. Those are completely different technologies altogether. It should be possible to port the driver algorithm to work on I2C however, if someone is interested.
At the moment one cannot utilize the XPT2046/ADS7846 touch controllers while running fbcp-ili9341, so touch is mutually incompatible with this driver. In order for fbcp-ili9341 to function, you will need to remove all dtoverlay s in /boot/config.txt related to touch.
I have done close to everything possible to my displays - cut power in middle of operation, sent random data and command bytes, set their operating voltage commands and clock timings to arbitrary high and low values, tested unspecified and reserved command fields, and driven the displays dozens of MHz faster than they managed to keep up with, and I have not yet done permanent damage to any of my displays or Pis.
Easiest way to do permanent damage is to fail at wiring, eg drive 5 volts if your display requires 3.3v, or short a connection, or something similar.
The one thing that fbcp-ili9341 stays clear off is that it does not program the non-volatile memory areas of any of the displays. Therefore a hard power off on a display should clear all performed initialization and reset the display to its initial state at next power on.
That being said, if it breaks, you'll get to purchase a new shiny one to replace it.
Yes, fbcp-ili9341 shows the output of the HDMI display on the SPI screen, and both can be attached at the same time. A HDMI display does not have to be connected however, although fbcp-ili9341 operation will still be affected by whatever HDMI display mode is configured. Check out tvservice -s on the command line to check what the current DispmanX HDMI output mode is.
At the moment fbcp-ili9341 has been developed to only display the contents of the main DispmanX GPU framebuffer over to the SPI display. That is, the SPI display will show the same picture as the HDMI output does. There is no technical restriction that requires this though, so if you know C/C++ well, it should be a manageable project to turn fbcp-ili9341 to operate as an offscreen display library to show a completely separate (non-GPU-accelerated) image than what the main HDMI display outputs. For example you could have two different outputs, eg a HUD overlay, a dashboard for network statistics, weather, temps, etc. showing on the SPI while having the main Raspberry Pi desktop on the HDMI.
In this kind of mode, you would probably strip the DispmanX bits out of fbcp-ili9341, and recast it as a static library that you would link to in your drawing application, and instead of snapshotting frames, you can then programmatically write to a framebuffer in memory from your C/C++ code.
Unfortunately there are a number of things to go wrong that all result in a white screen. This is probably the hardest part to diagnose. Some ideas:
This suggests that the power line or the backlight line might not be properly connected. Or if the backlight connects to a GPIO pin on the Pi (and not a voltage pin), then it may be that the pin is not in correct state for the backlight to turn on. Most of the LCD TFT displays I have immediately light up their backlight when they receive power. The Tontec one has a backlight GPIO pin that boots up high but must be pulled low to activate the backlight. OLED displays on the other hand seem to stay all black even after they do get power, while waiting for their initialization to be performed, so for OLEDs it may be normal for nothing to show up on the screen immediately after boot.
If the backlight connects to a GPIO pin, you may need to define -DGPIO_TFT_BACKLIGHT=<pin> in CMake command line or config.h , and edit config.h to enable #define BACKLIGHT_CONTROL .
fbcp-ili9341 runs a clear screen command at low speed as first thing after init, so if that goes through, it is a good sign. Try increasing -DSPI_BUS_CLOCK_DIVISOR= CMake option to a higher number to see if the display driving rate was too fast. Or try disabling DMA with -DUSE_DMA_TRANSFERS=OFF to see if this might be a DMA conflict.
This suggests same as above, increase SPI bus divisor or troubleshoot disabling DMA. If DMA is detected to be the culprit, try changing up the DMA channels. Double check that /boot/config.txt does not have any dtoverlay s regarding other SPI display drivers or touch screen controllers, and that it does NOT have a dtparam=spi=on line in it - fbcp-ili9341 does not use the Linux kernel SPI driver.
Make sure other fbcp programs are not running, or that another copy of fbcp-ili9341 is not running on the background.
This is likely caused by the program resizing the video resolution at runtime, which breaks DispmanX. See raspberrypi/userland#461 for more details.
Check that the Pi is powered off of a power supply that can keep up with the voltage, and the low voltage icon is not showing up. (remove any avoid_warnings=1/2 directive from /boot/config.txt if that was used to get rid of warnings overlay, to check that voltage is good) It has been observed that if there is not enough power supplied, the display can be the first to starve, while the Pi might keep on running fine. Try removing turbo settings or lowering the clock speed if you have overclocked to verify that the display crash is not power usage related.
Also try lowering SPI bus speed to a safe lower value, eg half of the maximum speed that the display was able to manage.
Double check the Data/Command (D/C) GPIO pin physically, and in CMake command line. Whenever fbcp-ili9341 refers to pin numbers, they are always specified in BCM pin numbers. Try setting a higher -DSPI_BUS_CLOCK_DIVISOR= value to CMake. Make sure no other fbcp programs or SPI drivers or dtoverlays are enabled.
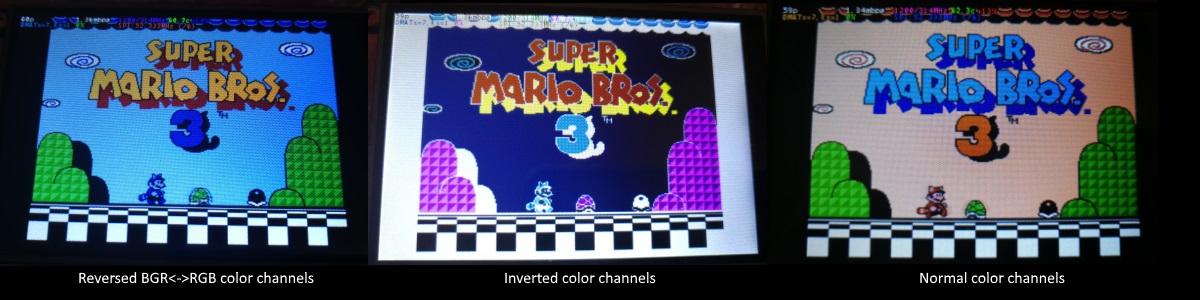
If the color channels are mixed (red is blue, blue is red, green is green) like shown on the left image, pass the CMake option -DDISPLAY_SWAP_BGR=ON to the build.
If the color intensities look wrong (white is black, black is white, color looks like a negative image) like seen in the middle image, pass the CMake option -DDISPLAY_INVERT_COLORS=ON to the build.
If the colors looks off in some other fashion, it is possible that the display is just being driven at a too high SPI bus speed, in which case try making the display run slower by choosing a higher -DSPI_BUS_CLOCK_DIVISOR= option to CMake. Especially on ILI9486 displays it has been observed that the colors on the display can become distorted if the display is run too fast beyond its maximum capability.
fbcp-ili9341 needs a few megabytes of GPU memory to function if DMA transfers are enabled. The gpu_mem boot config option dictates how much of the Pi's memory area is allocated to the GPU. By default this is 64MB, which has been observed to not leave enough memory for fbcp-ili9341 if HDMI is run at 1080p. If this error happens, try increasing GPU memory to eg 128MB by adding a line gpu_mem=128 in /boot/config.txt .
As the number of supported displays, Raspberry Pi device models, Raspbian/Retropie/Lakka OS versions, accompanied C++ compiler versions and fbcp-ili9341 build options have grown in number, there is a combinatorial explosion of all possible build modes that one can put the codebase through, so it is not easy to keep every possible combo tested all the time. Something may have regressed or gotten outdated. Stay calm, and report a bug.
You can also try looking through the commit history to find changes related to your configuration combo, to see if there's a mention of a known good commit in time that should work for your case. If you get an odd compiler error on cmake or make lines, those will usually be very easy to fix, as they are most of the time a result of some configurational oversight.
First, make sure the display is a 4-wire SPI and not a 3-wire one. A display is 4-wire SPI if it has a Data/Control (DC) GPIO line that needs connecting. Sometimes the D/C pin is labeled RS (Register Select). Support for 3-wire SPI displays does exist, but it is experimental and not nearly as well tested as 4-wire displays.
Second is the consideration about display speed. Below is a performance chart of the different displays I have tested. Note that these are sample sizes of one, I don't know how much sample variance there exists. Also I don't know if it is likely that there exists big differences between displays with same controller from different manufacturers. At least the different ILI9341 displays that I have are all quite consistent on performance, whether they are from Adafruit or WaveShare or from BuyDisplay.com.
| بائع | مقاس | دقة | وحدة تحكم | Rated SPI Bus Speed | Obtained Bus Speed | معدل الإطارات |
|---|---|---|---|---|---|---|
| Adafruit PiTFT | 2.8" | 240x320 | ILI9341 | 10MHz | 294MHz/4=73.50MHz | 59.81 fps |
| Adafruit PiTFT | 2.2" | 240x320 | ILI9340 | 15.15MHz | 338MHz/4=84.50MHz | 68.76 fps |
| Adafruit PiTFT | 3.5" | 320x480 | HX8357D | 15.15MHz | 314MHz/6=52.33MHz | 21.29 fps |
| Adafruit OLED | 1.27" | 128x96 | SSD1351 | 20MHz | 360MHz/20=18.00MHz | 91.55 fps |
| Waveshare RPi LCD (B) IPS | 3.5" | 320x480 | ILI9486 | 15.15MHz | 255MHz/8=31.88MHz | 12.97 fps |
| maithoga TFT LCD | 3.5" | 320x480 | ILI9486L | 15.15MHz | 400MHz/8=50.00MHz | 13.56 fps* |
| BuyDisplay.com SPI TFT copy #1 | 3.2" | 240x320 | ILI9341 | 10MHz | 310MHz/4=77.50MHz | 63.07 fps |
| BuyDisplay.com SPI TFT copy #2 | 3.2" | 240x320 | ILI9341 | 10MHz | 300MHz/4=75.00MHz | 61.03 fps |
| Arduino A000096 LCD | 1.77" | 128x160 | ST7735R | 15.15MHz | 355MHz/6=59.16MHz | 180.56 fps |
| Tontec MZ61581-PI-EXT 2016.1.28 | 3.5" | 320x480 | MZ61581 | 128MHz | 280MHz/2=140.00MHz | 56.97 fps |
| Adafruit 240x240 Wide Angle TFT | 1.54" | 240x240 | ST7789 | ؟ | 340MHz/4=85.00MHz | 92.23 fps |
| WaveShare 240x240 Display HAT | 1.3" | 240x240 | ST7789VW | 62.5MHz | 338MHz/4=84.50MHz | 91.69 fps |
| WaveShare 128x128 Display HAT | 1.44" | 128x128 | ST7735S | 15.15MHz | (untested) | (untested) |
| KeDei v6.3 | 3.5" | 320x480 | MPI3501 | ؟ | 400MHz/12=33.333MHz | 4.8fps ** |
In this list, Rated SPI Bus Speed is the maximum clock speed that the display controller is rated to run at. The Obtained Bus Speed column lists the fastest SPI bus speed that was achieved in practice, and the core_freq BCM Core speed and SPI Clock Divider CDIV setting that was used to achieve that rate. Note how most display controllers can generally be driven much faster than what they are officially rated at in their spec sheets.
The Frame Rate column shows the worst case frame rate when full screen updates are being performed. This occurs for example when watching fullscreen video (that is not a flat colored cartoon). Because fbcp-ili9341 only sends over the pixels that have changed, displays such as HX8357D and ILI9486 can still be used to play many games at 60fps. Retro games work especially well.
All the ILI9341 displays work nice and super fast at ~70-80MHz. My WaveShare 3.5" 320x480 ILI9486 display runs really slow compared to its pixel resolution, ~32MHz only. See fbcp-ili9341 ported to ILI9486 WaveShare 3.5" (B) SpotPear 320x480 SPI display for a video of this display in action. Adafruit's 320x480 3.5" HX8357D PiTFTs is ~64% faster in comparison.
The ILI9486L controller based maithoga display runs a bit faster than ILI9486 WaveShare, 50MHz versus 31.88MHz, ie +56.8% bandwidth increase. However fps-wise maithoga reaches only 13.56 vs WaveShare 12.97 fps, because the bandwidth advantage is fully lost in pixel format differences: ILI9486L requires transmitting 24 bits per each pixel (R6G6B6 mode), whereas ILI9486 supports 16 bits per pixel R5G6B5 mode. This is reflected in the above chart refresh rate for the maithoga display (marked with a star).
If manufacturing variances turn out not to be high between copies, and you'd like to have a bigger 320x480 display instead of a 240x320 one, then it is recommended to avoid ILI9486, they indeed are slow.
The KeDei v6.3 display with MPI3501 controller takes the crown of being horrible, in all aspects imaginable. It is able to run at 33.33 MHz, but due to technical design limitations of the display (see #40), effective bus speed is halved, and only about 72% utilization of the remaining bus rate is achieved. DMA cannot be used, so CPU usage will be off the charts. Even though fbcp-ili9341 supports this display, level of support is expected to be poor, because the hardware design is a closed secret without open documentation publicly available from the manufacturer. Stay clear of KeDei or MPI3501 displays.
The Tontec MZ61581 controller based 320x480 3.5" display on the other hand can be driven insanely fast at up to 140MHz! These seem to be quite hard to come by though and they are expensive. Tontec seems to have gone out of business and for example the domain itontec.com from which the supplied instructions sheet asks to download original drivers from is no longer registered. I was able to find one from eBay for testing.
Search around, or ask the manufacturer of the display what the maximum SPI bus speed is for the device. This is the most important aspect to getting good frame rates, but unfortunately most web links never state the SPI speed rating, or they state it ridiculously low like in the spec sheets. Try and buy to see, or ask in some community forums from people who already have a particular display to find out what SPI bus speed it can achieve.
One might think that since Pi Zero is slower than a Pi 3, the SPI bus speed might not matter as much when running on a Pi Zero, but the effect is rather the opposite. To get good framerates on a Pi Zero, it should be paired with a display with as high SPI bus speed capability as possible. This is because the higher the SPI bus speed is, the more autonomously a DMA controller can drive it without CPU intervention. For the same reason, the interlacing technique does not (currently at least) perform well on a Pi Zero, so it is disabled there by default. ILI9341s run well on Pi Zero, ILI9486 on the other hand is quite difficult to combine with a Pi Zero.
Ultimately, it should be noted that parallel displays (DPI) are the proper method for getting fast framerates easily. SPI displays should only be preferred if display form factor is important and a desired product might only exist as SPI and not as DPI, or the number of GPIO pins that are available on the Pi is scarce that sacrificing dozens of pins to RGB data is not ممكن.
Hardware-wise, there are six different ways to connect displays to the Pi. Here are the pros and cons of each:
Displays are generally manufactured to utilize one specific interfacing method, with the exception that some displays have a both I²C and SPI modes that can be configured via soldering.
Fbcp-ili9341 driver is about interfacing with SPI displays. If your display utilizes some other connection mechanism, fbcp-ili9341 will not apply.
Software-wise, there are two possible alternatives to fbcp-ili9341:
The following links proved helpful when writing this:
If you would like to help push Raspberry Pi SPI display support further, there are always more things to do in the project. Here is a list of ideas and TODOs for recognized work items to contribute, roughly rated in order of increasing difficulty.
top / htop , or with a power meter off the wall and report the results.SPI_3WIRE_PROTOCOL + ALL_TASKS_SHOULD_DMA to work together, or 3) fix up SPI_3WIRE_PROTOCOL + OFFLOAD_PIXEL_COPY_TO_DMA_CPP to work together.ALL_TASKS_SHOULD_DMA mode to be always superior in performance and CPU usage so that the non- ALL_TASKS_SHOULD_DMA path can be dropped from the codebase. (probably requires the above chaining to function efficiently)This driver is licensed under the MIT License. See LICENSE.txt. In nonlegal terms, it's yours for both free and commercial projects, DIY packages, kickstarters, Etsys and Ebays, and you don't owe back a dime. Feel free to apply and derive as you wish.
If you found fbcp-ili9341 useful, it makes me happy to hear back about the projects it found a home in. If you did a build or a project where fbcp-ili9341 worked out, it'd be great to see a video or some photos or read about your experiences.
I hope you build something you enjoy!
Best way to discuss the driver is to open a GitHub issue. You may also be able to find me over at sudomod.com Discord channel.


