all in one
v9.8.0
Die offizielle Installationsmethode für Nextcloud. NextCloud AIO bietet eine einfache Bereitstellung und Wartung mit den meisten Funktionen, die in dieser einen Nextcloud -Instanz enthalten sind.
Enthalten sind:
ffmpeg , smbclient , libreoffice und nodejs sind standardmäßig enthalten| Erstes Setup | Nach der Installation |
|---|---|
 |  |
Die folgenden Anweisungen sind für Installationen ohne Webserver oder Reverse -Proxy (wie Apache, Nginx, Caddy, Cloudflare -Tunnel und sonst) vorgesehen. Wenn Sie AIO hinter einem Webserver oder einem Reverse -Proxy ausführen möchten (wie Apache, Nginx, Caddy, Cloudflare -Tunnel und sonst), finden Sie in der Reverse Proxy -Dokumentation. Außerdem sind die folgenden Anweisungen speziell für Linux gedacht. Für macOS sehen Sie dies für Windows und für die Synologie. Sehen Sie dies.
Warnung
Sie können das Convenience -Skript unten verwenden, um Docker zu installieren. Wir empfehlen jedoch, Skripte nicht blind als sudo herunterzuladen und auszuführen. Aber wenn Sie Lust dazu haben, können Sie es natürlich benutzen. Siehe unten:
curl -fsSL https://get.docker.com | sudo shWenn Sie IPv6-Unterstützung benötigen, sollten Sie dies aktivieren, indem Sie https://github.com/nextcloud/all-in-one/blob/main/docker-ipv6-support.md folgen.
Führen Sie den folgenden Befehl aus, um den Container unter Linux und ohne einen Webserver oder einen Reverse -Proxy (wie Apache, Nginx, Caddy, Cloudflare -Tunnel und sonst) zu starten:
 # For Linux and without a web server or reverse proxy (like Apache, Nginx, Caddy, Cloudflare Tunnel and else) already in place:
sudo docker run
--init
--sig-proxy=false
--name nextcloud-aio-mastercontainer
--restart always
--publish 80:80
--publish 8080:8080
--publish 8443:8443
--volume nextcloud_aio_mastercontainer:/mnt/docker-aio-config
--volume /var/run/docker.sock:/var/run/docker.sock:ro
nextcloud/all-in-one:latest
sudo docker run diesen Befehl aus einen neuen Docker -Container. Docker -Befehle können optional ohne sudo verwendet werden, wenn der Benutzer zur Docker -Gruppe hinzugefügt wird (dies ist nicht mit DOCKER rootless, siehe FAQ unten).--init diese Option stellt sicher, dass niemals Zombieprozesse erstellt werden. Siehe Doker -Dokumentation.--sig-proxy=false Mit dieser Option können Sie die Containerhülle beenden, die bei Verwendung docker run automatisch angehängt wird, indem Sie [CTRL] + [C] verwenden, ohne den Container abzuschalten.--name nextcloud-aio-mastercontainer Dies ist der Name des Containers. Diese Zeile darf nicht geändert werden, da MasterContainer -Updates fehlschlagen würden.--restart always DAS IST DIE "RESTART-Richtlinie". always bedeutet, dass der Container immer mit dem Docker -Daemon beginnen sollte. Weitere Informationen zu den Neustart-Richtlinien finden Sie in der Docker-Dokumentation: https://docs.docker.com/config/containers/start-containers-automatic/--publish 80:80 Dies bedeutet, dass Port 80 des Containers mit Port 80 auf dem Host veröffentlicht werden sollte. Er wird zum Erhalten gültig AIO hinter einem Webserver oder einem Reverse -Proxy und kann in diesem Fall entfernt werden, da Sie dann Port 8080 für die AIO -Schnittstelle verwenden können.--publish 8080:8080 Dies bedeutet, dass Port 8080 des Containers mit Port 8080 auf dem Host veröffentlicht werden sollte. Dieser Port wird für die AIO-Schnittstelle verwendet und verwendet standardmäßig ein selbstsigniertes Zertifikat. Sie können auch einen anderen Host -Port verwenden, wenn Port 8080 bereits auf Ihrem Host verwendet --publish 8081:8080 , z. ).--publish 8443:8443 Dies bedeutet, dass Port 8443 des Containers mit Port 8443 auf dem Host veröffentlicht werden sollte. Wenn Sie Port 80 und 8443 im öffentlichen Internet veröffentlichen, können Sie über dieses Port mit einem gültigen Zertifikat auf die AIO-Schnittstelle zugreifen. Es ist nicht erforderlich, wenn Sie AIO hinter einem Webserver oder einem Reverse -Proxy ausführen und in diesem Fall entfernt werden können, da Sie dann Port 8080 für die AIO -Schnittstelle verwenden können.--volume nextcloud_aio_mastercontainer:/mnt/docker-aio-config Dies bedeutet, dass die vom MasterContainer erstellten Dateien in einem Docker-Volumen gespeichert werden, das als nextcloud_aio_mastercontainer bezeichnet wird. Diese Linie darf nicht geändert werden, da eingebaute Backups später scheitern würden.--volume /var/run/docker.sock:/var/run/docker.sock:ro Der Docker-Socket ist in den Container montiert, der zum Spenden aller anderen Container und für weitere Funktionen verwendet wird. Es muss unter Windows/MacOS und auf Docker rootless eingestellt werden. Weitere Informationen finden Sie in der zutreffenden Dokumentation. Vergessen Sie nicht, auch WATCHTOWER_DOCKER_SOCKET_PATH zu setzen! Wenn Sie dies nicht mögen, finden Sie unter https://github.com/nextcloud/all-in-one/tree/main/manual-install.nextcloud/all-in-one:latest Dies ist das verwendete Docker-Containerbild.--env NEXTCLOUD_DATADIR="/mnt/ncdata" (Dies ist ein Beispiel für Linux. Siehe dies für andere Betriebssysteme und für eine Erklärung, was dieser Wert tut. Dieser spezifische Bedarf benötigt. beim ersten Start angegeben werden, wenn Sie es an einen bestimmten Pfad anstelle des Standard -Docker -Bandes ändern möchten). Lesen Sie diese Readme und schauen Sie sich die Docker-Compose-Datei an: https://github.com/. NextCloud/All-in-One/Blob/Main/Compose.yamlHinweis: Möglicherweise sind Sie daran interessiert, das Datadir von NextCloud anzupassen, um die Dateien an einem anderen Ort zu speichern als das Standard -Docker -Volumen. Siehe diese Dokumentation, wie es geht.
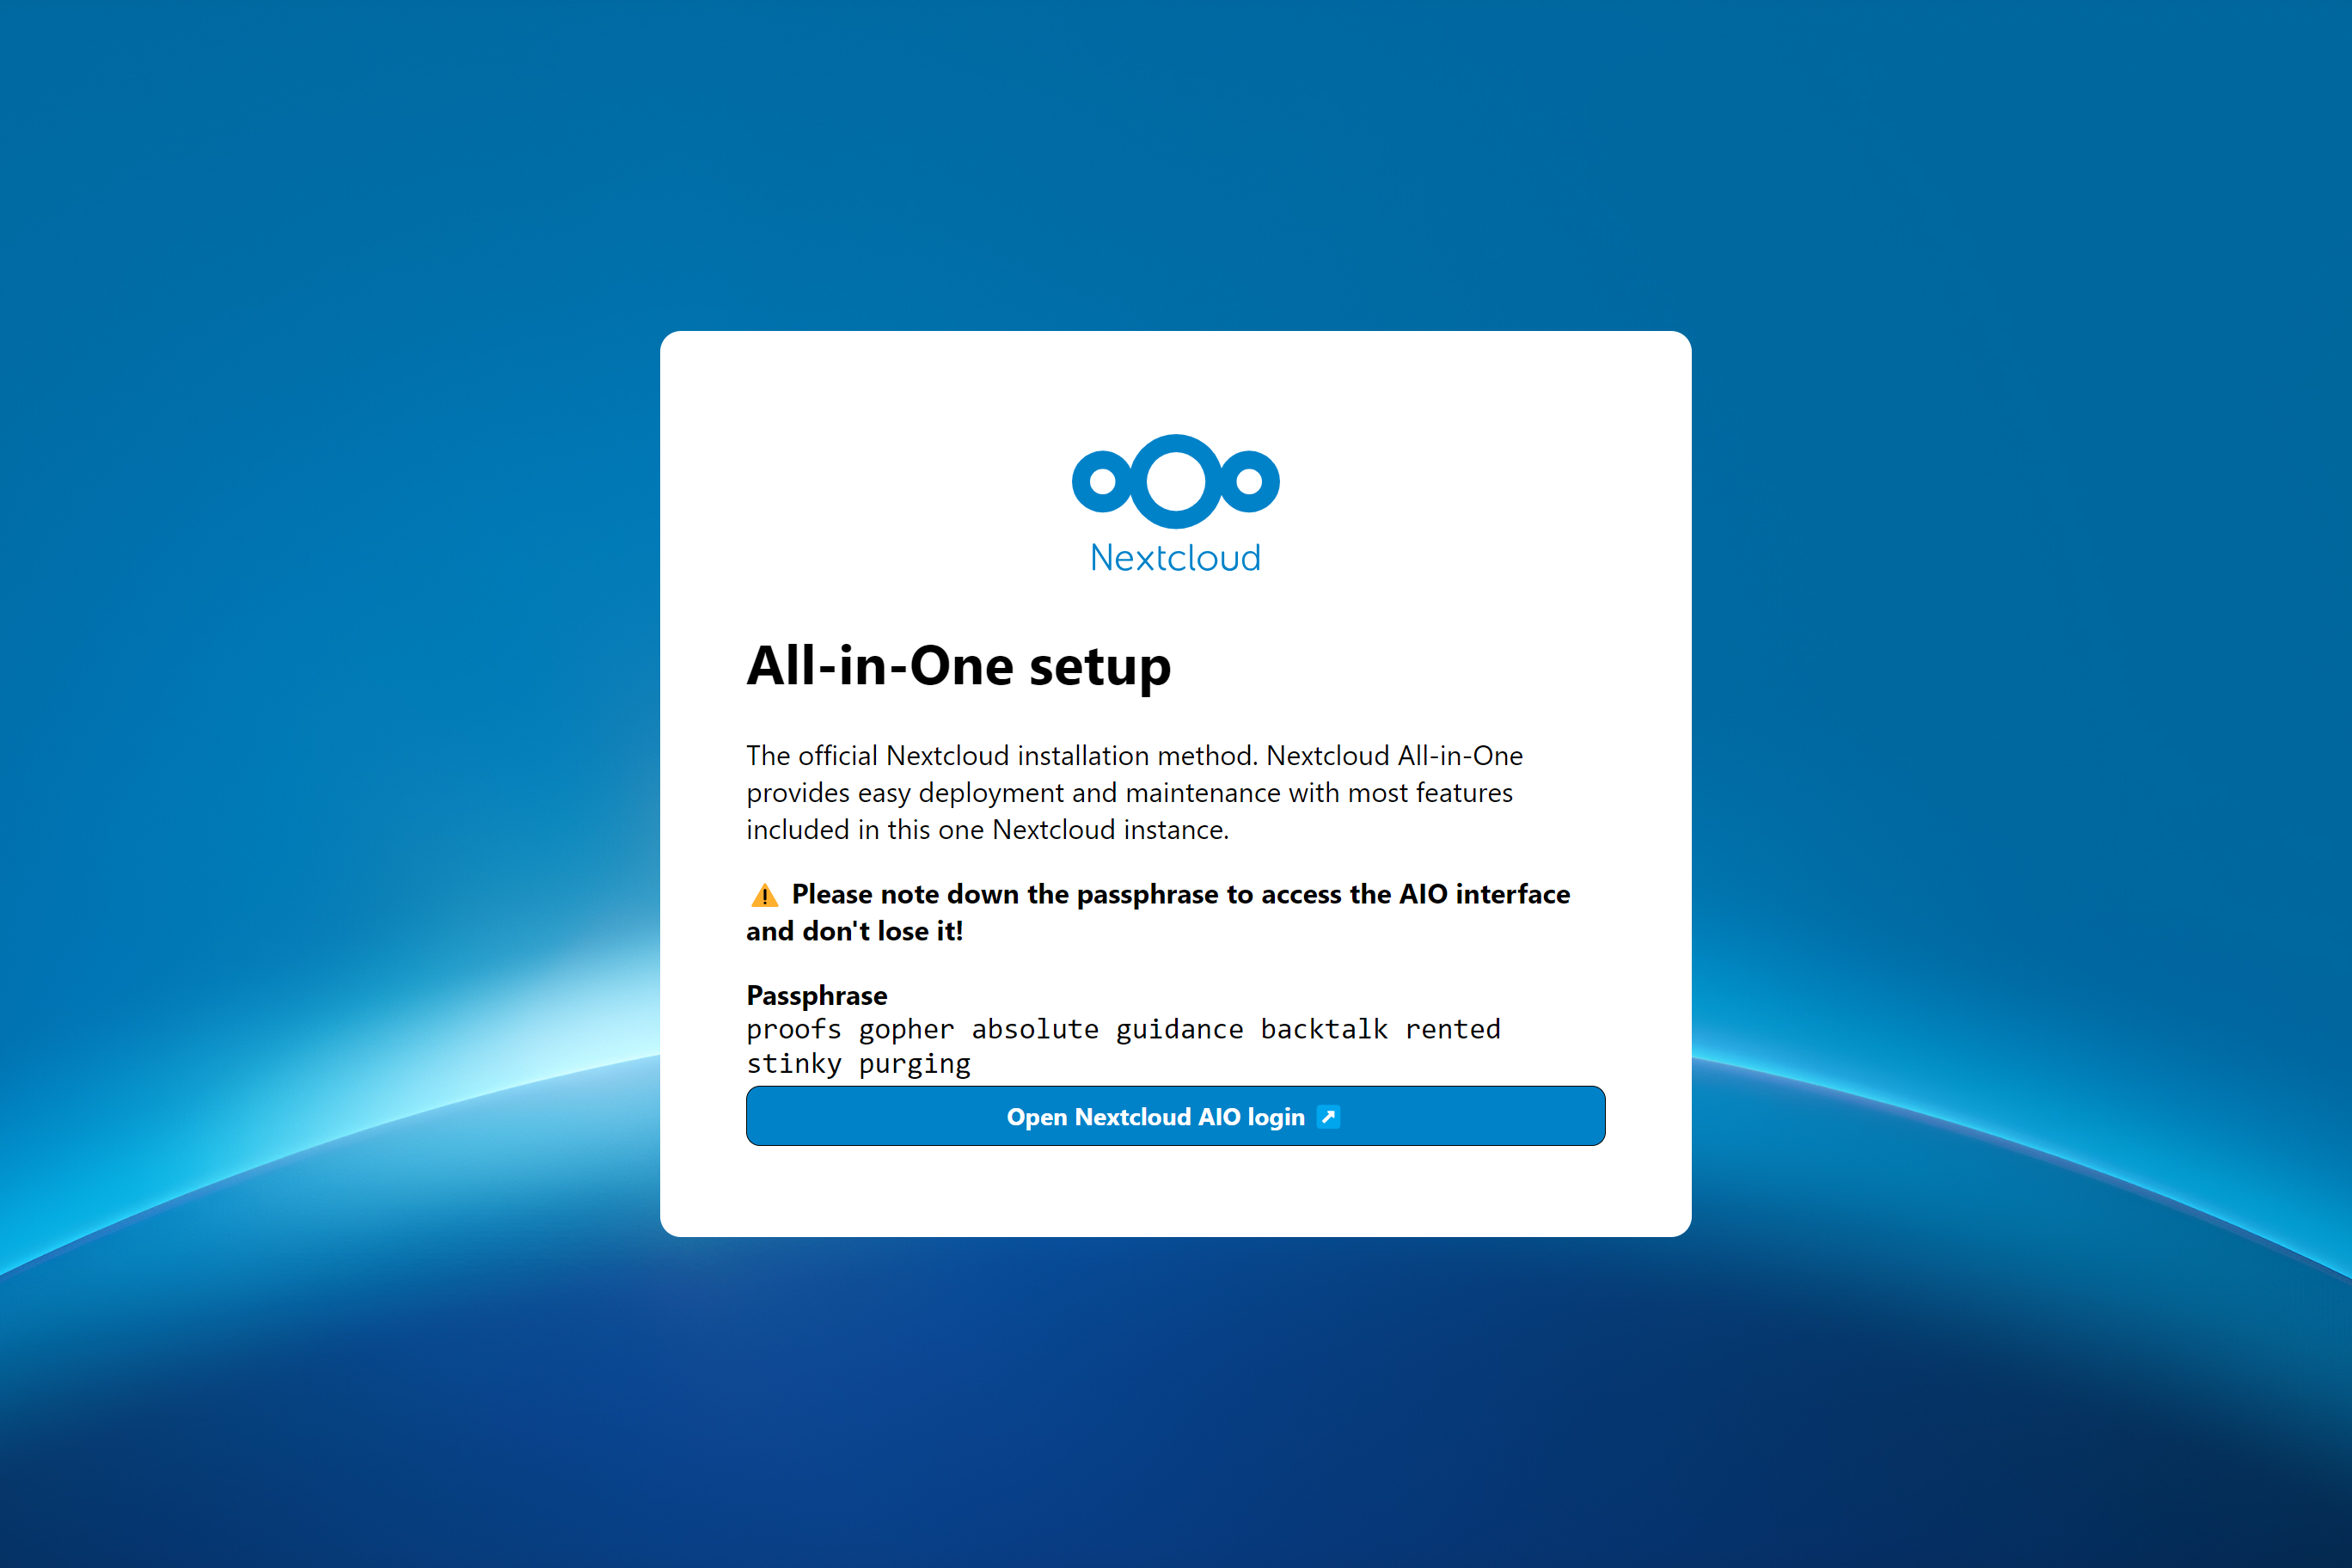
Nach dem ersten Start sollten Sie in der Lage sein, die NextCloud AIO -Schnittstelle jetzt auf Port 8080 dieses Servers zu öffnen.
EG https://ip.address.of.this.server:8080
Wenn Ihr Firewall/Router an Port 80 und 8443 offen/weitergeleitet ist und Sie eine Domain auf Ihren Server verweisen, können Sie automatisch ein gültiges Zertifikat erhalten, indem Sie die NEXTCLOUD -AIO -Schnittstelle über:
https://your-domain-that-points-to-this-server.tld:8443
Bitte vergessen Sie nicht, Port 3478/TCP und 3478/UDP in Ihrer Firewall/Router für den Talk Container zu öffnen!
NextCloud AIO ist von Projekten wie Portainer inspiriert, die den Docker -Daemon verwalten, indem sie direkt über den Docker -Socket sprechen. Mit diesem Konzept kann ein Benutzer nur einen Container mit einem einzigen Befehl installieren, bei dem das Erstellen und Verwalten aller Container erforderlich ist, die benötigt werden, um eine Nextcloud -Installation mit den meisten enthaltenen Funktionen bereitzustellen. Es macht auch die Aktualisierung des Brise und ist nicht mehr an das Host -System (und seine langsamen Aktualisierungen) gebunden, da sich alles in Containern befindet. Darüber hinaus ist es sehr einfach, aus Benutzerperspektive zu handhaben, da eine einfache Schnittstelle zur Verwaltung Ihrer nächsten AIO -Installation bereitgestellt wird.
In diesem Problem finden Sie eine Liste von Feature -Anfragen, die Hilfe von Mitwirkenden benötigen.
Ja. Weitere Informationen finden Sie in der folgenden Dokumentation: Reverse-Proxy.md
Sie können dies unter Linux überprüfen, indem Sie: uname -m ausführen
Nur diese (wenn Sie über Port 8080 intern auf die Schnittstelle von MasterContainer zugreifen):
443/TCP für den Apache -Container443/UDP Wenn Sie HTTP3 für den Apache -Container aktivieren möchten3478/TCP und 3478/UDP für den Talk Container8080/TCP : MasterContainer-Schnittstelle mit selbstsigniertem Zertifikat (funktioniert immer, auch wenn nur der Zugriff über IP-Address möglich ist, z. B. https://ip.address.of.this.server:8080/ )80/TCP : Weiterleitet in NextCloud (wird zum Erhalten des Zertifikats über ACME HTTP-Challenge für den MasterContainer verwendet)8443/TCP : MasterContainer -Schnittstelle mit einem gültigen Zertifikat (nur dann, wenn Port 80 und 8443 in Ihrem Firewall/Router geöffnet/weitergeleitet werden und Sie eine Domäne auf Ihren Server verweisen. Es generiert ein gültiges Zertifikat und greifen Sie automatisch auf und greifen Sie über z https://public.domain.com:8443/ ist möglich.)443/TCP : Wird später vom Apache -Container verwendet und muss in Ihrem Firewall/Router offen/weitergeleitet werden443/UDP : Wird später vom Apache -Container verwendet und muss in Ihrer Firewall/Router offen/weitergeleitet werden, wenn Sie HTTP3 aktivieren möchten3478/TCP und 3478/UDP : Sie werden vom TurnServer im Talk Container verwendet und müssen in Ihrem Firewall/Router offen/weitergeleitet werden Auf macOS gibt es nur eine Sache im Vergleich zu Linux: Anstatt --volume /var/run/docker.sock:/var/run/docker.sock:ro zu verwenden, müssen Sie --volume /var/run/docker.sock.raw:/var/run/docker.sock:ro verwenden --volume /var/run/docker.sock.raw:/var/run/docker.sock:ro , um es auszuführen, nachdem Sie den Docker -Desktop installiert haben (und vergessen Sie nicht, IPv6 zu aktivieren, wenn Sie dies benötigen). Abgesehen davon sollte es funktionieren und sich genauso verhalten wie unter Linux.
Möglicherweise sind Sie möglicherweise daran interessiert, den Datadir von NextCloud anzupassen, um die Dateien auf dem Host -System zu speichern. Siehe diese Dokumentation, wie es geht.
Installieren Sie unter Windows Docker Desktop (und vergessen Sie nicht, IPv6 zu aktivieren, wenn Sie dies benötigen) und führen Sie den folgenden Befehl in der Eingabeaufforderung aus:
 docker run ^
--init ^
--sig-proxy=false ^
--name nextcloud-aio-mastercontainer ^
--restart always ^
--publish 80:80 ^
--publish 8080:8080 ^
--publish 8443:8443 ^
--volume nextcloud_aio_mastercontainer:/mnt/docker-aio-config ^
--volume //var/run/docker.sock:/var/run/docker.sock:ro ^
nextcloud/all-in-one:latest
Möglicherweise sind Sie möglicherweise daran interessiert, den Datadir von NextCloud anzupassen, um die Dateien auf dem Host -System zu speichern. Siehe diese Dokumentation, wie es geht.
Notiz
Fast alle Befehle in der Dokumentation dieses Projekts verwenden sudo docker ... Da sudo unter Windows nicht verfügbar ist, entfernen Sie sudo einfach aus den Befehlen und sie sollten funktionieren.
Über die Synologie gibt es zwei Dinge im Vergleich zu Linux --volume /volume1/docker/docker.sock:/var/run/docker.sock:ro Anstatt --volume /var/run/docker.sock:/var/run/docker.sock:ro --volume /volume1/docker/docker.sock:/var/run/docker.sock:ro um es auszuführen. Sie müssen auch hinzufügen --env WATCHTOWER_DOCKER_SOCKET_PATH="/volume1/docker/docker.sock" zum Befehl docker run des mastercontainer (aber vor der letzten leiten line nextcloud/all-in-one:latest ). Abgesehen davon sollte es funktionieren und sich genauso verhalten wie unter Linux. Offensichtlich funktioniert die Synology Docker-GUI nicht damit, sodass Sie entweder SSH verwenden oder eine benutzerdefinierte Skriptaufgabe im Task Scheduler als "Root" erstellen müssen, um den Befehl auszuführen.
Notiz
Es ist möglich, dass sich der Docker -Socket Ihrer Synologie in /var/run/docker.sock wie die Standardeinstellung unter Linux befindet. Dann können Sie den Befehl Linux einfach verwenden, ohne etwas ändern zu müssen - Sie werden dies bemerken, wenn Sie versuchen, den Container zu starten, und es heißt, dass die Bindmontage fehlgeschlagen ist. ZB docker: Error response from daemon: Bind mount failed: '/volume1/docker/docker.sock' does not exists.
Möglicherweise sind Sie möglicherweise daran interessiert, den Datadir von NextCloud anzupassen, um die Dateien auf dem Host -System zu speichern. Siehe diese Dokumentation, wie es geht.
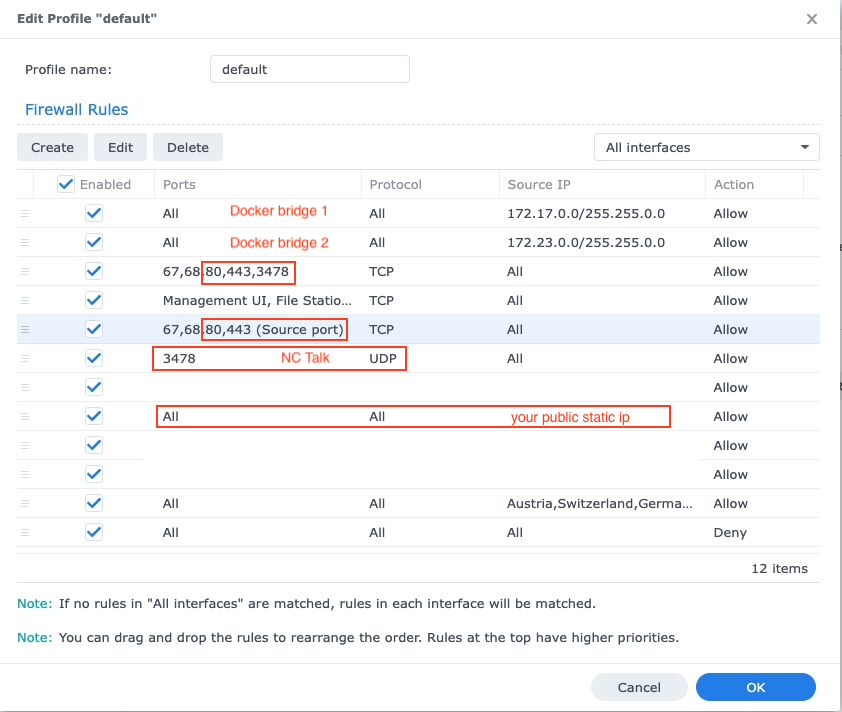
Sie müssen auch die Firewall der Synologie anpassen, siehe unten:
Die Synology DSM ist anfällig für Angriffe mit offenen Ports und Anmeldestellungen, weshalb ein Firewall -Setup immer empfohlen wird. Wenn eine Firewall aktiviert ist +UDP:
Wenn Sie über das NAS -Setup in Ihrem lokalen Netzwerk (das am häufigsten der Fall ist) haben, müssen Sie den DNS der Synologie einrichten, um über seine Domain von Ihrem Netzwerk von Ihrem Netzwerk aus zugreifen zu können. Vergessen Sie auch nicht, den neuen DNS Ihrem DHCP -Server und Ihren festen IP -Einstellungen hinzuzufügen:

Der einfachste Weg, es mit Portainer unter Linux auszuführen, besteht darin, die Stapelfunktion von Portainer zu verwenden und diese Docker-Compose-Datei zu verwenden, um AIO korrekt zu starten.
Mit der Truenas Scale Release 24.10.0 (die am 29. Oktober 2024 offiziell als stabile Version veröffentlicht wurde) stellte IX Systems die Kubernetes -Integration ab und implementierte eine vollständig funktionierende Docker -Umgebung.
Eine vollständigere Anleitung finden Sie in dieser Anleitung von @zybster: #5506
Auf älteren Truenas -Releases mit Kubernetes -Umgebung gibt es zwei Möglichkeiten, AIO zu betreiben. Der bevorzugte ist es, AIO in einer VM zu laufen. Dies ist notwendig, da sie den Docker-Socket für Container auf dem Host nicht aussetzen. Sie können auch Docker-Compos nicht verwenden, und es ist auch nicht möglich, benutzerdefinierte Helm-Charts auszuführen, die nicht explizit für die Skala von Truenas geschrieben sind.
Eine weitere, aber ungetestete Möglichkeit besteht darin, Portainer auf Ihrer Truenas-Skala von hier aus https://truecharts.org/charts/stable/Portainer/installation-notes zu installieren und das Helm-chart-Repository https://nextcloud.github.io/all- hinzuzufügen In-One/in Portainer, indem Sie https://docs.portainer.io/user/kubernetes/helm folgen. Weitere Dokumente zum AIOS-Helm-Diagramm finden Sie hier: https://github.com/nextcloud/all-in-one/tree/main/nextcloud-aio-helm-chart#nextcloud-aio-helm-chart.
https://yourdomain.com/settings/admin/richdocuments hinzufügenhttps://yourdomain.com/settings/admin/talk drehen.Obwohl es nicht so aussieht, als wäre es der Fall, aber aus AIO -Sicht funktioniert ein Cloudflare -Tunnel wie ein umgekehrter Proxy. Befolgen Sie also die Reverse -Proxy -Dokumentation, in der dokumentiert wird, wie es hinter einem Cloudflare -Tunnel läuft. Bitte beachten Sie jedoch die Vorbehalte, bevor Sie fortfahren.
Für einen Reverse -Proxy -Beispielhandbuch für Tailscale finden Sie diese Anleitung von @fllll: #5439
/proc/user_beancounters -Datei hat und ein niedriges numproc -Limit in IT eingestellt ist, verhalten sich Ihr Server wahrscheinlich schlecht, sobald sie diese Grenze erreicht, die von AIO sehr schnell erreicht wird, hier.Im Allgemeinen sind empfohlene VPs diejenigen, die KVM/nicht virtualisiert sind, da Docker am besten für sie funktionieren sollten.
Sie können AIO im Reverse-Proxy-Modus installieren, in dem auch dokumentiert ist, wie Sie es mit dem ACME DNS-Challenge zum Laufen bringen, um ein gültiges Zertifikat für AIO zu erhalten. Siehe die Reverse Proxy -Dokumentation. (Gemeint ist der Caddy with ACME DNS-challenge -Abschnitt). Siehe auch https://github.com/dani-garcia/vaultwarden/wiki/running-a-private-vaultwarden-instance-with-let%27s-crypts#getting-a-custom-caddy-build für zusätzliche Dokumente zu diesem Thema.
Wenn Sie Nextcloud nicht für das öffentliche Internet öffnen möchten, sehen Sie sich möglicherweise die folgende Dokumentation darüber an, wie Sie es lokal einrichten können: lokalinstanz.md, aber denken Sie daran, dass Sie immer noch die HTTPS ordnungsgemäß funktionieren lassen müssen .
Nein und es wird nicht hinzugefügt. Wenn Sie es nur lokal ausführen möchten, sehen Sie sich möglicherweise die folgende Dokumentation an: Local-Instance.md für die Konfiguration ohne herkömmliche Domäne. Oder in Betracht ziehen, NextCloudPi für den IP-Addesse-Zugriff lokal zu verwenden (es bündelt weniger Funktionen als AIO).
Nein. Dies ist nicht möglich und wird aus mehreren Gründen nicht hinzugefügt: Aktualisieren von Überprüfungen, App-Installationen über App-Store, das Herunterladen zusätzlicher Docker-Bilder bei Bedarf und mehr.
Nein und sie werden es nicht sein. Wenn Sie es lokal ausführen möchten, ohne Nextcloud für das öffentliche Internet zu öffnen, sehen Sie sich bitte die lokale Instanzdokumentation an.
Nein und es wird nicht hinzugefügt. Sie können diese Funktion jedoch verwenden, um mehrere AIO -Instanzen für jede Domäne zu erstellen.
Nein und sie werden es nicht sein. Bitte verwenden Sie eine dedizierte Domain für NextCloud und stellen Sie sie korrekt ein, indem Sie der Reverse -Proxy -Dokumentation folgen. Wenn Port 443 und/oder 80 für Sie blockiert sind, können Sie einen Cloudflare -Tunnel verwenden, wenn Sie ihn online veröffentlichen möchten. Sie können auch die ACME DNS-Challenge verwenden, um ein gültiges Zertifikat zu erhalten. In allen Fällen wird die NEXTCLOUD -Schnittstelle Sie jedoch in Port 443 umleiten.
Nein und es wird nicht hinzugefügt. Bitte verwenden Sie eine dedizierte (sub-) Domain für Nextcloud und richten Sie sie korrekt ein, indem Sie der Reverse-Proxy-Dokumentation folgen.
Bitte beachten Sie, dass der lokale Zugriff nicht möglich ist, wenn Sie AIO hinter dem Cloudflare -Tunnel ausführen, da das TLS -Proxying in diesem Fall in die Cloudflares -Infrastruktur geladen wird. Sie können dies beheben, indem Sie Ihren eigenen Reverse -Proxy einrichten, der TLS -Proxen vor Ort behandelt und die folgenden Schritte ausführen.
Bitte stellen Sie sicher, dass der Reverse -Proxy so konfiguriert ist, dass der Reverse -Proxy AIO hinter einem Reverse -Proxy ausführt, so konfiguriert ist, dass Port 443 auf dem Server verwendet wird, der ihn ausführt. Andernfalls funktionieren die folgenden Schritte nicht.
Nachdem dies nicht im Weg ist, besteht die empfohlene Art und Weise, wie Sie auf Nextcloud lokal zugreifen können Adddress Ihres Servers, der NextCloud AIO ausführt. Im Folgenden finden Sie einige Anleitungen:
Wenn Sie sich ganz sicher sind, dass Sie alles richtig konfiguriert haben und die Domänenvalidierung nicht übergeben können, können Sie die Domänenvalidierung durch Hinzufügen --env SKIP_DOMAIN_VALIDATION=true zum Befehl Docker Run des MasterContainer (aber vor der letzten Zeile nextcloud/all-in-one:latest !
Es ist bekannt, dass Linux -Distributionen, die Firewall als Firewall -Daemon verwenden, Probleme mit Docker -Netzwerken haben. Falls die Container nicht miteinander kommunizieren können, können Sie Ihre Firewall ändern, um das Iptables -Backend durch Laufen zu verwenden:
 sudo sed -i 's/FirewallBackend=nftables/FirewallBackend=iptables/g' /etc/firewalld/firewalld.conf
sudo systemctl restart firewalld docker
Danach sollte es funktionieren.
Weitere Informationen dazu finden Sie unter https://dev.to/ozorest/fedora-32-how-to-solve-in-internal-network- isue-22me. Diese Einschränkung wird sogar auf der offiziellen Firewall-Website erwähnt: https://firewalld.org/#who-is-using-it
Ja. Wenn Selinux aktiviert ist, müssen Sie möglicherweise die --security-opt label:disable dem Befehl Docker Run des MasterContainer hinzufügen, um den Zugriff auf den Docker Socket (oder security_opt: ["label:disable"] in den Docker Socket zu ermöglichen. compose.yaml). Siehe #485
occ -Befehle aus? Führen Sie einfach Folgendes aus: sudo docker exec --user www-data -it nextcloud-aio-nextcloud php occ your-command . Natürlich muss your-command mit dem Befehl ausgetauscht werden, den Sie ausführen möchten.
Security & setup warnings displays the "missing default phone region" after initial install ? Führen Sie einfach den folgenden Befehl aus: sudo docker exec --user www-data nextcloud-aio-nextcloud php occ config:system:set default_phone_region --value="yourvalue" . Natürlich müssen Sie yourvalue basierend auf Ihrem Standort ändern. Beispiele sind DE , US und GB . Weitere Codes finden Sie in dieser Liste
Weitere Unterlagen finden Sie in mehreren Instances.md.
NextCloud verfügt über einen integrierten Bruteforce-Schutz, der möglicherweise ausgelöst wird und eine IP-Adressgress blockiert oder einen Benutzer deaktiviert. Sie können eine IP-Addesse entsperren, indem Sie sudo docer exec sudo docker exec --user www-data -it nextcloud-aio-nextcloud php occ user:enable <name of user> sudo docker exec --user www-data -it nextcloud-aio-nextcloud php occ security:bruteforce:reset <ip-address> ausführen und einen deaktivierten Benutzer aktivieren sudo docker exec --user www-data -it nextcloud-aio-nextcloud php occ user:enable <name of user> . Weitere Informationen finden Sie unter https://docs.nextcloud.com/server/latest/admin_manual/configuration_server/occ_command.html#security für weitere Informationen.
Dieses Projekt schätzt die Stabilität über neue Funktionen. Das bedeutet, dass wir zumindest bis zur ersten Patch -Veröffentlichung mindestens bis zum ersten Patch -Veröffentlichung warten werden, z. B. 24.0.1, bevor ein neues Major Nextcloud -Update eingeführt wird, z. B. 24.0.1 bevor wir darauf aufrüsten. Außerdem werden wir mit dem Upgrade warten, bis alle wichtigen Apps mit der neuen Hauptversion kompatibel sind. Moll- oder Patch -Veröffentlichungen für NextCloud und alle Abhängigkeiten sowie alle Container werden so schnell wie möglich auf neue Versionen aktualisiert, aber wir versuchen, alle Updates zuerst eine gute Testrunde zu geben, bevor wir sie drücken. Das bedeutet, dass es ungefähr 2 Wochen dauern kann, bis neue Updates den latest Kanal erreichen. Wenn Sie beim Testen helfen möchten, können Sie auf den beta -Kanal wechseln, indem Sie dieser Dokumentation folgen, die Ihnen auch die Updates früher ermöglicht.
Sie können zu einem anderen Kanal wie z. B. im Beta -Kanal oder vom Beta -Kanal zurück zum neuesten Kanal wechseln, indem Sie den MasterContainer stoppen, ihn entfernen (keine Daten gehen verloren) und den Container mit demselben Befehl neu zu erstellen, den Sie ursprünglich zum Erstellen verwendet haben der MasterContainer. Sie müssen lediglich die letzte Zeile nextcloud/all-in-one:latest nextcloud/all-in-one:beta und umgekehrt ändern.
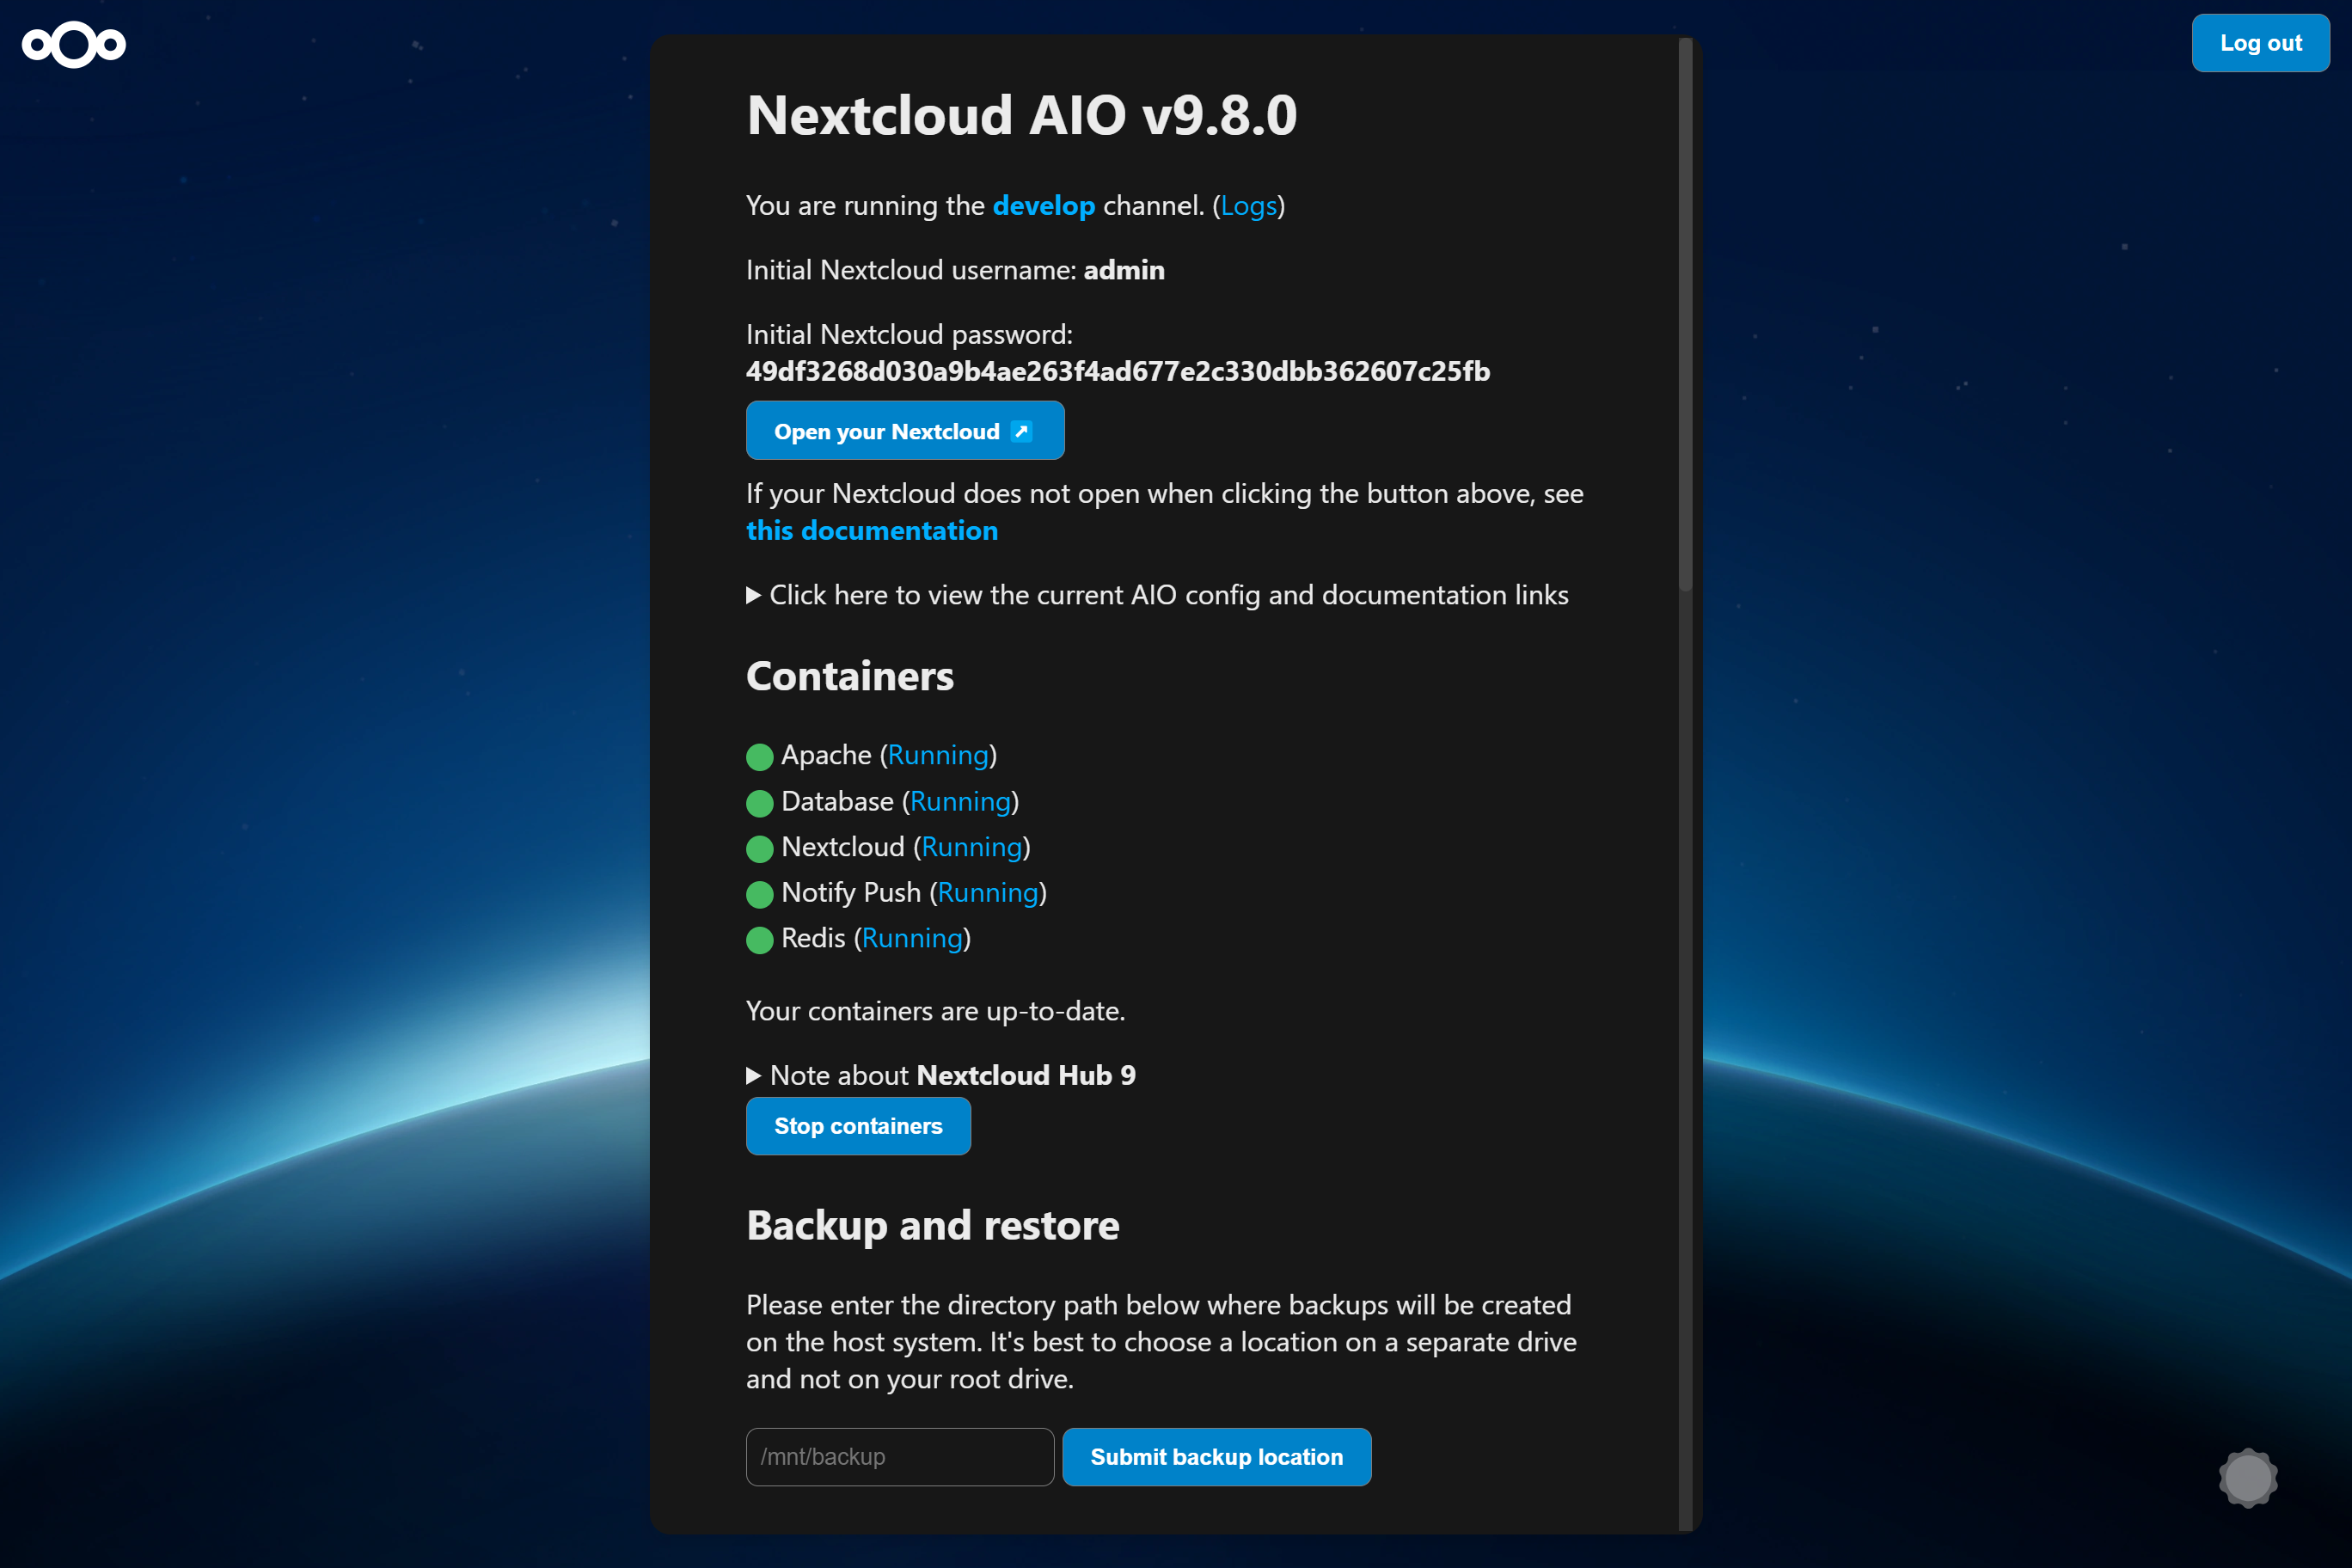
Wenn wir neue Container nach latest schieben, werden Sie in der AIO -Schnittstelle unter dem Abschnitt containers angezeigt, dass neue Container -Updates gefunden wurden. In diesem Fall drücken Sie einfach Stop containers und Start and update containers um die Container zu aktualisieren. Der MasterContainer hat jedoch ein eigenes Update -Verfahren. Siehe unten. Und vergessen Sie nicht, den aktuellen Status Ihrer Instanz mit der integrierten Sicherungslösung zu sichern, bevor Sie die Container wieder starten! Andernfalls können Sie Ihre Instanz nicht leicht wiederherstellen, wenn während des Updates etwas brechen sollte.
If a new mastercontainer update was found, you'll see a note below the Stop containers button that allows to show the changelog. If you click that button and the containers are stopped, you will see a new button that allows to update the mastercontainer. After doing so and after the update is gone through, you will have the option again to Start and update containers . It is recommended to create a backup before clicking the Start and update containers button.
Additionally, there is a cronjob that runs once a day that checks for container and mastercontainer updates and sends a notification to all Nextcloud admins if a new update was found.
AIO ships its own update notifications implementation. It checks if container updates are available. If so, it sends a notification with the title Container updates available! on saturdays to Nextcloud users that are part of the admin group. If the Nextcloud container image should be older than 90 days (~3 months) and thus badly outdated, AIO sends a notification to all Nextcloud users with the title AIO is outdated! . Thus admins should make sure to update the container images at least once every 3 months in order to make sure that the instance gets all security bugfixes as soon as possible.
If your Nextcloud is running and you are logged in as admin in your Nextcloud, you can easily log in to the AIO interface by opening https://yourdomain.tld/settings/admin/overview which will show a button on top that enables you to log in to the AIO interface by just clicking on this button.
Notiz
You can change the domain/ip-address/port of the button by simply stopping the containers, visiting the AIO interface from the correct and desired domain/ip-address/port and clicking once on Start containers .
Notiz
Editing the configuration.json manually and making a mistake may break your instance so please create a backup first!
If you set up a new AIO instance, you need to enter a domain. Currently there is no way to change this domain afterwards from the AIO interface. So in order to change it, you need to edit the configuration.json manually using sudo docker run -it --rm --volume nextcloud_aio_mastercontainer:/mnt/docker-aio-config:rw alpine sh -c "apk add --no-cache nano && nano /mnt/docker-aio-config/data/configuration.json" , substitute each occurrence of your old domain with your new domain and save and write out the file. Afterwards restart your containers from the AIO interface and everything should work as expected if the new domain is correctly configured.
If you are running AIO behind a web server or reverse proxy (like Apache, Nginx, Caddy, Cloudflare Tunnel and else), you need to obviously also change the domain in your reverse proxy config.
Additionally, after restarting the containers, you need to open the admin settings and update some values manually that cannot be changed automatically. Here is a list of some known places:
https://your-nc-domain.com/settings/admin/talk for Turn/Stun server and Signaling Server if you enabled Talk via the AIO interfacehttps://your-nc-domain.com/settings/admin/theming for the theming URLhttps://your-nc-domain.com/settings/admin/app_api for the deploy daemon if you enabled the App API via the AIO interfaceIf something goes unexpected routes during the initial installation, you might want to reset the AIO installation to be able to start from scratch.
Notiz
If you already have it running and have data on your instance, you should not follow these instructions as it will delete all data that is coupled to your AIO instance.
Here is how to reset the AIO instance properly:
sudo docker stop nextcloud-aio-mastercontainersudo docker stop nextcloud-aio-domainchecksudo docker ps --format {{.Names}} . If no nextcloud-aio containers are listed, you can proceed with the steps below. If there should be some, you will need to stop them with sudo docker stop <container_name> until no one is listed anymore.sudo docker ps --filter "status=exited"sudo docker container prunesudo docker network rm nextcloud-aiosudo docker volume ls --filter "dangling=true"sudo docker volume prune --filter all=1 (on Windows you might need to remove some volumes afterwards manually with docker volume rm nextcloud_aio_backupdir , docker volume rm nextcloud_aio_nextcloud_datadir ).NEXTCLOUD_DATADIR to a path on your host instead of the default volume, you need to clean that up as well. (Eg by simply deleting the directory).sudo docker volume ls --format {{.Name}} . If no nextcloud-aio volumes are listed, you can proceed with the steps below. If there should be some, you will need to remove them with sudo docker volume rm <volume_name> until no one is listed anymore.sudo docker image prune -a .Nextcloud AIO provides a backup solution based on BorgBackup. These backups act as a restore point in case the installation gets corrupted. By using this tool, backups are incremental, differential, compressed and encrypted – so only the first backup will take a while. Further backups should be fast as only changes are taken into account.
It is recommended to create a backup before any container update. By doing this, you will be safe regarding any possible complication during updates because you will be able to restore the whole instance with basically one click.
For local backups, the restore process should be pretty fast as rsync is used to restore the chosen backup which only transfers changed files and deletes additional ones. For remote borg backups, the whole backup archive is extracted from the remote, which depending on how clever borg extract is, may require downloading the whole archive.
If you connect an external drive to your host, and choose the backup directory to be on that drive, you are also kind of safe against drive failures of the drive where the docker volumes are stored on.
/mnt/backup ./mnt/backup .Create Backup which should create the first backup on the external disk.If you want to back up directly to a remote borg repository:
Create backup , this will create an ssh key pair and fail because the remote doesn't trust this key yet. Copy the public key shown in AIO and add it to your authorized keys on the remote. Backups can be created and restored in the AIO interface using the buttons Create Backup and Restore selected backup . Additionally, a backup check is provided that checks the integrity of your backups but it shouldn't be needed in most situations.
The backups themselves get encrypted with an encryption key that gets shown to you in the AIO interface. Please save that at a safe place as you will not be able to restore from backup without this key.
Daily backups can get enabled after the initial backup is done. Enabling this also allows to enable an option that allows to automatically update all containers, Nextcloud and its apps.
Be aware that this solution does not back up files and folders that are mounted into Nextcloud using the external storage app - but you can add further Docker volumes and host paths that you want to back up after the initial backup is done.
Backed up will get all important data of your Nextcloud AIO instance like the database, your files and configuration files of the mastercontainer and else. Files and folders that are mounted into Nextcloud using the external storage app are not getting backed up. There is currently no way to exclude the data directory because it would require hacks like running files:scan and would make the backup solution much more unreliable (since the database and your files/folders need to stay in sync). If you still don't want your datadirectory to be backed up, see https://github.com/nextcloud/all-in-one#how-to-enable-automatic-updates-without-creating-a-backup-beforehand for options (there is a hint what needs to be backed up in which order).
The built-in borg-based backup solution has by default a retention policy of --keep-within=7d --keep-weekly=4 --keep-monthly=6 . See https://borgbackup.readthedocs.io/en/stable/usage/prune.html for what these values mean. You can adjust the retention policy by providing --env BORG_RETENTION_POLICY="--keep-within=7d --keep-weekly=4 --keep-monthly=6" to the docker run command of the mastercontainer (but before the last line nextcloud/all-in-one:latest ! If it was started already, you will need to stop the mastercontainer, remove it (no data will be lost) and recreate it using the docker run command that you initially used) and customize the value to your fitting.
Backing up directly to a remote borg repository is supported. This avoids having to store a local copy of your backups, supports append-only borg keys to counter ransomware and allows using the AIO interface to manage your backups.
Some alternatives, which do not have all the above benefits:
If you are running AIO in a LXC container, you need to make sure that FUSE is enabled in the LXC container settings. Also, if using Alpine Linux as host OS, make sure to add fuse via apk add fuse . Otherwise the backup container will not be able to start as FUSE is required for it to work.
As stated in the AIO interface, it is possible to use a docker volume as backup target. Before you can use that, you need to create it first. Here is an example how to create one on Windows:
 docker volume create ^
--driver local ^
--name nextcloud_aio_backupdir ^
-o device="/host_mnt/e/your/backup/path" ^
-o type="none" ^
-o o="bind"
In this example, it would mount E:yourbackuppath into the volume so for a different location you need to adjust /host_mnt/e/your/backup/path accordingly. Afterwards enter nextcloud_aio_backupdir in the AIO interface as backup location.
You can open the BorgBackup archives on your host by following these steps:
(instructions for Ubuntu Desktop)
 # Install borgbackup on the host
sudo apt update && sudo apt install borgbackup

# In any shell where you use borg, you must first export this variable
# If you are using the default backup location /mnt/backup/borg
export BORG_REPO= ' /mnt/backup/borg '
# or if you are using a remote repository
export BORG_REPO= ' user@host:/path/to/repo '

# Mount the archives to /tmp/borg
sudo mkdir -p /tmp/borg && sudo borg mount " $BORG_REPO " /tmp/borg

# After entering your repository key successfully, you should be able to access all archives in /tmp/borg
# You can now do whatever you want by syncing them to a different place using rsync or doing other things
# E.g. you can open the file manager on that location by running:
xhost +si:localuser:root && sudo nautilus /tmp/borg

# When you are done, simply close the file manager and run the following command to unmount the backup archives:
sudo umount /tmp/borg You can delete BorgBackup archives on your host manually by following these steps:
(instructions for Debian based OS' like Ubuntu)
 # Install borgbackup on the host
sudo apt update && sudo apt install borgbackup

# In any shell where you use borg, you must first export this variable
# If you are using the default backup location /mnt/backup/borg
export BORG_REPO= ' /mnt/backup/borg '
# or if you are using a remote repository
export BORG_REPO= ' user@host:/path/to/repo '

# List all archives (if you are using the default backup location /mnt/backup/borg)
sudo borg list

# After entering your repository key successfully, you should now see a list of all backup archives
# An example backup archive might be called 20220223_174237-nextcloud-aio
# Then you can simply delete the archive with:
sudo borg delete --stats --progress " ::20220223_174237-nextcloud-aio "

# If borg 1.2.0 or higher is installed, you then need to run borg compact in order to clean up the freed space
sudo borg --version
# If version number of the command above is higher than 1.2.0 you need to run the command below:
sudo borg compact
After doing so, make sure to update the backup archives list in the AIO interface!
You can do so by clicking on the Check backup integrity button or Create backup button.
For increased backup security, you might consider syncing the local backup repository regularly to another drive.
To do that, first add the drive to /etc/fstab so that it is able to get automatically mounted and then create a script that does all the things automatically. Here is an example for such a script:
 #! /bin/bash

# Please modify all variables below to your needings:
SOURCE_DIRECTORY= " /mnt/backup/borg "
DRIVE_MOUNTPOINT= " /mnt/backup-drive "
TARGET_DIRECTORY= " /mnt/backup-drive/borg "

# #######################################
# Please do NOT modify anything below! #
# #######################################

if [ " $EUID " -ne 0 ] ; then
    echo " Please run as root "
    exit 1
fi

if ! [ -d " $SOURCE_DIRECTORY " ] ; then
    echo " The source directory does not exist. "
    exit 1
fi

if [ -z " $( ls -A " $SOURCE_DIRECTORY / " ) " ] ; then
    echo " The source directory is empty which is not allowed. "
    exit 1
fi

if ! [ -d " $DRIVE_MOUNTPOINT " ] ; then
    echo " The drive mountpoint must be an existing directory "
    exit 1
fi

if ! grep -q " $DRIVE_MOUNTPOINT " /etc/fstab ; then
    echo " Could not find the drive mountpoint in the fstab file. Did you add it there? "
    exit 1
fi

if ! mountpoint -q " $DRIVE_MOUNTPOINT " ; then
    mount " $DRIVE_MOUNTPOINT "
    if ! mountpoint -q " $DRIVE_MOUNTPOINT " ; then
        echo " Could not mount the drive. Is it connected? "
        exit 1
    fi
fi

if [ -f " $SOURCE_DIRECTORY /lock.roster " ] ; then
    echo " Cannot run the script as the backup archive is currently changed. Please try again later. "
    exit 1
fi

mkdir -p " $TARGET_DIRECTORY "
if ! [ -d " $TARGET_DIRECTORY " ] ; then
    echo " Could not create target directory "
    exit 1
fi

if [ -f " $SOURCE_DIRECTORY /aio-lockfile " ] ; then
    echo " Not continuing because aio-lockfile already exists. "
    exit 1
fi

touch " $SOURCE_DIRECTORY /aio-lockfile "

if ! rsync --stats --archive --human-readable --delete " $SOURCE_DIRECTORY / " " $TARGET_DIRECTORY " ; then
    echo " Failed to sync the backup repository to the target directory. "
    exit 1
fi

rm " $SOURCE_DIRECTORY /aio-lockfile "
rm " $TARGET_DIRECTORY /aio-lockfile "

umount " $DRIVE_MOUNTPOINT "

if docker ps --format " {{.Names}} " | grep " ^nextcloud-aio-nextcloud$ " ; then
    docker exec -it nextcloud-aio-nextcloud bash /notify.sh " Rsync backup successful! " " Synced the backup repository successfully. "
else
    echo " Synced the backup repository successfully. "
fi
You can simply copy and paste the script into a file eg named backup-script.sh eg here: /root/backup-script.sh . Do not forget to modify the variables to your requirements!
Afterwards apply the correct permissions with sudo chown root:root /root/backup-script.sh and sudo chmod 700 /root/backup-script.sh . Then you can create a cronjob that runs eg at 20:00 each week on Sundays like this:
sudo crontab -u root -e (and choose your editor of choice if not already done. I'd recommend nano).0 20 * * 7 /root/backup-script.sh which will run the script at 20:00 on Sundays each week.Ctrl + o -> Enter and close the editor with Ctrl + x ).Warnung
The below script will only work after the initial setup of AIO. So you will always need to first visit the AIO interface, type in your domain and start the containers the first time or restore an older AIO instance from its borg backup before you can use the script.
You can do so by running the /daily-backup.sh script that is stored in the mastercontainer. It accepts the following environment variables:
AUTOMATIC_UPDATES if set to 1 , it will automatically stop the containers, update them and start them including the mastercontainer. If the mastercontainer gets updated, this script's execution will stop as soon as the mastercontainer gets stopped. You can then wait until it is started again and run the script with this flag again in order to update all containers correctly afterwards.DAILY_BACKUP if set to 1 , it will automatically stop the containers and create a backup. If you want to start them again afterwards, you may have a look at the START_CONTAINERS option.START_CONTAINERS if set to 1 , it will automatically start the containers without updating them.STOP_CONTAINERS if set to 1 , it will automatically stop the containers.CHECK_BACKUP if set to 1 , it will start the backup check. This is not allowed to be enabled at the same time like DAILY_BACKUP . Please be aware that this option is non-blocking which means that the backup check is not done when the process is finished since it only start the borgbackup container with the correct configuration. One example for this would be sudo docker exec -it --env DAILY_BACKUP=1 nextcloud-aio-mastercontainer /daily-backup.sh , which you can run via a cronjob or put it in a script.
Notiz
None of the option returns error codes. So you need to check for the correct result yourself.
If you already have a backup solution in place, you may want to hide the backup section. You can do so by adding --env AIO_DISABLE_BACKUP_SECTION=true to the docker run command of the mastercontainer (but before the last line nextcloud/all-in-one:latest ! If it was started already, you will need to stop the mastercontainer, remove it (no data will be lost) and recreate it using the docker run command that you initially used).
Warnung
Do not set or adjust this value after the initial Nextcloud installation is done! If you still want to do it afterwards, see this on how to do it.
You can configure the Nextcloud container to use a specific directory on your host as data directory. You can do so by adding the environmental variable NEXTCLOUD_DATADIR to the docker run command of the mastercontainer (but before the last line nextcloud/all-in-one:latest ! If it was started already, you will need to stop the mastercontainer, remove it (no data will be lost) and recreate it using the docker run command that you initially used). Allowed values for that variable are strings that start with / and are not equal to / . The chosen directory or volume will then be mounted to /mnt/ncdata inside the container.
--env NEXTCLOUD_DATADIR="/mnt/ncdata" ./mnt/ncdata , make sure to choose a subfolder like eg /mnt/ncdata/nextcloud as datadir, since the root folder is not suited as datadir in that case . See #2696.--env NEXTCLOUD_DATADIR="/var/nextcloud-data"--env NEXTCLOUD_DATADIR="/volume1/docker/nextcloud/data" .--env NEXTCLOUD_DATADIR="/run/desktop/mnt/host/c/ncdata" . (This path is equivalent to C:ncdata on your Windows host so you need to translate the path accordingly. Hint: the path that you enter needs to start with /run/desktop/mnt/host/ . Append to that the exact location on your windows host, eg c/ncdata which is equivalent to C:ncdata .)--env NEXTCLOUD_DATADIR="nextcloud_aio_nextcloud_datadir" . This volume needs to be created beforehand manually by you in order to be able to use it. eg on Windows with: docker volume create ^
--driver local ^
--name nextcloud_aio_nextcloud_datadir ^
-o device="/host_mnt/e/your/data/path" ^
-o type="none" ^
-o o="bind"
E:yourdatapath into the volume so for a different location you need to adjust /host_mnt/e/your/data/path accordingly. Sicher. Add this to the /etc/fstab file on the host system:
<your-storage-host-and-subpath> <your-mount-dir> cifs rw,mfsymlinks,seal,credentials=<your-credentials-file>,uid=33,gid=0,file_mode=0770,dir_mode=0770 0 0
(Of course you need to modify <your-storage-host-and-subpath> , <your-mount-dir> and <your-credentials-file> for your specific case.)
One example could look like this:
//your-storage-host/subpath /mnt/storagebox cifs rw,mfsymlinks,seal,credentials=/etc/storage-credentials,uid=33,gid=0,file_mode=0770,dir_mode=0770 0 0
and add into /etc/storage-credentials :
 username=<smb/cifs username>
password=<password>
(Of course you need to modify <smb/cifs username> and <password> for your specific case.)
Now you can use /mnt/storagebox as Nextcloud's datadir like described in the section above this one.
By default, the Nextcloud container is confined and cannot access directories on the host OS. You might want to change this when you are planning to use local external storage in Nextcloud to store some files outside the data directory and can do so by adding the environmental variable NEXTCLOUD_MOUNT to the docker run command of the mastercontainer (but before the last line nextcloud/all-in-one:latest ! If it was started already, you will need to stop the mastercontainer, remove it (no data will be lost) and recreate it using the docker run command that you initially used). Allowed values for that variable are strings that start with / and are not equal to / .
--env NEXTCLOUD_MOUNT="/mnt/" and --env NEXTCLOUD_MOUNT="/media/" .--env NEXTCLOUD_MOUNT="/Volumes/your_drive/"--env NEXTCLOUD_MOUNT="/volume1/" .--env NEXTCLOUD_MOUNT="/run/desktop/mnt/host/d/your-folder/" . (This path is equivalent to D:your-folder on your Windows host so you need to translate the path accordingly. Hint: the path that you enter needs to start with /run/desktop/mnt/host/ . Append to that the exact location on your windows host, eg d/your-folder/ which is equivalent to D:your-folder .) After using this option, please make sure to apply the correct permissions to the directories that you want to use in Nextcloud. Eg sudo chown -R 33:0 /mnt/your-drive-mountpoint and sudo chmod -R 750 /mnt/your-drive-mountpoint should make it work on Linux when you have used --env NEXTCLOUD_MOUNT="/mnt/" . On Windows you could do this eg with docker exec -it nextcloud-aio-nextcloud chown -R 33:0 /run/desktop/mnt/host/d/your-folder/ and docker exec -it nextcloud-aio-nextcloud chmod -R 750 /run/desktop/mnt/host/d/your-folder/ .
You can then navigate to https://your-nc-domain.com/settings/apps/disabled , activate the external storage app, navigate to https://your-nc-domain.com/settings/admin/externalstorages and add a local external storage directory that will be accessible inside the container at the same place that you've entered. Eg /mnt/your-drive-mountpoint will be mounted to /mnt/your-drive-mountpoint inside the container, etc.
Be aware though that these locations will not be covered by the built-in backup solution - but you can add further Docker volumes and host paths that you want to back up after the initial backup is done.
Notiz
If you can't see the type "local storage" in the external storage admin options, a restart of the containers from the AIO interface may be required.
By default will the talk container use port 3478/UDP and 3478/TCP for connections. You can adjust the port by adding eg --env TALK_PORT=3478 to the docker run command of the mastercontainer (but before the last line nextcloud/all-in-one:latest ! If it was started already, you will need to stop the mastercontainer, remove it (no data will be lost) and recreate it using the docker run command that you initially used) and adjusting the port to your desired value. Best is to use a port over 1024, so eg 3479 to not run into this: #2517
By default, public uploads to Nextcloud are limited to a max of 10G (logged in users can upload much bigger files using the webinterface or the mobile/desktop clients, since chunking is used in that case). You can adjust the upload limit by providing --env NEXTCLOUD_UPLOAD_LIMIT=10G to the docker run command of the mastercontainer (but before the last line nextcloud/all-in-one:latest ! If it was started already, you will need to stop the mastercontainer, remove it (no data will be lost) and recreate it using the docker run command that you initially used) and customize the value to your fitting. It must start with a number and end with G eg 10G .
By default, uploads to Nextcloud are limited to a max of 3600s. You can adjust the upload time limit by providing --env NEXTCLOUD_MAX_TIME=3600 to the docker run command of the mastercontainer (but before the last line nextcloud/all-in-one:latest ! If it was started already, you will need to stop the mastercontainer, remove it (no data will be lost) and recreate it using the docker run command that you initially used) and customize the value to your fitting. It must be a number eg 3600 .
By default, each PHP process in the Nextcloud container is limited to a max of 512 MB. You can adjust the memory limit by providing --env NEXTCLOUD_MEMORY_LIMIT=512M to the docker run command of the mastercontainer (but before the last line nextcloud/all-in-one:latest ! If it was started already, you will need to stop the mastercontainer, remove it (no data will be lost) and recreate it using the docker run command that you initially used) and customize the value to your fitting. It must start with a number and end with M eg 1024M .
If you get an error during the domain validation which states that your ip-address is an internal or reserved ip-address, you can fix this by first making sure that your domain indeed has the correct public ip-address that points to the server and then adding --add-host yourdomain.com:<public-ip-address> to the docker run command of the mastercontainer (but before the last line nextcloud/all-in-one:latest ! If it was started already, you will need to stop the mastercontainer, remove it (no data will be lost) and recreate it using the docker run command that you initially used) which will allow the domain validation to work correctly. And so that you know: even if the A record of your domain should change over time, this is no problem since the mastercontainer will not make any attempt to access the chosen domain after the initial domain validation.
Ja. For that to work, you need to use and follow the manual-install documentation.
Ja. For that to work, you need to use and follow the helm-chart documentation.
You can run AIO also with docker rootless. How to do this is documented here: docker-rootless.md
Since Podman is not 100% compatible with the Docker API, Podman is not supported (since that would add yet another platform where the maintainer would need to test on). However you can use and follow the manual-install documentation to get AIO's containers running with Podman or use Docker rootless, as described in the above section. Also there is this now: #3487
You might want to adjust the Nextcloud apps that are installed upon the first startup of the Nextcloud container. You can do so by adding --env NEXTCLOUD_STARTUP_APPS="deck twofactor_totp tasks calendar contacts notes" to the docker run command of the mastercontainer (but before the last line nextcloud/all-in-one:latest ! If it was started already, you will need to stop the mastercontainer, remove it (no data will be lost) and recreate it using the docker run command that you initially used) and customize the value to your fitting. It must be a string with small letters az, 0-9, spaces and hyphens or '_'. You can disable shipped and by default enabled apps by adding a hyphen in front of the appid. Eg -contactsinteraction .
Some Nextcloud apps require additional external dependencies that must be bundled within Nextcloud container in order to work correctly. As we cannot put each and every dependency for all apps into the container - as this would make the project quickly unmaintainable - there is an official way in which you can add additional dependencies into the Nextcloud container. However note that doing this is disrecommended since we do not test Nextcloud apps that require external dependencies.
You can do so by adding --env NEXTCLOUD_ADDITIONAL_APKS="imagemagick dependency2 dependency3" to the docker run command of the mastercontainer (but before the last line nextcloud/all-in-one:latest ! If it was started already, you will need to stop the mastercontainer, remove it (no data will be lost) and recreate it using the docker run command that you initially used) and customize the value to your fitting. It must be a string with small letters az, digits 0-9, spaces, dots and hyphens or '_'. You can find available packages here: https://pkgs.alpinelinux.org/packages?branch=v3.20. By default imagemagick is added. If you want to keep it, you need to specify it as well.
Some Nextcloud apps require additional php extensions that must be bundled within Nextcloud container in order to work correctly. As we cannot put each and every dependency for all apps into the container - as this would make the project quickly unmaintainable - there is an official way in which you can add additional php extensions into the Nextcloud container. However note that doing this is disrecommended since we do not test Nextcloud apps that require additional php extensions.
You can do so by adding --env NEXTCLOUD_ADDITIONAL_PHP_EXTENSIONS="imagick extension1 extension2" to the docker run command of the mastercontainer (but before the last line nextcloud/all-in-one:latest ! If it was started already, you will need to stop the mastercontainer, remove it (no data will be lost) and recreate it using the docker run command that you initially used) and customize the value to your fitting. It must be a string with small letters az, digits 0-9, spaces, dots and hyphens or '_'. You can find available extensions here: https://pecl.php.net/packages.php. By default imagick is added. If you want to keep it, you need to specify it as well.
The facerecognition app requires the pdlib PHP extension to be installed. Unfortunately, it is not available on PECL nor via PHP core, so there is no way to add this into AIO currently. However you can use this community container in order to run facerecognition.
Warnung
This only works if the /dev/dri device is present on the host! If it does not exists on your host, don't proceed as otherwise the Nextcloud container will fail to start! If you are unsure about this, better do not proceed with the instructions below.
The memories app allows to enable hardware transcoding for videos. In order to use that, you need to add --env NEXTCLOUD_ENABLE_DRI_DEVICE=true to the docker run command of the mastercontainer (but before the last line nextcloud/all-in-one:latest ! If it was started already, you will need to stop the mastercontainer, remove it (no data will be lost) and recreate it using the docker run command that you initially used) which will mount the /dev/dri device into the container. There is now a community container which allows to easily add the transcoding container of Memories to AIO: https://github.com/nextcloud/all-in-one/tree/main/community-containers/memories
In certain situations you might want to keep Nextcloud apps that are disabled in the AIO interface and not uninstall them if they should be installed in Nextcloud. You can do so by adding --env NEXTCLOUD_KEEP_DISABLED_APPS=true to the docker run command of the mastercontainer (but before the last line nextcloud/all-in-one:latest ! If it was started already, you will need to stop the mastercontainer, remove it (no data will be lost) and recreate it using the docker run command that you initially used).
Warnung
Doing this might cause unintended problems in Nextcloud if an app that requires an external dependency is still installed but the external dependency not for example.
If you should run into issues with huge docker logs, you can adjust the log size by following https://docs.docker.com/config/containers/logging/local/#usage. However for the included AIO containers, this should usually not be needed because almost all of them have the log level set to warn so they should not produce many logs.
The files and folders that you add to Nextcloud are by default stored in the following docker directory: nextcloud_aio_nextcloud:/mnt/ncdata/ (usually /var/lib/docker/volumes/nextcloud_aio_nextcloud_data/_data/ on linux host systems). If needed, you can modify/add/delete files/folders there but ATTENTION : be very careful when doing so because you might corrupt your AIO installation! Best is to create a backup using the built-in backup solution before editing/changing files/folders in there because you will then be able to restore your instance to the backed up state.
After you are done modifying/adding/deleting files/folders, don't forget to apply the correct permissions by running: sudo docker exec nextcloud-aio-nextcloud chown -R 33:0 /mnt/ncdata/ and sudo docker exec nextcloud-aio-nextcloud chmod -R 750 /mnt/ncdata/ and rescan the files with sudo docker exec --user www-data -it nextcloud-aio-nextcloud php occ files:scan --all .
You can move the whole docker library and all its files including all Nextcloud AIO files and folders to a separate drive by first mounting the drive in the host OS (NTFS is not supported and ext4 is recommended as FS) and then following this tutorial: https://www.guguweb.com/2019/02/07/how-to-move-docker-data-directory-to-another-location-on-ubuntu/
(Of course docker needs to be installed first for this to work.)
docker rm nextcloud-aio-collabora ) AND the Collabora image ( docker image rm nextcloud/aio-collabora ).docker system prune ) (no data will be lost).This should solve the problem.
You can edit Nextclouds config.php file directly from the host with your favorite text editor. Eg like this: sudo docker run -it --rm --volume nextcloud_aio_nextcloud:/var/www/html:rw alpine sh -c "apk add --no-cache nano && nano /var/www/html/config/config.php" . Make sure to not break the file though which might corrupt your Nextcloud instance otherwise. In best case, create a backup using the built-in backup solution before editing the file.
All users see a set of default files and folders as dictated by Nextcloud's configuration. To change these default files and folders a custom skeleton directory must first be created; this can be accomplished by copying your skeleton files sudo docker cp --follow-link /path/to/nextcloud/skeleton/ nextcloud-aio-nextcloud:/mnt/ncdata/skeleton/ , applying the correct permissions with sudo docker exec nextcloud-aio-nextcloud chown -R 33:0 /mnt/ncdata/skeleton/ and sudo docker exec nextcloud-aio-nextcloud chmod -R 750 /mnt/ncdata/skeleton/ and setting the skeleton directory option with sudo docker exec --user www-data -it nextcloud-aio-nextcloud php occ config:system:set skeletondirectory --value="/mnt/ncdata/skeleton" . Further information is available in the Nextcloud documentation on configuration parameters for the skeleton directory.
You can configure your server to block certain ip-addresses using fail2ban as bruteforce protection. Here is how to set it up: https://docs.nextcloud.com/server/stable/admin_manual/installation/harden_server.html#setup-fail2ban. The logpath of AIO is by default /var/lib/docker/volumes/nextcloud_aio_nextcloud/_data/data/nextcloud.log . Do not forget to add chain=DOCKER-USER to your nextcloud jail config ( nextcloud.local ) otherwise the nextcloud service running on docker will still be accessible even if the IP is banned. Also, you may change the blocked ports to cover all AIO ports: by default 80,443,8080,8443,3478 (see this). Apart from that there is now a community container that can be added to the AIO stack: https://github.com/nextcloud/all-in-one/tree/main/community-containers/fail2ban
It is possible to connect to an existing LDAP server. You need to make sure that the LDAP server is reachable from the Nextcloud container. Then you can enable the LDAP app and configure LDAP in Nextcloud manually. If you don't have a LDAP server yet, recommended is to use this docker container: https://hub.docker.com/r/nitnelave/lldap. Make sure here as well that Nextcloud can talk to the LDAP server. The easiest way is by adding the LDAP docker container to the docker network nextcloud-aio . Then you can connect to the LDAP container by its name from the Nextcloud container. There is now a community container which allows to easily add LLDAP to AIO: https://github.com/nextcloud/all-in-one/tree/main/community-containers/lldap
Netdata allows you to monitor your server using a GUI. You can install it by following https://learn.netdata.cloud/docs/agent/packaging/docker#create-a-new-netdata-agent-container. Apart from that there is now a way for the community to add containers: #392 (comment)
If you want to use the user_sql app, the easiest way is to create an additional database container and add it to the docker network nextcloud-aio . Then the Nextcloud container should be able to talk to the database container using its name.
It is possible to install any of these to get a GUI for your AIO database. The pgAdmin container is recommended. You can get some docs on it here: https://www.pgadmin.org/docs/pgadmin4/latest/container_deployment.html. For the container to connect to the aio-database, you need to connect the container to the docker network nextcloud-aio and use nextcloud-aio-database as database host, oc_nextcloud as database username and the password that you get when running sudo docker exec nextcloud-aio-nextcloud grep dbpassword config/config.php as the password. Apart from that there is now a way for the community to add containers: #3061 (comment)
You can configure one yourself by using either of these four recommended projects: Docker Mailserver, Mailu, Maddy Mail Server, Mailcow or Stalwart. There is now a community container which allows to easily add Stalwart Mail server to AIO: https://github.com/nextcloud/all-in-one/tree/main/community-containers/stalwart
Please see the following documentation on this: migration.md
For integrating new containers, they must pass specific requirements for being considered to get integrated in AIO itself. Even if not considered, we may add some documentation on it. Also there is this now: https://github.com/nextcloud/all-in-one/tree/main/community-containers#community-containers
What are the requirements?
For some applications it might be necessary to establish a secure connection to another host/server which is using a certificate issued by a Certification Authority that is not trusted out of the box. An example could be configuring LDAPS against a domain controller (Active Directory or Samba-based) of an organization.
You can make the Nextcloud container trust any Certification Authority by providing the environmental variable NEXTCLOUD_TRUSTED_CACERTS_DIR to the docker run command of the mastercontainer (but before the last line nextcloud/all-in-one:latest ! If it was started already, you will need to stop the mastercontainer, remove it (no data will be lost) and recreate it using the docker run command that you initially used). The value of the variables should be set to the absolute paths of the directory on the host, which contains one or more Certification Authorities certificates. You should use X.509 certificates, Base64 encoded. (Other formats may work but have not been tested!) All the certificates in the directory will be trusted.
When using docker run , the environmental variable can be set with --env NEXTCLOUD_TRUSTED_CACERTS_DIR=/path/to/my/cacerts .
In order for the value to be valid, the path should start with / and not end with / and point to an existing directory . Pointing the variable directly to a certificate file will not work and may also break things.
The Collabora container enables Seccomp by default, which is a security feature of the Linux kernel. On systems without this kernel feature enabled, you need to provide --env COLLABORA_SECCOMP_DISABLED=true to the initial docker run command in order to make it work.
If you have an external backup solution, you might want to enable automatic updates without creating a backup first. However note that doing this is disrecommended since you will not be able to easily create and restore a backup from the AIO interface anymore and you need to make sure to shut down all the containers properly before creating the backup, eg by stopping them from the AIO interface first.
But anyhow, is here a guide that helps you automate the whole procedure:
 #! /bin/bash

# Stop the containers
docker exec --env STOP_CONTAINERS=1 nextcloud-aio-mastercontainer /daily-backup.sh

# Below is optional if you run AIO in a VM which will shut down the VM afterwards
# poweroff
You can simply copy and paste the script into a file eg named shutdown-script.sh eg here: /root/shutdown-script.sh .
Afterwards apply the correct permissions with sudo chown root:root /root/shutdown-script.sh and sudo chmod 700 /root/shutdown-script.sh . Then you can create a cronjob that runs it on a schedule eg runs the script at 04:00 each day like this:
sudo crontab -u root -e (and choose your editor of choice if not already done. I'd recommend nano).0 4 * * * /root/shutdown-script.sh which will run the script at 04:00 each day.Ctrl + o and then Enter to save, and close the editor with Ctrl + x ).After that is in place, you should schedule a backup from your backup solution that creates a backup after AIO is shut down properly. Hint: If your backup runs on the same host, make sure to at least back up all docker volumes and additionally Nextcloud's datadir if it is not stored in a docker volume.
Afterwards, you can create a second script that automatically updates the containers:
 #! /bin/bash

# Run container update once
if ! docker exec --env AUTOMATIC_UPDATES=1 nextcloud-aio-mastercontainer /daily-backup.sh ; then
    while docker ps --format " {{.Names}} " | grep -q " ^nextcloud-aio-watchtower$ " ; do
        echo " Waiting for watchtower to stop "
        sleep 30
    done

    while ! docker ps --format " {{.Names}} " | grep -q " ^nextcloud-aio-mastercontainer$ " ; do
        echo " Waiting for Mastercontainer to start "
        sleep 30
    done

    # Run container update another time to make sure that all containers are updated correctly.
    docker exec --env AUTOMATIC_UPDATES=1 nextcloud-aio-mastercontainer /daily-backup.sh
fi
You can simply copy and paste the script into a file eg named automatic-updates.sh eg here: /root/automatic-updates.sh .
Afterwards apply the correct permissions with sudo chown root:root /root/automatic-updates.sh and sudo chmod 700 /root/automatic-updates.sh . Then you can create a cronjob that runs eg at 05:00 each day like this:
sudo crontab -u root -e (and choose your editor of choice if not already done. I'd recommend nano).0 5 * * * /root/automatic-updates.sh which will run the script at 05:00 each day.Ctrl + o then Enter to save, and close the editor with Ctrl + x ).By design, Caddy that runs inside the mastercontainer, which handles automatic TLS certificate generation for the AIO interface, is vulnerable to receiving DNS challenges for arbitrary hostnames from anyone on the internet. While this does not compromise your server's security, it can result in cluttered logs and rejected certificate renewal attempts due to rate limit abuse. To mitigate this issue, it is recommended to place the AIO interface behind a VPN and/or limit its public exposure.


