curl is not available
Makefile
db Shortcut for Database Utilities & db top
db Functionsdb
db connections
db pga (eg. pg_activity)bin/tablet Scriptbin/specs scriptbin/spec -P
Makefile
Makefile
| Badges | FOSSA Scanning | |
|---|---|---|
FOSSSA |
||
CI Tests |
||
CI Install |
||
ShellCheck |
||
Gitter |
Bashmatic® is a BASH framework, meaning its a collection of BASH functions (almost 900 of them) that, we hope, make BASH programming easier, more enjoyable, and more importantly, fun - due to the library’s focus on providing the developer with a constant feedback about what is happening, while a script that uses Bashmatic’s helpers is running.
|
Tip
|
We suggest that you learn about Bashmatic from the PDF version of this document which is much better for print.
|
After you install the library (the default location is ~/.bashmatic), realize that you have a choice of either:
Automatically sourcing the library (and all 900+ functions) from your shell 'dotfiles' like ~/.bash_profile by adding this line: source ~/.bashmatic/init.sh. On a recent M1 Apple laptop this adds about 100ms total.
OR, can skip it during your login initialization, and only load it at the top of the scripts that use the library.
|
Caution
|
Both approaches are absolutely valid and have their pros and cons. Loading bashmatic in your dotfiles could be a bit risky. One way or another we’ll soon provide ways to verify that bashmatic you download is the safe and correct version, every time. |
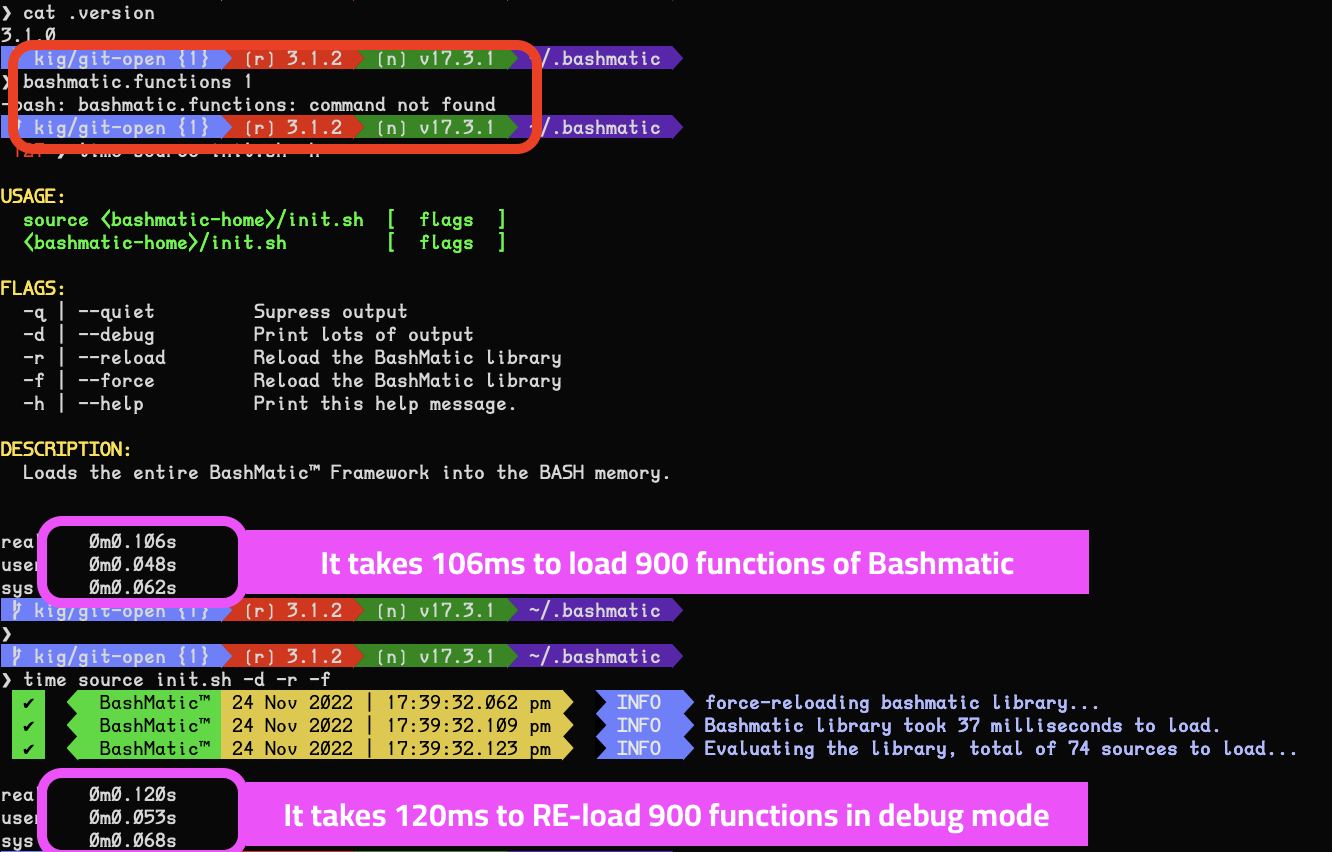
All we’ll say on this matter is that we manage the optimize the hell out of the sourcing the library. Here is an example:
Bashmatic®'s programming style is heavily influenced by Ruby’s DSL languages. If you take a quick look at the is.sh script, it defines a bunch of DSL functions that can be chained with && and || to create a compact and self-documenting code like this:
[arrow circle down]
# An example of a DSL-like function
function bashmatic.auto-update() {
  local dir="${1:-"${BASHMATIC_HOME"}}"
  is.a-directory "${dir}" && {
    file.exists-and-newer-than "${dir}/.last-update" 30 && return 0
    (
      cd ${BASHMATIC_HOME} &&
      git.is-it-time-to-update &&
      git.sync-remote
    )
  }
}

# check if the function is defined and call it
is.a-function.invoke bashmatic.auto-update "$@"
To use it in your own scripts, you’ll want to first study the Examples provided below, and take advantage of ach module available under lib.
Final note, - once Bashmatic is installed and loaded by your shell init files, you can type is.<tab><tab> to see what functions are available to you that start with is. Each module under lib typically defines public functions starting with the name of the file. Such as, functions in array.sh typically start with array.<something>.<action>
Bashmatic® offers a huge range of ever-growing helper functions for running commands, auto-retrying, repeatable, runtime-measuring execution framework with the key function run. There are helpers for every occasion, from drawing boxes, lines, headers, to showing progress bars, getting user input, installing packages, and much more.
|
Note
|
A good portion of the helpers within Bashmatic® are written for OS-X, although many useful functions will also work under linux. Our entire test suite runs on Ubuntu. There is an effort underway to convert Homebrew-specific functions to OS-neutral helpers such as package.install that would work equally well on linux.
|
Start exploring Bashmatic® below with our examples section. When you are ready, the complete entire set of pubic functions (nearly 500 of those) can be found in the functions index page.
And, finally, don’t worry, Bashmatic® is totally open source and free to use and extend. We just like the way it looks with a little ® :)
BASH version 4+
BASH version 3 (partial compatibility, some functions are disabled)
ZSH – as of recent update, Bashmatic is almost 90% compatible with ZSH.
Not Currently Supported
FISH (although you could use Bashmatic via bin/bashmatic script helper, or its executables)
This project was born out of a simple realization made by several very senior and highly experienced engineers, that:
It is often easier to use BASH for writing things like universal installers, a.k.a. setup scripts, uploaders, wrappers for all sorts of functionality, such as NPM, rbenv, installing gems, rubies, using AWS, deploying code, etc.
BASH function’s return values lend themselves nicely to a compact DSL (domain specific language) where multiple functions can be chained by logical AND && and OR || to provide a very compact execution logic. Most importantly, we think that this logic is extremely easy to read and understand.
Despite the above points, it is also generally accepted that:
A lot of BASH scripts are very poorly written and hard to read and understand.
It’s often difficult to understand what the hell is going on while the script is running, because either its not outputting anything useful, OR it’s outputting way too much.
When BASH errors occur, shit generally hits the fan and someone decides that they should rewrite the 20-line BASH script in C++ or Go, because, well, it’s a goddamn BASH script and it ain’t working.
|
Tip
|
Bashmatic's goal is to make BASH programming both fun, consistent, and provide plenty of visible output to the user so that there is no mystery as to what is going on. |
Perhaps the easiest way to install Bashmatic® is using curl as shown below.
First, make sure that you have Curl installed, run which curl to see. Then copy/paste this command into your Terminal.
[arrow down]
bash -c "$(curl -fsSL https://bashmatic.re1.re); bashmatic-install -q"[arrow up]
Where:
-q stands for "quiet";
-v for "verbose"
|
Tip
|
The URL https://bashmatic.re1.re redirects to the HEAD of the bin/bashmatic-install script in the Github Bashmatic Repo. We use this URL so that we retain the ability to redirect the installation to a different script in the future, if need be.
|
If you prefer to be able to examine the script before executing code piped straight off the Internet, I don’t blame you. You are cautious and smart.
For folks like you, here is a slightly more secure way of doing the same thing:
export script="/tmp/install"
curl -fsSL https://bashmatic.re1.re > /tmp/install
chmod 755  /tmp/install

# At this point you can examine /tmp/install
/tmp/install --help
/tmp/install --verbose --debug # install with extra info
This method allows you to examine the /tmp/install script before running it.
Below are some of the explanations
You can install a branch or a tag of Bashmatic by passing -b / --git-branch <tag|branch> flag.
You can pass flags to the bashmatic-install function to control how, where to Bashmatic is installed, and where from it is downloaded, including:
-v or --verbose for displaying additional output, or the opposite:
-d or --debug will print additional debugging output
-f or --force will replace any existing bashmatic folder with the new one
-q or --quiet for no output
-l or --skip-on-login to NOT install the hook that loads Bashmatic on login.
If you prefer to install Bashmatic in a non-standard location (the default is ~/.bashmatic), you can use the -H PATH flag
For instance, here we are installing Bashmatic into a non-default destination, while printing additional verbose & debug information, as well as using -f (force) to possibly overwrite the destination folder (if it already exists) with a checkout of Bashmatic according to a tag v2.4.1:
bash -c "$(curl -fsSL https://bashmatic.re1.re);
    bashmatic-install -d -v -f -b v2.4.1 -H ~/workspace/bashmatic"
If you have your SSH keys installed both locally, and the public key was configured with your account on Github, you might want to install Bashmatic using [email protected]:kigster/bashmatic origin, instead of the default https://github.com/kigster/bashmatic:
Here is the complete list of options accepted by the installer:
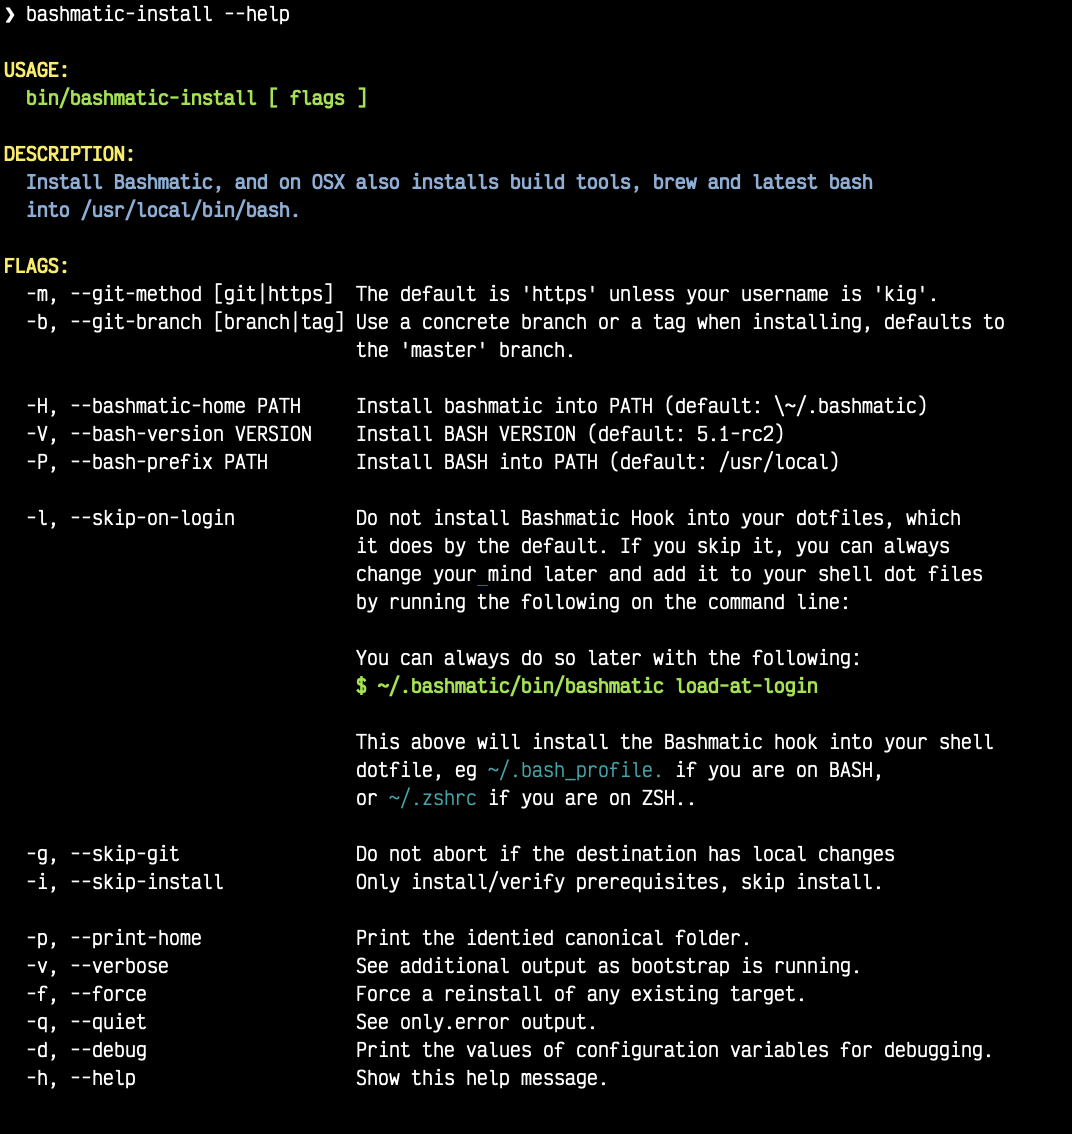
When you run bash -c "$(curl -fsSL https://bashmatic.re1.re); bashmatic-install", the following typically happens:
curl downloads the bin/bashmatic-install script and passes it to the built-in BASH for evaluation.
Once evaluated, function bashmatic-install is invoked, which actually performs the installation.
This is the function that accepts the above listed arguments.
The script may ask for your password to enable sudo access - this may be required on OS-X to install XCode Developer tools (which include git)
If your version of BASH is 3 or older, the script will download and build from sources version 5+ of BASH, and install it into /usr/local/bin/bash. SUDO may be required for this step.
On OS-X the script will install Homebrew on OS-X, if not already there.
Once Brew is installed, brew packages coreutils and gnu-sed are installed, as both are required and are relied upon by Bashmatic.
The script will then attempt to git clone the bashmatic repo into the Bashmatic home folder, or - if it already exists - it will git pull latest changes.
Finally, unless you specify -l or --skip-on-login the script will check your bash dot files, and will add the hook to load Bashmatic from either ~/.bashrc or ~/.bash_profile.
The last part my require some explanation.
Now, you may or may not want to load Bashmatic on login.
In other words, you have something like this in your ~/.bashrc:
# Let's see if ~/.bashrc mentions Bashmatic:
$ grep bashmatic ~/.bashrc
[[ -f ~/.bashmatic/init.sh ]] && source ~/.bashmatic/init.shInstant access to 800+ convenience functions Bashmatic© offers and helpers. Bashmatic will auto-update whenever its loaded from the main branch.
About 134ms delay at login, and a potential security attack vector (eg, if someone hacks the repo).
|
Tip
|
We recently dramatically improved the loading time of the entirety of Bashmatic© functions. Previously it took nearly 900ms, almost a full second to load 854 functions. Today it’s no more than 180ms: |
❯ time source init.sh

real  0m0.134s
user  0m0.078s
sys	  0m0.074s
If the above command shows the output you see above, when you grep your bashrc or zshrc, then all Bashmatic Functions will be loaded into your shell. This could be very convenient, for instance,
you could invoke ruby.install-ruby-with-readline-and-openssl 3.0.1 to get Ruby installed.
You could invoke gem.remote.version sym to see that the last published verison of sym is 3.0.1.
You could join an array of values with with array.join ", " apple pear orange
NOTICE: Bashmatic takes no more than 200-300ms to load typically. That said, you might not want to have this many shell functions in your environment, so in that case you can skip login hook by passing -l or --skip-on-login.
Install it with:
bash -c "$(curl -fsSL https://bashmatic.re1.re); bashmatic-install -l"In this case we suggest that you simply add the Bashmatic’s bin folder to the $PATH.
For instance:
# ~/.bashrc
export BASHMATIC_HOME="${HOME}/.bashmatic"
export PATH="${BASHMATIC_HOME}/bin:${PATH}"
Then you will have access to the executable script bashmatic which can be used *as a "gateway" to all bashmatic functions:
You use it like so: bashmatic <function> <args>:
|
Important
|
Examples below assume you’ve set the PATH to include ${HOME}/.bashmatic/bin
|
# Eg, if as in the previous example you sourced in Bashmatic:
$ bashmatic.version
2.1.2

# If you have not, you can still invoke 'bashmatic.version':
$ bashmatic version

# Or another function, 'array.join' — if you sourced in init.sh:
$ array.join '|' hello goodbye
hello|goodbye

# Or using the script:
$ bashmatic array.join '|' hello goodbye
hello|goodbye
If you get an error, perhaps Bashmatic® did not properly install.
curl is not availableTherefore for situawtion where curl may not be available, offer the following shell function that works on Linux/Ubuntu and OS-X-based systems. It can be easily extended with new operating systems:
# @description Installs bashmatic dependency into the ~/.bashmatic folder.
function install_bashmatic() {
  # install bashmatic using https:// URL instead of git@
  command -v curl >/dev/null || {
    local OS=$(uname -s)
    local code
    case ${OS} in
    Linux)
      apt-get update -yq && apt-get install curl -yqq
      code=$?
      ((code)) && sudo apt-get update -yq && sudo apt-get install curl -yqq
      ;;
    Darwin)
      command -v brew >/dev/null || /bin/bash -c "$(curl -fsSL https://raw.githubusercontent.com/Homebrew/install/HEAD/install.sh)"
      hash -r
      brew install curl
      ;;
    *)
      echo "OS ${OS} is not supported."
      ;;
    esac
  }
  [[ -d ~/.bashmatic ]] || bash -c "$(curl -fsSL https://bashmatic.re1.re); bashmatic-install -q -m https"
  return 0
}To discover the breadth of available functions, type the following command to see all imported shell functions:
# List all functions using 4-column mode; print top 5 lines.
❯ bashmatic functions 4 | head -5
7z.a         db.psql.connect.db-set hl.yellow-on-gray  run.inspect-variables
7z.install   db.psql.connect.db-set hr                 run.inspect-variables-
7z.unzip     db.psql.connect.just-d hr.colored         run.inspect.set-skip-f
7z.x         db.psql.connect.table- http.servers       run.on-error.ask-is-en
7z.zip       db.psql.connect.table- https.servers      run.print-command

# or, to get the count of all functions, use 1 column output:
$ bashmatic functions 1 | wc -l
773To install Bashmatic manually, follow these steps (feel free to change BASHMATIC_HOME if you like):
export BASHMATIC_HOME="${HOME}/.bashmatic"
test -d "${BASHMATIC_HOME}" ||
  git clone https://github.com/kigster/bashmatic.git "${BASHMATIC_HOME}"
cd "${BASHMATIC_HOME}" && ./bin/bashmatic-install -v
cd ->/dev/nullSometimes you may not be able to use git (I have seen issues ranging from local certificate mismatch to old versions of git, and more), but maybe able to download with curl. In that case, you can lookup the latest tag (substitute "v1.6.0" below with that tag), and then issue this command:
export BASHMATIC_TAG="v2.4.1"
set -e
cd ${HOME}
curl --insecure -fSsl
  https://codeload.github.com/kigster/bashmatic/tar.gz/${BASHMATIC_TAG}
  -o bashmatic.tar.gz
rm -rf .bashmatic && tar xvzf bashmatic.tar.gz && mv bashmatic-${BASHMATIC_TAG} .bashmatic
source ~/.bashmatic/init.sh
cd ${HOME}/.bashmatic && ./bin/bashmatic-install -v
cd ~ >/dev/nullYou can always reload Bashmatic® with bashmatic.reload function. This simply performs the sourcing of ${BASHMATIC_HOME}/init.sh.
When you install Bashmatic it automatically adds a hook to your ~/.bash_profile, but if you are on ZSH you may need to add it manually (for now).
Add the following to your ~/.zshrc file:
[[ -f ~/.bashmatic/init.sh ]] && source "~/.bashmatic/init.sh"|
Note
|
The entire library takes less than 300ms to load on ZSH and a recent MacBook Pro. |
Makefile
The top-level Makefile is mostly provided as a convenience as it encapsulates some common tasks used in development by Bashmatic Author(s), as well as others useful to anyone exploring Bashmatic.
You can run make help and read the available targets:
❯ make

help               Prints help message auto-generated from the comments.
open-readme        Open README.pdf in the system viewer

docker-build       Builds the Docker image with the tooling inside
docker-run-bash    Drops you into a BASH session with Bashmatic Loaded
docker-run-fish    Drops you into a FISH session with Bashmatic Loaded
docker-run-zsh     Drops you into a ZSH session with Bashmatic Loaded
docker-run         Drops you into a BASH session

file-stats-git     Print all  files  known to `git ls-files` command
file-stats-local   Print all non-test files and run `file` utility on them.

install-dev        Installs the Development Tooling using dev-setup script
install-ruby       Installs the Bashmatic default Ruby version using rbenv
install            install BashMatic Locally in ~/.bashmatic

release            Make a new release named after the latest tag
tag                Tag this commit with .version and push to remote

setup              Run the comprehensive development setup on this machine
shell-files        Lists every single checked in SHELL file in this repo

test               Run fully automated test suite based on Bats
test-parallel      Run the fully auto-g mated test suite

update-changelog   Auto-generate the doc/CHANGELOG (requires GITHUB_TOKEN env var set)
update-functions   Auto-generate doc/FUNCTIONS index at doc/FUNCTIONS.adoc/pdf
update-readme      Re-generate the PDF version of the README
update-usage       Auto-generate doc/USAGE documentation from lib shell files,
                   to doc/USAGE.adoc/pdf

update             Runs all update targets to regenerate all PDF docs and the
                   Changelog.
I’ve added whitespaces around a set of common tasks you might find useful.
Let’s take a quick look at what’s available here.
Makefile is provided as a convenience for running most common tasks and to simplify running some more complex tasks that require remembering many arguments, such as make setup. You might want to use the Makefile for several reasons:
make open-readme
This tasks opens the PDF version of the README in your PDF system viewer.
make install
This allows you to install the Bashmatic Framework locally. It simply runs bin/bashmatic-install script. At most this will add hooks to your shell init files so that Bashmatic is loaded at login.
make setup
This task invokes the bin/dev-setup script under the hood, so that you can setup your local computer developer setup for software development.
Now, this script offers a very rich CLI interface, so you can either run the script directly and have a fine-grained control over what it’s doing, or you can run it with default flags via this make target.
This particular make target runs bin/dev-setup script with the following actions:
dev, cpp, fonts, gnu, go, java, js, load-balancing, postgres, ruby
make test and make test-parallel are both meant for Bashmatic Developers and contributors. Please see the Contributing section on how to run and what to expect from the UNIT tests.
make update is the task that should be run by library contributors after they’ve made their their changes and want the auto-generated documentation to reflect the new functions added and so on and so force. This tasks also generates the function index, re-generate the latest PDFs of README, USAGE or the CHANGELOG files.
|
Note
|
Running make update is is required for submitting any pull request.
|
Bashmatic comes with a Dockerfile that can be used to run tests or jsut manually validate various functionality under linux, and possibly to experiment.
Run make docker-build to create an docker image bashmatic:latest.
Run make docker-run-bash (or …-zsh or …-fish) to start a container with your favorite shell, and then validate if your functions work as expected.
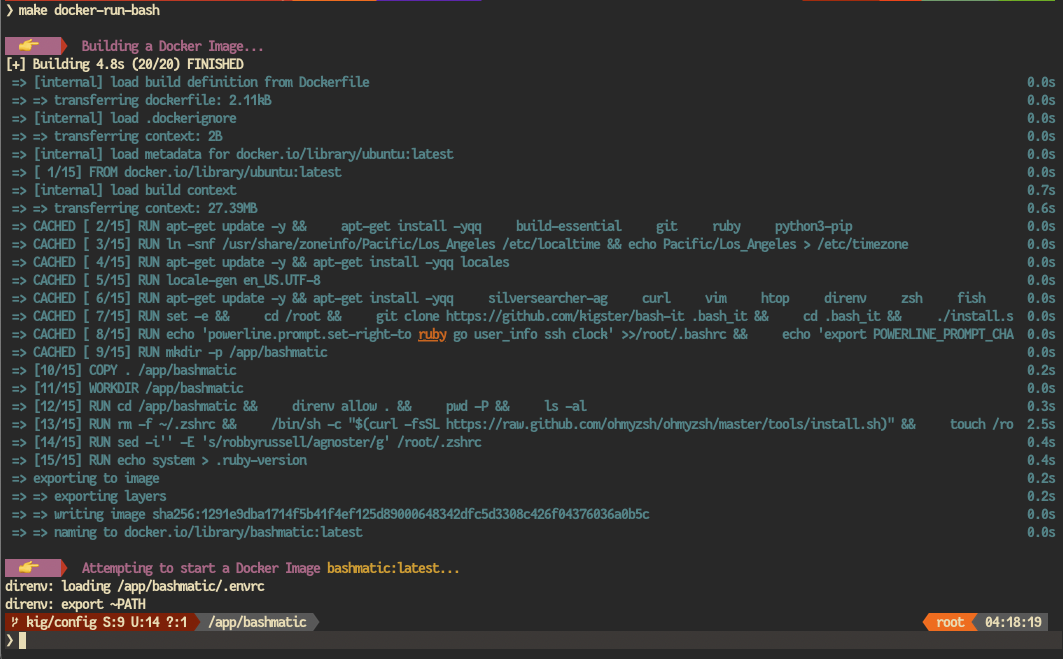
Note how this dropped me straight into the Linux environment prompt with Bashmatic already installed.
Why do we need another BASH framework?
BASH is know to be too verbose and unreliable. We beg to differ. This is why we wanted to start this README with a couple of examples.
Just look at this tiny, five-line script:
#!/usr/bin/env bash

source ${BASHMATIC_HOME}/init.sh

h2 "Installing ruby gem sym and brew package curl..."
   "Please standby..."

gem.install "sym" && brew.install.package "curl" &&
  success "installed sym ruby gem, version $(gem.version sym)"
Results in this detailed and, let’s be honest, gorgeous ASCII output:

Tell me you are not at all excited to start writing complex installation flows in BASH right away?
Not only you get pretty output, but you can each executed command, it’s exit status, whether it’s been successful (green/red), as well each command’s bloody duration in milliseconds. What’s not to like?!?
Still not convinced?
Take a look at a more comprehensive example next.
In this example, we’ll download and install binaries kubectl and minikube binaries into /usr/local/bin
We provided an example script in examples/k8s-installer.sh. Please click and take a look at the source.
Here is the output of running this script:
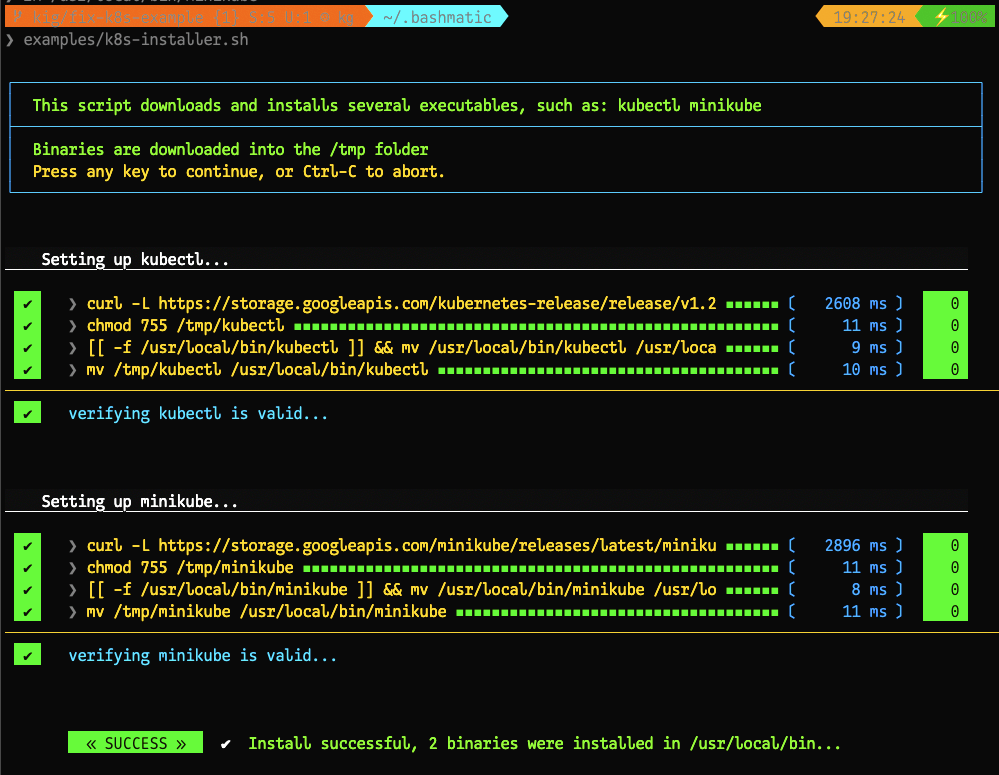
Why do we think this type of installer is pretty awesome, compared to a silent but deadly shell script that "Jim-in-the-corner" wrote and now nobody understands?
Because:
The script goes out of its way to over-communicate what it does to the user.
It allows and reminds about a clean getaway (Ctrl-C)
It shares the exact command it runs and its timings so that you can eyeball issues like network congestions or network addresses, etc.
It shows in green exit code '0' of each command. Should any of the commands fail, you’ll see it in red.
It’s source code is terse, explicit, and easy to read. There is no magic. Just BASH functions.
|
Note
|
If you need to create a BASH installer, Bashmatic® offers some incredible time savers. |
Let’s get back to the Earth, and talk about how to install Bashmatic, and how to use it in more detail right after.
This final and most feature-rich example is not just an example – it’s a working functioning tool that can be used to install a bunch of developer dependencies on your Apple Laptop.
|
Note
|
the script relies on Homebrew behind the scenes, and therefore would not work on linux or Windows (unless Brew gets ported there). |
It’s located in bin/dev-setup and has many CLI flags:
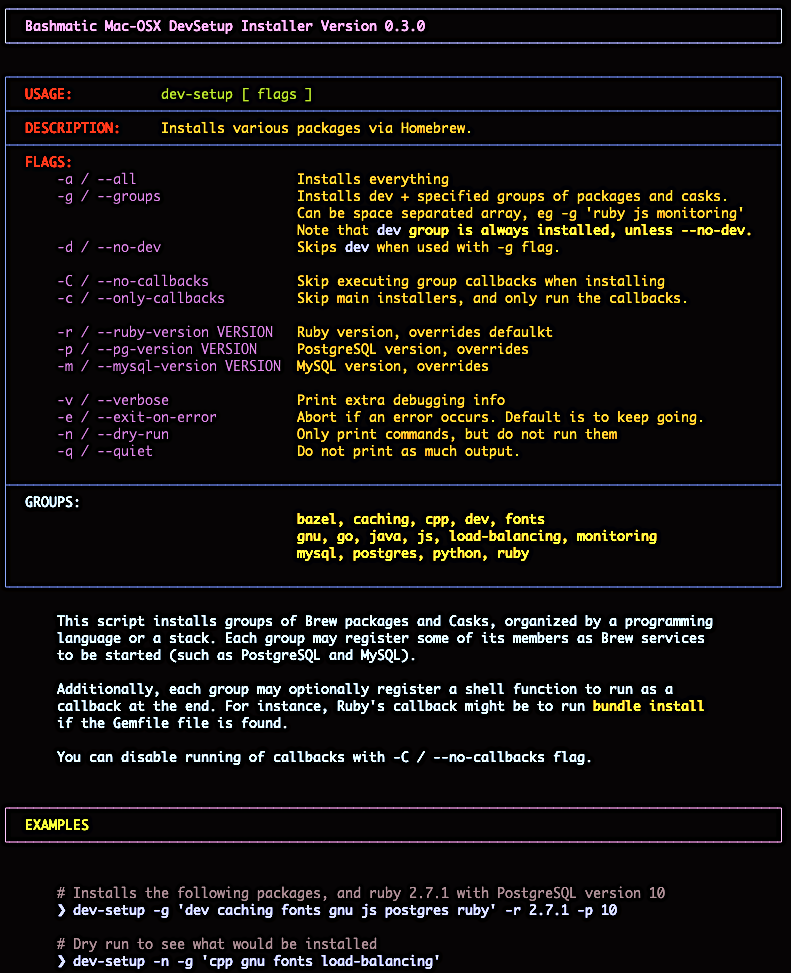
In the example below we’ll use dev-setup script to install the following:
Dev Tools
PostgreSQL
Redis
Memcached
Ruby 2.7.1
NodeJS/NPM/Yarn
Despite that this is a long list, we can install it all in one command.
We’ll run this from a folder where our application is installed, because then the Ruby Version will be auto-detected from our .ruby-version file, and in addition to installing all the dependencies the script will also run bundle install and npm install (or yarn install). Not bad, huh?
${BASHMATIC_HOME}/bin/dev-setup
  -g "ruby postgres mysql caching js monitoring"
  -r $(cat .ruby-version)
  -p 9.5  # use PostgreSQL version 9.5
  -m 5.6   # use MySQL version 5.6
This compact command line installs a ton of things, but don’t take our word for it - run it yourself. Or, at the very least enjoy this one extremely long screenshot :)
This is a great tool that colorizes nearly any other tool''s output.
Run it like so:
${BASHMATIC_HOME}/bin/install-grcYou might need to enter your password for SUDO.
Once it completes, run source ~/.bashrc (or whatever shell you use), and type something like ls -al or netstat -rn or ping 1.1.1.1 and notice how all of the above is nicely colored.
db Shortcut for Database Utilities & db top
If you are using PostgreSQL, you are in luck! Bashmatic includes numerous helpers for PostreSQL’s CLI
utility psql.
|
Note
|
Before you begin, we recommend that you install file .psqlrc from Bashmatic’s conf directory into your home folder. While not required, this file sets up your prompt and various macros for PostgreSQL that will come very handy if you use psql with any regularity.
|
What is db top anyway?
Just like with the regular top you can see the "top" resource-consuming processes running on your local system, with dbtop you can observe a self-refreshing report of the actively running queries on up to three database servers at the same time.
Here is the pixelated screenshot of dbtop running against two live databases:
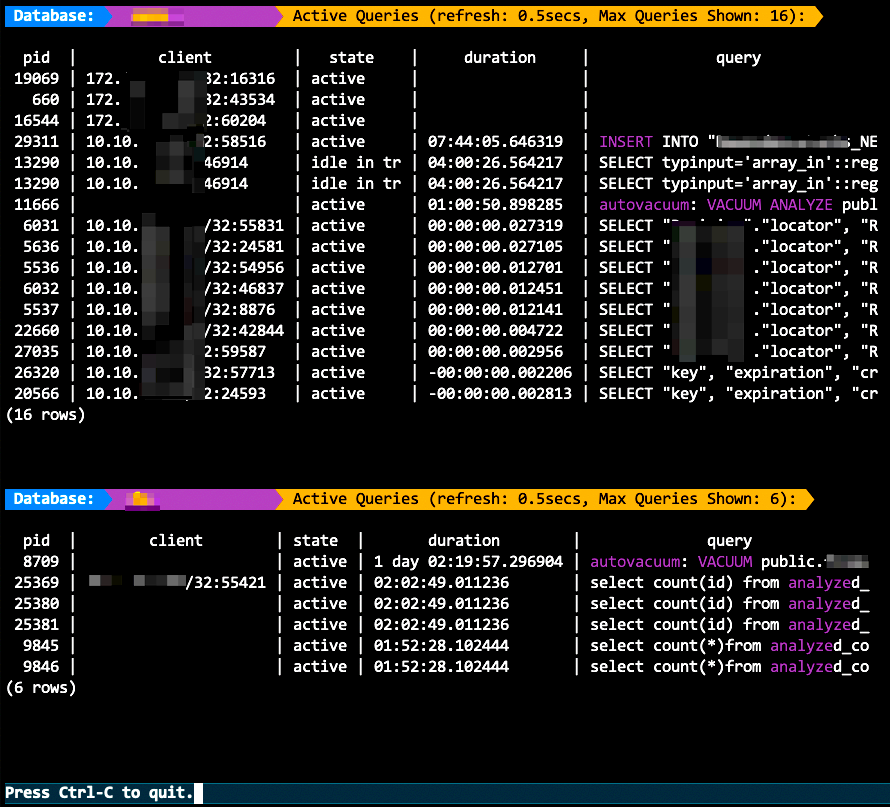
In order for this to work, you must first define database connection parameters in a YAML file located at the following PATH: ~/.db/database.yml.
Here is how the file should be organized (if you ever used Ruby on Rails, the standard config/database.yml file should be fully compatible):
development:
  database: development
  username: postgres
  host: localhost
  password:
staging:
  database: staging
  username: postgres
  host: staging.db.example.com
  password:
production:
  database: production
  username: postgres
  host: production.db.example.com
  password: "a098098safdaf0998ff79789a798a7sdf"
Given the above file, you should be able to run the following command to see all available (registered in the above YAML file) connections:
$ db connections
development
staging
production
Once that’s working, you should be able run dbtop: