gpt home
v1.6.0 ? ?
Chatgpt en casa! Básicamente, un mejor centro de Google Nest o Asistente de casa de Amazon Alexa. Construido en la Raspberry Pi usando la API Operai.

Esta guía explicará cómo construir la suya. Es bastante sencillo. También puede usar esto como referencia para construir otros proyectos en Raspberry Pi.
|
| ||||||||
echo " export OPENAI_API_KEY='your_api_key_here' " >> ~ /.bashrc && source ~ /.bashrcLITELLM_API_KEY . Vea los documentos de Litellm para obtener una lista de todos los proveedores compatibles. echo " export LITELLM_API_KEY='your_api_key_here' " >> ~ /.bashrc && source ~ /.bashrc--no-build para extraer la última imagen de DockerHub: curl -s https://raw.githubusercontent.com/judahpaul16/gpt-home/main/contrib/setup.sh |
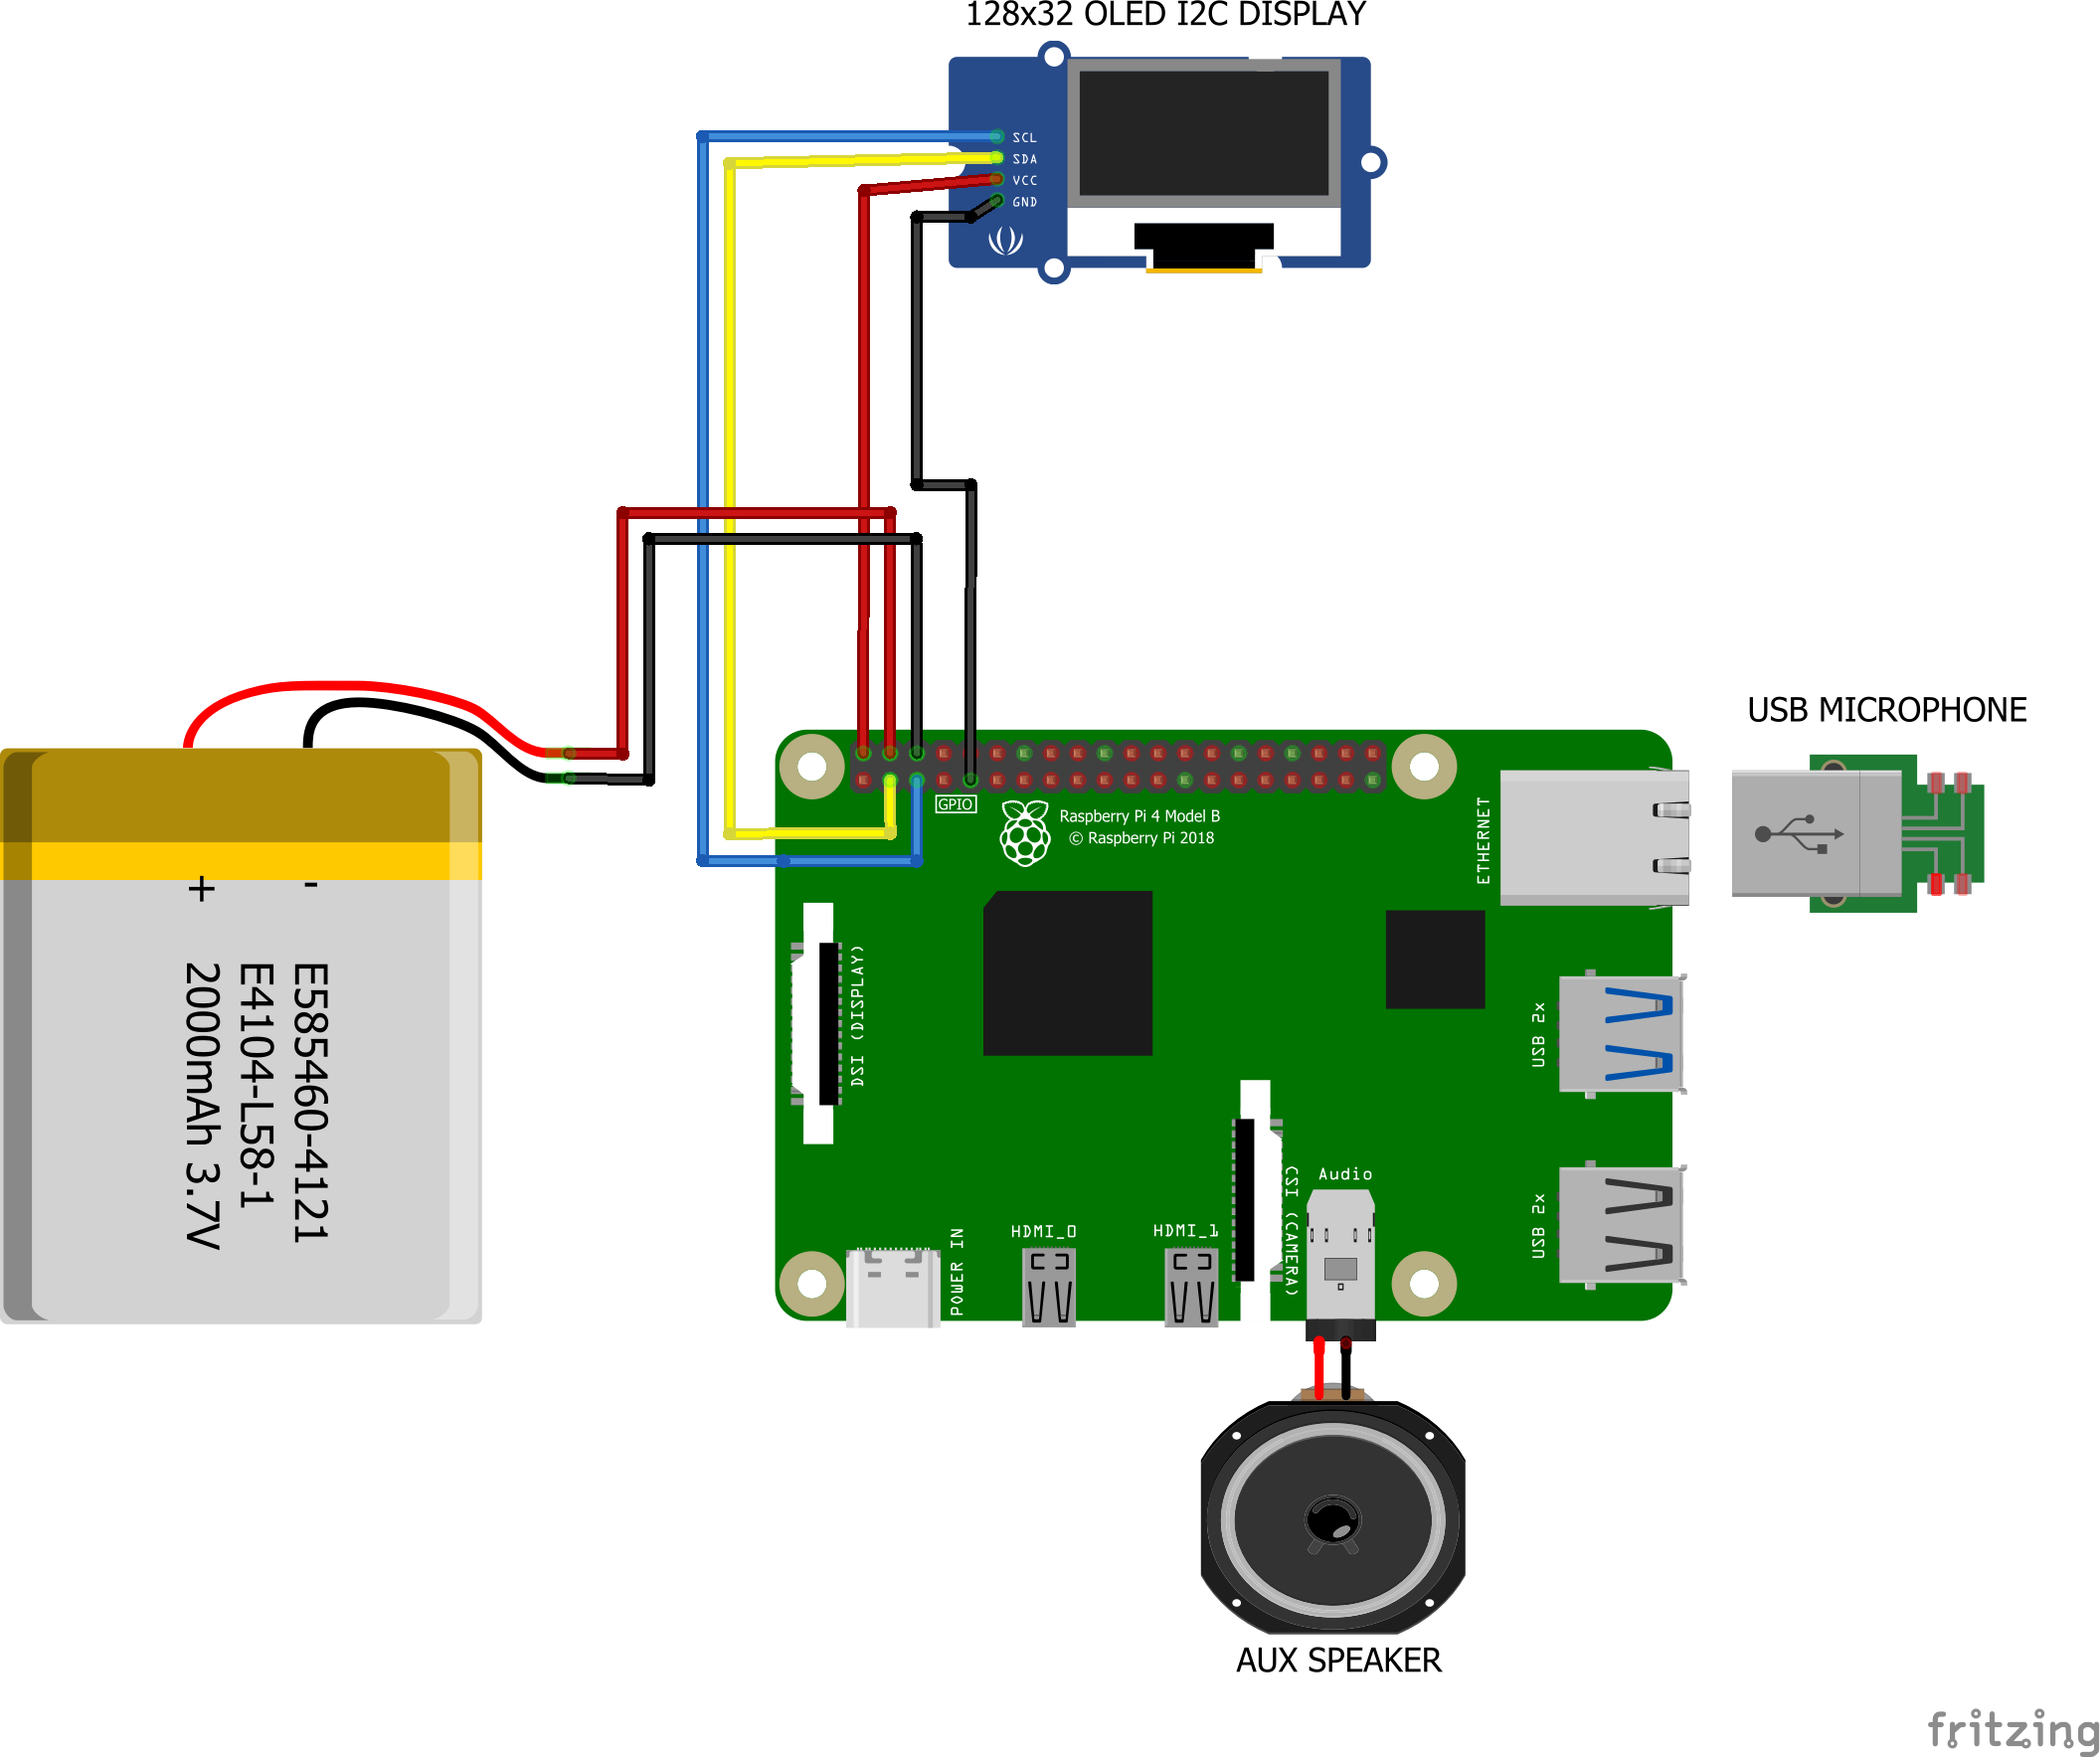
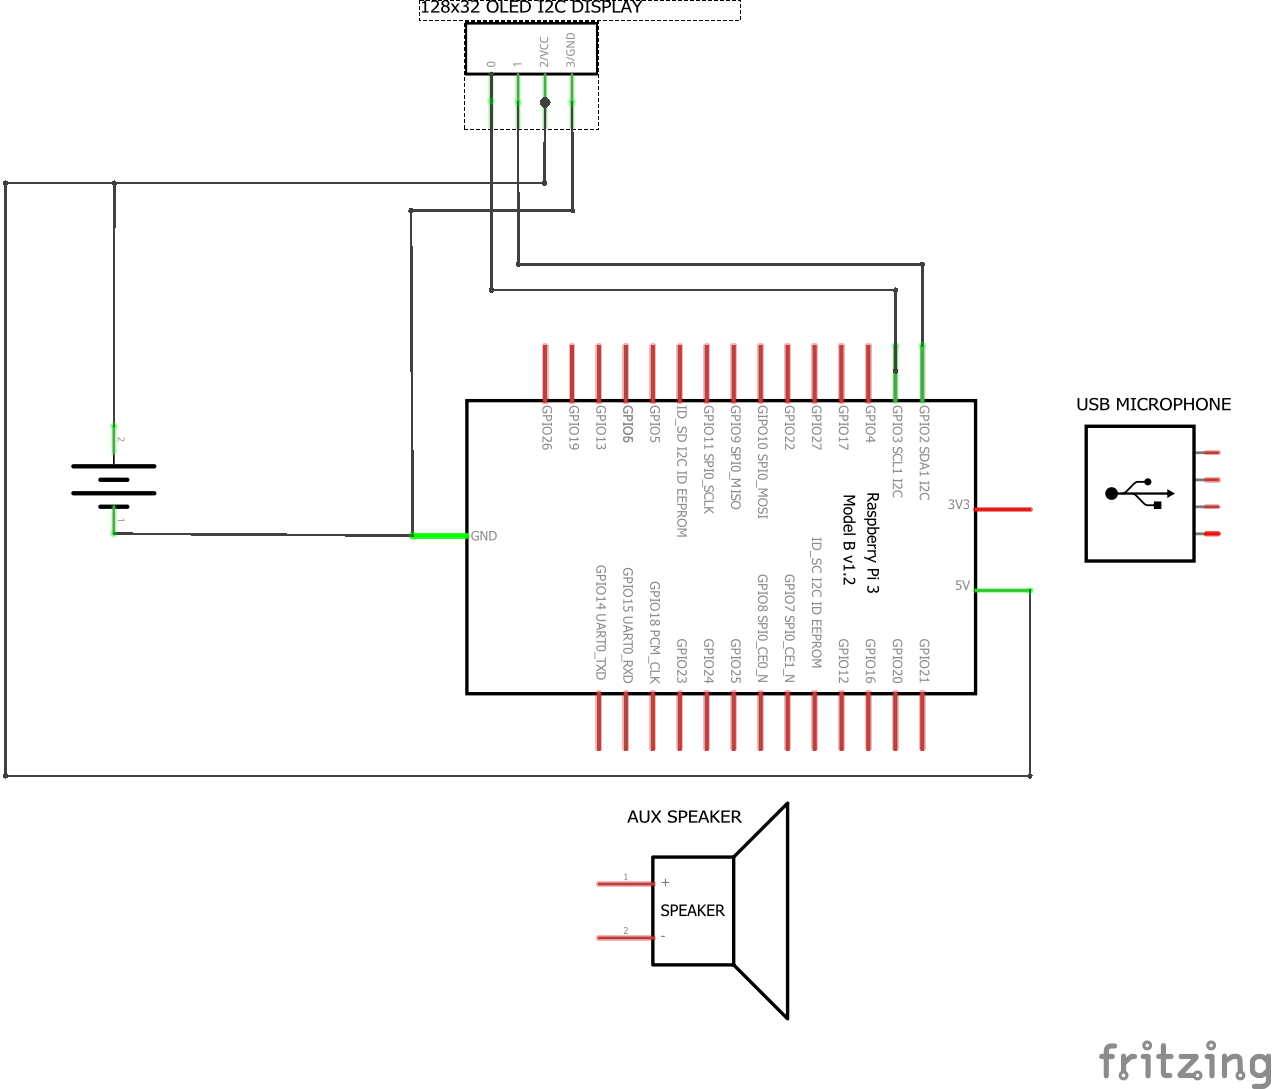
bash -s -- --no-buildIMPORTANTE : La imagen de la izquierda es para fines de ilustración. No conecte la batería directamente a la Raspberry Pi. Use un UPS o una fuente de alimentación con una batería como esta. Conectar la batería directamente a la Raspberry Pi puede causar daños a la placa por fluctuaciones de voltaje.
Antes de conectar la batería, asegúrese de que la polaridad sea correcta para evitar daños a su Raspberry Pi u otros componentes. Desconecte las fuentes de alimentación antes de hacer cambios.
 |  |
Esta es la lista de piezas que usé para construir mi primer hogar GPT. Puede usar esto como referencia para construir la suya. También he incluido piezas opcionales que puede agregar para mejorar su configuración. Para ser claros, puede usar cualquier sistema que ejecute Linux.
Componentes centrales
Componentes opcionales
Para configurar Wi-Fi en su Raspberry Pi, deberá editar el archivo wpa_supplicant.conf y asegurarse de que la interfaz inalámbrica esté habilitada en el arranque. Este método admite la configuración de múltiples redes Wi-Fi y es adecuada para configuraciones sin cabeza. También puede usar el raspi-config o la utilidad nmcli para configurar Wi-Fi; O simplemente use una conexión Ethernet si lo prefiere.
Paso 1: crea el script bash
sudo nano /usr/local/bin/start_wifi.shAgregue el siguiente contenido al script:
#! /bin/bash
# Set the interface and SSID details
INTERFACE= " wlan0 "
SSID= " your_wifi_ssid "
PASSWORD= " your_wifi_password "
# Make sure no previous configuration interferes
sudo killall wpa_supplicant
sudo dhcpcd -x $INTERFACE
# Ensure the wireless interface is up
sudo ip link set $INTERFACE up
# Create a wpa_supplicant configuration file
WPA_CONF= " /etc/wpa_supplicant/wpa_supplicant.conf "
wpa_passphrase " $SSID " " $PASSWORD " | sudo tee $WPA_CONF > /dev/null
# Start wpa_supplicant
sudo wpa_supplicant -B -i $INTERFACE -c $WPA_CONF
# Obtain an IP address
sudo dhcpcd $INTERFACE Asegúrese de reemplazar your_wifi_ssid y your_wifi_password con el SSID y la contraseña de su red wifi real.
Paso 2: Haga que el script sea ejecutable
sudo chmod +x /usr/local/bin/start_wifi.shPaso 3: crear un archivo de servicio Systemd
sudo nano /etc/systemd/system/start_wifi.serviceAgregue el siguiente contenido al archivo de servicio:
[Unit]
Description =Start WiFi at boot
After =network.target
[Service]
ExecStart =/usr/local/bin/start_wifi.sh
RemainAfterExit =true
[Install]
WantedBy =multi-user.targetPaso 4: Recargar Systemd y habilitar el servicio
sudo systemctl daemon-reload
sudo systemctl enable start_wifi.service
sudo systemctl start start_wifi.serviceSu Raspberry Pi ahora debe conectarse a la red Wi-Fi automáticamente en el arranque.
Si desea conectarse a redes ocultas o múltiples redes, edite el archivo wpa_supplicant.conf ubicado en /etc/wpa_supplicant/wpa_supplicant.conf y agregue la siguiente configuración:
network={
priority=1 # Higher priority networks are attempted first
ssid= " Your_Wi-Fi_Name "
psk= " Your_Wi-Fi_Password "
key_mgmt=WPA-PSK
scan_ssid=1 # Hidden network
priority=2
ssid= " Enterprise_Wi-Fi_Name "
key_mgmt=WPA-EAP
eap=PEAP # or TTLS, TLS, FAST, LEAP
identity= " Your_Username "
password= " Your_Password "
phase1= " peaplabel=0 " # or "peapver=0" for PEAPv0
phase2= " auth=MSCHAPV2 " # or "auth=MSCHAP" for MSCHAPv1
} Reinicie el servicio wpa_supplicant para aplicar los cambios:
sudo systemctl restart wpa_supplicantConsulte el archivo de ejemplo WPA_Supplicant para obtener más información sobre las opciones de configuración.
Antes de ejecutar este proyecto en su sistema, asegúrese de que el reloj de su sistema esté sincronizado, se actualizan las listas de sus paquetes y se instalan Nginx y Docker. El script de configuración se encargará de esto por usted, pero también puede hacerlo manualmente.
Sincronice el reloj de su sistema:
Instale chrony para la sincronización del tiempo:
sudo apt install -y chrony # For Debian/Ubuntu
sudo yum install -y chrony # For RHEL/CentOS/Alma
sudo dnf install -y chrony # # For RHEL/CentOS/Alma 9^
sudo zypper install -y chrony # For openSUSE
sudo pacman -S chrony # For Arch Linux Active y sincronice el tiempo inmediatamente con chrony :
sudo chronyc makestep Actualice su lista de paquetes:
Actualizaciones periódicas a su lista de paquetes Asegure el acceso a los últimos software y parches de seguridad.
sudo apt update # For Debian/Ubuntu
sudo yum makecache # For RHEL/CentOS/Alma
sudo dnf makecache # For RHEL/CentOS/Alma 9^
sudo zypper refresh # For openSUSE
sudo pacman -Sy # For Arch Linux Habilitar repositorios adicionales:
Para los sistemas que utilizan EPEL y otros repositorios especiales, es posible que deba permitirles acceder a una gama más amplia de paquetes disponibles.
Para Debian/Ubuntu:
sudo add-apt-repository universe
sudo apt updatePara Rhel/Centos/Alma y Fedora:
sudo yum install -y epel-release # For RHEL/CentOS/Alma
sudo dnf install -y epel-release # For RHEL/CentOS/Alma 9^
sudo yum makecache --timer # For RHEL/CentOS/Alma
sudo dnf makecache --timer # For RHEL/CentOS/Alma 9^ Instalación de herramientas de desarrollo:
Las herramientas de desarrollo son esenciales para construir paquetes y compilar software. Asegúrese de tener las herramientas necesarias instaladas.
Para Debian/Ubuntu:
sudo apt install -y build-essentialPara Rhel/Centos/Alma y Fedora:
sudo yum groupinstall -y " Development Tools " # For RHEL/CentOS/Alma
sudo dnf groupinstall -y " Development Tools " # For RHEL/CentOS/Alma 9^Instalar dependencias del sistema
Docker : requerido para la contenedorización.
sudo apt-get install -y docker.io # For Debian/Ubuntu
sudo yum install -y docker # For RHEL/CentOS/Alma
sudo dnf install -y docker # For RHEL/CentOS/Alma 9^
sudo zypper install -y docker # For openSUSE
sudo pacman -S docker # For Arch Linux Entonces sudo systemctl enable --now docker
Nginx : requerido para proxy inverso para la interfaz web.
sudo apt-get install -y nginx # For Debian/Ubuntu
sudo yum install -y nginx # For RHEL/CentOS/Alma
sudo dnf install -y nginx # For RHEL/CentOS/Alma 9^
sudo zypper install -y nginx # For openSUSE
sudo pacman -S nginx # For Arch Linux Antes de ejecutar el script de configuración para construir el contenedor, primero debe asegurarse de exportar su clave API OpenAI a una variable de entorno.
LITELLM_API_KEY . Vea los documentos de Litellm para obtener una lista de todos los proveedores compatibles. El script de configuración utilizará esta variable para inicializar el contenedor. Nota: Ejecución de export directamente en el terminal no persiste después del reinicio.
export OPENAI_API_KEY= " your_api_key_here " Alternativamente, puede poner esto al final de su archivo ~/.bashrc . (recomendado)
# export your API Key in here to initialize it at boot
export OPENAI_API_KEY= " your_api_key_here "
# Optional: Anthropic, Mistral, Cohere, HuggingFace, etc.
export LITELLM_API_KEY= " your_api_key_here "
# Optional: Add these aliases to your .bashrc file for easier management
alias gpt-start= " docker exec -it gpt-home supervisorctl start app "
alias gpt-restart= " docker exec -it gpt-home supervisorctl restart app "
alias gpt-stop= " docker exec -it gpt-home supervisorctl stop app "
alias gpt-status= " docker exec -it gpt-home supervisorctl status app "
alias gpt-log= " docker exec -it gpt-home tail -n 100 -f /app/src/events.log "
alias wi-start= " docker exec -it gpt-home supervisorctl start web-interface "
alias wi-restart= " docker exec -it gpt-home supervisorctl restart web-interface && sudo systemctl restart nginx "
alias wi-stop= " docker exec -it gpt-home supervisorctl stop web-interface "
alias wi-status= " docker exec -it gpt-home supervisorctl status web-interface "
alias wi-build= " docker exec -it gpt-home bash -c 'cd /app/src/frontend && npm run build' "
alias wi-log= " tail -n 100 -f /var/log/nginx/access.log "
alias wi-error= " tail -n 100 -f /var/log/nginx/error.log "
alias spotifyd-start= " docker exec -it gpt-home supervisorctl start spotifyd "
alias spotifyd-restart= " docker exec -it gpt-home supervisorctl restart spotifyd "
alias spotifyd-stop= " docker exec -it gpt-home supervisorctl stop spotifyd "
alias spotifyd-status= " docker exec -it gpt-home supervisorctl status spotifyd "
alias spotifyd-log= " docker exec -it gpt-home tail -n 100 -f /var/log/spotifyd.log " Ejecute source ~/.bashrc para aplicar los cambios a su sesión de terminal actual.
El script de configuración llevará bastante tiempo en ejecución (900.0S+ para construir y configurar dependencias en mi Raspberry Pi 4B de cuatro núcleos con RAM 1G) . Instalará todas las dependencias y construirá el contenedor Docker. Sin embargo, puede omitir el proceso de compilación pasando la bandera --no-build al script; Instalará las dependencias, configurará el firewall y Nginx, y tirará del contenedor del Hub Docker y lo ejecutará.
curl -s https://raw.githubusercontent.com/judahpaul16/gpt-home/main/contrib/setup.sh |
bash -s -- --no-build Alternativamente, con fines de desarrollo, ejecutar setup.sh sin el indicador --no-build monta el directorio del proyecto al contenedor agregando -v ~/gpt-home:/app al comando docker run . Esto le permite realizar cambios en los archivos del proyecto en su Raspberry Pi y ver los cambios reflejados en el contenedor sin reconstruir la imagen. Esto es útil para probar cambios en la base de código. Corre directamente con:
curl -s https://raw.githubusercontent.com/judahpaul16/gpt-home/main/contrib/setup.sh |
    bash -s
También puede ejecutar el contenedor de manera interactiva si necesita depurar o probar los cambios en la base de código con el -it (terminal interactivo), --entrypoint /bin/bash y --rm (eliminar en el proceso de salida) los indicadores. Esto lo dejará en una sesión de conchas dentro del contenedor. Alternativamente, si el Conatiner ya se está ejecutando:
docker exec -it gpt-home bashEsto iniciará el contenedor y lo dejará en una sesión de shell dentro del contenedor.
Explicación de las banderas de Docker Run
- -tmpfs /run :
    Mounts a tmpfs at /run for transient runtime data.
- -tmpfs /run/lock :
    Mounts a tmpfs at /run/lock for lock files.
- -privileged :
    Grants extended privileges to the container
    Necessary for accessing host audio devices.
- -net=host :
    Uses the host network stack directly.
    May be necessary for avahi-daemon services.
- v /dev/snd:/dev/snd :
    Provides access to the host's sound devices.
- v /dev/shm:/dev/shm :
    Provides access to shared memory.
- v /usr/share/alsa:/usr/share/alsa:ro :
    Maps the ALSA shared data as read-only.
- v /var/run/dbus:/var/run/dbus :
    Provides access to the D-Bus system for inter-process communication.
- -mount type=bind,source=/etc/asound.conf,target=/etc/asound.conf :
Binds the host's ALSA configuration to the container. Si prefiere ejecutar el script de configuración manualmente, puede hacerlo. Cree un script en su carpeta de inicio con vim ~/setup.sh o nano ~/setup.sh y pegue en lo siguiente:
#! /bin/bash
latest_release= $( curl -s https://api.github.com/repos/judahpaul16/gpt-home/releases/latest | grep ' tag_name ' | cut -d " -f4 )
# Colors
RED= ' �33[0;31m '
GREEN= ' �33[0;32m '
YELLOW= ' �33[0;33m '
BLUE= ' �33[0;34m '
MAGENTA= ' �33[0;35m '
CYAN= ' �33[0;36m '
WHITE= ' �33[0;37m '
NC= ' �33[0m ' # No Color
echo " "
echo -e " ${MAGENTA} "
echo " GPT Home $latest_release "
echo " Created by Judah Paul "
echo " More info @ https://github.com/judahpaul16/gpt-home/ "
echo -e " ${NC} "
echo -e " ${GREEN} "
echo " ____ ____ _____ _ _ "
echo " / ___| _ \ _ _| | | | | ___ _ __ ___ ___ "
echo " | | _| |_) || | | |_| |/ _ \ | '_ ` _ \ / _ \ "
echo " | |_| | __/ | | | _ | (_) | | | | | | __/ "
echo " \ ____|_| |_| |_| |_| \ ___/|_| |_| |_| \ ___| "
echo -e " ${NC} "
echo -e " ${CYAN} "
echo " ______________ "
echo " | how may I | "
echo " | assist you | "
echo " | today? | "
echo " |______________| "
echo " \ | "
echo " \ | "
echo " \ | "
echo " _______ ________ | "
echo " |ooooooo| ____ | __ __ | | "
echo " |[]+++[]| [____] |/ \ / \ | | "
echo " |+ ___ +| ]()()[ | \ __/ \ __/| | "
echo " |:| |:| ___ \ __/___ |[][][][]| | "
echo " |:|___|:| |__| |__| |++++++++| | "
echo " |[]===[]| |_|/ \ |_| | ______ | | "
echo " _ ||||||||| _ | | __ | | __ ||______|| __| "
echo " |_______| |_|[::]|_| |________| \ "
echo " \ _|_||_|_/ \ "
echo " |_||_| \ "
echo " _|_||_|_ \ "
echo " ____ |___||___| \ "
echo -e " ${NC} "
# Mask systemd-networkd-wait-online.service to prevent boot delays
sudo systemctl mask systemd-networkd-wait-online.service
# Set Permissions
sudo chown -R $( whoami ) : $( whoami ) .
sudo chmod -R 755 .
# Function to install system dependencies
function install() {
local package= $1
echo " Ensuring package ' $package ' is installed... "
# Detect the package management system
if command -v apt-get > /dev/null ; then
if ! dpkg -s " $package " > /dev/null 2>&1 ; then
sudo yes | add-apt-repository universe > /dev/null 2>&1 || true
sudo apt update || true
if [ " $package " == " docker " ] ; then
sudo apt-get install -y docker.io
else
sudo apt-get install -y " $package "
fi
fi
elif command -v yum > /dev/null ; then
if ! rpm -q " $package " > /dev/null 2>&1 ; then
sudo yum install -y epel-release > /dev/null 2>&1 || true
sudo yum makecache --timer || true
sudo yum install -y " $package "
fi
elif command -v dnf > /dev/null ; then
if ! dnf list installed " $package " > /dev/null 2>&1 ; then
sudo dnf install -y epel-release > /dev/null 2>&1 || true
sudo dnf makecache --timer || true
sudo dnf install -y " $package "
fi
elif command -v zypper > /dev/null ; then
if ! zypper se -i " $package " > /dev/null 2>&1 ; then
sudo zypper refresh || true
sudo zypper install -y " $package "
fi
elif command -v pacman > /dev/null ; then
if ! pacman -Q " $package " > /dev/null 2>&1 ; then
sudo pacman -Sy
sudo pacman -S --noconfirm " $package "
fi
else
echo " Package manager not supported. "
return 1
fi
if [ " $package " == " docker " ] ; then
if ! docker ps > /dev/null 2>&1 ; then
echo " Docker installed. Adding $( whoami ) to the 'docker' group... "
sudo usermod -aG docker $( whoami )
echo -e " ${RED} User added to ` docker ` group but the session must be reloaded to access the Docker daemon. Please log out, log back in, and rerun the script. Exiting... ${NC} "
exit 0
fi
fi
}
install chrony
install nginx
install containerd
install docker
install docker-buildx-plugin
install alsa-utils
sudo systemctl enable docker
sudo systemctl start docker
# Create ALSA config (asound.conf, adjust as needed)
sudo tee /etc/asound.conf > /dev/null << EOF
pcm.!default { type hw card Headphones device 0 }
ctl.!default { type hw card Headphones }
EOF
# Install Docker Buildx plugin
mkdir -p $HOME /.docker/cli-plugins
curl -Lo $HOME /.docker/cli-plugins/docker-buildx https://github.com/docker/buildx/releases/download/v0.14.0/buildx-v0.14.0.linux-arm64
sudo chmod +x $HOME /.docker/cli-plugins/docker-buildx
docker buildx version
# Setup UFW Firewall
echo " Setting up UFW Firewall... "
if which firewalld > /dev/null ; then
sudo systemctl stop firewalld
sudo systemctl disable firewalld
sudo yum remove firewalld -y 2> /dev/null || sudo apt-get remove firewalld -y 2> /dev/null || sudo zypper remove firewalld -y 2> /dev/null
fi
if ! which ufw > /dev/null ; then
sudo yum install ufw -y 2> /dev/null || sudo apt-get install ufw -y 2> /dev/null || sudo zypper install ufw -y 2> /dev/null
fi
sudo ufw allow ssh
sudo ufw allow 80,443/tcp
sudo ufw allow 5353/udp
echo " y " | sudo ufw enable
# Setup NGINX for reverse proxy
echo " Setting up NGINX... "
sudo mkdir -p /etc/nginx/sites-available /etc/nginx/sites-enabled
sudo tee /etc/nginx/sites-available/gpt-home << EOF
server {
listen 80;
location / {
proxy_pass http://127.0.0.1:8000/;
proxy_set_header Host $ host;
proxy_set_header X-Real-IP $ remote_addr;
proxy_set_header X-Forwarded-For $ proxy_add_x_forwarded_for;
}
}
EOF
# Remove gpt-home site symlink if it exists
[ -L " /etc/nginx/sites-enabled/gpt-home " ] && sudo unlink /etc/nginx/sites-enabled/gpt-home
# Remove the default site if it exists
[ -L " /etc/nginx/sites-enabled/default " ] && sudo unlink /etc/nginx/sites-enabled/default
# Create a symlink to the gpt-home site and reload NGINX
sudo ln -s /etc/nginx/sites-available/gpt-home /etc/nginx/sites-enabled
sudo systemctl enable nginx
sudo nginx -t && sudo systemctl restart nginx
sudo systemctl status --no-pager nginx
if [[ " $1 " != " --no-build " ]] ; then
[ -d ~ /gpt-home ] && rm -rf ~ /gpt-home
git clone https://github.com/judahpaul16/gpt-home ~ /gpt-home
cd ~ /gpt-home
echo " Checking if the container 'gpt-home' is already running... "
if [ $( docker ps -q -f name=gpt-home ) ] ; then
echo " Stopping running container 'gpt-home'... "
docker stop gpt-home
fi
echo " Checking for existing container 'gpt-home'... "
if [ $( docker ps -aq -f status=exited -f name=gpt-home ) ] ; then
echo " Removing existing container 'gpt-home'... "
docker rm -f gpt-home
fi
echo " Pruning Docker system... "
docker system prune -f
# Check if the buildx builder exists, if not create and use it
if ! docker buildx ls | grep -q mybuilder ; then
docker buildx create --name mybuilder --use
docker buildx inspect --bootstrap
fi
# Building Docker image 'gpt-home' for ARMhf architecture
echo " Building Docker image 'gpt-home' for ARMhf... "
timeout 3600 docker buildx build --platform linux/arm64 -t gpt-home --load .
if [ $? -ne 0 ] ; then
echo " Docker build failed. Exiting... "
exit 1
fi
echo " Container 'gpt-home' is now ready to run. "
echo " Running container 'gpt-home' from image 'gpt-home'... "
docker run --restart unless-stopped -d --name gpt-home
--mount type=bind,source=/etc/asound.conf,target=/etc/asound.conf
--privileged
--net=host
--tmpfs /run
--tmpfs /run/lock
-v ~ /gpt-home:/app
-v /dev/snd:/dev/snd
-v /dev/shm:/dev/shm
-v /usr/share/alsa:/usr/share/alsa
-v /var/run/dbus:/var/run/dbus
-e OPENAI_API_KEY= $OPENAI_API_KEY
-e LITELLM_API_KEY= $LITELLM_API_KEY
gpt-home
echo " Container 'gpt-home' is now running. "
# Show status of the container
docker ps -a | grep gpt-home
sleep 10
# Show status of all programs managed by Supervisor
docker exec -i gpt-home supervisorctl status
fi
if [[ " $1 " == " --no-build " ]] ; then
docker ps -aq -f name=gpt-home | xargs -r docker rm -f
docker pull judahpaul/gpt-home
docker run --restart unless-stopped -d --name gpt-home
--mount type=bind,source=/etc/asound.conf,target=/etc/asound.conf
--privileged
--net=host
--tmpfs /run
--tmpfs /run/lock
-v /dev/snd:/dev/snd
-v /dev/shm:/dev/shm
-v /usr/share/alsa:/usr/share/alsa
-v /var/run/dbus:/var/run/dbus
-e OPENAI_API_KEY= $OPENAI_API_KEY
-e LITELLM_API_KEY= $LITELLM_API_KEY
judahpaul/gpt-home
docker ps -a | grep gpt-home
sleep 10
docker exec -i gpt-home supervisorctl status
fiAsegúrese de hacer que el script se ejecute para ejecutarlo
chmod +x setup.sh
./setup.sh
|
|
|
| ||||||||||||||||||||||||||||||||||||||||||||||||||||||||||||||
|
|
|
¡Las contribuciones son ciertamente bienvenidas! Lea las contributing guidelines para obtener más información sobre cómo contribuir.
Este proyecto tiene licencia bajo la licencia GNU GPL V3.0: consulte el archivo LICENSE para obtener más detalles.


