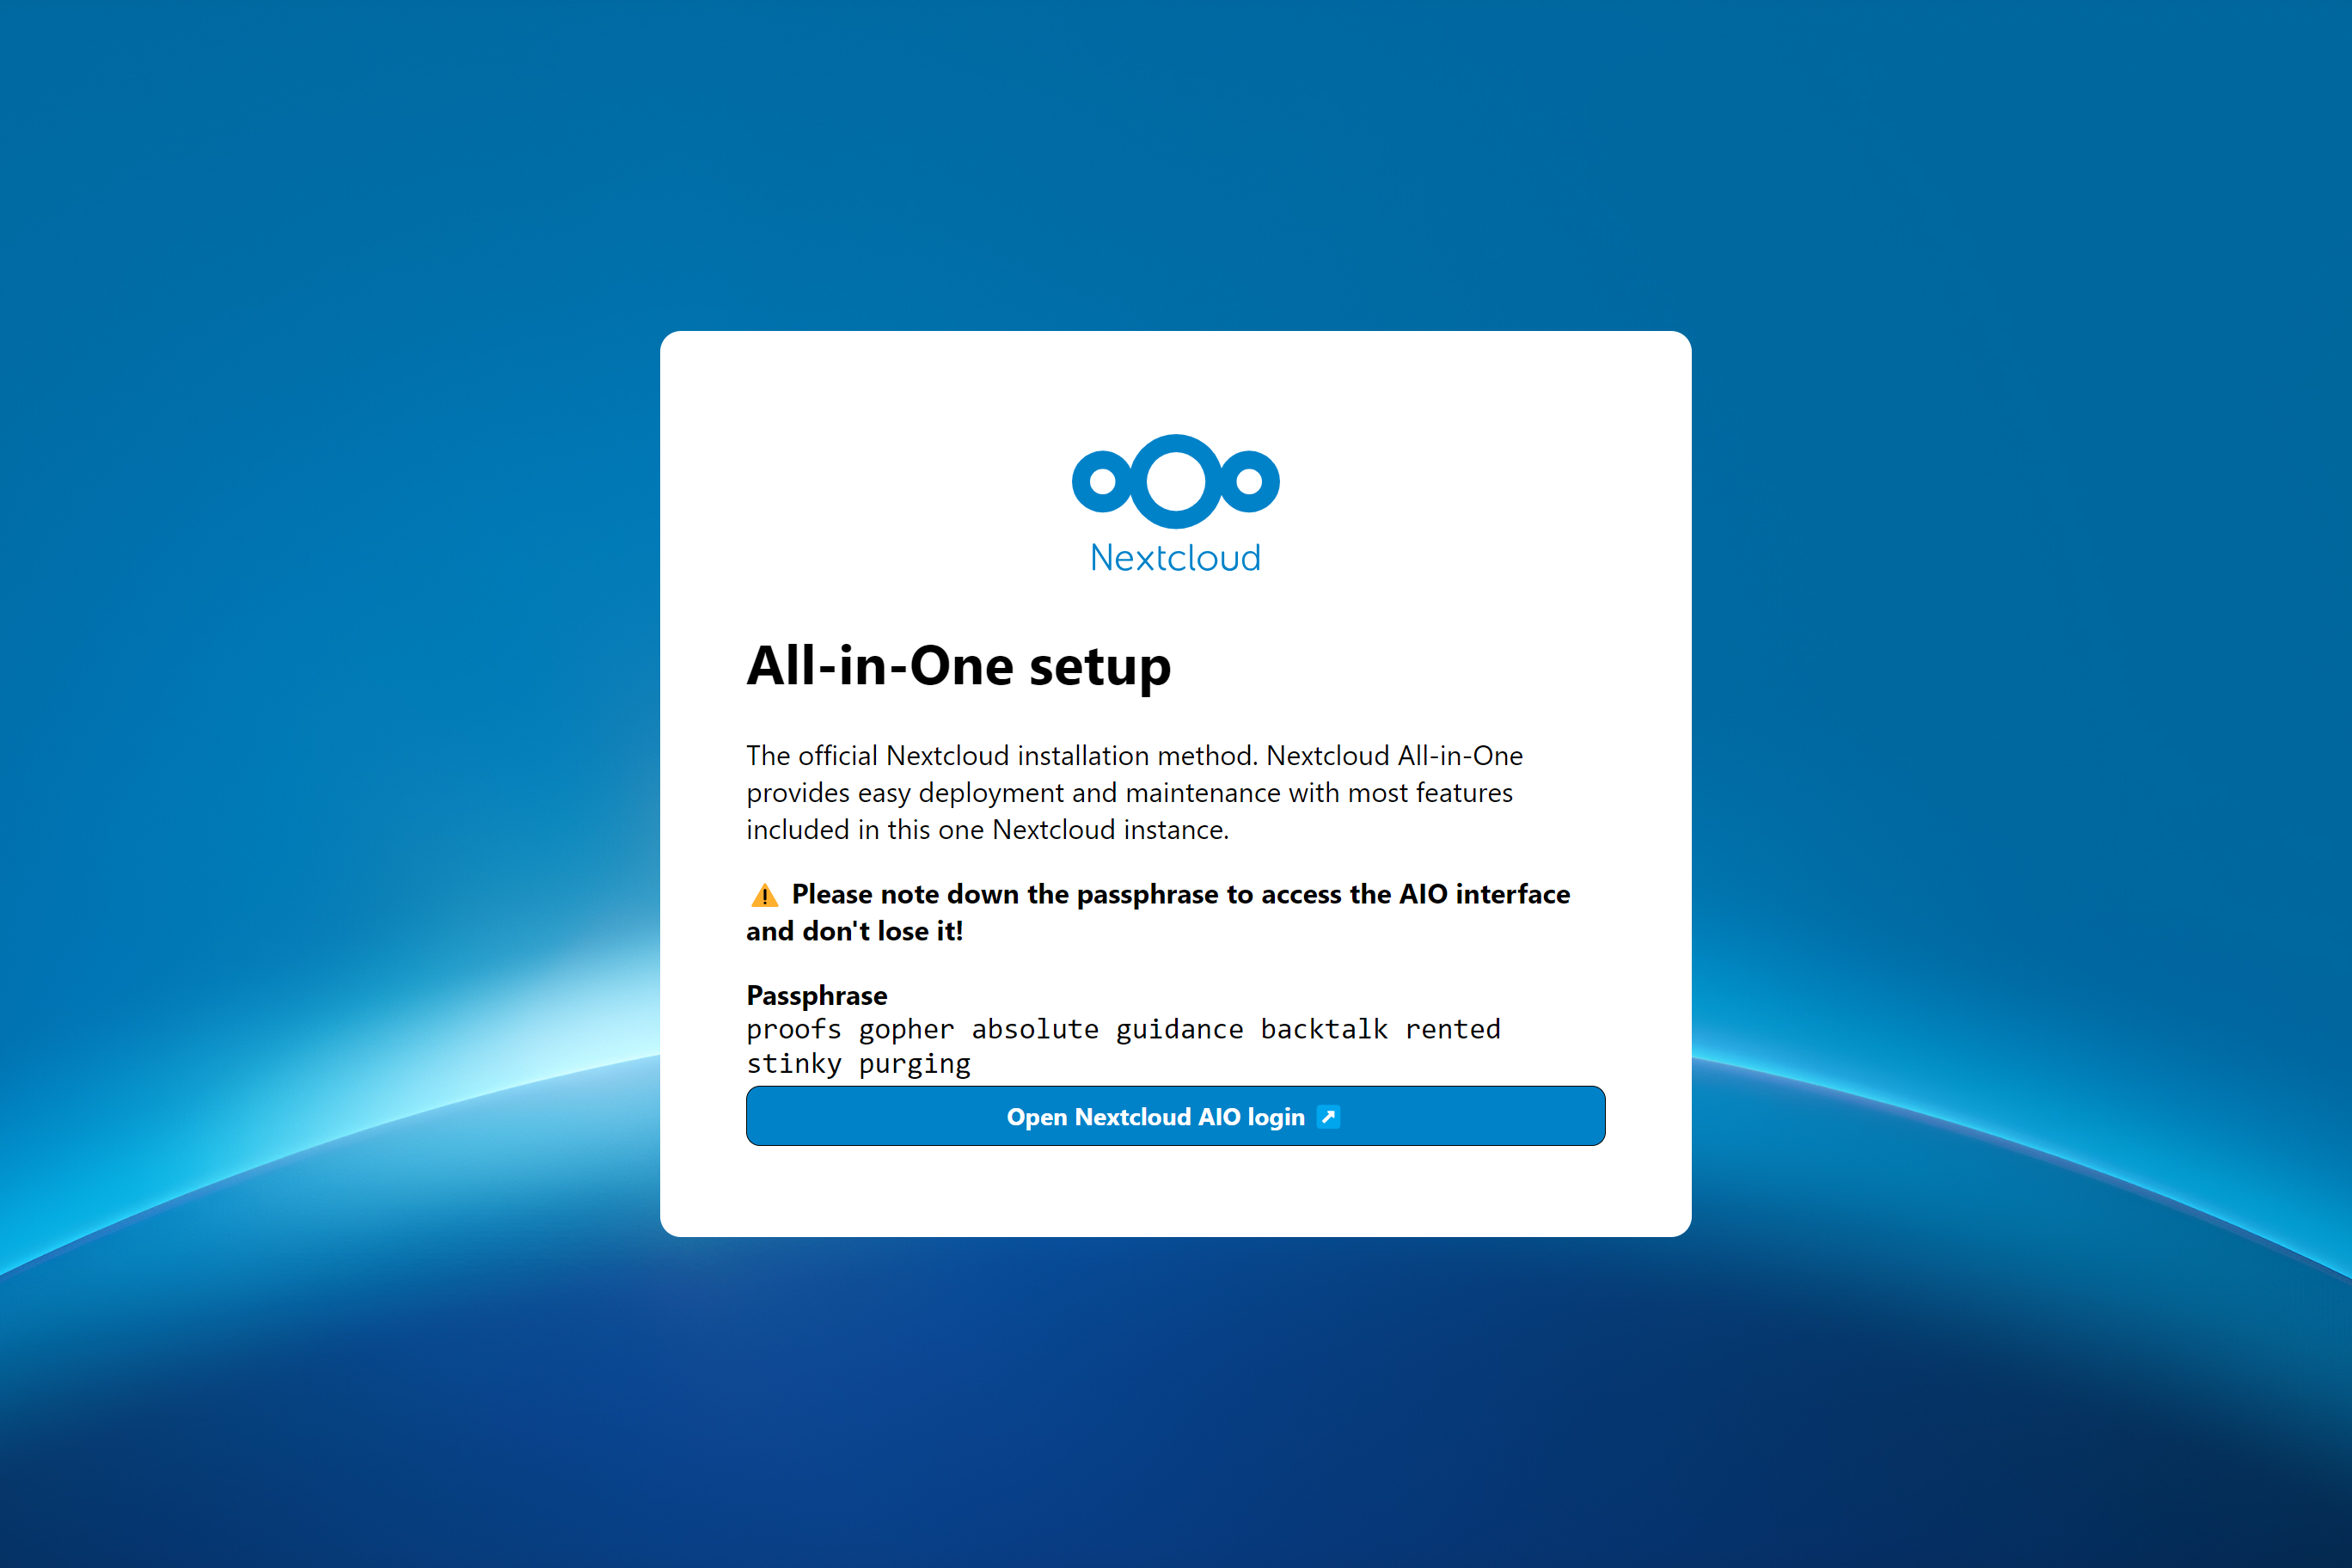
all in one
v9.8.0
La méthode d'installation officielle de NextCloud. NextCloud AIO offre un déploiement et une maintenance faciles avec la plupart des fonctionnalités incluses dans cette instance NextCloud.
Inclus sont:
ffmpeg , smbclient , libreoffice ET nodejs sont inclus par défaut| Première configuration | Après l'installation |
|---|---|
 |  |
Les instructions suivantes sont destinées aux installations sans serveur Web ou proxy inversé (comme Apache, Nginx, Caddy, CloudFlare Tunnel et autre) déjà en place. Si vous souhaitez exécuter AIO derrière un serveur Web ou un proxy inversé (comme Apache, Nginx, Caddy, CloudFlare Tunnel et sinon), consultez la documentation de proxy inverse. De plus, les instructions ci-dessous sont particulièrement destinées à Linux. Pour macOS, voir ceci, pour Windows, voir ceci et pour la synologie, voir cela.
Avertissement
Vous pouvez utiliser le script de commodité ci-dessous pour installer Docker. Cependant, nous vous recommandons de ne pas télécharger et d'exécuter aveuglément des scripts en tant que sudo. Mais si vous en avez envie, vous pouvez bien sûr l'utiliser. Voir ci-dessous:
curl -fsSL https://get.docker.com | sudo shSi vous avez besoin d'une prise en charge IPv6, vous devez l'activer en suivant https://github.com/nextcloud/all-in-one/blob/main/docker-ipv6-support.md.
Exécutez la commande ci-dessous afin de démarrer le conteneur sur Linux et sans serveur Web ou proxy inversé (comme Apache, Nginx, Caddy, CloudFlare Tunnel et autre) déjà en place:
 # For Linux and without a web server or reverse proxy (like Apache, Nginx, Caddy, Cloudflare Tunnel and else) already in place:
sudo docker run
--init
--sig-proxy=false
--name nextcloud-aio-mastercontainer
--restart always
--publish 80:80
--publish 8080:8080
--publish 8443:8443
--volume nextcloud_aio_mastercontainer:/mnt/docker-aio-config
--volume /var/run/docker.sock:/var/run/docker.sock:ro
nextcloud/all-in-one:latest
sudo docker run cette commande tourne un nouveau conteneur Docker. Les commandes Docker peuvent éventuellement être utilisées sans sudo si l'utilisateur est ajouté au groupe Docker (ce n'est pas la même chose que Docker sans racine, voir FAQ ci-dessous).--init cette option s'assure qu'aucun processus de zombie n'est créé, jamais. Voir la documentation Docker.--sig-proxy=false Cette option permet de quitter le shell de conteneur qui est fixé automatiquement lors de l'utilisation docker run en utilisant [CTRL] + [C] sans arrêter le conteneur.--name nextcloud-aio-mastercontainer C'est le nom du conteneur. Cette ligne ne peut pas être modifiée, car les mises à jour de MasterContainer échoueraient.--restart always c'est la "politique de redémarrage". signifie always que le conteneur doit toujours commencer avec le démon Docker. Voir la documentation Docker pour plus de détails sur les politiques de redémarrage: https://docs.docker.com/config/containeners/start-Containers-automatiquemated/--publish 80:80 Cela signifie que le port 80 du conteneur doit être publié sur l'hôte à l'aide du port 80. Il est utilisé pour obtenir des certificats valides pour l'interface AIO si vous souhaitez utiliser le port 8443. Il n'est pas nécessaire si vous exécutez AIO derrière un serveur Web ou un proxy inversé et peut être supprimé dans ce cas car vous pouvez simplement utiliser le port 8080 pour l'interface AIO.--publish 8080:8080 Cela signifie que le port 8080 du conteneur doit être publié sur l'hôte à l'aide du port 8080. Ce port est utilisé pour l'interface AIO et utilise un certificat auto-signé par défaut. Vous pouvez également utiliser un port hôte différent si le port 8080 est déjà utilisé sur votre hôte, par exemple --publish 8081:8080 (seul le premier port peut être modifié pour l'hôte, le deuxième port est pour le conteneur et doit rester au 8080 ).--publish 8443:8443 Cela signifie que le port 8443 du conteneur doit être publié sur l'hôte en utilisant le port 8443. Si vous publiez les ports 80 et 8443 vers le public Internet, vous pouvez accéder à l'interface AIO via ce port avec un certificat valide. Il n'est pas nécessaire si vous exécutez AIO derrière un serveur Web ou un proxy inversé et que vous pouvez être supprimé dans ce cas car vous pouvez simplement utiliser le port 8080 pour l'interface AIO.--volume nextcloud_aio_mastercontainer:/mnt/docker-aio-config Cela signifie que les fichiers créés par le MasterContainer seront stockés dans un volume Docker qui s'appelle nextcloud_aio_mastercontainer . Cette ligne ne peut pas être modifiée, car les sauvegardes intégrées échoueraient plus tard.--volume /var/run/docker.sock:/var/run/docker.sock:ro La prise Docker est montée dans le conteneur qui est utilisé pour faire tourner tous les autres conteneurs et pour d'autres fonctionnalités. Il doit être ajusté sur Windows / MacOS et sur Docker sans racine. Voir la documentation applicable à ce sujet. En cas de réglage, n'oubliez pas de définir également WATCHTOWER_DOCKER_SOCKET_PATH ! Si vous n'aimez pas cela, consultez https://github.com/nextcloud/all-in-one/tree/main/manual-install.nextcloud/all-in-one:latest Ceci est l'image Docker Container qui est utilisée.--env NEXTCLOUD_DATADIR="/mnt/ncdata" (c'est un exemple pour Linux. Voir ceci pour d'autres OS 'et pour une explication de ce que fait cette valeur. Pour être spécifié lors du premier démarrage si vous souhaitez le changer en un chemin spécifique au lieu du volume Docker par défaut). Pour voir des explications et des exemples pour d'autres variables (comme modifier l'emplacement du datadir de NextCloud ou le montage de certains emplacements en tant que stockage externe dans le conteneur NextCloud), lisez cette lecture et regardez le fichier docker-compose: https://github.com/ NextCloud / All-in-One / Blob / Main / Compose.yamlRemarque: Vous pouvez être intéressé à ajuster Datadir de NextCloud pour stocker les fichiers à un emplacement différent du volume Docker par défaut. Voir cette documentation sur la façon de le faire.
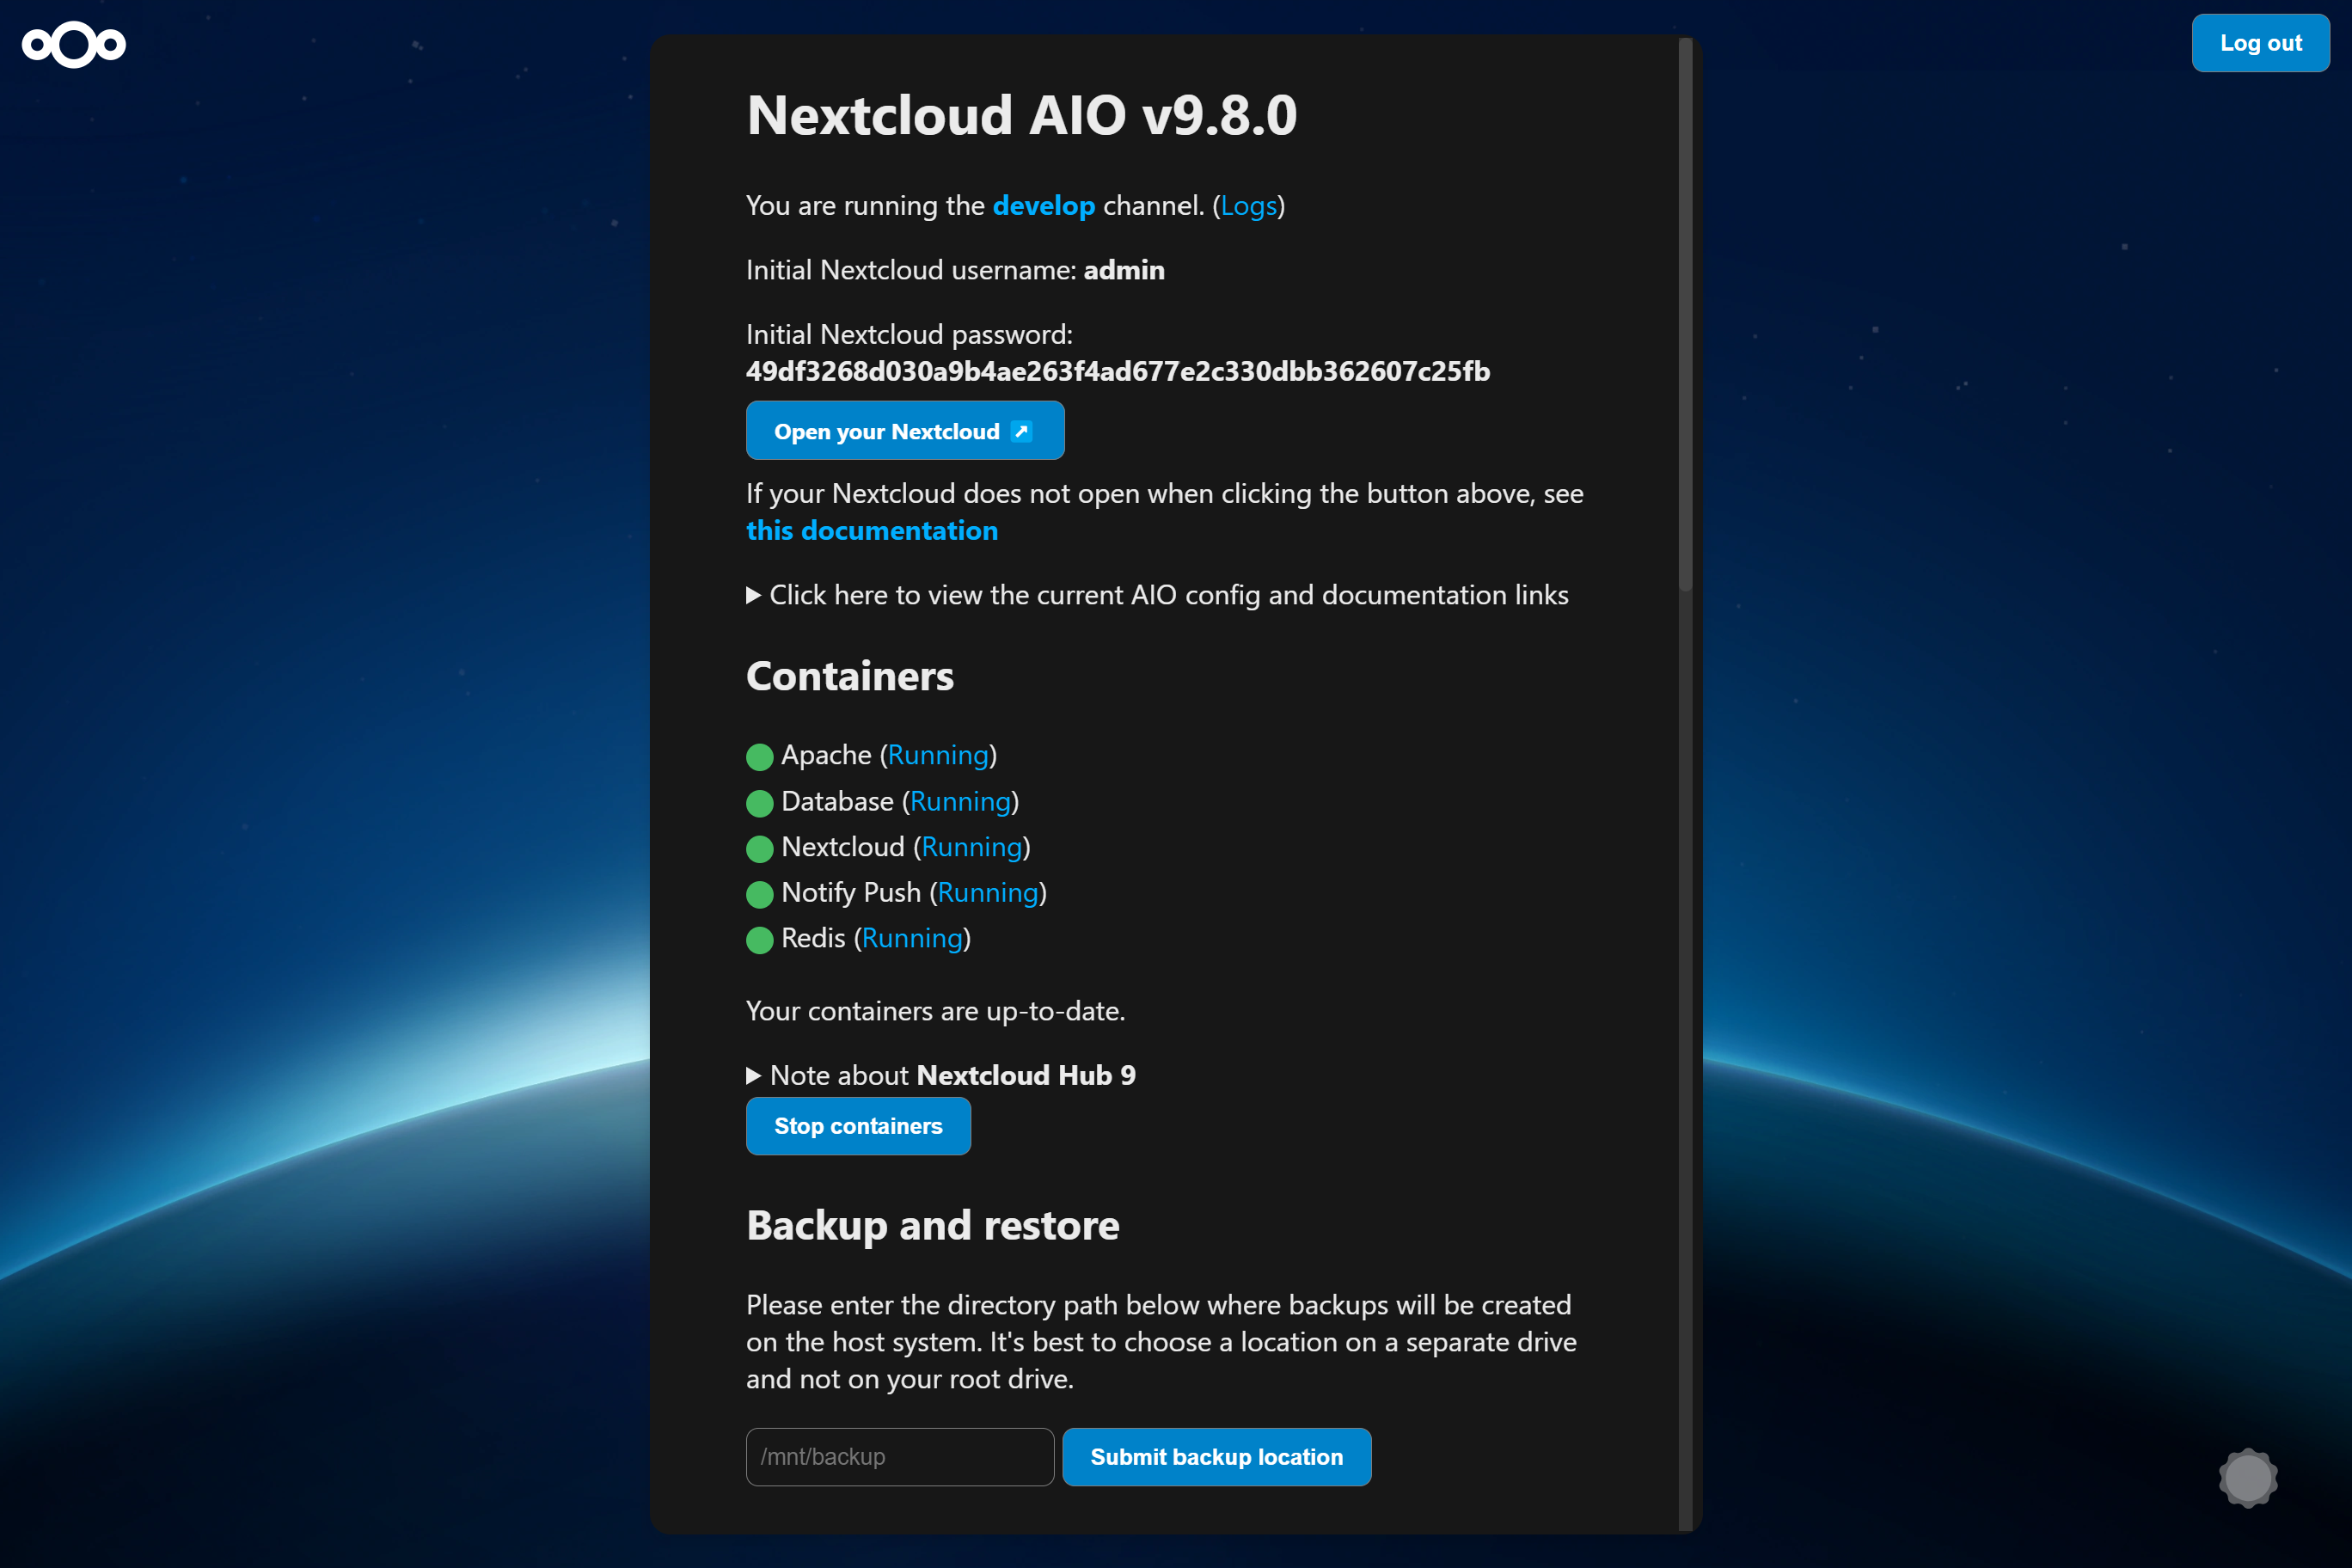
Après le démarrage initial, vous devriez être en mesure d'ouvrir l'interface NextCloud AIO maintenant sur le port 8080 de ce serveur.
Par exemple https://ip.address.of.this.server:8080
Si votre pare-feu / routeur dispose d'un port 80 et 8443 ouvert / transféré et que vous pointez un domaine sur votre serveur, vous pouvez obtenir un certificat valide automatiquement en ouvrant l'interface NextCloud AIO via:
https://your-domain-that-points-to-this-server.tld:8443
N'oubliez pas d'ouvrir le port 3478/TCP et 3478/UDP dans votre pare-feu / routeur pour le conteneur de discussion!
NextCloud AIO est inspiré par des projets comme Portainer qui gèrent le démon Docker en lui parlant directement via le socket Docker. Ce concept permet à un utilisateur d'installer un seul conteneur avec une seule commande qui fait le levage de création et de gestion de tous les conteneurs nécessaires afin de fournir une installation NextCloud avec la plupart des fonctionnalités incluses. Il rend également la mise à jour un jeu d'enfant et n'est plus lié au système hôte (et à ses mises à jour lents) car tout est dans les conteneurs. De plus, il est très facile à gérer du point de vue de l'utilisateur car une interface simple pour gérer votre installation NextCloud AIO est fournie.
Voir ce problème pour une liste des demandes de fonctionnalités qui ont besoin d'aide des contributeurs.
Oui. Veuillez vous référer à la documentation suivante à ce sujet: Reverse-Proxy.md
Vous pouvez vérifier ceci sur Linux en fonctionnant: uname -m
Seuls ceux (si vous accédez à l'interface MasterContainer en interface via le port 8080):
443/TCP pour le conteneur Apache443/UDP Si vous souhaitez activer HTTP3 pour le conteneur Apache3478/TCP et 3478/UDP pour le conteneur de discussion8080/TCP : Interface MasterContainer avec un certificat auto-signé (fonctionne toujours, si seulement l'accès via IP-Address est possible, par exemple https://ip.address.of.this.server:8080/ )80/TCP : Redirection vers NextCloud (est utilisé pour obtenir le certificat via ACME HTTP-Challenge pour le MasterContainer)8443/TCP : Interface MasterContainer avec un certificat valide (ne fonctionne que si les ports 80 et 8443 sont ouverts / transmis dans votre pare-feu / routeur et que vous pointez un domaine sur votre serveur. Il génère un certificat valide puis accédez automatiquement et accédez via par exemple https://public.domain.com:8443/ est possible.)443/TCP : sera utilisé par le conteneur Apache plus tard et doit être ouvert / transmis dans votre pare-feu / routeur443/UDP : sera utilisé par le conteneur Apache plus tard et doit être ouvert / transmis dans votre pare-feu / routeur si vous souhaitez activer HTTP33478/TCP et 3478/UDP : sera utilisé par le Turnserver à l'intérieur du conteneur de discussion et doit être ouvert / transmis dans votre pare-feu / routeur Sur macOS, il n'y a qu'une seule chose différente par rapport à Linux: au lieu d'utiliser --volume /var/run/docker.sock:/var/run/docker.sock:ro , vous devez utiliser --volume /var/run/docker.sock.raw:/var/run/docker.sock:ro pour l'exécuter après avoir installé Docker Desktop (et n'oubliez pas d'activer IPv6 si vous en avez besoin). En dehors de cela, cela devrait fonctionner et se comporter de la même manière que sur Linux.
En outre, vous pourriez être intéressé à ajuster Datadir de NextCloud pour stocker les fichiers du système hôte. Voir cette documentation sur la façon de le faire.
Sur Windows, installez Docker Desktop (et n'oubliez pas d'activer IPv6 si vous en avez besoin) et exécutez la commande suivante dans l'invite de commande:
 docker run ^
--init ^
--sig-proxy=false ^
--name nextcloud-aio-mastercontainer ^
--restart always ^
--publish 80:80 ^
--publish 8080:8080 ^
--publish 8443:8443 ^
--volume nextcloud_aio_mastercontainer:/mnt/docker-aio-config ^
--volume //var/run/docker.sock:/var/run/docker.sock:ro ^
nextcloud/all-in-one:latest
En outre, vous pourriez être intéressé à ajuster Datadir de NextCloud pour stocker les fichiers du système hôte. Voir cette documentation sur la façon de le faire.
Note
Presque toutes les commandes de la documentation de ce projet utilisent sudo docker ... Étant donné que sudo n'est pas disponible sur Windows, vous supprimez simplement sudo des commandes et qu'ils devraient fonctionner.
Sur Synology, il y a deux choses différentes par rapport à Linux: au lieu d'utiliser --volume /var/run/docker.sock:/var/run/docker.sock:ro , vous devez utiliser --volume /volume1/docker/docker.sock:/var/run/docker.sock:ro pour l'exécuter. Vous devez également ajouter --env WATCHTOWER_DOCKER_SOCKET_PATH="/volume1/docker/docker.sock" à la commande docker run du masternontainer (mais avant la dernière ligne nextcloud/all-in-one:latest ). En dehors de cela, cela devrait fonctionner et se comporter de la même manière que sur Linux. De toute évidence, la GUI Docker Synology ne fonctionnera pas avec cela, vous devrez donc soit utiliser SSH ou créer une tâche de script définie par l'utilisateur dans le planificateur de tâches comme «racine» de l'utilisateur afin d'exécuter la commande.
Note
Il est possible que la prise Docker de votre synologie soit située dans /var/run/docker.sock comme la valeur par défaut sur Linux. Ensuite, vous pouvez simplement utiliser la commande Linux sans avoir à changer quoi que ce soit - vous le remarquerez lorsque vous essayez de démarrer le conteneur et il indique que le support de liaison a échoué. EG docker: Error response from daemon: Bind mount failed: '/volume1/docker/docker.sock' does not exists.
En outre, vous pourriez être intéressé à ajuster Datadir de NextCloud pour stocker les fichiers du système hôte. Voir cette documentation sur la façon de le faire.
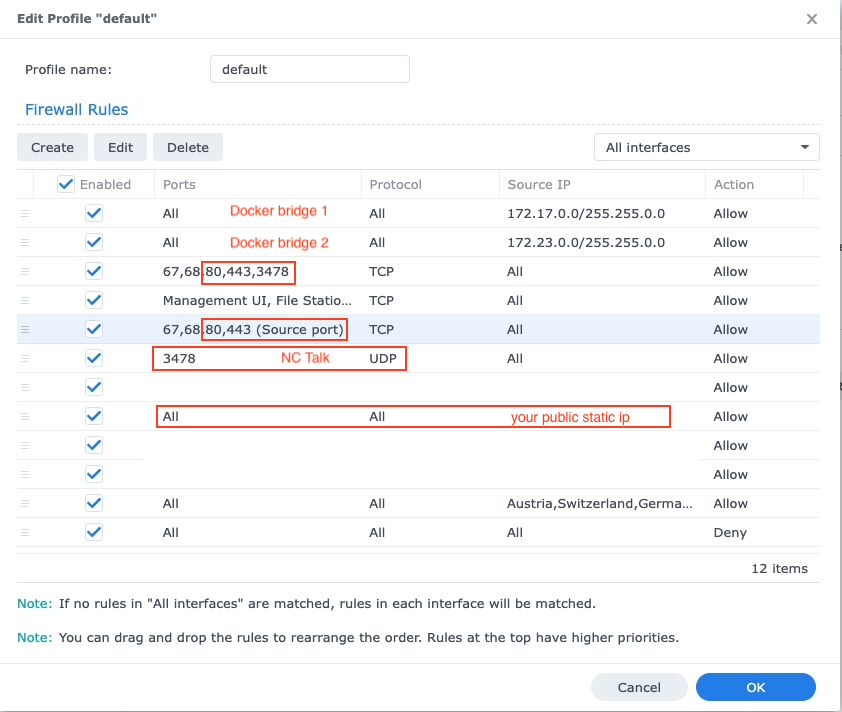
Vous devrez également ajuster le pare-feu de Synology, voir ci-dessous:
Le Synology DSM est vulnérable aux attaques avec ses ports ouverts et ses interfaces de connexion, c'est pourquoi une configuration de pare-feu est toujours recommandée. Si un pare-feu est activé, il est nécessaire d'avoir des exceptions pour les ports 80 443, le sous-réseau du pont Docker qui comprend les conteneurs NextCloud, votre IP statique publique (si vous n'utilisez pas DDNS) et le cas échéant vos ports NC-Talk 3478 TCP + UDP:
Si vous avez la configuration NAS sur votre réseau local (qui est le plus souvent le cas), vous devrez configurer le DNS Synology pour pouvoir accéder à NextCloud à partir de votre réseau via son domaine. N'oubliez pas non plus d'ajouter le nouveau DNS à votre serveur DHCP et à vos paramètres IP fixes:

Le moyen le plus simple de l'exécuter avec Portainer sur Linux est d'utiliser la fonction de piles de Portainer et d'utiliser ce fichier Docker-Compose afin de démarrer correctement AIO.
Avec la version 24.10.0 de l'échelle de Truenas (qui a été officiellement publiée le 29 octobre 2024 en tant que version stable) IX Systems a abandonné l'intégration de Kubernetes et a mis en œuvre un environnement Docker entièrement fonctionnel.
Pour un guide plus complet, consultez ce guide de @zybster: # 5506
Sur les versions de Truenas plus anciennes avec Kubernetes Environment, il existe deux façons d'exécuter AIO. Le préféré est d'exécuter AIO dans une machine virtuelle. Ceci est nécessaire car ils n'exposent pas la prise Docker pour les conteneurs sur l'hôte, vous ne pouvez pas non plus utiliser Docker-Compose dessus et il n'est pas non plus possible d'exécuter des carreaux de barre personnalisés qui ne sont pas explicitement écrits pour l'échelle de Truenas.
Un autre moyen mais non testé consiste à installer Portainer sur votre échelle Truenas à partir d'ici https://truecharts.org/charts/stable/portainer/installation-notes et ajouter le référentiel Helm-Chart https://nextcloud.github.io/all- en un / en portainer en suivant https://docs.portainer.io/user/kubernetes/helm. Plus de documents sur le graphique de la barre AIOS sont disponibles ici: https://github.com/nextcloud/all-in-one/tree/main/nextcloud-aio-helm-chart#nextcloud-aio-helm-chart.
https://yourdomain.com/settings/admin/richdocumentshttps://yourdomain.com/settings/admin/talk .Bien qu'il ne semble pas que ce soit le cas, mais du point de vue de l'AIO, un tunnel CloudFlare fonctionne comme un proxy inversé. Veuillez donc suivre la documentation de proxy inverse où est documenté comment le faire fonctionner derrière un tunnel CloudFlare. Cependant, veuillez consulter les mises en garde avant de continuer.
Pour un exemple de proxy inversé pour TailScale, voir ce guide de @flll: # 5439
/proc/user_beancounters et une limite de limite numproc faible, votre serveur se comportera probablement une fois qu'il atteindra cette limite qui est très rapidement atteinte par AIO, voyez ici.En général, les VP recommandés sont ceux qui sont KVM / non virtualisés car Docker devrait fonctionner le mieux sur eux.
Vous pouvez installer AIO en mode proxy inverse où est également documenté comment le faire fonctionner en utilisant le déficit ACME DNS pour obtenir un certificat valide pour AIO. Voir la documentation de proxy inverse. (Signifie le Caddy with ACME DNS-challenge ). Voir également https://github.com/dani-garcia/vaultwarden/wiki/running-a-private-vaultwarden-instance-with-let%27s-encrypt-certs#getting-custom-caddy-build pour des documents supplémentaires pour des documents supplémentaires de documents sur ce sujet.
Si vous ne souhaitez pas ouvrir NextCloud à Internet public, vous pouvez jeter un œil à la documentation suivante sur la façon de le configurer localement: local-stance.md, mais gardez à l'esprit que vous devez toujours faire fonctionner les HTTP .
Non et il ne sera pas ajouté. Si vous souhaitez seulement l'exécuter localement, vous pouvez jeter un œil à la documentation suivante: local-stance.md pour la configuration sans domaine traditionnel. Ou envisagez d'utiliser NextCloudPI pour l'accès IP-Address Localement (il regroupe moins de fonctionnalités que AIO).
Non. Ce n'est pas possible et ne sera pas ajouté pour plusieurs raisons: Mettre à jour les vérifications, les installations de l'application via l'application-magasin, le téléchargement d'images Docker supplémentaires à la demande et plus encore.
Non et ils ne le seront pas. Si vous souhaitez l'exécuter localement, sans ouvrir NextCloud sur Internet public, veuillez consulter la documentation d'instance locale.
Non et il ne sera pas ajouté. Cependant, vous pouvez utiliser cette fonctionnalité afin de créer plusieurs instances AIO, une pour chaque domaine.
Non et ils ne le seront pas. Veuillez utiliser un domaine dédié pour NextCloud et le configurer correctement en suivant la documentation de proxy inverse. Si le port 443 et / ou 80 est bloqué pour vous, vous pouvez utiliser le tunnel A CloudFlare si vous souhaitez le publier en ligne. Vous pouvez également utiliser l'ACME DNS-Challenge pour obtenir un certificat valide. Cependant, dans tous les cas, l'interface NextCloud vous redirigera vers le port 443.
Non et il ne sera pas ajouté. Veuillez utiliser un domaine (sous-) dédié pour NextCloud et le configurer correctement en suivant la documentation proxy inverse.
Veuillez noter que l'accès local n'est pas possible si vous exécutez AIO derrière le tunnel CloudFlare, car le proxyage TLS est dans ce cas déchargé dans l'infrastructure CloudFlares. Vous pouvez résoudre ce problème en configurant votre propre proxy inversé qui gère le proxy TLS localement et fera fonctionner les étapes ci-dessous.
Veuillez vous assurer que si vous exécutez AIO derrière un proxy inversé, le proxy inverse est configuré pour utiliser le port 443 sur le serveur qui l'exécute. Sinon, les étapes ci-dessous ne fonctionneront pas.
Maintenant que cela est à l'écart, la manière recommandée comment accéder à NextCloud localement, consiste à configurer un serveur DNS local comme un trou Pi et à configurer un record DNS personnalisé pour ce domaine qui pointe vers l'IP interne Adddress de votre serveur qui exécute NextCloud AIO. Voici quelques guides:
Si vous êtes complètement sûr que vous avez tout configuré correctement et que vous ne pouvez pas transmettre la validation du domaine, vous pouvez ignorer la validation du domaine en ajoutant --env SKIP_DOMAIN_VALIDATION=true à la commande docker run du maître (mais avant la dernière ligne nextcloud/all-in-one:latest !
Il est connu que les distros Linux qui utilisent le pare-feu comme démon de pare-feu ont des problèmes avec les réseaux Docker. Dans le cas où les conteneurs ne sont pas en mesure de communiquer entre eux, vous pouvez changer votre pare-feu pour utiliser le backend iptables en fonctionnant:
 sudo sed -i 's/FirewallBackend=nftables/FirewallBackend=iptables/g' /etc/firewalld/firewalld.conf
sudo systemctl restart firewalld docker
Ensuite, cela devrait fonctionner.
Voir https://dev.to/ozorest/fedora-32-how-to-f-solve-docker-intern-network-issue-22me pour plus de détails à ce sujet. Cette limitation est même mentionnée sur le site officiel de Firewalld: https://firewalld.org/#who-is-using-it
Oui. Si seLinux est activé, vous devrez peut-être ajouter la --security-opt label:disable l'option à la commande Docker Run du MasterContainer afin de lui permettre d'accéder au socket Docker (ou security_opt: ["label:disable"] dans Compose.yaml). Voir # 485
occ ? Exécutez simplement ce qui suit: sudo docker exec --user www-data -it nextcloud-aio-nextcloud php occ your-command . Bien sûr, your-command doit être échangée avec la commande que vous souhaitez exécuter.
Security & setup warnings displays the "missing default phone region" after initial install ? Exécutez simplement la commande suivante: sudo docker exec --user www-data nextcloud-aio-nextcloud php occ config:system:set default_phone_region --value="yourvalue" . Bien sûr, vous devez modifier yourvalue en fonction de votre emplacement. Les exemples sont DE , US et GB . Voir cette liste pour plus de codes: https://en.wikipedia.org/wiki/iso_3166-1_alpha-2#official_assigned_code_elements
Voir plusieurs instances.md pour une documentation à ce sujet.
NextCloud propose une protection Bruteforce intégrée qui peut être déclenchée et bloquera une adresse IP ou désactiver un utilisateur. Vous pouvez débloquer une adresse IP en exécutant sudo docker exec --user www-data -it nextcloud-aio-nextcloud php occ security:bruteforce:reset <ip-address> et activer un utilisateur désactivé en exécutant sudo docker exec --user www-data -it nextcloud-aio-nextcloud php occ user:enable <name of user> . Voir https://docs.nextcloud.com/server/latest/admin_manual/configuration_server/occ_command.html#security pour plus d'informations.
Ce projet valorise la stabilité sur les nouvelles fonctionnalités. Cela signifie que lorsqu'une nouvelle mise à jour majeure NextCloud sera présentée, nous attendrons au moins jusqu'à la première version du patch, par exemple 24.0.1 est disponible avant de passer à elle. Nous attendrons également avec la mise à niveau jusqu'à ce que toutes les applications importantes soient compatibles avec la nouvelle version principale. Les versions mineures ou de correctifs pour NextCloud et toutes les dépendances ainsi que tous les conteneurs seront mis à jour vers de nouvelles versions dès que possible, mais nous essayons de donner à toutes les mises à jour d'abord un bon tour de test avant de les pousser. Cela signifie que cela peut prendre environ 2 semaines avant que les nouvelles mises à jour n'atteignent le latest canal. Si vous souhaitez aider les tests, vous pouvez passer à la chaîne beta en suivant cette documentation qui vous donnera également les mises à jour plus tôt.
Vous pouvez passer à un canal différent comme par exemple le canal bêta ou de la chaîne bêta vers le dernier canal en arrêtant le MasterContainer, en le supprimant (aucune donnée ne sera perdue) et en recréant le conteneur en utilisant la même commande que vous avez utilisée initialement pour créer Le MasterContainer. Vous devez simplement modifier la dernière ligne nextcloud/all-in-one:latest à nextcloud/all-in-one:beta et vice versa.
Si nous poussons les nouveaux conteneurs vers latest , vous verrez dans l'interface AIO sous la section containers que de nouvelles mises à jour de conteneurs ont été trouvées. Dans ce cas, appuyez simplement sur Stop containers et Start and update containers afin de mettre à jour les conteneurs. Le MasterContainer a cependant sa propre procédure de mise à jour. Voir ci-dessous. Et n'oubliez pas de sauvegarder l'état actuel de votre instance en utilisant la solution de sauvegarde intégrée avant de recommencer les conteneurs! Sinon, vous ne pourrez pas restaurer votre instance facilement si quelque chose devait se casser pendant la mise à jour.
If a new mastercontainer update was found, you'll see a note below the Stop containers button that allows to show the changelog. If you click that button and the containers are stopped, you will see a new button that allows to update the mastercontainer. After doing so and after the update is gone through, you will have the option again to Start and update containers . It is recommended to create a backup before clicking the Start and update containers button.
Additionally, there is a cronjob that runs once a day that checks for container and mastercontainer updates and sends a notification to all Nextcloud admins if a new update was found.
AIO ships its own update notifications implementation. It checks if container updates are available. If so, it sends a notification with the title Container updates available! on saturdays to Nextcloud users that are part of the admin group. If the Nextcloud container image should be older than 90 days (~3 months) and thus badly outdated, AIO sends a notification to all Nextcloud users with the title AIO is outdated! . Thus admins should make sure to update the container images at least once every 3 months in order to make sure that the instance gets all security bugfixes as soon as possible.
If your Nextcloud is running and you are logged in as admin in your Nextcloud, you can easily log in to the AIO interface by opening https://yourdomain.tld/settings/admin/overview which will show a button on top that enables you to log in to the AIO interface by just clicking on this button.
Note
You can change the domain/ip-address/port of the button by simply stopping the containers, visiting the AIO interface from the correct and desired domain/ip-address/port and clicking once on Start containers .
Note
Editing the configuration.json manually and making a mistake may break your instance so please create a backup first!
If you set up a new AIO instance, you need to enter a domain. Currently there is no way to change this domain afterwards from the AIO interface. So in order to change it, you need to edit the configuration.json manually using sudo docker run -it --rm --volume nextcloud_aio_mastercontainer:/mnt/docker-aio-config:rw alpine sh -c "apk add --no-cache nano && nano /mnt/docker-aio-config/data/configuration.json" , substitute each occurrence of your old domain with your new domain and save and write out the file. Afterwards restart your containers from the AIO interface and everything should work as expected if the new domain is correctly configured.
If you are running AIO behind a web server or reverse proxy (like Apache, Nginx, Caddy, Cloudflare Tunnel and else), you need to obviously also change the domain in your reverse proxy config.
Additionally, after restarting the containers, you need to open the admin settings and update some values manually that cannot be changed automatically. Here is a list of some known places:
https://your-nc-domain.com/settings/admin/talk for Turn/Stun server and Signaling Server if you enabled Talk via the AIO interfacehttps://your-nc-domain.com/settings/admin/theming for the theming URLhttps://your-nc-domain.com/settings/admin/app_api for the deploy daemon if you enabled the App API via the AIO interfaceIf something goes unexpected routes during the initial installation, you might want to reset the AIO installation to be able to start from scratch.
Note
If you already have it running and have data on your instance, you should not follow these instructions as it will delete all data that is coupled to your AIO instance.
Here is how to reset the AIO instance properly:
sudo docker stop nextcloud-aio-mastercontainersudo docker stop nextcloud-aio-domainchecksudo docker ps --format {{.Names}} . If no nextcloud-aio containers are listed, you can proceed with the steps below. If there should be some, you will need to stop them with sudo docker stop <container_name> until no one is listed anymore.sudo docker ps --filter "status=exited"sudo docker container prunesudo docker network rm nextcloud-aiosudo docker volume ls --filter "dangling=true"sudo docker volume prune --filter all=1 (on Windows you might need to remove some volumes afterwards manually with docker volume rm nextcloud_aio_backupdir , docker volume rm nextcloud_aio_nextcloud_datadir ).NEXTCLOUD_DATADIR to a path on your host instead of the default volume, you need to clean that up as well. (Eg by simply deleting the directory).sudo docker volume ls --format {{.Name}} . If no nextcloud-aio volumes are listed, you can proceed with the steps below. If there should be some, you will need to remove them with sudo docker volume rm <volume_name> until no one is listed anymore.sudo docker image prune -a .Nextcloud AIO provides a backup solution based on BorgBackup. These backups act as a restore point in case the installation gets corrupted. By using this tool, backups are incremental, differential, compressed and encrypted – so only the first backup will take a while. Further backups should be fast as only changes are taken into account.
It is recommended to create a backup before any container update. By doing this, you will be safe regarding any possible complication during updates because you will be able to restore the whole instance with basically one click.
For local backups, the restore process should be pretty fast as rsync is used to restore the chosen backup which only transfers changed files and deletes additional ones. For remote borg backups, the whole backup archive is extracted from the remote, which depending on how clever borg extract is, may require downloading the whole archive.
If you connect an external drive to your host, and choose the backup directory to be on that drive, you are also kind of safe against drive failures of the drive where the docker volumes are stored on.
/mnt/backup ./mnt/backup .Create Backup which should create the first backup on the external disk.If you want to back up directly to a remote borg repository:
Create backup , this will create an ssh key pair and fail because the remote doesn't trust this key yet. Copy the public key shown in AIO and add it to your authorized keys on the remote. Backups can be created and restored in the AIO interface using the buttons Create Backup and Restore selected backup . Additionally, a backup check is provided that checks the integrity of your backups but it shouldn't be needed in most situations.
The backups themselves get encrypted with an encryption key that gets shown to you in the AIO interface. Please save that at a safe place as you will not be able to restore from backup without this key.
Daily backups can get enabled after the initial backup is done. Enabling this also allows to enable an option that allows to automatically update all containers, Nextcloud and its apps.
Be aware that this solution does not back up files and folders that are mounted into Nextcloud using the external storage app - but you can add further Docker volumes and host paths that you want to back up after the initial backup is done.
Backed up will get all important data of your Nextcloud AIO instance like the database, your files and configuration files of the mastercontainer and else. Files and folders that are mounted into Nextcloud using the external storage app are not getting backed up. There is currently no way to exclude the data directory because it would require hacks like running files:scan and would make the backup solution much more unreliable (since the database and your files/folders need to stay in sync). If you still don't want your datadirectory to be backed up, see https://github.com/nextcloud/all-in-one#how-to-enable-automatic-updates-without-creating-a-backup-beforehand for options (there is a hint what needs to be backed up in which order).
The built-in borg-based backup solution has by default a retention policy of --keep-within=7d --keep-weekly=4 --keep-monthly=6 . See https://borgbackup.readthedocs.io/en/stable/usage/prune.html for what these values mean. You can adjust the retention policy by providing --env BORG_RETENTION_POLICY="--keep-within=7d --keep-weekly=4 --keep-monthly=6" to the docker run command of the mastercontainer (but before the last line nextcloud/all-in-one:latest ! If it was started already, you will need to stop the mastercontainer, remove it (no data will be lost) and recreate it using the docker run command that you initially used) and customize the value to your fitting.
Backing up directly to a remote borg repository is supported. This avoids having to store a local copy of your backups, supports append-only borg keys to counter ransomware and allows using the AIO interface to manage your backups.
Some alternatives, which do not have all the above benefits:
If you are running AIO in a LXC container, you need to make sure that FUSE is enabled in the LXC container settings. Also, if using Alpine Linux as host OS, make sure to add fuse via apk add fuse . Otherwise the backup container will not be able to start as FUSE is required for it to work.
As stated in the AIO interface, it is possible to use a docker volume as backup target. Before you can use that, you need to create it first. Here is an example how to create one on Windows:
 docker volume create ^
--driver local ^
--name nextcloud_aio_backupdir ^
-o device="/host_mnt/e/your/backup/path" ^
-o type="none" ^
-o o="bind"
In this example, it would mount E:yourbackuppath into the volume so for a different location you need to adjust /host_mnt/e/your/backup/path accordingly. Afterwards enter nextcloud_aio_backupdir in the AIO interface as backup location.
You can open the BorgBackup archives on your host by following these steps:
(instructions for Ubuntu Desktop)
 # Install borgbackup on the host
sudo apt update && sudo apt install borgbackup

# In any shell where you use borg, you must first export this variable
# If you are using the default backup location /mnt/backup/borg
export BORG_REPO= ' /mnt/backup/borg '
# or if you are using a remote repository
export BORG_REPO= ' user@host:/path/to/repo '

# Mount the archives to /tmp/borg
sudo mkdir -p /tmp/borg && sudo borg mount " $BORG_REPO " /tmp/borg

# After entering your repository key successfully, you should be able to access all archives in /tmp/borg
# You can now do whatever you want by syncing them to a different place using rsync or doing other things
# E.g. you can open the file manager on that location by running:
xhost +si:localuser:root && sudo nautilus /tmp/borg

# When you are done, simply close the file manager and run the following command to unmount the backup archives:
sudo umount /tmp/borg You can delete BorgBackup archives on your host manually by following these steps:
(instructions for Debian based OS' like Ubuntu)
 # Install borgbackup on the host
sudo apt update && sudo apt install borgbackup

# In any shell where you use borg, you must first export this variable
# If you are using the default backup location /mnt/backup/borg
export BORG_REPO= ' /mnt/backup/borg '
# or if you are using a remote repository
export BORG_REPO= ' user@host:/path/to/repo '

# List all archives (if you are using the default backup location /mnt/backup/borg)
sudo borg list

# After entering your repository key successfully, you should now see a list of all backup archives
# An example backup archive might be called 20220223_174237-nextcloud-aio
# Then you can simply delete the archive with:
sudo borg delete --stats --progress " ::20220223_174237-nextcloud-aio "

# If borg 1.2.0 or higher is installed, you then need to run borg compact in order to clean up the freed space
sudo borg --version
# If version number of the command above is higher than 1.2.0 you need to run the command below:
sudo borg compact
After doing so, make sure to update the backup archives list in the AIO interface!
You can do so by clicking on the Check backup integrity button or Create backup button.
For increased backup security, you might consider syncing the local backup repository regularly to another drive.
To do that, first add the drive to /etc/fstab so that it is able to get automatically mounted and then create a script that does all the things automatically. Here is an example for such a script:
 #! /bin/bash

# Please modify all variables below to your needings:
SOURCE_DIRECTORY= " /mnt/backup/borg "
DRIVE_MOUNTPOINT= " /mnt/backup-drive "
TARGET_DIRECTORY= " /mnt/backup-drive/borg "

# #######################################
# Please do NOT modify anything below! #
# #######################################

if [ " $EUID " -ne 0 ] ; then
    echo " Please run as root "
    exit 1
fi

if ! [ -d " $SOURCE_DIRECTORY " ] ; then
    echo " The source directory does not exist. "
    exit 1
fi

if [ -z " $( ls -A " $SOURCE_DIRECTORY / " ) " ] ; then
    echo " The source directory is empty which is not allowed. "
    exit 1
fi

if ! [ -d " $DRIVE_MOUNTPOINT " ] ; then
    echo " The drive mountpoint must be an existing directory "
    exit 1
fi

if ! grep -q " $DRIVE_MOUNTPOINT " /etc/fstab ; then
    echo " Could not find the drive mountpoint in the fstab file. Did you add it there? "
    exit 1
fi

if ! mountpoint -q " $DRIVE_MOUNTPOINT " ; then
    mount " $DRIVE_MOUNTPOINT "
    if ! mountpoint -q " $DRIVE_MOUNTPOINT " ; then
        echo " Could not mount the drive. Is it connected? "
        exit 1
    fi
fi

if [ -f " $SOURCE_DIRECTORY /lock.roster " ] ; then
    echo " Cannot run the script as the backup archive is currently changed. Please try again later. "
    exit 1
fi

mkdir -p " $TARGET_DIRECTORY "
if ! [ -d " $TARGET_DIRECTORY " ] ; then
    echo " Could not create target directory "
    exit 1
fi

if [ -f " $SOURCE_DIRECTORY /aio-lockfile " ] ; then
    echo " Not continuing because aio-lockfile already exists. "
    exit 1
fi

touch " $SOURCE_DIRECTORY /aio-lockfile "

if ! rsync --stats --archive --human-readable --delete " $SOURCE_DIRECTORY / " " $TARGET_DIRECTORY " ; then
    echo " Failed to sync the backup repository to the target directory. "
    exit 1
fi

rm " $SOURCE_DIRECTORY /aio-lockfile "
rm " $TARGET_DIRECTORY /aio-lockfile "

umount " $DRIVE_MOUNTPOINT "

if docker ps --format " {{.Names}} " | grep " ^nextcloud-aio-nextcloud$ " ; then
    docker exec -it nextcloud-aio-nextcloud bash /notify.sh " Rsync backup successful! " " Synced the backup repository successfully. "
else
    echo " Synced the backup repository successfully. "
fi
You can simply copy and paste the script into a file eg named backup-script.sh eg here: /root/backup-script.sh . Do not forget to modify the variables to your requirements!
Afterwards apply the correct permissions with sudo chown root:root /root/backup-script.sh and sudo chmod 700 /root/backup-script.sh . Then you can create a cronjob that runs eg at 20:00 each week on Sundays like this:
sudo crontab -u root -e (and choose your editor of choice if not already done. I'd recommend nano).0 20 * * 7 /root/backup-script.sh which will run the script at 20:00 on Sundays each week.Ctrl + o -> Enter and close the editor with Ctrl + x ).Avertissement
The below script will only work after the initial setup of AIO. So you will always need to first visit the AIO interface, type in your domain and start the containers the first time or restore an older AIO instance from its borg backup before you can use the script.
You can do so by running the /daily-backup.sh script that is stored in the mastercontainer. It accepts the following environment variables:
AUTOMATIC_UPDATES if set to 1 , it will automatically stop the containers, update them and start them including the mastercontainer. If the mastercontainer gets updated, this script's execution will stop as soon as the mastercontainer gets stopped. You can then wait until it is started again and run the script with this flag again in order to update all containers correctly afterwards.DAILY_BACKUP if set to 1 , it will automatically stop the containers and create a backup. If you want to start them again afterwards, you may have a look at the START_CONTAINERS option.START_CONTAINERS if set to 1 , it will automatically start the containers without updating them.STOP_CONTAINERS if set to 1 , it will automatically stop the containers.CHECK_BACKUP if set to 1 , it will start the backup check. This is not allowed to be enabled at the same time like DAILY_BACKUP . Please be aware that this option is non-blocking which means that the backup check is not done when the process is finished since it only start the borgbackup container with the correct configuration. One example for this would be sudo docker exec -it --env DAILY_BACKUP=1 nextcloud-aio-mastercontainer /daily-backup.sh , which you can run via a cronjob or put it in a script.
Note
None of the option returns error codes. So you need to check for the correct result yourself.
If you already have a backup solution in place, you may want to hide the backup section. You can do so by adding --env AIO_DISABLE_BACKUP_SECTION=true to the docker run command of the mastercontainer (but before the last line nextcloud/all-in-one:latest ! If it was started already, you will need to stop the mastercontainer, remove it (no data will be lost) and recreate it using the docker run command that you initially used).
Avertissement
Do not set or adjust this value after the initial Nextcloud installation is done! If you still want to do it afterwards, see this on how to do it.
You can configure the Nextcloud container to use a specific directory on your host as data directory. You can do so by adding the environmental variable NEXTCLOUD_DATADIR to the docker run command of the mastercontainer (but before the last line nextcloud/all-in-one:latest ! If it was started already, you will need to stop the mastercontainer, remove it (no data will be lost) and recreate it using the docker run command that you initially used). Allowed values for that variable are strings that start with / and are not equal to / . The chosen directory or volume will then be mounted to /mnt/ncdata inside the container.
--env NEXTCLOUD_DATADIR="/mnt/ncdata" ./mnt/ncdata , make sure to choose a subfolder like eg /mnt/ncdata/nextcloud as datadir, since the root folder is not suited as datadir in that case . See #2696.--env NEXTCLOUD_DATADIR="/var/nextcloud-data"--env NEXTCLOUD_DATADIR="/volume1/docker/nextcloud/data" .--env NEXTCLOUD_DATADIR="/run/desktop/mnt/host/c/ncdata" . (This path is equivalent to C:ncdata on your Windows host so you need to translate the path accordingly. Hint: the path that you enter needs to start with /run/desktop/mnt/host/ . Append to that the exact location on your windows host, eg c/ncdata which is equivalent to C:ncdata .)--env NEXTCLOUD_DATADIR="nextcloud_aio_nextcloud_datadir" . This volume needs to be created beforehand manually by you in order to be able to use it. eg on Windows with: docker volume create ^
--driver local ^
--name nextcloud_aio_nextcloud_datadir ^
-o device="/host_mnt/e/your/data/path" ^
-o type="none" ^
-o o="bind"
E:yourdatapath into the volume so for a different location you need to adjust /host_mnt/e/your/data/path accordingly. Bien sûr. Add this to the /etc/fstab file on the host system:
<your-storage-host-and-subpath> <your-mount-dir> cifs rw,mfsymlinks,seal,credentials=<your-credentials-file>,uid=33,gid=0,file_mode=0770,dir_mode=0770 0 0
(Of course you need to modify <your-storage-host-and-subpath> , <your-mount-dir> and <your-credentials-file> for your specific case.)
One example could look like this:
//your-storage-host/subpath /mnt/storagebox cifs rw,mfsymlinks,seal,credentials=/etc/storage-credentials,uid=33,gid=0,file_mode=0770,dir_mode=0770 0 0
and add into /etc/storage-credentials :
 username=<smb/cifs username>
password=<password>
(Of course you need to modify <smb/cifs username> and <password> for your specific case.)
Now you can use /mnt/storagebox as Nextcloud's datadir like described in the section above this one.
By default, the Nextcloud container is confined and cannot access directories on the host OS. You might want to change this when you are planning to use local external storage in Nextcloud to store some files outside the data directory and can do so by adding the environmental variable NEXTCLOUD_MOUNT to the docker run command of the mastercontainer (but before the last line nextcloud/all-in-one:latest ! If it was started already, you will need to stop the mastercontainer, remove it (no data will be lost) and recreate it using the docker run command that you initially used). Allowed values for that variable are strings that start with / and are not equal to / .
--env NEXTCLOUD_MOUNT="/mnt/" and --env NEXTCLOUD_MOUNT="/media/" .--env NEXTCLOUD_MOUNT="/Volumes/your_drive/"--env NEXTCLOUD_MOUNT="/volume1/" .--env NEXTCLOUD_MOUNT="/run/desktop/mnt/host/d/your-folder/" . (This path is equivalent to D:your-folder on your Windows host so you need to translate the path accordingly. Hint: the path that you enter needs to start with /run/desktop/mnt/host/ . Append to that the exact location on your windows host, eg d/your-folder/ which is equivalent to D:your-folder .) After using this option, please make sure to apply the correct permissions to the directories that you want to use in Nextcloud. Eg sudo chown -R 33:0 /mnt/your-drive-mountpoint and sudo chmod -R 750 /mnt/your-drive-mountpoint should make it work on Linux when you have used --env NEXTCLOUD_MOUNT="/mnt/" . On Windows you could do this eg with docker exec -it nextcloud-aio-nextcloud chown -R 33:0 /run/desktop/mnt/host/d/your-folder/ and docker exec -it nextcloud-aio-nextcloud chmod -R 750 /run/desktop/mnt/host/d/your-folder/ .
You can then navigate to https://your-nc-domain.com/settings/apps/disabled , activate the external storage app, navigate to https://your-nc-domain.com/settings/admin/externalstorages and add a local external storage directory that will be accessible inside the container at the same place that you've entered. Eg /mnt/your-drive-mountpoint will be mounted to /mnt/your-drive-mountpoint inside the container, etc.
Be aware though that these locations will not be covered by the built-in backup solution - but you can add further Docker volumes and host paths that you want to back up after the initial backup is done.
Note
If you can't see the type "local storage" in the external storage admin options, a restart of the containers from the AIO interface may be required.
By default will the talk container use port 3478/UDP and 3478/TCP for connections. You can adjust the port by adding eg --env TALK_PORT=3478 to the docker run command of the mastercontainer (but before the last line nextcloud/all-in-one:latest ! If it was started already, you will need to stop the mastercontainer, remove it (no data will be lost) and recreate it using the docker run command that you initially used) and adjusting the port to your desired value. Best is to use a port over 1024, so eg 3479 to not run into this: #2517
By default, public uploads to Nextcloud are limited to a max of 10G (logged in users can upload much bigger files using the webinterface or the mobile/desktop clients, since chunking is used in that case). You can adjust the upload limit by providing --env NEXTCLOUD_UPLOAD_LIMIT=10G to the docker run command of the mastercontainer (but before the last line nextcloud/all-in-one:latest ! If it was started already, you will need to stop the mastercontainer, remove it (no data will be lost) and recreate it using the docker run command that you initially used) and customize the value to your fitting. It must start with a number and end with G eg 10G .
By default, uploads to Nextcloud are limited to a max of 3600s. You can adjust the upload time limit by providing --env NEXTCLOUD_MAX_TIME=3600 to the docker run command of the mastercontainer (but before the last line nextcloud/all-in-one:latest ! If it was started already, you will need to stop the mastercontainer, remove it (no data will be lost) and recreate it using the docker run command that you initially used) and customize the value to your fitting. It must be a number eg 3600 .
By default, each PHP process in the Nextcloud container is limited to a max of 512 MB. You can adjust the memory limit by providing --env NEXTCLOUD_MEMORY_LIMIT=512M to the docker run command of the mastercontainer (but before the last line nextcloud/all-in-one:latest ! If it was started already, you will need to stop the mastercontainer, remove it (no data will be lost) and recreate it using the docker run command that you initially used) and customize the value to your fitting. It must start with a number and end with M eg 1024M .
If you get an error during the domain validation which states that your ip-address is an internal or reserved ip-address, you can fix this by first making sure that your domain indeed has the correct public ip-address that points to the server and then adding --add-host yourdomain.com:<public-ip-address> to the docker run command of the mastercontainer (but before the last line nextcloud/all-in-one:latest ! If it was started already, you will need to stop the mastercontainer, remove it (no data will be lost) and recreate it using the docker run command that you initially used) which will allow the domain validation to work correctly. And so that you know: even if the A record of your domain should change over time, this is no problem since the mastercontainer will not make any attempt to access the chosen domain after the initial domain validation.
Oui. For that to work, you need to use and follow the manual-install documentation.
Oui. For that to work, you need to use and follow the helm-chart documentation.
You can run AIO also with docker rootless. How to do this is documented here: docker-rootless.md
Since Podman is not 100% compatible with the Docker API, Podman is not supported (since that would add yet another platform where the maintainer would need to test on). However you can use and follow the manual-install documentation to get AIO's containers running with Podman or use Docker rootless, as described in the above section. Also there is this now: #3487
You might want to adjust the Nextcloud apps that are installed upon the first startup of the Nextcloud container. You can do so by adding --env NEXTCLOUD_STARTUP_APPS="deck twofactor_totp tasks calendar contacts notes" to the docker run command of the mastercontainer (but before the last line nextcloud/all-in-one:latest ! If it was started already, you will need to stop the mastercontainer, remove it (no data will be lost) and recreate it using the docker run command that you initially used) and customize the value to your fitting. It must be a string with small letters az, 0-9, spaces and hyphens or '_'. You can disable shipped and by default enabled apps by adding a hyphen in front of the appid. Eg -contactsinteraction .
Some Nextcloud apps require additional external dependencies that must be bundled within Nextcloud container in order to work correctly. As we cannot put each and every dependency for all apps into the container - as this would make the project quickly unmaintainable - there is an official way in which you can add additional dependencies into the Nextcloud container. However note that doing this is disrecommended since we do not test Nextcloud apps that require external dependencies.
You can do so by adding --env NEXTCLOUD_ADDITIONAL_APKS="imagemagick dependency2 dependency3" to the docker run command of the mastercontainer (but before the last line nextcloud/all-in-one:latest ! If it was started already, you will need to stop the mastercontainer, remove it (no data will be lost) and recreate it using the docker run command that you initially used) and customize the value to your fitting. It must be a string with small letters az, digits 0-9, spaces, dots and hyphens or '_'. You can find available packages here: https://pkgs.alpinelinux.org/packages?branch=v3.20. By default imagemagick is added. If you want to keep it, you need to specify it as well.
Some Nextcloud apps require additional php extensions that must be bundled within Nextcloud container in order to work correctly. As we cannot put each and every dependency for all apps into the container - as this would make the project quickly unmaintainable - there is an official way in which you can add additional php extensions into the Nextcloud container. However note that doing this is disrecommended since we do not test Nextcloud apps that require additional php extensions.
You can do so by adding --env NEXTCLOUD_ADDITIONAL_PHP_EXTENSIONS="imagick extension1 extension2" to the docker run command of the mastercontainer (but before the last line nextcloud/all-in-one:latest ! If it was started already, you will need to stop the mastercontainer, remove it (no data will be lost) and recreate it using the docker run command that you initially used) and customize the value to your fitting. It must be a string with small letters az, digits 0-9, spaces, dots and hyphens or '_'. You can find available extensions here: https://pecl.php.net/packages.php. By default imagick is added. If you want to keep it, you need to specify it as well.
The facerecognition app requires the pdlib PHP extension to be installed. Unfortunately, it is not available on PECL nor via PHP core, so there is no way to add this into AIO currently. However you can use this community container in order to run facerecognition.
Avertissement
This only works if the /dev/dri device is present on the host! If it does not exists on your host, don't proceed as otherwise the Nextcloud container will fail to start! If you are unsure about this, better do not proceed with the instructions below.
The memories app allows to enable hardware transcoding for videos. In order to use that, you need to add --env NEXTCLOUD_ENABLE_DRI_DEVICE=true to the docker run command of the mastercontainer (but before the last line nextcloud/all-in-one:latest ! If it was started already, you will need to stop the mastercontainer, remove it (no data will be lost) and recreate it using the docker run command that you initially used) which will mount the /dev/dri device into the container. There is now a community container which allows to easily add the transcoding container of Memories to AIO: https://github.com/nextcloud/all-in-one/tree/main/community-containers/memories
In certain situations you might want to keep Nextcloud apps that are disabled in the AIO interface and not uninstall them if they should be installed in Nextcloud. You can do so by adding --env NEXTCLOUD_KEEP_DISABLED_APPS=true to the docker run command of the mastercontainer (but before the last line nextcloud/all-in-one:latest ! If it was started already, you will need to stop the mastercontainer, remove it (no data will be lost) and recreate it using the docker run command that you initially used).
Avertissement
Doing this might cause unintended problems in Nextcloud if an app that requires an external dependency is still installed but the external dependency not for example.
If you should run into issues with huge docker logs, you can adjust the log size by following https://docs.docker.com/config/containers/logging/local/#usage. However for the included AIO containers, this should usually not be needed because almost all of them have the log level set to warn so they should not produce many logs.
The files and folders that you add to Nextcloud are by default stored in the following docker directory: nextcloud_aio_nextcloud:/mnt/ncdata/ (usually /var/lib/docker/volumes/nextcloud_aio_nextcloud_data/_data/ on linux host systems). If needed, you can modify/add/delete files/folders there but ATTENTION : be very careful when doing so because you might corrupt your AIO installation! Best is to create a backup using the built-in backup solution before editing/changing files/folders in there because you will then be able to restore your instance to the backed up state.
After you are done modifying/adding/deleting files/folders, don't forget to apply the correct permissions by running: sudo docker exec nextcloud-aio-nextcloud chown -R 33:0 /mnt/ncdata/ and sudo docker exec nextcloud-aio-nextcloud chmod -R 750 /mnt/ncdata/ and rescan the files with sudo docker exec --user www-data -it nextcloud-aio-nextcloud php occ files:scan --all .
You can move the whole docker library and all its files including all Nextcloud AIO files and folders to a separate drive by first mounting the drive in the host OS (NTFS is not supported and ext4 is recommended as FS) and then following this tutorial: https://www.guguweb.com/2019/02/07/how-to-move-docker-data-directory-to-another-location-on-ubuntu/
(Of course docker needs to be installed first for this to work.)
docker rm nextcloud-aio-collabora ) AND the Collabora image ( docker image rm nextcloud/aio-collabora ).docker system prune ) (no data will be lost).This should solve the problem.
You can edit Nextclouds config.php file directly from the host with your favorite text editor. Eg like this: sudo docker run -it --rm --volume nextcloud_aio_nextcloud:/var/www/html:rw alpine sh -c "apk add --no-cache nano && nano /var/www/html/config/config.php" . Make sure to not break the file though which might corrupt your Nextcloud instance otherwise. In best case, create a backup using the built-in backup solution before editing the file.
All users see a set of default files and folders as dictated by Nextcloud's configuration. To change these default files and folders a custom skeleton directory must first be created; this can be accomplished by copying your skeleton files sudo docker cp --follow-link /path/to/nextcloud/skeleton/ nextcloud-aio-nextcloud:/mnt/ncdata/skeleton/ , applying the correct permissions with sudo docker exec nextcloud-aio-nextcloud chown -R 33:0 /mnt/ncdata/skeleton/ and sudo docker exec nextcloud-aio-nextcloud chmod -R 750 /mnt/ncdata/skeleton/ and setting the skeleton directory option with sudo docker exec --user www-data -it nextcloud-aio-nextcloud php occ config:system:set skeletondirectory --value="/mnt/ncdata/skeleton" . Further information is available in the Nextcloud documentation on configuration parameters for the skeleton directory.
You can configure your server to block certain ip-addresses using fail2ban as bruteforce protection. Here is how to set it up: https://docs.nextcloud.com/server/stable/admin_manual/installation/harden_server.html#setup-fail2ban. The logpath of AIO is by default /var/lib/docker/volumes/nextcloud_aio_nextcloud/_data/data/nextcloud.log . Do not forget to add chain=DOCKER-USER to your nextcloud jail config ( nextcloud.local ) otherwise the nextcloud service running on docker will still be accessible even if the IP is banned. Also, you may change the blocked ports to cover all AIO ports: by default 80,443,8080,8443,3478 (see this). Apart from that there is now a community container that can be added to the AIO stack: https://github.com/nextcloud/all-in-one/tree/main/community-containers/fail2ban
It is possible to connect to an existing LDAP server. You need to make sure that the LDAP server is reachable from the Nextcloud container. Then you can enable the LDAP app and configure LDAP in Nextcloud manually. If you don't have a LDAP server yet, recommended is to use this docker container: https://hub.docker.com/r/nitnelave/lldap. Make sure here as well that Nextcloud can talk to the LDAP server. The easiest way is by adding the LDAP docker container to the docker network nextcloud-aio . Then you can connect to the LDAP container by its name from the Nextcloud container. There is now a community container which allows to easily add LLDAP to AIO: https://github.com/nextcloud/all-in-one/tree/main/community-containers/lldap
Netdata allows you to monitor your server using a GUI. You can install it by following https://learn.netdata.cloud/docs/agent/packaging/docker#create-a-new-netdata-agent-container. Apart from that there is now a way for the community to add containers: #392 (comment)
If you want to use the user_sql app, the easiest way is to create an additional database container and add it to the docker network nextcloud-aio . Then the Nextcloud container should be able to talk to the database container using its name.
It is possible to install any of these to get a GUI for your AIO database. The pgAdmin container is recommended. You can get some docs on it here: https://www.pgadmin.org/docs/pgadmin4/latest/container_deployment.html. For the container to connect to the aio-database, you need to connect the container to the docker network nextcloud-aio and use nextcloud-aio-database as database host, oc_nextcloud as database username and the password that you get when running sudo docker exec nextcloud-aio-nextcloud grep dbpassword config/config.php as the password. Apart from that there is now a way for the community to add containers: #3061 (comment)
You can configure one yourself by using either of these four recommended projects: Docker Mailserver, Mailu, Maddy Mail Server, Mailcow or Stalwart. There is now a community container which allows to easily add Stalwart Mail server to AIO: https://github.com/nextcloud/all-in-one/tree/main/community-containers/stalwart
Please see the following documentation on this: migration.md
For integrating new containers, they must pass specific requirements for being considered to get integrated in AIO itself. Even if not considered, we may add some documentation on it. Also there is this now: https://github.com/nextcloud/all-in-one/tree/main/community-containers#community-containers
Quelles sont les exigences?
For some applications it might be necessary to establish a secure connection to another host/server which is using a certificate issued by a Certification Authority that is not trusted out of the box. An example could be configuring LDAPS against a domain controller (Active Directory or Samba-based) of an organization.
You can make the Nextcloud container trust any Certification Authority by providing the environmental variable NEXTCLOUD_TRUSTED_CACERTS_DIR to the docker run command of the mastercontainer (but before the last line nextcloud/all-in-one:latest ! If it was started already, you will need to stop the mastercontainer, remove it (no data will be lost) and recreate it using the docker run command that you initially used). The value of the variables should be set to the absolute paths of the directory on the host, which contains one or more Certification Authorities certificates. You should use X.509 certificates, Base64 encoded. (Other formats may work but have not been tested!) All the certificates in the directory will be trusted.
When using docker run , the environmental variable can be set with --env NEXTCLOUD_TRUSTED_CACERTS_DIR=/path/to/my/cacerts .
In order for the value to be valid, the path should start with / and not end with / and point to an existing directory . Pointing the variable directly to a certificate file will not work and may also break things.
The Collabora container enables Seccomp by default, which is a security feature of the Linux kernel. On systems without this kernel feature enabled, you need to provide --env COLLABORA_SECCOMP_DISABLED=true to the initial docker run command in order to make it work.
If you have an external backup solution, you might want to enable automatic updates without creating a backup first. However note that doing this is disrecommended since you will not be able to easily create and restore a backup from the AIO interface anymore and you need to make sure to shut down all the containers properly before creating the backup, eg by stopping them from the AIO interface first.
But anyhow, is here a guide that helps you automate the whole procedure:
 #! /bin/bash

# Stop the containers
docker exec --env STOP_CONTAINERS=1 nextcloud-aio-mastercontainer /daily-backup.sh

# Below is optional if you run AIO in a VM which will shut down the VM afterwards
# poweroff
You can simply copy and paste the script into a file eg named shutdown-script.sh eg here: /root/shutdown-script.sh .
Afterwards apply the correct permissions with sudo chown root:root /root/shutdown-script.sh and sudo chmod 700 /root/shutdown-script.sh . Then you can create a cronjob that runs it on a schedule eg runs the script at 04:00 each day like this:
sudo crontab -u root -e (and choose your editor of choice if not already done. I'd recommend nano).0 4 * * * /root/shutdown-script.sh which will run the script at 04:00 each day.Ctrl + o and then Enter to save, and close the editor with Ctrl + x ).After that is in place, you should schedule a backup from your backup solution that creates a backup after AIO is shut down properly. Hint: If your backup runs on the same host, make sure to at least back up all docker volumes and additionally Nextcloud's datadir if it is not stored in a docker volume.
Afterwards, you can create a second script that automatically updates the containers:
 #! /bin/bash

# Run container update once
if ! docker exec --env AUTOMATIC_UPDATES=1 nextcloud-aio-mastercontainer /daily-backup.sh ; then
    while docker ps --format " {{.Names}} " | grep -q " ^nextcloud-aio-watchtower$ " ; do
        echo " Waiting for watchtower to stop "
        sleep 30
    done

    while ! docker ps --format " {{.Names}} " | grep -q " ^nextcloud-aio-mastercontainer$ " ; do
        echo " Waiting for Mastercontainer to start "
        sleep 30
    done

    # Run container update another time to make sure that all containers are updated correctly.
    docker exec --env AUTOMATIC_UPDATES=1 nextcloud-aio-mastercontainer /daily-backup.sh
fi
You can simply copy and paste the script into a file eg named automatic-updates.sh eg here: /root/automatic-updates.sh .
Afterwards apply the correct permissions with sudo chown root:root /root/automatic-updates.sh and sudo chmod 700 /root/automatic-updates.sh . Then you can create a cronjob that runs eg at 05:00 each day like this:
sudo crontab -u root -e (and choose your editor of choice if not already done. I'd recommend nano).0 5 * * * /root/automatic-updates.sh which will run the script at 05:00 each day.Ctrl + o then Enter to save, and close the editor with Ctrl + x ).By design, Caddy that runs inside the mastercontainer, which handles automatic TLS certificate generation for the AIO interface, is vulnerable to receiving DNS challenges for arbitrary hostnames from anyone on the internet. While this does not compromise your server's security, it can result in cluttered logs and rejected certificate renewal attempts due to rate limit abuse. To mitigate this issue, it is recommended to place the AIO interface behind a VPN and/or limit its public exposure.


