build your local ragstack chatbot
1.0.0
DataStax Enterprise v7、ローカル推論器、およびローカルでオープンな大規模言語モデルである Mistral を使用した検索拡張生成を使用して、独自の Enterprise Co-Pilot を構築およびデプロイするためのこのワークショップへようこそ。
このリポジトリは、機密データをファイアウォール内に保管することで、安全性とセキュリティに重点を置いています。
なぜ?
DataStax RAGStack は、DataStax Enterprise、Astra Vector DB、または Apache Cassandra をベクター ストアとして使用する実稼働対応アプリケーションでの RAG パターンの実装を容易にするための、最高のオープンソース ソフトウェアの厳選されたスタックです。
学べる内容:
? DataStax RAGStack を活用して、次のコンポーネントを実稼働環境ですぐに使用できるようにする方法:
? Ollama をローカル推論エンジンとして使用する方法
? Mistral を Q&A スタイルのチャットボット用のローカルでオープンなラージ言語モデル (LLM) として使用する方法
? Streamlit を使用して素晴らしいアプリを簡単にデプロイする方法!
プレゼンテーションのスライドはこちらからご覧いただけます
このワークショップは、次のものにアクセスできることを前提としています。
次のステップでは、リポジトリ、DataStax Enterprise、Jupyter Notebook、および Ollama を使用した Ollama 推論エンジンを準備します。
まず、このリポジトリをローカルの開発ラップトップにクローンする必要があります。
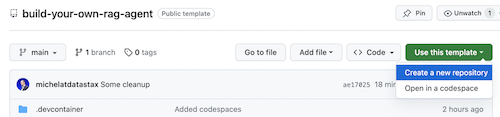
build-your-local-ragstack-chatbot リポジトリを開きます
次のようにUse this template -> Ceate new repositoryをクリックします。
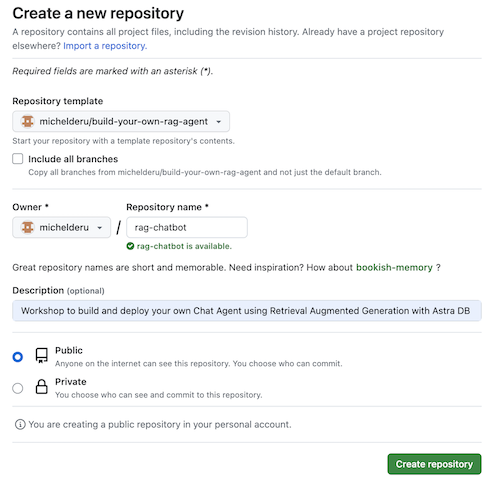
次に、github アカウントを選択し、新しいリポジトリに名前を付けます。理想的には説明も設定します。 Create repositoryをクリックします
いいね!自分の Gihub アカウントにコピーが作成されました。
cdで適切なディレクトリ (/projects など) に移動します。git clone <url-to-your-repo>cd !ロックンロールの準備は完了です! ?
仮想環境を作成すると便利です。以下を使用して設定します。
python3 -m venv myenv
次に、次のようにアクティブ化します。
 source myenv/bin/activate   # on Linux/Mac
myenvScriptsactivate.bat  # on Windows
これで、必要なパッケージのインストールを開始できます。
pip3 install -r requirements.txt
新しいターミナル ウィンドウから次の 2 つの方法のいずれかで DSE 7 を実行します。
docker-compose up
これは、このリポジトリのルートにある docker-compose.yml ファイルを使用します。これにより、Jupyter インタプリタも簡単に起動できます。
DataStax は http://localhost:9042 で実行され、Jupyter は http://localhost:8888 を参照することでアクセスできます。
推論エンジンは多数あります。優れた UI を備えた LM Studio を使用することができます。このノートブックでは、Ollama を使用します。
ollama run mistralコマンドを使用して Mistral (~4GB) をダウンロードしながら、推論エンジンを開始します。RAM の制限によりこれがすべて失敗した場合は、モデルとして tinyllama を使用することを選択できます。
このワークショップを開始するには、まず付属のノートブックのコンセプトを試してみましょう。 Jupyter Docker コンテナ内から実行することを想定していますが、そうでない場合は、ホスト名をhost.docker.internalからlocalhostに変更してください。
このノートブックでは、幻覚を起こさずに LLM インタラクションを有意義にする手段として DataStax Enterprise Vector Store を使用する手順を示します。ここで採用されるアプローチは、検索拡張生成です。
次のことを学びます:
http://localhost:8888 にアクセスし、ルートにあるBuild_Your_Own_RAG_Meetup.ipnbというノートブックを開きます。
このワークショップでは、フロントエンド Web アプリケーションを作成するための驚くほど簡単に使用できるフレームワークである Streamlit を使用します。
まず、次のようにhello worldアプリケーションを作成しましょう。
 import streamlit as st

# Draw a title and some markdown
st . markdown ( """# Your Enterprise Co-Pilot
Generative AI is considered to bring the next Industrial Revolution.
Why? Studies show a **37% efficiency boost** in day to day work activities!

### Security and safety
This Chatbot is safe to work with sensitive data. Why?
- First of all it makes use of [Ollama, a local inference engine](https://ollama.com);
- On top of the inference engine, we're running [Mistral, a local and open Large Language Model (LLM)](https://mistral.ai/);
- Also the LLM does not contain any sensitive or enterprise data, as there is no way to secure it in a LLM;
- Instead, your sensitive data is stored securely within the firewall inside [DataStax Enterprise v7 Vector Database](https://www.datastax.com/blog/get-started-with-the-datastax-enterprise-7-0-developer-vector-search-preview);
- And lastly, the chains are built on [RAGStack](https://www.datastax.com/products/ragstack), an enterprise version of Langchain and LLamaIndex, supported by [DataStax](https://www.datastax.com/).""" )
st . divider ()
最初のステップは、streamlit パッケージをインポートすることです。次に、 st.markdown呼び出してタイトルを書き込み、最後に Web ページにコンテンツを書き込みます。
このアプリケーションをローカルで開始するには、次のように streamlit 依存関係をインストールする必要があります (これは前提条件の一部としてすでに完了しているはずです)。
pip install streamlit次に、アプリを実行します。
streamlit run app_1.pyこれにより、アプリケーション サーバーが起動し、作成したばかりの Web ページが表示されます。
シンプルですね。 ?
このステップでは、ユーザーとのチャットボット対話を可能にするアプリの準備を開始します。次の Streamlit コンポーネントを使用します。 1. 2. ユーザーが質問を入力できるようにするためのst.chat_input 2. ユーザーの入力を描画するためのst.chat_message('human') 3. st.chat_message('assistant')チャットボットの応答を描画します
これにより、次のコードが生成されます。
 # Draw the chat input box
if question := st . chat_input ( "What's up?" ):

    # Draw the user's question
    with st . chat_message ( 'human' ):
        st . markdown ( question )

    # Generate the answer
    answer = f"""You asked: { question } """

    # Draw the bot's answer
    with st . chat_message ( 'assistant' ):
        st . markdown ( answer )
app_2.py を使用して試してみて、次のように開始します。
以前のアプリがまだ実行中の場合は、事前にctrl-c押してアプリを強制終了します。
streamlit run app_2.pyここで質問を入力し、別の質問をもう一度入力します。最後の質問だけが保持されていることがわかります。
なぜ???
これは、Streamlit が最新の入力に基づいて画面全体を何度も再描画するためです。質問を覚えていないので、最後のオンのみを表示します。
このステップでは、再描画のたびに履歴が表示されるように、質問と回答を確実に追跡します。
これを行うには、次の手順を実行します。
st.session_stateにmessagesという質問を追加します。st.session_stateにmessagesという答えを追加します。for message in st.session_state.messagesようなループを使用して履歴を出力します。 session_stateは Streamlit の実行全体にわたってステートフルであるため、このアプローチは機能します。
app_3.py の完全なコードを確認してください。
ご覧のとおり、辞書を使用してrole (人間または AI のいずれか) とquestionまたはanswerの両方を保存します。ブラウザーに適切な画像が描画されるため、ロールを追跡することが重要です。
次のように実行します。
streamlit run app_3.pyここで複数の質問を追加すると、Streamlit が再実行されるたびに質問が画面に再描画されることがわかります。 ?
ここでは、Jupyter Notebook を使用して行った作業にリンクし、質問を Mistral Chat Model への呼び出しと統合します。
ユーザーが操作するたびに Streamlit がコードを再実行することを覚えていますか?このため、Streamlit でデータとリソースのキャッシュを利用して、接続が 1 回だけセットアップされるようにします。 @st.cache_data()と@st.cache_resource()を使用してキャッシュを定義します。通常、 cache_dataデータ構造に使用されます。 cache_resourceは主にデータベースなどのリソースに使用されます。
これにより、プロンプトとチャット モデルを設定する次のコードが生成されます。
 # Cache prompt for future runs
@ st . cache_data ()
def load_prompt ():
    template = """You're a helpful AI assistent tasked to answer the user's questions.
You're friendly and you answer extensively with multiple sentences. You prefer to use bulletpoints to summarize.

QUESTION:
{question}

YOUR ANSWER:"""
    return ChatPromptTemplate . from_messages ([( "system" , template )])
prompt = load_prompt ()

# Cache Mistral Chat Model for future runs
@ st . cache_resource ()
def load_chat_model ():
    # parameters for ollama see: https://api.python.langchain.com/en/latest/chat_models/langchain_community.chat_models.ollama.ChatOllama.html
    # num_ctx is the context window size
    return ChatOllama (
        model = "mistral:latest" ,
        num_ctx = 18192 ,
        base_url = st . secrets [ 'OLLAMA_ENDPOINT' ]
    )
chat_model = load_chat_model ()
前の例で使用した静的な回答の代わりに、チェーンの呼び出しに切り替えます。
 # Generate the answer by calling Mistral's Chat Model
inputs = RunnableMap ({
    'question' : lambda x : x [ 'question' ]
})
chain = inputs | prompt | chat_model
response = chain . invoke ({ 'question' : question })
answer = response . content
app_4.py の完全なコードを確認してください。
続行する前に、 ./streamlit/secrets.tomlにOLLAMA_ENDPOINT指定する必要があります。 secrets.toml.exampleに例が示されています。
 # Ollama/Mistral Endpoint
OLLAMA_ENDPOINT = " http://localhost:11434 "
このアプリケーションをローカルで開始するには、LangChain の安定バージョンとすべての依存関係を含む RAGStack をインストールする必要があります (前提条件の一部としてすでに実行されている必要があります)。
pip install ragstack次に、アプリを実行します。
streamlit run app_4.pyこれで、チャットボットとの質問と回答の対話を開始できるようになりました。もちろん、DataStax Enterprise Vector Storeとの統合がないため、状況に応じた答えは得られません。まだストリーミング機能が組み込まれていないため、エージェントがすぐに完全な答えを見つけるまで少し時間をください。
質問から始めましょう:
What does Daniel Radcliffe get when he turns 18?
ご覧のとおり、CNN データで入手可能な情報を含まない、非常に一般的な答えが得られます。
さあ、本当に面白くなってきました!このステップでは、チャット・モデルにリアルタイムでコンテキストを提供するために、DataStax Enterprise Vector Storeを統合します。検索拡張生成を実装するために必要な手順:
ノートブックのおかげで挿入した CNN データを再利用します。
これを有効にするには、まず DataStax Enterprise Vector Store への接続をセットアップする必要があります。
 # Cache the DataStax Enterprise Vector Store for future runs
@ st . cache_resource ( show_spinner = 'Connecting to Datastax Enterprise v7 with Vector Support' )
def load_vector_store ():
    # Connect to DSE
    cluster = Cluster (
        [ st . secrets [ 'DSE_ENDPOINT' ]]
    )
    session = cluster . connect ()

    # Connect to the Vector Store
    vector_store = Cassandra (
        session = session ,
        embedding = HuggingFaceEmbeddings (),
        keyspace = st . secrets [ 'DSE_KEYSPACE' ],
        table_name = st . secrets [ 'DSE_TABLE' ]
    )
    return vector_store
vector_store = load_vector_store ()

# Cache the Retriever for future runs
@ st . cache_resource ( show_spinner = 'Getting retriever' )
def load_retriever ():
    # Get the retriever for the Chat Model
    retriever = vector_store . as_retriever (
        search_kwargs = { "k" : 5 }
    )
    return retriever
retriever = load_retriever ()
他に行う必要があるのは、チェーンを変更して Vector Store への呼び出しを含めることだけです。
 # Generate the answer by calling Mistral's Chat Model
inputs = RunnableMap ({
    'context' : lambda x : retriever . get_relevant_documents ( x [ 'question' ]),
    'question' : lambda x : x [ 'question' ]
})
app_5.py の完全なコードを確認してください。
続行する前に、 ./streamlit/secrets.tomlにDSE_ENDPOINT 、 DSE_KEYSPACE 、およびDSE_TABLE指定する必要があります。 secrets.toml.exampleに例が示されています。
 # DataStax Enterprise Endpoint
DSE_ENDPOINT = " localhost "
DSE_KEYSPACE = " default_keyspace "
DSE_TABLE = " dse_vector_table "
そしてアプリを実行します:
streamlit run app_5.pyもう一度質問してみましょう。
What does Daniel Radcliffe get when he turns 18?
ご覧のとおり、Vector Store が関連する CNN データをチャット モデルに提供するため、非常に状況に応じた回答が得られます。
答えが生成されるときに画面に表示されたら、どんなにすばらしいでしょう。まあ、それは簡単です。
まず、次のように、新しいトークンが生成されるたびに呼び出されるストリーミング コールバック ハンドラーを作成します。
 # Streaming call back handler for responses
class StreamHandler ( BaseCallbackHandler ):
    def __init__ ( self , container , initial_text = "" ):
        self . container = container
        self . text = initial_text

    def on_llm_new_token ( self , token : str , ** kwargs ):
        self . text += token
        self . container . markdown ( self . text + "▌" )
次に、StreamHandler をユーザーにするチャット モデルについて説明します。
response = chain . invoke ({ 'question' : question }, config = { 'callbacks' : [ StreamHandler ( response_placeholder )]})上記のコードのresponse_placeholerは、トークンを書き込む必要がある場所を定義します。次のようにst.empty()を呼び出すことで、そのスペースを作成できます。
 # UI placeholder to start filling with agent response
with st . chat_message ( 'assistant' ):
    response_placeholder = st . empty ()
app_6.py の完全なコードを確認してください。
そしてアプリを実行します:
streamlit run app_6.pyこれで、応答がブラウザ ウィンドウにリアルタイムで書き込まれることがわかります。
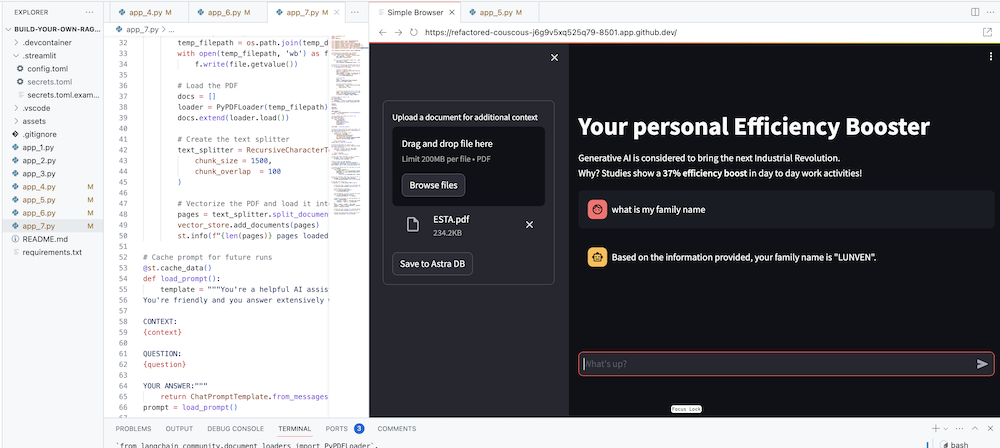
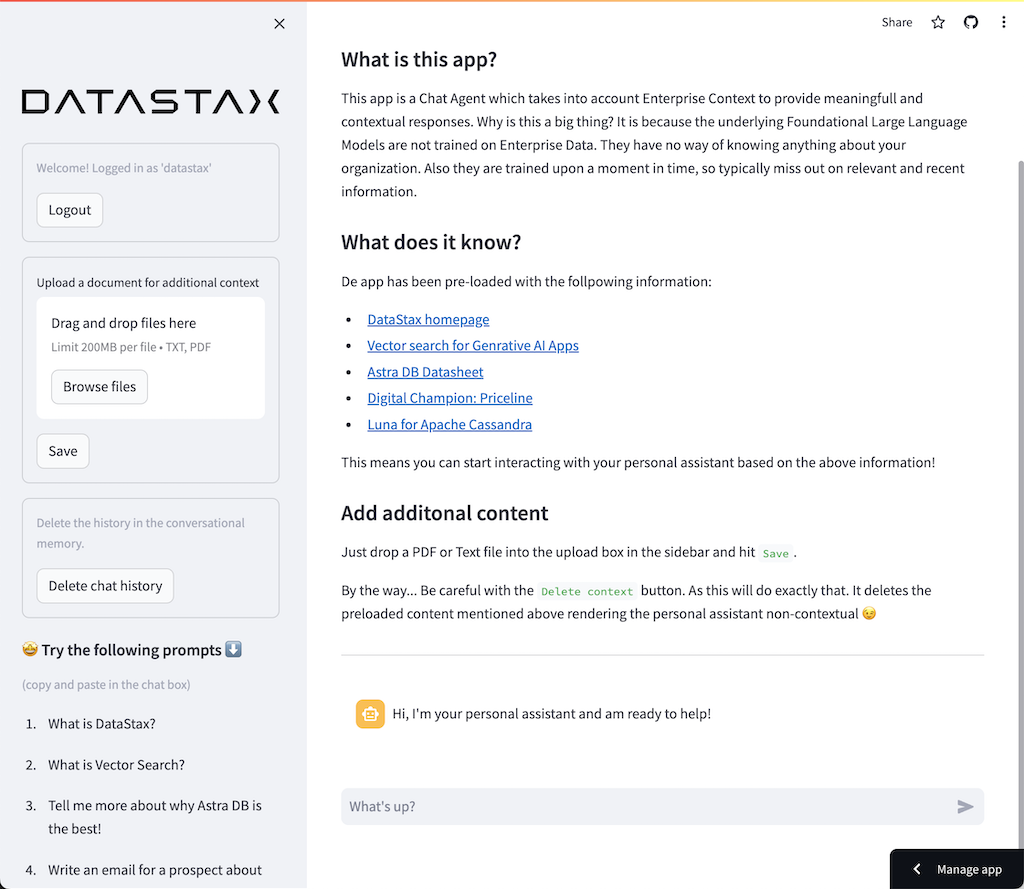
もちろん、最終的な目標は、エージェントに自社のコンテキストを追加することです。これを行うために、PDF ファイルをアップロードできるアップロード ボックスを追加します。PDF ファイルは、意味のある文脈に応じた応答を提供するために使用されます。
まず、Streamlit で簡単に作成できるアップロード フォームが必要です。
 # Include the upload form for new data to be Vectorized
with st . sidebar :
    with st . form ( 'upload' ):
        uploaded_file = st . file_uploader ( 'Upload a document for additional context' , type = [ 'pdf' ])
        submitted = st . form_submit_button ( 'Save to DataStax Enterprise' )
        if submitted :
            vectorize_text ( uploaded_file )
ここで、コンテンツをベクトル化しながら PDF をロードして DataStax Enterprise に取り込む関数が必要になります。
 # Function for Vectorizing uploaded data into DataStax Enterprise
def vectorize_text ( uploaded_file , vector_store ):
    if uploaded_file is not None :

        # Write to temporary file
        temp_dir = tempfile . TemporaryDirectory ()
        file = uploaded_file
        temp_filepath = os . path . join ( temp_dir . name , file . name )
        with open ( temp_filepath , 'wb' ) as f :
            f . write ( file . getvalue ())

        # Load the PDF
        docs = []
        loader = PyPDFLoader ( temp_filepath )
        docs . extend ( loader . load ())

        # Create the text splitter
        text_splitter = RecursiveCharacterTextSplitter (
            chunk_size = 1500 ,
            chunk_overlap  = 100
        )

        # Vectorize the PDF and load it into the DataStax Enterprise Vector Store
        pages = text_splitter . split_documents ( docs )
        vector_store . add_documents ( pages )
        st . info ( f" { len ( pages ) } pages loaded." )
app_7.py の完全なコードを確認してください。
このアプリケーションをローカルで開始するには、次のように PyPDF 依存関係をインストールする必要があります (これは前提条件の一部としてすでに完了しているはずです)。
pip install pypdfそしてアプリを実行します:
streamlit run app_7.pyここで、自分に関連する PDF ドキュメント (多ければ多いほどよい) をアップロードし、それについて質問を始めてください。答えが関連性があり、意味があり、文脈に沿ったものであることがわかります。 ?魔法が起こるのを見てください!