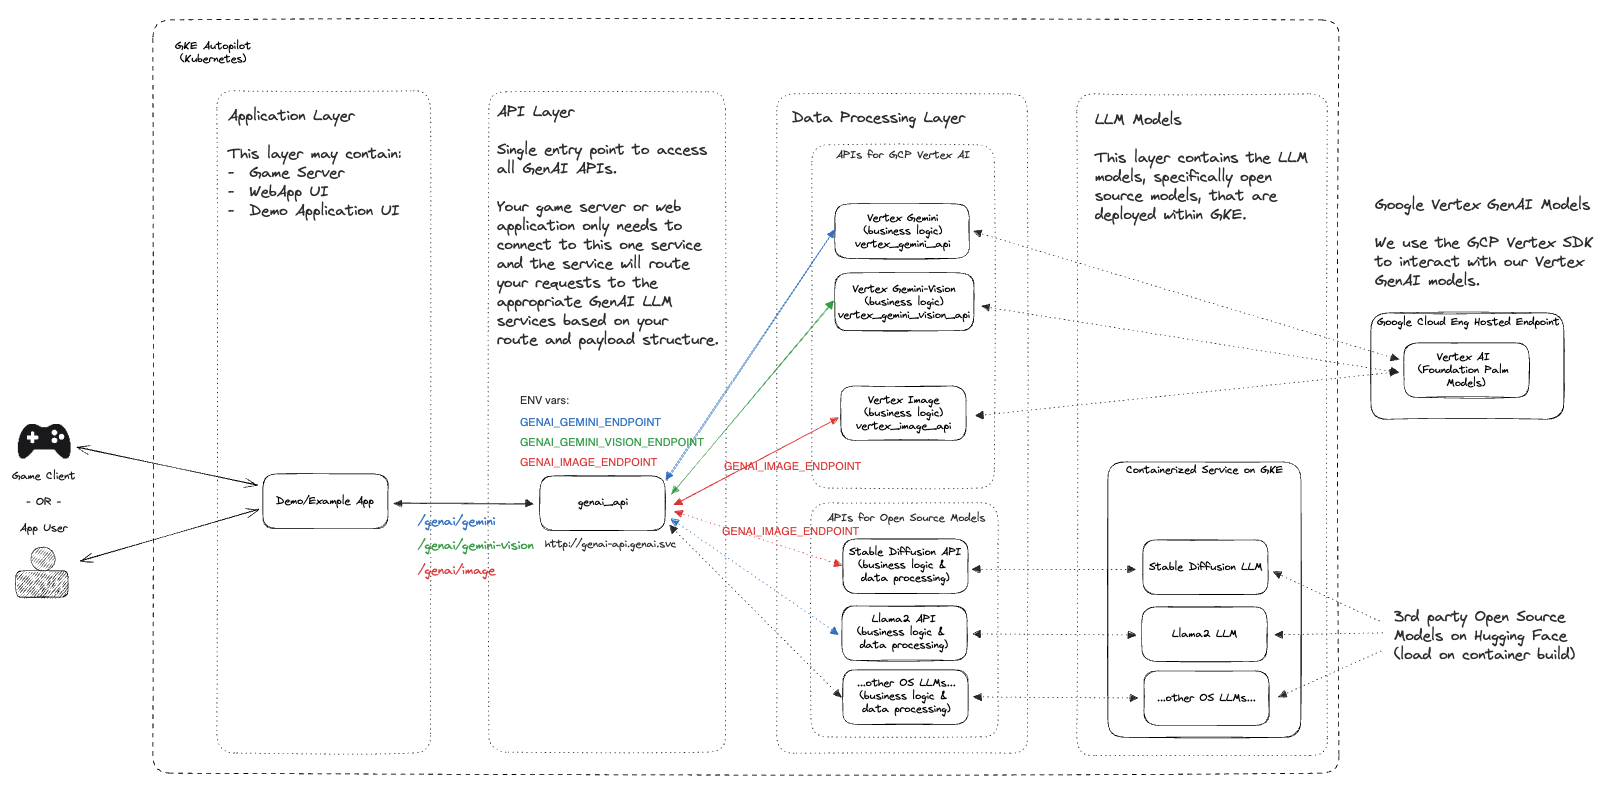
이 프로젝트는 Google Cloud 제품 및 오픈소스 게임 솔루션을 사용하여 라이브 게임 환경 내에서 GenAI 통합 및 개인화를 가속화하는 것을 목표로 하는 일련의 빠른 시작을 제공합니다.
오늘날의 게임 산업에서는 플레이어에게 개인화되고 매력적인 경험을 제공하는 것이 중요합니다. 이 프로젝트는 게임 개발자에게 GenAI 기능을 라이브 게임 환경에 통합하는 데 도움이 되는 일련의 빠른 시작 리소스를 제공합니다. Google Cloud 제품과 오픈소스 게임 솔루션을 활용하면 플레이어 참여도를 높이고 Generative AI로 새로운 사용 사례를 발굴하며 기억에 남는 게임 경험을 만들 수 있습니다.
참고: 이는 빠르게 발전하는 저장소이며 다양한 사용 사례에 맞게 조정되고 있습니다. 기여하고 싶거나 버그를 발견하고 싶다면 이슈를 공개하거나 검토를 위해 자유롭게 PR을 제출해 주세요.
이 프로젝트를 사용하고 계시다면 ★이 저장소에 별표를 표시해 관심을 보여주세요!
| 접는 사람 | 설명 |
|---|---|
| 테라폼 | Terraform 기반 인프라 배포 스크립트 |
| 예 | 사용 사례에 따라 테스트하고 배포할 수 있는 개별 빠른 시작 |
| 소스 | 빠른 시작의 일부로 사용되는 핵심 소스 코드 |

아래의 다음 단계는 GenAI Quickstart 설정 가이드를 안내합니다. 이 프로세스에서는 적절한 Google Cloud API 활성화, Terraform을 통한 리소스 생성, 프로젝트 실행에 필요한 Kubernetes 매니페스트 배포를 안내합니다.
참고: 이 단계에서는 리소스를 배포할 수 있는 IAM 권한이 있는 GCP에 이미 실행 중인 프로젝트가 있다고 가정합니다.
 git clone https://github.com/googleforgames/GenAI-quickstart.git

cd GenAI-quickstart
Google Cloud의 고유 프로젝트 ID 설정
 # To just use your current project
export PROJECT_ID=$(gcloud config list --format 'value(core.project)' 2>/dev/null)

# Otherwise set it to the project you wish to use.
Google Cloud의 기본 위치 설정
export LOCATION=us-central1
이 빠른 시작 가이드를 더 잘 따르려면 CUR_DIR 환경 변수를 설정하세요.
export CUR_DIR=$(pwd)
gcloud auth list
인증이 제대로 되었는지, PROJECT_ID 가 유효한지 확인하세요.
gcloud projects describe ${PROJECT_ID:?}
ACTIVE 상태로 나열된 PROJECT_ID 가 표시되어야 합니다.
 gcloud services enable --project ${PROJECT_ID:?}
  aiplatform.googleapis.com
  artifactregistry.googleapis.com
  cloudbuild.googleapis.com
  cloudresourcemanager.googleapis.com
  compute.googleapis.com
  container.googleapis.com
  containerfilesystem.googleapis.com
  containerregistry.googleapis.com
  iam.googleapis.com
  servicecontrol.googleapis.com
  spanner.googleapis.com
 cd ${CUR_DIR:?}/terraform

cat terraform.example.tfvars | sed -e "s:your-unique-project-id:${PROJECT_ID:?}:g" > terraform.tfvars

terraform init

terraform plan

terraform apply
클라우드 리소스 배포에는 5~10분 정도 걸릴 수 있습니다. 배포된 리소스에 대한 자세한 내용은 terraform 디렉터리의 README를 참조하세요.
Terraform을 사용하여 클라우드 리소스를 성공적으로 배포한 후 새로 생성된 GKE 클러스터 사용자 인증 정보를 가져옵니다.
gcloud container clusters get-credentials genai-quickstart --region us-central1 --project ${PROJECT_ID:?}
Kubernetes 클라이언트 자격 증명을 테스트합니다.
kubectl get nodes
genai 디렉터리로 전환하고 고유한 프로젝트 ID를 사용하는 공통 템플릿을 렌더링합니다.
 # Find all files named .template.yaml, replace `your-unique-project-id` with PROJECT_ID, and output to .yaml.
cd ${CUR_DIR:?}/genai && find common -type f -name "*.template.yaml" -exec
  bash -c "template_path={}; sed "s:your-unique-project-id:${PROJECT_ID:?}:g" < ${template_path} > ${template_path/%.template.yaml/.yaml} " ;
Skaffold를 사용하여 GenAI 워크로드 구축 및 실행
 gcloud auth configure-docker ${LOCATION:?}-docker.pkg.dev

export SKAFFOLD_DEFAULT_REPO=${LOCATION:?}-docker.pkg.dev/${PROJECT_ID:?}/repo-genai-quickstart

cd ${CUR_DIR:?}/genai

# To run all apis and models (requires a GPU node for stable-diffusion)
skaffold run --build-concurrency=0
워크로드가 배포된 후에는 대신 GPU 배포를 사용하도록 전환할 수 있습니다.
 # Scale up a 2xL4 Mixtral 8x7B Deployment:
kubectl scale -n genai deployment huggingface-tgi-mixtral-small --replicas=1

# Or scale up a 8xL4 Mixtral 8x7B Deployment:
kubectl scale -n genai deployment huggingface-tgi-mixtral-big --replicas=1

# Scale down CPU Deployment:
kubectl scale -n genai deployment huggingface-tgi-mistral-cpu --replicas=0

# Note that the `huggingface-tgi-api` Service matches all of the huggingface-tgi-*
# Deployments, so if you have multiple replicas running, it will load balance
# between them.
개별 백엔드를 별도로 실행할 수도 있습니다.
 # To run only stable-diffusion (requires a GPU node)
#skaffold run --module stable-diffusion-api-cfg,stable-diffusion-endpt-cfg

# To run only Vertex chat (Vertex AI is required)
#skaffold run --module vertex-chat-api-cfg
API에 액세스 - 여기에서 애플리케이션과 모든 API를 테스트할 수 있습니다. :)
클러스터는 내부 패스스루 Network Load Balancer(ILB)를 생성합니다. API에 액세스하려면 다음을 실행하세요.
kubectl port-forward svc/genai-api -n genai 8080:80
그런 다음 다른 창에서 다음을 실행하십시오.
 export EXT_IP=localhost:8080
echo "Browse to http://${EXT_IP}/genai_docs to try out the GenAI APIs!"
그런 다음 브라우저에서 URL로 이동합니다.
curl 사용하여 API를 테스트합니다.
 curl -X 'POST' "http://${EXT_IP}/genai/text"
  -H 'accept: application/json'
  -H 'Content-Type: application/json'
  -d '{"prompt": "Who are the founders of Google?"}'
또는 클러스터 내부의 api-caller 컨테이너를 사용하여 API를 테스트합니다.
 # See available service endpoints. The `genai` endpoint wraps them all.
kubectl get svc -ngenai

# Start `api-caller` pod interactively
kubectl run -it -ngenai --rm --restart=Never api-caller --image=${SKAFFOLD_DEFAULT_REPO}/api-caller:latest

# Examples:

# See available example scripts
root@api-caller:/app# ls
embeddings.py  genai_api.py  huggingface_tgi.py  npc_chat_api.py  stable_diffusion_api.py  vertex_chat_api.py  vertex_code_api.py  vertex_gemini_api.py  vertex_image_api.py  vertex_text_api.py

# The genai_api script works for text prompts
root@api-caller:/app# python3 genai_api.py --endpoint=http://genai-api/genai/text --prompt "Describe a wombat"
INFO:root:Status Code: 200
INFO:root:Response:    "A wombat is a marsupial native to Australia. [...]"

# To try the Smart NPC, first reset the world data:
root@api-caller:/app# python3 npc_chat_api.py --endpoint http://genai-api/genai/npc_chat/reset_world_data --empty
INFO:root:Status Code: 200
INFO:root:Response:    {"status":"ok"}

# Then you can use the interactive chat:
root@api-caller:/app# python3 npc_chat_api.py --endpoint http://genai-api/genai/npc_chat --chat
>>> hey, how are you?
<<< I am doing my best here at the distribution center. It's a tough situation, but I am staying focused on helping those in need. How about you? How are you holding up?

# You can also interact with the services underneath, e.g.: Hugging Face TGI supports an interactive chat
root@api-caller:/app# python3 huggingface_tgi.py --endpoint=http://huggingface-tgi-api:8080/v1
>>> hello!
INFO:httpx:HTTP Request: POST http://huggingface-tgi-api:8080/v1/chat/completions "HTTP/1.1 200 OK"
<<<  Hello! How can I help you today? If you have any questions or need assistance with something, feel free to ask and I'll do my best to help. If you just want to chat, we can talk about pretty much anything. What's on your mind?
genai 디렉토리에서
 cd ${CUR_DIR:?}/genai

skaffold delete
terraform 디렉토리
 cd ${CUR_DIR:?}/terraform

terraform destroy
Google Cloud Shell에서 위 프로젝트를 실행하지 않는 경우 원하는 프로젝트에 로그인하고 인증되었는지 확인하세요.
 gcloud auth application-default login

gcloud config set project ${PROJECT_ID:?}
인증 흐름을 따르세요.
전체 저장소를 그대로 복제하여 사용할 수 있습니다. 또는 대부분의 경우 이 저장소를 포크하고 사용 사례에 가장 유용하고 관련성이 높은 코드 기반을 유지하도록 선택할 수 있습니다. 기여하고 싶다면 기여 가이드에서 더 많은 정보를 찾을 수 있습니다.