 WoR 점멸 장치
Linux 시스템을 사용하여 Raspberry Pi SD 카드에 Windows 10 또는 Windows 11을 설치합니다.
2020년에는 이것이 완전히 불가능했습니다.
2021년에는 복잡한 튜토리얼을 따라야 했습니다.
이제 새로운 WoR-flasher를 사용하는 것은 매우 쉽습니다 .
RPi에서 WoR-flasher를 실행하는 가장 빠른 방법은 Raspberry Pi용 Pi-Apps 앱 스토어를 사용하는 것입니다.
Pi-Apps에서 WoR-flasher를 설치하면 여러 가지 장점이 있습니다. 시작 메뉴에 편리한 버튼이 생성되고, 한 번의 클릭으로 제거가 가능하며, 업데이트가 원활하게 처리됩니다.
git clone https://github.com/Botspot/wor-flasher
그러면 wor-flasher 라는 새 디렉터리에 스크립트가 다운로드됩니다.
종속성: 패키지를 수동으로 설치할 필요가 없습니다. 스크립트를 실행하면 다음 항목이 자동으로 설치됩니다: yad aria2 cabextract wimtools chntpw genisoimage exfat-fuse exfat-utils wget
~/wor-flasher/install-wor-gui.sh
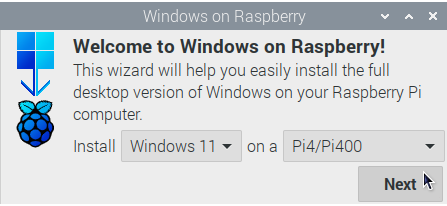


install-wor.sh 스크립트를 시작하고 실행합니다. 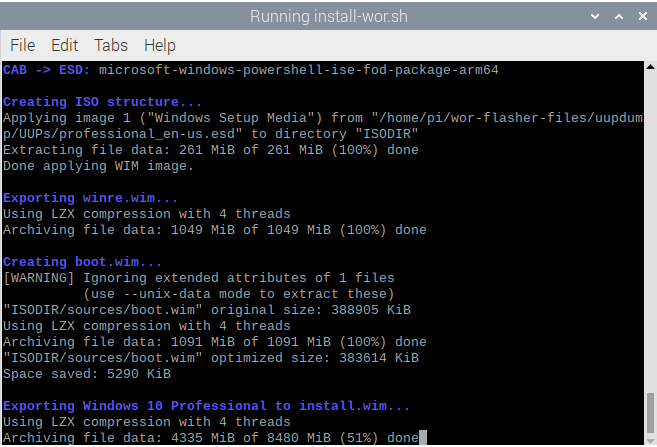
~/wor-flasher/install-wor.sh
$ ~/wor-flasher/install-wor.sh
Choose Windows version:
1) Windows 11
2) Windows 10
3) Custom...
Enter 1, 2 or 3: 1
Choose language: en-us
Choose Raspberry Pi model to deploy Windows on:
1) Raspberry Pi 4 / 400
2) Raspberry Pi 2 rev 1.2 / 3 / CM3
Enter 1 or 2: 1
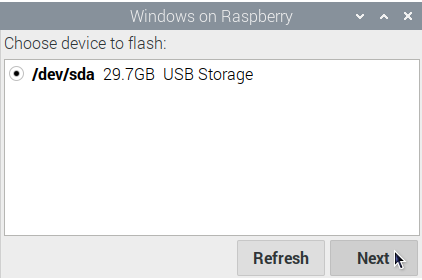
Available devices:
/dev/sdb - 59.5GB - USB Storage
Choose a device to flash the Windows setup files to: /dev/sdb
1) Create an installation drive (minimum 25 GB) capable of installing Windows to itself
2) Create a recovery drive (minimum 7 GB) to install Windows on other >16 GB drives
Choose the installation mode (1 or 2): 1
Input configuration:
DL_DIR: /home/pi/wor-flasher-files
RUN_MODE: cli
RPI_MODEL: 4
DEVICE: /dev/sdb
CAN_INSTALL_ON_SAME_DRIVE: 1
UUID: 6f7de912-4143-431b-b605-924c22ab9b1f
WIN_LANG: en-us
Formatting /dev/sdb
Generating partitions
Generating filesystems
# script output continues... It generates a Windows image legally, downloads all necessary drivers, the BIOS, the bootloader, and the modified kernel. Once done it ejects the drive.
install-wor.sh 스크립트는 다른 더 큰 bash 스크립트 내에서 사용되도록 설계되었습니다. 자동화 및 사용자 정의를 위해 install-wor.sh 특정 환경 변수를 감지하고 준수합니다.
DL_DIR : 기본 다운로드 위치를 변경하려면 이 변수를 설정합니다. 기본적으로 ~/wor-flasher-files 입니다.BID : 정확한 Windows 버전 ID를 선택하려면 이 변수를 설정하세요. 예제 값: " 22631.2861 ". 이 변수가 설정되면 install-wor.sh 사용할 Windows 버전을 사용자에게 묻지 않습니다.WIN_LANG : Windows 이미지의 언어를 선택하려면 이 변수를 설정합니다. 예시 값: " en-us ". 이 변수가 설정되면 install-wor.sh 사용자에게 사용할 언어를 묻지 않습니다.RPI_MODEL : Raspberry Pi 모델을 선택하려면 이 변수를 설정합니다. 허용되는 값: " 3 ", " 4 ". 이 변수가 설정되면 install-wor.sh 사용자에게 사용할 Raspberry Pi 모델을 묻지 않습니다.DEVICE : 이 변수를 플래시하려는 장치로 설정하십시오. 예제 값: " /dev/sda ". 이 변수가 설정되면 install-wor.sh 사용자에게 사용할 장치를 묻지 않습니다.CAN_INSTALL_ON_SAME_DRIVE : 장치가 25GB보다 크고 자체적으로 Windows를 설치하려는 경우 이 변수를 " 1 "로 설정하십시오. 그렇지 않으면 " 0 "으로 설정합니다.CONFIG_TXT : 결과 드라이브의 /boot/config.txt 를 사용자 정의하려면 이 변수를 설정합니다. 이는 일반적으로 오버클럭킹이나 HDMI 설정 변경에 사용됩니다. 이것이 기본값입니다.RUN_MODE : install-wor.sh 그래픽 오류 메시지를 표시하도록 하려면 이를 " gui "로 설정하십시오.DRY_RUN : 이 변수를 " 1 "로 설정하면 정상적으로 설정을 진행하지만 모든 항목을 다운로드한 후 종료합니다. 이렇게 하면 장치가 플래시되는 것을 방지할 수 있습니다.사용 예:
DL_DIR=/media/pi/my-big-flash-drive DEVICE=/dev/sdg DRY_RUN=1 UUID=db8ec987-d136-4421-afb8-2ef109396b00 RPI_MODEL=4 WIN_LANG=en-us ~/wor-flasher/install-wor-gui.sh
install-wor.sh 스크립트는 다른 더 큰 bash 스크립트 내에서 사용되도록 설계되었습니다. 향상된 통합을 위해 install-wor.sh 에는 install-wor-gui.sh 와 같은 프런트엔드 스크립트에서 사용할 수 있는 다양하고 유용한 기능이 탑재되어 있습니다.
함수를 사용할 수 있도록 스크립트를 소싱하려면 다음을 수행하세요.
source ~/wor-flasher/install-wor.sh source
질문: 해당 명령이 " source "를 두 번 말하는 이유는 무엇입니까? 답변: 첫 번째 " source "는 명령이고, 두 번째 " source "는 스크립트에 전달되어 소스임을 알리는 명령줄 플래그입니다. 스크립트가 소스로 제공되면 다음과 같은 새로운 명령(함수라고도 함)을 사용할 수 있습니다.
error - Botspot이 bash 스크립트에서 사용자에게 무언가 실패했음을 경고하고 실패 코드와 함께 스크립트를 종료하는 데 사용하는 간단한 기능입니다. (1) command-that-downloads-windows || error "Windows failed to download! Check your internet connection and try again."
echo_white - 원하는 메시지를 일반적인 밝은 회색 대신 흰색 텍스트로 표시하는 echo 명령에 대한 간단한 프런트엔드입니다. echo_white "Now, downloading windows... please wait"
package_available - 적절한 저장소에서 패키지를 설치할 수 있는지 확인합니다. 입력: 패키지 이름 하나 사용법: if package_available yad ;then
echo "yad can be installed"
fi
install_packages - 인용된 패키지 목록을 확인하고 설치합니다. install_packages 'yad aria2 cabextract wimtools chntpw genisoimage exfat-fuse exfat-utils wget'
download_from_gdrive - Google 드라이브에서 공개적으로 공유된 대용량 파일을 다운로드합니다. 여기에 내가 적용한 튜토리얼이 있습니다. download_from_gdrive 1WHyHFYjM4WPAAGH2PICGEhT4R5TlxlJC WoR-PE_Package.zip
get_partition - 파티션의 블록 장치를 결정하는 깔끔하고 안정적인 방법입니다. get_partition /dev/sda 2
#Assuming partition 2 exists, the above command returns "/dev/sda2"
get_partition /dev/mmcblk0 2
#Assuming partition 2 exists, the above command returns "/dev/mmcblk0p2"
get_partition /dev/mmcblk0 all
#Returns every partition within the drive, each one on a line
get_name - 지정된 스토리지 드라이브에 대해 사람이 읽을 수 있는 이름을 결정합니다. get_name /dev/sda
get_size_raw - 드라이브 크기를 바이트 단위로 결정합니다. get_size_raw /dev/sda
list_devs - 사용 가능한 스토리지 드라이브를 사람이 읽을 수 있는 색상 형식으로 나열합니다. list_devs
get_bid - Windows 10 또는 Windows 11에 대한 최신 Windows 빌드 ID를 가져옵니다.10 " 또는 " 11 " 사용법: get_bid 11
get_space_free - 폴더의 사용 가능한 디스크 공간을 가져옵니다. get_space_free ~/wor-flasher-files
get_os_name - 사람이 읽을 수 있는 운영 체제 이름을 가져옵니다. get_os_name 22631.2861
이 코드는 비대화형 방식으로 Windows 11을 /dev/sda 에 플래시하고 오버클럭 설정을 추가합니다. 코드를 복사하여 터미널에 붙여넣거나 이를 쉘 스크립트로 저장할 수 있습니다.
 # make all variables we set to be visible to the script (only necessary if you run this in a terminal)
set -a

# First, source the script so its functions are available
source ~ /wor-flasher/install-wor.sh source

# Determine the latest Windows 11 update ID using a function
BID= " $( get_bid 11 ) "

# set destination RPi model
RPI_MODEL=4

# choose language
WIN_LANG=en-us

# set the device to flash
DEVICE=/dev/sda

# set a custom config.txt
CONFIG_TXT= " over_voltage=6
arm_freq=2147
gpu_freq=750

# don't change anything below this point #
arm_64bit=1
enable_uart=1
uart_2ndstage=1
enable_gic=1
armstub=RPI_EFI.fd
disable_commandline_tags=1
disable_overscan=1
device_tree_address=0x1f0000
device_tree_end=0x200000
dtoverlay=miniuart-bt "

# indicate that drive is large enough to install Windows to itself
CAN_INSTALL_ON_SAME_DRIVE=1

~ /wor-flasher/install-wor.sh

