참고 : 라이브러리는 적극적으로 유지관리/구축되지 않습니다. 기여하고 싶다면 이슈를 열어주세요.
Simulate는 지능형 에이전트(예: 강화 학습) 또는 합성 데이터 생성을 위한 시뮬레이션 환경을 쉽게 생성하고 공유하기 위한 라이브러리입니다.
간단한 pip install simulate 사용하여 Simulate를 설치합니다(가상 환경에서 우선적으로). 참고 : vtk Python 3.8이 포함된 Apple Silicon용으로 구축되지 않았습니다. 이 경우 >3.9로 설치하십시오.
가상 환경을 생성한 다음 코드 스타일/품질 도구와 코드 베이스를 로컬에 설치합니다.
pip install --upgrade simulate
PR을 병합하기 전에 스타일을 수정하세요( isort + black 사용).
make style
Simulate의 API는 위대한 Kubric의 API에서 영감을 받았습니다. 사용자는 Scene 만들고 그 안에 Assets (객체, 카메라, 조명 등)을 추가합니다.
장면이 생성되면 파일로 저장하고 공유할 수 있습니다. 이는 관련 리소스가 포함된 JSON 파일이라고도 불리는 gIFT 파일입니다.
백엔드 렌더링/시뮬레이션 엔진(현재 Unity, Blender 및 Godot) 중 하나를 사용하여 장면을 렌더링하거나 시뮬레이션을 수행할 수도 있습니다.
저장/공유 형식은 엔진에 구애받지 않으며 그래픽 산업 표준을 사용합니다.
함께 빠르게 탐색해 봅시다.
 import simulate as sm

scene = sm.Scene()
Python API는 src/simulate에 있습니다. 장면을 생성 및 로드하고 백엔드로 명령을 보낼 수 있습니다.
우리는 장면을 렌더링 및/또는 실행하기 위해 여러 백엔드를 제공합니다. 기본 백엔드는 특정 설치가 필요하지 않으며 pyvista를 기반으로 합니다. 장면을 빠르게 렌더링/탐색할 수 있지만 물리 시뮬레이션은 처리하지 않습니다. 물리 시뮬레이션을 허용하려면 예를 들어 engine="unity" 설정하여 Unity 백엔드를 사용할 수 있습니다(곧 Godot 및 Blender 엔진 백엔드도 사용 가능). Unity 빌드는 자동으로 다운로드되고(아직 다운로드되지 않은 경우) 시뮬레이션을 실행하기 위해 생성됩니다. 또는 Unity 편집기 자체를 다운로드하여 사용할 수 있으며, 그런 다음 Unity 버전 2021.3.2f1에서 열어야 합니다.
로컬 파일이나 허브에서 장면 로드는 Scene.create_from() 으로 수행되며, 로컬로 저장하거나 scene.save() 또는 scene.push_to_hub() 로 허브에 푸시됩니다.
 from simulate import Scene

scene = Scene.create_from('tests/test_assets/fixtures/Box.gltf')  # either local (priority) or on the Hub with full path to file
scene = Scene.create_from('simulate-tests/Box/glTF/Box.gltf', is_local=False)  # Set priority to the Hub file

scene.save('local_dir/file.gltf')  # Save to a local file
scene.push_to_hub('simulate-tests/Debug/glTF/Box.gltf')  # Save to the Hub - use a token if necessary

scene.show()
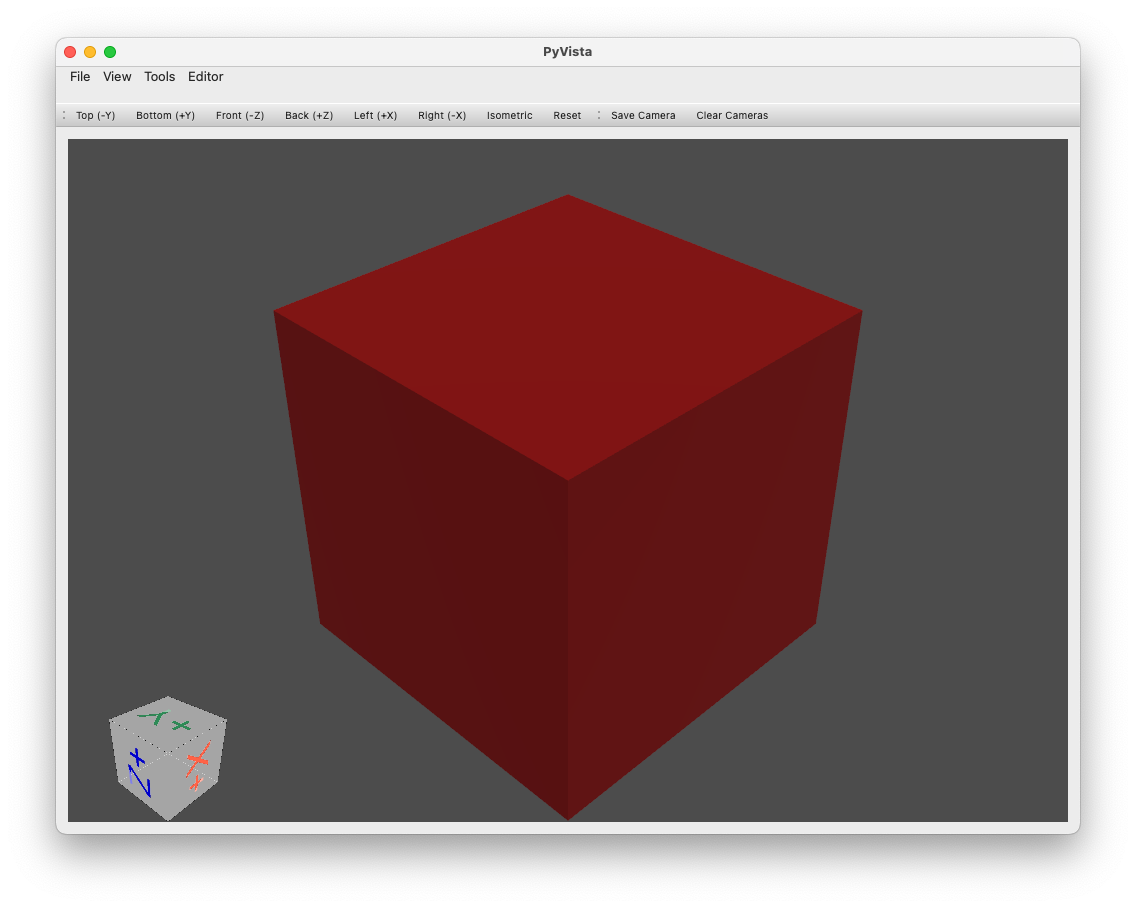
위에 평면과 구가 있는 장면을 만드는 기본 예:
 import simulate as sm

scene = sm.Scene()
scene += sm.Plane() + sm.Sphere(position=[0, 1, 0], radius=0.2)

>>> scene
>>> Scene(dimensionality=3, engine='PyVistaEngine')
>>> └── plane_01 (Plane - Mesh: 121 points, 100 cells)
>>>     └── sphere_02 (Sphere - Mesh: 842 points, 870 cells)

scene.show()
객체(장면 포함)는 선택적 메시(내부적으로 pyvista.PolyData 또는 pyvista.MultiBlock 객체로 생성/저장/편집됨)와 재질 및/또는 조명, 카메라, 에이전트가 제공되는 트리의 노드일 뿐입니다. 특별한 물건.
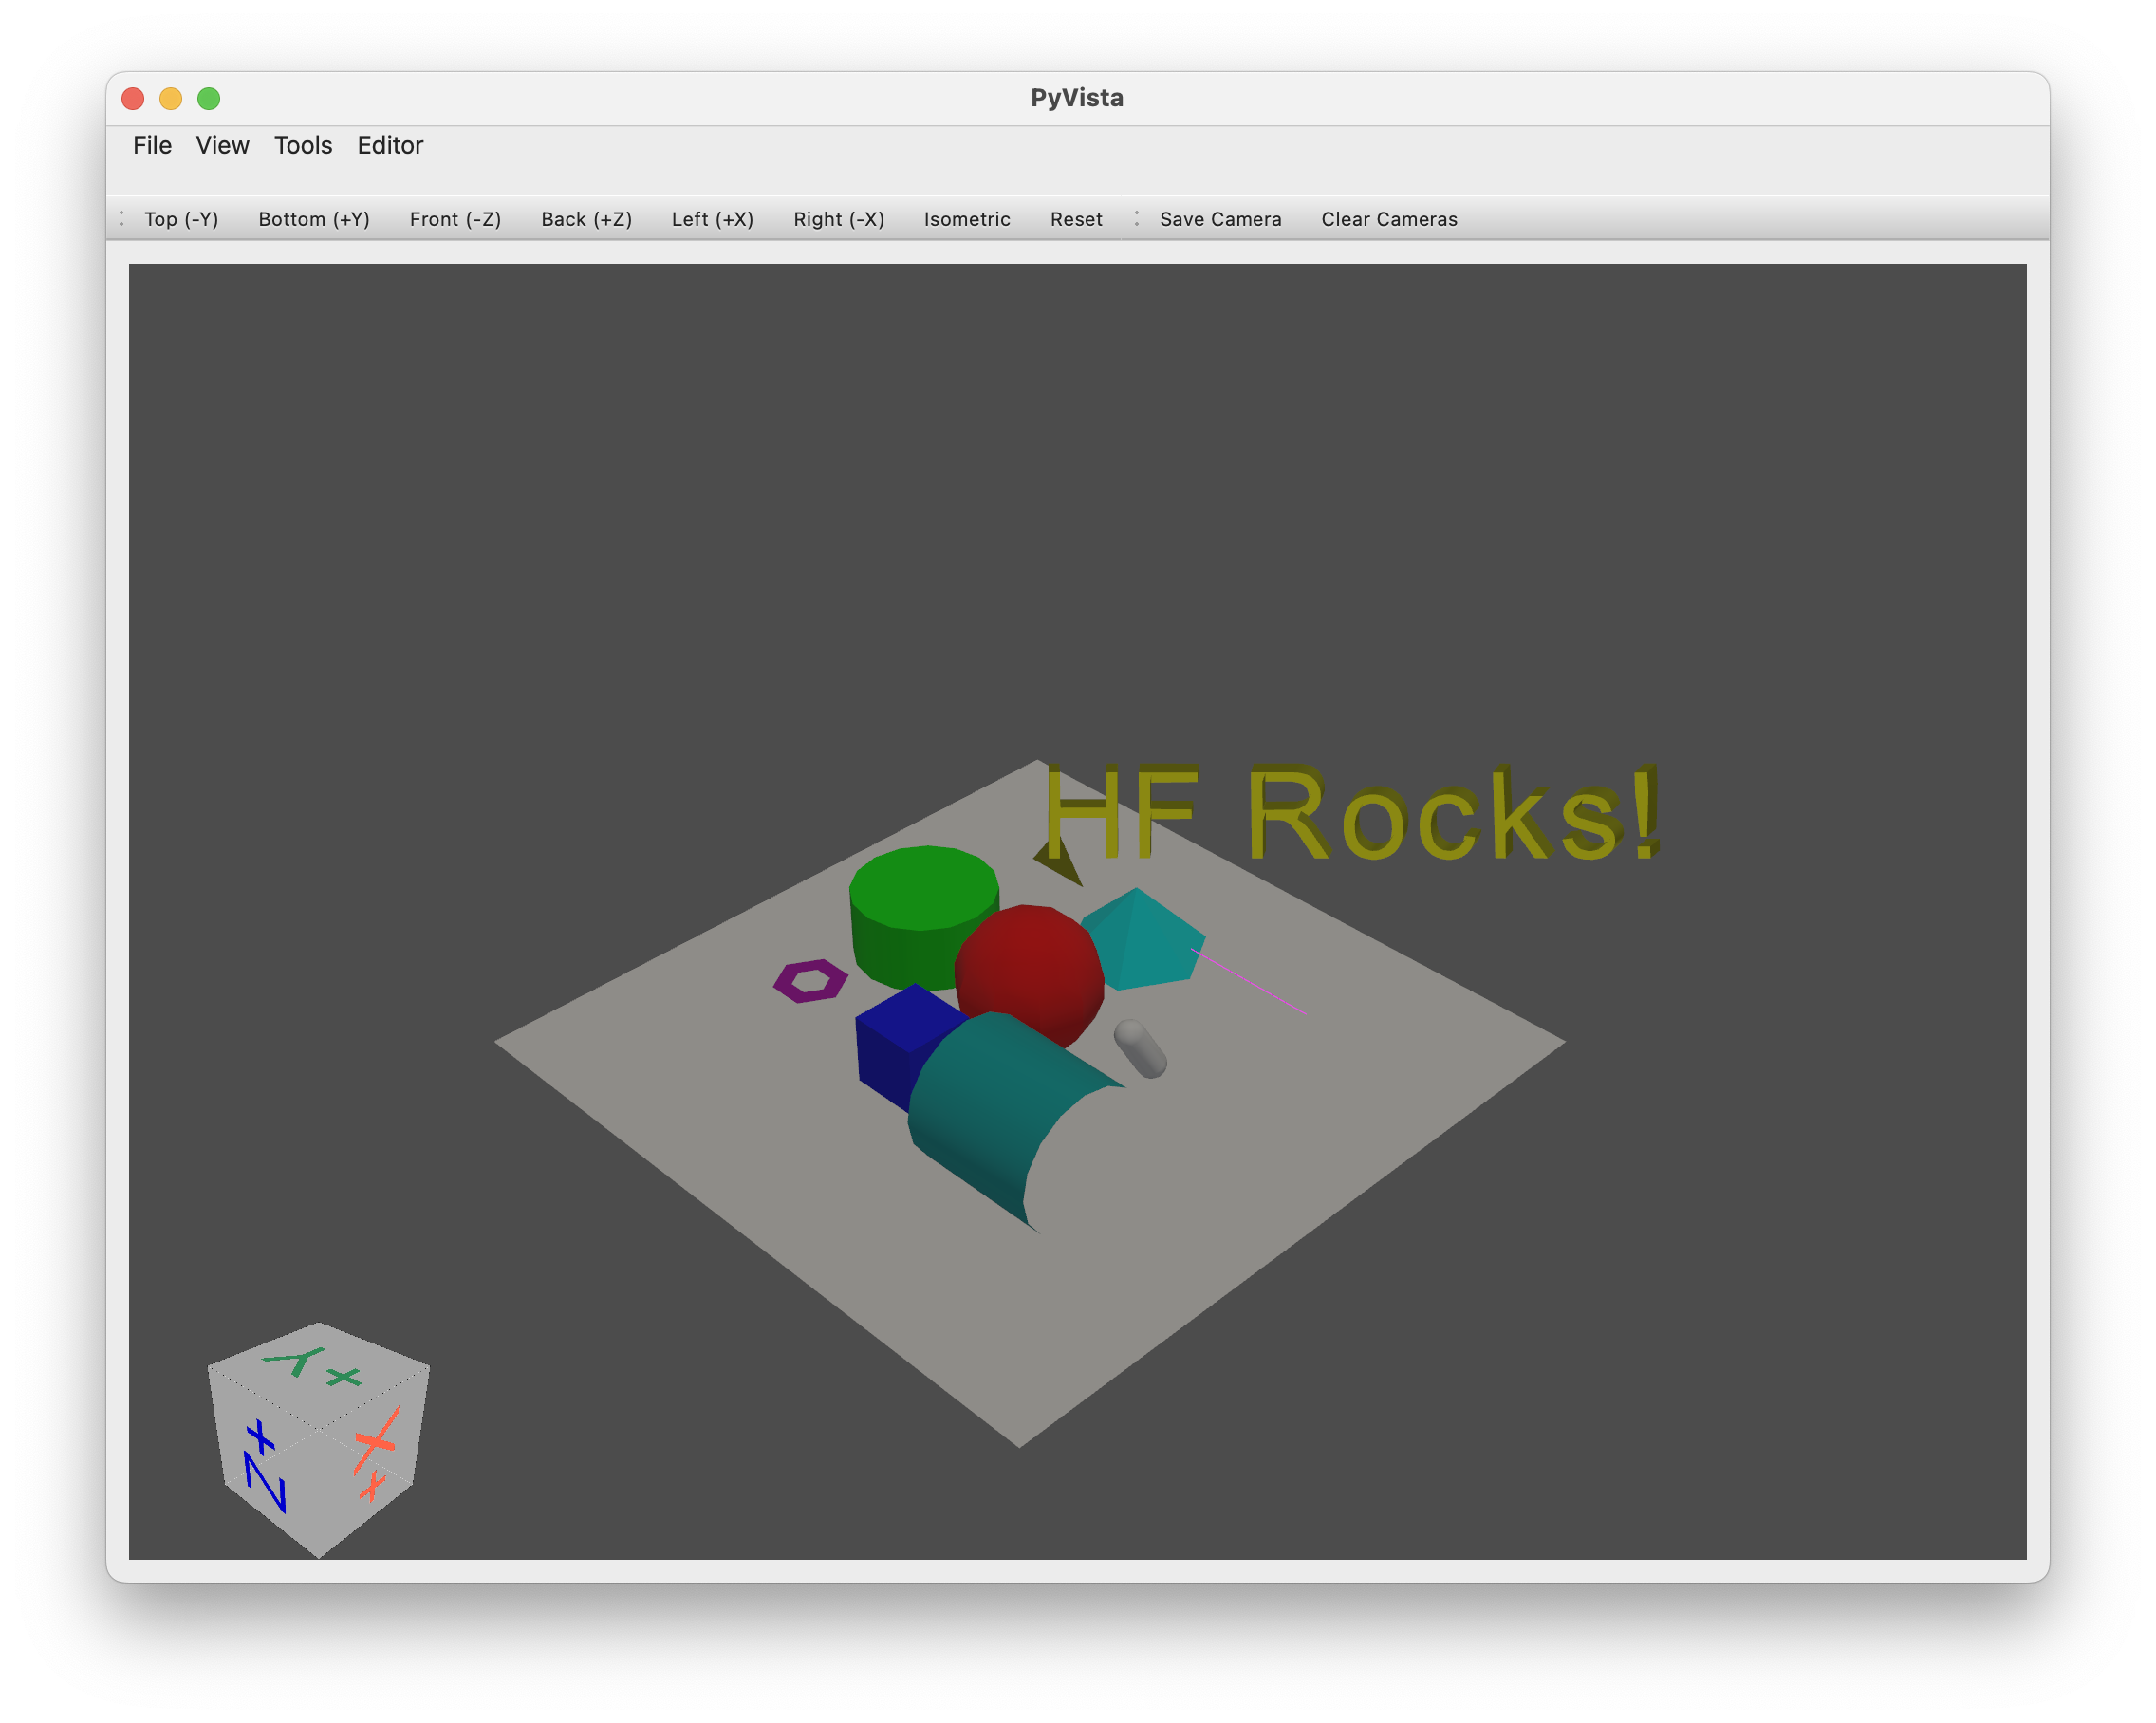
현재 다음과 같은 객체 생성 도우미가 제공됩니다.
Object3D 메쉬 및/또는 재질이 있는 모든 개체PlaneSphereCapsuleCylinderBoxConeLineMultipleLinesTubePolygonRingText3DTriangleRectangleCircleStructuredGrid다음 예제를 실행하면 이러한 객체 중 다수를 시각화할 수 있습니다.
python examples/basic/objects.py
개체 추가/제거:
+ ) 연산자(또는 .add(object) 메서드)를 사용하면 개체가 이전 개체의 자식으로 추가됩니다.- ) 연산자나 .remove(object) 명령을 사용하여 제거할 수 있습니다..clear() 로 지울 수 있습니다.scene.sphere += sphere_child .객체에 접근하기:
name 속성으로 제공되거나 클래스 이름 + 생성 카운터에서 자동으로 생성됨)..get_node(name) 사용하여 이름으로 객체에 액세스할 수도 있습니다.tree_* 속성을 사용할 수 있습니다.다음은 조작의 몇 가지 예입니다.
 # Add two copy of the sphere to the scene as children of the root node (using list will add all objects on the same level)
# Using `.copy()` will create a copy of an object (the copy doesn't have any parent or children)
scene += [scene.plane_01.sphere_02.copy(), scene.plane_01.sphere_02.copy()]

>>> scene
>>> Scene(dimensionality=3, engine='pyvista')
>>> ├── plane_01 (Plane - Mesh: 121 points, 100 cells)
>>> │   └── sphere_02 (Sphere - Mesh: 842 points, 870 cells)
>>> ├── sphere_03 (Sphere - Mesh: 842 points, 870 cells)
>>> └── sphere_04 (Sphere - Mesh: 842 points, 870 cells)

# Remove the last added sphere
>>> scene.remove(scene.sphere_04)
>>> Scene(dimensionality=3, engine='pyvista')
>>> ├── plane_01 (Plane - Mesh: 121 points, 100 cells)
>>> │   └── sphere_02 (Sphere - Mesh: 842 points, 870 cells)
>>> └── sphere_03 (Sphere - Mesh: 842 points, 870 cells)
객체를 쉽게 번역, 회전, 크기 조정할 수 있습니다.
다음은 몇 가지 예입니다.
 # Let's translate our floor (with the first sphere, it's child)
scene.plane_01.translate_x(1)

# Let's scale the second sphere uniformly
scene.sphere_03.scale(0.1)

# Inspect the current position and scaling values
print(scene.plane_01.position)
>>> array([1., 0., 0.])
print(scene.sphere_03.scaling)
>>> array([0.1, 0.1, 0.1])

# We can also translate from a vector and rotate from a quaternion or along the various axis
개체 편집:
기본 시각화 엔진은 pyvista 의 vtk 백엔드와 함께 제공됩니다.
시각화 엔진 시작은 .show() 사용하여 간단하게 수행할 수 있습니다.
scene.show()
integrations 디렉토리에서 다른 렌더링/시뮬레이션 엔진에 대한 브리지를 찾을 수 있습니다.
GCP에서 실행 중인 경우 pyvistaqt 설치하지 마세요. 설치한 경우에는 QT가 GCP에서 제대로 작동하지 않으므로 환경에서 제거하세요.
 @misc { simulate ,
  author = { Thomas Wolf, Edward Beeching, Carl Cochet, Dylan Ebert, Alicia Machado, Nathan Lambert, Clément Romac } ,
  title = { Simulate } ,
  year = { 2022 } ,
  publisher = { GitHub } ,
  journal = { GitHub repository } ,
  howpublished = { url{https://github.com/huggingface/simulate} }
}

