lipgloss
v1.0.0

멋진 터미널 레이아웃을 위한 스타일 정의. TUI를 염두에 두고 구축되었습니다.

립글로스는 터미널 렌더링에 대해 표현적이고 선언적인 접근 방식을 취합니다. CSS에 익숙한 사용자는 립글로스를 사용하면 편안함을 느낄 것입니다.
 import "github.com/charmbracelet/lipgloss"

var style = lipgloss . NewStyle ().
    Bold ( true ).
    Foreground ( lipgloss . Color ( "#FAFAFA" )).
    Background ( lipgloss . Color ( "#7D56F4" )).
    PaddingTop ( 2 ).
    PaddingLeft ( 4 ).
    Width ( 22 )

fmt . Println ( style . Render ( "Hello, kitty" ))립글로스는 다음 색상 프로필을 지원합니다.
 lipgloss . Color ( "5" )  // magenta
lipgloss . Color ( "9" )  // red
lipgloss . Color ( "12" ) // light blue lipgloss . Color ( "86" ) // aqua
lipgloss . Color ( "201" ) // hot pink
lipgloss . Color ( "202" ) // orange lipgloss . Color ( "#0000FF" ) // good ol' 100% blue
lipgloss . Color ( "#04B575" ) // a green
lipgloss . Color ( "#3C3C3C" ) // a dark gray...흑백 전용 1비트 ASCII 프로필도 있습니다.
터미널의 색상 프로필이 자동으로 감지되고 현재 팔레트 범위 밖의 색상은 사용 가능한 가장 가까운 값으로 자동으로 강제 적용됩니다.
밝은 배경과 어두운 배경에 대한 색상 옵션을 지정할 수도 있습니다.
lipgloss. AdaptiveColor { Light : "236" , Dark : "248" }터미널의 배경색은 자동으로 감지되며 런타임 시 적절한 색상이 선택됩니다.
CompleteColor는 트루 컬러, ANSI256 및 ANSI 색상 프로필에 대한 정확한 값을 지정합니다.
lipgloss. CompleteColor { TrueColor : "#0000FF" , ANSI256 : "86" , ANSI : "5" }이 경우 자동 색상 저하가 수행되지 않으며 지정된 색상을 기준으로 수행됩니다.
CompleteColor AdaptiveColor 와 함께 사용하면 자동 색상 저하 없이 밝은 배경과 어두운 배경에 대한 정확한 값을 지정할 수 있습니다.
lipgloss. CompleteAdaptiveColor {
    Light : CompleteColor { TrueColor : "#d7ffae" , ANSI256 : "193" , ANSI : "11" },
    Dark :  CompleteColor { TrueColor : "#d75fee" , ANSI256 : "163" , ANSI : "5" },
}립글로스는 일반적인 ANSI 텍스트 형식 지정 옵션을 지원합니다.
 var style = lipgloss . NewStyle ().
    Bold ( true ).
    Italic ( true ).
    Faint ( true ).
    Blink ( true ).
    Strikethrough ( true ).
    Underline ( true ).
Reverse ( true )립글로스는 블록 수준 서식 규칙도 지원합니다.
 // Padding
var style = lipgloss . NewStyle ().
    PaddingTop ( 2 ).
    PaddingRight ( 4 ).
    PaddingBottom ( 2 ).
    PaddingLeft ( 4 )

// Margins
var style = lipgloss . NewStyle ().
    MarginTop ( 2 ).
    MarginRight ( 4 ).
    MarginBottom ( 2 ).
    MarginLeft ( 4 )
CSS와 동일한 형식을 따르는 여백 및 패딩에 대한 단축 구문도 있습니다.
 // 2 cells on all sides
lipgloss . NewStyle (). Padding ( 2 )

// 2 cells on the top and bottom, 4 cells on the left and right
lipgloss . NewStyle (). Margin ( 2 , 4 )

// 1 cell on the top, 4 cells on the sides, 2 cells on the bottom
lipgloss . NewStyle (). Padding ( 1 , 4 , 2 )

// Clockwise, starting from the top: 2 cells on the top, 4 on the right, 3 on
// the bottom, and 1 on the left
lipgloss . NewStyle (). Margin ( 2 , 4 , 3 , 1 )
텍스트 단락을 왼쪽, 오른쪽 또는 가운데로 정렬할 수 있습니다.
 var style = lipgloss . NewStyle ().
    Width ( 24 ).
    Align ( lipgloss . Left ).  // align it left
    Align ( lipgloss . Right ). // no wait, align it right
Align ( lipgloss . Center ) // just kidding, align it in the center 최소 너비와 높이를 설정하는 것은 간단하고 간단합니다.
 var style = lipgloss . NewStyle ().
    SetString ( "What’s for lunch?" ).
    Width ( 24 ).
    Height ( 32 ).
Foreground ( lipgloss . Color ( "63" ))테두리를 추가하는 것은 쉽습니다:
 // Add a purple, rectangular border
var style = lipgloss . NewStyle ().
    BorderStyle ( lipgloss . NormalBorder ()).
    BorderForeground ( lipgloss . Color ( "63" ))

// Set a rounded, yellow-on-purple border to the top and left
var anotherStyle = lipgloss . NewStyle ().
    BorderStyle ( lipgloss . RoundedBorder ()).
    BorderForeground ( lipgloss . Color ( "228" )).
    BorderBackground ( lipgloss . Color ( "63" )).
    BorderTop ( true ).
    BorderLeft ( true )

// Make your own border
var myCuteBorder = lipgloss. Border {
    Top :         "._.:*:" ,
    Bottom :      "._.:*:" ,
    Left :        "|*" ,
    Right :       "|*" ,
    TopLeft :     "*" ,
    TopRight :    "*" ,
    BottomLeft :  "*" ,
    BottomRight : "*" ,
}
테두리를 정의하는 속기 함수도 있는데, 이는 여백 및 패딩 속기 함수와 유사한 패턴을 따릅니다.
 // Add a thick border to the top and bottom
lipgloss . NewStyle ().
    Border ( lipgloss . ThickBorder (), true , false )

// Add a double border to the top and left sides. Rules are set clockwise
// from top.
lipgloss . NewStyle ().
    Border ( lipgloss . DoubleBorder (), true , false , false , true )
테두리에 대한 자세한 내용은 문서를 참조하세요.
그냥 할당을 사용하십시오.
 style := lipgloss . NewStyle (). Foreground ( lipgloss . Color ( "219" ))

copiedStyle := style // this is a true copy

wildStyle := style . Blink ( true ) // this is also true copy, with blink added
Style 데이터 구조에는 기본 유형만 포함되므로 스타일을 다른 스타일에 할당하면 원본을 변경하지 않고도 스타일의 새 복사본이 효과적으로 생성됩니다.
스타일은 다른 스타일의 규칙을 상속받을 수 있습니다. 상속 시 수신자에 설정되지 않은 규칙만 상속됩니다.
 var styleA = lipgloss . NewStyle ().
    Foreground ( lipgloss . Color ( "229" )).
    Background ( lipgloss . Color ( "63" ))

// Only the background color will be inherited here, because the foreground
// color will have been already set:
var styleB = lipgloss . NewStyle ().
    Foreground ( lipgloss . Color ( "201" )).
Inherit ( styleA )모든 규칙을 설정 해제할 수 있습니다.
 var style = lipgloss . NewStyle ().
    Bold ( true ).                        // make it bold
    UnsetBold ().                       // jk don't make it bold
    Background ( lipgloss . Color ( "227" )). // yellow background
    UnsetBackground ()                  // never mind
규칙이 설정 해제되면 상속되거나 복사되지 않습니다.
구성 요소를 개발할 때와 같이 스타일 정의가 UI에서 의도한 목적을 준수하는지 확인하려는 경우가 있습니다. Inline 과 MaxWidth , MaxHeight 필요한 곳은 다음과 같습니다.
 // Force rendering onto a single line, ignoring margins, padding, and borders.
someStyle . Inline ( true ). Render ( "yadda yadda" )

// Also limit rendering to five cells
someStyle . Inline ( true ). MaxWidth ( 5 ). Render ( "yadda yadda" )

// Limit rendering to a 5x5 cell block
someStyle . MaxWidth ( 5 ). MaxHeight ( 5 ). Render ( "yadda yadda" )
탭 문자( t )는 터미널에 따라 다르게 표시됩니다(대개 공백 8개, 때로는 4개). 이러한 불일치로 인해 립글로스는 렌더링 시 탭을 4개의 공백으로 변환합니다. 그러나 이 동작은 스타일별로 변경할 수 있습니다.
 style := lipgloss . NewStyle () // tabs will render as 4 spaces, the default
style = style . TabWidth ( 2 )    // render tabs as 2 spaces
style = style . TabWidth ( 0 )    // remove tabs entirely
style = style . TabWidth ( lipgloss . NoTabConversion ) // leave tabs intact 일반적으로 lipgloss.Style 에서 Render(string...) 메서드를 호출하면 됩니다.
 style := lipgloss . NewStyle (). Bold ( true ). SetString ( "Hello," )
fmt . Println ( style . Render ( "kitty." )) // Hello, kitty.
fmt . Println ( style . Render ( "puppy." )) // Hello, puppy.
그러나 Stringer 인터페이스를 사용할 수도 있습니다.
 var style = lipgloss . NewStyle (). SetString ( "你好,猫咪。" ). Bold ( true )
fmt . Println ( style ) // 你好,猫咪。사용자 정의 렌더러를 사용하면 특정 출력으로 렌더링할 수 있습니다. 이는 서버-클라이언트 상황과 같이 서로 다른 출력으로 렌더링하고 각 출력에 대한 색상 프로필과 어두운 배경 상태를 올바르게 감지하려는 경우 특히 중요합니다.
 func myLittleHandler ( sess ssh. Session ) {
    // Create a renderer for the client.
    renderer := lipgloss . NewRenderer ( sess )

    // Create a new style on the renderer.
    style := renderer . NewStyle (). Background (lipgloss. AdaptiveColor { Light : "63" , Dark : "228" })

    // Render. The color profile and dark background state will be correctly detected.
    io . WriteString ( sess , style . Render ( "Heyyyyyyy" ))
}
Wish를 통해 SSH를 통해 사용자 정의 렌더러를 사용하는 방법에 대한 예는 SSH 예를 참조하세요.
순수한 스타일링 외에도 립글로스는 레이아웃을 구성하는 데 도움이 되는 몇 가지 유틸리티도 함께 제공됩니다.
수평 및 수직으로 단락을 결합하는 것은 매우 간단합니다.
 // Horizontally join three paragraphs along their bottom edges
lipgloss . JoinHorizontal ( lipgloss . Bottom , paragraphA , paragraphB , paragraphC )

// Vertically join two paragraphs along their center axes
lipgloss . JoinVertical ( lipgloss . Center , paragraphA , paragraphB )

// Horizontally join three paragraphs, with the shorter ones aligning 20%
// from the top of the tallest
lipgloss . JoinHorizontal ( 0.2 , paragraphA , paragraphB , paragraphC )레이아웃을 작성할 때 텍스트 블록의 너비와 높이를 알고 싶을 때가 있습니다.
 // Render a block of text.
var style = lipgloss . NewStyle ().
    Width ( 40 ).
    Padding ( 2 )
var block string = style . Render ( someLongString )

// Get the actual, physical dimensions of the text block.
width := lipgloss . Width ( block )
height := lipgloss . Height ( block )

// Here's a shorthand function.
w , h := lipgloss . Size ( block )때로는 단순히 공백 안에 텍스트 블록을 배치하고 싶을 수도 있습니다.
 // Center a paragraph horizontally in a space 80 cells wide. The height of
// the block returned will be as tall as the input paragraph.
block := lipgloss . PlaceHorizontal ( 80 , lipgloss . Center , fancyStyledParagraph )

// Place a paragraph at the bottom of a space 30 cells tall. The width of
// the text block returned will be as wide as the input paragraph.
block := lipgloss . PlaceVertical ( 30 , lipgloss . Bottom , fancyStyledParagraph )

// Place a paragraph in the bottom right corner of a 30x80 cell space.
block := lipgloss . Place ( 30 , 80 , lipgloss . Right , lipgloss . Bottom , fancyStyledParagraph )
공백 스타일을 지정할 수도 있습니다. 자세한 내용은 문서를 참조하세요.
립글로스는 테이블 렌더링 하위 패키지와 함께 제공됩니다.
import "github.com/charmbracelet/lipgloss/table"일부 데이터 행을 정의합니다.
 rows := [][] string {
    { "Chinese" , "您好" , "你好" },
    { "Japanese" , "こんにちは" , "やあ" },
    { "Arabic" , "أهلين" , "أهلا" },
    { "Russian" , "Здравствуйте" , "Привет" },
    { "Spanish" , "Hola" , "¿Qué tal?" },
}
테이블 패키지를 사용하여 테이블의 스타일을 지정하고 렌더링합니다.
 t := table . New ().
    Border ( lipgloss . NormalBorder ()).
    BorderStyle ( lipgloss . NewStyle (). Foreground ( lipgloss . Color ( "99" ))).
    StyleFunc ( func ( row , col int ) lipgloss. Style {
        switch {
        case row == 0 :
            return HeaderStyle
        case row % 2 == 0 :
            return EvenRowStyle
        default :
            return OddRowStyle
        }
    }).
    Headers ( "LANGUAGE" , "FORMAL" , "INFORMAL" ).
    Rows ( rows ... )

// You can also add tables row-by-row
t . Row ( "English" , "You look absolutely fabulous." , "How's it going?" )
테이블을 인쇄합니다.
fmt . Println ( t )
경고
테이블 Rows Offset 전에 선언되어야 하며 그렇지 않으면 아무 작업도 수행되지 않습니다.
테이블에 대한 자세한 내용은 문서와 예제를 참조하세요.
립글로스는 목록 렌더링 하위 패키지와 함께 제공됩니다.
import "github.com/charmbracelet/lipgloss/list"새 목록을 정의합니다.
l := list . New ( "A" , "B" , "C" )목록을 인쇄하세요.
 fmt . Println ( l )

// • A
// • B
// • C
목록에는 중첩 기능이 있습니다.
 l := list . New (
    "A" , list . New ( "Artichoke" ),
    "B" , list . New ( "Baking Flour" , "Bananas" , "Barley" , "Bean Sprouts" ),
    "C" , list . New ( "Cashew Apple" , "Cashews" , "Coconut Milk" , "Curry Paste" , "Currywurst" ),
    "D" , list . New ( "Dill" , "Dragonfruit" , "Dried Shrimp" ),
    "E" , list . New ( "Eggs" ),
    "F" , list . New ( "Fish Cake" , "Furikake" ),
    "J" , list . New ( "Jicama" ),
    "K" , list . New ( "Kohlrabi" ),
    "L" , list . New ( "Leeks" , "Lentils" , "Licorice Root" ),
)
목록을 인쇄하세요.
fmt . Println ( l )
목록은 열거 함수와 lipgloss.Style 을 사용하여 사용자 정의할 수 있습니다.
 enumeratorStyle := lipgloss . NewStyle (). Foreground ( lipgloss . Color ( "99" )). MarginRight ( 1 )
itemStyle := lipgloss . NewStyle (). Foreground ( lipgloss . Color ( "212" )). MarginRight ( 1 )

l := list . New (
    "Glossier" ,
    "Claire’s Boutique" ,
    "Nyx" ,
    "Mac" ,
    "Milk" ,
    ).
    Enumerator ( list . Roman ).
    EnumeratorStyle ( enumeratorStyle ).
    ItemStyle ( itemStyle )
목록을 인쇄하세요.

미리 정의된 열거자( Arabic , Alphabet , Roman , Bullet , Tree ) 외에도 사용자 정의 열거자를 정의할 수도 있습니다.
 l := list . New ( "Duck" , "Duck" , "Duck" , "Duck" , "Goose" , "Duck" , "Duck" )

func DuckDuckGooseEnumerator ( l list. Items , i int ) string {
    if l . At ( i ). Value () == "Goose" {
        return "Honk →"
    }
    return ""
}

l = l . Enumerator ( DuckDuckGooseEnumerator )
목록을 인쇄합니다.

필요한 경우 목록을 점진적으로 작성할 수도 있습니다.
 l := list . New ()

for i := 0 ; i < repeat ; i ++ {
    l . Item ( "Lip Gloss" )
}립글로스는 나무 렌더링 하위 패키지와 함께 배송됩니다.
import "github.com/charmbracelet/lipgloss/tree"새 트리를 정의합니다.
 t := tree . Root ( "." ).
    Child ( "A" , "B" , "C" )
나무를 인쇄하세요.
 fmt . Println ( t )

// .
// ├── A
// ├── B
// └── C
나무에는 둥지를 틀 수 있는 능력이 있습니다.
 t := tree . Root ( "." ).
    Child ( "macOS" ).
    Child (
        tree . New ().
            Root ( "Linux" ).
            Child ( "NixOS" ).
            Child ( "Arch Linux (btw)" ).
            Child ( "Void Linux" ),
        ).
    Child (
        tree . New ().
            Root ( "BSD" ).
            Child ( "FreeBSD" ).
            Child ( "OpenBSD" ),
    )
나무를 인쇄하세요.
fmt . Println ( t )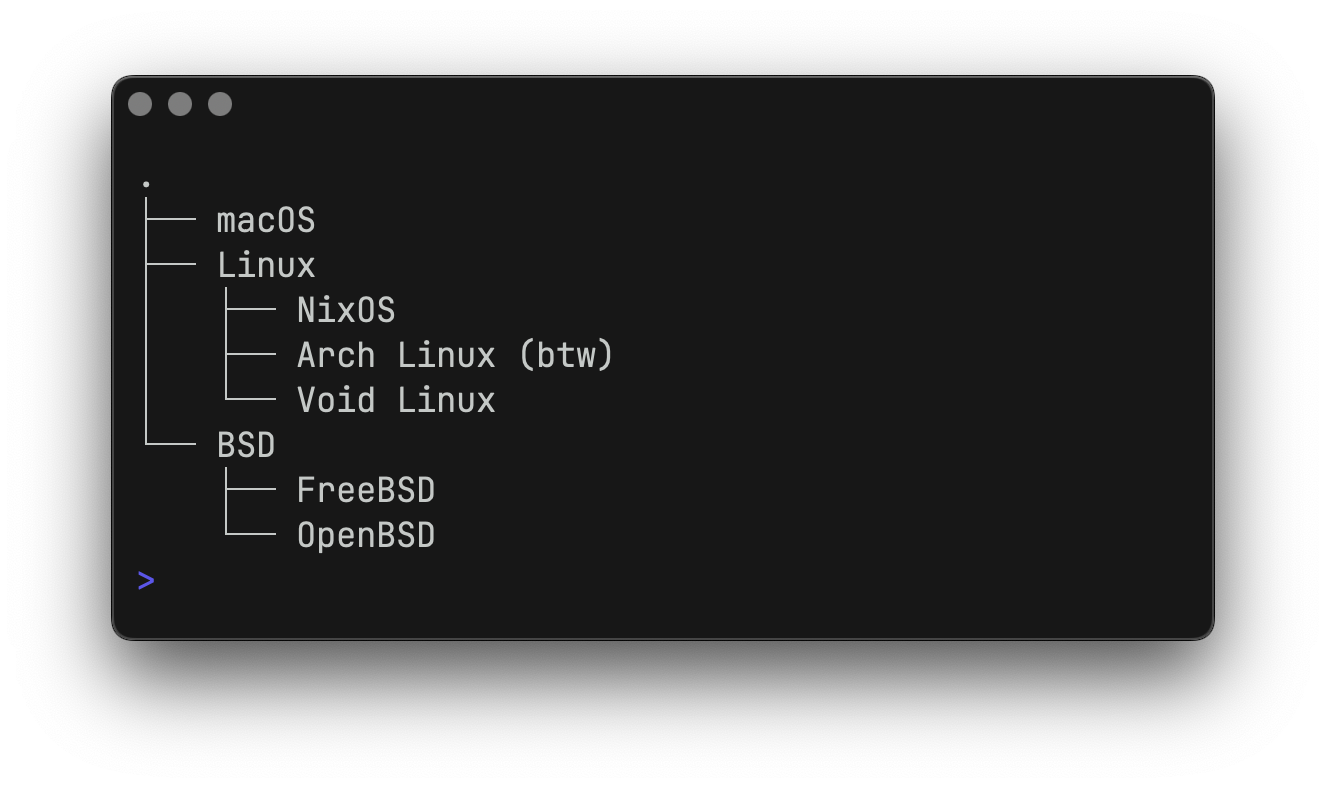
나무는 열거 기능과 lipgloss.Style 을 사용하여 사용자 정의할 수 있습니다.
 enumeratorStyle := lipgloss . NewStyle (). Foreground ( lipgloss . Color ( "63" )). MarginRight ( 1 )
rootStyle := lipgloss . NewStyle (). Foreground ( lipgloss . Color ( "35" ))
itemStyle := lipgloss . NewStyle (). Foreground ( lipgloss . Color ( "212" ))

t := tree .
    Root ( "⁜ Makeup" ).
    Child (
        "Glossier" ,
        "Fenty Beauty" ,
        tree . New (). Child (
            "Gloss Bomb Universal Lip Luminizer" ,
            "Hot Cheeks Velour Blushlighter" ,
        ),
        "Nyx" ,
        "Mac" ,
        "Milk" ,
    ).
    Enumerator ( tree . RoundedEnumerator ).
    EnumeratorStyle ( enumeratorStyle ).
    RootStyle ( rootStyle ).
    ItemStyle ( itemStyle )
나무를 인쇄하세요.

트리에 대해 미리 정의된 열거자는 DefaultEnumerator 및 RoundedEnumerator 입니다.
필요한 경우 트리를 점진적으로 구축할 수도 있습니다.
 t := tree . New ()

for i := 0 ; i < repeat ; i ++ {
    t . Child ( "Lip Gloss" )
} 이는 특히 중국어, 일본어 및 한국어(예: zh_CN.UTF-8 또는 ja_JP.UTF-8 )와 관련된 로케일 및 인코딩 때문일 가능성이 높습니다. 이 문제를 해결하는 가장 직접적인 방법은 환경에서 RUNEWIDTH_EASTASIAN=0 설정하는 것입니다.
자세한 내용은 https://github.com/charmbracelet/lipgloss/issues/40을 참조하세요.
립글로스는 지정된 터미널에서 사용 가능한 최상의 옵션으로 색상을 자동으로 저하시키며, 출력이 TTY가 아닌 경우 색상 출력을 완전히 제거합니다. 이는 테스트, CI를 실행하거나 출력을 다른 곳으로 파이프할 때 일반적입니다.
필요한 경우 SetColorProfile 사용하여 테스트에서 색상 프로필을 강제로 적용할 수 있습니다.
 import (
    "github.com/charmbracelet/lipgloss"
    "github.com/muesli/termenv"
)

lipgloss . SetColorProfile ( termenv . TrueColor )
참고: 이 옵션은 애플리케이션의 유연성을 제한하며 원하지 않는 경우 ANSI 이스케이프 코드가 출력될 수 있습니다. 색상 프로필을 강제로 선택하기 전에 사용 사례와 환경을 주의 깊게 기록해 두세요.
립글로스는 버블티를 대체하지 않습니다. 오히려 훌륭한 버블티 동반자입니다. 터미널 사용자 인터페이스 보기를 최대한 간단하고 재미있게 구성하여 하위 수준의 레이아웃 세부 사항에 신경쓰는 대신 응용 프로그램 구축에 집중할 수 있도록 설계되었습니다.
간단히 말해서 립글로스를 사용하면 버블티 뷰를 구축하는 데 도움이 될 수 있습니다.
Lip Gloss는 각각 색상 및 ANSI 인식 텍스트 작업을 처리하는 우수한 Termenv 및 Reflow 라이브러리를 기반으로 구축되었습니다. 많은 사용 사례에서 Termenv 및 Reflow는 귀하의 요구에 충분합니다.
목록, 표, 구문 강조 코드 등을 지원하는 보다 문서 중심적인 렌더링 솔루션을 원하시면 스타일시트 기반 마크다운 렌더러인 Glamour를 살펴보세요.
기여를 참조하세요.
우리는 이 프로젝트에 대한 귀하의 생각을 듣고 싶습니다. 언제든지 메모를 남겨주세요!
MIT
매력의 일부.
Charm爱开源 • Charm은 오픈소스를 좋아합니다.


