fbcp ili9341
1.0.0
FBCP-ILI9341의 시대가 끝났습니다. FBCP-ILI9341은 Raspberry Pi의 Videocore Dispmanx API 위에 구축되었습니다.
그러나이 API는 Raspberry Pi Foundation에 의해 한동안 더 이상 사용되지 않았으며, Raspberry Pi 5에서 마침내 쓸모 없게되었습니다 (= = 사용할 수 없음).
나중에 Raspberry Pi 배포판은 PI0-PI4의 경우에도 더 이상 Dispmanx를 활성화하지 않지만 Raspberry Pi는 SPI 디스플레이 드라이버를 통합하기위한 다른 추상화를 갖는 최신 KMS 드라이버 작곡가 스택으로 이동했습니다. 다른 사람들은 KMS 스택과 호환되는 PI의 SPI 디스플레이 드라이버를 개발하고 있습니다. 이 Raspberry Pi 포럼 스레드로 가서 자세한 내용을 알아보십시오.
이 저장소는 아카이브/부드러움으로 간주되는 것이 좋습니다. 그러나 GitHub 기능을 사용하여 아카이브를 표시하지는 않지만이 기능은 문제 추적기를 읽을 수있게 만들 수 있기 때문입니다. 추적기에서 문제를 계속 논의하십시오.
이 저장소는 Raspberry Pi A, B, 2, 3, 4 및 0에 대한 특정 SPI 기반 LCD 디스플레이의 드라이버를 구현합니다.

이 작업은 Retromancave YouTube 채널 에서이 일련의 비디오를 본 후 호기심에 동기를 부여했습니다.
이 비디오에서 SPI (GPIO) 버스는 병목 현상이라고합니다. SPI 기반은 직렬 데이터 버스를 통해 업데이트를 표시하여 버스에서 클럭 사이클 당 1 비트를 전송합니다. 320x240x16bpp 디스플레이는 전체 60fps 새로 고침 주파수를 달성하기 위해 73.728MHz의 SPI 버스 시계 속도가 필요합니다. 많은 SPI LCD 컨트롤러가 실제로이를 빠르게 통신 할 수는 없지만 16-50MHz SPI 버스 클럭 속도로 제한되어 최대 업데이트 속도를 크게 캡핑합니다. 이것에 대해 무엇을 할 수 있습니까?
FBCP-ILI9341 프로젝트는 ILI9341 컨트롤러를 사용하는 Raspberry Pi 디스플레이 용 Adafruit 2.8 "320x240 TFT w/ 터치 스크린의 디스플레이 드라이버로 시작되었습니다.이 디스플레이에서는 컨텐츠에 따라 FBCP-ILI9341이 컨텐츠에 따라 60fps 업데이트 속도를 달성 할 수 있습니다. 그것은 표시되고 있습니다. 운전자의 예제는이 비디오를 확인하십시오.
SPI 버스가 대역폭에 너무 제한 될 수 있다는 점을 감안할 때 FBCP-ILI9341이 어떻게 최대 60fps로 업데이트 할 수 있습니까? 이것이 달성되는 방식은 적응 디스플레이 스트림 업데이트 라고 할 수있는 것입니다. 각 디스플레이 새로 고침 사이클에서 각 픽셀을 업로드하는 대신 화면의 실제로 변경된 픽셀 만 디스플레이에 제출됩니다. ILI9341 컨트롤러는 다른 많은 인기있는 컨트롤러와 마찬가지로 부분 화면 업데이트를 지정할 수있는 통신 인터페이스 기능을 갖추고 있기 때문에 가능합니다. 이를 통해 대역폭 제한을 제압 할 수 있습니다. 예를 들어 쿼크에서는 빠른 페이싱 게임이지만 각 렌더링 된 프레임의 화면 변경에서 모든 픽셀의 평균 약 46%에 불과합니다. UI와 같은 일부 부품은 여러 프레임에 걸쳐 실질적으로 일정하게 유지됩니다.
다른 최적화는 또한 더 많은 성능을 짜기 위해 사용됩니다.
config.h 에서 #define NO_INTERLACING 사용하지 않으면이를 쉽게 비활성화 할 수 있습니다.결과적으로 SPI 버스는 버스의 이용률을 극대화하기 위해 ~ 94-97% 평소 100% 포화 상태를 유지할 수 있으며, 각각의 새로운 프레임을 설명하는 데 필요한 최소 수의 바이트 만 전송합니다.
드라이버는 다음 시스템에서 작동하도록 확인되었습니다 (과거의 적어도 어느 시점).
모든 보드가 적극적으로 테스트되는 것은 아니지만 특히 이전 보드에서 YMMV. (버그 수정 환영, https://elinux.org/rpi_hardwarehistory를 사용하여 실행중인 보드를 식별하십시오)
다음 LCD 디스플레이가 테스트되었습니다.
드라이버를 설정하려면 다음 섹션을 확인하십시오.
이 드라이버는 NOTRO/FBTFT FrameBuffer 드라이버를 사용하지 않으므로 활성화 된 경우 비활성화해야합니다. 즉, /boot/config.txt 파일에 dtoverlay=pitft28r, ... , dtoverlay=waveshare32b, ... 또는 dtoverlay=flexfb, ... 와 같은 줄이있는 줄이 있다면 제거해야합니다.
이 프로그램은 기본 SPI 드라이버를 사용하지 않으므로 /boot/config.txt 에서 dtparam=spi=on in dtparam = spi = on도 충돌을 일으키지 않도록 제거해야합니다.
마찬가지로 dtoverlay=ads7846,... 등과 같은 터치 컨트롤러 관련 Dtoverlays Active가 있거나 penirq= 지시문이있는 모든 경우 충돌을 피하기 위해 제거해야합니다. 누군가가 찌르기를 원한다면 FBCP-ILI9341에 터치 지원을 추가 할 수 있습니다.
Raspberry Pi의 콘솔에서 실행하십시오.
sudo apt-get install cmake
cd ~
git clone https://github.com/juj/fbcp-ili9341.git
cd fbcp-ili9341
mkdir build
cd build
cmake [options] ..
make -j
sudo ./fbcp-ili9341
특히 두 개의 점에 주목하십시오 .. 이 경우 "더 많은 항목이 여기에 갈 것"을 참조하는 대신 "Up One Directory"를 나타냅니다.
[옵션] 에서 무엇을 입력 해야하는지 확인하려면 다음 섹션을 참조하십시오.
기존 fbcp 드라이버를 실행 한 경우 sudo pkill fbcp 통해 먼저 해당 EG를 제거하십시오 (SSH 프롬프트에서 실행되거나 HDMI 디스플레이에 연결되어있는 동안)이 두 개는 동시에 실행할 수 없습니다. /etc/rc.local 또는 /etc/init.d 부팅시 fbcp 시작하기위한 항목이 포함 된 경우 해당 지침을 삭제해야합니다.
일반적으로 빌드 옵션을 구성하는 두 가지 방법, CMake 명령 줄 및 파일 config.h에서.
CMAKE 명령 줄에서 다음 옵션을 구성 할 수 있습니다.
FBCP-ILI9341에서 이미 인식하고있는 PI 위에 스택 스택 중 하나를 사용하는 경우 GPIO 핀 할당을 지정할 필요는 없지만 FBCP-ILI9341 코드에는 이미 그 코드가 있습니다. 모자에 대한 다음 CMAKE 지시 중 하나를 통과하십시오.
-DADAFRUIT_ILI9341_PITFT=ON : adafruit 2.8 "320x240 tft w/ raspberry pi (또는 adafruit pitft 2.2"hat mini kit -320x240 2.2 "tft -display, 호환되는 터치 디스플레이)에서 실행중인 경우, 통과하는 경우, 통과하십시오. 깃발.-DADAFRUIT_HX8357D_PITFT=ON : adafruit pitft- 조립 된 480x320 3.5 "TFT+터치 스크린 용 Raspberry Pi 디스플레이가있는 경우이 줄을 추가하십시오.-DFREEPLAYTECH_WAVESHARE32B=ON : freeplay cm3 또는 Zero 장치에서 실행중인 경우이 플래그를 통과하십시오. (이것은 모자가 아니지만 여전히 미리 구성된 핀 할당)-DWAVESHARE35B_ILI9486=ON : 지정된 경우 Waveshare 3.5 "480x320 ILI9486 디스플레이를 대상으로합니다.-DTONTEC_MZ61581=ON : Tontec 3.5 "320x480 LCD 디스플레이에서 실행중인 경우이를 전달하십시오.-DPIRATE_AUDIO_ST7789_HAT=ON : 지정된 경우 ST7789 디스플레이 컨트롤러가있는 Raspberry Pi 용 해적 오디오 240x240, 1.3 인치 IPS LCD 디스플레이 모자를 대상으로합니다.-DWAVESHARE_ST7789VW_HAT=ON : 지정된 경우 ST7789VW 디스플레이 컨트롤러가 장착 된 Raspberry Pi 용 240x240, 1.3 인치 IPS LCD 디스플레이 모자를 대상으로합니다.-DWAVESHARE_ST7735S_HAT=ON : 지정된 경우 ST7735S 디스플레이 컨트롤러가 장착 된 Raspberry Pi 용 128x128, 1.44 인치 LCD 디스플레이 모자를 대상으로합니다.-DKEDEI_V63_MPI3501=ON : 지정된 경우 KEDEI 3.5 인치 SPI TFTLCD 480*320 16BIT/18 비트 버전 6.3 2018/4/9 디스플레이 MPI3501 디스플레이 컨트롤러를 대상으로합니다. 위 목록에서 모자를 사용하는 대신 PI에 직접 전선을 연결 한 경우 아래 구성 지시서를 사용해야합니다. 디스플레이를 지정하는 것 외에도 FBCP-ILI9341에게 연결을 연결 한 GPIO 핀에 알려 주어야합니다. 디스플레이 컨트롤러를 구성하려면 다음 중 하나를 전달하십시오.
-DILI9341=ON : 다른 일반 ILI9341 디스플레이 또는 FreePlayTech CM3/Zero 장치가 아닌 독립형 WaVeshare32B 디스플레이 에서이 플래그를 통과하는 경우.-DILI9340=ON : ILI9340 디스플레이가있는 경우이 지침을 전달하십시오. ILI9340 및 ILI9341 칩셋은 매우 유사하지만 ILI9340은 ILI9341의 모든 기능을 지원하지 않으며 비활성화 또는 다운 그레이드됩니다.-DHX8357D=ON : HX8357D 디스플레이가있는 경우이 지침을 전달하십시오.-DSSD1351=ON : SSD1351 OLED 디스플레이가있는 경우 이것을 사용하십시오.-DST7735R=ON : ST7735R 디스플레이가있는 경우 사용하십시오.-DST7789=ON : ST7789 디스플레이가있는 경우이를 사용하십시오.-DST7789VW=ON : ST7789VW 디스플레이가있는 경우 사용하십시오.-DST7735S=ON : ST7735S 디스플레이가있는 경우 이것을 사용하십시오.-DILI9486=ON : ILI9486 디스플레이가있는 경우이 지침을 통과하십시오.-DILI9486L=ON : ILI9486L 디스플레이가있는 경우이 지침을 전달하십시오. ILI9486 및 ILI9486L은 상당히 다르고 상호 호환되지 않는 컨트롤러 칩이므로 여기에서 어떤 것이 있는지 확인하십시오. (또는 두 가지를 시도하고, 잘못 식별하면 부서져서는 안됩니다)-DILI9488=ON : ILI9488 디스플레이가있는 경우이 지침을 전달하십시오.-DMPI3501=ON : 지정된 경우 MPI3501 디스플레이 컨트롤러가있는 디스플레이를 대상으로합니다.또한 사용한 GPIO 핀 할당을 사용자 정의하려면 다음을 전달하십시오.
-DGPIO_TFT_DATA_CONTROL=number : 4 와이어 SPI 통신에서 데이터/제어 (DC) 라인에 사용할 gpio 핀을 지정/재정의합니다. 이 핀 번호는 BCM 핀 번호로 지정됩니다. 데이터/제어 라인이없는 3 와이어 SPI 디스플레이가있는 경우이 값이 -1 , 즉 -DGPIO_TFT_DATA_CONTROL=-1 로 설정하여 FBCP-ILI9341을 3 와이어 ( "9-bit") SPI로 알려줍니다. 의사소통.-DGPIO_TFT_RESET_PIN=number : 디스플레이 리셋 라인에 사용할 gpio 핀을 지정/재정의합니다. 이 핀 번호는 BCM 핀 번호로 지정됩니다. 생략하면 디스플레이에 재설정 핀이없고 항상 켜져 있다고 가정합니다.-DGPIO_TFT_BACKLIGHT=number : 디스플레이 백라이트 라인에 사용할 gpio 핀을 지정/재정의합니다. 이 핀 번호는 BCM 핀 번호로 지정됩니다. 생략하면 디스플레이에 GPIO 제어 백라이트 핀이없고 항상 켜져 있다고 가정합니다. 이것을 설정하면 config.h 에서 #define BACKLIGHT_CONTROL 옵션도 참조하십시오.FBCP-ILI9341은 항상 하드웨어 SPI0 포트를 사용하므로 된장, MOSI, CLK 및 CE0 핀은 항상 동일하며 변경할 수 없습니다. MISO 핀은 실제로 사용되지 않으므로 (현재) 그 순간에 연결을 건너 뛸 수 있습니다. 디스플레이가 칩 활성화 라인을 무시하는 도적 인 경우, 연결에도 연결을 단순화하기 위해 (디스플레이에 따라) 배선을 단순화하기 위해 눌러지면 접지에 연결하여이를 연결하여 도망 갈 수 있습니다.
디스플레이에서 우수한 성능을 얻으려면 디스플레이를 정격 속도 사양보다 훨씬 높게 구동합니다 (정격 사양은 디스플레이에 따라 약 ~ 10fps를 산출합니다). 이로 인해 디스플레이를 구동하려는 대상 속도를 명시 적으로 구성해야합니다. 제조 차이로 인해 각 디스플레이 사본이 다른 최대 속도에 도달하기 때문입니다. FBCP-ILI9341이 사용할 "기본 속도"는 없습니다. 옵션을 통해 속도를 설정합니다
-DSPI_BUS_CLOCK_DIVISOR=even_number : PI CORE_FREQ = 옵션과 함께 /boot/config.txt 의 옵션과 함께 클록 디바이저 번호를 설정합니다. SPI_frequency = core_freq/divisor . SPI_BUS_CLOCK_DIVISOR 짝수 숫자 여야합니다. Default Pi 3B 및 Zero W core_freq 는 400MHz이며 일반적으로 값 -DSPI_BUS_CLOCK_DIVISOR=6 ILI9341 디스플레이가 수행 할 수있는 가장 좋은 것 같습니다. 디스플레이에 손상된 출력이 표시되거나 더 높은 대역폭을 얻기 위해 더 작은 값을 표시하는 경우 더 큰 값을 시도하십시오. 최대 SPI 성능을 조정할 때의 데이터 포인트는 ILI9341.H 및 WAVESHARE35B.H를 참조하십시오. 안전한 초기 값은 -DSPI_BUS_CLOCK_DIVISOR=30 과 같은 것일 수 있습니다. 어떤 PI 보드를 타겟팅하고자하는지 명시 적으로 말할 수있는 몇 가지 옵션이 있습니다. 이것들은 당신을 위해 자동으로 측정해야하며 일반적으로 필요하지 않지만 예를 들어 다른 시스템에서 다른 PI 보드를 크로스 컴파일하거나 명시 적으로 원한다면 시도 할 수 있습니다.
-DSINGLE_CORE_BOARD=ON : 하드웨어 스레드가 하나만있는 PI에서 실행중인 경우이 옵션을 전달하십시오 (PI Model A, PI Model B, Compute Module 1, Pi Zero/Zero W). 존재하지 않으면 자동 검출.-DARMV6Z=ON :이 옵션을 전달하여 ARMV6Z 명령 세트 (pi 1a, 1a+, 1b, 1b+, Zero, Zero W)에 대해 구체적으로 최적화하십시오. 존재하지 않으면 자동 검출.-DARMV7A=ON :이 옵션을 전달하여 ARMV7-A 명령 세트에 대해 구체적으로 최적화하십시오 (PI 2B <Rev 1.2). 존재하지 않으면 자동 검출.-DARMV8A=ON : ARMV8-A 명령 세트에 대해 구체적으로 최적화하려면이 옵션을 전달합니다 (PI 2B> = Rev. 1.2, 3B, 3B+, CM3, CM3 LITE, 4B, CM4, PI400). 존재하지 않으면 자동 검출. 다음 빌드 옵션은 모든 디스플레이 및 PI 보드에 일반적이며 빌드를 추가로 사용자 정의합니다.
-DBACKLIGHT_CONTROL=ON : SET, FBCP-ILI9341을 활성화하여 주어진 백라이트 핀에서 디스플레이 백라이트를 제어합니다. 화면에서 일정 기간이 지나면 디스플레이가 잠들게됩니다. 그렇지 않으면 백라이트가 닿지 않습니다.-DDISPLAY_CROPPED_INSTEAD_OF_SCALING=ON : SET 및 소스 비디오 프레임이 SPI 디스플레이 비디오 해상도보다 큰 경우 소스 비디오는 스케일링하는 대신 모든 방향으로 일부를 자르면 SPI 디스플레이에 표시됩니다.-DDISPLAY_BREAK_ASPECT_RATIO_WHEN_SCALING=ON : 소스 비디오를 SPI 디스플레이로 스케일링하면 종횡비에 따라 기본적으로 스케일링이 수행되며, 필요에 따라 레터 박스/기둥 박스를 추가합니다. 이 설정이 설정되면 스트레칭은 중단 종횡비를 수행합니다.-DSTATISTICS=number : 화면에 표시 할 오버레이 통계 수준을 지정합니다. 0 : 비활성화, 1 : 활성화, 2 : 활성화 및 프레임 속도 간격 그래프도 표시합니다. 기본값은 1 (활성화)입니다.-DUSE_DMA_TRANSFERS=OFF : 지정된 경우 DMA 전송을 사용하여 비활성화합니다 (CPU 사용이 손실 된 비용이 많이 듭니다). DMA가 몇 가지 문제를 제기하는 경우이 지침을 통과하십시오.-DDMA_TX_CHANNEL=<num> : spi send 명령에 사용할 dma 채널 번호를 지정합니다. DMA 채널 충돌을 찾으면이를 변경하십시오.-DDMA_RX_CHANNEL=<num> : SPI 수신 명령에 사용할 DMA 채널 번호를 지정합니다. DMA 채널 충돌을 찾으면이를 변경하십시오.-DDISPLAY_SWAP_BGR=ON :이 옵션이 전달되면 빨간색과 청색 채널이 반전됩니다 (rgb <-> bgr) 스왑. 일부 디스플레이에는 디스플레이 컨트롤러가 자동으로 설명되지 않는 반대쪽 색상 패널 서브 픽셀 레이아웃이 있으므로 파란색과 빨간색이 혼합 된 경우이를 정의하십시오.-DDISPLAY_INVERT_COLORS=ON :이 옵션이 전달되면 픽셀 색상 값 해석이 반전됩니다 (흰색 = 0, black = 31/63). 기본값 : black = 0, 화이트 = 31/63. 디스플레이 이미지가 실제 색상의 음수처럼 보이는 경우이 옵션을 전달하십시오.-DDISPLAY_ROTATE_180_DEGREES=ON : Set, 디스플레이가 180도 회전됩니다. 이것은 HDMI 출력에 영향을 미치지 않으며 SPI 디스플레이 출력 만 영향을 미칩니다.-DLOW_BATTERY_PIN=<num> : 배터리 상태를 얻기 위해 투표 할 수있는 gpio 핀을 지정합니다. 기본적으로 설정되면 핀이 낮게 당겨지면 배터리 아이콘이 낮습니다 (조정할 수있는 방법은 config.h 참조). 위의 CMAKE 지시문 외에도 CONDIP.H에 다른 런타임 옵션을 제어하는 코드베이스 주위에 산란 된 다양한 정의가 있습니다. 프로그램의 동작을 추가로 조정하기 위해 직접 편집하십시오. 특히 설정을 마친 후 CMake 구성 줄에서 -DSTATISTICS=0 옵션으로 빌드 할 수 있습니다.
ILI9341 컨트롤러가 장착 된 Raspberry Pi 용 Adafruit 2.8 "320x240 Tft w/ 터치 스크린이있는 경우 빌드 및 실행을 입력 할 내용의 전체 예입니다.
 cd ~
sudo apt-get install cmake
git clone https://github.com/juj/fbcp-ili9341.git
cd fbcp-ili9341
mkdir build
cd build
cmake -DSPI_BUS_CLOCK_DIVISOR=6 -DADAFRUIT_ILI9341_PITFT=ON ..
make -j
sudo ./fbcp-ili9341
위의 작동이 작동하지 않으면 -DSPI_BUS_CLOCK_DIVISOR=8 또는 =10 지정하여 디스플레이가 약간 느리게 실행되거나 -DUSE_DMA_TRANSFERS=OFF 로 DMA가 문제가 될 경우 문제를 해결하십시오. ILI9341보다 다른 디스플레이 컨트롤러를 사용하는 경우 30 또는 40과 같이 훨씬 높은 값을 사용하는 것이 필요할 수 있습니다. CMAKE 옵션을 변경할 때 build 디렉토리를 반복하거나 재현하지 않고도 CMAKE 디렉토리 라인을 재발행 할 수 있습니다. 그러나 이전 설정을 기억하는 CMAKE를 피하기 위해 변경 옵션간에 파일 CMAKECACHE.TXT를 수동으로 삭제해야 할 수도 있습니다.
처음부터 완전히 재건하려면 rm -rf build 통해 빌드 디렉토리를 삭제하고 처음부터 깨끗하게 재건 할 수 있도록 다시 만들 수 있습니다. 이 디렉토리의 이름이나 위치에는 특별한 것이 없습니다. 그것은 나의 일반적인 컨벤션 일뿐입니다. 원하는 경우 FBCP-ILI9341 디렉토리와 관련하여 다른 디렉토리에서 빌드를 수행 할 수도 있습니다.
시작시 출시 할 드라이버를 설정하려면 sudo 모드에서 /etc/rc.local 파일을 편집하고 줄을 추가하십시오.
sudo /path/to/fbcp-ili9341/build/fbcp-ili9341 & 결국. 필요한 앰퍼 샌드 & 해당 라인의 끝에 주목하십시오.
예를 들어, 위에 나열된 명령 줄 단계를 사용하여 빌드하기 위해 /etc/rc.local 파일은 줄을받습니다.
sudo /home/pi/fbcp-ili9341/build/fbcp-ili9341 & Raspberry Pi 설치의 사용자 이름이 기본 pi 이외의 다른 인 경우 디렉토리를 변경하여 사용자의 홈 디렉토리를 가리 키십시오. ( pwd 사용하여 터미널에서 현재 디렉토리를 찾으십시오)
systemd 로 디스플레이 드라이버를 시작합니다 또는 /etc/rc.local 수정하는 대신 다음과 같이 제공된 systemd 장치 파일을 사용하십시오.
sudo install -m 0644 -t /etc fbcp-ili9341.conf
sudo install -m 0644 -t /etc/systemd/system fbcp-ili9341.service
sudo systemctl daemon-reload
sudo systemctl enable fbcp && sudo systemctl start fbcp 기본 HDMI 출력 /dev/fb0 framebuffer의 크기가 디스플레이의 해상도와 다르면 소스 비디오 크기는 기본적으로 SPI 디스플레이의 크기에 맞게 재조정됩니다. FBCP-ILI9341은 필요한 경우이 재조정 설정을 관리하며 GPU에 의해 수행되므로 성능이 너무 크지 않아야합니다. 그러나 결의안이 일치하지 않으면 작은 텍스트는 불가능 해 보일 것입니다. 크기 조정은 종횡비 보존 방식으로 수행되므로 종횡비가 일치하지 않으면 수평 또는 수직 검은 색 테두리가 디스플레이에 나타납니다. HDMI 출력을 전혀 사용하지 않으면 SPI 디스플레이 크기와 일치하도록 HDMI 출력을 구성하는 것이 가장 좋습니다. 다음 줄을 /boot/config.txt 에서 설정하여 수행 할 수 있습니다.
 hdmi_group=2
hdmi_mode=87
hdmi_cvt=320 240 60 1 0 0 0
hdmi_force_hotplug=1
SPI 디스플레이가 320x240과 다른 해상도를 갖는 경우 320 240 부품을 EG 480 320 으로 변경하십시오.
이 라인은 기본 디스플레이 모드에 대한 기본 응용 프로그램을 암시하고 TFT 디스플레이의 기본 해상도로 렌더링 할 수 있습니다. 그러나 HDMI 연결 디스플레이가 이러한 작은 해상도를 지원하지 않으면 HDMI 커넥터의 사용을 방지 할 수 있습니다. 타협으로, HDMI와 SPI 디스플레이가 동시에 사용되기를 원한다면 640x480과 같은 다른 호환 해상도를 사용할 수 있습니다. 이용 가능한 옵션은 Raspberry Pi HDMI 문서를 참조하십시오.
디스플레이의 새로 고침 속도는 디스플레이가 연결된 SPI 버스의 클럭 속도로 결정됩니다. Raspberry Pi의 BCM2835 칩이 작동하는 방식으로 인해 버스 속도를 정의하도록 설정할 수있는 간단한 speed=xxx Mhz 옵션이 없습니다. 대신, SPI 버스 속도는 두 개의 개별 매개 변수에서 파생됩니다. 일반적으로 BCM2835 SOC의 핵심 주파수 ( /boot/config.txt 의 core_freq ) 및 SPI 주변 장치 CDIV (Clock Divider) 설정. 그런 다음 결과 SPI 버스 속도는 공식 SPI_speed=core_freq/CDIV 로 계산합니다.
가능한 한 빨리 실행하도록 디스플레이를 최적화하려면
cmake 명령 줄에서 숫자 -DSPI_BUS_CLOCK_DIVISOR=number 전달하여 CDIV 값을 조정하십시오. 가능한 값은 숫자 2 , 4 , 6 , 8 , ... 입니다. CDIV SPI_speed 의 공식에서 분모에 나타나기 때문에 더 작은 값은 버스 속도가 높아지고 값이 높을수록 디스플레이가 느려집니다. 처음에는 디스플레이가 얼마나 빨리 실행될 수 있는지 모르면 -DSPI_BUS_CLOCK_DIVISOR=30 과 같은 안전한 높은 설정으로 시작하여 디스플레이가 대처할 수있는 최대 속도를 찾기 위해 더 작은 숫자로 이동하십시오. 다른 디스플레이의 특정 관찰 된 최대 버스 속도에 대해서는 readme 끝의 테이블을 참조하십시오.
터보 속도를 보장하십시오. 이것은 우수한 프레임 속도에 중요합니다. Raspberry Pi 3 Model B에서 BCM2835 코어는 기본적 으로 400MHz에서 실행됩니다 ( 400/CDIV MHZ SPI 속도 결과). CPU가 유휴 상태이거나 전압이 낮은 경우 BCM2835 코어는 대신 비 터보 250MHz 상태로 되돌아 250/CDIV MHZ SPI 속도를 초래합니다. 400MHz 대 비 터보 250MHz가 더 많은 대역폭의 +60%로 나오기 때문에 터보 속도가 성능에 미치는 영향이 중요합니다. Quake, Sonic 또는 Tyrian에서 60fps를 얻으려면 종종이 터보 주파수가 필요하지만, 예를 들어 NES 및 C64 에뮬레이션 된 게임은 250MHz에서도 60fps에 도달 할 수 있습니다. 어떤 이유로 든 전력이 충분한 전력을 공급해야하더라도 전압 보호가 시작되는 경우, avoid_warnings=2 를 파일 /boot/config.txt 값을 설정하여 저전압이있을 때 터보를 강제로 활성화 할 수 있습니다.
아마도 약간 반 직관적으로, 코어를 언더 클록하십시오 . 기본 터보 400MHz보다 작은 코어 주파수를 설정하면 더 작은 클럭 분배기를 사용하여 더 높은 결과 SPI 버스 속도를 얻을 수 있습니다. 예를 들어, 기본 core_freq=400 SPI CDIV=8 작업 (SPI 버스 속도 400MHz/8=50MHz )이지만 CDIV=6 ( 400MHz/6=66.67MHz 가 너무 많았 으면) core_freq=360 낮추는 시도를 시도 할 수 있습니다. core_freq=360 및 CDIV=6 설정하여 360MHz/6=60MHz 의 효과적인 SPI 버스 속도를 얻을 수 있습니다. 균형 core_freq= 및 CDIV 옵션을 사용하면 디스플레이 컨트롤러가 견딜 수있는 마지막 몇 kHz까지 최대 SPI 버스 속도를 찾을 수 있습니다. 반대 방향과 오버 클럭을 시도 할 수도 있지만, 물론 오버 클로킹 할 때 발생하는 모든 문제가 있습니다. 언더 클로킹에는 PI 달리기가 전반적으로 느려지는 단점이 있으므로 확실히 트레이드 오프입니다.
반면에, CPU 시간 FBCP-ILI9341을 사용할 수있는 CPU 시간을 제어하는 것이 바람직하다. 기본 빌드 설정은 PI 3B의 전력 소비를 희생시키면서 디스플레이 새로 고침 속도를 최대화하도록 조정됩니다. Pi Zero에서는 반대가 완료됩니다. 즉, 기본적으로 드라이버는 최대 디스플레이 업데이트 속도 대신 배터리 절약을 최적화합니다. 다음 옵션은이 두 가지 간의 균형을 맞추기 위해 제어 할 수 있습니다.
CPU 사용 대 성능 측면을 제어하는 주요 옵션은 config.h 에서 옵션 #define ALL_TASKS_SHOULD_DMA 입니다. 이 옵션을 활성화하면 CPU 사용량이 크게 줄어 듭니다. 이 옵션이 비활성화되면 SPI 버스 활용이 최대화되지만 CPU 사용량은 최대 80%-120%가 될 수 있습니다. 이 옵션이 활성화되면 CPU 사용량은 일반적으로 약 15%-30%입니다. 비디오를 보거나 빠르게 움직이는 게임을 할 때 최대 CPU 사용이 발생합니다. 화면에서 아무것도 변경되지 않으면 운전자의 CPU 소비는 0-5%에 가까워 야합니다. 기본적으로 #define ALL_TASKS_SHOULD_DMA pi zero 용으로 활성화되었지만 Pi 3B에는 비활성화됩니다.
cmake 옵션 -DUSE_DMA_TRANSFERS=ON 항상 낮은 CPU 사용을 위해 활성화되어야합니다. DMA 전송이 비활성화되면 드라이버는 폴링 된 SPI 모드에서 실행되며, 이는 일반적으로 전용 단일 코어의 CPU 시간을 사용합니다. DMA 전송이 문제를 일으키는 경우 -DDMA_TX_CHANNEL=<num> 및 -DDMA_RX_CHANNEL=<num> cmake 옵션과 SPI 통신에 사용할 DMA 보내기 및 수신 채널을 조정해보십시오.
통계 오버레이는 실행 상태에 대한 자세한 정보를 인쇄합니다. cmake에 -DSTATISTICS=0 옵션으로 오버레이를 비활성화하면 성능이 향상되고 CPU 사용이 줄어 듭니다. 인쇄 통계를 유지하려면 config.h의 #define STATISTICS_REFRESH_INTERVAL <timeInMicroseconds> 옵션으로 간격을 높일 수 있습니다.
#define USE_GPU_VSYNC 활성화하면 CPU 소비가 줄어들면 raspberrypi/userland #440으로 인해 말더듬이 발생할 수 있습니다. #defined USE_GPU_VSYNC 비활성화하면 말더듬이 줄어들지 만 Raspberrypi/Userland #440으로 인해 CPU 전력 소비가 증가합니다.
옵션 #define SELF_SYNCHRONIZE_TO_GPU_VSYNC_PRODUCED_NEW_FRAMES 는 #define USE_GPU_VSYNC 와 함께 사용하여 raspberrypi/userly #440 문제 사이에서 중간 지점을 찾으려고 노력할 수 있습니다. 이 설정을 활성화하거나 비활성화하는 실험을 시도하십시오.
config.h에는 여러 #define SAVE_BATTERY_BY_x 옵션이 있으며 모든 기본값이 활성화됩니다. 이들은 항상 절충없이 사용하는 것이 안전해야합니다. 대기 시간 또는 성능 관련 문제가있는 경우 문제를 해결하기 위해이를 전환 할 수 있습니다.
옵션 #define DISPLAY_FLIP_ORIENTATION_IN_SOFTWARE 옵션은 약간의 추가 CPU 사용을 유발하므로 CPU로드가 약간 밝아집니다.
SPI 디스플레이 버스가 디스플레이 크기 및 화면에서 변경된 콘텐츠의 양과 비교하여 실제로 빠르게 실행할 수 있다면 config.h 에서 #define UPDATE_FRAMES_IN_SINGLE_RECTANGULAR_DIFF 옵션을 활성화하여 CPU 사용량을 늘리면 CPU 사용량을 줄입니다. 버스를 통해 보낸 바이트 수. 이것은 Pi Zero에 큰 영향을 미치는 것으로 관찰되었으므로 특히 확인할 가치가 있습니다.
SPI 디스플레이 버스가 실제로 실제로 빠르게 실행될 수 있거나 (프레임 속도에 관심이 없지만 CPU 사용량이 적음) config.h 델타 차이를 포기하려면 #define UPDATE_FRAMES_WITHOUT_DIFFING 옵션을 활성화 할 수 있습니다. 옵션 모두. 이렇게하면 전반적인 최소 CPU 사용을 위해 순진한 풀 프레임 업데이트로 되돌아갑니다.
옵션 #define RUN_WITH_REALTIME_THREAD_PRIORITY 를 사용하여 실시간 프로세스 우선 순위에서 드라이버를 실행할 수 있습니다. 그러나 이것은 시스템을 잠글 수 있지만 여전히 고급 실험에 사용할 수있게되었습니다.
display.h 옵션 #define TARGET_FRAME_RATE <number> 옵션이 있습니다. 이것을 30과 같이 더 작은 값으로 설정하면 CPU 소비를 줄이기 위해 새로 고침 비율을 거래합니다.
FBCP-ILI9341의 즐거운 측면은 대기 시간 간접비를 거의 소개한다는 것입니다. 119Hz의 새로 고침 ILI9341 디스플레이에서 FBCP-ILI9341은 16.66msecs 시간 이내에 GPIO 입력에서 화면에 대한 응답으로 픽셀을 얻습니다. 120fps 녹음 카메라 만 가지고 있으므로 그보다 짧은 지연을 쉽게 측정 할 수는 없지만 슬로우 모션 비디오 영상의 대략적인 통계적 추정치는이 지연이 ~ 8.4msecs 패널 새로 고침 속도로 지배하는 2-3msec만큼 낮을 수 있음을 시사합니다. ILI9341의.
그렇다고해서 게임에서 대기 시간을 표시하려는 전체 입력이 매우 즉각적이라는 의미는 아닙니다. Retropie에서 NES 에뮬레이션 된 게임을 간단히 테스트하면 약 60-80msec의 총 대기 시간이 나타납니다. 이 대기 시간은 NES 게임 에뮬레이터 오버 헤드와 Linux, Dispmanx 및 GPU 렌더링 및 GPU 프레임 버퍼 스냅 샷에 의해 추가 된 추가 대기 시간으로 인해 발생합니다. (FBCP-ILI9341을 Dispmanx와 GPU 스택을 우회하는 정적 라이브러리로 GPIO 입력 및 응용 프로그램 로직을 FBCP-ILI9341에 직접 연결하면 전체 대기 시간 의이 소수의 MSEC로 내려갈 수 있습니다. 위의 GPIO 입력 비디오)
흥미롭게도, FBCP-ILI9341 지연 오버 헤드. 흥미로운 질문은 또한 SPI가 PI의 DPI 연결 디스플레이와 비교하는 방법입니다.
불행히도 SPI 연결 디스플레이의 제한은 SPI 모드에서 실행될 때 VSYNC 라인 신호가 디스플레이 컨트롤러에서 사용할 수 없으므로 디스플레이의 SPI 버스 대역폭이 빠르더라도 VSync 잠금 업데이트를 수행 할 수 없다는 것입니다. . 예를 들어, 4 ILI9341 디스플레이는 모두 75MHz보다 빠르게 실행할 수 있으므로 SPI 버스 대역폭별로 모든 프레임을 VSYNC 간격으로 업데이트 할 수는 있지만 업데이트를 동기화 할 수는 없습니다. vsync since the display controllers do not report it. (If you do know of a display that does actually expose a vsync clock signal even in SPI mode, you can try implementing support to locking on to it)
You can however choose between two distinct types of tearing artifacts: straight line tearing and diagonal tearing . Whichever looks better is a bit subjective, which is why both options exist. I prefer the straight line tearing artifact, it seems to be less intrusive than the diagonal tearing one. To toggle this, edit the option #define DISPLAY_FLIP_ORIENTATION_IN_SOFTWARE in config.h . When this option is enabled, fbcp-ili9341 produces straight line tearing, and consumes a tiny few % more CPU power. By default Pi 3B builds with straight line tearing, and Pi Zero with the faster diagonal tearing. Check out the video Latency and tearing test #2: GPIO input to display latency in fbcp-ili9341 and tearing modes to see in slow motion videos how these two tearing modes look like.
Another option that is known to affect how the tearing artifact looks like is the internal panel refresh rate. For ILI9341 displays this refresh rate can be adjusted in ili9341.h , and this can be set to range between ILI9341_FRAMERATE_61_HZ and ILI9341_FRAMERATE_119_HZ (default). Slower refresh rates produce less tearing, but have higher input-to-display latency, whereas higher refresh rates will result in the opposite. Again visually the resulting effect is a bit subjective.
To get tearing free updates, you should use a DPI display, or a good quality HDMI display. Beware that cheap small 3.5" HDMI displays such as KeDei do also tear - that is, even if they are controlled via HDMI, they don't actually seem to implement VSYNC timed internal operation.
Having no vsync is not all bad though, since with the lack of vsync, SPI displays have the opportunity to obtain smoother animation on content that is not updating at 60Hz. It is possible that content on the SPI display will stutter even less than what DPI or HDMI displays on the Pi can currently provide (although I have not been able to test this in detail, except for the KeDei case above).
The main option that affects smoothness of display updates is the #define USE_GPU_VSYNC line in config.h . If this is enabled, then the internal Pi GPU HDMI vsync clock is used to drive frames onto the display. The Pi GPU clock runs at a fixed rate that is independent of the content. This rate can be discovered by running tvservice -s on the Pi console, and is usually 59Hz or 60Hz. If your application renders at this rate, animation will look smooth, but if not, there will be stuttering. For example playing a PAL NES game that updates at 50Hz with HDMI clock set at 60Hz will cause bad microstuttering in video output if #define USE_GPU_VSYNC is enabled.
If USE_GPU_VSYNC is disabled, then a busy spinning GPU frame snapshotting thread is used to drive the updates. This will produce smoother animation in content that does not maintain a fixed 60Hz rate. Especially in OpenTyrian, a game that renders at a fixed 36fps and has slowly scrolling scenery, the stuttering caused by USE_GPU_VSYNC is particularly visible. Running on Pi 3B without USE_GPU_VSYNC enabled produces visually smoother looking scrolling on an Adafruit 2.8" ILI9341 PiTFT set to update at 119Hz, compared to enabling USE_GPU_VSYNC on the same setup. Without USE_GPU_VSYNC , the dedicated frame polling loop thread "finds" the 36Hz update rate of the game, and then pushes pixels to the display at this exact rate. This works nicely since SPI displays disregard vsync - the result is that frames are pushed out to the SPI display immediately as they become available, instead of pulling them at a fixed 60Hz rate like HDMI does.
A drawback is that this kind of polling consumes more CPU time than the vsync option. The extra overhead is around +34% of CPU usage compared to the vsync method. It also requires using a background thread, and because of this, it is not feasible to be used on a single core Pi Zero. If this polling was unnecessary, this mode would also work on a Pi Zero, and without the added +34% CPU overhead on Pi 3B. See the Known Issues section below for more details.

There are two other main options that affect frame delivery timings, #define SELF_SYNCHRONIZE_TO_GPU_VSYNC_PRODUCED_NEW_FRAMES and #define SAVE_BATTERY_BY_PREDICTING_FRAME_ARRIVAL_TIMES . Check out the video fbcp-ili9341 frame delivery smoothness test on Pi 3B and Adafruit ILI9341 at 119Hz for a detailed side by side comparison of these different modes. The conclusions drawn from the four tested scenarios in the video are:
1. vc_dispmanx_vsync_callback() (top left) , set #define USE_GPU_VSYNC and unset #define SELF_SYNCHRONIZE_TO_GPU_VSYNC_PRODUCED_NEW_FRAMES :
This mode uses the DispmanX HDMI vsync signal callback to drive frames to the display.
장점 :
단점 :
2. vc_dispmanx_vsync_callback() + self synchronization (top right) , set #define USE_GPU_VSYNC and #define SELF_SYNCHRONIZE_TO_GPU_VSYNC_PRODUCED_NEW_FRAMES :
This mode uses the GPU vsync signal, but also aims to find and synchronize to the edge trigger when content is producing frames. This is the default build mode on Pi Zero.
장점 :
단점 :
3. gpu polling thread + sleep heuristic (bottom left) , unset #define USE_GPU_VSYNC and set #define SAVE_BATTERY_BY_PREDICTING_FRAME_ARRIVAL_TIMES :
This mode runs a dedicated background thread that drives frames from the GPU to the SPI display. This is the default build mode on Pi 3B.
장점 :
단점 :
4. gpu polling thread without sleeping (bottom right) , unset #define USE_GPU_VSYNC and unset #define SAVE_BATTERY_BY_PREDICTING_FRAME_ARRIVAL_TIMES :
This mode runs the dedicated GPU thread as fast as possible, without attempting to sleep CPU.
장점 :
단점 :
Be aware of the following limitations:
vc_dispmanx_snapshot() API, and the obtained pixels are then routed on to the SPI-based display. This kind of polling is performed, since there does not exist an event-based mechanism to get new frames from the GPU as they are produced. The result is inefficient and can easily cause stuttering, since different applications produce frames at different paces. Ideally the code would ask the VideoCore API to receive finished frames in callback notifications immediately after they are rendered , but this kind of functionality does not exist in the current GPU driver stack. In the absence of such event delivery mechanism, the code has to resort to polling snapshots of the display framebuffer using carefully timed heuristics to balance between keeping latency and stuttering low, while not causing excessive power consumption. These heuristics keep continuously guessing the update rate of the animation on screen, and they have been tuned to ensure that CPU usage goes down to 0% when there is no detected activity on screen, but it is certainly not perfect. This GPU limitation is discussed at raspberrypi/userland#440. If you'd like to see fbcp-ili9341 operation reduce latency, stuttering and power consumption, please throw a (kind!) comment or a thumbs up emoji in that bug thread to share that you care about this, and perhaps Raspberry Pi engineers might pick the improvement up on the development roadmap. If this issue is resolved, all of the #define USE_GPU_VSYNC , #define SAVE_BATTERY_BY_PREDICTING_FRAME_ARRIVAL_TIMES and #define SELF_SYNCHRONIZE_TO_GPU_VSYNC_PRODUCED_NEW_FRAMES hacks from the previous section could be deleted from the driver, hopefully leading to a best of all worlds scenario without drawbacks. /boot/config.txt and configure all applications to never change that at runtime. 400/250=+60% as well. Therefore when choosing the SPI CDIV value to use, one has to pick one that works for both idle and turbo clock speeds. Conversely, the BCM core reverts to non-turbo speed when there is only light CPU load active, and this slows down the display, so if an application is graphically intensive but light on CPU, the SPI display bus does not get a chance to run at maximum speeds. A way to work around this is to force the BCM core to always stay in its turbo state with force_turbo=1 option in /boot/config.txt , but this has an unfortunate effect of causing the ARM CPU to always run in turbo speed as well, consuming excessive amounts of power. At the time of writing, there does not yet exist a good solution to have both power saving and good performance. This limitation is being discussed in more detail at raspberrypi/firmware#992. For more known issues and limitations, check out the bug tracker, especially the entries marked retired , for items that are beyond current scope.
By default fbcp-ili9341 builds with a statistics overlay enabled. See the video fbcp-ili9341 ported to ILI9486 WaveShare 3.5" (B) SpotPear 320x480 SPI display to find details on what each field means. Build with CMake option -DSTATISTICS=0 to disable displaying the statistics. You can also try building with CMake option -DSTATISTICS=2 to show a more detailed frame delivery timings histogram view, see screenshot and video above.
The fbcp part in the name means framebuffer copy ; specifically for the ILI9341 controller. fbcp-ili9341 is not actually a framebuffer copying driver, it does not create a secondary framebuffer that it would copy bytes across to from the primary framebuffer. It is also no longer a driver only for the ILI9341 controller. A more appropriate name might be userland-raspi-spi-display-driver or something like that, but the original name stuck.
Yes, it does, although not quite as well as on Pi 3B. If you'd like it to run better on a Pi Zero, leave a thumbs up at raspberrypi/userland#440 - hard problems are difficult to justify prioritizing unless it is known that many people care about them.
Edit the file config.h and comment out the line #define DISPLAY_OUTPUT_LANDSCAPE . This will make the display output in portrait mode, effectively rotating it by 90 degrees. Note that this only affects the pixel memory reading mode of the display. It is not possible to change the panel scan order to run between landscape and portrait, the SPI displays typically always scan in portrait mode. The result is that it will change the panel vsync tearing mode from "straight line tearing" over to "diagonal tearing" (see the section About Tearing above).
If you do not want to have diagonal tearing, but would prefer straight line tearing, then additionally enable the option #define DISPLAY_FLIP_ORIENTATION_IN_SOFTWARE in config.h . That will restore straight line tearing, but it will also increase overall CPU consumption.
Enable the option #define DISPLAY_ROTATE_180_DEGREES in config.h . This should rotate the SPI display to show up the other way around, while keeping the HDMI connected display orientation unchanged. Another option is to utilize a /boot/config.txt option display_rotate=2, which rotates both the SPI output and the HDMI output.
Note that the setting DISPLAY_ROTATE_180_DEGREES only affects the pixel memory reading mode of the display. It is not possible to flip the panel scan to run inverted by 180 degrees. This means that adjusting these settings will also have effects of changing the visual appearance of the vsync tearing artifact. If you have the ability to mount the display 180 degrees around in your project, it is recommended to do that instead of using the DISPLAY_ROTATE_180_DEGREES option.
Edit the file config.h in a text editor (a command line one such as pico , vim , nano , or SSH map the drive to your host), and find the appropriate line in the file. Add comment lines // in front of that text to disable the option, or remove the // characters to enable it.
After having edited and saved the file, reissue make -j in the build directory and restart fbcp-ili9341.
Some options are passed to the build from the CMake configuration script. You can run with make VERBOSE=1 to see which configuration items the CMake build is passing. See the above Configuring Build Options section to customize the CMake configure items. For example, to remove the statistics overlay, pass -DSTATISTICS=0 directive to CMake.
Building requires CMake to be installed on the Pi: try sudo apt-get install cmake .
Try deleting CMakeCache.txt between changing CMake settings.
Yes, both work fine. For linux command line terminal, the /dev/tty1 console should be set to output to Linux framebuffer 0 ( /dev/fb0 ). This is the default mode of operation and there do not exist other framebuffers in a default distribution of Raspbian, but if you have manually messed with the con2fbmap command in your installation, you may have inadvertently changed this configuration. Run con2fbmap 1 to see which framebuffer the /dev/tty1 console is outputting to, it should print console 1 is mapped to framebuffer 0 . Type con2fbmap 1 0 to reset console 1 back to outputting to framebuffer 0.
Likewise, the X windowing system should be configured to render to framebuffer 0. This is by default the case. The target framebuffer for X windowing service is usually configured via the FRAMEBUFFER environment variable before launching X. If X is not working by default, you can try overriding the framebuffer by launching X with FRAMEBUFFER=/dev/fb0 startx instead of just running startx .
I don't know, I don't currently have any to test. Perhaps the code does need some model specific configuration, or perhaps it might work out of the box. I only have Pi 3B, Pi 3B+, Pi Zero W and a Pi 3 Compute Module based systems to experiment on. Pi 2 B has been reported to work by users (#17).
If the display controller is one of the currently tested ones (see the list above), and it is wired up to run using 4-line SPI, then it should work. Pay attention to configure the Data/Control GPIO pin number correctly, and also specify the Reset GPIO pin number if the device has one.
If the display controller is not one of the tested ones, it may still work if it is similar to one of the existing ones. For example, ILI9340 and ILI9341 are practically the same controller. You can just try with a specific one to see how it goes.
If fbcp-ili9341 does not support your display controller, you will have to write support for it. fbcp-ili9341 does not have a "generic SPI TFT driver routine" that might work across multiple devices, but needs specific code for each. If you have the spec sheet available, you can ask for advice, but please do not request to add support to a display controller "blind", that is not possible.
아마도. This is a more recent experimental feature that may not be as stable, and there are some limitations, but 3-wire ("9-bit") SPI display support is now available. If you have a 3-wire SPI display, ie one that does not have a Data/Control (DC) GPIO pin to connect, configure it via CMake with directive -DGPIO_TFT_DATA_CONTROL=-1 to tell fbcp-ili9341 that it should be driving the display with 3-wire protocol.
Current limitations of 3-wire communication are:
ALL_TASKS_SHOULD_DMA is currently not supported, there is an issue with DMA chaining that prevents this from being enabled. As result, CPU usage on 3-wire displays will be slightly higher than on 4-wire displays.OFFLOAD_PIXEL_COPY_TO_DMA_CPP is currently not supported. As a result, 3-wire displays may not work that well on single core Pis like Pi Zero.No. Those are completely different technologies altogether. It should be possible to port the driver algorithm to work on I2C however, if someone is interested.
At the moment one cannot utilize the XPT2046/ADS7846 touch controllers while running fbcp-ili9341, so touch is mutually incompatible with this driver. In order for fbcp-ili9341 to function, you will need to remove all dtoverlay s in /boot/config.txt related to touch.
I have done close to everything possible to my displays - cut power in middle of operation, sent random data and command bytes, set their operating voltage commands and clock timings to arbitrary high and low values, tested unspecified and reserved command fields, and driven the displays dozens of MHz faster than they managed to keep up with, and I have not yet done permanent damage to any of my displays or Pis.
Easiest way to do permanent damage is to fail at wiring, eg drive 5 volts if your display requires 3.3v, or short a connection, or something similar.
The one thing that fbcp-ili9341 stays clear off is that it does not program the non-volatile memory areas of any of the displays. Therefore a hard power off on a display should clear all performed initialization and reset the display to its initial state at next power on.
That being said, if it breaks, you'll get to purchase a new shiny one to replace it.
Yes, fbcp-ili9341 shows the output of the HDMI display on the SPI screen, and both can be attached at the same time. A HDMI display does not have to be connected however, although fbcp-ili9341 operation will still be affected by whatever HDMI display mode is configured. Check out tvservice -s on the command line to check what the current DispmanX HDMI output mode is.
At the moment fbcp-ili9341 has been developed to only display the contents of the main DispmanX GPU framebuffer over to the SPI display. That is, the SPI display will show the same picture as the HDMI output does. There is no technical restriction that requires this though, so if you know C/C++ well, it should be a manageable project to turn fbcp-ili9341 to operate as an offscreen display library to show a completely separate (non-GPU-accelerated) image than what the main HDMI display outputs. For example you could have two different outputs, eg a HUD overlay, a dashboard for network statistics, weather, temps, etc. showing on the SPI while having the main Raspberry Pi desktop on the HDMI.
In this kind of mode, you would probably strip the DispmanX bits out of fbcp-ili9341, and recast it as a static library that you would link to in your drawing application, and instead of snapshotting frames, you can then programmatically write to a framebuffer in memory from your C/C++ code.
Unfortunately there are a number of things to go wrong that all result in a white screen. This is probably the hardest part to diagnose. Some ideas:
This suggests that the power line or the backlight line might not be properly connected. Or if the backlight connects to a GPIO pin on the Pi (and not a voltage pin), then it may be that the pin is not in correct state for the backlight to turn on. Most of the LCD TFT displays I have immediately light up their backlight when they receive power. The Tontec one has a backlight GPIO pin that boots up high but must be pulled low to activate the backlight. OLED displays on the other hand seem to stay all black even after they do get power, while waiting for their initialization to be performed, so for OLEDs it may be normal for nothing to show up on the screen immediately after boot.
If the backlight connects to a GPIO pin, you may need to define -DGPIO_TFT_BACKLIGHT=<pin> in CMake command line or config.h , and edit config.h to enable #define BACKLIGHT_CONTROL .
fbcp-ili9341 runs a clear screen command at low speed as first thing after init, so if that goes through, it is a good sign. Try increasing -DSPI_BUS_CLOCK_DIVISOR= CMake option to a higher number to see if the display driving rate was too fast. Or try disabling DMA with -DUSE_DMA_TRANSFERS=OFF to see if this might be a DMA conflict.
This suggests same as above, increase SPI bus divisor or troubleshoot disabling DMA. If DMA is detected to be the culprit, try changing up the DMA channels. Double check that /boot/config.txt does not have any dtoverlay s regarding other SPI display drivers or touch screen controllers, and that it does NOT have a dtparam=spi=on line in it - fbcp-ili9341 does not use the Linux kernel SPI driver.
Make sure other fbcp programs are not running, or that another copy of fbcp-ili9341 is not running on the background.
This is likely caused by the program resizing the video resolution at runtime, which breaks DispmanX. See raspberrypi/userland#461 for more details.
Check that the Pi is powered off of a power supply that can keep up with the voltage, and the low voltage icon is not showing up. (remove any avoid_warnings=1/2 directive from /boot/config.txt if that was used to get rid of warnings overlay, to check that voltage is good) It has been observed that if there is not enough power supplied, the display can be the first to starve, while the Pi might keep on running fine. Try removing turbo settings or lowering the clock speed if you have overclocked to verify that the display crash is not power usage related.
Also try lowering SPI bus speed to a safe lower value, eg half of the maximum speed that the display was able to manage.
Double check the Data/Command (D/C) GPIO pin physically, and in CMake command line. Whenever fbcp-ili9341 refers to pin numbers, they are always specified in BCM pin numbers. Try setting a higher -DSPI_BUS_CLOCK_DIVISOR= value to CMake. Make sure no other fbcp programs or SPI drivers or dtoverlays are enabled.
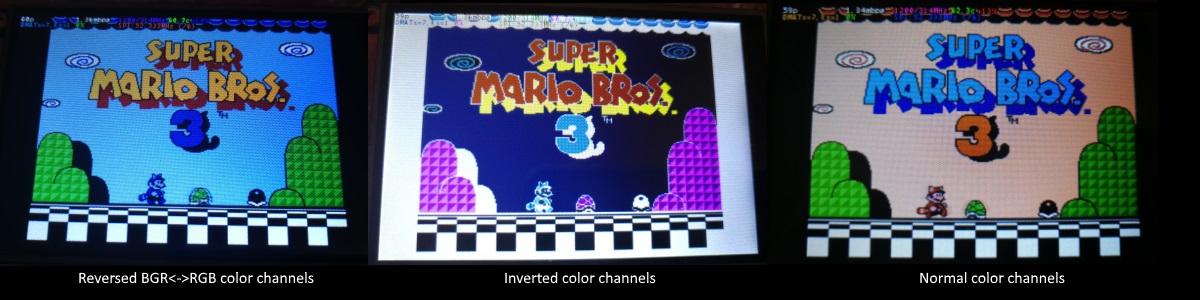
If the color channels are mixed (red is blue, blue is red, green is green) like shown on the left image, pass the CMake option -DDISPLAY_SWAP_BGR=ON to the build.
If the color intensities look wrong (white is black, black is white, color looks like a negative image) like seen in the middle image, pass the CMake option -DDISPLAY_INVERT_COLORS=ON to the build.
If the colors looks off in some other fashion, it is possible that the display is just being driven at a too high SPI bus speed, in which case try making the display run slower by choosing a higher -DSPI_BUS_CLOCK_DIVISOR= option to CMake. Especially on ILI9486 displays it has been observed that the colors on the display can become distorted if the display is run too fast beyond its maximum capability.
fbcp-ili9341 needs a few megabytes of GPU memory to function if DMA transfers are enabled. The gpu_mem boot config option dictates how much of the Pi's memory area is allocated to the GPU. By default this is 64MB, which has been observed to not leave enough memory for fbcp-ili9341 if HDMI is run at 1080p. If this error happens, try increasing GPU memory to eg 128MB by adding a line gpu_mem=128 in /boot/config.txt .
As the number of supported displays, Raspberry Pi device models, Raspbian/Retropie/Lakka OS versions, accompanied C++ compiler versions and fbcp-ili9341 build options have grown in number, there is a combinatorial explosion of all possible build modes that one can put the codebase through, so it is not easy to keep every possible combo tested all the time. Something may have regressed or gotten outdated. Stay calm, and report a bug.
You can also try looking through the commit history to find changes related to your configuration combo, to see if there's a mention of a known good commit in time that should work for your case. If you get an odd compiler error on cmake or make lines, those will usually be very easy to fix, as they are most of the time a result of some configurational oversight.
First, make sure the display is a 4-wire SPI and not a 3-wire one. A display is 4-wire SPI if it has a Data/Control (DC) GPIO line that needs connecting. Sometimes the D/C pin is labeled RS (Register Select). Support for 3-wire SPI displays does exist, but it is experimental and not nearly as well tested as 4-wire displays.
Second is the consideration about display speed. Below is a performance chart of the different displays I have tested. Note that these are sample sizes of one, I don't know how much sample variance there exists. Also I don't know if it is likely that there exists big differences between displays with same controller from different manufacturers. At least the different ILI9341 displays that I have are all quite consistent on performance, whether they are from Adafruit or WaveShare or from BuyDisplay.com.
| 공급업체 | 크기 | 해결 | 제어 장치 | Rated SPI Bus Speed | Obtained Bus Speed | 프레임 속도 |
|---|---|---|---|---|---|---|
| Adafruit PiTFT | 2.8" | 240x320 | ILI9341 | 10MHz | 294MHz/4=73.50MHz | 59.81 fps |
| Adafruit PiTFT | 2.2" | 240x320 | ILI9340 | 15.15MHz | 338MHz/4=84.50MHz | 68.76 fps |
| Adafruit PiTFT | 3.5" | 320x480 | HX8357D | 15.15MHz | 314MHz/6=52.33MHz | 21.29 fps |
| Adafruit OLED | 1.27" | 128x96 | SSD1351 | 20MHz | 360MHz/20=18.00MHz | 91.55 fps |
| Waveshare RPi LCD (B) IPS | 3.5" | 320x480 | ILI9486 | 15.15MHz | 255MHz/8=31.88MHz | 12.97 fps |
| maithoga TFT LCD | 3.5" | 320x480 | ILI9486L | 15.15MHz | 400MHz/8=50.00MHz | 13.56 fps* |
| BuyDisplay.com SPI TFT copy #1 | 3.2" | 240x320 | ILI9341 | 10MHz | 310MHz/4=77.50MHz | 63.07 fps |
| BuyDisplay.com SPI TFT copy #2 | 3.2" | 240x320 | ILI9341 | 10MHz | 300MHz/4=75.00MHz | 61.03 fps |
| Arduino A000096 LCD | 1.77" | 128x160 | ST7735R | 15.15MHz | 355MHz/6=59.16MHz | 180.56 fps |
| Tontec MZ61581-PI-EXT 2016.1.28 | 3.5" | 320x480 | MZ61581 | 128MHz | 280MHz/2=140.00MHz | 56.97 fps |
| Adafruit 240x240 Wide Angle TFT | 1.54" | 240x240 | ST7789 | ? | 340MHz/4=85.00MHz | 92.23 fps |
| WaveShare 240x240 Display HAT | 1.3" | 240x240 | ST7789VW | 62.5MHz | 338MHz/4=84.50MHz | 91.69 fps |
| WaveShare 128x128 Display HAT | 1.44" | 128x128 | ST7735S | 15.15MHz | (untested) | (untested) |
| KeDei v6.3 | 3.5" | 320x480 | MPI3501 | ? | 400MHz/12=33.333MHz | 4.8fps ** |
In this list, Rated SPI Bus Speed is the maximum clock speed that the display controller is rated to run at. The Obtained Bus Speed column lists the fastest SPI bus speed that was achieved in practice, and the core_freq BCM Core speed and SPI Clock Divider CDIV setting that was used to achieve that rate. Note how most display controllers can generally be driven much faster than what they are officially rated at in their spec sheets.
The Frame Rate column shows the worst case frame rate when full screen updates are being performed. This occurs for example when watching fullscreen video (that is not a flat colored cartoon). Because fbcp-ili9341 only sends over the pixels that have changed, displays such as HX8357D and ILI9486 can still be used to play many games at 60fps. Retro games work especially well.
All the ILI9341 displays work nice and super fast at ~70-80MHz. My WaveShare 3.5" 320x480 ILI9486 display runs really slow compared to its pixel resolution, ~32MHz only. See fbcp-ili9341 ported to ILI9486 WaveShare 3.5" (B) SpotPear 320x480 SPI display for a video of this display in action. Adafruit's 320x480 3.5" HX8357D PiTFTs is ~64% faster in comparison.
The ILI9486L controller based maithoga display runs a bit faster than ILI9486 WaveShare, 50MHz versus 31.88MHz, ie +56.8% bandwidth increase. However fps-wise maithoga reaches only 13.56 vs WaveShare 12.97 fps, because the bandwidth advantage is fully lost in pixel format differences: ILI9486L requires transmitting 24 bits per each pixel (R6G6B6 mode), whereas ILI9486 supports 16 bits per pixel R5G6B5 mode. This is reflected in the above chart refresh rate for the maithoga display (marked with a star).
If manufacturing variances turn out not to be high between copies, and you'd like to have a bigger 320x480 display instead of a 240x320 one, then it is recommended to avoid ILI9486, they indeed are slow.
The KeDei v6.3 display with MPI3501 controller takes the crown of being horrible, in all aspects imaginable. It is able to run at 33.33 MHz, but due to technical design limitations of the display (see #40), effective bus speed is halved, and only about 72% utilization of the remaining bus rate is achieved. DMA cannot be used, so CPU usage will be off the charts. Even though fbcp-ili9341 supports this display, level of support is expected to be poor, because the hardware design is a closed secret without open documentation publicly available from the manufacturer. Stay clear of KeDei or MPI3501 displays.
The Tontec MZ61581 controller based 320x480 3.5" display on the other hand can be driven insanely fast at up to 140MHz! These seem to be quite hard to come by though and they are expensive. Tontec seems to have gone out of business and for example the domain itontec.com from which the supplied instructions sheet asks to download original drivers from is no longer registered. I was able to find one from eBay for testing.
Search around, or ask the manufacturer of the display what the maximum SPI bus speed is for the device. This is the most important aspect to getting good frame rates, but unfortunately most web links never state the SPI speed rating, or they state it ridiculously low like in the spec sheets. Try and buy to see, or ask in some community forums from people who already have a particular display to find out what SPI bus speed it can achieve.
One might think that since Pi Zero is slower than a Pi 3, the SPI bus speed might not matter as much when running on a Pi Zero, but the effect is rather the opposite. To get good framerates on a Pi Zero, it should be paired with a display with as high SPI bus speed capability as possible. This is because the higher the SPI bus speed is, the more autonomously a DMA controller can drive it without CPU intervention. For the same reason, the interlacing technique does not (currently at least) perform well on a Pi Zero, so it is disabled there by default. ILI9341s run well on Pi Zero, ILI9486 on the other hand is quite difficult to combine with a Pi Zero.
Ultimately, it should be noted that parallel displays (DPI) are the proper method for getting fast framerates easily. SPI displays should only be preferred if display form factor is important and a desired product might only exist as SPI and not as DPI, or the number of GPIO pins that are available on the Pi is scarce that sacrificing dozens of pins to RGB data is not 실행할 수 있는.
Hardware-wise, there are six different ways to connect displays to the Pi. Here are the pros and cons of each:
Displays are generally manufactured to utilize one specific interfacing method, with the exception that some displays have a both I²C and SPI modes that can be configured via soldering.
Fbcp-ili9341 driver is about interfacing with SPI displays. If your display utilizes some other connection mechanism, fbcp-ili9341 will not apply.
Software-wise, there are two possible alternatives to fbcp-ili9341:
The following links proved helpful when writing this:
If you would like to help push Raspberry Pi SPI display support further, there are always more things to do in the project. Here is a list of ideas and TODOs for recognized work items to contribute, roughly rated in order of increasing difficulty.
top / htop , or with a power meter off the wall and report the results.SPI_3WIRE_PROTOCOL + ALL_TASKS_SHOULD_DMA to work together, or 3) fix up SPI_3WIRE_PROTOCOL + OFFLOAD_PIXEL_COPY_TO_DMA_CPP to work together.ALL_TASKS_SHOULD_DMA mode to be always superior in performance and CPU usage so that the non- ALL_TASKS_SHOULD_DMA path can be dropped from the codebase. (probably requires the above chaining to function efficiently)This driver is licensed under the MIT License. See LICENSE.txt. In nonlegal terms, it's yours for both free and commercial projects, DIY packages, kickstarters, Etsys and Ebays, and you don't owe back a dime. Feel free to apply and derive as you wish.
If you found fbcp-ili9341 useful, it makes me happy to hear back about the projects it found a home in. If you did a build or a project where fbcp-ili9341 worked out, it'd be great to see a video or some photos or read about your experiences.
I hope you build something you enjoy!
Best way to discuss the driver is to open a GitHub issue. You may also be able to find me over at sudomod.com Discord channel.


