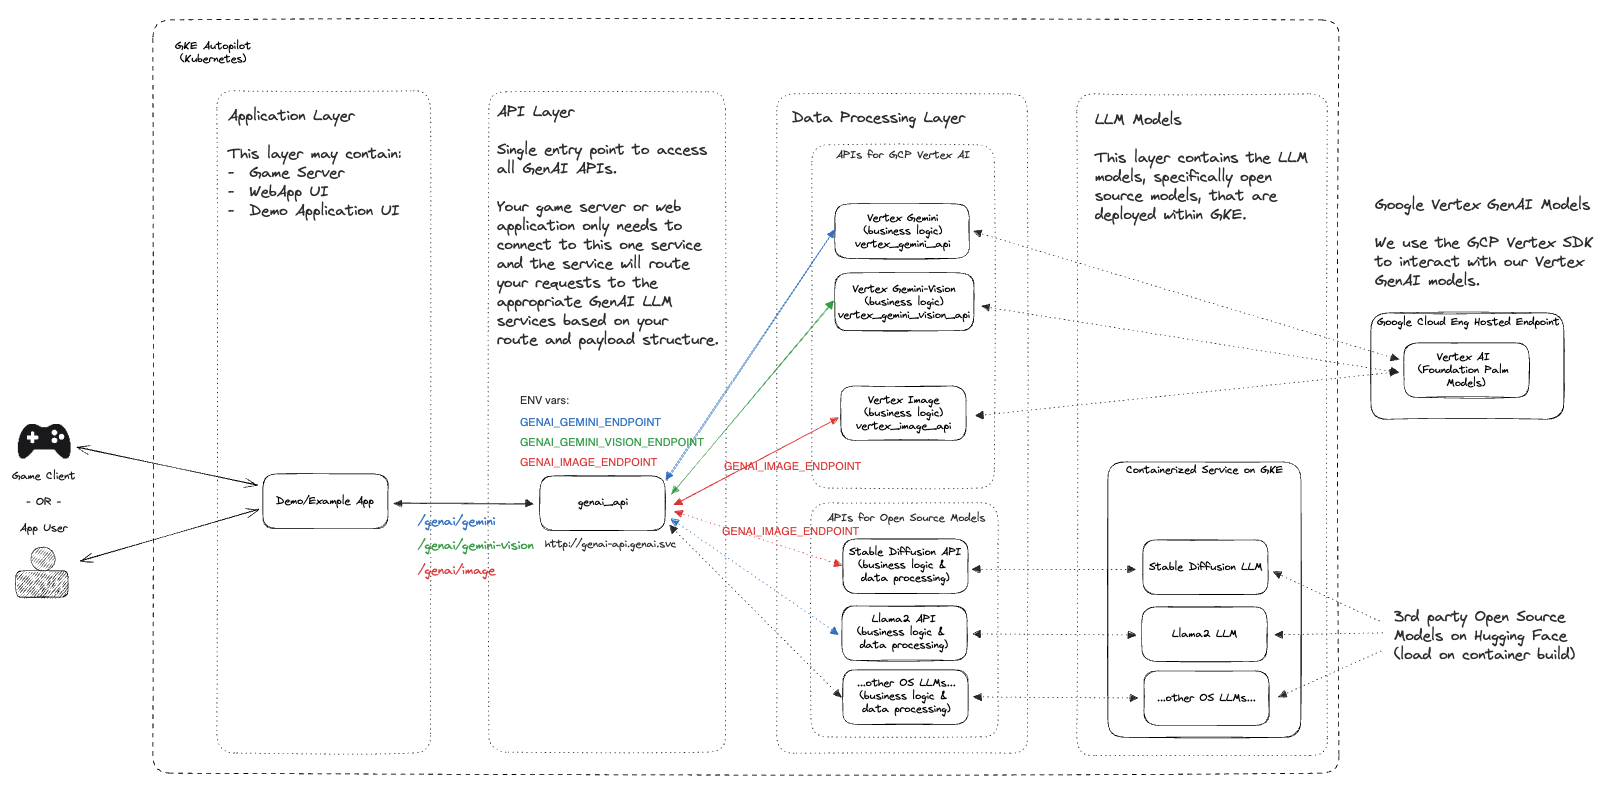
โปรเจ็กต์นี้จัดเตรียมชุดการเริ่มต้นอย่างรวดเร็วโดยมีเป้าหมายเพื่อเร่งการบูรณาการ GenAI และการปรับเปลี่ยนในแบบของคุณภายในสภาพแวดล้อมเกมถ่ายทอดสดโดยใช้ผลิตภัณฑ์ Google Cloud และโซลูชันเกมโอเพ่นซอร์ส
ในอุตสาหกรรมเกมในปัจจุบัน การมอบประสบการณ์ที่เป็นส่วนตัวและมีส่วนร่วมแก่ผู้เล่นถือเป็นสิ่งสำคัญ โปรเจ็กต์นี้นำเสนอชุดทรัพยากรการเริ่มต้นอย่างรวดเร็วแก่นักพัฒนาเกม เพื่อช่วยให้พวกเขารวมความสามารถของ GenAI เข้ากับสภาพแวดล้อมเกมสดของพวกเขา ด้วยการใช้ประโยชน์จากผลิตภัณฑ์ Google Cloud และโซลูชันเกมโอเพนซอร์ส คุณจะสามารถเพิ่มการมีส่วนร่วมของผู้เล่น ปลดล็อกกรณีการใช้งานใหม่ด้วย Generative AI และสร้างประสบการณ์การเล่นเกมที่น่าจดจำ
หมายเหตุ: นี่คือการซื้อคืนที่มีการพัฒนาอย่างรวดเร็วและกำลังได้รับการปรับใช้สำหรับกรณีการใช้งานที่หลากหลาย หากคุณต้องการมีส่วนร่วมหรือสังเกตเห็นข้อบกพร่องใด ๆ โปรดเปิดปัญหาและ/หรือส่ง PR เพื่อตรวจสอบ
หากคุณกำลังใช้โปรเจ็กต์นี้ โปรด ★ติดดาวพื้นที่เก็บข้อมูลนี้เพื่อแสดงความสนใจ!
| โฟลเดอร์ | คำอธิบาย |
|---|---|
| ภูมิประเทศ | สคริปต์การปรับใช้โครงสร้างพื้นฐานที่ใช้ Terraform |
| ตัวอย่าง | การเริ่มต้นอย่างรวดเร็วส่วนบุคคลที่สามารถทดสอบและปรับใช้ตามกรณีการใช้งานของคุณ |
| src | ซอร์สโค้ดหลักที่ใช้เป็นส่วนหนึ่งของการเริ่มต้นอย่างรวดเร็วของเรา |

ขั้นตอนต่อไปนี้จะแนะนำคุณเกี่ยวกับคู่มือการตั้งค่าสำหรับ GenAI Quickstart กระบวนการนี้จะอธิบายการเปิดใช้งาน Google Cloud API ที่เหมาะสม การสร้างทรัพยากรผ่าน Terraform และการปรับใช้ รายการ Kubernetes ที่จำเป็นในการดำเนินโครงการ
หมายเหตุ: ขั้นตอนเหล่านี้ถือว่าคุณมีโปรเจ็กต์ที่กำลังทำงานอยู่ใน Google Cloud อยู่แล้ว ซึ่งคุณมีสิทธิ์ IAM ในการใช้งานทรัพยากร
 git clone https://github.com/googleforgames/GenAI-quickstart.git

cd GenAI-quickstart
ตั้งค่ารหัสโปรเจ็กต์เฉพาะของคุณสำหรับ Google Cloud
 # To just use your current project
export PROJECT_ID=$(gcloud config list --format 'value(core.project)' 2>/dev/null)

# Otherwise set it to the project you wish to use.
ตั้งค่าตำแหน่งเริ่มต้นสำหรับ Google Cloud
export LOCATION=us-central1
เพื่อให้ปฏิบัติตามคู่มือเริ่มต้นอย่างรวดเร็วนี้ได้ดียิ่งขึ้น ให้ตั้งค่าตัวแปร env CUR_DIR
export CUR_DIR=$(pwd)
gcloud auth list
ตรวจสอบว่าการรับรองความถูกต้องของคุณใช้ได้และ PROJECT_ID ของคุณถูกต้องหรือไม่
gcloud projects describe ${PROJECT_ID:?}
คุณควรเห็น PROJECT_ID ของคุณแสดงอยู่ในสถานะ ACTIVE
 gcloud services enable --project ${PROJECT_ID:?}
  aiplatform.googleapis.com
  artifactregistry.googleapis.com
  cloudbuild.googleapis.com
  cloudresourcemanager.googleapis.com
  compute.googleapis.com
  container.googleapis.com
  containerfilesystem.googleapis.com
  containerregistry.googleapis.com
  iam.googleapis.com
  servicecontrol.googleapis.com
  spanner.googleapis.com
 cd ${CUR_DIR:?}/terraform

cat terraform.example.tfvars | sed -e "s:your-unique-project-id:${PROJECT_ID:?}:g" > terraform.tfvars

terraform init

terraform plan

terraform apply
การปรับใช้ทรัพยากรระบบคลาวด์อาจใช้เวลาประมาณ 5 - 10 นาที สำหรับมุมมองโดยละเอียดของทรัพยากรที่ใช้งาน โปรดดู README ในไดเร็กทอรี terraform
หลังจากทำให้ทรัพยากรระบบคลาวด์ใช้งานได้กับ Terraform สำเร็จแล้ว ให้รับข้อมูลรับรองคลัสเตอร์ GKE ที่สร้างขึ้นใหม่
gcloud container clusters get-credentials genai-quickstart --region us-central1 --project ${PROJECT_ID:?}
ทดสอบข้อมูลประจำตัวไคลเอ็นต์ Kubernetes ของคุณ
kubectl get nodes
สลับไปที่ไดเร็กทอรี genai และเรนเดอร์เทมเพลตทั่วไปที่ใช้รหัสโปรเจ็กต์เฉพาะของคุณ
 # Find all files named .template.yaml, replace `your-unique-project-id` with PROJECT_ID, and output to .yaml.
cd ${CUR_DIR:?}/genai && find common -type f -name "*.template.yaml" -exec
  bash -c "template_path={}; sed "s:your-unique-project-id:${PROJECT_ID:?}:g" < ${template_path} > ${template_path/%.template.yaml/.yaml} " ;
สร้างและรันปริมาณงาน GenAI ด้วย Skaffold
 gcloud auth configure-docker ${LOCATION:?}-docker.pkg.dev

export SKAFFOLD_DEFAULT_REPO=${LOCATION:?}-docker.pkg.dev/${PROJECT_ID:?}/repo-genai-quickstart

cd ${CUR_DIR:?}/genai

# To run all apis and models (requires a GPU node for stable-diffusion)
skaffold run --build-concurrency=0
หลังจากปรับใช้ปริมาณงานแล้ว คุณสามารถสลับไปใช้การปรับใช้ GPU แทนได้:
 # Scale up a 2xL4 Mixtral 8x7B Deployment:
kubectl scale -n genai deployment huggingface-tgi-mixtral-small --replicas=1

# Or scale up a 8xL4 Mixtral 8x7B Deployment:
kubectl scale -n genai deployment huggingface-tgi-mixtral-big --replicas=1

# Scale down CPU Deployment:
kubectl scale -n genai deployment huggingface-tgi-mistral-cpu --replicas=0

# Note that the `huggingface-tgi-api` Service matches all of the huggingface-tgi-*
# Deployments, so if you have multiple replicas running, it will load balance
# between them.
คุณยังสามารถเรียกใช้แบ็กเอนด์แต่ละรายการแยกกันได้:
 # To run only stable-diffusion (requires a GPU node)
#skaffold run --module stable-diffusion-api-cfg,stable-diffusion-endpt-cfg

# To run only Vertex chat (Vertex AI is required)
#skaffold run --module vertex-chat-api-cfg
เข้าถึง API - คุณสามารถทดสอบแอปพลิเคชันและ API ทั้งหมดได้จากที่นี่ :)
คลัสเตอร์จะสร้าง Network Load Balancer (ILB) ที่ส่งผ่านภายใน ในการเข้าถึง API ให้รัน:
kubectl port-forward svc/genai-api -n genai 8080:80
จากนั้นในหน้าต่างอื่นให้รัน:
 export EXT_IP=localhost:8080
echo "Browse to http://${EXT_IP}/genai_docs to try out the GenAI APIs!"
จากนั้นไปที่ URL ในเบราว์เซอร์ของคุณ
ทดสอบ API โดยใช้ curl :
 curl -X 'POST' "http://${EXT_IP}/genai/text"
  -H 'accept: application/json'
  -H 'Content-Type: application/json'
  -d '{"prompt": "Who are the founders of Google?"}'
หรือทดสอบ API โดยใช้คอนเทนเนอร์ api-caller ภายในคลัสเตอร์:
 # See available service endpoints. The `genai` endpoint wraps them all.
kubectl get svc -ngenai

# Start `api-caller` pod interactively
kubectl run -it -ngenai --rm --restart=Never api-caller --image=${SKAFFOLD_DEFAULT_REPO}/api-caller:latest

# Examples:

# See available example scripts
root@api-caller:/app# ls
embeddings.py  genai_api.py  huggingface_tgi.py  npc_chat_api.py  stable_diffusion_api.py  vertex_chat_api.py  vertex_code_api.py  vertex_gemini_api.py  vertex_image_api.py  vertex_text_api.py

# The genai_api script works for text prompts
root@api-caller:/app# python3 genai_api.py --endpoint=http://genai-api/genai/text --prompt "Describe a wombat"
INFO:root:Status Code: 200
INFO:root:Response:    "A wombat is a marsupial native to Australia. [...]"

# To try the Smart NPC, first reset the world data:
root@api-caller:/app# python3 npc_chat_api.py --endpoint http://genai-api/genai/npc_chat/reset_world_data --empty
INFO:root:Status Code: 200
INFO:root:Response:    {"status":"ok"}

# Then you can use the interactive chat:
root@api-caller:/app# python3 npc_chat_api.py --endpoint http://genai-api/genai/npc_chat --chat
>>> hey, how are you?
<<< I am doing my best here at the distribution center. It's a tough situation, but I am staying focused on helping those in need. How about you? How are you holding up?

# You can also interact with the services underneath, e.g.: Hugging Face TGI supports an interactive chat
root@api-caller:/app# python3 huggingface_tgi.py --endpoint=http://huggingface-tgi-api:8080/v1
>>> hello!
INFO:httpx:HTTP Request: POST http://huggingface-tgi-api:8080/v1/chat/completions "HTTP/1.1 200 OK"
<<<  Hello! How can I help you today? If you have any questions or need assistance with something, feel free to ask and I'll do my best to help. If you just want to chat, we can talk about pretty much anything. What's on your mind?
ในไดเรกทอรี genai
 cd ${CUR_DIR:?}/genai

skaffold delete
ในไดเร็กทอรี terraform
 cd ${CUR_DIR:?}/terraform

terraform destroy
หากคุณไม่ได้รันโปรเจ็กต์ข้างต้นใน Google Cloud Shell ตรวจสอบให้แน่ใจว่าคุณได้เข้าสู่ระบบและตรวจสอบสิทธิ์กับโปรเจ็กต์ที่คุณต้องการ:
 gcloud auth application-default login

gcloud config set project ${PROJECT_ID:?}
และปฏิบัติตามขั้นตอนการตรวจสอบสิทธิ์
Repo ทั้งหมดสามารถโคลนและใช้งานได้ตามที่เป็นอยู่ หรือในหลายกรณี คุณอาจเลือกที่จะแยก Repo นี้และเก็บฐานโค้ดที่เป็นประโยชน์และเกี่ยวข้องกับกรณีการใช้งานของคุณมากที่สุด หากคุณต้องการมีส่วนร่วม คุณสามารถดูข้อมูลเพิ่มเติมได้ในคู่มือการบริจาคของเรา