DALLE2 pytorch
1.15.6
การใช้งาน DALL-E 2 ซึ่งเป็นโครงข่ายประสาทเทียมการสังเคราะห์ข้อความเป็นรูปภาพที่ได้รับการอัปเดตของ OpenAI ใน Pytorch
ยานนิค คิลเชอร์ สรุป | ตัวอธิบาย AssemblyAI
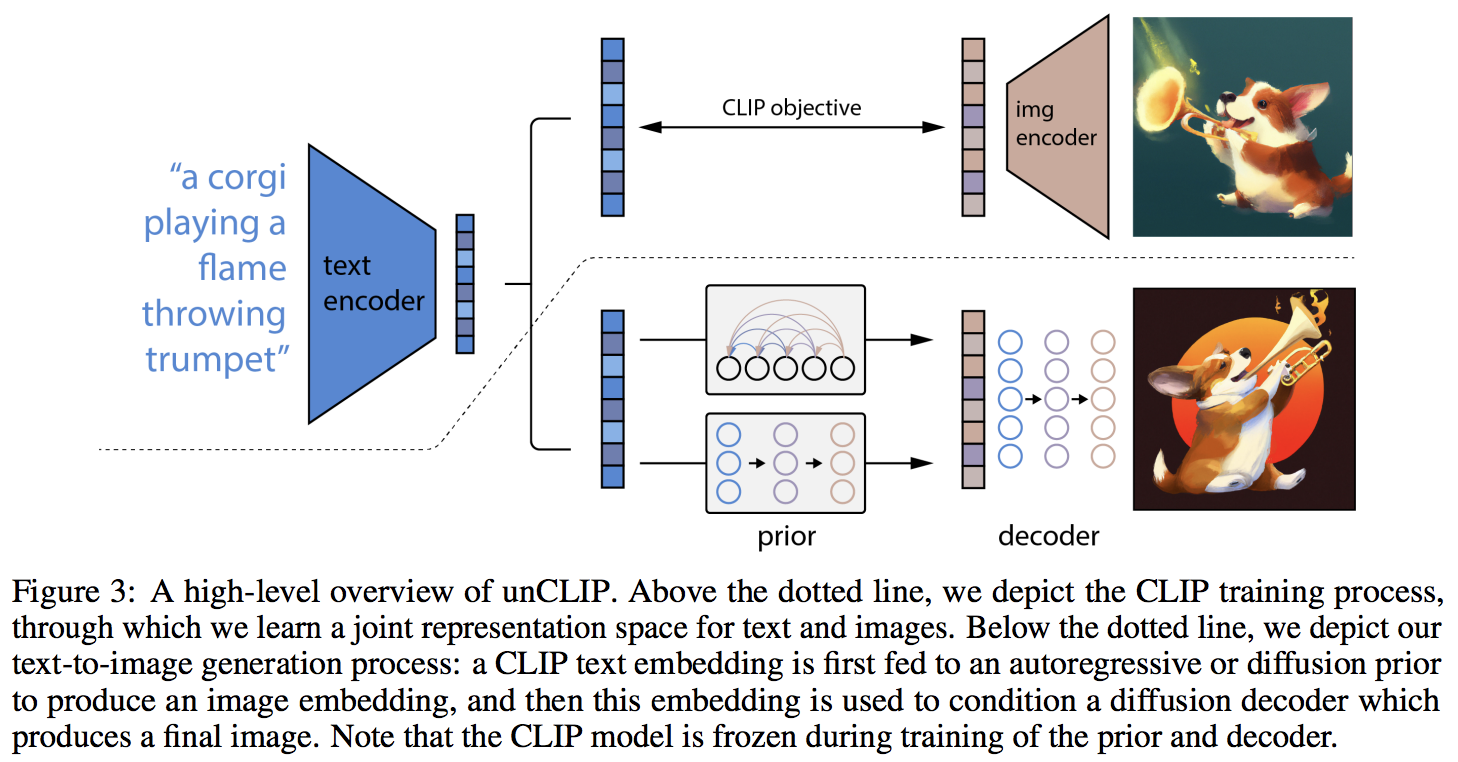
ความแปลกใหม่หลักดูเหมือนจะเป็นชั้นพิเศษของการอ้อมกับเครือข่ายก่อนหน้า (ไม่ว่าจะเป็นหม้อแปลงแบบออโตรีเกรสซีฟหรือเครือข่ายการแพร่กระจาย) ซึ่งคาดการณ์การฝังรูปภาพตามข้อความที่ฝังจาก CLIP โดยเฉพาะอย่างยิ่ง พื้นที่เก็บข้อมูลนี้จะสร้างเฉพาะเครือข่ายการแพร่กระจายก่อนหน้าเท่านั้น เนื่องจากเป็นตัวแปรที่มีประสิทธิภาพดีที่สุด (แต่ซึ่งบังเอิญเกี่ยวข้องกับหม้อแปลงเชิงสาเหตุเป็นเครือข่าย denoising ?)
รุ่นนี้เป็น SOTA สำหรับการแปลงข้อความเป็นรูปภาพในขณะนี้
โปรดเข้าร่วมหากคุณสนใจที่จะช่วยเหลือในการจำลองแบบกับชุมชน LAION | สัมภาษณ์ยานนิค
ณ วันที่ 23/5/22 จะไม่มี SOTA อีกต่อไป โซตะจะอยู่ที่นี่ เวอร์ชัน Jax และโปรเจ็กต์ข้อความเป็นวิดีโอจะถูกเปลี่ยนไปใช้สถาปัตยกรรม Imagen เนื่องจากง่ายกว่ามาก
กลุ่มวิจัยได้ใช้โค้ดในพื้นที่เก็บข้อมูลนี้เพื่อฝึกการแพร่กระจายของฟังก์ชันก่อนที่จะมีการสร้าง CLIP จะแชร์ผลงานเมื่อเผยแพร่งานพิมพ์ล่วงหน้า สิ่งนี้และการทดลองของแคทเธอรีนเอง ตรวจสอบการค้นพบของ OpenAI ว่าส่วนก่อนหน้านั้นเพิ่มความหลากหลายในรุ่นต่างๆ
ตอนนี้ตัวถอดรหัสได้รับการตรวจสอบแล้วว่าทำงานเพื่อสร้างแบบไม่มีเงื่อนไขในการตั้งค่าทดลองของฉันสำหรับดอกไม้ Oxford นักวิจัย 2 คนยังยืนยันว่า Decoder กำลังทำงานให้พวกเขาอยู่
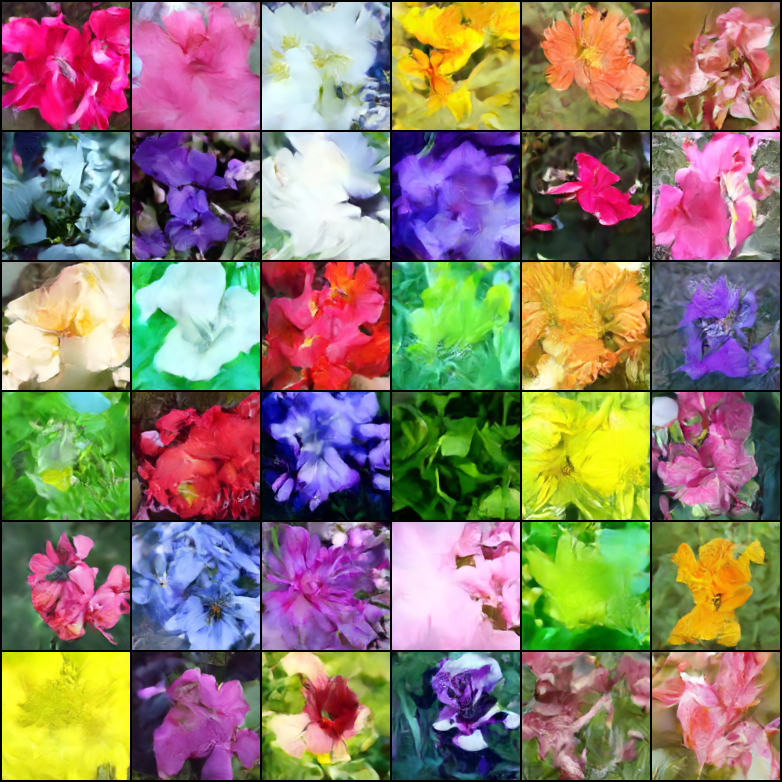
ต่อเนื่องที่ 21,000 ก้าว
Justin Pinkney ประสบความสำเร็จในการฝึกการแพร่กระจายก่อนหน้านี้ในพื้นที่เก็บข้อมูลสำหรับแอปพลิเคชันแปลงข้อความเป็นรูปภาพ CLIP to Stylegan2
Romain ได้ขยายขนาดการฝึกอบรมเป็น 800 GPU ด้วยสคริปต์ที่มีอยู่โดยไม่มีปัญหาใดๆ
ห้องสมุดนี้จะไม่ได้เข้าสู่สถานะการทำงานนี้หากไม่ได้รับความช่วยเหลือจาก
... และอีกมากมาย ขอบคุณ!
$ pip install dalle2-pytorchการฝึก DALLE-2 มี 3 ขั้นตอน โดยการฝึกอบรม CLIP มีความสำคัญที่สุด
หากต้องการฝึก CLIP คุณสามารถใช้แพ็คเกจ x-clip หรือเข้าร่วมความไม่ลงรอยกันของ LAION ซึ่งมีความพยายามในการจำลองแบบจำนวนมากอยู่แล้ว
พื้นที่เก็บข้อมูลนี้จะสาธิตการรวมเข้ากับ x-clip สำหรับผู้เริ่มต้น
 import torch
from dalle2_pytorch import CLIP

clip = CLIP (
    dim_text = 512 ,
    dim_image = 512 ,
    dim_latent = 512 ,
    num_text_tokens = 49408 ,
    text_enc_depth = 1 ,
    text_seq_len = 256 ,
    text_heads = 8 ,
    visual_enc_depth = 1 ,
    visual_image_size = 256 ,
    visual_patch_size = 32 ,
    visual_heads = 8 ,
    use_all_token_embeds = True ,            # whether to use fine-grained contrastive learning (FILIP)
    decoupled_contrastive_learning = True ,  # use decoupled contrastive learning (DCL) objective function, removing positive pairs from the denominator of the InfoNCE loss (CLOOB + DCL)
    extra_latent_projection = True ,         # whether to use separate projections for text-to-image vs image-to-text comparisons (CLOOB)
    use_visual_ssl = True ,                  # whether to do self supervised learning on images
    visual_ssl_type = 'simclr' ,             # can be either 'simclr' or 'simsiam', depending on using DeCLIP or SLIP
    use_mlm = False ,                        # use masked language learning (MLM) on text (DeCLIP)
    text_ssl_loss_weight = 0.05 ,            # weight for text MLM loss
    image_ssl_loss_weight = 0.05            # weight for image self-supervised learning loss
). cuda ()

# mock data

text = torch . randint ( 0 , 49408 , ( 4 , 256 )). cuda ()
images = torch . randn ( 4 , 3 , 256 , 256 ). cuda ()

# train

loss = clip (
    text ,
    images ,
    return_loss = True              # needs to be set to True to return contrastive loss
)

loss . backward ()

# do the above with as many texts and images as possible in a loop
จากนั้น คุณจะต้องฝึกตัวถอดรหัส ซึ่งจะเรียนรู้การสร้างรูปภาพโดยอิงจากการฝังรูปภาพที่มาจาก CLIP ที่ได้รับการฝึกด้านบน
 import torch
from dalle2_pytorch import Unet , Decoder , CLIP

# trained clip from step 1

clip = CLIP (
    dim_text = 512 ,
    dim_image = 512 ,
    dim_latent = 512 ,
    num_text_tokens = 49408 ,
    text_enc_depth = 1 ,
    text_seq_len = 256 ,
    text_heads = 8 ,
    visual_enc_depth = 1 ,
    visual_image_size = 256 ,
    visual_patch_size = 32 ,
    visual_heads = 8
). cuda ()

# unet for the decoder

unet = Unet (
    dim = 128 ,
    image_embed_dim = 512 ,
    cond_dim = 128 ,
    channels = 3 ,
    dim_mults = ( 1 , 2 , 4 , 8 )
). cuda ()

# decoder, which contains the unet and clip

decoder = Decoder (
    unet = unet ,
    clip = clip ,
    timesteps = 100 ,
    image_cond_drop_prob = 0.1 ,
    text_cond_drop_prob = 0.5
). cuda ()

# mock images (get a lot of this)

images = torch . randn ( 4 , 3 , 256 , 256 ). cuda ()

# feed images into decoder

loss = decoder ( images )
loss . backward ()

# do the above for many many many many steps
# then it will learn to generate images based on the CLIP image embeddings
ในที่สุดการสนับสนุนหลักของบทความนี้ พื้นที่เก็บข้อมูลนำเสนอเครือข่ายก่อนหน้าการแพร่กระจาย ใช้การฝังข้อความ CLIP และพยายามสร้างการฝังรูปภาพ CLIP อีกครั้ง คุณจะต้องใช้ CLIP ที่ได้รับการฝึกอบรมตั้งแต่ขั้นตอนแรก
 import torch
from dalle2_pytorch import DiffusionPriorNetwork , DiffusionPrior , CLIP

# get trained CLIP from step one

clip = CLIP (
    dim_text = 512 ,
    dim_image = 512 ,
    dim_latent = 512 ,
    num_text_tokens = 49408 ,
    text_enc_depth = 6 ,
    text_seq_len = 256 ,
    text_heads = 8 ,
    visual_enc_depth = 6 ,
    visual_image_size = 256 ,
    visual_patch_size = 32 ,
    visual_heads = 8 ,
). cuda ()

# setup prior network, which contains an autoregressive transformer

prior_network = DiffusionPriorNetwork (
    dim = 512 ,
    depth = 6 ,
    dim_head = 64 ,
    heads = 8
). cuda ()

# diffusion prior network, which contains the CLIP and network (with transformer) above

diffusion_prior = DiffusionPrior (
    net = prior_network ,
    clip = clip ,
    timesteps = 100 ,
    cond_drop_prob = 0.2
). cuda ()

# mock data

text = torch . randint ( 0 , 49408 , ( 4 , 256 )). cuda ()
images = torch . randn ( 4 , 3 , 256 , 256 ). cuda ()

# feed text and images into diffusion prior network

loss = diffusion_prior ( text , images )
loss . backward ()

# do the above for many many many steps
# now the diffusion prior can generate image embeddings from the text embeddings
ในรายงานนี้ พวกเขาใช้เทคนิคที่เพิ่งค้นพบเมื่อเร็วๆ นี้ จาก Jonathan Ho เอง (ผู้เขียนต้นฉบับของ DDPM ซึ่งเป็นเทคนิคหลักที่ใช้ใน DALL-E v2) สำหรับการสังเคราะห์ภาพที่มีความละเอียดสูง
ซึ่งสามารถใช้งานได้ง่ายภายในกรอบนี้เช่นกัน
 import torch
from dalle2_pytorch import Unet , Decoder , CLIP

# trained clip from step 1

clip = CLIP (
    dim_text = 512 ,
    dim_image = 512 ,
    dim_latent = 512 ,
    num_text_tokens = 49408 ,
    text_enc_depth = 6 ,
    text_seq_len = 256 ,
    text_heads = 8 ,
    visual_enc_depth = 6 ,
    visual_image_size = 256 ,
    visual_patch_size = 32 ,
    visual_heads = 8
). cuda ()

# 2 unets for the decoder (a la cascading DDPM)

unet1 = Unet (
    dim = 32 ,
    image_embed_dim = 512 ,
    cond_dim = 128 ,
    channels = 3 ,
    dim_mults = ( 1 , 2 , 4 , 8 )
). cuda ()

unet2 = Unet (
    dim = 32 ,
    image_embed_dim = 512 ,
    cond_dim = 128 ,
    channels = 3 ,
    dim_mults = ( 1 , 2 , 4 , 8 , 16 )
). cuda ()

# decoder, which contains the unet(s) and clip

decoder = Decoder (
    clip = clip ,
    unet = ( unet1 , unet2 ),            # insert both unets in order of low resolution to highest resolution (you can have as many stages as you want here)
    image_sizes = ( 256 , 512 ),         # resolutions, 256 for first unet, 512 for second. these must be unique and in ascending order (matches with the unets passed in)
    timesteps = 1000 ,
    image_cond_drop_prob = 0.1 ,
    text_cond_drop_prob = 0.5
). cuda ()

# mock images (get a lot of this)

images = torch . randn ( 4 , 3 , 512 , 512 ). cuda ()

# feed images into decoder, specifying which unet you want to train
# each unet can be trained separately, which is one of the benefits of the cascading DDPM scheme

loss = decoder ( images , unet_number = 1 )
loss . backward ()

loss = decoder ( images , unet_number = 2 )
loss . backward ()

# do the above for many steps for both unets
สุดท้ายนี้ เพื่อสร้างภาพ DALL-E2 จากข้อความ ใส่ DiffusionPrior ที่ผ่านการฝึกอบรมแล้ว เช่นเดียวกับ Decoder (ซึ่งล้อม CLIP , หม้อแปลงเชิงสาเหตุ และ unet(s))
 from dalle2_pytorch import DALLE2

dalle2 = DALLE2 (
    prior = diffusion_prior ,
    decoder = decoder
)

# send the text as a string if you want to use the simple tokenizer from DALLE v1
# or you can do it as token ids, if you have your own tokenizer

texts = [ 'glistening morning dew on a flower petal' ]
images = dalle2 ( texts ) # (1, 3, 256, 256)
แค่นั้นแหละ!
เรามาดูสคริปต์ทั้งหมดด้านล่าง
 import torch
from dalle2_pytorch import DALLE2 , DiffusionPriorNetwork , DiffusionPrior , Unet , Decoder , CLIP

clip = CLIP (
    dim_text = 512 ,
    dim_image = 512 ,
    dim_latent = 512 ,
    num_text_tokens = 49408 ,
    text_enc_depth = 6 ,
    text_seq_len = 256 ,
    text_heads = 8 ,
    visual_enc_depth = 6 ,
    visual_image_size = 256 ,
    visual_patch_size = 32 ,
    visual_heads = 8
). cuda ()

# mock data

text = torch . randint ( 0 , 49408 , ( 4 , 256 )). cuda ()
images = torch . randn ( 4 , 3 , 256 , 256 ). cuda ()

# train

loss = clip (
    text ,
    images ,
    return_loss = True
)

loss . backward ()

# do above for many steps ...

# prior networks (with transformer)

prior_network = DiffusionPriorNetwork (
    dim = 512 ,
    depth = 6 ,
    dim_head = 64 ,
    heads = 8
). cuda ()

diffusion_prior = DiffusionPrior (
    net = prior_network ,
    clip = clip ,
    timesteps = 1000 ,
    sample_timesteps = 64 ,
    cond_drop_prob = 0.2
). cuda ()

loss = diffusion_prior ( text , images )
loss . backward ()

# do above for many steps ...

# decoder (with unet)

unet1 = Unet (
    dim = 128 ,
    image_embed_dim = 512 ,
    text_embed_dim = 512 ,
    cond_dim = 128 ,
    channels = 3 ,
    dim_mults = ( 1 , 2 , 4 , 8 ),
    cond_on_text_encodings = True    # set to True for any unets that need to be conditioned on text encodings
). cuda ()

unet2 = Unet (
    dim = 16 ,
    image_embed_dim = 512 ,
    cond_dim = 128 ,
    channels = 3 ,
    dim_mults = ( 1 , 2 , 4 , 8 , 16 )
). cuda ()

decoder = Decoder (
    unet = ( unet1 , unet2 ),
    image_sizes = ( 128 , 256 ),
    clip = clip ,
    timesteps = 100 ,
    image_cond_drop_prob = 0.1 ,
    text_cond_drop_prob = 0.5
). cuda ()

for unet_number in ( 1 , 2 ):
    loss = decoder ( images , text = text , unet_number = unet_number ) # this can optionally be decoder(images, text) if you wish to condition on the text encodings as well, though it was hinted in the paper it didn't do much
    loss . backward ()

# do above for many steps

dalle2 = DALLE2 (
    prior = diffusion_prior ,
    decoder = decoder
)

images = dalle2 (
    [ 'cute puppy chasing after a squirrel' ],
    cond_scale = 2. # classifier free guidance strength (> 1 would strengthen the condition)
)

# save your image (in this example, of size 256x256)
ทุกอย่างใน readme นี้ควรทำงานโดยไม่มีข้อผิดพลาด
คุณยังสามารถฝึกตัวถอดรหัสกับภาพที่ใหญ่กว่าขนาด (เช่น 512x512) ที่ CLIP ได้รับการฝึกฝน (256x256) รูปภาพจะถูกปรับขนาดเป็นความละเอียดของรูปภาพ CLIP สำหรับการฝังรูปภาพ
สำหรับคนทั่วไป ไม่ต้องกังวล การฝึกอบรมทั้งหมดจะดำเนินการโดยอัตโนมัติในเครื่องมือ CLI อย่างน้อยก็สำหรับการฝึกอบรมขนาดเล็ก
เมื่อขยายขนาด มีแนวโน้มว่าคุณจะต้องประมวลผลรูปภาพและข้อความของคุณล่วงหน้าเป็นการฝังที่เกี่ยวข้องก่อนจะฝึกเครือข่ายก่อนหน้า คุณสามารถทำได้ง่ายๆ เพียงส่งผ่าน image_embed , text_embed และเลือก text_encodings
ตัวอย่างการทำงานด้านล่าง
 import torch
from dalle2_pytorch import DiffusionPriorNetwork , DiffusionPrior , CLIP

# get trained CLIP from step one

clip = CLIP (
    dim_text = 512 ,
    dim_image = 512 ,
    dim_latent = 512 ,
    num_text_tokens = 49408 ,
    text_enc_depth = 6 ,
    text_seq_len = 256 ,
    text_heads = 8 ,
    visual_enc_depth = 6 ,
    visual_image_size = 256 ,
    visual_patch_size = 32 ,
    visual_heads = 8 ,
). cuda ()

# setup prior network, which contains an autoregressive transformer

prior_network = DiffusionPriorNetwork (
    dim = 512 ,
    depth = 6 ,
    dim_head = 64 ,
    heads = 8
). cuda ()

# diffusion prior network, which contains the CLIP and network (with transformer) above

diffusion_prior = DiffusionPrior (
    net = prior_network ,
    clip = clip ,
    timesteps = 100 ,
    cond_drop_prob = 0.2 ,
    condition_on_text_encodings = False  # this probably should be true, but just to get Laion started
). cuda ()

# mock data

text = torch . randint ( 0 , 49408 , ( 4 , 256 )). cuda ()
images = torch . randn ( 4 , 3 , 256 , 256 ). cuda ()

# precompute the text and image embeddings
# here using the diffusion prior class, but could be done with CLIP alone

clip_image_embeds = diffusion_prior . clip . embed_image ( images ). image_embed
clip_text_embeds = diffusion_prior . clip . embed_text ( text ). text_embed

# feed text and images into diffusion prior network

loss = diffusion_prior (
    text_embed = clip_text_embeds ,
    image_embed = clip_image_embeds
)

loss . backward ()

# do the above for many many many steps
# now the diffusion prior can generate image embeddings from the text embeddings
คุณยังสามารถใช้ CLIP -less ได้อย่างสมบูรณ์ ซึ่งในกรณีนี้คุณจะต้องส่ง image_embed_dim ไปยัง DiffusionPrior เมื่อเริ่มต้น
 import torch
from dalle2_pytorch import DiffusionPriorNetwork , DiffusionPrior

# setup prior network, which contains an autoregressive transformer

prior_network = DiffusionPriorNetwork (
    dim = 512 ,
    depth = 6 ,
    dim_head = 64 ,
    heads = 8
). cuda ()

# diffusion prior network, which contains the CLIP and network (with transformer) above

diffusion_prior = DiffusionPrior (
    net = prior_network ,
    image_embed_dim = 512 ,               # this needs to be set
    timesteps = 100 ,
    cond_drop_prob = 0.2 ,
    condition_on_text_encodings = False  # this probably should be true, but just to get Laion started
). cuda ()

# mock data

text = torch . randint ( 0 , 49408 , ( 4 , 256 )). cuda ()
images = torch . randn ( 4 , 3 , 256 , 256 ). cuda ()

# precompute the text and image embeddings
# here using the diffusion prior class, but could be done with CLIP alone

clip_image_embeds = torch . randn ( 4 , 512 ). cuda ()
clip_text_embeds = torch . randn ( 4 , 512 ). cuda ()

# feed text and images into diffusion prior network

loss = diffusion_prior (
    text_embed = clip_text_embeds ,
    image_embed = clip_image_embeds
)

loss . backward ()

# do the above for many many many steps
# now the diffusion prior can generate image embeddings from the text embeddings แม้ว่าจะมีความเป็นไปได้ที่พวกเขากำลังใช้ CLIP ที่ยังไม่เผยแพร่และมีประสิทธิภาพมากกว่า แต่คุณสามารถใช้หนึ่งใน CLIP ที่เผยแพร่ได้ หากคุณไม่ต้องการฝึก CLIP ของคุณเองตั้งแต่เริ่มต้น นอกจากนี้ยังช่วยให้ชุมชนสามารถตรวจสอบข้อสรุปของรายงานได้รวดเร็วยิ่งขึ้น
หากต้องการใช้ OpenAI CLIP ที่ได้รับการฝึกไว้ล่วงหน้า เพียงนำเข้า OpenAIClipAdapter แล้วส่งต่อไปยัง DiffusionPrior หรือ Decoder เช่นนั้น
 import torch
from dalle2_pytorch import DALLE2 , DiffusionPriorNetwork , DiffusionPrior , Unet , Decoder , OpenAIClipAdapter

# openai pretrained clip - defaults to ViT-B/32

clip = OpenAIClipAdapter ()

# mock data

text = torch . randint ( 0 , 49408 , ( 4 , 256 )). cuda ()
images = torch . randn ( 4 , 3 , 256 , 256 ). cuda ()

# prior networks (with transformer)

prior_network = DiffusionPriorNetwork (
    dim = 512 ,
    depth = 6 ,
    dim_head = 64 ,
    heads = 8
). cuda ()

diffusion_prior = DiffusionPrior (
    net = prior_network ,
    clip = clip ,
    timesteps = 100 ,
    cond_drop_prob = 0.2
). cuda ()

loss = diffusion_prior ( text , images )
loss . backward ()

# do above for many steps ...

# decoder (with unet)

unet1 = Unet (
    dim = 128 ,
    image_embed_dim = 512 ,
    cond_dim = 128 ,
    channels = 3 ,
    dim_mults = ( 1 , 2 , 4 , 8 ),
    text_embed_dim = 512 ,
    cond_on_text_encodings = True  # set to True for any unets that need to be conditioned on text encodings (ex. first unet in cascade)
). cuda ()

unet2 = Unet (
    dim = 16 ,
    image_embed_dim = 512 ,
    cond_dim = 128 ,
    channels = 3 ,
    dim_mults = ( 1 , 2 , 4 , 8 , 16 )
). cuda ()

decoder = Decoder (
    unet = ( unet1 , unet2 ),
    image_sizes = ( 128 , 256 ),
    clip = clip ,
    timesteps = 1000 ,
    sample_timesteps = ( 250 , 27 ),
    image_cond_drop_prob = 0.1 ,
    text_cond_drop_prob = 0.5
). cuda ()

for unet_number in ( 1 , 2 ):
    loss = decoder ( images , text = text , unet_number = unet_number ) # this can optionally be decoder(images, text) if you wish to condition on the text encodings as well, though it was hinted in the paper it didn't do much
    loss . backward ()

# do above for many steps

dalle2 = DALLE2 (
    prior = diffusion_prior ,
    decoder = decoder
)

images = dalle2 (
    [ 'a butterfly trying to escape a tornado' ],
    cond_scale = 2. # classifier free guidance strength (> 1 would strengthen the condition)
)

# save your image (in this example, of size 256x256)
หรือคุณสามารถใช้ Open Clip ก็ได้
$ pip install open-clip-torchอดีต. โดยใช้โมเดล SOTA Open Clip ที่ได้รับการฝึกโดย Romain


