
หุ่นยนต์ตัวใหม่ในเมือง: SO-100

เราเพิ่งเพิ่มบทช่วยสอนใหม่เกี่ยวกับวิธีสร้างหุ่นยนต์ที่มีราคาไม่แพงมากขึ้น ในราคา 110 ดอลลาร์ต่อแขน!
สอนทักษะใหม่ๆ ด้วยการแสดงการเคลื่อนไหวเพียงไม่กี่ครั้งด้วยแล็ปท็อป
ถ้าอย่างนั้นก็ดูหุ่นยนต์ทำเองของคุณทำงานอัตโนมัติ ?
ตามลิงก์ไปยังบทช่วยสอนฉบับเต็มสำหรับ SO-100
LeRobot: AI ที่ล้ำสมัยสำหรับหุ่นยนต์ในโลกแห่งความเป็นจริง
- LeRobot มุ่งหวังที่จะจัดหาโมเดล ชุดข้อมูล และเครื่องมือสำหรับหุ่นยนต์ในโลกแห่งความเป็นจริงใน PyTorch เป้าหมายคือการลดอุปสรรคในการเข้าสู่วิทยาการหุ่นยนต์ เพื่อให้ทุกคนสามารถมีส่วนร่วมและได้รับประโยชน์จากการแบ่งปันชุดข้อมูลและแบบจำลองที่ได้รับการฝึกอบรมมาแล้ว
- LeRobot มีแนวทางที่ล้ำสมัยซึ่งแสดงให้เห็นว่าสามารถถ่ายทอดสู่โลกแห่งความเป็นจริง โดยมุ่งเน้นไปที่การเรียนรู้ด้วยการเลียนแบบและการเรียนรู้แบบเสริมกำลัง
- LeRobot ได้จัดเตรียมแบบจำลองที่ได้รับการฝึกอบรม ชุดข้อมูลที่มีการสาธิตที่รวบรวมโดยมนุษย์ และสภาพแวดล้อมการจำลองเพื่อเริ่มต้นโดยไม่ต้องประกอบหุ่นยนต์ ในอีกไม่กี่สัปดาห์ข้างหน้า มีแผนจะเพิ่มการสนับสนุนหุ่นยนต์ในโลกแห่งความเป็นจริงมากขึ้นเรื่อยๆ บนหุ่นยนต์ที่มีราคาไม่แพงและมีความสามารถมากที่สุด
- LeRobot โฮสต์โมเดลและชุดข้อมูลที่ฝึกไว้ล่วงหน้าบนหน้าชุมชน Hugging Face นี้: Huggingface.co/lerobot
 |  |  |
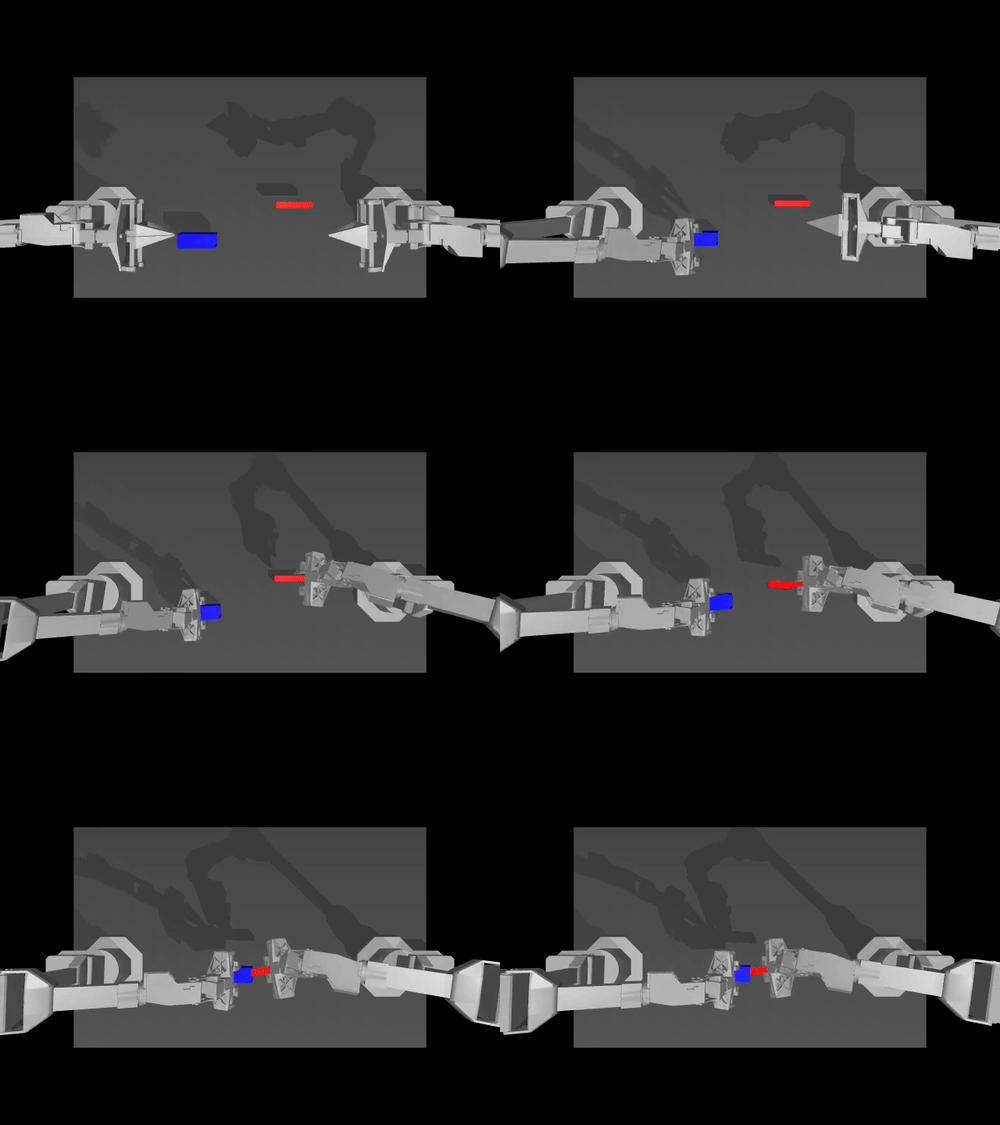
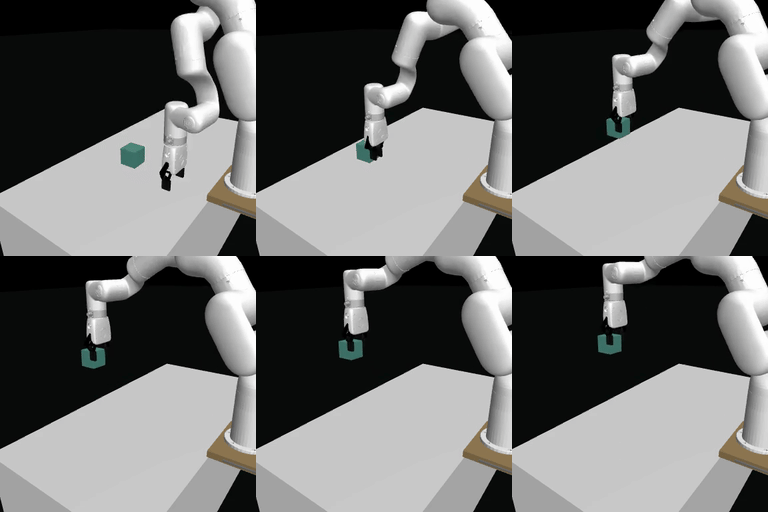
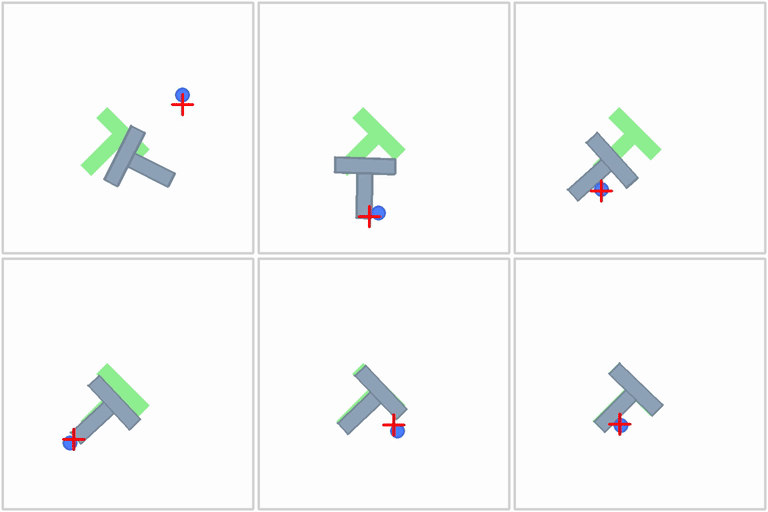
| นโยบาย ACT เกี่ยวกับสภาพแวดล้อม ALOHA | นโยบาย TDMPC บนสภาพแวดล้อม SimXArm | นโยบายการแพร่กระจายบนสภาพแวดล้อม PushT |
ดาวน์โหลดซอร์สโค้ดของเรา:
git clone https://github.com/huggingface/lerobot.git
cd lerobot
สร้างสภาพแวดล้อมเสมือนจริงด้วย Python 3.10 และเปิดใช้งาน เช่น ด้วย miniconda :
conda create -y -n lerobot python=3.10
conda activate lerobot
ติดตั้ง ? เลอโรบอต:
pip install -e .หมายเหตุ: หากคุณพบข้อผิดพลาดในการสร้างในระหว่างขั้นตอนนี้ ขึ้นอยู่กับแพลตฟอร์มของคุณ คุณอาจต้องติดตั้ง
cmakeและbuild-essentialเพื่อสร้างการขึ้นต่อกันบางส่วนของเรา บน linux:sudo apt-get install cmake build-essential
สำหรับการจำลอง ? LeRobot มาพร้อมกับสภาพแวดล้อมโรงยิมที่สามารถติดตั้งเป็นส่วนเสริมได้:
เช่น หากต้องการติดตั้ง ? LeRobot กับ aloha และ pusht ใช้:
pip install -e " .[aloha, pusht] "หากต้องการใช้น้ำหนักและอคติในการติดตามการทดลอง ให้เข้าสู่ระบบด้วย
wandb login(หมายเหตุ: คุณจะต้องเปิดใช้งาน WandB ในการกำหนดค่าด้วย ดูด้านล่าง)
 .
├── examples             # contains demonstration examples, start here to learn about LeRobot
|   └── advanced         # contains even more examples for those who have mastered the basics
├── lerobot
|   ├── configs          # contains hydra yaml files with all options that you can override in the command line
|   |   ├── default.yaml   # selected by default, it loads pusht environment and diffusion policy
|   |   ├── env            # various sim environments and their datasets: aloha.yaml, pusht.yaml, xarm.yaml
|   |   └── policy         # various policies: act.yaml, diffusion.yaml, tdmpc.yaml
|   ├── common           # contains classes and utilities
|   |   ├── datasets       # various datasets of human demonstrations: aloha, pusht, xarm
|   |   ├── envs           # various sim environments: aloha, pusht, xarm
|   |   ├── policies       # various policies: act, diffusion, tdmpc
|   |   ├── robot_devices  # various real devices: dynamixel motors, opencv cameras, koch robots
|   |   └── utils          # various utilities
|   └── scripts          # contains functions to execute via command line
|       ├── eval.py                 # load policy and evaluate it on an environment
|       ├── train.py                # train a policy via imitation learning and/or reinforcement learning
|       ├── control_robot.py        # teleoperate a real robot, record data, run a policy
|       ├── push_dataset_to_hub.py  # convert your dataset into LeRobot dataset format and upload it to the Hugging Face hub
|       └── visualize_dataset.py    # load a dataset and render its demonstrations
├── outputs               # contains results of scripts execution: logs, videos, model checkpoints
└── tests                 # contains pytest utilities for continuous integration
ลองดูตัวอย่างที่ 1 ที่แสดงวิธีใช้คลาสชุดข้อมูลซึ่งจะดาวน์โหลดข้อมูลจากฮับ Hugging Face โดยอัตโนมัติ
คุณยังสามารถแสดงภาพตอนต่างๆ ภายในเครื่องจากชุดข้อมูลบนฮับได้โดยการรันสคริปต์ของเราจากบรรทัดคำสั่ง:
python lerobot/scripts/visualize_dataset.py
    --repo-id lerobot/pusht
    --episode-index 0
หรือจากชุดข้อมูลในโฟลเดอร์ในเครื่องที่มีตัวแปรสภาพแวดล้อมรูท DATA_DIR (ในกรณีต่อไปนี้ ชุดข้อมูลจะถูกค้นหาใน ./my_local_data_dir/lerobot/pusht )
DATA_DIR= ' ./my_local_data_dir ' python lerobot/scripts/visualize_dataset.py
    --repo-id lerobot/pusht
    --episode-index 0
มันจะเปิด rerun.io และแสดงสตรีมของกล้อง สถานะหุ่นยนต์ และการดำเนินการ เช่นนี้:
สคริปต์ของเรายังสามารถแสดงภาพชุดข้อมูลที่จัดเก็บไว้ในเซิร์ฟเวอร์ที่อยู่ห่างไกลได้ ดู python lerobot/scripts/visualize_dataset.py --help สำหรับคำแนะนำเพิ่มเติม
LeRobotDataset ชุดข้อมูลในรูปแบบ LeRobotDataset นั้นใช้งานง่ายมาก สามารถโหลดได้จากพื้นที่เก็บข้อมูลบนฮับ Hugging Face หรือโฟลเดอร์ในเครื่องโดยใช้ เช่น dataset = LeRobotDataset("lerobot/aloha_static_coffee") และสามารถจัดทำดัชนีเป็นเช่นเดียวกับชุดข้อมูล Hugging Face และ PyTorch อื่นๆ สำหรับอินสแตนซ์ dataset[0] จะดึงข้อมูลเฟรมชั่วคราวเดียวจากชุดข้อมูลที่มีการสังเกตและการดำเนินการเป็นเทนเซอร์ PyTorch ที่พร้อมที่จะป้อนให้กับโมเดล
ลักษณะเฉพาะของ LeRobotDataset คือ แทนที่จะดึงข้อมูลเฟรมเดียวด้วยดัชนี เราสามารถดึงหลายเฟรมตามความสัมพันธ์ชั่วคราวกับเฟรมที่จัดทำดัชนี โดยการตั้งค่า delta_timestamps ให้เป็นรายการเวลาสัมพัทธ์ที่เกี่ยวข้องกับเฟรมที่จัดทำดัชนี ตัวอย่างเช่น ด้วย delta_timestamps = {"observation.image": [-1, -0.5, -0.2, 0]} เราสามารถดึงข้อมูลได้ 4 เฟรมสำหรับดัชนีที่กำหนด: 3 เฟรม "ก่อนหน้า" 1 วินาที 0.5 วินาที และ 0.2 วินาทีก่อนเฟรมที่จัดทำดัชนี และเฟรมที่จัดทำดัชนีเอง (ตรงกับรายการ 0) ดูตัวอย่าง 1_load_lerobot_dataset.py สำหรับรายละเอียดเพิ่มเติมเกี่ยวกับ delta_timestamps
ภายใต้ประทุน รูปแบบ LeRobotDataset ใช้หลายวิธีในการทำให้ข้อมูลเป็นอนุกรม ซึ่งอาจมีประโยชน์ในการทำความเข้าใจหากคุณวางแผนที่จะทำงานกับรูปแบบนี้อย่างใกล้ชิดมากขึ้น เราพยายามสร้างรูปแบบชุดข้อมูลที่ยืดหยุ่นแต่เรียบง่าย ซึ่งจะครอบคลุมคุณลักษณะและความเฉพาะเจาะจงส่วนใหญ่ที่มีอยู่ในการเรียนรู้แบบเสริมกำลังและหุ่นยนต์ ในการจำลองและในโลกแห่งความเป็นจริง โดยมุ่งเน้นไปที่กล้องและสถานะของหุ่นยนต์ แต่ขยายไปสู่ประสาทสัมผัสประเภทอื่นได้อย่างง่ายดาย อินพุตตราบเท่าที่สามารถแสดงด้วยเทนเซอร์ได้
ต่อไปนี้เป็นรายละเอียดที่สำคัญและการจัดระเบียบโครงสร้างภายในของ LeRobotDataset ทั่วไปที่สร้างอินสแตนซ์ด้วย dataset = LeRobotDataset("lerobot/aloha_static_coffee") คุณลักษณะที่แน่นอนจะเปลี่ยนจากชุดข้อมูลเป็นชุดข้อมูล แต่ไม่ใช่ประเด็นหลัก:
 dataset attributes:
  ├ hf_dataset: a Hugging Face dataset (backed by Arrow/parquet). Typical features example:
  │  ├ observation.images.cam_high (VideoFrame):
  │  │   VideoFrame = {'path': path to a mp4 video, 'timestamp' (float32): timestamp in the video}
  │  ├ observation.state (list of float32): position of an arm joints (for instance)
  │  ... (more observations)
  │  ├ action (list of float32): goal position of an arm joints (for instance)
  │  ├ episode_index (int64): index of the episode for this sample
  │  ├ frame_index (int64): index of the frame for this sample in the episode ; starts at 0 for each episode
  │  ├ timestamp (float32): timestamp in the episode
  │  ├ next.done (bool): indicates the end of en episode ; True for the last frame in each episode
  │  └ index (int64): general index in the whole dataset
  ├ episode_data_index: contains 2 tensors with the start and end indices of each episode
  │  ├ from (1D int64 tensor): first frame index for each episode — shape (num episodes,) starts with 0
  │  └ to: (1D int64 tensor): last frame index for each episode — shape (num episodes,)
  ├ stats: a dictionary of statistics (max, mean, min, std) for each feature in the dataset, for instance
  │  ├ observation.images.cam_high: {'max': tensor with same number of dimensions (e.g. `(c, 1, 1)` for images, `(c,)` for states), etc.}
  │  ...
  ├ info: a dictionary of metadata on the dataset
  │  ├ codebase_version (str): this is to keep track of the codebase version the dataset was created with
  │  ├ fps (float): frame per second the dataset is recorded/synchronized to
  │  ├ video (bool): indicates if frames are encoded in mp4 video files to save space or stored as png files
  │  └ encoding (dict): if video, this documents the main options that were used with ffmpeg to encode the videos
  ├ videos_dir (Path): where the mp4 videos or png images are stored/accessed
  └ camera_keys (list of string): the keys to access camera features in the item returned by the dataset (e.g. `["observation.images.cam_high", ...]`)
LeRobotDataset ได้รับการซีเรียลไลซ์โดยใช้รูปแบบไฟล์ที่ใช้กันอย่างแพร่หลายสำหรับแต่ละส่วน กล่าวคือ:
safetensor เทนเซอร์safetensor ชุดข้อมูลสามารถอัพโหลด/ดาวน์โหลดได้จากฮับ HuggingFace ได้อย่างราบรื่น หากต้องการทำงานบนชุดข้อมูลในเครื่อง คุณสามารถตั้งค่าตัวแปรสภาพแวดล้อม DATA_DIR ให้กับโฟลเดอร์ชุดข้อมูลรากของคุณได้ดังที่แสดงในส่วนด้านบนเกี่ยวกับการแสดงชุดข้อมูล
ดูตัวอย่างที่ 2 ที่แสดงวิธีดาวน์โหลดนโยบายที่ได้รับการฝึกล่วงหน้าจากฮับ Hugging Face และรันการประเมินในสภาพแวดล้อมที่เกี่ยวข้อง
นอกจากนี้เรายังจัดเตรียมสคริปต์ที่มีความสามารถมากขึ้นเพื่อทำการประเมินแบบคู่ขนานกับสภาพแวดล้อมต่างๆ ในระหว่างการเปิดตัวเดียวกัน นี่คือตัวอย่างที่มีโมเดลที่ผ่านการฝึกอบรมซึ่งโฮสต์บน lerobot/diffusion_pusht:
python lerobot/scripts/eval.py
    -p lerobot/diffusion_pusht
    eval.n_episodes=10
    eval.batch_size=10
หมายเหตุ: หลังจากฝึกอบรมนโยบายของคุณเองแล้ว คุณสามารถประเมินจุดตรวจสอบอีกครั้งด้วย:
python lerobot/scripts/eval.py -p {OUTPUT_DIR}/checkpoints/last/pretrained_model ดู python lerobot/scripts/eval.py --help สำหรับคำแนะนำเพิ่มเติม
ลองดูตัวอย่างที่ 3 ที่แสดงวิธีฝึกโมเดลโดยใช้ไลบรารีหลักของเราใน Python และตัวอย่างที่ 4 ที่แสดงวิธีใช้สคริปต์การฝึกของเราจากบรรทัดคำสั่ง
โดยทั่วไป คุณสามารถใช้สคริปต์การฝึกอบรมของเราเพื่อฝึกอบรมนโยบายต่างๆ ได้อย่างง่ายดาย นี่คือตัวอย่างการฝึกอบรมนโยบาย ACT เกี่ยวกับวิถีที่มนุษย์รวบรวมในสภาพแวดล้อมการจำลอง Aloha สำหรับงานแทรก:
python lerobot/scripts/train.py
    policy=act
    env=aloha
    env.task=AlohaInsertion-v0
    dataset_repo_id=lerobot/aloha_sim_insertion_human
ไดเร็กทอรีการทดลองจะถูกสร้างขึ้นโดยอัตโนมัติ และจะแสดงเป็นสีเหลืองในเทอร์มินัลของคุณ ดูเหมือนว่า outputs/train/2024-05-05/20-21-12_aloha_act_default คุณสามารถระบุไดเร็กทอรีการทดลองได้ด้วยตนเองโดยการเพิ่มอาร์กิวเมนต์นี้ในคำสั่ง train.py python:
hydra.run.dir=your/new/experiment/dir ในไดเร็กทอรีการทดลองจะมีโฟลเดอร์ชื่อ checkpoints ซึ่งจะมีโครงสร้างดังต่อไปนี้:
checkpoints
├── 000250  # checkpoint_dir for training step 250
│   ├── pretrained_model  # Hugging Face pretrained model dir
│   │   ├── config.json  # Hugging Face pretrained model config
│   │   ├── config.yaml  # consolidated Hydra config
│   │   ├── model.safetensors  # model weights
│   │   └── README.md  # Hugging Face model card
│   └── training_state.pth  # optimizer/scheduler/rng state and training step
หากต้องการดำเนินการฝึกต่อจากจุดตรวจ คุณสามารถเพิ่มสิ่งเหล่านี้ลงในคำสั่ง train.py python:
hydra.run.dir=your/original/experiment/dir resume=trueมันจะโหลดโมเดลที่ได้รับการฝึกอบรม เครื่องมือเพิ่มประสิทธิภาพ และสถานะของตัวกำหนดตารางเวลาสำหรับการฝึกอบรม สำหรับข้อมูลเพิ่มเติม โปรดดูบทช่วยสอนของเราเกี่ยวกับการเริ่มฝึกต่ออีกครั้งที่นี่
หากต้องการใช้ wandb สำหรับการบันทึกการฝึกและเส้นโค้งการประเมิน ตรวจสอบให้แน่ใจว่าคุณได้เรียกใช้ wandb login เป็นขั้นตอนการตั้งค่าครั้งเดียว จากนั้น เมื่อรันคำสั่งการฝึกด้านบน ให้เปิดใช้งาน WandB ในการกำหนดค่าโดยเพิ่ม:
wandb.enable=trueลิงก์ไปยังบันทึกไม้กายสิทธิ์สำหรับการรันจะแสดงเป็นสีเหลืองในเทอร์มินัลของคุณ นี่คือตัวอย่างรูปลักษณ์ในเบราว์เซอร์ของคุณ โปรดตรวจสอบที่นี่เพื่อดูคำอธิบายของเมตริกที่ใช้กันทั่วไปในบันทึก

หมายเหตุ: เพื่อประสิทธิภาพ ในระหว่างการฝึก ทุกจุดตรวจจะได้รับการประเมินในจำนวนตอนต่ำ คุณสามารถใช้ eval.n_episodes=500 เพื่อประเมินตอนต่างๆ มากกว่าค่าเริ่มต้น หรือหลังการฝึกอบรม คุณอาจต้องการประเมินจุดตรวจสอบที่ดีที่สุดของคุณอีกครั้งในตอนต่างๆ เพิ่มเติม หรือเปลี่ยนการตั้งค่าการประเมิน ดู python lerobot/scripts/eval.py --help สำหรับคำแนะนำเพิ่มเติม
เราได้จัดระเบียบไฟล์การกำหนดค่าของเรา (พบภายใต้ lerobot/configs ) เพื่อให้สร้างผลลัพธ์ SOTA จากตัวแปรโมเดลที่กำหนดในงานต้นฉบับที่เกี่ยวข้อง เพียงแค่ทำงาน:
python lerobot/scripts/train.py policy=diffusion env=pushtสร้างผลลัพธ์ SOTA สำหรับนโยบายการแพร่กระจายในงาน PushT
นโยบายที่ได้รับการฝึกไว้ล่วงหน้า พร้อมด้วยรายละเอียดการทำซ้ำมีอยู่ในส่วน "แบบจำลอง" ของ https://huggingface.co/lerobot
หากคุณต้องการที่จะมีส่วนร่วมกับ ? LeRobot โปรดดูคู่มือการมีส่วนร่วมของเรา
หากต้องการเพิ่มชุดข้อมูลลงในฮับ คุณต้องเข้าสู่ระบบโดยใช้โทเค็นการเข้าถึงการเขียน ซึ่งสามารถสร้างขึ้นได้จากการตั้งค่า Hugging Face:
huggingface-cli login --token ${HUGGINGFACE_TOKEN} --add-to-git-credential จากนั้นชี้ไปที่โฟลเดอร์ชุดข้อมูลดิบของคุณ (เช่น data/aloha_static_pingpong_test_raw ) และพุชชุดข้อมูลของคุณไปที่ฮับด้วย:
python lerobot/scripts/push_dataset_to_hub.py
--raw-dir data/aloha_static_pingpong_test_raw
--out-dir data
--repo-id lerobot/aloha_static_pingpong_test
--raw-format aloha_hdf5
ดู python lerobot/scripts/push_dataset_to_hub.py --help สำหรับคำแนะนำเพิ่มเติม
หากไม่รองรับรูปแบบชุดข้อมูลของคุณ ให้ปรับใช้รูปแบบของคุณเองใน lerobot/common/datasets/push_dataset_to_hub/${raw_format}_format.py โดยการคัดลอกตัวอย่าง เช่น pusht_zarr, umi_zarr, aloha_hdf5 หรือ xarm_pkl
เมื่อคุณฝึกอบรมนโยบายแล้ว คุณสามารถอัปโหลดไปยังฮับ Hugging Face ได้โดยใช้รหัสฮับที่มีลักษณะดังนี้ ${hf_user}/${repo_name} (เช่น lerobot/diffusion_pusht)
ก่อนอื่นคุณต้องค้นหาโฟลเดอร์จุดตรวจสอบที่อยู่ในไดเร็กทอรีการทดลองของคุณ (เช่น outputs/train/2024-05-05/20-21-12_aloha_act_default/checkpoints/002500 ) ภายในนั้นจะมีไดเร็กทอรี pretrained_model ซึ่งควรมี:
config.json : เวอร์ชันต่อเนื่องของการกำหนดค่านโยบาย (ตามการกำหนดค่าคลาสข้อมูลของนโยบาย)model.safetensors : ชุดพารามิเตอร์ torch.nn.Module บันทึกในรูปแบบ Hugging Face Safetensorsconfig.yaml : การกำหนดค่าการฝึก Hydra แบบรวมที่มีการกำหนดค่านโยบาย สภาพแวดล้อม และชุดข้อมูล การกำหนดค่านโยบายควรตรงกับ config.json ทุกประการ การกำหนดค่าสภาพแวดล้อมมีประโยชน์สำหรับทุกคนที่ต้องการประเมินนโยบายของคุณ การกำหนดค่าชุดข้อมูลทำหน้าที่เป็นเส้นทางกระดาษสำหรับการทำซ้ำหากต้องการอัปโหลดสิ่งเหล่านี้ไปยังฮับ ให้รันสิ่งต่อไปนี้:
huggingface-cli upload ${hf_user} / ${repo_name} path/to/pretrained_modelดู eval.py เพื่อดูตัวอย่างว่าผู้อื่นอาจใช้นโยบายของคุณอย่างไร
ตัวอย่างโค้ดสำหรับประเมินการประเมินนโยบาย:
 from torch . profiler import profile , record_function , ProfilerActivity

def trace_handler ( prof ):
    prof . export_chrome_trace ( f"tmp/trace_schedule_ { prof . step_num } .json" )

with profile (
    activities = [ ProfilerActivity . CPU , ProfilerActivity . CUDA ],
    schedule = torch . profiler . schedule (
        wait = 2 ,
        warmup = 2 ,
        active = 3 ,
    ),
    on_trace_ready = trace_handler
) as prof :
    with record_function ( "eval_policy" ):
        for i in range ( num_episodes ):
            prof . step ()
# insert code to profile, potentially whole body of eval_policy function หากต้องการ คุณสามารถอ้างอิงงานนี้ด้วย:
 @misc { cadene2024lerobot ,
    author = { Cadene, Remi and Alibert, Simon and Soare, Alexander and Gallouedec, Quentin and Zouitine, Adil and Wolf, Thomas } ,
    title = { LeRobot: State-of-the-art Machine Learning for Real-World Robotics in Pytorch } ,
    howpublished = " url{https://github.com/huggingface/lerobot} " ,
    year = { 2024 }
}
นอกจากนี้ หากคุณใช้สถาปัตยกรรมนโยบาย โมเดลที่ได้รับการฝึกล่วงหน้า หรือชุดข้อมูลใดโดยเฉพาะ ขอแนะนำให้อ้างอิงผู้เขียนต้นฉบับของงานตามที่ปรากฏด้านล่าง:
 @article { chi2024diffusionpolicy ,
	author = { Cheng Chi and Zhenjia Xu and Siyuan Feng and Eric Cousineau and Yilun Du and Benjamin Burchfiel and Russ Tedrake and Shuran Song } ,
	title = { Diffusion Policy: Visuomotor Policy Learning via Action Diffusion } ,
	journal = { The International Journal of Robotics Research } ,
	year = { 2024 } ,
} @article { zhao2023learning ,
title = { Learning fine-grained bimanual manipulation with low-cost hardware } ,
author = { Zhao, Tony Z and Kumar, Vikash and Levine, Sergey and Finn, Chelsea } ,
journal = { arXiv preprint arXiv:2304.13705 } ,
year = { 2023 }
} @inproceedings { Hansen2022tdmpc ,
title = { Temporal Difference Learning for Model Predictive Control } ,
author = { Nicklas Hansen and Xiaolong Wang and Hao Su } ,
booktitle = { ICML } ,
year = { 2022 }
} @article { lee2024behavior ,
title = { Behavior generation with latent actions } ,
author = { Lee, Seungjae and Wang, Yibin and Etukuru, Haritheja and Kim, H Jin and Shafiullah, Nur Muhammad Mahi and Pinto, Lerrel } ,
journal = { arXiv preprint arXiv:2403.03181 } ,
year = { 2024 }
}