lipgloss
v1.0.0

คำจำกัดความสไตล์สำหรับเลย์เอาต์เทอร์มินัลที่ดี สร้างขึ้นโดยคำนึงถึง TUI

ลิปกลอสใช้แนวทางที่ชัดเจนในการเรนเดอร์เทอร์มินัล ผู้ใช้ที่คุ้นเคยกับ CSS จะรู้สึกเหมือนอยู่บ้านด้วยลิปกลอส
 import "github.com/charmbracelet/lipgloss"

var style = lipgloss . NewStyle ().
    Bold ( true ).
    Foreground ( lipgloss . Color ( "#FAFAFA" )).
    Background ( lipgloss . Color ( "#7D56F4" )).
    PaddingTop ( 2 ).
    PaddingLeft ( 4 ).
    Width ( 22 )

fmt . Println ( style . Render ( "Hello, kitty" ))ลิปกลอสรองรับโปรไฟล์สีต่อไปนี้:
 lipgloss . Color ( "5" )  // magenta
lipgloss . Color ( "9" )  // red
lipgloss . Color ( "12" ) // light blue lipgloss . Color ( "86" ) // aqua
lipgloss . Color ( "201" ) // hot pink
lipgloss . Color ( "202" ) // orange lipgloss . Color ( "#0000FF" ) // good ol' 100% blue
lipgloss . Color ( "#04B575" ) // a green
lipgloss . Color ( "#3C3C3C" ) // a dark gray...เช่นเดียวกับโปรไฟล์ ASCII 1 บิตซึ่งเป็นขาวดำเท่านั้น
โปรไฟล์สีของเทอร์มินัลจะถูกตรวจจับโดยอัตโนมัติ และสีที่อยู่นอกขอบเขตของชุดสีปัจจุบันจะถูกบังคับให้ใช้ค่าที่ใกล้เคียงที่สุดที่มีอยู่โดยอัตโนมัติ
คุณยังสามารถระบุตัวเลือกสีสำหรับพื้นหลังสีอ่อนและสีเข้มได้:
lipgloss. AdaptiveColor { Light : "236" , Dark : "248" }สีพื้นหลังของเทอร์มินัลจะถูกตรวจจับโดยอัตโนมัติ และเลือกสีที่เหมาะสมในขณะรันไทม์
CompleteColor ระบุค่าที่แน่นอนสำหรับโปรไฟล์สี True Color, ANSI256 และ ANSI
lipgloss. CompleteColor { TrueColor : "#0000FF" , ANSI256 : "86" , ANSI : "5" }การสลายสีอัตโนมัติจะไม่เกิดขึ้นในกรณีนี้ และจะขึ้นอยู่กับสีที่ระบุ
คุณสามารถใช้ CompleteColor กับ AdaptiveColor เพื่อระบุค่าที่แน่นอนสำหรับพื้นหลังสีอ่อนและสีเข้มโดยไม่ทำให้สีเสื่อมลงโดยอัตโนมัติ
lipgloss. CompleteAdaptiveColor {
    Light : CompleteColor { TrueColor : "#d7ffae" , ANSI256 : "193" , ANSI : "11" },
    Dark :  CompleteColor { TrueColor : "#d75fee" , ANSI256 : "163" , ANSI : "5" },
}ลิปกลอสรองรับตัวเลือกการจัดรูปแบบข้อความ ANSI ตามปกติ:
 var style = lipgloss . NewStyle ().
    Bold ( true ).
    Italic ( true ).
    Faint ( true ).
    Blink ( true ).
    Strikethrough ( true ).
    Underline ( true ).
Reverse ( true )ลิปกลอสยังรองรับกฎสำหรับการจัดรูปแบบระดับบล็อกด้วย:
 // Padding
var style = lipgloss . NewStyle ().
    PaddingTop ( 2 ).
    PaddingRight ( 4 ).
    PaddingBottom ( 2 ).
    PaddingLeft ( 4 )

// Margins
var style = lipgloss . NewStyle ().
    MarginTop ( 2 ).
    MarginRight ( 4 ).
    MarginBottom ( 2 ).
    MarginLeft ( 4 )
นอกจากนี้ยังมีไวยากรณ์ชวเลขสำหรับระยะขอบและช่องว่างภายในซึ่งมีรูปแบบเดียวกับ CSS:
 // 2 cells on all sides
lipgloss . NewStyle (). Padding ( 2 )

// 2 cells on the top and bottom, 4 cells on the left and right
lipgloss . NewStyle (). Margin ( 2 , 4 )

// 1 cell on the top, 4 cells on the sides, 2 cells on the bottom
lipgloss . NewStyle (). Padding ( 1 , 4 , 2 )

// Clockwise, starting from the top: 2 cells on the top, 4 on the right, 3 on
// the bottom, and 1 on the left
lipgloss . NewStyle (). Margin ( 2 , 4 , 3 , 1 )คุณสามารถจัดแนวย่อหน้าของข้อความไปทางซ้าย ขวา หรือกึ่งกลางได้
 var style = lipgloss . NewStyle ().
    Width ( 24 ).
    Align ( lipgloss . Left ).  // align it left
    Align ( lipgloss . Right ). // no wait, align it right
Align ( lipgloss . Center ) // just kidding, align it in the center การตั้งค่าความกว้างและความสูงขั้นต่ำทำได้ง่ายและตรงไปตรงมา
 var style = lipgloss . NewStyle ().
    SetString ( "What’s for lunch?" ).
    Width ( 24 ).
    Height ( 32 ).
Foreground ( lipgloss . Color ( "63" ))การเพิ่มเส้นขอบเป็นเรื่องง่าย:
 // Add a purple, rectangular border
var style = lipgloss . NewStyle ().
    BorderStyle ( lipgloss . NormalBorder ()).
    BorderForeground ( lipgloss . Color ( "63" ))

// Set a rounded, yellow-on-purple border to the top and left
var anotherStyle = lipgloss . NewStyle ().
    BorderStyle ( lipgloss . RoundedBorder ()).
    BorderForeground ( lipgloss . Color ( "228" )).
    BorderBackground ( lipgloss . Color ( "63" )).
    BorderTop ( true ).
    BorderLeft ( true )

// Make your own border
var myCuteBorder = lipgloss. Border {
    Top :         "._.:*:" ,
    Bottom :      "._.:*:" ,
    Left :        "|*" ,
    Right :       "|*" ,
    TopLeft :     "*" ,
    TopRight :    "*" ,
    BottomLeft :  "*" ,
    BottomRight : "*" ,
}
นอกจากนี้ยังมีฟังก์ชันชวเลขสำหรับกำหนดเส้นขอบ ซึ่งมีรูปแบบคล้ายกับฟังก์ชันมาร์จิ้นและการเติมชวเลข
 // Add a thick border to the top and bottom
lipgloss . NewStyle ().
    Border ( lipgloss . ThickBorder (), true , false )

// Add a double border to the top and left sides. Rules are set clockwise
// from top.
lipgloss . NewStyle ().
    Border ( lipgloss . DoubleBorder (), true , false , false , true )
สำหรับข้อมูลเพิ่มเติมเกี่ยวกับพรมแดน โปรดดูเอกสาร
เพียงใช้การมอบหมายงาน:
 style := lipgloss . NewStyle (). Foreground ( lipgloss . Color ( "219" ))

copiedStyle := style // this is a true copy

wildStyle := style . Blink ( true ) // this is also true copy, with blink added
เนื่องจากโครงสร้างข้อมูล Style ประกอบด้วยประเภทดั้งเดิมเท่านั้น การกำหนดสไตล์ให้กับอีกประเภทหนึ่งจะสร้างสำเนาใหม่ของสไตล์ได้อย่างมีประสิทธิภาพโดยไม่ต้องเปลี่ยนรูปแบบต้นฉบับ
สไตล์สามารถสืบทอดกฎจากสไตล์อื่นได้ เมื่อรับค่ามา ระบบจะสืบทอดเฉพาะกฎที่ไม่ได้ตั้งค่าบนผู้รับเท่านั้น
 var styleA = lipgloss . NewStyle ().
    Foreground ( lipgloss . Color ( "229" )).
    Background ( lipgloss . Color ( "63" ))

// Only the background color will be inherited here, because the foreground
// color will have been already set:
var styleB = lipgloss . NewStyle ().
    Foreground ( lipgloss . Color ( "201" )).
Inherit ( styleA )กฎทั้งหมดสามารถยกเลิกได้:
 var style = lipgloss . NewStyle ().
    Bold ( true ).                        // make it bold
    UnsetBold ().                       // jk don't make it bold
    Background ( lipgloss . Color ( "227" )). // yellow background
    UnsetBackground ()                  // never mind
เมื่อกฎไม่ได้ตั้งค่า กฎนั้นจะไม่ได้รับการสืบทอดหรือคัดลอก
ในบางครั้ง เช่น เมื่อพัฒนาส่วนประกอบ คุณต้องแน่ใจว่าคำจำกัดความสไตล์เคารพวัตถุประสงค์ที่ตั้งใจไว้ใน UI นี่คือที่มาของ Inline และ MaxWidth และ MaxHeight :
 // Force rendering onto a single line, ignoring margins, padding, and borders.
someStyle . Inline ( true ). Render ( "yadda yadda" )

// Also limit rendering to five cells
someStyle . Inline ( true ). MaxWidth ( 5 ). Render ( "yadda yadda" )

// Limit rendering to a 5x5 cell block
someStyle . MaxWidth ( 5 ). MaxHeight ( 5 ). Render ( "yadda yadda" ) อักขระแท็บ ( t ) แสดงผลแตกต่างกันในเทอร์มินัลที่แตกต่างกัน (มักเป็น 8 ช่องว่าง บางครั้ง 4) เนื่องจากความไม่สอดคล้องกันนี้ ลิปกลอสจึงแปลงแท็บเป็น 4 ช่องว่างในเวลาเรนเดอร์ ลักษณะการทำงานนี้สามารถเปลี่ยนแปลงได้ในแต่ละสไตล์ อย่างไรก็ตาม:
 style := lipgloss . NewStyle () // tabs will render as 4 spaces, the default
style = style . TabWidth ( 2 )    // render tabs as 2 spaces
style = style . TabWidth ( 0 )    // remove tabs entirely
style = style . TabWidth ( lipgloss . NoTabConversion ) // leave tabs intact โดยทั่วไป คุณเพียงแค่เรียกเมธอด Render(string...) บน lipgloss.Style :
 style := lipgloss . NewStyle (). Bold ( true ). SetString ( "Hello," )
fmt . Println ( style . Render ( "kitty." )) // Hello, kitty.
fmt . Println ( style . Render ( "puppy." )) // Hello, puppy.
แต่คุณสามารถใช้อินเทอร์เฟซ Stringer ได้:
 var style = lipgloss . NewStyle (). SetString ( "你好,猫咪。" ). Bold ( true )
fmt . Println ( style ) // 你好,猫咪。ตัวเรนเดอร์แบบกำหนดเองทำให้คุณสามารถเรนเดอร์ไปยังเอาต์พุตเฉพาะได้ นี่เป็นสิ่งสำคัญอย่างยิ่งเมื่อคุณต้องการเรนเดอร์ไปยังเอาท์พุตที่แตกต่างกัน และตรวจจับโปรไฟล์สีและสถานะพื้นหลังสีเข้มสำหรับแต่ละเอาท์พุตได้อย่างถูกต้อง เช่น ในสถานการณ์เซิร์ฟเวอร์ไคลเอ็นต์
 func myLittleHandler ( sess ssh. Session ) {
    // Create a renderer for the client.
    renderer := lipgloss . NewRenderer ( sess )

    // Create a new style on the renderer.
    style := renderer . NewStyle (). Background (lipgloss. AdaptiveColor { Light : "63" , Dark : "228" })

    // Render. The color profile and dark background state will be correctly detected.
    io . WriteString ( sess , style . Render ( "Heyyyyyyy" ))
}
สำหรับตัวอย่างการใช้ตัวเรนเดอร์แบบกำหนดเองบน SSH กับ Wish โปรดดูตัวอย่าง SSH
นอกจากสไตล์ที่ลงตัวแล้ว ลิปกลอสยังมาพร้อมกับประโยชน์ใช้สอยเพื่อช่วยประกอบเลย์เอาต์ของคุณอีกด้วย
การรวมย่อหน้าในแนวนอนและแนวตั้งเป็นเรื่องง่าย
 // Horizontally join three paragraphs along their bottom edges
lipgloss . JoinHorizontal ( lipgloss . Bottom , paragraphA , paragraphB , paragraphC )

// Vertically join two paragraphs along their center axes
lipgloss . JoinVertical ( lipgloss . Center , paragraphA , paragraphB )

// Horizontally join three paragraphs, with the shorter ones aligning 20%
// from the top of the tallest
lipgloss . JoinHorizontal ( 0.2 , paragraphA , paragraphB , paragraphC )บางครั้งคุณอาจต้องการทราบความกว้างและความสูงของบล็อกข้อความเมื่อสร้างเลย์เอาต์ของคุณ
 // Render a block of text.
var style = lipgloss . NewStyle ().
    Width ( 40 ).
    Padding ( 2 )
var block string = style . Render ( someLongString )

// Get the actual, physical dimensions of the text block.
width := lipgloss . Width ( block )
height := lipgloss . Height ( block )

// Here's a shorthand function.
w , h := lipgloss . Size ( block )บางครั้งคุณก็แค่ต้องการวางบล็อกข้อความในช่องว่าง
 // Center a paragraph horizontally in a space 80 cells wide. The height of
// the block returned will be as tall as the input paragraph.
block := lipgloss . PlaceHorizontal ( 80 , lipgloss . Center , fancyStyledParagraph )

// Place a paragraph at the bottom of a space 30 cells tall. The width of
// the text block returned will be as wide as the input paragraph.
block := lipgloss . PlaceVertical ( 30 , lipgloss . Bottom , fancyStyledParagraph )

// Place a paragraph in the bottom right corner of a 30x80 cell space.
block := lipgloss . Place ( 30 , 80 , lipgloss . Right , lipgloss . Bottom , fancyStyledParagraph )
คุณยังสามารถจัดสไตล์ช่องว่างได้ สำหรับรายละเอียด โปรดดูเอกสาร
ลิปกลอสมาพร้อมกับแพ็คเกจย่อยแบบตาราง
import "github.com/charmbracelet/lipgloss/table"กำหนดแถวข้อมูลบางแถว
 rows := [][] string {
    { "Chinese" , "您好" , "你好" },
    { "Japanese" , "こんにちは" , "やあ" },
    { "Arabic" , "أهلين" , "أهلا" },
    { "Russian" , "Здравствуйте" , "Привет" },
    { "Spanish" , "Hola" , "¿Qué tal?" },
}
ใช้แพ็คเกจตารางเพื่อจัดรูปแบบและเรนเดอร์ตาราง
 t := table . New ().
    Border ( lipgloss . NormalBorder ()).
    BorderStyle ( lipgloss . NewStyle (). Foreground ( lipgloss . Color ( "99" ))).
    StyleFunc ( func ( row , col int ) lipgloss. Style {
        switch {
        case row == 0 :
            return HeaderStyle
        case row % 2 == 0 :
            return EvenRowStyle
        default :
            return OddRowStyle
        }
    }).
    Headers ( "LANGUAGE" , "FORMAL" , "INFORMAL" ).
    Rows ( rows ... )

// You can also add tables row-by-row
t . Row ( "English" , "You look absolutely fabulous." , "How's it going?" )
พิมพ์ตาราง
fmt . Println ( t )
คำเตือน
จำเป็นต้องประกาศ Rows ของตารางก่อน Offset ไม่เช่นนั้นจะไม่ทำอะไรเลย
สำหรับข้อมูลเพิ่มเติมเกี่ยวกับตาราง โปรดดูเอกสารและตัวอย่าง
ลิปกลอสมาพร้อมกับรายการเรนเดอร์แพ็คเกจย่อย
import "github.com/charmbracelet/lipgloss/list"กำหนดรายการใหม่
l := list . New ( "A" , "B" , "C" )พิมพ์รายการ
 fmt . Println ( l )

// • A
// • B
// • C
รายการมีความสามารถในการซ้อน
 l := list . New (
    "A" , list . New ( "Artichoke" ),
    "B" , list . New ( "Baking Flour" , "Bananas" , "Barley" , "Bean Sprouts" ),
    "C" , list . New ( "Cashew Apple" , "Cashews" , "Coconut Milk" , "Curry Paste" , "Currywurst" ),
    "D" , list . New ( "Dill" , "Dragonfruit" , "Dried Shrimp" ),
    "E" , list . New ( "Eggs" ),
    "F" , list . New ( "Fish Cake" , "Furikake" ),
    "J" , list . New ( "Jicama" ),
    "K" , list . New ( "Kohlrabi" ),
    "L" , list . New ( "Leeks" , "Lentils" , "Licorice Root" ),
)
พิมพ์รายการ
fmt . Println ( l )
รายการสามารถปรับแต่งได้ผ่านฟังก์ชันการแจงนับรวมถึงการใช้ lipgloss.Style s
 enumeratorStyle := lipgloss . NewStyle (). Foreground ( lipgloss . Color ( "99" )). MarginRight ( 1 )
itemStyle := lipgloss . NewStyle (). Foreground ( lipgloss . Color ( "212" )). MarginRight ( 1 )

l := list . New (
    "Glossier" ,
    "Claire’s Boutique" ,
    "Nyx" ,
    "Mac" ,
    "Milk" ,
    ).
    Enumerator ( list . Roman ).
    EnumeratorStyle ( enumeratorStyle ).
    ItemStyle ( itemStyle )
พิมพ์รายการ

นอกเหนือจากตัวแจงนับที่กำหนดไว้ล่วงหน้า ( Arabic , Alphabet , Roman , Bullet , Tree ) คุณยังสามารถกำหนดตัวแจงนับที่คุณกำหนดเองได้:
 l := list . New ( "Duck" , "Duck" , "Duck" , "Duck" , "Goose" , "Duck" , "Duck" )

func DuckDuckGooseEnumerator ( l list. Items , i int ) string {
    if l . At ( i ). Value () == "Goose" {
        return "Honk →"
    }
    return ""
}

l = l . Enumerator ( DuckDuckGooseEnumerator )
พิมพ์รายการ:

หากต้องการ คุณสามารถสร้างรายการแบบเพิ่มทีละรายการได้:
 l := list . New ()

for i := 0 ; i < repeat ; i ++ {
    l . Item ( "Lip Gloss" )
}ลิปกลอสมาพร้อมกับแพ็คเกจย่อยการเรนเดอร์ต้นไม้
import "github.com/charmbracelet/lipgloss/tree"กำหนดต้นไม้ใหม่
 t := tree . Root ( "." ).
    Child ( "A" , "B" , "C" )
พิมพ์ต้นไม้.
 fmt . Println ( t )

// .
// ├── A
// ├── B
// └── C
ต้นไม้มีความสามารถในการทำรัง
 t := tree . Root ( "." ).
    Child ( "macOS" ).
    Child (
        tree . New ().
            Root ( "Linux" ).
            Child ( "NixOS" ).
            Child ( "Arch Linux (btw)" ).
            Child ( "Void Linux" ),
        ).
    Child (
        tree . New ().
            Root ( "BSD" ).
            Child ( "FreeBSD" ).
            Child ( "OpenBSD" ),
    )
พิมพ์ต้นไม้.
fmt . Println ( t )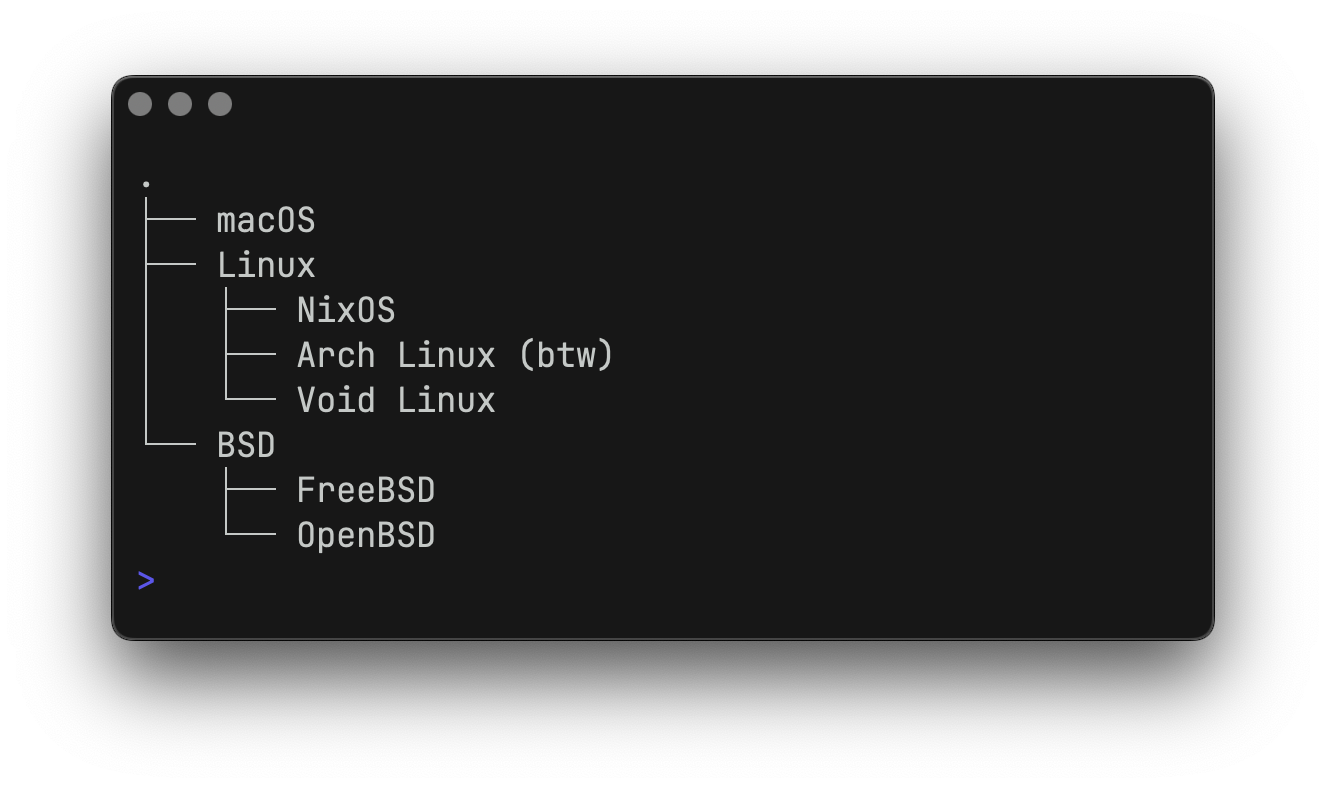
ต้นไม้สามารถปรับแต่งได้ผ่านฟังก์ชันการแจงนับ เช่นเดียวกับการใช้ lipgloss.Style s
 enumeratorStyle := lipgloss . NewStyle (). Foreground ( lipgloss . Color ( "63" )). MarginRight ( 1 )
rootStyle := lipgloss . NewStyle (). Foreground ( lipgloss . Color ( "35" ))
itemStyle := lipgloss . NewStyle (). Foreground ( lipgloss . Color ( "212" ))

t := tree .
    Root ( "⁜ Makeup" ).
    Child (
        "Glossier" ,
        "Fenty Beauty" ,
        tree . New (). Child (
            "Gloss Bomb Universal Lip Luminizer" ,
            "Hot Cheeks Velour Blushlighter" ,
        ),
        "Nyx" ,
        "Mac" ,
        "Milk" ,
    ).
    Enumerator ( tree . RoundedEnumerator ).
    EnumeratorStyle ( enumeratorStyle ).
    RootStyle ( rootStyle ).
    ItemStyle ( itemStyle )
พิมพ์ต้นไม้.

ตัวแจงนับที่กำหนดไว้ล่วงหน้าสำหรับทรีคือ DefaultEnumerator และ RoundedEnumerator
หากต้องการ คุณสามารถสร้างต้นไม้ทีละน้อยได้:
 t := tree . New ()

for i := 0 ; i < repeat ; i ++ {
    t . Child ( "Lip Gloss" )
} สาเหตุน่าจะมาจากภาษาและการเข้ารหัสของคุณ โดยเฉพาะภาษาจีน ญี่ปุ่น และเกาหลี (เช่น zh_CN.UTF-8 หรือ ja_JP.UTF-8 ) วิธีแก้ไขปัญหานี้โดยตรงที่สุดคือตั้งค่า RUNEWIDTH_EASTASIAN=0 ในสภาพแวดล้อมของคุณ
สำหรับรายละเอียด โปรดดู https://github.com/charmbracelet/lipgloss/issues/40
ลิปกลอสจะลดระดับสีให้เป็นตัวเลือกที่ดีที่สุดในเทอร์มินัลที่กำหนดโดยอัตโนมัติ และหากเอาท์พุตไม่ใช่ TTY มันจะลบเอาท์พุตสีทั้งหมด นี่เป็นเรื่องปกติเมื่อรันการทดสอบ CI หรือเมื่อไปป์เอาท์พุตที่อื่น
หากจำเป็น คุณสามารถบังคับโปรไฟล์สีในการทดสอบของคุณด้วย SetColorProfile
 import (
    "github.com/charmbracelet/lipgloss"
    "github.com/muesli/termenv"
)

lipgloss . SetColorProfile ( termenv . TrueColor )
หมายเหตุ: ตัวเลือกนี้จะจำกัดความยืดหยุ่นของแอปพลิเคชันของคุณ และอาจทำให้โค้ด Escape ANSI แสดงผลได้ในกรณีที่อาจไม่ต้องการ สังเกตกรณีการใช้งานและสภาพแวดล้อมของคุณอย่างรอบคอบก่อนที่จะเลือกบังคับใช้โปรไฟล์สี
ลิปกลอสไม่ได้แทนที่ Bubble Tea แต่มันเป็นเพื่อนคู่หู Bubble Tea ที่ยอดเยี่ยม ได้รับการออกแบบมาเพื่อให้การประกอบมุมมองอินเทอร์เฟซผู้ใช้เทอร์มินัลเป็นเรื่องง่ายและสนุกที่สุดเท่าที่จะเป็นไปได้ เพื่อให้คุณสามารถมุ่งเน้นไปที่การสร้างแอปพลิเคชันของคุณ แทนที่จะกังวลกับรายละเอียดเค้าโครงระดับต่ำ
พูดง่ายๆ ก็คือคุณสามารถใช้ลิปกลอสเพื่อช่วยสร้างมุมมองชาบับเบิ้ลของคุณได้
ลิปกลอสสร้างขึ้นจากไลบรารี Termenv และ Reflow ที่ยอดเยี่ยม ซึ่งจัดการกับการใช้สีและข้อความที่รับรู้ ANSI ตามลำดับ สำหรับการใช้งานหลายกรณี Termenv และ Reflow จะเพียงพอสำหรับความต้องการของคุณ
หากต้องการโซลูชันการเรนเดอร์ที่เน้นเอกสารเป็นศูนย์กลางมากขึ้นพร้อมการรองรับสิ่งต่าง ๆ เช่น รายการ ตาราง และโค้ดที่เน้นไวยากรณ์ โปรดดูที่ Glamour ซึ่งเป็นตัวเรนเดอร์ Markdown ที่ใช้สไตล์ชีต
ดูการบริจาค
เราชอบที่จะได้ยินความคิดของคุณเกี่ยวกับโครงการนี้ โปรดแจ้งให้เราทราบ!
เอ็มไอที
ส่วนหนึ่งของเสน่ห์
Charm热爱เริ่ม源 • Charm รักโอเพ่นซอร์ส


