build your local ragstack chatbot
1.0.0
ยินดีต้อนรับสู่เวิร์กชอปนี้เพื่อสร้างและปรับใช้ Enterprise Co-Pilot ของคุณเองโดยใช้การดึงข้อมูล Augmented Generation ด้วย DataStax Enterprise v7 ซึ่งเป็นผู้อนุมานเฉพาะที่ และ Mistral ซึ่งเป็นโมเดลภาษาขนาดใหญ่แบบเปิดในท้องถิ่น
พื้นที่เก็บข้อมูลนี้มุ่งเน้นไปที่ความปลอดภัยโดยการเก็บข้อมูลที่ละเอียดอ่อนของคุณไว้ในไฟร์วอลล์!
ทำไม
โดยใช้ประโยชน์จาก DataStax RAGStack ซึ่งเป็นสแต็กที่ได้รับการดูแลจัดการของซอฟต์แวร์โอเพ่นซอร์สที่ดีที่สุด เพื่อลดความยุ่งยากในการใช้งานรูปแบบ RAG ในแอปพลิเคชันที่พร้อมสำหรับการผลิตซึ่งใช้ DataStax Enterprise, Astra Vector DB หรือ Apache Cassandra เป็นที่เก็บเวกเตอร์
สิ่งที่คุณจะได้เรียนรู้:
- วิธีใช้ประโยชน์จาก DataStax RAGStack เพื่อการใช้งานจริงของส่วนประกอบต่อไปนี้:
- วิธีใช้ Ollama เป็นเครื่องมืออนุมานเฉพาะที่
- วิธีใช้ Mistral เป็น Large Language Model (LLM) ในพื้นที่และแบบเปิดสำหรับแชทบอทสไตล์ถามตอบ
- วิธีใช้ Streamlit เพื่อปรับใช้แอปที่ยอดเยี่ยมของคุณได้อย่างง่ายดาย!
สไลด์การนำเสนอสามารถพบได้ที่นี่
เวิร์กชอปนี้ถือว่าคุณมีสิทธิ์เข้าถึง:
ในขั้นตอนถัดไป เราจะเตรียมพื้นที่เก็บข้อมูล DataStax Enterprise, Jupyter Notebook และ Ollama Inference Engine พร้อม Ollama
สิ่งแรก เราจะต้องโคลนพื้นที่เก็บข้อมูลนี้ไปยังแล็ปท็อปการพัฒนาในพื้นที่ของคุณ
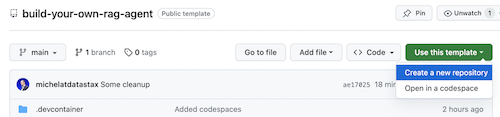
เปิดที่เก็บ build-your-local-ragstack-chatbot
คลิกที่ Use this template -> Ceate new repository ดังต่อไปนี้:
ตอนนี้เลือกบัญชี GitHub ของคุณและตั้งชื่อที่เก็บใหม่ ควรตั้งค่าคำอธิบายด้วย คลิก Create repository
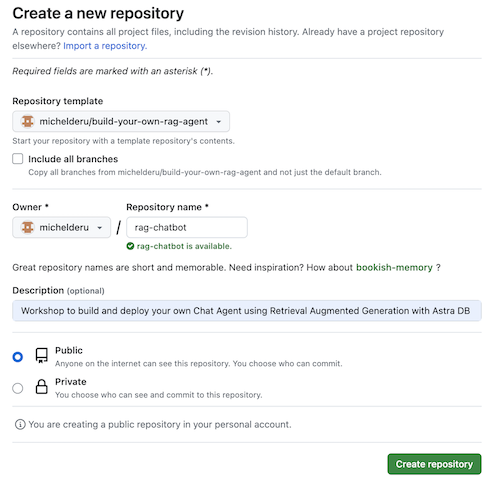
เย็น! คุณเพิ่งสร้างสำเนาในบัญชี Gihub ของคุณเอง!
cd ไปยังไดเร็กทอรีที่เหมาะสม (เช่น /projects หรือประมาณนั้น);git clone <url-to-your-repo>cd ไปยังไดเรกทอรีใหม่ของคุณ!และคุณพร้อมที่จะร็อคแอนด์โรลแล้ว! -
การสร้าง Virtual Environment มีประโยชน์ ใช้ด้านล่างเพื่อตั้งค่า:
python3 -m venv myenv
จากนั้นเปิดใช้งานดังนี้:
 source myenv/bin/activate   # on Linux/Mac
myenvScriptsactivate.bat  # on Windows
ตอนนี้คุณสามารถเริ่มการติดตั้งแพ็คเกจที่ต้องการได้:
pip3 install -r requirements.txt
เรียกใช้ DSE 7 ด้วยสองวิธีจากหน้าต่างเทอร์มินัลใหม่:
docker-compose up
สิ่งนี้ใช้ไฟล์ docker-compose.yml ในรูทของที่เก็บนี้ ซึ่งจะเริ่ม Jupyter Interpreter ได้อย่างสะดวก
DataStax จะทำงานบน http://localhost:9042 และ Jupyter จะสามารถเข้าถึงได้โดยการเรียกดู http://localhost:8888
มีกลไกการอนุมานมากมาย คุณสามารถเลือกใช้ LM Studio ซึ่งมี UI ที่สวยงามได้ ในสมุดบันทึกนี้ เราจะใช้ Ollama
ollama run mistral ในหน้าต่างเทอร์มินัลใหม่ในกรณีที่ทั้งหมดนี้ล้มเหลว เนื่องจากข้อจำกัดของ RAM คุณสามารถเลือกใช้ Tinyllama เป็นโมเดลได้
เพื่อเริ่มต้นเวิร์กชอปนี้ ก่อนอื่นเราจะลองใช้แนวคิดในสมุดบันทึกที่ให้มาด้วย เราสมมติว่าคุณจะเรียกใช้จากภายใน Jupyter Docker Container ในกรณีนี้ หากคุณไม่ได้ทำงาน โปรดเปลี่ยนชื่อโฮสต์จาก host.docker.internal เป็น localhost
สมุดบันทึกนี้แสดงขั้นตอนในการใช้ DataStax Enterprise Vector Store เพื่อทำให้การโต้ตอบ LLM มีความหมายและปราศจากภาพหลอน แนวทางที่ดำเนินการที่นี่คือดึงข้อมูลรุ่น Augmented
คุณจะได้เรียนรู้:
เรียกดู http://localhost:8888 และเปิดสมุดบันทึกที่มีอยู่ในรูทที่เรียกว่า Build_Your_Own_RAG_Meetup.ipnb
ในเวิร์คช็อปนี้ เราจะใช้ Streamlit ซึ่งเป็นเฟรมเวิร์กที่ใช้งานง่ายมากอย่างน่าทึ่งเพื่อสร้างเว็บแอปพลิเคชันส่วนหน้า
ในการเริ่มต้น เรามาสร้างแอปพลิเคชัน Hello World กันดังนี้:
import streamlit as st
# Draw a title and some markdown
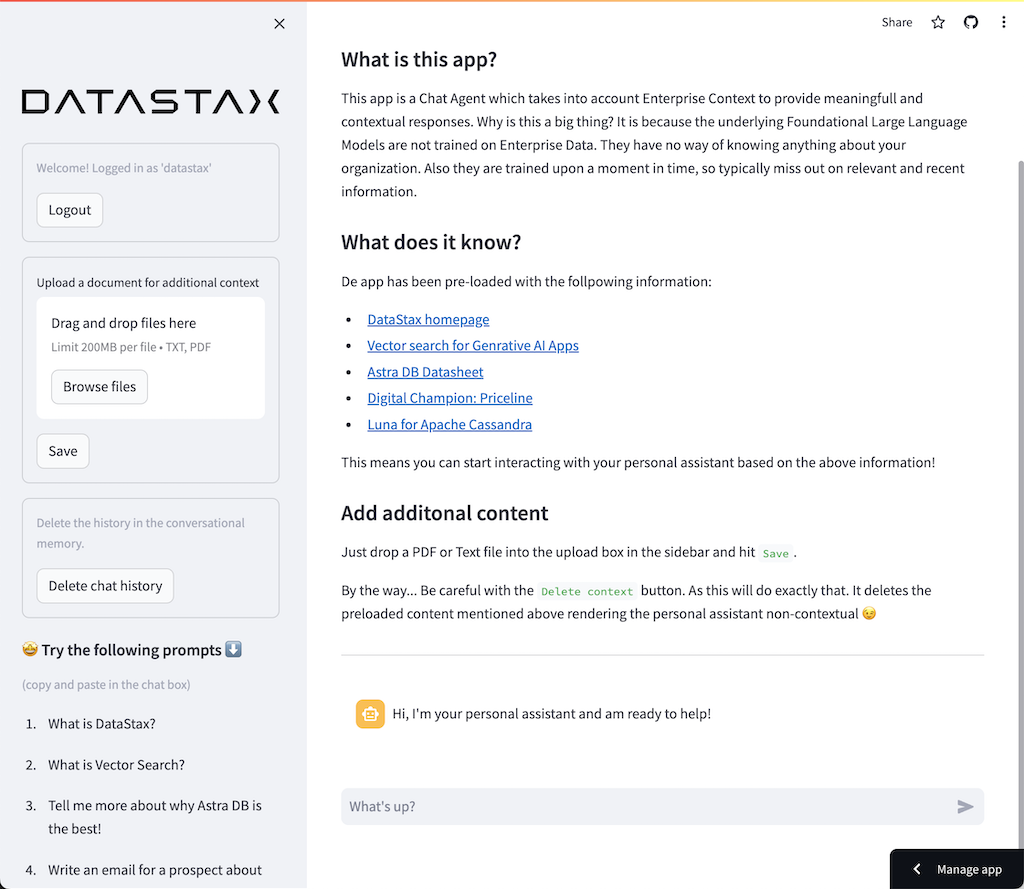
st . markdown ( """# Your Enterprise Co-Pilot
Generative AI is considered to bring the next Industrial Revolution.
Why? Studies show a **37% efficiency boost** in day to day work activities!
### Security and safety
This Chatbot is safe to work with sensitive data. Why?
- First of all it makes use of [Ollama, a local inference engine](https://ollama.com);
- On top of the inference engine, we're running [Mistral, a local and open Large Language Model (LLM)](https://mistral.ai/);
- Also the LLM does not contain any sensitive or enterprise data, as there is no way to secure it in a LLM;
- Instead, your sensitive data is stored securely within the firewall inside [DataStax Enterprise v7 Vector Database](https://www.datastax.com/blog/get-started-with-the-datastax-enterprise-7-0-developer-vector-search-preview);
- And lastly, the chains are built on [RAGStack](https://www.datastax.com/products/ragstack), an enterprise version of Langchain and LLamaIndex, supported by [DataStax](https://www.datastax.com/).""" )
st . divider () ขั้นตอนแรกคือการนำเข้าแพ็คเกจ streamlit จากนั้นเราเรียก st.markdown เพื่อเขียนชื่อเรื่อง และสุดท้ายเราเขียนเนื้อหาบางส่วนลงในหน้าเว็บ
ในการเริ่มต้นแอปพลิเคชันนี้ในเครื่อง คุณจะต้องติดตั้งการพึ่งพา streamlit ดังต่อไปนี้ (ซึ่งควรทำแล้วโดยเป็นส่วนหนึ่งของข้อกำหนดเบื้องต้น):
pip install streamlitตอนนี้รันแอป:
streamlit run app_1.pyสิ่งนี้จะเริ่มต้นแอปพลิเคชันเซิร์ฟเวอร์และจะนำคุณไปยังหน้าเว็บที่คุณเพิ่งสร้างขึ้น
ง่ายใช่มั้ย? -
ในขั้นตอนนี้ เราจะเริ่มเตรียมแอปเพื่อให้สามารถโต้ตอบแชทบอทกับผู้ใช้ได้ เราจะใช้ส่วนประกอบ Streamlit ต่อไปนี้: 1. 2. st.chat_input เพื่อให้ผู้ใช้สามารถป้อนคำถาม 2. st.chat_message('human') เพื่อดึงอินพุตของผู้ใช้ 3. st.chat_message('assistant') เพื่อดึงการตอบสนองของแชทบอท
ผลลัพธ์ที่ได้คือรหัสต่อไปนี้:
 # Draw the chat input box
if question := st . chat_input ( "What's up?" ):

    # Draw the user's question
    with st . chat_message ( 'human' ):
        st . markdown ( question )

    # Generate the answer
    answer = f"""You asked: { question } """

    # Draw the bot's answer
    with st . chat_message ( 'assistant' ):
        st . markdown ( answer )
ลองใช้ app_2.py และเริ่มต้นดังต่อไปนี้
หากแอปก่อนหน้าของคุณยังทำงานอยู่ ให้ปิดแอปโดยกด ctrl-c ไว้ล่วงหน้า
streamlit run app_2.pyตอนนี้พิมพ์คำถามแล้วพิมพ์คำถามอื่นอีกครั้ง คุณจะเห็นว่ามีเพียงคำถามสุดท้ายเท่านั้นที่ถูกเก็บไว้
ทำไม???
เนื่องจาก Streamlit จะวาดทั้งหน้าจอใหม่ซ้ำแล้วซ้ำเล่าตามอินพุตล่าสุด เนื่องจากเราจำคำถามไม่ได้ จึงแสดงเฉพาะรายการสุดท้ายเท่านั้น
ในขั้นตอนนี้ เราจะคอยติดตามคำถามและคำตอบ เพื่อให้ประวัติถูกแสดงทุกครั้งที่วาดใหม่
เพื่อดำเนินการนี้ เราจะดำเนินการตามขั้นตอนถัดไป:
st.session_state ที่เรียกว่า messagesst.session_state ที่เรียกว่า messagesfor message in st.session_state.messages วิธีการนี้ใช้งานได้เนื่องจาก session_state มีสถานะตลอดการรัน Streamlit
ตรวจสอบรหัสที่สมบูรณ์ใน app_3.py
ดังที่คุณเห็นเราใช้พจนานุกรมเพื่อจัดเก็บทั้ง role (ซึ่งอาจเป็นมนุษย์หรือ AI) และ question หรือ answer การติดตามบทบาทเป็นสิ่งสำคัญเนื่องจากจะวาดภาพที่ถูกต้องในเบราว์เซอร์
เรียกใช้ด้วย:
streamlit run app_3.pyตอนนี้เพิ่มคำถามหลายข้อแล้วคุณจะเห็นว่าคำถามเหล่านี้ถูกวาดใหม่บนหน้าจอทุกครั้งที่สตรีม Streamlit ซ้ำ -
ที่นี่เราจะเชื่อมโยงกลับไปยังงานที่เราทำโดยใช้ Jupyter Notebook และรวมคำถามเข้ากับการเรียกไปยัง Mistral Chat Model
โปรดจำไว้ว่า Streamlit รันโค้ดซ้ำทุกครั้งที่ผู้ใช้โต้ตอบ ด้วยเหตุนี้ เราจะใช้การแคชข้อมูลและทรัพยากรใน Streamlit เพื่อให้การเชื่อมต่อได้รับการตั้งค่าเพียงครั้งเดียว เราจะใช้ @st.cache_data() และ @st.cache_resource() เพื่อกำหนดการแคช โดยทั่วไป cache_data จะใช้สำหรับโครงสร้างข้อมูล cache_resource ส่วนใหญ่จะใช้สำหรับทรัพยากรเช่นฐานข้อมูล
ผลลัพธ์ที่ได้คือโค้ดต่อไปนี้เพื่อตั้งค่า Prompt และ Chat Model:
 # Cache prompt for future runs
@ st . cache_data ()
def load_prompt ():
    template = """You're a helpful AI assistent tasked to answer the user's questions.
You're friendly and you answer extensively with multiple sentences. You prefer to use bulletpoints to summarize.

QUESTION:
{question}

YOUR ANSWER:"""
    return ChatPromptTemplate . from_messages ([( "system" , template )])
prompt = load_prompt ()

# Cache Mistral Chat Model for future runs
@ st . cache_resource ()
def load_chat_model ():
    # parameters for ollama see: https://api.python.langchain.com/en/latest/chat_models/langchain_community.chat_models.ollama.ChatOllama.html
    # num_ctx is the context window size
    return ChatOllama (
        model = "mistral:latest" ,
        num_ctx = 18192 ,
        base_url = st . secrets [ 'OLLAMA_ENDPOINT' ]
    )
chat_model = load_chat_model ()
แทนที่จะเป็นคำตอบคงที่ที่เราใช้ในตัวอย่างก่อนหน้านี้ ตอนนี้เราจะเปลี่ยนไปใช้การเรียก Chain:
 # Generate the answer by calling Mistral's Chat Model
inputs = RunnableMap ({
    'question' : lambda x : x [ 'question' ]
})
chain = inputs | prompt | chat_model
response = chain . invoke ({ 'question' : question })
answer = response . content
ตรวจสอบรหัสที่สมบูรณ์ใน app_4.py
ก่อนดำเนินการต่อ เราต้องระบุ OLLAMA_ENDPOINT ใน ./streamlit/secrets.toml ก่อน มีตัวอย่างที่ให้ไว้ใน secrets.toml.example :
 # Ollama/Mistral Endpoint
OLLAMA_ENDPOINT = " http://localhost:11434 "
ในการเริ่มต้นแอปพลิเคชันนี้ในเครื่อง คุณจะต้องติดตั้ง RAGStack ซึ่งมี LangChain เวอร์ชันเสถียรและการขึ้นต่อกันทั้งหมด (ซึ่งควรทำแล้วโดยเป็นส่วนหนึ่งของข้อกำหนดเบื้องต้น):
pip install ragstackตอนนี้รันแอป:
streamlit run app_4.pyตอนนี้คุณสามารถเริ่มต้นการโต้ตอบคำถามและคำตอบกับ Chatbot ได้แล้ว แน่นอนว่า เนื่องจากไม่มีการผสานรวมกับ DataStax Enterprise Vector Store จึงไม่มีคำตอบตามบริบท เนื่องจากยังไม่มีการสตรีมในตัว โปรดให้เวลาเจ้าหน้าที่สักครู่เพื่อหาคำตอบให้ครบถ้วนในคราวเดียว
เริ่มต้นด้วยคำถาม:
What does Daniel Radcliffe get when he turns 18?
ดังที่คุณจะเห็น คุณจะได้รับคำตอบทั่วไปโดยไม่มีข้อมูลที่มีอยู่ในข้อมูลของ CNN
ตอนนี้สิ่งต่าง ๆ น่าสนใจมาก! ในขั้นตอนนี้ เราจะรวม DataStax Enterprise Vector Store เพื่อให้บริบทแบบเรียลไทม์สำหรับ Chat Model ขั้นตอนที่ดำเนินการเพื่อดำเนินการดึงข้อมูลรุ่น Augmented:
เราจะนำข้อมูล CNN ที่เราใส่เข้าไปกลับมาใช้ซ้ำในสมุดบันทึก
เพื่อเปิดใช้งานสิ่งนี้ เราต้องตั้งค่าการเชื่อมต่อกับ DataStax Enterprise Vector Store ก่อน:
 # Cache the DataStax Enterprise Vector Store for future runs
@ st . cache_resource ( show_spinner = 'Connecting to Datastax Enterprise v7 with Vector Support' )
def load_vector_store ():
    # Connect to DSE
    cluster = Cluster (
        [ st . secrets [ 'DSE_ENDPOINT' ]]
    )
    session = cluster . connect ()

    # Connect to the Vector Store
    vector_store = Cassandra (
        session = session ,
        embedding = HuggingFaceEmbeddings (),
        keyspace = st . secrets [ 'DSE_KEYSPACE' ],
        table_name = st . secrets [ 'DSE_TABLE' ]
    )
    return vector_store
vector_store = load_vector_store ()

# Cache the Retriever for future runs
@ st . cache_resource ( show_spinner = 'Getting retriever' )
def load_retriever ():
    # Get the retriever for the Chat Model
    retriever = vector_store . as_retriever (
        search_kwargs = { "k" : 5 }
    )
    return retriever
retriever = load_retriever ()
สิ่งเดียวที่เราต้องทำคือเปลี่ยน Chain เพื่อรวมการโทรไปยัง Vector Store:
 # Generate the answer by calling Mistral's Chat Model
inputs = RunnableMap ({
    'context' : lambda x : retriever . get_relevant_documents ( x [ 'question' ]),
    'question' : lambda x : x [ 'question' ]
})
ตรวจสอบรหัสที่สมบูรณ์ใน app_5.py
ก่อนดำเนินการต่อ เราต้องระบุ DSE_ENDPOINT , DSE_KEYSPACE และ DSE_TABLE ใน . ./streamlit/secrets.toml มีตัวอย่างที่ให้ไว้ใน secrets.toml.example :
 # DataStax Enterprise Endpoint
DSE_ENDPOINT = " localhost "
DSE_KEYSPACE = " default_keyspace "
DSE_TABLE = " dse_vector_table "
และเรียกใช้แอป:
streamlit run app_5.pyลองถามคำถามอีกครั้ง:
What does Daniel Radcliffe get when he turns 18?
ดังที่คุณจะเห็น ตอนนี้คุณจะได้รับคำตอบตามบริบท เนื่องจาก Vector Store ให้ข้อมูล CNN ที่เกี่ยวข้องกับโมเดลการแชท
จะดีแค่ไหนที่ได้เห็นคำตอบปรากฏบนหน้าจอในขณะที่คำตอบถูกสร้างขึ้น! นั่นเป็นเรื่องง่าย
ก่อนอื่น เราจะสร้าง Streaming Call Back Handler ที่ถูกเรียกใช้ในการสร้างโทเค็นใหม่ทุกครั้งดังนี้:
 # Streaming call back handler for responses
class StreamHandler ( BaseCallbackHandler ):
    def __init__ ( self , container , initial_text = "" ):
        self . container = container
        self . text = initial_text

    def on_llm_new_token ( self , token : str , ** kwargs ):
        self . text += token
        self . container . markdown ( self . text + "▌" )
จากนั้นเราจะอธิบาย Chat Model เพื่อให้ผู้ใช้ StreamHandler:
response = chain . invoke ({ 'question' : question }, config = { 'callbacks' : [ StreamHandler ( response_placeholder )]}) response_placeholer ในโค้ดด้านบนจะกำหนดตำแหน่งที่ต้องเขียนโทเค็น เราสามารถสร้างพื้นที่นั้นได้โดยการเรียก st.empty() ดังนี้
 # UI placeholder to start filling with agent response
with st . chat_message ( 'assistant' ):
    response_placeholder = st . empty ()
ตรวจสอบรหัสที่สมบูรณ์ใน app_6.py
และเรียกใช้แอป:
streamlit run app_6.pyตอนนี้คุณจะเห็นว่าการตอบกลับจะถูกเขียนแบบเรียลไทม์ไปยังหน้าต่างเบราว์เซอร์
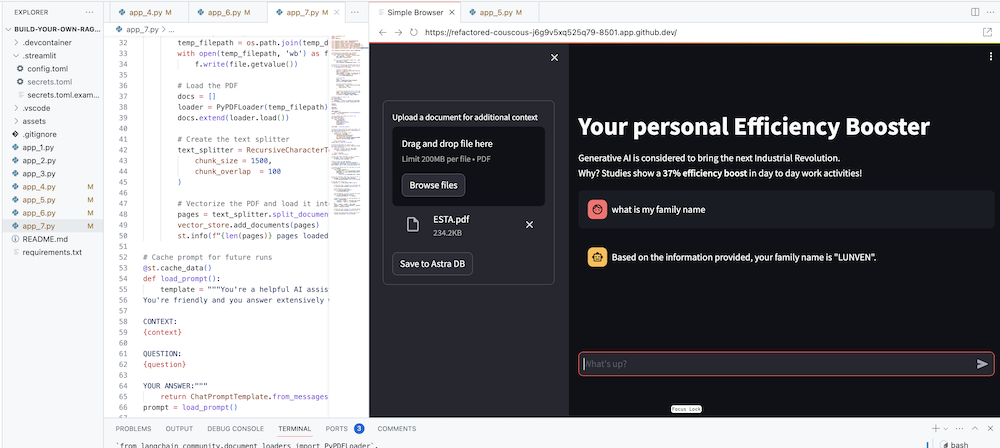
เป้าหมายสูงสุดคือการเพิ่มบริบทของบริษัทของคุณเองให้กับตัวแทน ในการดำเนินการนี้ เราจะเพิ่มช่องอัปโหลดที่ให้คุณอัปโหลดไฟล์ PDF ซึ่งจะถูกนำมาใช้เพื่อให้การตอบกลับที่มีความหมายและมีบริบท!
ก่อนอื่น เราต้องการแบบฟอร์มการอัปโหลดซึ่งสร้างได้ง่ายด้วย Streamlit:
 # Include the upload form for new data to be Vectorized
with st . sidebar :
    with st . form ( 'upload' ):
        uploaded_file = st . file_uploader ( 'Upload a document for additional context' , type = [ 'pdf' ])
        submitted = st . form_submit_button ( 'Save to DataStax Enterprise' )
        if submitted :
            vectorize_text ( uploaded_file )
ตอนนี้เราต้องการฟังก์ชันในการโหลด PDF และนำเข้าสู่ DataStax Enterprise ในขณะที่สร้างเวกเตอร์เนื้อหา
 # Function for Vectorizing uploaded data into DataStax Enterprise
def vectorize_text ( uploaded_file , vector_store ):
    if uploaded_file is not None :

        # Write to temporary file
        temp_dir = tempfile . TemporaryDirectory ()
        file = uploaded_file
        temp_filepath = os . path . join ( temp_dir . name , file . name )
        with open ( temp_filepath , 'wb' ) as f :
            f . write ( file . getvalue ())

        # Load the PDF
        docs = []
        loader = PyPDFLoader ( temp_filepath )
        docs . extend ( loader . load ())

        # Create the text splitter
        text_splitter = RecursiveCharacterTextSplitter (
            chunk_size = 1500 ,
            chunk_overlap  = 100
        )

        # Vectorize the PDF and load it into the DataStax Enterprise Vector Store
        pages = text_splitter . split_documents ( docs )
        vector_store . add_documents ( pages )
        st . info ( f" { len ( pages ) } pages loaded." )
ตรวจสอบรหัสที่สมบูรณ์ใน app_7.py
ในการเริ่มต้นแอปพลิเคชันนี้ในเครื่อง คุณจะต้องติดตั้งการพึ่งพา PyPDF ดังต่อไปนี้ (ซึ่งควรทำแล้วโดยเป็นส่วนหนึ่งของข้อกำหนดเบื้องต้น):
pip install pypdfและเรียกใช้แอป:
streamlit run app_7.pyตอนนี้ให้อัปโหลดเอกสาร PDF (ยิ่งสนุกมากขึ้น) ที่เกี่ยวข้องกับคุณ และเริ่มถามคำถามเกี่ยวกับเรื่องนี้ คุณจะเห็นว่าคำตอบจะมีความเกี่ยวข้อง มีความหมาย และมีบริบท! - พบกับความมหัศจรรย์ที่เกิดขึ้น!