สไตล์เลเยอร์ Comfyui
中文说明点这里
商务合作请联系อีเมล [email protected]
สำหรับความร่วมมือทางธุรกิจกรุณาติดต่ออีเมล [email protected]
ชุดของโหนดสำหรับ comfyui ที่สามารถคอมโพสิตเลเยอร์และหน้ากากเพื่อให้ได้ Photoshop เช่นฟังก์ชันการทำงาน
มันโยกย้ายฟังก์ชั่นพื้นฐานบางอย่างของ Photoshop ไปยัง Comfyui โดยมีวัตถุประสงค์เพื่อรวมศูนย์เวิร์กโฟลว์และลดความถี่ของการสลับซอฟต์แวร์
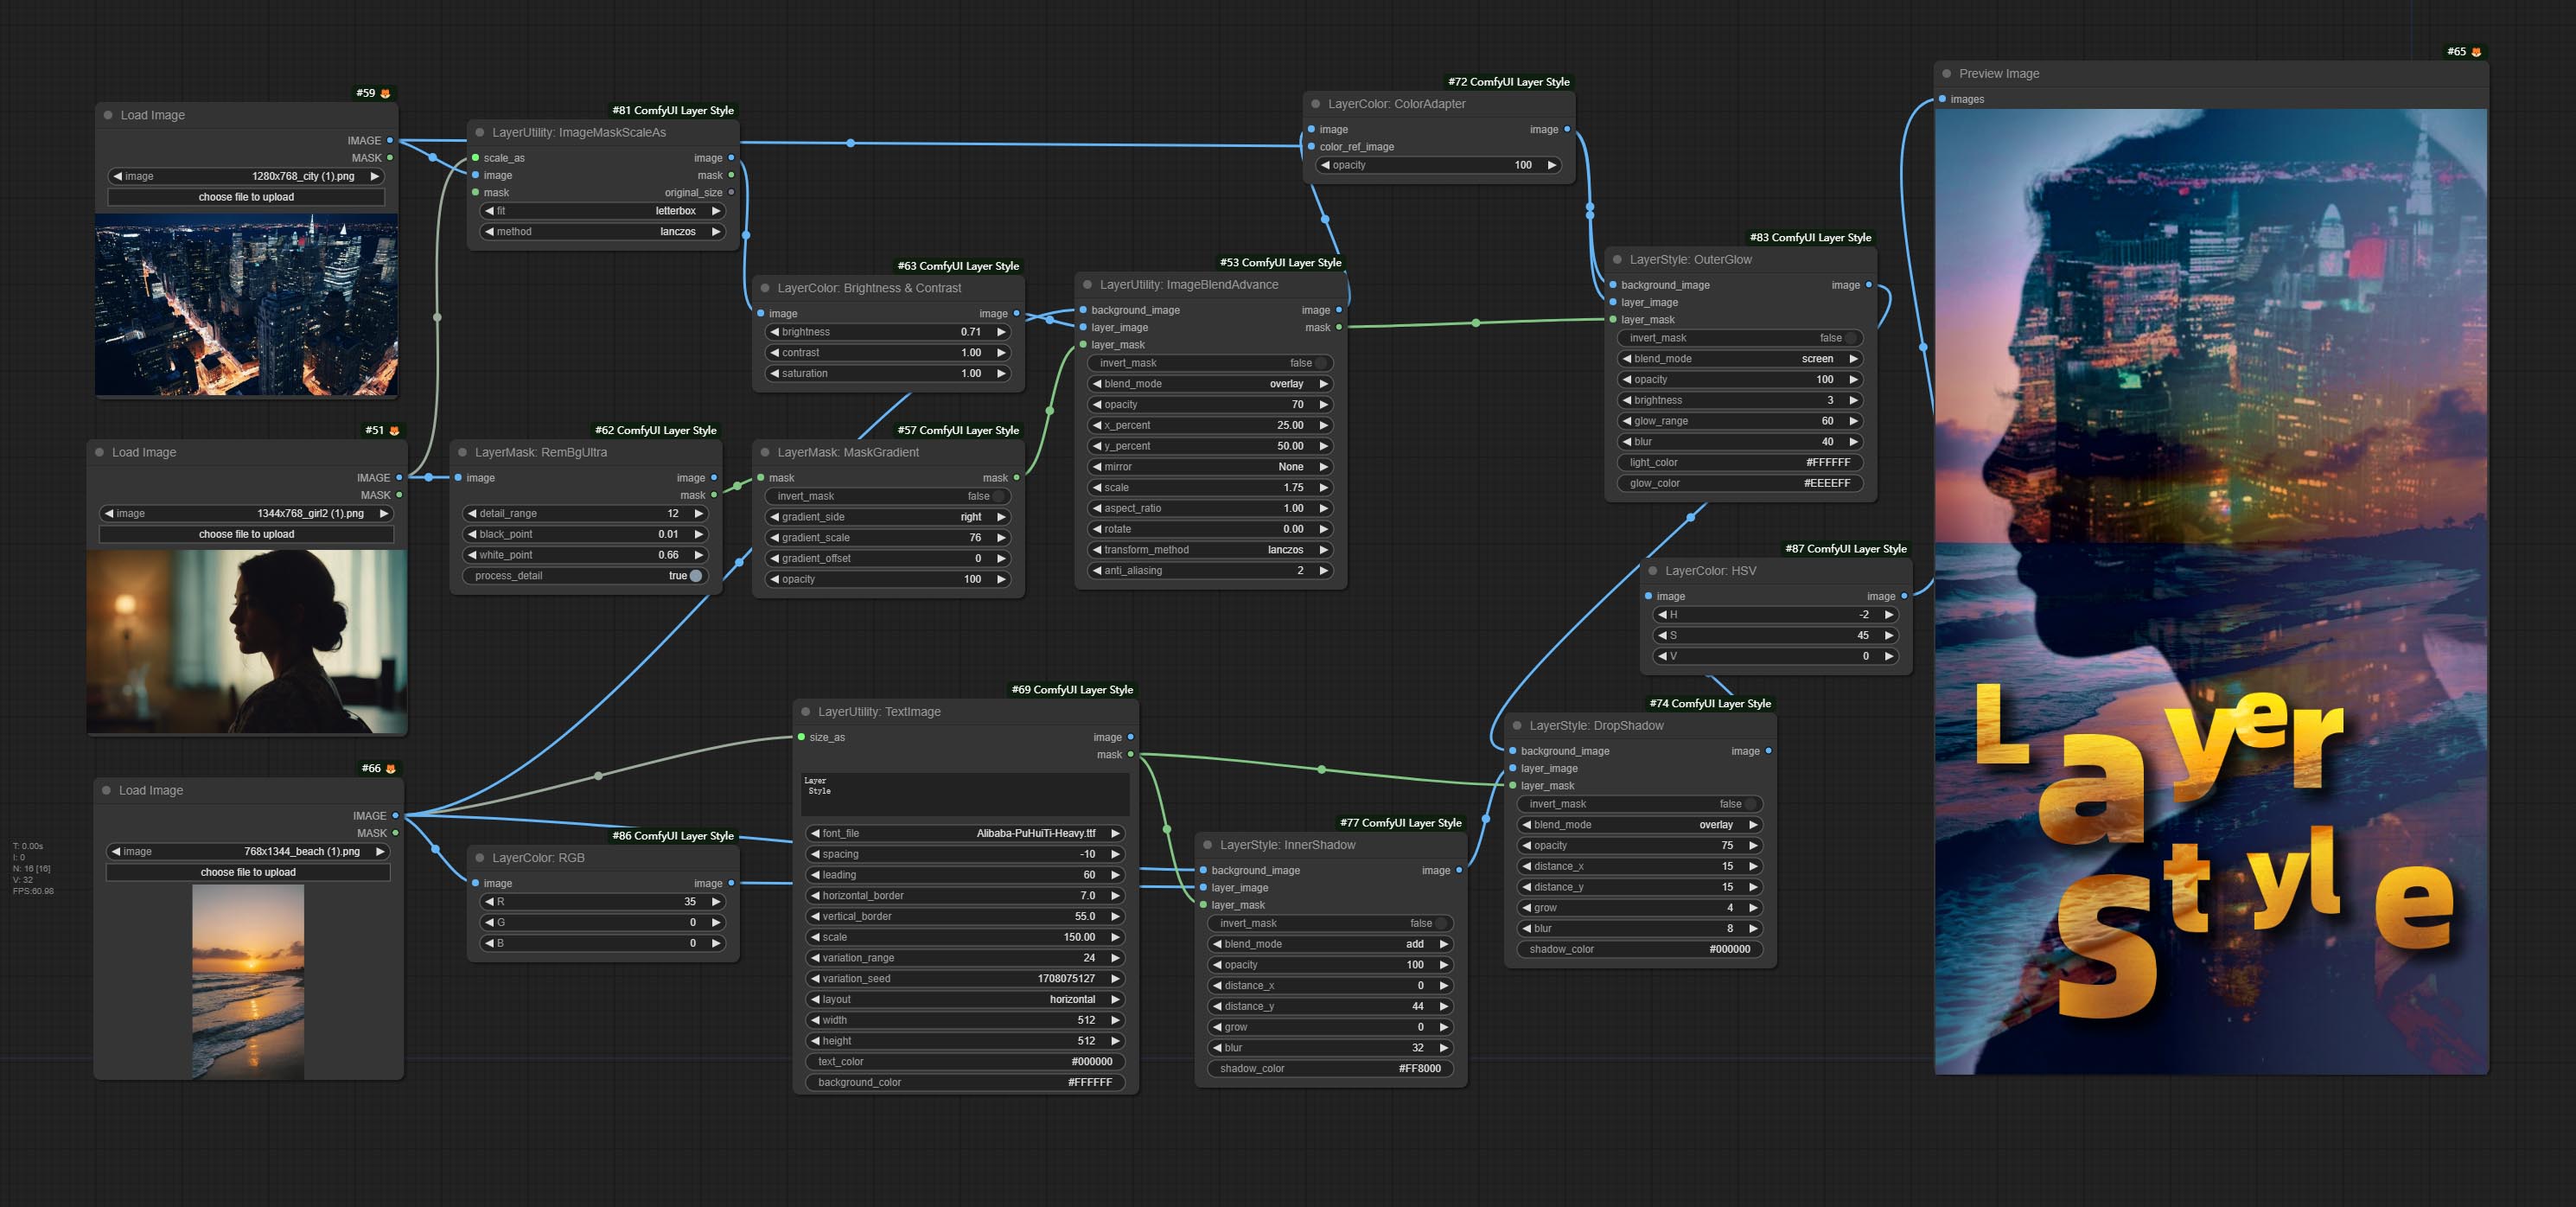
*เวิร์กโฟลว์นี้ (title_example_workflow.json) อยู่ในไดเรกทอรีเวิร์กโฟลว์
ตัวอย่างเวิร์กโฟลว์
ไฟล์เวิร์กโฟลว์ JSON บางไฟล์ในไดเรกทอรี workflow นั่นคือตัวอย่างของวิธีการใช้โหนดเหล่านี้ใน Comfyui
วิธีการติดตั้ง
(การใช้แพ็คเกจพกพาอย่างเป็นทางการของ Comfyui และแพ็คเกจ Aki Comfyui เป็นตัวอย่างโปรดแก้ไขไดเรกทอรีสภาพแวดล้อมการพึ่งพาสำหรับสภาพแวดล้อม comfyui อื่น ๆ )
ติดตั้งปลั๊กอิน
แนะนำให้ใช้ Comfyui Manager สำหรับการติดตั้ง
หรือเปิดหน้าต่าง CMD ในไดเรกทอรีปลั๊กอินของ comfyui เช่น ComfyUIcustom_nodes , พิมพ์
git clone https://github.com/chflame163/ComfyUI_LayerStyle.git
หรือดาวน์โหลดไฟล์ zip และแยกคัดลอกโฟลเดอร์ผลลัพธ์ไปยัง ComfyUIcustom_ Nodes
ติดตั้งแพ็คเกจการพึ่งพา
สำหรับแพ็คเกจพกพาอย่างเป็นทางการของ Comfyui ให้ดับเบิลคลิกที่ install_requirements.bat ในไดเรกทอรีปลั๊กอินสำหรับแพ็คเกจ Aki Comfyui ดับเบิลคลิกที่สองเท่าใน install_requirements_aki.bat ในไดเรกทอรีปลั๊กอินและรอการติดตั้งให้เสร็จสมบูรณ์
หรือติดตั้งแพ็คเกจการพึ่งพาให้เปิดหน้าต่าง CMD ในไดเรกทอรีปลั๊กอิน comfyui_layerstyle เช่น ComfyUIcustom_ NodesComfyUI_LayerStyle และป้อนคำสั่งต่อไปนี้
สำหรับแพ็คเกจพกพาอย่างเป็นทางการของ Comfyui พิมพ์:
 ......python_embededpython.exe -s -m pip install .whldocopt-0.6.2-py2.py3-none-any.whl
......python_embededpython.exe -s -m pip install .whlhydra_core-1.3.2-py3-none-any.whl
......python_embededpython.exe -s -m pip install -r requirements.txt
.repair_dependency.bat
สำหรับแพ็คเกจ Aki Comfyui พิมพ์:
 ....pythonpython.exe -s -m pip install .whldocopt-0.6.2-py2.py3-none-any.whl
....pythonpython.exe -s -m pip install .whlhydra_core-1.3.2-py3-none-any.whl
....pythonpython.exe -s -m pip install -r requirements.txt
.repair_dependency.bat
ดาวน์โหลดไฟล์รุ่น
ผู้ใช้ในประเทศจีนจาก BaidunetDisk และผู้ใช้อื่น ๆ จาก huggingface.co/chflame163/comfyui_layerstyle
ดาวน์โหลดไฟล์ทั้งหมดและคัดลอกไปยังโฟลเดอร์ ComfyUImodels ลิงค์นี้ให้ไฟล์รุ่นทั้งหมดที่จำเป็นสำหรับปลั๊กอินนี้ หรือดาวน์โหลดไฟล์รุ่นตามคำแนะนำของแต่ละโหนด
ปัญหาทั่วไป
หากโหนดไม่สามารถโหลดได้อย่างถูกต้องหรือมีข้อผิดพลาดระหว่างการใช้งานโปรดตรวจสอบข้อความแสดงข้อผิดพลาดในหน้าต่างเทอร์มินัล Comfyui ต่อไปนี้เป็นข้อผิดพลาดทั่วไปและการแก้ปัญหาของพวกเขา
คำเตือน: ไม่พบ xxxx.ini ใช้ xxxx เริ่มต้น ..
ข้อความเตือนนี้บ่งชี้ว่าไม่พบไฟล์ INI และไม่ส่งผลกระทบต่อการใช้งาน หากคุณไม่ต้องการเห็นคำเตือนเหล่านี้โปรดแก้ไขไฟล์ *.ini.example ทั้งหมดในไดเรกทอรีปลั๊กอินเป็น *.ini
ModulenotFoundError: ไม่มีโมดูลชื่อ 'psd_tools'
ข้อผิดพลาดนี้คือ psd_tools ไม่ได้ติดตั้งอย่างถูกต้อง
สารละลาย:
- ปิด comfyui และเปิดหน้าต่างเทอร์มินัลในไดเรกทอรีปลั๊กอินและดำเนินการคำสั่งต่อไปนี้:
../../../python_embeded/python.exe -s -m pip install psd_tools หากเกิดข้อผิดพลาดในระหว่างการติดตั้ง ModuleNotFoundError: No module named 'docopt' โปรดดาวน์โหลด WHL และ Manual ของ Docopt และติดตั้งด้วยตนเอง ดำเนินการคำสั่งต่อไปนี้ในหน้าต่างเทอร์มินัล: ../../../python_embeded/python.exe -s -m pip install path/docopt-0.6.2-py2.py3-none-any.whl path คือเส้นทางเส้นทาง ของไฟล์ whl
ไม่สามารถนำเข้าชื่อ 'GuidedFilter' จาก 'cv2.ximgproc'
ข้อผิดพลาดนี้เกิดจากแพ็คเกจ opencv-contrib-python เวอร์ชันที่ไม่ถูกต้องหรือแพ็คเกจนี้มีการเขียนทับโดยแพ็คเกจ OpENCV อื่น ๆ
NameError: ชื่อ 'GuidedFilter' ไม่ได้กำหนดไว้
เหตุผลสำหรับปัญหาเหมือนกับข้างต้น
ไม่สามารถนำเข้าชื่อ 'Vitmatteimageprocessor' จาก 'Transformers'
ข้อผิดพลาดนี้เกิดจากแพ็คเกจ transformers รุ่นต่ำ
InsightFace โหลดช้ามาก
ข้อผิดพลาดนี้เกิดจากแพ็คเกจ protobuf รุ่นต่ำ
สำหรับปัญหาเกี่ยวกับแพ็คเกจการพึ่งพาสามประการข้างต้นโปรดดับเบิลคลิกที่ repair_dependency.bat (สำหรับ Protable Comfyui อย่างเป็นทางการ) หรือ repair_dependency_aki.bat (สำหรับ comfyui-aki-v1.x) ในโฟลเดอร์ปลั๊กอินเพื่อแก้ไขโดยอัตโนมัติ
onnxruntime :: python :: createexecutionproviderinstance cuda_path ถูกตั้งค่า แต่ cuda ไม่สามารถโหลดได้ โปรดติดตั้ง Cuda และ Cudnn เวอร์ชันที่ถูกต้องตามที่กล่าวไว้ในหน้าข้อกำหนด GPU
วิธีแก้ปัญหา: ติดตั้งแพ็คเกจการพึ่งพา onnxruntime ใหม่
ข้อผิดพลาดในการโหลดรุ่น XXX: เราไม่สามารถเชื่อมต่อกับ huggingface.co ...
ตรวจสอบสภาพแวดล้อมเครือข่าย หากคุณไม่สามารถเข้าถึง huggingface.co ตามปกติในประเทศจีนลองแก้ไขแพ็คเกจ HuggingFace_Hub เพื่อบังคับใช้ HF_Mirror
ValueError: TRIMAP ไม่มีค่าเบื้องหน้า (xxxx ... )
ข้อผิดพลาดนี้เกิดจากพื้นที่หน้ากากที่มีขนาดใหญ่เกินไปหรือเล็กเกินไปเมื่อใช้วิธี PyMatting เพื่อจัดการขอบหน้ากาก
สารละลาย:
- โปรดปรับพารามิเตอร์เพื่อเปลี่ยนพื้นที่ที่มีประสิทธิภาพของหน้ากาก หรือใช้วิธีการอื่นเพื่อจัดการขอบ
requests.exceptions.proxyerror: httpsconnectionPool (xxxx ... )
เมื่อเกิดข้อผิดพลาดนี้โปรดตรวจสอบสภาพแวดล้อมเครือข่าย
UnboundLocalError: ตัวแปรท้องถิ่น 'clip_processor' อ้างอิงก่อนการมอบหมาย
unboundLocalError: ตัวแปรท้องถิ่น 'text_model' อ้างอิงก่อนการกำหนด
หากข้อผิดพลาดนี้เกิดขึ้นเมื่อเรียกใช้โหนด JoyCaption2 และได้รับการยืนยันว่าไฟล์โมเดลถูกวางไว้ในไดเรกทอรีที่ถูกต้องโปรดตรวจสอบเวอร์ชันแพ็คเกจการพึ่งพา transformers อย่างน้อย 4.43.2 หรือสูงกว่า หากเวอร์ชัน transformers สูงกว่าหรือเท่ากับ 4.45.0 และยังมีข้อความแสดงข้อผิดพลาด:
 Error loading models: De️️scriptors cannot be created directly.
If this call came from a _pb2.py file, your generated code is out of date and must be regenerated with protoc >= 3.19.0.
......
โปรดลองลดระดับแพ็คเกจการพึ่งพา protobuf เป็น 3.20.3 หรือตั้งค่าตัวแปรสภาพแวดล้อม: PROTOCOL_BUFFERS_PYTHON_IMPLEMENTATION=python
อัปเดต
** หากข้อผิดพลาดของแพ็คเกจการพึ่งพาหลังจากอัปเดตโปรดดับเบิลคลิกที่ repair_dependency.bat (สำหรับ Protable Comfyui อย่างเป็นทางการ) หรือ repair_dependency_aki.bat (สำหรับ comfyui-aki-v1.x) ในโฟลเดอร์ปลั๊กอินเพื่อติดตั้งแพ็คเกจการพึ่งพาใหม่
ยอมรับโหนด benultra และ loadbenmodel ทั้งสองโหนดนี้เป็นการดำเนินการของโครงการ Pramallc/Ben ใน Comfyui
ดาวน์โหลด BEN_Base.pth และ config.json จาก HuggingFace หรือ BaidunetDisk และคัดลอกไปยัง ComfyUI/models/BEN Folder
ผสาน PR ที่ส่งโดย Jimlee2048 เพิ่มโหนด LoadBireFnetModelV2 และรองรับการโหลดรุ่น RMBG 2.0
ดาวน์โหลดไฟล์รุ่นจาก HuggingFace หรือ BaidunetDisk และคัดลอกไปยังโฟลเดอร์ ComfyUI/models/BiRefNet/RMBG-2.0
Florence2 Nodes รองรับ Base-Promptgen-V2.0 และขนาดใหญ่ PromptGen-V2.0 ดาวน์โหลด base-PromptGen-v2.0 และ large-PromptGen-v2.0 สองโฟลเดอร์จาก HuggingFace หรือ BaidunetDisk และคัดลอกไปยัง ComfyUI/models/florence2 Folder .
Sam2ultra และโหนด ObjectDetector รองรับชุดภาพ
โหนด Sam2ultra และ Sam2Videoultra เพิ่มการสนับสนุนสำหรับรุ่น SAM2.1 รวมถึงรุ่น FP16 ของ Kijai ดาวน์โหลดไฟล์รุ่นจาก BaidunetDisk หรือ HuggingFace.co/kijai/sam2-safetensors และคัดลอกไปยัง ComfyUI/models/sam2 โฟลเดอร์
กระทำ joycaption2split และ loadjoycaption2model โหนดการแชร์โมเดลในหลายโหนด joycaption2 หลายโหนดช่วยเพิ่มประสิทธิภาพ
segmentanythingultra และ segmentanythingultrav2 เพิ่มตัวเลือก cache_model ง่ายต่อการจัดการการใช้ VRAM ที่ยืดหยุ่นได้ง่าย
เนื่องจากข้อกำหนดรุ่นสูงของโหนด Llamavision สำหรับ transformers ซึ่งมีผลต่อการโหลดปลั๊กอินของบุคคลที่สามที่เก่ากว่าดังนั้นปลั๊กอิน Layerstyle จึงลดความต้องการเริ่มต้นเป็น 4.43.2 หากคุณต้องการเรียกใช้ Llamavision โปรดอัปเกรดเป็น 4.45.0 หรือสูงกว่าด้วยตัวเอง
ยอมรับ JoyCaption2 และ JoyCaption2Extraoptions โหนด ต้องติดตั้งแพ็คเกจการพึ่งพาใหม่ ใช้โมเดล Joycaption-Alpha-Two สำหรับการอนุมานในท้องถิ่น สามารถใช้เพื่อสร้างคำที่รวดเร็ว โหนดนี้คือ https://huggingface.co/john6666/joy-caption-alpha-two-cli-mod ใน Comfyui ขอบคุณผู้เขียนต้นฉบับ ดาวน์โหลดโมเดลฟอร์ม BaidunetDisk และ BaidunetDisk หรือ HuggingFace/Orenguteng และ Huggingface/Unsloth จากนั้นคัดลอกไปที่ ComfyUI/models/LLM , ดาวน์โหลดรุ่นจาก cgrkzexw-599808 หรือ HuggingFace/Google และคัดลอกไปยัง ComfyUI/models/clip baidunetdisk หรือ huggingface/john6666 และคัดลอกไปยัง ComfyUI/models/Joy_caption 。
ยอมรับโหนด Llamavision ใช้รูปแบบ Llama 3.2 Vision สำหรับการอนุมานในท้องถิ่น สามารถใช้เพื่อสร้างคำที่รวดเร็ว ส่วนหนึ่งของรหัสสำหรับโหนดนี้มาจาก comfyui-pixtralllamamolmovision ขอบคุณผู้เขียนต้นฉบับ ในการใช้โหนดนี้ transformers ต้องอัพเกรดเป็น 4.45.0 หรือสูงกว่า ดาวน์โหลดรุ่นจาก BaidunetDisk หรือ HuggingFace/Seanscripts และคัดลอกไปยัง ComfyUI/models/LLM
ให้โหนดสุ่ม GENERATORV2 เพิ่มช่วงการสุ่มและตัวเลือกเมล็ดอย่างน้อยที่สุด
ให้โหนด TextJoinv2 เพิ่มตัวเลือกตัวคั่นที่ด้านบนของ TextJion
โหนด GaussianBlurv2 ความแม่นยำของพารามิเตอร์ได้รับการปรับปรุงเป็น 0.01
ยอมรับโหนด UserPromptGenerAtOrtItimGwithReference
ส่งโหนด GreyValue ส่งออกค่าสีเทาที่สอดคล้องกับค่าสี RGB
LUT ใช้, textimagev2, textimage, simpletextimage โหนดเพื่อรองรับการกำหนดโฟลเดอร์หลายโฟลเดอร์ใน resource-dir.ini , คั่นด้วยเครื่องหมายจุลภาค, เครื่องหมายอัฒภาคหรือช่องว่าง รองรับการอัปเดตแบบเรียลไทม์ที่สดชื่นพร้อมกัน
LUT ใช้, textimagev2, textimage, simpletextimage โหนดรองรับการกำหนดแบบอักษรหลายไดเรกทอรีและโฟลเดอร์ LUT และรองรับการอัปเดตการรีเฟรชและการอัปเดตแบบเรียลไทม์
ยอมรับโหนด Humanpartsultra ใช้เพื่อสร้างมาสก์ชิ้นส่วนร่างกายมนุษย์ มันขึ้นอยู่กับ warrper ของ Metal3d/comfyui_human_parts ขอบคุณผู้เขียนดั้งเดิม ดาวน์โหลดไฟล์รุ่นจาก BaidunetDisk หรือ HuggingFace และคัดลอกไปยังโฟลเดอร์ ComfyUImodelsonnxhuman-parts
โหนด ObjectDetector เพิ่มการเรียงตามตัวเลือกความมั่นใจ
ยอมรับโหนด drawbboxmask ที่ใช้ในการแปลงเอาต์พุต bboxes โดยโหนดตัวตรวจจับวัตถุเป็นหน้ากาก
ส่ง userpromptGeneratortItimg และ userpromptGenerAtorReplaceword โหนดใช้เพื่อสร้างข้อความข้อความและรูปภาพและแทนที่เนื้อหาพรอมต์
ยอมรับโหนด phiprompt ใช้ Microsoft PHI 3.5 ข้อความและโมเดลภาพสำหรับการอนุมานในท้องถิ่น สามารถใช้เพื่อสร้างคำที่พร้อมใช้งานคำที่พร้อมใช้งานคำหรืออนุมานคำที่รวดเร็วจากภาพ การเรียกใช้รุ่นนี้ต้องใช้หน่วยความจำวิดีโออย่างน้อย 16GB
ดาวน์โหลดไฟล์รุ่นจาก BaidUnetDisk หรือ HuggingFace.co/Microsoft/phi-3.5-vision-instruct และ huggingface.co/microsoft/phi-3.5-intruct และคัดลอกไปยังโฟลเดอร์ ComfyUImodelsLLM
โหนด GetMainColors สามารถรับภาพหลักได้ 5 สี ยอมรับโหนด Colorname สามารถรับชื่อสีของค่าสีอินพุต
ทำซ้ำโหนดความสว่างและความคมชัดเป็น BrightnessContrastv2 สีของ Shadow & Highlight Node เป็น Colorofshadowhighlight และ Shadow & Highlight Mask ไปยัง Shadow Highlight Mask V2 เพื่อหลีกเลี่ยงข้อผิดพลาดในการแยกเวิร์กโฟลว์ Comfyui ที่เกิดจากชื่อ "&" ในชื่อโหนด
ยอมรับโหนด VQAPROMPT และ LOADVQAMODEL
ดาวน์โหลดโมเดลจาก BaidunetDisk หรือ HuggingFace.co/Salesforce/blip-vqa-capfilt-large และ huggingface.co/salesforce/blip-vqa-base และคัดลอกไปยัง ComfyUImodelsVQA
Florence2ultra, Florence2Image2Prompt 和 loadflorence2model โหนดรองรับ miaoshouai/florence-2-large-promptgen-v1.5 และ miaoshouai/florence-2-base-promptgen-v1.5 รุ่น
ดาวน์โหลดไฟล์รุ่นจาก BaidunetDisk หรือ huggingface.co/miaoshouai/florence-2-large-promptgen-v1.5 และ huggingface.co/mioshouai/florence-2-base-promptgen-v1.5 คัดลอกไปที่ ComfyUImodelsflorence2 .
ส่ง birefnetultrav2 และ loadbirefnetmodel โหนดที่รองรับการใช้รุ่น birefnet ล่าสุด ดาวน์โหลดไฟล์รุ่นจาก BaidunetDisk หรือ GoogleDrive ชื่อ BiRefNet-general-epoch_244.pth ถึง ComfyUI/Models/BiRefNet/pth นอกจากนี้คุณยังสามารถดาวน์โหลดรุ่น Birefnet เพิ่มเติมและวางไว้ที่นี่
ExtendCanVASv2 โหนดรองรับค่าลบค่าลบหมายความว่าภาพจะถูกครอบตัด
สีชื่อชื่อเริ่มต้นของโหนดจะเปลี่ยนเป็นสีน้ำเงิน-เขียวและโหนดในเลเยอร์, layercolor, layermask, layerutility และ layerfilter มีความโดดเด่นด้วยสีที่แตกต่างกัน
โหนดเครื่องตรวจจับวัตถุเพิ่มตัวเลือกการเรียงลำดับ BBOX ซึ่งอนุญาตให้เรียงลำดับจากซ้ายไปขวา, บนลงล่างและขนาดใหญ่ถึงขนาดเล็กทำให้การเลือกวัตถุใช้งานง่ายและสะดวกยิ่งขึ้น โหนดที่ปล่อยออกมาเมื่อวานนี้ถูกทอดทิ้งโปรดแทนที่ด้วยตนเองด้วยโหนดเวอร์ชันใหม่ (ขออภัย)
ส่ง Sam2ultra, Sam2videoultra, ObjectDetectorfl2, ObjectDetectoryoloworld, ObjectDetectoryolo8, ObjectDetectormask และ BboxJoin โหนด ดาวน์โหลดรุ่นจาก BaidunetDisk หรือ HuggingFace.co/kijai/sam2-safetensors และคัดลอกไปยัง ComfyUI/models/sam2 โฟลเดอร์, ดาวน์โหลดรุ่นจาก BaidunetDisk หรือ GoogleDrive และคัดลอกไปยัง ComfyUI/models/yolo-world การอัปเดตนี้แนะนำการพึ่งพาใหม่โปรดติดตั้งแพ็คเกจการพึ่งพาใหม่
ให้โหนดสุ่ม Generator ซึ่งใช้เพื่อสร้างตัวเลขสุ่มภายในช่วงที่ระบุด้วยเอาต์พุตของ int, ลอยและบูลีนรองรับการสร้างแบทช์ของตัวเลขสุ่มที่แตกต่างกันโดยชุดภาพ
ยอมรับโหนด EVF-Samultra มันคือการใช้งานของ EVF-SAM ใน Comfyui โปรดดาวน์โหลดไฟล์รุ่นจาก BaidunetDisk หรือ HuggingFace/EVF-SAM2, HuggingFace/EVF-SAM ไปยังโฟลเดอร์ ComfyUI/models/EVF-SAM (บันทึกโมเดลในไดเรกทอรีย่อยที่เกี่ยวข้อง) เนื่องจากการเปิดตัวแพ็คเกจการพึ่งพาใหม่หลังจากการอัพเกรดปลั๊กอินโปรดติดตั้งแพ็คเกจการพึ่งพาใหม่
ยอมรับโหนด imagetaggersave และ imageautocropv3 ใช้ในการใช้เวิร์กโฟลว์การตัดแต่งอัตโนมัติและการทำเครื่องหมายสำหรับชุดการฝึกอบรม (เวิร์กโฟลว์ image_tagger_save.json ตั้งอยู่ในไดเรกทอรีเวิร์กโฟลว์)
ยอมรับโหนด checkmaskv2 เพิ่มวิธี simple ในการตรวจจับมาสก์ได้เร็วขึ้น
ให้โหนด ImageReel และ Imagereelcomposite เพื่อรวมภาพหลายภาพบนผืนผ้าใบ
NumberCalculatorv2 และ NumberCalculator เพิ่มวิธี min และ max
เพิ่มประสิทธิภาพความเร็วในการโหลดโหนด
Florence2Image2Prompt เพิ่มการสนับสนุนสำหรับ thwri/CogFlorence-2-Large-Freeze และ thwri/CogFlorence-2.1-Large โปรดดาวน์โหลดไฟล์รุ่นจาก BaidunetDisk หรือ HuggingFace/CogFlorence-2-Large-Large-Freeze และ HuggingFace/Cogflorence-2.1 ขนาดใหญ่จากนั้นคัดลอกไปยัง ComfyUI/models/florence2 Folder
ผสานสาขาจาก clownsharkbatwing "ใช้ GPU สำหรับโหมดผสมสี" ความเร็วของเลเยอร์บางชั้นผสมกันมากกว่าสิบครั้ง
กระทำ Florence2ultra, Florence2Image2Prompt และ LoadFlorence2Model โหนด
โหนด transparentbackgroundultra เพิ่มการสนับสนุนรุ่นใหม่ โปรดดาวน์โหลดไฟล์รุ่นตามคำแนะนำ
ส่ง Segformerultrav2, SegFromerFashionPipeline และโหนด SegformerClothespipeline ซึ่งใช้สำหรับการแบ่งส่วนของเสื้อผ้า โปรดดาวน์โหลดไฟล์รุ่นตามคำแนะนำ
commit install_requirements.bat และ install_requirements_aki.bat , โซลูชันคลิกเดียวเพื่อติดตั้งแพ็คเกจการพึ่งพา
ส่งโหนด transparentbackgroundultra มันจะลบพื้นหลังตามโมเดลพื้นหลังโปร่งใส
เปลี่ยนโมเดล Vitmatte ของโหนดพิเศษเป็นการโทรในท้องถิ่น โปรดดาวน์โหลดไฟล์ทั้งหมดของรุ่น Vitmatte ไปยังโฟลเดอร์ ComfyUI/models/vitmatte
โหนด getColortonev2 เพิ่มวิธี mask ลงในตัวเลือกการเลือกสีซึ่งสามารถรับสีหลักและสีเฉลี่ยภายในหน้ากากได้อย่างแม่นยำ
โหนด imagescalebyaspectratiov2 เพิ่มตัวเลือก "background_color"
LUT ใช้เพิ่มตัวเลือก "ความแข็งแกร่ง"
ส่งโหนด AutoadJustv2 เพิ่มอินพุตหน้ากากเสริมและรองรับสำหรับโหมดการปรับสีอัตโนมัติหลายโหมด
เนื่องจากการหยุดการใช้งานของ Gemini-Pro Vision Services, Prottttagger และ Prottembellish ได้เพิ่ม API "Gemini-1.5-Flash" เพื่อใช้งานต่อไป
Ultra Nodes เพิ่มตัวเลือกในการเรียกใช้ VitMatte บนอุปกรณ์ CUDA ส่งผลให้ความเร็วในการทำงานเพิ่มขึ้น 5 เท่า
ยอมรับโหนด queuestop ใช้เพื่อยุติการดำเนินการคิว
เพิ่มประสิทธิภาพประสิทธิภาพของวิธี VitMate สำหรับโหนดพิเศษเมื่อประมวลผลภาพขนาดใหญ่
cropbymaskv2 เพิ่มตัวเลือกเพื่อปัดขนาดการตัดด้วยทวีคูณ
ส่งมอบโหนดตรวจสอบมาสก์มันตรวจพบว่าหน้ากากมีพื้นที่ที่มีประสิทธิภาพเพียงพอหรือไม่ ส่งโหนด HSVVALUE มันจะแปลงค่าสีเป็นค่า HSV
Booleanoperatorv2, NumberCalculatorv2, จำนวนเต็ม, ลอย, โหนดบูลีนเพิ่มเอาต์พุตสตริงเพื่อส่งออกค่าเป็นสตริงสำหรับใช้กับ switchcase
ส่งโหนด switchcase สลับเอาต์พุตตามสตริงการจับคู่ สามารถใช้สำหรับการสลับข้อมูลทุกประเภท
ส่งโหนดสตริงใช้เพื่อส่งออกสตริง มันเป็นโหนด textbox ที่เรียบง่าย
กระทำถ้าโหนด, สลับเอาต์พุตขึ้นอยู่กับอินพุตแบบมีเงื่อนไขบูลีน สามารถใช้สำหรับการสลับข้อมูลทุกประเภท
ส่งโหนดสตริงคอนดิชั่นกำหนดว่าข้อความมีหรือไม่มีสตริงย่อย
ส่ง NumberCalculatorv2 โหนด, เพิ่มการดำเนินการรูท Nth ยอมรับโหนด booleanoperatorv2 เพิ่มขึ้นมากขึ้น/น้อยกว่าการตัดสินเชิงตรรกะที่มากขึ้น/น้อยลงหรือเท่ากัน ทั้งสองโหนดสามารถเข้าถึงอินพุตตัวเลขและสามารถป้อนค่าตัวเลขภายในโหนด หมายเหตุ: อินพุตตัวเลขมีความสำคัญกว่า ค่าในโหนดจะไม่ถูกต้องเมื่อมีอินพุต
ส่งโหนด SD3NegativeConditioning, ห่อหุ้มโหนดสี่โหนดของเงื่อนไขเชิงลบใน SD3 ลงในโหนดแยกต่างหาก
โหนด ImagerEmoveAlpha เพิ่มอินพุตหน้ากากเสริม
ส่ง HLFrequencyDetailRestore โหนดโดยใช้การกรองความถี่ต่ำและการรักษาความถี่สูงเพื่อคืนรายละเอียดภาพฟิวชั่นดีกว่า
ยอมรับโหนด addgrain และ maskgrain เพิ่มเสียงรบกวนลงในรูปภาพหรือหน้ากาก
ให้โหนด Filmv2 วิธีการ Fastgrain จะถูกเพิ่มบนพื้นฐานของวิธีการก่อนหน้านี้และความเร็วในการสร้างเสียงรบกวนนั้นเร็วขึ้น 10 เท่า
โหนด Imagetomask สามารถแปลงภาพเป็นหน้ากากได้ รองรับการแปลงช่องทางใด ๆ ในห้องปฏิบัติการ, RGBA, YUV และ HSV โหมดเป็นมาสก์ในขณะที่ให้การปรับระดับสี รองรับการป้อนข้อมูลเสริมสำหรับมาสก์เพื่อรับมาสก์ที่มีชิ้นส่วนที่ถูกต้องเท่านั้น
ตัวเลือก Blackpoint และ Whitepoint ในบางโหนดได้ถูกเปลี่ยนเป็นการปรับตัวเลื่อนสำหรับการแสดงที่ใช้งานง่ายมากขึ้น รวมถึง maskedgeultradetailv2, segmentanythingultrav2, rmbgultrav2, personmaskultrav2, birefnetultra, segformerb2clothesultra, blendifmask และระดับ
ImageScalerestorev2 และ ImagesCalebyaspectratiov2 โหนดเพิ่มวิธี total_pixel เพื่อปรับขนาดภาพ
ส่งโหนด MediaPipeFacialSegment, ใช้ในการแบ่งส่วนคุณสมบัติใบหน้ารวมถึงคิ้วซ้ายและขวา, ดวงตา, ริมฝีปากและฟัน
ส่งโหนด batchSelector, ใช้เพื่อดึงภาพหรือมาสก์ที่ระบุจากภาพแบทช์หรือมาสก์
Layerutility สร้างไดเรกทอรีย่อยใหม่เช่นระบบข้อมูลและพรอมต์ บางโหนดแบ่งออกเป็นไดเรกทอรีย่อย
ยอมรับโหนด MaskbyColor สร้างหน้ากากตามสีที่เลือก
ส่งโหนด LOADPSD อ่านรูปแบบ PSD และภาพเลเยอร์เอาต์พุต โปรดทราบว่าโหนดนี้ต้องการการติดตั้งแพ็คเกจการพึ่งพา psd_tools หากเกิดข้อผิดพลาดในระหว่างการติดตั้ง PSD_Tool เช่น ModuleNotFoundError: No module named 'docopt' โปรดดาวน์โหลด WHL ของ DocOpt และติดตั้งด้วยตนเอง
ยอมรับโหนด segformerb2clothesultra มันใช้ในการแบ่งส่วนเสื้อผ้าตัวละคร รหัสการแบ่งส่วนแบบจำลองคือ Fromstarthua ขอบคุณผู้เขียนต้นฉบับ
SaveImagePlus Node เพิ่มเวิร์กโฟลว์เอาต์พุตให้กับฟังก์ชั่น JSON รองรับ %date และ %time ในวันที่ EmbedDint หรือเวลาในเส้นทางและชื่อไฟล์และเพิ่มสวิตช์ตัวอย่าง
ส่งโหนด SaveImagePlus, สามารถปรับแต่งไดเรกทอรีที่บันทึกรูปภาพเพิ่มการประทับเวลาลงในชื่อไฟล์เลือกรูปแบบบันทึกตั้งค่าอัตราการบีบอัดภาพตั้งค่าว่าจะบันทึกเวิร์กโฟลว์และเพิ่มลายน้ำที่มองไม่เห็น
กระทำ Addblindwatermark, โหนด Showblindwatermark เพิ่มลายน้ำที่มองไม่เห็นและลายน้ำที่ถอดรหัสลงในภาพ ส่ง createqrCode, decodeQrCode โหนดสามารถสร้างรูปภาพรหัสสองมิติและถอดรหัสรหัสสองมิติ
ImageScalerestorev2, imagescalebyyaspectratiov2, imageautocropv2 โหนดเพิ่มตัวเลือกสำหรับ width และ height ซึ่งสามารถระบุความกว้างหรือความสูงเป็นค่าคงที่
ยอมรับโหนด Purgevram ทำความสะอาด ram an
ยอมรับโหนด AutoadJust สามารถปรับความคมชัดของภาพและสมดุลสีขาวโดยอัตโนมัติ
ส่งโหนด RGBVALUE เพื่อส่งออกค่าสีเป็นค่าทศนิยมเดียวของ R, G, B. ความคิดนี้มาจาก VXINHAO ขอบคุณ
กระทำโหนดเมล็ดเพื่อส่งออกค่าเมล็ด Imagemaskscaleas, Imagescalebyspectratio, Imagescalebyspectratiov2, Imagescalerestore, Imagescalerestorev2 โหนดเพิ่ม width height
โหนดระดับการกระทำมันสามารถบรรลุฟังก์ชั่นการปรับระดับสีเดียวกันกับ photoshop.sharp & soft เพิ่มตัวเลือก "ไม่มี"
ส่งโหนด Blendifmask โหนดนี้ร่วมมือกับ IMGAEBLENDV2 หรือ ImageBlendAdvanceV2 เพื่อให้ได้การผสมผสานแบบเดียวกันหากฟังก์ชั่นเป็น Photoshop
ยอมรับโหนด colortemperature และ colorgalance ใช้เพื่อปรับอุณหภูมิสีและความสมดุลของสีของภาพ
เพิ่มโหมดผสมประเภทใหม่ V2 ระหว่างรูปภาพ ตอนนี้รองรับโหมดการผสมผสานสูงสุด 30 โหมด โหมดผสมใหม่มีให้สำหรับ V2 ทุกรุ่นที่รองรับโหนดโหมดผสมรวมถึง ImageBlend V2, ImageBlendAdvance V2, Dropshadow V2, Innershadow V2, Outerglow V2, InnerGlow V2, Stroke V2, Coloroverlay V2, Gradientoverlay V2
ส่วนหนึ่งของรหัสสำหรับ BlendMode V2 มาจากโหนด Virtuoso สำหรับ Comfyui ขอบคุณผู้เขียนดั้งเดิม
ยอมรับโหนด YOLOV8DETECT
ส่งโหนด QWENIMAGE2PROMPT โหนดนี้เป็นสำรองของ UForm-Gen2 Qwen Node ของ ComFYUI_VLM_NODES
ยอมรับ booleanoperator, numbercalculator, กล่องข้อความ, จำนวนเต็ม, ลอย, booleannodes โหนดเหล่านี้สามารถดำเนินการทางคณิตศาสตร์และตรรกะ
ส่ง ExtendCanVASv2 โหนด, สนับสนุนอินพุตค่าสี
ยอมรับโหนด Autobrightness, สามารถปรับความสว่างของภาพโดยอัตโนมัติ
ตัวเลือก CreateGradientMask Node Add center
โหนด GetColortonev2 สามารถเลือกสีหลักและสีเฉลี่ยสำหรับพื้นหลังหรือร่างกาย
ส่งโหนด imageRewardFilter สามารถกรองรูปภาพที่มีคุณภาพไม่ดี
โหนดพิเศษเพิ่มวิธี VITMatte(local) คุณสามารถเลือกวิธีนี้เพื่อหลีกเลี่ยงการเข้าถึง huggingface.co หากคุณเคยดาวน์โหลดโมเดลมาก่อนแล้ว
ส่ง HDR เอฟเฟกต์โหนด, ช่วยเพิ่มช่วงไดนามิกและการดึงดูดความสนใจของภาพอินพุต โหนดนี้คือการบรรจุใหม่ของเอฟเฟกต์ HDR (superbeasts.ai)
ยอมรับโหนด CropboxResolve
ยอมรับโหนด birefnetultra โดยใช้โมเดล birefnet เพื่อลบพื้นหลังมีความสามารถในการรับรู้ที่ดีขึ้นและรายละเอียดขอบสูงเป็นพิเศษ
โหนด ImageAutocropv2 สามารถเลือกที่จะไม่ลบพื้นหลังรองรับการป้อนข้อมูลหน้ากากและขนาดตามขนาดยาวหรือสั้น
ส่งมอบโหนด ImageHub รองรับการสลับภาพและหน้ากากได้สูงสุด 9 ชุดและรองรับเอาต์พุตแบบสุ่ม
ส่งข้อความถึงโหนด
ยอมรับโหนด Promptembellish มันส่งออกคำที่พรอมต์ขัดเงาและรองรับการป้อนรูปภาพเป็นข้อมูลอ้างอิง
โหนดพิเศษได้รับการอัพเกรดเป็นรุ่น V2 อย่างเต็มที่ด้วยการเพิ่มวิธีการประมวลผล Vitmatte Edge ซึ่งเหมาะสำหรับการจัดการพื้นที่กึ่งโปร่งใส รวมถึง maskedgeultradetailv2, segmentanythingultrav2, Rmbgultrav2 และ personmaskultrav2 โหนด
ให้สีของโหนดเงาและไฮไลต์สามารถปรับสีของชิ้นส่วนที่มืดและสว่างแยกต่างหาก ยอมรับโหนด Shadow & Highlight Mask มันสามารถส่งออกหน้ากากสำหรับพื้นที่มืดและสว่าง
Commit CropByMaskV2 node, On the basis of the original node, it supports crop_box input, making it convenient to cut layers of the same size.
ส่งโหนด Simpletextimage มันสร้างภาพการเรียงพิมพ์และมาสก์ง่าย ๆ จากข้อความ โหนดนี้อ้างอิงบางส่วนของฟังก์ชันและรหัสของ Zho-Zho-Zho/Comfyui-text_image-composite
ส่งต่อโหนด Prompttagger, อนุมานการแจ้งตามภาพ และสามารถแทนที่คำสำคัญสำหรับพรอมต์ (จำเป็นต้องสมัครสำหรับคีย์ Google Studio API) อัพเกรด ColorImagev2 และ gradientimagev2, รองรับผู้ใช้ปรับแต่งขนาดที่ตั้งไว้ล่วงหน้าและอินพุต size_as
ส่ง Lama Node มันสามารถลบวัตถุออกจากภาพตามหน้ากาก โหนดนี้เป็นแบบจำลองของ iopaint
ส่งโหนด imageRemoveAlpha และ imagecombinealpha, ช่องอัลฟ่าของภาพสามารถลบหรือรวมกันได้
ส่ง ImageScalerestorev2 และ ImagesCalebyyPeScectratiov2 โหนดรองรับการปรับภาพให้กับขนาดขอบยาวหรือสั้นที่ระบุ
ยอมรับโหนด Personmaskultra สร้างหน้ากากสำหรับใบหน้าของแนวตั้งผมผิวหนังเสื้อผ้าเสื้อผ้าหรืออุปกรณ์เสริม รหัสรุ่นสำหรับโหนดนี้มาจาก A-Person-Mask-Generator
ส่งโหนดแสงไฟตัวกรองนี้จำลองเอฟเฟกต์การรั่วไหลของแสงของฟิล์ม
ส่งผลให้โหนดฟิล์มตัวกรองนี้จำลองเมล็ดข้าว, ขอบมืดและขอบเบลอของฟิล์ม, รองรับแผนที่ความลึกอินพุตเพื่อจำลองการเบลอ มันมีการจัดระเบียบใหม่และห่อหุ้ม DigitalJohn/Comfyui-Propost
ยอมรับโหนด Imageautocrop ซึ่งออกแบบมาเพื่อสร้างวัสดุภาพสำหรับรูปแบบการฝึกอบรม
โหนด ImageScalebyaspectratio สามารถปรับขนาดภาพหรือหน้ากากตามอัตราส่วนเฟรม
แก้ไขข้อผิดพลาดของการไล่ระดับสีใน LUT ใช้การเรนเดอร์โหนดและตอนนี้โหนดนี้รองรับพื้นที่สีบันทึก *โปรดโหลดไฟล์ LOT บันทึกเฉพาะสำหรับอิมเมจพื้นที่สีบันทึก
ยอมรับโหนด CreateGradientMask ยอมรับโหนด layerimagetransform และ layerMaskTransform
ยอมรับโหนด maskedeDultradetail, มันประมวลผลมาสก์ขรุขระไปยังขอบที่ดีเป็นพิเศษโหนดการเปิดรับแสง
ยอมรับโหนดที่คมชัดและนุ่มสามารถปรับปรุงหรือทำให้รายละเอียดภาพราบรื่นได้ ส่งโหนด MaskByDifferent เปรียบเทียบภาพสองภาพและส่งออกหน้ากาก มุ่งมั่นที่จะแบ่งส่วนโหนด ULDUNTRA ปรับปรุงคุณภาพของขอบหน้ากาก *หากไม่ได้ติดตั้ง segmentAnything คุณจะต้องดาวน์โหลดโมเดลด้วยตนเอง
โหนดทั้งหมดมีภาพแบทช์ที่รองรับอย่างเต็มที่ให้ความสะดวกสำหรับการสร้างวิดีโอ (โหนด cropbymask รองรับการตัดขนาดเท่ากันเท่านั้นหากมีการใช้ batch mask_for_crop ข้อมูลจากแผ่นแรกจะถูกใช้))
ยอมรับโหนด rembgultra และพิกเซลปรับปรุงคุณภาพของหน้ากากอย่างมีนัยสำคัญ *REMBGULTRA ต้องการการดาวน์โหลดแบบจำลองด้วยตนเอง
ส่งโหนด TextImage สร้างภาพข้อความและมาสก์
เพิ่มโหมดการผสมผสานประเภทใหม่ระหว่างรูปภาพ ตอนนี้รองรับโหมดผสมผสานได้มากถึง 19 โหมด เพิ่ม color_burn, color_dodge, linear_burn, linear_dodge, ซ้อนทับ, soft_light, hard_light, vivid_light, pin_light, linear_light และ hard_mix โหมดผสมที่เพิ่มเข้ามาใหม่ใช้กับโหนดทั้งหมดที่รองรับโหมดผสมผสาน
ส่งโหนดตัวกรอง colormap เพื่อสร้างเอฟเฟกต์ความร้อนสีเทียม
ทำโหนดสีน้ำและผิวหนังผิวหนังนี่คือตัวกรองภาพที่สร้างผลกระทบของสีน้ำและผิวเรียบเนียน
ส่งโหนด ImageShift เพื่อเปลี่ยนภาพและส่งออกหน้ากากตะเข็บการกระจัดทำให้สะดวกในการสร้างพื้นผิวอย่างต่อเนื่อง
ยอมรับโหนด ImageMaskscaleas เพื่อปรับขนาดภาพหรือขนาดหน้ากากตามภาพอ้างอิง
ยอมรับโหนด ImageScalerestore เพื่อทำงานร่วมกับ Cropbymask สำหรับงานที่มีระดับสูงและการซ่อมแซม
ยอมรับโหนด cropbymask และ restorecropbox การรวมกันของทั้งสองนี้สามารถครอบตัดภาพบางส่วนและวาดภาพก่อนที่จะกู้คืน
ส่งโหนด ColorAdapter ซึ่งสามารถปรับโทนสีของภาพโดยอัตโนมัติ
ยอมรับโหนด maskstroke มันสามารถสร้างจังหวะการเข้ามาหน้ากาก
เพิ่มกลุ่มโหนด LayerColor ใช้เพื่อปรับสีของภาพ มันรวมถึง LUT ใช้, แกมม่า, ความสว่างและความคมชัด, RGB, YUV, Lab ADN HSV
ยอมรับโหนด ImageChannelsPlit และ ImageChannelMerge
ยอมรับโหนด maskmotionblur
ยอมรับโหนด Softlight
ส่งโหนด ChannelShake ซึ่งเป็นตัวกรองสามารถสร้างเอฟเฟกต์การเคลื่อนที่ของช่องสัญญาณคล้ายกับโลโก้ Tiktok
ยอมรับโหนด maskgradient สามารถสร้างการไล่ระดับสีในหน้ากาก
ส่งโหนด getColortone สามารถรับสีหลักหรือสีเฉลี่ยของภาพ ยอมรับโหนด maskgrow และ maskedgeshrink
ยอมรับโหนด maskboxdetect ซึ่งสามารถตรวจจับตำแหน่งผ่านหน้ากากและส่งออกไปยังโหนดคอมโพสิตโดยอัตโนมัติ มอบโหนด XY เป็นเปอร์เซ็นต์เพื่อแปลงพิกัดสัมบูรณ์เป็นเปอร์เซ็นต์พิกัด ยอมรับโหนด Gaussianblur ยอมรับโหนด getImagesize
ส่ง ExtendCanvas Node
ยอมรับโหนด ImageBlendAdvance โหนดนี้ช่วยให้การสังเคราะห์ภาพพื้นหลังและเลเยอร์ที่มีขนาดแตกต่างกันซึ่งให้ประสบการณ์การสังเคราะห์ฟรีมากขึ้น ยอมรับโหนด printinfo เป็นเครื่องช่วยแก้ไขปัญหาเวิร์กโฟลว์
ทำโหนด ColorImage และ GradientImage ซึ่งใช้ในการสร้างภาพสีที่เป็นของแข็งและการไล่ระดับสี
กระทำการไล่ระดับสีและโหนด Coloroverlay เพิ่มการตัดสินอินพุตหน้ากากที่ไม่ถูกต้องและไม่สนใจเมื่อมาสก์ไม่ถูกต้องเป็นอินพุต
กระทำ Innerglow, Innershadow และ Motionblur โหนด
การเปลี่ยนชื่อโหนดที่เสร็จสมบูรณ์ทั้งหมดโหนดจะแบ่งออกเป็น 4 กลุ่ม: เลเยอร์, layermask, layerutility, layerfilter เวิร์กโฟลว์ที่มีโหนดเวอร์ชันเก่าต้องถูกแทนที่ด้วยตนเองด้วยโหนดเวอร์ชันใหม่ด้วยตนเอง
โหนด Outerglow ได้รับการแก้ไขอย่างมีนัยสำคัญโดยการเพิ่มตัวเลือกสำหรับ ความสว่าง Light_Color และ Glow_Color
ยอมรับโหนด maskinvert
ยอมรับโหนด Colorpick
ยอมรับโหนดจังหวะ
ยอมรับโหนด MaskPreview
ยอมรับโหนด ImageOpacity
LAYER_MASK ไม่ใช่อินพุตที่จำเป็นในขณะนี้ ได้รับอนุญาตให้ใช้เลเยอร์และมาสก์ที่มีรูปร่างที่แตกต่างกัน แต่ขนาดจะต้องสอดคล้องกัน
ยอมรับโหนด ImageBlend
ยอมรับโหนด Outerglow
ยอมรับโหนด Dropshadow
คำอธิบาย
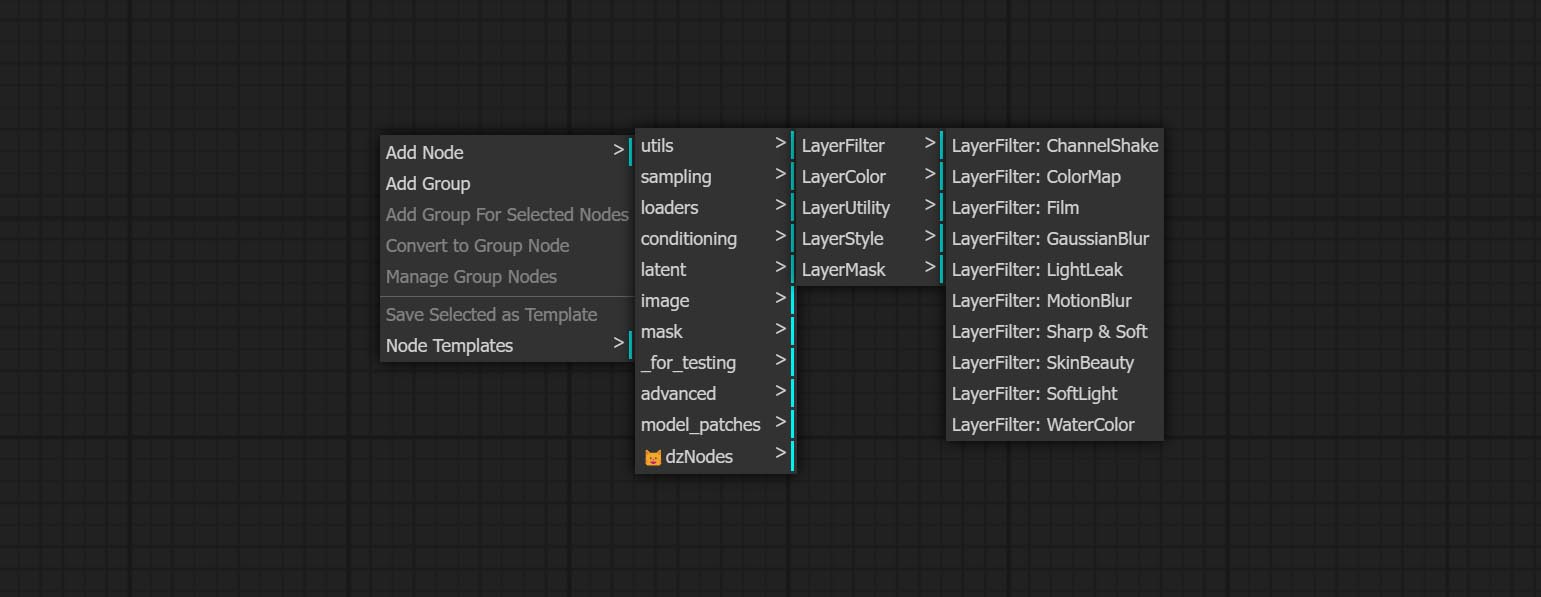
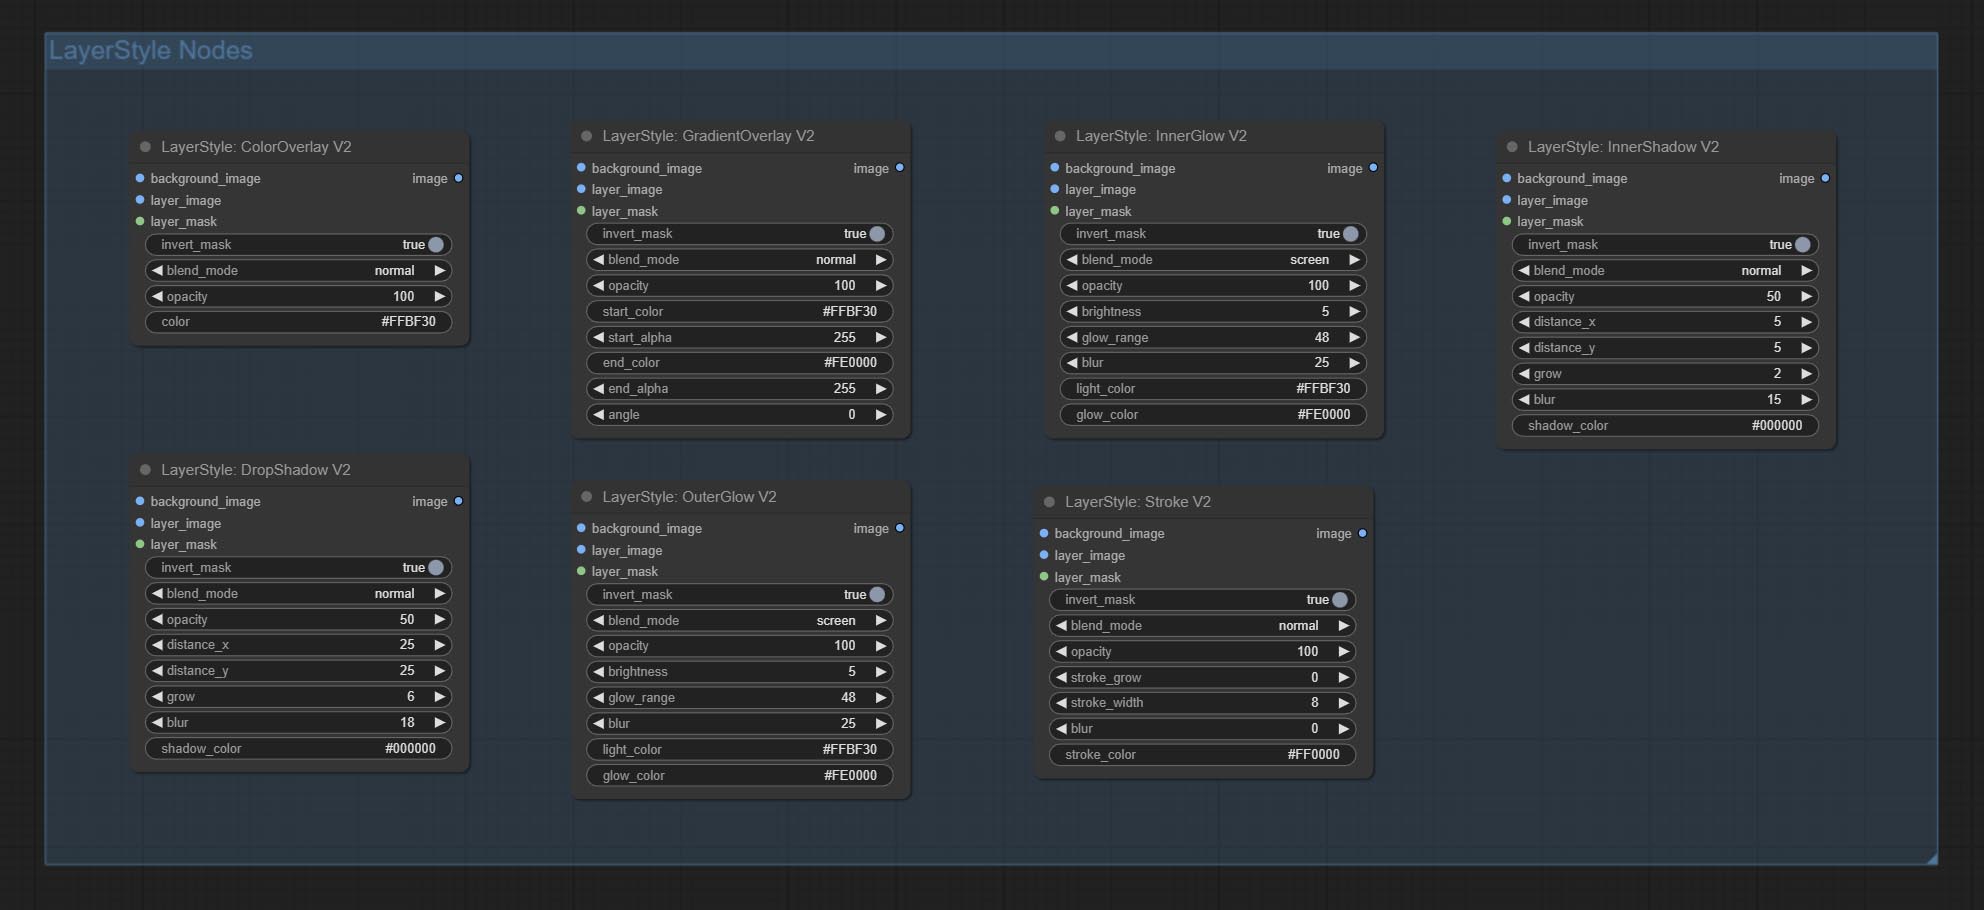
โหนดแบ่งออกเป็น 5 กลุ่มตามฟังก์ชั่นของพวกเขา: layerstyle, layercolor, layermask, layerutility และ layerfilter
- Layerstyle Nodes ให้สไตล์เลเยอร์ที่เลียนแบบ Adobe Photoshop

- กลุ่มโหนด LayerColor ให้ฟังก์ชั่นการปรับสี
- LayerMask Nodes จัดเตรียมเครื่องมือช่วยเหลือหน้ากาก
- โหนด Layerutility ให้โหนดเสริมที่เกี่ยวข้องกับเครื่องมือคอมโพสิตเลเยอร์และเวิร์กโฟลว์
- โหนด LayerFilter ให้ตัวกรองเอฟเฟกต์ภาพ
เลเยอร์
dropshadow
สร้างเงา 
ตัวเลือกโหนด: 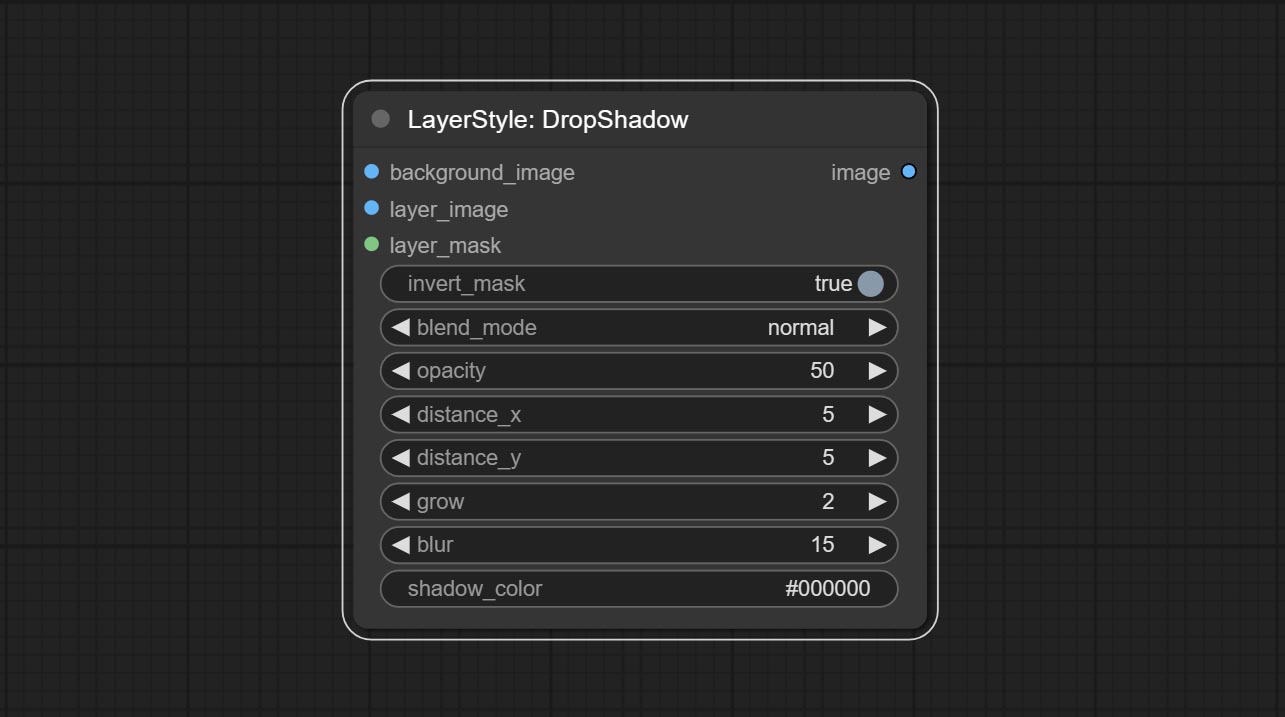
- background_image 1 : ภาพพื้นหลัง
- Layer_image 1 : ภาพเลเยอร์สำหรับคอมโพสิต
- layer_mask 1,2 : หน้ากากสำหรับ layer_image, เงาถูกสร้างขึ้นตามรูปร่างของพวกเขา
- invert_mask: จะย้อนกลับหน้ากากหรือไม่
- Blend_Mode 3 : โหมดการผสมเงา
- ความทึบ: ความทึบของเงา
- ระยะทาง _x: ชดเชยแนวนอนของเงา
- ระยะทาง _y: ชดเชยแนวตั้งของเงา
- Grow: แอมพลิจูดการขยายตัวของเงา
- เบลอ: ระดับเงาของเงา
- shadow_color 4 : สีเงา
- บันทึก
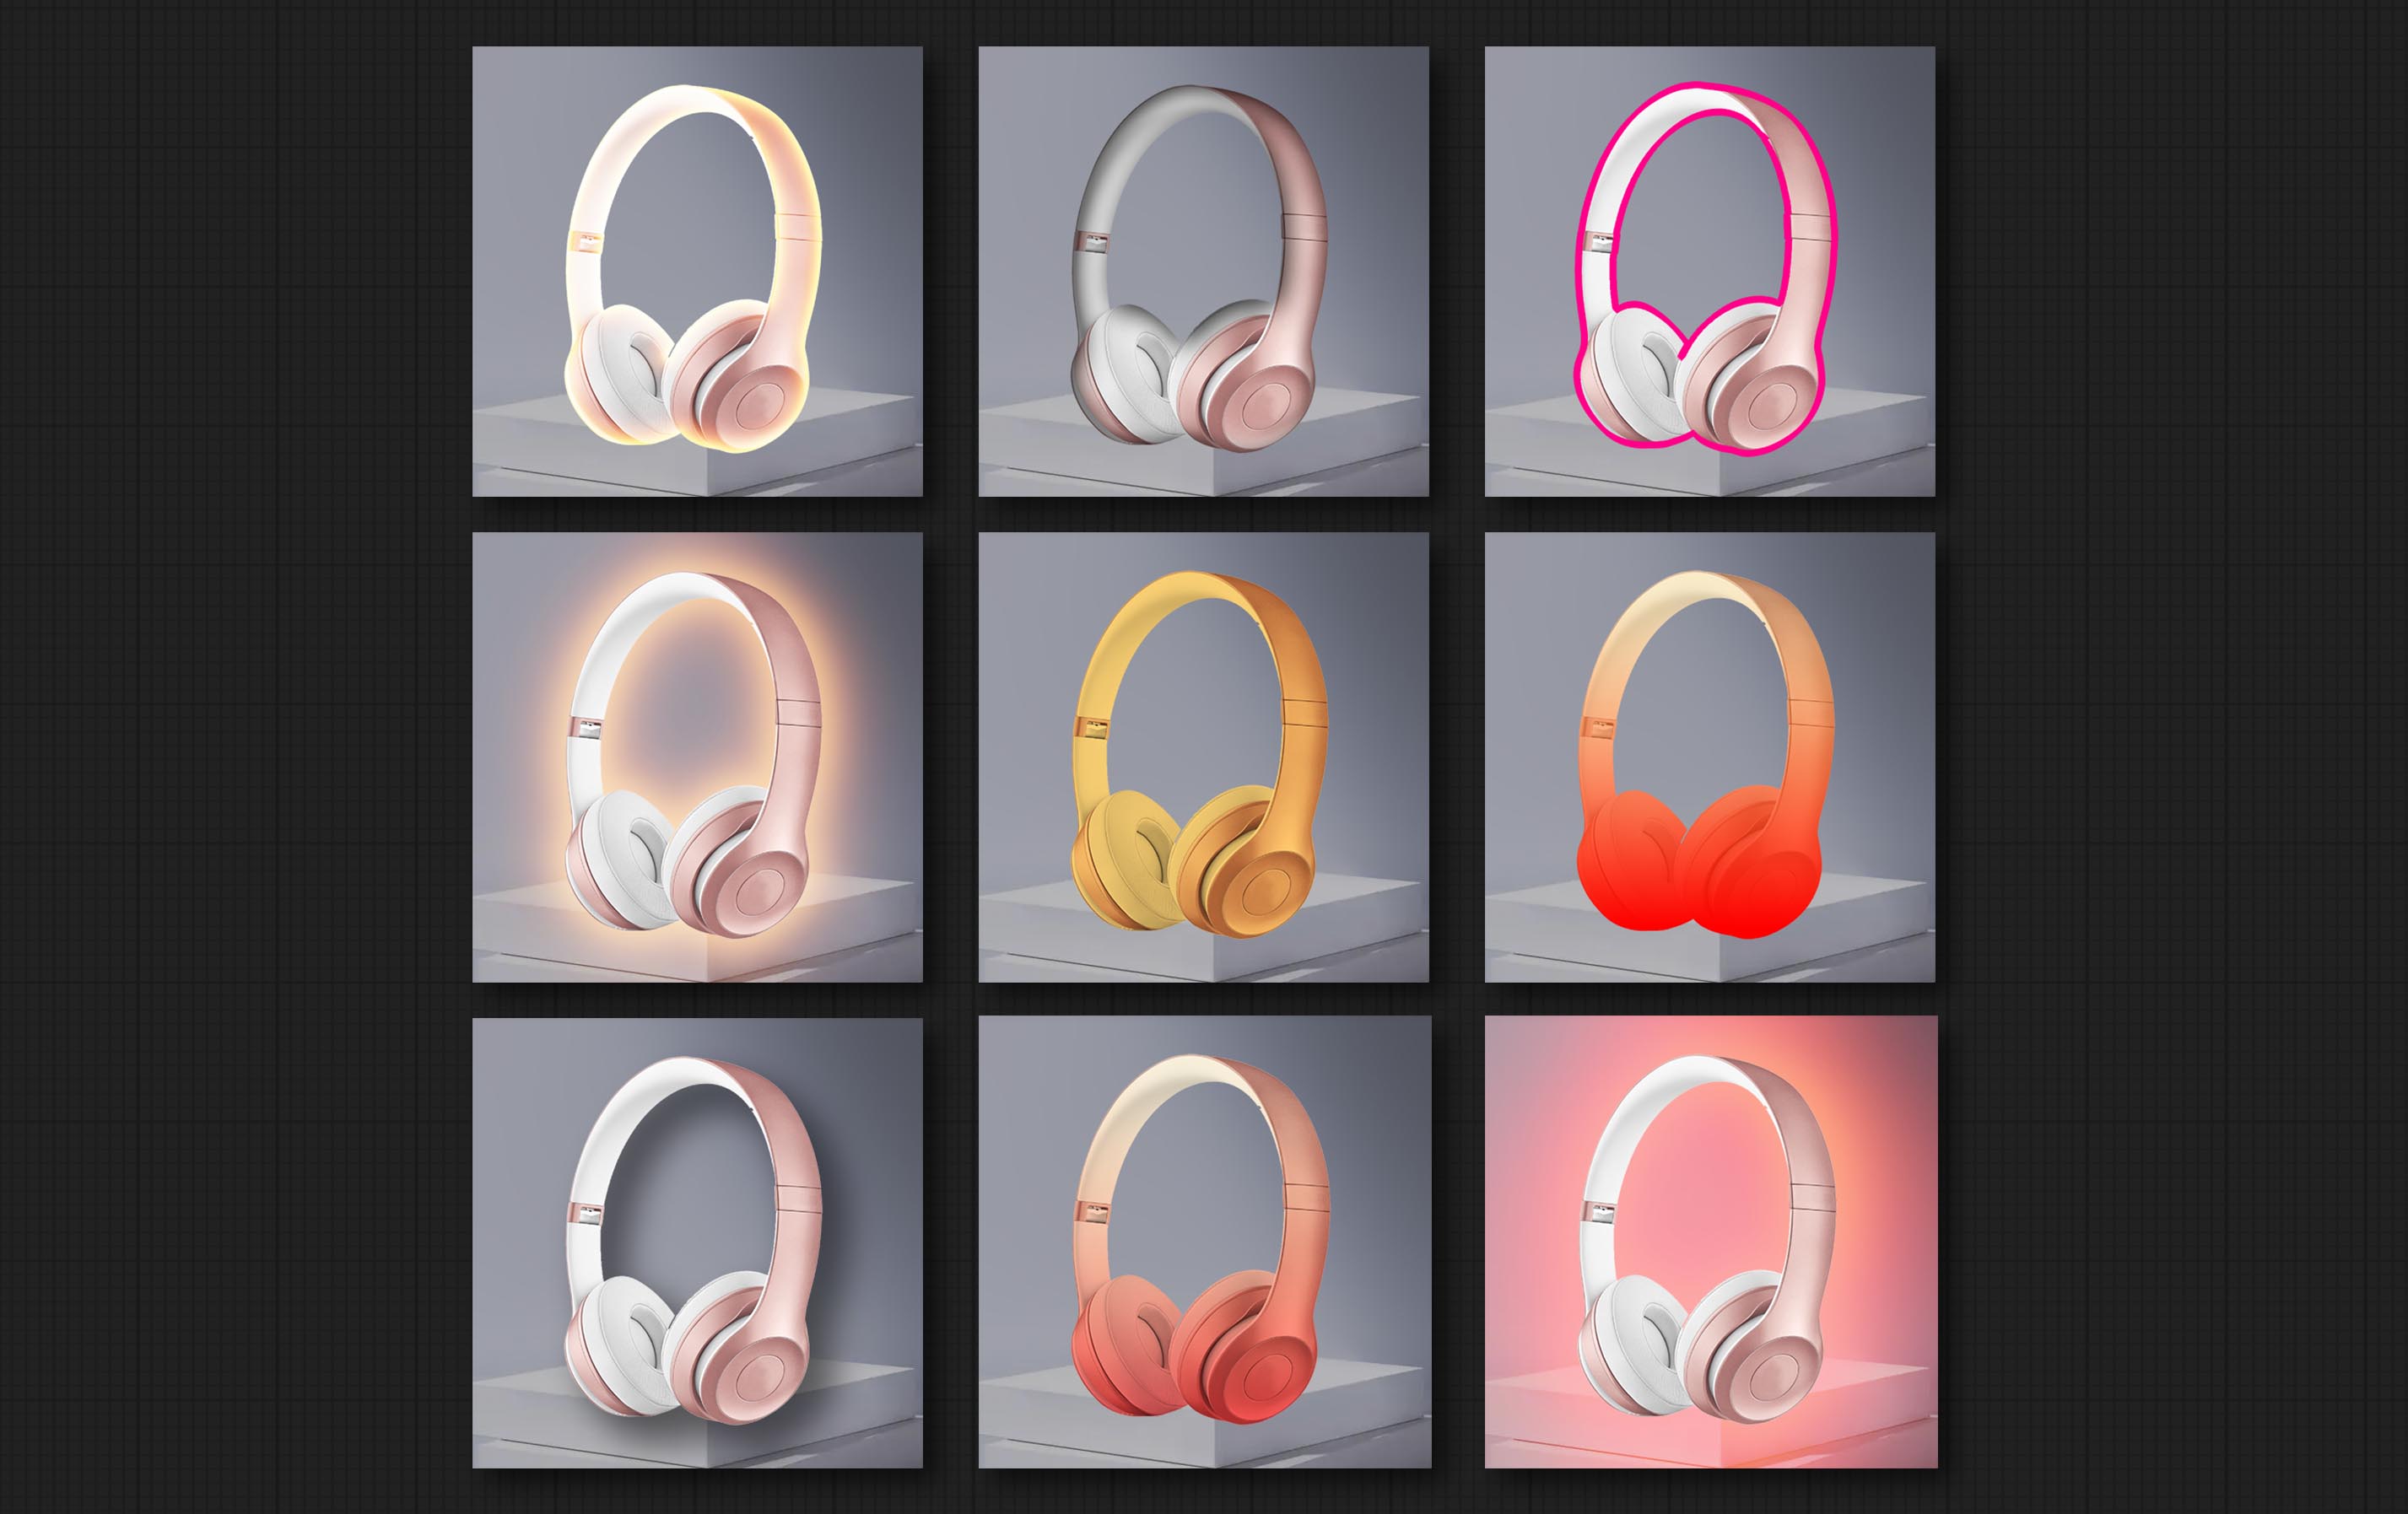
นอกโลก
สร้างเรืองแสงด้านนอก 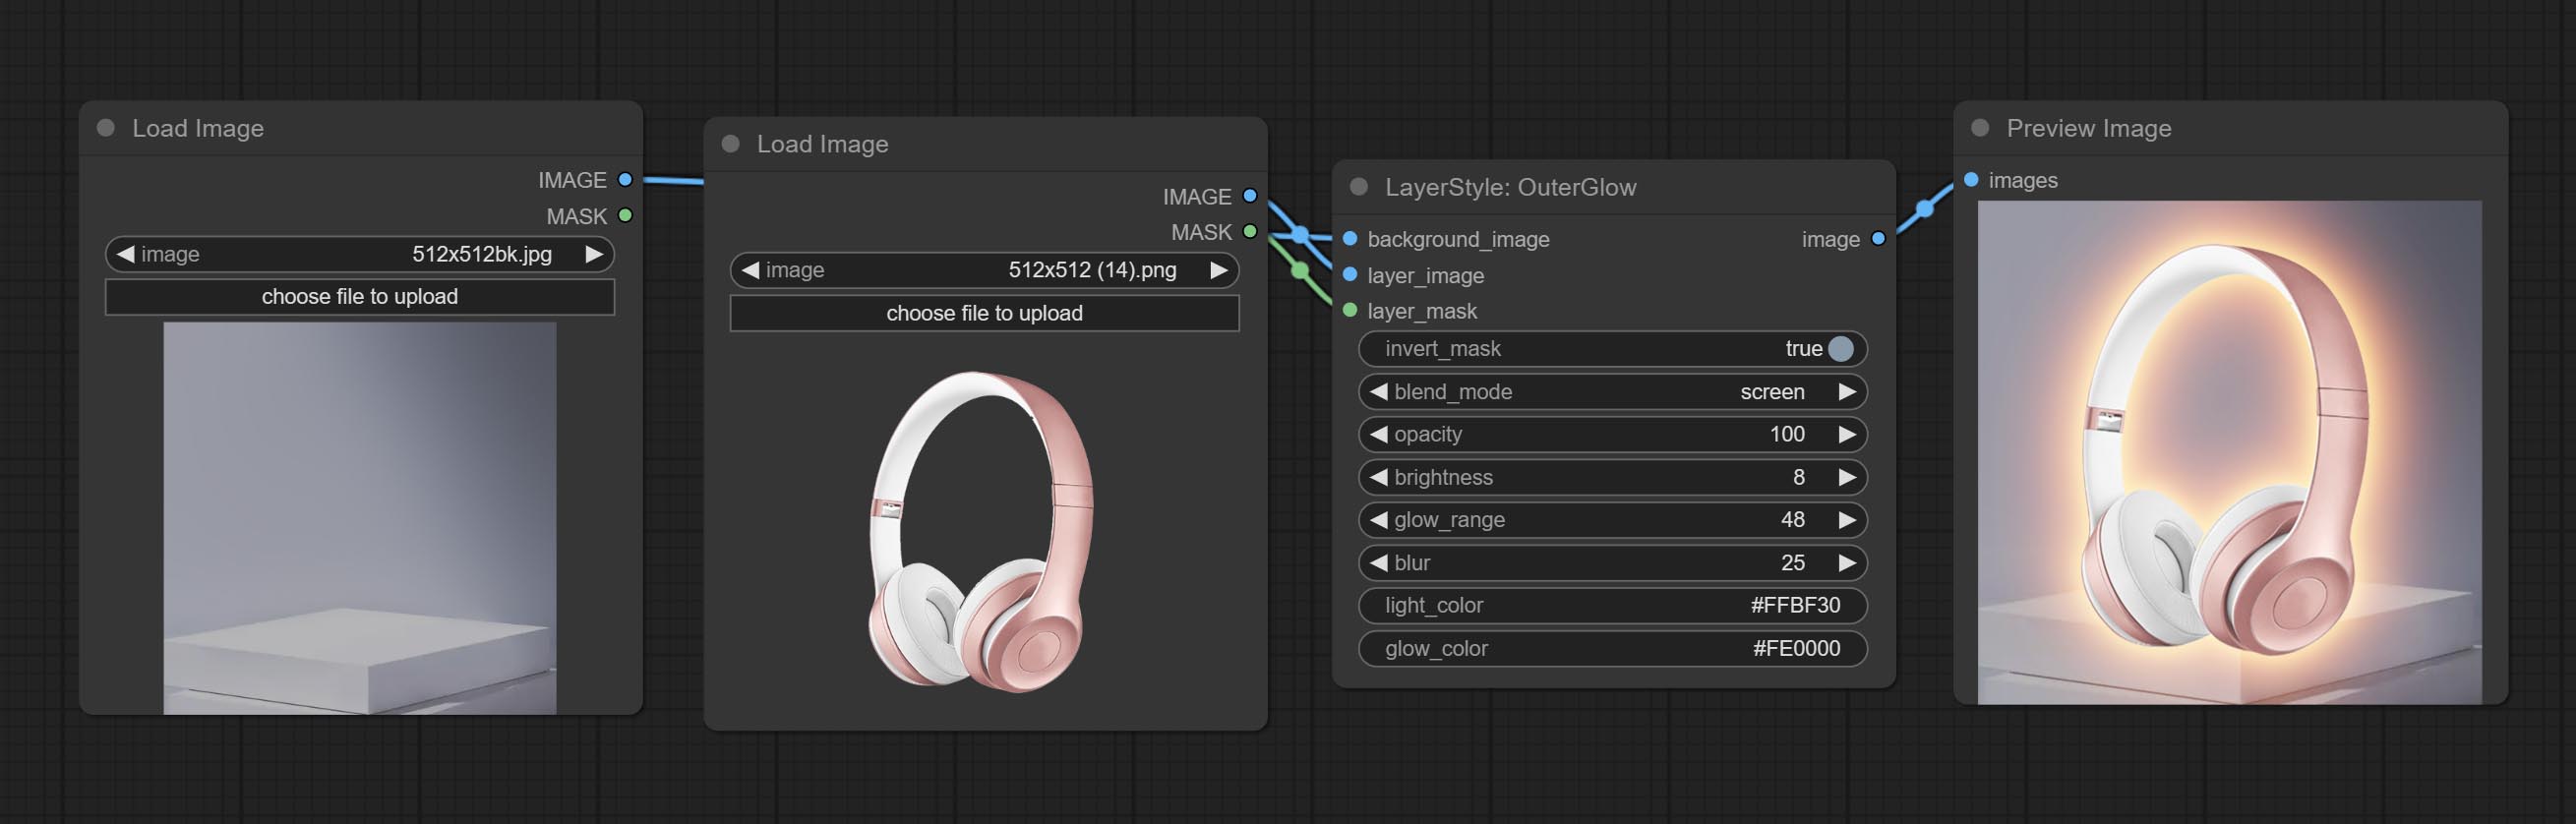
ตัวเลือกโหนด: 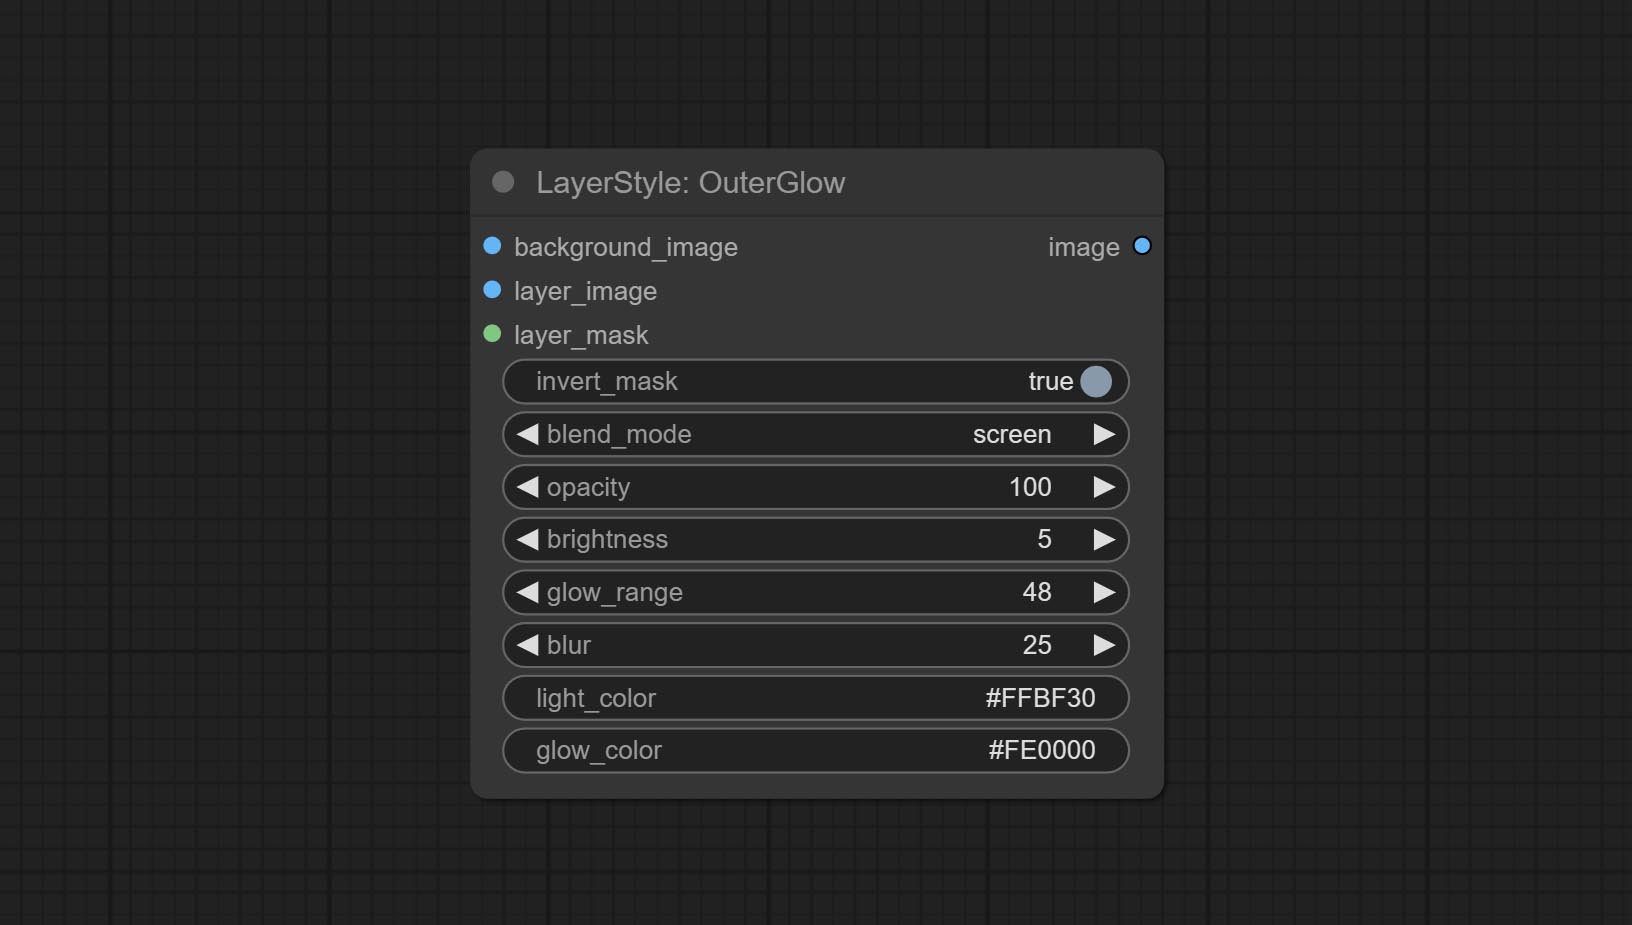
- background_image 1 : ภาพพื้นหลัง
- Layer_image 1 : ภาพเลเยอร์สำหรับคอมโพสิต
- layer_mask 1,2 : หน้ากากสำหรับ layer_image การเติบโตจะถูกสร้างขึ้นตามรูปร่างของพวกเขา
- invert_mask: จะย้อนกลับหน้ากากหรือไม่
- Blend_Mode 3 : โหมดการผสมของ Glow
- ความทึบแสง: ความทึบของเรืองแสง
- ความสว่าง: ความส่องสว่างของแสง
- GLOW_RANGE: ช่วงของแสง
- เบลอ: เบลอของแสง
- Light_Color 4 : ส่วนตรงกลางสีของแสง
- GLOW_COLOR 4 : สีส่วนขอบของแสง
- บันทึก
Innershadow
สร้างเงาภายใน 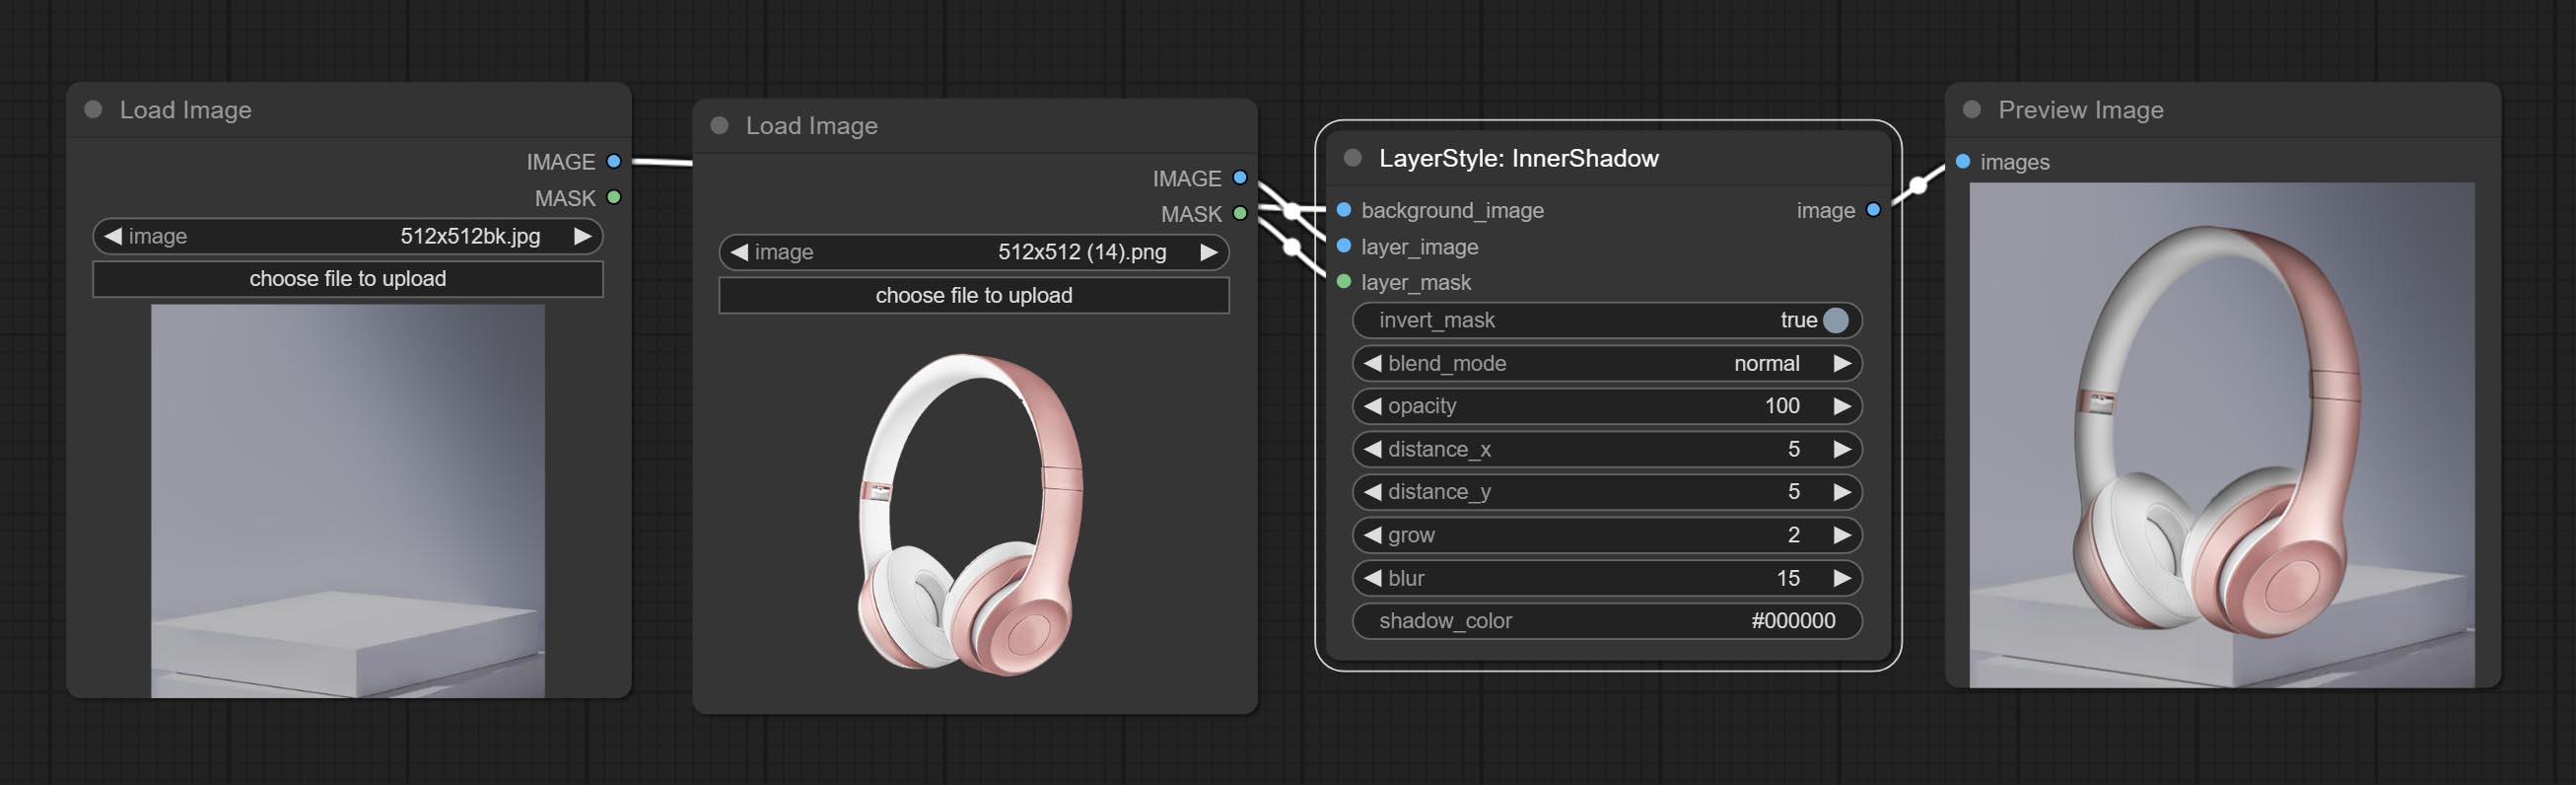
ตัวเลือกโหนด: 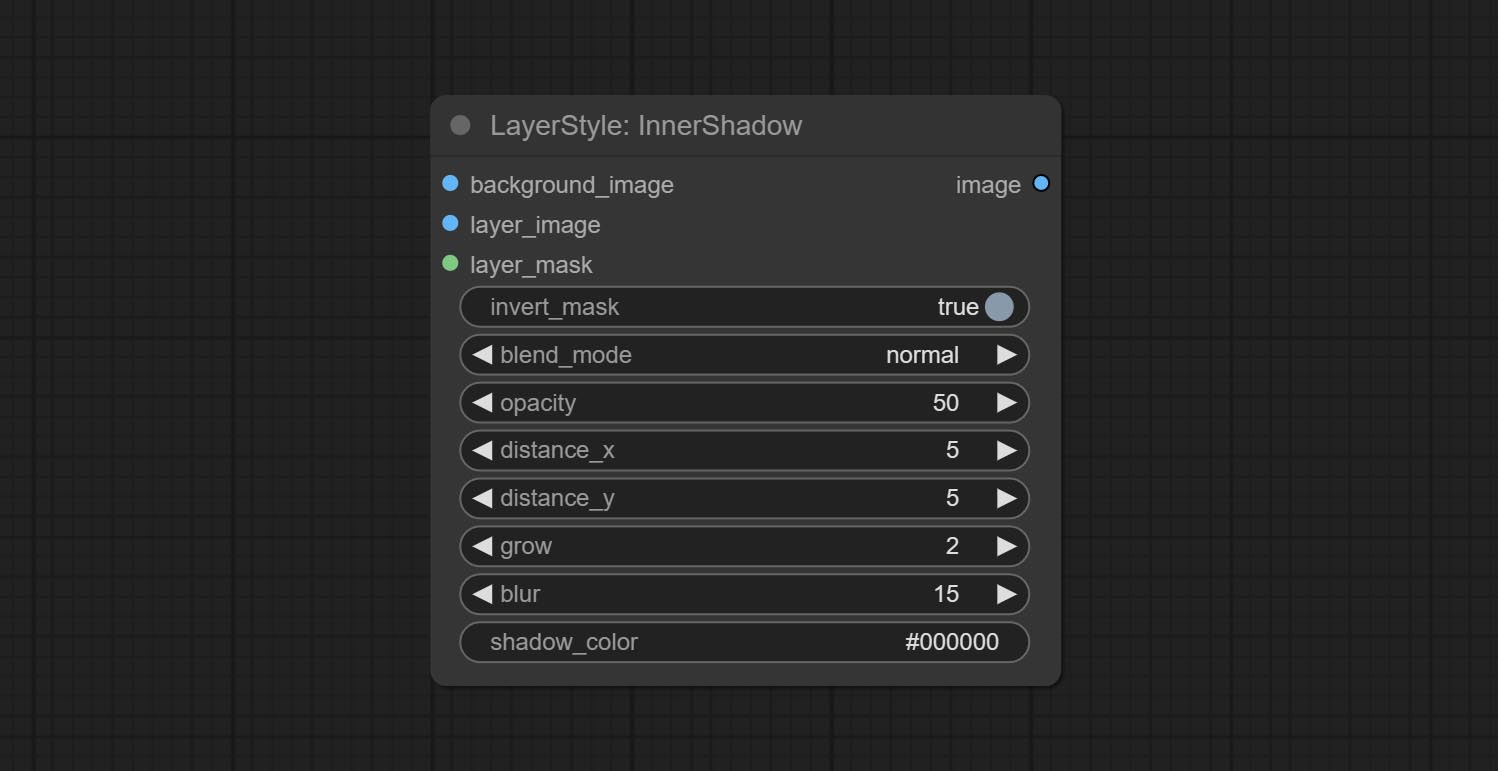
- background_image 1 : ภาพพื้นหลัง
- Layer_image 1 : ภาพเลเยอร์สำหรับคอมโพสิต
- layer_mask 1,2 : หน้ากากสำหรับ layer_image, เงาถูกสร้างขึ้นตามรูปร่างของพวกเขา
- invert_mask: จะย้อนกลับหน้ากากหรือไม่
- Blend_Mode 3 : โหมดการผสมเงา
- ความทึบ: ความทึบของเงา
- ระยะทาง _x: ชดเชยแนวนอนของเงา
- ระยะทาง _y: ชดเชยแนวตั้งของเงา
- Grow: แอมพลิจูดการขยายตัวของเงา
- เบลอ: ระดับเงาของเงา
- shadow_color 4 : สีเงา
- บันทึก
innerglow
สร้างเรืองแสงภายใน 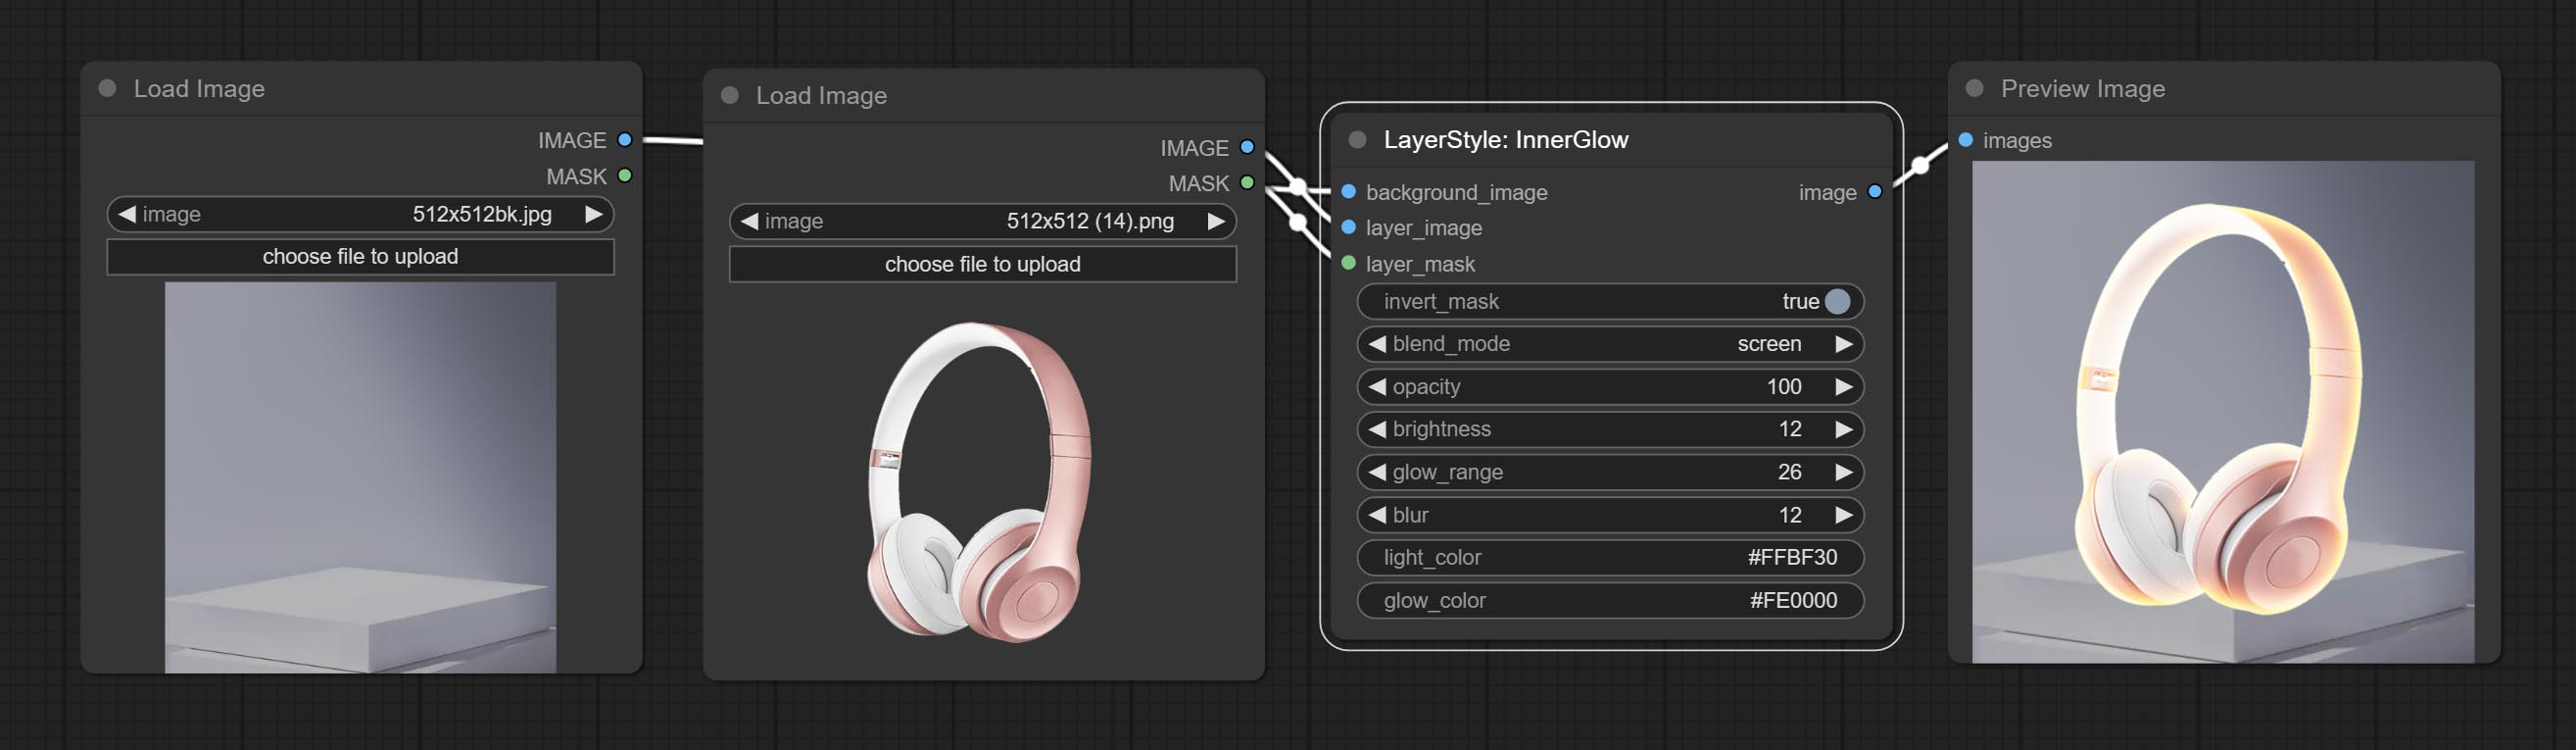
ตัวเลือกโหนด:
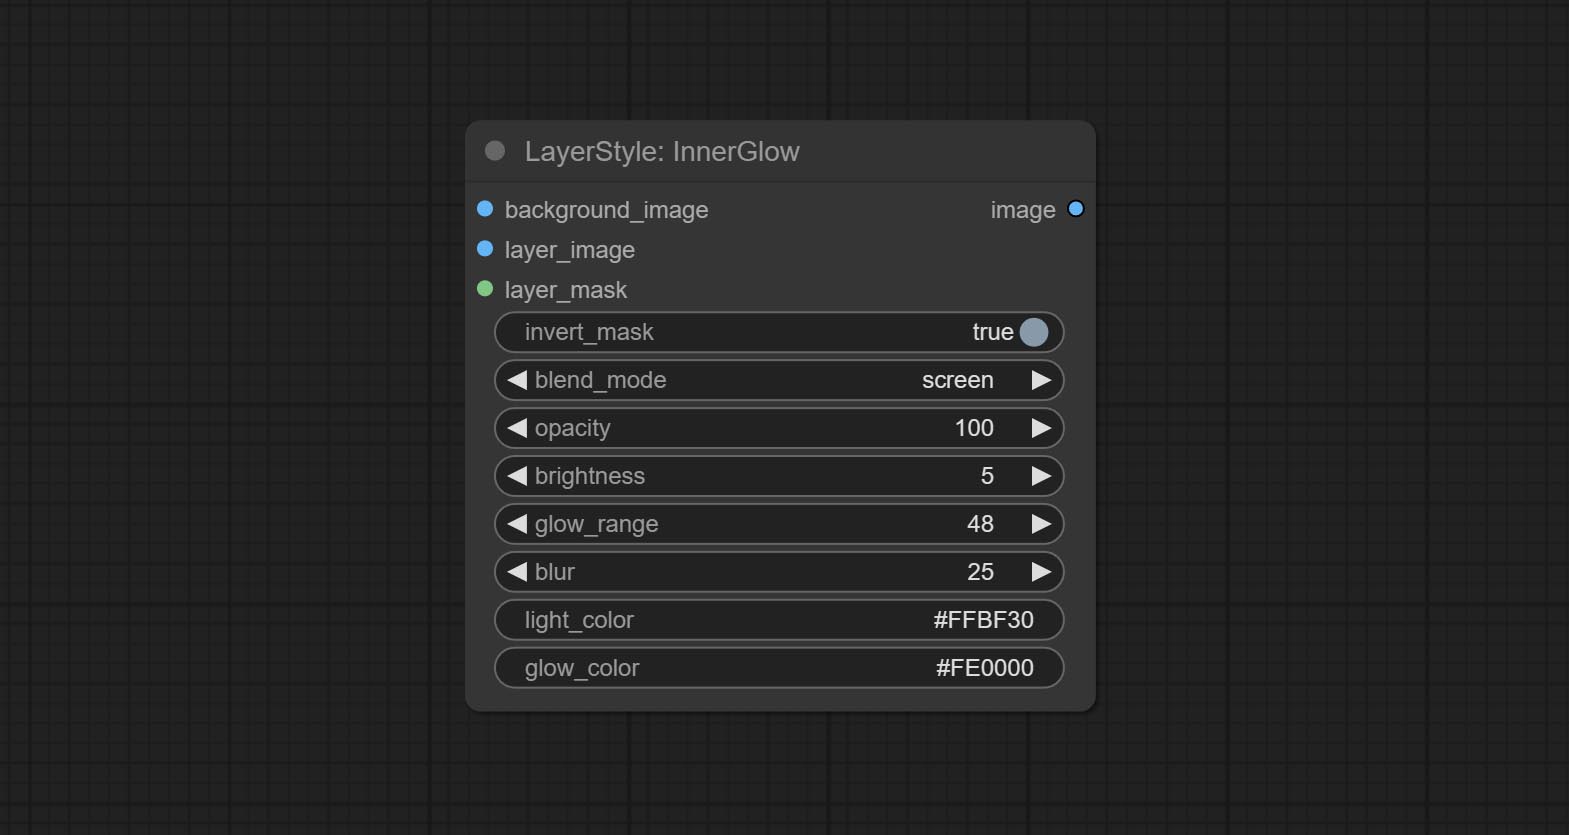
- background_image 1 : ภาพพื้นหลัง
- Layer_image 1 : ภาพเลเยอร์สำหรับคอมโพสิต
- layer_mask 1,2 : หน้ากากสำหรับ layer_image การเติบโตจะถูกสร้างขึ้นตามรูปร่างของพวกเขา
- invert_mask: จะย้อนกลับหน้ากากหรือไม่
- Blend_Mode 3 : โหมดการผสมของ Glow
- ความทึบแสง: ความทึบของเรืองแสง
- ความสว่าง: ความส่องสว่างของแสง
- GLOW_RANGE: ช่วงของแสง
- เบลอ: เบลอของแสง
- light_color 4 : Center part color of glow.
- GLOW_COLOR 4 : สีส่วนขอบของแสง
- บันทึก
จังหวะ
สร้างจังหวะของเลเยอร์。 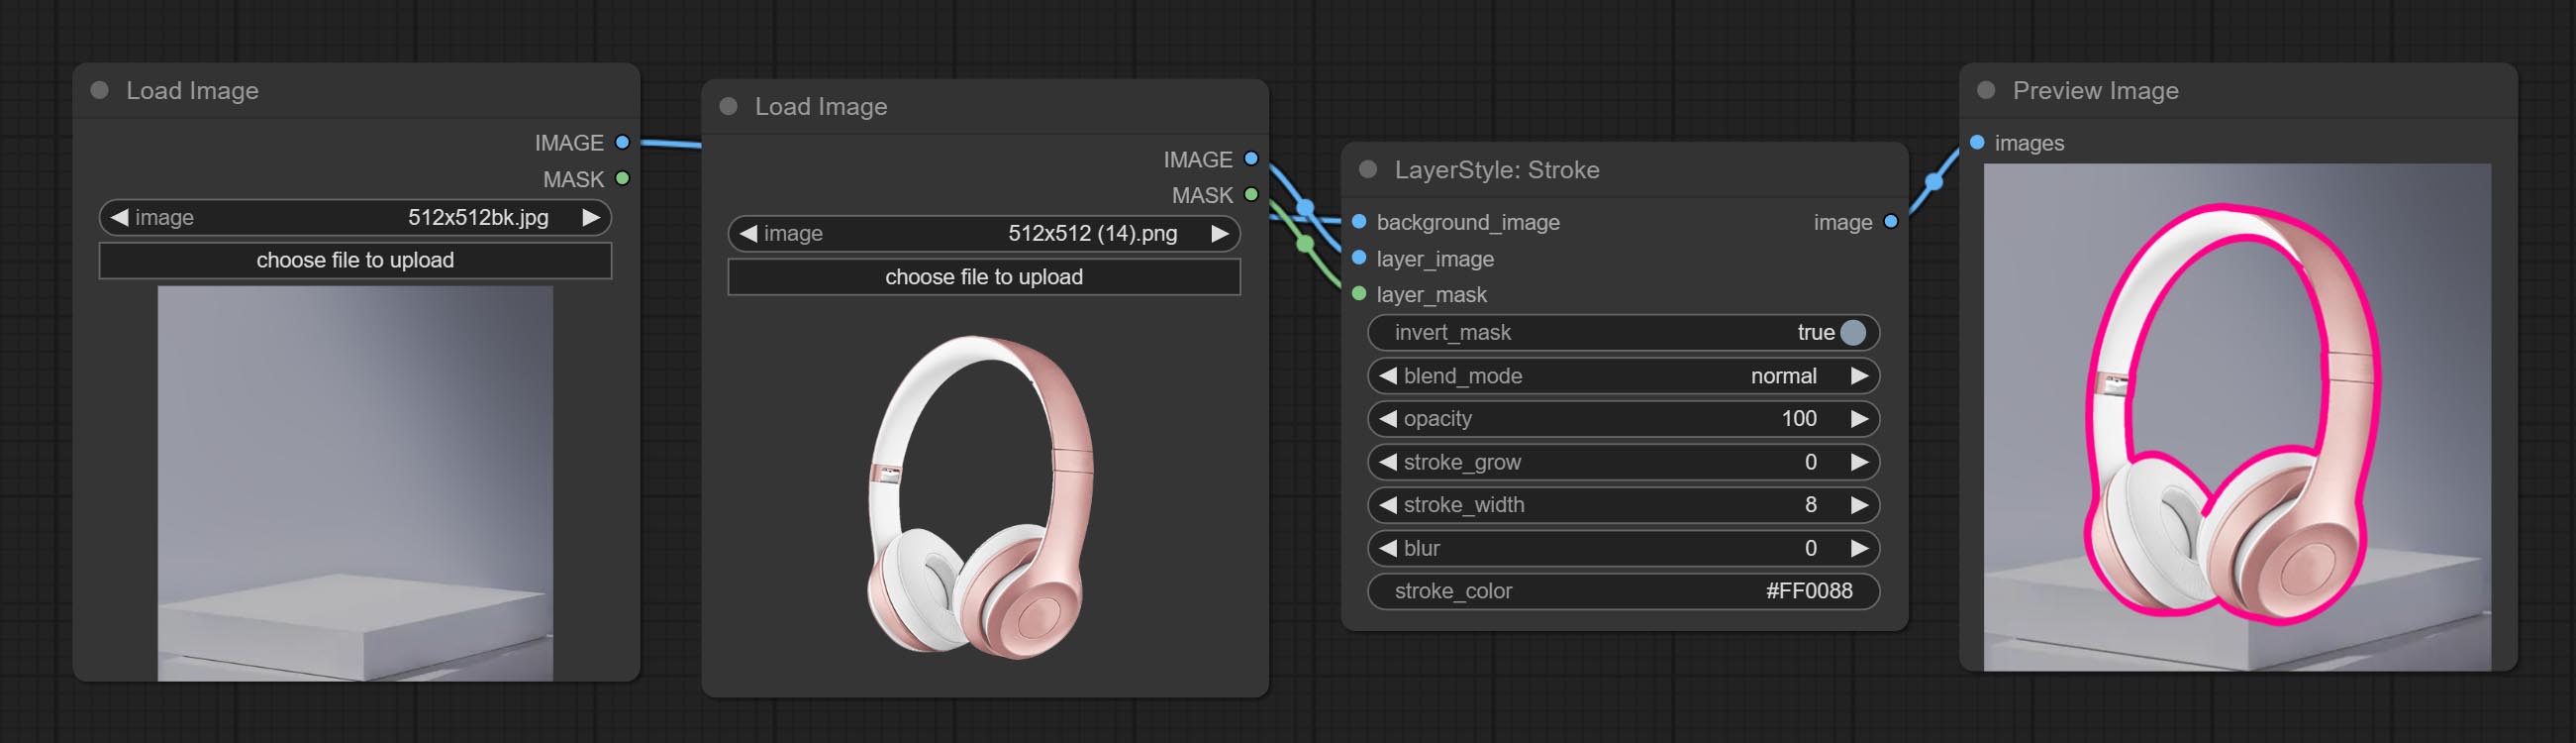
ตัวเลือกโหนด:
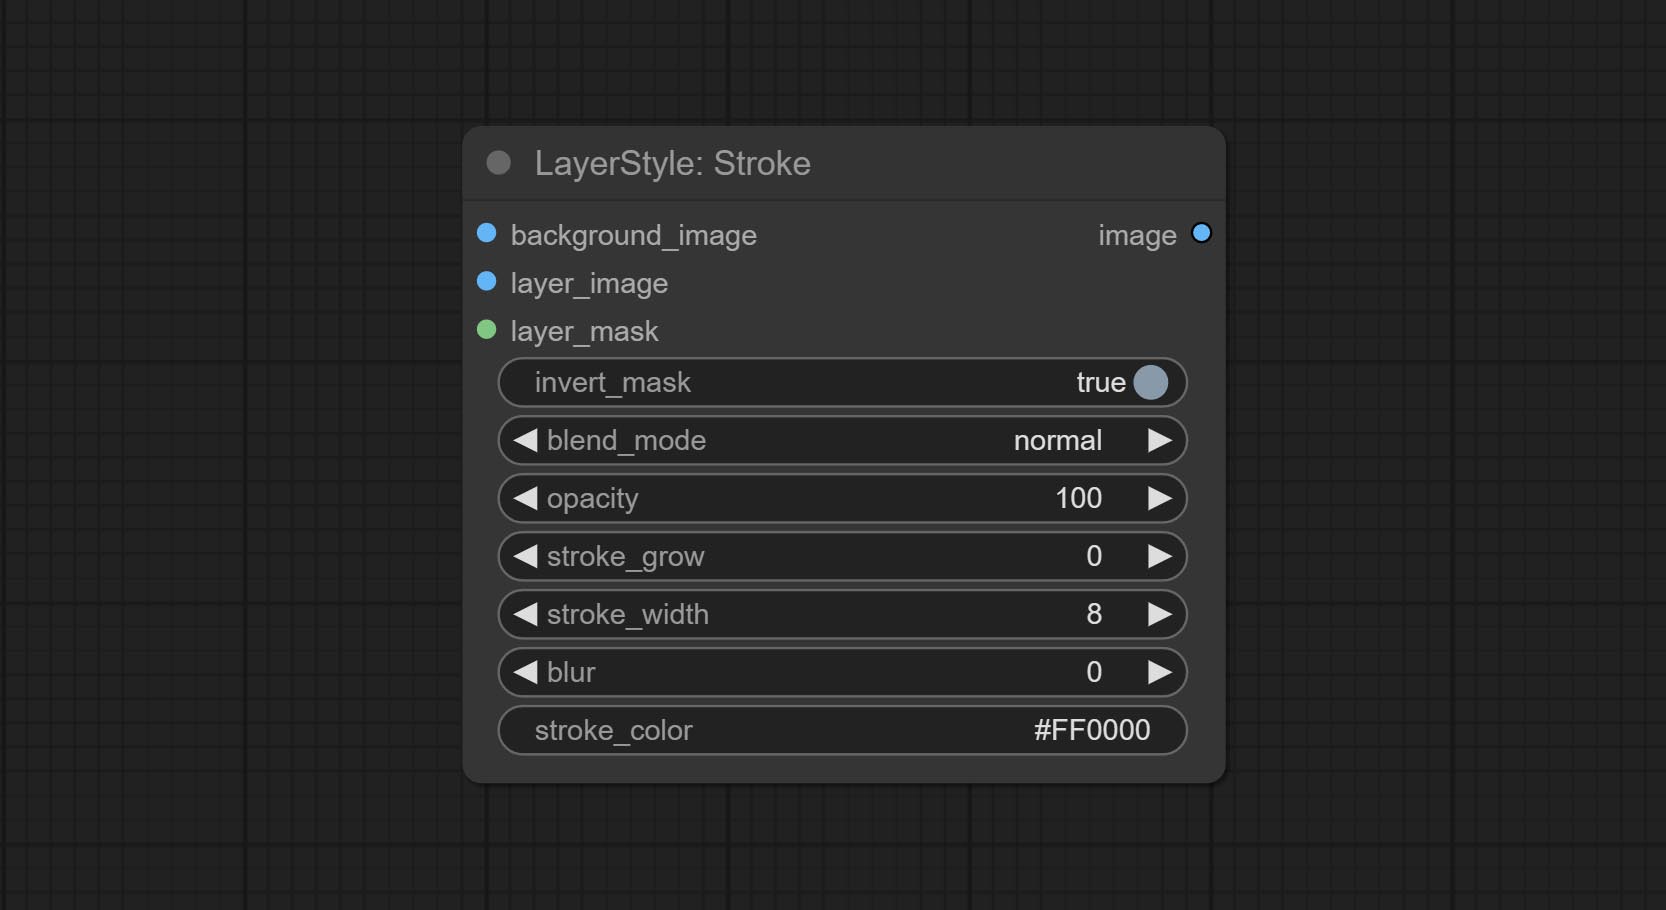
- background_image 1 : ภาพพื้นหลัง
- Layer_image 1 : ภาพเลเยอร์สำหรับคอมโพสิต
- layer_mask 1,2 : หน้ากากสำหรับ layer_image, stroke ถูกสร้างขึ้นตามรูปร่างของพวกเขา
- invert_mask: จะย้อนกลับหน้ากากหรือไม่
- Blend_Mode 3 : โหมดการผสมของโรคหลอดเลือดสมอง
- ความทึบ: ความทึบของโรคหลอดเลือดสมอง
- stroke_grow: แอมพลิจูดการขยายตัว/การหดตัวของแอมพลิจูดค่าบวกบ่งบอกถึงการขยายตัวและค่าลบบ่งบอกถึงการหดตัว
- stroke_width: ความกว้างของโรคหลอดเลือดสมอง
- เบลอ: เบลอของโรคหลอดเลือดสมอง
- stroke_color 4 : สีจังหวะที่อธิบายไว้ในรูปแบบ hexadecimal RGB
- บันทึก
การไล่ระดับสี
สร้างการซ้อนทับการไล่ระดับสี 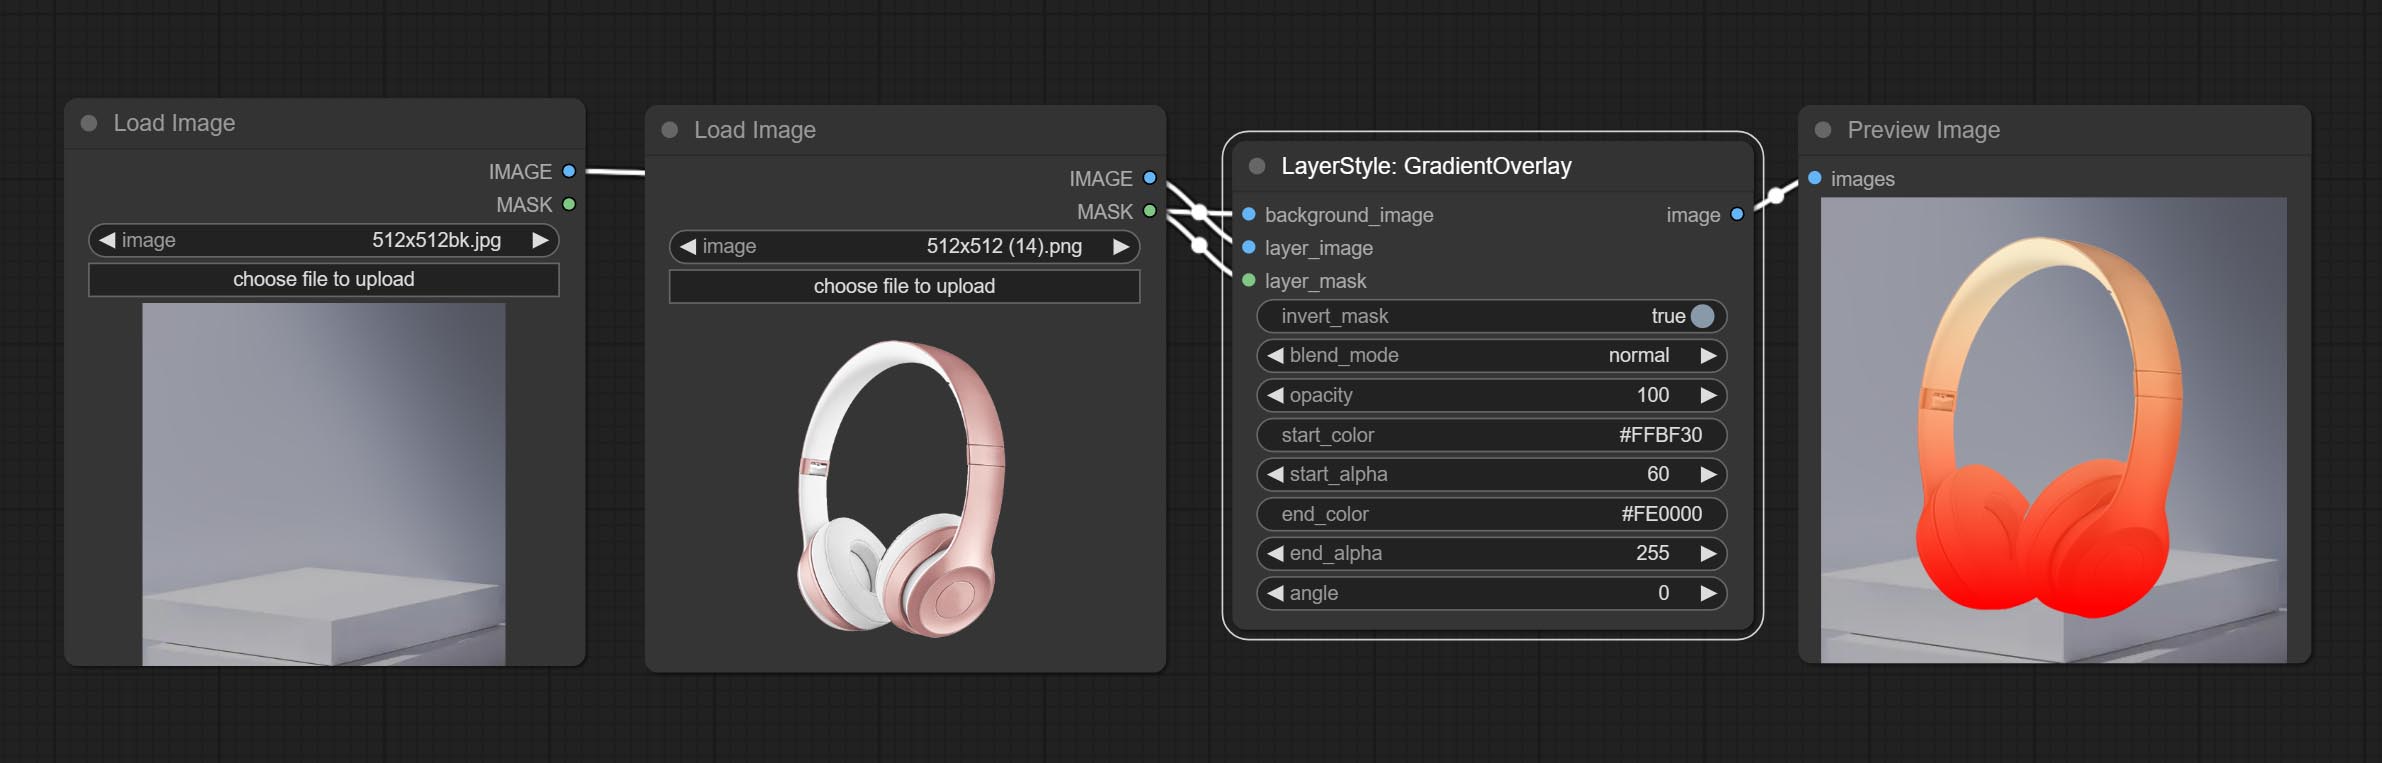
ตัวเลือกโหนด:
- background_image 1 : ภาพพื้นหลัง
- Layer_image 1 : ภาพเลเยอร์สำหรับคอมโพสิต
- layer_mask 1,2 : หน้ากากสำหรับ layer_image
- invert_mask: Whether to reverse the mask.
- blend_mode 3 : Blending mode of gradient.
- opacity: Opacity of stroke.
- start_color: Color at the beginning of the gradient.
- start_alpha: Transparency at the beginning of the gradient.
- end_color: Color at the end of the gradient.
- end_alpha: Transparency at the end of the gradient.
- angle: Gradient rotation angle.
- บันทึก
ColorOverlay
Generate color overlay 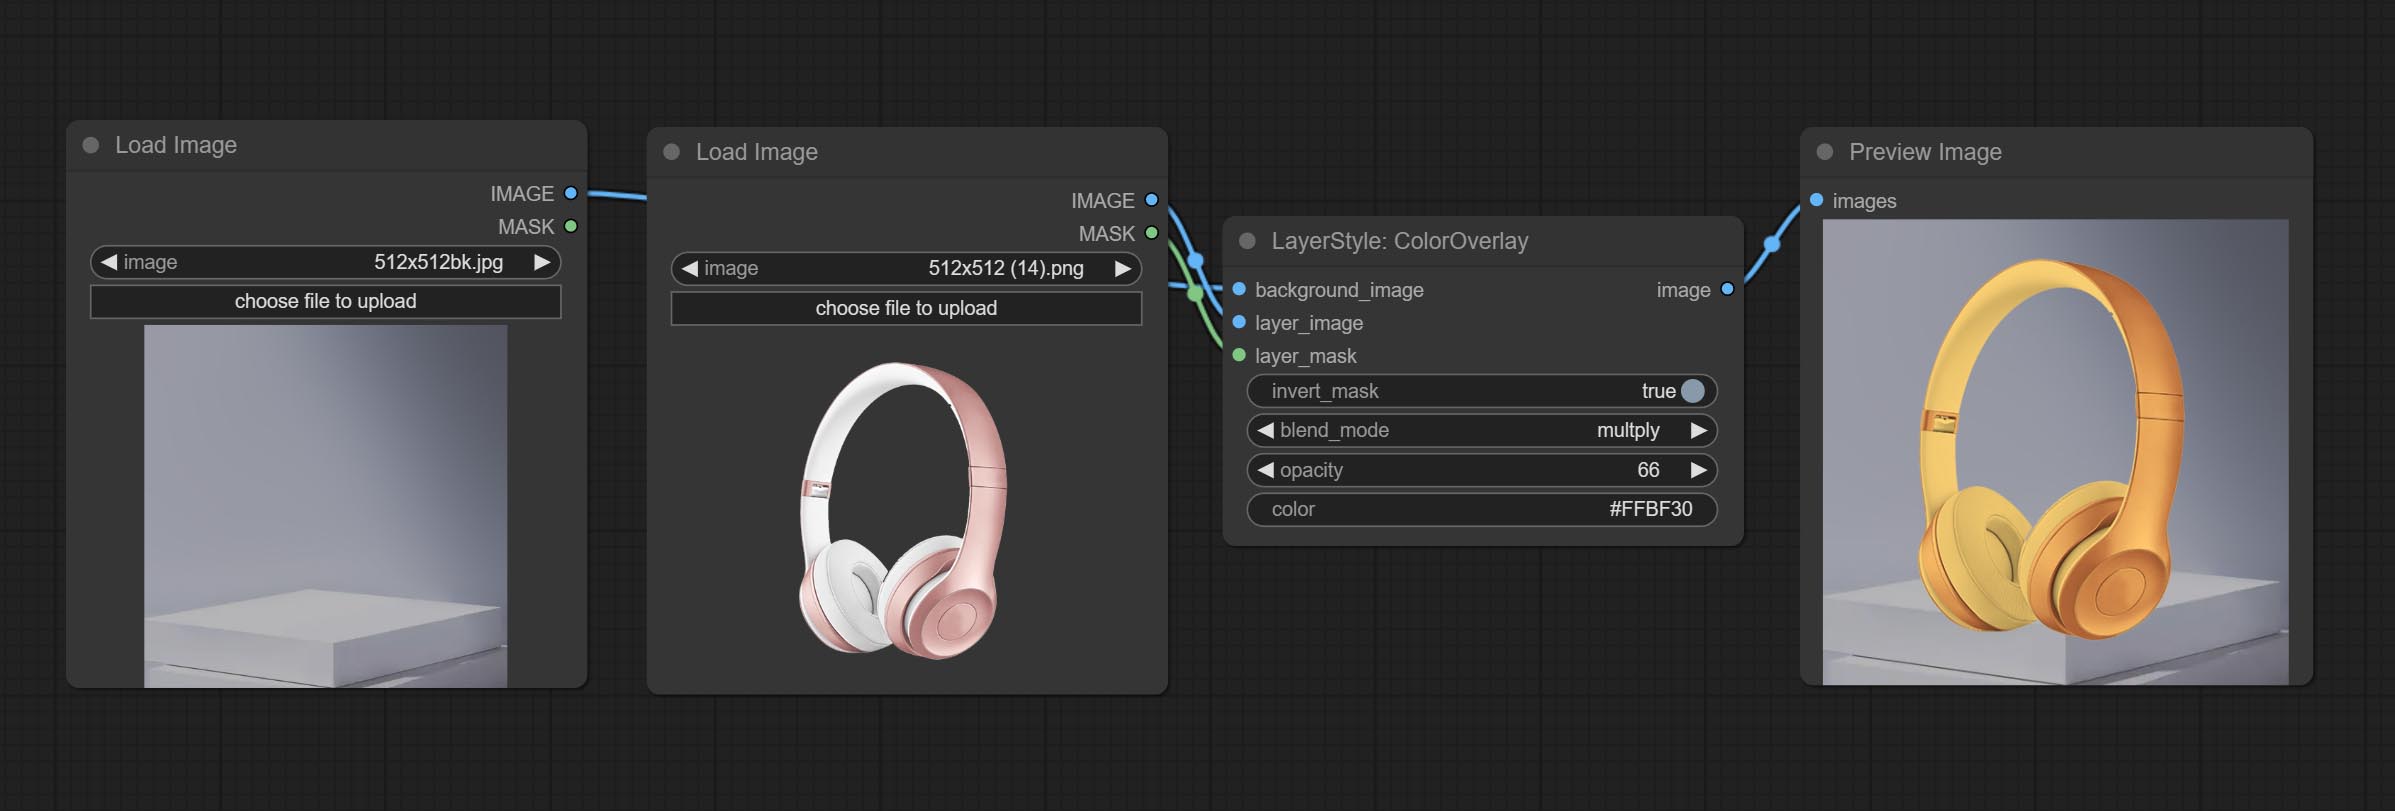
Node options: 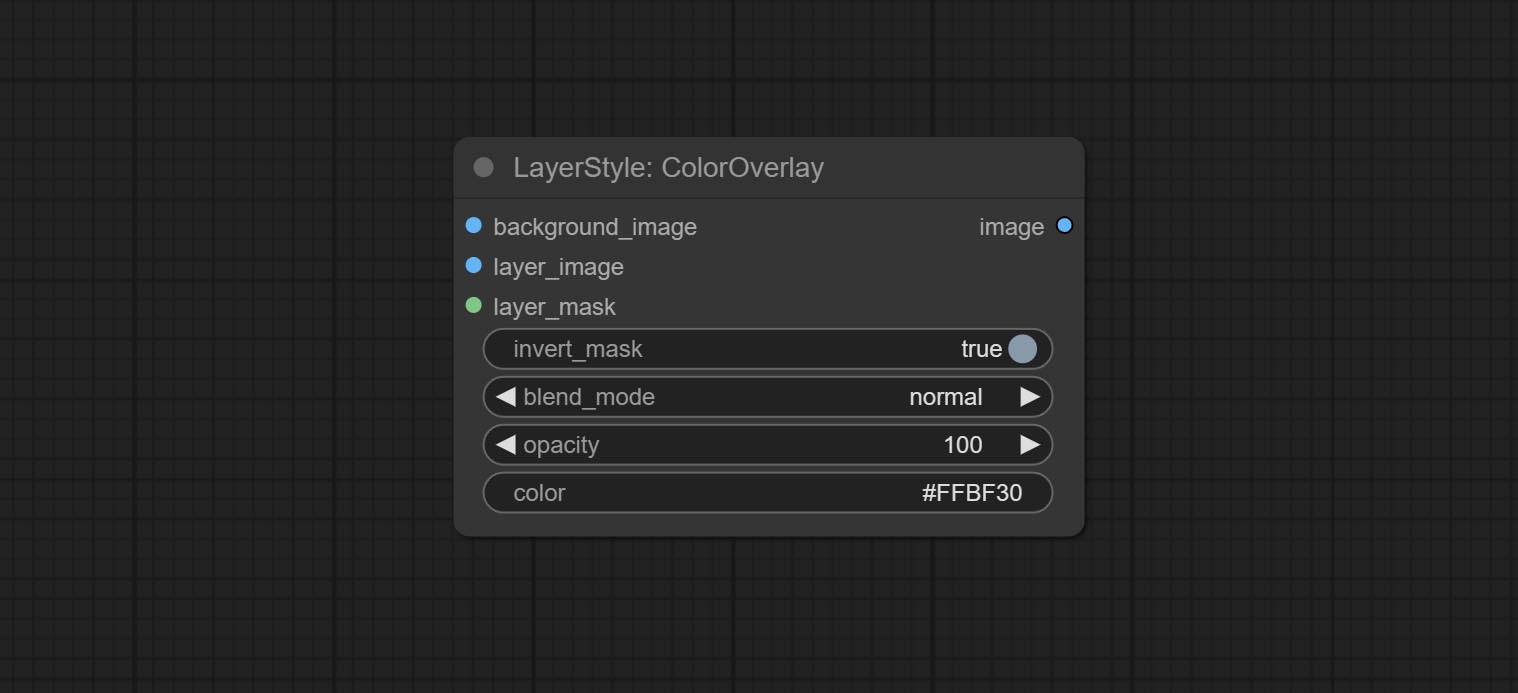
- background_image 1 : The background image.
- layer_image 1 : Layer image for composite.
- layer_mask 1,2 : Mask for layer_image.
- invert_mask: Whether to reverse the mask.
- blend_mode 3 : Blending mode of color.
- opacity: Opacity of stroke.
- color: Color of overlay.
- บันทึก
LayerColor
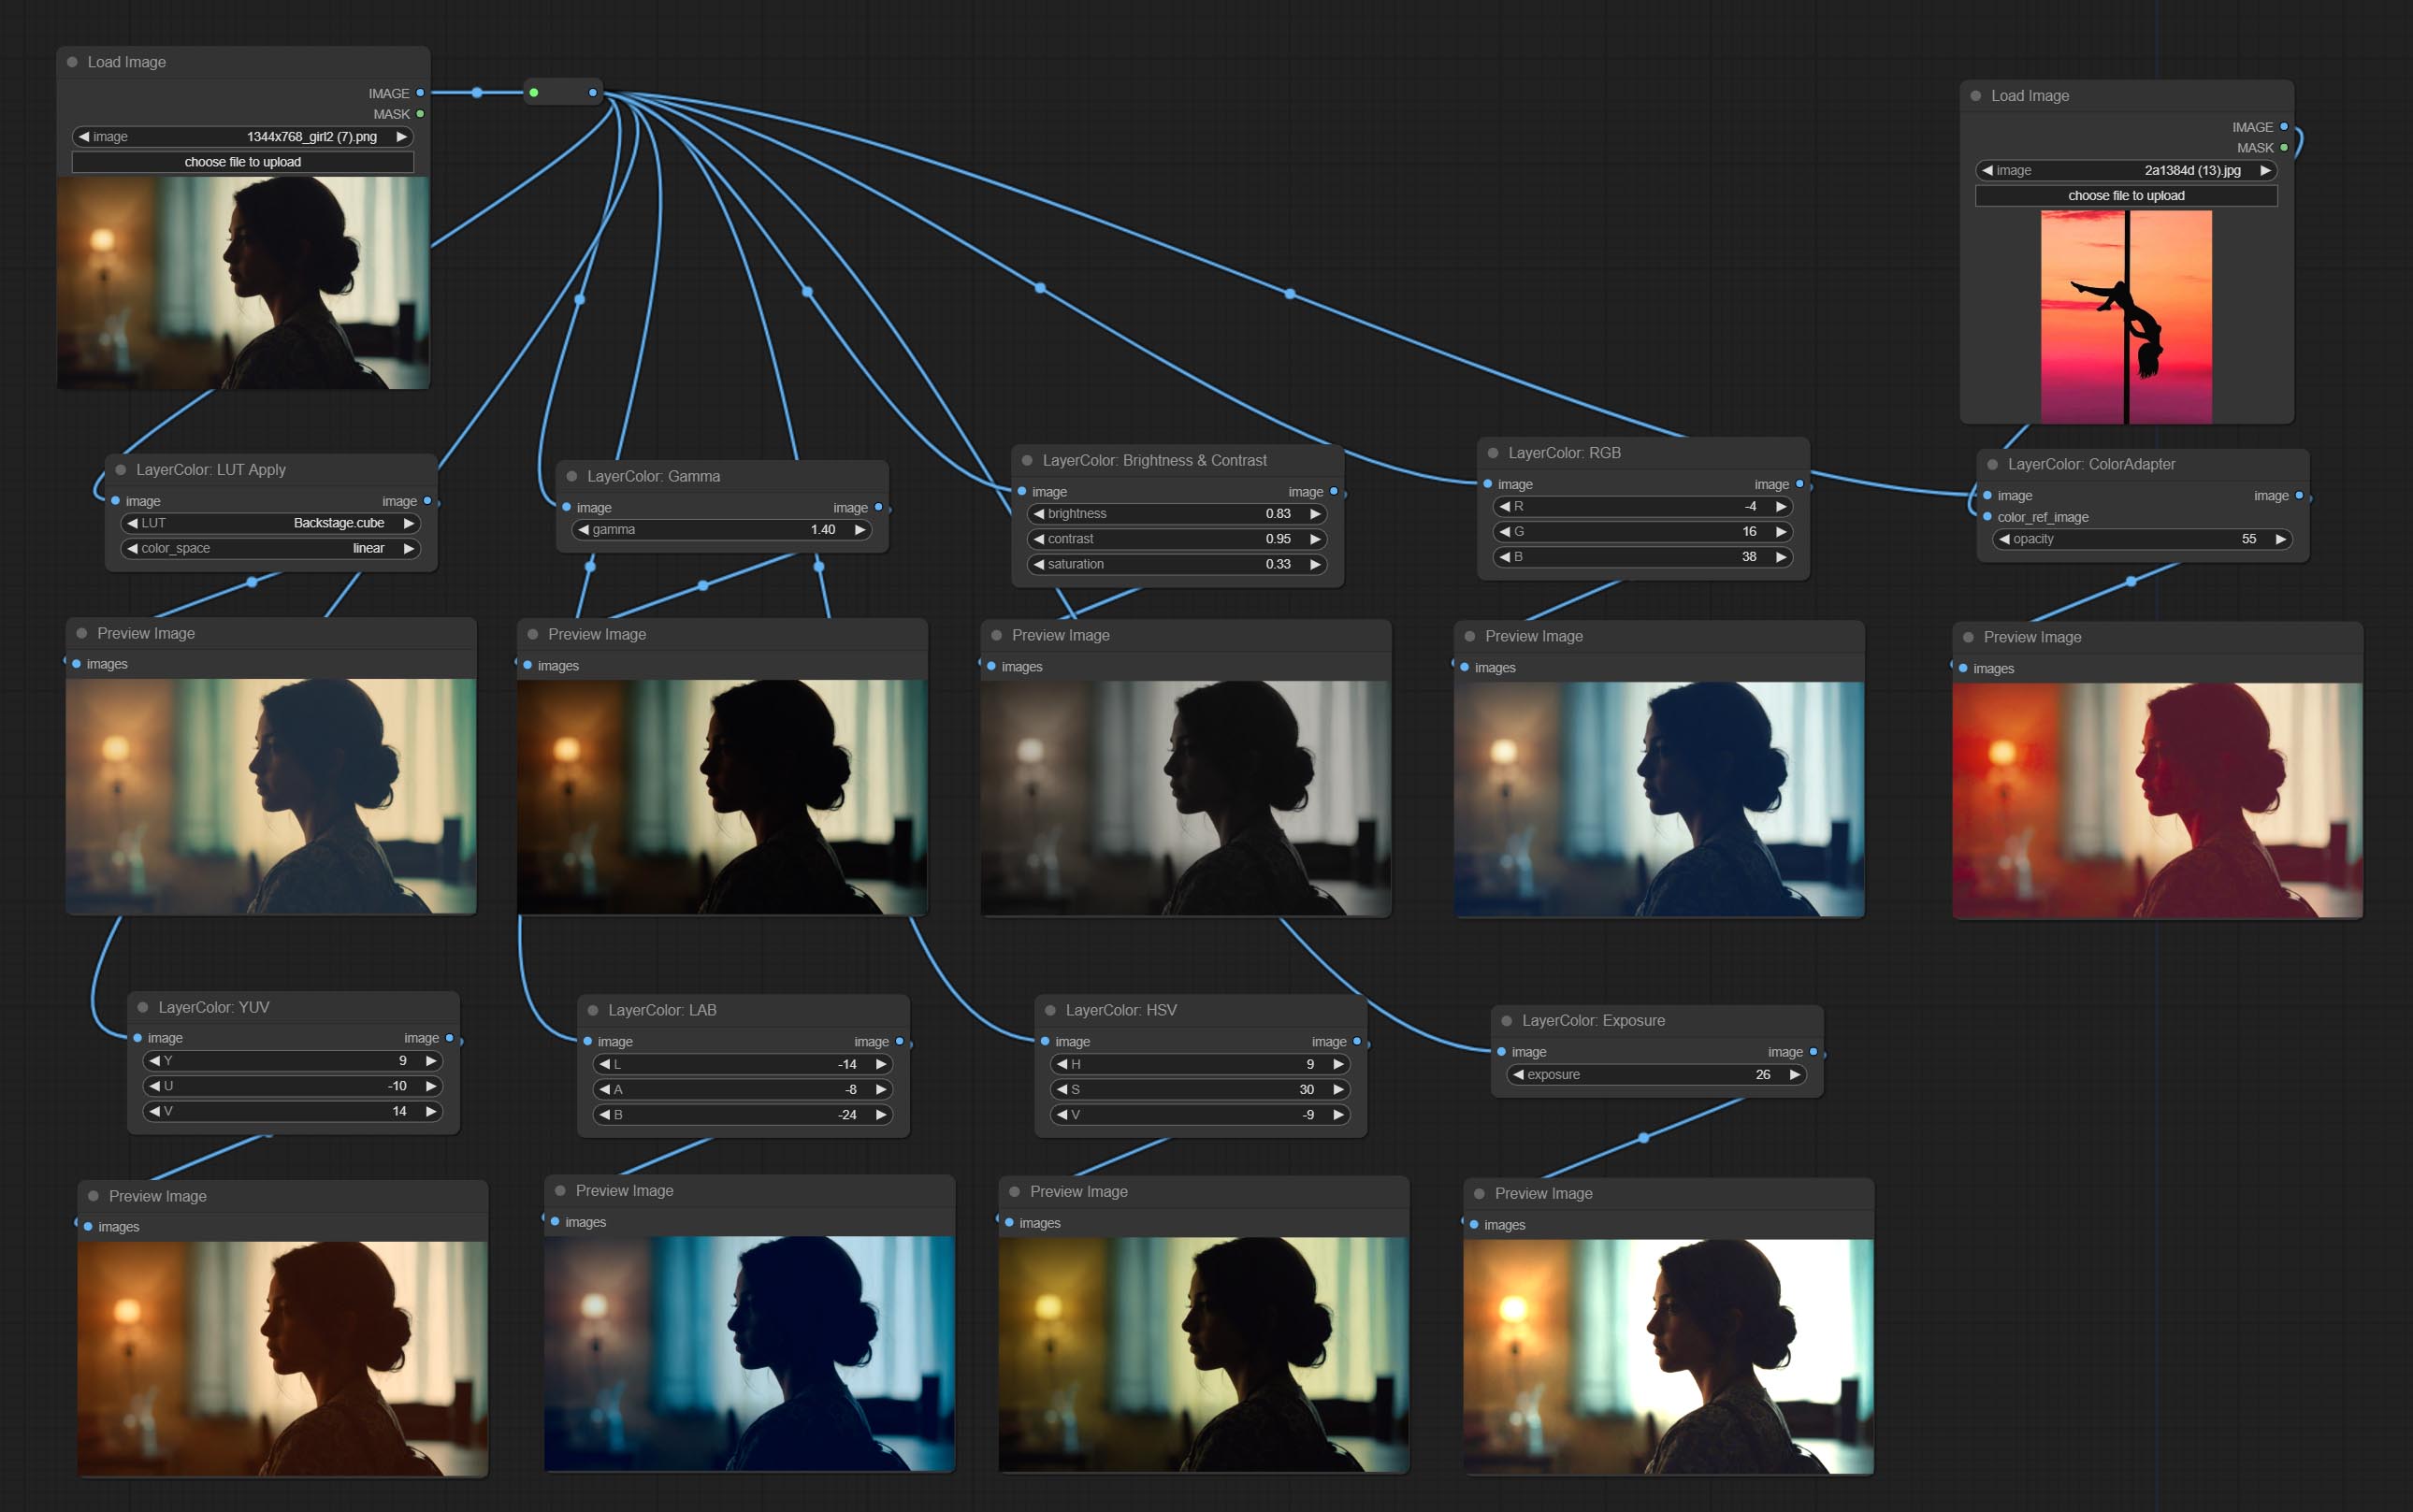
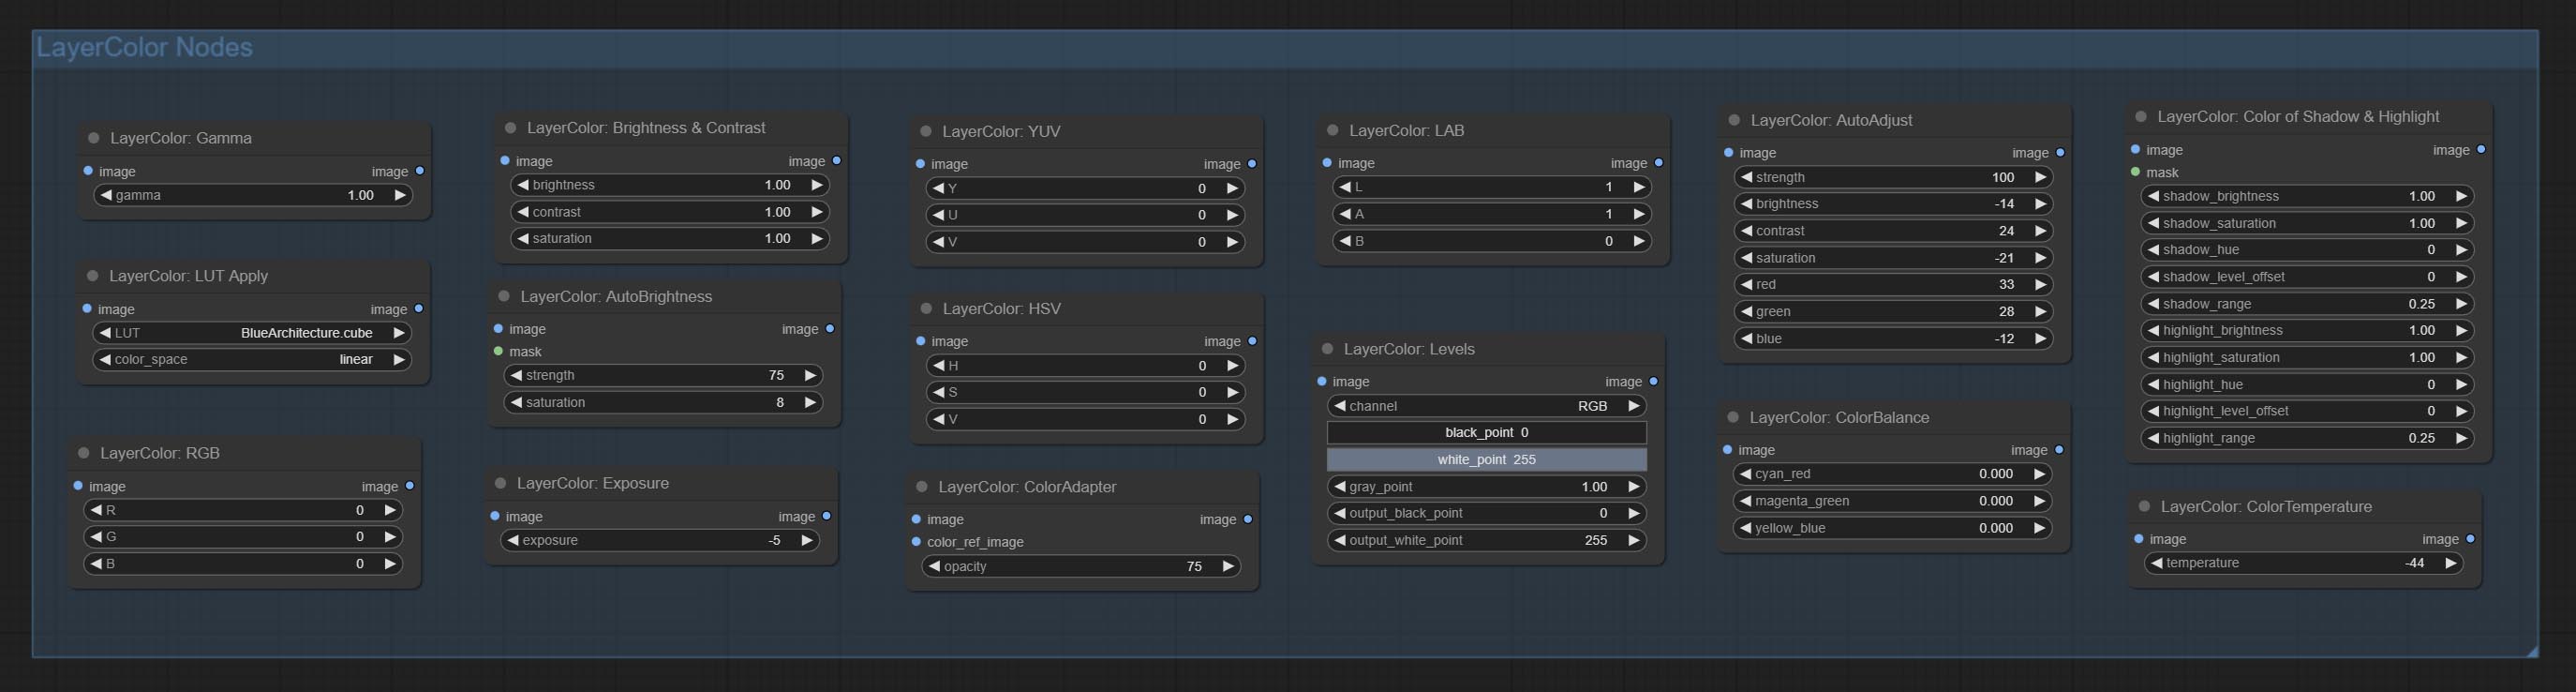
LUT Apply
Apply LUT to the image. only supports .cube format. 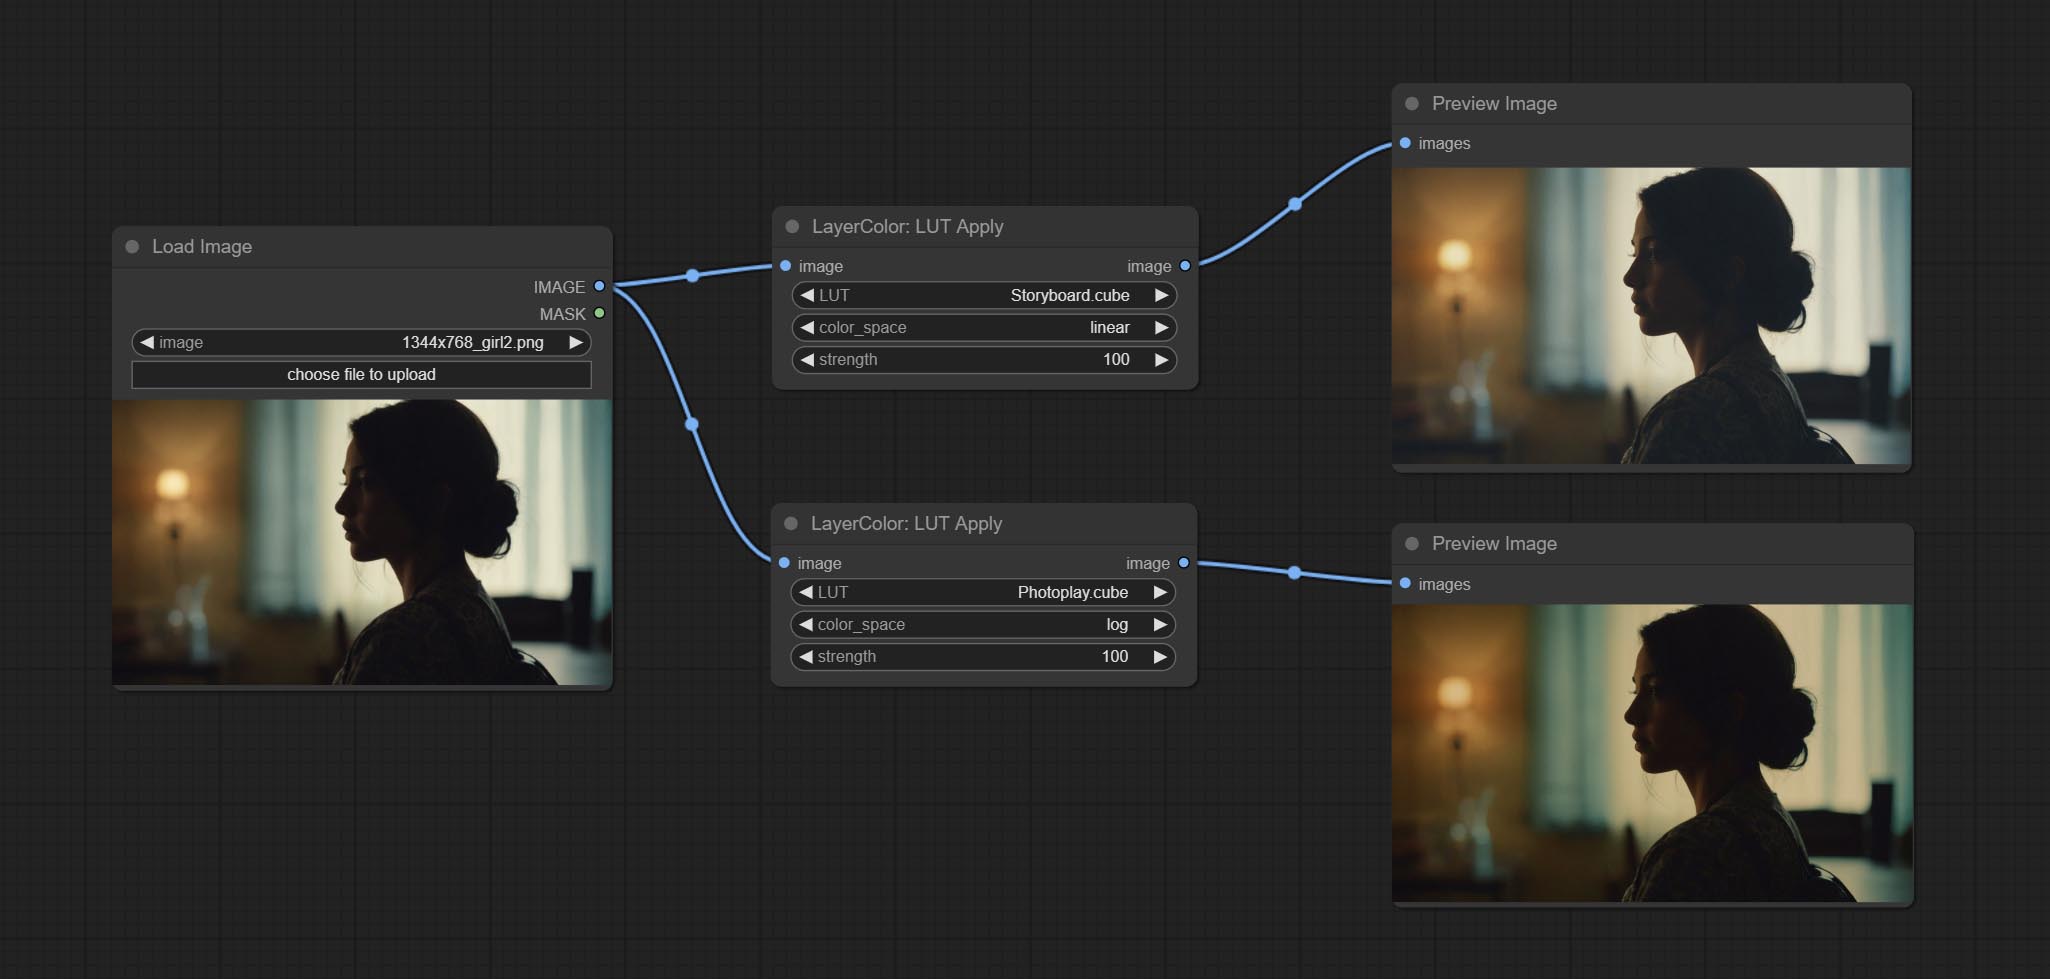
Node options:
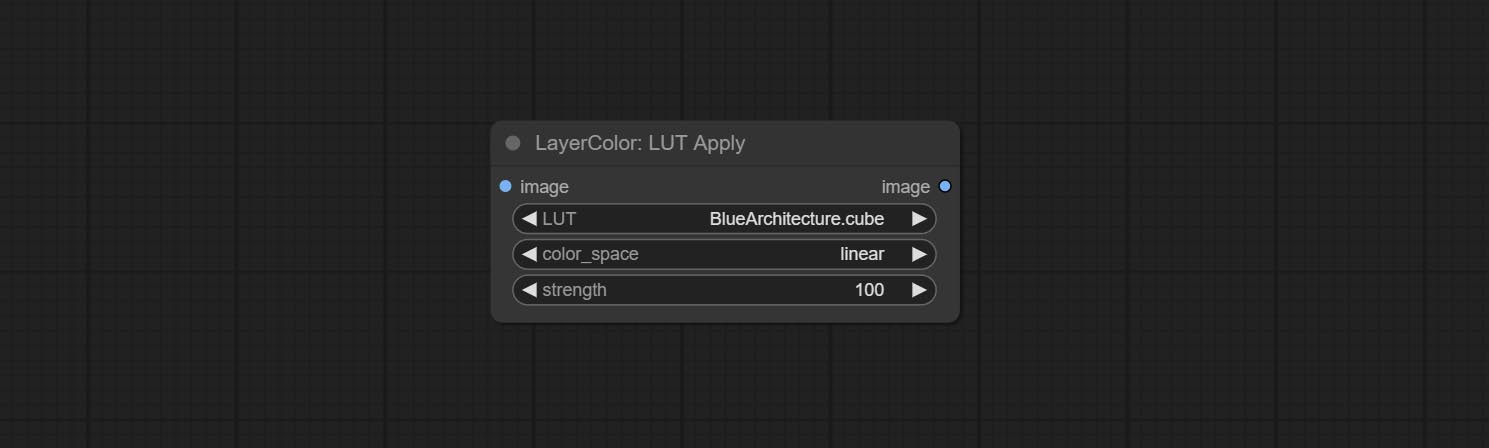
- LUT * : Here is a list of available. cube files in the LUT folder, and the selected LUT files will be applied to the image.
- color_space: For regular image, please select linear, for image in the log color space, please select log.
- strength: Range 0~100, LUT application strength. The larger the value, the greater the difference from the original image, and the smaller the value, the closer it is to the original image.
* LUT folder is defined in resource_dir.ini , this file is located in the root directory of the plug-in, and the default name is resource_dir.ini.example . to use this file for the first time, you need to change the file suffix to .ini . Open the text editing software and find the line starting with "LUT_dir=", after "=", enter the custom folder path name. support defining multiple folders in resource-dir.ini , separated by commas, semicolons, or spaces. all .cube files in this folder will be collected and displayed in the node list during ComfyUI initialization. If the folder set in ini is invalid, the LUT folder that comes with the plugin will be enabled.
AutoAdjust
Automatically adjust the brightness, contrast, and white balance of the image. Provide some manual adjustment options to compensate for the shortcomings of automatic adjustment. 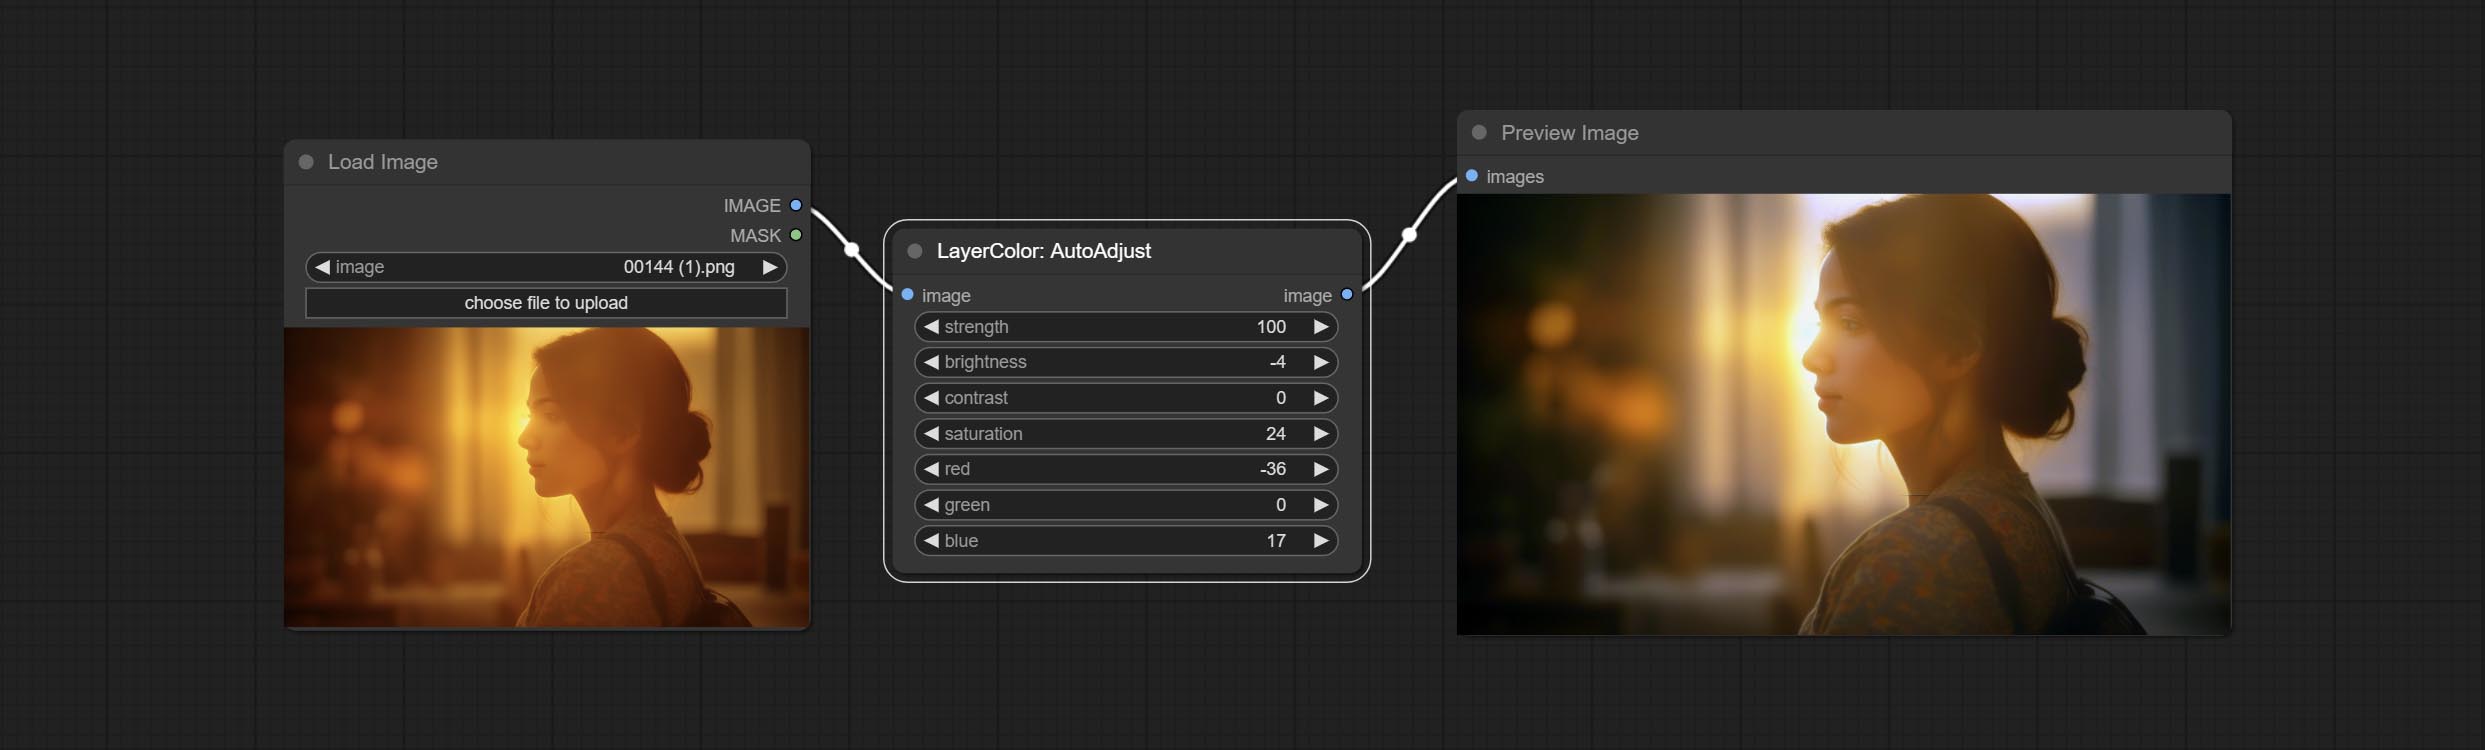
Node Options:
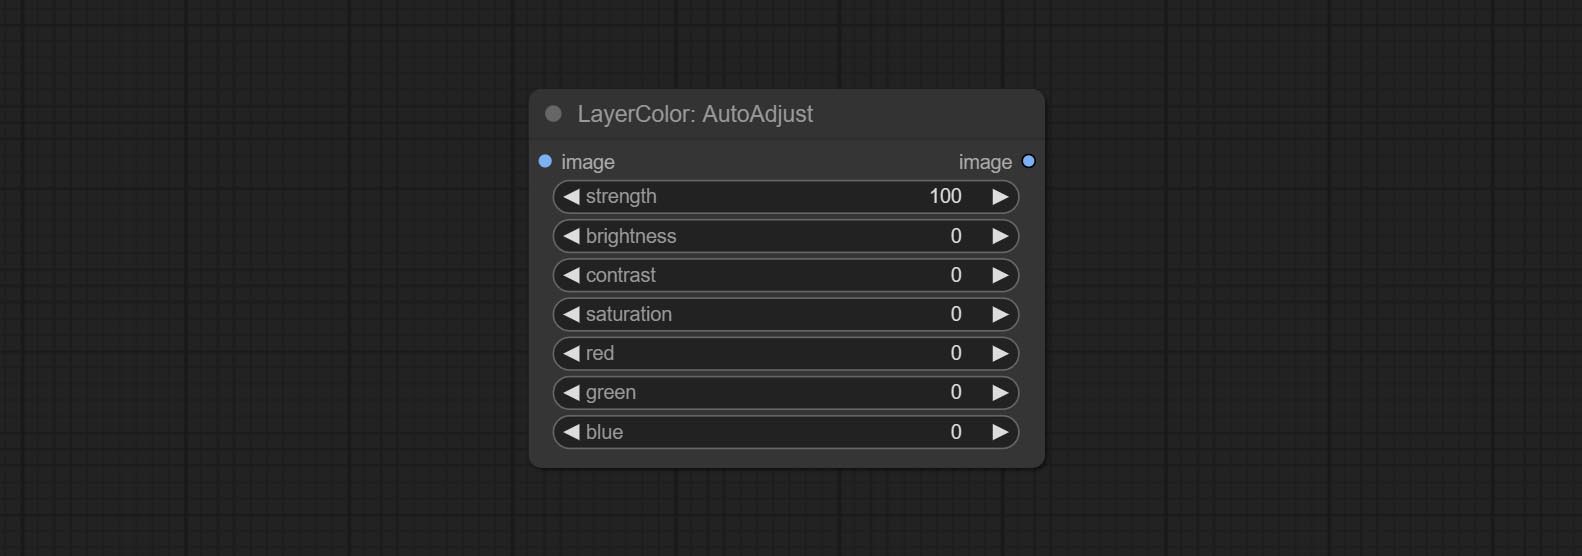
- strength: Strength of adjust. The larger the value, the greater the difference from the original image.
- brightness: Manual adjustment of brightness.
- contrast: Manual adjustment of contrast.
- saturation: Manual adjustment of saturation.
- red: Manual adjustment of the red channel.
- green: Manual adjustment of the green channel.
- blue: Manual adjustment of the blue channel.
AutoAdjustV2
On the basis of AutoAdjust, add mask input and only calculate the content inside the mask for automatic color adjustment. Add multiple automatic adjustment modes. 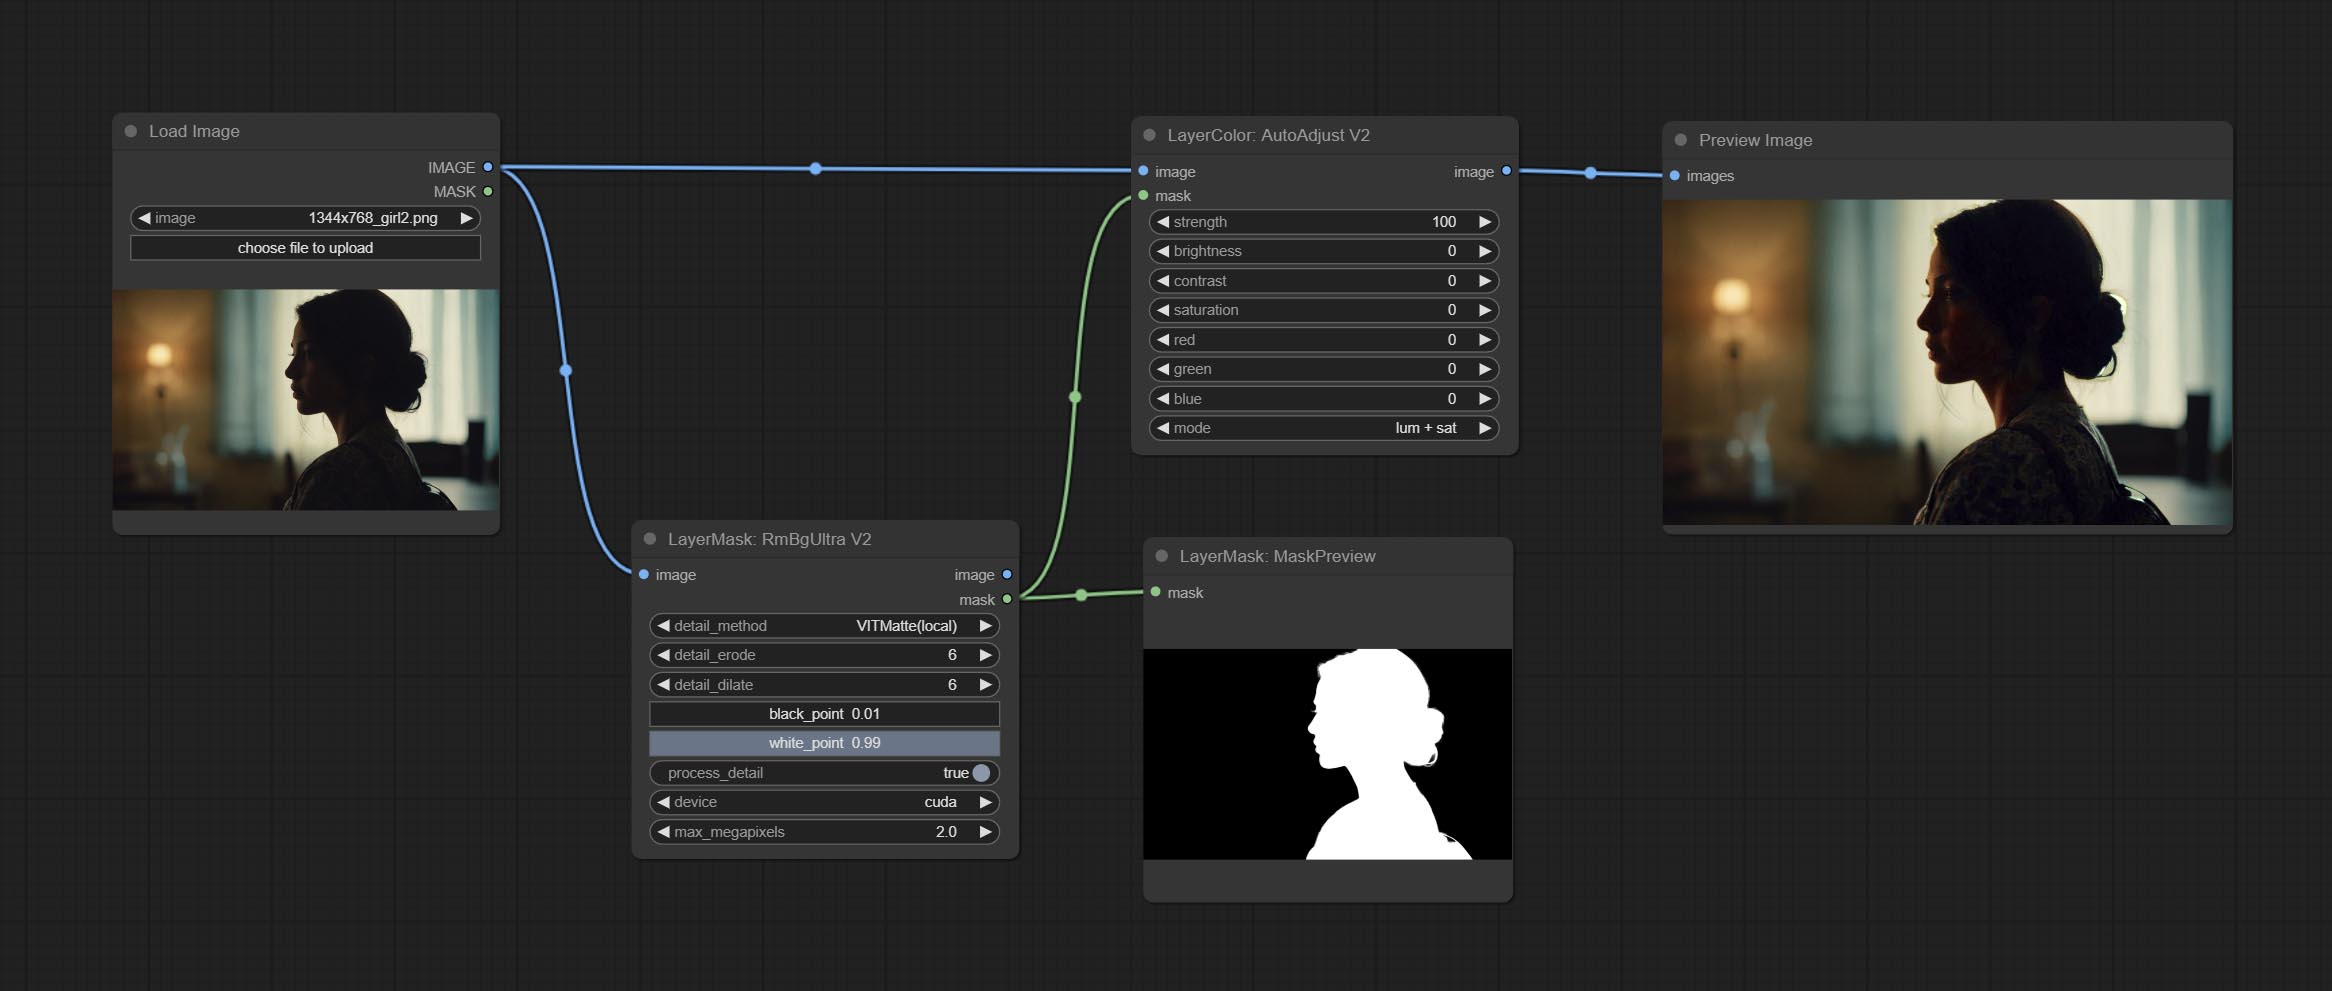
The following changes have been made based on AutoAdjust: 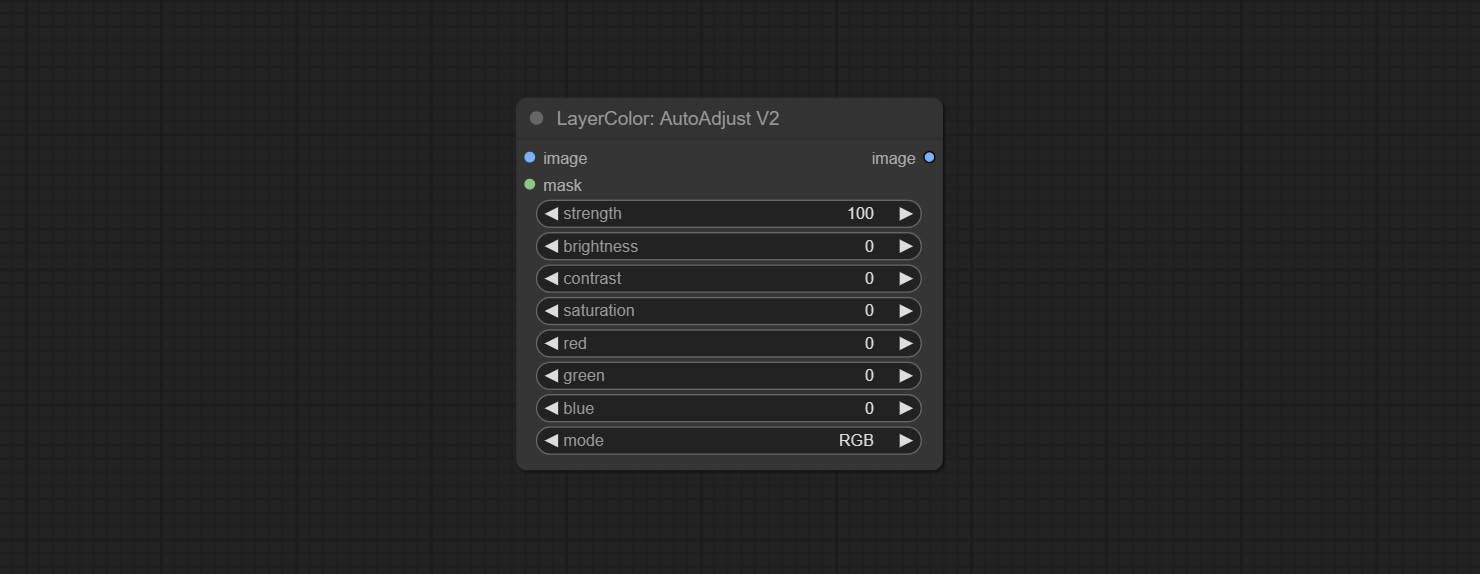
- mask: Optional mask input.
- mode: Automatic adjustment mode. "RGB" automatically adjusts according to the three channels of RGB, "lum + sat"automatically adjusts according to luminance and saturation, "luminance" automatically adjusts according to luminance, "saturation" automatically adjusts according to saturation, and "mono" automatically adjusts according to grayscale and outputs monochrome.
AutoBrightness
Automatically adjust too dark or too bright image to moderate brightness, and support mask input. When mask input, only the content of the mask part is used as the data source of the automatic brightness. The output is still the whole adjusted image. 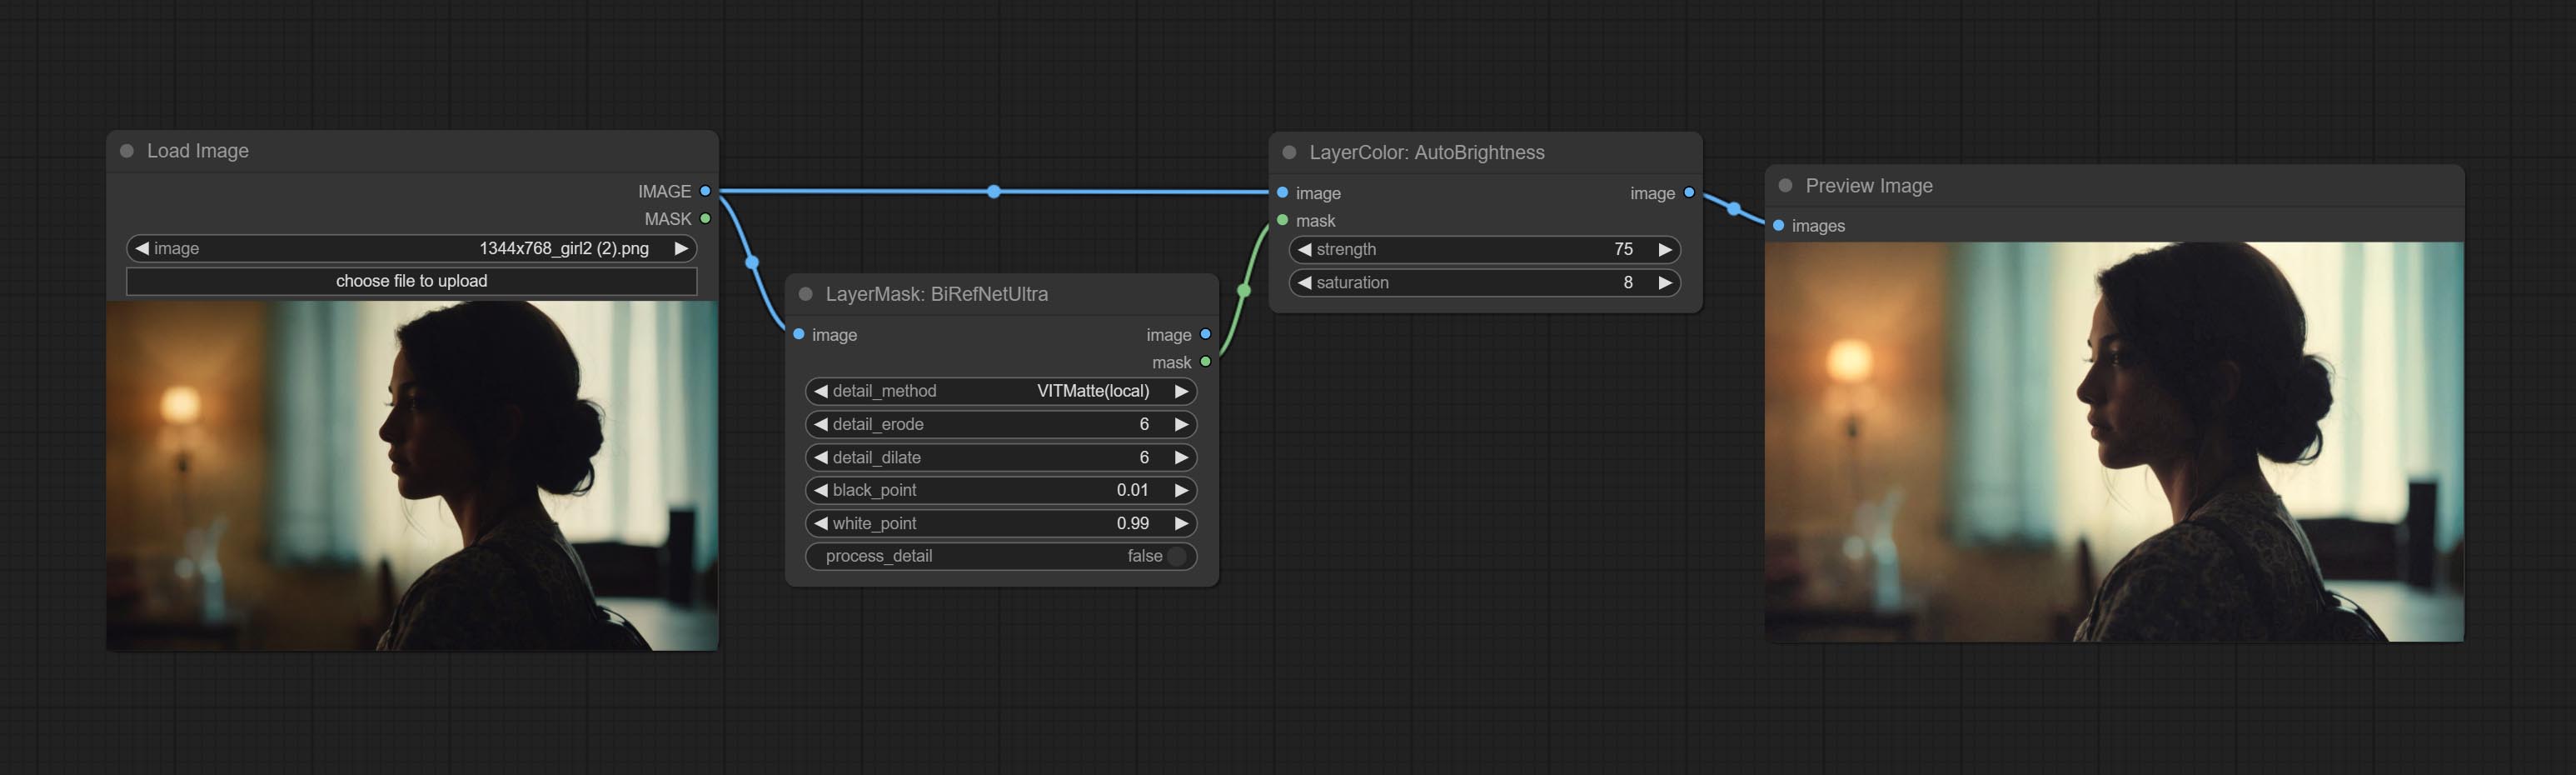
Node options:
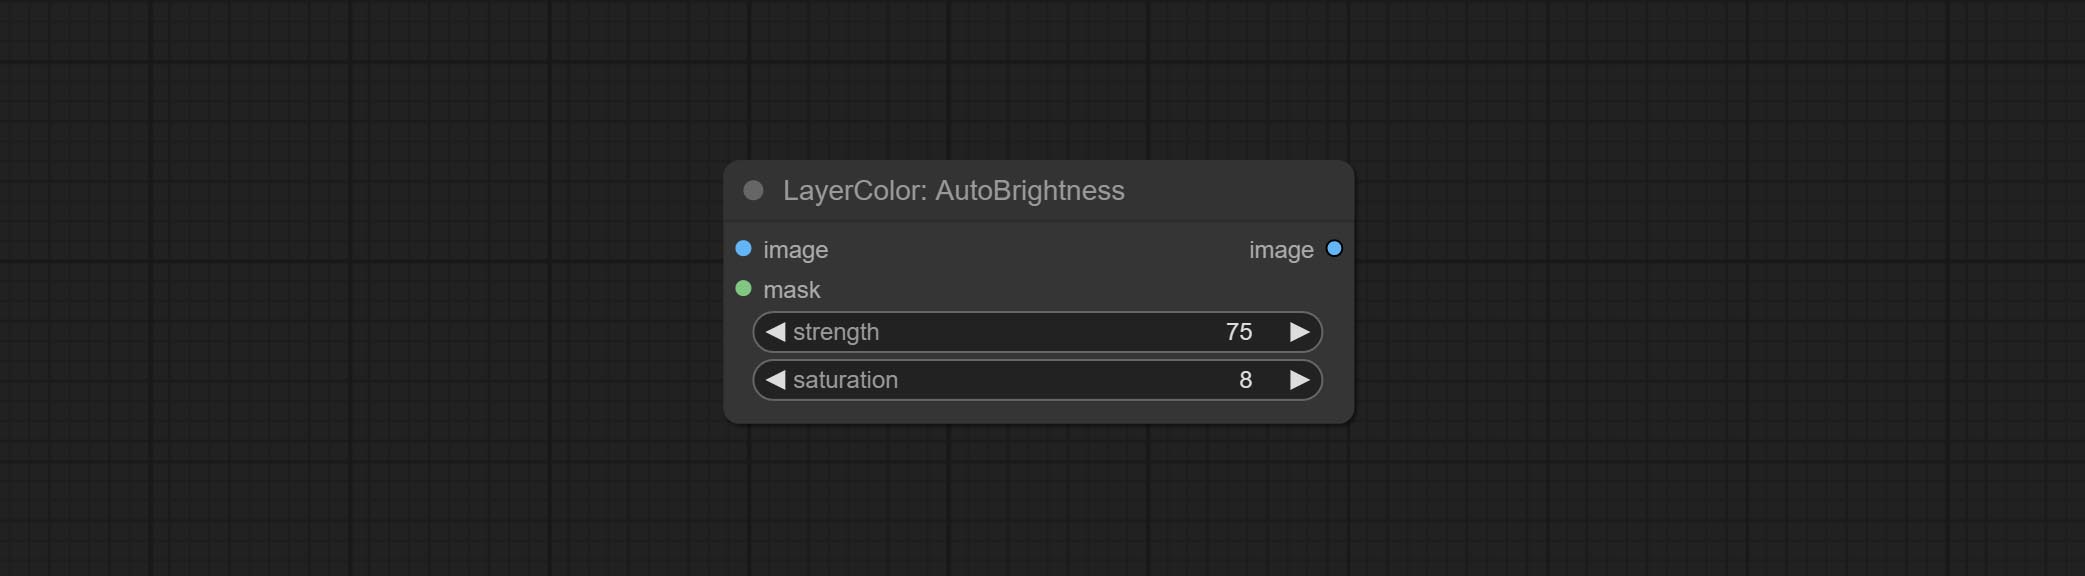
- strength: Automatically adjust the intensity of the brightness. The larger the value, the more biased towards the middle value, the greater the difference from the original picture.
- saturation: Color saturation. Changes in brightness usually result in changes in color saturation, where appropriate compensation can be adjusted.
ColorAdapter
Auto adjust the color tone of the image to resemble the reference image. 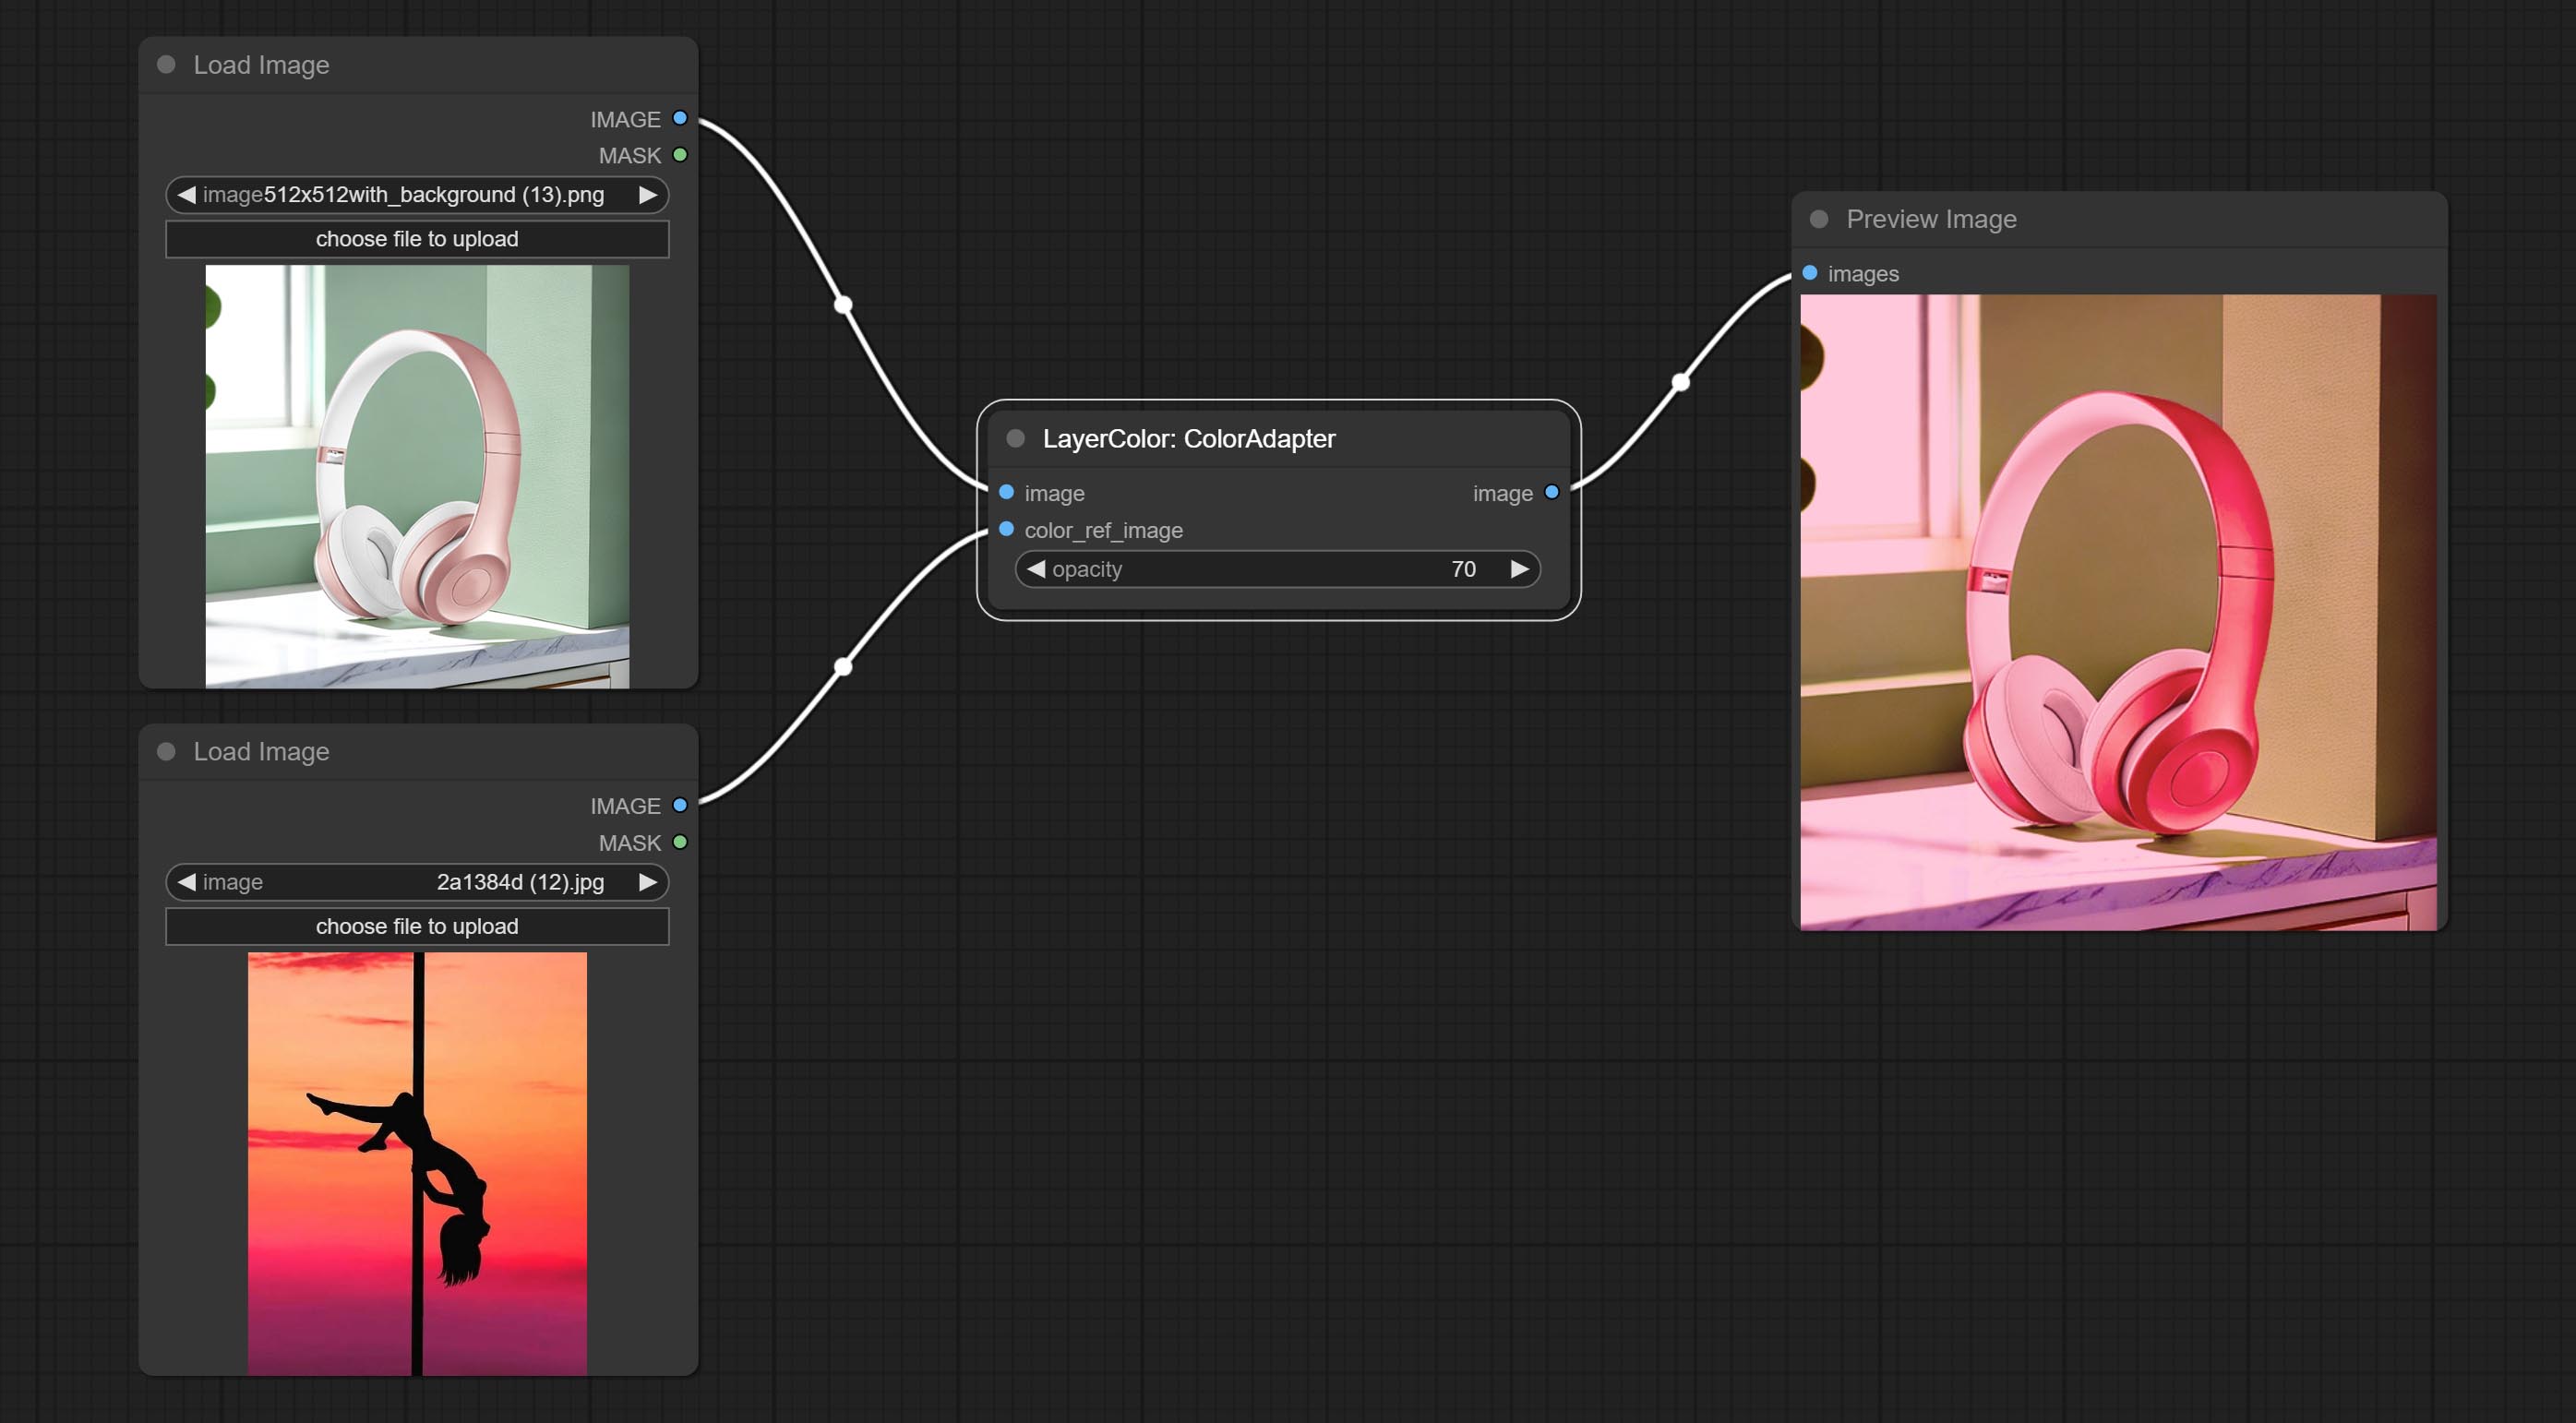
Node options:
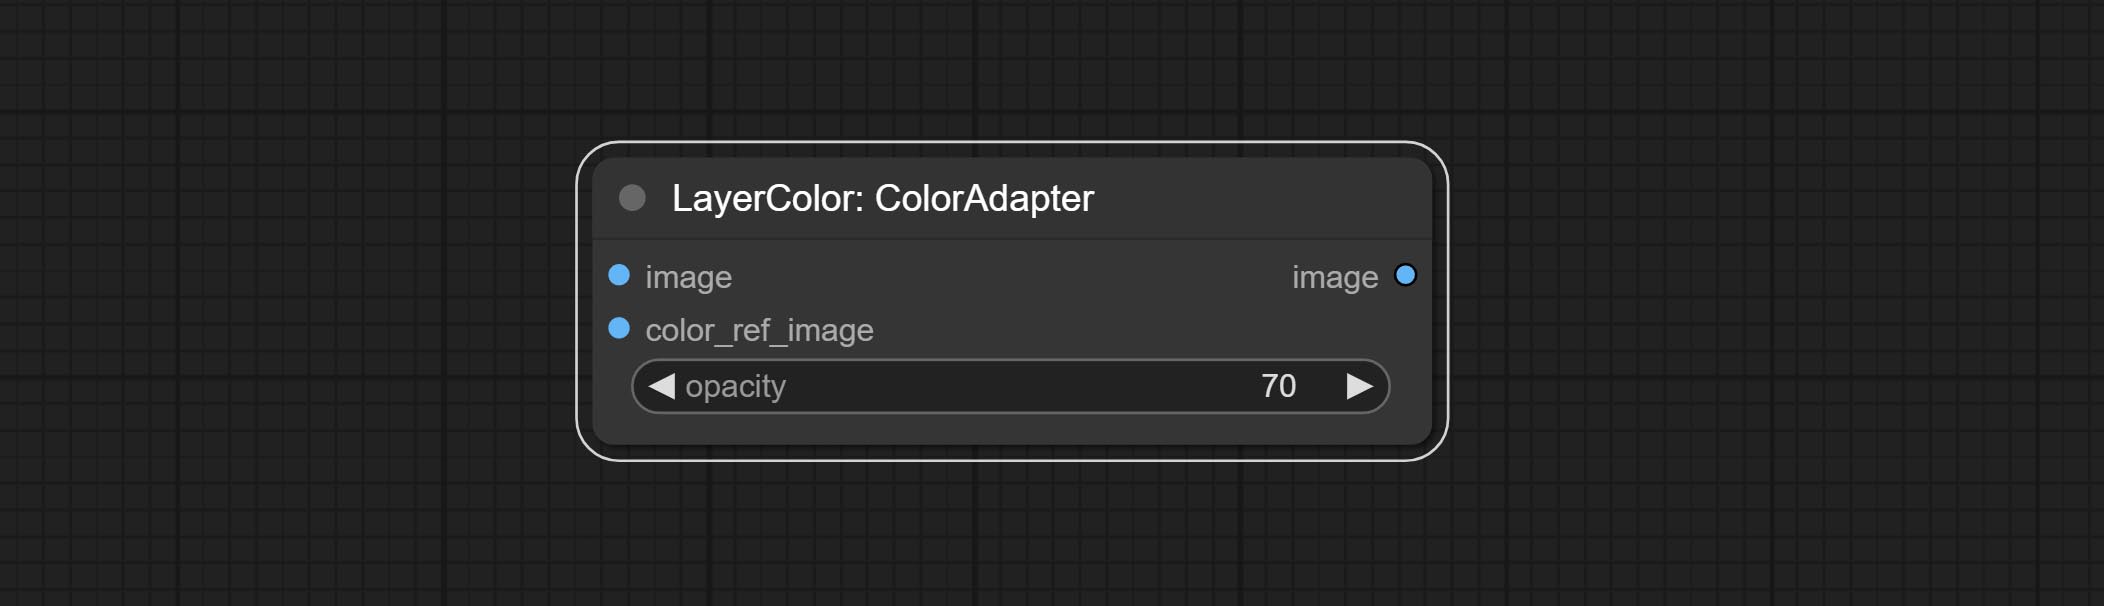
- opacity: The opacity of an image after adjusting its color tone.
การรับสัมผัสเชื้อ
Change the exposure of the image. 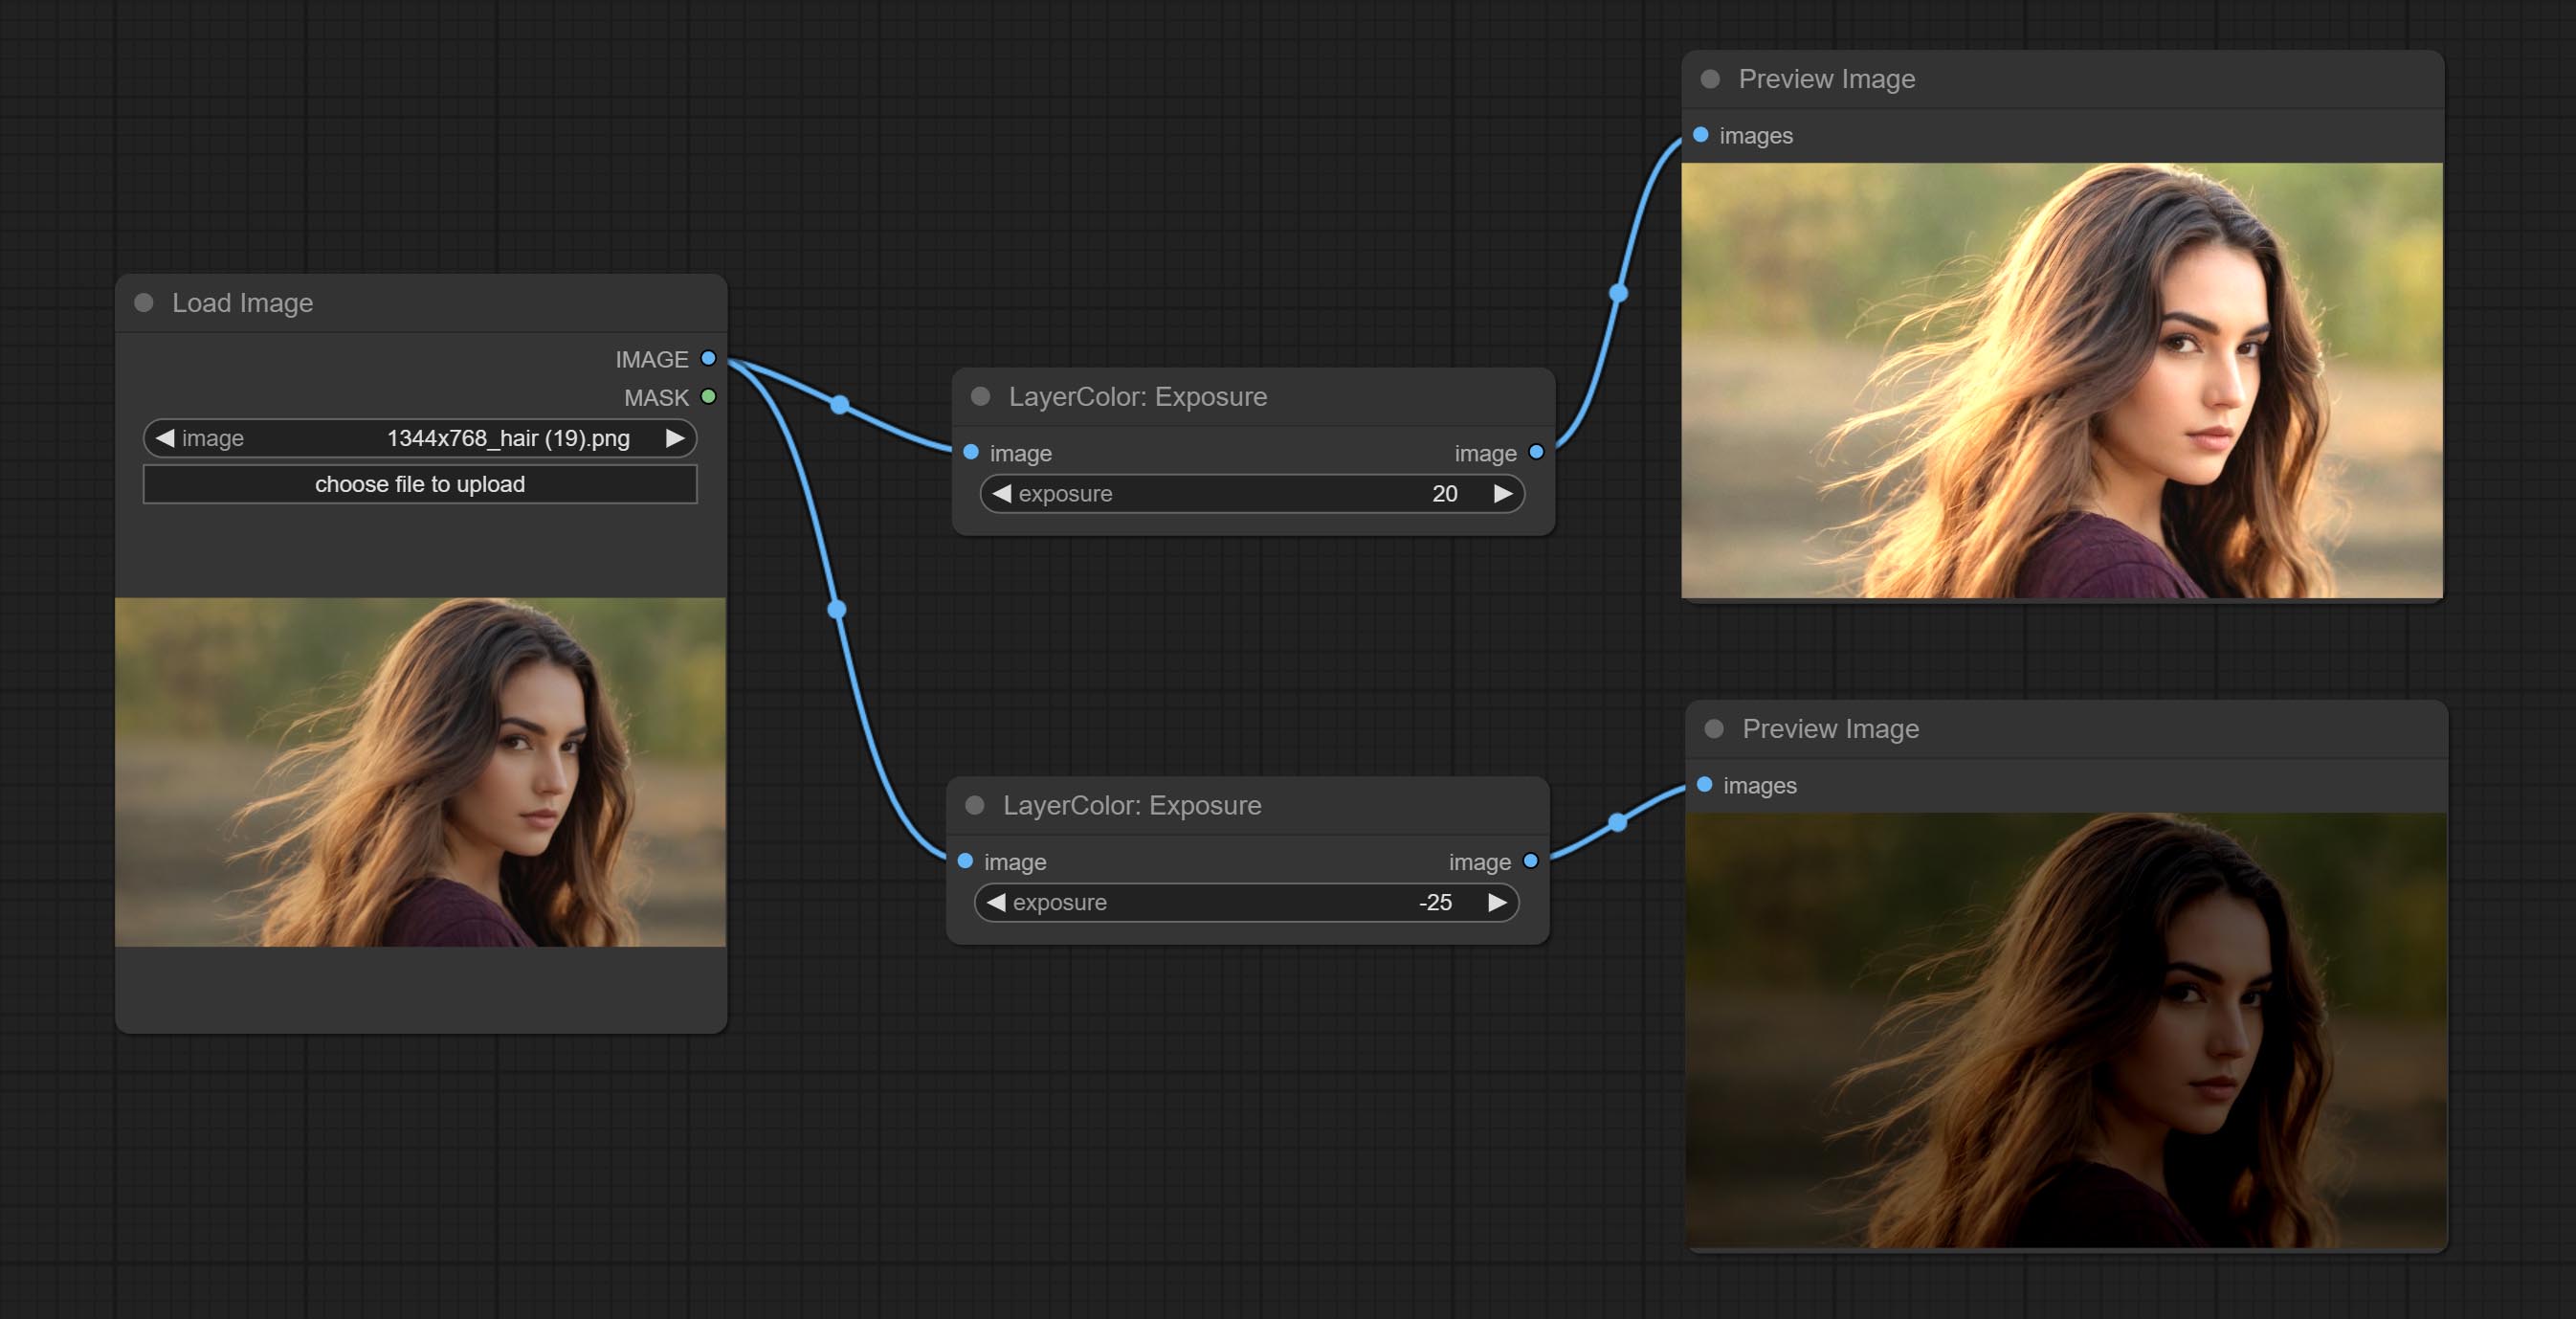
Color of Shadow & Highlight
Adjust the color of the dark and bright parts of the image. 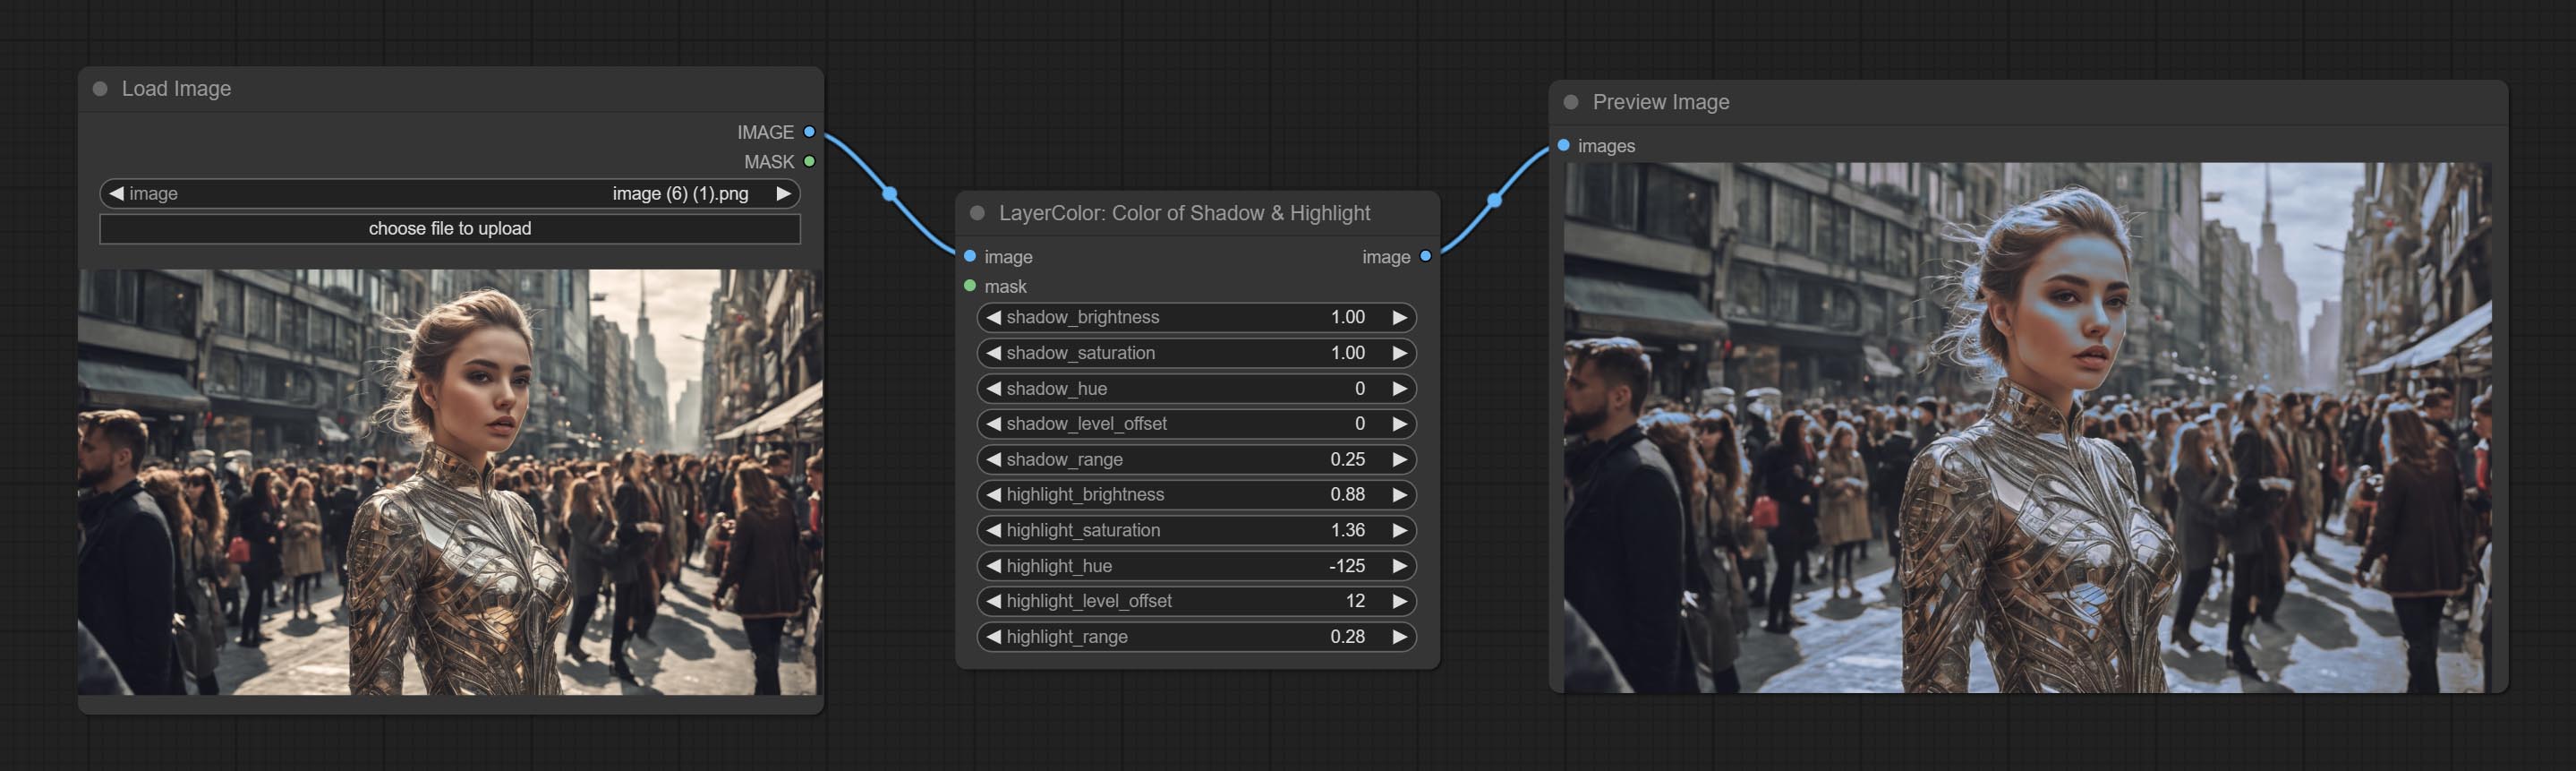
Node options:
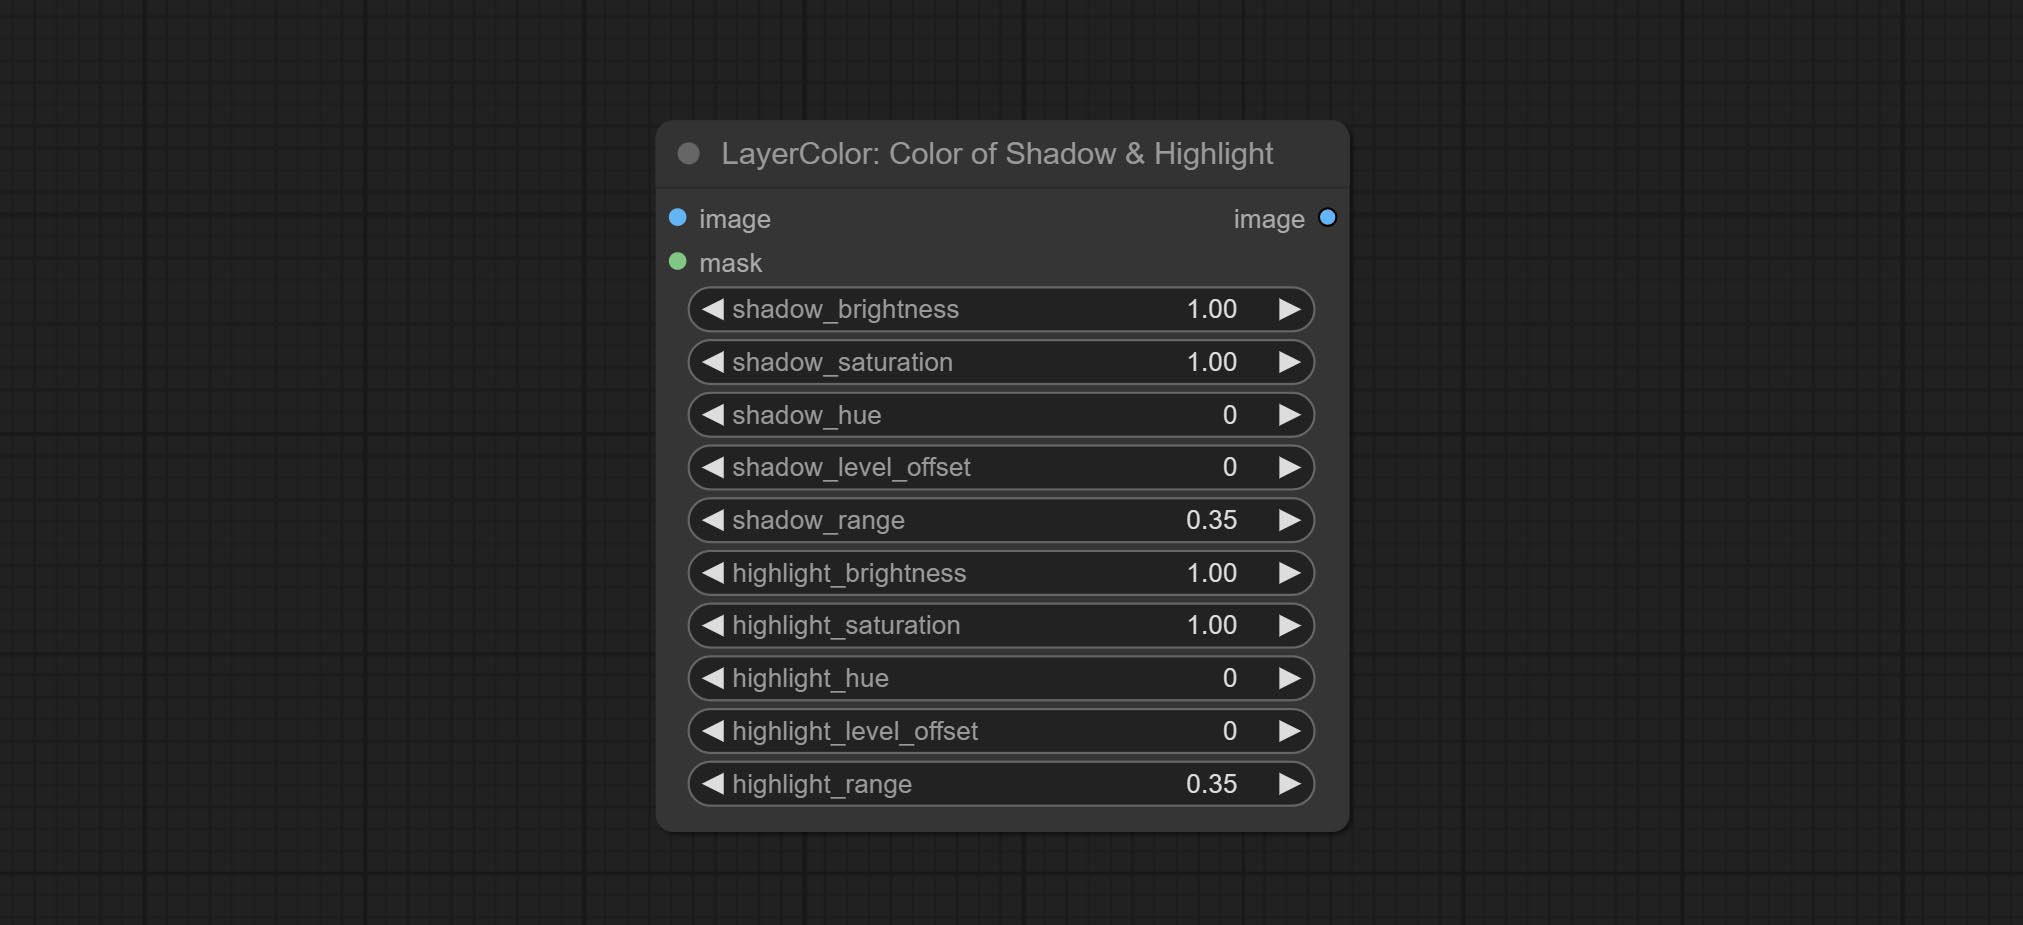
- image: The input image.
- mask: Optional input. if there is input, only the colors within the mask range will be adjusted.
- shadow_brightness: The brightness of the dark area.
- shadow_saturation: The color saturation in the dark area.
- shadow_hue: The color hue in the dark area.
- shadow_level_offset: The offset of values in the dark area, where larger values bring more areas closer to the bright into the dark area.
- shadow_range: The transitional range of the dark area.
- highlight_brightness: The brightness of the highlight area.
- highlight_saturation: The color saturation in the highlight area.
- highlight_hue: The color hue in the highlight area.
- highlight_level_offset: The offset of values in the highlight area, where larger values bring more areas closer to the dark into the highlight area.
- highlight_range: The transitional range of the highlight area.
Node option:
- exposure: Exposure value. Higher values indicate brighter image.
Color of Shadow HighlightV2
A replica of the Color of Shadow & Highlight node, with the "&" character removed from the node name to avoid ComfyUI workflow parsing errors.
ColorTemperature

Change the color temperature of the image.
Node Options:
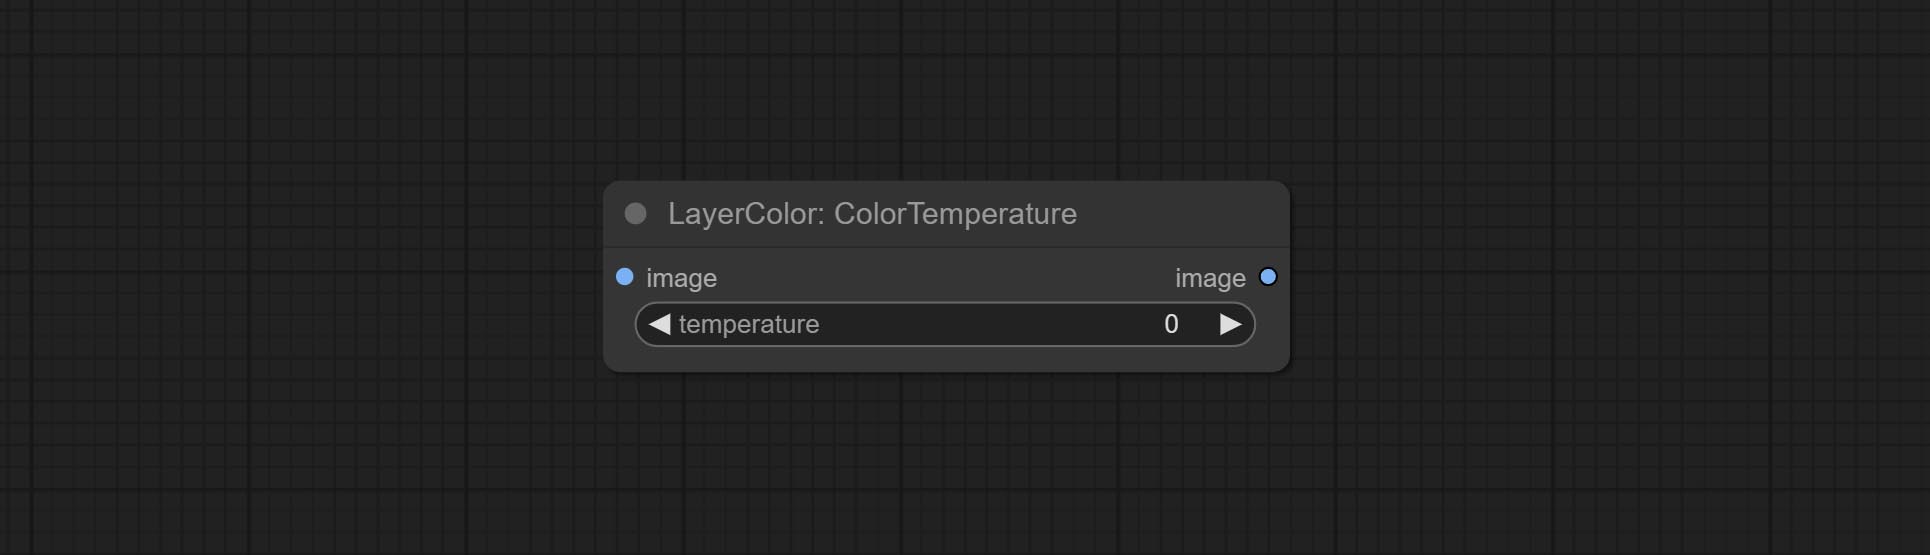
- temperature: Color temperature value. Range between-100 and 100. The higher the value, the higher the color temperature (bluer); The lower the color temperature, the lower the color temperature (yellowish).
Levels
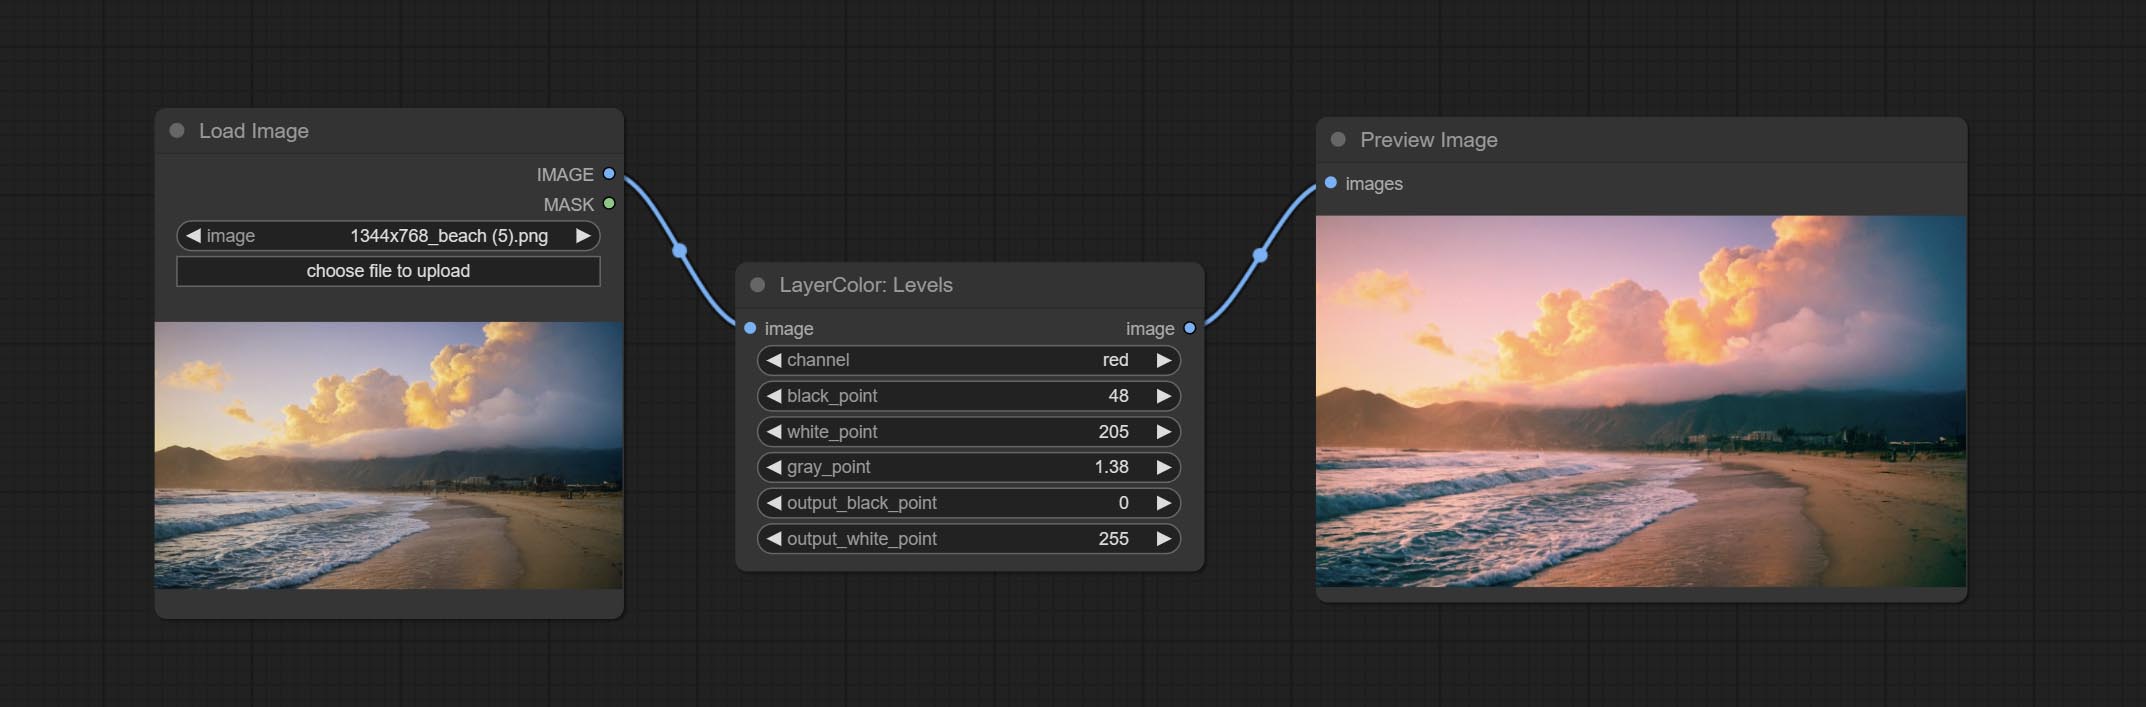
Change the levels of image.
Node Options:
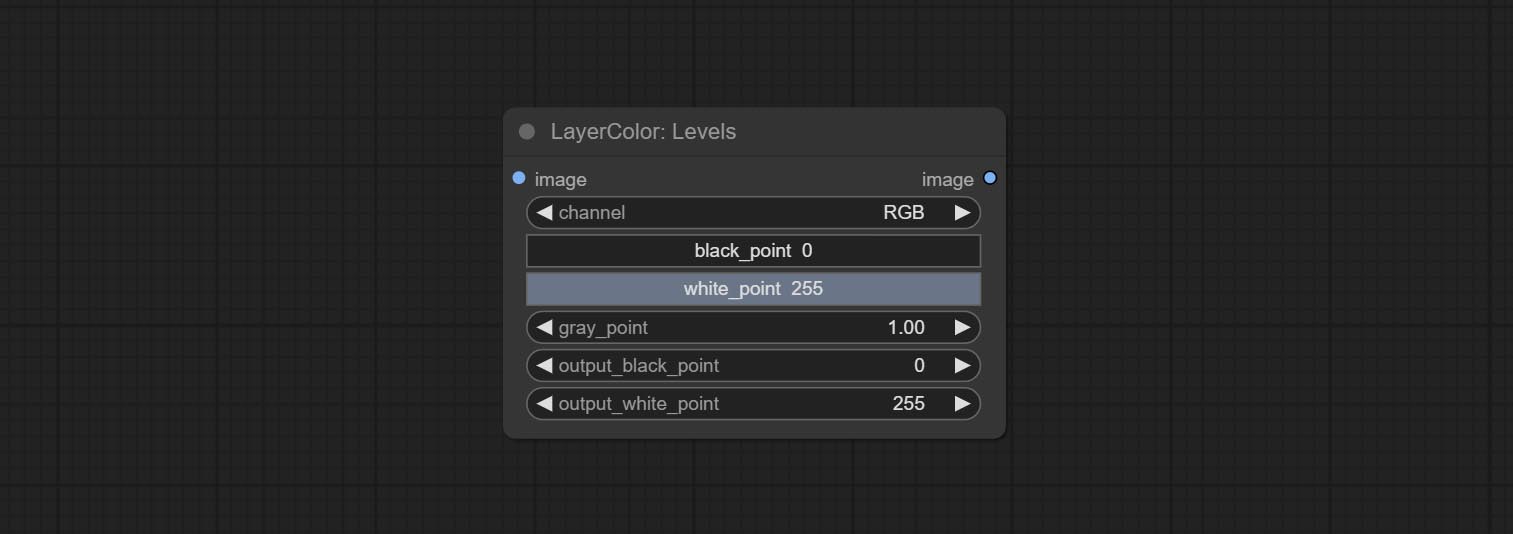
- channel: Select the channel you want to adjust. Available in RGB, red, green, blue.
- black_point * : Input black point value. Value range 0-255, default 0.
- white_point * : Input white point value. Value range 0-255, default 255.
- gray_point: Input grey point values. Value range 0.01-9.99, default 1.
- output_black_point * : Output black point value. Value range 0-255, default 0.
- output_white_point * : Output white point value. Value range 0-255, default 255.
* If the black_point or output_black_point value is greater than white_point or output_white_point, the two values are swapped, with the larger value used as white_point and the smaller value used as black_point.
ColorBalance
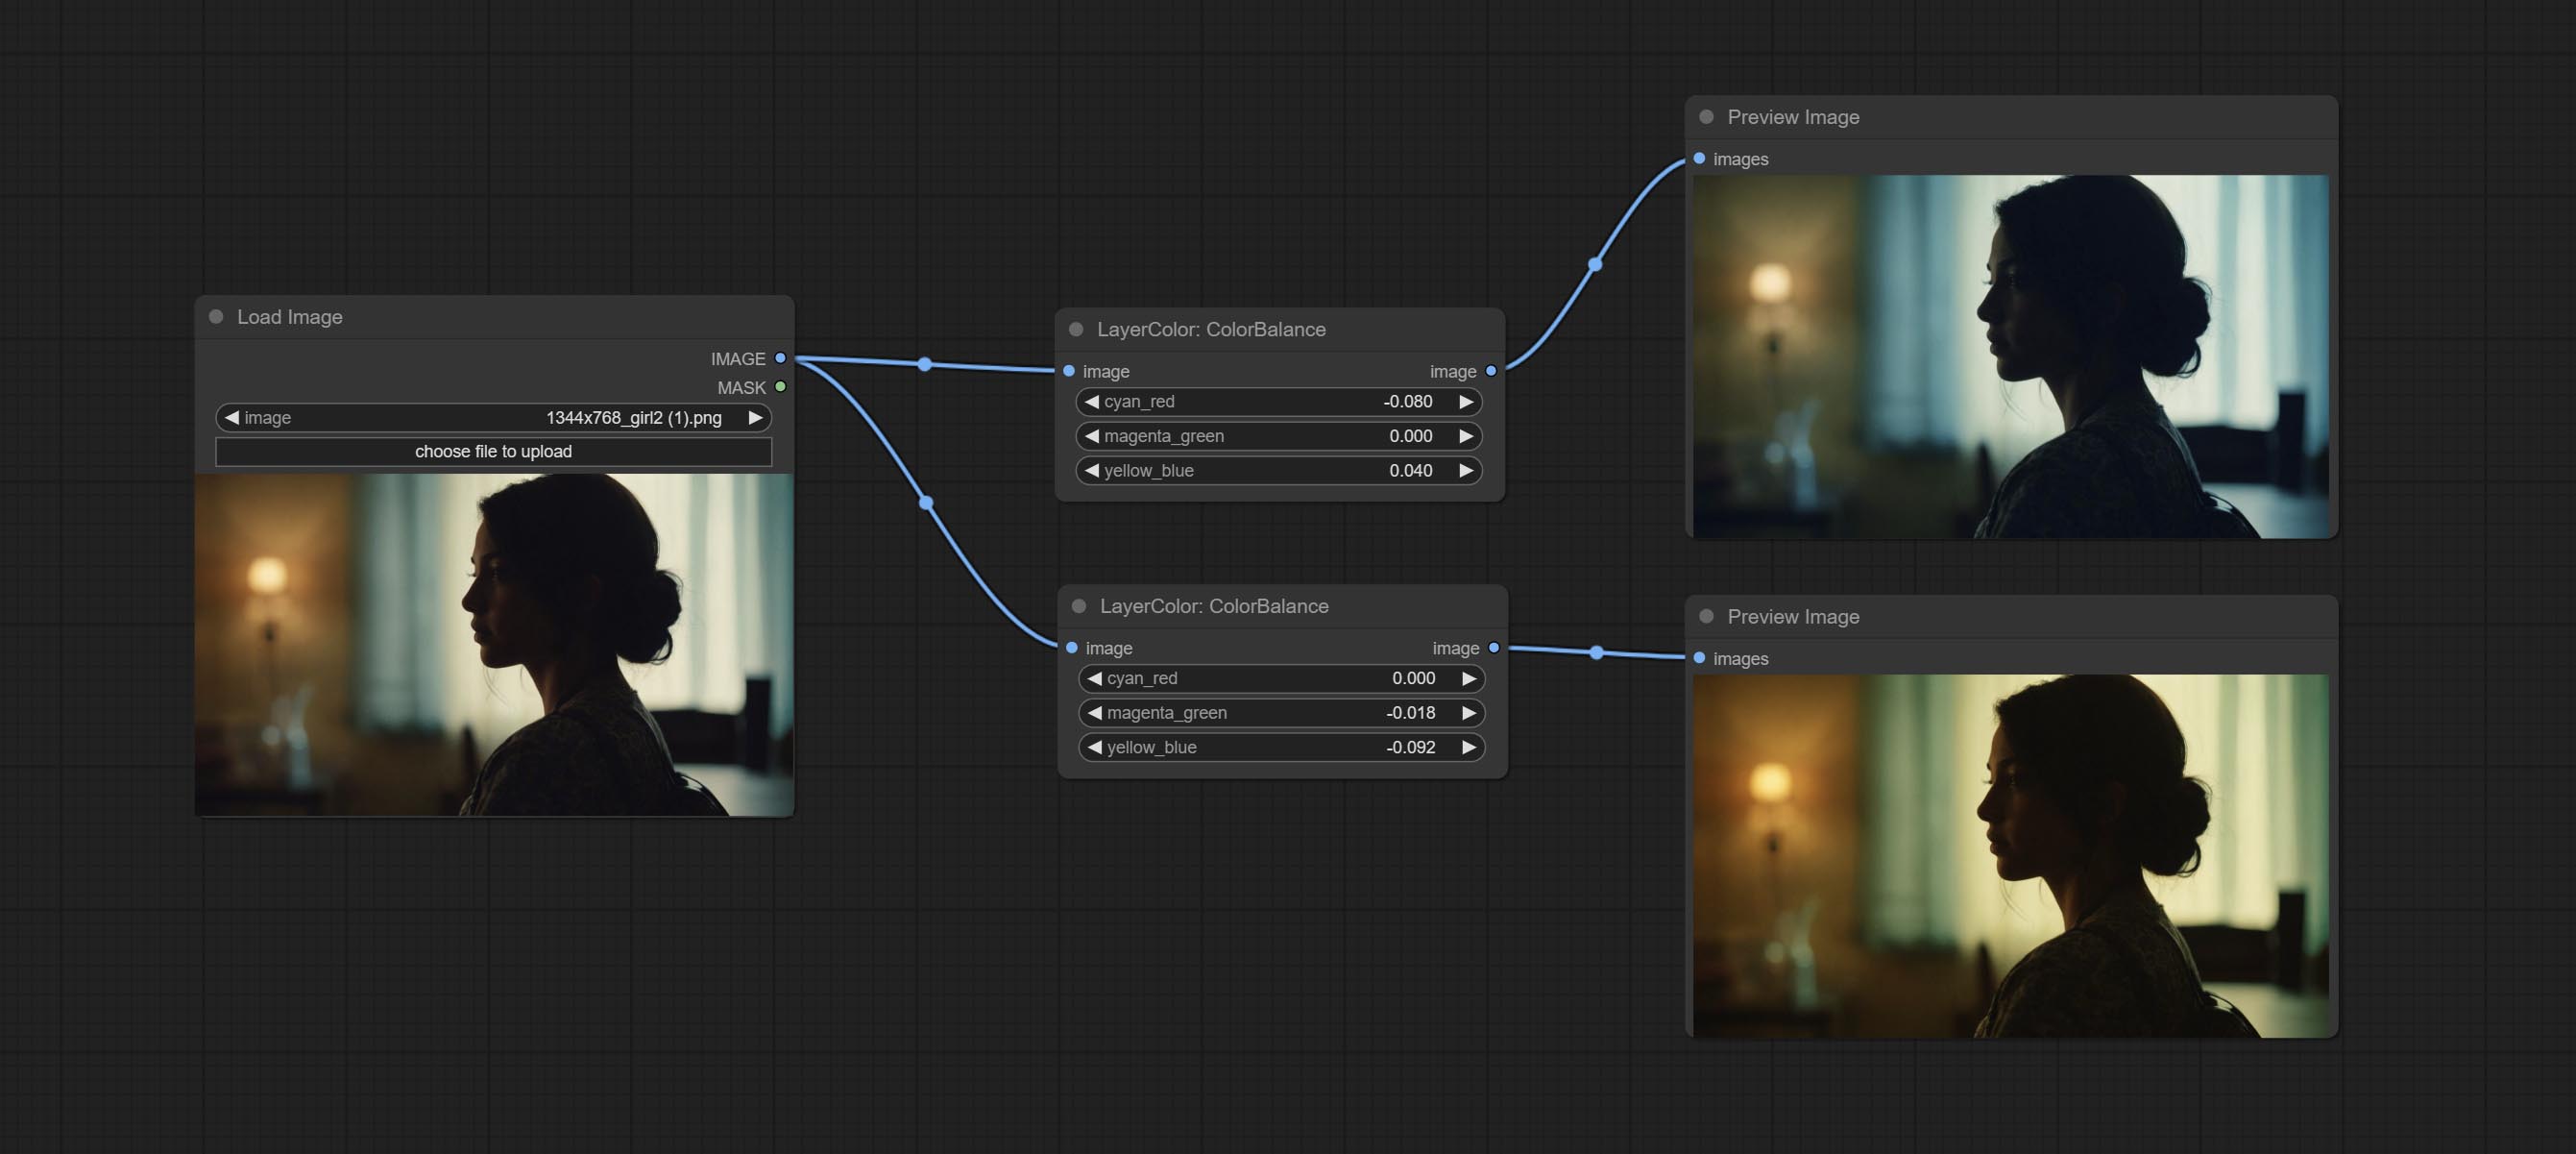
Change the color balance of an image.
Node Options:
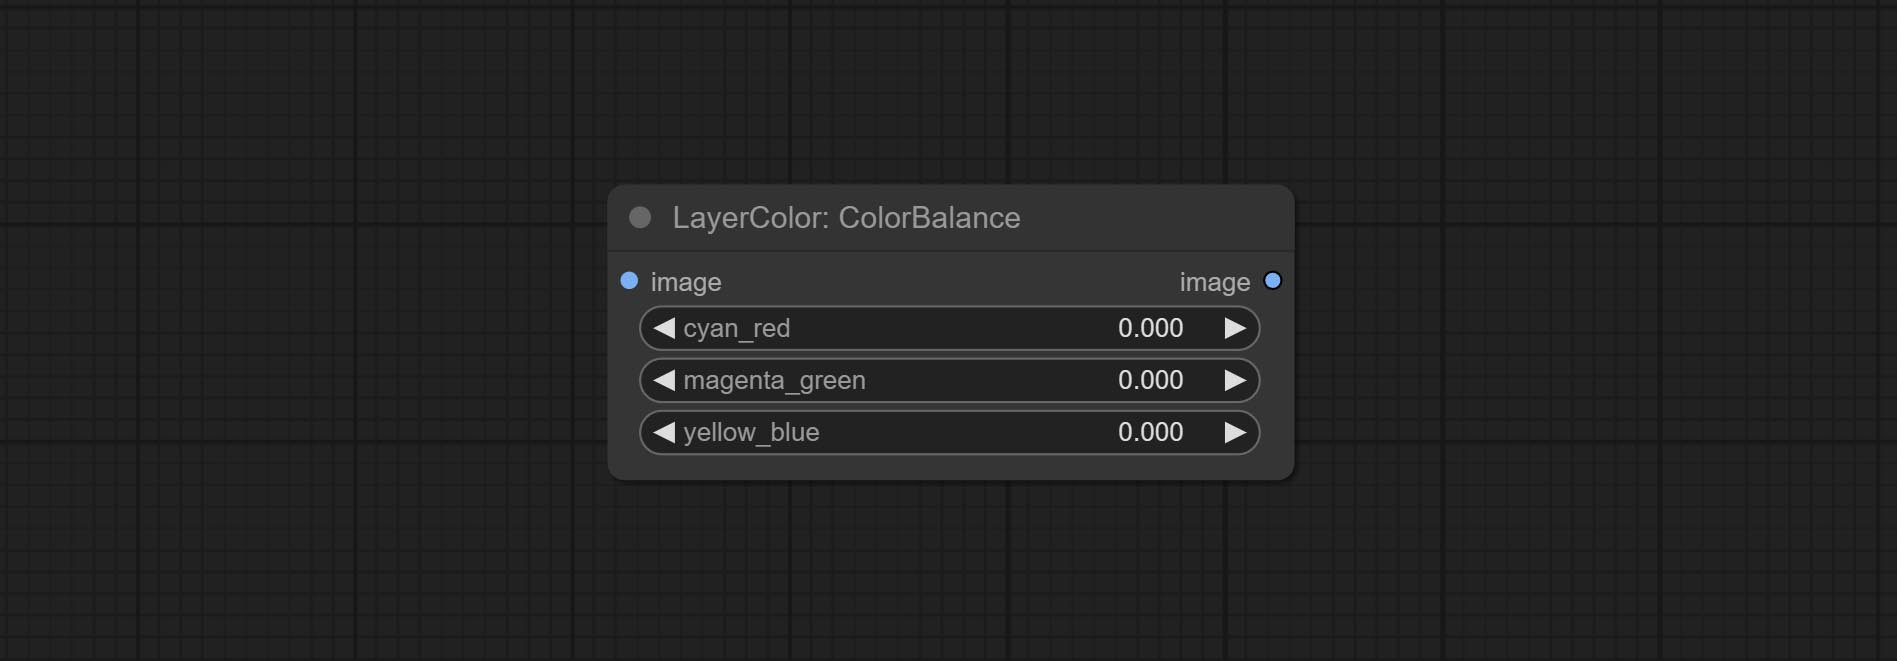
- cyan_red: Cyan-Red balance. negative values are leaning cyan, positive values are leaning red.
- magenta_green: Megenta-Green balance. negative values are leaning megenta, positive values are leaning green.
- yellow_blue: Yellow-Blue balance. negative values are leaning yellow, positive values are leaning blue.
Gamma
Change the gamma value of the image.
Node options:
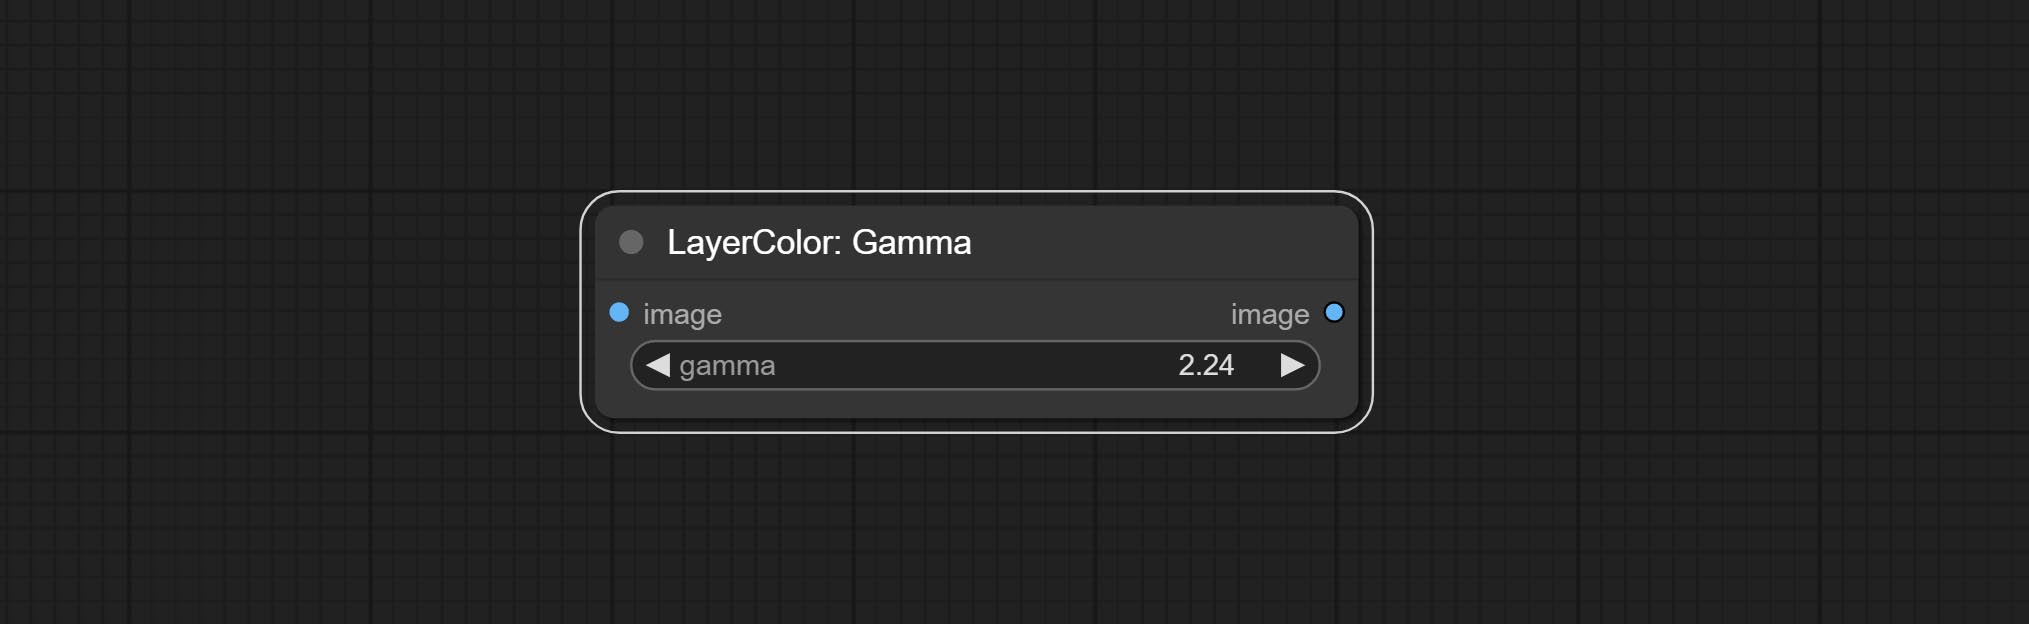
- gamma: Value of the Gamma.
Brightness & Contrast
Change the brightness, contrast, and saturation of the image.
Node options:
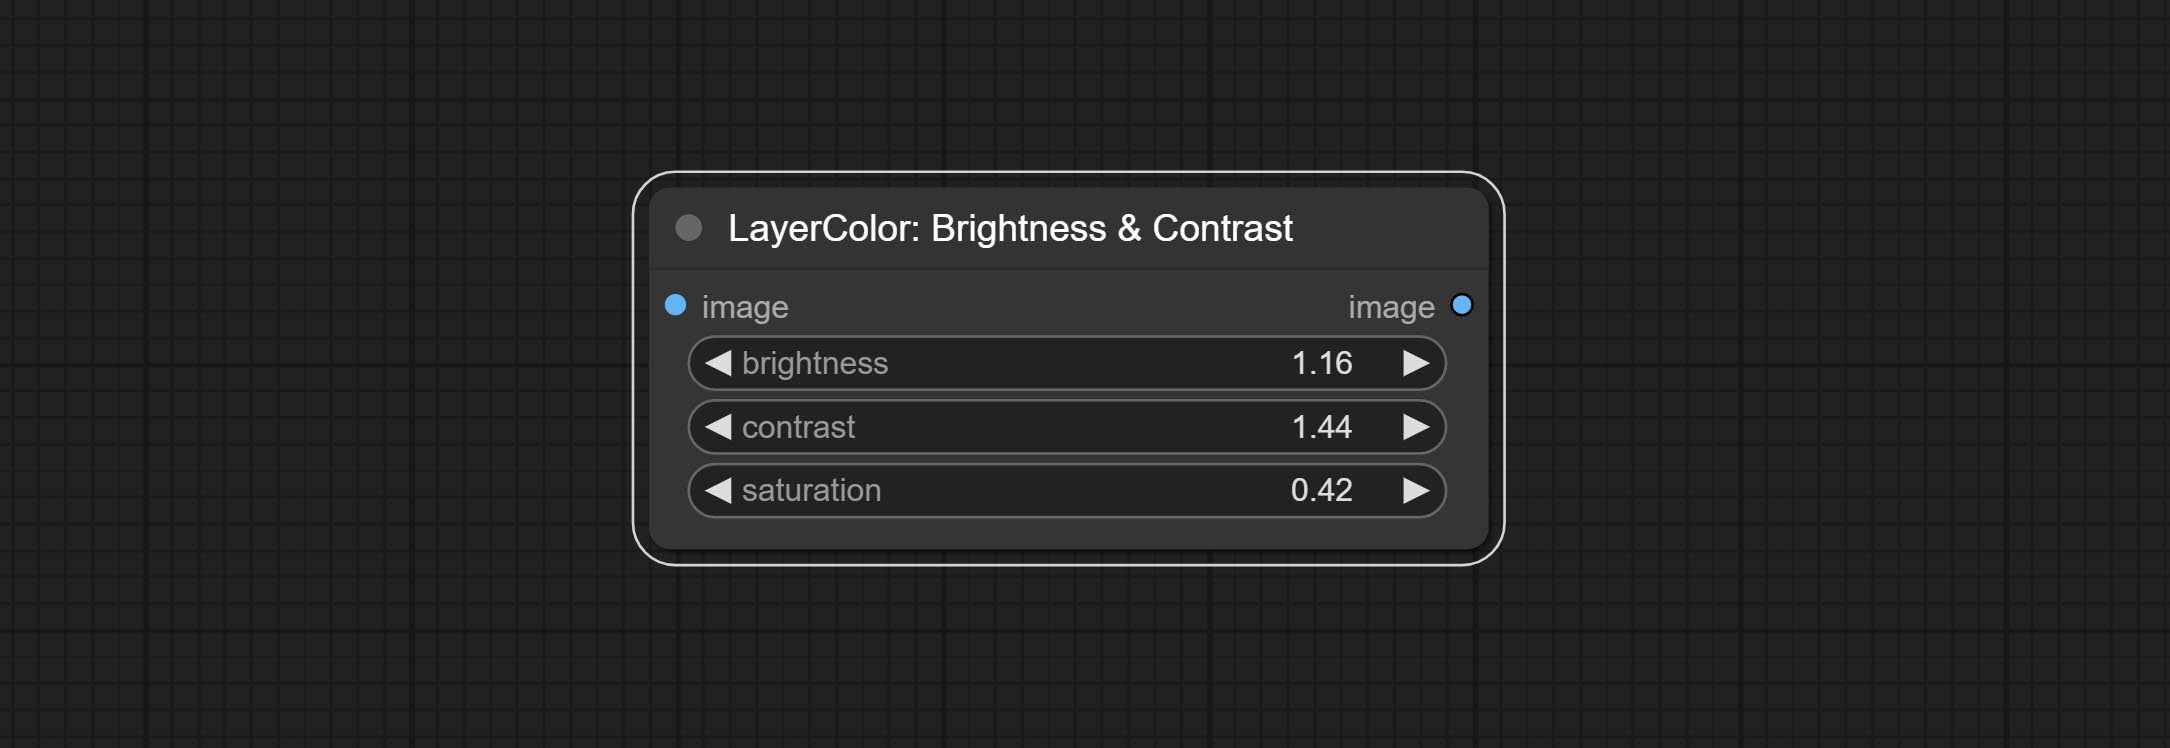
- brightness: Value of brightness.
- contrast: Value of contrast.
- saturation: Value of saturation.
BrightnessContrastV2
A replica of the Brightness & Contrast node, with the "&" character removed from the node name to avoid ComfyUI workflow parsing errors.
RGB
Adjust the RGB channels of the image.
Node options:
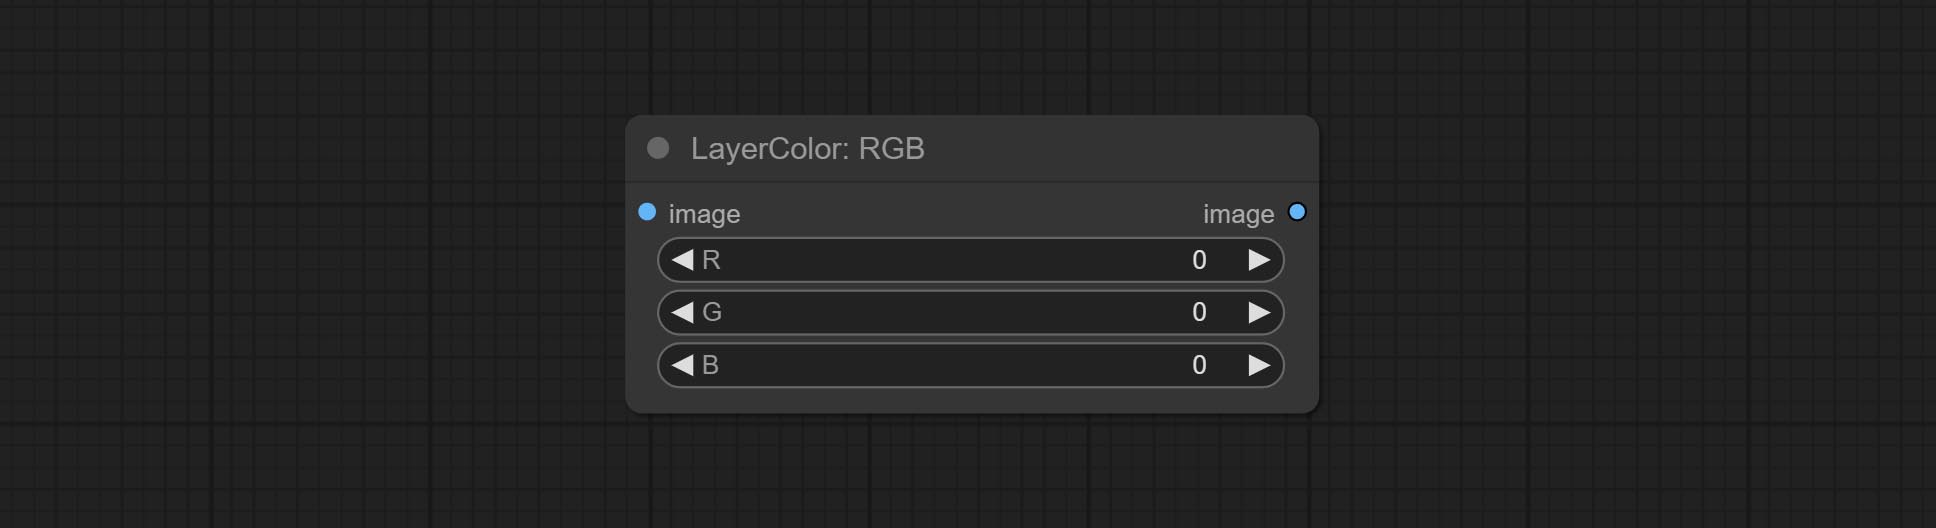
- R: R channel.
- G: G channel.
- B: B channel.
YUV
Adjust the YUV channels of the image.
Node options:
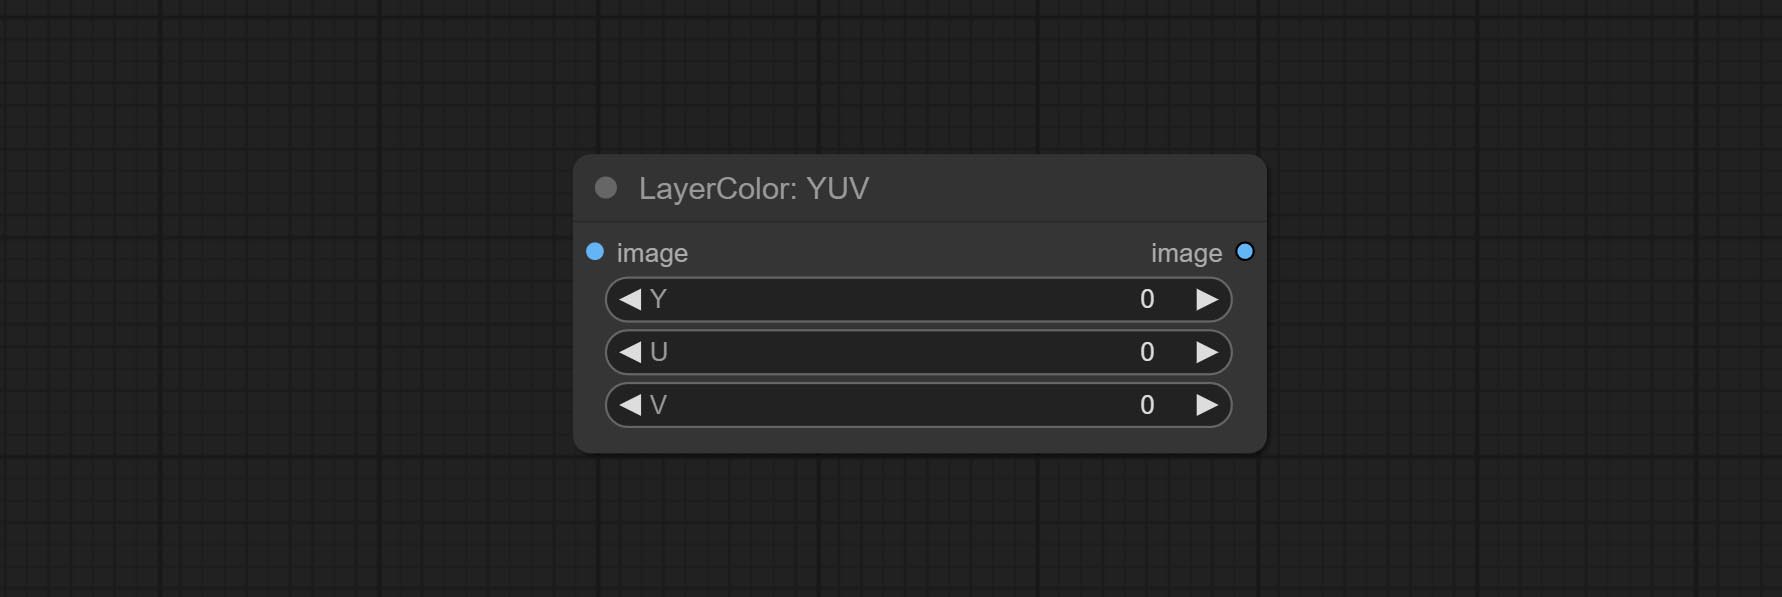
- Y: Y channel.
- U: U channel.
- V: V channel.
LAB
Adjust the LAB channels of the image.
Node options:
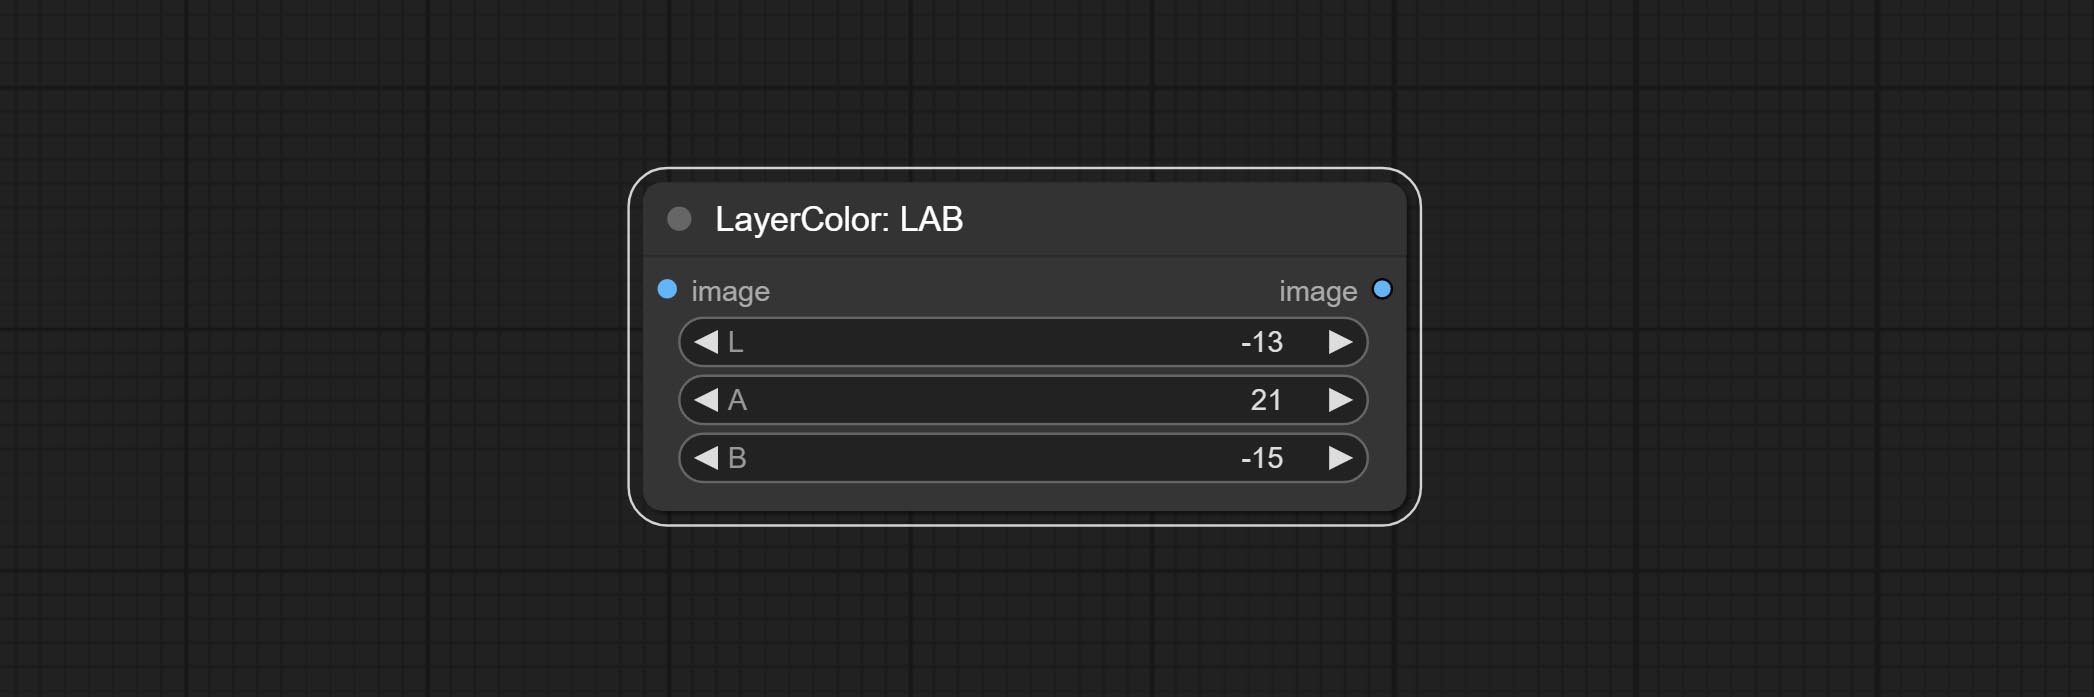
- L: L channel.
- A: A channel.
- B: B channel.
HSV
Adjust the HSV channels of the image.
Node options:
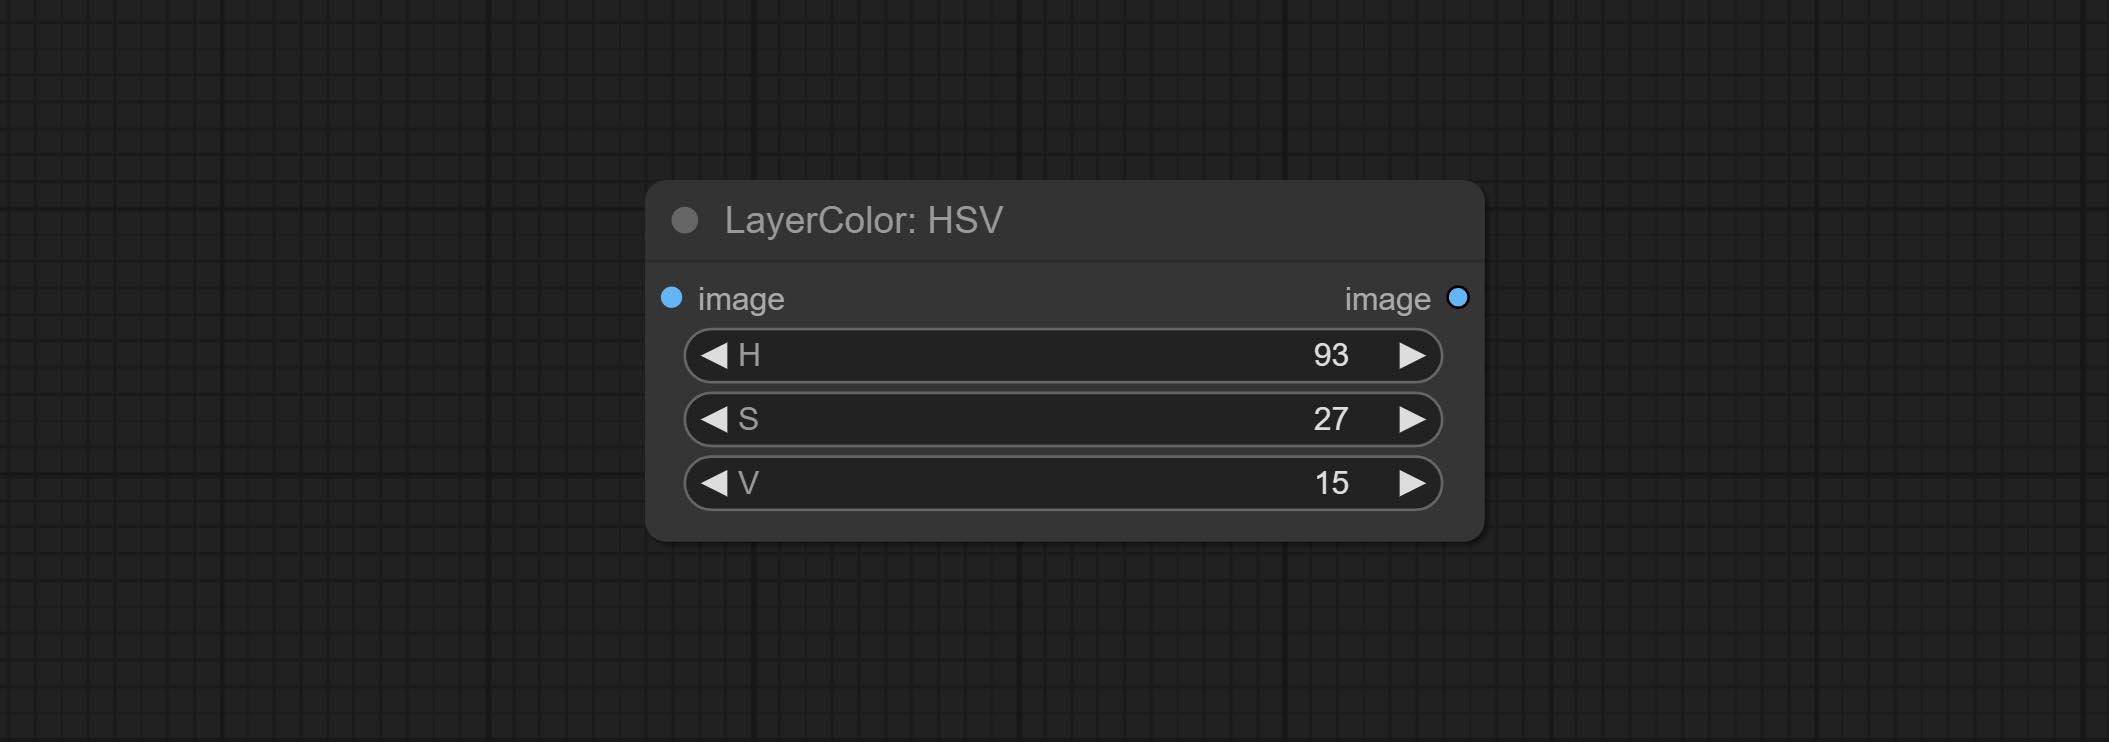
- H: H channel.
- S: S channel.
- V: V channel.
LayerUtility
ImageBlendAdvance
Used for compositing layers, allowing for compositing layer images of different sizes on the background image, and setting positions and transformations. multiple mixing modes are available for selection, and transparency can be set.
The node provide layer transformation_methods and anti_aliasing options. helps improve the quality of synthesized images.
The node provides mask output that can be used for subsequent workflows. 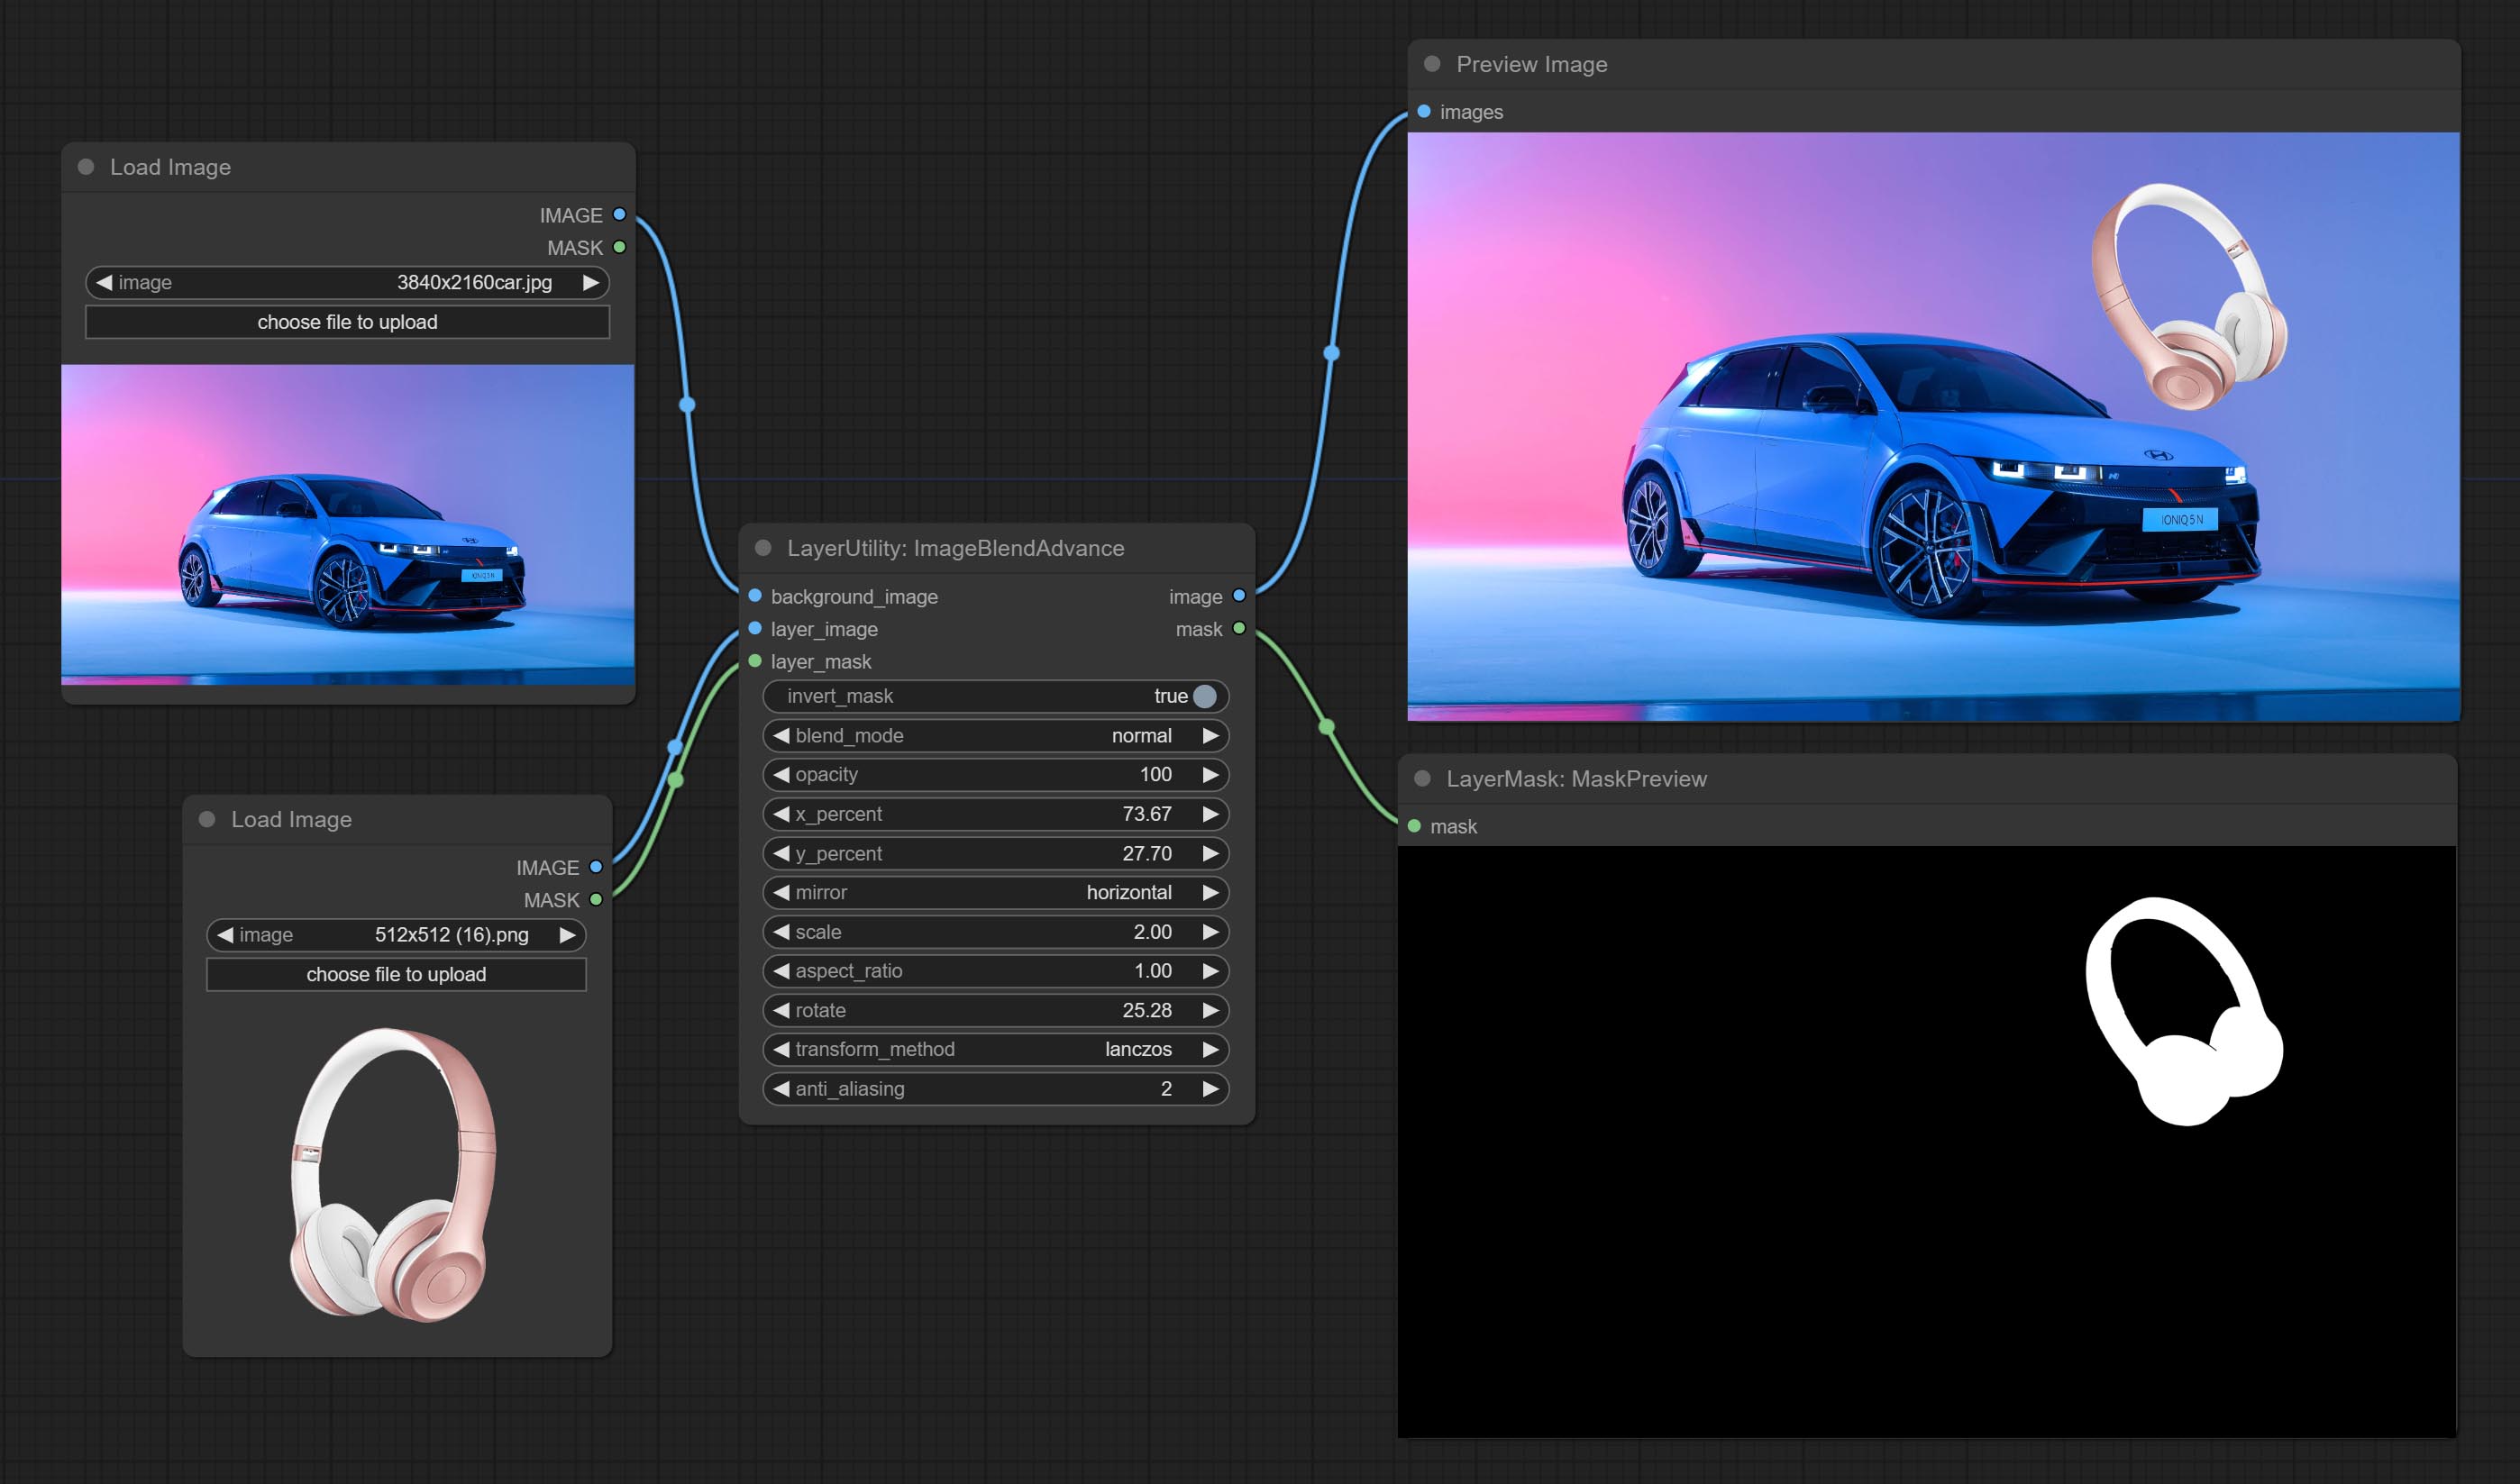
Node options:
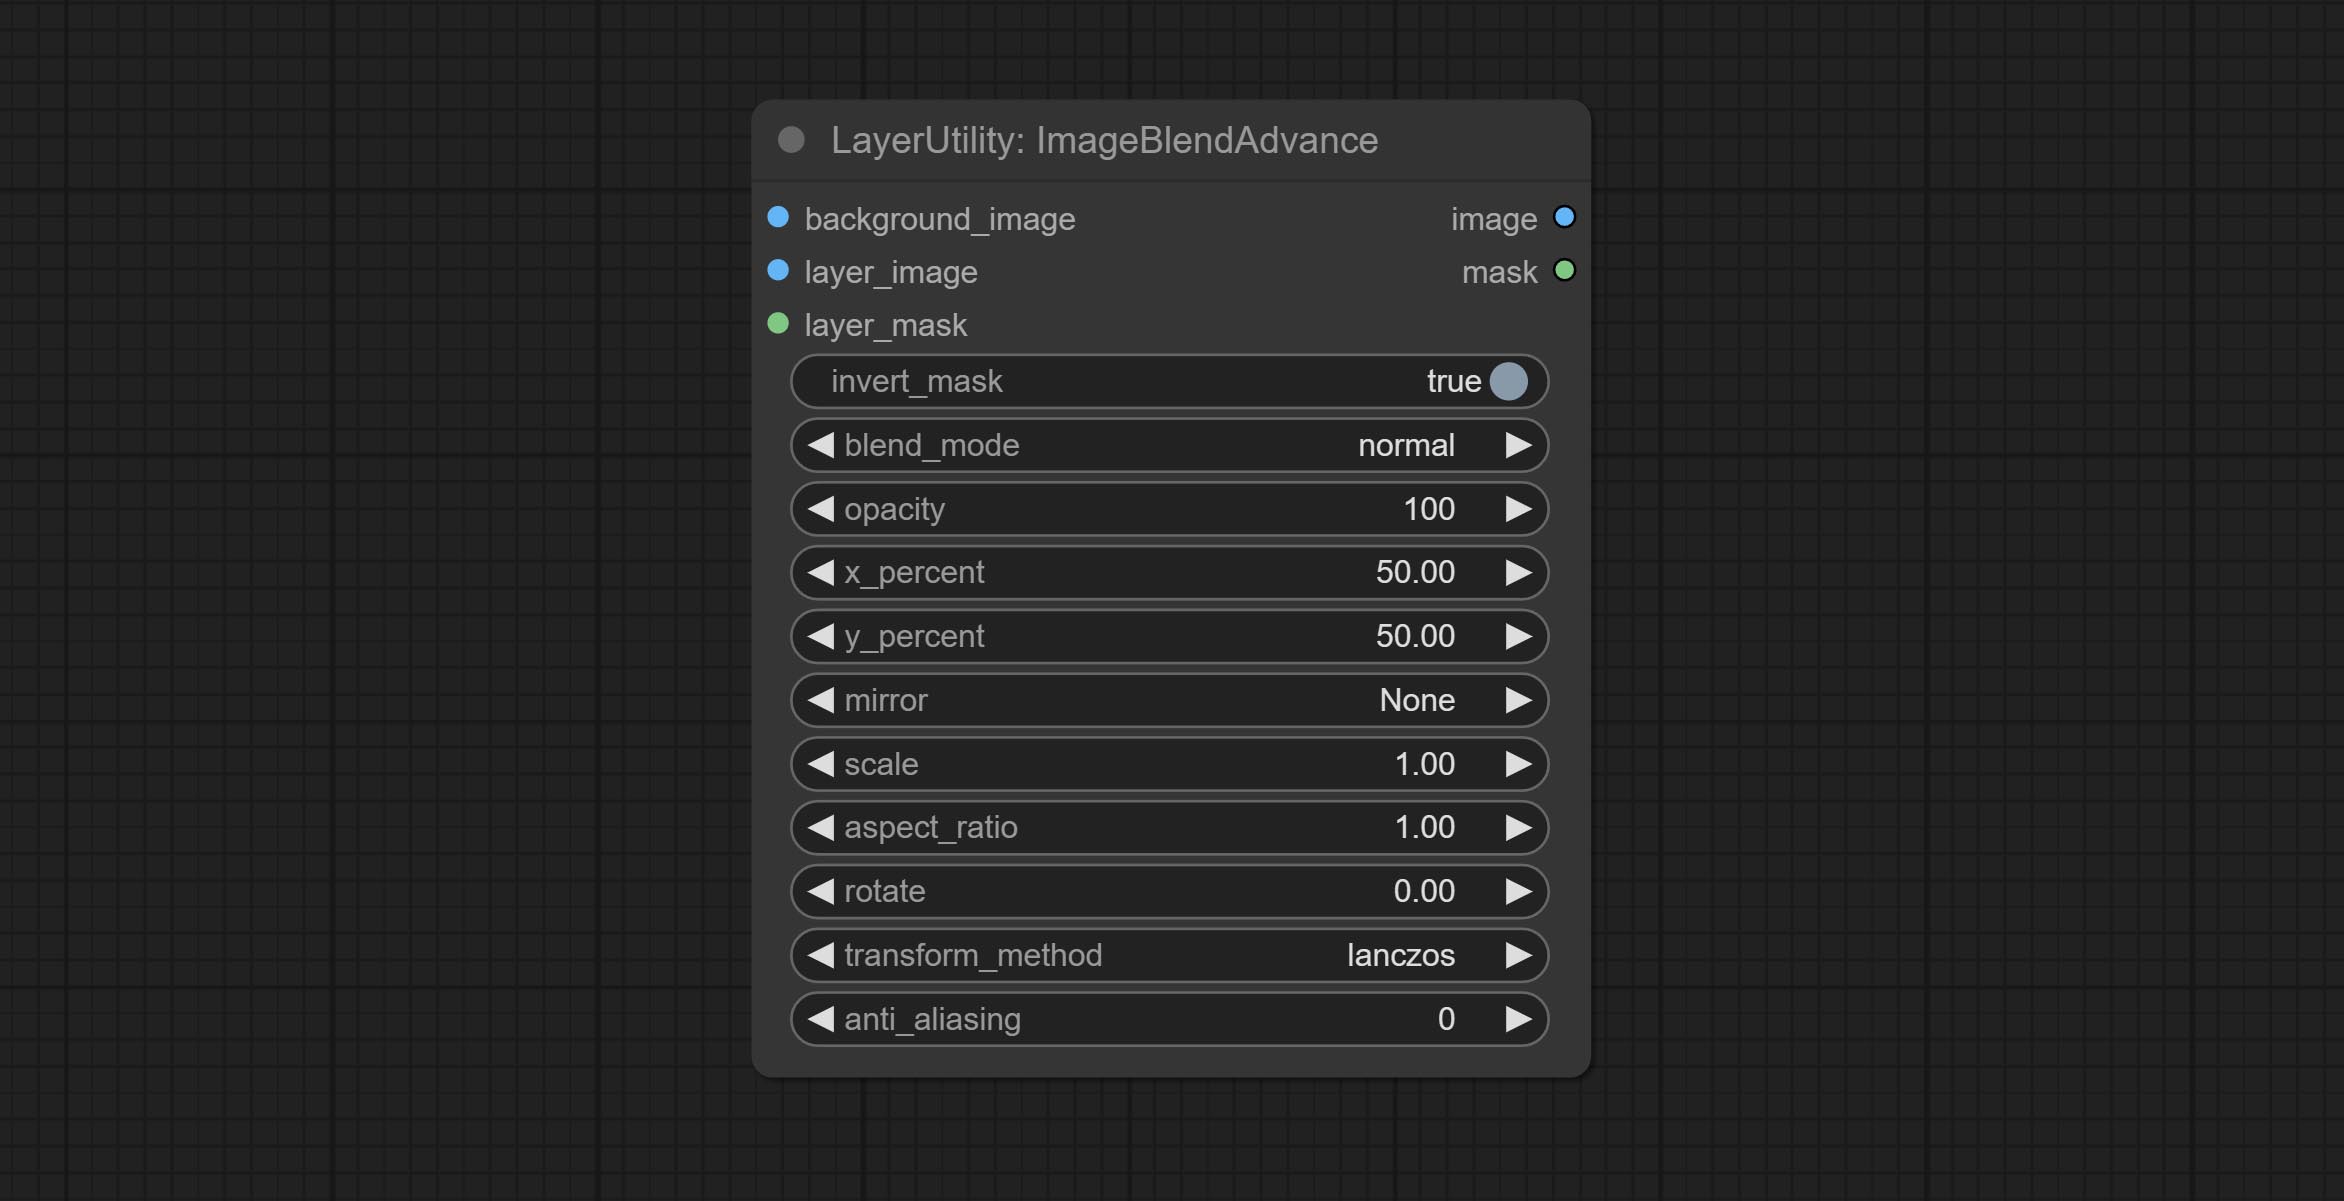
- background_image: The background image.
- layer_image 5 : Layer image for composite.
- layer_mask 2,5 : Mask for layer_image.
- invert_mask: Whether to reverse the mask.
- blend_mode 3 : Blending mode.
- opacity: Opacity of blend.
- x_percent: Horizontal position of the layer on the background image, expressed as a percentage, with 0 on the far left and 100 on the far right. It can be less than 0 or more than 100, indicating that some of the layer's content is outside the screen.
- y_percent: Vertical position of the layer on the background image, expressed as a percentage, with 0 on the top and 100 on the bottom. For example, setting it to 50 indicates vertical center, 20 indicates upper center, and 80 indicates lower center.
- mirror: Mirror flipping. Provide two flipping modes, horizontal flipping and vertical flipping.
- scale: Layer magnification, 1.0 represents the original size.
- aspect_ratio: Layer aspect ratio. 1.0 is the original ratio, a value greater than this indicates elongation, and a value less than this indicates flattening.
- rotate: Layer rotation degree.
- Sampling methods for layer enlargement and rotation, including lanczos, bicubic, hamming, bilinear, box and nearest. Different sampling methods can affect the image quality and processing time of the synthesized image.
- anti_aliasing: Anti aliasing, ranging from 0 to 16, the larger the value, the less obvious the aliasing. An excessively high value will significantly reduce the processing speed of the node.
- บันทึก
CropByMask
Crop the image according to the mask range, and set the size of the surrounding borders to be retained. This node can be used in conjunction with the RestoreCropBox and ImageScaleRestore nodes to crop and modify upscale parts of image, and then paste them back in place. 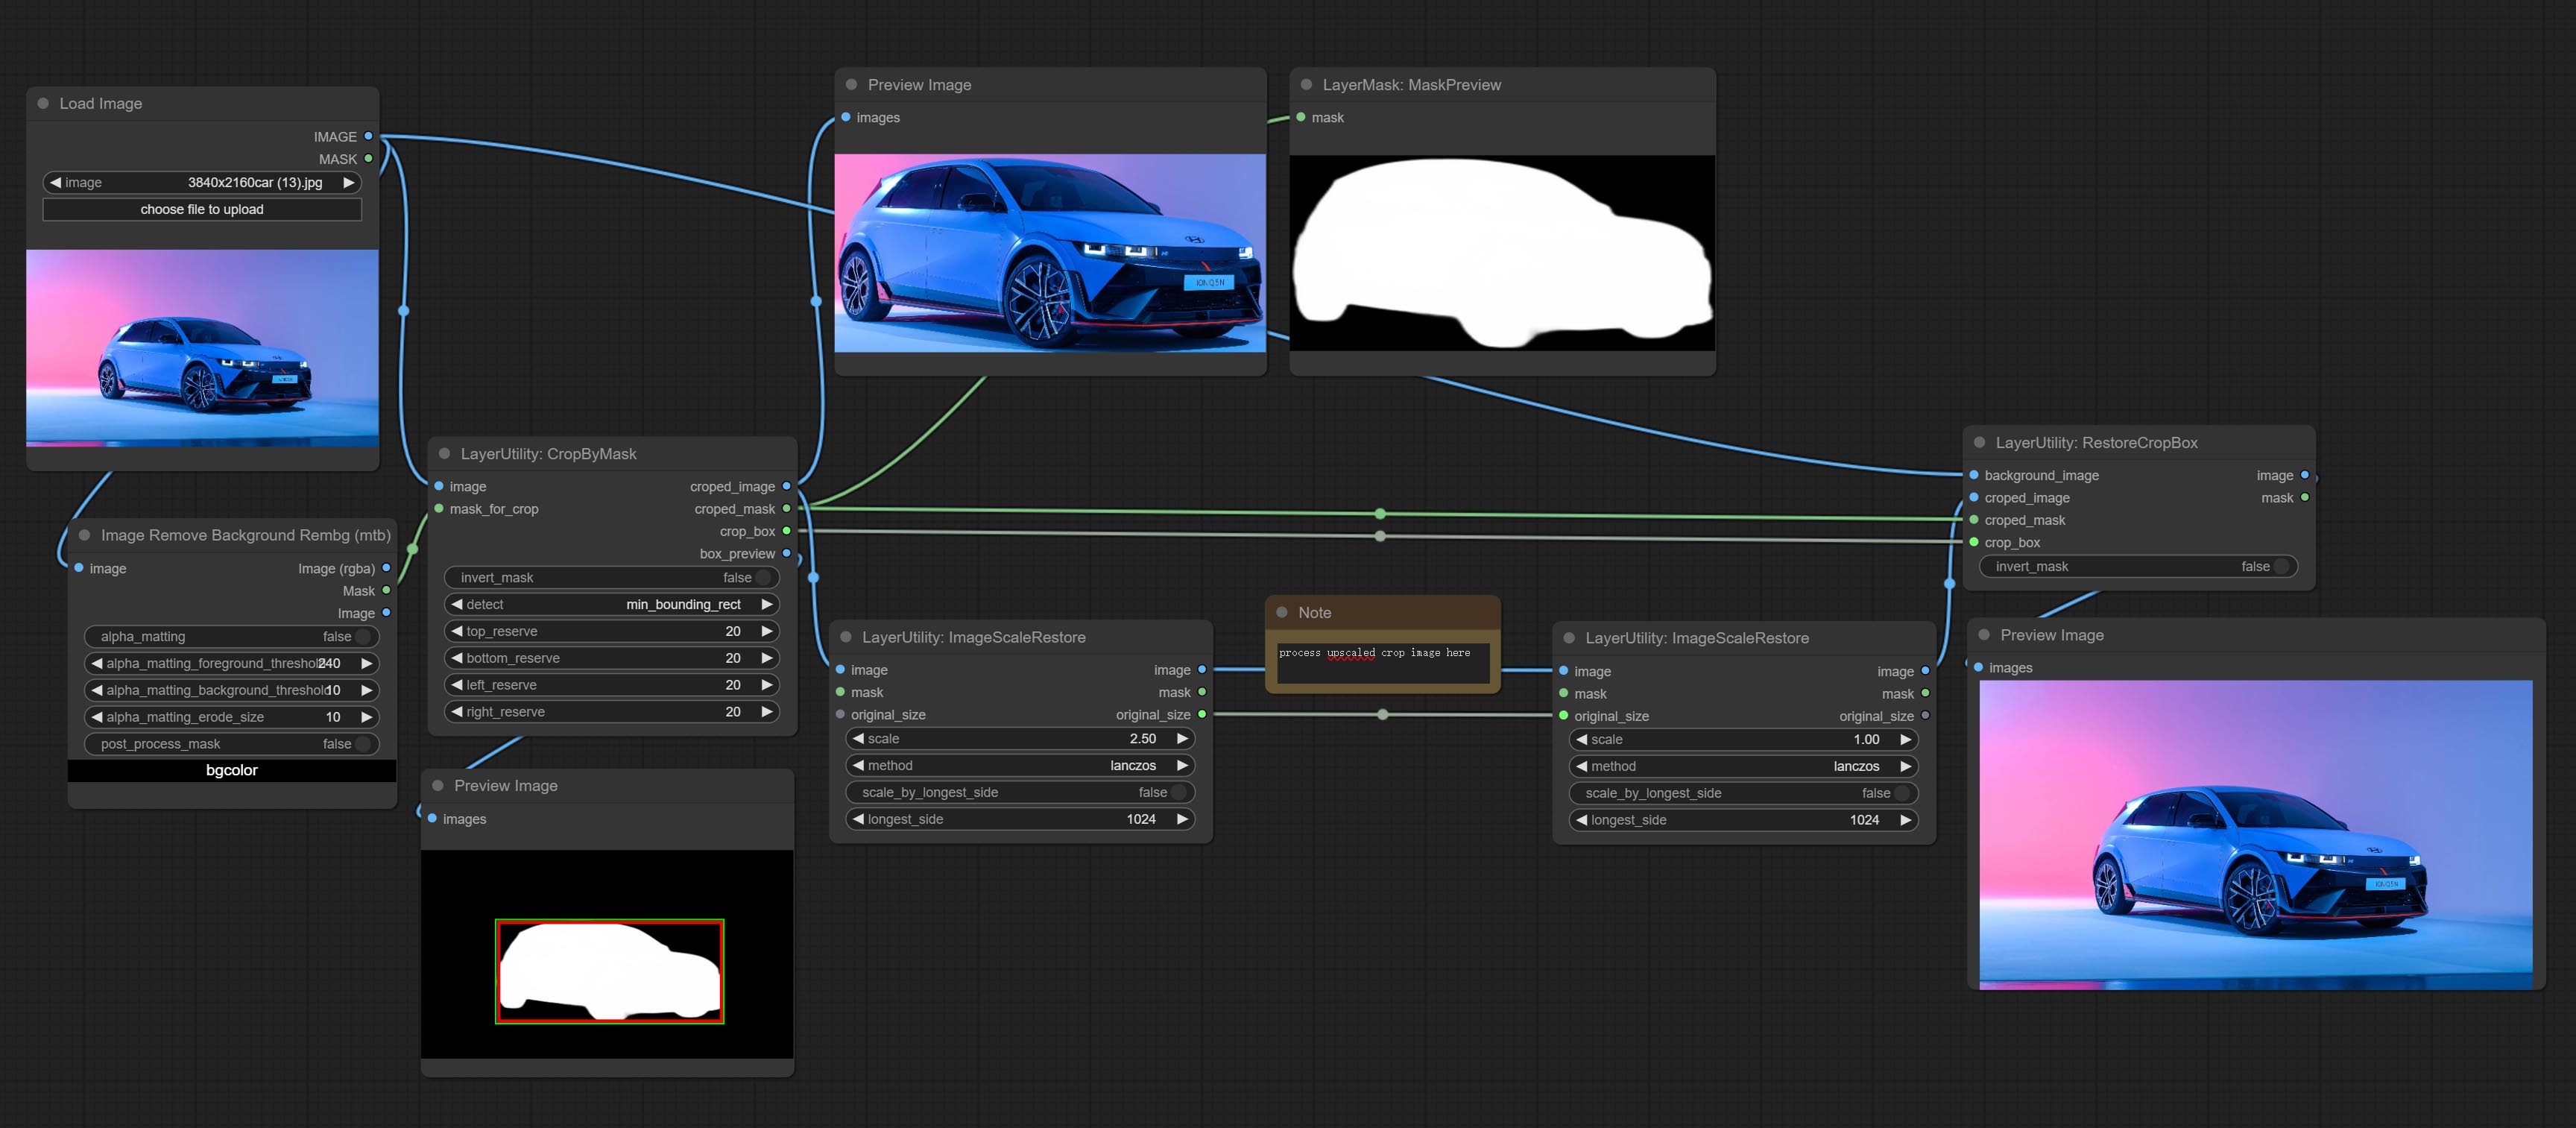
Node options:
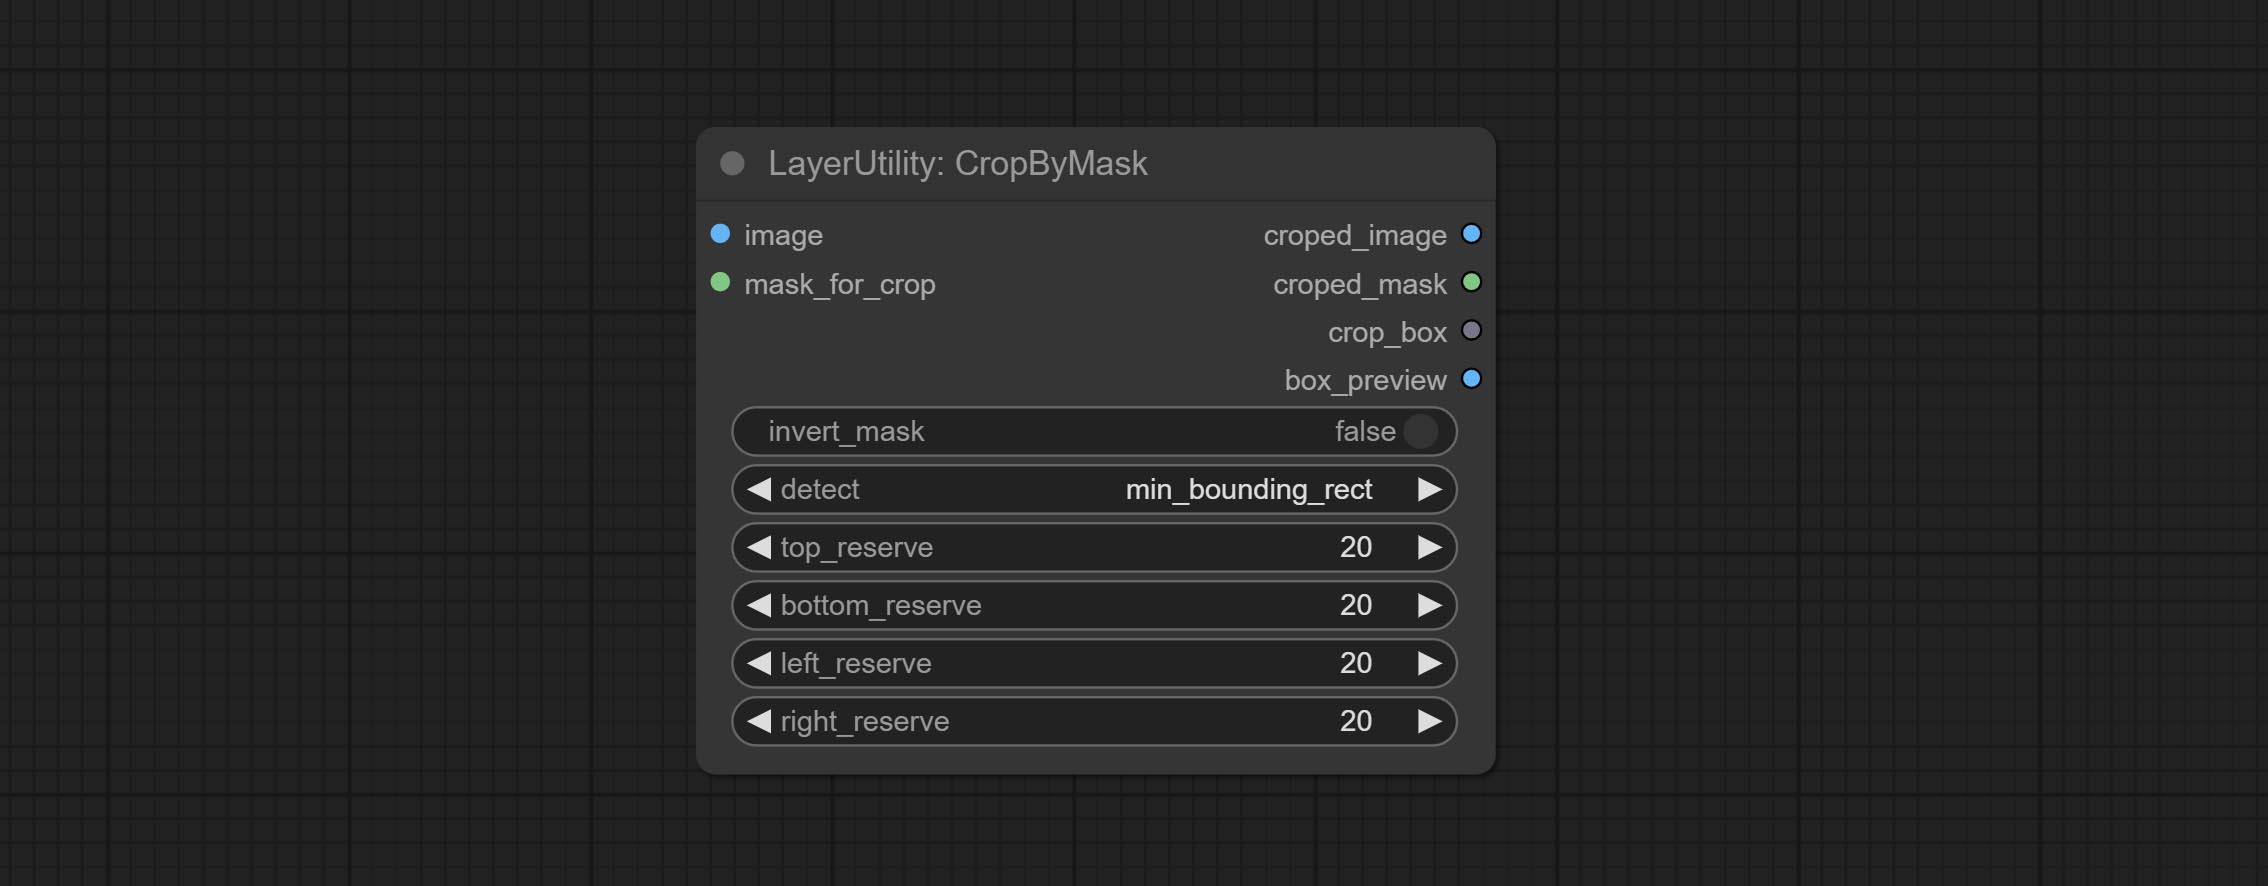
- image 5 : The input image.
- mask_for_crop 5 : Mask of the image, it will automatically be cut according to the mask range.
- invert_mask: Whether to reverse the mask.
- detect: Detection method,
min_bounding_rect is the minimum bounding rectangle of block shape, max_inscribed_rect is the maximum inscribed rectangle of block shape, and mask-area is the effective area for masking pixels. - top_reserve: Cut the top to preserve size.
- bottom_reserve: Cut the bottom to preserve size.
- left_reserve: Cut the left to preserve size.
- right_reserve: Cut the right to preserve size.
- บันทึก
Output:
- croped_image: The image after crop.
- croped_mask: The mask after crop.
- crop_box: The trimmed box data is used when restoring the RestoreCropBox node.
- box_preview: Preview image of cutting position, red represents the detected range, and green represents the cutting range after adding the reserved border.
CropByMaskV2
The V2 upgraded version of CropByMask. Supports crop_box input, making it easy to cut layers of the same size.
The following changes have been made based on CropByMask: 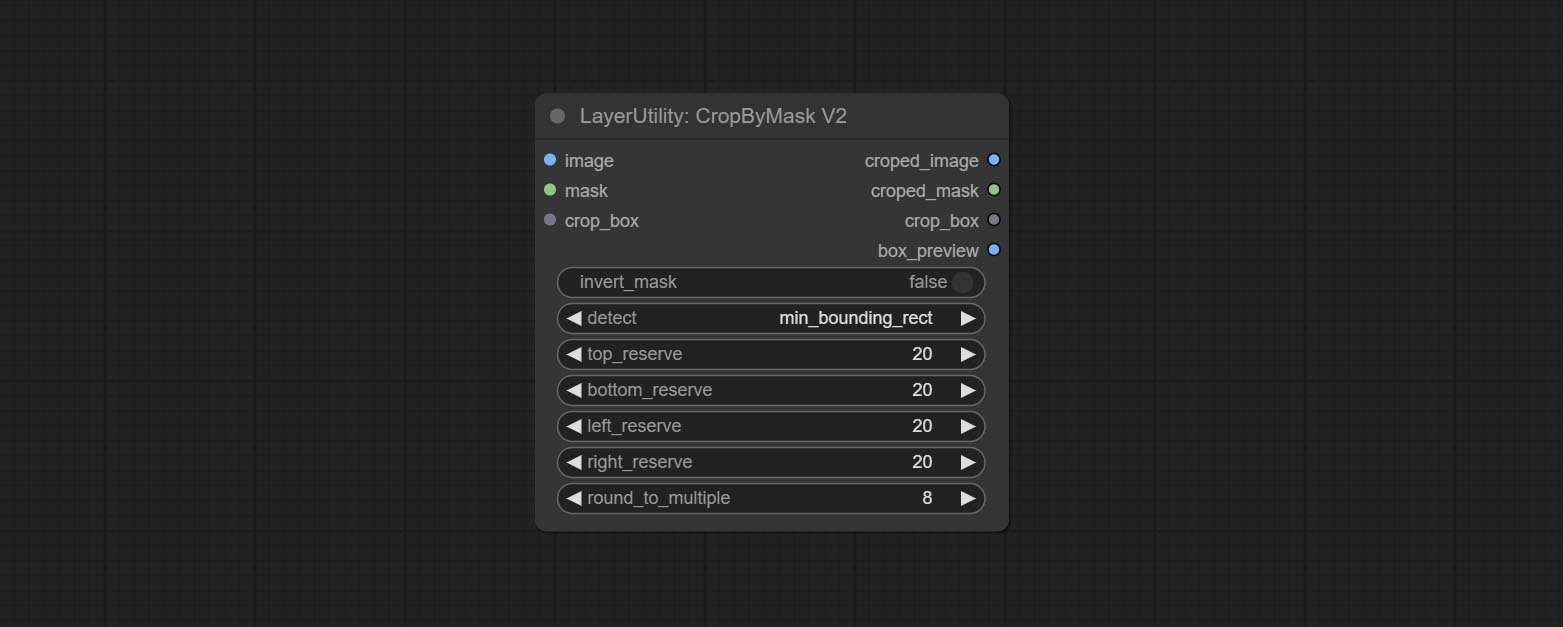
- The input
mask_for_crop reanme to mask 。 - Add optional inputs to the
crop_box . If there are inputs here, mask detection will be ignored and this data will be directly used for cropping. - Add the option
round_to_multiple to round the trimming edge length multiple. For example, setting it to 8 will force the width and height to be multiples of 8.
RestoreCropBox
Restore the cropped image to the original image by CropByMask.
Node options:
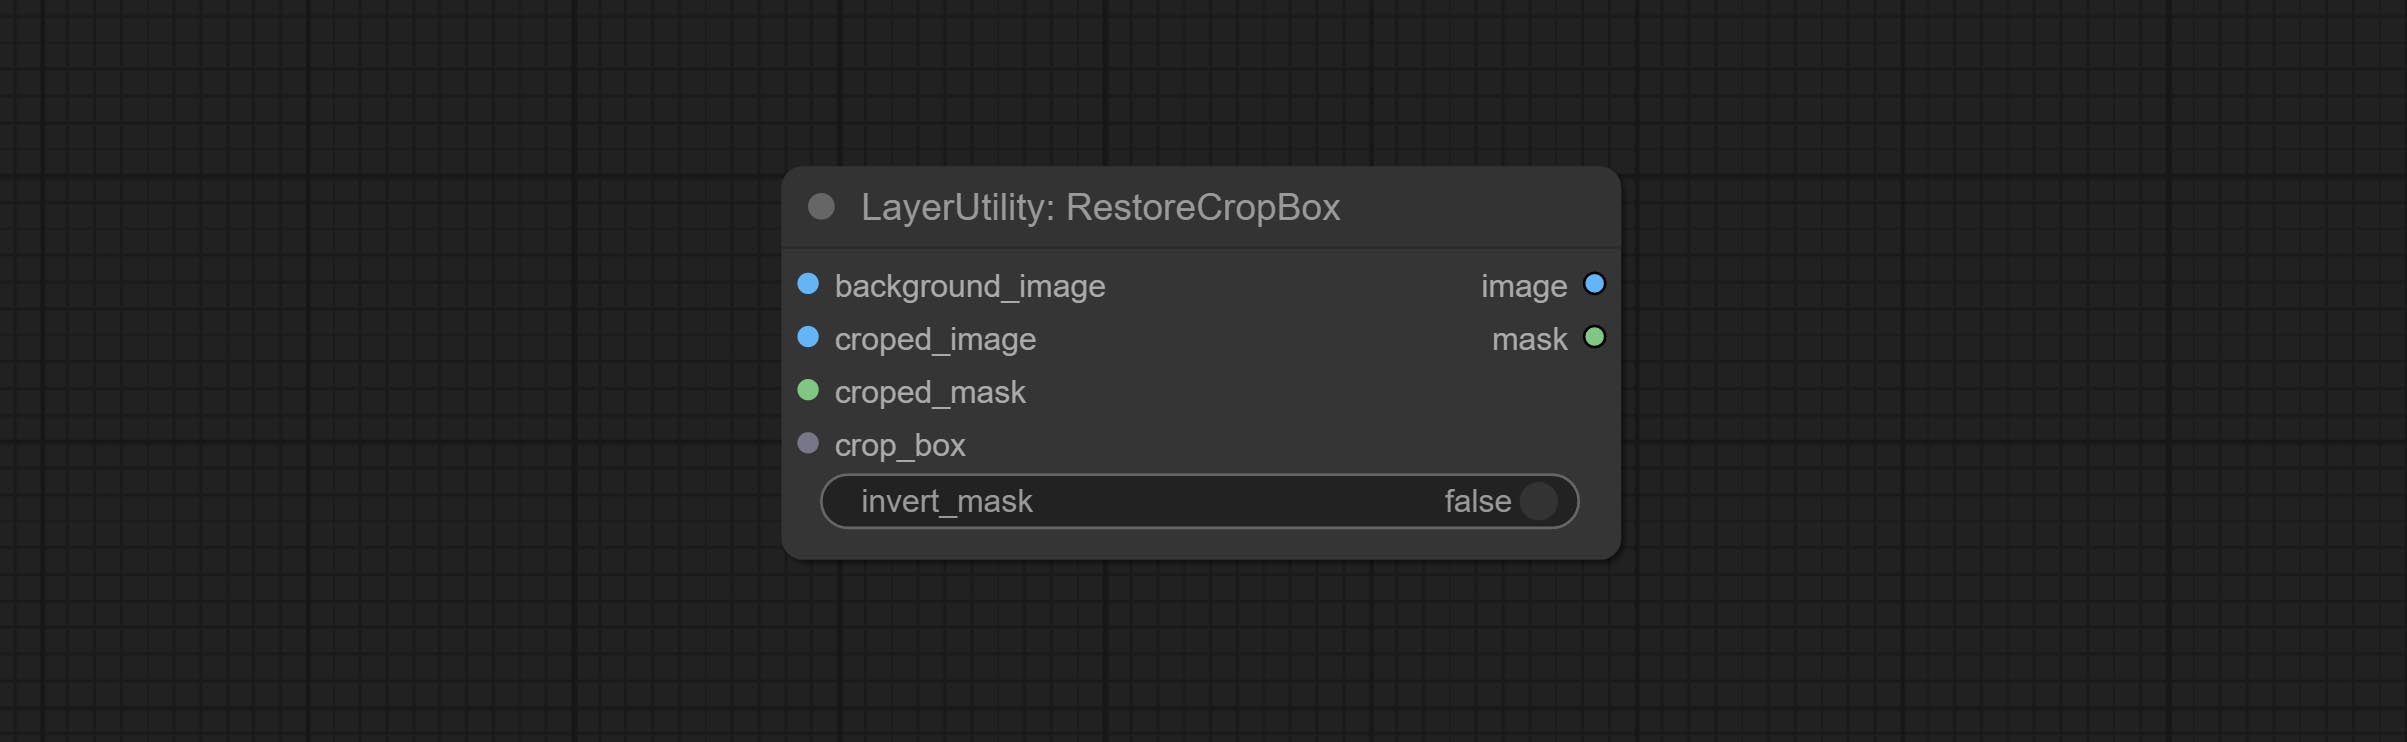
- background_image: The original image before cutting.
- croped_image 5 : The cropped image. If the middle is enlarged, the size needs to be restored before restoration.
- croped_mask 5 : The cut mask.
- crop_box: Box data during cutting.
- invert_mask: Whether to reverse the mask.
- บันทึก
CropBoxResolve
Parsing the corp_box to x , y , width , height . 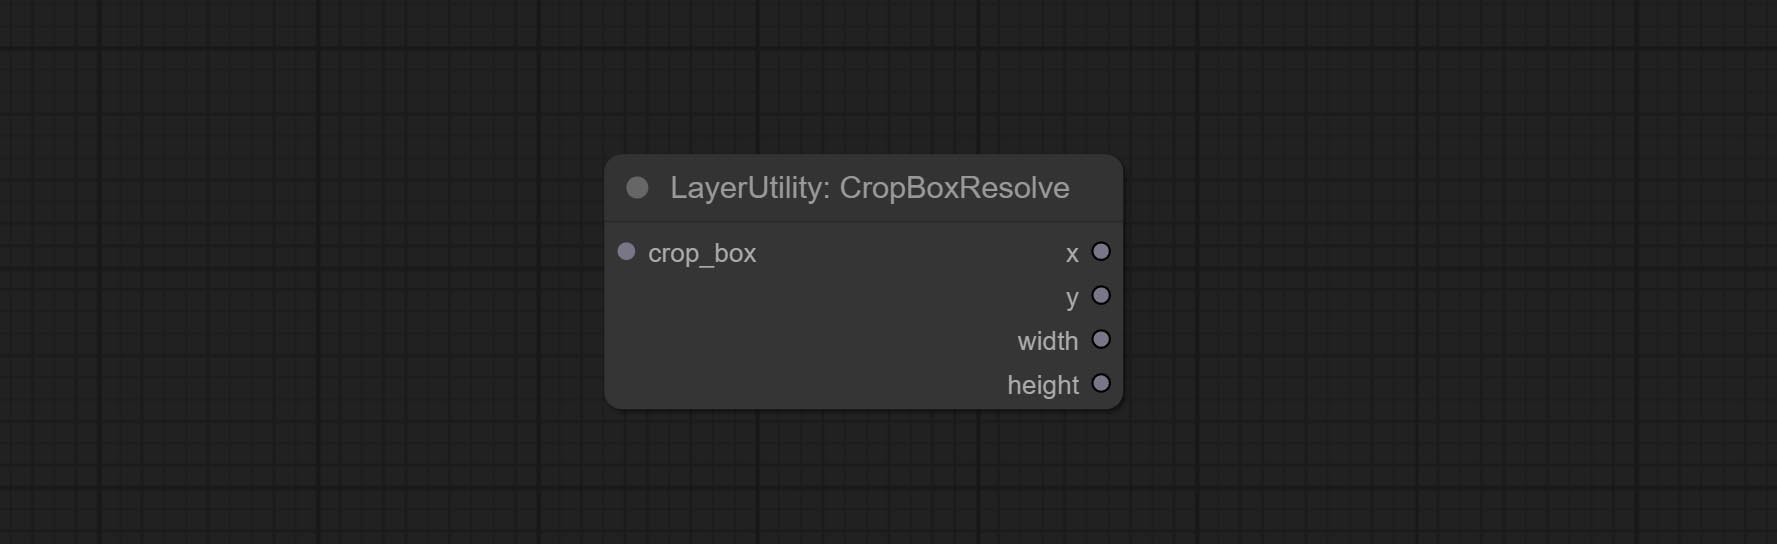
ImageScaleRestore
Image scaling. when this node is used in pairs, the image can be automatically restored to its original size on the second node. 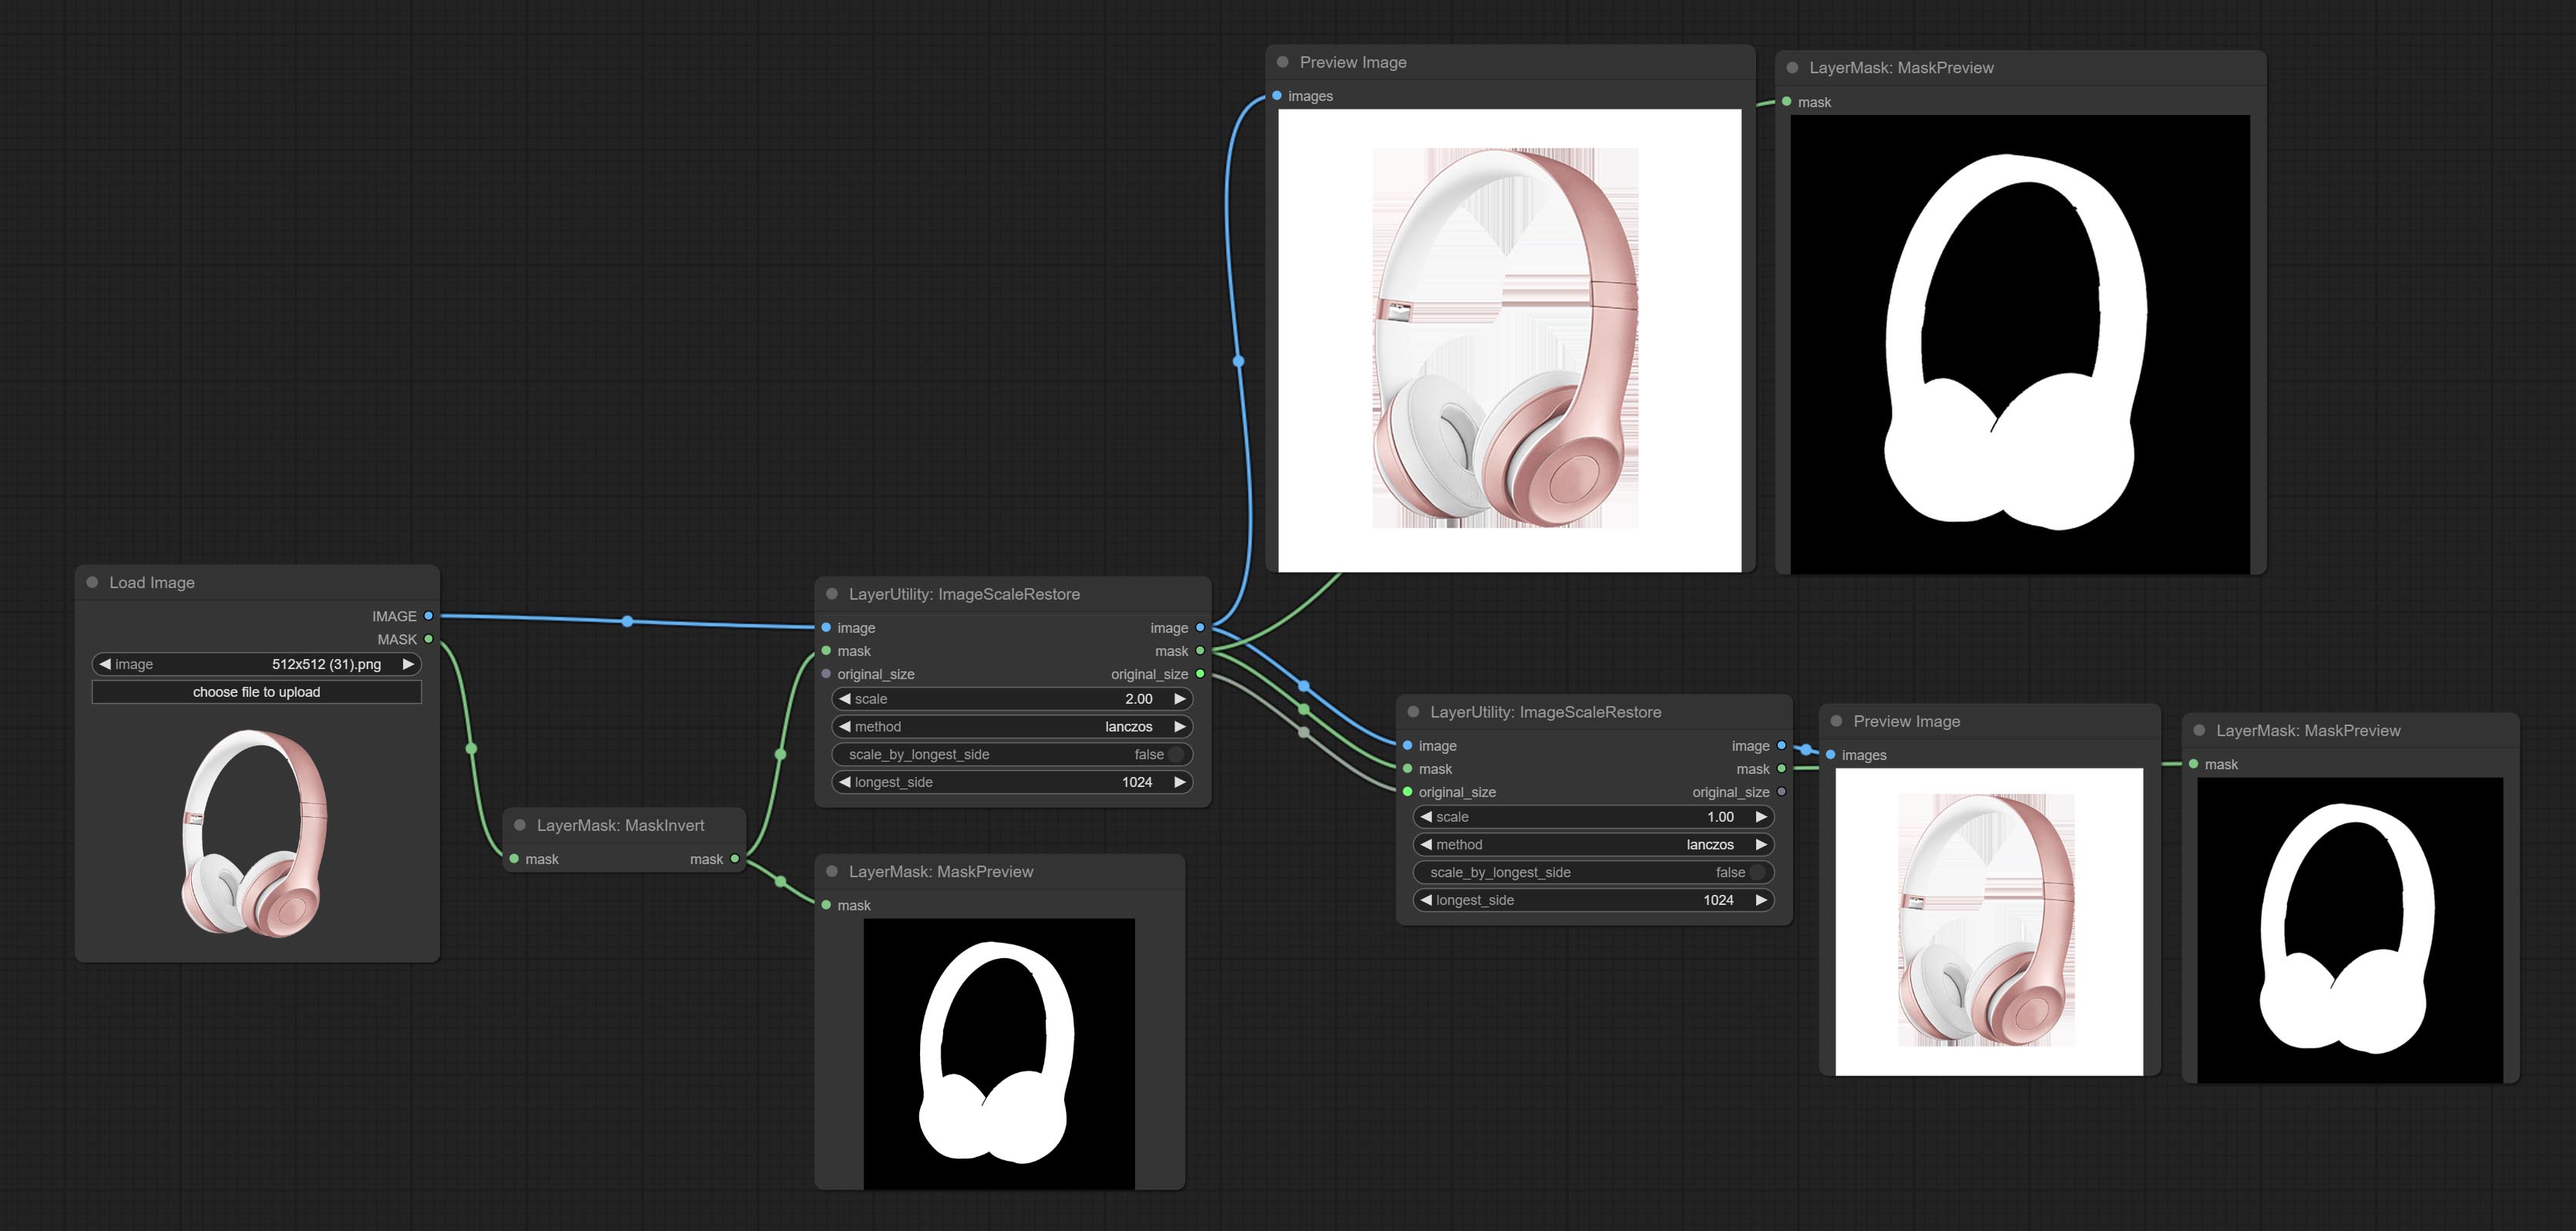
Node options:
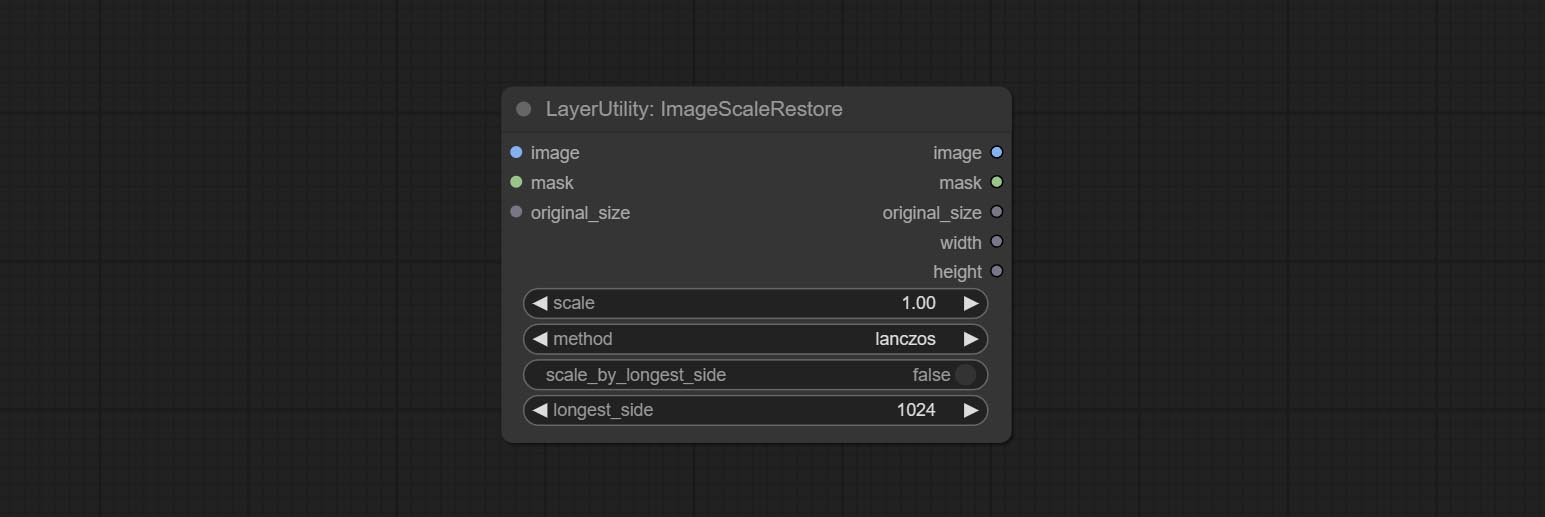
- image 5 : The input image.
- mask 2,5 : Mask of image.
- original_size: Optional input, used to restore the image to its original size.
- scale: Scale ratio. when the original_size have input, or scale_ by_longest_side is set to True, this setting will be ignored.
- scale_by_longest_side: Allow scaling by long edge size.
- longest_side: When the scale_by_longest_side is set to True, this will be used this value to the long edge of the image. when the original_size have input, this setting will be ignored.
Outputs:
- image: The scaled image.
- mask: If have mask input, the scaled mask will be output.
- original_size: The original size data of the image is used for subsequent node recovery.
- width: The output image's width.
- height: The output image's height.
ImageScaleRestoreV2
The V2 upgraded version of ImageScaleRestore.
Node options:
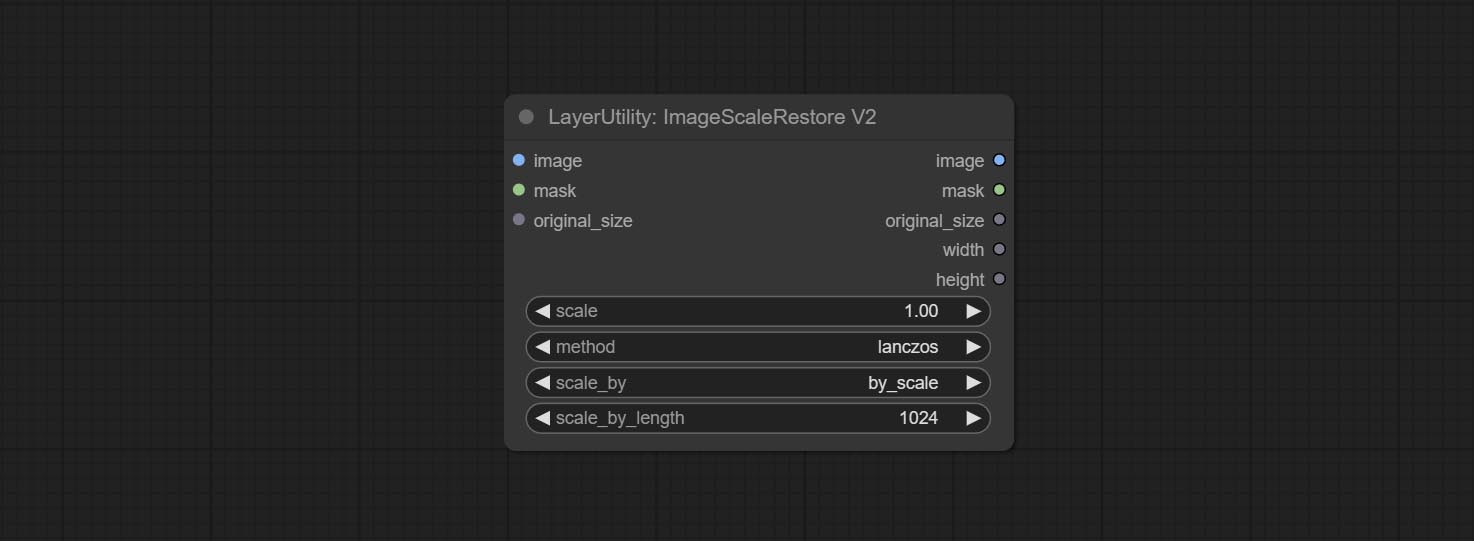
The following changes have been made based on ImageScaleRestore:
- scale_by: Allow scaling by specified dimensions for long, short, width, height, or total pixels. When this option is set to by_scale, use the scale value, and for other options, use the scale_by_length value.
- scale_by_length: The value here is used as
scale_by to specify the length of the edge.
ImageMaskScaleAs
Scale the image or mask to the size of the reference image (or reference mask). 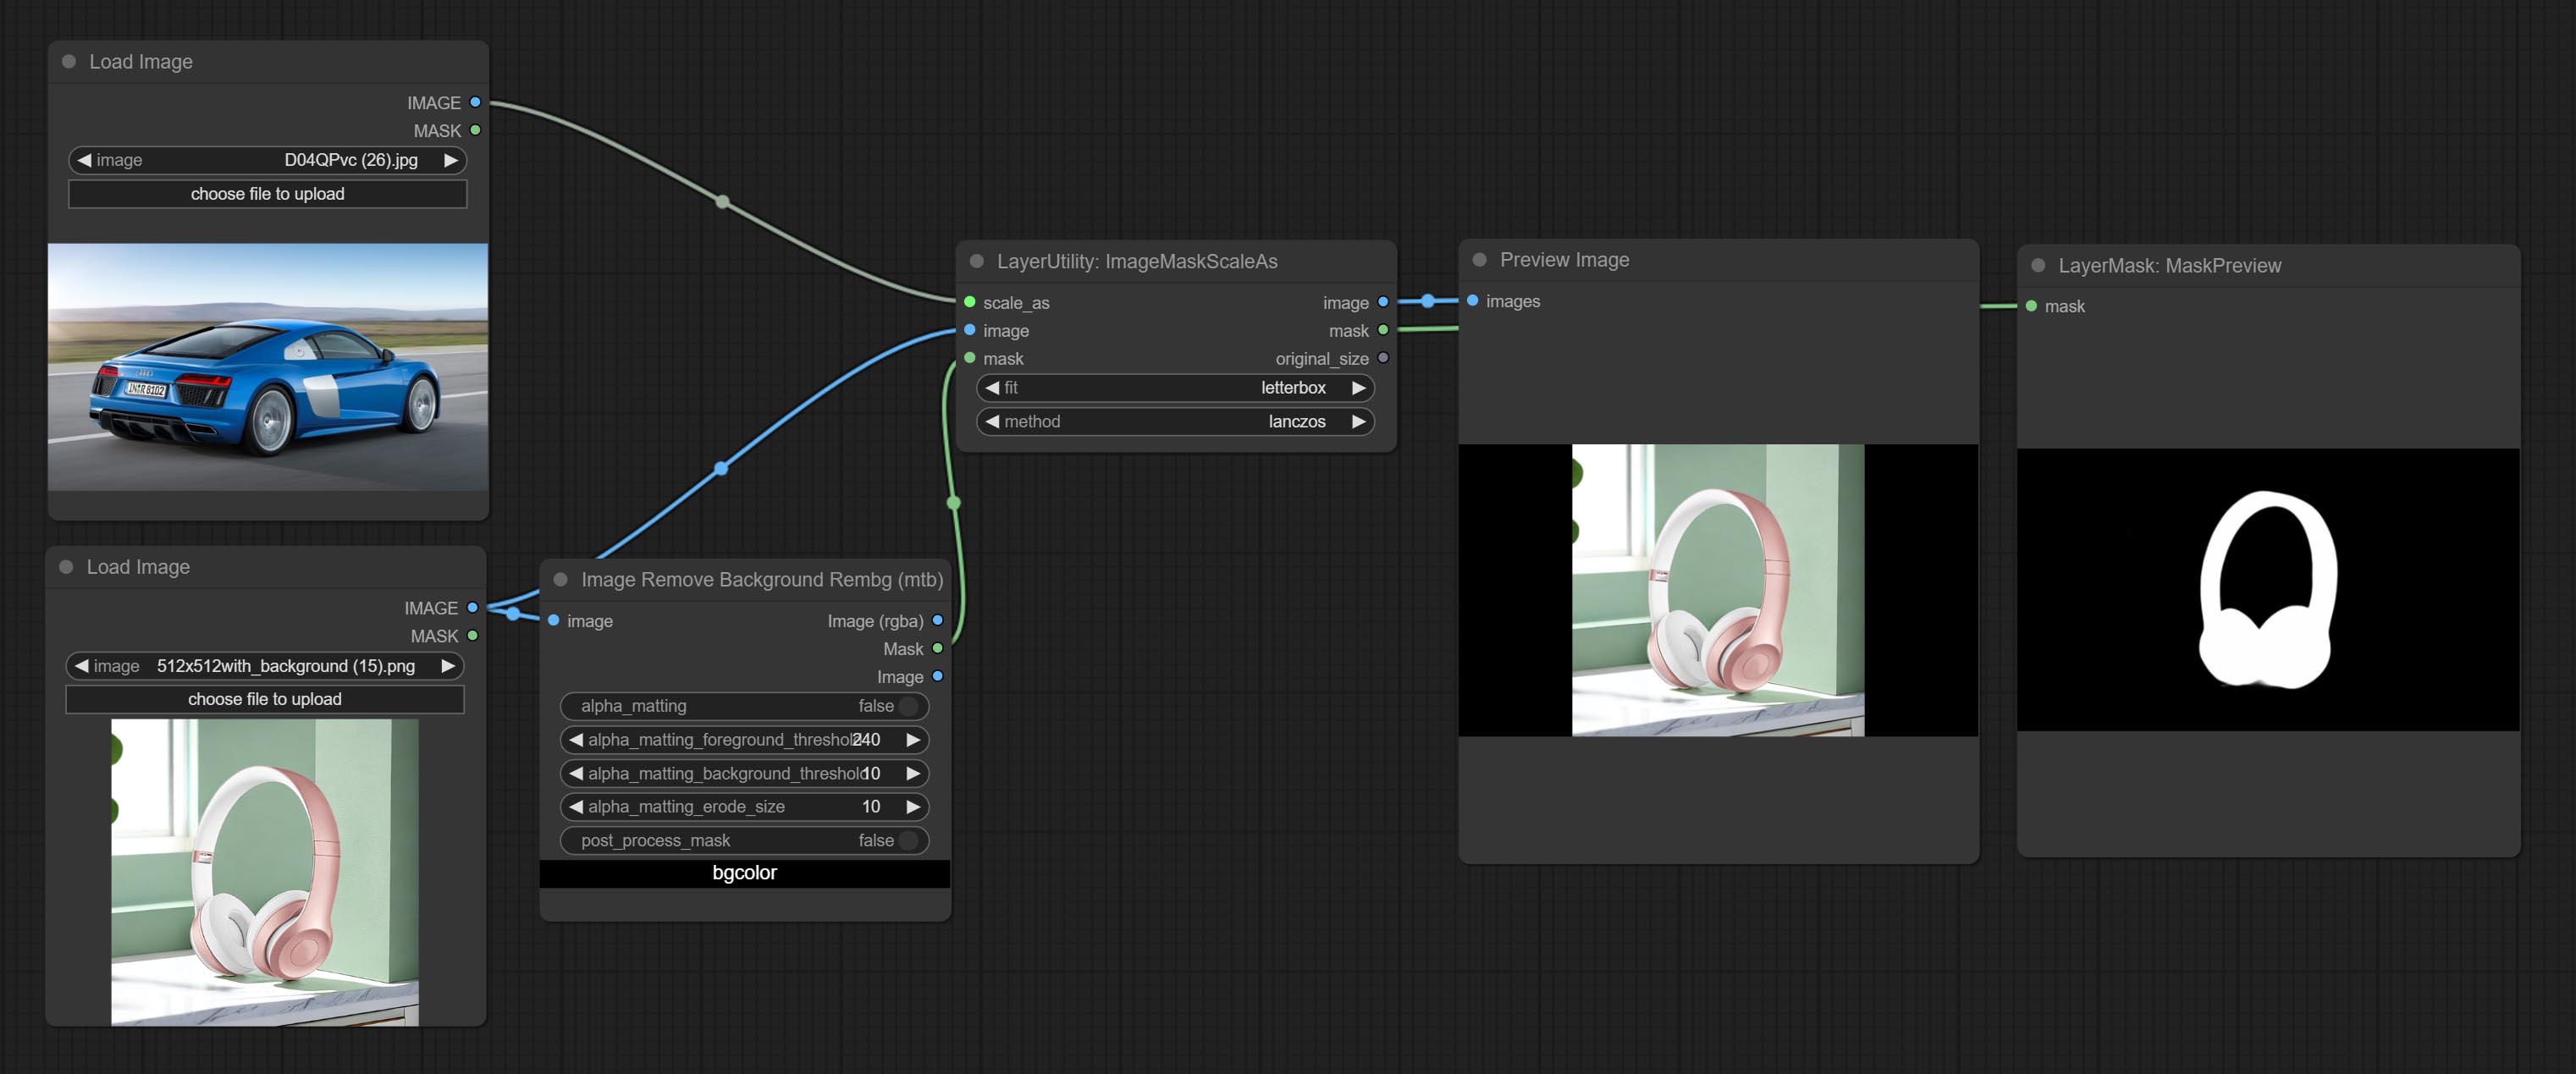
Node options: 
- scale_as * : Reference size. It can be an image or a mask.
- image: Image to be scaled. this option is optional input. if there is no input, a black image will be output.
- mask: Mask to be scaled. this option is optional input. if there is no input, a black mask will be output.
- fit: Scale aspect ratio mode. when the width to height ratio of the original image does not match the scaled size, there are three modes to choose from, The letterbox mode retains the complete frame and fills in the blank spaces with black; The crop mode retains the complete short edge, and any excess of the long edge will be cut off; The fill mode does not maintain frame ratio and fills the screen with width and height.
- method: Scaling sampling methods, including lanczos, bicubic, hamming, bilinear, box, and nearest.
* Only limited to input images and masks. forcing the integration of other types of inputs will result in node errors.
Outputs:
- image: If there is an image input, the scaled image will be output.
- mask: If there is a mask input, the scaled mask will be output.
- original_size: The original size data of the image is used for subsequent node recovery.
- width: The output image's width.
- height: The output image's height.
ImageScaleByAspectRatio
Scale the image or mask by aspect ratio. the scaled size can be rounded to a multiple of 8 or 16, and can be scaled to the long side size. 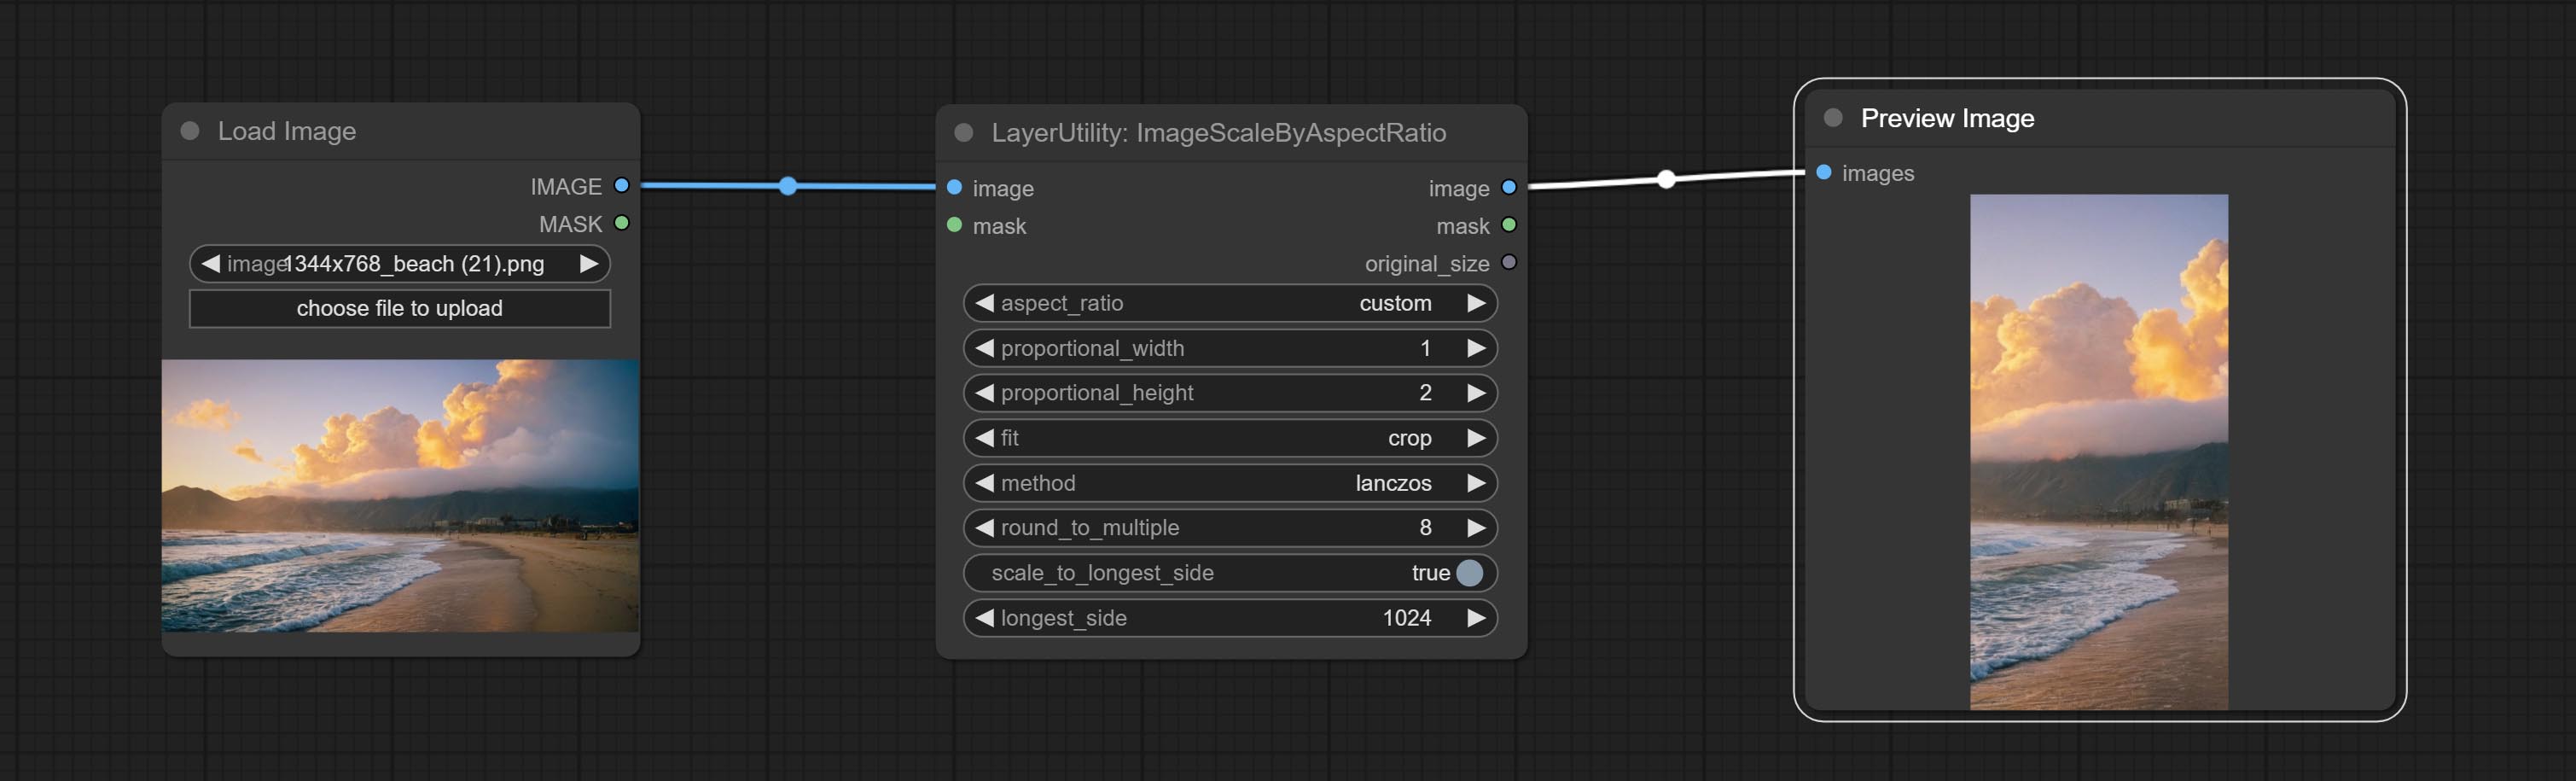
Node options:
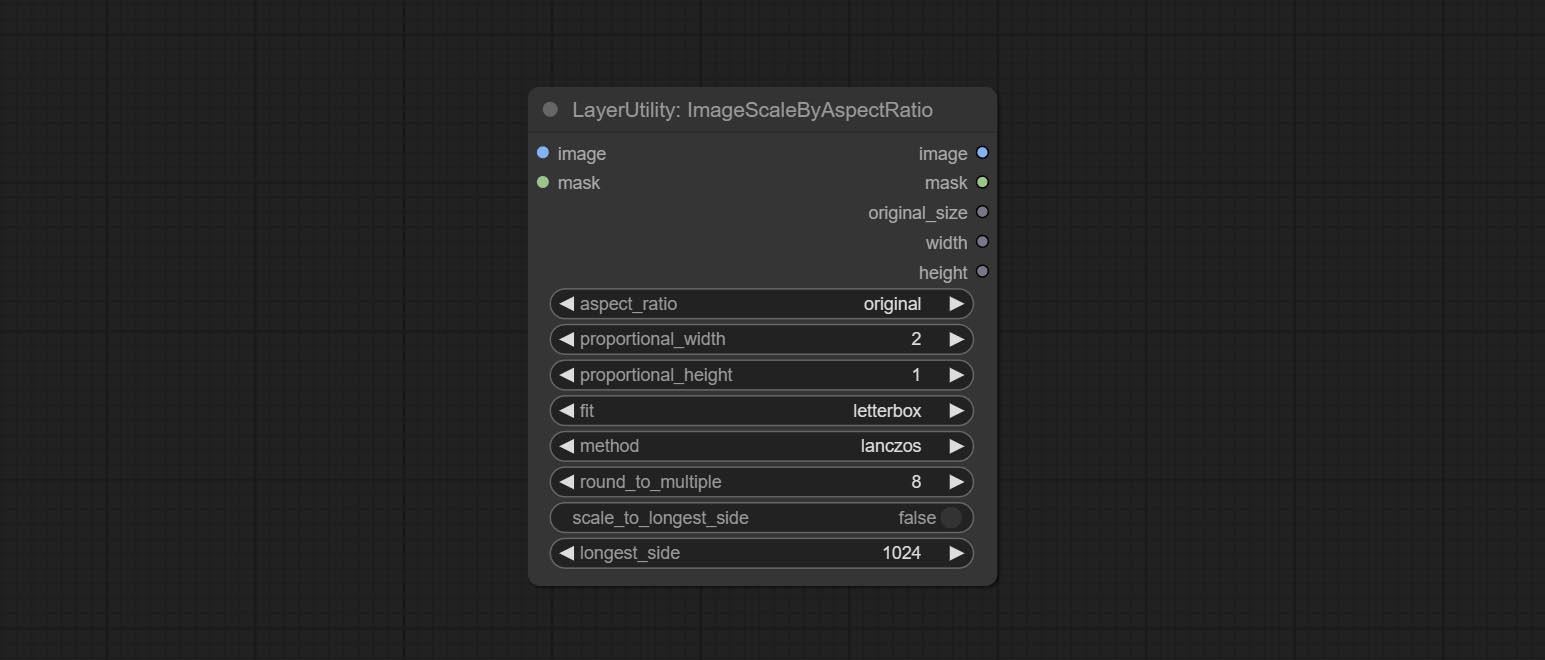
- aspect_ratio: Here are several common frame ratios provided. alternatively, you can choose "original" to keep original ratio or customize the ratio using "custom".
- proportional_width: Proportional width. if the aspect ratio option is not "custom", this setting will be ignored.
- proportional_height: Proportional height. if the aspect ratio option is not "custom", this setting will be ignored.
- fit: Scale aspect ratio mode. when the width to height ratio of the original image does not match the scaled size, there are three modes to choose from, The letterbox mode retains the complete frame and fills in the blank spaces with black; The crop mode retains the complete short edge, and any excess of the long edge will be cut off; The fill mode does not maintain frame ratio and fills the screen with width and height.
- method: Scaling sampling methods, including lanczos, bicubic, hamming, bilinear, box, and nearest.
- round_to_multiple: Round multiples. for example, setting it to 8 will force the width and height to be multiples of 8.
- scale_by_longest_side: Allow scaling by long edge size.
- longest_side: When the scale_by_longest_side is set to True, this will be used this value to the long edge of the image. when the original_size have input, this setting will be ignored.
Outputs:
- image: If have image input, the scaled image will be output.
- mask: If have mask input, the scaled mask will be output.
- original_size: The original size data of the image is used for subsequent node recovery.
- width: The output image's width.
- height: The output image's height.
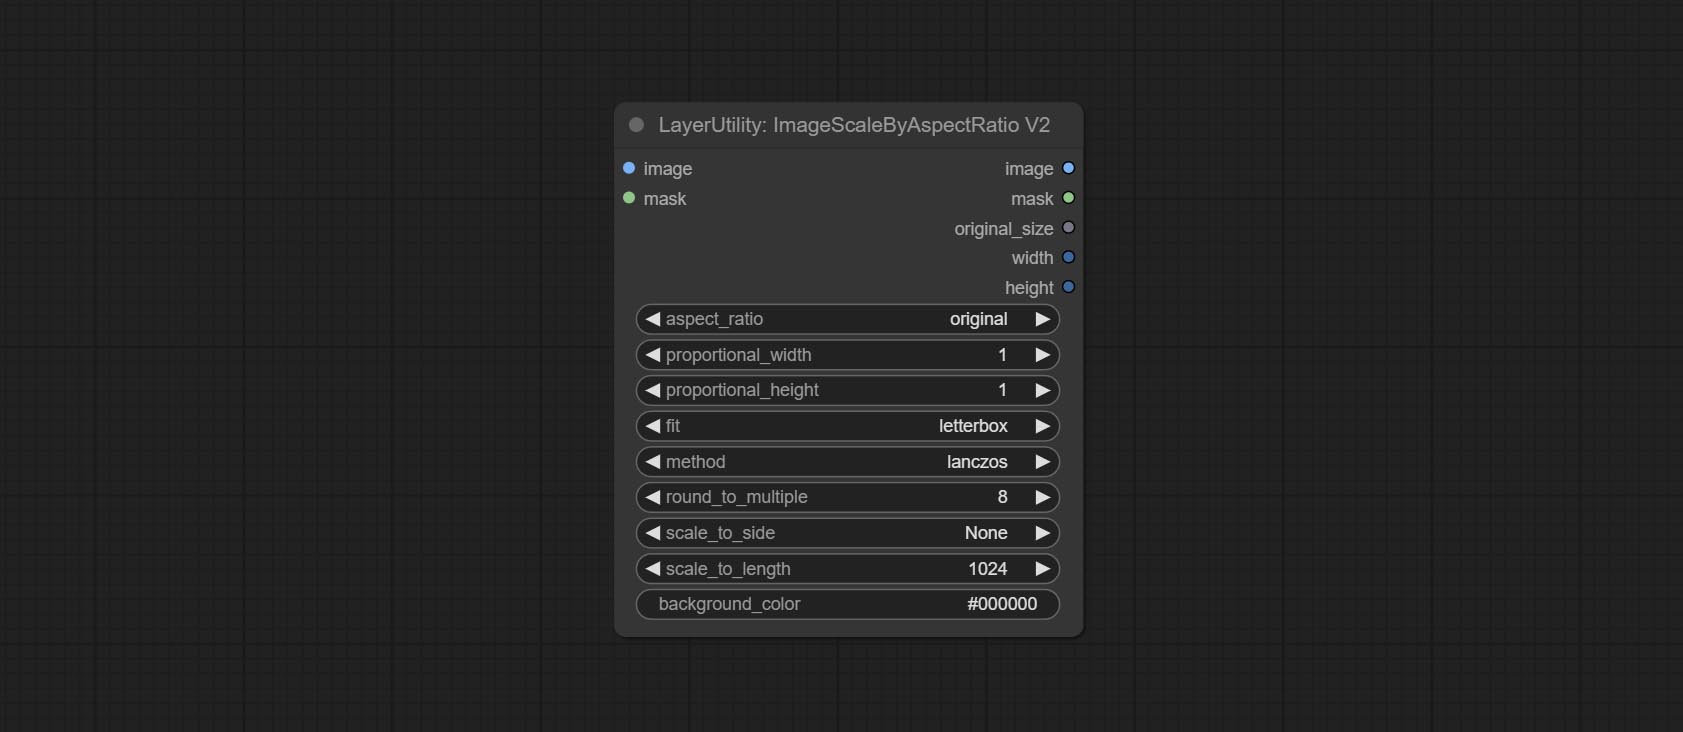
ImageScaleByAspectRatioV2
V2 Upgraded Version of ImageScaleByAspectRatio
Node options:
The following changes have been made based on ImageScaleByAspectRatio:
- scale_to_side: Allow scaling by specified dimensions for long, short, width, height, or total pixels.
- scale_to_length: The numerical value here serves as the length of the specified edge or the total pixels (kilo pixels) for scale_to_side.
- background_color 4 : The color of the background.
QWenImage2Prompt
Inference the prompts based on the image. this node is repackage of the ComfyUI_VLM_nodes's UForm-Gen2 Qwen Node , thanks to the original author. Download model files from huggingface or Baidu Netdisk to ComfyUI/models/LLavacheckpoints/files_for_uform_gen2_qwen folder.
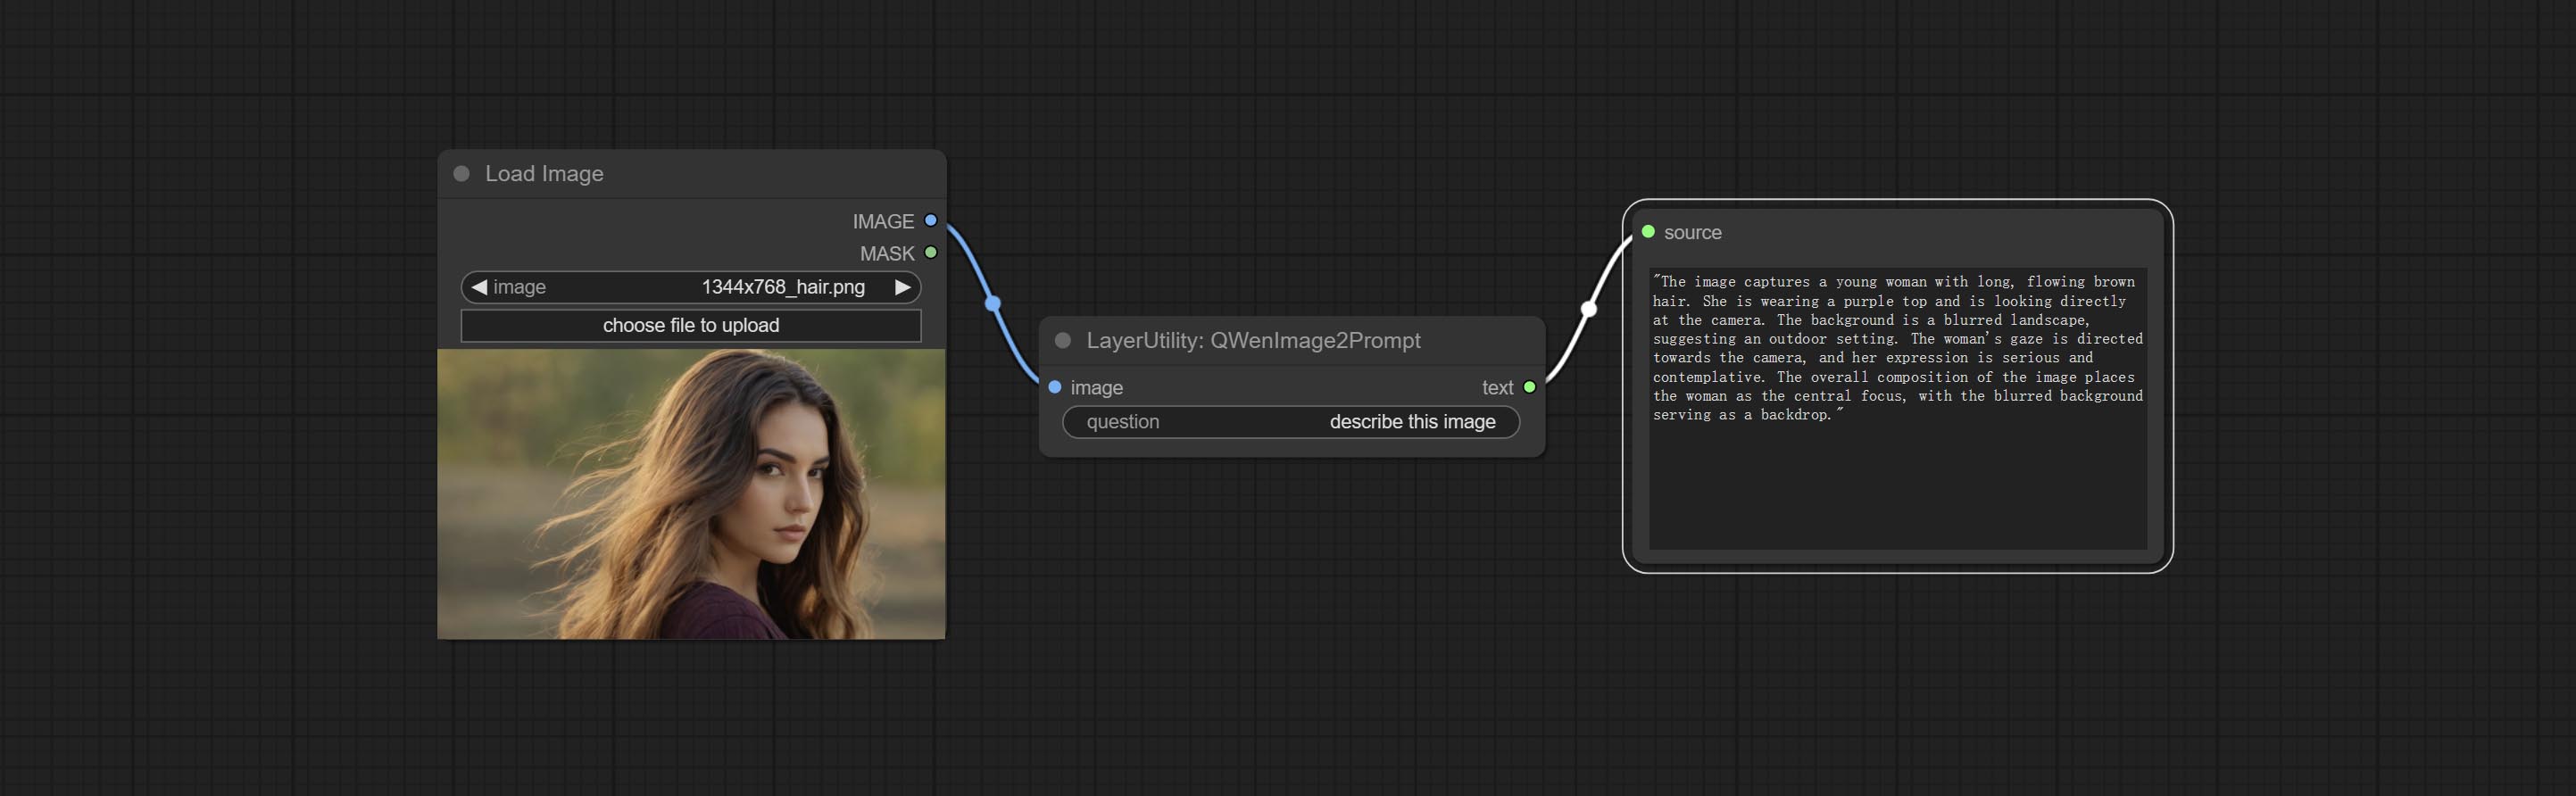
Node Options:
- question: Prompt of UForm-Gen-QWen model.
LlamaVision
Use the Llama 3.2 vision model for local inference. Can be used to generate prompt words. part of the code for this node comes from ComfyUI-PixtralLlamaMolmoVision, thank you to the original author. To use this node, the transformers need upgraded to 4.45.0 or higher. Download models from BaiduNetdisk or huggingface/SeanScripts , and copy to ComfyUI/models/LLM . 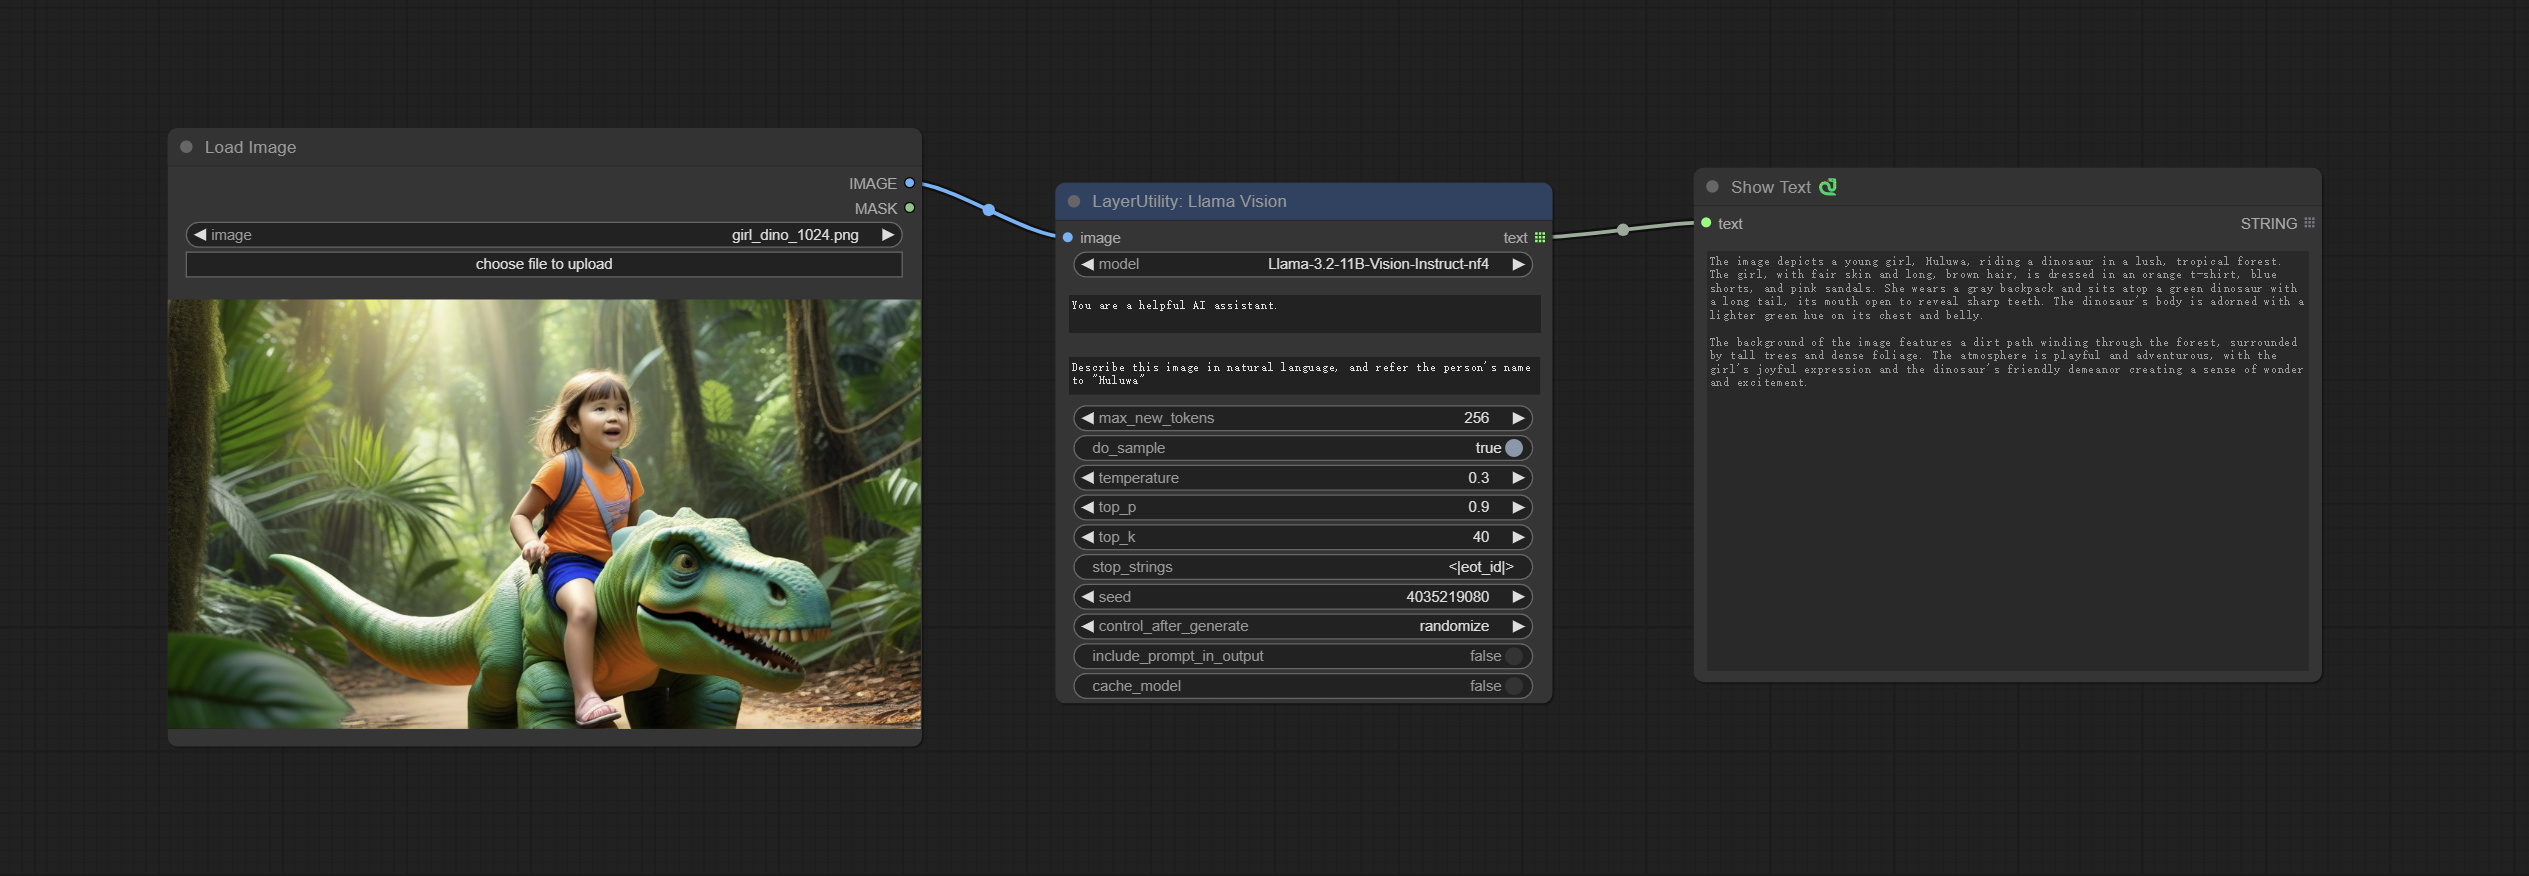
Node Options:
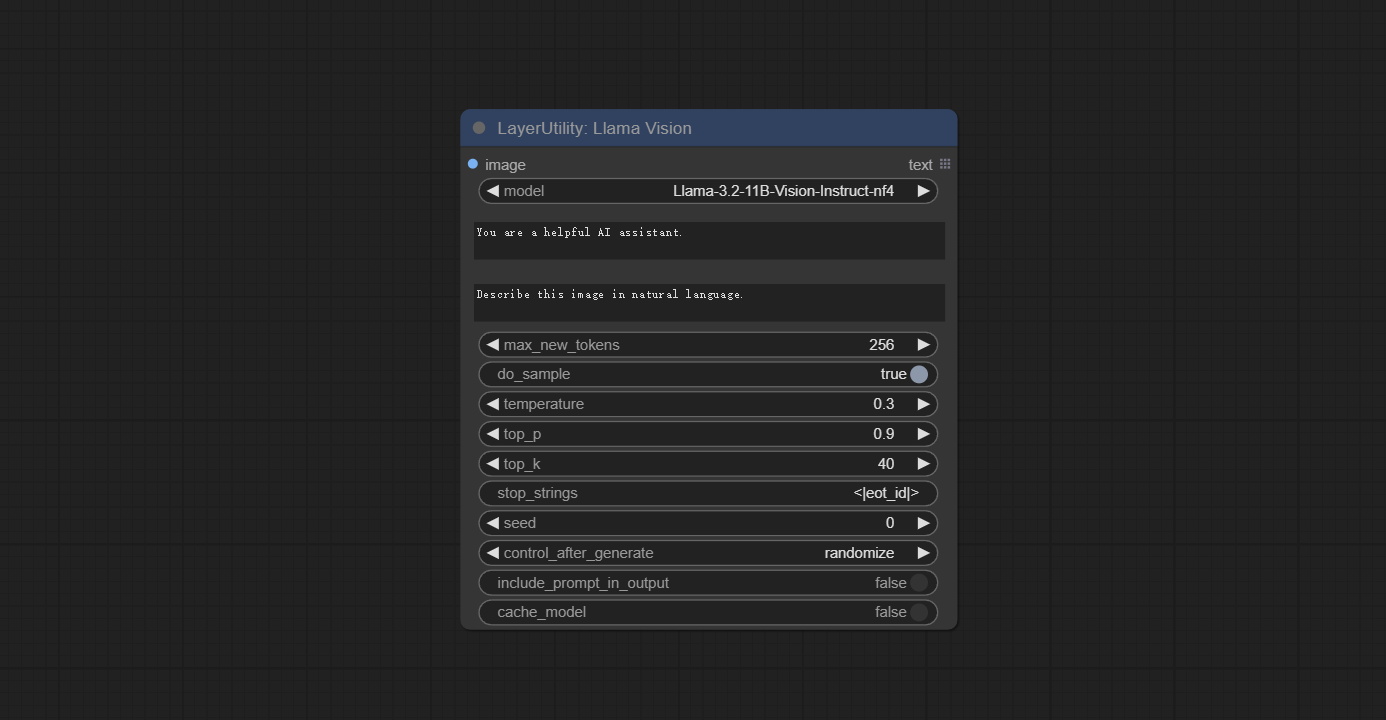
- image: Image input.
- model: Currently, only the "Llama-3.2-11B-Vision-Instruct-nf4" is available.
- system_prompt: System prompt words for LLM model.
- user_prompt: User prompt words for LLM model.
- max_new_tokens: max_new_tokens for LLM model.
- do_sample: do_sample for LLM model.
- top-p: top_p for LLM model.
- top_k: top_k for LLM model.
- stop_strings: The stop strings.
- seed: The seed of random number.
- control_after_generate: Seed change options. If this option is fixed, the generated random number will always be the same.
- include_prompt_in_output: Does the output contain prompt words.
- cache_model: Whether to cache the model.
JoyCaption2
Use the JoyCaption-alpha-two model for local inference. Can be used to generate prompt words. this node is https://huggingface.co/John6666/joy-caption-alpha-two-cli-mod Implementation in ComfyUI, thank you to the original author. Download models form BaiduNetdisk and BaiduNetdisk , or huggingface/Orenguteng and huggingface/unsloth , then copy to ComfyUI/models/LLM , Download models from BaiduNetdisk or huggingface/google , and copy to ComfyUI/models/clip , Donwload the cgrkzexw-599808 folder from BaiduNetdisk or huggingface/John6666 , and copy to ComfyUI/models/Joy_caption 。 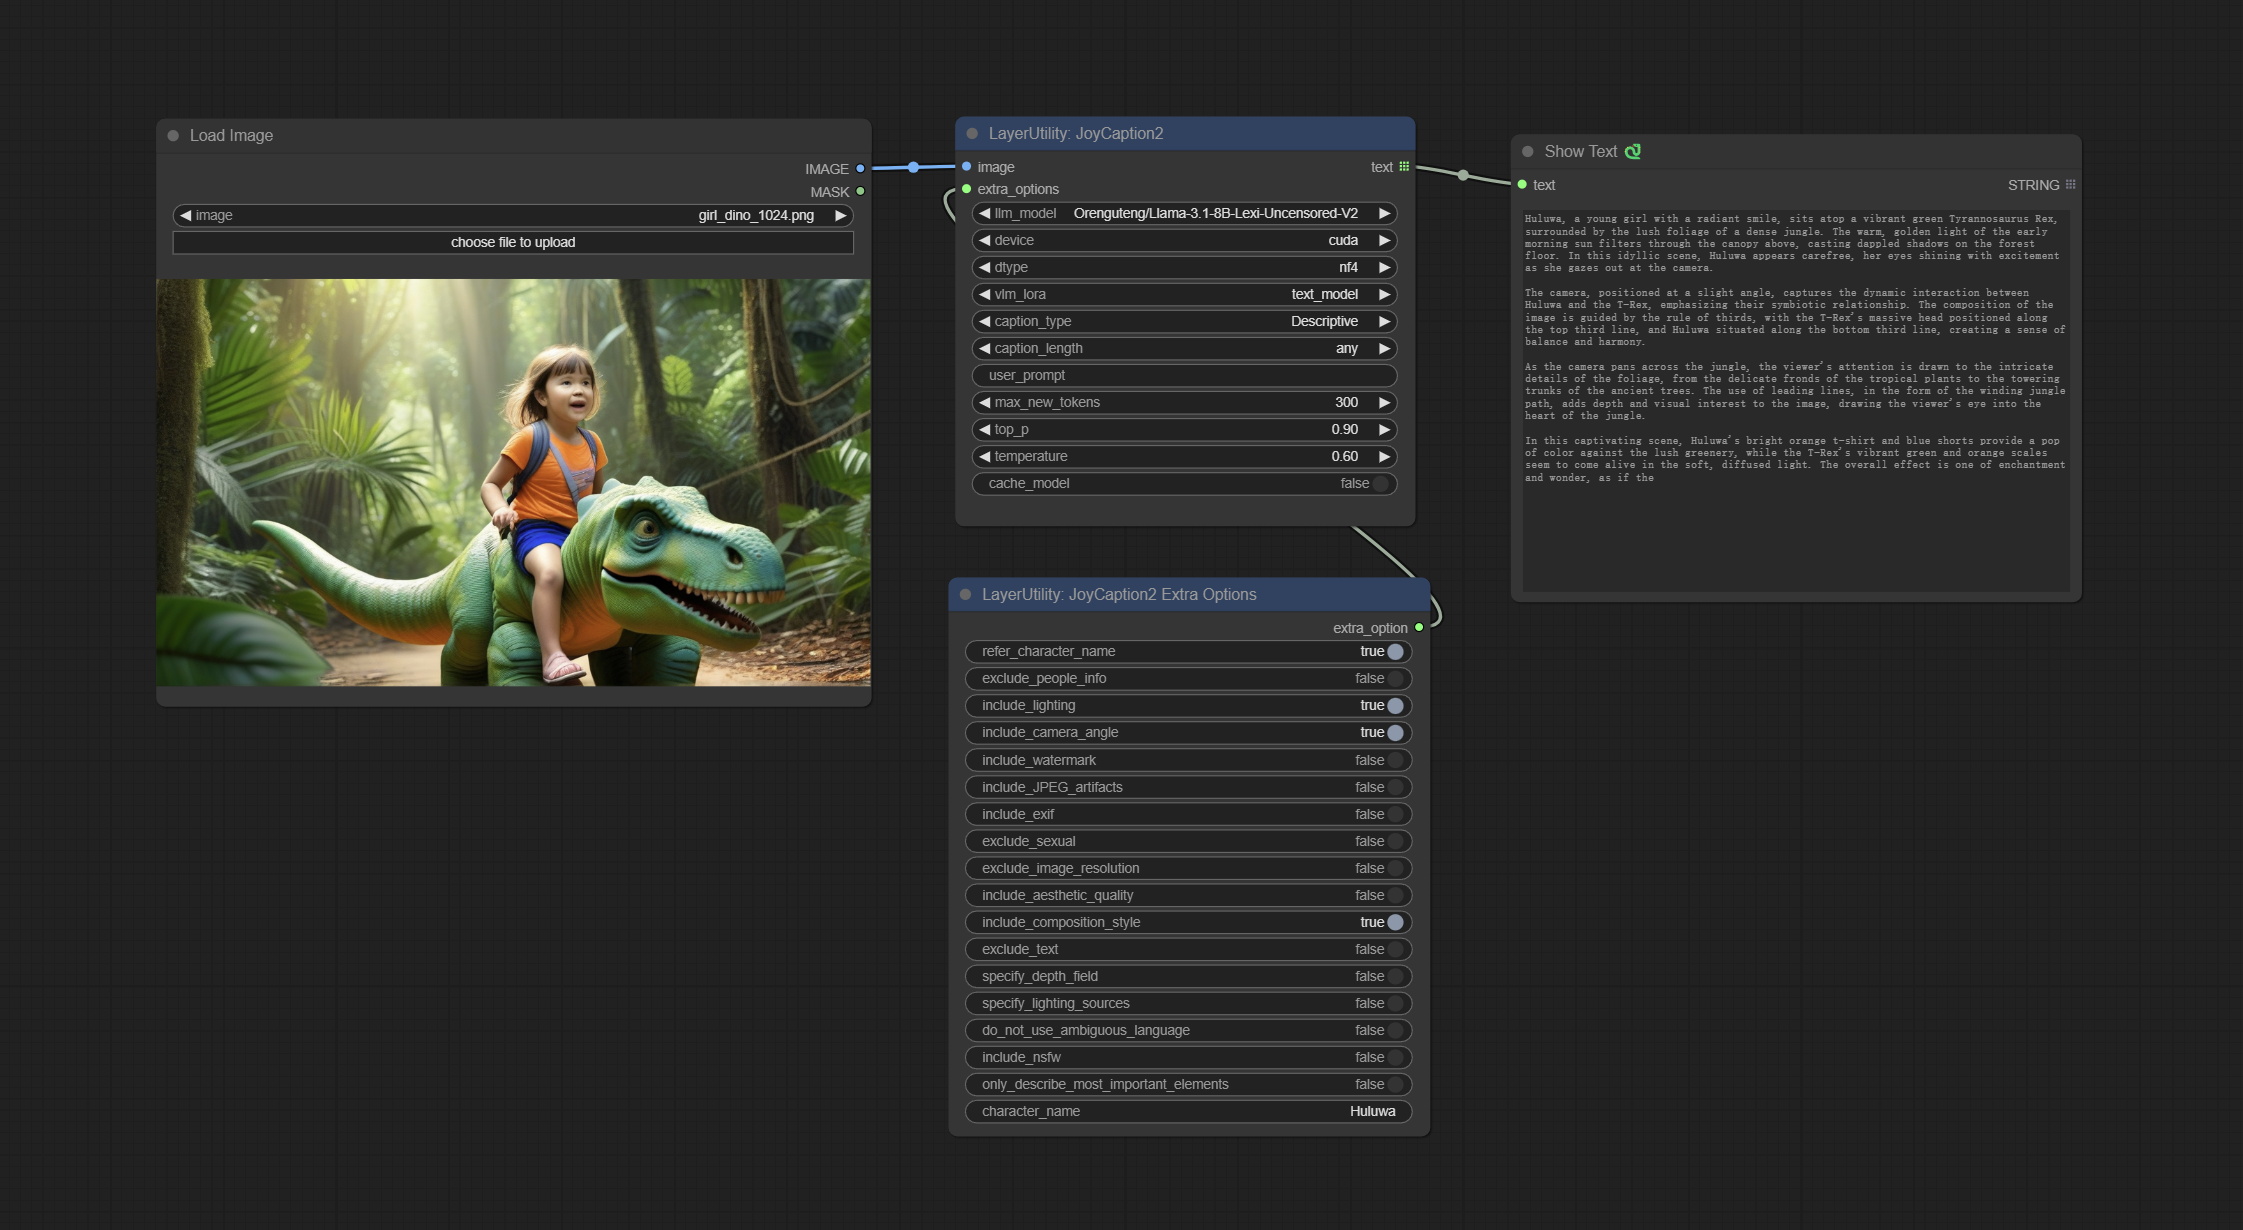
Node Options:

- image: Image input.
- extra_options: Input the extra_options.
- llm_model: There are two LLM models to choose, Orenguteng/Llama-3.1-8B-Lexi-Uncensored-V2 and unsloth/Meta-Llama-3.1-8B-Instruct.
- device: Model loading device. Currently, only CUDA is supported.
- dtype: Model precision, nf4 and bf16.
- vlm_lora: Whether to load text_madel.
- caption_type: Caption type options, including: "Descriptive", "Descriptive (Informal)", "Training Prompt", "MidJourney", "Booru tag list", "Booru-like tag list", "Art Critic", "Product Listing", "Social Media Post".
- caption_length: The length of caption.
- user_prompt: User prompt words for LLM model. If there is content here, it will overwrite all the settings for caption_type and extra_options.
- max_new_tokens: The max_new_token parameter of LLM.
- do_sample: The do_sample parameter of LLM.
- top-p: The top_p parameter of LLM.
- temperature: The temperature parameter of LLM.
- cache_model: Whether to cache the model.
JoyCaption2Split
The node of JoyCaption2 separate model loading and inference, and when multiple JoyCaption2 nodes are used, the model can be shared to improve efficiency.
Node Options:
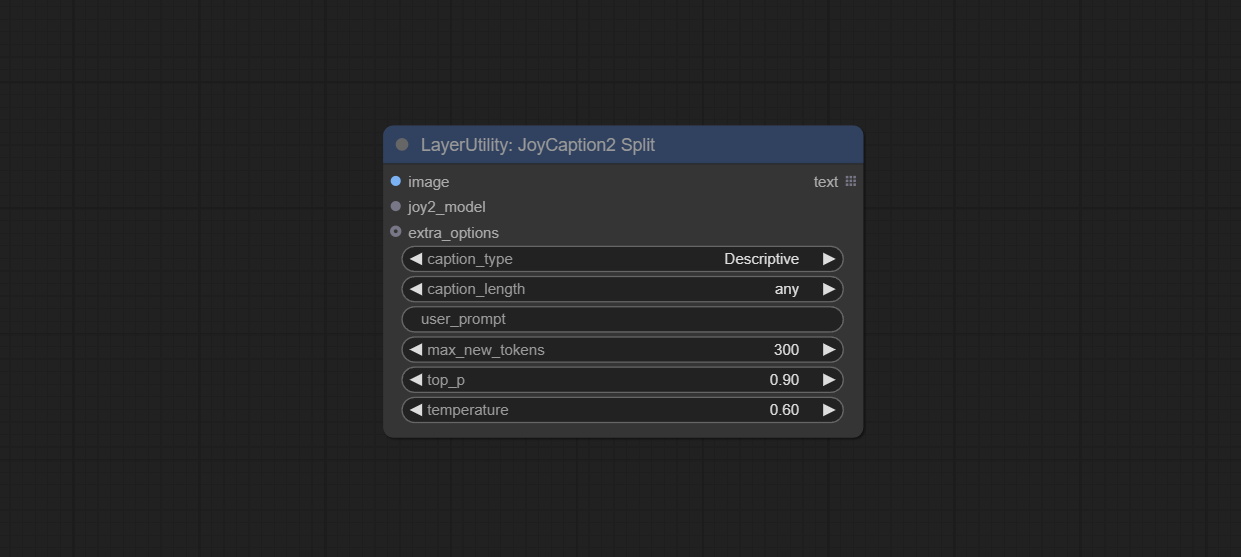
- image: Image input.。
- joy2_model: The JoyCaption model input.
- extra_options: Input the extra_options.
- caption_type: Caption type options, including: "Descriptive", "Descriptive (Informal)", "Training Prompt", "MidJourney", "Booru tag list", "Booru-like tag list", "Art Critic", "Product Listing", "Social Media Post".
- caption_length: The length of caption.
- user_prompt: User prompt words for LLM model. If there is content here, it will overwrite all the settings for caption_type and extra_options.
- max_new_tokens: The max_new_token parameter of LLM.
- do_sample: The do_sample parameter of LLM.
- top-p: The top_p parameter of LLM.
- temperature: The temperature parameter of LLM.
LoadJoyCaption2Model
JoyCaption2's model loading node, used in conjunction with JoyCaption2Split.
Node Options:
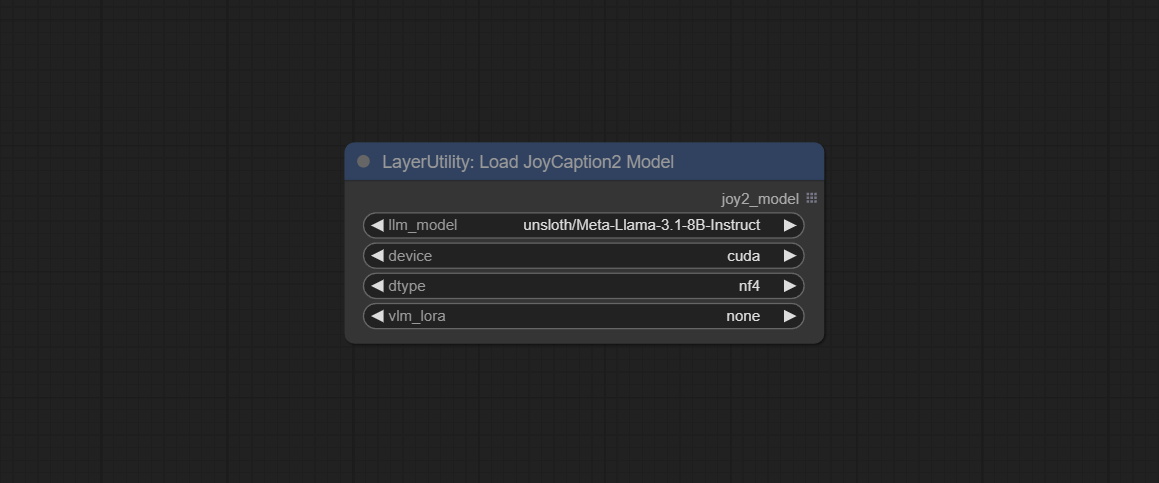
- llm_model: There are two LLM models to choose, Orenguteng/Llama-3.1-8B-Lexi-Uncensored-V2 and unsloth/Meta-Llama-3.1-8B-Instruct.
- device: Model loading device. Currently, only CUDA is supported.
- dtype: Model precision, nf4 and bf16.
- vlm_lora: Whether to load text_madel.
JoyCaption2ExtraOptions
The extra_options parameter node of JoyCaption2.
Node Options:
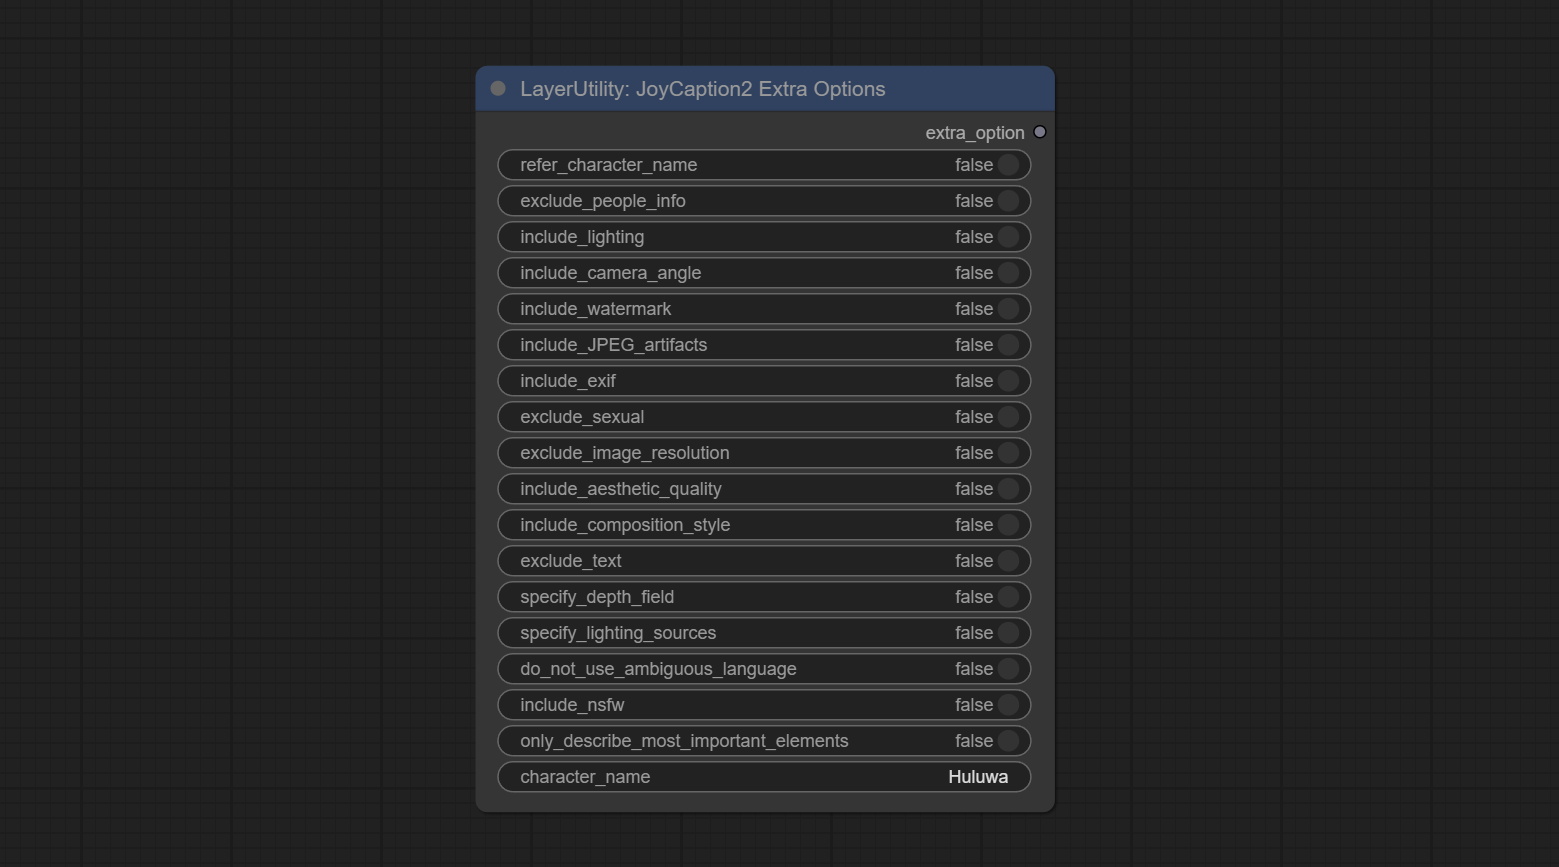
- refer_character_name: If there is a person/character in the image you must refer to them as {name}.
- exclude_people_info: Do NOT include information about people/characters that cannot be changed (like ethnicity, gender, etc), but do still include changeable attributes (like hair style).
- include_lighting: Include information about lighting.
- include_camera_angle: Include information about camera angle.
- include_watermark: Include information about whether there is a watermark or not.
- include_JPEG_artifacts: Include information about whether there are JPEG artifacts or not.
- include_exif: If it is a photo you MUST include information about what camera was likely used and details such as aperture, shutter speed, ISO, etc.
- exclude_sexual: Do NOT include anything sexual; keep it PG.
- exclude_image_resolution: Do NOT mention the image's resolution.
- include_aesthetic_quality: You MUST include information about the subjective aesthetic quality of the image from low to very high.
- include_composition_style: Include information on the image's composition style, such as leading lines, rule of thirds, or symmetry.
- exclude_text: Do NOT mention any text that is in the image.
- specify_depth_field: Specify the depth of field and whether the background is in focus or blurred.
- specify_lighting_sources: If applicable, mention the likely use of artificial or natural lighting sources.
- do_not_use_ambiguous_language: Do NOT use any ambiguous language.
- include_nsfw: Include whether the image is sfw, suggestive, or nsfw.
- only_describe_most_important_elements: ONLY describe the most important elements of the image.
- character_name: Person/Character Name, if choice
refer_character_name .
PhiPrompt
Use Microsoft Phi 3.5 text and visual models for local inference. Can be used to generate prompt words, process prompt words, or infer prompt words from images. Running this model requires at least 16GB of video memory. Download model files from BaiduNetdisk or huggingface.co/microsoft/Phi-3.5-vision-instruct and huggingface.co/microsoft/Phi-3.5-mini-instruct and copy to ComfyUImodelsLLM folder. 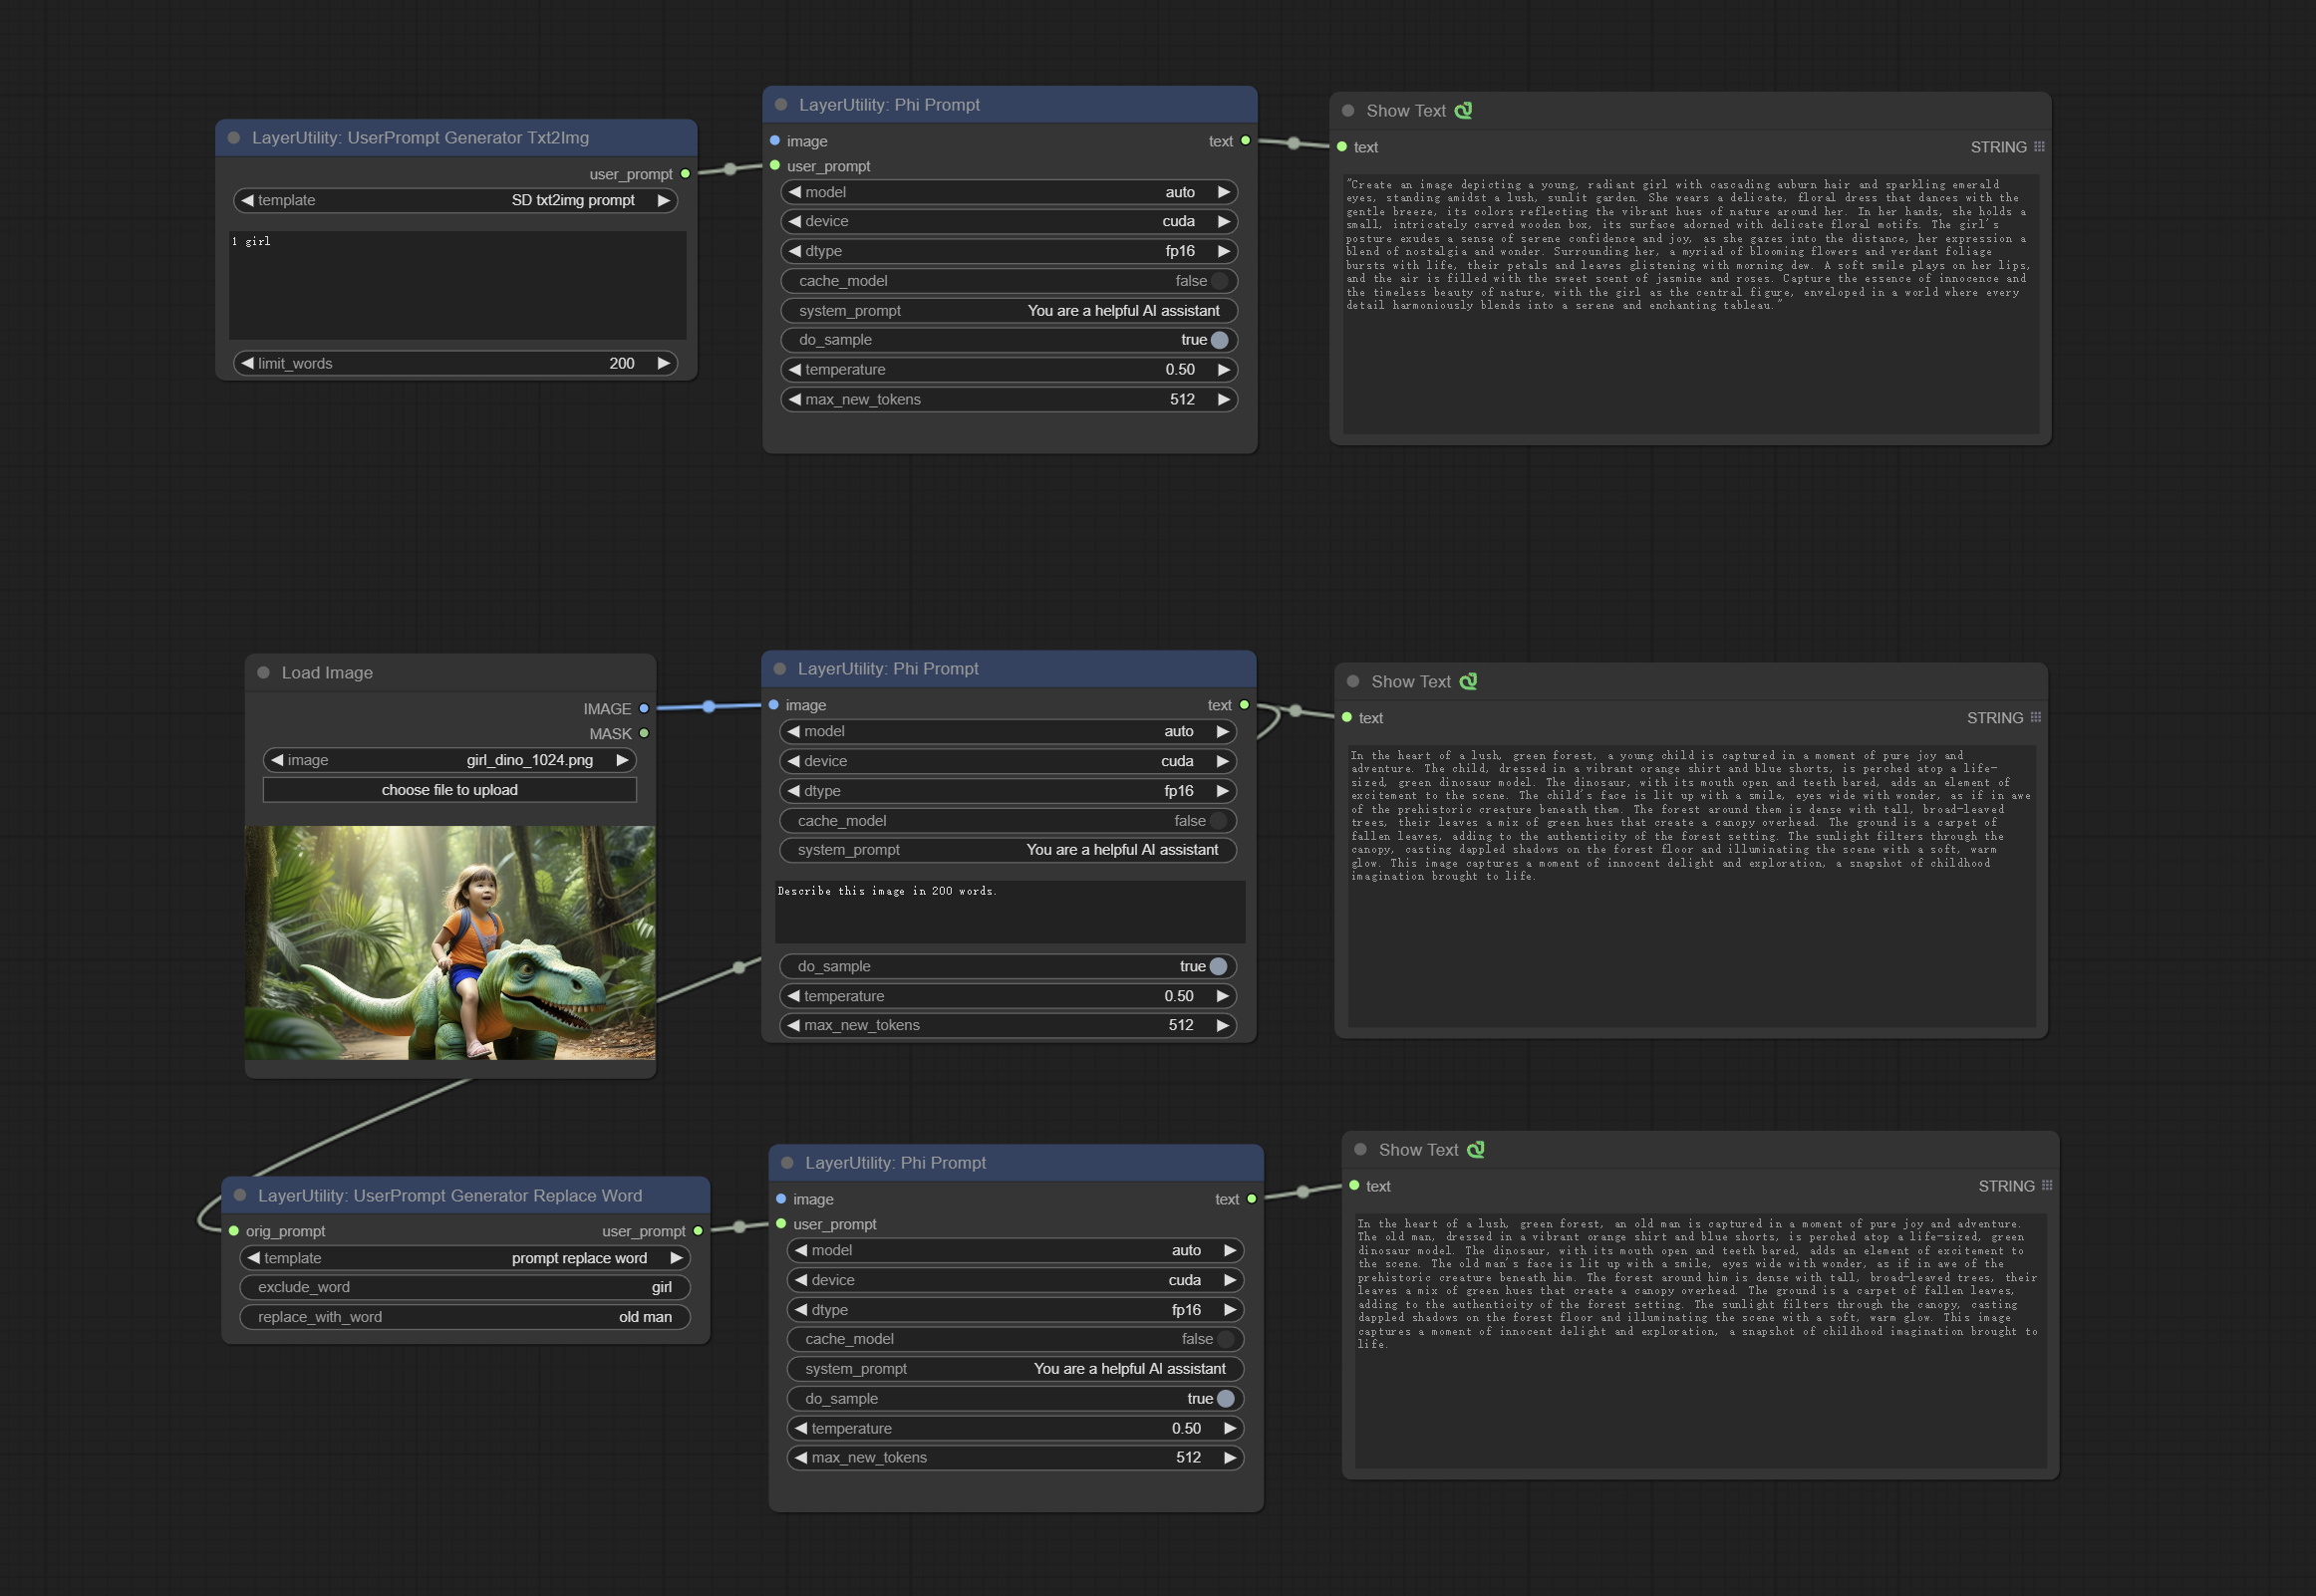
Node Options:
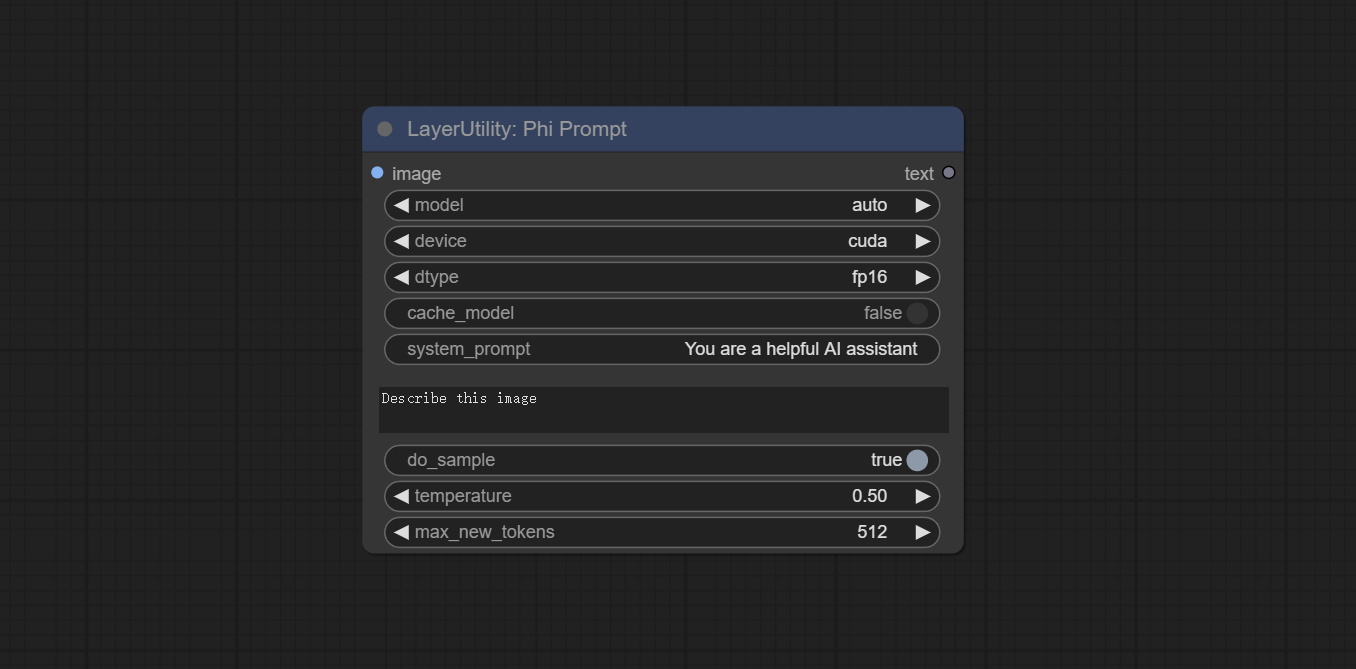
- image: Optional input. The input image will serve as the input for Phi-3.5-vision-instruct.
- model: Selectable to load Phi-3.5-vision-instruct or Phi-3.5-mini-instruct model. The default value of auto will automatically load the corresponding model based on whether there is image input.
- device: Model loading device. Supports CPU and CUDA.
- dtype: The model loading accuracy has three options: fp16, bf16, and fp32.
- cache_model: Whether to cache the model.
- system_prompt: The system prompt of Phi-3.5-mini-instruct.
- user_prompt: User prompt words for LLM model.
- do_sample: The do_Sample parameter of LLM defaults to True.
- temperature: The temperature parameter of LLM defaults to 0.5.
- max_new_tokens: The max_new_token parameter of LLM defaults to 512.
UserPromptGeneratorTxtImg
UserPrompt preset for generating SD text to image prompt words.
Node options:
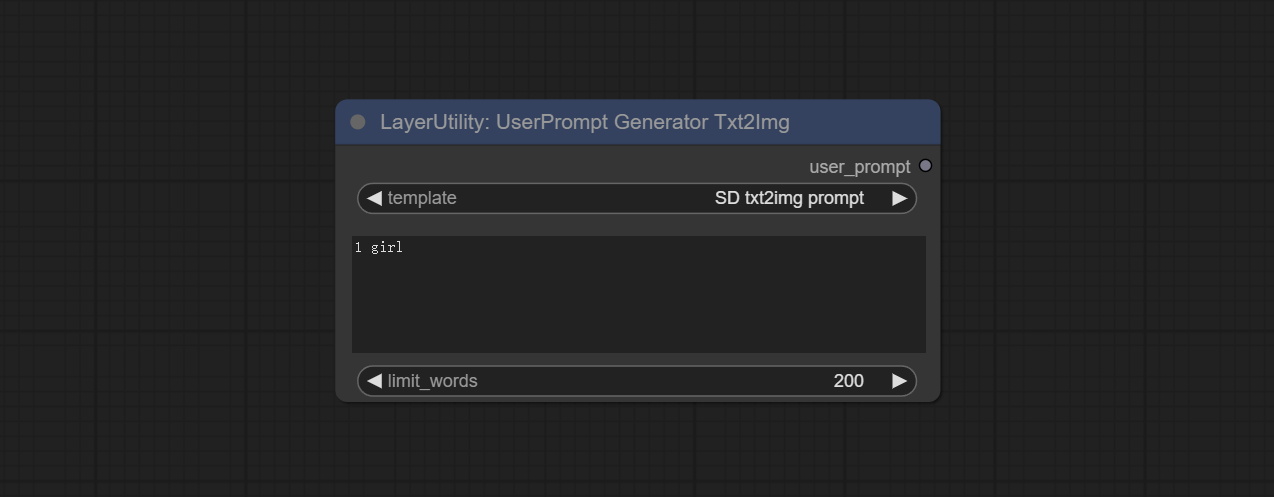
- template: Prompt word template. Currently, only the 'SD txt2img prompt' is available.
- describe: Prompt word description. Enter a simple description here.
- limit_word: Maximum length limit for output prompt words. For example, 200 means that the output text will be limited to 200 words.
UserPromptGeneratorTxtImgWithReference
UserCompt preset for generating SD text to image prompt words based on input content.
Node options:
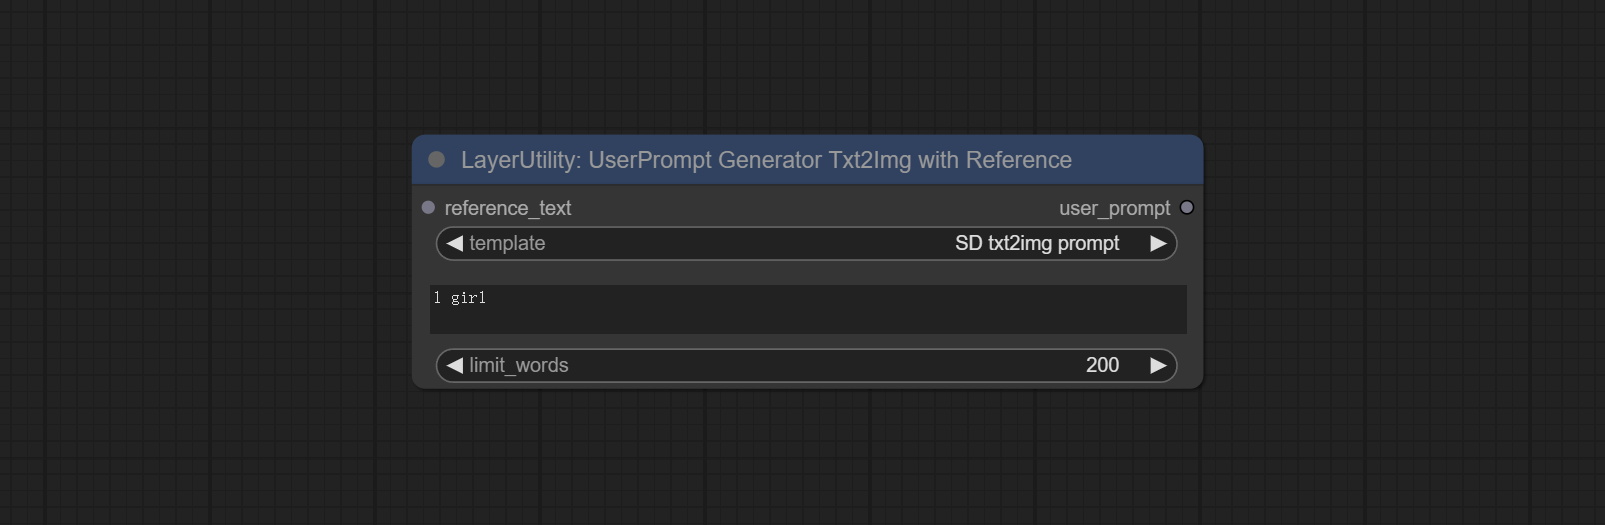
- reference_text: Reference text input. Usually it is a style description of the image.
- template: Prompt word template. Currently, only the 'SD txt2img prompt' is available.
- describe: Prompt word description. Enter a simple description here.
- limit_word: Maximum length limit for output prompt words. For example, 200 means that the output text will be limited to 200 words.
UserPromptGeneratorReplaceWord
UserPrompt preset used to replace a keyword in text with different content. This is not only a simple replacement, but also a logical sorting of the text based on the context of the prompt words to achieve the rationality of the output content.
Node options:
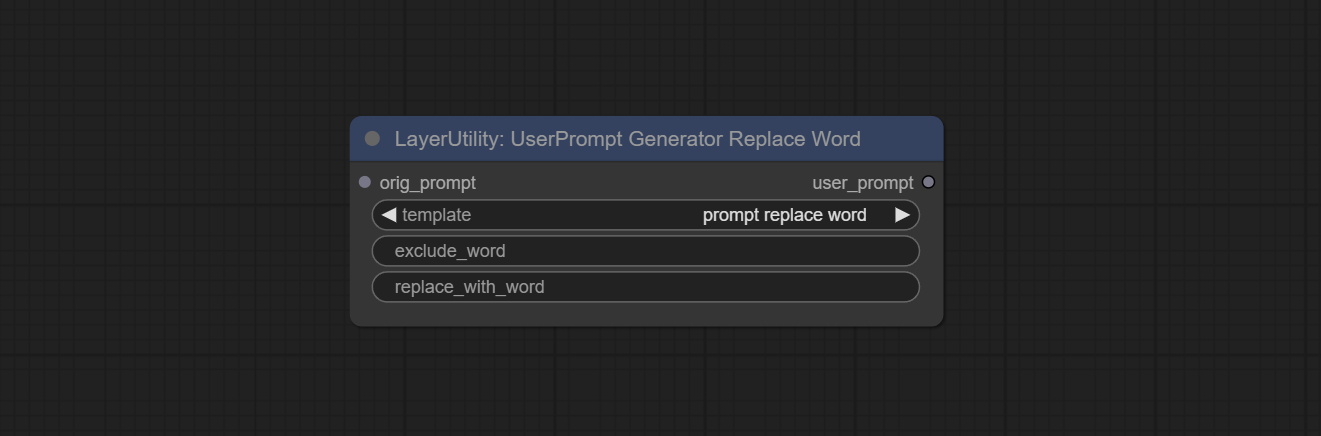
- orig_prompt: Original prompt word input.
- template: Prompt word template. Currently, only 'prompt replace word' is available.
- exclude_word: Keywords that need to be excluded.
- replace_with_word: That word will replace the exclude_word.
PromptTagger
Inference the prompts based on the image. it can replace key word for the prompt. This node currently uses Google Gemini API as the backend service. Please ensure that the network environment can use Gemini normally. Please apply for your API key on Google AI Studio, And fill it in api_key.ini , this file is located in the root directory of the plug-in, and the default name is api_key.ini.example . to use this file for the first time, you need to change the file suffix to .ini . Open it using text editing software, fill in your API key after google_api_key= and save it. 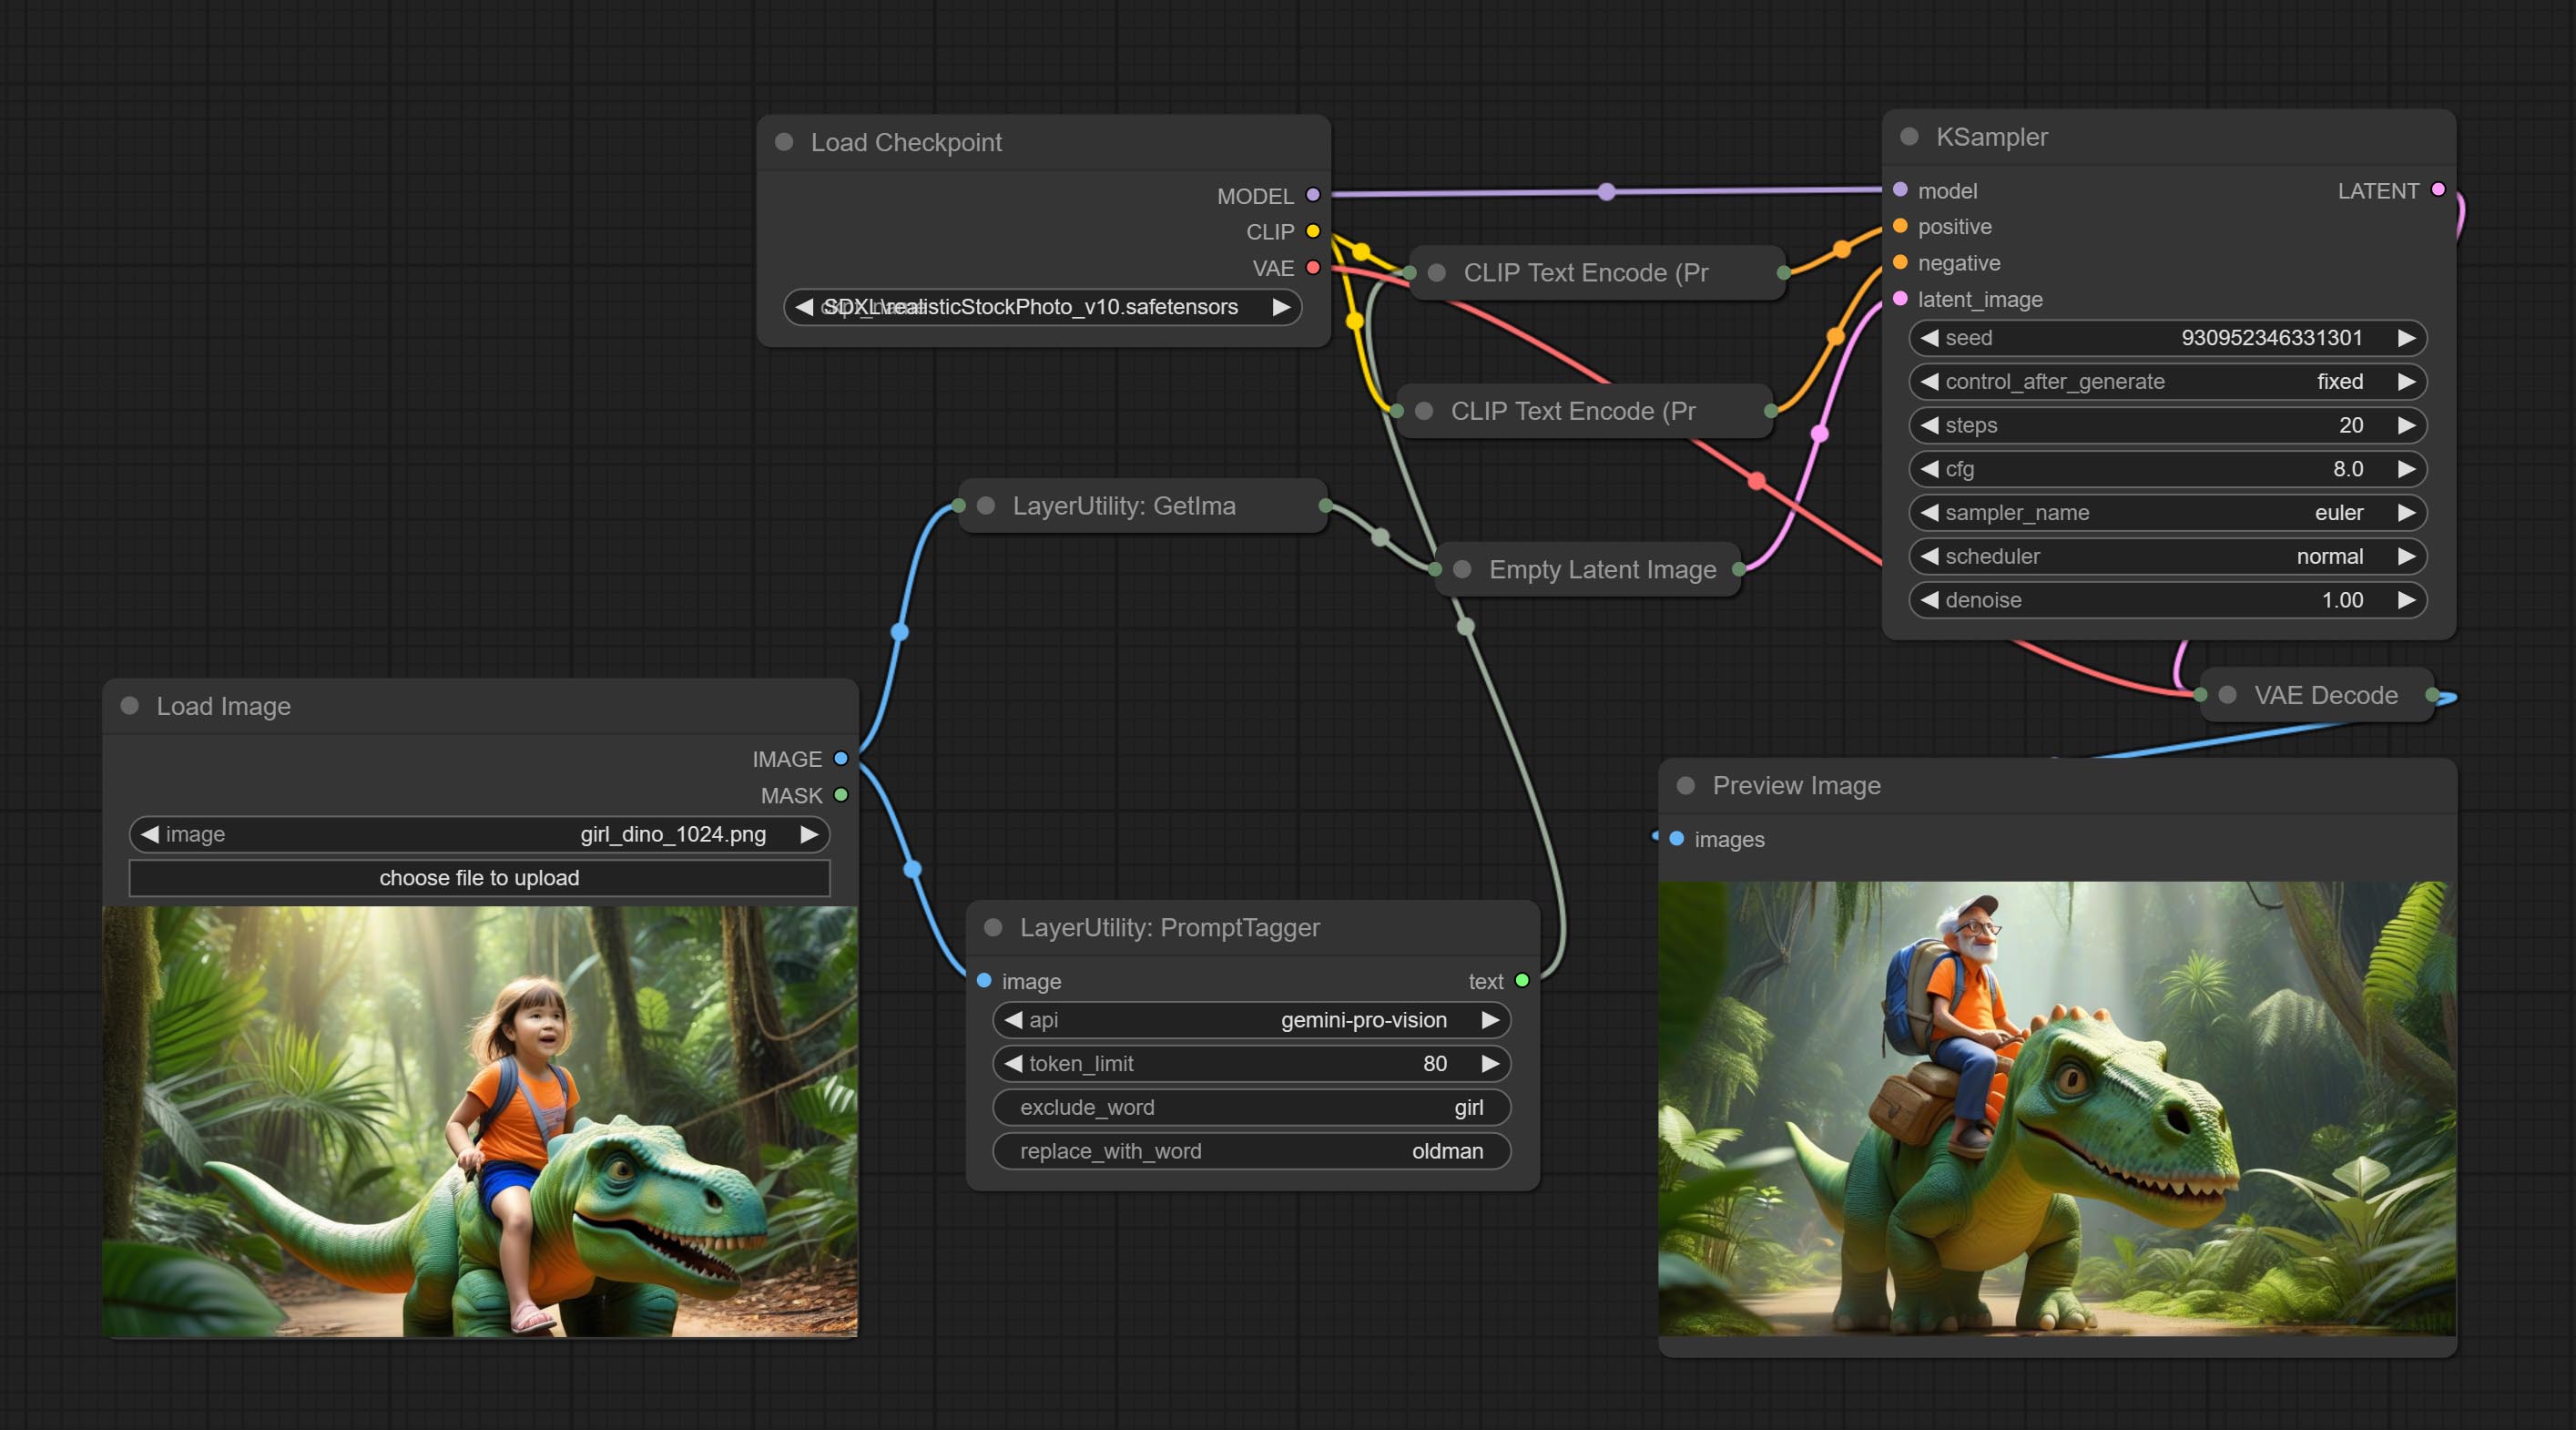
Node options:
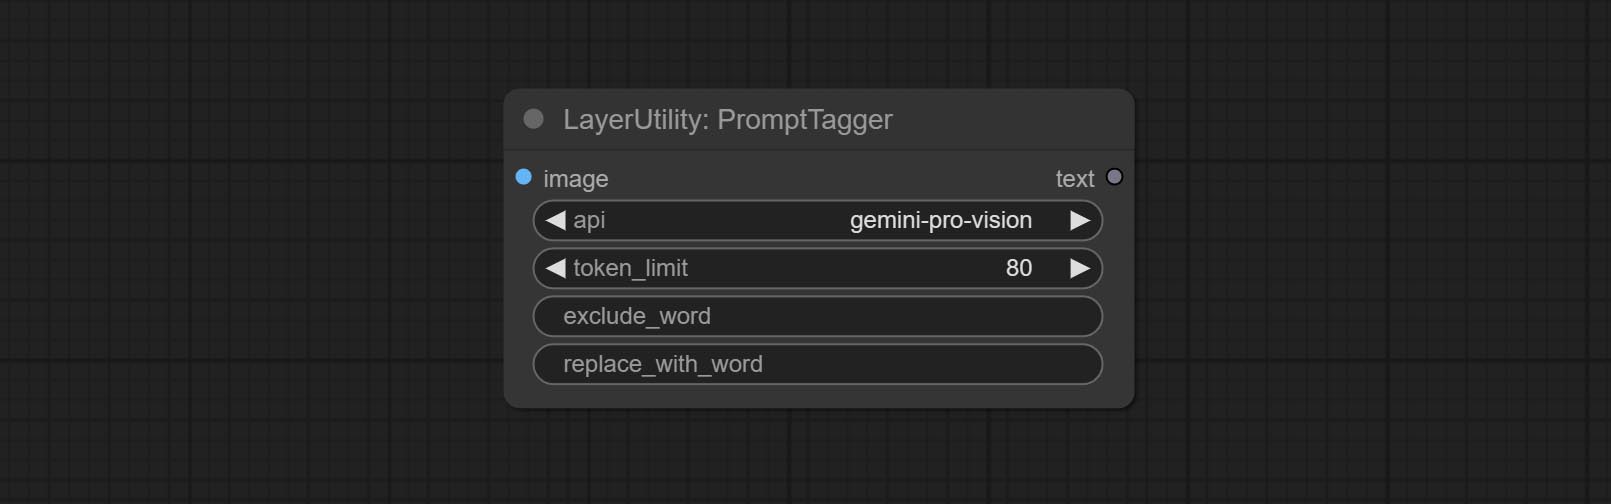
- api: The Api used. At present, there are two options "gemini-1. 5-flash" and "google-gemini".
- token_limit: The maximum token limit for generating prompt words.
- exclude_word: Keywords that need to be excluded.
- replace_with_word: That word will replace the exclude_word.
PromptEmbellish
Enter simple prompt words, output polished prompt words, and support inputting images as references, and support Chinese input. This node currently uses Google Gemini API as the backend service. Please ensure that the network environment can use Gemini normally. Please apply for your API key on Google AI Studio, And fill it in api_key.ini , this file is located in the root directory of the plug-in, and the default name is api_key.ini.example . to use this file for the first time, you need to change the file suffix to .ini . Open it using text editing software, fill in your API key after google_api_key= and save it. 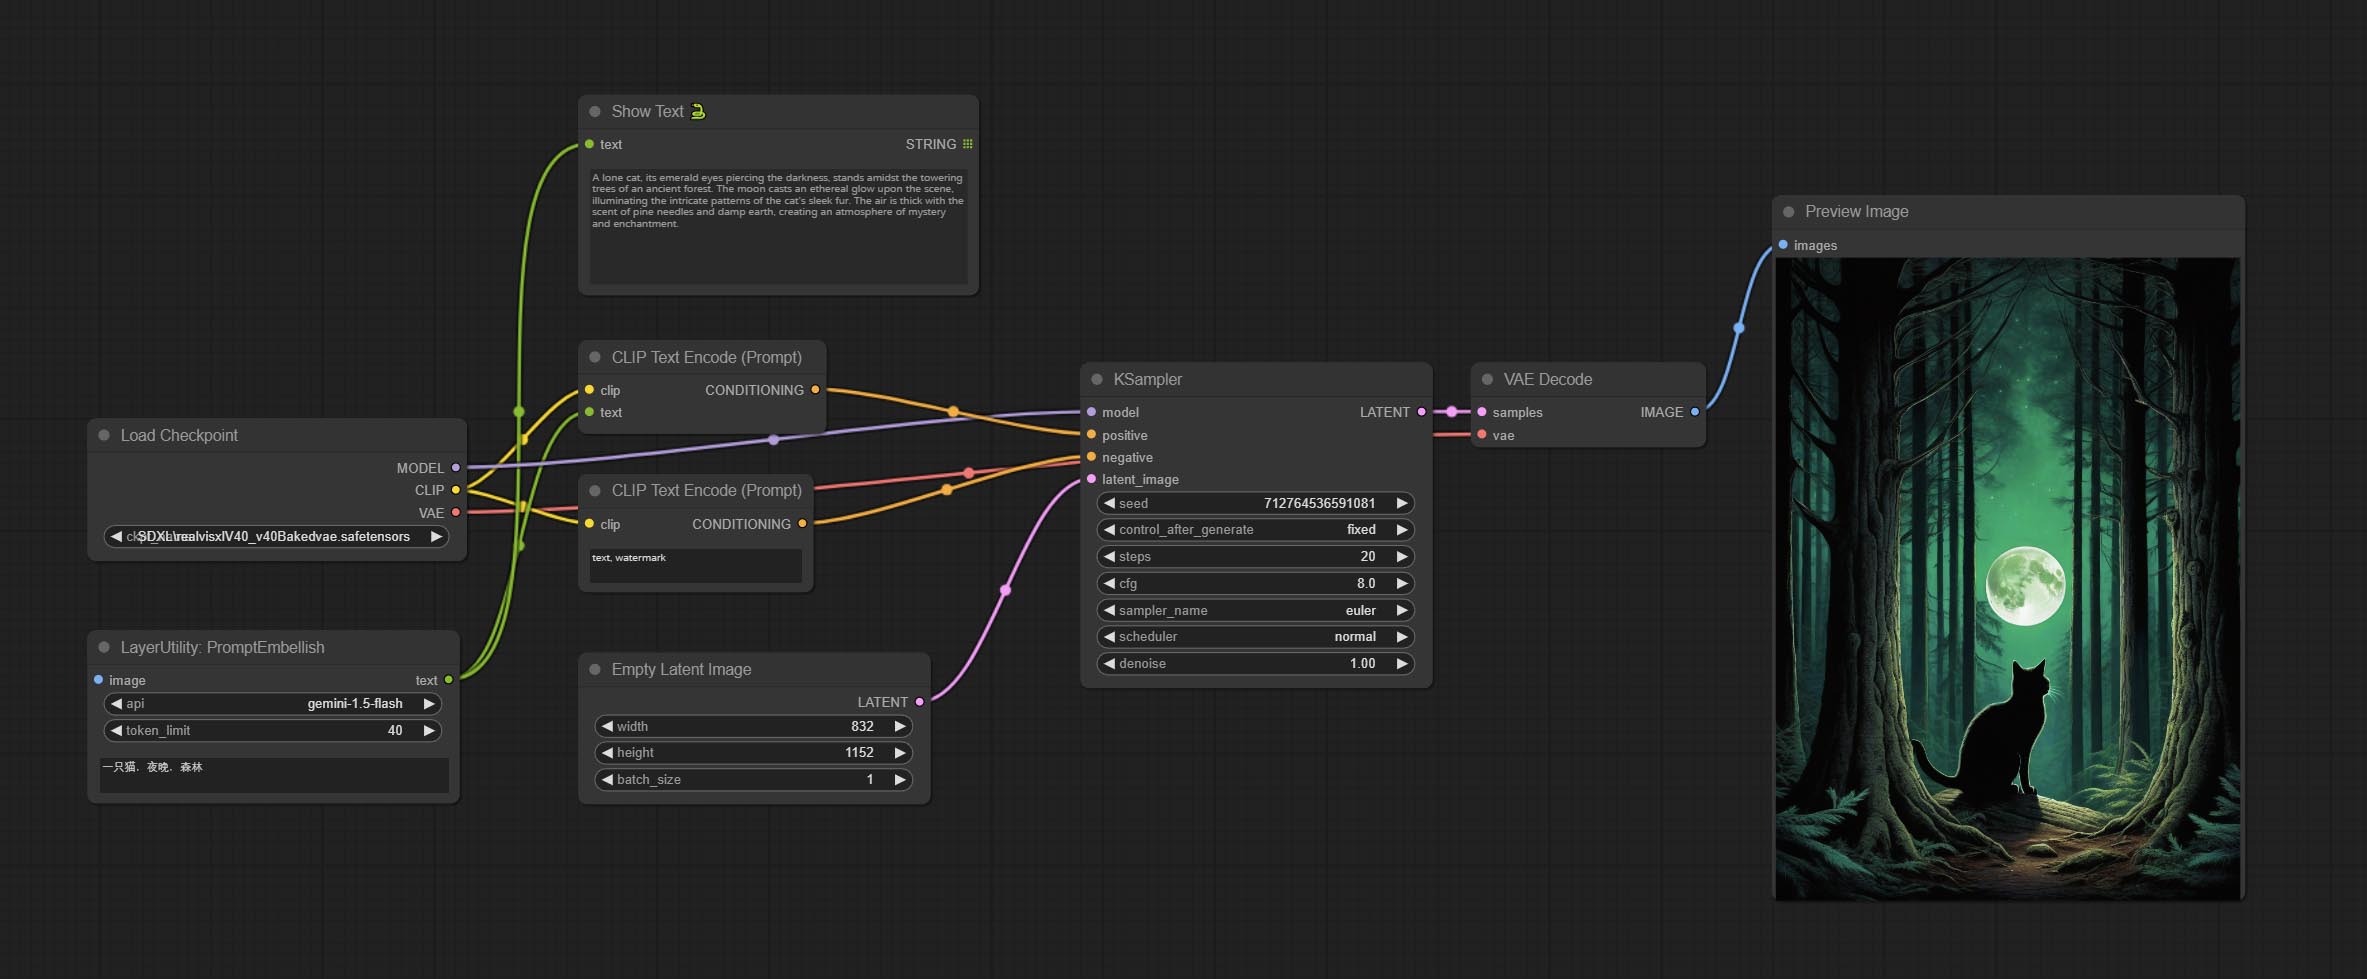
Node options:
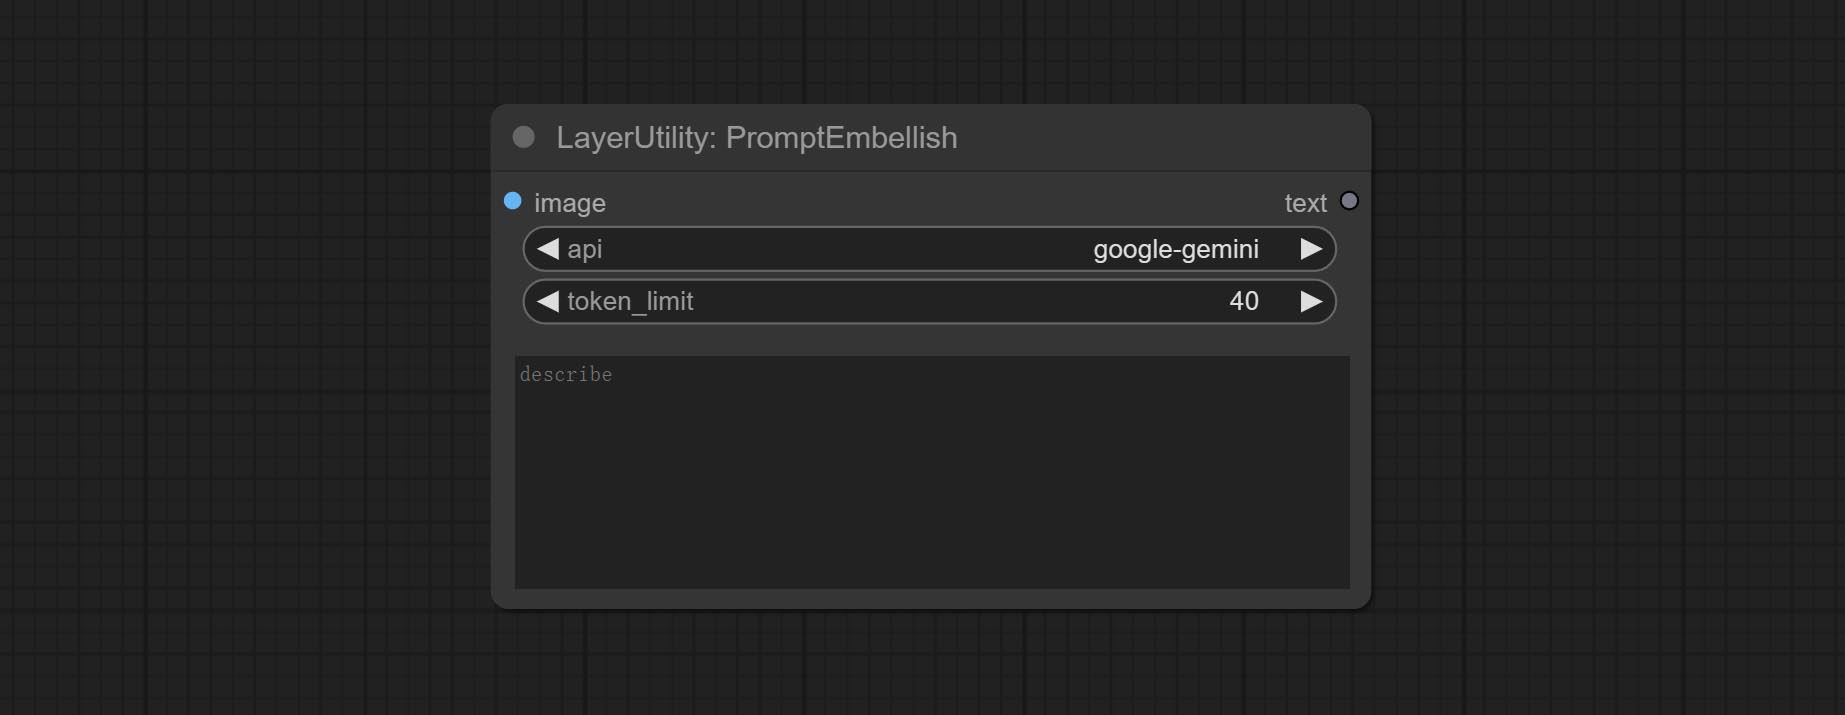
- image: Optional, input image as a reference for prompt words.
- api: The Api used. At present, there are two options "gemini-1. 5-flash" and "google-gemini".
- token_limit: The maximum token limit for generating prompt words.
- discribe: Enter a simple description here. supports Chinese text input.
Florence2Image2Prompt
Use the Florence 2 model to infer prompt words. The code for this node section is fromyiwangsimple/florence_dw, thanks to the original author. *When using it for the first time, the model will be automatically downloaded. You can also download the model file from BaiduNetdisk to ComfyUI/models/florence2 folder. 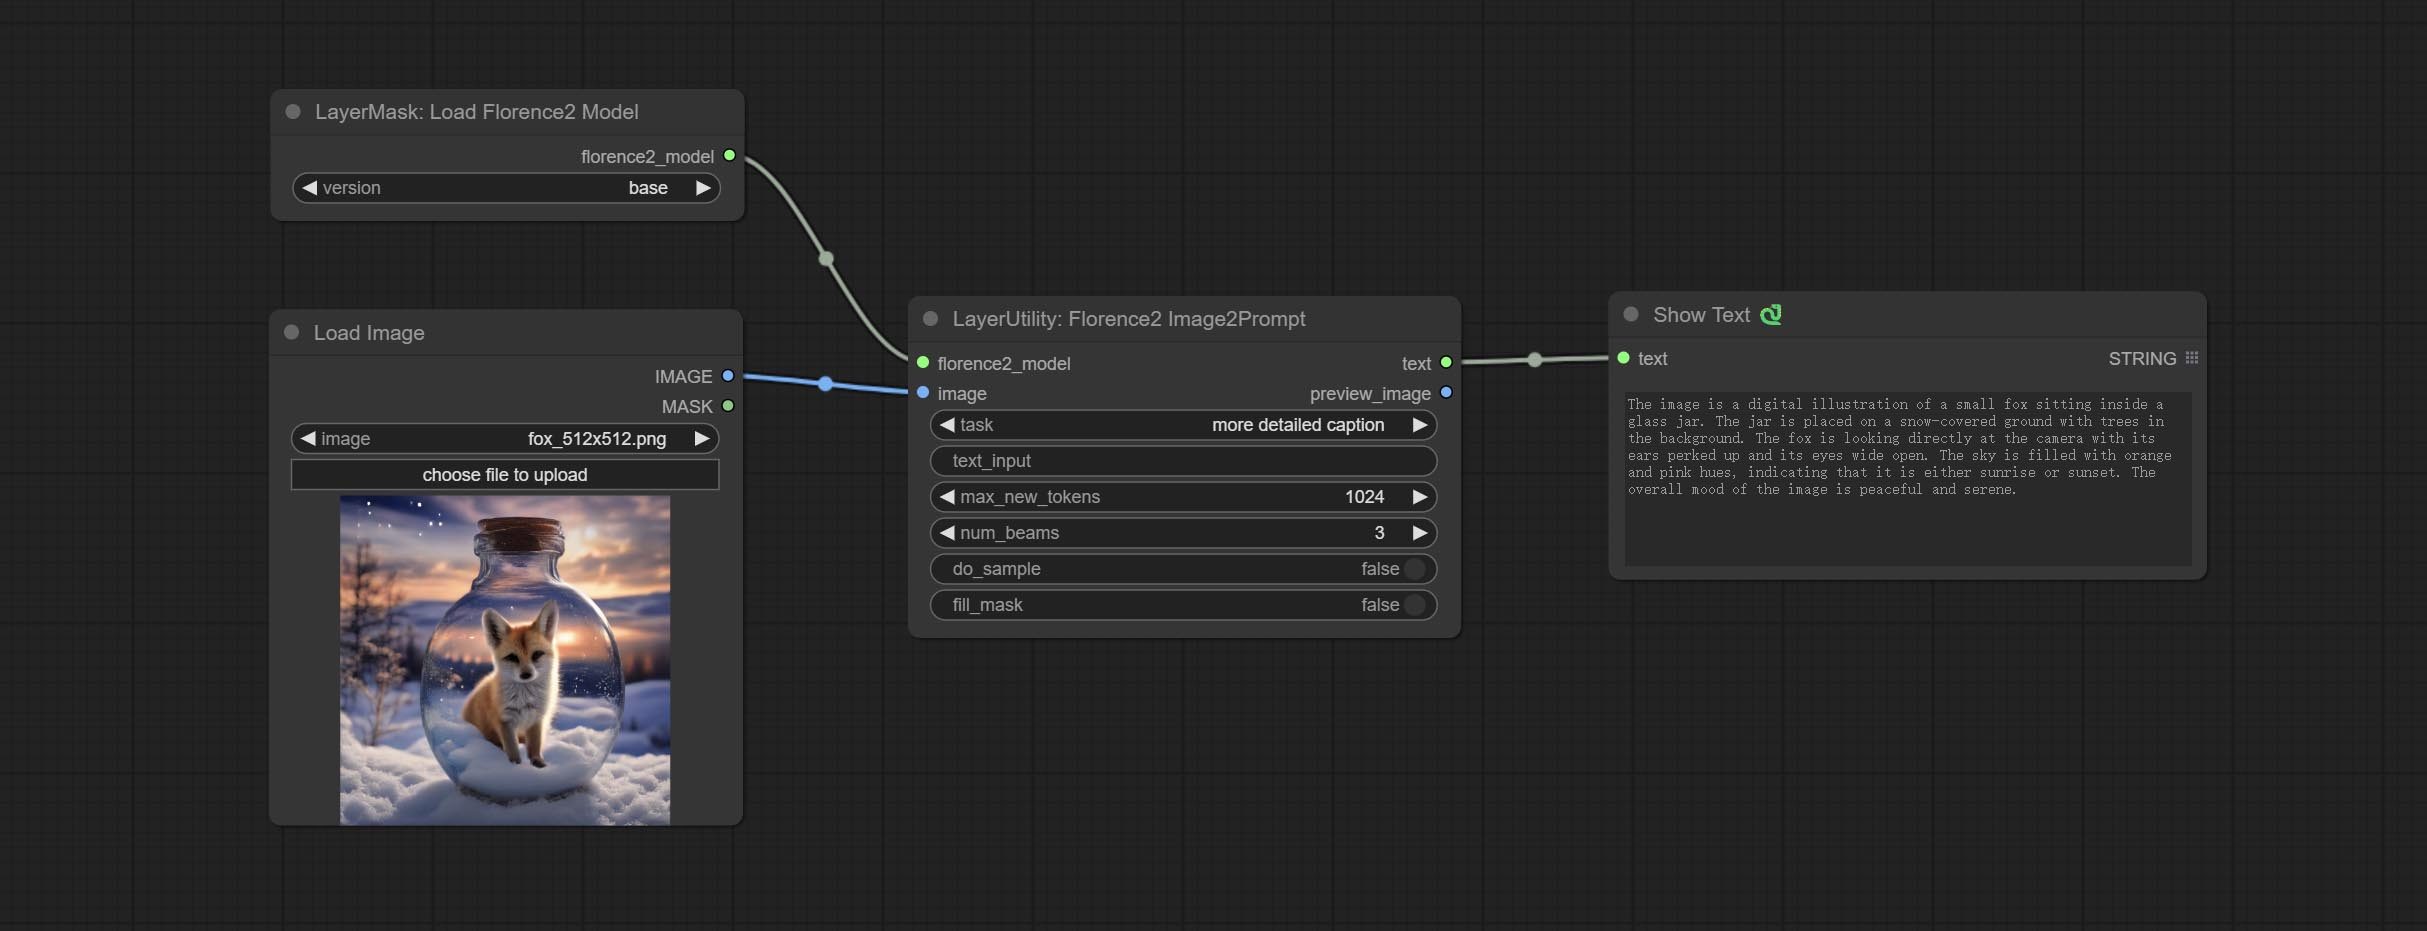
Node Options: 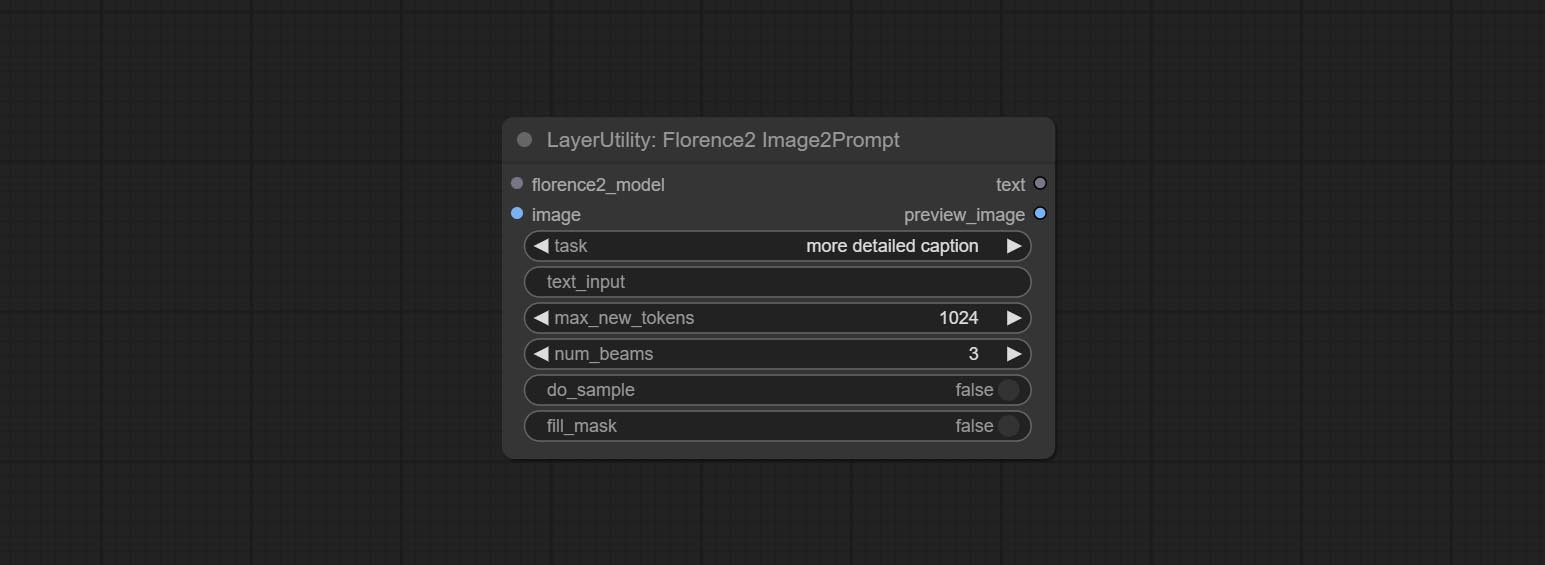
- florence2_model: Florence2 model input.
- image: Image input.
- task: Select the task for florence2.
- text_input: Text input for florence2.
- max_new_tokens: The maximum number of tokens for generating text.
- num_beams: The number of beam searches that generate text.
- do_sample: Whether to use text generated sampling.
- fill_mask: Whether to use text marker mask filling.
VQAPrompt
Use the blip-vqa model for visual question answering. Part of the code for this node is referenced from celoron/ComfyUI-VisualQueryTemplate, thanks to the original author.
*Download model files from BaiduNetdisk or huggingface.co/Salesforce/blip-vqa-capfilt-large and huggingface.co/Salesforce/blip-vqa-base and copy to ComfyUImodelsVQA folder.
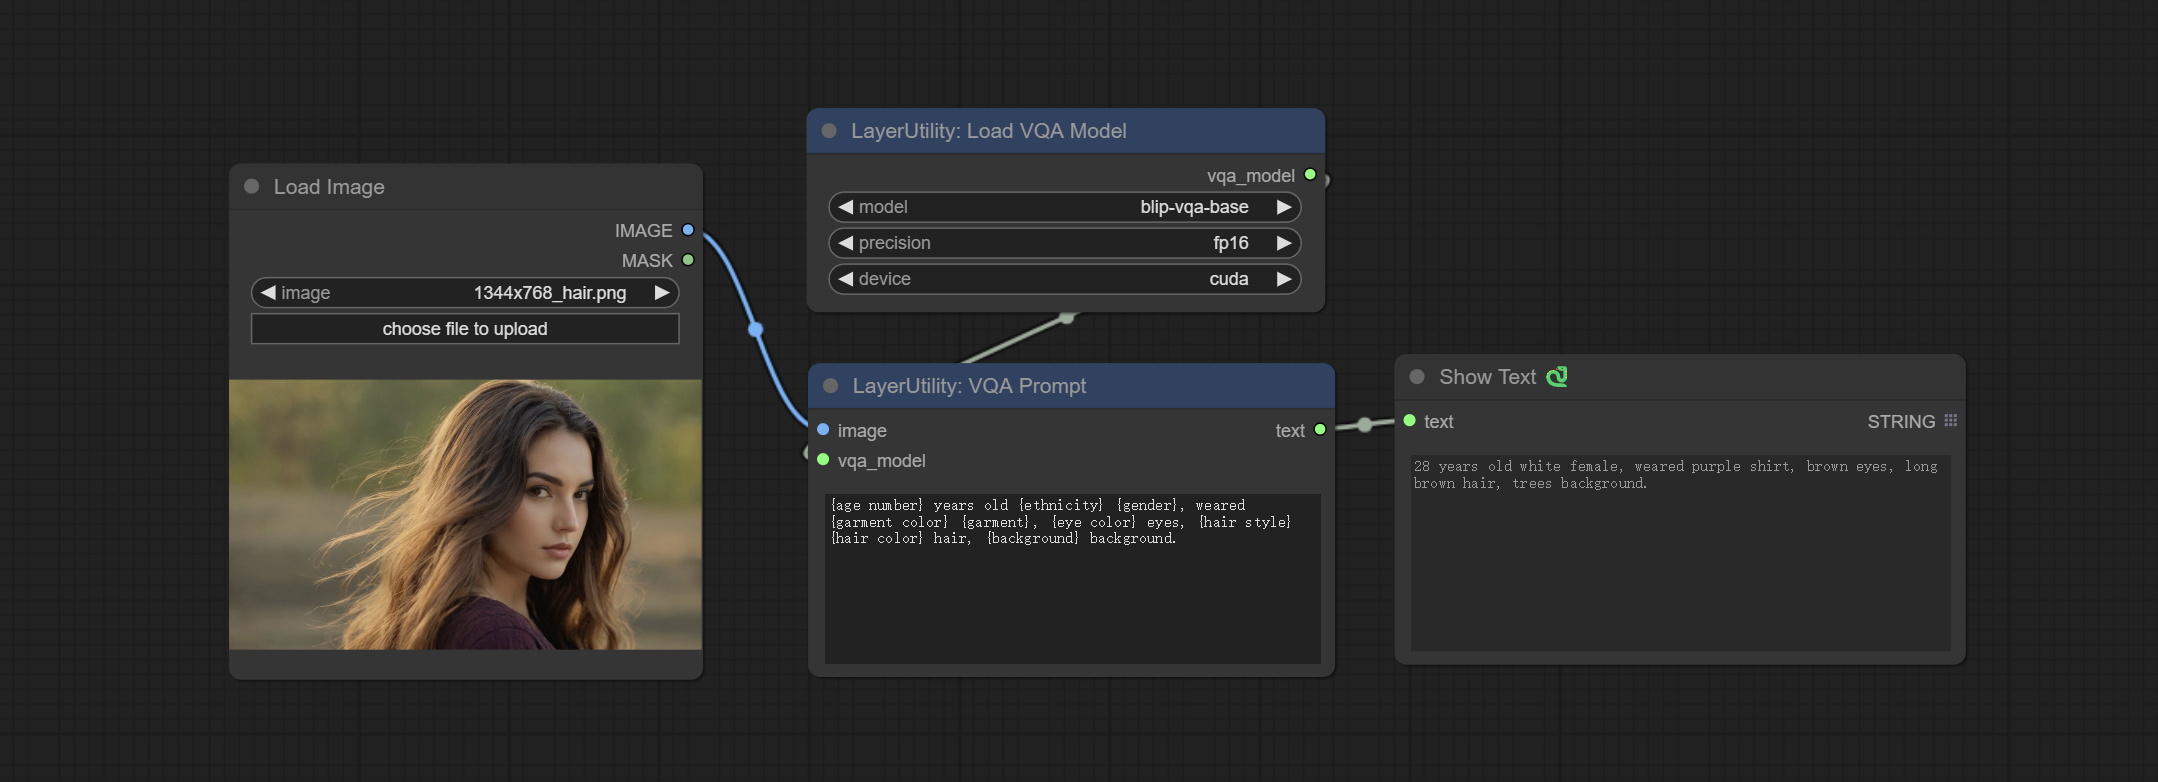
Node Options: 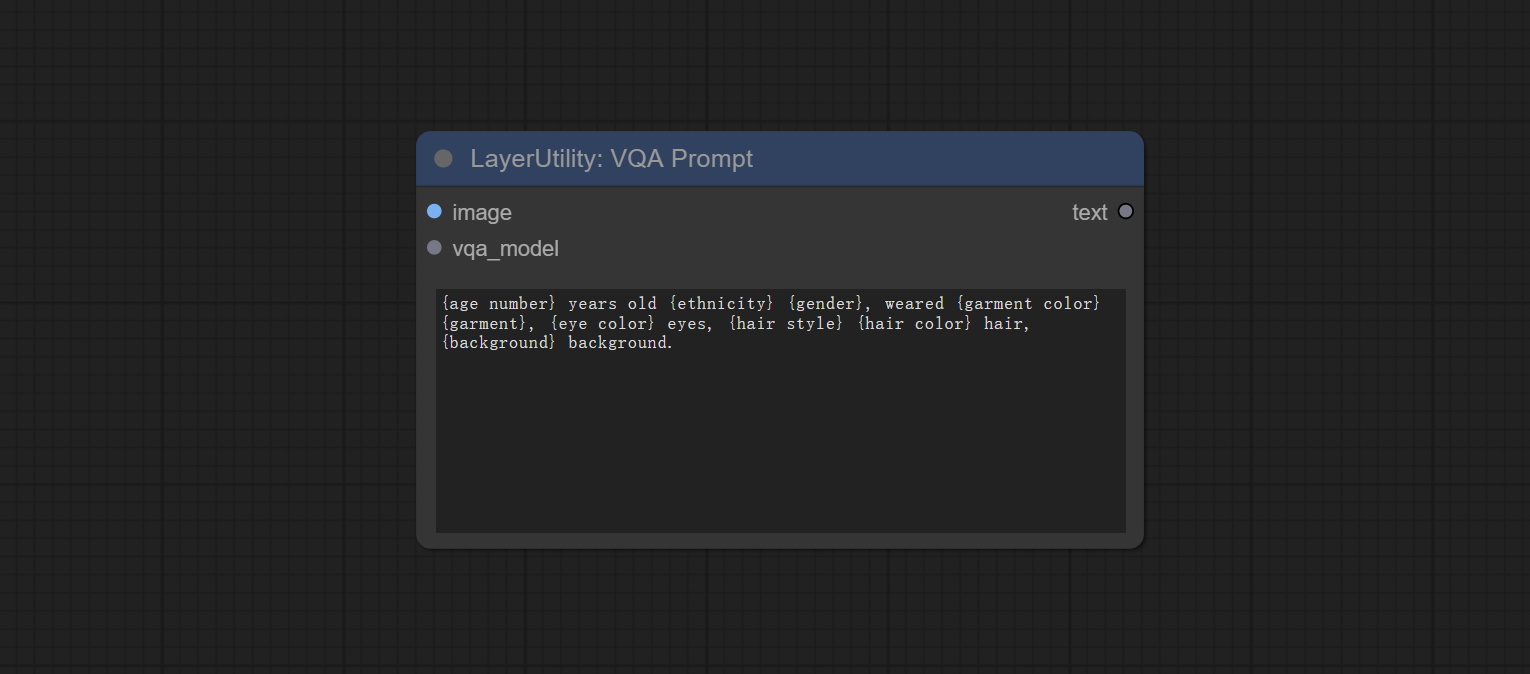
- image: The image input.
- vqa_model: The vqa model input, it from LoadVQAModel node.
- question: Task text input. A single question is enclosed in curly braces "{}", and the answer to the question will be replaced in its original position in the text output. Multiple questions can be defined using curly braces in a single Q&A. For example, for a picture of an item placed in a scene, the question is:"{object color} {object} on the {scene}".
LoadVQAModel
Load the blip-vqa model.
Node Options: 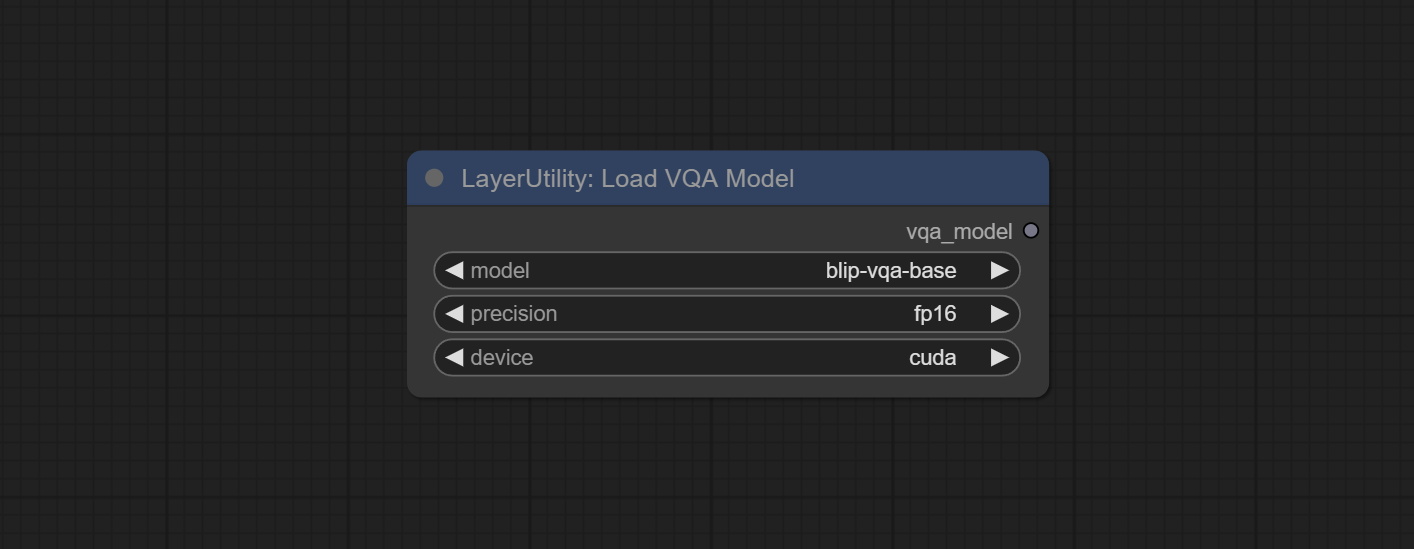
- model: There are currently two models to choose from "blip-vqa-base" and "blip-vqa-capfilt-large".
- precision: The model accuracy has two options: "fp16" and "fp32".
- device: The model running device has two options: "cuda" and "cpu".
ImageShift
Shift the image. this node supports the output of displacement seam masks, making it convenient to create continuous textures. 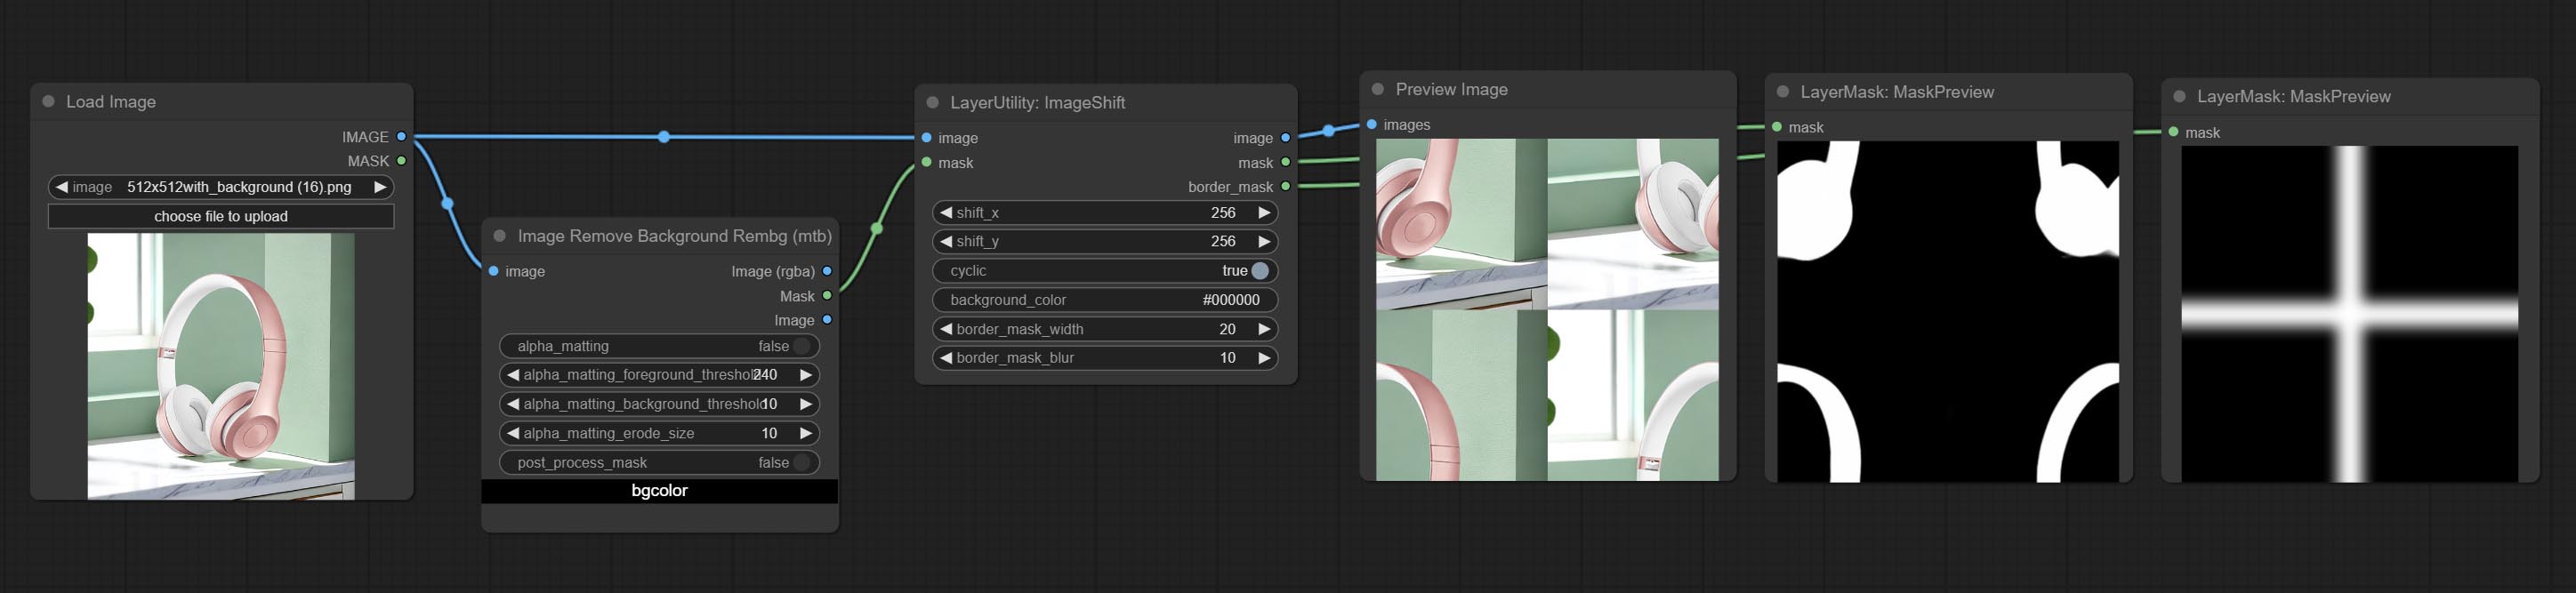
Node options:
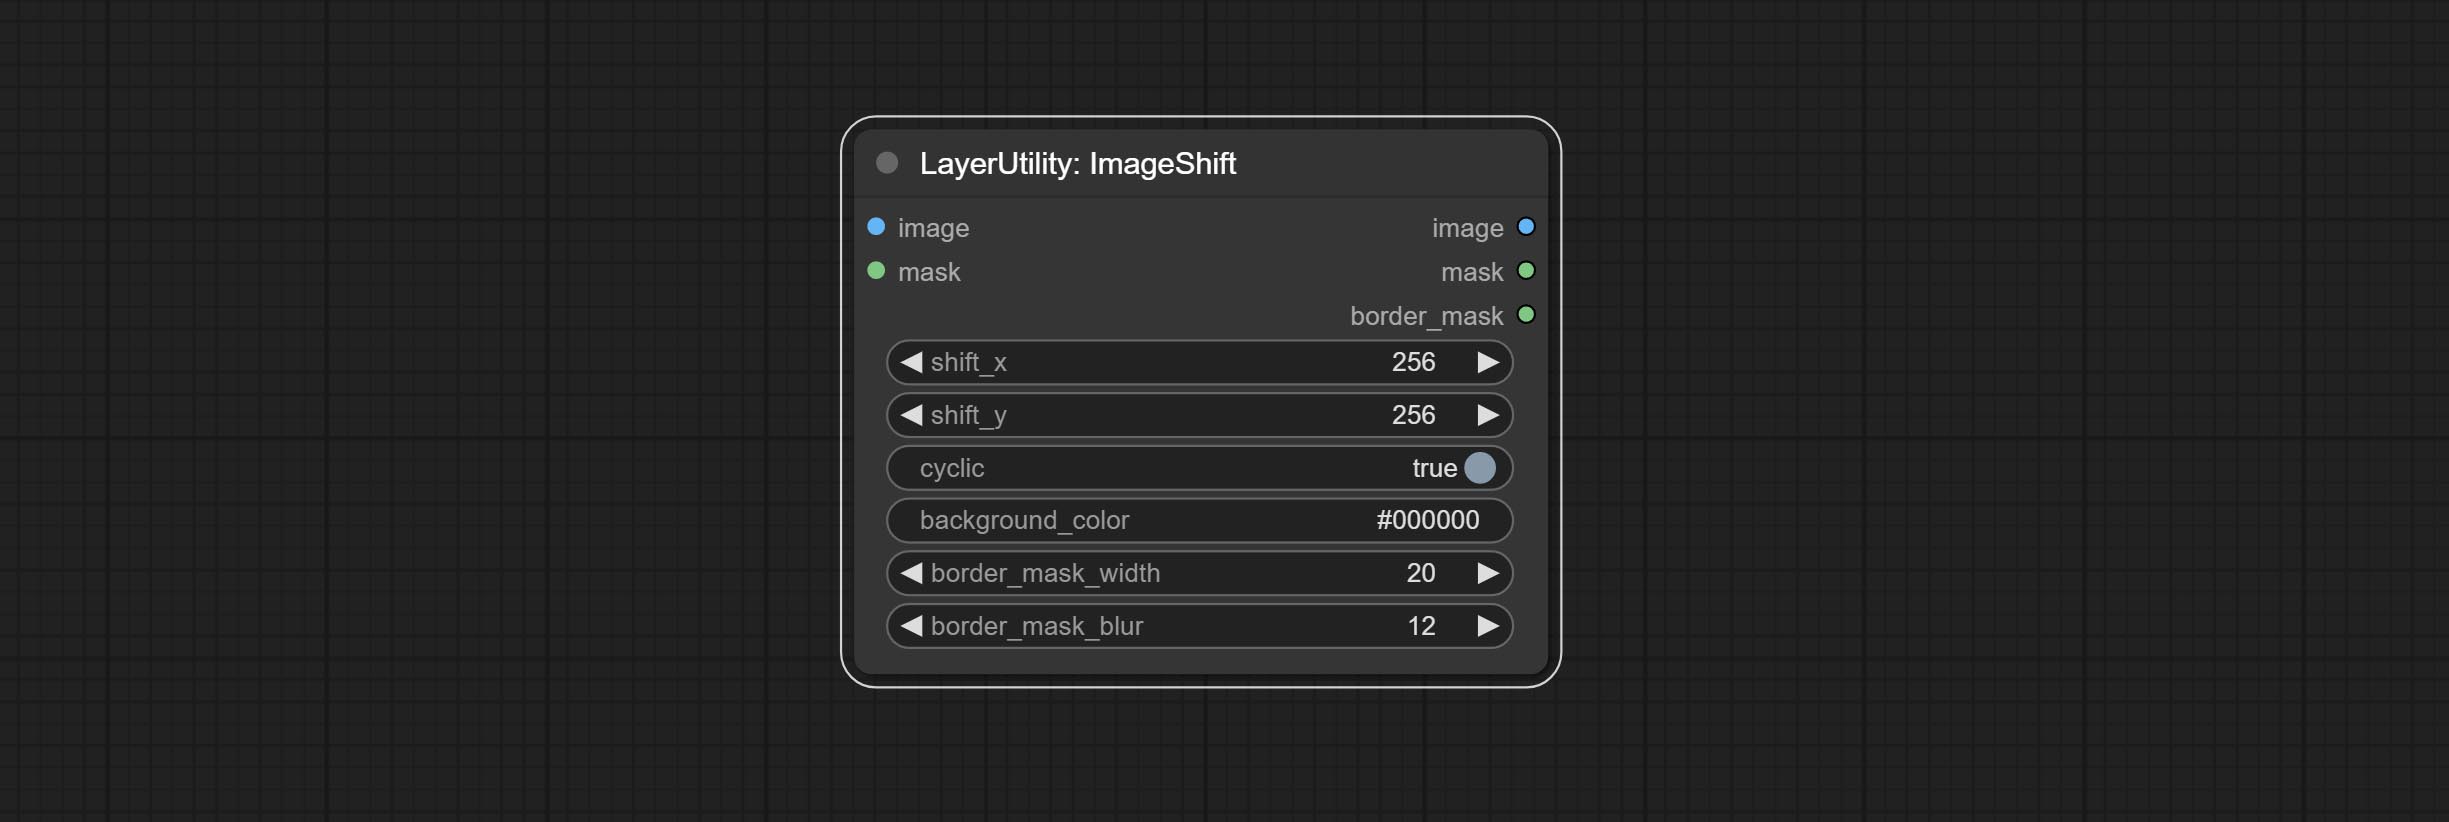
- image 5 : The input image.
- mask 2,5 : The mask of image.
- shift_x: Horizontal distance of shift.
- shift_y: Vertical distance of shift.
- cyclic: Is the part of displacement that is out of bounds cyclic.
- background_color 4 : Background color. if cyclic is set to False, the setting here will be used as the background color.
- border_mask_width: Border mask width.
- border_mask_blur: Border mask blur.
- บันทึก
ImageBlend
A simple node for composit layer image and background image, multiple blend modes are available for option, and transparency can be set. 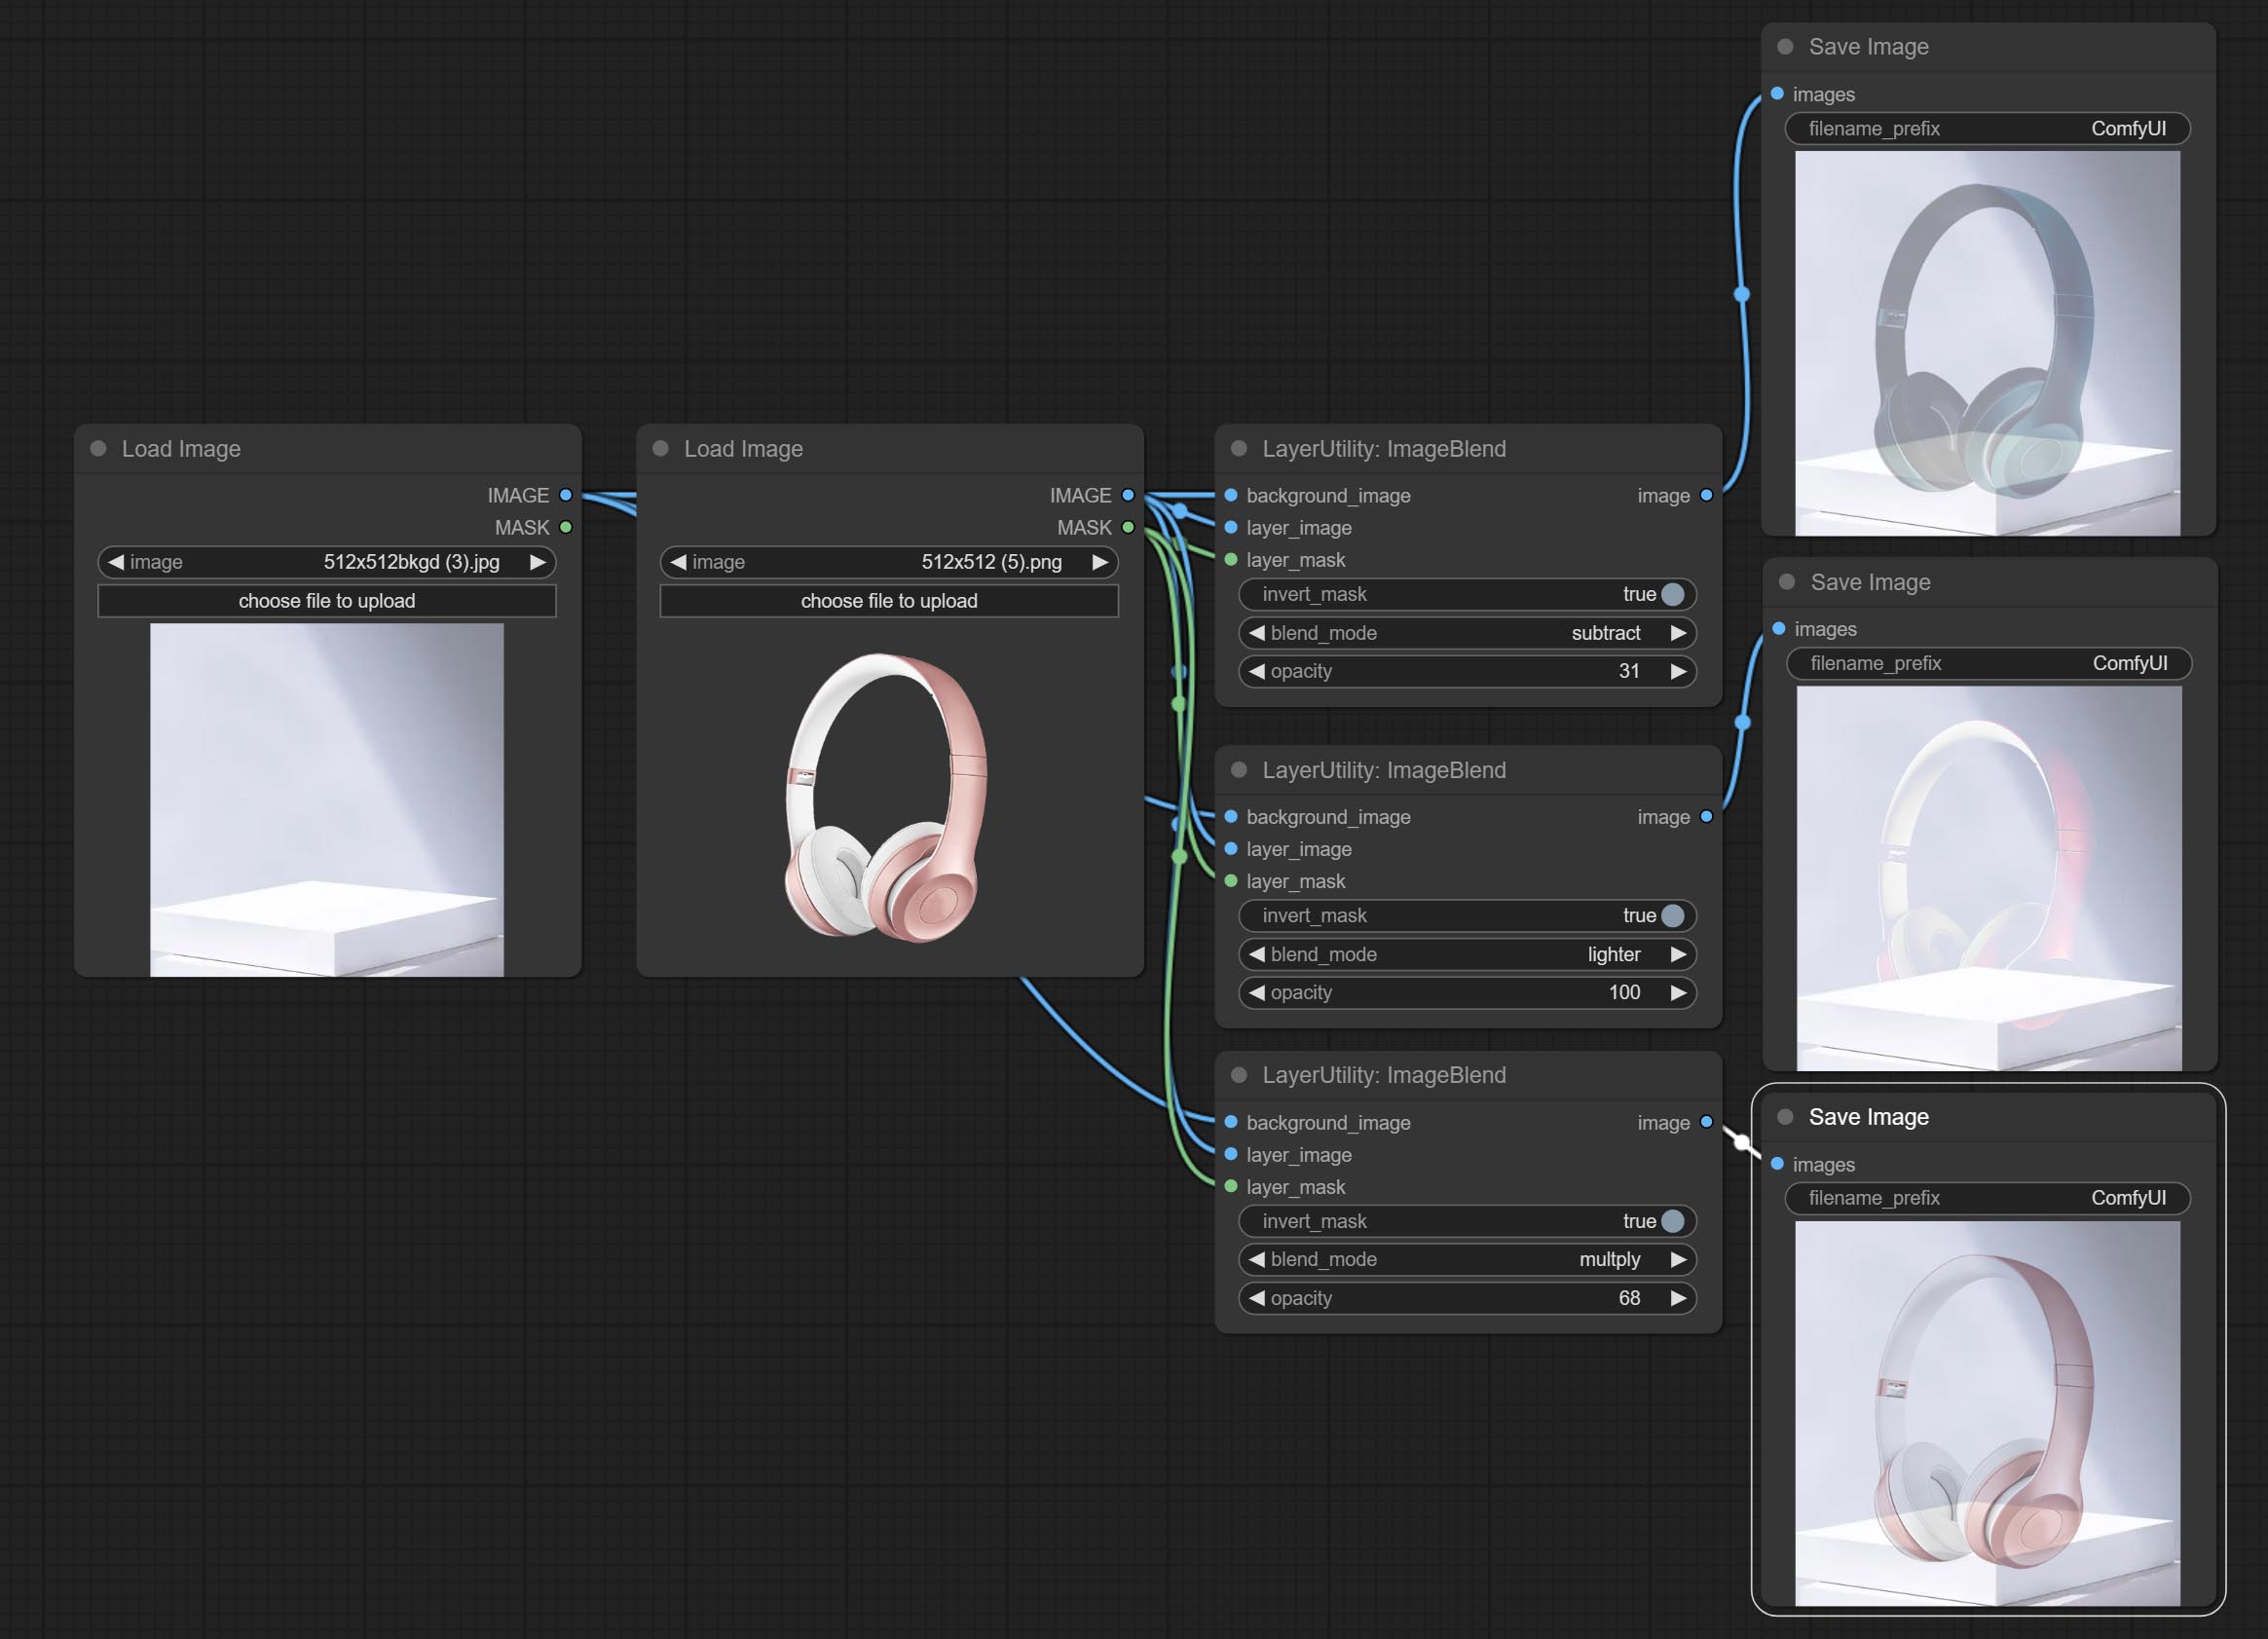
Node options: 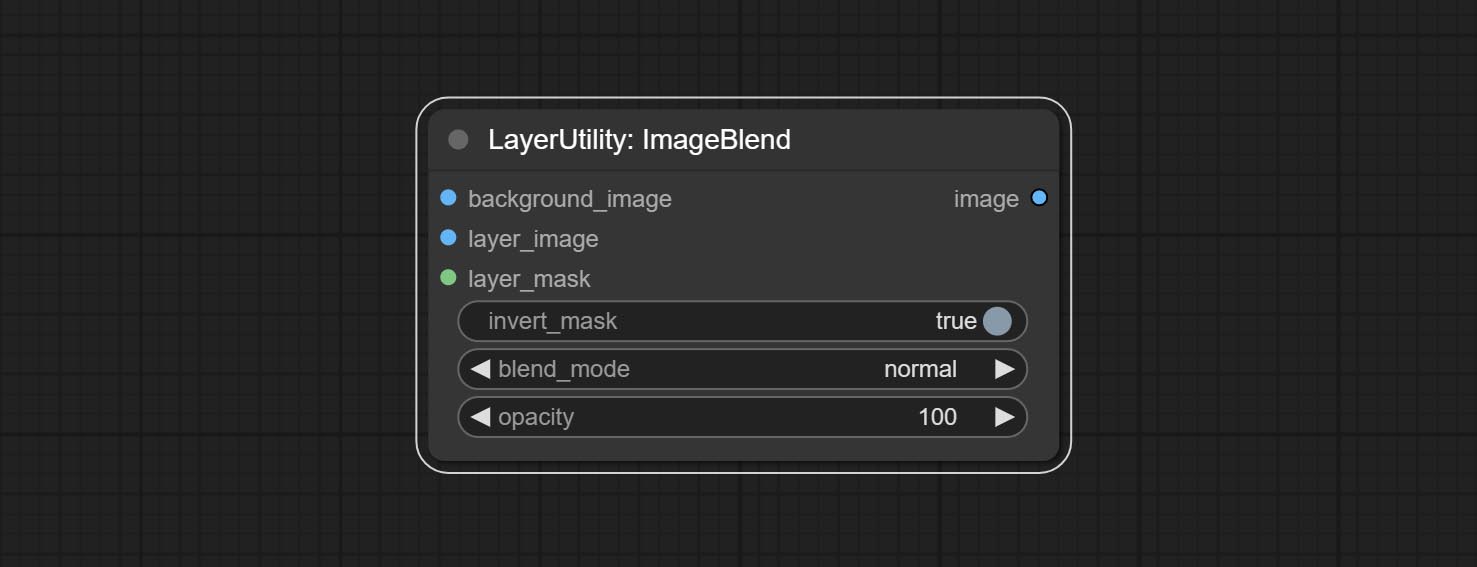
- background_image 1 : The background image.
- layer_image 1 : Layer image for composite.
- layer_mask 1,2 : Mask for layer_image.
- invert_mask: Whether to reverse the mask.
- blend_mode 3 : Blending mode.
- opacity: Opacity of blend.
- บันทึก
ImageReel
Display multiple images in one reel. Text annotations can be added to each image in the reel. By using the ImageReelComposite node, multiple reel can be combined into one image. 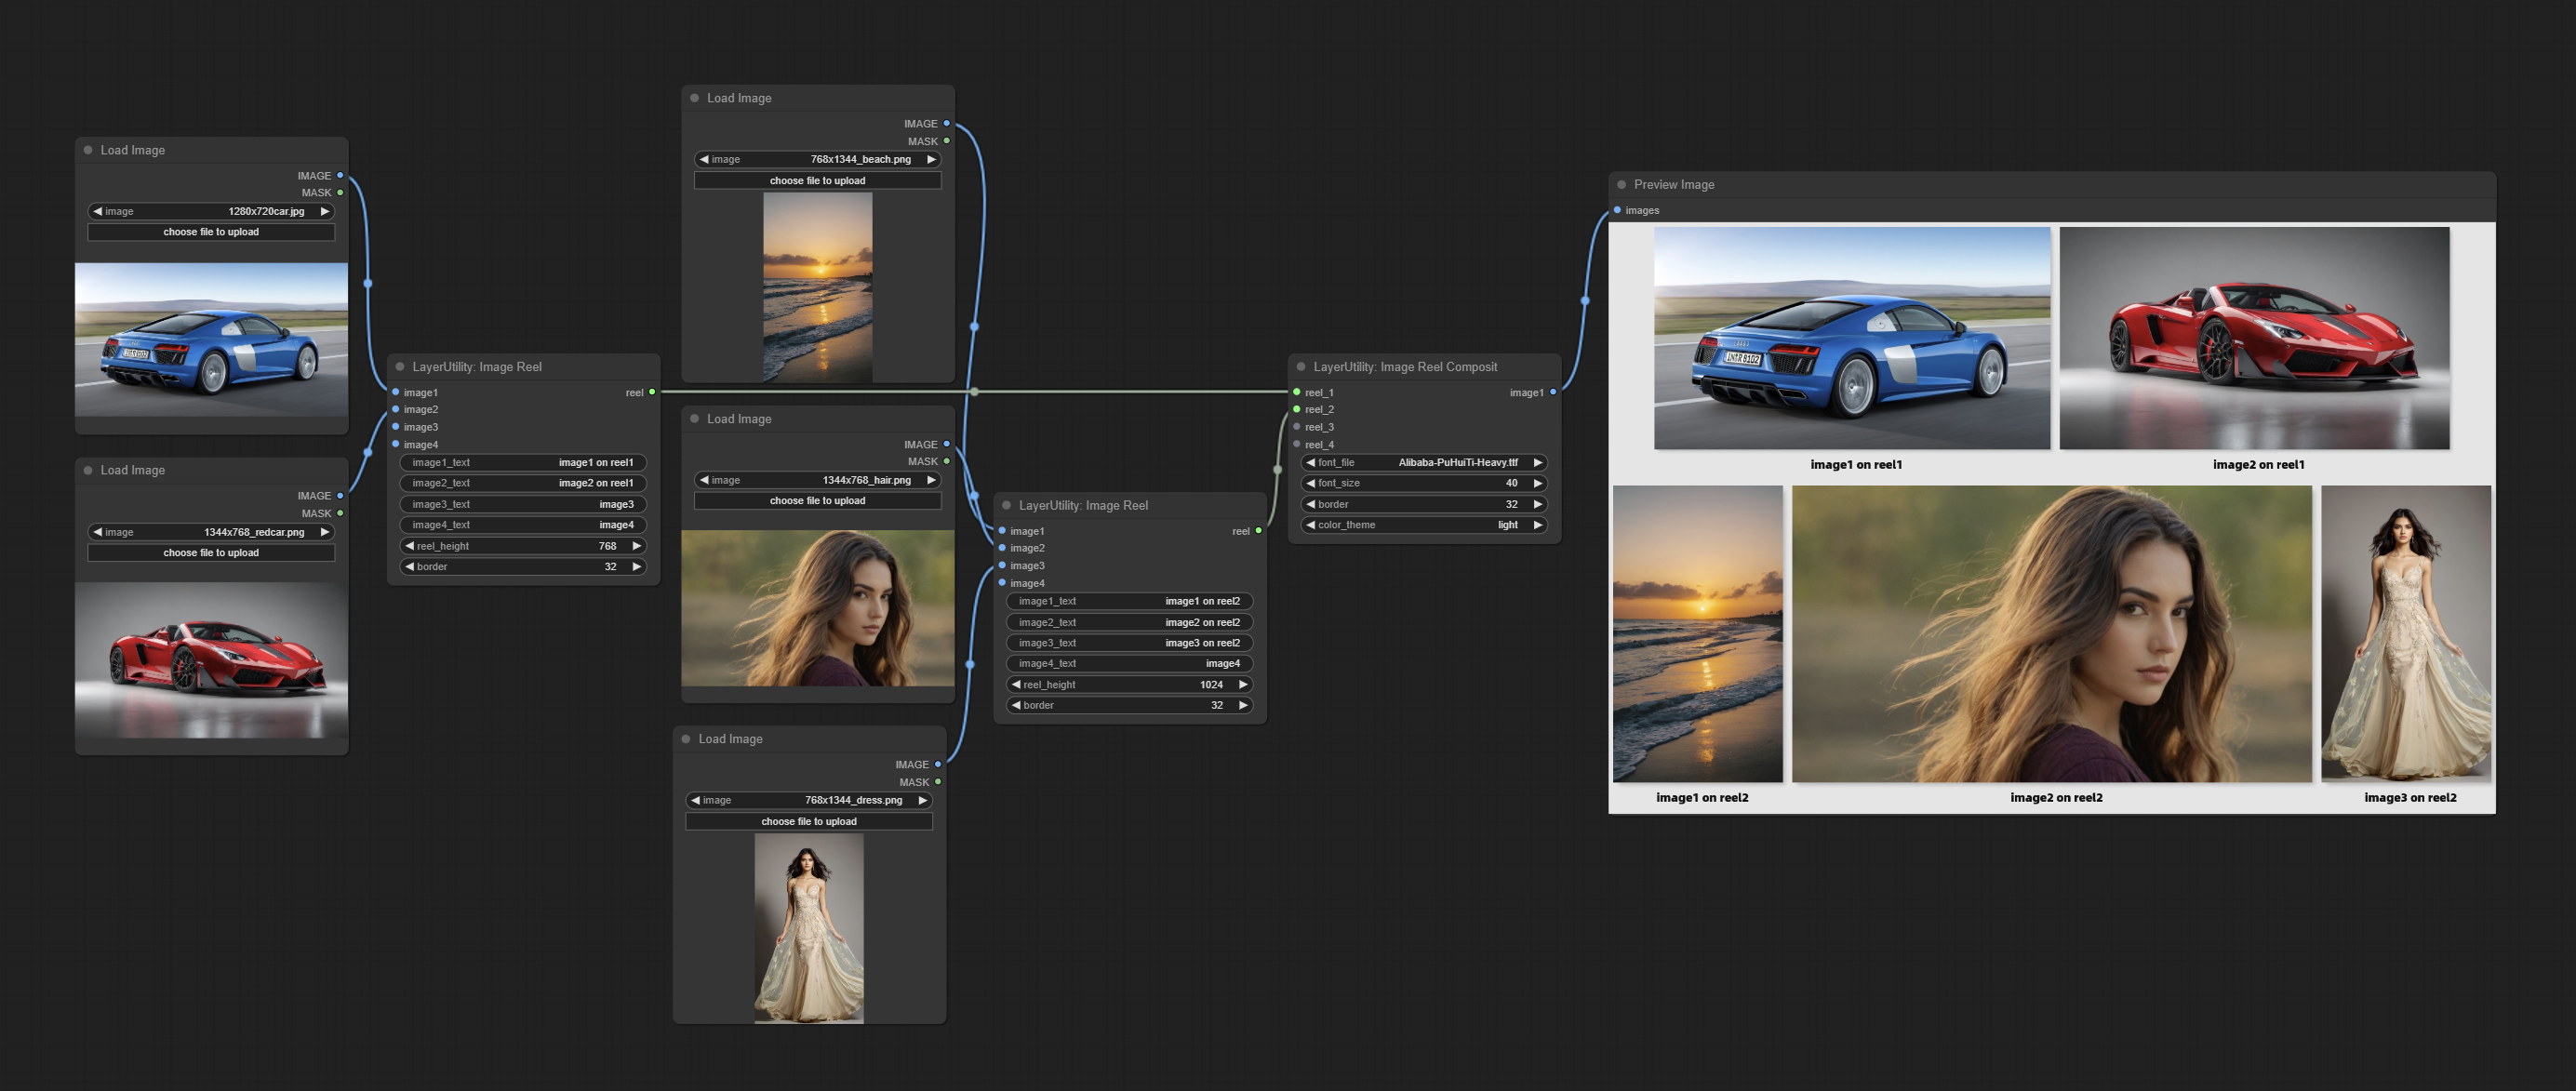
Node Options:
- image1: The first image. it must be input.
- image2: The second image. optional input.
- image3: The third image. optional input.
- image4: The fourth image. optional input.
- image1_text: Text annotation for the first image.
- image2_text: Text annotation for the second image.
- image3_text: Text annotation for the third image.
- image4_text: Text annotation for the fourth image.
- reel_height: The height of reel.
- border: The border width of the image in the reel.
Output:
- reel: The reel of ImageReelComposite node input.
ImageReelComposite
Combine multiple reel into one image.
Node Options: 
- reel_1: The first reel. it must be input.
- reel_2: The second reel. optional input.
- reel_3: The third reel. optional input.
- reel_4: The fourth reel. optional input.
- font_file ** : Here is a list of available font files in the font folder, and the selected font files will be used to generate images.
- border: The border width of the reel.
- color_theme: Theme color for the output image.
* The font folder is defined in resource_dir.ini , this file is located in the root directory of the plug-in, and the default name is resource_dir.ini.example . to use this file for the first time, you need to change the file suffix to .ini . Open the text editing software and find the line starting with "FONT_dir=", after "=", enter the custom folder path name. support defining multiple folders in resource-dir.ini , separated by commas, semicolons, or spaces. all font files in this folder will be collected and displayed in the node list during ComfyUI initialization. If the folder set in ini is invalid, the font folder that comes with the plugin will be enabled.
ImageOpacity
Adjust image opacity 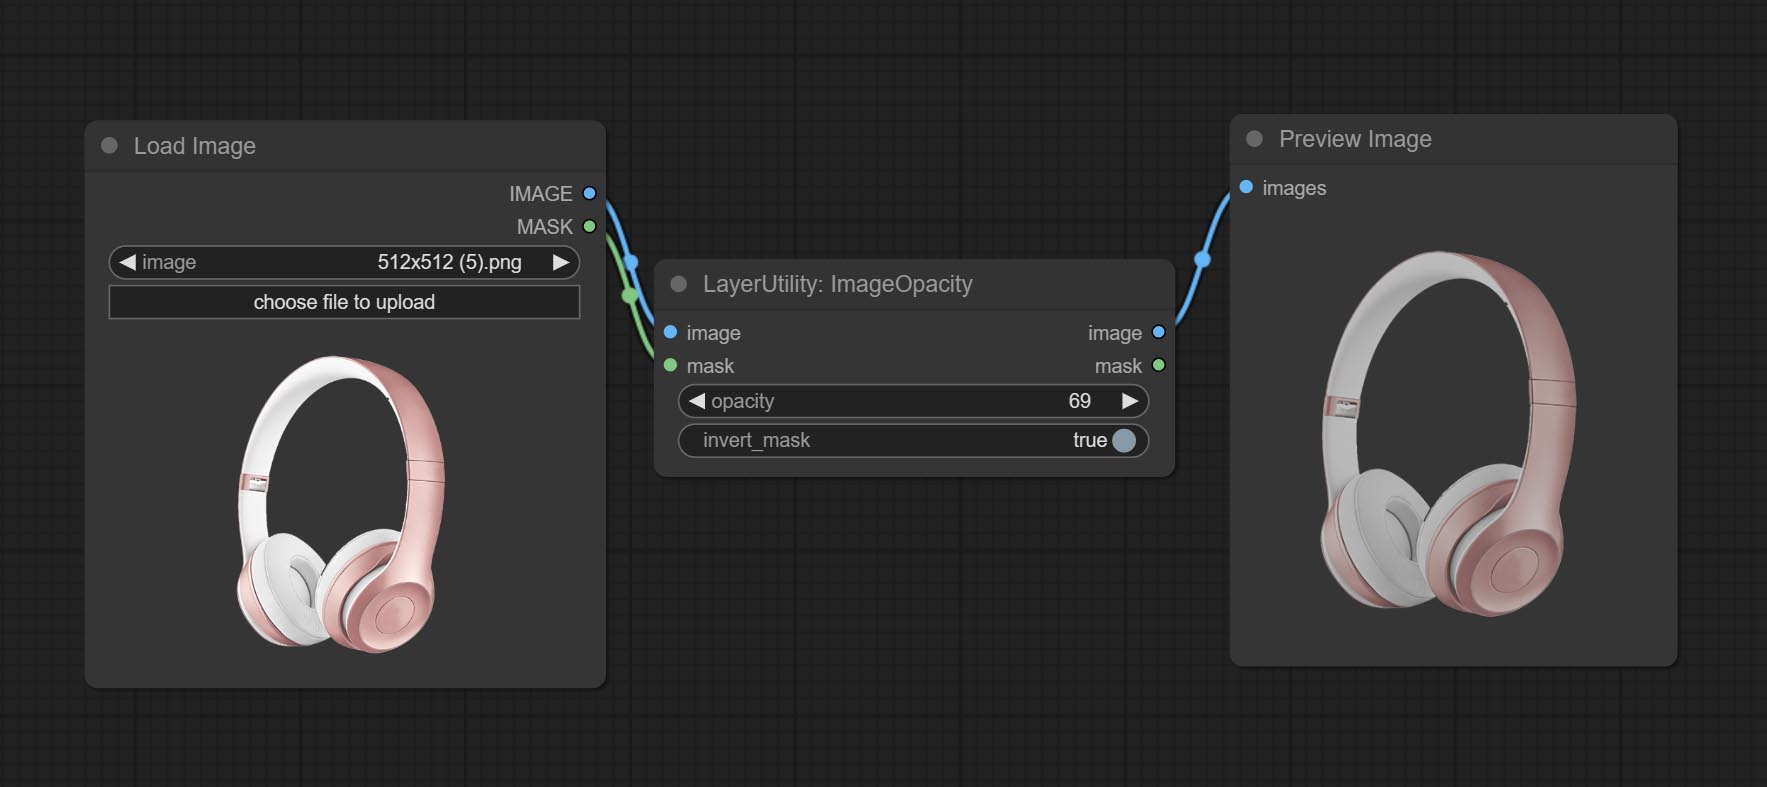
Node option:
- image 5 : Image input, supporting RGB and RGBA. if is RGB, the alpha channel of the entire image will be automatically added.
- mask 2,5 : Mask input.
- invert_mask: Whether to reverse the mask.
- opacity: Opacity of image.
- บันทึก
ColorPicker
Modify web extensions from mtb nodes. Select colors on the color palette and output RGB values, thanks to the original author. 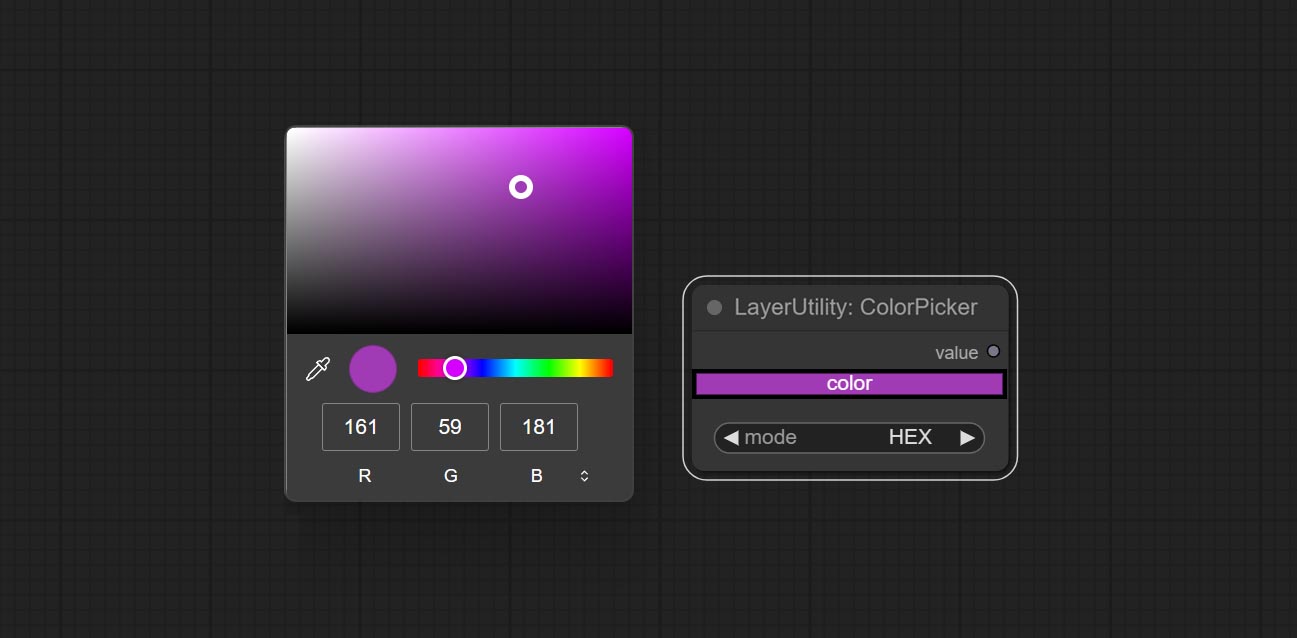
Node options:
- mode: The output format is available in hexadecimal (HEX) and decimal (DEC).
Output type:
RGBValue
Output the color value as a single R, G, B three decimal values. Supports HEX and DEC formats for ColorPicker node output.
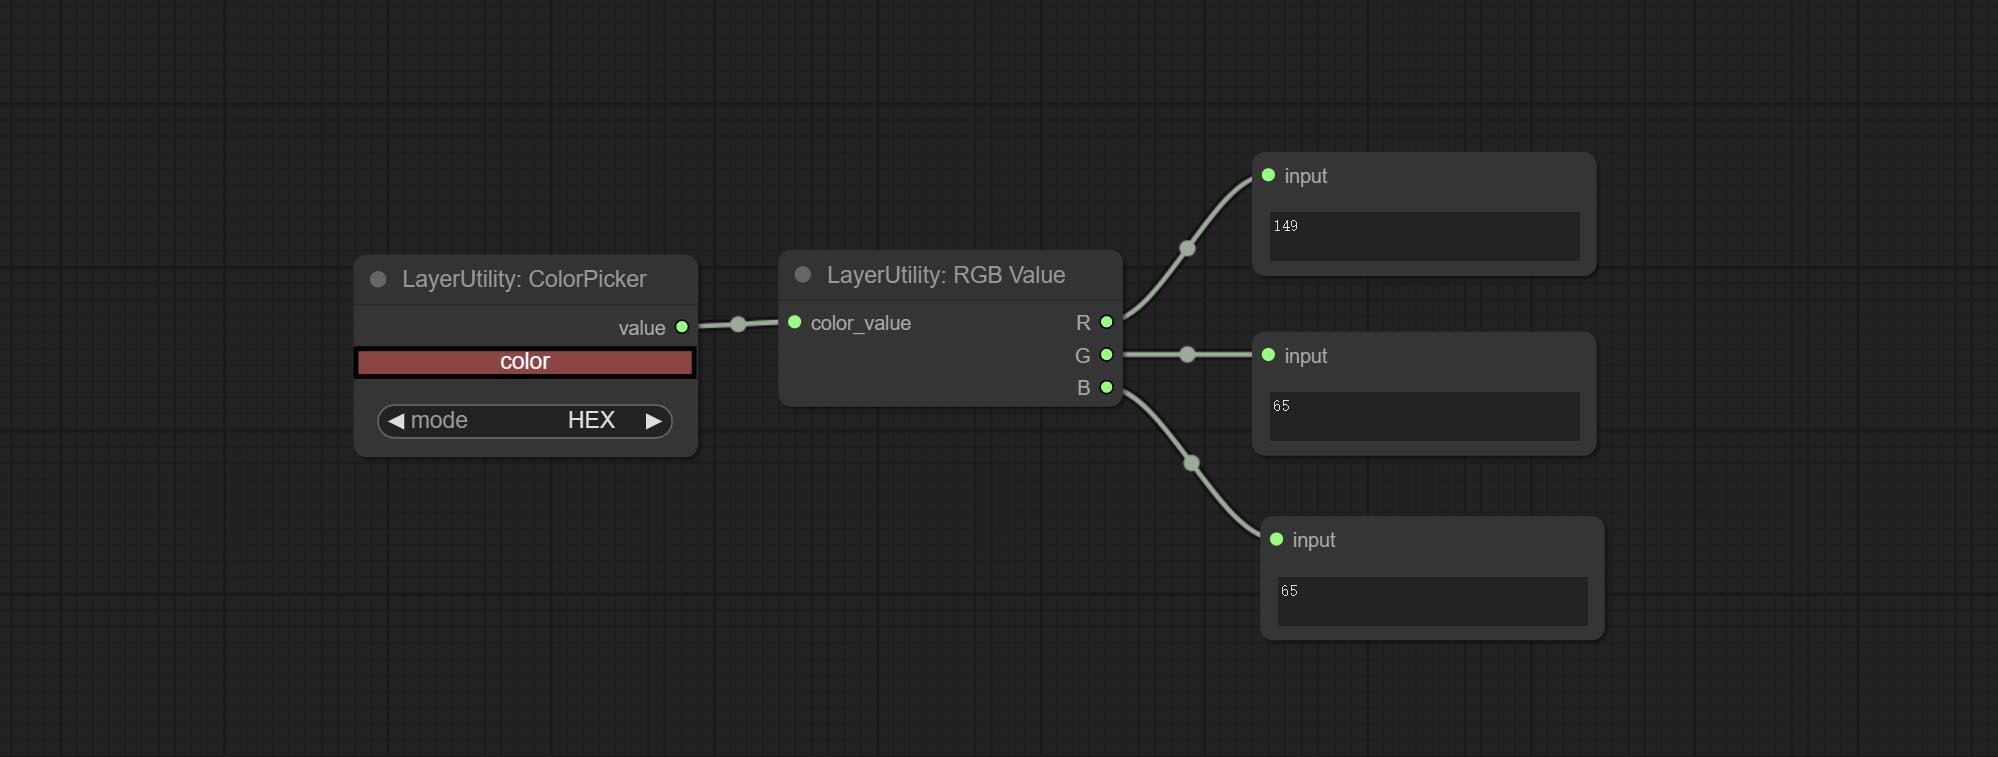
Node Options:
- color_value: Supports hexadecimal (HEX) or decimal (DEC) color values and should be of string or tuple type. Forcing in other types will result in an error.
HSVValue
Output color values as individual decimal values of H, S, and V (maximum value of 255). Supports HEX and DEC formats for ColorPicker node output. 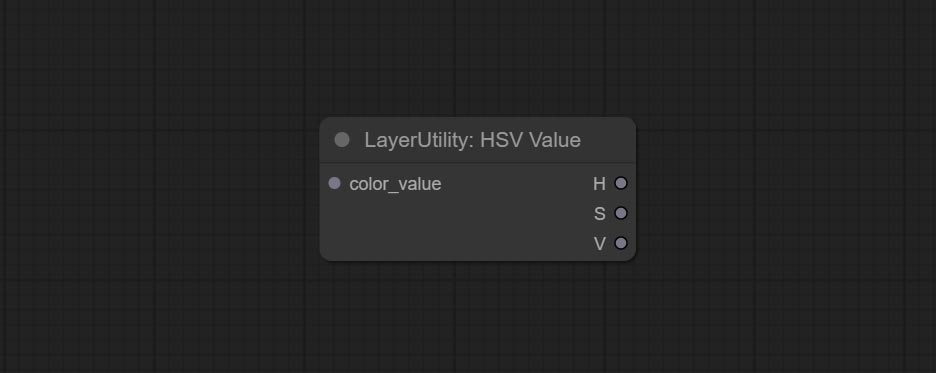
Node Options:
- color_value: Supports hexadecimal (HEX) or decimal (DEC) color values and should be of string or tuple type. Forcing in other types will result in an error.
GrayValue
Output grayscale values based on color values. Supports outputting 256 level and 100 level grayscale values. 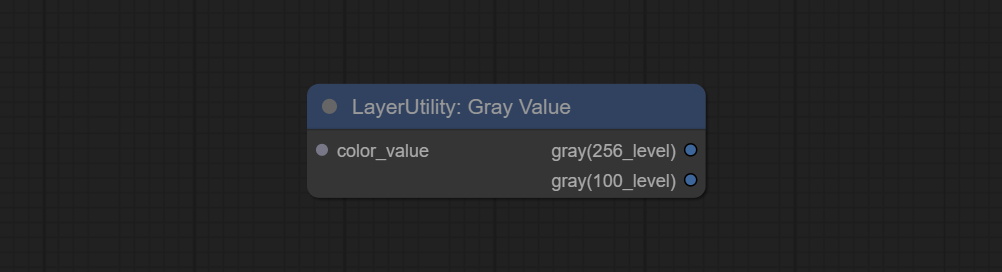
Node Options:
- color_value: Supports hexadecimal (HEX) or decimal (DEC) color values and should be of string or tuple type. Forcing in other types will result in an error.
Outputs:
- gray(256_level): 256 level grayscale value. Integer type, range 0~255.
- gray(100_level): 100 level grayscale value. Integer type, range 0~100.
GetColorTone
Obtain the main color or average color from the image and output RGB values. 
Node options: 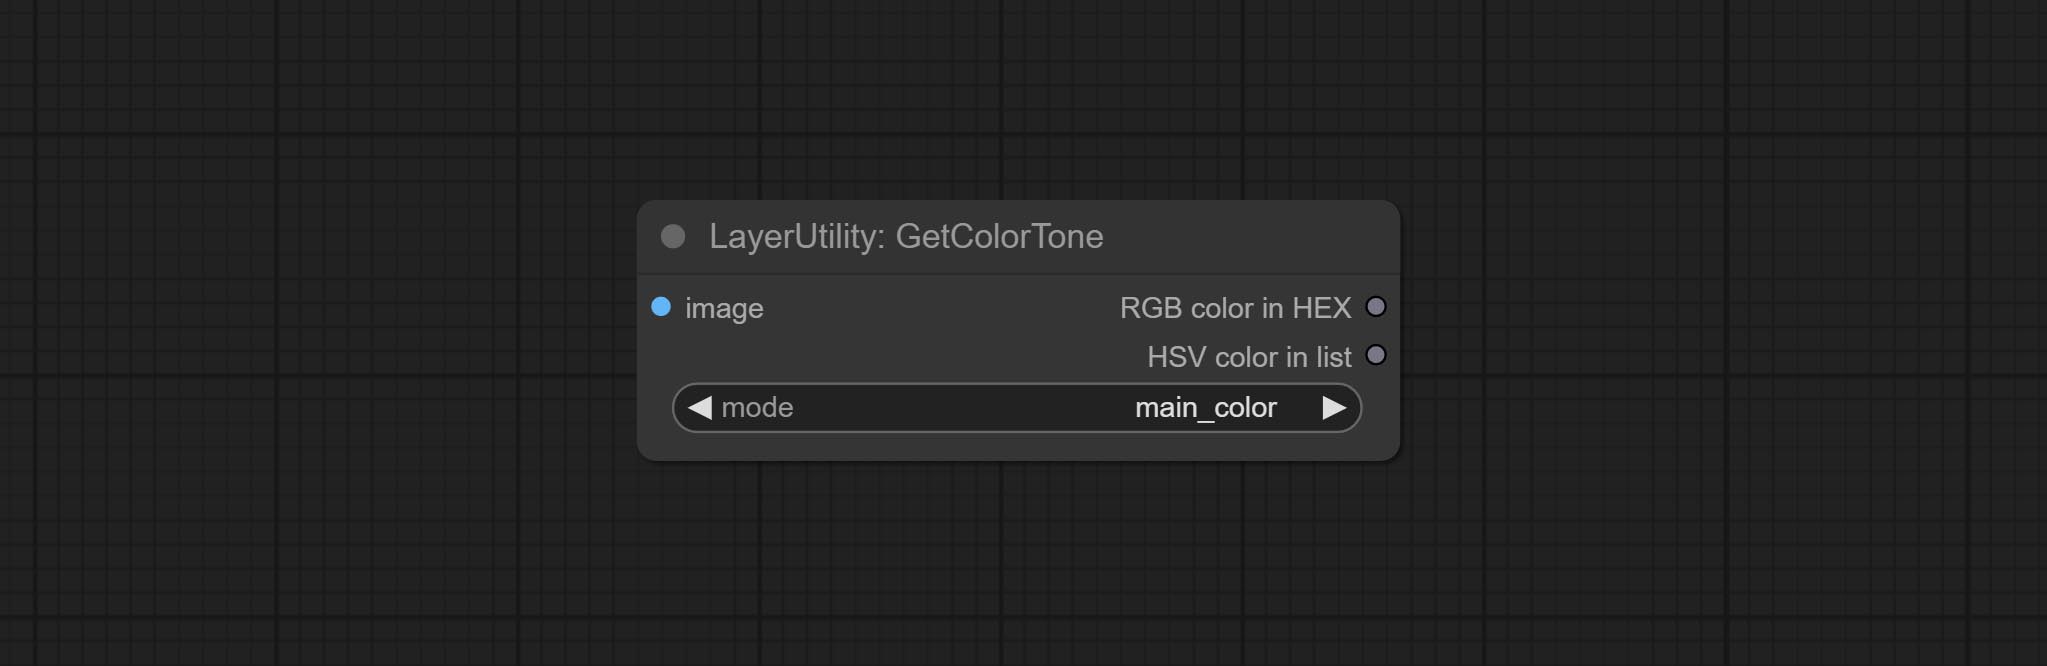
- mode: There are two modes to choose from, with the main color and average color.
Output type:
- RGB color in HEX: The RGB color described by hexadecimal RGB format, like '#FA3D86'.
- HSV color in list: The HSV color described by python's list data format.
GetColorToneV2
V2 upgrade of GetColorTone. You can specify the dominant or average color to get the body or background.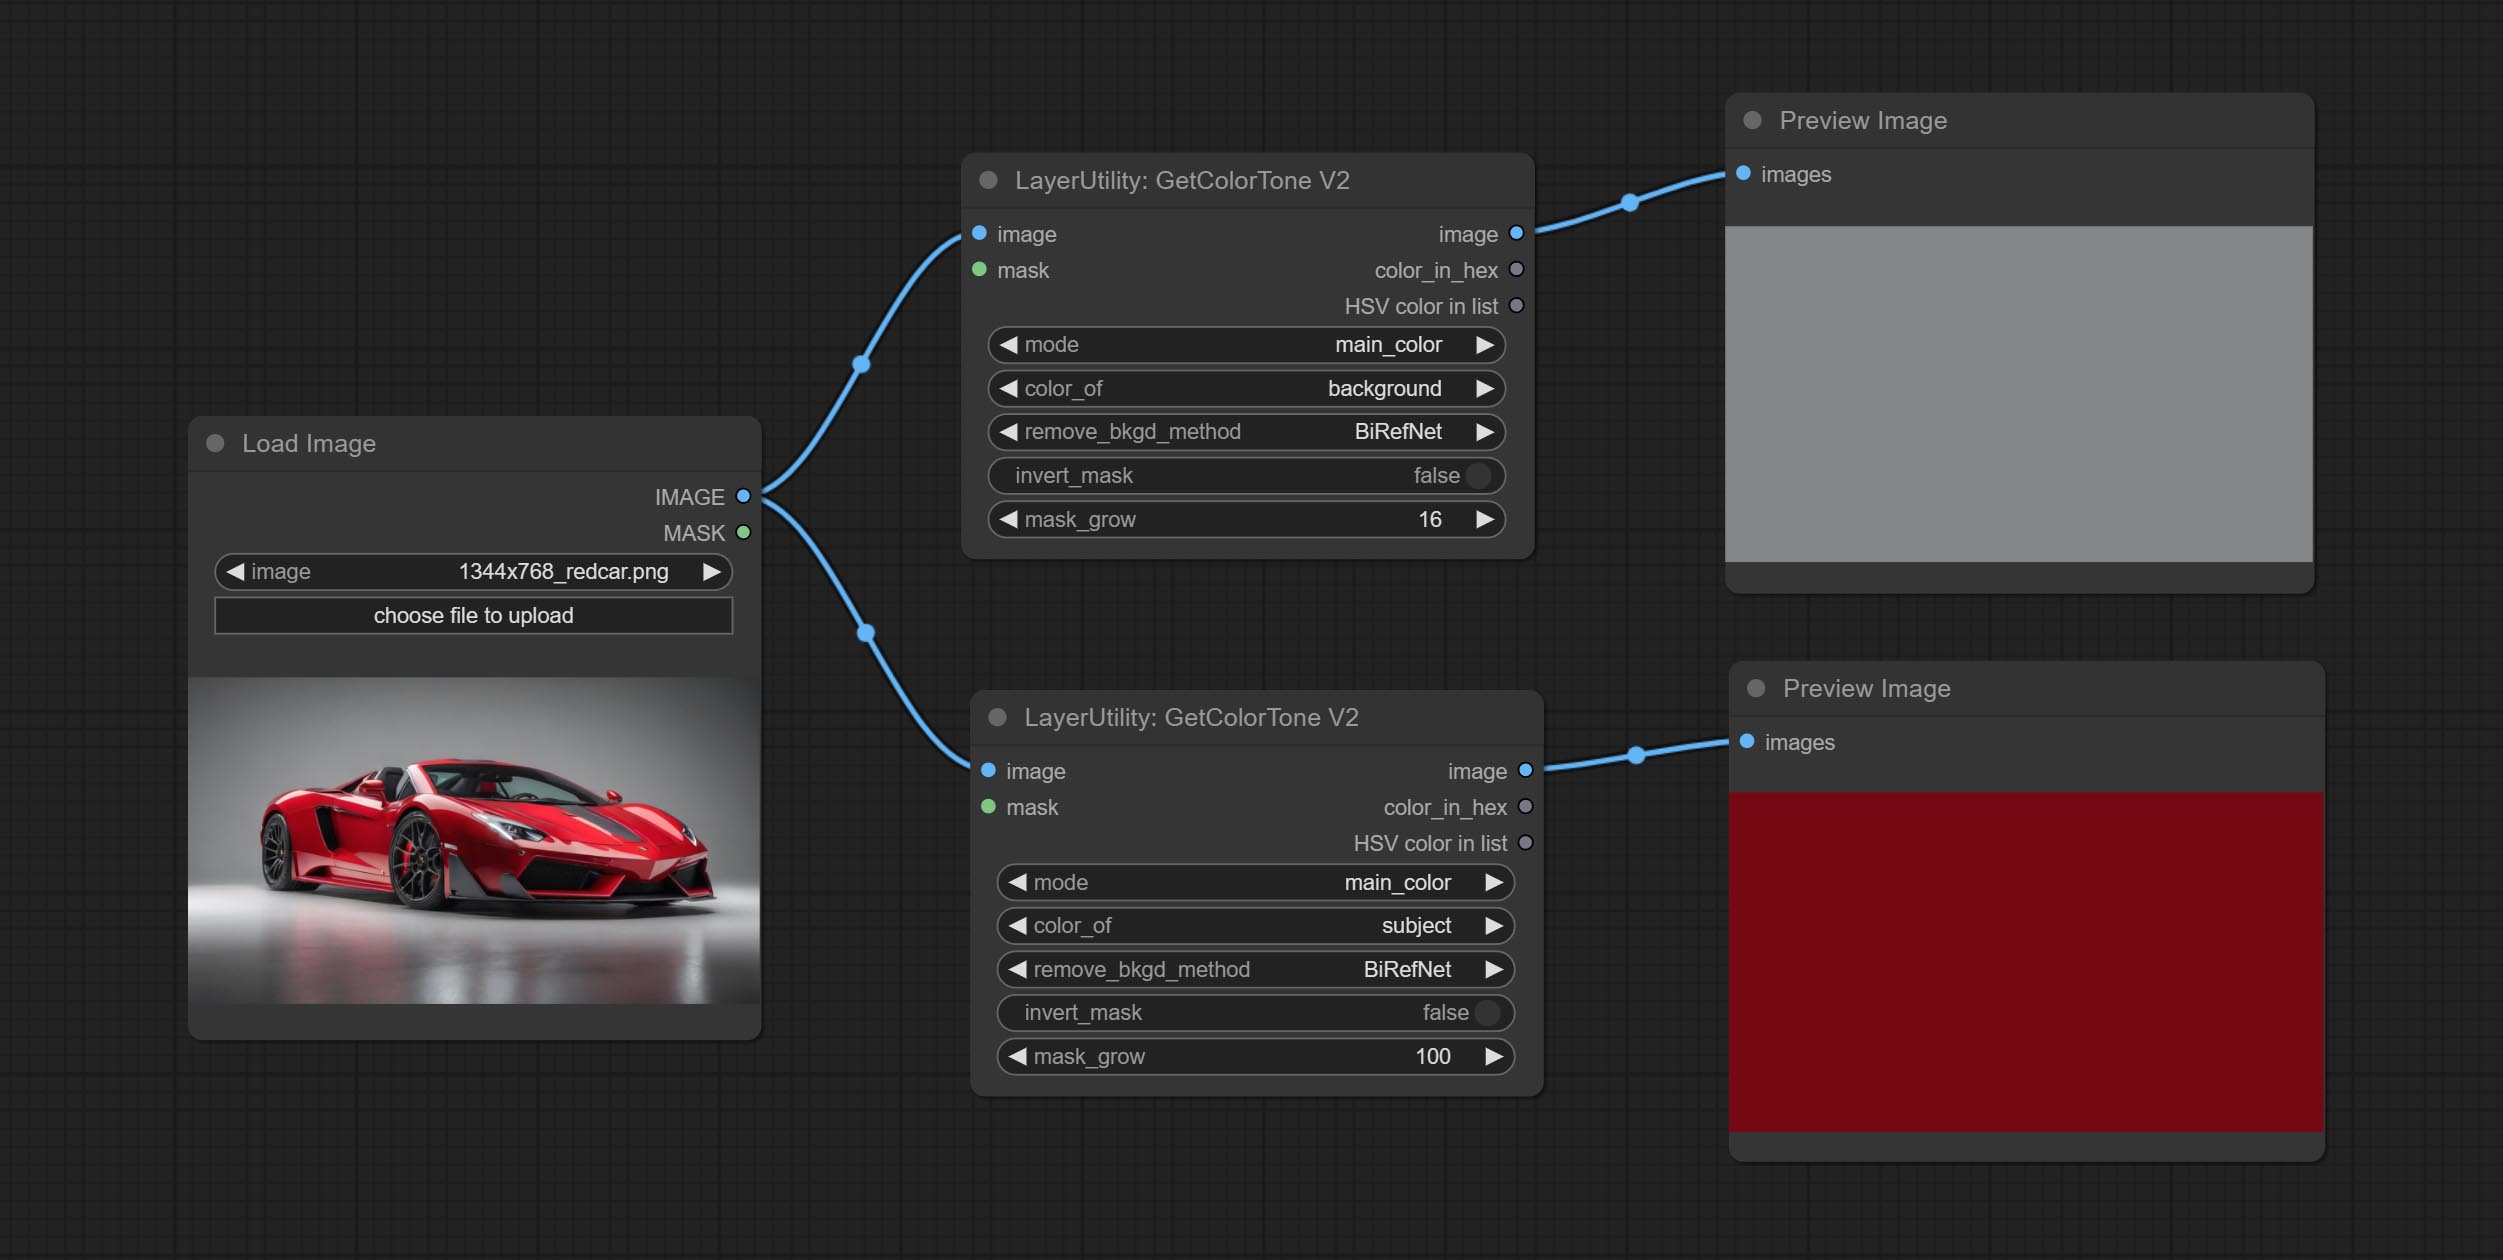
The following changes have been made on the basis of GetColorTong: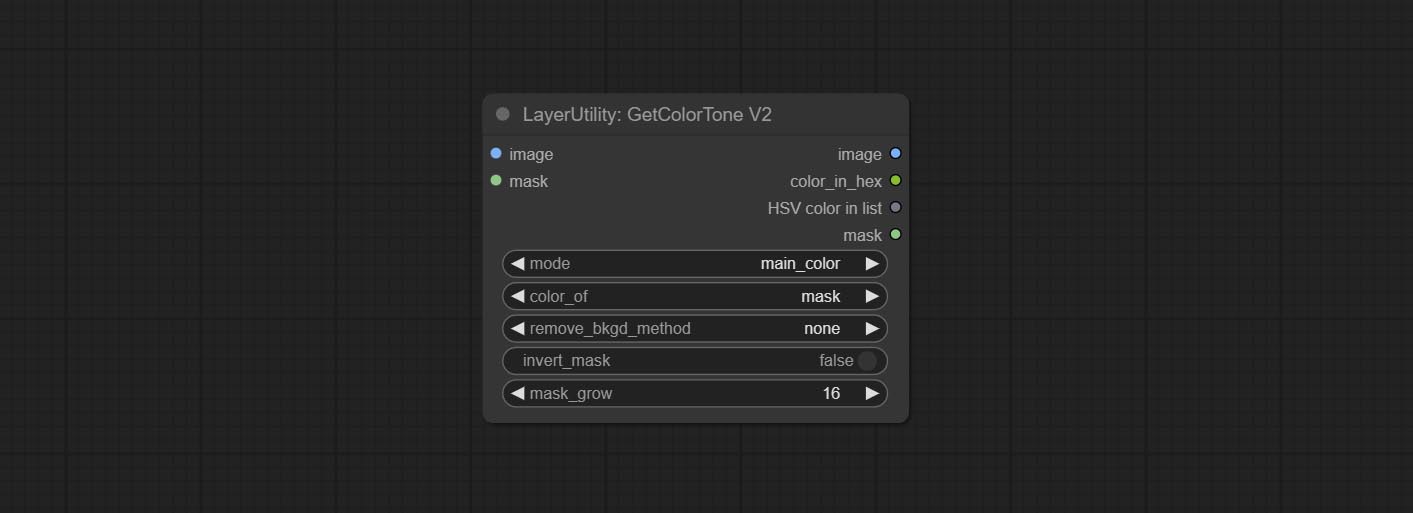
- color_of: Provides 4 options, mask, entire, background, and subject, to select the color of the mask area, entire picture, background, or subject, respectively.
- remove_background_method: There are two methods of background recognition: BiRefNet and RMBG V1.4.
- invert_mask: Whether to reverse the mask.
- mask_grow: Mask expansion. For subject, a larger value brings the obtained color closer to the color at the center of the body.
Output:
- image: Solid color picture output, the size is the same as the input picture.
- mask: Mask output.
GetMainColors
Obtain the main color of the image. You can obtain 5 colors. 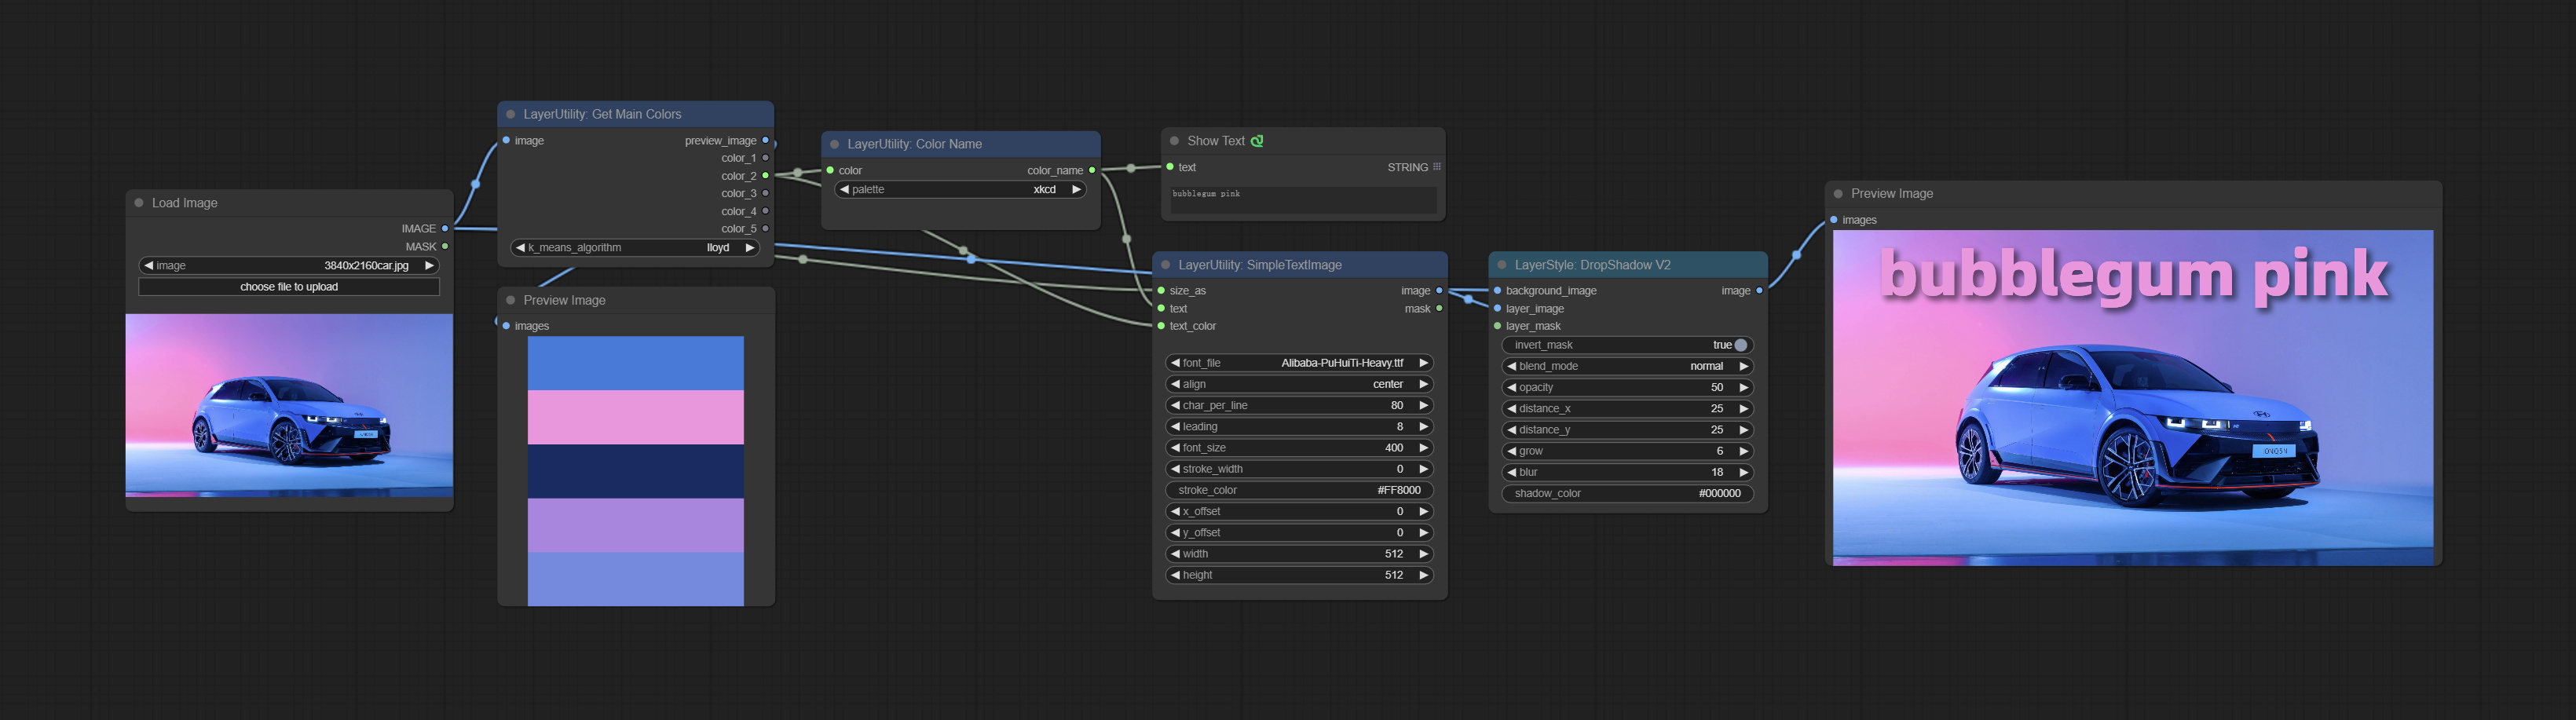
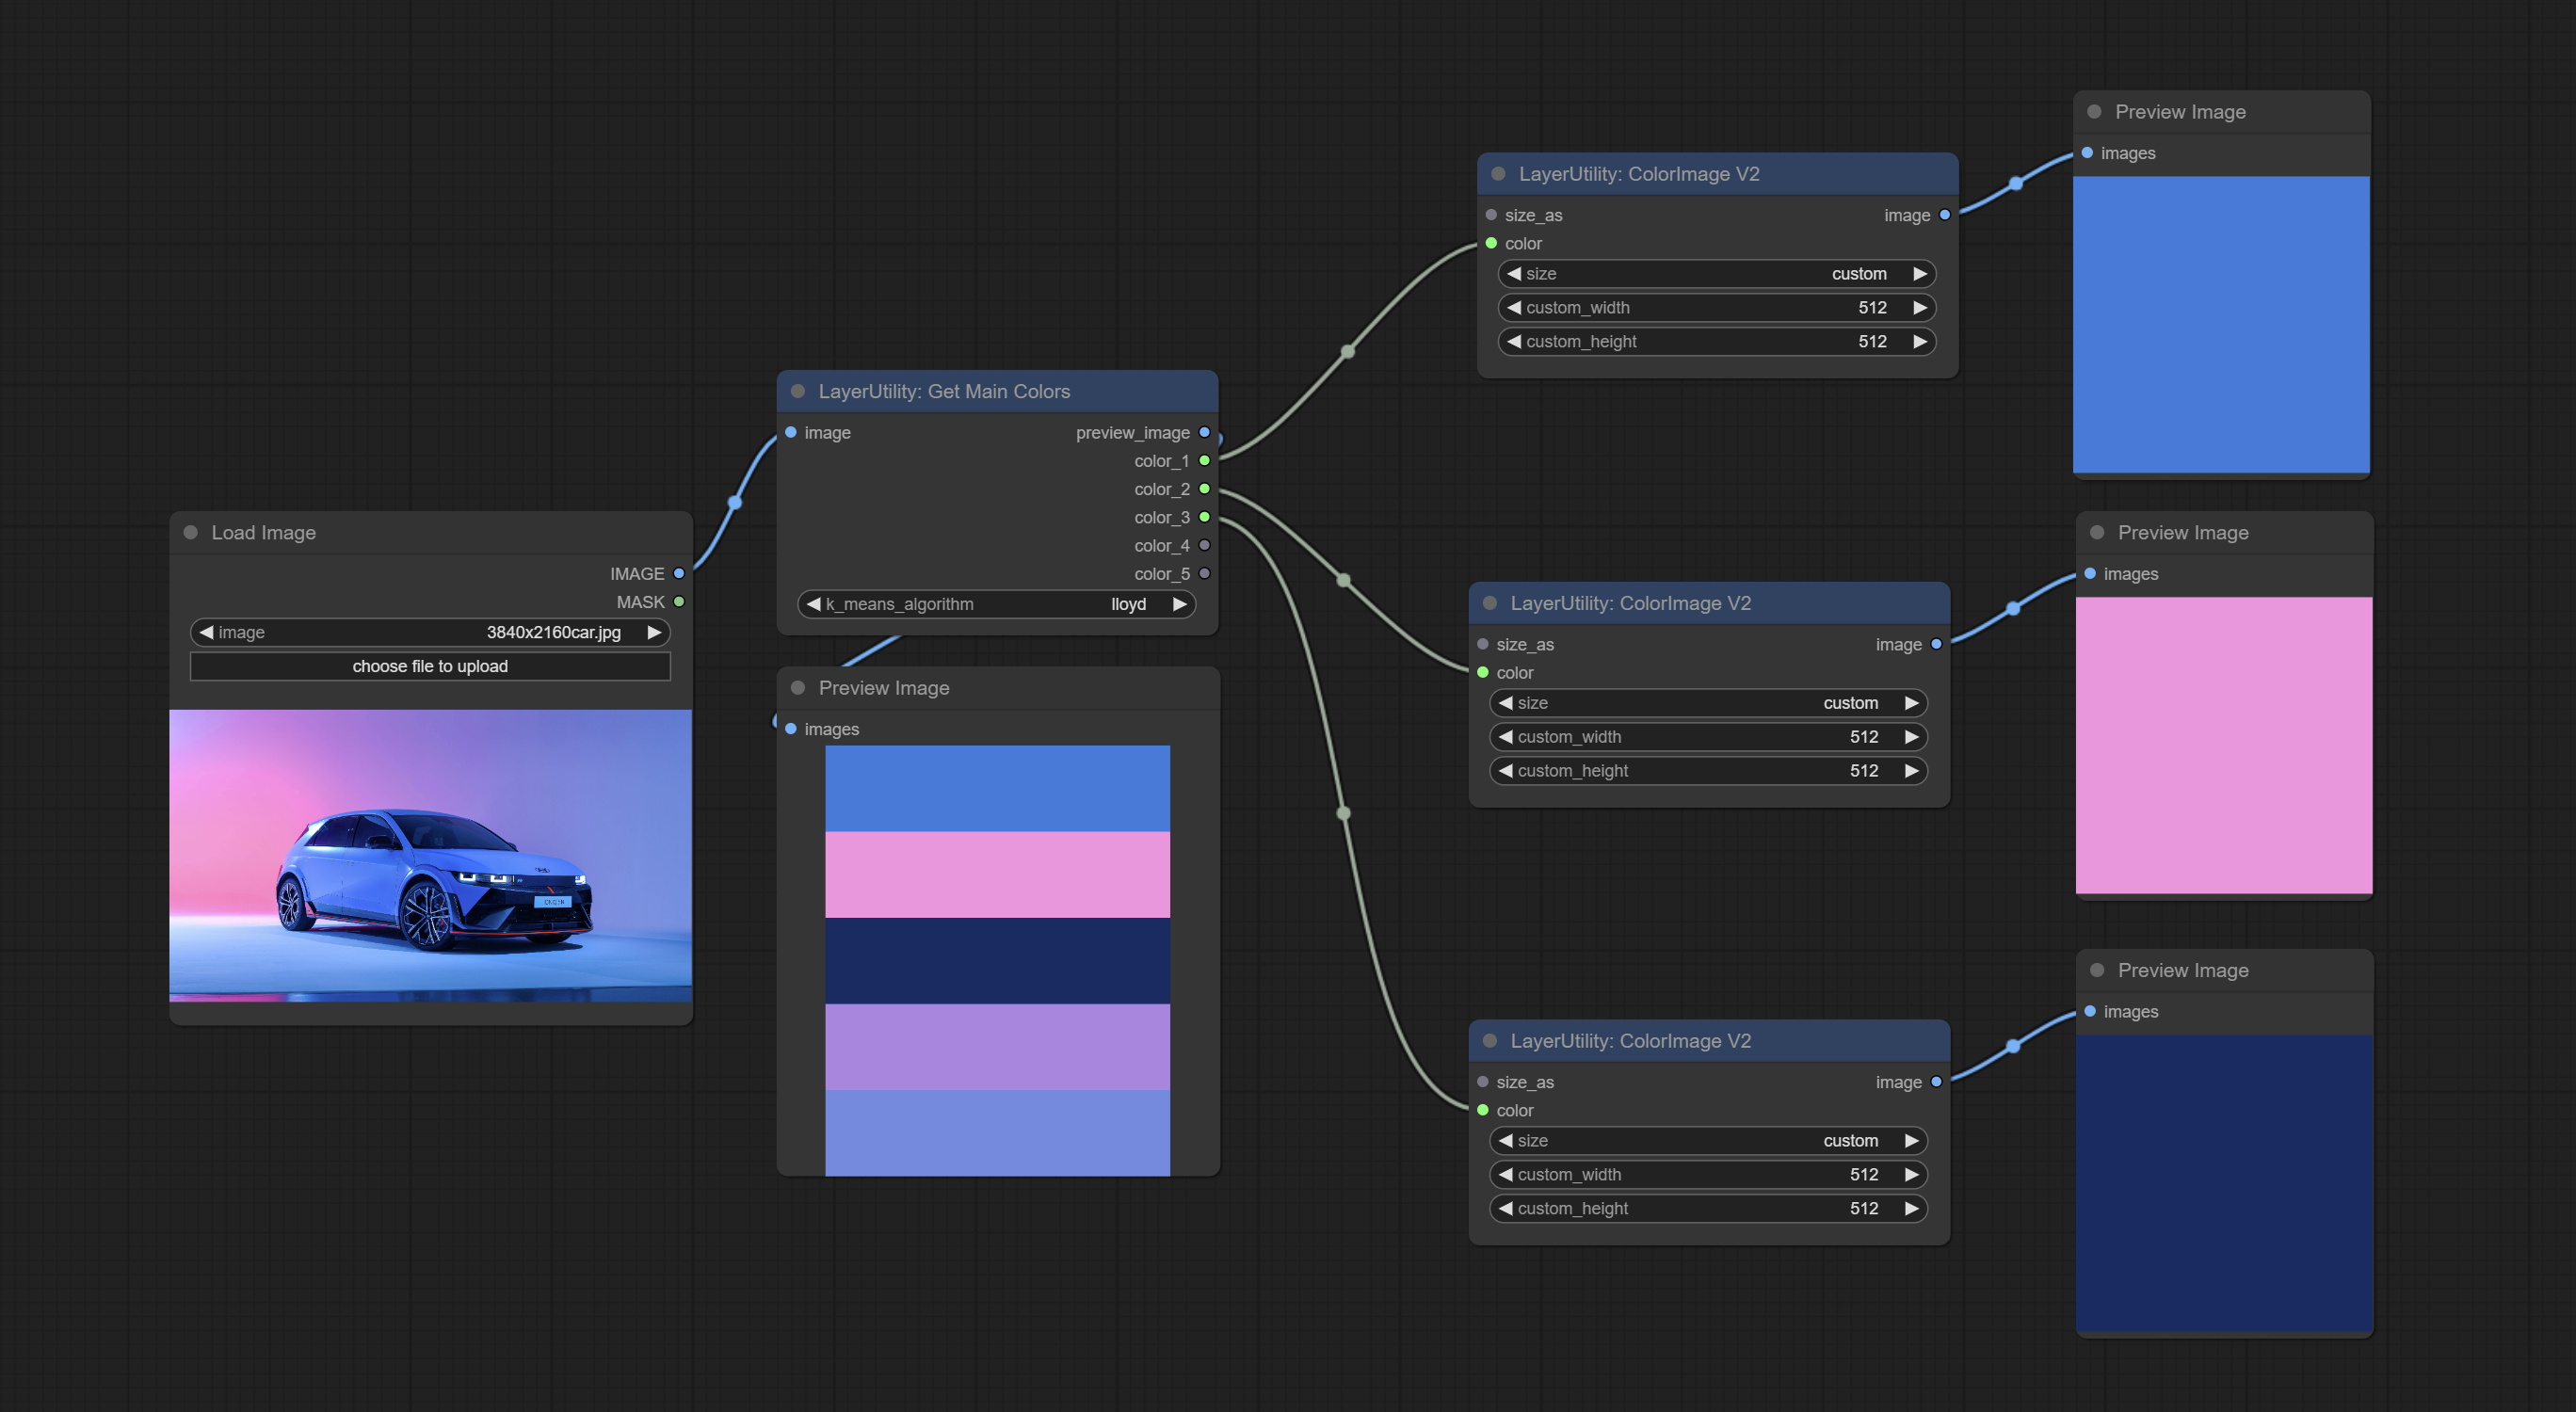
Node Options: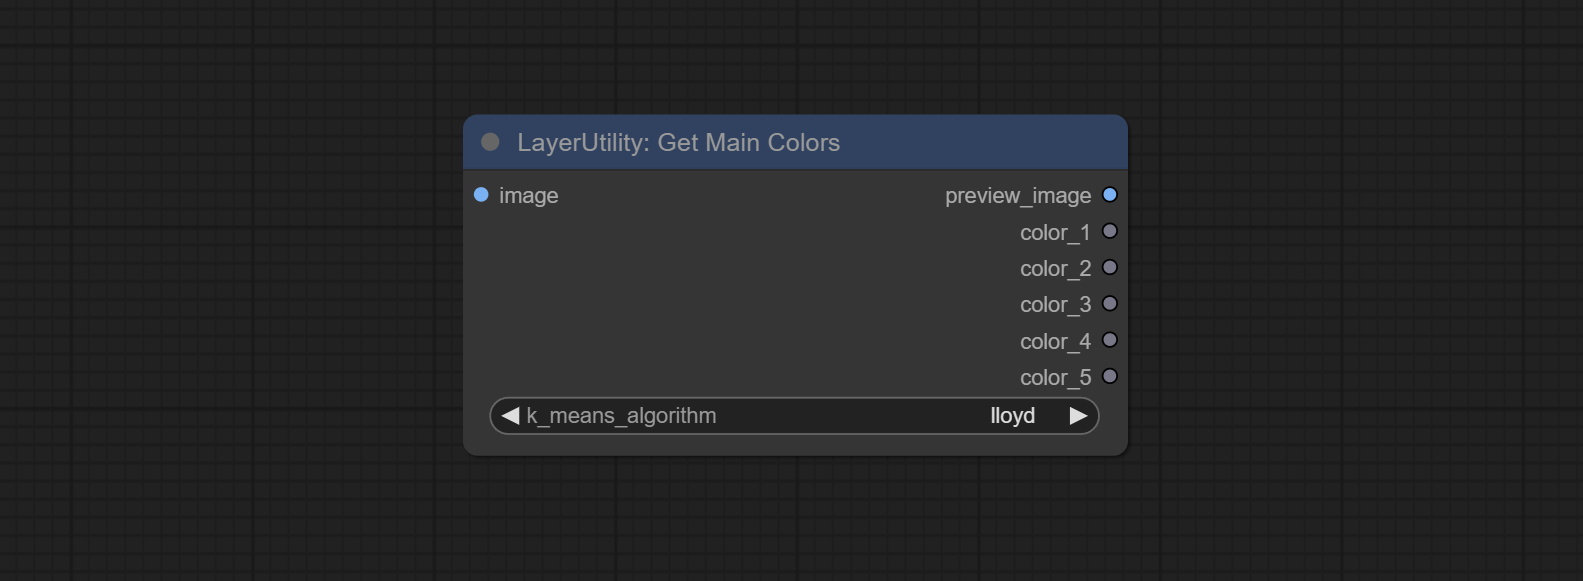
- image: The image input.
- k_means_algorithm:K-Means algorithm options. "lloyd" is the standard K-Means algorithm, while "elkan" is the triangle inequality algorithm, suitable for larger images.
Outputs:
- preview_image: 5 main color preview images.
- color_1~color_5: Color value output. Output an RGB string in HEX format.
ColorName
Output the most similar color name in the color palette based on the color value.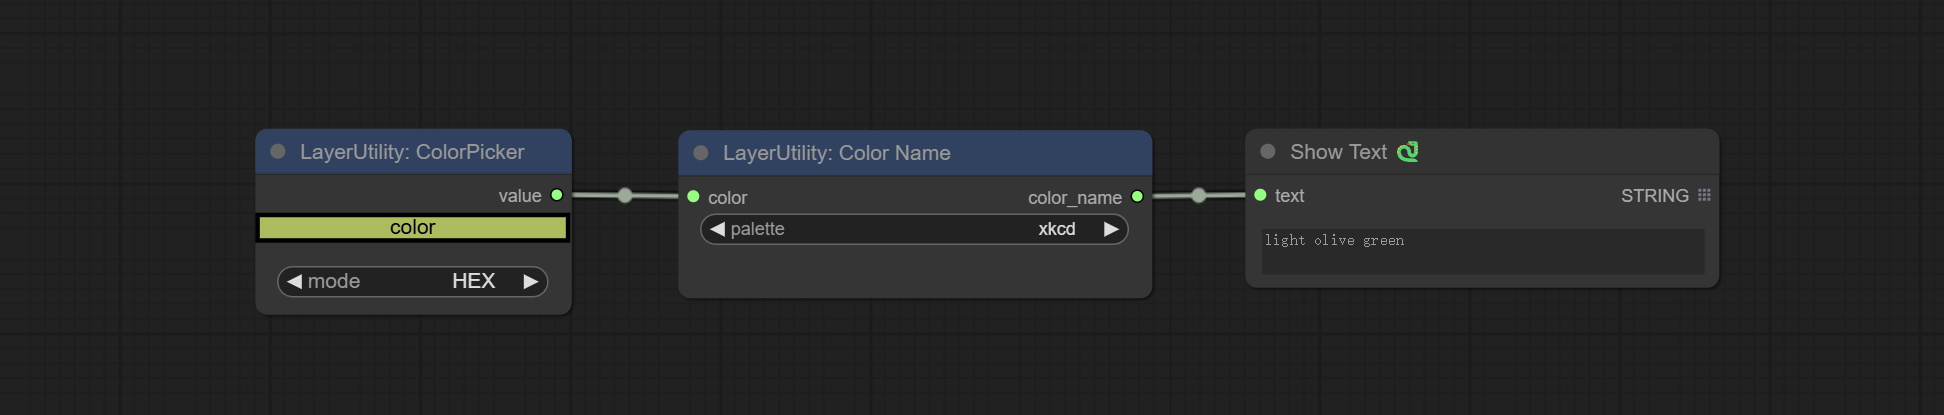
Node Options: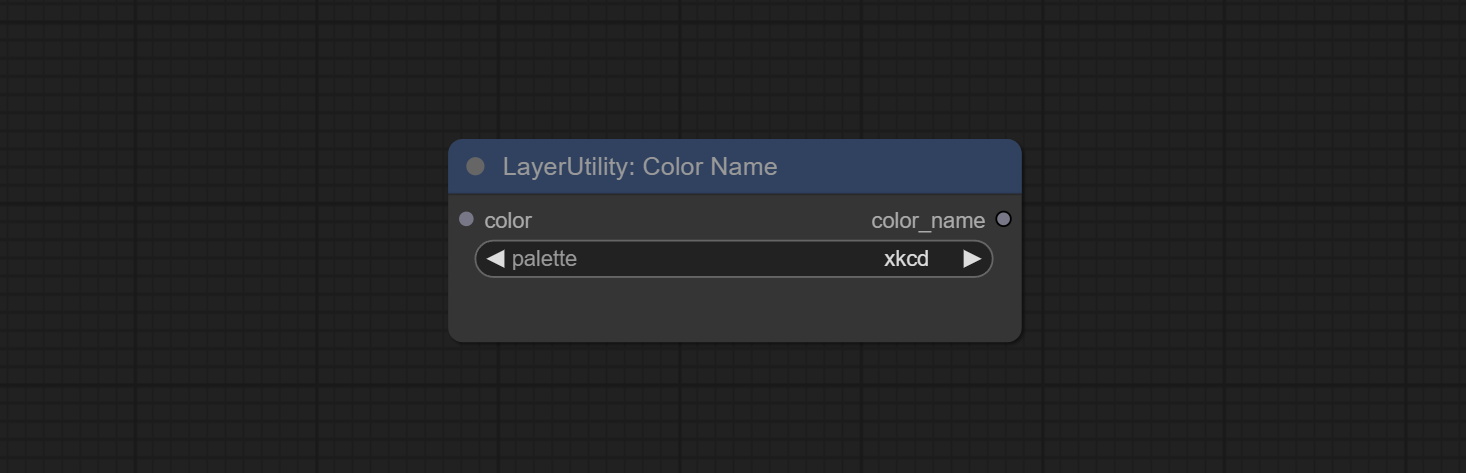
- color: Color value input, in HEX format RGB string format.
- palette: Color palette.
xkcd includes 949 colors, css3 includes 147 colors, and html4 includes 16 colors.
Output:
- color_name: Color name in string.
ExtendCanvas
Extend the canvas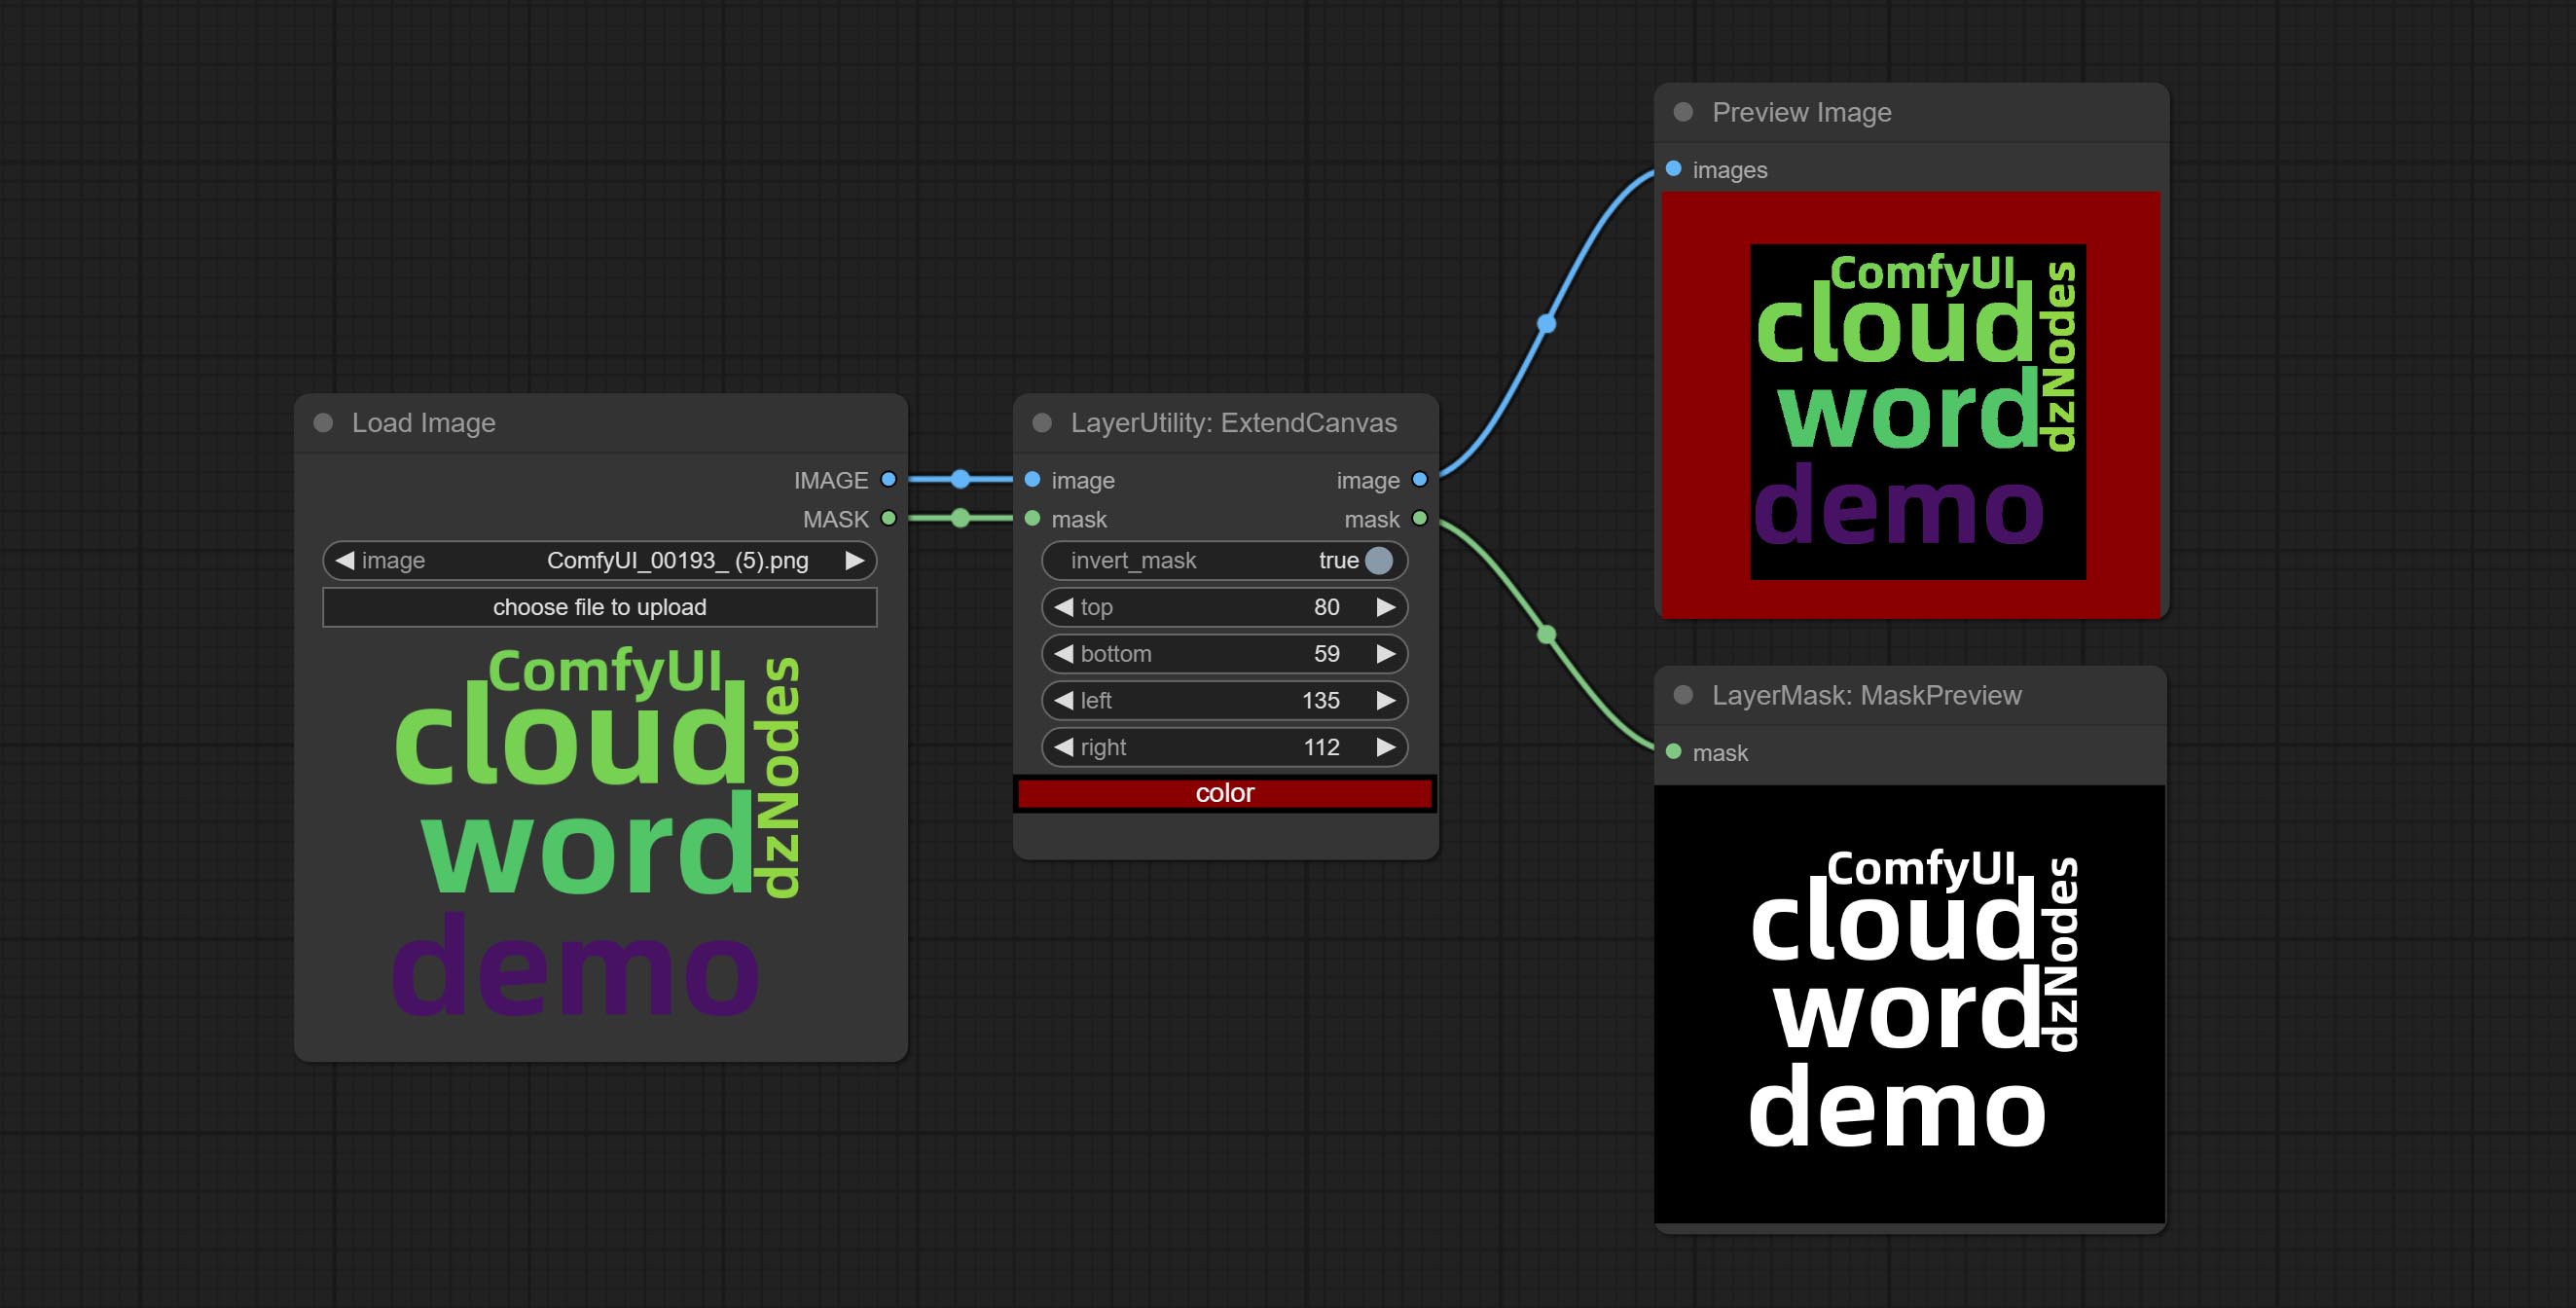
Node options: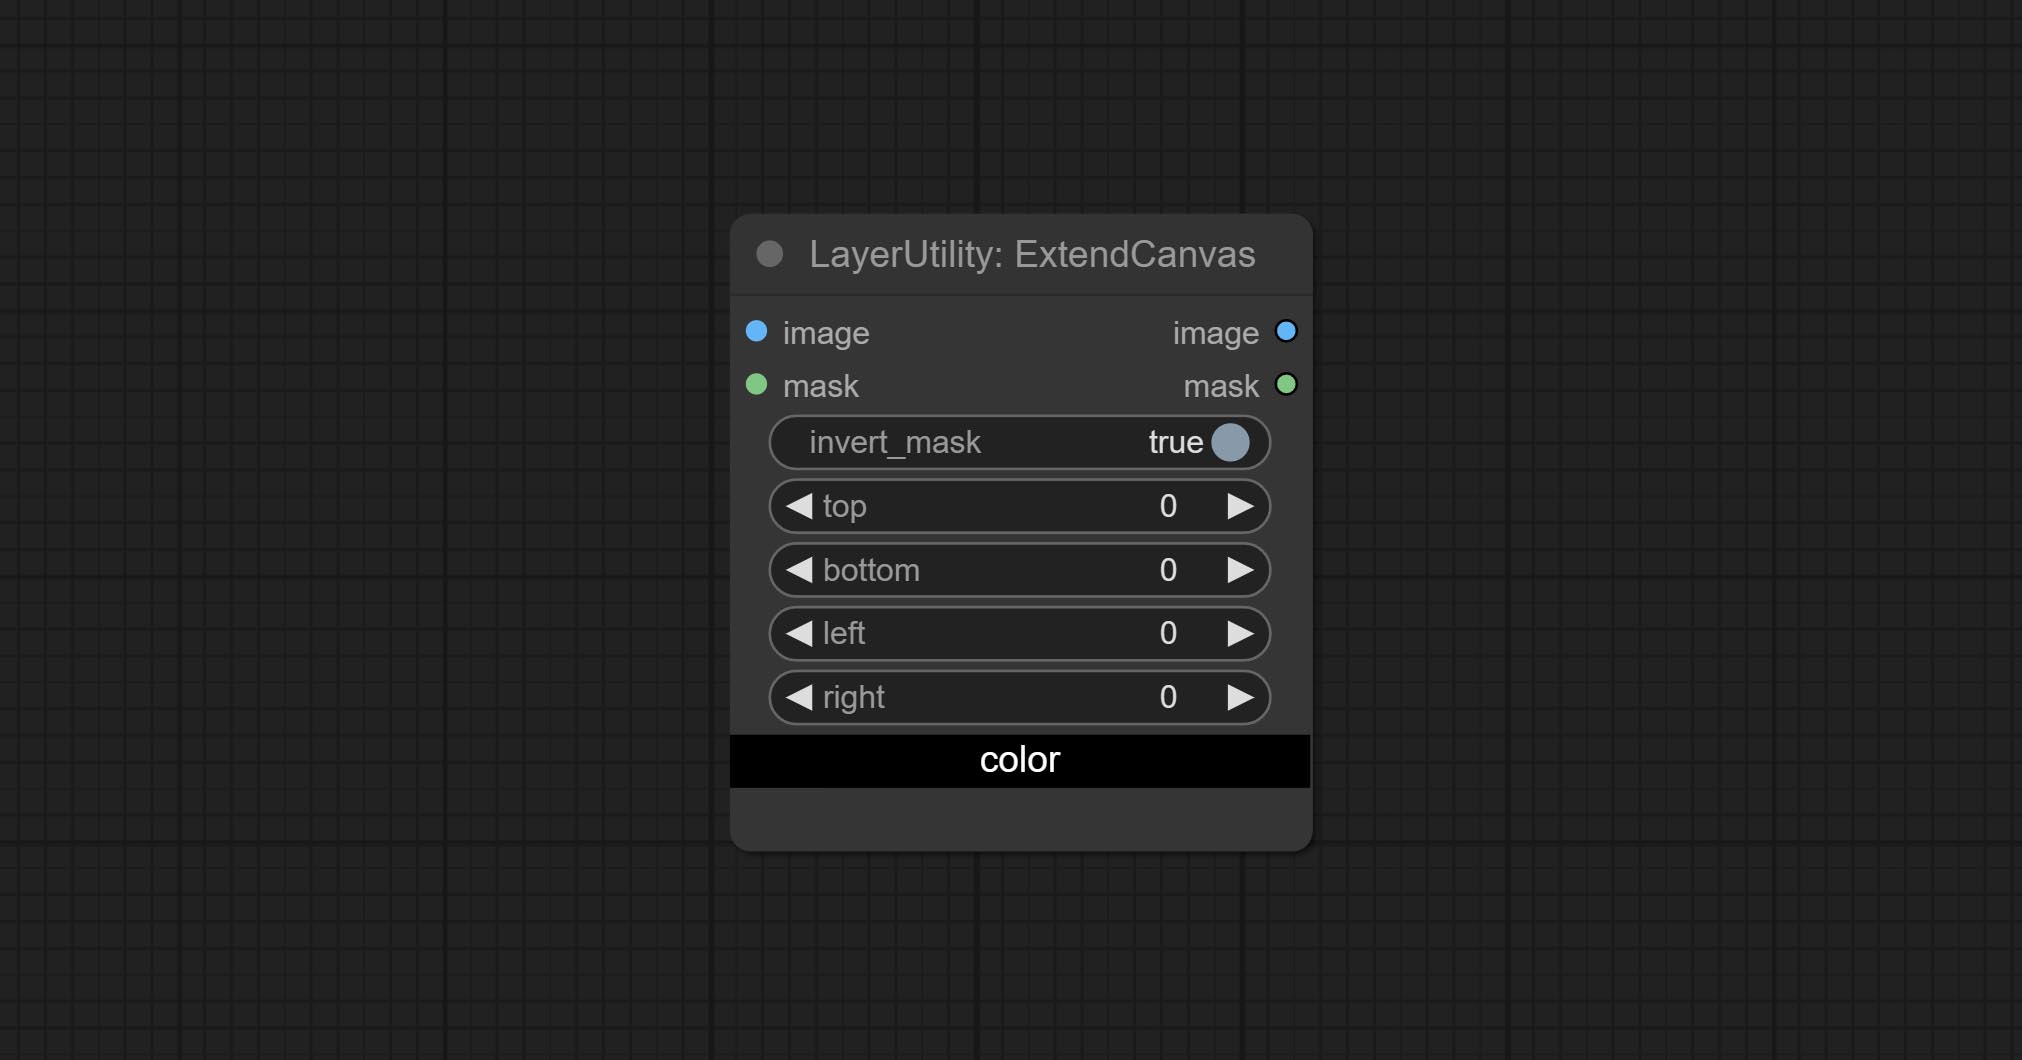
- invert_mask: Whether to reverse the mask.
- top: Top extension value.
- bottom: Bottom extension value.
- left: Left extension value.
- right: Right extension value.
- สี; Color of canvas.
ExtendCanvasV2
V2 upgrade to ExtendCanvas.
Based on ExtendCanvas, color is modified to be a string type, and it supports external ColorPicker input, Support negative value input, it means image will be cropped.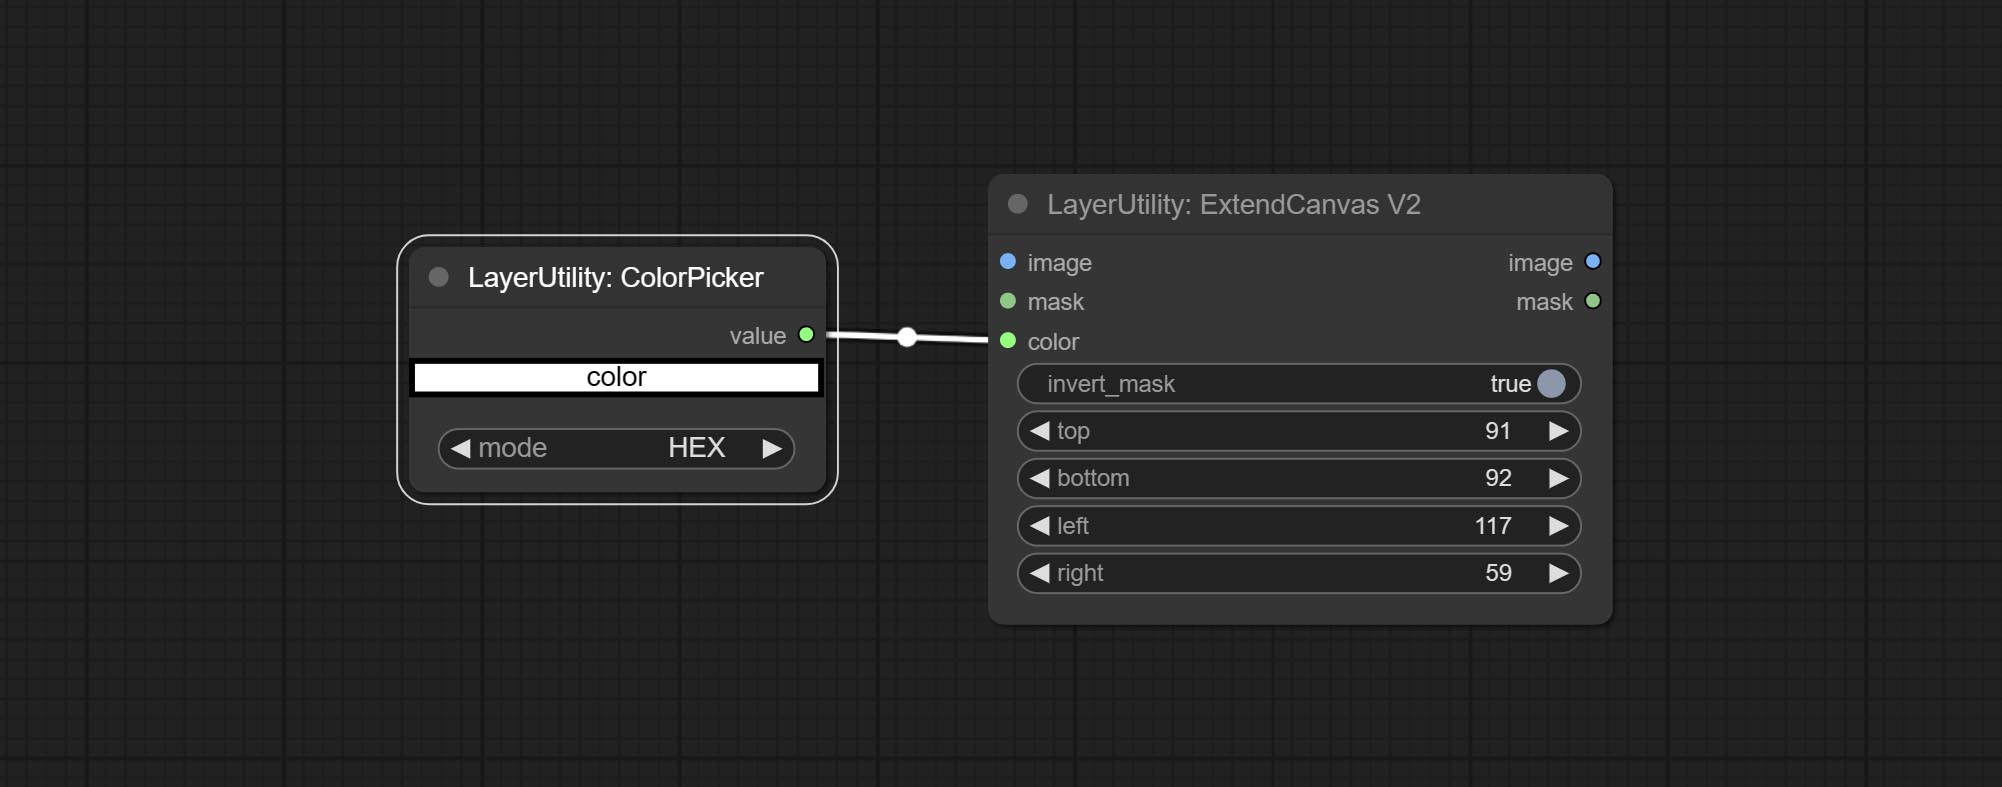
XY to Percent
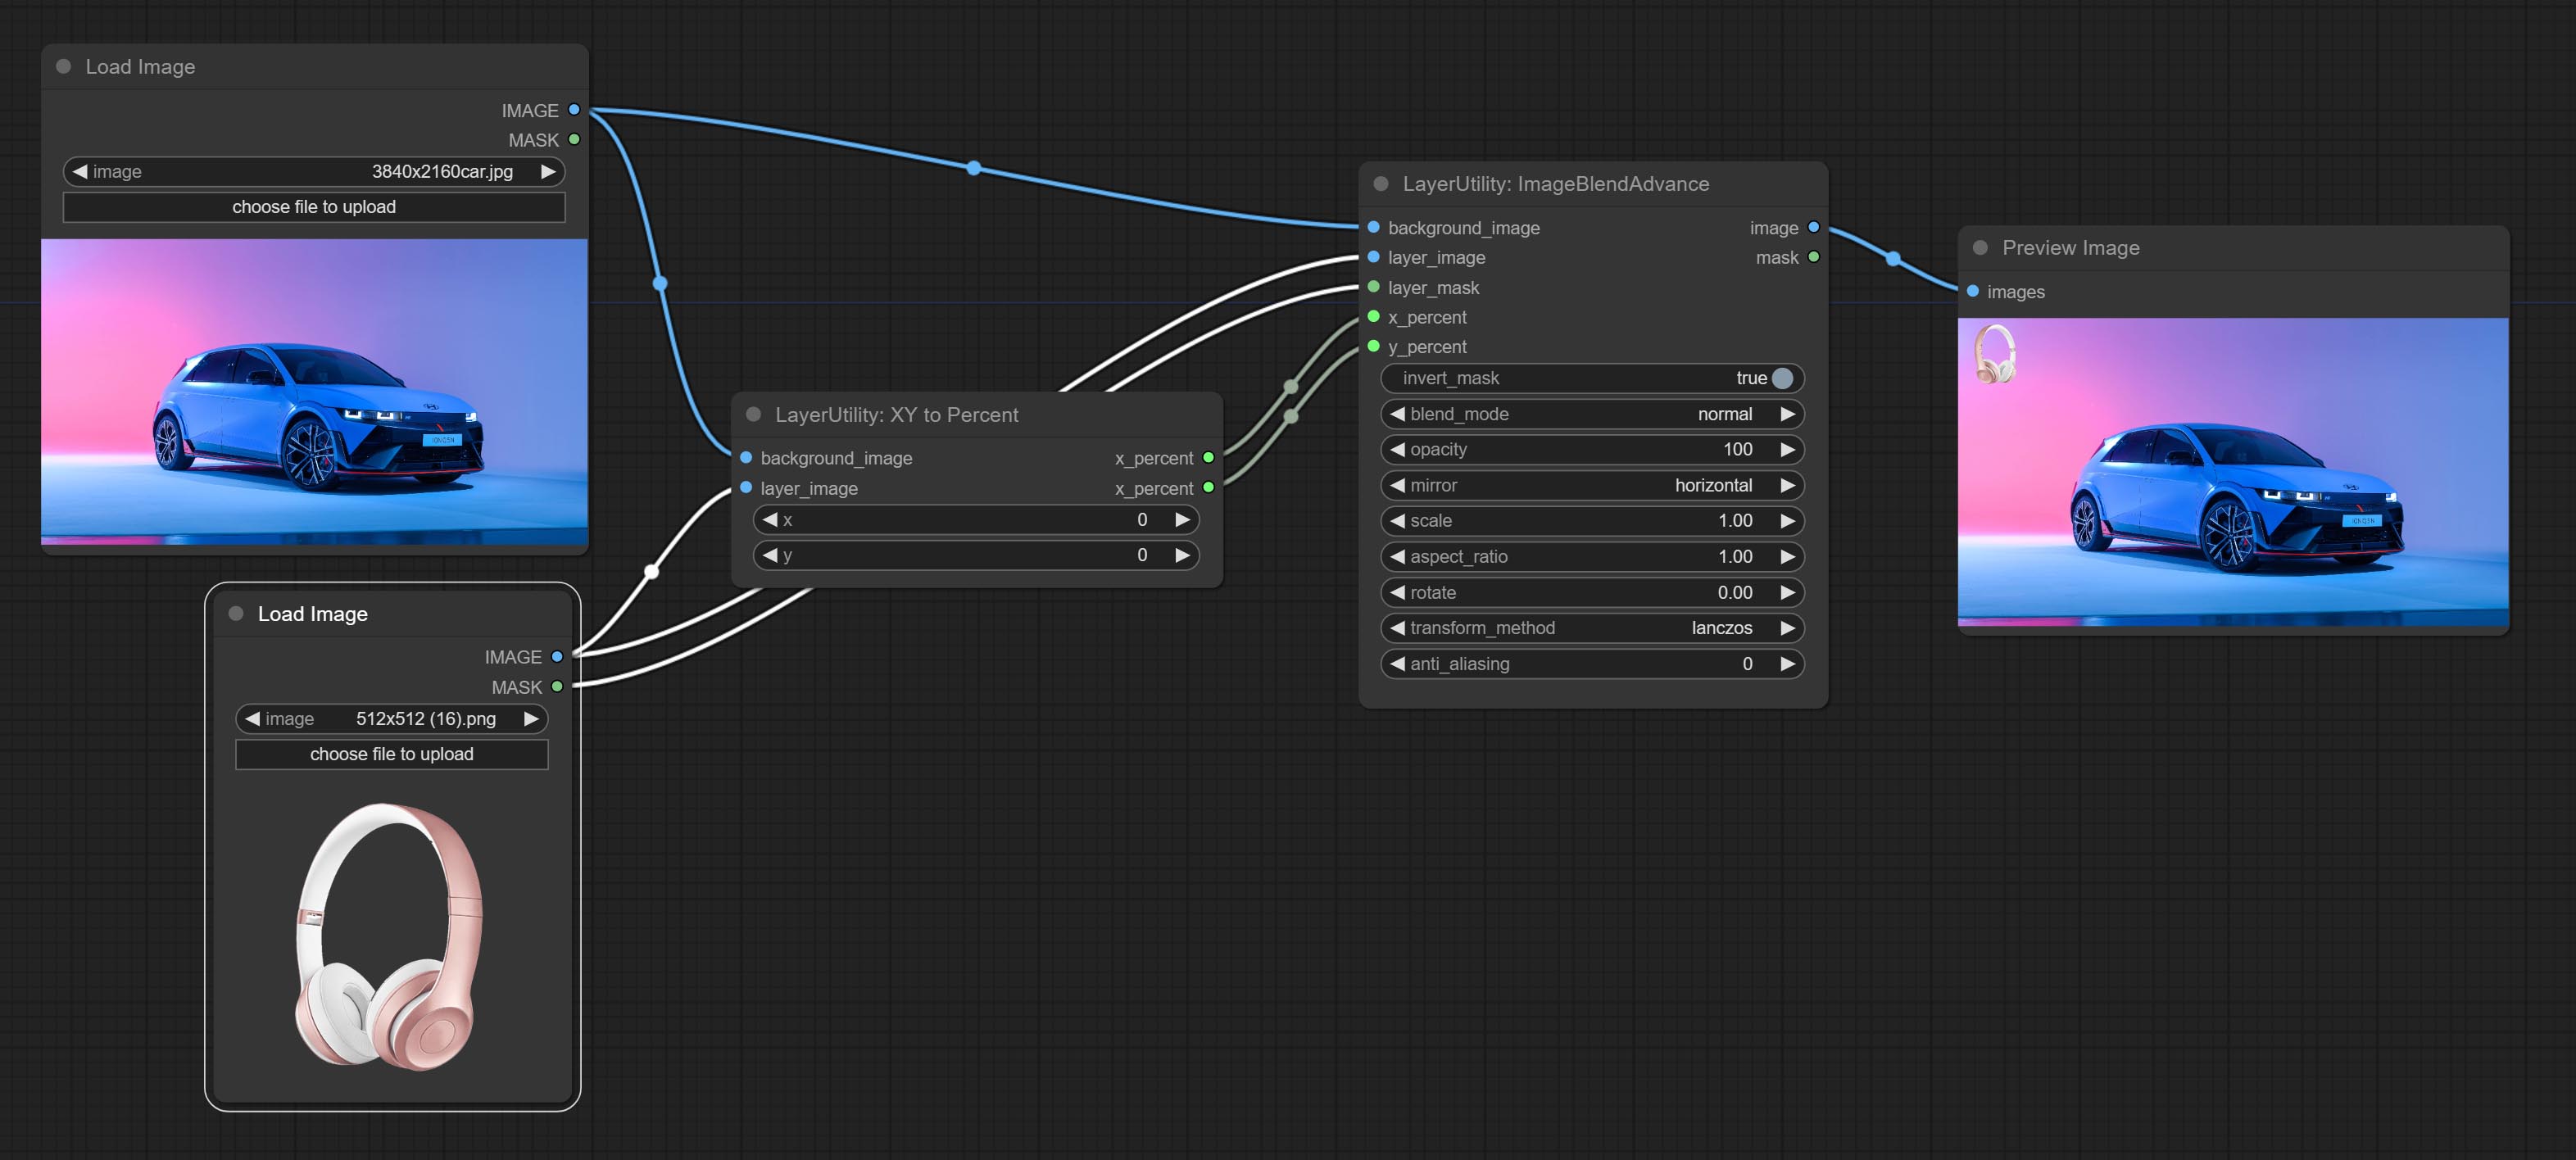
Convert absolute coordinates to percentage coordinates.
Node options:
- x: Value of X.
- y: Value of Y.
LayerImageTransform
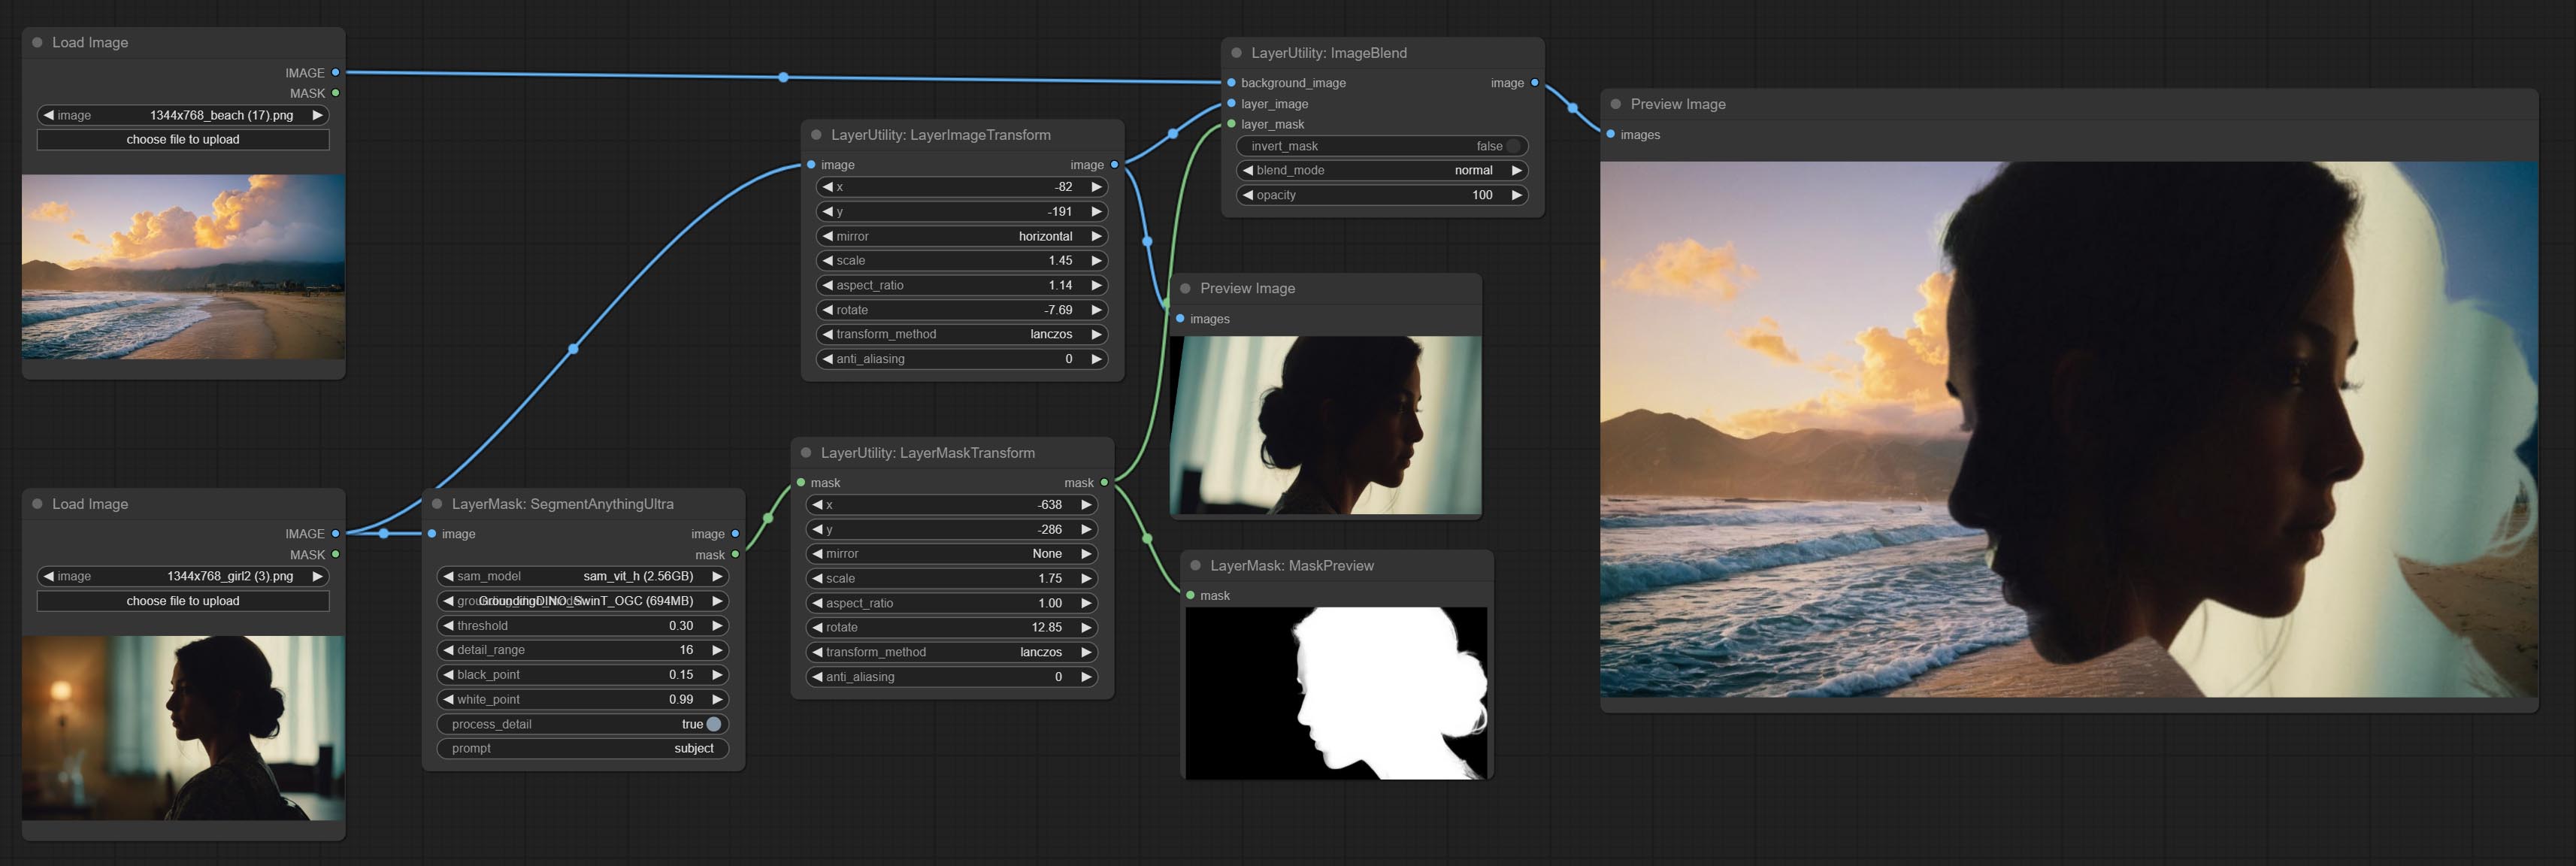
This node is used to transform layer_image separately, which can change size, rotation, aspect ratio, and mirror flip without changing the image size.
Node options:
- x: Value of X.
- y: Value of Y.
- mirror: Mirror flipping. Provide two flipping modes, horizontal flipping and vertical flipping.
- scale: Layer magnification, 1.0 represents the original size.
- aspect_ratio: Layer aspect ratio. 1.0 is the original ratio, a value greater than this indicates elongation, and a value less than this indicates flattening.
- rotate: Layer rotation degree.
- Sampling methods for layer enlargement and rotation, including lanczos, bicubic, hamming, bilinear, box and nearest. Different sampling methods can affect the image quality and processing time of the synthesized image.
- anti_aliasing: Anti aliasing, ranging from 0 to 16, the larger the value, the less obvious the aliasing. An excessively high value will significantly reduce the processing speed of the node.
LayerMaskTransform
Similar to LayerImageTransform node, this node is used to transform the layer_mask separately, which can scale, rotate, change aspect ratio, and mirror flip without changing the mask size.
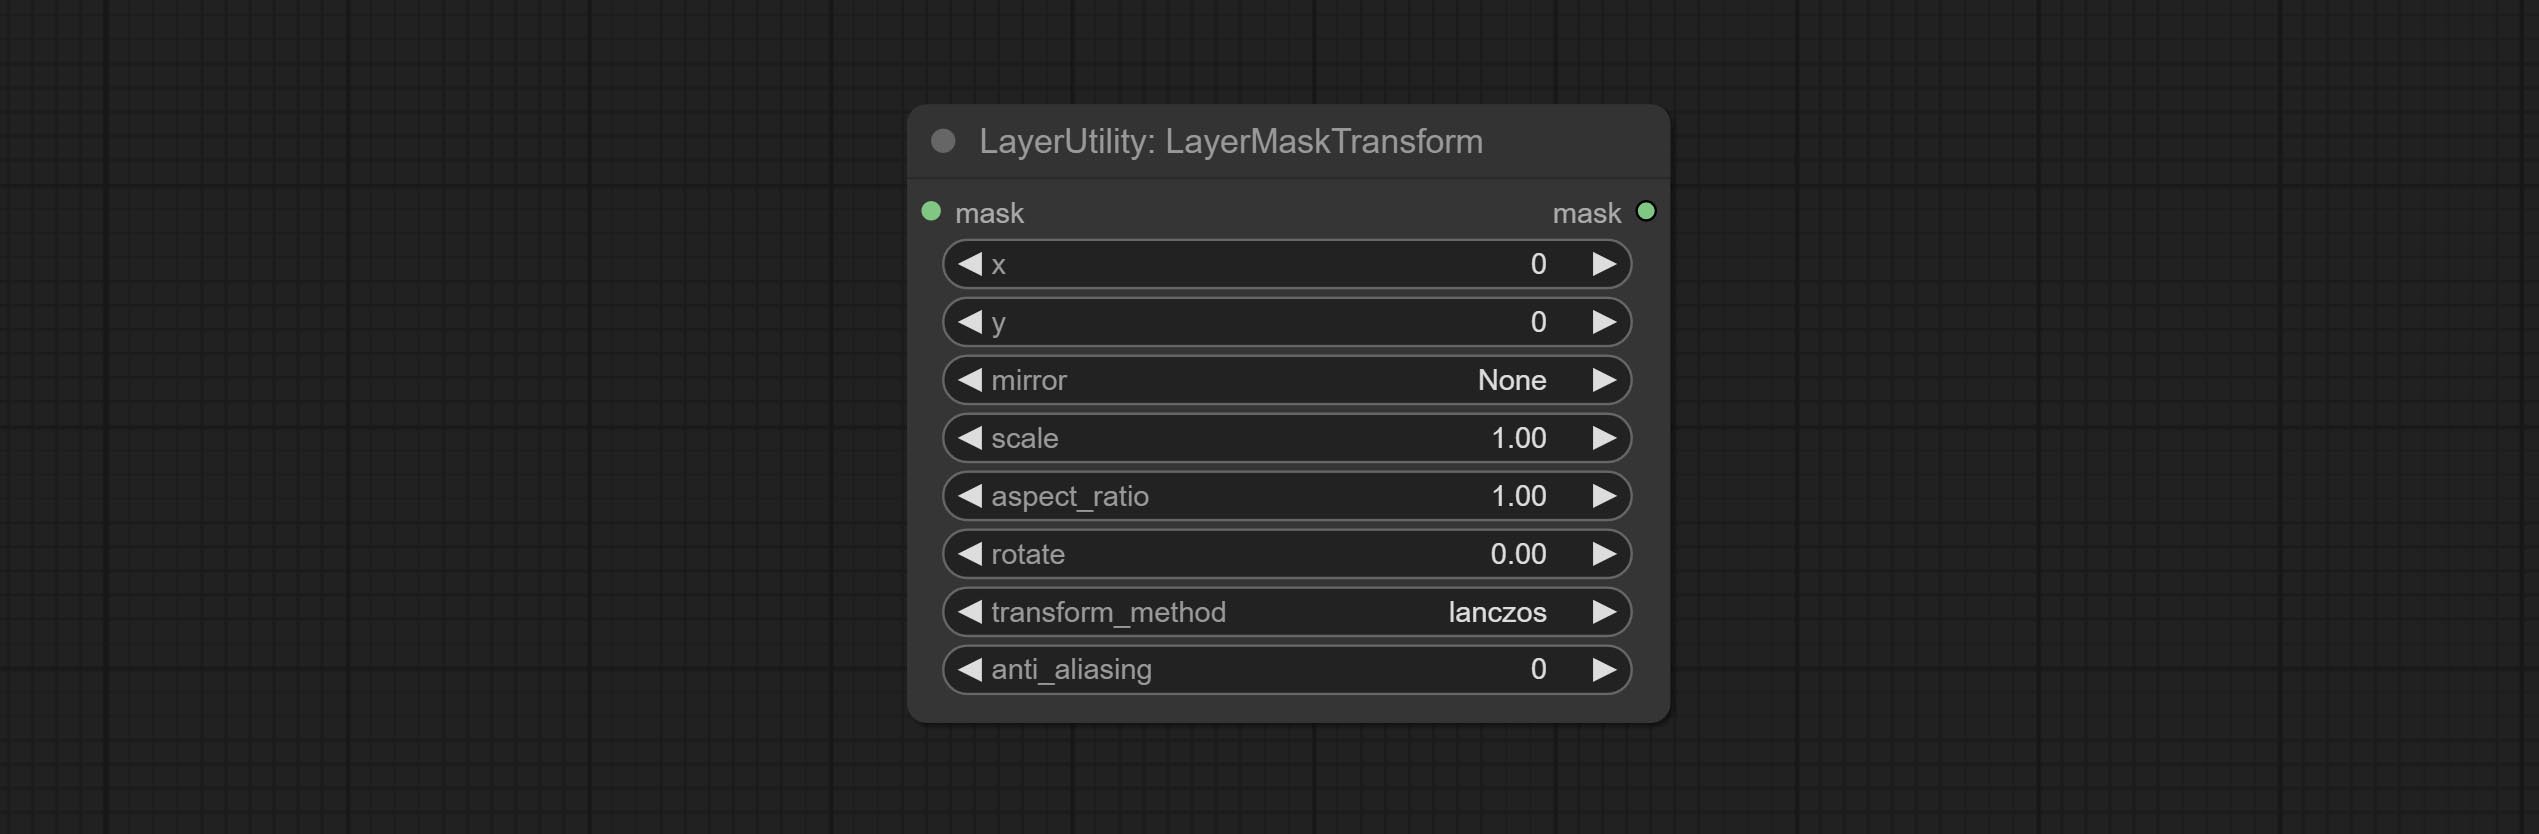
Node options:
- x: Value of X.
- y: Value of Y.
- mirror: Mirror flipping. Provide two flipping modes, horizontal flipping and vertical flipping.
- scale: Layer magnification, 1.0 represents the original size.
- aspect_ratio: Layer aspect ratio. 1.0 is the original ratio, a value greater than this indicates elongation, and a value less than this indicates flattening.
- rotate: Layer rotation degree.
- Sampling methods for layer enlargement and rotation, including lanczos, bicubic, hamming, bilinear, box and nearest. Different sampling methods can affect the image quality and processing time of the synthesized image.
- anti_aliasing: Anti aliasing, ranging from 0 to 16, the larger the value, the less obvious the aliasing. An excessively high value will significantly reduce the processing speed of the node.
ColorImage
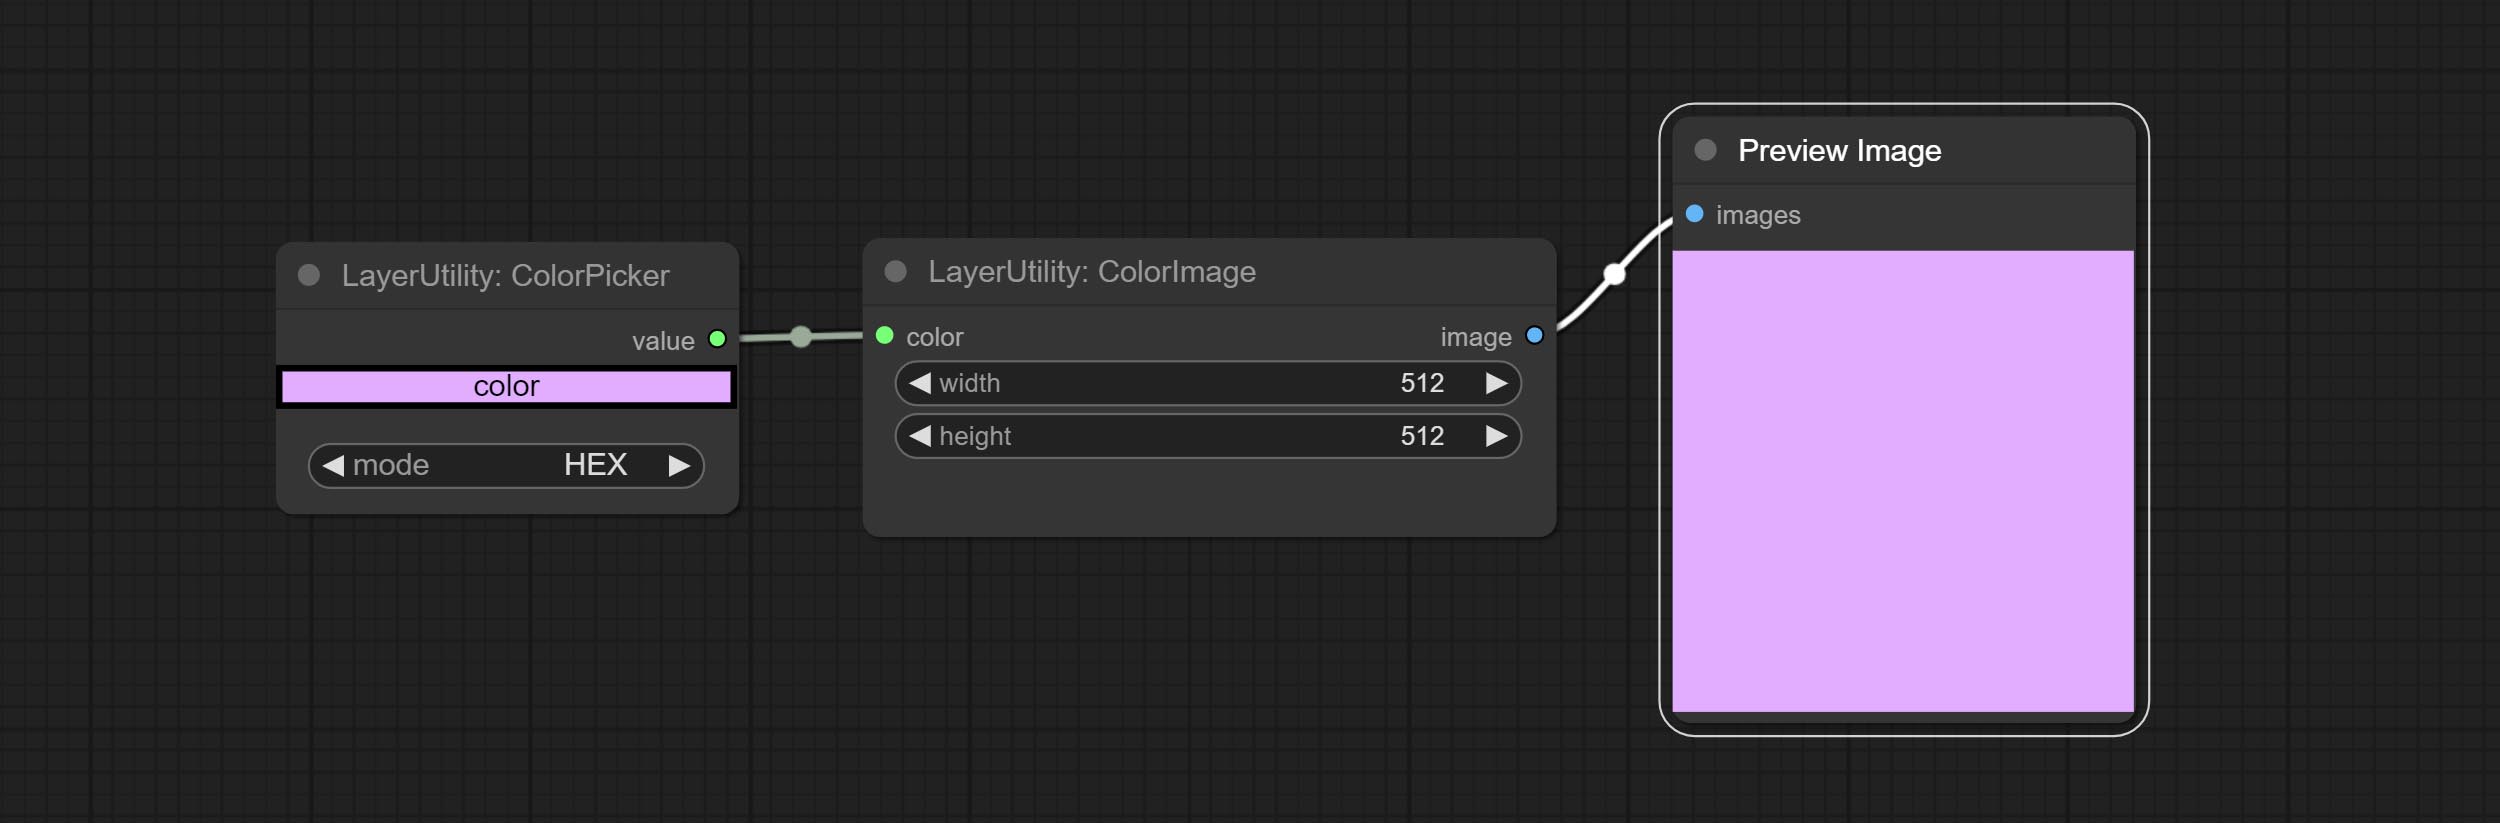
Generate an image of a specified color and size.

Node options:
- width: Width of the image.
- height: Height of the image.
- color 4 : Color of the image.
ColorImageV2
The V2 upgraded version of ColorImage.
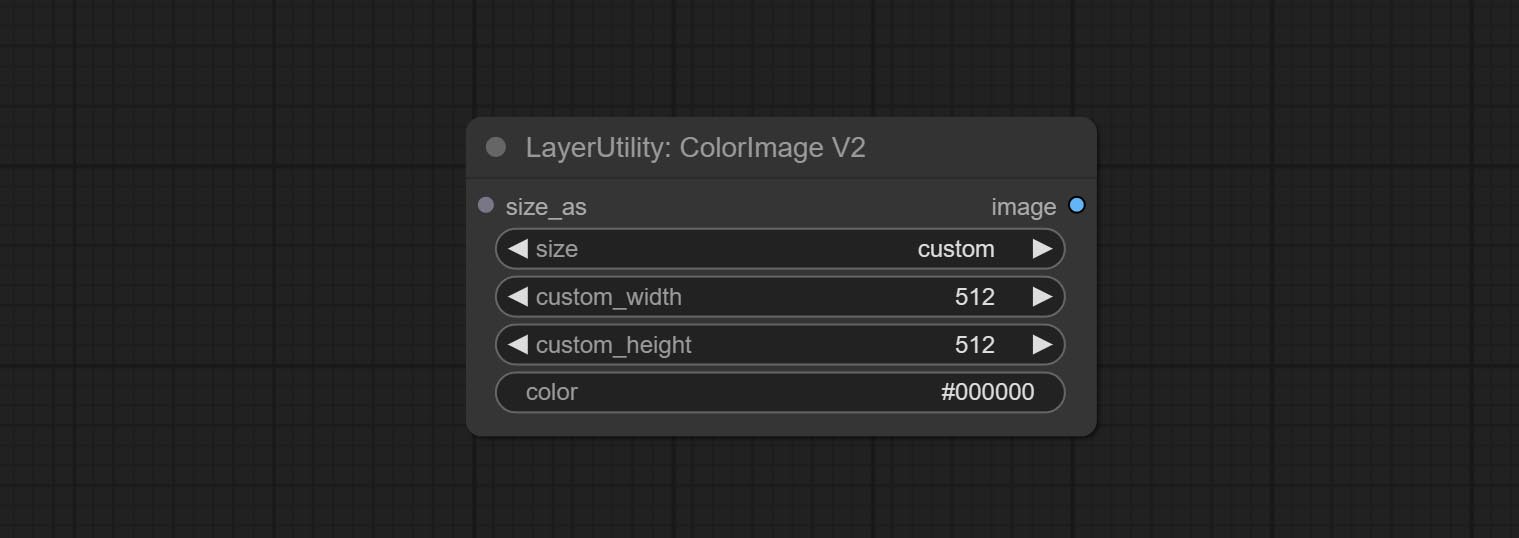
The following changes have been made based on ColorImage:
- size_as * : Input image or mask here to generate image according to its size. Note that this input takes priority over other size settings.
- size ** : Size preset. the preset can be customized by the user. if have size_as input, this option will be ignored.
- custom_width: Image width. it valid when size is set to "custom". if have size_as input, this option will be ignored.
- custom_height: Image height. it valid when size is set to "custom". if have size_as input, this option will be ignored.
* Only limited to input images and masks. forcing the integration of other types of inputs will result in node errors. ** The preset size is defined in custom_size.ini , this file is located in the root directory of the plug-in, and the default name is custom_size.ini.example . to use this file for the first time, you need to change the file suffix to .ini . Open with text editing software. Each row represents a size, with the first value being width and the second being height, separated by a lowercase "x" in the middle. To avoid errors, please do not enter extra characters.
GradientImage
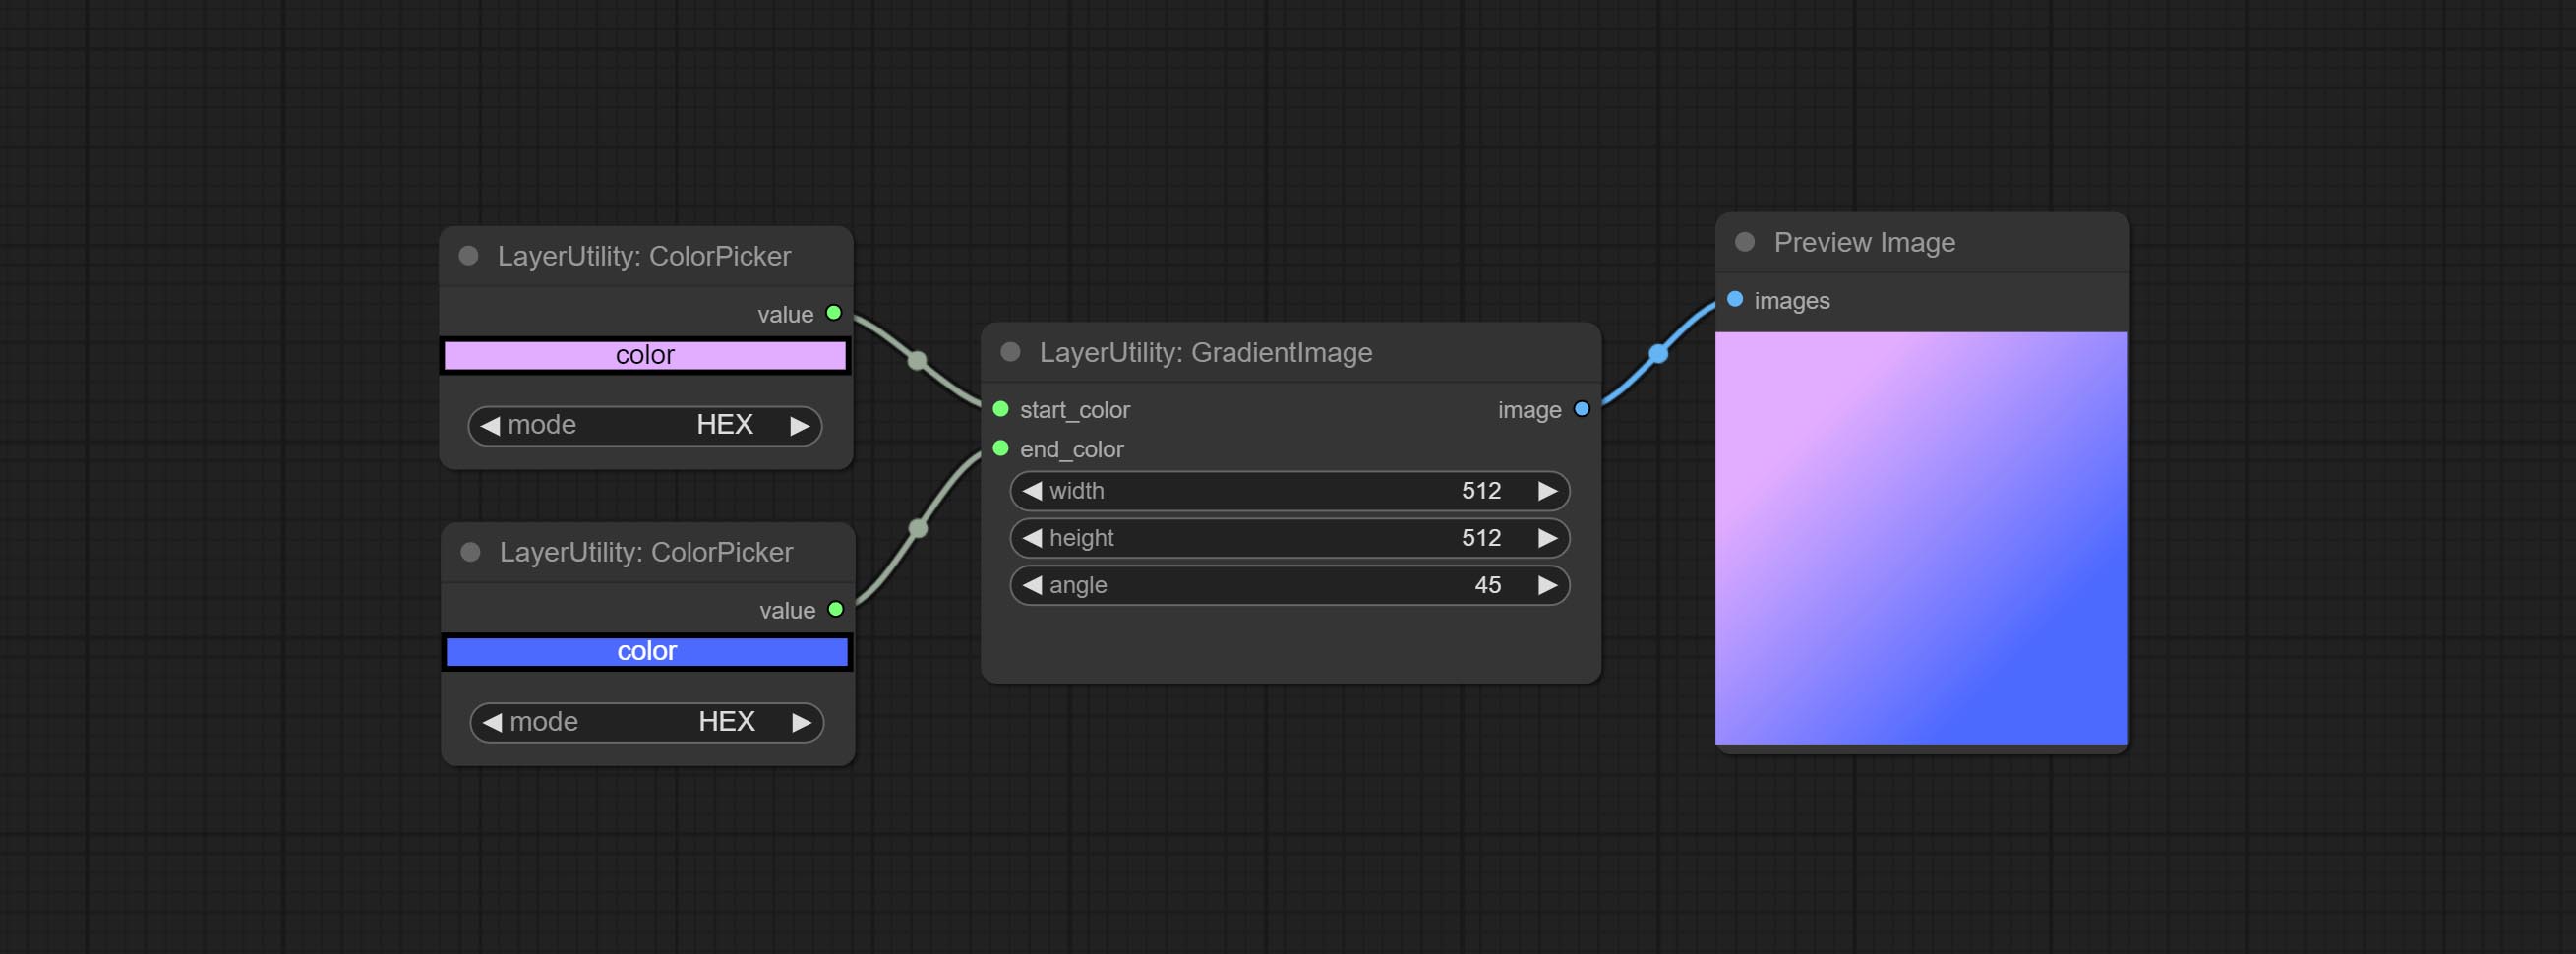
Generate an image with a specified size and color gradient.
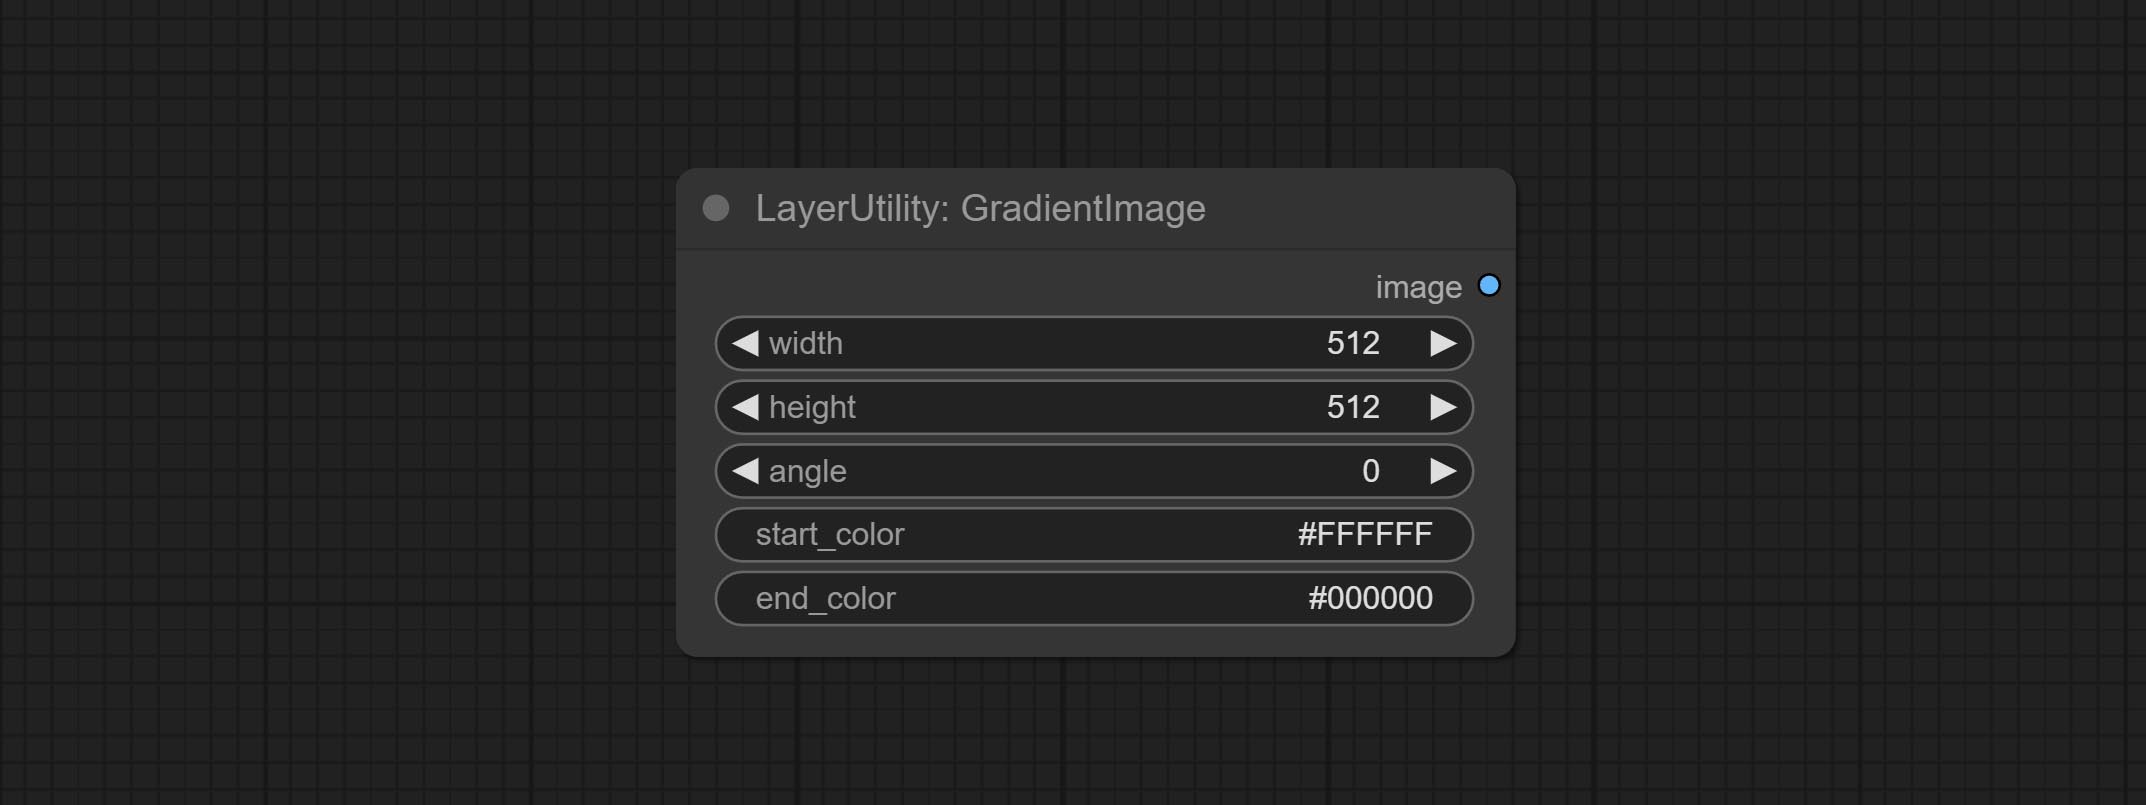
Node options:
- width: Width of the image.
- height: Height of the image.
- angle: Angle of gradient.
- start_color 4 : Color of the begging.
- end_color 4 : Color of the ending.
GradientImageV2
The V2 upgraded version of GradientImage.
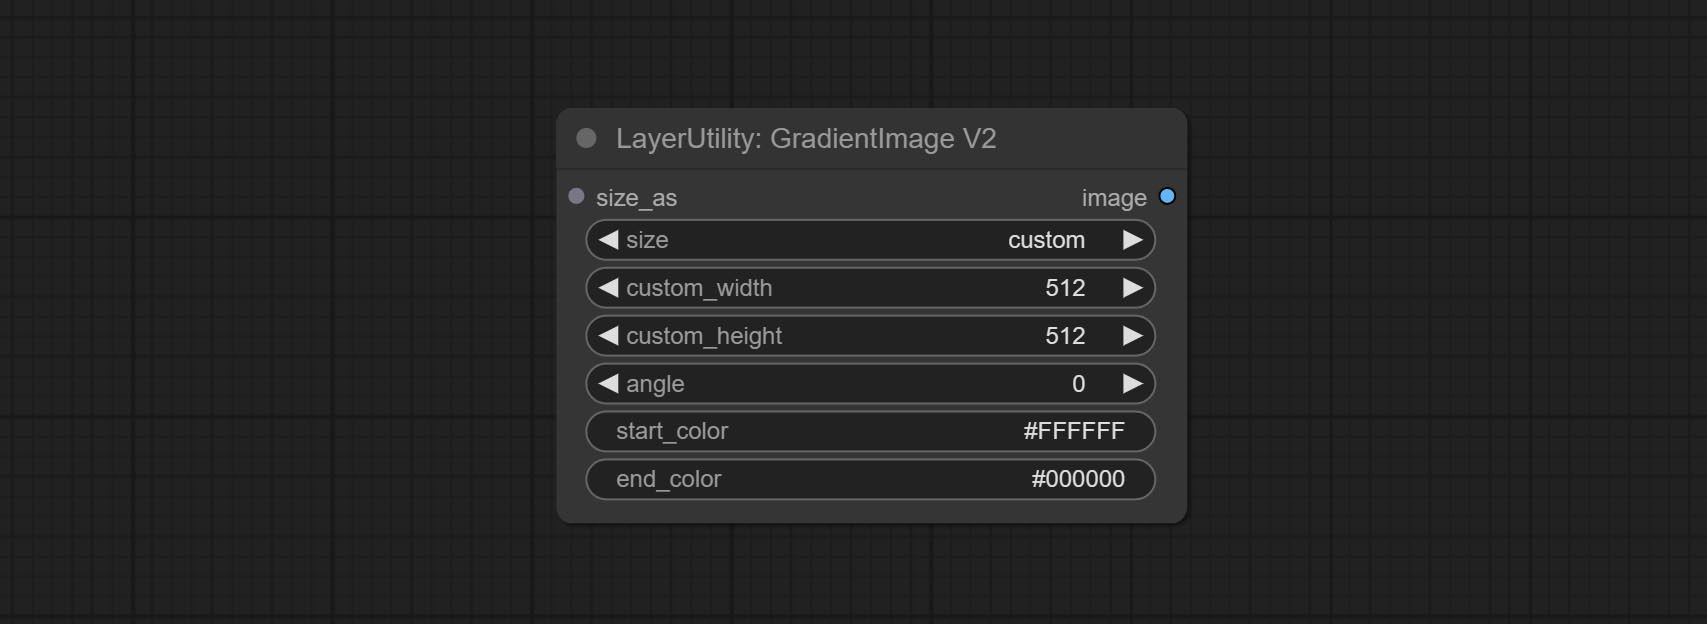
The following changes have been made based on GradientImage:
- size_as * : Input image or mask here to generate image according to its size. Note that this input takes priority over other size settings.
- size ** : Size preset. the preset can be customized by the user. if have size_as input, this option will be ignored.
- custom_width: Image width. it valid when size is set to "custom". if have size_as input, this option will be ignored.
- custom_height: Image height. it valid when size is set to "custom". if have size_as input, this option will be ignored.
* Only limited to input images and masks. forcing the integration of other types of inputs will result in node errors. ** The preset size is defined in custom_size.ini , this file is located in the root directory of the plug-in, and the default name is custom_size.ini.example . to use this file for the first time, you need to change the file suffix to .ini . Open with text editing software. Each row represents a size, with the first value being width and the second being height, separated by a lowercase "x" in the middle. To avoid errors, please do not enter extra characters.
ImageRewardFilter
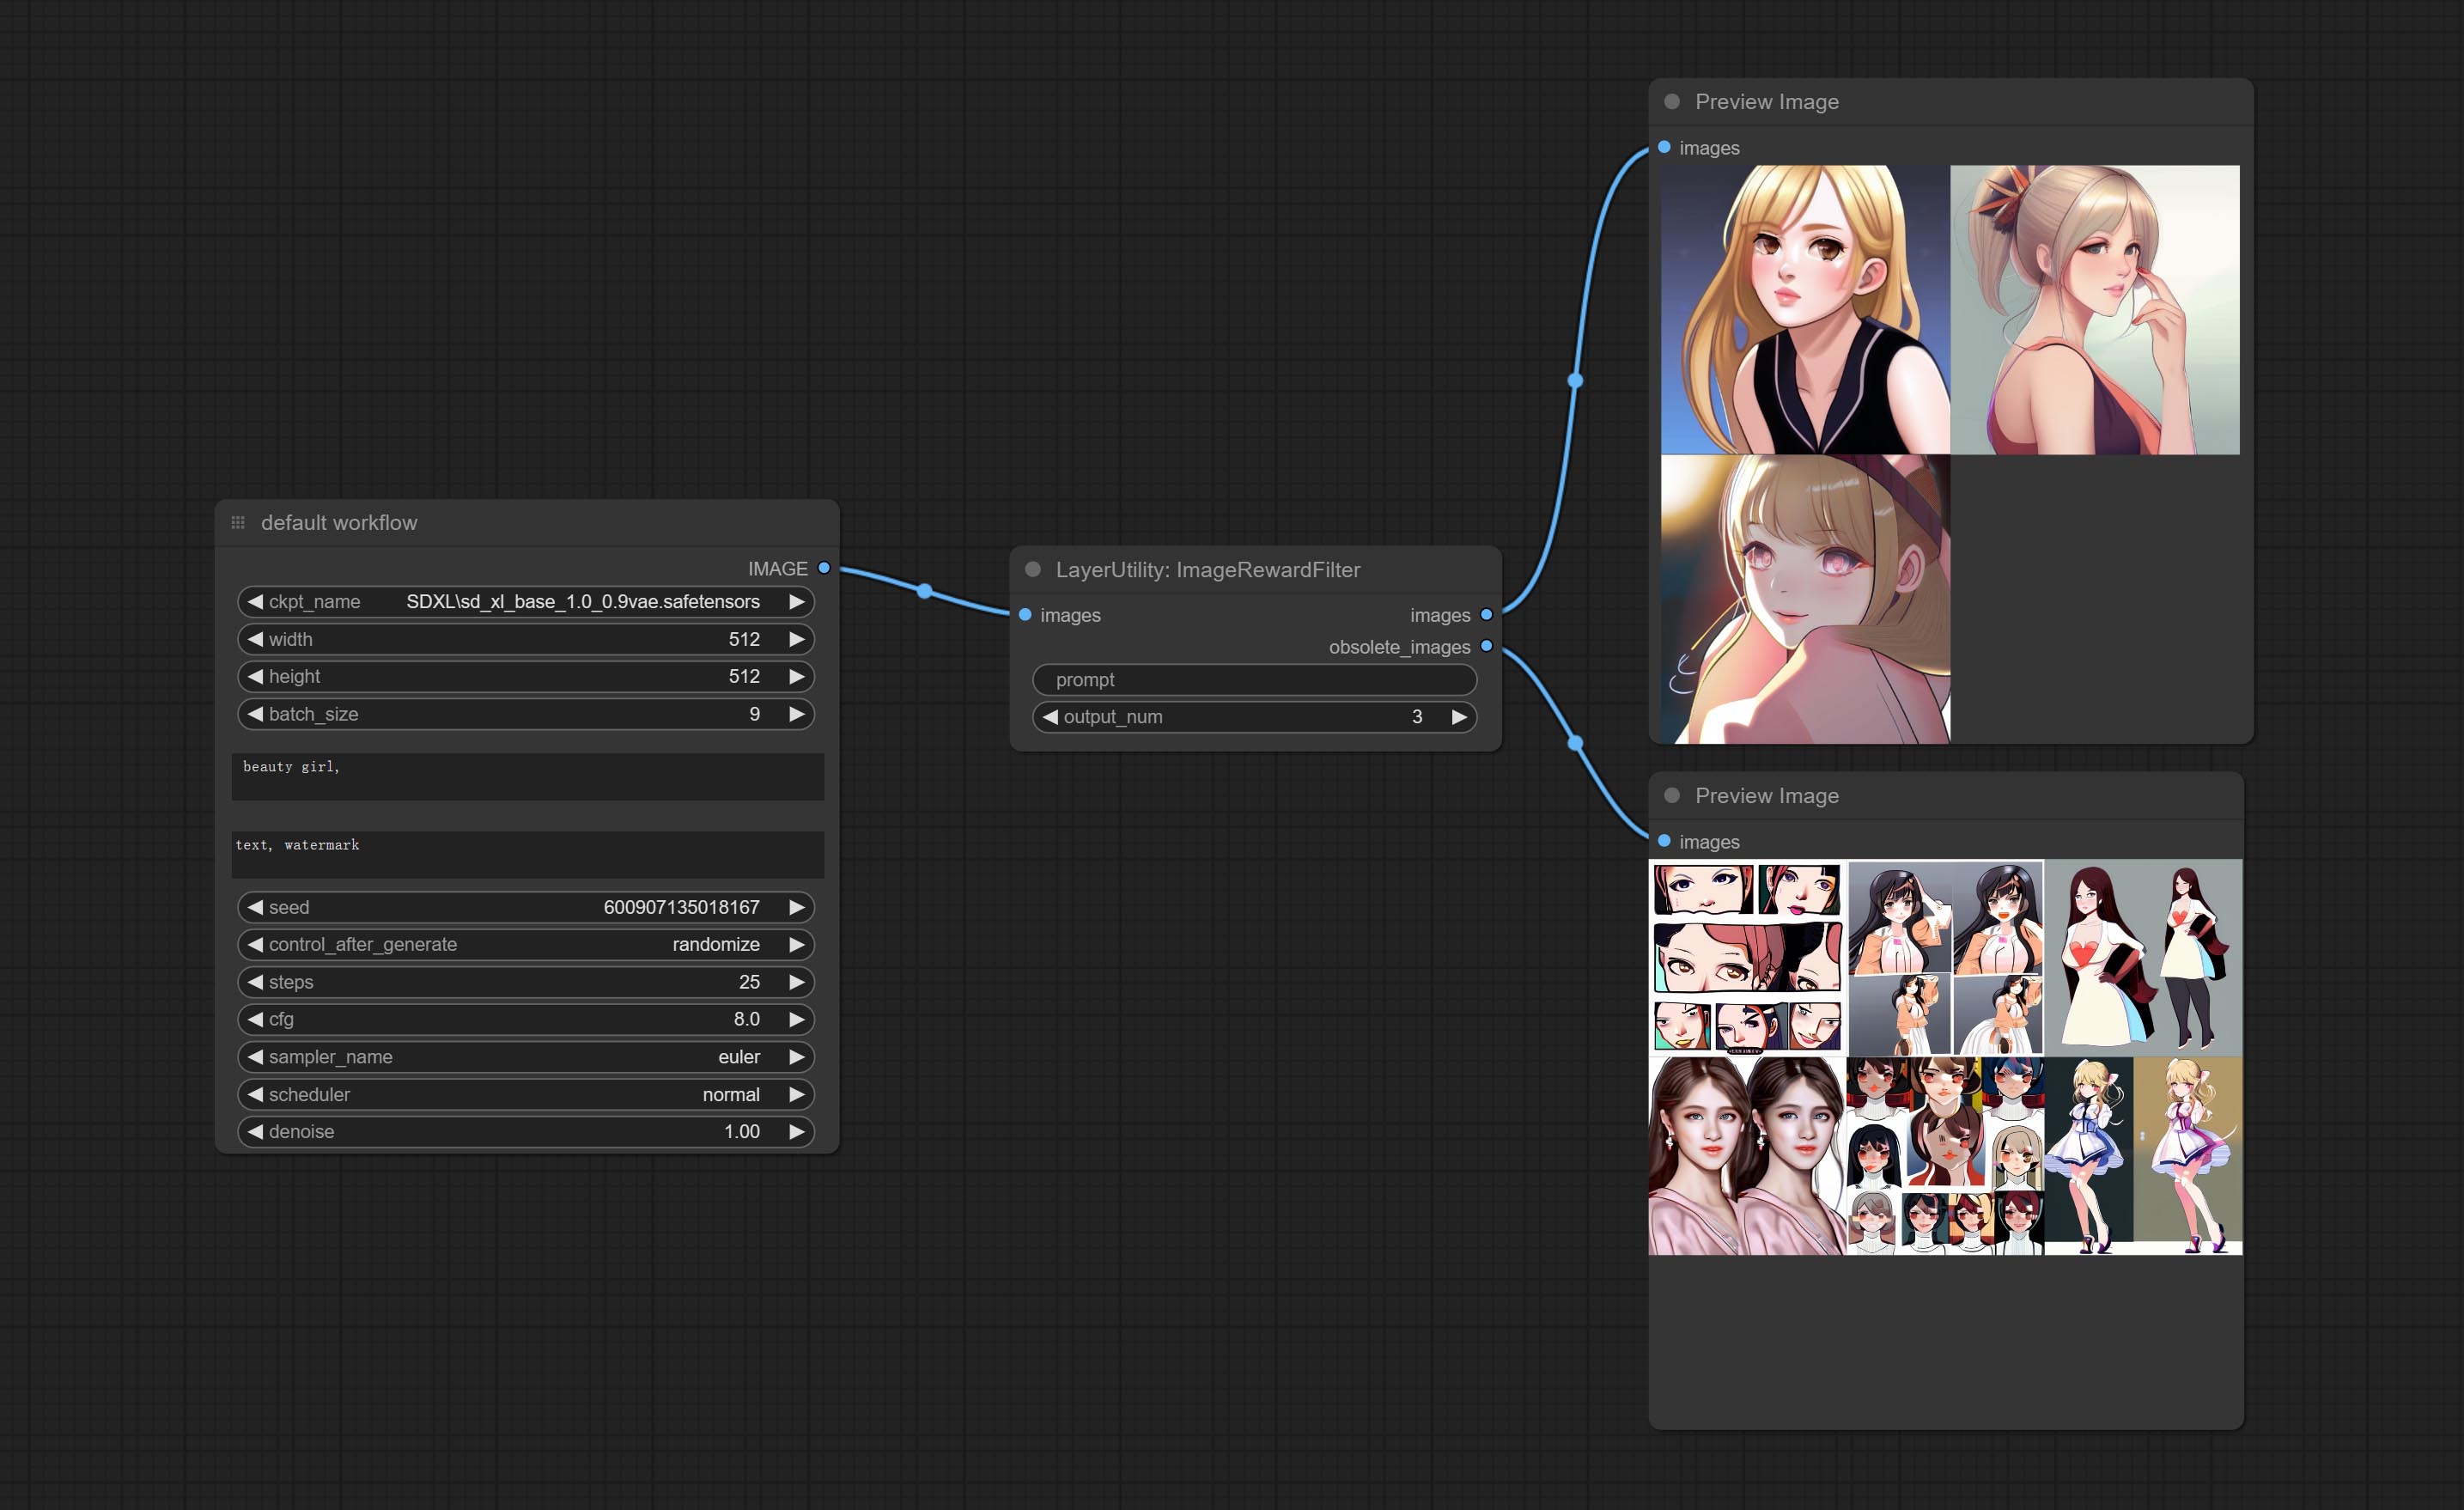
Rating bulk pictures and outputting top-ranked pictures. it used [ImageReward] (https://github.com/THUDM/ImageReward) for image scoring, thanks to the original authors.
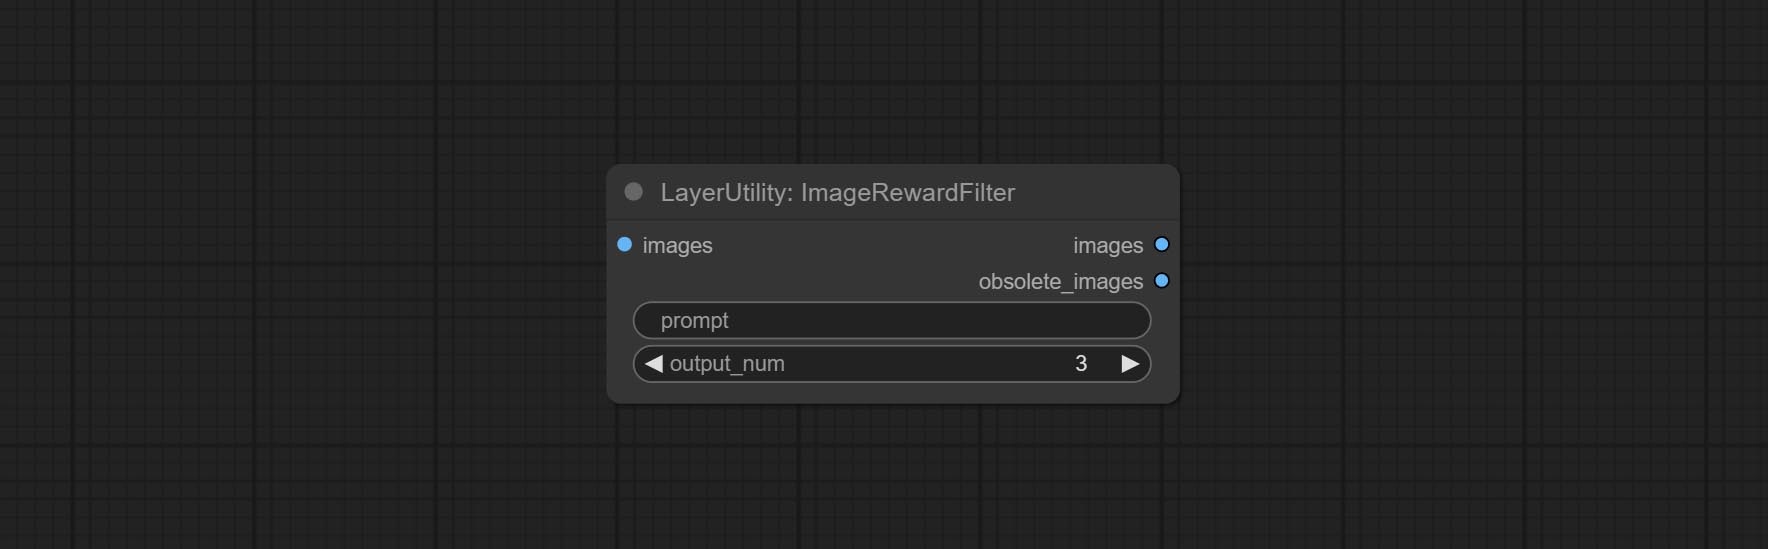
Node options:
- prompt: Optional input. Entering prompt here will be used as a basis to determine how well it matches the picture.
- output_nun: Number of pictures outputted. This value should be less than the picture batch.
Outputs:
- images: Bulk pictures output from high to low in order of rating.
- obsolete_images: Knockout pictures. Also output in order of rating from high to low.
SimpleTextImage
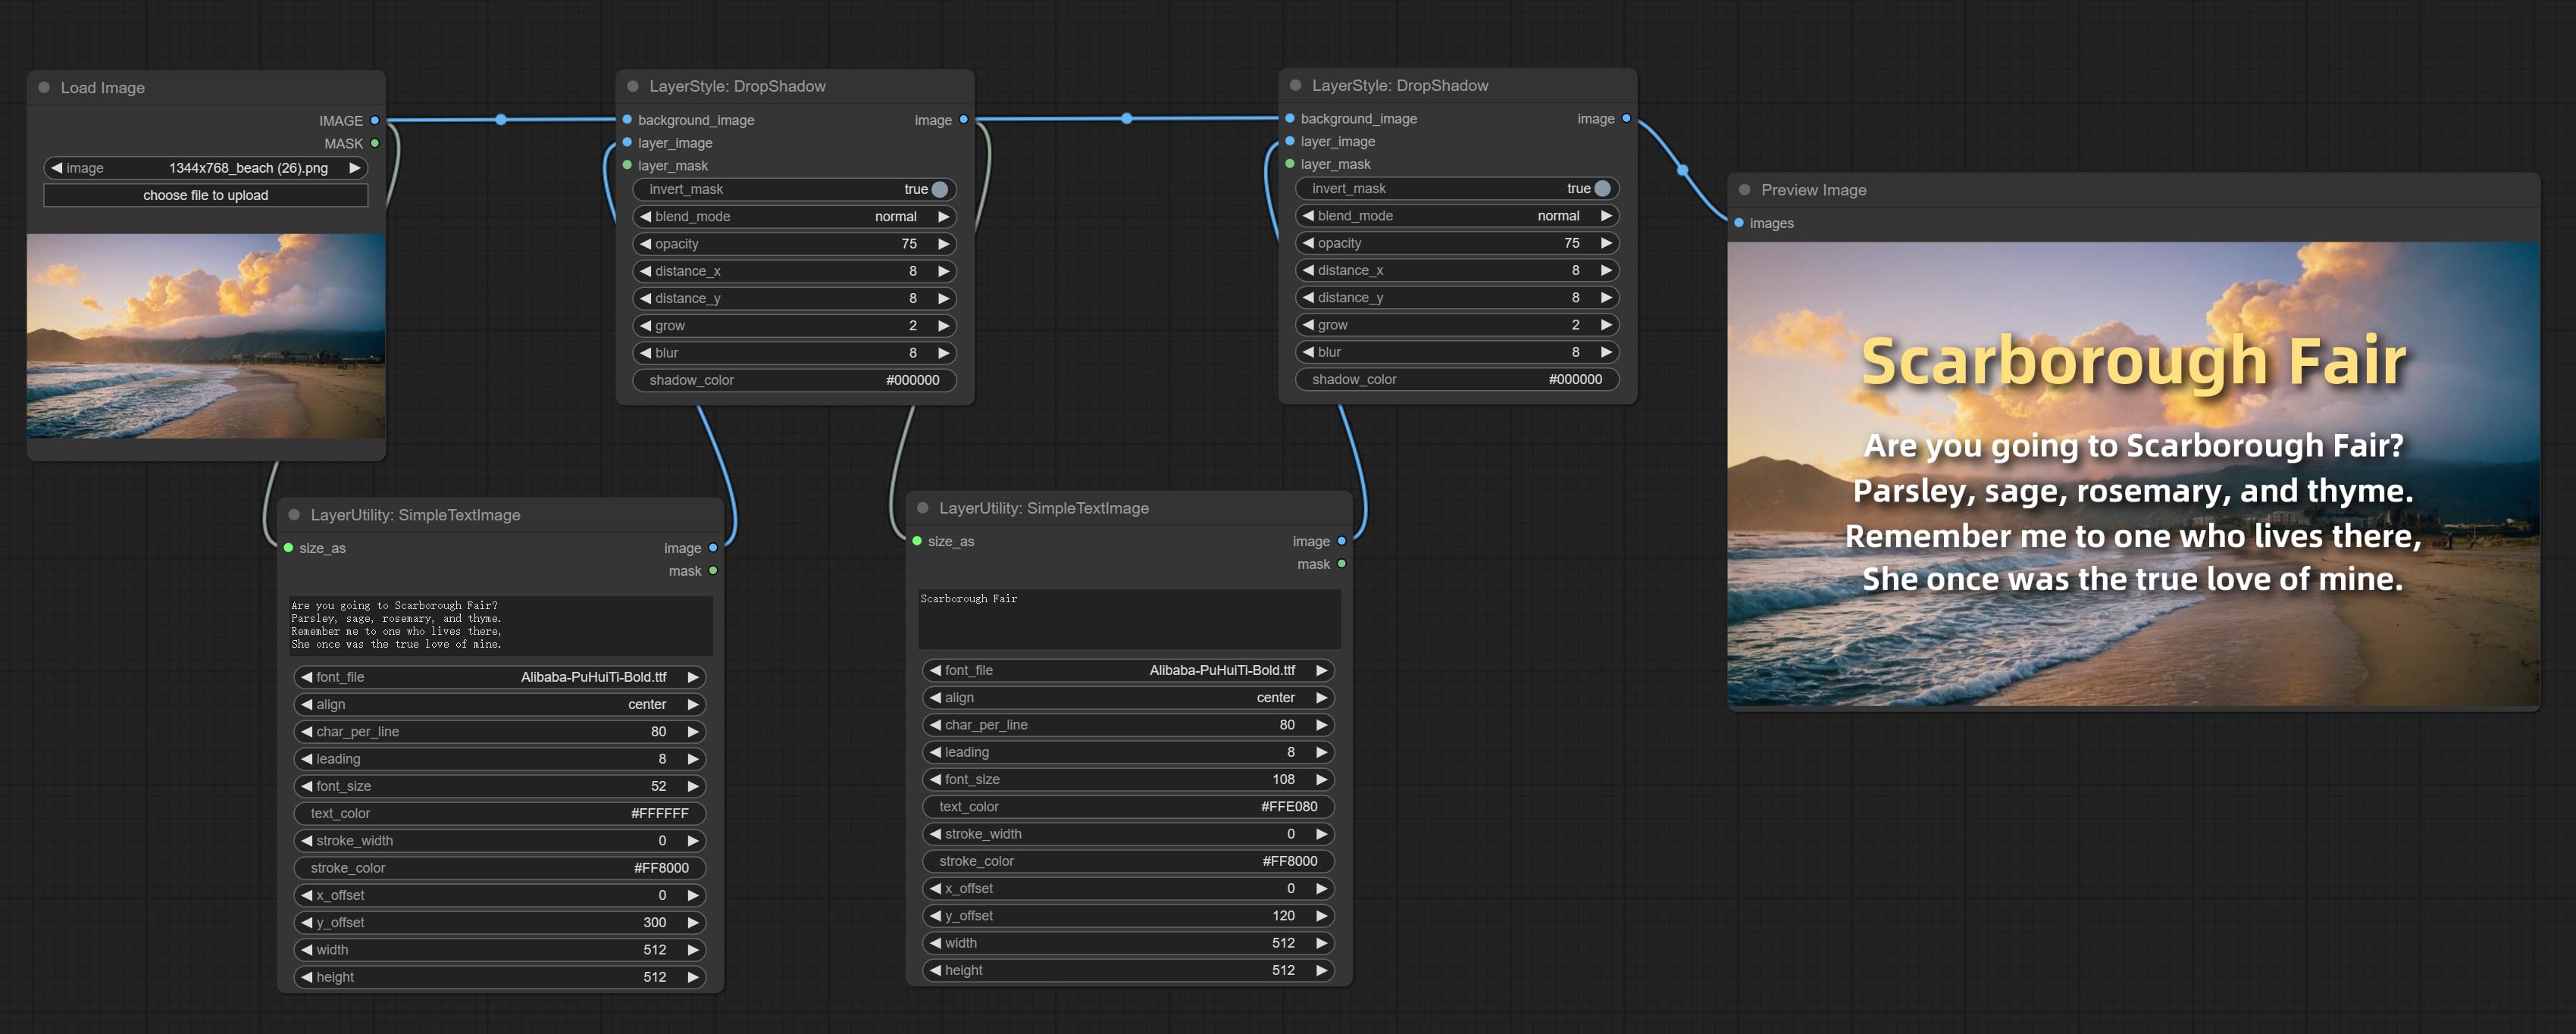
Generate simple typesetting images and masks from text. This node references some of the functionalities and code of ZHO-ZHO-ZHO/ComfyUI-Text_Image-Composite, thanks to the original author.
Node options:
- size_as * : The input image or mask here will generate the output image and mask according to their size. this input takes priority over the width and height below.
- font_file ** : Here is a list of available font files in the font folder, and the selected font files will be used to generate images.
- align: Alignment options. There are three options: center, left, and right.
- char_per_line: The number of characters per line, any excess will be automatically wrapped.
- leading: The leading space.
- font_size: The size of font.
- text_color: The color of text.
- stroke_width: The width of stroke.
- stroke_color: The color of stroke.
- x_offset: The horizontal offset of the text position.
- y_offset: The vertical offset of the text position.
- width: Width of the image. If there is a size_as input, this setting will be ignored.
- height: Height of the image. If there is a size_as input, this setting will be ignored.
* Only limited to input image and mask. forcing the integration of other types of inputs will result in node errors.
** The font folder is defined in resource_dir.ini , this file is located in the root directory of the plug-in, and the default name is resource_dir.ini.example . to use this file for the first time, you need to change the file suffix to .ini . Open the text editing software and find the line starting with "FONT_dir=", after "=", enter the custom folder path name. support defining multiple folders in resource-dir.ini , separated by commas, semicolons, or spaces. all font files in this folder will be collected and displayed in the node list during ComfyUI initialization. If the folder set in ini is invalid, the font folder that comes with the plugin will be enabled.
TextImage
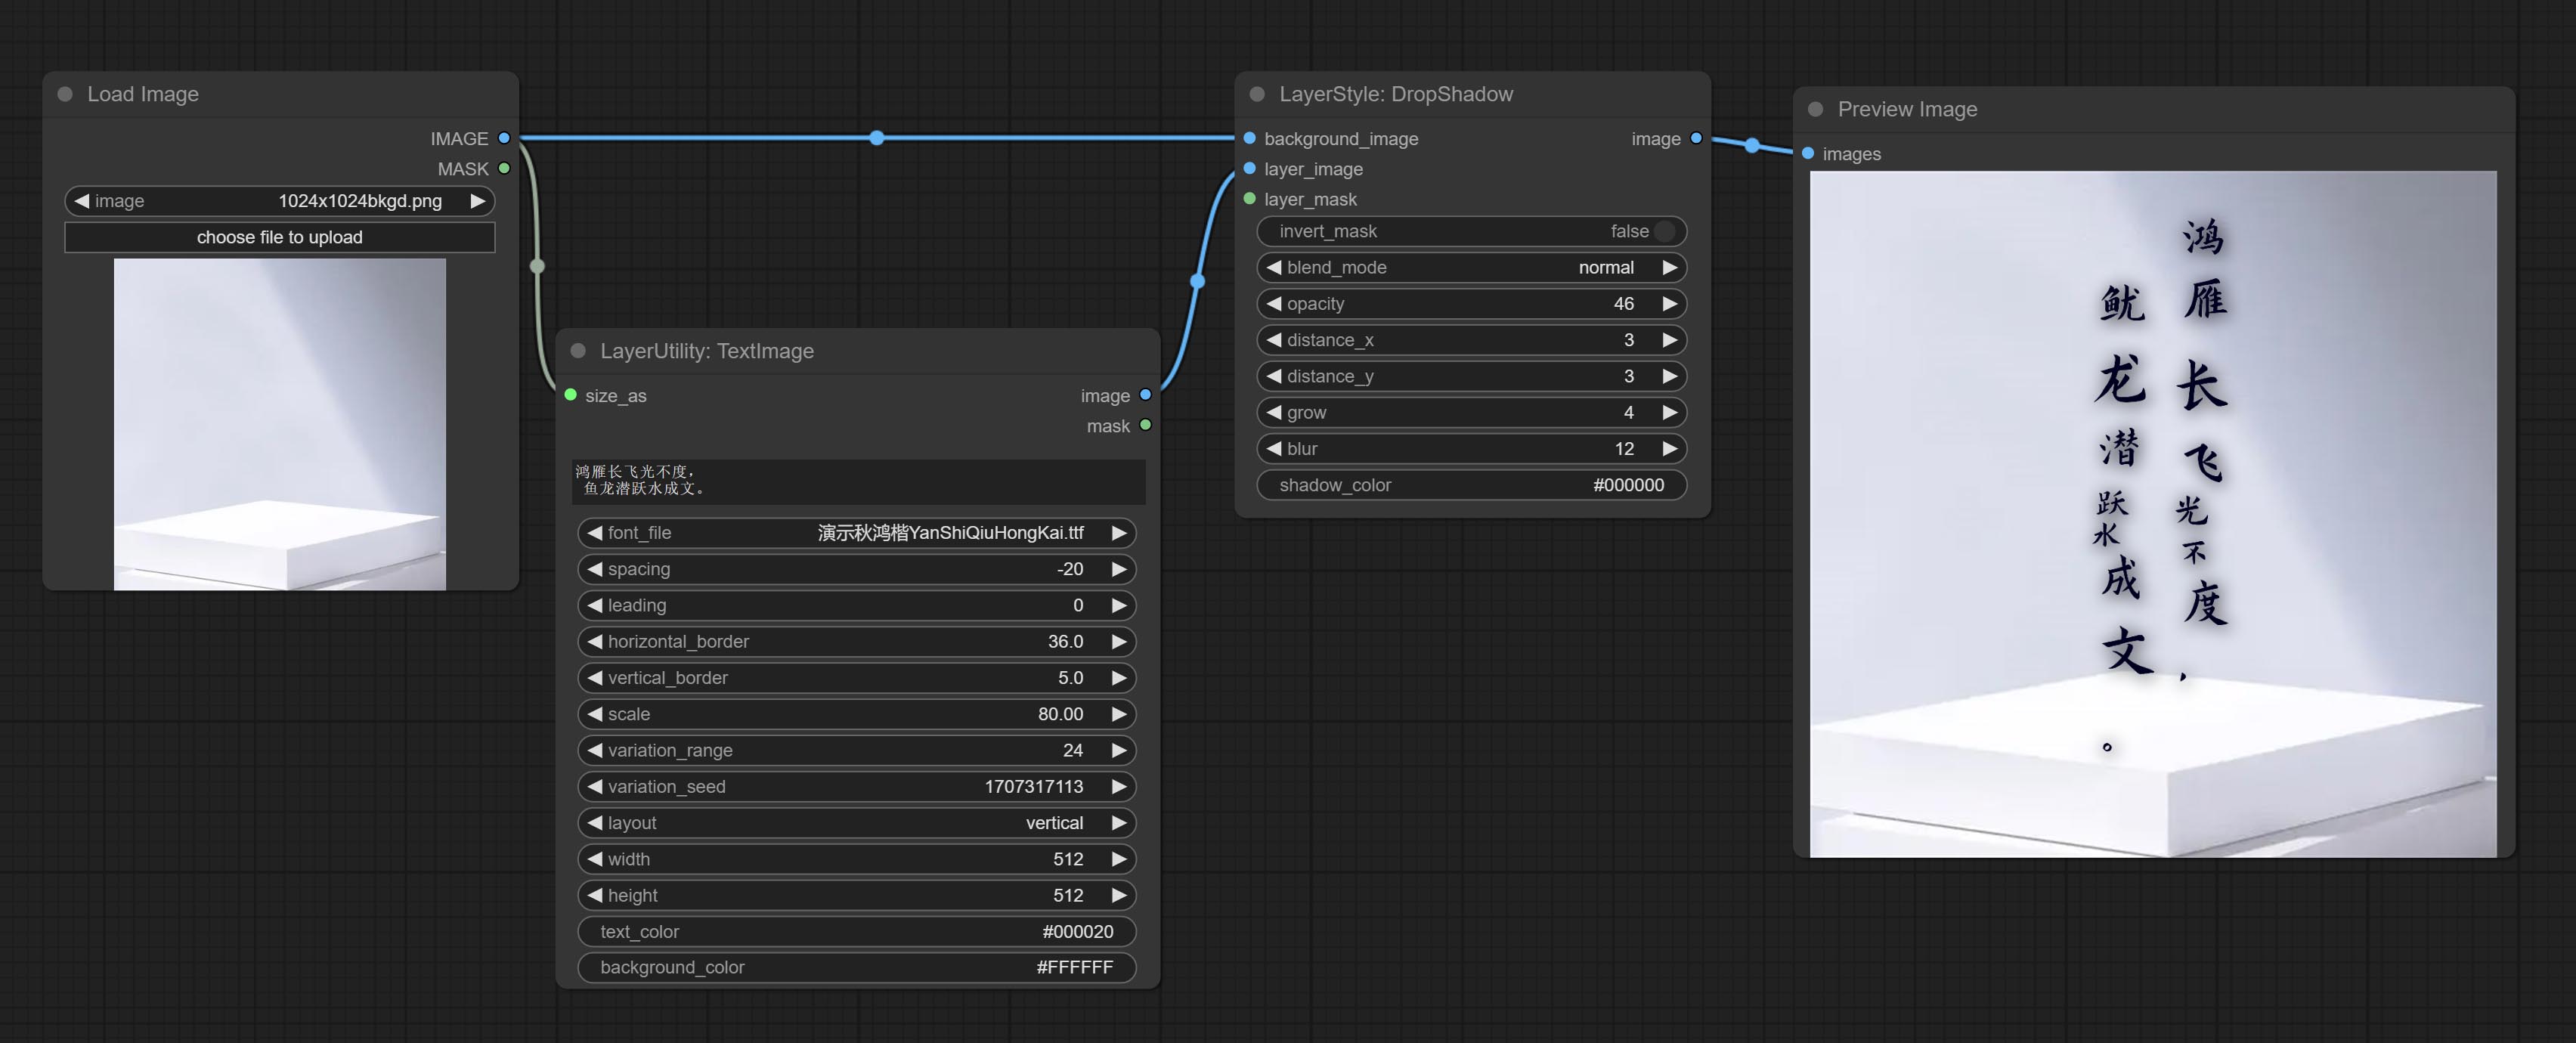
Generate images and masks from text. support for adjusting the spacing between words and lines, horizontal and vertical adjustments, it can set random changes in each character, including size and position.
Node options:
- size_as * : The input image or mask here will generate the output image and mask according to their size. this input takes priority over the width and height below.
- font_file ** : Here is a list of available font files in the font folder, and the selected font files will be used to generate images.
- spacing: Word spacing.this value is in pixels.
- leading: Row leading.this value is in pixels.
- horizontal_border: Side margin. If the text is horizontal, it is the left margin, and if it is vertical, it is the right margin. this value is represents a percentage, for example, 50 indicates that the starting point is located in the center on both sides.
- vertical_border: Top margin. this value is represents a percentage, for example, 10 indicates that the starting point is located 10% away from the top.
- scale: The overall size of the text. the initial size of text is automatically calculated based on the screen size and text content, with the longest row or column by default adapting to the image width or height. adjusting the value here will scale the text as a whole. this value is represents a percentage, for example, 60 represents scaling to 60%.
- variation_range: The range of random changes in characters. when this value is greater than 0, the character will undergo random changes in size and position, and the larger the value, the greater the magnitude of the change.
- variation_seed: The seed for randomly. fix this value to individual characters changes generated each time will not change.
- layout: Text layout. there are horizontal and vertical options to choose from.
- width: Width of the image. If there is a size_as input, this setting will be ignored.
- height: Height of the image. If there is a size_as input, this setting will be ignored.
- text_color: The color of text.
- background_color 4 : The color of background.
* Only limited to input image and mask. forcing the integration of other types of inputs will result in node errors.
** The font folder is defined in resource_dir.ini , this file is located in the root directory of the plug-in, and the default name is resource_dir.ini.example . to use this file for the first time, you need to change the file suffix to .ini . Open the text editing software and find the line starting with "FONT_dir=", after "=", enter the custom folder path name. support defining multiple folders in resource-dir.ini , separated by commas, semicolons, or spaces. all font files in this folder will be collected and displayed in the node list during ComfyUI initialization. If the folder set in ini is invalid, the font folder that comes with the plugin will be enabled.
TextImageV2
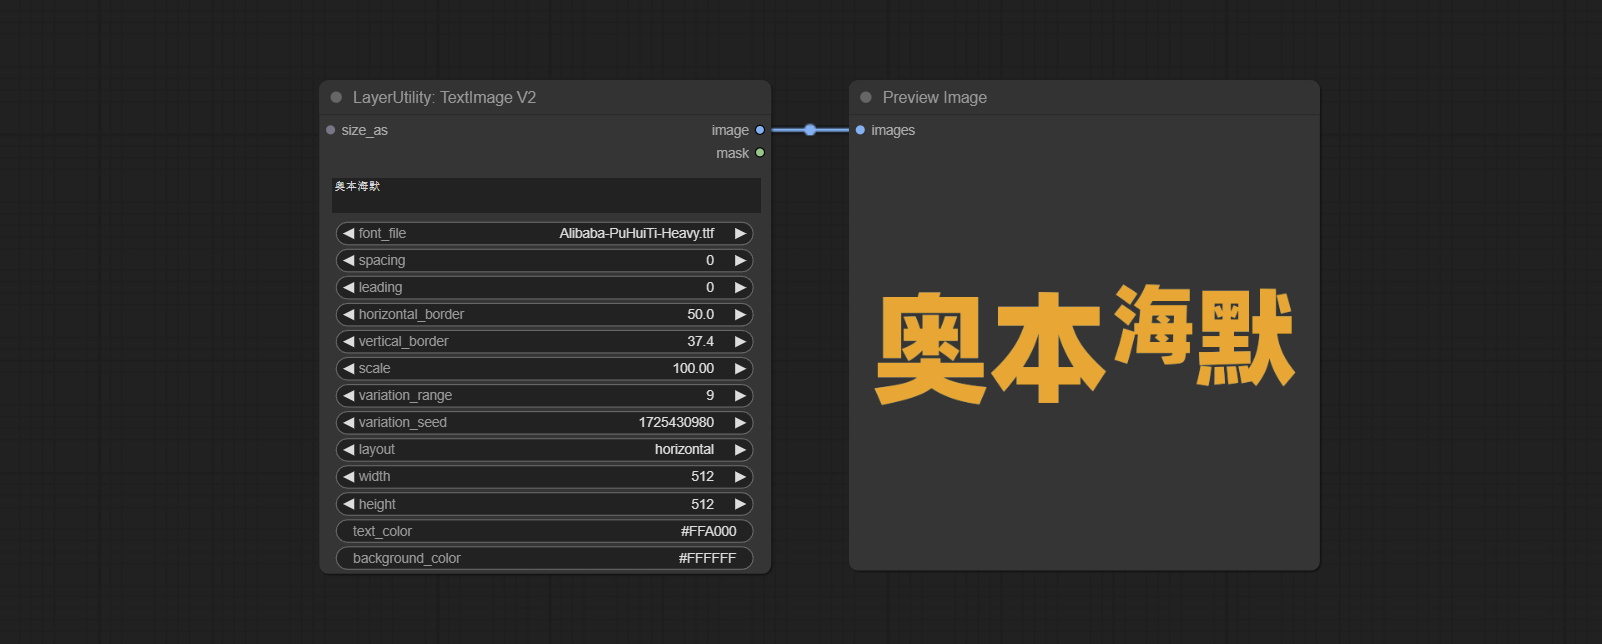
This node is merged from heshengtao. The PR modifies the scaling of the image text node based on the TextImage node. The font spacing follows the scaling, and the coordinates are no longer based on the top left corner of the text, but on the center point of the entire line of text. Thank you for the author's contribution.
LaMa
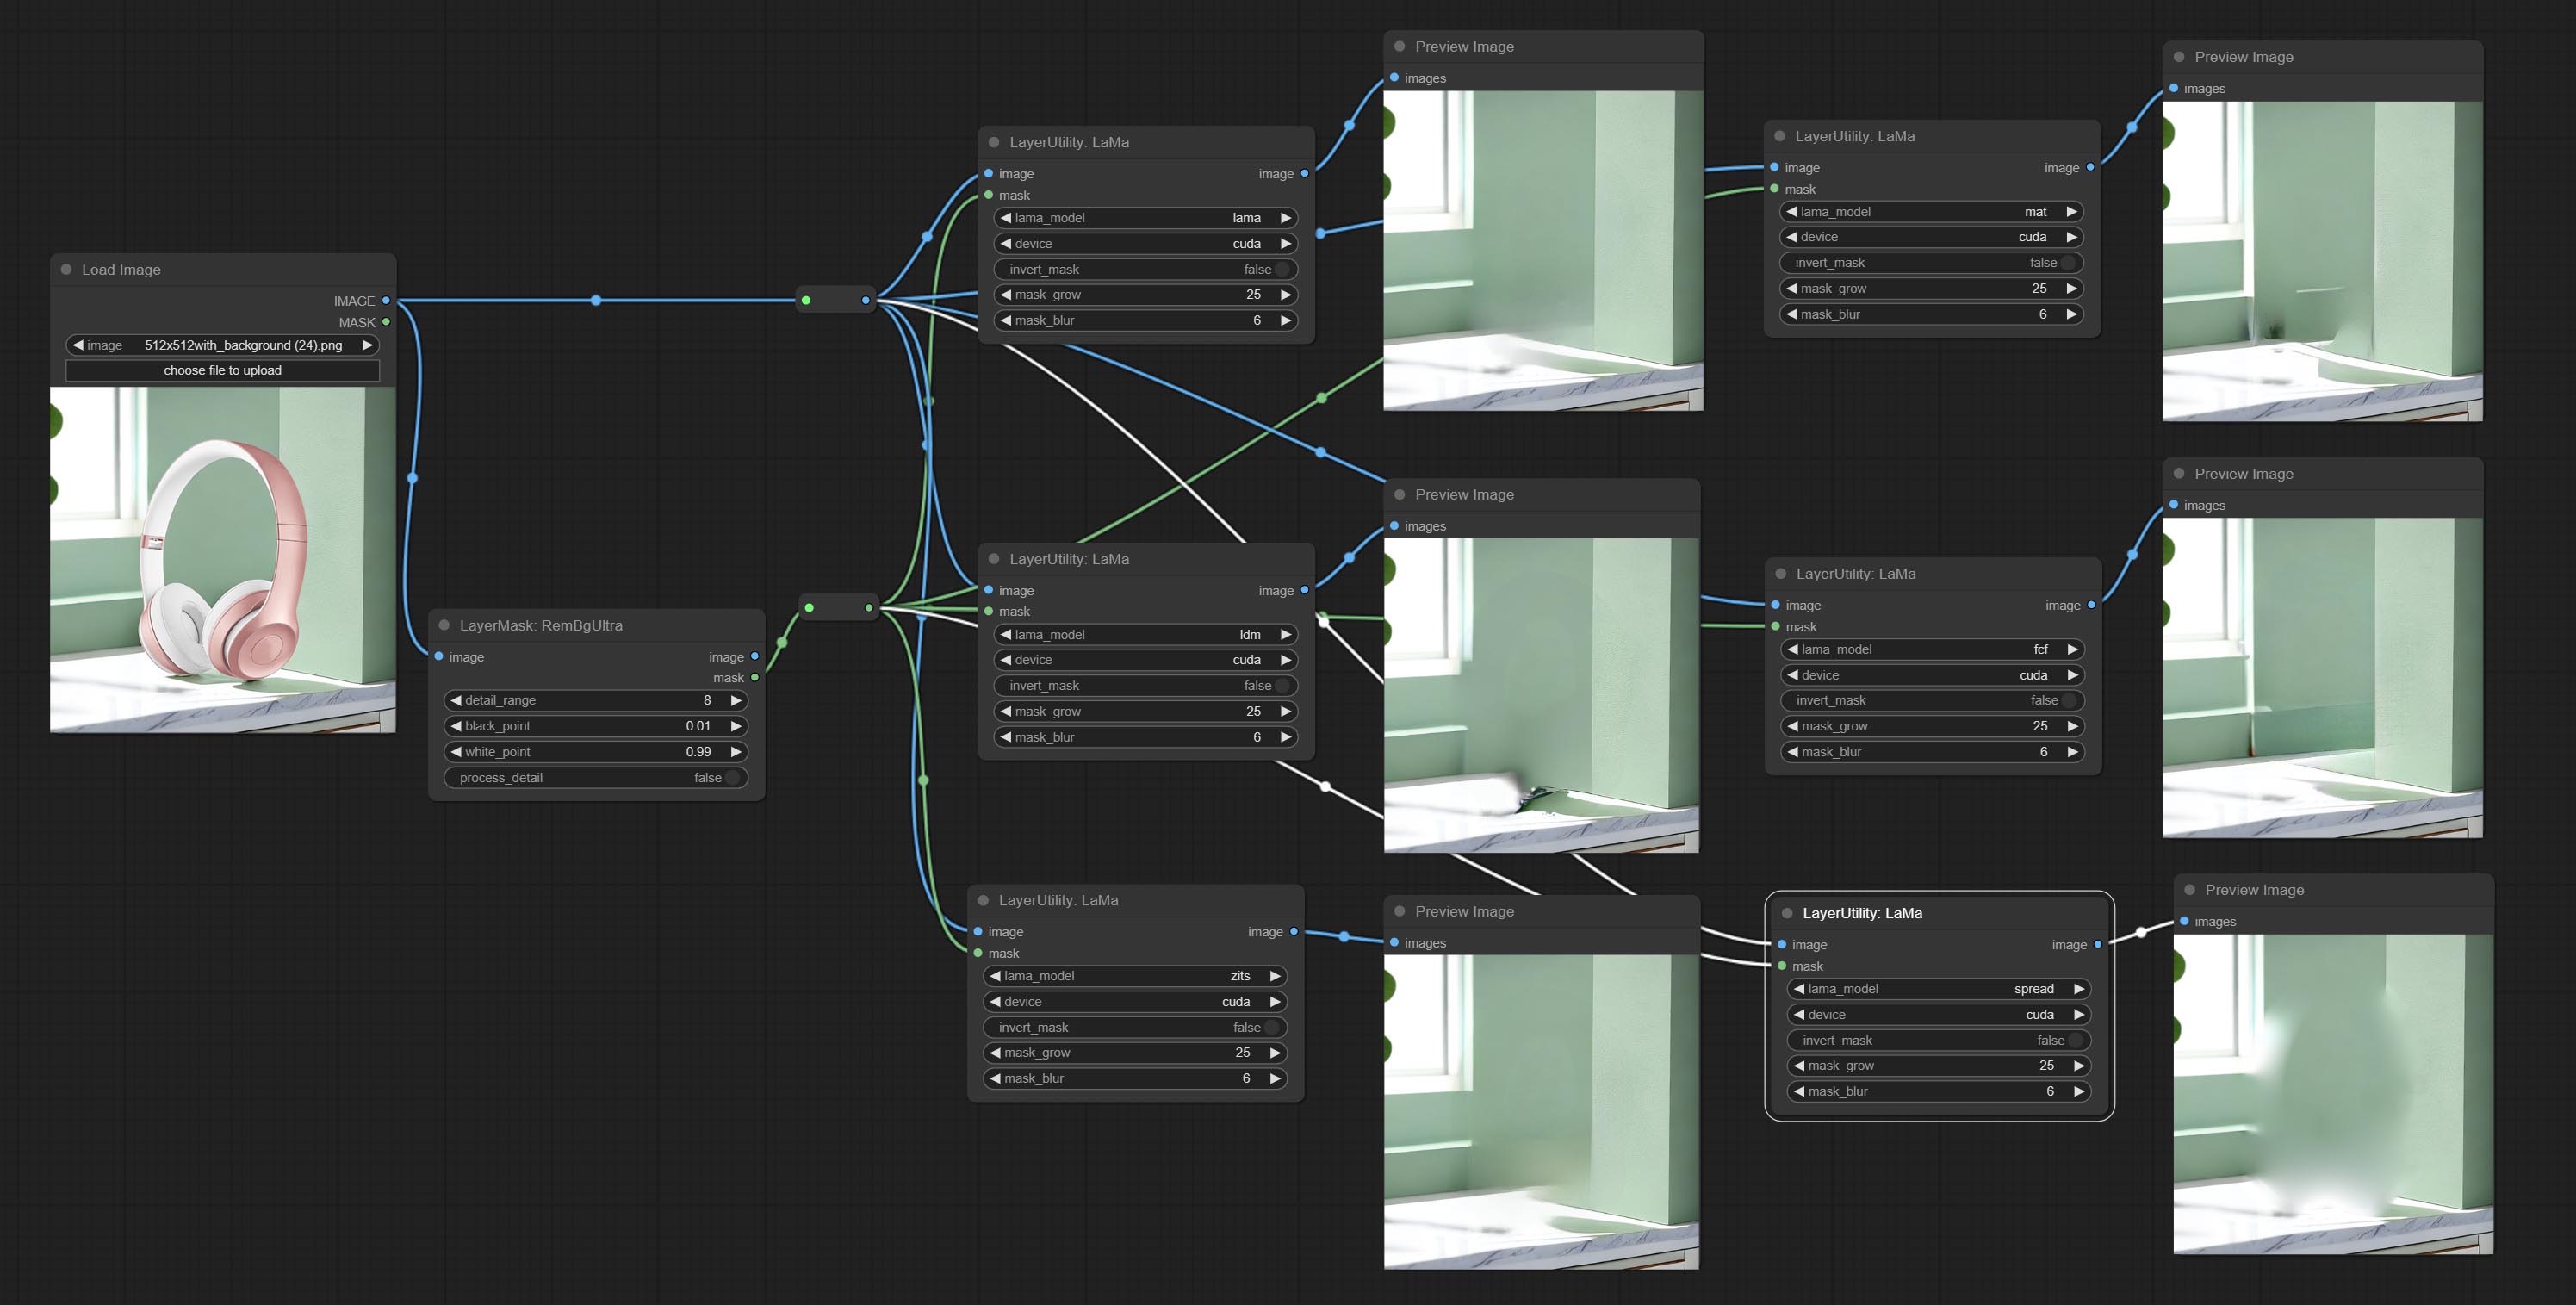
Erase objects from the image based on the mask. this node is repackage of IOPaint, powered by state-of-the-art AI models, thanks to the original author.
It is have LaMa, LDM, ZITS,MAT, FcF, Manga models and the SPREAD method to erase. Please refer to the original link for the introduction of each model.
Please download the model files from lama models(BaiduNetdisk) or lama models(Google Drive) to ComfyUI/models/lama folder.
Node optons: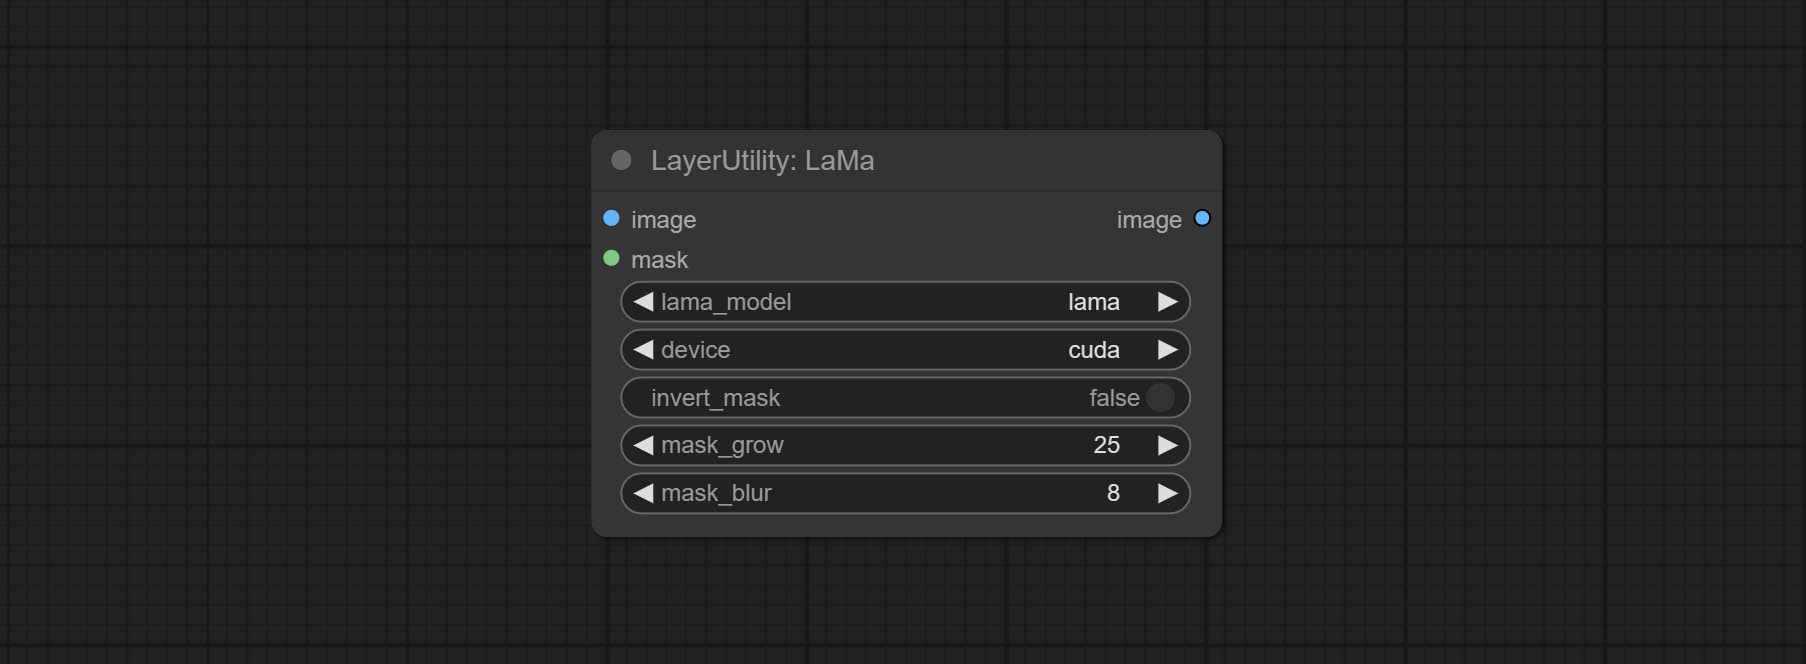
- lama_model: Choose a model or method.
- device: After correctly installing Torch and Nvidia CUDA drivers, using cuda will significantly improve running speed.
- invert_mask: Whether to reverse the mask.
- grow: Positive values expand outward, while negative values contract inward.
- blur: Blur the edge.
ImageChannelSplit
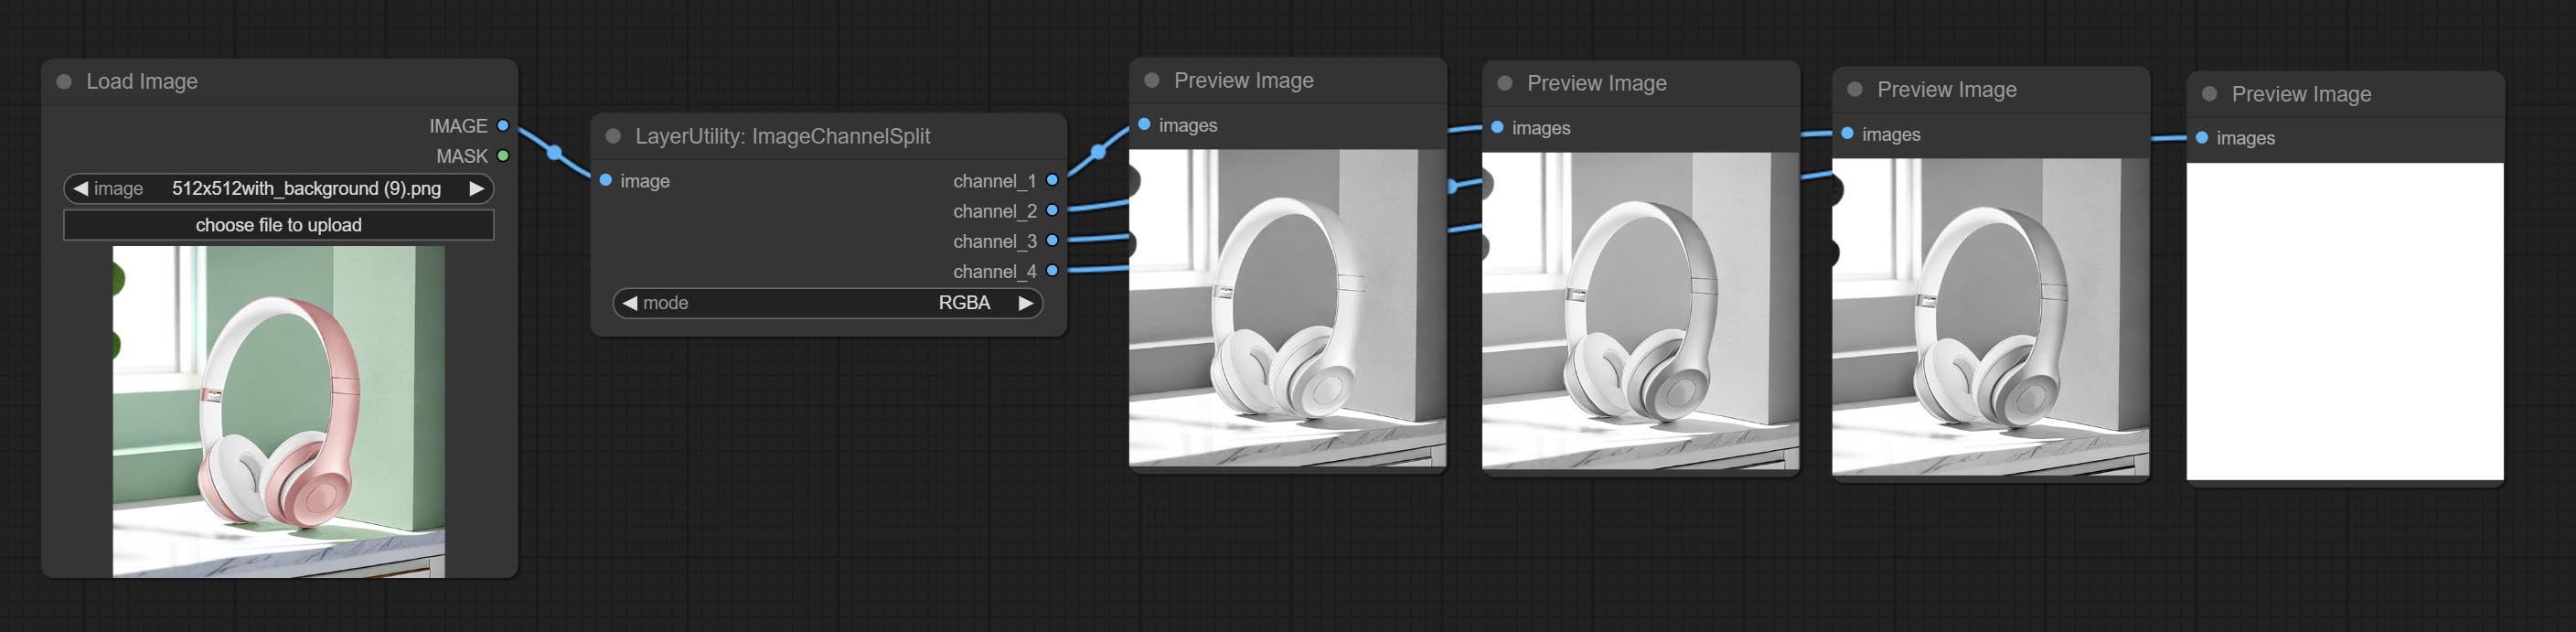
Split the image channel into individual images.
Node options: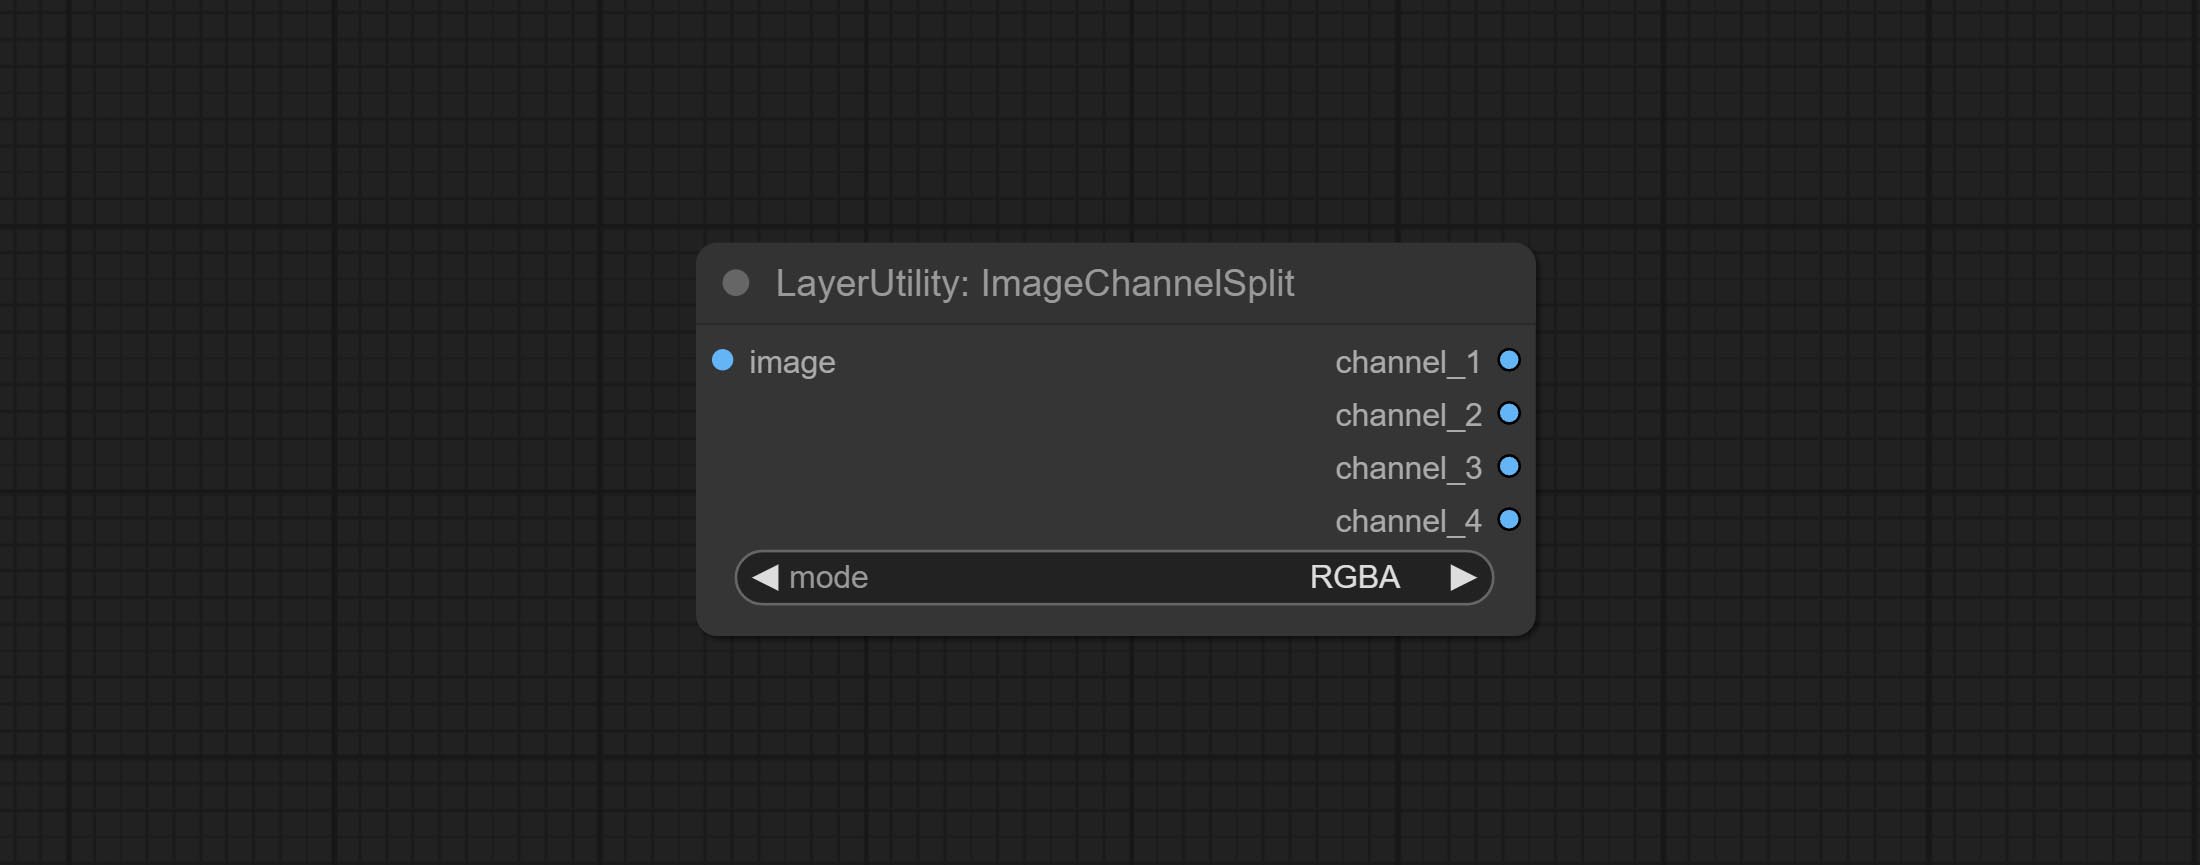
- mode: Channel mode, include RGBA, YCbCr, LAB adn HSV.
ImageChannelMerge
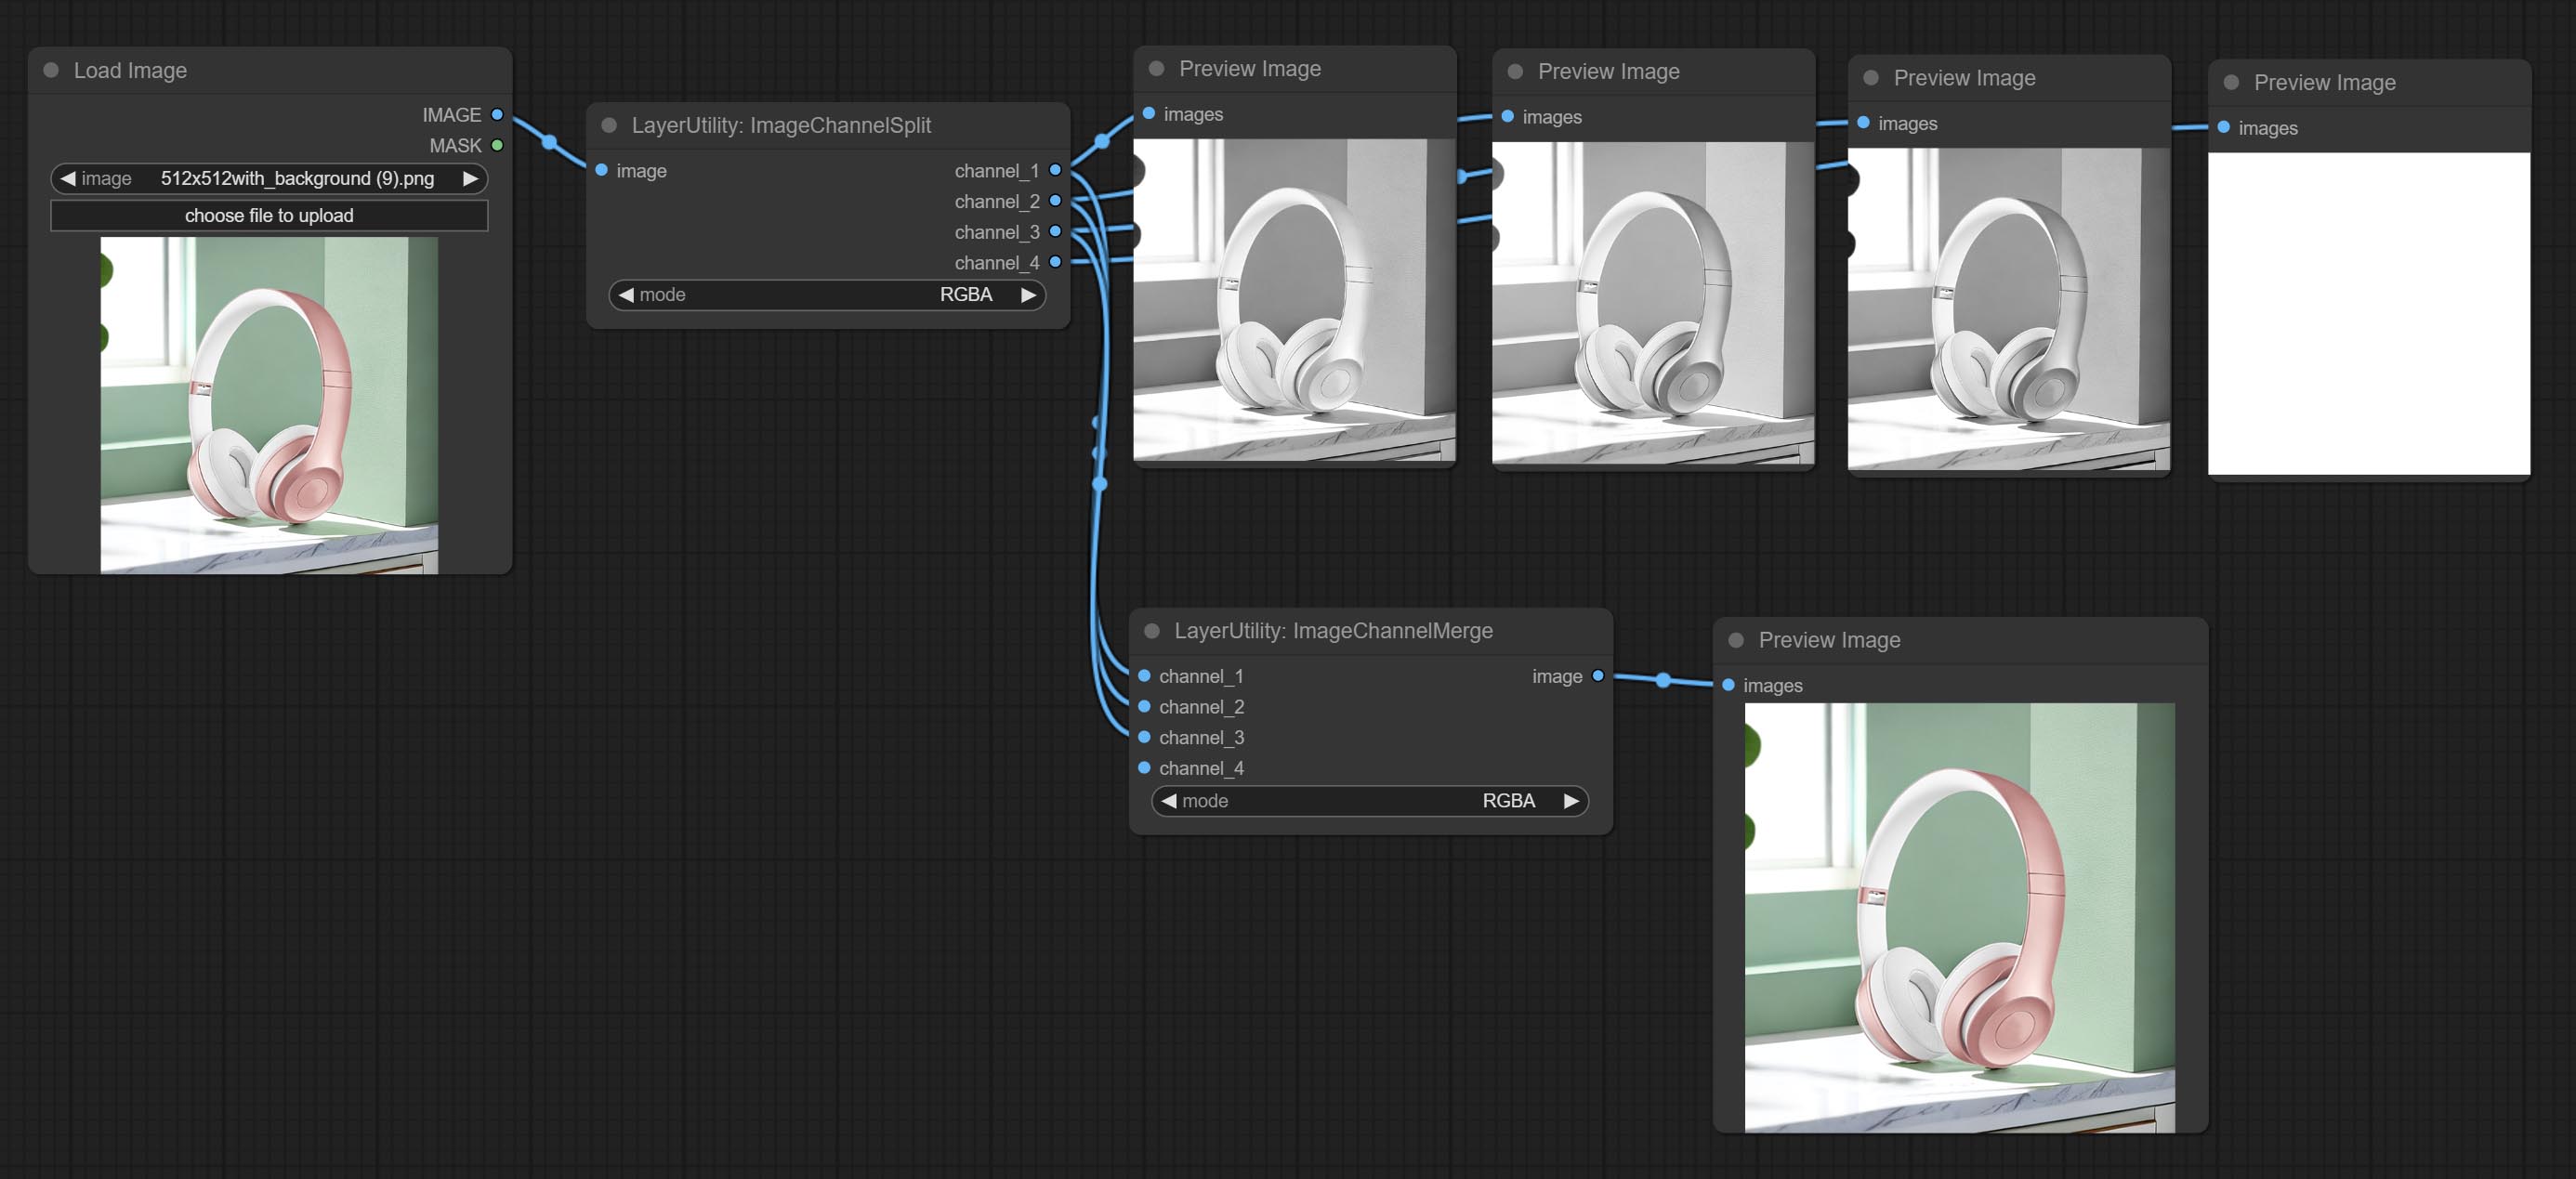
Merge each channel image into one image.
Node options: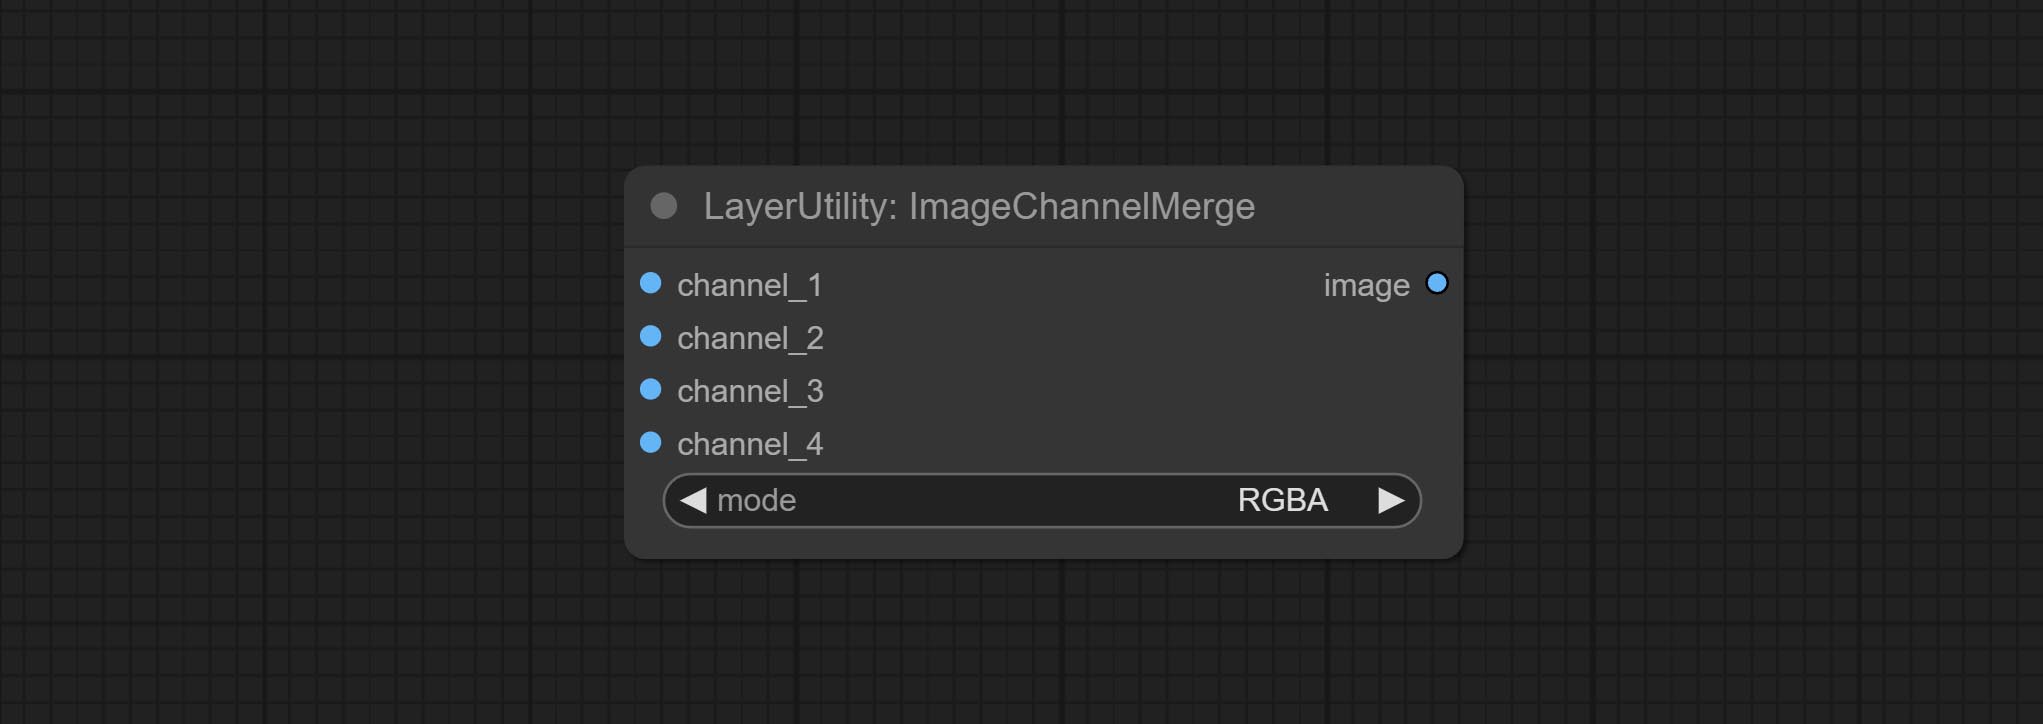
- mode: Channel mode, include RGBA, YCbCr, LAB adn HSV.
ImageRemoveAlpha
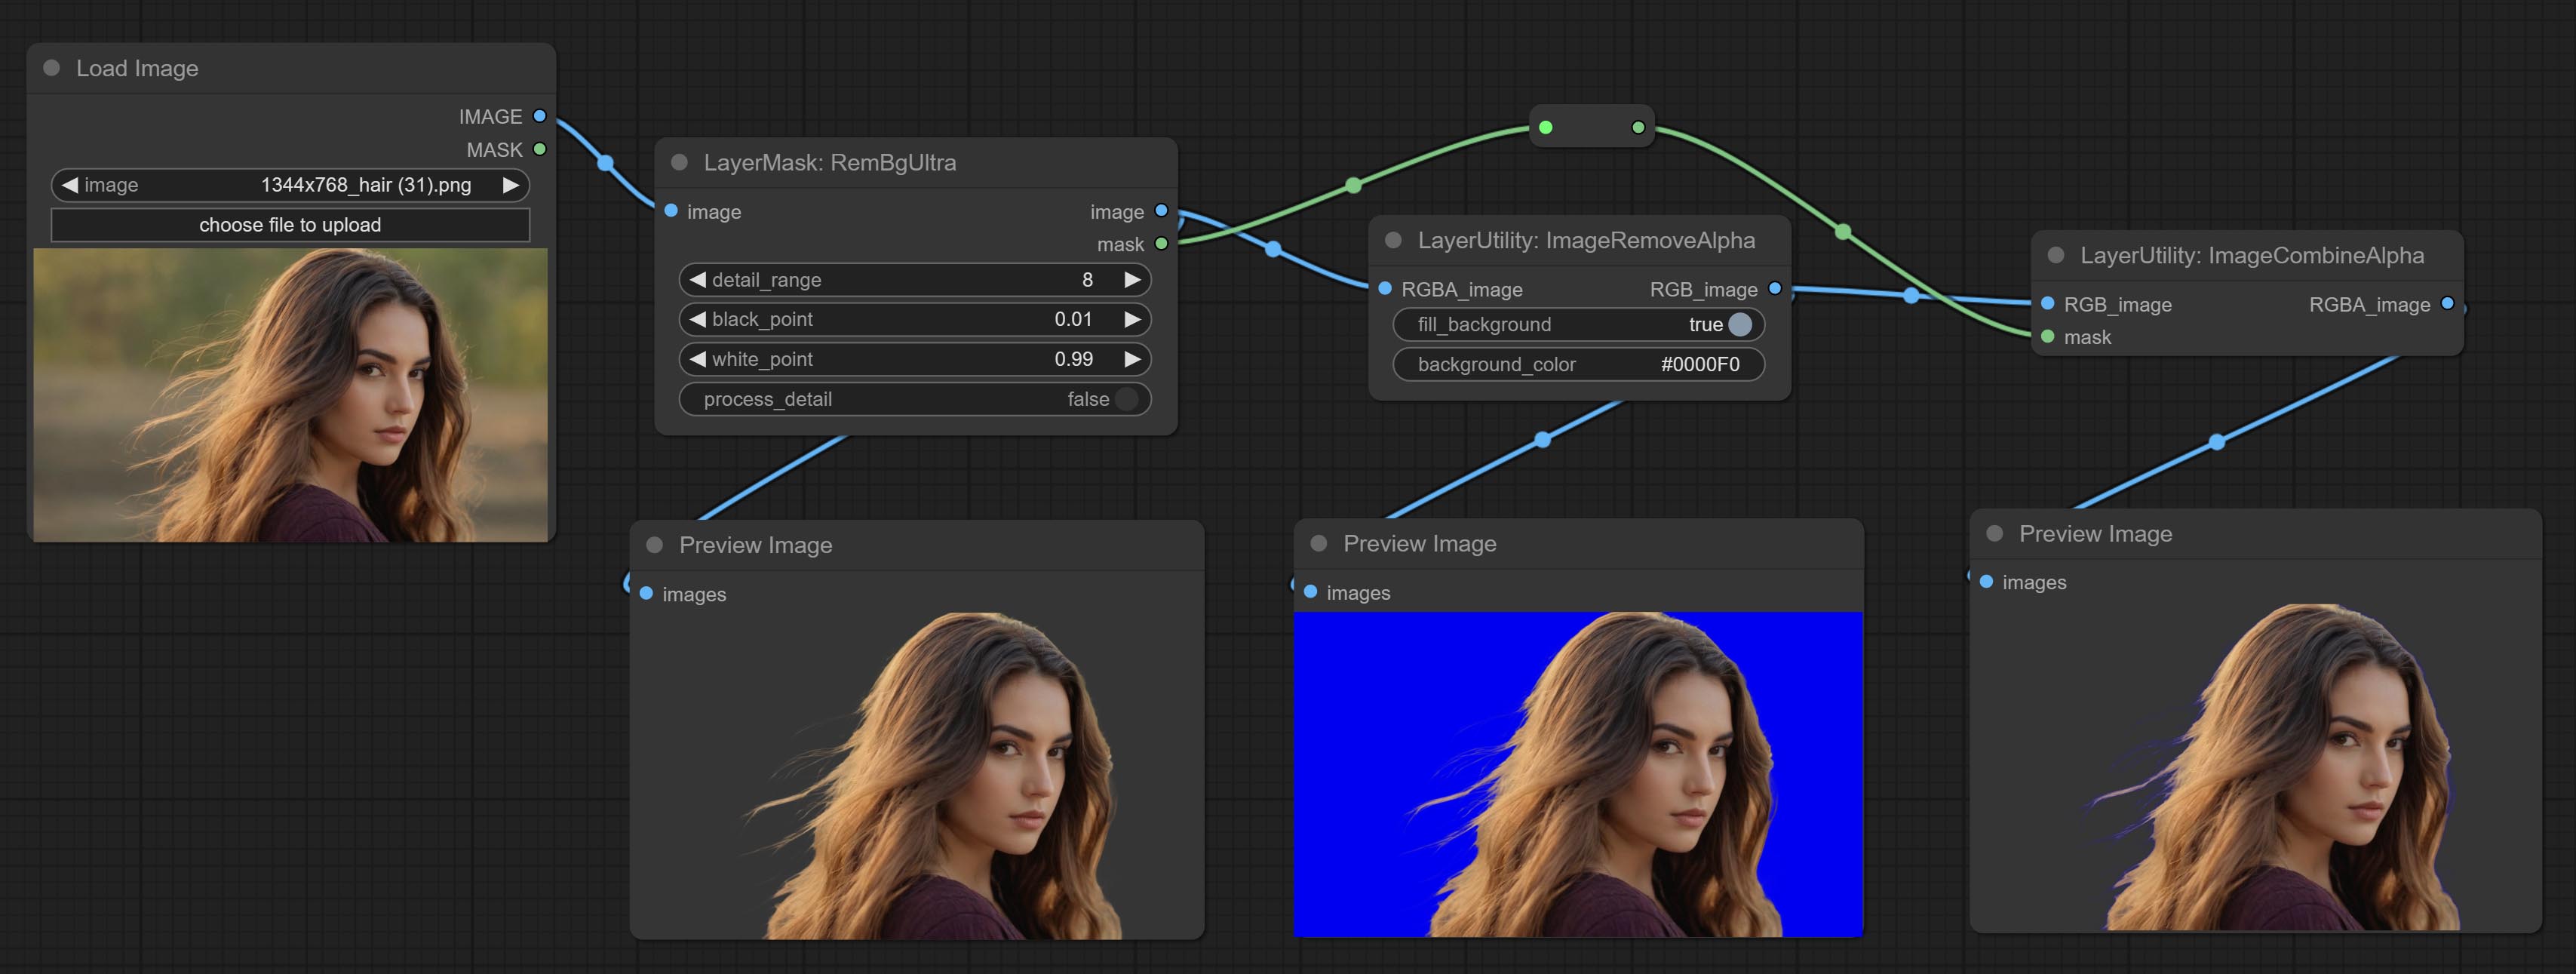
Remove the alpha channel from the image and convert it to RGB mode. you can choose to fill the background and set the background color.
Node options: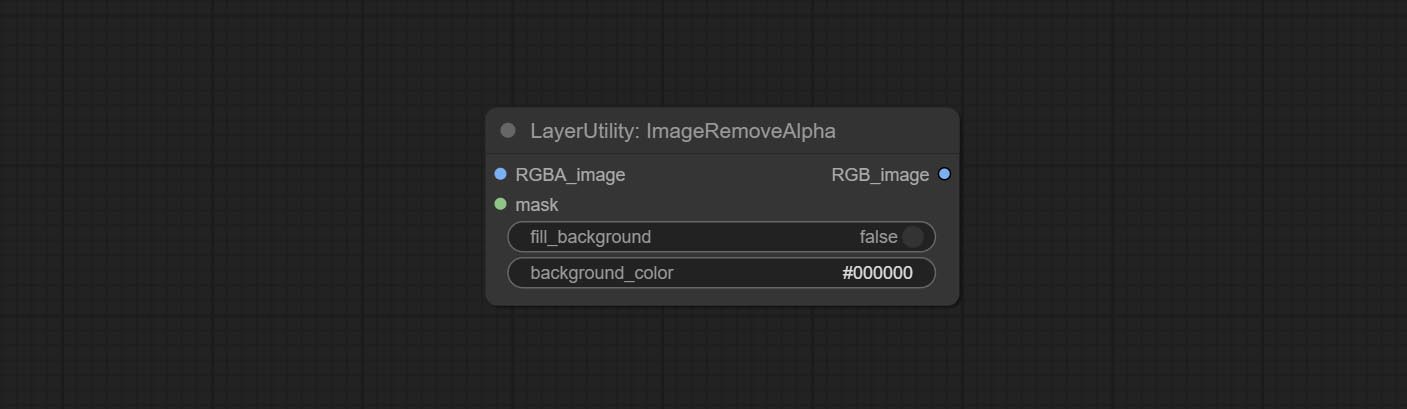
- RGBA_image: The input image supports RGBA or RGB modes.
- mask: Optional input mask. If there is an input mask, it will be used first, ignoring the alpha that comes with RGBA_image.
- fill_background: Whether to fill the background.
- background_color 4 : Color of background.
ImageCombineAlpha
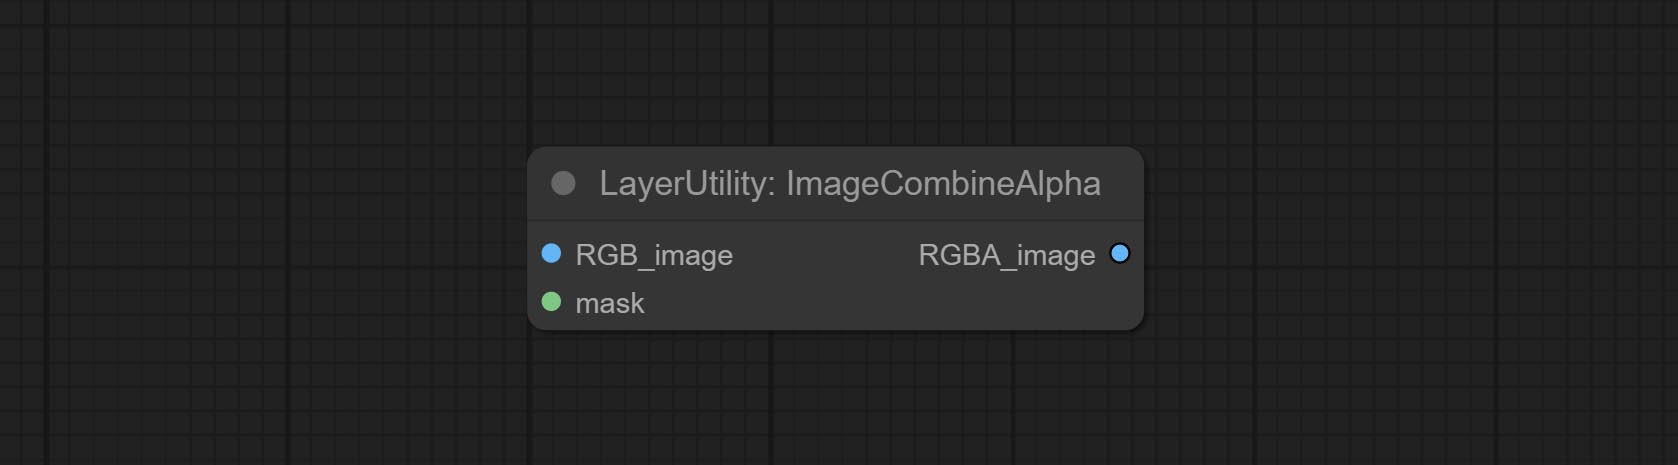
Merge the image and mask into an RGBA mode image containing an alpha channel.
ImageAutoCrop
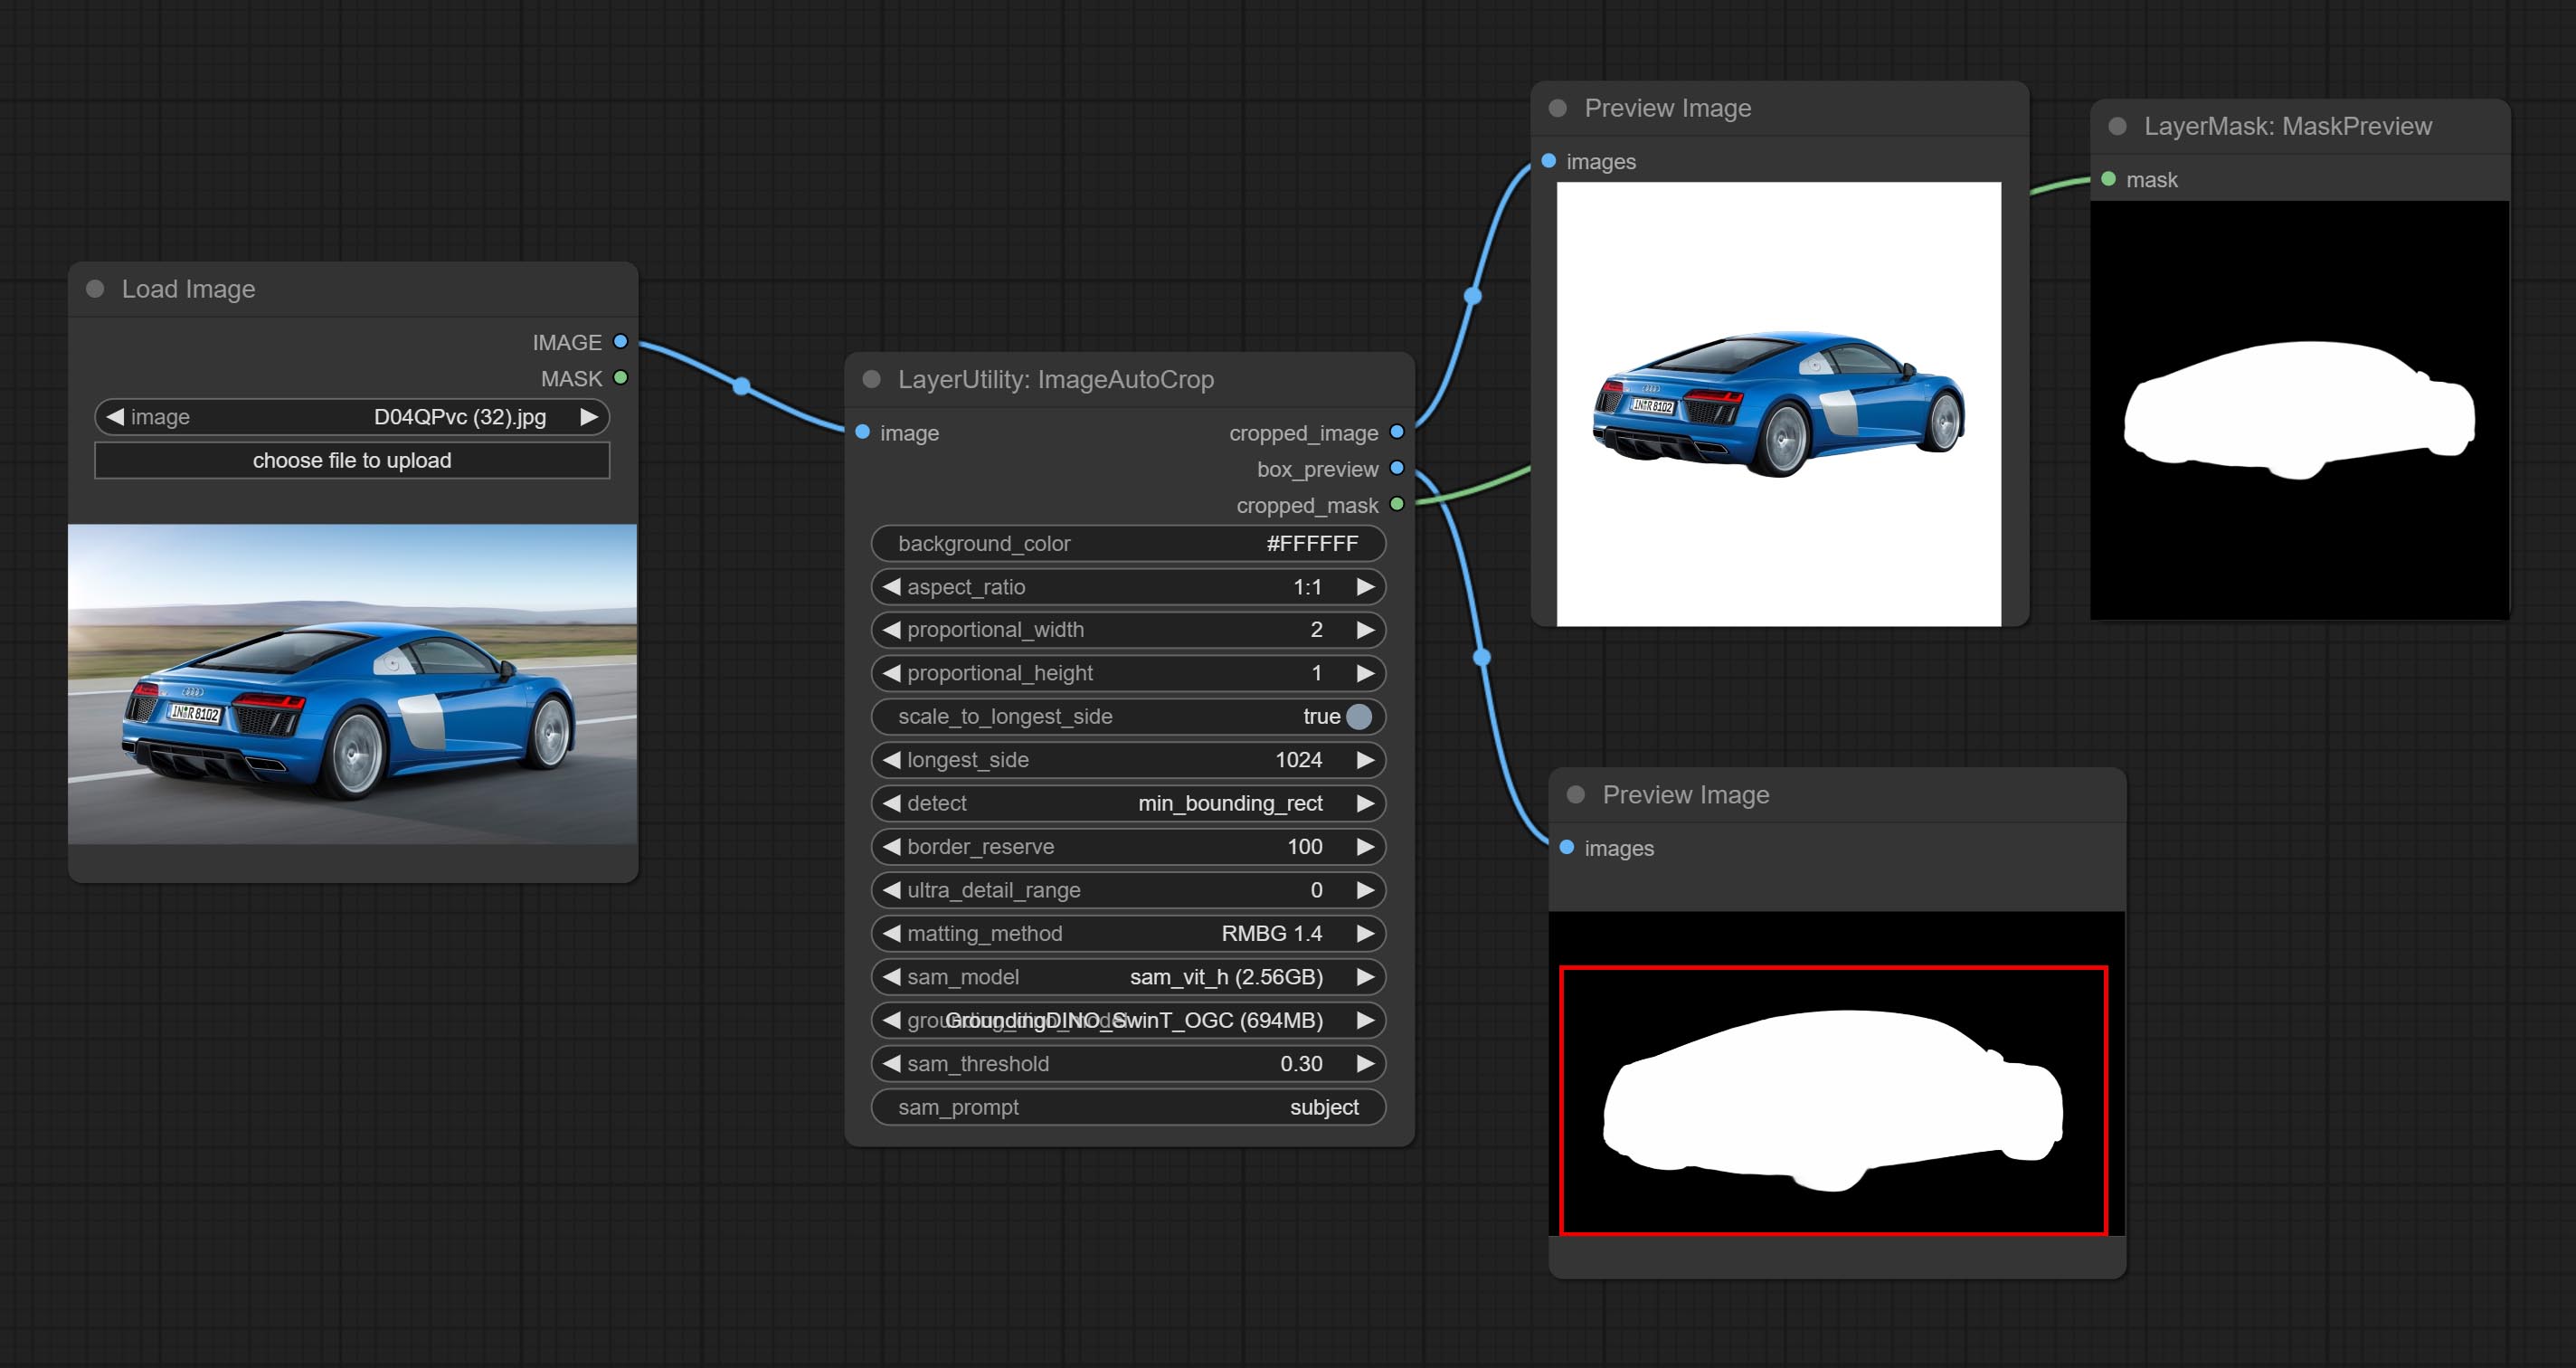
Automatically cutout and crop the image according to the mask. it can specify the background color, aspect ratio, and size for output image. this node is designed to generate the image materials for training models.
*Please refer to the model installation methods for SegmentAnythingUltra and RemBgUltra.
Node options: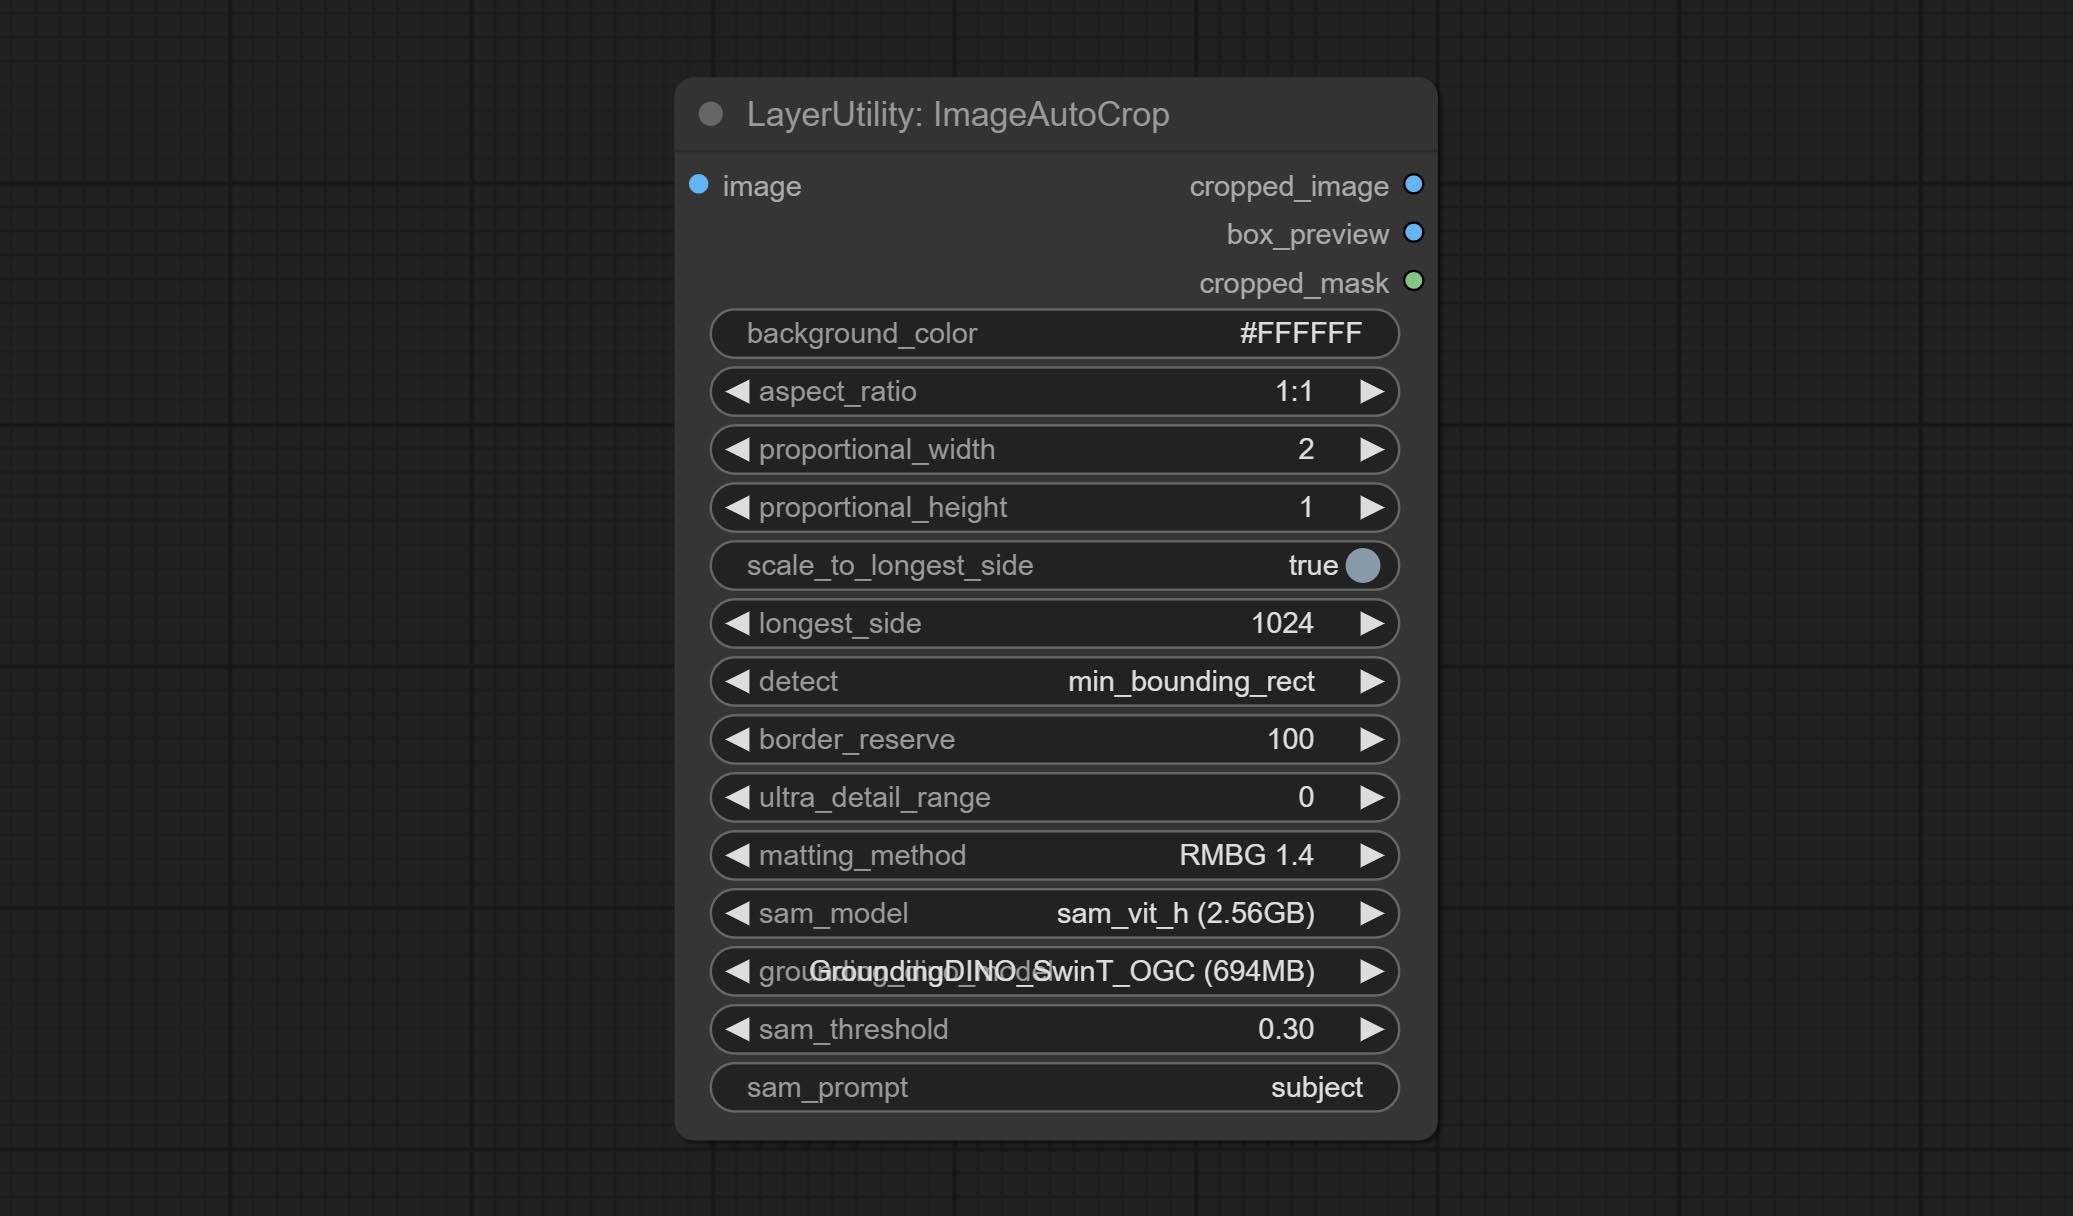
- background_color 4 : The background color.
- aspect_ratio: Here are several common frame ratios provided. alternatively, you can choose "original" to keep original ratio or customize the ratio using "custom".
- proportional_width: Proportional width. if the aspect ratio option is not "custom", this setting will be ignored.
- proportional_height: Proportional height. if the aspect ratio option is not "custom", this setting will be ignored.
- scale_by_longest_side: Allow scaling by long edge size.
- longest_side: When the scale_by_longest_side is set to True, this will be used this value to the long edge of the image. when the original_size have input, this setting will be ignored.
- detect: Detection method, min_bounding_rect is the minimum bounding rectangle, max_inscribed_rect is the maximum inscribed rectangle.
- border_reserve: Keep the border. expand the cutting range beyond the detected mask body area.
- ultra_detail_range: Mask edge ultra fine processing range, 0 is not processed, which can save generation time.
- matting_method: The method of generate masks. There are two methods available: Segment Anything and RMBG 1.4. RMBG 1.4 runs faster.
- sam_model: Select the SAM model used by Segment Anything here.
- grounding_dino_model: Select the Grounding_Dino model used by Segment Anything here.
- sam_threshold: The threshold for Segment Anything.
- sam_prompt: The prompt for Segment Anything.
Output: cropped_image: Crop and replace the background image. box_preview: Crop position preview. cropped_mask: Cropped mask.
ImageAutoCropV2
The V2 upgrad version of ImageAutoCrop , it has made the following changes based on the previous version: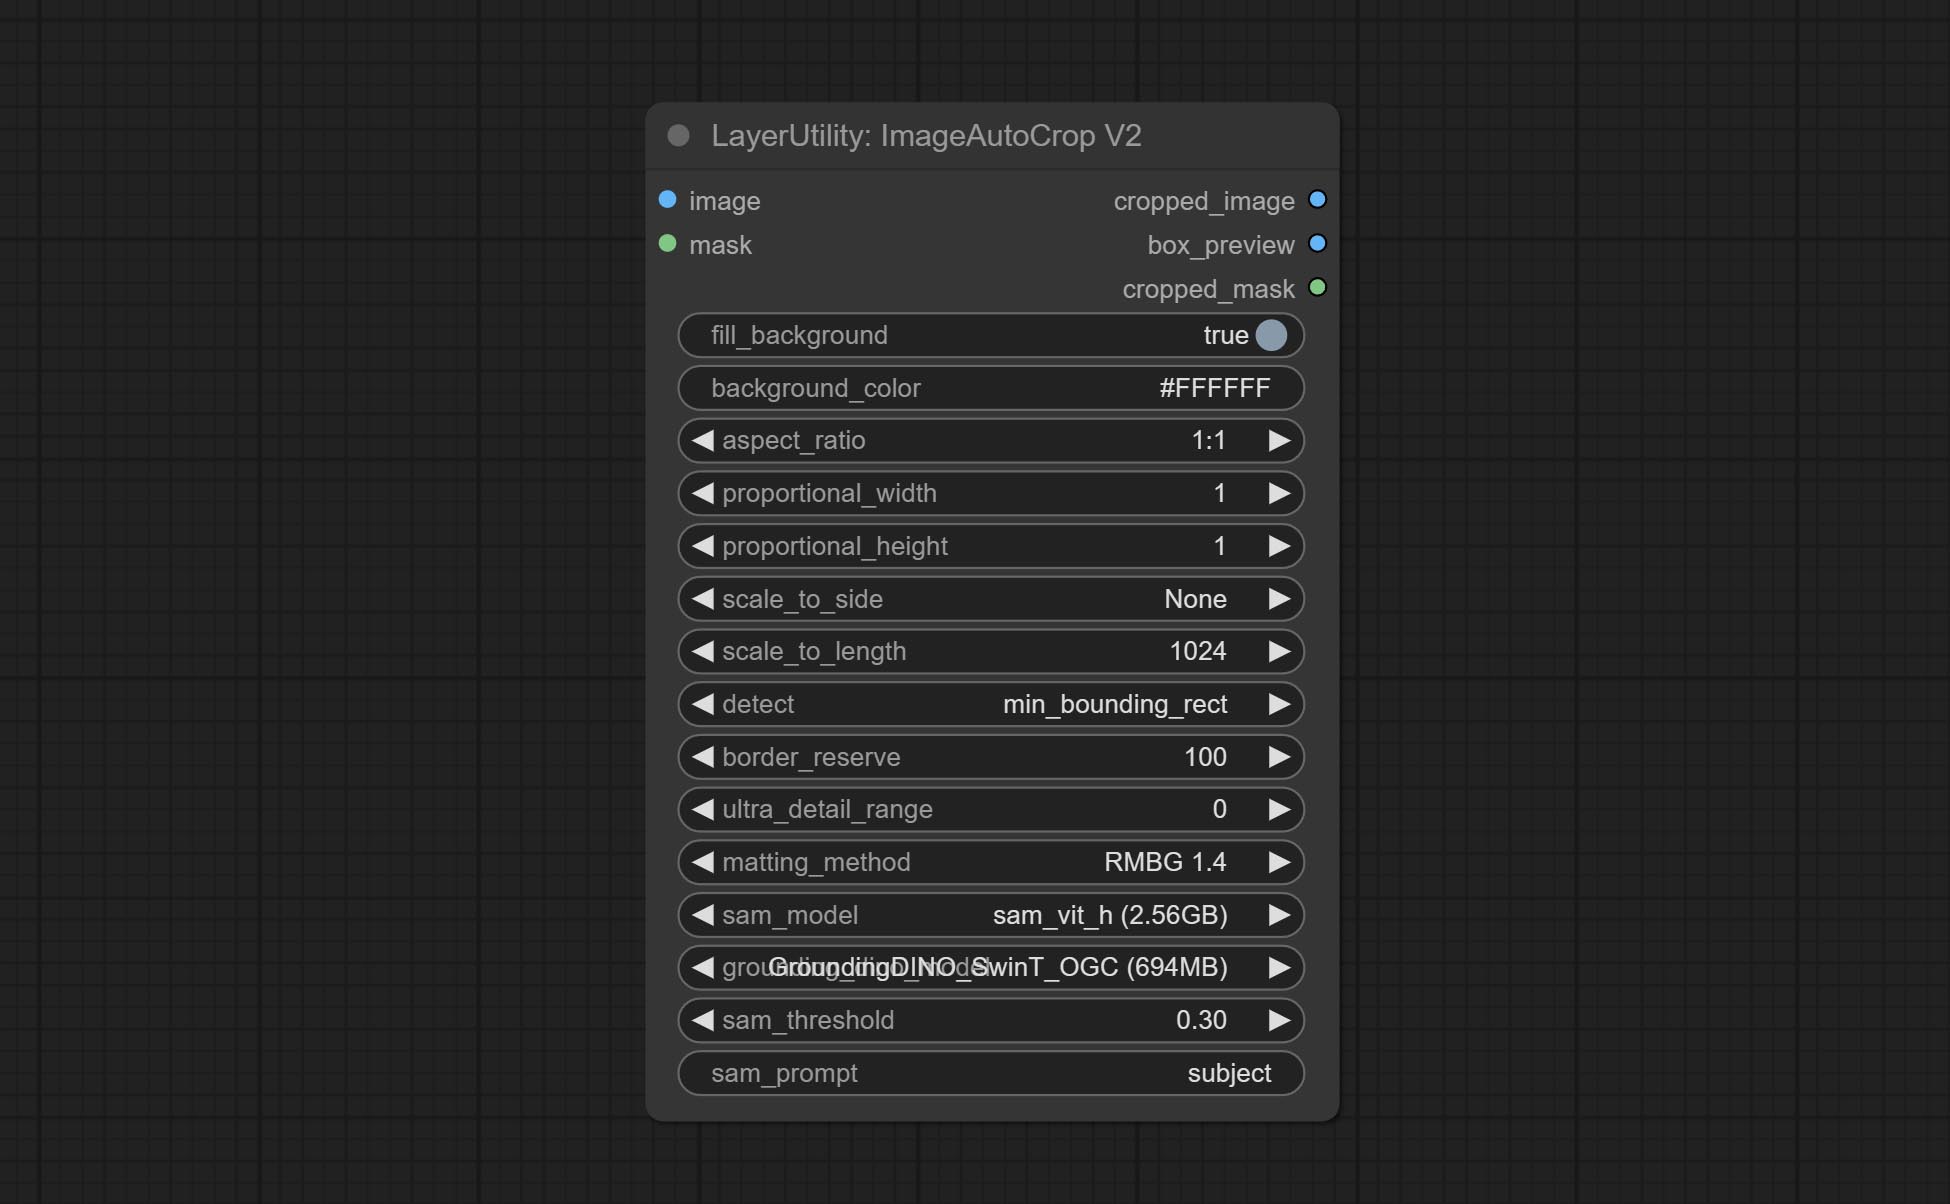
- Add optional input for mask. when there is a mask input, use that input directly to skip the built-in mask generation.
- Add
fill_background . When set to False, the background will not be processed and any parts beyond the frame will not be included in the output range. -
aspect_ratio adds the original option. - scale_by: Allow scaling by specified dimensions for longest, shortest, width, or height.
- scale_by_length: The value here is used as
scale_by to specify the length of the edge.
ImageAutoCropV3
Automatically crop the image to the specified size. You can input a mask to preserve the specified area of the mask. This node is designed to generate image materials for training the model.
Node Options: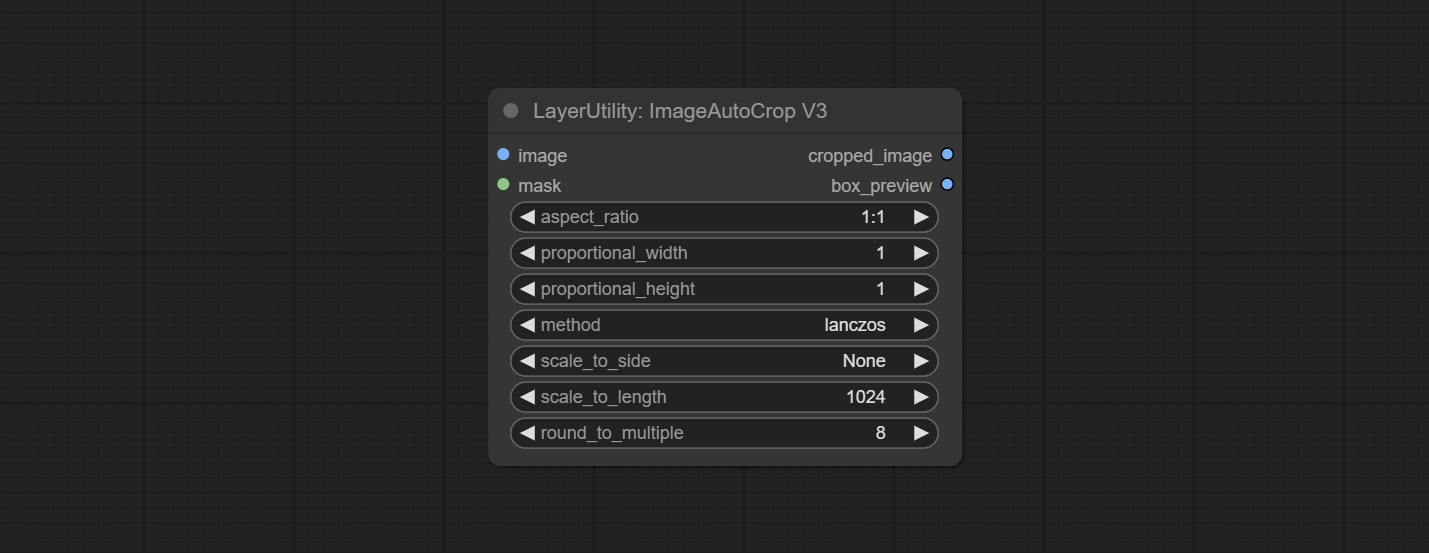
- image: The input image.
- mask: Optional input mask. The masking part will be preserved within the range of the cutting aspect ratio.
- aspect_ratio: The aspect ratio of the output. Here are common frame ratios provided, with "custom" being the custom ratio and "original" being the original frame ratio.
- proportional_width: Proportionally wide. If the aspect_ratio option is not 'custom', this setting will be ignored.
- proportional_height: High proportion. If the aspect_ratio option is not 'custom', this setting will be ignored.
- method: Scaling sampling methods include Lanczos, Bicubic, Hamming, Bilinear, Box, and Nearest.
- scale_to_side: Allow scaling to be specified by long side, short side, width, height, or total pixels.
- scale_to_length: The value here is used as the scale_to-side to specify the length of the edge or the total number of pixels (kilo pixels).
- round_to_multiple: Multiply to the nearest whole. For example, if set to 8, the width and height will be forcibly set to multiples of 8.
Outputs: cropped_image: The cropped image. box_preview: Preview of cutting position.
HLFrequencyDetailRestore
Using low frequency filtering and retaining high frequency to recover image details. Compared to kijai's DetailTransfer, this node is better integrated with the environment while retaining details.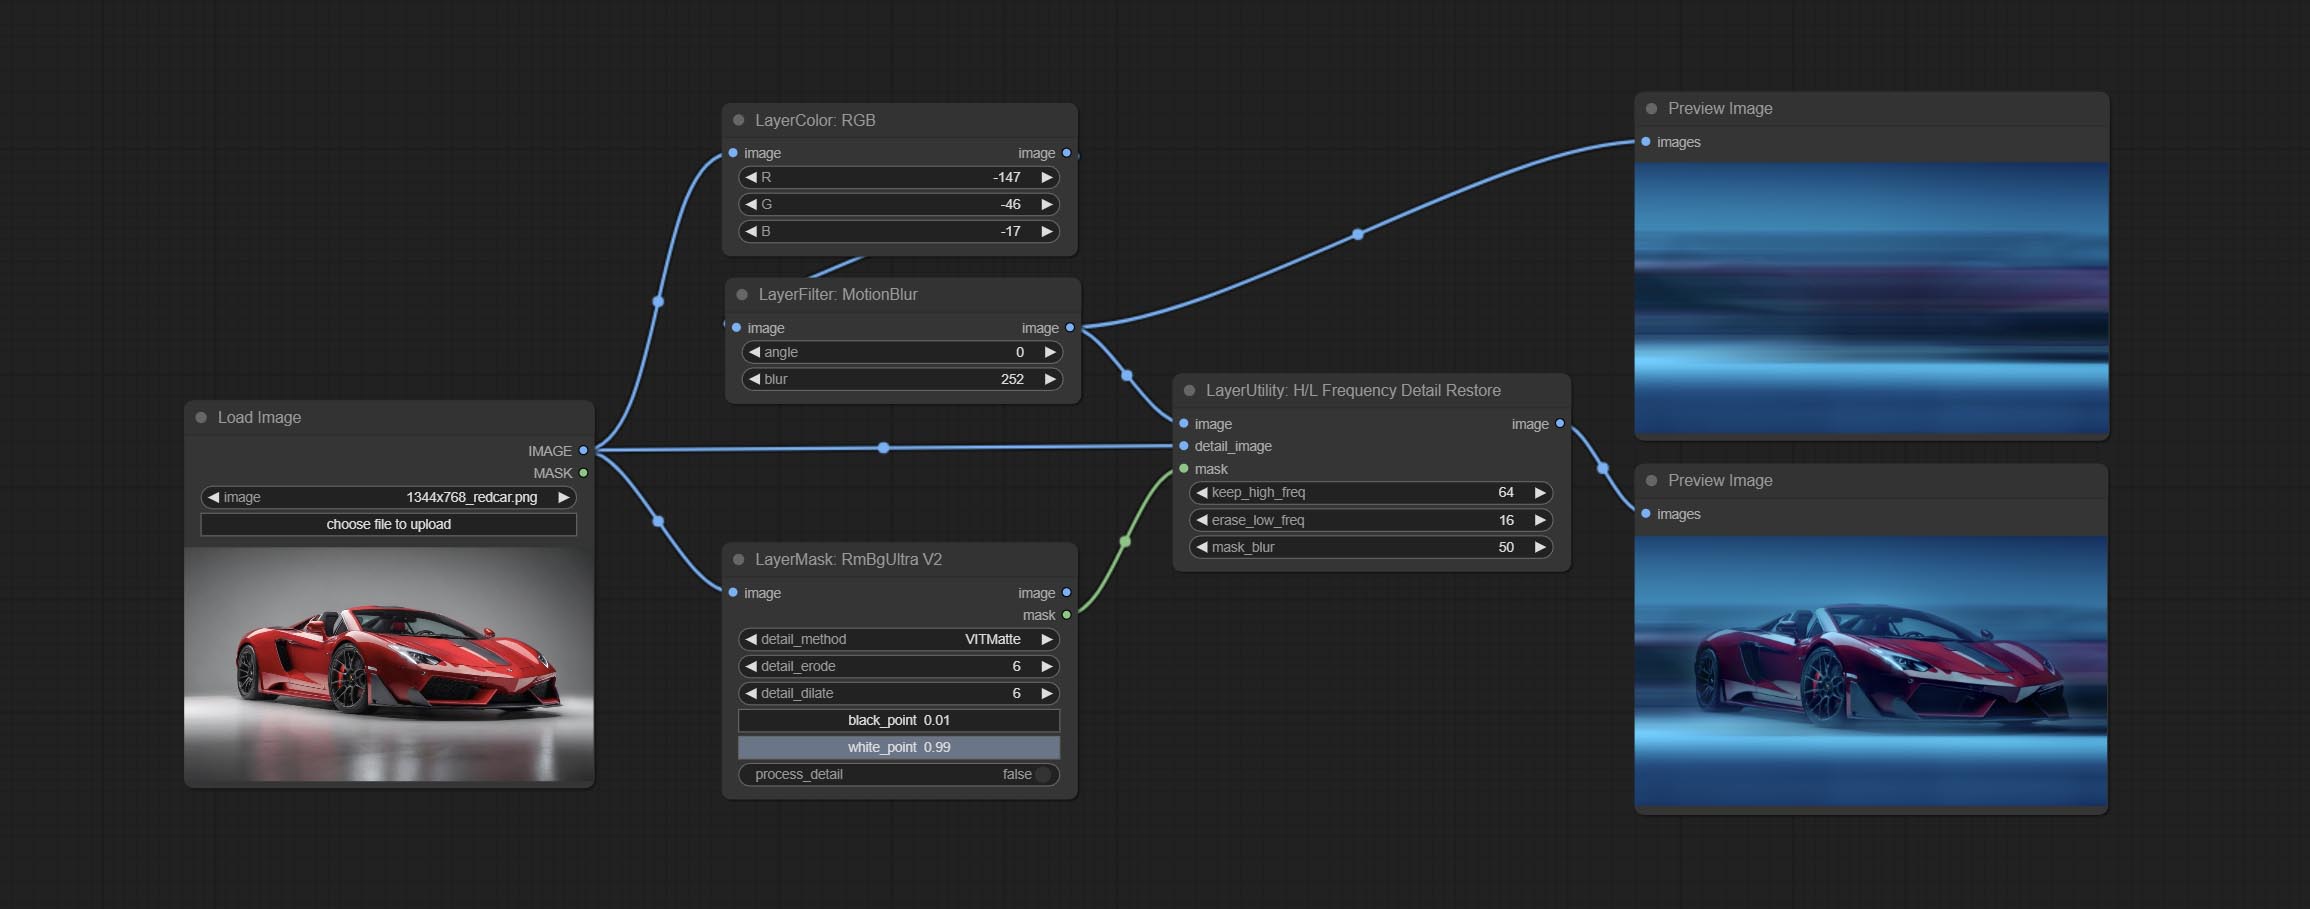
Node Options:
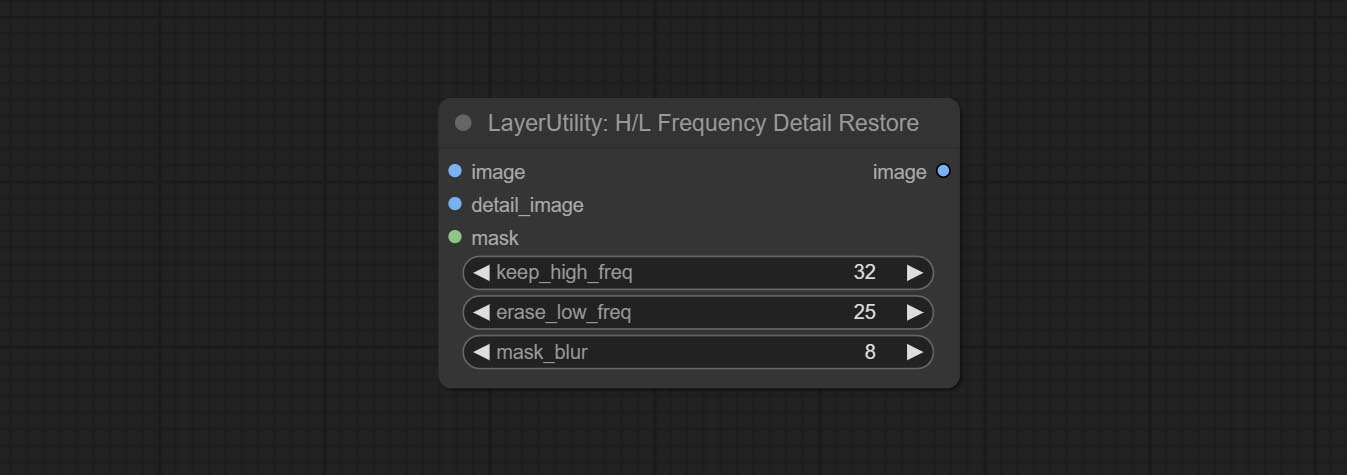
- image: Background image input.
- detail_image: Detail image input.
- mask: Optional input, if there is a mask input, only the details of the mask part are restored.
- keep_high_freq: Reserved range of high frequency parts. The larger the value, the richer the retained high-frequency details.
- erase_low_freq: The range of low frequency parts of the erasure. The larger the value, the more the low frequency range of the erasure.
- mask_blur: Mask edge blur. Valid only if there is masked input.
GetImageSize
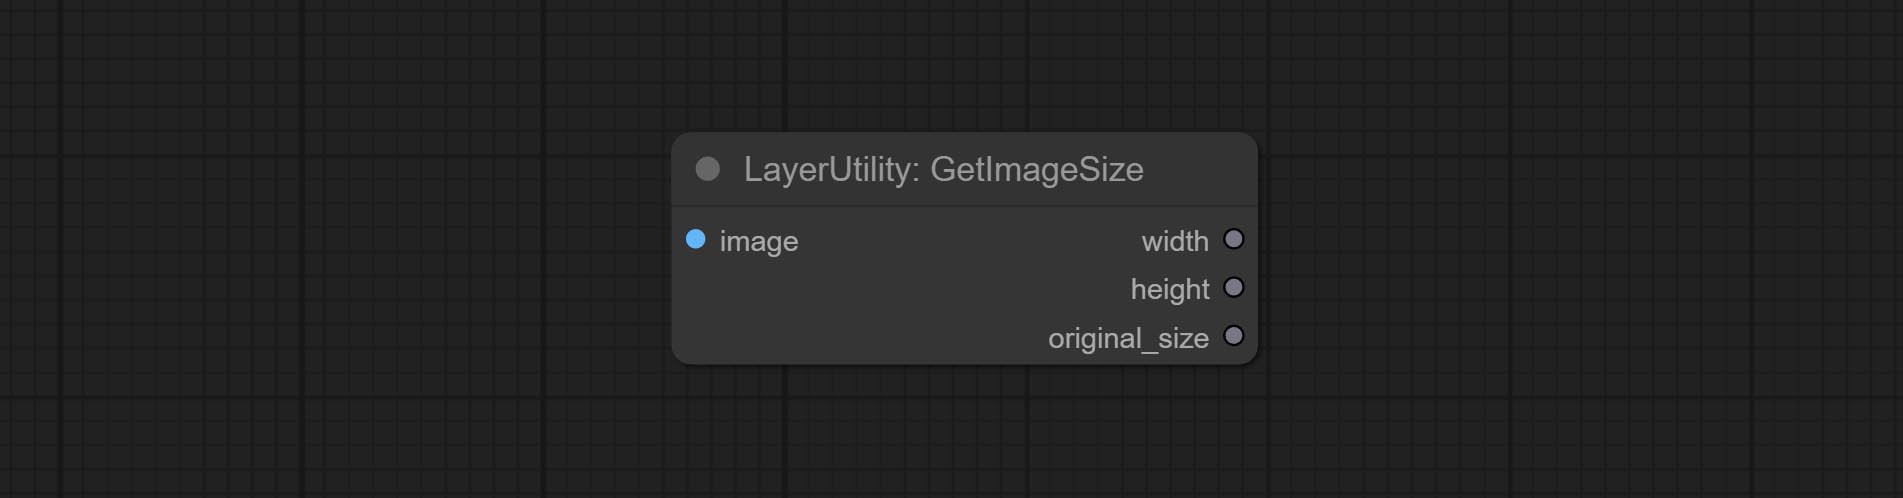
Obtain the width and height of the image.
Output:
- width: The width of image.
- height: The height of image.
- original_size: The original size data of the image is used for subsequent node recovery.
ImageHub
Switch output from multiple input images and masks, supporting 9 sets of inputs. All input items are optional. if there is only image or mask in a set of input, the missing item will be output as None.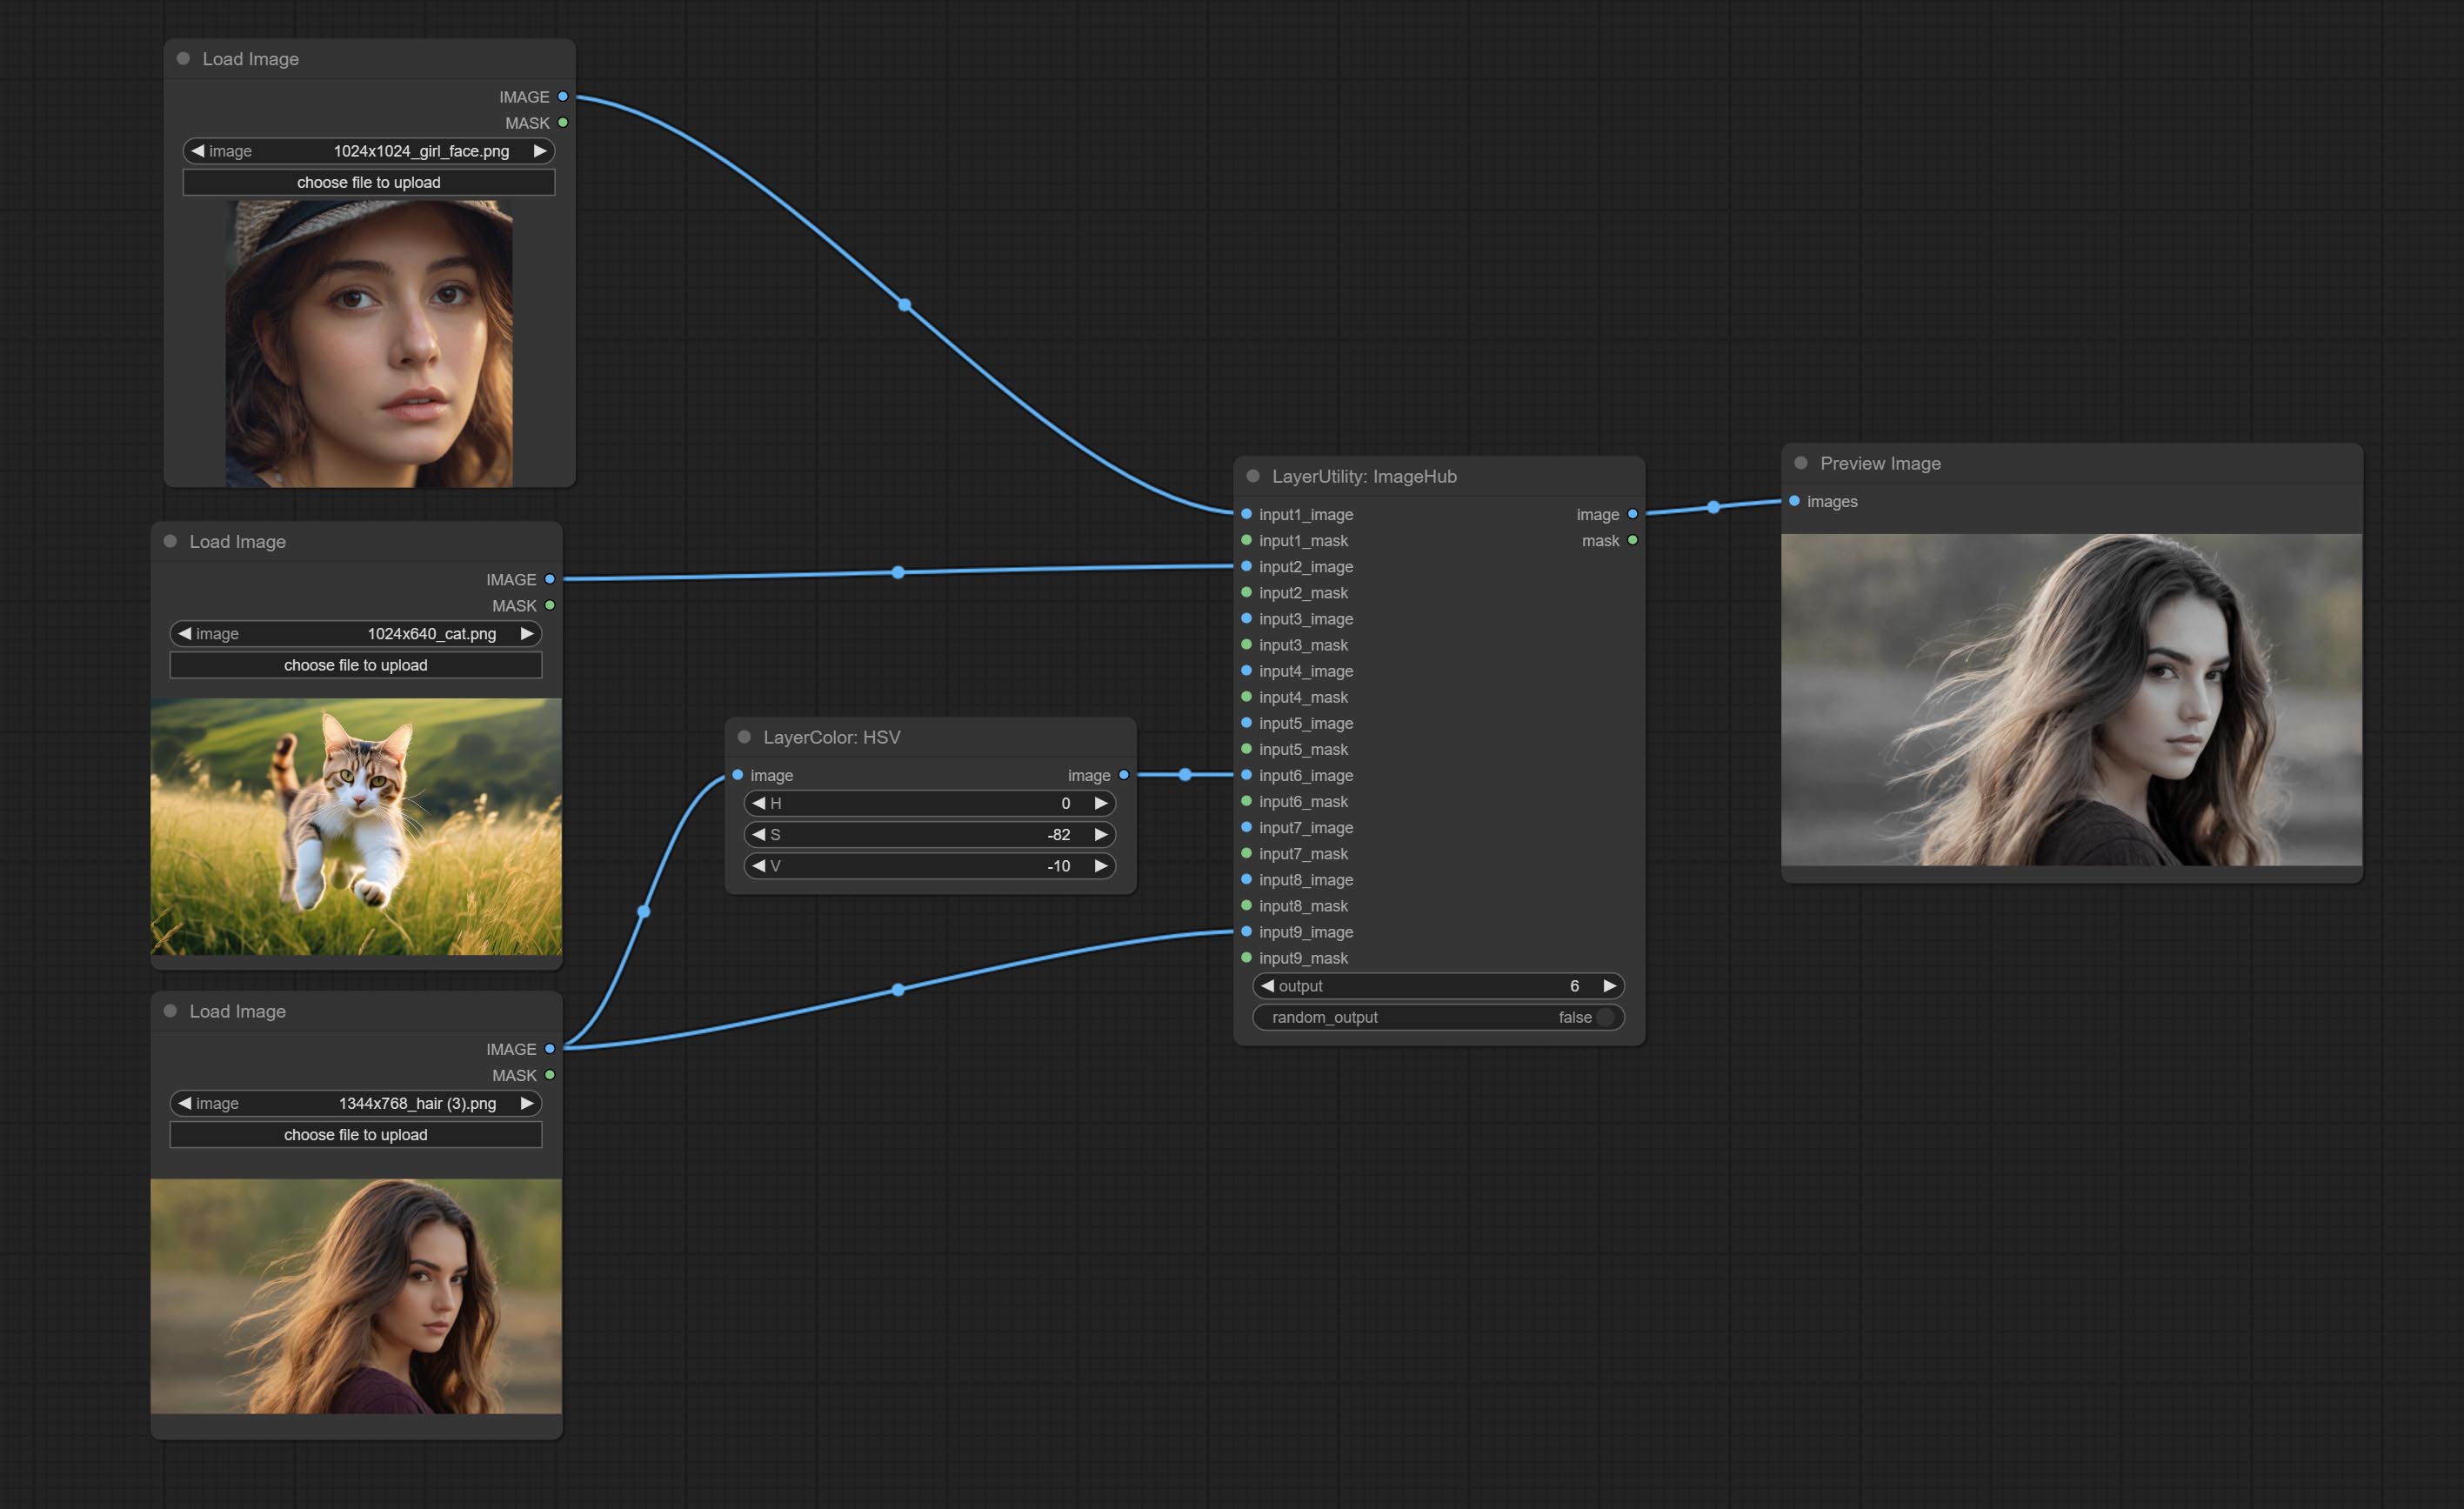
Node options:
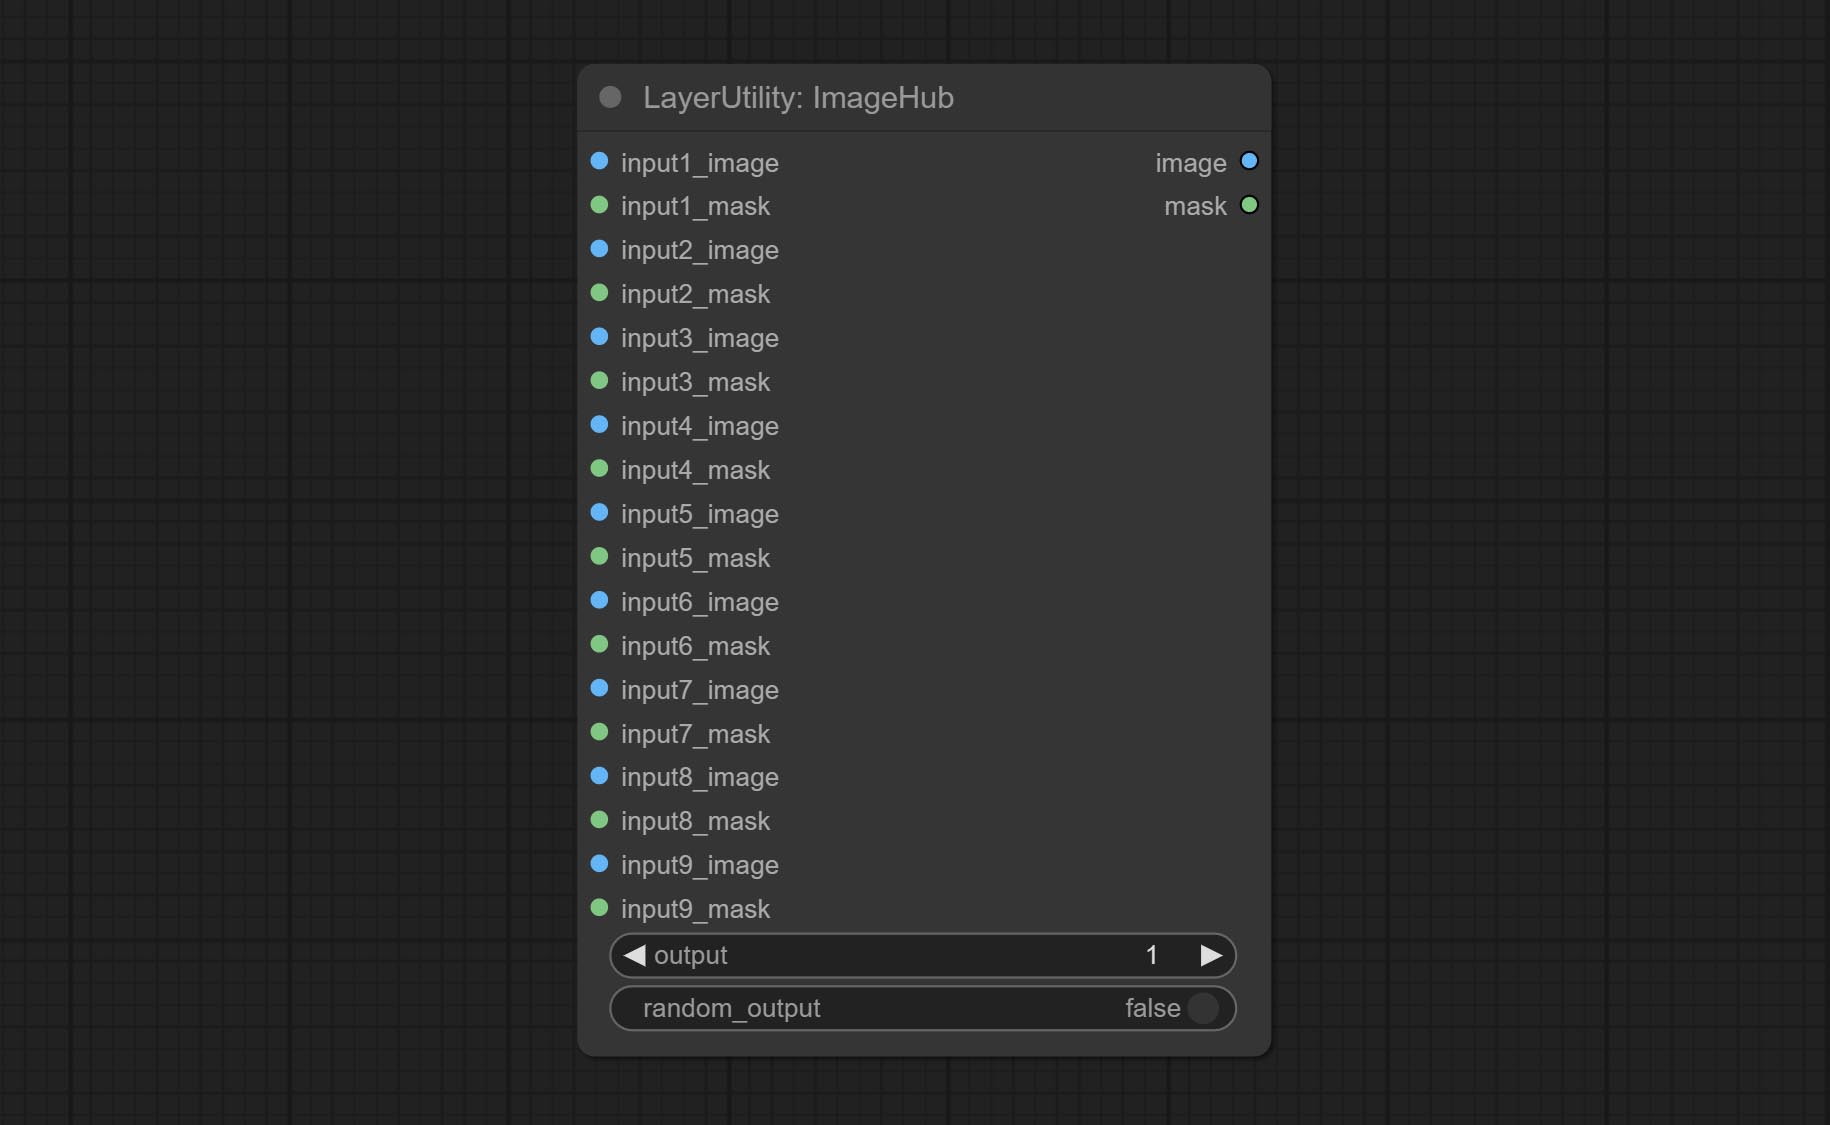
- output: Switch output. the value is the corresponding input group. when the
random-output option is True, this setting will be ignored. - random_output: When this is true, the
output setting will be ignored and a random set will be output among all valid inputs.
BatchSelector
Retrieve specified images or masks from batch images or masks.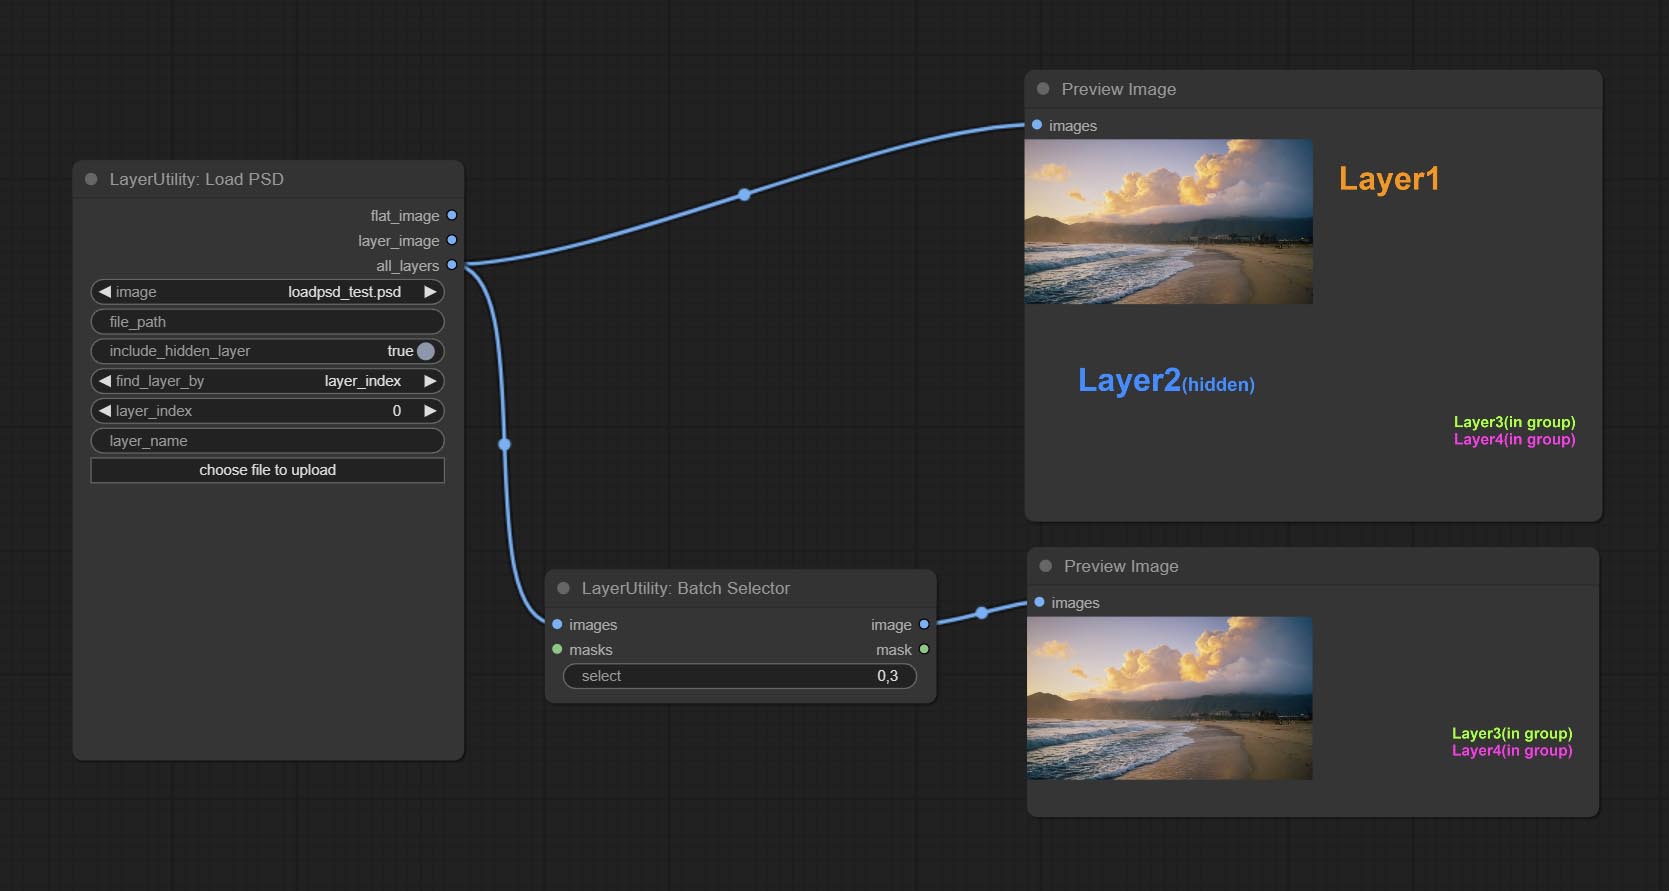
Node Options:
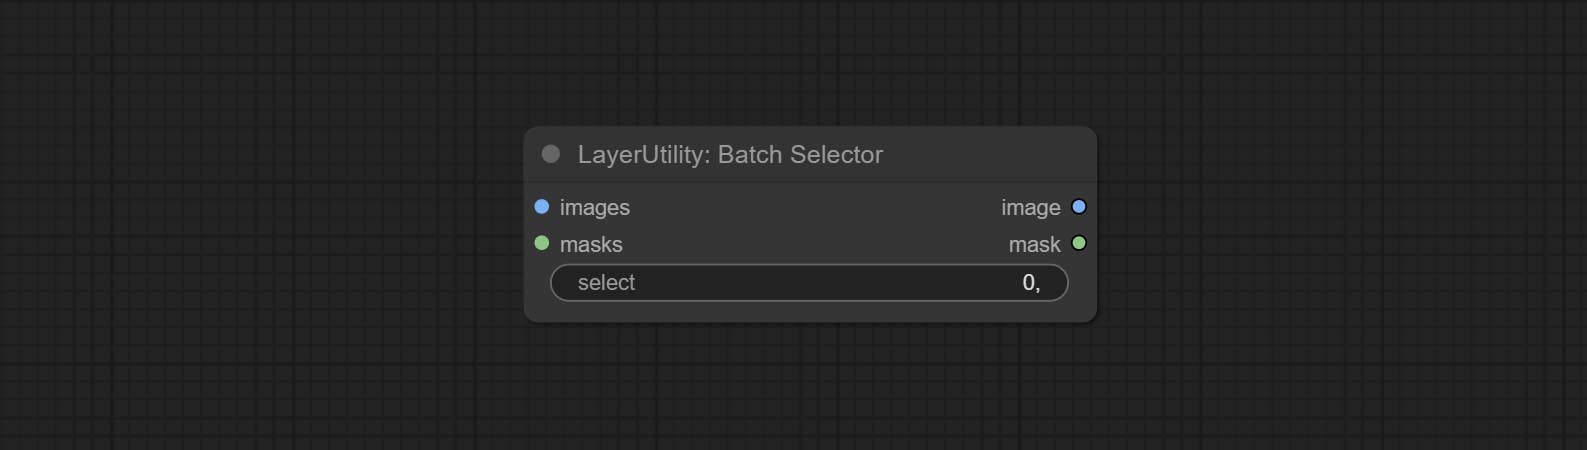
- images: Batch images input. This input is optional.
- masks: Batch masks input. This input is optional.
- select: Select the output image or mask at the batch index value, where 0 is the first image. Multiple values can be entered, separated by any non numeric character, including but not limited to commas, periods, semicolons, spaces or letters, and even Chinese characters. Note: If the value exceeds the batch size, the last image will be output. If there is no corresponding input, an empty 64x64 image or a 64x64 black mask will be output.
TextJoin
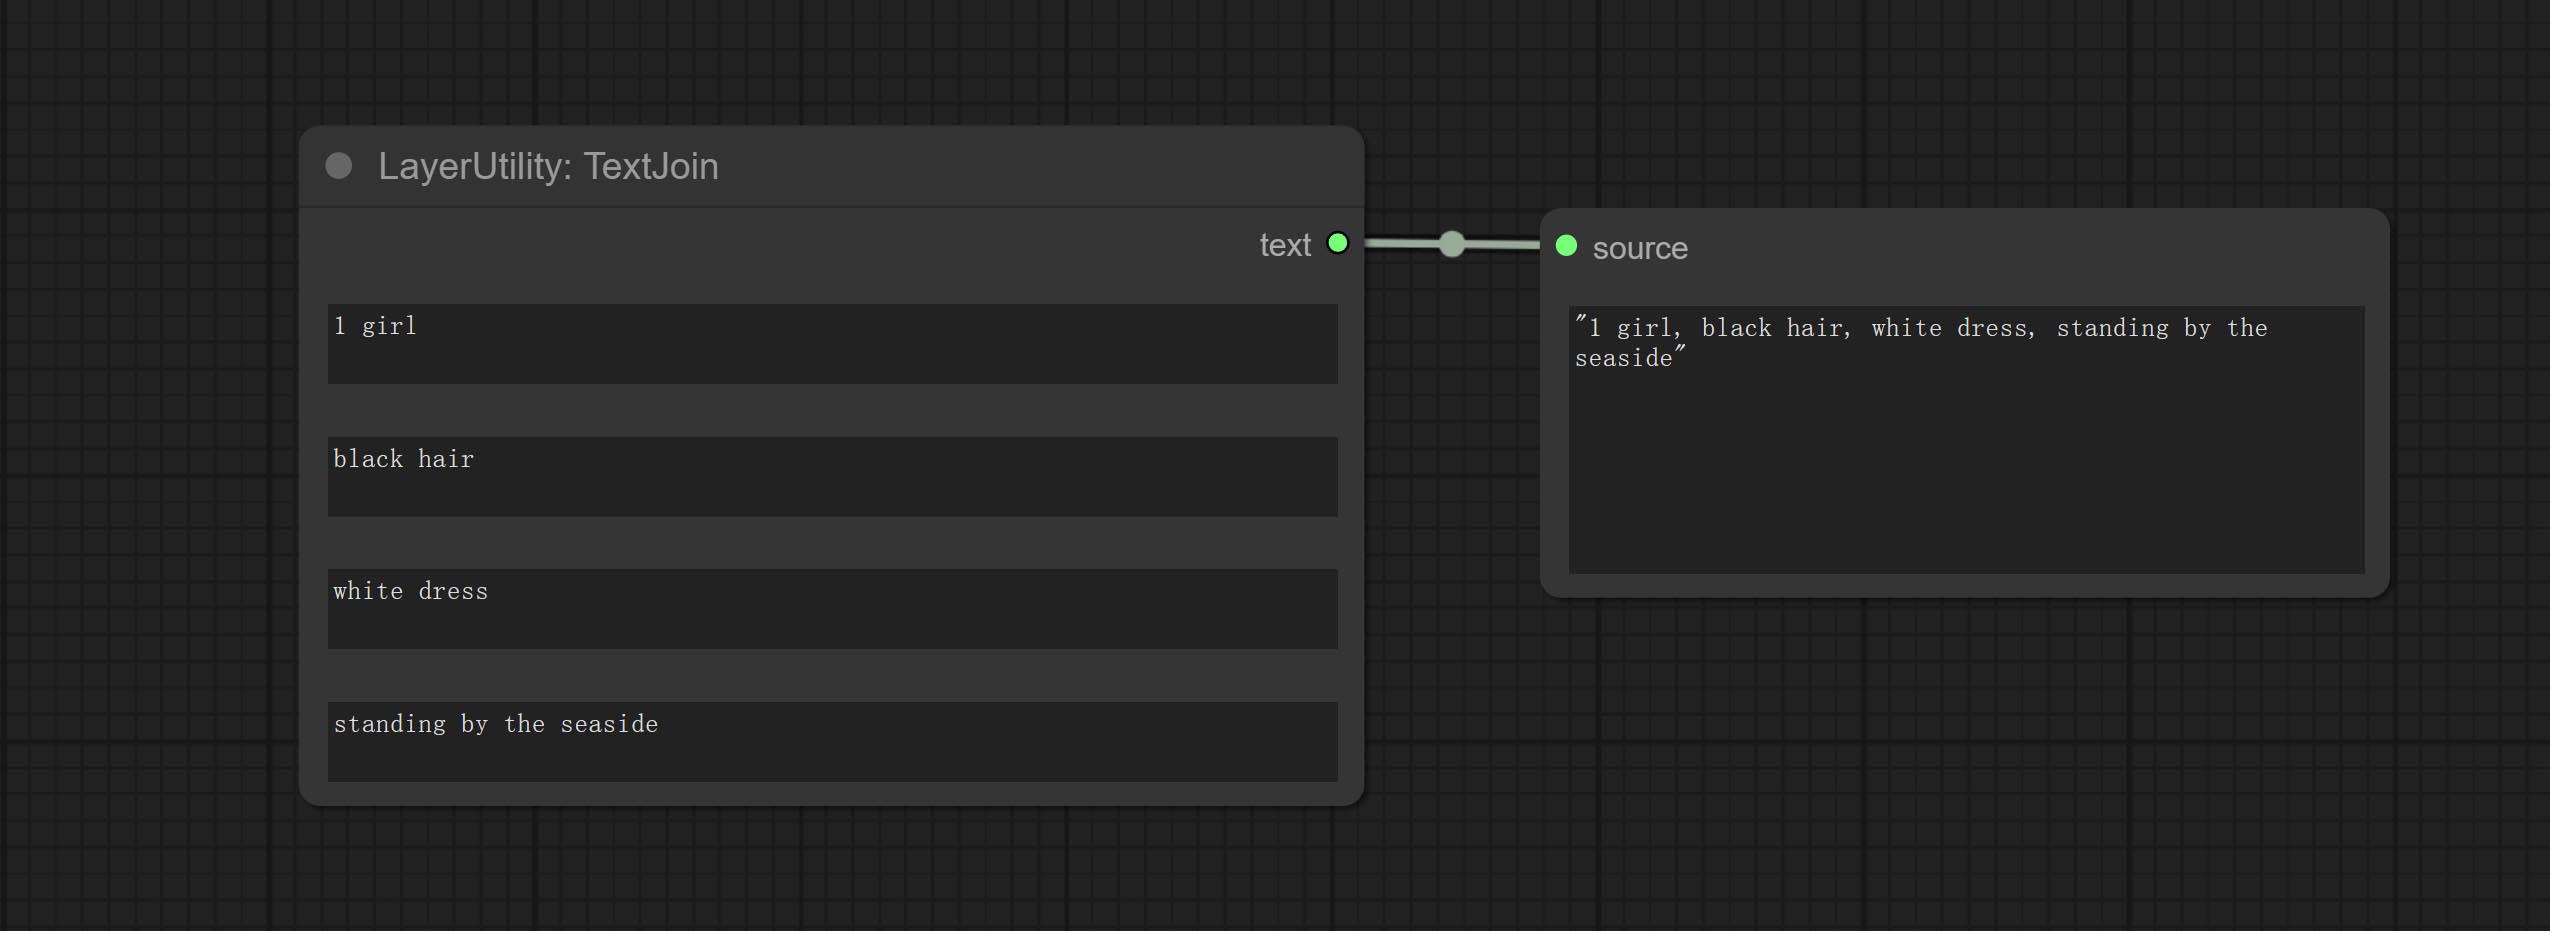
Combine multiple paragraphs of text into one.
TextJoinV2
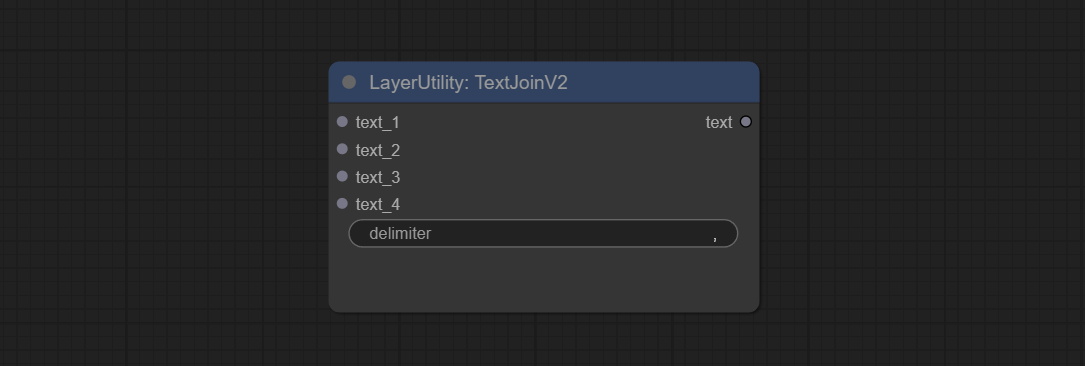
Added delimiter options on the basis of TextJoin.
PrintInfo
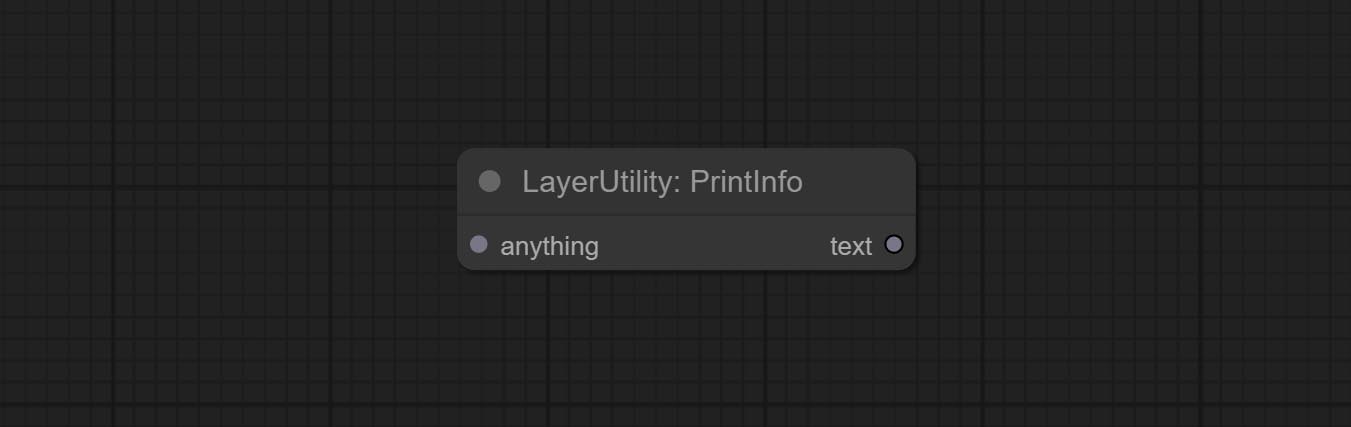
Used to provide assistance for workflow debugging. When running, the properties of any object connected to this node will be printed to the console.
This node allows any type of input.
TextBox
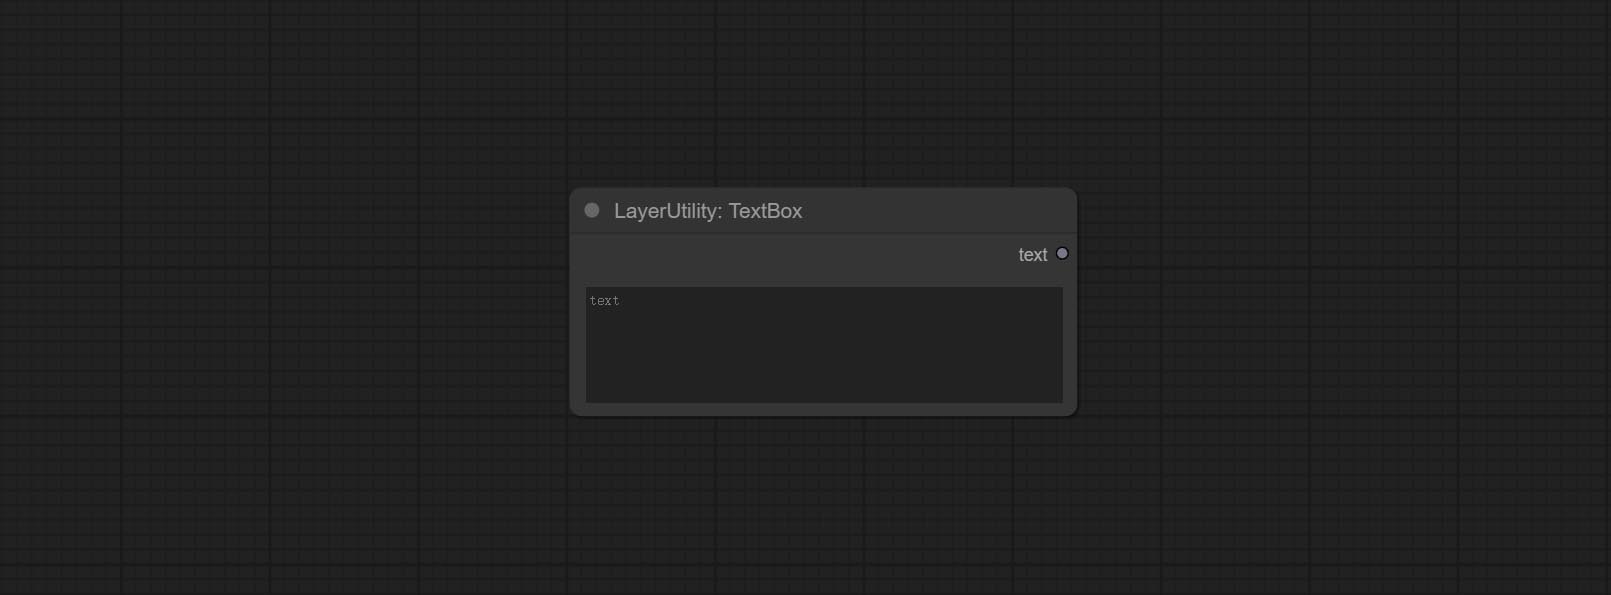
Output a string.
สาย
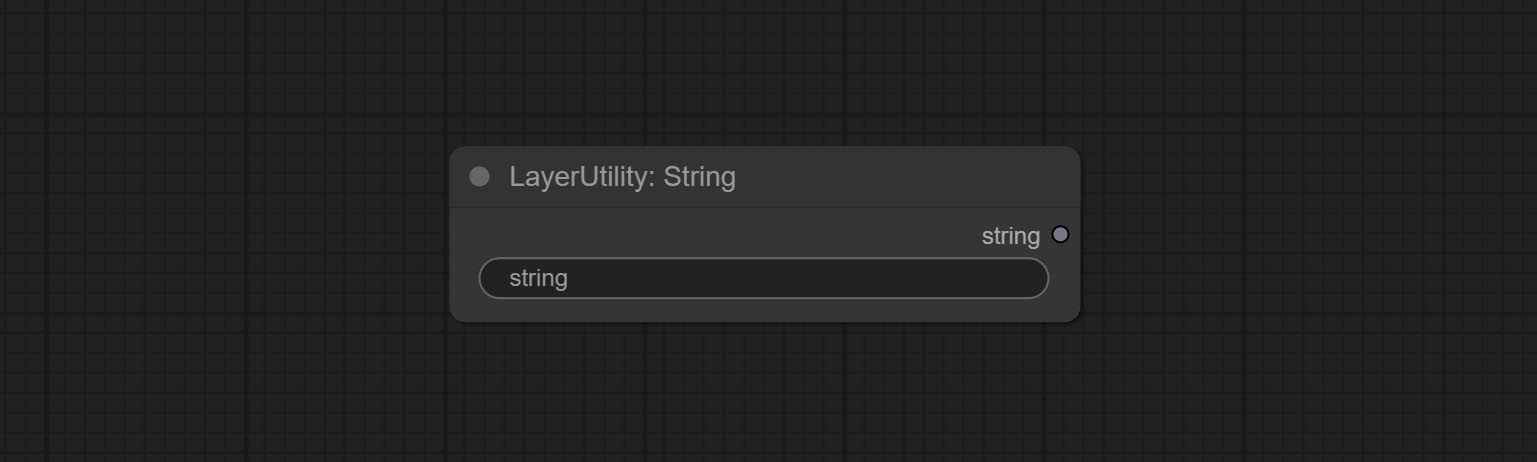
Output a string. same as TextBox.
จำนวนเต็ม
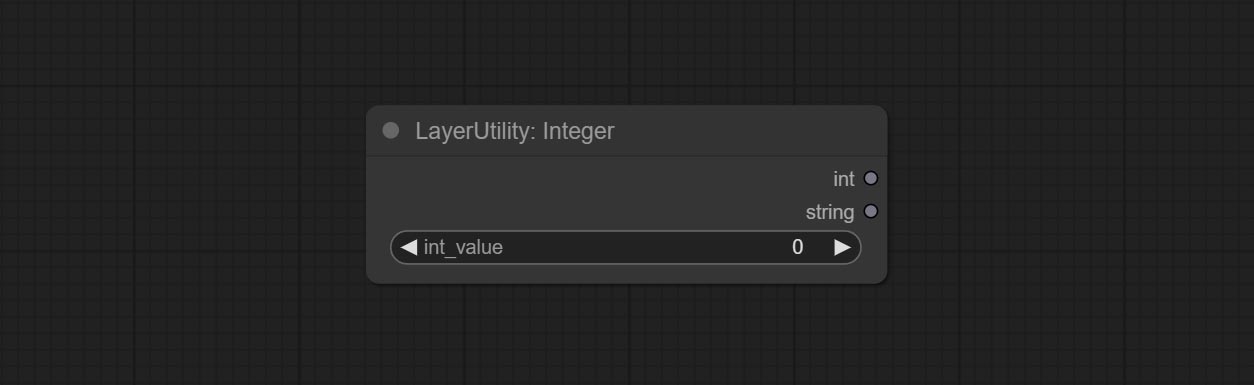
Output a integer value.
ลอย
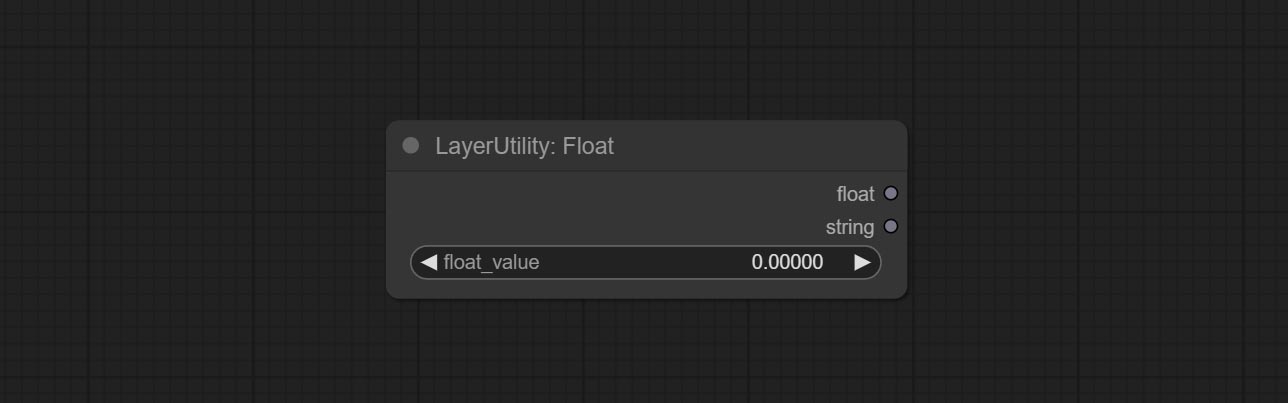
Output a floating-point value with a precision of 5 decimal places.
บูลีน

Output a boolean value.
RandomGenerator
Used to generate random value within a specified range, with outputs of int, float, and boolean. Supports batch and list generation, and supports batch generation of a set of different random number lists based on image batch.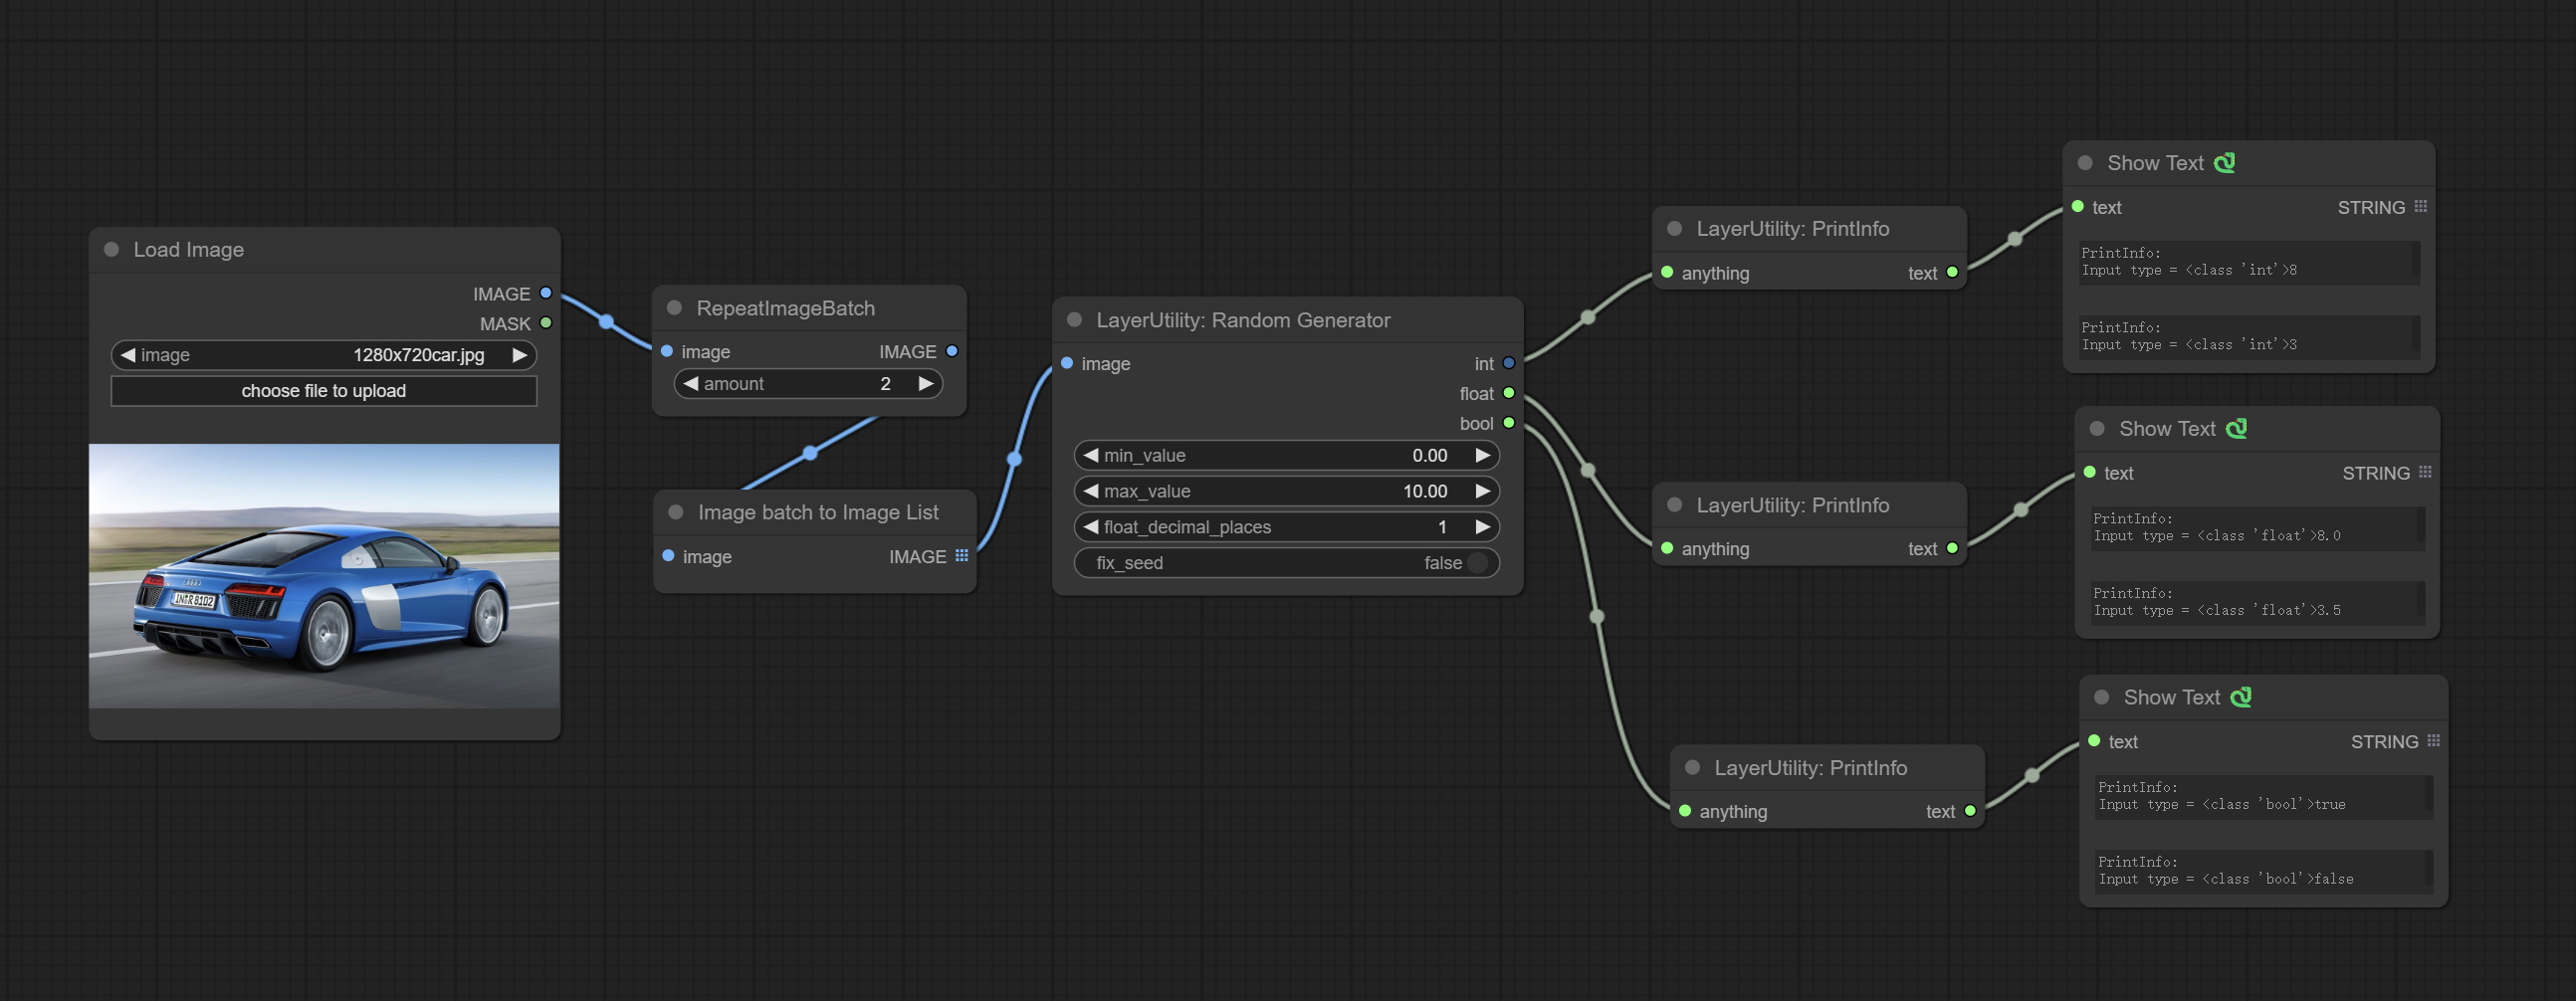
Node Options:
- image: Optional input, generate a list of random numbers that match the quantity in batches according to the image.
- min_value: Minimum value. Random numbers will randomly take values from the minimum to the maximum.
- max_value: Maximum value. Random numbers will randomly take values from the minimum to the maximum.
- float_decimal_places: Precision of float value.
- fix_seed:Is the random number seed fixed. If this option is fixed, the generated random number will always be the same.
Outputs: int: Integer random number. float: Float random number. bool: Boolean random number.
RandomGeneratorV2
On the based of RandomGenerator, add the least random range and seed options.
Node Options: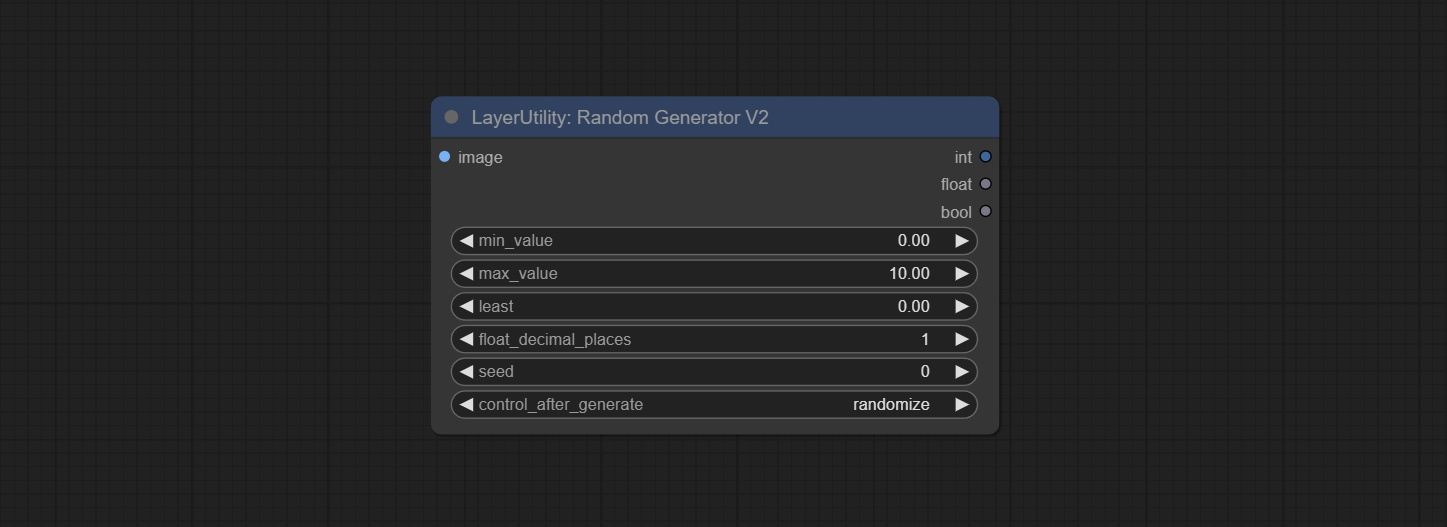
- image: Optional input, generate a list of random numbers that match the quantity in batches according to the image.
- min_value: Minimum value. Random numbers will randomly take values from the minimum to the maximum.
- max_value: Maximum value. Random numbers will randomly take values from the minimum to the maximum.
- least: Minimum random range. Random numbers will randomly at least take this value.
- float_decimal_places: Precision of float value.
- seed: The seed of random number.
- control_after_generate: Seed change options. If this option is fixed, the generated random number will always be the same.
Outputs: int: Integer random number. float: Float random number. bool: Boolean random number.
NumberCalculator
Performs mathematical operations on two numeric values and outputs integer and floating point results * . Supported operations include + , - , * , / , ** , // , % .
* The input only supports boolean, integer, and floating point numbers, forcing in other data will result in error.
NumberCalculatorV2
The upgraded version of NumberCalculator has added numerical inputs within nodes and square root operations. The square root operation option is nth_root Note: The input takes priority, and when there is input, the values within the node will be invalid.
BooleanOperator

Perform a Boolean operation on two numeric values and output the result * . Supported operations include == , != , and , or , xor , not , min , max .
* The input only supports boolean, integer, and floating point numbers, forcing in other data will result in error. The and operation between the values outputs a larger number, and the or operation outputs a smaller number.
BooleanOperatorV2
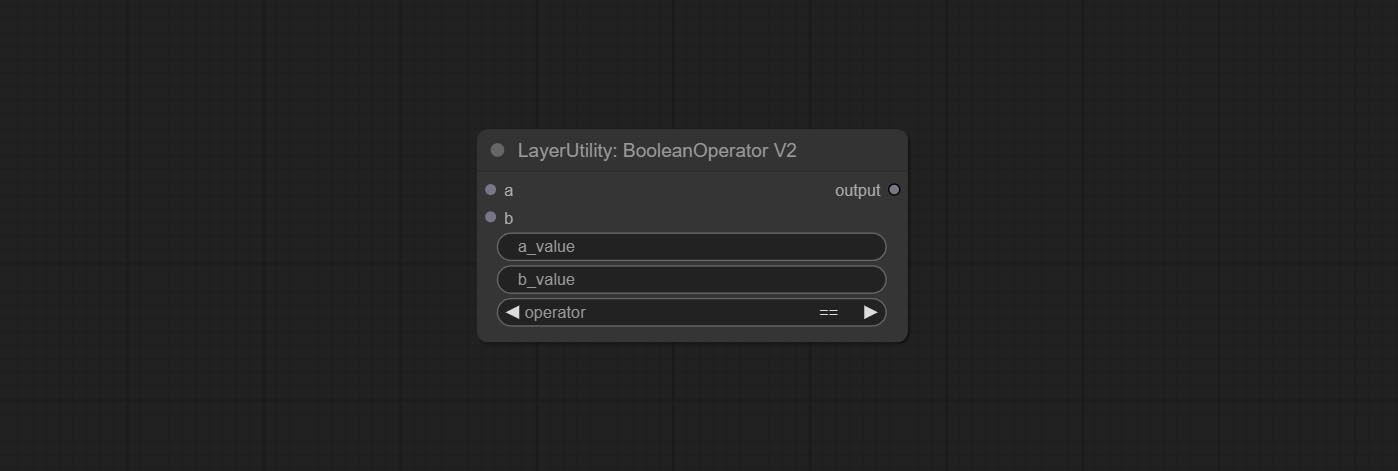
The upgraded version of Boolean Operator has added numerical inputs within nodes and added judgments for greater than, less than, greater than or equal to, and less than or equal to. Note: The input takes priority, and when there is input, the values within the node will be invalid.
StringCondition
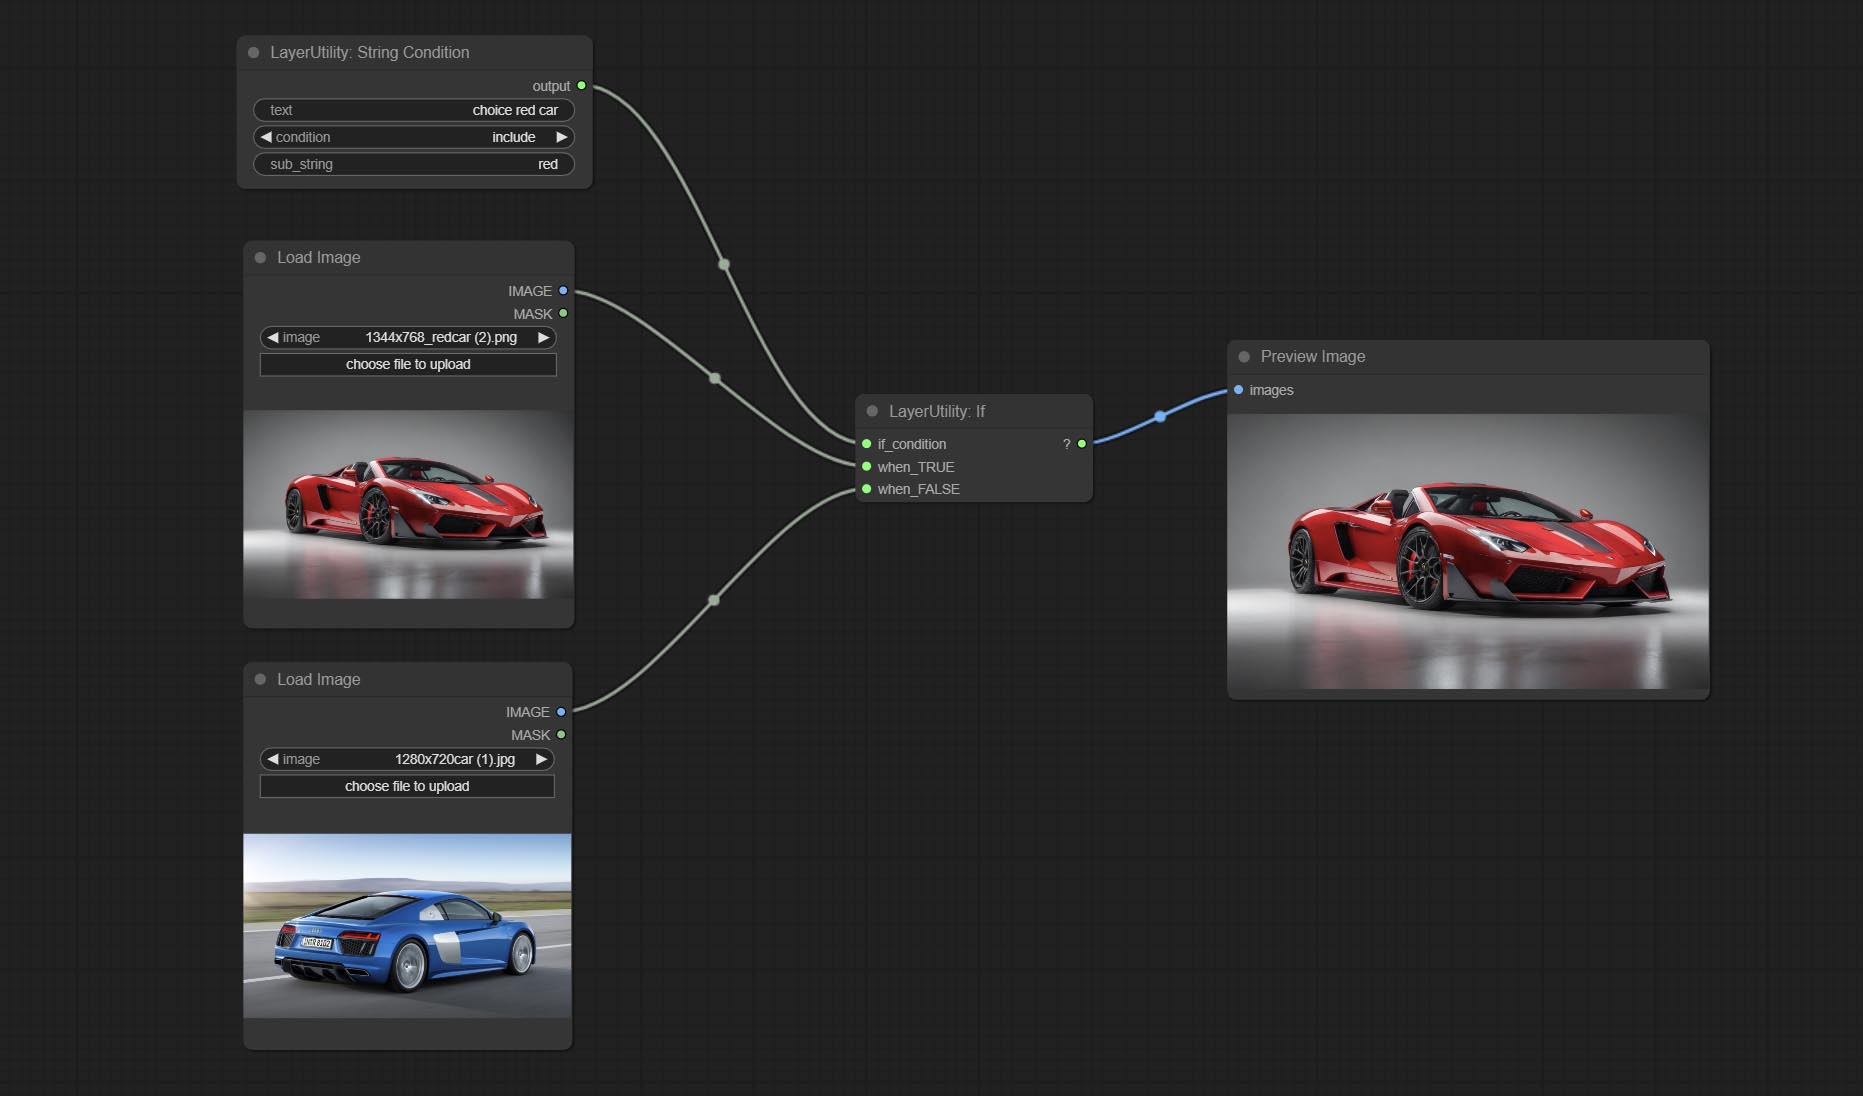
Determine whether the text contains or does not contain substrings, and output a Boolean value.
Node Options:
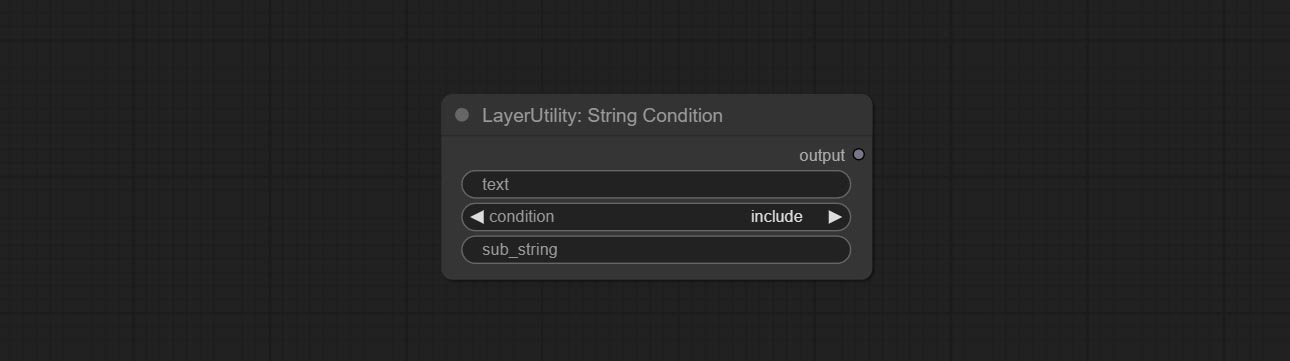
- text: Input text.
- condition: Judgment conditions.
include determines whether it contains a substring, and exclude determines whether it does not. - sub_string: Substring.
CheckMask
Check if the mask contains enough valid areas and output a Boolean value.
Node Options:

- white_point: The white point threshold used to determine whether the mask is valid is considered valid if it exceeds this value.
- area_percent: The percentage of effective areas. If the proportion of effective areas exceeds this value, output True.
CheckMaskV2
On the basis of CheckMask, the method option has been added, which allows for the selection of different detection methods. The area_percent is changed to a floating point number with an accuracy of 2 decimal places, which can detect smaller effective areas.
Node Options:
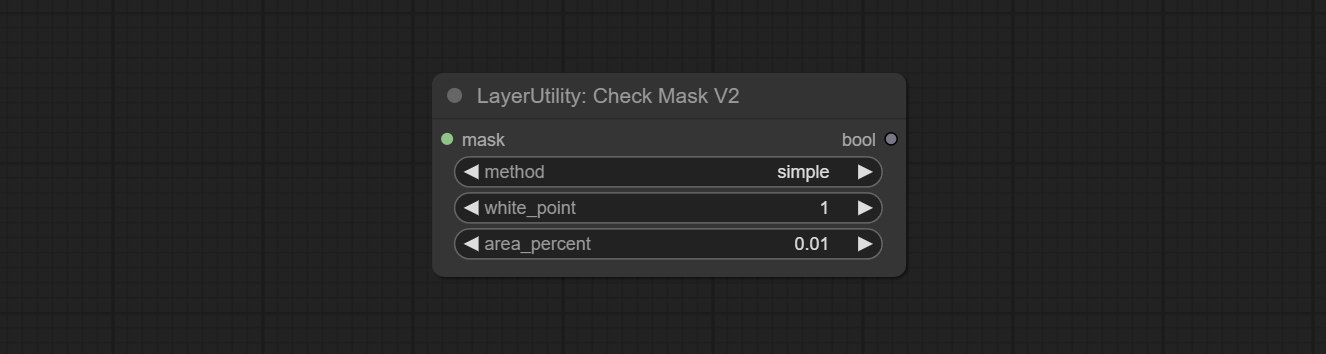
- method: There are two detection methods, which are
simple and detectability . The simple method only detects whether the mask is completely black, while the detect_percent method detects the proportion of effective areas.
ถ้า
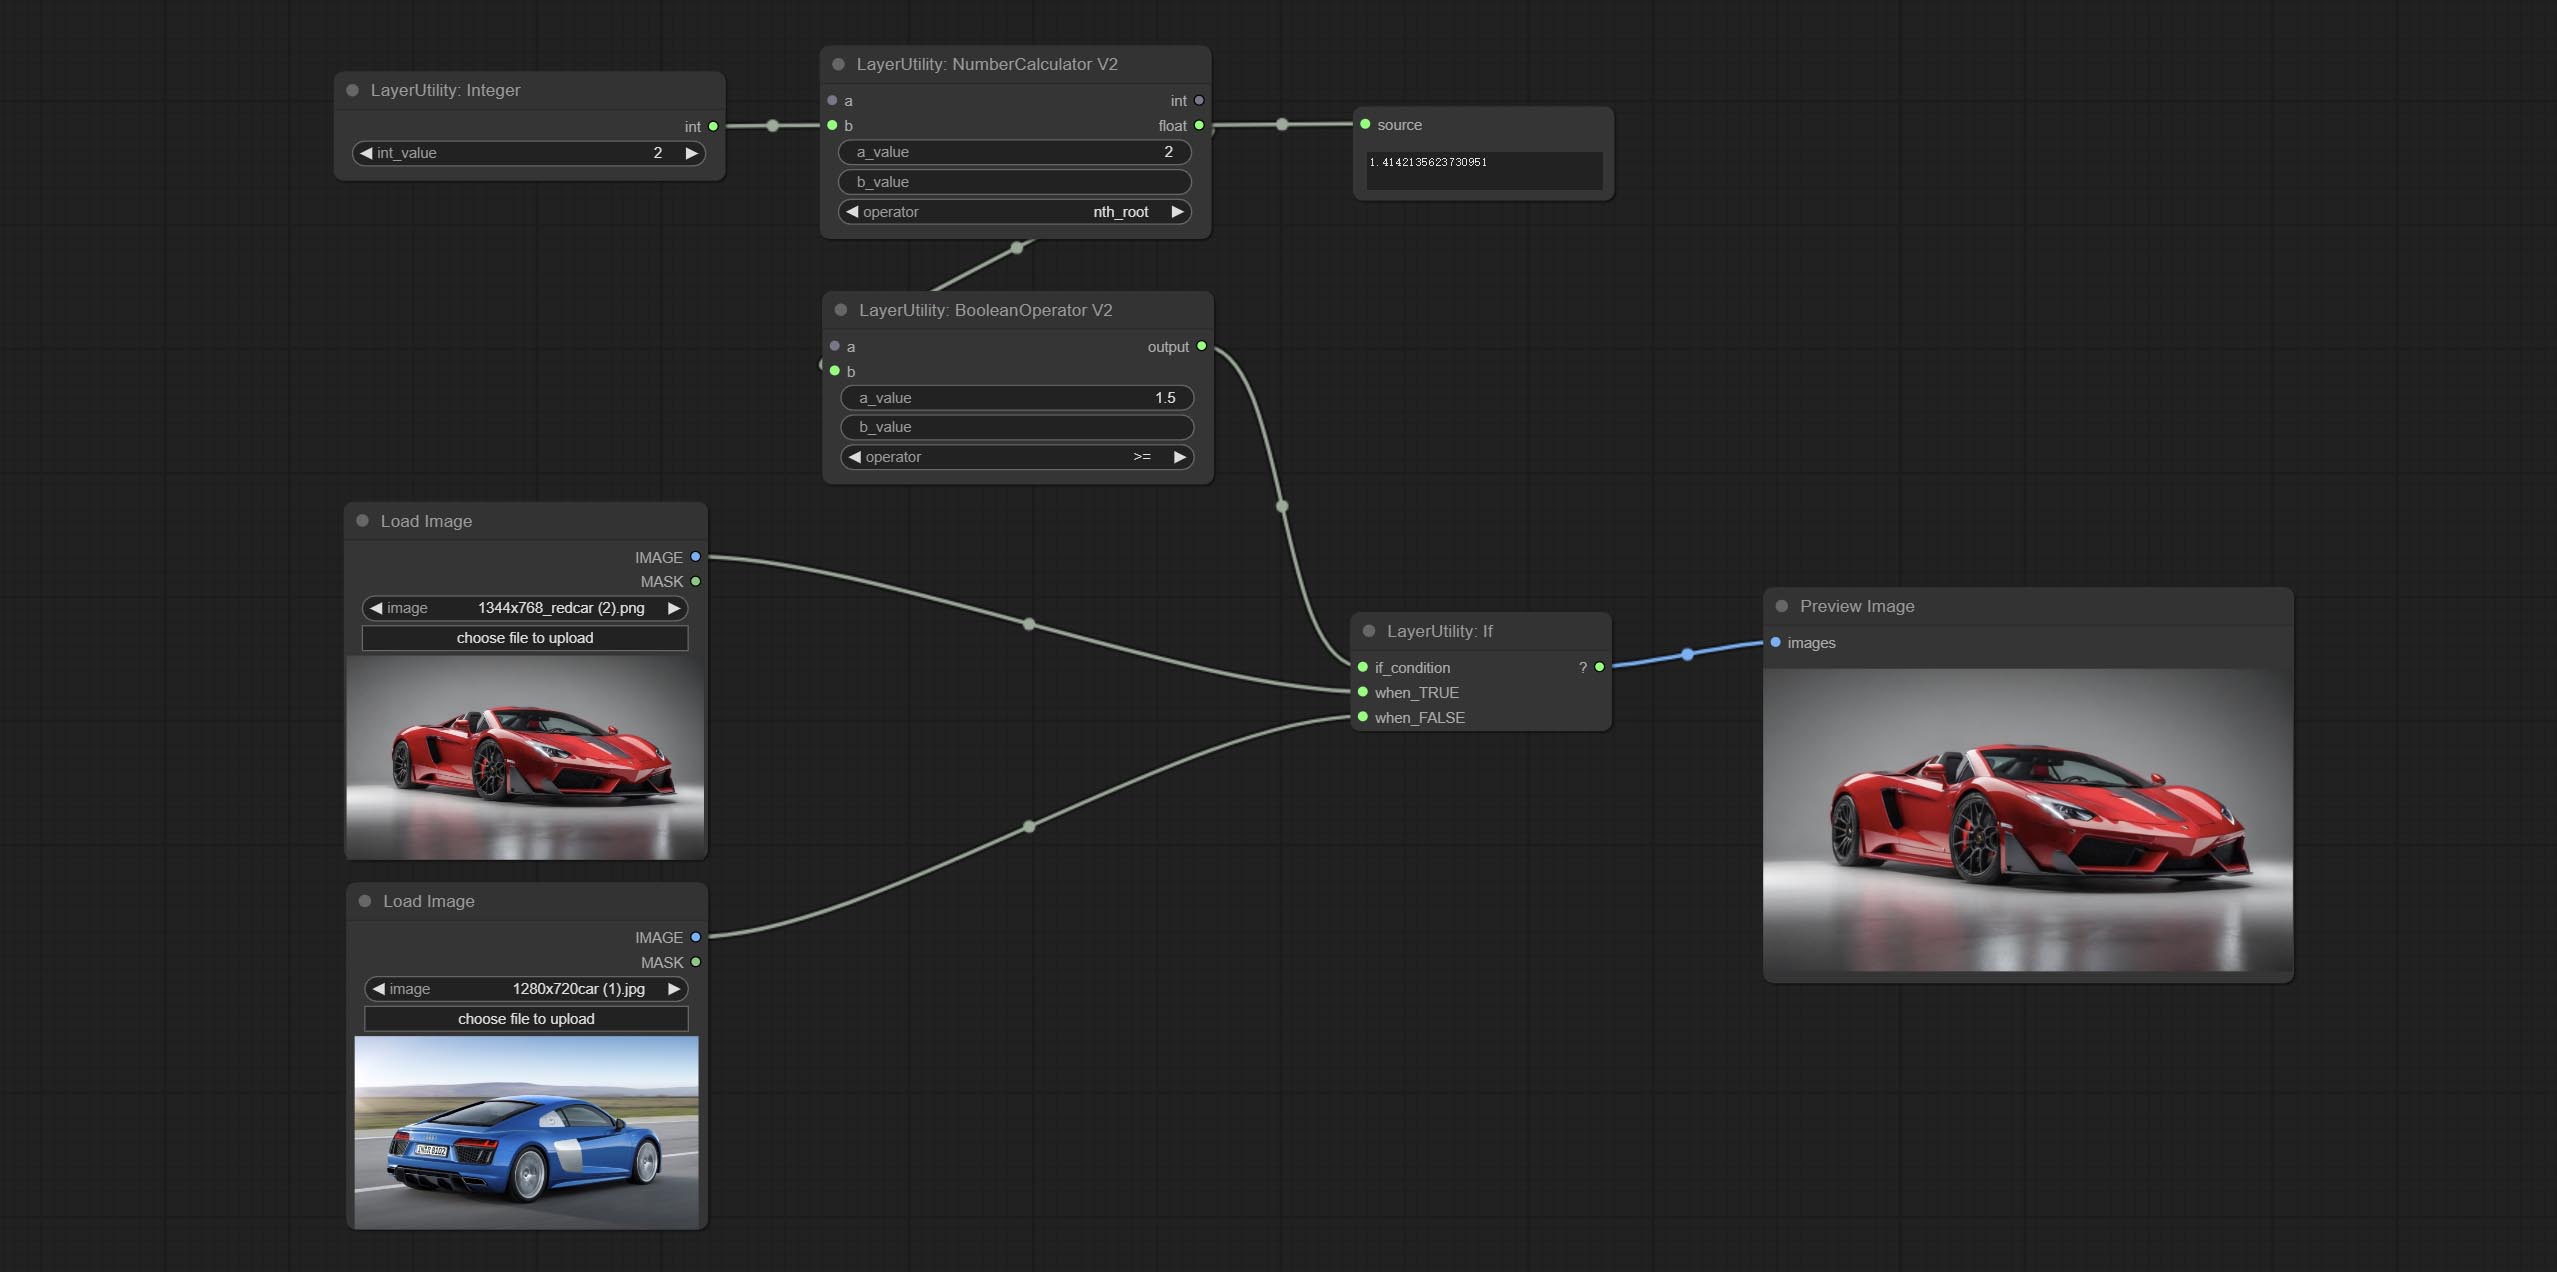
Switches output based on Boolean conditional input. It can be used for any type of data switching, including but not limited to numeric values, strings, pictures, masks, models, latent, pipe pipelines, etc.
Node Options:
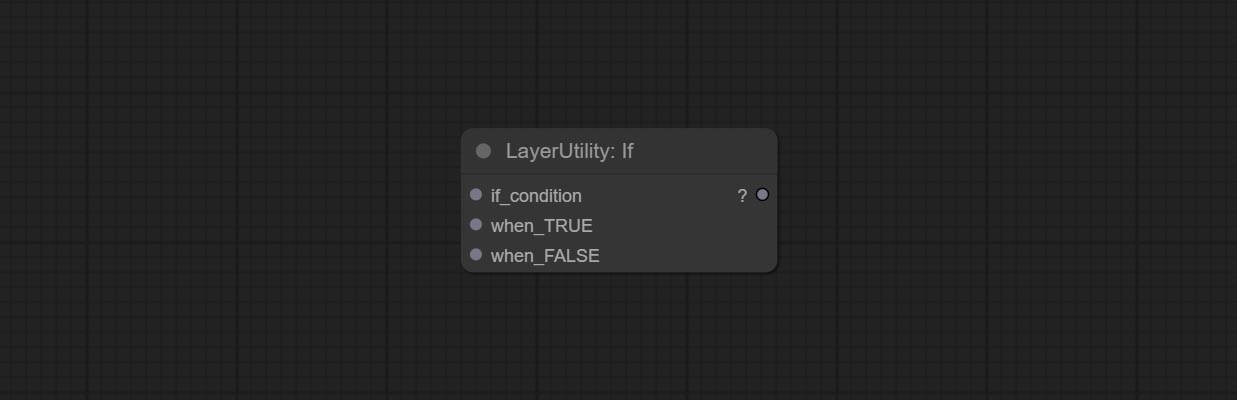
- if_condition: Conditional input. Boolean, integer, floating point, and string inputs are supported. When entering a value, 0 is judged to be False; When a string is entered, an empty string is judged as Flase.
- when_True: This item is output when the condition is True.
- when_False: This item is output when the condition is False.
SwitchCase

Switches the output based on the matching string. It can be used for any type of data switching, including but not limited to numeric values, strings, pictures, masks, models, latent, pipe pipelines, etc. Supports up to 3 sets of case switches. Compare case to switch_condition , if the same, output the corresponding input. If there are the same cases, the output is prioritized in order. If there is no matching case, the default input is output. Note that the string is case sensitive and Chinese and English full-width and half-width.
Node Options:
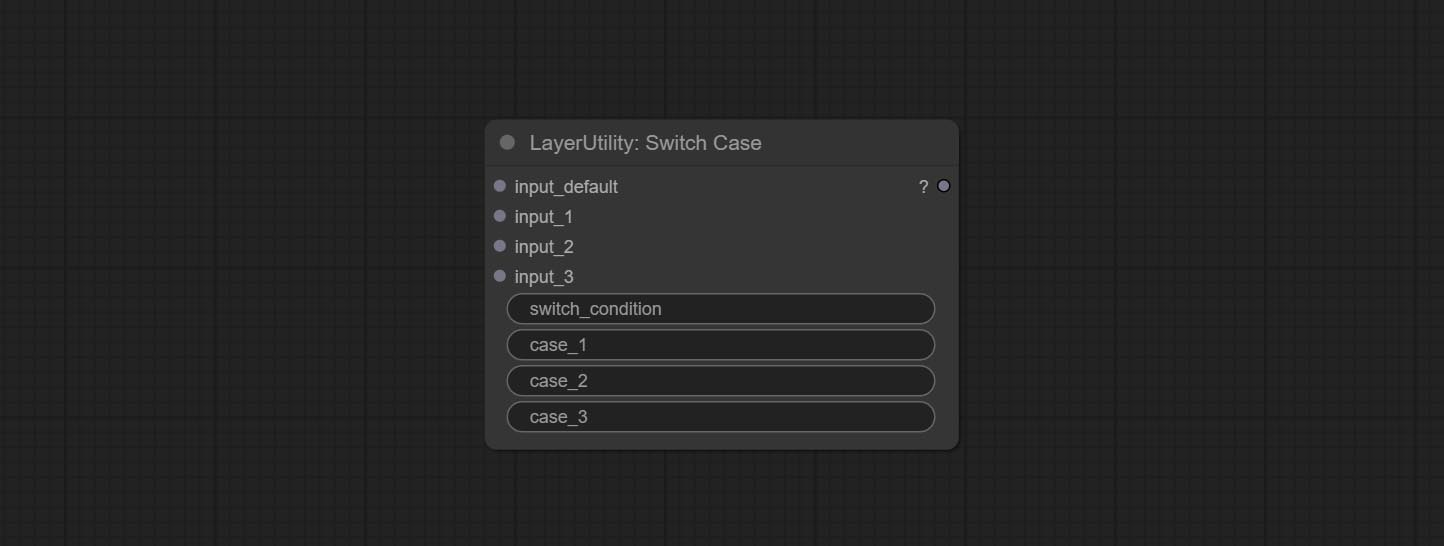
- input_default: Input entry for default output. This input is required.
- input_1: Input entry used to match
case_1 . This input is optional. - input_2: Input entry used to match
case_2 . This input is optional. - input_3: Input entry used to match
case_3 . This input is optional. - switch_condition: String used to judge with case.
- case_1: case_1 string.
- case_2: case_2 string.
- case_3: case_3 string.
QueueStop
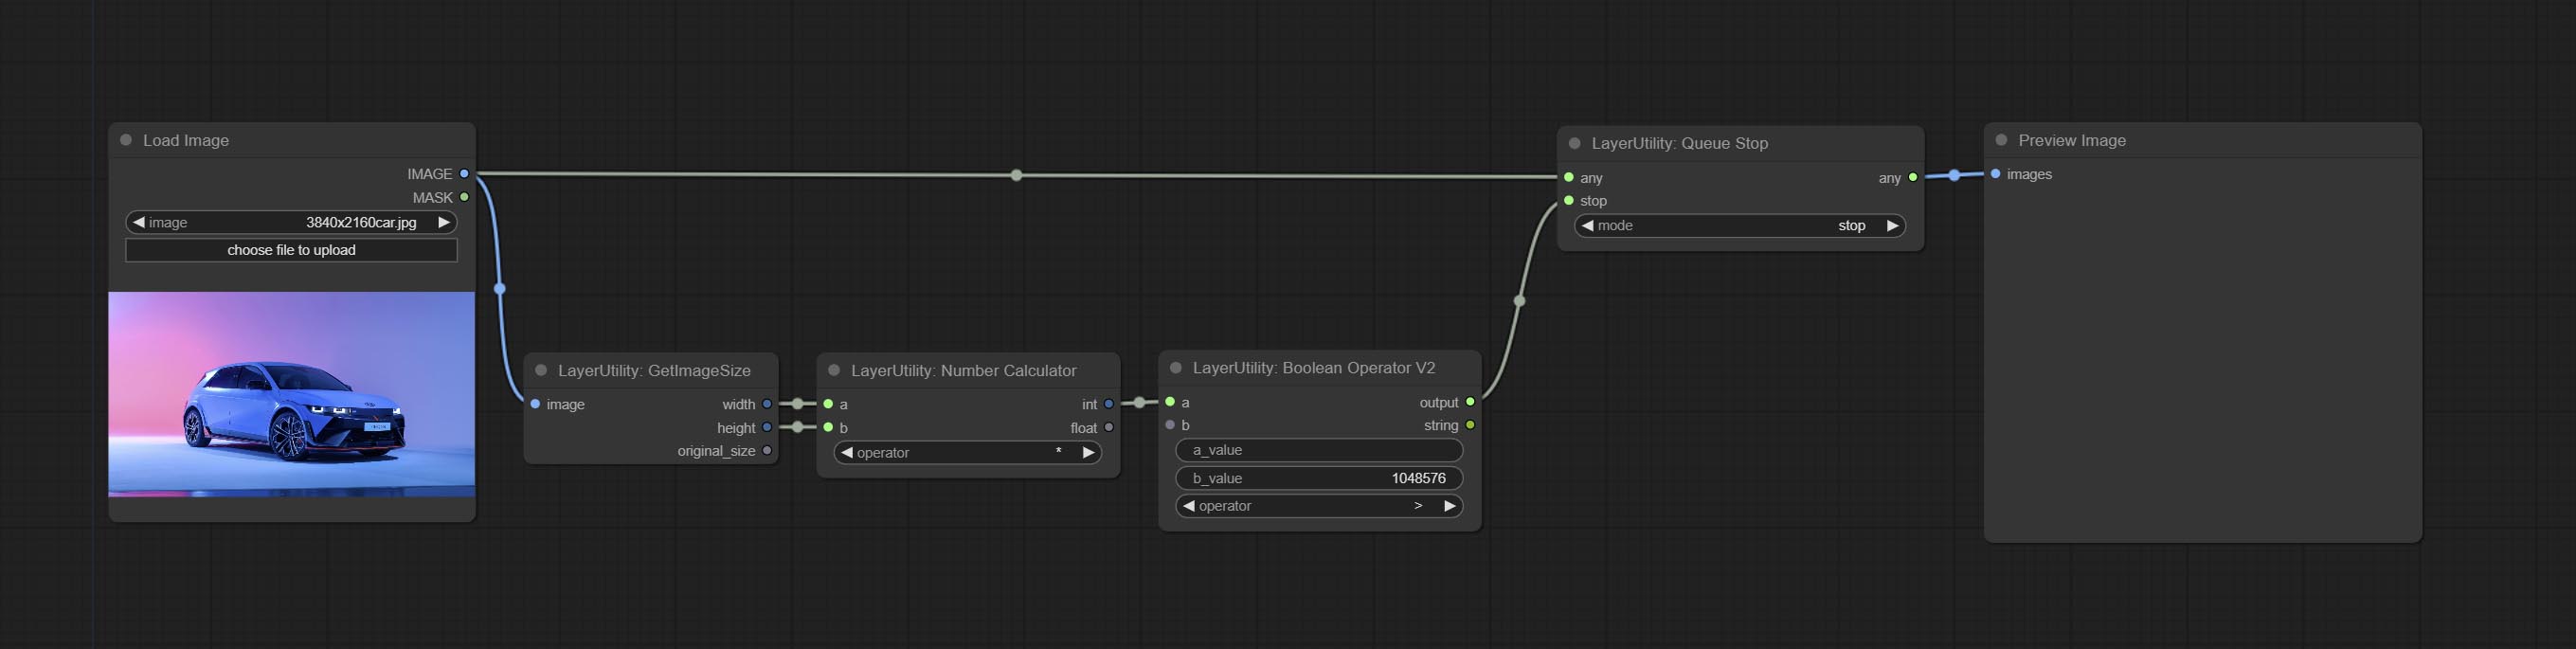
Stop the current queue. When executed at this node, the queue will stop. The workflow diagram above illustrates that if the image is larger than 1Mega pixels, the queue will stop executing.
Node Options:
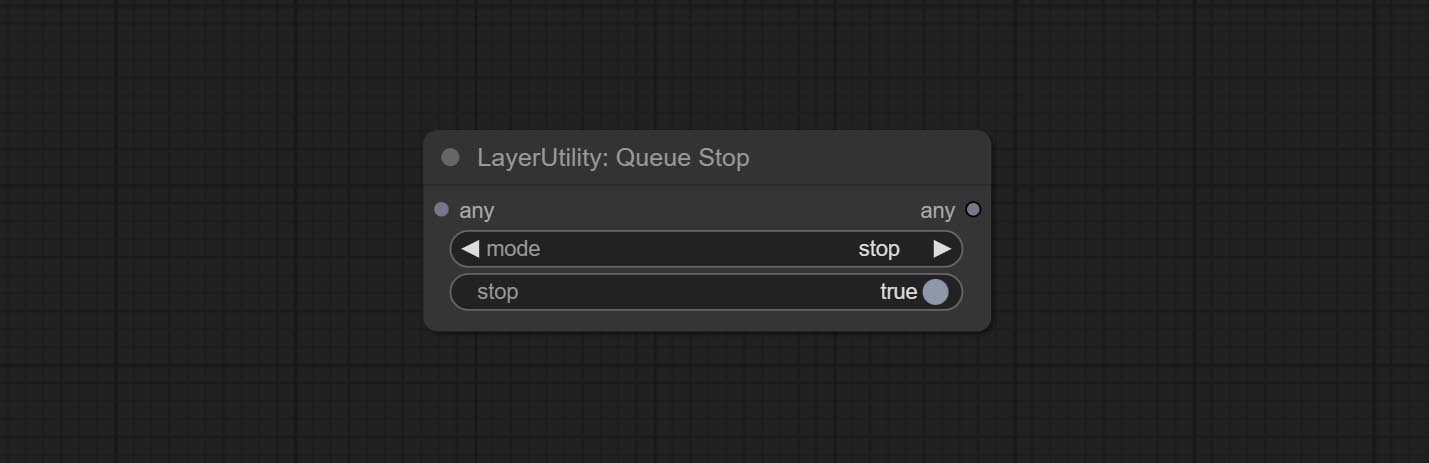
- mode: Stop mode. If you choose
stop , it will be determined whether to stop based on the input conditions. If you choose continue , ignore the condition to continue executing the queue. - stop: If true, the queue will stop. If false, the queue will continue to execute.
PurgeVRAM
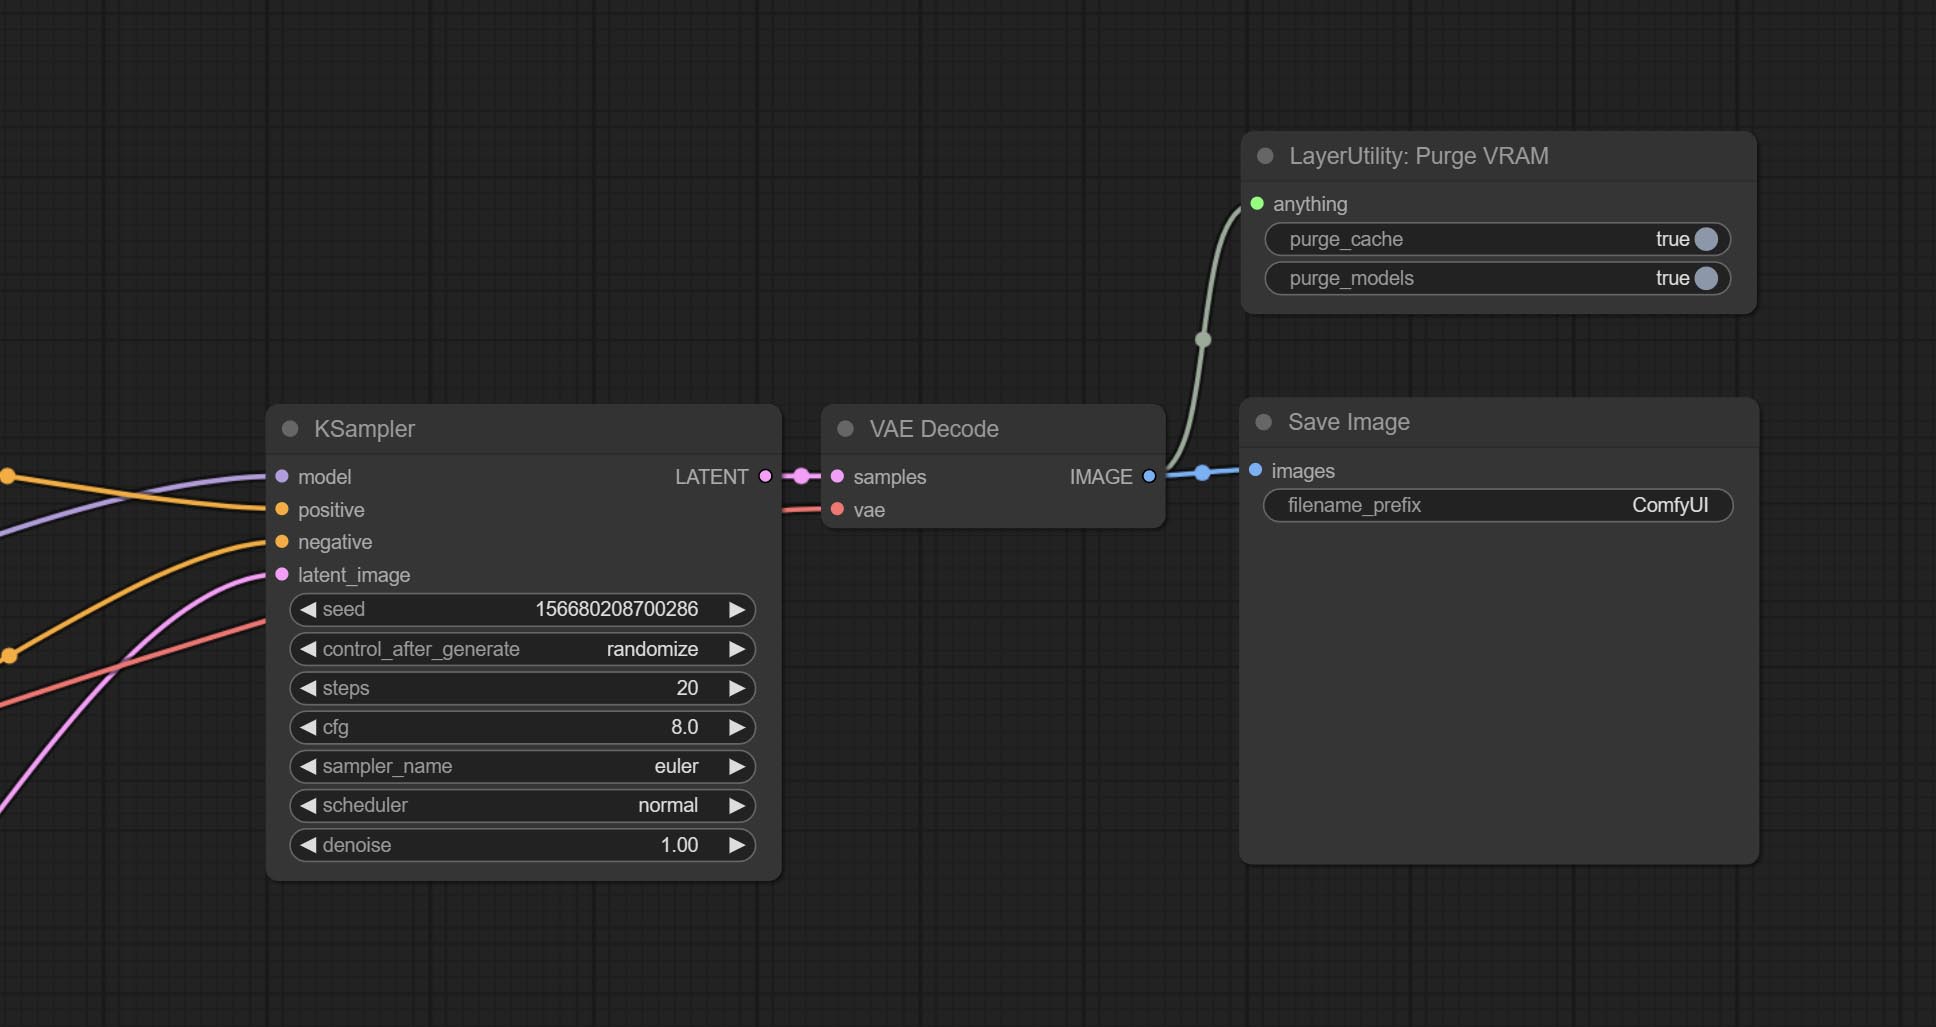
Clean up GPU VRAM and system RAM. any type of input can be accessed, and when executed to this node, the VRAM and garbage objects in the RAM will be cleaned up. Usually placed after the node where the inference task is completed, such as the VAE Decode node.
Node Options:
- purge_cache: Clean up cache。
- purge_models: Unload all loaded models。
SaveImagePlus
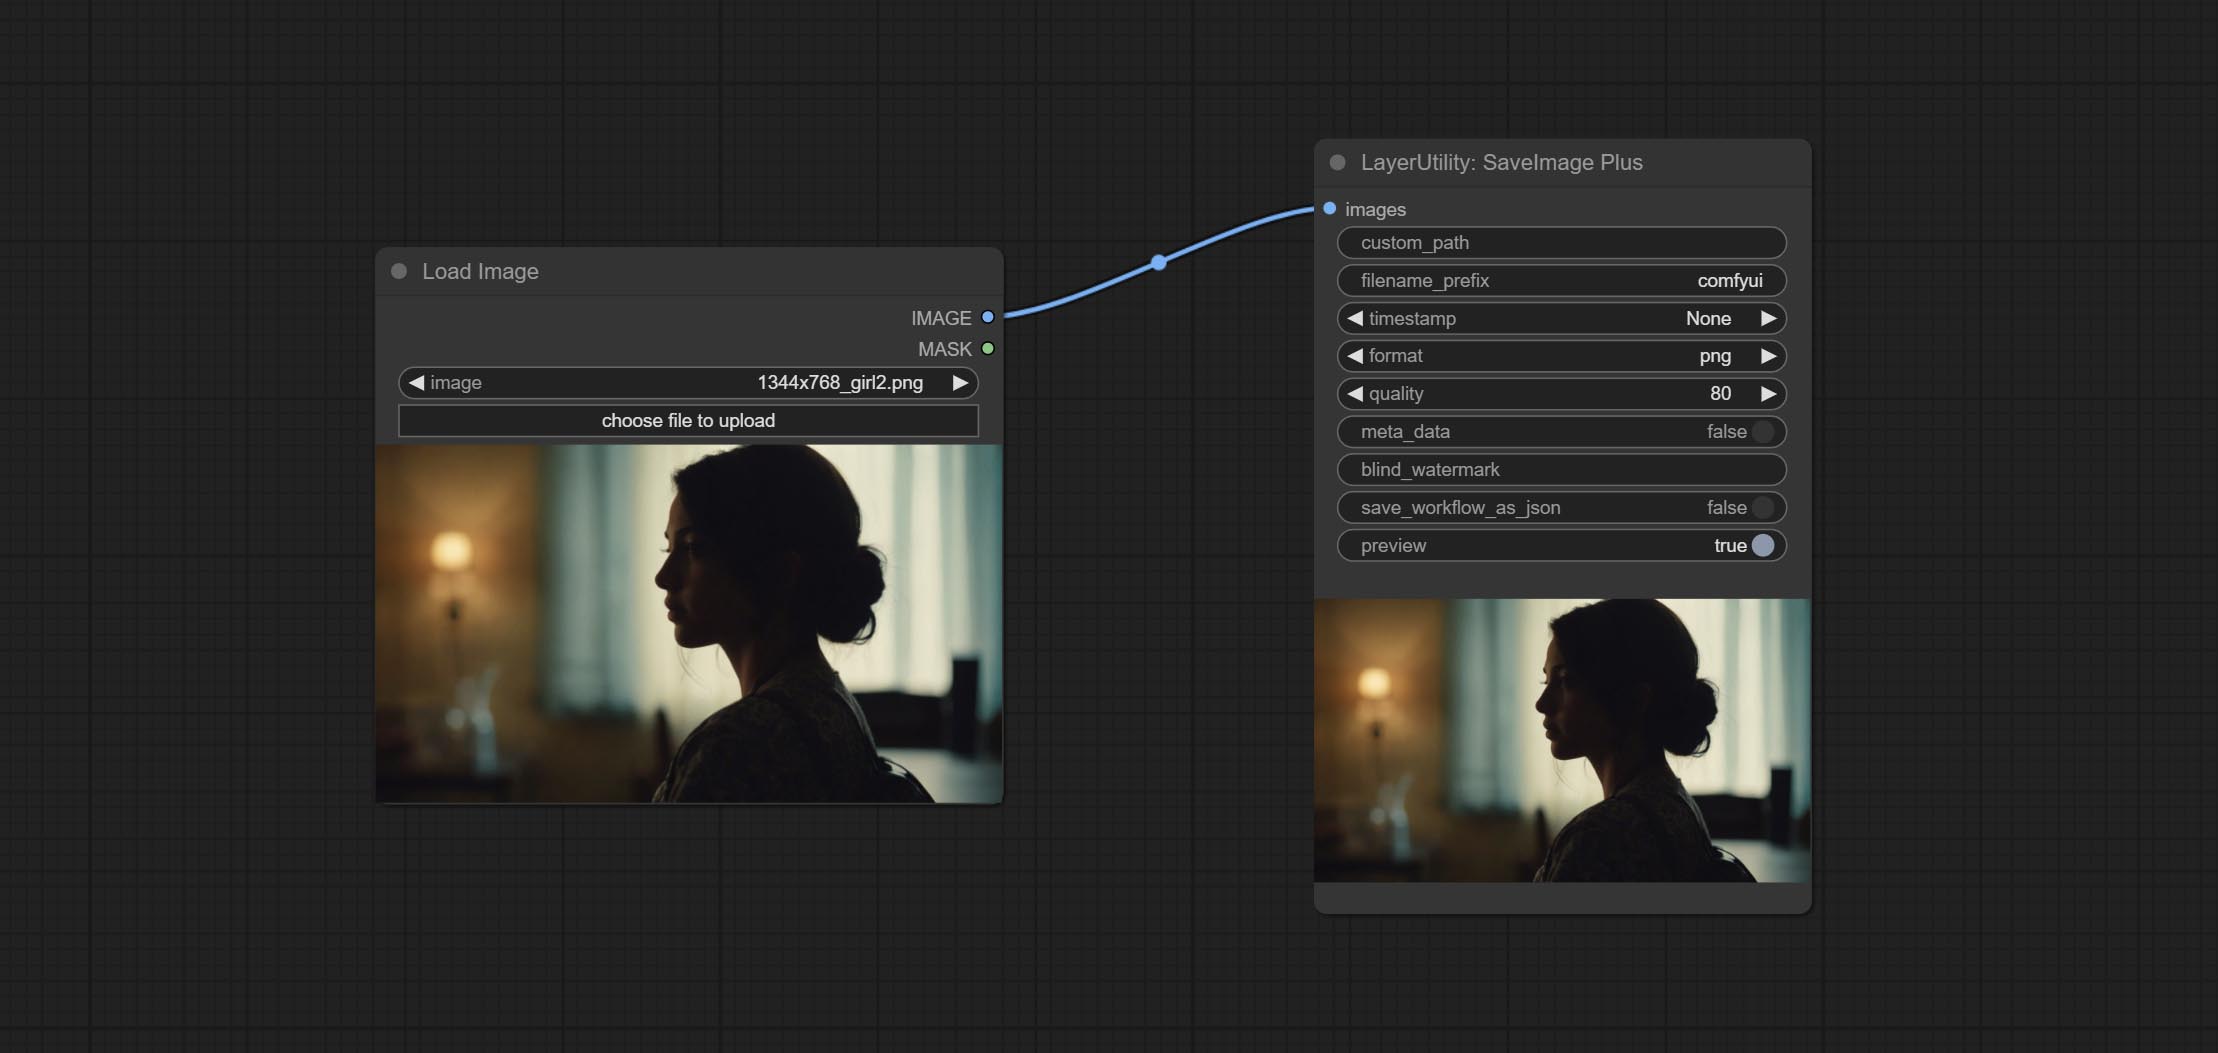
Enhanced save image node. You can customize the directory where the picture is saved, add a timestamp to the file name, select the save format, set the image compression rate, set whether to save the workflow, and optionally add invisible watermarks to the picture. (Add information in a way that is invisible to the naked eye, and use the ShowBlindWaterMark node to decode the watermark). Optionally output the json file of the workflow.
Node Options: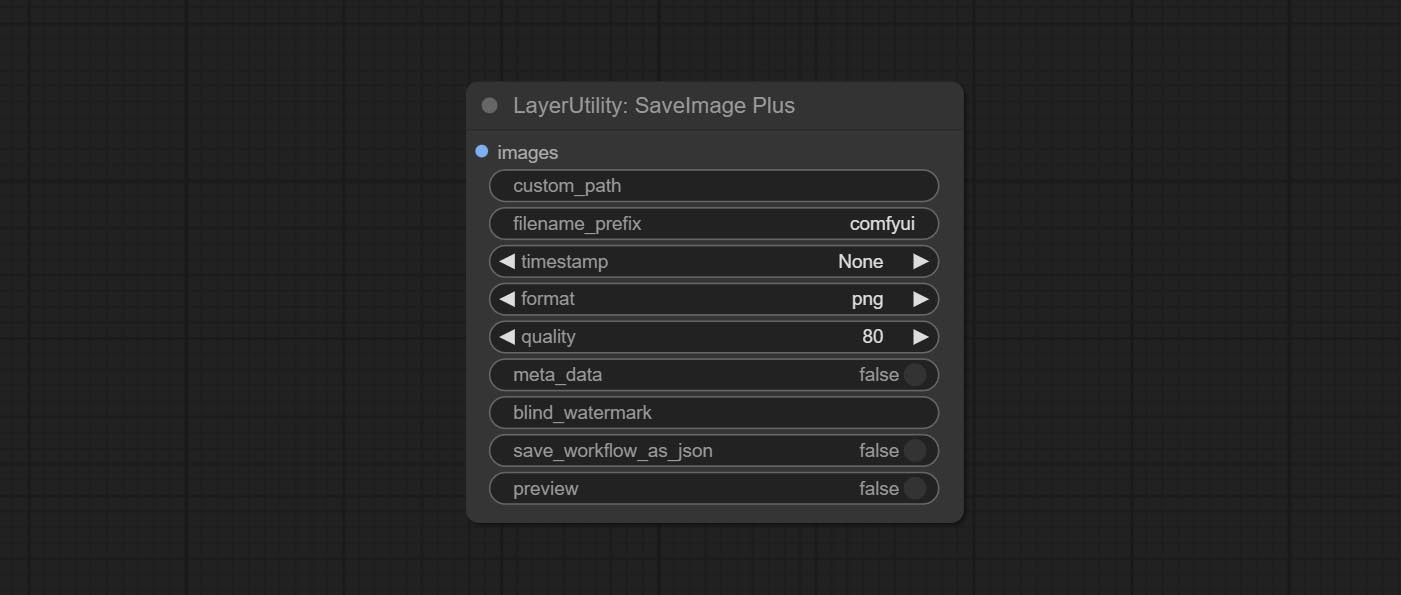
- iamge: The input image.
- custom_path * : User-defined directory, enter the directory name in the correct format. If empty, it is saved in the default output directory of ComfyUI.
- filename_prefix * : The prefix of file name.
- timestamp: Timestamp the file name, opting for date, time to seconds, and time to milliseconds.
- format: The format of image save. Currently available in
png and jpg . Note that only png format is supported for RGBA mode pictures. - quality: Image quality, the value range 10-100, the higher the value, the better the picture quality, the volume of the file also correspondingly increases.
- meta_data: Whether to save metadata to png file, that is workflow information. Set this to false if you do not want the workflow to be leaked.
- blind_watermark: The text entered here (does not support multilingualism) will be converted into a QR code and saved as an invisible watermark. Use
ShowBlindWaterMark node can decode watermarks. Note that pictures with watermarks are recommended to be saved in png format, and lower-quality jpg format will cause watermark information to be lost. - save_workflow_as_json: Whether the output workflow is a json file at the same time (the output json is in the same directory as the picture).
- preview: Preview switch.
* Enter %date for the current date (YY-mm-dd) and %time for the current time (HH-MM-SS). You can enter / for subdirectories. For example, %date/name_%tiem will output the image to the YY-mm-dd folder, with name_HH-MM-SS as the file name prefix.
ImageTaggerSave
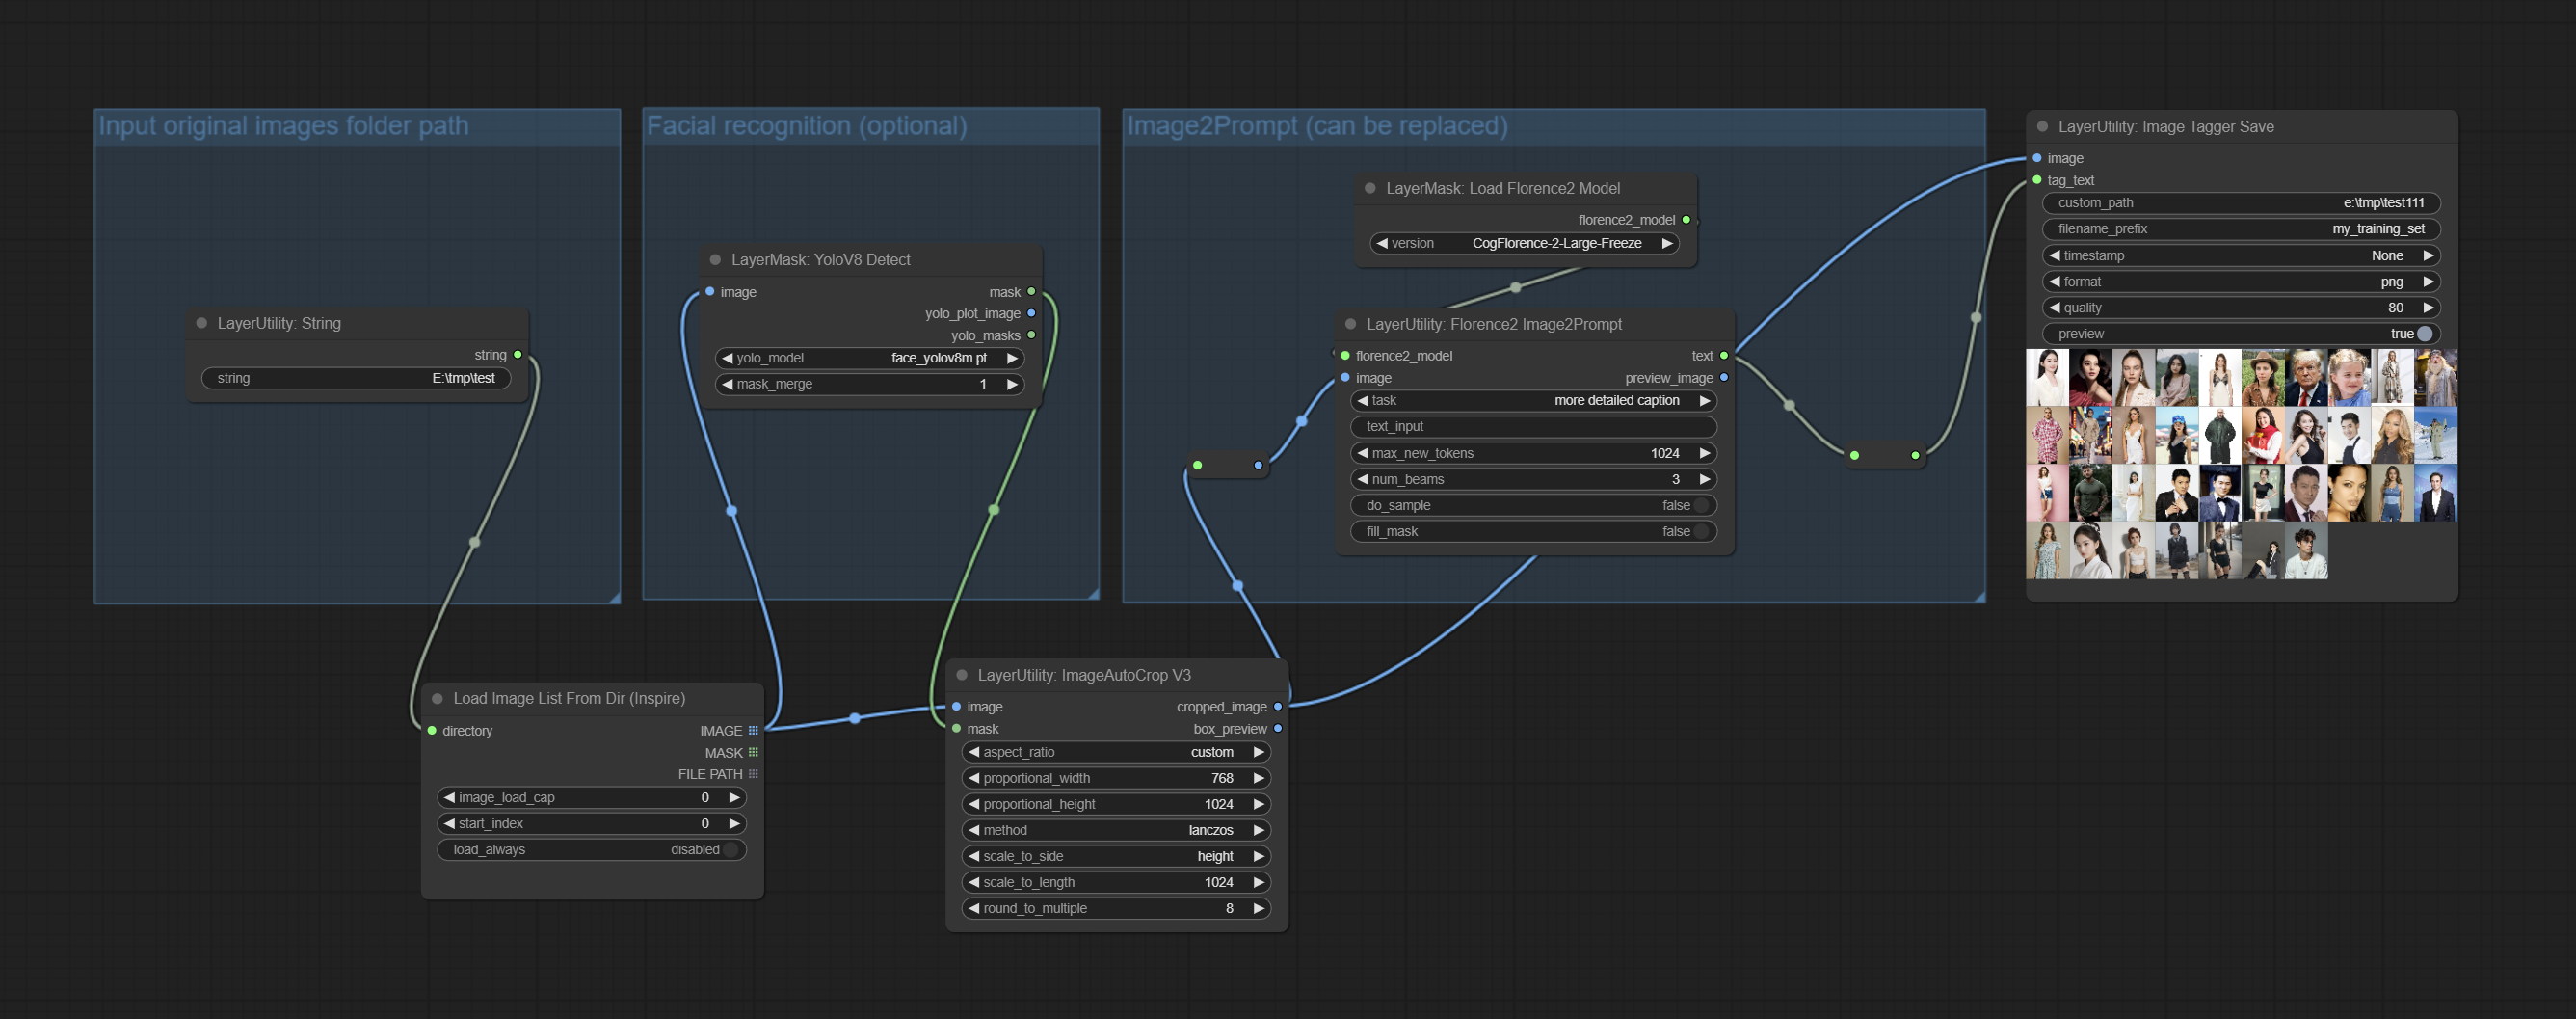
The node used to save the training set images and their text labels, where the image files and text label files have the same file name. Customizable directory for saving images, adding timestamps to file names, selecting save formats, and setting image compression rates. *The workflow image_tagger_stave.exe is located in the workflow directory.
Node Options: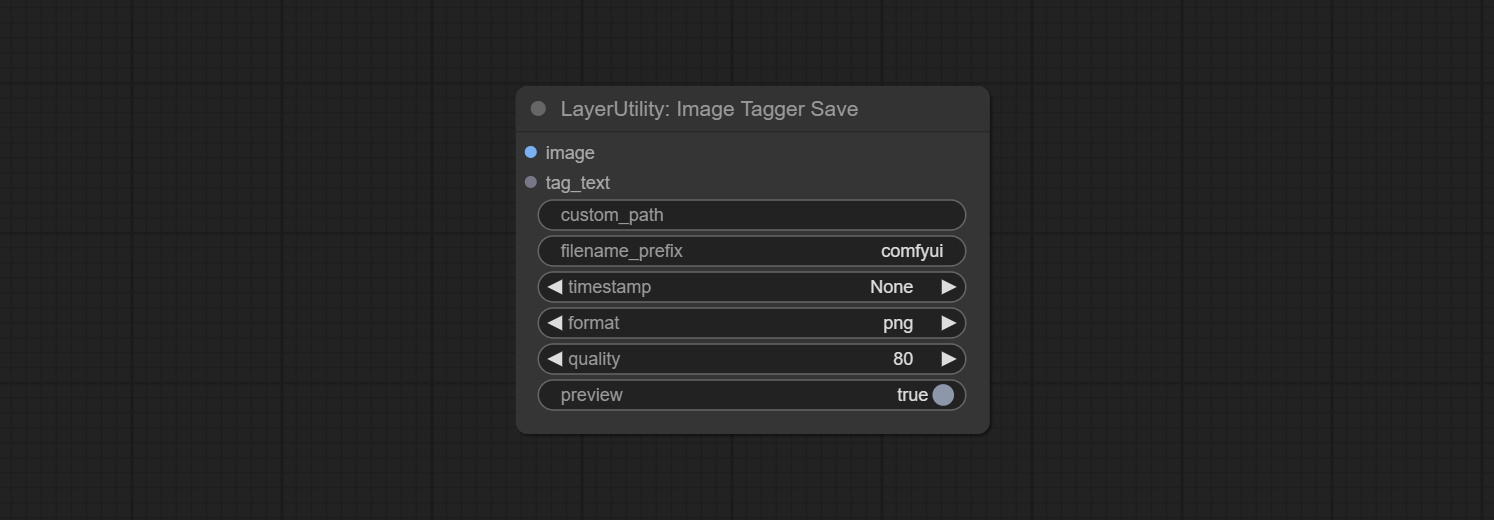
- iamge: The input image.
- tag_text: Text label of image.
- custom_path * : User-defined directory, enter the directory name in the correct format. If empty, it is saved in the default output directory of ComfyUI.
- filename_prefix * : The prefix of file name.
- timestamp: Timestamp the file name, opting for date, time to seconds, and time to milliseconds.
- format: The format of image save. Currently available in
png and jpg . Note that only png format is supported for RGBA mode pictures. - quality: Image quality, the value range 10-100, the higher the value, the better the picture quality, the volume of the file also correspondingly increases.
- preview: Preview switch.
* Enter %date for the current date (YY-mm-dd) and %time for the current time (HH-MM-SS). You can enter / for subdirectories. For example, %date/name_%tiem will output the image to the YY-mm-dd folder, with name_HH-MM-SS as the file name prefix.
AddBlindWaterMark
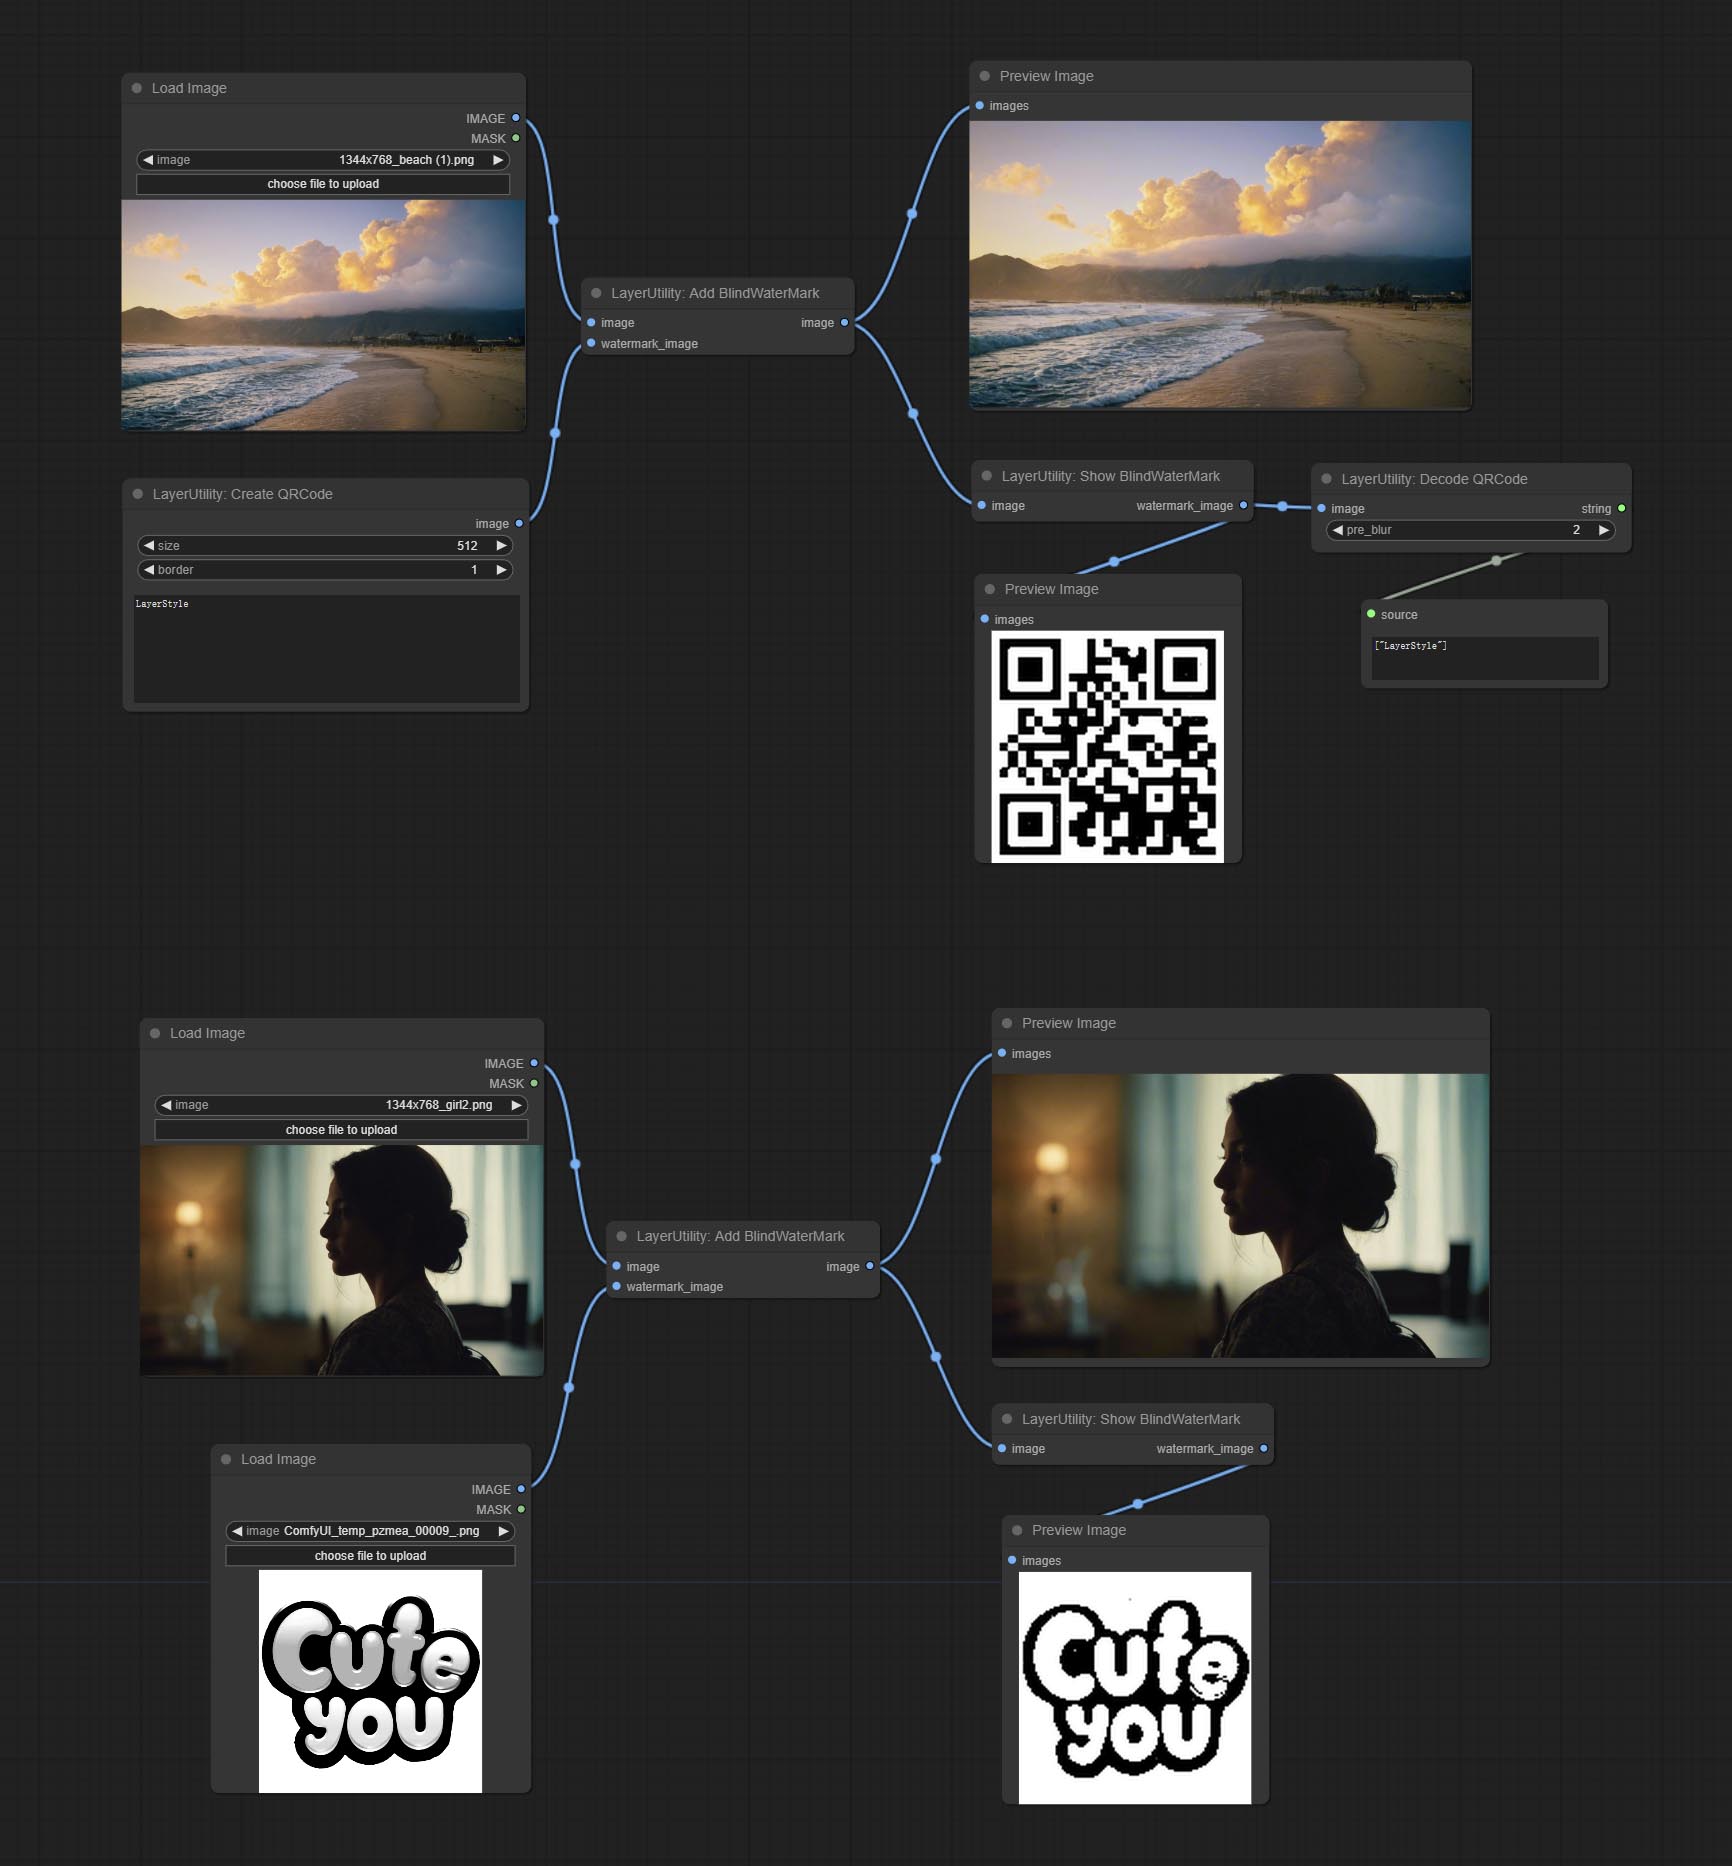
Add an invisible watermark to a picture. Add the watermark image in a way that is invisible to the naked eye, and use the ShowBlindWaterMark node to decode the watermark.
Node Options: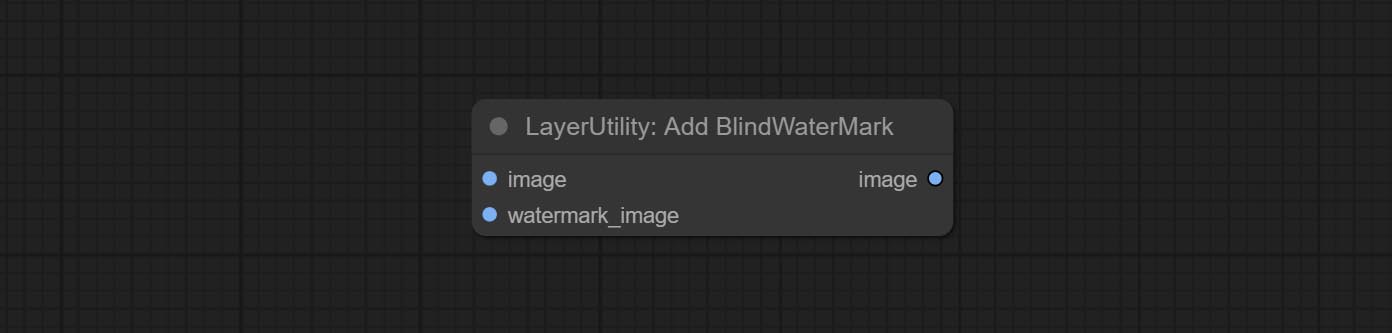
- iamge: The input image.
- watermark_image: Watermark image. The image entered here will automatically be converted to a square black and white image as a watermark. It is recommended to use a QR code as a watermark.
ShowBlindWaterMark
Decoding the invisible watermark added to the AddBlindWaterMark and SaveImagePlus nodes.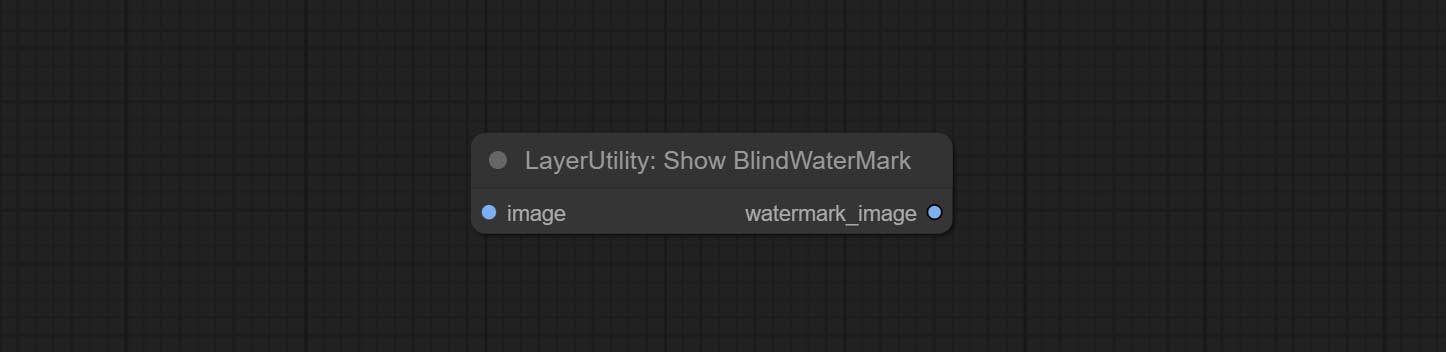
CreateQRCode
Generate a square QR code picture.
Node Options:

- size: The side length of image.
- border: The size of the border around the QR code, the larger the value, the wider the border.
- text: Enter the text content of the QR code here, and multi-language is not supported.
DecodeQRCode
Decoding the QR code.
Node Options:
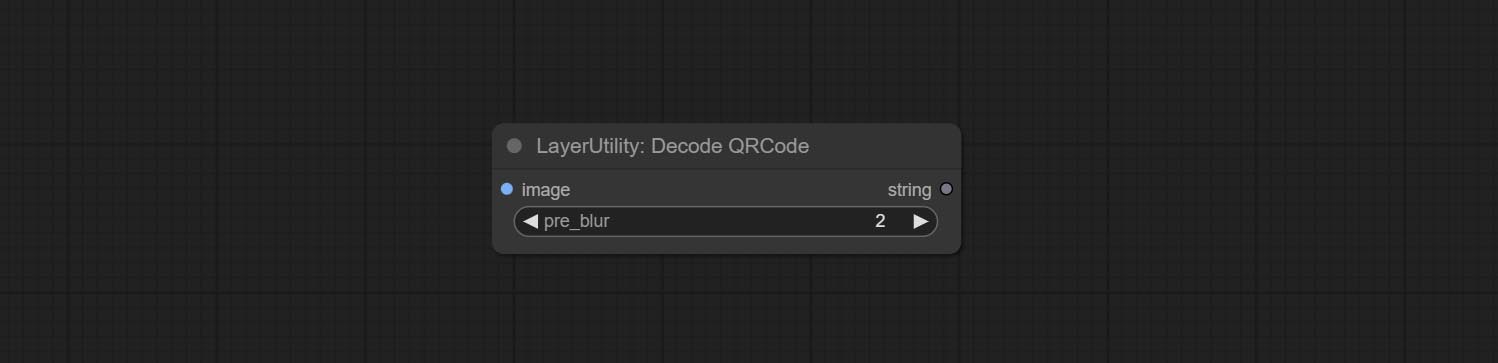
- image: The input QR code image.
- pre_blur: Pre-blurring, you can try to adjust this value for QR codes that are difficult to identify.
LoadPSD
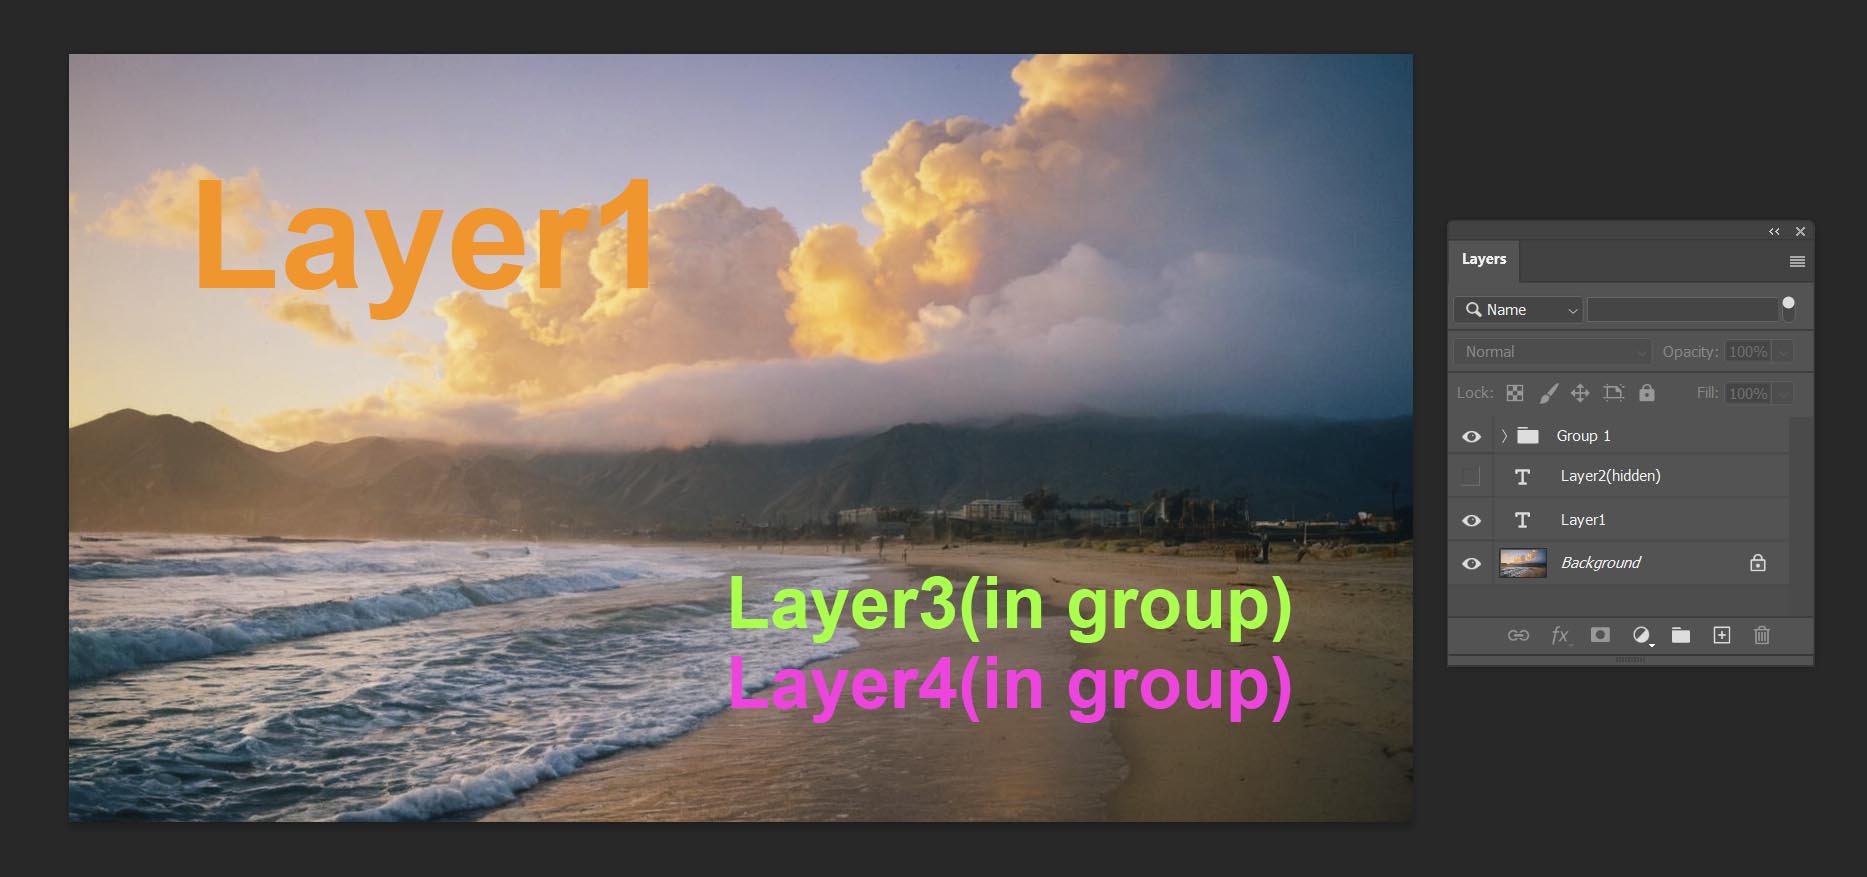
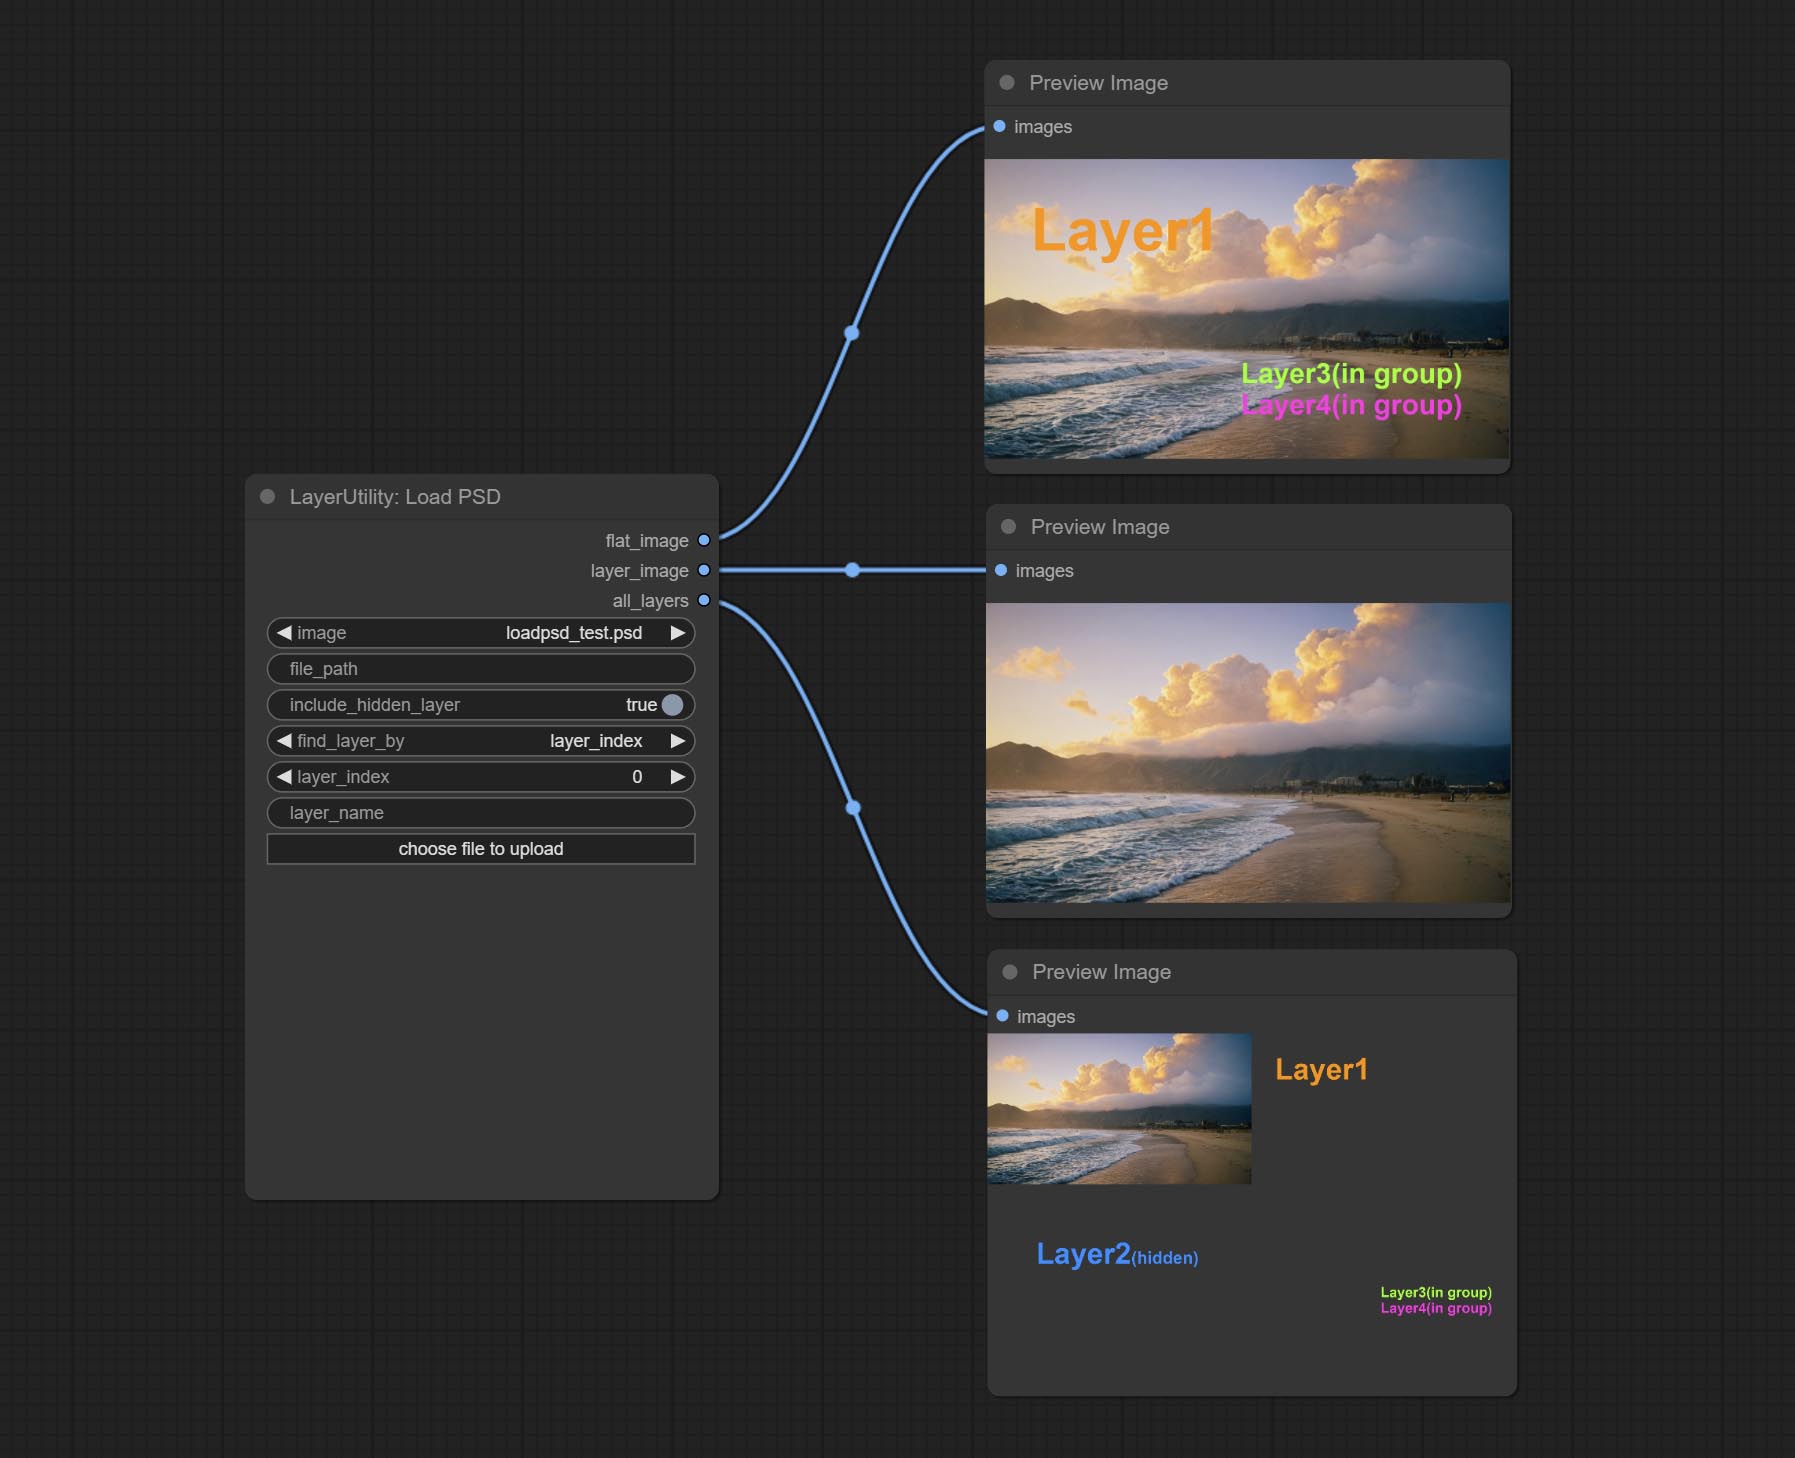
Load the PSD format file and export the layers. Note that this node requires the installation of the psd_tools dependency package, If error occurs during the installation of psd_tool, such as ModuleNotFoundError: No module named 'docopt' , please download docopt's whl and manual install it.
Node Options:
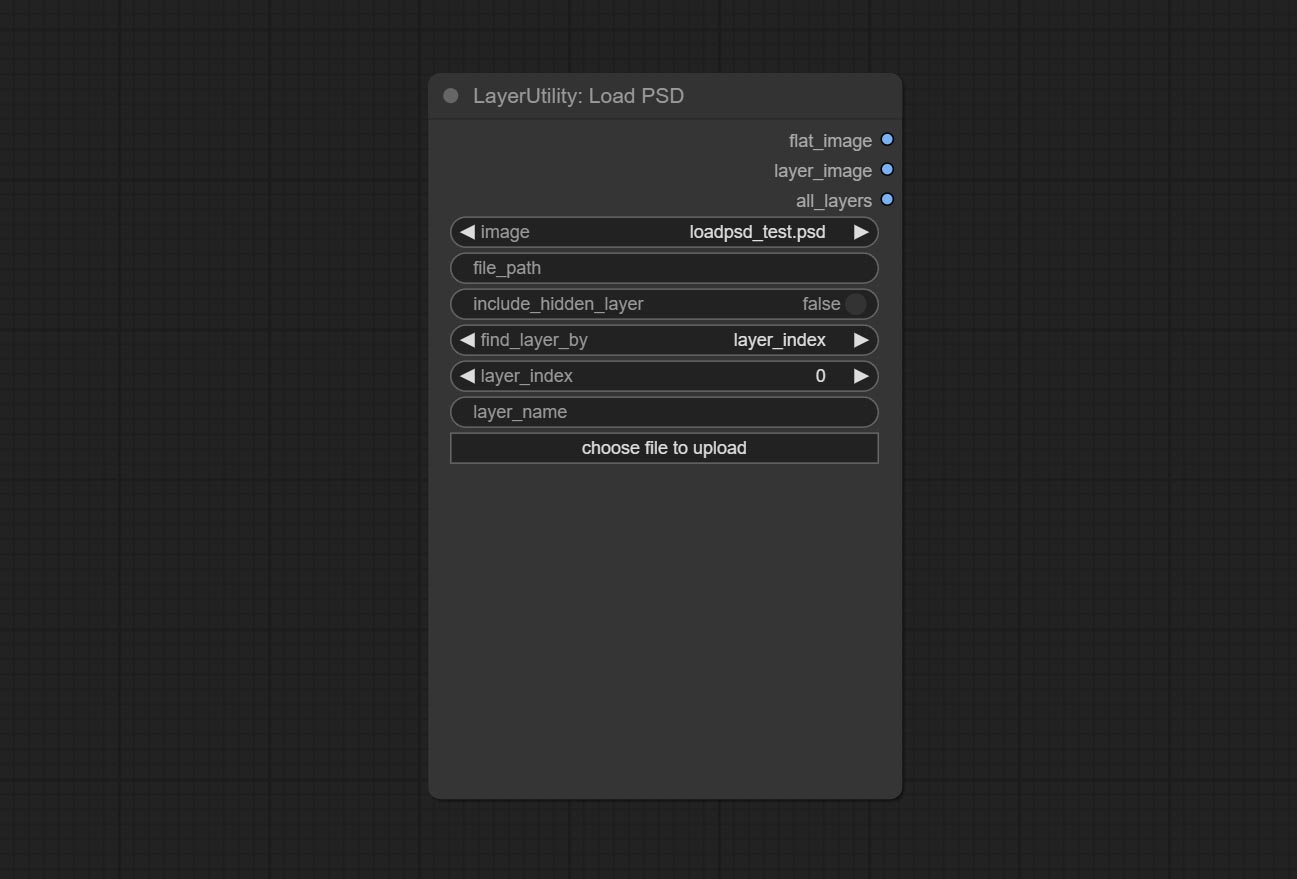
- image: Here is a list of *.psd files under
ComfyUI/input , where previously loaded psd images can be selected. - file_path: The complete path and file name of the psd file.
- include_hidden_layer: whether include hidden layers.
- find_layer_by: The method for finding layers can be selected by layer key number or layer name. Layer groups are treated as one layer.
- layer_index: The layer key number, where 0 is the bottom layer, is incremented sequentially. If include_hiddenlayer is set to false, hidden layers are not counted. Set to -1 to output the top layer.
- layer_name: Layer name. Note that capitalization and punctuation must match exactly.
Outputs: flat_image: PSD preview image. layer_iamge: Find the layer output. all_layers: Batch images containing all layers.
SD3NegativeConditioning
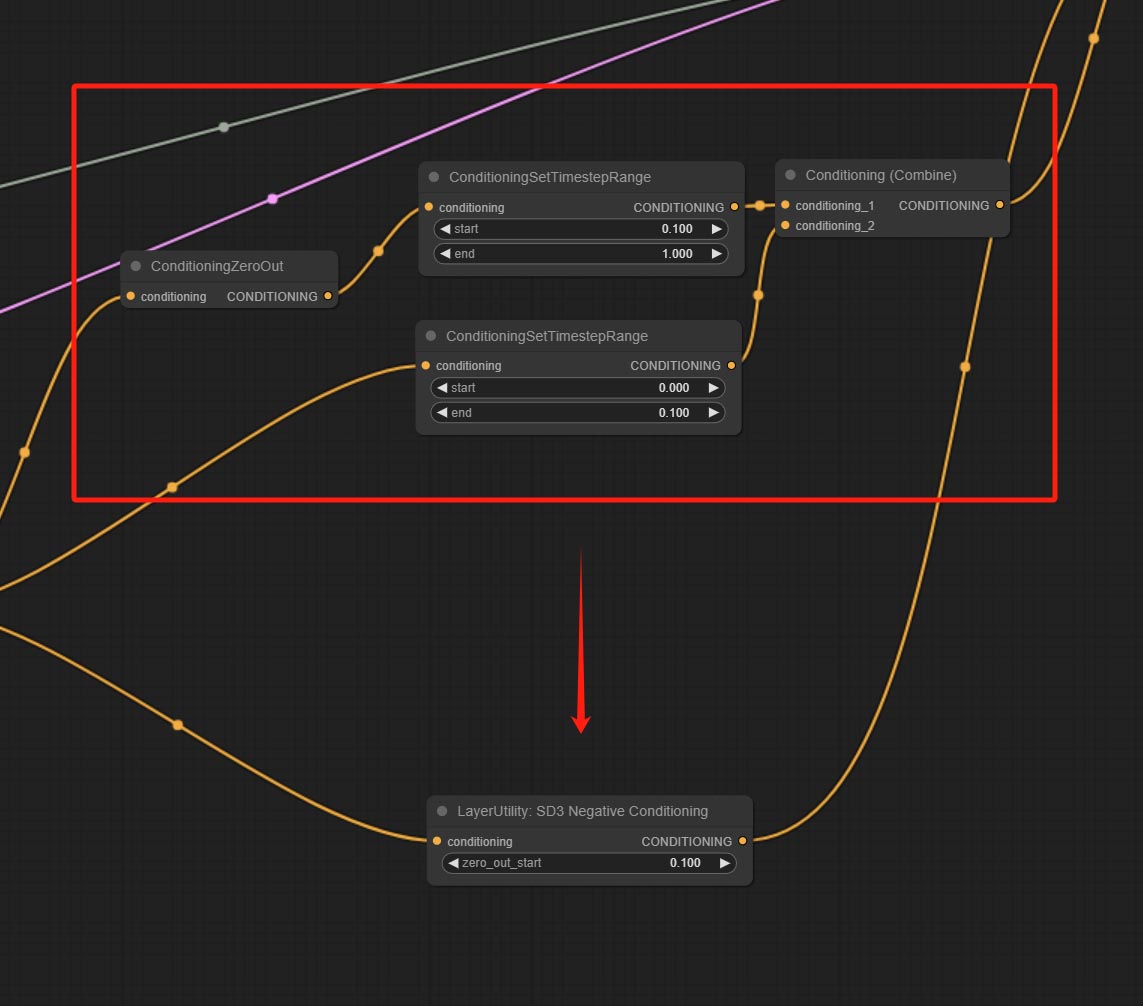
Encapsulate the four nodes of Negative Condition in SD3 into a separate node.
Node Options:
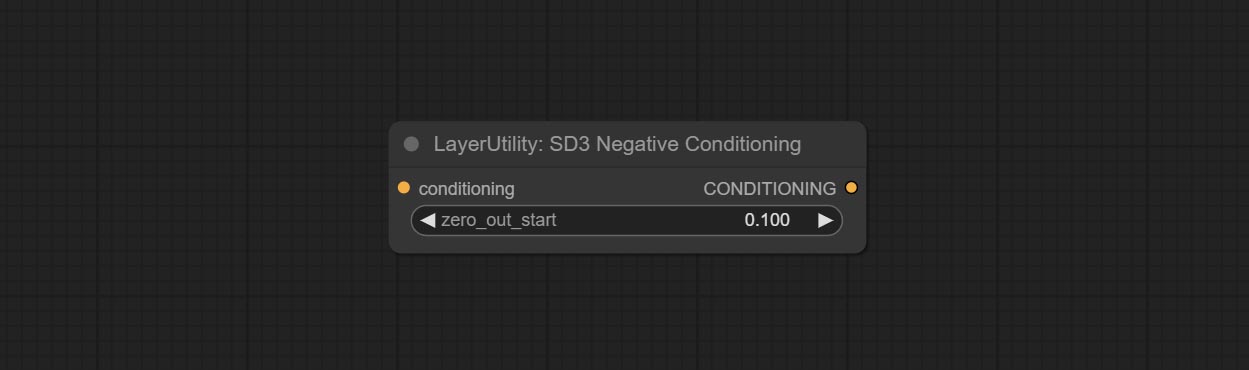
- zero_out_start: Set the ConditioningSetTimestepRange start value for Negative ConditioningZeroOut, which is the same as the ConditioningSetTimestepRange end value for Negative.
LayerMask
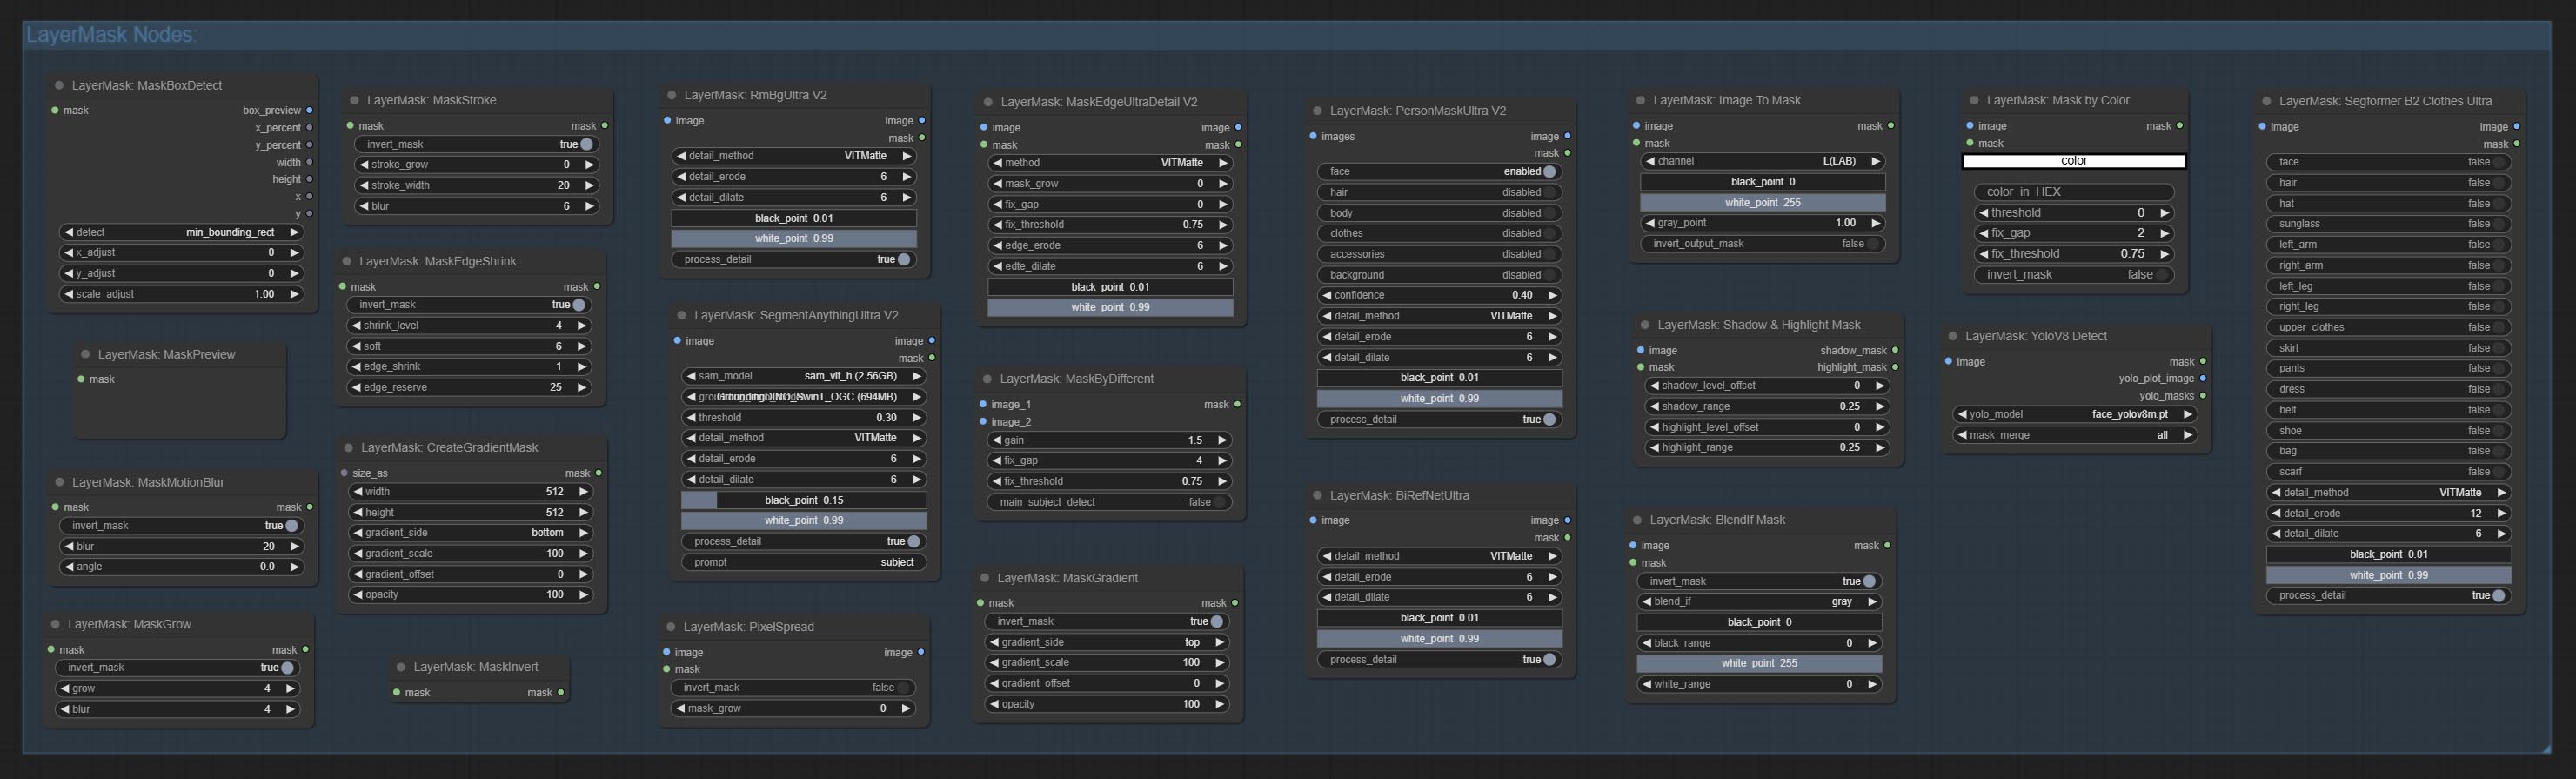
BlendIfMask
Reproduction of Photoshop's layer Style - Blend If function. This node outputs a mask for layer composition on the ImageBlend or ImageBlendAdvance nodes. mask is an optional input, and if you enter a mask here, it will act on the output.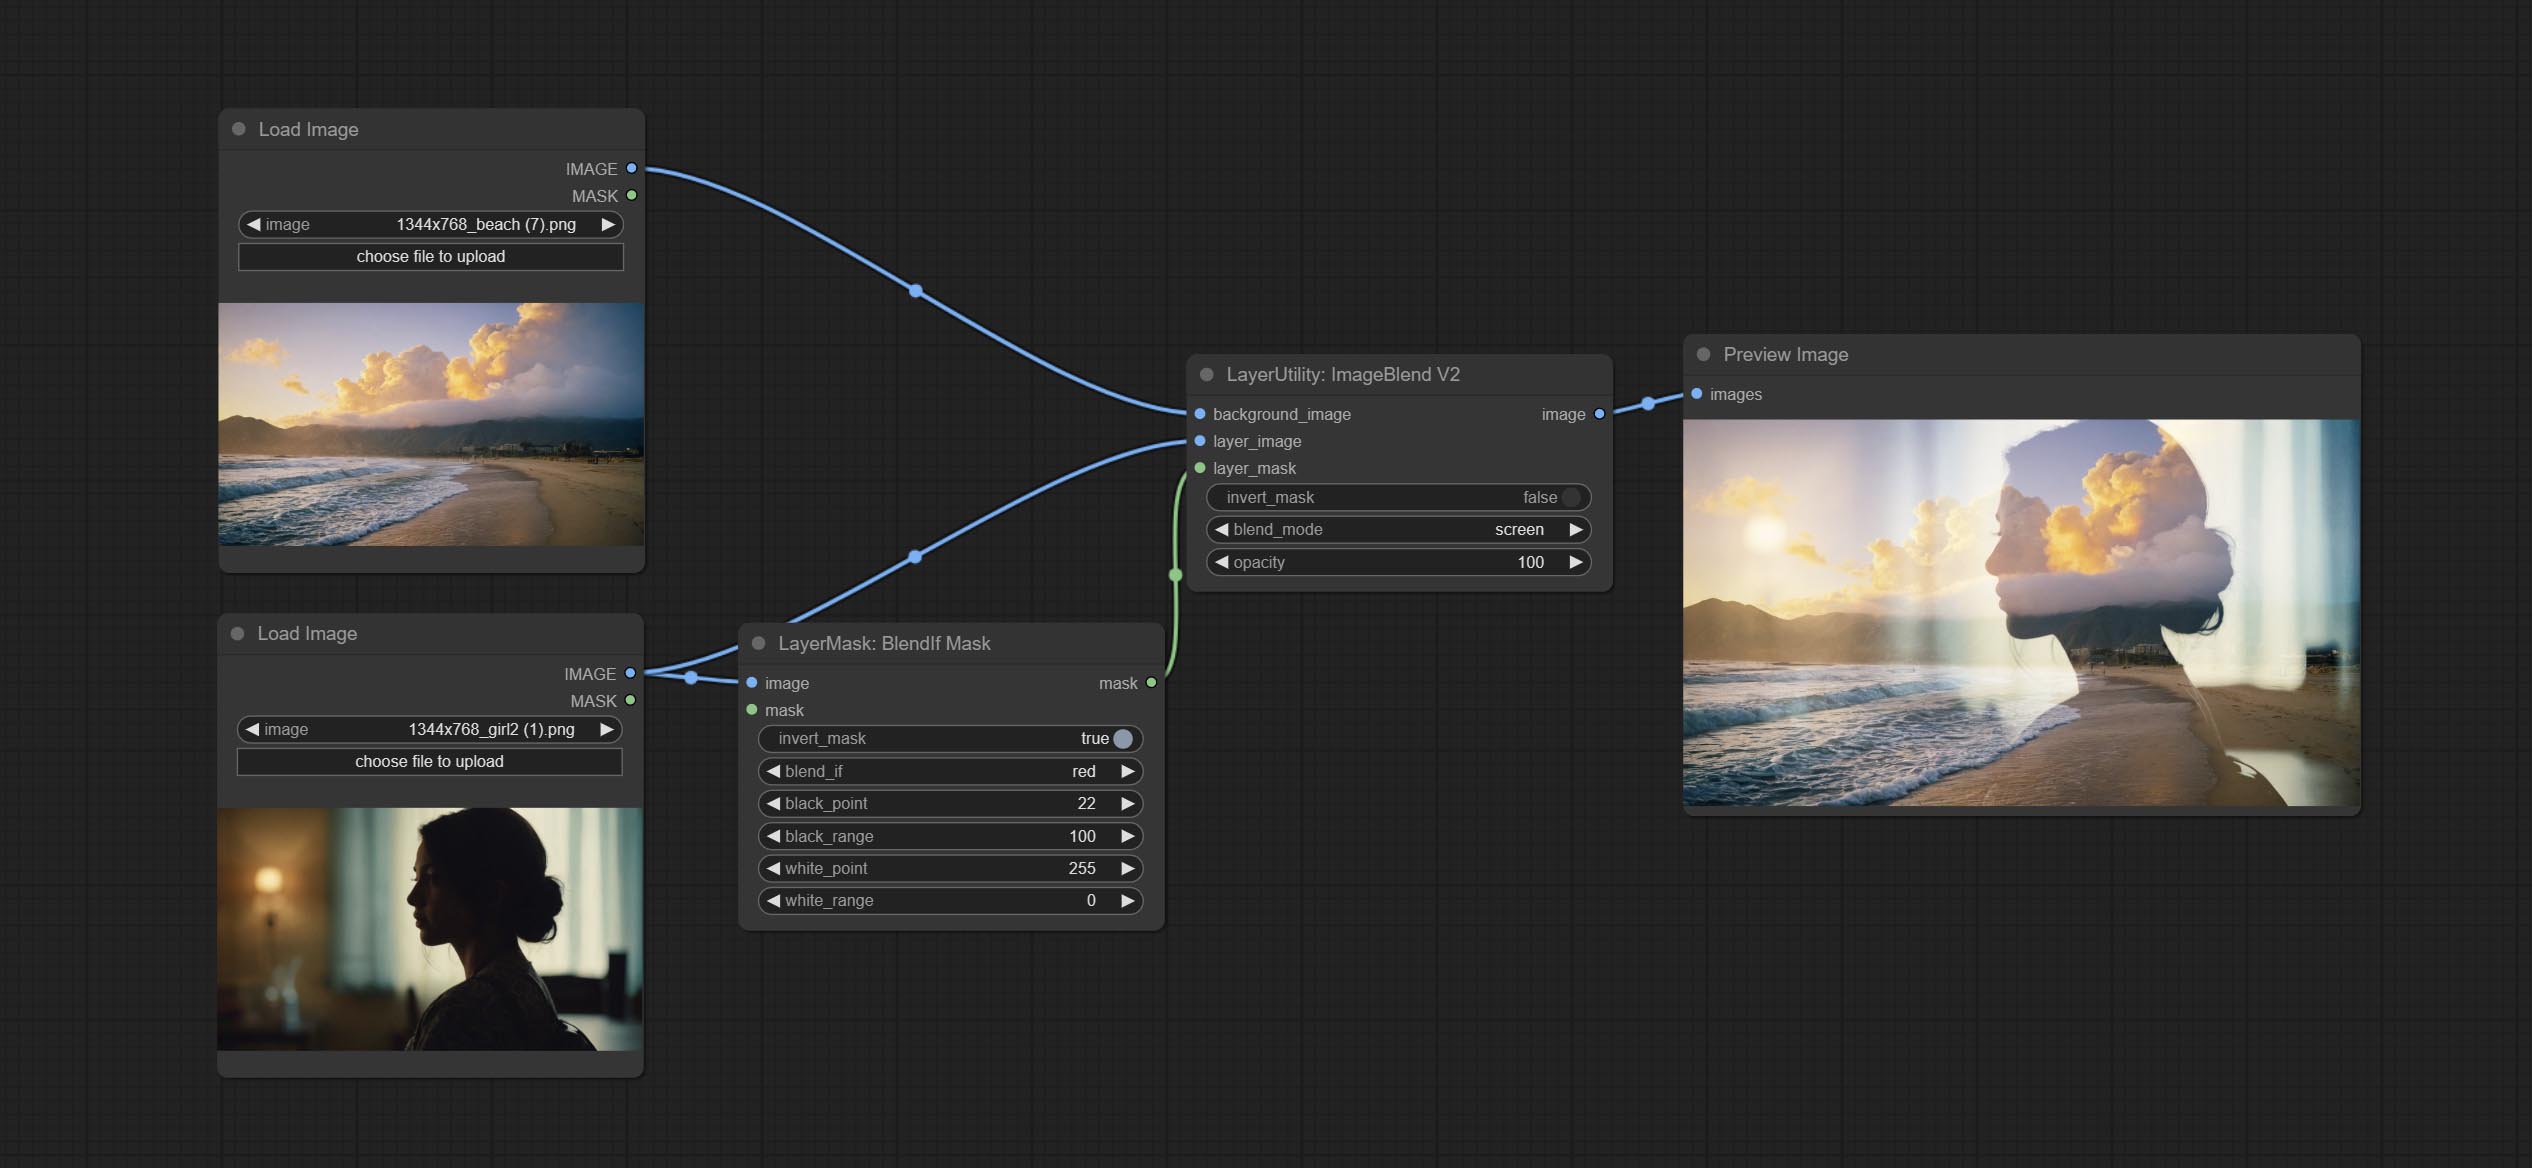
Node Options:
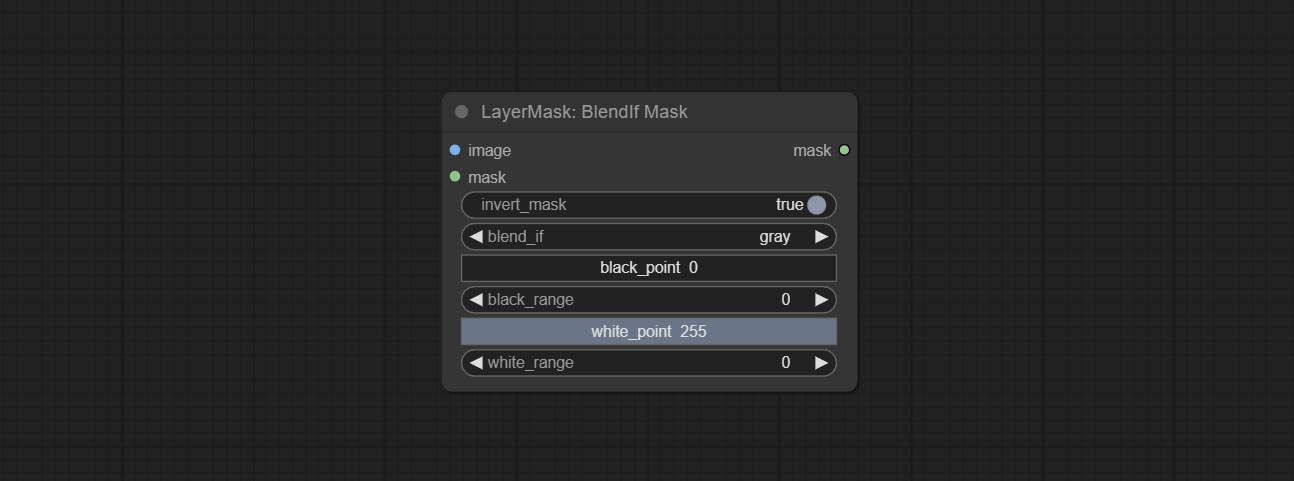
- invert_mask: Whether to reverse the mask.
- blend_if: Channel selection for Blend If. There are four options:
gray , red , green , and blue . - black_point: Black point values, ranging from 0-255.
- black_range: Dark part transition range. The larger the value, the richer the transition level of the dark part mask.
- white_point: White point values, ranging from 0-255.
- white_range: Brightness transition range. The larger the value is, the richer the transition level of the bright part mask is.
MaskBoxDetect
Detect the area where the mask is located and output its position and size.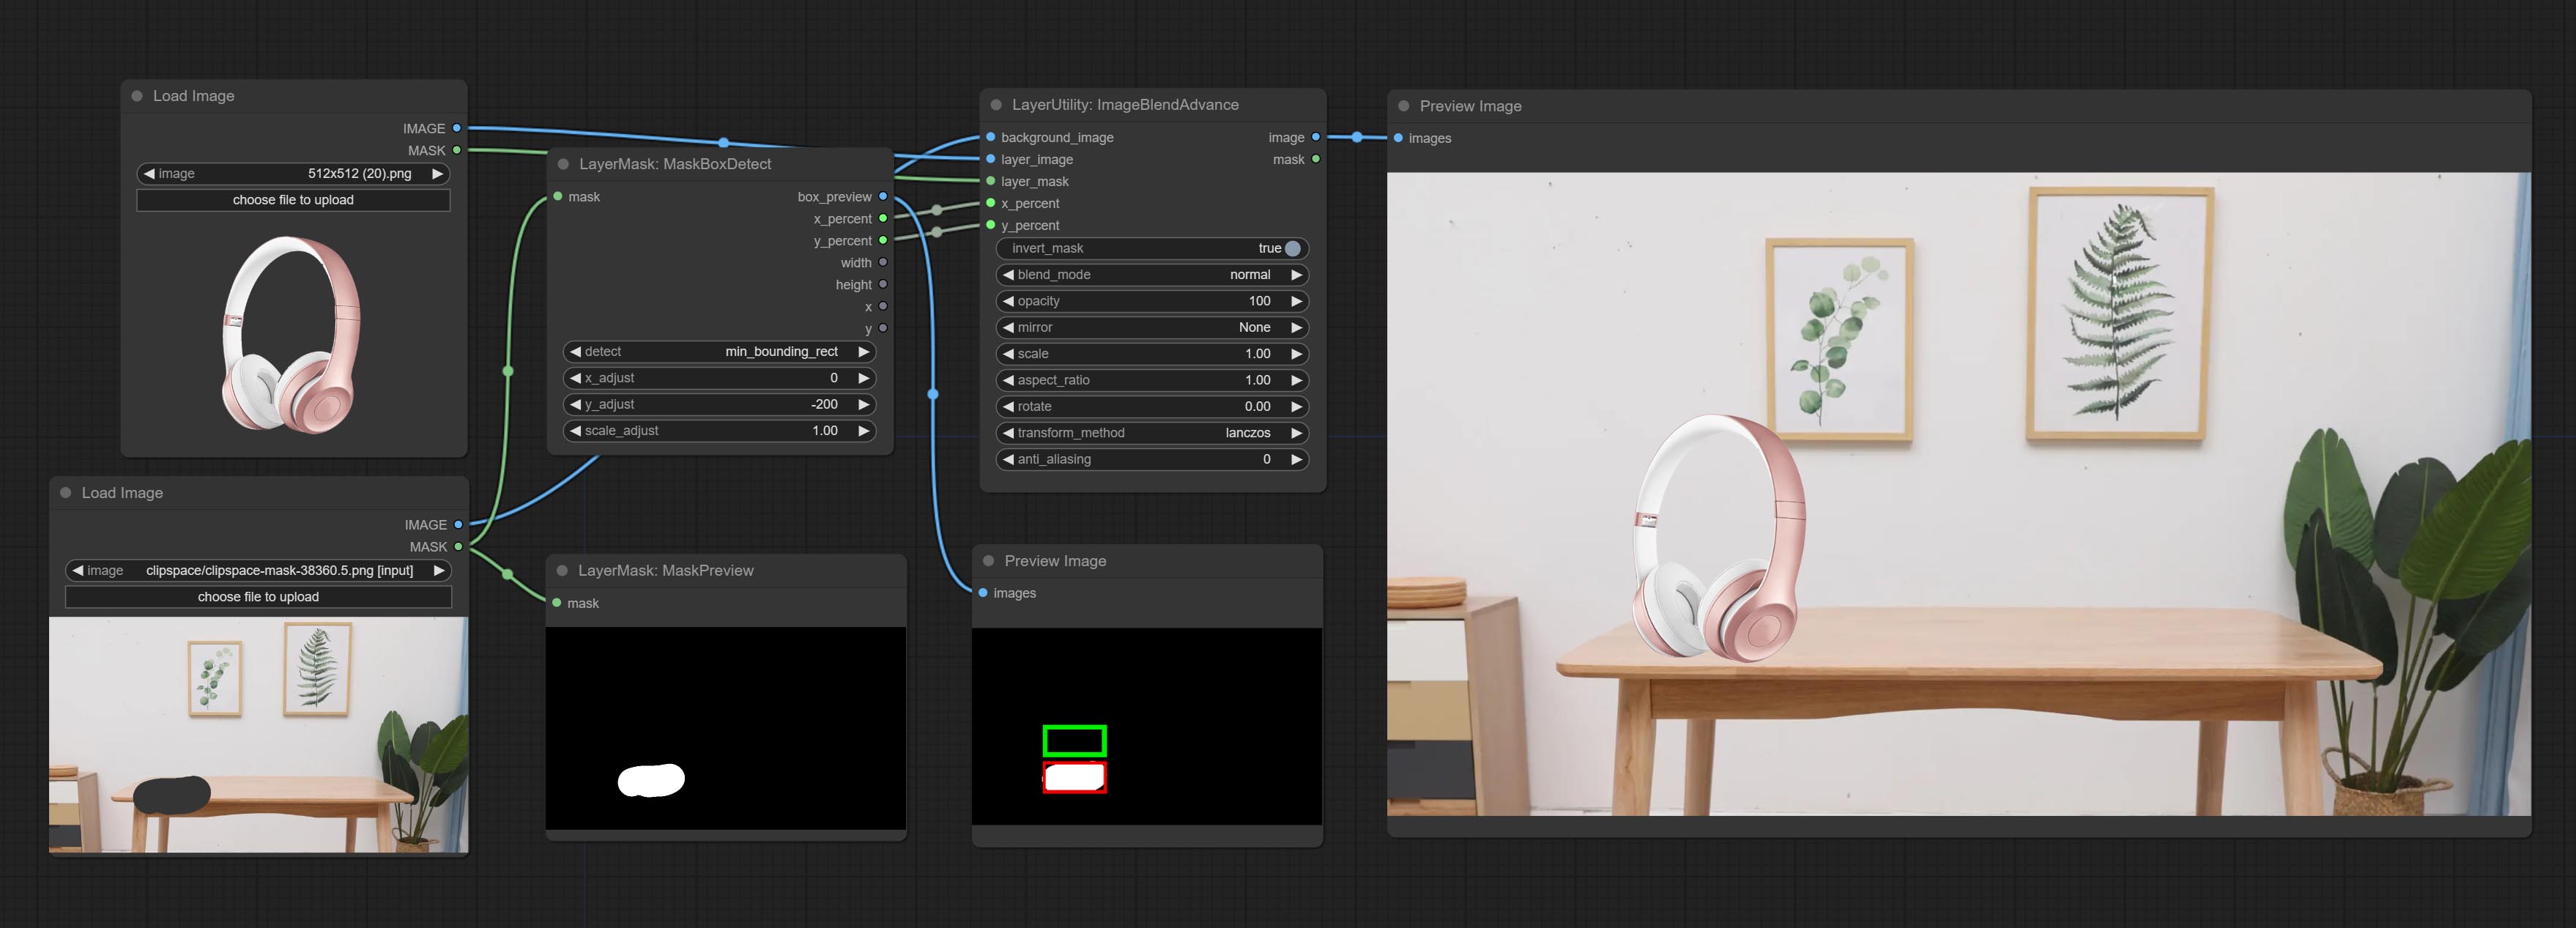
Node options:
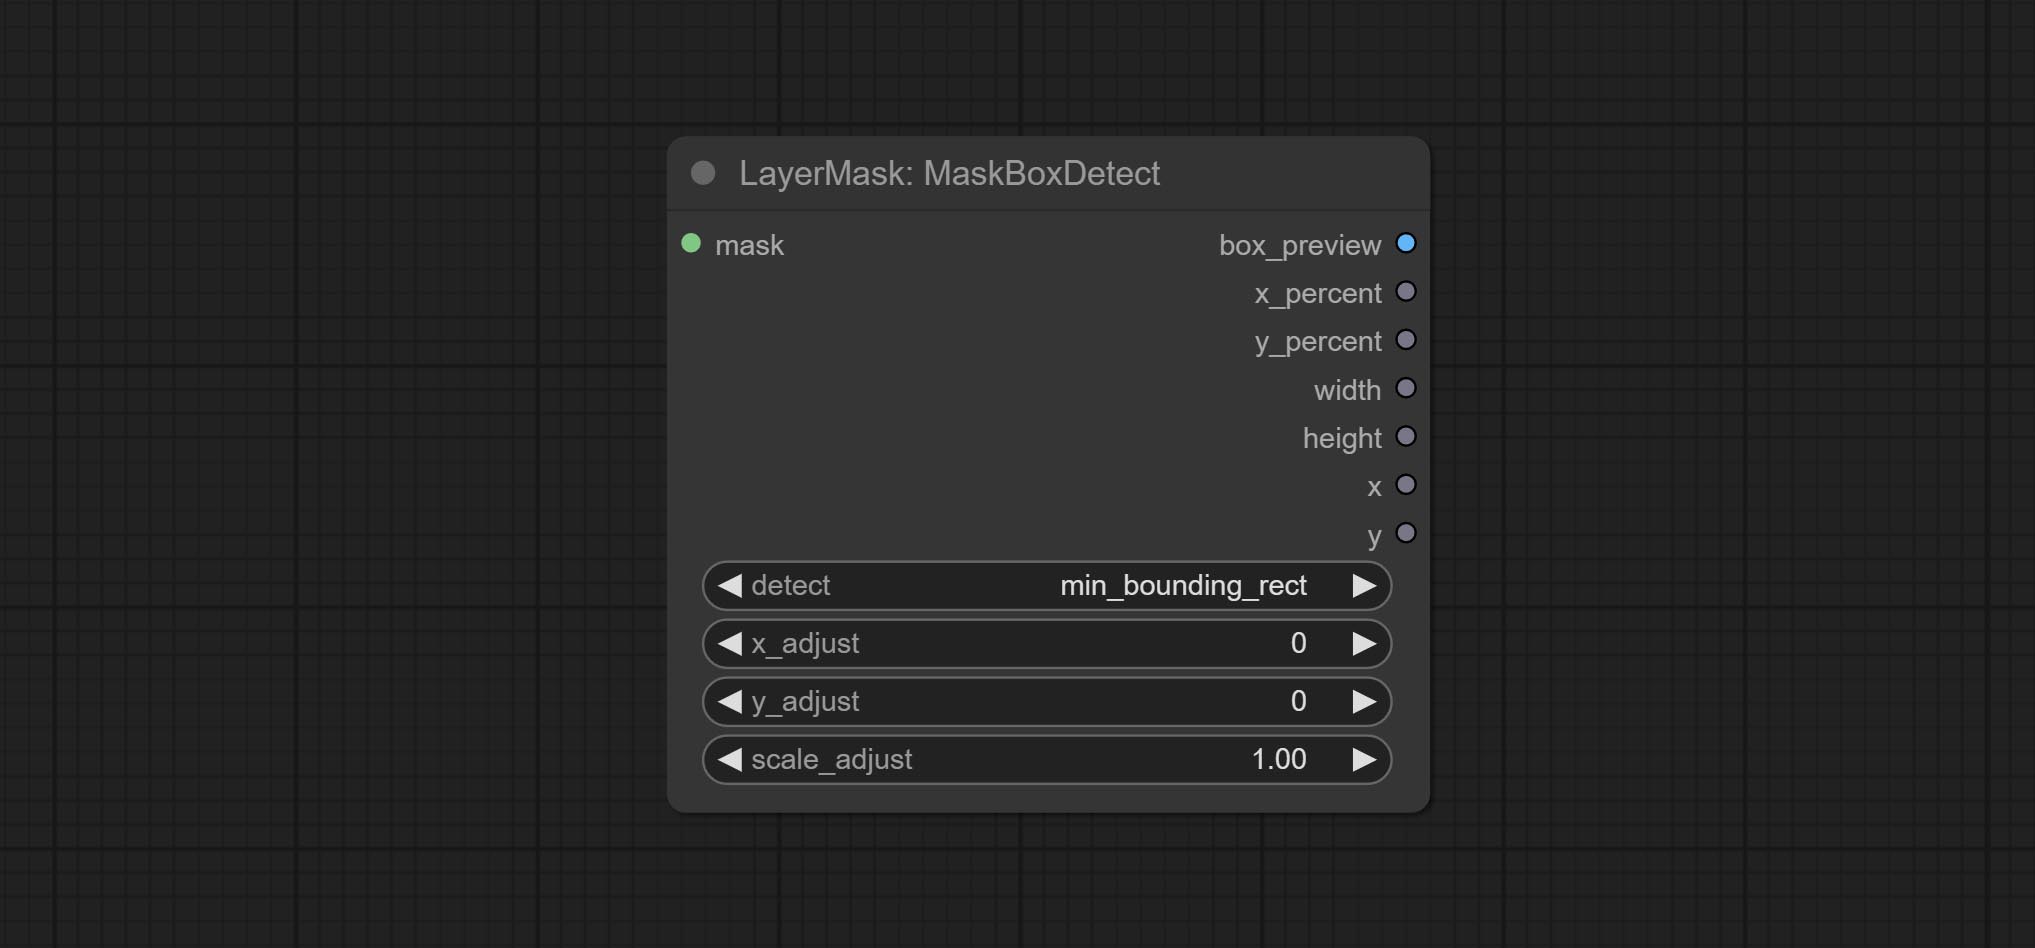
- detect: Detection method,
min_bounding_rect is the minimum bounding rectangle of block shape, max_inscribed_rect is the maximum inscribed rectangle of block shape, and mask-area is the effective area for masking pixels. - x_adjust: Adjust of horizontal deviation after detection.
- y_adjust: Adjust of vertical offset after detection.
- scale_adjust: Adjust the scaling offset after detection.
Output:
- box_preview: Preview image of detection results. Red represents the detected result, and green represents the adjust output result.
- x_percent: Horizontal position output in percentage.
- y_percent: Vertical position output in percentage.
- width: Width.
- height: Height.
- x: The x-coordinate of the top left corner position.
- y: The y-coordinate of the top left corner position.
Ultra Nodes
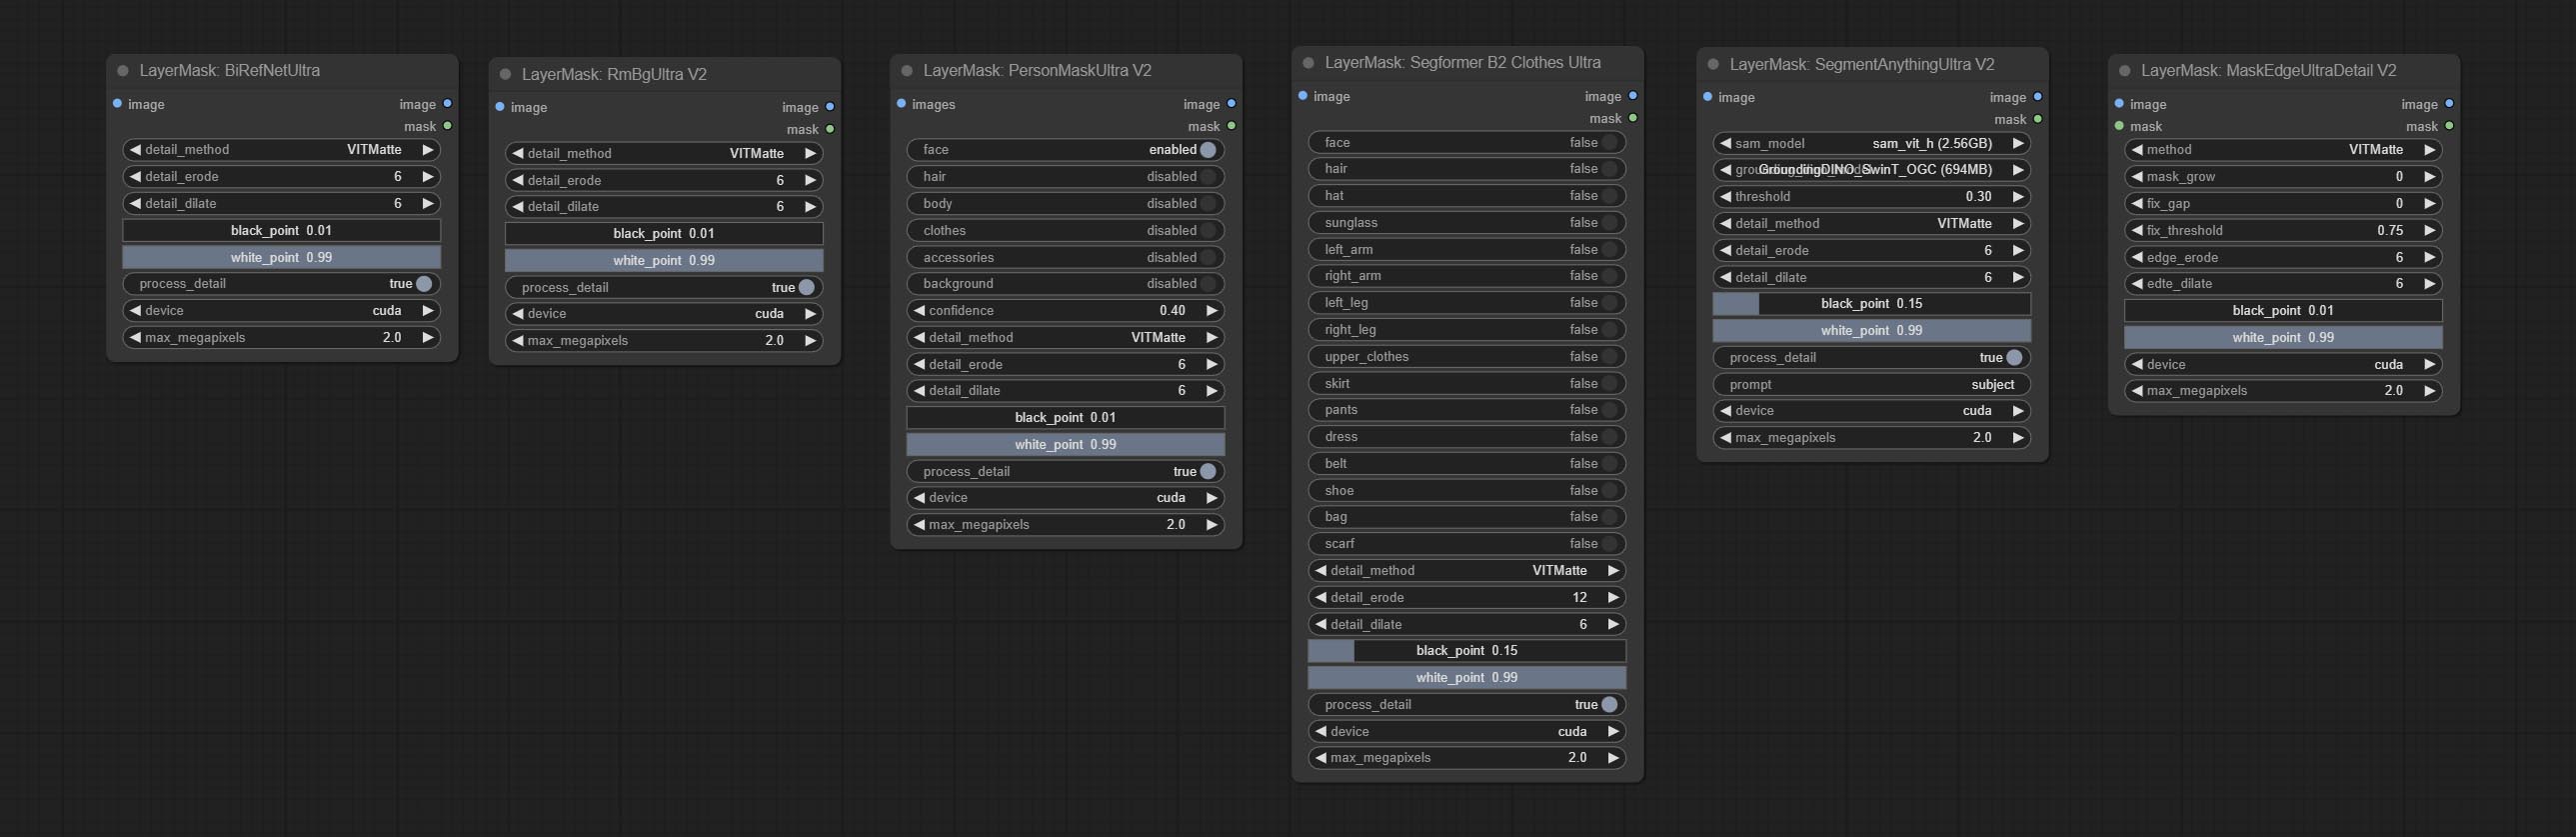
Nodes that use ultra fine edge masking processing methods, the latest version of nodes includes: SegmentAnythingUltraV2, RmBgUltraV2, BiRefNetUltra, PersonMaskUltraV2, SegformerB2ClothesUltra and MaskEdgeUltraDetailV2. There are three edge processing methods for these nodes:
-
PyMatting optimizes the edges of the mask by using a closed form matching to mask trimap. -
GuideFilter uses opencv guidedfilter to feather edges based on color similarity, and performs best when edges have strong color separation.
The code for the above two methods is from the ComfyUI-Image-Filters in spacepxl's Alpha Matte, thanks to the original author. -
VitMatte uses the transformer vit model for high-quality edge processing, preserving edge details and even generating semi transparent masks. Note: When running for the first time, you need to download the vitmate model file and wait for the automatic download to complete. If the download cannot be completed, you can run the command huggingface-cli download hustvl/vitmatte-small-composition-1k to manually download. After successfully downloading the model, you can use VITMatte(local) without accessing the network. - VitMatte's options:
device set whether to use CUDA for vitimate operations, which is about 5 times faster than CPU. max_megapixels set the maximum image size for vitmate operation, and oversized images will be reduced in size. For 16G VRAM, it is recommended to set it to 3.
*Download all model files from BaiduNetdisk or Huggingface to ComfyUI/models/vitmatte folder.
The following figure is an example of the difference in output between three methods.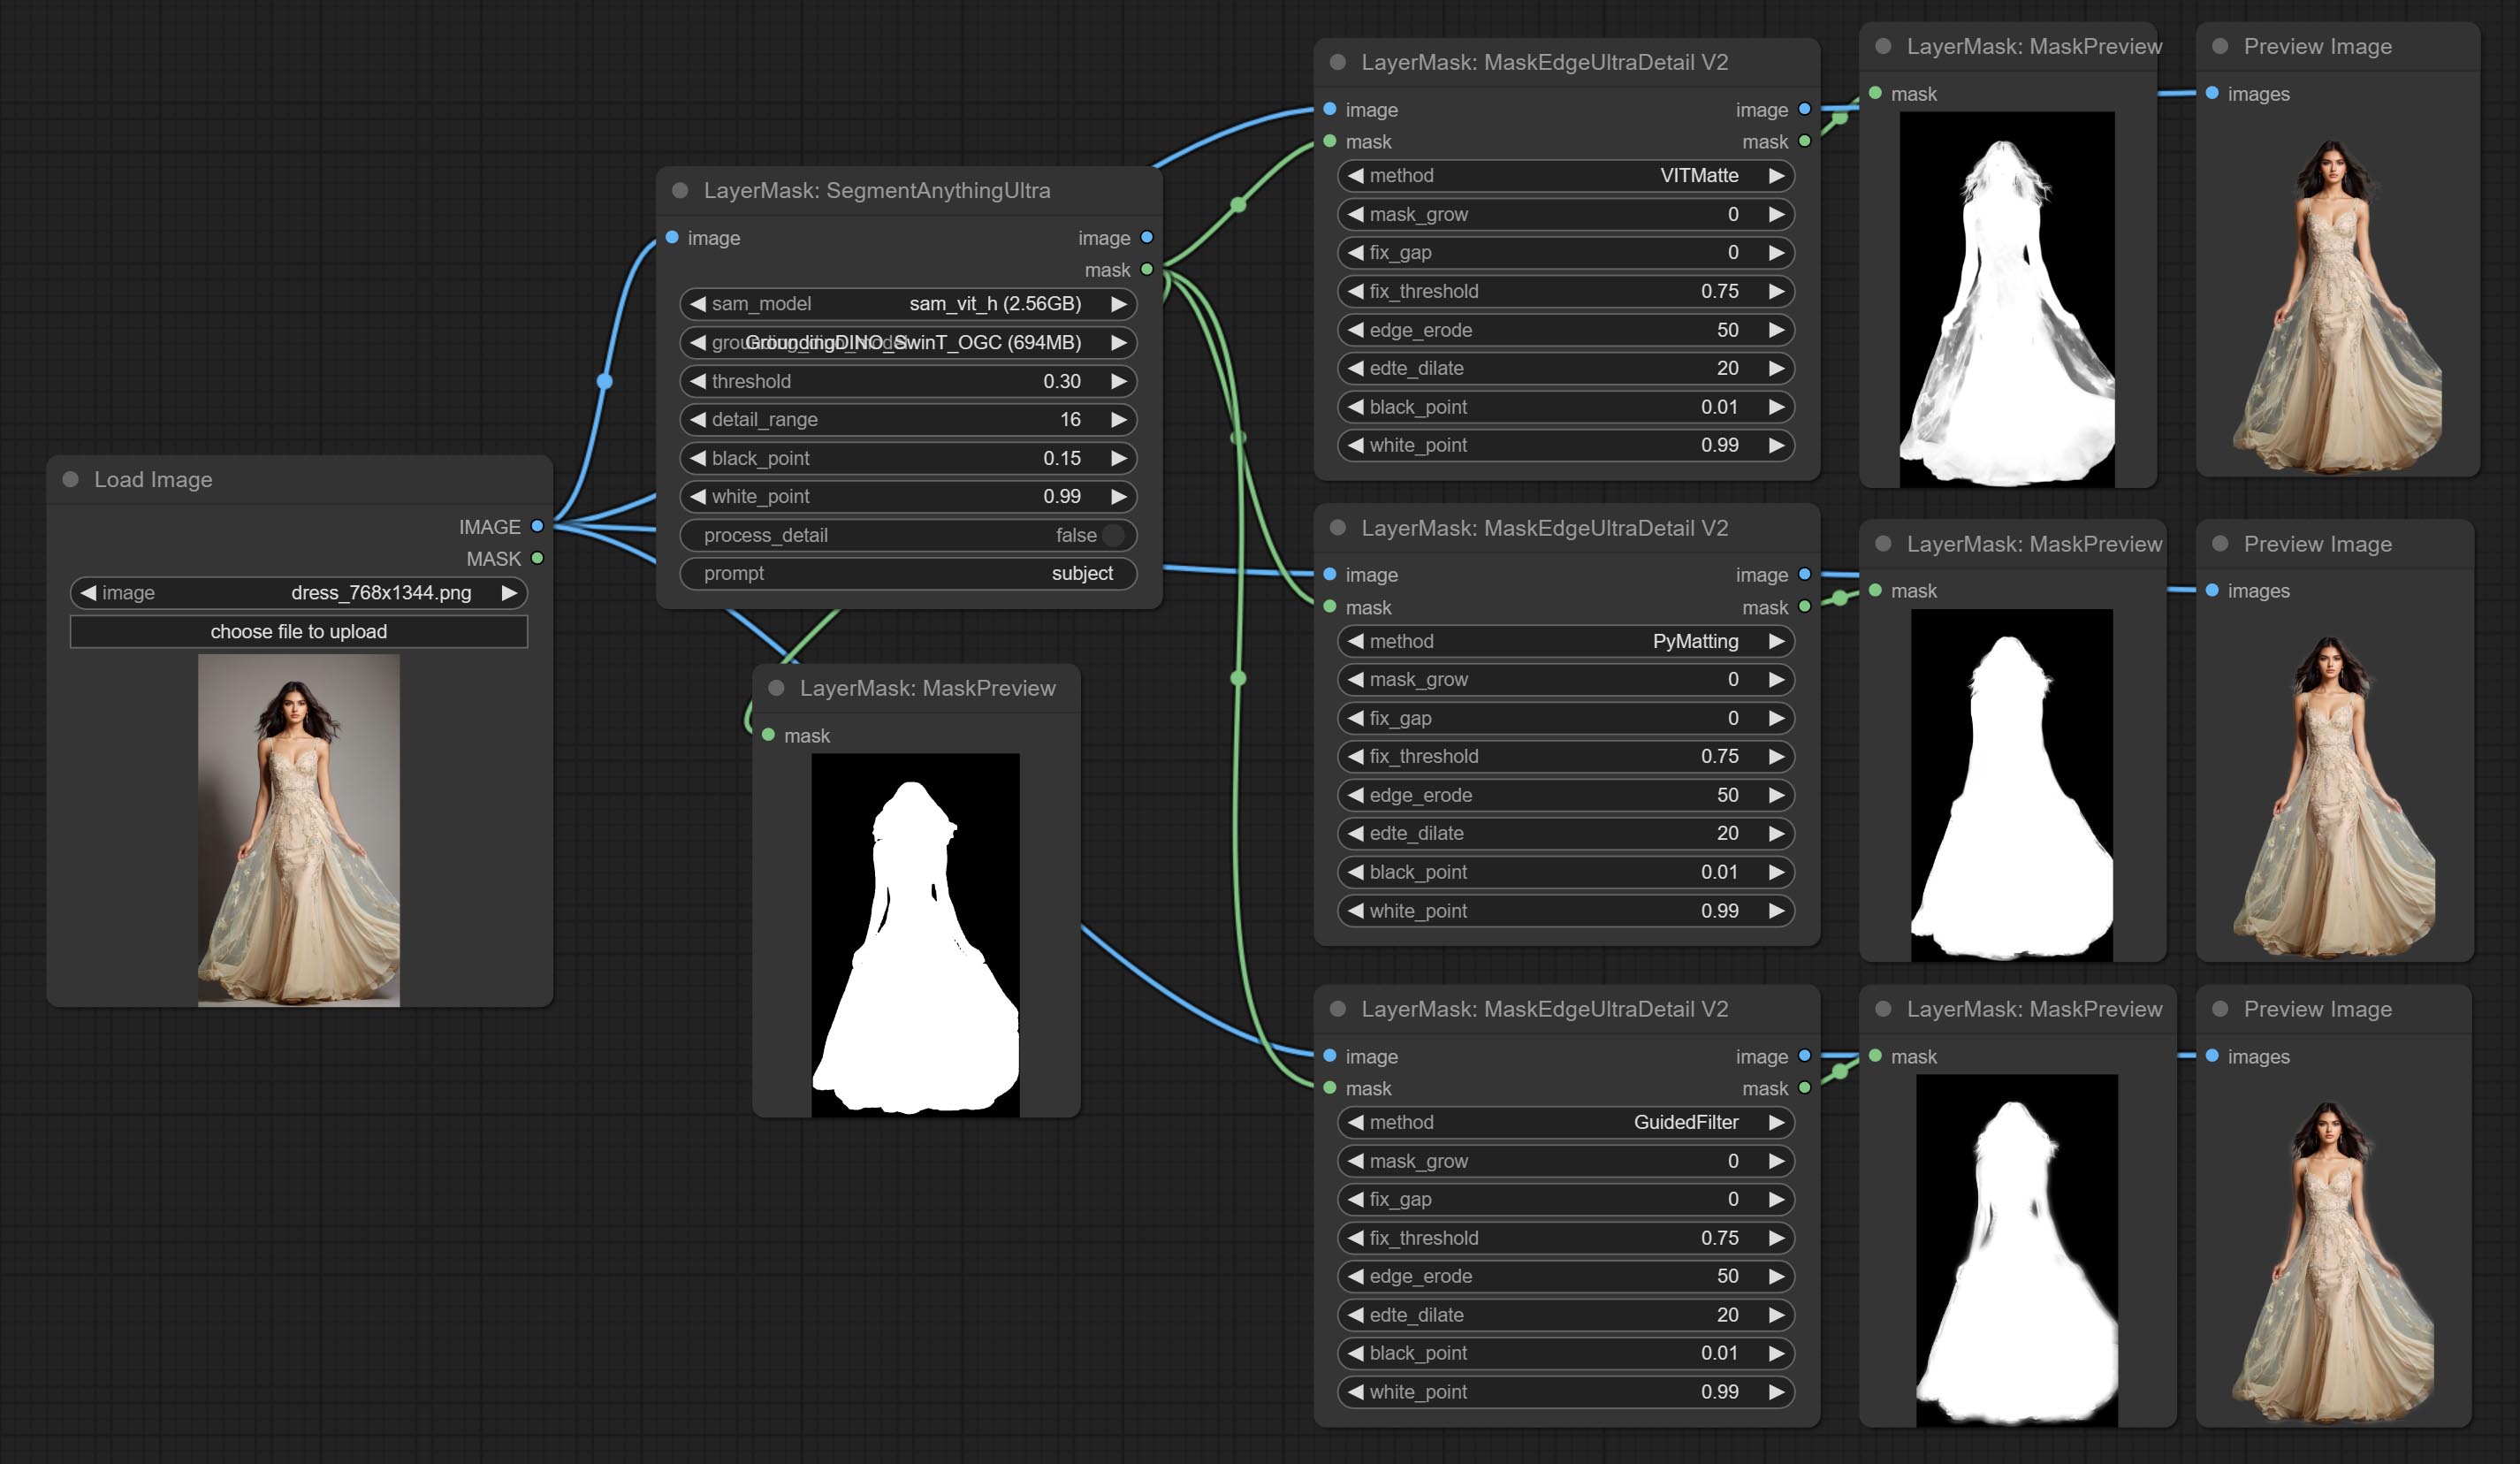
SegmentAnythingUltra
Improvements to ComfyUI Segment Anything, thanks to the original author.
*Please refer to the installation of ComfyUI Segment Anything to install the model. If ComfyUI Segment Anything has been correctly installed, you can skip this step.
- From here download the config.json,model.safetensors,tokenizer_config.json,tokenizer.json and vocab.txt 5 files to
ComfyUI/models/bert-base-uncased folder. - Download GroundingDINO_SwinT_OGC config file, GroundingDINO_SwinT_OGC model, GroundingDINO_SwinB config file, GroundingDINO_SwinB model to
ComfyUI/models/grounding-dino folder. - Download sam_vit_h,sam_vit_l, sam_vit_b, sam_hq_vit_h, sam_hq_vit_l, sam_hq_vit_b, mobile_sam to
ComfyUI/models/sams folder. *Or download them from GroundingDino models on BaiduNetdisk and SAM models on BaiduNetdisk .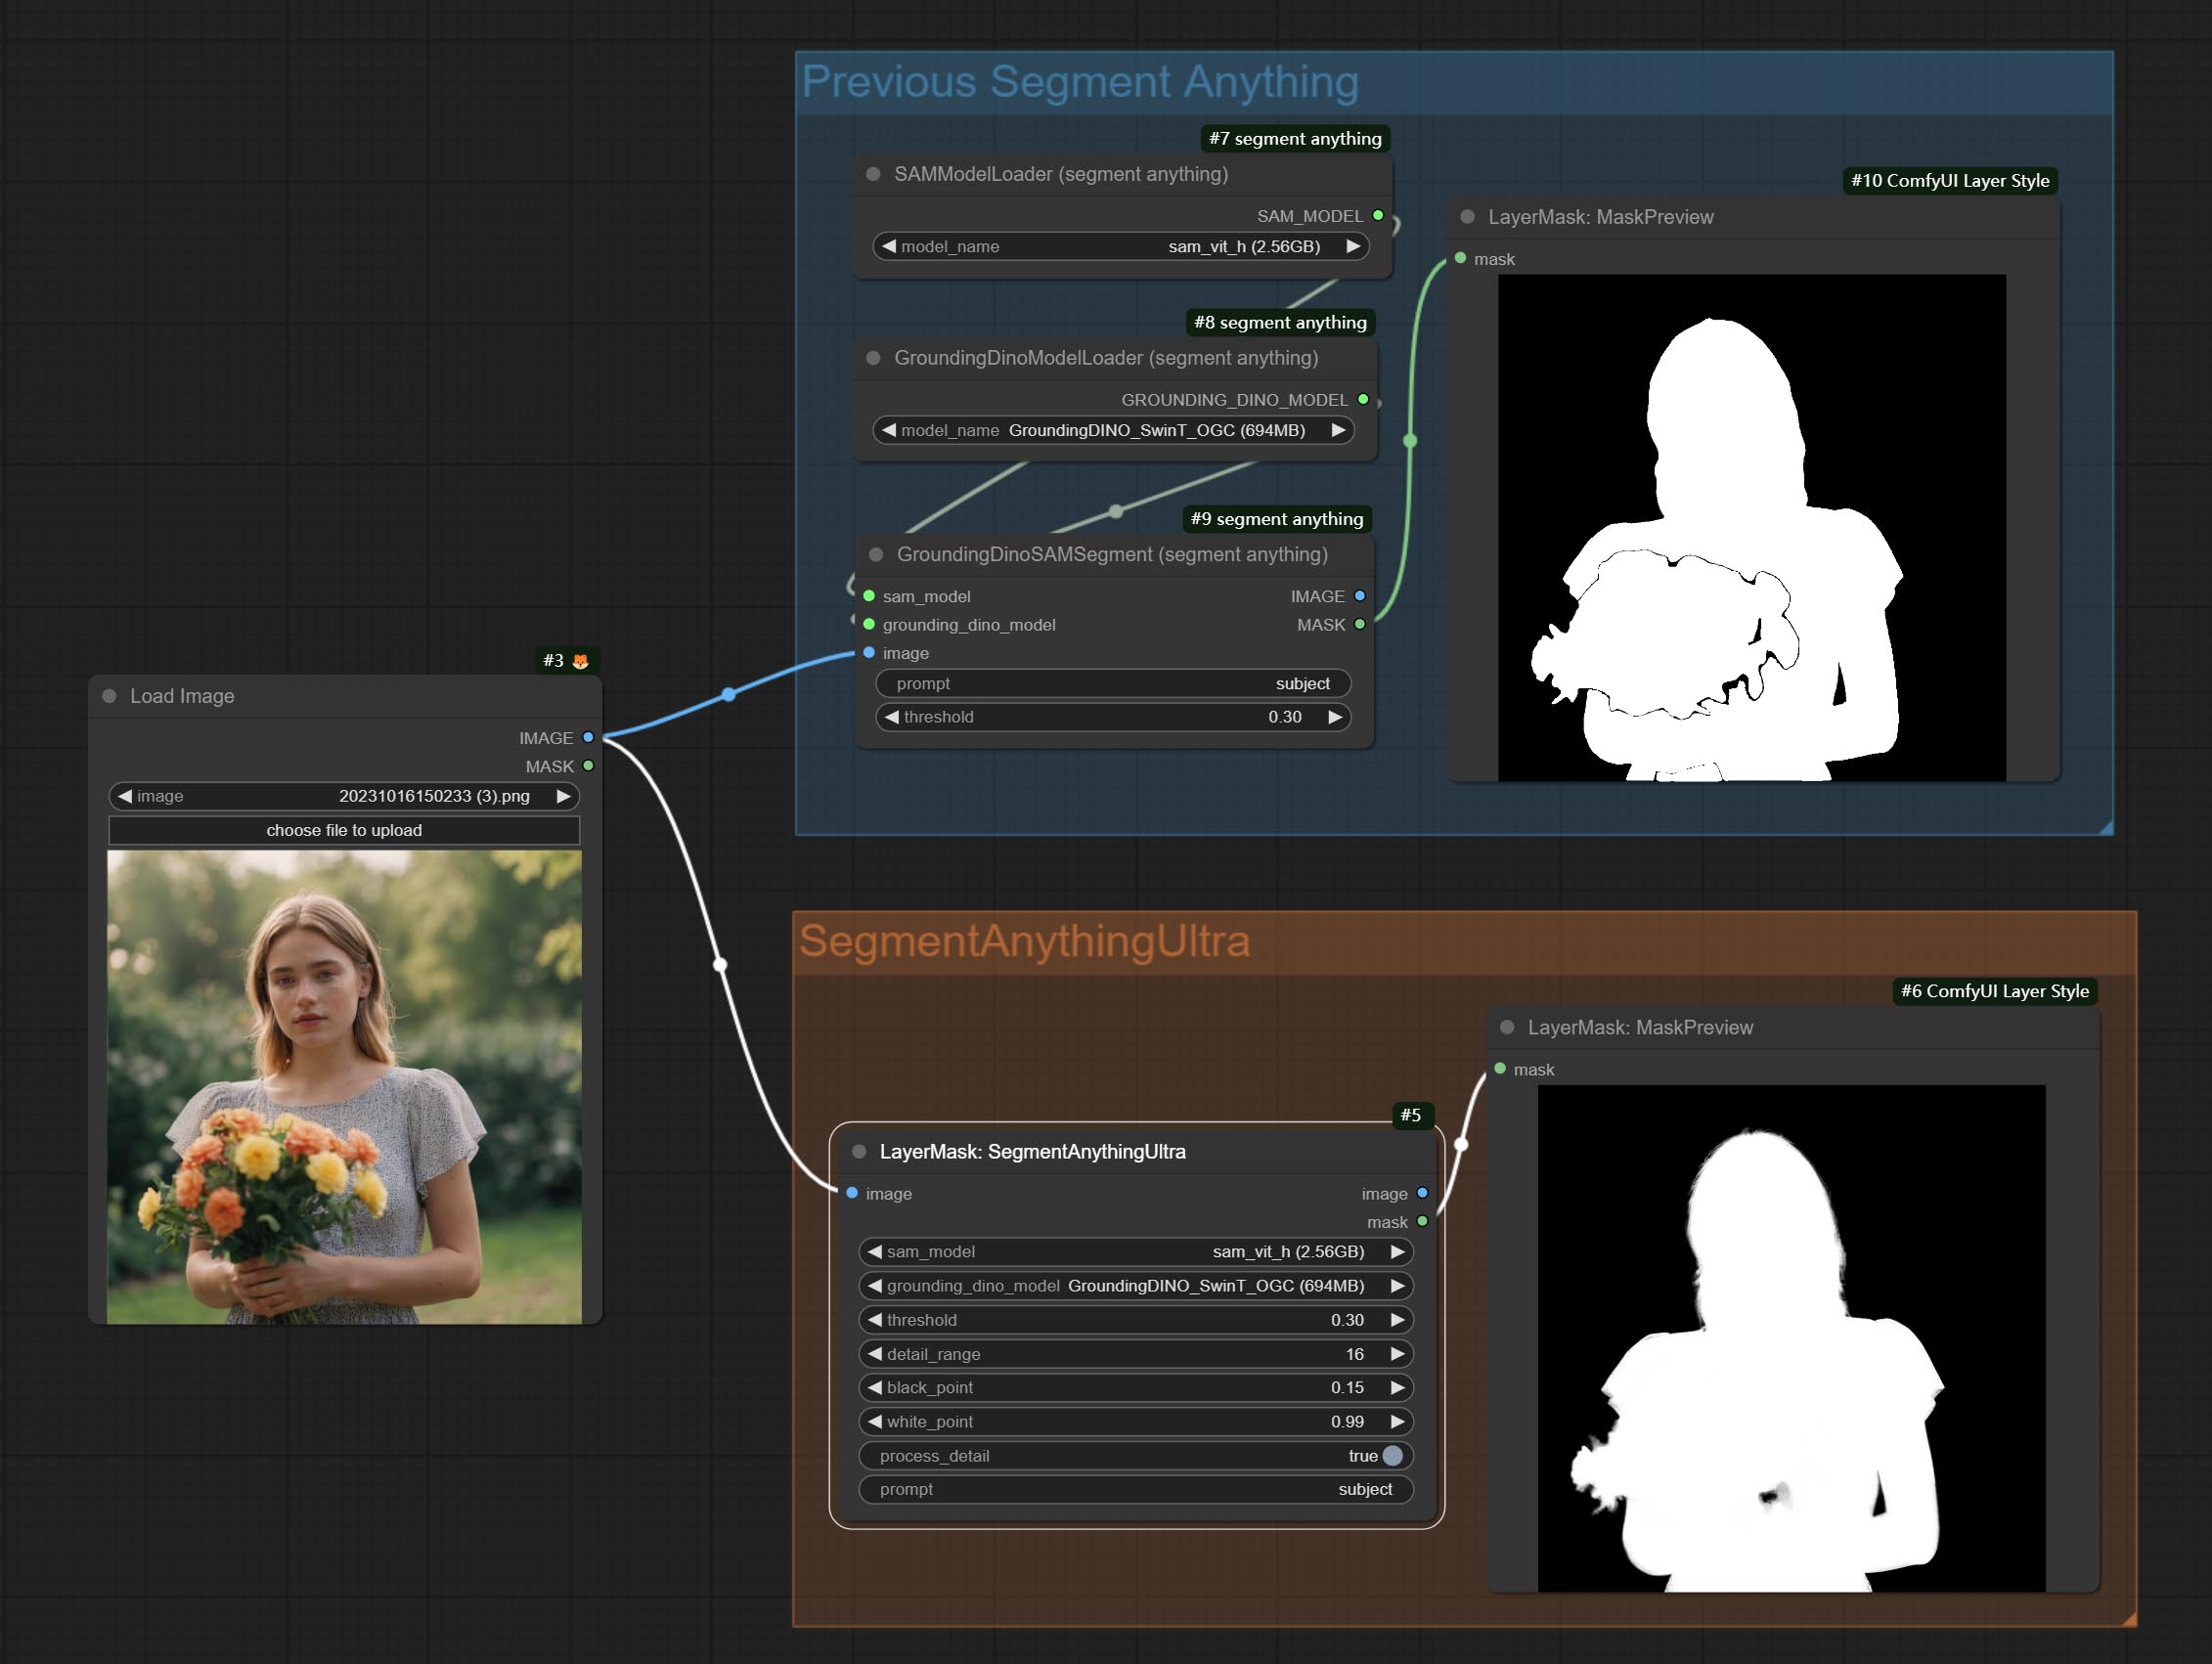
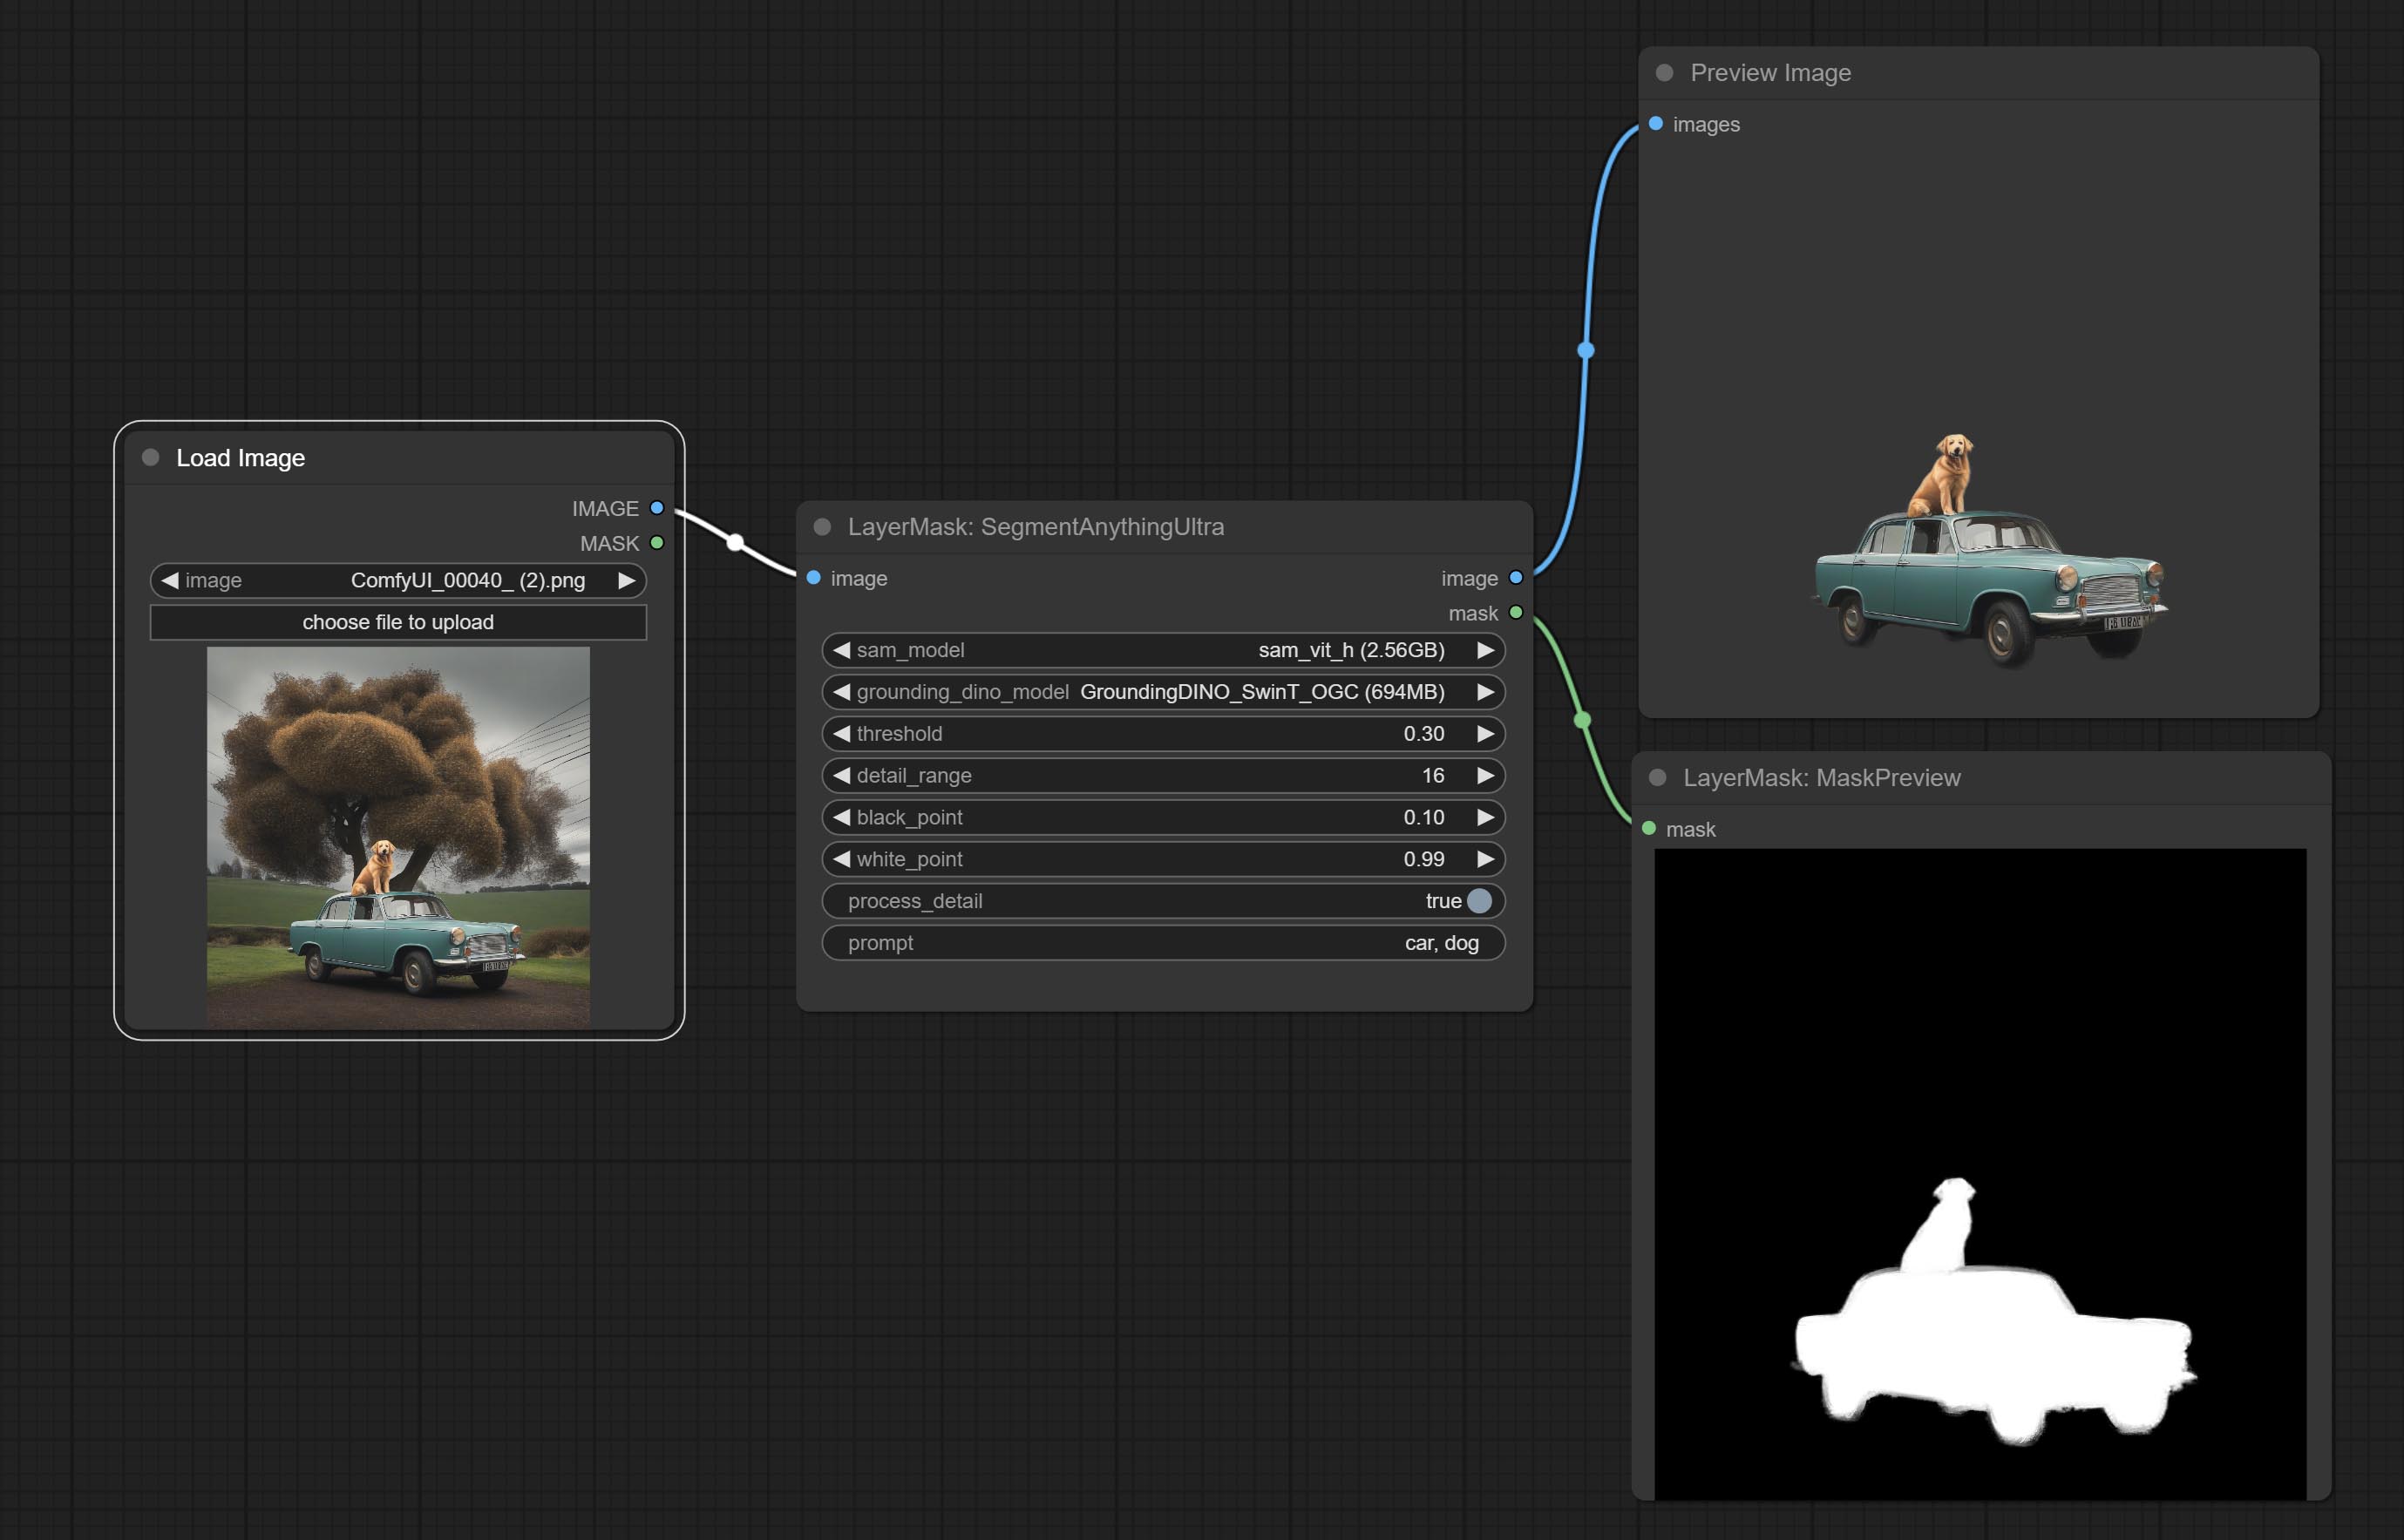
Node options:

- sam_model: Select the SAM model.
- ground_dino_model: Select the Grounding DINO model.
- threshold: The threshold of SAM.
- detail_range: Edge detail range.
- black_point: Edge black sampling threshold.
- white_point: Edge white sampling threshold.
- process_detail: Set to false here will skip edge processing to save runtime.
- prompt: Input for SAM's prompt.
- cache_model: Set whether to cache the model.
SegmentAnythingUltraV2
The V2 upgraded version of SegmentAnythingUltra has added the VITMatte edge processing method.(Note: Images larger than 2K in size using this method will consume huge memory)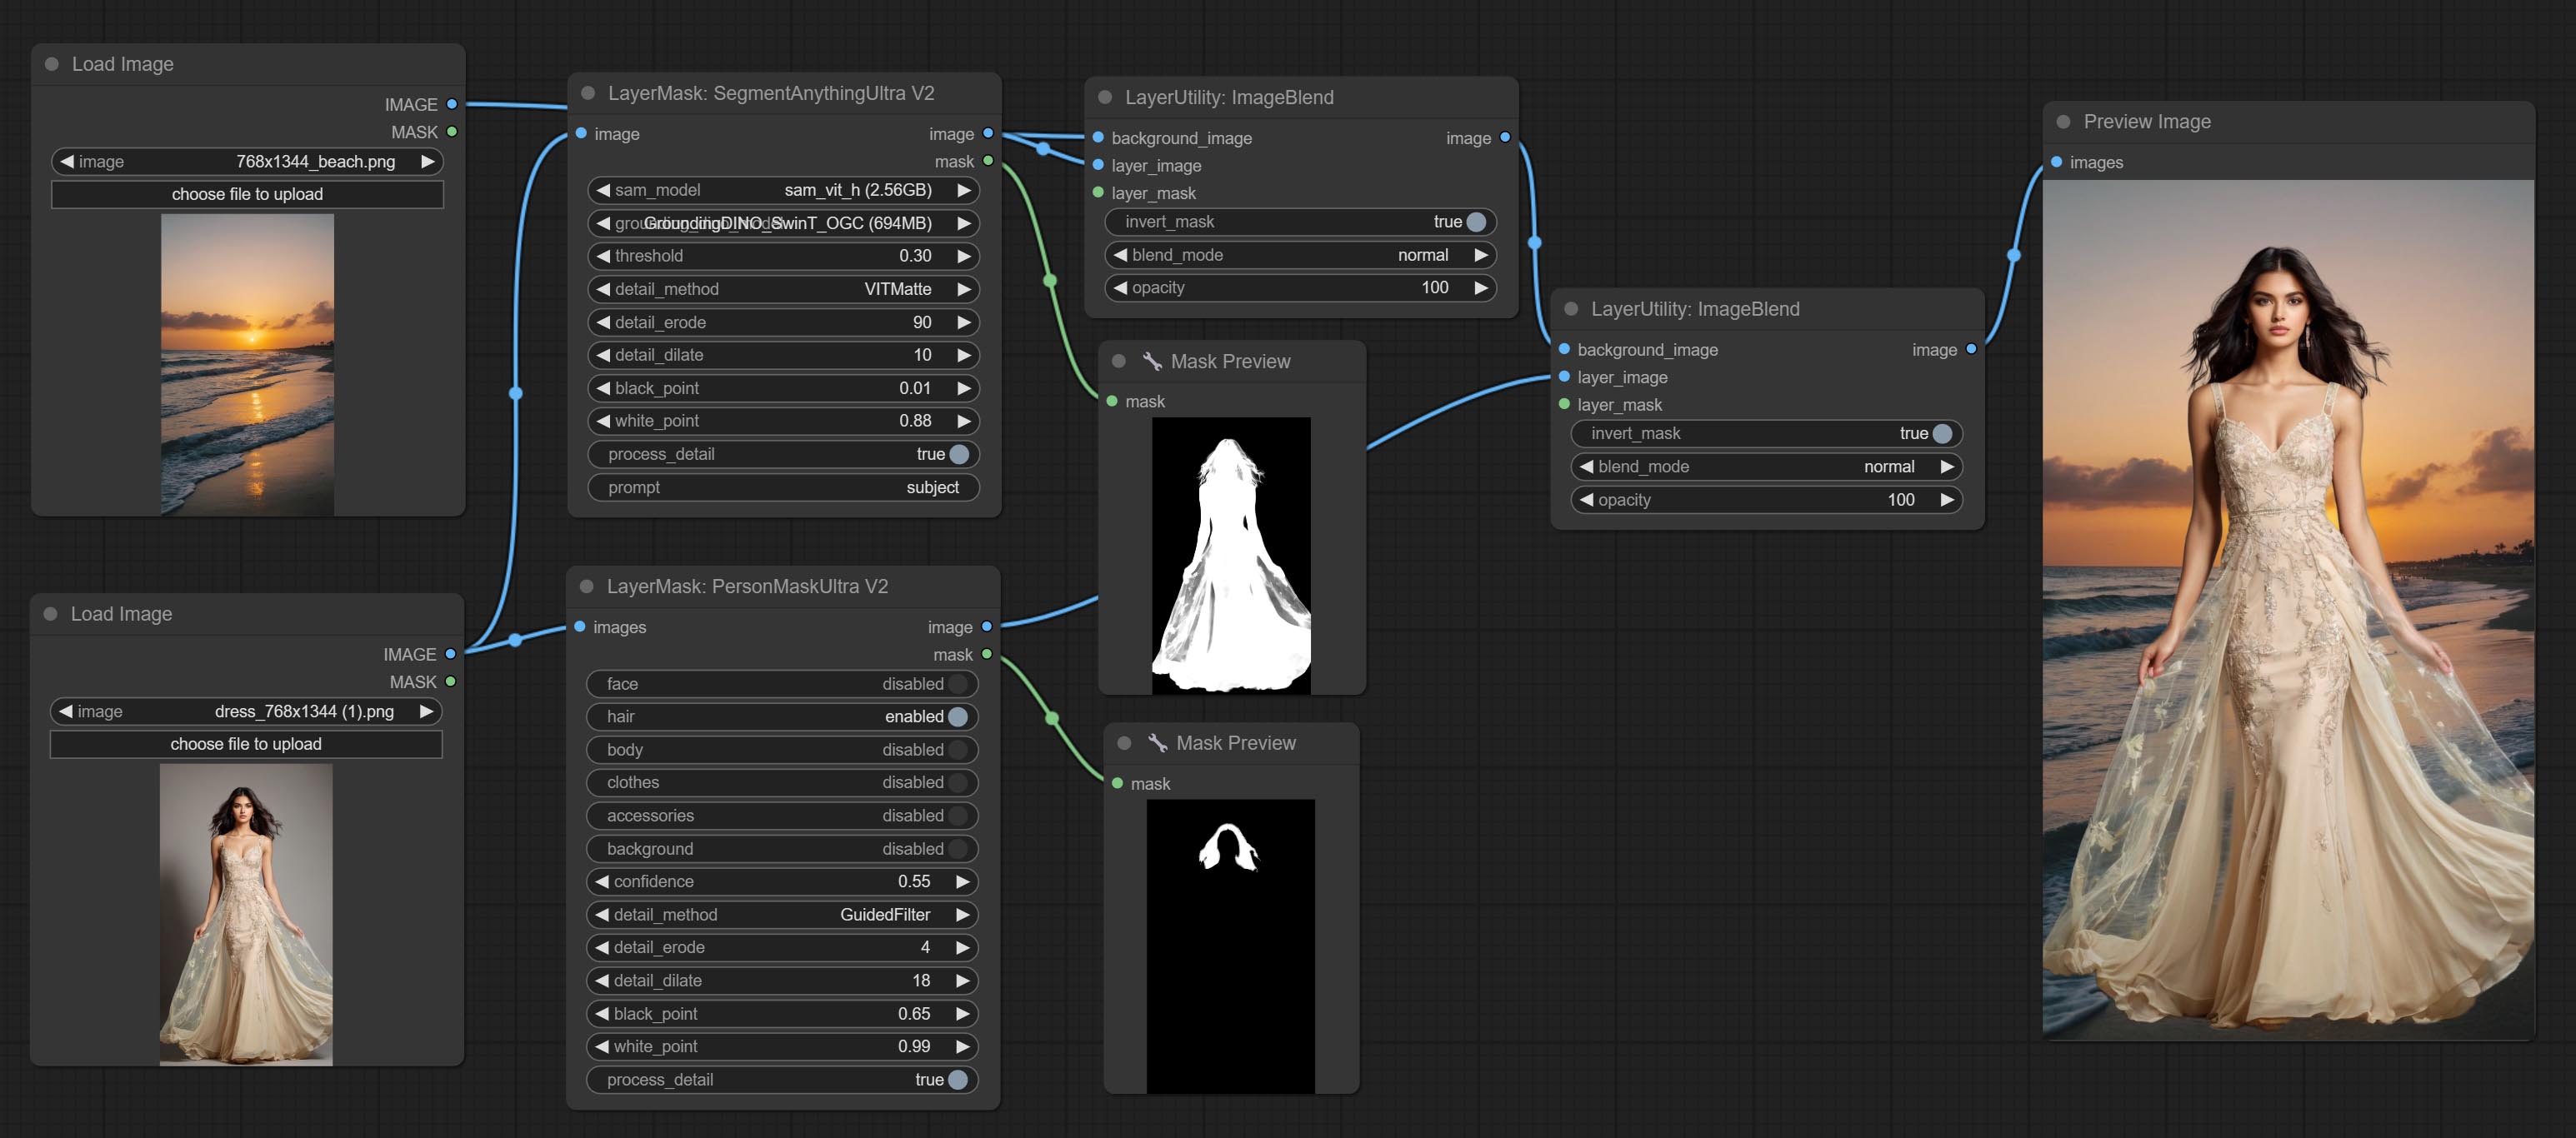
On the basis of SegmentAnythingUltra, the following changes have been made: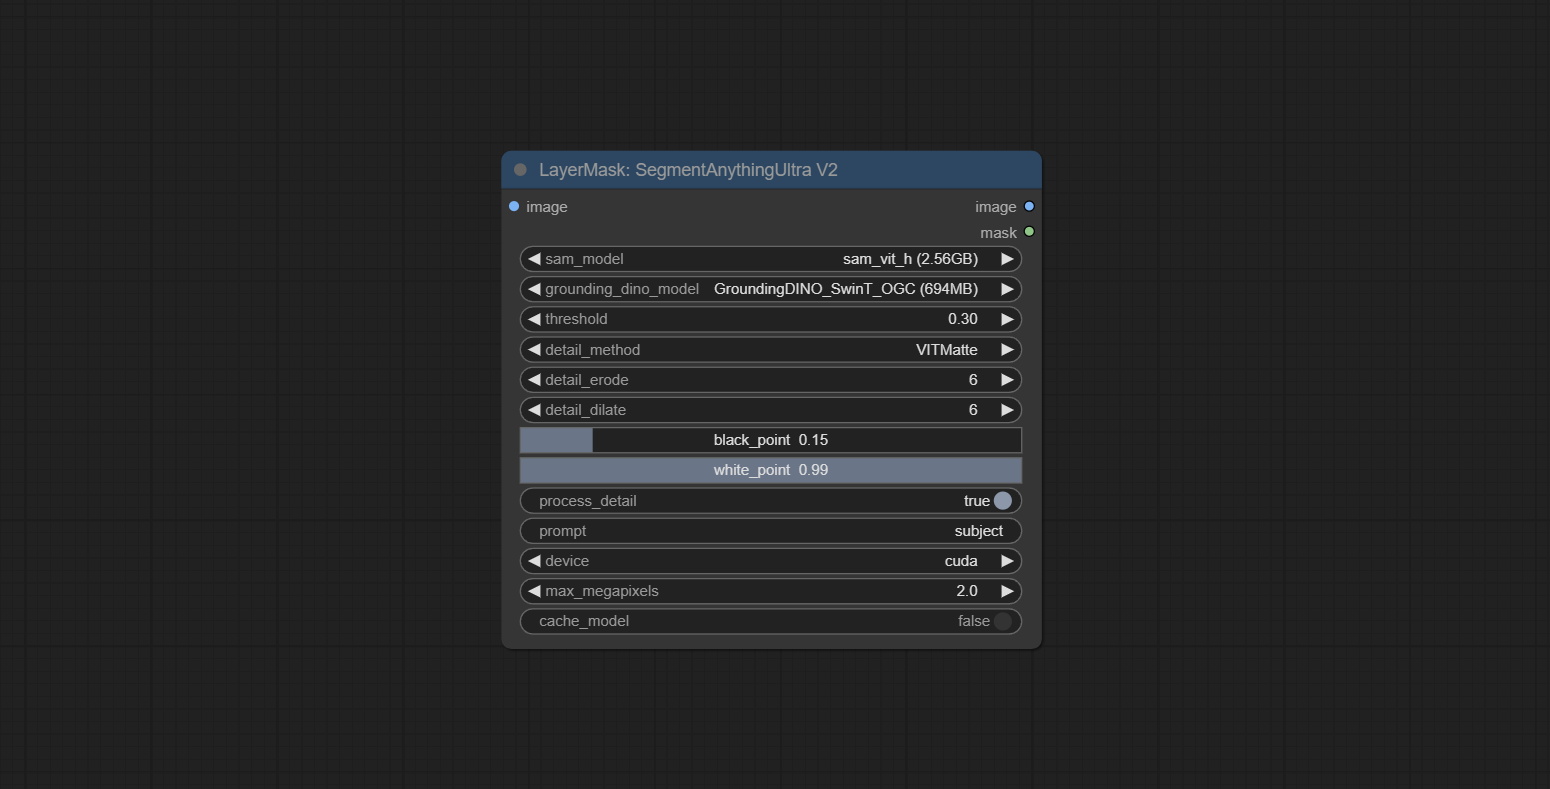
- detail_method: Edge processing methods. provides VITMatte, VITMatte(local), PyMatting, GuidedFilter. If the model has been downloaded after the first use of VITMatte, you can use VITMatte (local) afterwards.
- detail_erode: Mask the erosion range inward from the edge. the larger the value, the larger the range of inward repair.
- detail_dilate: The edge of the mask expands outward. the larger the value, the wider the range of outward repair.
- device: Set whether the VitMatte to use cuda.
- max_megapixels: Set the maximum size for VitMate operations.
SAM2Ultra
This node is modified from kijai/ComfyUI-segment-anything-2. Thank to kijai for making significant contributions to the Comfyui community.
SAM2 Ultra node only support single image. If you need to process multiple images, please first convert the image batch to image list.
*Download models from BaiduNetdisk or huggingface.co/Kijai/sam2-safetensors and copy to ComfyUI/models/sam2 folder.
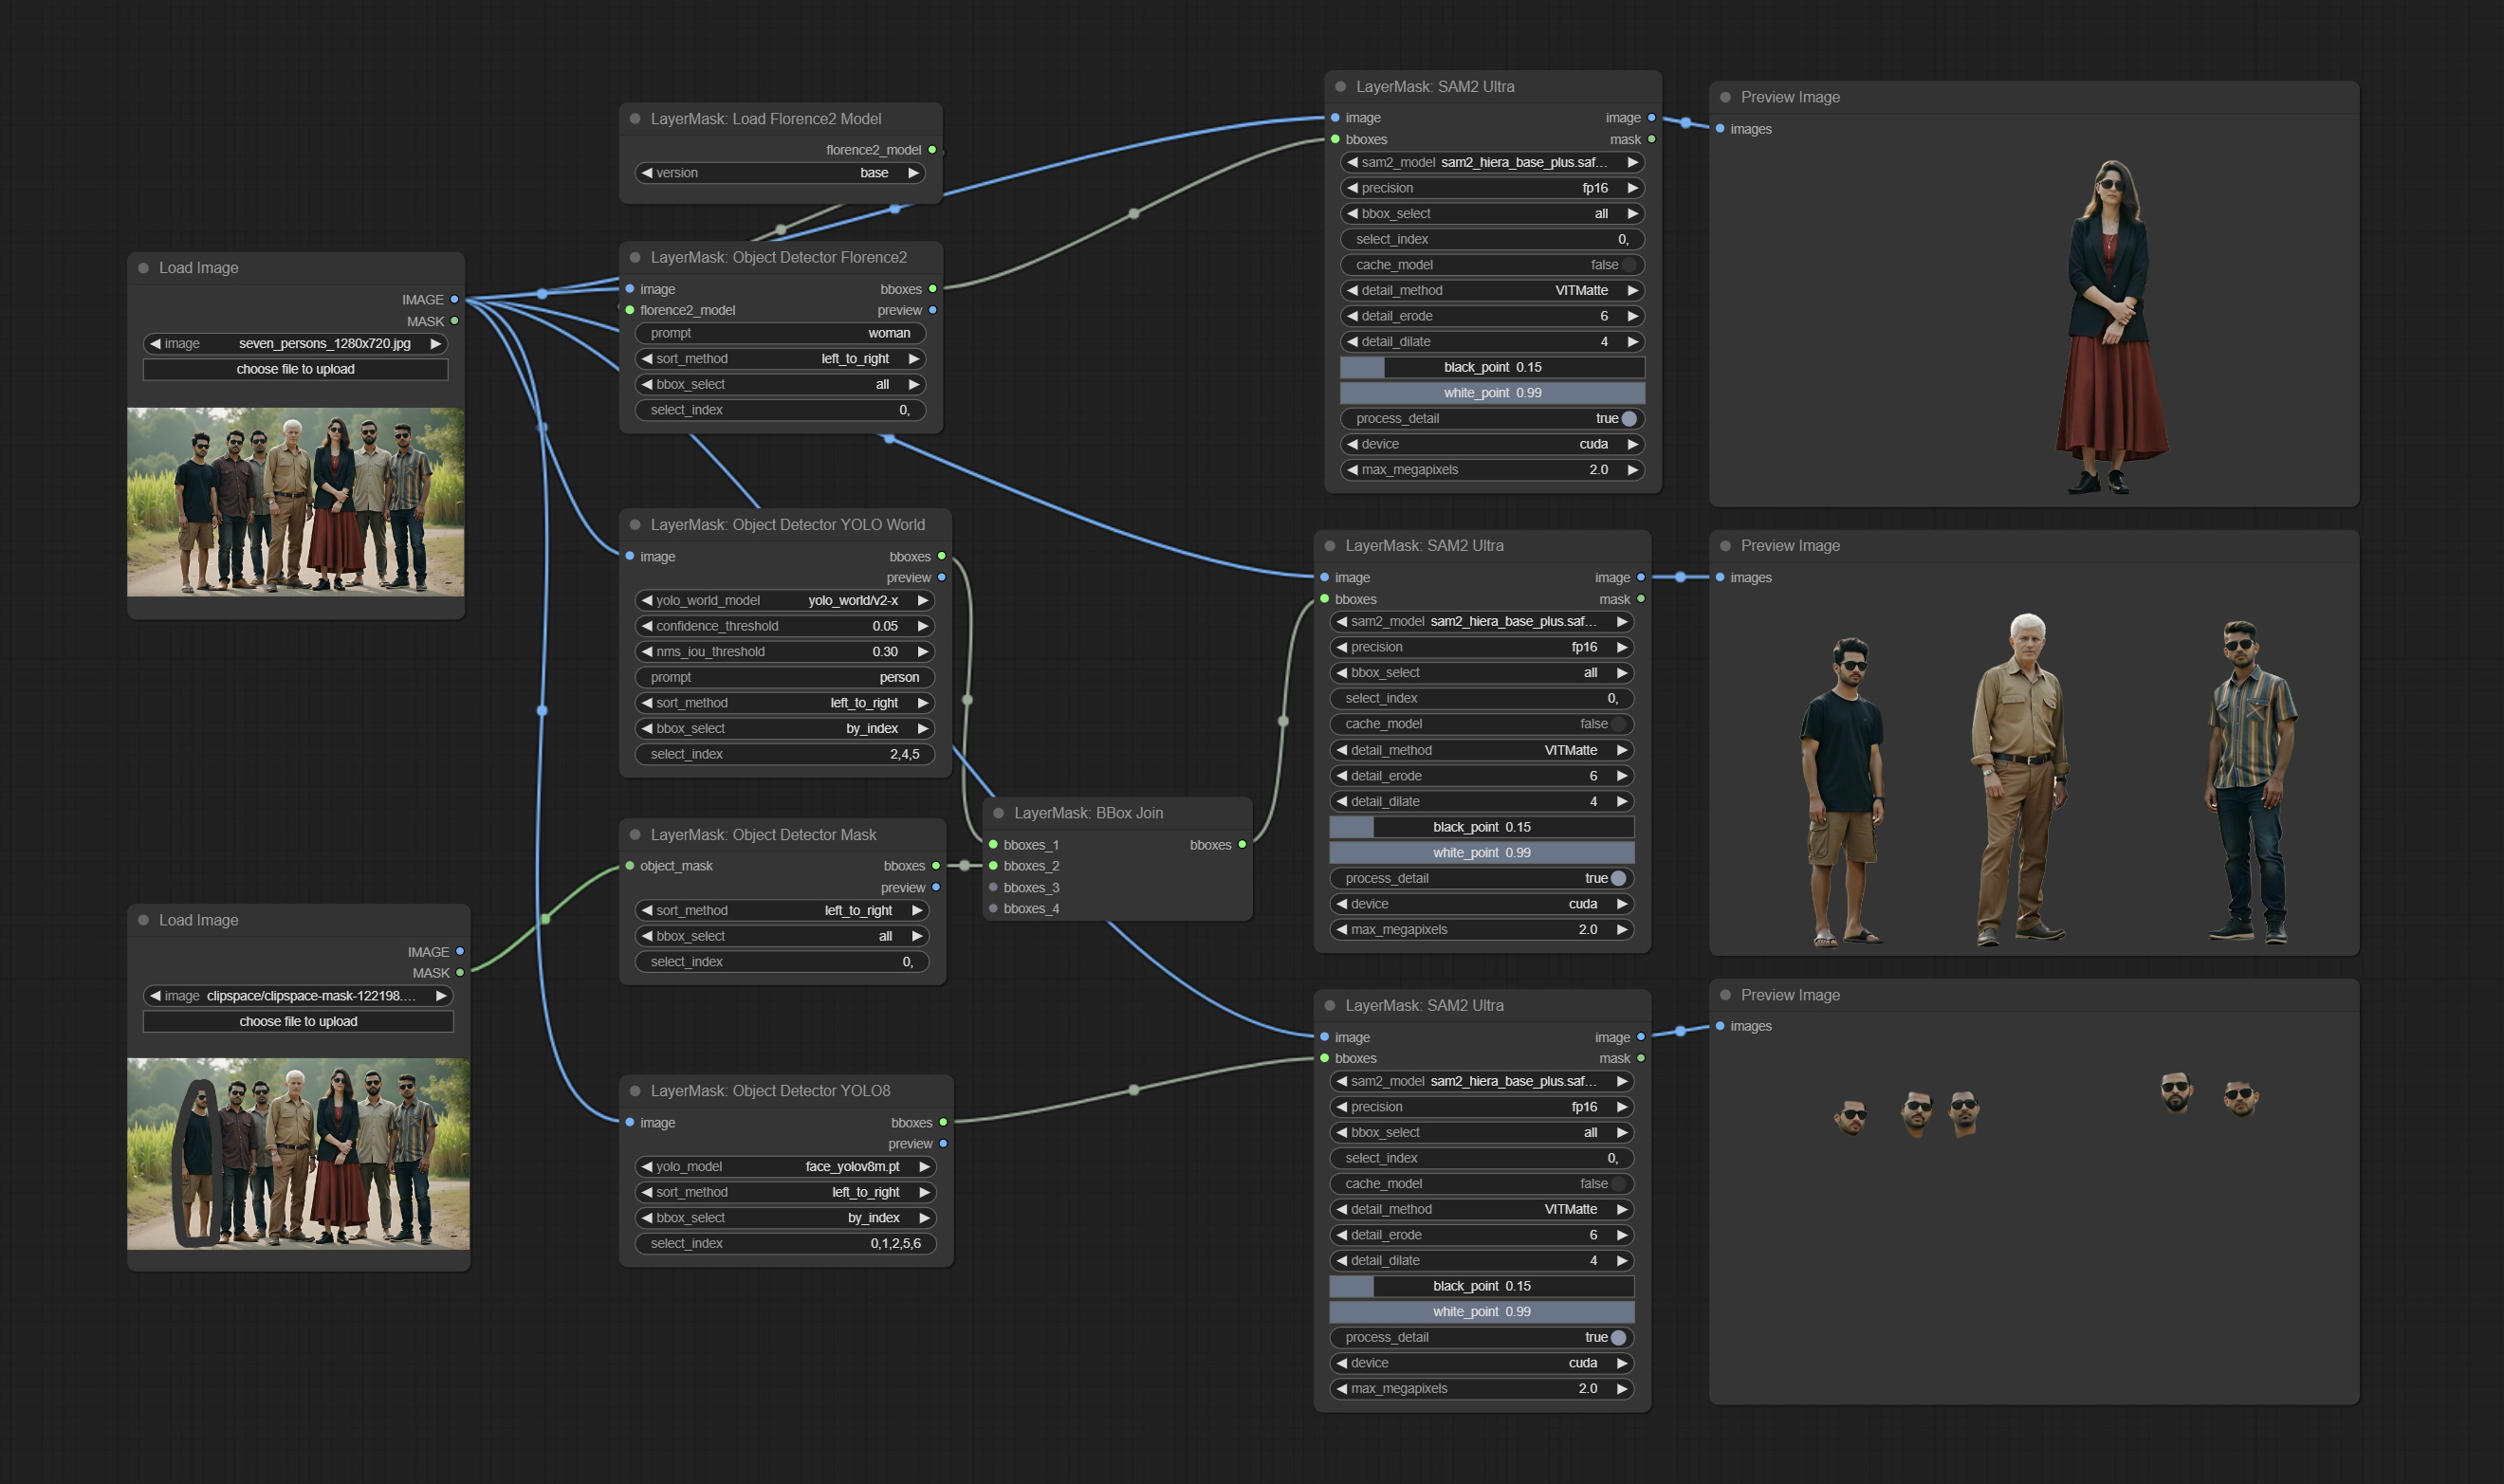
Node Options:
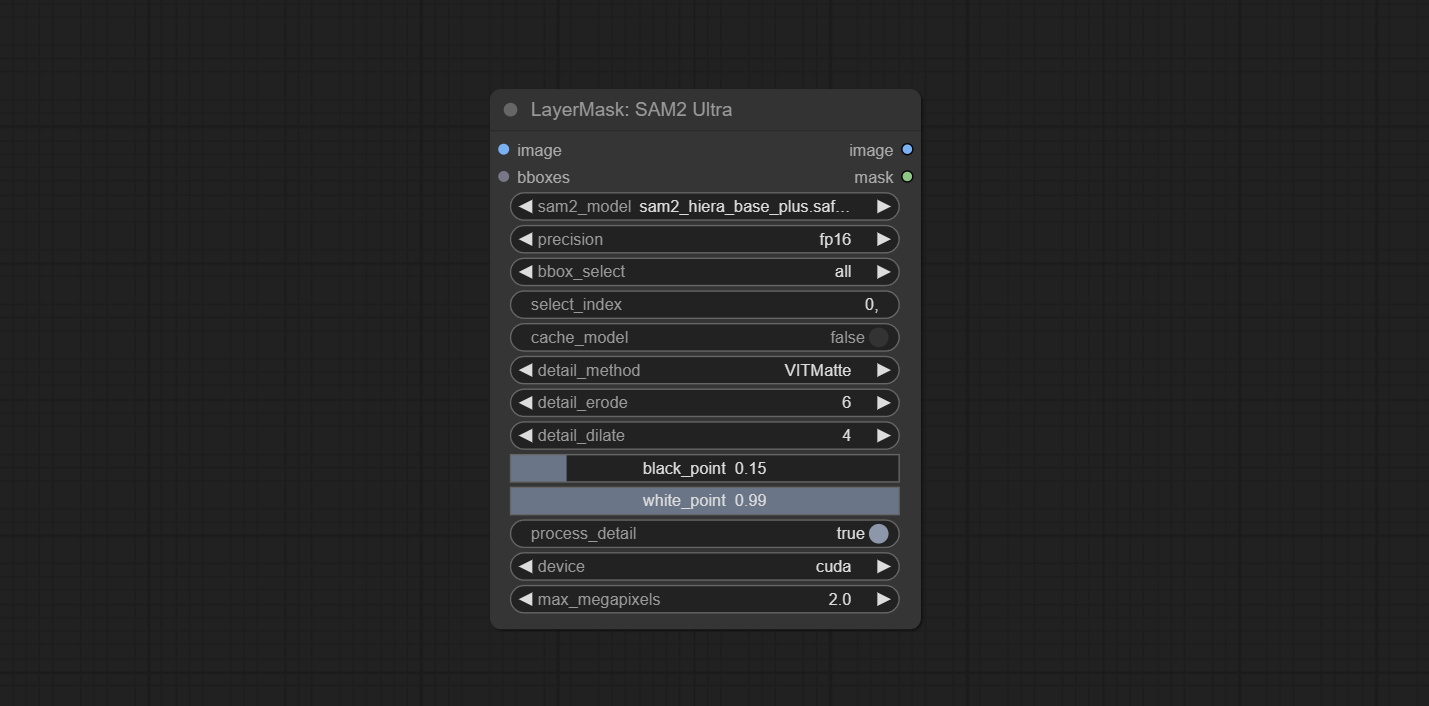
- image: The image to segment.
- bboxes: Input recognition box data.
- sam2_model: Select the SAM2 model.
- presicion: Model's persicion. can be selected from fp16, bf16, and fp32.
- bbox_select: Select the input box data. There are three options: "all" to select all, "first" to select the box with the highest confidence, and "by_index" to specify the index of the box.
- select_index: This option is valid when bbox_delect is 'by_index'. 0 is the first one. Multiple values can be entered, separated by any non numeric character, including but not limited to commas, periods, semicolons, spaces or letters, and even Chinese.
- cache_model: Whether to cache the model. After caching the model, it will save time for model loading.
- detail_method: Edge processing methods. provides VITMatte, VITMatte(local), PyMatting, GuidedFilter. If the model has been downloaded after the first use of VITMatte, you can use VITMatte (local) afterwards.
- detail_erode: Mask the erosion range inward from the edge. the larger the value, the larger the range of inward repair.
- detail_dilate: The edge of the mask expands outward. the larger the value, the wider the range of outward repair.
- black_point: Edge black sampling threshold.
- white_point: Edge white sampling threshold.
- process_detail: Set to false here will skip edge processing to save runtime.
- device: Set whether the VitMatte to use cuda.
- max_megapixels: Set the maximum size for VitMate operations.
SAM2VideoUltra
SAM2 Video Ultra node support processing multiple frames of images or video sequences. Please define the recognition box data in the first frame of the sequence to ensure correct recognition.
sam2_video_ultra_example.mp4
2024-09-03.152625.mp4
Node Options:
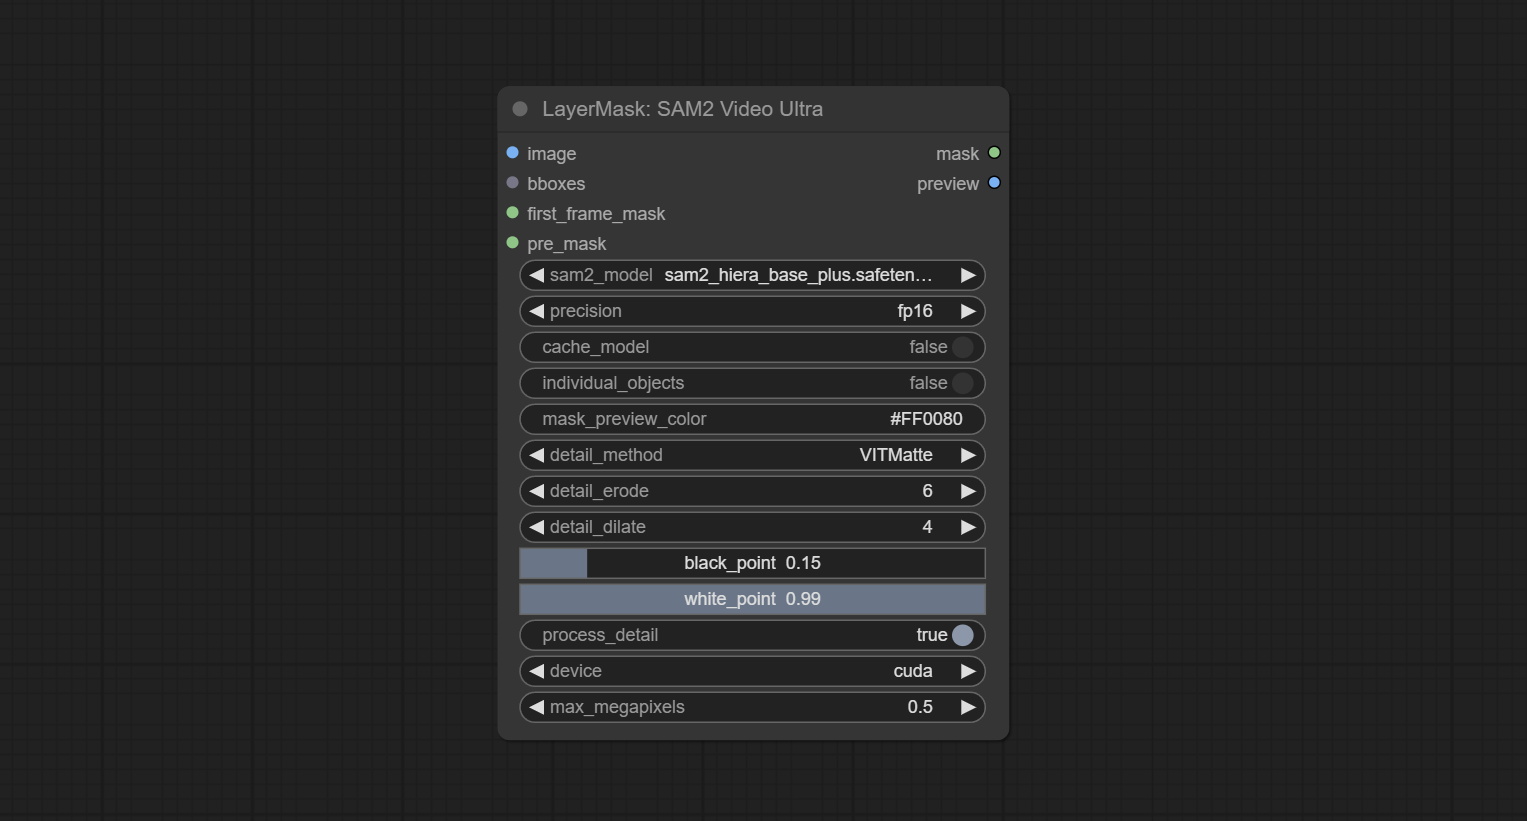
- image: The image to segment.
- bboxes: Optional input of recognition bbox data.
bboxes and first_frame_mask must have least one input. If first_frame_mask inputed, bbboxes will be ignored. - first_frame_mask: Optional input of the first frame mask. The mask will be used as the first frame recognition object.
bboxes and first_frame_mask must have least one input. If first_frame_mask inputed, bbboxes will be ignored. - pre_mask: Optional input mask, which will serve as a propagation focus range limitation and help improve recognition accuracy.
- sam2_model: Select the SAM2 model.
- presicion: Model's persicion. can be selected from fp16 and bf16.
- cache_model: Whether to cache the model. After caching the model, it will save time for model loading.
- individual_object: When set to True, it will focus on identifying a single object. When set to False, attempts will be made to generate recognition boxes for multiple objects.
- mask_preview_color: Display the color of non masked areas in the preview output.
- detail_method: Edge processing methods. Only VITMatte method can be used.
- detail_erode: Mask the erosion range inward from the edge. the larger the value, the larger the range of inward repair.
- detail_dilate: The edge of the mask expands outward. the larger the value, the wider the range of outward repair.
- black_point: Edge black sampling threshold.
- white_point: Edge white sampling threshold.
- process_detail: Set to false here will skip edge processing to save runtime.
- device: Only cuda can be used.
- max_megapixels: Set the maximum size for VitMate operations.A larger size will result in finer mask edges, but it will lead to a significant decrease in computation speed.
ObjectDetectorFL2
Use the Florence2 model to identify objects in images and output recognition box data.
*Download models from BaiduNetdisk and copy to ComfyUI/models/florence2 folder.
Node Options:
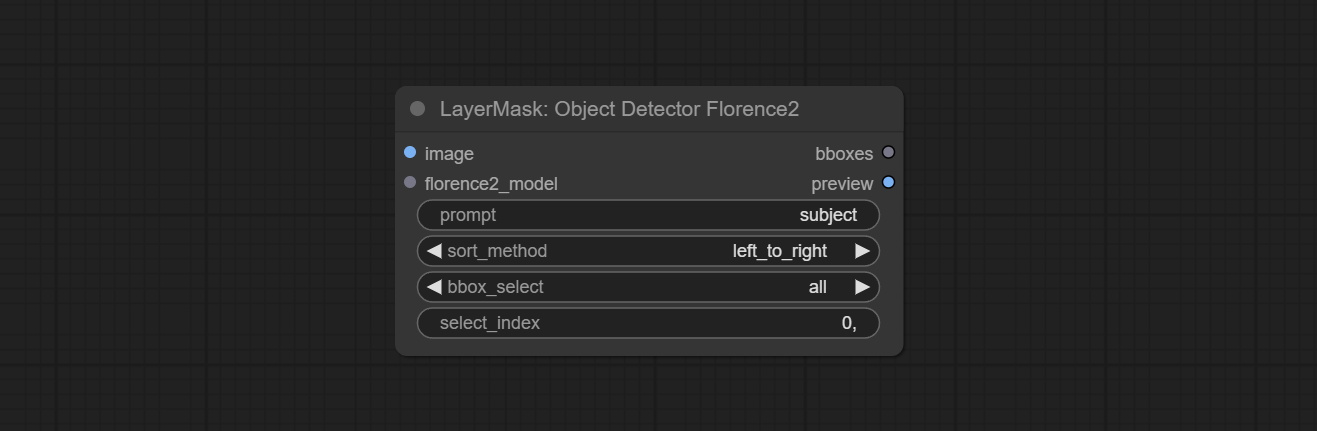
- image: The image to segment.
- florence2_model: Florence2 model, it from LoadFlorence2Model node.
- prompt: Describe the object that needs to be identified.
- sort_method: The selection box sorting method has 4 options: "left_to_right", "top_to_bottom", "big_to_small" and "confidence".
- bbox_select: Select the input box data. There are three options: "all" to select all, "first" to select the box with the highest confidence, and "by_index" to specify the index of the box.
- select_index: This option is valid when bbox_delect is 'by_index'. 0 is the first one. Multiple values can be entered, separated by any non numeric character, including but not limited to commas, periods, semicolons, spaces or letters, and even Chinese.
ObjectDetectorYOLOWorld
Use the YOLO-World model to identify objects in images and output recognition box data.
*Download models from BaiduNetdisk or GoogleDrive and copy to ComfyUI/models/yolo-world folder.
Node Options:
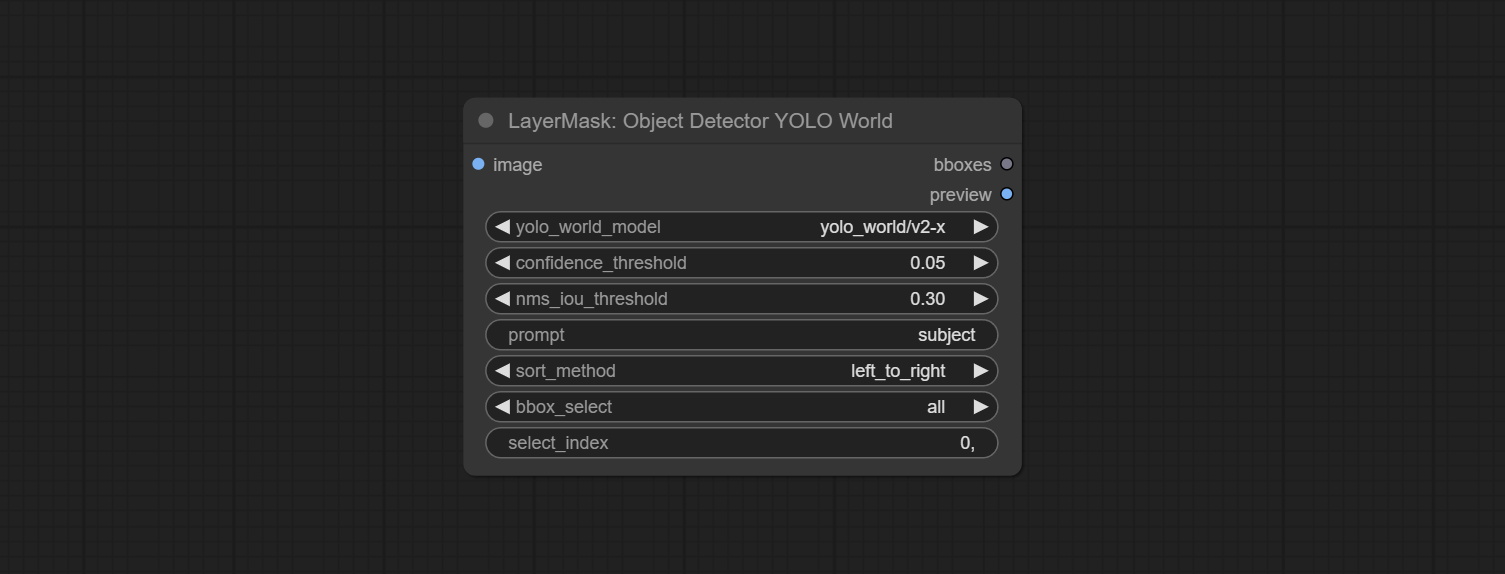
- image: The image to segment.
- confidence_threshold: The threshold of confidence.
- nms_iou_threshold: The threshold of Non-Maximum Suppression.
- prompt: Describe the object that needs to be identified.
- sort_method: The selection box sorting method has 4 options: "left_to_right", "top_to_bottom", "big_to_small" and "confidence".
- bbox_select: Select the input box data. There are three options: "all" to select all, "first" to select the box with the highest confidence, and "by_index" to specify the index of the box.
- select_index: This option is valid when bbox_delect is 'by_index'. 0 is the first one. Multiple values can be entered, separated by any non numeric character, including but not limited to commas, periods, semicolons, spaces or letters, and even Chinese.
ObjectDetectorYOLO8
Use the YOLO-8 model to identify objects in images and output recognition box data.
*Download models from GoogleDrive or BaiduNetdisk and copy to ComfyUI/models/yolo folder.
Node Options:
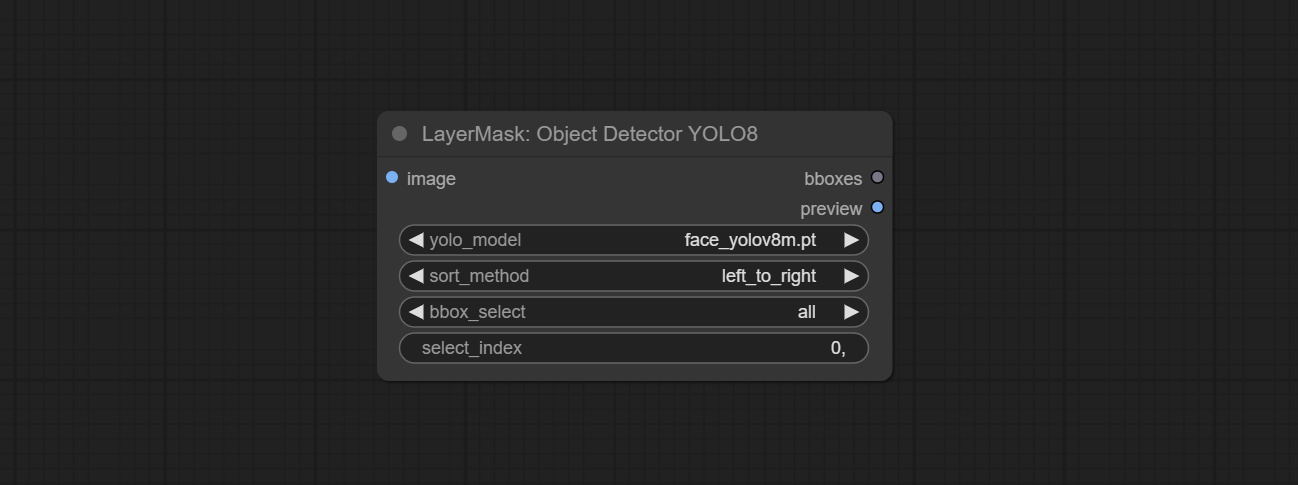
- image: The image to segment.
- yolo_model: Choose the yolo model.
- sort_method: The selection box sorting method has 4 options: "left_to_right", "top_to_bottom", "big_to_small" and "confidence".
- bbox_select: Select the input box data. There are three options: "all" to select all, "first" to select the box with the highest confidence, and "by_index" to specify the index of the box.
- select_index: This option is valid when bbox_delect is 'by_index'. 0 is the first one. Multiple values can be entered, separated by any non numeric character, including but not limited to commas, periods, semicolons, spaces or letters, and even Chinese.
ObjectDetectorMask
Use mask as recognition box data. All areas surrounded by white areas on the mask will be recognized as an object. Multiple enclosed areas will be identified separately.
Node Options:
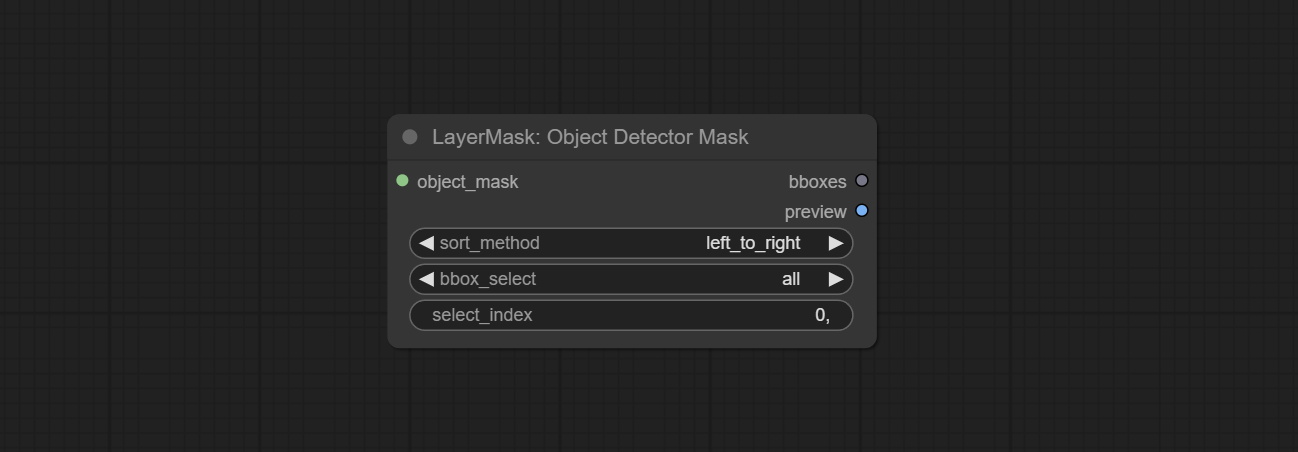
- object_mask: The mask input.
- sort_method: The selection box sorting method has 4 options: "left_to_right", "top_to_bottom", "big_to_small" and "confidence".
- bbox_select: Select the input box data. There are three options: "all" to select all, "first" to select the box with the highest confidence, and "by_index" to specify the index of the box.
- select_index: This option is valid when bbox_delect is 'by_index'. 0 is the first one. Multiple values can be entered, separated by any non numeric character, including but not limited to commas, periods, semicolons, spaces or letters, and even Chinese.
BBoxJoin
Merge recognition box data.
Node Options:

- bboxes_1: Required input. The first set of identification boxes.
- bboxes_2: Optional input. The second set of identification boxes.
- bboxes_3: Optional input. The third set of identification boxes.
- bboxes_4: Optional input. The fourth set of identification boxes.
DrawBBoxMask
Draw the recognition BBoxes data output by the Object Detector node as a mask.
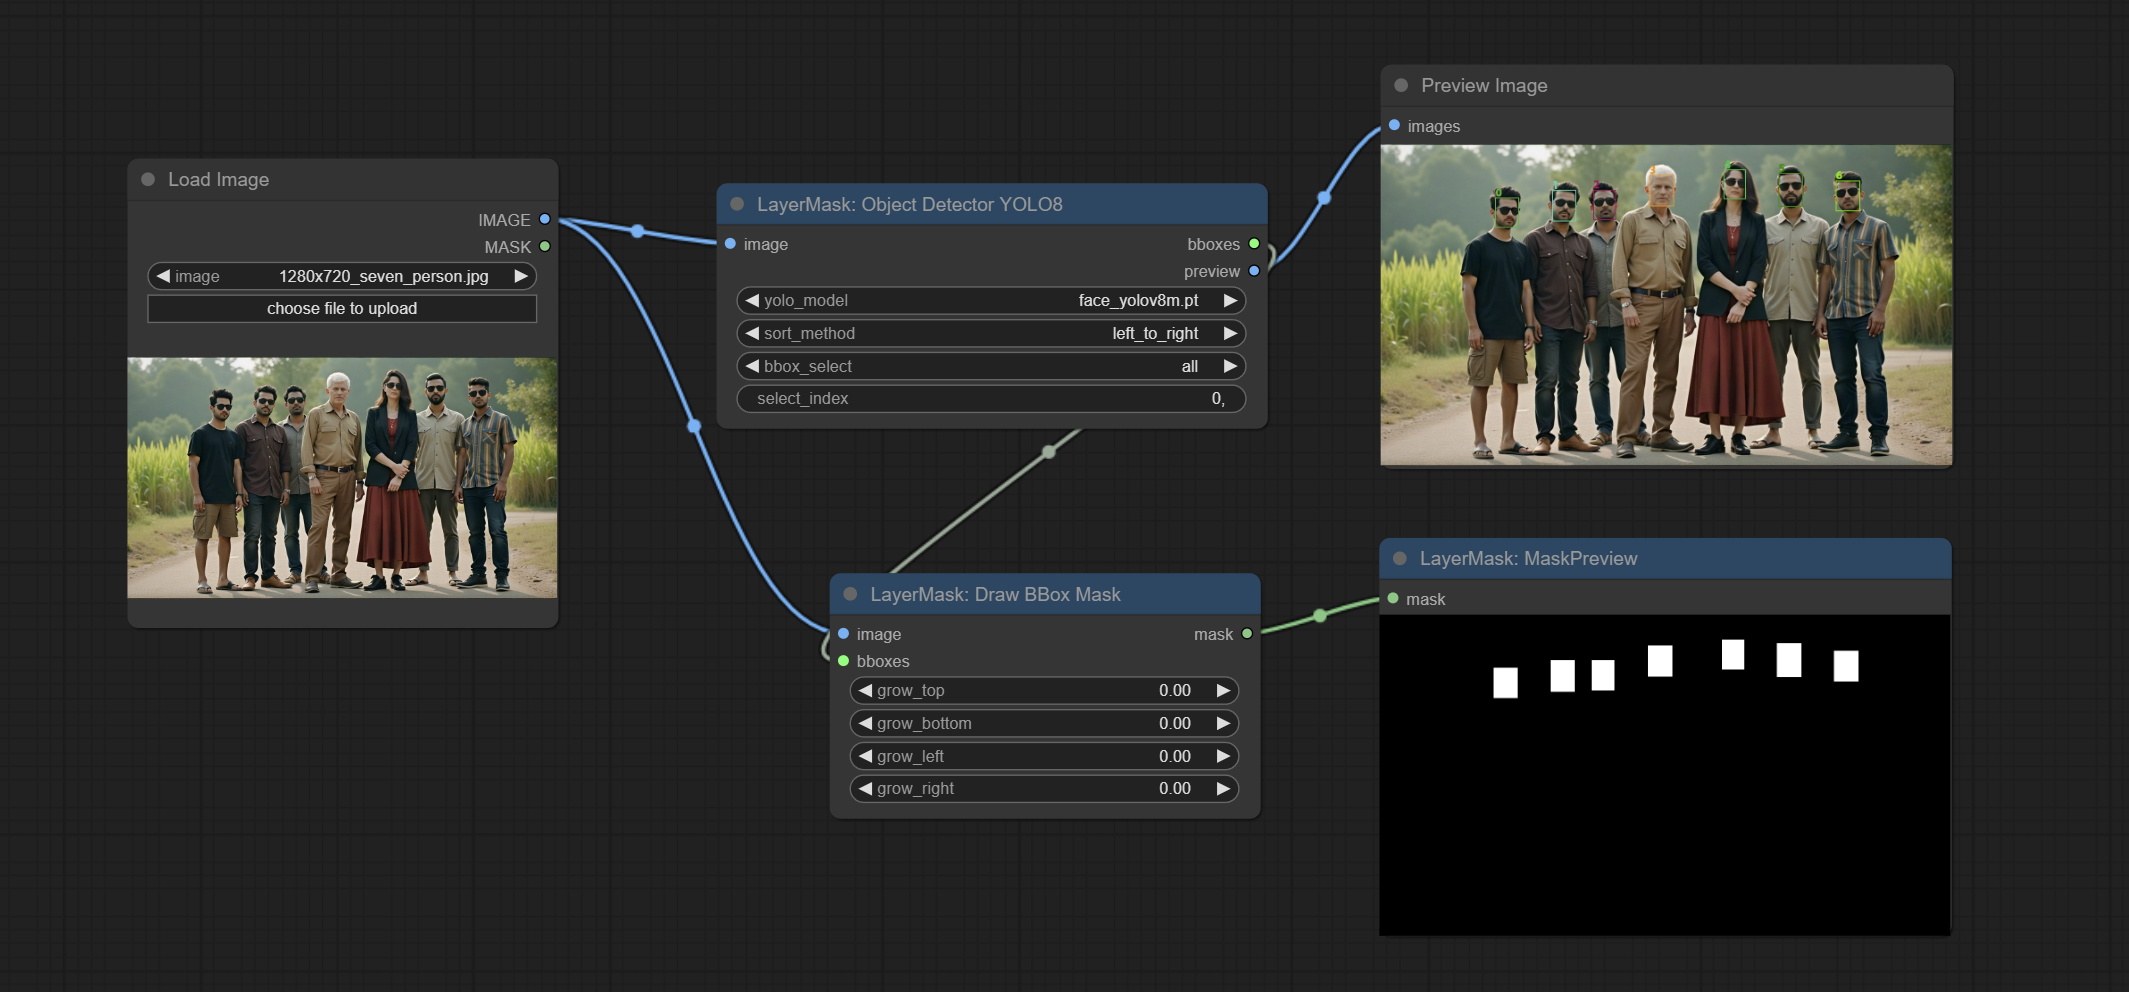
Node Options:
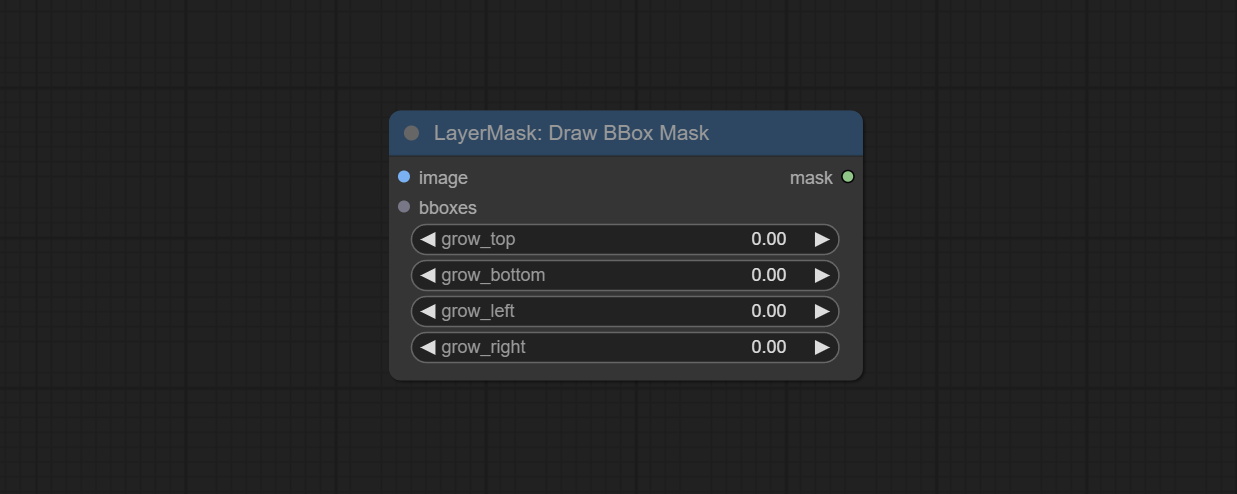
- image: Image input. It must be consistent with the image recognized by the Object Detector node.
- bboxes: Input recognition BBoxes data.
- grow_top: Each BBox expands upwards as a percentage of its height, positive values indicate upward expansion and negative values indicate downward expansion.
- grow_bottom: Each BBox expands downwards as a percentage of its height, positive values indicating downward expansion and negative values indicating upward expansion.
- grow_left: Each BBox expands to the left as a percentage of its width, positive values expand to the left and negative values expand to the right.
- grow_right: Each BBox expands to the right as a percentage of its width, positive values indicate expansion to the right and negative values indicate expansion to the left.
EVF-SAMUltra
This node is implementation of EVF-SAM in ComfyUI.
*Please download model files from BaiduNetdisk or huggingface/EVF-SAM2, huggingface/EVF-SAM to ComfyUI/models/EVF-SAM folder(save the models in their respective subdirectories).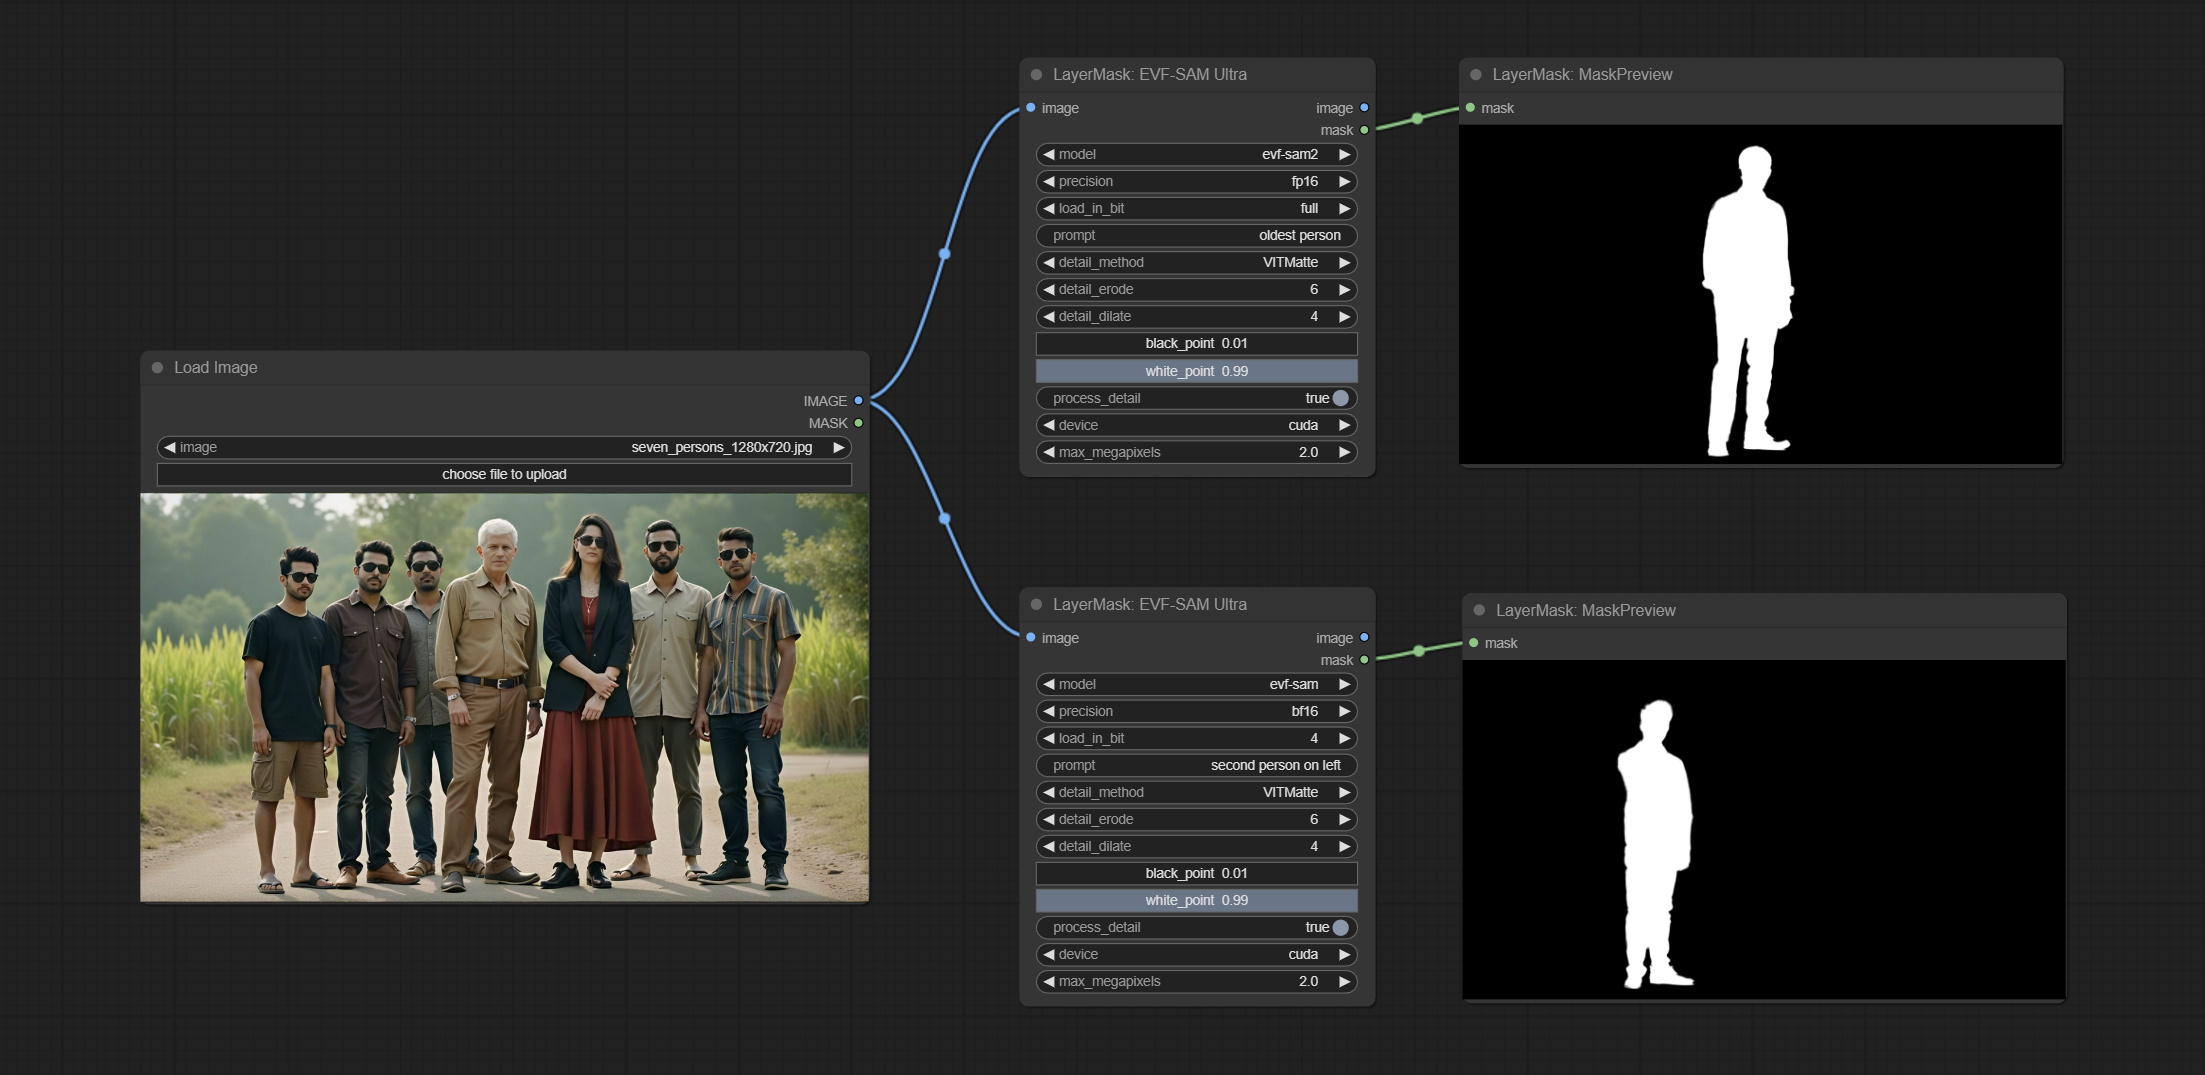
Node Options:
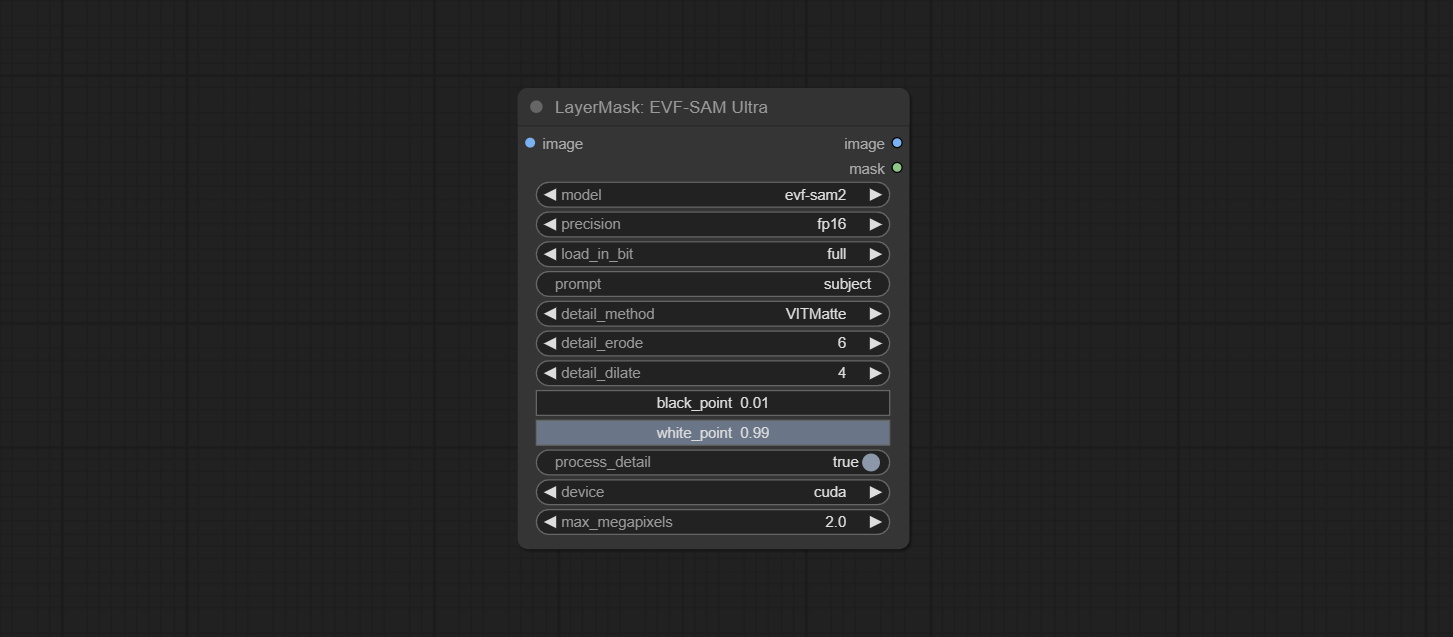
- image: The input image.
- model: Select the model. Currently, there are options for evf-sam2 and evf sam.
- presicion: Model accuracy can be selected from fp16, bf16, and fp32.
- load_in_bit: Load the model with positional accuracy. You can choose from full, 8, and 4.
- pormpt: Prompt words used for segmentation.
- detail_method: Edge processing methods. provides VITMatte, VITMatte(local), PyMatting, GuidedFilter. If the model has been downloaded after the first use of VITMatte, you can use VITMatte (local) afterwards.
- detail_erode: Mask the erosion range inward from the edge. the larger the value, the larger the range of inward repair.
- detail_dilate: The edge of the mask expands outward. the larger the value, the wider the range of outward repair.
- black_point: Edge black sampling threshold.
- white_point: Edge white sampling threshold.
- process_detail: Set to false here will skip edge processing to save runtime.
- device: Set whether the VitMatte to use cuda.
- max_megapixels: Set the maximum size for VitMate operations.
Florence2Ultra
Using the segmentation function of the Florence2 model, while also having ultra-high edge details. The code for this node section is from spacepxl/ComfyUI-Florence-2, thanks to the original author. *Download the model files from BaiduNetdisk to ComfyUI/models/florence2 folder.
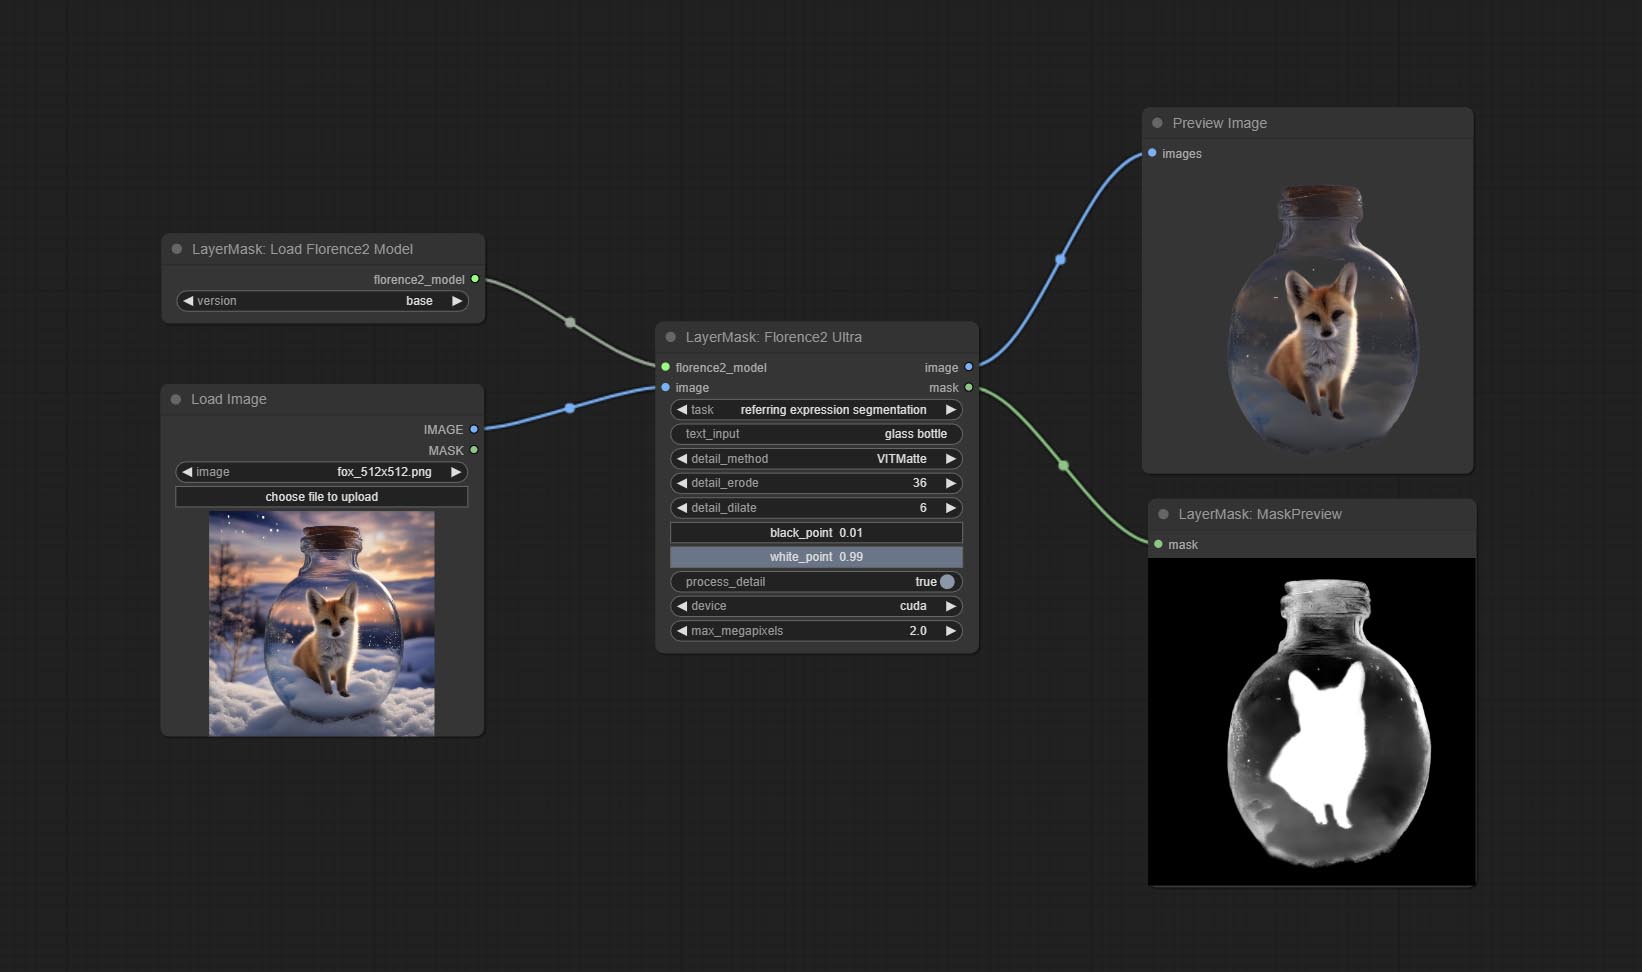
Node Options:
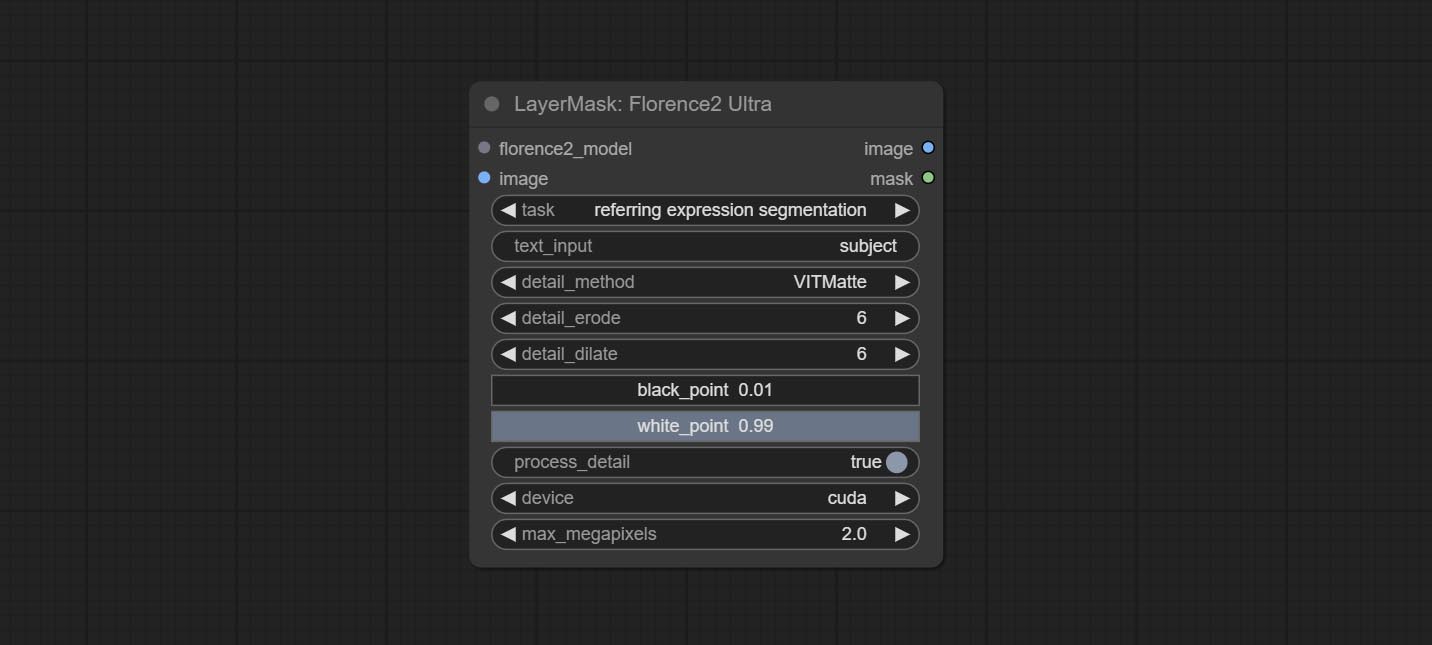
- florence2_model: Florence2 model input.
- image: Image input.
- task: Select the task for florence2.
- text_input: Text input for florence2.
- detail_method: Edge processing methods. provides VITMatte, VITMatte(local), PyMatting, GuidedFilter. If the model has been downloaded after the first use of VITMatte, you can use VITMatte (local) afterwards.
- detail_erode: Mask the erosion range inward from the edge. the larger the value, the larger the range of inward repair.
- detail_dilate: The edge of the mask expands outward. the larger the value, the wider the range of outward repair.
- black_point: Edge black sampling threshold.
- white_point: Edge white sampling threshold.
- process_detail: Set to false here will skip edge processing to save runtime.
- device: Set whether the VitMatte to use cuda.
- max_megapixels: Set the maximum size for VitMate operations.
LoadFlorence2Model
Florence2 model loader. *When using it for the first time, the model will be automatically downloaded.
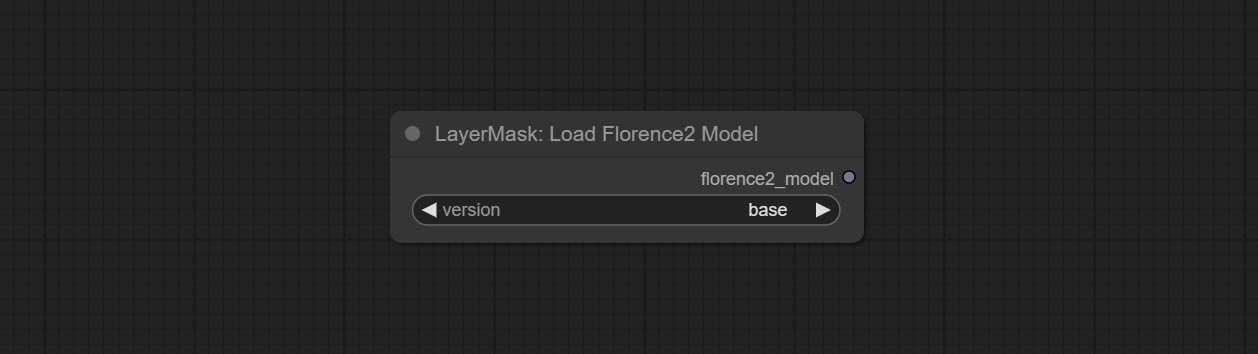
At present, there are base, base-ft, large, large-ft, DocVQA, SD3-Captioner and base-PromptGen models to choose from.
RemBgUltra
Remove background. compared to the similar background removal nodes, this node has ultra-high edge details.
This node combines the Alpha Matte node of Spacepxl's ComfyUI-Image-Filters and the functionality of ZHO-ZHO-ZHO's ComfyUI-BRIA_AI-RMBG, thanks to the original author.
*Download model files from BRIA Background Removal v1.4 or BaiduNetdisk to ComfyUI/models/rmbg/RMBG-1.4 folder. This model can be used for non-commercial purposes.
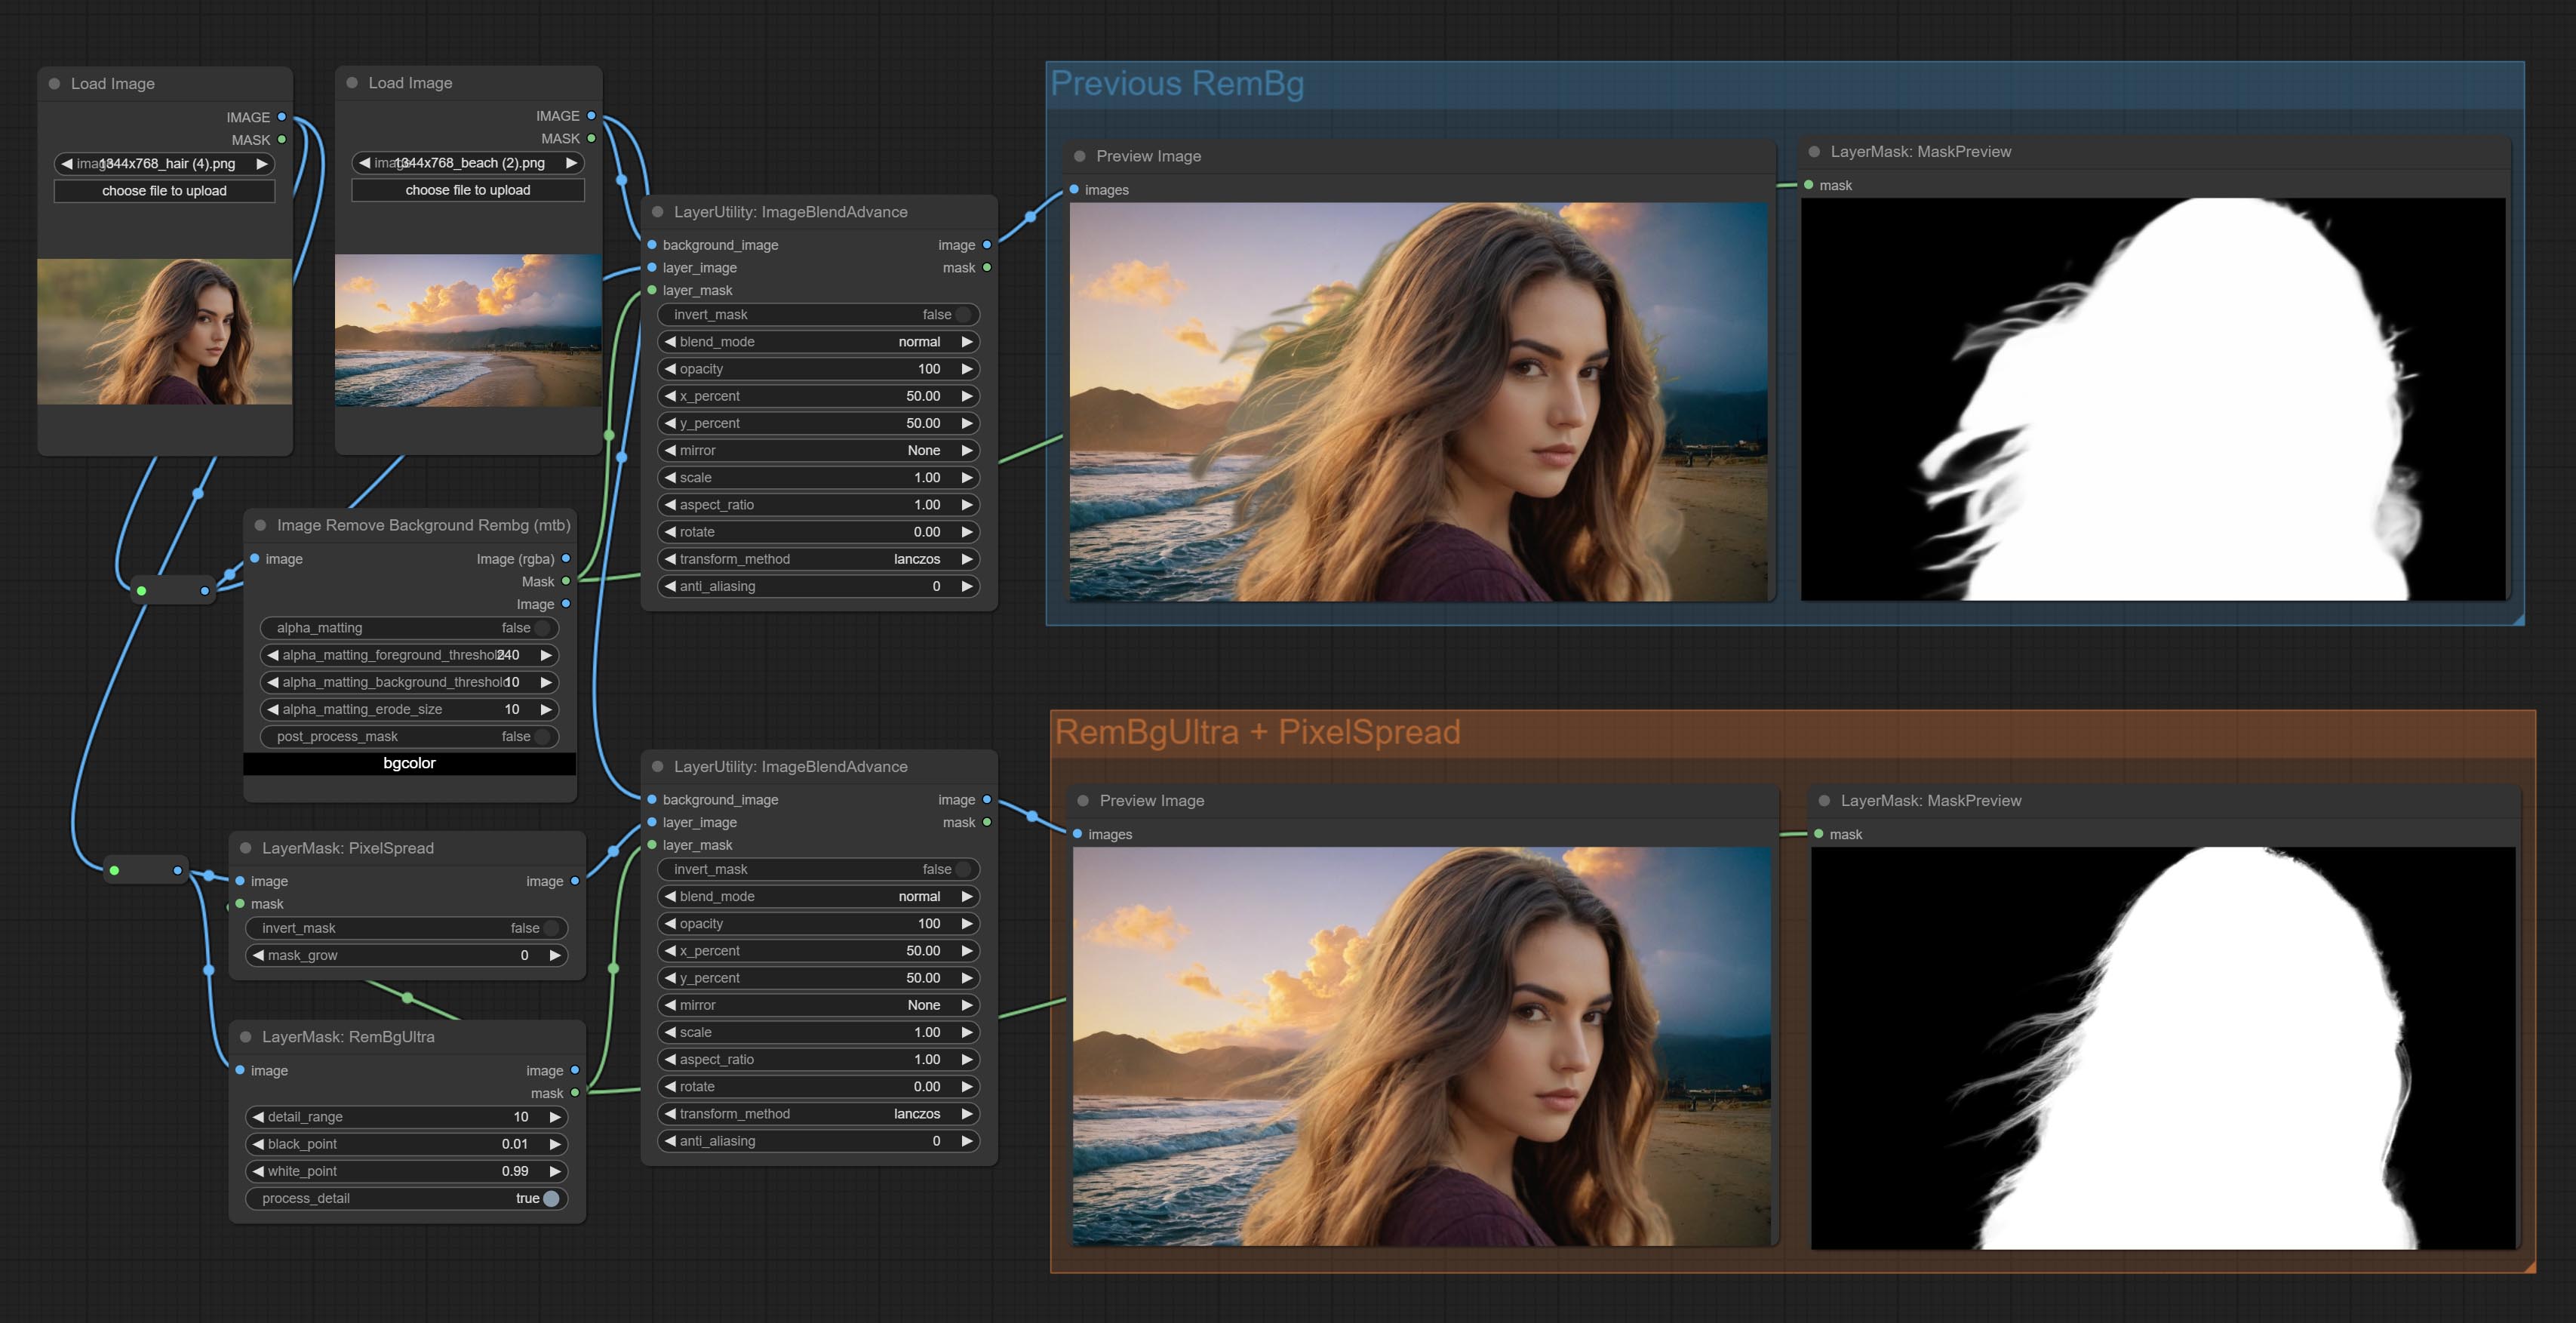
Node options:
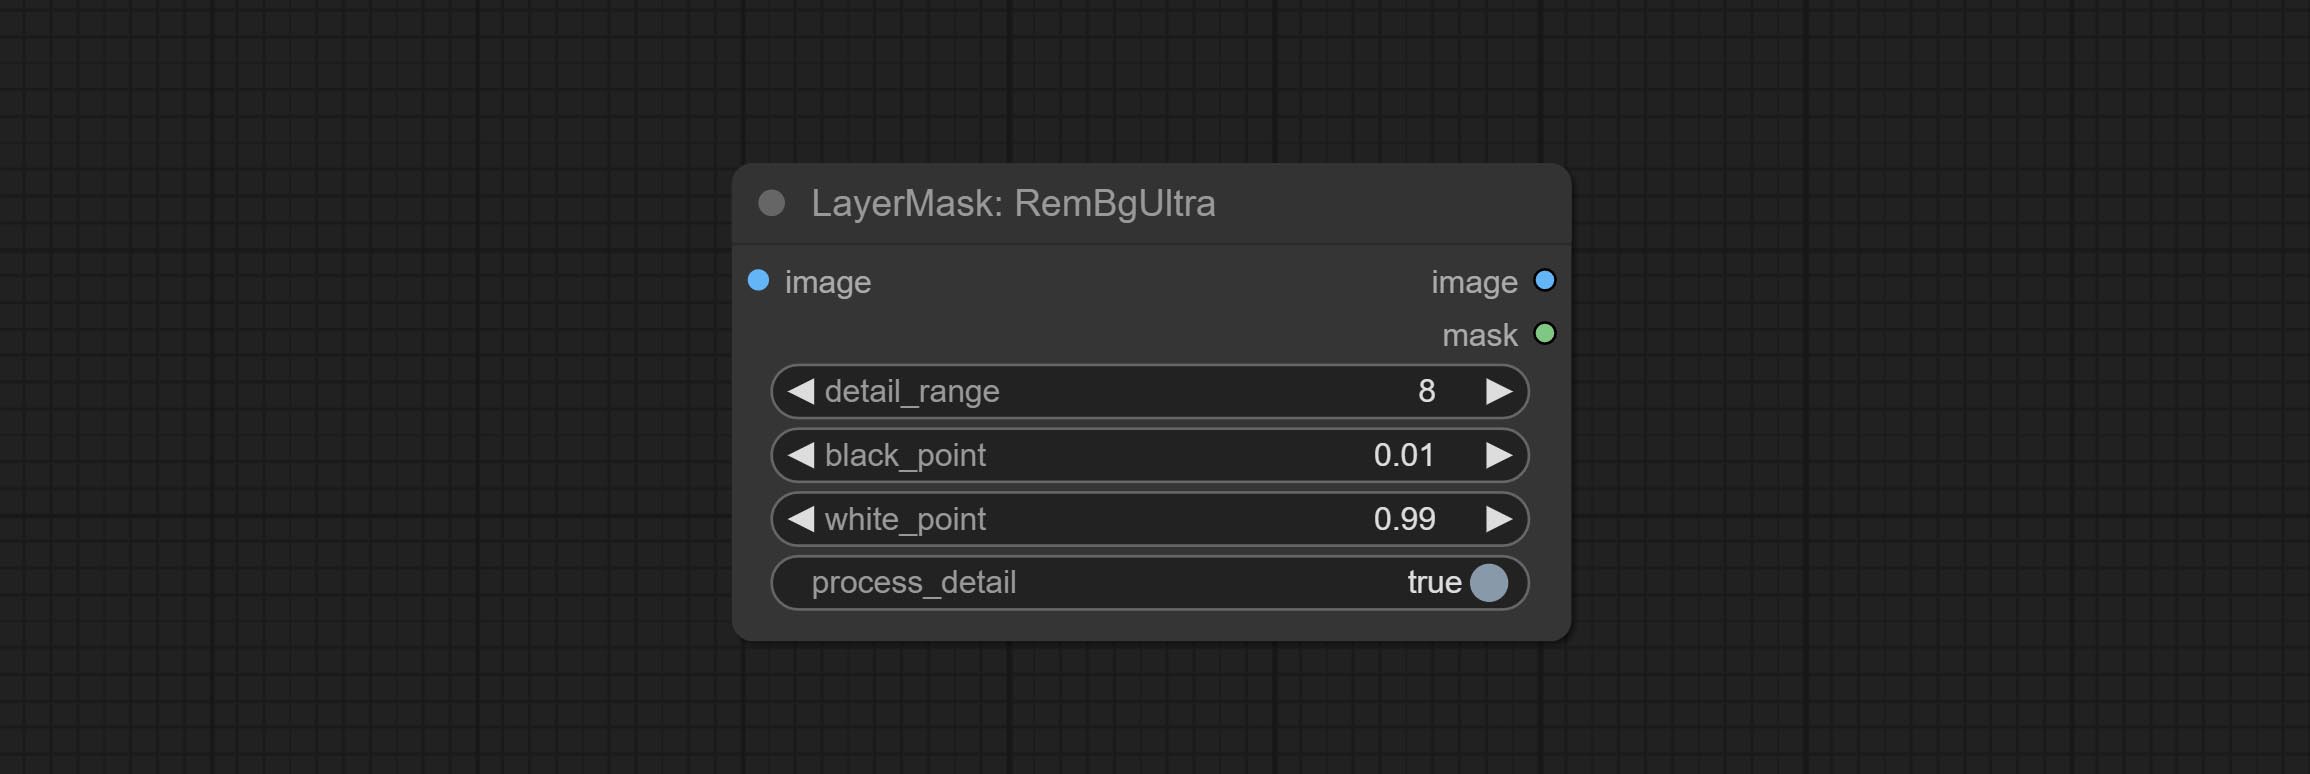
- detail_range: Edge detail range.
- black_point: Edge black sampling threshold.
- white_point: Edge white sampling threshold.
- process_detail: Set to false here will skip edge processing to save runtime.
RmBgUltraV2
The V2 upgraded version of RemBgUltra has added the VITMatte edge processing method.(Note: Images larger than 2K in size using this method will consume huge memory)
On the basis of RemBgUltra, the following changes have been made: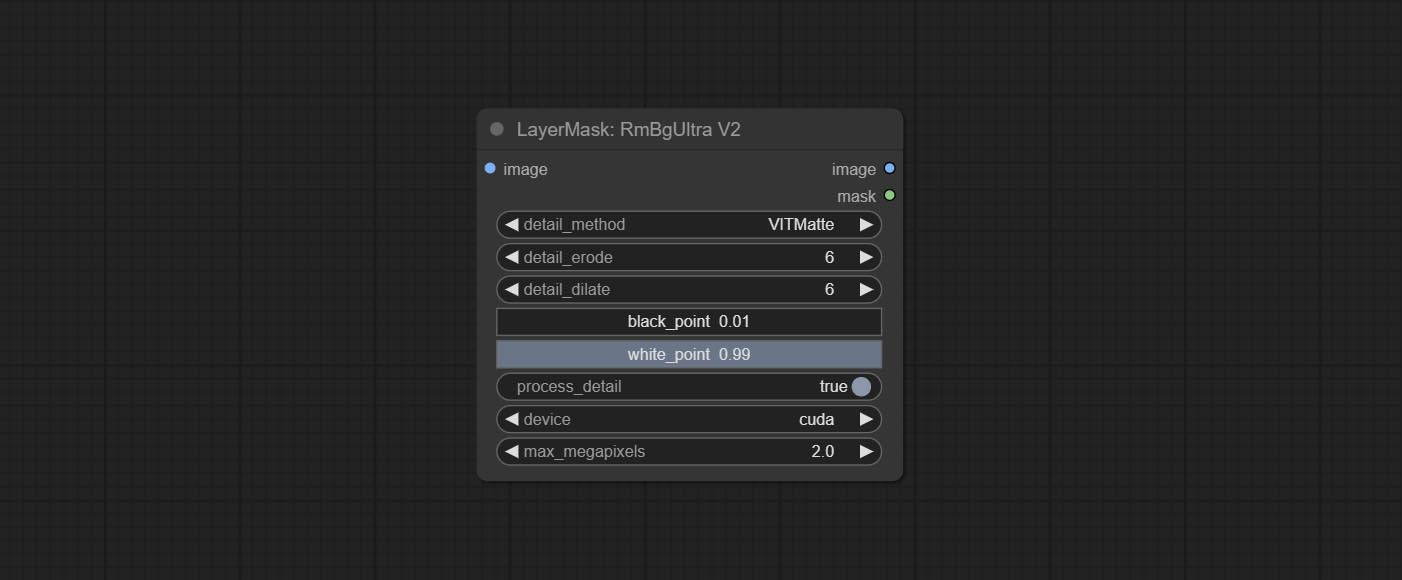
- detail_method: Edge processing methods. provides VITMatte, VITMatte(local), PyMatting, GuidedFilter. If the model has been downloaded after the first use of VITMatte, you can use VITMatte (local) afterwards.
- detail_erode: Mask the erosion range inward from the edge. the larger the value, the larger the range of inward repair.
- detail_dilate: The edge of the mask expands outward. the larger the value, the wider the range of outward repair.
- device: Set whether the VitMatte to use cuda.
- max_megapixels: Set the maximum size for VitMate operations.
BenUltra
It is the implementation of PramaLLC/BEN project in ComfyUI. Thank you to the original author.
Download the BEN_Base.pth and config.json from huggingface or BaiduNetdisk and copy to ComfyUI/models/BEN folder.
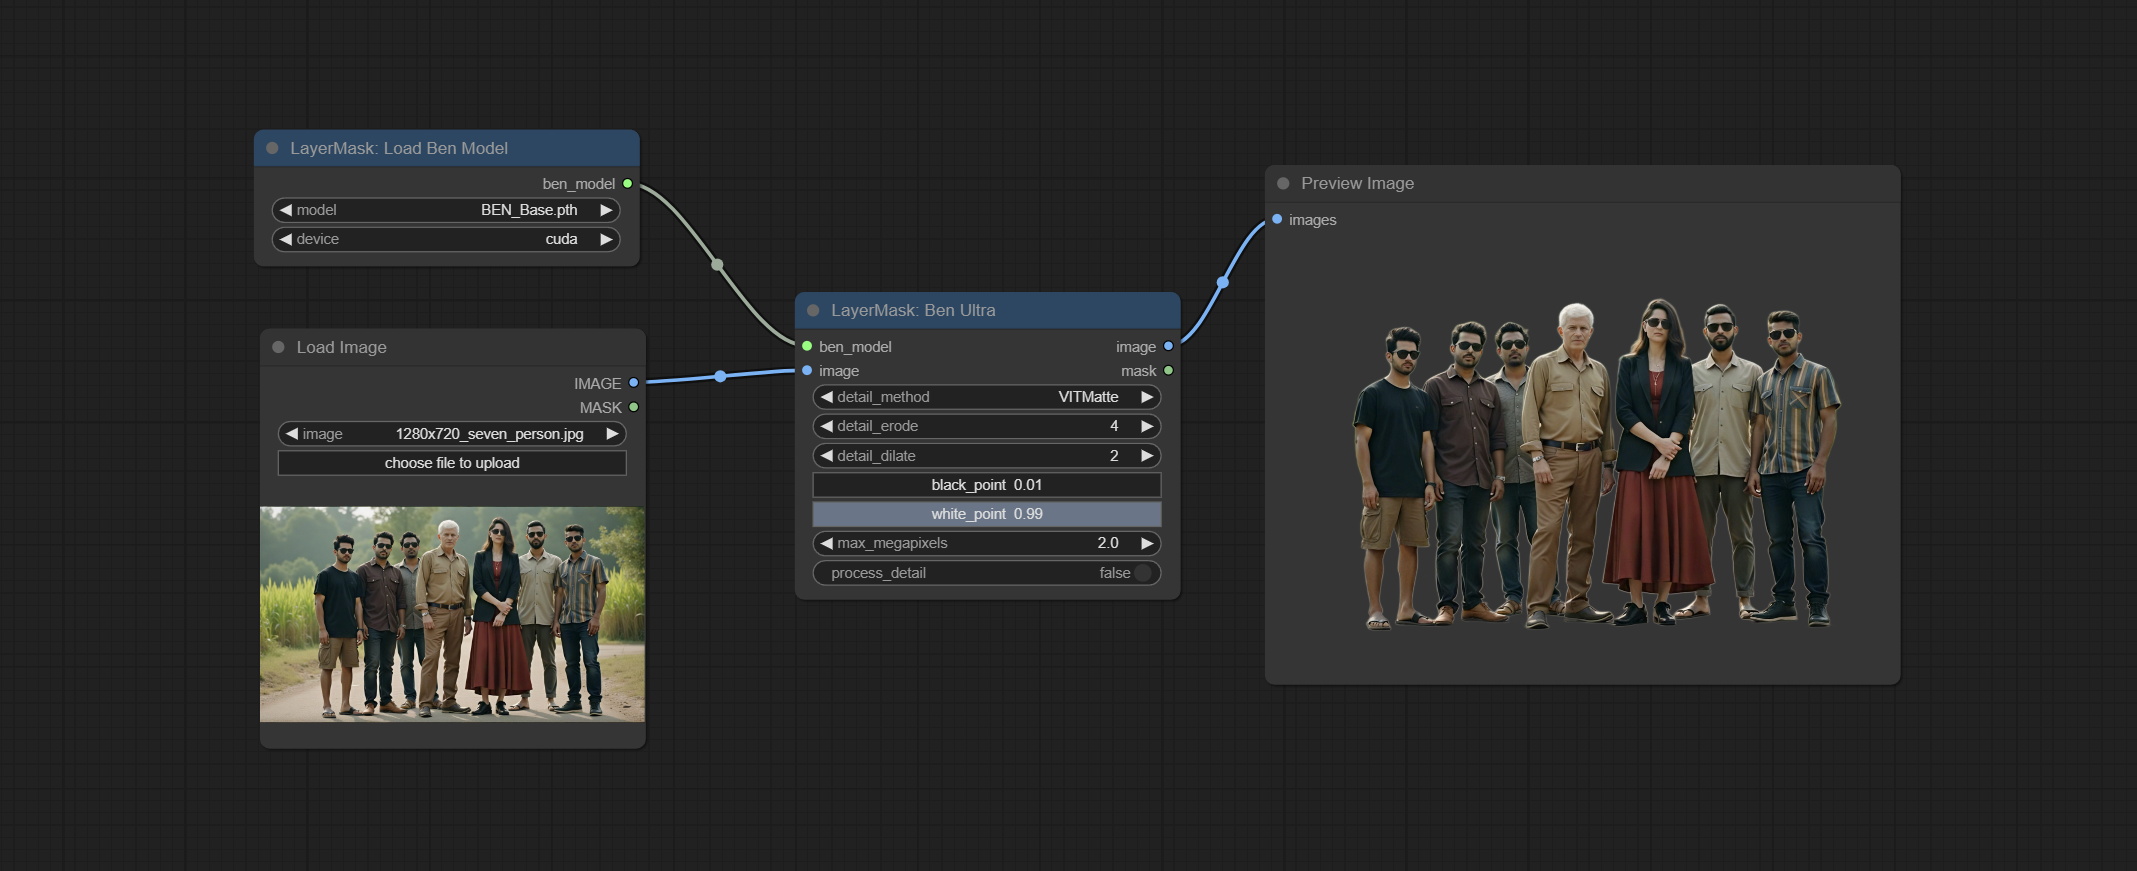
Node Options: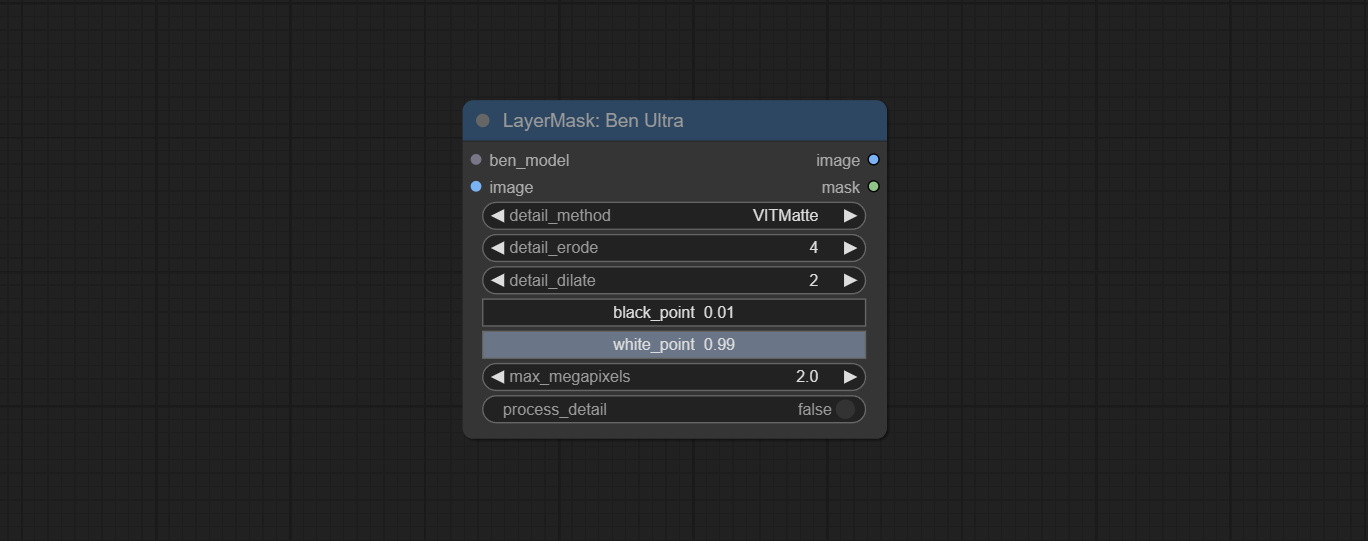
- ben_model: Ben model input.
- image: Image input.
- detail_method: Edge processing methods. provides VITMatte, VITMatte(local), PyMatting, GuidedFilter. If the model has been downloaded after the first use of VITMatte, you can use VITMatte (local) afterwards.
- detail_erode: Mask the erosion range inward from the edge. the larger the value, the larger the range of inward repair.
- detail_dilate: The edge of the mask expands outward. the larger the value, the wider the range of outward repair.
- black_point: Edge black sampling threshold.
- white_point: Edge white sampling threshold.
- process_detail: Set to false here will skip edge processing to save runtime.
- max_megapixels: Set the maximum size for VitMate operations.
LoadBenModel
Load the BEN model.
Node Options:
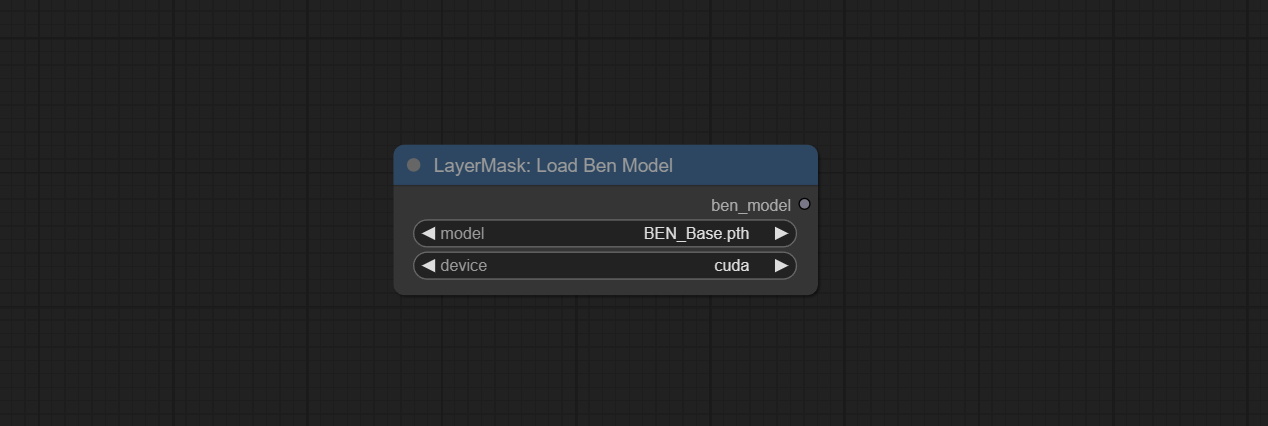
- model: Select the model. Currently, only the Ben_Sase model is available for selection.
BiRefNetUltra
Using the BiRefNet model to remove background has better recognition ability and ultra-high edge details. The code for the model part of this node comes from Viper's ComfyUI-BiRefNet,thanks to the original author.
*From https://huggingface.co/ViperYX/BiRefNet or BaiduNetdisk download the BiRefNet-ep480.pth , pvt_v2_b2.pth , pvt_v2_b5.pth , swin_base_patch4_window12_384_22kto1k.pth , swin_large_patch4_window12_384_22kto1k.pth 5 files to ComfyUI/models/BiRefNet folder.
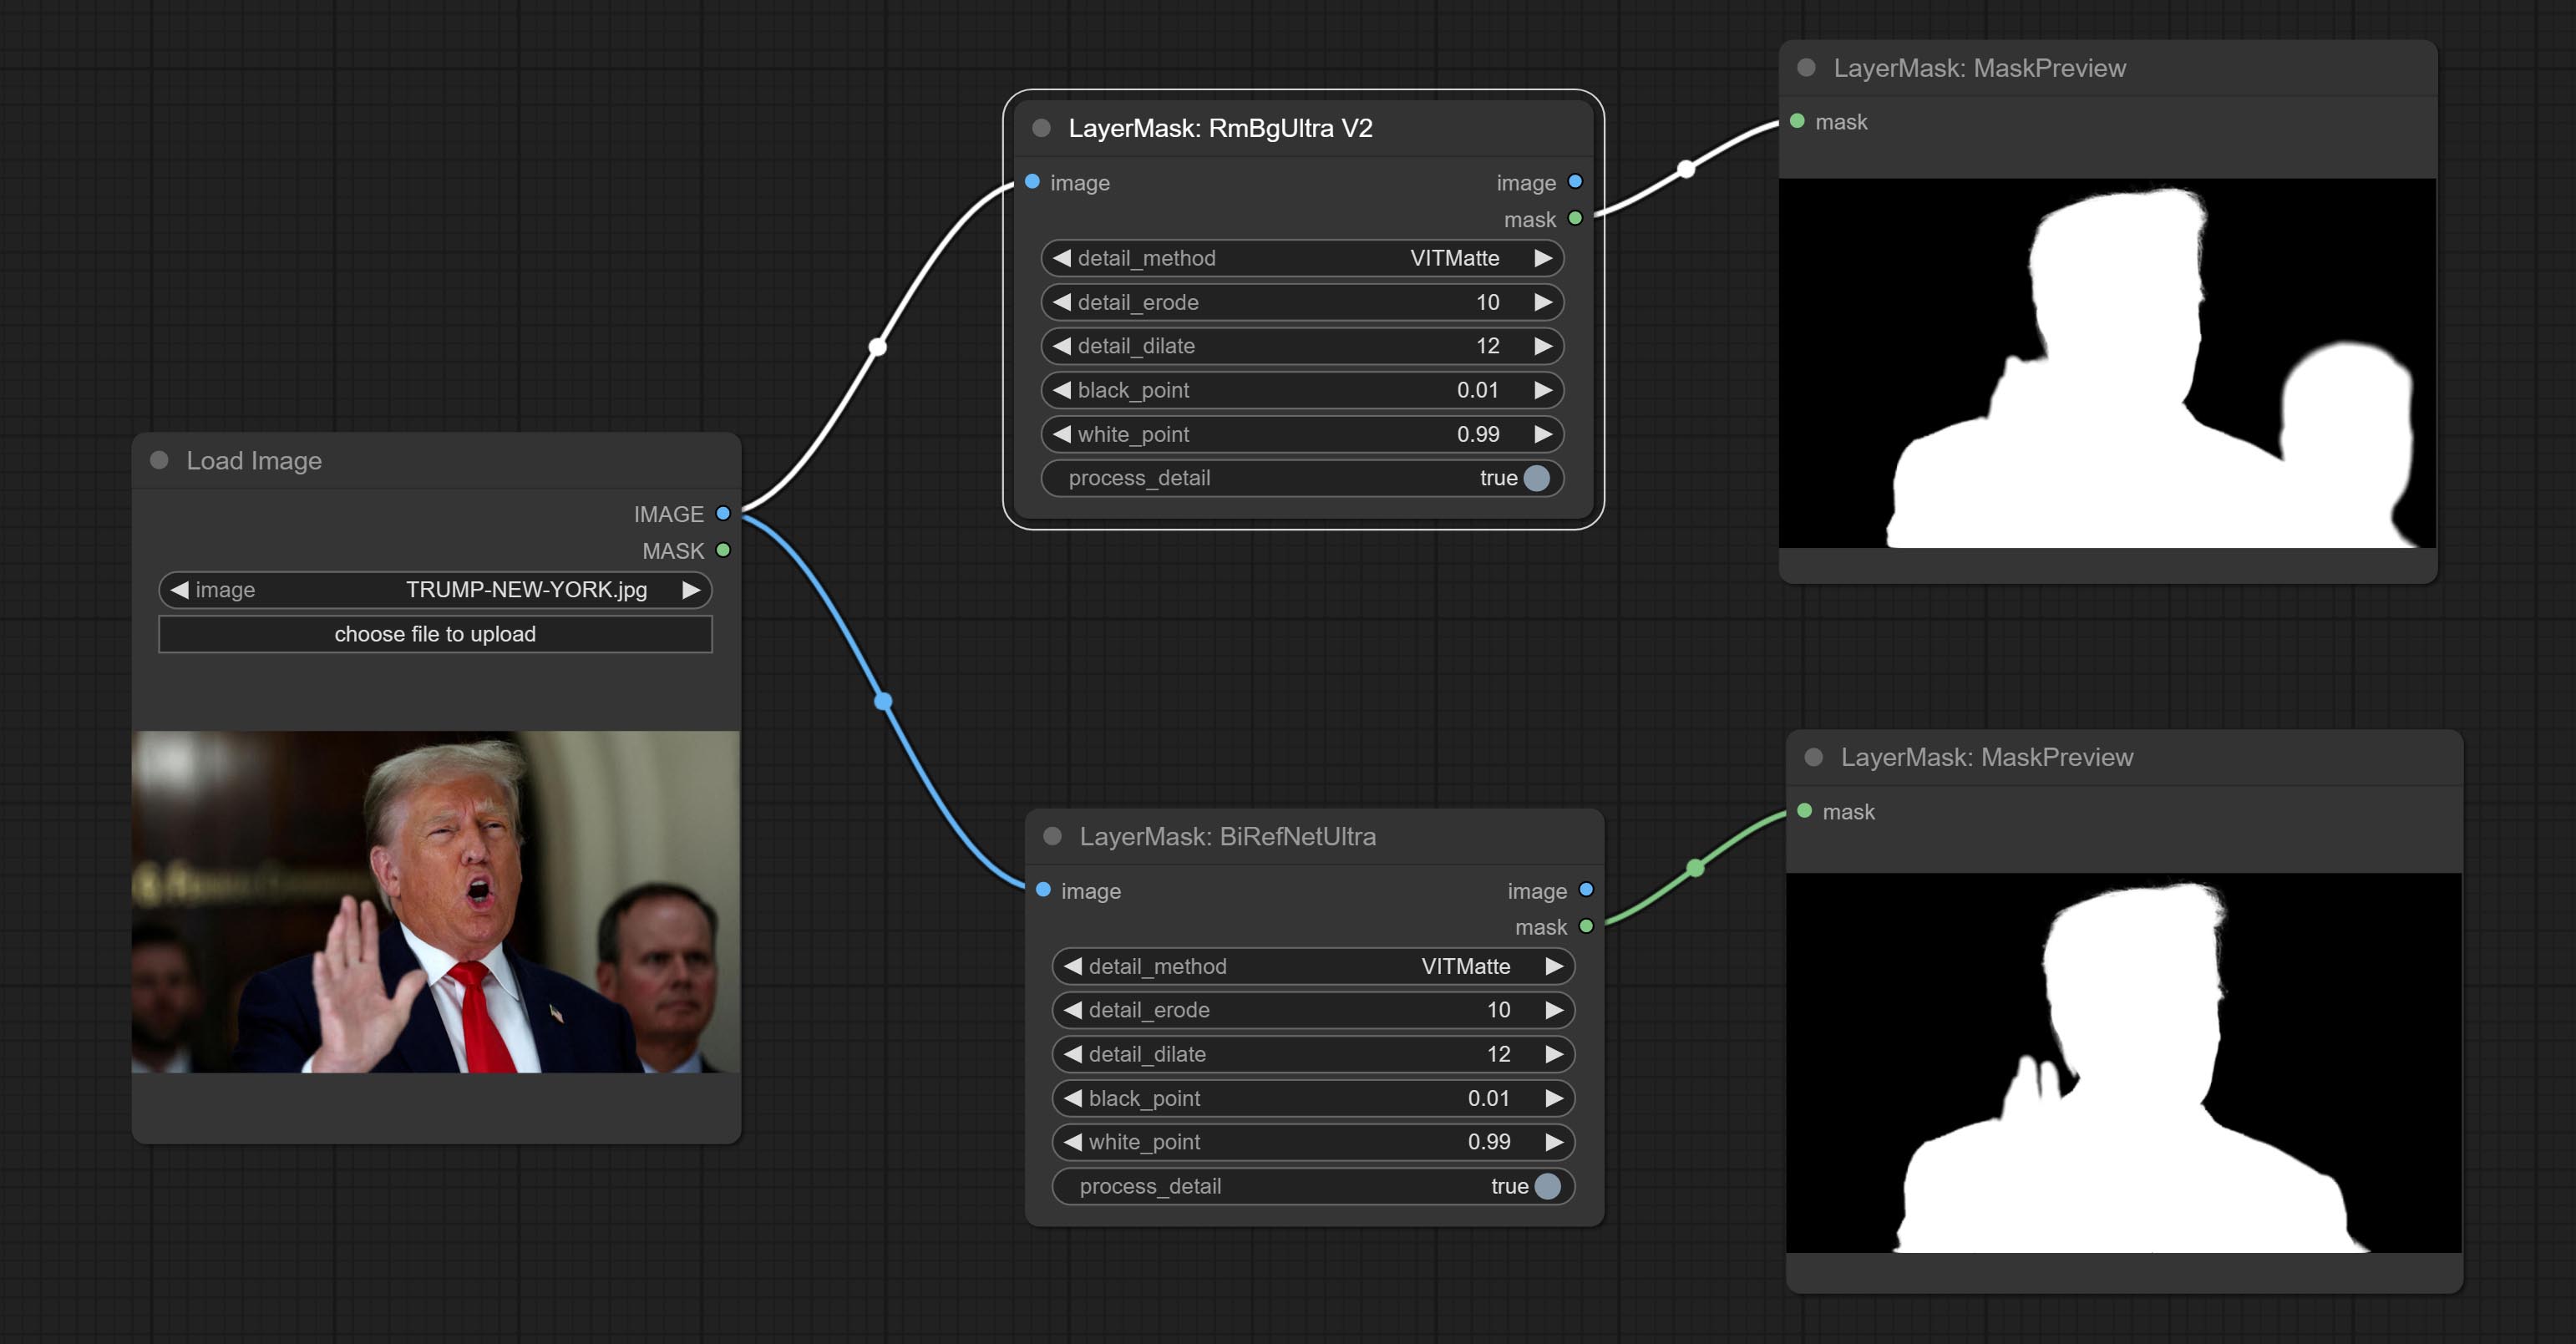
Node options:
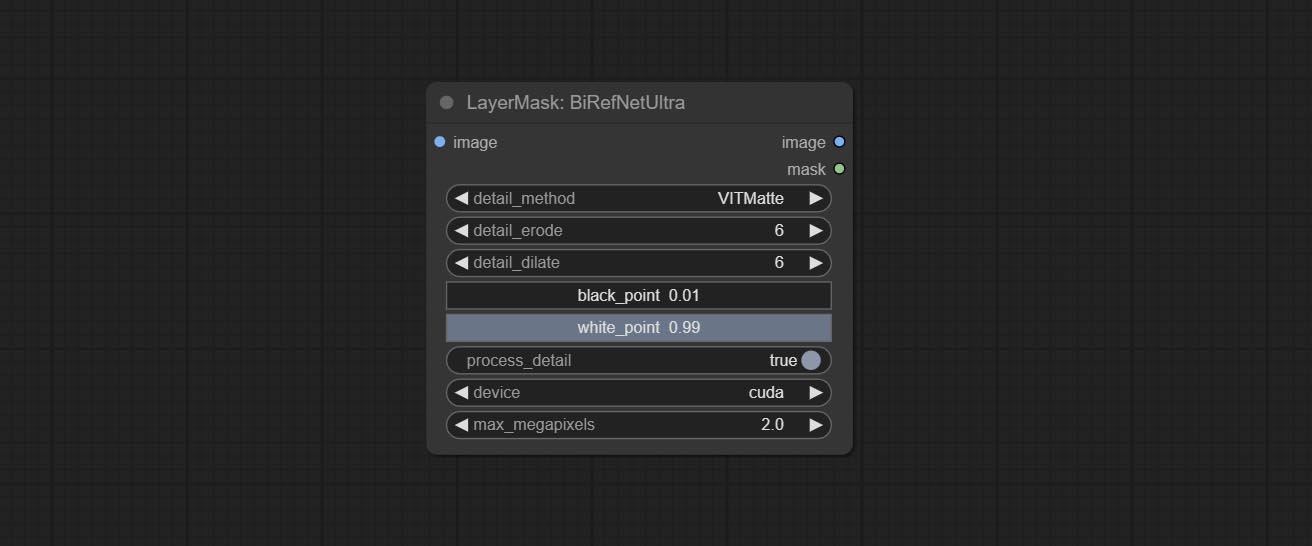
- detail_method: Edge processing methods. provides VITMatte, VITMatte(local), PyMatting, GuidedFilter. If the model has been downloaded after the first use of VITMatte, you can use VITMatte (local) afterwards.
- detail_erode: Mask the erosion range inward from the edge. the larger the value, the larger the range of inward repair.
- detail_dilate: The edge of the mask expands outward. the larger the value, the wider the range of outward repair.
- black_point: Edge black sampling threshold.
- white_point: Edge white sampling threshold.
- process_detail: Set to false here will skip edge processing to save runtime.
- device: Set whether the VitMatte to use cuda.
- max_megapixels: Set the maximum size for VitMate operations.
BiRefNetUltraV2
This node supports the use of the latest BiRefNet model. *Download model file from BaiduNetdisk or GoogleDrive named BiRefNet-general-epoch_244.pth to ComfyUI/Models/BiRefNet/pth folder. You can also download more BiRefNet models and put them here.
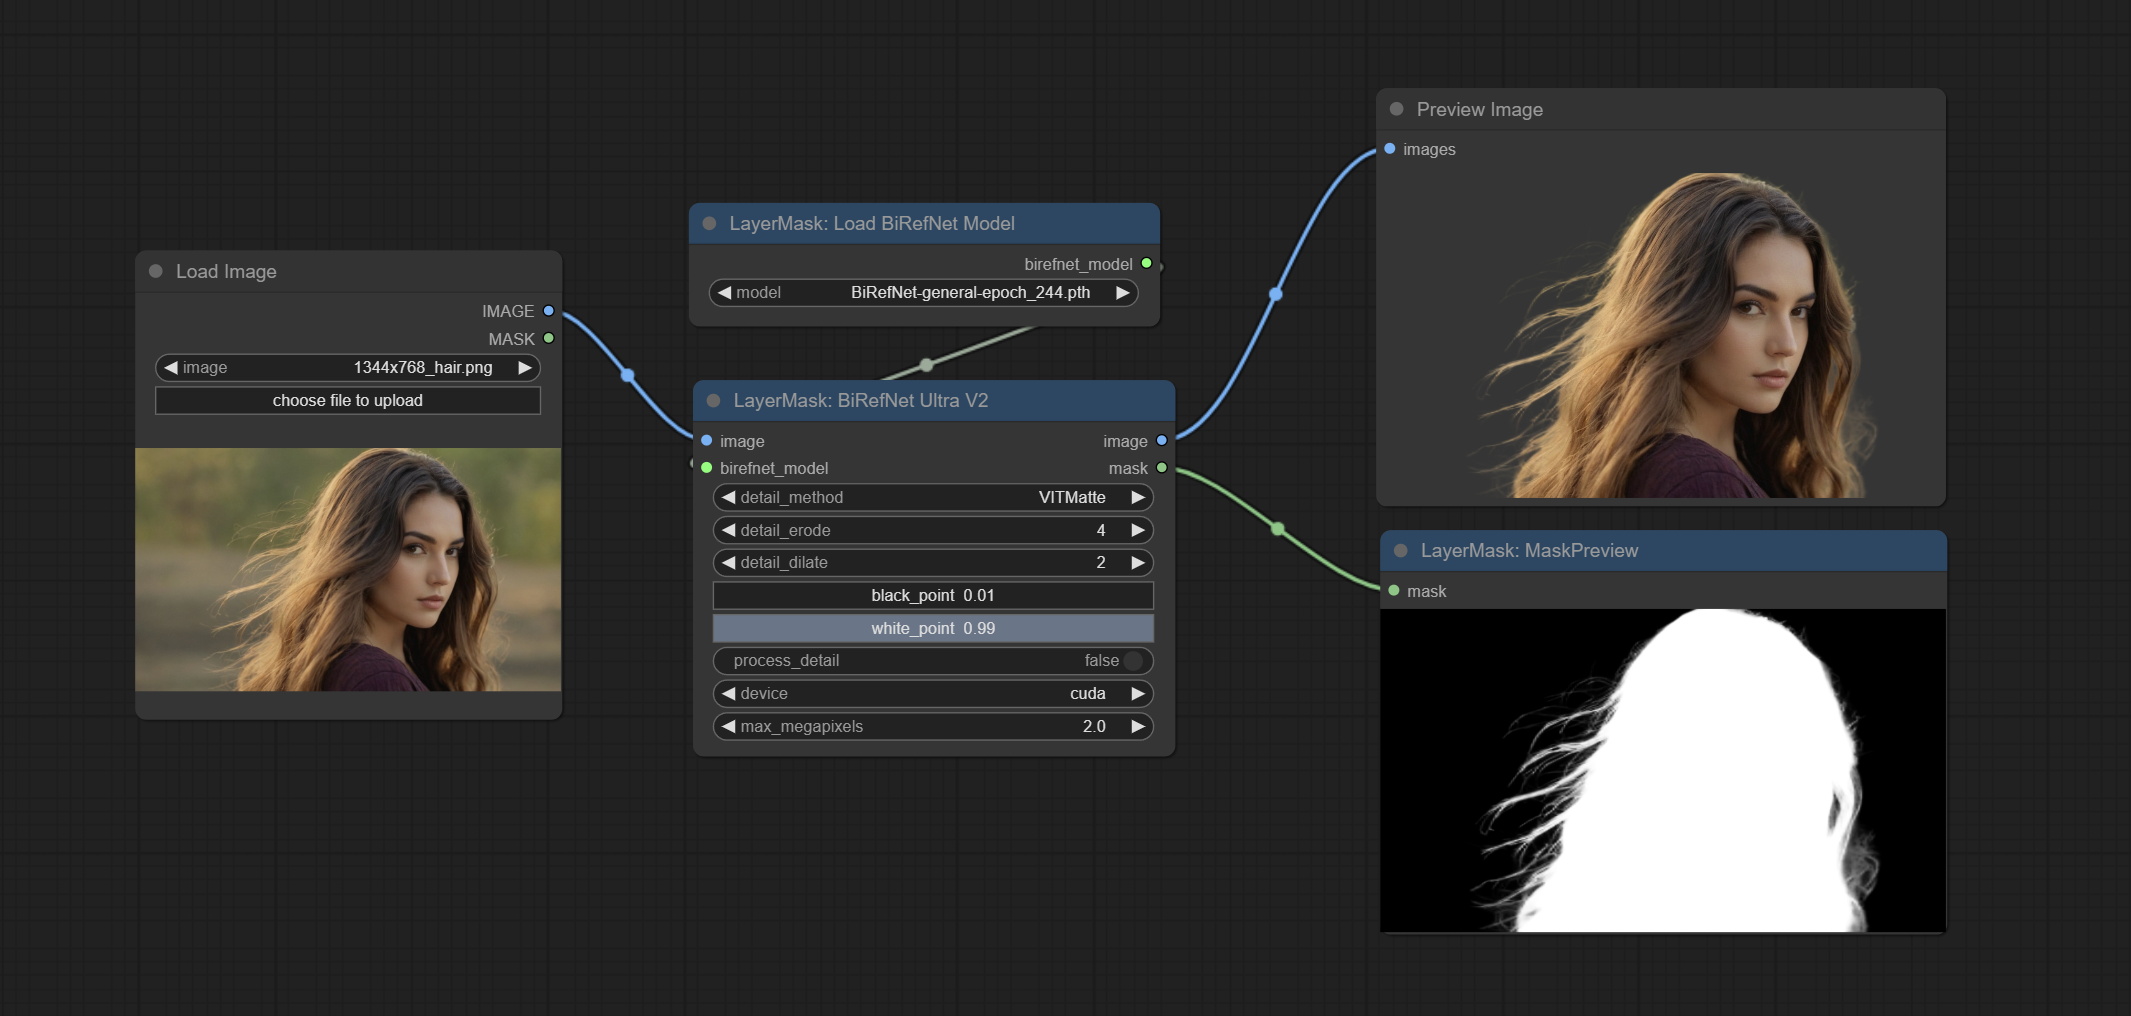
Node Options:
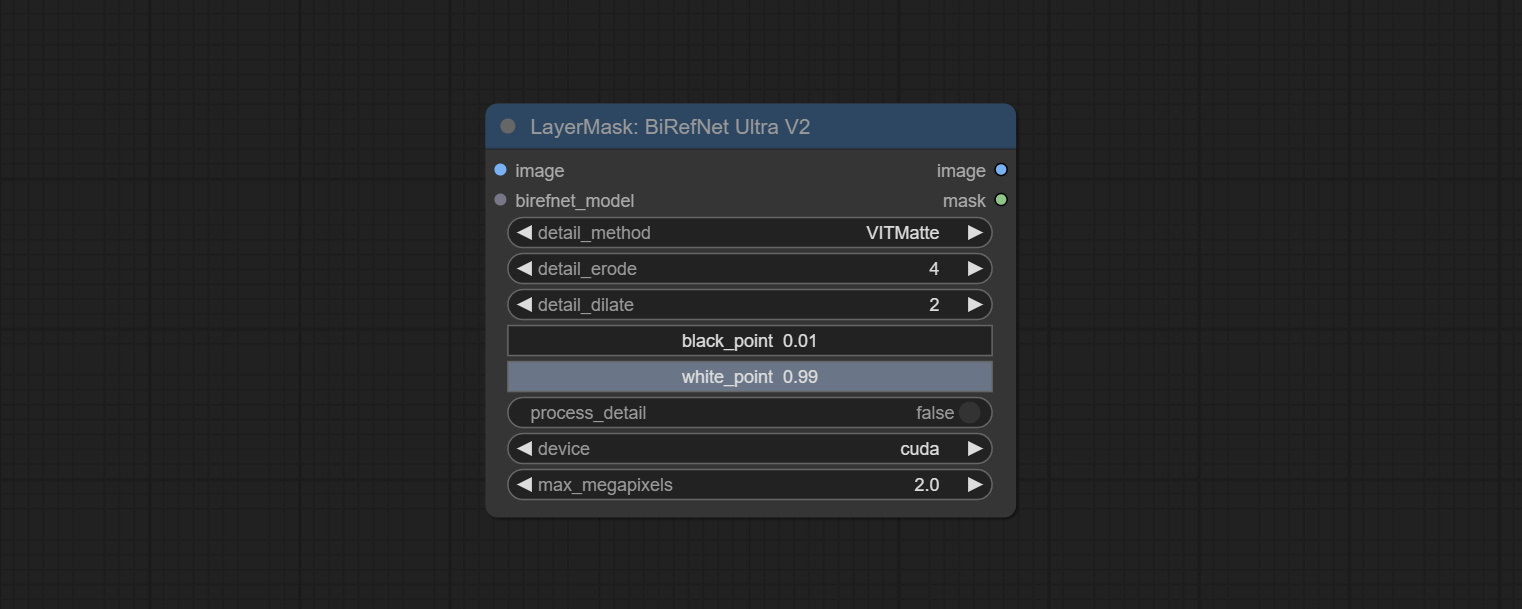
- image: The input image.
- birefnet_model: The BiRefNet model is input and it is output from the LoadBiRefNetModel node.
- detail_method: Edge processing methods. provides VITMatte, VITMatte(local), PyMatting, GuidedFilter. If the model has been downloaded after the first use of VITMatte, you can use VITMatte (local) afterwards.
- detail_erode: Mask the erosion range inward from the edge. the larger the value, the larger the range of inward repair.
- detail_dilate: The edge of the mask expands outward. the larger the value, the wider the range of outward repair.
- black_point: Edge black sampling threshold.
- white_point: Edge white sampling threshold.
- process_detail: Due to the excellent edge processing of BiRefNet, it is set to False by default here.
- device: Set whether the VitMatte to use cuda.
- max_megapixels: Set the maximum size for VitMate operations.
LoadBiRefNetModel
Load the BiRefNet model.
Node Options:
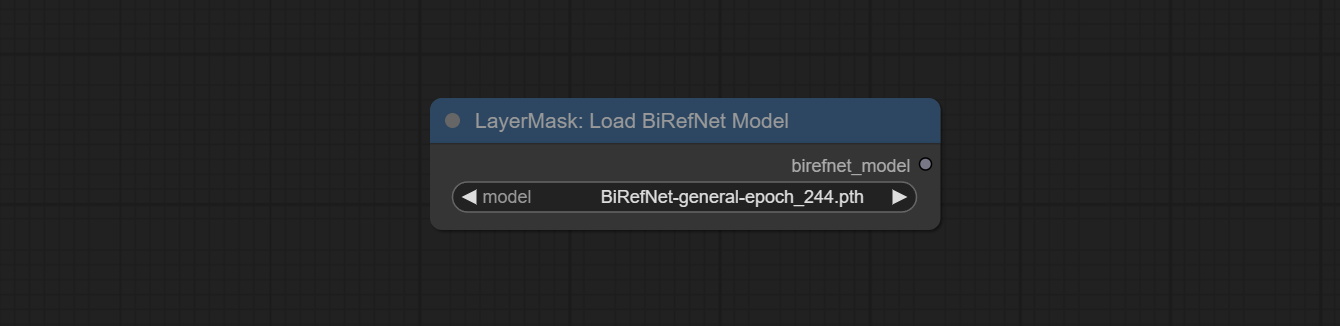
- model: Select the model. List the files in the
CoomfyUI/models/BiRefNet/pth folder for selection.
LoadBiRefNetModelV2
This node is a PR submitted by jimlee2048 and supports loading RMBG-2.0 models.
Download model files from huggingface or 百度网盘 and copy to ComfyUI/models/BiRefNet/RMBG-2.0 folder.
Node Options:
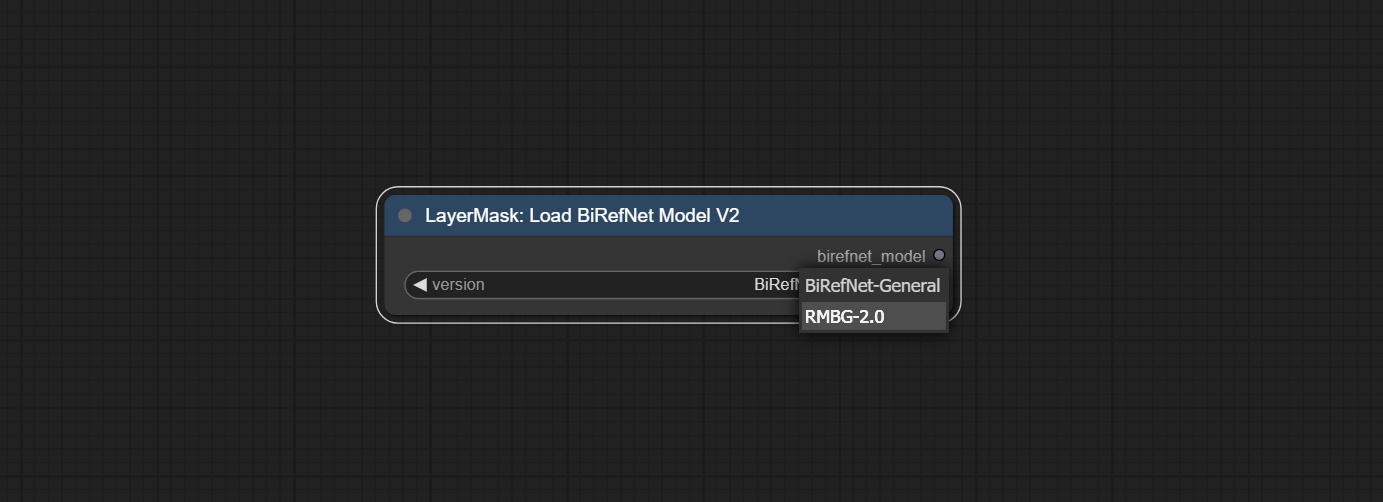
- model: Select the model. There are two options,
BiRefNet-General and RMBG-2.0 .
TransparentBackgroundUltra
Using the transparent-background model to remove background has better recognition ability and speed, while also having ultra-high edge details.
*From googledrive or BaiduNetdisk download all files to ComfyUI/models/transparent-background folder.
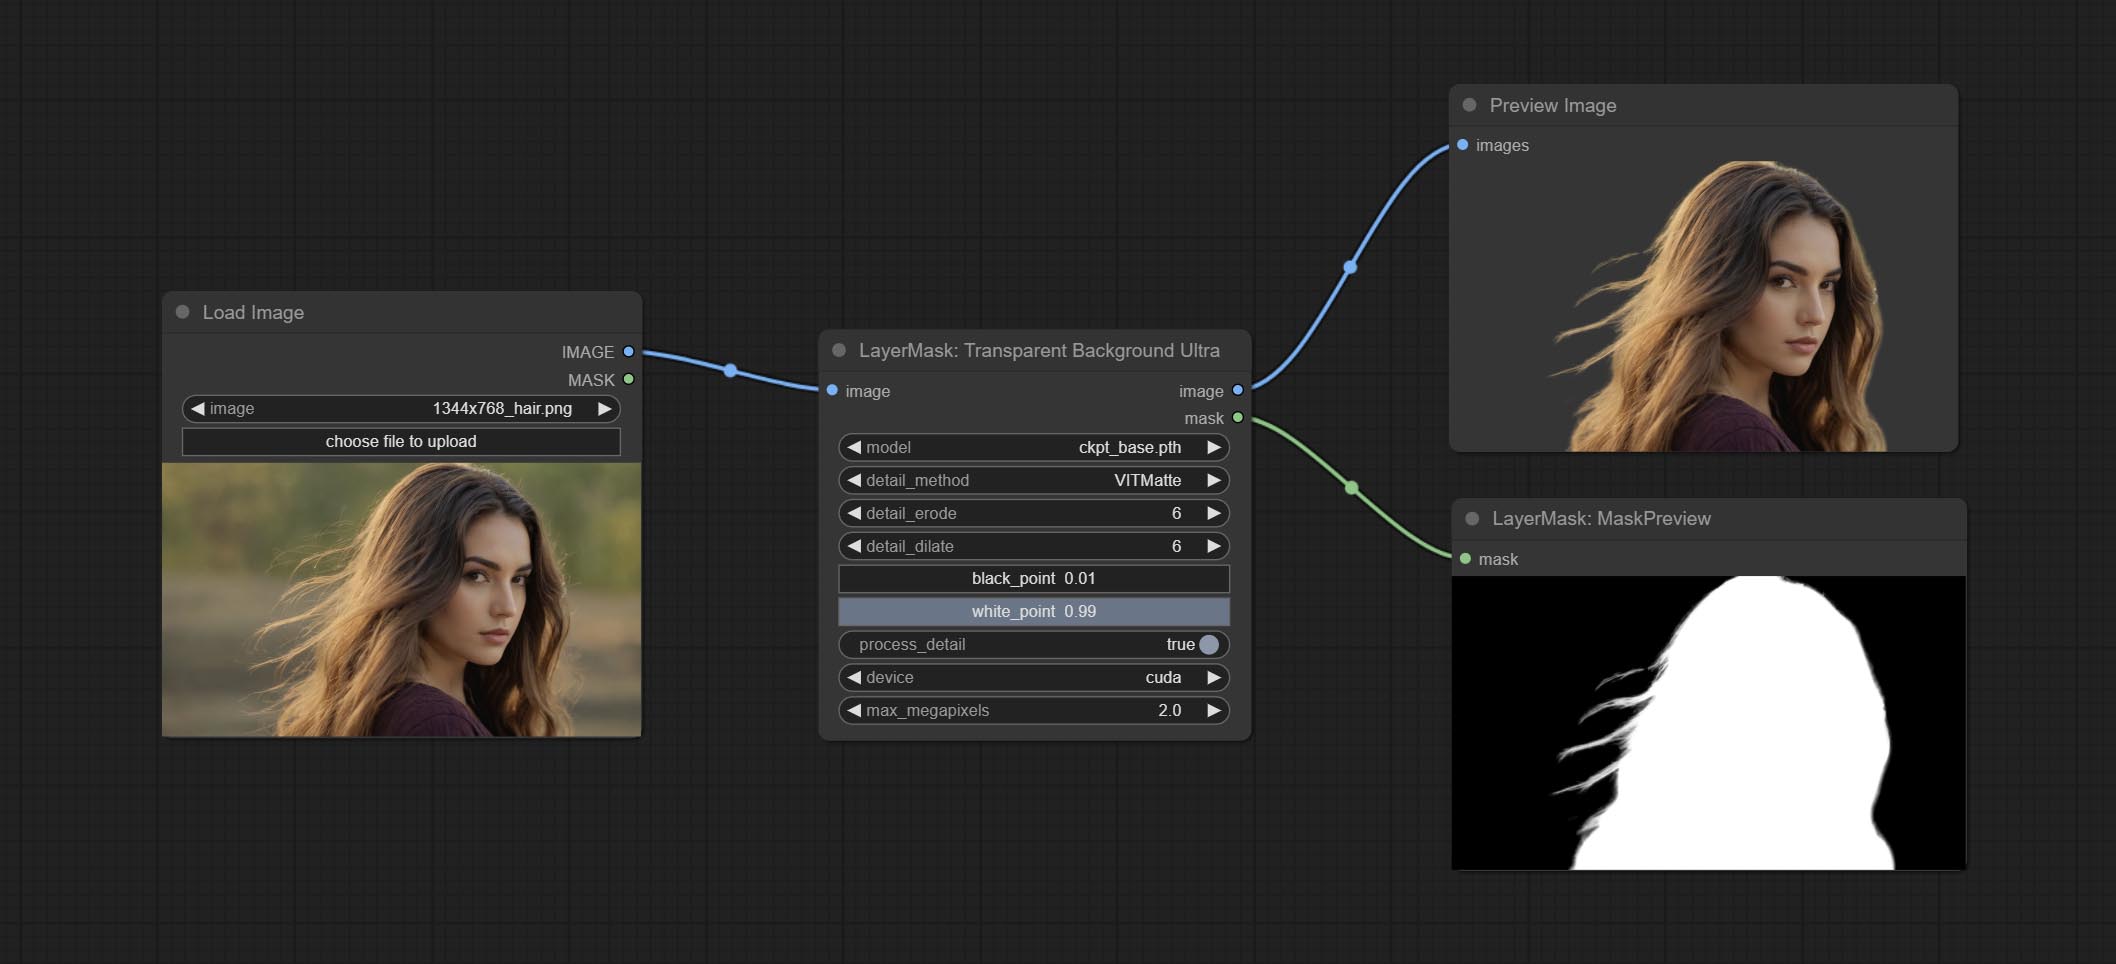
Node Options:
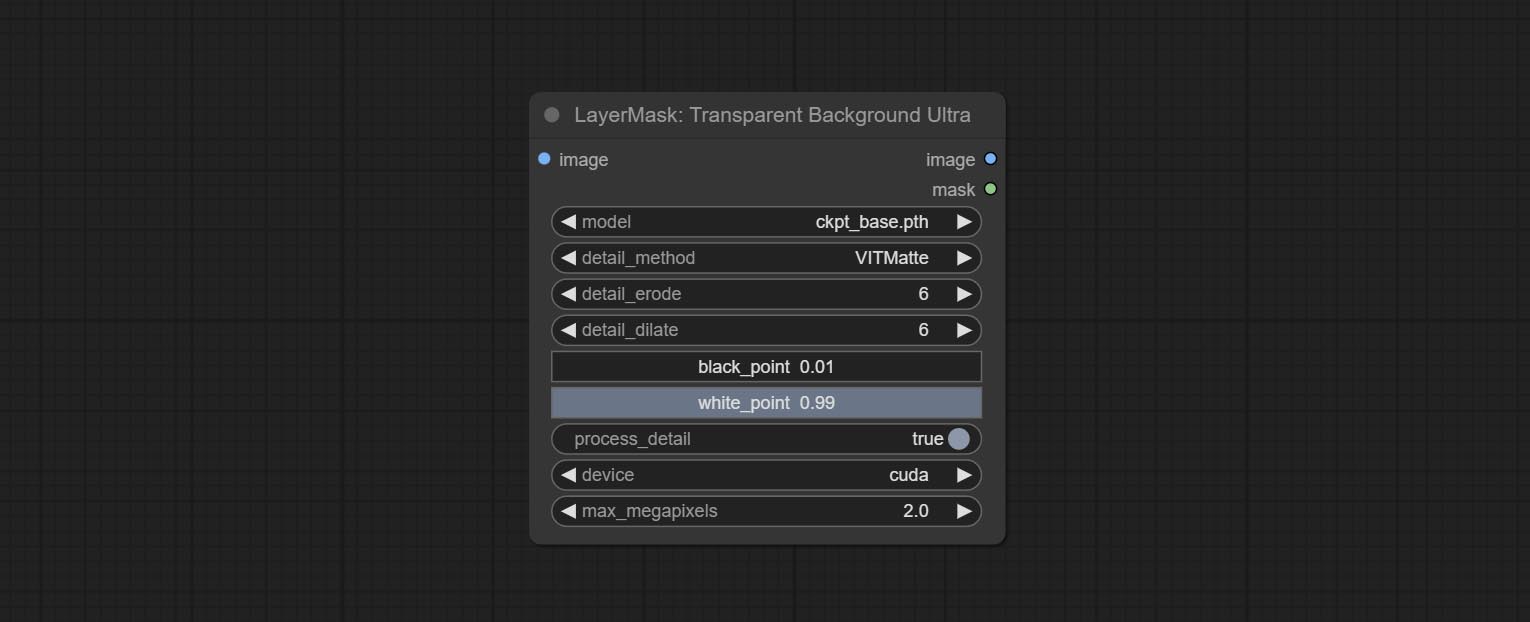
- model: Select the model.
- detail_method: Edge processing methods. provides VITMatte, VITMatte(local), PyMatting, GuidedFilter. If the model has been downloaded after the first use of VITMatte, you can use VITMatte (local) afterwards.
- detail_erode: Mask the erosion range inward from the edge. the larger the value, the larger the range of inward repair.
- detail_dilate: The edge of the mask expands outward. the larger the value, the wider the range of outward repair.
- black_point: Edge black sampling threshold.
- white_point: Edge white sampling threshold.
- process_detail: Set to false here will skip edge processing to save runtime.
- device: Set whether the VitMatte to use cuda.
- max_megapixels: Set the maximum size for VitMate operations.
PersonMaskUltra
Generate masks for portrait's face, hair, body skin, clothing, or accessories. Compared to the previous A Person Mask Generator node, this node has ultra-high edge details. The model code for this node comes from a-person-mask-generator, edge processing code from ComfyUI-Image-Filters,thanks to the original author. *Download model files from BaiduNetdisk to ComfyUI/models/mediapipe folder.
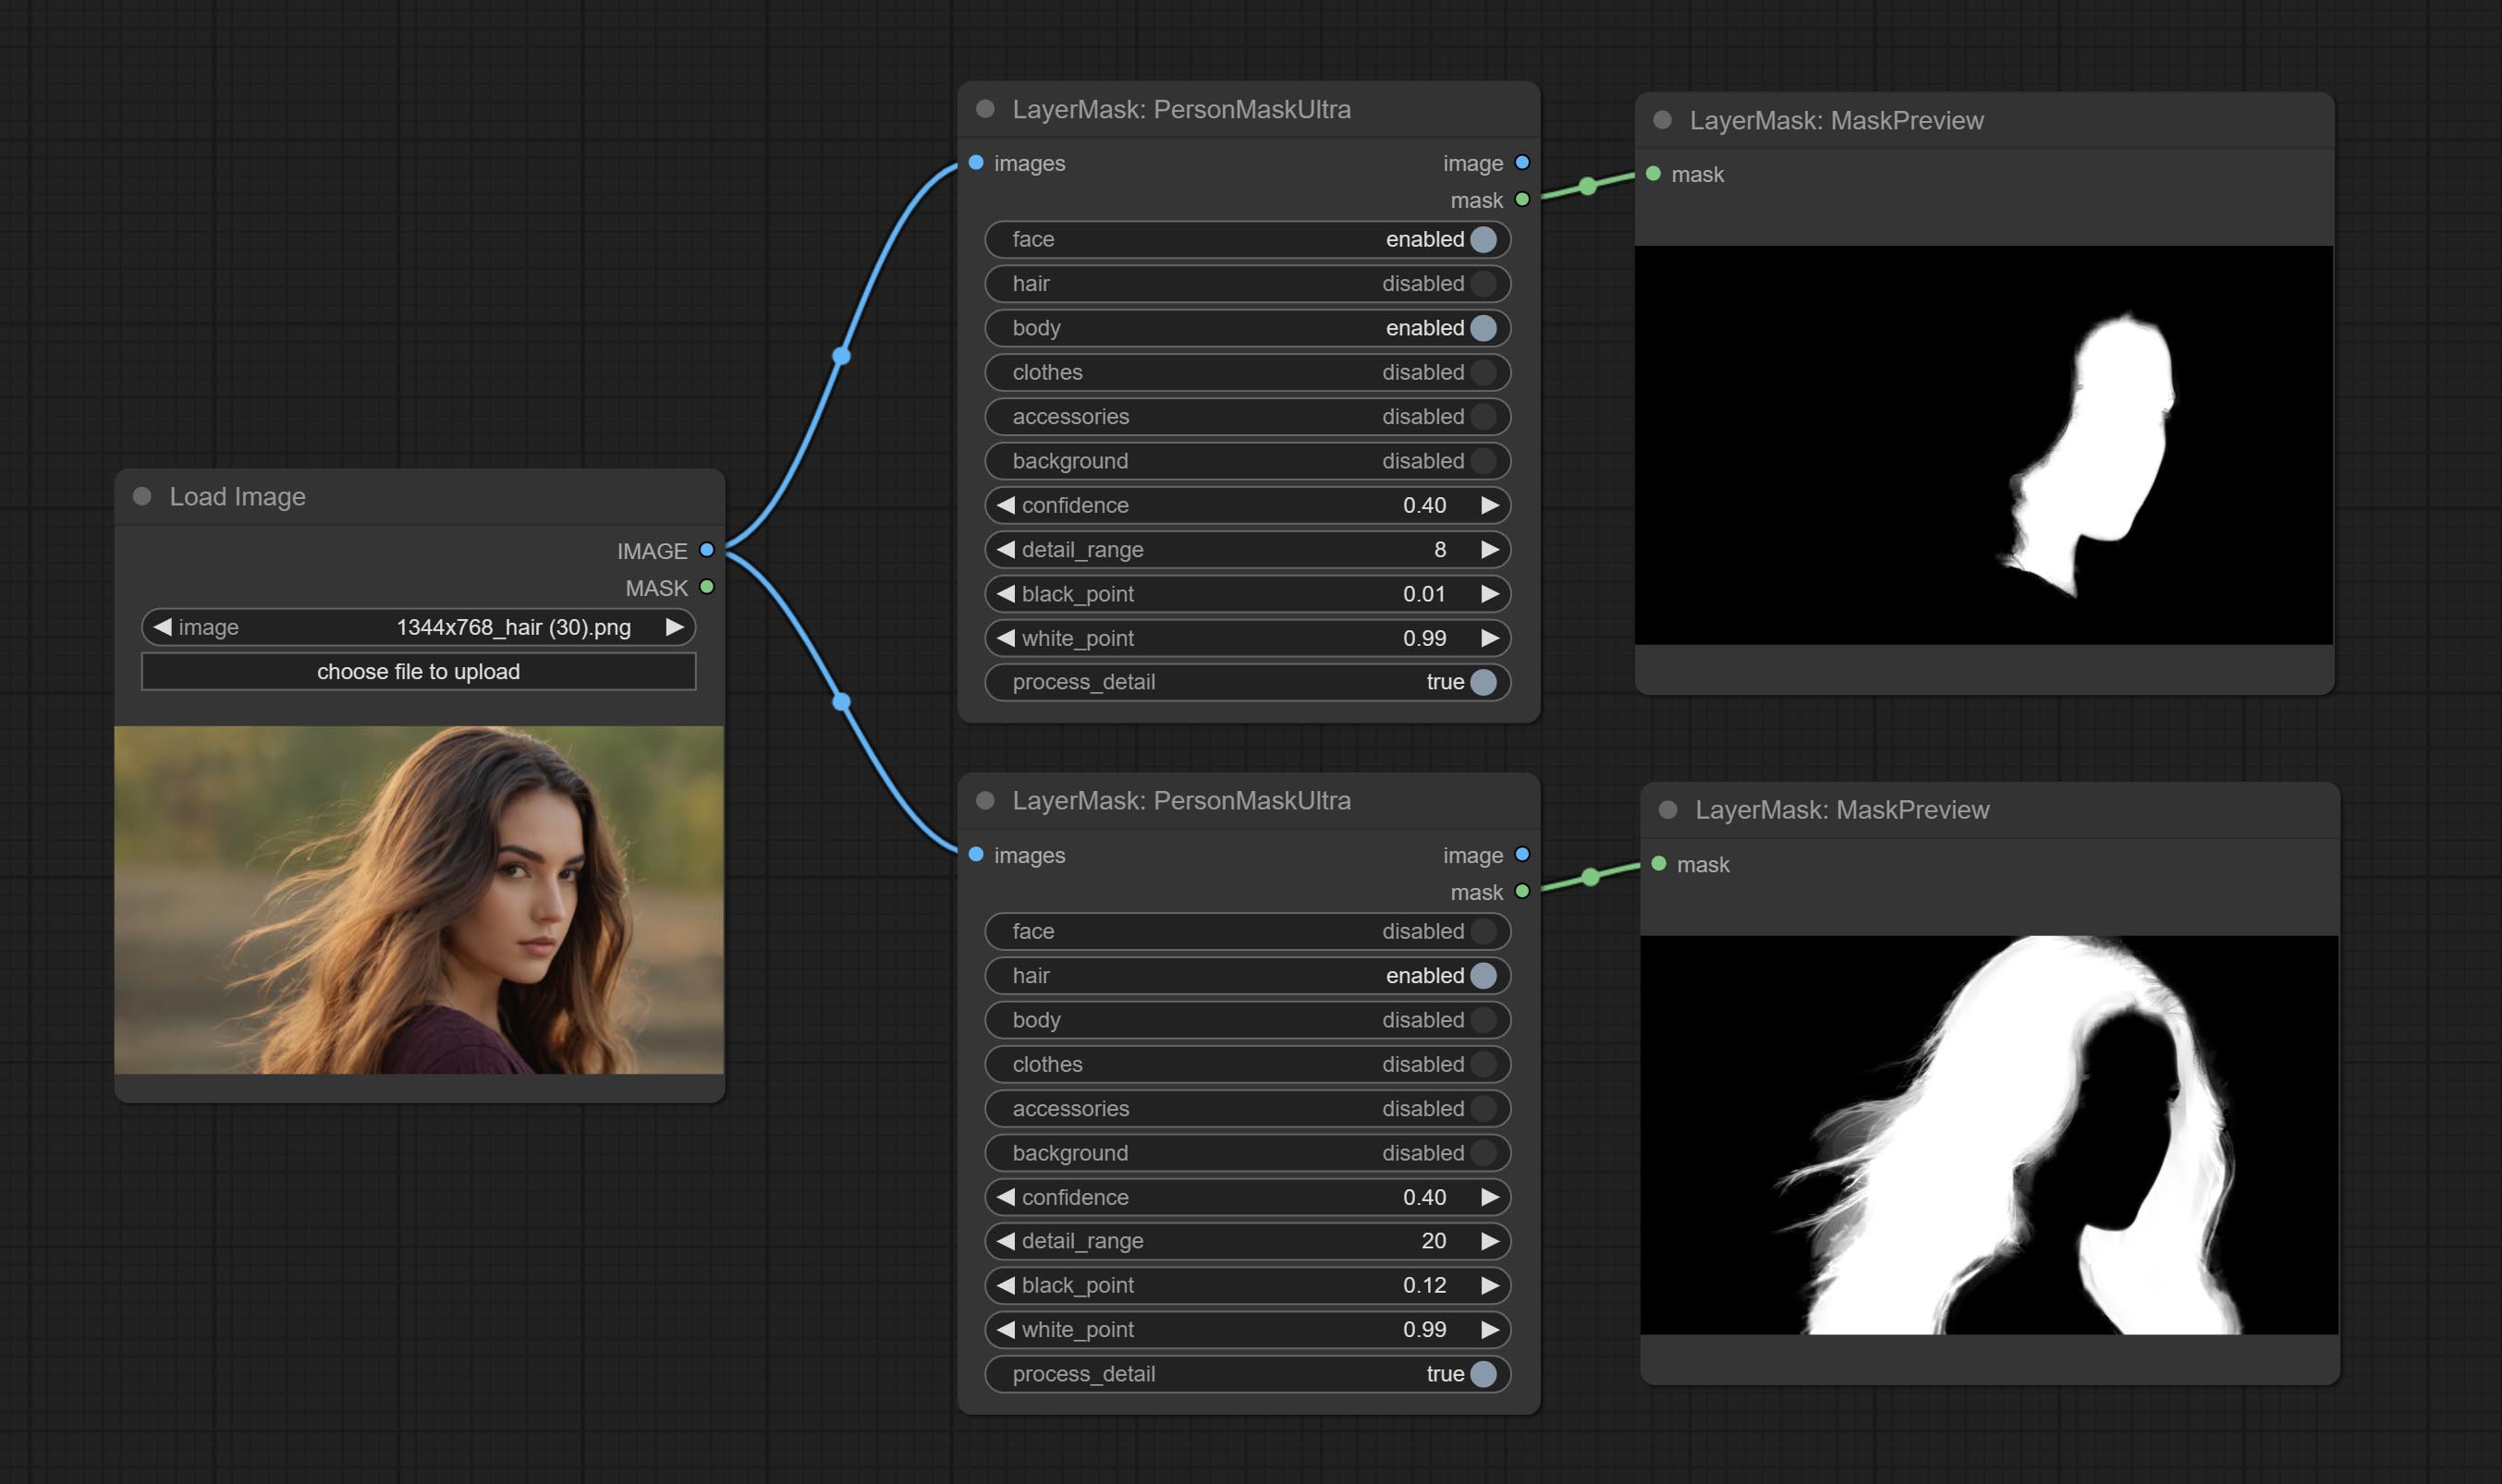
Node options:
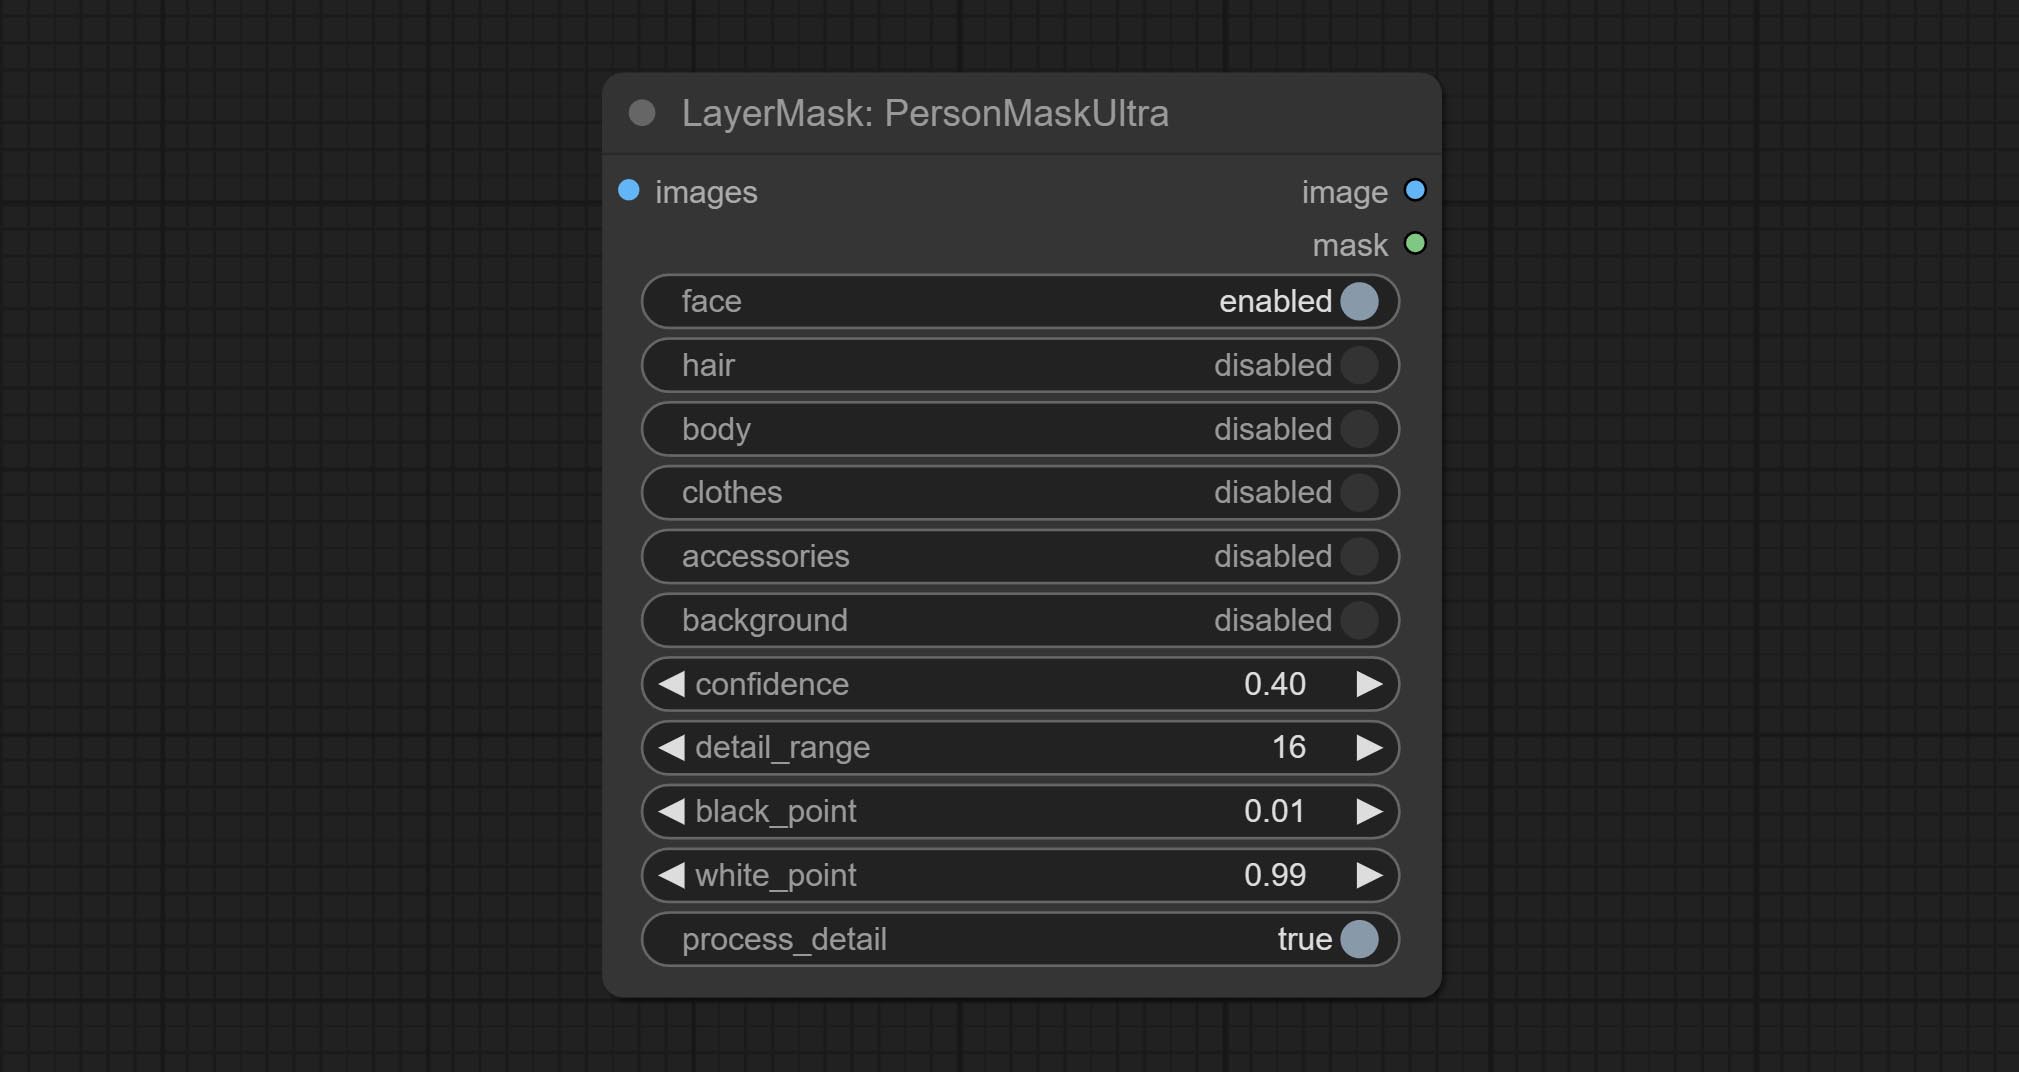
- face: Face recognition.
- hair: Hair recognition.
- body: Body skin recognition.
- clothes: Clothing recognition.
- accessories: Identification of accessories (such as backpacks).
- background: Background recognition.
- confidence: Recognition threshold, lower values will output more mask ranges.
- detail_range: Edge detail range.
- black_point: Edge black sampling threshold.
- white_point: Edge white sampling threshold.
- process_detail: Set to false here will skip edge processing to save runtime.
PersonMaskUltraV2
The V2 upgraded version of PersonMaskUltra has added the VITMatte edge processing method.(Note: Images larger than 2K in size using this method will consume huge memory)
On the basis of PersonMaskUltra, the following changes have been made: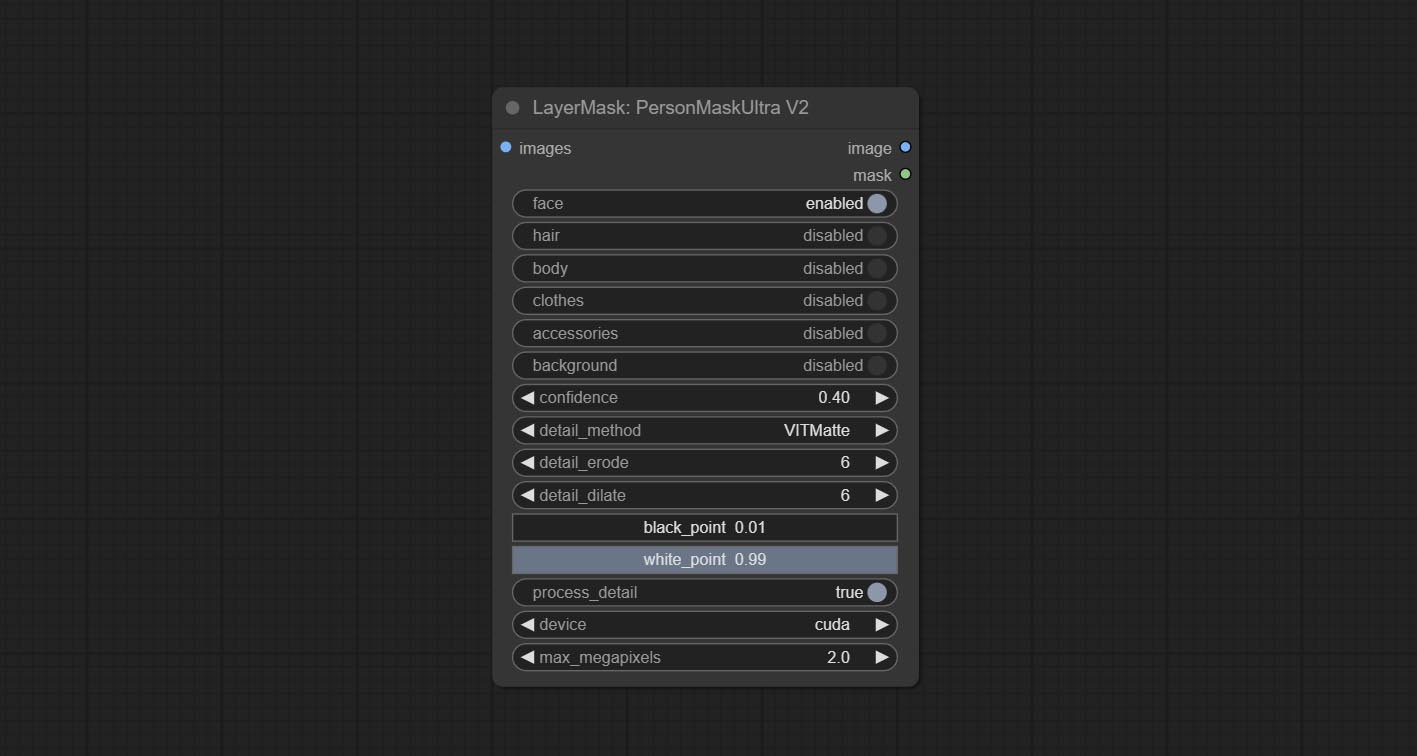
detail_method: Edge processing methods. provides VITMatte, VITMatte(local), PyMatting, GuidedFilter. If the model has been downloaded after the first use of VITMatte, you can use VITMatte (local) afterwards.
detail_erode: Mask the erosion range inward from the edge. the larger the value, the larger the range of inward repair.
detail_dilate: The edge of the mask expands outward. the larger the value, the wider the range of outward repair.
device: Set whether the VitMatte to use cuda.
max_megapixels: Set the maximum size for VitMate operations.
SegformerB2ClothesUltra

Generate masks for characters' faces, hair, arms, legs, and clothing, mainly used for segmenting clothing. The model segmentation code is fromStartHua,thanks to the original author. Compared to the comfyui_segformer_b2_clothes, this node has ultra-high edge details. (Note: Generating images with edges exceeding 2K in size using the VITMatte method will consume a lot of memory)
*Download all model files from huggingface or BaiduNetdisk to ComfyUI/models/segformer_b2_clothes folder.
Node Options:
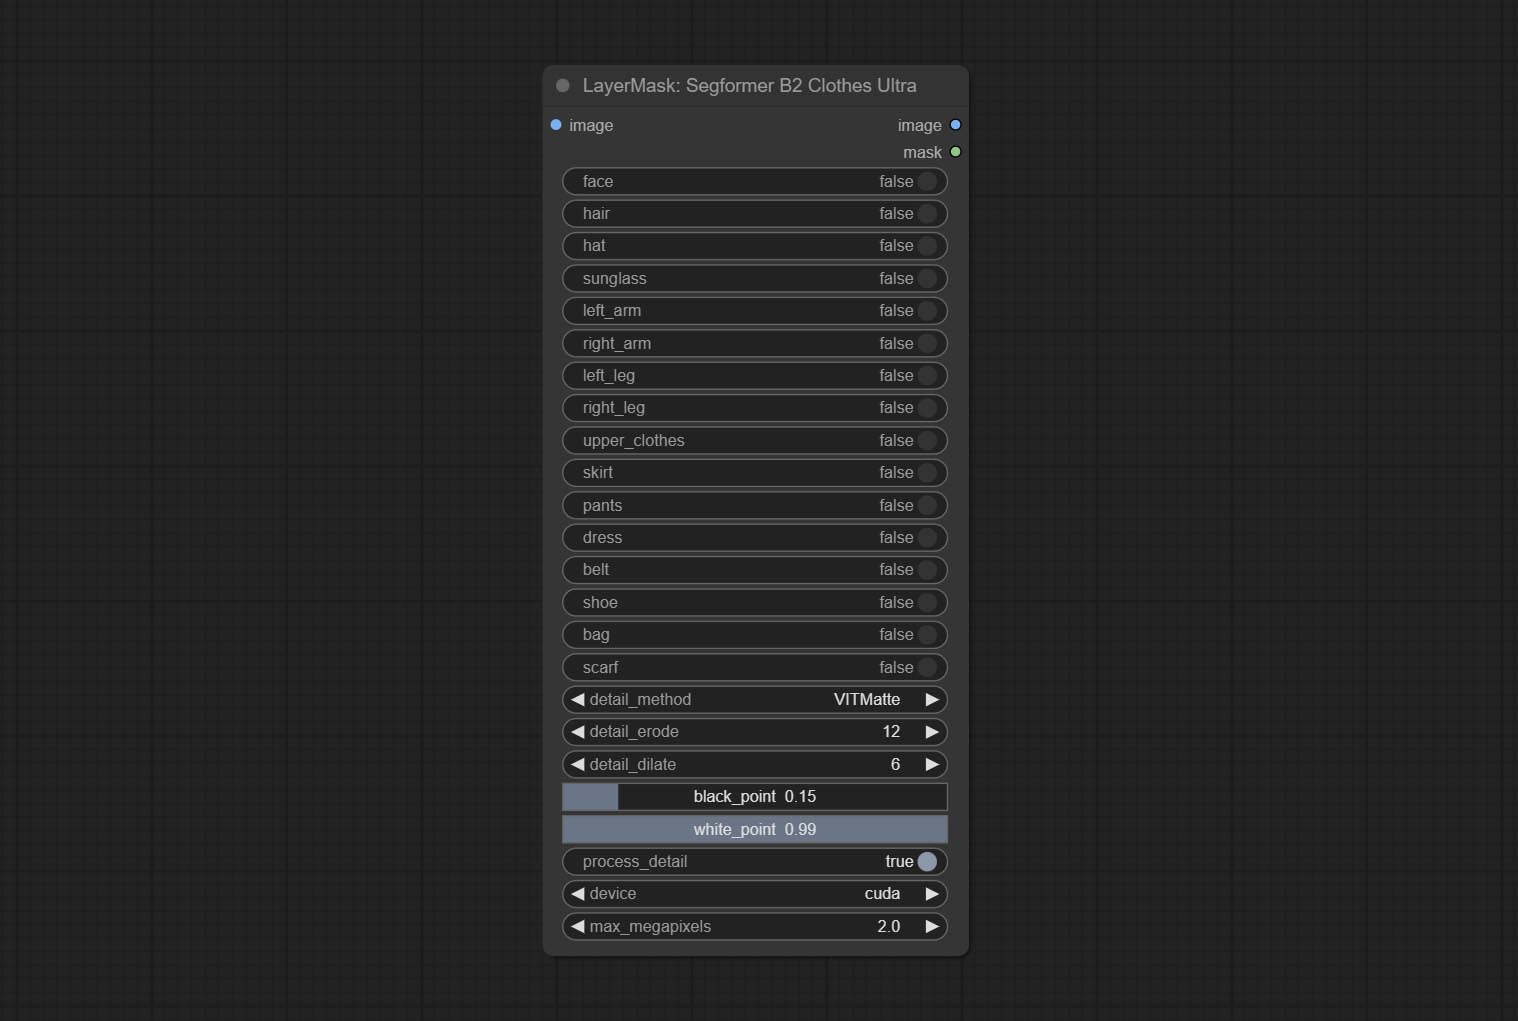
- face: Facial recognition switch.
- hair: Hair recognition switch.
- hat: Hat recognition switch.
- sunglass: Sunglass recognition switch.
- left_arm: Left arm recognition switch.
- right_arm: Right arm recognition switch.
- left_leg: Left leg recognition switch.
- right_leg: Right leg recognition switch.
- skirt: Skirt recognition switch.
- pants: Pants recognition switch.
- dress: Dress recognition switch.
- belt: Belt recognition switch.
- shoe: Shoes recognition switch.
- bag: Bag recognition switch.
- scarf: Scarf recognition switch.
- detail_method: Edge processing methods. provides VITMatte, VITMatte(local), PyMatting, GuidedFilter. If the model has been downloaded after the first use of VITMatte, you can use VITMatte (local) afterwards.
- detail_erode: Mask the erosion range inward from the edge. the larger the value, the larger the range of inward repair.
- detail_dilate: The edge of the mask expands outward. the larger the value, the wider the range of outward repair.
- black_point: Edge black sampling threshold.
- white_point: Edge white sampling threshold.
- process_detail: Set to false here will skip edge processing to save runtime.
- device: Set whether the VitMatte to use cuda.
- max_megapixels: Set the maximum size for VitMate operations.
SegformerUltraV2
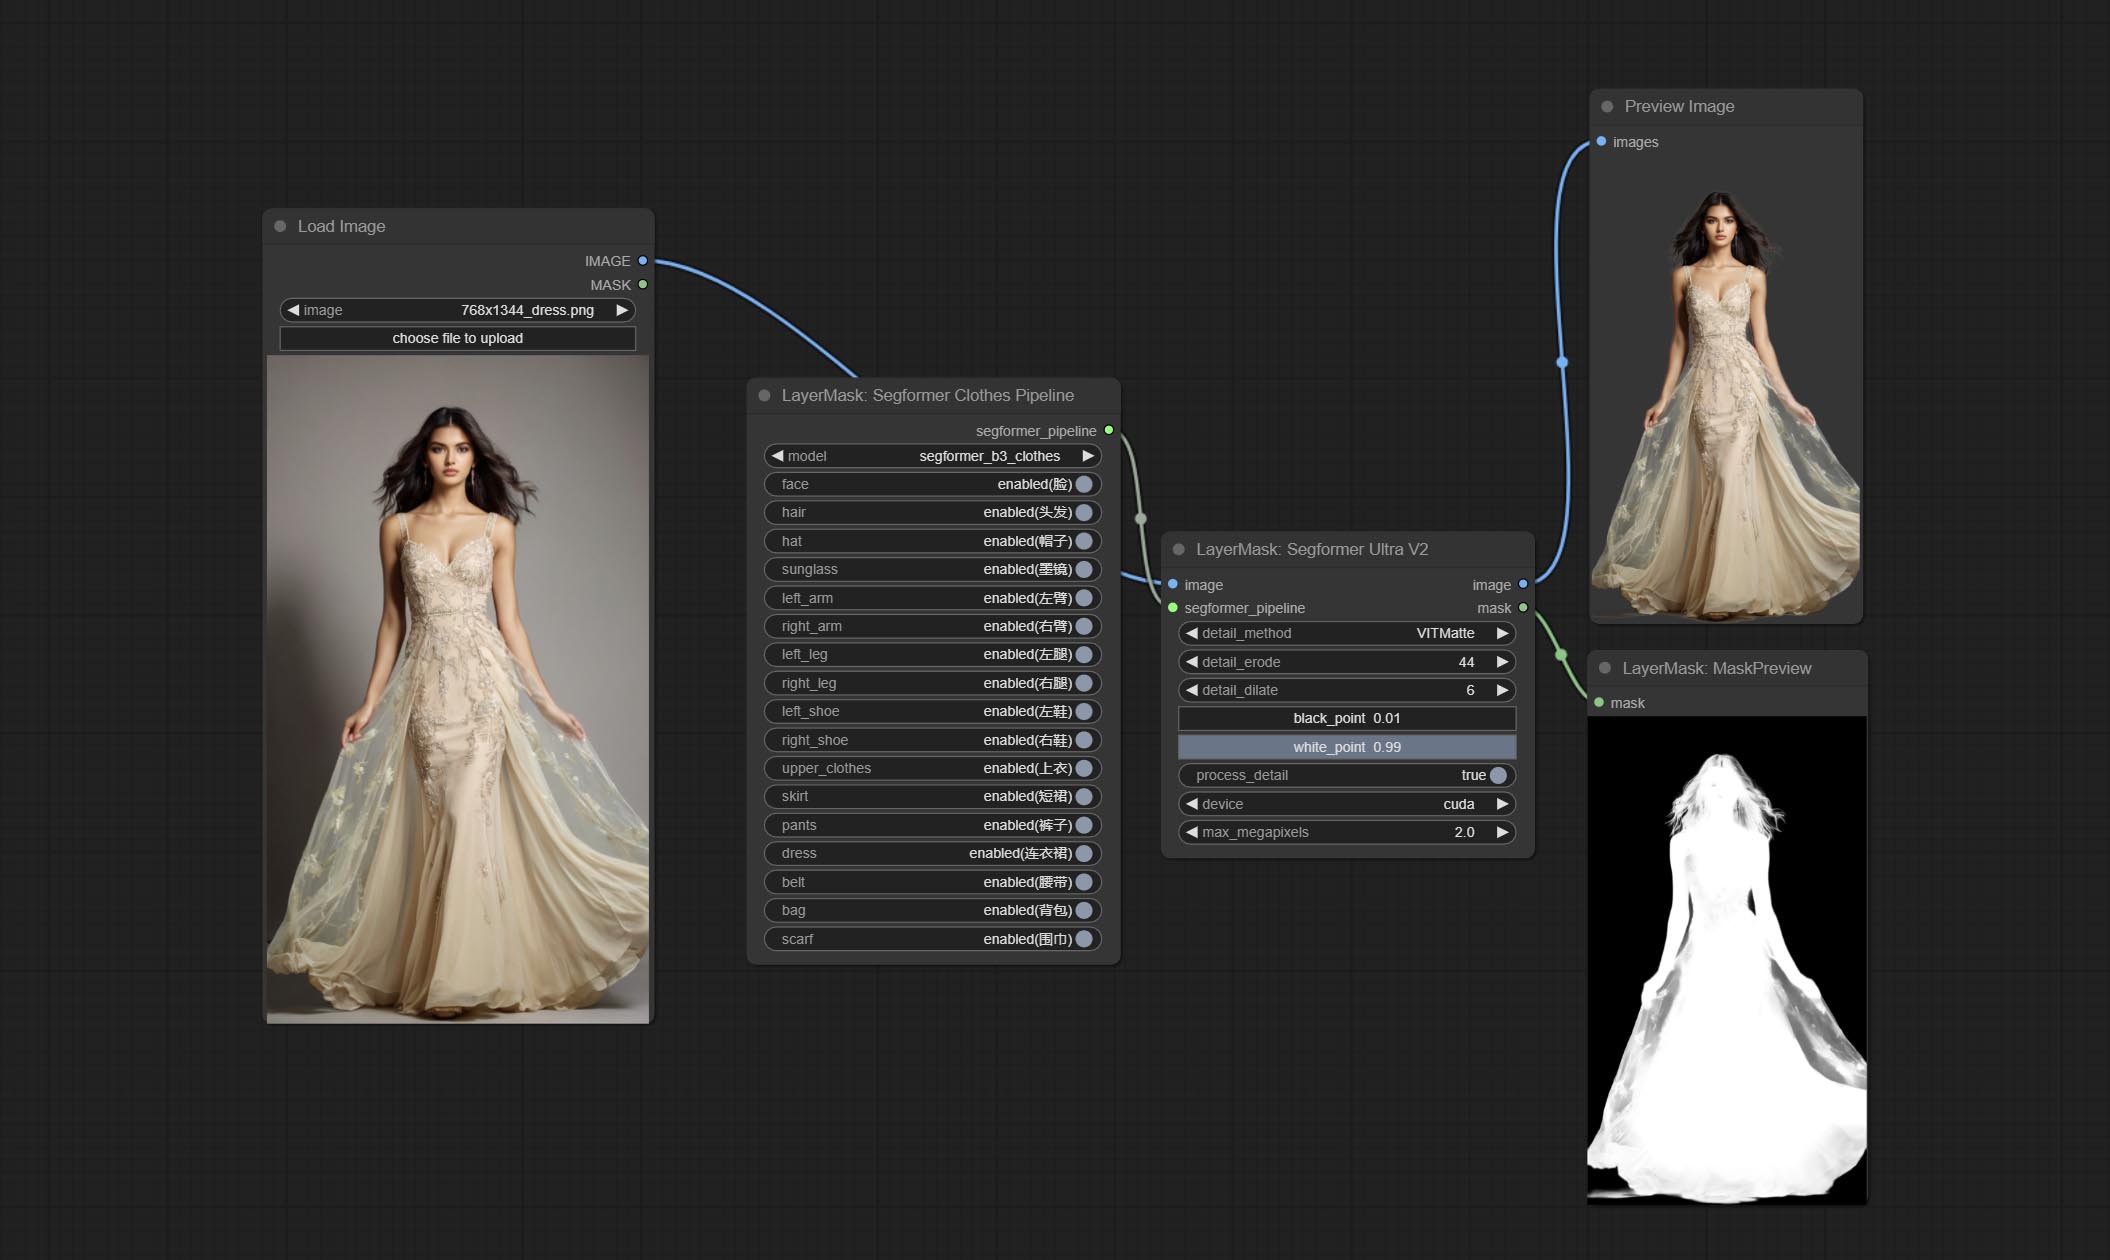
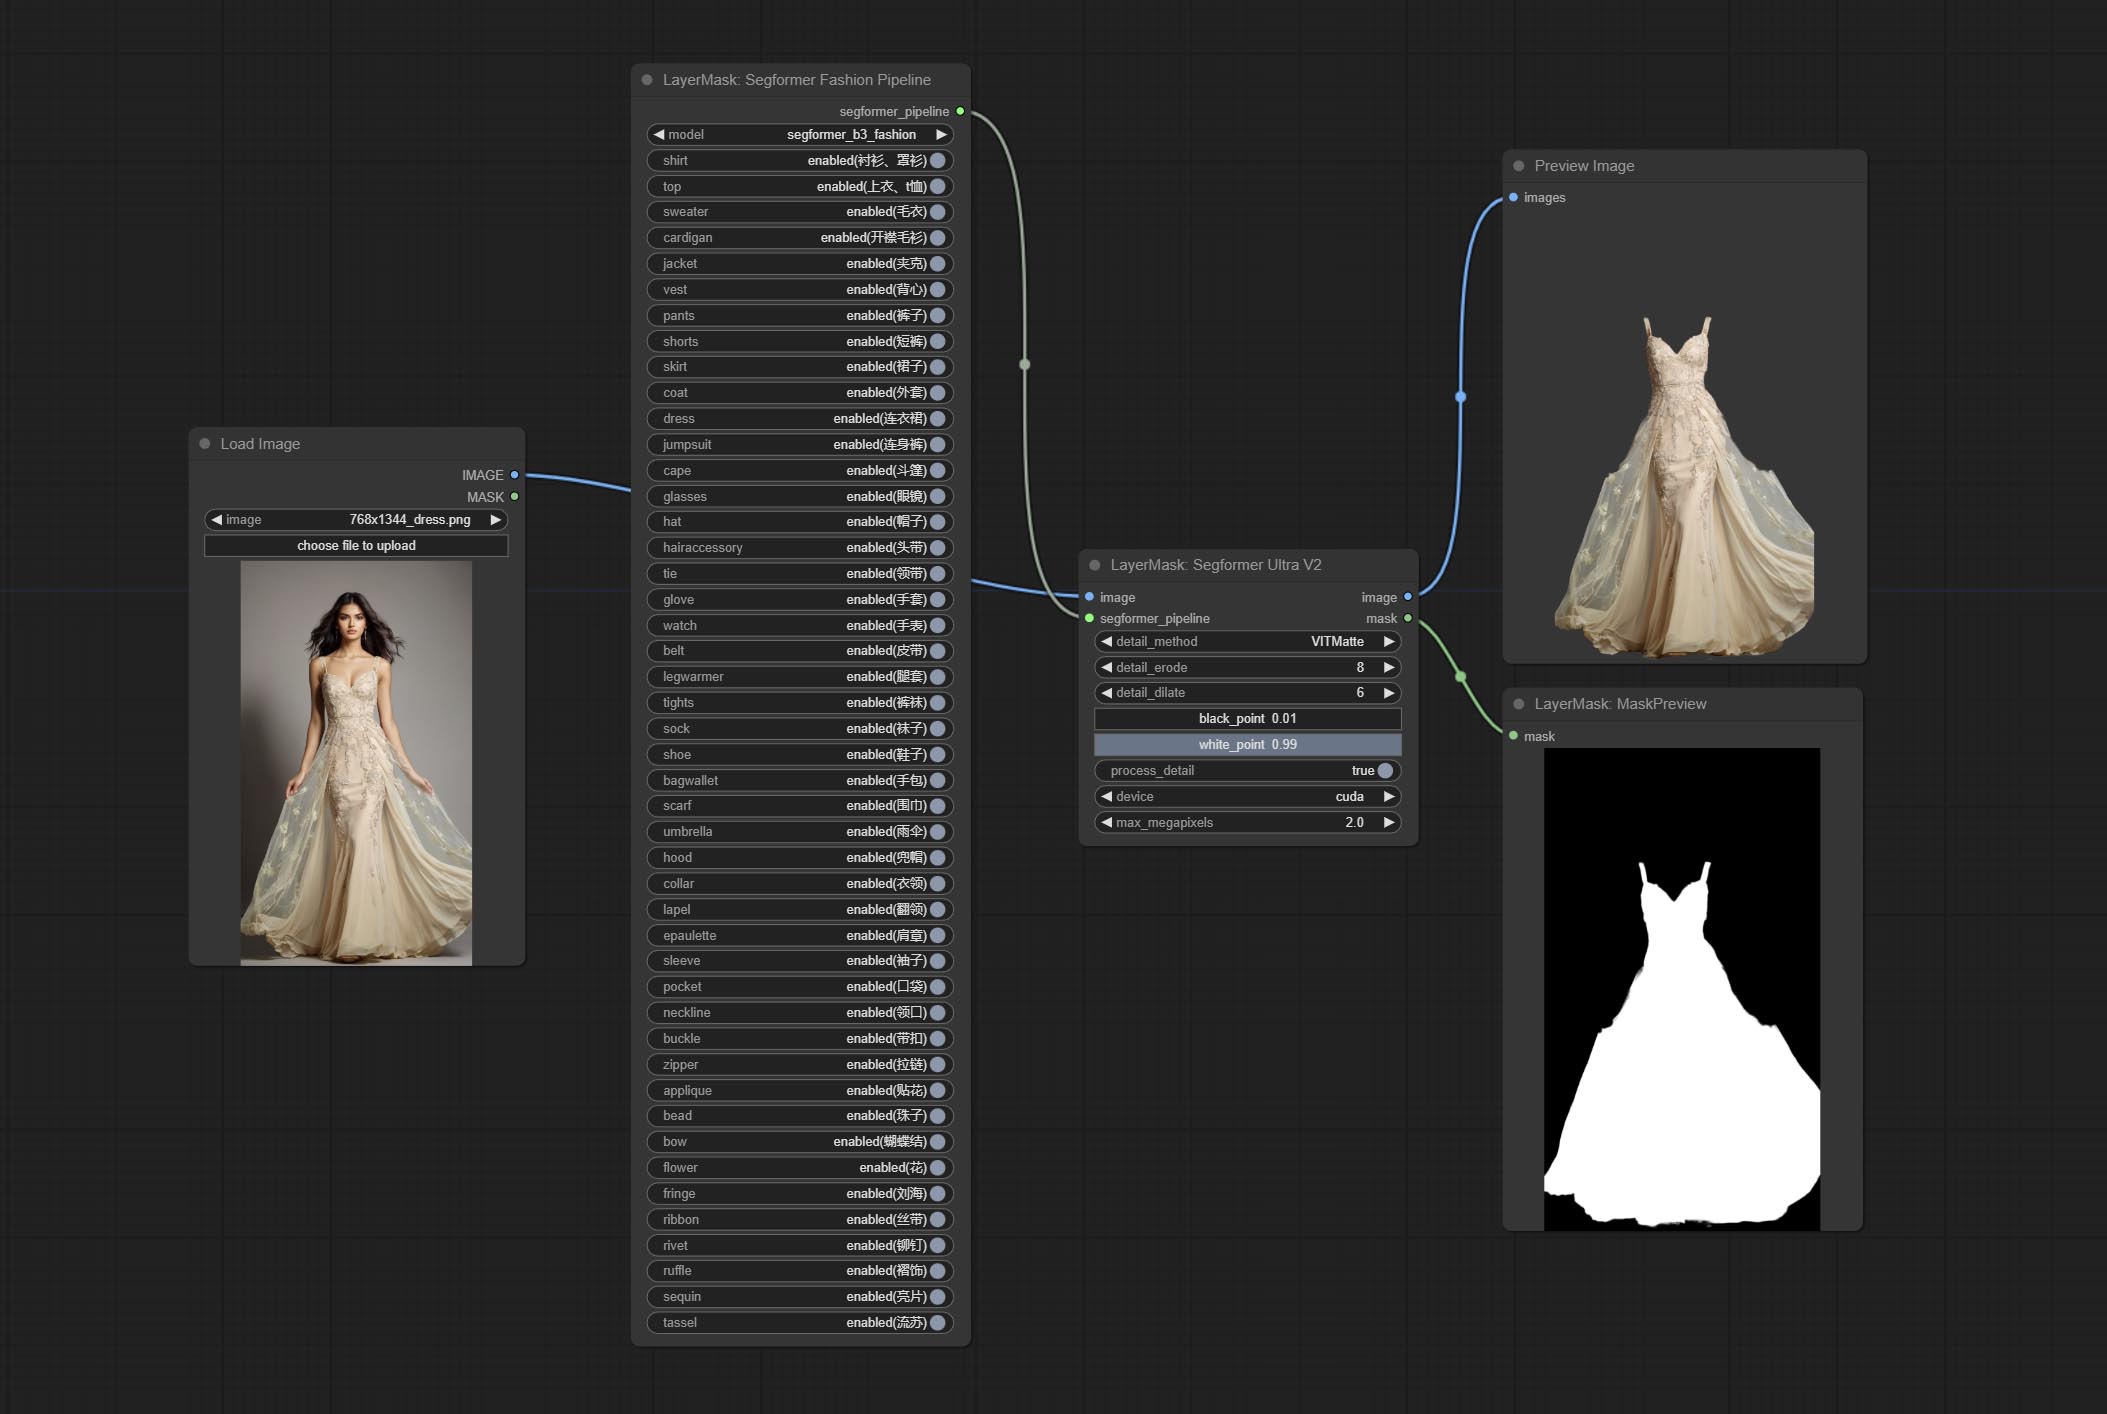
Using the segformer model to segment clothing with ultra-high edge details. Currently supports segformer b2 clothes, segformer b3 clothes and segformer b3 fashion。
*Download modelfiles from huggingface or BaiduNetdisk to ComfyUI/models/segformer_b2_clothes folder.
*Download modelfiles from huggingface or BaiduNetdisk to ComfyUI/models/segformer_b3_clothes folder.
*Download modelfiles from huggingface or BaiduNetdisk to ComfyUI/models/segformer_b3_fashion folder.
Node Options:
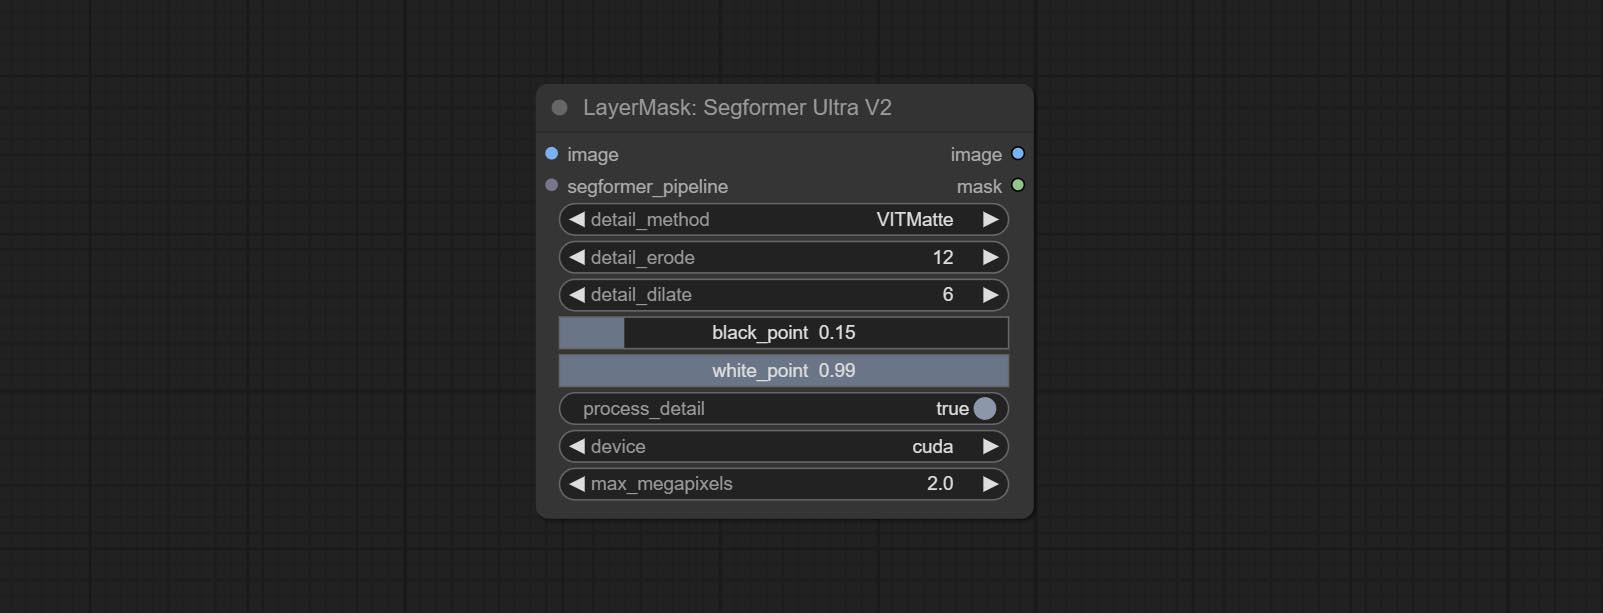
- image: The input image.
- segformer_pipeline: Segformer pipeline input. The pipeline is output by SegformerClottesPipeline and SegformerFashionPipeline node.
- detail_method: Edge processing methods. provides VITMatte, VITMatte(local), PyMatting, GuidedFilter. If the model has been downloaded after the first use of VITMatte, you can use VITMatte (local) afterwards.
- detail_erode: Mask the erosion range inward from the edge. the larger the value, the larger the range of inward repair.
- detail_dilate: The edge of the mask expands outward. the larger the value, the wider the range of outward repair.
- black_point: Edge black sampling threshold.
- white_point: Edge white sampling threshold.
- process_detail: Set to false here will skip edge processing to save runtime.
- device: Set whether the VitMatte to use cuda.
- max_megapixels: Set the maximum size for VitMate operations.
SegformerClothesPipiline
Select the segformer clothes model and choose the segmentation content.
Node Options:

- model: Model selection. There are currently two models available to choose from for segformer b2 clothes and segformer b3 clothes.
- face: Facial recognition switch.
- hair: Hair recognition switch.
- hat: Hat recognition switch.
- sunglass: Sunglass recognition switch.
- left_arm: Left arm recognition switch.
- right_arm: Right arm recognition switch.
- left_leg: Left leg recognition switch.
- right_leg: Right leg recognition switch.
- left_shoe: Left shoe recognition switch.
- right_shoe: Right shoe recognition switch.
- skirt: Skirt recognition switch.
- pants: Pants recognition switch.
- dress: Dress recognition switch.
- belt: Belt recognition switch.
- bag: Bag recognition switch.
- scarf: Scarf recognition switch.
SegformerFashionPipiline
Select the segformer fashion model and choose the segmentation content.
Node Options:
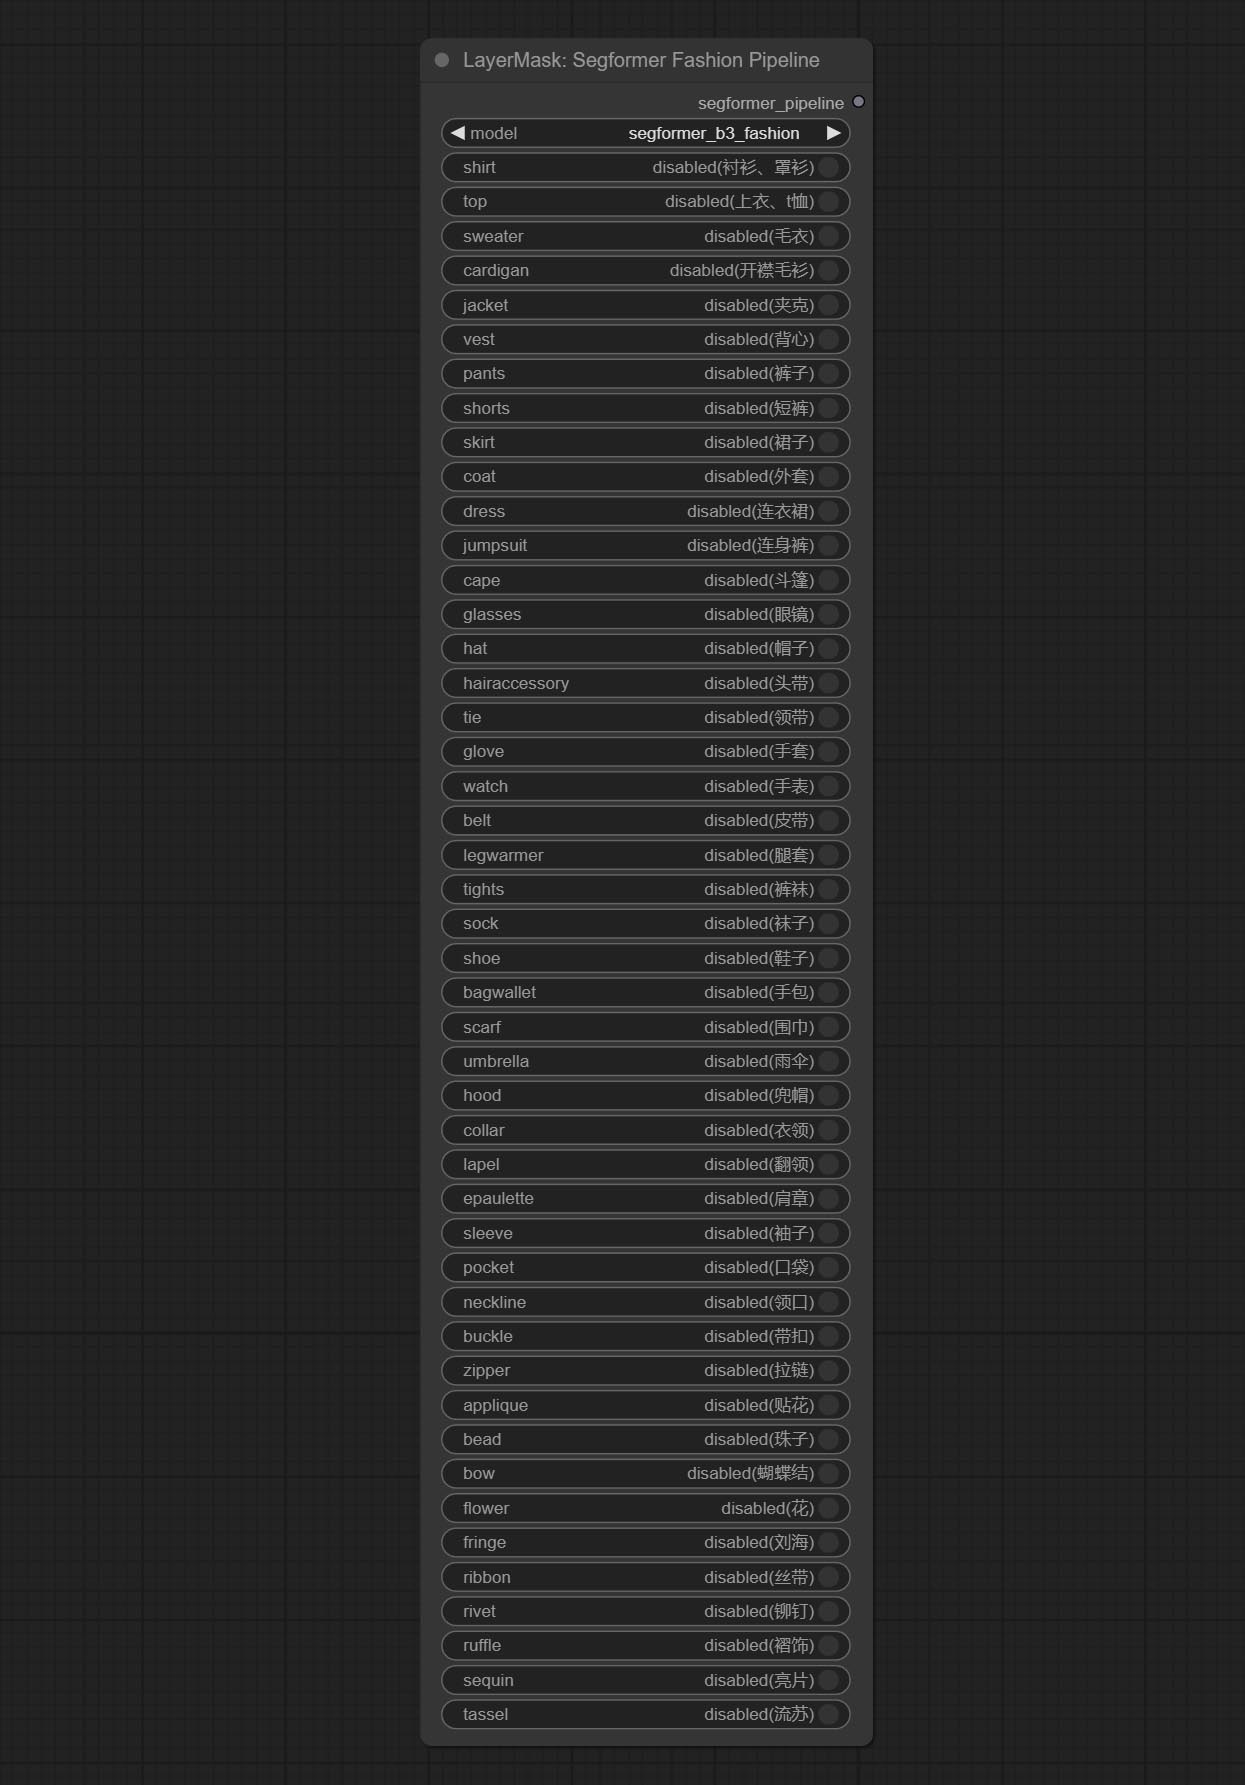
- model: Model selection. Currently, there is only one model available for selection: segformer b3 fashion。
- shirt: shirt and blouse switch.
- top: top, t-shirt, sweatshirt switch.
- sweater: sweater switch.
- cardigan: cardigan switch.
- jacket: jacket switch.
- vest: vest switch.
- pants: pants switch.
- shorts: shorts switch.
- skirt: skirt switch.
- coat: coat switch.
- dress: dress switch.
- jumpsuit: jumpsuit switch.
- cape: cape switch.
- glasses: glasses switch.
- hat: hat switch.
- hairaccessory: headband, head covering, hair accessory switch.
- tie: tie switch.
- glove: glove switch.
- watch: watch switch.
- belt: belt switch.
- legwarmer: leg warmer switch.
- tights: tights and stockings switch.
- sock: sock switch.
- shoe: shoes switch.
- bagwallet: bag and wallet switch.
- scarf: scarf switch.
- umbrella: umbrella switch.
- hood: hood switch.
- collar: collar switch.
- lapel: lapel switch.
- epaulette: epaulette switch.
- sleeve: sleeve switch.
- pocket: pocket switch.
- neckline: neckline switch.
- buckle: buckle switch.
- zipper: zipper switch.
- applique: applique switch.
- bead: bead switch.
- bow: bow switch.
- flower: flower switch.
- fringe: fringe switch.
- ribbon: ribbon switch.
- rivet: rivet switch.
- ruffle: ruffle switch.
- sequin: sequin switch.
- tassel: tassel switch.
HumanPartsUltra
Used for generate human body parts masks, it is based on the warrper of metal3d/ComfyUI_Human_Parts, thank the original author. This node has added ultra-fine edge processing based on the original work. Download model file from BaiduNetdisk or huggingface and copy to ComfyUImodelsonnxhuman-parts folder.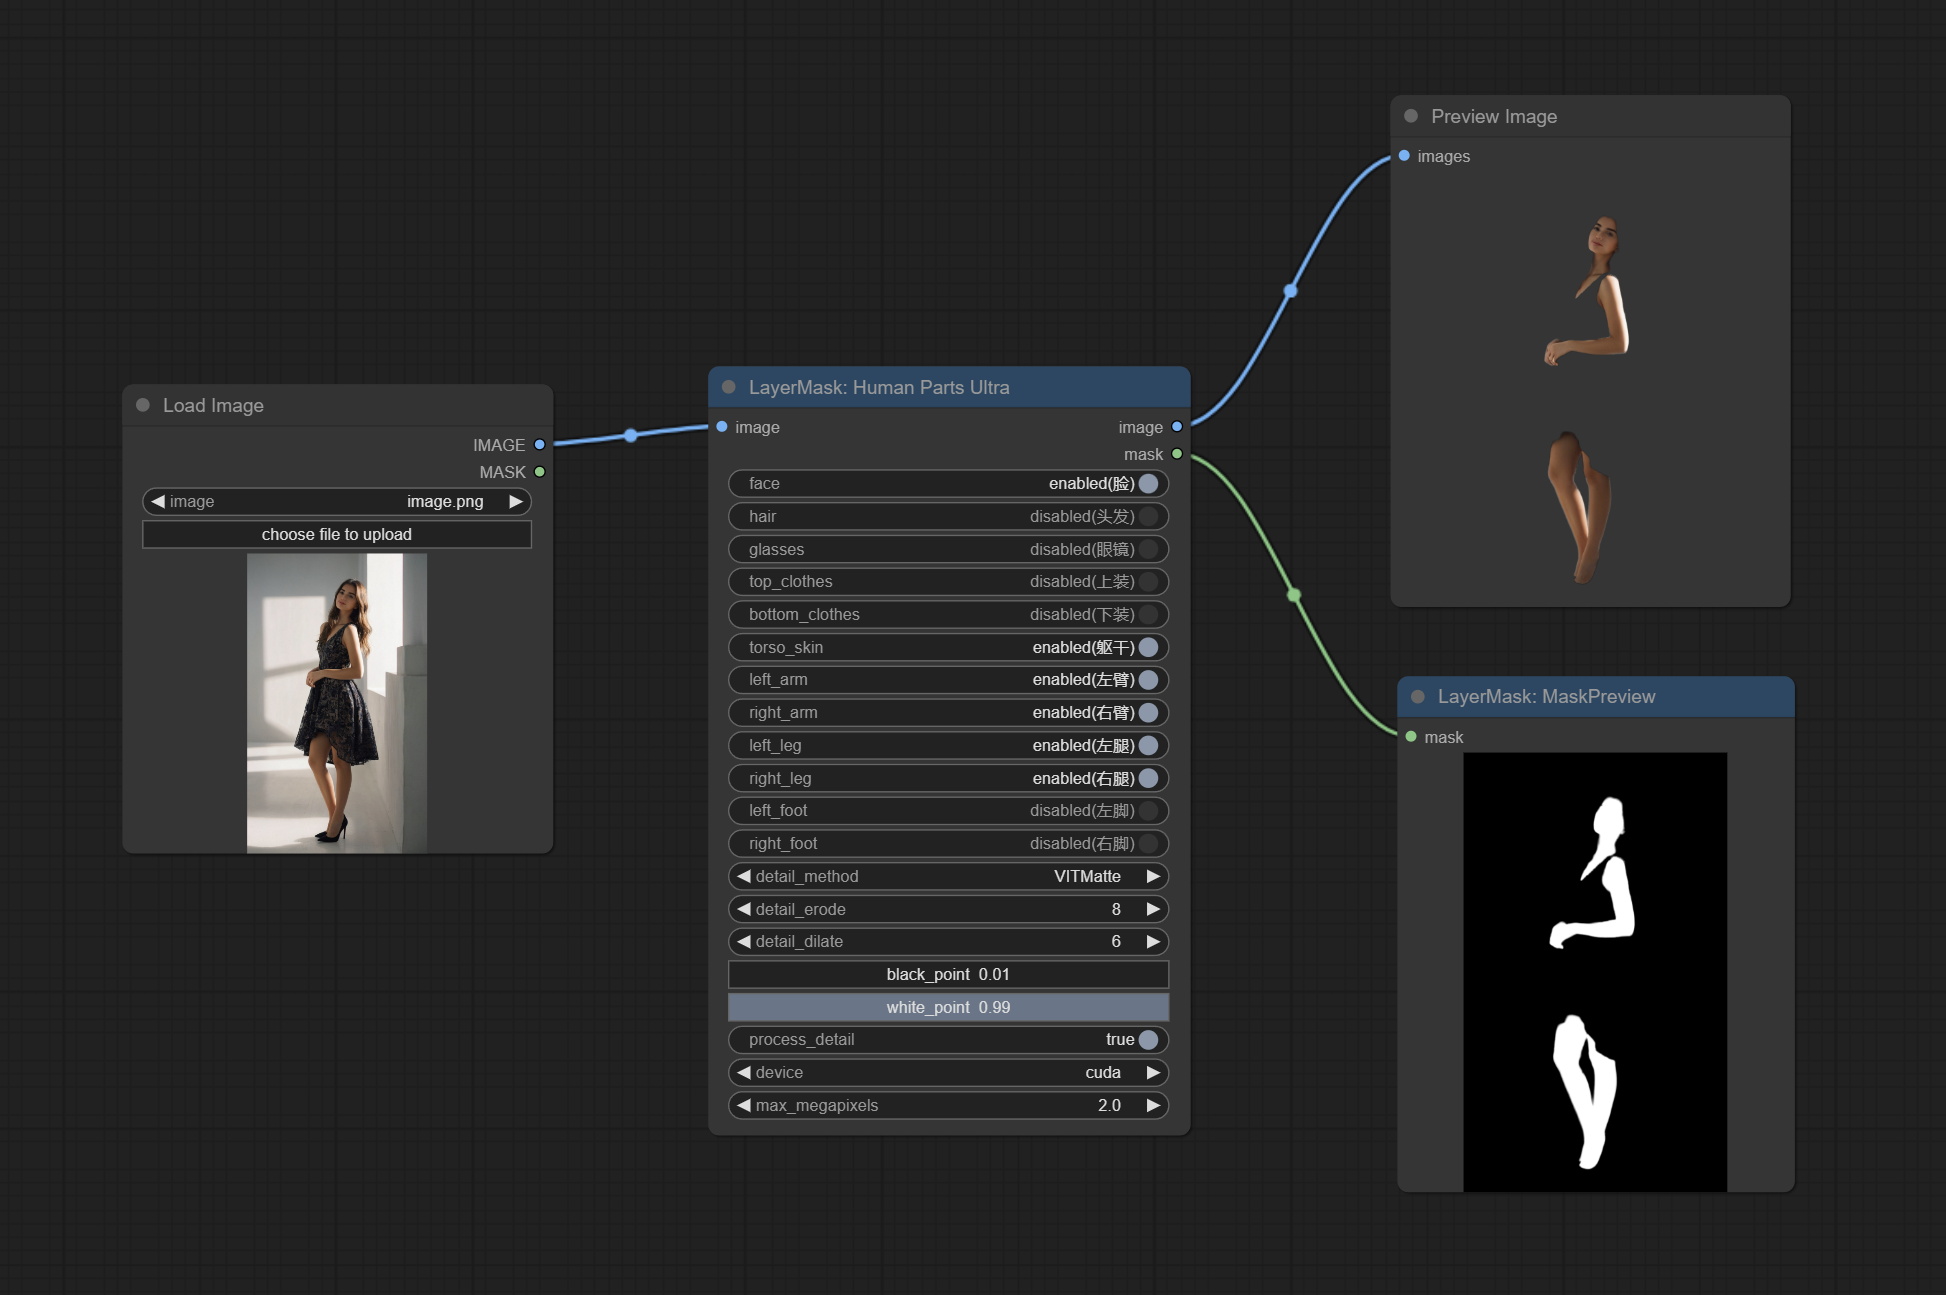
Node Options:
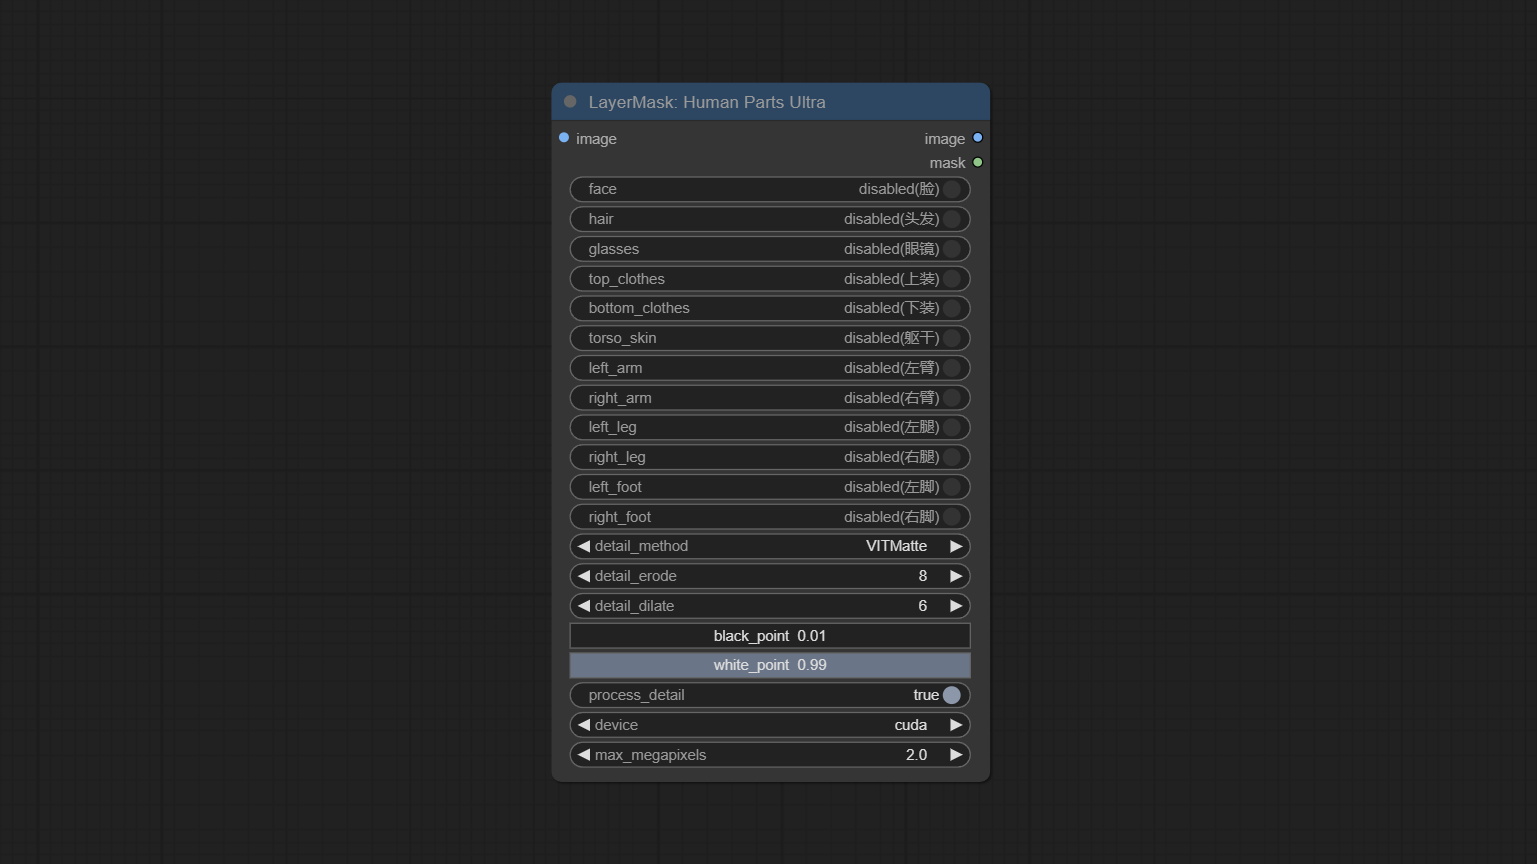
- image: The input image.
- face: Recognize face switch.
- hair: Recognize hair switch.
- galsses: Recognize glasses switch.
- top_clothes: Recognize top clothes switch.
- bottom_clothes: Recognize bottom clothes switch.
- torso_skin: Recognize torso skin switch.
- left_arm: Recognize left arm switch.
- right_arm: Recognize right arm switch.
- left_leg: Recognize left leg switch.
- right_leg: Recognize right leg switch.
- left_foot: Recognize left foot switch.
- right_foot: Recognize right foot switch.
- detail_method: Edge processing methods. provides VITMatte, VITMatte(local), PyMatting, GuidedFilter. If the model has been downloaded after the first use of VITMatte, you can use VITMatte (local) afterwards.
- detail_erode: Mask the erosion range inward from the edge. the larger the value, the larger the range of inward repair.
- detail_dilate: The edge of the mask expands outward. the larger the value, the wider the range of outward repair.
- black_point: Edge black sampling threshold.
- white_point: Edge white sampling threshold.
- process_detail: Set to false here will skip edge processing to save runtime.
- device: Set whether the VitMatte to use cuda.
- max_megapixels: Set the maximum size for VitMate operations.
MaskEdgeUltraDetail
Process rough masks to ultra fine edges. This node combines the Alpha Matte and the Guided Filter Alpha nodes functions of Spacepxl's ComfyUI-Image-Filters, thanks to the original author.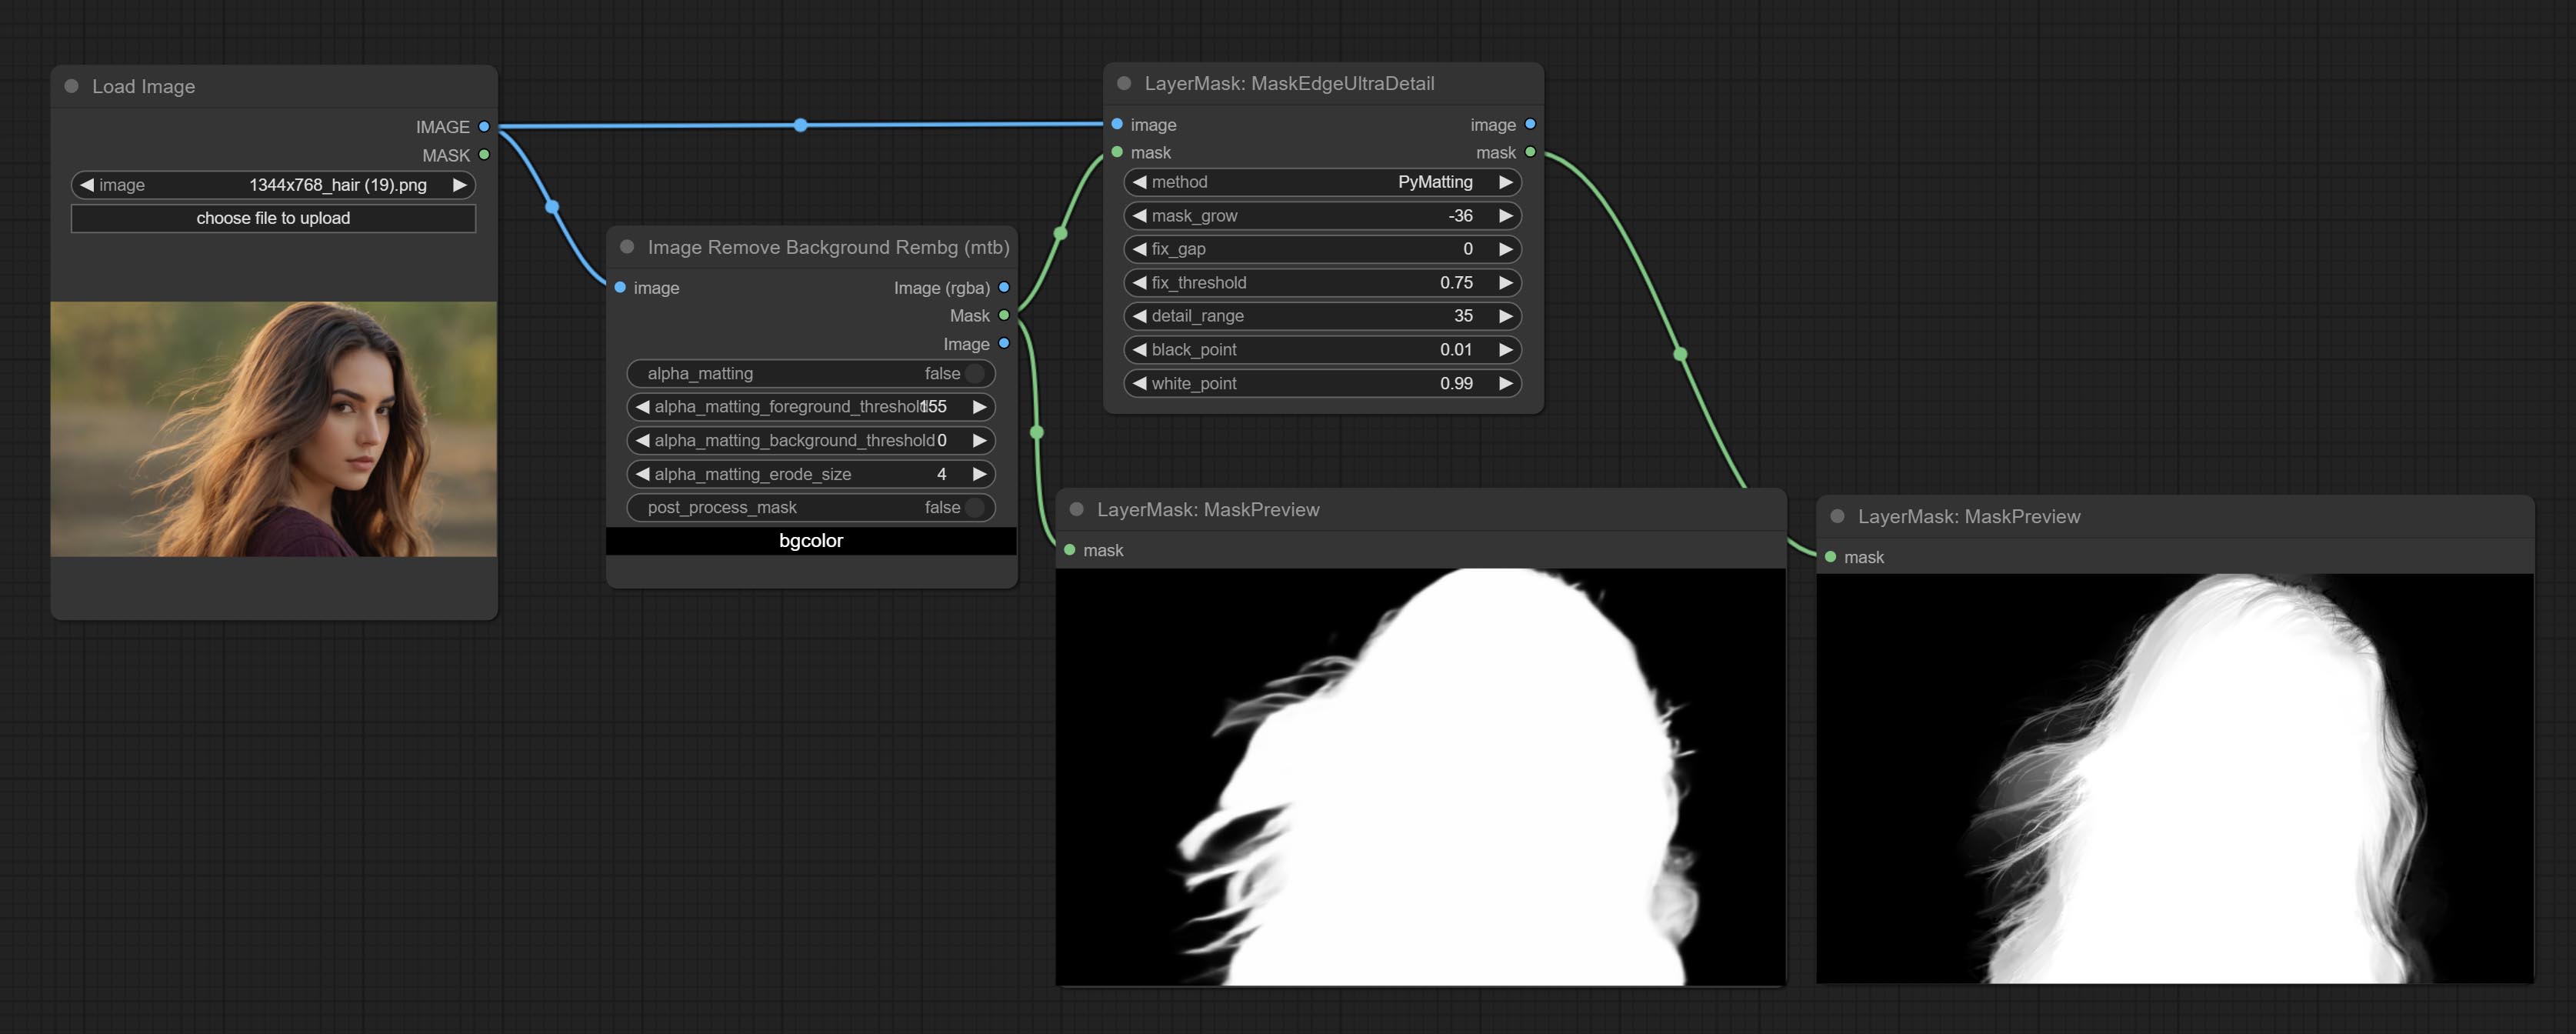
Node options:
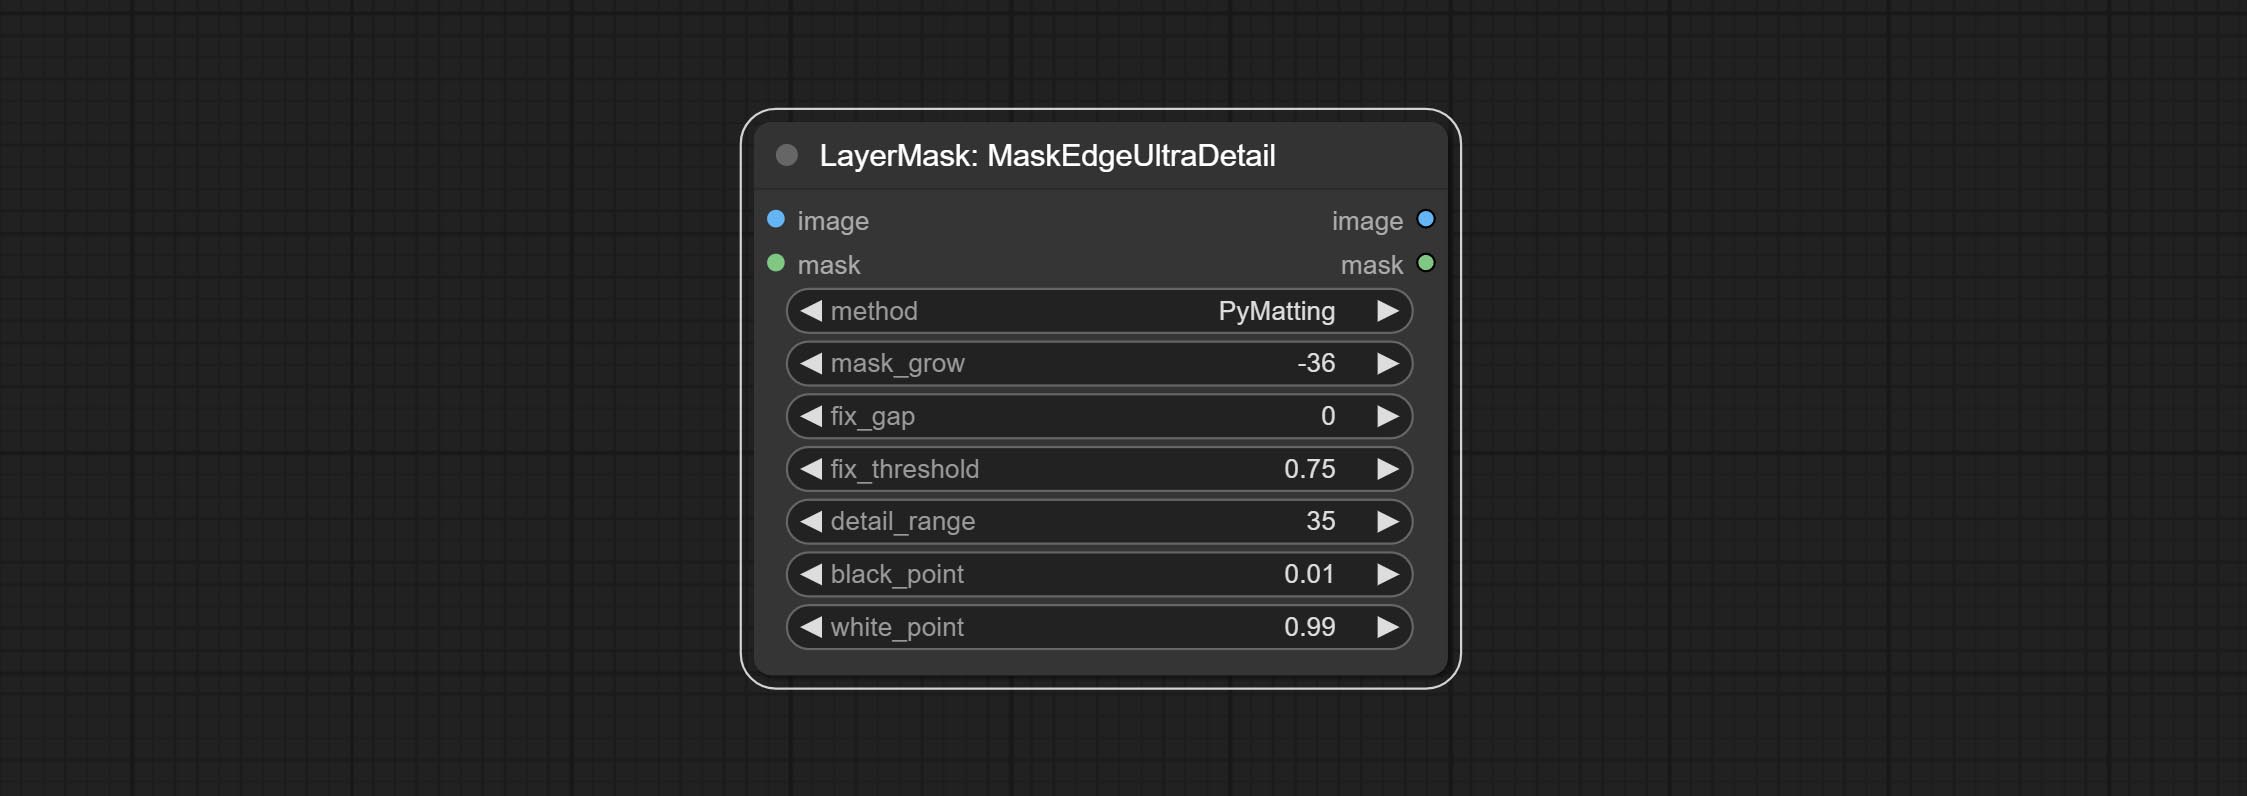
- method: Provide two methods for edge processing: PyMatting and OpenCV-GuidedFilter. PyMatching has a slower processing speed, but for video, it is recommended to use this method to obtain smoother mask sequences.
- mask_grow: Mask expansion amplitude. positive values expand outward, while negative values contract inward. For rougher masks, negative values are usually used to shrink their edges for better results.
- fix_gap: Repair the gaps in the mask. if obvious gaps in the mask, increase this value appropriately.
- fix_threshold: The threshold of fix_gap.
- detail_range: Edge detail range.
- black_point: Edge black sampling threshold.
- white_point: Edge white sampling threshold.
MaskEdgeUltraDetailV2
The V2 upgraded version of MaskEdgeUltraDetail has added the VITMatte edge processing method.(Note: Images larger than 2K in size using this method will consume huge memory)
This method is suitable for handling semi transparent areas.
On the basis of MaskEdgeUltraDetail, the following changes have been made: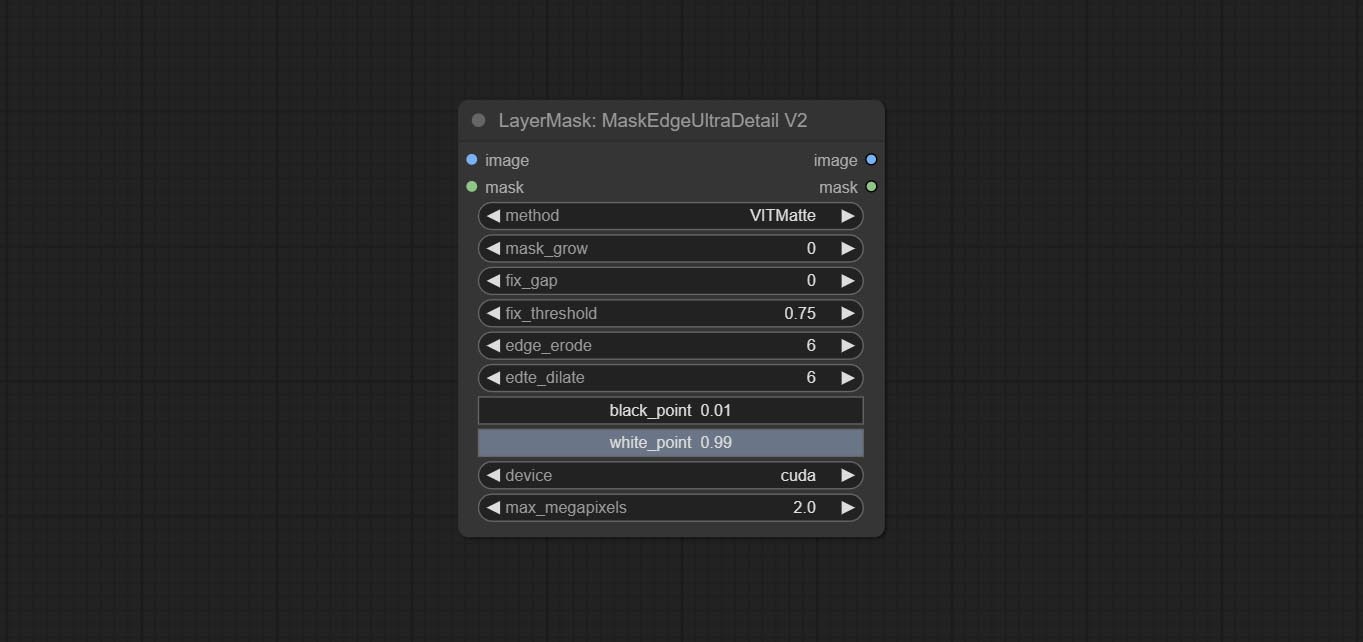
- method: Edge processing methods. provides VITMatte, VITMatte(local), PyMatting, GuidedFilter. If the model has been downloaded after the first use of VITMatte, you can use VITMatte (local) afterwards.
- edge_erode: Mask the erosion range inward from the edge. the larger the value, the larger the range of inward repair.
- edge_dilate: The edge of the mask expands outward. the larger the value, the wider the range of outward repair.
- device: Set whether the VitMatte to use cuda.
- max_megapixels: Set the maximum size for VitMate operations.
YoloV8Detect
Use the YoloV8 model to detect faces, hand box areas, or character segmentation. Supports the output of the selected number of channels. Download the model files from GoogleDrive or BaiduNetdisk to ComfyUI/models/yolo folder.
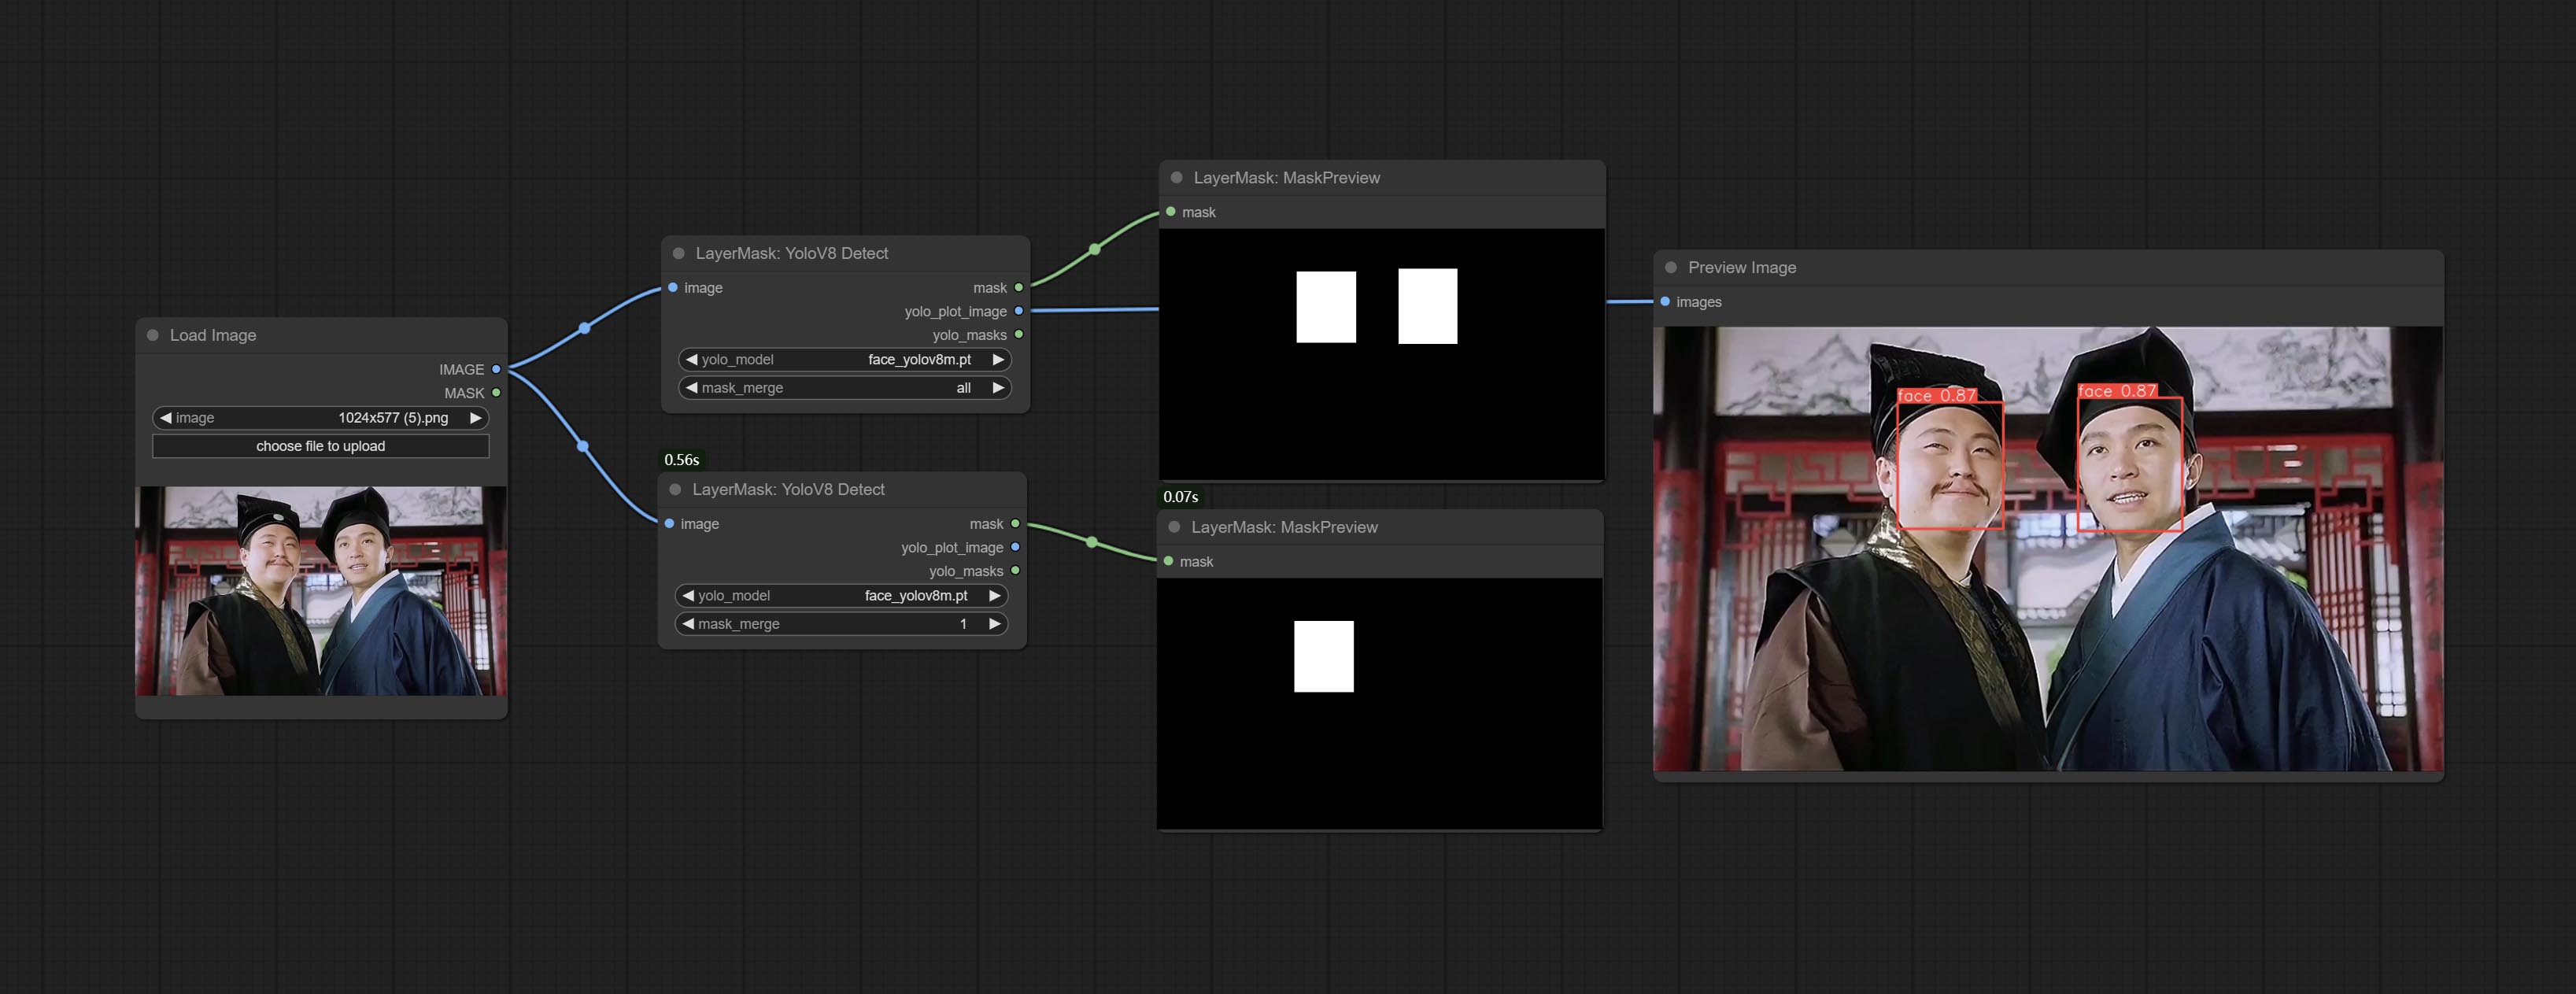
Node Options:
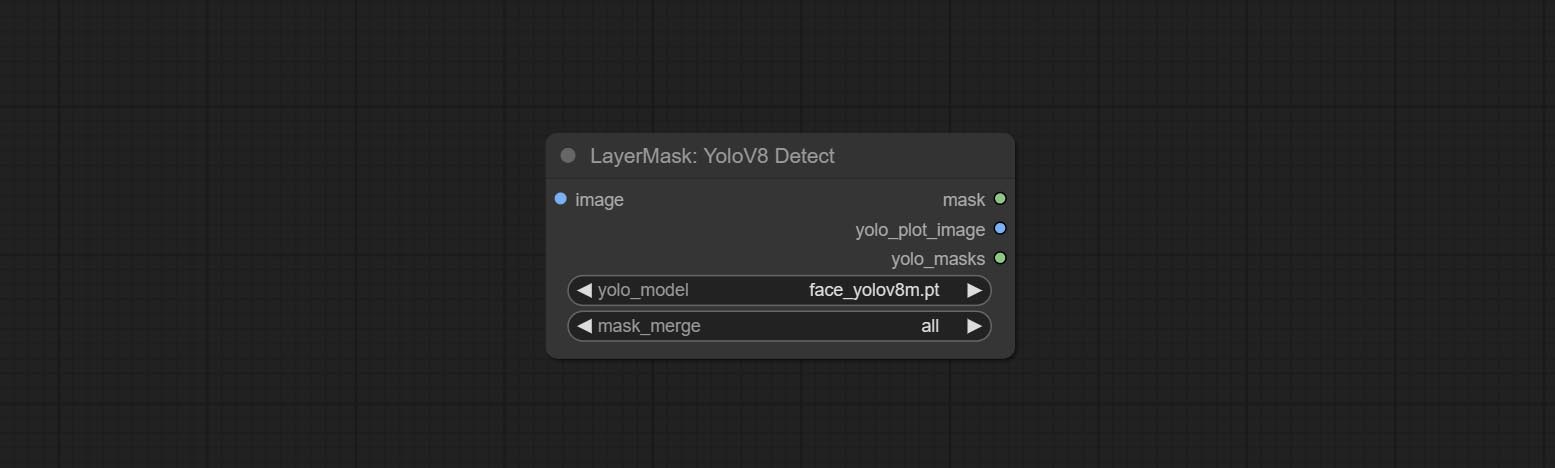
- yolo_model: Yolo model selection. the model with
seg name can output segmented masks, otherwise they can only output box masks. - mask_merge: Select the merged mask.
all is to merge all mask outputs. The selected number is how many masks to output, sorted by recognition confidence to merge the output.
Outputs:
- mask: The output mask.
- yolo_plot_image: Preview of yolo recognition results.
- yolo_masks: For all masks identified by yolo, each individual mask is output as a mask.
MediapipeFacialSegment
Use the Mediapipe model to detect facial features, segment left and right eyebrows, eyes, lips, and tooth. *Download the model files from BaiduNetdisk to ComfyUI/models/mediapipe folder.
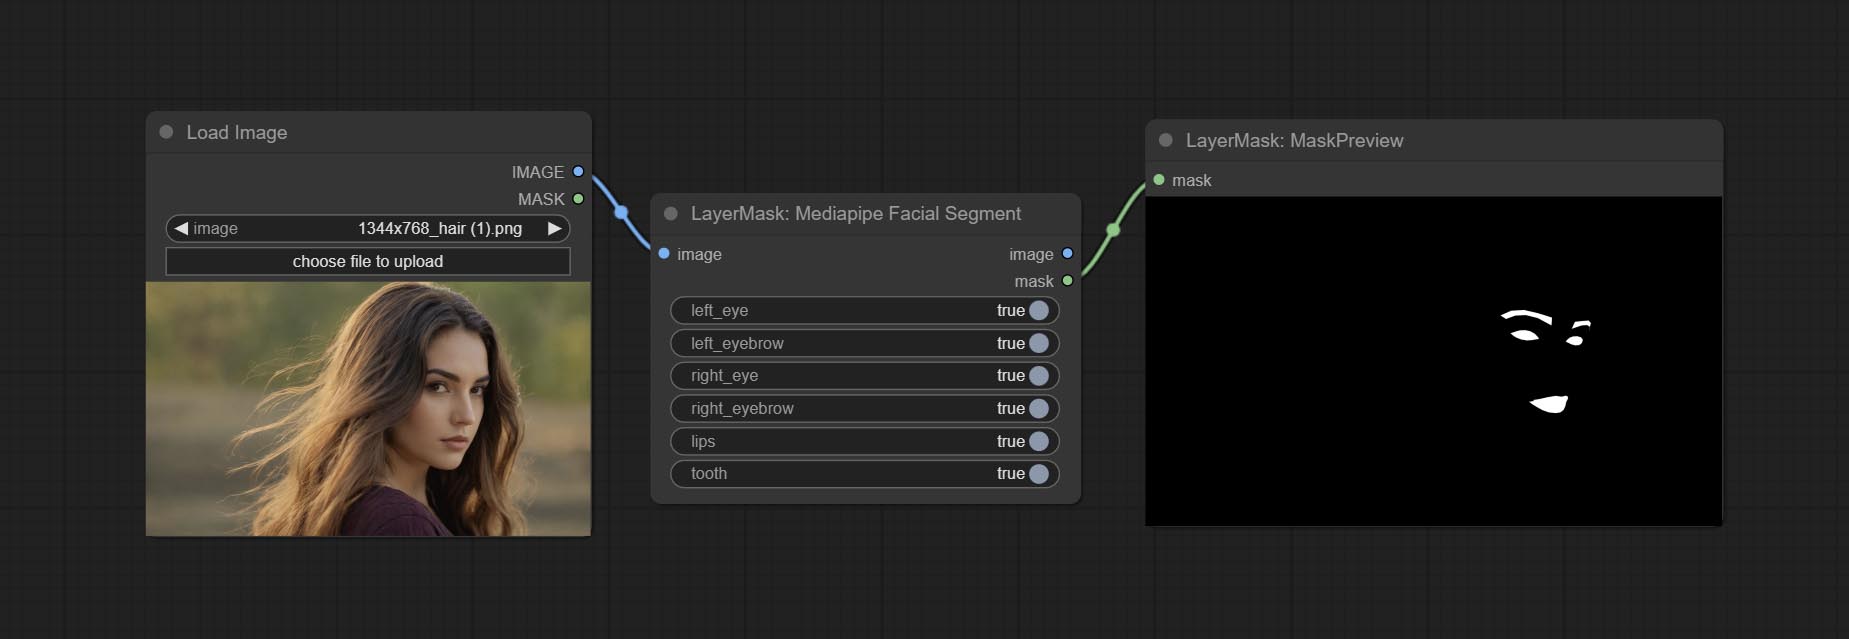
Node Options:
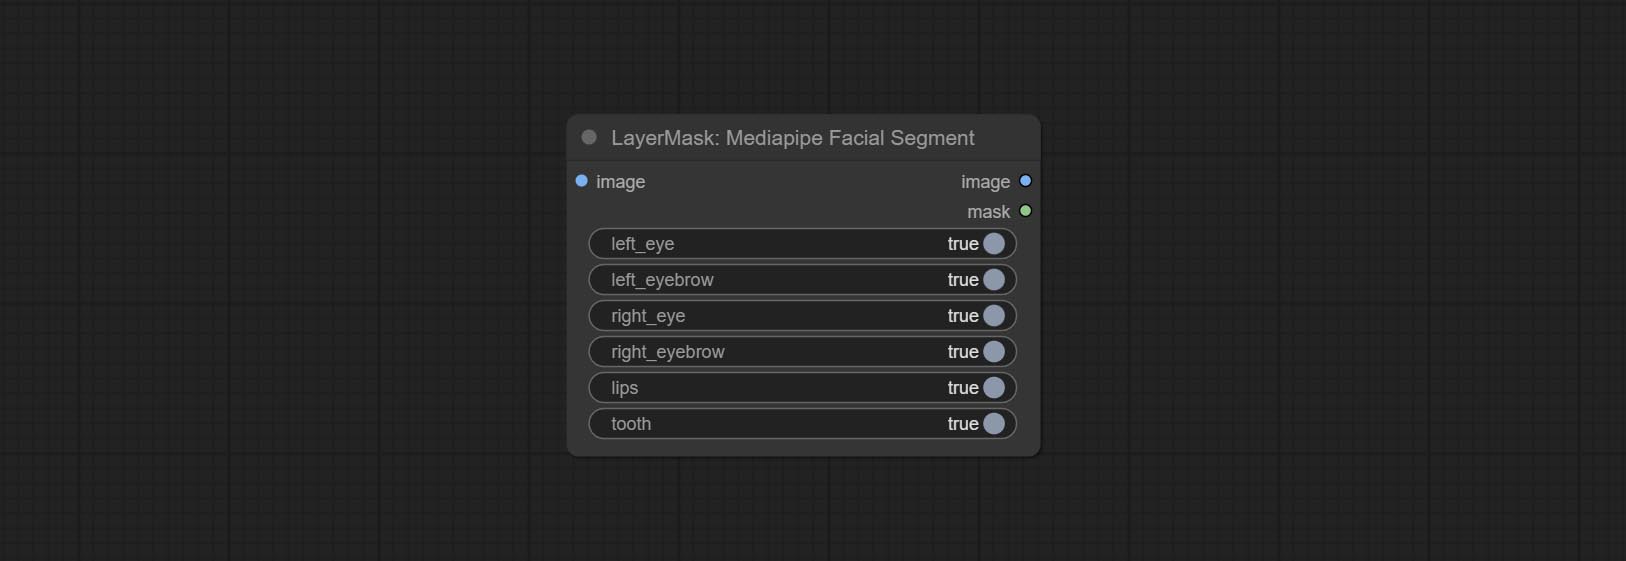
- left_eye: Recognition switch of left eye.
- left_eyebrow: Recognition switch of left eyebrow.
- right_eye: Recognition switch of right eye.
- right_eyebrow: Recognition switch of right eyebrow.
- lips: Recognition switch of lips.
- tooth: Recognition switch of tooth.
MaskByColor
Generate a mask based on the selected color.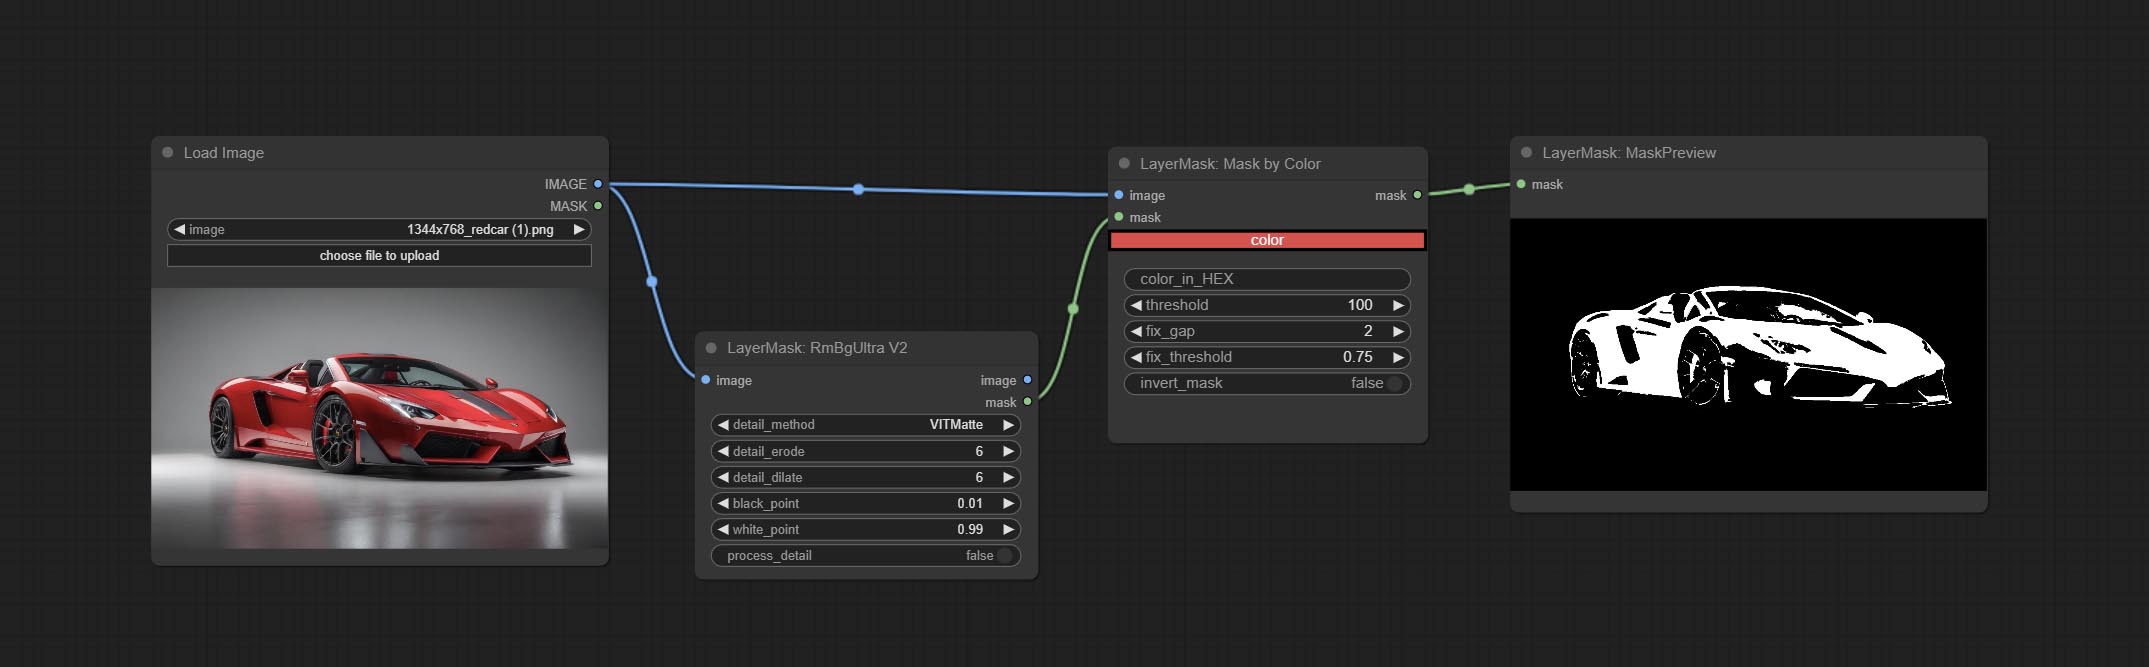
Node Options:
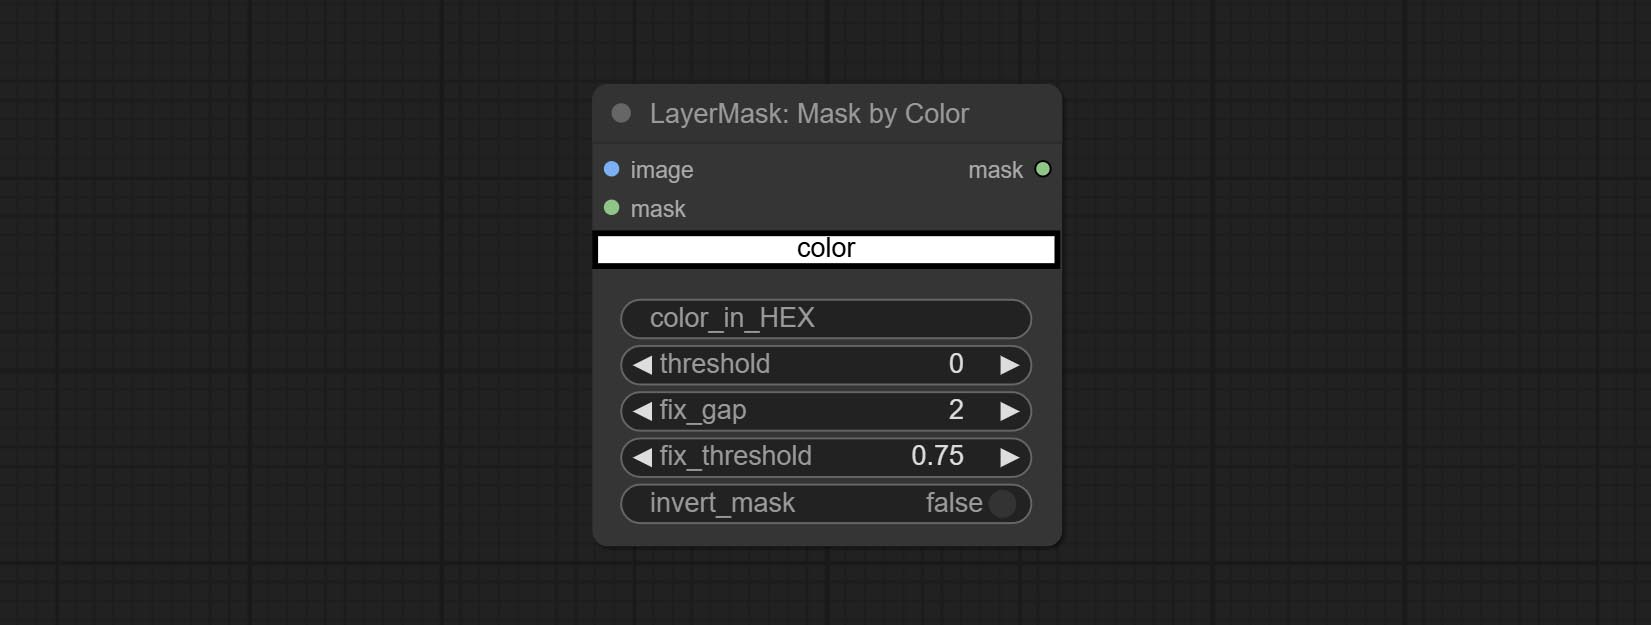
- image: Input image.
- mask: This input is optional, if there is a mask, only the colors inside the mask are included in the range.
- color: Color selector. Click on the color block to select a color, and you can use the straws on the color picker panel to pick up the screen color. Note: When using straws, maximize the browser window.
- color_in_HEX 4 : Enter color values. If this item has input, it will be used first, ignoring the color selected by the
color . - threshold: Mask range threshold, the larger the value, the larger the mask range.
- fix_gap: Repair the gaps in the mask. If there are obvious gaps in the mask, increase this value appropriately.
- fix_threshold: The threshold for repairing masks.
- invert_mask: Whether to reverse the mask.
ImageToMask
Convert the image to a mask. Supports converting any channel in LAB, RGBA, YUV, and HSV modes into masks, while providing color scale adjustment. Support mask optional input to obtain masks that only include valid parts.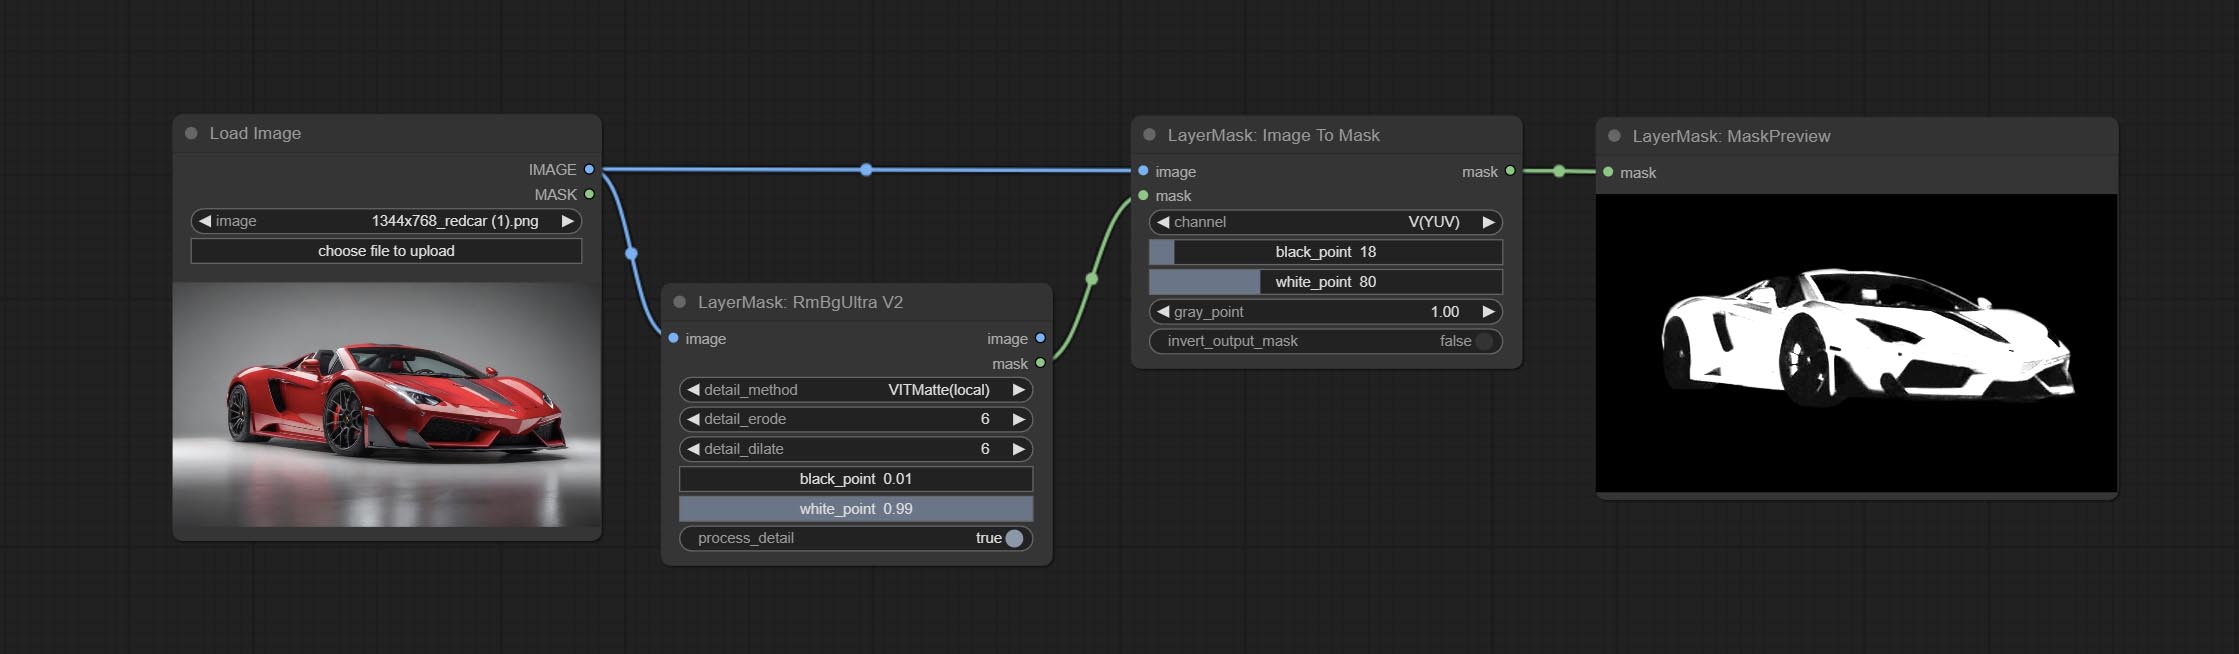
Node Options:
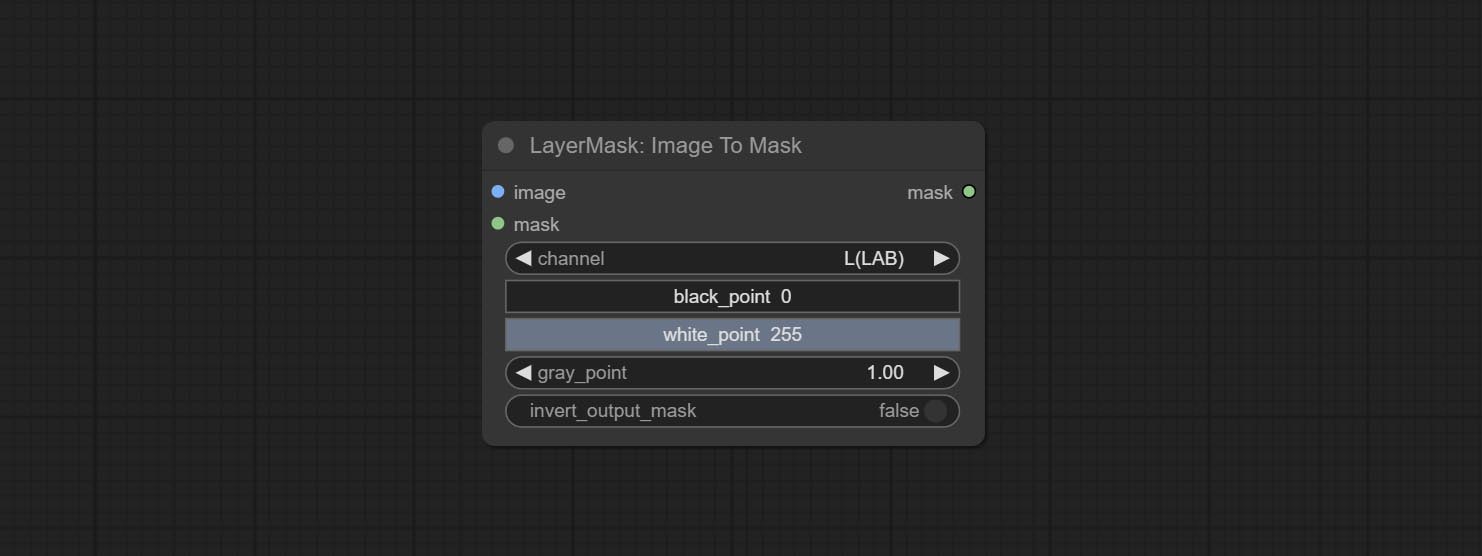
- image: Input image.
- mask: This input is optional, if there is a mask, only the colors inside the mask are included in the range.
- channel: Channel selection. You can choose any channel of LAB, RGBA, YUV, or HSV modes.
- black_point * : Black dot value for the mask. The value range is 0-255, with a default value of 0.
- white_point * : White dot value for the mask. The value range is 0-255, with a default value of 255.
- gray_point: Gray dot values for the mask. The value range is 0.01-9.99, with a default of 1.
- invert_output_mask: Whether to reverse the mask.
* If the black_point or output_black_point value is greater than white_point or output_white_point, the two values are swapped, with the larger value used as white_point and the smaller value used as black_point.
Shadow & Highlight Mask
Generate masks for the dark and bright parts of the image.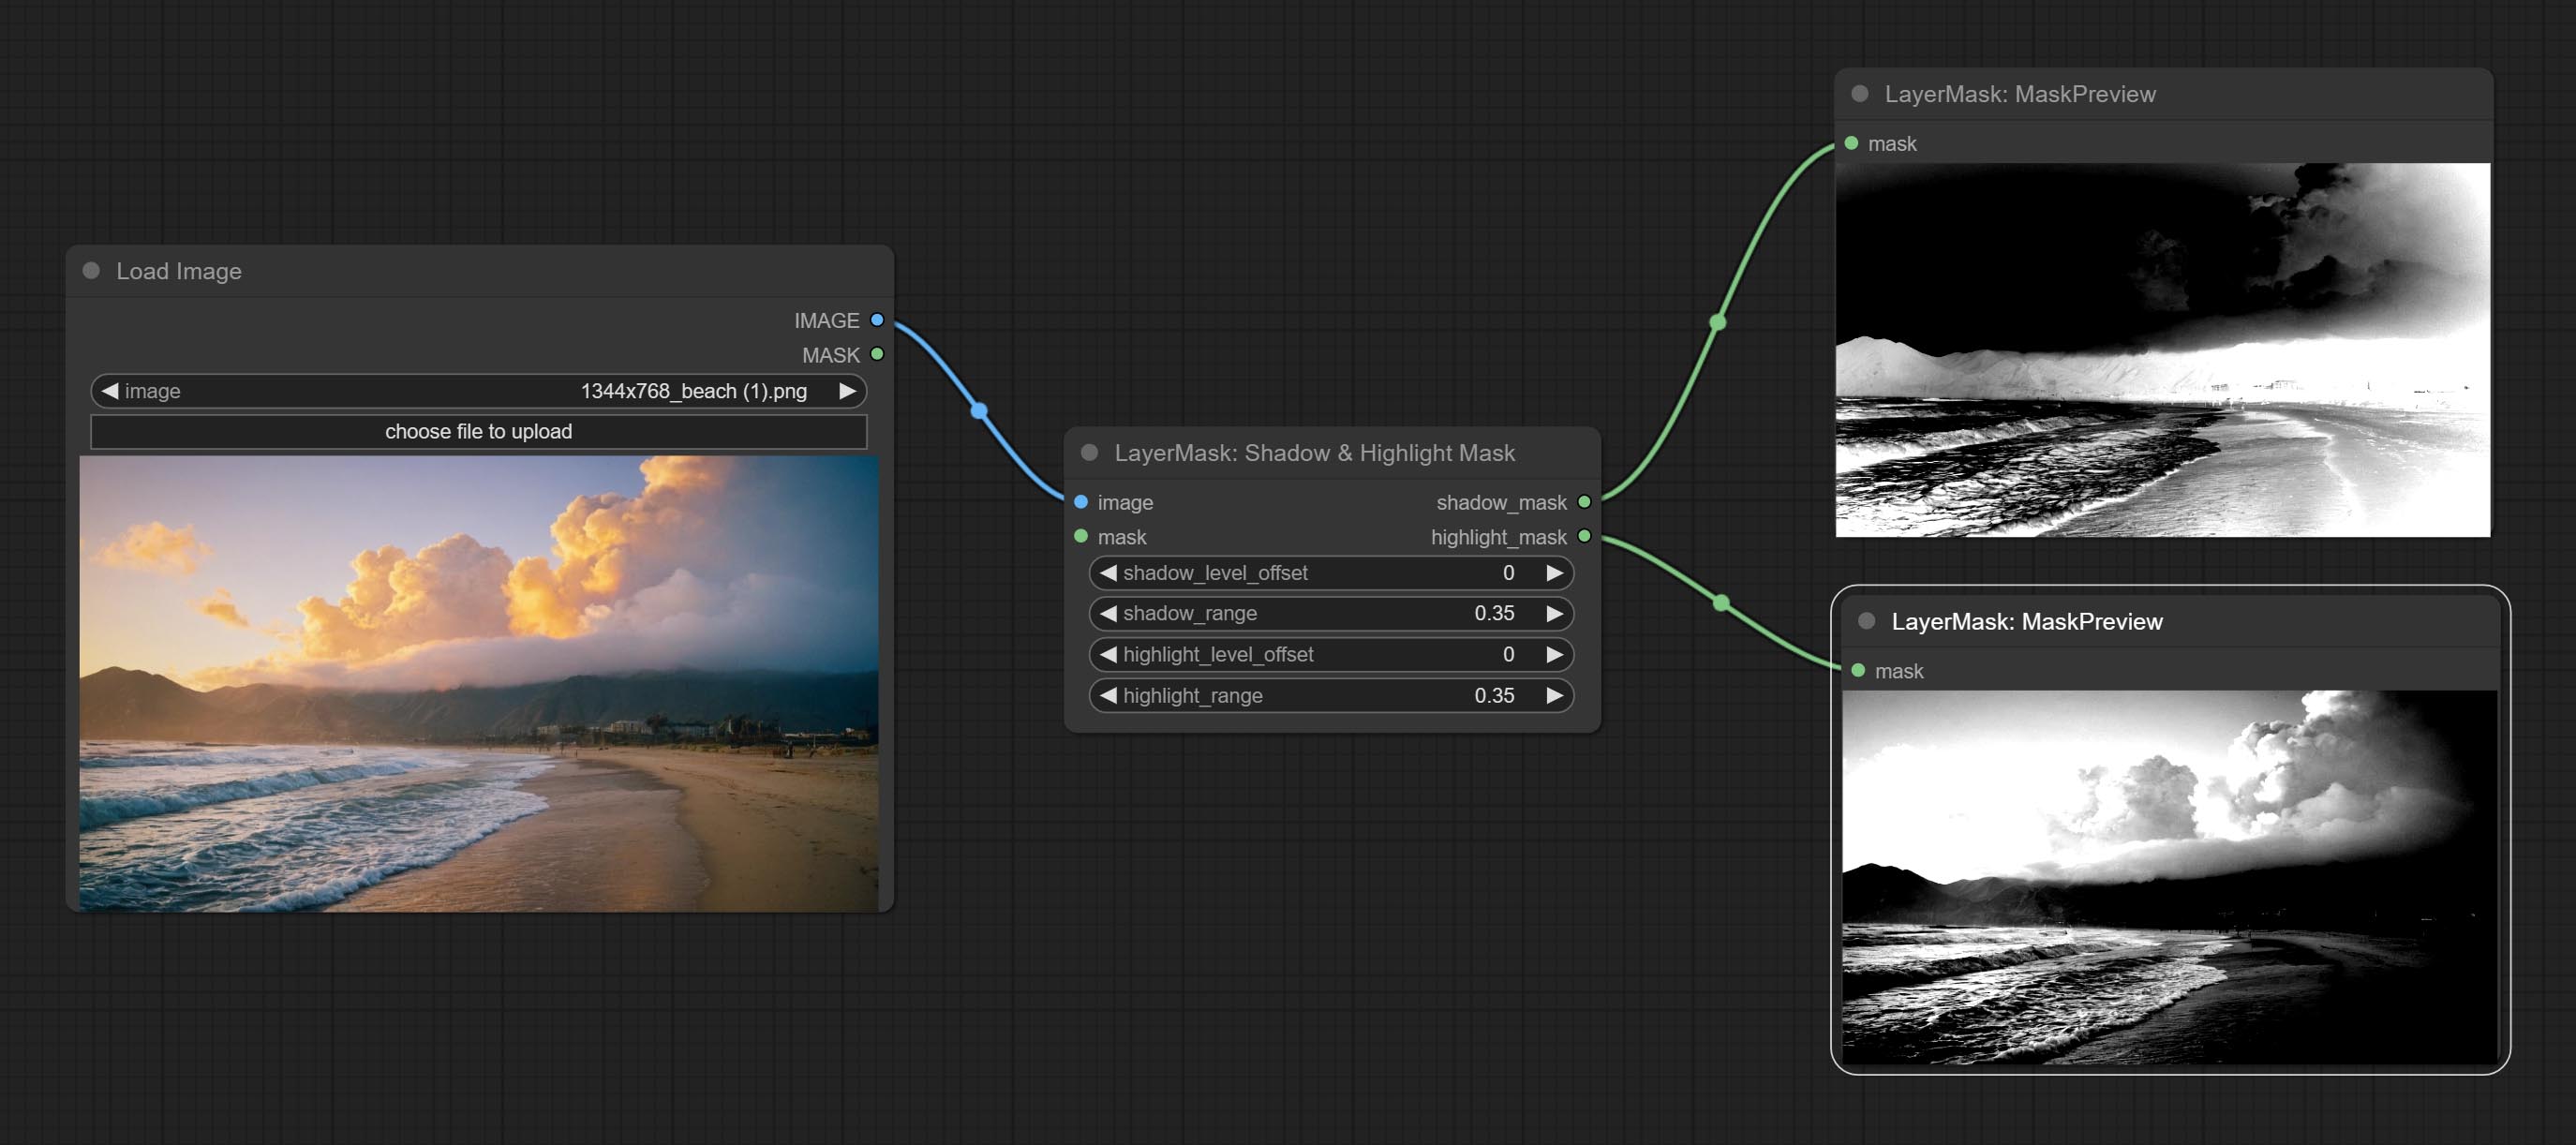
Node options:
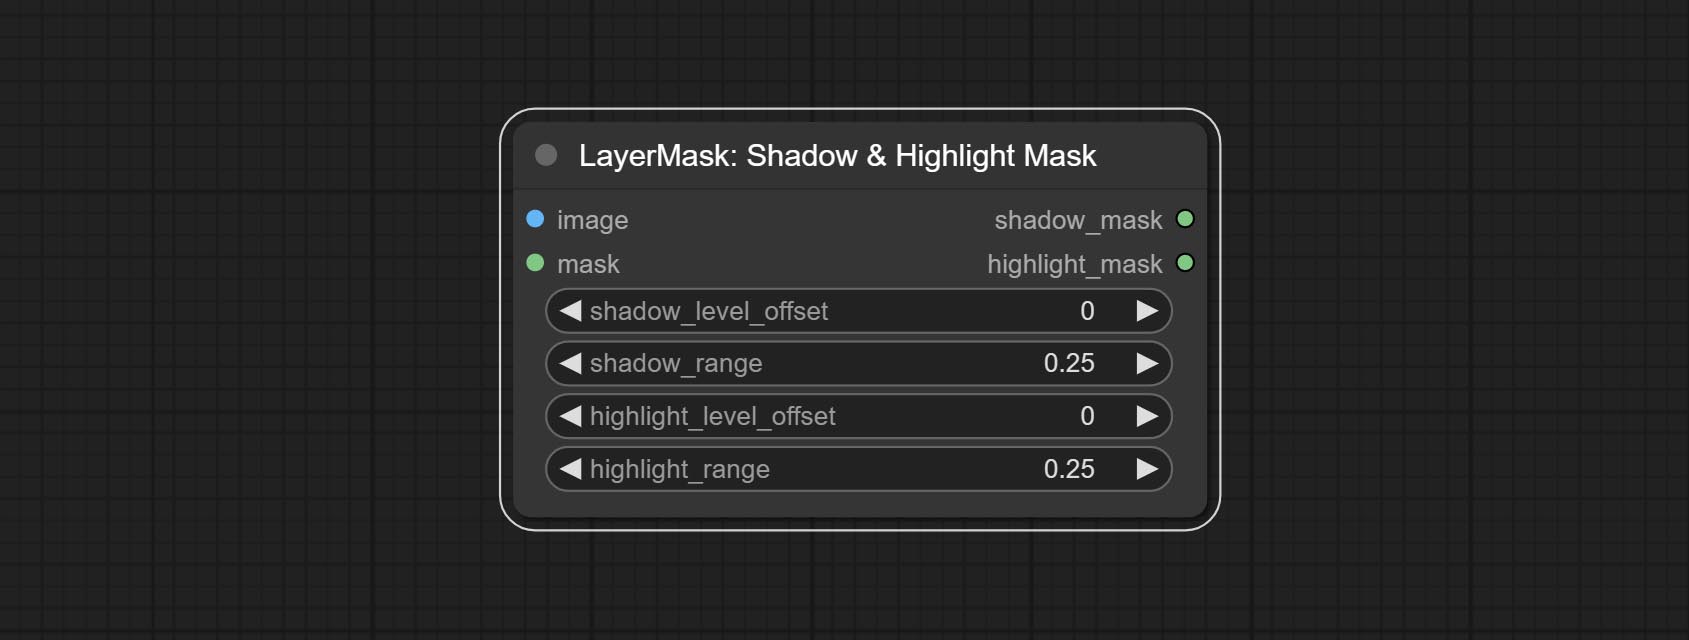
- image: The input image.
- mask: Optional input. if there is input, only the colors within the mask range will be adjusted.
- shadow_level_offset: The offset of values in the dark area, where larger values bring more areas closer to the bright into the dark area.
- shadow_range: The transitional range of the dark area.
- highlight_level_offset: The offset of values in the highlight area, where larger values bring more areas closer to the dark into the highlight area.
- highlight_range: The transitional range of the highlight area.
Shadow Highlight Mask V2
A replica of the Shadow & Highlight Mask node, with the "&" character removed from the node name to avoid ComfyUI workflow parsing errors.
PixelSpread
Pixel expansion preprocessing on the masked edge of an image can effectively improve the edges of image composit.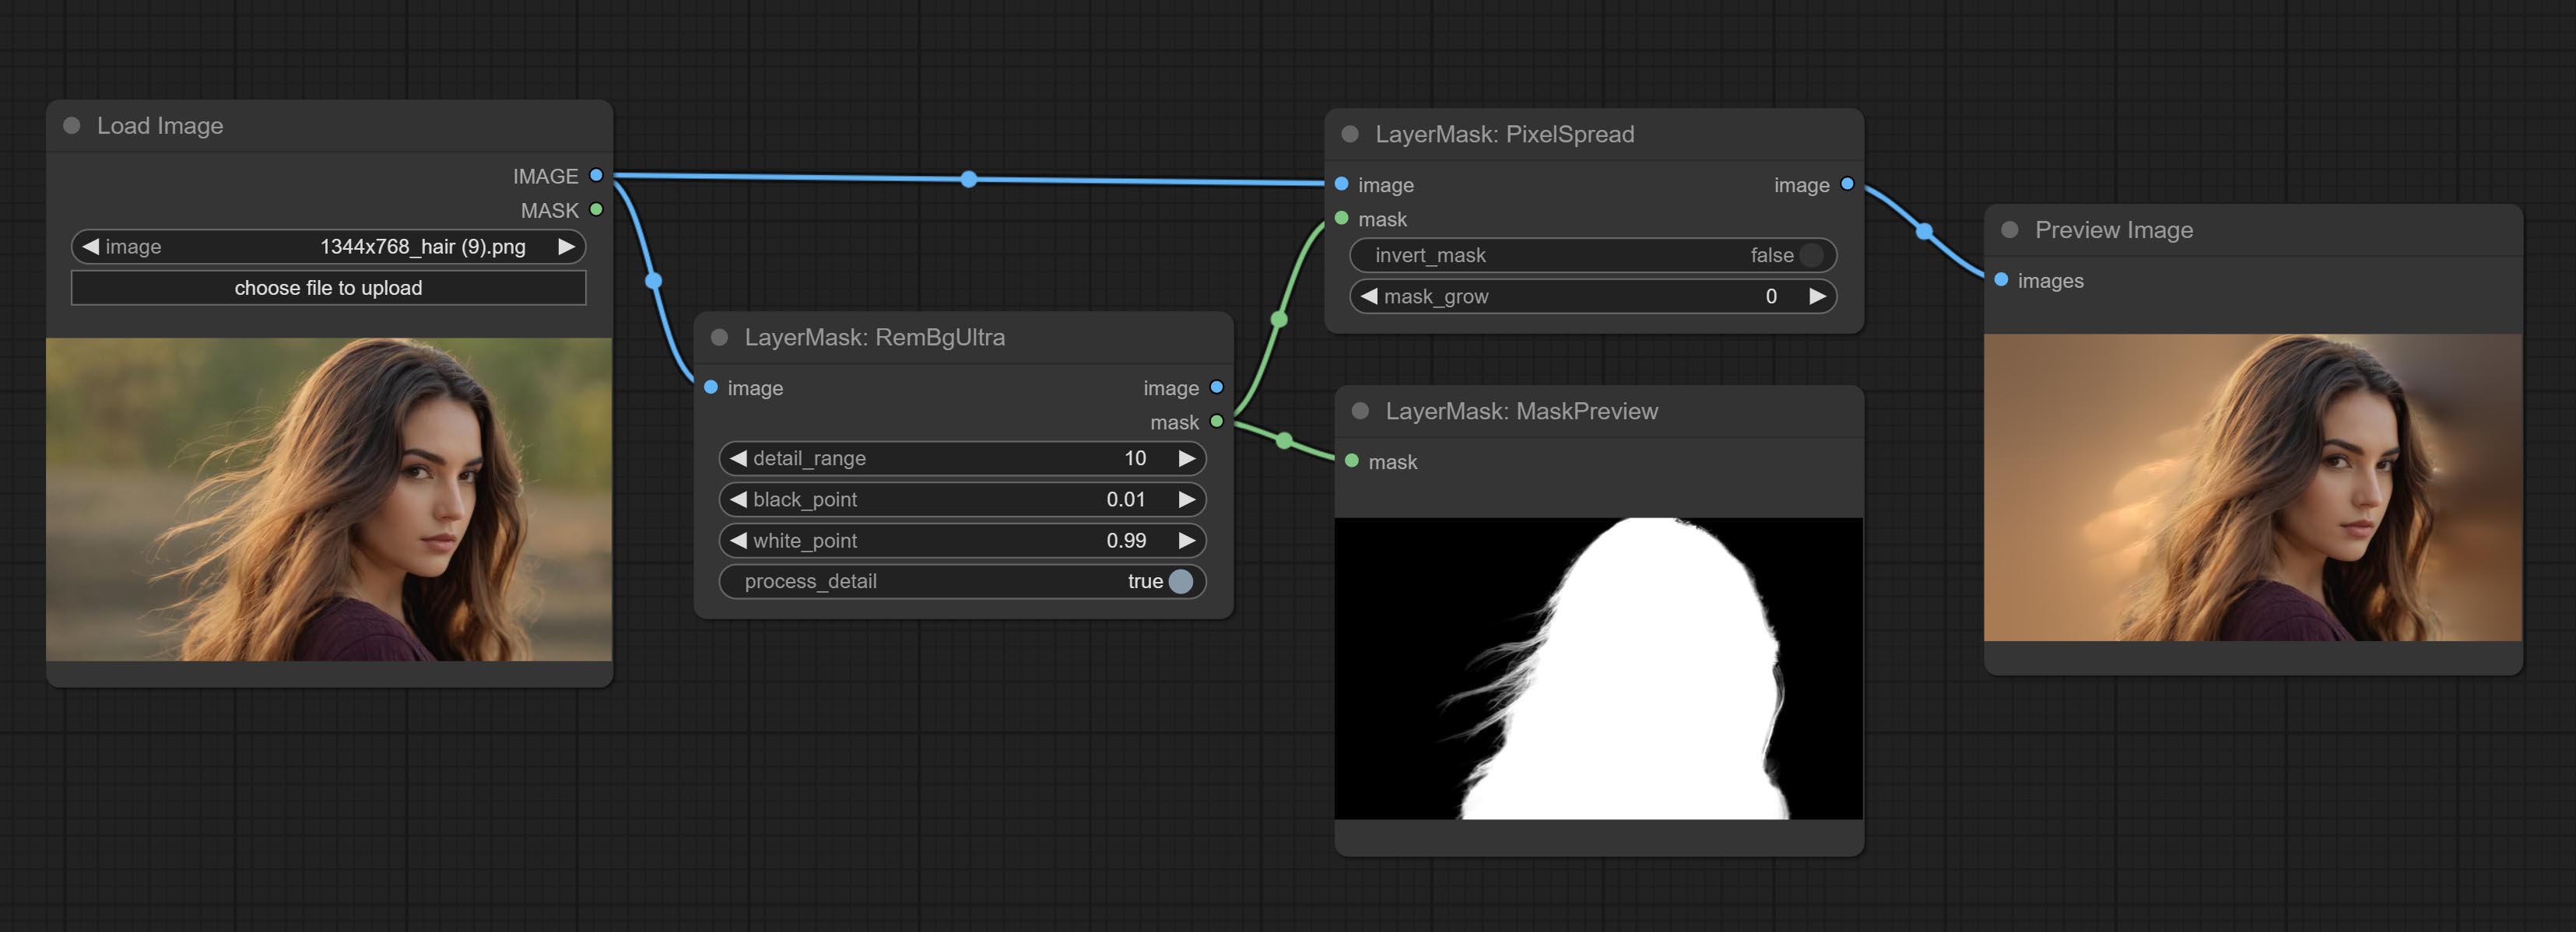
Node options:
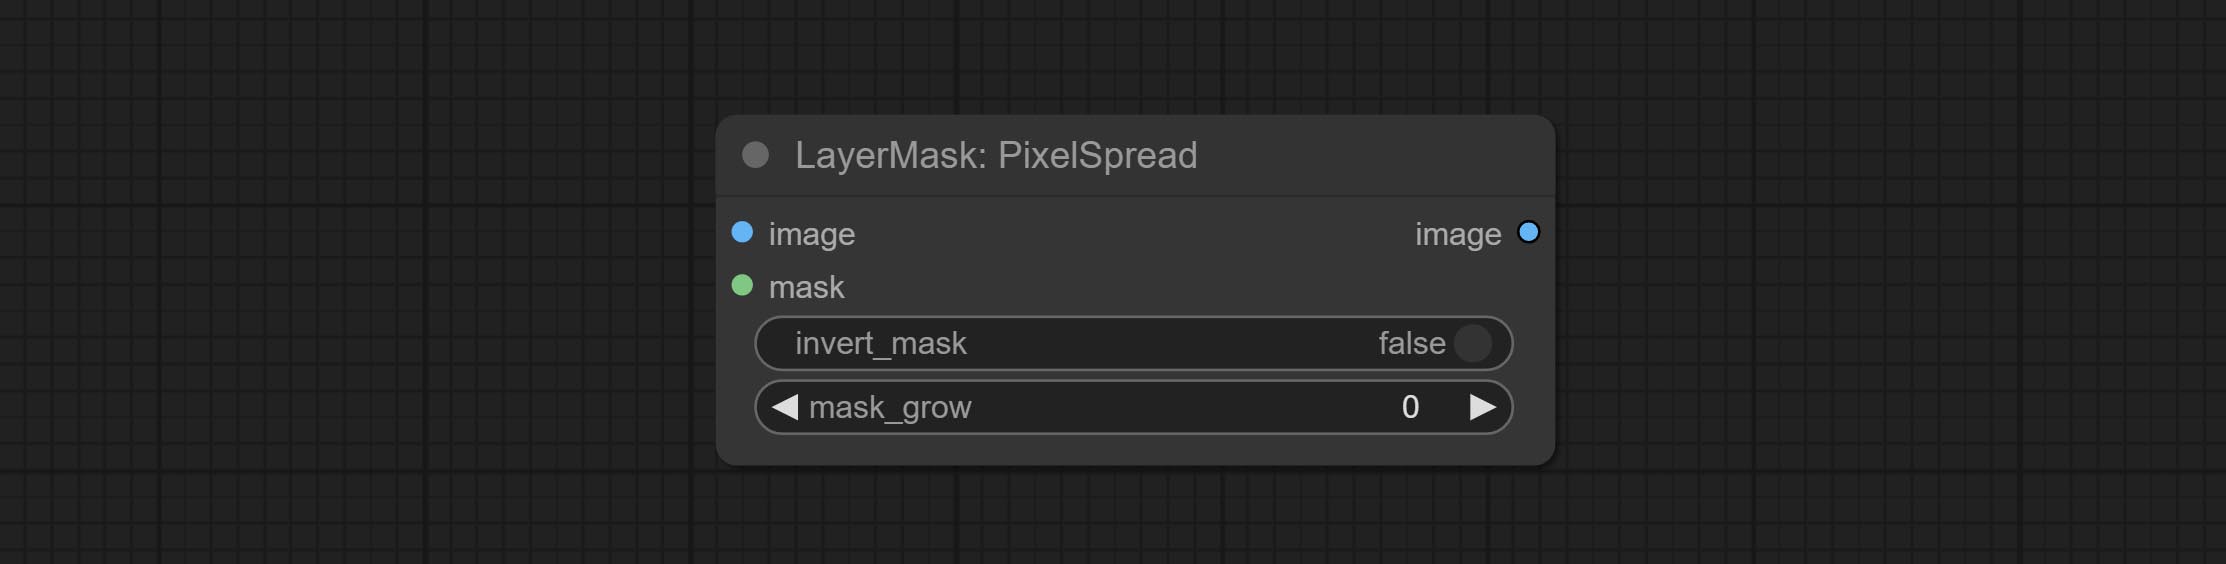
- invert_mask: Whether to reverse the mask.
- mask_grow: Mask expansion amplitude.
MaskByDifferent
Calculate the differences between two images and output them as mask.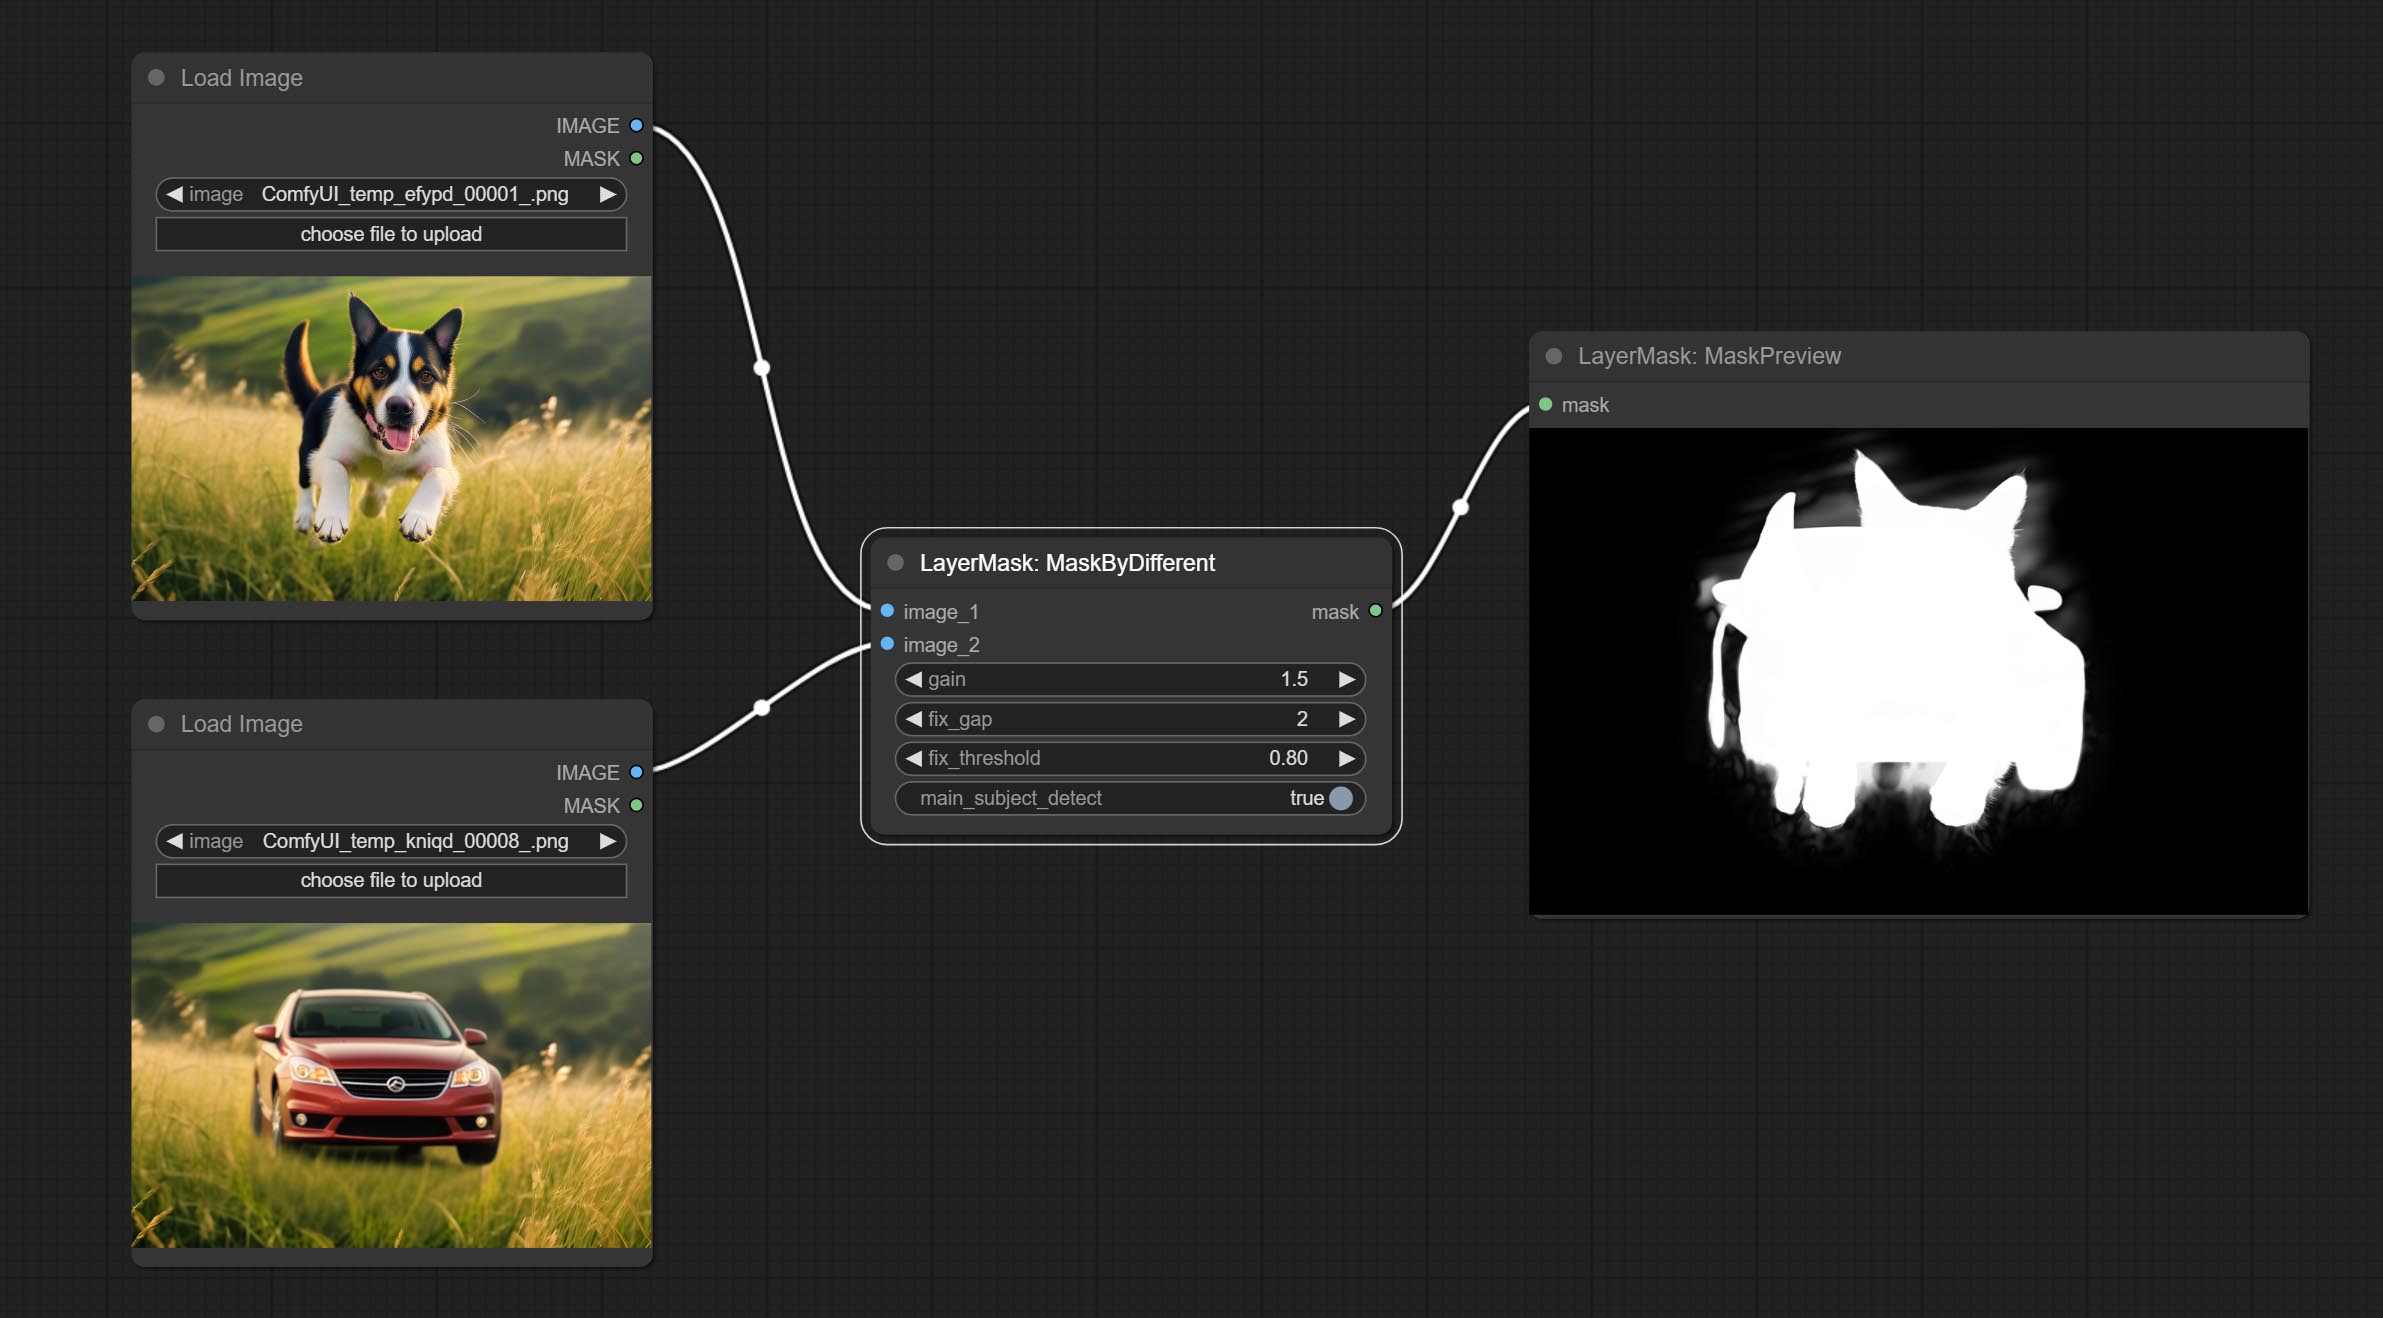
Node options:
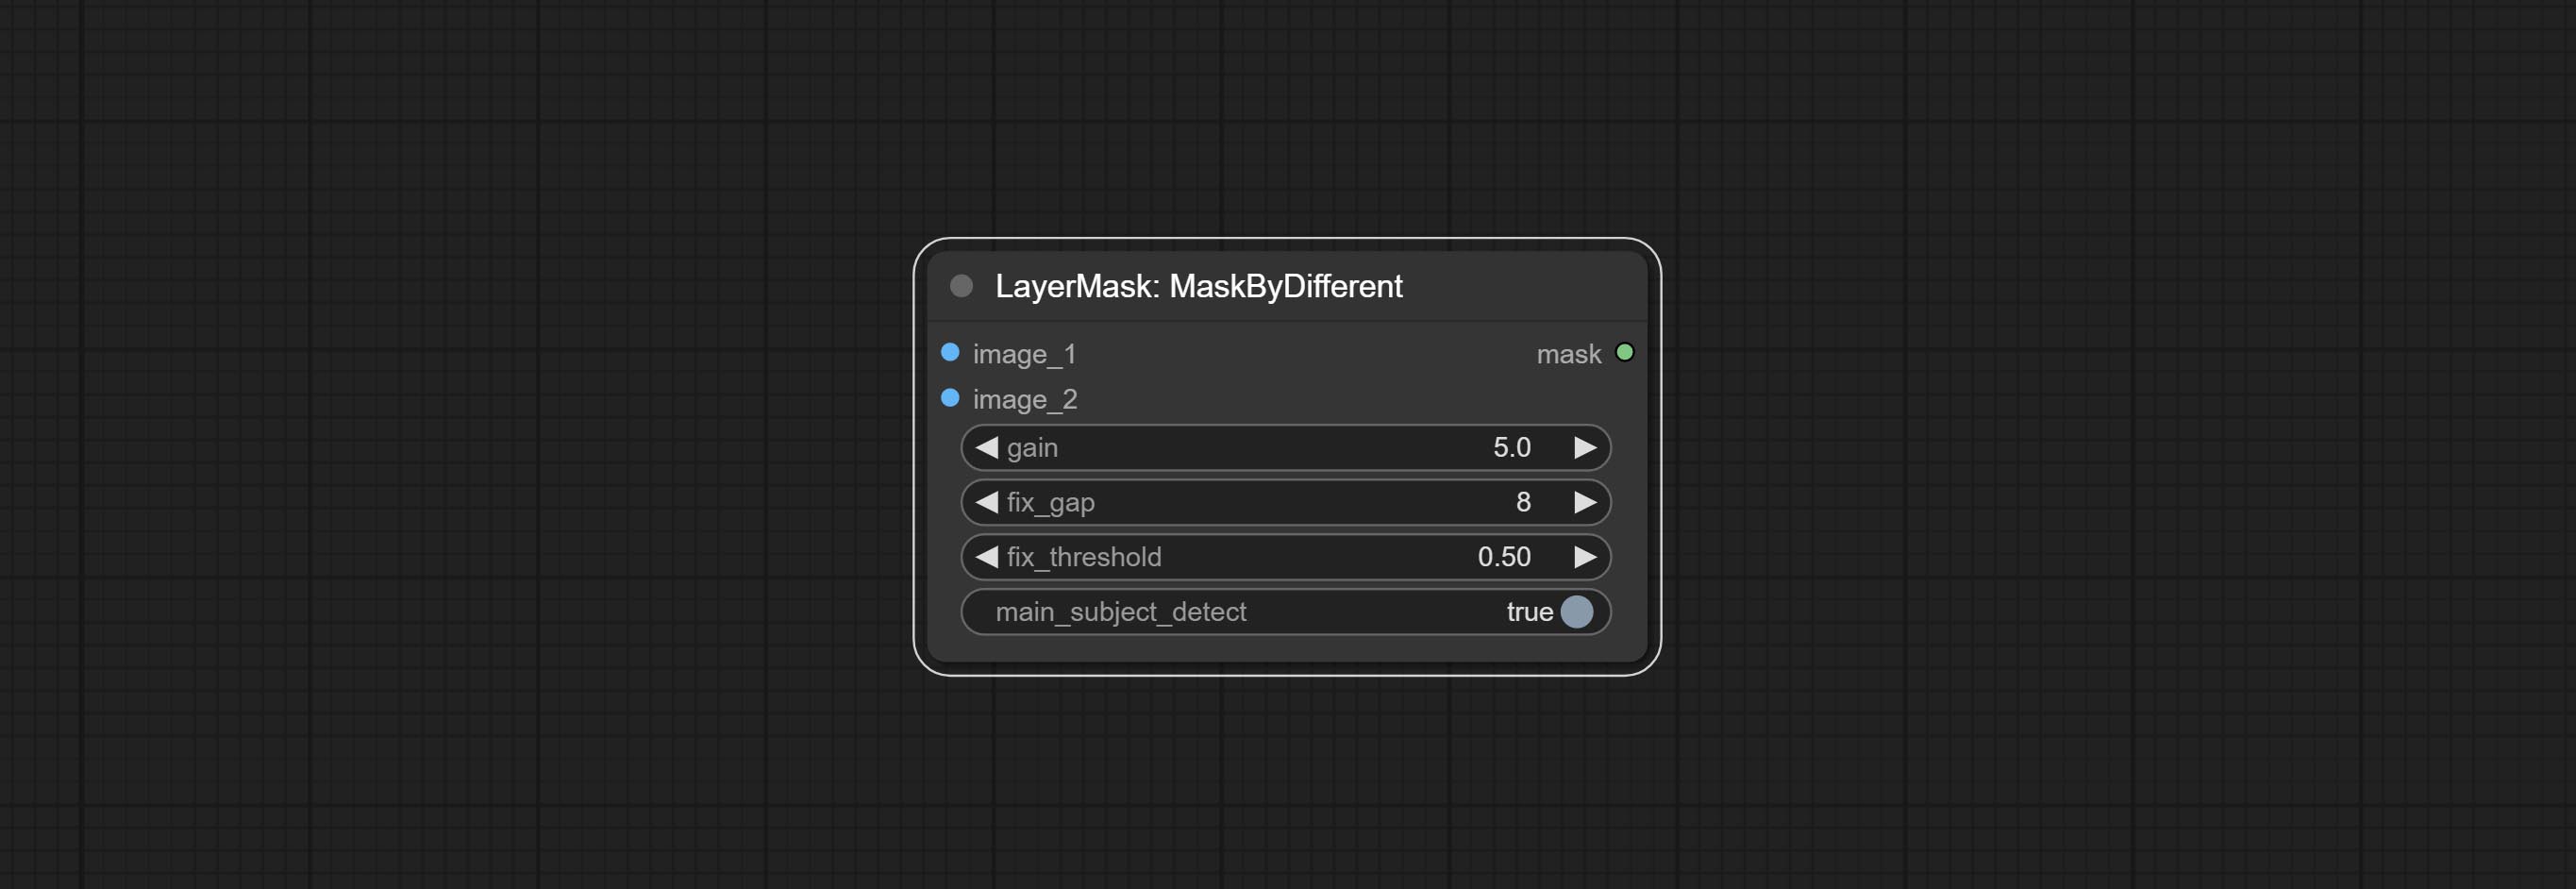
- gain: The gain of difference calculate. higher value will result in a more significant slight difference.
- fix_gap: Fix the internal gaps of the mask. higher value will repair larger gaps.
- fix_threshold: The threshold for fix_gap.
- main_subject_detect: Setting this to True will enable subject detection, ignoring differences outside of the subject.
MaskGrow
Grow and shrink edges and blur the mask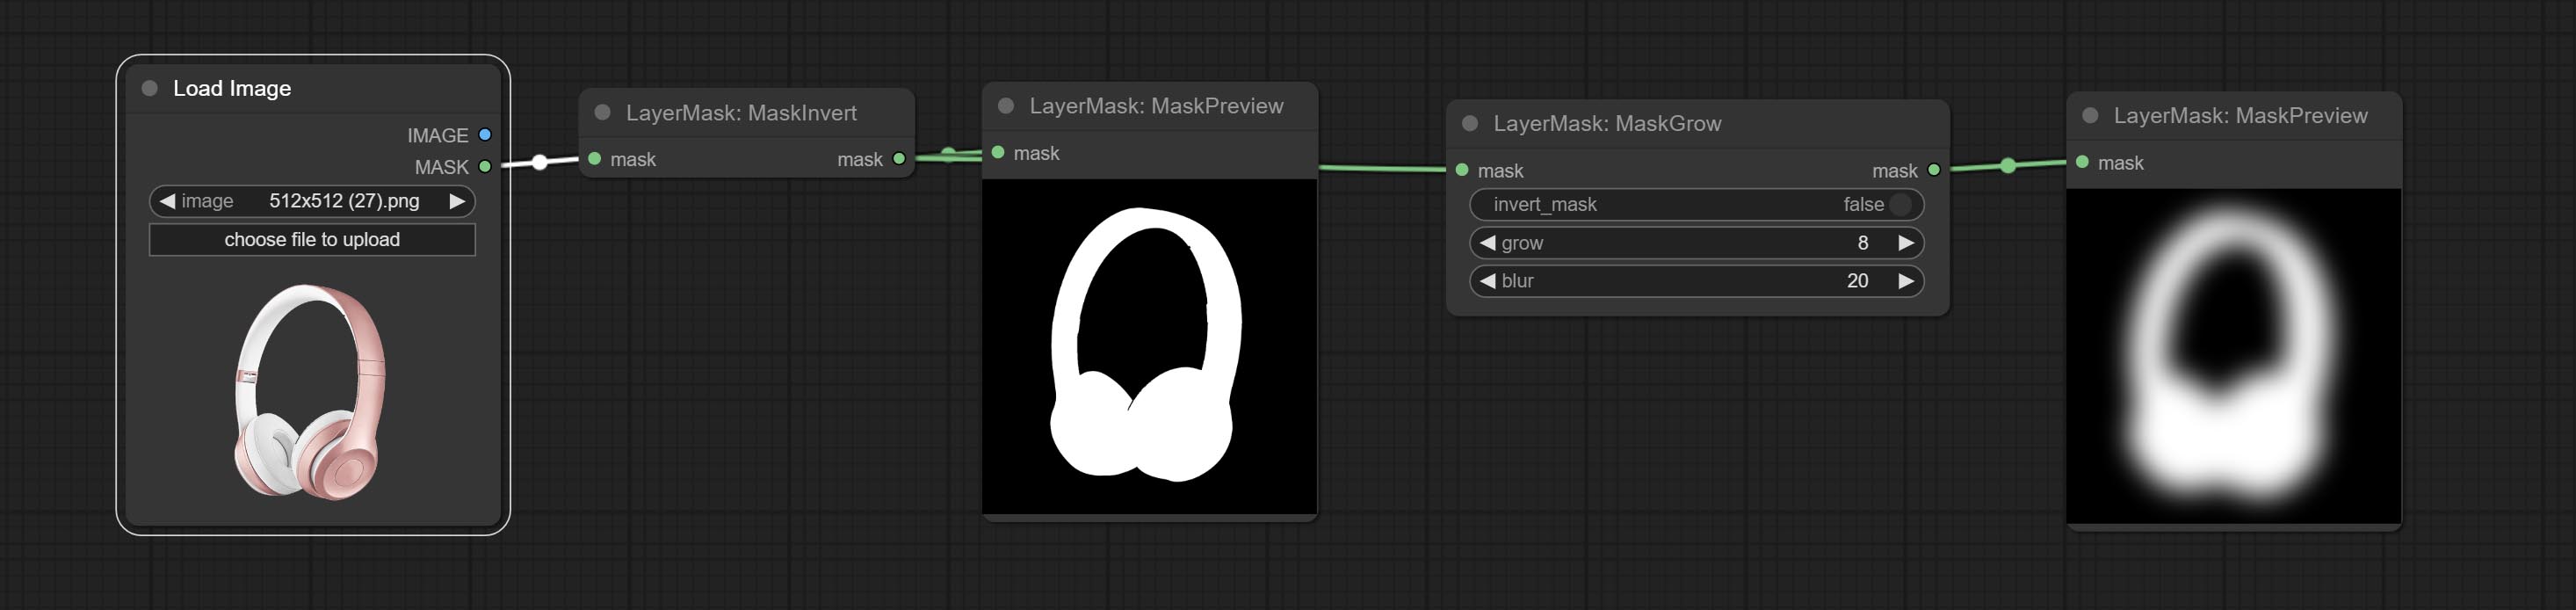
Node options: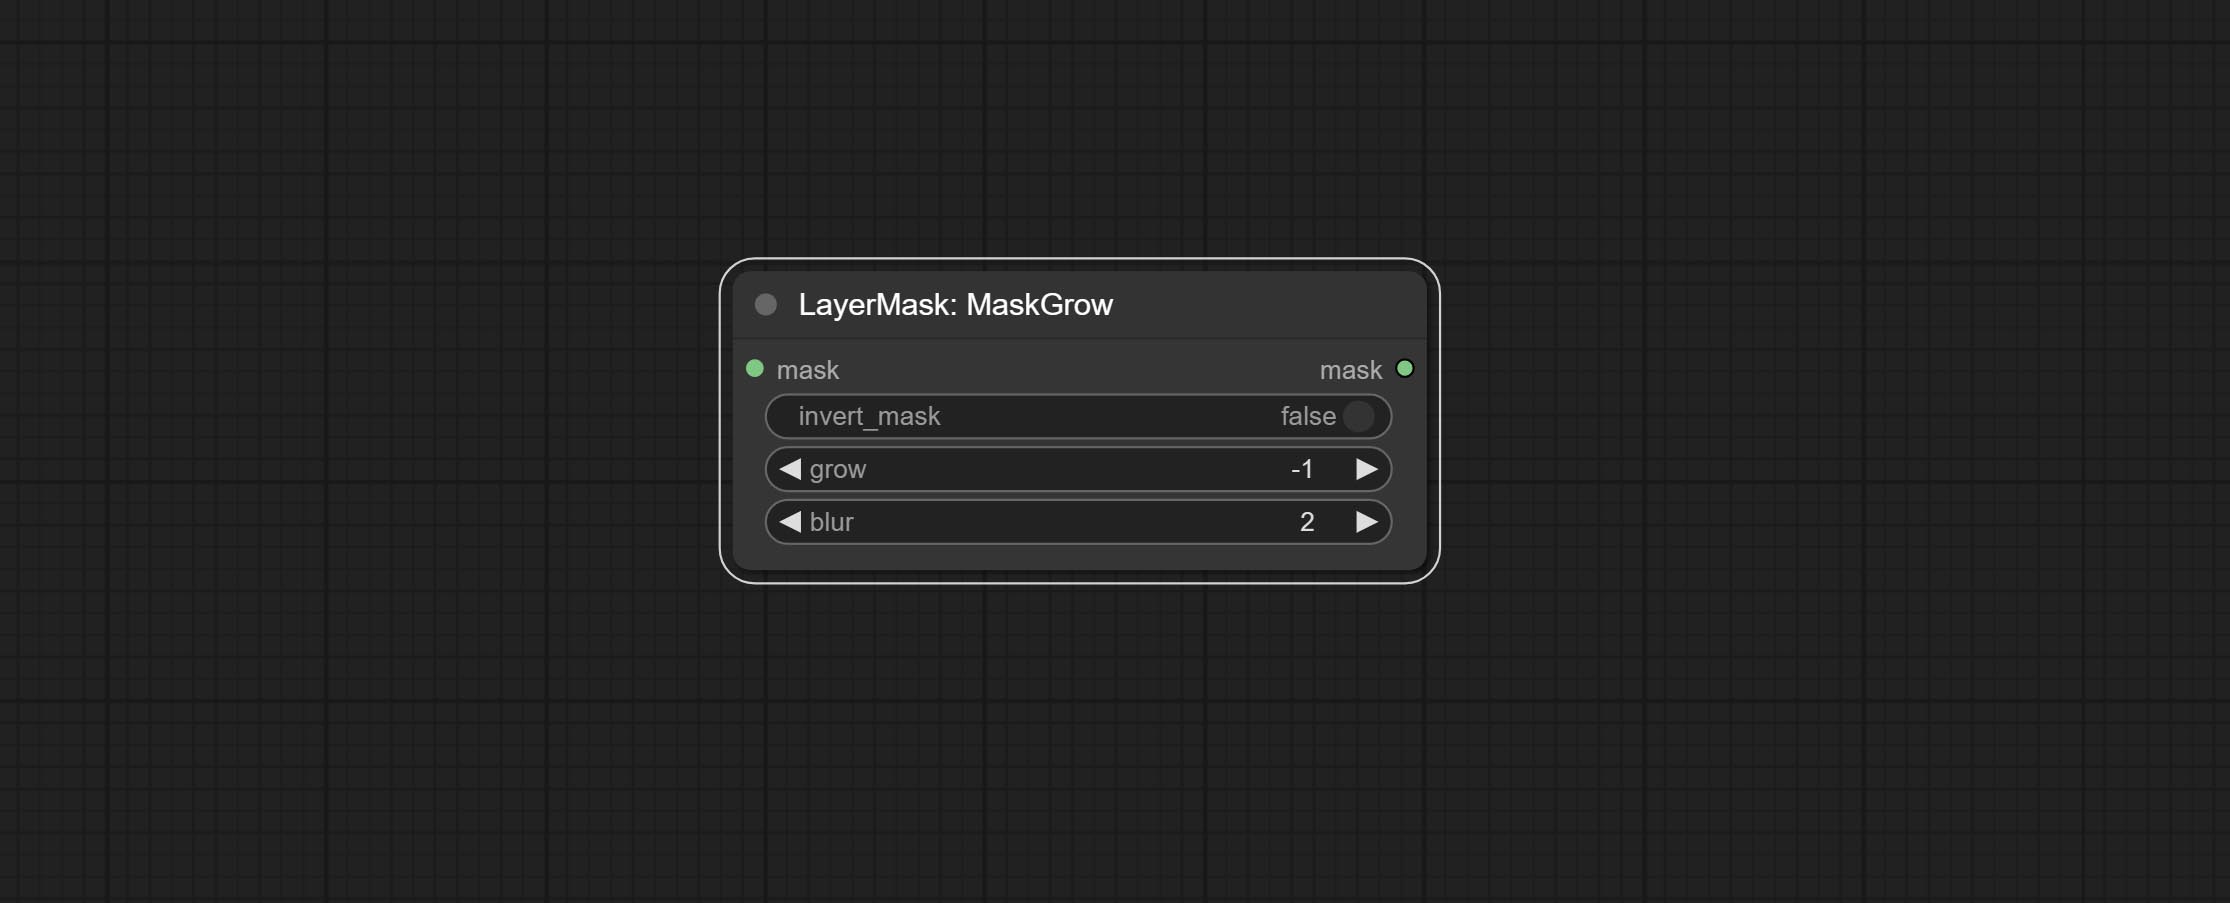
- invert_mask: Whether to reverse the mask.
- grow: Positive values expand outward, while negative values contract inward.
- blur: Blur the edge.
MaskEdgeShrink
Smooth transition and shrink the mask edges while preserving edge details.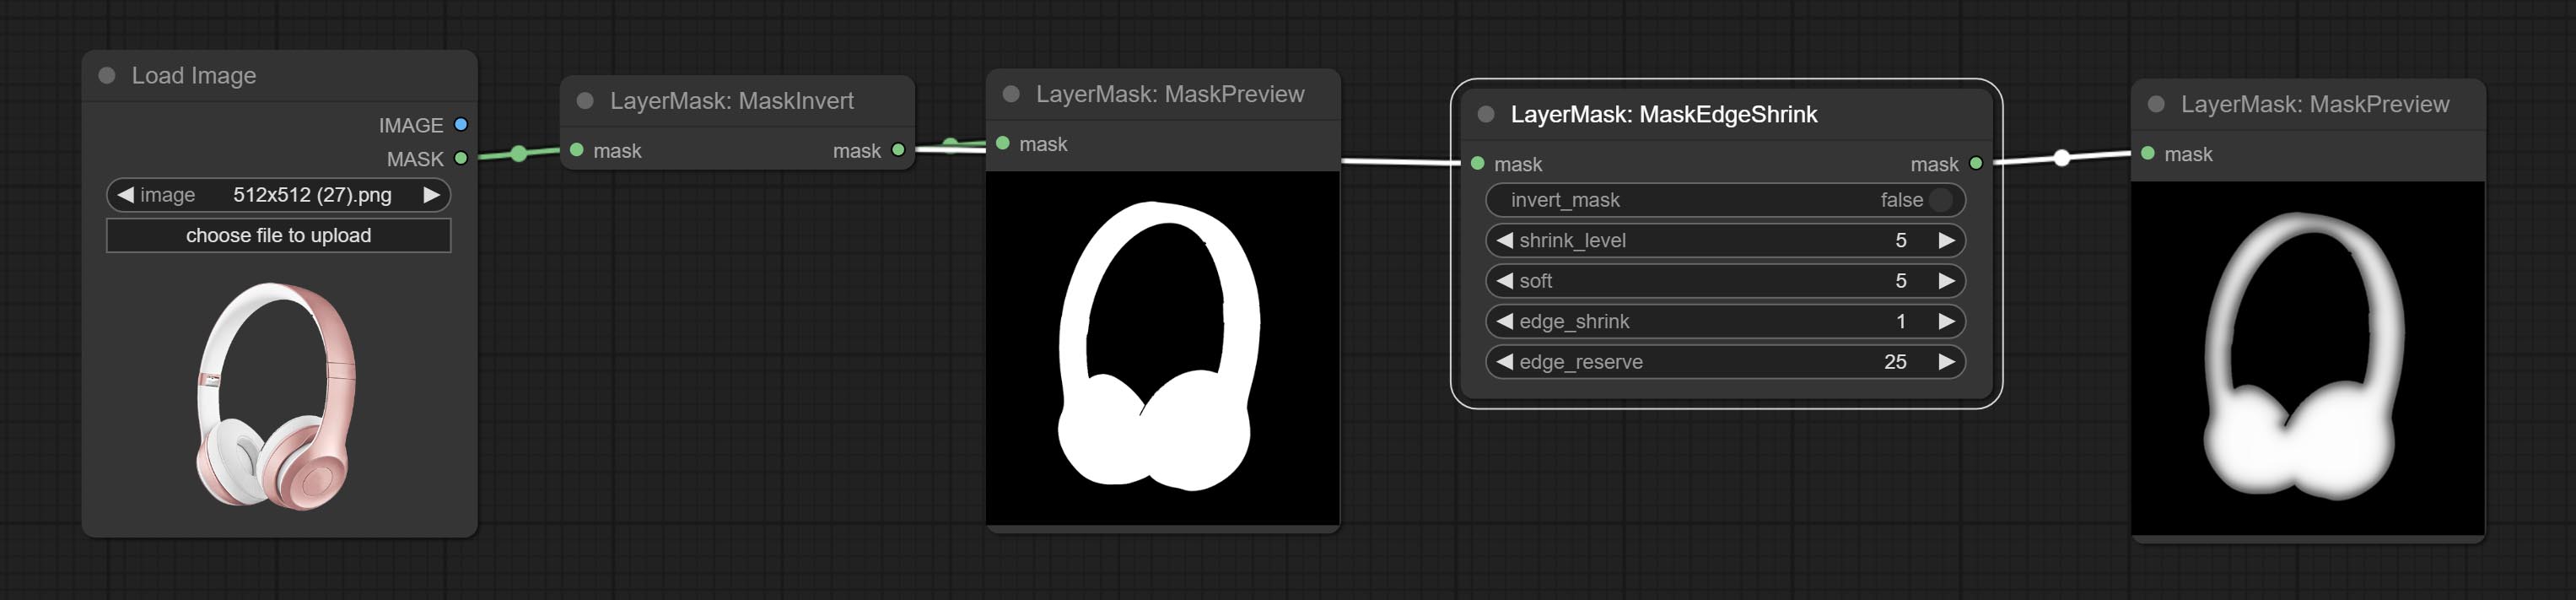
Node options: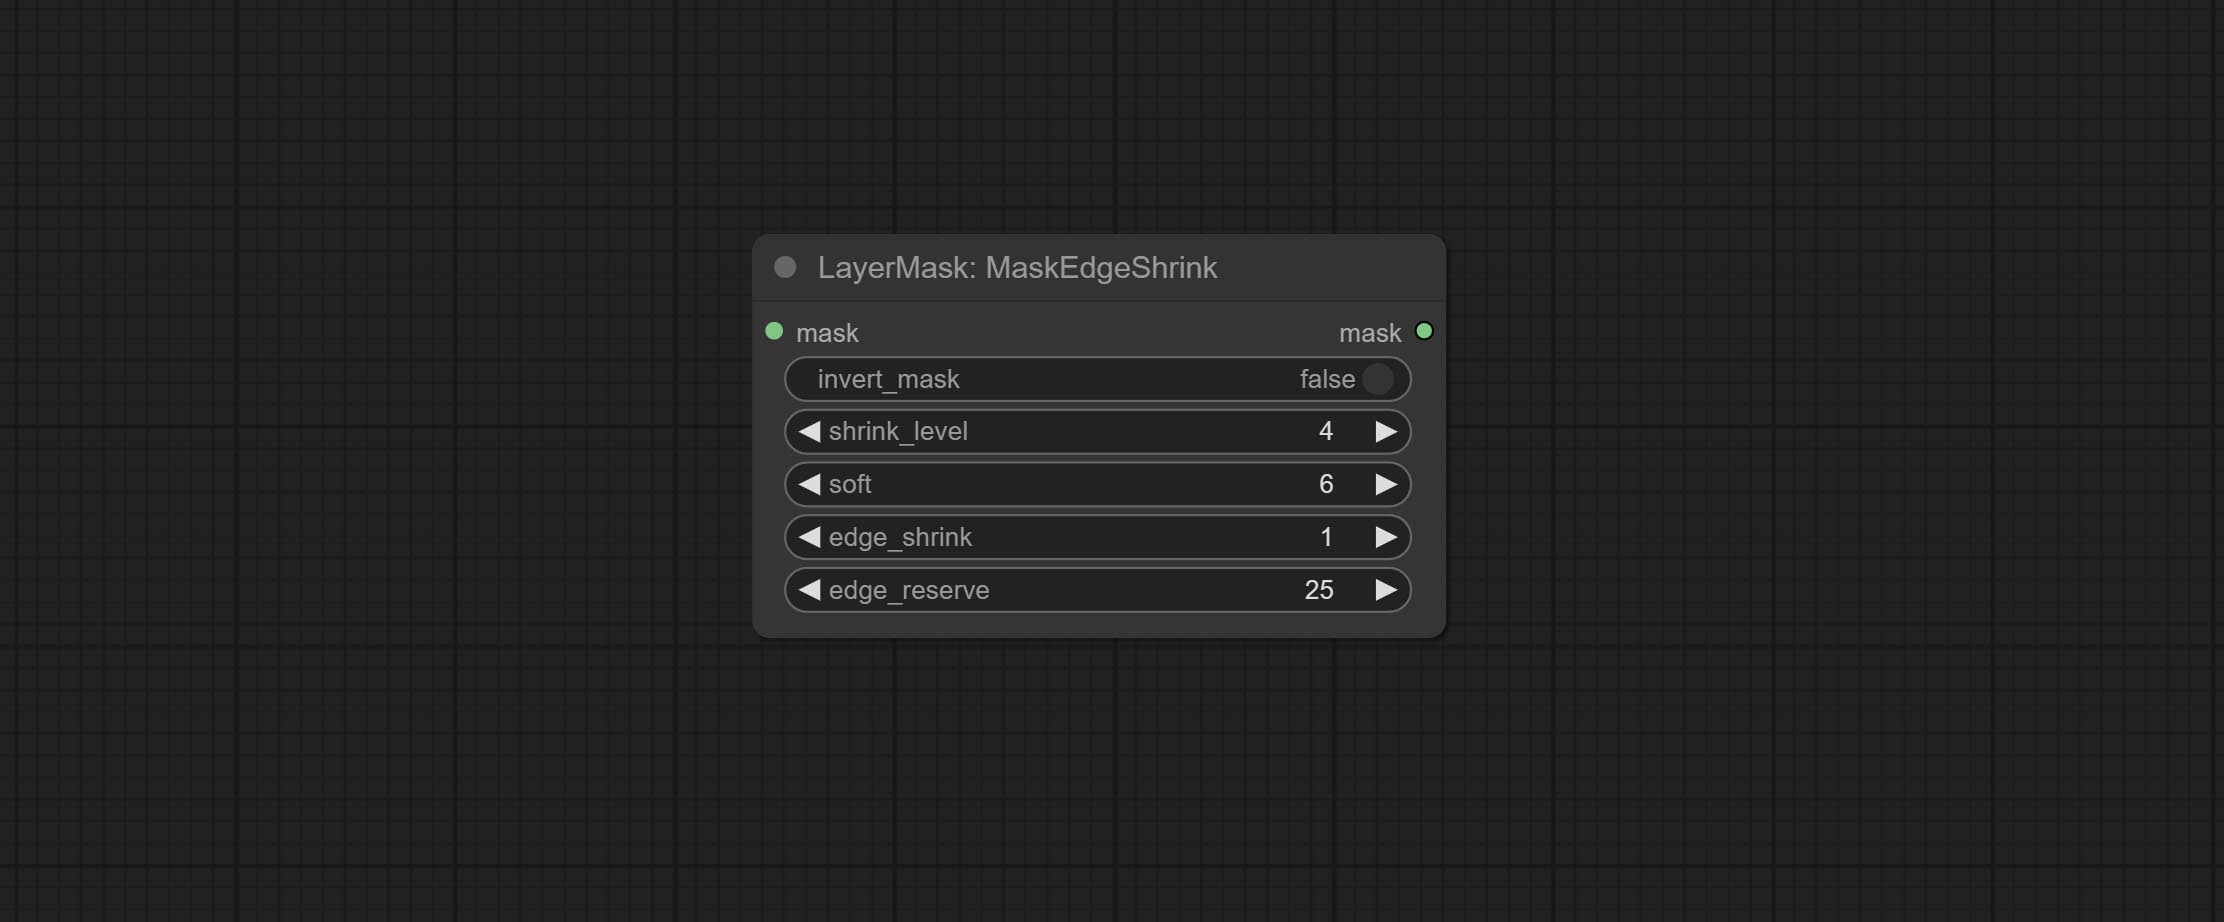
- invert_mask: Whether to reverse the mask.
- shrink_level: Shrink the smoothness level.
- soft: Smooth amplitude.
- edge_shrink: Edge shrinkage amplitude.
- edge_reserve: Preserve the amplitude of edge details, 100 represents complete preservation, and 0 represents no preservation at all.
Comparison of MaskGrow and MaskEdgeShrink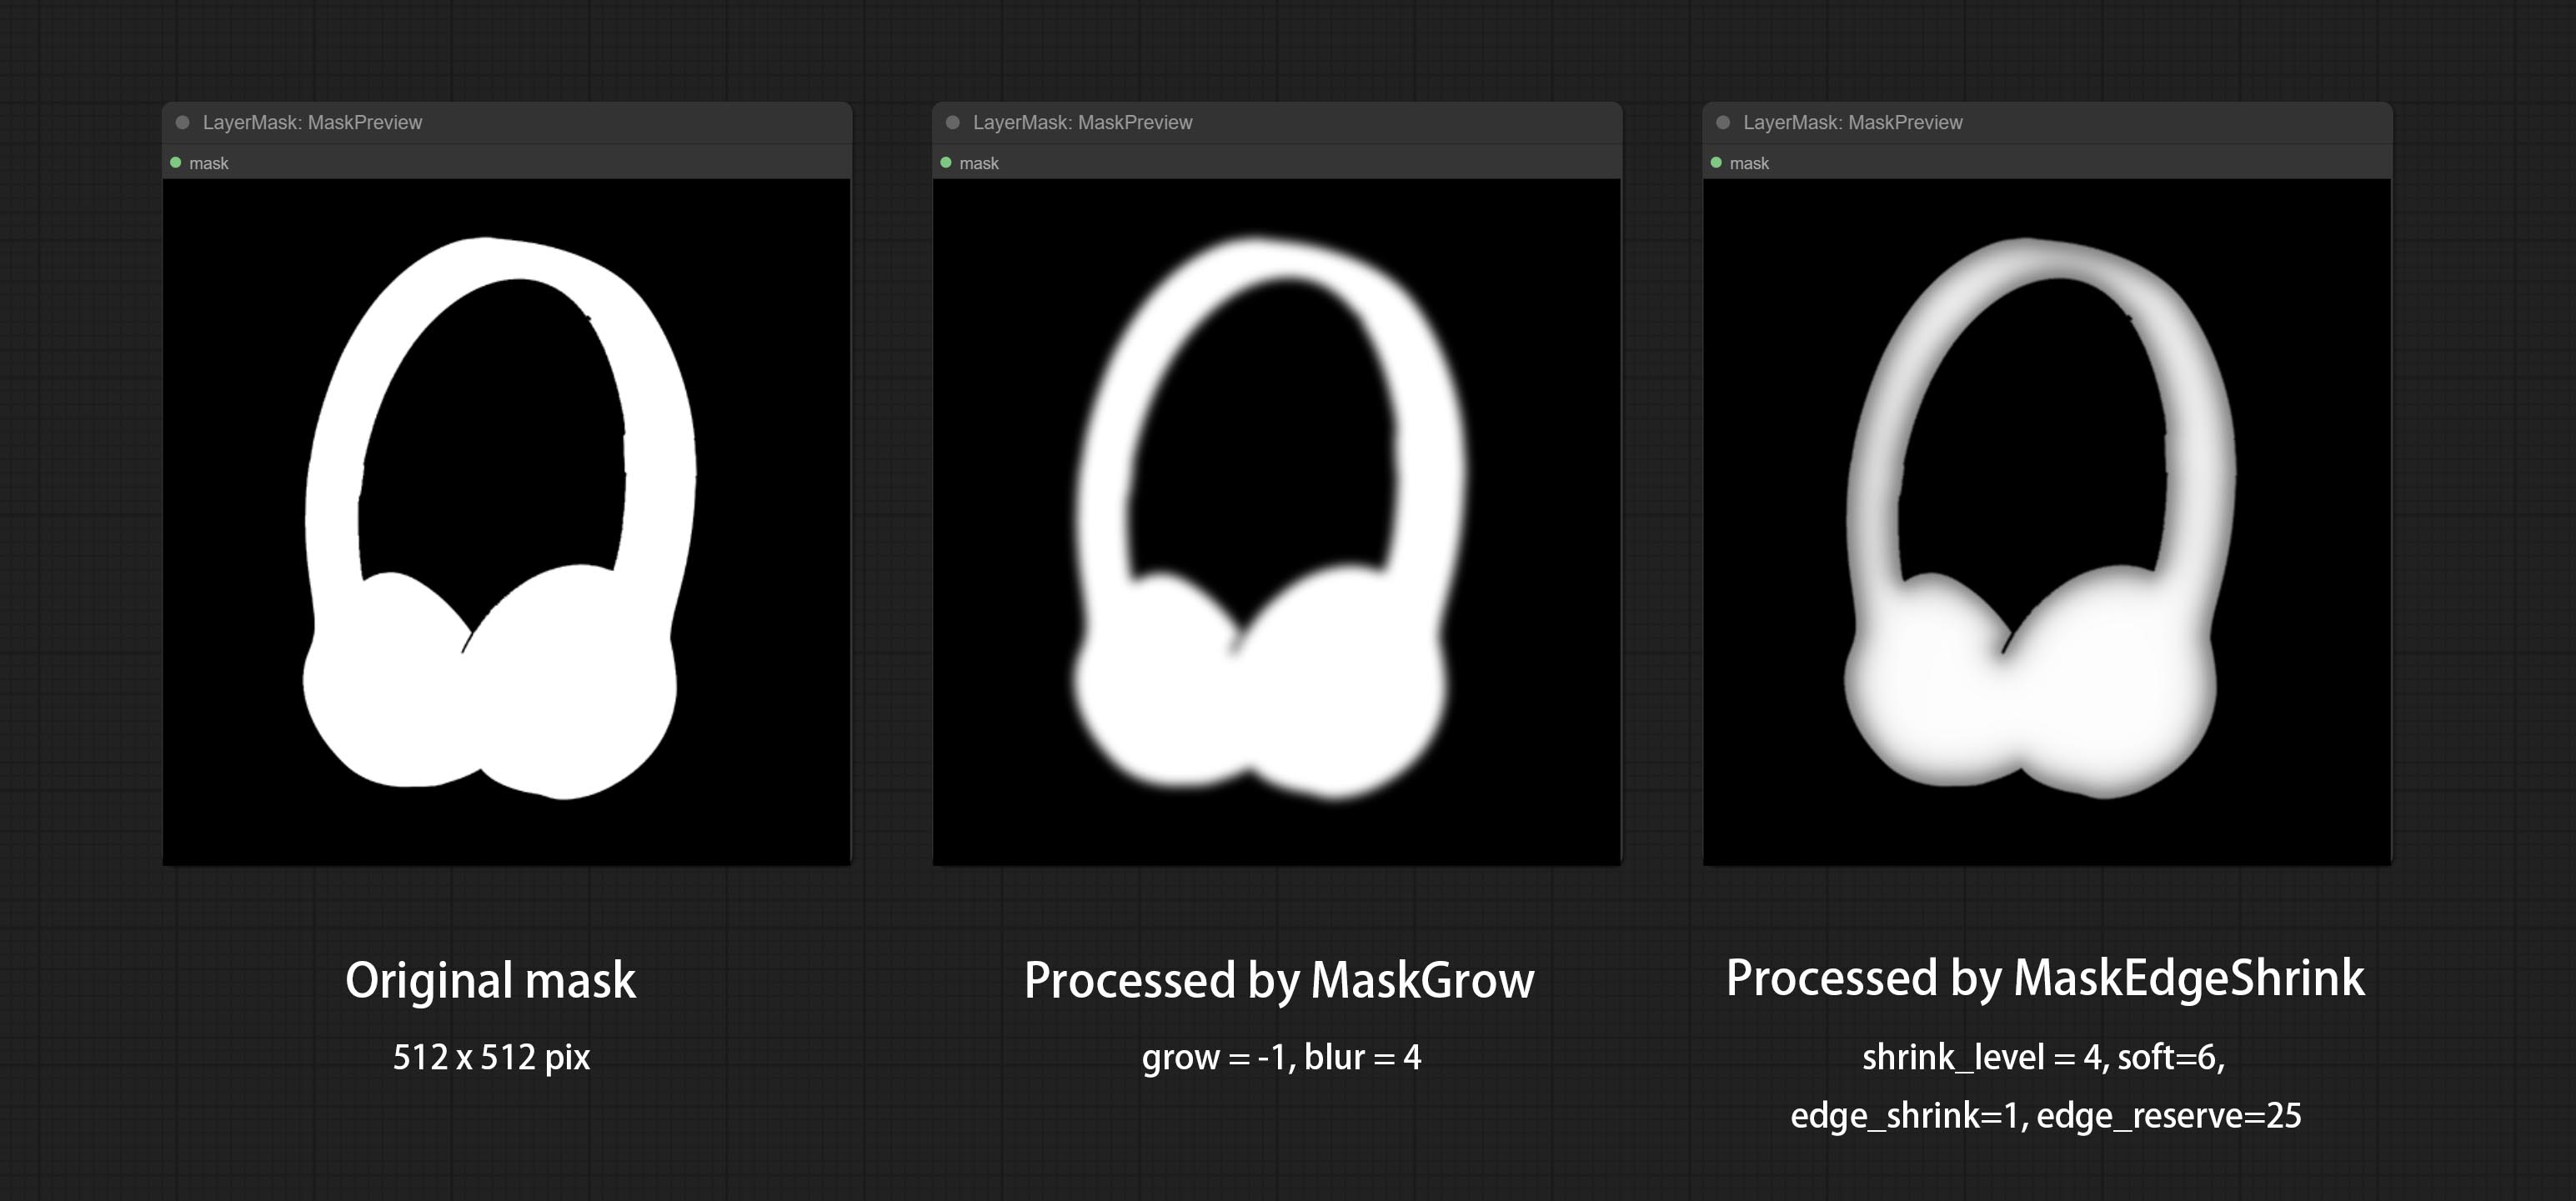
MaskMotionBlur
Create motion blur on the mask.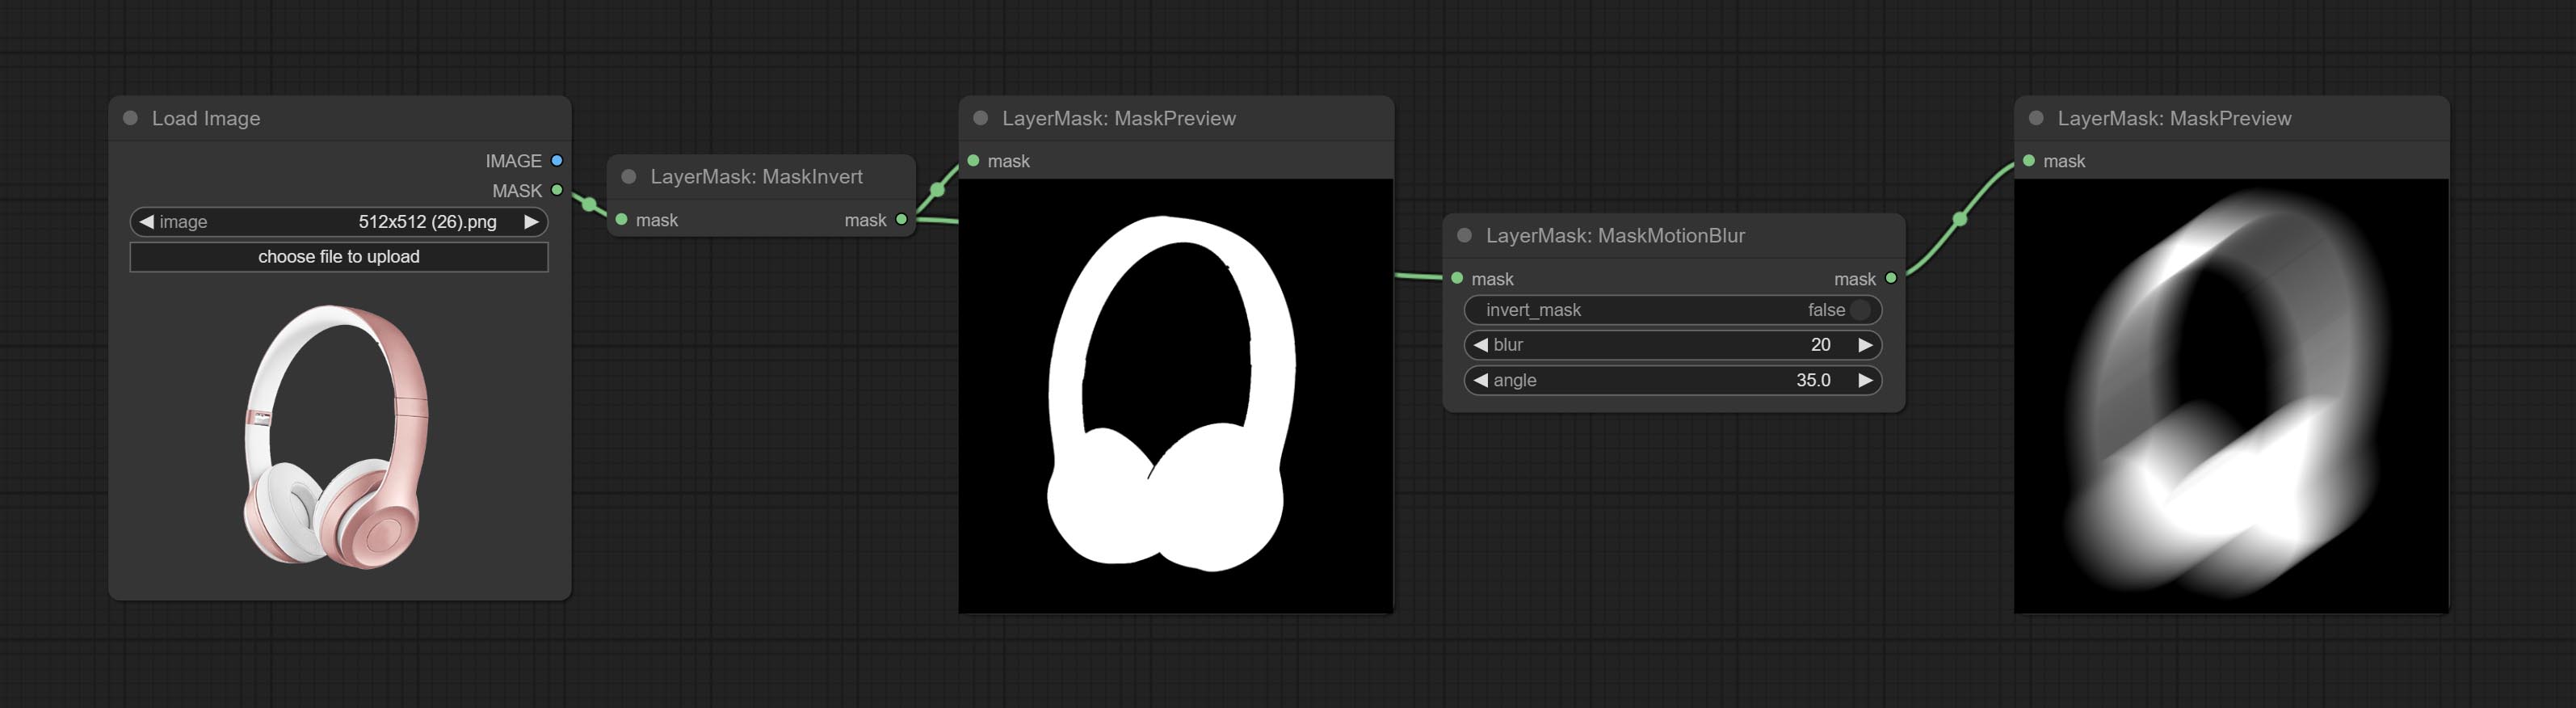
Node options:
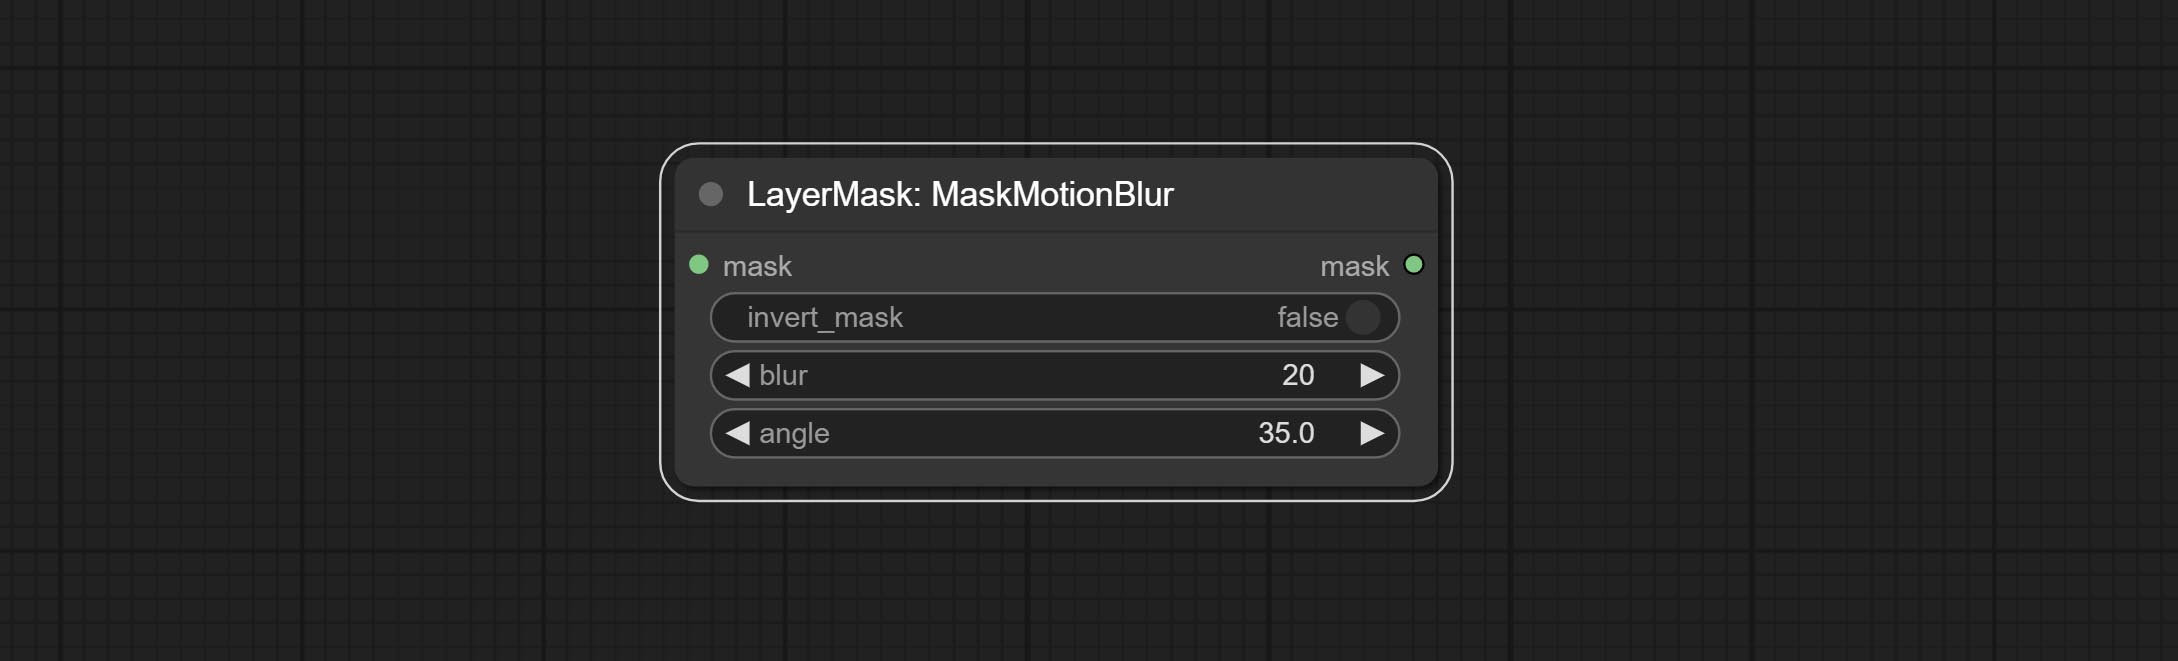
- invert_mask: Whether to reverse the mask.
- blur: The size of blur.
- angle: The angle of blur.
MaskGradient
Create a gradient for the mask from one side. please note the difference between this node and the CreateGradientMask node.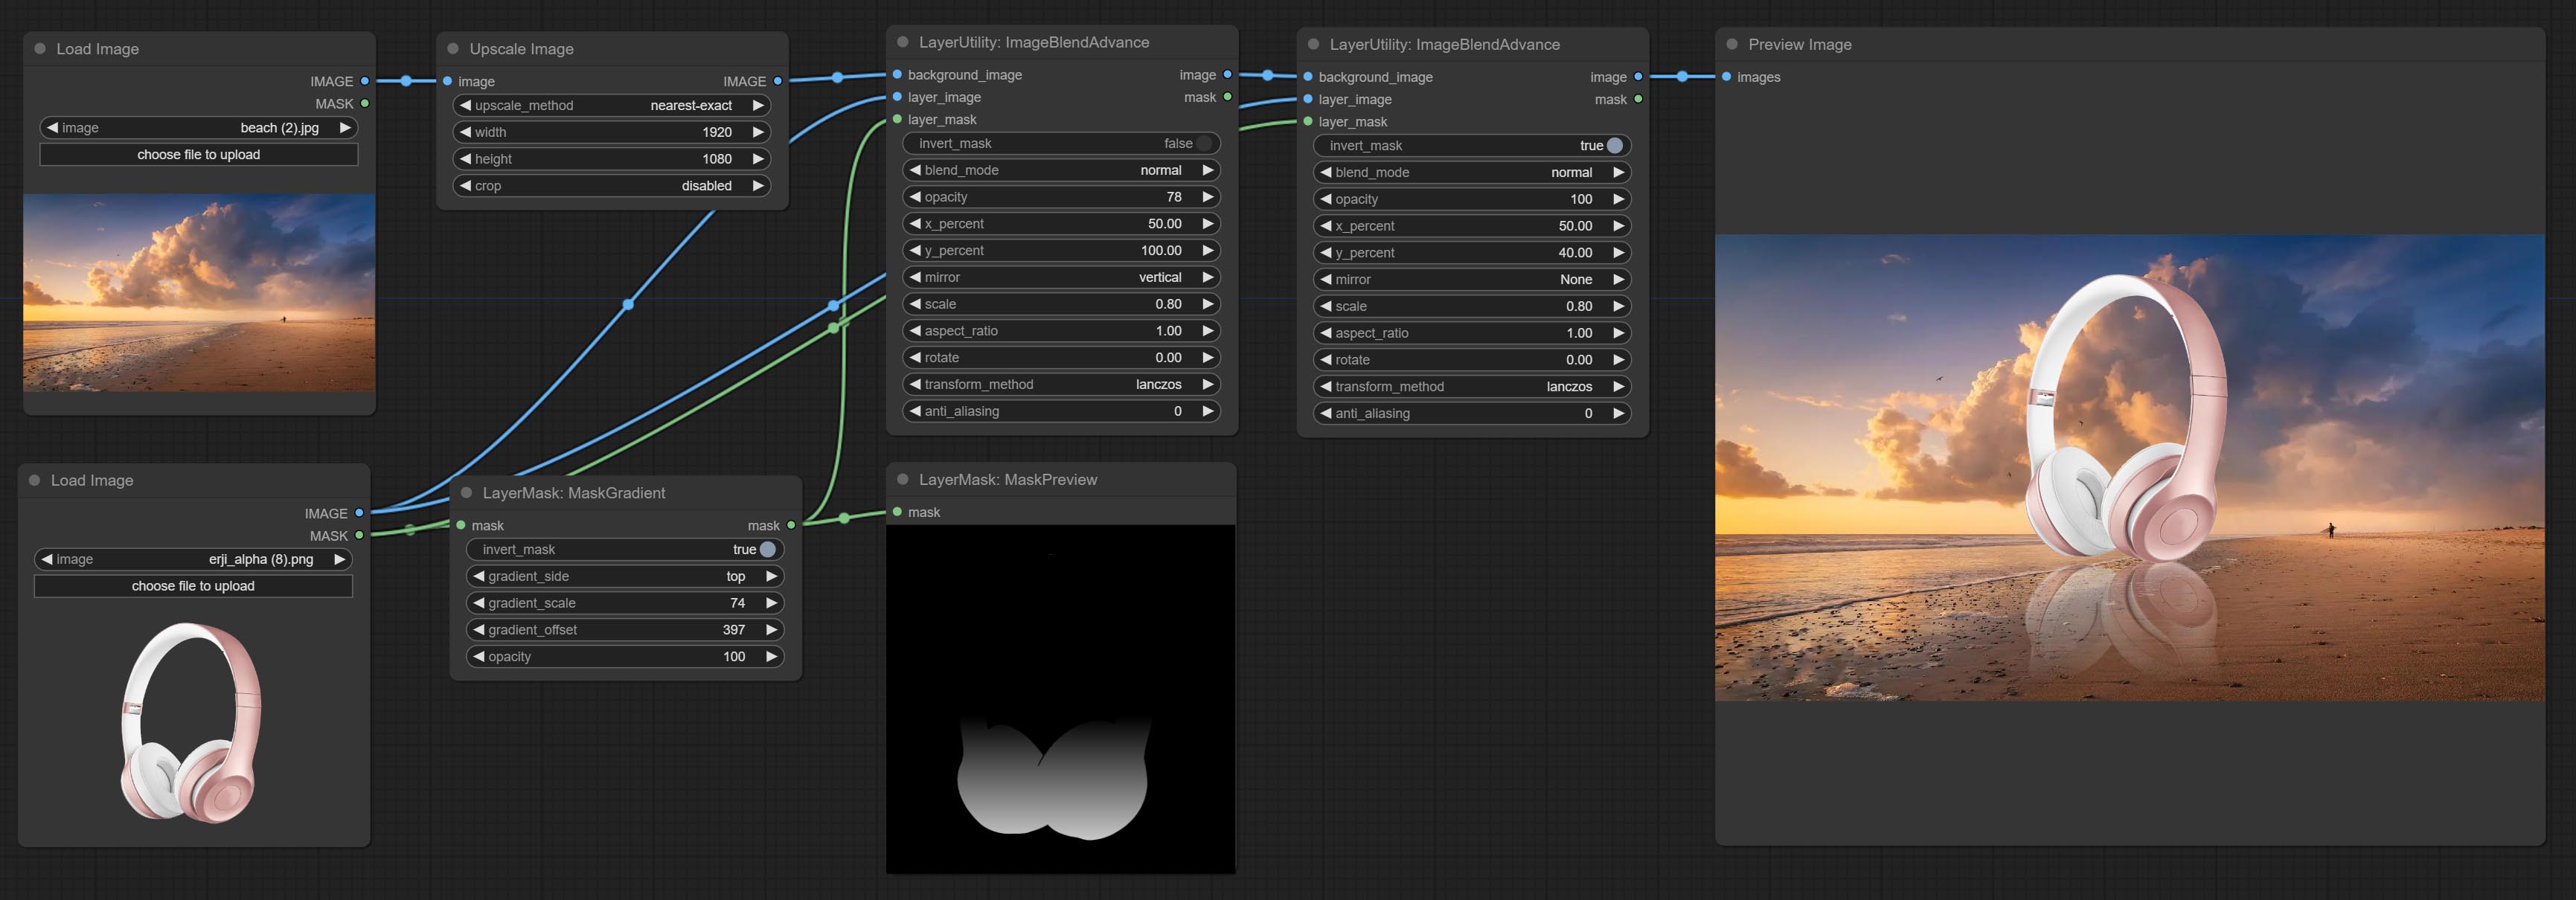
Node options:
- invert_mask: Whether to reverse the mask.
- gradient_side: Generate gradient from which edge. There are four directions: top, bottom, left and right.
- gradient_scale: Gradient distance. The default value of 100 indicates that one side of the gradient is completely transparent and the other side is completely opaque. The smaller the value, the shorter the distance from transparent to opaque.
- gradient_offset: Gradient position offset.
- opacity: The opacity of the gradient.
CreateGradientMask
Create a gradient mask. please note the difference between this node and the MaskGradient node.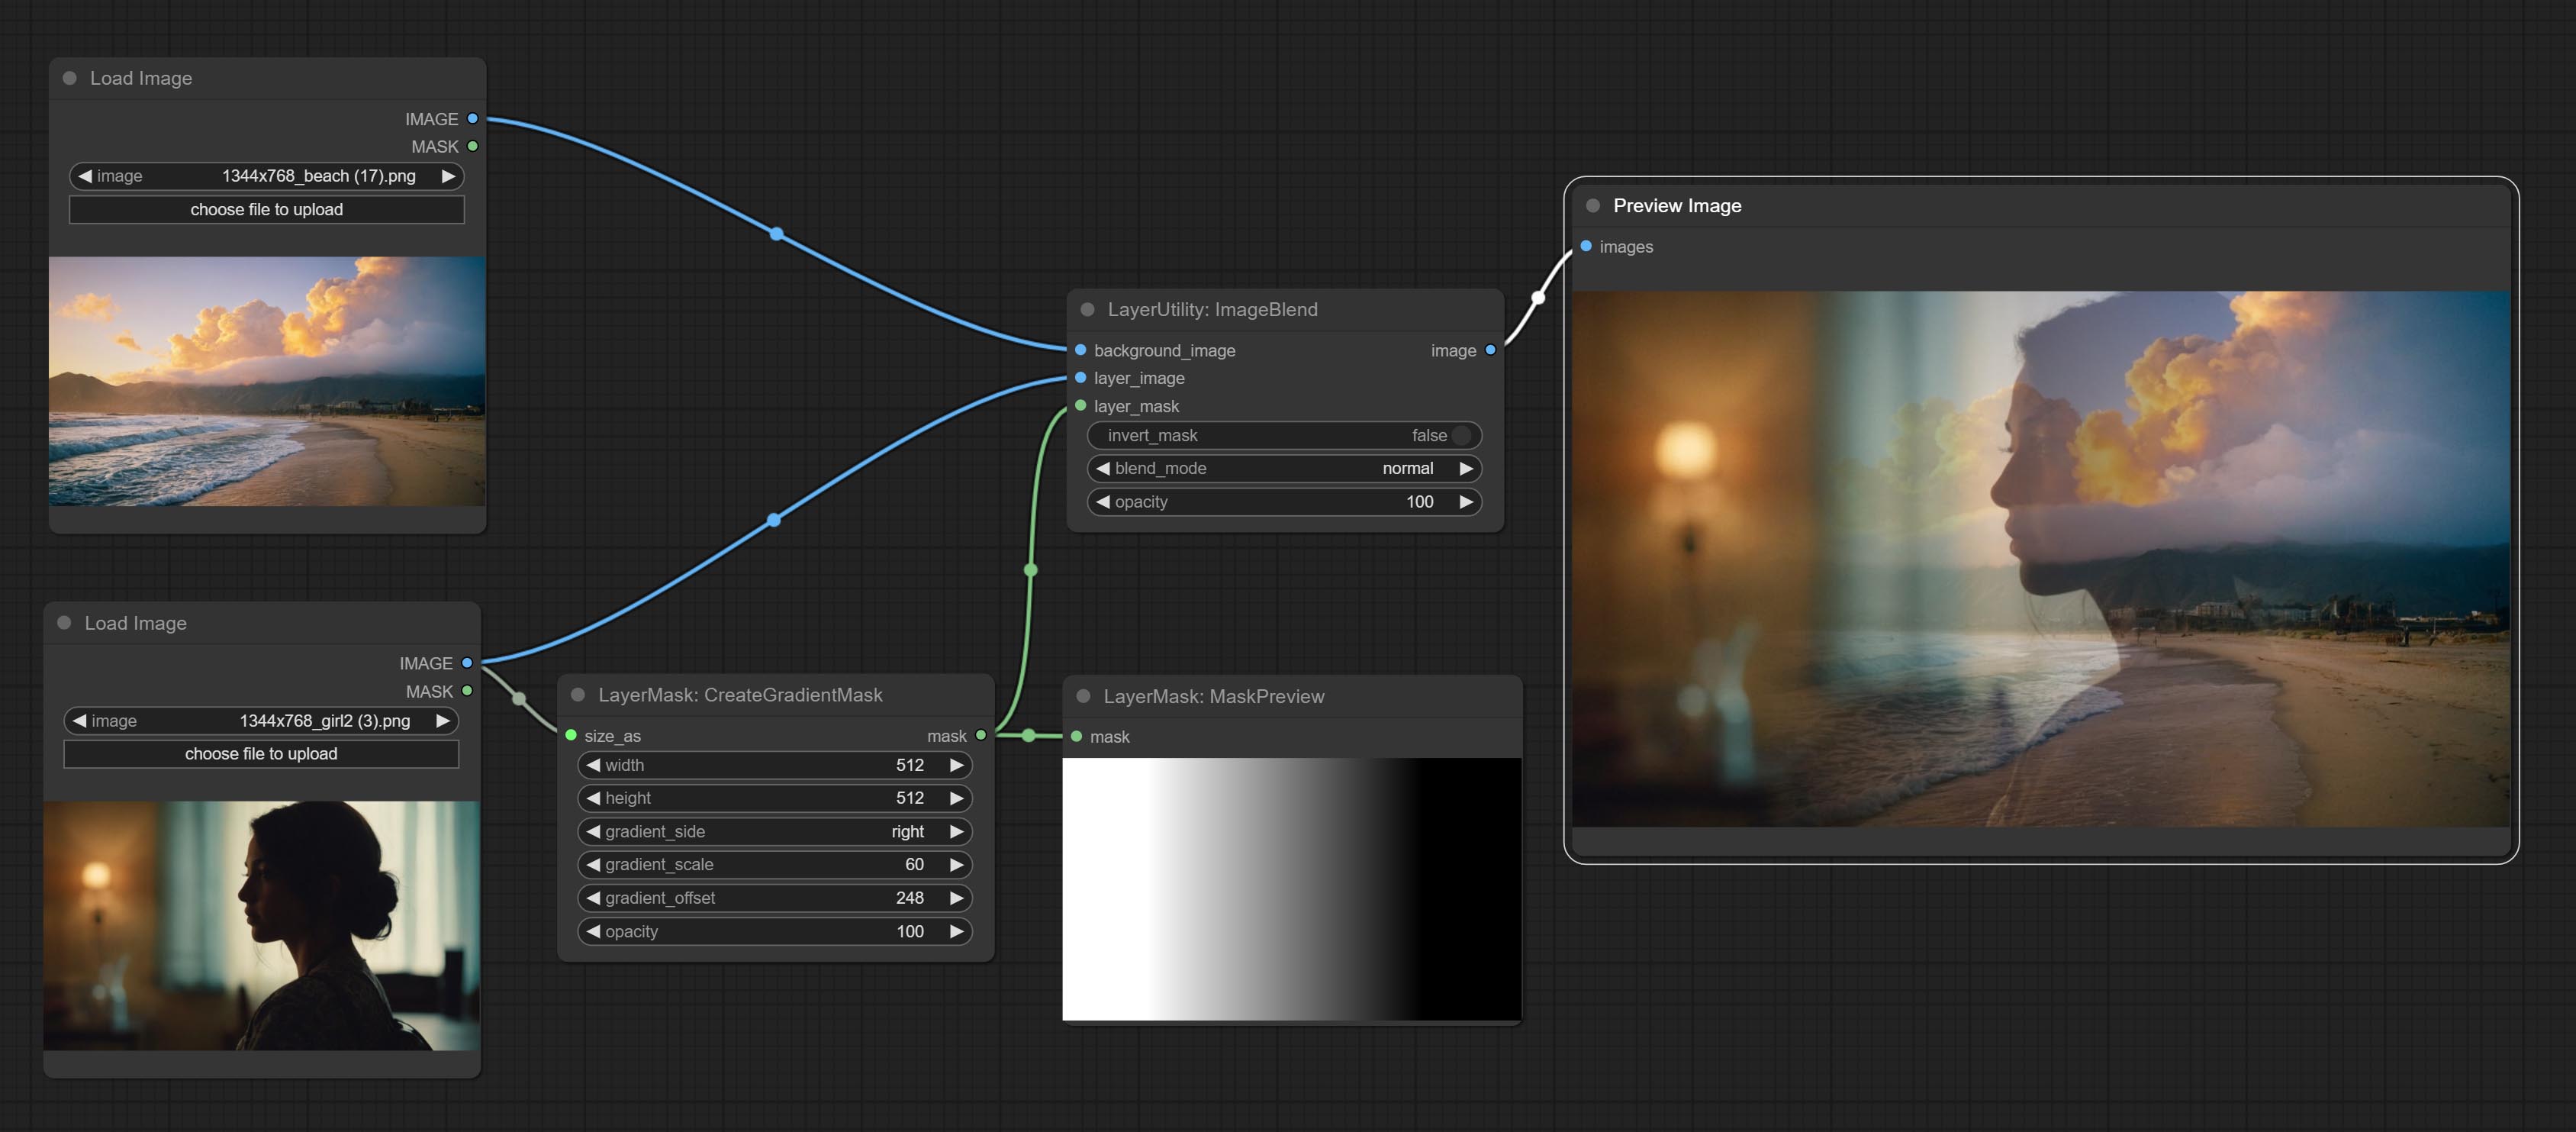
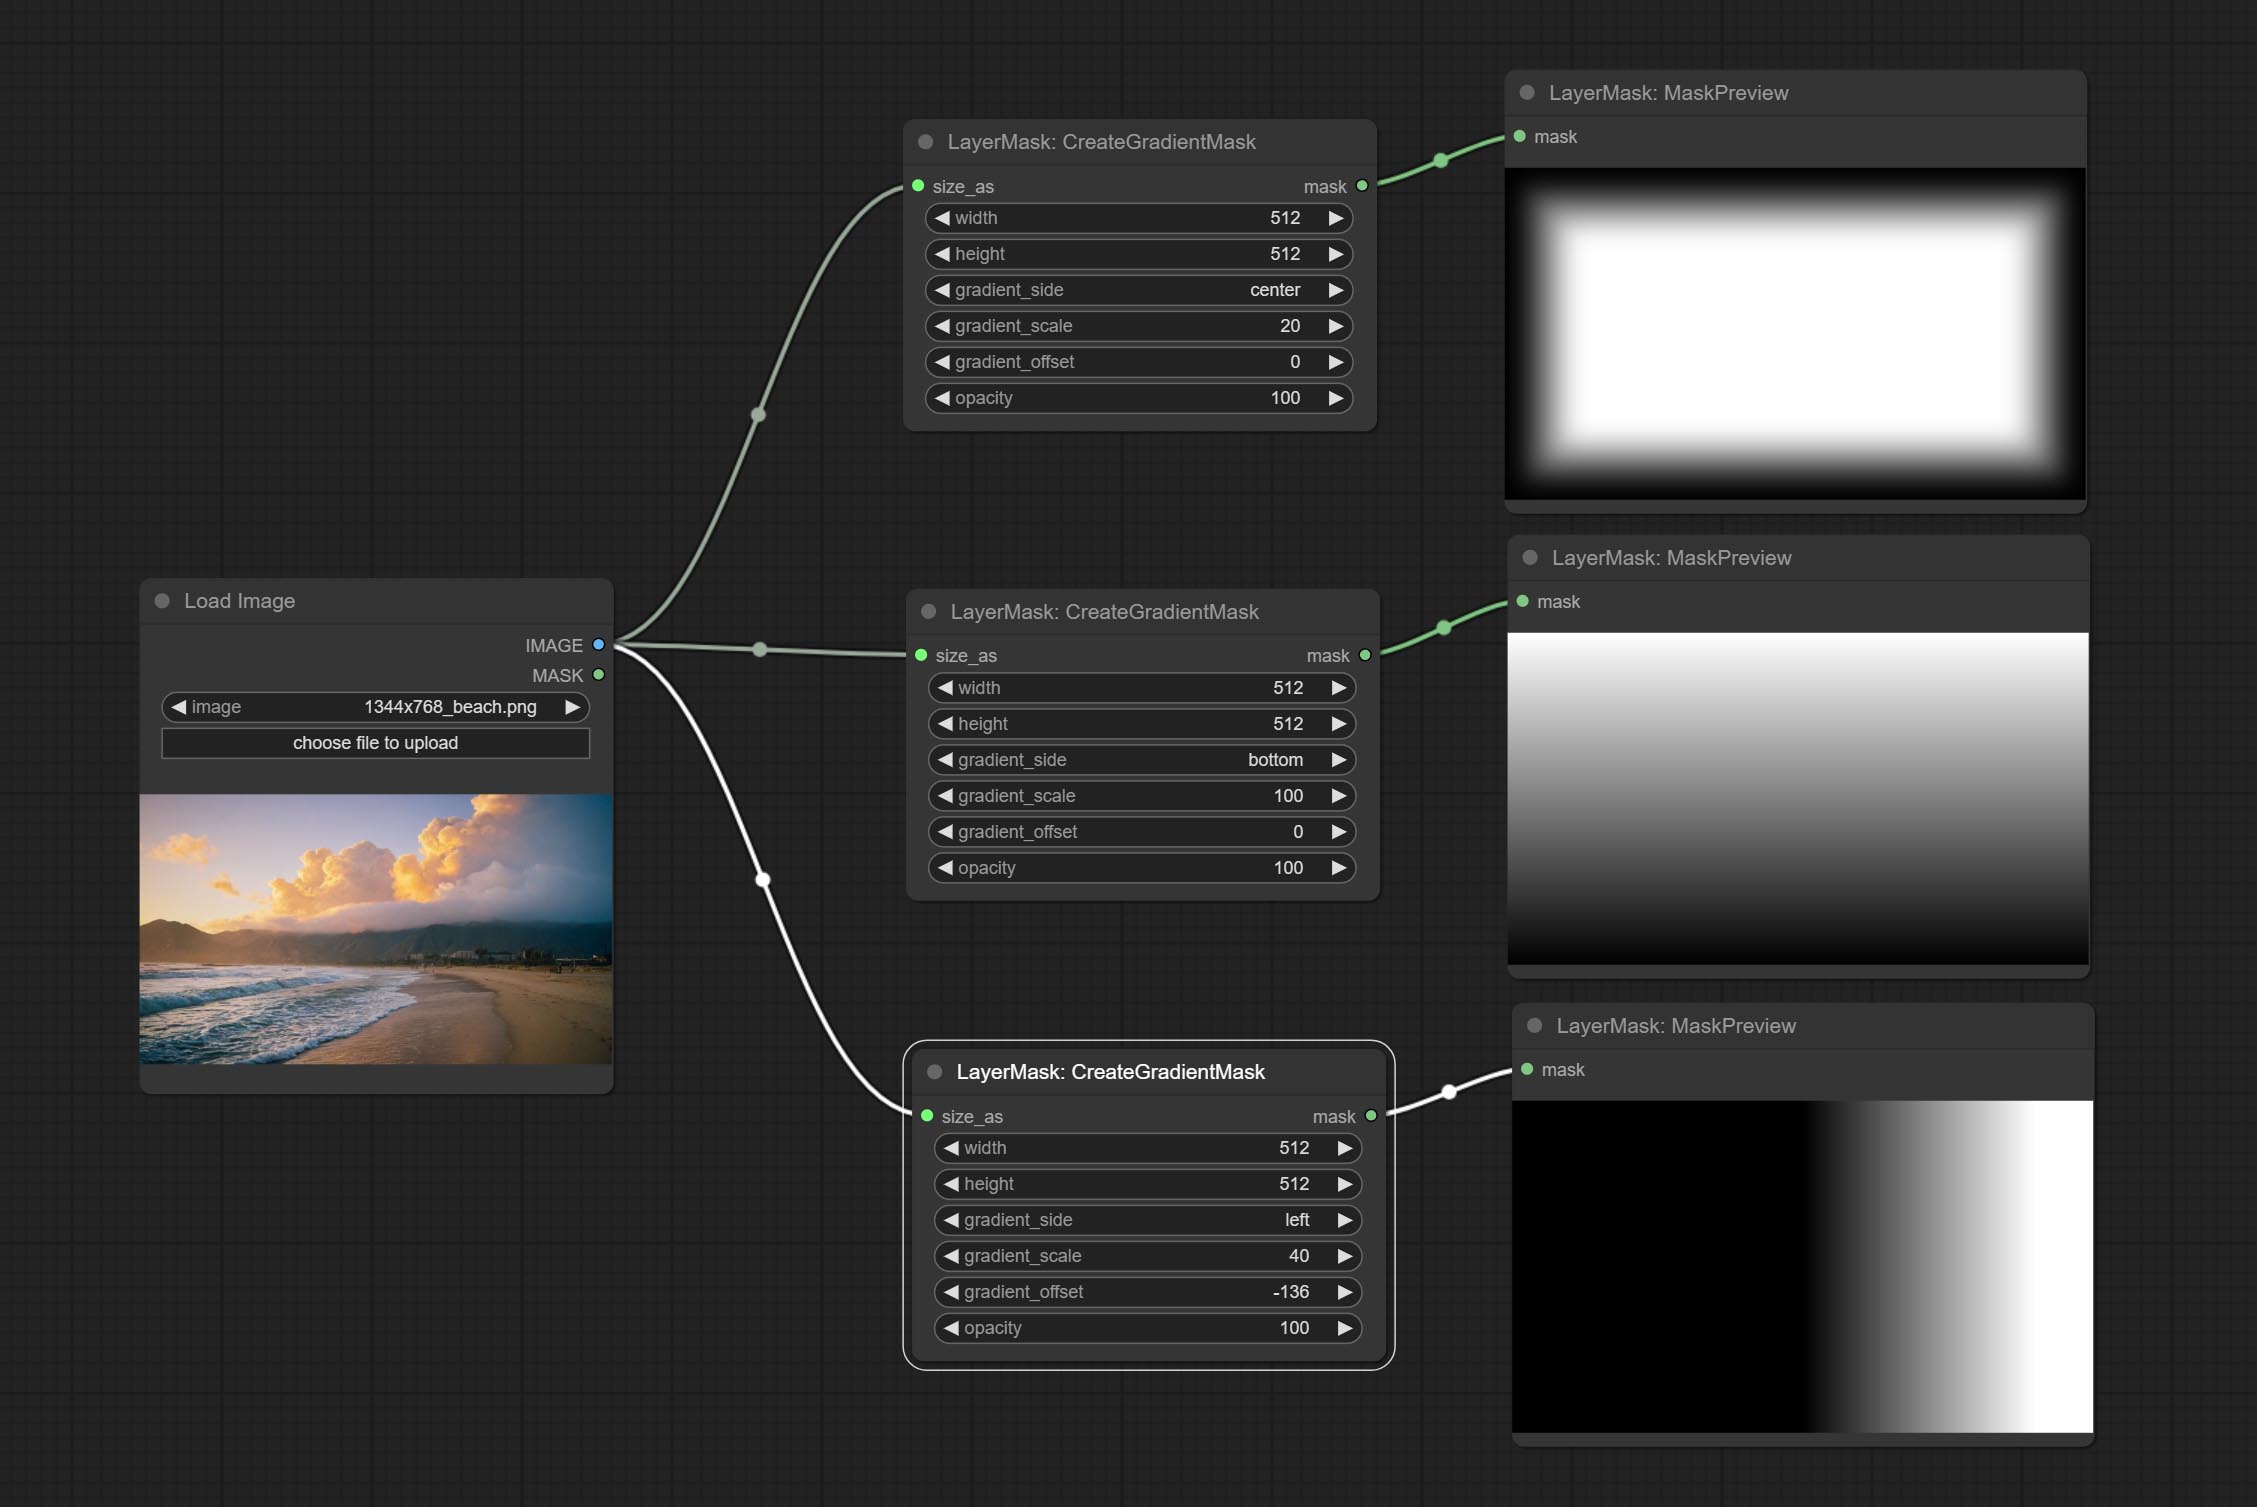
Node options:

- size_as * : The input image or mask here will generate the output image and mask according to their size. this input takes priority over the width and height below.
- width: Width of the image. If there is a size_as input, this setting will be ignored.
- height: Height of the image. If there is a size_as input, this setting will be ignored.
- gradient_side: Generate gradient from which edge. There are five directions: top, bottom, left, right and center.
- gradient_scale: Gradient distance. The default value of 100 indicates that one side of the gradient is completely transparent and the other side is completely opaque. The smaller the value, the shorter the distance from transparent to opaque.
- gradient_offset: Gradient position offset. When
gradient_side is center, the size of the gradient area is adjusted here, positive values are smaller, and negative values are enlarged. - opacity: The opacity of the gradient.
* Only limited to input image and mask. forcing the integration of other types of inputs will result in node errors.
MaskStroke
Generate mask contour strokes.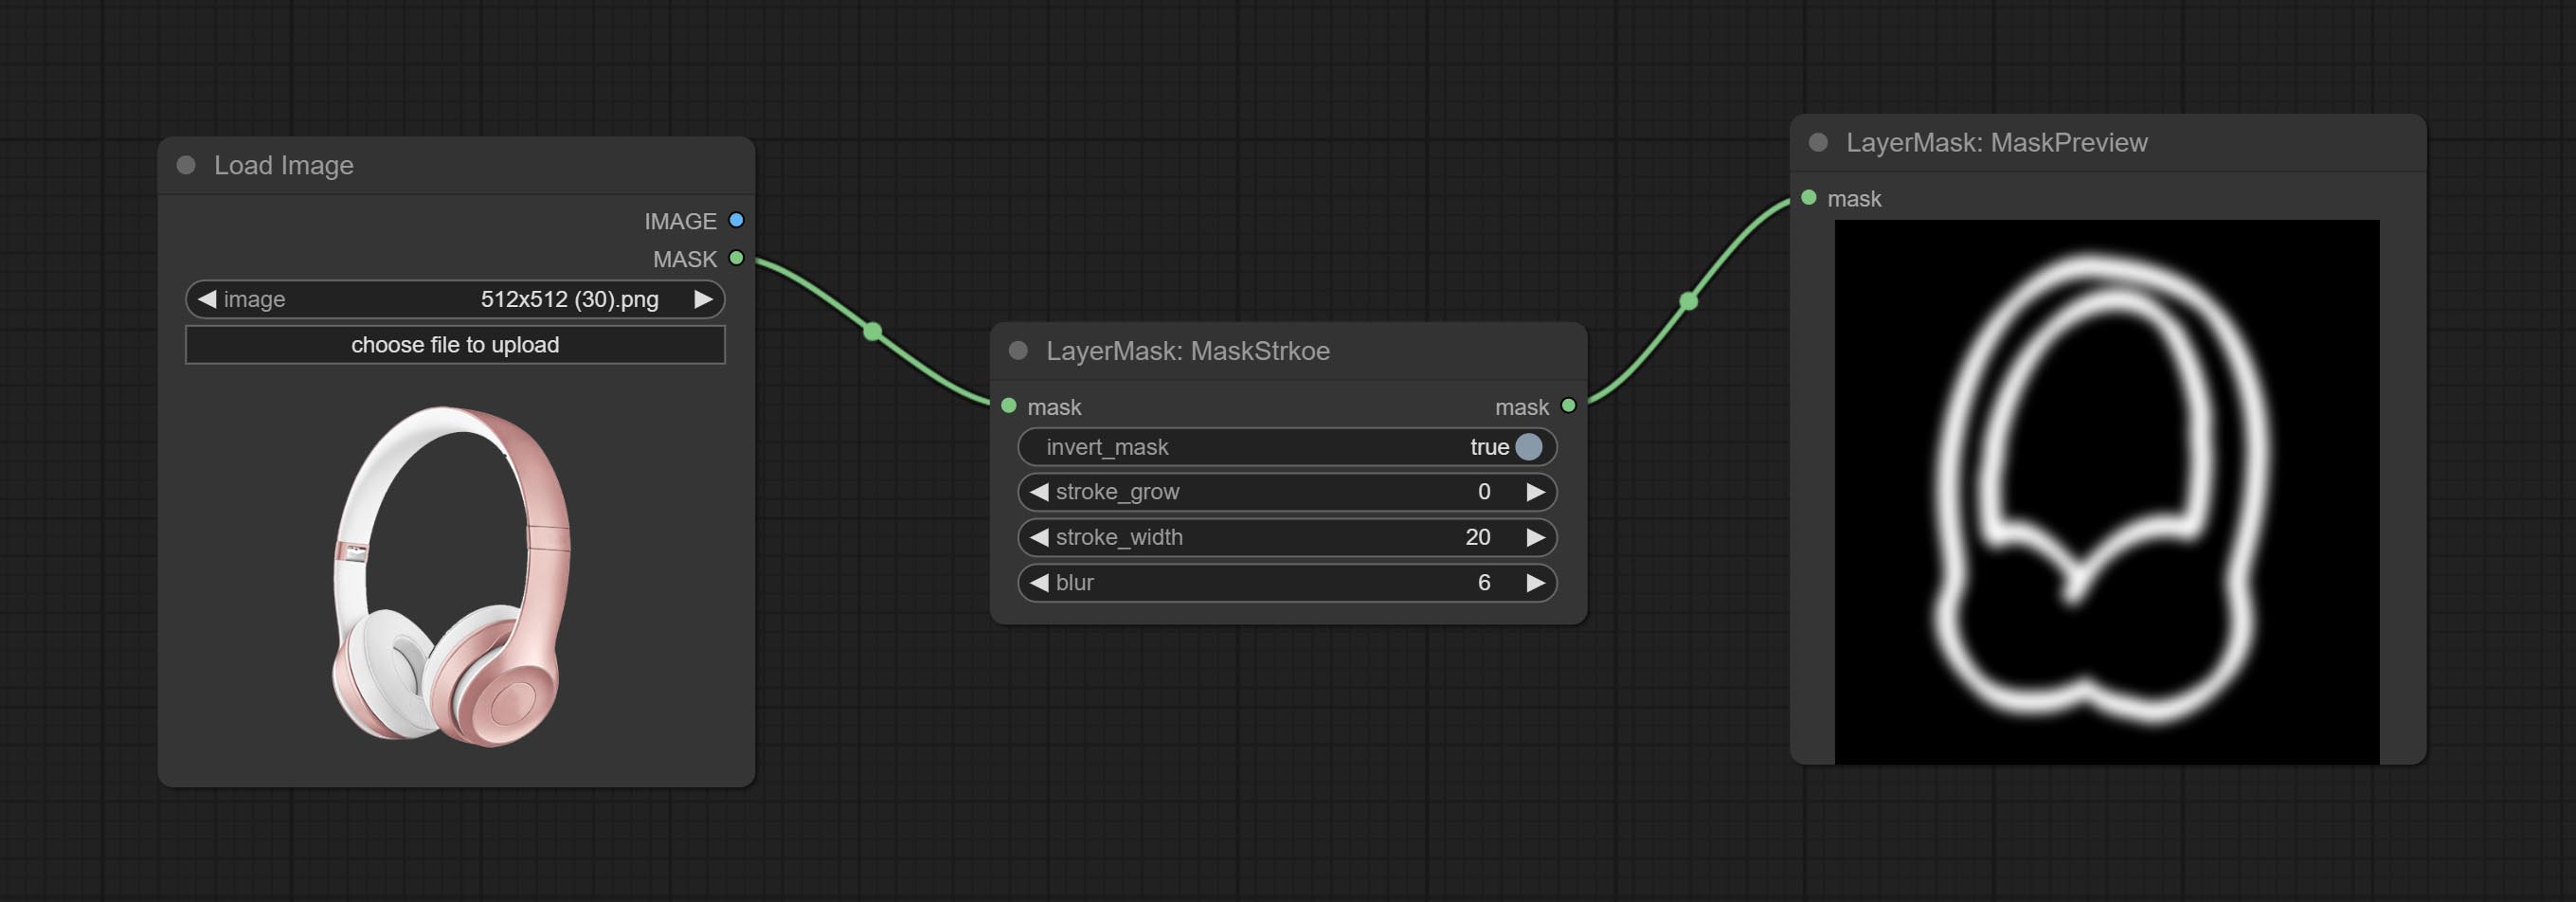
Node options:
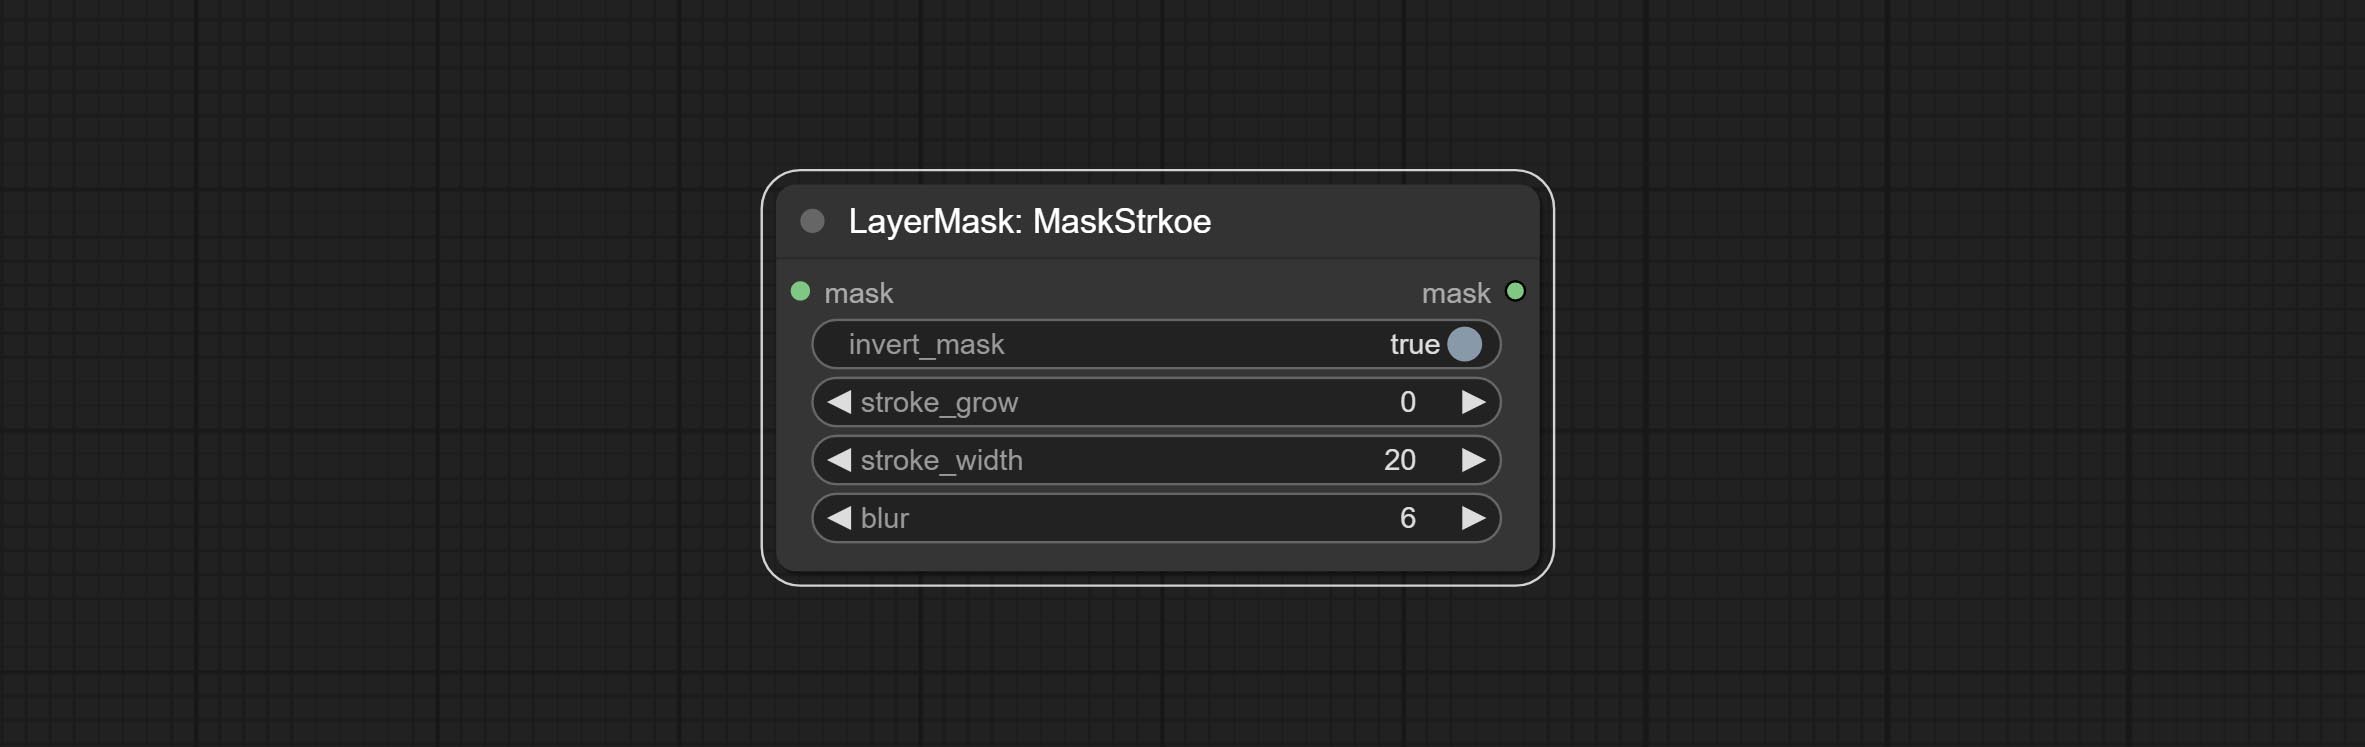
- invert_mask: Whether to reverse the mask.
- stroke_grow: Stroke expansion/contraction amplitude, positive values indicate expansion and negative values indicate contraction.
- stroke_width: Stroke width.
- blur: Blur of stroke.
MaskGrain
Generates noise for the mask.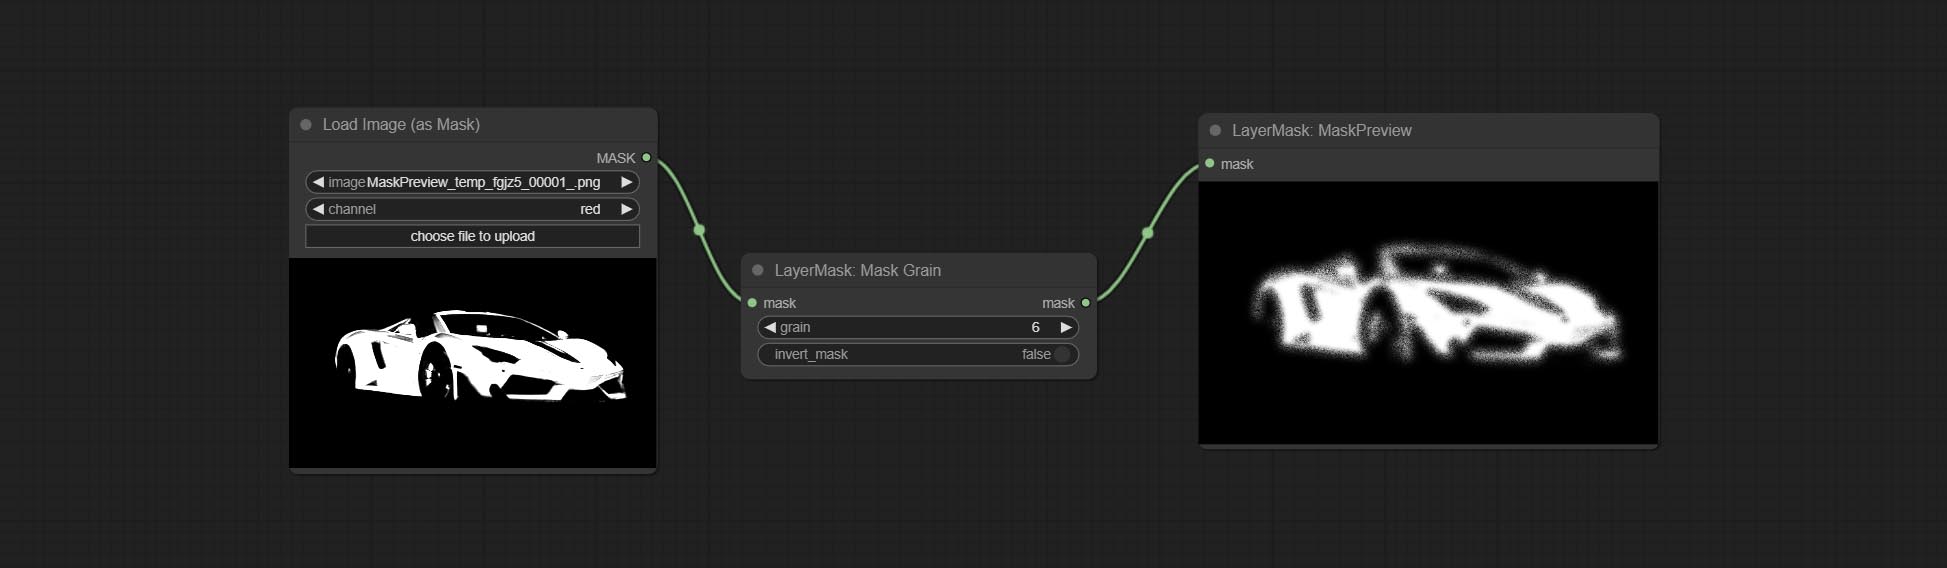
Node Options:
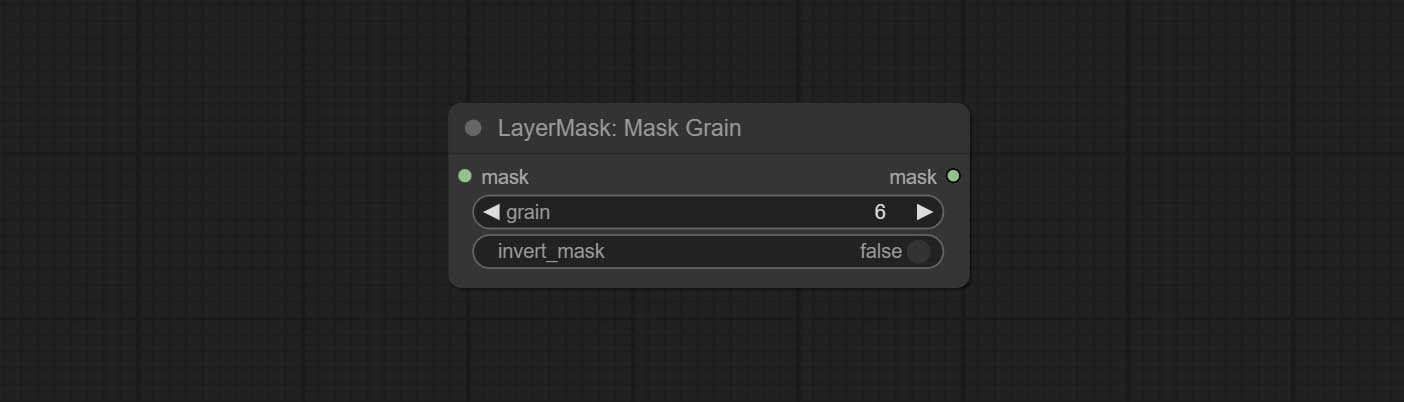
- grain: Noise intensity.
- invert_mask: Whether to reverse the mask.
MaskPreview
Preview the input mask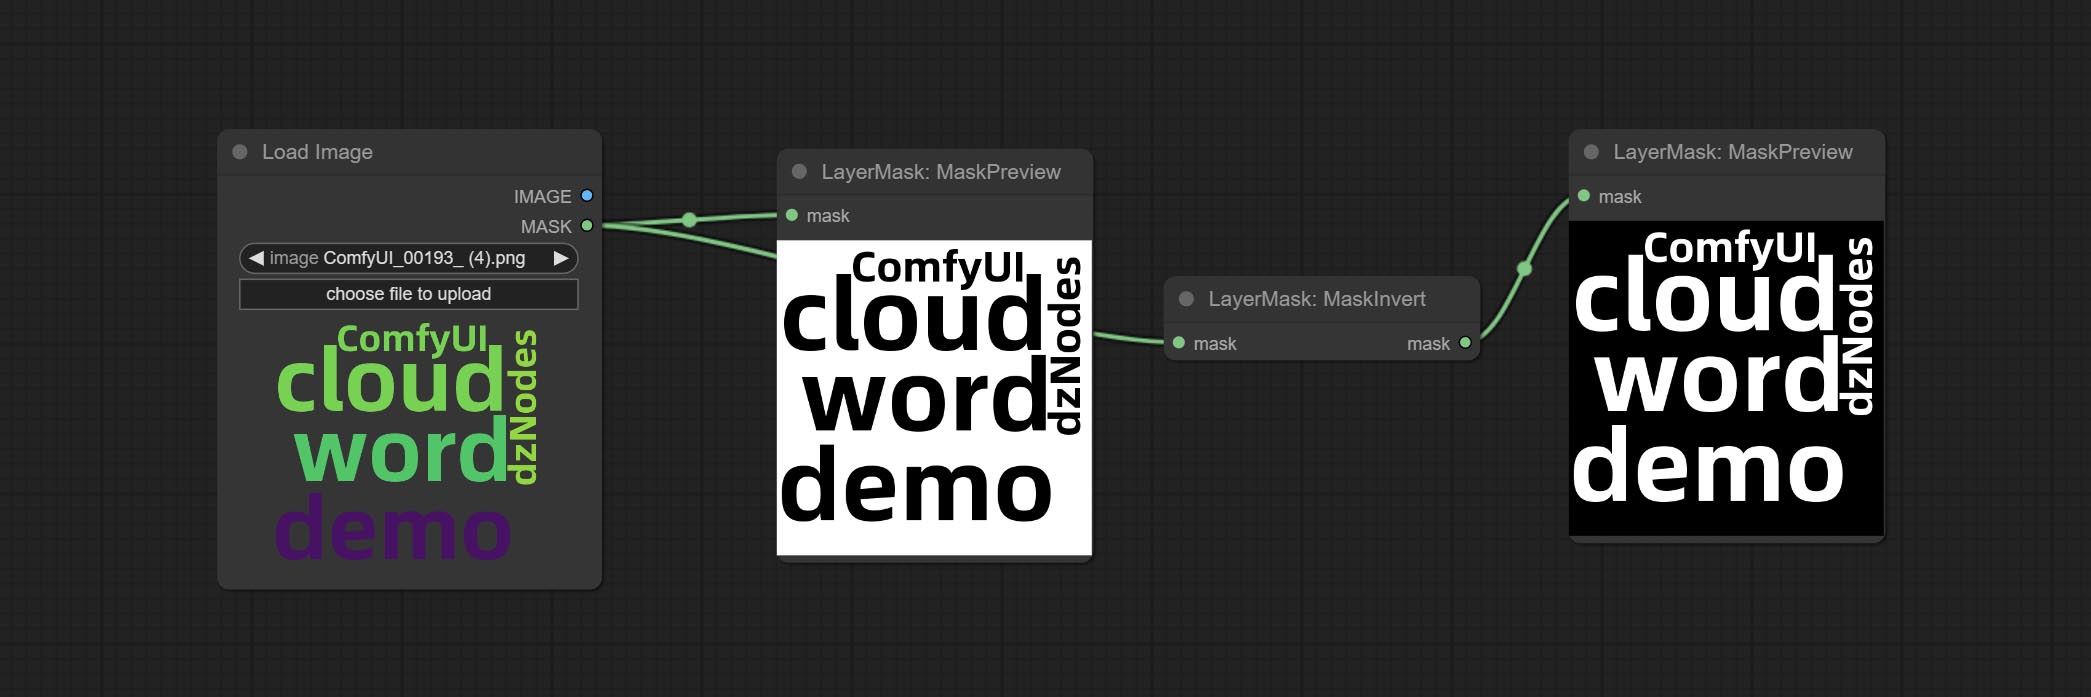
MaskInvert
Invert the mask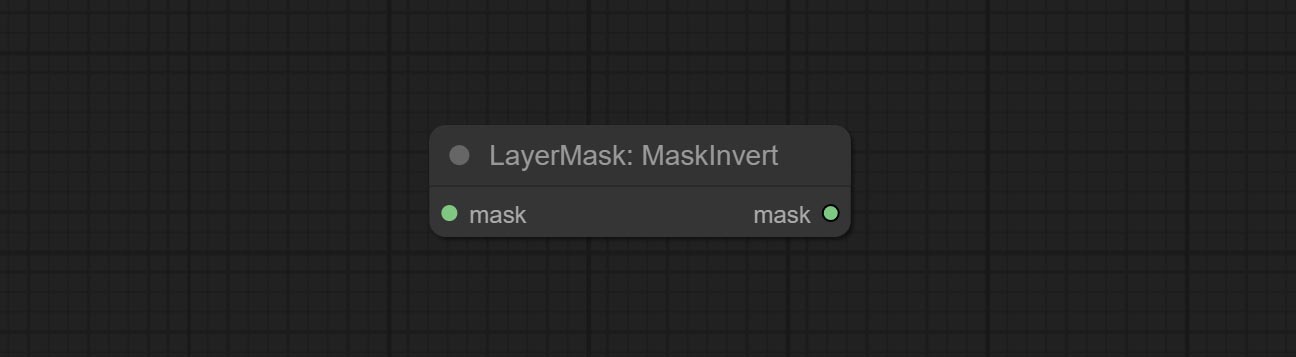
LayerFilter
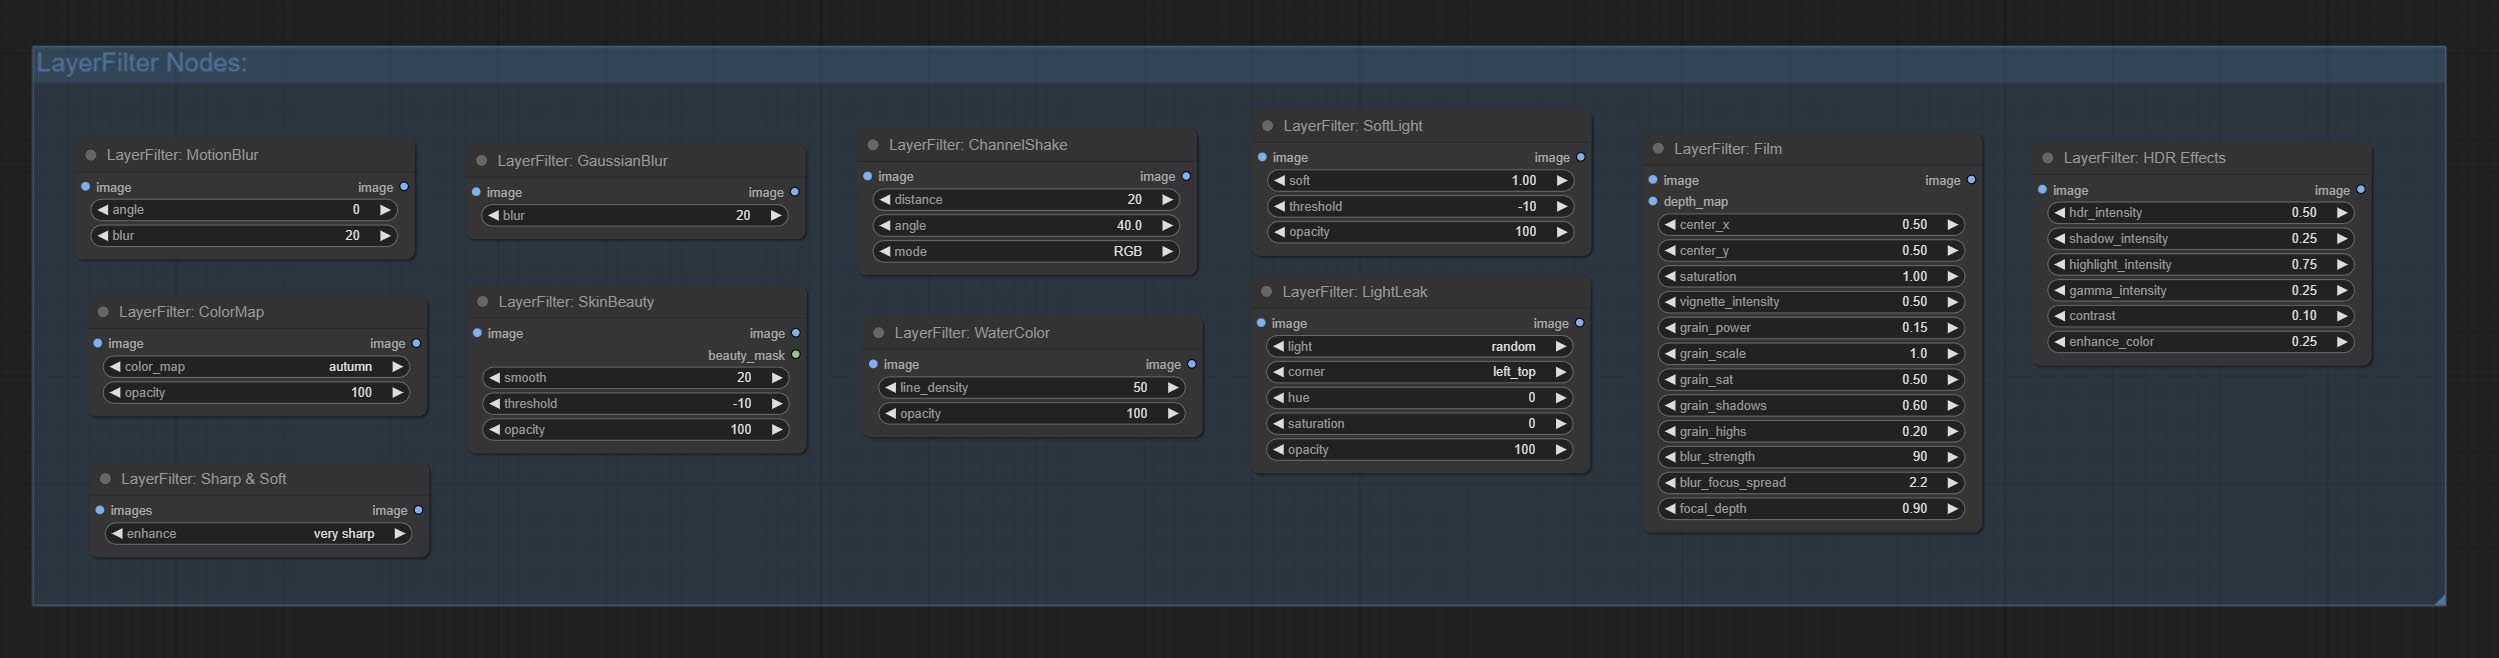
Sharp & Soft
Enhance or smooth out details for image.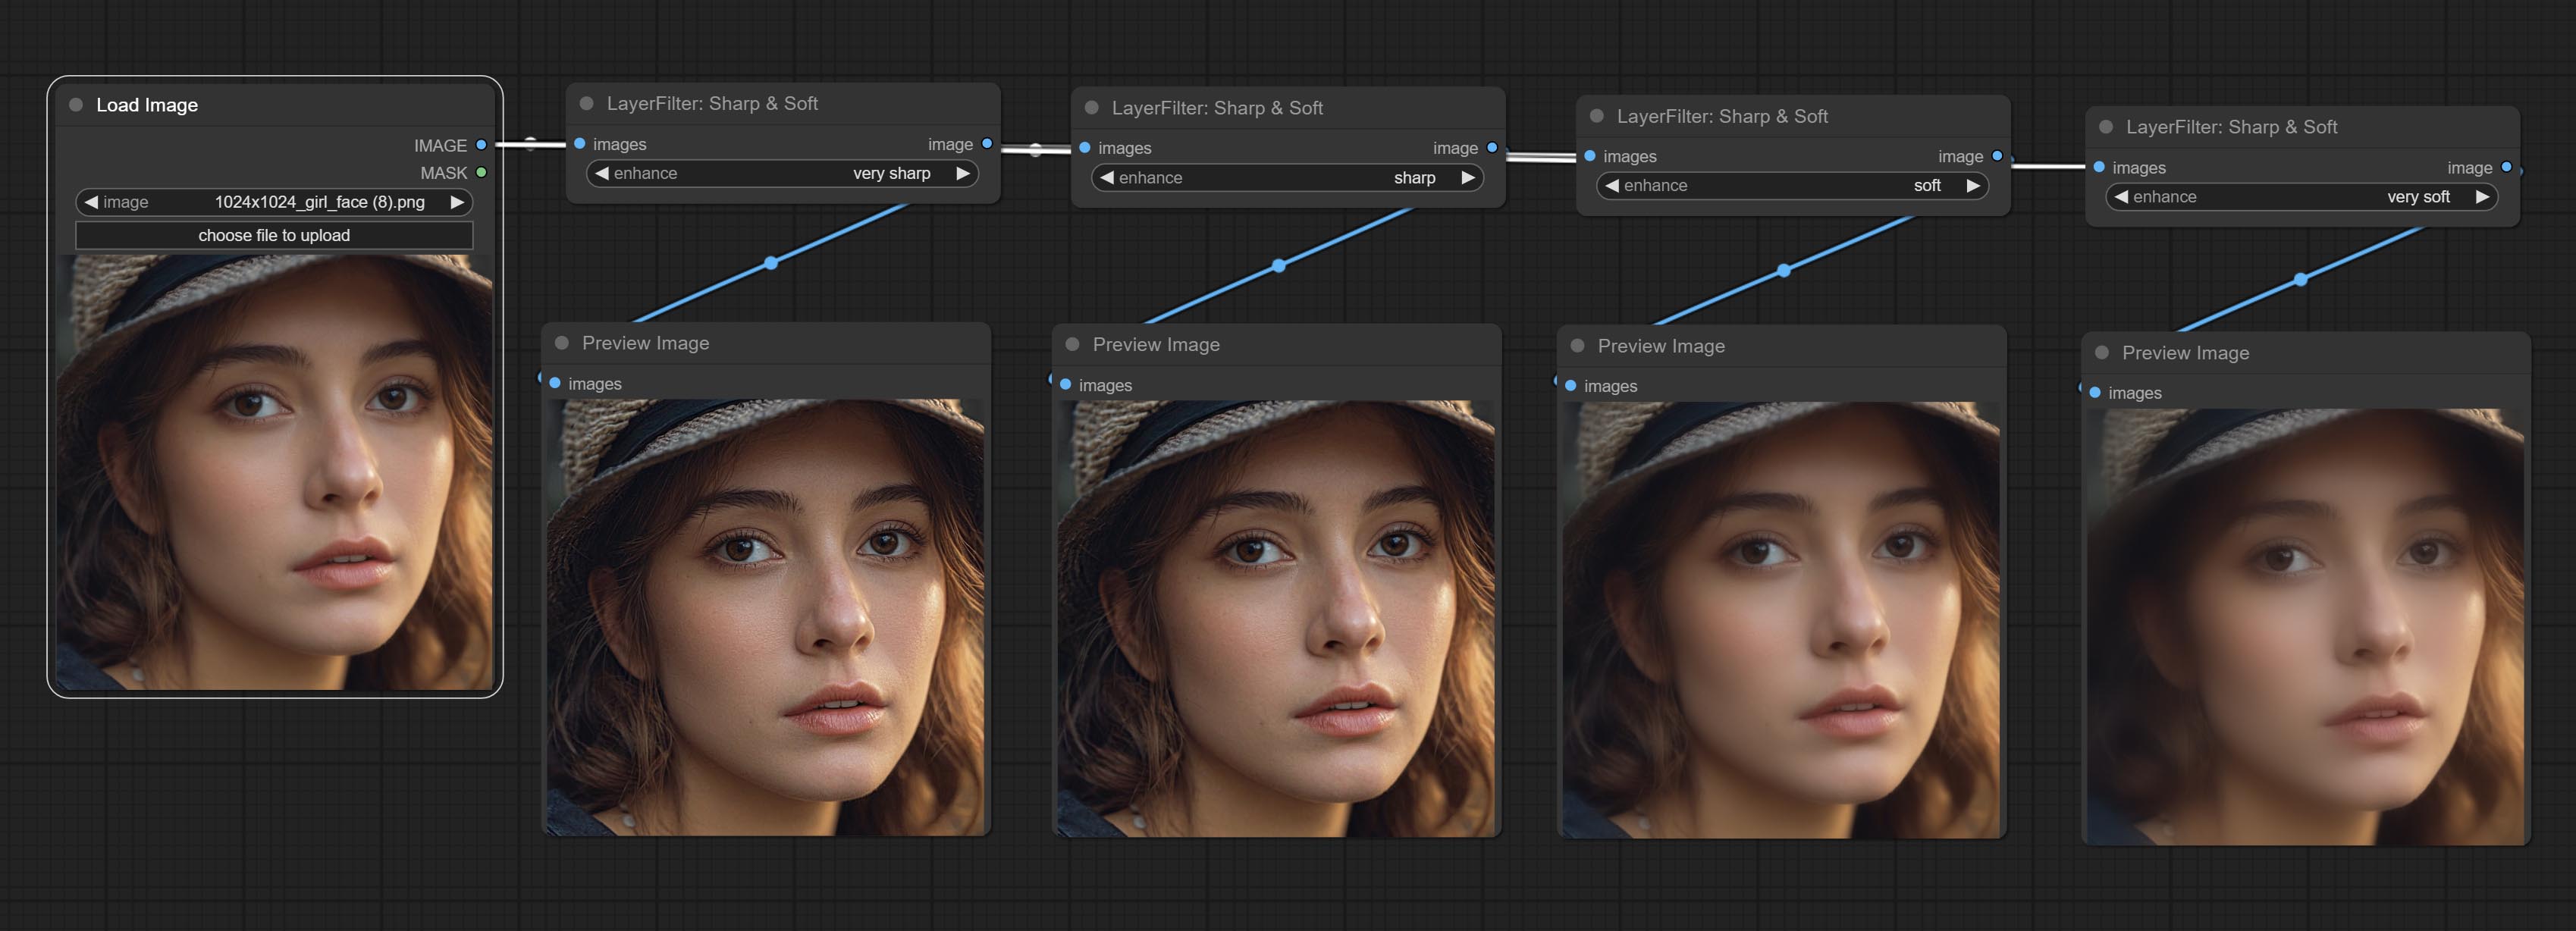
Node options: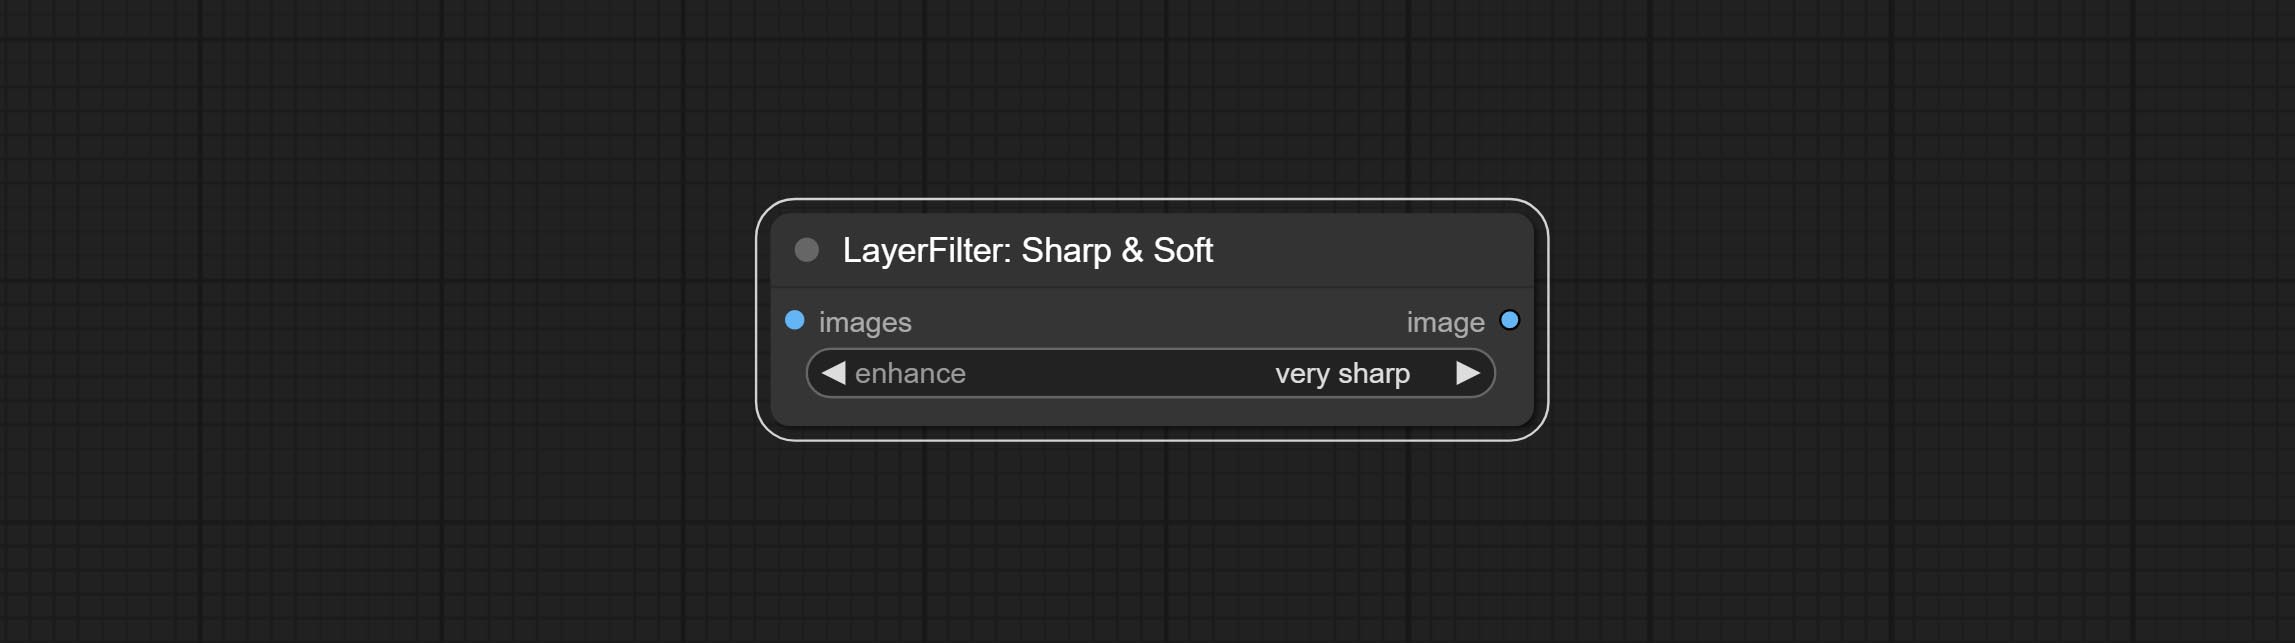
- enhance: Provide 4 presets, which are very sharp, sharp, soft and very soft. If you choose None, you will not do any processing.
SkinBeauty
Make the skin look smoother.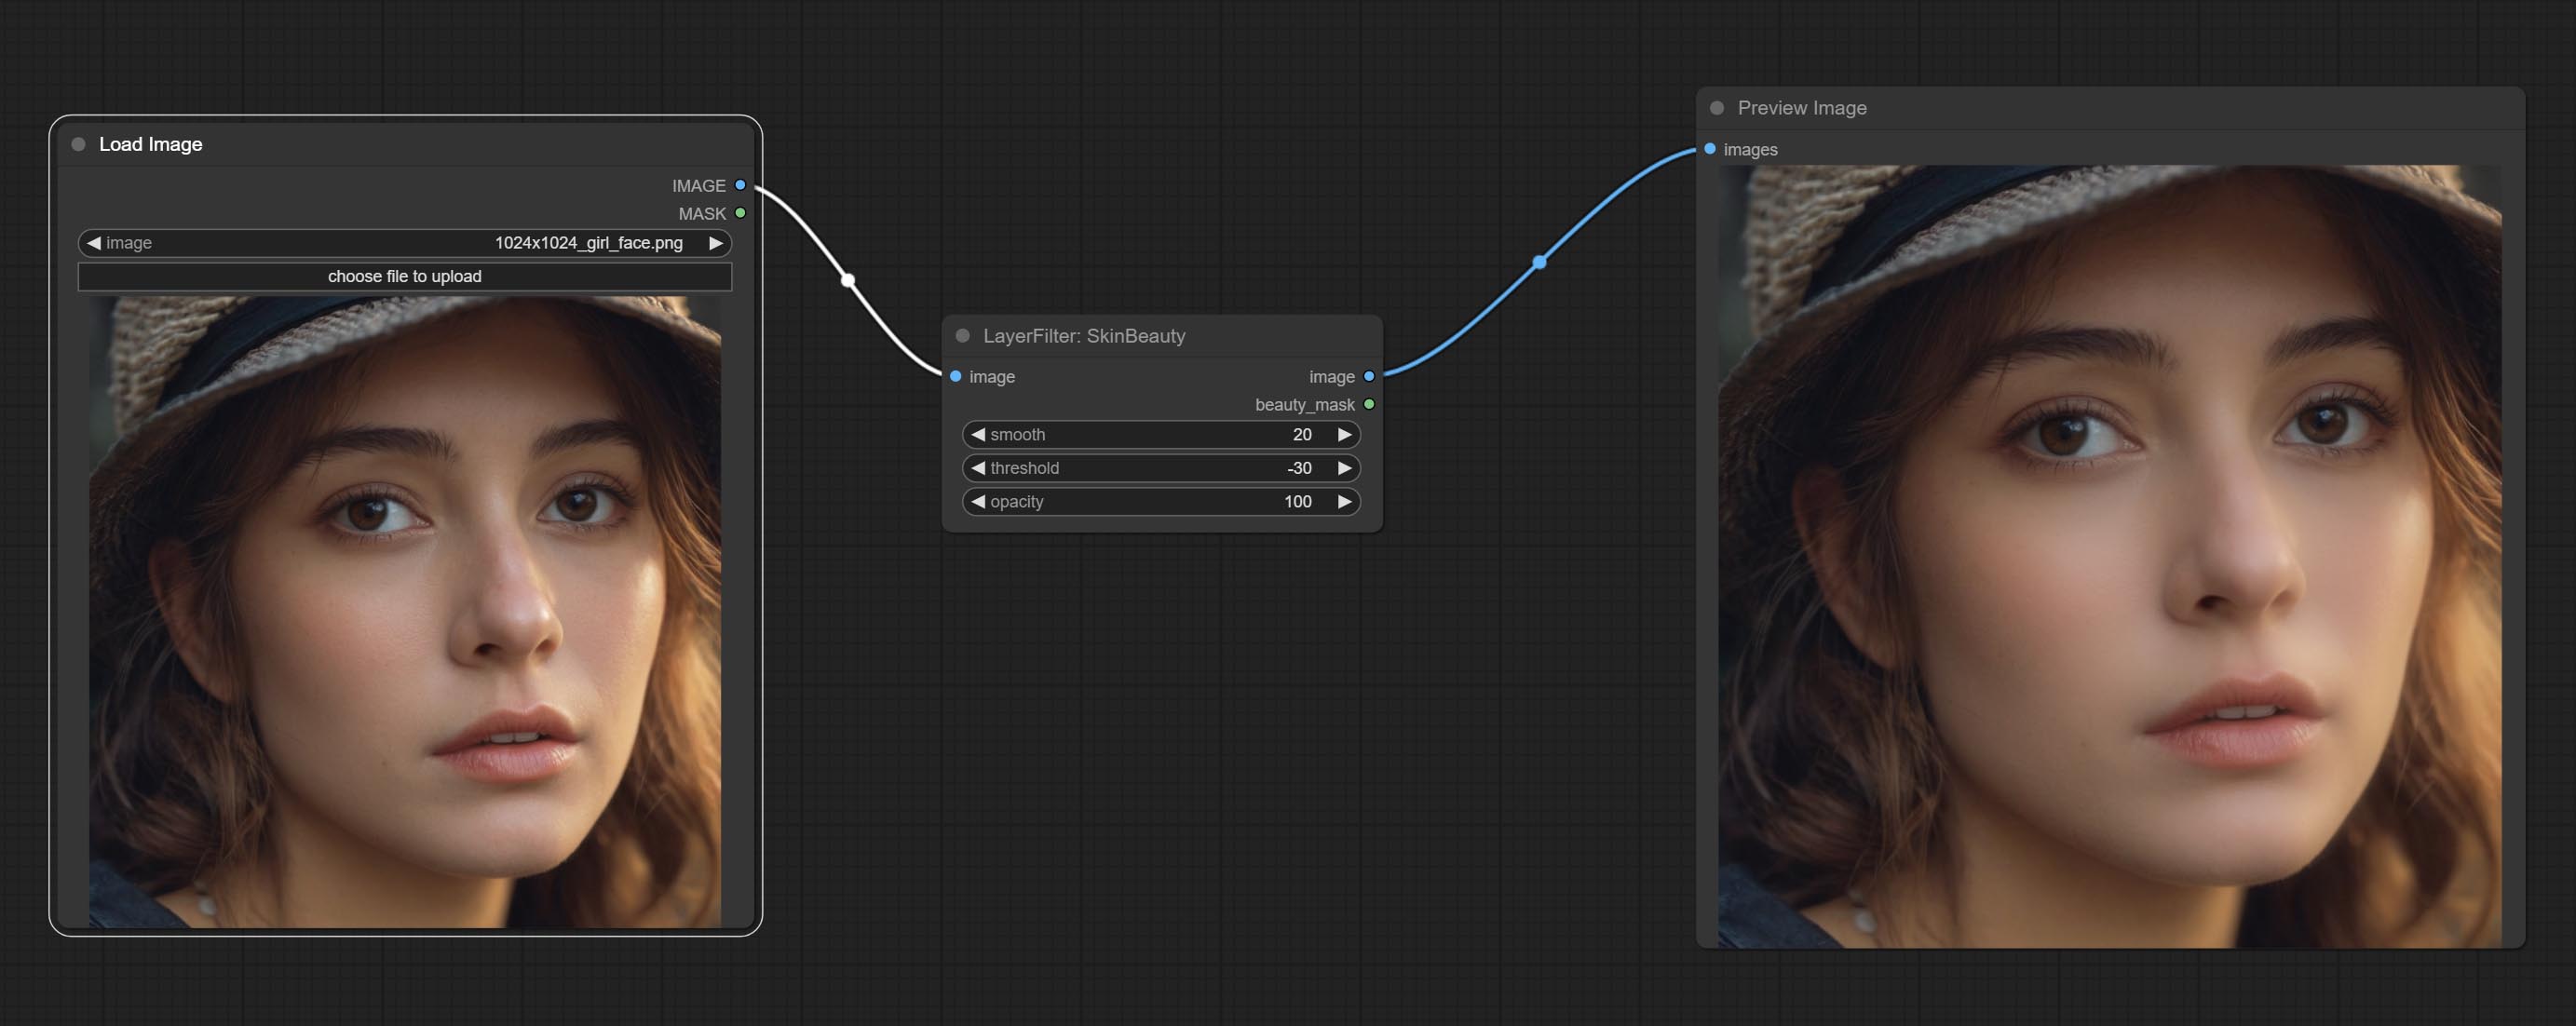
Node options: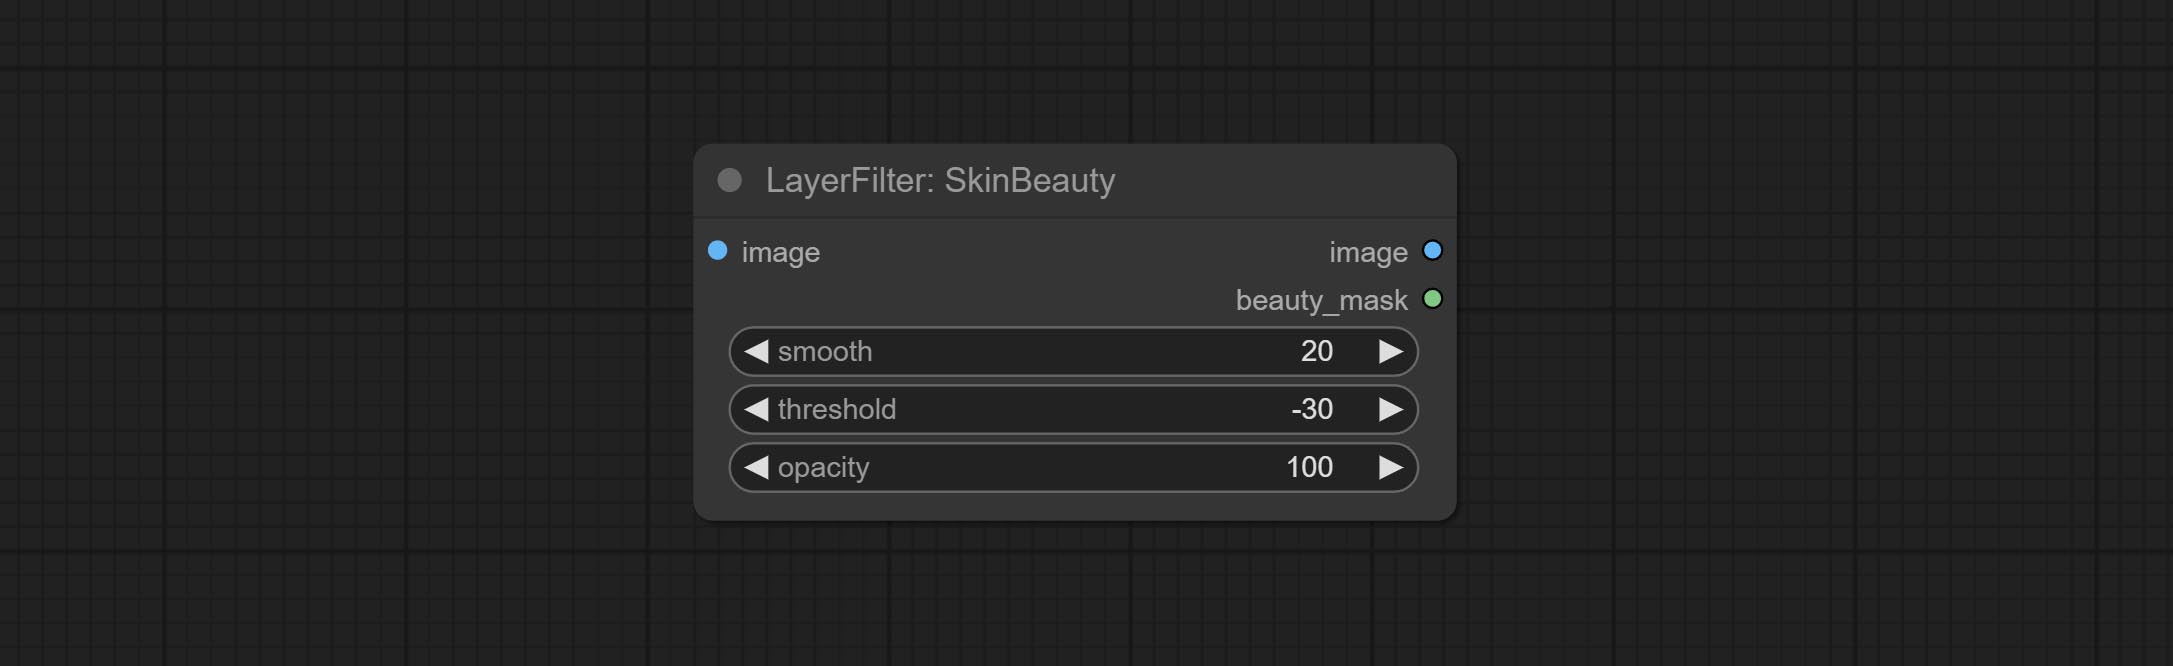
- smooth: Skin smoothness.
- threshold: Smooth range. the larger the range with the smaller value.
- opacity: The opacity of the smoothness.
WaterColor
Watercolor painting effect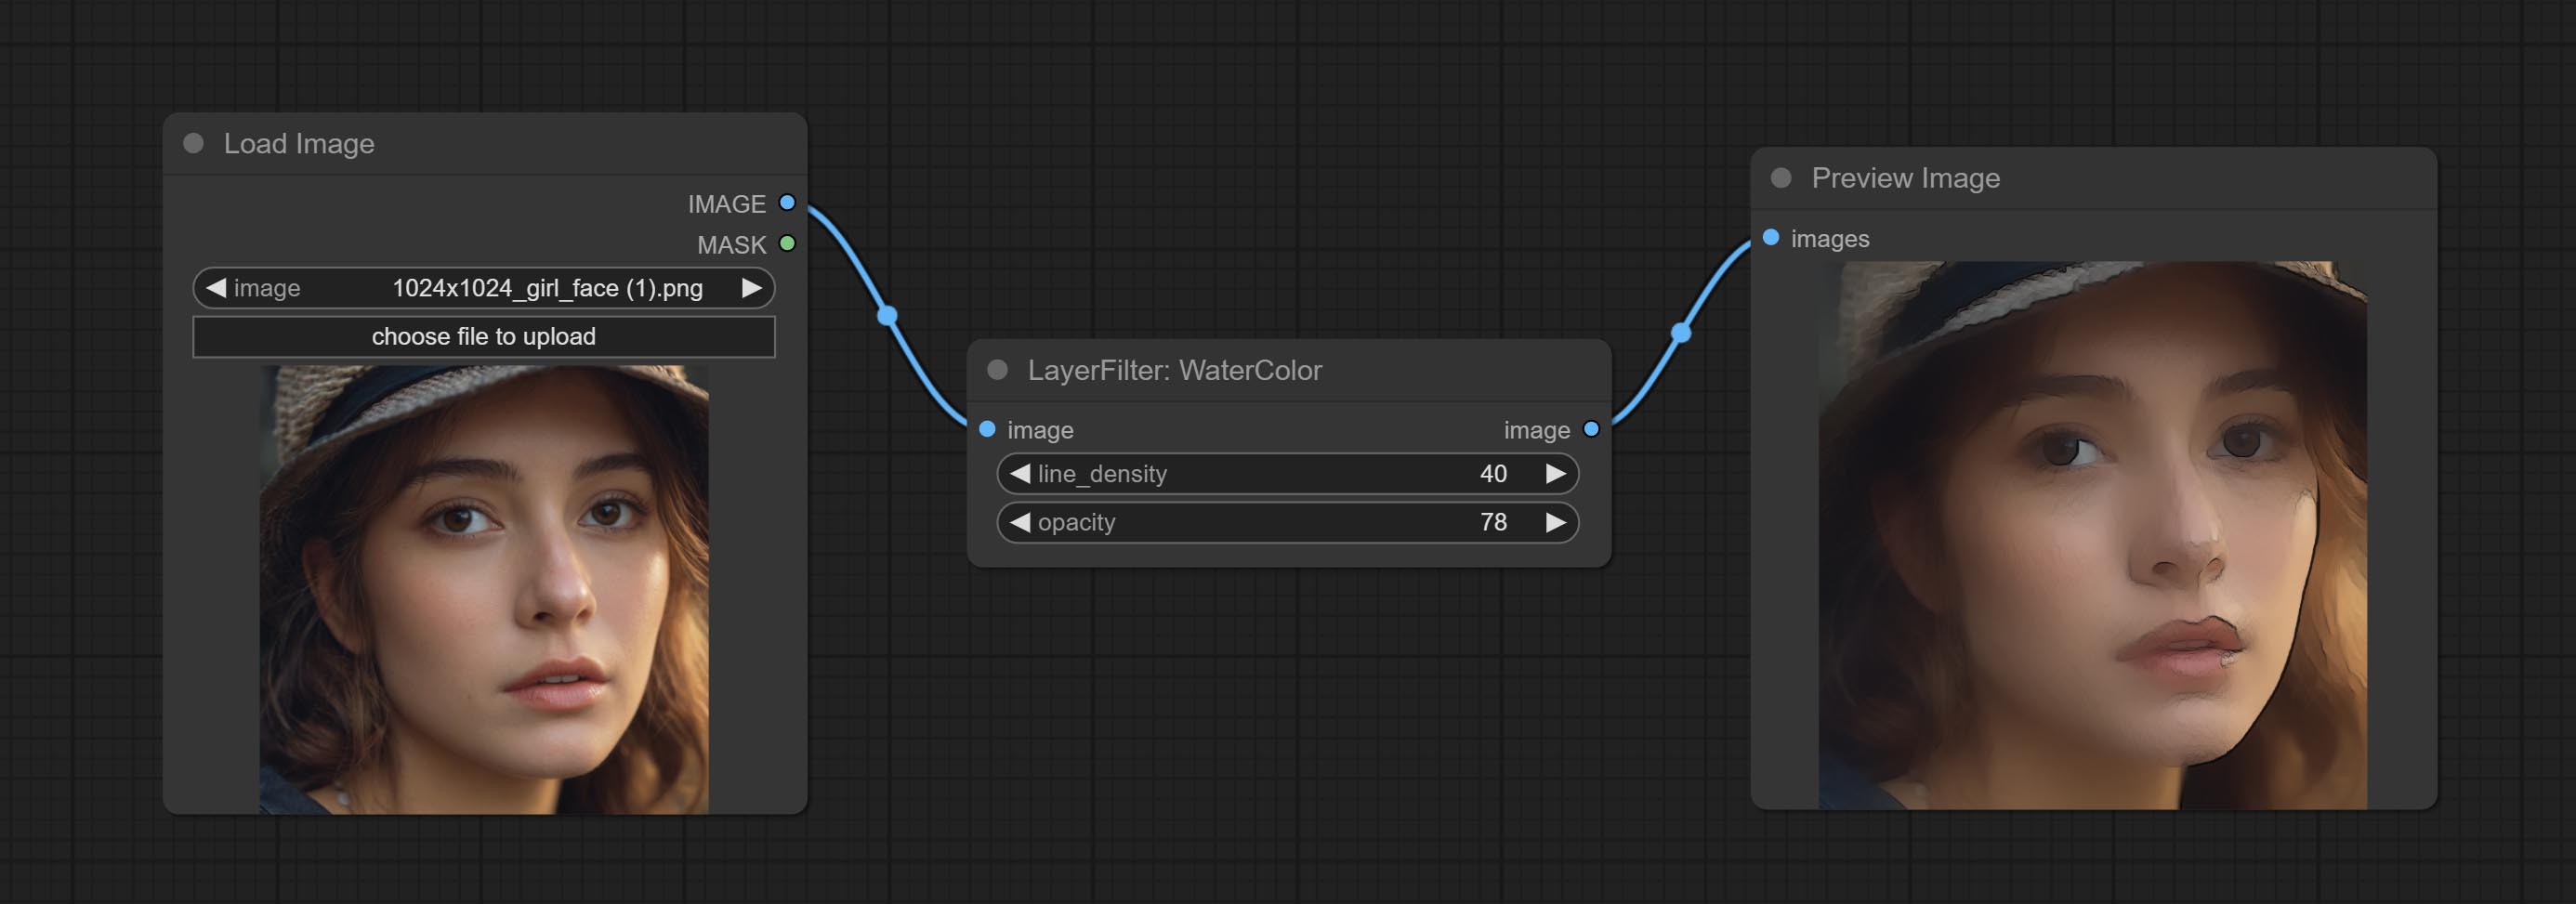
Node option: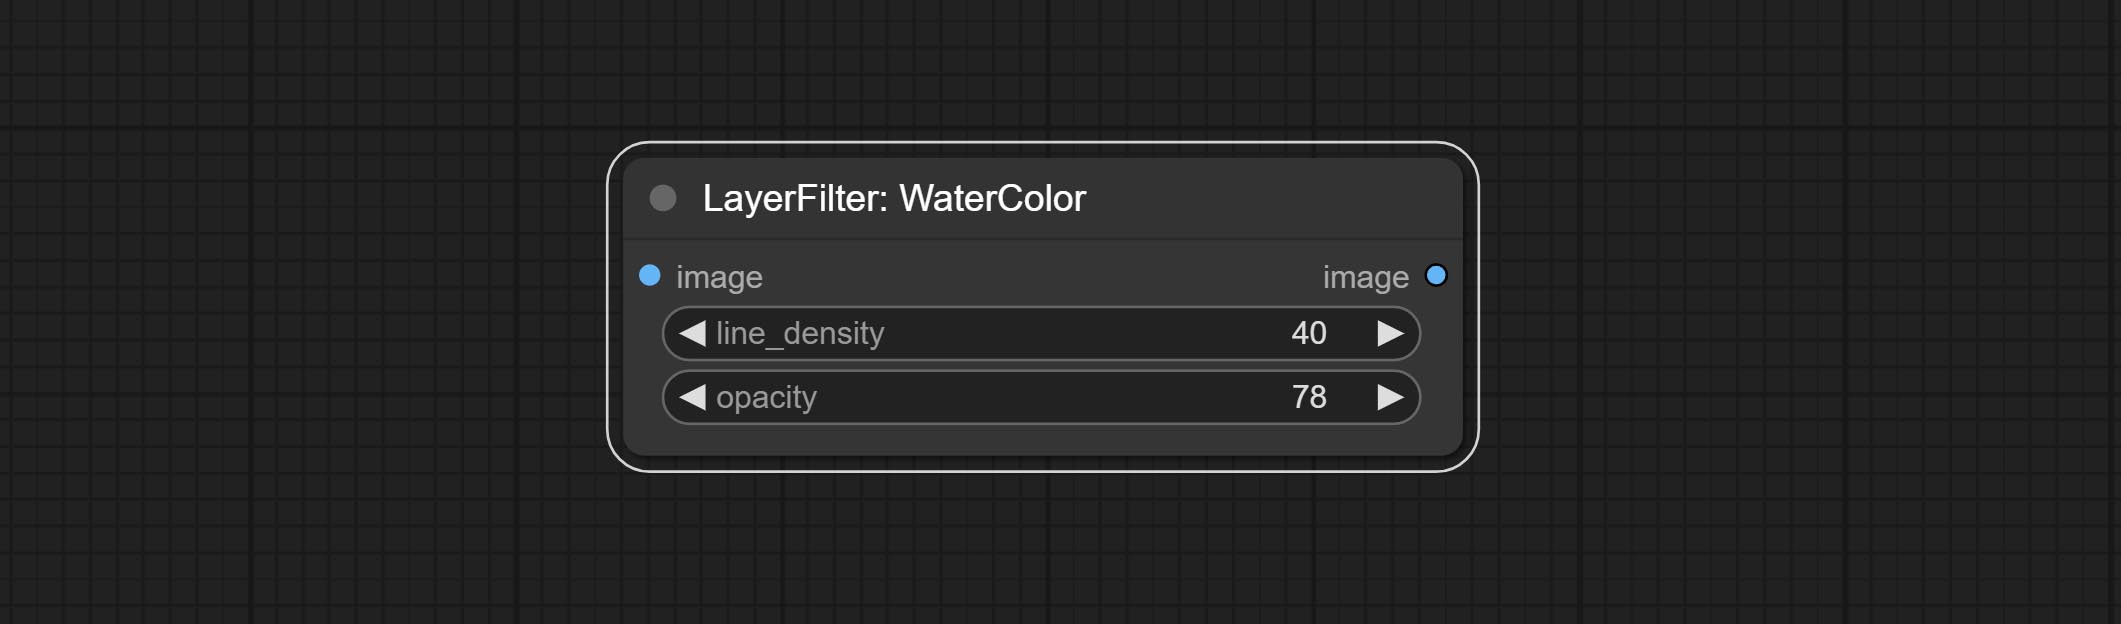
- line_density: The black line density.
- opacity: The opacity of watercolor effects.
SoftLight
Soft light effect, the bright highlights on the screen appear blurry.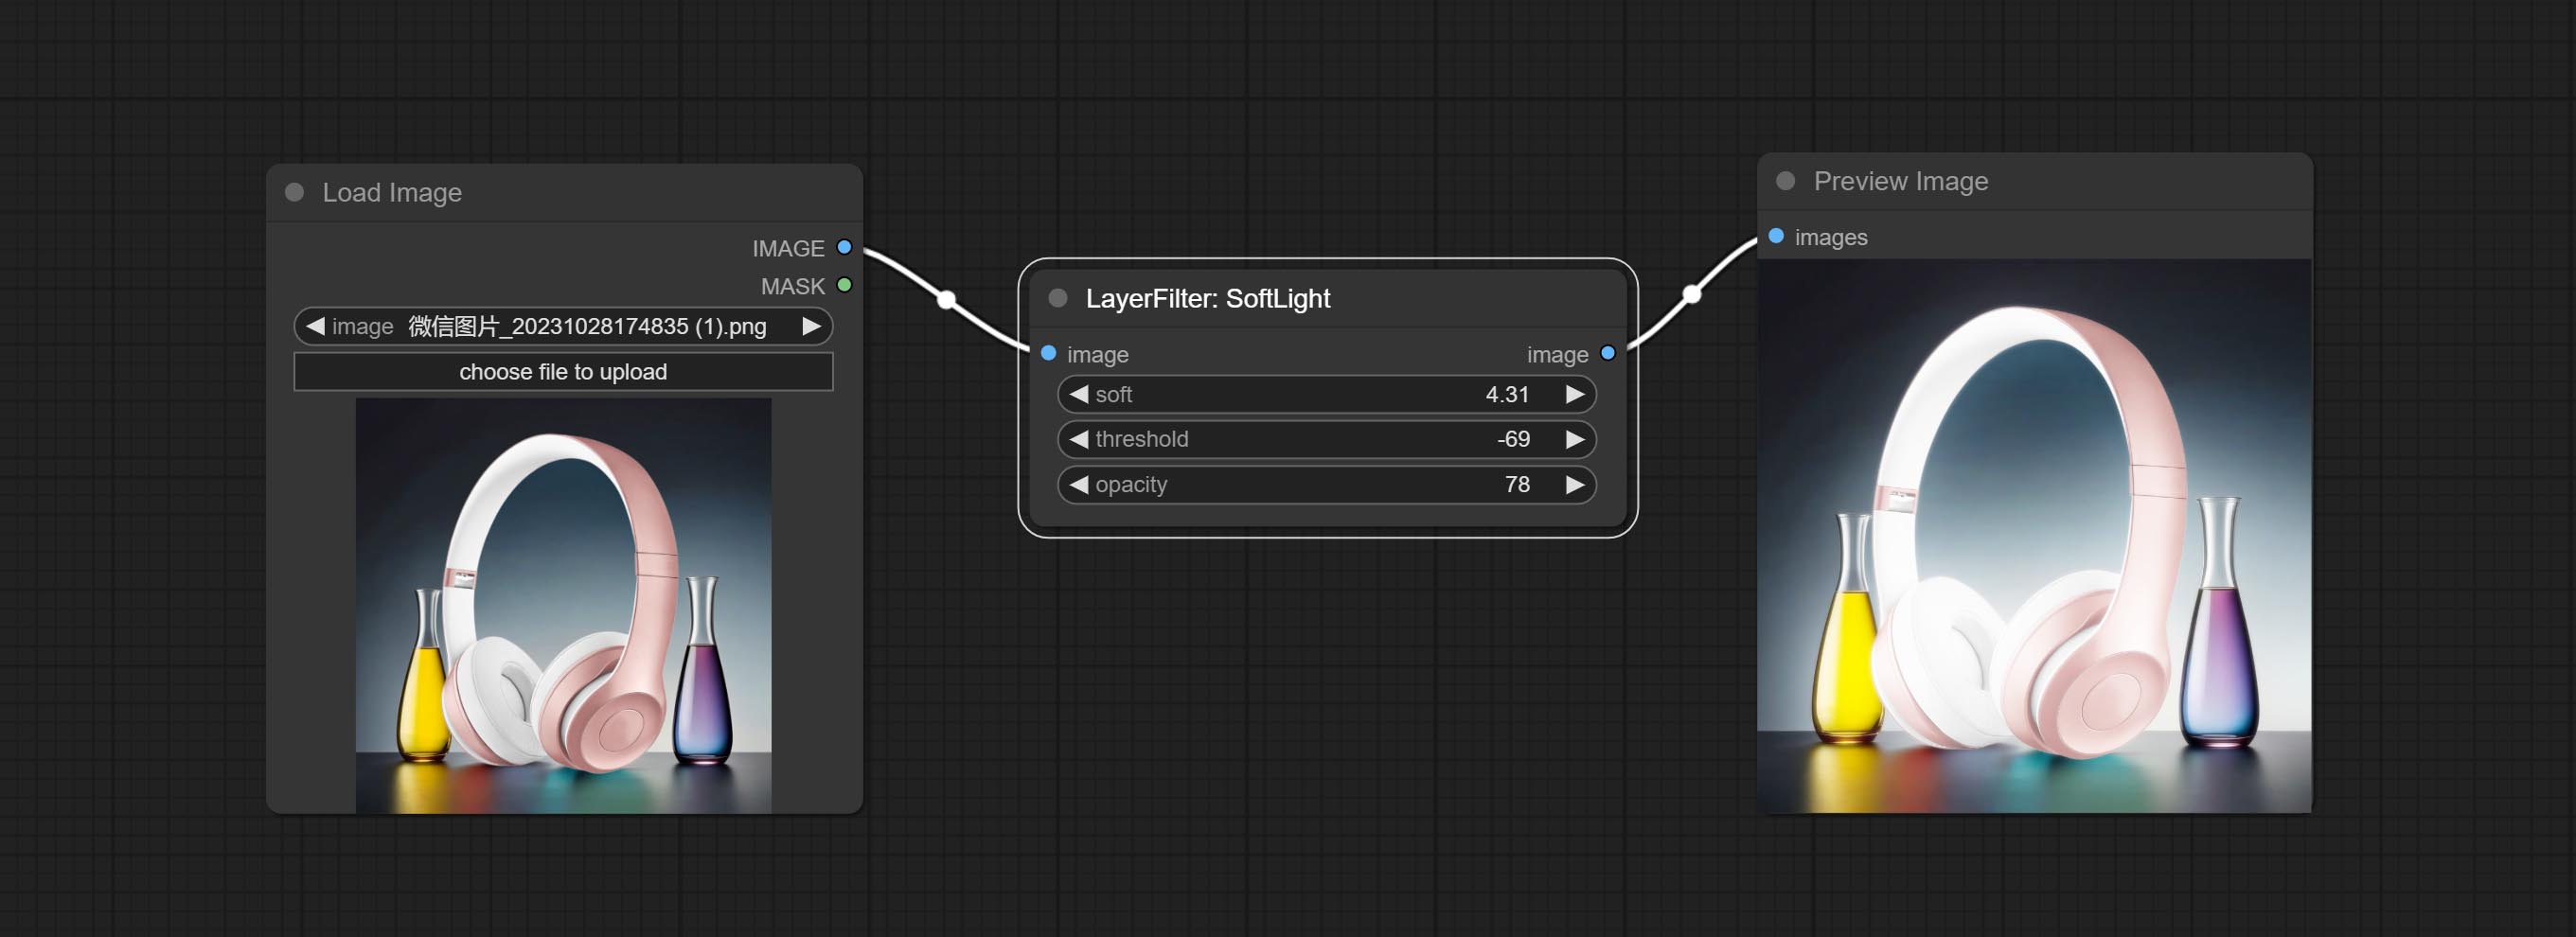
Node options:
- soft: Size of soft light.
- threshold: Soft light range. the light appears from the brightest part of the picture. in lower value, the range will be larger, and in higher value, the range will be smaller.
- opacity: Opacity of the soft light.
ChannelShake
Channel misalignment. similar to the effect of Tiktok logo.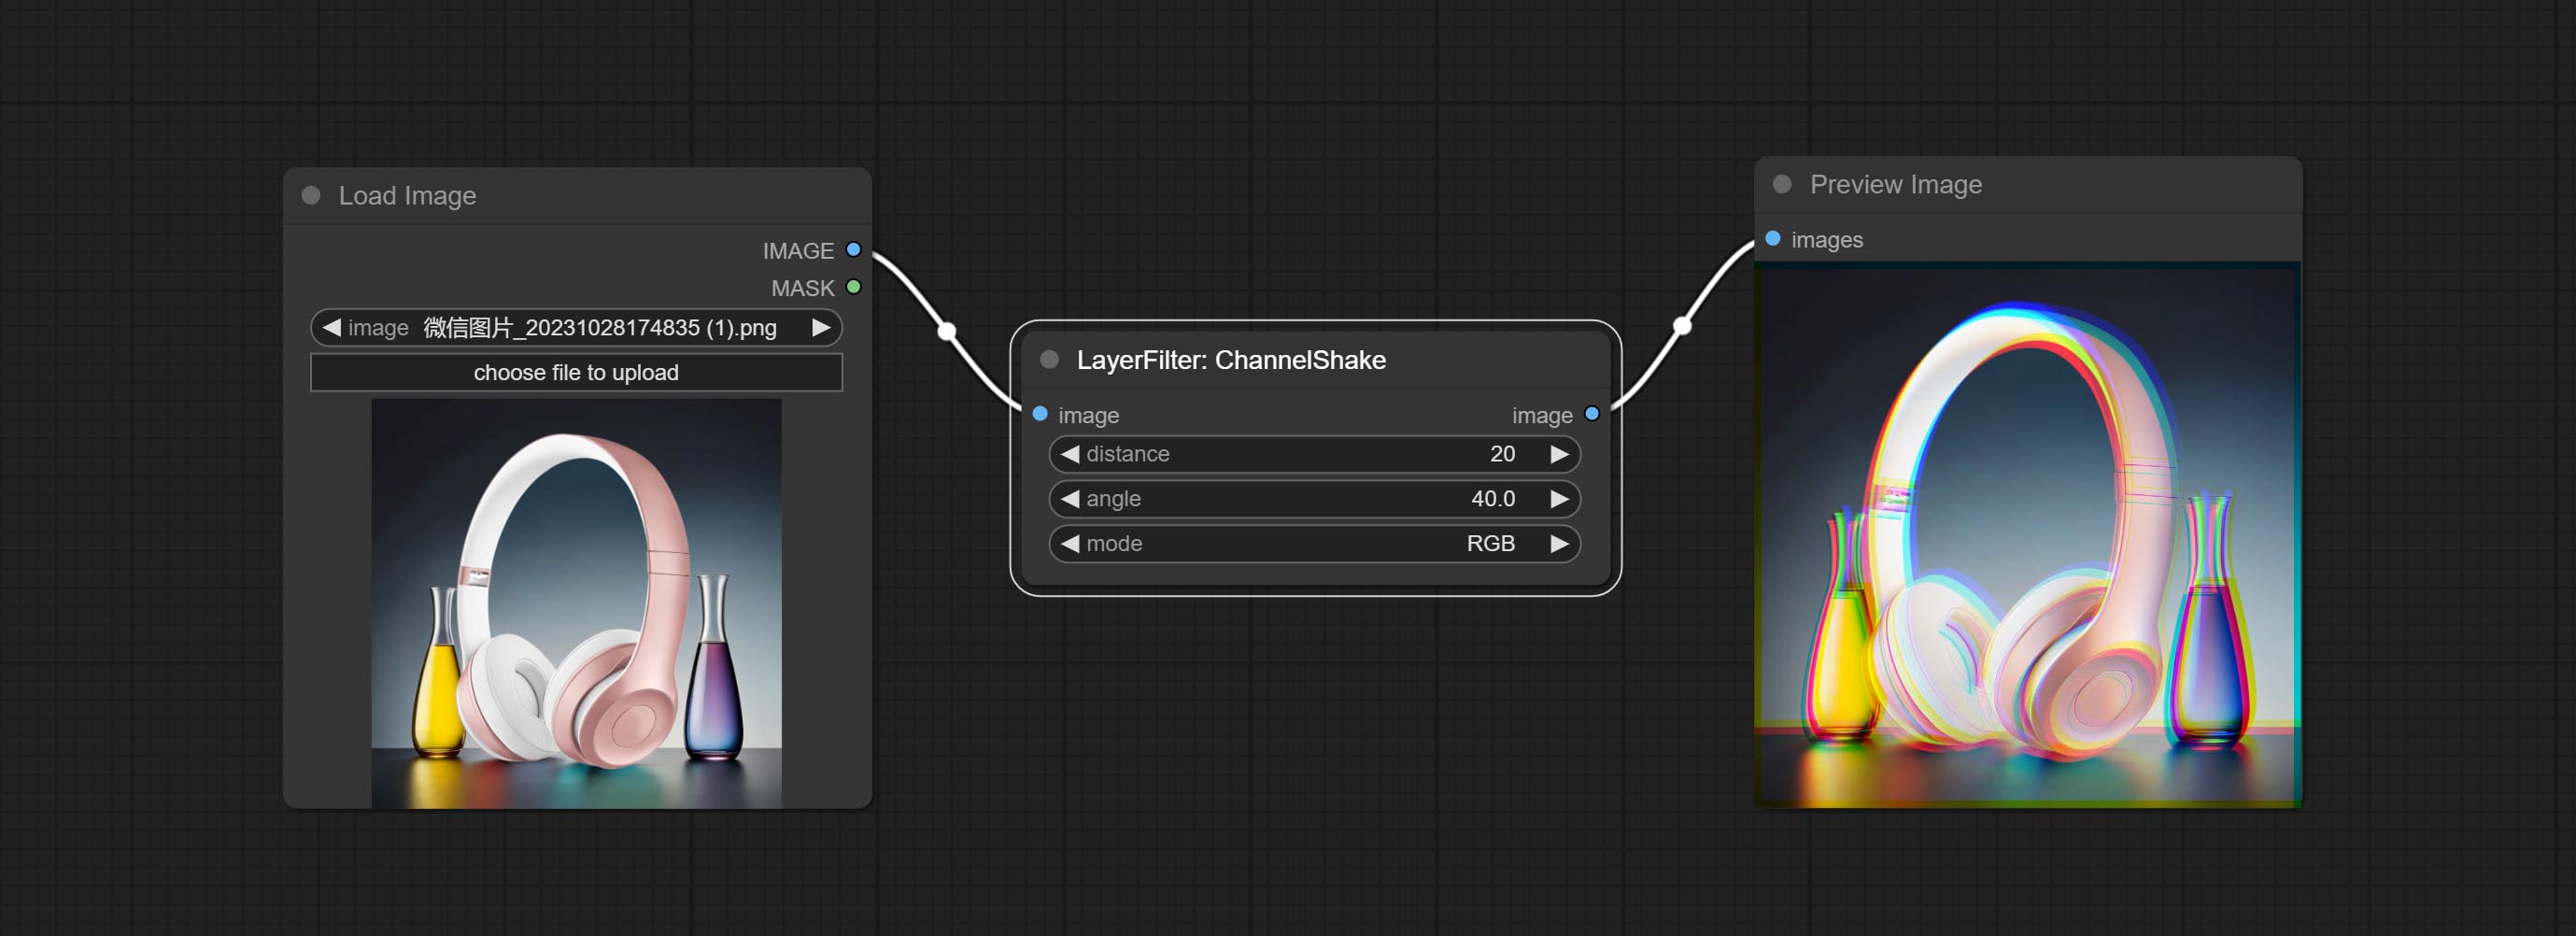
Node options: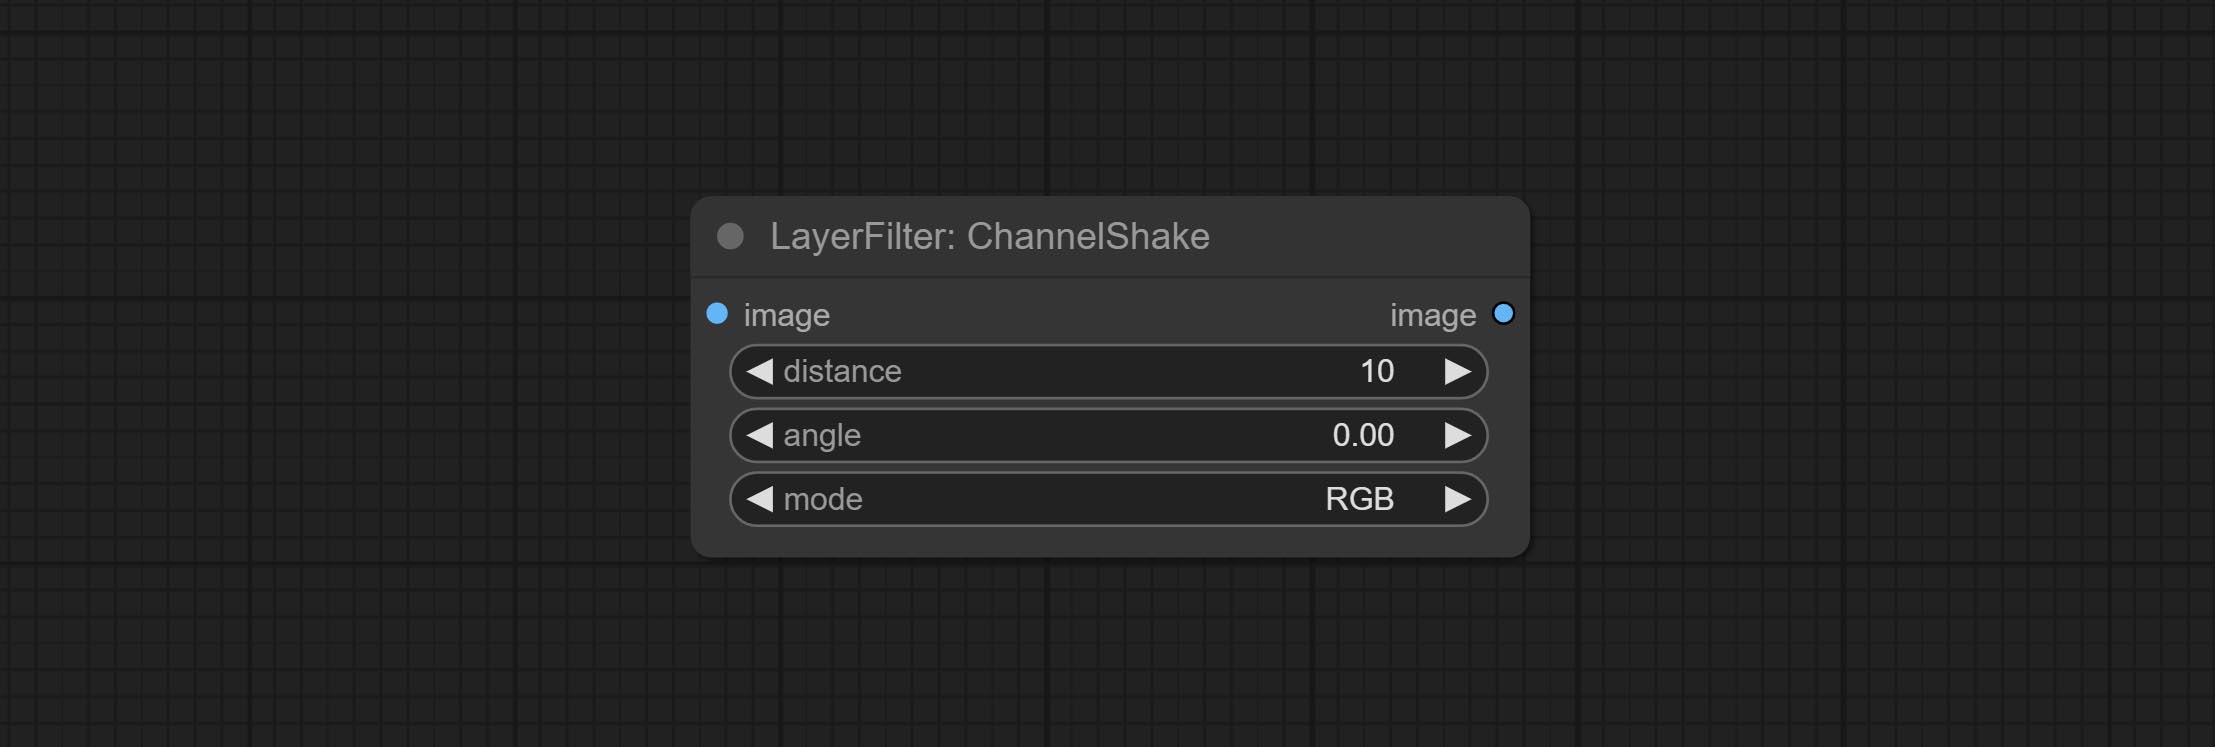
- distance: Distance of channel separation.
- angle: Angle of channel separation.
- mode: Channel shift arrangement order.
HDR Effects
enhances the dynamic range and visual appeal of input images. This node is reorganize and encapsulate of HDR Effects (SuperBeasts.AI), thanks to the original author.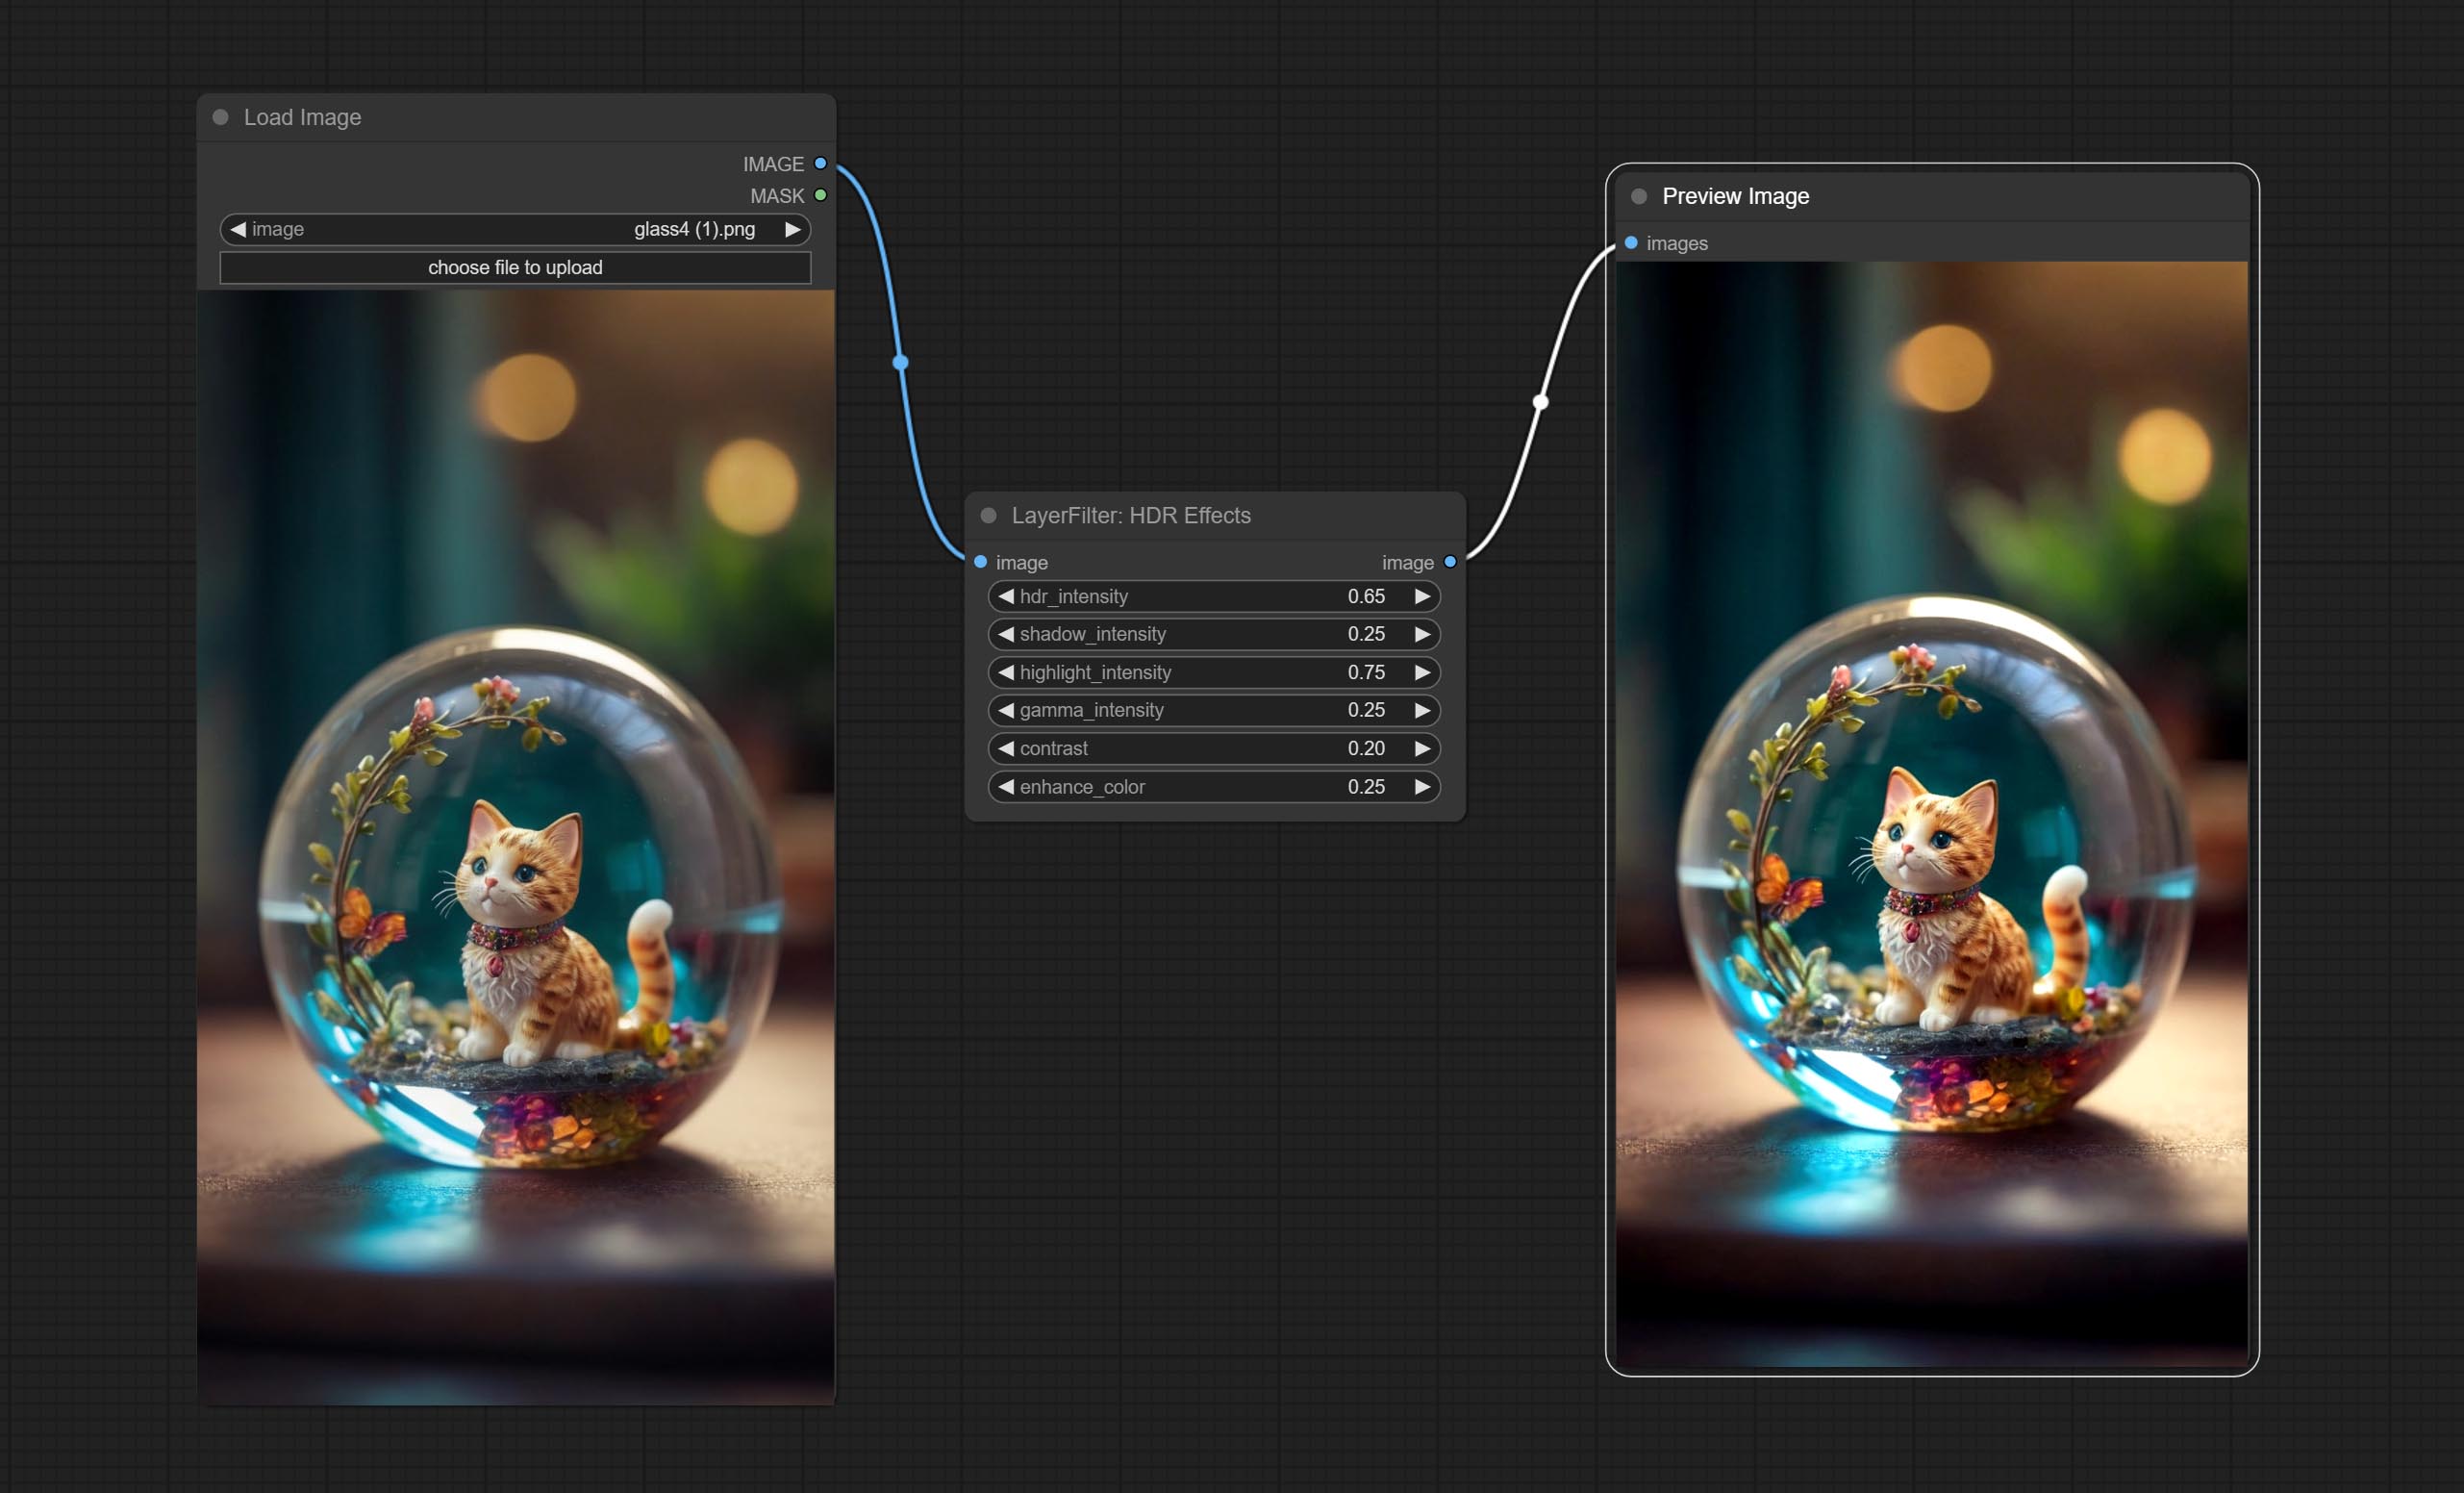
Node options: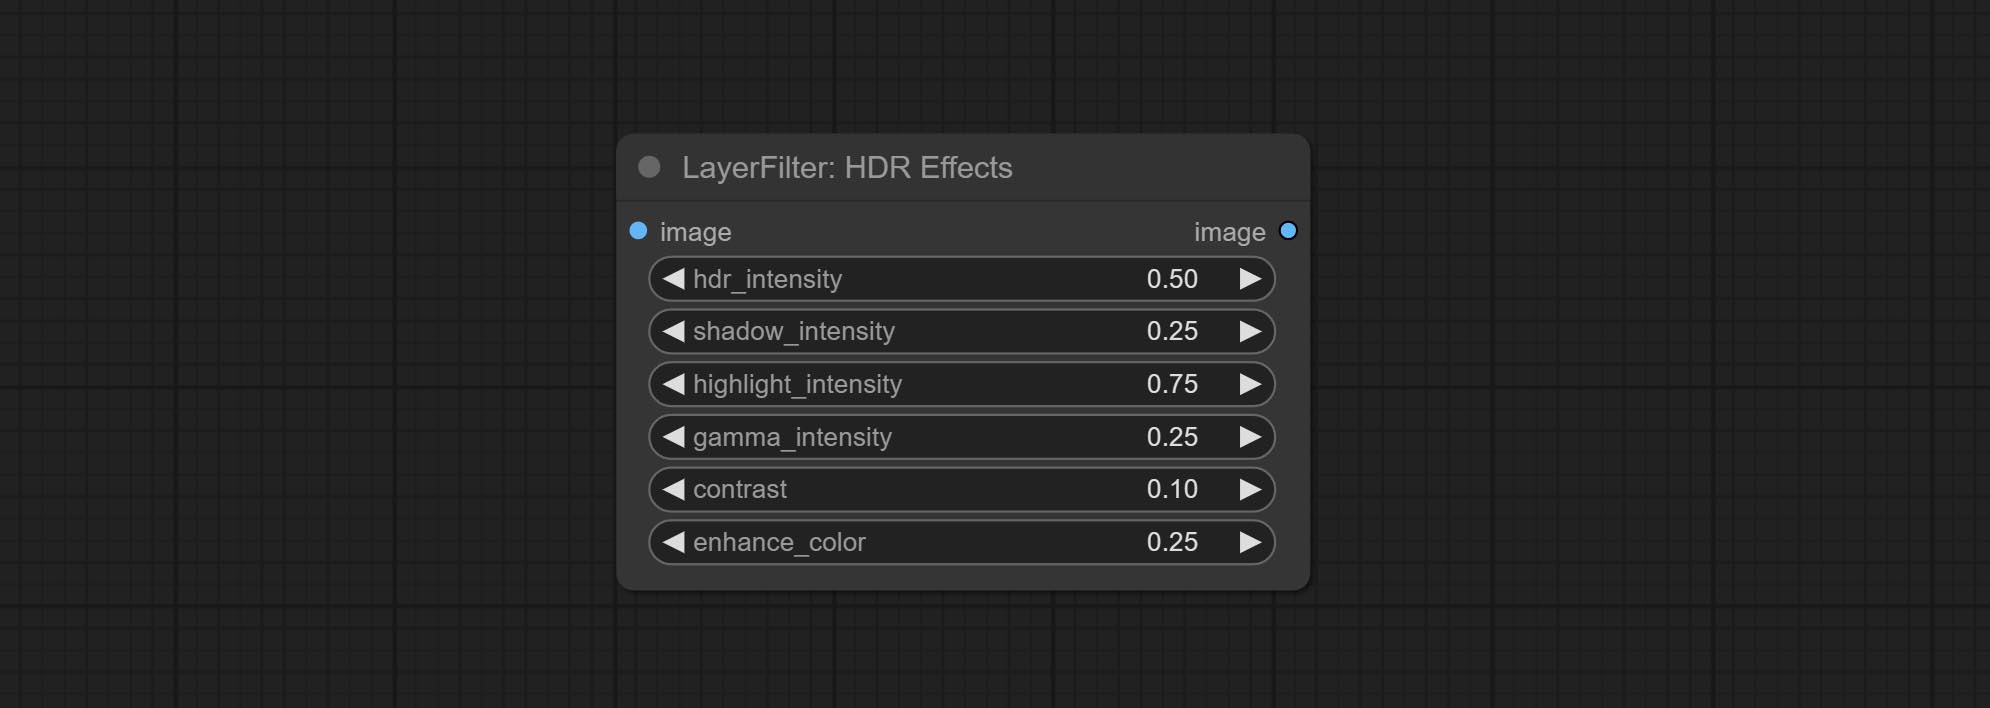
- hdr_intensity: Range: 0.0 to 5.0, Controls the overall intensity of the HDR effect, Higher values result in a more pronounced HDR effect.
- shadow_intensity: Range: 0.0 to 1.0,Adjusts the intensity of shadows in the image,Higher values darken the shadows and increase contrast.
- highlight_intensity: Range: 0.0 to 1.0,Adjusts the intensity of highlights in the image,Higher values brighten the highlights and increase contrast.
- gamma_intensity: Range: 0.0 to 1.0,Controls the gamma correction applied to the image,Higher values increase the overall brightness and contrast.
- contrast: Range: 0.0 to 1.0,Enhances the contrast of the image, Higher values result in more pronounced contrast.
- enhance_color: Range: 0.0 to 1.0,Enhances the color saturation of the image, Higher values result in more vibrant colors.
ฟิล์ม
Simulate the grain, dark edge, and blurred edge of the film, support input depth map to simulate defocus.
This node is reorganize and encapsulate of digitaljohn/comfyui-propost, thanks to the original author.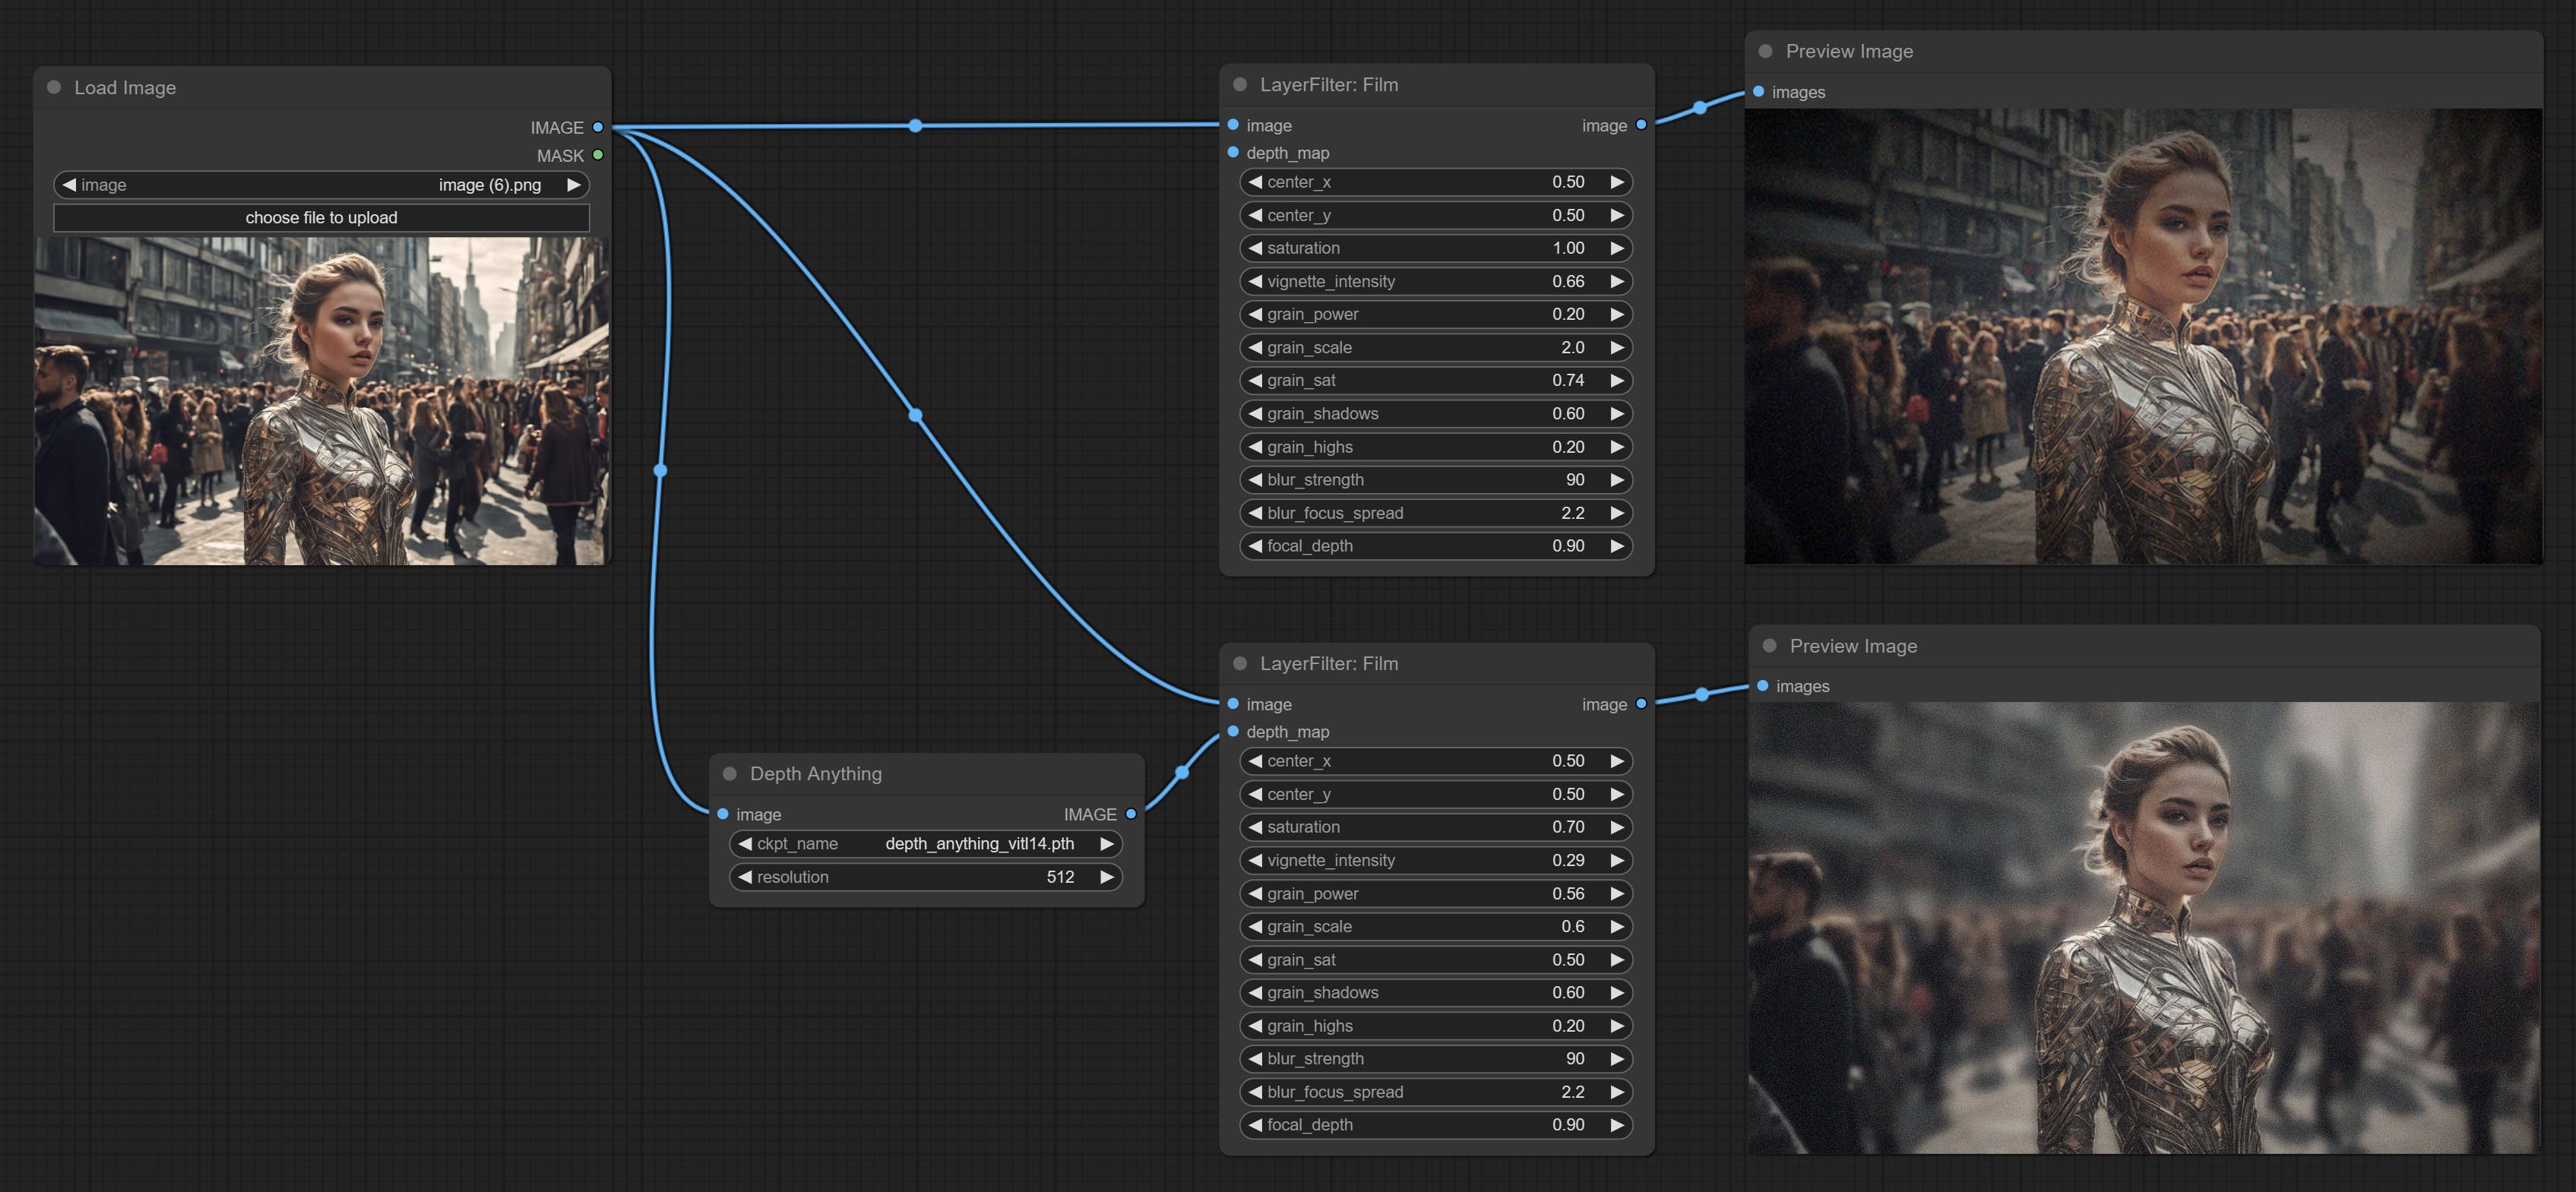
Node options: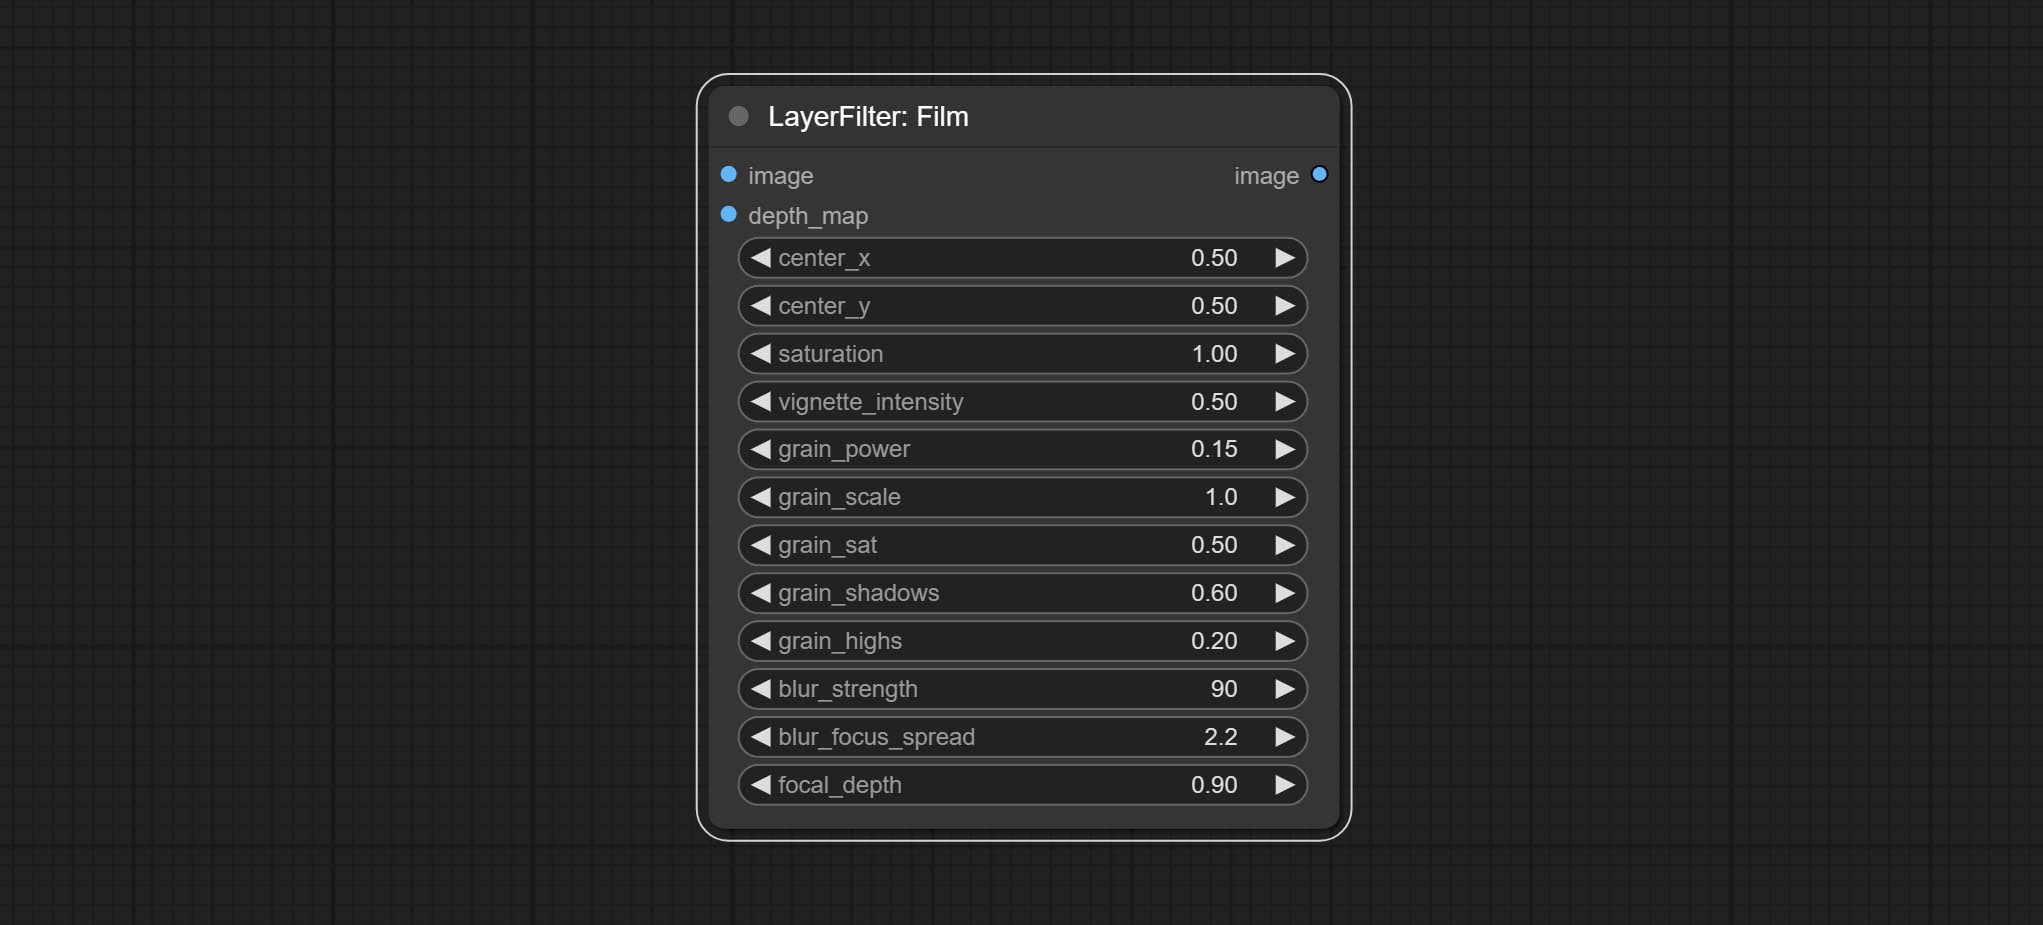
- image: The input image.
- depth_map: Input depth map to simulate defocus effect. it is an optional input. if there is no input, will simulates radial blur at the edges of the image.
- center_x: The horizontal axis of the center point position of the dark edge and radial blur, where 0 represents the leftmost side, 1 represents the rightmost side, and 0.5 represents at the center.
- center_y: The vertical axis of the center point position of the dark edge and radial blur, where 0 represents the leftmost side, 1 represents the rightmost side, and 0.5 represents at the center.
- saturation: Color saturation, 1 is the original value.
- grain_power: Grain intensity. larger value means more pronounced the noise.
- grain_scale: Grain size.
- grain_sat: The color saturation of grain. 0 represents mono noise, and the larger the value, the more prominent the color.
- grain_shadows: Grain intensity of dark part.
- grain_highs: Grain intensity of light part.
- blur_strength: The strength of blur. larger value means more blurry it becomes.
- blur_focus_spread: Focus diffusion range. larger value means larger clear range.
- focal_depth: Simulate the focal distance of defucus. 0 indicates that focus is farthest, and 1 indicates that is closest. this setting only valid when input the depth_map.
FilmV2
The upgraded version of the Film node adds the fastgrain method on the basis of the previous one, and the speed of generating noise is accelerated by 10 times. The code for fastgrain is from github.com/spacepxl/ComfyUI-Image-Filters BetterFilmGrain node, thanks to the original authors.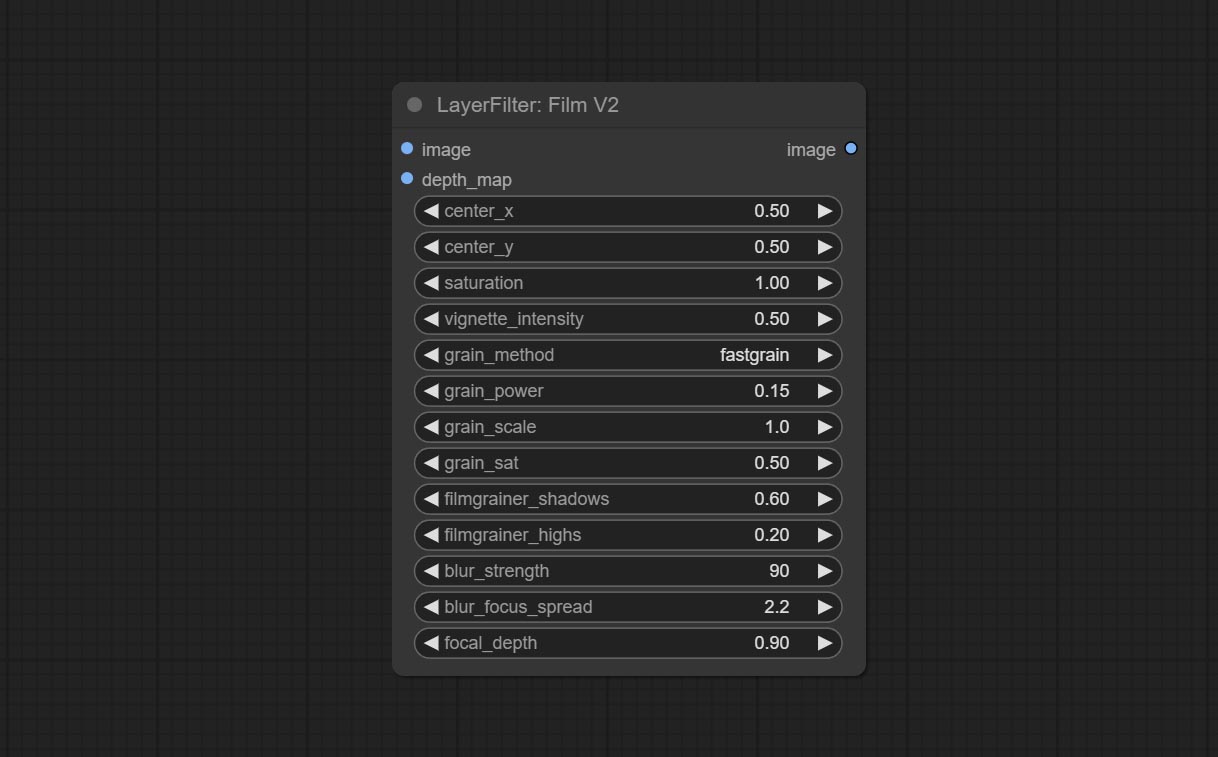
LightLeak
Simulate the light leakage effect of the film. please download model file from Baidu Netdisk or [Google Drive]([light_leak.pkl(Google Drive)(https://drive.google.com/file/d/1DcH2Zkyj7W3OiAeeGpJk1eaZpdJwdCL-/view?usp=sharing)) and copy to ComfyUI/models/layerstyle folder.
Node options: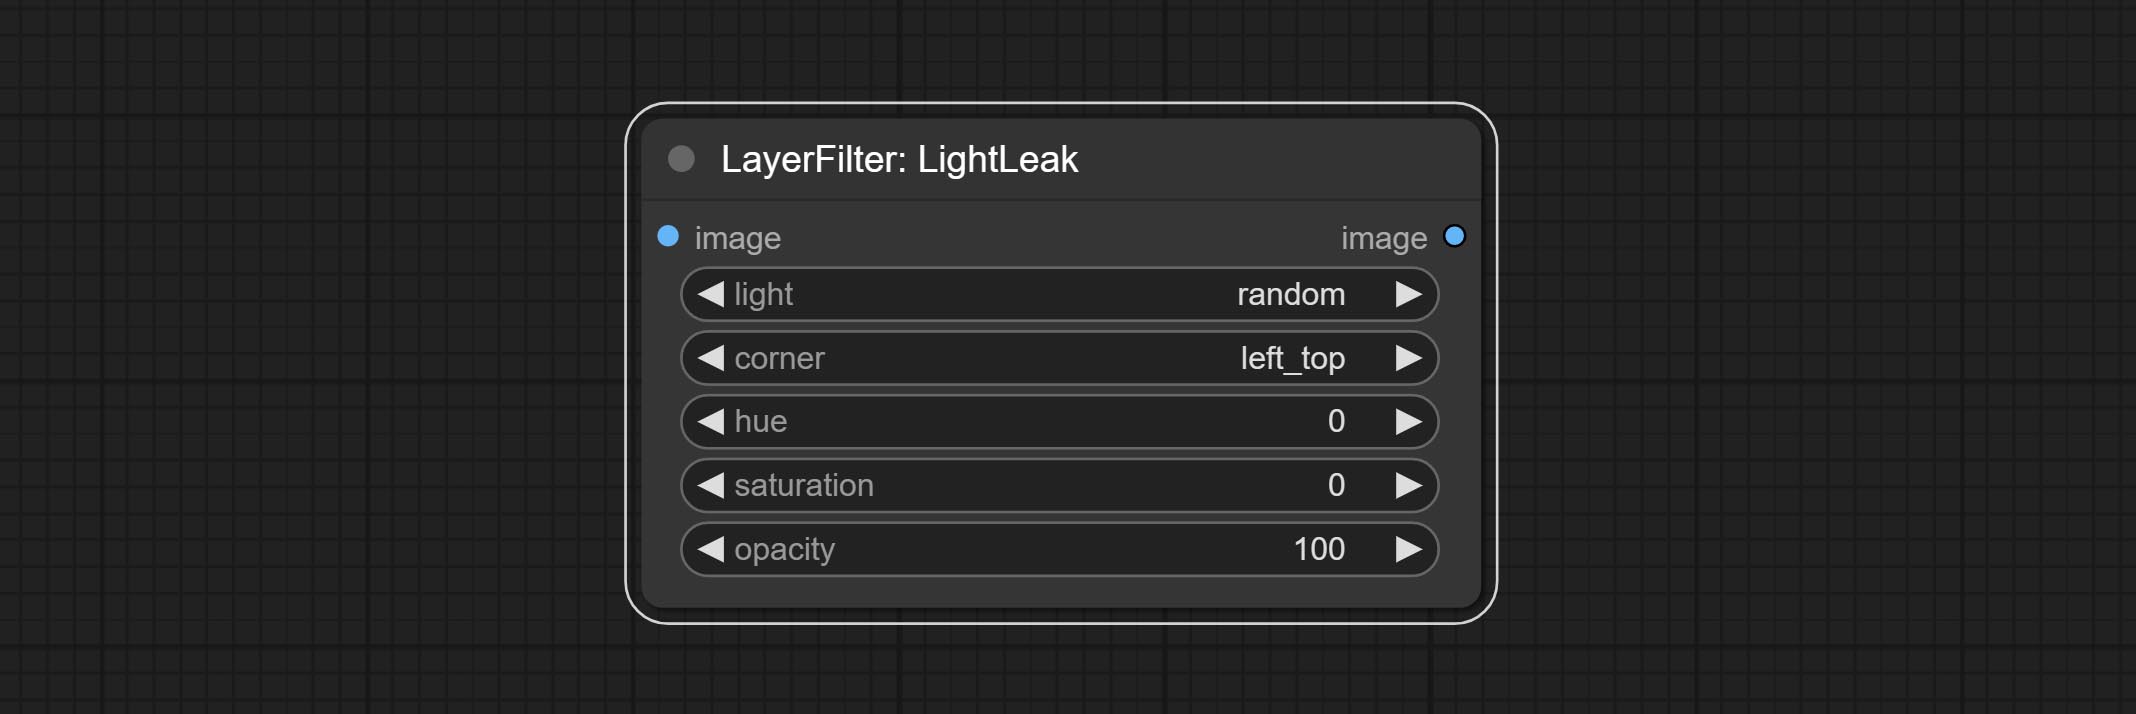
- light: 32 types of light spots are provided. random is a random selection.
- corner: There are four options for the corner where the light appears: top left, top right, bottom left, and bottom right.
- hue: The hue of the light.
- saturation: The color saturation of the light.
- opacity: The opacity of the light.
ColorMap
Pseudo color heat map effect.
Node options: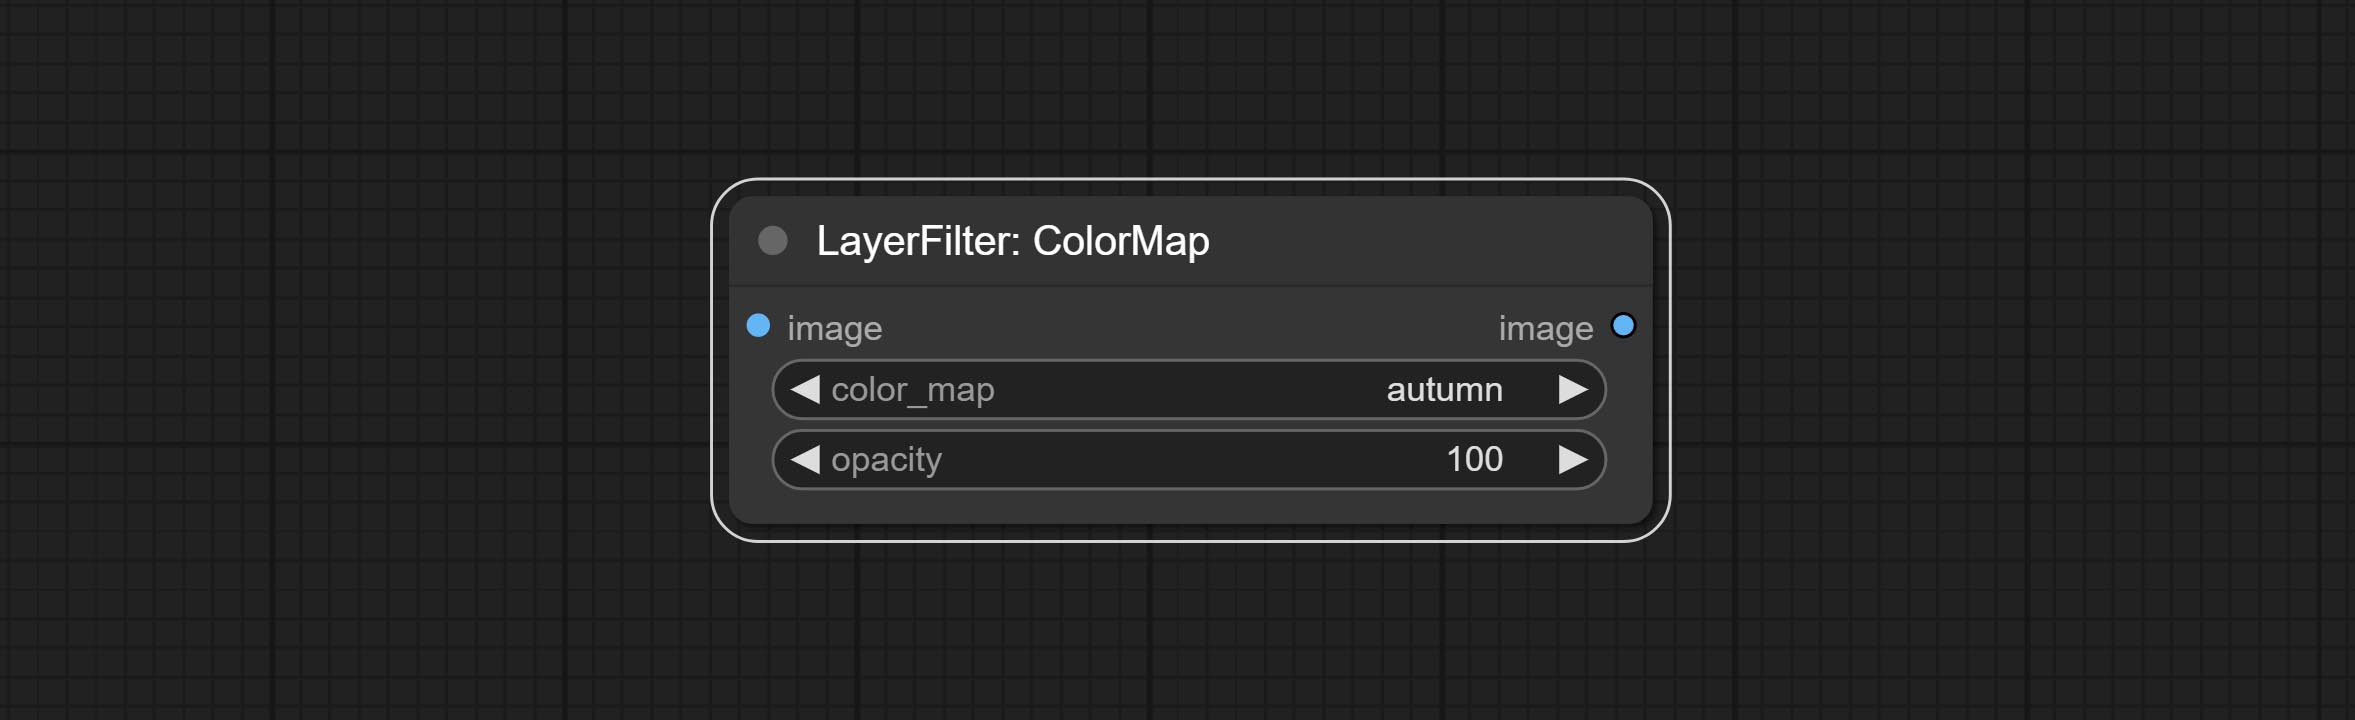
- color_map: Effect type. there are a total of 22 types of effects, as shown in the above figure.
- opacity: The opacity of the color map effect.
MotionBlur
Make the image motion blur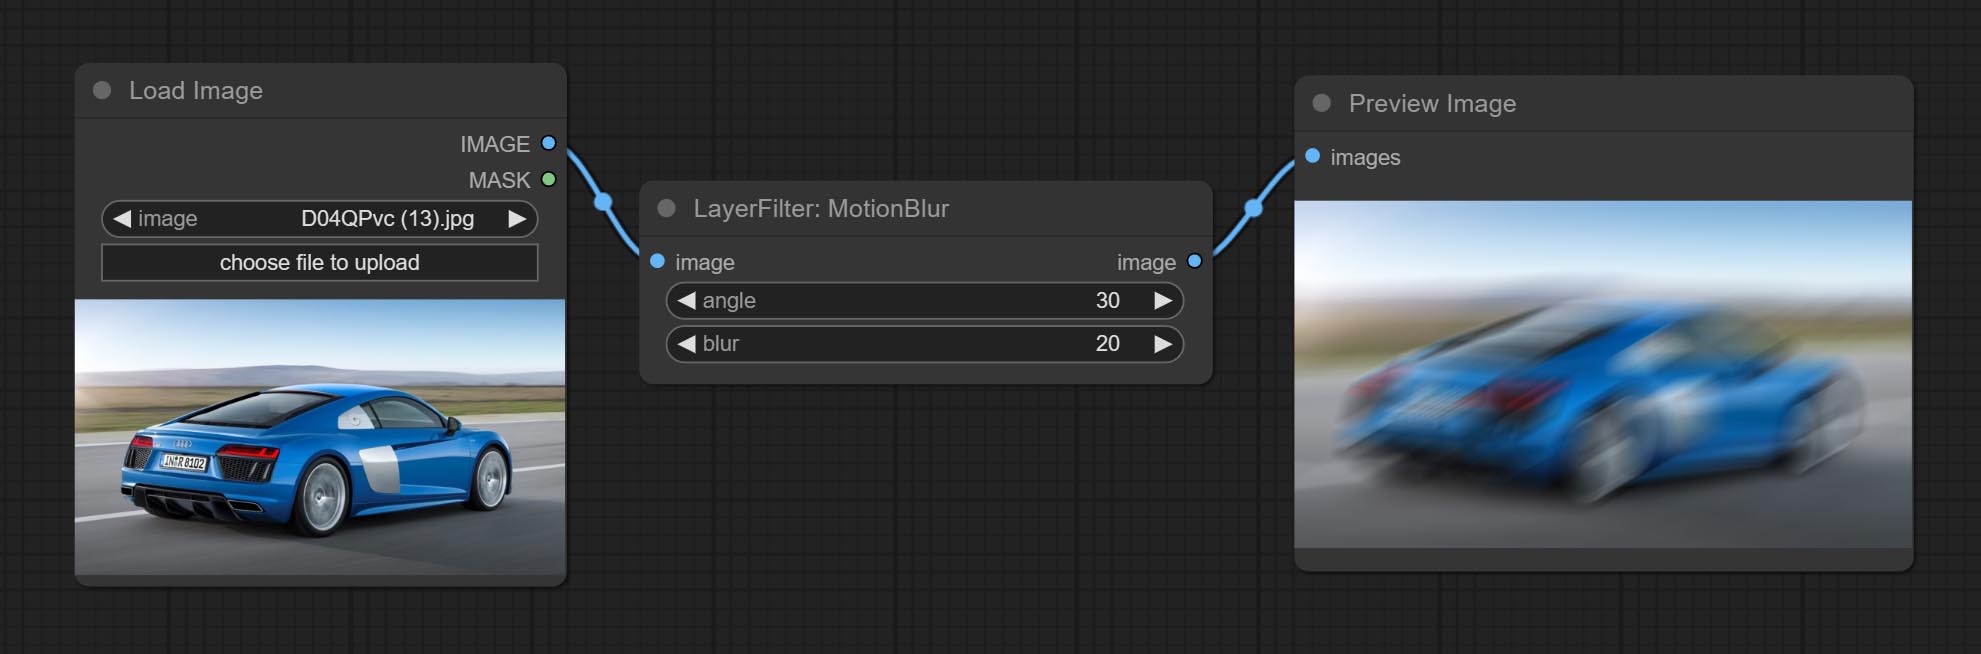
Node options:
- angle: The angle of blur.
- blur: The size of blur.
GaussianBlur
Make the image gaussian blur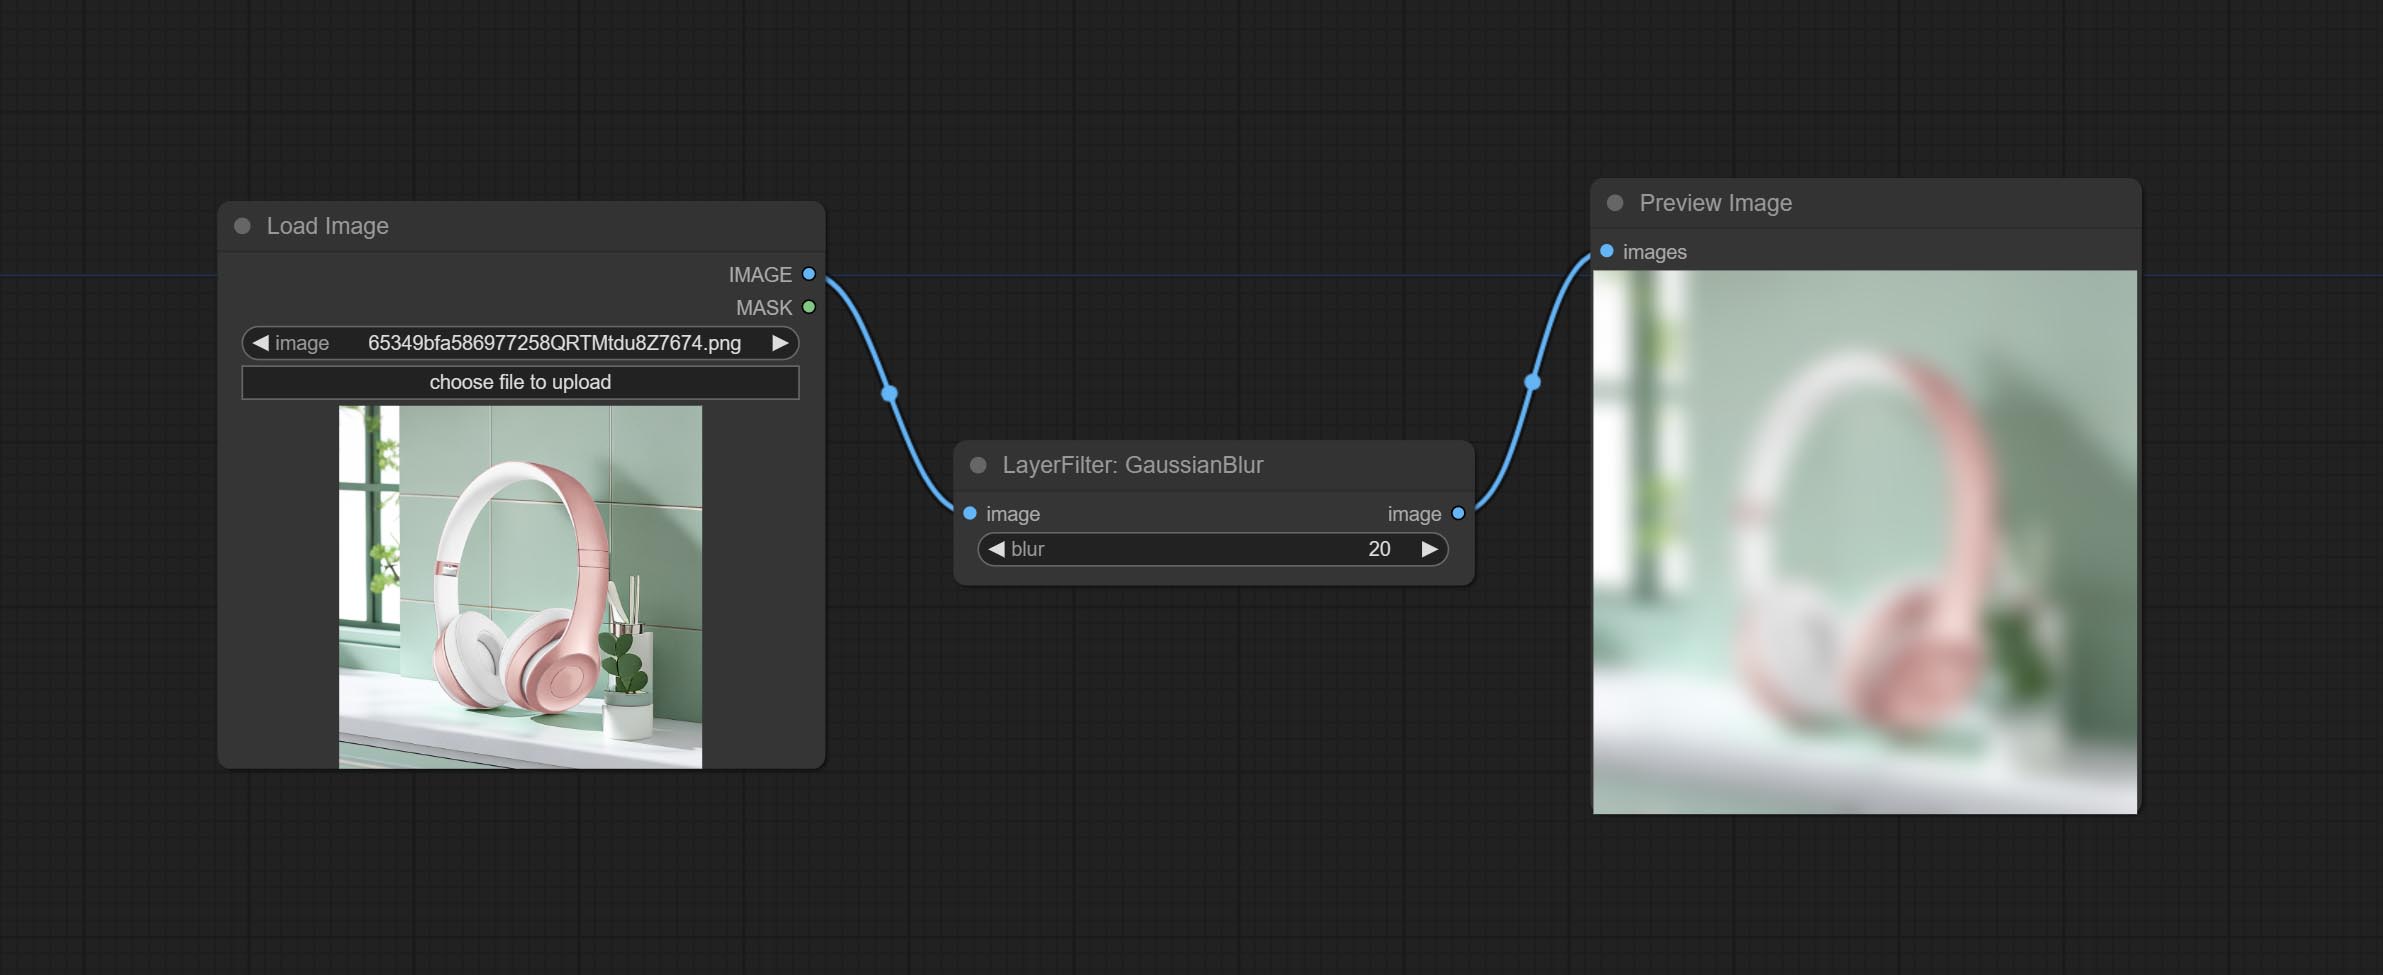
Node options:
- blur: The size of blur, integer, range 1-999.
GaussianBlurV2
Gaussian blur. Change the parameter precision to floating-point number, with a precision of 0.01
Node options: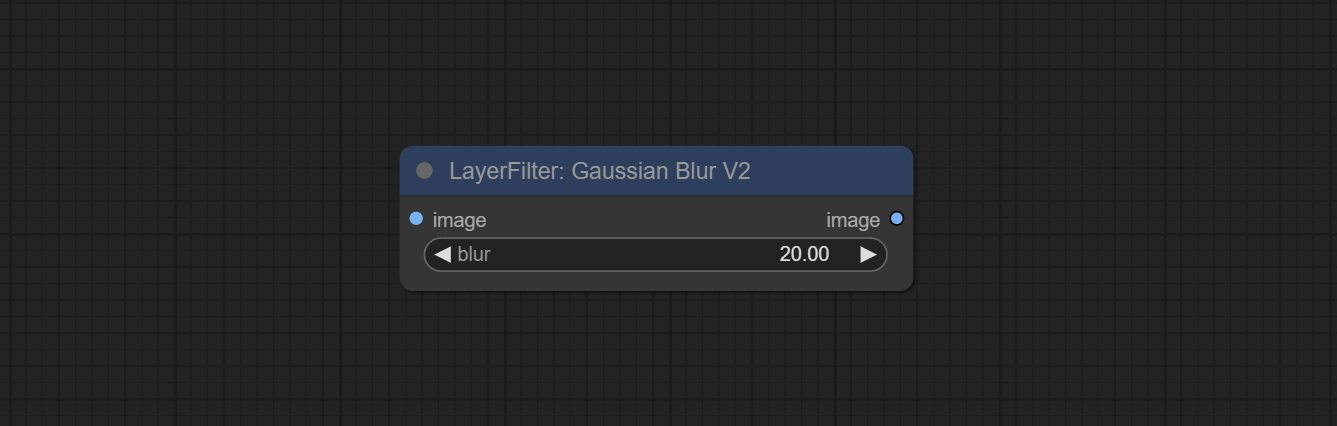
- blur: The size of blur, float, range 0 - 1000.
AddGrain
Add noise to the picture.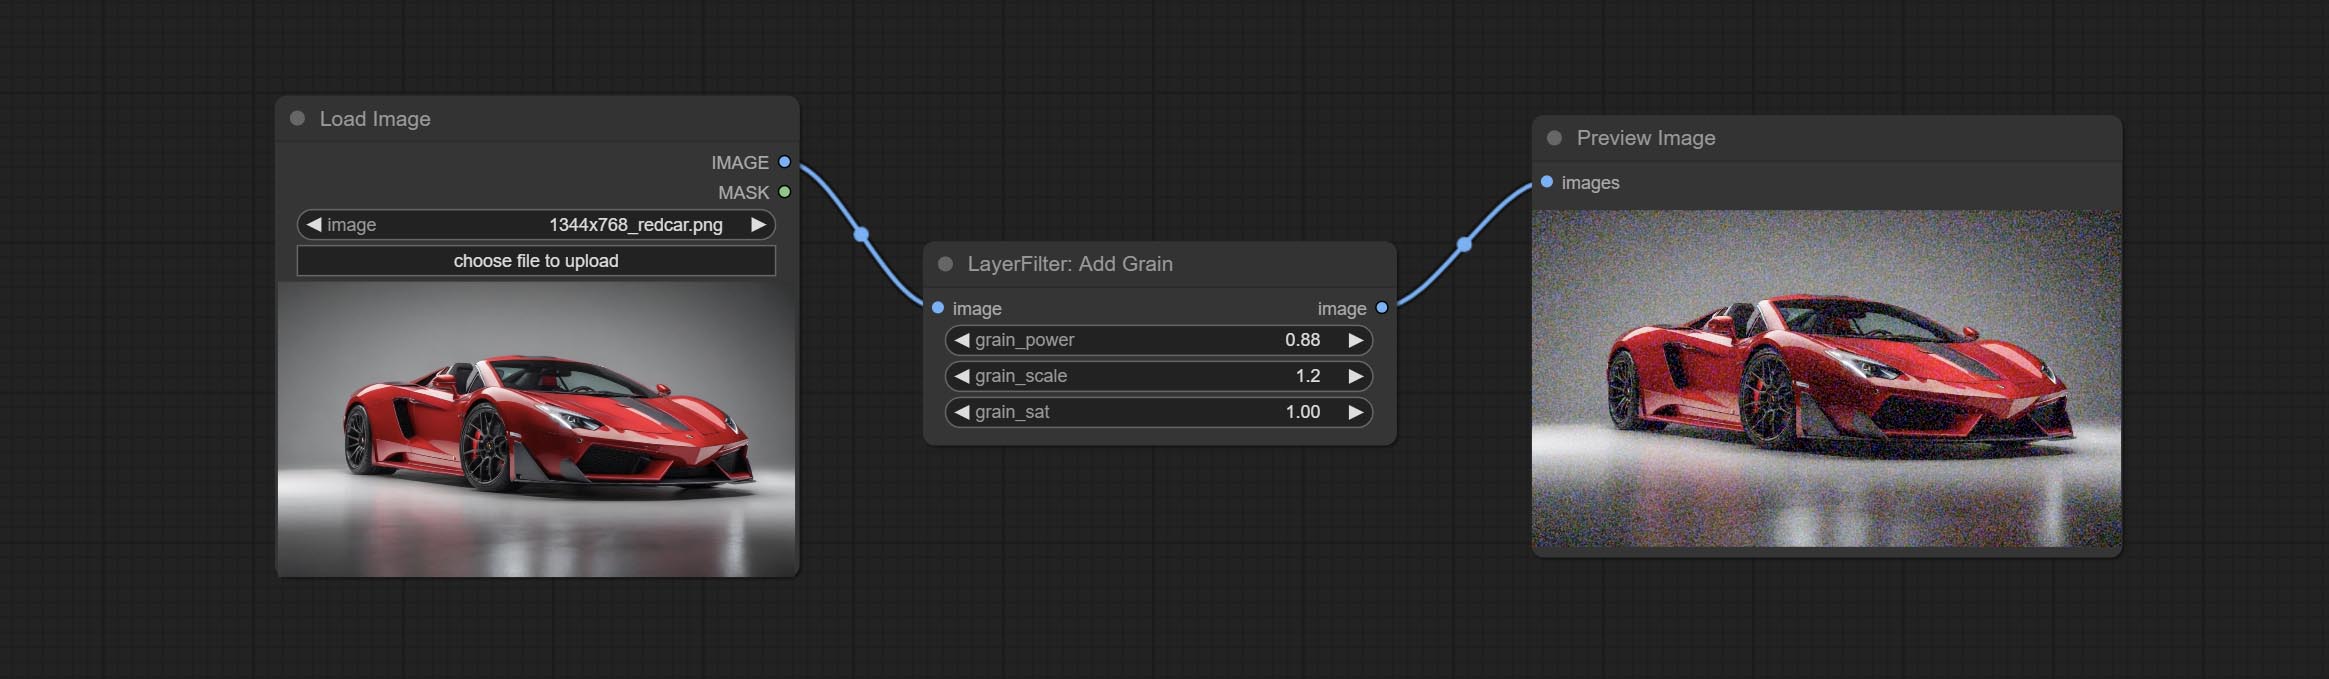
Node Options: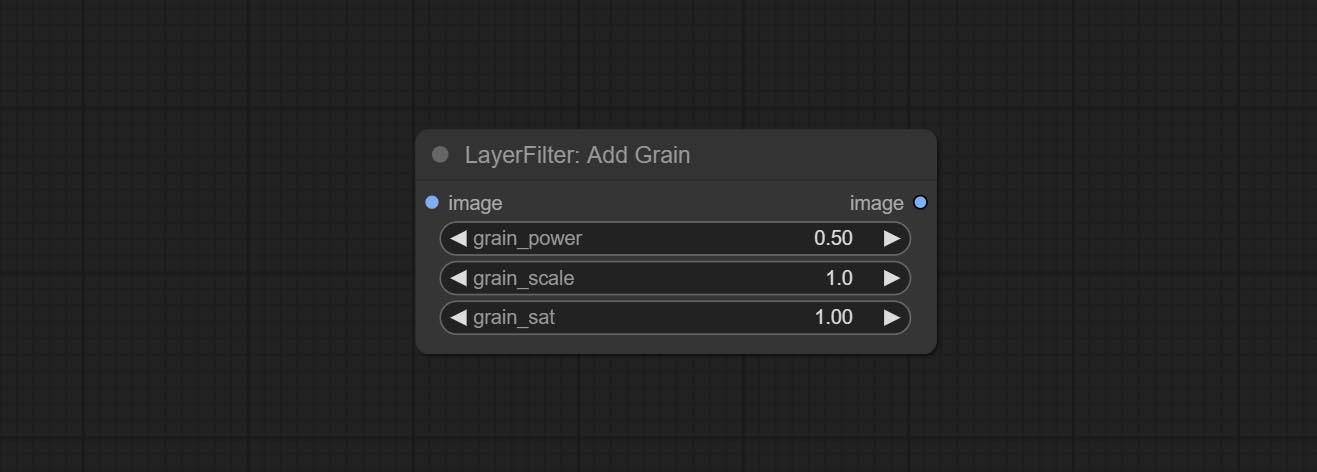
- grain_power: Noise intensity.
- grain_scale: Noise size.
- grain_sat: Color saturation of noise.
Annotation for notes
1 The layer_image, layer_mask and the background_image(if have input), These three items must be of the same size.
2 The mask not a mandatory input item. the alpha channel of the image is used by default. If the image input does not include an alpha channel, the entire image's alpha channel will be automatically created. if have masks input simultaneously, the alpha channel will be overwrite by the mask.
3 The Blend Mode include normal, multply, screen, add, subtract, difference, darker, color_burn, color_dodge, linear_burn, linear_dodge, overlay, soft_light, hard_light, vivid_light, pin_light, linear_light, and hard_mix. all of 19 blend modes in total.
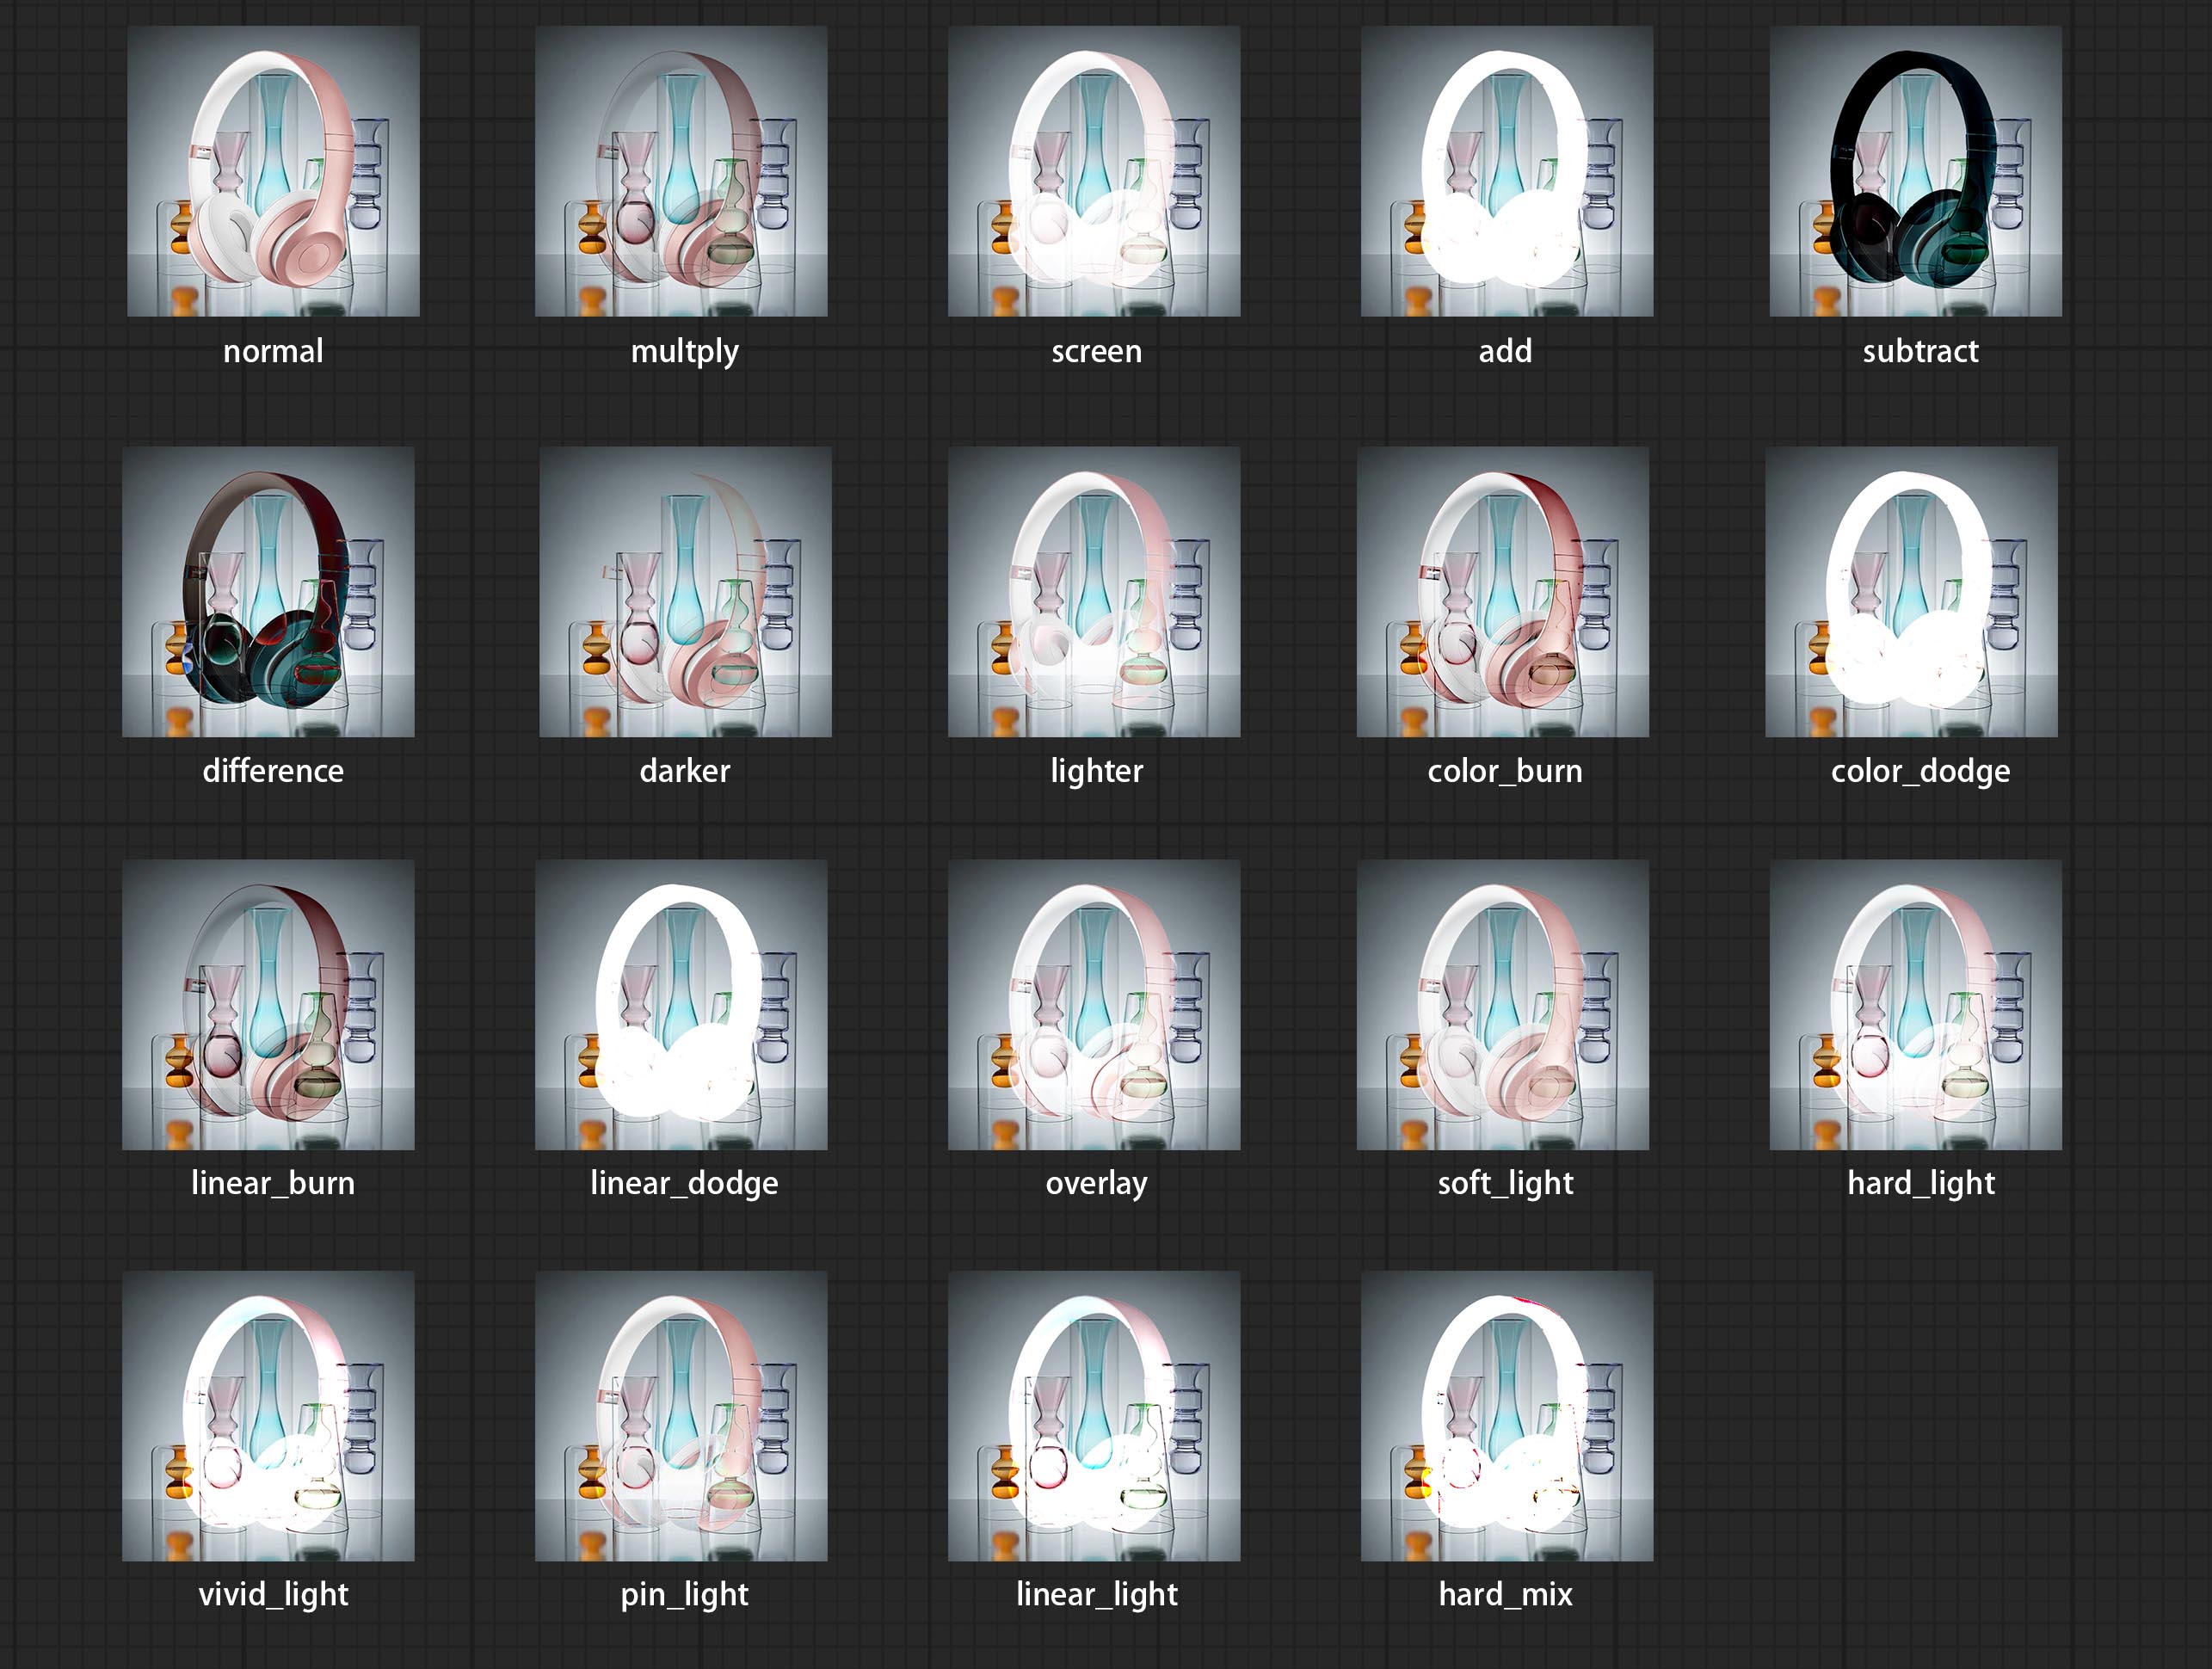
*Preview of the blend mode
3 The BlendModeV2 include normal, dissolve, darken, multiply, color burn, linear burn, darker color, lighten, screen, color dodge, linear dodge(add), lighter color, dodge, overlay, soft light, hard light, vivid light, linear light, pin light, hard mix, difference, exclusion, subtract, divide, hue, saturation, color, luminosity, grain extract, grain merge all of 30 blend modes in total.
Part of the code for BlendMode V2 is from Virtuoso Nodes for ComfyUI. Thanks to the original authors.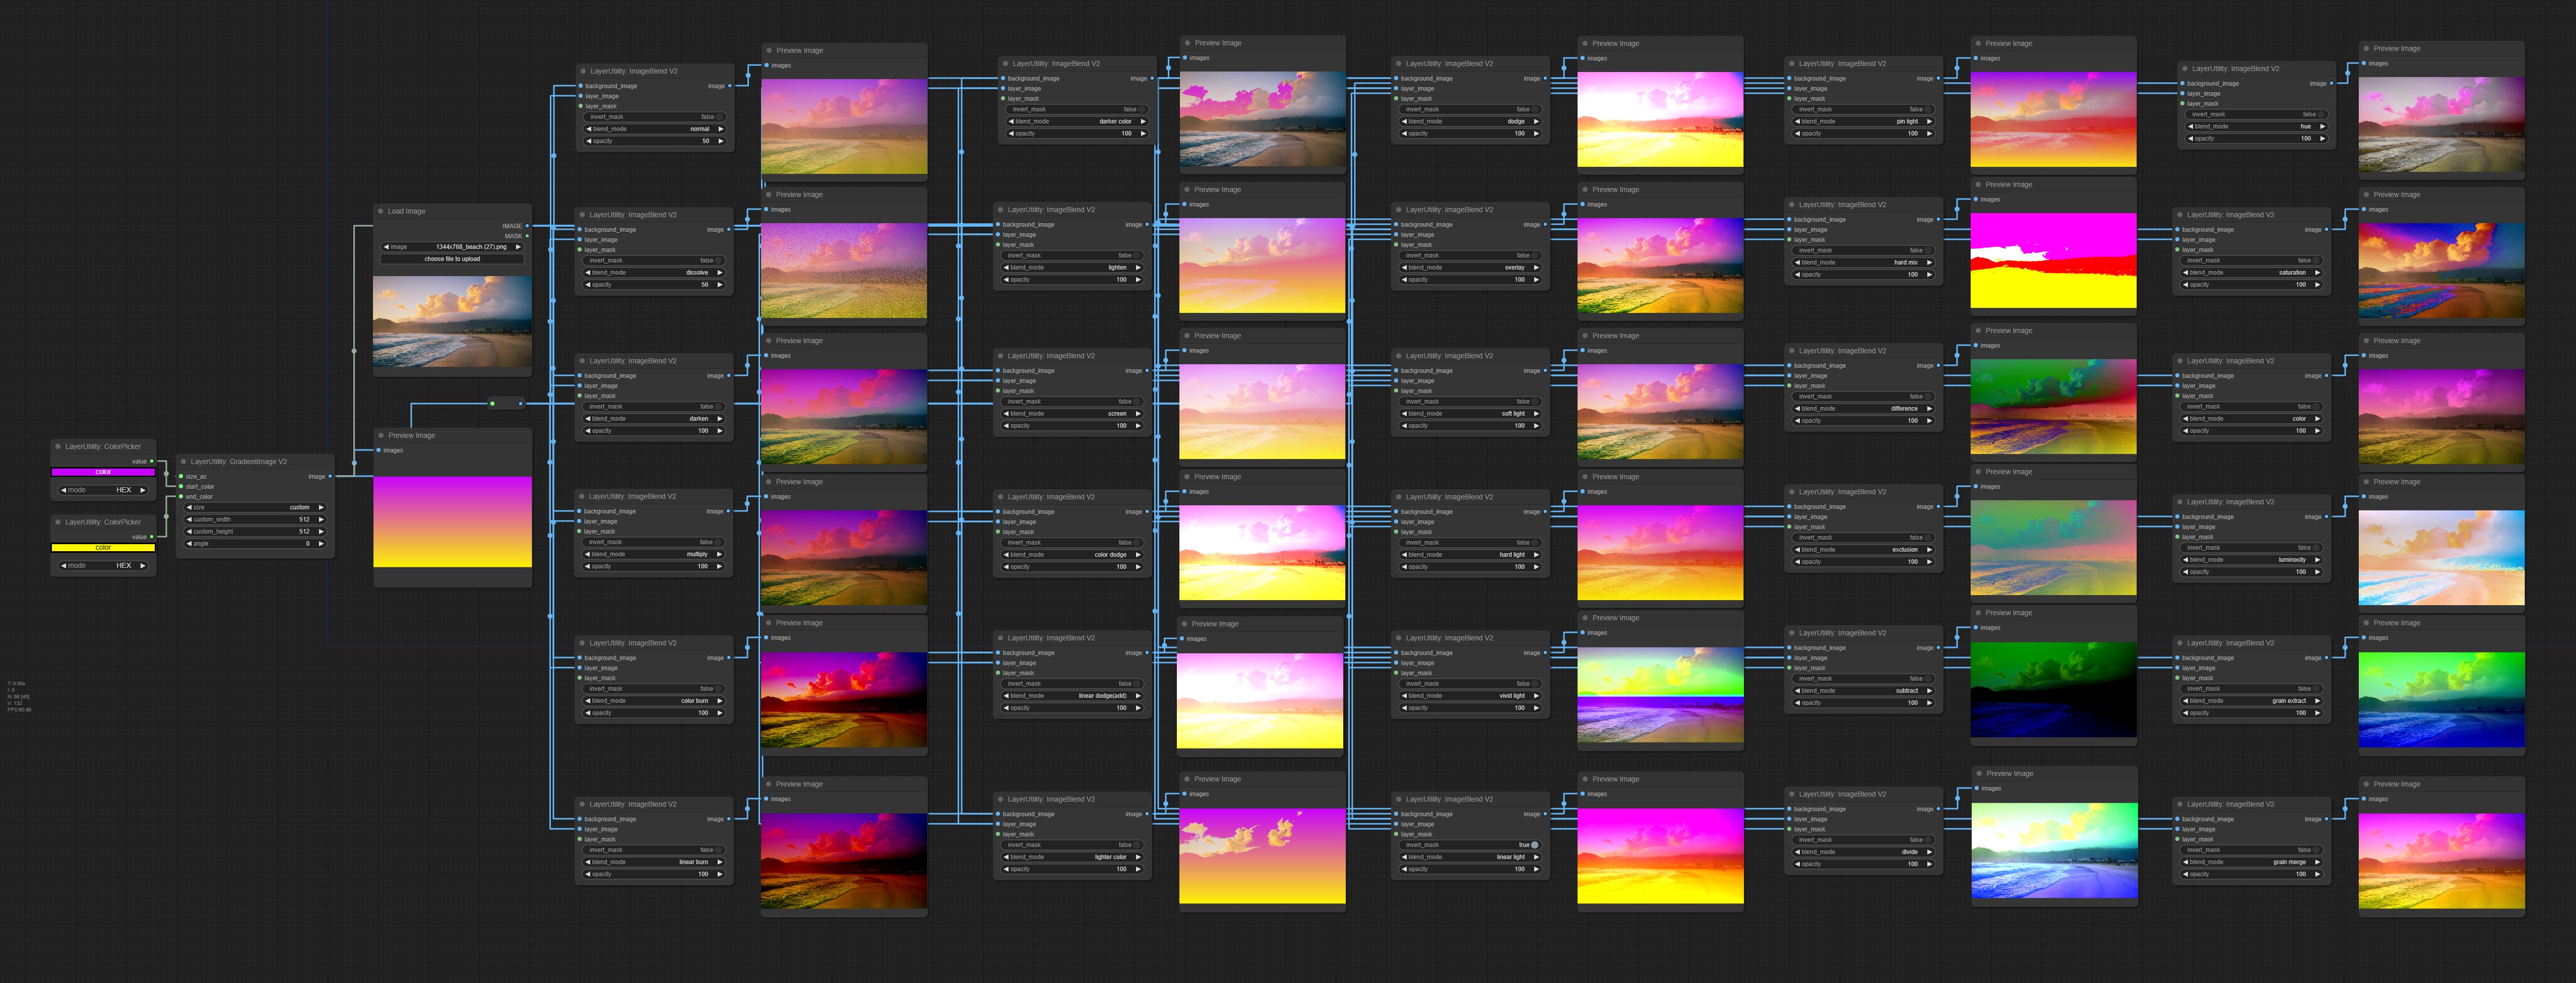
*Preview of the Blend Mode V2
4 The RGB color described by hexadecimal RGB format, like '#FA3D86'.
5 The layer_image and layer_mask must be of the same size.
Stars
คำแถลง
LayerStyle nodes follows the MIT license, Some of its functional code comes from other open-source projects. Thanks to the original author. If used for commercial purposes, please refer to the original project license to authorization agreement.


