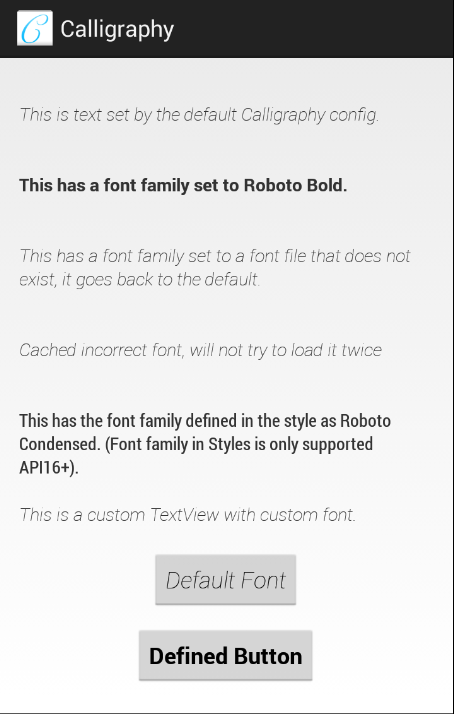
แบบอักษรที่กำหนดเองใน Android เป็นวิธีที่ตกลง
คุณเบื่อกับมุมมองที่กำหนดเองเพื่อตั้งค่าแบบอักษรหรือไม่? หรือข้าม ViewTree เพื่อค้นหา TextViews? ใช่ฉันด้วย

รวมการดาวน์โหลดการพึ่งพา (.AAR):
dependencies {
    compile ' uk.co.chrisjenx:calligraphy:2.3.0 '
} เพิ่มแบบอักษรที่กำหนดเองของคุณใน assets/ คำจำกัดความแบบอักษรทั้งหมดสัมพันธ์กับเส้นทางนี้
สมมติว่าคุณกำลังใช้ Gradle คุณควรสร้างไดเรกทอรีสินทรัพย์ภายใต้ src/main/ ในไดเรกทอรีโครงการของคุณหากไม่มีอยู่แล้ว เนื่องจากเป็นที่นิยมในการใช้งานสร้างหลายโครงการกับ Gradle เส้นทางมักจะเป็น app/src/main/assets/ โดยที่ app เป็นชื่อโครงการ
คุณอาจพิจารณาสร้าง fonts/ ไดเรกทอรีย่อยในไดเรกทอรีสินทรัพย์ (เช่นในตัวอย่าง)
< TextView fontPath = " fonts/MyFont.ttf " />หมายเหตุ: เนมสเปซที่หายไปนี่เป็นความตั้งใจ
กำหนดฟอนต์เริ่มต้นของคุณโดยใช้ CalligraphyConfig ในคลาส Application ของคุณในเมธอด #onCreate()
 @ Override
public void onCreate () {
    super . onCreate ();
    CalligraphyConfig . initDefault ( new CalligraphyConfig . Builder ()
                            . setDefaultFontPath ( "fonts/Roboto-RobotoRegular.ttf" )
                            . setFontAttrId ( R . attr . fontPath )
                            . build ()
            );
    //....
}
หมายเหตุ: คุณไม่จำเป็นต้องกำหนด CalligraphyConfig แต่ไลบรารีจะไม่ใช้แบบอักษรเริ่มต้นและใช้แอตทริบิวต์เริ่มต้นของ R.attr.fontPath
ห่อบริบท Activity :
 @ Override
protected void attachBaseContext ( Context newBase ) {
    super . attachBaseContext ( CalligraphyContextWrapper . wrap ( newBase ));
}
คุณสบายดี!
< TextView
    android : text = " @string/hello_world "
    android : layout_width = " wrap_content "
    android : layout_height = " wrap_content "
    fontPath = " fonts/Roboto-Bold.ttf " />
หมายเหตุ: IDE ที่ได้รับความนิยม (Android Studio, Intellij) น่าจะทำเครื่องหมายว่านี่เป็นข้อผิดพลาดแม้จะถูกต้อง คุณอาจต้องการเพิ่ม tools:ignore="MissingPrefix" ในมุมมองของตัวเองหรือ ViewGroup ผู้ปกครองเพื่อหลีกเลี่ยงสิ่งนี้ คุณจะต้องเพิ่มเนมสเปซเครื่องมือเพื่อให้สามารถเข้าถึงแอตทริบิวต์ "ละเว้น" นี้ได้ xmlns:tools=" http://schemas.android.com/tools" ดู https://code.google.com/p/android/issues/detail?id=65176
< style name = " TextAppearance.FontPath " parent = " android:TextAppearance " >
    <!-- Custom Attr -->
    < item name = " fontPath " >fonts/RobotoCondensed-Regular.ttf</ item >
</ style >
< TextView
android : text = " @string/hello_world "
android : layout_width = " wrap_content "
android : layout_height = " wrap_content "
android : textAppearance = " @style/TextAppearance.FontPath " />
< style name = " TextViewCustomFont " >
    < item name = " fontPath " >fonts/RobotoCondensed-Regular.ttf</ item >
</ style >< style name = " AppTheme " parent = " android:Theme.Holo.Light.DarkActionBar " >
< item name = " android:textViewStyle " >@style/AppTheme.Widget.TextView</ item >
</ style >
< style name = " AppTheme.Widget " />
< style name = " AppTheme.Widget.TextView " parent = " android:Widget.Holo.Light.TextView " >
< item name = " fontPath " >fonts/Roboto-ThinItalic.ttf</ item >
</ style > CalligraphyFactory จะมองหาแบบอักษรตามลำดับที่เฉพาะเจาะจงซึ่ง ส่วนใหญ่ มันคล้ายกับวิธีการที่เฟรมเวิร์ก Android แก้ไขแอตทริบิวต์
View XML - attt ที่กำหนดไว้ที่นี่จะให้ความสำคัญเสมอStyle XML - ATTT ที่กำหนดไว้ที่นี่จะถูกตรวจสอบต่อไปTextAppearance XML - Attt ได้รับการตรวจสอบถัดไปข้อแม้เพียงอย่างเดียวสำหรับเรื่องนี้คือ ถ้า คุณมีตัวอักษรที่กำหนดไว้ใน Style และ TextAttribute ที่กำหนดไว้ในมุม View คุณลักษณะ Style จะถูกเลือกก่อน!Theme - ถ้ากำหนดสิ่งนี้จะถูกใช้Default - หากกำหนดไว้ใน CalligraphyConfig สิ่งนี้จะใช้ในการไม่พบข้างต้น หรือ หากหนึ่งในนั้นส่งคืนแบบอักษรที่ไม่ถูกต้องตอนแรกเราทำ แต่มันขัดแย้งกับผู้ใช้ที่ต้องการใช้แอตทริบิวต์นั้นจริงตอนนี้คุณต้องกำหนดแอตทริบิวต์ที่กำหนดเอง
เราจำเป็นต้องจัดส่งรหัสที่กำหนดเองด้วยการประดิษฐ์ตัวอักษรเพื่อปรับปรุงการไหลของการฉีดแบบอักษร น่าเสียดายที่นี่หมายความว่าจะต้องเป็น aar แต่ตอนนี้คุณกำลังใช้ Gradle ใช่มั้ย
เป็นไปได้ที่จะใช้แบบอักษรหลายตัวภายใน TextView นี่ไม่ใช่แนวคิดใหม่สำหรับ Android
สิ่งนี้ สามารถ ทำได้โดยใช้บางอย่างเช่นรหัสต่อไปนี้
 SpannableStringBuilder sBuilder = new SpannableStringBuilder ();
sBuilder . append ( "Hello!" ) // Bold this
        . append ( "I use Calligraphy" ); // Default TextView font.
// Create the Typeface you want to apply to certain text
CalligraphyTypefaceSpan typefaceSpan = new CalligraphyTypefaceSpan ( TypefaceUtils . load ( getAssets (), "fonts/Roboto-Bold.ttf" ));
// Apply typeface to the Spannable 0 - 6 "Hello!" This can of course by dynamic.
sBuilder . setSpan ( typefaceSpan , 0 , 6 , Spanned . SPAN_EXCLUSIVE_EXCLUSIVE );
setText ( sBuilder , TextView . BufferType . SPANNABLE );
แน่นอนว่านี่เป็นเพียงตัวอย่าง ไมล์สะสมของคุณอาจแตกต่างกันไป
สำหรับความรู้ของเรา (ลอง: grep -r -e "void set[^(]*(Typeface " <android source dir> ) มีวิดเจ็ต Android มาตรฐานสองตัวที่มีหลายวิธีในการตั้งค่าแบบอักษร
ทั้งสองมีวิธีการที่เรียกว่า setSwitchTypeface ที่ตั้งค่าตัวอักษรภายในสวิตช์ (เช่นเปิด/ปิดใช่/ไม่ใช่) SetTypeface ตั้งค่าตัวอักษรของฉลาก คุณจะต้องสร้างคลาสย่อยของคุณเองที่แทนที่ setTypeface และโทรทั้ง super.setTypeface และ super.setSwitchTypeface
ไลบรารีนี้ถูกสร้างขึ้นเนื่องจากปัจจุบันไม่สามารถประกาศตัวอักษรที่กำหนดเองในไฟล์ XML ใน Android
หากคุณรู้สึกว่าสิ่งนี้ควรทำเช่นนี้โปรดแสดงปัญหานี้ในตัวติดตามข้อผิดพลาด Android อย่างเป็นทางการ
 Copyright 2013 Christopher Jenkins

Licensed under the Apache License, Version 2.0 (the "License");
you may not use this file except in compliance with the License.
You may obtain a copy of the License at

    http://www.apache.org/licenses/LICENSE-2.0

Unless required by applicable law or agreed to in writing, software
distributed under the License is distributed on an "AS IS" BASIS,
WITHOUT WARRANTIES OR CONDITIONS OF ANY KIND, either express or implied.
See the License for the specific language governing permissions and
limitations under the License.